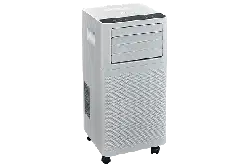
User Manual for Portable Air Conditioner
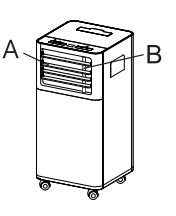
Descreption
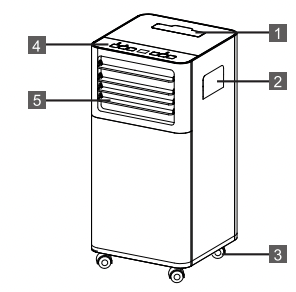
1.Remote control slot
2.Handle ( both side)
3.Castors
4.Contol panel
5.Deflector
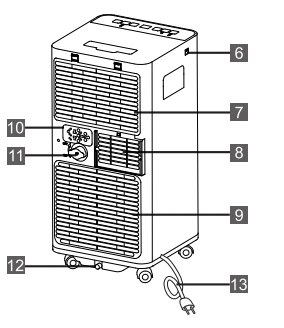
6.USB charging slot
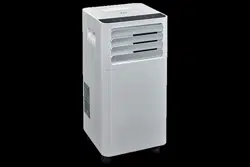
7.Intake grille
8.Air outlet grille
9.Intake grille
10.Plug fixer
11.Middle condenser drain
12.Condenser drain
13.Power cable
Installation Instructions
EXHAUSTING HOTAIR
|
In the Cool Mode the appliance must be placed close to a window or opening so that the warm exhaust air can be ducked outside.
First position unit on a flat floor and make sure there's a minimum of 17.7" (45cm) clearance around the unit. and is within the vicinity of a single circuit outlet power source.
1.Extend either side of the hose (Fig.1)
2.Screw the hose inlet (Fig.2).
3.Screw it to the hose inlet (Fig.3).
4.Install the hose inlet into the unit (Fig.4).
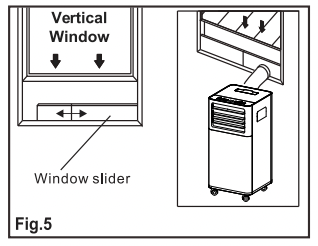
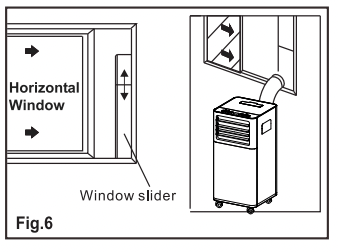
5.Affix the hose outlet into the window slider kit and seal. (Fig.5 &6).
|
|

|
 |
|
 |
The window slider kit has been designed to fit most standard vertical and horizontal window applications. however. it may be necessary for you to modify some aspects of the installation procedures for certain types of windows. The window slider kit can be fastened with screws.
NOTE: If the window opening is less than the minimum length of the window slider kit. cut the end without the hold in it short enough to fit in the window opening. Never cut out the hole in window slider kit.
WINDOW SLIDER KIT INSTALLATION
|
1.Parts:
A) Panel
B) Panel with one hole
C) Screw to lock window kit in place
2.Assembly:
Slide Panel B into Panel A and size to window width. Window sizes vary. When sizing the window width. be sure that the window kit assembly is free from gaps and/or air pockets when taking measurements.
3.Lock the screw into the holes that correspond with the width that your window requires to ensure that there are no gaps or air pockets in the window kit assembly after installation.
4. Use the provided foam window kit sealer to close any gaps or air pockets.
|
|
 |
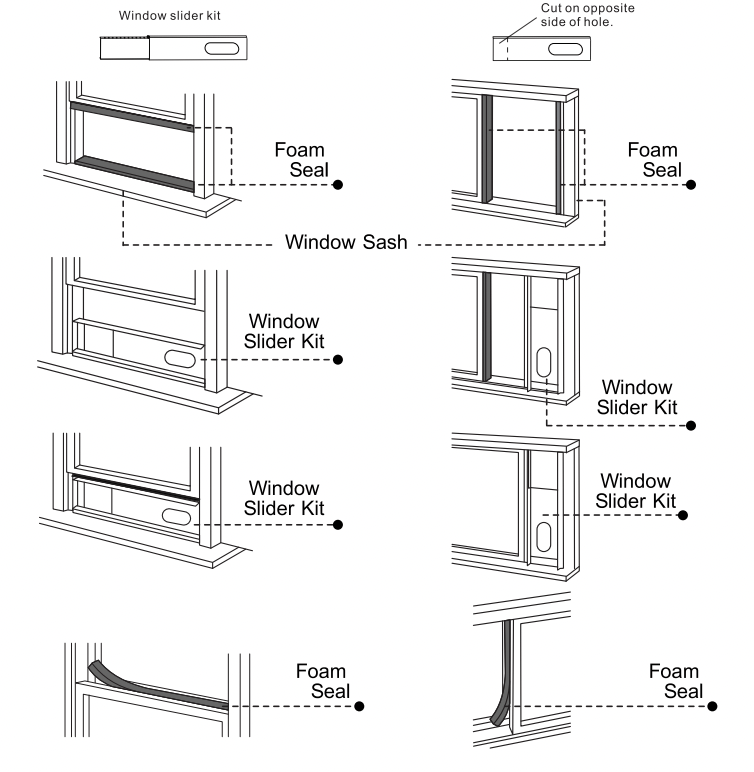
- 1. Cut the foam seal(adhesive type) to the proper length and attach it to the window sash.
- 2. Attach the window slider kit to the window sash. Adjust the length of the window slider kit according to the width of window. If necessary. mark the kit and cut one end down to properly fit the window.
- 3. Cut the foam seal(adhesive type) to the proper length and attach it on the top of the window.
- 4. Close the window securely against the window slider kit.
- 5. Secure the window slider kit to the window sash.
- 6. Cut the foam seal to an appropriate length and seal the open gap between the top window frame and outer window frame.
LOCATION
- The unit should be placed on a firm foundation to minimize noise and vibration. For safe and secure positioning. place the unit on a smooth. level floor strong enough to support the unit.
- The unit has casters to aid placement. but it should only be rolled on smooth. flat surfaces. Use caution when rolling on carpeted surfaces. Use caution and protect floors when rolling over wood floors. Do not attempt to roll the unit over objects.
- The unit must be placed within reach of a properly rated grounded socket.
- Never place any obstacles around the air inlet or outlet of the unit.
- Allow at least 17.5"(45cm) of space away from the wall for efficient air conditioning.
- The hose can be extended. but it is the best to keep the length to a minimum of 15.7" (40cm). Also make sure that the hose does not have any sharp bends or sags.
|
|
 |
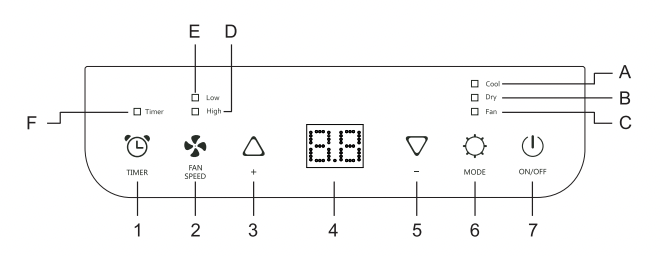
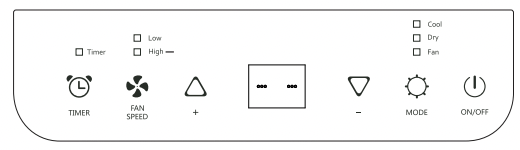
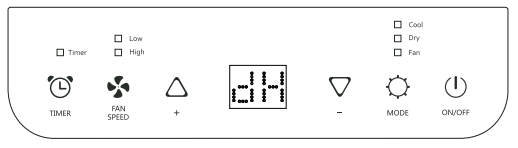
DESCRIPTION OF THE DISPLAY SCREEN
|
1. Timer button
2. Fan button
3. Increase button
4. Display screen
5. Decrease button
6. Mode button
7. ON/OFF button
|
A.Cool symbol
B. Dehumidify symbol
C. Fan symbol
D. High Speed Fan symbol
E. Low Speed Fan symbol
F. Timer symbol
|
TURNING THE APPLIANCE ON
Plug into the mains socket. then the appliance is standby.
Press the  button to make the appliance turn on. The last function active when it was turned off will appear.
 Never turn the air conditioner off by unplugging from the mains. Always press the button . then wait for a few minutes before unplugging. This allows the appliance to perform a cycle of checks to verify operation.
COOL mode
Ideal for hot muggy weather when you need to cooling and dehumidify the room.
To set this mode correctly:
+ Press the “  ” button a number of times until the “Cool” symbol light appears.
+ Select the target temperature 64°F-90°F(18°C-32°C) by pressing the “ ”or “
”or “ ” button until the corresponding value is displayed.
+ Select the required fan speed by pressing “  ” button. Different fan speed have different
High To achieved the temperature as fast as possible.
Low Run of the low noise.
The most suitable temperature for the room during the summer varies from 24°C to 27°C. You are recommended. however. not to set a temperature much below the outdoor temperature. This will cause unnecessary power consumption.
FAN mode
When using the appliance in this mode. the air hose does not need to be attached.
To set this mode correctly:
+ Press the" ” button a number of times until the “Fan” symbol appears.
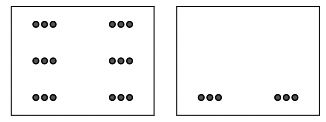
+ Select the required fan speed by pressing the “” button. Two speeds are available: High/Low
+ |f appear “ " symbol standard for high speed fan. and “
  ” stand for low speed fan.
As the figure below:
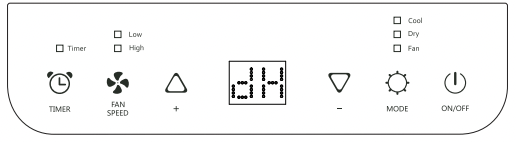
DRY mode
Ideal to reduce room humidity (spring and autumn. damp rooms rainy periods. etc). Before using the dry mode. the appliance should be prepared in the same way as for cool mode. with the air exhaust hose attached to enable the moisture to be discharged outside.
To set this mode correctly:
+ Press the “ ” button a number of times until the “Dry” symbol light appears. the screen will appear “ ” ;
” ;
+ In this mode. fan speed is selected automatically by the appliance.
SETTING THE TIMER
This timer can be used to delay the appliance start up or shutdown. this avoids wasting electricity by optimizing operating periods.
Programming start up
+ Turn on the appliance. choose the mode you desire. for example cooling. 24°C and high fan speed. Turn off the appliance.
+ Press the  button. the screen will display 1-24 hours.
+ Press several times until the corresponding time is displayed. Wait about 5 seconds. the timer will be active. then “Timer” symbol is displayed on screen.
+ Press again the “ " button. the timer will be canceled. and the "Timer” symbol will disappear from screen.
Programming shut down
+ Under the running of appliance. please press the “ ” button. the screen will display 1-24 hours.
+ Press several times until the corresponding time is displayed. Wait about 5 seconds. the timer will be active. then “Timer” symbol is displayed on screen.
+ Press again the “ ” button. the timer will be canceled. and the “Timer” symbol will disappear from screen.
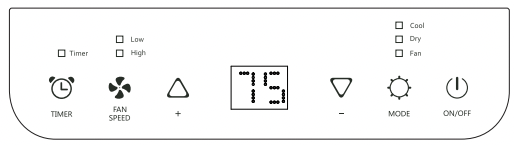
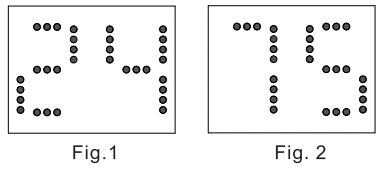
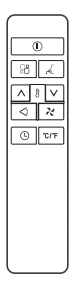
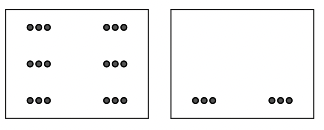
Switch the unit of temperature
Hold on “” and” ” button three seconds by the same time. then you can change the unit of temperature.
For example:
Before change. in cool mode. the screen display like Fig.1.
After change. in cool mode. the screen display like Fig.2
SELF-DIAGNOSIS
The appliance has a self diagnosis system to identify unit malfunctions. Error messages are displayed on the appliance display.
| IF DISPLAYED |
WHAT SHOULD | DO? |
|

Low TEMPERATURE (frost prevention)
|
The appliance is fitted with a frost protection device to avoid excessive formation of ice. The appliance starts up again automatically when the defrosting process is completed.
|
|

PROBE FAILURE (sensor damaged)
|
If this is displayed. contact customer service. |
|

FULL TANK (safety tank full)
|
Empty the internal safety tank. following the instructions in the “End of season operations" paragraph.
|
REMOTE CONTROL MANUAL
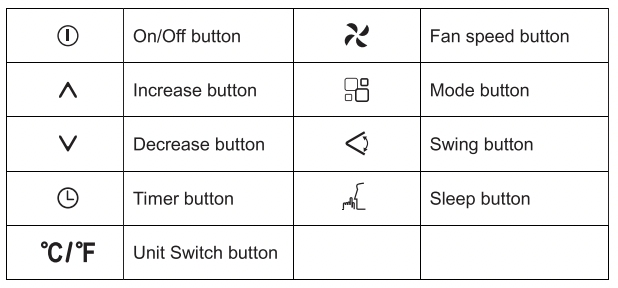
NOTE: This serial model have no auto swing function.
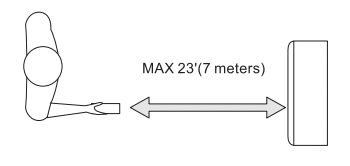
Point the remote control at the sensor on the appliance.
The remote control must be no more than 23ft (7 meters) away from the appliance (without obstacles between the remote control and the receiver).
The remote control must be handled with extreme care. Do not drop it or expose it to direct sunlight or sources of heat. If the remote control does not work. check the batteries and replace with new batteries. Do not mix new and old batteries.
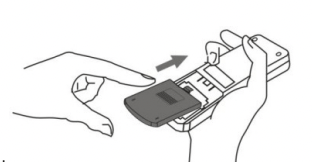
INSERTING OR REPLACING THE BATTERIES
- Remove the cover on the rear of the remote control;
- Insert two "AAA" 1.5V batteries in the correct position (see instructions inside the battery compartment);
NOTE:
If the remote control unit is replaced or disposed of. the batteries must be removed and discarded in
accordance with current legislation as they are harmful to the environment.
Do not mix old and new batteries. Do not mix alkaline. standard (carbon-zinc) or rechargeable (nickel-cadmium) batteries.
Batteries may explode or leak if exposed to open flames. Dispose of batteries accordingly.
If the remote control is not being used for extended periods of time (winter storage). remove the batteries and store in a cool. dry location.
COOL mode
Ideal for hot muggy weather when you need to cooling and dehumidify the room.
To set this mode correctly:
- Press the “
 ” button a number of times until the “Cool” symbol light appears.
- Select the target temperature18°C-32°C (64°F-90°F) by pressing the “^ ”or “v"button until the corresponding value is displayed.
- Select the required fan speed by pressing the “ " button. Different fan speed have different function.
HighTo achieved the temperature as fast as possible.
Low Run of the low noise.
The most suitable temperature for the room during the summer varies f rom 75°F to 81°F (24°C to 27°C). You are recommended. however. not to set a temperature much below the outdoor temperature. The fan speed difference is more noticeable when the appliance is under FAN mode but may not be noticeable under COOL mode.
FAN mode
When using the appliance in this mode. the air hose does not need to be attached.
- Press the “" button a number of times until the “Fan” symbol light appears.
- Select the required fan speed by pressing the “ ” button.
Two speeds are available: High/Low
- If appear ""symbol standard for high speed fan. and “” stand for low speed fan.
As the figure below:
DRY mode
Ideal to reduce room humidity (spring and autumn. damp rooms rainy periods. etc).
In dry mode. the appliance should be prepared in the same way as for cool mode. with the air exhaust hose attached to enable the moisture to be discharged outside.
To set this mode correctly:
- Press the "” button a number of times until the “Dry” symbol light appears. the screen will appear “ ";
- In this mode. fan speed is selected automatically by the appliance and default low peed fan.
SWING function
NOTE: This serial unit have no auto swing function.
Please adjust the deflectors by manual to the suitable position.
A: Horizon deflector
B: Vertical deflector
SLEEP function
This function is useful for the night as it gradually reduces operation of the appliance.
To set this function correctly:
- Select the cool or heat mode as described above.
- Press the “
 ” button.
The appliance operates in the previously selected mode.
When you choose the sleep function. the screen will reduce the brightness. and the fan speed is low.
The SLEEP function maintains the room at optimum temperature without excessive fluctuations in either temperature or humidity with silent operation. Fan speed is always at Low. while room temperature and humidity vary gradually to ensure the most comfortable.
When in COOL mode. the selected temperature will increase by 1°C(1°F) per hour in a 2 hour period. This new temperature will be maintained for the next 6 hours. Then the appliance turn it off.
The SLEEP function can be canceled at any time during operation by pressing the "Sleep". "Mode" or "fan speed" button.
In FAN or DRY mode. SLEEP function cannot be set.
TIPS FOR CORRECT USE
|
To get the optimal performance from your appliance. follow these recommendations:
- Close the windows and doors in the room to be air conditioned (Fig. 21).When installing the appliance semi-permanently. you should leave a door slightly open (as little as 1 cm) to guarantee correct ventilation.
- Protect the room from direct exposure to the sun by partially closing curtains and/or blinds to make the appliance much more economical to run (Fig. 22).
- Never rest objects of any kind on the appliance.
- Do not obstruct the air intake and outlet (Fig. 23). Leave the grilles free.
- Make sure there are no heat sources in the room.
- Never use the appliance in very damp rooms (laundry room. for example).
- Never use the appliance outdoors.
- Make sure the appliance is standing on a level surface.
|
|

|
WATER DRAINAGE METHOD
When there is excess water condensation inside the unit. the appliance stops running and shows “ ” (FULL TANK as mentioned in SELF-DIAGNOSE). This indicates that the water condensation needs to be drained using the following procedures:
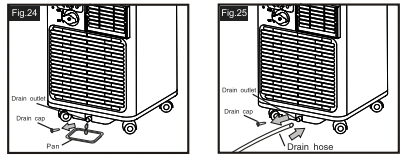
Manual Draining (Fig.24)
- 1 .Unplug the unit from power source.
- 2. Place a pan(not supply) under the lower drain plug. See diagram.
- 3. Remove the lower drain plug.
- 4. Water will drain out and collect in the pan.
- 5. After the water is drained. replace the lower drain plug firmly.
- 6.Turn on the unit.
Continuous Draining (Fig.25)
- 1 .Unplug the unit from the power source.
- 2. Remove the drain plug. While doing this operation some residual water may spill so please have a pan ( not supply) to collect the water.
- 3. Connect the drain hose (1/2" or 12.7mm. maybe not supplied ). See diagram.
- 4. The water can be continuously drained through the hose into a floor drain or bucket.
- 5. Turn on the unit.
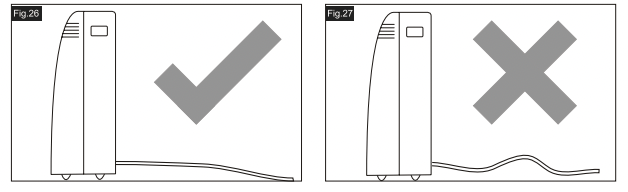
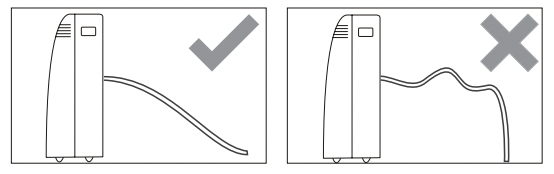
NOTE:
Please be sure that the height of and section of the drain hose should not be higher than that of the drain outlet. or the water tank may not be drained. (fig.26 and fig.27)
Middle drainage
When unit running in Dry mode. you can choose the way below to drainage.
- 1 .Unplug the unit from the power source.
- 2. Remove the drain plug(Fig.A). While doing this operation some residual water may spill so please have a pan to collect the water.
- 3. Connect the drain hose (1/2" or 12.7mm. maybe not supplied ). (Fig.B)
- 4. The water can be continuously drained through the hose into a floor drain or bucket.
- 5. Turn on the unit.

NOTE:
Please be sure that the height of and section of the drain hose should not be higher than that of the drain outlet. or the water tank may not be drained. Please see following fig.
CLEANING
Before cleaning or maintenance. turn the appliance off by pressing the button on the control panel or remote control. wait for a few minutes then unplug from the mains socket.
CLEANING THE CABINET
You should clean the appliance with a slightly damp cloth then dry with a dry cloth. may not used water to wash appliance.
- Never wash the appliance with water. It could be dangerous.
- Never use petrol. alcohol or solvents to clean the appliance.
- Never spray insecticide liquids or similar.
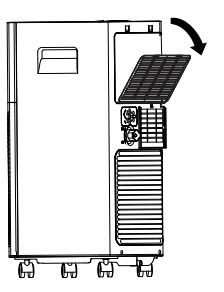
CLEANING THE AIR FILTERS
To keep your appliance working efficiently. you should clean the filter every week of operation.
Follow the fig.28 direction and open the grid of appliance. then take out evaporator from the back of grid. Use a vacuum cleaner to remove dust accumulations from the filter. If it is very dirty. immerse in warm water and rinse a number of times. The water should never be hotter than 104°F(40°C). After washing. leave the filter to dry then attach the intake grille to the appliance.
START-END OF SEASON OPERATIONS
START OF SEASON CHECKS
Make sure the power cable and plug are undamaged and the earth system is efficient.
Follow the installation instructions precisely.
END OF SEASON OPERATIONS
To empty the internal circuit completely of water. remove the cap.
Run off all water left into a basin. When all the water has been drained. put the cap back in place.
Clean the filter and dry thoroughly before putting back.
LIMIT CONDITIONS.
Temperature of room 64°F-95°F (18°C-35°C)(Cooling)
Humidity of room 30%RH - 80%RH
TROUBLESHOOTING
ROOM CONDITIONS
Temperature of room 64°F-95°F (18°C-35°C)(Cooling)
Temperature of room 50°F-77°F (10°C-25°C)(Heating)
| PROBLEM |
CAUSE |
SOLUTION |
| The appliance does not come on |
- There is no current
- It is not plugged in
- The internal safety device has tripped
|
- Check the power supply
- Plug the unit into a power outlet
- Wait 30 minutes. If the problem persists. contact TCL customer service
|
| The appliance works for a short time only |
- There are bends in the air exhaust hose
- Something is preventing the air from being discharged
|
- Position the air exhaust hose correctly. keeping it as short as possible and free of curves to avoid bottlenecks
- Check and remove any obsta cles obstructing air discharge
|
The appliance works. but does not cool the room
|
- Windows. doors and/or curtains open
|
- Close doors. windows and curtains. bearing in mind the "tips for correct use" given above
|
- There are heat sources in the room (oven. hairdryer. etc)
|
- Eliminate the heat sources
|
- The air exhaust hose is detached from the appliance
|
- Fit the air exhaust hose in the housing at the back of the appliance
|
- The technical specification of the appliance is not adequate for the room in which it is located
|
|
| During operation. there is an unpleasant smell in the room |
|
- Clean the filter as described above
|
| The appliance does not operate for about three minutes after restarting it |
- The internal compressor safety device prevents the appliance from being restarted until three minutes have elapsed since it was last turned off
|
- This delay is part of normal operation and the unit will be able to operate after three minutes have passed
|
|
The following message appears on the display:
Lt/PF/Ft

|
- The appliance has a self diagnosing system to identify unit malfunctions
|
- See the SELF-DIAGNOSIS section above
|