TO REDUCE THE RISK OF FIRE OR ELECTRIC SHOCK, DO
NOT EXPOSE THIS PRODUCT TO RAIN OR MOISTURE.
WARNING:
This “bolt of lightning” indicates
uninsulated material within your unit
may cause an electrical shock. For
the safety of everyone in your
household, please do not remove
product covering.
The “exclamation point” calls
attention to features for which you
should read the enclosed literature
closely to prevent operating and
maintenance problems.
CAUTION
RISK OF ELECTRIC SHOCK
DO NOT OPEN
CAUTION: TO REDUCE THE RISK OF ELECTRIC SHOCK,
DO NOT REMOVE COVER (OR BACK).
NO USER-SERVICEABLE PARTS INSIDE.
REFER SERVICING TO QUALIFIED SERVICE
PERSONNEL.
TO PREVENT ELECTRIC SHOCK, MATCH WIDE BLADE OF PLUG TO WIDE
SLOT, FULLY INSERT.
CAUTION:
1
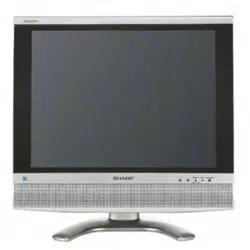
LC-42SB45U
OPERATION MANUAL
• Theillustrationsandon-screendisplaysinthisoperationmanualarefor
explanationpurposesandmayvaryslightlyfromtheactualoperations.
• Menuitemsthatarenotselectablearegrayedout.
• Toavoidscratchingtheframeorscreen,pleaseuseasoft,lintfreecloth
forcleaning.ApprovedcleaningclothsareavailabledirectlyfromSharpin
single(00Z-LCD-CLOTH)ortriple(00Z-LCD-CLOTH-3)packs.Call1-800
BESHARPforordering,orVISITwww.sharpusa.com/SharpDirect.
IMPORTANT:
Toaidreportingincaseoflossortheft,pleaserecordthe
TV'smodelandserialnumbersinthespaceprovided.The
numbersarelocatedattherearoftheTV.
ModelNo.:
SerialNo.:
LIQUID CRYSTAL TELEVISION
ENGLISH
IMPORTANT INFORMATION
ENGLISH

WARNING: FCC Regulations state that any unauthorized changes or modications to this equipment not expressly approved
by the manufacturer could void the user's authority to operate this equipment.
“Note to CAT V system installer: This reminder is provided to call the CATV system installer's attention to Article 820-40 of the
National Electrical Code that provides guidelines for proper grounding and, in particular, species that the cable ground shall be
connected to the grounding system of the building, as close to the point of cable entry as practical.”
This product utilizes tin-lead solder, and uorescent lamp containing a small amount of
mercury. Disposal of these materials may be regulated due to environmental considerations.
For disposal or recycling information, please contact your local authorities, the Electronic
Industries Alliance: www.eiae.org, the lamp recycling organization: www.lamprecycle.org or
Sharp at 1-800-BE-SHARP
(For U.S.A. only)
CAUTION:
This product satises FCC regulations when shielded cables and connectors are used to connect the unit to other equipment. To
prevent electromagnetic interference with electric appliances such as radios and televisions, use shielded cables and connectors
for connections.
INFORMATION:
This equipment has been tested and found to comply with the limits for a Class B digital device, pursuant to Part 15 of the FCC
Rules. These limits are designed to provide reasonable protection against harmful interference in a residential installation. This
equipment generates, uses and can radiate radio frequency energy and, if not installed and used in accordance with the
instructions, may cause harmful interference to radio communications. However, there is no guarantee that interference will not
occur in a particular installation. If this equipment does cause harmful interference to radio or television reception, which can be
determined by turning the equipment o and on, the user is encouraged to try to correct the interference by one or more of the
following measures:
Reorient or relocate the receiving antenna.
Increase the separation between the equipment and receiver.
Connect the equipment into an outlet on a circuit dierent from that to which the receiver is connected.
Consult the dealer or an experienced radio/TV technician for help.
DECLARATION OF CONFORMITY:
This device complies with Part 15 of the FCC Rules. Operation is subject to the following two conditions: (1) This
device may not cause harmful interference, and (2) this device must accept any interference received, including
interference that may cause undesired operation.
RESPONSIBLE PARTY:
SHARP ELECTRONICS CORPORATION
Sharp Plaza, Mahwah, New Jersey 07495-1163
TEL: 1-800-BE-SHARP
For Business Customers: URL http://www.sharpusa.com
CAUTION:
DO NOT PLACE THIS PRODUCT ON AN UNSTABLE CART, STAND, TRIPOD, BRACKET, OR TABLE. THE
PRODUCT MAY FALL CAUSING SERIOUS PERSONAL INJURY AND SERIOUS DAMAGE TO THE PRODUCT. USE
ONLY WITH A CART, STAND, TRIPOD, BRACKET, OR TABLE RECOMMENDED BY THE MANUFACTURER OR
SOLD WITH THE PRODUCT. FOLLOW THE MANUFACTURER'S INSTRUCTIONS WHEN INSTALLING THE
PRODUCT AND USE MOUNTING ACCESSORIES RECOMMENDED BY THE MANUFACTURER. A PRODUCT
AND CART COMBINATION SHOULD BE MOVED WITH CARE. QUICK STOPS, EXCESSIVE FORCE, AND UNEVEN
SURFACES MAY CAUSE THE PRODUCT AND CART COMBINATION TO OVERTURN.
2
• ManufacturedunderlicensefromDolbyLaboratories.“Dolby”andthedouble-DsymbolaretrademarksofDolby
Laboratories.
• “HDMI,theHDMIlogoandHigh-DenitionMultimediaInterfacearetrademarksorregisteredtrademarksofHDMI
LicensingLLC.”
IMPORTANT INFORMATION
SHARPLIQUIDCRYSTALTELEVISION,MODELLC-42SB45U
TRADEMARKS
• ProductsthathaveearnedtheENERGYSTAR
®
aredesignedtoprotecttheenvironmentthroughsuperiorenergy
efciency.
Electricity is used to perform many useful functions, but it can also cause personal injuries and property damage if
improperly handled. This product has been engineered and manufactured with the highest priority on safety. However,
improper use can result in electric shock and/or re. In order to prevent potential danger, please observe the following
instructions when installing, operating and cleaning the product. To ensure your safety and prolong the service life of
your Liquid Crystal Television, please read the following precautions carefully before using the product.
1) Read these instructions.
2) Keep these instructions.
3) Heed all warnings.
4) Follow all instructions.
5) Do not use this apparatus near water.
6) Clean only with dry cloth.
7) Do not block any ventilation openings. Install in accordance with the manufacturer's instructions.
8) Do not install near any heat sources such as radiators, heat registers, stoves, or other apparatus (including
ampliers) that produce heat.
9) Do not defeat the safety purpose of the polarized or grounding-type plug. A polarized plug has two blades with
one wider than the other. A grounding type plug has two blades and a third grounding prong. The wide blade or
the third prong are provided for your safety. If the provided plug does not t into your outlet, consult an electrician
for replacement of the obsolete outlet.
10) Protect the power cord from being walked on or pinched particularly at plugs, convenience receptacles, and the
point where they exit from the apparatus.
11) Only use attachments/accessories specied by the manufacturer.
12) Use only with the cart, stand, tripod, bracket, or table specied by the manufacturer, or sold with the
apparatus. When a cart is used, use caution when moving the cart/apparatus combination to avoid
injury from tip-over.
13) Unplug this apparatus during lightning storms or when unused for long periods of time.
14) Refer all servicing to qualied service personnel. Servicing is required when the apparatus has been damaged in
any way, such as power-supply cord or plug is damaged, liquid has been spilled or objects have fallen into the
apparatus, the apparatus has been exposed to rain or moisture, does not operate normally, or has been dropped.
Additional Safety Information
15) Power Sources—This product should be operated only from the type of power source indicated on the marking
label. If you are not sure of the type of power supply to your home, consult your product dealer or local power
company. For products intended to operate from battery power, or other sources, refer to the operating
instructions.
16) Overloading—Do not overload wall outlets, extension cords, or integral convenience receptacles as this can result
in a risk of re or electric shock.
17) Object and Liquid Entry—Never push objects of any kind into this product through openings as they may touch
dangerous voltage points or short-out parts that could result in a re or electric shock. Never spill liquid of any kind
on the product.
18) Damage Requiring Service—Unplug this product from the wall outlet and refer servicing to qualied service
personnel under the following conditions:
a) When the AC cord or plug is damaged,
b) If liquid has been spilled, or objects have fallen into the product,
c) If the product has been exposed to rain or water,
d) If the product does not operate normally by following the operating instructions.
Adjust only those controls that are covered by the operating instructions as an improper adjustment of other
controls may result in damage and will often require extensive work by a qualied technician to restore the
product to its normal operation,
e) If the product has been dropped or damaged in any way, and
f) When the product exhibits a distinct change in performance - this indicates a need for service.
19) Replacement Parts—When replacement parts are required, be sure the service technician has used replacement
parts specied by the manufacturer or have the same characteristics as the original part. Unauthorized
substitutions may result in re, electric shock, or other hazards.
20) Safety Check—Upon completion of any service or repairs to this product, ask the service technician to perform
safety checks to determine that the product is in proper operating condition.
21) Wall or ceiling mounting—When mounting the product on a wall or ceiling, be sure to install the product
according to the method recommended by the manufacturer.
22) The apparatus must be connected to a mains socket outlet with a protected earthed connection.
23) The appliance coupler is used as the disconnect device of this apparatus, the disconnect device shall remain
readily operable.
3
DEAR SHARP CUSTOMER
Thank you for your purchase of the Sharp Liquid Crystal Television. To ensure safety and many years
of trouble-free operation of your product, please read the Important Safety Instructions carefully before
using this product.
IMPORTANT SAFETY INSTRUCTIONS

IMPORTANT SAFETY INSTRUCTIONS
• Water and Moisture — Do not use this product near water - for example, near a bath tub, wash bowl, kitchen sink, or
laundry tub; in a wet basement; or near a swimming pool; and the like.
• Stand — Do not place the product on an unstable cart, stand, tripod or table. Placing the product on an unstable base can
cause the product to fall, resulting in serious personal injuries as well as damage to the product. Use only a cart, stand,
tripod, bracket or table recommended by the manufacturer or sold with the product. When mounting the product on a wall,
be sure to follow the manufacturer’s instructions. Use only the mounting hardware recommended by the manufacturer.
• Selecting the location — Select a place with no direct sunlight and good ventilation.
• Ventilation — The vents and other openings in the cabinet are designed for ventilation. Do not cover or block these vents
and openings since insucient ventilation can cause overheating and/or shorten the life of the product. Do not place the
product on a bed, sofa, rug or other similar surface, since they can block ventilation openings. This product is not designed
for built-in installation; do not place the product in an enclosed place such as a bookcase or rack, unless proper ventilation
is provided or the manufacturer’s instructions are followed.
• The Liquid Crystal panel used in this product is made of glass. Therefore, it can break when the product is dropped or
applied with impact. Be careful not to be injured by broken glass pieces in case the panel breaks.
• Heat — The product should be situated away from heat sources such as radiators, heat registers, stoves, or other products
(including ampliers) that produce heat.
• The Liquid Crystal panel is a very high technology product with 2,073,600 pixels, giving you ne picture details.
Occasionally, a few non-active pixels may appear on the screen as a xed point of blue, green or red. Please note that this
does not aect the performance of your product.
• Lightning — For added protection for this television equipment during a lightning storm, or when it is left unattended and
unused for long periods of time, unplug it from the wall outlet and disconnect the antenna. This will prevent damage to the
equipment due to lightning and power-line surges.
• Power Lines — An outside antenna system should not be located in the vicinity of overhead power lines or other electric
light or power circuits, or where it can fall into such power lines or circuits. When installing an outside antenna system,
extreme care should be taken to keep from touching such power lines or circuits as contact with them might be fatal.
• Outdoor Antenna Grounding — If an outside antenna is connected to the television equipment, be sure the antenna system
is grounded so as to provide some protection against voltage surges and built-up static charges. Article 810 of the National
Electrical Code, ANSI/NFPA 70, provides information with regard to proper grounding of the mast and supporting structure,
grounding of the lead-in wire to an antenna discharge unit, size of grounding conductors, location of antenna-discharge
unit, connection to grounding electrodes, and requirements for the grounding electrode.
EXAMPLE OF ANTENNA GROUNDING AS PER
NATIONAL ELECTRICAL CODE, ANSI/NFPA 70
ANTENNA
LEAD IN WIRE
GROUND
CLAMP
NEC — NATIONAL ELECTRICAL CODE
GROUNDING CONDUCTORS
(NEC SECTION 810-21)
GROUND CLAMPS
POWER SERVICE GROUNDING ELECTRODE
SYSTEM
(NEC ART 250, PART H)
ELECTRIC
SERVICE
EQUIPMENT
ANTENNA
DISCHARGE UNIT
(NEC SECTION 810-20)
• To prevent re, never place any type of candle or ames on the top or near the TV set.
• To prevent re or shock hazard, do not expose this product to dripping or splashing.
No objects lled with liquids, such as vases, should be placed on the product.
• To prevent re or shock hazard, do not place the AC cord under the TV set or other heavy items.
• Turn o the main power and unplug the AC cord from the wall outlet before handling.
• Use a soft cloth and gently wipe the surface of the display panel. Using a hard cloth may scratch the panel surface.
• Use a soft damp cloth to gently wipe the panel when it is really dirty.
(It may scratch the panel surface when wiped strongly.)
• If the panel is dusty, use an anti-static brush, which is commercially available, to clean it.
• To protect the panel, do not use a dirty cloth, liquid cleaners or chemical cloth to clean it, such materials may damage the
panel surface.
• Do not display a still picture for a long time, as this could cause an afterimage to remain.
• Install the product on the place where the AC cord can be unplugged easily from the AC outlet, or from the AC INPUT
terminal on the rear of the product.
• When transporting the TV, never carry it by holding or otherwise putting pressure onto the display.
Be sure to always carry the TV by two people holding it with two hands – one hand on each side of the TV.
• Do not insert foreign objects into the product. Inserting objects in the air vents or other openings may result in re or electric
shock. Exercise special caution when using the product around children.
4
IMPORTANT SAFETY INSTRUCTIONS
5
6
Supplied Accessories
Detaching the stand neck for wall mounting
QUICK REFERENCE
Attaching/Detaching the Stand
• Beforeattaching(ordetaching)thestand,unplugtheACcordfromtheACINPUTterminal.
• BeforeperformingworkspreadcushioningoverthebaseareatolaytheTVon.Thiswillpreventitfrombeingdamaged.
CAUTION
• Attach the stand in the correct direction.
• Be sure to follow the instructions. Incorrect installation of the stand may result in the TV falling over.
• Todetachthestand,performthestepsinreverseorder.
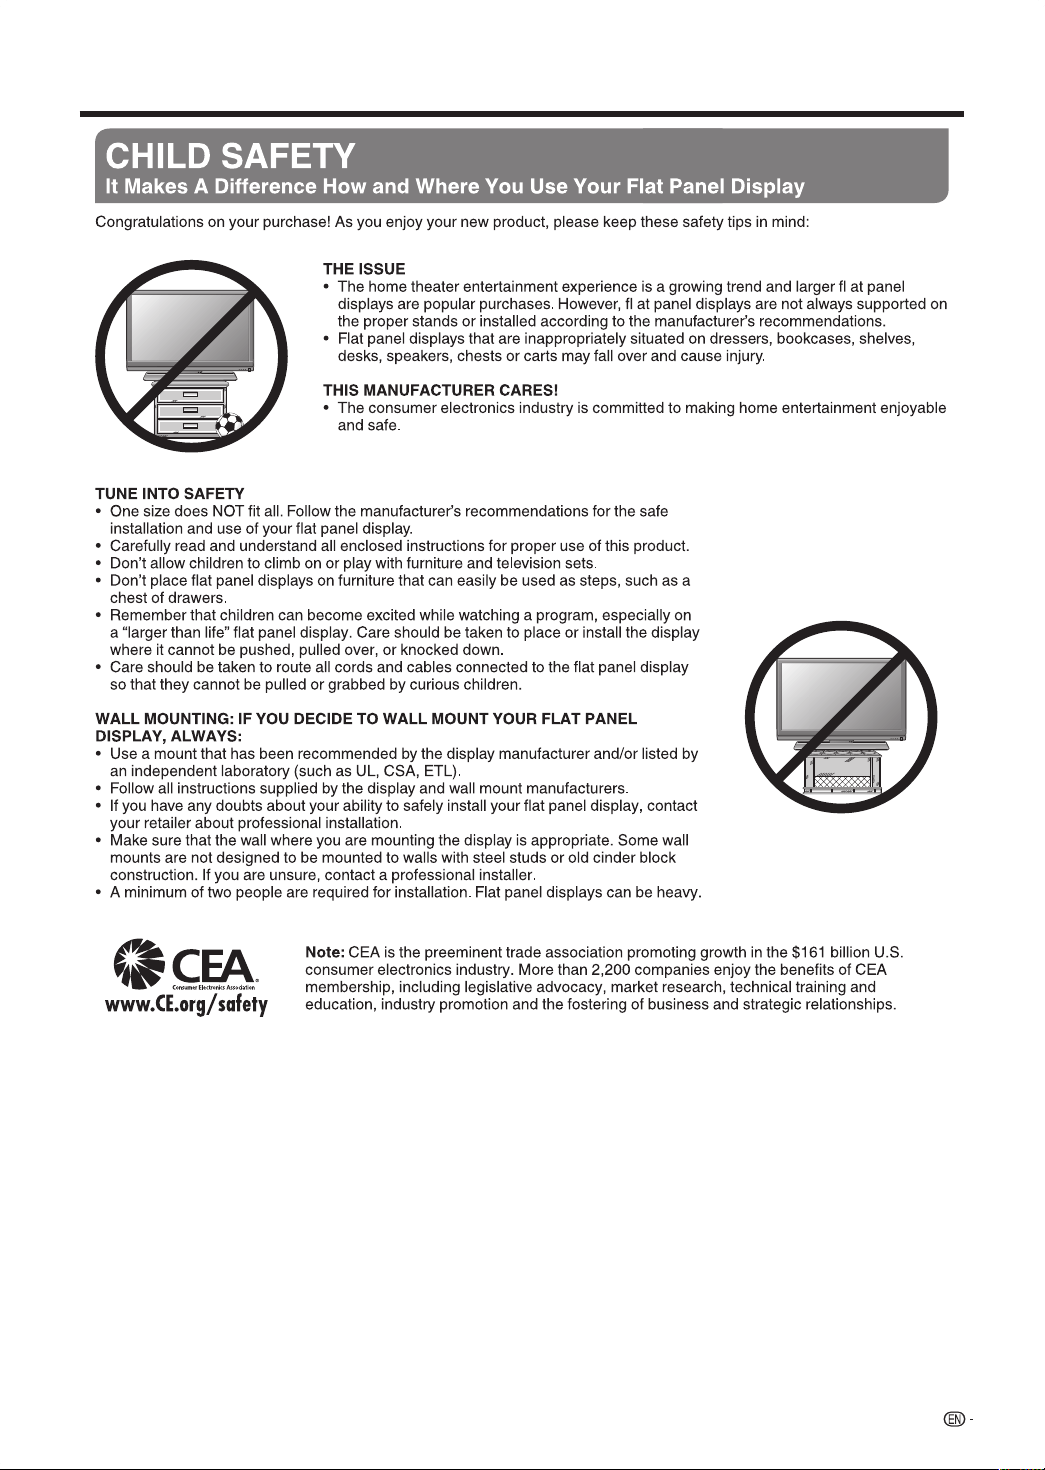
1Conrmthatthereare4screwssuppliedwiththestandunit.
2
1
InsertthestandintotheopeningsonthebottomoftheTV.
2
Insertandtightenthe4screwsintothe4holesonthebottomoftheTV.
1
2
1
• AlwaysusetheACcordsuppliedwiththeTV.
•ACcordenclosedinthisproductisfor110-125V.Inusingitonthe125-240VAC,pleaseconsultthefollowing.
SHARP ELECTRONICS CORPORATION, LATIN AMERICA GROUP
6100 Blue Lagoon Drive, Suite 150, Miami, Florida 33126, U.S.A.
Makesurethefollowingaccessoriesareprovidedwiththeproduct.
Remotecontrolunit
(
g
1)
Page7
“AA”sizebattery
(
g
2)
Page8
ACcord
(
g
1)
Page7
Stand
(
g
1)
Page6
Screws
(
g
4)
Page6
Operationmanual
(
g
1)
2
1
1
2
1
2
3
CAUTION
• Detach the stand neck in the correct direction.
• Do not remove the stand neck from the TV unless using an optional wall mount bracket to mount it.
1
1
Loosenthe4screwsthatsecurethestandneck
byusingacross-headscrewdriver.
2
RemovestandneckfromtheTVset.
2 Loosenthe4screwsandpullouthingeplate.
3
1
PlacethehingeplateintheTVsetasillustration
shown.
2
PlacethestandcoverintheTVsetandtighten
the4screwsintothe4holes.
• Toattachthestandneck,performthestepsinreverse
order.
7
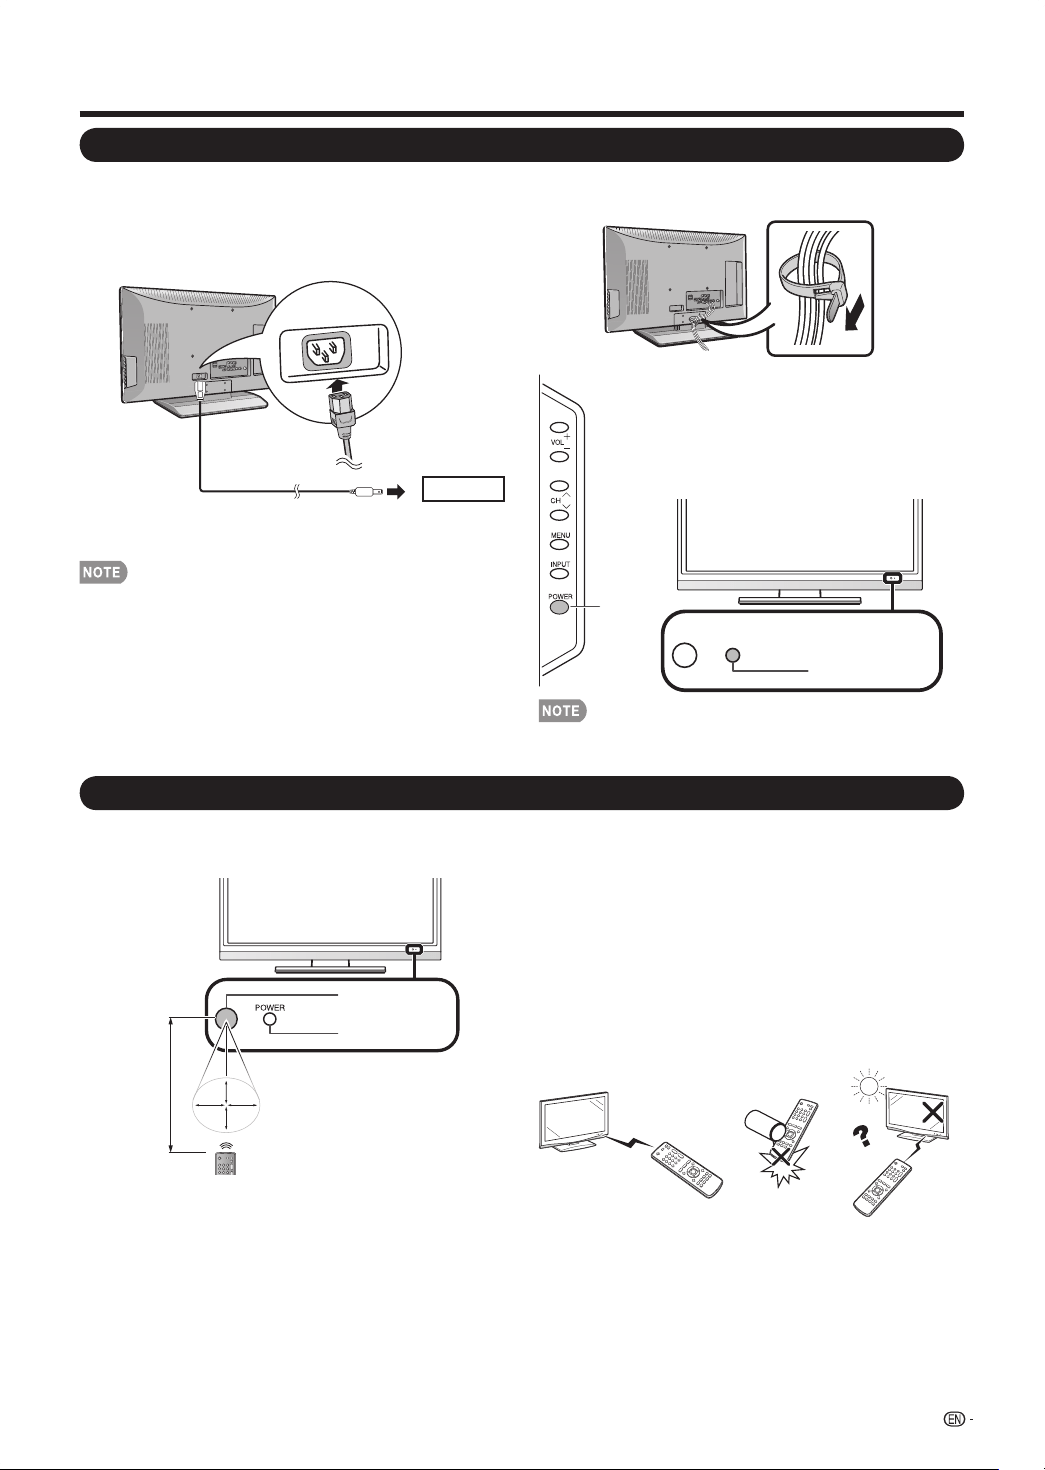
Using the Remote Control Unit
UsetheremotecontrolunitbypointingittowardstheremotecontrolsensorontheTV.Objectsbetweenthe
remotecontrolunitandtheremotecontrolsensormaypreventproperoperation.
Remote control sensor
POWER indicator
30º 30º
30º
30º
17´ (5 m)
■
Cautions regarding the remote control unit
• Donotexposetheremotecontrolunittoshock.Inaddition,
donotexposetheremotecontrolunittoliquids,anddonot
placeinanareawithhighhumidity.
• Donotinstallorplacetheremotecontrolunitunderdirect
sunlight.Theheatmaycausedeformationoftheremote
controlunit.
• Theremotecontrolunitmaynotworkproperlyiftheremote
controlsensorontheTVisunderdirectsunlightorstrong
lighting.Insuchcases,changetheangleofthelighting
ortheTV,oroperatetheremotecontrolunitclosertothe
remotecontrolsensor.
IMPORTANT:
ThePOWERindicatoronthetelevisionshouldlightGREENindicatingyouhavepowertothetelevision.
IfthePOWERindicatoronthetelevisionstilldoesnotlightup,press POWERontheremotecontroltoturnthepoweron.
IMPORTANT:
IFTHEUNITDOESNOTPOWERON-UNPLUGTHETELEVISIONFROMTHEOUTLETANDREPEATTHEINSTALLATION
STEPS.
IFYOUSTILLENCOUNTERNOPOWER,PLEASECONTACTUSAT1-800-BE-SHARP.
QUICK REFERENCE
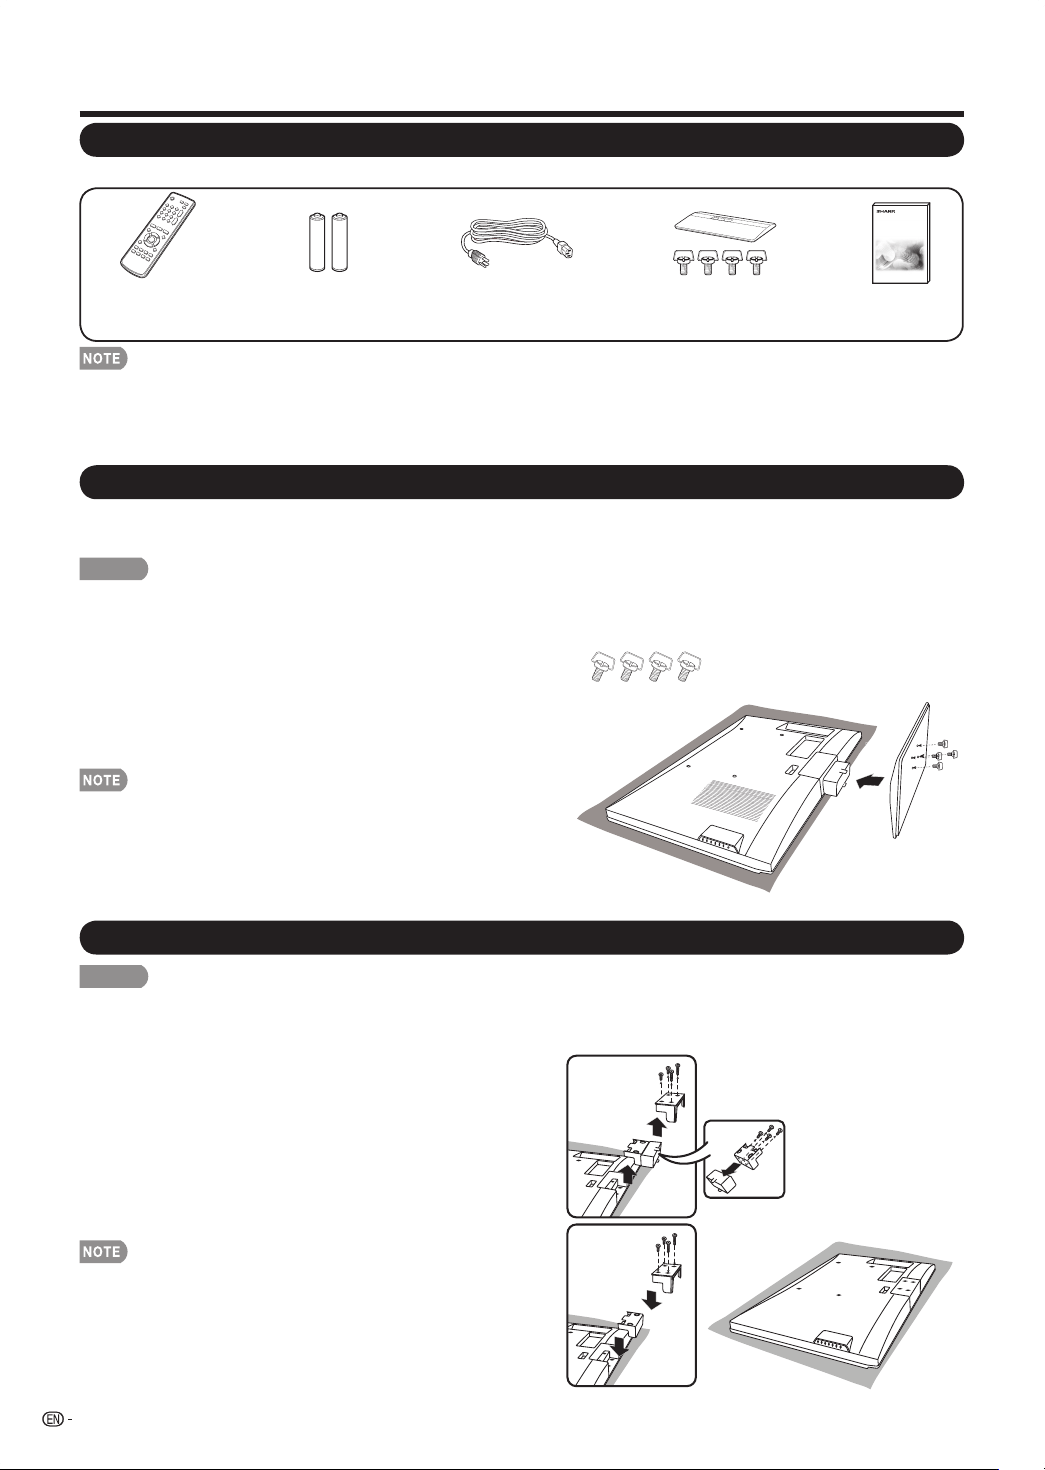
Attachyourantennatothebackofthetelevision.
(Seepage8.)
Bundlethecordsproperlywiththecabletie.
Howtoturnonthetelevisionforthersttime.
A) PressPOWER onthetelevision.
ConnecttheACplugforthetelevisionintotheAC
outlet.
B) ThePOWERindicatoronthefrontof
thetelevisionlightsGREEN.
• SpeakerscannotbedetachedfromtheTV.
• TVanglecannotbeadjusted.
• PlacetheTVclosetotheACoutlet,andkeepthepower
plugwithinreach.
• TO PREVENT RISK OF ELECTRIC SHOCK, DO NOT
TOUCH UN-INSULATED PARTS OF ANY CABLES
WITH THE AC CORD CONNECTED.
1
2
3
4
Quick Installation Tips
ACoutlet
POWER
POWER indicator
POWER
8
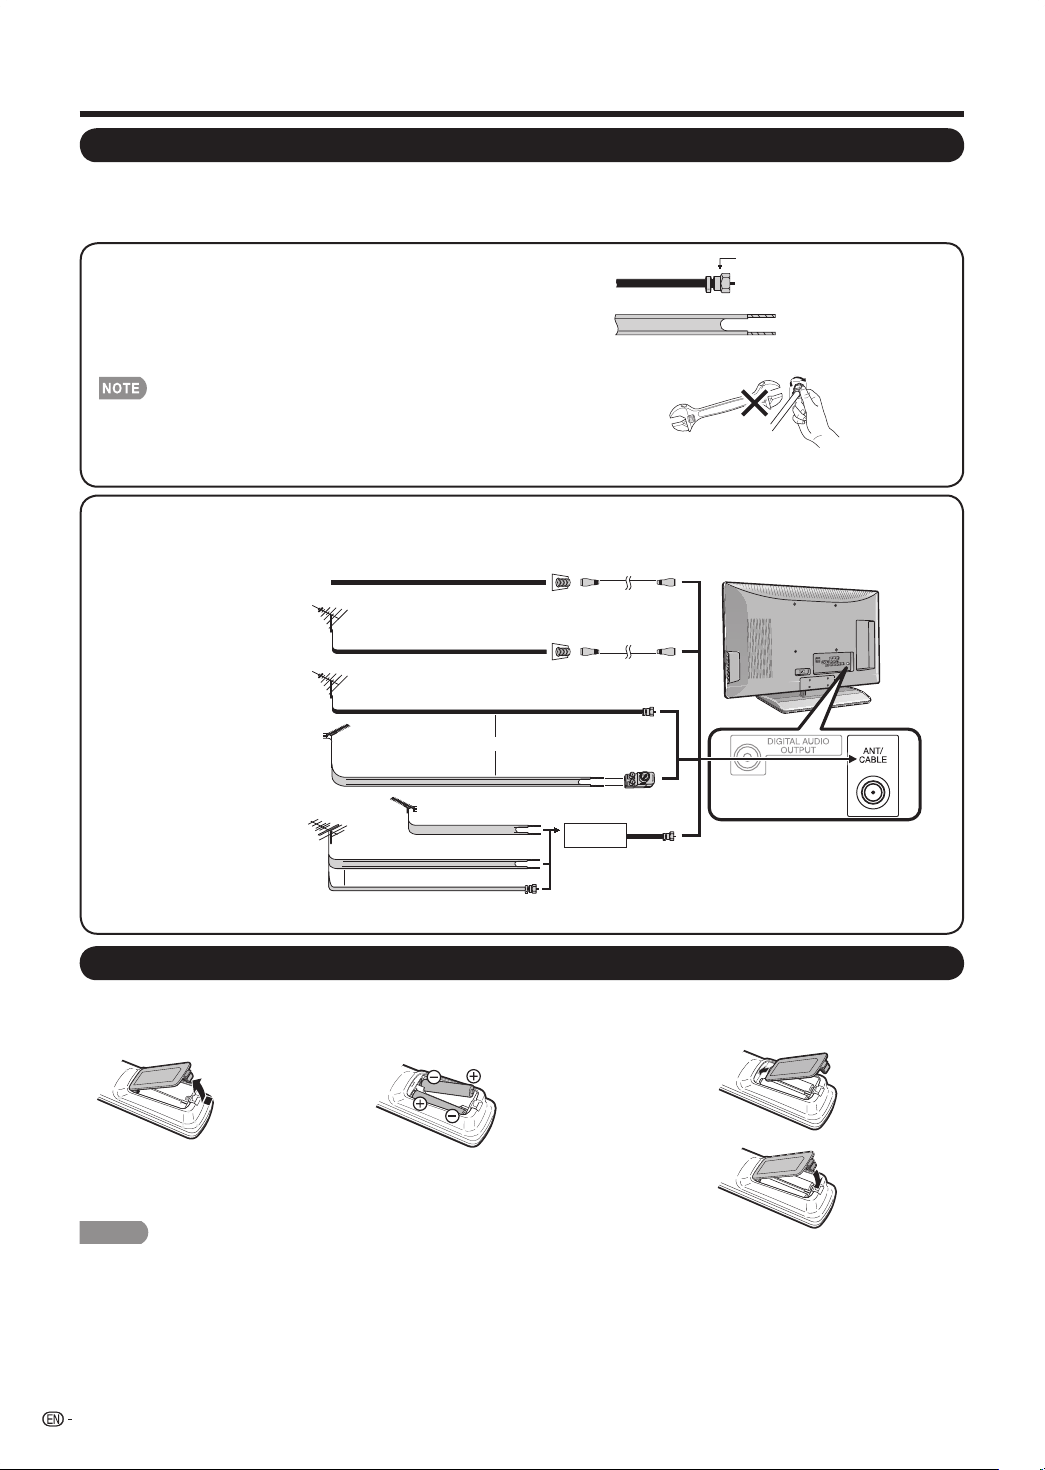
Antennas
Toenjoyaclearerpicture,useanoutdoorantenna.Thefollowingisabriefexplanationofthetypesofconnections
thatareusedforacoaxialcable.Ifyouroutdoorantennausesa75-ohmcoaxialcablewithanF-typeconnector,
plugitintotheantennaterminalattherearoftheTVset.
1.A75-ohmsystemisgenerallyaroundcablewithF-typeconnector
thatcaneasilybeattachedtoaterminalwithouttools(Commercially
available).
F-typeconnector
300-ohmtwin-leadcable(at)
F-typeconnector
75-ohmcoaxialcable(round)
75-ohmcoaxialcable
2.A300-ohmsystemisaat“twin-lead”cablethatcanbeattached
toa75-ohmterminalthrougha300/75-ohmadapter(Commercially
available).
WhenconnectingtheRFcabletotheTVset,donottightenF-type
connectorwithtools.
Iftoolsareused,itmaycausedamagetoyourTVset.(Thebreaking
ofinternalcircuit,etc.)
300-ohm twin-lead cable
75-ohm coaxial cable (round)
75-ohm coaxial cable
IN OUT
300-ohm
twin-lead cable
VHF
ANTENNA
UHF
ANTENNA
Combiner
(commercially available)
300/75-ohm adapter
(commercially available)
300-ohm twin-lead cable (at)
75-ohm coaxial cable (round)
Cable TV lead-In
Coaxial cable
(commercially available)
Coaxial cable
(commercially available)
Home Antenna
terminal (75-ohm)
Home Antenna
terminal (75-ohm)
or
or
F-type connector should be finger-tightened only.
CAUTION
Improperuseofbatteriescanresultinchemicalleakageorexplosion.Besuretofollowtheinstructionsbelow.
• Donotmixbatteriesofdifferenttypes.Differenttypesofbatterieshavedifferentcharacteristics.
• Donotmixoldandnewbatteries.Mixingoldandnewbatteriescanshortenthelifeofnewbatteriesorcausechemicalleakage
inoldbatteries.
• Removebatteriesassoonastheyarewornout.Chemicalsthatleakfrombatteriesthatcomeincontactwithskincancausea
rash.Ifyoundanychemicalleakage,wipethoroughlywithacloth.
• Thebatteriessuppliedwiththisproductmayhaveashorterlifeexpectancyduetostorageconditions.
• Ifyouwillnotbeusingtheremotecontrolunitforanextendedperiodoftime,removebatteriesfromit.
1 Openthebatterycover.
• Placethebatterieswiththeirterminals
correspondingtothe(
e
)and(
f
)
indicationsinthebatterycompartment.
2Inserttwo“AA”sizebatteries
(suppliedwiththeproduct).
3Closethebatterycover.
Installing Batteries in the Remote Control Unit
IftheremotecontrolfailstooperateTVfunctions,replacethebatteriesintheremotecontrolunit.
Preparation
Connecting Antenna
Cable
1
Cable without a CATV
converter
3
Combination VHF/
UHF antenna
4
Separate VHF/UHF
antenna
ToTVantenna
terminal
2
VHF/UHF antenna
• Connect the antenna cable to the TV using one of the methods in the illustration as shown (
1
,
2
,
3
or
4
).

9
Contents
Dimensional Drawings
• ThedimensionaldrawingsfortheLCDTVsetareshownontheinsidebackcover.
IMPORTANT INFORMATION ............................................................................................................................ 1
TRADEMARKS ................................................................................................................................................... 2
IMPORTANT SAFETY INSTRUCTIONS ............................................................................................................ 3
QUICK REFERENCE .......................................................................................................................................... 6
SuppliedAccessories.................................................................................................................................... 6
Attaching/DetachingtheStand...................................................................................................................... 6
Detachingthestandneckforwallmounting................................................................................................... 6
QuickInstallationTips.................................................................................................................................... 7
UsingtheRemoteControlUnit...................................................................................................................... 7
Antennas....................................................................................................................................................... 8
InstallingBatteriesintheRemoteControlUnit................................................................................................ 8
Contents ............................................................................................................................................................. 9
Part Names ...................................................................................................................................................... 10
TV(Front)..................................................................................................................................................... 10
TV(Side/Rear).............................................................................................................................................. 10
RemoteControlUnit.................................................................................................................................... 11
Connecting to External Equipment ................................................................................................................ 12
Watching TV ..................................................................................................................................................... 13
TurningOn/OffthePower............................................................................................................................ 13
InitialSetup.................................................................................................................................................. 13
Direct Button Operation .................................................................................................................................. 14
On-Screen Display Menu ................................................................................................................................ 17
MenuItems.................................................................................................................................................. 17
ForTVMode................................................................................................................................................ 17
ForPCMode............................................................................................................................................... 17
On-ScreenDisplayMenuOperation............................................................................................................. 18
MenuOperationButtons.............................................................................................................................. 18
PictureMenu............................................................................................................................................... 19
AudioMenu................................................................................................................................................. 19
FeaturesMenu............................................................................................................................................. 20
ParentalControlMenu................................................................................................................................. 21
SetupMenu................................................................................................................................................. 23
Troubleshooting........................................................................................................................................... 24
Specications.............................................................................................................................................. 25
PCCompatibilityChart................................................................................................................................ 26
InformationontheSoftwareLicenseforThisProduct.................................................................................. 26
Calling for Service ........................................................................................................................................... 27
LIMITED WARRANTY ...................................................................................................................................... 27
Remote control sensor
POWER indicator
(See page 13.)
10
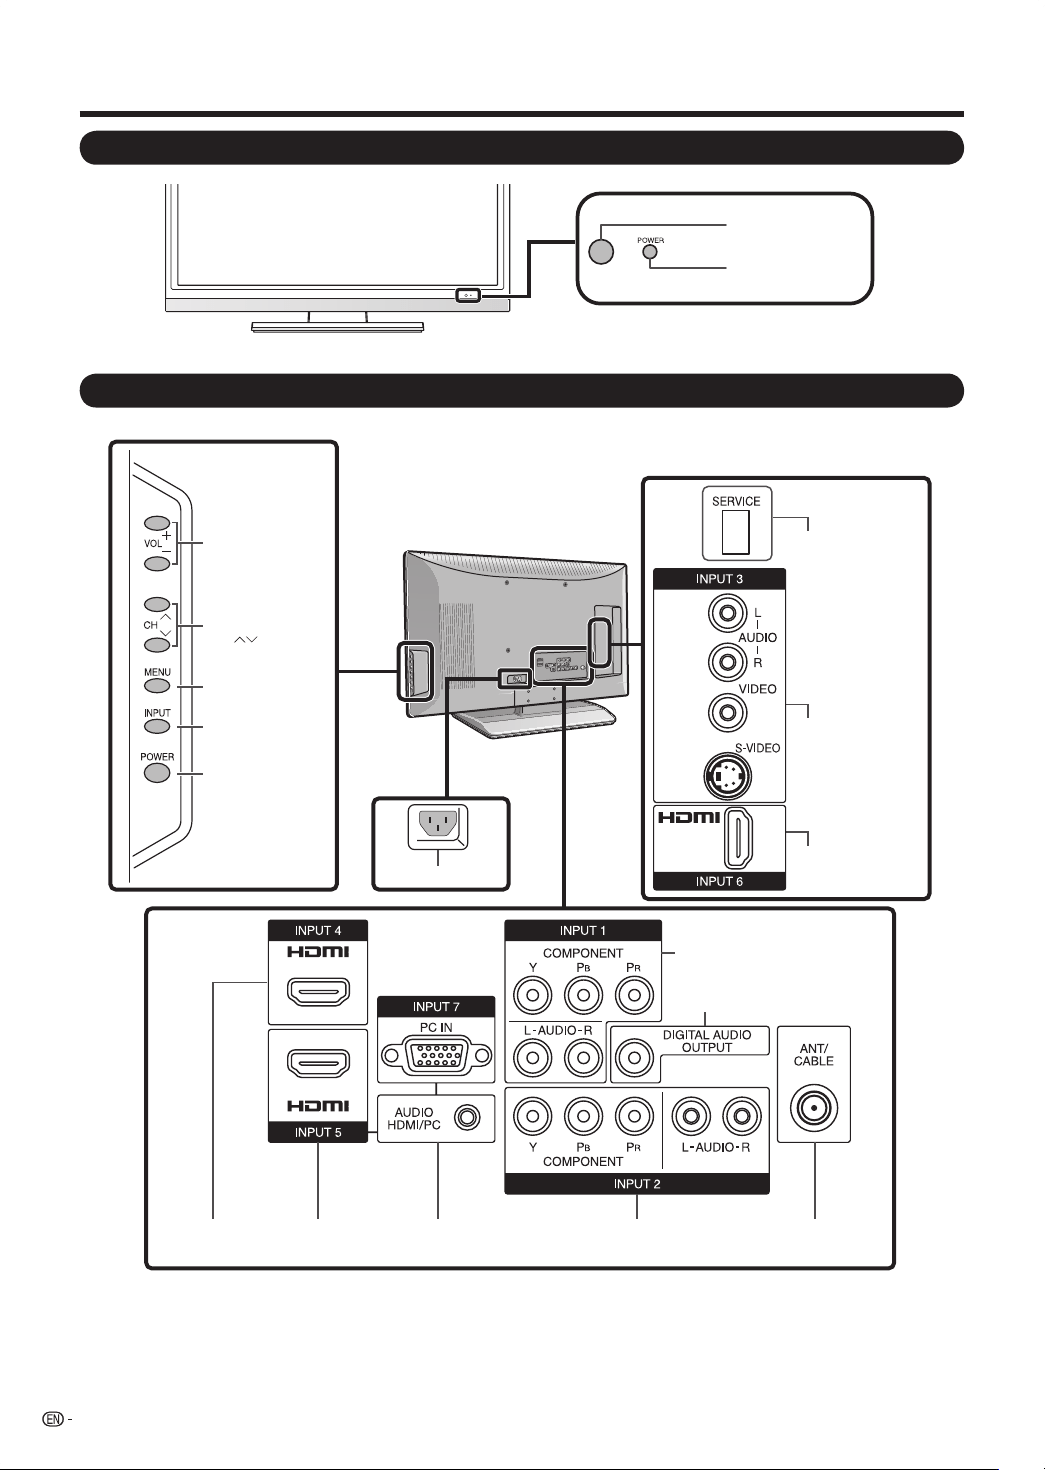
Part Names
TV (Front)
TV (Side/Rear)
SERVICE terminal
INPUT 3 terminals
(SIDE AV IN)
INPUT 6 terminal
(HDMI)
Channel buttons
(CH )
MENU button
INPUT button
POWER button
Volume buttons
(VOL +/-)
AC INPUT terminal
INPUT 5 terminal
(HDMI)
INPUT 4 terminal
(HDMI)
INPUT 7 terminals
(PC-IN)
INPUT 2 terminals
INPUT 1 terminals
DIGITAL AUDIO OUTPUT
terminal
Antenna/Cable in
*1
*3
*1
*2
*1:Seepages8and12forexternalequipmentconnection.
*2:Seepage18forbuttonoperations.
*3:Seepage7forconnectingtheACcord..
11
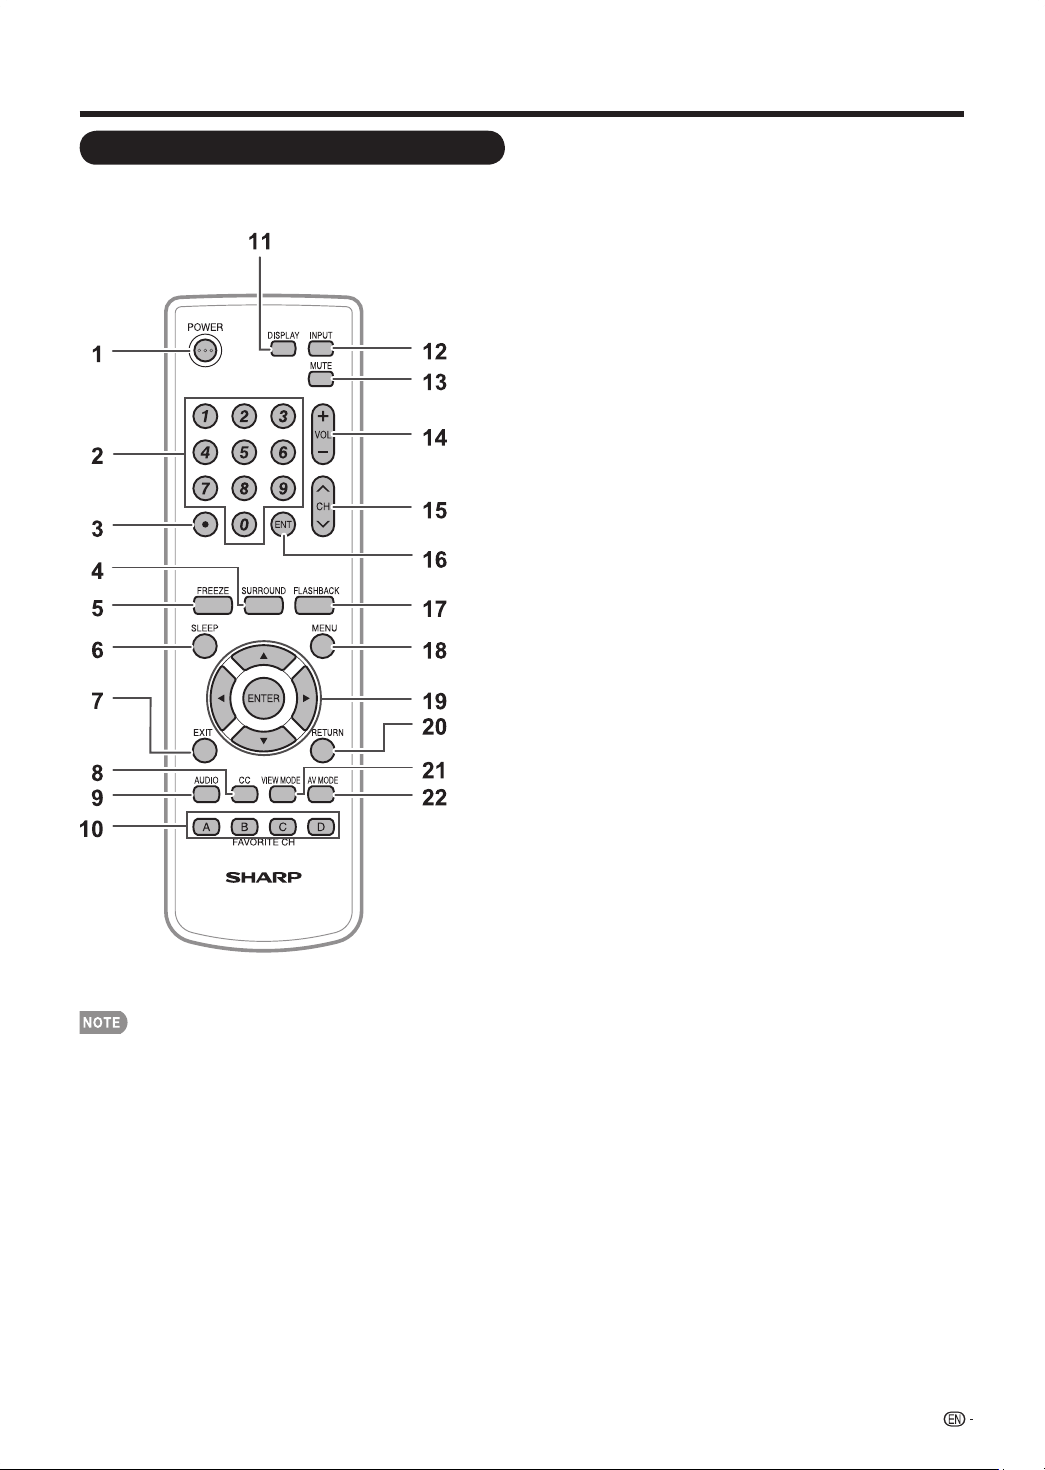
Part Names
1 POWER: Switchthepoweronorentersstandbymode.
(Seepage13.)
2 0–9: Setthechannel.
3 • (DOT): (Seepage14.)
4 SURROUND: Displaythesurroundsettingmenu.(See
page14.)
5 FREEZE: Setthestillimage.Pressagaintoreturnto
normalscreen.
6 SLEEP: AllowsyoutosetatimewhentheTV
automaticallyswitchestostandby.Eachtimeyoupress
thisbutton,theremainingtimesettingswitchesby5
minutesupto3hours.Thisdisplaywilldisappearafter
afewseconds,andthesleeptimerautomaticallystarts
countingdown.
• Ifyouwanttoadjustthesleeptimeragain,youcan
pressthisbuttonrepeatedlythenchangethetime
setting.
• TheTVwillenterthestandbymodewhenthe
remainingtimereacheszero.
7 EXIT: Turnoffthemenuscreen.
8 CC: Displaycaptionsduringclosed-captionsource.(See
page15.)
9 AUDIO: DisplaytheMTSsettingmenu.(Seepage15.)
10 FAVORITE CH
A, B, C, D:Select4presetfavoritechannelsin4different
categories.(Seepage23fordetails.)Whilewatching,
youcantoggletheselectedchannelsbypressingA,B,
CandD.
11 DISPLAY: Displaythecurrentchannel(orinputsource)
informationonthescreen.
12 INPUT: SelectaTVinputsource.(Seepage14.)
13 MUTE: Mutethesound.“MUTE”willbedisplayedonthe
screen,andthesoundissilenced.Themutingfeature
canbereleasedbypressingthisbuttonagainoroneof
theVOL +/–buttons.
14 VOL +/– : Setthevolume.(Seepage14.)
15 CH
s
/
r
: Selectthechannel.(Seepage14.)
16 ENT: Jumpstoachannelafterselectingwiththe0–9
buttons.
17 FLASHBACK: Presstoswitchtothepreviouslytuned
channel.Pressagaintoswitchbacktothecurrently
tunedchannel.
• Thisfunctionwillnotworkifnochannelhasbeen
changedaftertheTVisturnedon.
18 MENU: Displaythemenuscreen.
19
a
/
b
/
c
/
d
ENTER: Selectadesireditemonthescreen.
20 RETURN: Returntothepreviousmenuscreen.
21 VIEW MODE: Selectthescreensize.(Seepage16.)
22 AV MODE: Selectanadjustedpictureandaudio
settings.(User,Dynamic,Standard,Movie,Game.)(See
page14.)
Remote Control Unit
• Whenusingtheremotecontrolunit,pointitattheTV.
12
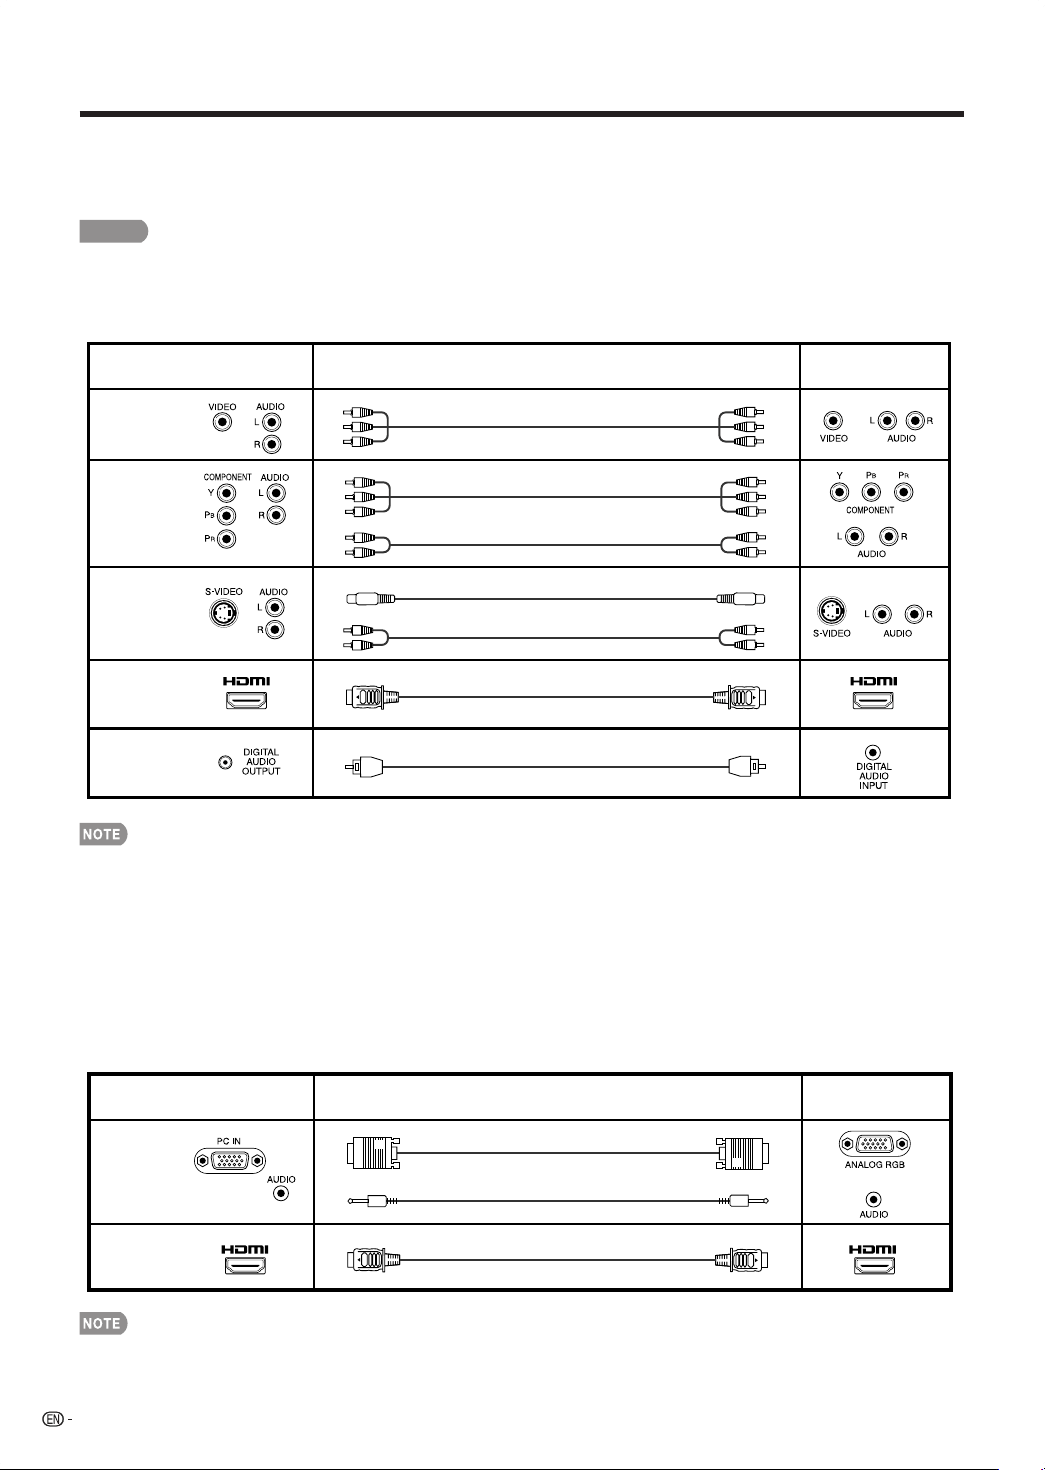
Connecting to External Equipment
YoucanconnectmanytypesofexternalequipmenttoyourTVlikeaBlu-raydiscplayer,HD-DVDplayer,DVD
player,VCR,DigitalTVtuner,HDMIequipment,gameconsoleorcamcorder.Toviewexternalsourceimages,
selecttheinputsourcefromINPUTontheremotecontrolunitorontheTV.(Seepage14.)
CAUTION
• Toprotectequipment,alwaysturnofftheTVbeforeconnectinganyexternalequipment.
• Pleasereadtherelevantoperationmanual(Blu-raydiscplayer,etc.)carefullybeforemakingconnections.
*1 •Toenjoythe1080pdisplaycapability,connectyourexternalequipmentusingacomponentcableandsetthe
equipmentto1080poutput.
*2 •TheS-VIDEOterminaltakespriorityoverthevideoterminals.(INPUT3only)
*3 •WhenusinganHDMI-DVIconversioncable,inputtheaudiosignaltoAUDIOterminalofINPUT5.
•Toenjoythe1080pdisplaycapability,connectyourBlu-raydiscplayer,HD-DVDplayerorotherexternalequipmentusing
anHDMI-certiedcableandsettheequipmentto1080poutput.
*4 •Dependingontheconnectedequipment,audiowillnotoutputfromtheDIGITALAUDIOOUTPUTterminalinHDMI
connection.Inthiscase,settheaudioformatsoftheconnectedequipmenttoPCM,32/44.1/48kHzand16bits.
*5 •DigitalaudiocannotbeoutputthroughtheHDMIterminal.
*6 •DolbyDigitalaudiooutputsignalscannotbeconvertedtoPCM.
• TheHDMIterminalsonlysupportdigitalsignal.
• Refertopage26foralistofPCsignalscompatiblewiththeTV.
Terminal on the TV
Cable
Terminal on external
equipment
INPUT 3
INPUT 1 or 2
INPUT 4, 5, or 6
DIGITAL AUDIO
OUTPUT
INPUT 3
Connecting a Blu-ray disc player, HD-DVD player, DVD player, Digital TV STB (Air or Cable), VCR,
game console or camcorder.
AV cable (commercially available)
Component video cable (commercially available)
S-VIDEO cable (commercially available)
HDMI-certified cable (commercially available)
Coaxial cable (commercially available)
Audio cable (commercially available)
Audio cable (commercially available)
*1
*2
*3
*4
Terminal on the TV
Cable
Terminal on PC
INPUT 7
Connecting a PC
RGB cable (commercially available)
ø 3.5 mm stereo minijack cable (commercially available)
INPUT 4, 5, or 6
HDMI-certified cable (commercially available)
13
Next
Language
English
Français
Español
Previous
TV Setup 1/4
Next
NextEXIT
Previous
TV Setup 2/4
If you are connecting the TV to a High
Definition Cable box or Satellite Receiver,
you will only need to tune your TV to the
input signal source connected. Use the
INPUT button to select your inputs.
Option 1 Option 2
If you are connecting your TV to
Air or Cable signal from the
wall outlet, use the 75 Ohm
connector on the back of the TV.
Refer to the user manual for additional
connections.
Auto ProgramAuto Program
Exit Next
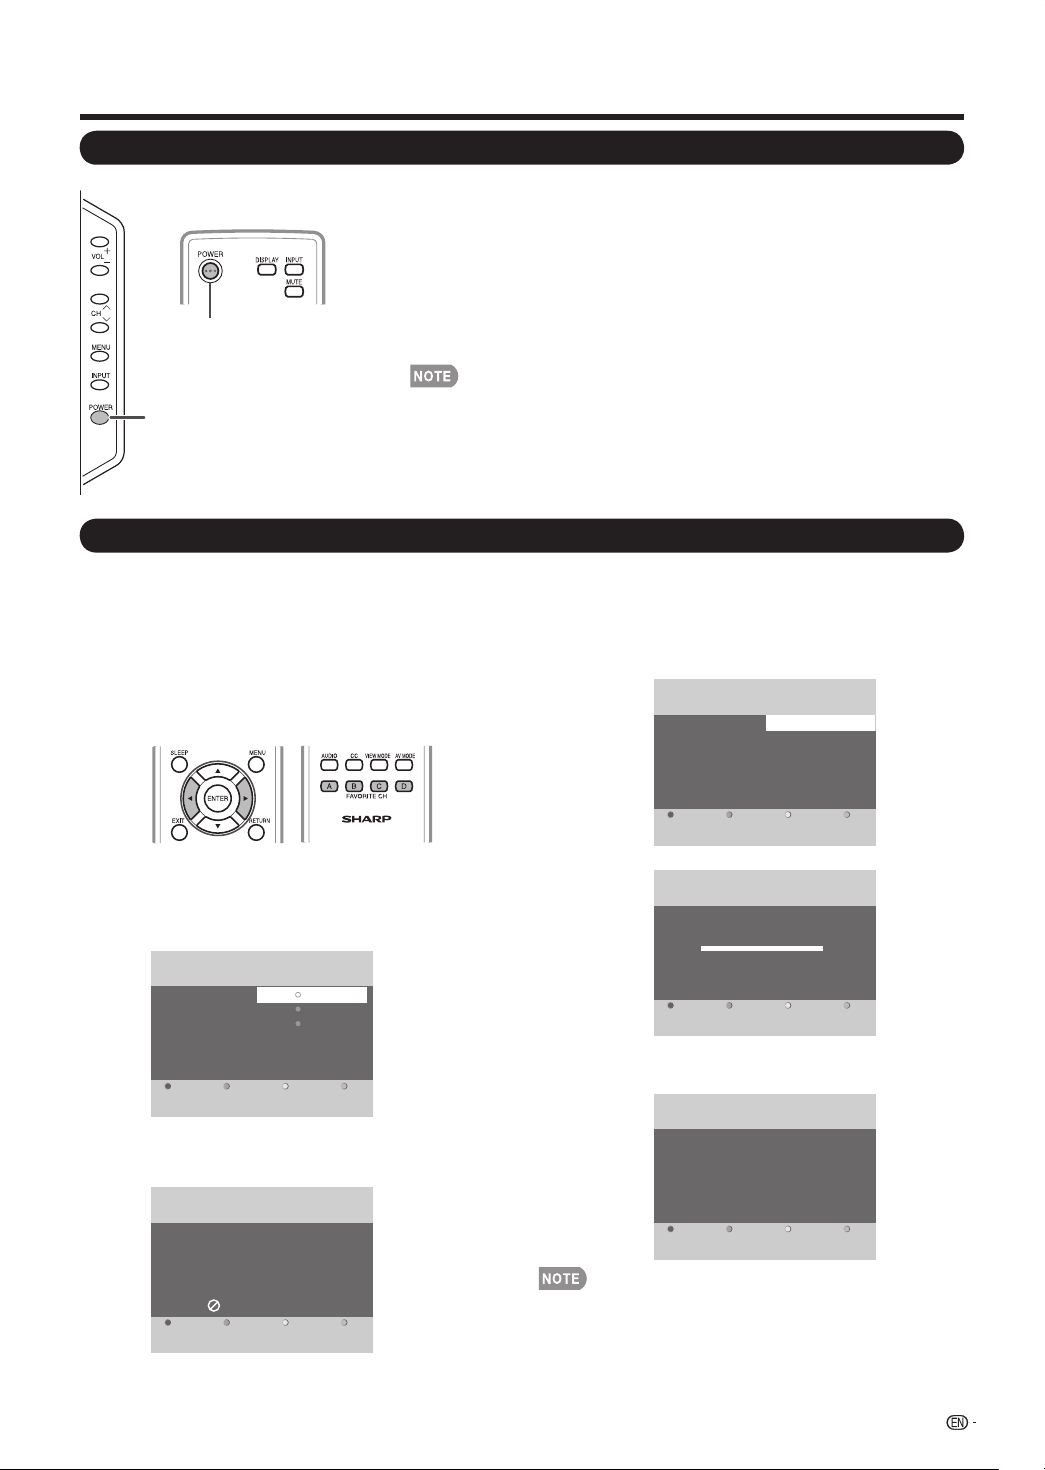
POWER
Turning On/Off the Power
POWER
(On/Standby)
PressPOWERontheTV,or POWERontheremotecontrolunittoturn
thepoweron.
• POWERindicator(Green):TheTVison.(Afterafewseconds,awindow
appearswithsound.)
PressPOWERontheTV,orPOWERontheremotecontrolunitagain
toturnthepoweroff.
• TheTVentersstandbyandtheimageonthescreendisappears.
• POWERindicator(Red):TheTVisstandby.
• IfyouarenotgoingtousethisTVforalongperiodoftime,besuretoremove
theACcordfromtheACoutlet.
• WeakelectricpowerisstillconsumedevenwhentheTVisturnedoff.
• Ifthereisnosignalinputfor30minutes,thepowerwillturntostandbymode
automatically.
Watching TV
Initial Setup
WhenyouturnontheTVforthersttime,itwill
automaticallymemorizethebroadcastingchannels
availableintheregionwhereyoulive.Performthe
followingstepsbeforeyoupressPOWERonthe
remotecontrolunit.
1. Insertthebatteriesintotheremotecontrolunit.(Seepage8.)
2. ConnecttheantennacabletotheTV.(Seepage8.)
3. PlugintheACcordtotheACoutlet.(Seepage7.)
Language (Language setting)
Selectfromamong3languages:English,FrenchandSpanish.
1
Press
a
/
b
toselectthedesiredlanguagelistedonthe
screen,andthenpresstheBbutton.
• Autoprogrammingmaytakeupto20minutestocomplete.
DigitalchannelswilltakelongerthanAnalogtondand
program.PleasewaituntilyouseetheAutoprogramming
completemessage.TheTVwillthenswitchautomatically
totherstchannelfound.
2
IfyouareconnectingtoaHDcablebox,presstheA
buttontoexit.IfyouareconnectingtoAntennaorCable
fromwalloutlet,presstheBbuttontonextstep.
NextExit Previous
TV Setup
Make sure that you have attached
your Air or Cable signal into
the jack on the back of your TV
that is labeled 75 Ohm.
Now select either Air or Cable,
using the cursor up/down buttons
on the remote. Once you have
made your selection, press the
GREEN Next button to proceed.
Air
Cable
3/4
Exit Previous
TV Setup 4/4
System searching. Please wait...
Analog channels found: 5
Digital channels found: 5
Auto programming may take up to 20 minutes to complete. Digital channels
will take longer than Analog to find and program. Please wait until you see the
Auto Programming complete message. The TV will then switch automatically
to the first channel found.
Finish
TV Setup 4/4
Channel search completed.
Analog channels found: 10
Digital channels found: 10
Air/Cable (Antenna setting)
MakesurewhatkindofconnectionismadewithyourTV
whenselecting"Air"or"Cable".
3
Press
▲
/
▼
toselect"Air"or"Cable".
PresstheBbuttontocontinue.
4
PresstheAbuttontonish.
14
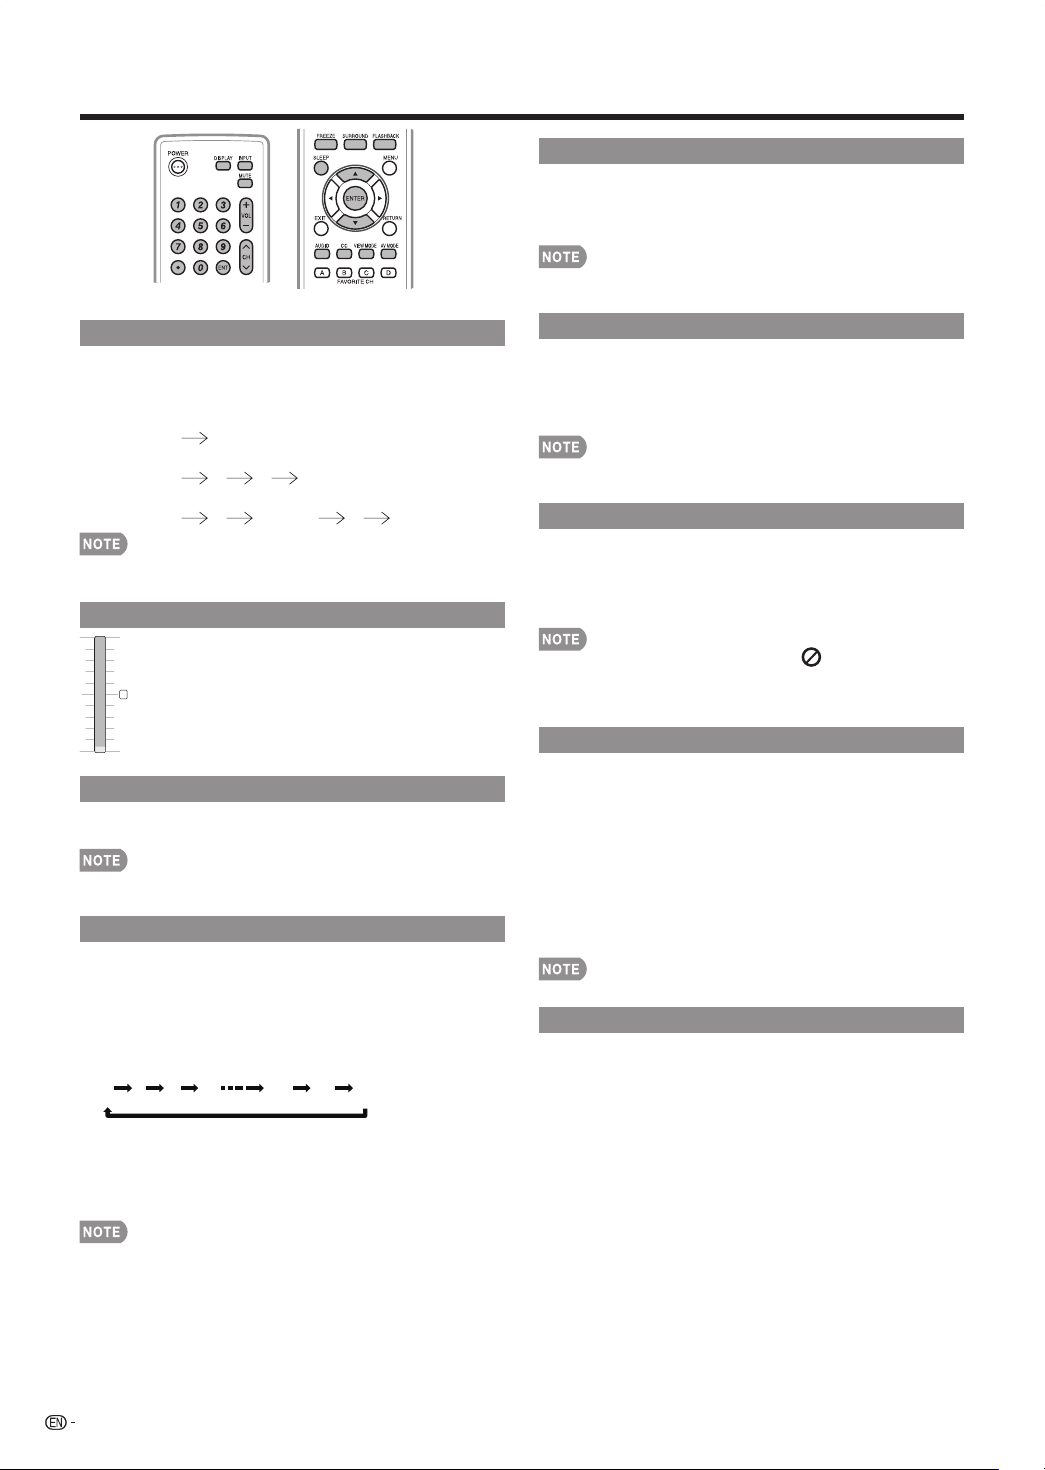
Direct Button Operation
FLASHBACK
PressFLASHBACKtoswitchtothepreviouslytuned
channel.
Press• FLASHBACKagaintoswitchbacktothecurrently
tunedchannel.
FLASHBACK• willnotworkifnochannelhasbeenchanged
aftertheTVisturnedon.
SURROUND
ThesurroundfunctionproducesSurroundeffectfrom
thespeakers.EachtimeyoupressSURROUND,the
modechanges.
Press• SURROUNDtotogglebetweenMono,Stereo,and
Virtual surroundmodes.
Youcanhavethesamesettingsbychoosing"Surround"on•
themenuitems.(Seepage19.)
FREEZE
Allowsyoutocaptureandfreezeamovingimagethat
youarewatching.
PressFREEZE.
Amovingimageiscaptured.•
Press• FREEZEagaintocancelthefunction.
Whenthisfunctionisnotavailable,"• "willdisplay.
Ifyouareusingthefreezefunctionandabroadcast•
activatestheV-CHIPBLOCK,thefreezefunctionwillbe
canceledandaV-CHIPBLOCKmessagewillappear.
INPUT
Toviewexternalsourceimages,selecttheinput
source
usingINPUTontheremotecontrolunitorontheTV.
1
PressINPUT.
Alistofselectablesourcesappears.•
2
PressINPUTagainorpress
a
/
b
toselectthe
inputsource.
Animagefromtheselectedsourceautomaticallydisplays.•
Eachtime• INPUTispressed,theinputsourcetoggles.
Ifthecorrespondinginputisnotpluggedin,youcannotchange•
theinput.Besuretoconnecttheequipmentbeforehand.
Seepage12forexternalequipmentconnection.•
AV MODE
AVMODEgivesyou5viewingoptionstochoosefrom
tobestmatchthesurroundingenvironmentoftheTV,
whichcanvaryduetofactorslikeroombrightness,
typeofprogramwatchedorthetypeofimageinput
fromexternalequipment.
PressAV MODE.CurrentAVMODEdisplays.
Press• AV MODEagainbeforethemodedisplayedonthe
screendisappears.Themodechangesasshownbelow:
USER:Allowstheusertocustomizedsettingsasdesired.
Youcansetthemodeforeachinputsource.
DYMAMIC: Changestheimageandsoundsettingsto
thefactorypresetvalues.
STANDARD:FornormalTVviewing.
MOVIE:Brilliantpicturesettingsforacinematic
experience.
GAME:Lowersimagebrightnessforeasierviewing.
Changing Channels
YoucanchangechannelsbypressingCH
r
/
s
or0-9,
•(DOT).
Examples:
To select a 1 or 2-digit channel number (e. g., Channel 5):
Press5 ENT.
To select a 3-digit channel number (e. g., Channel 115):
Press1 1 5 ENT.
To select a 4-digit channel number (e. g., Channel 22.1):
Press2 2 •(DOT) 1 ENT.
Whenselectinga1-digitchannelnumber,itisnot•
necessarytopress0beforethenumber.
Changing Volume
Youcanchangethevolumebypressing
VOL
k
/
l
ontheTVorontheremotecontrol
unit.
Toincreasethevolume,press• VOL
k
.
Todecreasethevolume,press• VOL
l
.
MUTE
Mutesthecurrentsoundoutput.
PressMUTE.
Mutecanbecanceledbyusingthemethodbelow.•
-MutewillbecanceledifyoupressVOL
k
/
l
orMUTE.
Sleep Timer
AllowsyoutosetatimewhentheTVautomatically
switchestostandby.
PressSLEEP.
Theremainingtimedisplayswhenthesleeptimerhasbeen•
set.
Eachtimeyoupress• SLEEP,theremainingtimeswitches
asshownbelow.
0 5 10 15 170 175 180
O
Whenset,thetimeautomaticallystartscountingdown.•
Ifyouwanttoadjustthesleeptimer,youcanpress• SLEEP
twicethenchangethetimesetting.
Oneminutebeforethetimeexpires,theremainingtime•
displayseverysecond.
Select"0"bypressing• SLEEPtocancelthesleeptimer.
TheTVwillenterstandbymode(powerindicatorlightsred)when•
theremainingtimereacheszero.
0

15
AUDIO
■
MTS/SAP stereo mode
TheTVhasafeaturethatallowsreceptionofsound
otherthanthemainaudiofortheprogram.Thisfeature
iscalledMulti-channelTelevisionSound(MTS).TheTV
withMTScanreceivemonosound,stereosound
andSecondaryAudioPrograms(SAP).TheSAP
featureallowsaTVstationtobroadcastother
information,whichcouldbeaudioinanotherlanguage
orsomethingcompletelydifferentlikeweather
information.
You can enjoy Hi-Fi stereo sound or SAP broadcasts
where available.
Stereo broadcasts:• Viewprogramslikelivesporting
events,showsandconcertsindynamicstereosound.
SAP broadcasts:• ReceiveTVbroadcastsineitherMAINor
SAPsound.
MAINsound:Thenormalprogramsoundtrack(eitherin
monoorstereo).
SAPsound:Listentoasecondlanguage,supplementary
commentaryorotherinformation.(SAPismonosound.)
If stereo sound is difficult to hear.
Obtainaclearersoundbymanuallyswitchingtoxed•
mono-soundmode.
YoucanchangeMTSasshownbelowtomatchthetelevision
broadcastsignal.
PressAUDIOtotogglebetweenaudiomodes.
Examples: when receiving MTS and SAP
MAIN+SAPmode:
MAIN SAP
MONOmode:MONO
■
Digital broadcasting audio mode
Thetypesofaudiotransmittedinadigitalbroadcastinclude
SURROUNDaswellasMONOandSTEREO.Inaddition,it
ispossibleformultipleaudiotrackstoaccompanyasingle
videotrack.
PressAUDIOtotogglebetweenaudiomodes.
Example: when receiving Digital broadcasting
STEREO (Audio1) STEREO (Audio2)
SURROUND (Audio3)
MTSonlyoperateswhileinTVmode.•
Direct Button Operation
YourTVisequippedwithaninternalClosedCaption
decoder.Itallowsyoutoviewconversations,narration
andsoundeffectsassubtitlesonyourTV.Closed
CaptionsareavailableonsomeTVprogramsandon
someVHShomevideotapesatthediscretionofthe
programprovider.
DigitalClosedCaptionserviceisanewcaptionservice
availableonlyondigitalTVprograms(alsoatthe
discretionoftheserviceprovider).Itisamoreexible
systemthantheoriginalClosedCaptionsystem,
becauseitallowsforavarietyofcaptionsizesandfont
styles.WhentheDigitalClosedCaptionserviceisin
use,itwillbeindicatedbytheappearanceofa3-letter
abbreviationthatalsoindicatesthelanguageofthe
DigitalClosedCaptions:ENG(English),SPA(Spanish),
FRA(French)orotherlanguagecodes.
NotallprogramsandVHSvideotapesofferclosed
captions.PleasepressDISPLAYandlookforCC
presenceinformation.
IntheClosedCaptionsystem,therecanbemorethan
onecaptionserviceprovided.Eachisidentiedbyits
ownnumber.The“CC1”and“CC2”servicesdisplay
subtitlesofTVprogramssuperimposedoverthe
program'spicture.
IntheClosedCaptionsystem,the“Text1”or“Text2”
servicesdisplaytextthatisunrelatedtotheprogram
beingviewed(e.g.,weatherornews).Theseservices
arealsosuperimposedovertheprogramcurrently
beingviewed.
PressDISPLAY.
ThiswillpresenttheClosedCaptioninformation•
display.
PressCC whiletheClosedCaptionsettingison
thescreen.
Pressrepeatedlyuntilyouselectthedesiredclosed•
captionservice.
1
2
Closed Captions and Digital Closed Captions
O On On during mute
16
Direct Button Operation
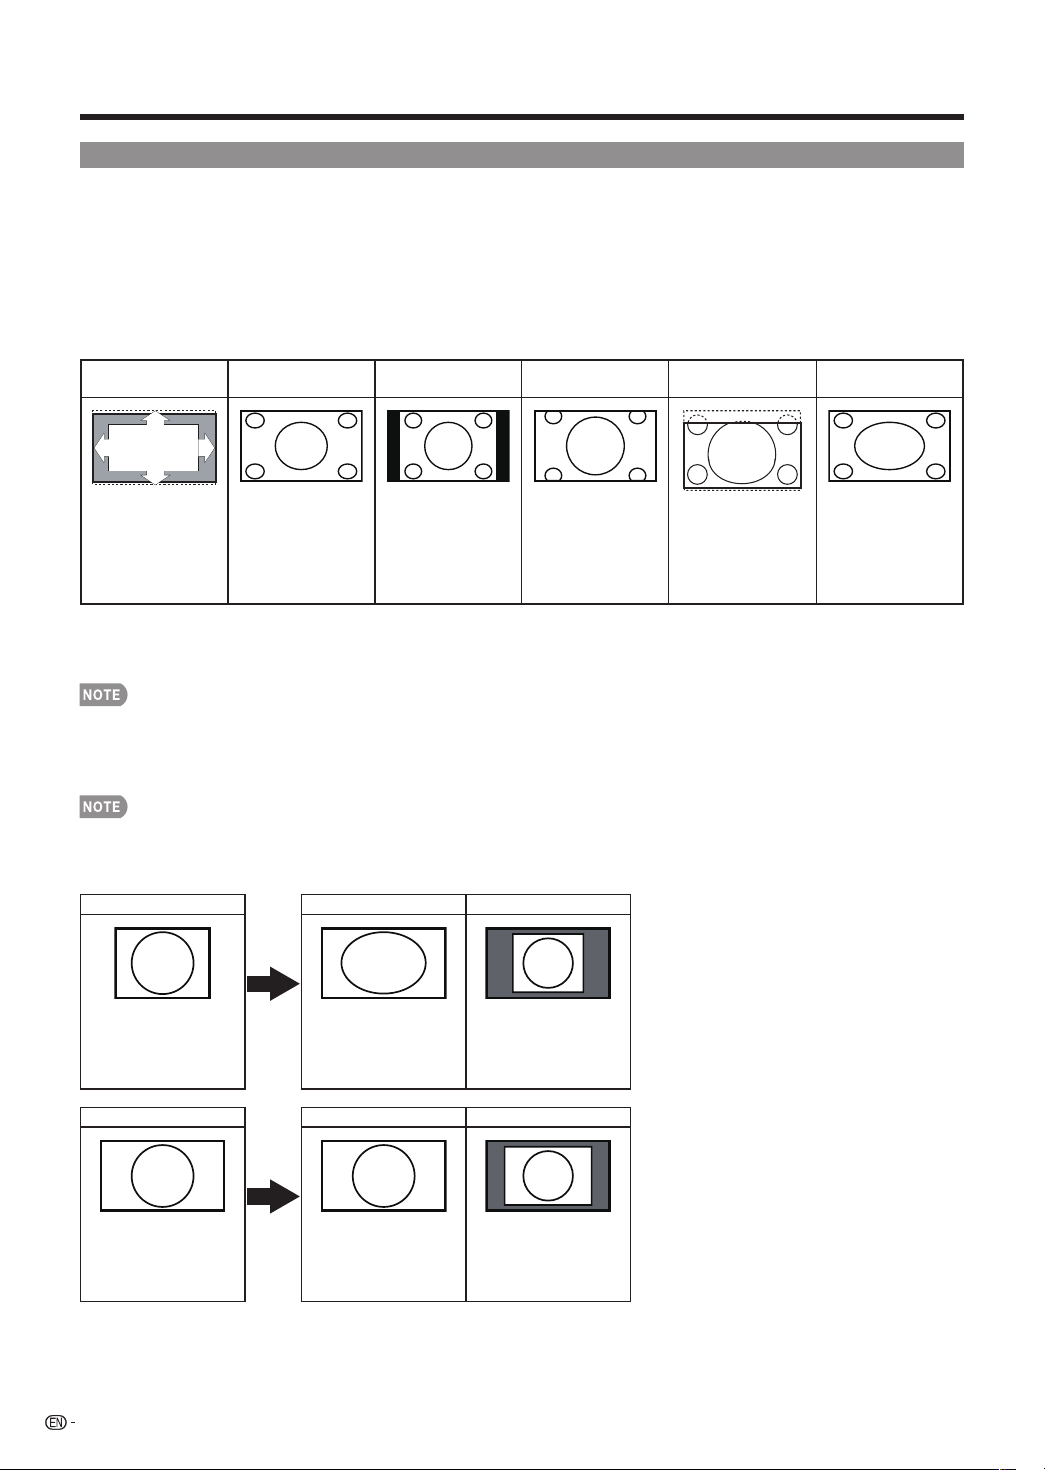
VIEW MODE
Youcanselectthescreensize.
1
PressVIEW MODE.
TheViewModemenudisplays.•
ThemenuliststheViewModeoptionsselectableforthetypeofvideosignalcurrentlybeingreceived.•
2
PressVIEW MODEor
a
/
b
whiletheViewModemenuisdisplayedtoselectadesireditemonthemenu.
YoucansequentiallyselectaViewModethathasitsownaspectratio.•
■
For 4:3 programs
Example: Screen size images
Automatic
S.Stretch
(Smart stretch)
Side Bar Zoom 16:9 Subtitle Stretch
Suitableforviewing
subtitlesand
enlargingpicture
automaticallytoll
thescreen.
Suitableforstretching
4:3programstoll
thescreen.
Suitableforviewing
conventional4:3
programsintheir
normalformat.
Suitableforviewing
wide-screen2.35:1
anamorphicDVDsin
fullscreen.
Suitableforviewing
4:3picturesand
leavingthesubtitle
visible.
Thismodeisusefulfor
1.78:1DVDs.When
viewing1.85:1DVDs,
stretchmodewillstill
showverythinblack
bandsatthetopand
bottomofthescreen.
■
For HD programs
Stretch:Suitableforviewingwide-screen1.78:1aspectratioprogram,stretchmodewillstillshowverythinblackbandsat
thetopandbottomofthescreen.
WhenusingDotbyDot,itispossibletoseenoiseorbarsarounddifferentouterportionsofthescreen.Pleasechangeview•
modetocorrectthis.
ForHD-DTVprograms,only“Automatic”,“SmartStretch”,and“Stretch”modescanbeselected.•
■
For PC input mode
ConnectthePCbeforemakingadjustments.(Seepage12.)•
Selectablescreensizemayvarywithinputsignaltype.•
Example: Screen size images
Input signal Stretch Dot by Dot
4:3
Animagefullyllsthe
screen.
Detectstheresolutionof
thesignalanddisplays
animagewiththesame
numberofpixelsonthe
screen.
Input signal Stretch Dot by Dot
16:9 Animagefullyllsthe
screen.
Detectstheresolutionof
thesignalanddisplays
animagewiththesame
numberofpixelsonthe
screen.

17
Menu Items
Somemenuitemsmaynotbedisplayeddependingontheselectedinputsource.•
On-Screen Display Menu
For TV Mode
For PC Mode
Picture Menu
Contrast............................................................................... Page19
Brightness............................................................................ Page19
Colortemperature................................................................ Page19
Normal....................................................................... Page19
Warm......................................................................... Page19
Cool........................................................................... Page19
ViewMode........................................................................... Page16
Stretch....................................................................... Page16
DotbyDot.................................................................. Page16
Audio Menu
AudioSetting....................................................................... Page19
Surround.............................................................................. Page19
Setup Menu
Language............................................................................. Page23
English....................................................................... Page23
Français..................................................................... Page23
Español...................................................................... Page23
InputSource......................................................................... Page23
Pictureadjustment................................................................ Page23
Autoadjust................................................................. Page23
Manualadjust............................................................. Page23
Reset.................................................................................... Page23
Picture
Contrast............................................................................... Page19
Brightness............................................................................ Page19
Color.................................................................................... Page19
Sharpness............................................................................ Page19
Colortemperature................................................................ Page19
Normal....................................................................... Page19
Warm......................................................................... Page19
Cool........................................................................... Page19
Tint....................................................................................... Page19
Activecontrast..................................................................... Page19
ViewMode........................................................................... Page16
Automatic................................................................... Page16
SmartStretch............................................................. Page16
SideBar..................................................................... Page16
Zoom......................................................................... Page16
16:9subtitle............................................................... Page16
Stretch....................................................................... Page16
Audio Menu
Audiosetting........................................................................ Page19
Audiomode.......................................................................... Page19
Mono......................................................................... Page19
Stereo........................................................................ Page19
Virtualsurround.......................................................... Page19
Alternateaudio..................................................................... Page19
Main........................................................................... Page19
SAP............................................................................ Page19
Digitalaudiolanguage........................................................... Page19
AVL...................................................................................... Page19
Features Menu
Closedcaptions.................................................................... Page20
Captionservice..................................................................... Page20
Digitalcaptionservice........................................................... Page20
Digitalcaptionoptions.......................................................... Page20
Resettodefault.......................................................... Page20
Size............................................................................ Page20
Text............................................................................ Page20
Background............................................................... Page20
Edge.......................................................................... Page20
FavoriteChannels................................................................. Page20
Sleeptimer........................................................................... Page20
Parental control Menu
Channellock........................................................................ Page21
USTVratingslock................................................................ Page21
USMovieratingslock........................................................... Page22
CanadaEnglishratingslock.................................................. Page22
CanadaFrenchratingslock................................................. Page22
Regionratingslock............................................................... Page22
SetPIN/ChangePin............................................................ Page21
Setup Menu
Language............................................................................. Page23
English....................................................................... Page23
Français..................................................................... Page23
Español...................................................................... Page23
AutoCHSearch................................................................... Page23
InputSource......................................................................... Page23
Clock.................................................................................... Page23
Currentsoftwareinfo............................................................ Page23
Reset.................................................................................. Page23
18
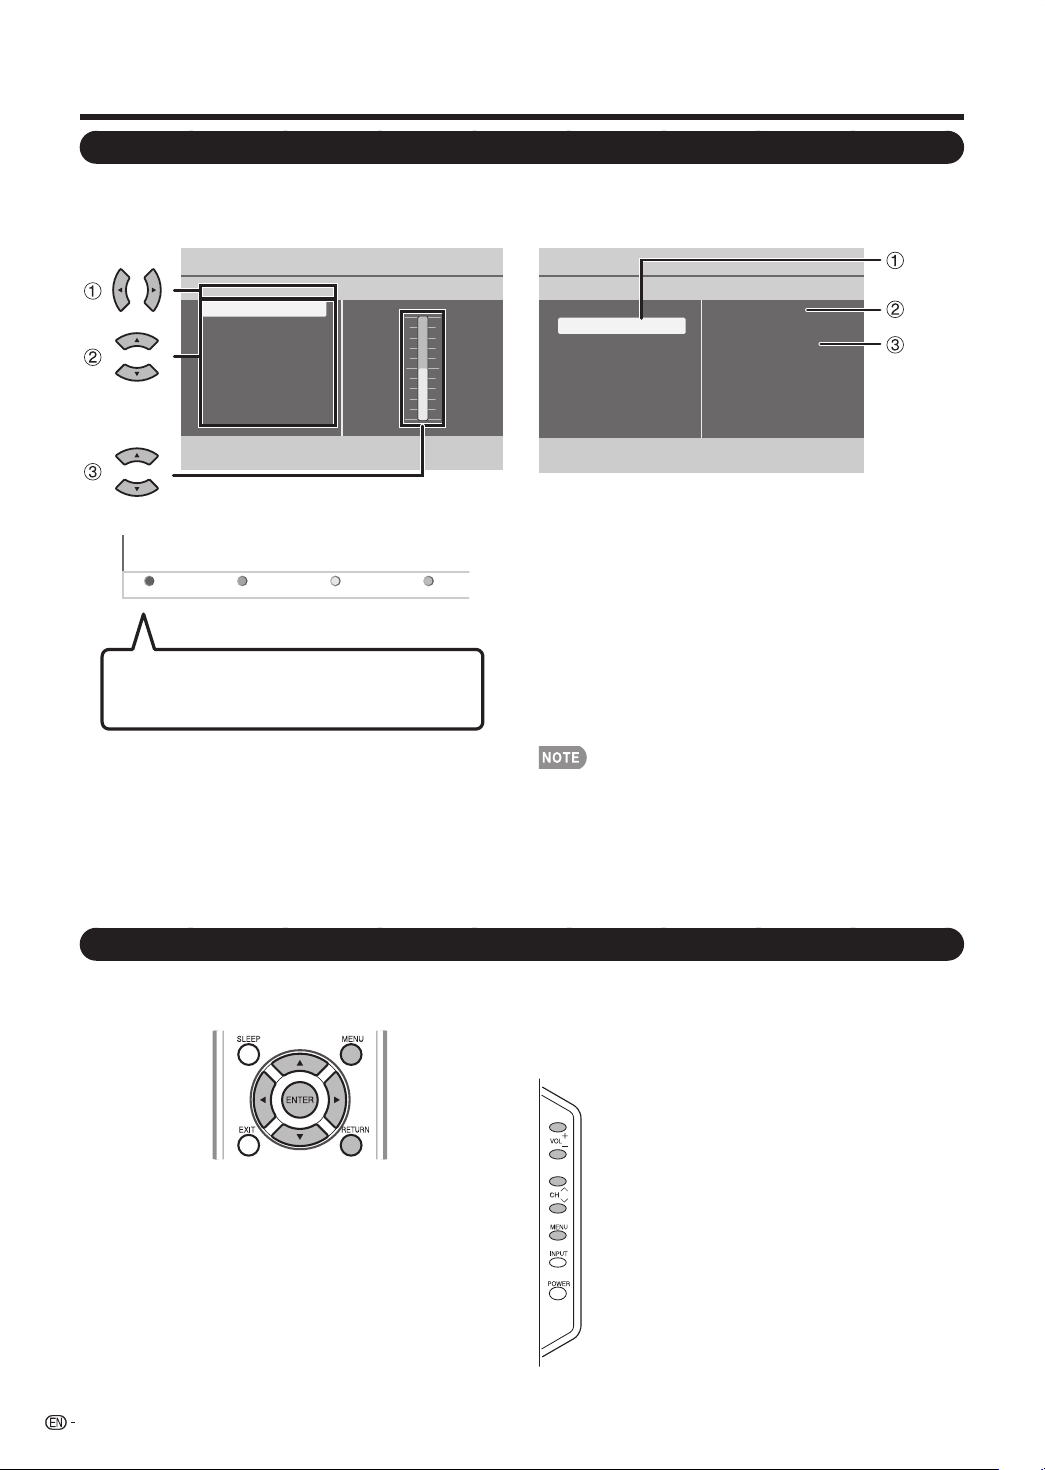
NextEXIT
Previous
Exit
Next
1
Itemdisplayedinyellow
• Thisindicatestheitemcurrentlyselected.
• Press
d
togototheadjustmentscreenforthisitem.
2
Itemdisplayedinwhite
• Thisindicatesthattheitemcanbeselected.
3
Itemdisplayedingray
• Thisindicatesthattheitemcannotbeselected.
Therearevariousreasonswhytheitemscannotbe
selected,butthemainreasonsareasfollows:
—Nothingisconnectedtotheselectedinputterminal.
—Thefunctionisnotcompatiblewiththecurrentinput
signal.
Menuoptionsdifferintheselectedinputmodes,butthe•
operatingproceduresarethesame.
Thescreensintheoperationmanualareforexplanation•
purposes(someareenlarged,otherscropped)andmay
varyslightlyfromtheactualscreens.
PictureContrast
Contrast 50
Brightness 50
Color 50
Sharpness 4
Color temperature
Tint 0
Active contrast
View mode
1
Press
c
/
d
toenterthedesireditemorreturnto
theupperlevelmenu.
2
Press
a
/
b
toselectthedesireditem.
3
Press
a
/
b
toadjusttheitem.
On-Screen Display Menu
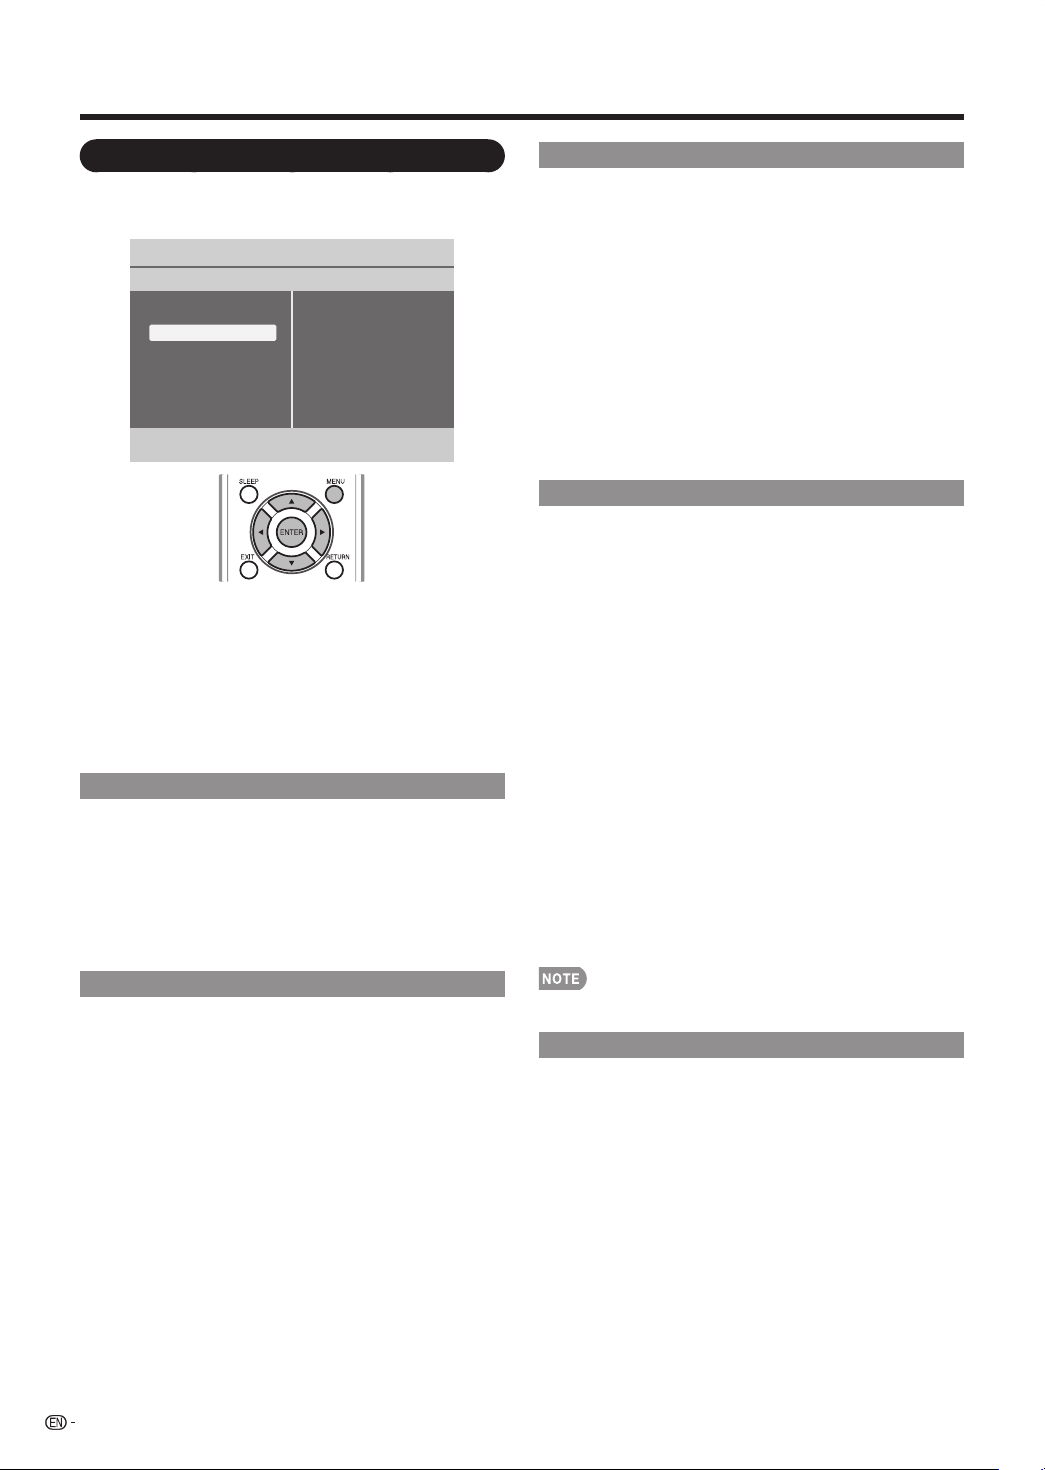
On-Screen Display Menu Operation
MENU: Presstoopenorclosethemenuscreen.
a
/
b
/
c
/
d
: Presstoselectadesireditemonthescreenor
adjustaselecteditem.
ENTER: Presstogotothenextsteporcompletethe
setting.
RETURN: Presstoreturntothepreviousstep.
Settings
Audio setting
Audio mode
Alternate audio
Digital audio language
AVL
Audio
Picture
Audio
Features
Parental control
Setup
Example
Thebaraboveisanoperationalguidefor
theremotecontrol.Thebarwillchangein
accordancewitheachmenusettingscreen.
VOL
k
/
l
:Cursor
c
/
d
ontheremotecontrol.
CH
s
/
r
:Cursor
b
/
a
ontheremotecontrol.
MENU:MENUontheremotecontrolorENTERon
theremotecontrolwhileOSDmenuison.
Example
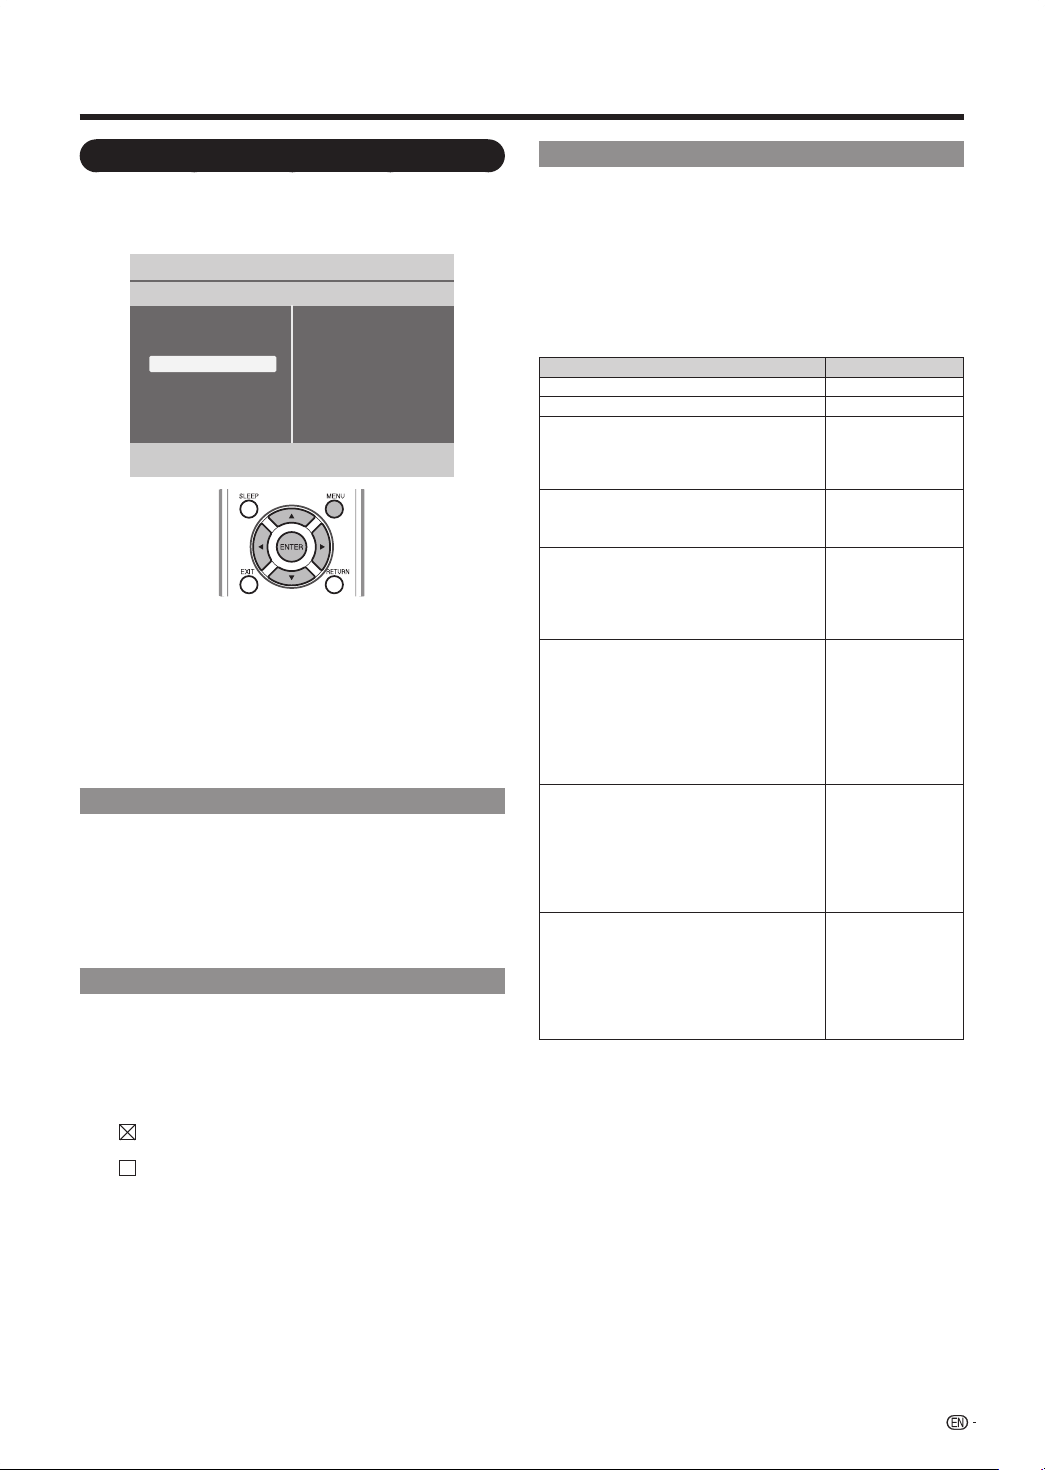
Menu Operation Buttons
Using the control panel of the main unit
Youcanalsooperatethemenuwiththecontrolpanel
ofthemainunit.
Buttonoperationsonthecontrolpanelcorrespondto
theonesontheremotecontrolasshownbelow.
Using the remote control
Usethefollowingbuttonsontheremotecontrolto
operatethemenu.

19
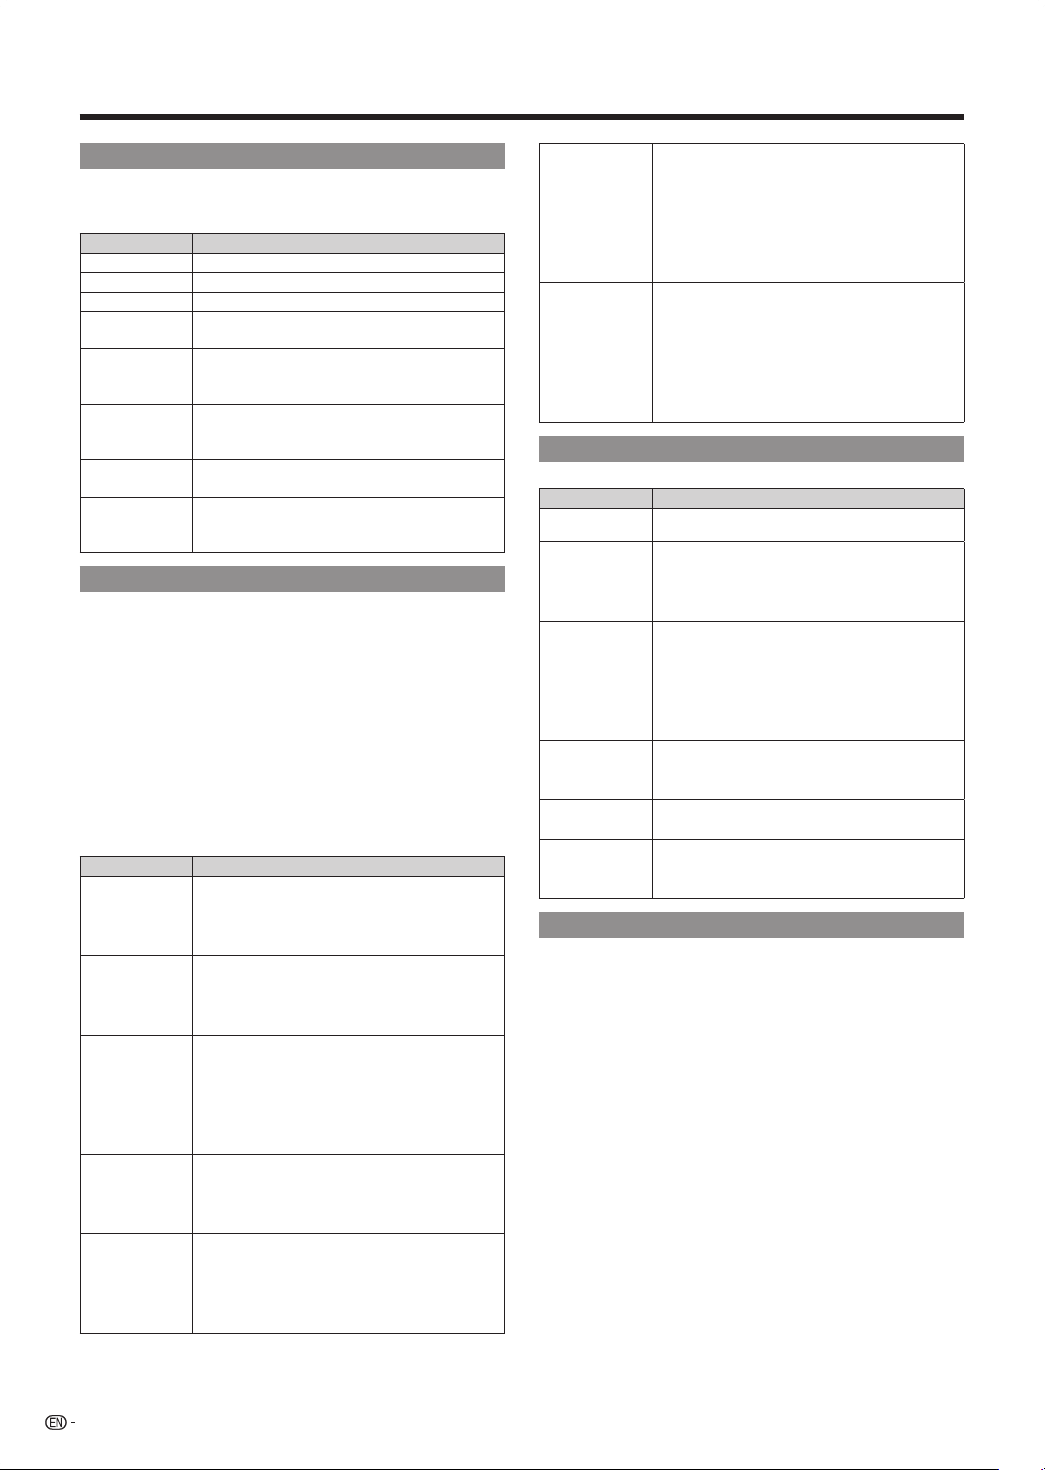
On-Screen Display Menu
Audio Menu
Adjuststhesoundqualitytoyourpreferencewiththe
followingsettings.
Settings
Audio setting
Audio mode
Alternate audio
Digital audio language
AVL
Audio
Picture
Audio
Features
Parental control
Setup
Example
1
PressMENU todisplaytheMENUscreen,andthen
press
a
/
b
toselect“Audio”andpress
d
toenter
it.
2
Press
a
/
b
toselectaspecicadjustmentitemand
press
d
toenterthesetting.
3
Press
a
/
b
toselectthesettingandpressENTER
or
c
toreturntotheupperlevelmenu.
4
PressMENUtoexit.
Audio Setting
Changestheaudiofrequencieswithdifferentcentral
frequenciestocreateacompletelynewanddifference
sounddependingonyourfavorite.
Audio Mode Setting
Selectsthemodesformorespatialorsurroundsound
reproductiondependonthebroadcastsignalsor
signalsforexternalinputsreceived.
Use
a
/
b
totogglebetween“Mono”,“Stereo”,and
“Virtualsurround”andpressENTERor
c
toreturnto
upperlevel.
Alternate Audio Setting
Use
a
/
b
totogglebetween“Main”andsecondaudio
program“SAP”,whenitisavailableinanalogchannel.
Digital Audio Language Setting
Givesyouthepossibilitytoswapbetweenmainand
alternativelanguage,whenitisavailableindigital
channel.
AVL Setting
Automaticallyreducesthevolumedifferencebetween
channelsandprograms.Use
a
/
b
totogglebetween
“On”or“Off”.
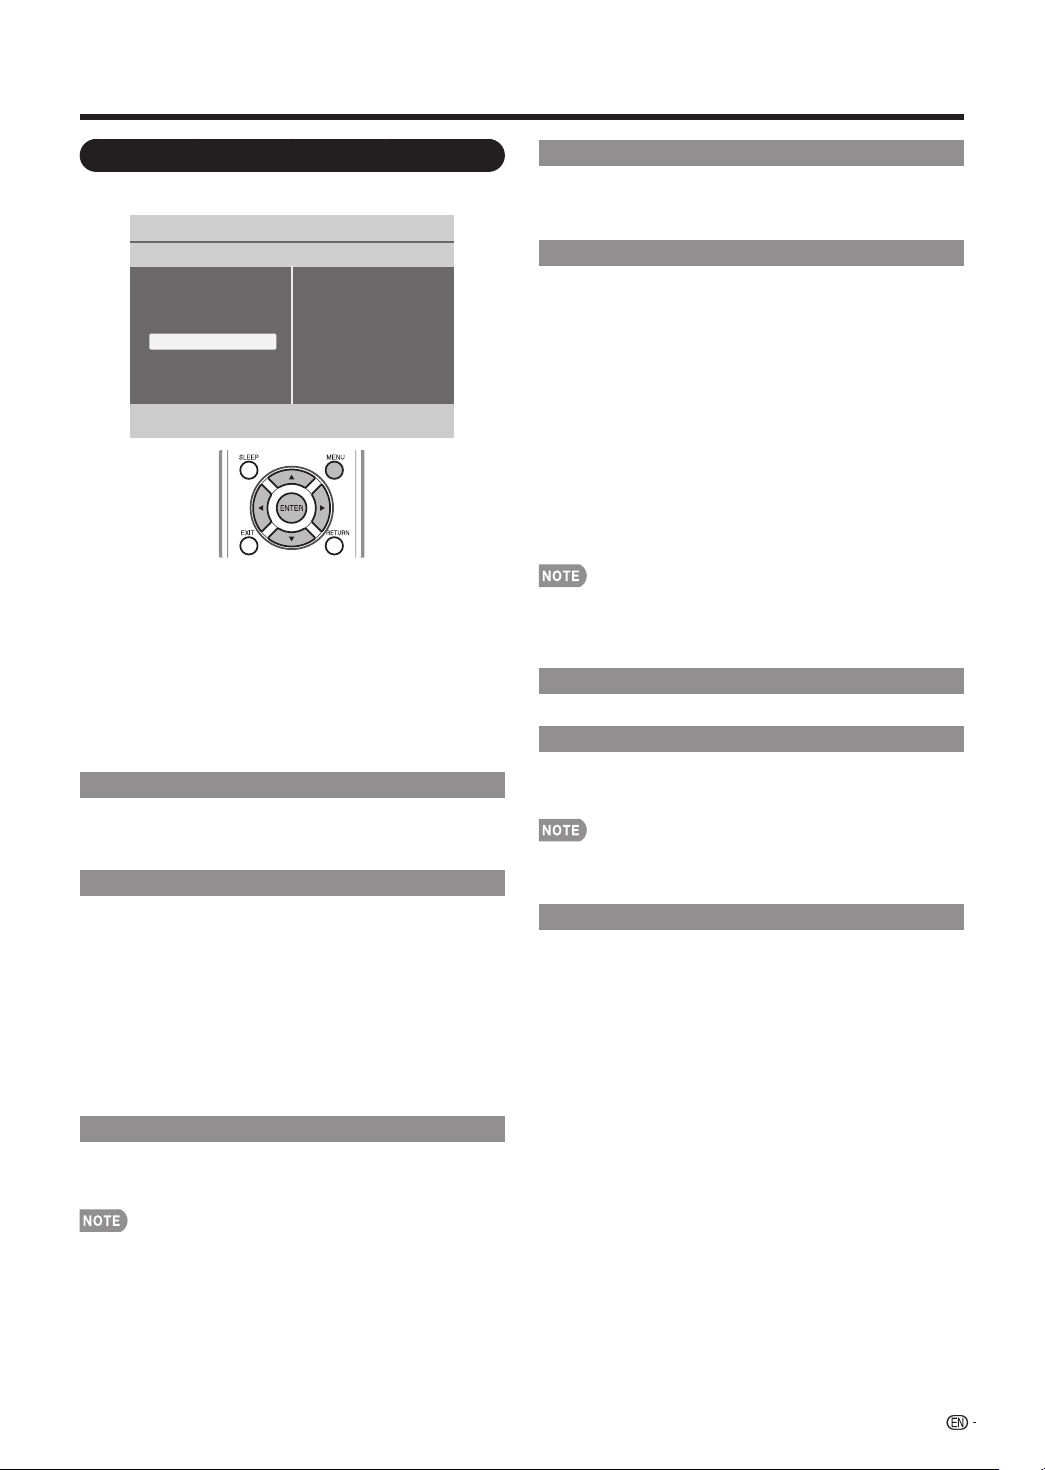
Picture Menu
Adjuststhepicturetoyourpreferencewiththe
followingpicturesettings.
Settings
Contrast
Brightness
Color
Sharpness
Color temperature
Tint
Active contrast
View mode
Picture
Picture
Audio
Features
Parental control
Setup
Example
1
PressMENU todisplaytheMENUscreen,andthen
press
a
/
b
toselect“Picture”andpress
d
toenter
it.
2
Press
a
/
b
toselectaspecicadjustmentitemand
press
d
toenterthesetting.
3
Press
a
/
b
toadjustthesettingandpressENTER
or
c
toreturntotheupperlevelmenu.
4
PressMENUtoexit.
Selected item
b
button
a
button
Contrast Forlesscontrast Formorecontrast
Brightness Forlessbrightness Formorebrightness
Color
Forlesscolor
intensity
Formorecolor
intensity
Sharpness Forlesssharpness Formoresharpness
Tint
Skintones
becomereddish
Skintonesbecome
greenish
Color Temperature Setting
Forabetterwhitebalance,usecolortemperature
correction.
Warm: Whitewithreddishtone
Normal:
Cool: Whitewithbluishtone
Active Contrast Setting
Automaticallyadjusttheimagecontrastaccordingto
thescreen.
Off: Noadjustment.
On: Automaticallyadjuststheimagecontrast.
View Mode Setting
Changestheformatofthepicture.(seepage16.)
Picturesettings(Contrast,Brightness,Color,Sharpness,•
Tint,andActiveContrast)arelimitedwhenviewingaPC
signalinputthroughtheHDMIterminal.
20
Features Menu
Example
Settings
Closed captions
Caption service
Digital caption service
Digital caption options
Sleep Timer
Features
Picture
Audio
Features
Parental control
Setup
1
PressMENU todisplaytheMENUscreen,and
thenpress
a
/
b
toselect“Features”andpress
d
toenterit.
2
Press
a
/
b
toselectaspecicadjustmentitemand
press
d
toenterthesetting.
3
Press
a
/
b
toselectthesettingandpressENTER
or
c
toreturntotheupperlevelmenu.
4
PressMENUtoexit.
Closed Captions Setting
ThisdisplaysthetransmittedCC-orCS-texton
thescreenaccordingtoyourchosenCCorCS
service.Thistextcaneitherbepermanentlydisplayed
(assumingthattheserviceisavailableinthebroadcast)
oronlywhenmuteisactive.
Use
a
/
b
totogglebetween“On”,“Off”,and“On
duringmute”andpressdtoconrmthechange.(see
page15.)
Caption Services Setting
ThisallowsyoutoselecttheClosedcaptionsservice
levelsofanalogbroadcastingtobedisplayed.
Closedcaptioningallowsyoutoreadthevoicecontent
oftelevisionprogramsontheTVscreen.Designedto
helpthehearingimpaired,thisfeatureuseson-screen
“textboxes“toshowdialogueandconversationswhile
theTVprogramisinprogress.Captionswillappearon
thescreenduringcaptionedbroadcasts.
CC1,2,3or4•
Dialogue(anddescriptions)fortheactiononthecaptioned
TVprogramshowsonscreen.UsuallyCC1isthemost
used.CC2canbeusedforalternatelanguagesiftheyare
beingtransmitted.
T1,2,3or4•
Oftenusedforchannelguide,schedules,bulletinboard
informationforClosedcaptionsprograms,news,weather
informationsorstockmarketreports.NotallCaption
servicesarenecessarilybeingusedbyaTVchannelduring
thetransmissionofaClosedcaptionprogram.
On-Screen Display Menu
Digital Caption Service Setting
Thisallowsyoutocongurethewayyouchoose
toviewdigitalcaptioning.Selectoneofthedigital
servicechannelsmadeavailablebythecaption
provider.Therearesixstandardservices.Service1
isdesignatedasthePrimaryCaptionService.This
servicecontainstheverbatim,ornear-verbatim
captionsfortheprimarylanguagebeingspokeninthe
accompanyingprogramaudio.Service2isdesignated
astheSecondaryLanguageService.Thisservice
containscaptionsinasecondarylanguage,whichis
atranslationofthecaptionsintheprimaryCaption
Service.Theotherservicesubchannelsarenotpre-
assigned.Itisuptothediscretionoftheindividual
captionprovidertoutilizetheremainingservice
channels.
Digital Caption Options Setting
Thisallowsyoutomodifyhowdigitalcaptionsare
displayedonyouTV.Selectfromthefollowingoptions
tochangethevisualcharacteristicsoftheTV’sdigital
captioning
Reset to default: Selectsthisoptiontoresetthedigital
captionoptionstothecaptionsproviderdefault
settings.
Size:Selectsthisoptiontochooseacaptiondisplaysize
accordingtoyourownpreference.Select“Default”,
“Small”,“Standard”,or“Large”.
Text: Selectsthisoptiontochoosecaptiondisplaytext
box,textcolorand/ortheopacityaccordingtoyour
ownpreference.Selecta“Color”andan“Opacity”
option.
Background:Selectsthisoptiontochoosecaption
displaycharacterbackgroundcolororoneofthe
backgroundopacityoptionsaccordingtoyourown
preference.Selecta“Color”andoneofthe“Opacity”
options.
Edge:Selectsthisoptiontochoosecaptiondisplayedge
colororoneofthetypeoptionsaccordingtoyourown
preference.
Onlydigitalcaptionoptionscanbeselectedin“Caption•
service”of“Features”menu.
Sleep Timer Setting
AllowsyoutosetatimewhentheTVautomatically
switchestostandby.
21
US TV Ratings Lock Setting
YourTVisequippedwithaV-chipthatallowsyouto
controlaccesstoindividualprogramsbasedontheir
ageratingandcontentrating.Theprogramcontent
advisorydataaresentbythebroadcasterorbythe
programprovider.
Ifyouarereceivingchannelsthroughaset-topboxor
cablereceiverboxconnectedbyHDMI,youcannot
usetheTVratingslock.Yourset-topboxorcable
receiverboxmustbeconnectedthroughRForAV
connectors.
Age rating Content rating
All None
None None
TV-Y
Appropriateforchildrenofallages
withthemesandelementssuitablefor
childrenaged2-6.
None
TV-Y7
Programsdesignedforchildrenage7
andolder.
FantasyViolence
(FV)
TV-G
Programssuitableforallages.These
programscontainlittleornoviolence,
nostronglanguageandlittleorno
sexualdialogorsituations.
None
TV-PG
Programscontainelementsthat
someparentsmayndunsuitablefor
youngerchildrenandwhichmayneed
parentalguidance.Theprogrammay
containmoderateviolence,sexual
dialogand/orsituationsandsome
stronglanguage.
Dialog(D)
Language(L)
Sex(S)
Violence(V)
TV-14
Programscontainelementsthatmay
notbesuitableforchildrenunder14
yearsofage.Theseprogramsinclude
oneormoreofthefollowing:intense
violence,intensesexualsituations,
suggestivedialogandstronglanguage.
Dialog(D)
Language(L)
Sex(S)
Violence(V)
TV-MA
Programsaredesignedtobeviewed
byadultsandmaybeunsuitablefor
childrenundertheageof17.These
programsmaycontaingraphical
violence,explicitsexualactivityand/or
crudeorindecentlanguage.
Language(L)
Sex(S)
Violence(V)
On-Screen Display Menu
Parental Control Menu
ControlsspecialfunctionsfortheTVchannels.
Example
Settings
Channel lock
US TV ratings lock
US Movie ratings lock
Canada English ratings lock
Canada French ratings lock
Region ratings lock
Set PIN
Parental control
Picture
Audio
Features
Parental control
Setup
1
PressMENU todisplaytheMENUscreen,andthen
press
a
/
b
toselect“Parentalcontrol”andpress
d
toenterit.
2
Press
a
/
b
toselectaspecicadjustmentitemand
press
d
toenterthesetting.
3
Press
a
/
b
toselectthesettingandpressENTER
or
c
toreturntotheupperlevelmenu.
4
PressMENUtoexit.
Set PIN/Change PIN
1
Entera4-digitPINwiththenumberbuttonsonthe
remotecontrol.
IfyouhaveaPIN,enteryourcurrentPIN.•
IfyouhaveloseyourPIN,entermastercode0711.•
2
Enteryournew4-digitPINandthenenteritagainto
conrm.Amessageappearstoconrmthatyour
PINhasbeenchanged.
Channel Lock Setting
Locksoneormorechannelsandconnecteddevices.
1
EnteryourPIN.
2
Press
a
/
b
toselectthechannelordeviceyou
wanttolockorunlock.
3
Ateachselection,pressENTERtolockorunlock
thechannelordevice.
• :Thechannelislocked.
• :Thechannelisunlocked.
4
PressMENUtoquit.
22
US Movie Ratings Lock Setting
Thissectiondescribeshowtocontrolviewingof
moviesbasedontheirMotionPictureAssociationof
America(MPAA)rating.
Movie rating Description
All None.
NR None.
G Generalaudiences.Allagesadmitted.
PG
Parentalguidancesuggested.Some
materialmaynotbesuitableforchildren.
PG-13
Parentsstronglycautioned.Somematerial
maybeinappropriateforchildrenunder
13.
R
Restricted.Under17requires
accompanyingparentoradultguardian
(agevariesinsomejurisdictions).
NC-17 Noone17andunderadmitted.
X
Xisanolderratingthatisuniedwith
NC-17butmaybeencodedinthedataof
oldermovies.
Canada English Ratings Lock Setting
CanadianRatingSystems(CanadianEnglishratings
andCanadianFrenchratings).
TheTVratingsystemsinCanadaarebasedonthe•
CanadianRadio-TelevisionandTelecommunications
Commission(CRTC)policyonviolenceintelevision
programming.
Whileviolenceisthemostimportantcontentelementto•
berated,thestructuredevelopedtakesintoconsideration
otherprogramcontentlikelanguage,nudity,sexualityand
maturethemes.
WhensettingtheV-CHIPontheCanadiansystemyoucan•
chooseeithertheCanadianEnglishratingsortheCanadian
Frenchratings.
Movie rating Description
E
Exempt:Includesnews,sports,
documentariesandotherinformation
programming;talkshows,musicvideos,
andvarietyprogramming.
C
Children:Intendedforyoungerchildren
undertheageof8years.Payscareful
attentiontothemesthatcouldthreaten
theirsenseofsecurityandwell-being.
C8+
Childrenover8yearsold:Containsno
portrayalofviolenceasthepreferred,
acceptable,oronlywaytoresolve
conict;norencouragechildrentoimitate
dangerousactswhichtheymayseeonthe
screen.
G
General:Consideredacceptableforall
agegroups.Appropriateviewingforthe
entirefamily,containsverylittleviolence,
physical,verbaloremotional.
PG
ParentalGuidance:Intendedforageneral
audience,butmaynotbesuitablefor
youngerchildren(undertheageof8)
becauseitcouldcontaincontroversial
themesorissues.
14+
Over14years:Couldcontainthemes
whereviolenceisoneofthedominant
elementsofthestoryline,butitmustbe
integraltothedevelopmentofplotor
character.Languageusagecouldbe
profaneandnuditypresentwithinthe
contextofthetheme.
18+
Adults:Intendedforviewers18years
andolderandmightcontaindepictions
ofviolence,whichwhilerelatedtothe
developmentofplot,characterorthemes,
areintendedforadultviewing.Could
containgraphiclanguageandportrayalsof
sexandnudity.
Canada French Ratings Lock Setting
Movie rating Description
E Exemptprogramming.
G
General:Allagesandchildren,contains
minimaldirectviolence,butmaybe
integratedintotheplotinahumorousor
unrealisticmanner.
8ans+
Generalbutinadvisableforyoungchildren:
Maybeviewedbyawidepublicaudience,
butcouldcontainscenesdisturbingto
childrenunder8whocannotdistinguish
betweenimaginaryandrealsituations.
Recommendedforviewingwithparent.
13ans+
Over13years:Couldcontainscenesof
frequentviolentscenesandtherefore
recommendedforviewingwithparent.
16ans+
Over16years:Couldcontainfrequent
violentscenesandintenseviolence.
18ans+
Over18years:Onlyforadultviewing.
Couldcontainfrequentviolentscenesand
extremeviolence.
Region Ratings Lock Setting
Thissectiondescribeshowtocontrolaccessto
digitalprogramsbasedondownloadedregionratings.
Beforeyoudownloadaratingstable,ensurethat
regionalratingsarebroadcast.
Eachratinghasabox-graphicinfrontofittoindicate•
whetheritislocked
AboxwithXindicatesthattheratingislocked.•
Anemptyboxindicatesthattheratingisnotlocked•
On-Screen Display Menu
23
On-Screen Display Menu
Setup Menu
Settings
Language
Auto CH search
Input source
Clock
Favorite channels
Current software info
Reset
Setup
Picture
Audio
Features
Parental control
Setup
Example
1
PressMENU todisplaytheMENUscreen,andthen
press
a
/
b
toselect“Setup”andpress
d
toenter
it.
2
Press
a
/
b
toselectaspecicadjustmentitemand
press
d
toenterthesetting.
3
Press
a
/
b
toselectthesettingandpressENTER
toconrmthechange.
4
PressMENUtoexit.
Language Setting
YoucanalsoselectalanguagefromtheSetupmenu.
Selectfromamong3languages:English,Frenchand
Spanish.
Auto CH Search Setting
Ifinitialsetupdoesnotmemorizeallthechannelsin
yourregion,followtheinstructionsbelowtomanually
memorizethechannels.
Air/Cable: Makesurewhatkindofconnectionismade
withyourTVwhenselectingAirorCable.
WhenAirisselected,theTVdetectsantennasignals.•
ItsearchesforNTSCandATSCchannelsavailable
inyourarea.
WhenCableisselected,theTVdetectssignals•
suppliedbycable.ItsearchesforNTSC,ATSC,and
QAMmodulatedchannelsavailableinyourarea.
Input Source Setting
Letsyousettheinputterminaldisplayedwhenusing
theInputsourcemenuorchanneldisplay.Press
a
/
b
toselectthenewnamefortheinputmode.
IfINPUT7isselectedwithoutsignalinput,thentheTVwill•
turnoffautomaticallyafter30secondsapproximately.
Clock Setting
ThisfunctionallowsyoutousetheTVasaclock.
Use
a
/
b
tosetthetime(Hour/Minute/AMorPM)and
pressENTERtoconrmthechange.
Favorite Channels Setting
(only in TV mode)
Thisfunctionallowsyoutoprogram4favorite
channels,in4differentcategories.Bysettingthe
favoritechannelsinadvance,youcanselectyour
favoritechannelseasily.
To register your favorite channel:
1 PressMENU ontheremotecontrolandselect
“Setup”/”Favoritechannels”.
2 Press
a
/
b
toselectyourdesiredchannelandpress
d
or
the
ENTERbuttontoconrm.
To delete your favorite channel:
1 PressMENU ontheremotecontrolandselect
“Setup”/”Favoritechannels”.
2 Press
a
/
b
toselect“Alldataclear”andpress
d
to
startclearingallfavoritechanneldata.
Beforesettingthechannel,selectthechannelyouwantto•
registerasafavoritechannel.
Whilewatching,youcantoggletheselectedchannelsby•
pressingtheA,B,CandDbuttonontheremotecontrol.
Current Software Info
ThisfunctiondisplaysTVsoftwareinformation.
Reset
Ifcomplexadjustmentsaremadeandthesettings
cannotberestoredtonormal,youcanresetthe
settingstothefactorypresetvalues.
Thechannelsetupsettingswillnotbechanged.•
Thelanguagesettingwillnotbechanged.•
ThePINnumbersettingwillnotbechanged.•
Picture Adjustment
Setting
(only in PC mode)
Auto adjust: Automaticallyadjustspicturetothebest
imageposition,phase,andclocksetting.
Manual adjust:Allowstomanuallynetunetheimage
asitappearsonthescreen.
Phase:• Eliminatesthehorizontalinterferinglines.
Clock:• Eliminatestheverticalinterferinglines.
Horizontal: • Adjuststhehorizontalplacementofthe
picture:
Vertical:• Adjuststheverticalplacementofthe
picture.
Cautions regarding use in high and low temperature environments
• Whentheunitisusedinalowtemperaturespace(e.g.room,ofce),thepicturemayleavetrailsorappearslightlydelayed.
Thisisnotamalfunction,andtheunitwillrecoverwhenthetemperaturereturnstonormal.
• Donotleavetheunitinahotorcoldlocation.Also,donotleavetheunitinalocationexposedtodirectsunlightorneara
heater,asthismaycausethecabinettodeformandtheLiquidCrystalpaneltomalfunction.
Storagetemperature:-4°Cto+140°F(-20°Cto+60°C)
24
Troubleshooting
Possible Solution
• Isthevolumetoolow?(Seepage14.)
• HaveyoupressedMUTEontheremotecontrolunit?(Seepage14.)
Appendix
Problem
• Nopower
• Unitcannotbeoperated.
• Remotecontrolunitdoesnot
operate.
• Pictureiscutoff/withsidebar
screen.
• Strangecolor,lightcolor,orcolor
misalignment
• Powerissuddenlyturnedoff.
• Nopicture
• Nosound
• CheckifyoupressedPOWERontheremotecontrolunit.(Seepage13.)Ifthe
indicatorontheTVdoesnotlightup,pressPOWERontheTV.
• IstheACcorddisconnected?(Seepage7.)
• Hasthepowerbeenturnedon?(Seepage13.)
• Externalinuencessuchaslightning,staticelectricity,maycauseimproperoperation.
Inthiscase,operatetheunitafterrstturningoffthepoweroftheTVorunplugging
theACcordandrepluggingitinafter1or2minutes.
• IstheFUNCTIONsetcorrectly?SetittotheTVsettingposition.
• Arebatteriesinsertedwithpolarity(
e
,
f
)aligned?(Seepage8.)
• Arebatterieswornout?(Replacewithnewbatteries.)
• Areyouusingitunderstrongoruorescentlighting?
• Isauorescentlightilluminatedneartheremotecontrolsensor?
• Arescreenmodeadjustmentssuchaspicturesizemadecorrectly?(Seepage16.)
• Adjustthepicturetone.(Seepage19.)
• Istheroomtoobright?Thepicturemaylookdarkinaroomthatistoobright.
• Checktheinputsignalsetting.(Seepage23.)
• Isthesleeptimerset?(Seepage14.)
• Theunit'sinternaltemperaturehasincreased.Removeanyobjectsblockingventor
clean.
• Isconnectiontoothercomponentscorrect?(Seepage12.)
• Iscorrectinputsignalsourceselectedafterconnection?(Seepage23.)
• Isthecorrectinputselected?(Seepage23.)
• Ispictureadjustmentcorrect?(Seepage23.)
• Thisisnotamalfunction.Thishappenswhenthecabinetslightlyexpandsand
contractsaccordingtochangeintemperature.ThisdoesnotaffecttheTV's
performance.
• TheTVsometimesmakesa
crackingsound.
Item Model: LC-42SB45U
LCDpanel a-siTFTLCD42
o
Class(42
1
/
64
o
Diagonal)
Resolution 2,073,600pixels(1,920
g
1,080)
TV
Function
TV-standard(CCIR) AmericanTVStandardATSC/NTSCSystem
Receiving
Channel
VHF/UHF VHF2-13ch,UHF14-69ch
CATV 1-135ch(non-scrambledchannelonly)
DigitalTerrestrial
Broadcast(8VSB)
2-69ch
Digitalcable
*1
(64/256QAM)
1-135ch(non-scrambledchannelonly)
Audiomultiplex BTSCSystem
Backlight 60,000hours(atBacklightStandardposition)
Audioout 10W
g
2
Terminals
Rear
INPUT1 COMPONENTin,AUDIOin
INPUT2 COMPONENTin,AUDIOin
INPUT4 HDMIinwithHDCP
INPUT5 HDMIinwithHDCP,Audioin(Ø3.5mmjack)
INPUT7 15-pinminiD-subfemaleconnector,Audioin(Ø3.5mmjack)
ANT/CABLE 75
q
Unbalance,FType
g
1forAnalog(VHF/UHF/CATV)andDigital(AIR/CABLE)
DIGITALAUDIOOUTPUT
Digitalaudiooutput
g
1(PCM/DolbyDigital)
Side
INPUT3 AVin,S-VIDEOin
INPUT6 HDMIinwithHDCP
SERVICE Softwareupdate
OSDlanguage English/French/Spanish
PowerRequirement
AC120V,60Hz(ForNorthAmerica)
AC110~240V,50/60Hz(ForOthers)
PowerConsumption 220W(0.7WStandbywithAC120V)
Weight
TV+stand 48.72lbs./22.1kg
TVonly 43.80lbs./19.87kg
Dimension
*2
(W
g
H
g
D)
TV+stand 39
3
/
4
g
27
3
/
4
g
10
11
/
16
inch
TVonly 39
3
/
4
g
25
3
/
8
g
3
7
/
8
inch
Operatingtemperature
e
32°Fto
e
104°F(0°Cto
e
40°C)
*1
EmergencyalertmessagesviaCableareunreceivable.
*2
Thedimensionaldrawingsareshownontheinsidebackcover.
• Aspartofpolicyofcontinuousimprovement,SHARPreservestherighttomakedesignandspecicationchangesforproduct
improvementwithoutpriornotice.Theperformancespecicationguresindicatedarenominalvaluesofproductionunits.
Theremaybesomedeviationsfromthesevaluesinindividualunits.
25
Specifications
Appendix
26
• Asaprecautionarymeasure,makeanoteofyoursecretnumberabove,cutitfromthismanual,andkeepitinasafeplace.
The secret number is .
CLEARING THE SECRET NUMBER
Ifyouforgetthesecretnumber,clearthesecretnumberusingthefollowingprocedure.
1
PressMENUtodisplaytheMENUscreen,andthenpress
a
/
b
toselect“Parentalcontrol”andpress
d
to
enterit.
2
Press
a
/
b
toselect"ChangePIN"andpress0711asamastercode.
3
EnteranewPIN.(seepage21.)
PC Compatibility Chart
ItisnecessarytosetthePCcorrectlytodisplayXGAandWXGAsignal.Refertopage14tosetPCinputsignals.
DDCisaregisteredtrademarkofVideoElectronicsStandardsAssociation.
PowerManagementisaregisteredtrademarkofSunMicrosystems,Inc.
VGAandXGAareregisteredtrademarksofInternationalBusinessMachinesCorp.
PC
31.5 kHz
31.5 kHz
37.9 kHz
37.5 kHz
35.1 kHz
37.9 kHz
48.1 kHz
46.9 kHz
48.4 kHz
56.5 kHz
60.0 kHz
47.7 kHz
640 x 480
720 x 400
VGA
800 x 600SVGA
XGA 1024 x 768
WXGA 1360 x 768
70 Hz
60 Hz
72 Hz
75 Hz
56 Hz
60 Hz
72 Hz
75 Hz
60 Hz
70 Hz
75 Hz
60 Hz
O
O
O
O
O
O
O
O
O
O
O
64.0 kHzSXGA 1280 x 1024 60 Hz O
64.0 kHzSXGA+ 1400 x 1050 60 Hz O
75.0 kHzUXGA 1600 x 1200 60 Hz O
*
*
*
*
*These 4 formats are not supported by the analog RGB terminal.
PC Horizontal Frequency VESA StandardResolution Vertical Frequency
Information on the Software License for This Product
■
Software composition
Thesoftwareincludedinthisproductiscomprisedofvarioussoftwarecomponentswhoseindividualcopyrights
areheldbySHARPorbythirdparties.
■
Software developed by SHARP and open source software
Thecopyrightsforthesoftwarecomponentsandvariousrelevantdocumentsincludedwiththisproductthatwere
developedorwrittenbySHARPareownedbySHARPandareprotectedbytheCopyrightAct,internationaltreaties,
andotherrelevantlaws.Thisproductalsomakesuseoffreelydistributedsoftwareandsoftwarecomponents
whosecopyrightsareheldbythirdparties.TheseincludesoftwarecomponentscoveredbyaGNUGeneralPublic
License(hereafterGPL),aGNULesserGeneralPublicLicense(hereafterLGPL)orotherlicenseagreement.
■
Obtaining source code
Someoftheopensourcesoftwarelicensorsrequirethedistributortoprovidethesourcecodewiththeexecutable
softwarecomponents.GPLandLGPLincludesimilarrequirements.Forinformationonobtainingthesourcecode
fortheopensourcesoftwareandforobtainingtheGPL,LGPL,andotherlicenseagreementinformation,visitthe
followingwebsite:
http://www.sharpusa.com/gpl
Weareunabletoansweranyquestionsaboutthesourcecodefortheopensourcesoftware.Thesourcecodefor
thesoftwarecomponentswhosecopyrightsareheldbySHARPisnotdistributed.
■
Acknowledgements
Thefollowingopensourcesoftwarecomponentsareincludedinthisproduct:
•linuxkernel/busybox/uClibc/zlib/libpng/libjpeg
27
ForlocationofthenearestSharpAuthorizedService,ortoobtainproductliterature,accessories,supplies,or
customerassistance,pleasecall1-800-BE-SHARP.
Calling for Service
LIMITED WARRANTY
31
For location of the nearest Sharp Authorized Service, or to obtain product literature, accessories, supplies, or
customer assistance, please call 1-800-BE-SHARP.
Calling for Service
LIMITED WARRANTY
CONSUMER LIMITED WARRANTY
SHARP ELECTRONICS CORPORATION warrants to the first consumer purchaser that this Sharp brand Liquid Crystal Display product (the
“Product”), when shipped in its original container, will be free from defective workmanship and materials, and agrees that it will, at its option,
either repair the defect or replace the defective Product or part thereof with a new or remanufactured equivalent at no charge to the
purchaser for parts or labor for the period(s) set forth below.
This warranty does not apply to any appearance items of the Product or if the serial number or model number affixed to the Product has
been removed, defaced, changed, altered or tampered with. This warranty does not cover installation or signal reception problems. This
limited warranty will not apply if the Product has been or is being used in a commercial setting or application; this warranty is meant solely
for the non-commercial, household use of the Product by consumers in their home or residence. If you intend to or already use this Product
for commercial purposes or in a commercial setting, there are warranties available to cover your use of this Product, the terms of which may
vary. Please contact 1-888-GO-SHARP for further information.
In order to enforce your rights under this limited warranty, you should follow the steps set forth below. You must be able to provide proof of
purchase to the servicer, which proof must include the date of purchase.
To the extent permitted by applicable state law, the warranties set forth are in lieu of, and exclusive of, all other warranties, express or
implied. Specifically ALL OTHER WARRANTIES OTHER THAN THOSE SET FORTH ABOVE ARE EXCLUDED, ALL EXPRESS AND
IMPLIED WARRANTIES INCLUDING THE WARRANTIES OF MERCHANTABILITY, FITNESS FOR USE, AND FITNESS FOR A PARTICULAR
PURPOSE ARE SPECIFICALLY EXCLUDED. IF, UNDER APPLICABLE STATE LAW, IMPLIED WARRANTIES MAY NOT VALIDLY BE
DISCLAIMED OR EXCLUDED, THE DURATION OF SUCH IMPLIED WARRANTIES IS LIMITED TO THE PERIOD(S) FROM THE DATE OF
PURCHASE SET FORTH BELOW. THIS WARRANTY GIVES YOU SPECIFIC LEGAL RIGHTS. YOU MAY ALSO HAVE OTHER RIGHTS
WHICH VARY FROM STATE TO STATE.
The warranties given herein shall be the sole and exclusive warranties granted by Sharp and shall be the sole and exclusive remedy
available to the purchaser and only for the time periods set forth herein. No other representations or promises made by anyone are
permitted. Correction of defects, in the manner and for the period of time described herein, shall constitute complete fulfillment of all
liabilities and responsibilities of Sharp to the purchaser with respect to the Product, and shall constitute full satisfaction of all claims,
whether based on contract, negligence, strict liability or otherwise. Sharp does not warrant nor shall Sharp be liable, or in any way
responsible, for Products which have been subject to abuse (including, but not limited to, improper voltage), accident, misuse, negligence,
lack of reasonable care, alteration, modification, tampering, misuse, improper operation or maintenance or any damages or defects in the
Product which were caused by repairs or attempted repairs performed by anyone other than a Sharp authorized servicer. Nor shall Sharp
be liable or in any way responsible for any incidental or consequential economic or property damage. Some states do not allow limits on
warranties or on remedies for breach in certain transactions; in such states, the limits herein may not apply.
THIS LIMITED WARRANTY IS VALID ONLY IN THE FIFTY (50) UNITED STATES, THE DISTRICT OF COLUMBIA AND PUERTO RICO.
Model Specific Section
Where to Obtain Service: From a Sharp Authorized Servicer located in the United States. To find the
location of the nearest Sharp Authorized Servicer, please call Sharp toll free
at 1-800-BE-SHARP.
What to do to Obtain Service: Contact your Sharp Authorized Servicer to obtain in home service for this
product. The Servicer will come to your location and if necessary remove the
unit for repair at the Servicer’s facility and return the set to you once
completed. Be sure to have Proof of Purchase available.
TO OBTAIN PRODUCT INFORMATION OR PURCHASE ACCESSORIES AND EXTENDED WARRANTIES, CALL 1-800-BE-SHARP
OR VISIT www.sharpusa.com
Additional Exclusions from
Warranty Coverage (if any):
In order for the Product to be serviced, the Product must be readily available
to the servicer, free and clear of any complex or non-standard installation,
mounting or other encumbrance which would unreasonably interfere with
servicing the Product. The Servicer will remount the Product after service,
provided that such remounting is not into a complex or non-standard installa-
tion. Any additional labor and materials required to remove and/or reinstall a
Product above and beyond the foregoing are not covered by this warranty,
may result in additional charges and are the responsibility of the consumer.
Image Retention resulting from a fixed image being displayed for long
periods of time is not covered by this Limited Warranty (see Operation
Manual on how to prevent this).
Warranty Period for this Product: One (1) year parts, 90 days labor from the date of purchase.
Your Product Model Number & Description: LC-52SB55U LCD Color Television
(Be sure to have this information available when you need service for your
Product.)
SHARP ELECTRONICS CORPORATION
Sharp Plaza, Mahwah, New Jersey 07495-1163
SHARP CORPORATION
LC-52SB55U.indb31 2008/05/230:13:33
LC-42SB45ULCDColorTelevision