Owner Manual Television
Basic Controls and Connections
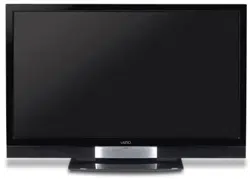
Front Bezel

Right Side Panel Controls

POWER (  ) – Switch the SV420XVT1A on by pressing the button once. Press the button again to turn the SV420XVT1A off.
MENU – This button activates the On Screen Display (OSD). If a submenu is active, pressing this button will return to the previous menu level.
CHANNEL +/- – Use these buttons to step up or down the TV channels.
While the OSD is active, these buttons function as up and down controls in the OSD menus.
VOLUME +/- – Use these buttons to increase or decrease to the speaker volume. While the OSD is active, these buttons function as left and right controls in the OSD menus.
INPUT (ENTER) – Repeated pressing of this buttons steps through the input sources in the following sequence: TV, AV1, AV2 (S-Video), Component 1, Component 2, RGB, HDMI1, HDMI2, HDMI3 and HDMI4. Once you have stepped through the entire sequence, you will return to the beginning.
Additionally, when the OSD is active, this button confirms the menu function to be adjusted. When the OSD is not active, this button will show the current input selections.
TX INPUT – This slot is used only when upgrading your TV to Dolby Digital 5.1wireless surround system. Do not insert any object into the slot which may compromise the integrity and functionality of your TV. The manufacturer’s warranty does not cover user abuse or improper use of this input.
Rear Panel Connections

- SERVICE – This custom communication port is for factory service only. Use of this input for any purpose other than factory authorized service will void the manufacturer’s warranty of this equipment.
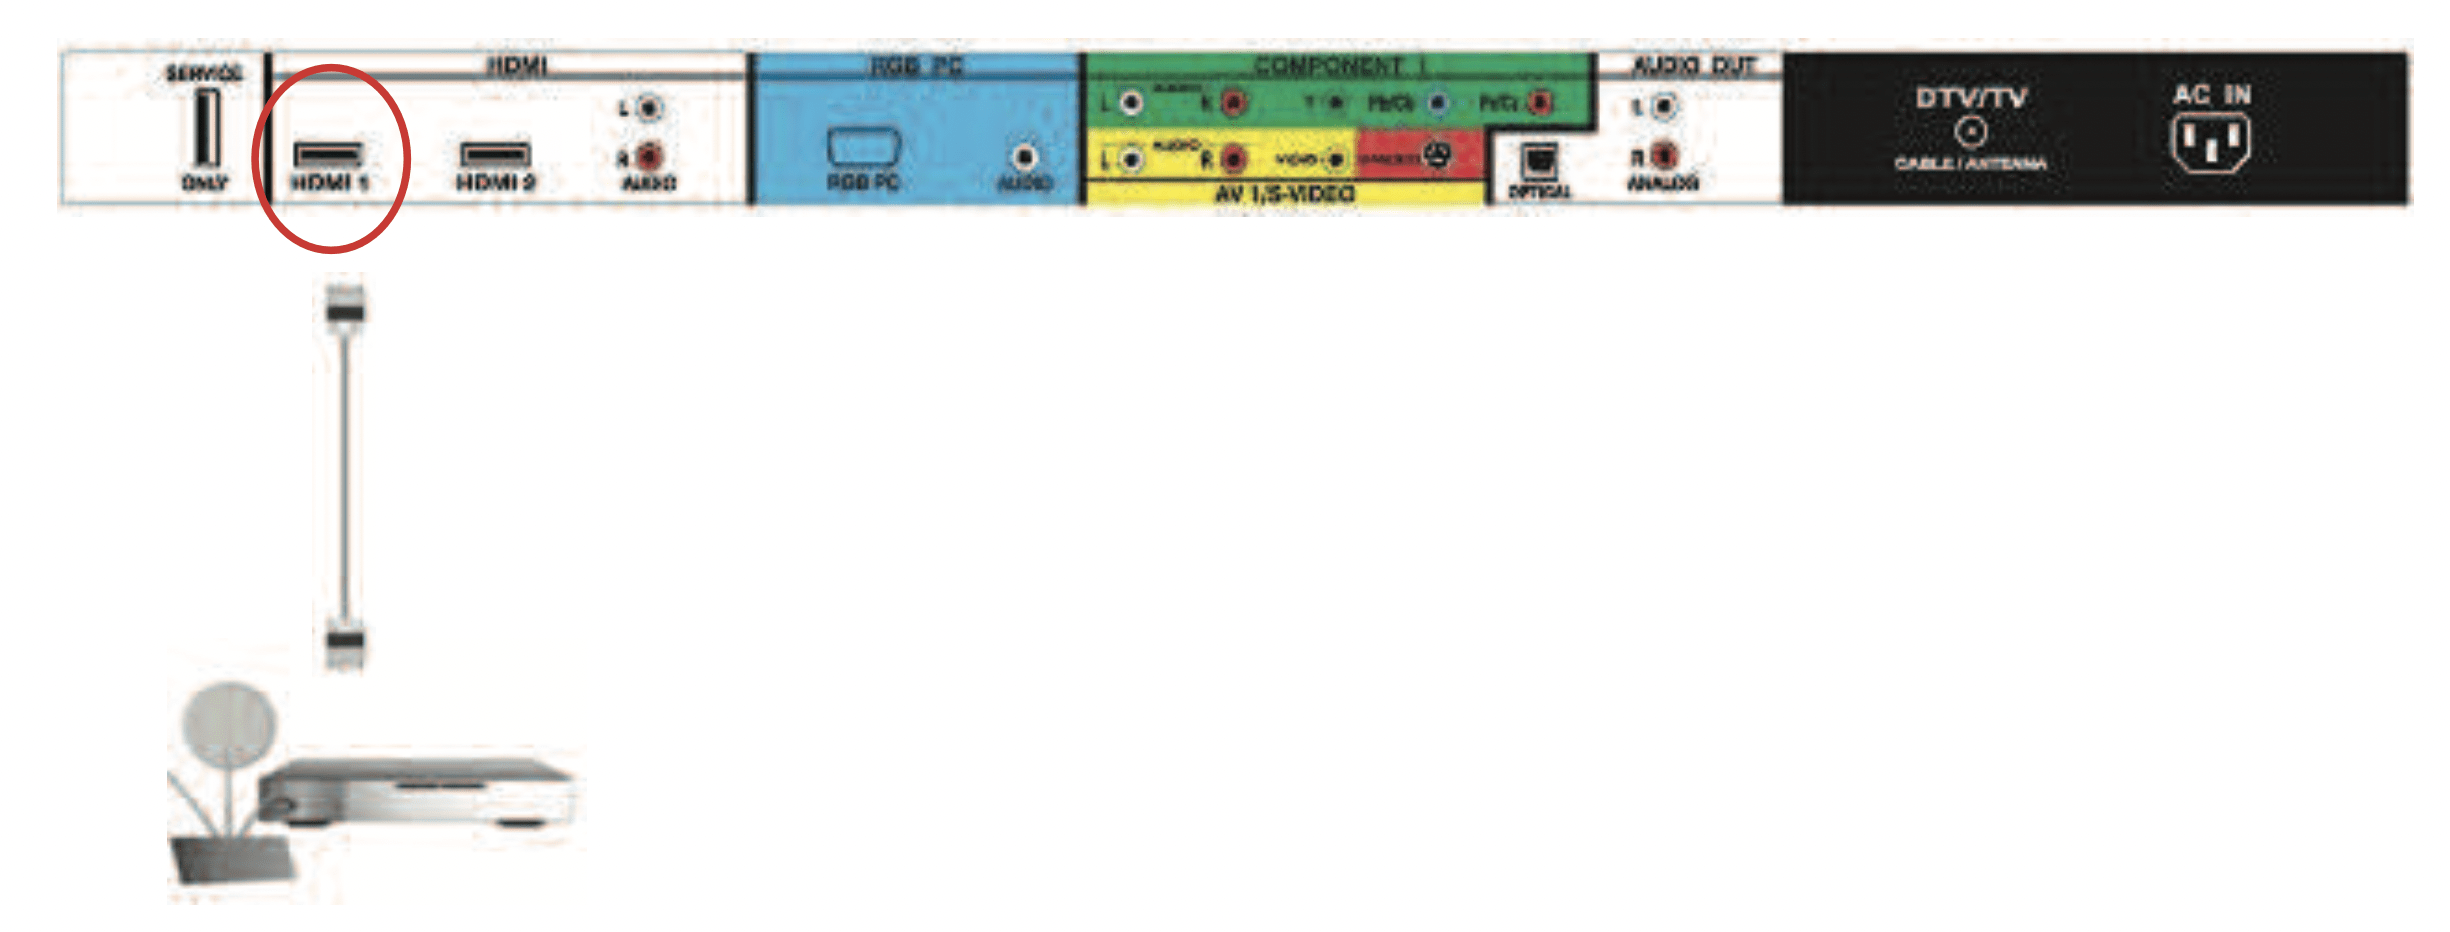
- HDMI 1 – Connect the primary source for digital video such as a DVD multimedia player or set top box through this all digital connector. The white color band on the rear of the TV indicates this connection.
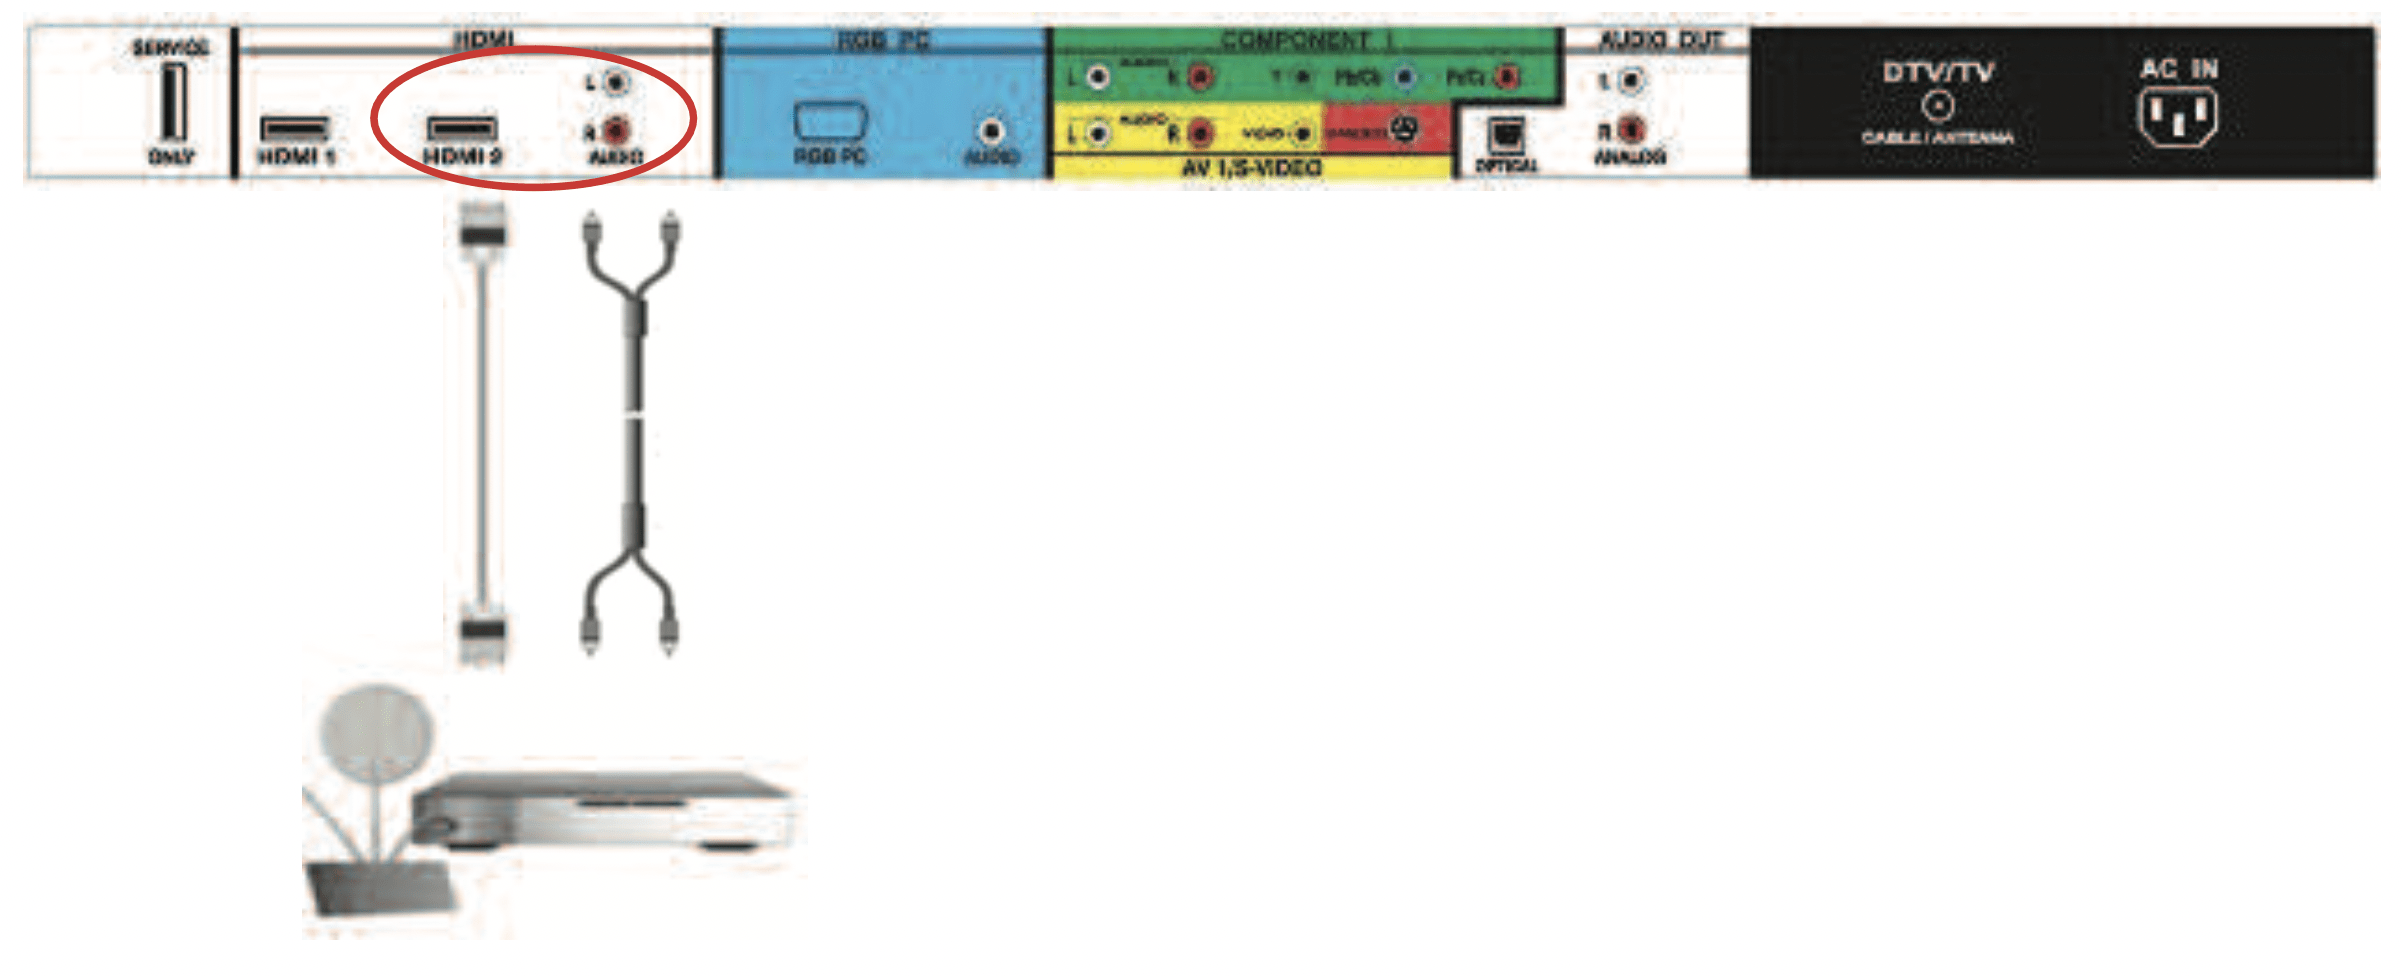
- HDMI 2 – Connect a secondary source for digital video such as a DVD multimedia player or set top box through this all digital connector. The white color band on the rear of the TV indicates this connection. For users who want to connect to a DVI enabled device, use a DVI-HDMI cable and connect the Analog Audio output of the device to the L+R AUDIO here.
- RGB PC – Connect the video and audio from a computer here. The blue color band on the rear of the TV indicates this connection. A cable with a 1/8” mini plug stereo connector at the end connecting to the TV is needed if sound is also transmitted with this signal.
- COMPONENT 1 (YPb/CbPr/Cr with Audio L/R) – Connect the primary source for component video devices such as a DVD Player or set top box here. From left to right, use white for left audio and red for right audio, green for Y, blue for Pb (or Cb), and red for Pr (or Cr) inputs. The green color band on the rear of the TV indicates this connection.
- AV1/S-VIDEO IN – Connect the primary source for composite video devices, such as a VCR or video game. Use the white and red connectors to connect the external audio from the same source. The yellow color band on the rear of the TV indicates this connection.
- OPTICAL AUDIO OUT – When the DTV input is selected for viewing, the audio associated with the programming will be available on this SPDIF Optical connector for connection to your home theatre system. The white color band on the rear of the TV indicates this connection.
- ANALOG AUDIO OUT – Connect the audio from the LCD HDTV to an external device, such as a home theatre system, external amplifier or stereo. Speakers can not be connected directly to here. The white color band on the rear of the TV indicates this connection.
- DTV/TV – Connect to an antenna or digital cable (no Cable Box) for Digital TV.*
- AC IN – Plug-in the supplied AC Power Cord here.
Right-Side Panel Connection

- AV2 – Connect the secondary source for composite video devices, such as a VCR or video game. Use the white and red connectors to connect the external audio from the same source, and then use the yellow connector to connect the external video from the same source.
Note: The red and white audio connectors are shared between AV2 and COMPONENT2.
- COMPONENT2 (YPb/CbPr/Cr with Audio L/R) – Connect the secondary source for component video devices such as a DVD Player or set top box here. From top to bottom, left to right, use green for Y, blue for Pb (or Cb), red for Pr (or Cr), then connect white for left audio and red for right audio inputs under the orange band.
Note: The red and white audio connectors are shared between AV2 and COMPONENT2.
- HDMI 3 – Connect the third source for digital video such as a DVD multimedia player or set top box through this all digital connector.
- HDMI 4 – Connect the fourth source for digital video such as a DVD multimedia player or set top box through this all digital connector.
VIZIO Universal Remote Control

The VIZIO Universal Remote Control is a comprehensive remote that can be used to control up to four different components. The remote button functions are explained on the following pages.
 This button starts all programming of the Remote Control.
 Press this button to turn the TV on from the Standby mode. Press it again to return to the Standby mode.
 Repeated pressing of this button will switch between HDMI 1, HDMI 2, HDMI 3 and HDMI 4 inputs.
 Repeated pressing of this button will switch between Component 1 and Component 2 inputs
 Repeated pressing of this button will switch between AV1 and AV2 inputs.
 Press this button to select TV programming.
 Use these buttons to select a channel or enter a password.
 This button allows the user to cycle through the inputs.
 This DASH button is for the DTV mode. When selecting a digital channel directly use this button for the separation of main and sub channels. For example, channel 28-2 would be selected by the button sequence 2 8 DASH 2.
NOTE: This is a programmable remote supporting up to 4 devices (see TV, VCR, CABLE, DVD buttons at the top of the remote). If the remote is not working with your VIZIO TV, press the TV button on the remote to set the functions back to TV.

 Use this button for the On-Screen Display (OSD) menus.
 LAST – This button recalls the previously viewed channel.
 Use the Navigation Wheel to operate the On-Screen Display (OSD) after it has been activated by pressing the MENU button.
Use the  button to select your chosen option in On-Screen Display (OSD) menus.
 GUIDE – This button displays program information. Note: This function is only available on DTV.
 EXIT – This button exits the On-Screen Display (OSD) menus.
 VOL (+ or -) – These buttons turn the volume up or down.
 5.1 Surround Sound – This function is not available on this model and pressing this button has no effect, unless wireless speaker system is present.
 MUTE – This button turns the sound on and off.
 CH (+ or -) – These buttons change the channels up or down.

 When CABLE is selected and the code to match your Cable (or Satellite) Box has been entered, this button will operate the Cable (or Satellite) Box the same as this button on your Cable (or Satellite) Remote. When TV is selected, this button activates Picture-in-Picture mode.
 When CABLE is selected and the code to match your Cable (or Satellite) Box has been entered, this button will operate the Cable (or Satellite) Box the same as this button on your Cable Remote. When TV is selected, press this button to select the size of the PIP screen from one of the following: small, medium or large
 When CABLE is selected and the code to match your Cable Box (or Satellite) has been entered, this button will operate the Cable Box (or Satellite) the same as this button on your Cable Remote (or Satellite). When TV is selected, press the button to choose the PIP input.
Note: The TV must be in PIP mode for this button to be functional.
 When CABLE is selected and the code to match your Cable Box (or Satellite) has been entered, this button will operate the Cable Box (or Satellite) the same as this button on your Cable Remote (or Satellite). When TV is selected, this button is used to select the channels within the PIP screen when DTV/TV is the PIP input selected
 This button cycles through the available screen formats. The options are Zoom, Panoramic, Normal and Wide.
 Press this button to “Freeze-Frame” the current screen. Press this button again to continue playing.
 This button will select the MTS options of Stereo, SAP or Mono in standard TV mode and alternate audio channels, where available, in DTV mode.
 While in PIP/POP mode; pressing SWAP will switch the displays from the main screen to the sub-screen or vice versa.
 Use this button to change the picture mode from Custom, Standard, Movie and Game
 This button displays the image and system information display.
 Press this button to switch the audio from the main screen to the sub-screen while in PIP or POP mode.
 This button will select the Closed Caption mode. The options are OFF, CC1, CC2, CC3, and CC4 and if Digital Cable Service is the signal; you would get Service1 through Service6, depending on your local company.
 This button selects a programmed DVD player.
 This button selects a programmed Audio Receiver/Amp/Home Theater System.
 This button selects a programmed cable TV set-top box or a satellite TV set-top box.
 This button has been pre-programmed to select the codes to operate the VIZIO HDTV.
Connecting Equipment
Which Video Connection Should I Use?

Connecting Your Cable or Satellite Box
Using HDMI
Cable and Satellite Boxes that have a HDMI digital interface should be connected to the HDMI input of the LCD HDTV for optimal results.
Connecting your Cable or Satellite Box (Best)
- Turn off the power to the LCD HDTV and HDTV Set-Top Box.
- Connect a HDMI cable to the HDMI output of your HDTV Set-Top Box and the other end to the HDMI Input (white color area) at the rear of the LCD HDTV.
- Turn on the power to the LCD HDTV and HDTV Set-Top Box.
- Select HDMI using the INPUT button on the remote or side of the LCD HDTV, or directly by pressing the HDMI button on the Remote Control.
Note:
- The HDMI input on the LCD TV supports High-bandwidth Digital Content Protection (HDCP). HDCP encrypts the transmission between the video source and the digital display for added security and protection.
- If you are already using the HDMI1 input for another component, or you do not want to use the HDMI1 input for the Set-Top Box, you can connect the Set-Top Box to the HDMI2, HDMI3 or HDMI4 connection.
- Refer to your HDTV Set-Top Box user manual for more information about the video output requirements of the product or consult your cable or satellite operator.
For Cable or Satellite Boxes with DVI:
- Turn off the power to the LCD HDTV and HDTV Set-Top Box.
- Using a HDMI-DVI cable, connect the DVI end to your HDTV Set-Top Box and the HDMI end to the HDMI2 Input (white color area) at the rear of the LCD HDTV.
- Using an audio cable (white and red connectors), connect the cable to the audio output connectors associated with the DVI output on your HDTV Set-Top Box and connect the other end to the audio connectors associated with the HDMI input (white area) at the rear of the LCD HDTV.
- Turn on the power to the LCD HDTV and HDTV Set-Top Box.
- Select HDMI2 using the INPUT button on the remote or side of the LCD HDTV, or directly by pressing the HDMI button on the Remote Control.
Note:
- The HDMI input on the LCD TV supports High-bandwidth Digital Content Protection (HDCP). HDCP encrypts the transmission between the video source and the digital display for added security and protection.
- If you are already using the HDMI2 input for another component, or you do not want to use the HDMI2 input for the Set-Top Box, you can connect the Set-Top Box to the HDMI1, HDMI3 or HDMI4 connection. The LCD TV will recognize the DVI connection and obtain audio information from the audio connectors near HDMI2 input.
- Refer to your HDTV Set-Top Box user manual for more information about the video output requirements of the product or consult your cable or satellite operator.
Using Component Video
Connecting your Cable or Satellite Box (Better)
- Turn off the power to the LCD HDTV and HDTV Set-Top Box.
- Connect the Y (green color) connector on your HDTV Set-Top Box to the corresponding Y (green color) connector in the Component 1 group (green color area - row of connectors nearest to you when viewing from the rear of the TV) at the rear of the LCD HDTV.
- Connect the PbCb (blue color) connector on your HDTV Set-Top Box to the corresponding Pb (blue color) connector in the Component 1 group (green color area - row of connectors nearest to you when viewing from the rear of the TV) at the rear of the LCD HDTV.
- Connect the PrCr (red color) connector on your HDTV Set-Top Box to the corresponding Pr Cr (red color) connector in the Component 1 group (green color area - row of connectors nearest to you when viewing from the rear of the TV) at the rear of the LCD HDTV.
- Using an audio cable (white and red connectors), connect the cable to the audio output connectors associated with the Component output on your HDTV Set-Top Box and connect the other end to the audio connectors associated with the Component 1 input (green color area) at the rear of the LCD HDTV.
- Turn on the power to the LCD HDTV and HDTV Set-Top Box.
- Select Component 1 using the INPUT button on the remote or side of the LCD HDTV, or directly by pressing the COMP button on the Remote Control.
Note:
- If you are already using the Component 1 input for another component, or you do not want to use the Component 1 input for the Set-Top Box, you can connect the Set-Top Box to the Component 2 connections on the side of the TV.
- Refer to your HDTV Set-Top Box user manual for more information about the video output requirements of the product or consult your cable or satellite operator.
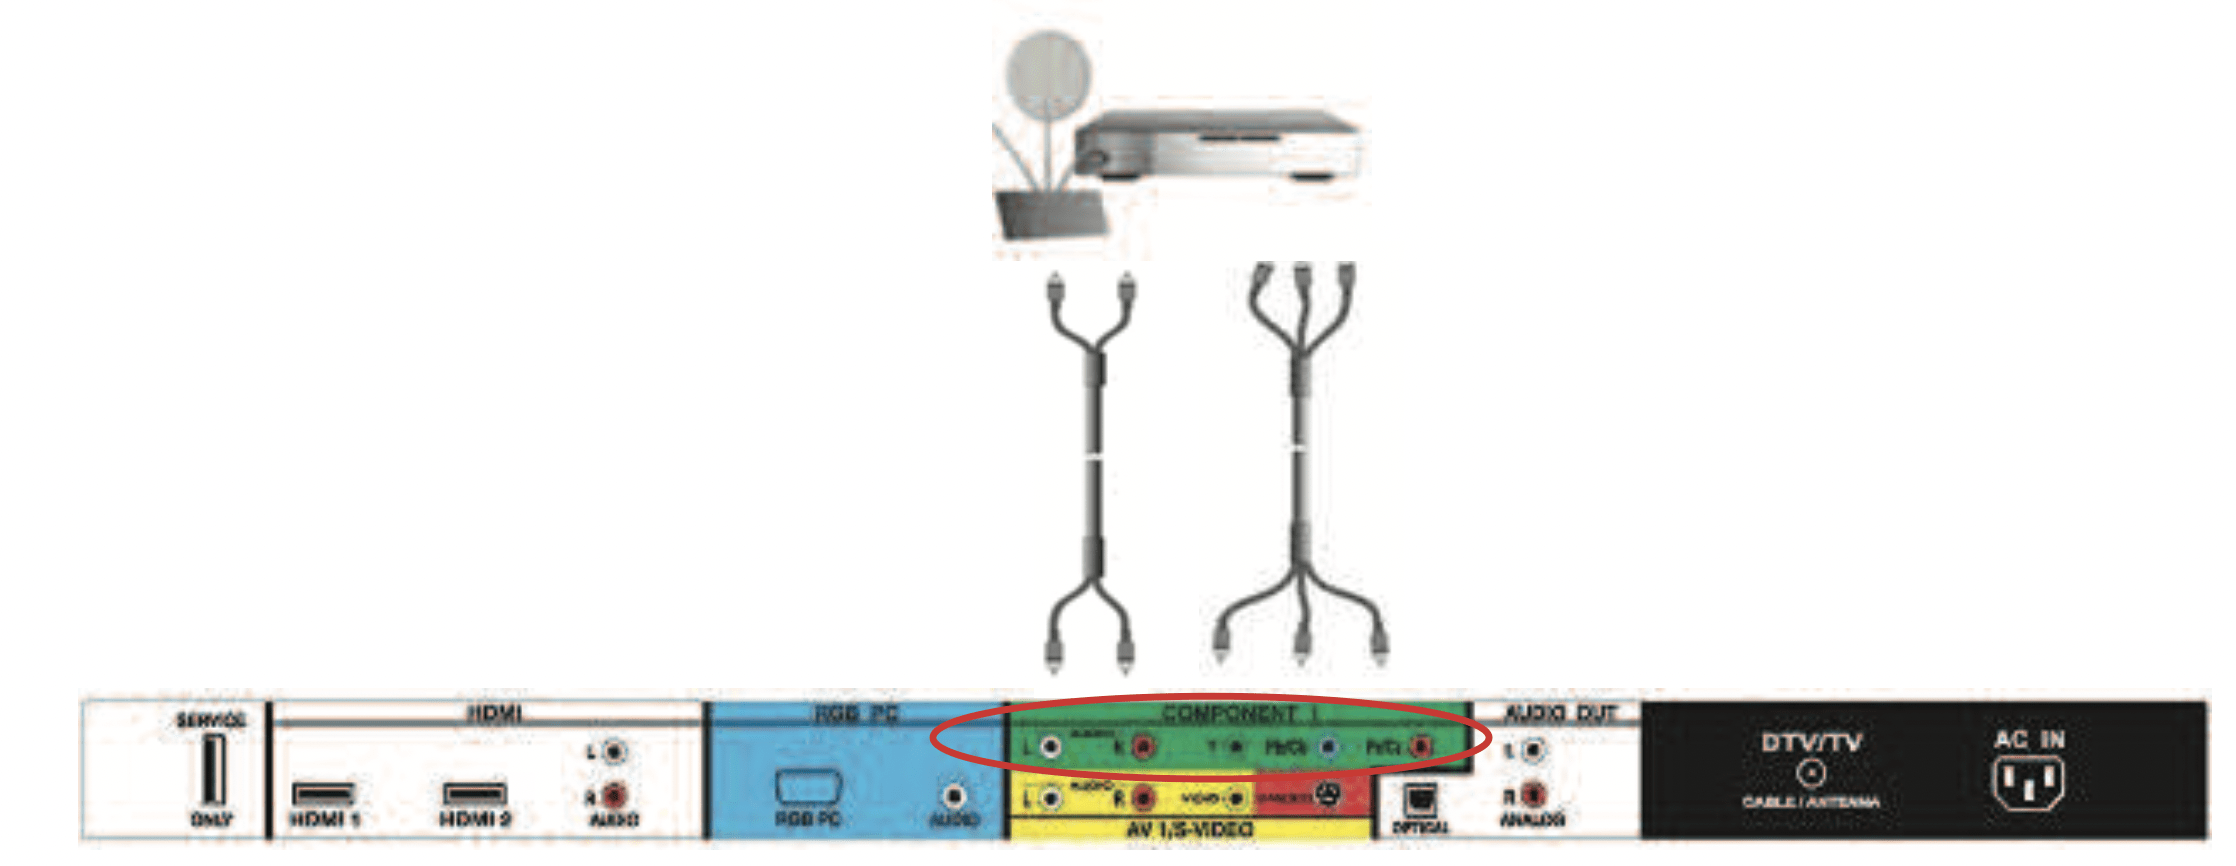
Connecting Your DVD Player
You have several options for connecting your DVD player to your SV420XVT1A – HDMI, Component, SVideo and Composite (AV) inputs. Based on your home theater configuration, you can decide which option is the right one for you.
Using HDMI
DVD players that have a digital interface such as HDMI (High Definition Multimedia Interface) should be connected to the HDMI input of the VIZIO SV420XVT1A for optimal results.
Connecting your DVD Player (Best):
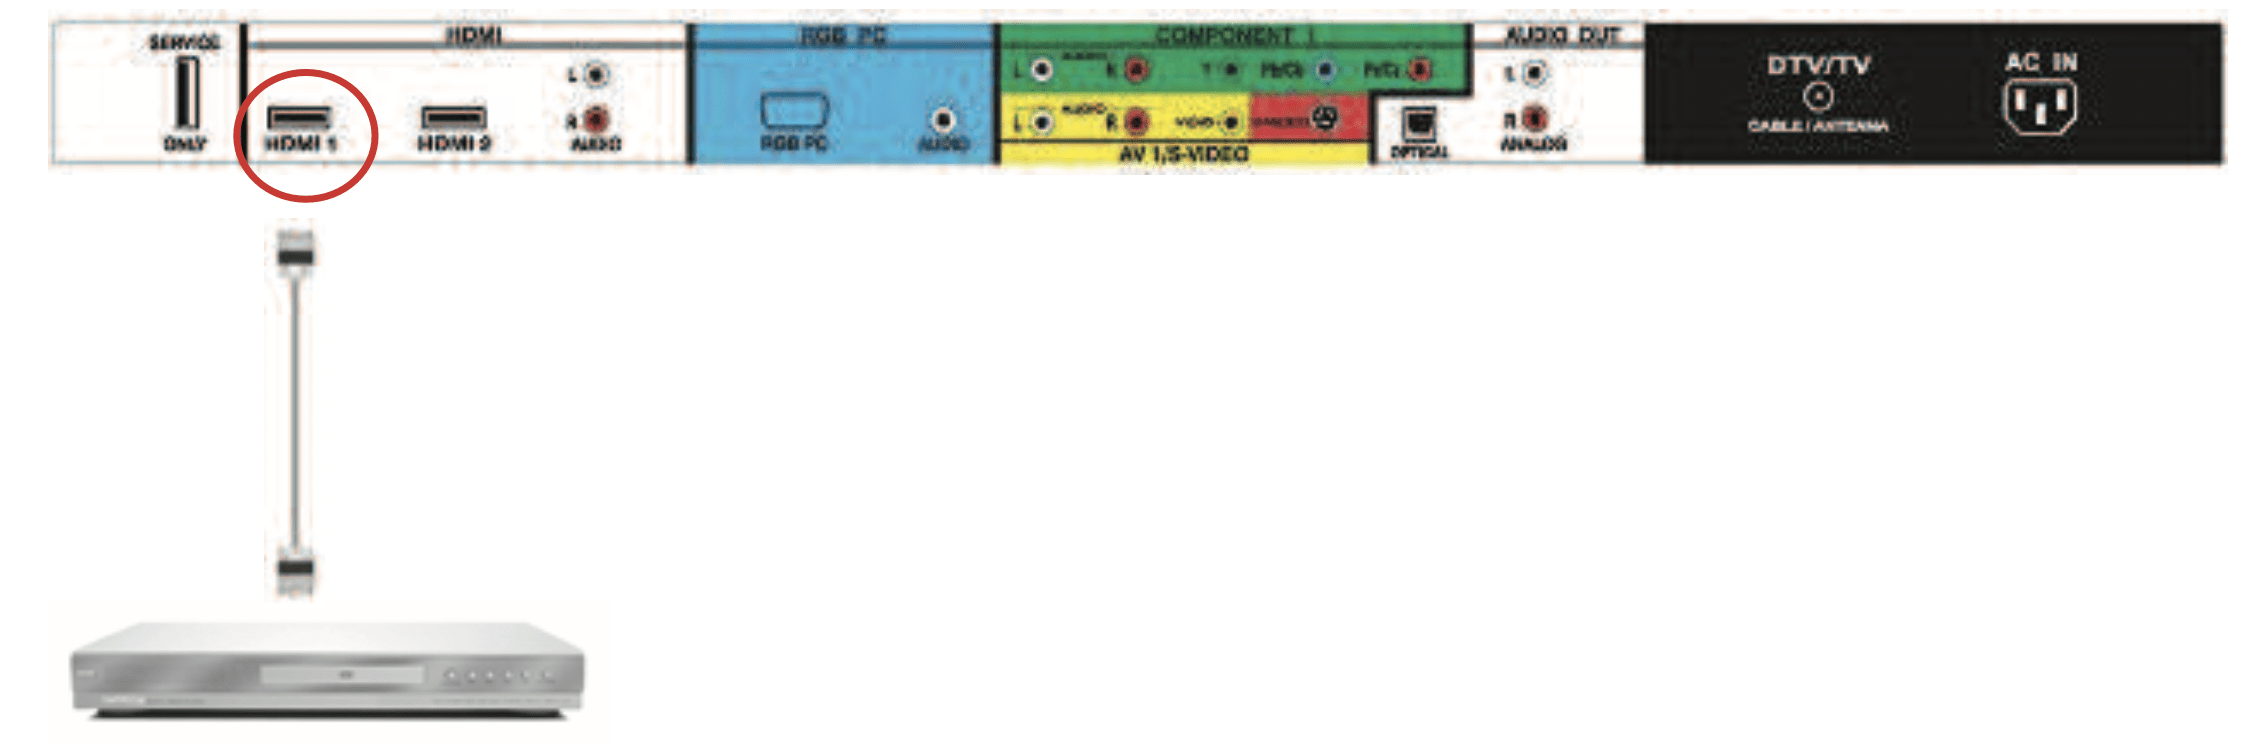
- Turn off the power to the LCD HDTV and DVD player.
- Connect a HDMI cable to the HDMI output of your DVD player and the other end to the HDMI Input (white color area) at the rear of the LCD HDTV.
- Turn on the power to the LCD HDTV and your DVD player.
- Select HDMI using the INPUT button on the remote or side of the LCD HDTV, or directly by pressing the HDMI button on the Remote Control.
Note:
- If you are already using the HDMI1 input for another component, or you do not want to use the HDMI 1 input for the DVD player, you can connect the DVD player to the HDMI2, HDMI3 or HDMI4 connection.
- Refer to your DVD player user manual for more information about the video output requirements of the product.
For DVD Players with DVI:
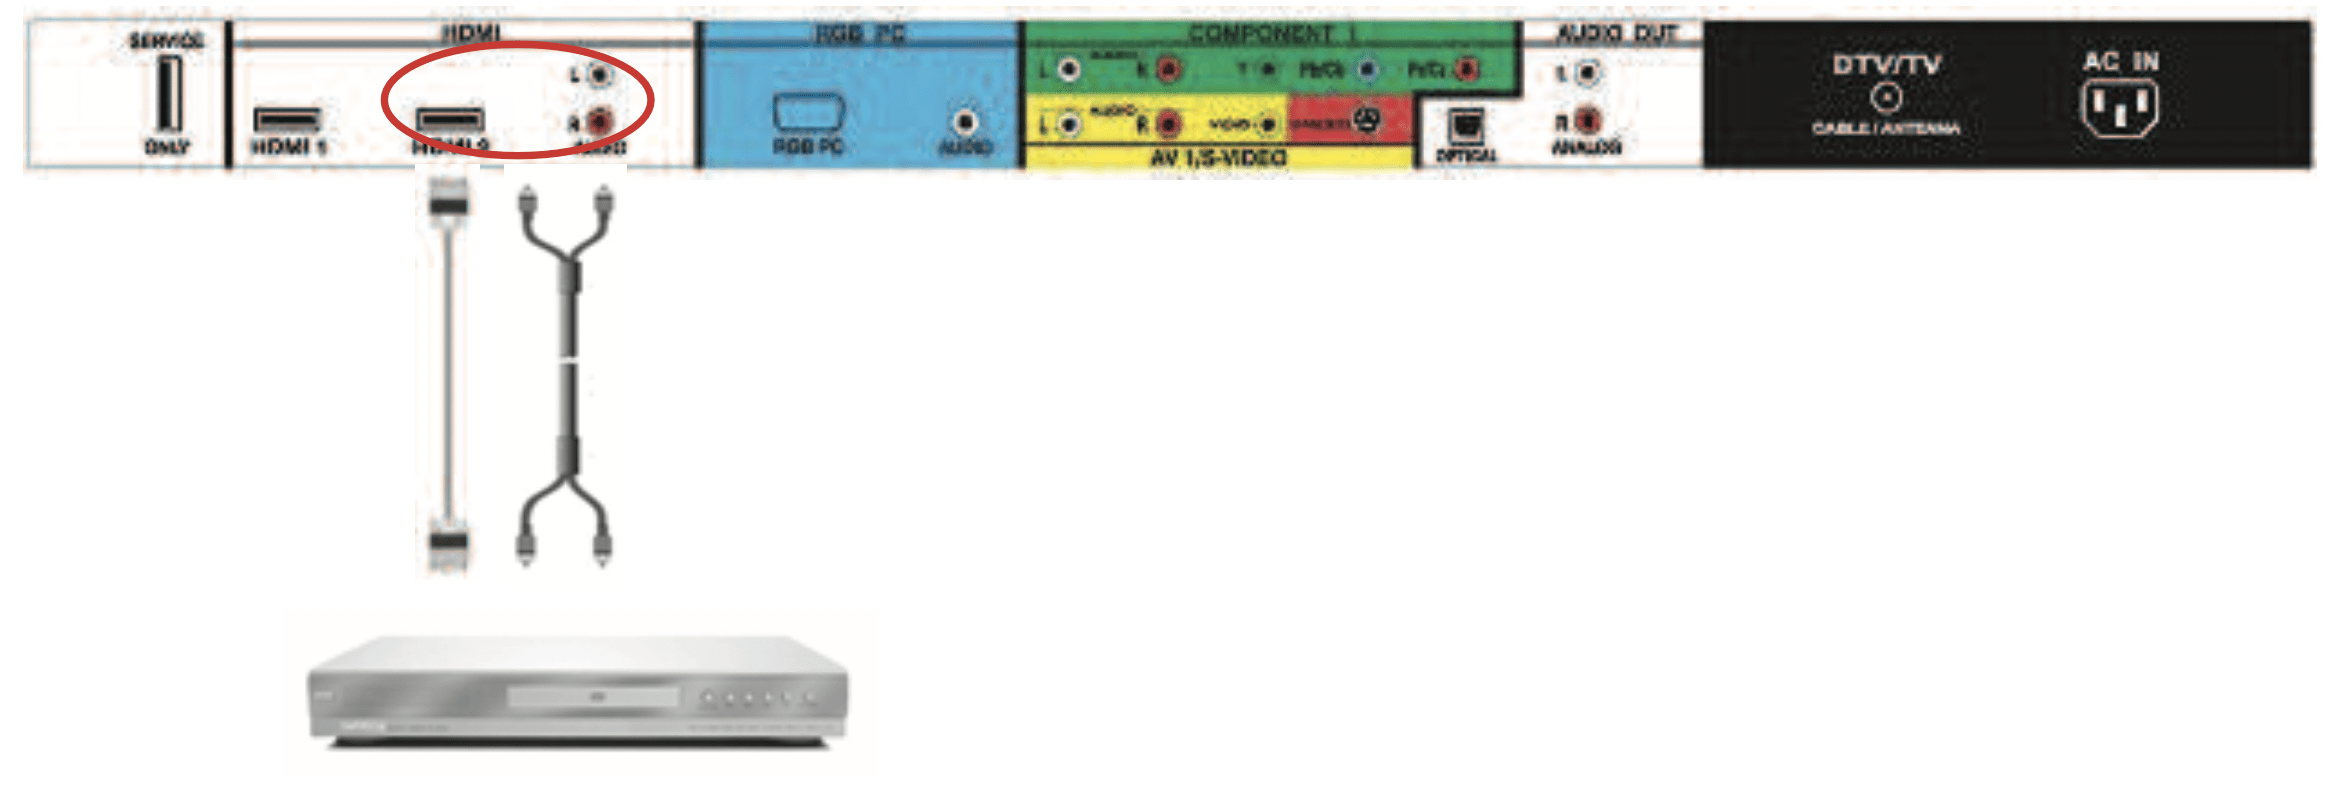
- Turn off the power to the LCD HDTV and DVD player.
- Using a HDMI-DVI cable, connect the DVI end to your DVD player and the HDMI end to the HDMI2 Input (white color area) at the rear of the LCD HDTV.
- Using an audio cable (white and red connectors), connect the cable to the audio output connectors associated with the DVI output on your DVD player and connect the other end to the audio connectors associated with the HDMI input (white area) at the rear of the LCD HDTV.
- Turn on the power to the LCD HDTV and your DVD player.
- Select HDMI 2 using the INPUT button on the remote or side of the LCD HDTV, or directly by pressing the HDMI button on the Remote Control.
Note:
- If you are already using the HDMI2 input for another component, or you do not want to use the HDMI 2 input for the DVD Player, you can connect the DVD player to the HDMI1, HDMI3 or HDMI4 connection. The LCD TV will recognize the DVI connection and obtain audio information from the audio connectors near HDMI2 input.
- Refer to your DVD player user manual for more information about the video output requirements of the product.
Using Component Video
Connecting your DVD Player (Better):
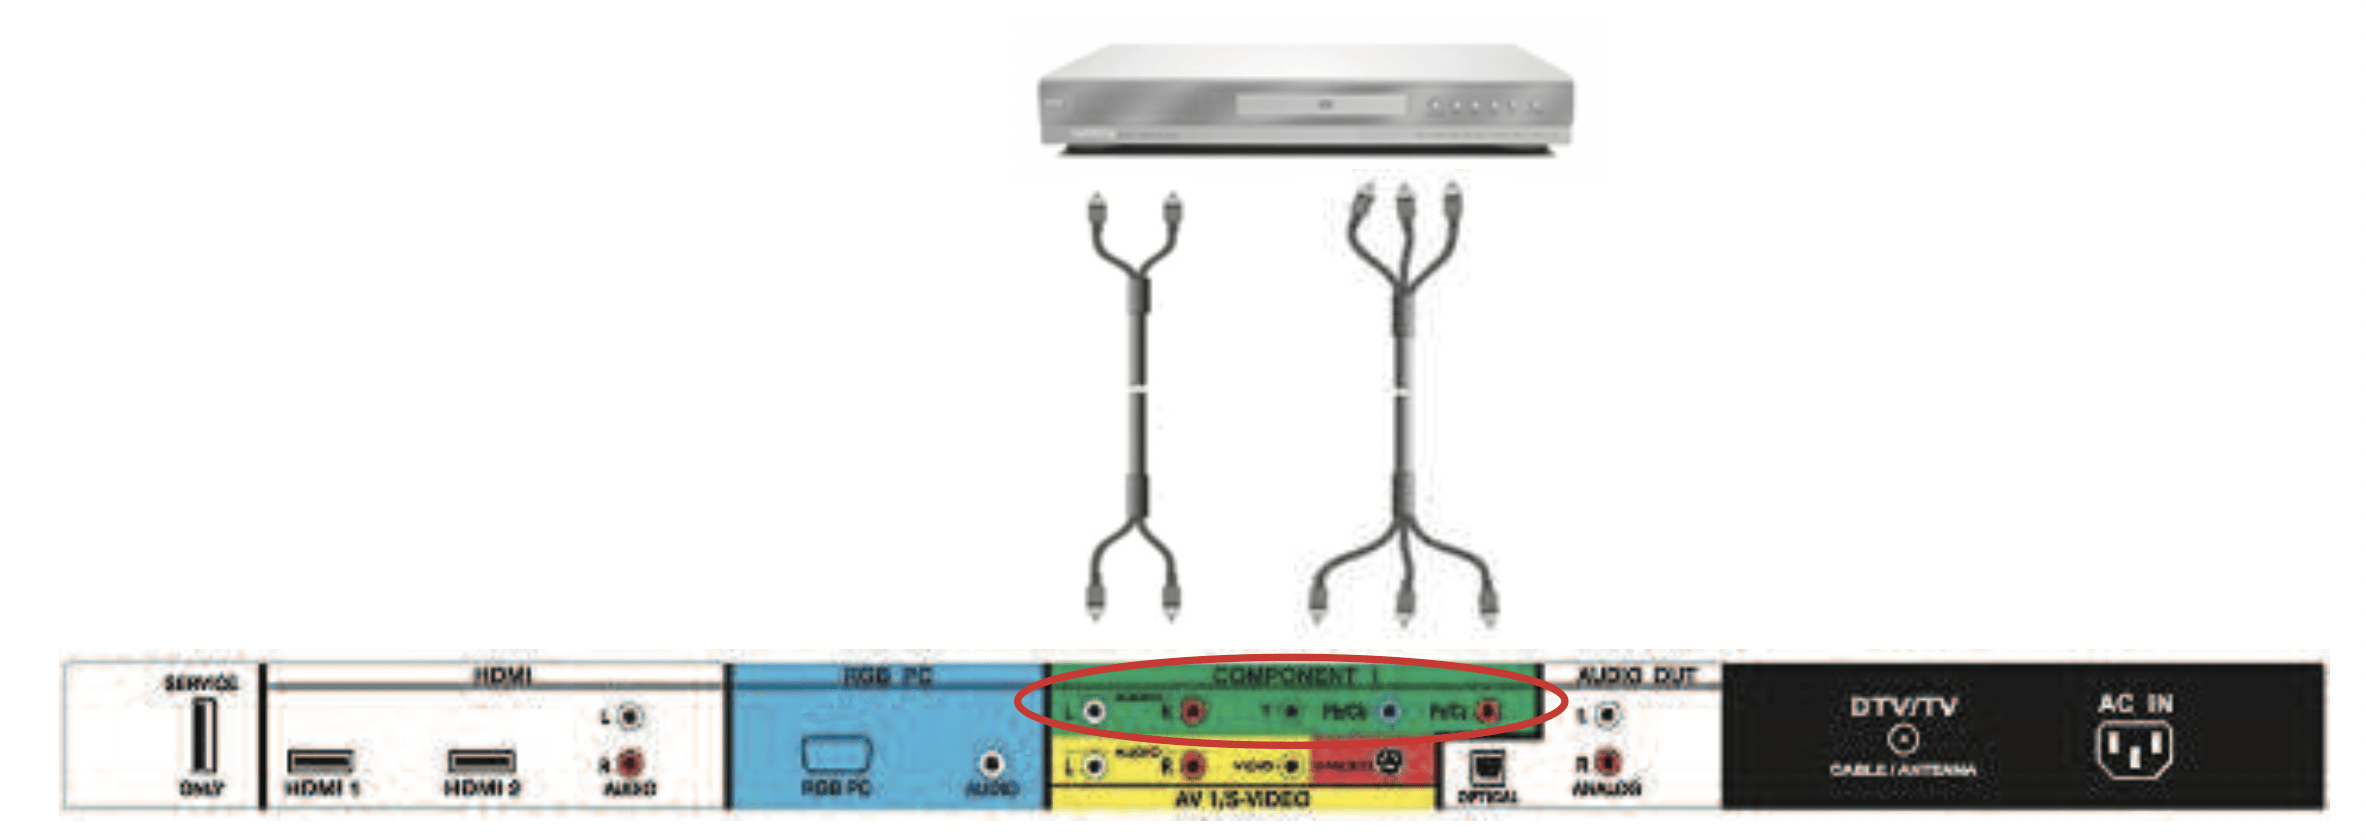
- Turn off the power to the LCD HDTV and DVD player.
- Connect the Y (green color) connector on your DVD player to the corresponding Y (green color) connector in the Component 1 group (green color area - row of connectors nearest to you when viewing from the rear of the TV) at the rear of the LCD HDTV.
- Connect the PbCb (blue color) connector on your DVD player to the corresponding PbCb (blue color) connector in the Component 1 group (green color area - row of connectors nearest to you when viewing from the rear of the TV) at the rear of the LCD HDTV.
- Connect the PrCr (red color) connector on your DVD player to the corresponding PrCr (red color) connector in the Component 1 group (green color area - row of connectors nearest to you when viewing from the rear of the TV) at the rear of the LCD HDTV.
- Using an audio cable (white and red connectors), connect the cable to the audio output connectors associated with the Component output on your DVD player and connect the other end to the audio connectors associated with the Component 1 input (green color area) at the rear of the LCD HDTV.
- Turn on the power to the LCD HDTV and DVD player.
- Select Component 1 using the INPUT button on the remote or side of the LCD HDTV, or directly by pressing the COMP button on the Remote Control.
Note:
- If you are already using the Component 1 input for another component, or you do not want to use the Component 1 input for the DVD player, you can connect the DVD player to the Component 2 connections on the side of the TV.
- Refer to your DVD player user manual for more information about the video output requirements of the product.
Maintenance
Important
- Make sure that the power cable is removed from the socket before cleaning the TV.
- Do not use volatile solvent (such as toluene, rosin and alcohol) to clean the TV. Such chemicals may damage the housing, screen glass and remote control, and cause paint to peel.
Cleaning the Housing and Remote Control
- Use the VIZIO soft cloth for cleaning.
- If the housing or remote control is seriously contaminated, use a soft cloth moistened with diluted neutral cleaner to clean the display. Wring water out of the cloth before cleaning to prevent water from penetrating into the housing. Wipe the display with a dry cloth after cleaning.
Cleaning the Screen
- Use the VIZIO soft cotton cloth to gently clean the screen.
- The screen glass is very fragile. Do not scrape it with any sharp object. Do not press or tap the screen to avoid cracking. When the screen is seriously contaminated, use a soft cloth moistened with diluted neutral cleaner to clean the display. Wring water out of the cloth before cleaning to prevent water from penetrating into the housing. Wipe the display with a dry cloth after cleaning.
Troubleshooting Guide
| Problem |
Solution |
| No power. |
Make sure the power button is ON (White VIZIO Logo).
Make sure AC power cord is securely connected to the AC socket.
Plug another electrical device (like a radio) to the power outlet to verify that the outlet is supplying the proper voltage.
|
| No sound. |
Check your audio connection
Press MUTE on the remote control again, so that MUTE disappears from the screen
Check your audio settings, your TV audio may be set to SAP, min or speakers off.
Press the Volume + (Up) key on your remote control
Make sure that headphones are not connected
|
| If the screen is black. |
Check your input connections. |
| Power is ON but no screen |
Make sure the video cable supplied with the TV is secured to the correct video |
| Image. |
Output port on the back of the VCR and the TV.
Make any cable you have attached to the TV is secured to the correct output your Set-Top Box, DVD, etc.
Adjust brightness and contrast.
Check Source settings.
|
| Wrong or abnormal colors appear. |
If any colors (red, green, or blue) are missing, check the video cable to make sure it is securely connected. |
| Control buttons do not work. |
Press only one button at a time. |
| Remote Control does not work. |
Make sure batteries are inserted correctly.
Batteries could be weak.
Make sure you have selected TV on the remote.
|
| There appears to be image quality issues. |
For best image quality, view HD wide screen programs where possible. If HD content is not available view “Standard Definition” from a digital source. Standard, analog TV will always be noticeably inferior to HD because your digital flat panel TV has video that is many times better than old TV’s and so you can see interference and deficiencies you did not know you had. |
| You cannot see a picture. |
Make sure that the power cord is plugged into a grounded electrical outlet.
Make sure that the power button is turned on.
Make sure that the selected input source is connected to a working input source.
If your TV is connected to your computer in RGB or HDMI mode, press any key on your keyboard to “wake” your computer.
|
| You see a distorted picture or hear unusual sound. |
You may be getting interference from electrical appliances, cars, motorcycles, or fluorescent lights. If you have not mounted it on the wall, try moving your TV to another location to see if this is the cause of the problem. |
| The picture has abnormal patterns. |
Make sure that the input source cable is attached securely and correctly to the back of your TV.
Make sure that the video input source is within the range of your TV. Compare the video input source’s specifications with yourTV specifications.
|
| The display image does not cover the entire screen. |
If you are using RGB mode, make sure that H Size and V Position in the On Screen Display (OSD) are set correctly.
If you are using TV, AV1, AV2 or Component with 480i input, use the WIDE button on the remote control to scroll through various screen modes.
|
| You can see a picture but you cannot hear sound. |
Make sure that the volume is not turned down.
Make sure that the sound is not muted.
Make sure that your audio input source cables are connected securely and correctly.
|
| The TV has pixels that are always dark or colored. |
Your LCD HDTV is manufactured using an extremely high level of precision technology, however, sometimes some pixels of your LCD HDTV may not display. Pixel defects within industry specifications are inherent to this type of product and do not constitute a defective product. |
| You see “noise” or “trash” on the screen. |
When your LCD HDTV’s digital capabilities exceed a digital broadcast signal, the signal is up-converted (increased) to match your TV’s display capabilities. Up-converting can cause noise or trash. |
| You switch to a different input and the volume changes. |
The TV remembers the volume level from the last time you adjusted it. If the sound level is higher or lower from another source, then the loudness will change. |
| Tips for High-Definition Users. |
The LCD HDTV is an ideal platform for viewing High Definition Content.
Best Image Quality will be achieved by the HDMI Input, then YPbPr, then RGB.
However, due to variances in broadcast practices, it is possible some image distortions can occur.
|
| Tips for Letterbox Content Users. |
Letterboxed (or “Widescreen”) versions of DVD movies are most commonly formatted for standard 4:3 Televisions. The LCD HDTV has the capability of expanding this content so the entire screen is filled at the expense of image accuracy. To use this function, press the “ZOOM” key on the remote control and cycle among the available options. |
Wireless Speakers System and TV Pairing
If pairing of the Wireless Speakers System is needed, please follow the steps below:
- Make sure that the slide switch in the Tx Card is to the ID position and insert it into TV slot.
- Plug AC Power cord into subwoofer, subwoofer LED power indicator will flash intermittently.
- Press and hold down the Channel Search button at the back side of the Subwoofer for approximate 5 seconds; a long beep will be heard.
- Light of the LED indicator will stop flashing and a solid light will be displayed. Pairing is done.
- To have the two sets working as one, please take the Tx Card out from the slot. Slide the switch to the Play position and reinsert it into the TV slot.
- Your TV and Wireless Speakers System have become now a Dolby 5.1 theatre entertainment system.