Loading ...
ICF-C1PJ_U2 [US] 4-528-478-11(2)
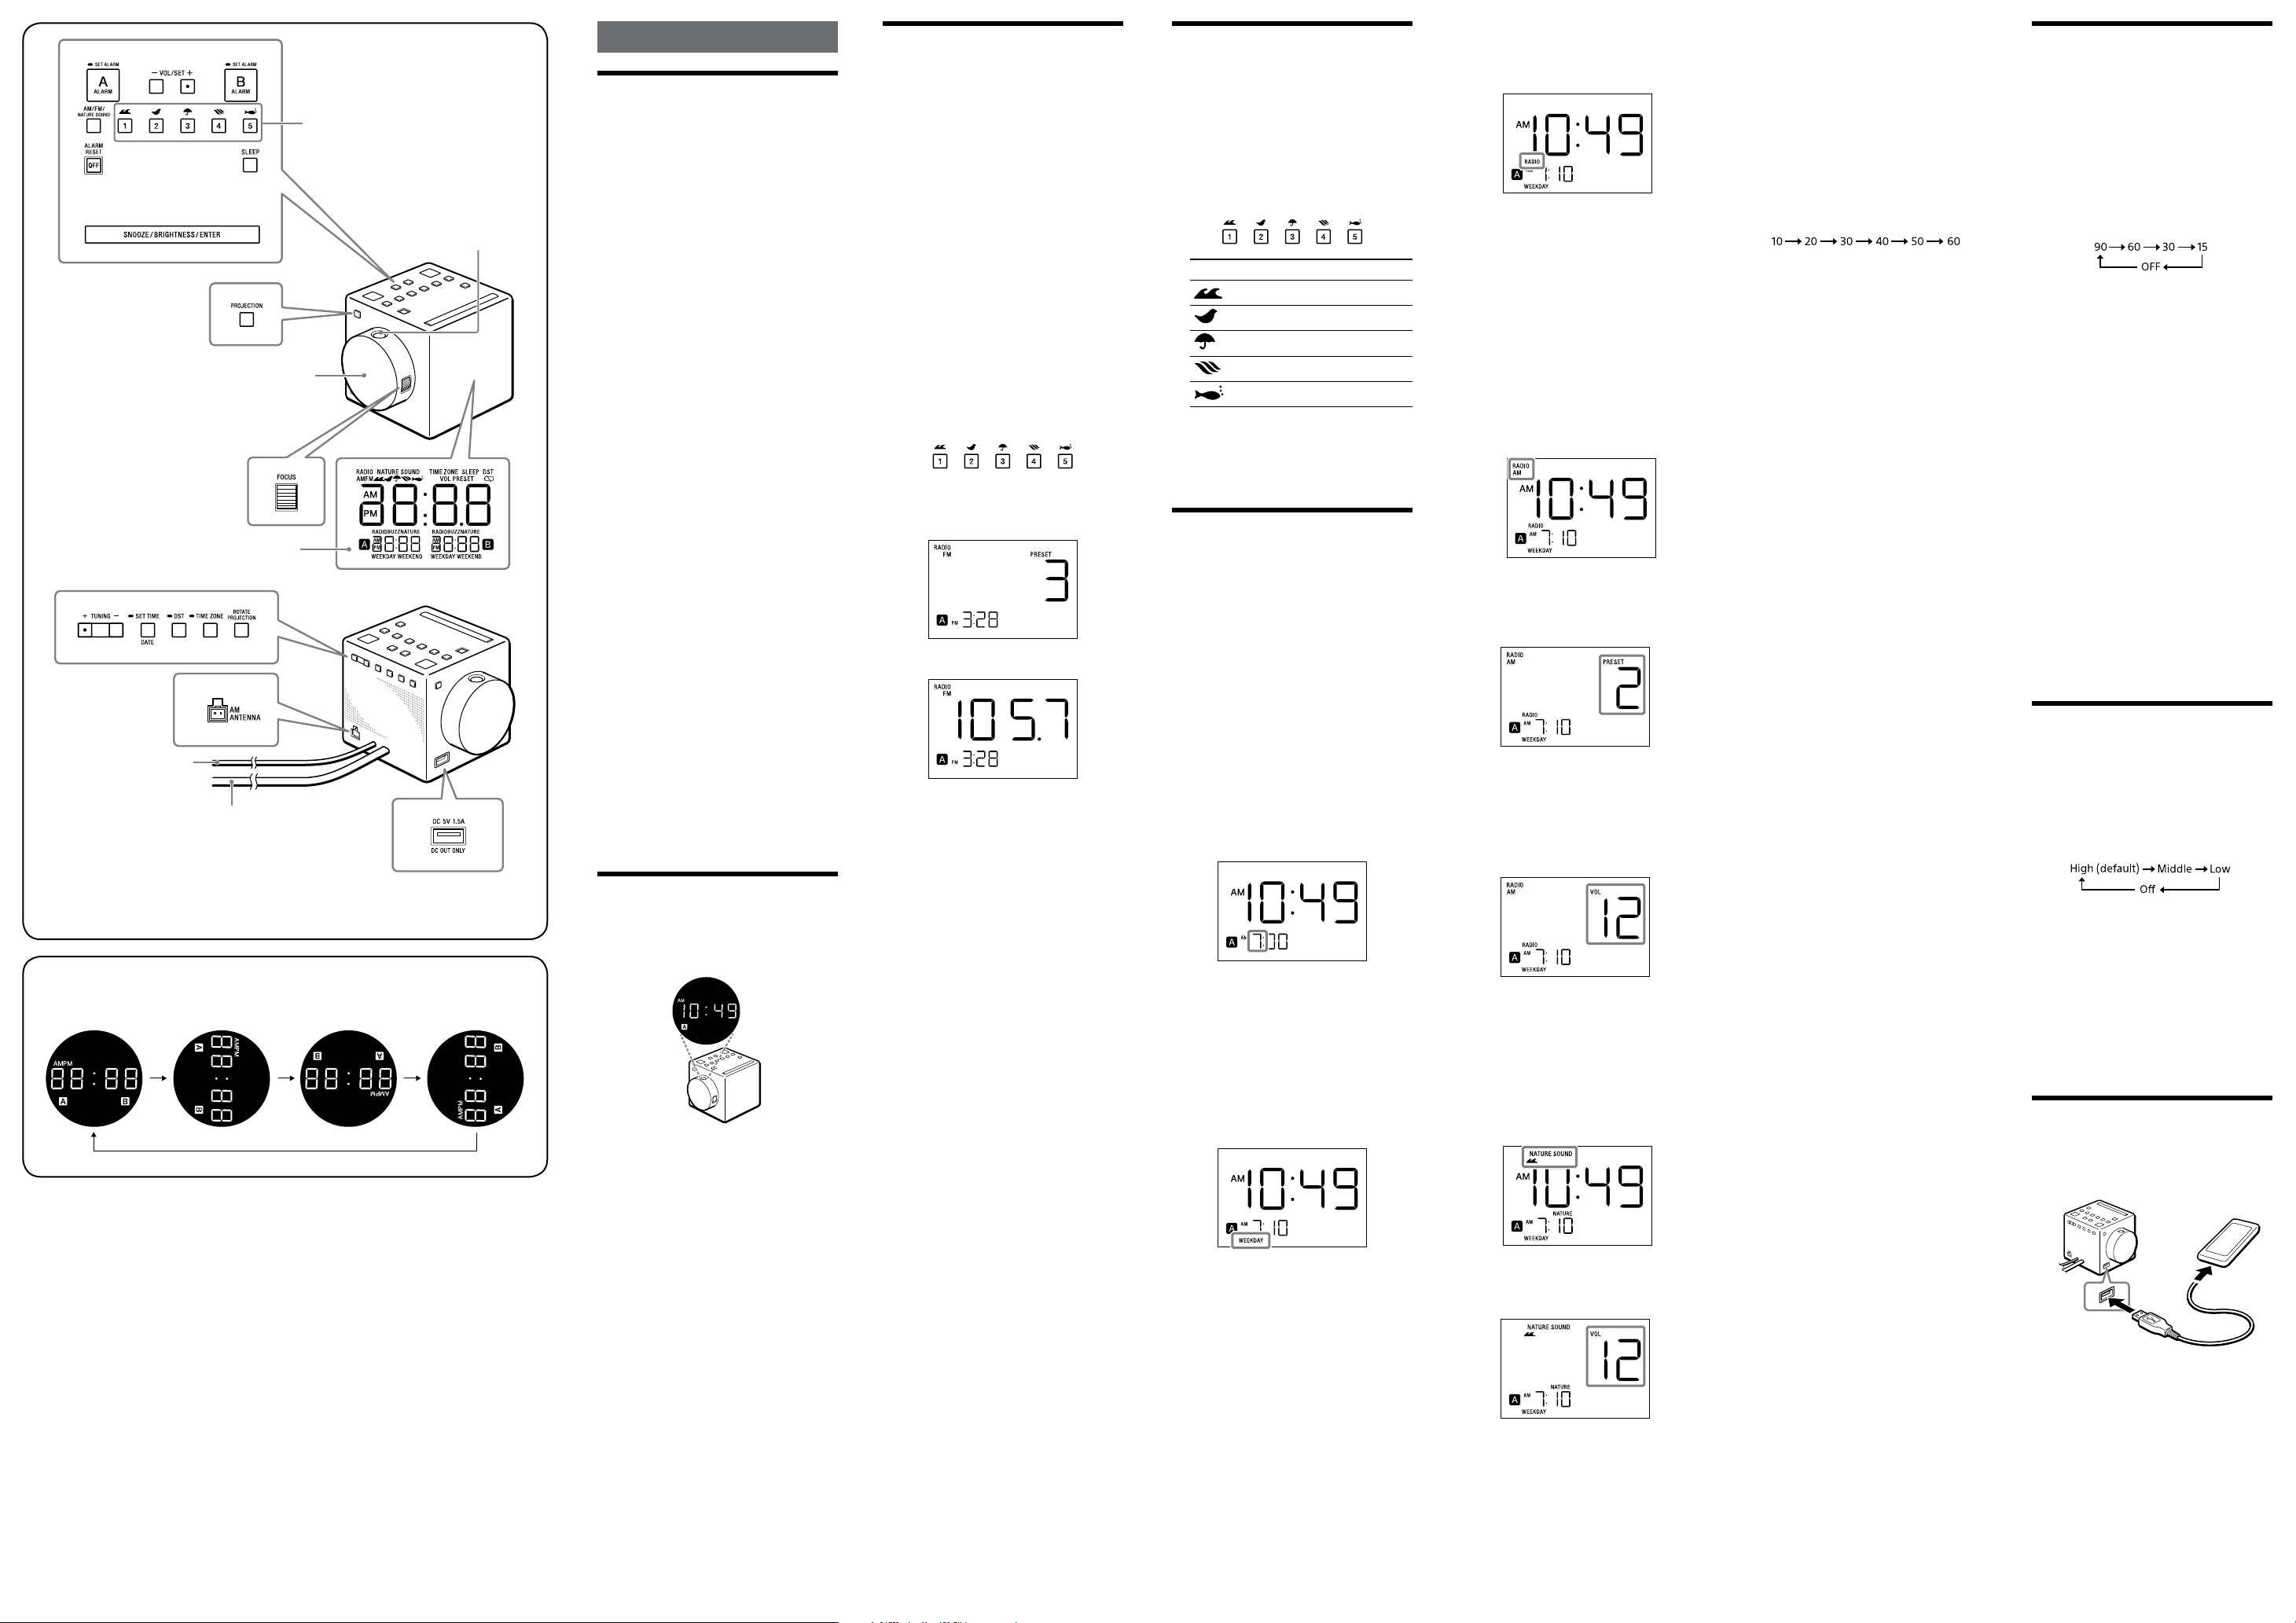
Display
Projector unit
Projector lens
NATURE SOUND/PRESET
AC power cord
FM wire antenna
Use the tactile dots on VOL/SET + and TUNING + and the tactile characters on 3
(NATURE SOUND/PRESET) and ALARM RESET/OFF as a guide when operating the
unit.
Operations
Setting the clock
manually
To change the clock setting manually, operate
the unit as follows.
1 Press and hold SET TIME/DATE for
more than 2 seconds.
The year will start to flash on the display.
2 Press VOL/SET + or – repeatedly to
select the year, and then press
SNOOZE/BRIGHTNESS/ENTER.
3 Repeat step 2 to set the month, day
and time.
After setting the time, a beep will sound.
Notes
If you do not press any button for about 1
minute while setting the clock, clock setting
mode will be canceled.
A 100-year calendar (2013 - 2112) is installed
in the system.
To change the time format
You can choose between the 12-hour system
(default) or the 24-hour system to display the
time.
Press and hold ALARM RESET/OFF and
SNOOZE/BRIGHTNESS/ENTER for about
3 seconds.
The time format toggles between the 12-hour
system (“AM 12:00” = midnight) and the
24-hour system (“0:00” = midnight).
To display the date and year
Press SET TIME/DATE once to display the
month and day, and press again to display the
year. To return to the current time display, press
SET TIME/DATE once again; or after a few
seconds the clock display will return
automatically.
When daylight saving time
(summer time) begins/ends
while Automatic DST/summer
time adjustment is set to off
Change the clock setting manually if you have
canceled the Automatic DST/summer time
adjustment.
Using the projector
The projector function allows you to display the
clock and the currently used alarm icons on a
nearby wall or ceiling at a range of 0.5 m – 4 m
(1 / feet – 13 / feet).
1 Rotate the projector unit to point the
projector lens in the desired direction.
2 Press PROJECTION.
3 Turn FOCUS to adjust the focus.
To turn off the projector, press PROJECTION
again.
To rotate the projection view
Press ROTATE PROJECTION repeatedly.
Each time you press ROTATE PROJECTION, the
projection view rotates as Fig. .
Notes
Do not stare into the lens directly.
The projector function cannot be used unless
the clock has been set.
Certain walls and ceilings may not display
the projection properly.
The projector unit can be rotated 90° forward
or backward from the upward position, and
clicks when returned to the upward position.
If the projector unit is rotated beyond its
limits, it may be damaged.
The projector will automatically turn off after
16 hours.
Listening to the radio
1 Press AM/FM/NATURE SOUND
repeatedly to select the desired band
(AM or FM).
2 Press TUNING + or – to tune to the
desired station.
If you press and hold TUNING + or –,
scanning starts. Scanning pauses when a
station is found, and restarts after a few
seconds. To stop scanning, press TUNING +
or – (or SNOOZE/BRIGHTNESS/ENTER).
3 Press VOL/SET + or – to adjust the
volume.
To turn off the radio, press ALARM RESET/
OFF.
To preset radio stations
You can preset 5 stations for FM and 5 stations
for AM.
1 Tune to the station you wish to preset.
2 Press and hold the desired NATURE
SOUND/PRESET (1 to 5) until you hear
a beep.
Example: The following display appears
when you preset FM 105.7 MHz to preset
number 3 for FM.
The display shows the frequency for a few
seconds and then changes back to the
current time.
To change the preset station, tune to the
desired station and press and hold the
NATURE SOUND/PRESET (1 to 5) until you
hear a beep.
Note
If you try to store another station with the
same preset number, the previously stored
station will be replaced.
To tune to a preset station
1 Press AM/FM/NATURE SOUND
repeatedly to select the desired band
(AM or FM).
2 Press NATURE SOUND/PRESET (1 to 5)
where the desired station is stored.
3 Press VOL/SET + or – to adjust the
volume.
Note
If no station has been preset yet, “Non”
appears on the display. Then the unit returns
to the same state as in step 1.
Selecting a Nature
Sound
This unit includes 5 types of Nature Sounds:
Sea Waves, Birds, Rain, Brook, and Under the
Sea.
1 Press AM/FM/NATURE SOUND
repeatedly to select the Nature Sound.
2 Press the desired NATURE SOUND/
PRESET (1 to 5).
Icons Sound type
Sea Waves
Birds
Rain
Brook
Under the Sea
To turn off the Nature Sound, press ALARM
RESET/OFF.
Note
When other functions are in use, Nature
Sounds are not available.
Setting the alarm
The dual alarm function allows you to set two
alarm programs (ALARM A and ALARM B).
The alarm time can be set for each program
and the alarm sound can be selected from
“RADIO” (radio), “BUZZ” (buzzer), or “NATURE”
(Nature Sound).
Before setting the alarm
Make sure to set the clock. (See “Setting the
clock manually.”)
To set the radio alarm, first preset your
favorite station. (See “To preset radio
stations.”)
1 Press and hold SET ALARM/ALARM A
(or B) for more than 2 seconds.
While setting the alarm, “A” (or “B”) flashes
on the display.
2 Press VOL/SET + or – to select the
desired hour, and press SNOOZE/
BRIGHTNESS/ENTER.
3 Press VOL/SET + or – to select the
desired minute, and press SNOOZE/
BRIGHTNESS/ENTER.
4 Press VOL/SET + or – to select the
desired alarm period (“WEEKDAY,”
“WEEKEND,” or every day*), and press
SNOOZE/BRIGHTNESS/ENTER.
* In the case of every day, both
“WEEKDAY” and “WEEKEND” are
displayed.
5 Press VOL/SET + or – to select the
desired alarm mode (“RADIO,” “BUZZ,”
or “NATURE”), and press SNOOZE/
BRIGHTNESS/ENTER.
When selecting “RADIO”
Proceed to “ Setting the radio alarm.”
When selecting “BUZZ”
The setting is complete. The buzzer will
sound at the set time, gradually increasing
in volume. (“A” (or “B”) flashes on the
display.)
When selecting “NATURE”
Proceed to “ Setting the Nature Sound
alarm.”
Setting the radio alarm
6 Press VOL/SET + or – to select the AM
band or FM band, and press SNOOZE/
BRIGHTNESS/ENTER.
7 Press VOL/SET + or – (or NATURE
SOUND/PRESET (1 to 5)) to select the
preset number of desired station, and
press SNOOZE/BRIGHTNESS/ENTER.
If no station has been preset yet
The preset number and “Non” appear on
the display alternately. In this case, the
buzzer will sound at the set time.
8 Press VOL/SET + or – to adjust the
volume, and press SNOOZE/
BRIGHTNESS/ENTER.
The setting is complete. The radio will turn
on at the set time, gradually increasing in
volume. (“A” (or “B”) flashes on the display.)
Setting the Nature Sound alarm
6 Press VOL/SET + or – (or NATURE
SOUND/PRESET (1 to 5)) to select the
desired Nature Sound, and press
SNOOZE/BRIGHTNESS/ENTER.
7 Press VOL/SET + or – to adjust the
volume, and press SNOOZE/
BRIGHTNESS/ENTER.
The setting is complete. The Nature Sound
will sound at the set time, gradually
increasing in volume. (“A” (or “B”) flashes on
the display.)
To stop the alarm
Press ALARM RESET/OFF to turn off the
alarm.
The alarm will sound again at the same time
the next weekday or the next weekend.
To doze for a few more minutes
Press SNOOZE/BRIGHTNESS/ENTER.
The sound turns off, but will automatically
come on again after about 10 minutes.
Each time you press SNOOZE/BRIGHTNESS/
ENTER, the snooze time changes as follows:
The display shows the snooze time for a few
seconds and returns to show the current time.
(“A” (or “B”) flashes on the display.)
To deactivate the alarm
Press SET ALARM/ALARM A (or B).
“A” (or “B”) disappears from the display.
To change an alarm setting
Set the alarm again.
Tips
When the alarm setting is complete, the
alarm time setting is displayed.
If you press and hold SNOOZE/BRIGHTNESS/
ENTER for more than 2 seconds while setting
the alarm, the alarm setting is immediately
complete.
Notes
If a second alarm sounds during a first (or
the snooze function is active), the second
alarm takes priority.
If the same alarm time is set for both ALARM
A and ALARM B, ALARM A takes priority.
If no operation is performed while the alarm
is sounding, the alarm will stop after about
60 minutes.
When Automatic DST/summer time
adjustment is set, the alarm sounds as
follows:
– If the alarm is set to a time that is
skipped as a result of daylight saving
time starting, the alarm will sound when
daylight saving time is applied.
– If the alarm is set to a time that is
doubled as a result of daylight saving
time ending, the alarm will sound twice.
Notes on the alarm in the event of a
power interruption
In the event of a power interruption, the alarm
functions work until the battery is fully
discharged. But certain functions may be
affected as follows:
The display will disappear.
If the alarm sound is set to “RADIO” or
“NATURE,” the buzzer will sound.
If a power interruption occurs while the
alarm is sounding, the buzzer will sound.
If ALARM RESET/OFF is not pressed, the
alarm will sound for about 5 minutes.
If “
” appears on the display, the alarm will
not sound in the event of a power
interruption. Replace the battery if “
”
appears.
The snooze function will not work.
During a power interruption, the alarm will
sound only once at the set time.
Setting the sleep
timer
You can fall asleep to the radio or Nature
Sound using the sleep timer, which turns off
the radio or Nature Sound automatically after a
preset duration.
Press SLEEP while the radio or Nature
Sound is playing.
“SLEEP” appears on the display.
Each time you press SLEEP, the duration (in
minutes) changes on the display as follows:
The radio or Nature Sound will play for the
duration you set, then shut off.
To deactivate the sleep timer, press SLEEP
repeatedly to set the sleep timer to “OFF.”
To turn off the radio or Nature
Sound before the preset time
Press ALARM RESET/OFF.
To use both the sleep timer and
alarm
You can fall asleep to the radio or Nature
Sound and also be awakened by the alarm at
the preset time.
Set the alarm, then set the sleep timer.
Tip
When you press SLEEP while the sleep timer
is activated, the remaining time appears on
the display.
Note
When the alarm is set to sound during the
sleep timer duration, the sleep timer will be
deactivated automatically when the alarm
sounds.
Setting the brightness
of the display
Three levels of brightness are available.
Press SNOOZE/BRIGHTNESS/ENTER.
Each time you press SNOOZE/BRIGHTNESS/
ENTER, the brightness of the display changes
as follows:
Tip
You can also set the brightness of the display
to off by pressing and holding SNOOZE/
BRIGHTNESS/ENTER.
Notes
When the alarm is sounding or the snooze
function is active, the brightness of the
display cannot be changed.
Even if the brightness is set to off, the display
lights at a low brightness level when the
alarm sounds.
Charging a
smartphone
You can charge a smartphone by connecting it
to the unit using a USB cable (not supplied).
Smartphone
USB cable supplied
with the smartphone
Notes
There is no guarantee that this unit can be
used to charge all products that can be
charged via USB.
This unit does not support power feeds
greater than 5 V/1.5 A.
Check the charge status on the smartphone.
If a warning tone sounds, remove the
smartphone from the unit.
The reception sensitivity on the radio may
worsen when charging a smartphone via
USB.