
Loading ...
Loading ...
SONANCE
|
OUTDOOR SPEAKERS MARINER
|
INSTRUCTION MANUAL 3
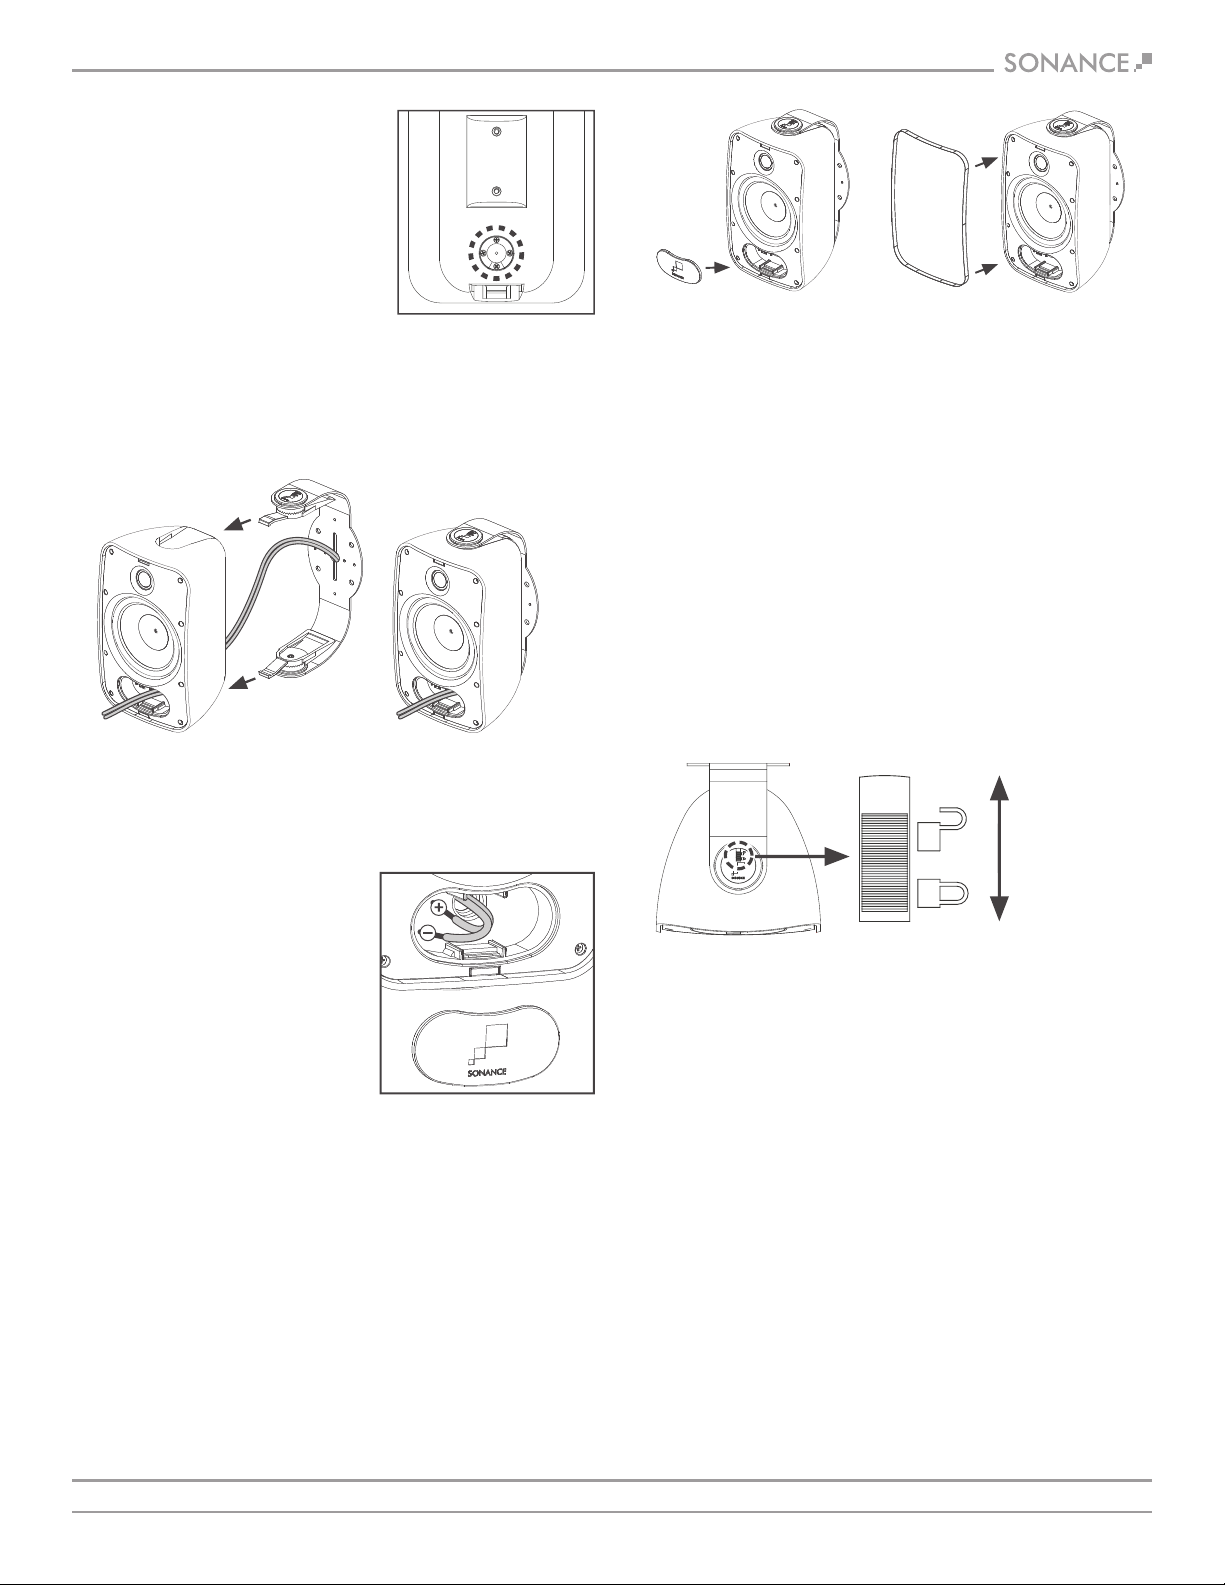
4. Feed the speaker wires from the
bracket into the wire entry
grommet on the back of the
speaker, through the wire tunnel
and out the opening on the
speaker’s front panel (see figure 7).
• The grommet forms a water-resistant
seal around the speaker wire.
• Make sure there is enough slack
in the wire to allow the speaker
to pivot on the bracket.
FIGURE 7:
WIRE ENTRY GROMMET
5. Slide the speaker onto the bracket until the locks snap into place.
Pull enough wire through the front of the speaker to allow
connection to the terminals (see figure 8).
6. Connect the speaker wires to
the speaker’s terminals:
A. Strip about .5” of insulation
from each conductor and
twist the strands together or
tin them with solder.
B. Press-down on the tops of
the connectors to open them.
C. Insert the wires into the
connector holes (see figure 9).
D. Release the connectors.
6. Connect the speaker wires to the speaker’s terminals:
A. Strip about .5” of insulation from each conductor and twist
the strands together or tin them with solder.
• The binding post connectors can accept wire up to 14 gauge.
• Double-check that you connected all of the wires properly
(amplifier ‘+’ to speaker ‘+’; amplifier ‘–’ to speaker ‘–’) at
all connections.
IMPORTANT: BE SURE NOT TO LET ANY STRAY ‘+’ AND ‘–’ WIRES
TOUCH EACH OTHER. TOUCHING WIRES CAN CAUSE A SHORT-
CIRCUIT THAT COULD DAMAGE YOUR AMPLIFIER.
FIGURE 8:
ATTACH SPEAKERS TO BRACKETS
FIGURE 9:
CONNECTION TERMINALS
7. Fit the wiring connector cover into the recess in the speaker’s
front panel. The cover should fit tightly, but can be removed and
replaced if the speaker needs to be disconnected (see figure 10).
8. Fit the grille onto the speaker (see figure 11).
FIGURE 10:
ATTACH THE
CONNECTOR COVER
FIGURE 11:
ATTACH THE GRILLE
UNLOCK
(towards rear
of speaker)
LOCK
(towards front
of speaker)
UNLOCK (towards rear of speaker)
LOCK (towards front of speaker)
FIGURE 12:
LOCK AND
UNLOCK SLIDE
LOCKS TO
PIVOT SPEAKER
NOTE: ALL SONANCE MARINER SPEAKERS ARE COMPATIBLE WITH
OMNIMOUNT STAINLESS STEEL 15.0 C AND 15.0 W SERIES SPEAKER
BRACKETS. FOR MORE INFORMATION CONTACT YOUR SONANCE
AUTHORIZED DEALER OR GO TO WWW.OMNIMOUNT.COM.
PIVOTING THE SPEAKER
You can rotate the speaker in the bracket to direct the sound towards
the listeners.
1. Unlock the slide locks on the speaker pivots by moving them
towards the rear of the speaker (see figure 12).
2. Rotate the speakers to the desired position.
3. Lock the slide locks by moving them towards the front of
the speaker.
PAINTING THE SPEAKER AND GRILLE
All Mariner speakers feature a tough polypropylene enclosure that
can be painted. Sonance recommends using a weather-resistant
outdoor paint and a spray gun to paint the Mariner speakers.
1. If it has already been installed, remove the grille from the speaker.
2. To protect the speaker driver units during painting, place the
grille on a piece of cardboard and trace around its outline. Then
cut the cardboard just inside of the trace line and fit this “paint
plug” into the speaker’s baffle. (Be careful not to damage the
driver components while fitting the paint plug.)
3. Paint the speaker the desired color according to the paint
manufacturer’s instructions. Remove the paint plug after the
paint has thoroughly dried.
4. Paint the grille separately from the speaker using very thin paint
(5:1 thinner:paint ratio). Avoid plugging the grille holes with
excess paint.
5. After the paint has thoroughly dried, re-attach the grille to
the speaker.
Loading ...