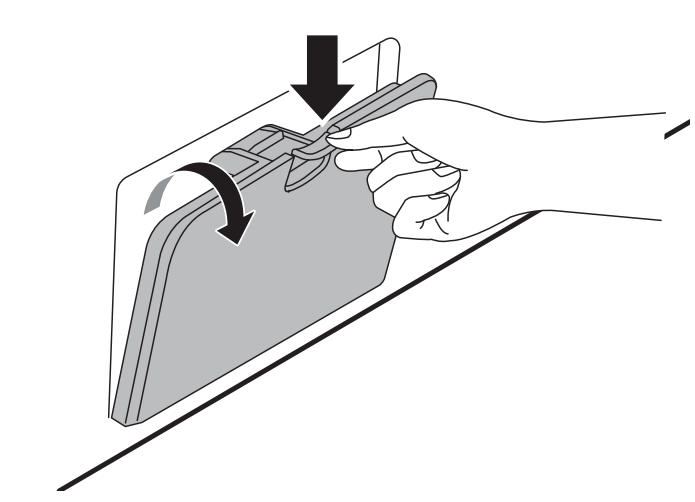
Sort laundry by fabric type, soil level, colour and load size as needed. Open the door and load items into the appliance.
CAUTION
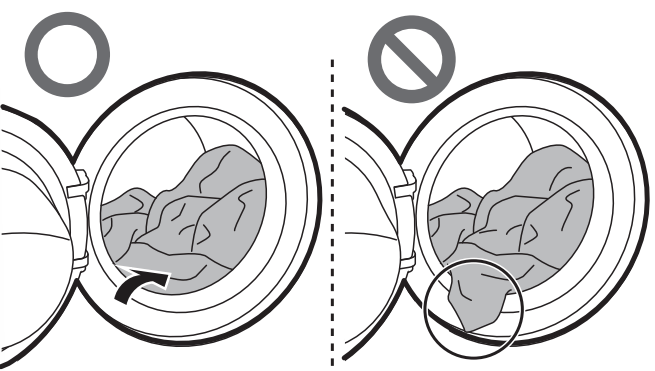
Before closing the door, ensure that all clothes and items are inside the tub and not overhanging on the rubber door seal where they will become caught when the door is closed. Failing to do so will cause damage to the door seal and the clothes.
Remove items from the flexible door seal gasket to prevent clothing and door seal damage.
2. Add detergent or softener
Add the proper amount of detergent to the detergent dispenser. If desired, add bleach or fabric softener to the appropriate areas of the dispenser.
3. Turn on the appliance.
Press the Power button to turn on the appliance.
4. Choose the desired cycle.
Press the cycle button repeatedly or turn the cycle selector knob until the desired cycle is selected.
Now select a wash temperature and spin speed. Pay attention to the care labeling of your clothes
5. Begin cycle.
Press the Start/Pause button to begin the cycle. The appliance will agitate briefly without water to measure the weight of the load. If the Start/Pause button is not pressed within 15 minutes, the appliance will shut off and all settings will be lost.
6. End of cycle.
When the cycle is finished, a melody will sound. Immediately remove your clothing from the appliance to reduce wrinkling. Check around the door seal when removing the load for small items that may be caught in the seal.
Preparing the Wash Load
Sorting the Clothes
For best washing results, sort your clothes according to the care label stating fabric type and washing temperature. Adjust the spin speed or spin intensity in accordance with the fabric type.
Soil level (Heavy, Normal, Light): Separate clothes according to soil level. If possible, do not wash heavily soiled items with lightly soiled ones.
Colour (White, Lights, Darks): Wash dark or dyed clothes separately from whites or light colours. Mixing dyed clothes with light clothes can result in dye transfer or discolouration of lighter clothes.
Lint (Lint producers, Collectors): Wash separately lint producing fabrics from lint collecting fabrics. Lint producers can result in pilling and linting on the lint collectors.
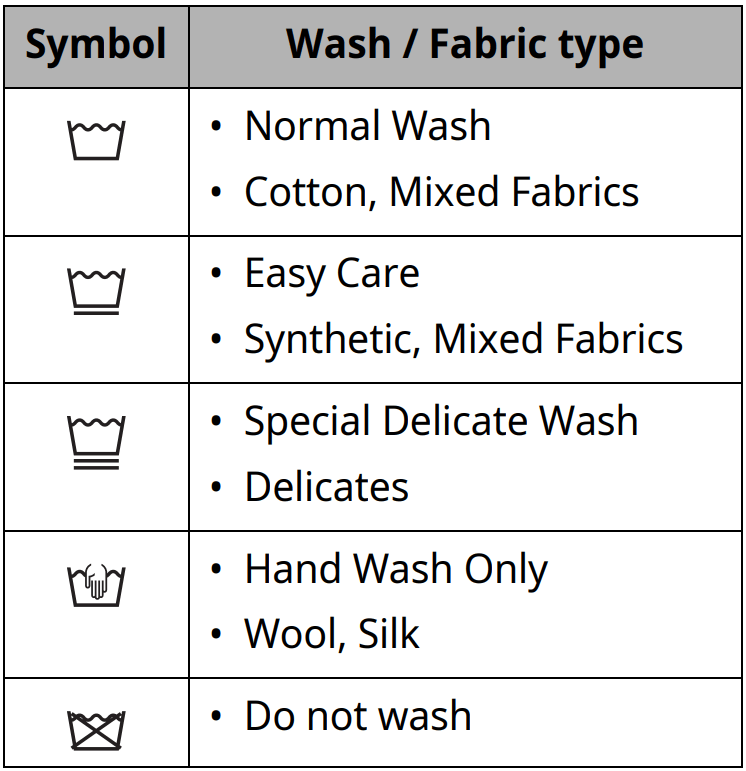
Checking the Clothes Care Label
The symbols tell you about the fabric content of your garment and how it should be washed.
Symbols on the Care Labels
NOTE The dashes under the symbol give you information about the type of fabric and the maximum allowance of mechanical stress.
Checking the Clothes before Loading
Combine large and small items in a load. Load large items first.
Large items should not be more than half of the total wash load. Do not wash single items. This may cause an unbalanced load. Add one or two similar items.
Check all pockets to make sure that they are empty. Items such as nails, hair clips, matches, pens, coins and keys can damage both your appliance and clothes.
Wash delicates (stockings, underwired bras) in a wash net.
Close zippers, hooks and strings to make sure that these items do not snag on other clothes.
Pre-treat dirt and stains by brushing a small amount of detergent dissolved water onto stains to help lift dirt.
Adding Detergents and Softeners
Detergent Dosage
Detergent should be used according to the instruction of the detergent manufacturer and selected according to type, colour, soiling of the fabric and the washing temperature. Use only detergents that are suitable for Drum (front load) type washers.
If too many suds occur, reduce the detergent amount.
If too much detergent is used, too many suds can occur and this will result in poor washing results or cause heavy load to the motor.
If you wish to use liquid detergent, follow the guidelines provided by the detergent manufacturer.
You can pour liquid detergent directly into the main detergent drawer if you are starting the wash cycle immediately.
Do not use liquid detergent if you are using Delay End function, or if you have selected Pre Wash option, as the liquid will dispense immediately and may harden in the drawer or the tub.
Detergent usage may need to be adjusted for water temperature, water hardness, size and soil level of the load. For best results, avoid oversudsing.
Refer to the label of the clothes, before choosing the detergent and water temperature.
Use only suitable detergents for the respective type of clothing:
Liquid detergent is often designed for special applications, e.g. for coloured fabric, wool, delicate or dark laundry.
Powdered detergent is suitable for all types of fabric.
For better washing results of white and pale garments, use powdered detergent with bleach.
Detergent is flushed from the dispenser at the beginning of the wash cycle.
NOTE
Do not let the detergent harden. Doing so may lead to blockages, poor rinse performance or odour.
Full load: According to manufacturer’s recommendati or less.
Part load: ½ of the normal amount
Minimum load: ⅓ of full load Using the Dispenser
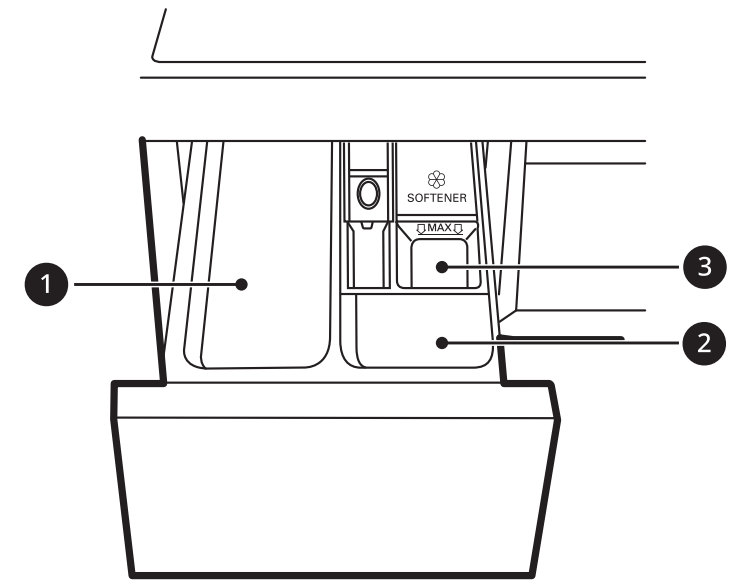
Open the dispenser drawer.
Add the detergent and softener into the appropriate compartments.
1. Main wash detergent compartment
2. Pre-wash detergent compartment
3. Liquid fabric softener compartment
3. Gently close the detergent dispenser drawer before starting the cycle.
Slamming the drawer closed may result in the detergent overflowing into another compartment or dispensing into the drum earlier than programmed.
Be careful not to get a hand caught in the drawer while closing.
It is normal for a small amount of water to remain in the dispenser compartments at the end of the cycle.
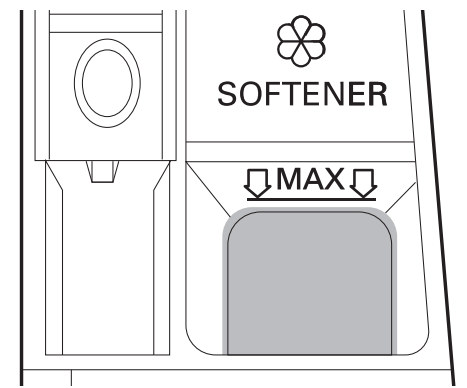
Fabric Softener Compartment
This compartment holds liquid fabric softener, which is automatically dispensed during the final rinse cycle. Either powdered or liquid fabric softener may be used.
Pour fabric softer to the maximum fill line. Pouring excessive fabric softener over the maximum fill line can cause it to dispense too early, which may stain the clothes.
NOTE
Do not pour fabric softener directly onto the clothes in the wash drum, doing so will cause dark staining on the clothes that will be difficult to remove.
Do not leave the fabric softener in the detergent drawer for more than 1 day. Fabric softener may harden. Softener may remain in the dispenser if it is too thick. The softener should be diluted if the consistency is too thick so that it can flow easily.
Do not open the drawer when water is being supplied during the wash.
Solvents (benzene, etc.) must never be used.
Adding Detergent Tablet
Detergent tablets can also be used when washing as an alternative to powder or liquid.
Open the door and put detergent tablets into the drum.
Load the clothes into the drum and close the door.
NOTE Do not put tablets into the drawer
Adding Water Softener
A water softener, such as anti-limescale can be used to cut down on the use of detergent in areas with high water hardness level.
First add detergent, and then the water softener. Dispense according to the amount specified on the packaging.
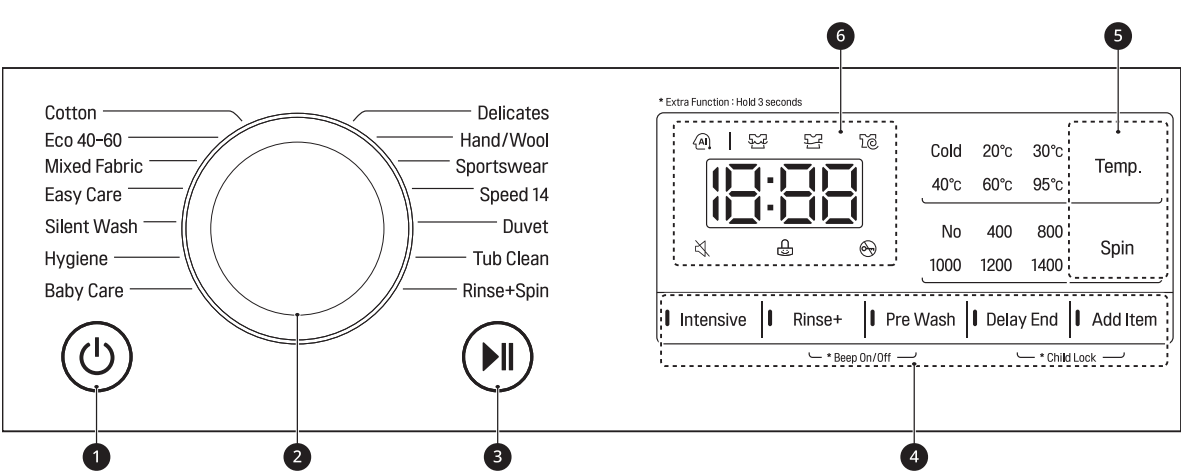
Control Panel
1. Power Button
Press the Power button to turn on or off the appliance. b Programme Knob
2. Programme Knob
Programmes are available according to the laundry type.
The lamp will light up to indicate the selected programme.
3. Start/Pause Button
This Start/Pause button is used to start the wash cycle or pause the wash cycle.
If a temporary stop of the wash cycle is needed, press the Start/Pause button.
4. Extra Options and Functions
To use the extra functions, press and hold the corresponding button for 3 seconds. The corresponding symbol lights up in the display.
This allows you to select an additional programmes and will light when selected.
5. Customizing Washing Programme Buttons
Use these buttons to adjust the water temperature or spin speed settings for the selected programme.
The current settings are shown in the display.
Press the button for that option to select other settings.
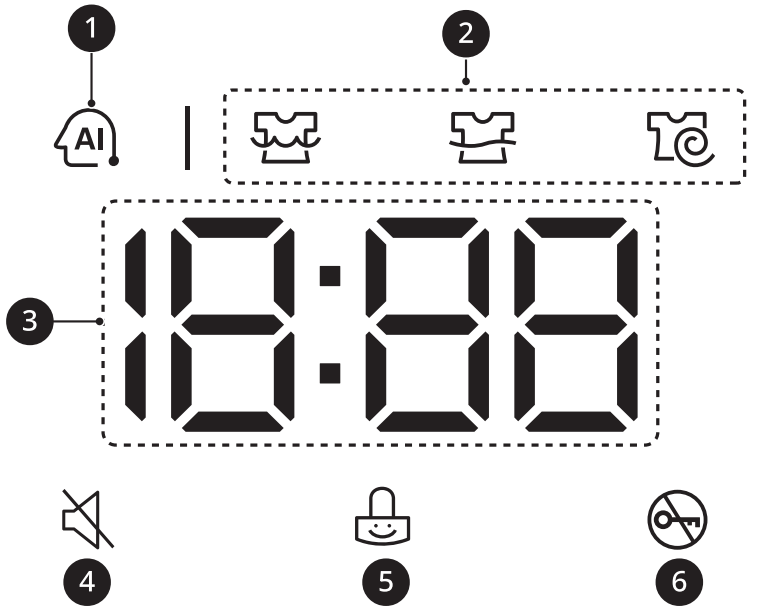
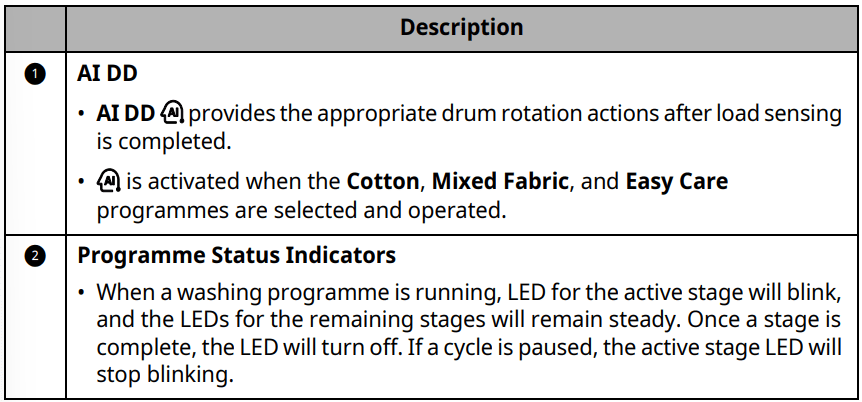
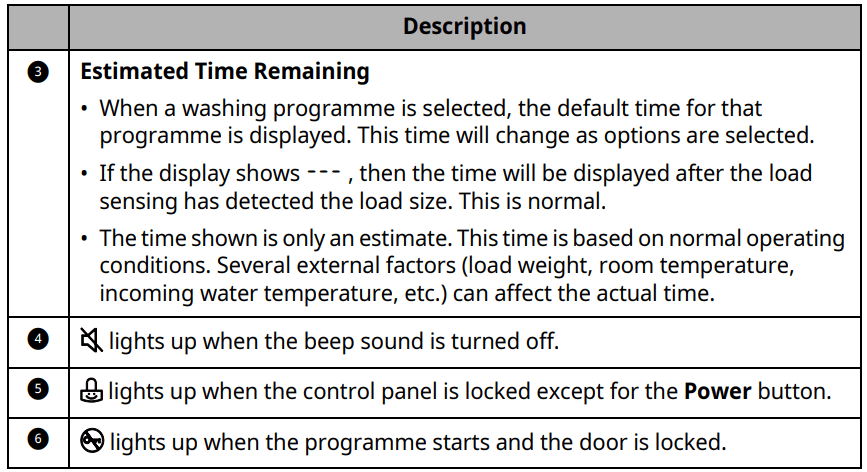
6. Display
The display shows the settings, estimated remaining time, options, and status messages. When the appliance is turned on, the default settings in the display will illuminate.
While the load weight is sensed automatically, the display on the control panel blinks.
Time and Status Display
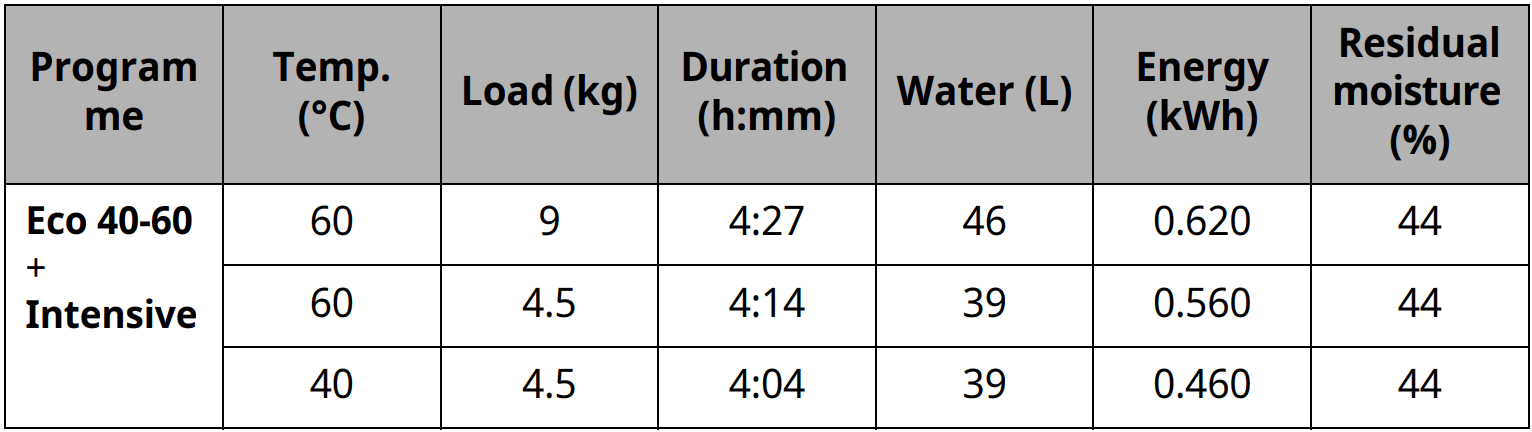
Consumption Data of Standard Programme
Extra Options and Functions
Temp. This button selects the wash temperature for the selected programme
Press the Temp. button until the desired setting is lit.
Select the water temperature suitable for the type of load you are washing. Follow the garment fabric care labels for best results.
Spin The spin intensity level can be selected by pressing this button repeatedly.
Press the Spin button to select spin speed.
NOTE If No is selected by pressing the Spin button, it will still rotate for a short time to drain quickly.
Rinse+ This function is recommended for people with detergent allergies.
Press the Rinse+ button for adding rinse once.
Intensive
This function is used to wash normal and heavily soiled clothes.
Press the Intensive button.
Follow the next steps to customise a washing programme:
Prepare the clothes and load the drum.
Press the Power button.
Add detergent.
Select a washing programme.
Customise the washing programme (Temp., Spin, Rinse+ and Intensive) as necessary.
Press the Start/Pause button.
Only Using a Spin Function
Prepare the clothes and load the drum.
Press the Power button.
Do not select a washing programme and do not add a detergent.
Press the Spin button.
Press the Start/Pause button.
NOTE If you select the washing programme, you will be unable to select a spin only. If this occurs, press Power button twice to cycle the machine off and back on.
Using Basic Options
Pre Wash
This option is recommended when washing a heavily soiled load.
Press the Power button.
Select a washing programme.
Press the Pre Wash button.
Press the Start/Pause button
Add Item You can use this option in order to add or remove the laundry after the washing programme has started.
Press the Power button.
Select a washing programme
Press the Start/Pause button.
Press the Add Item button as necessary.
Open the door after it unlocks itself and add or remove necessary clothing items.
Close the door and press the Start/ Pause button.
NOTE For safety reasons, the door remains locked when the water level or temperature inside of the drum is high. It is not possible to add laundry at this time.
Delay End You can set this function so that the appliance starts automatically and finishes after a specified time interval.
Press the Power button.
Select a washing programme.
Press the Delay End button as necessary.
Press the Start/Pause button.
NOTE
The delay time is the time to the end of the programme, not the start. The actual running time may vary due to water temperature, wash load and other factors.
To cancel the function, the Power button should be pressed.
Avoid using liquid detergent for this function.
Settings
Child Lock
Use this function to disable the controls. This function can prevent children from changing cycles or operating the appliance.
NOTE
Once this function is set, all buttons are locked except the Power button.
When the controls are locked, and the remaining time are alternatively shown on the display during the wash while this function is engaged.
Turning off the power will not reset this function. You must deactivate this function before you can access any other functions.
Locking the Control Panel
Turn on the power.
Press and hold the Delay End and Add Item buttons at the same time for 3 seconds to activate this function.
A beeper will sound, and will appear on the display.
Unlocking the Control Panel
Turn on the power.
Press and hold the Delay End and Add Item buttons at the same time for 3 seconds to deactivate this function.
Beep On/Off
This appliance plays a melody when it starts and stops.
Press and hold the Rinse+ and Pre Wash buttons simultaneously for 3 seconds to deactivate/activate this function.
SMART FUNCTIONS
Smart Diagnosis
This feature is only available on models with the or logo.
Use this feature to help you diagnose and solve problems with your appliance.
NOTE
For reasons not attributable to LGE’s negligence, the service may not operate due to external factors such as, but not limited to, Wi-Fi unavailability, Wi-Fi disconnection, local app store policy, or app unavailability.
The feature may be subject to change without prior notice and may have a different form depending on where you are located.
Using Audible Diagnosis to Diagnose Issues
Follow the instructions below to use the audible diagnosis method.
Launch the LG ThinQ application and select the Smart Diagnosis feature in the menu. Follow the instructions for audible diagnosis provided in the LG ThinQ application.
1. Press the Power button to turn on the appliance.
Do not press any other buttons.
2. Place the mouthpiece of your smartphone close to the or logo.
3. Press and hold the Temp. button for 3 seconds or longer while holding the smartphone mouthpiece to the logo until the data transfer is complete.
Keep the smartphone in place until the data transfer has finished. Time remaining for data transfer is displayed.
4. After the data transfer is complete, the diagnosis will be displayed in the application.
NOTE For best results, do not move the smartphone while the tones are being transmitted.
MAINTENANCE
WARNING
Unplug the appliance before cleaning to avoid the risk of electric shock. Failure to follow this warning may result in serious injury, fire, electric shock, or death.
Never use harsh chemicals, abrasive cleaners, or solvents to clean the appliance.
They may damage the finish.
Cleaning After Every Wash
What to Clean
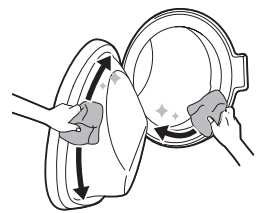
After the wash cycle is finished, wipe the door and door seal to remove any moisture.
Leave the door slightly open to dry the drum.
Wipe the appliance with a dry cloth to remove any moisture
WARNING Leave the door open to dry inside of the appliance only if the children are supervised at home.
Cleaning the Exterior
Exterior
Immediately wipe off any spills.
Wipe with a damp cloth and then again with a dry cloth ensuring there is no moisture in cabinet joints or crevices.
Do not press on the surface or the display with sharp objects.
WARNING Do not attempt to separate any panels or disassemble the appliance. Do not apply any sharp objects to the control panel in order to operate the appliance.
Door
Wash with a damp cloth on the outside and inside and then dry with a soft cloth.
WARNING Do not attempt to separate any panels or disassemble the appliance. Do not apply any sharp objects to the control panel in order to operate the appliance.
Cleaning the Appliance Periodically & Performing an Emergency Water Evacuation
Tub Clean
This is a special function to help clean the inside of the appliance by soaking, washing, rinsing and spinning.
Run this function once a month (or more often if needed) to reduce build-up of detergent and softener and other residue.
If there is a bad smell or mildew inside the appliance, run this function once a week for 3 weeks in addition to the regularly prompted intervals.
NOTE The message will be displayed to alert to the recommendation of operating this function.
Remove any clothing or items from the appliance and close the door
Open the dispenser drawer and add anti-limescale powder to the main wash compartment.
Tablets can be placed directly into the drum as an alternative to powder.
Close the dispenser drawer slowly.
Turn on the power, and then select the Tub Clean
Press the Start/Pause button to start.
Leave the door open to dry the inside of the appliance completely
When the inside of the appliance is not dried completely, it may cause a bad smell or mildew.
WARNING Leave the door open to dry inside of the appliance only if the children are supervised at home.
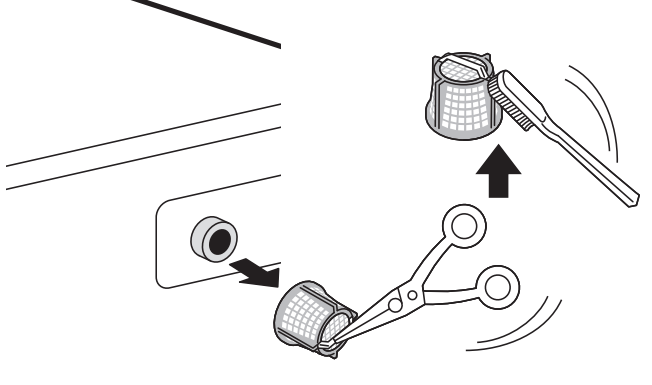
Cleaning the Water Inlet Filter
The water inlet filter collects lime or any sediment that may be in water that is supplied to the appliance. Clean the inlet filter every six months or so, or more often if the water is very hard or contains traces of limescale.
Turn off the water supply taps to the appliance if the appliance is to be left for a certain period of time (e.g. holiday), especially if there is no floor drain (gully) in the immediate vicinity.
error message will be displayed on the control panel when the water is not entering the detergent drawer.
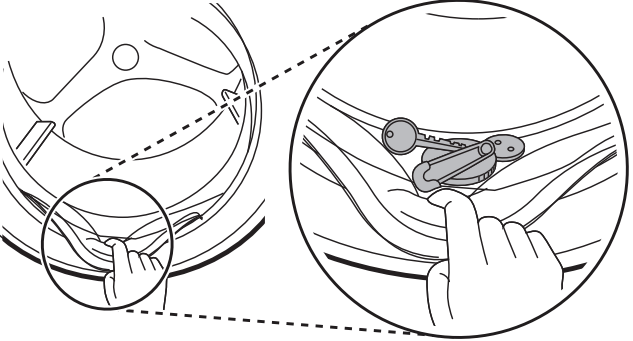
1. Turn off the water tap and unscrew the water inlet hose.
2. Remove the water inlet filter with small pliers and then clean the filter using a medium bristle tooth brush.
Cleaning the Drain Pump Filter and Performing an Emergency Water Evacuation
The drain filter collects threads and small objects that may have been accidentally left in the clothes. Make sure that the filter is clean every six months to ensure smooth running of your appliance.
Allow the water to cool before cleaning the drain pump filter. Open the door in an emergency or perform an emergency water evacuation.
1. Unplug the appliance.
2. Open the cover cap and pull out the drain tube.
3. Remove the drain plug from the drain tube first (1), and then drain the water. Then slowly unscrew the drain pump filter (2) to drain the remaining water and then proceed to remove any debris or objects from the filter.
4. After cleaning the drain pump filter, carefully reinsert the filter and screw the drain cap back in clockwise carefully to avoid cross-threading and leakage. Reinsert the plug back into the drain tube and place the tube into its holder.
5. Close the cover cap.
CAUTION
Be careful when draining, as the water may be hot.
Run the drum cleaning programme once a month (or more often, as needed) to remove excess detergent and other debris.
Cleaning the Dispenser Drawer
Detergent and fabric softener can build up in the dispenser drawer. Liquid detergents can remain under the dispenser drawer and not dispense completely. Remove the drawer and inserts and check for build-up of cleaning products once or twice a month.
1. Remove the detergent dispenser drawer by pulling the drawer straight out until the drawer stops.
Then gently pull the drawer outward while pressing hard the disengage button.
2. Remove the build-up of detergent and softener.
Rinse the drawer and the components of the drawer with warm water to remove the build-up from detergent and softener. Use only water to clean the dispenser drawer. Dry the drawer and the components of the drawer with a soft cloth or towel.
3. To clean the drawer opening, use a cloth or small, non-metal brush to clean the recess.
Remove all residue from the upper and lower parts of the recess.
4. Wipe any moisture off the recess with a soft cloth or towel.
5. Reassemble the components of the drawer to the proper compartments and insert the drawer.
TROUBLESHOOTING
Symptoms
Possible Cause & Solution
INLET ERROR
Water supply is not adequate in that location. Water does not enter appliance or it enters slowly.
• Check another tap in the house.
Water supply tap is not completely open. Water does not enter the appliance or it enters slowly.
• Open fully tap.
Water supply hose(s) are kinked.
• Straighten hose or reinstall the water inlet hose
The filter of the supply hose(s) are clogged.
• Check and clean the filter of the inlet hose.
UNBALANCE ERROR
The appliance has a system which detects and corrects the unbalance of the appliance.
• The laundry may be too wet at the end of the cycle, rearrange the load to allow proper spinning. Close the door and press Start/Pause button. It may take a few moments before the appliance begins to spin. The door must be locked before spin can be achieved.
Load is too small. This system may stop spinning or even interrupt the spin cycle altogether if individual heavy articles (e.g. bath mat, bath robe, etc.) are loaded.
• Add 1 or 2 similar items or smaller articles of laundry to help balance the load. Close the door and press Start/Pause button. It may take a few moments before the appliance begins to spin. The door must be locked before spin can be achieved.
WATER OUTLET ERROR
Drain hose is kinked or clogged. Water in the appliance does not drain or drains slowly.
• Clean and straighten the drain hose.
The drain filter is clogged.
• Check and clean the drain filter.
DOOR ERROR
Door sensor malfunctions. • Please call LG service centre. You can find your local LG service centre phone number in the warranty card.
CONTROL ERROR
This is a control error. • Unplug the power plug and call for service.
MOTOR LOCKED ERROR
Over load in motor. • Let the appliance wait for 30 minutes until the motor is cooled down and then, restart the cycle.
OVERFLOW ERROR
Water overfills due to the faulty water valve
• Close the water tap.
• Unplug the power plug.
• Call for service.
PRESSURE SENSOR ERROR
Water level sensor malfunctions.
• Close the water tap.
• Unplug the power plug.
• Call for service.
VIBRATION SENSOR ERROR
Vibration sensor malfunctions. • Call for service.
FROZEN FAILURE
Is supply/drain hose or drain pump frozen? • Supply warm water into the drum in order to unfreeze the drain hose and the drain pump. Cover the supply hose with wet and warm towel.
WATER LEAKAGE
Water leaks. • Call for service.
POWER FAILURE
The appliance experienced a mains power failure. • Restart the cycle.
Noises
Symptoms
Possible Cause & Solution
Rattling and clanking noise
Foreign objects, such as keys, coins, or safety pins may be in the drum.
• Stop the appliance, check the drum for foreign objects. If the noise continues after the appliance is restarted, call for service.
Thumping sound
Heavy wash loads may produce a thumping sound. This is usually normal.
• If the sound continues, the appliance is probably out of balance. Stop and redistribute the wash load.
Wash load may be out of balance.
• Pause the cycle and redistribute the load after the door unlocks.
Vibrating noise
Package materials are not removed.
• Remove package materials.
Wash load may be unevenly distributed in the drum.
• Pause the cycle and redistribute the load after the door unlocks.
Not all leveling feet are resting firmly and evenly on the floor.
• Adjust the leveling of the appliance. Floor not rigid enough.
• Check if the floor is sold and does not flex.
Floor not rigid enough.
• Check if the floor is sold and does not flex. See the Installation Place Requirements to select the proper location.
Operation
Symptoms
Possible Cause & Solution
Water is leaking.
House drain pipes are clogged.
• Unclog waste pipes. Contact plumber if necessary.
Leakage is caused by improper installation of drain hose or clogged drain hose.
• Clean and straighten the drain hose. Check and clean the drain filter regularly.
Drain pump filter cap is not fitted correctly.
• Refit the drain pump filter.
Appliance does not operate.
Control panel has powered off due to inactivity.
• This is normal. Press the Power button to turn the appliance on.
Appliance is unplugged.
• Make sure that the cord should be plugged securely into a working outlet.
Water supply is turned off.
• Turn the water supply tap completely.
Controls are not set properly.
• Make sure that the cycle should be correctly set. Close the door and press the Start/Pause button.
Door is open.
• Close the door and make sure that nothing should be caught under the door preventing it from closing completely.
Circuit breaker/fuse is tripped/blown.
• Check house circuit breakers/fuses. Replace fuses or reset breaker. The appliance should be on a dedicated branch circuit. The appliance will resume the cycle where it stopped once power is restored.
Control needs to be reset.
• Press the Power button, then reselect the desired programme and press the Start/Pause button.
Start/Pause was not pressed after a cycle was set.
• Press the Power button, then reselect the desired programme and press the Start/Pause button. The appliance is turned off if the Start/Pause button is not pressed within 15 minutes.
Extremely low water pressure.
• Check another tap in the house to make sure that household water pressure should be adequate.
Appliance is heating the water or making steam.
• The drum may stop operating temporarily during certain cycles, while water is safely heated to a set temperature.
Buttons may not function properly.
The Child Lock option is activated.
• Deactivate the Child Lock option if necessary
Door does not open.
The door cannot be opened for safety reasons once the appliance starts.
• This is normal. You can safely open the door after turns off.
Appliance is not filling properly.
Inlet Filter clogged.
• Make sure the inlet filters on the fill valves are not clogged.
Inlet hoses may be kinked.
• Check that inlet hoses are not kinked or clogged.
Insufficient water supply.
• Make sure that both hot and cold water taps are turned on all the way.
Hot and cold inlet hoses are reversed.
• Check inlet hose connections.
Appliance does not drain water.
Kinked drain hose.
• Ensure that the drain hose is not kinked.
Drain located higher than 1.2 m above the floor.
• Make sure that the drain hose should not be higher than 1.2 m above the bottom of the appliance.
Detergent is not dispensed completely or not dispensed at all.
Too much detergent is used.
• Follow the guidelines provided by the detergent manufacturer.
Drain Pump Filter may be blocked.
• Clean the Drain filter.
Cycle time is longer than usual.
The load is too small.
• Add more items to allow the appliance to balance the loads.
Heavy articles are mixed with lighter items.
• Always try to wash articles with similar weight in order to allow the appliance to evenly distribute the weight of the load for spinning.
The load is out of balance.
• Manually redistribute the load if articles have become tangled.
Cycle end is delayed
Unbalance is detected or suds removing programme is on.
• This is normal. The time remaining shown on the display is only an estimated duration. Actual time may vary.
Performance
Symptoms
Possible Cause & Solution
Poor stain removal
Previously set stains.
• Articles that have been previously washed may have stains which have been set. These stains may be difficult to remove and may require hand washing or pre-treating to aid in stain removal.
Staining
Bleach or softener is dispensed too soon.
• Dispenser compartment is overfilled. It makes bleach or softer dispensed rapidly. Always measure bleach or softener to prevent overfilling.
• Close the dispenser drawer slowly.
Bleach or softener was added directly to the wash load in the drum.
• Always use the dispensers to ensure that laundry products are properly dispensed at the right time in the cycle.
Clothes were not properly sorted.
• Always wash dark colours separately from light colours and whites to prevent discolouration.
• Never wash heavily soiled items with lightly soiled items.
Wrinkling
Appliance is not unloaded promptly.
• Always remove items from the appliance as soon as the cycle is complete.
Appliance is overloaded.
• The appliance can be fully loaded, but the drum should not be tightly packed with items. The door of the appliance should be closed easily.
Hot and cold water inlet hoses are reversed.
• Hot water rinse can set wrinkles in garments. Check the inlet hose connections.
Spin speed may be too high.
• Set the spin speed to suit the garment type.
Odour
Symptoms
Possible Cause & Solution
Musty or mildewy odour in appliance
Inside of drum is not cleaned properly.
• Run the Tub Clean function regularly.
The drain hose is not properly installed, causing siphoning (water flowing back inside of the appliance).
• When installing the drain hose, make sure that it does not get kinked or blocked.
The detergent dispenser drawer is not cleaned regularly.
• Clean the detergent dispenser drawer, especially the top and the bottom of the drawer's opening.
Odours can occur if the drain hose is not properly installed, causing siphoning (water flowing back inside of the appliance).
• When installing the drain hose, make sure that it does not get kinked or blocked.
If the detergent dispenser drawer is not cleaned regularly, odours can occur from mold or foreign substances.
• Clean the detergent dispenser drawer, especially the top and bottom of the drawer's opening.
 and the remaining time are alternatively shown on the display during the wash while this function is engaged.
 will appear on the display.
 or
or  logo.
logo.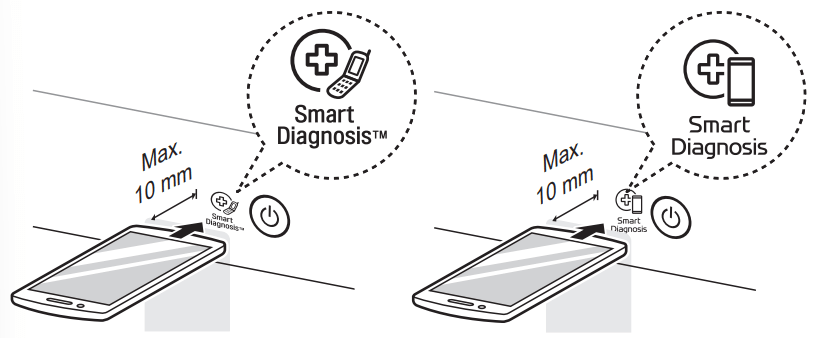
 message will be displayed to alert to the recommendation of operating this function.
 error message will be displayed on the control panel when the water is not entering the detergent drawer.
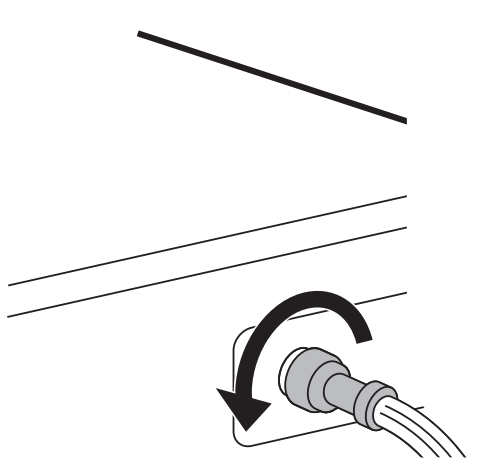


 INLET ERROR
 UNBALANCE
 WATER OUTLET


 turns off.