BEFORE USING THIS APPLIANCE READ ALL INSTRUCTIONS AND CAUTIONARY MARKINGS IN THIS MANUAL AND ON THE APPLIANCE
When using an electrical appliance, basic precautions should always be followed, including the following:
WARNING
These warnings apply to the appliance, and also where applicable, to all tools, accessories, chargers or mains adaptors.
TO REDUCE THE RISK OF FIRE, ELECTRIC SHOCK, OR INJURY:
1. This Dyson appliance is not intended for use by young children or infirm persons with reduced physical, sensory or reasoning capabilities, or lack of experience and knowledge, unless they have been given supervision or instruction by a responsible person concerning use of the appliance to ensure that they can use it safely.
2. Do not allow to be used as a toy. Close attention is necessary when used by or near children. Children should be supervised to ensure that they do not play with the appliance.
3. Use only as described in this Dyson Operating Manual. Do not carry out any maintenance other than that shown in this manual, or advised by the Dyson Helpline.
4. Suitable for dry locations ONLY. Do not use outdoors or on wet surfaces.
5. Do not handle any part of the plug or appliance with wet hands.
6. Do not use with a damaged cord or plug. If the supply cord is damaged it must be replaced by Dyson, its service agent or similarly qualified persons in order to avoid a hazard.
7. If the appliance is not working as it should, has received a sharp blow, has been dropped, damaged, left outdoors, or dropped into water, do not use and contact the Dyson Helpline.
8. Contact the Dyson Helpline when service or repair is required. Do not disassemble the appliance as incorrect reassembly may result in an electric shock or fire.
9. Do not stretch the cable or place the cable under strain. Keep the cable away from heated surfaces. Do not close a door on the cable, or pull the cable around sharp edges or corners. Arrange the cable away from traffic areas and where it will not be stepped on or tripped over. Do not run over the cable.
10. Do not unplug by pulling on the cord. To unplug, grasp the plug, not the cord. The use of an extension cord is not recommended.
11. Do not use to pick up water.
12. Do not use to pick up flammable or combustible liquids, such as gasoline, or use in areas where they or their vapours may be present.
13. Do not pick up anything that is burning or smoking, such as cigarettes, matches, or hot ashes.
14. Keep hair, loose clothing, fingers, and all parts of the body away from openings and moving parts. Do not point the hose, wand or tools at your eyes or ears or put them in your mouth.
15. Do not put any object into openings. Do not use with any opening blocked; keep free of dust, lint, hair, and anything that may reduce airflow.
16. Use only Dyson recommended accessories and replacement parts.
17. To avoid a tripping hazard wind the cord when not in use.
18. Do not use without the clear bin and filters in place.
19. Do not leave the appliance when plugged in. Unplug when not in use and before servicing.
20. Do not pull or carry by cable or use cable as a handle.
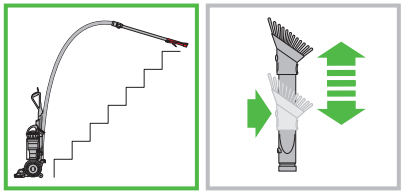
21. Use extra care when cleaning on stairs. Do not work with the appliance above you on the stairs.
22. Turn off all controls before unplugging. Unplug before connecting any tool or accessory.
23. FIRE WARNING – Do not apply any fragrance or scented product to the filter(s) of this appliance. The chemicals in such products are known to be flammable and can cause the appliance to catch fire.
Operation
Emptying the clear bin
Looking for blockages
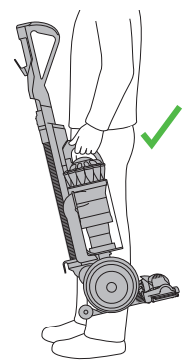
Carrying the appliance
Carpets or hard floors
Tool attachments
Brush bar – clearing obstructions
Base plate disassembly
Base plate reassembly
IMPORTANT
WASH FILTERS
Wash filters with cold water at least once every month.The filters may require more frequent washing if vacuuming fine dust.
USING YOUR DYSON APPLIANCE
PLEASE READ THE 'IMPORTANT SAFETY INSTRUCTIONS' IN THIS DYSON OPERATING MANUAL BEFORE PROCEEDING.
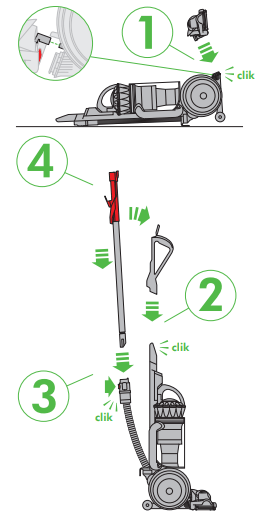
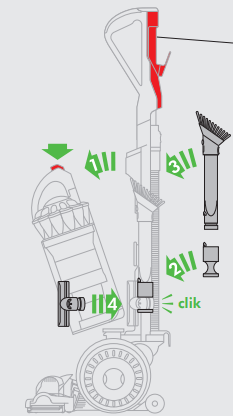
ASSEMBLY
Lay the appliance on its back.
Attach the cleaner head by sliding it on to the connections on the lower front part of the ball. Ensure the electrical plug on the cleaner head fits into the twin - block connection on the body of the appliance, which is directly above the airway. Push firmly: the cleaner head will click into place.
Stand the appliance up straight.
Attach the wand handle by sliding it on to the top of the appliance. The spring clip in the handle will click into place.
Ensure the hose is straight. Press the red button on the hose. Slide the wand into the hose.
Ensure the wand and hose sit in the recess of the handle. Slide the end of the wand down into the handle to secure it.
Slide the tool holder onto the side of the duct as shown.
Attach the tools as shown. In use, the tools can be attached to either the hose or the wand.
Wind the cable around the cable hooks. Secure with the clip.
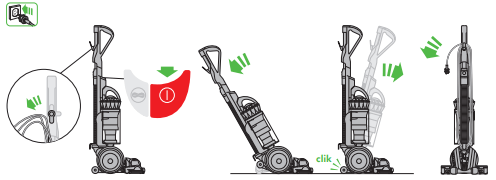
OPERATION
Unwind the cable.
Plug the appliance into the mains electricity supply.
To switch ‘ON’ or ‘OFF’ press the red power button, located as shown.
To use, recline the handle. The stabiliser stand will automatically lift up.
After use, return the appliance to the upright position, pushing it firmly into place. The stabiliser wheels will automatically lower.
Then unplug the appliance, coil the cable safely and put the appliance away.
Switch 'OFF' the appliance, unplug and ensure it is upright before:
changing or using tools
removing the hose or airway inspection parts.
Use the cyclone carry handle to carry the machine.
ATTACHMENTS
To release the wand, open the wand cap and pull the red tube up and away from the handle until it clicks into place.
Should you wish to use the hose without the wand, follow the above instruction and press the red button to release the wand from the hose.
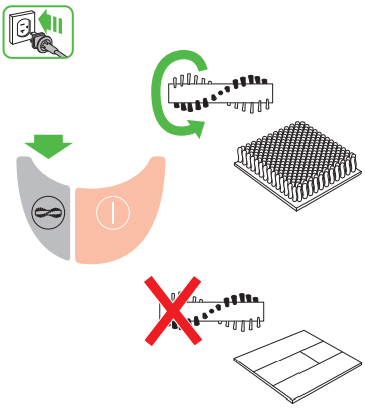
CARPETS OR HARD FLOORS
The brush bar will always default to ‘ON’ (spinning) each time you switch the appliance ‘ON’ and recline it for cleaning.
The brush bar will not rotate when the appliance is upright.
To switch the brush bar 'OFF' (e.g. for delicate rugs and delicate flooring):
switch the appliance ‘ON’
recline the appliance
press the brush bar ‘ON/OFF’ button – the brush bar will stop spinning.
The brush bar will automatically stop if it becomes obstructed. See ‘Brush bar – clearing obstructions’.
Before vacuuming your flooring, rugs and carpets, check the manufacturer's recommended cleaning instructions.
Some carpets may fuzz if a rotating brush bar is used when vacuuming. If this happens, we recommend vacuuming with the brush bar switched 'OFF' and consulting with the flooring manufacturer.
The brush bar on the appliance may damage some carpet types. If you are unsure, turn ‘OFF’ the brush bar.
Check the brush bar regularly and clear away any debris (such as hair). Debris left on the brush bar may cause damage to flooring when vacuuming.
LOOKING AFTER YOUR DYSON APPLIANCE
Do not carry out any maintenance or repair work other than that shown in this Dyson Operating Manual, or advised by the Dyson Helpline.
Only use parts recommended by Dyson. If you do not this could invalidate your warranty.
Store the appliance indoors. Do not use or store it below 3˚C (37.4˚F). Ensure the appliance is at room temperature before operating.
Clean the appliance only with a dry cloth. Do not use any lubricants, cleaning agents, polishes or air fresheners on any part of the appliance.
If used in a garage, always wipe the base plate and ball with a dry cloth after vacuuming to clean off any sand, dirt, or pebbles that could damage delicate floors.
VACUUMING
Do not use without the clear bin and filters in place.
Fine dirt such as flour should only be vacuumed in very small amounts.
Do not use the appliance to pick up sharp hard objects, small toys, pins, paper clips, etc. They may damage the appliance.
When vacuuming, certain carpets may generate small static charges in the clear bin or wand. These are harmless and are not associated with the mains electricity supply. To minimize any effect from this (small static charge), do not put your hand or insert any object into the clear bin unless you have first emptied it and cleaned it with a damp cloth (see ‘Cleaning the clear bin’).
Do not work with the appliance above you on the stairs. When cleaning stairs it is recommended that you use a tool on the end of the hose rather than the wand.
Do not put the appliance on chairs, tables, etc.
Before vacuuming highly polished floors, such as wood or linoleum, first check that the underside of the floor tool and its brushes are free from foreign objects that could cause marking.
Do not leave the cleaner head in one place on delicate floors.
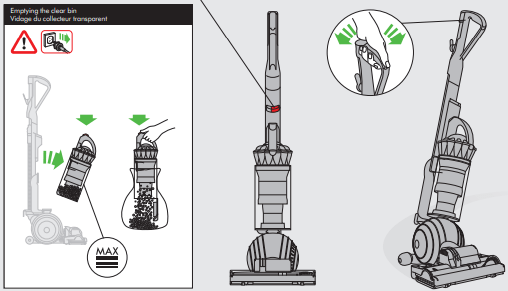
EMPTYING THE CLEAR BIN
Empty as soon as the dirt reaches the level of the MAX mark – do not overfill.
Switch ‘OFF’ and unplug before emptying the clear bin.
To remove the cyclone and clear bin unit, press down on the red button on the top of the carrying handle on the cyclone.
To release the dirt, press all the way down on the same red button on the top of the carrying handle on the cyclone.
To minimize dust/allergen contact when emptying, encase the clear bin tightly in a plastic bag and empty.
Remove the clear bin carefully from the bag.
Seal the bag tightly, dispose as normal.
To refit:
– ensure the airway in the bin base is clear of dust and dirt
– close the clear bin base so it clicks into place
– push the cyclone and clear bin unit into the main body of the appliance; it will click into place
– ensure the cyclone and clear bin unit is secure.
CLEANING THE CLEAR BIN
To remove the cyclone unit from the clear bin press the red bin release button. This exposes a small silver button behind the opening mechanism. Press the silver button and separate the cyclone unit from the clear bin.
Do not use detergents, polishes or air fresheners to clean the clear bin.
Do not put the clear bin in a dishwasher.
Do not immerse the whole cyclone in water or pour water into the cyclones.
Clean the cyclone shroud with a damp cloth only.
Ensure the clear bin is completely dry before replacing.
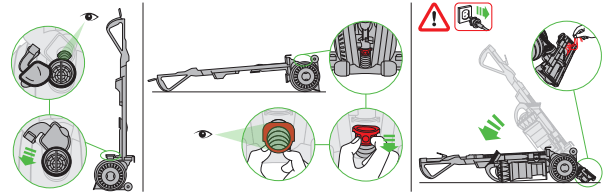
WASHING YOUR FILTERS
Your appliance has two washable filters, located as shown.
Check and wash the filters regularly according to instructions to maintain performance.
Switch ‘OFF’ and unplug before checking or removing the filters. The filters may require more frequent washing if vacuuming fine dust.
Wash with cold water only. Do not use detergents.
Do not put the filters in a dishwasher, washing machine, tumble dryer, oven, microwave or near a naked flame.
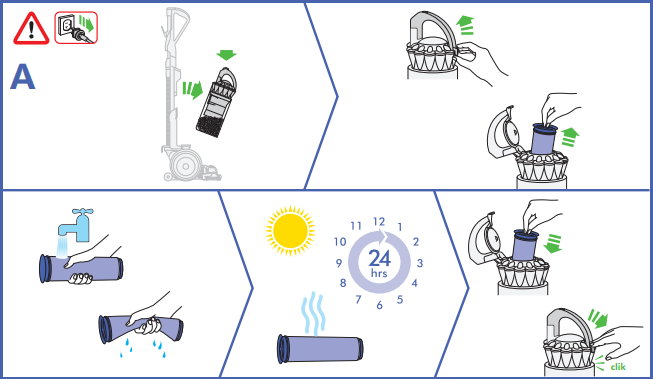
FILTER A
Remove cyclone and clear bin (see 'Emptying the clear bin').
Release the catch on the front of the cyclone handle and then remove the filter.
Wash the filter with cold water only. Hold under a tap and run water through the open end until the water runs clear. Turn upside down and tap out.
Run water over the outside of the filter until the water runs clear.
Squeeze and twist with both hands to make sure the excess water is removed.
Stand the filter on its wide, open end to dry. Leave to dry completely for a minimum of 24 hours.
Replace the filter into the cyclone. Swing the handle back into place. Ensure the latch clicks to engage and is secure. Fit the cyclone and clear bin unit onto the appliance (instructions above).
FILTER B
Lie the appliance on its side.
To remove filter B:
– turn the blue central locking dial on the outer cover of the ball counter-clockwise until the cover is released
– lift off the cover
– turn the filter one-quarter counter-clockwise to release.
Wash the filter with cold water only.
Filter B should be rinsed and tapped out until the water runs clear, then tapped out again to ensure all excess water is removed. (Tap on the plastic rim, not the filter material.) Leave to dry completely for a minimum of 24 hours.
It is normal for the filter in the ball to turn grey in colour.
To refit filter B:
– refit the filter on to the ball
– secure the filter by turning it clockwise so the arrows align.
When refitting the outer cover of the ball, keep turning the central locking dial clockwise. When it starts to click it is locked.
BLOCKAGES – THERMAL CUT-OUT
This appliance is fitted with an automatically resetting thermal cut-out.
Large items may block the tools or wand inlet. If any part becomes blocked the appliance may overheat and automatically cut-out.
If this happens, follow the instructions below in 'Looking for blockages'.
NOTE: Large items may block the tools or wand inlet. If this happens, do not operate the wand release catch. Switch ‘OFF’ and unplug. Failure to do so could result in personal injury
LOOKING FOR BLOCKAGES
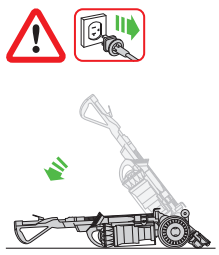
Switch ‘OFF’ and unplug before looking for blockages. Failure to do so could result in personal injury.
Leave to cool down for 1-2 hours before checking the filters or for blockages.
Clear any blockage before restarting.
Look for blockages in the wand, airways and cleaner head.
To release the hose from the machine, you will need to remove the wand.
Open the wand release cap.
Pull the wand up and away from the handle.
Press the red release button in the connecting collar and remove the wand from the hose.
Remove the clear bin and cyclone unit. Then release the hose from the appliance by pressing the red tab on the base of the hose – you can see it from the front of the appliance.
Check for blockages in the hose.
Beware of sharp objects when checking for blockages.
To refit the hose, align the guides on the base of the hose with the channels in the neck of the airway. Ensure the red tab faces the front of the appliance. Push the hose on. It will click into place. To refit the wand follow the instructions above in the ‘Operation’ section.
To remove the base plate to access an obstruction, see ‘Base plate – disassembly/reassembly’.
To look for blockages in the front airway between the ball and the cleaner head you will need to remove the cleaner head: see ‘Base plate – disassembly/reassembly' on how to do this.
To look for blockages in the rear airway between the ball and the cleaner head you will need to release the hose. Hold and slide the red cuff out. Check thoroughly for blockages and slot back into place.
Beware of sharp objects when checking for blockages.
To look for blockages in the ball, open the clear plastic inlet on the top.
Refit all parts securely before using.
Clearing blockages is not covered by your warranty
BRUSH BAR – CLEARING OBSTRUCTIONS
If your brush bar is obstructed, it may shut ‘OFF’. If this happens, you will need to remove the blockage.
Switch ‘OFF’ and unplug before proceeding. Failure to do so could result in personal injury.
Beware of sharp objects when clearing obstructions.
If you still cannot clear the obstruction, please follow the instructions below to remove the base plate. This gives more access to the obstruction. Alternatively, contact a Dyson expert on the Dyson Helpline or visit the website. Clearing brush bar obstructions is not covered by your warranty.
BASE PLATE – DISASSEMBLY/REASSEMBLY
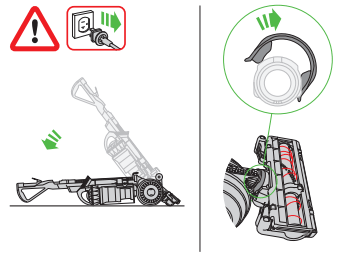
Switch ‘OFF’ and unplug before proceeding. Failure to do so could result in personal injury.
Lay the appliance on its front.
Detach the red ‘C’ clip which is on the connection between the cleaner head and the appliance. It is quite firm, but do not pull it off roughly. Use a constant, firm pressure.
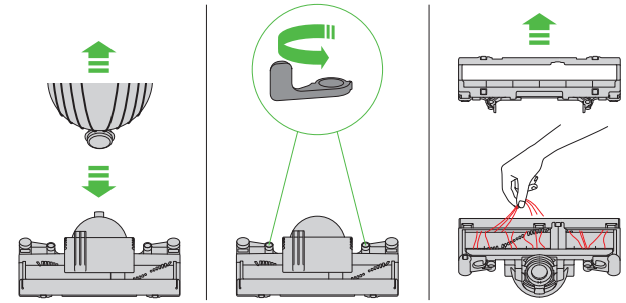
Pull the cleaner head away from the appliance. Use a constant, firm pressure.
At each end of the cleaner head there are 2 red levers:
– swing them out at right angles
– hinge the base plate open.
Beware of sharp objects when clearing obstructions.
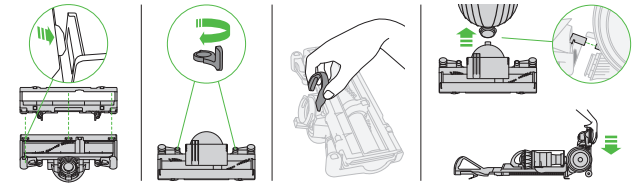
To refit the base plate, hinge it closed.
To secure the base plate push both red levers back into position so they are flush with the surface of the cleaner head.
Refit the red ‘C’ clip onto the cleaner head. The flatter edge of the clip fits against the cleaner head. It is easier to slide one lug into its slot before the other.
Lay the appliance on its back.
Attach the cleaner head by sliding it on to the connections on the lower front part of the ball. Ensure the electrical plug on the cleaner head fits into the twin - block connection on the body of the appliance, which is directly above the airway. Push firmly: the cleaner head will click into place.
IMPORTANT SAFETY INSTRUCTIONS
BEFORE USING THIS APPLIANCE READ ALL INSTRUCTIONS AND CAUTIONARY MARKINGS IN THIS MANUAL AND ON THE APPLIANCE
When using an electrical appliance, basic precautions should always be followed, including the following:
WARNING These warnings apply to the appliance, and also where applicable, to all tools, accessories, chargers or mains adaptors.
TO REDUCE THE RISK OF FIRE, ELECTRIC SHOCK, OR INJURY:
This Dyson appliance is not intended for use by young children or infirm persons with reduced physical, sensory or reasoning capabilities, or lack of experience and knowledge, unless they have been given supervision or instruction by a responsible person concerning use of the appliance to ensure that they can use it safely.
Do not allow to be used as a toy. Close attention is necessary when used by or near children. Children should be supervised to ensure that they do not play with the appliance.
Use only as described in this Dyson Operating Manual. Do not carry out any maintenance other than that shown in this manual, or advised by the Dyson Helpline.
Suitable for dry locations ONLY. Do not use outdoors or on wet surfaces.
Do not handle any part of the plug or appliance with wet hands.
Do not use with a damaged cord or plug. If the supply cord is damaged it must be replaced by Dyson, its service agent or similarly qualified persons in order to avoid a hazard.
If the appliance is not working as it should, has received a sharp blow, has been dropped, damaged, left outdoors, or dropped into water, do not use and contact the Dyson Helpline.
Contact the Dyson Helpline when service or repair is required. Do not disassemble the appliance as incorrect reassembly may result in an electric shock or fire.
Do not stretch the cable or place the cable under strain. Keep the cable away from heated surfaces. Do not close a door on the cable, or pull the cable around sharp edges or corners. Arrange the cable away from traffic areas and where it will not be stepped on or tripped over. Do not run over the cable.
Do not unplug by pulling on the cord. To unplug, grasp the plug, not the cord. The use of an extension cord is not recommended.
Do not use to pick up water.
Do not use to pick up flammable or combustible liquids, such as gasoline, or use in areas where they or their vapours may be present.
Do not pick up anything that is burning or smoking, such as cigarettes, matches, or hot ashes.
Keep hair, loose clothing, fingers, and all parts of the body away from openings and moving parts. Do not point the hose, wand or tools at your eyes or ears or put them in your mouth.
Do not put any object into openings. Do not use with any opening blocked; keep free of dust, lint, hair, and anything that may reduce airflow.
Use only Dyson recommended accessories and replacement parts.
To avoid a tripping hazard wind the cord when not in use.
Do not use without the clear bin and filters in place.
Do not leave the appliance when plugged in. Unplug when not in use and before servicing.
Do not pull or carry by cable or use cable as a handle.
Use extra care when cleaning on stairs. Do not work with the appliance above you on the stairs.
Turn off all controls before unplugging. Unplug before connecting any tool or accessory.
FIRE WARNING – Do not apply any fragrance or scented product to the filter(s) of this appliance. The chemicals in such products are known to be flammable and can cause the appliance to catch fire.
READ AND SAVE THESE INSTRUCTIONS
THIS DYSON APPLIANCE IS INTENDED FOR HOUSEHOLD USE ONLY
POLARIZATION INSTRUCTIONS
To reduce the risk of electric shock, this appliance has a polarized plug (one blade is wider than the other). This plug will fit in a polarized outlet only one way. If the plug does not fit fully in the outlet, reverse the plug. If it still does not fit, contact a qualified electrician to install the proper outlet. Do not attempt to defeat this safety feature and do not change the plug in any way