User Manual Vacuum
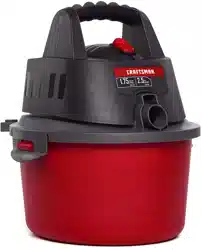
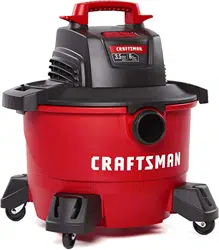
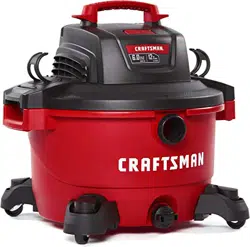
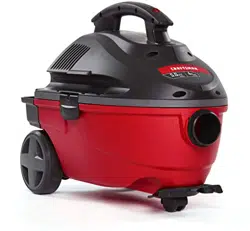
Components
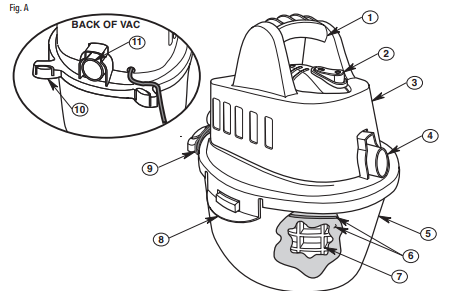
- Carry Handle
- ON/OFF Switch
- Powerhead Assembly
- Inlet Port
- Dust Drum
- Filter Bag and Retainer Band
- Filter Cage
- Drum Latch
- Power Cord
- Accessory Holder
- Blowing Port
Grounding Instructions
This Vac must be Grounded. If it should malfunction or break down, Grounding provides a path of least resistance for Electric Current to reduce the risk of Electric Shock. This Vac is equipped with a Cord having an Equipment-grounding Conductor and Grounding Plug. The Plug must be inserted into an appropriate Outlet that is properly installed and Grounded in accordance with all Local Codes and Ordinances.
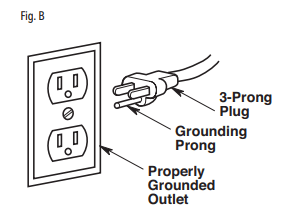
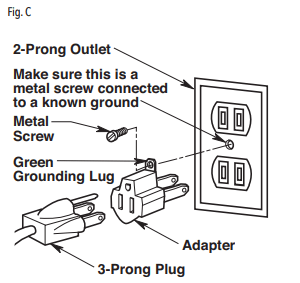
This Vac is for use on a nominal 120 Volt Circuit, and has a Grounded Plug that looks like the Plug shown. A Temporary Adapter that looks like the Adapter shown may be used to connect this Plug to a 2-Pole Receptacle, as shown. If a properly Grounded Outlet is not available, the Temporary Adapter should be used only until a properly Grounded Outlet can be installed by a Qualified Electrician. The Green Colored Rigid Ear, Lug or the like extending from the Adapter must be connected to a Permanent Ground such as a properly Grounded Outlet Box Cover. Whenever the Adapter is used, it must be held in place by a Metal Screw
NOTE: In Canada, the Use of a Temporary Adapter is Not Permitted by the Canadian Electrical Code.
Carton Contents
Remove entire contents of carton. Check each item against the Carton Contents List. If any parts are damaged or missing, immediately call Customer Service at 1-888-331-4569.
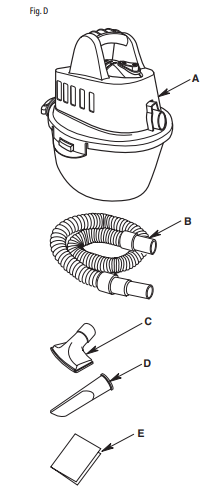
Filter Bag and Retainer Band (already assembled). Filter Bag is sold by Stock No. CMXZVBE38737.
Installation
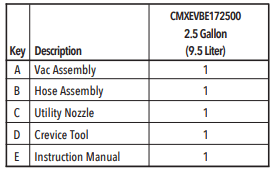
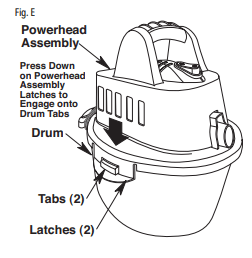
Vac Assembly
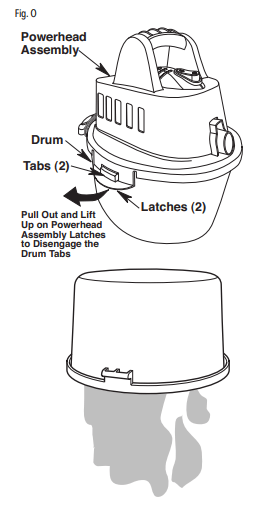
1. To Attach the Powerhead Assembly (Fig. E): Line up the Powerhead Assembly Latches to the Notches located on each side of the Drum.
2. Place Powerhead Assembly on top of Drum.
3. Be sure Powerhead Assembly completely covers the top of the Drum so leakage does not occur.
4. Press down on the Powerhead Assembly Latches to securely attach the Powerhead Assembly to the Drum.
5. To Remove the Powerhead Assembly (Fig. F): First unplug the unit from the electrical outlet. Then pull out and lift up on the Powerhead Assembly Latches to remove from Drum Tabs.

Insert Hose
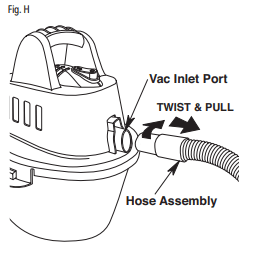
To Insert Hose Assembly into the Vac (Fig. G): Insert the End of the Hose Assembly into the Vac Inlet.

To Remove the Hose Assembly from the Vac (Fig. H): Twist and pull out on the Hose Assembly to release the Hose from the Vac Inlet.
Accessory Storage
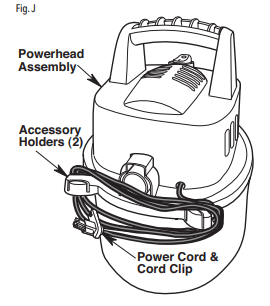
Accessories can be stored in the Accessory Holder Tab Slots, located on the back of the Powerhead Assembly.

Power Cord Storage
The Power Cord should be wrapped around both Accessory Holders, located on the back of the Powerhead Assembly. Snap the Cord Clip onto the Power Cord, to secure in place.
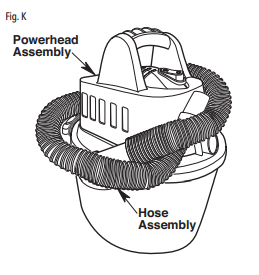
Hose Assembly Storage
The Hose Assembly may be stored by wrapping it around the Powerhead Assembly, as shown.
Operation
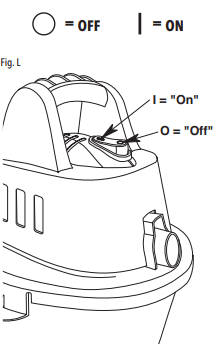
Power Switch
After you Plug the Power Cord into the Outlet, turn the Unit on by pushing the Switch from position “O” to position “l”. The symbols used on the Switch Actuator are International “On & Off” Symbols:
Vacuuming Dry Materials
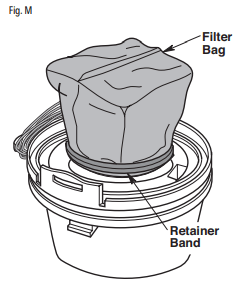
1. The Filter Bag must always be in correct position to reduce the risk of leaks and possible damage to Vac. Make sure that the Filter Bag is completely covering the Filter Cage and that the Retainer Band is as close to the Powerhead Assembly as possible. Make sure there are no gaps between the Filter Bag and the Powerhead Assembly
2. When using your Vac to pick up very fine dust, it will be necessary for you to empty the Dust Drum and clean or replace the Filter Bag at more frequent intervals to maintain peak Vac performance.
Vacuuming Liquids
1. Removal of the Filter Bag is highly recommended for wet pickups.
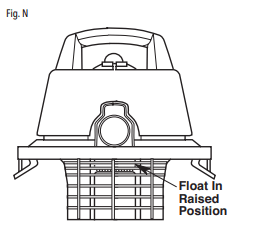
2. This Wet/Dry Vac is equipped with a Float Mechanism which will rise automatically to cut off the airflow when the liquid in the Drum reaches a predetermined level. When this happens, turn OFF Vac, unplug the Power Cord, and empty the Dust Drum. You will know that the Float has shut the airflow off because the suction ceases and the motor noise becomes higher in pitch, due to increased motor speed. The liquid capacity may vary with the rate of pickup
Emptying the Drum
1. Remove the Powerhead Assembly: Pull Powerhead Assembly Latches outward to release from the Drum.
2. Lift the Powerhead Assembly up and away from the Drum.
3. Lay Powerhead Assembly upside down on a clean area while emptying the Drum.
4. Dump the Drum contents into the proper waste disposal container.
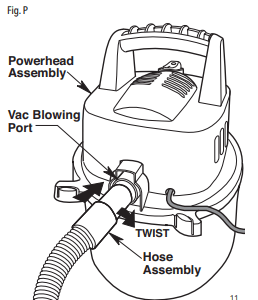
Blowing Feature
Your Vac features a Blowing Port. It can blow sawdust and other debris. Follow the following steps to use your Vac as a Blower.
1. Locate the Blowing Port on the back of your Vac.
2. Insert one End of the Hose Assembly into the Vac Blowing Port. Twist the Hose to lock into place.
3. Turn Vac ON and you are ready to use your Vac as a Blower.
4. To Remove the Hose from the Vac: Turn OFF Vac. Twist and pull out on the Hose Assembly to release the Hose from the Vac Blowing Port.
Maintenance
Filter Cleaning
Your Filter should be cleaned often to maintain peak Vac performance. After dirty Filter Bag removal from the Vac, remove the dry debris by gently tapping Filter against the inside wall of the disposal container.
NOTE: Clean the Filter Bag in an open area. Cleaning should be done outdoors and not in the living quarters.
IMPORTANT: After cleaning, check the Filter Bag for tears or small holes. Tears and holes in the Filter Bag can cause debris and dust to be blown from the Vac. Do not use a Filter Bag with holes or tears. Replace immediately.
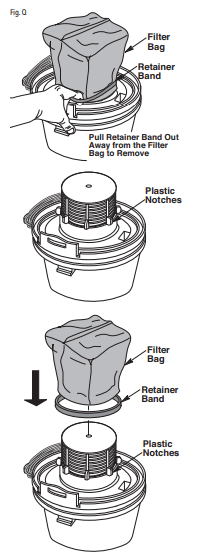
Filter Removal and Replacement
1. Extend the Retainer Band around the Plastic Notches on the Powerhead Assembly.
2. Remove Filter Bag off the Filter Cage.
3. Place the replacement Filter Bag on the Filter Cage until open end touches bottom of the Powerhead Assembly.
4. Release the Retainer Band from the Plastic Notches on the Powerhead Assembly, holding the Filter Bag secure to the Powerhead Assembly.
5. Make sure the Retainer Band is positioned on the Filter Bag between the printed lines.
Cleaning and Disinfecting the Wet/Dry Vac
To keep your Wet/Dry Vac looking its best, clean the outside with a cloth dampened with warm water and mild soap. To clean the Drum:
1. Dump debris out.
2. Wash Drum thoroughly with warm water and mild soap.
3. Wipe out with dry cloth.
Before prolonged storage or as needed (i.e., waste water pick up) the Drum should be disinfected.
To disinfect the Drum:
1. Pour 1 gallon (4 L) of water and 1 teaspoon (5 mL) chlorine bleach into the Drum.
2. Let solution stand for 20 minutes, carefully swishing every few minutes, making sure to wet all inside surfaces of the Drum.
3. Empty Drum after 20 minutes. Rinse with water until bleach smell is gone. Allow Drum to dry completely before sealing the Motor on the Drum.
Storage
Before storing your Vac, the Dust Drum should be emptied and cleaned. The Power Cord should be wrapped around the Accessory Holder Tabs, located on the back of the Powerhead Assembly. The Hose should be stored as described in this manual. Accessories should be kept in the same area as the Vac so they can be readily available. The Vac should be stored indoors.
Important Safety Instructions
Warning: To reduce the risk of fire, electric shock, or injury
- Read and understand this manual and all labels on the Vac before operating.
- Use only as described in this manual.
- Do not leave Vac running while unattended - you may fail to notice important signs indicating abnormal operation such as loss of suction, debris/liquid exiting exhaust, or abnormal motor noises. Immediately stop using Vac if you notice these signs.
- Do not leave Vac when plugged in. Unplug from outlet when not in use and before servicing.
- Sparks inside the motor can ignite flammable vapors or dust. To reduce the risk of fire or explosion, do not use near combustible liquids, gases, or dusts, such as gasoline or other fuels, lighter fluid, cleaners, oil-based paints, natural gas, coal dust, magnesium dust, grain dust, aluminum dust, or gun powder.
- Do not vacuum anything that is burning or smoking, such as cigarettes, matches, or hot ashes.
- To avoid the risk of self-ignition of drum debris, empty drum after each use. Combustible materials, such as rags or saw dust containing stain or urethane, can be sources of such overheating.
- Do not vacuum drywall dust, cold fireplace ash, or other fine dusts with standard filter. These may pass through the filter and be exhausted back into the air. Use a fine dust filter instead.
- To reduce the risk of inhaling toxic vapors, do not vacuum or use near toxic or hazardous materials.
- This Wet/Dry Vac is not intended for use by persons (including children) with reduced physical, sensory, or mental capabilities, or lack of experience and knowledge, unless they have been given supervision or instruction concerning use of the appliance by a person responsible for their safety.
- To reduce the risk of electric shock, do not expose to rain or allow liquid to enter motor compartment. Store indoors.
- Do not allow to be used as a toy. Close attention is necessary when used by or near children.
- Do not use with a torn filter or without the filter installed except when vacuuming liquids as described in this manual. Dry debris ingested by the impeller may damage the motor or be exhausted into the air.
- Turn off Vac before unplugging.
- To reduce the risk of injury from accidental starting, unplug power cord before changing or cleaning filter.
- Do not unplug by pulling on cord. To unplug, grasp the plug, not the cord.
- Do not use with damaged cord, plug, or other parts. If your Vac is not working as it should, has missing parts, has been dropped, damaged, left outdoors, or dropped into water, call customer service at 1-888-331-4569.
- Do not handle plug, switch, or the Vac with wet hands.
- Do not pull or carry by cord, use cord as handle, close a door on cord, or pull cord around sharp edges or corners. Do not run Vac over cord. Keep cord away from heated surfaces.
- Use only extension cords that are rated for outdoor use and have a grounding conductor. Extension cords in poor condition or too small in wire size can pose fire and shock hazards. To reduce the risk of these hazards, be sure the cord is in good condition and that liquid does not contact the connection. Do not use an extension cord with conductors smaller than 1,3 mm2 (16 AWG) in size.
- Connect only to a properly grounded outlet. See grounding instructions.
- Do not put any object into ventilation openings. Do not vacuum with any ventilation openings blocked; keep free of dust, lint, hair, or anything that may reduce air flow.
- Keep hair, loose clothing, fingers, and all parts of body away from openings and moving parts.
- To reduce the risk of falls, use extra care when cleaning on stairs.
- To reduce the risk of personal injury or damage to Vac, use only CRAFTSMAN recommended accessories.
- When using as a blower:
- Direct air discharge only at work area.
- Do not direct air at bystanders.
- Keep children away when blowing.
- Do not use blower for any job except blowing dirt and debris.
- Do not use as a sprayer.
- To reduce the risk of eye injury, wear safety eyewear. The operation of any utility Vac or blower can result in foreign objects being blown into the eyes, which can result in severe eye damage.