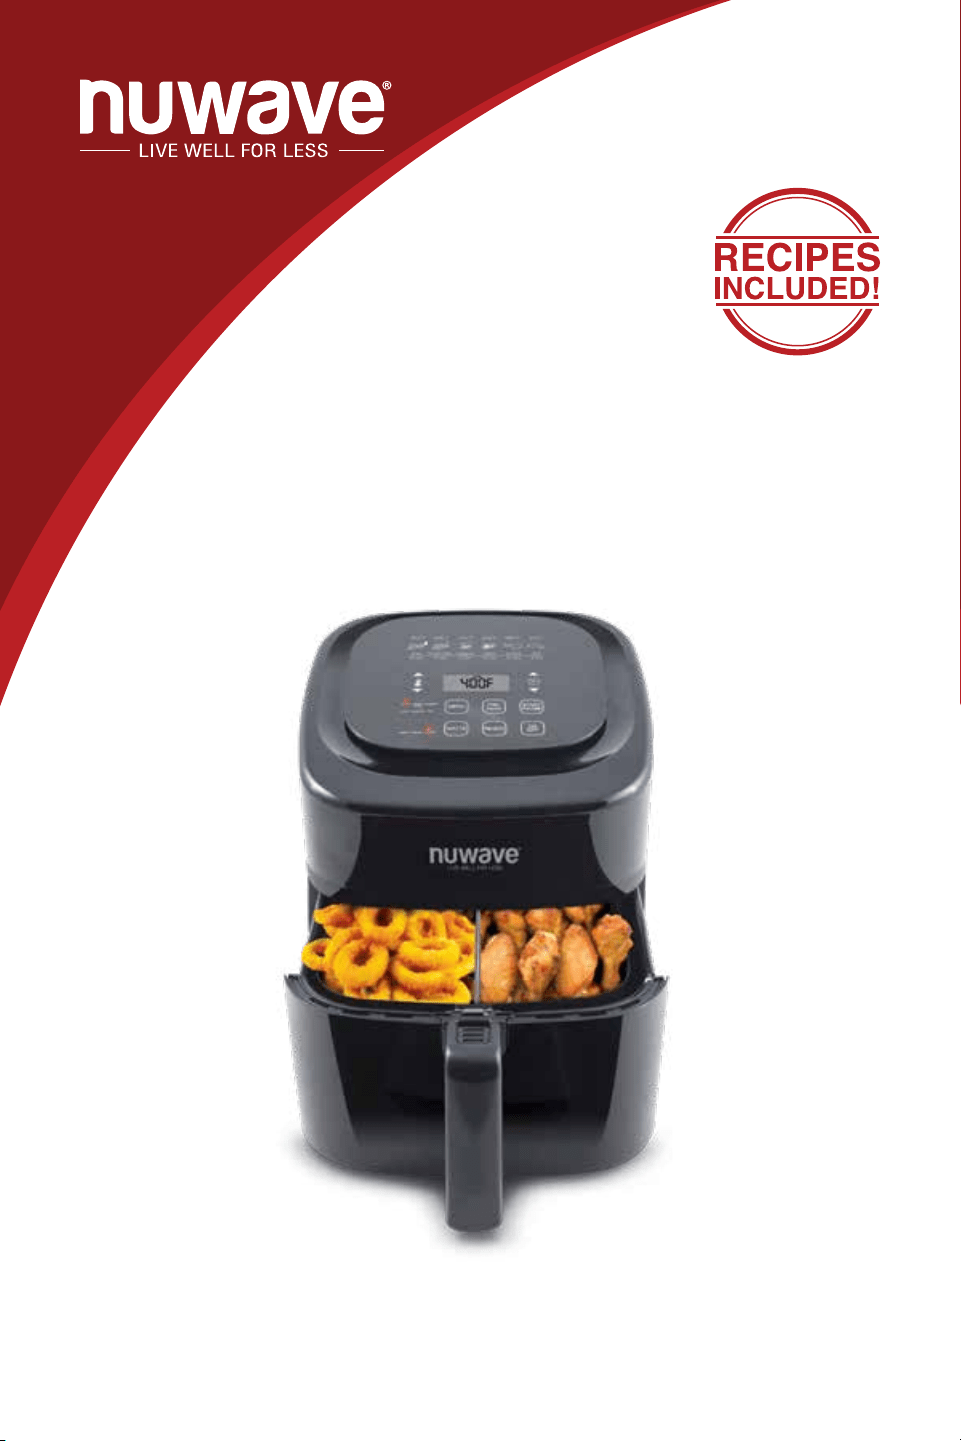
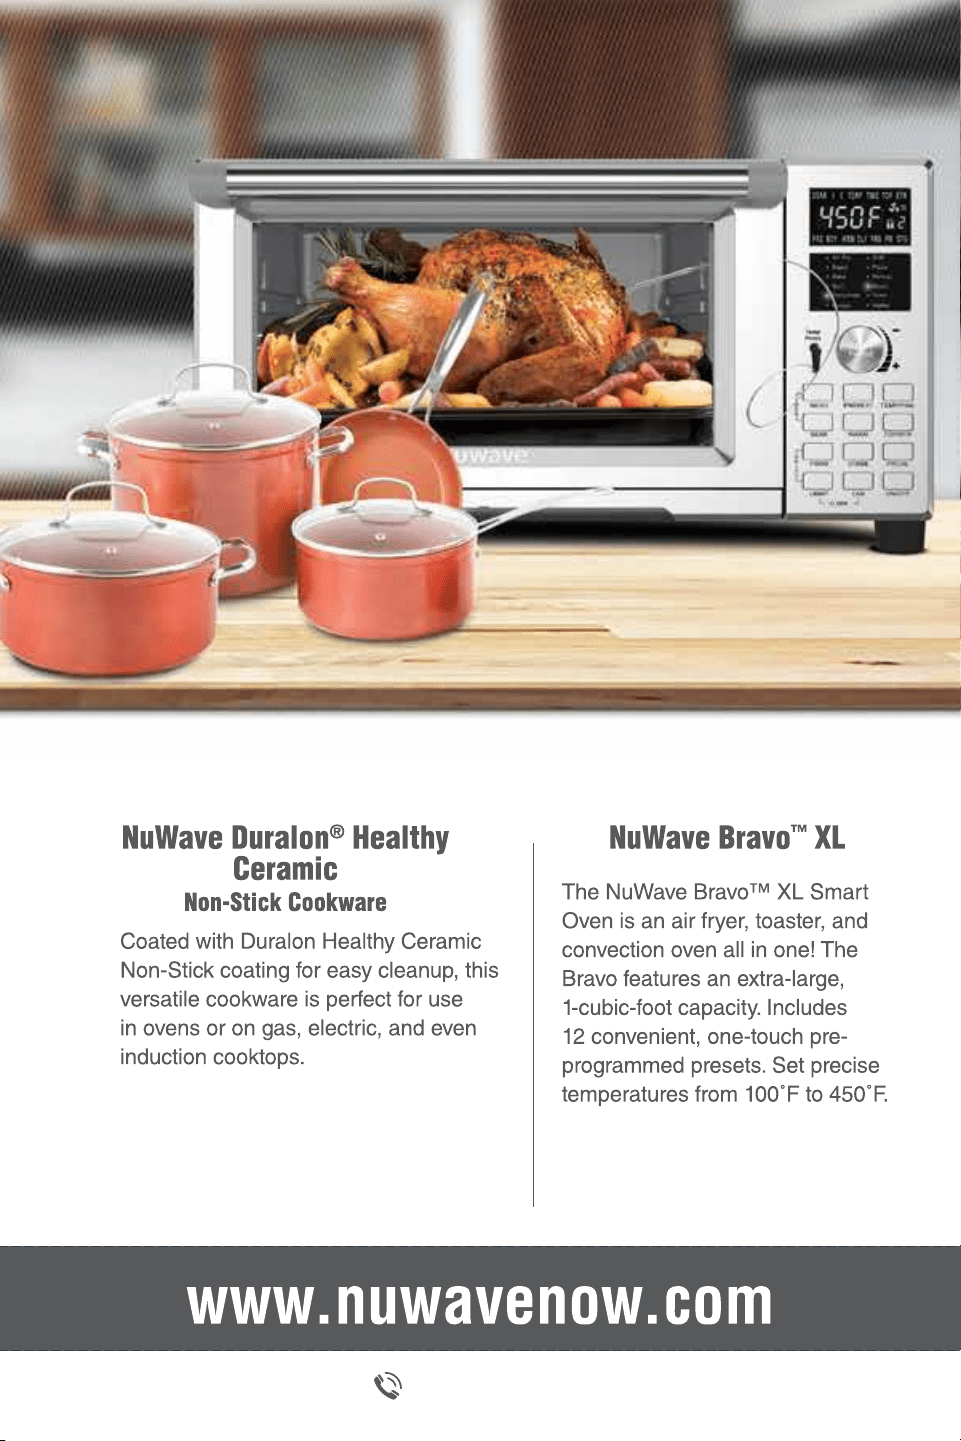
NuWave Brio
®
6-Qt Healthy Digital
Air Fryer
Owner’s Manual & Complete Recipe Book

2 • NuWave Electric Skillet Complete Cookbook
As a special thank-you for registering your NuWave unit, you’ll
automatically receive an additional 6 months added to your limited
manufacturer’s warranty!*
All you have to do is follow these
simple steps.
Using your smartphone or
smart device, scan the QR code
located on the unit label on the
back of the unit.
You will be directed to NuWave’s
product registration page with
your unit’s unique serial number
automatically entered in the
appropriate eld.
NOTE: If you do not have a
web-enabled smart device,
simply visit nuwavenow.com/QR
and manually enter in your unit’s
serial number.
Fill out the remaining information
and complete the optional survey.
Once you submit your
information, you will receive a
conrmation email containing
your extended warranty details.
1
2
3
4
1
2
3
Open your mobile app store
(App Store, Google Play).
Search for "QR code readers."
Simply download the QR code reader to your phone,
open it, scan the code and you are ready to go.
NOTE: You may need to open your downloaded QR
code reader each time you want to scan a QR code.
DOWNLOAD THE QR CODE
APP TO YOUR MOBILE DEVICE
3
for an additional
months
warranty!
REGISTER
NOW!
*Register your product within 1 year of date of purchase for a
free 3-month extension of your limited warranty.
QR code readers
1-877-689-2838
1-877-689-2838

1-877-689-2838
1-877-689-2838

TABLE OF CONTENTS
OWNER'S MANUAL
Important Safeguards ......................... 10-11
Additional Safeguards ............................. 12
Parts Description .....................................13
Operating Instructions ........................14-20
Care & Maintenance ...............................21
Troubleshooting ..................................22-23
Limited Warranty ................................24-25
Recipes
Twice-Baked Potatoes ............................27
Roasted Brussels Sprouts ....................... 28
Home Fries ..............................................29
Air-Baked Eggs .......................................30
Air-Fried Tortilla Chips ............................. 31
Classic Bacon Cheeseburger .................. 32
Buffalo Wings ......................................... 33
Spinach-Stuffed Chicken .........................34
Chicken Satay ......................................... 35
Grilled Chicken Tenders .......................... 36
Parmesan Chicken Tenders .................... 37
Butter-Infused Chicken ............................38
Cajun Shrimp ..........................................39
Chimichurri Skirt Steak ............................ 40
Grilled Ham and Cheese ......................... 41
Tortilla-Crusted Tilapia ............................. 42
Salmon with Orange Curry Sauce ........... 43
Turkey Sliders .........................................44
Apple-Glazed Pork Tenderloin................. 45
Citrus Green Beans .................................46
Crispy Tofu .............................................. 47
Bacon-Wrapped Onion Rings..................48
Party Meatballs .......................................49
Pasta Bake ..............................................50
Philly Cheesesteak Braid ........................ 51
Cheesy Rice-Stuffed Meatloaf.................52
Santa Fe Stuffed Bell Peppers ................53
Kale Chips ...............................................54
Roasted Tomatoes .................................. 55
Roasted Root Vegetables .......................56
Apple Pie .................................................57
Banana and Nutella
®
Wontons ................ 58
Pineapple Crescents ............................... 59
Apple Pie Egg Rolls ................................60
Berry Cheesecake Egg Rolls .................. 61
Easy Blueberry Mufns ........................... 62
Spanish................................................63-83
8
Owner's Manual
GUIDE
Note:
Actual cooking times may vary depending on the size and shape of the ingredients
used. Listed cooking times should be used as a guide. Adjust the settings as necessary to
suit your needs. According to the FDA, the safe internal temperature is 165°F for poultry and
160°F for pork.
The following guide indicates the amount of time, temperature, and weight for the
various food types that are listed below.
Food Type
Shake/
Flip
Time
(min)
Temp
(˚F)
Suggested
Amount
Additional Notes
Frozen French Toast
Sticks
Flip 8-10 380 8 oz
Frozen Hash Brown
Patties
Flip 18-25 360 1-4 patties
Cinnamon Rolls
10-12 350 1-5 rolls Cover w/foil halfway
Thin Frozen Fries
Shake 8-14 400 28 oz
Thick Frozen Fries
Shake 14-17 400 24 oz Medium-thick cut
Homemade Fries
Shake 20-25 360 12-16 oz
Soak in water - 30
minutes
Homemade Potato
Wedges
Shake 20-25 360 12-16 oz
Soak in water - 30
minutes
Homemade Potato
Cubes
Shake 15-20 360 12-16 oz
Soak in water - 30
minutes
Steak (½" ribeye)
Flip 12-18 360 1-4 (8 oz each)
Pork Chops (with bone)
Flip 15-20 375
1-3 (8- to 12-
oz each)
Frozen Hamburgers
Flip 16-20 360 1-2 (5 oz each)
Fresh Hamburgers
Flip 12-16 360 1-4 (8 oz each)
Italian Sausage
Flip 13-15 400 3-7 (4 oz each)
Chicken Wings
Shake 20-25 390 24 oz
Poultry
Flip 11-14 360 1-2 (8 oz each) Chicken Breast
Spiral Ham
9-10
min/lb
300 Up to 5 lbs Cover with foil
Boneless Ham
11-13
min/lb
300 Up to 7 lbs Cover with foil
Whole Chicken
Flip
10-12
min/lb
375 Up to 6 lbs Cover with foil
Frozen Tater Tots
Shake 6-8 360 16-20 oz
Spring Rolls
Shake 6-8 360 16 oz
Chicken Nuggets
Shake 8-12 390 12 oz
Fish
Shake 6-10 400 12 oz Frozen Fish Sticks
Stuffed Poppers
Shake 8-10 360 12 oz
Onion Rings
Shake 12-16 360 16 oz
Breaded Mushrooms
Shake 8-10 390 12 oz
Mozz. Sticks/Zucchini
Shake 5-7 360 16 oz
9
Owner's Manual
www.nuwavenow.com

10 11
Owner's Manual Owner's Manual
IMPORTANT SAFEGUARDS
READ ALL INSTRUCTIONS
When using electrical units, basic safety precautions should always be
followed including the following:
1. Do not touch hot surfaces. Use handles or knobs.
2. To protect against electrical shock, do not immerse cord, plugs, or the Brio
in water or other liquids.
3. Do not operate the Brio with a damaged cord, plug, or after the appliance
malfunctions or has been damaged in any manner. Return appliance to the
nearest authorized service facility for examination, repair, or adjustment.
4. Close supervision is necessary when any appliance is used near children.
This appliance is not intended for use by persons (including children) with
reduced physical, sensory or mental capabilities, or lack of experience
and knowledge, unless they have been given supervision or instruction
concerning use of the appliance by a person responsible for their safety.
5. The use of other accessories that are not intended to be used with
the Brio is not recommended. Doing so may damage the Brio and can
cause accidents.
6. NOT INTENDED FOR OUTDOOR USE.
7. Do not use appliance for other than intended use.
8. Do not let cord hang over edge of table or counter or touch hot surfaces.
9. Do not place on a stovetop, near a hot gas, electric burner, or in a
heated oven.
10. Extreme caution must be used when moving the Brio containing hot oil or
other hot liquids.
11. To disconnect, turn the Brio “OFF”, then remove plug from the wall outlet.
12. During air-frying, hot steam is released from the air outlet vent.
Keep hands and face at a distance from the steam and from the air outlet
vent. Also, be careful of hot steam and air when removing Fry Pan Basket.
13. Make sure the ingredients prepared in the Brio come out golden brown
instead of dark brown and not burnt. Remove any burnt remnants from Fry
Pan Basket during cleaning and before each use.
14. Never put the Brio against the wall or other appliances. There should be
at least 3 inches of free space for the back side, left/right sides, and the
upper side of the Brio.
15. Do not place anything on top of the Brio.
16. Unplug the Brio from outlet when not in use and before cleaning. Allow the
Brio to cool before cleaning, putting on or taking off parts.
17. INTENDED FOR HOUSEHOLD USE ONLY.
18. Keep manual handy for future reference.
IMPORTANT SAFEGUARDS (Continued)
SAVE THESE INSTRUCTIONS
Read and understand the entire manual before using the Brio.
DO NOT USE THE UNIT FOR OTHER THAN INTENDED USE.
Note: Put the Brio on a surface that is horizontal, even, and stable.
This appliance is intended for normal household use. It is not intended to be
used in environments such as kitchen staffs of shops, ofces, farms, or other
work environments. Nor is it intended to be used by clients in hotels, motels,
bed and breakfasts, and non-residential environments.
NOTICE: THE FAILURE TO FOLLOW ANY OF THE IMPORTANT
SAFEGUARDS, ADDITIONAL SAFEGUARDS, OR THE INSTRUCTIONS
FOR SAFE USE IS A MISUSE OF YOUR BRIO THAT CAN VOID YOUR
WARRANTY AND CREATE THE RISK OF SERIOUS INJURY.
Electrical Information
A short power-supply cord (or detachable power-supply cord) is
provided to reduce the risk resulting from becoming entangled in
or tripping over a longer cord. Longer detachable power-supply
cords or extension cords are available and may be used if care is
exercised in their use. If a longer detachable power-supply cord or
extension cord is used:
1. The marked electrical rating of the extension cord should be at least as
great as the electrical rating of the appliance.
2. The longer cord should be arranged so that it will not drape over the
countertop or tabletop where it could be pulled on or tripped over
unintentionally. The Brio should be operated on a separate electrical
outlet from other operating appliances due to wattage limitations.
The appliance has a polarized plug (one blade is wider than the other).
To reduce the risk of electric shock, this plug is intended to fit into a
polarized outlet only one way. If the plug does not fit fully into the outlet,
reverse the plug. If it still does not fit, contact a qualified electrician.
Do not attempt to modify the plug in any way.
3. If the appliance is of the grounded type, the cord set or extension cord
should be a grounding-type 3-wire cord.
SEE OPERATING INSTRUCTIONS BEFORE USE
WARNING
In case of other problems, immediately unplug and contact
Customer Service Department.
1-877-689-2838 • help@nuwavenow.com

12 13
Owner's Manual Owner's Manual
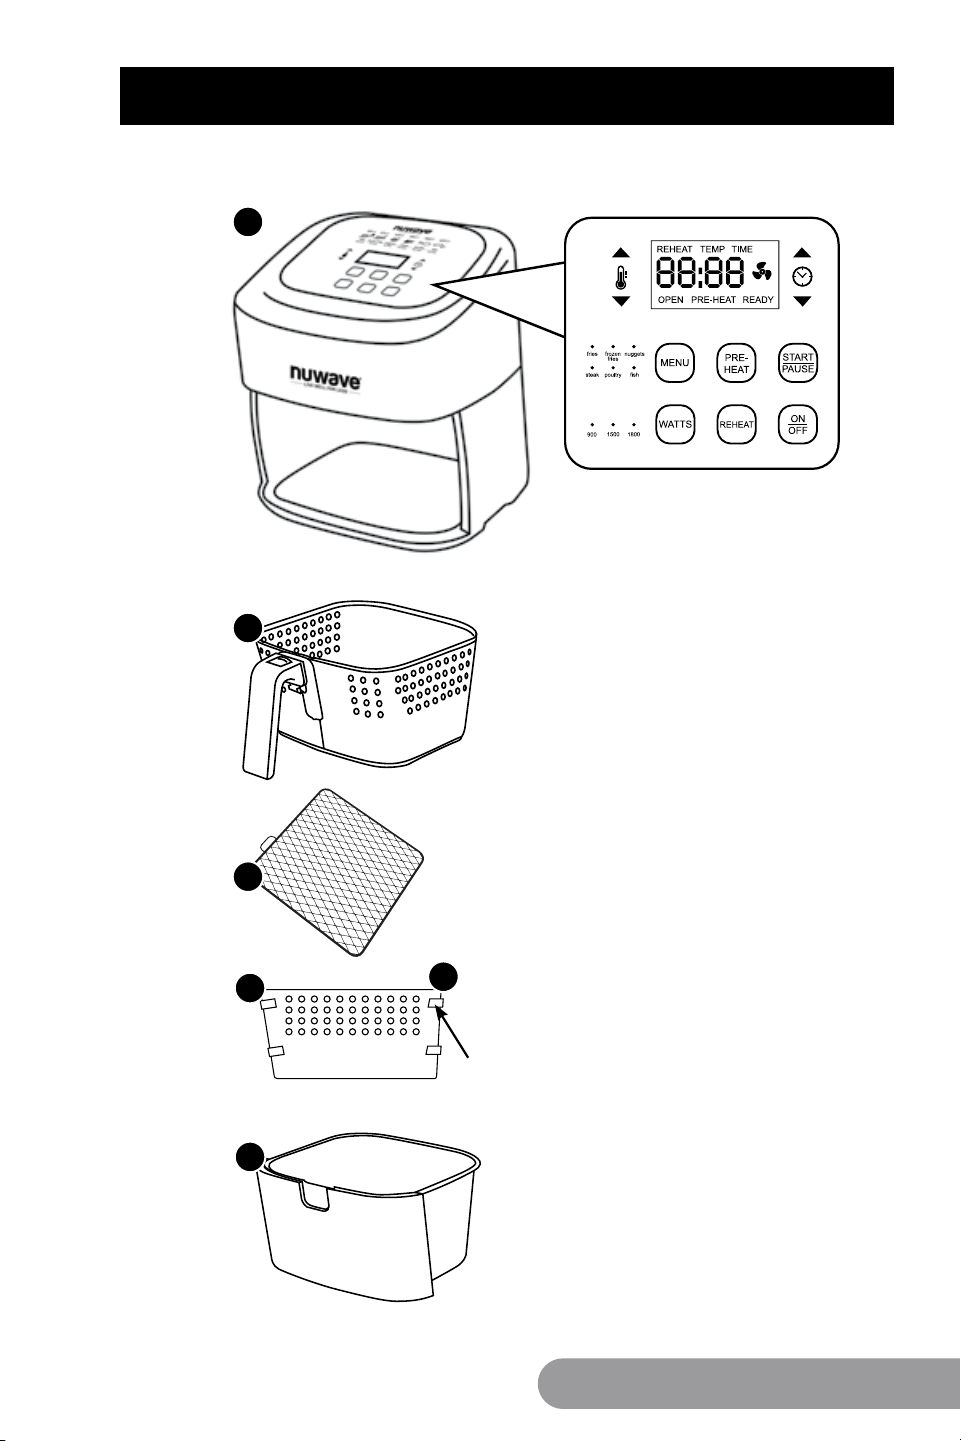
PARTS DESCRIPTION
1
2
4a
1. Air Fryer Power Base
Part #: 37206
2. Fry Pan Basket
Part #: 37202
3. Fry Pan Basket Net
Part #: 37204
4a. Fry Pan Divider
Part #: 37205
4b. 4 Silicone Tabs
Part #: 37207
5. Base Tray
Part #: 37201
5
Silicone Tabs
4b
3
ADDITIONAL SAFEGUARDS
CAUTION
• Always put the ingredients to be fried in the Fry Pan Basket to
prevent direct contact with the heating components.
• Do not cover the air inlet and outlet openings while the
appliance is operating.
• Do not pour oil into the Base Tray or Fry Pan Basket, as this may
create a re hazard.
• Never touch the insides of the appliance while it is operating.
1. Do not place the Brio close to ammable materials, heating units,
or wet environments.
2. Height of ingredients placed in the Fry Pan Basket should comply with the
directions listed under “Operating Instructions.”
3. Do not put any other cooking pans in the Fry Pan Basket. Do not replace
any parts with other containers.
4. It is normal for some smoke to escape the Brio when heating for the
rst time.
5. If a lot of smoke is escaping from the air vent during operation, unplug the
Brio immediately and contact Customer Service.*
6. Do not move the Brio while in operation. Only after the Brio has completely
cooled should moving be attempted. Always wait for the Air Fryer to cool
down prior to handling it.
7. Children should be supervised to ensure that they do not play with
the appliance.
8. Never use a towel or other material or object to block the air vents.
9. If any trouble arises during operation, any service MUST be done by
NuWave, LLC or authorized by the manufacturer for repairs.
10. The appliance is not intended to be operated by means of an external
timer or separate remote-control system.
11. Do not disassemble the Brio or replace any parts without prior written
consent from the manufacturer.
12. Do not use metal utensils with the coated Fry Pan Basket or Fry Pan
Basket Net as this can damage the surface.
13. Make sure the Brio is always clean prior to cooking.
*Customer Service Department: 1-877-689-2838 • help@nuwavenow.com
12 13
Owner's Manual Owner's Manual
PARTS DESCRIPTION
1
2
4a
1. Air Fryer Power Base
Part #: 37206
2. Fry Pan Basket
Part #: 37202
3. Fry Pan Basket Net
Part #: 37204
4a. Fry Pan Divider
Part #: 37205
4b. 4 Silicone Tabs
Part #: 37207
5. Base Tray
Part #: 37201
5
Silicone Tabs
4b
3
ADDITIONAL SAFEGUARDS
CAUTION
• Always put the ingredients to be fried in the Fry Pan Basket to
prevent direct contact with the heating components.
• Do not cover the air inlet and outlet openings while the
appliance is operating.
• Do not pour oil into the Base Tray or Fry Pan Basket, as this may
create a re hazard.
• Never touch the insides of the appliance while it is operating.
1. Do not place the Brio close to ammable materials, heating units,
or wet environments.
2. Height of ingredients placed in the Fry Pan Basket should comply with the
directions listed under “Operating Instructions.”
3. Do not put any other cooking pans in the Fry Pan Basket. Do not replace
any parts with other containers.
4. It is normal for some smoke to escape the Brio when heating for the
rst time.
5. If a lot of smoke is escaping from the air vent during operation, unplug the
Brio immediately and contact Customer Service.*
6. Do not move the Brio while in operation. Only after the Brio has completely
cooled should moving be attempted. Always wait for the Air Fryer to cool
down prior to handling it.
7. Children should be supervised to ensure that they do not play with
the appliance.
8. Never use a towel or other material or object to block the air vents.
9. If any trouble arises during operation, any service MUST be done by
NuWave, LLC or authorized by the manufacturer for repairs.
10. The appliance is not intended to be operated by means of an external
timer or separate remote-control system.
11. Do not disassemble the Brio or replace any parts without prior written
consent from the manufacturer.
12. Do not use metal utensils with the coated Fry Pan Basket or Fry Pan
Basket Net as this can damage the surface.
13. Make sure the Brio is always clean prior to cooking.
*Customer Service Department: 1-877-689-2838 • help@nuwavenow.com

14 15
Owner's Manual Owner's Manual
OPERATING INSTRUCTIONS
OPERATING INSTRUCTIONS (Continued)
Before First Use:
1. Remove all the packaging materials.
2. Remove the glue and labels on the appliance.
3. Clean the Base Tray and Fry Pan Basket with Fry Pan Basket Net thoroughly
with hot water, a nonabrasive sponge, and a mild dish detergent, or in the
dishwasher, top rack only.
4. Wipe the inside and outside of the appliance with a wet cloth. Do not
immerse the appliance in water. See "Assembling the Brio" under
Operating Instructions for more.
Note: This appliance cooks using hot air. DO NOT ll the Fry Pan Basket
with oil.
Operation Preparation:
1. Place the appliance on a level, even, and stable heat-resistant surface.
2. Place the Base Tray and Fry Pan Basket in the Brio. See "Assembling the
Brio" under Operating Instructions for more.
3. Plug the appliance into a standard wall socket. The power plug is included in
the package.
Note: Do not cover or block the vent located on the back of the Brio. Doing so
can prevent proper ventilation and will adversely affect the cooking results.
On/Off Function
1. Press “ON/OFF” once to turn the unit on.
• The control panel should display “0”, indicating that no cooking time
or temperature has been selected and the unit is powered on.
• The light above the last used wattage will be on.
2. Press “ON/OFF” again to turn the unit off, and the last wattage
used will be ashing.
Wattage Function
The default wattage of the Brio is 1800 watts.
1. To change the wattage, press “WATTS” once. The light will
illuminate above the “900”, indicating that the Air Fryer is now set
to 900 watts.
2. Press “WATTS” once more and the light above “1500” will
illuminate. The Air Fryer is now set to 1500 watts.
3. Press “WATTS” again and the light above “1800” will illuminate,
indicating the Air Fryer is now set to the default of 1800 watts.
Note: If you change the wattage from the default 1800W to either
900W or 1500W and unplug or turn off the unit, the Brio will remember
the last wattage setting when it is turned back on. The light above that
wattage will ash until unit is turned on and then it will remain solid.
ON
OFF
WATTS
Easy Start/Pause Function
1. Press “START/PAUSE” once to begin cooking. “TIME” will be
displayed. “0:15” and the FAN Icon will also be displayed with the
“:” and FAN Icon ashing.
• The Brio will start to countdown. The default is 360°F for
15 minutes.
• To interrupt the cooking process, press “START/PAUSE”.
• To resume cooking or preheating, press “START/PAUSE” again.
• Once the Brio nishes cooking, the unit will “beep” three
times and the control panel will display “End”.
Note: Removing the Base Tray and Fry Pan Basket will also Pause
the unit. “OPEN” will be displayed on the control panel. Return the
Base Tray and Fry Pan Basket to resume cooking.
Pre-Heat Function
The Pre-Heat function ensures that the Brio reaches the desired
temperature before you begin cooking your food. The Pre-Heat
function is the perfect choice for foods that require a crisp nish,
such as frozen appetizers, French fries or chicken wings.
1. Press “PRE-HEAT”. The control panel will display “PRE-HEAT”
and “0”. The default for Pre-Heat is 360°F for 15 minutes.
2. To preheat with the default settings, press “START/PAUSE”. The
control panel will display “TEMP” and “PRE-HEAT”. “360F” and the
FAN Icon will ash during pre-heating.
• Once the preheat temperature is reached, the control panel
will display “READY” and “TIME” and the Air Fryer will beep
once. “5” will ash and a 5-minute countdown will begin.
• The unit will maintain the pre-heat temperature during the
5-minute countdown OR until the Fry Pan Basket is removed,
whichever comes rst.
3. Once the food has been added to the Fry Pan Basket, insert the
Fry Pan Basket back in place. This will start the cooking process at
the selected temperature and time.
• If no temperature or time were selected prior to Pre-heat, the
default temperature (360°F) and time (15 minutes) will be used.
• If nothing is done within the 5-minute countdown, the NuWave
Brio will return to the ON setting and “0” will be displayed.
START
PAUSE
PRE-
HEAT

16 17
Owner's Manual Owner's Manual
OPERATING INSTRUCTIONS (Continued)
Note: Pre-heat temperature can be adjusted at any time during the pre-
heat process by pressing the arrows above and below the Temp Icon.
• During cooking, Preheat can be canceled.
• If the Fry Pan Basket is removed at any point during the pre-
heating stage, the Air Fryer will automatically pause, and start a
5-minute countdown until the Fry Pan Basket is replaced.
• If nothing is done within the 5-minute countdown, the NuWave
Brio will return to the ON setting and “0” will be displayed.
• If another batch of food is cooked shortly after cooking, the
Pre-Heat Function will not need to be used. The unit will
already be hot.
• If longer cooking time is desired, simply place the Base Tray and Fry
Pan Basket back into the appliance and continue cooking in 2- to
3-minute increments until desired consistency has been reached.
Menu Function
1. Press “MENU”. The light above “fries” will illuminate and “360F”
and “TEMP” will be displayed in the control panel.
2. Press “START/PAUSE” to begin cooking. The pre-programmed
time will begin to countdown.
• Remaining cooking time will be displayed in the control panel
with “TIME” lit and “:” and the FAN Icon will ash.
3. To choose a different Menu selection, simply press “MENU”
until the desired Menu program is selected BEFORE pressing
“START/PAUSE”.
4. To get out of Menu selection, press “MENU” until no lights are lit
above the pre-programmed menu selection.
• Once the Brio nishes cooking, the unit will “beep” three
times and the control panel will display “End”.
Note: The default wattage for all Menu selections is 1800 watts.
MENU
Food Type
Time
(minutes)
Temp
Food Amount
(ounces)
Fries (Homemade Thick cut) 25 360˚F 8-12
Frozen Fries (Medium cut) 15 400˚F 28
Chicken Nuggets 8 400˚F 12
Steak (½" ribeye) 12 360˚F 8 oz each
Poultry (Chicken breast) 12 360˚F 8 oz each
Fish (Frozen Fish Sticks) 8 400˚F 12
Adjusting Temperature
The Brio is set to cook at 360°F by default.
1. To set a different cooking temperature, press the arrows above or below
the Temp Icon. The control panel will display “360F” and “TEMP”.
2. To adjust the temperature, continue to press the “Up” or “Down”
arrows until the desired cooking temperature is reached.
• The temperature will adjust in 5-degree increments between
100°F and 400°F.
3. To quickly adjust the temperature, hold down the arrows until
desired cooking temperature is reached.
Note: Cooking temperature can be adjusted at any time before or
during the cooking process. Once display is switched to temperature
display, it will remain in the temperature display.
Adjusting Time
The Brio is set to cook for 15 minutes by default.
1. To set a different cooking time, press the arrows above or below
the Time Icon. The control panel will display “0:15” and “TIME”.
2. To adjust the time, continue to press the “Up” or “Down” arrows
until the desired cooking time is reached.
• The time will adjust in 1-minute increments.
3. To quickly adjust the time, hold down the arrows until desired
cooking time is reached.
• The time will be adjusted in 10-minute increments, followed
by 20-minute increments, followed by 30-minute increments.
OPERATING INSTRUCTIONS (Continued)
Using PRE-HEAT with MENU
• Using Pre-Heat with a Menu selection can be done two ways:
Example #1
1. Press “PRE-HEAT” then press “MENU”.
2. Choose the desired Menu selection and press “START/PAUSE”.
• The Brio will pre-heat rst before cooking.
Example #2
1. Press “MENU”.
2. Choose the desired Menu selection and then press “PRE-HEAT”.
3. Press “START/PAUSE” The NuWave Brio Healthy Digital 6-Qt.
Air Fryer will pre-heat rst before cooking.

18 19
Owner's Manual Owner's Manual
OPERATING INSTRUCTIONS (Continued)
4. The maximum selectable cooking time differs depending on the
selected cooking temperature:
• 100°F - 345°F, maximum cooking time is 99 hours 59 minutes.
• 350°F - 400°F, maximum cooking time is 1 hour.
Note: Cooking time can be adjusted at any time before or during
the cooking process.
Reheat Function
The default setting is programmed at 360°F for 4 minutes at
1800 watts.
1. Press “REHEAT”. The NuWave Brio will automatically begin the
reheat process. The control panel will display “REHEAT” and
“TIME” and begin a 4-minute countdown.
• Once the unit nishes reheating, the unit will “beep” three
times and the control panel will display “End”.
Note:
• Reheat cooking temperature and time can be adjusted at any
time during the reheat process.
• During cooking, Reheat can be canceled.
• The Reheat function is perfect for reheating single-portion-sized foods.
• When using the Reheat function, food can be placed directly in
the Fry Pan Basket, any oven-safe dish, or foil.
REHEAT
OPERATING INSTRUCTIONS (Continued)
Removing the Fry Pan Basket Net:
1. After removing Fry Pan Basket from Base Tray, turn Fry Pan Basket
upside down.
2. Using oven mitts, press the underneath of the Fry Pan Basket Net down
until it is released from Fry Pan Basket. Net and its tab will be released
from Fry Pan Basket.
Assembling the Fry Pan Basket Net
1. Place Tab of Fry Pan Basket Net
into slot of Fry Pan Basket. (See
Fig. 3.)
2. Press other end of Fry Pan Basket
Net down until Net snaps into place
and is at inside Fry Pan Basket.
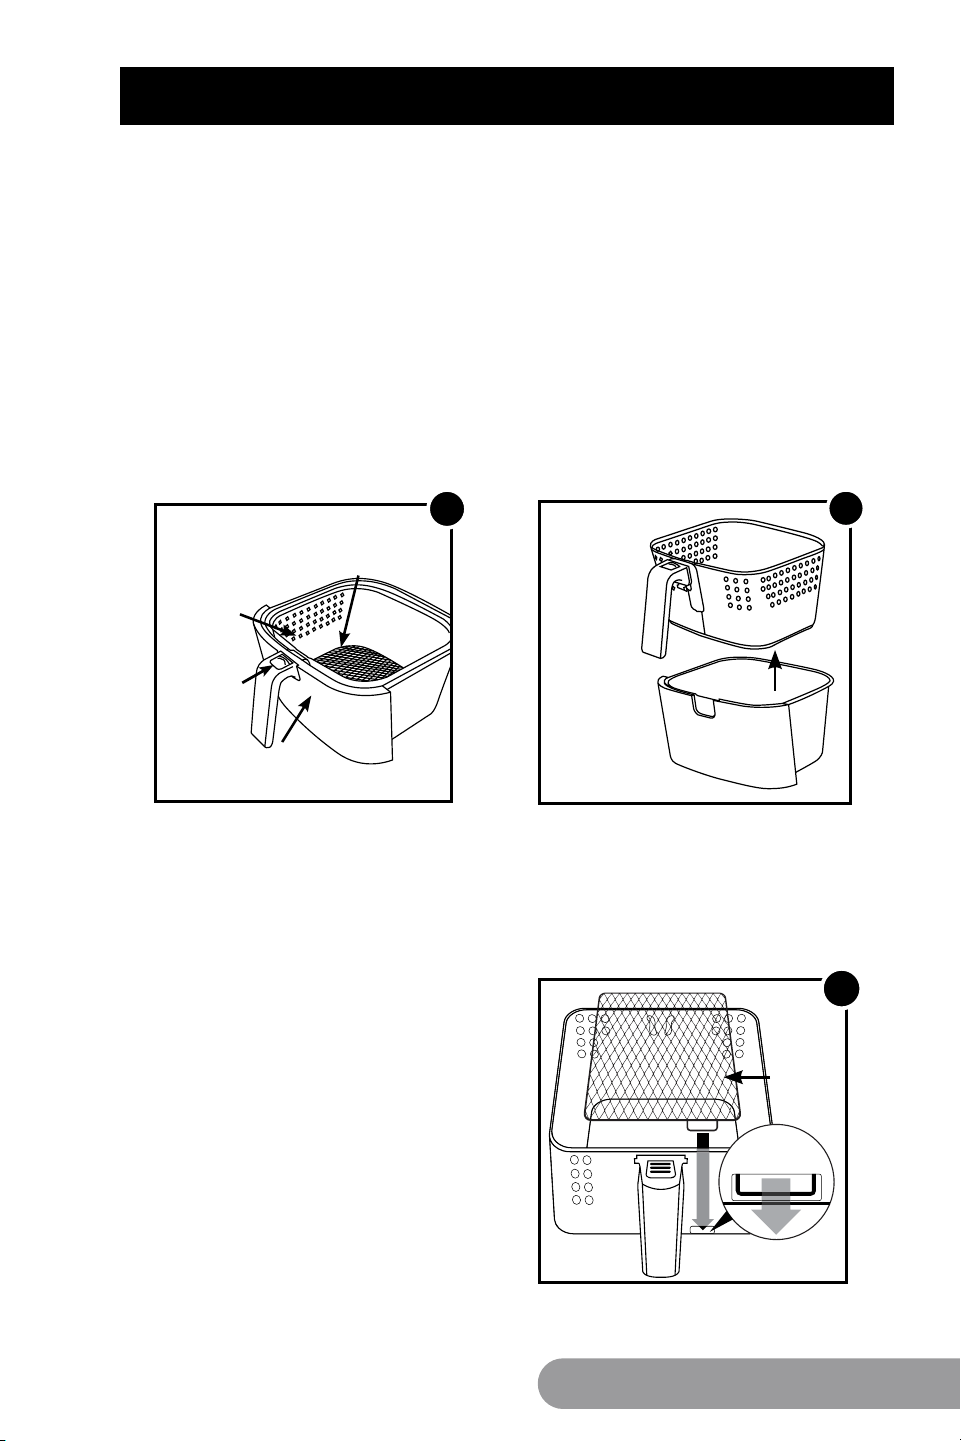
Assembling the Brio
CAUTION: DO NOT use the Brio without the Base Tray and Fry Pan Basket
with Net. DO NOT touch the insides of the Base Tray, Fry Pan Basket, and
Net immediately after cooking. Parts will be hot. ONLY hold the Base Tray
and Fry Pan Basket by the handle.
Removing Base Tray with Fry Pan Basket
1. Using the handle, pull and slide out the Base Tray and Fry Pan Basket
with Net. (See Fig. 1.)
2. To remove Fry Pan Basket from Base Tray, while holding the handle, push
demounting button forward and lift up Fry Pan Basket from Base Tray.
(See Fig. 2.) When cooking, this will reduce extra weight from Base Tray
and make it easier to pour or shake smaller foods.
Fry Pan
Basket
Demounting
Button
Base Tray
Basket Net
1
Air Fryer
Fry Pan
Basket
Base Tray
2
3
Basket
Net
Tab
18 19
Owner's Manual Owner's Manual
OPERATING INSTRUCTIONS (Continued)
4. The maximum selectable cooking time differs depending on the
selected cooking temperature:
• 100°F - 345°F, maximum cooking time is 99 hours 59 minutes.
• 350°F - 400°F, maximum cooking time is 1 hour.
Note: Cooking time can be adjusted at any time before or during
the cooking process.
Reheat Function
The default setting is programmed at 360°F for 4 minutes at
1800 watts.
1. Press “REHEAT”. The NuWave Brio will automatically begin the
reheat process. The control panel will display “REHEAT” and
“TIME” and begin a 4-minute countdown.
• Once the unit nishes reheating, the unit will “beep” three
times and the control panel will display “End”.
Note:
• Reheat cooking temperature and time can be adjusted at any
time during the reheat process.
• During cooking, Reheat can be canceled.
• The Reheat function is perfect for reheating single-portion-sized foods.
• When using the Reheat function, food can be placed directly in
the Fry Pan Basket, any oven-safe dish, or foil.
REHEAT
OPERATING INSTRUCTIONS (Continued)
Removing the Fry Pan Basket Net:
1. After removing Fry Pan Basket from Base Tray, turn Fry Pan Basket
upside down.
2. Using oven mitts, press the underneath of the Fry Pan Basket Net down
until it is released from Fry Pan Basket. Net and its tab will be released
from Fry Pan Basket.
Assembling the Fry Pan Basket Net
1. Place Tab of Fry Pan Basket Net
into slot of Fry Pan Basket. (See
Fig. 3.)
2. Press other end of Fry Pan Basket
Net down until Net snaps into place
and is at inside Fry Pan Basket.
Assembling the Brio
CAUTION: DO NOT use the Brio without the Base Tray and Fry Pan Basket
with Net. DO NOT touch the insides of the Base Tray, Fry Pan Basket, and
Net immediately after cooking. Parts will be hot. ONLY hold the Base Tray
and Fry Pan Basket by the handle.
Removing Base Tray with Fry Pan Basket
1. Using the handle, pull and slide out the Base Tray and Fry Pan Basket
with Net. (See Fig. 1.)
2. To remove Fry Pan Basket from Base Tray, while holding the handle, push
demounting button forward and lift up Fry Pan Basket from Base Tray.
(See Fig. 2.) When cooking, this will reduce extra weight from Base Tray
and make it easier to pour or shake smaller foods.
Fry Pan
Basket
Demounting
Button
Base Tray
Basket Net
1
Air Fryer
Fry Pan
Basket
Base Tray
2
3
Basket
Net
Tab
20 21
Owner's Manual Owner's Manual
OPERATING INSTRUCTIONS (Continued)
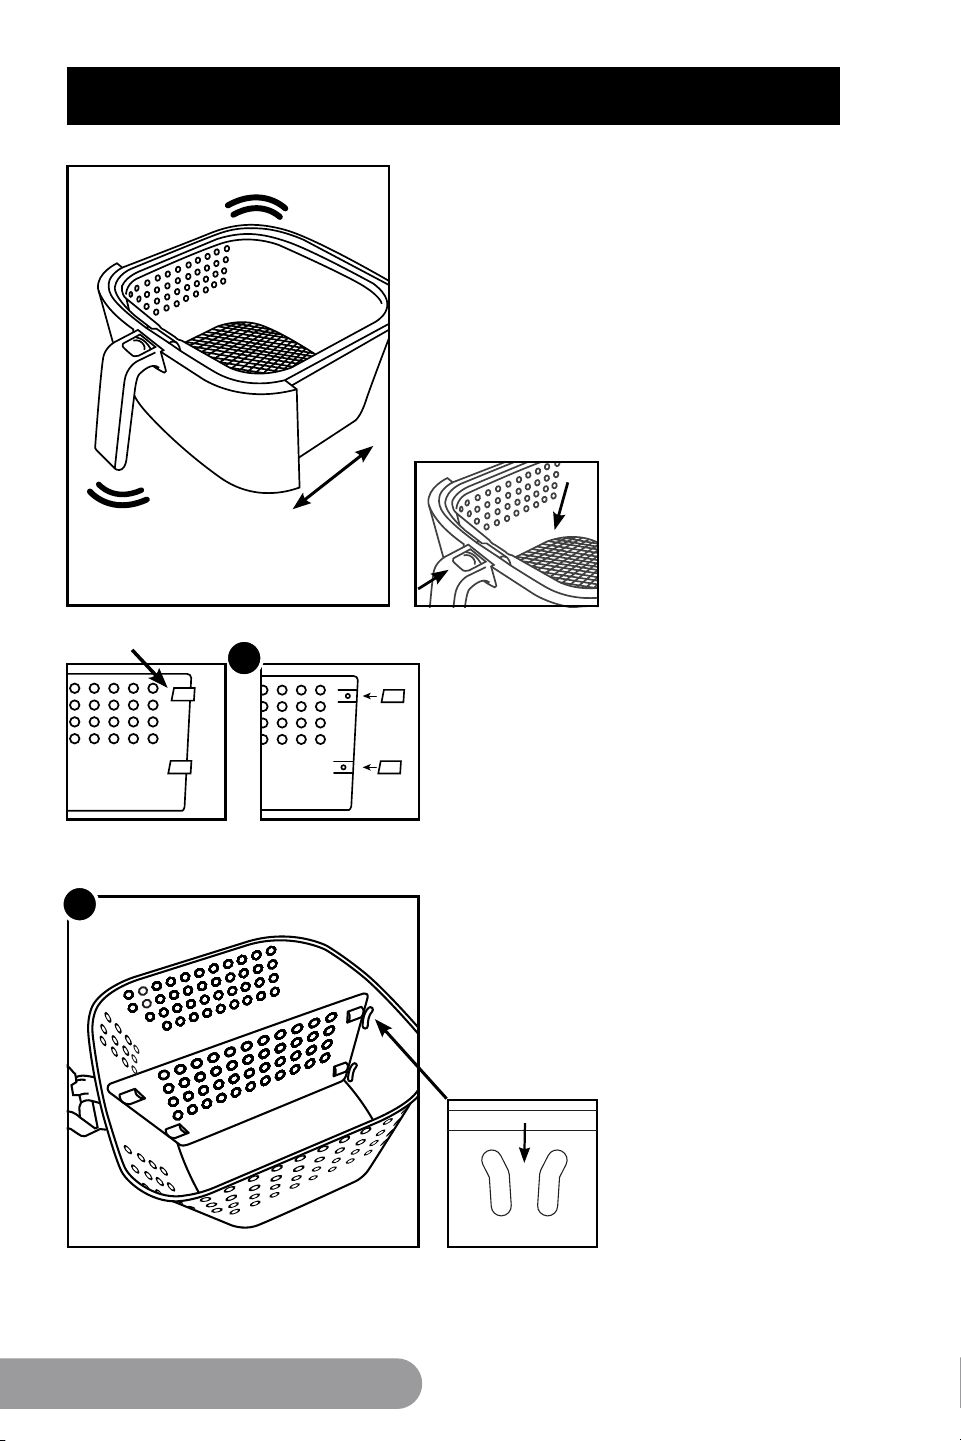
1
DO NOT PUSH THE
DEMOUNTING
BUTTON FORWARD
WHILE SHAKING.
Using the Fry Pan Divider:
Fig.1.
Make sure all 4 Silicone Tabs are
placed on the Divider tabs.
Fig. 2.
Looking down at the Fry Pan Basket,
slide the Divider down the center of
the Basket.
Make sure the Divider is between both
the groves and screws of the Basket.
To remove Divider, simply slide the
Divider straight up. (Caution: Divider
will be hot from cooking.)
You can remove the Silicone Tabs from
the Divider when cleaning.
XX
Shaking Food
Some foods require shaking halfway
through cooking. To properly shake the
food, hold the handle, remove the Base
Tray from the appliance, and shake. Once
the food has been adequately shaken,
slide the Base Tray and Fry Pan Basket
back into the NuWave Digital Brio 6-Qt
Digital Air Fryer.
2
Silicone Tabs
CARE & MAINTENANCE
Note: For best results, when cooking, do
not ll more than
4
⁄
5
full.
Cleaning
Clean the appliance after every use or in between a number of large batches.
The Fry Pan Basket and the Base Tray have a non-stick coating with a
stainless steel Basket Net. Do not use metal utensils or harsh abrasives when
cleaning as this can damage the coating.
1. Unplug the appliance and make sure it cools completely.
2. Use a damp cloth to wipe the outside of the appliance.
3. Clean the Base Tray, Fry Pan Basket, Fry Pan Basket Net, or removable
components with a nonabrasive sponge, hot water, and mild detergent.
Note: Remove the Base Tray and Fry Pan Basket and place on a heat-
resistant surface to help cool the appliance quicker.
Note: If using the dishwasher for the Base Tray, Fry Pan Basket, and Fry Pan
Basket Net, it is recommended to use top rack only.
Tip: If there is residual food in the Base Tray and Fry Pan Basket, add some
hot water and let it soak separately for about 10 minutes for easier cleaning.
Afterward, use a soft cleaning brush to remove any lingering food.
Storage:
1. Unplug the appliance and let it cool down completely.
2. Make sure that all the parts are clean and dry.
3. Push the power cord into the storing capsule. Afx the cord by inserting it
into the cord-afxing opening in the back of the unit.
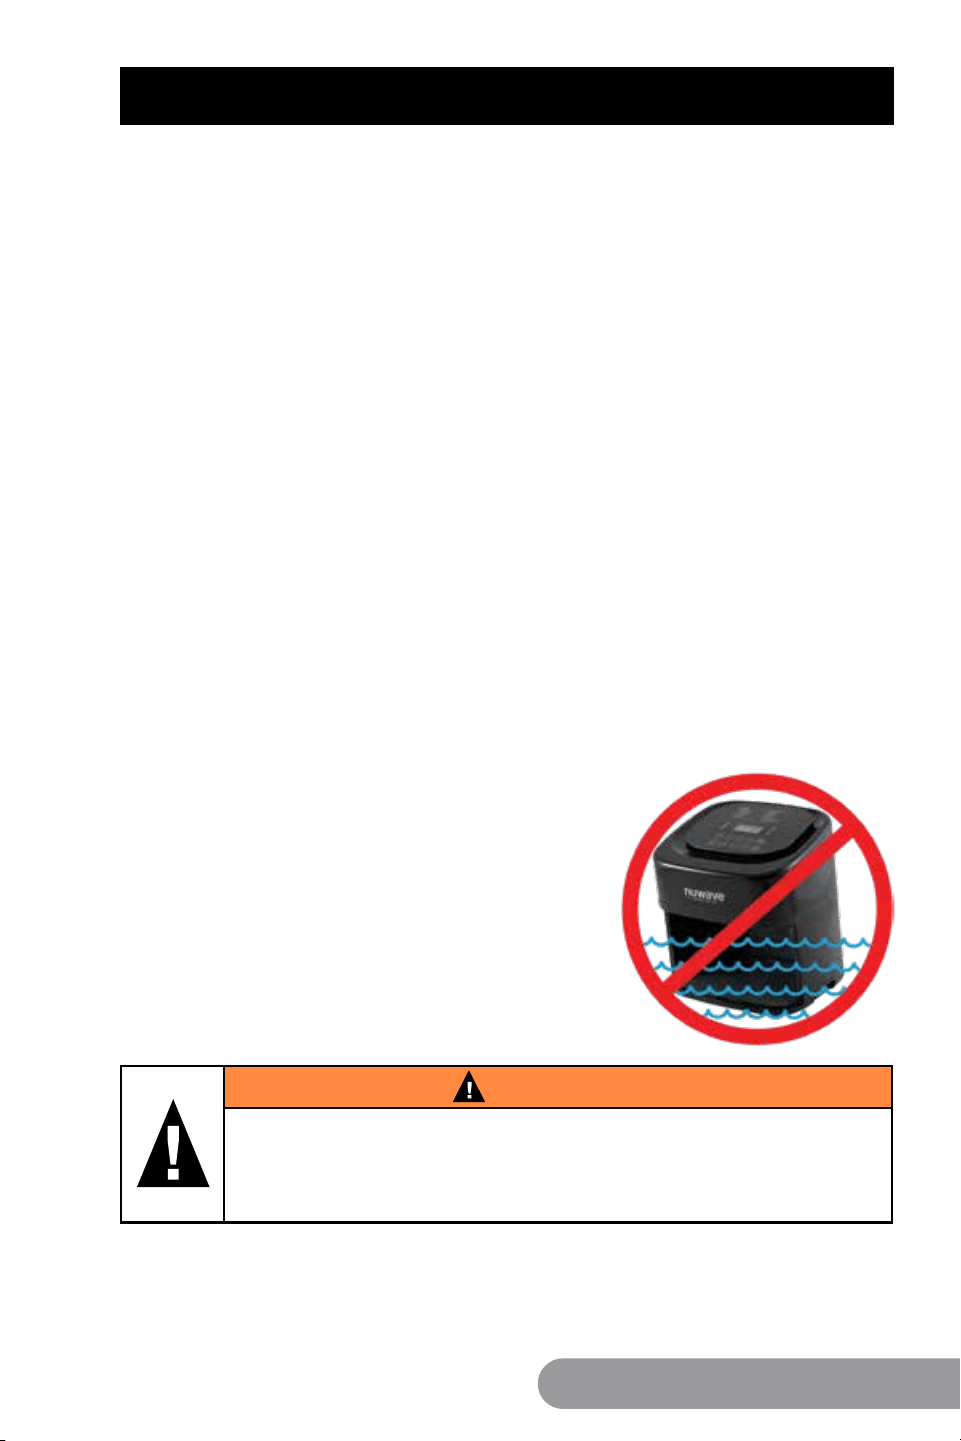
IMPORTANT - Do not immerse unit in water
or attempt to cycle through dishwasher.
The outer surface may be cleaned by wiping
carefully with a damp dishcloth or sponge.
Make sure unit has cooled completely prior
to cleaning.
WARNING
In case of other problems, immediately unplug and contact
Customer Service Department.
1-877-689-2838 • help@nuwavenow.com
20 21
Owner's Manual Owner's Manual
OPERATING INSTRUCTIONS (Continued)
1
DO NOT PUSH THE
DEMOUNTING
BUTTON FORWARD
WHILE SHAKING.
Using the Fry Pan Divider:
Fig.1.
Make sure all 4 Silicone Tabs are
placed on the Divider tabs.
Fig. 2.
Looking down at the Fry Pan Basket,
slide the Divider down the center of
the Basket.
Make sure the Divider is between both
the groves and screws of the Basket.
To remove Divider, simply slide the
Divider straight up. (Caution: Divider
will be hot from cooking.)
You can remove the Silicone Tabs from
the Divider when cleaning.
XX
Shaking Food
Some foods require shaking halfway
through cooking. To properly shake the
food, hold the handle, remove the Base
Tray from the appliance, and shake. Once
the food has been adequately shaken,
slide the Base Tray and Fry Pan Basket
back into the NuWave Digital Brio 6-Qt
Digital Air Fryer.
2
Silicone Tabs
CARE & MAINTENANCE
Note: For best results, when cooking, do
not ll more than
4
⁄
5
full.
Cleaning
Clean the appliance after every use or in between a number of large batches.
The Fry Pan Basket and the Base Tray have a non-stick coating with a
stainless steel Basket Net. Do not use metal utensils or harsh abrasives when
cleaning as this can damage the coating.
1. Unplug the appliance and make sure it cools completely.
2. Use a damp cloth to wipe the outside of the appliance.
3. Clean the Base Tray, Fry Pan Basket, Fry Pan Basket Net, or removable
components with a nonabrasive sponge, hot water, and mild detergent.
Note: Remove the Base Tray and Fry Pan Basket and place on a heat-
resistant surface to help cool the appliance quicker.
Note: If using the dishwasher for the Base Tray, Fry Pan Basket, and Fry Pan
Basket Net, it is recommended to use top rack only.
Tip: If there is residual food in the Base Tray and Fry Pan Basket, add some
hot water and let it soak separately for about 10 minutes for easier cleaning.
Afterward, use a soft cleaning brush to remove any lingering food.
Storage:
1. Unplug the appliance and let it cool down completely.
2. Make sure that all the parts are clean and dry.
3. Push the power cord into the storing capsule. Afx the cord by inserting it
into the cord-afxing opening in the back of the unit.
IMPORTANT - Do not immerse unit in water
or attempt to cycle through dishwasher.
The outer surface may be cleaned by wiping
carefully with a damp dishcloth or sponge.
Make sure unit has cooled completely prior
to cleaning.
WARNING
In case of other problems, immediately unplug and contact
Customer Service Department.
1-877-689-2838 • help@nuwavenow.com

22 23
Owner's Manual Owner's Manual
TROUBLESHOOTING
PROBLEM: POSSIBLE CAUSE(S): RESOLUTION(S):
The NuWave Brio
Healthy Digital
6-Qt. Air Fryer is
not turning on or
working.
The appliance is not
plugged in.
Did not press "ON/
OFF" button.
Base Tray with Fry
Pan Basket is not
in the NuWave Brio
Healthy Digital 6-Qt.
Air Fryer.
Insert the plug into an
appropriate grounded power
socket. Press "ON/OFF"
button after settings are
selected. Place the Fry Pan
Basket in the NuWave Brio
Healthy Digital 6-Qt
Air Fryer.
The ingredients
fried in the Fry Pan
Basket are not
completely cooked.
Too many ingredients
were used. The cooking
temperature is too low.
The cooking time is
too short.
Remove some ingredients
from the Fry Pan Basket.
Smaller batches are fried
more evenly. Fry at a
higher temperature. Set the
NuWave Brio Healthy Digital
6-Qt. Air Fryer to fry for a
longer time.
The food is
fried unevenly.
Certain types of
ingredients need to be
shaken halfway through
the cooking time.
Ingredients that are on
the top need to be shaken
halfway through the
cooking time.
Fried snacks are
not crispy when
they come out of the
NuWave Brio Healthy
Digital 6-Qt. Air Fryer.
You used a type of
snack meant to be
prepared in a traditional
deep fryer.
Use snacks designed to be
baked in a traditional oven,
or lightly brush some olive
oil onto the snacks before
placing in Brio for a crispier
result.
Cannot slide the Fry
Pan Basket into the
appliance properly.
The Fry Pan Basket is
overlled. The Fry Pan
Basket is not placed in
the Base Tray correctly.
Do not ll the Fry Pan
Basket more than 4/5. Push
the Fry Pan Basket down
into the Base Tray until you
hear a click.
PROBLEM: POSSIBLE CAUSE(S): RESOLUTION(S):
White smoke is
coming out of
the product.
You are frying greasy
foods. The Fry Pan
Basket Net contains
greasy residue from
previous uses.
When preparing greasy
ingredients in the Air Fryer,
large amounts of oil can
smoke and inltrate Fry Pan
Basket. The oil will produce
white smoke and the Fry
Pan Basket might become
hotter than usual. This will not
affect the nal cooking result.
White smoke is caused by
grease heating up in the Fry
Pan Basket. Make sure you
clean Fry Pan Basket properly
after use.
French fries are
fried unevenly in
the NuWave Brio
Healthy Digital
6-Qt. Air Fryer.
You did not soak the
potato sticks properly
before you fried them.
You did not use the
right potato type or
they were not fresh.
Soak potato sticks in a
bowl of water for at least
30 minutes, take them out,
and dry them with paper
towels. Use fresh potatoes
and make sure they stay rm
during air-frying.
French fries are not
crispy when they
come out of the
NuWave Brio Healthy
Digital 6-Qt. Air Fryer.
The crispiness of the
fries depends on the
amount of oil and water
in the fries.
Make sure you dry the potato
sticks properly before you add
the oil. Cut the potato sticks
smaller and dry them for a
crispier result. Add slightly
more oil on potatoes before
placing in Brio again for a
crispier result.
If the unit needs to be replaced or returned to the manufacturer,
please contact our Customer Service Department at: 1-877-689-2838
or help@nuwavenow.com.
TROUBLESHOOTING (Continued)
Contact Customer Service if any of these errors occur:
Code
Error
E1 E2 E3
Sensor open
ended
Sensor short
circuit
Overheat

24 25
Owner's Manual Owner's Manual
LIMITED WARRANTY
The NuWave Brio
®
6Q Digital Air Fryer
THE MANUFACTURER WARRANTS
The Brio, including the Base Tray, Fry Pan Divider, Fry Pan Basket, Fry Pan Basket
Net, are to be free from manufacturer defects.
All electrical components are warrantied for 1 year from the date of purchase, under
normal household use, and when operated in accordance with the Manufacturer’s
written instructions. The Manufacturer will provide the necessary parts and labor to
repair any part of the Brio at NuWave LLC Service Department. After the expiration of
the warranty, the cost of the labor and parts will be the responsibility of the owner.
MANUFACTURER’S OBLIGATION
The Manufacturer’s obligation under this Limited Warranty is limited, to the extent
allowable by law, to repairing or replacing any part covered by this Limited Warranty
which upon examination is found to be defective under normal use. The Limited
Warranty is applicable only within the continental United States and only to the
original purchaser of the manufacturer’s authorized channels of distribution. THE
LIMITED WARRANTY MAY NOT BE ALTERED, VARIED OR EXTENDED EXCEPT
BY A WRITTEN INSTRUMENT EXECUTED BY THE MANUFACTURER. THE
REMEDY OF REPAIR OR REPLACEMENT AS PROVIDED UNDER THIS LIMITED
WARRANTY IS EXCLUSIVE. IN NO EVENT SHALL THE MANUFACTURER BE
LIABLE FOR ANY CONSEQUENTIAL OR INCIDENTAL DAMAGES TO ANY PERSON,
WHETHER OR NOT OCCASIONED BY NEGLIGENCE OF THE MANUFACTURER,
INCLUDING WITHOUT LIMITATION, DAMAGES FOR LOSS OF USE, COSTS OF
SUBSTITUTION, PROPERTY DAMAGE, OR OTHER MONEY LOSS.
Some states do not allow the exclusion or limitation of incidental or consequential
damages, so the above limitation exclusions may not apply. This Limited Warranty gives
specic legal rights, and there may also be other rights which vary from state to state.
EXCEPT AS OTHERWISE EXPRESSLY PROVIDED ABOVE, THE MANUFACTURER
MAKES NO WARRANTIES EXPRESSED OR IMPLIED ARISING BY LAW OR
OTHERWISE, INCLUDING WITHOUT LIMITATION, THE IMPLIED WARRANTIES OF
MERCHANTABILITY AND FITNESS FOR A PARTICULAR PURPOSE TO ANY OTHER
PERSON. READ YOUR OWNER’S MANUAL. IF YOU STILL HAVE ANY QUESTIONS
ABOUT OPERATION OR WARRANTY OF THE PRODUCT, PLEASE CONTACT
NUWAVE LLC.
DISPUTE RESOLUTION PROCEDURE. For disputes relating to use of the website or
use or purchase of a NuWave product or service (collectively “Disputes”), you agree
to rst contact NuWave LLC at (877) 689-2838 (phone), (847) 367-5486 (facsimile),
or legal@nuwavenow.com (email). If we cannot resolve your dispute informally, any
and all disputes shall be submitted to nal and binding arbitration. You may start the
arbitration process by submitting in writing a demand to the American Arbitration
Association (“AAA”) and sending a copy to NuWave. NuWave will pay all ling costs. A
single arbitrator of the AAA will conduct the arbitration in a location convenient to you
or by phone. The arbitrator’s award will be binding and may be entered as a judgment
in a court of competent jurisdiction. The arbitration will be conducted in accordance
with the provisions of AAA’s Commercial Arbitration Rules and Mediation Procedures
in effect at the time of submission of your demand for arbitration. See https://www.adr.
org/sites/default/les/CommercialRules_Web.pdf. Except as may be required by law as
determined by an arbitrator, no party or arbitrator may disclose the existence, content,
or results of any arbitration hereunder without prior written consent of both parties.
LIMITED WARRANTY (Continued)
A. WAIVER OF RIGHT TO SUE. By agreeing to arbitration you understand that, to the
maximum extent permitted by law, you are agreeing to waive your right to le suit in
any court, to a court hearing, judge trial, and jury trial.
B. CLASS ACTION WAIVER. To the maximum extent permitted by law you expressly
agree to refrain from bringing or joining any claims in any representative or class-
wide capacity, including but not limited to, bringing or joining any claims in any class
action or class-wide arbitration.
C. OPT OUT PROCEDURE. To opt out of arbitration you must contact NuWave. To
request to opt out of arbitration contact us at legal@nuwavenow.com (email), NuWave
LLC, 1795 N. Buttereld Road, Libertyville, IL 60048, U.S.A., (847) 367-5486 (fax), or
(877) 689-2838 or (224) 206-3019 (phone). You will have thirty (30) days from the date
of product delivery to opt out of arbitration with respect to any dispute arising out of or
relating to use or purchase of any NuWave product. If more than 30 days have passed
you are not eligible to opt out of arbitration and will have waived your right to sue or
participate in a class action with respect to the dispute arising out of your purchase or
use of a NuWave product. For any dispute arising out of your use of NuWave’s website,
you have thirty (30) days from the date you provided information to the website to opt
out of arbitration. If more than 30 days have passed you are not eligible to opt out of
arbitration and you will have waived your right to sue and participate in a class action
with respect to the dispute arising out of your use of NuWave’s website.
D. SOME MATTERS ARE NOT SUBJECT TO ARBITRATION. Notwithstanding the
foregoing, the following shall not be subject to arbitration and may be adjudicated
only in the state and federal courts of Illinois: (i) any dispute, controversy, or claim
relating to or contesting the validity of our intellectual property rights and proprietary
rights, including without limitation, patents, trademarks, service marks, copyrights,
or trade secrets; (ii) an action by a party for temporary, preliminary, or permanent
injunctive relief, whether prohibitive or mandatory, or other provisional relief; or
(iii) interactions with governmental and regulatory authorities. You expressly agree
to refrain from bringing or joining any claims in any representative or class-wide
capacity, including but not limited to, bringing or joining any claims in any class action
or any class-wide arbitration.
READ YOUR OWNER’S MANUAL
If you still have any questions about operation or warranty of the product, please
contact NuWave LLC at: 1-877-689-2838 or email help@nuwavenow.com.
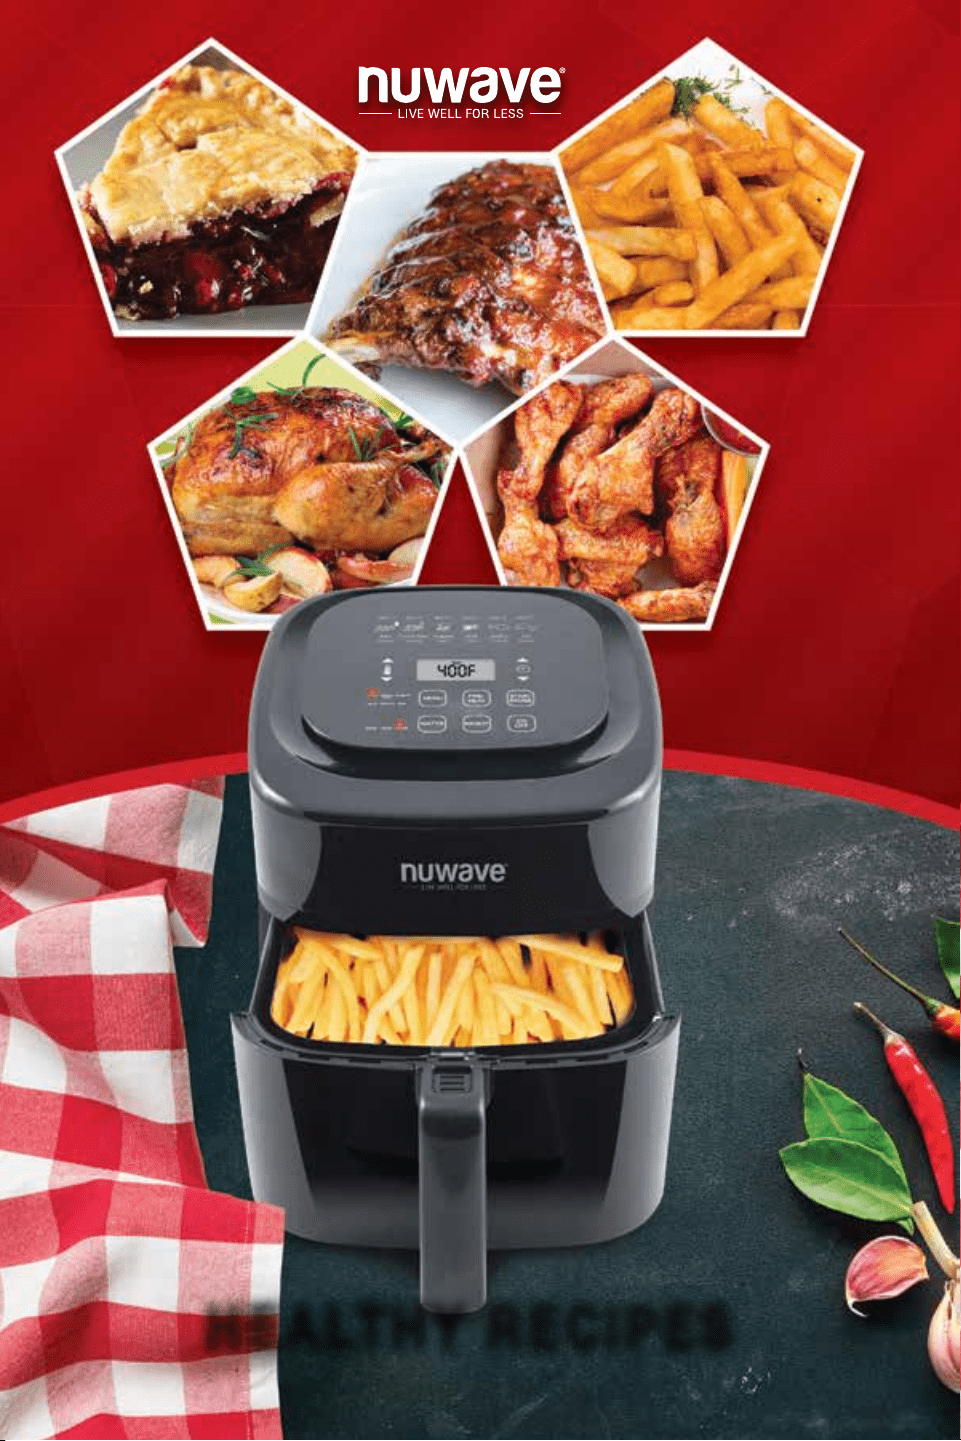
26 27
Recipes Recipes
26
Recipes
HEALTHY RECIPESHEALTHY RECIPES
Twice-Baked Potatoes (Serves 2)
Time and Temp:
Prep Time: 10 minutes
Cook Time: 43-50 minutes
Temp: 390˚F + 350˚F
Ingredients:
2 russet potatoes
½ cup of sour cream, plus extra for garnish
½ cup of chopped broccoli
5 slices of chopped bacon, cooked
1 tablespoon of salt
1 tablespoon of black pepper
1 tablespoon of butter
¾ cup of milk
¾ cup sharp cheddar cheese, shredded
2 tablespoons of chopped chives
Directions:
1. Place potatoes in NuWave Brio Fry Pan Basket and bake at 390°F for 35-40
minutes, or until soft in the middle.
2. Once fully baked, remove potatoes from NuWave Brio and let cool.
3. While potatoes are baking, combine sour cream, broccoli, bacon, salt, pepper, butter,
and milk in medium bowl; set aside.
4. When potatoes are cool to the touch, cut potatoes in half and scoop out insides.
5. Add removed potato to sour cream mixture and stir to combine.
6. Place potato mixture back in skins and place in NuWave Brio Basket.
7. Bake potatoes at 350°F for 8-10 minutes.
8. Let potatoes cool for about 3-5 minutes, then transfer to serving tray and top with
sour cream, cheese and chives.

28 29
Recipes Recipes
Roasted Brussels Sprouts (Serves 4)
Time and Temp:
Prep Time: 10 minutes
Cook Time: 15 minutes
Temp: 390˚F
Ingredients:
1 pound fresh Brussels sprouts
2 teaspoons olive oil
½ teaspoon kosher salt
½ teaspoon black pepper
½ teaspoon granulated garlic
Directions:
1. Remove any tough or bruised outer Brussels sprouts leaves.
2. Trim the stems on the sprouts.
3. Rinse sprouts, shake dry, and set aside.
4. Press “Pre-Heat”. Set temperature at 390°F for 15 minutes. Press “Start”.
5. Combine salt, pepper, garlic, and olive oil in bowl.
6. Add sprouts to bowl and toss to coat.
7. Once ready, place sprouts in Fry Pan Basket and cook, pausing occasionally to shake.
Tip: The sprouts are done when the centers are tender and the outsides are
caramelized and a bit crispy. If the Brussels sprouts are large, cut in half vertically to
ensure proper cooking.
Home Fries (Serves 6)
Time and Temp:
Prep Time: 40 minutes
Cook Time: 15 minutes
Temp: 390˚F
Ingredients:
6 medium russet potatoes
2 tablespoons oil
½ tablespoon granulated garlic
1½ teaspoons paprika
½ teaspoon black pepper
½ teaspoon salt
Directions:
1. Boil potatoes in salted water for 40 minutes or until fork tender. Cool completely.
2. Add oil, garlic, paprika, pepper, and salt in mixing bowl and mix to combine.
3. Cut cooled potatoes into quarters and lightly toss in the mixture of oil and spices.
4. Press “Pre-Heat”, set temperature at 390˚F and set cooking time at 14-16 minutes.
Press “Start”.
5. Once ready, add the potato wedges to Fry Pan Basket skin side down, being
careful not to overcrowd.
6. Cook wedges until golden brown.

30 31
Recipes Recipes
Air-Baked Eggs (Serves 3)
Time and Temp:
Prep Time: 10 minutes
Cook Time: 7-10 minutes
Temp: 300˚F
Ingredients:
3 ramekins
6 ounces diced ham
3 large eggs
3-6 spinach leaves (optional)
3 teaspoons milk, divided
Non-Stick cooking spray or butter
salt and pepper to taste
Directions:
1. Press “Pre-Heat”. Set temperature at 300˚F for 7-10 minutes. Press “Start”.
2. Spray ramekins with non-stick spray.
3. Add spinach, ham, 1 egg, 1 teaspoon milk, salt, and pepper to each ramekin.
4. Once ready, place ramekins in Fry Pan Basket and cook.
Air-Fried Tortilla Chips (Serves 4)
Time and Temp:
Prep: 5 minutes
Cook: 4 minutes
Temp: 390˚F
Ingredients:
8 corn tortillas
1 teaspoon olive oil
Salt to taste
Directions:
1. Press “Pre-Heat”, set temperature at 390˚F and set cooking time for 4 minutes.
Press “Start”.
2. Brush tortillas with olive oil.
3. Cut tortillas into triangles.
4. Once ready, place in Fry Pan Basket and cook.
5. Season with salt and enjoy.
Tip: Serve with your favorite salsa or guacamole.

32 33
Recipes Recipes
Time and Temp:
Prep Time: 5 minutes
Cook Time: 16-18 minutes
Temp: 360˚F
Ingredients:
1 ½ pounds of ground beef
8 slices of cooked bacon, cooked
1 egg
2 tablespoons Worchestershire sauce
½ cup of fresh chopped onions
2 tablespoons of hamburger
seasoning
4 slices of cheese
4 slices of tomatoes
4 leaves of lettuce
4 hamburger buns
Classic Bacon Cheeseburger (Serves 4)
Directions:
1. Place ground beef in a mixing bowl, add chopped onions, Worchestershire sauce,
egg, and hamburger seasoning.
2. Form 4 hamburgers patties.
3. Place patties in air fryer basket and cook for 360˚F for 16 minutes, ipping ½
way through.
4. Once patties are nished place to the side on a plate.
5. Place hamburger buns on a serving tray put patty between buns add cheese,
tomatoes, and, bacon, and lettuce your choice of spread.
Buffalo Wings (Serves 4)
Time and Temp:
Prep Time: 10 minutes
Cook Time: 25 minutes
Temp: 390˚F
Ingredients:
2 pounds chicken wings
(tips removed and wings cut into
drumettes and ats)
½ teaspoon salt
½ teaspoon pepper
½ teaspoon granulated garlic
¼ cup favorite wing sauce
½ c of vegetable oil
Directions:
1. Press “Pre-Heat”, set temperature at 360˚F and set cooking time at 25 minutes.
Press “Start”.
2. Combine salt, pepper, garlic, and oil in bowl and mix well.
3. Add wings to bowl and toss until fully coated.
4. Once ready, place half of the chicken wings in the Fry Pan Basket, and cook.
Shake the Fry Pan Basket to ensure that the wings are evenly cooked.
5. Transfer cooked wings to large bowl and toss with 2 tablespoons wing sauce.
6. Repeat steps 4-5 with remaining wings and sauce.

34 35
Recipes Recipes
Spinach-Stuffed Chicken (Serves 2)
Time and Temp:
Prep Time: 15 minutes
Cook Time: 31-35 minutes
Temp: 360˚F
Ingredients:
2 (1-pound) boneless, skinless chicken
breasts
2 cups breadcrumbs
1 tablespoon butter, melted
1 tablespoon olive oil
¼ cup chopped red pepper (optional)
¼ cup chopped yellow pepper (optional)
¼ cup chopped onion
2 cups fresh spinach
1 tablespoon salt
1 tablespoon pepper
½ cup mozzarella cheese, shredded
Toothpicks
Directions:
1. Place chicken on cutting board and slice through one side making a pocket; set aside.
2. Add breadcrumbs and butter to bowl and stir to combine; set aside.
3. Add oil, peppers, onion, salt, and pepper to fry pan and sauté on medium heat for
3-5 minutes.
4. Add spinach and continue to cook until wilted.
5. Add breadcrumb mixture and cheese to pan and stir to combine.
6. Stuff spinach mixture into prepared chicken pockets and secure with toothpicks.
7. Place chicken in NuWave Brio Basket and cook at 360°F for 31-35 minutes.
Tip: If chicken begins to brown too quickly, simply cover with foil.
Chicken Satay (Serves 4)
Time and Temp:
Prep Time: 15 minutes
Cook Time: 6-8 minutes
Temp: 390˚F
Ingredients:
1 pound boneless chicken thighs
½ cup soy sauce
½ cup pineapple juice
¼ cup sesame oil
4 garlic cloves, chopped ne
4 scallions, chopped
1 tablespoon grated ginger
2 teaspoons toasted sesame seeds
1 pinch black pepper
Directions:
1. Cut each thigh into strips, trim excess fat.
2. Combine all the other ingredients into a large mixing bowl and mix well.
3. Place chicken onto skewers.
4. Add skewered chicken to mixing bowl and spoon marinade onto chicken to coat
all sides.
5. Cover and refrigerate chicken for at least 2 hours, up to 24 hours.
6. Press “Pre-Heat”, set temperature at 390˚F and set cooking time at 6-8 minutes.
Press “Start”.
7. Once ready, place skewers in the Fry Pan Basket and cook.
8. Repeat steps 6-7 with remaining skewers.
Tip: If using wooden skewers, soak the skewers in water for 15 minutes adding
chicken to keep them from burning.

36 37
Recipes Recipes
Grilled Chicken Tenders (Serves 3)
Time and Temp:
Prep Time: 5 minutes
Cook Time: 15 minutes
Temp: 390˚F
Ingredients:
½ pound boneless chicken tenderloins
¼ cup creamy Caesar dressing
1 tablespoon olive oil
dash garlic powder
½ teaspoon dried basil leaves
1 teaspoon dried minced onion
dash pepper
Directions:
1. Rinse chicken and pat dry.
2. Combine chicken with all remaining ingredients in bowl or food storage bag.
3. Seal or cover chicken and refrigerate for 1-2 hours.
4. Press “Pre-Heat”, set temperature at 390˚F and set cooking time at 15 minutes.
Press “Start”.
5. Once ready, place chicken in Fry Pan Basket, and cook, halfway through to ip
the tenders to ensure they are evenly cooked.
Parmesan Chicken Tenders (Serves 4)
Time and Temp:
Prep Time: 10 minutes
Cook Time: 8-12 minutes
Temp: 330˚F
Ingredients:
non-stick cooking spray
¼ cup all-purpose our
2 large eggs
½ cup nely shredded parmesan cheese
1 cup coarse dry breadcrumbs
1 pound chicken tenders
1 tablespoon Italian seasoning
1 teaspoon garlic powder
¼ teaspoon salt
Directions:
1. Press “Pre-Heat”, set temperature at 330˚F and set cooking time at 8-12 minutes.
Press “Start”.
2. Place our in shallow dish.
3. Lightly beat eggs in separate shallow dish.
4. Combine Parmesan and breadcrumbs in separate shallow dish.
5. In medium bowl, toss chicken tenders in Italian seasoning, garlic powder, and salt.
6. Coat each chicken tender in our, shaking off any excess.
7. Dip tender in egg and let any excess drip off.
8. Roll tender in breadcrumb mixture.
9. Once ready, spray Fry Pan Basket with non-stick cooking spray and place half of
the tenders in the Fry Pan Basket. Set remaining half aside for later.
10. Generously coat tops of each tender with non-stick cooking spray.
11. Halfway through carefully turn each tender and top with more cooking spray.
12. Ensure the remaining cooking time is at least 4 minutes, and cook until outside is
crisp and tenders are cooked through.
13. Repeat steps 9-12 with remaining tenders.
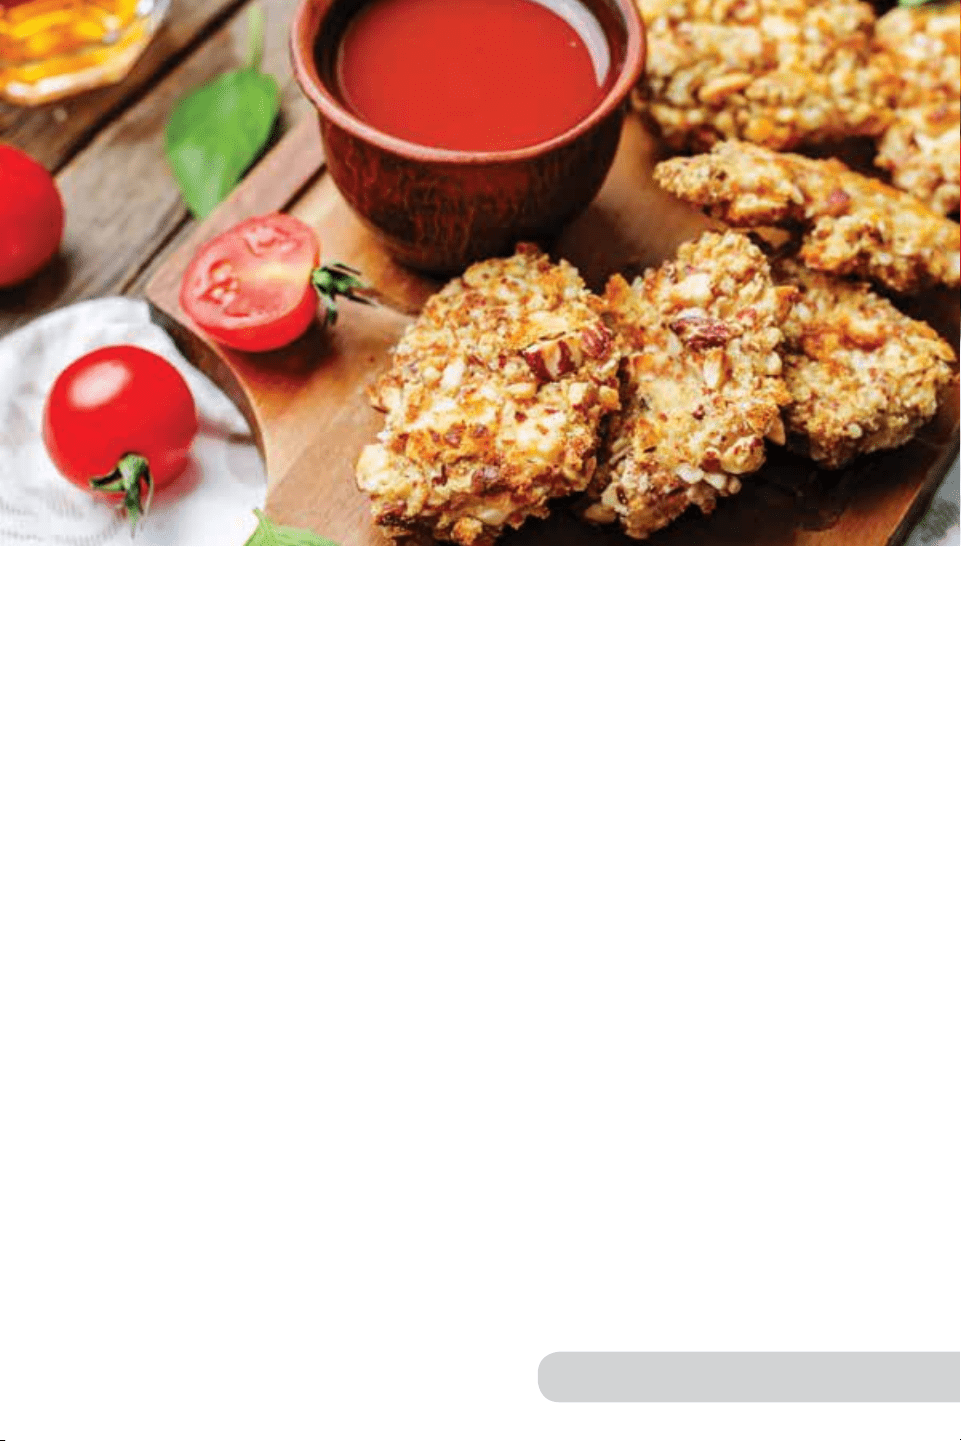

38 39
Recipes Recipes
Butter-Infused Chicken (Serves 6-8)
Time and Temp:
Prep Time: 15 minutes
Cook Time: 10-12 minutes a pound
Temp: 375˚F
Butter Paste Ingredients:
1 stick of butter
4 teaspoons garlic powder
2 tablespoons dry oregano seasoning
1 onion, sliced
1 Green pepper, sliced (seeds and
membrane removed)
Chicken Ingredients:
1 (3-5 pound) whole chicken
4 tablespoons seasoning salt
3 tablespoons black pepper
Directions:
1. In a small mixing bowl, combine butter, oregano, and garlic powder; set aside.
2. Press Pre-Heat, set temperature at 375°F and set cooking time for 10-12 minutes
a pound, then press "Start".
3. Lightly separate the skin from the meat of the chicken without tearing the skin.
4. Carefully spread butter mixture between the skin and the meat.
5. Place sliced onions and peppers between the skin and meat.
6. Sprinkle remaining seasonings over chicken.
7. Once ready, place chicken in NuWave Brio Basket breast side down and cook,
pausing halfway through to ip chicken and cover with foil during remaining
cooking time.
8. Let chicken rest at least 10 minutes before carving.
Tip: Make sure internal temperature of the chicken is 160-165°F.
Cajun Shrimp (Serves 2)
Time and Temp:
Prep Time: 5 minutes
Cook Time: 6 minutes
Temp: 390˚F
Ingredients:
½ pound shrimp, peeled and deveined
¼ teaspoon cayenne pepper
½ teaspoon Old Bay
®
Seasoning
¼ teaspoon smoked paprika
1 tablespoon olive oil
Pinch of salt
Directions:
1. Press “Pre-Heat”, set temperature at 390˚F and set cooking time at 6 minutes.
Press “Start”.
2. Add all ingredients to mixing bowl and mix until shrimp is completely coated.
3. Once ready, place shrimp in Fry Pan Basket and cook.

40 41
Recipes Recipes
Chimichurri Skirt Steak (Serves 2)
Time and Temp:
Prep Time: 1 hr 30 minutes
Cook Time: 10-15 minutes
Temp: 390˚F
Sauce Ingredients:
1 bunch at leaf parsley, roughly chopped
(about 1 cup, packed)
5 large garlic cloves, roughly chopped
(about 3 tablespoons)
1 tablespoon dried oregano
1 teaspoon crushed red pepper akes
½ cup distilled white vinegar
½ cup extra-virgin olive oil
1 teaspoon salt
1 teaspoon pepper
Steak Ingredients:
1-pound skirt steak
Salt and pepper to taste
Directions:
1. Place all sauce ingredients in food processor or blender and blend until just
combined; set aside.
2. Place steak in bowl or container.
3. Add 4 tablespoons chimichurri sauce to container, spreading evenly on all sides of
the steak.
4. Let steak marinate at room temperature for 1 hour, or in the refrigerator for at least
2 hours, or overnight.
5. Press “Pre-Heat”, set temperature at 390˚F and set cooking time at 8-10 minutes.
Press “Start”.
6. Once ready, season steak with salt and pepper and place in Fry Pan Basket.
7. Add additional time if you prefer your steak more done.
8. Let steak rest for 5 minutes, then slice against the grain.
9. Serve steak with remaining chimichurri sauce.
Tip: Marinate the steak in a container made from non-reactive materials, such as
plastic, enamel, glass or stainless steel. If you marinate the steak in the refrigerator,
allow the steak to return to room temperature before s cooking. This should take about
30 minutes. Chimichurri sauce is best served at room temperature.
Grilled Ham and Cheese (Serves 2)
Time and Temp:
Prep Time: 10 minutes
Cook Time: 4-5 minutes
Temp: 360˚F
Ingredients:
4 slices white bread
2 slices American cheese
2 slices of thinly sliced ham
¼ cup melted butter
Directions:
1. Press “Pre-Heat”, set temperature at 360˚F and set cooking time at 4-5 minutes.
Press “Start”.
2. Brush each bread slice with butter on one side.
3. Layer ham and cheese on bread and assemble sandwiches with the buttered sides
of the bread out.
4. One ready, place sandwiches in Fry Pan Basket and cook until golden brown.
Tip: Use precooked bacon or sliced turkey instead of ham for a different avor.

42 43
Recipes Recipes
Tortilla-Crusted Tilapia (Serves 2)
Time and Temp:
Prep Time: 5 minutes
Cook Time: 15 minutes
Temp: 375˚F
Ingredients:
1 whole jalapeño, seeded & deveined
¾ cup cilantro
½ teaspoon chili powder
¼ teaspoon cumin
¼ teaspoon onion powder
1 teaspoon seasoning salt
18 whole tortilla chips
1 whole large egg, beaten
2 whole tilapia llets
Directions:
1. Press “Pre-Heat”, set temperature at 375˚F and set cooking time at 12-15 minutes.
Press “Start”.
2. Add jalapeño, cilantro, chili powder, cumin, onion powder, and salt to food
processor and mix to combine.
3. Add tortilla chips to food processor and mix until mixture forms small chunks.
4. Transfer chip mixture to plate.
5. Place beaten egg in small dish.
6. Dredge each tilapia let in egg, then chip mixture, ensuring mixture adheres to
each side.
7. Once ready, spray Fry Pan Basket with non-stick cooking spray and place breaded
lets in Fry Pan Basket and cook till golden.
Salmon with Orange Curry Sauce (Serves 2)
Time and Temp:
Prep: 10 minutes
Cook: 8-10 minutes
Temp: 375˚F
Curry Sauce Ingredients:
½ cup mayonnaise
2 teaspoons curry powder
¾ cup concentrated frozen orange juice
Salmon Ingredients:
1½ pounds salmon, cut into 2 llets
2 tablespoons salt
2 tablespoons pepper
2 cups of spinach
Directions:
1. Add mayonnaise, curry powder and frozen orange juice to small bowl and stir to
combine; set aside.
2. Place salmon in NuWave Brio Basket and season with salt and pepper.
3. Cook salmon at 375°F for 8-10 minutes, pausing halfway through to ip.
4. While salmon is cooking, sauté butter and spinach in fry pan on medium heat for
3-4 minutes or until wilted.
5. Once salmon is ready, place spinach on serving plate and place salmon on top.
6. Drizzle curry sauce over salmon and serve.
Tip: Curry sauce can be served either warm or cold.

44 45
Recipes Recipes
Turkey Sliders (Serves 2)
Time and Temp:
Prep Time: 5 minutes
Cook Time: 10 minutes
Temp: 390˚F
Ingredients:
1 pound ground turkey
2 slices Colby Jack cheese, cut in half
4 dinner rolls
½ teaspoon granulated garlic powder
½ teaspoon salt
½ teaspoon pepper
Directions:
1. Press “Pre-Heat”, set temperature at 390˚F and set cooking time at 10 minutes.
Press “Start”.
2. Form ground turkey into 4 (4-ounce) patties and season with salt, pepper,
and garlic.
3. Once ready, add sliders to Fry Pan Basket and cook. Halfway through ip the
sliders to ensure they are evenly cooked.
4. Open Air Fryer and top each slider with cheese.
5. Set cooking time at 1 minute, press "Start" and cook sliders until cheese has melted.
Apple-Glazed Pork Tenderloin (Serves 4)
Time and Temp:
Prep: 20 minutes
Cook: 15 minutes
Temp: 390˚F
Apple Vinegar Sauce
Ingredients:
⅓ cup of apple vinegar
½ cup of chicken broth
½ teaspoon of cinnamon
½ teaspoon of brown sugar
2 tablespoons of maple syrup
½ Granny Smith apple, cored and cut
into in ½-inch slices
Pork Tenderloin Ingredients:
1-1½ pounds pork tenderloin
2 tablespoons of salt
2 tablespoons of pepper
1 half of chopped onion
Directions:
1. Place tenderloin re-sealable plastic bag.
2. Add vinegar, salt, pepper and onion to bag, ensuring tenderloin is completely coated.
3. Seal bag and place in refrigerator to marinate for at least 20 minutes.
4. Place marinated tenderloin in NuWave Brio Basket and season with additional salt
and pepper.
5. Cook tenderloin at 390°F for 15-20 minutes.
6. While tenderloin cooks, place remaining ingredients in saucepan and simmer on
medium heat for 4-5 minutes.
7. Once tenderloin is cooked, remove from NuWave Brio and let sit for 3-5 minutes.
8. Cut tenderloin into ½-inch slices and top with cooked apples and sauce.
Tip: You can use any leftover sauce for dipping.

46 47
Recipes Recipes
Citrus Green Beans (Serves 4)
Time and Temp:
Prep Time: 10 minutes
Cook Time: 10 minutes
Temp: 390˚F
Ingredients:
1 pound green beans, washed
& de-stemmed
juice from 1 lemon
pinch salt
black pepper to taste
¼ teaspoon olive oil
Directions:
1. Press “Pre-Heat”, set temperature at 390˚F and set cooking time at 10 minutes.
Press “Start”.
2. Once ready, place green beans in Fry Pan Basket and cook.
3. When nished, squeeze lemon juice onto green beans.
4. Season green beans with salt and pepper and toss with oil.
Crispy Tofu (Serves 6)
Time and Temp:
Prep: 10 minutes
Cook: 8-10 minutes
Temp: 350˚F
Ingredients:
12 ounces low-fat, extra-rm tofu
1 teaspoon sesame oil
1 teaspoon teriyaki sauce
1 tablespoon honey
2 tablespoons Sriracha sauce
2 tablespoons low-sodium soy sauce
1 teaspoon oil
Directions:
1. Cut tofu into 1-inch cubes; set aside in medium bowl.
2. Combine all remaining ingredients and pour over tofu, mixing to combine.
3. Let tofu marinate for at least 30 minutes, tossing a few times.
4. Press “Pre-Heat”, set temperature at 350˚F and set cooking time at 8-10 minutes.
Press “Start”.
5. Once ready, add marinated tofu to Fry Pan Basket, and cook, halfway through to
ip the tofu to ensure they are evenly cooked.
Tip: Serve over sauteed kale and tomatoes for a complete meal.

48 49
Recipes Recipes
Bacon-Wrapped Onion Rings (Serves 2)
Time and Temp:
Prep: 10 minutes
Cook: 8-10 minutes
Temp: 390˚F
Ingredients:
1 large white onion
1 pound bacon
3 tablespoons Sriracha sauce (optional)
Directions:
1. Cut onion horizontally into ½-inch thick slices and separate into individual rings.
2. Brush each onion ring with Sriracha.
3. Wrap each onion rings with bacon.
4. Place bacon-wrapped onion rings in Fry Pan Basket.
5. Cook at 390°F for 8-10 minutes.
6. Repeat air frying process with remaining rings.
Tip: Cut bacon slices in half for easier wrapping.
Party Meatballs (Serves 4)
Time and Temp:
Prep: 20 minutes
Cook: 15 minutes
Temp: 350˚F
Ingredients:
1 pound ground beef
¾ cup tomato ketchup
1 tablespoon Tabasco sauce
2 teaspoons Worcestershire sauce
¼ cup vinegar
1 tablespoon lemon juice
½ cup brown sugar
½ teaspoon dry mustard
3 gingersnaps, crushed
Directions:
1. Add all seasonings to large mixing bowl and mix to combine.
2. Add beef to bowl and mix well.
3. Press “Pre-Heat”, set temperature at 350˚F, and set cooking time at 15 minutes.
Press “Start”.
4. Form beef into medium-sized meatballs.
5. Once ready, place meatballs in Fry Pan Basket and cook.
Tip: Do not overcrowd the Fry Pan Basket. Cook in batches if you need to.

50 51
Recipes Recipes
Pasta Bake (Serves 4)
Time and Temp:
Prep: 5 minutes
Cook: 18 minutes
Temp: 390˚F
Ingredients:
½ box of dry penne noodles
2 cups of heavy whipping cream
⅓ cup of milk
1 cup of shredded sharp cheese
1 cup of shredded mozzarella cheese
1 tablespoon of salt
1 tablespoon of pepper
1 teaspoon of garlic powder
5 slices of chopped Canadian bacon
1 cup of chopped broccoli
Directions:
1. Press Pre-Heat, set temperature at 390°F and set cooking time for 18 minutes,
then press Start.
2. In medium bowl, combine Canadian bacon and broccoli, then mix in
remaining ingredients.
3. Pour pasta mixture into NuWave Brio Baking Pan and cover with foil.
4. Once ready, place Baking Pan in NuWave Brio Basket and cook.
5. Once complete, remove foil, stir pasta and let rest for about 3-5
minutes before serving.
Tip: You can use any type of cheese, meat or even veggies with this dish.
You can bake your pasta in any oven-safe dish that will t inside the NuWave Brio.
Philly Cheesesteak Braid (Serves 6-8)
Time and Temp:
Prep: 15 minutes
Cook: 12-15 minutes
Temp: 350˚F
Ingredients:
1-pound skirt steak, thinly sliced
2 tablespoons melted butter
1 tablespoon olive oil
½ onion, thinly sliced
½ green pepper, seeded, membrane
removed, and thinly sliced
½ cup mozzarella cheese, shredded
1 (8-ounce) tube crescent dough
Pinch of flour
Non-stick cooking spray
Directions:
1. Add olive oil to fry pan and sauté steak on medium heat for 4-6 minutes.
2. Add onions and green pepper to pan and cook for additional 5 minutes; set aside.
3. Dust cutting board with our.
4. Unroll crescent dough onto cutting board and shape into 1 large rectangle that will
t in NuWave Brio Basket.
5. Spoon steak mixture in a strip down the center of the dough and top with cheese.
6. Using a sharp knife, make cuts 1½ inches apart on the long sides of the dough
within ½-inch of the steak mixture.
7. Twist each strip once, alternating while crossing over the lling. Tuck the short
ends of the strips under and press together to seal.
8. Spray NuWave Brio Basket with non-stick cooking spray and place braid in the basket.
9. Brush braid with melted butter and cook at 350°F for 12-15 minutes.
10. Once ready, carefully remove braid, place on cutting board or serving tray and
cut crosswise.
Tip: Use any meat, cheese or vegetables for a variety of llings.

52 53
Recipes Recipes
Cheesy Rice-Stuffed Meatloaf (Serves 4-6)
Time and Temp:
Prep: 15 minutes
Cook: 15-20 minutes
Temp: 350˚F
Ingredients:
1 pound ground beef
1 egg
2 tablespoons Worchestershire sauce
2 tablespoons salt
2 tablespoons pepper
½ cup cooked rice
½ cup chopped yellow pepper
½ cup chopped green pepper
½ cup chopped onion
1 cup mozzarella cheese, shredded
2 cups marinara sauce
Directions:
1. In large bowl, combine beef, egg, Worcestershire sauce, salt, and pepper; set aside.
2. In separate bowl, combine rice, peppers, onion, and cheese; set aside.
3. Shape beef mixture into loaf that will t into the NuWave Brio Basket.
4. Place loaf on parchment paper or cutting board and cut in half horizontally.
5. Place rice mixture in center of bottom loaf.
6. Replace top loaf above rice mixture and seal the edges.
7. Place meatloaf in NuWave Brio Basket and cover in marinara sauce.
8. Cook at 350°F for 15-20 minutes.
9. Once complete, carefully remove meatloaf from NuWave Brio Basket and let it rest
for about 10 minutes before slicing.
Tip: To add avor, add chopped spinach, kale, parsley or cilantro to the cooked rice.
Santa Fe Stuffed Bell Peppers (Serves 4)
Time and Temp:
Prep: 10 minutes
Cook: 9 minutes
Temp: 360˚F
Ingredients:
1½ cups cooked rice
1 red pepper
1 yellow pepper
1 green pepper
1 orange pepper
2 pounds ground beef
2 cups fresh spinach
1 cup mozzarella cheese, shredded
1 cup frozen corn medley
1 tablespoon cayenne pepper
2 tablespoons seasoning salt
2 tablespoons black pepper
Directions:
1. Add water to stock pot and bring to a boil.
2. While waiting for water to boil, slice off top of each pepper and remove the
membrane and seeds. Set tops aside.
3. When water is at a boil, lightly drop in peppers and cook for up to 3 minutes before
removing and drain on paper towel upside down.
4. Add ground beef to fry pan and brown on medium-high heat until cooked through.
5. Drain fat from fry pan and set aside.
6. Press Pre-Heat, set temperature at 360°F and set cooking time for 9 minutes, then
press Start.
7. Lower stove temperature to medium and add spinach, cheese, cooked rice, corn
and spices to ground beef, mix together and cook until spinach begins to wilt.
8. Fill each pepper with the beef mixture.
9. Once ready, place peppers in NuWave Brio Basket and cook.
10. Once cooked, transfer peppers to serving plate and top with reserved top.

54 55
Recipes Recipes
Kale Chips (Serves 4)
Time and Temp:
Prep: 5 minutes
Cook: 2-3 minutes
Temp: 390˚F
Ingredients:
1 head kale
1 teaspoon olive oil
1 teaspoon soy sauce
Directions:
1. Press “Pre-Heat”, set temperature at 390˚F and set cooking time at 2-3 minutes.
Press “Start”.
2. Remove the center stem from kale and cut leaves into 1½-inch pieces.
3. Wash kale pieces and dry thoroughly.
4. Toss kale with the olive oil and soy sauce.
5. Once ready, place kale in Fry Pan Basket, and cook, halfway through to ip the
kale chips to ensure they are evenly cooked.
Roasted Tomatoes (Serves 4)
Time and Temp:
Prep: 5 minutes
Cook: 20 minutes
Temp: 320˚F
Ingredients:
2 tomatoes
Parsley to taste
Oregano to taste
Basil to taste
Thyme to taste
Rosemary to taste
Sage to taste
Black pepper to taste
Non-stick cooking spray
½ tablespoon extra-virgin olive oil
Directions:
1. Press “Pre-Heat”, set temperature at 320˚F and set cooking time at 20 minutes.
Press “Start”.
2. Wash tomatoes and cut in half.
3. Once ready, spray bottoms of tomato halves with non-stick spray and place
tomatoes in Fry Pan Basket.
4. Drizzle olive oil onto tomatoes and top with seasonings and cook.
5. Check for doneness and cook for additional 3-5 minutes if needed.
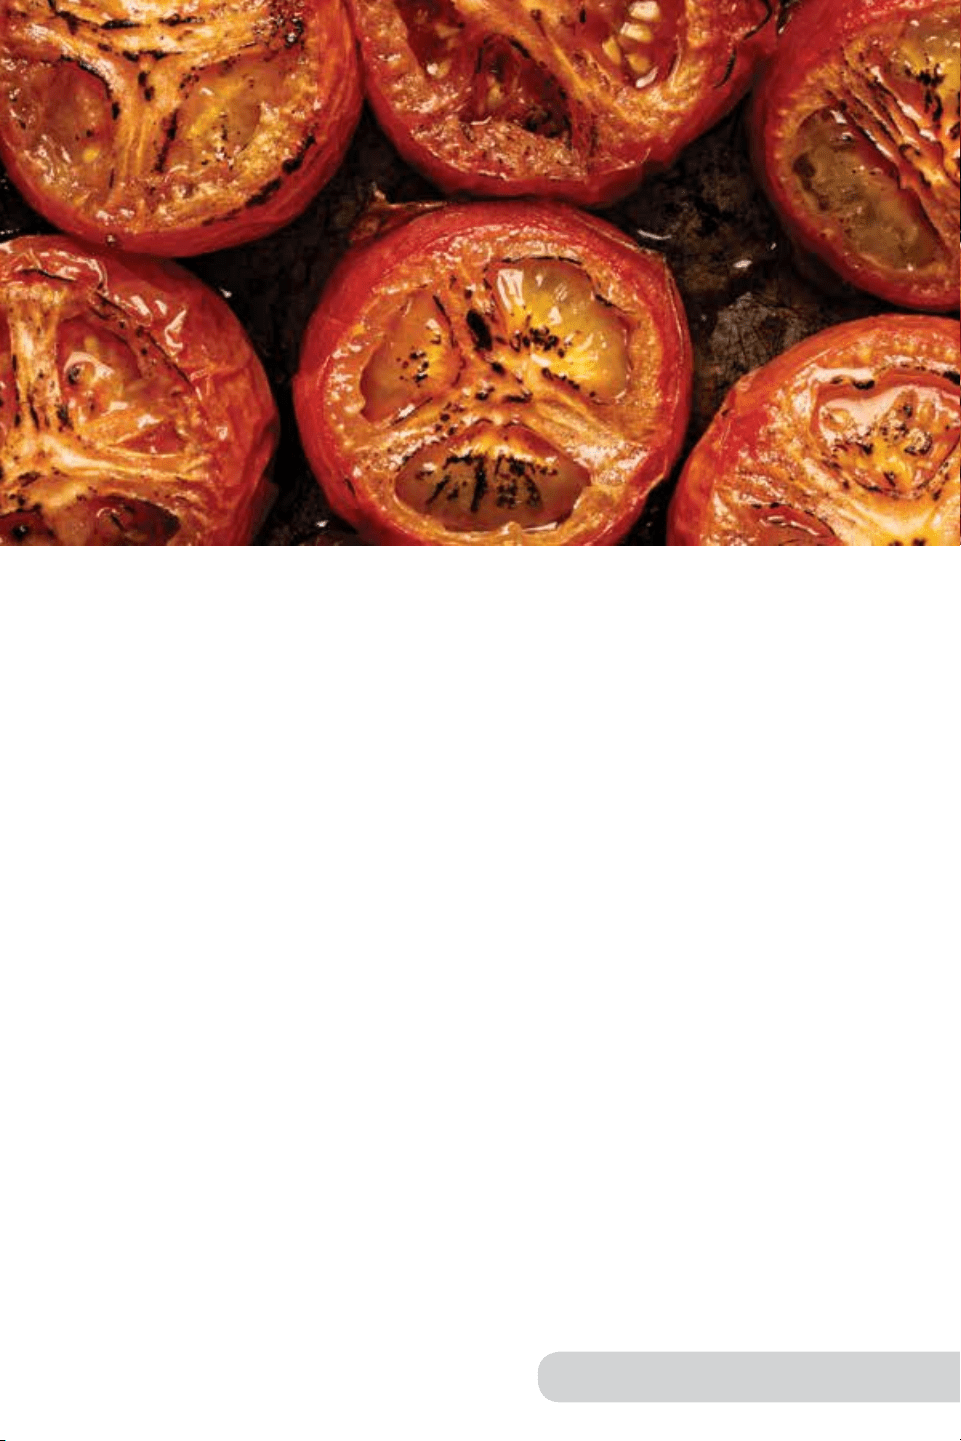

56 57
Recipes Recipes
Roasted Root Vegetables (Serves 4)
Time and Temp:
Prep Time: 10 minutes
Cook Time: 35 minutes
Temp: 330˚F
Ingredients:
2 carrots, peeled, halved & cut into
chunks
2 parsnips, peeled, halved
& cut into chunks
½ butternut squash, de-seeded, peeled
& cut into chunks
4 celery stalks, peeled and cut into
chunks
1 teaspoon ground cumin seeds
1 teaspoon ground coriander
1 tablespoon vegetable oil
1 teaspoon granulated garlic
salt and pepper to taste
Directions:
1. Press “Pre-Heat”, set temperature at 330˚F and set cooking time at 35 minutes.
Press “Start”.
2. Place all vegetables into bowl and drizzle with vegetable oil.
3. Add cumin seeds, coriander, garlic, salt, and pepper to bowl and stir well to combine.
4. Once ready, place vegetables in Fry Pan Basket, and cook, pausing halfway through
to shake.
Apple Pie (Serves 2-3)
Time and Temp:
Prep Time: 10 minutes
Cook Time: 30 minutes
Temp: 320˚F
Ingredients:
1 premade frozen pie crust
baking spray
1 large apple, cored & chopped
2 teaspoons lemon juice
1 tablespoon ground cinnamon
2 tablespoons sugar
½ teaspoon vanilla extract
1 tablespoon butter
1 beaten egg
1 tablespoon raw sugar
Directions:
1. Defrost pie crust according to package directions.
2. Press “Pre-Heat”, set temperature at 320˚F and set cooking time at 30 minutes.
Press “Start”.
3. Cut enough dough from pre-made crust to t 1 inch larger than small pie tin.
4. Use remaining dough to form smaller top crust; set aside.
5. Spray baking tin with baking spray and place the larger cut crust inside the baking
pan; set aside.
6. Add chopped apple, lemon juice, cinnamon, sugar, and vanilla extract to small
bowl and mix to combine.
7. Pour apple mixture into prepared pie crust.
8. Top apples with butter, spreading evenly.
9. Top pie with second pie crust and pinch edges closed. Make a few slits in the top
of the dough.
10. Spread beaten egg onto pie crust and sprinkle on raw sugar.
11. Once ready, place pie in Fry Pan Basket, and bake.
Tip: If necessary, roll the larger crust with a rolling pin to stretch to a uniform thickness.
Any baking tin 7 inches wide or smaller will t in the Air Fryer.

58 59
Recipes Recipes
Banana and Nutella
®
Wontons (Serves 4)
Time and Temp:
Prep Time: 10 minutes
Cook Time: 6-8 minutes
Temp: 350˚F
Ingredients:
8 wonton wrappers
8 teaspoons Nutella
®
1 banana
1 egg
1 teaspoon water
Cinnamon sugar or powdered sugar
for garnish
Directions:
1. Press “Pre-Heat”, set temperature at 350˚F and set cooking time at 6-8 minutes.
Press “Start”.
2. Add egg and water to small bowl and mix together to make egg wash.
3. Place 1 teaspoon Nutella in center of wonton wrapper.
4. Slice banana and place atop Nutella.
5. Brush egg wash along two sides of the wonton.
6. Seal wonton wrapper by folding the sides together.
7. Once ready, place wontons in Fry Pan Basket and cook.
8. Once the wontons have sufciently browned, carefully remove from the Air Fryer
and dust with cinnamon sugar or powdered sugar.
Time and Temp:
Prep Time: 20 minutes
Cook Time: 10 minutes
Temp: 350˚F
Ingredients:
½ pineapple
½ cup shredded coconut
1 small sprig fresh mint
1 cup vanilla yogurt
Pineapple Crescents (Serves 4)
Directions:
1. Cut pineapple into ½-inch-thick slices, cut slices in half, and remove the core.
2. Press “Pre-Heat”, set temperature at 350˚F and set cooking time at 10 minutes.
Press “Start”.
3. Dip pineapple slices into shredded coconut.
4. Once ready, gently place pineapple in Fry Pan Basket and cook.
5. While pineapple cooks, nely dice mint leaves and stir into vanilla yogurt.
6. Serve pineapple with yogurt dip.
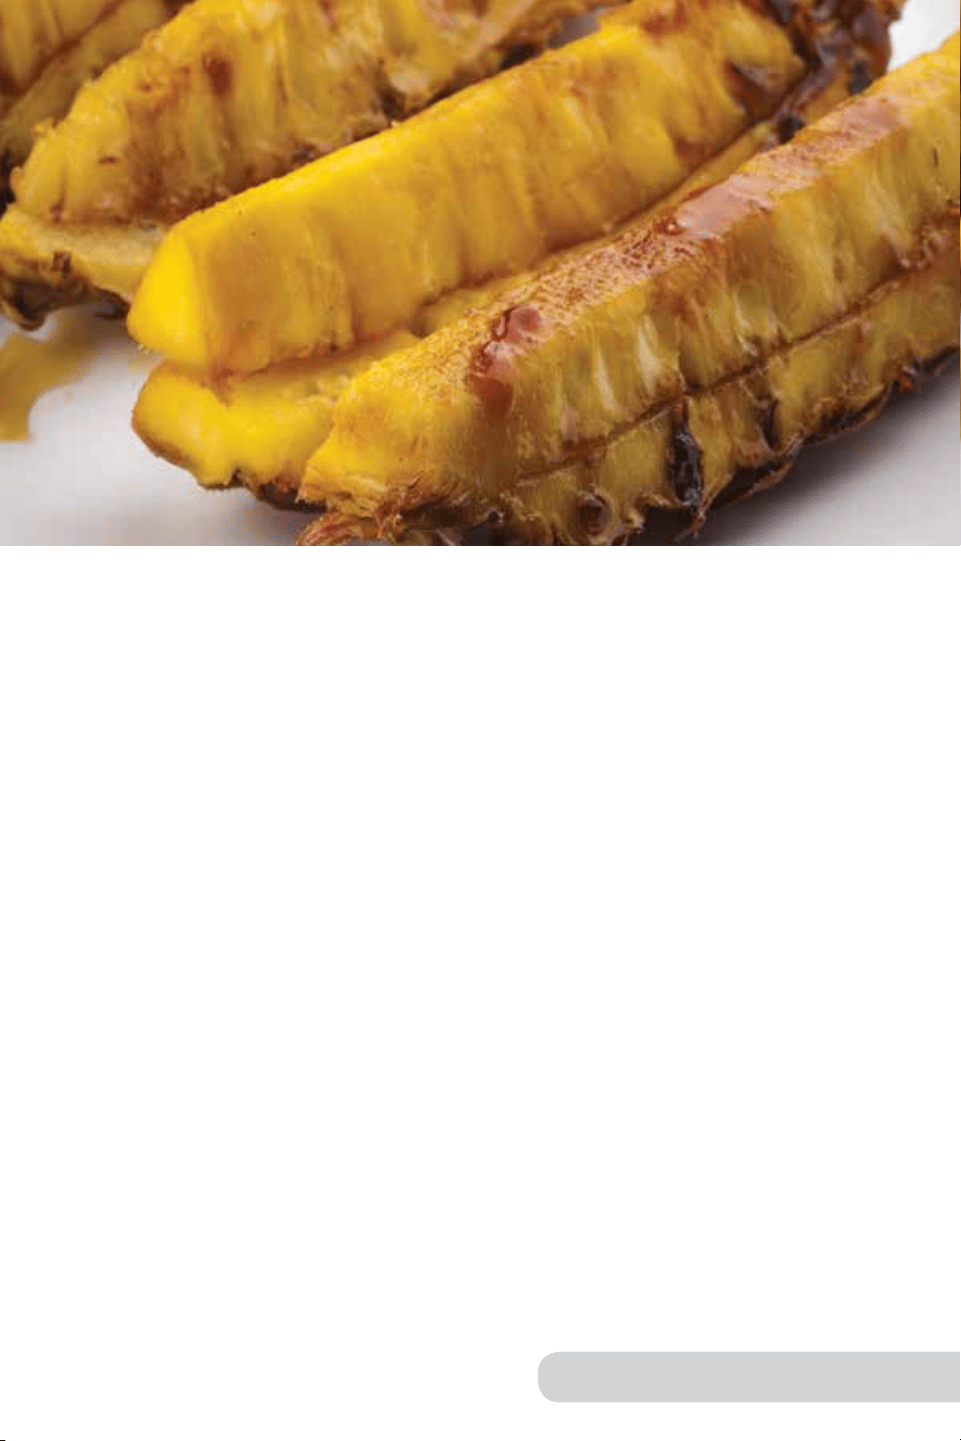

60 61
Recipes Recipes
Time and Temp:
Prep Time: 15 minutes
Cook Time: 8-10 minutes
Temp: 390˚F
Ingredients:
8 tablespoons unsalted butter
3 granny smith apples, peeled, cored,
and cut into ¼-inch cubes
½ tablespoon vanilla extract
½ teaspoon cinnamon
½ cup sugar
Pinch salt
2 tablespoons all-purpose our
2 tablespoons lemon juice
6 egg roll wrappers
¼ stick melted butter
Non-stick cooking spray
Apple Pie Egg Rolls (Yield 6 Egg Rolls)
Directions:
1. Add unsalted butter, apples, vanilla, cinnamon, sugar, salt, our, and lemon juice to
saucepan bring to a simmer on medium-high heat and simmer for 2-3 minutes.
2. Reduce heat to medium-low and continue simmering for 2-3 minutes.
3. Remove pan from heat and let apple mixture cool; set aside.
4. Lay out egg roll wrappers on cutting board in a diamond shape.
5. Brush edges of wrappers with melted butter.
6. Place about 2 tablespoons of apple mixture in center of each wrapper, leaving
about 1-inch of space along the edges.
7. Fold end of wrapper nearest to you over the lling to seal, then fold sides over and
roll the wrapper into a tight cylinder shape.
8. Spray NuWave Brio Basket with non-stick cooking spray.
9. Place egg rolls in NuWave Brio Basket and cook at 390°F for 8-10 minutes.
10. Serve immediately.
Tip: Sprinkle the egg rolls with powdered sugar for a nice nal touch.
Time and Temp:
Prep Time: 10 minutes
Cook Time: 8-10 minutes
Temp: 390˚F
Ingredients:
4 ounces cream cheese, softened
3 tablespoons sugar
½ teaspoon lemon juice
½ cup mixed berries
6 egg roll wrappers
¼ stick melted butter
Berry Cheesecake Egg Rolls (Yield 6 Egg Rolls)
Directions:
1. In small mixing bowl, combine cream cheese, sugar, and lemon juice.
2. Lightly mix in berries and set aside.
3. Lay out egg roll wrappers on cutting board in a diamond shape.
4. Brush edges of wrappers with melted butter.
5. Place about 2 tablespoons of berry mixture in center of each wrapper, leaving
about 1inch of space along the edges.
6. Fold end of wrapper nearest to you over the lling to seal, then fold sides over and
roll the wrapper into a tight cylinder shape.
7. Spray NuWave Brio Basket with non-stick cooking spray.
8. Place egg rolls in NuWave Brio Basket and cook at 390°F for 8-10 minutes.
9. Serve immediately.
Tip: Sprinkle the egg rolls with powdered sugar for a nice nal touch.

62
Recipes
Time and Temp:
Prep Time: 10 minutes
Cook Time: 14-16 minutes
Temp: 300˚F
Ingredients:
1 (6.5 oz. box) of your favorite mufn mix
¼ cup of blueberries
Easy Blueberry Mufns (Yield 12 Mufns)
Directions:
1. According to package directions combine package mix.
2. Gently fold into blueberries.
3. Spray each cooking liner with cooking spray.
4. Pour into 12 Silicone liners.
5. Place 6 Silicone cupcake liners in the basket.
6. Set for 300˚F and cook for 14-16 minutes.
7. Repeat step 5 for the remaining cupcake liners.
NuWave Brio
®
Freidora Digital
de Aire de 6-Qt
Manual del Usuario
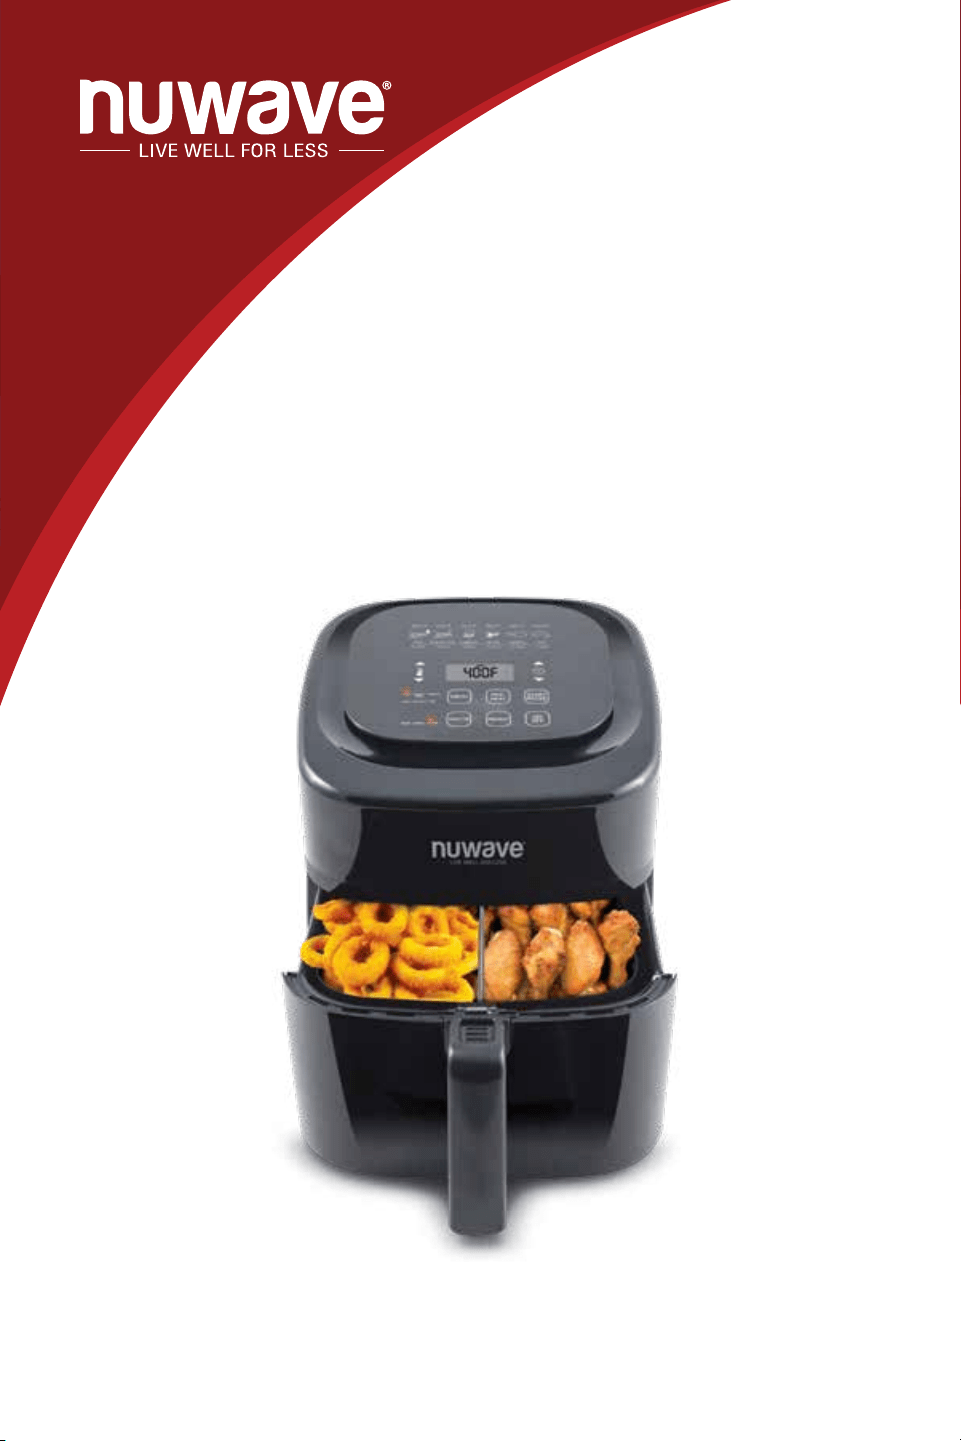

Como agradecimiento especial por registrar su producto, ¡recibirá
automáticamente 6 meses adicionales a su garantía limitada del
fabricante! *
Todo lo que tiene que hacer es seguir estos simples pasos.
Usando su teléfono inteligente o
dispositivo inteligente, escanee el
código QR ubicado en la etiqueta
de su producto ubicada en la parte
posterior de la unidad.
Se le dirigirá a la página de registro
del producto NuWave con el número
de serie único de su producto que
se ingresa automáticamente en el
campo correspondiente.
NOTA: Si no tiene un dispositivo
inteligente habilitado para la web,
simplemente visite nuwavenow.
com/QR e ingrese manualmente el
número de serie de su producto.
Complete la información restante y
complete la encuesta opcional.
Una vez que envíe su información,
recibirá un correo electrónico de
conrmación con los detalles de la
garantía extendida.
¡REGÍSTRESE
AHORA!
* Registre su producto dentro de 1 año a partir de la fecha de compra
para una extensión gratuita de 3 meses de garantía limitada.
1
2
3
Abra su tienda de aplicaciones móviles (App Store,
Google Play).
Busque "lectores de códigos QR."
Simplemente descargue el lector de códigos QR a
su teléfono, ábralo y escanee el código, ya está listo
para comenzar.
NOTA: Es posible que deba abrir el lector de código
QR descargado cada vez que desee escanear un
código QR.
DESCARGUE LA APLICACIÓN QR
CODE EN SU DISPOSITIVO MÓVIL
3
!para una garantía
adicional de
meses
Lectores de códigos QR
1
2
3
4

66 67
Manual de el Usuario Manual de el Usuario
GUÍA
La siguiente guía indica la cantidad de tiempo, temperatura y peso
para los diferentes tipos de comida que se enlistan a continuación:
Tipo de Comida
Mover/
Voltear
Tiempo
(mins)
Temp
(˚F)
Cantidad
Sugerida
Notas Adicionales
Barritas Congeladas
de Pan Francés
Voltear 8-10 380 8 oz
Tortitas de Hash
Brown Congeladas
Voltear 18-25 360 1-4 tortitas
Rollos de Canela
10-12 350 1-5 rollos
Cubrir con aluminio
(a la me del tiempo)
Papas a la Francesa
Delgadas Congeladas
Mover 8-14 400 28 oz
Papas a la
Francesa Gruesas
Congeladas
Mover 14-17 400 24 oz Corte Medio-Grueso
Papas a la
Francesa Caseras
Mover 20-25 360 12-16 oz
Remojar en Agua por
30 minutos
Gajos de Papa
Caseros
Mover 20-25 360 12-16 oz
Remojar en Agua por
30 minutos
Cubos de Papa
Caseros
Mover 15-20 360 12-16 oz
Remojar en Agua por
30 minutos
Carne (½" ribeye)
Voltear 12-18 360 1-4 (8 oz c/u)
Chuletas de Cerdo
(con hueso)
Voltear 15-20 375
1-3 (8-12 oz
c/u)
Hamburguesas
Congeladas
Voltear 16-20 360 1-2 (5 oz c/u)
Hamburguesas
Frescas
Voltear 12-16 360 1-4 (8 oz c/u)
Salchicha Italiana
Voltear 13-15 400 3-7 (4 oz c/u)
Alitas de Pollo
Mover 20-25 390 24 oz
Aves
Voltear 11-14 360 1-2 (8 oz c/u) Pechuga de Pollo
Jamón en Espiral
9-10 min/
lb
300 Hasta 5 lbs Cubrir con Aluminio
Jamón sin Hueso
11-13
min/lb
300 Hasta 7 lbs Cubrir con Aluminio
Pollo Entero
Voltear
10-12
min/lb
375 Hasta 6 lbs Cubrir con Aluminio
Tater Tots
Congeladas
Mover 6-8 360 16-20 oz
Rollos Primavera
Mover 6-8 360 16 oz
Nuggets de Pollo
Mover 8-12 390 12 oz
Pescado
Mover 6-10 400 12 oz
Palitos de Pescado
Congelados
Tipo de Comida
Mover/
Voltear
Tiempo
(mins)
Temp
(˚F)
Cantidad
Sugerida
Notas Adicionales
Chiles Rellenos
Mover 8-10 360 12 oz
Aros de Cebolla
Mover 12-16 360 16 oz
Champiñones
Empanizados
Mover 8-10 390 12 oz
Palitos de Mozarella/
Calabacin
Mover 5-7 360 16 oz
GUÍA (Continuación)
Nota: Los tiempos de cocción actuales pueden variar dependiendo del
tamaño y forma de los ingredientes utilizados. Los tiempos de cocción
enlistados deberán ser utilizados como una guía. Ajuste los niveles cuanto
sea necesario para cubrir sus necesidades. De acuerdo con la FDA, la
temperatura interna segura es de 165°F para aves y de 160°F para cerdo.

68 69
Manual de el Usuario Manual de el Usuario
MEDIDAS DE SEGURIDAD IMPORTANTES MEDIDAS DE SEGURIDAD IMPORTANTES
LEE TODAS LAS INSTRUCCIONES
Al usar unidades eléctricas, siempre se deben seguir las precauciones
básicas de seguridad, incluidas las siguientes:
1. No toque las supercies calientes. Utilice asas o perillas.
2. Para protegerse contra descargas eléctricas, no sumerja el cable, los
enchufes ni la Brio en agua u otros líquidos.
3. No opere ningún electrodoméstico con un cable o enchufe dañados, o después
de que el electrodoméstico funcione mal o se haya dañado de alguna manera.
Devuelva el aparato al centro de servicio autorizado más cercano para que lo
examinen, reparen o ajusten.
4. Es necesaria una estrecha supervisión cuando se utiliza cualquier
aparato cerca de niños. Este dispositivo no está destinado a ser utilizado
por personas (incluidos niños) con capacidades físicas, sensoriales o
mentales reducidas, o con falta de experiencia y conocimiento, a menos
que sean supervisados o instruidos sobre el uso del dispositivo por una
persona responsable de su seguridad.
5. El uso de otros accesorios que no están destinados a ser utilizados
con la Brio no es recomendable. Hacerlo podría dañar la Brio y
causar accidentes.
6. NO APTO PARA SU USO EN EXTERIORES.
7. No utilice el aparato para otro uso que no sea el previsto.
8. No deje que el cable cuelgue del borde de la mesa o mostrador ni que
toque supercies calientes.
9. No la coloque sobre una estufa, ni cerca de un quemador de gas o
eléctrico o en un horno caliente.
10. Se debe tener mucho cuidado al mover la Brio si contiene aceite caliente
u otros líquidos calientes.
11. Para desconectar, apague la Brio, luego retire el enchufe del
tomacorriente de pared.
12. Durante la fritura al aire, se libera vapor caliente de la salida de aire.
Mantenga las manos y la cara alejadas del vapor y de la salida de
aire. Además, tenga cuidado con el vapor caliente y el aire cuando
retire la canastilla.
13. Asegúrese de que los ingredientes preparados en la Brio salgan de
color marrón dorado en lugar de marrón oscuro y no se quemen. Retire
cualquier resto quemado de la canastilla durante la limpieza y antes de
cada uso.
14. Nunca ponga la Brio contra la pared u otros aparatos. Debe haber al menos 3
pulgadas de espacio libre para el lado posterior, los lados izquierdo/derecho y
el lado superior de la Brio.
15. No coloque nada encima de la Brio.
16. Desenchufe la Brio del tomacorriente cuando no esté en uso y antes de
limpiarla. Permita que la Brio se enfríe antes de limpiar, poner o quitar partes.
17. PARA USO DOMÉSTICO SOLAMENTE.
18. Mantenga el manual a mano para futuras referencias.
GUARDE ESTAS INSTRUCCIONES
Lea y comprenda todo el manual antes de usar la Brio.
NO UTILICE LA UNIDAD PARA OTRO USO QUE NO SEA
EL PREVISTO.
No utilice la unidad para otro uso que no sea el previsto.
Nota: Coloque la Brio en una supercie que sea horizontal, uniforme y estable.
Este aparato está diseñado para uso doméstico normal. No está diseñado para
ser utilizado en entornos como el de cocinas para personal de tiendas, ocinas,
granjas u otros entornos de trabajo. Tampoco está destinado a ser utilizado por
clientes en hoteles, moteles, bed and breakfast y entornos no residenciales.
AVISO: EL FALLO DE SEGUIR CUALQUIERA DE LAS MEDIDAS DE
SEGURIDAD IMPORTANTES, ADICIONALES O LAS INSTRUCCIONES
PARA UN USO SEGURO ES UN ABUSO DE SU BRIO QUE PUEDE
ANULAR SU GARANTÍA Y CREAR EL RIESGO DE LESIONES GRAVES.
ADVERTENCIA
En caso de otros problemas, desenchúfela inmediatamente y
comuníquese con el Departamento de Servicio al Cliente.
1-877-689-2838 * help@nuwavenow.com
Información eléctrica
Se proporciona un cable de suministro de energía corto (o cable de
suministro de energía desmontable) para reducir el riesgo resultante
de enredarse o tropezar con un cable más largo. Los cables de
alimentación desmontables más largos o los cables de extensión están
disponibles y se pueden usar si se tiene cuidado en su uso. Si se usa un
cable de alimentación desmontable más largo o un cable de extensión:
1. La calificación eléctrica marcada del cable de extensión debe ser al
menos tan grande como la calificación eléctrica del aparato.
2. El cable más largo debe estar dispuesto de modo que no se cuelgue
sobre la encimera o sobre la mesa, donde se pueda tirar o tropezar
involuntariamente. La Brio debe operarse en una toma eléctrica
separada de otros aparatos operativos debido a limitaciones de vataje.
El aparato tiene un enchufe polarizado (una cuchilla es más ancha que
la otra). Para reducir el riesgo de descarga eléctrica, este enchufe está
diseñado para encajar en una toma de corriente polarizada de una sola
manera. Si el enchufe no encaja completamente en el tomacorriente,
invierta el enchufe. Si aún no encaja, comuníquese con un electricista
calificado. No intente modificar el enchufe de ninguna manera.
3. Si el aparato es del tipo con conexión a tierra, el juego de cables o el
cable de extensión debe ser un cable de 3 hilos con conexión a tierra.
VEA LAS INSTRUCCIONES DE OPERACIÓN ANTES DE USAR

70 71
Manual de el Usuario Manual de el Usuario
DESCRIPCIÓN DE LAS PARTES
1
2
4a
1. Fuente de Potencia
de la Freidora de Aire
Parte #: 37206
2. Canastilla para Freir
Parte #: 37202
3.
Malla de Metal para
la Canastilla
Parte #: 37204
4a. Divisor para la
Canastilla
Parte #: 37205
4b. 4 Pestañas de Silicón
Part #: 37207
5. Cacerola
Parte #: 37201
5
Pestañas de Silicón
4b
3
MEDIDAS DE SEGURIDAD ADDICIONALES
1. No coloque la Brio cerca de materiales inamables, unidades de
calefacción, o ambientes húmedos.
2. La altura de los ingredientes colocados en la canastilla debe cumplir con
las instrucciones enumeradas en las "Instrucciones de Funcionamiento".
3. No coloque ningún otro recipiente en la cacerola. No reemplace ninguna
parte con otros contenedores.
4. Es normal que algo de humo escape de la Brio cuando se calienta por
primera vez.
5. Si sale mucho humo del respiradero de aire durante el funcionamiento,
desenchufe la Brio de inmediato y comuníquese con Servicio al Cliente.*
6. No mueva la Brio mientras esté en funcionamiento. Sólo después de que
la Brio se haya enfriado completamente debe intentarse moverla. Siempre
espere a que la freidora de aire se enfríe antes de manipularla.
7. Los niños deben ser supervisados para asegurarse de que no jueguen
con el aparato.
8. Nunca use una toalla u otro material u objeto para bloquear las salidas de aire.
9. Si surge algún problema durante la operación, cualquier servicio DEBE ser
realizado por NuWave, LLC o autorizado por el fabricante para reparaciones.
10. El aparato no está diseñado para ser operado por medio de un
temporizador externo o un sistema de control remoto separado.
11. No desarme la Brio ni reemplace ninguna pieza sin el consentimiento
previo por escrito del fabricante.
12. No utilice utensilios de metal en la cacerola recubierta o en la canastilla,
ya que esto puede dañar la supercie.
13. Asegúrese de que la Brio esté siempre limpia antes de cocinar.
*Departamento de Servicio al Cliente: 1-877-689-2838 • help@nuwavenow.com
PRECAUCIÓN
• Siempre coloque los alimentos a cocinar en la canastilla para
evitar que entren en contacto con los componentes de calor.
• No tape las ventilaciones mientras esté funcionando.
• No vierta aceite en la cacerola o en la canastilla, ya que podría
generarse un riesgo de incendio.
• Nunca toque el interior del aparato mientras esté funcionando.
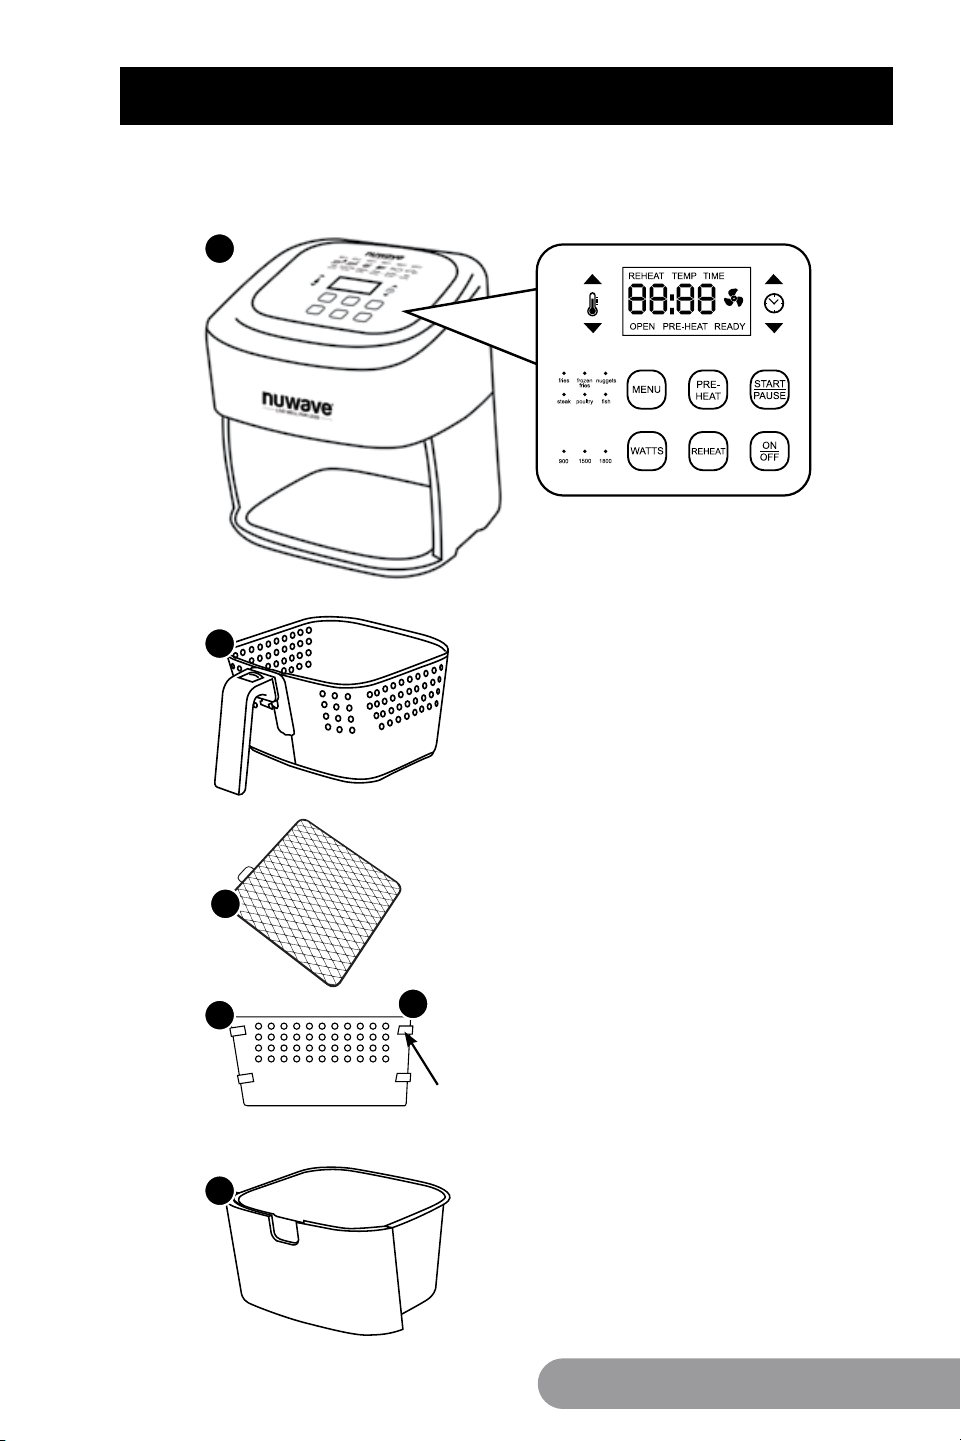

72 73
Manual de el Usuario Manual de el Usuario
INSTRUCCIONES DE OPERACION
Antes del Primer Uso:
1. Retire todo el material de empaque.
2. Retire el pegamento y las etiquetas del aparato.
3. Limpie muy bien la Canastilla y la Cacerola con agua caliente, esponja y
detergente suave o, en el lavavajillas, sólo en la parte superior.
4. Limpie el interior y el exterior del aparato con un paño húmedo. No
sumerja el aparato en agua. Consulte "Montaje del la Brio" en las
Instrucciones de funcionamiento.
Nota: Este aparato cocina usando aire caliente. NO llene la canastilla
con aceite.
Preparación para el Uso:
1. Coloque el aparato en una supercie plana, estable y resistente al calor.
2. Coloque la bandeja de la base y la canastilla con la malla en la Brio.
Consulte "Ensamble de la Brio" en las Instrucciones de funcionamiento.
3. Conecte el aparato en un contacto de pared estándar. Se incluye el cable en
el paquete.
Nota: No cubra u obstruya el respiradero localizado en la parte de arriba de
la Freidora Digital de Aire NuWave Brio Healthy 6-Qt para que tenga buena
ventilación y no afecte los resultados de cocción.
Función Encendido/Apagado:
1. Presione "ON / OFF" una vez para encender la unidad.
• El panel de control debe mostrar "0", lo que indica que no
hay cocina hora o temperatura ha sido seleccionada y la
unidad está encendida.
• La luz por encima de la última potencia utilizada
estará encendida.
2. Presione "ON / OFF" nuevamente para apagar la unidad,
y la última potencia usado parpadeará.
Función de Potencia Eléctrica:
La potencia por defecto del NuWave Brio Healthy Digital 6-Qt.
Aire La freidora es de 1800 vatios.
1. Para cambiar la potencia, presione "WATTS" una vez. La luz
iluminar por encima del "900", indicación de que la freidora está
ahora congurada a 900 vatios
2. Presione "WATTS" una vez más y la luz por encima de "1500"
iluminar. La freidora de aire ahora está congurada en
1500 vatios.
3. Presione "WATTS" nuevamente y la luz sobre "1800" se
iluminará, indicación de que la freidora de aire ahora está
congurada en el valor predeterminado de 1800 vatios.
ON
OFF
WATTS
Nota: Si cambia el vatiaje del 1800W predeterminado a 900W o
1500W y desenchufe la unidad, el NuWave Brio recordará el último
ajuste de vatiaje cuando vuelva a enchufarlo. La luz por encima de
esa potencia parpadeará hasta que la unidad se encienda y luego
permanecer sólido
Función de Inicio Rápido/Pausa:
1. Presione el botón “Start/Pause” una vez para empezar a cocinar,
se mostrará un ":15" así como un ícono de ventilador y la Freidora
de Aire Digital NuWave Brio Healthy 6-Qt. comenzará la cuenta
regresiva. Está automáticamente a 360˚F por 15 minutos.
• Para interrumpir el proceso de cocción, presione el botón “Start/
Pause” otra vez.
• Para reanudar la cocción o el precalentamiento, presione
nuevamente el botón “Start/Pause”.
• Una vez que el NuWave Brio termine de cocinarse, la
unidad emitirá un "beep" de tres veces y el panel de control
mostrará "End".
Nota: Quitar la bandeja de la base y la cesta de la sartén también
se detendrá la unidad. "OPEN" se mostrará en el panel de control.
Devuelve el Bandeja base y cesta de sartén para reanudar la cocción.
Función de Precalentar:
La función de Precalentamiento asegura que NuWave Brio
alcance la temperatura deseada antes de comenzar a cocinar
sus alimentos. La función de Precalentamiento es la elección
perfecta para alimentos que requieren un acabado crujiente,
como aperitivos congelados, papas fritas o alitas de pollo.
1. Presione "PRE-HEAT". El panel de control mostrará "PRE-
HEAT" y "0". El valor predeterminado para precalentamiento
es 360°F durante 15 minutos.
2. Para precalentar con las conguraciones predeterminadas,
presione "START / PAUSE". El panel de control mostrará
"TEMP" y "PRE-HEAT". "360F" y el icono del VENTILADOR
parpadearán durante el precalentamiento.
• Una vez que se alcanza la temperatura de
precalentamiento, el panel de control mostrará "LISTO"
y "HORA" y la freidora emitirá un pitido. "5" parpadeará y
comenzará una cuenta regresiva de 5 minutos.
• La unidad mantendrá la temperatura de precalentamiento
durante el cuenta atrás de 5 minutos O hasta que se quite
la cesta de la sartén, lo que sea que venga primero.
3. Una vez que la comida se ha agregado a la cesta de la sartén,
inserte la canaste de freir vuelve a su lugar. Esto comenzará el
proceso de cocción a la temperatura y tiempo seleccionados.
START
PAUSE
PRE-
HEAT
INSTRUCCIONES DE OPERACION (Continuación)

74 75
Manual de el Usuario Manual de el Usuario
INSTRUCCIONES DE OPERACION (Continuación)
• Si no hay temperatura o tiempo fueron seleccionados antes
del precalentamiento, la temperatura predeterminada (360°F)
y el tiempo (15 minutos) será utilizado.
• Si no se hace nada dentro de la cuenta regresiva de 5
minutos, NuWave Brio volverá a la conguración ON y se
mostrará "0".
Nota: La temperatura de precalentamiento se puede ajustar en
cualquier momento durante el precaliente el proceso presionando las
echas arriba y debajo del Icono de temperatura.
• Durante la coccion, Preheat se puede cancelar.
• Si se retira la cesta de la sartén en cualquier punto
durante el precalentamiento etapa, la freidora se pausará
automáticamente, y comenzará una cuenta regresiva de 5
minutos hasta que se reemplaza la canasta de la sartén.
• Si no se hace nada dentro de la cuenta regresiva de 5 minutos,
NuWave Brio volverá a la conguración On y se mostrará "0".
• Si otro lote de comida se cocina poco después de cocinarlo,
La función de precalentamiento no necesitará ser utilizada.
La unidad lo hará ya estar caliente.
• Si desea un tiempo de cocción más largo, simplemente
coloque la Bandeja Base y Fry Pan Basket nuevamente en el
electrodoméstico y continúe cocinando en incrementos de 2 a 3
minutos hasta que la consistencia deseada haya sido alcanzado.
Función Menú
1. Presione "MENÚ". La luz sobre "papas fritas" se iluminará y
"360F" & "TEMP" se mostrará en el panel de control.
2. Presione "START / PAUSE" para comenzar a cocinar. El
preprogramado el tiempo comenzará a contar atrás. El tiempo
de cocción restante será se muestra en el panel de control con
"TIME" encendido y ":" y la VENTILADOR Icono parpadeando.
• Para elegir una selección de menú diferente, simplemente
presione "MENÚ" hasta que se seleccione el programa de
menú deseado ANTES de presionar "START/PAUSE".
3. Para salir de la selección del menú, presione "MENÚ" hasta que no
se enciendan las luces sobre la selección de menú preprogramado.
• Una vez que el NuWave Brio termine de cocinarse, la
unidad emitirá un "bip" de tres veces y el panel de control
mostrará "End".
Nota: La potencia por defecto para todas las selecciones de menú
es de 1800 vatios.
MENU
INSTRUCCIONES DE OPERACION (Continuación)
Tipo de Platillo
Tiempo
(minutos)
Temp
Cantidad
(onzas)
Papas a la Francesa (Caseras y
gruesas)
25 360˚F 8-12
Papas a la Francesa Congeladas
(corte medio)
15 400˚F 28
Nuggets de Pollo 8 400˚F 12
Carne (½" ribeye) 12 360˚F 8 oz each
Aves (Pechuga de pollo) 12 360˚F 8 oz each
Pescado (Palitos de Pescado
Congelados)
8 400˚F 12
Usando PRE-HEAT con MENÚ
• El uso del precalentamiento con una selección de menú se
puede hacer de dos maneras:
Ejemplo 1
1. Presione "PRE-HEAT" y luego presione "MENU".
2. Elija la selección de menú deseada y presione "START / PAUSE".
• El NuWave Brio Healthy Digital 6-Qt. La freidora de aire
precalentará primero antes de cocinar.
Ejemplo # 2
1. Presione "MENÚ".
2. Elija la selección de menú deseada y luego presione "PRE-HEAT".
3. Presione "START/PAUSE" El NuWave Brio Healthy Digital 6-Qt.
La freidora de aire precalentará primero antes de cocinar.
Ajuste de temperatura:
El NuWave Brio Healthy Digital 6-Qt. La freidora está lista para
cocinar en 360°F por defecto.
1. Para establecer una temperatura de cocción diferente, presione
las echas arriba o debajo del icono de temperatura. El panel de
control mostrará "360F" y "TEMP".
2. Para ajustar la temperatura, continúe presionando "Up" o "Down"
echas hasta que se alcanza la temperatura de cocción deseada.
• los la temperatura se ajustará en incrementos de 5 grados
entre 100°F y 400°F.
3. Para ajustar rápidamente la temperatura, mantenga presionadas
las echas hasta se alcanza la temperatura de cocción deseada.
Nota: La temperatura de cocción se puede ajustar en cualquier
momento antes o durante el proceso de cocción. Una vez que la
pantalla cambia a visualización de temperatura, permanecerá en la
pantalla de temperatura.

76 77
Manual de el Usuario Manual de el Usuario
INSTRUCCIONES DE OPERACION (Continuación)
Ajuste de tiempo:
El NuWave Brio Healthy Digital 6-Qt. La freidora está lista para
cocinar por 15 minutos por defecto.
1. Para establecer un tiempo de cocción diferente, presione las
echas arriba o debajo del ícono del tiempo. El panel de control
mostrará "0:15" y "TIME".
2. Para ajustar la hora, continúe presionando las echas "Arriba" o
"Abajo" hasta que se alcanza el tiempo de cocción deseado.
• El tiempo se ajustará en incrementos de 1 minuto.
3. Para ajustar rápidamente la hora, mantenga presionadas las
echas hasta que lo desee el tiempo de cocción es alcanzado.
• El tiempo se ajustará en 10 minutos incrementos, seguidos
de incrementos de 20 minutos, seguidos de Incrementos e
30 minutos.
4. El tiempo máximo de cocción seleccionable varía según la
temperatura de cocción seleccionada:
• 100°F - 345°F el tiempo máximo de cocción es 99 horas
59 minutos.
• 350°F - 400°F el tiempo máximo de cocción es de 1 hora.
Nota: El tiempo de cocción se puede ajustar en cualquier momento
antes o durante el proceso de cocción.
Función de recalentamiento:
La conguración predeterminada está programada a 360° F
durante 4 minutos a 1800 vatios.
1. Presione "REHEAT". El NuWave Brio comenzará
automáticamente el proceso de recalentamiento.El panel de
control mostrará "REHEAT" y "TIME" y comenzará una Cuenta
regresiva de 4 minutos.
• Una vez que la unidad termina de recalentarse, la
unidad emitirá un "beep" tres veces y el panel de control
mostrará "End".
Nota:
• Recalentar la temperatura de cocción y el tiempo se puede ajustar
a cualquier tiempo durante el proceso de recalentamiento.
• Durante la coccion, Reheat se puede cancelar.
• La función Reheat es perfecta para recalentar single-
portionized alimentos.
• Cuando se utiliza la función de recalentamiento, los alimentos se
pueden colocar directamente en la cesta Fry Pan, cualquier plato
apto para horno o papel de aluminio.
REHEAT
INSTRUCCIONES DE OPERACION (Continuación)
Retirar la Malla de la Cesta para Freír:
1. Después de retirar la Cesta para Freír de la Bandeja de la Base, voltee
la Cesta boca abajo.
2. Utilizando guantes para horno, presione la parte de abajo de la Malla de
la Cesta hasta que salga de ella.
Montaje de la Malla de la Cesta
para Freír
1. Coloque la lengüeta de la Malla
en la ranura de la Cesta para Freír
(Vea Fig. 3.)
2. Presione el otro extremo de la
Malla de la Cesta hasta que entre
en su lugar y quede de forma
plana dentro de la Cesta.
Montaje de la Brio
PRECAUCIÓN: NO utilice la Brio sin la Bandeja de la Base o la Cesta
con la Malla. NO toque el interior de la Bandeja de la Base, la Cesta ni la
Malla inmediatamente después de cocinar. Las partes estarán calientes.
Solamente sostenga la Bandeja de la Base y la Cesta por el mango.
Retirar la Bandeja de la Base y la Cesta para Freír
1. Utilizando el mango, jale y deslice hacia afuera la Bandeja de la Base y la
Cesta con la Malla. (Vea Fig. 1.)
2. Para quitar la Cesta para Freír de la Bandeja de la Base, mientras
sostiene por el mango, presione el botón de desmontaje hacia adelante
y levante la Cesta para Freír de la Bandeja de la Base. (Vea Fig. 2.) Al
cocinar, esto reducirá el peso extra de la Bandeja de la Base y hará más
fácil verter o agitar alimentos más pequeños.
Cesta
para Freír
Botón de
Desmontaje
Bandeja de la Base
Malla de la Cesta
1
Freidora de Aire
Freidora
de Aire
Cesta para
Freír
2
3
Lengüeta de
la Malla de
la Cesta
Lengüeta
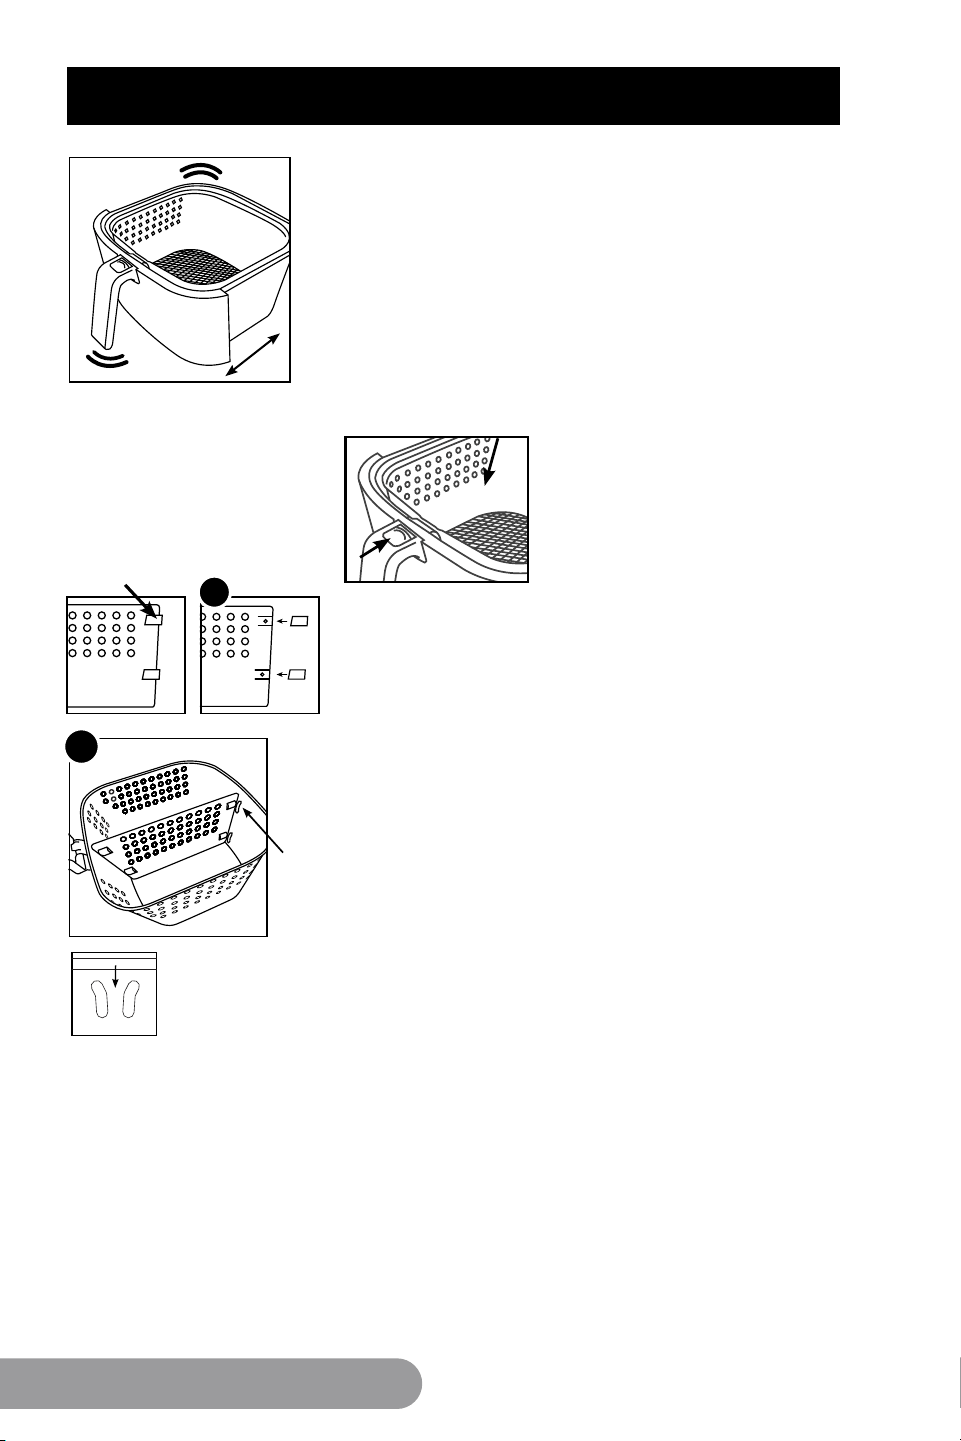
78 79
Manual de el Usuario Manual de el Usuario
INSTRUCCIONES DE OPERACION (Continuación) CUIDADO Y MANTENIMIENTO
1
Usando el divisor de la Canastilla
Figura 1.
Asegúrese de que las 4 pestañas de silicón estén
colocadas en las pestañas divisorias.
Figura 2.
Mirando hacia abajo en la canastilla, deslice el
divisor hacia abajo en el centro de la canastilla.
Asegúrese de que el divisor se encuentre entre los
dos aros y los tornillos de la cesta. Para quitar el
divisor, simplemente deslice el divisor hacia arriba.
(Precaución: el divisor estará caliente al cocinar.
Use guantes para horno).
Las pestañas de silicón se pueden quitar del
divisor antes de limpiar. (Precaución: las pestañas
de silicona pueden estar calientes.)
2
Pestañas de
Silicón
NO PRESIONE
EL BOTÓN DE
DESMONTAJE
MIENTRAS AGITA.
XX
Mover los Alimentos
Algunos alimentos requieren agitarse a la mitad
de la cocción. Para agitar adecuadamente los
alimentos, sostenga el asa, retire la Bandeja
de la Base con la cesta de sartén del aparato y
agite. Una vez que la comida se haya agitado
adecuadamente, deslice la bandeja de la base
con la canastilla de nuevo en la Brio.
Nota: Para mejores resultados al cocinar,
no llene a más de
4
⁄
5
.
Limpieza
Limpie el aparato después de cada uso o entre varios lotes grandes.
La canastilla y la bandeja de la base tienen un revestimiento antiadherente
con una cesta de acero inoxidable. No utilice utensilios metálicos o abrasivos
fuertes al limpiar, ya que esto puede dañar el revestimiento.
1. Desenchufe el aparato y asegúrese de que se enfríe completamente.
2. Use un paño húmedo para limpiar el exterior del aparato.
3. Limpie la canastilla y la malla con una esponja no abrasiva, agua caliente
y detergente suave.
Nota: retire la bandeja de la base y la canastilla y colóquelas sobre una
supercie resistente al calor para ayudar a enfriar el aparato más rápido.
Nota: Si usa el lavavajillas para la bandeja de la base, la canastilla y la malla,
se recomienda usar solo la rejilla superior.
Consejo: Si hay comida residual en la bandeja de la base y en la canastilla,
agregue un poco de agua caliente y deje que se remoje por separado durante
unos 10 minutos para facilitar la limpieza. Luego, use un cepillo de limpieza
suave para eliminar cualquier alimento persistente.
Almacenamiento:
1. Desenchufe el aparato y deje que se enfríe completamente.
2. Asegúrese de que todas las piezas estén limpias y secas.
3. Limpie la Bandeja de la Base, la cesta, la Cesta de la Canestilla o los
componentes extraíbles con una esponja no abrasiva, agua caliente y
detergente suave.
IMPORTANTE - No sumerja la unidad en
agua ni intente lavarla en el lavavajillas.
La supercie exterior podrá ser limpiada
cuidadosamente con un trapo o esponja
húmedos. Asegúrese de que la unidad se
ha enfriado completamente antes de limpiarla.
ADVERTENCIA
En caso de otros problemas, desenchúfela inmediatamente y
comuníquese con el Departamento de Servicio al Cliente.
1-877-689-2838 * help@nuwavenow.com
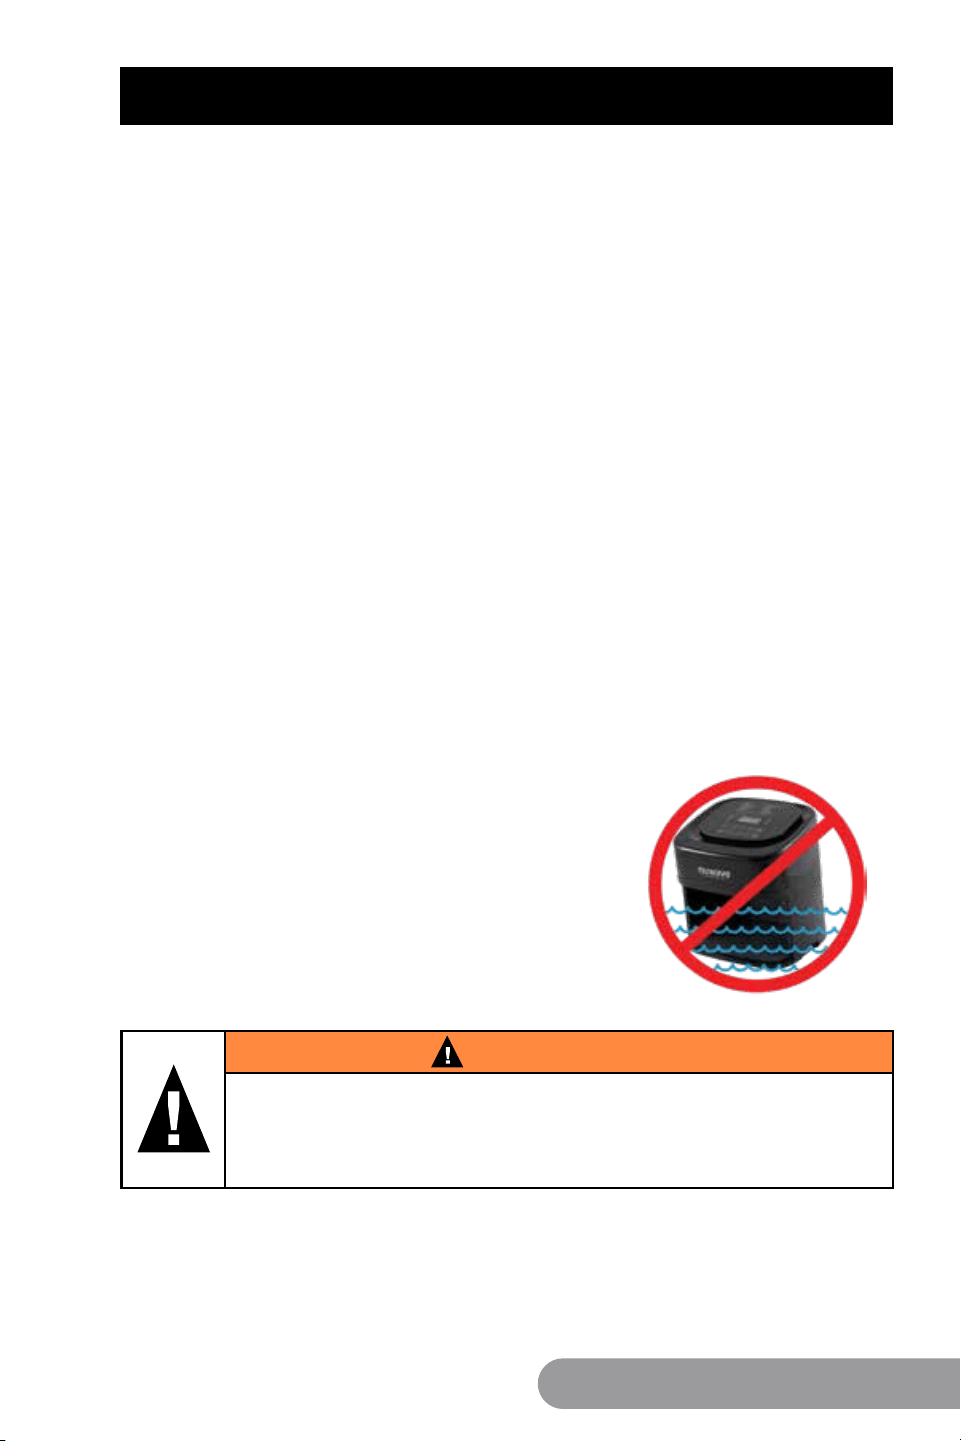

80 81
Manual de el Usuario Manual de el Usuario
GUÍA DE SOLUCIÓN DE PROBLEMAS
PROBLEMA: POSIBLE CAUSA(S): SOLUCIÓN (ES):
La Freidora Digital
de Aire NuWave Brio
Healthy 6-Qt.
no funciona.
El aparato no está
conectado. No se
presionó el botón
ON/OFF.
No está la Canastilla
en la Freidora Digital
de Aire NuWave Brio.
Healthy 6-Qt.
Conecte la clavija en un
contacto apropiado. Presione
el botón ON/OFF después de
seleccionar los ajustes.
Coloque la Canastilla en
la Freidora Digital de Aire
NuWave Brio.6-Qt.
Los ingredientes
en la Canastilla
no están lo
sucientemente
fritos.
Se usaron demasiados
ingredientes.
La temperatura es
muy baja.
El tiempo es muy corto
Quite algunos ingredientes
de la Canastilla.
Las porciones pequeñas se
fríen mejor.
Fría a una temperatura
más alta.
Programe la Freidora por
más tiempo
La comida no se
fríe uniformemente.
Algunos alimentos
necesitan ser movidos
a la mitad del tiempo
de coccion.
Los alimentos de encima
necesitan ser movidos
a la mitad el tiempo de
preparación.
Las botanas fritas no
salen crujientes de
la Freidora Digital de
Aire NuWave Brio
Healthy 6-Qt.
Se utilizó un tipo
de botana que
está diseñada para
prepararse en una
freidora tradicional.
Utilice botanas hechas
para hornos tradicionales
o cepille las botanas con
aceite de oliva antes de
coccion para que queden
crujientes.
No se puede
meter la Canastilla
en el aparato
correctamente.
La Canastilla está
muy llena.
La Canastilla no está
colocada correctamente
en la Cacerola.
No llene la Canastilla más
de un 4/5 partes. Presione la
Canastilla hacia abajo en la
Cacerola hasta que escuche
un click.
GUÍA DE SOLUCIÓN DE PROBLEMAS
PROBLEMA: POSIBLE CAUSA(S): SOLUCIÓN(ES):
Sale humo blanco
del aparato.
Está friendo alimentos
grasosos.
La Cacerola tiene
residuos grasosos de
los usos anteriores.
Cuando se preparen
alimentos grasosos en la
Freidora Digital de Aire
NuWave Brio Healthy 6-Qt.
pueden surgir grandes
cantidades de humo y
adherirse a la Cacerola.
La grasa producirá humo
blanco y la Cacerola puede
calentarse más de lo habitual.
Esto no afectará el efecto nal.
El humo blanco es causado
por la grasa caliente en
la cacerola.
Asegúrese de limpiar la
cacerola correctamente
después de cada uso.
Las papas a la
francesa no se fríen
uniformemente en la
Freidora Digital de
Aire NuWave Brio
Healthy 6-Qt.
Las papas no se
remojaron bien antes
de freírlas.
No se utilizó el tipo de
papa correcto.
Remoje las papas en un
recipiente por al menos
30 minutos. Sáquelas y
séquelas con una toalla
de papel.
Utilice papas frescas y
asegúrese de que estén
rmes durante su cocción.
Las papas a la
francesa no salen
crujientes de la
Freidora Digital de
Aire NuWave Brio
Healthy 6-Qt.
Lo crujiente de las
papas depende de la
cantidad de aceite y
agua en ellas.
Asegúrese de secar bien
las papas antes de ponerles
aceite. Corte las papas más
pequeñas o agregue un
poco más de aceite antes
de coccion para que queden
más crujientes.
Si la unidad necesita ser reemplazada o devuelta al fabricante, contacte a
nuestro Departamento de Servicio al Cliente al 1-877-689-2838
help@nuwavenow.com
Contacte a Servicio al Cliente si ocurre alguno de estos errores:
Código
Error
E1 E2 E3
Sensor abierto
Corto circuito
en el sensor
Sobrecalenta-
miento

82 83
Manual de el Usuario Manual de el Usuario
GARANTÍA LIMITADA
La Freidora de Aire Digital NuWave Brio 6Q
LOS GARANTÍAS DEL FABRICANTE
La Freidora de Aire Digital de 6Q NuWave Brio, incluida la bandeja de la base, el divisor, la canastilla,
la malla, deben estar libres de defectos del fabricante.
Todos los componentes eléctricos están garantizados por 1 año a partir de la fecha de compra,
bajo un uso doméstico normal y siempre que se hayan manejado de acuerdo a las instrucciones
por escrito del Fabricante. El Fabricante proporcionará las partes necesarias y mano de obra para
reparar cualquier parte de la Freidora de Aire Digital NuWave Brio 6Q en el Departamento de
Servicio de NuWave LLC. Una vez vencida la garantía, el costo de mano de obra y las partes será
responsabilidad del propietario.
LA GARANTÍA NO CUBRE
La garantía limitada se anula si las reparaciones son realizadas por un distribuidor no autorizado
o si la placa de datos del número de serie se retira o borra. Esta garantía no cubre el deterioro
normal del acabado debido al uso o la exposición. Esta garantía limitada no cubre fallas, daños
o un desempeño inadecuado debido a un accidente, actos de Dios (como rayos), uctuaciones
en la energía eléctrica, alteraciones, abuso, mal uso, aplicaciones incorrectas, atmósferas de tipo
corrosivo, instalación incorrecta, falta de funcionamiento de acuerdo con las instrucciones escritas
del fabricante, uso anormal o uso comercial. NuWave LLC se reserva el derecho de anular la
Garantía Limitada, según lo permita la ley, para los productos adquiridos a través de un distribuidor
no autorizado.
OBTENER SERVICIO
El propietario tendrá la obligación y la responsabilidad de: pagar por todos los servicios y piezas
no cubiertos por la garantía; prepagar el ete hacia y desde el Departamento de Servicio para
cualquier parte o sistema devuelto bajo esta garantía; y empacar cuidadosamente el producto con
materialde relleno adecuado para evitar daños durante el transporte.El envase original es ideal
para este propósito. Incluya en el paquete el nombre del propietario, la dirección, el número de
teléfono durante el día, una descripción detallada del problema y su “número RGA”. (Llame al
1-877-689-2838)o envíe un correo electrónico a help@nuwavenow.com para obtener el número
RGA (Número de autorización de devolución de mercancías). Proporcione el modelo del sistema
de cocción y el número de serie y el comprobante de la fecha de compra (una copia del recibo) al
realizar reclamaciones bajo esta garantía.
OBLIGACIÓN DEL FABRICANTE
La obligación del fabricante en virtud de esta Garantía Limitada se limita, en la medida en
que lo permita la ley, a reparar o reemplazar cualquier pieza cubierta por esta Garantía
Limitada que, al examinarla, se encuentre defectuosa en el uso normal. La Garantía Limitada
se aplica solo dentro de los Estados Unidos continentales y solo al comprador original de los
canales de distribución autorizados por el fabricante. LA GARANTÍA LIMITADA NO PUEDE
SER ALTERADA, VARIADA O EXTENDIDA, EXCEPTO POR UN INSTRUMENTO ESCRITO
EJECUTADO POR EL FABRICANTE. EL RECHAZO DE REPARACIÓN O REEMPLAZO SEGÚN
LO PROPORCIONADO POR ESTA GARANTÍA LIMITADA ES EXCLUSIVO. EN NINGÚN
CASO, EL FABRICANTE SERÁ RESPONSABLE DE CUALQUIER DAÑO CONSECUENTE O
INCIDENTAL A CUALQUIER PERSONA, SEA O NO OCASIONADO POR LA NEGLIGENCIA DEL
FABRICANTE, INCLUIDOS, SIN LIMITACIÓN, DAÑOS POR PÉRDIDA DE USO, COSTOS DE
SUSTITUCIÓN, DAÑO A LA PROPIEDAD U OTRA PÉRDIDA DE DINERO.
Algunos estados no permiten la exclusión o limitación de daños incidentales o consecuentes,
por lo que es posible que no se apliquen las exclusiones de limitación anteriores. Esta
Garantía Limitada otorga derechos legales especícos, y también puede haber otros derechos
que varían de estado a estado. EXCEPTO OTRAS MANERAS QUE EXPRESAMENTE SE
PROPORCIONAN ANTERIORMENTE, EL FABRICANTE NO HACE GARANTÍAS EXPRESAS
O IMPLÍCITAS DE LA LEY O DE OTRA MANERA, INCLUYENDO SIN LIMITACIONES, LAS
GARANTÍAS IMPLÍCITAS DE COMERCIALIZACIÓN Y EJERCICIO PARA UN PROPÓSITO
PARTICULAR A CUALQUIER OTRA PERSONA. LEA EL MANUAL DEL USUARIO. SI TUVIERA
ALGUNA DUDA SOBRE EL FUNCIONAMIENTO O LA GARANTÍA DEL PRODUCTO,
CONTACTE A NUWAVE LLC.
PROCEDIMIENTO DE RESOLUCIÓN DE CONTROVERSIAS. Para disputas relacionadas con
el uso del sitio web o el uso o la compra de un producto o servicio NuWave (colectivamente
“Disputas”), usted acepta comunicarse primero con NuWave LLC al (877) 689-2838 (teléfono),
(847) 367-5486 ( facsímil) o legal@nuwavenow.com (correo electrónico). Si no podemos resolver
su disputa de manera informal, todas las disputas se someterán a un arbitraje nal y vinculante.
Puede comenzar el proceso de arbitraje enviando una solicitud por escrito a la Asociación
Americana de Arbitraje (“AAA”) y enviando una copia a NuWave. NuWave pagará todos los costos
de presentación. Un solo árbitro de la AAA llevará a cabo el arbitraje en un lugar conveniente para
usted o por teléfono.
El laudo del árbitro será vinculante y podrá presentarse como un fallo en un tribunal de
jurisdicción competente. El arbitraje se llevará a cabo de conformidad con las disposiciones
de las Reglas de arbitraje comercial de AAA y los Procedimientos de mediación vigentes en el
momento de la presentación de su solicitud de arbitraje. Ver https://www.adr.org/sites/default/les/
CommercialRules_Web.pdf. Salvo que lo exija la ley según lo determine un árbitro, ninguna de las
partes o el árbitro puede revelar la existencia, el contenido o los resultados de cualquier arbitraje
a continuación sin el consentimiento previo por escrito de ambas partes.
A. RENUNCIA DE DERECHO A DEMANDAR. Al aceptar el arbitraje, comprende que, en la
medida máxima permitida por la ley, acepta renunciar a su derecho a presentar una demanda en
cualquier tribunal, a una audiencia judicial, un juicio con jueces y un juicio con jurado.
B. RENUNCIA A LA ACCIÓN DE CLASE. En la medida máxima permitida por la ley, usted acepta
expresamente abstenerse de presentar o unirse a cualquier reclamo en cualquier capacidad
representativa o de toda la clase, incluyendo, entre otros, presentar o unir cualquier reclamo en cualquier
acción de clase o arbitraje de clase.
C. PROCEDIMIENTO DE SALIDA. Para optar por no participar en el arbitraje, debe comunicarse
con NuWave. Para solicitar la exclusión voluntaria del arbitraje, contáctenos en legal@nuwavenow.
com (correo electrónico), NuWave LLC, 1795 N. Buttereld Road, Libertyville, IL 60048, EE. UU.,
(847) 367-5486 (fax) o (877) 689 -2838 o (224) 206-3019 (teléfono). Tendrá treinta (30) días a partir
de la fecha de entrega del producto para optar por el arbitraje con respecto a cualquier disputa que
surja o esté relacionada con el uso o la compra de cualquier producto NuWave.
Si han pasado más de 30 días, no es elegible para optar por no participar en el arbitraje y habrá
renunciado a su derecho de demandar o participar en una demanda colectiva con respecto a la
disputa que surge de su compra o uso de un producto NuWave. Para cualquier disputa que surja
de su uso del sitio web de NuWave, tiene treinta (30) días a partir de la fecha en que proporcionó
información al sitio web para optar por no participar en el arbitraje. Si han pasado más de 30 días,
no es elegible para optar por no participar en el arbitraje y habrá renunciado a su derecho de
demandar y participar en una demanda colectiva con respecto a la disputa que surge del uso del
sitio web de NuWave.
D. ALGUNOS ASUNTOS NO ESTÁN SUJETOS A ARBITRAJE. Sin perjuicio de lo anterior,
lo siguiente no estará sujeto a arbitraje y podrá ser juzgado solo en los tribunales estatales y
federales de Illinois: (i) cualquier disputa, controversia o reclamo relacionado o que impugne
la validez de nuestros derechos de propiedad intelectual y derechos de propiedad , incluidas,
entre otras, patentes, marcas comerciales, marcas de servicio, derechos de autor o secretos
comerciales; (ii) una acción de una parte para una medida cautelar temporal, preliminar o
permanente, ya sea prohibitiva u obligatoria, u otra medida provisional; o (iii) interacciones
con autoridades gubernamentales y reguladoras.
Usted acepta expresamente abstenerse de presentar o unirse a cualquier reclamo en cualquier
capacidad representativa o de toda la clase, incluyendo, entre otros, presentar o unir cualquier
reclamo en cualquier acción de clase o cualquier arbitraje de clase.
LEA EL MANUAL DE SU PROPIETARIO
Si aún tiene preguntas sobre el funcionamiento o la garantía del producto, comuníquese con
NuWave LLC al: 1-877-689-2838 o envíe un correo electrónico a help@nuwavenow.com.
GARANTÍA LIMITADA
FOR HOUSEHOLD USE ONLY
Model: 37001 120V, 60Hz, 1800 Watts
For patent information please go to: www.nuwavenow.com/legal/patent
www.nuwavenow.com
Item No: BM37001
Rev: 20-OG
07-08-20
Designed and Developed in USA by:
NuWave, LLC
1795 N. Buttereld Road
Libertyville, IL 60048, U.S.A.
Customer Service:
1-877-689-2838 • help@nuwavenow.com
Made in China
©2020 NuWave LLC • All Rights Reserved.