User Manual
PRODUCT COMPONENTS
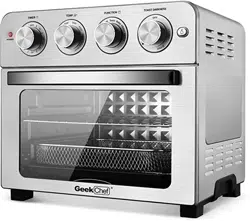
PRODUCT STRUCTURE DIAGRAM
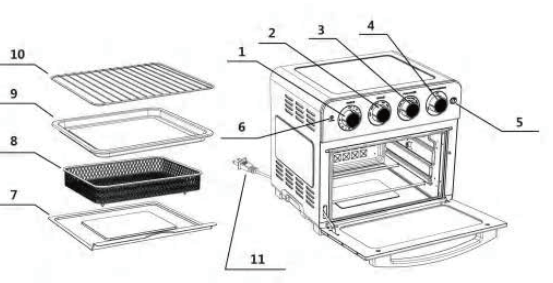
1.Timer Dial
2.Temperature Dial
3.Function Dial
4.Toast Darkness Function
5.Light Button
6.Power On Light
7.Crumb Tray
8. Airfryer Basket
9. Baking Pan/Drip Tray
10.Oven Rack
11.Power Cord
Product Features
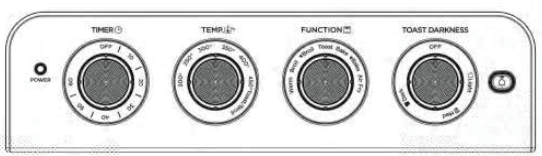
1. Timer Dial
Use to set the desired time for all functions except Toast. Setting the oven timer, powers the unit on and begins the cooking cycle. When the timer runs out, the unit will power off.
2. Temperature Dial
Use to set the desired temperature.
3. Function Dial
Use to select the cooking function ‒ Warm,  Broil, Broil(Convection), Toast, Bake,
  Bake (Convection), Air Fry.
4. Toast Darkness Function
Use to set desired toast shade from light to dark. Setting the toast dark�ness level, powers the unit on and begins the toasting cycle. When cycle is complete, the unit will power off.
5. Light Button
Push the button to turn on the interior oven light. The light will not work if the power is off.
6. Power On Light
Indicator light will turn on and remain lit when oven is in use.
7. Crumb Tray
Always ensure that the removable Crumb Tray is placed underneath the bottom heating elements whenever the oven is being used.
8. Air Fryer Basket
The Air Fryer Basket is grated to allow air to pass through the basket for even cooking. The Air Fryer Basket can only be used in conjunction with either the Baking/Drip Pan or on the Wire Rack. The Air Fryer Basket should be placed in the middle rack position unless a recipe states otherwise.
9. Baking Pan/Drip Tray
The Baking/Drip Pan is can be placed in any of the three rack positions.
10. Oven Rack
The oven rack can be used in three rack positions, bottom, middle, and top. See “Oven Rack/Pan Position” section in the manual. Generally, the top position should be used for Broil, the middle for Air Fry and Toast, and the bottom for Warm and Bake. Always reference recipe instructions for proper position.
Control Panel
Operation Instructions for Accessories
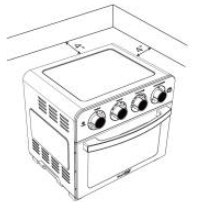
1. Place your Air Fryer Countertop Oven on a flat surface. Before using your Air Fryer Countertop Oven, move it 4 inches away from the wall or from any objects on the countertop. Do not use on heat-sensitive surfaces.
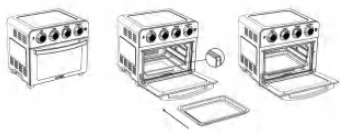
2. Crumb Tray
Opening front door, put crumb tray into the unit according to the directions shown in the picture below:
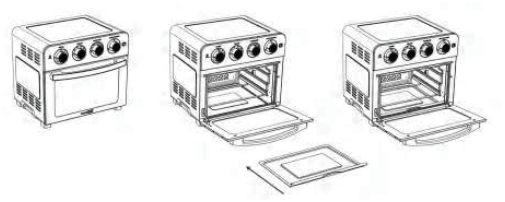
3. Bake Tray
Put the food into the bake tray and put it into the cooking chamber, and then close the door.
4. Oven Rack
Insert the oven rack into the unit according to the directions shown in the picture below:
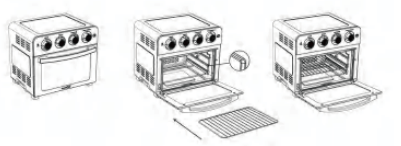
5. Air Fry Basket
Insert the oven rack into the unit, then put the food into the mesh basket and put it on the rack.

Note
- Air fry basket must be used with the oven rack.
- Choose proper accessories for different cooking purpose.
- Please use oven mitts to take out the crumb tray, bake tray, oven rack and air fryer basket etc. after cooking finished.
- Please always keep the crumb tray on the bottom of the cooking chamber for gathering oil from the fried food.
Operation Instruction
Before First Use
- Remove all packaging materials, stickers and labels.
- Clean all the accessories with hot water, cleaning agent and a non-abrasive sponge
- Wipe the inside and outside of the appliance with a damp cloth.
Note
- Objects should not be stored on the top of the oven.
- The exterior housing will get very hot when in use, keep out of reach of children.
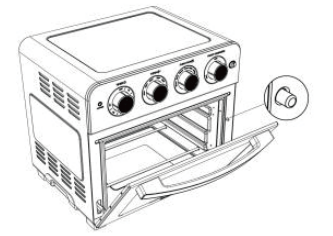
- There is a safety switch as shown in the below picture. Only when the door is closed completely, the machine can work properly. If not, oven will not work.
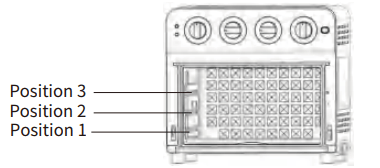
Oven Rack / Pan Positions
Oven have 3 rack/pan positions: Position 1 (bottom), Position 2 (middle), position 3 (top). Usually suggested put over rack or pan in position 2 (middle) for best cooking result.
Operations
Unwind the power cord. Check that the Crumb Tray is in place and that there is nothing in the oven. Plug power cord into the wall outlet.
Broil or  Broil(Convection)
Set the Function Dial to Broil or  Broil. Set Temperature Dial to Toast/Broil(450 ℉). Then turn the Timer Dial to the desired cooking time to turn on the oven and begin broiling. The power light will illuminate. The timer will ring once when the cycle is complete and the oven will power off when the time expires. To stop broiling, turn the Timer Dial to the OFF position.
Broiling Tips:
Never use glass oven dishes to broil.
Be sure to keep an eye on food ‒ items can get dark quickly while broiling.
Bake or  Bake(Convection)
Set the function to Bake or  Bake. Set the Temperature Dial to desired temperature. Then turn the Timer Dial to the desired cooking time to start the oven and begin baking (It is recommended to preheat oven for 5 minutes prior to baking. Incorporate this into the total baking time). The power light will turn on. The timer will ring once when the cycle is complete and the oven will power off when the time expires. Place the pan in Position 2 for baking. For chicken or other large items, the pan can be in Position 1. To stop operation, turn the Timer Dial to the OFF position.
Warm
Set the Temperature Dial to 200℉. Set the Function Dial to Warm. Then turn the Timer Dial to the desired warming time to start the oven and begin warming. The power light will illuminate. The timer will ring once when the cycle is complete and the oven will power off when the time expires. To stop warming, turn the Timer Dial to the OFF position.
Toast
Fit Oven Rack into Position 2. If toasting two items, center them in the middle of the Oven Rack. Four items should be evenly spaced ‒ two in front, two in back. Six items should be evenly spaced ‒ three in front, three in back.
Set the Function Dial to Toast. Set the Temperature Dial to Toast/Broil. Turn the Toast Darkness Dial to desired shade setting from light to dark within the marked settings to turn on the oven and begin toasting. The oven power light will illuminate. When completed, the timer will ring and turn off. To stop toasting, turn the Toast Darkness Dial to the OFF position.
Air Fry
Place the Air Fryer Basket onto the Baking Pan or Oven Rack. Air Fry in rack Position 2.
Set the Function Dial to Air Fry. Set Temperature Dial to desired temperature. Then turn the Timer Dial to the desired cooking time to turn on the oven and begin Air Frying. The oven power light will illuminate. The timer will ring once when the cycle is complete and the oven will power off when the time expires. To stop Air Frying, turn the Timer Dial to the OFF position.
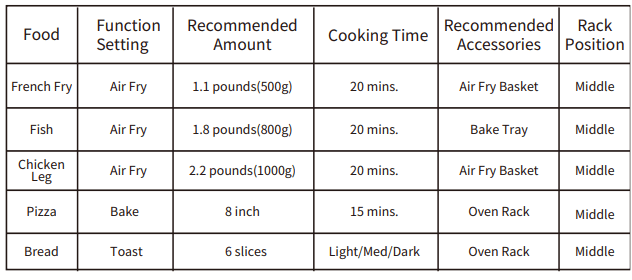
Cooking Chart
The chart below lists recommended cooking times and portions for various types of foods that can be used in this Air Fryer Countertop Oven.
Cleaning and Maintenance
- Unplug your Air Fryer Countertop Oven and allow it to completely cool before cleaning. Do not use abrasive cleaners, as they will damage the finish. Simply wipe the exterior with a clean, damp cloth and dry thoroughly. Apply the cleaning agent to a cloth, not directly onto the Air Fryer Countertop Oven. Do not use excess pressure when cleaning the area of the control panel as it could cause the text to be removed over time.
- To clean the interior walls and bottom of the oven (remove the Crumb Tray first) use a damp soapy cloth or sponge. Never use harsh abrasives or corrosive products including oven cleaner sprays. These could damage the oven surface. Never use steel wool pads on the Air Fryer Countertop Oven or accessories.
- The Oven Rack, Baking/Drip Pan, Air Fryer Basket and Crumb Tray should be hand-washed in hot, sudsy water or use a nylon scouring pad or nylon brush. These parts are not dishwasher safe.
- Always clean the Crumb Tray after each use. Excess food particles could cause smoking and will be hard to remove from tray. To remove baked-on grease or burnt food particles you can soak the Crumb Tray in hot, sudsy water or use nonabrasive cleaners. Never operate the oven without the Crumb Tray in place.
- The top interior of the Air Fryer Countertop Oven should be cleaned to remove excess grease that may accumulate after cooking greasy foods. Doing so will prevent smoking in the oven during subsequent uses.
TROUBLESHOOTING
The oven will not turn on.
- Make sure the oven is plugged in.
Foods are not completely cooked.
- Increase cooking temperature or time.
Foods are overcooked or burned.
- Decrease cooking temperature or time.
- Make sure food items are not too large and are not touching the heating elements.
Foods are cooked unevenly.
- Preheat the oven
- Make sure food items are not too closely packed into a tray, rack or other container.
White smoke is coming out of the oven.
- The oven may produce some white smoke when you use it for the first time. This is normal.
- Excess oil or fatty foods may produce white smoke. Make sure the inside of the oven is cleaned properly and not greasy.
Black smoke is coming out of the oven.
- Immediately turn off the oven and then unplug it. Cool the oven to room temperature.Wait for smoke to clear before opening the oven door or pulling out the tray, basket or rack.
LIMITED WARRANTY
HOME EASY LTD warrants to the original consumer or purchaser this Geek Chef Air Fryer Countertop Oven is free from defects in material or workmanship for a period of One (1) year from the date of purchase. If any such defect is discovered within the warranty period, HOME EASY LTD, at its discretion, will repair or replace the Product at no cost. This limited warranty is good only to the original purchaser of the product and effective only when used in United States.
For warranty orrepair service: Call 1-844-801-8880 and choose the appropriate prompt. Please have your Product’s model number, your name, address, city, state, zip code and phone number ready.
NO OTHER WARRANTY IS APPLICABLE TO THIS PRODUCT. THIS WARRANTY IS IN LIEU OF ANY OTHER WARRANTY, EXPERSS OR IMPLIED. INCLUDING WITHOUT LIMITATION, ANY WARRANTY OF MERCHANTABILITY OR FITNESS FOR A PARTICULAR PURPOSE. TO THE EXTENT ANY IMPLIED WARRANTY IS REQUIRED BY LAW. IT IS LIMITED IN DURATION TO THE EXPRESS WARRANTY PERIOD ABOVE. NEITHER THE MANUFACTURER NOR ITS U.S.DISTRIBUTOR SHALL BE LIABLE FOR ANY INCIDENTAL, CONSEQUENTIAL, INDI RECT, SPECIAL, OR PUNITIVE DAMAGES OF ANY NATURE. INCLUDING WITHOUT LIMITATION. LOST REVENUES OR PROFITS, OR ANY OTHER DAMAGE WHETHER BASED IN CONTRACT, TORT, OR OTH ERWISE, SOME STATES AND/OR TERRITORIES DO NOT ALLOW THE EXCLUSION OR LIMITATION OF INCIDENTAL OR CONSEQUENTIAL DAMAGES OR LIMITATIONS ON HOW LONG AN IMPLIED WARRANTY LASTS. SO THE ABOVE EXCLUSION OR LIMITATION MAY NOT APPLY TO YOU. THIS WARRANTY GIVES YOU, THE ORIGINAN PURCHASER, SPECIFIC LEGAL RIGHTS AND YOU MAY ALSO HAVE OTHER RIGHTS THAT VARY FROM STATE TO STATE OR TERRITORY TO TERRITORY