
Loading ...
Loading ...
Loading ...
8
|
ENGLISH
OPERATING UNIT
DRY IRONING
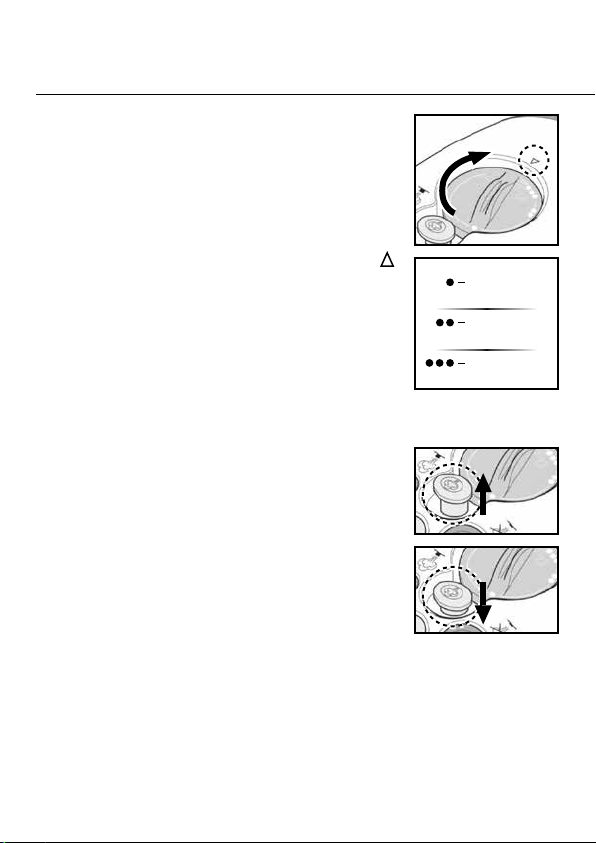
IMPORTANT: Make sure Steam Button is locked in lowered
position (FIGURE 4-B) before dry ironing. This will prevent any
water from accidentally dripping.
1. Plug power cord into a convenient electrical outlet.
2. Turn Temperature Control Dial clockwise so that small arrow ( )
on Hand Grip (FIGURE 3-A) points to one of three heat settings
on Dial (FIGURE 3-B). Heating Indicator Light will illuminate.
NOTE: It is recommended to start with lower temperatures
first, as high settings designed for heavy materials can
damage delicate fabrics.
3. When Heating Indicator Light turns off, Ironing Plate is heated
and ready for use.
NOTE: During use, Heating Indicator Light will cycle on and
off as unit works to maintain a constant temperature. You may
continue to iron while Light cycles.
STEAM IRONING
1. Plug power cord into a convenient electrical outlet.
2. Turn Temperature Control Dial clockwise as far as possible to
set unit to high temperature (MAX •••). Heating Indicator Light
will illuminate.
3. When Heating Indicator Light turns off, press Steam Button.
Button will lock into raised position (FIGURE 4-A), and unit will
begin emitting steam from steam vents on Ironing Plate.
NOTE: Unit is designed to steam horizontally. Steam flow will
stop whenever unit is in vertical upright position.
4. To stop steam flow, press Steam Button again to lock it into
lowered position (FIGURE 4-B).
A
B
A
B
ARROW
Synthetics, Silks
(LOW TEMP)
Wool
(MEDIUM TEMP)
Cotton, Linen
(HIGH TEMP)
FIGURE 3
FIGURE 4
Once all ironing tasks are finished, immediately turn Temperature Control Dial counter-clockwise
until it is set to off (O) position. Be sure that Steam Button is locked in lowered position - this
will prevent water from accidentally dripping during next use. Prop unit upright on Stands to
cool, and refer to CARE & STORAGE GUIDELINES on Page 9 for proper cleaning and storage.
Loading ...
Loading ...
Loading ...