Loading ...
Loading ...
Loading ...
7
English
8
English
SETTING UP THE UNIT
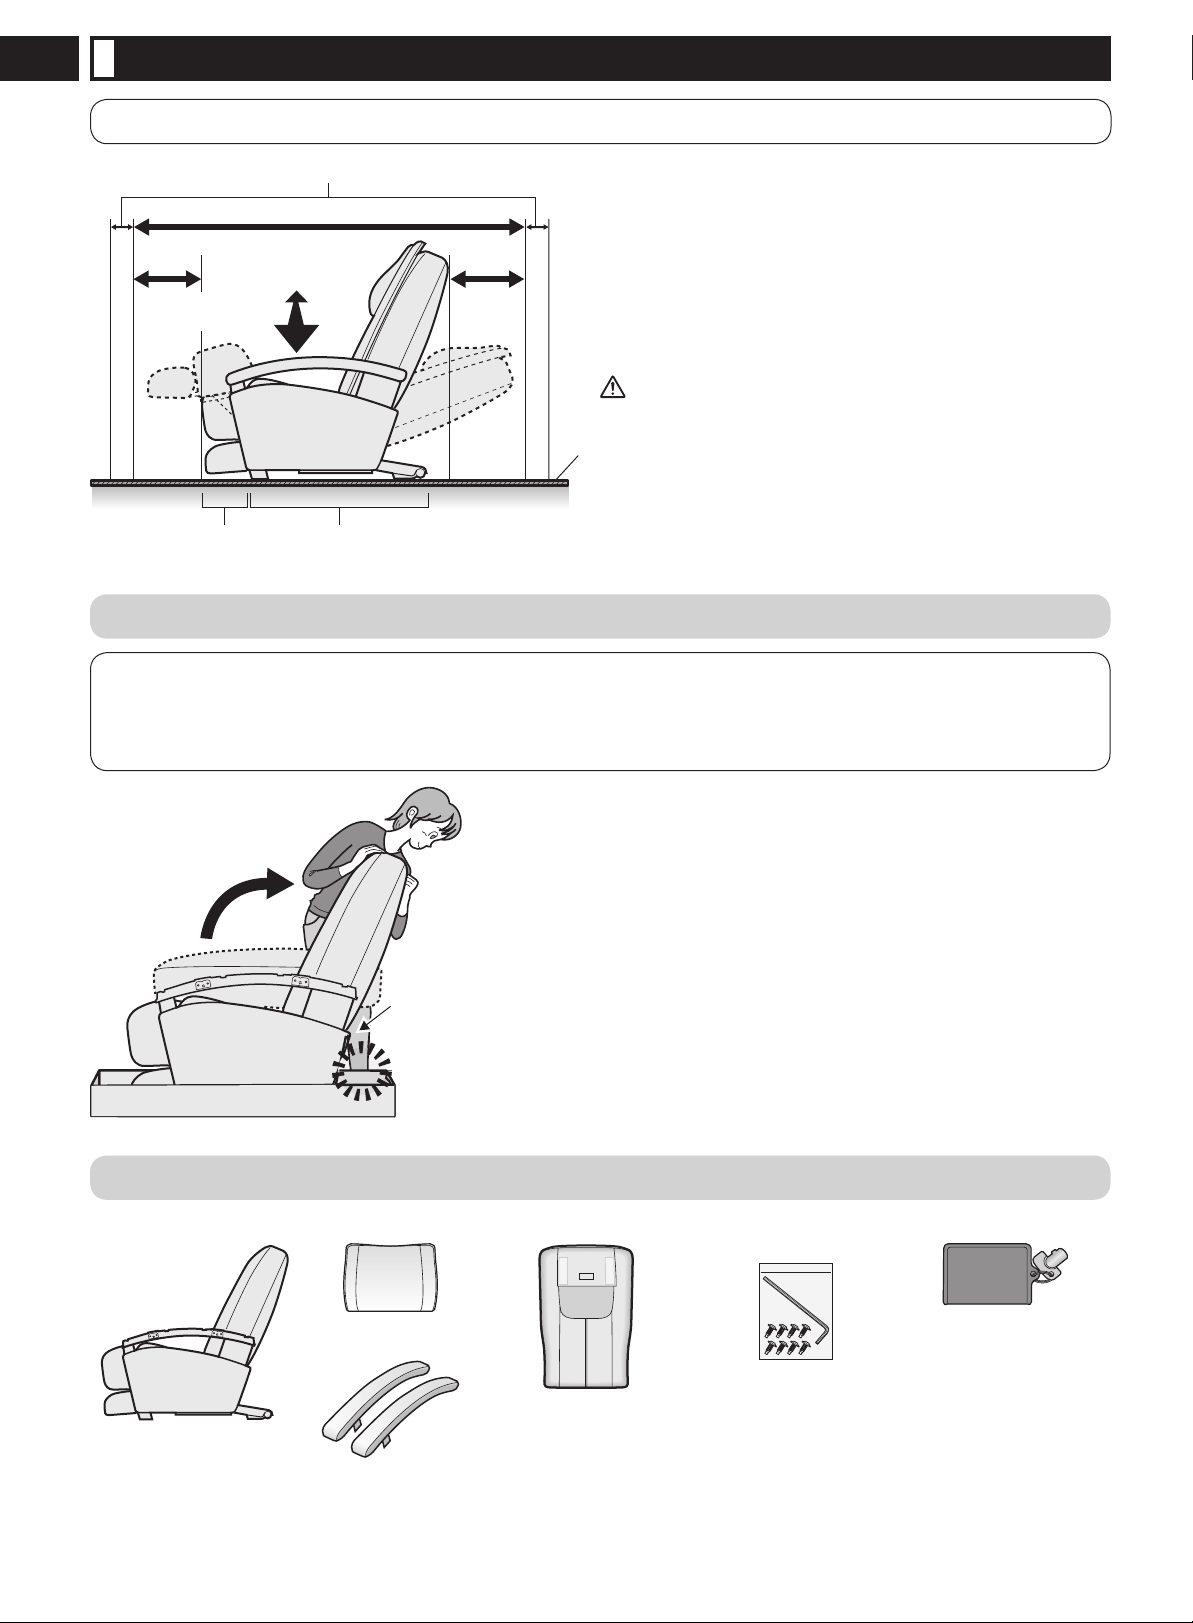
WHERE TO USE THE UNIT
Keep at least 3.9 (10 cm) away from the wall.
Approx. 76.8
(195 cm)
Approx. 13.8
(35 cm)
Width approx.
27.5
(70 cm)
Approx. 11.8
(30 cm)
Mat
Area where legrest
could touch the floor
Area where unit
touches the floor
Avoid places where the unit will be exposed to direct sunlight
for long periods of time or places where it will be exposed to
high temperatures, such as in front of a heater, etc., as this
can cause discoloration or hardening of the leather.
Placing a mat or cloth under the unit is recommended to
prevent floor damage. The size of the mat should be sufficient
[at least 47.2 in. × 27.5 in. (120 cm × 70 cm)] to cover the
areas where the unit touches and where the legrest could
touch the floor.
Set the unit near the outlet.
See Warning No. 11 and 12 on page 1.
•
•
•
1 UNPACK THE UNIT AND RAISE THE BACKREST
CAUTION
When raising the backrest, be careful not to cause hands or feet to become caught between the backrest and the
backrest latch or the backrest and the armrests.
Failure to follow this precaution may result in injury.
•
Check that there
is nothing
around the unit.
Backrest latch
1
Remove the top of the shipping container.
When packed for shipping the backrest is folded forward.
2
Remove the packing and cushioning
materials and take out all accessories.
3
Raise the backrest.
Do not connect the power cord to an electrical outlet during setup.
Hold the backrest with both hands and lift in the direction of the
arrow until it comes to a stop.
Be careful the power cord and controller are not caught in the
backrest.
•
•
•
•
2 INSPECT CONTENTS OF SHIPPING CONTAINER
Massage Lounger Pillow Back Cushion Allen Key — 1
Attachment Screws — 8
Lock Switch Key — 1
The lock switch key has
been inserted in the
lock switch prior to
leaving the factory.
•
Armrests
— 2
3 HOW TO MOVE THE UNIT
Using the wheels to move the unit
Grasp the legrest to move the unit when using the wheels.
It is easier to move the unit with the massage heads
retracted and the backrest in the upright position.
*
Place a mat or cloth on the floor and move the unit slowly
to prevent floor damage.
•
•
Lifting the Unit
Move the unit by having one person hold the legrest and
another person use the handles on the back.
*
Please hold the handles and legrest securely to avoid
dropping the unit as it may damage your floor.
•
Move it slowly
Legrest
Wheels
Place your
fingers inside
the handle
4 INSTALL THE ARMRESTS ON THE UNIT
Front
Back
Left
Velcro
Zipper
Convex
Front Rear
Round hole
1
Install the armrests.
(Be careful to avoid damaging the coated fabric.)
1 Unfasten the velcro.
2 Unfasten the zipper of the armrest completely.
3 Check the side (right or left) of the armrest. Check
the direction (front or back) of the armrest as well.
The illustration shows the left armrest. The right armrest
is stamped “Front”, “Right” and “Back”.
*
The left armrest must be installed on the left hand side of
the unit.
4
Align the convex portion of the armrest with the
round hole on the unit, and embed the armrest on
the unit. Avoid catching the coated fabric between
them.
If it is caught, pull it out without damaging the fabric.
Lift up
Secure with screws
Allen key
2
Secure the armrests with attachment
screws.
(Total of 4 positions for a single armrest)
Lift the coated fabric on the side of the armrest and
insert the attachment screw onto the end of the Allen
key, and then tighten.
(Tighten the screws in the 4 positions lightly at first, and
then tighten all screws firmly.)
*
If the screw does not enter into the hole, tighten the screw
by pushing the armrest from the top.
3
Close the zipper at the bottom side of
the armrests.
When closing the zipper, be careful not to twist the end of
the zipper.
1
Set the zipper.
2 Fasten the zipper.
4
Put both ends of the zipper into the
inside.
1 Turn in the edge of the zipper.
2 Fix the sliding tab of the zipper with the velcro.
7-8 2008/07/31 15:18:57
Loading ...
Loading ...
Loading ...