Loading ...
Loading ...
Loading ...
E-7
System preparation (continued)
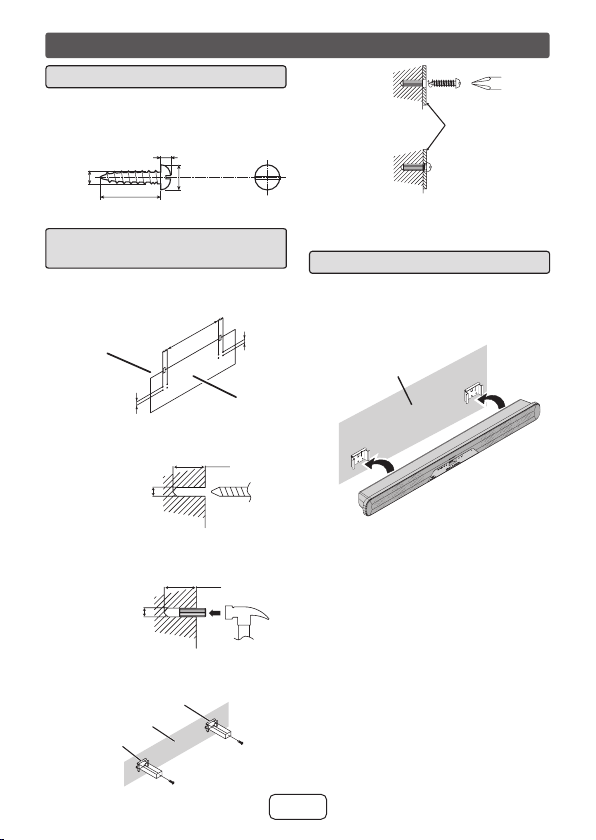
Driving screws■
SHARP designed the speakers so you may hang
them on the wall. Use proper screws (not sup-
plied). See below for size and type.
1/8” (3.2 mm)
3/8” (9 mm)
Min. 7/8” (22 mm)
3/16”
(5 mm)
Wall mount angle xed to
the wall (Horizontal position)
■
Fix the pattern paper to the wall in horizontal
position as below.
1
29 mm
29 mm
44 mm
44 mm
509 mm
Wall surface
Pattern paper
Fix a wall mount plug into the hole using a
hammer, until it is ush with the wall surface.
3
1-1/4” (32 mm)
3/8” (8-9 mm)
Wall surface
Wall surface
Screw the wall mount angle to the wall as shown
in the illustration. (Total screw is 8 pieces)
4
Wall mount angle
Wall mount angle
(screws x 4)
(screws x 4)
Make a hole on the wall following the screw point
marks on the pattern paper by using a drill.
2
Wall surface
1-1/4” (32 mm)
3/8” (8-9 mm)
Wall mount angle
Wall surface
Wall surface
Note:
Make sure all screws are fully tightened. (screws
are not supplied)
Installing the sound bar■
Align the wall mount slot at the unit to the
wall mount angle.
Slot the unit into the wall mount angle.
Fix them securely.
1
2
3
Wall surface
Loading ...
Loading ...
Loading ...