
PF3 User Guide
PF3 – ATC at its best
User Guide
Document Issue 3.7
Included with PF3 release version 3.22.0
Page 1 of 212
Copyright © 2007-2024 by OnCourse Software

PF3 User Guide
Table of Contents
1. WELCOME ABOARD..............................................................................................................................7
2. WHAT'S NEW............................................................................................................................................8
3. SYSTEM REQUIREMENTS..................................................................................................................12
4. INSTALLATION......................................................................................................................................13
4.1 INSTALLING PF3....................................................................................................................................13
5. PF3 LICENCE AUTHORISATION.......................................................................................................14
5.1 OVERVIEW.............................................................................................................................................14
5.2 WHAT IS IT?..........................................................................................................................................14
5.3 ONLINE AUTHORISATION........................................................................................................................15
5.4 OFFLINE AUTHORISATION.......................................................................................................................17
5.5 FAQ'S FOR ONLINE AUTHORISATION......................................................................................................21
6. HOW TO UNINSTALL PF3...................................................................................................................25
7. PF3 OPTIONS AND CONFIGURATION.............................................................................................26
7.1 OVERVIEW.............................................................................................................................................26
7.1.1 Main Menu Options Selection.....................................................................................................26
7.1.2 Options #1 Main Display.............................................................................................................27
7.1.3 Pilot's Voice.................................................................................................................................28
7.1.4 Virtual Co-Pilot modes................................................................................................................28
7.1.5 Taxi Guidance System..................................................................................................................30
7.1.6 ATIS Volume and Options...........................................................................................................32
7.1.7 Traffic Advisory en-route.............................................................................................................33
7.1.8 Debug Info...................................................................................................................................33
7.1.9 Misc Options................................................................................................................................34
7.1.10 Push & Start Options.................................................................................................................37
7.1.11 Other Options from this display................................................................................................37
7.1.12 Trans Alt & Alt Baro Calls........................................................................................................38
7.1.13 Rebuild PF3 Database Procedure.............................................................................................39
7.1.14 Hotkey Options..........................................................................................................................44
7.1.15 SID/STAR Page Options............................................................................................................46
7.1.16 Even More Main Menu Options................................................................................................51
7.1.17 Select a Flight Plan...................................................................................................................51
7.1.18 … the remaining Main Menu Options.......................................................................................56
7.1.19 Options #2 Main Display...........................................................................................................58
7.1.20 Adjusting the Regional Voice Accent.........................................................................................59
7.1.21 Add a New Facility Frequency or mark Airport Closed............................................................60
7.1.22 Mark Airport Close....................................................................................................................63
7.1.23 Control Center Mapping and Altitude Settings.........................................................................65
7.1.24 Excluding Individual Voices......................................................................................................68
7.1.25 Designated Parking Control......................................................................................................70
7.1.26 Advanced Options and INI File Tweaks....................................................................................71
7.1.27 Validate your PF3 Installation..................................................................................................91
7.1.28 Deactivate your PF3 License on this PC...................................................................................91
7.1.29 Adjust Altitudes, SIDs, STARs and Holds for Selected Flight Plan...........................................92
7.1.30 Define Oceanic Airspace for the Selected Flight Plan..............................................................98
Page 2 of 212
Copyright © 2007-2024 by OnCourse Software

PF3 User Guide
7.1.31 PF3 Profiles...............................................................................................................................99
8. PF3 FEATURES IN MORE DETAIL..................................................................................................100
8.1 THE TGS GAUGE................................................................................................................................100
8.2 THE STANDALONE TGS DISPLAY ........................................................................................................101
8.3 THE TGS2 GAUGE..............................................................................................................................103
8.4 OCEANIC PROCEDURES.........................................................................................................................104
8.5 TRAFFIC ADVISORIES...........................................................................................................................104
8.6 REQUESTING HIGHER/LOWER ALTITUDE...............................................................................................104
8.7 AUTO TAXI SPEED CONTROL ...............................................................................................................105
8.8 AI AIRCRAFT CONFLICT MONITORING..................................................................................................105
8.9 OTHER AI TRAFFIC DETECTION............................................................................................................106
8.9.1 Additional Ground Control Monitoring....................................................................................107
8.10 HOW WE HANDLE ATC CHATTER CALL SIGNS...................................................................................107
8.11 STEP CLIMBS AND DESCENTS.............................................................................................................108
8.12 EN-ROUTE CONTROL CENTRES...........................................................................................................108
8.13 HOW WE DETERMINE THE ACTIVE RUNWAY........................................................................................108
8.14 DESIGNATED PARKING.......................................................................................................................108
8.14.1 Stage 1.....................................................................................................................................109
8.14.2 Stage 2 ....................................................................................................................................109
8.15 RESUMING A FLIGHT..........................................................................................................................110
8.16 VISUAL CONNECTION INDICATOR.......................................................................................................112
8.17 INTERACTIVE SUPPORT FOR FDC USERS.............................................................................................113
8.18 ACARS ATIS..................................................................................................................................114
8.19 IN-FLIGHT VOLUME ADJUSTMENT......................................................................................................116
8.20 VFR FLIGHTS IN PF3........................................................................................................................117
8.20.1 Standard VFR..........................................................................................................................117
8.20.2 VFR Free Flight.......................................................................................................................117
8.21 LOCAL TRANSITION ALTITUDES..........................................................................................................119
8.22 FAILING TO CONTACT THE NEXT ATC FACILITY.................................................................................119
9. SOME ATC INSTRUCTIONS..............................................................................................................120
9.1 DESCENDING FROM TOD AT PILOT’S DISCRETION................................................................................120
9.2 VARIABLE TAKE-OFF INSTRUCTIONS.....................................................................................................120
9.3 NEW CALLS FROM TOWER AFTER LANDING...........................................................................................120
9.4 ENTERING A HOLDING PATTERN...........................................................................................................120
9.5 REQUESTING ‘DIRECT TO…’................................................................................................................121
10. DECLARING AN EMERGENCY......................................................................................................123
10.1 OVERVIEW.........................................................................................................................................123
10.2 MAYDAY...........................................................................................................................................123
11. OCEANIC PROCEDURES ................................................................................................................125
11.1 ABOUT...............................................................................................................................................125
11.2 OCEANIC COM PROCEDURES.............................................................................................................125
12. DEFAULT HOTKEY DETAILS........................................................................................................127
12.1 HOW TO USE HOTKEYS.......................................................................................................................127
12.2 HOTKEY FUNCTIONALITY EXPLAINED.................................................................................................127
12.2.1 Hotkey Ctrl + Shift + E...........................................................................................................127
12.2.2 Hotkey Ctrl + Shift + =...........................................................................................................127
12.2.3 Hotkey Ctrl + Shift + \.............................................................................................................127
Page 3 of 212
Copyright © 2007-2024 by OnCourse Software

PF3 User Guide
12.2.4 Hotkey Ctrl + Shift + C...........................................................................................................127
12.2.5 Hotkey Ctrl + Shift + D...........................................................................................................128
12.2.6 Hotkey Ctrl + Shift + V...........................................................................................................128
12.2.7 Hotkey Ctrl + Shift + W..........................................................................................................128
12.2.8 Hotkey ‘H’ ..............................................................................................................................129
12.2.9 Hotkey ‘L’................................................................................................................................129
12.2.10 Hotkey Ctrl + Shift + Y..........................................................................................................129
12.2.11 Hotkey Ctrl + Shift + N.........................................................................................................129
12.2.12 Hotkey ESC............................................................................................................................129
12.2.13 Hotkey Ctrl+Shift+T..............................................................................................................130
12.2.14 Hotkey Ctrl+Shift+S..............................................................................................................130
12.2.15 Hotkey '0' (zero).....................................................................................................................130
12.2.16 Hotkey ‘1’..............................................................................................................................131
12.2.17 Hotkey ‘2’..............................................................................................................................131
12.2.18 Hotkey '3'...............................................................................................................................132
12.2.19 Hotkey '4'...............................................................................................................................132
12.2.20 Hotkey '5'...............................................................................................................................133
12.2.21 Hotkey '6'...............................................................................................................................133
12.2.22 Hotkey '7'...............................................................................................................................134
12.2.23 Hotkey '8'...............................................................................................................................134
12.2.24 Hotkey '9'...............................................................................................................................135
13. REMOTE RADIO STACK PROGRAM...........................................................................................136
13.1 OVERVIEW.........................................................................................................................................136
14. REMOTE TEXT PROGRAM.............................................................................................................138
14.1 GENERAL...........................................................................................................................................138
14.2 INSTALLATION....................................................................................................................................138
14.3 FEATURES..........................................................................................................................................138
15. TGS GAUGE REPLACEMENT PROGRAM..................................................................................140
15.1 OVERVIEW.........................................................................................................................................140
15.2 THE PROGRAM ..................................................................................................................................140
16. PF3 DISPLAY UTILITY PROGRAM...............................................................................................143
16.1 GENERAL...........................................................................................................................................143
16.2 THE PROGRAM...................................................................................................................................144
16.3 CUSTOMISING THE DATA FILE............................................................................................................147
16.3.1 Changing the Data file.............................................................................................................147
16.3.2 Data File Content (default).....................................................................................................148
17. WHICH MESSAGE WINDOW TO USE?........................................................................................152
17.1 WHAT WE RECOMMEND......................................................................................................................152
17.2 SETTING UP REMOTETEXT..................................................................................................................152
17.3 SETTING UP THE FSUIPC MESSAGE WINDOW....................................................................................152
18. USING VR SOFTWARE WITH PF3.................................................................................................153
18.1 OVERVIEW.........................................................................................................................................153
18.2 SETTING UP PF3................................................................................................................................153
18.2.1 Using VR for all ATC communications...................................................................................153
18.2.2 Switching between using VR and your VCP for ATC communication....................................153
19. TIME TO FLY......................................................................................................................................155
Page 4 of 212
Copyright © 2007-2024 by OnCourse Software

PF3 User Guide
19.1 THE PF3 QUICK-START TUTORIAL.....................................................................................................155
20. HINTS AND TIPS................................................................................................................................157
20.1 EXECUTING A FLIGHT PLAN...............................................................................................................157
20.2 HOLDING PATTERNS...........................................................................................................................164
20.2.1 Entry Procedures.....................................................................................................................165
20.2.2 Inbound Leg.............................................................................................................................166
20.2.3 Outbound Leg..........................................................................................................................166
20.2.4 Procedural Turns.....................................................................................................................166
20.2.5 Exit Point.................................................................................................................................167
20.3 UNCONTROLLED AIRPORTS.................................................................................................................168
20.4 USING PF3 WITH MCE......................................................................................................................168
20.5 A WORD ABOUT SID/STAR USE IN PF3............................................................................................169
20.6 HOW TO RESET PF3'S WINDOW POSITIONS.........................................................................................171
20.7 HOW TO TURN OFF TGS MESSAGES (FS9, FSX ONLY)........................................................................171
20.8 MARTIN'S TIPS ON USING THE FMC WITH PF3....................................................................................172
20.8.1 Using the new Flight Plan Filter option
............................................................................................................................................................172
20.8.2 Using the same flight plan with an FMC.................................................................................175
21. PF3 GENERAL FAQ SECTION .......................................................................................................179
22. TGS GAUGE INSTALLATION INSTRUCTIONS..........................................................................186
22.1 HOW TO INSTALL THE OPTIONAL GAUGE ONTO A PANEL.....................................................................186
22.2 BACKING UP YOUR HARD WORK.......................................................................................................192
22.2.1 This one is for a third party aircraft in FS9............................................................................192
22.2.2 This is for the default Cessna in FS9:......................................................................................192
22.2.3 This is the default 737-800 FSX...............................................................................................193
22.2.4 The default 747-400 in FSX.....................................................................................................193
22.2.5 Installing TGS into the PMDG747-400 Queen of the Skies for FSX.......................................193
22.3 INSTALLING THE TGS GAUGE INTO A WINDOW..................................................................................197
22.3.1 Install the gauge into a window for the FS2004 default 747-400...........................................197
22.3.2 Install the gauge into a window for a 3rd party aircraft in FS2004.......................................198
22.3.3 Install the gauge into a window for a 3rd party aircraft in FSX.............................................199
22.3.4 Install the gauge into a window for a default aircraft for FSX...............................................199
22.3.5 A Few Useful Notes:................................................................................................................200
23. EXTENDED CONTROL SECTOR FILE.........................................................................................201
23.1 OVERVIEW.........................................................................................................................................201
23.2 ARGENTINA-CHILE ANTARTIC PENNINSULA DISPUTE..........................................................................202
23.3 UNUSED SECTOR NAMES....................................................................................................................202
24. TGS GENERAL FAQ SECTION.......................................................................................................203
25. KNOWN ISSUES..................................................................................................................................204
25.1 YOUR SKIN........................................................................................................................................204
25.2 SENIOR MOMENTS..............................................................................................................................204
25.3 IN THE UNLIKELY EVENT ..................................................................................................................204
26. SUPPORT..............................................................................................................................................207
27. CREDITS...............................................................................................................................................208
Page 5 of 212
Copyright © 2007-2024 by OnCourse Software

PF3 User Guide
27.1 BETA TESTERS...................................................................................................................................208
27.2 PF3 PROGRAM DESIGN AND DEVELOPMENT.......................................................................................208
27.3 PF3 DOCUMENTATION.......................................................................................................................208
27.4 SPECIAL THANKS…...........................................................................................................................208
27.5 ADDITIONAL WORK...........................................................................................................................209
28. COPYRIGHT AND LICENSING.......................................................................................................210
28.1 COPYRIGHT........................................................................................................................................210
28.2 ACKNOWLEDGEMENTS........................................................................................................................210
28.3 SOFTWARE LICENSE AGREEMENT ......................................................................................................210
Page 6 of 212
Copyright © 2007-2024 by OnCourse Software

PF3 User Guide
1. WELCOME ABOARD
Thank you for purchasing PF3 – ATC at its best.
To ensure your journey with us is as comfortable and trouble free as possible,
please take the time to peruse this user guide.
+ + + + + +
PF3 is the next stage in our flight plan to bring you the most realistic,
encapsulating and stable ATC program available for flight simulation.
The name is probably somewhat familiar and you may well remember us for
bringing back the much loved ATC program Proflight 2000 to your flight sim
world several years ago. But PF3 goes much, much further than that.
PF3 is almost a complete rewrite and a stand-alone program that
doesn't require nor use anything from the now defunct ProFlight
2000.
So what's new?
Read on...
Page 7 of 212
Copyright © 2007-2024 by OnCourse Software

PF3 User Guide
2. WHAT'S NEW
PF3 includes all the relevant, much loved features and options
available in our previous ATC program plus, much, much more...
• PF3 now supports MSFS – Please also see the separate document
Known Issues when using MSFS
• PF3 comes complete with 119 voice sets, covering 20+ different
geographic regions in our PF3 world.
• PF3 monitors AI aircraft on the ground as you taxi to/from the runway
to ensure there are no conflicts.
• Automatic speed control when taxiing to/from the runway.
• PF3 offers a simple point and click on any flight plan, then fly !!
• Additional ATIS voice sets.
• Radio enhancement voice packs included as part of the basic
installation.
• Control center hand-off altitudes configurable for each PF3 geographic
region.
• PF3 does NOT alter your flight plan in any way
• PF3 is configurable for most voice recognition programs.
• All ATC and ATIS frequencies used in PF3 are taken DIRECTLY from
your flight simulator.
• Just a single installation of PF3 will work with either FS2004, FSX, P3D
and MSFS, even if you have all four flight simulators installed.
Whichever one is running PF3 will work with it (provided you use the
correct FREE version of FSUIPC)
• PF3 allows you to add any missing ATC frequency that doesn't
currently exist in your flight simulator.
• Use either COM1 or COM2 to communicate with ATC or listen to ATIS.
• PF3 offers the use of configurable flight profiles, so you can set up the
type of airport required, your aircraft's rate of climb/descent and also
your preferred approach speed.
• Receive a simulated ACARS display using your flight sim's kneeboard
(FS9 and FSX) or the new (V3.10) In-Sim display windows (P3D and
MSFS) to show all the ATC frequencies available at your departure
airport, thereby alleviating the problem of not knowing what frequency
to tune to. You can also request ATIS reports via ACARS.
• Much more accurate control center hand-offs as all our ATC control
zones have been revamped and extended.
Page 8 of 212
Copyright © 2007-2024 by OnCourse Software

PF3 User Guide
• Check your PF3 installation using the PF3 Validation program to
ensure you have all the correct files installed.
• Improved handling of emergency situations.
• PF3 supports both IFR and VFR flights plus our exciting (new in Ver
3.10) VFR Free Flight mode so you can take full advantage of enjoying
the outstanding visual qualities of the new MSFS.
• PF3 supports alternate airports which you can choose to divert to for
whatever reason.
• PF3 comes complete with 50+ application skins to give the program
the look you prefer... don't worry though if you prefer the look of our
previous ATC program as we've included that skin too. And if you don't
like using any skins at all PF3 let's you do that also.
• The maximum length of SID/STAR names has been increased from 5
to 7 characters.
• PF3's Hold feature has been completely changed. You can now easily
select which VOR/NDB waypoint within your flight plan you want to
initiate a hold, by a simple mouse click.
• Full taxi instructions to/from the runway. i.e. ATC instructs you to....
"taxi to gate 27 via taxiway delta, bravo two, alpha one, charlie
three".
• Taxi Guidance System (TGS) includes an (optional) panel gauge or
stand-alone program. The gauge (a new version is included in PF3
Version 3.10) and/or standalone utility program points to the next
taxi waypoint, displays a series of LEDs to indicate the distance to the
next taxi waypoint. TGS also includes AUDIBLE instructions from your
VCP telling you... "next left into delta.... bear right into bravo two...
straight on... gate 27 on the right" (just like your in-car navigation
system).
• PF3 provides full Oceanic Procedures when flying to/from the US (over
the pond) and between Gander/Shanwick controlled areas. This
includes simulated HF radio transmissions using real world SELCAL
sounds when ATC contact you. Your VCP will also radio through
position reports at each intersection.
• PF3 also provides a way for you to define Oceanic Procedures to any
flight plan if you wish, no matter how unrealistic it may be, PF3 will
accommodate you.
• PF3 supports 'Push and Start' request options.
• PF3 offers extended SID/STAR functionality.
• Closed Caption mode to make it easier to hear what ATC are saying,
also useful for those who maybe hard of hearing.
• Designated Parking at your destination airport.
Page 9 of 212
Copyright © 2007-2024 by OnCourse Software

PF3 User Guide
• Transition Altitudes can be set globally or for individual airports or you
may use a combination of both.
• User defined runway settings so any runway can be marked for
landings only, takeoffs only, both or even closed.
• User defined variable background radio interference noise that changes
when you tune to another control centre for that added realism.
• PF3 supports restarting a flight due to problems or simply because
you want to.
• Full interactive support for those using PF3 and FDC together.
• Automatically pause PF3 and FS at a specified distance from the
airport, runway and/or FAF.
• In addition to normal ATIS broadcasts PF3 also provides ATIS via its
simulated ACARS system (now available in both P3D and MSFS with
our - new in ver 3.10 - In-Sim window displays)).
• PF3 supports user defined minimum FAF altitudes for any FS airport,
particularly handy for those hazardous approaches.
• Even during your flight you can change the volume for either ATIS,
ATC, your VCP or the radio background noise.
• Free PF3 in-flight frequency/hotkey display utility included for those
with a second monitor or client machine perhaps.
• Free PF3 Remote Text utility included for those with a second monitor
of client machine perhaps.
• 'Request Direct To...' feature if you wish to deviate from your flight
plan.
• Two-way AI traffic advisories.
• Minimum departure altitude settings can be configured for any of your
FS airports.
• Mark any voice set you may not like so that it is not used again.
• Remap ATC control centres names if you hear one which is no longer
in use.
• PF3 supports the Project Magenta Boeing type MCP (and probably
others but they have not been tested).
• Display the last 10 transmissions ATC made to you.
• Adjust the speed of ATC taxi instructions and your read-back.
• Database refresh utility to apply any add-on scenery data you may
install for your flight simulator to ensure PF3's database is perfectly in
sync.
• All new approach vectoring code.
Page 10 of 212
Copyright © 2007-2024 by OnCourse Software

PF3 User Guide
• Integrated ATIS for all of the 1200+ equipped airports in FS9, FSX,
P3D and MAFS, plus the ability to add more.
• You will hear the full airport name announced in PF3's ATIS for all
those ATIS equipped FS9/FSX/P3D/MSFS airports.
• AI traffic based chatter, so you actually hear ATC communicating with
other traffic around you.
• Listen to ATC as they give clearance, taxi, takeoff, landing, climb,
descend, turn and hand off instructions to AI Traffic.
• Intelligent step climbs and descents which will be slightly different
each time for added realism.
• Regional ATC calls and instructions, reflecting the subtle and
sometimes not so subtle differences between FAA and CAA controllers.
• New In-Sim display windows for showing Closed Caption text, ACARS
simulated transmission messages and also the current available PF3
Hotkeys for each section of your flight. In-Sim display windows ONLY
work with P3D and MSFS and can be displayed even when you're using
full screen mode. Further details of this new feature later in this User
Guide
• A new feature to allow aircraft to taxi along the runway if the taxiway
takes you to the runway some distance from the runway end. In such
circumstances the aircraft would have to enter the active runway, taxi
along to the end and then do a 180 degree turn to line up. Prior to
PF3 version 3.10, if there was no inbound traffic, you would just be
cleared for takeoff. With this new feature you will be told to 'line up
and wait'. You could then enter the active runway and taxi to the end,
where you would then turn 180 degrees to line up. Once lined up ATC
would then clear you for take off... you would not have to contact
Tower again as the call would happen automatically.
• PF3 supports Aerosoft's CRJ
• PF3 supports PMDG's 737
Page 11 of 212
Copyright © 2007-2024 by OnCourse Software

PF3 User Guide
3. SYSTEM REQUIREMENTS
Microsoft Flight Simulator FS9, FSX, P3D or MSFS.
3.5 GB disk space required
Microsoft's NET Framework ver 4.0.30319 or later
DirectX (9.0c) for Managed Code Runtimes
A FREE copy of Pete & John Dowson's FSUIPC module (although we highly
recommend purchasing the registered module)
Runs under Windows XP (32/64), VISTA (32/64), Windows 7 (32/64),
Windows 8.1 (32/64), Windows 10 (32/64) and Windows 11 (32/64)
Page 12 of 212
Copyright © 2007-2024 by OnCourse Software

PF3 User Guide
4. INSTALLATION
4.1 Installing PF3
Once you have downloaded your purchase simply unzip and run the
PF3_Installation_Setup.exe program (right-click and select Run as
Administrator) and follow the onscreen instructions.
PF3 can be installed on the same computer running your flight simulator
program or on any client machine connected to your flight simulator program
via Pete Dowson's WideServer/WideClient application.
The exact location you choose to install PF3 is not important except we
strongly recommend you DO NOT install into the 'C:\Program Files' folder or
'C:\Program Files (x86)' folder. Since as far back as Windows Vista the
Program Files folder is regarded as a protected area and Windows will prevent
certain files from being created and/or updated, which can lead to some
programs failing intermittently.
Also, during the installation, it is always best to stop all other programs,
especially your anti virus program and any other security type programs you
might have. Once the installation is complete you must then configure your
anti virus program to exclude PF3 and its sub-directories from any scanning.
Note: Depending on the speed of your PC the installation can take between 2
and 40 minutes
IMPORTANT
When using PF3 you must turn your flight simulator's ATC volume
OFF (i.e down to zero), otherwise you could find yourself listening to
PF3 and FS ATC simultaneously.
It has been reported that turning Microsoft Flight Simulator off by
deselecting the adjacent ATC tick boxes can cause FS to crash, so
please just turn the volume right down.
Page 13 of 212
Copyright © 2007-2024 by OnCourse Software

PF3 User Guide
5. PF3 LICENCE AUTHORISATION
5.1 Overview
Software companies around the world have come to realize that activation-
type copy protection systems provide a reasonable solution to the problem of
piracy while at the same time respecting customers by not burdening them
with a hard-to-use licensing system.
Reducing piracy means that the software vendor can use steady revenues to
further improve the product and guarantee business continuation. It is
unfortunate that piracy exists because we know the majority of our customers
follow the licence terms but it is a fact of life in this digital age.
We trust the system we have chosen will be virtually transparent for the
majority our customers.
5.2 What is it?
Activation is a set of simple and quick steps taken upon installation in order to
begin using PF3. There are many products available that use a similar system
activation system. When PF3 is installed it contacts a central server via the
internet to complete the 'activation' and tie it to the provided
licence/activation code (which was provided by email).
This anti-piracy system helps protect our investment in our software and
enables us to continue its development at a competitive price. The licence
protection and monitoring system is managed by software_DNA from
softWORKZ Innovation Inc. This system does not collect any details about you
or your computer during licence activation and re-activation. You may
optionally enter your email address for password retrieval if ever you lose
your password.
Unlike other activation systems, the software_DNA system does not tie your
licence permanently to your computer hardware. Instead, your licence is tied
to your activation code and password that you define. As a result, you will
have no problem re-activating your software after reformatting your hard
drive, after upgrading hardware components in your computer, or when you
move your software to a new computer. However, activation and reactivation
does require an Internet connection. This Internet connection can be on a
different computer from where your application is installed.
Page 14 of 212
Copyright © 2007-2024 by OnCourse Software
PF3 User Guide
5.3 Online Authorisation
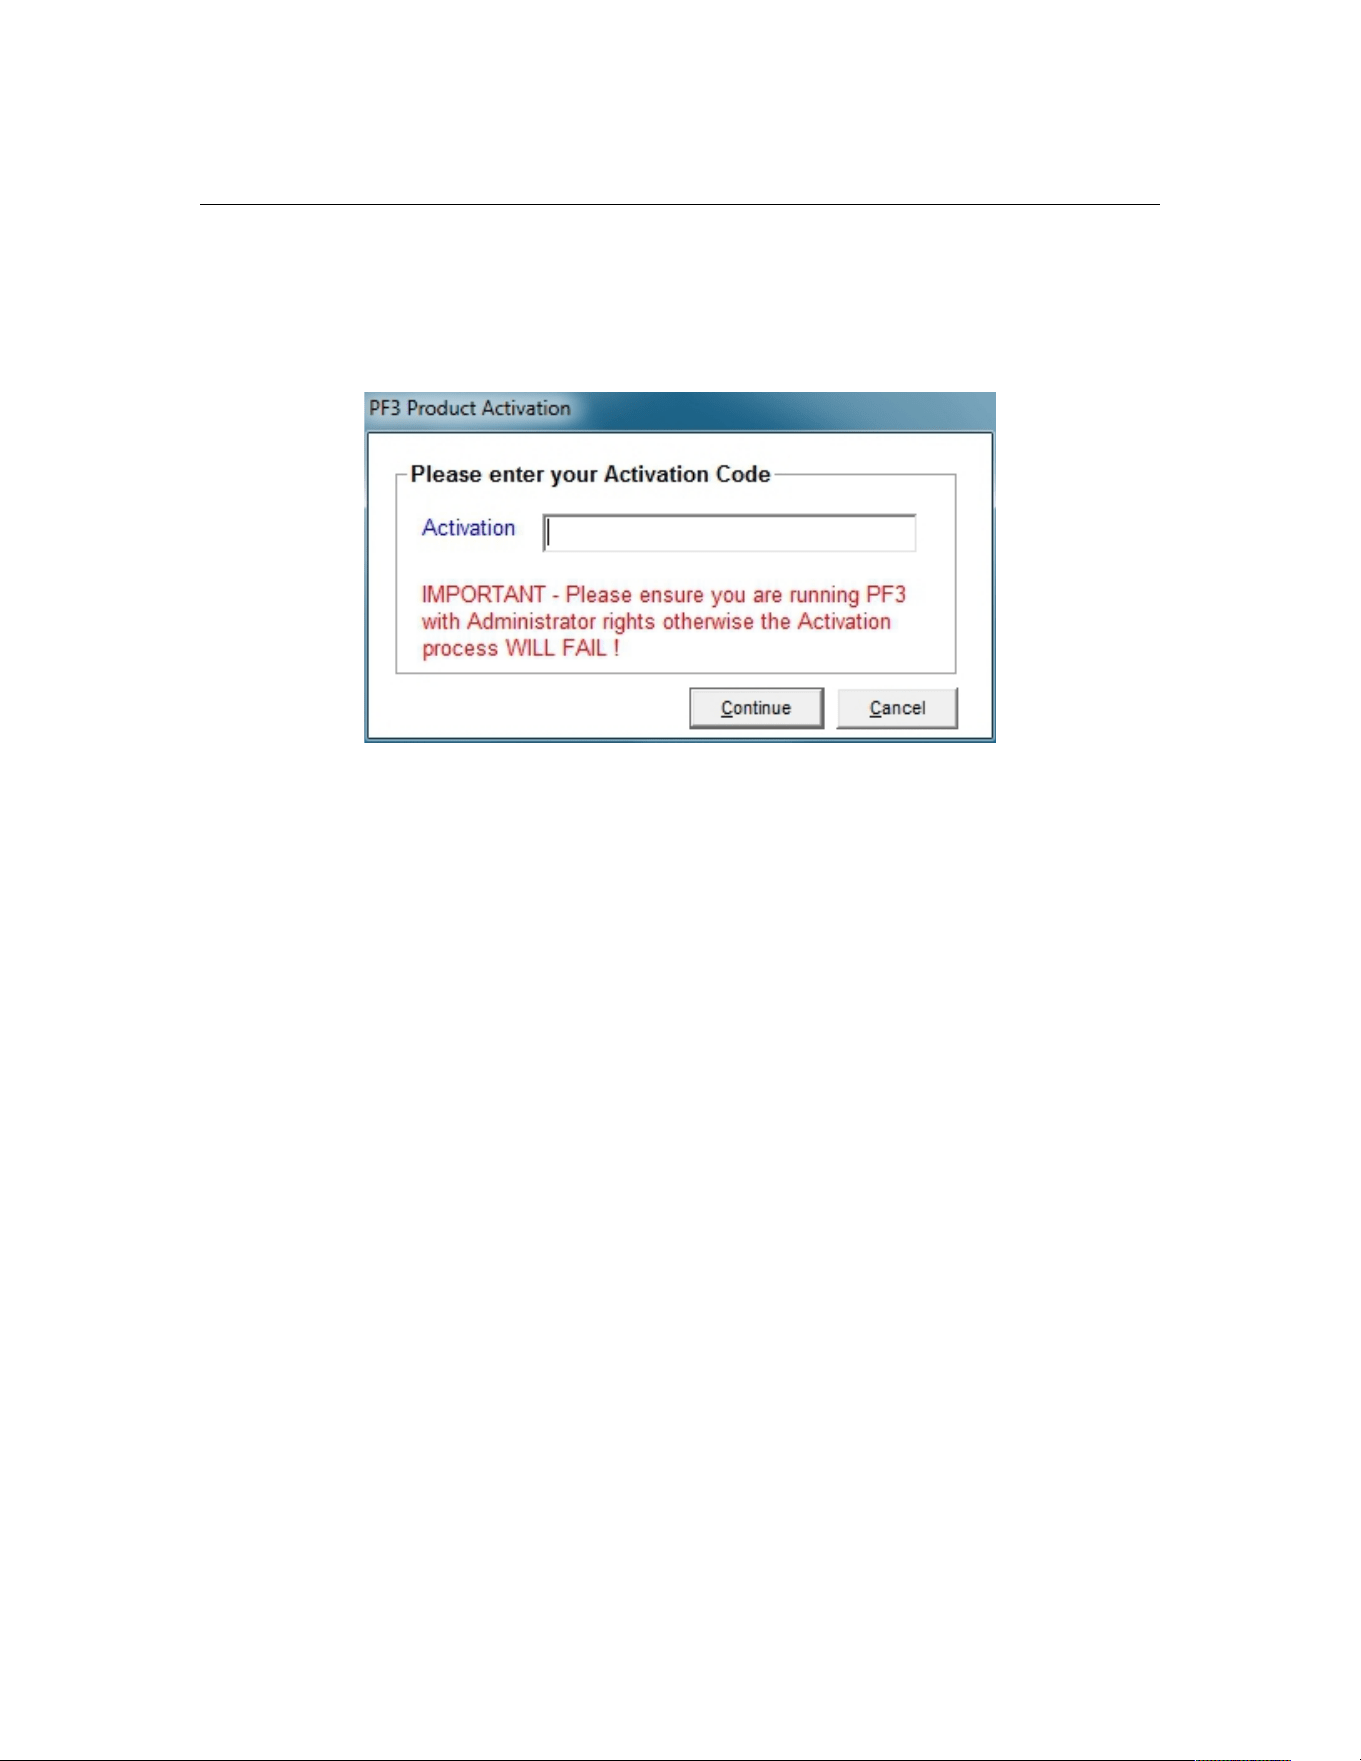
If the PC you are running PF3 on is connected to the internet you will see the
following screen displayed the very first time you run it.
Now enter your licence/activation code you received via email when you
purchased PF3. This would have been included in the same email you
received with the download link.
Please do take note of the reminder and ensure you run PF3 as
Administrator. If you don't this activation WILL FAIL!
Now click on Continue.
Page 15 of 212
Copyright © 2007-2024 by OnCourse Software

PF3 User Guide
The next screen requires you to create/enter a password and enter your email
address. In addition to activating PF3 this information will allow you to access
details about the activation and/or request reactivating it at anytime should
you change your PC. Your email address will also be required to retrieve your
password should you forget it at anytime, so please enter this information
carefully and make a note of it somewhere safe for future reference.
Here's what the password/email request screen looks like:-
Once complete please click on the Activate button.
As soon as the activation process is complete, which will only take a few
seconds, the PF3 main menu will be displayed.
This is a one-time activation process and you will not be required to do it
again unless you uninstall/reinstall PF3 or make a major hardware change to
your computer.
Page 16 of 212
Copyright © 2007-2024 by OnCourse Software
PF3 User Guide
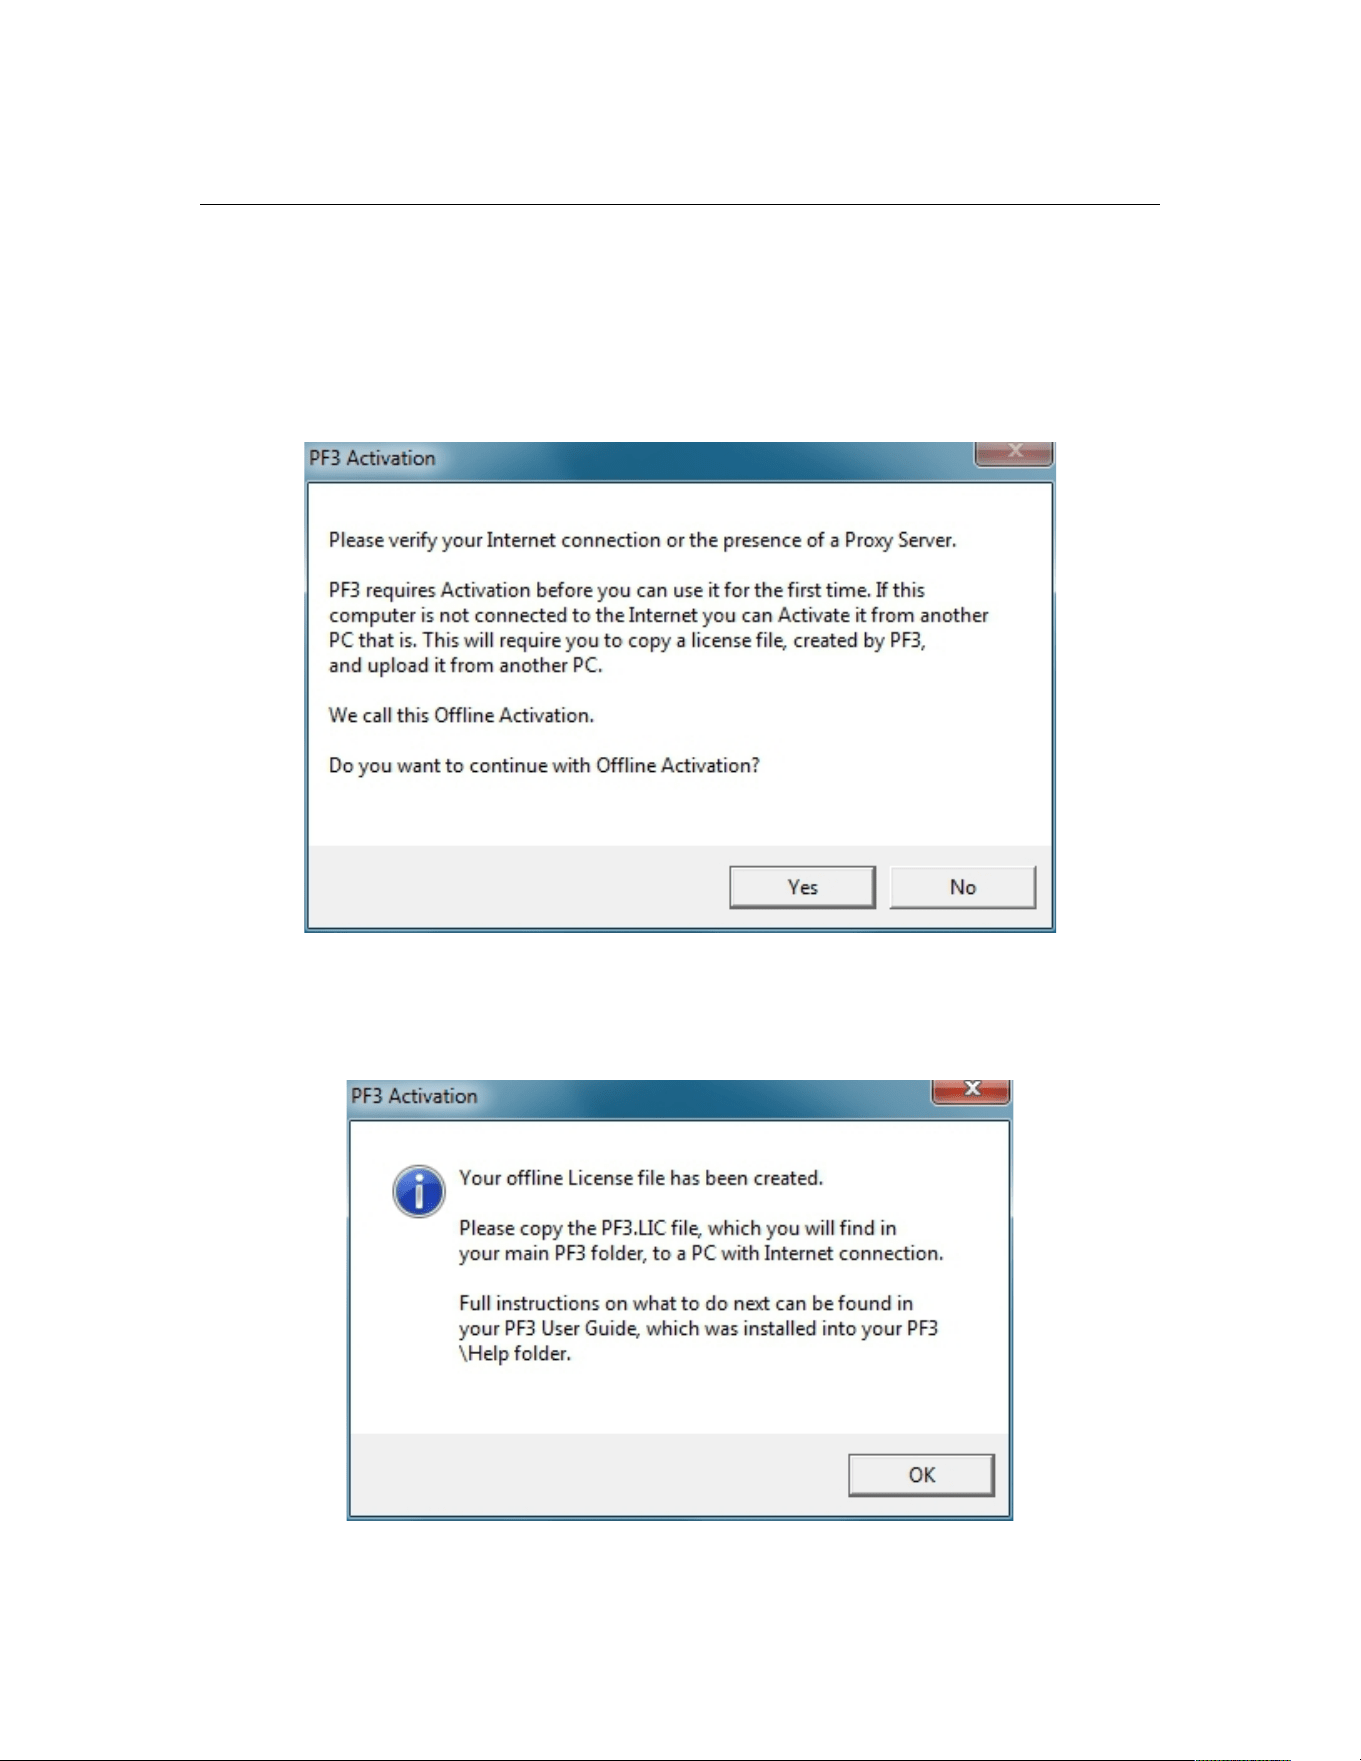
5.4 Offline Authorisation
If PF3 is installed on a PC which doesn't have an Internet connection you will
see the same screens as detailed in section 5.3. However, after entering a
password/email address and clicking Activate you will see the following
message window:-
To continue with Offline Activation select Yes, at which point the following
message will appear:-
Page 17 of 212
Copyright © 2007-2024 by OnCourse Software
PF3 User Guide
Now you need to transfer the PF3.LIC file, which was just created in your
main PF3 folder, over to the PC with Internet connection.
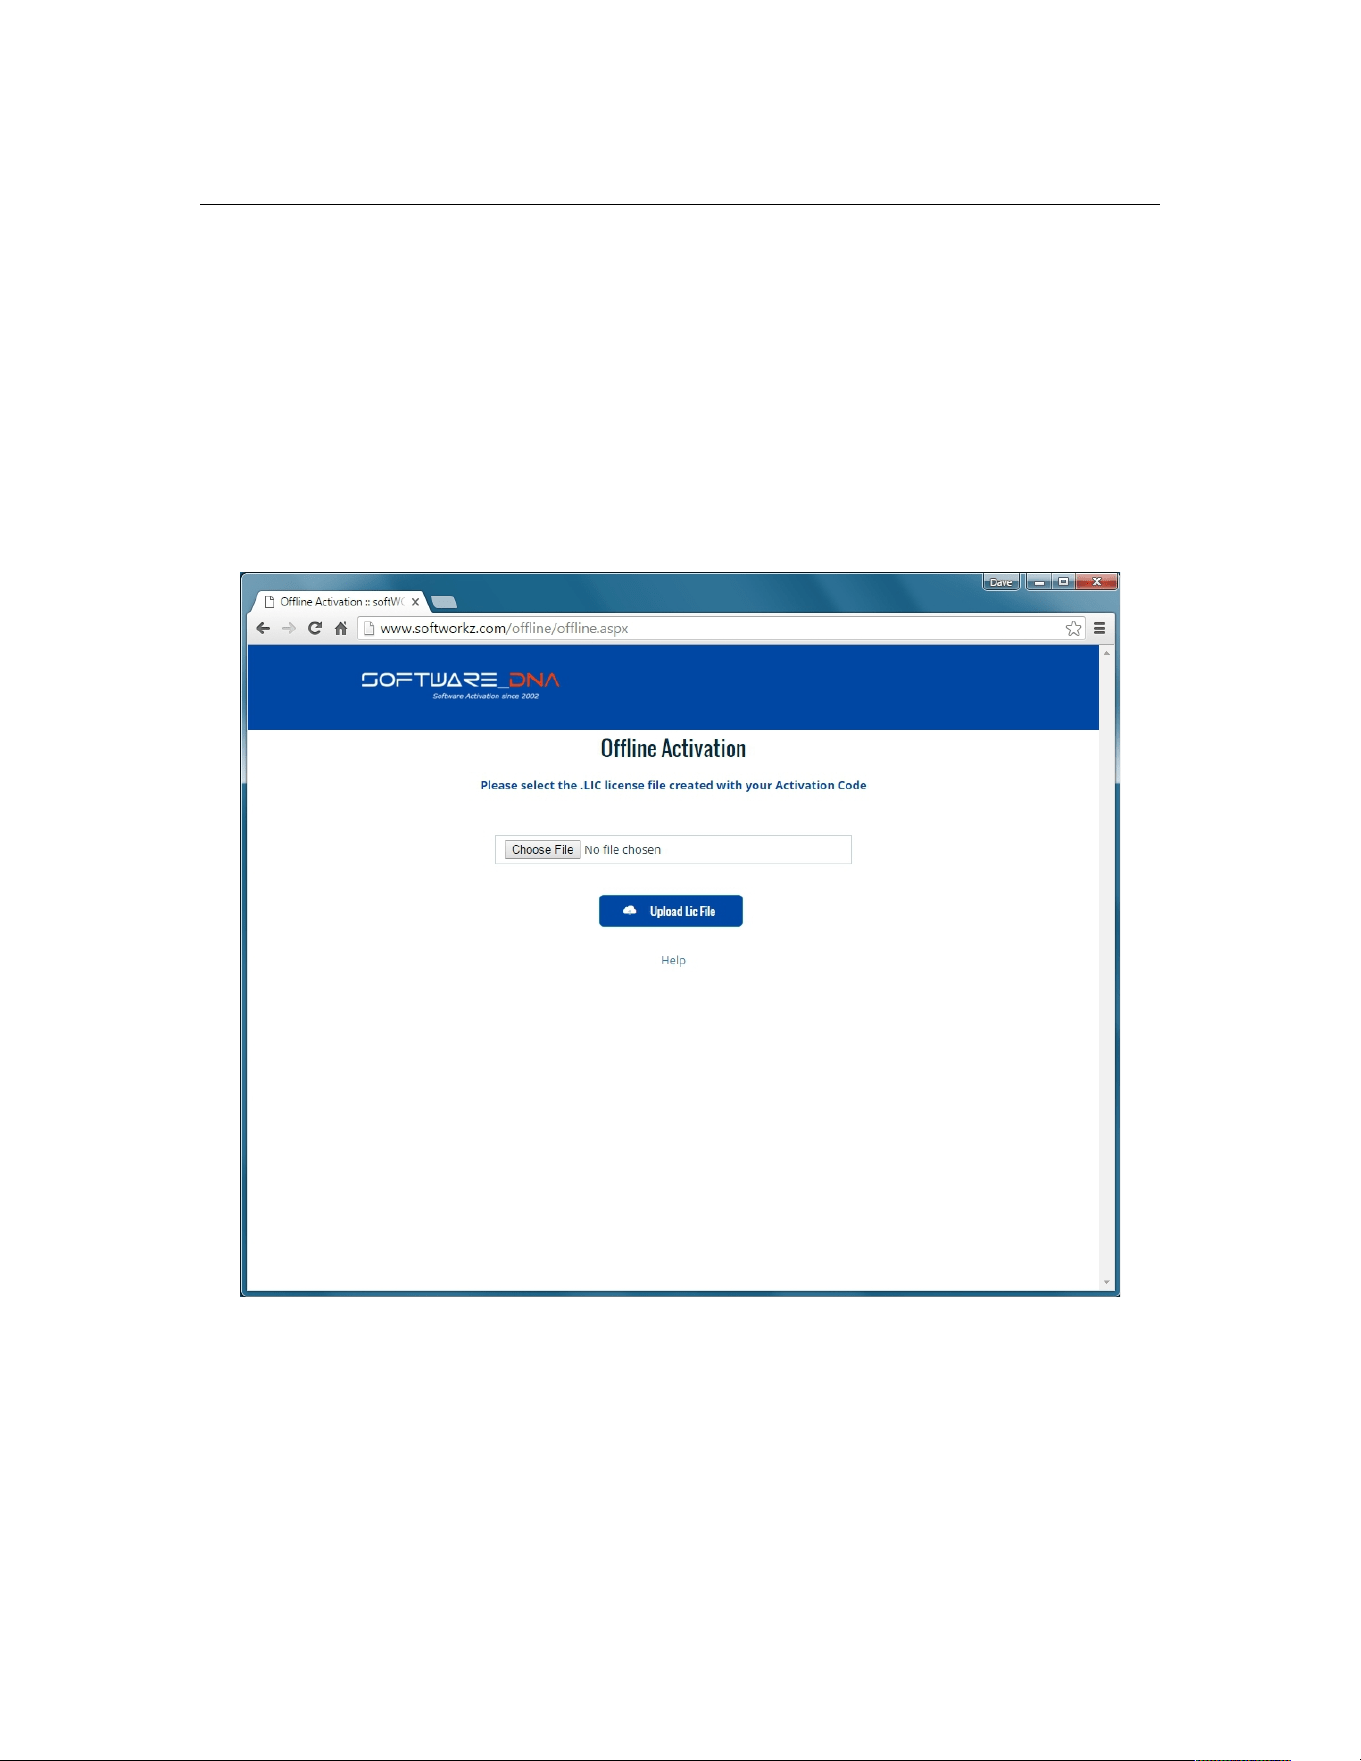
Enter the following into your web browser to access the offline activation
upload area:-
www.softworkz.com/offline
This is the web page you should see:
Page 18 of 212
Copyright © 2007-2024 by OnCourse Software
PF3 User Guide
Now select Choose File and navigate to wherever you copied the PF3.LIC
file, then select Upload Lic File to see the following page:
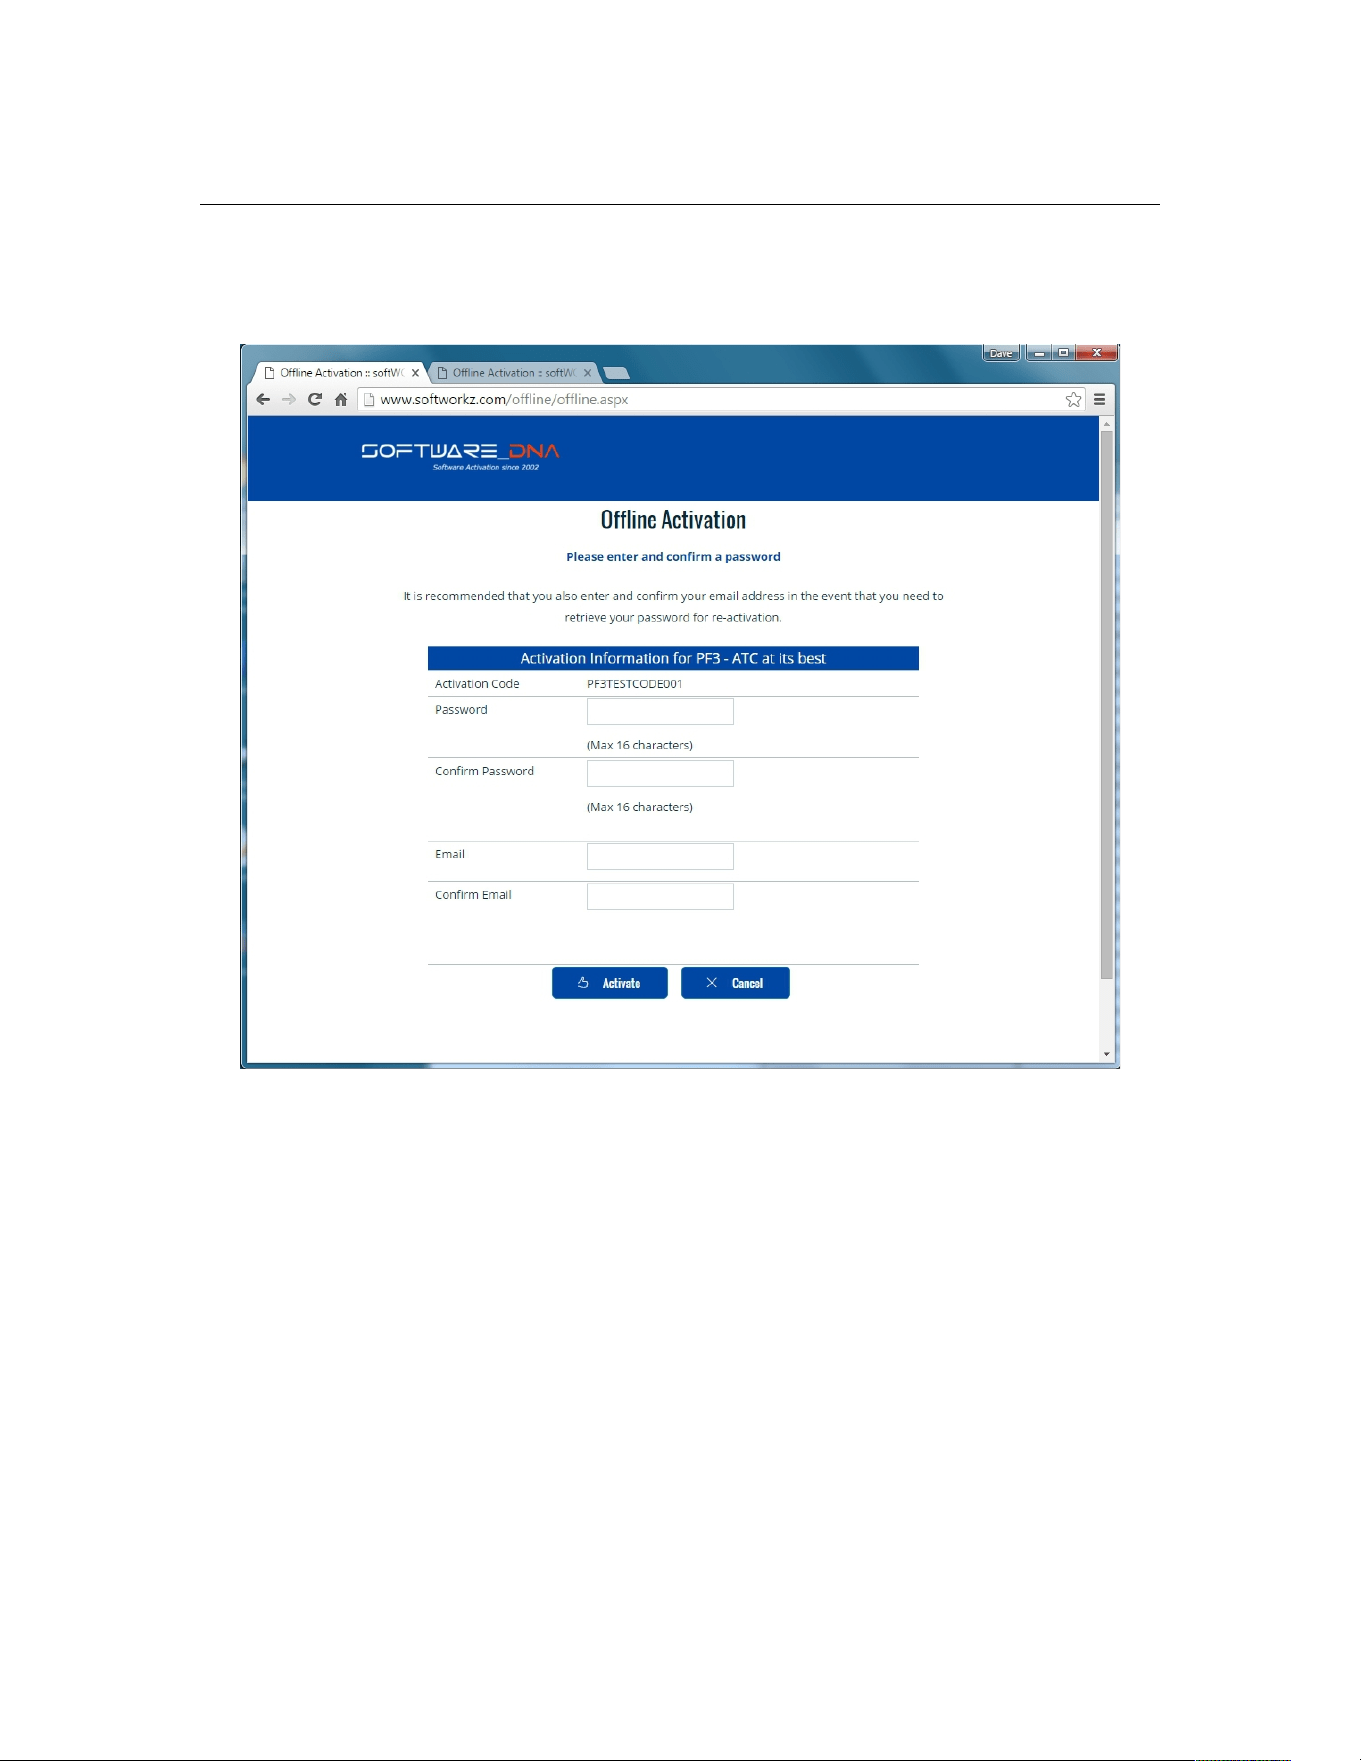
The page requires you to create/enter a password and enter your email
address. In addition to activating PF3 this information will allow you to access
details about the activation and/or request reactivating it at anytime should
you change your PC. Your email address will also be required to retrieve your
password should you forget it at anytime, so please enter this information
carefully and make a note of it somewhere safe for future reference.
So go ahead, enter the required information then select Activate.
Page 19 of 212
Copyright © 2007-2024 by OnCourse Software
PF3 User Guide
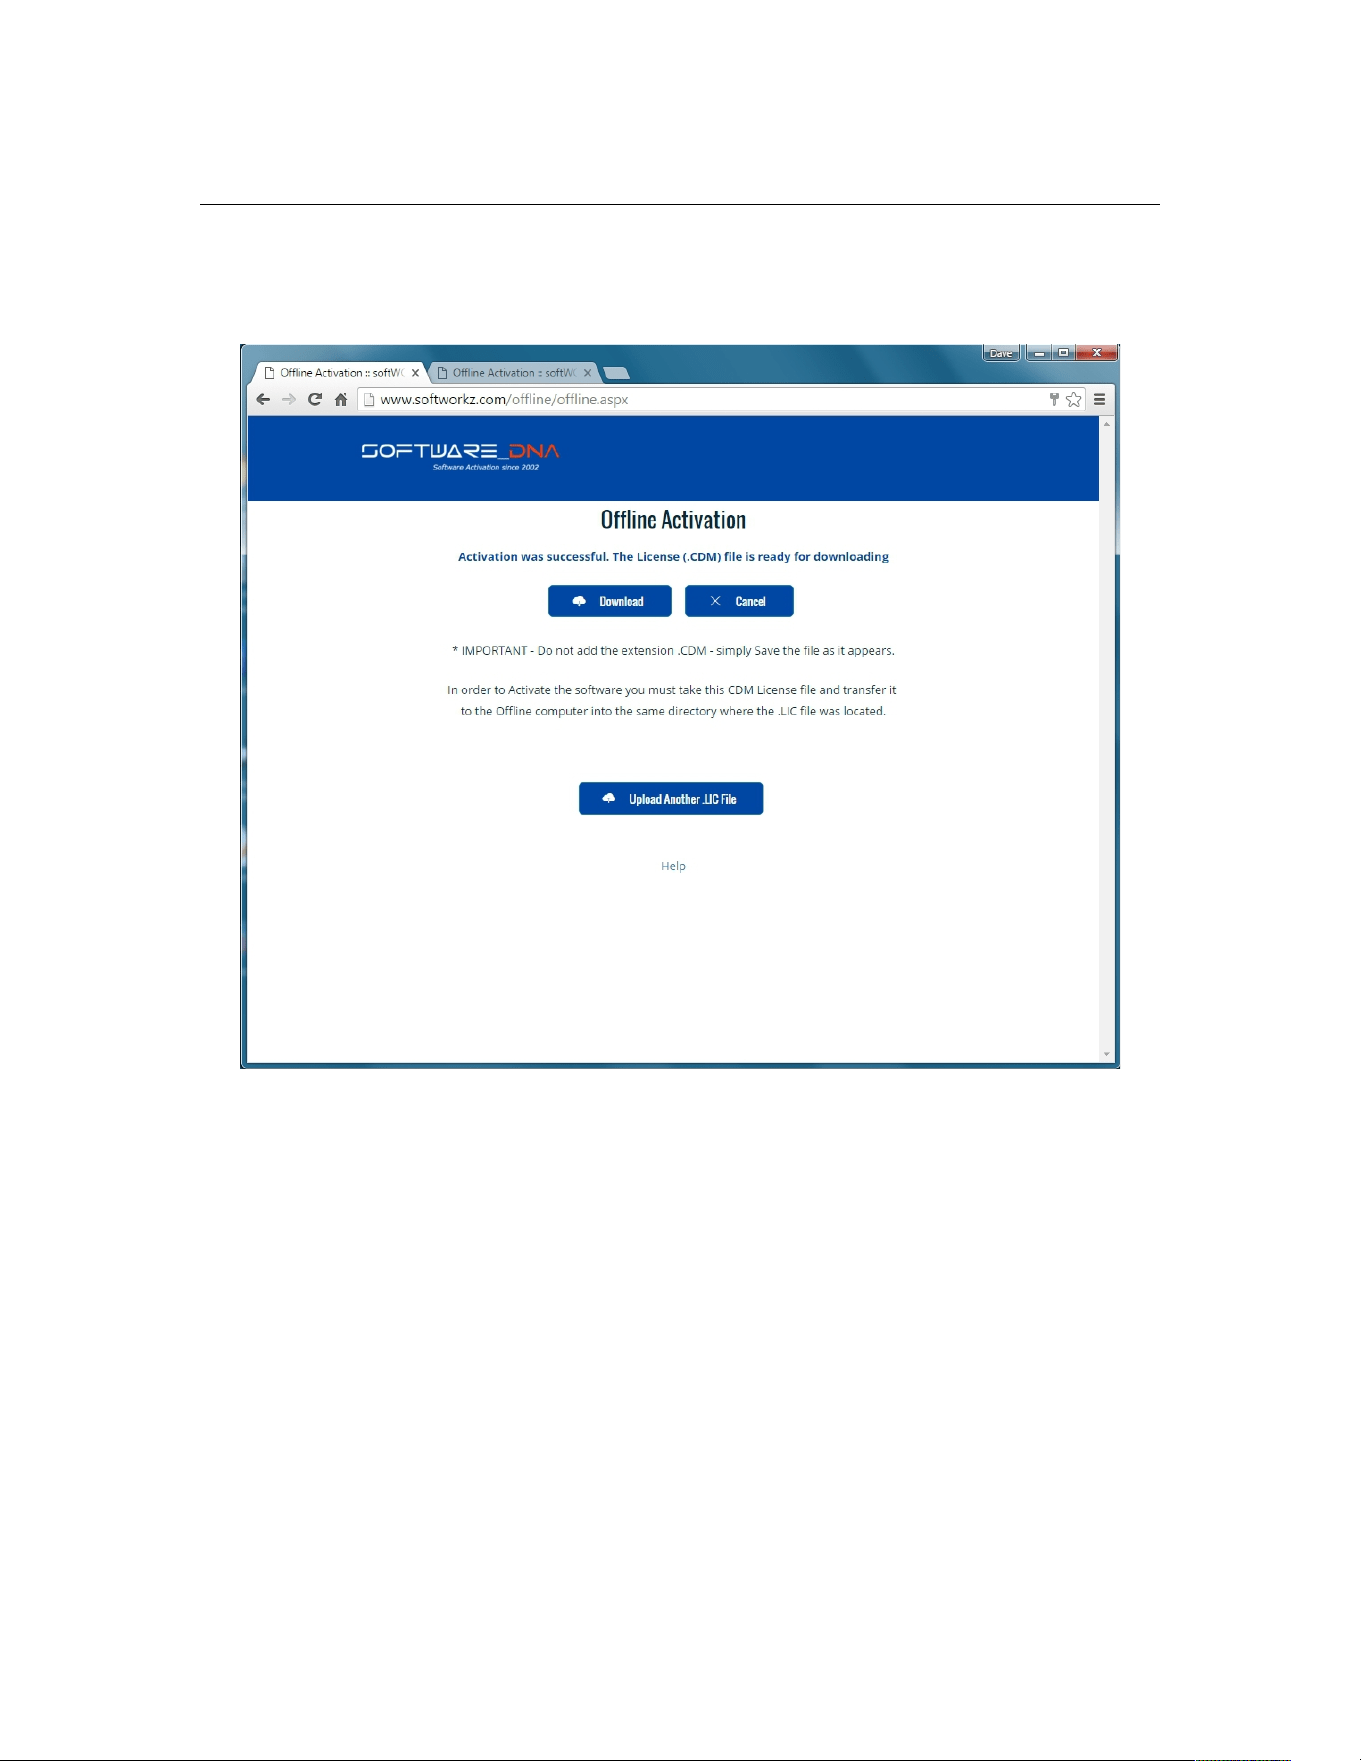
Provided you've entered everything correctly you should be presented with
the following screen:
Now you need to select Download to get your Licence (.CDM) file and
transfer it to your PF3 computer, copying into the main PF3 folder.
Finally you can start PF3 and the activation is complete.
This is a one-time activation process and you will not be required to do it
again unless you uninstall/reinstall PF3 or make a major hardware change to
your computer.
Page 20 of 212
Copyright © 2007-2024 by OnCourse Software

PF3 User Guide
5.5 FAQ's for Online Authorisation
I have entered my code correctly and have an internet connection,
why is PF3 saying I have to do an off-line activation?
PF3 cannot reach the activation server. You may be using a proxy server or
have a firewall (Windows firewall, ZoneAlarm, BitDefender, etc.). Make sure
you have given permission for PF3 to access the Internet in your firewall (see
question below).
To verify if you have an Internet Connection, access the Internet using your
web browser. If your web browser can connect, then look for a proxy or
firewall.
I have entered my code and password correctly with a new password
to do a re-activation, why is PF3 not being re-activated?
Verify that you have an Internet Connection. Your new password must be a
new and never-used password. Verify that you have not previously used this
password with this activation code.
How often will PF3 connect to the activation server via the Internet?
PF3 checks with the activation server when it is first installed, when it is re-
activated, such as after a disk reformat and reinstall, or if the software is
moved to a new computer.
Will PF3 work if I don't have an internet connection?
Yes, there is an offline activation method available. If no Internet connection
is found during activation, or the activation server is not reachable, PF3 will
ask you to do offline activation. PF3 will provide step-by-step instructions,
where a file is written to disk that you move to a computer that does have
Internet access (or email access). You can move this file via LAN, floppy disk,
CD-R or USB key. You can use your Internet browser (on a machine that does
have Internet access) to visit a special page to upload this file and receive
another file in return. If you do not have any working browsers then the file
can be emailed to our support (note there may be a delay in the return of the
file depending on the time of day and week).
Does the internet connection speed affect Activation? Will dial-up
Activation work?
The amount of data transferred during activations is very small. Any stable
internet connection will work. Obviously slower connections will take slightly
longer to complete the activation steps but this will be negligible.
Page 21 of 212
Copyright © 2007-2024 by OnCourse Software

PF3 User Guide
What information is passed to your server during activation?
No personal information or information about your computer configuration are
transferred. There is a one-way hash* of some machine configuration data,
your chosen password, and the optional email address sent to the server. If
you do not provide the optional information (email address and registration
information) then no personal information will be transferred. We suggest you
do not use one of your important personal passwords for the activation
password, or a password that personally identifies you.
*One-way Hash: Codes that identify parts of the computer are put through a
special function (called a 'one way hash') that turns the codes into one code
number that is unique to your computer but cannot be deciphered (or reverse
engineered) to determine what those components are. Only this hash value is
sent to the activation server and not the details on the computer parts.
Can I move PF3 to another computer?
Yes, this can be done easily. It is simply a matter of deactivating PF3 and
then uninstalling the application on one computer, reinstalling the application
on the new machine, and reactivating the software. If you have remembered
your password this will be a fast and easy process.
What is the password for?
The password uniquely identifies your licence/activation code. You will need
the password if you ever need to reactivate PF3 (such as after a disk
reformat and reinstall or moving PF3 to a new machine). We suggest you do
not use one of your important personal passwords for the activation password
or a password that personally identifies you. The password has to be changed
and be new (never-used) each time you re-activate the software.
What is the email address for?
The email address on the activation and reactivation dialogues is optional.
You will be able to activate even if you do not provide an email address. If
you do provide an email address, it can be used to retrieve a lost password. If
you do provide the email address it will not be used for marketing purposes
or sold / provided to any third party. If you do provide an email address we
recommend it be one that will be active for some time.
What if I have forgotten my password and did not provide an email
address (or my email address is no longer valid)?
During a reactivation the previously provided password is required. If the
password has been lost and cannot be recovered (because an email address
was not provided, or the email address is no longer valid) you will need to
contact our support via email.
We will be happy to reset your password.
Page 22 of 212
Copyright © 2007-2024 by OnCourse Software

PF3 User Guide
Will changes to my computer cause PF3 to stop working?
There are no changes that will cause a permanent disabling of PF3. Major
changes (disk reformat being one such major change) will mean that you
need to reactivate the software. If you have your password this will be a fast
and easy process.
What happens if OnCourse Software or softWORKZ suspends service
or goes out of business?
Both companies have been in business for quite a few years. In fact both
companies were formed in 2002 and are healthy, stable and will be around
for many years to come!
Regardless, your activated application will continue working without the
Activation server, although new activations or re-activations will not be
possible. Both companies are committed to ensure that a patch will be made
available ASAP to resolve this. Either a version with a replaced activation
system or a version with no activation will be provided.
I wish to do an online activation but my firewall is setup to block such
requests. What are the firewall settings I need?
The following is the information that you need to setup your firewall:
Main server IP address: reg1.softworkz.com
Backup server IP: reg2.softworkz.com
Backup server IP: reg3.softworkz.com
Port: 80 (Standard HTTP)
Domain: softworkz.com
I want to reinstall PF3 but can't remember my Activation code, what
should I do?
In the first instance simply go to the License Manager portal using the
following link:
https://www.softworkz.com/licensemanager/index.aspx
Page 23 of 212
Copyright © 2007-2024 by OnCourse Software
PF3 User Guide
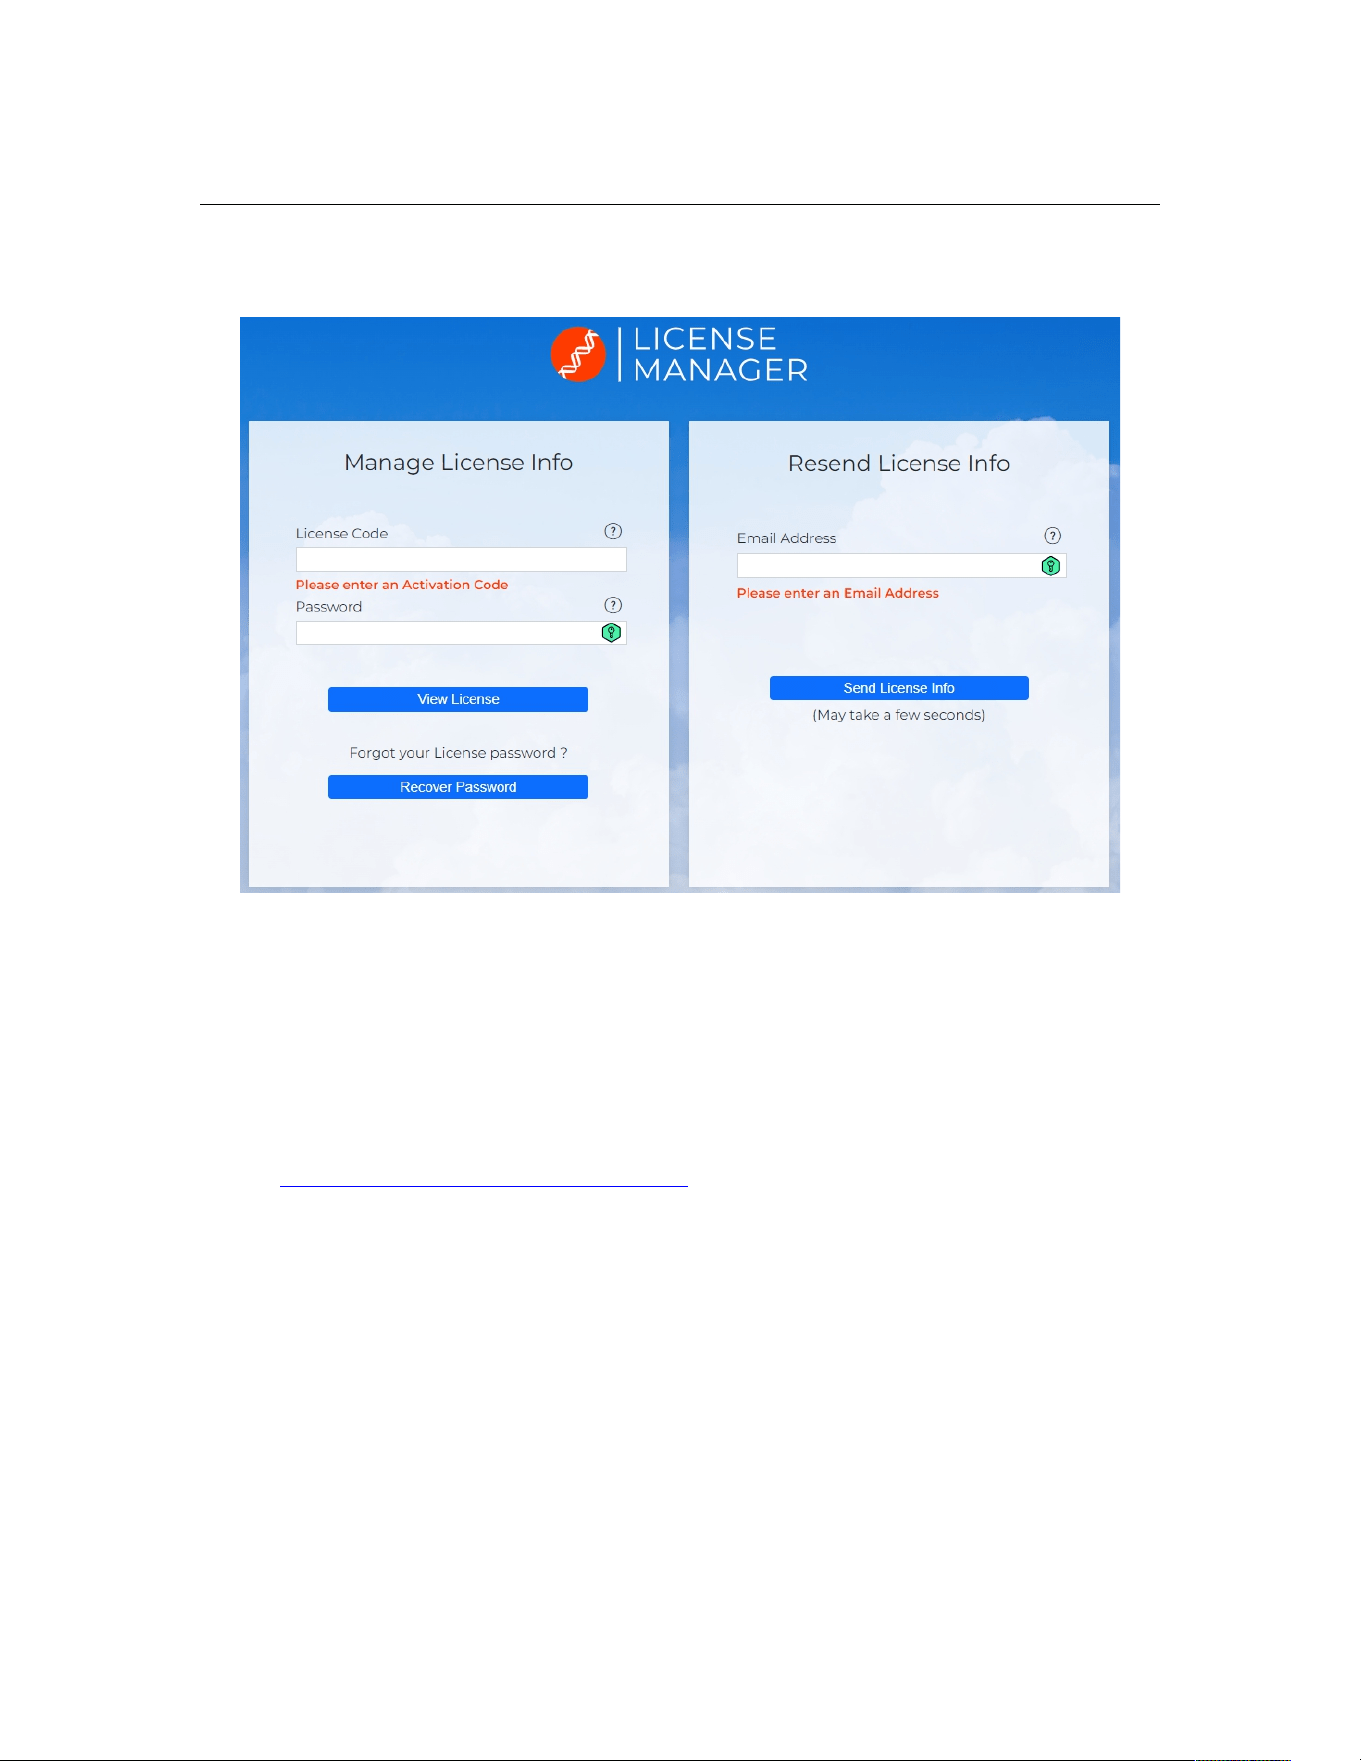
This will take you to the following page
If you have you activation code you can simply complete the left hand pane
details to retrieve all your licence details, or if you've forgotten your password
just select 'Recover Password' and it will be sent to your registered email
address.
If you don't have your activation code just enter you email address in the
right hand pane and the details will be sent to you.
If all else fails then you can write to us at:
But we would need as much information as possible in order to be able to
trace your activation code. So please provide the following:
1. Approximate date you purchased PF3
2. Where you purchased it
3. How you paid for it
Page 24 of 212
Copyright © 2007-2024 by OnCourse Software

PF3 User Guide
6. HOW TO UNINSTALL PF3
Before uninstalling PF3 please ensure you DEACTIVATE the software
first by going to the Options #2 menu and then selecting 'Deactivate
your PF3 License on this pc'.
We recommend you uninstall PF3 using the standard Windows Control Panel,
Uninstall a Program feature.
Page 25 of 212
Copyright © 2007-2024 by OnCourse Software

PF3 User Guide
7. PF3 OPTIONS AND CONFIGURATION
7.1 Overview
PF3 offers a host of configurable options for you to tinker with and setup the
system to your very own requirements, personal likes and dislikes.
Please Note: Some screen shots may differ on your system due to the skin
you're using or changes to PF3 since this document was written.
7.1.1 Main Menu Options Selection
General options are accessed from the main PF3 screen by selecting either
the Options #1 or Options #2 buttons.
Page 26 of 212
Copyright © 2007-2024 by OnCourse Software
PF3 User Guide
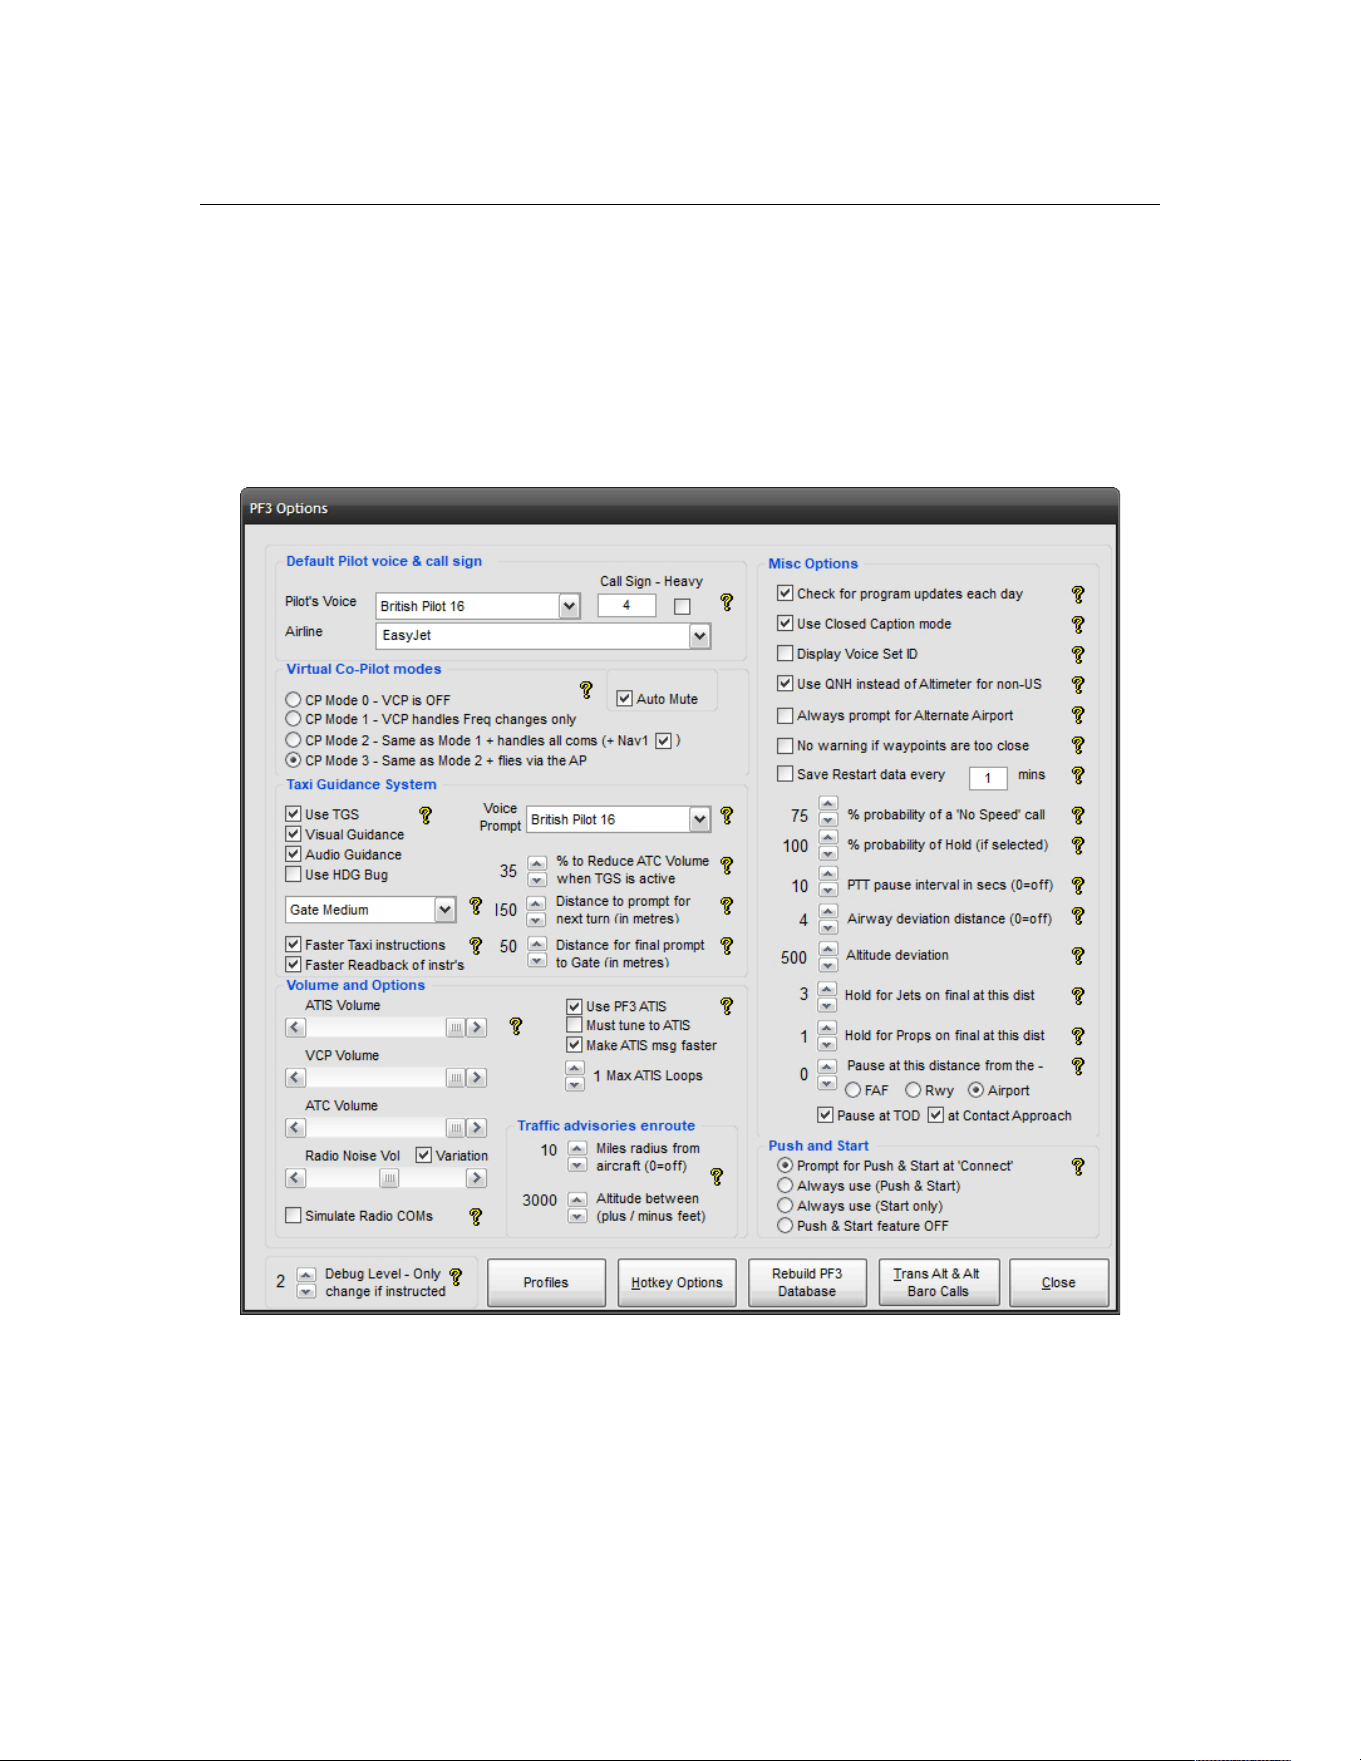
7.1.2 Options #1 Main Display
The first Options page shown below shows the majority of the most
commonly used options available in PF3. In this section we hope to show you
what each of these options are for plus how and when you might use them
within your flight simulator environment. Hovering your mouse over one of
the '?' icons will display some context-sensitive help.
Page 27 of 212
Copyright © 2007-2024 by OnCourse Software
PF3 User Guide
7.1.3 Pilot's Voice
At the top left you can select the Pilot’s Voice you want to use. This is the
voice you will hear communicating with ATC (unless of course you use voice
recognition software, but more about that option a little later), so in reality it
is actually the PNF rather than the PF, unless you're flying solo!
To the right of the voice selection box is where you enter your actual call sign
and next to that is the ‘Heavy’ indicator.
Below the call sign option is a drop down box listing all the available airlines
that PF3 recognises and which call signs are supported.
So in the above example ATC would contact you as “Easy Four”. But if you
selected the 'Heavy' option the call would become “Easy Four Heavy”
Obviously, if you selected British Airways in the drop-down box you would
hear “Speedbird Four” or “Speedbird Four, Heavy”
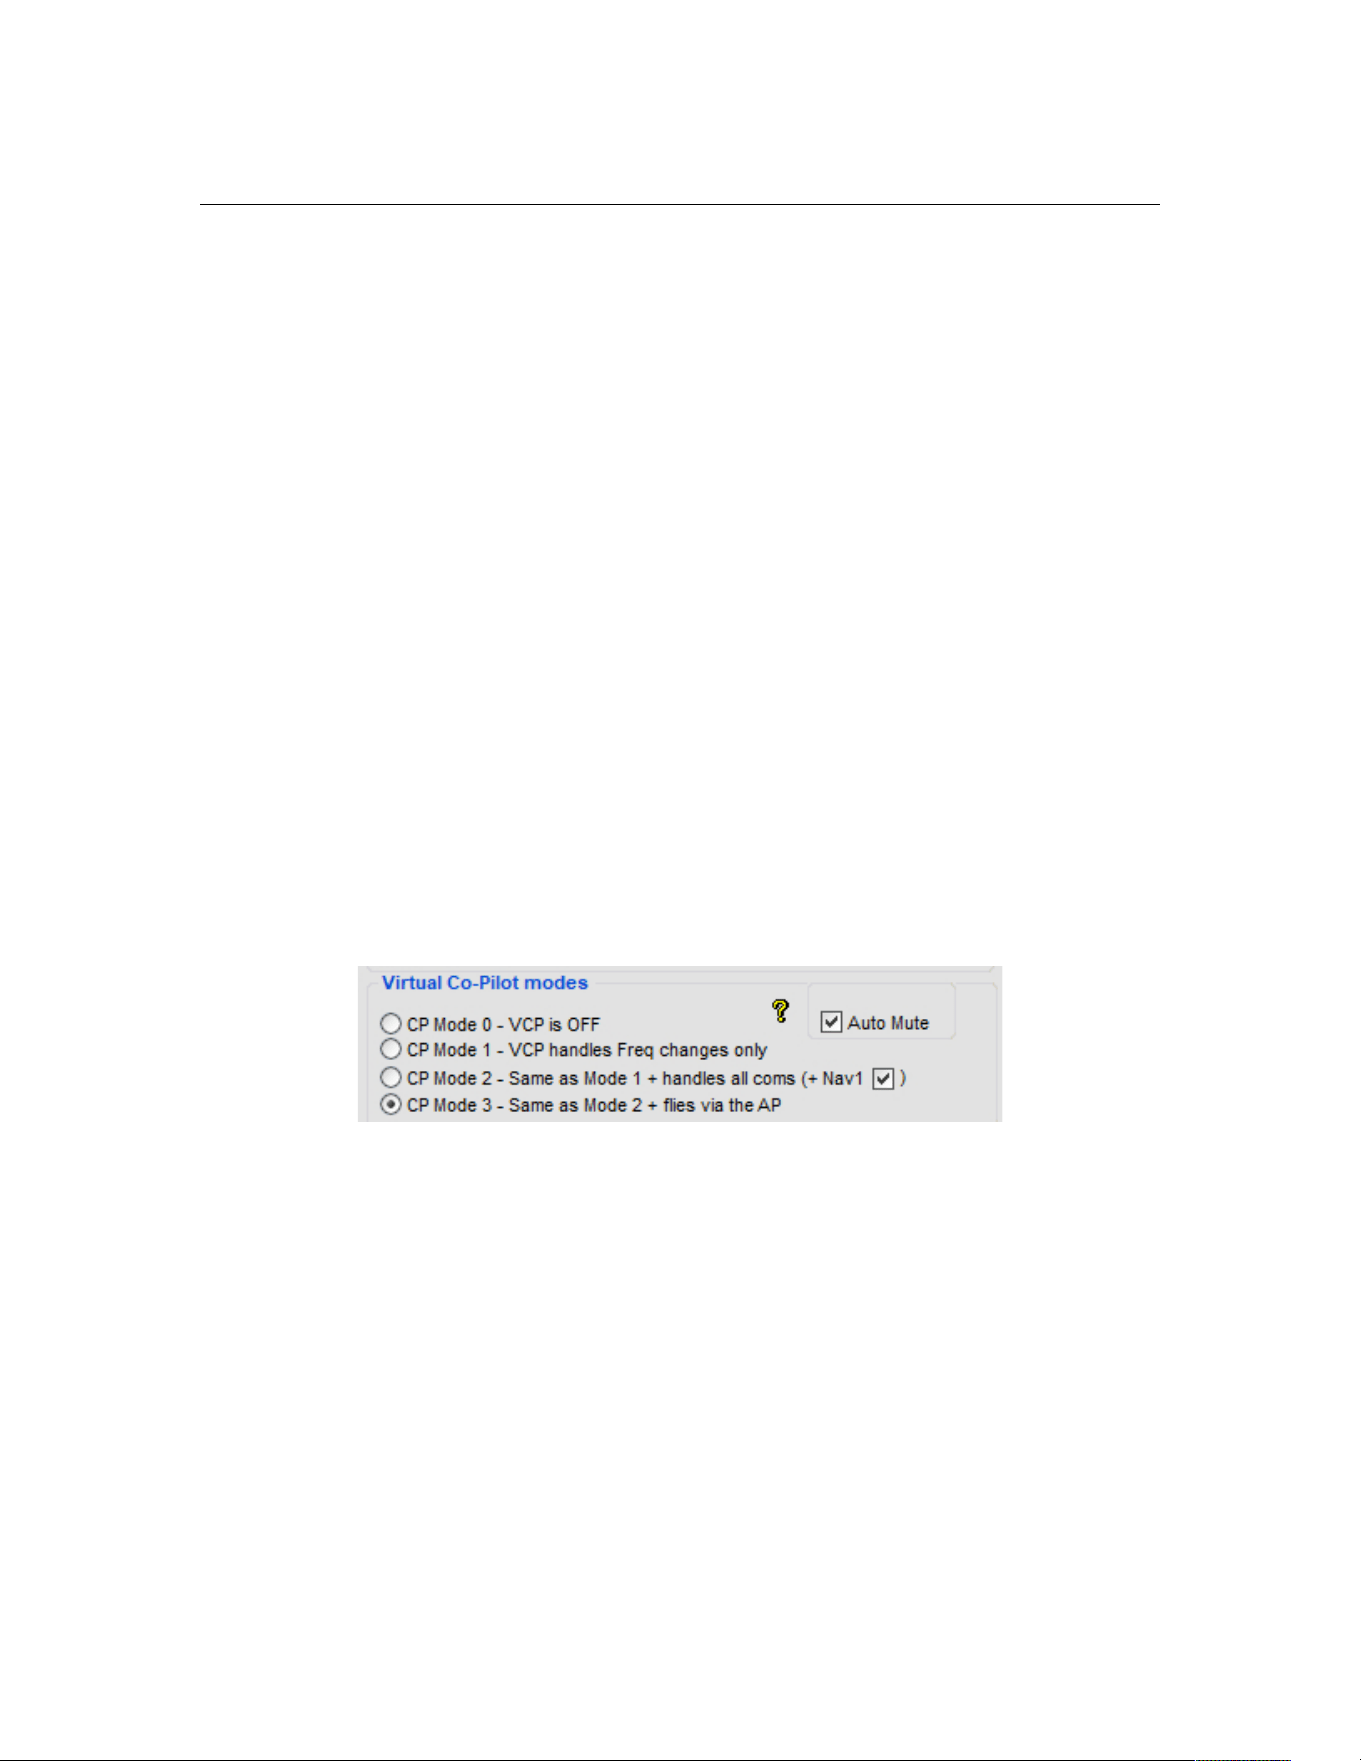
7.1.4 Virtual Co-Pilot modes
Below the Default Pilot voice & call sign panel you will see the various Virtual
Co Pilot modes available, all of which are fully explained on the options page
by right-clicking the actual option text or hovering your mouse over the
yellow '?' icon
Selecting a particular mode will be the one used for all loaded flight plans.
This mode can also be changed mid-flight by using the default C\S\V hotkey.
Note: C\S\V means pressing and holding the Ctrl and Shift keys together,
then pressing and releasing the V key. Finally you release the Ctrl and Shift
keys.
So what do each of these options do I hear you ask...
CP Mode 0 - Tells your virtual co-pilot not to say anything at all and don't
touch anything either!
CP Mode 1 - With this mode selected your VCP will handle any frequency
changes received from ATC. He will actually dial in the required frequency for
your COM radio.
Page 28 of 212
Copyright © 2007-2024 by OnCourse Software

PF3 User Guide
CP Mode 2 - In this mode you start to work your VCP a little harder and
make him/her (yes there are some hers available) handle all your
communications with ATC plus handle any necessary frequency changes. You
will also notice a small tick box next to this option marked (+ Nav1) and this
enables you to select if you would like your VCP to also set your NAV1
frequency when on an ILS approach. This particular option is new to version
3.1 and was added following a user request. If you prefer to set the NAV1
yourself then you can simply turn this feature off.
CP Mode 3 - With this option you can almost start to relax a little. Not only
will your VCP change COM frequencies when required and handle all the
verbal stuff with ATC but he will also ensure your auto-pilot is correctly setup
up too. So any changes in heading or altitude, instructed by ATC, your VCP
will dial them into the AP. This can be really useful if you're on a long haul
flight and want to pop off to get your tea!
All joking aside, CP Mode 3 can be really useful when you first start using PF3
because it gives you time to see exactly how things work with regard to the
interaction between you, ATC and your flight sim.
Auto Mute - This option (added in version 3.3.0) provides the means by
which you may use Voice Recognition software and you trusty VCP, switching
between each as and when you like.
This option will only be activated if
(a) your pilots voice is NOT set set 'None'
(b) your VCP mode is set to 0 or 1
(c) your PTT pause interval (Options #1) is set to a value greater than zero
(d) you use the PTT hotkey before pressing any ATC communication hotkey.
Configured correctly, when you press the PTT hotkey and then a
communication hotkey (say C/S/0) you will not hear your pilot/vcp voice
talking to ATC, provided you complete the keying sequence before the PTT
pause interval expires. This would then allow you time to speak directly to
ATC via your VR software. If at any time you wanted your VCP to take over
talking to ATC you simply hit the communication hotkey without using the PTT
key. This will be detailed again in section 18 Using vr software with pf3
Page 29 of 212
Copyright © 2007-2024 by OnCourse Software
PF3 User Guide
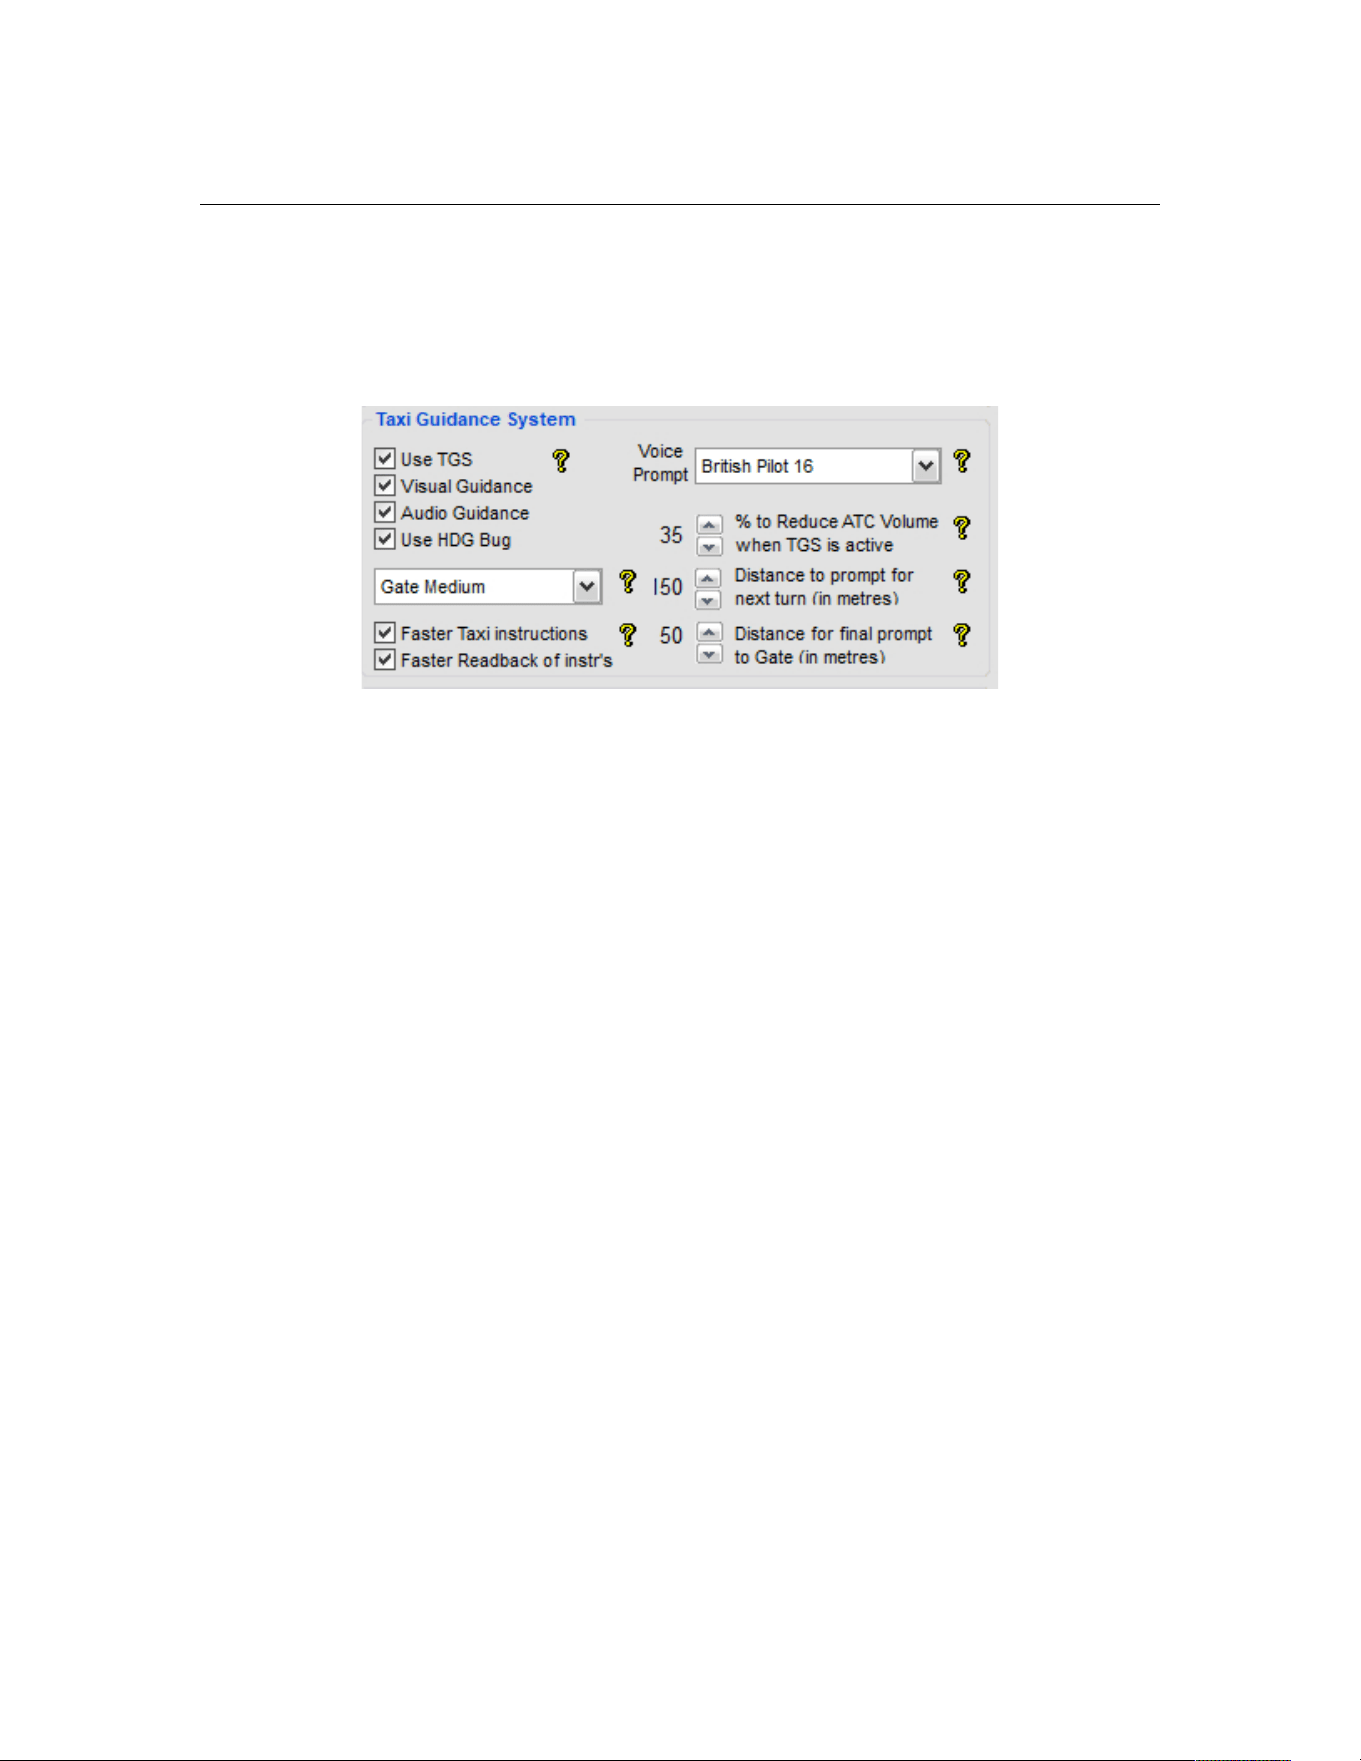
7.1.5 Taxi Guidance System
Below the Virtual Co-Pilot modes panel you will see a really exciting and
useful feature of PF3 , the Taxi Guidance System.
This panel allows you to configure the TGS in a variety of ways. You must
check the Use TGS option in order to activate this feature. Doing so will
ensure you arrive at the correct runway/gate/parking position as assigned by
the ground or tower controller!
Visual Guidance - This option enables the nifty TGS Gauge and or
Standalone Program which will display directional guidance for you during the
taxi segment of your flight. Each of these items will be described fully in a
later section of this document.
Audio Guidance will provide you with audio directions, not unlike an in-car
GPS system. The audio guidance will also give you the name of the taxiway
you should be turning onto. Eg. “Turn left onto taxiway Delta”
The Use HDG Bug enables your heading bug to constantly point towards the
next taxi waypoint along your route to the runway/gate, plus the number of
taxi waypoints remaining will appear in the AP Course display. This is a useful
feature should you decide not to install the TGS gauge or use the standalone
TGS Display utility for whatever reason. When you select to use the Hdg bug
as a taxi aid then whatever settings were originally showing on the AP HDG
and/or AP Course displays will be remembered by PF3 when TGS is started
and reset to their original values when TGS completes. Please Note this
function may be disabled with some third-party add-on aircraft.
The Voice Prompt selection enables you to choose a different voice for the
TGS commands than the one you hear communicating with ATC. If you select
‘None’ then the TGS voice defaults to the pilot voice selection. This option is
also useful for those using voice recognition software alongside PF3, as those
users have to select ‘None’ for their pilot’s voice and would therefore not hear
any TGS audio prompts. But this option now provides them with full TGS
operations too.
Page 30 of 212
Copyright © 2007-2024 by OnCourse Software

PF3 User Guide
The % to Reduce ATC Volume when TGS is active reduces the volume of
general ATC chatter so you don’t miss any of the taxi instructions given by
your trusty VCP. Any ATC instructions directed at you though will not be
affected by this option.
The Distance to prompt for next turn is the distance before the next
taxiway turn you will hear your VCP say “Next left” or “Next right on to
taxiway Delta”. So if you prefer to hear this when you are literally on top of
the next turn you need to reduce this setting. If you want more time to get
ready for the turn you need to increase the setting.
Distance for final prompt to Gate is much the same as the previous option
except it pertains only to when you're approaching your assigned gate after
landing.
Please Note: The reason this additional trigger was added is because we felt it
was the best way you could be absolutely certain which gate your VCP means
when he says turn 'left/right to gate'. If the setting is too high you could turn
too early toward the wrong gate, equally if the setting is too low you could
over shoot your turn. We/I have always found a setting of 50 to work
perfectly so you should only mess with this value if you're having problems
finding the right gate. Personally, by the time I get to the final taxi waypoint I
always ensure I am doing about 3-5 knots... that way my turn into the gate is
always just right.
Faster ATC instructions simply makes ATC's taxi instruction to you faster.
Some may prefer this as it is probably more realistic. However, if you're new
to PF3 and/or ATC communications you may find it easier to understand
these instructions if you turn this option off. You can also used the Closed
Caption mode (explained later) to display ATC instructions textually.
Faster Readback of Taxi instructions – This one probably doesn't need
any explanation... so I won't explain it!
Page 31 of 212
Copyright © 2007-2024 by OnCourse Software
PF3 User Guide
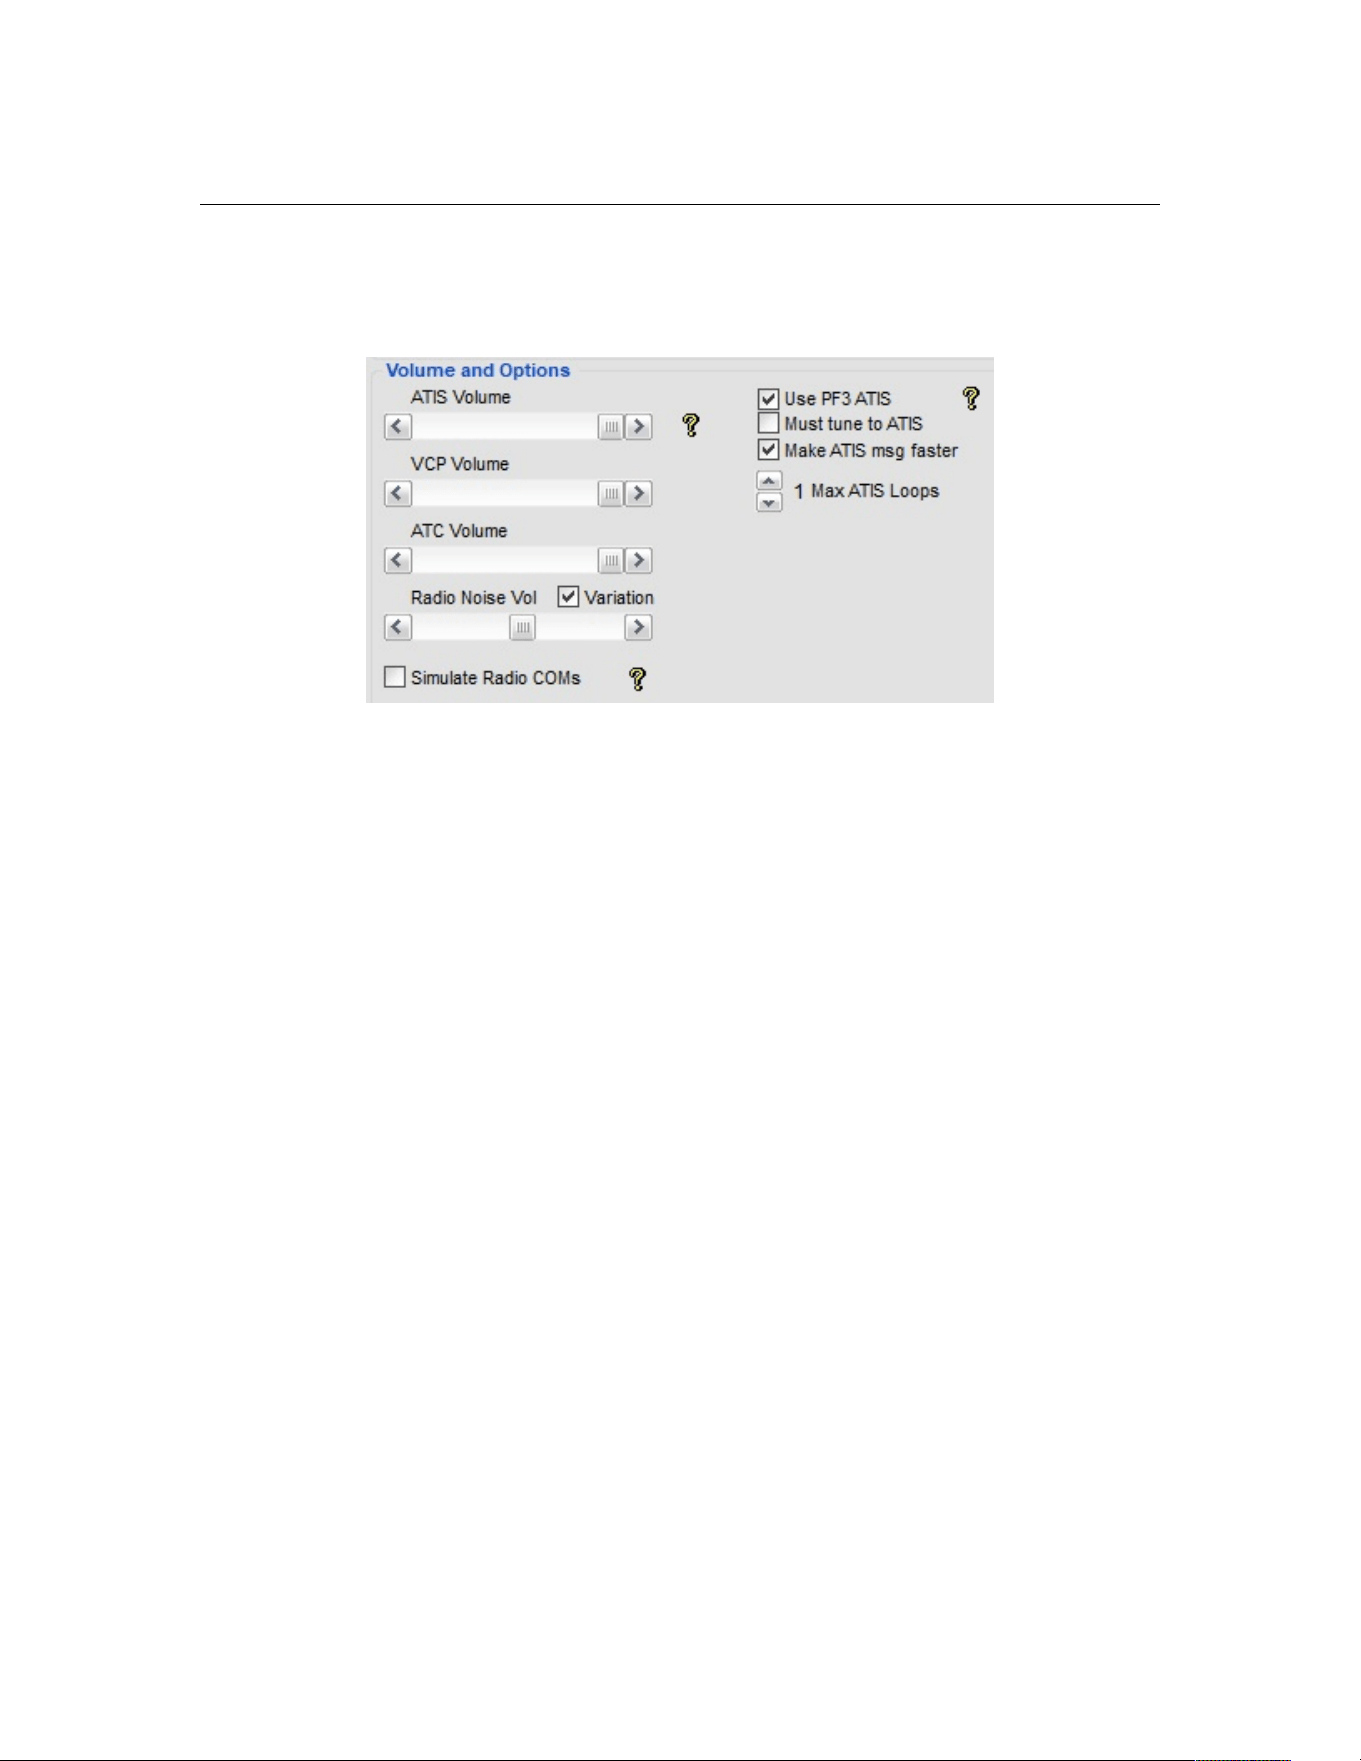
7.1.6 ATIS Volume and Options
Below the Taxi Guidance System selections you will find the Volume control
and ATIS control panel.
The first option ATIS Volume allows you to adjust the volume of PF3's own
ATIS messages.
VCP Volume controls the volume of your VCP.
ATC volume controls the volume ATC and other (AI) aircraft you might hear
on your current frequency.
Radio Noise Vol adjusts the sound heard 'behind' the radio transmissions.
This background noise adds to the authenticity of transmissions, and is
adjustable to your liking. This additional ambiance will only be heard when
ATC are talking or you hear another aircraft in communication with ATC, it is
not heard when your VCP is talking.
Variation - This small check box changes the type of background radio noise
you will hear each time you switch from one control facility to another. Not
only does this alleviate the risk of your ears becoming tired of the same
background noise but also adds a little more realism, replicating the fact that
some control facilities provide better signals than others.
Simulate Radio COMs - This option is off by default and will make all radio
transmissions sound like... well, radio transmissions... to emulate what it's
really like listening to ATC. If you try it and don't like, or would prefer to hear
a clearer sound over the radio, just leave it off.
All these options and controls provide the means by which you can finely tune
the sounds and volumes to suit your own particular taste and to create the
level of ambiance you prefer and consider to sound 'just right’.
Please Note: If you find the sound from your flight simulator is drowning out
all ATC calls and you have all PF3 settings at maximum, it's time to turn your
Page 32 of 212
Copyright © 2007-2024 by OnCourse Software
PF3 User Guide
flight sim volumes down till you reach the optimum level. Then, if need be,
you can push the overall sound balance (your amp) up to suit.
Use PF3 ATIS - Which you'll find a little to the right of the ATIS volume
control is the master switch that obviously turns this whole feature off, should
you wish to use the default system provided by your flight simulator to listen
to ATIS, although this is not really recommended.
Must Tune to ATIS ensures PF3 will prompt you to actually tune to ATIS
prior to making initial contact with ATC.
Make ATIS message faster for those impatient ones amongst you.
Max ATIS Loops sets the maximum number of times PF3's ATIS will play
before automatically stopping. However, if the message stops and you would
like to listen to it again just momentarily change your COM frequency and
then set it back to the correct ATIS frequency and the message will replay for
the number of loops defined here.
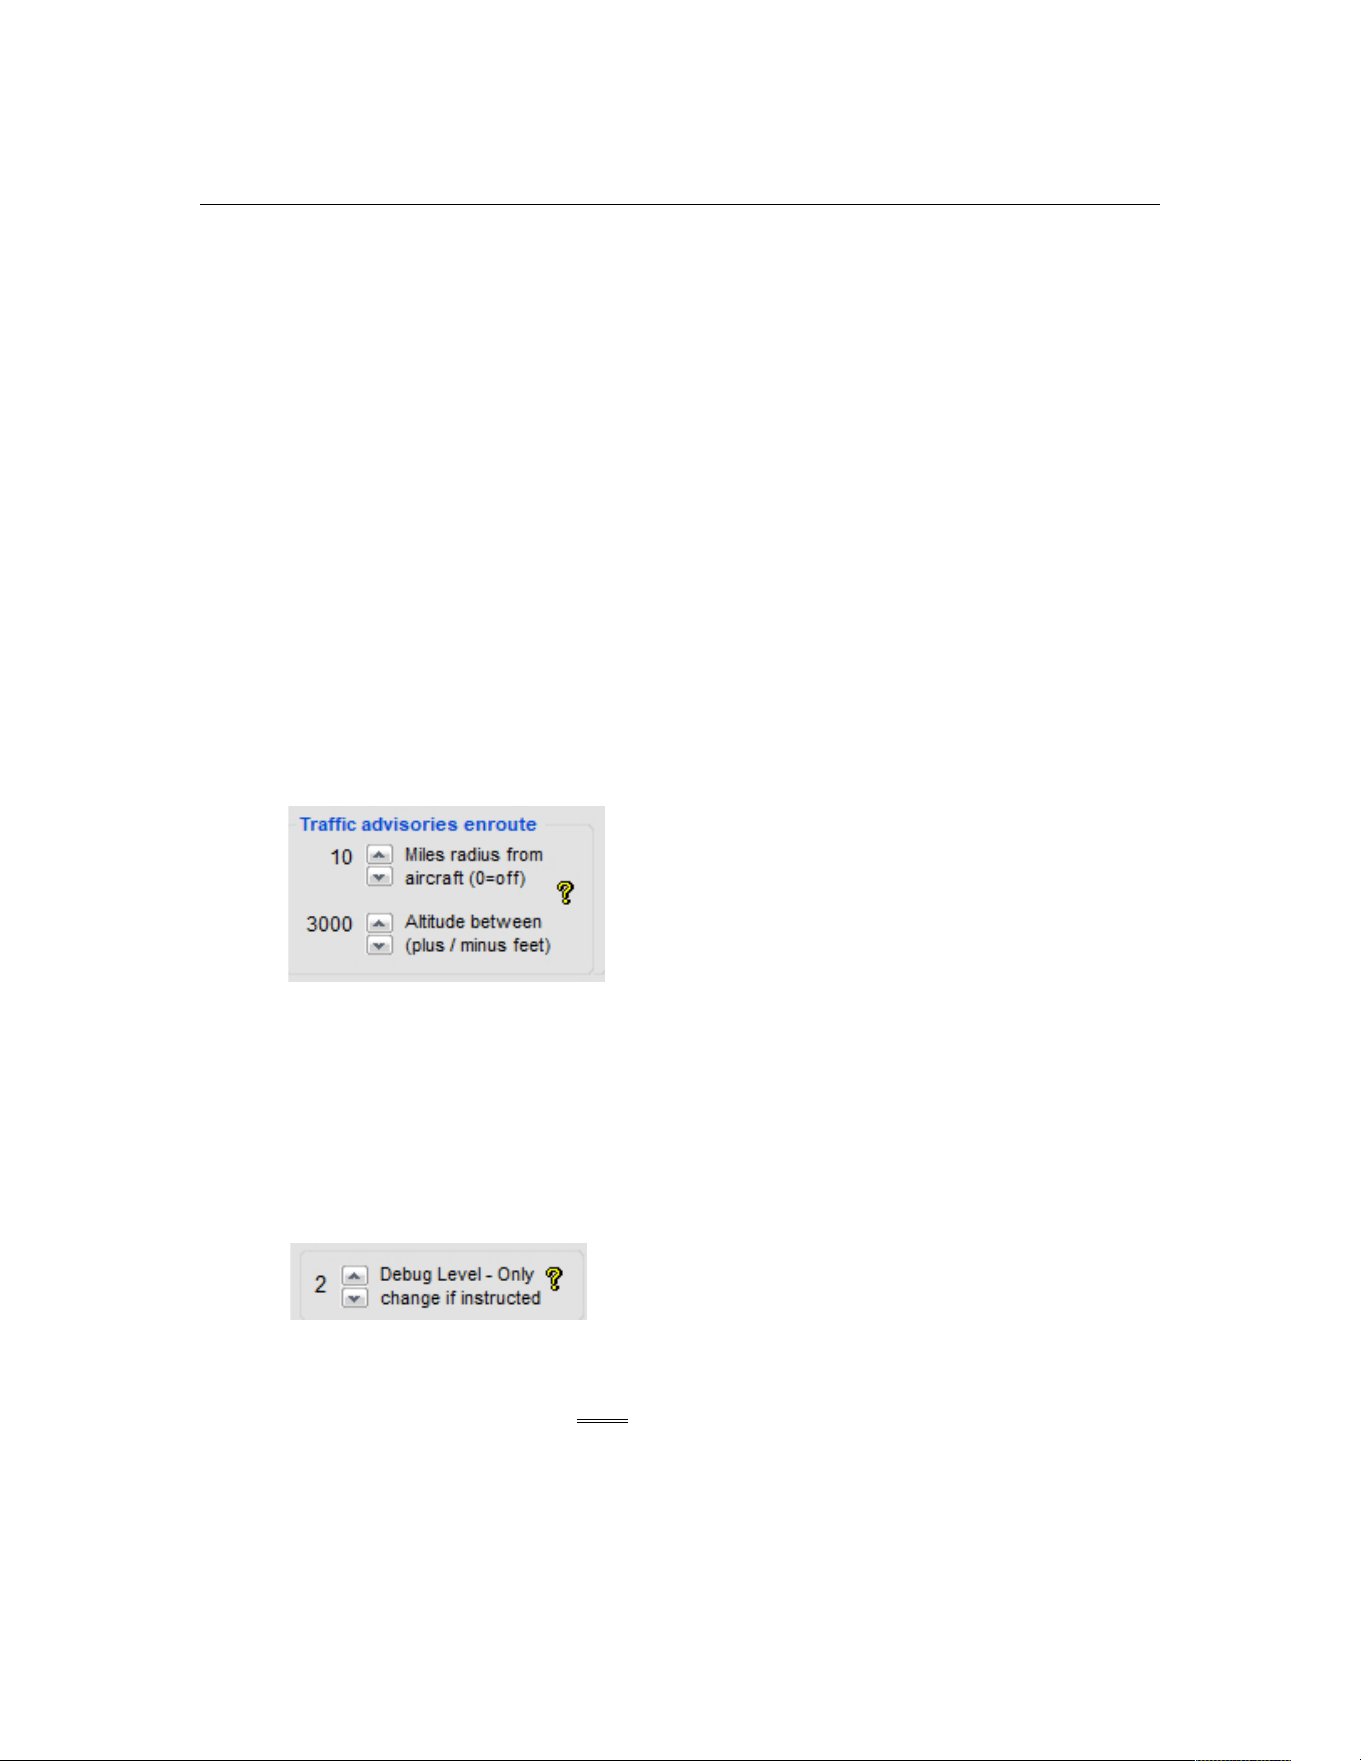
7.1.7 Traffic Advisory en-route
To the right of the volume controls are our Traffic Advisory options.
Miles radius from aircraft The first one controls the horizontal radius within
which you want to be advised of other (AI) traffic movements.
Altitude between This is the vertical radius within which you would be
advised of other (AI) traffic movements.
7.1.8 Debug Info
Below the volume controls at the lower left of the screen there is a Debug
Level control. This control filters the information written to the debug logging
file. Normally this would be set to '0' (zero) but you may be requested by
PF3 Support to increase this as an aid to collating data with regard to any
problems you may have reported. The range is from 0 (zero) to 4. Be
warned: setting this to 3 or 4 will produce very big logs and you should only
use this setting if/when asked to do so.
Page 33 of 212
Copyright © 2007-2024 by OnCourse Software
PF3 User Guide
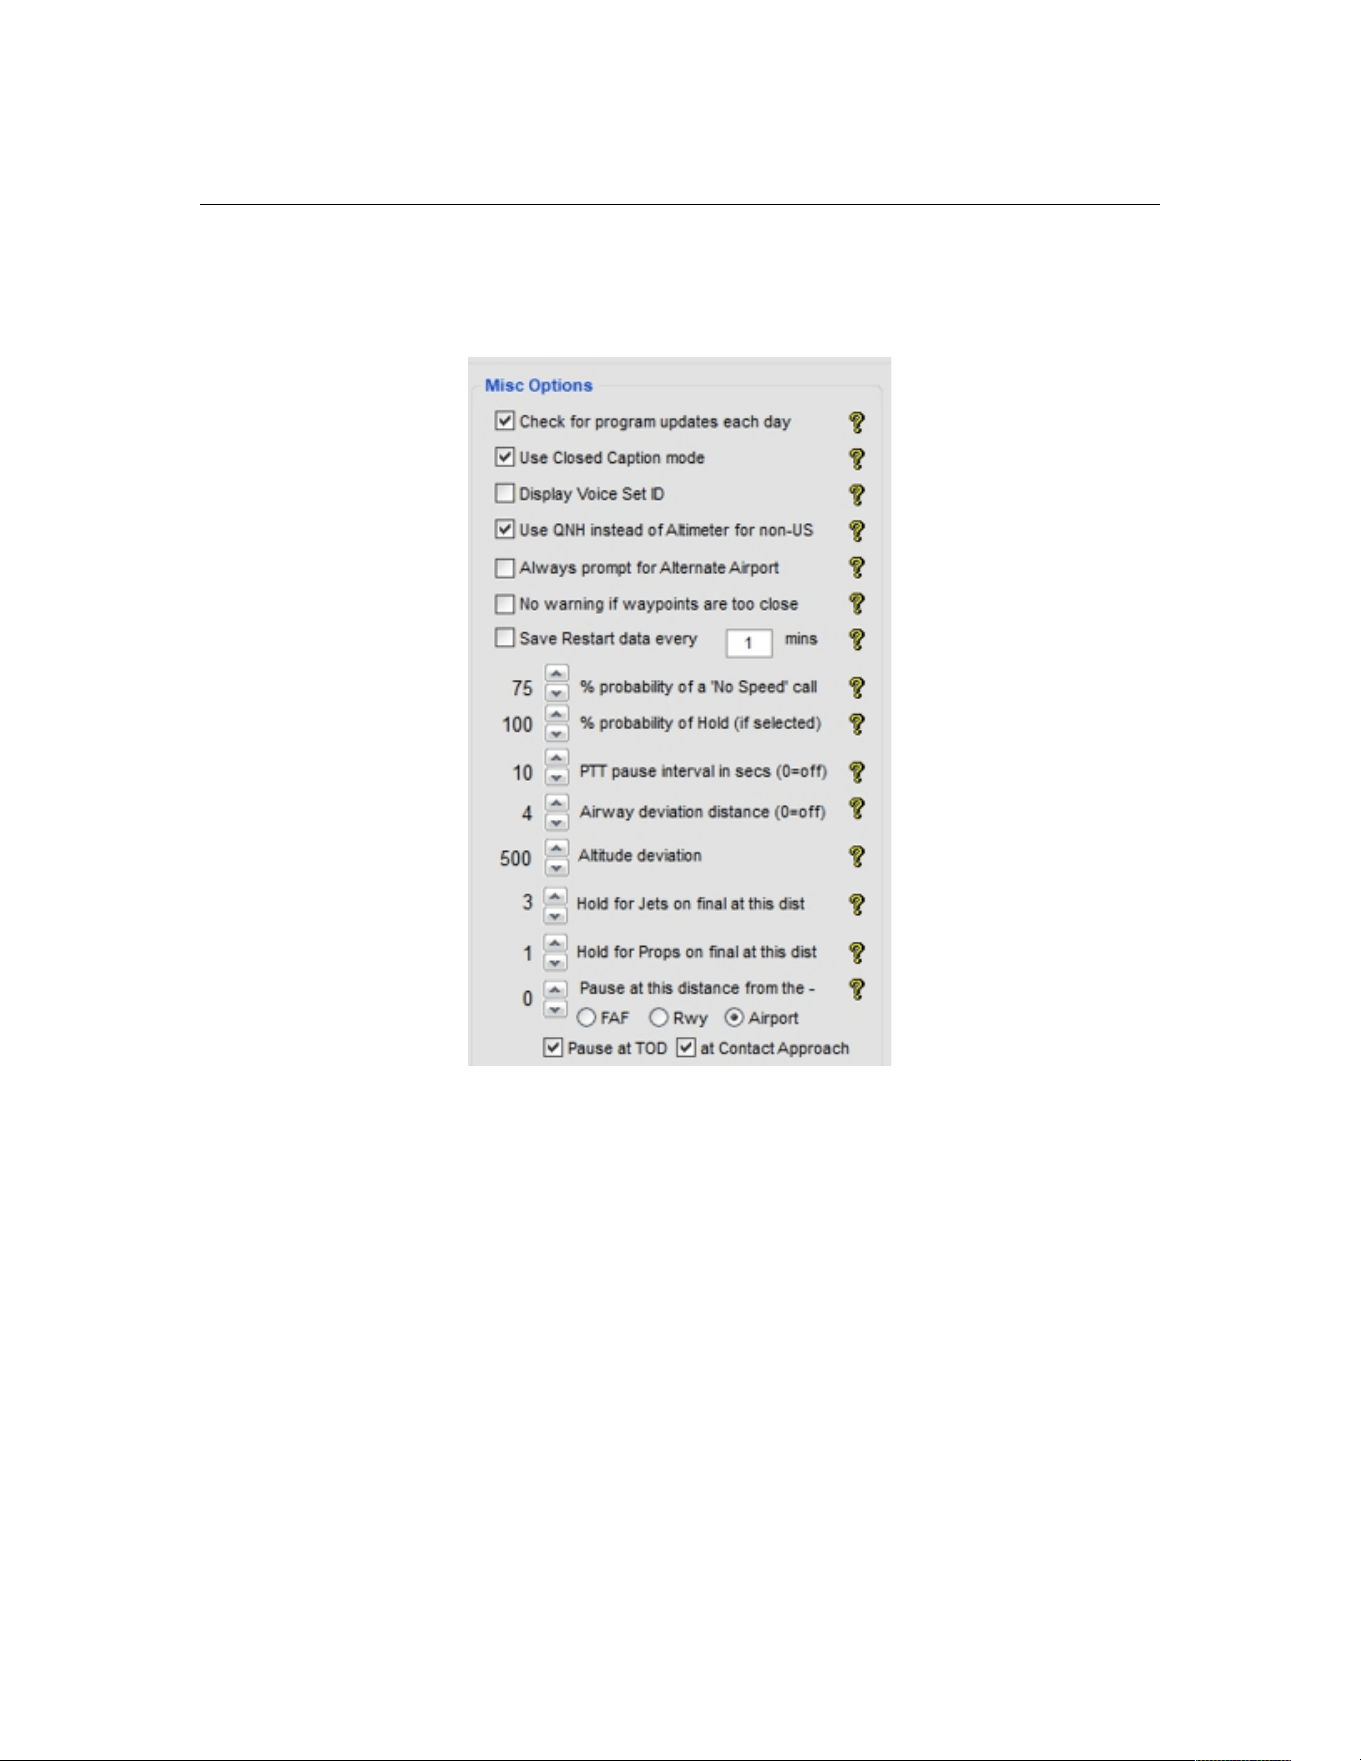
7.1.9 Misc Options
On the right-hand side of the main options page you will see the following
options:-
Check for Program Updates each day ensures you always keep up to date
with any program updates using our own auto-updates feature.
Please Note: OnCourse Software does NOT collect ANY personal data from
your computer during this process. PF3 does, however, require an internet
connection for this feature to work and connect to one of our updates servers.
Use Closed Caption mode enables you to ‘see’ a text display of all ATC
communications on the screen. This information can be displayed in either the
default FS message window (not recommended), the FSUIPC message
window or the RemoteText utility that comes with PF3 (recommended). Not
only is this feature really useful for those times when you may not be 100%
certain as to what was just said but it's also great for those who are a little
hard of hearing (like yours truly... what?)
Display Voice Set ID is used to prefix the closed caption text with a two
letter voice set identifier, which is required if you wish to use the 'Exclude
Individual Voices' feature. More about this later.
Page 34 of 212
Copyright © 2007-2024 by OnCourse Software

PF3 User Guide
Use QNH instead of Altimeter for non-US – In most countries outside
North America ATC will provide the current altimeter settings in millibars
(1013 rather than 29.92). The actual call would be “QNH 1013” instead of
“Altimeter 2992”). Setting this option to OFF will result in the 'Altimeter'
setting being given in all PF3 regions.
Always prompt for Alternate Airport – PF3 supports the use of alternate
airports and therefore, with this option set to ON, you will be prompted to
enter an alternative airport each time you load a flight plan. Even with this
prompt turned on you may still choose to skip entering an alternate airport if
you wish, or if you never want to use an alternate airport simply set this
option OFF. You select your alternate airport by entering the ICAO code when
prompted.
Please Note: PF3 only validates the ICAO code you enter to ensure it is valid.
It does not, however, perform any other checks. This means you could
actually enter an alternate airport that was on the other side of the World!
PF3 doesn't care and if/when you request to go to your alternate PF ATC
would be happy to facilitate your request... so please be careful when
planning your flight.
No warning if waypoints are too close – PF3 will warn you if any of your
flight plan waypoints are too close together or too close to either your
destination/departure airports. PF3 will not drop any waypoints from your
flight plan and this is only a cautionary message to ensure you have a
problem free flight. Tests have shown PF3 can happily handle waypoints
closer than the distance that triggers these warnings but this is largely
dependent on how acute the change of course is between one waypoint and
another and also the pilot's ability to navigate to each waypoint. This
message will be displayed if any of your waypoints are closer than 5 nautical
miles or your first waypoint is closer than 10 nautical miles from your
departure airport or the last waypoint is closer than 15 nautical miles from
your destination airport. By selecting this option you will suppress any such
warnings.
Save Restart data every – turns on PF3’s ‘resume-a-flight’ feature,
allowing you to resume from a point mid-flight should you either abort a flight
or as a result of a program problem. Next to this is a small data entry box
where you enter the interval length (in minutes) you want PF3 to save your
flight data. We recommend for best results to set this to 1 minute, which
means PF3 will save its restart data every minute. We will discuss this
feature in depth later in this document.
% Probability of a 'No Speed Restriction' under 10K - Normally aircraft
are restricted to a maximum of 250 knots below 10,000’, although at times
ATC can lift this restriction. If you set this to zero it turns the feature off
completely, setting it from 1-100 allows you to set the probability of getting
the call.
(A) As of version 3.7. The probability factor is set to something other than
zero
Page 35 of 212
Copyright © 2007-2024 by OnCourse Software

PF3 User Guide
(B) Your aircraft is capable of going faster than 250 knots
(C) You are still in climb mode (i.e. you haven't reached your cruise altitude)
(D) You are IFR
(E) Your altitude is between 3000' and 9000' (AGL), which is also subject to a
randomizing factor applied using your percentage setting. However, if you
have a 'heavy' call-sign you will bypass the probability factor and WILL get
the 'no speed' call.
% Probability of Hold (if selected) – New in version 3.1 this option allows
you to set the probability of being instructed to hold at the waypoint you may
have selected on the Adjust Altitudes, SIDs, ATRs and Holds page. If you
have a hold selected and set this to 100% then you will definitely be
instructed to hold when nearing the selected waypoint in your flight plan. If
you set this to 0% then obviously the hold would not be initiated and then if
you set this option to 50% there would be a fifty-fifty chance of being held at
the waypoint.
PTT pause interval in seconds is the amount of time PF3 goes silent when
you hit your Press to Talk hotkey, the intention is to allow for using voice
recognition software without being interrupted during your call. PF3's default
PTT Hotkey is the Esc key. This key is NOT active by default. We will discuss
using voice recognition software alongside PF3 later in this document.
Airway Deviation Distance - by default ATC will nag you if you are +4 or
-4 miles off the designated airway. You can use this option to increase this
margin or set it to zero to turn the 'nags' off completely.
Altitude Deviation - This is used to trigger the altitude 'nag' if you're not
within a margin (+/- this figure) of your ATC assigned altitude
Hold for Jets and Hold for Props - sets the distance at which ATC will
instruct you to hold for inbound traffic while waiting for takeoff clearance. The
default here for jets is 6 miles and for props it's 3 miles, but you may want to
make these less if using a lot of AI aircraft and therefore your departure
airport will probably be very busy.
Pause at this Distance from the - this determines the distance from
either the FAF, runway or your destination airport you would like to pause
FS/PF3. The first two options (FAF/Runway) would not become active until
you reach the last waypoint in your flight plan, whereas the last option
(Airport) is active for the entire flight.
Pause at TOD – Pretty self explanatory, this option will pause FS/PF3 at
your TOD and just before receiving your first descend instruction from ATC
at Contact Approach – This option will pause FS/PF3 just before you are
handed off to Approach
Page 36 of 212
Copyright © 2007-2024 by OnCourse Software
PF3 User Guide
You can use Pause at this Distance, Pause at TOD and Pause at Contact
Approach during the same flight.
You may find one or more of these pause options very useful for those long-
haul flights, where you might leave FS on auto-pilot but don't want to risk
missing the exciting part of your flight!
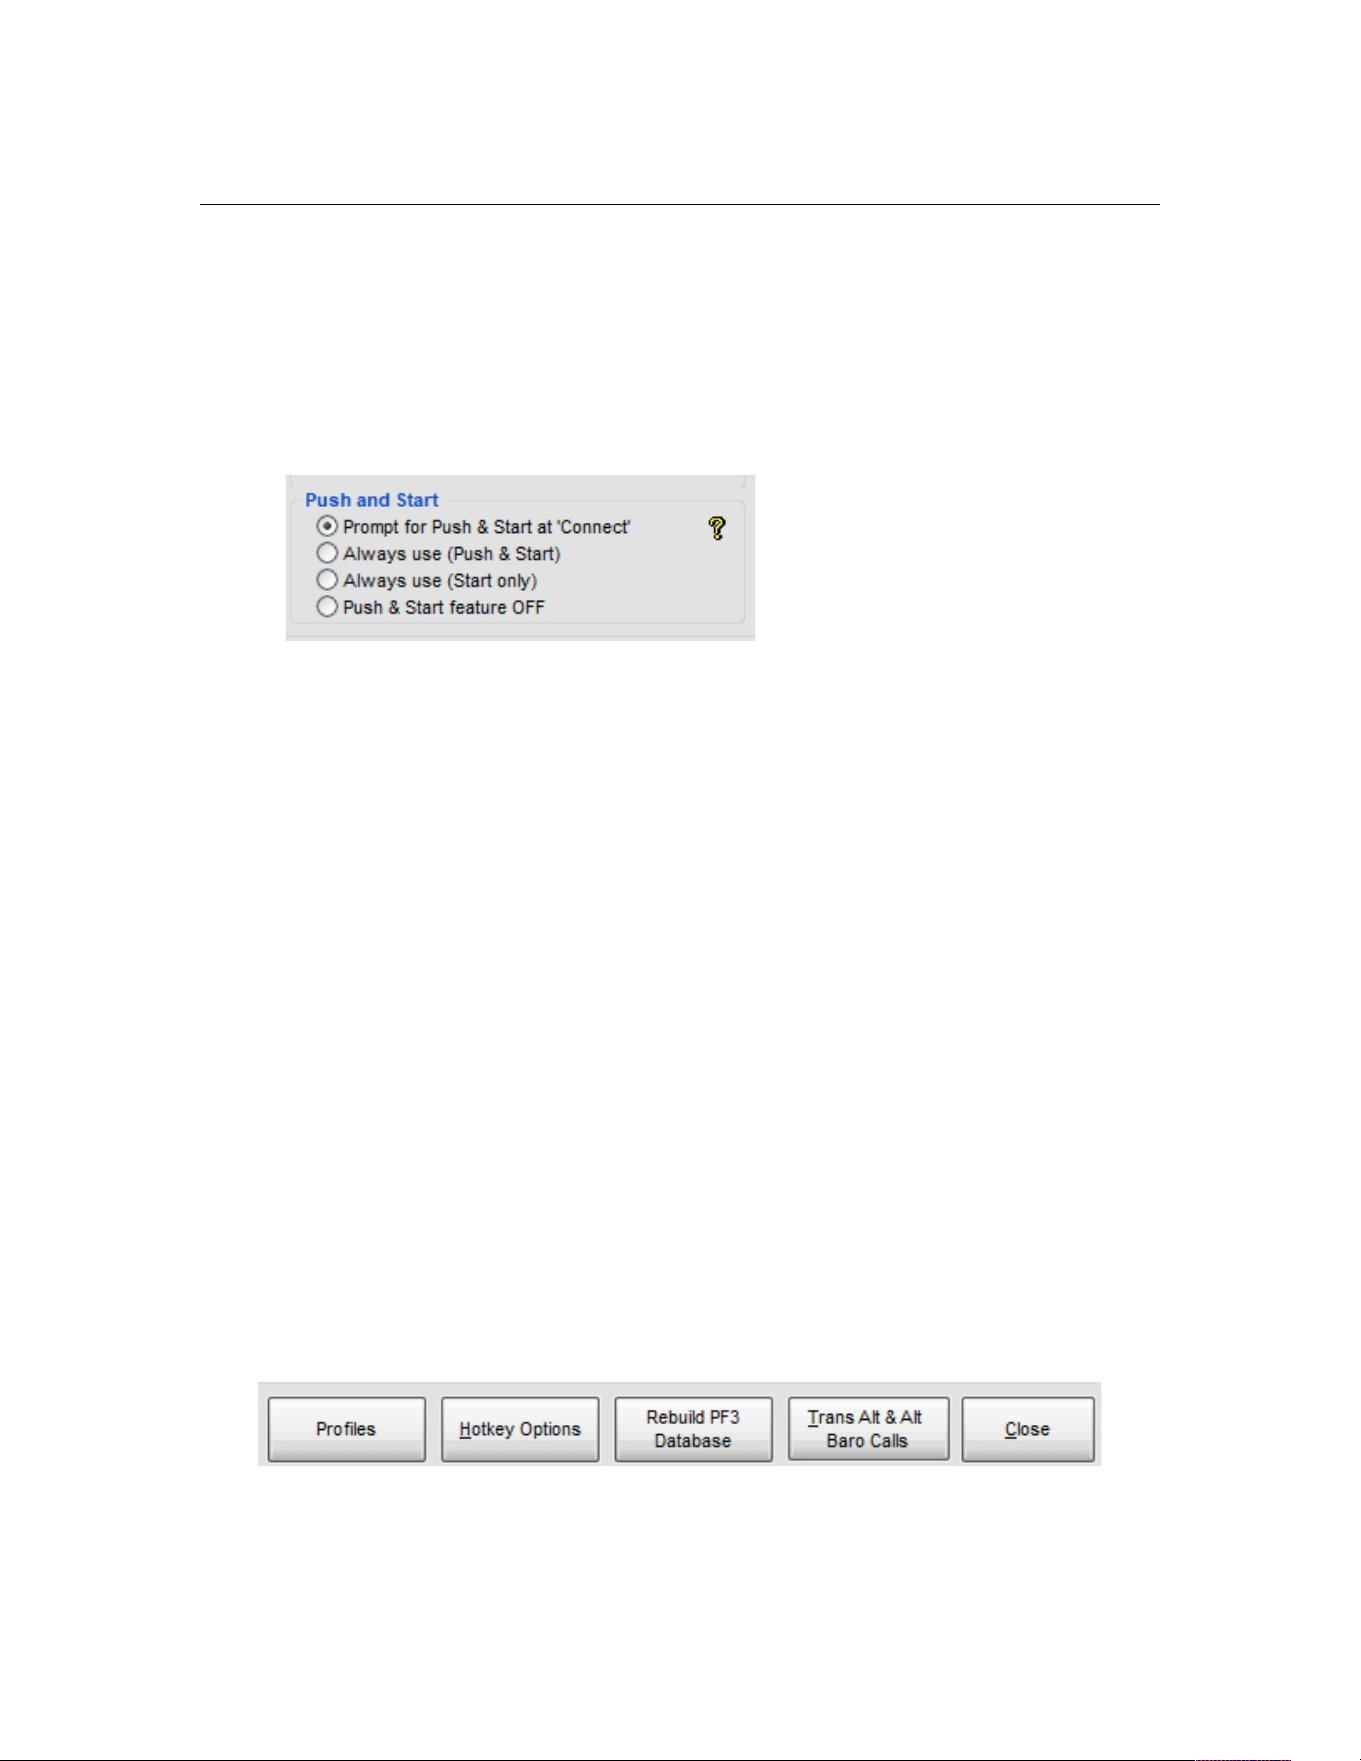
7.1.10 Push & Start Options
The Push and Start panel enables you to set the default behaviour of this
feature. Enabling the option gives you the greatest degree of flexibility on
each flight.
Prompt for Push & Start at 'Connect' – this selection will present you with
the following three options each time you hit 'connect' to begin your flight...
(1) Use Push and Start for this flight
(2) Use Start feature only for this flight
(3) No Push & Start for this flight
Always use (Push & Start) – With this option set to on you will use the
Push & Start feature on every flight.
Always use (Start only) – This option allows you to just use the Start
feature on every flight but no push back clearance.
Push & Start feature OFF – With this option selected you won't be
prompted when you 'connect' to FS to select your Push & Start option and
each of these features will be off permanently.
7.1.11 Other Options from this display
Below the Push and Start panel you will see four additional buttons:-
Page 37 of 212
Copyright © 2007-2024 by OnCourse Software

PF3 User Guide
7.1.12 Trans Alt & Alt Baro Calls
The Transition Alts & Alt Baro Calls button displays another screen
showing the 26 PF3 geographic regions available.
Each of the above regions will be set with a default value showing the
transition altitude for that particular area. The area you're currently flying
through will be determined by PF3 and the relevant ATC controller's accents
and transition altitude will be set accordingly. What this means is you could
fly from one country to another and experience varying transition altitude
calls together with a change in ATC controller accents. All part of the realism
PF3 brings to your flight sim world.
Regional specific Alt Baro call options are likewise provided, so you might hear
ATC say ‘one zero one three’ in the UK but ‘two nine nine two’ in the US, if
that’s how you had it configured. These options give you complete control
Page 38 of 212
Copyright © 2007-2024 by OnCourse Software

PF3 User Guide
over the transition altitude and altimeter setting calls you will hear within
each of these regions.
Closing the transition altitude display takes you back to the first options page
and from there you can select the Rebuild PF3 Database option.
7.1.13 Rebuild PF3 Database Procedure
Accessed by using the Rebuild PF3 Database button this is a very important
feature and one you will need to use from time to time, either when adding
new scenery/airports to Flight Simulator or when advised by OnCourse
Software following the addition of a new feature that might require the
database to be rebuilt.
This is important because PF3 uses the same data for runways and COM
frequencies as FS, so any time any such changes are made to FS we need to
reflect those changes in the PF3 database files to keep everything nicely in
sync.
As of version 3.22.0 PF3 now omits any airport with at least one 'closed'
runway from our emergency lookup file. This file is used if you ever have to
declare an emergency in-flight and are unable to make it back to your
departure airport. We obviously don't want to direct you to an airport which
has one or more or all their runways closed, so this is something else that is
taken care of during the rebuild.
So let’s see how easy this is to perform:-
Page 39 of 212
Copyright © 2007-2024 by OnCourse Software
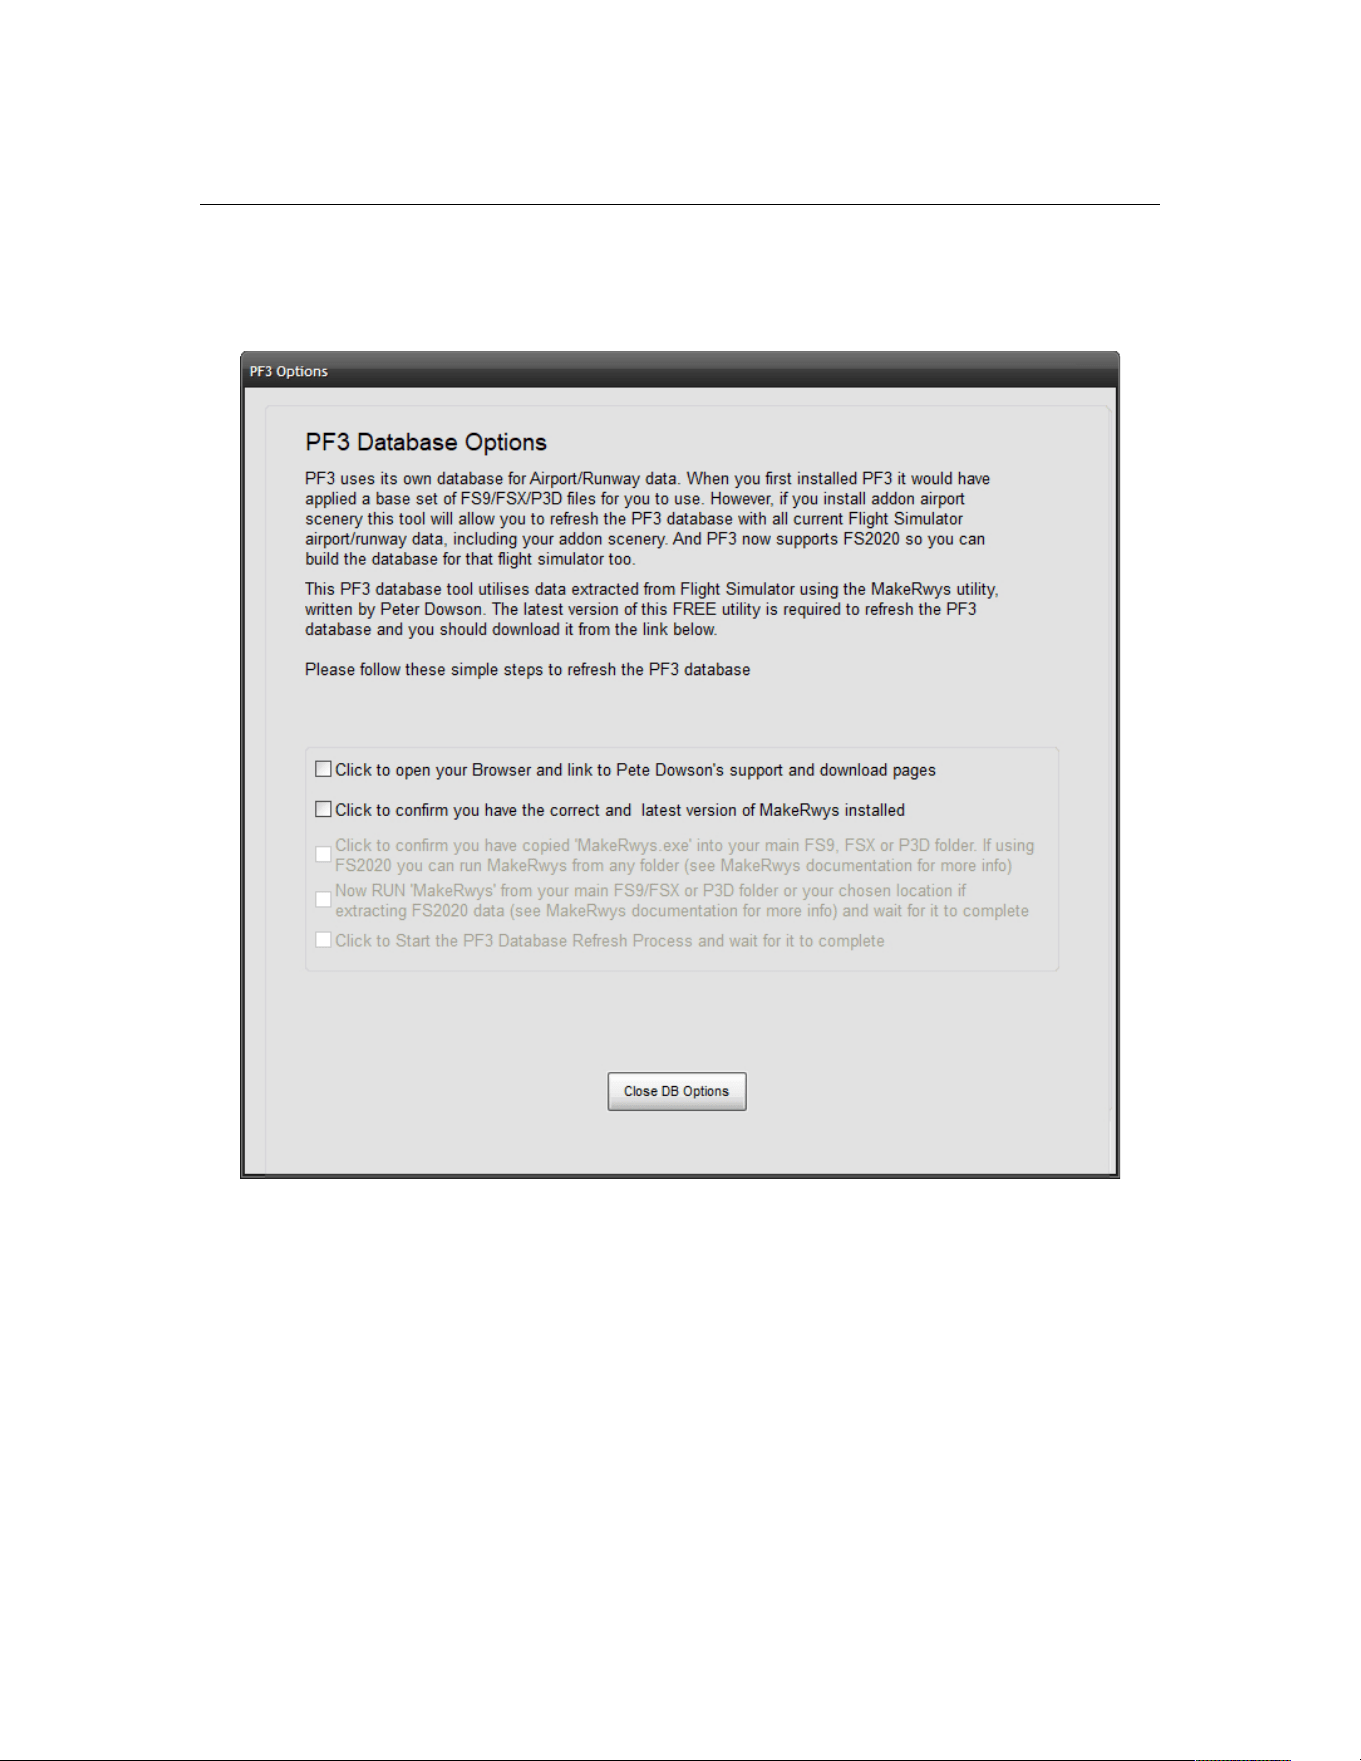
PF3 User Guide
After selecting Rebuild PF3 Database the following screen will be
displayed:-
This screen is quite self-explanatory, especially if you take the time to read
the displayed text. The whole idea here is to give you a checklist (you should
know all about checklists) of things to do and make each step as easy as
possible. So for this example we will assume this is the first time you have
rebuilt the PF3 database.
Selecting the first option will open your Broswer and link to Pete Dowson's
support and download pages, where you will find the MakeRwys utility, which
is used to extract the required data from FS.
Page 40 of 212
Copyright © 2007-2024 by OnCourse Software
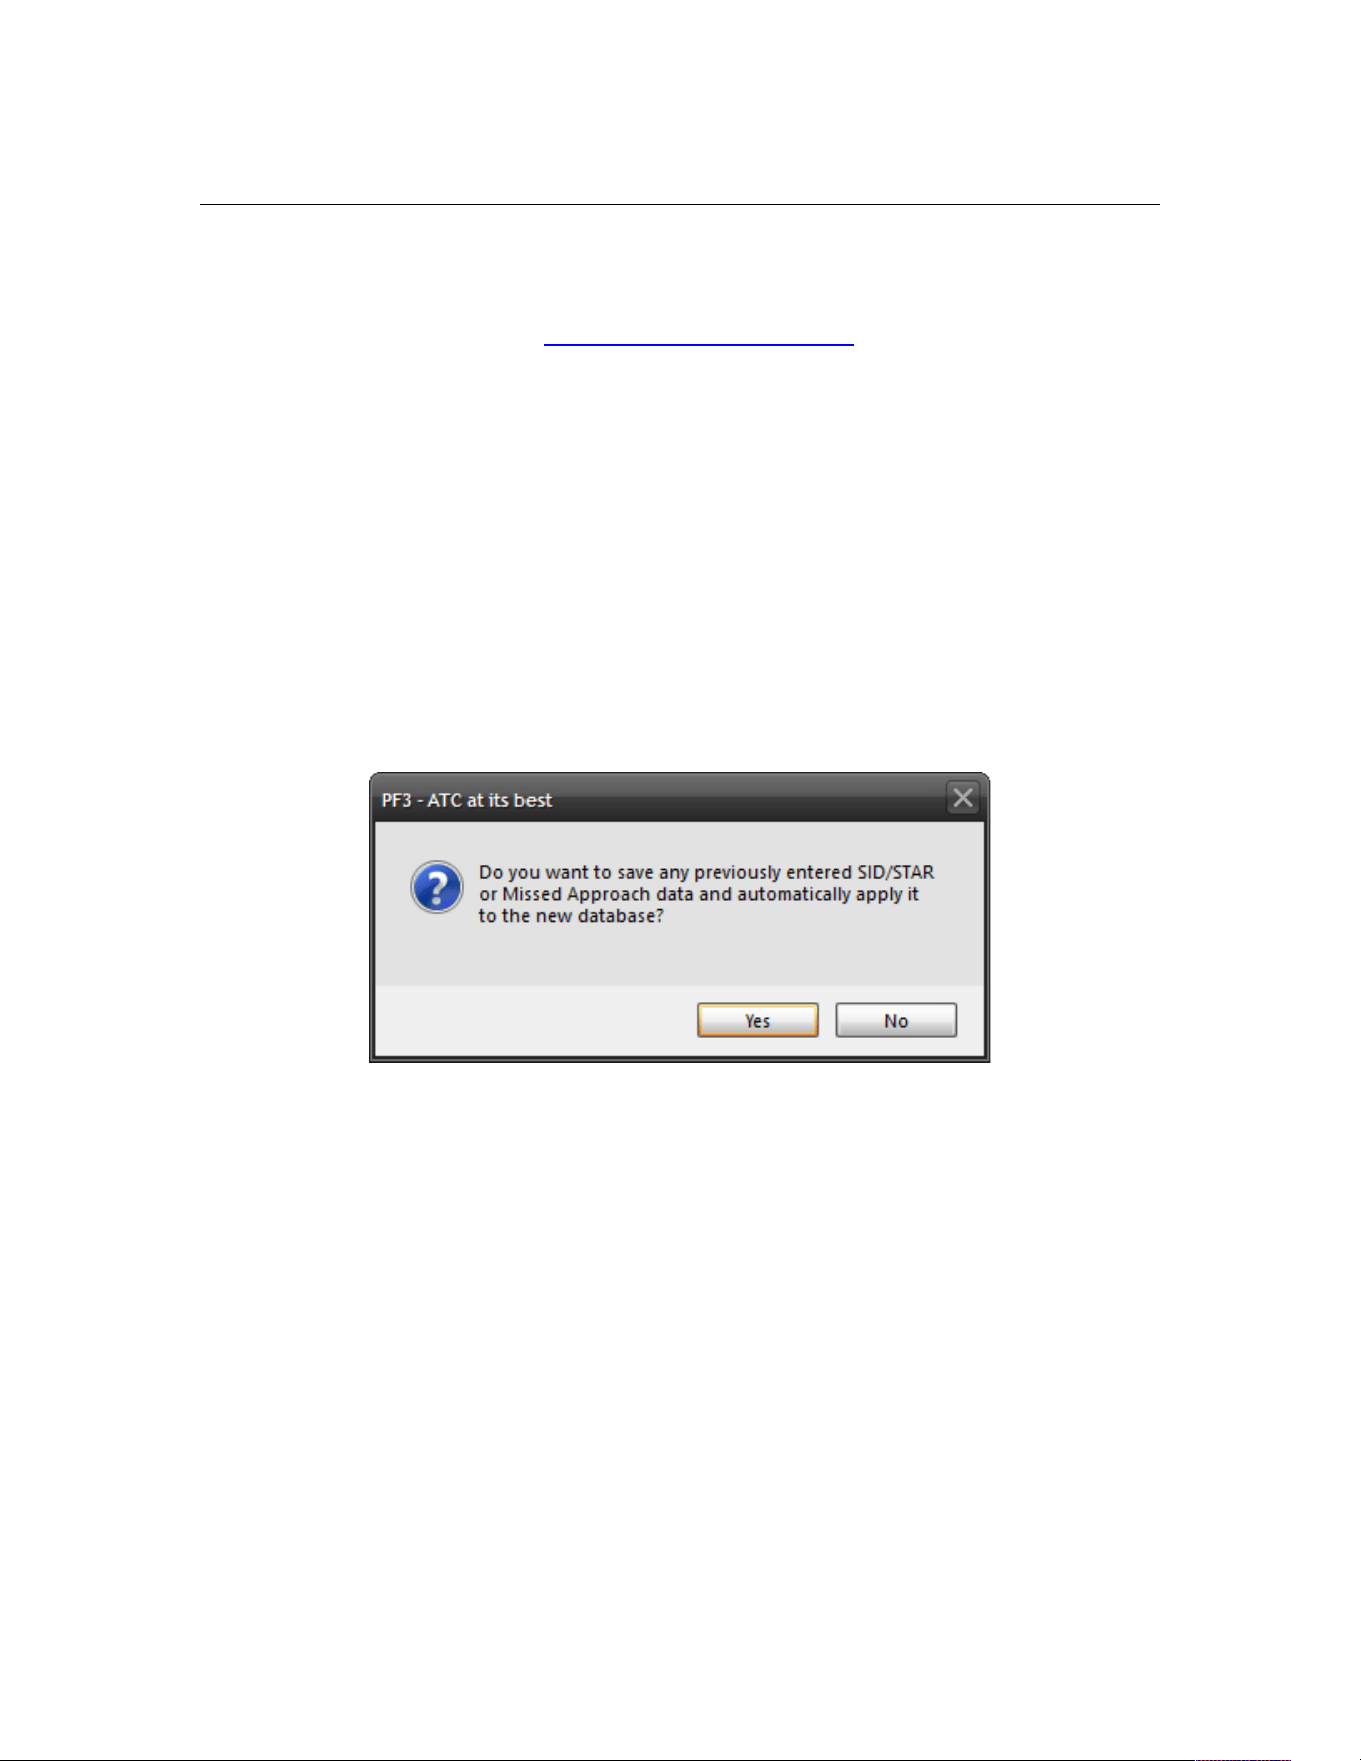
PF3 User Guide
Please note: At the time of writing this link was correct, but as we are not
responsible for this link or MakeRwys we cannot guarantee this will always be
the case. Should the link fail at any time the latest version of MakeRwys can
always be found at the Pete Dowson Support Forum... just google it!
Once you have downloaded the utility you should follow the instructions
provided with the program, but simply all you have to do is copy the
MakeRwys.exe program into your main FS folder, except for MSFS users,
then run it. At which point you can select the 2
nd
, 3
rd
and 4
th
checklist items
(see above) to confirm (a) you have the latest version of MakeRwys, (b) you
have installed it and (c) you have run it.
Finally, once MakeRwys has completed its task, which can take a few minutes,
you can then select the 5
th
and final check item that says 'Click here to Start
the PF3 Database Refresh Process and wait for it to complete'
A warning screen will then appear asking if you wish to save any of the
changes you may have made to the database.
If you have configured any SIDs/STARs, missed approach data, etc, etc, and
do not wish to lose it you should select 'Yes'. This will ensure PF3 saves any
user changes and reapply them following the creation of the new database
files.
Page 41 of 212
Copyright © 2007-2024 by OnCourse Software
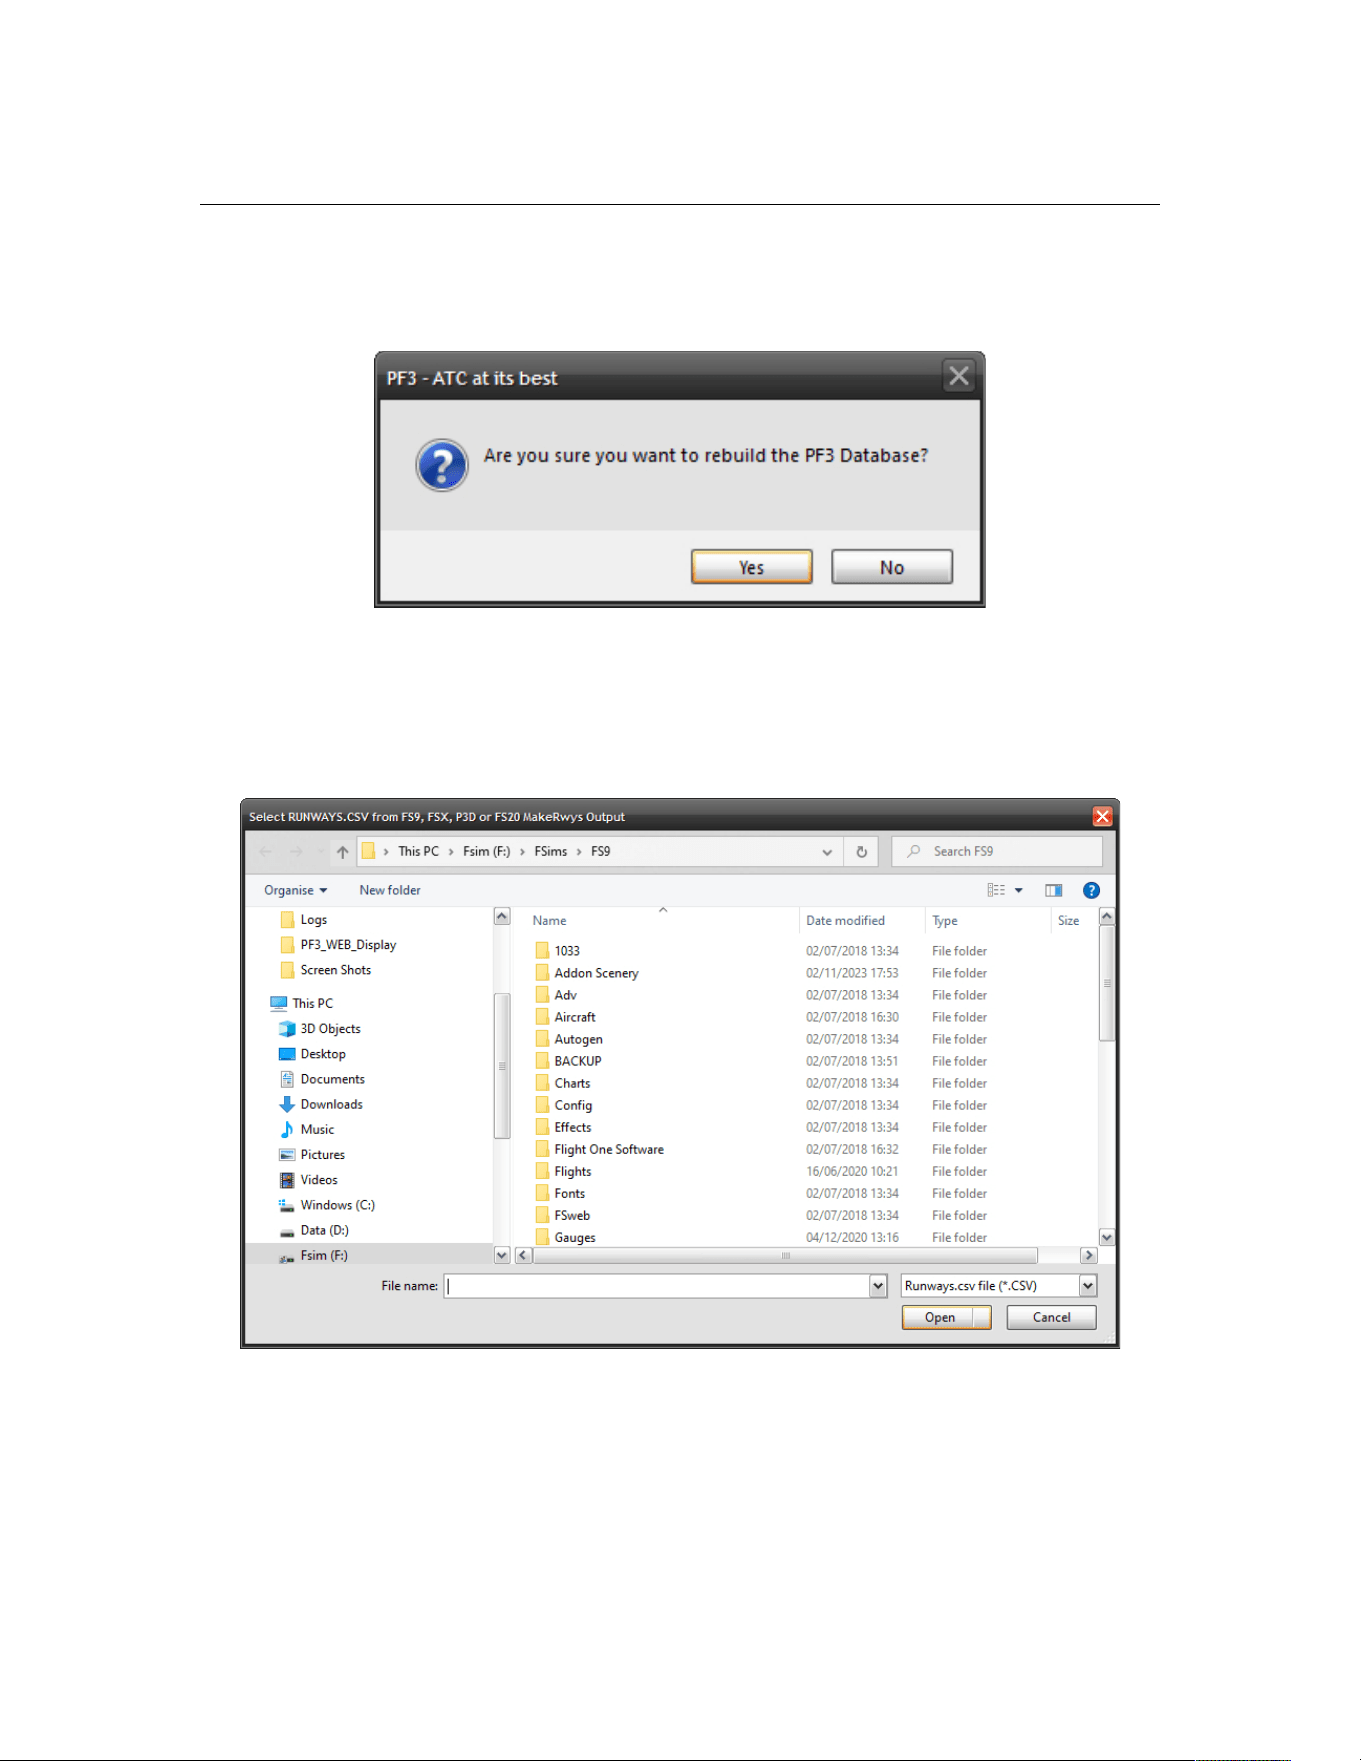
PF3 User Guide
After that you will be asked once more to confirm that you do actually want to
update/create the PF3 database.
If you select 'Yes' to continue the following screen will appear, from which you
have to select the runways.csv file from the main FS folder. This file should
have just been created by the MakeRwys.exe program.
After selecting the runways.csv file click on OPEN and the PF3 database will
be created/rebuilt, which should only take a few minutes maximum to
complete.
Page 42 of 212
Copyright © 2007-2024 by OnCourse Software
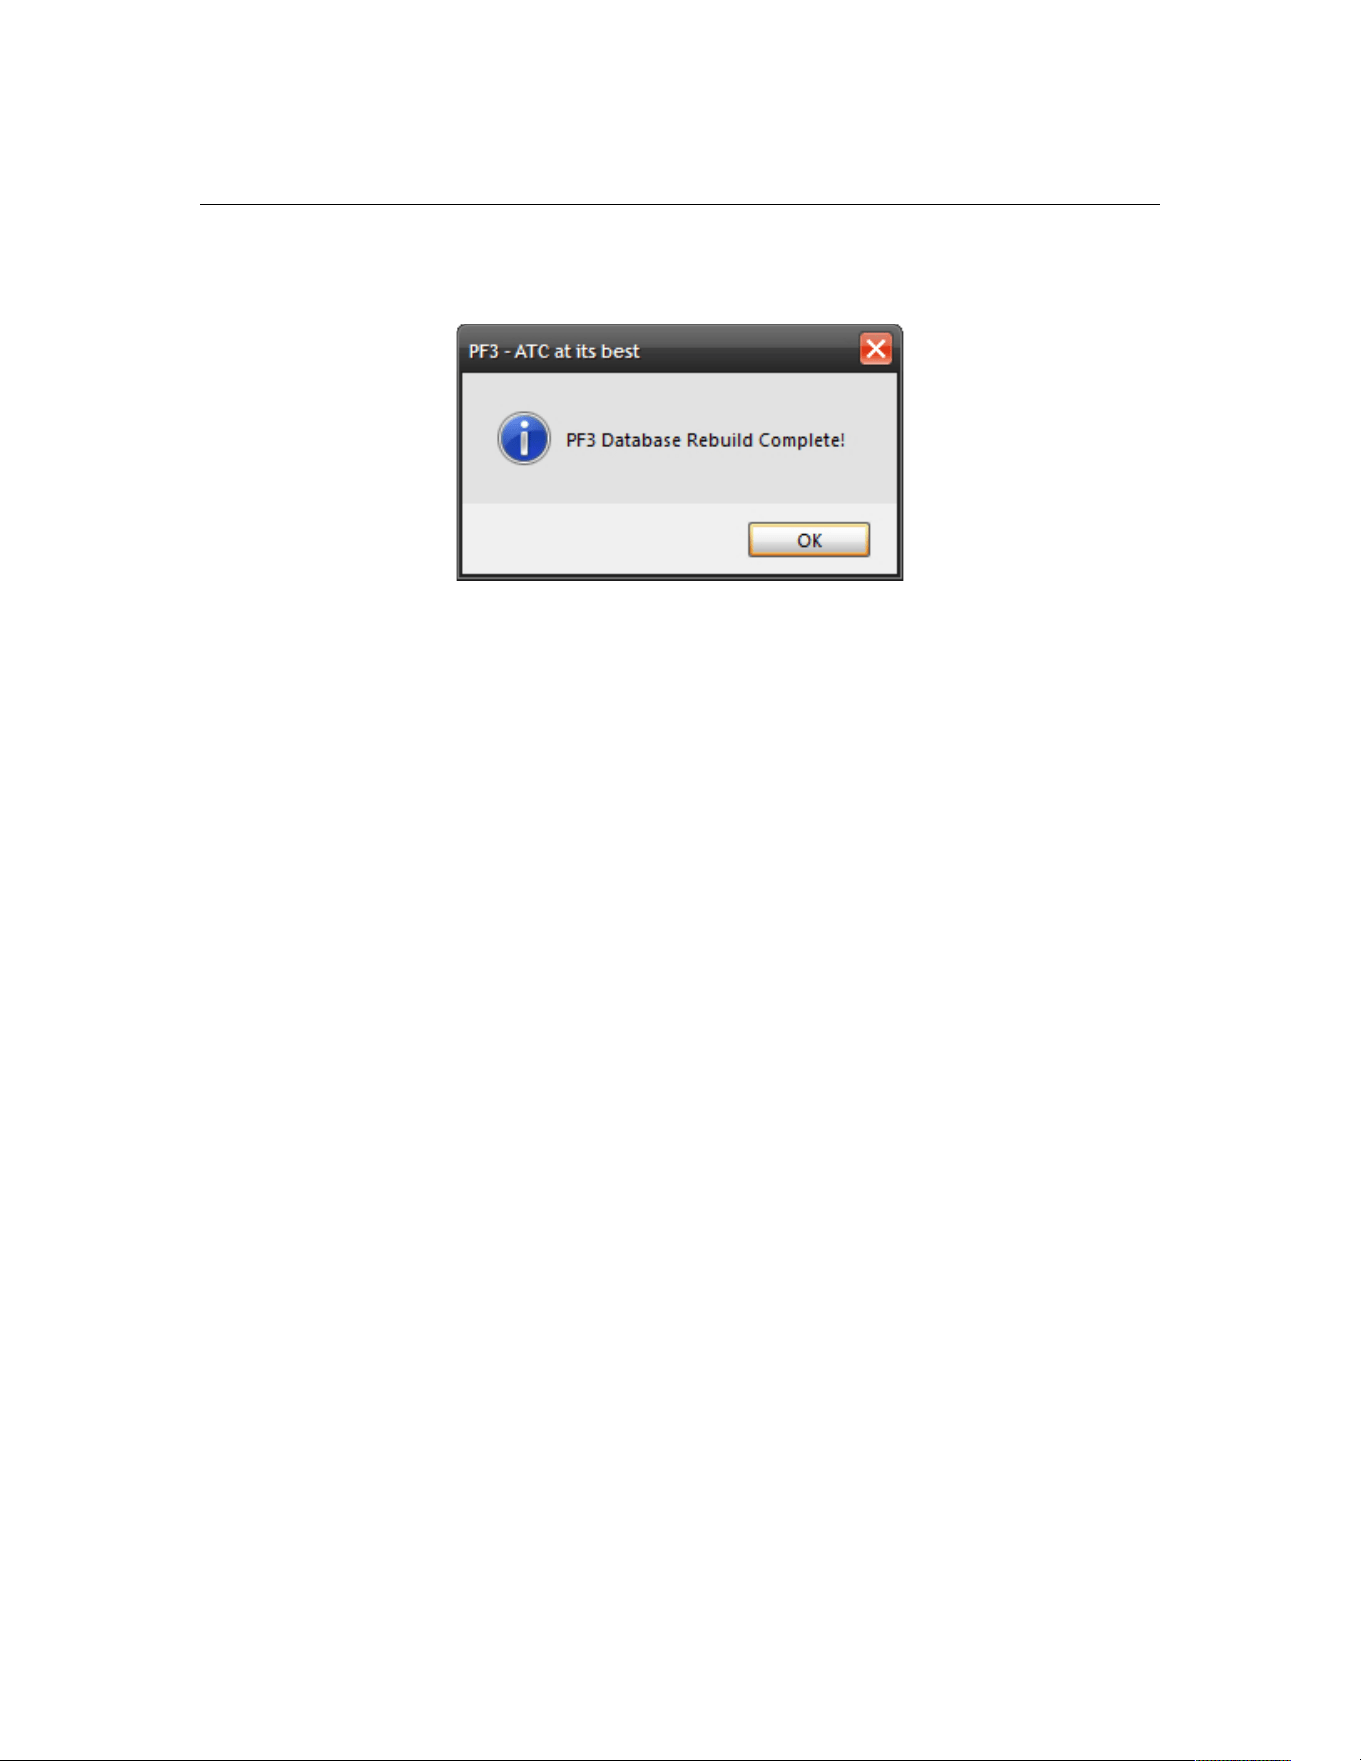
PF3 User Guide
Hopefully you will see this message following the rebuild:-
That’s it!
In the unlikely event that you should have any problems (I've always wanted
to say that) rebuilding the PF3 database try deleting the following files from
your main FS folder first, or the folder you chose to run MakeRwys for MSFS,
then rerun Makerwys and retry the rebuild:-
F5.csv
G5.csv
R5.csv
T5.csv
Runways.csv
You may run the PF3 database rebuild at anytime, even if you have not made
any changes to FS, although you should only need to after adding new
scenery/airports.
Now you can select the Close DB Options button to return to the main
options screen and from there you can select the Hotkey Options button
which will display the page shown in section 7.1.14
Page 43 of 212
Copyright © 2007-2024 by OnCourse Software
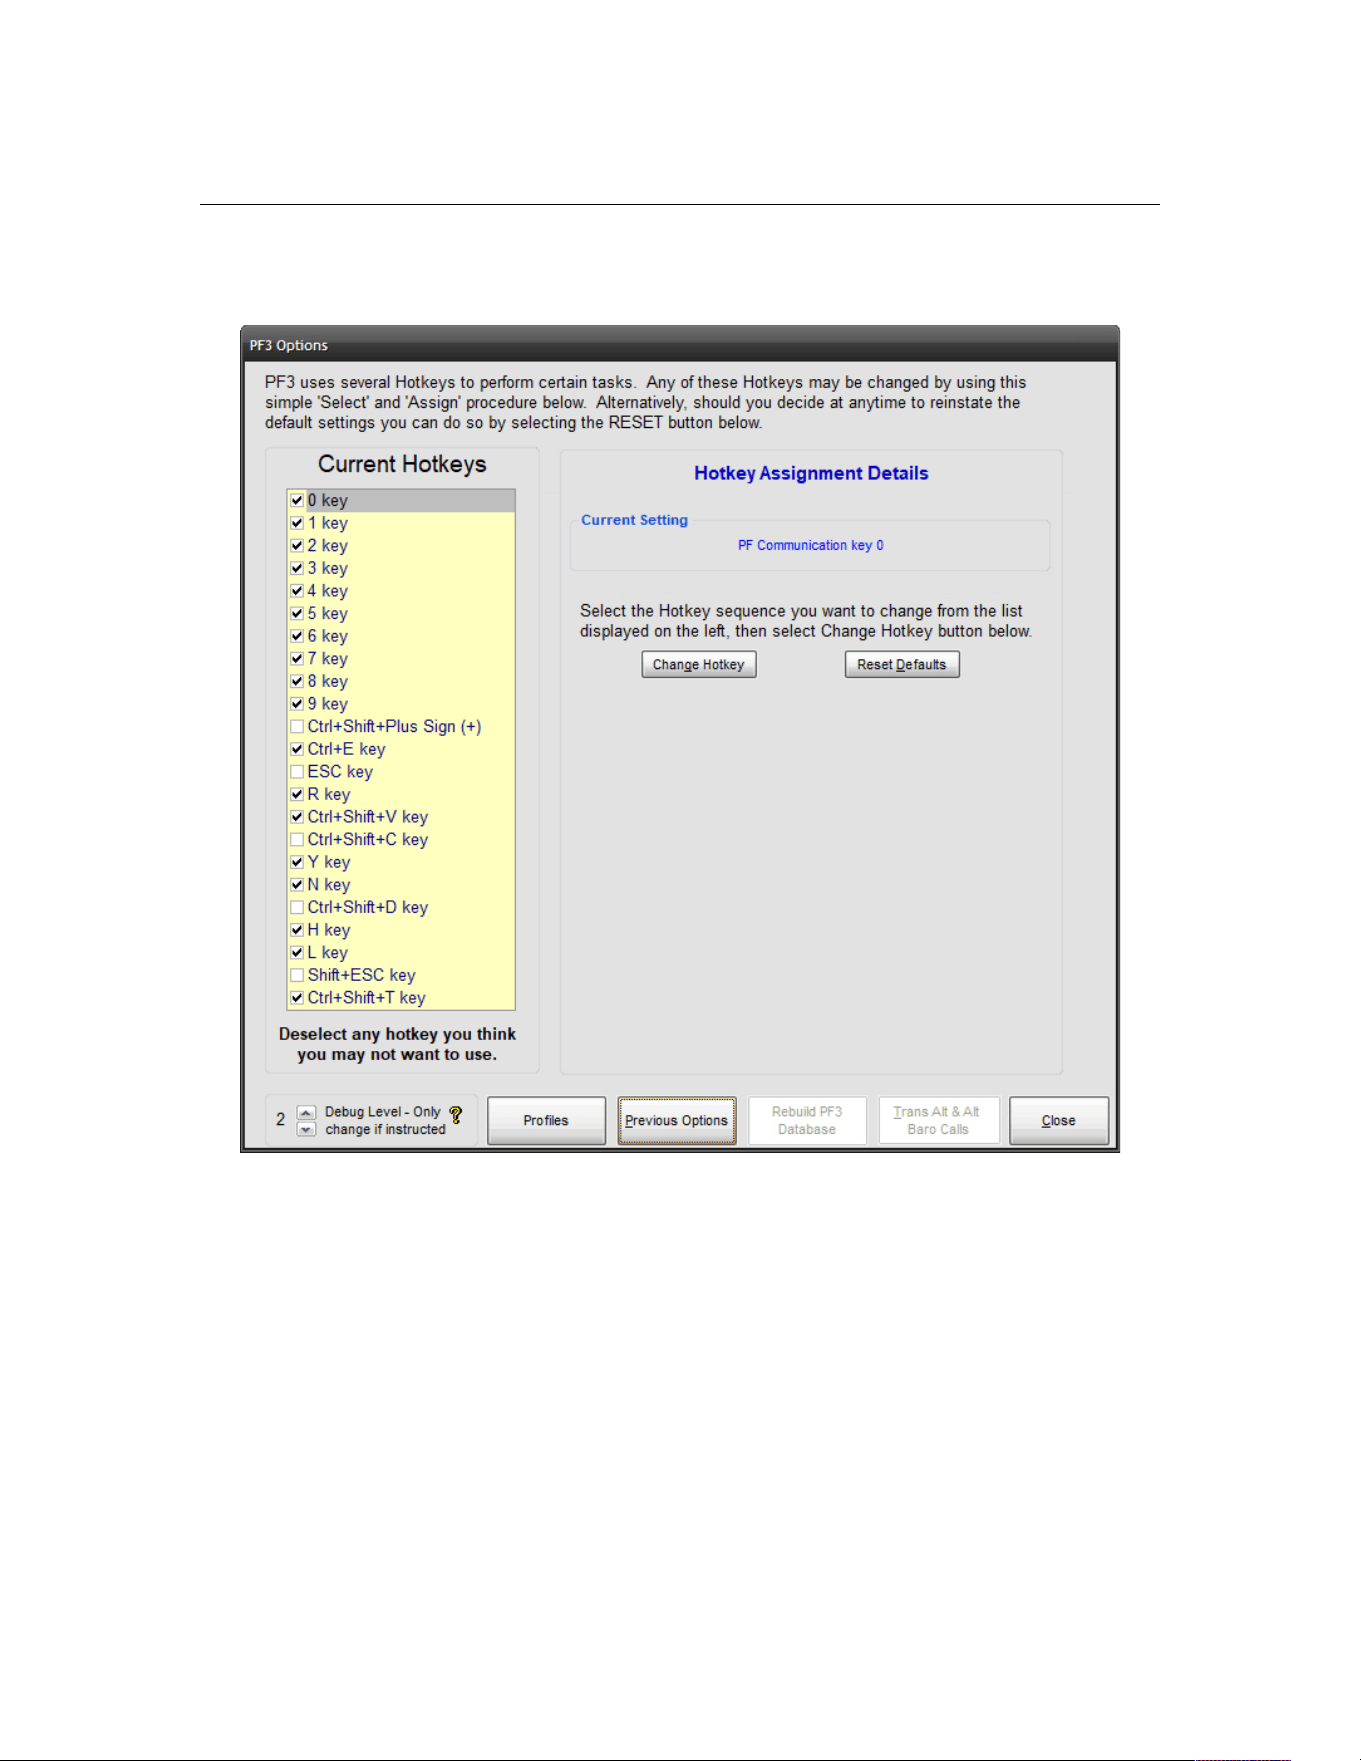
PF3 User Guide
7.1.14 Hotkey Options
There are 23 pre-configured hotkeys in PF3. However, the Hotkey page
allows you to assign any key or multi-key combination for each hotkey,
should you wish to change the defaults. Simply select the hotkey from the left
hand-side, then select Change Hotkey. Now press the actual key(s) you want
to use for this hotkey and click Assign and the new keying sequence will be
active and ready to use.
You must exit PF3 and restart it before any hotkey changes will
become active in your next flight.
Page 44 of 212
Copyright © 2007-2024 by OnCourse Software
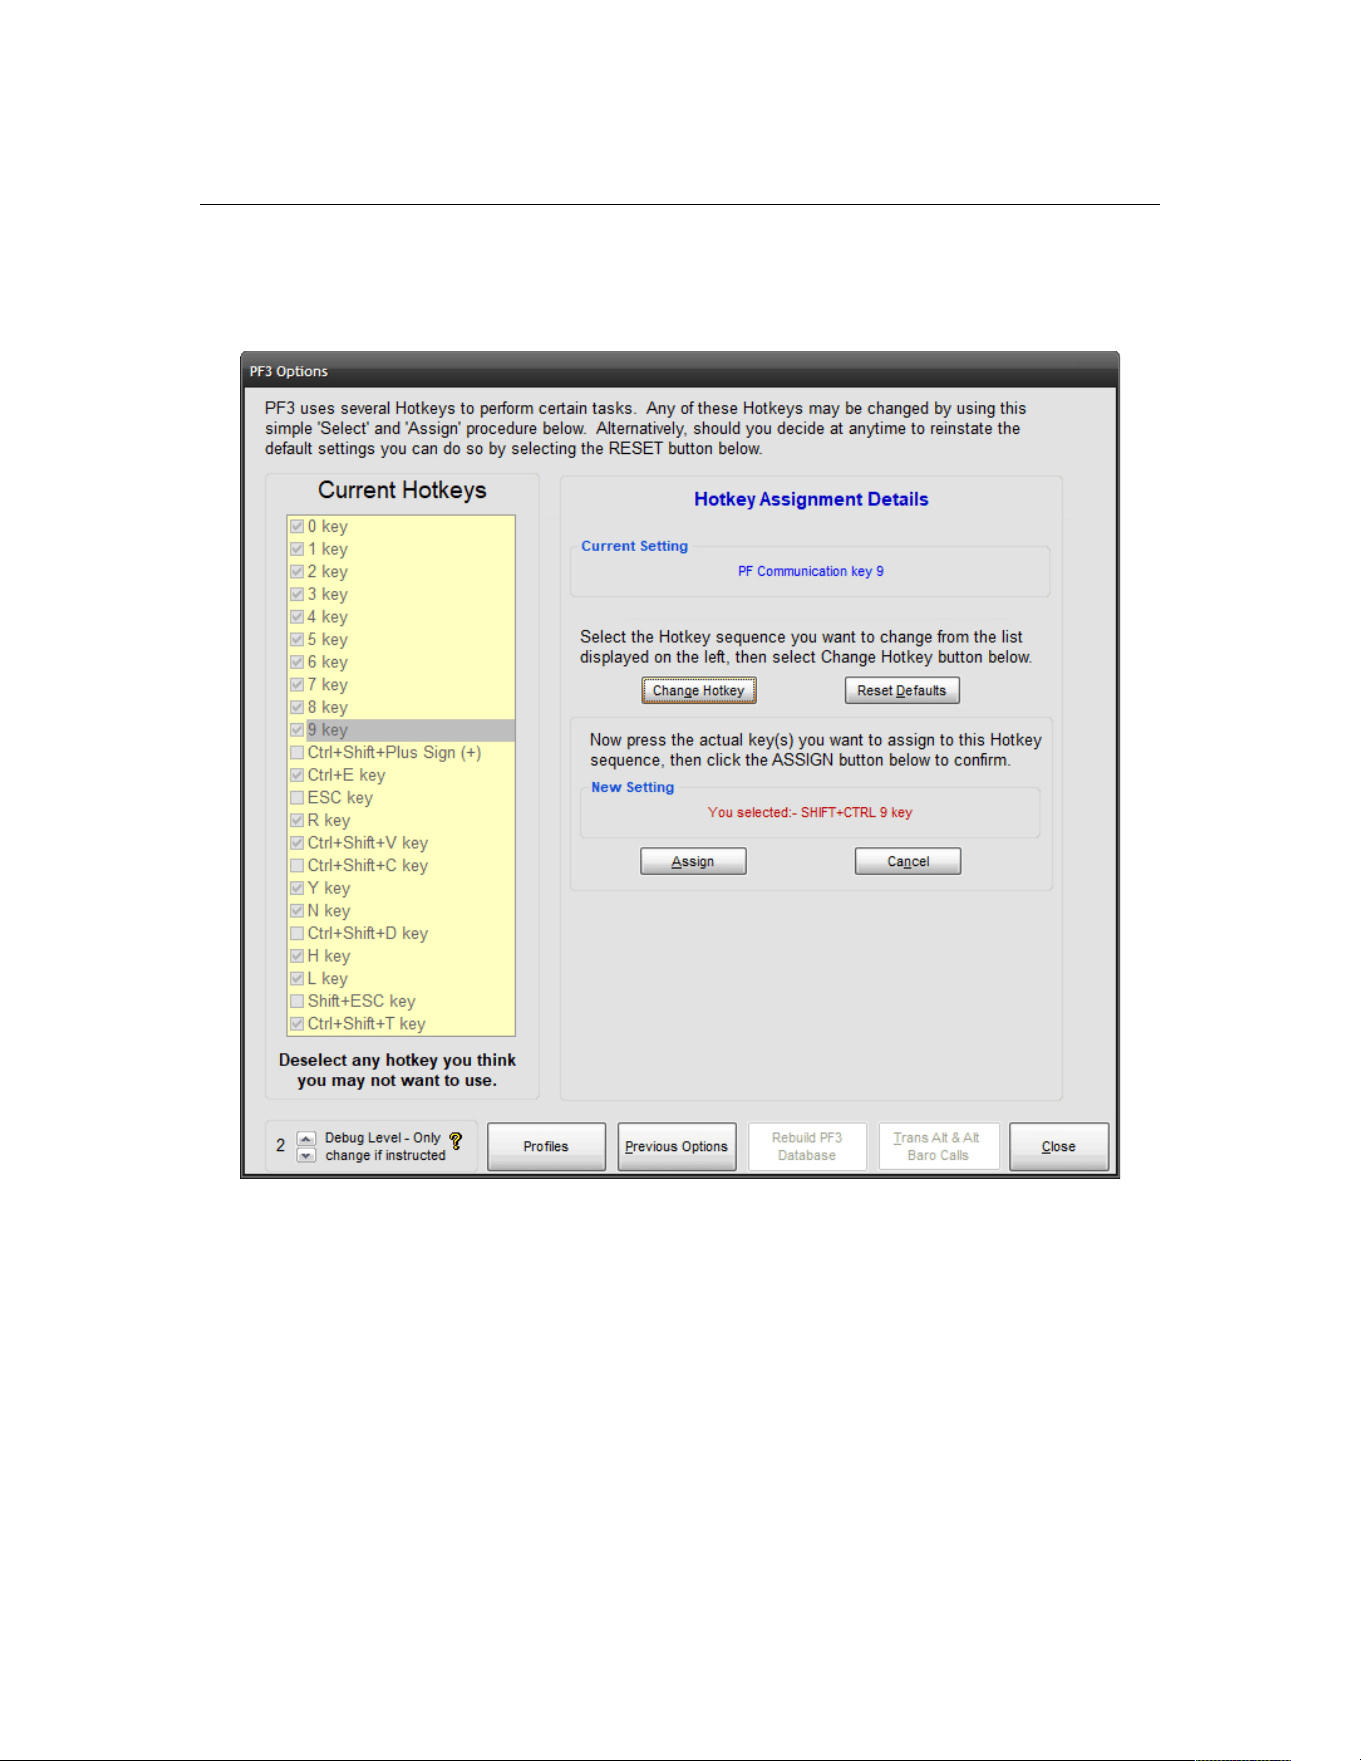
PF3 User Guide
The following screen shot shows how the above display changes after you
select the Change Hotkey option.
In this example we are attempting to change the default setting for the #9
hotkey to use the Shift+Ctrl+9 combination of keys instead.
You will also notice there is a small tick box to the left of each hotkey name
under the Current Hotkeys list. This indicates if the hotkey is active or not.
Any keys you don't use should be disabled because the total number of
hotkeys available, for all applications using this FSUIPC facility, is limited to a
maximum of 56. So it just makes sense if you don't use a particular key or
keys then deselect them.
You can now select the Close button to return to the main menu screen. If
you'd selected the Previous Options button you'd have returned to the
Options #1 display instead, but for now we're done with those options.
Page 45 of 212
Copyright © 2007-2024 by OnCourse Software
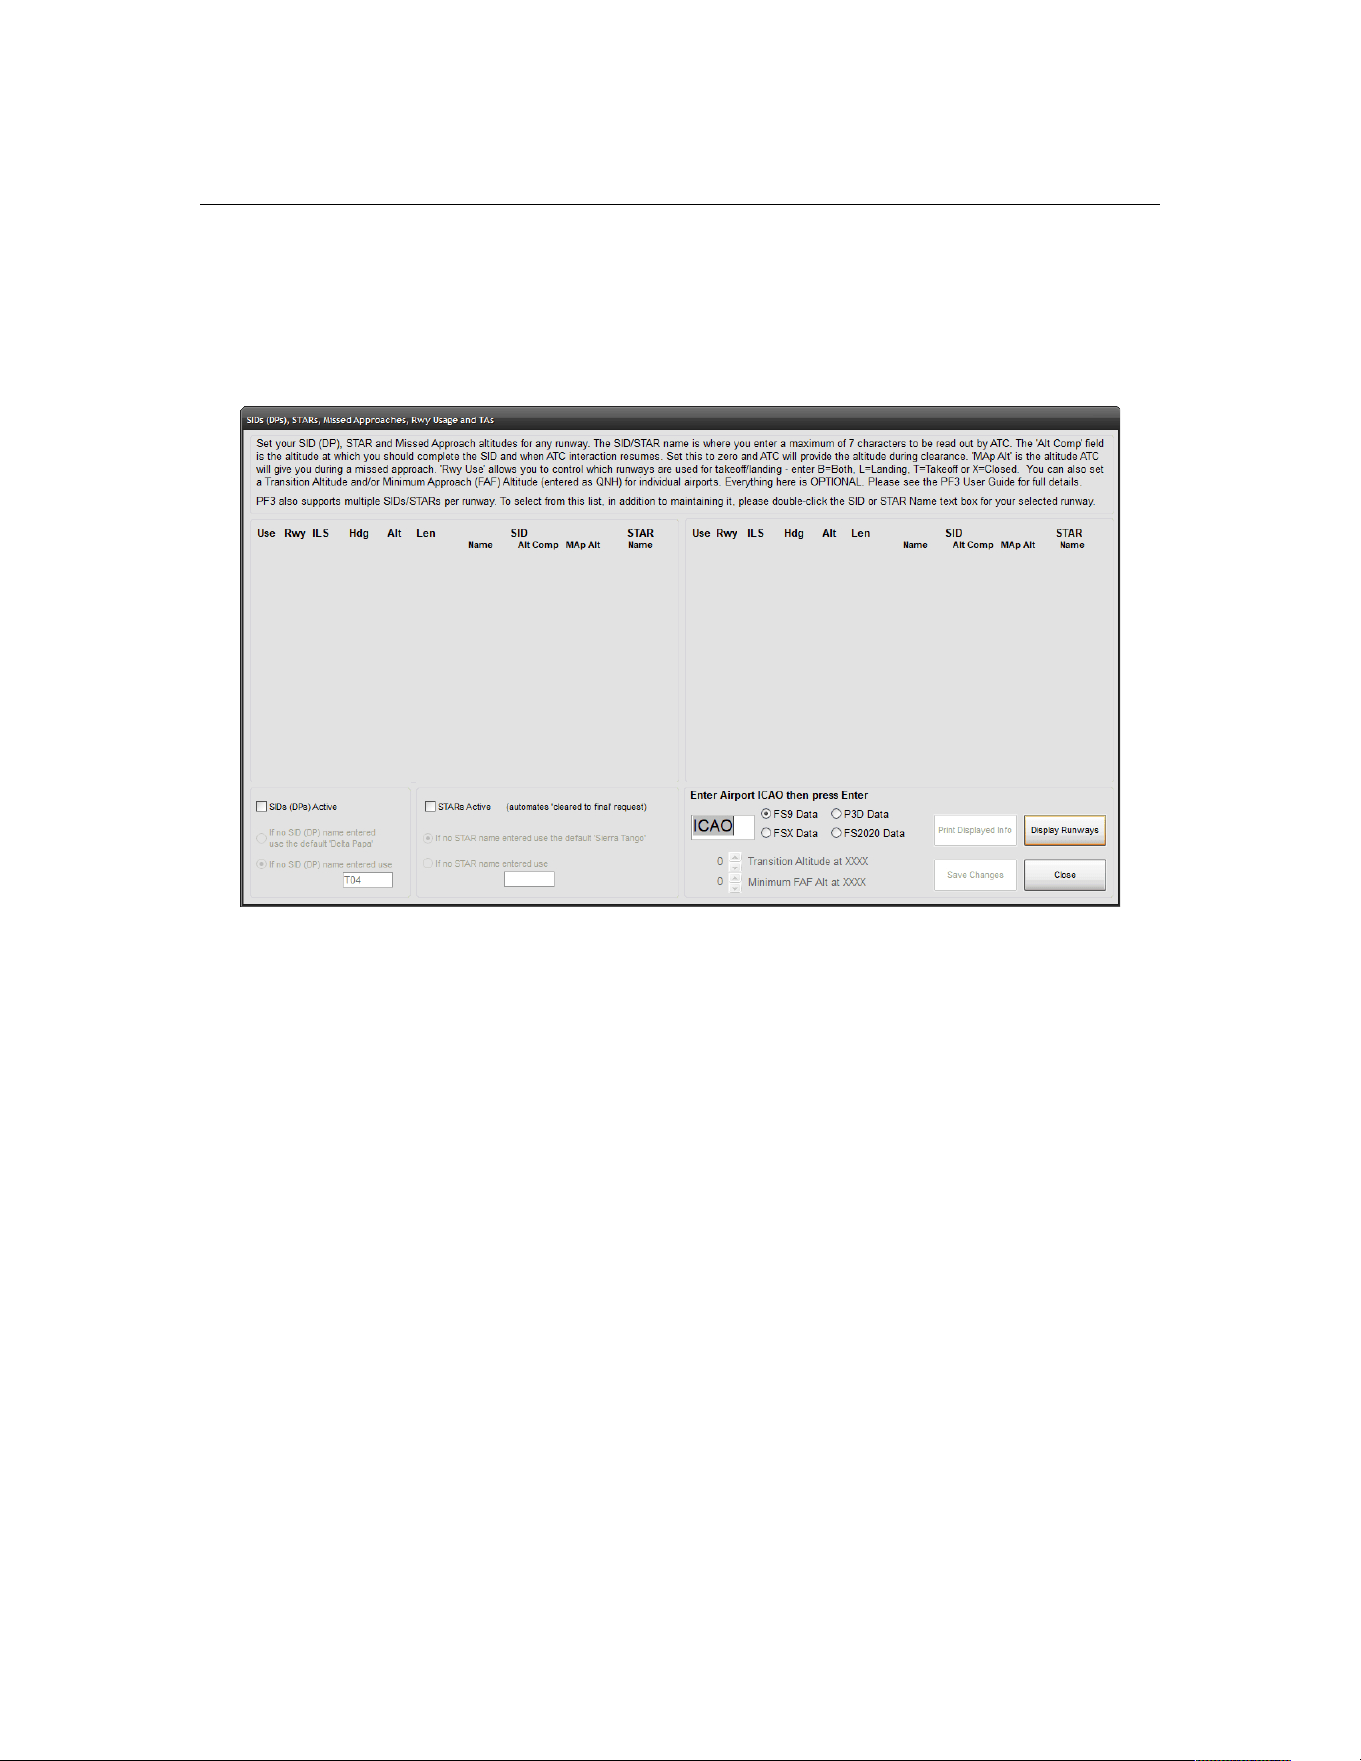
PF3 User Guide
7.1.15 SID/STAR Page Options
From the main menu display if you select SIDs/STARs PF3's unique SIDs
(DPs) and STARs screen will be displayed:-
This is where you control the use of SIDs (DPs), STARs, Missed Approach
altitudes, takeoff/landing designation for any runway, airport specific
transition altitudes and airport specific minimum FAF altitudes. And new for
version 3.3.0 the ability to add/maintain a list of multiple SIDs/STARs per
runway and from which you can select the procedure you wish to use for any
flight.
SIDs (DPs) - There are quite a few variations you can choose when deciding
how to use SIDs. If you wish to fly a published departure from all airports but
really can't be bothered to enter any data here, simply select the SIDs (DPs)
Active master switch. Just below this option if you choose If no SID (DP)
name entered use the default 'Delta Papa' then each time you contact
clearance (at any airport) you will hear 'Cleared as filed, Delta Papa departure
at xxxx approved, squawk 1234, contact ground on…" (where xxxx will be the
altitude you are initially cleared to while flying the published departure and at
which point ATC will resume interaction with you). Until you reach the SID
altitude you will not hear anything from ATC other than to hand you off to
another control facility and possibly give you new altitude instructions.
If you don't want to use the default 'Delta Papa' name for your generic
published departures you can enter your own default name if you select the
option 'If no SID (DP) named entered use...'. Here you can enter a
maximum of seven alpha numeric characters which ATC will read out.
Page 46 of 212
Copyright © 2007-2024 by OnCourse Software
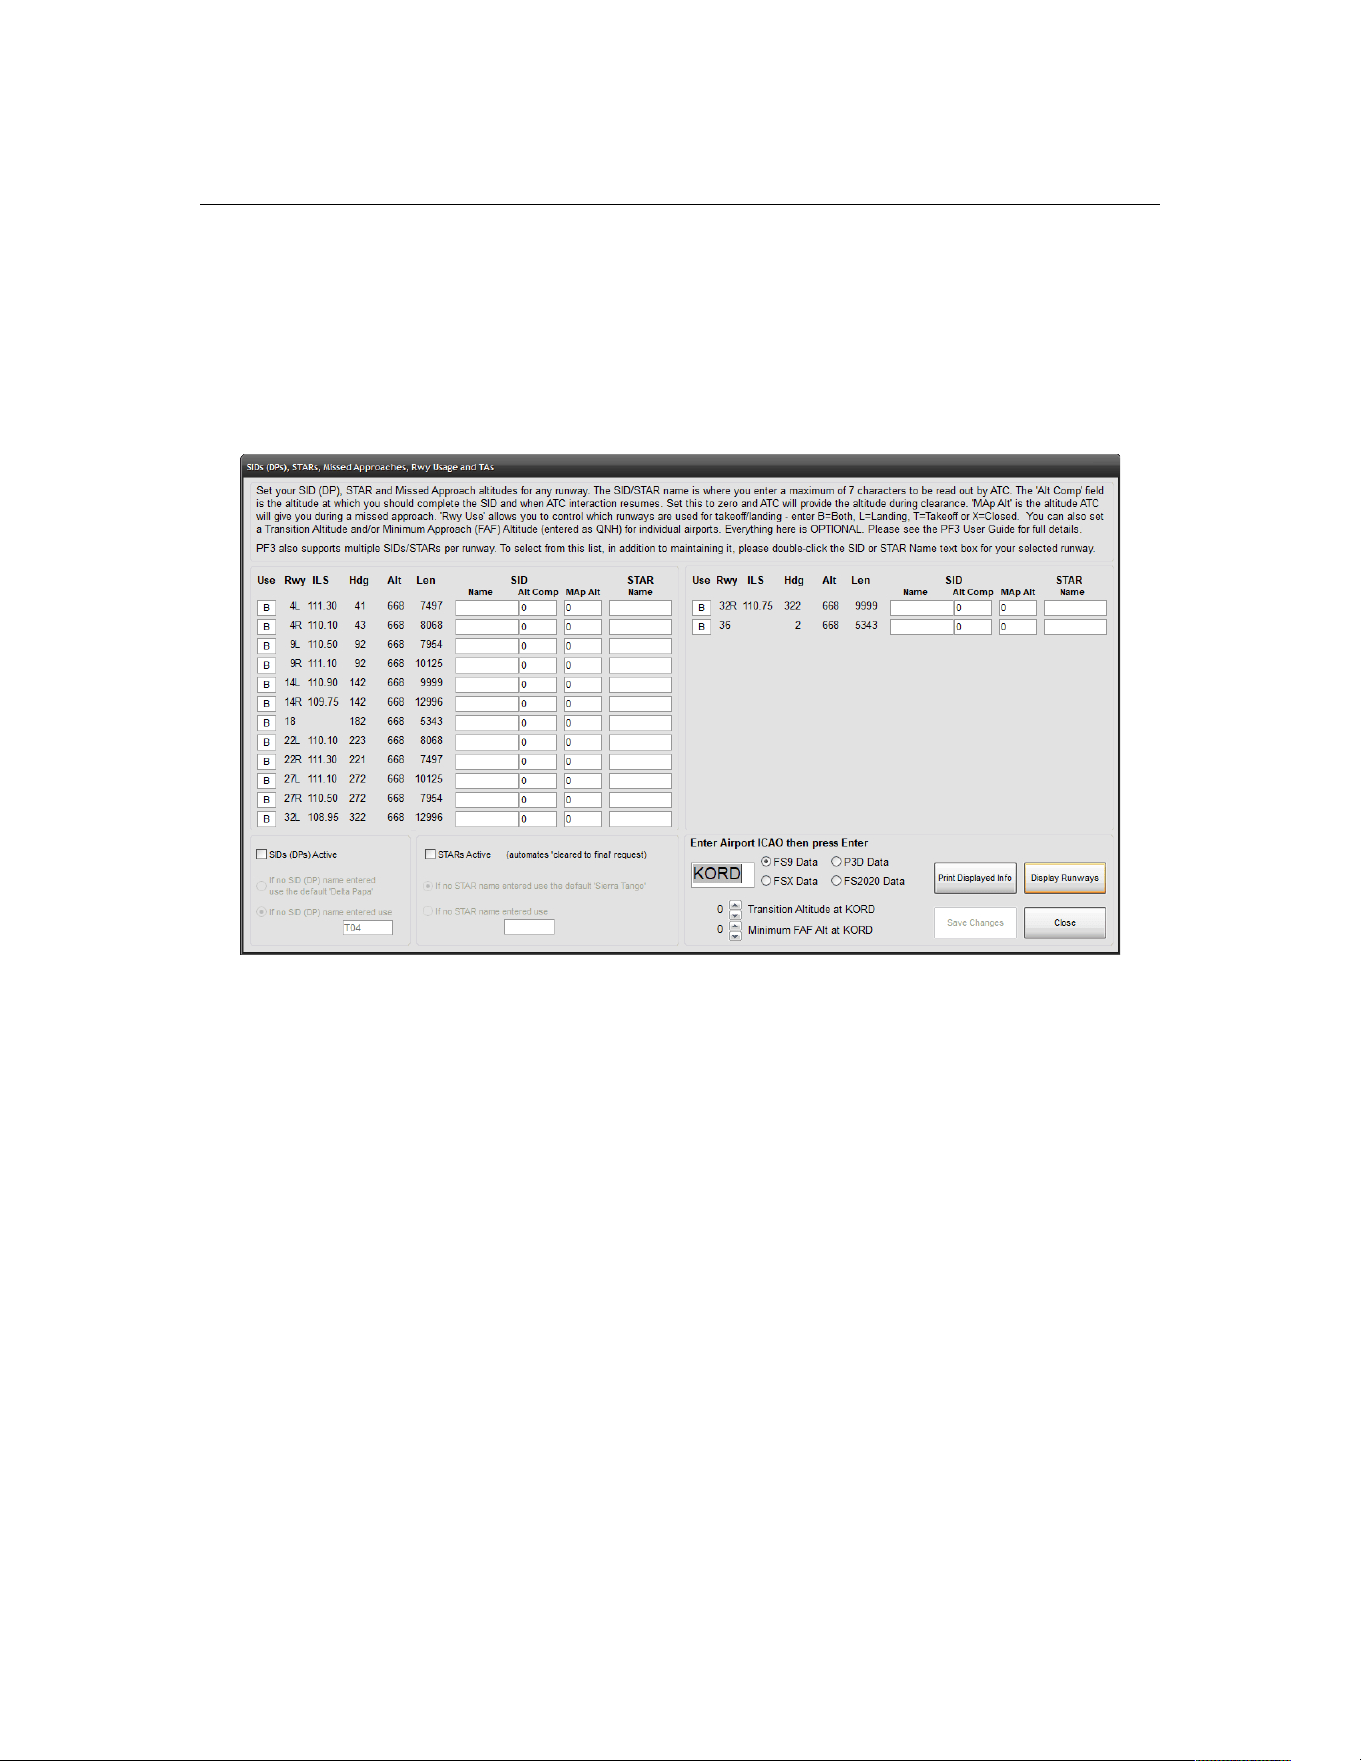
PF3 User Guide
The other alternative is for you to enter a name against individual runways.
To do so you need to first enter the ICAO code for the airport you want to
display, then hit ENTER or select the Display Runways button.
In the following example we're displaying the runways from FS2004 for KORD
(O'Hare International) Airport:
Using the above configuration, if departing runway 4L Clearance would
confirm "Cleared as filed, Mike-Alpha-Four-Lima at Five Thousand departure
approved, squawk 1234". You would also hear the same from Tower when
being cleared for takeoff.
Departing runway 14L you would hear "Cleared as filed, Alpha-Delta-Lima-
One-Four at Six Thousand departure approved, squawk 1234".
Departing from any other runway you would hear "Cleared as filed, Delta-
Papa at xxxxx Thousand departure approved, squawk 1234" where xxxx
would be determined by PF3 at the time of the clearance and would normally
be set at an altitude halfway between the current airports ground elevation
and the altitude set for the first waypoint. e.g. If your departure airport's
elevation is 1,000' and the first waypoint altitude is set to 11,000' then the
cleared to altitude would be 5,000' (11,000 - 1,000 / 2).
Please Note: When accessing, changing or adding any data on this screen you
need to ensure you are accessing data for the correct flight simulator,
especially if you have more than one flight sim installed. You can do this by
choosing either the FS9, FSX, P3D or FS2020 Data option situated just to the
right of the Airport ICAO entry box. PF3 will always remember your last
selection.
Page 47 of 212
Copyright © 2007-2024 by OnCourse Software
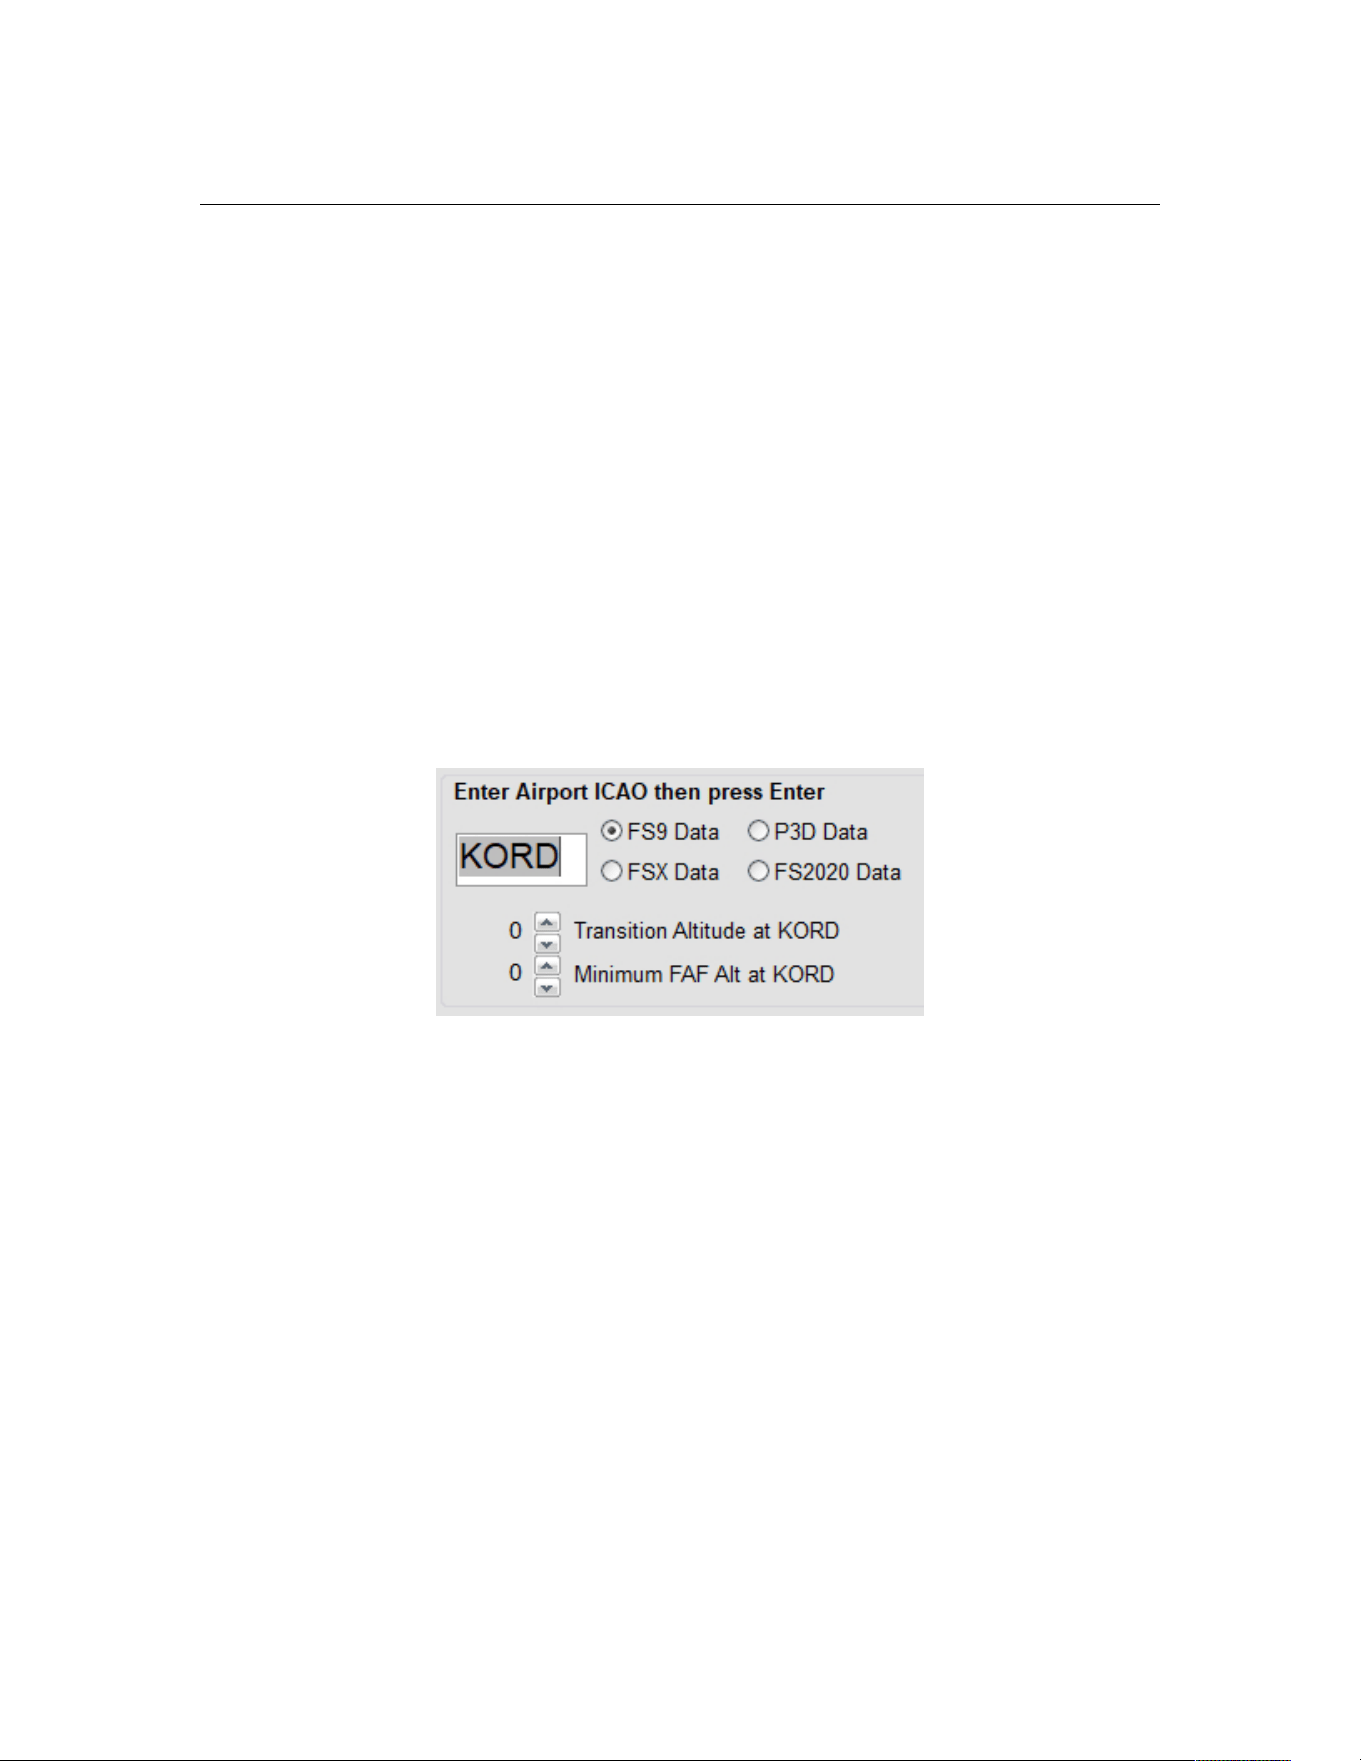
PF3 User Guide
This same screen is also used for configuring STARs and/or Missed Approach
altitudes. If you choose to activate the PF3 STARs option (using the default
STAR name) you would be cleared as such: "Cleared to final for Sierra-Tango
approach, runway xx..."
Exactly the same variations are available for STARs as they are for SIDs with
regard to the departure/approach name used by ATC.
This screen is also used to enter a missed approach altitude. This is the
altitude you will initially be told to climb to should you report a go around.
You don't have to use this feature as ATC will usually tell you to climb to
around 3,000' above the airports elevation, but should you find an airport
where surrounding terrain would make such an altitude too dangerous you
can adjust this feature for each runway/approach should you wish.
Any changes you make to runways, like entering SID/STAR names or
altitudes must be saved by selecting the Save Changes option. You will be
prompted to do so should you forget.
Just below where you enter the airport ICAO you will see a small up/down
arrow where you can set the transition altitude for the displayed airport and
this will override the value set against the regional area (see earlier
explanation). However, you do not need to adjust this for each airport and if
left at ‘zero’ then the value set for this airport’s region will be used instead. If
you do enter a TA for any airport this is how it will work within PF3. If you
have set a local TA for your departure airport, it will change to the region’s TA
at a distance of 30 miles from the airport, unless you are flying a SID that is
still active at that time in which case airport TA will remain in effect until you
complete your SID.
Destination airport TA is currently used once you reach the last waypoint and
that process will remain unchanged. For an approach the destination airport
TA will become active and override the regional setting when you reach your
last waypoint.
Below the TA setting is a similar option for setting the minimum FAF altitude
for the selected airport. This means this will be the minimum altitude ATC will
tell you to descend to during your approach to this airport. This is extremely
handy for those difficult approaches, particularly in mountainous areas or at
Page 48 of 212
Copyright © 2007-2024 by OnCourse Software
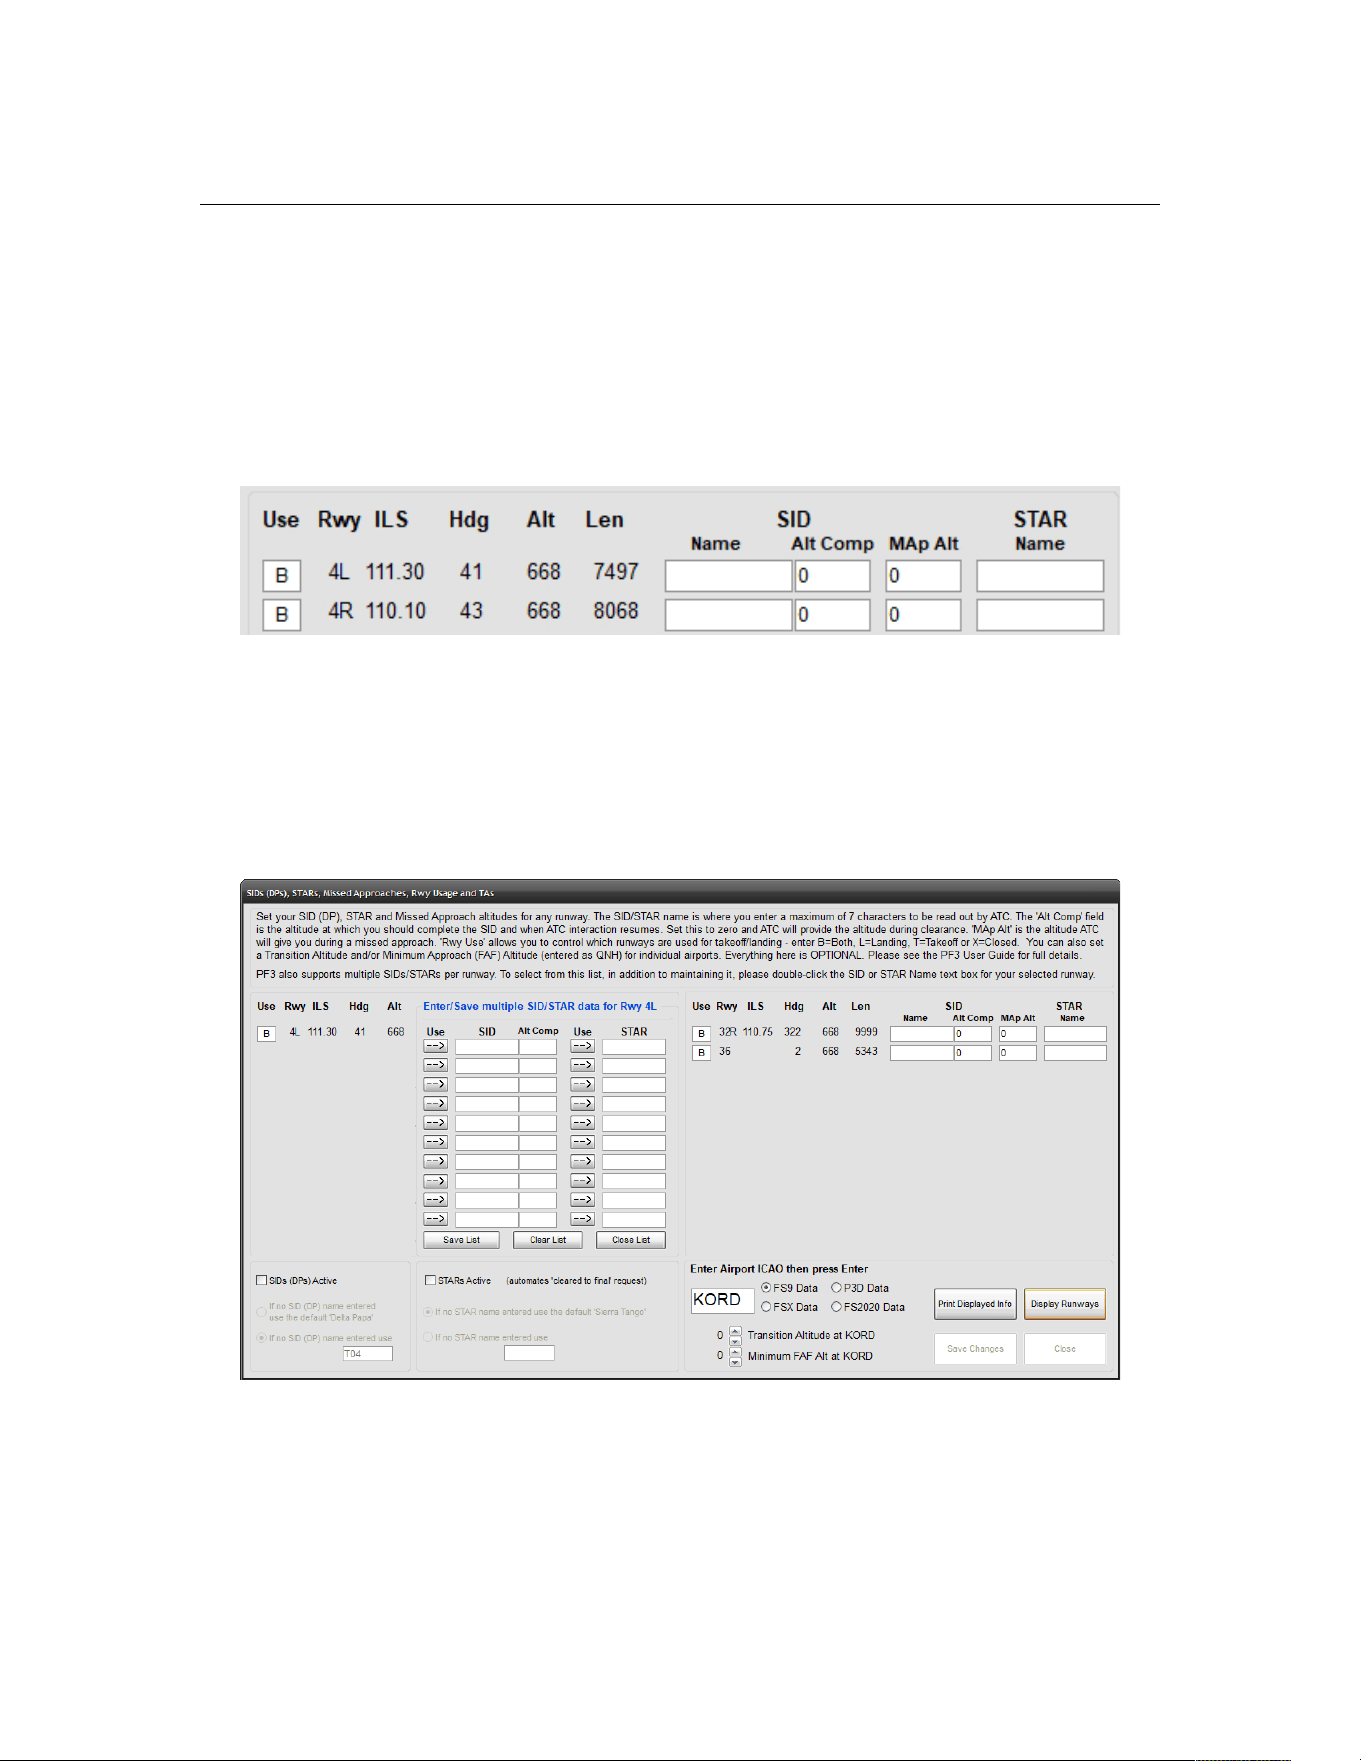
PF3 User Guide
airports surrounded by other hazardous obstructions. However, you do not
need to adjust this for each airport and if left at ‘zero’ PF3 will handle your
approach as normal.
To the left of each runway number you will see a small text box, which
defaults to the letter ‘B’, meaning that runway is designated for both landing
and takeoffs. You can change this to an ‘L’ for landing only, or ‘T’ to
designate it for takeoffs only or even enter an ‘X’ to marked the runway as
closed.
Please note, these settings will have no effect on AI traffic. To restrict AI
traffic from using a particular runway for landing/takeoff you would have to
configure the relevant FS AFCAD file, but that is beyond the scope of this
document.
If you double click within either the SID Name or STAR name columns you will
see a new popup overlay as shown below:-
This new popup allows you to enter up to 10 SIDs/STARs for each runway. In
addition for each SID you can also enter the SID ceiling, or in PF3 terms the
altitude at which your SID would be considered completed.
Page 49 of 212
Copyright © 2007-2024 by OnCourse Software
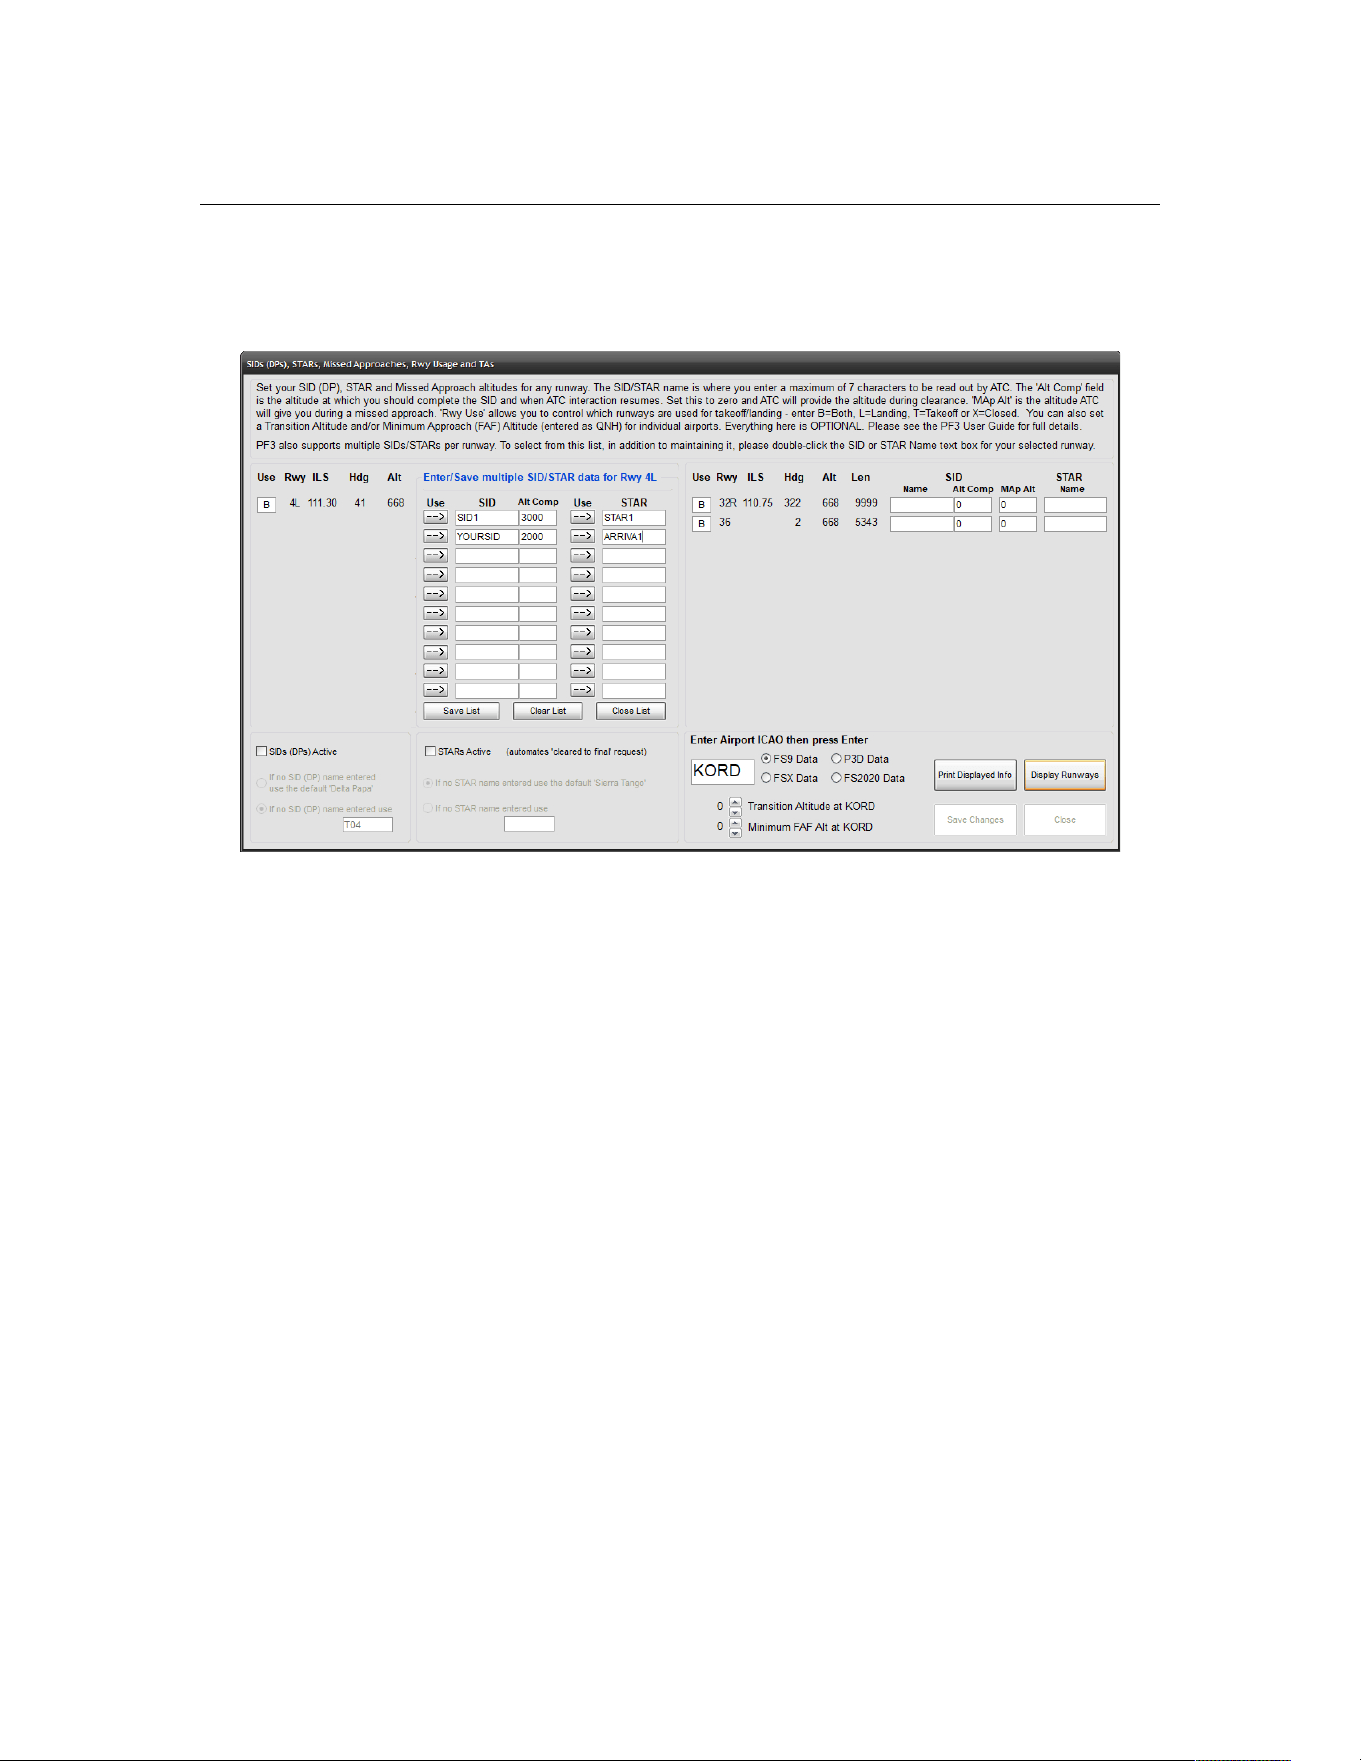
PF3 User Guide
The following screenshot shows a couple of SIDs and STARS entered for
KORD's Runway 4L:
This list can then be used to quickly select the desired procedure for your
flight simple by clicking on the relevant arrow button beside your chosen
SID\STAR:
At this point the selected data will be copied back to the main SID\STAR
display page in readiness for your flight.
Obviously this new feature is entirely optional and you could continue simply
typing in SID/STAR names for each flight. Equally there is no requirement for
you to spend weeks of your time typing in SID\STAR information for all the
airports you frequent. The thought process behind this new feature is it will
be completed as and when, on an airport by airport basis, as part of your
flight planning. In this way, your user list of multiple SIDs\STARs will expand
over time.
Page 50 of 212
Copyright © 2007-2024 by OnCourse Software
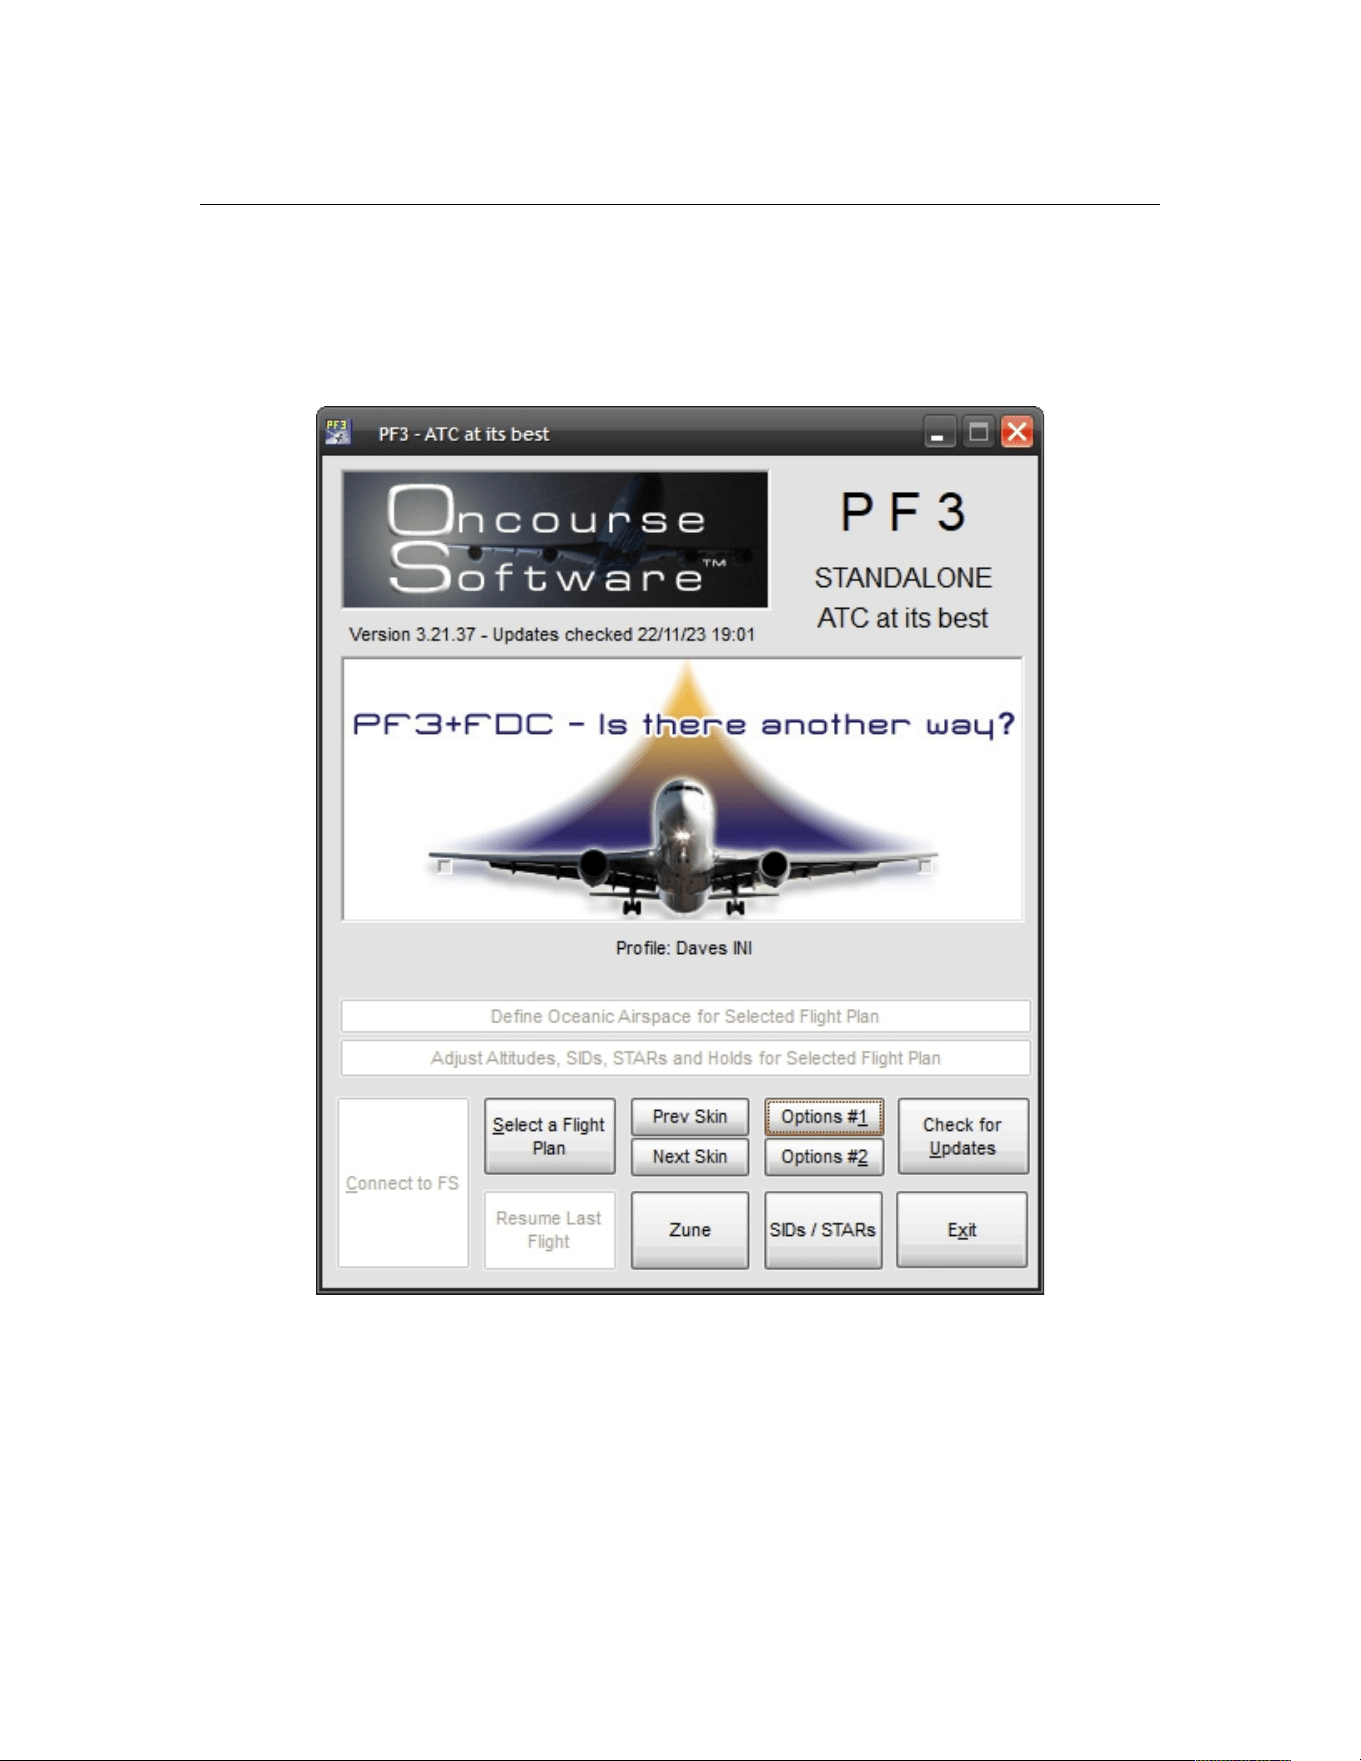
PF3 User Guide
7.1.16 Even More Main Menu Options
Okay, let's go back to the main menu display now and check out some more
options and features:
7.1.17 Select a Flight Plan
When you select this button for the very first t8ime you will be prompted to
tell PF3 where to find your FS9, FSX, P3D or MSFS flight plans. You will only
have to do this once, unless you have more than one flight simulator
installed, in which case if you change the version of flight simulator you are
Page 51 of 212
Copyright © 2007-2024 by OnCourse Software
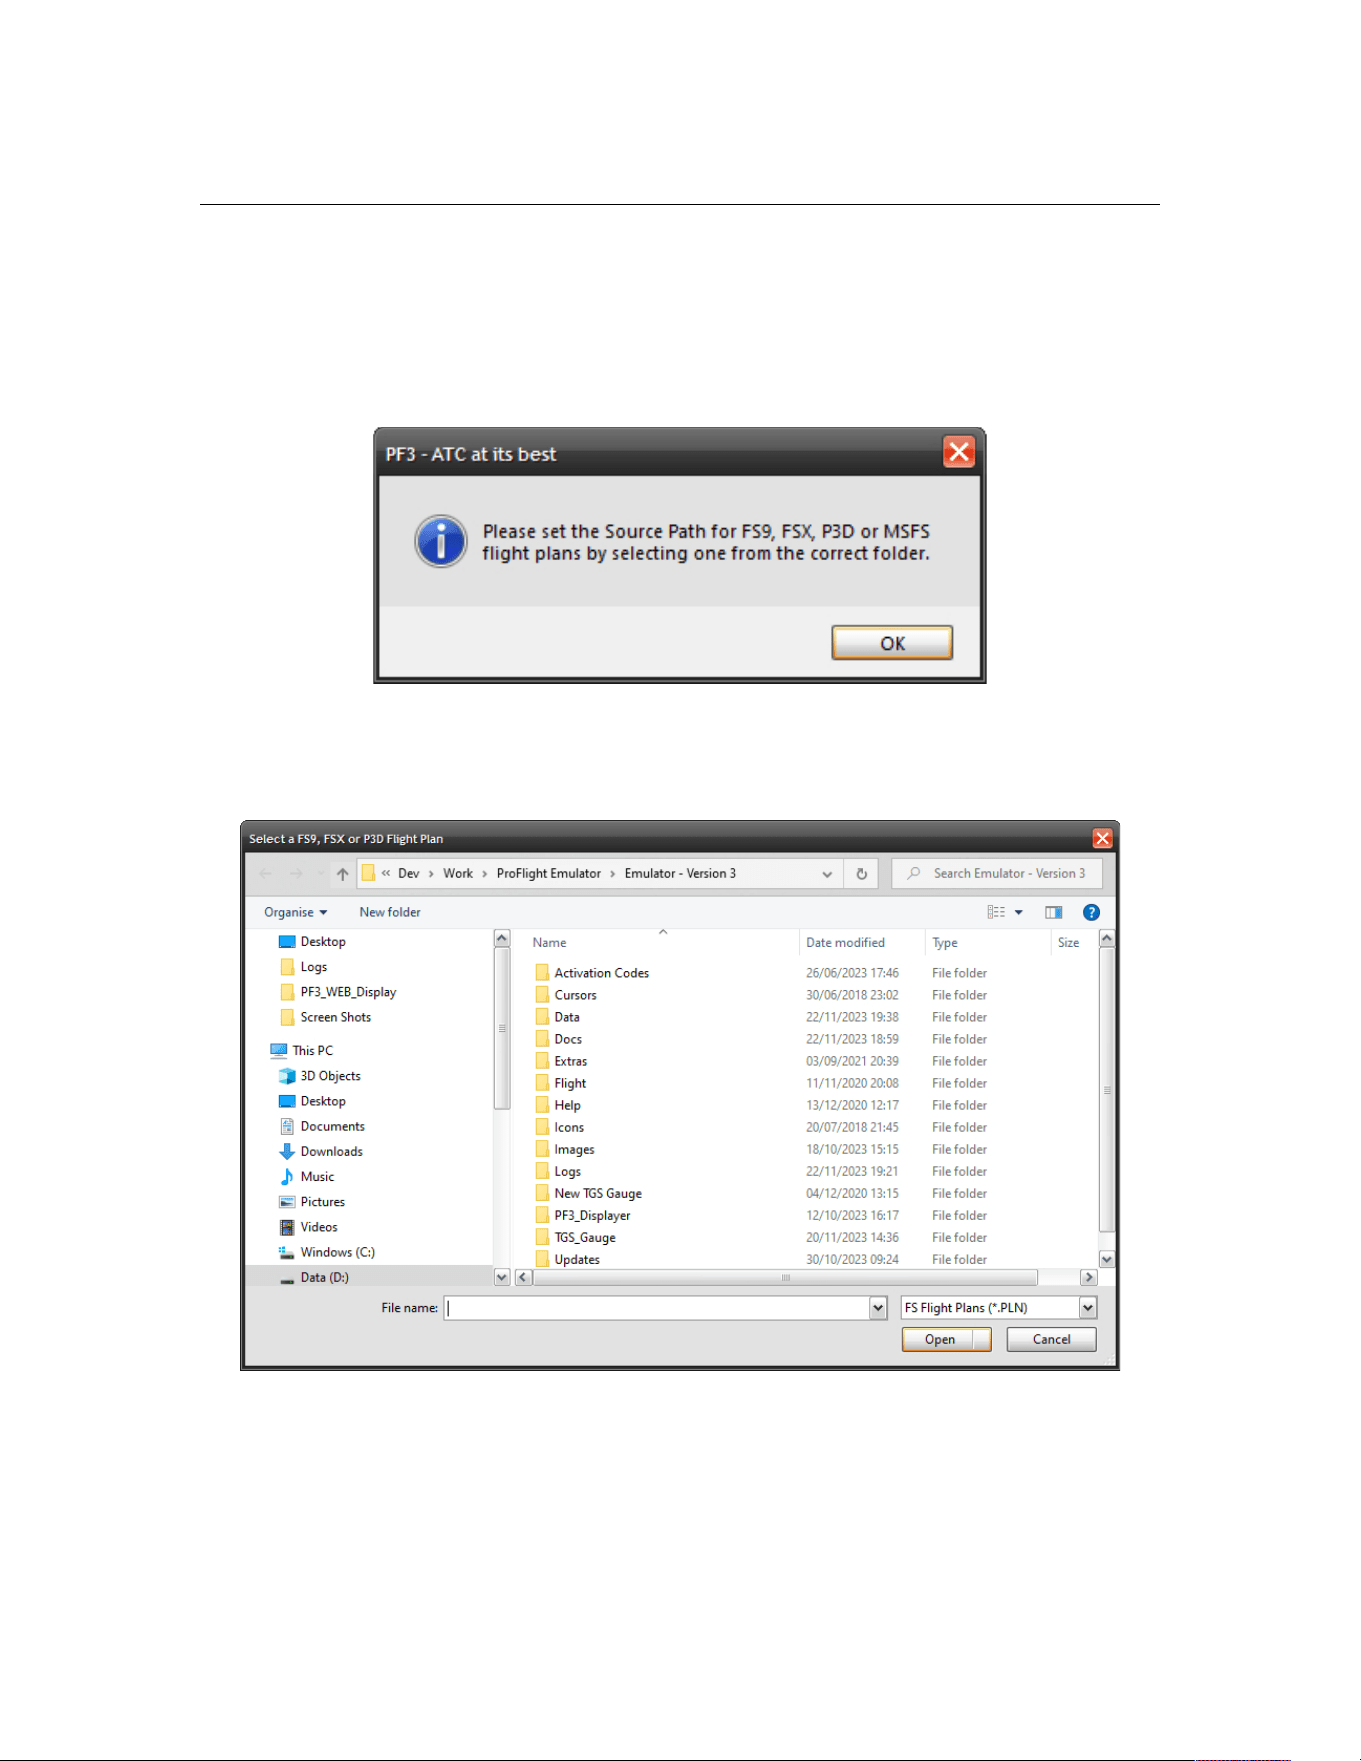
PF3 User Guide
going to use for a particular flight then you would have to change your flight
plan source folder at that time.
So this will be the screen you see first time into the program after hitting
Select a Flight Plan
Click on OK and the Select a Flight Plan dialogue will be displayed:-
From here you just have to select your current flight simulator flight plan path
by navigating to and selecting any flight plan.
For FS9 users your flight plans will normally be found here:
C:\Documents and Settings\YourName\My Documents\Flight Simulator Files
Page 52 of 212
Copyright © 2007-2024 by OnCourse Software

PF3 User Guide
For FSX users:
C:\Documents and Settings\YourName\My Documents\Flight Simulator X
Files
For P3D (V3) users:
C:\Documents and Settings\YourName\My Documents\Prepar3D V3 Files
For MSFS users:
...WpSystem\S-1-5-21-2506635614-967523915-2006091698-
1003\AppData\Local\Packages\Microsoft.FlightSimulator_8wekyb3d8bbwe\Loc
alState\
Once into the correct folder simply select any one of the files listed (it doesn't
matter what file it is at this stage) then select Open and the location will be
saved ready for the next time you want to select a flight plan. This location
can be changed at any time (explained later).
Page 53 of 212
Copyright © 2007-2024 by OnCourse Software
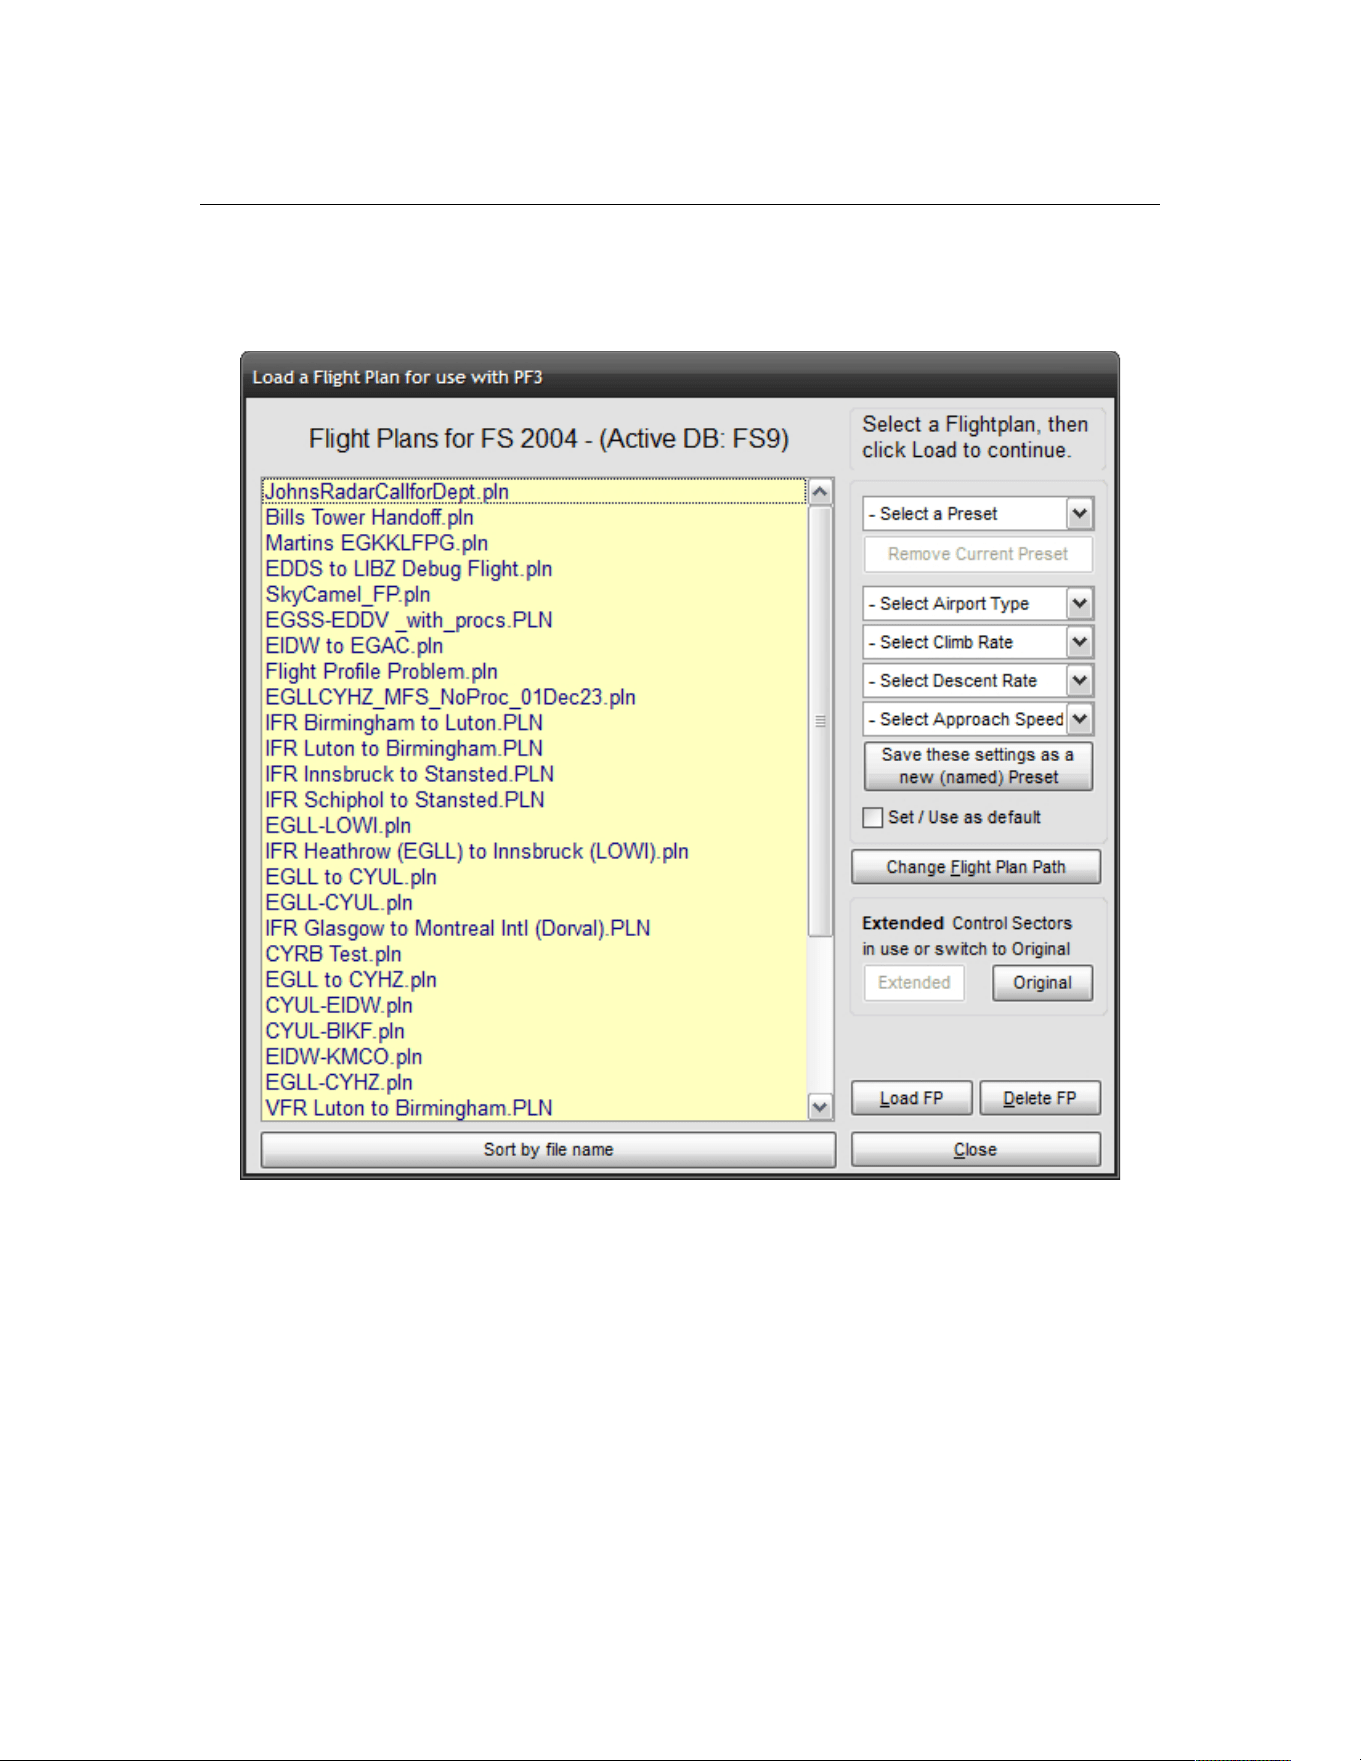
PF3 User Guide
At all other times, when you choose the Select a Flight Plan button, it will
take you directly to the following screen:
New for PF3 ver 3.20.0 is the Delete FP button, which allows you to delete
any selected flight plan.
New for PF3 ver 3.10 is the text just above the list of flight plans. This
indicates which flight simulator the flight plans are for and also the name of
the 'active' database. In the above example it shows the flight plans are for
FS2004 and the 'active' DB is also for FS2004 (or FS9). If you only have one
version of flight simulator on your system this title will not change. The main
point here is to ensure the 'active' database is for the same flight simulator as
the displayed flight plans.
Page 54 of 212
Copyright © 2007-2024 by OnCourse Software

PF3 User Guide
This is the screen from where you will normally start each of your flights,
unless there are some options you might want to change beforehand.
Select a flight plan by double-clicking the name from the listing, or single-
click to highlight the name and then select Load a Flight Plan.
Loading any flight plan takes literally seconds and depending on the length of
the flight you might see a 'Please wait... processing your flight plan...'
message and then you will be automatically returned to the main menu
screen... unless you have chosen to be prompted for an alternate airport, but
more about that later... for now, let's keep it simple.
However, just before we go back to the main menu screen, let's take a quick
look at some of the other options available on the Select a Flight Plan
screen.
PF3 allows you to setup certain presets for your flight and/or save these as
user profiles.
There are 5 drop down list boxes to the right of the flight plan files display
and they are each described below:
Select a Preset – This is where each of your saved preset profiles will be
listed by name and we would recommend you save each profile by giving it
the name of the aircraft to which it pertains. eg. 737-400, 737-800, 747-400,
etc, etc.
Select Airport Type – There are three types of airports available in PF3,
Small, Medium and Large, and they are designated as such.
Small airports have runways from 1500' to 5000'
Medium airports from 5001' to 8000'
Larger airports with runways over 8000'
So this is where you select the type of airport you want to use for the aircraft
type you are about to use for this flight. This is optional and if you don't select
one then PF3 will default to using medium.
Select Climb Rate – Select the climb rate for the aircraft type you are using
for this flight. Options range from 500 fpm to 4000 fpm in 50 fpm increments.
PF3 will use this information when calculating flight profiles, TOC, TOD, etc.
Select Descent Rate – Select the rate of descent for your chosen aircraft.
Again the options range from 500 fpm to 4000 fpm in 50 fpm increments.
PF3 will use this information when calculating flight profiles, TOC, TOD, etc.
Select Approach Speed – This is the minimum approach speed you want to
be given from ATC during your final approach. The options are from 50 IAS to
200 IAS. This is optional and if not entered PF3 will use the value entered in
Page 55 of 212
Copyright © 2007-2024 by OnCourse Software
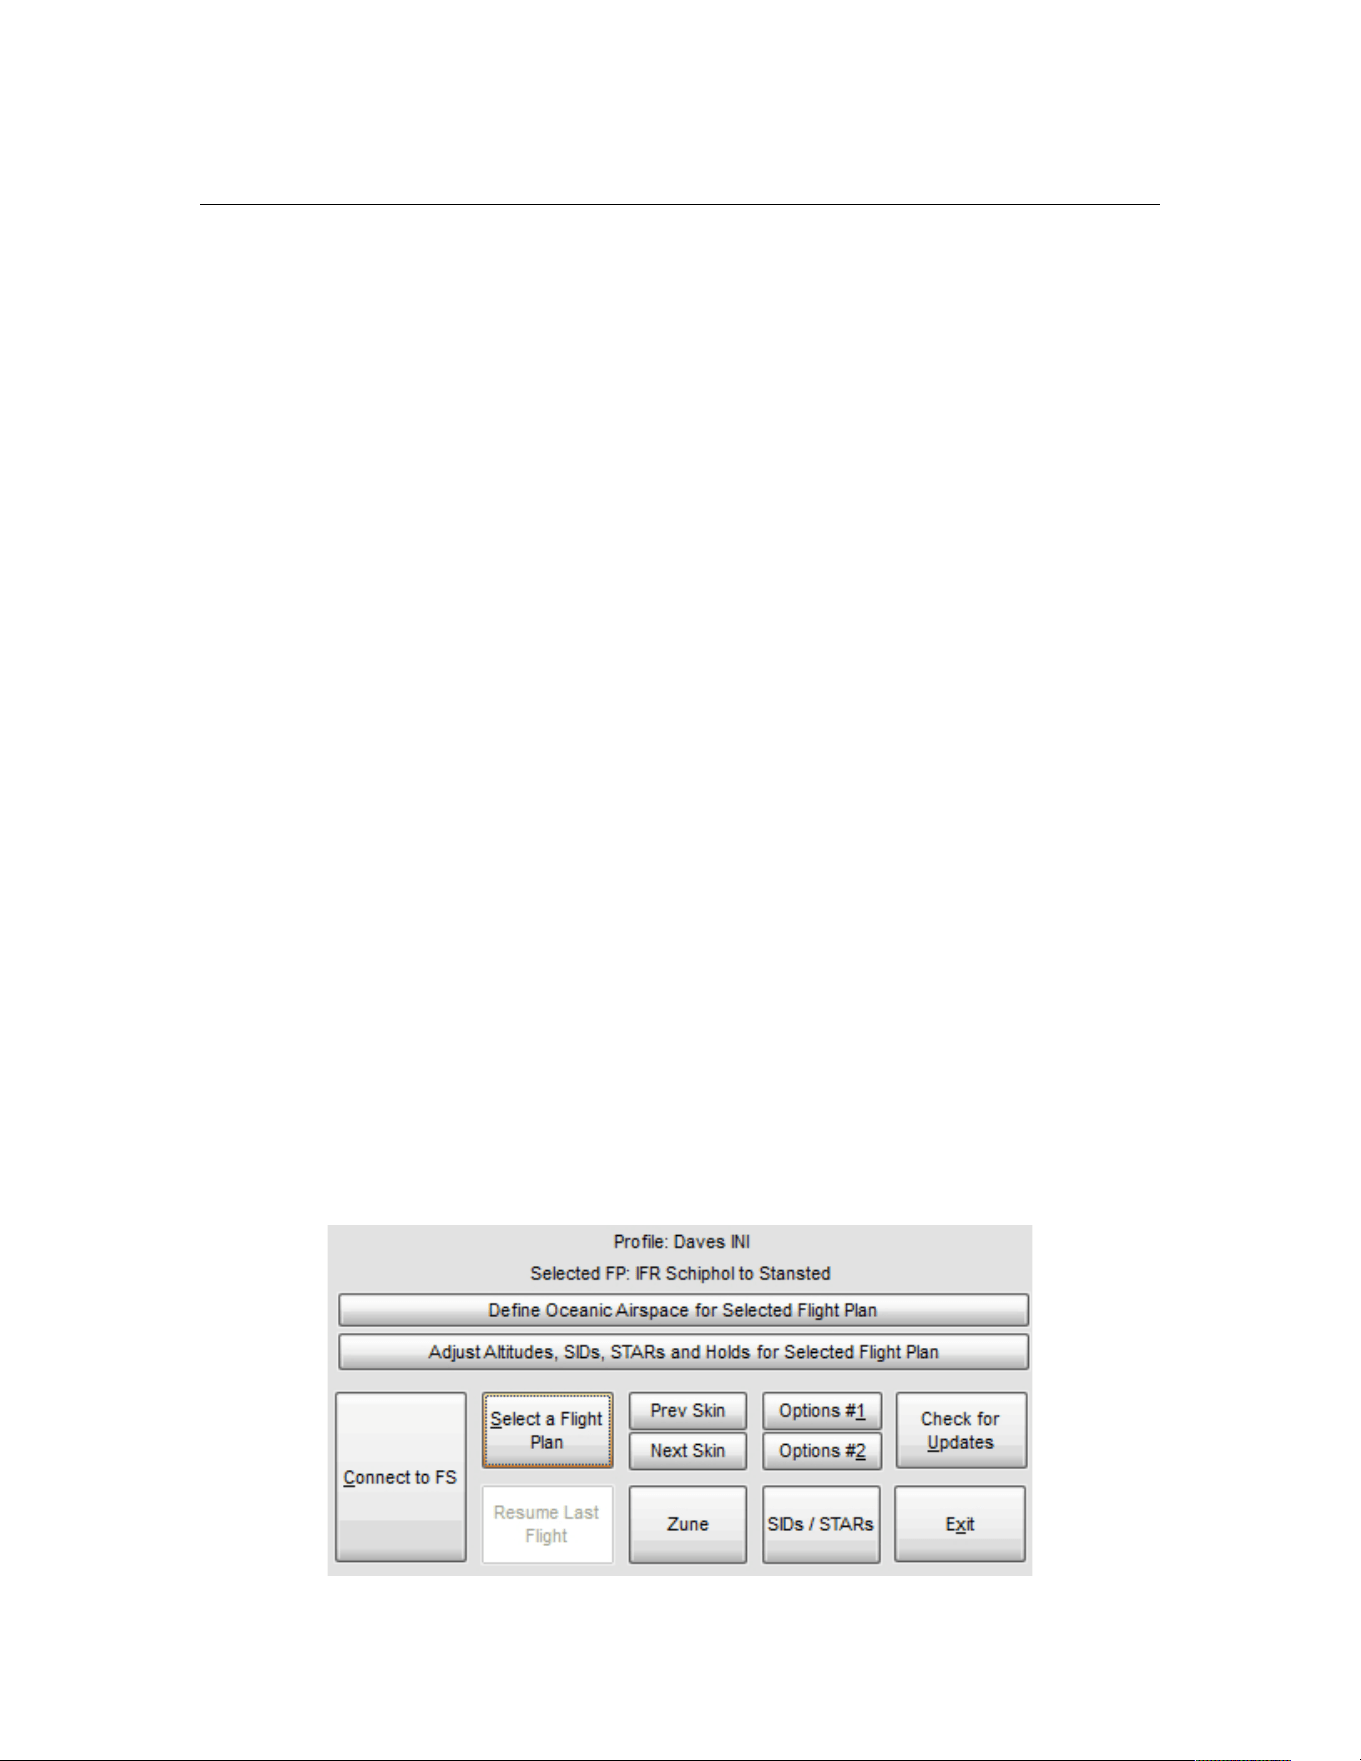
PF3 User Guide
the Advanced Options and INI File Tweaks - please see section 7.1.26 for
further details.
Once you have chosen each of your presets you need select Save these
Settings as a Preset and give it a name you will easily recognise.
You will also see a Set/Use as default which, as it says, will save the
currently selected presets profile as the default and which PF3 will use for
each of your flights. Obviously you don't have to use this option in which case
you would be expected to select a preset profile each time you load a flight.
Change Flight Plan Path – This button allows you to change the path
pointing to where your FS Flight Plans reside. New to PF3 version 3.10, when
you select this button you'll see a new display listing the 4 supported flight
simulators by name. Obviously this would only be useful if you have more
than one FS installed and if you do PF3 will remember the paths for each one
so you don't have to browse for the correct folder each time you switch paths.
Control Sectors in use - Just above the 'Load a Flight Plan' button you will
see some text referring to which Control Sector data is currently active and in
use by PF3. This will either indicate Original or Extended and you may
switch from one to the other here. Full details about the new Extended control
sector file can be found in section 23. Extended control sector file
New to 3.15.7 – Sort your flight plans – At the bottom of the list of flight
plans there's now a new option which allows you to sort your list either by
name (the default) or by creation date. Simply click on the button to toggle
between the two sort options
7.1.18 … the remaining Main Menu Options
Now we go back to the main menu and the last few buttons, most of which
are quite self-explanatory, but we'll go through them anyway.
Page 56 of 212
Copyright © 2007-2024 by OnCourse Software

PF3 User Guide
Options #2 – Please see section 7.1.19 for full details
Check for Updates - does just that and this feature can either be configured
to run automatically each day to check for updates or you can run it manually
at any time.
Prev Skin – PF3 comes with over 40 different skins to allow you to choose
the look that you prefer. This button selects and applies the previous available
skin
Next Skin – PF3 comes with over 40 different skins to allow you to choose
the look that you prefer. This button selects and applies the next available
skin
Please Note: The button immediately below the Next Skin button has two
functions. The first is to display the name of the currently displayed skin.
However, if you select this button it will apply and display the original default
PFE V2 skin. So if you prefer PF3 to look just like previous versions of PFE,
just hit this button.
Select a Flight Plan – Please see section 7.1.17 for full details
SIDs / STARs – Please see section 7.1.15 for full details
Connect to FS - Obviously once you've configured PF3 you select this option
to Connect to your flight simulator and begin your flight.
The two other buttons Define Oceanic Airspace for Selected Flight Plan
and Adjust Altitudes, SIDs, STARs and Holds for Selected Flight Plan
are explained in full detail a little later in this document.
Page 57 of 212
Copyright © 2007-2024 by OnCourse Software
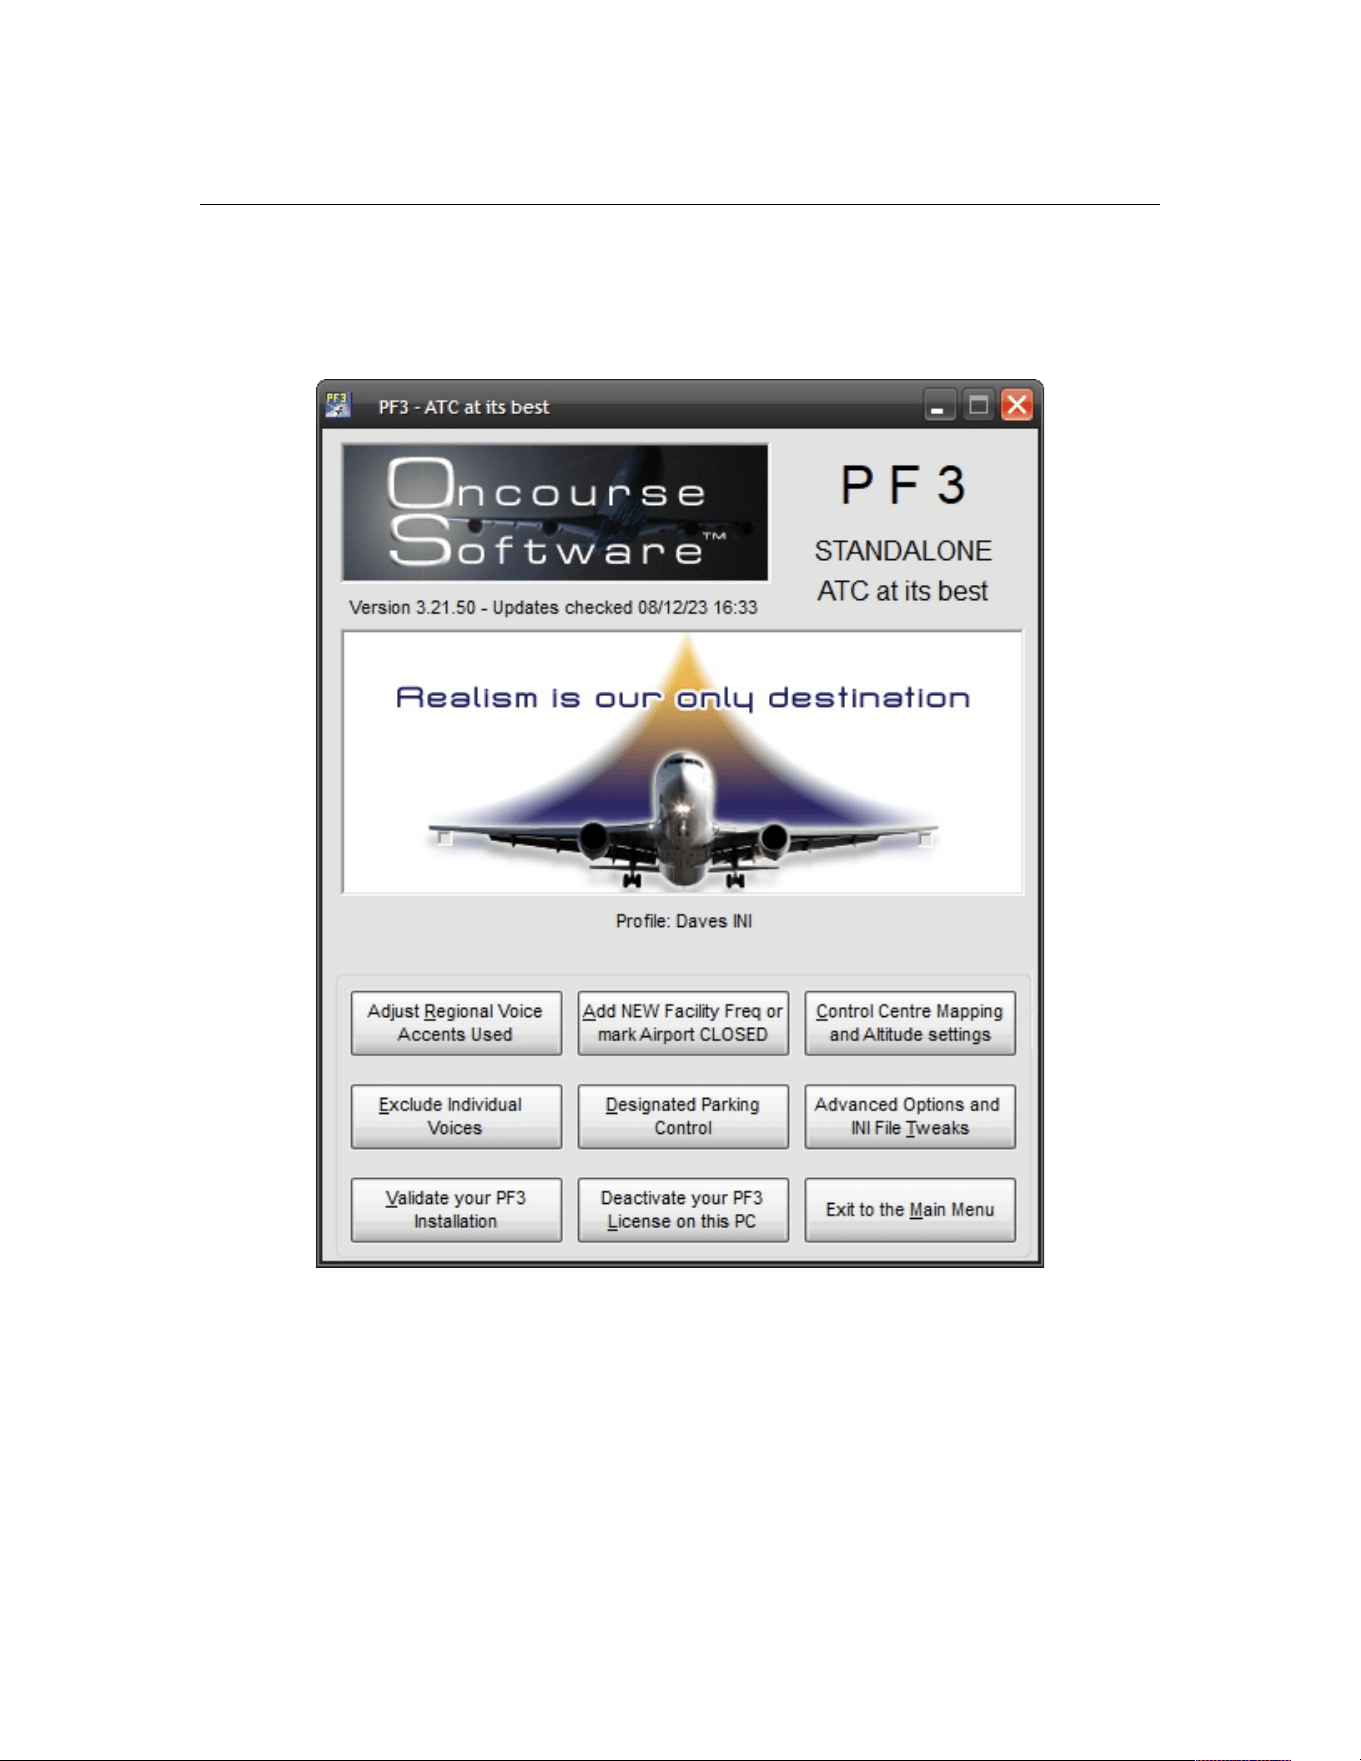
PF3 User Guide
7.1.19 Options #2 Main Display
Options #2 – displays another selection of options as shown here:-
Page 58 of 212
Copyright © 2007-2024 by OnCourse Software
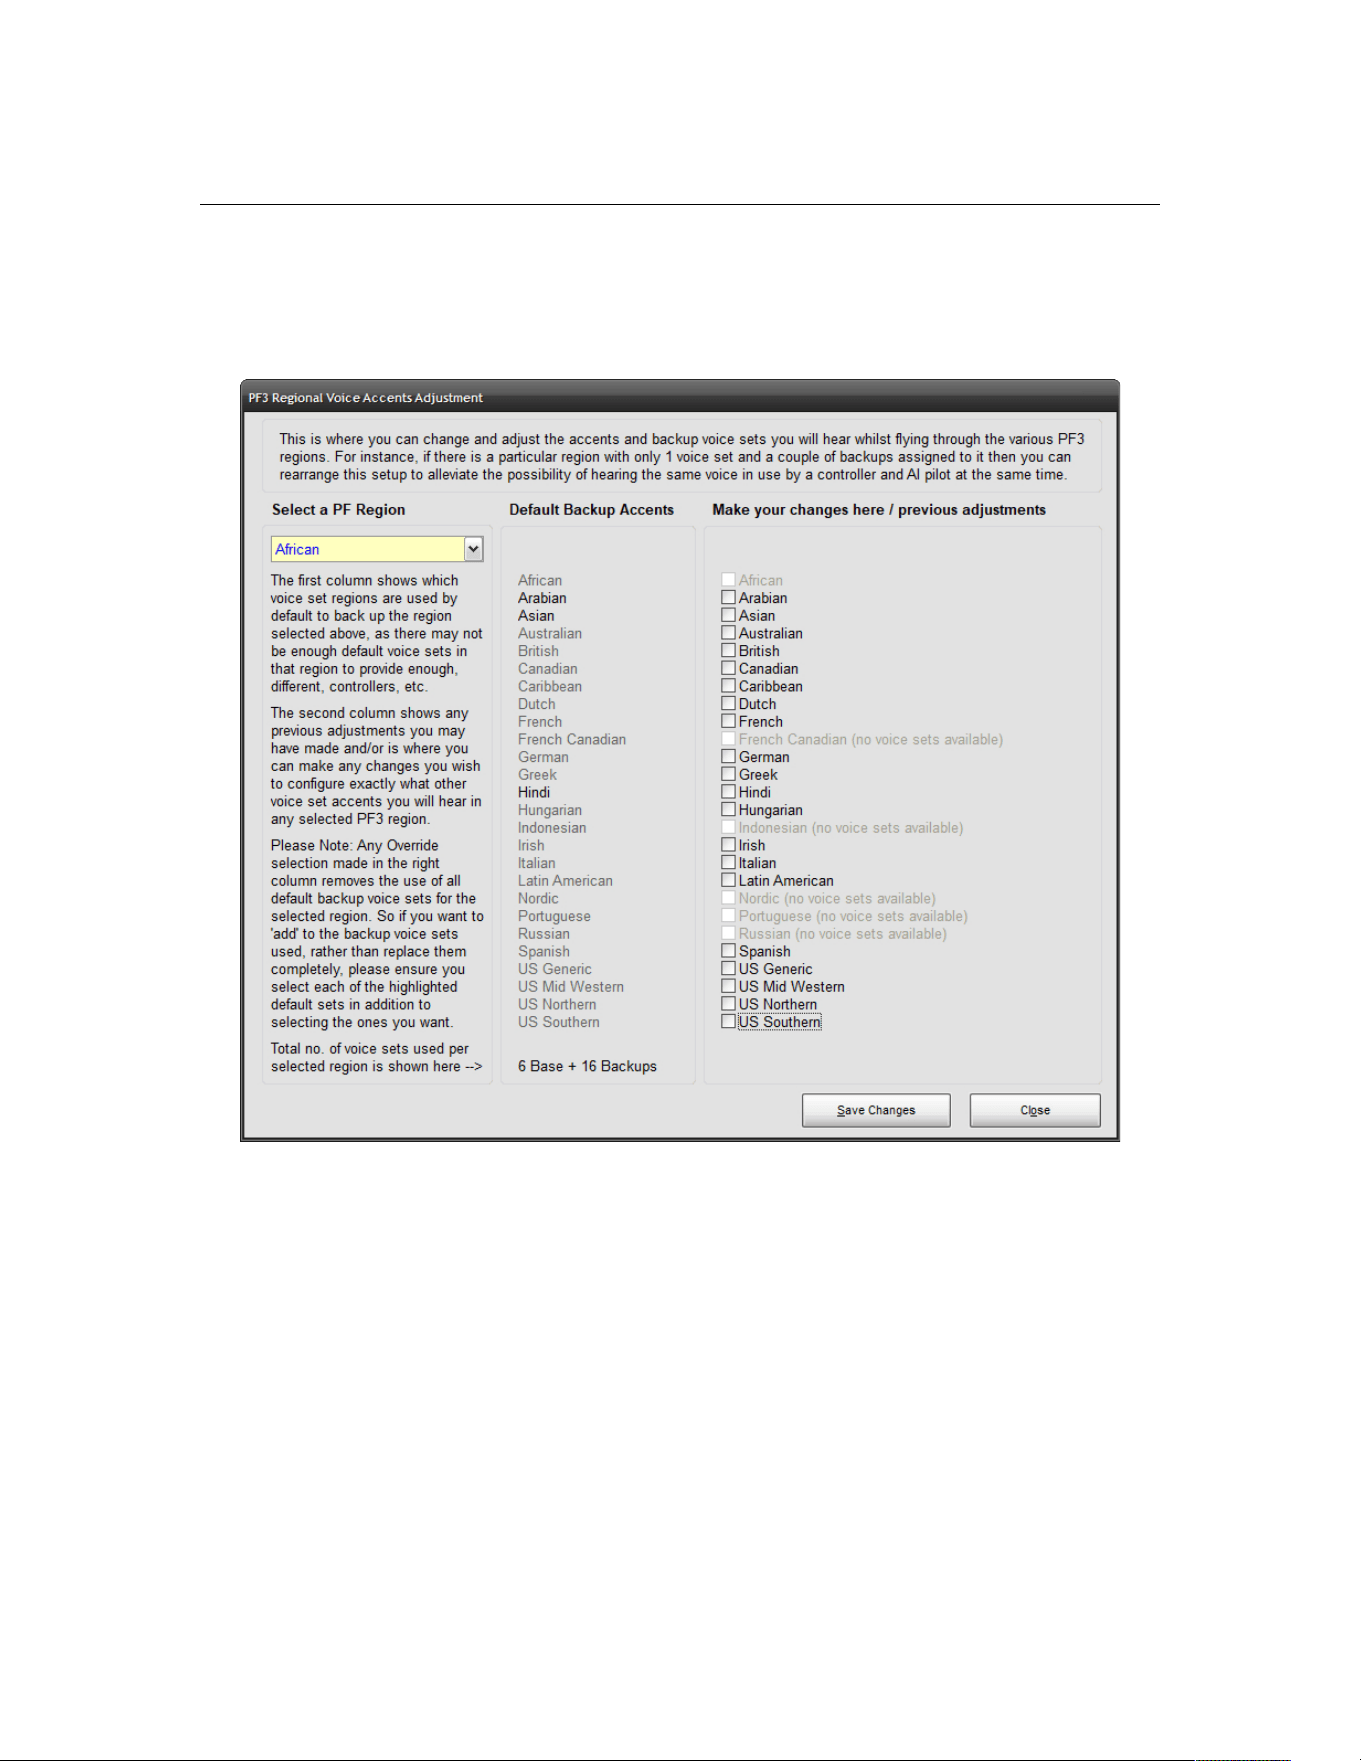
PF3 User Guide
7.1.20 Adjusting the Regional Voice Accent
Select Adjust Regional Voice Accents Used to display the following:-
I believe there is enough explanatory text on this screen for you to see how it
works. In a nutshell if PF3 cannot find a voice set for any particular region it
uses its default backup voice set(s) instead. Equally if there are only one or
two voice sets available for any region again we may have to use one of the
backup sets. This feature simply allows YOU to decide which accents you
would like to hear and where. You cannot change the main default accent…
e.g. The default for British will always be British but you can change which
voice sets are used to back them up. For instance, the British backup voice
sets are Australian and Irish but you could change this to use German voice
sets as a backup for British, then at some point in your flight, once all the
British voice sets have been used, you will hear a German accent. Not so
realistic I know, but I just wanted to give you an example.
Again, no need for you to ever touch these settings if you are happy with the
way PF3 currently assigns voice sets.
Page 59 of 212
Copyright © 2007-2024 by OnCourse Software
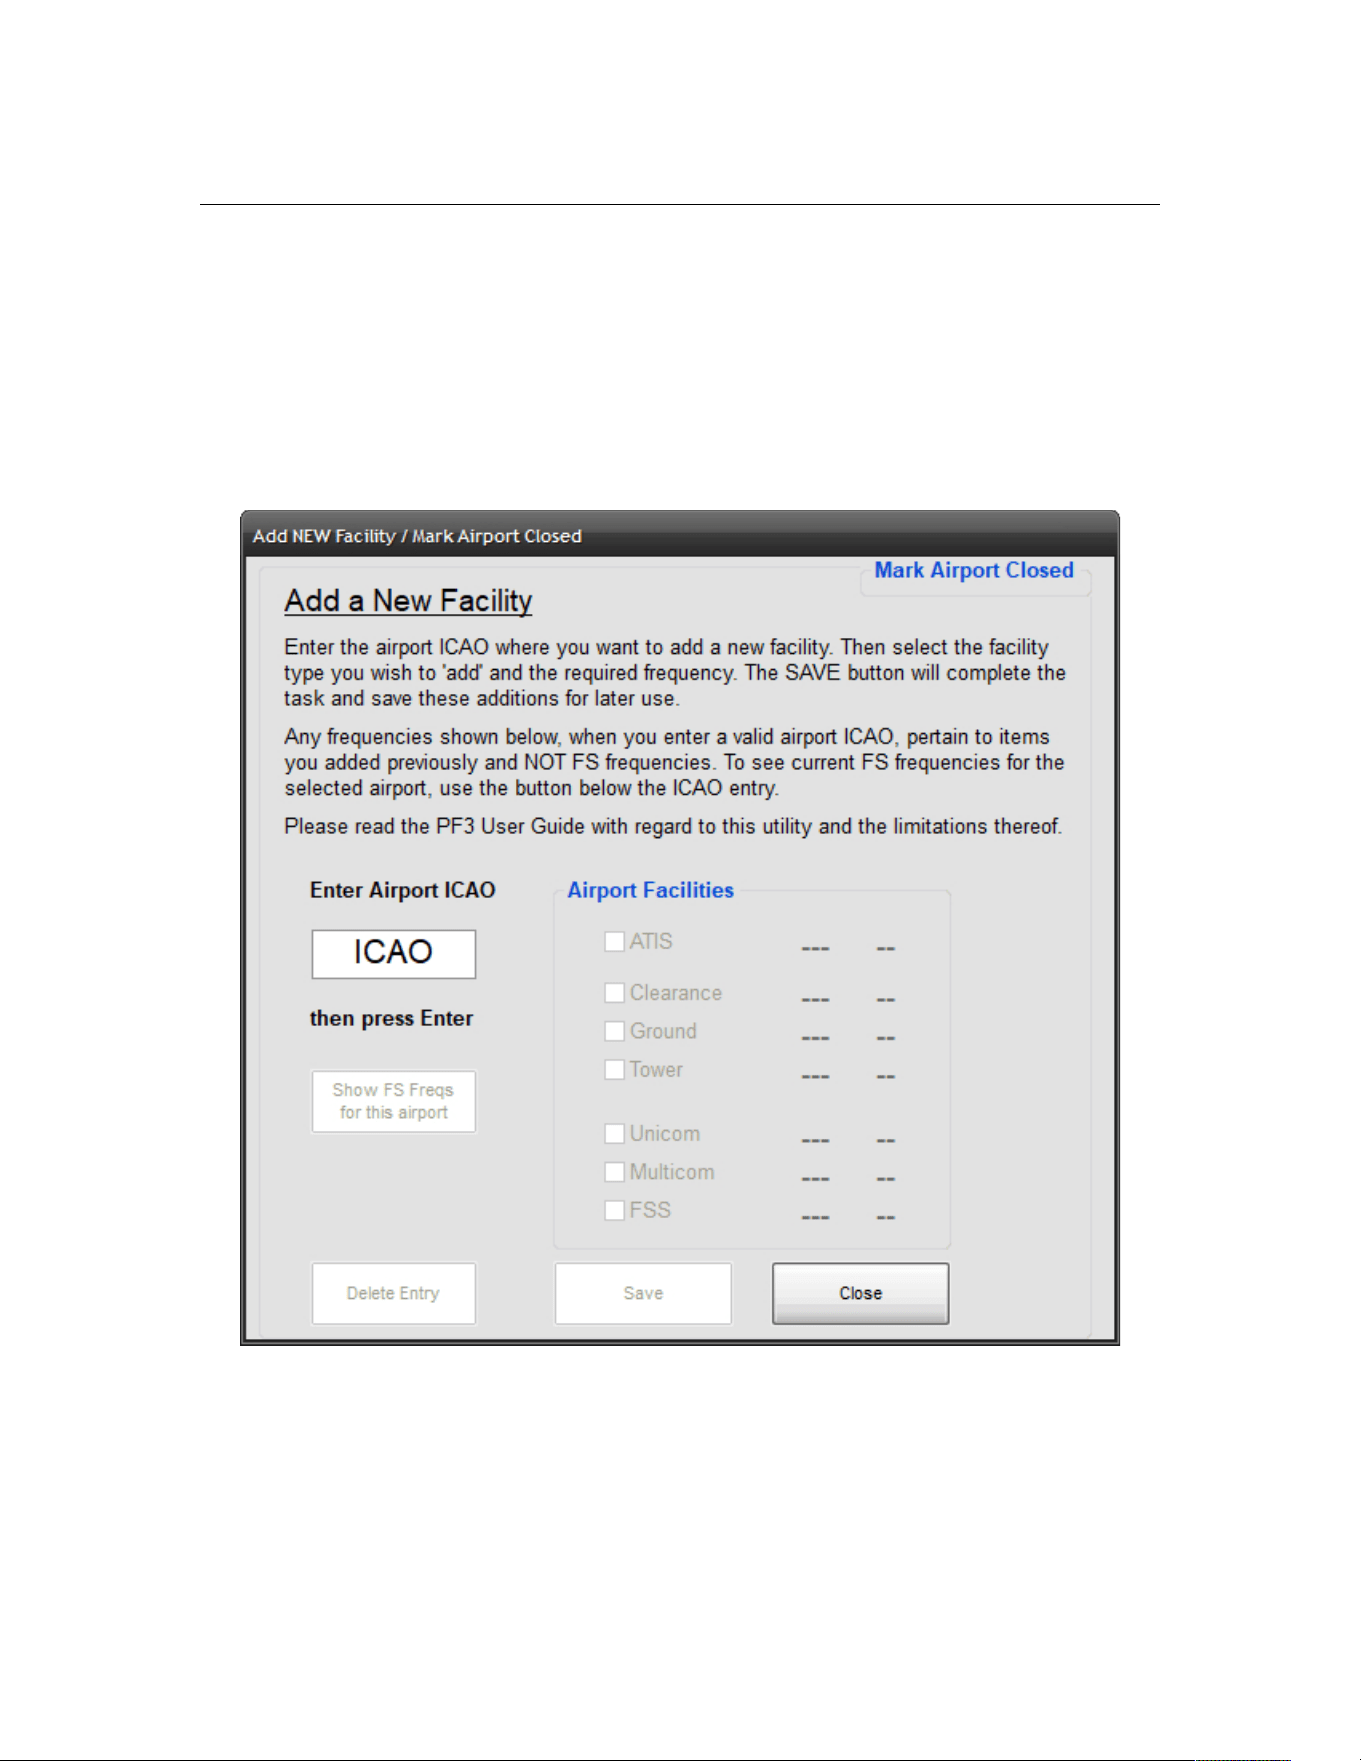
PF3 User Guide
7.1.21 Add a New Facility Frequency or mark Airport Closed
As mentioned previously, PF3 uses the COM frequencies from your chosen
flight simulator and there may be occasions where this is not up to date,
especially when using FS2004 which is quite old now. For instance, you may
find an airport you want to depart from doesn't have ATIS available in FS, so
using this PF3 feature you are able to add ATIS to that airport.
When you first select this option you will be presented with the following:-
For this example we're going to use EGSS (London Stansted) which, in the
base version of FS2004, does not have a Clearance facility available.
Page 60 of 212
Copyright © 2007-2024 by OnCourse Software
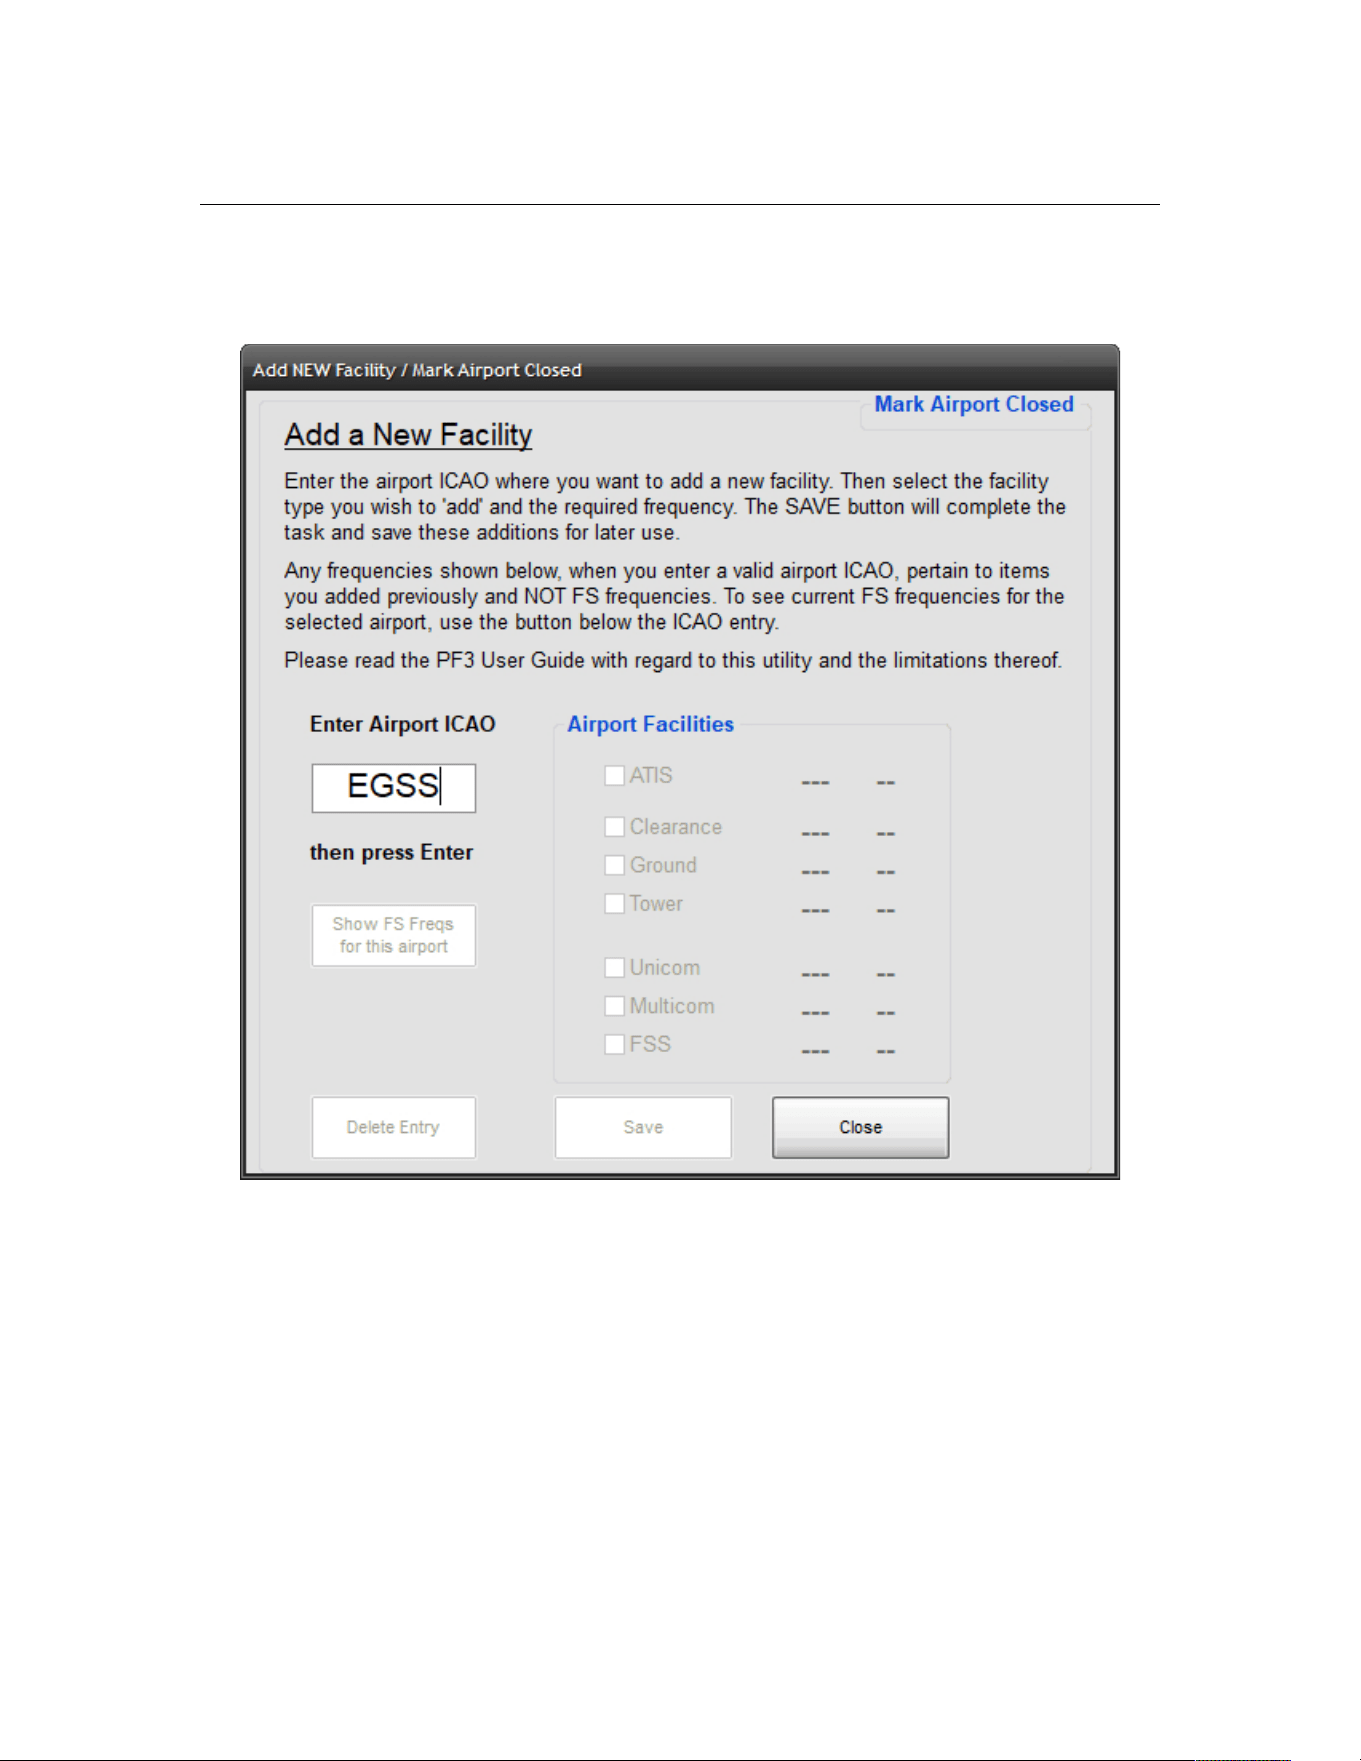
PF3 User Guide
So, enter EGSS in the ICAO box and most of the options and buttons will now
become 'active' (not greyed out), like this:-
Page 61 of 212
Copyright © 2007-2024 by OnCourse Software
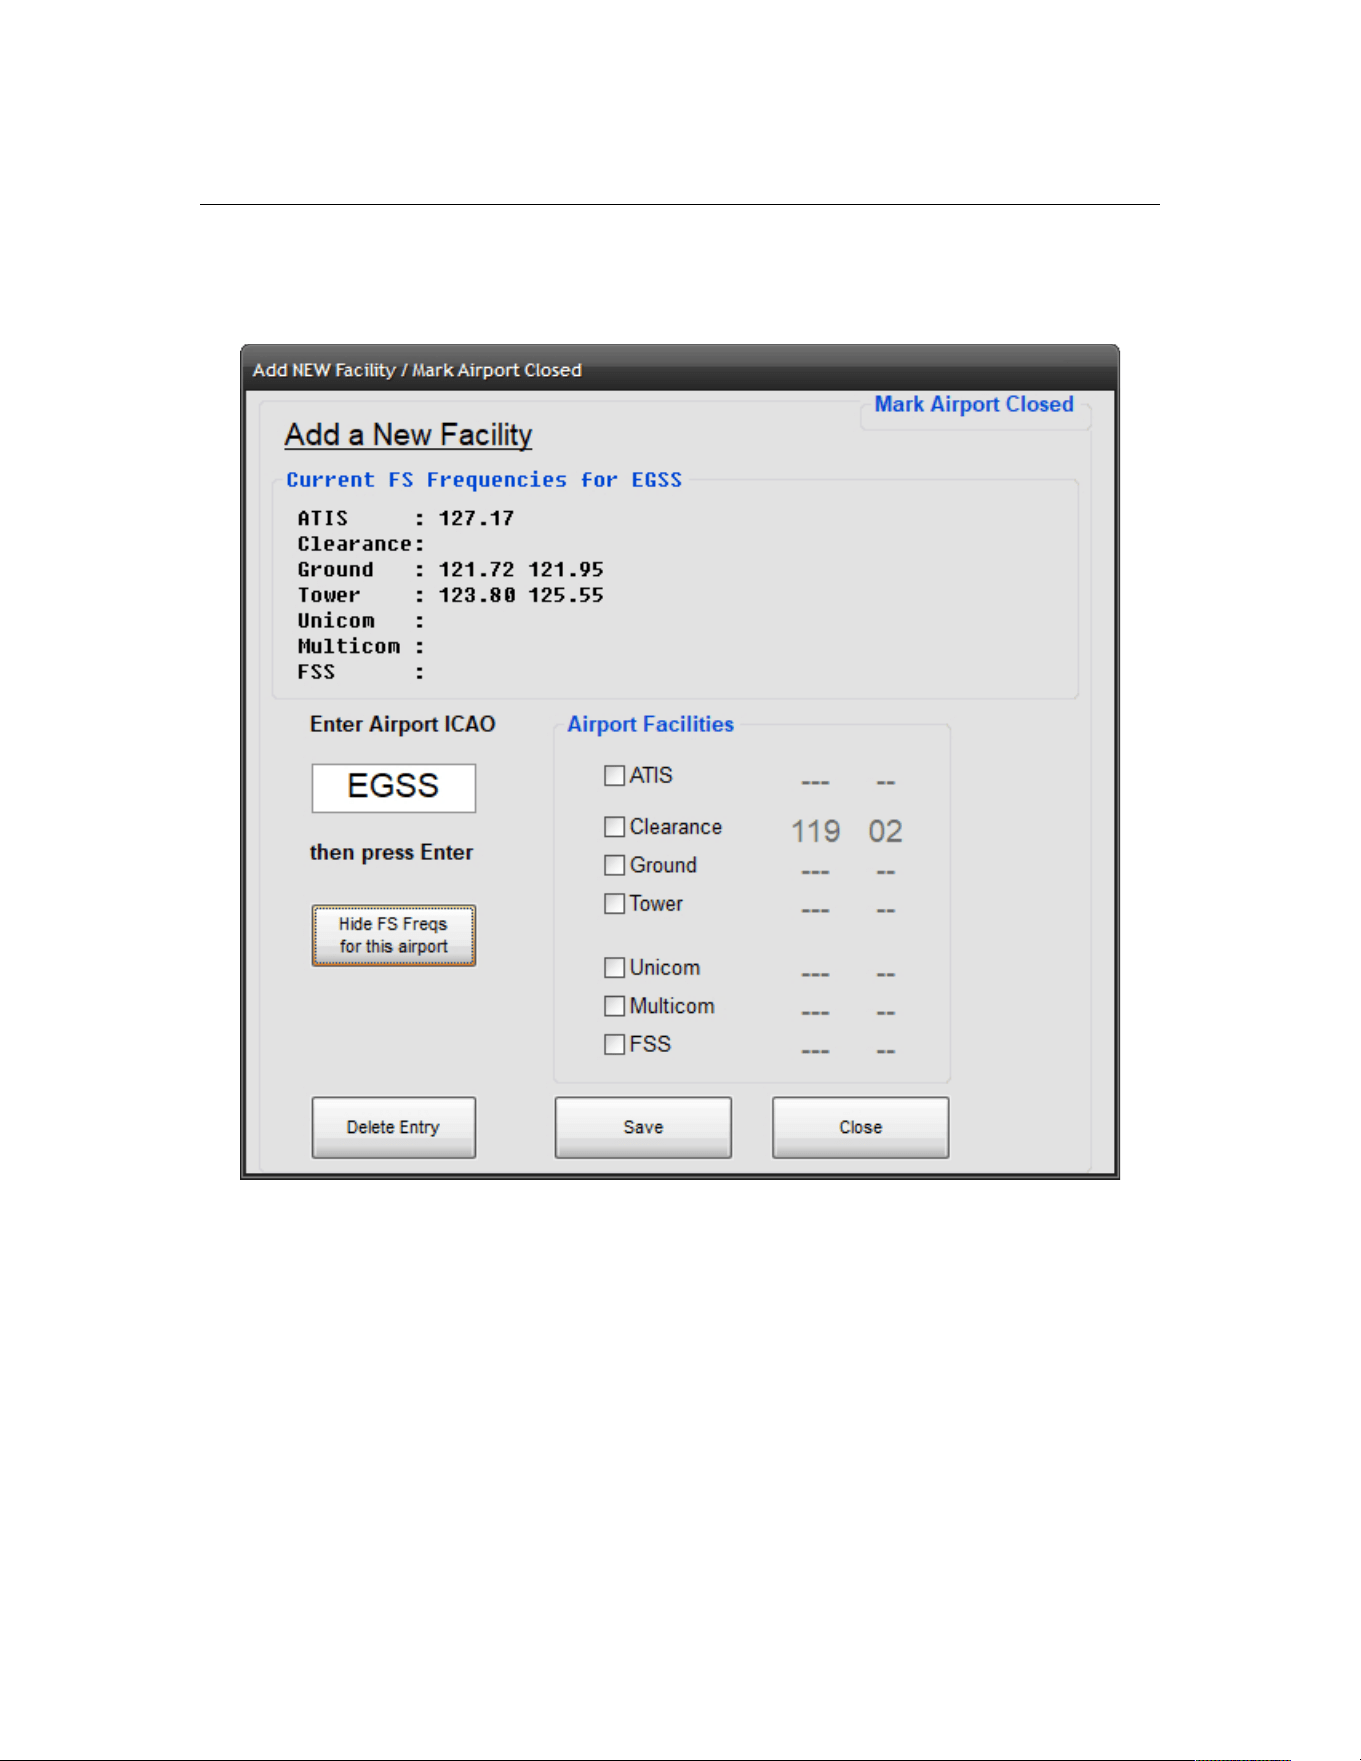
PF3 User Guide
At this point you can select Show FS Freqs for This Airport button to
display what FS frequencies are actually defined in FS2004 for EGSS:-
As you can see in the above example EGSS has two Ground, two Tower and
an ATIS frequency.
So now just select the Clearance item under Airport Facilities then dial in
the required frequency. This is done in the same way as you would change a
frequency in FS. Then select Save and you're done. Next time you do a flight
from EGSS you will have a Clearance facility available and it will be listed on
the ACARS COMs display shortly after you connect to FS.
Please Note: There are limitations when using this feature to add a facility
that doesn't currently exist in FS because the AI traffic will not know anything
about the new frequency. Therefore if you add a Ground facility you would
not hear other traffic on that frequency when tuned to Ground. Adding
frequencies to FS is not within the scope of this document.
Page 62 of 212
Copyright © 2007-2024 by OnCourse Software

PF3 User Guide
Since PF3 3.4.0 there is a new feature which allows you to 'virtually' remove
an FS facility. If, for instance, you select EGSS, which has two Tower
frequencies in the default FS9, and enter a frequency of 137 against 'Tower',
when you start your flight the COMS display will show that the Tower at EGSS
is no longer available. This allows you to basically remove any facility for any
airport.
Because PF3 does not allow duplicate frequencies you need to make each
137 frequency unique if you wish to remove more than one facility per
airport. eg. 137.02, 137.05, etc.
You cannot remove the ATIS, Departure or FSS facilities and we do not make
any alterations to FS at all, this is merely a mask whilst PF3 is running.
7.1.22 Mark Airport Close
This option was added in version 3.22.0 and provides a way for you to add an
airport to the 'Closed' or 'Not to be used during an emergency scenario'. This
has been added as we discovered some airports that are closed in the real
world and depicted as such in MSFS were not actually flagged as being so, at
least not in the output files produced by MakeRwys. So this new feature
simply allows you to mark any airport as 'closed' and then it will never be
used during an emergency. It's important to mention at this point that
marking an airport as 'closed' does not prevent you or AI traffic from using it.
It simply means PF3 will not direct you to that airport should it be nearby if
you declared an emergency. Also it doesn't alter any files in your FS.
Page 63 of 212
Copyright © 2007-2024 by OnCourse Software
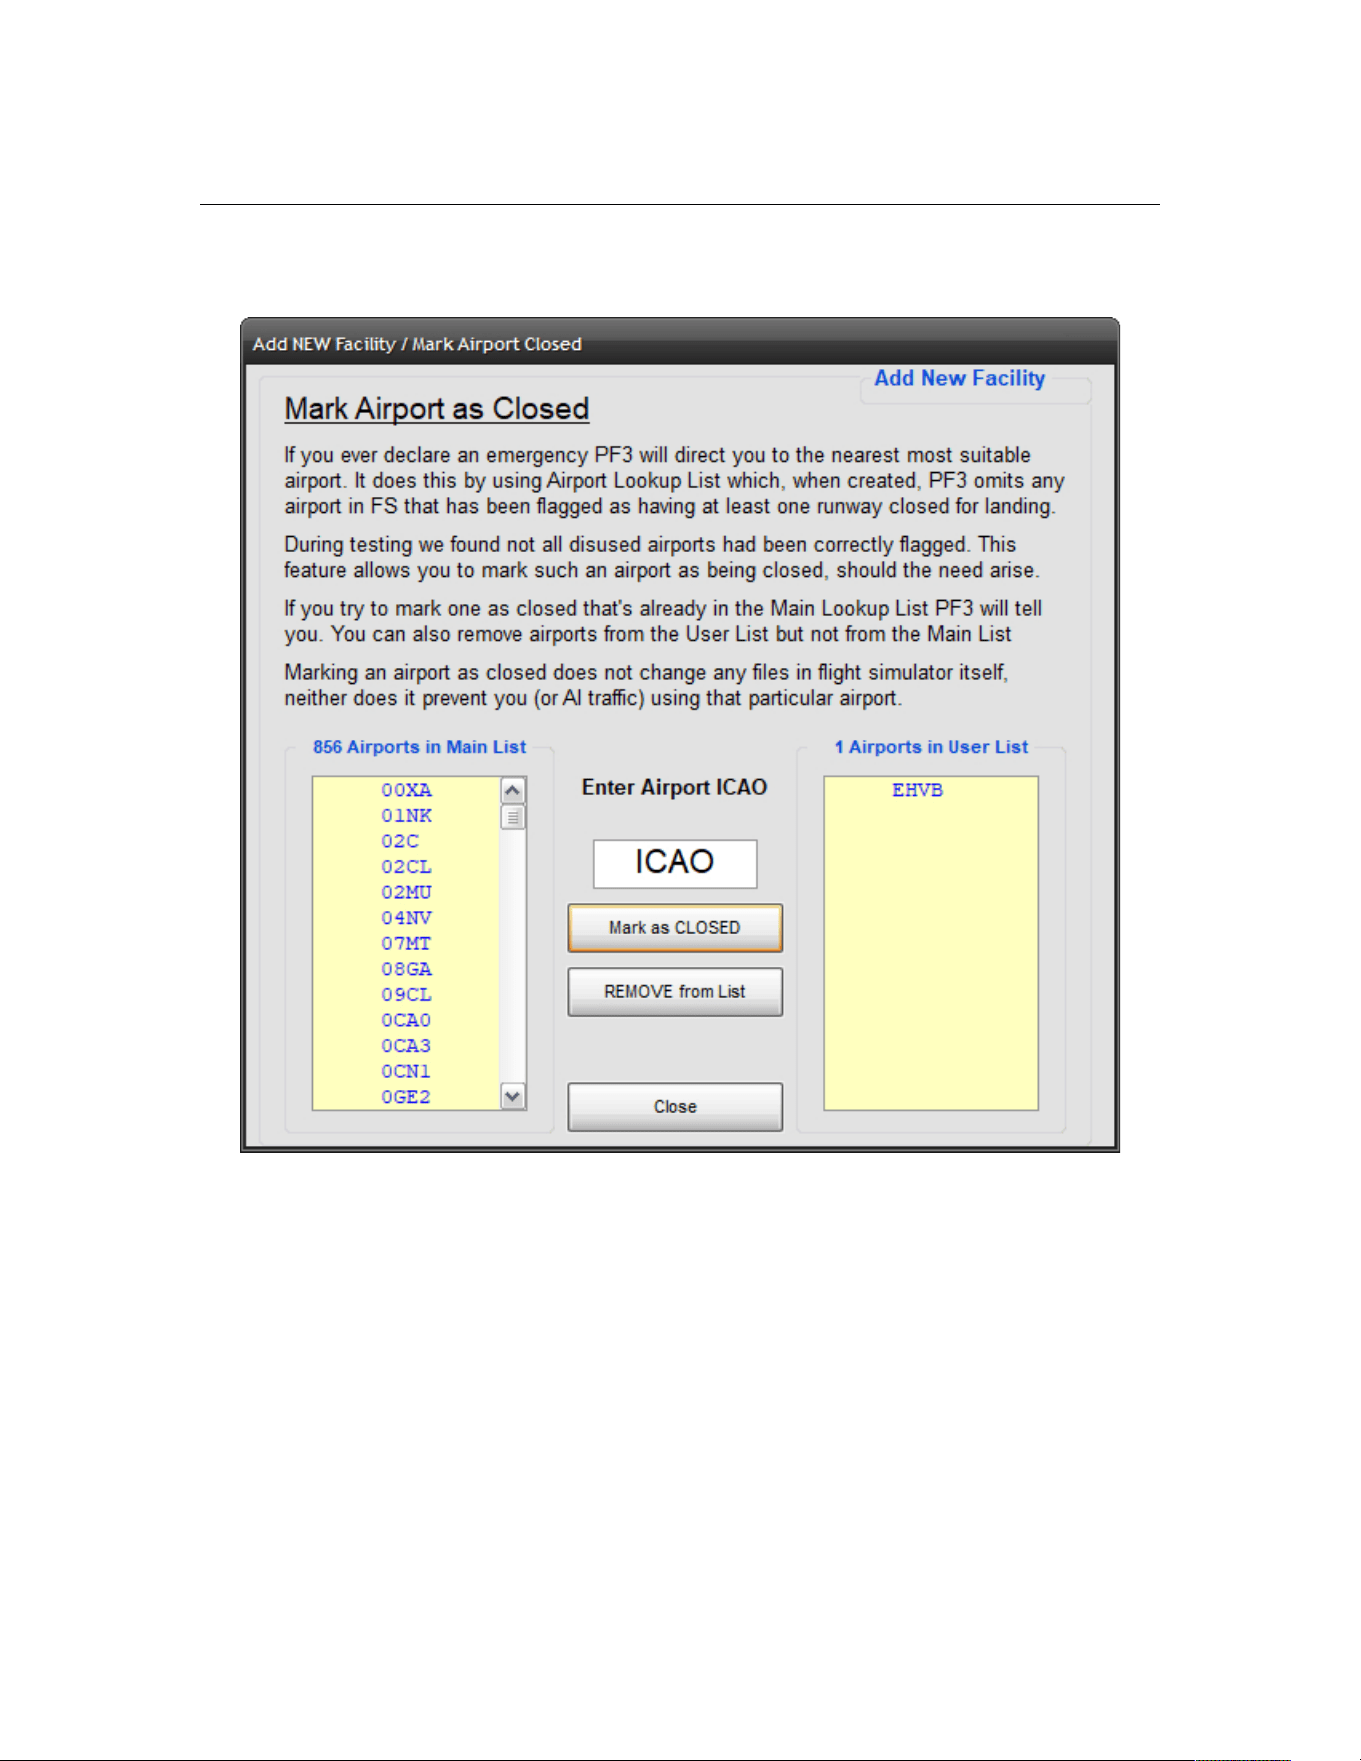
PF3 User Guide
The following screen shot was taken from an MSFS PC build
The list on the left shows all those airports currently flagged in MSFS as being
closed or with at least one runway closed. None of these will be used to
redirect you during an emergency.
The list to the right shows any airports that have been added using this
feature. In this example it shows EHVB, which is closed in the real world
(since 2006 in fact) and is not usable in MSFS, but it isn't flagged as being so.
This was discovered when one of our team declared an emergency and was
unluckily directed to EHVB! Hence this new feature.
You can't ass one that's already been tagged as closed not can you add or
remove any from the main list... this is maintained only by the PF3 rebuild
process. You can however add or remove any from the user list. Simply add
the ICAO and then select either Add or Remove. That's it!
Page 64 of 212
Copyright © 2007-2024 by OnCourse Software
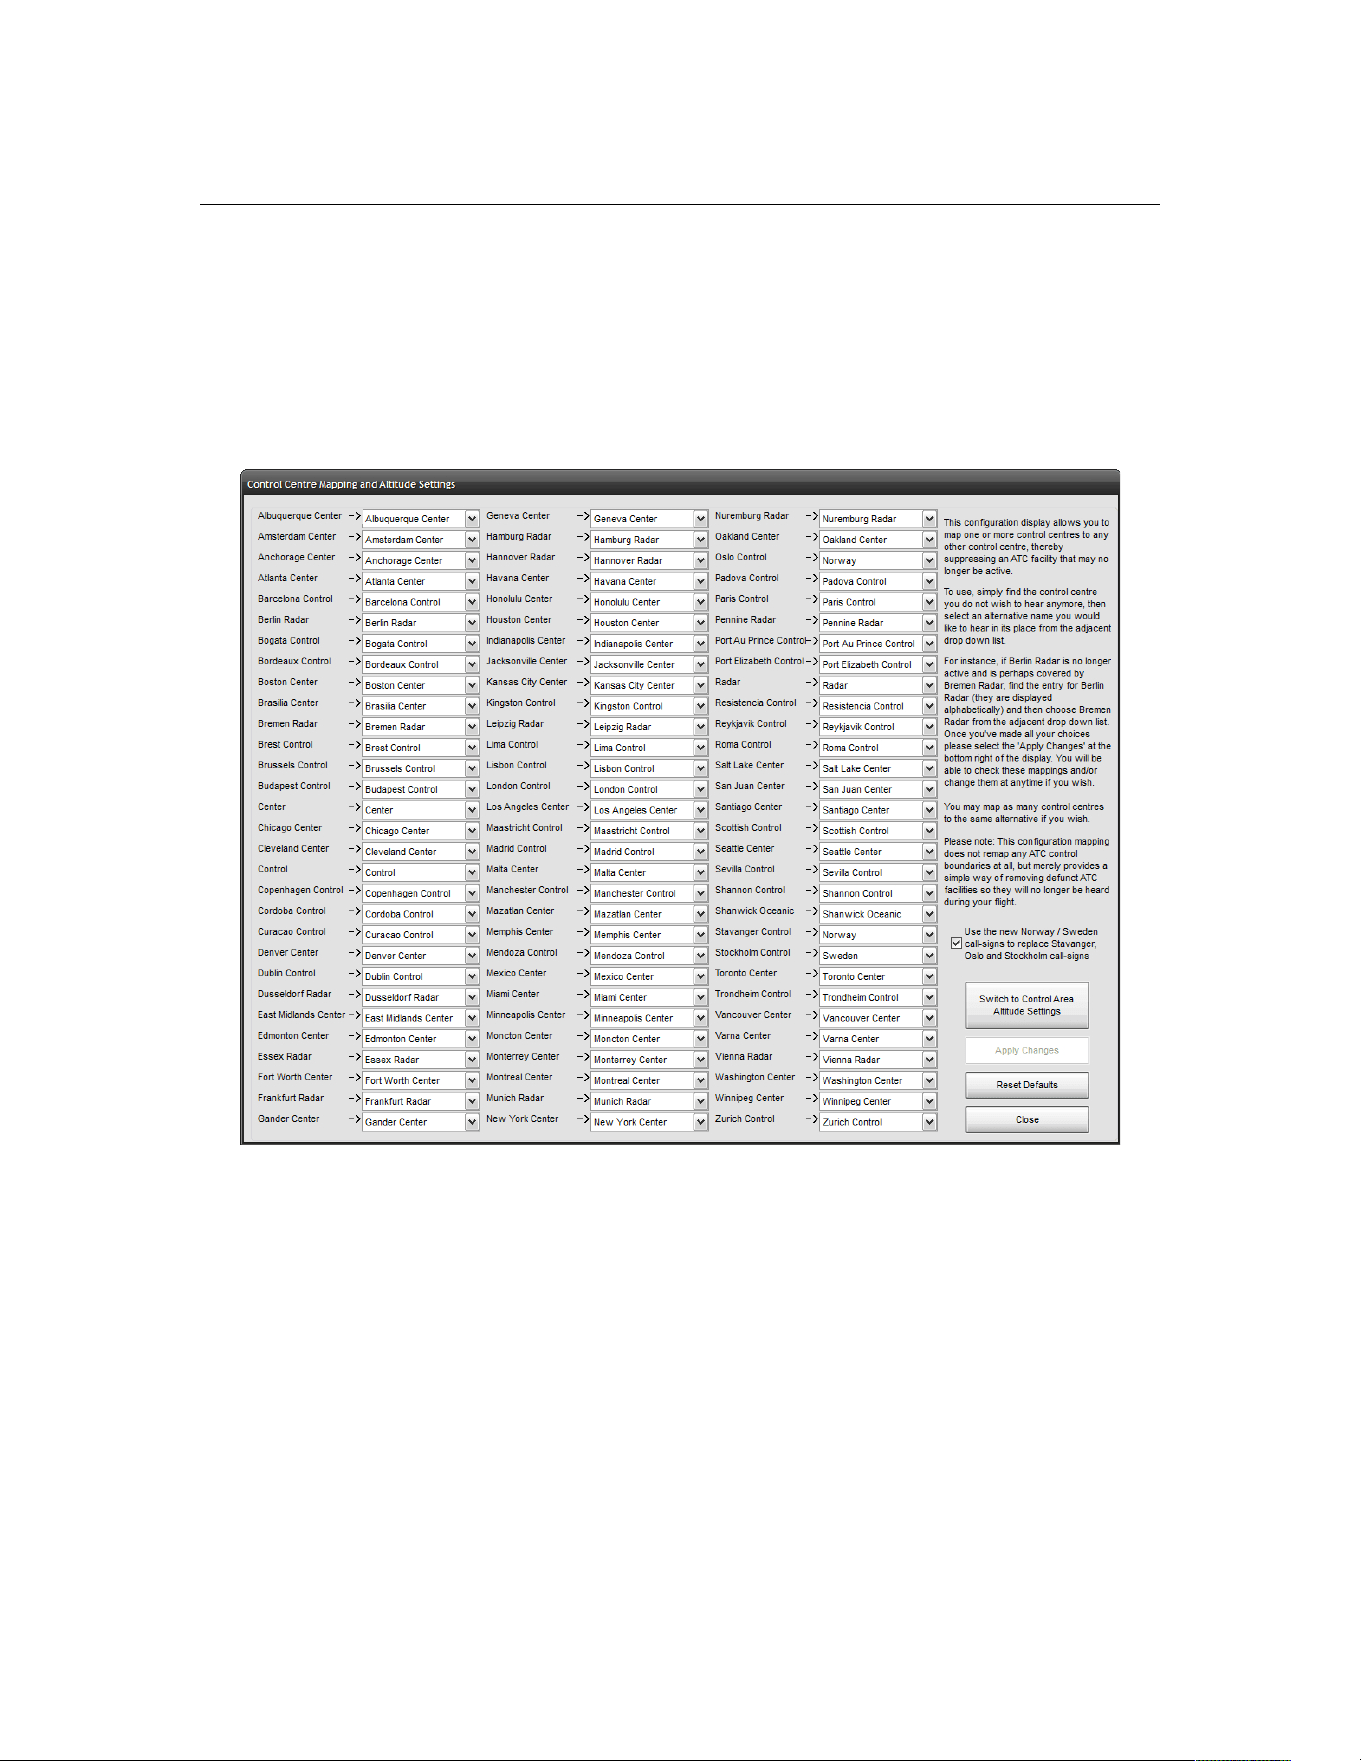
PF3 User Guide
7.1.23 Control Center Mapping and Altitude Settings
This feature provides a means of mapping control centre names. This is
purely for those users who may hear a particular control centre name that no
longer exists and provided it is now covered by one of our other control
centres it can be remapped.
Select the Control Centre Mapping and Altitude Settings button to
display the following:-
As you can see in the above example all the current PF3 control centres are
displayed. From here you can easily map one or more control centres to any
other control centre, thereby suppressing an ATC facility which may no longer
be active.
To use, simply find the control centre you do not wish to hear anymore, then
select an alternative name you would like to hear instead from the adjacent
drop down list.
For instance, if Berlin Radar is no longer active and is perhaps covered by
Bremen Radar, simply find the entry for Berlin Radar (they are displayed
alphabetically) then choose Bremen Radar from the adjacent drop down list.
Page 65 of 212
Copyright © 2007-2024 by OnCourse Software
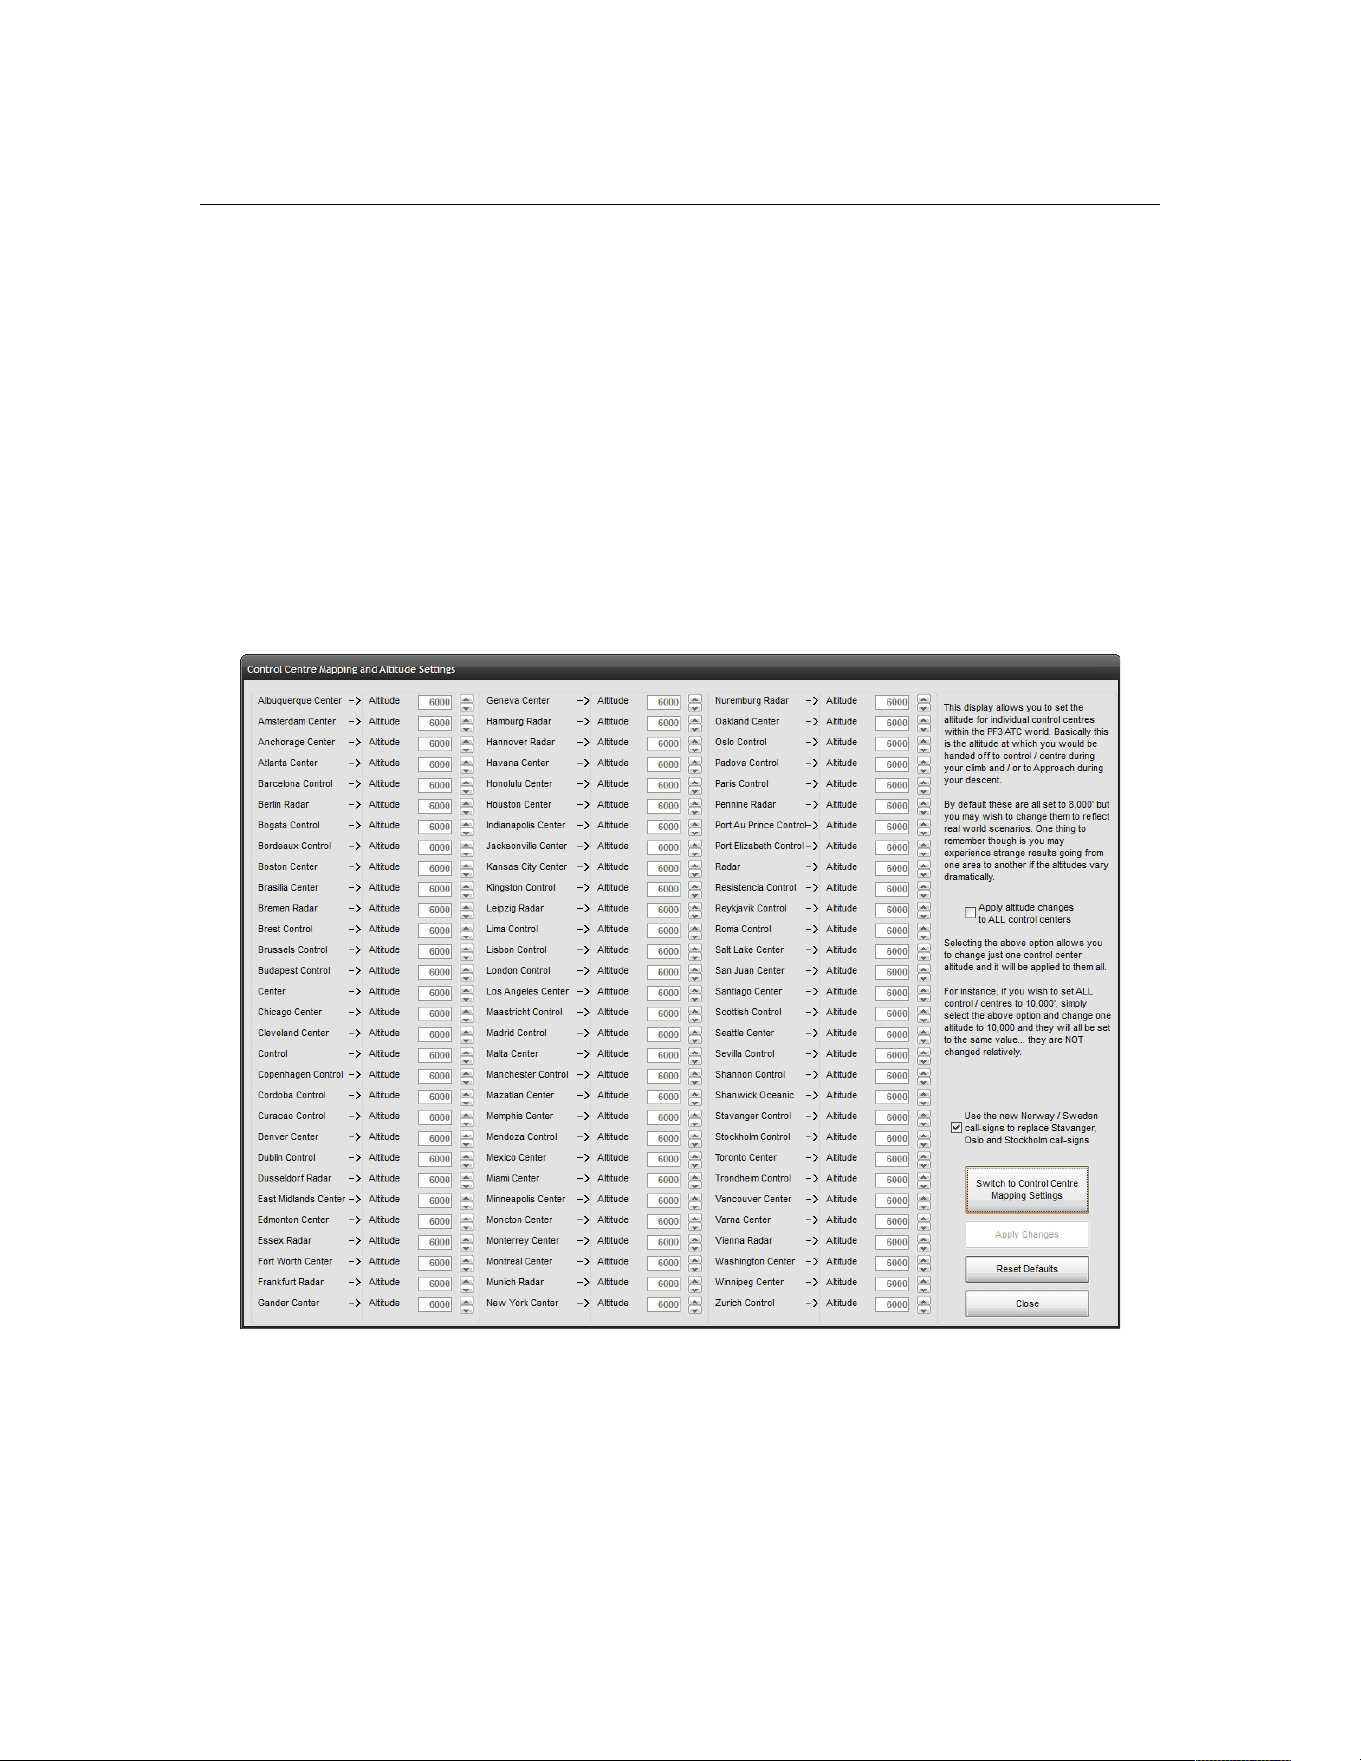
PF3 User Guide
Once you’ve made all your selections please select Apply Changes at the
bottom right of the display to save them. You will always be able to view
and/or change any of your remaps at a later date if you wish.
You may map as many control centres to the same alternative if you wish.
Please note: This configuration mapping does not remap any ATC control
boundaries at all, but merely provides a simple way of removing defunct ATC
facilities so they will no longer be heard during your flight.
If you are aware of any major inaccuracies in PF3's control zone boundaries
please let us know on our support forum, providing as much detail as possible
(screen shots preferred) and we will do our best to rectify the issue in our
next maintenance release.
Also on this screen you will see a large button named Switch to Control
Area Altitude Settings and that will display the following screen:-
In much the same way as the previous screen this display shows each of the
PF3 ATC control centres but this time beside each one you will see an entry
marked Altitude.
From here you can set the desired altitude for each control center This is the
altitude at which you will be handed off to the relevant ATC Control Center
during your climb or to the Approach Controller during your descent.
Page 66 of 212
Copyright © 2007-2024 by OnCourse Software

PF3 User Guide
By default these are all set to 8000' but you may wish to change them to
reflect real world scenarios. One thing to bear in mind though, you may
experience strange results flying from one area to another if the altitudes
vary dramatically.
If you wish to change all control centers to the same altitude just select the
option Apply altitude changes to ALL control centers, then, as you
change one altitude setting, the same changes will be automatically applied to
all the listed controls.
Don't forget to select Apply Changes when you're done.
Page 67 of 212
Copyright © 2007-2024 by OnCourse Software
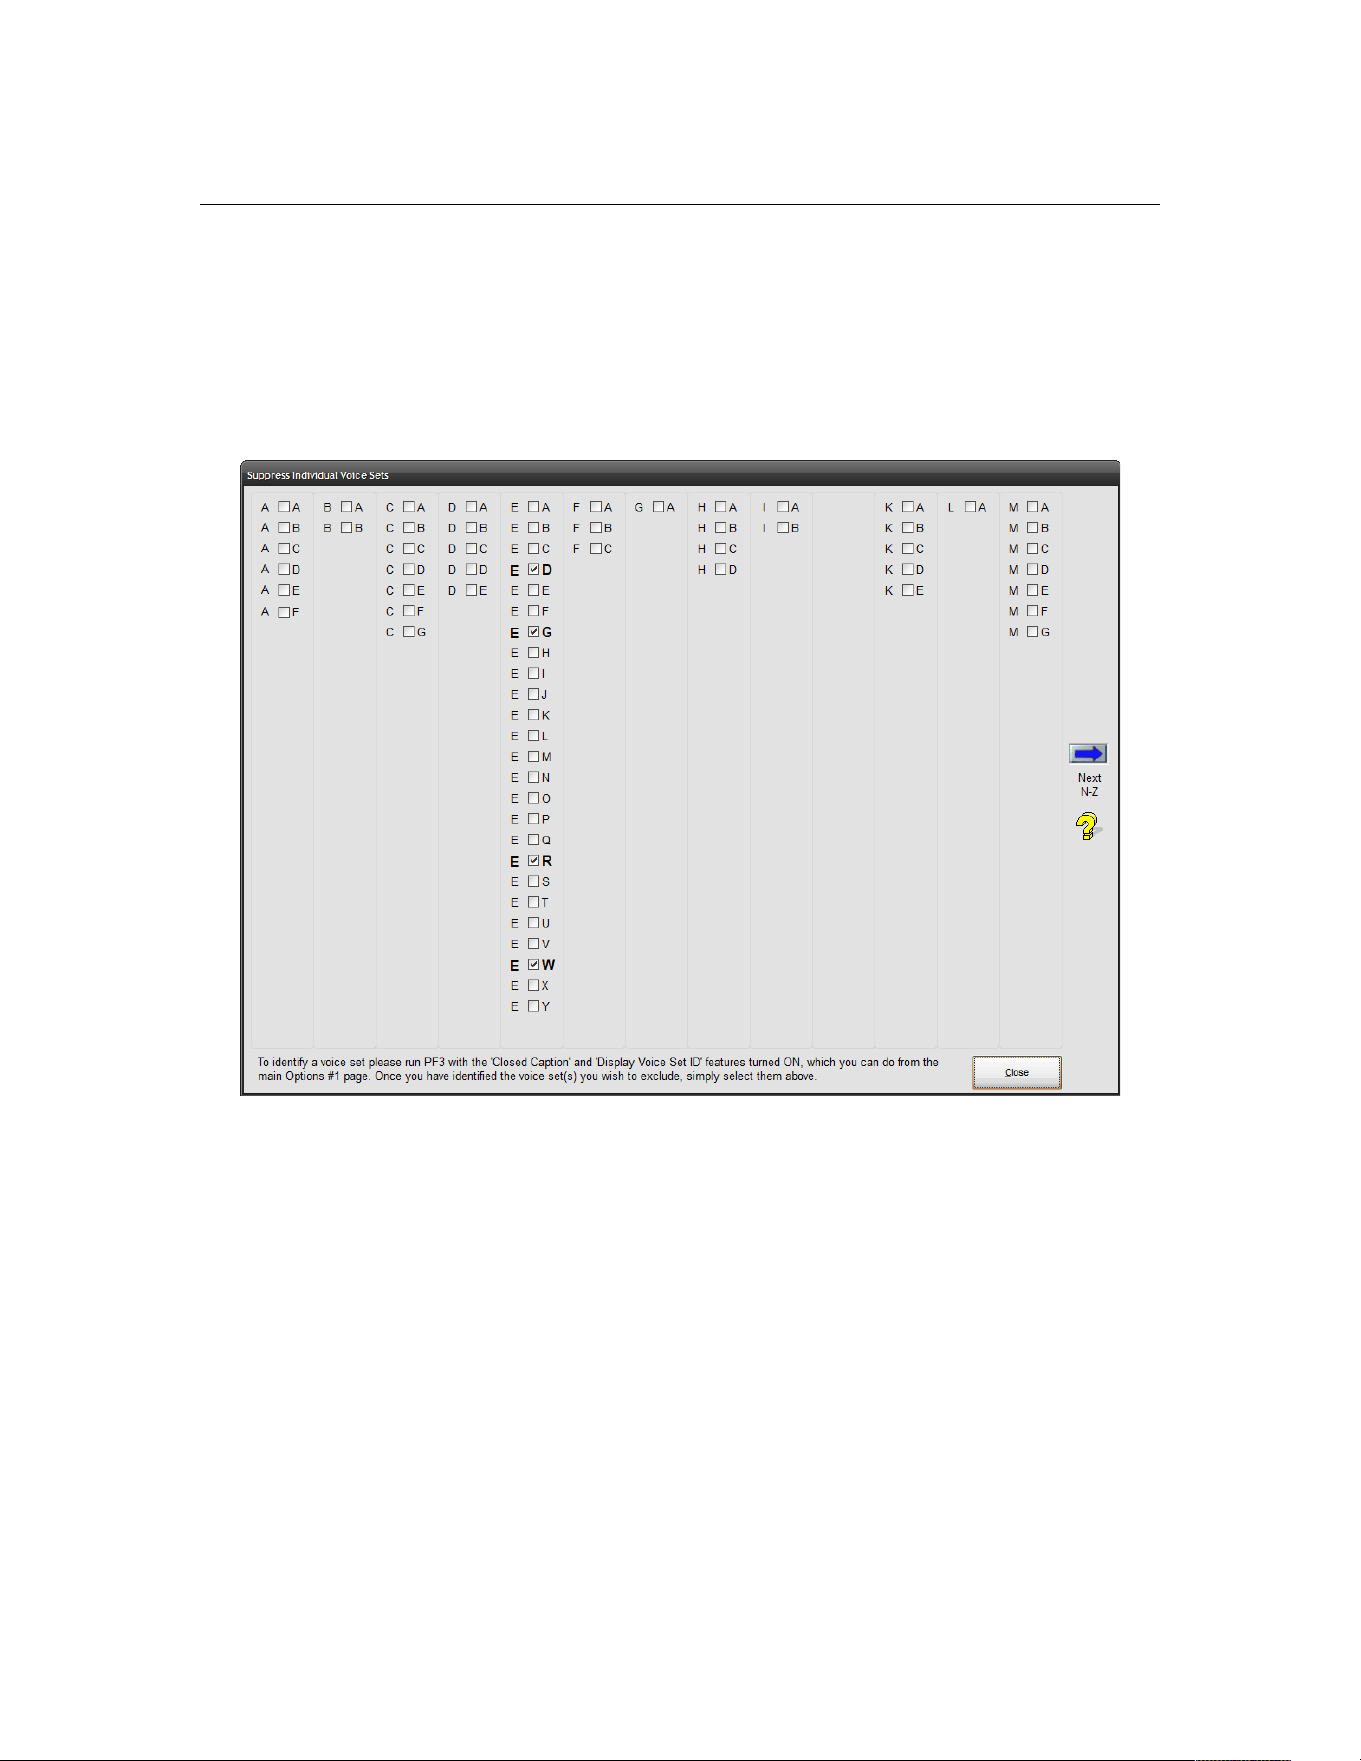
PF3 User Guide
7.1.24 Excluding Individual Voices
This option displays a list of currently available voice sets from the PF3
regions A thru M, which relate to the folder structure used under …\PF3\Wav,
although that is not really important to know at this stage. Here's a
screenshot of the first display you will see:-
To see a snapshot of the voice sets in the PF3 regions held in folders N thru Z
you need to click on the blue arrow icon to the right of the screen. If you try
this now and then click on it again to bring you back to the above display.
Now, any voice set you select on this page will be excluded from use as either
an ATC controller or AI aircraft pilot.
Why would you want to do this? Well, if you've ever heard one or more
controllers or AI pilots who's voice/accent you simply cannot understand or
just dislike listening to, you can do something about it. But first you need to
identify the actual voice set, which you can do by turning on 'closed caption'
and the 'display voice set ID' options which are accessed from the main
Options #1 screen.
With these options ‘on’, during your next flight, you will see the closed caption
messaging prefixed with two letters, as shown below:-
Page 68 of 212
Copyright © 2007-2024 by OnCourse Software

PF3 User Guide
“A-B Easy two one one is with you flight level two one zero”
“E-L Roger Easy two one one, radar contact”
So the first transmission you heard was using voice set ID A-B and the
controller responding was using voice set ID E-L
Once you have the voice set ID's you can now easily mark them as 'please
don't use this voice set again' and you will then not hear it anymore. Please
check it out... there is additional help on the selection screen but it should
really be self-explanatory.
Page 69 of 212
Copyright © 2007-2024 by OnCourse Software
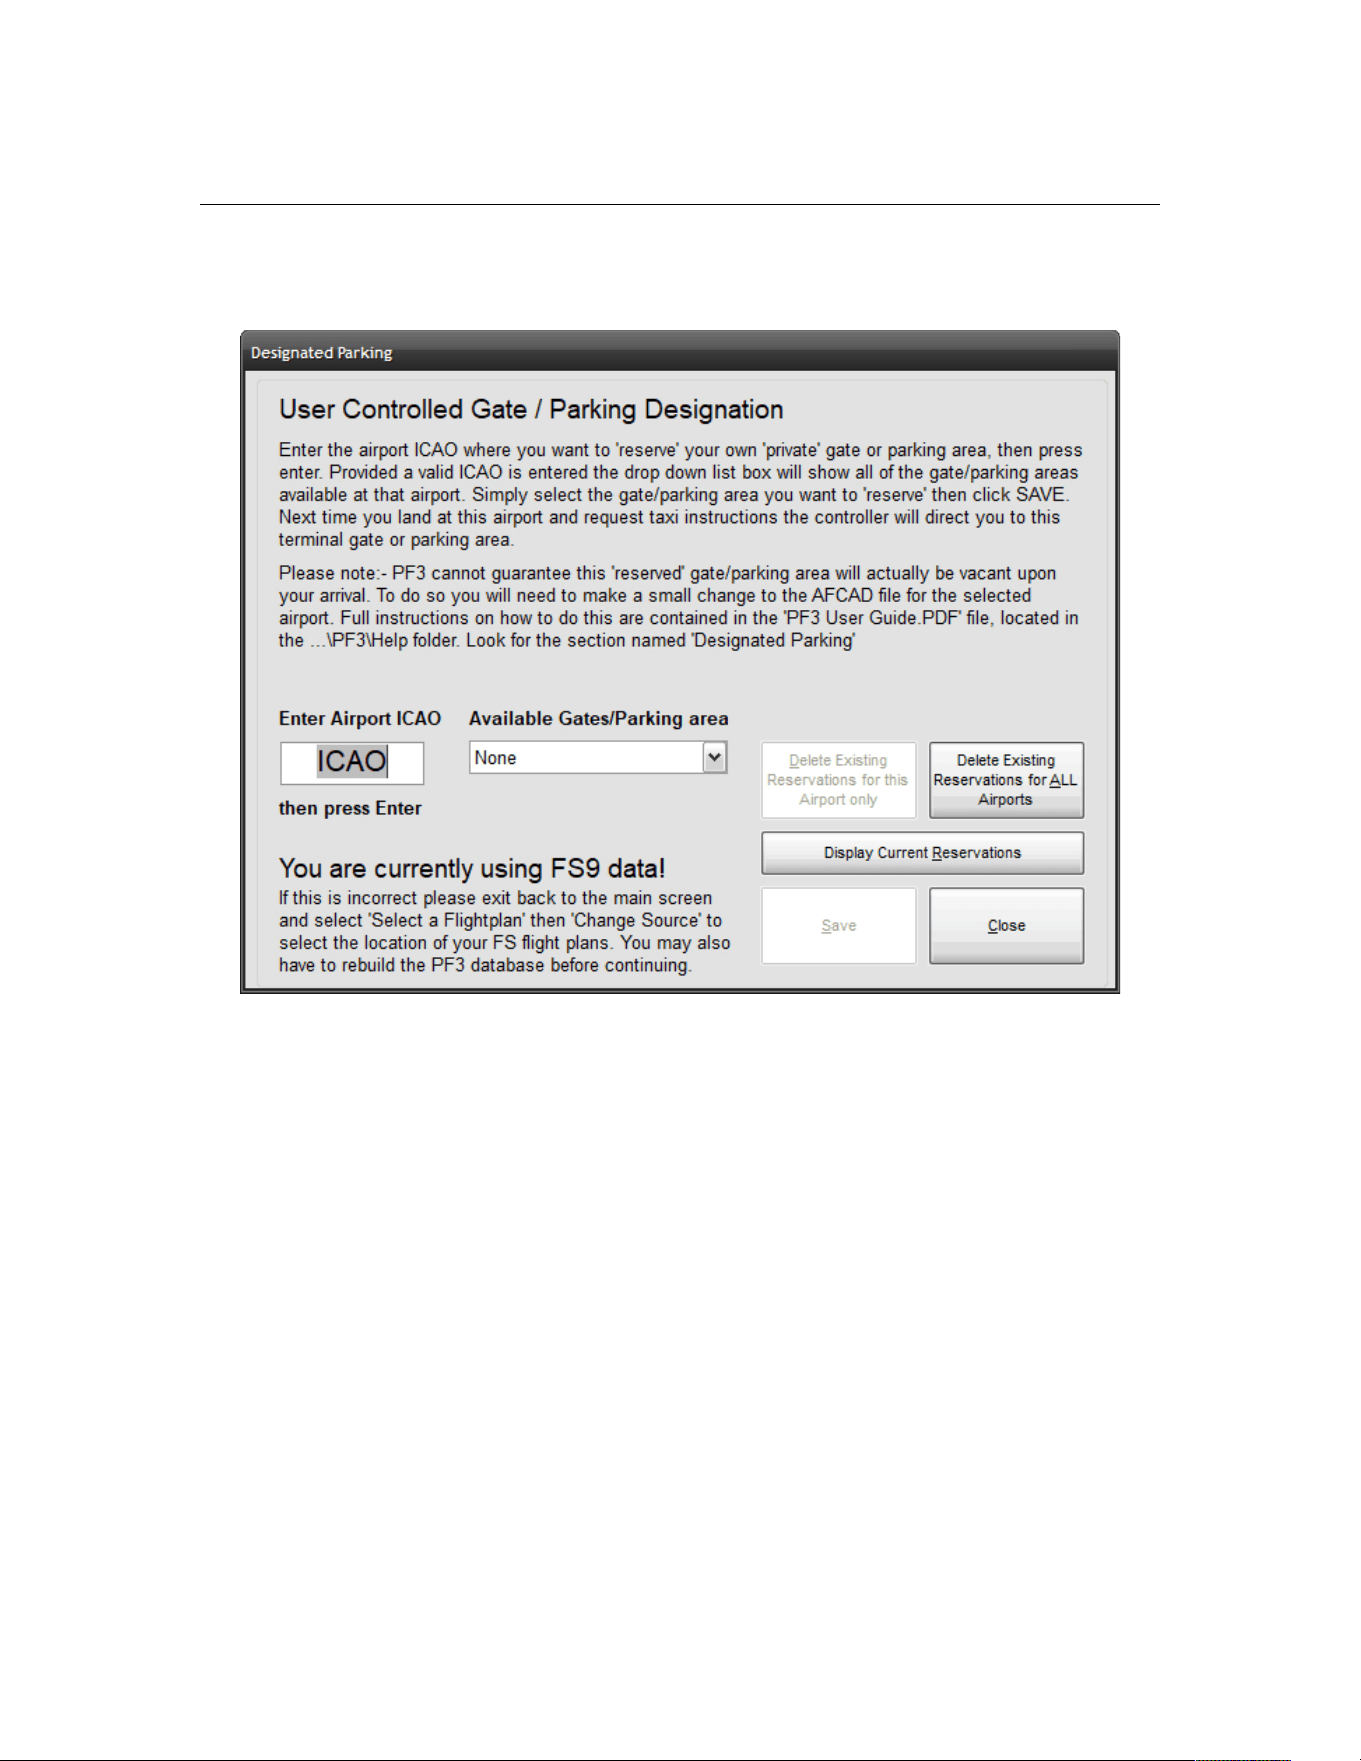
PF3 User Guide
7.1.25 Designated Parking Control
The Designated Parking Control button displays the following:-
From this page you can reserve a particular terminal gate or parking area for
any airport, so whenever you land at the configured airport ATC will always
give you taxi instructions to that location.
Further options on this screen also provide for displaying any previously
configured parking areas for all airports, plus options for deleting reservations
from one airport or all airports.
Please Note: PF3 cannot guarantee this 'reserved' gate/parking area will
actually be vacant upon your arrival. To do so you would have to make a
small change to the AFCAD file for the selected airport (not MSFS).
Starting with PF3 version 3.4.0 the designated parking feature can now be
selected even during your flight and when connected to FS. The new option
will appear just above the normal volume control sliders currently displayed
on the main menu display during your flight. This was added to the system
following a user request and will be useful if you use a third-party application
that may select and reserve a particular gate at your destination. If you know
which gate before landing you can use this new in-flight feature to set that
gate so when you get your taxi instructions they will lead you to the correct
gate. Alternatively, should you not know the actual gate until you land the
Page 70 of 212
Copyright © 2007-2024 by OnCourse Software
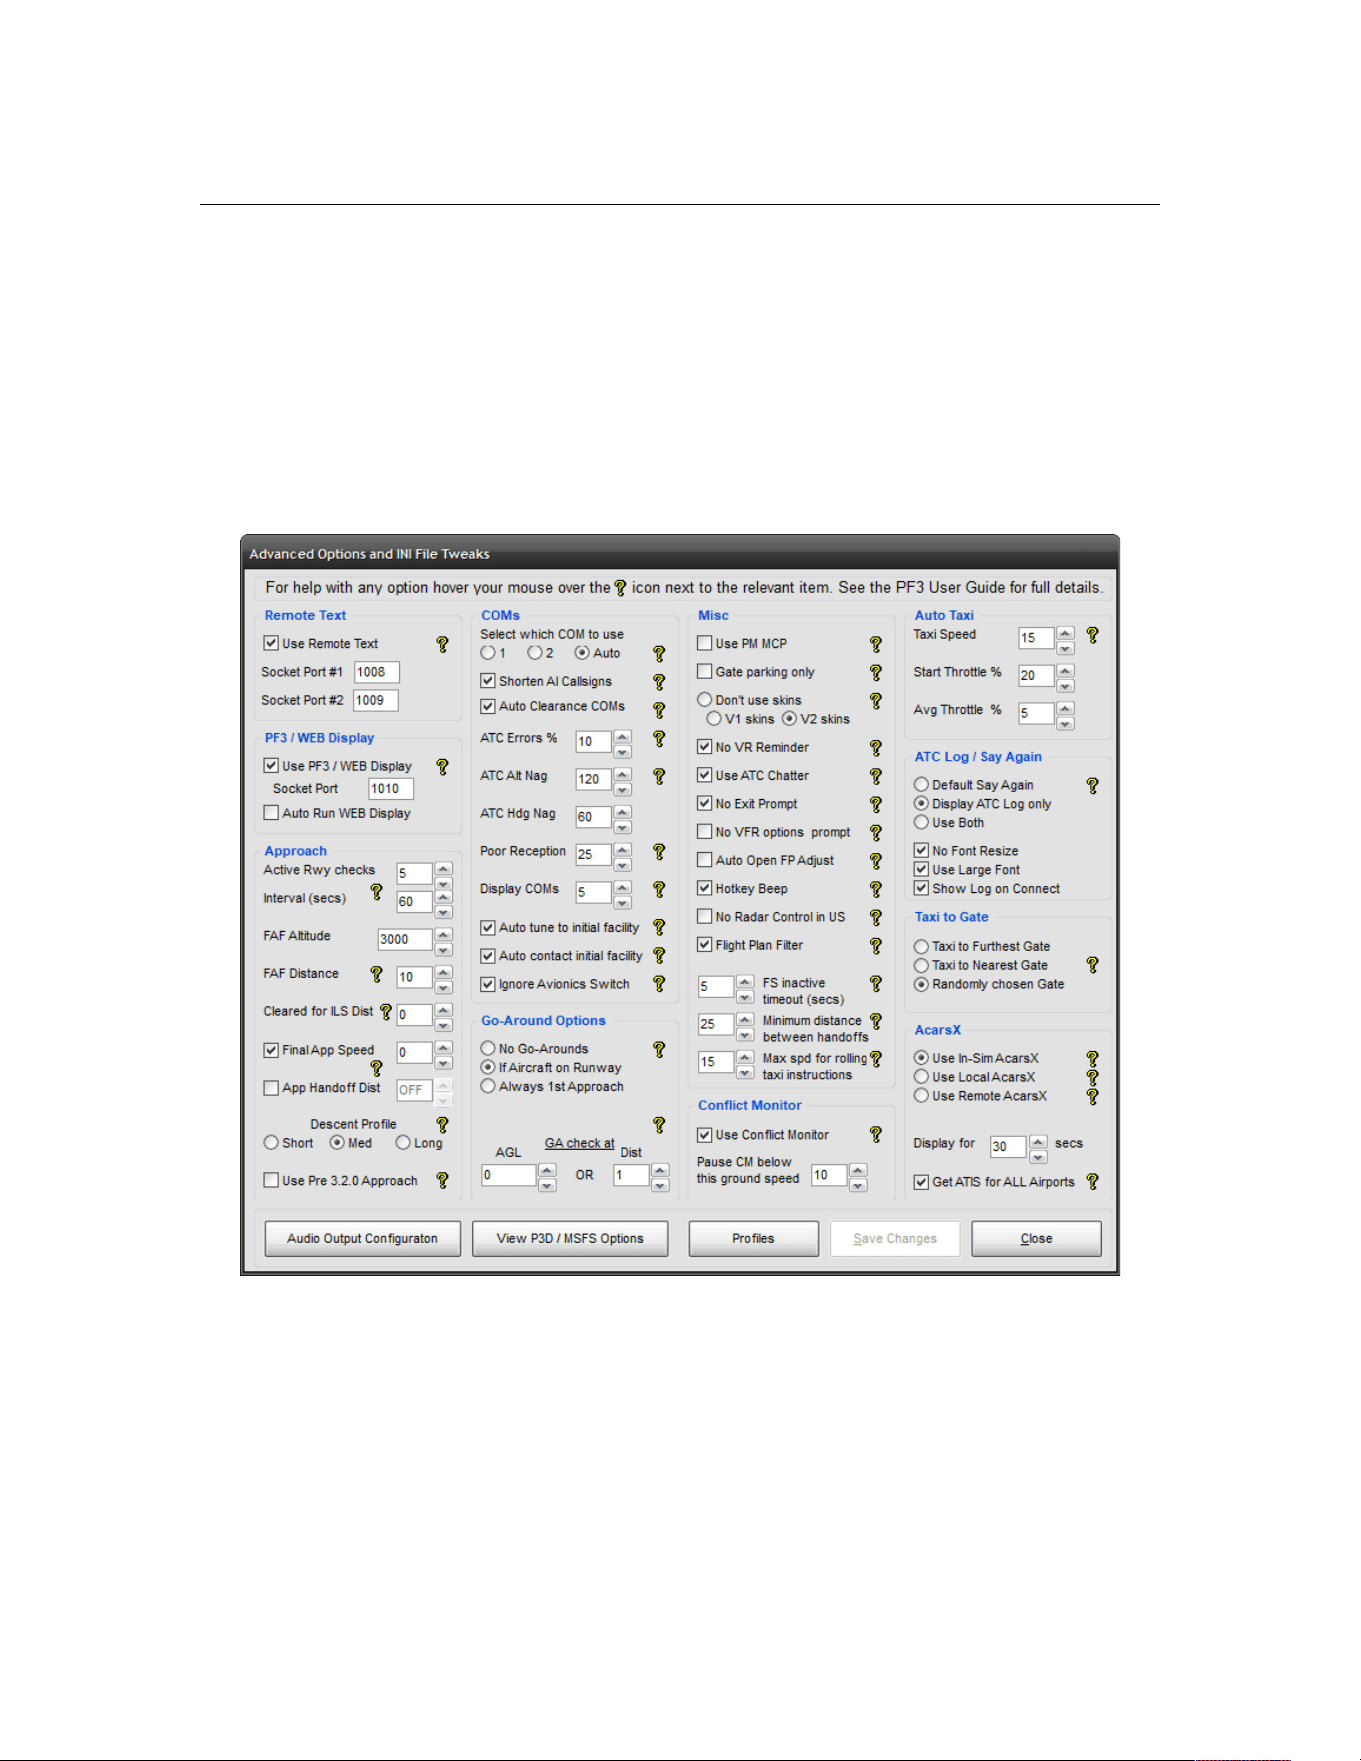
PF3 User Guide
best thing to do is to wait for PF3 taxi instructions then access this feature,
change your gate and then stop TGS (if it's running ) and request new taxi
instruction, which will then be given using your newly accepted gate.
7.1.26 Advanced Options and INI File Tweaks
This selection displays a collection of some advanced options and tweaks that
you might find useful when configuring PF3 to suit you own particular
requirements:-
If you hover your mouse pointer over any of the question-mark icons you will
see popup help for that item(s).
Each item is explained in detail in the following pages.
Page 71 of 212
Copyright © 2007-2024 by OnCourse Software

PF3 User Guide
Remote Text
Use Remote Text - If you wish to use the RemoteText utility provided
with PF3 you need to make it active by selecting this option.
Socket Port #1 - This where you can change the default Socket Port
if required - this is used to communicate with the Remote Text
program and the default setting should suffice for most users.
Socket Port #2 – This is for those who would like to run the
RemoteText utility on two networked PC's. Provided each copy of
RemoteText is configured to match the two port settings here (which
of course must be different) then PF3 will transmit all ATC closed
caption text to two copies of RemoteText running on the same network
at the same time.
For full details about this utility please see section 14.
PF3/WEB Display
Use PF3/WEB Display – Starting with PF3 version 3.10 our PF3
Display utility no longer requires FSUIPC or WideFS to work. Just like
Remote Text you can change the port number here if you wish but
there should be no need to change the default.
Starting with PF3 version 3.22.0 this option also pertains to the
relatively new addition WEB Display program, written by Martin
Cockerell. This is an excellent alternative for PF3 Display as it can also
be used when utilising the MSFS VR feature. If you haven't tried it yet,
please do!
If you're using wither the PF3 Display or WEB display you must have
this option selected, otherwise PF3 will be unable to communicate with
them.
Auto Run WEB Display – If this option is selected PF3 will
automatically run the WEB Display program as soon as you connect to
FS
Approach
Active Runway Checks – when PF3 is trying to determine the
correct active runway for your destination it will first try and detect
any AI traffic that maybe currently taking off or landing. If it finds any
then it will use the same runway for you approach. If not it will then
determine the best runway to use according to the current weather
and wind direction. In this scenario PF3 will then retry (a maximum of
5 times) every 60 seconds to see if AI has started using one of the
runways. If it finds any it will issue a runway change command. New
for version 3.8 provide you with the ability to change how this works.
Here you can enter the number of times you would like PF3 to recheck
for an AI active runway. You can enter 0 thru 9. E Selecting zero will in
Page 72 of 212
Copyright © 2007-2024 by OnCourse Software

PF3 User Guide
effect turn this feature off and PF3 will not recheck for an active
runway and you will have to use the one PF3 initially assigns.
Interval (secs) is where you decide the time delay between PF3
rechecking for an active AI runway. This value is given in 'seconds' and
you may select from 60 secs to 900 secs
FAF Altitude is the altitude (ASL) you wish to be at in order to
capture the ILS. This can be overridden for individual airports if you
wish
FAF Distance is the distance from the touchdown point of the runway
that you would like to capture the ILS.
Cleared for ILS Dist - Currently PF3 monitors the localiser needle for
any movement during the final phase of your approach to the FAF, at
which point you will be cleared for the ILS. If there's no localiser
needle movement PF3 will clear you for the ILS at approximately 2.5
miles from the FAF (this is dependant on your current speed. Faster
speeds would initiate the turn earlier). This new option provides a
configurable distance at which point you would like to be cleared for
the ILS, regardless of your speed or detecting the localiser. This works
in conjunction with the current methods so it becomes an either/or.
The available distance settings are 0-10 miles, with zero turning the
function off, which is also the default. Thanks to our very own Dan77
for this suggestion. I believe Dan has been helping us with PF3 for
about 11+ years now.
Important points to consider about the new 'Cleared for ILS Dist'
option. Normally, as you get to approximately 2.5 miles from the FAF
ATC will turn you onto a 30 degree heading to intercept the ILS and
then clear you for the approach. However, with this option you will
NOT be turned to intercept the ILS you will simply be cleared for the
ILS. The reason being is if you had this option set to 5 miles or more
then turning too soon to intercept the ILS could put you way too close
to the runway before you reached the localiser. The idea behind this
option is to allow you to determine at which point you wish to
commence your turn to intercept the ILS. I have completed some
extensive testing using this option and I personally won't be using it.
But hey, we're all different.
Final App Speed is the minimum final approach speed ATC will give
you during your final approach. With this option turned OFF (not
selected) the Final Approach Speed defaults to 190 knots for jet
aircraft and 140 for props. With this option selected and the adjacent
value set to zero PF3 uses the Flaps-Up-Stall-Speed read from your
Aircraft.CFG file. If you set it to any other value other than zero, PF3
will add this value to your Flaps-Up-Stall-Speed.
Please Note: This Final Approach Speed will be overridden should you
choose to use the Final Approach Speed entry provided in Flight Profile
Presets
Page 73 of 212
Copyright © 2007-2024 by OnCourse Software

PF3 User Guide
App Handoff Dist - This option controls when you will be handed off
to Approach. You can set it between 0 and 25. Setting it to zero
effectively turns the option OFF and thereby reverting to the normal
process of the handoff to Approach occurring at the last waypoint, as it
has done for many years. Should you wish to have the handoff happen
earlier simply adjust the distance to your liking.
Please Note: Whatever distance you apply here doesn't come into
effect until you are actually heading to the last waypoint. Eg. If your
penultimate waypoint is only 10 miles from the last waypoint and you
have this feature set to 20, the handoff will occur when you reach the
penultimate waypoint and not at 20 miles."
Descent Profile - This option provides a means by which you can
decide on the descent profile for your current flight plan. The default is
'Short' and this is how PF3 has always calculated your TOD, using the
standard 3 miles per 1000' calculation. The 'Med' option will increase
this to approximately 4x1000' and the 'Long' to approximately
5*1000'. Please note a lot also depends on the distance between the
waypoints during the approach so it's not an exact science. When you
check your descent profile, if it's not how you like it simply go back
and change this option, then reload your flight plan to see the
difference.
Use Pre 3.2.0 Approach - In PF3 version 3.2.0 we slightly changed
the way in which approach procedures are handled. The new
procedures mean that if, when reaching your last waypoint, the radial
from your aircraft to the assigned runway is +/- 90 degrees of the
actual runway heading, then the resulting approach pattern will be
simpler than it was originally... namely there should be fewer heading
changes. Should you find this is not to your liking (for whatever
reason) you can easily revert back to the original approach pattern
procedures simply by selecting this option.
COMMS
Select which COM to use - here you will see three radio buttons to
choose from, named '1', '2' and 'Auto'. Selecting '1' will set the default
working radio to COM1. Selecting '2' will use your COM2 radio.
Selecting Auto will tell PF3 to actually check internally which radio you
are using. It should be noted, however, that on some high-end third-
party aircraft this 'Auto' option may not be able to detect which radio
you are actually using. Should you experience any issues with the
'Auto' option you would have to manually choose COM1 or COM2.
Using the Auto option obviously lets you switch between COM1/COM2
on-the-fly.
Shorten AI Call Signs tells PF3 to truncate AI traffic call signs, which
basically makes AI transmissions a little faster.
Here's how it works
Page 74 of 212
Copyright © 2007-2024 by OnCourse Software

PF3 User Guide
If the call sign includes the airline name and the numeric part of the
call sign is more than 3 digits, only the last three are used. If the
Airline is not recognised, in which case PF3 would normally use the
first three characters of the Airline ICAO, with this option selected only
the first character is used and again only the last three digits of the
numeric part if that is longer than 3 digits.
Here's some examples with this feature turned ON:-
Original Truncated
Pacific Express 791 -> Pacific Express 791
Pacific Express 29791 -> Pacific Express 791
N79362 -> November 362
Echo Golf Hotel 39224 → Echo 224
Now, before anyone emails me or posts on our support forum telling
me how unrealistic this is and how it would never happen in the real
world... I KNOW !!! This is something that I have added FOR ME
because it's how I like it. I dislike listening to those long, drawn out
call signs, especially for GA aircraft, so I decided to truncate them...
because I can!
Auto Clearance Coms - With this option selected, after you've made
initial contact with ATC to request clearance, all other radio calls will
be performed automatically by your CP, provided of course you have
your CP mode set to 2 or 3. With this option OFF you will have to
manually press Hotkey #0 to request either 'Push & Start', 'Start' or
'Taxi clearance' when instructed to do so. Some users prefer to have it
this way so they can decide when they're ready to continue to the next
stage.
ATC Errors - This is the probability percentage with determines if the
controller giving you initial clearance will make a mistake or not. ATC
will always correct the error immediately but it's just another way PF3
attains such a high level of realism. Setting this option to 0 (zero)
turns the feature OFF.
ATC Alt Nag - If you fail to start your climb/descent to your cleared
altitude within this specified time (seconds) ATC will give you a
reminder to do so. The exception to this is when told to descend at
pilot's discretion. In that scenario the time set here would be increased
using the following calculation - ATC Alt Nag * 5 + 60. Additionaly, if
you have not reached your TOD this increased time delay would also
be doubled. Eg. If you have this set to 120 seconds (2 minutes) and
are instructed to descend to nnn' at pilot's discretion, PF3 would set
this nag time internally to 660 seconds (11 minutes). If you haven't
yet reached your TOD this delay would then be increased further 12
1320 seconds (22 minutes). However, you will only be nagged if you're
not currently climbing/descending
Page 75 of 212
Copyright © 2007-2024 by OnCourse Software

PF3 User Guide
ATC Hdg Nag – If you fail to start your turn to the required heading
within the specified time (seconds) ATC will give you a reminder.
However, you will only be nagged if you're not currently in an active
turn.
Poor Reception - This option sets the probability factor (between 1-
100) of the reception from AI traffic being much lower than normal,
due to poor reception. If you set this to 0 (zero) it will turn the
function off completely.
Display COMs - With this option set to any value other than 0 (zero)
there will be a simulated ACARS Communication as soon as you
connect to FS , showing all the relevant ATC frequencies for your
departure airport. This ensures you will always know the correct
frequency to tune to in order to make initial contact with ATC. The
value entered here is also the time delay before this information is
displayed after you connect to FS. Eg. Setting this value to 300
(seconds) will delay the window from displaying for 5 minutes once
you have connected to FS.
When using FS9 or FSX the ACARS transmission is displayed in your
Kneeboard. For P3D and MSFS users this is displayed in one of our
(new to version 3.10) In-Sim windows, which you need to activate
within these Advanced Options (see further down).
Page 76 of 212
Copyright © 2007-2024 by OnCourse Software
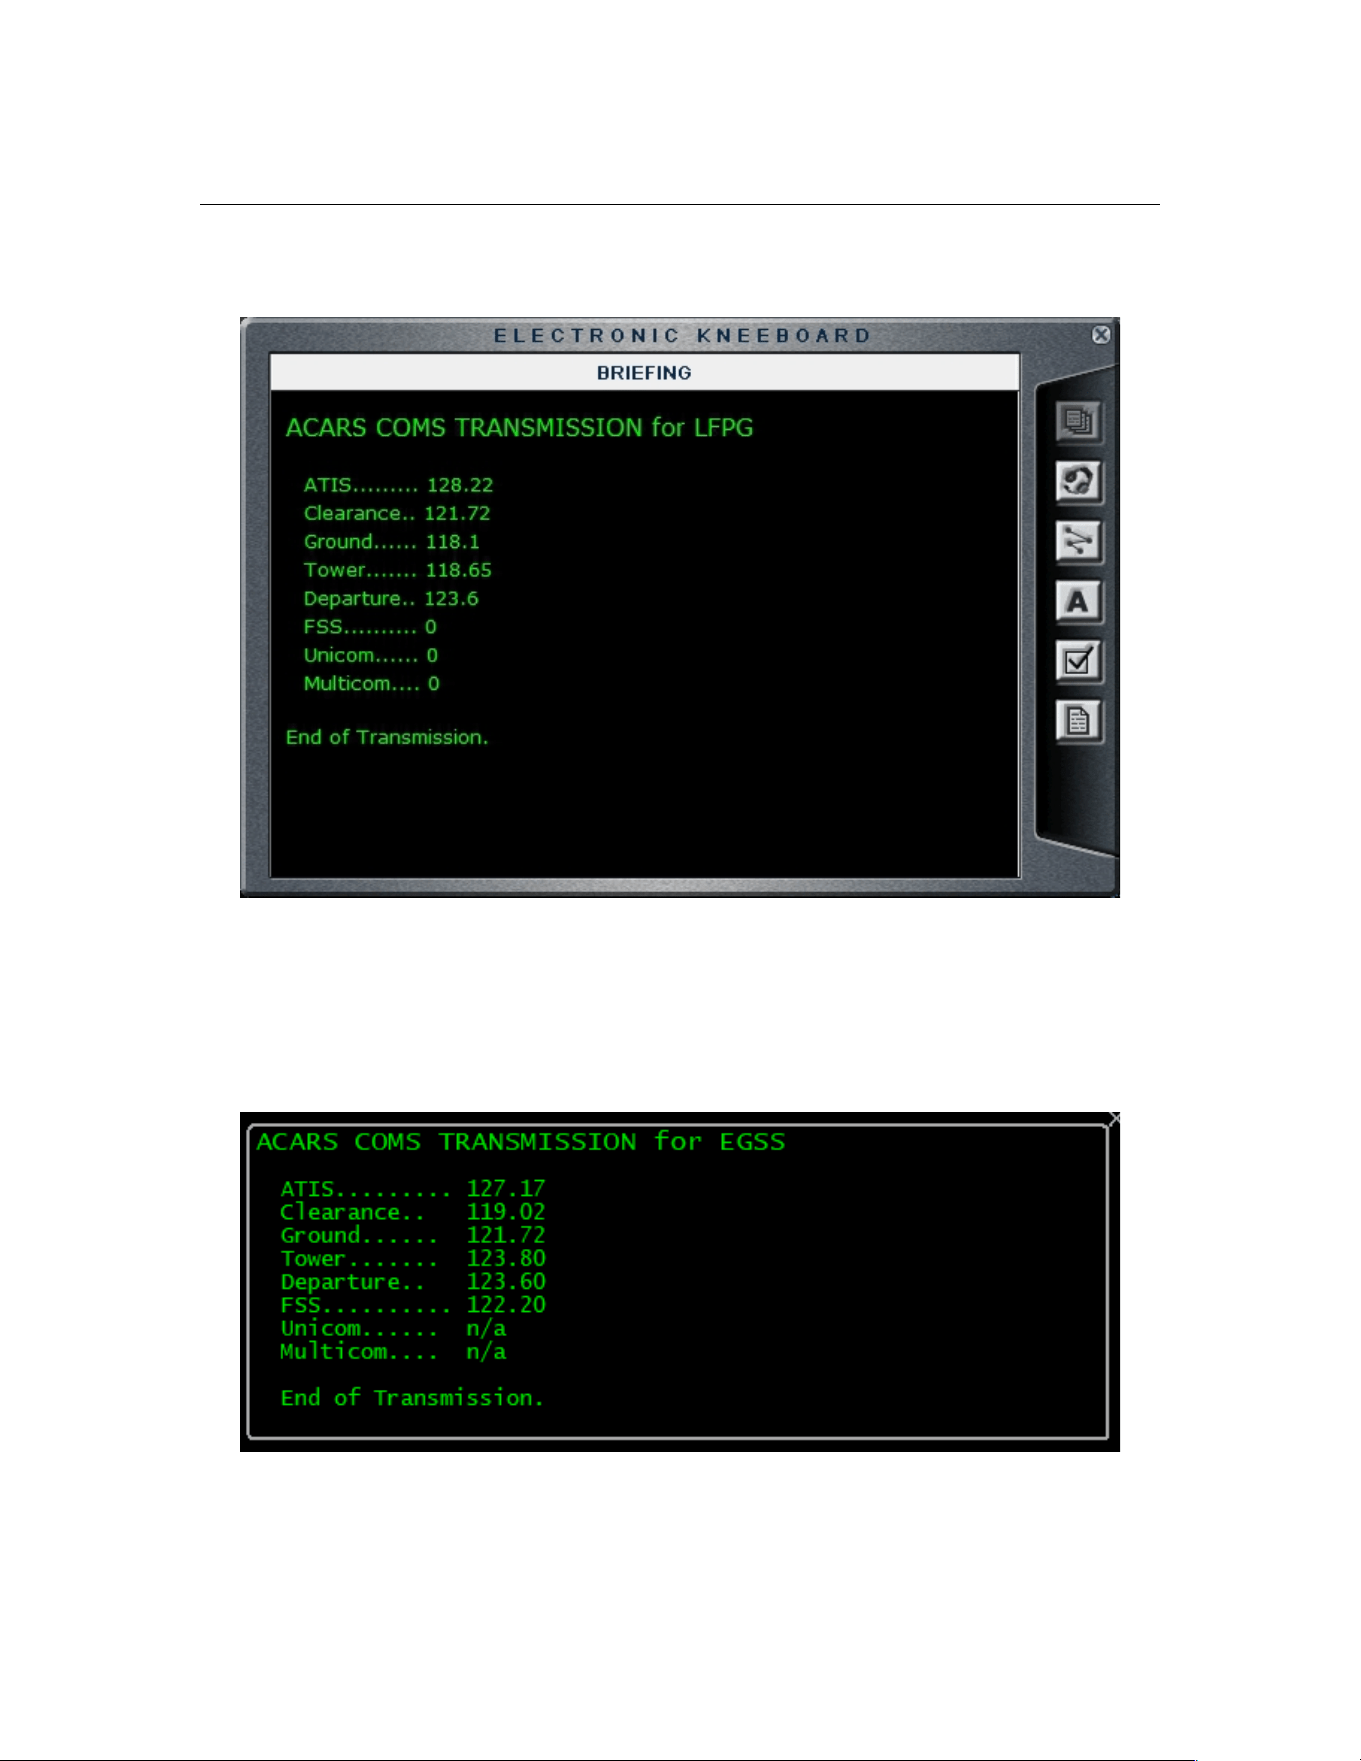
PF3 User Guide
Here's an example of how it looks in FS9:-
Please Note: PF3 actually goes into pause mode and will not do anything else
whilst waiting for this ACARS window to be displayed, so if you add a silly
value here I hope you have something to keep you amused whilst waiting.
And here's how the new In-Sim window looks in P3D/MSFS:-
Page 77 of 212
Copyright © 2007-2024 by OnCourse Software

PF3 User Guide
Auto tune to initial facility - Selecting this option tells PF3 to
automatically tune your COM radio to the correct ATC facility when you
first connect to FS. This will be either Clearance, Ground, Tower or
FSS.
Auto contact initial facility - Selecting this option tells PF3 to
automatically make contact with the initial ATC facility when you first
connect to FS. However, this feature will only work if you have also
selected the 'Auto tune to initial facility' option.
Ignore Avionics Switch - PF3 detects if the Master Avionics switch
is turned off, at which point you will no longer here any radio
transmissions. However, during testing, we discovered this switch is
not detected correctly in some aircraft and therefore you will never
hear radio com's even if you turn the avionics on. Should you
experience any issues simply select this option and PF3 will then
ignore the Master Avionics switch setting.
Go-Around Options
New with version 3.19.0, a 'go-around' feature where PF3 will check
for any other aircraft on the runway during your final approach and if
detected ATC will instruct you to go-around. Normally PF3 does a
pretty good job of keeping other aircraft out of your way and off the
runway, but on occasions, especially when AI traffic is landing in front
of you, they can be very slow to vacate the runway (especially in
MSFS). The following options determine how you use this new feature.
No Go-Arounds – This turns the feature off and with this option
selected ATC will never instruct you to go-around.
If Aircraft on Runway – With this option selected PF3 will check at a
determined altitude and/or distance (see below) if there are any AI
aircraft on the runway you're approaching to land. If there are then
ATC will instruct you to 'go-around'
eg. Callsign, go-around, go-around'
At this point you should declare a missed approach. For those using
VCP mode 2 or 3 this will be done automatically. For those using lower
VCP modes all you need to do is 'Roger' the go-around instruction and
a missed approach will be called.
Always 1
st
Approach – This one was left over from testing, but we
thought it might be useful for those wishing to practice a go-around.
With this option set you will be instructed to 'go-around' on your first
attempt to land, regardless if there are other aircraft on the runway or
not. On your second and subsequent attempts PF3 will handle your
approach in the same way as the previous option (If Aircraft on
Runway)
GA check at – This is where you can set at which point you want PF3
to check for other aircraft on the runway. AGL is the altitude (above
ground level) and Dist is the distance from the runway – whichever
Page 78 of 212
Copyright © 2007-2024 by OnCourse Software

PF3 User Guide
comes first. Turning either one down to zero effectively turns the
option off. So, if you only want to have PF3 check at a given distance
from the runway, set AGL to zero and Dist to your chosen distance.
Alternatively you could just use AGL and set Dist to zero so PF3 would
check at the configured altitude.
Conflict Monitor
Use Conflict Monitor – Select this option if you wish to use the AI
ground traffic Conflict Monitoring functionality. This feature should stop
any AI aircraft about to taxi into your path. Please see section 8.8 for
full details about this exciting feature
Pause CM below this ground speed - Conflict Monitoring will pause
once your ground (taxi) speed drops below this value.
Misc – There are quite a few options under this heading
Use PM MCP - if you use Project Magenta's Boeing MCP you need to
select this option. If not, just leave it off.
Gate parking only - This option will ensure ATC will always send you
to a Gate rather than a Parking location when you receive taxi
instructions at your destination airport.
Please note: If you already have a gate/parking location 'reserved' for
any airport then that will take precedence over this option. Also,
please remember, if you select this option and arrive at an airport
where (a) you haven't reserved a gate and (b) there are no free gates
available, you will not be sent to a parking location but will instead
simply receive the default taxi instructions 'Taxi to Terminal'
Don't use skins - There are three options here regarding PF3 skins,
the first being like a master switch and turning them off completely,
leaving you with that standard (quite ugly) plan old Windows skin.
With this option 'on' you can choose the style and look of PF3's GUI.
Use PF3 skins V1 - This option enables the new PF3
changeable skins that featured in the first release of PF3
(version 3). Some users unfortunately did experience some
problems using these skins, which is why the option to turn
them off was introduced. However, we believe since version
3.3.0 these problems have been addressed.
Use PF3 skins V2 - This option turns on a new batch of
simpler skins which you might enjoy. This new skinning engine
will also allow any MSStyle skin file to be used... many of which
can be found online. Simply copy the file into the new
PF3\Data\Skins2 folder and rename it from name.msstyles to
name.cjstyles. PF3 will do the rest.
Page 79 of 212
Copyright © 2007-2024 by OnCourse Software

PF3 User Guide
No VR Reminder - If you decide to use a voice recognition program
alongside PF3 you will have to configure PF3 in a certain way. When
configured for VR use PF3 will display a message each time you select
a flight plan. This is just to remind you that you will not hear your
pilot's voice during this flight (well you will, but it will be you chatting
to the computer. The first time my wife caught me doing that she
thought I'd really flipped!). If you prefer not to see this reminder
before each flight you can select this option to suppress the message.
Use ATC Chatter - This option was added after we received a request
to offer a way in which the AI chatter provided by PF3 could be turned
off. This I believe is useful for those who prefer to listen to live ATC
whilst flying. So, deselecting this option will render PF3 silent in that
department. Please not, however, this option has no affect on
receiving AI traffic advisories, by they can be deactivated from the
main Options #1 display.
No Exit Prompt - has been included following another user request
and this option simply turns off the 'Are you sure?' popup message
when you hit the main PF3 Exit button on the main menu.
No VFR options prompt – Starting with PF3 version 3.10 you can
now choose between two VFR options. One we call the standard VFR
and the other is the VFR Free Flight (these will both be explained in
detail later in this guide). If you've loaded a VFR flight plan then just
before you connect to FS you will be prompted to choose which type of
VFR flight you wish to fly. If you always want to use one particular
type you can select this option to disable the prompt.
Auto Open FP Adjust - If you select this option the altitude
adjustments display will be opened automatically immediately after
you open a flight plan. If you tend to view the adjustments page
before each flight you will find this saves you some time and a mouse
click.
Beep whenever a Hotkey is detected - If you've ever sat there
thinking if PF3 has actually detected the hotkey you pressed then this
option is for you. With this item selected you will hear an annoying
'beep' each time PF3 detects a hotkey has been pressed. This may not
be instantaneous and depending on what PF3 is actually doing at the
exact moment you hit the hotkey it may occur after a few seconds
delay, so please remember the 'beep' will be heard the second PF3
detects the hotkey has been used.
No Radar Control in US – This is specifically for those flying VFR in
the US and other FAA regions. If you select this option you will no
longer be able to contact or be handed off to our (new to 3.10) Radar
Control facilities. Instead you will be in contact with various Approach
facilities during your VFR flight. When nearing your destination, or
during a VFR FF flight when you use Hotkey #1, you will be handed off
to Approach on a different frequency in readiness for landing. If you
don't select this option then your VFR flights will continue as they do
Page 80 of 212
Copyright © 2007-2024 by OnCourse Software

PF3 User Guide
now and PF3 will use the 'Named' Radar Control facilities as it does
now for both CAA and FAA regions.
Flight Plan Filter – New to 3.22.0 this option is specifically aimed at
those users wanting the easiest way to use a flight plan for their FMC
and also to be able to load it into PF3. Whilst PF3 would accept any
flight plan if it contained a SID and/or STAR, with many waypoints at a
short distance apart, you would have a lot of NOTAM messages and
would have to remove the offending waypoints. With this option
selected, if you load a flight plan containing a SID and/or STAR PF3
will remove all the SID waypoints (except the exit point) and all the
STAR waypoints (except the entry point). It will flag (internally) that
you have loaded such a flight plan so you will not receive any vectors
until you complete your SID (by reaching the assigned altitude of the
exit waypoint) and you will be 'Cleared to Final' when reaching the last
waypoint (the STAR entry point)
In addition to the above you can also load a flight plan containing no
procedures at all when this Flight Plan Filter option is selected and in
that scenario PF3 will again enter your cruise altitude in the first
waypoint and all those waypoints up to and including your original
flight plan's TOD. The descent profile will remain unchanged. When
using such a flight plan (with no SID/STAR) you will be able to adjust
your altitudes as you can now.
This feature will only work with a valid flight plan. Basically that means
it should be in XML format and each waypoint should have a valid
altitude, so default FS9 or FSX flight plans would not be valid. The
former as it's not XML and the later as the XML file does not include
waypoint altitudes. P3D, MSFS, SimBrief and Little Nav Map (to name
but a few) all produce such flight plans.
For full details on utilising this option please see the new section
Martin's tips on using the FMC with PF3 on page 172
FS Inactive Timeout - is the amount of time PF3 will wait if not
getting any response from FS, before closing down automatically. It
should probably be set to a slightly higher value if/when running PF3
on a networked PC.
Minimum distance between handoffs - Sometimes flight plans can
be generated where ATC control sector boundaries are very close
together, resulting in you being handed off from one controller to
another in quick succession. This ping-ponging from controller to
controller can be even more troublesome if you are not using VCP
mode to set your radio and maybe take too long to make initial contact
with the new controller. This feature will check your flight plan and
basically merge control centers that are too close together. This buffer
is known as the 'Minimum distance between handoffs'. We would
suggest a setting of 25 miles as this was found to work very well
Page 81 of 212
Copyright © 2007-2024 by OnCourse Software

PF3 User Guide
during our testing but of course you are free to try whatever distance
you like. Setting this value to ZERO will turn the feature off.
Max Spd for rolling taxi instructions – New to version 3.15.0 –
Normally, after vacating the active runway at your destination airport,
you would be told to hold your position when contacting ground, in
readiness to receive taxi instructions to the terminal/gate. With this
new option you have the choice to set a maximum speed below which,
or at, you will receive taxi instructions whilst still moving. The values
available are 0 thru 30. Setting the option to 0 (zero) basically turns it
off and you will be told to hold your position as normal. However, let's
say you set this to 15, that means that provided you are 'at' or 'below'
that speed (i.e. taxiing between 1 and 15 mph) ATC will provide you
with taxi instructions.
Now, you must bear in mind this is not foolproof and may result in you
receiving what might seem incorrect instructions. Let me try and
explain further. Normally, you are stationary before PF3 calculates the
correct taxi path, so we know your exact starting position and your
first turn onto another taxiway can be calculated without fear of you
already being past it. But, and it's quite a big but (no offense madam)
if you are still moving when PF3 starts to calculate the route you may
very well pass the first turnoff before the calculations are complete,
especially if you're moving fairly quickly. So when you actually receive
the instructions there maybe one or more taxi waypoints immediately
behind you. Therefore you will have to pay attention to the taxiways
ahead of you when first contacting ground. If it's just a single taxiway
there shouldn't be a problem but if there are a few turn
turnoffs/junctions ahead of you you would need to hold back till you
know for certain which way ATC is going to send you.
This all sounds more complicated than it is really. It just takes a little
common sense but if you get it right you will be able to continue
moving after leaving the runway, receive instructions from ATC and
continue onto the terminal/gate. Obviously this makes it more
realistic.
Auto Taxi – This provides automatic taxi speed monitoring whenever TGS is
active and is activated by using the default #8 hotkey
Taxi Speed – This is the ground speed you would like to maintain
whilst taxiing to/from the runway.
Start Throttle % - To start any aircraft moving in FS you will often
need to set a higher throttle setting and then reduce it as you reach
your target taxi speed, this setting lets you decide how much throttle
will be needed to get the aircraft moving.
Avg Throttle % - This is the average throttle setting you need to
maintain your target speed.
Page 82 of 212
Copyright © 2007-2024 by OnCourse Software

PF3 User Guide
Please Note: The default settings for Auto Taxi have been set using the
default 737 in FS2004. You will obviously need to experiment with the
aircraft you are using in your FS
ATC Log / Say Again
Default Say Again - with this option selected, when you hit the say
again hotkey, you will hear your request and ATC should then reply
accordingly.
Display ATC Log only - displays the ATC log window, showing the
last 10 ATC commands to you. In this mode you will not hear your
normal request to 'say again' as you would in the default setting.
Use Both - will display the new ATC log showing the last 10 ATC
commands PLUS you will hear the normal 'say again' request/reply.
The ATC Log window can be positioned wherever you want and it will
remember that position the next time it is displayed. Also the log will
refresh every 5 seconds whilst displayed, so if you have the window
permanently displayed you will see all new ATC communication to you
appear automatically, with the older messages scrolling off the top of
the display.
No Font Resize – With this option ON it will prevent the size of the
text changing when/if you resize the ATC say again window. Turning
this option OFF means the size of text will change in relation to the
window size.
Use Large Font - This option allows you to choose a slightly larger
font than the one set by default. Obviously you could use both of these
options to show a larger font and keep it that size even when you
resize the window. Or maybe you could have the larger font but have
it resize when you make the window smaller to achieve your optimum
display preference.
Show Log on Connect - The final option in this section enables this
new ATC say again window to be displayed automatically as soon as
you connect PF3 to FS.
Taxi to Gate
New to version 3.22.0 is a new way by which PF3 decides which
gate/parking to send you at your destination, if you don't have one
pre-configured as your designated one. By default PF3 has always
used the nearest one. This was not calculated by the actual route you
would have to take but simply by measuring in a straight line from
your current aircraft position. This remains the default option but we
have added these new options'
The new options are 'Nearest' (default), 'Furthest' or 'Random'. They
hardly need explaining in depth, if they do I don't really think you
should be flying an aircraft ;-). The important thing to remember is if
Page 83 of 212
Copyright © 2007-2024 by OnCourse Software

PF3 User Guide
you already have a designated gate configured for your destination
these options will be ignored.
AcarsX
Use In-Sim AcarsX - This is the default setting when you first run
PF3. When this option is selected all ACARS Transmissions (e.g.
ACARS ATIS Reports or ACARS Local Frequency Reports) will be
displayed on the flight sim kneeboard if using FS9 or FSX and on the
new PF3 popup window if using P3D or MSFS. This window can be
displayed even when running P3D or MSFS in full screen mode.
Use Local AcarsX - Select this option to use the Local ACARS display
window to show ACARS Transmissions (e.g. ATIS Reports or ACARS
Local Frequency Reports). This is part of the PF3 process and is
displayed on the same PC where PF3 is running, instead of using the
standard FS kneeboard (FS9/FSX) or the new popup window
(P3D/MSFS) and is designed to be used on a second monitor.
Use Remote AcarsX - Select this option to use the Remote ACARS
display window to show ACARS Transmissions (e.g. ACARS ATIS
Reports or ACARS Local Frequency Reports) This is part of the PF3
Display process and used instead of using the standard FS kneeboard
(FS9/FSX) or the new popup window (P3D/FS2020) and is designed to
be used on a second monitor and/or PC. Please note: you need to have
the 'Use PF3 Display' option (also found on this page) selected in
addition to this option.
Display for - Display for nn secs" & vbCrLf & String(20, "-") & vbCrLf
& "This is the number of seconds the new display will remain on-
screen before automatically closing. Setting this value to zero turns all
ACARS Transmission windows OFF except when using the In-Sim
window display where setting this to zero means you want the windo
permanently displayed.
Get ATIS for ALL Airports – This option is new to version 3.10 and
gives you the opportunity to receive ACARS ATIS reports for ANY
airport, regardless of whether that airport has such an active facility.
Page 84 of 212
Copyright © 2007-2024 by OnCourse Software
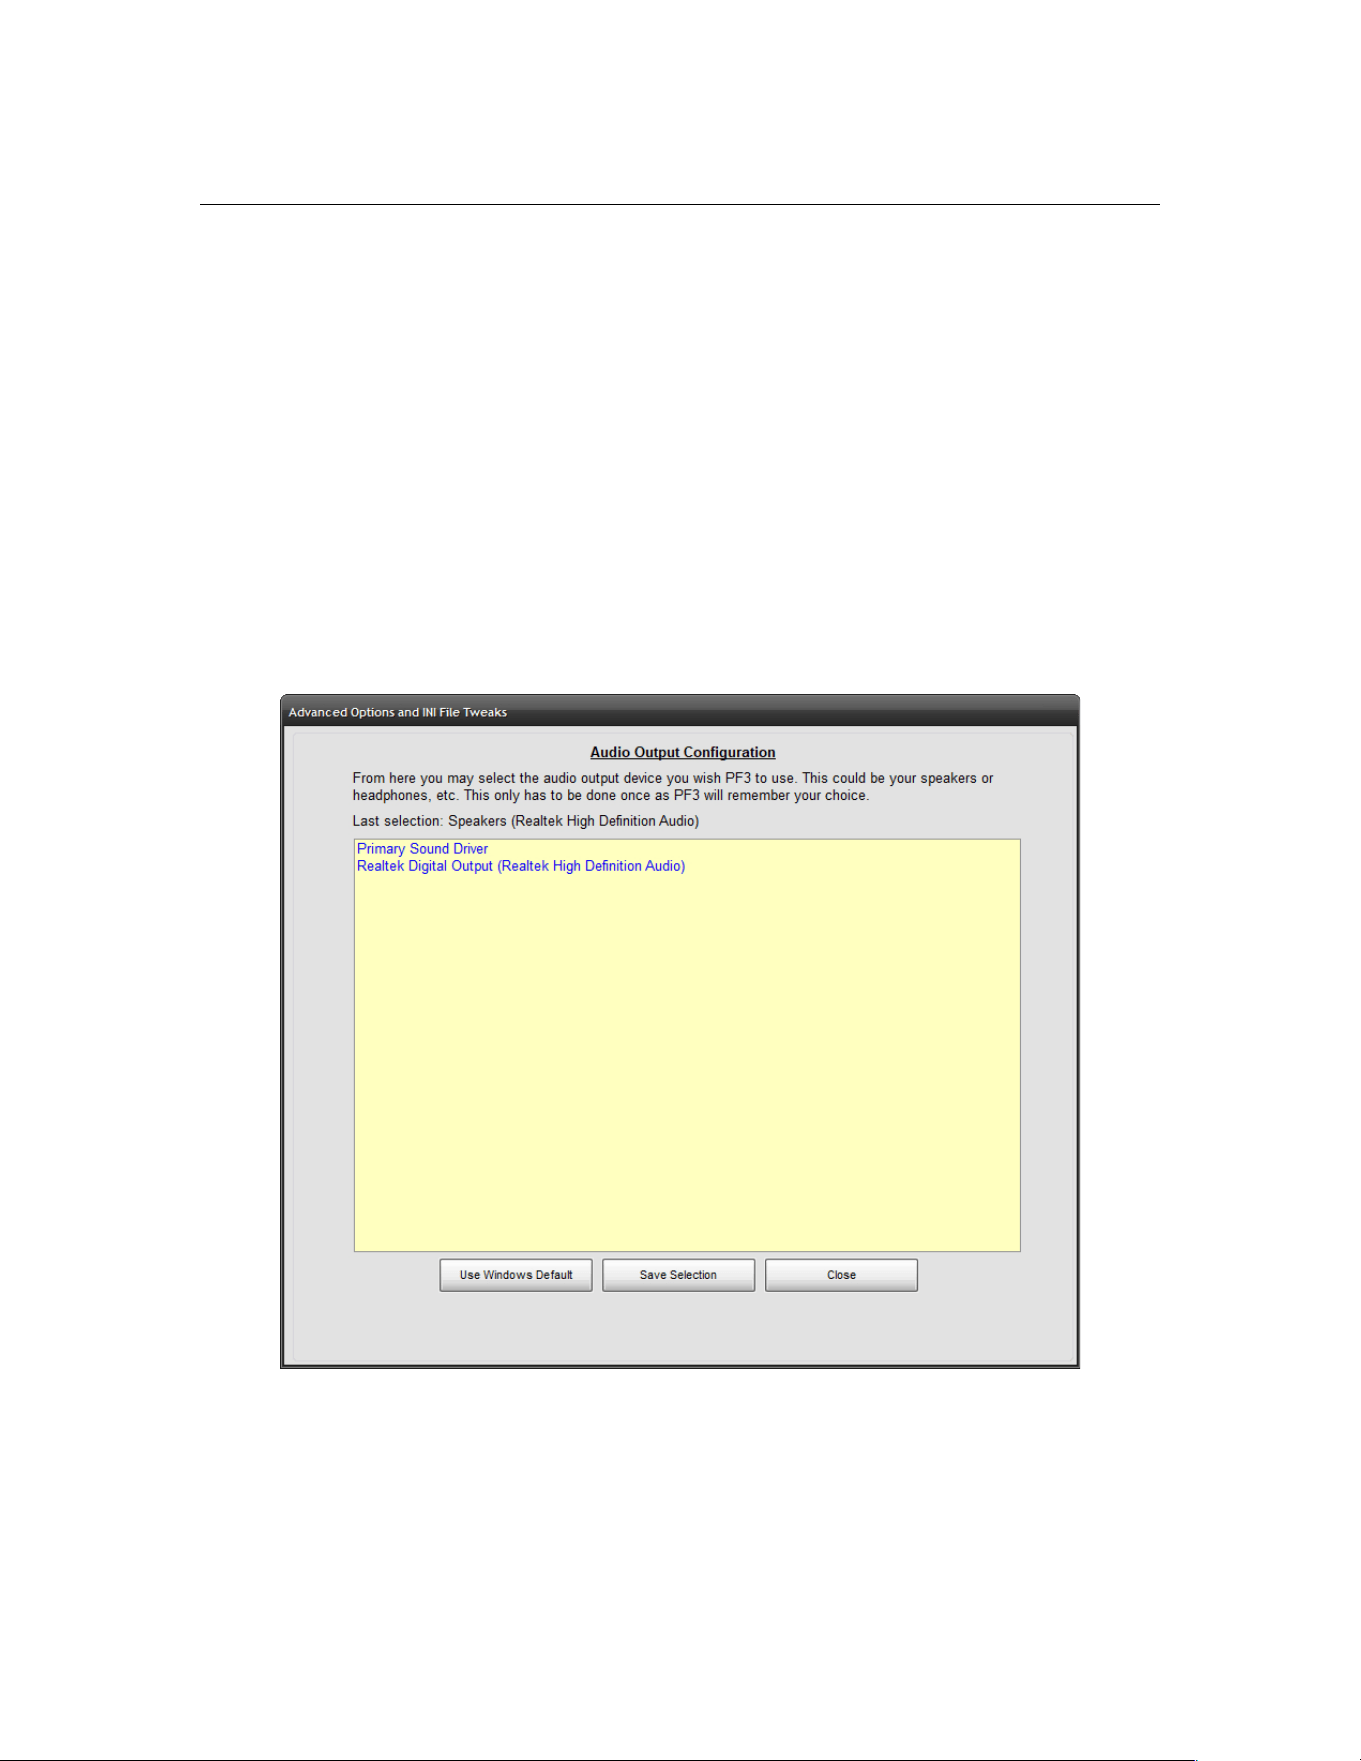
PF3 User Guide
Audio Output Configuration (New in version 3.15.1)
Firstly my thanks to the PF3 WEB Display author, Martin,
without his input this would not have been possible.
Selecting this option displays a list of all your current system audio
output devices. From here you may select the device you wish PF3 to
use. This may be your speakers or perhaps your headphones. Once
you made the choice simply click on the Save Selection button to
ensure PF3 remember your choice. PF3 will then use your chosen
output device until such time as you may change it.
If you ever experience issue or believe you may have chosen an
inactive device, all you need to do is select the Use Windows Default
button to reset your previous selection and use the Windows default.
Page 85 of 212
Copyright © 2007-2024 by OnCourse Software
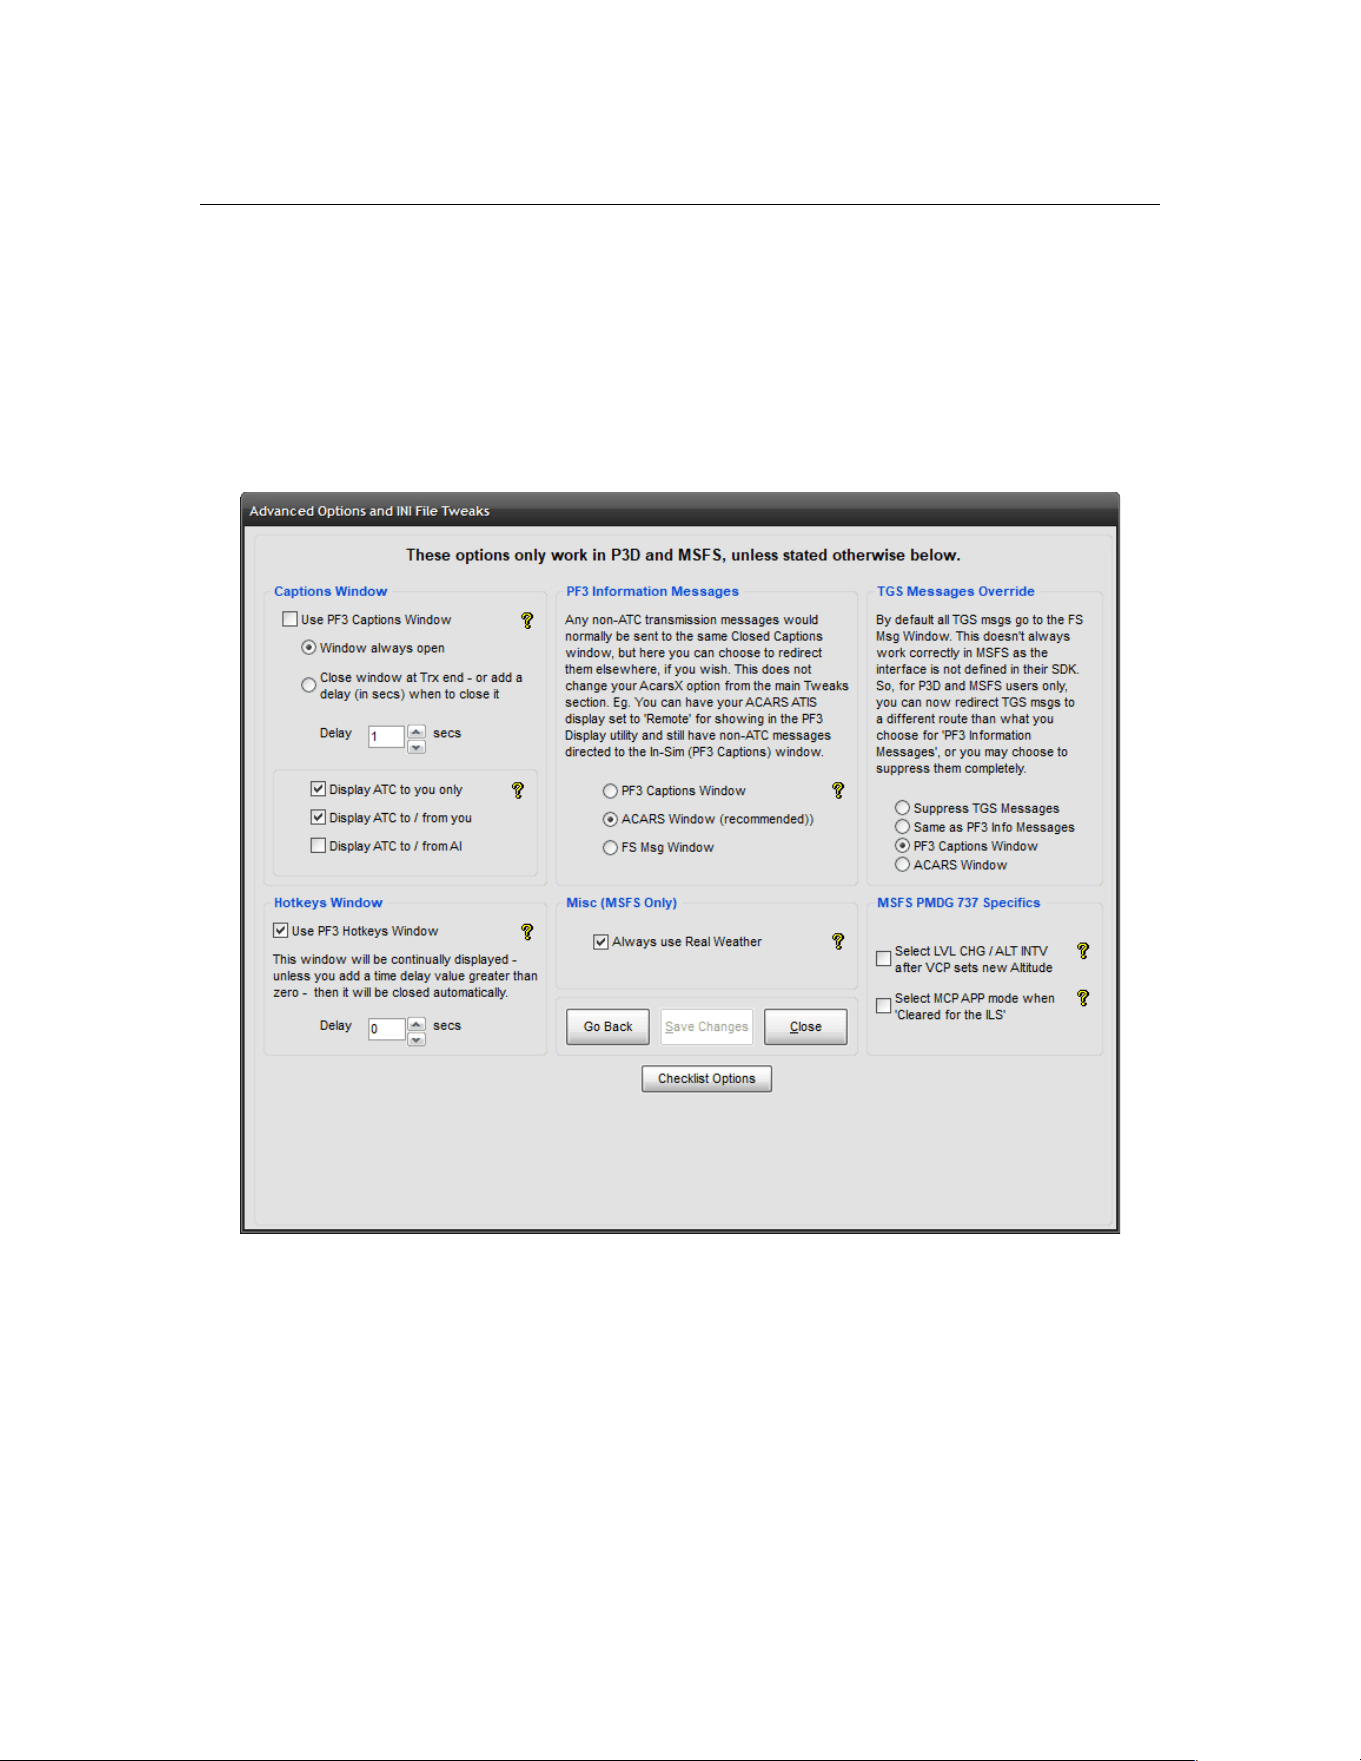
PF3 User Guide
View P3D/MSFS Options (Changed in 3.21.0)
Selecting this button takes you to a completely new page of options
specifically for the new In-Sim window features – These options are for
P3D/MSFS user only and will simply not work in other flight simulators.
Here's the new display page:-
Captions Window
Use PF3 Captions Window - This provides an In-Sim window to
display Closed Caption text right inside your flight simulator window,
whether in full screen mode or not. It's main purpose is for displaying
ATC transmissions to/from you and/or AI aircraft. In order for this to
work you must also have the Closed Captions option selected in the
main Options #1 section.
Window always open - This option will leave the In-Sim Captions
window displayed at all times... leaving the last transmission on-
Page 86 of 212
Copyright © 2007-2024 by OnCourse Software
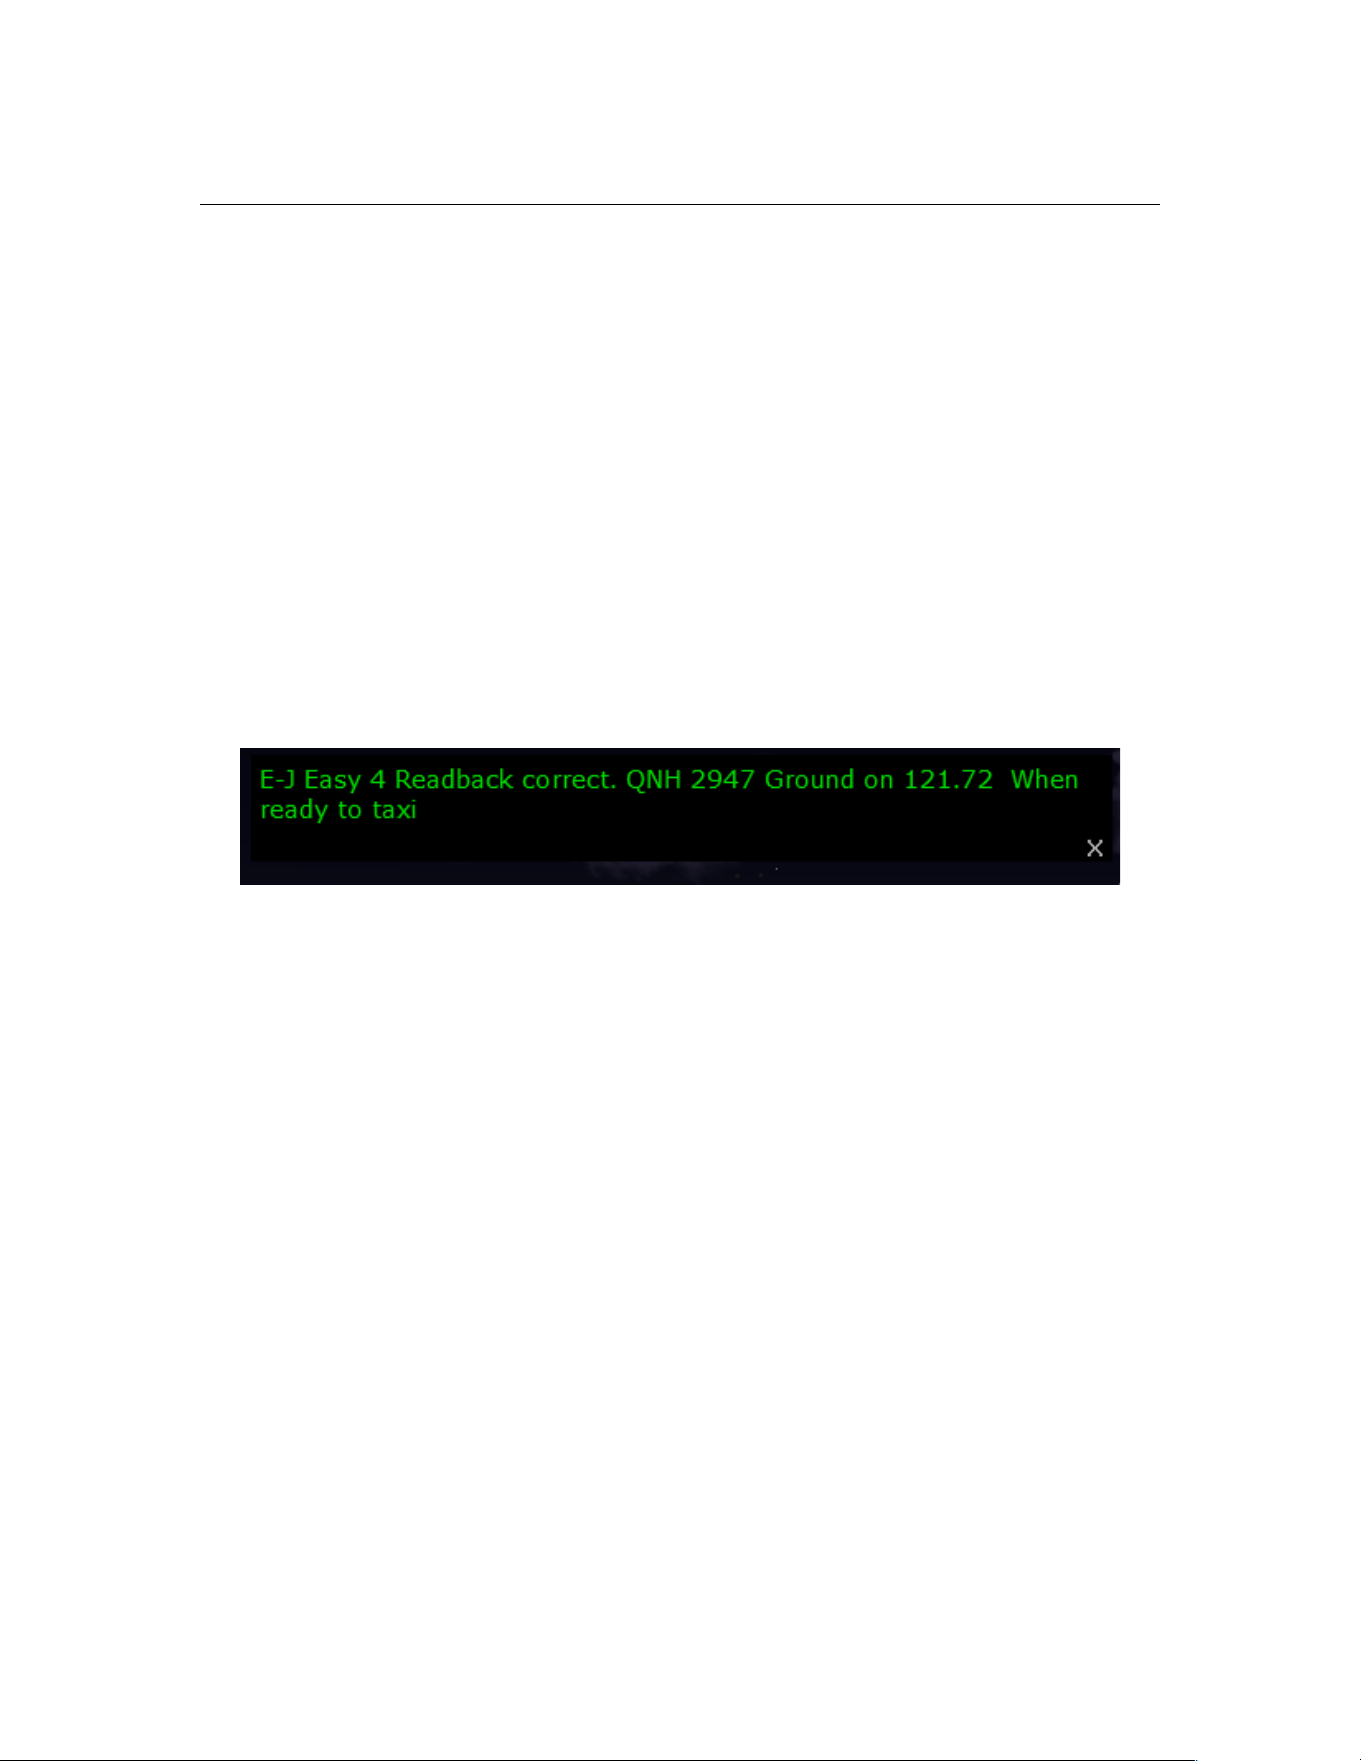
PF3 User Guide
screen for reference purposes. This could be even more useful if you
configure it to only show ATC messages to you!
Close window at Trx End - This option displays the window as soon
as an ATC transmission begins and closes it when the transmission
ends. If you also set the delay here the window will remain open for
this number of seconds after the transmission ends."
Display ATC to you only – Closed caption text will show only when
ATC is transmitting to you
Display ATC to/from you – Closed caption text will include two way
conversations between you and the ATC facility
Display ATC to/from AI – Displays Closed Caption text for ATC
messages too/from AI traffic
And here's what the window looks like:-
The window can be moved to any position on your screen and it will
remember its last position. It can be closed whenever you wish by
simply clicking on the small X at the bottom right of the window. The
window cannot be resized.
Hotkeys Window
Use PF3 Hotkeys Window - With this option selected you will see a
small window popup in your simulator showing a list of the current
hotkeys available according to which ATC facility you are currently
tuned. In order to keep the size of the hotkeys window as small and
unobtrusive as possible, hotkey descriptions are brief and hotkey
keying sequences abbreviated, but we're sure you will find this to be
an extremely useful aid to the enjoyment of PF3. This window will be
continually displayed unless you add a time delay, at which point it will
close automatically.
Please note: There has been a new hotkey introduced to support this
Hotkeys display window. The default is Ctrl+Shiift+T and its use will
toggle the window between Current Hotkeys available / Global Hotkeys
available / Close Window
Page 87 of 212
Copyright © 2007-2024 by OnCourse Software
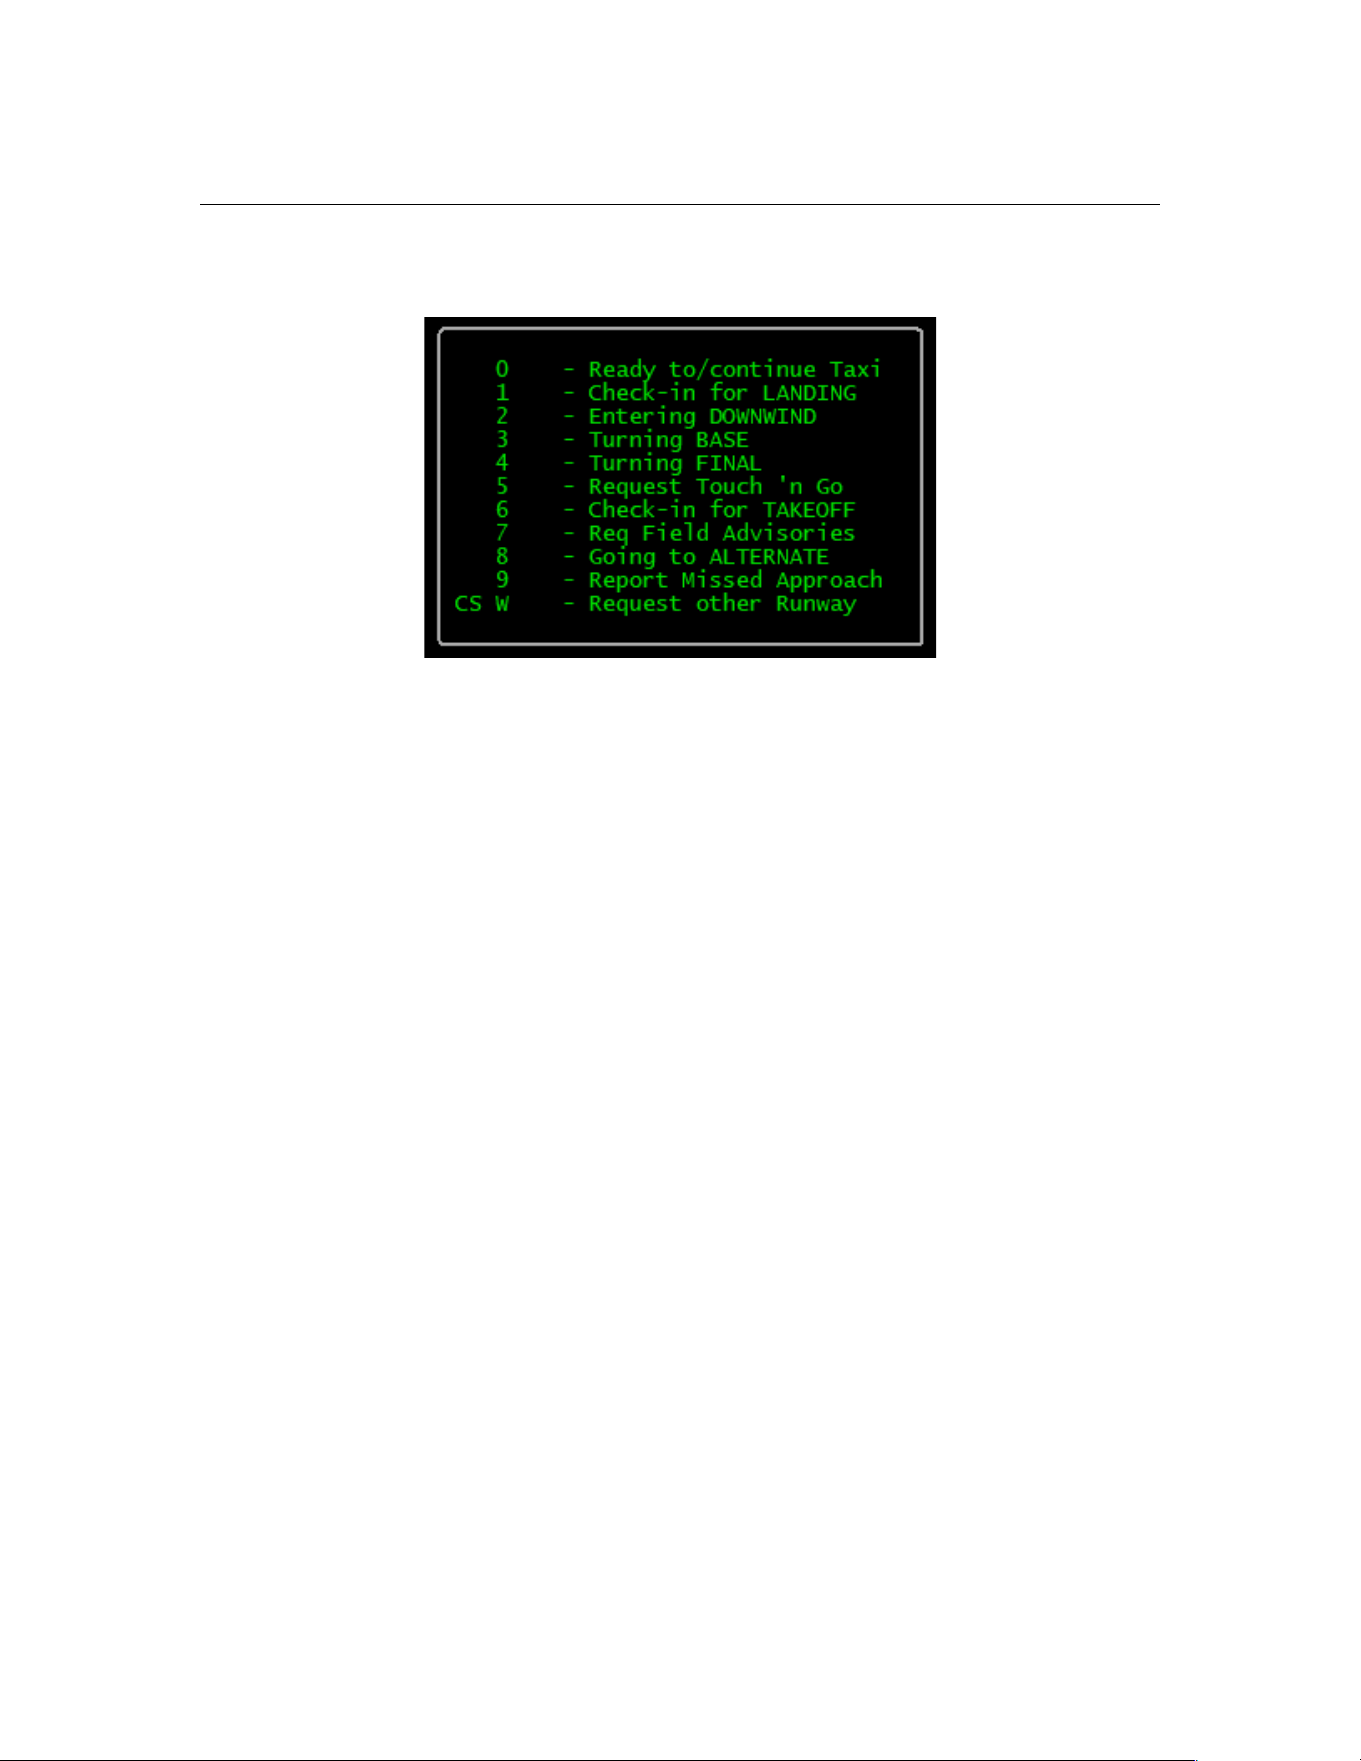
PF3 User Guide
And here's what the Hotkeys display looks like when tuned to Tower:-
PF3 Information Messages
Any non-ATC transmission messages would normally be sent to the
same Closed Captions window, but here you can choose to redirect
them elsewhere, if you wish. This does not change your AcarsX option
from the main Tweaks section. Eg. You can have your ACARS ATIS
display set to 'Remote' for showing in the PF3 Display utility and still
have non-ATC messages directed to the In-Sim (PF3 Captions)
window.
There are numerous messages that can be shown during a flight and
you have a choice to filter these message to another output. This can
either be the Captions window, the ACARS window (which we
recommend) or the FS default message window, simply by selecting
one of the following options
• PF3 Captions Window
• ACARS Window (recommended)
• FS Msg Window
Page 88 of 212
Copyright © 2007-2024 by OnCourse Software
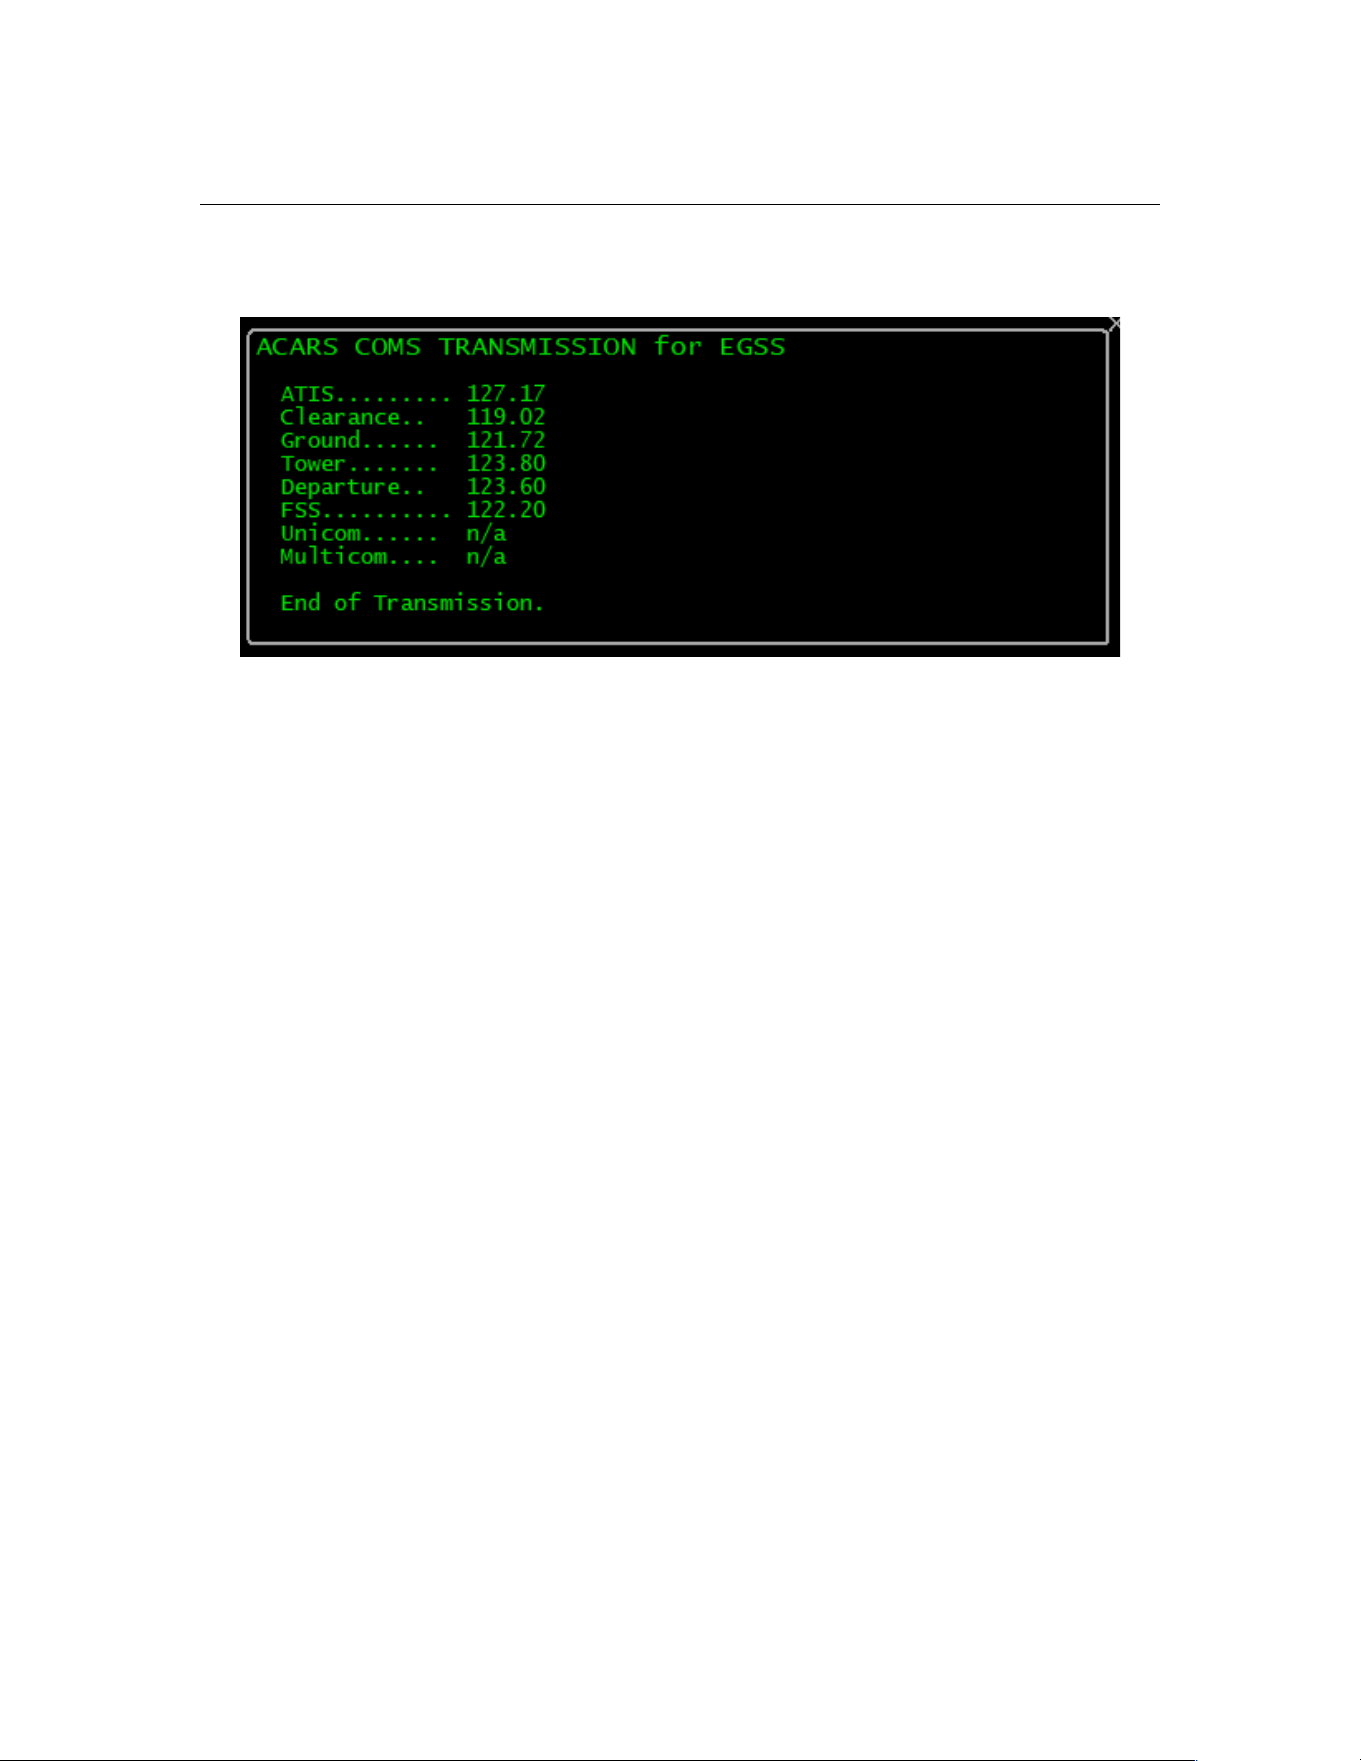
PF3 User Guide
Here's the ACARS window display:-
Always Use Real Weather
'Always Use Real Weather' means exactly that. Currently the default is
to always display a message asking if you are going to use Real
Weather with MSFS but now the new default is to have this option
selected, in this way you will not have to keep selecting 'Yes' before
each flight. So what does this option actually do I hear you ask. Well,
Asobo/Microsoft, in their wisdom, decided to deprecate the complete
weather interface in MSFS. Fortunately, we are able to collate 'local'
weather from SimConnect, but that's all. So, what PF3 does is to grab
real weather data online and use that for MSFS. The assumption is if
you use real weather in MSFS and PF3 accesses real weather data the
two 'should' hopefully match. Since MSFS has now been with us for
over three years it's highly unlikely this elusive weather interface is
going to return. So this new option simply means PF3 will continue to
use real weather but you won't have to keep confirming that's what
you want it to do for each flight. Obviously if you prefer to do so then
simply unselect this new option.
Page 89 of 212
Copyright © 2007-2024 by OnCourse Software

PF3 User Guide
TGS Messages Override
By default all TGS messages are directed to the FS Message Window.
However, this does not always work correctly in MSFS as the interface
is not defined in their SDK. So (for P3D and MSFS users only) you can
now redirect the TGS messages to a different route to your choice for
'PF3 Information Messages'. For instance, you may have all your other
messages going to the ACARS window but maybe that doesn't really
suit or look right for TGS messages... so these options allow you to
select where you would like to see these messages or you can even
choose to turn them off completely.
The following available options are really self explanatory:-
Suppress TGS Message
Same as PF3 Info Messages
PF3 Captions Window
ACARS Window
Personally I find the 'PF3 Captions Window' works nicely if you're not using it
for ATC captions. I use RemoteText for my ATC captions so that leaves the
InSim Captions window free just for TGS messages.
MSFS PMDG 737 Specifics
Added in 3.22.0, these options (select LVL CHG and select MCP APP
Mode) will only work when using PF3's VCP Mode 3. Currently, when
using the PMDG 737, when you're given a new altitude from ATC the
MCP Alt will be changed by the VCP but that's it. The aircraft will not
commence its climb/descent until you intervene manually.
Select LVL_CHG / ALT INTV - Choosing the 'Select LVL CHG' option,
if you're not using the FMC and only using the AP, your trusty VCP will
automatically select LVL CHG for you on after receiving new altitude
instructions from ATC and the AP will complete the climb/descent
whilst maintaining your speed. If you are using the FMC and you have
the VNAV mode activated your VCP will then select the ALT INTV
button on receiving new altitude instructions, the FMC will then handle
your climb/descent accordingly.
Select MCP APP – If you select this option, when you are 'Cleared for
the ILS' by ATC your VCP will automatically select the MCP APP Mode.
We have only tested these using the PMDG 737-600 but believe they
should work on all variants. Please let us know if they do or do not.
Page 90 of 212
Copyright © 2007-2024 by OnCourse Software

PF3 User Guide
7.1.27 Validate your PF3 Installation
Selecting this option will start the PF3 utility to check each of the files that
should have been installed with PF3.
A log file is created in the PF3/Logs folder and will list the names of any
missing file(s). If this utility confirms you have any missing files you should
report this to OnCourse Software at :-
7.1.28 Deactivate your PF3 License on this PC
This is where you can deactivate your PF3 license, which will then allow you
to activate it on another machine. You may install PF3 on as many computers
as you wish, but you can only have it activated on one PC at any one time.
Page 91 of 212
Copyright © 2007-2024 by OnCourse Software
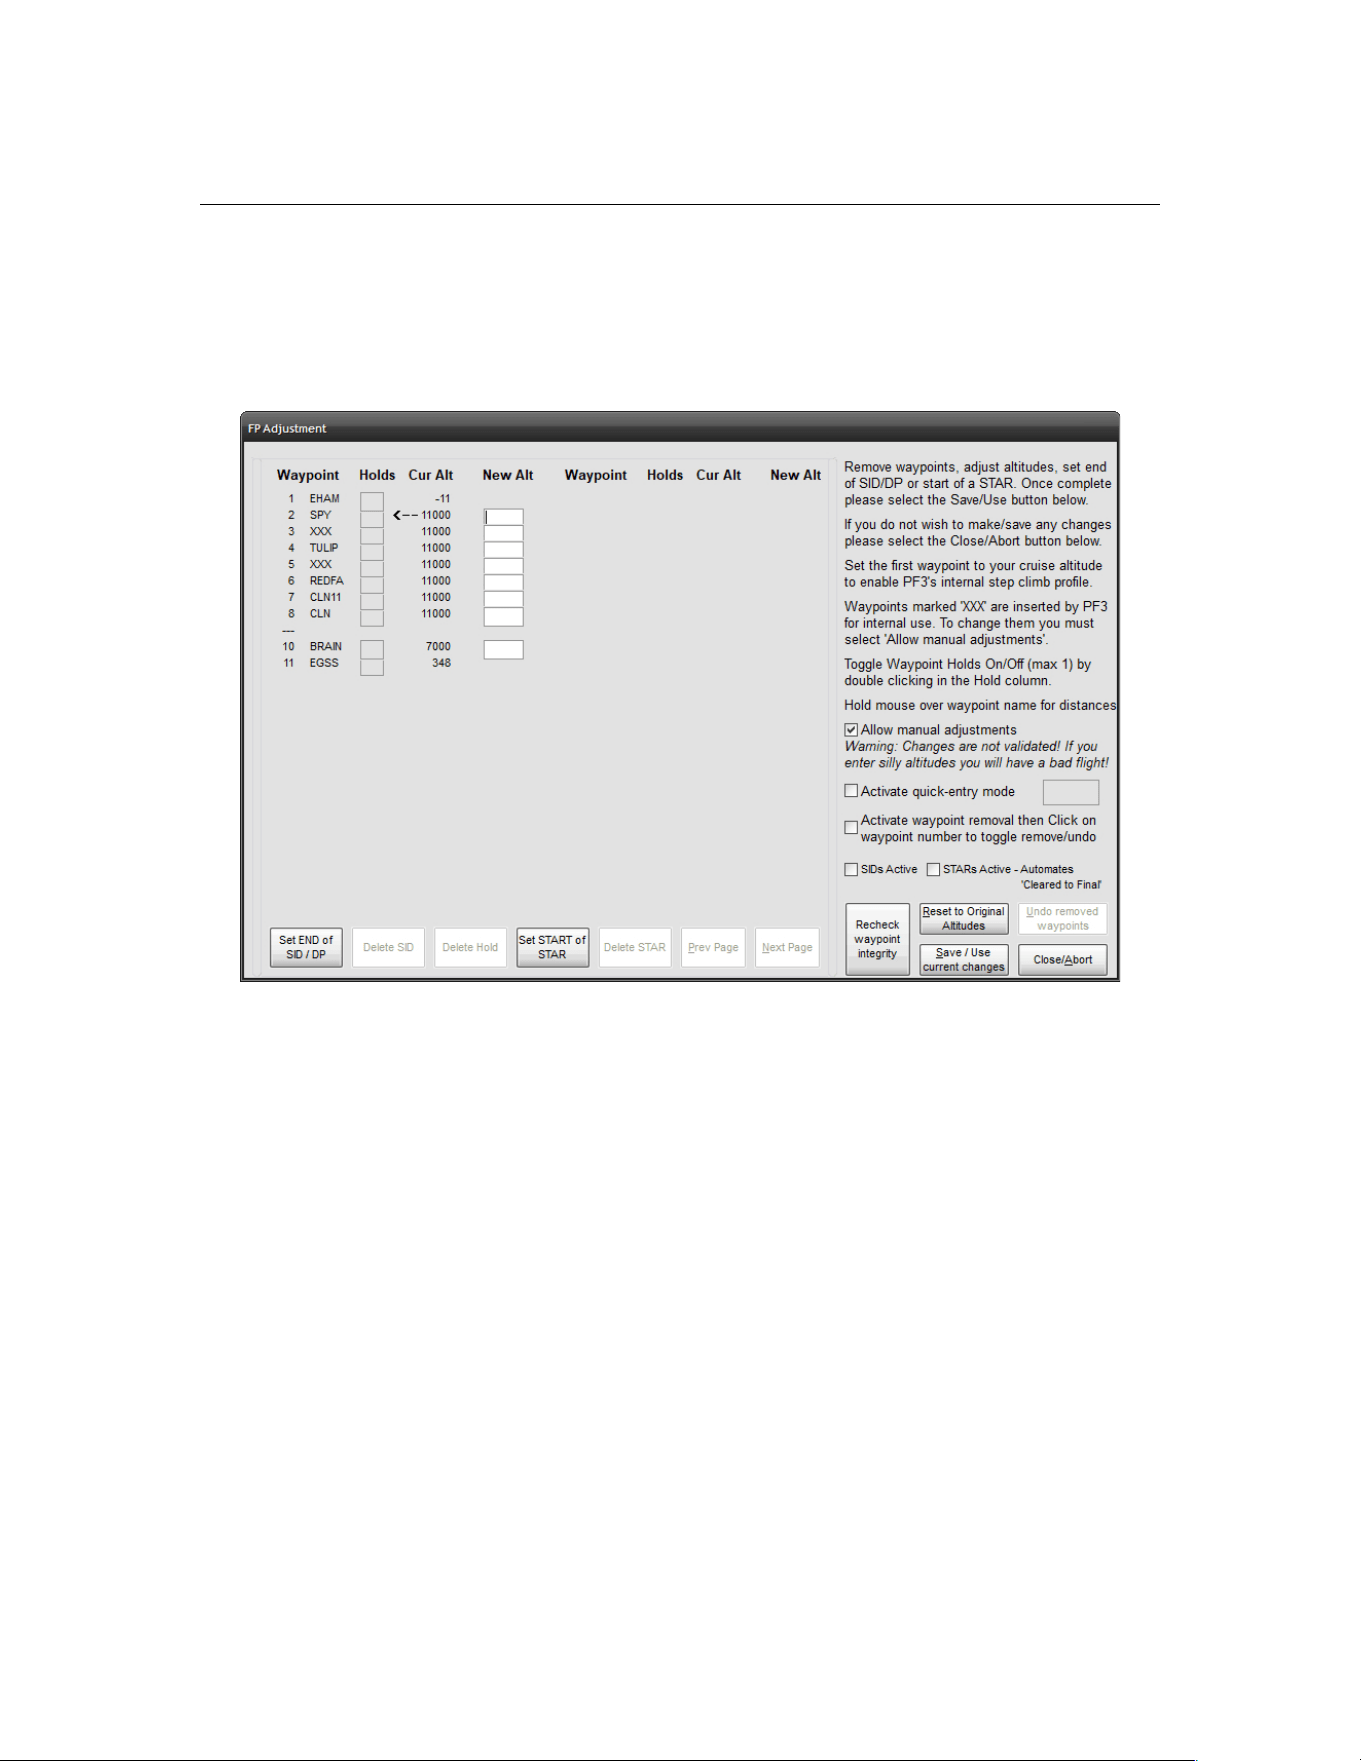
PF3 User Guide
7.1.29 Adjust Altitudes, SIDs, STARs and Holds for Selected Flight Plan
From the main menu display, once you’ve selected your flight and are ready
to connect to FS, there is another option of which you should be aware. Press
the Adjust Altitudes, SIDs, STARs and Holds for Selected Flight Plan
button and you will be presented with the following:-
This example shows a flight plan from EHAM to EGSS
New to PF3 ver 3.20.0 are the SID/STAR activate options. These mirror the
settings from the SIDs/STARs page and have been added following a user
request to have them accessible when adjusting the flight plan. Please
remember these are still global settings and are not linked to any one
flight plan.
Here you see each of the waypoints in your flight. If there are more than will
fit on one screen you can use the Next/Prev buttons to scroll back and forth
as necessary. From this screen you may alter any of your crossing altitudes,
but remain aware of the capabilities of your aircraft!
Also on this screen you are able to configure and setup several other features
for your flight. The most obvious change you might want to make will be
waypoint altitudes and this can be done in a couple of different ways. Firstly
you can simply enter the desired altitude against each waypoint, which is fine
and dandy, but if you're in a hurry and your flight plan has a hundred
waypoints you may want to consider using PF3's Quick Entry Mode which was
designed to make the job even easier. Want to know more? Okay, read on...
Page 92 of 212
Copyright © 2007-2024 by OnCourse Software
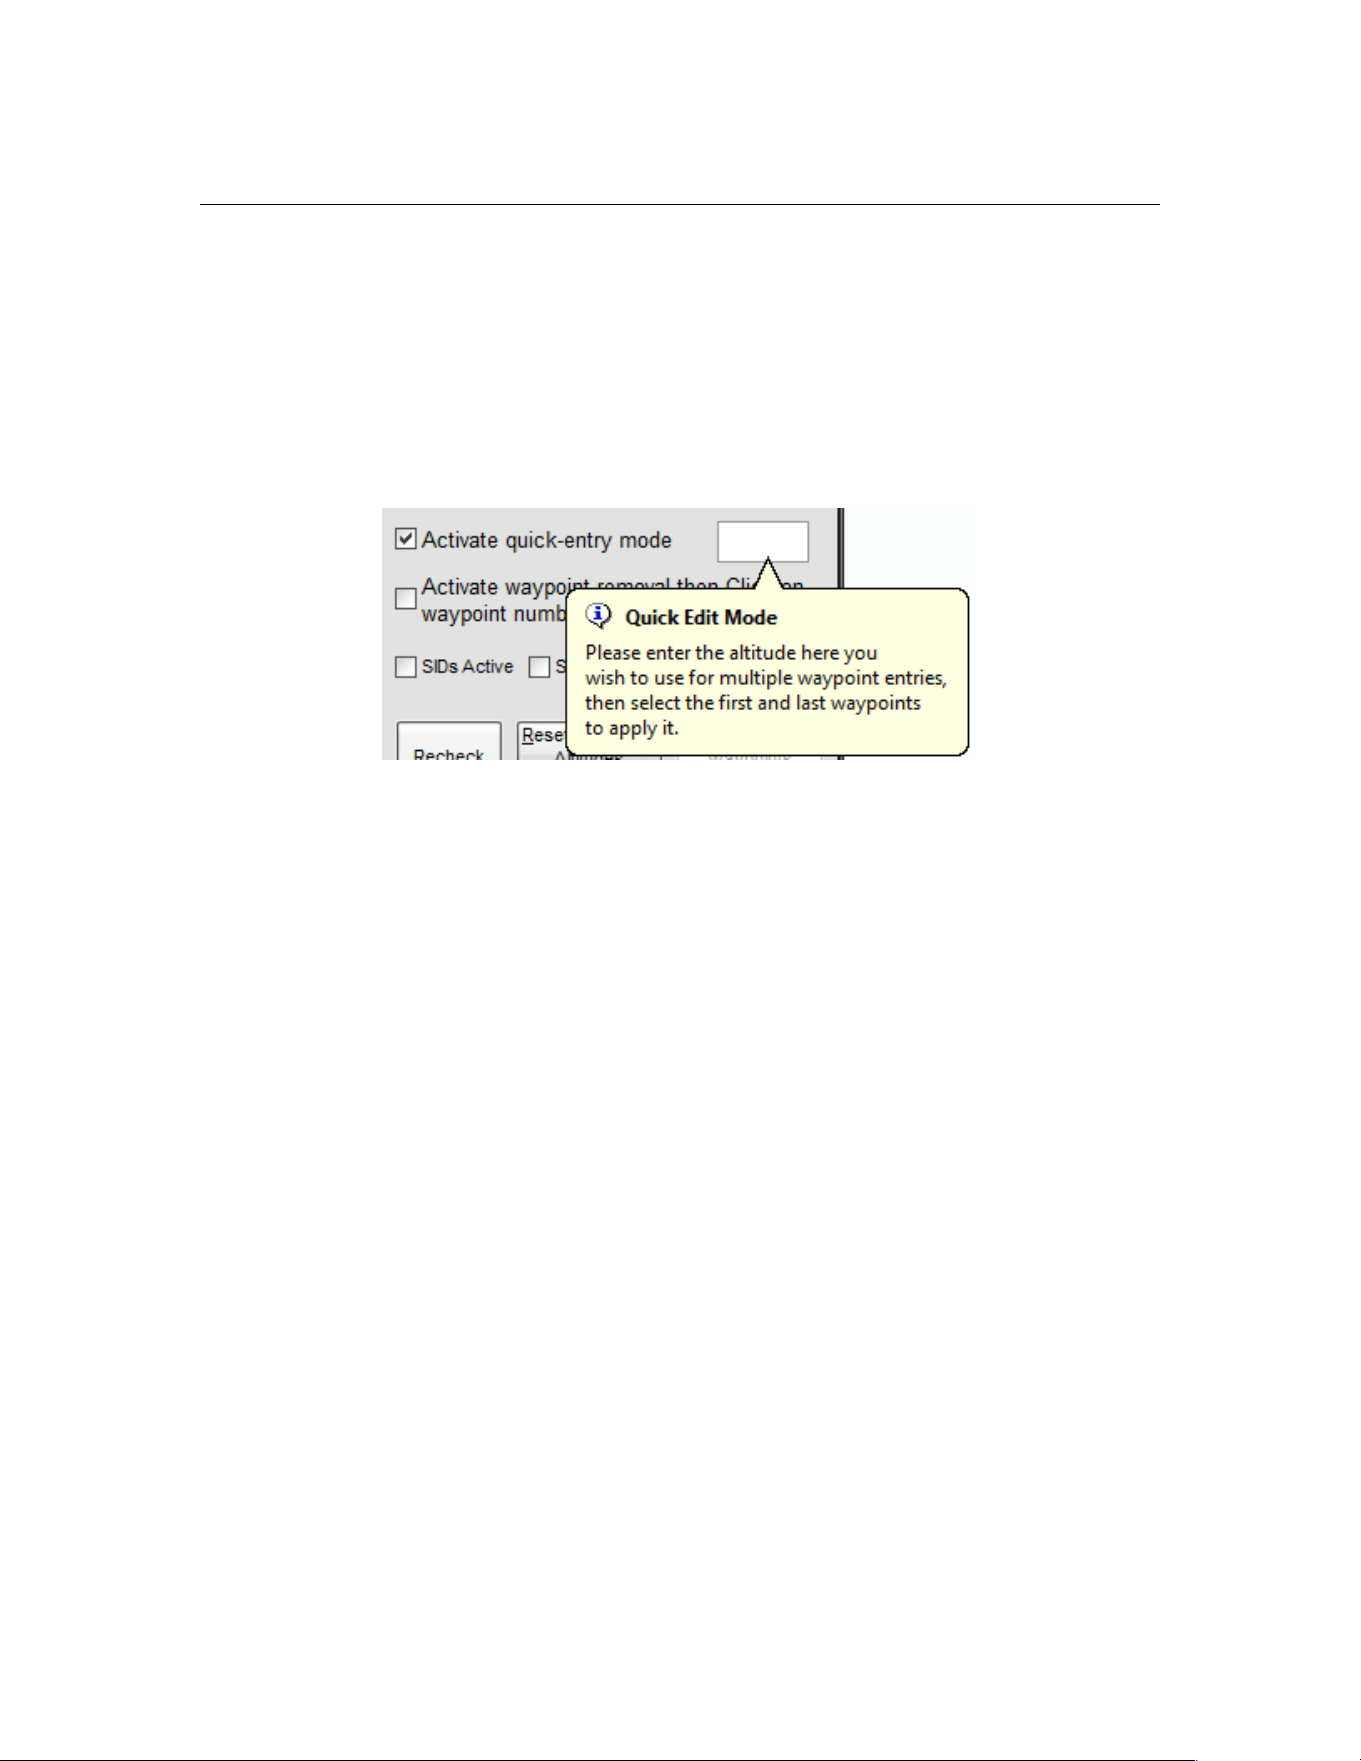
PF3 User Guide
In the above screen shot you will see the cruise altitude is set at 25,000’.
Let’s imagine this is either incorrect or you require it to be 22,000 for
whatever reason (maybe you don't like heights). Rather than having to
manually re-enter this for each waypoint all you have to do is select the
option near the bottom right of the screen to turn the Quick Entry Mode ON.
A small Help type Balloon will then appear, prompting you to enter the new
altitude you want to apply to selected waypoints:-
For this exercise enter 22000 for the new altitude
Now move your mouse to the left and double-click in the altitude box for the
first waypoint you want to change… you’ll see a small arrow displayed to the
right of the altitude entry box when the double-click is recognized.
Page 93 of 212
Copyright © 2007-2024 by OnCourse Software
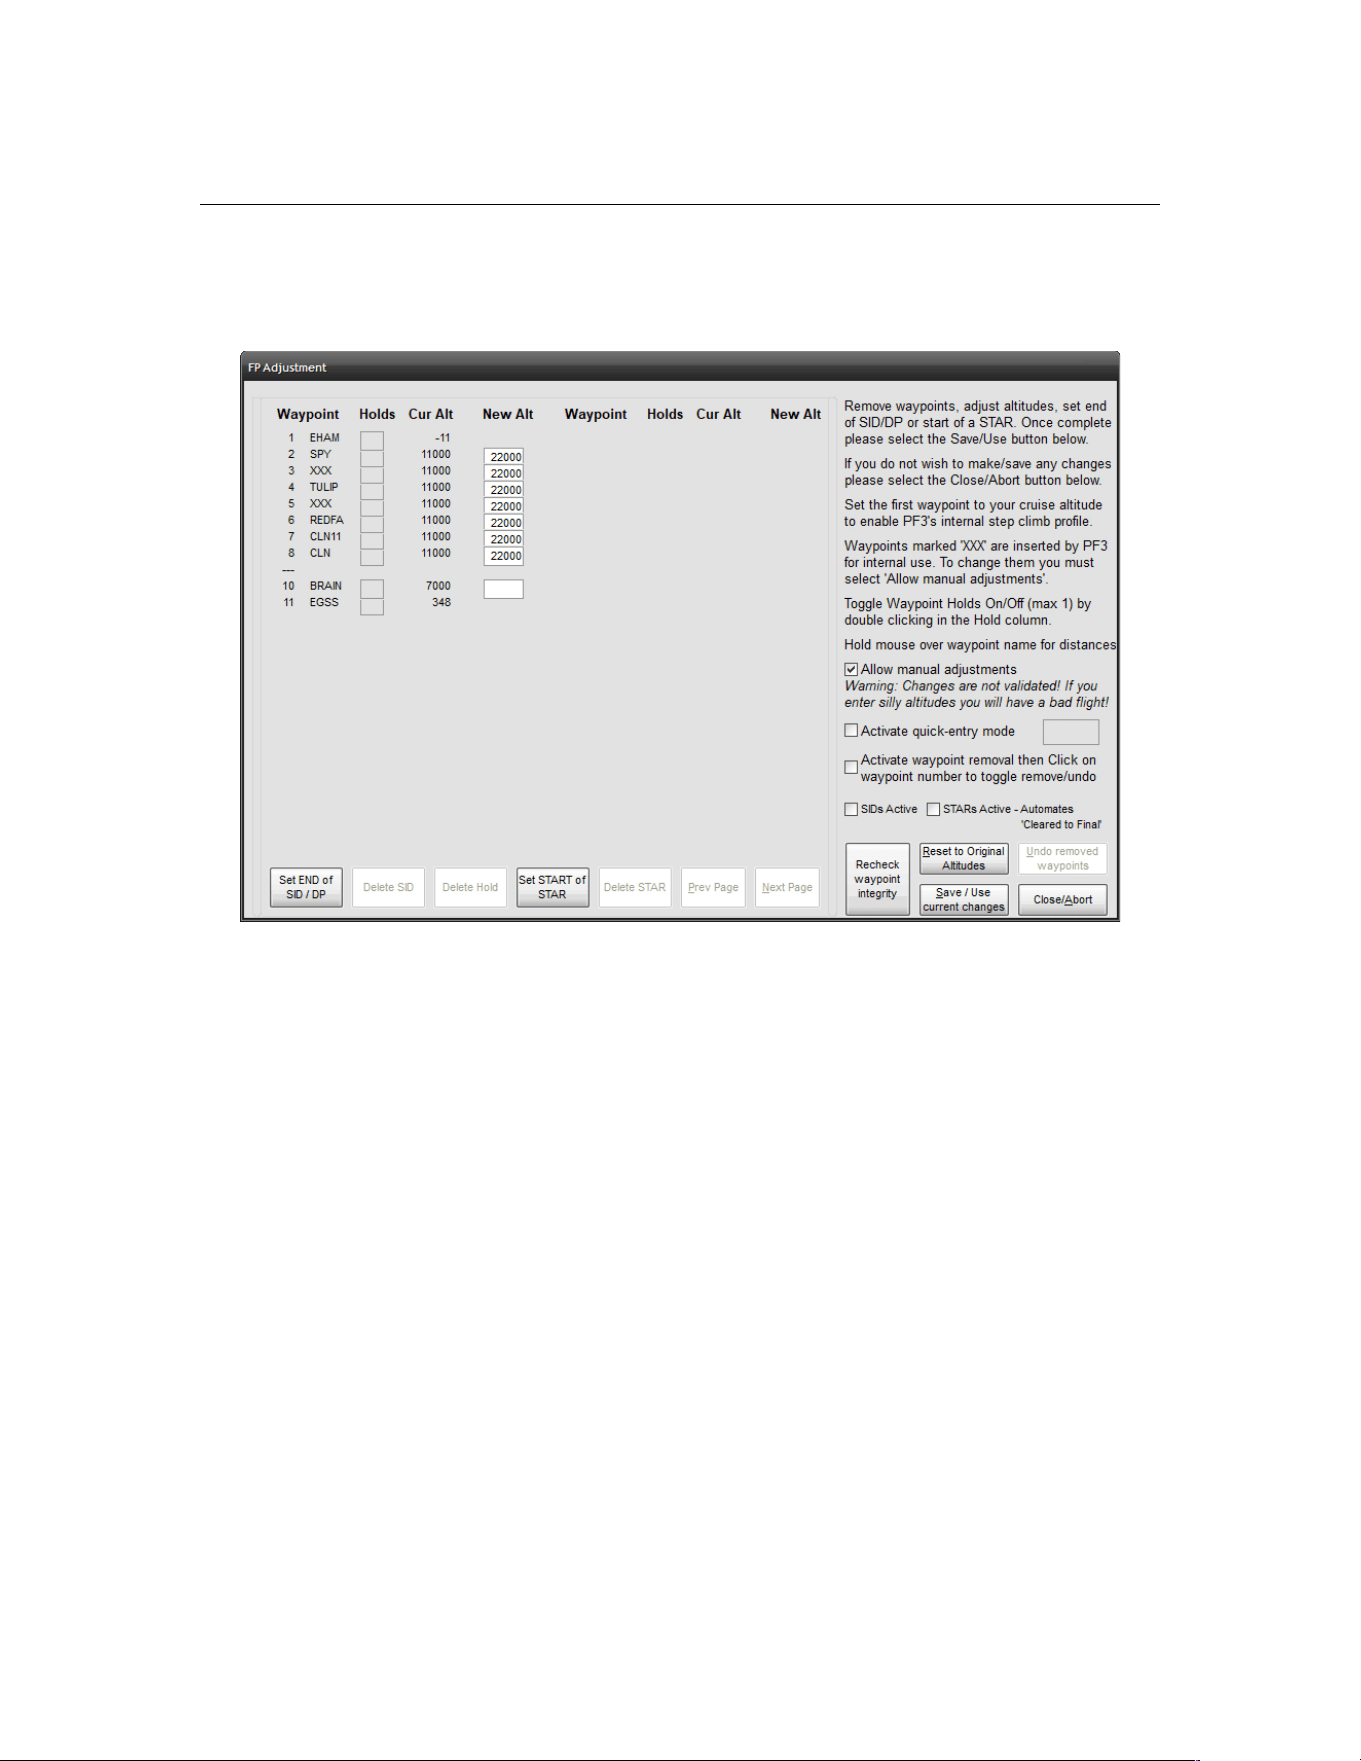
PF3 User Guide
Now do the same for the last waypoint., at which point your new altitude will
be copied into each of the waypoint’s New Alt entry boxes. (see below)
The waypoints listed will be exactly the same as those in your original flight
plan. PF3 does NOT drop ANY flight plan waypoints. If you see any duplicates
in this list that's because they are in your flight plan. PF3 will, at times, insert
waypoints designated as XXX. These are for internal use and usually indicate
the point in your flight plan that you will reach the boundary of another ATC
control zone and at which point you will be handed off to the new control
facility (if you are at the correct hand-off altitude of course). However, if you
are changing altitudes for all waypoints you will need to change these XXX
waypoints also, otherwise your passengers will be in for an interesting flight.
The way to achieve this is to select the Allow manual adjustments option
which you will find just above the Activate quick-entry mode option. Once
selected you will be able to change any XXX waypoints and thereby maintain
a good flight profile.
On this page you can hover your cursor over the waypoint names and a popup display
will show the distance to the previous and next waypoints as well as to your departure
and destination airports. Checking the distance to neighbouring waypoints is
particularly important should you decide to change any waypoint altitudes, because
PF3 does NOT automatically adjust altitudes of nearby waypoints when you change the
altitude of a waypoint or series of waypoints.
Please Note: During extensive testing we have found it best to have
your cruise altitude set from your very first waypoint and allow PF3
Page 94 of 212
Copyright © 2007-2024 by OnCourse Software

PF3 User Guide
to handle its internal step climbs. This saves you the hassle of having
to enter step climbs manually.
Now on to SIDs and STARs, which you can now configure from this same
waypoint altitude adjustment screen to complement and/or override the
entries on the main SID/STAR display page.
New buttons below the waypoint listing allow you to set the end of a SID (DP)
or the start of a STAR.
Now, before we all get confused let's explain a little more. Currently, if you
setup a SID you set an altitude and PF3 will assume your published departure
is complete once you reach that altitude or reach the first waypoint in your
flight plan (whichever occurs first) and at which point you are back under ATC
control. However, using the Set END of SID/DP button you can select any
waypoint in your flight plan to mark the end of your published departure. If
you use this feature PF3 will use the same altitude you may have set in the
SID/STAR page and will also turn on the global SID Active option if it is
currently off. Also, just like we do now, if you haven't set an altitude then
PF3 will automatically assign one at the time you receive clearance.
In much the same way a STAR works currently is this... you are automatically
cleared to finals at pilot's discretion upon reaching the last waypoint in your
flight plan. But from this screen you can also select any waypoint in your
flight plan to commence flying your published approach.
When you reach that waypoint ATC will clear you to continue via your STAR...
"Easy 211 continue via the Sierra Tango Approach... remain on this
frequency, I'll have traffic for you'.
...and then, when you reach the last waypoint in the flight plan ATC will take
over again and provided the STARs Active option (SID/STARs page) is set to
OFF, they will vector you to the FAF. If the STARs Active option is set to ON
you will not receive further vectors and will be expected to navigate to the
FAF and then contact Tower control when established.
Whilst flying your published approach you may of course descend accordingly
and indeed you are advised to ensure you reach the last waypoint in your
flight plan at a suitable altitude in order to be able to complete your approach
to the runway. If you leave your self too high please don't blame PF3.
One very important thing to remember... when you choose a waypoint to
begin your STAR you will still be expected to navigate to each of the
remaining waypoints in your flight plan.
The other feature you activate on this screen are Holds. In the Holds column
you will see a clickable box next to each valid waypoint at which you can
specify a Hold. Basically these are VORs or NDBs. You can only assign one
hold location per flight plan and you do so by simply double-clicking the hold-
box next to the waypoint. When you do so the letter H appears in the box. If
Page 95 of 212
Copyright © 2007-2024 by OnCourse Software
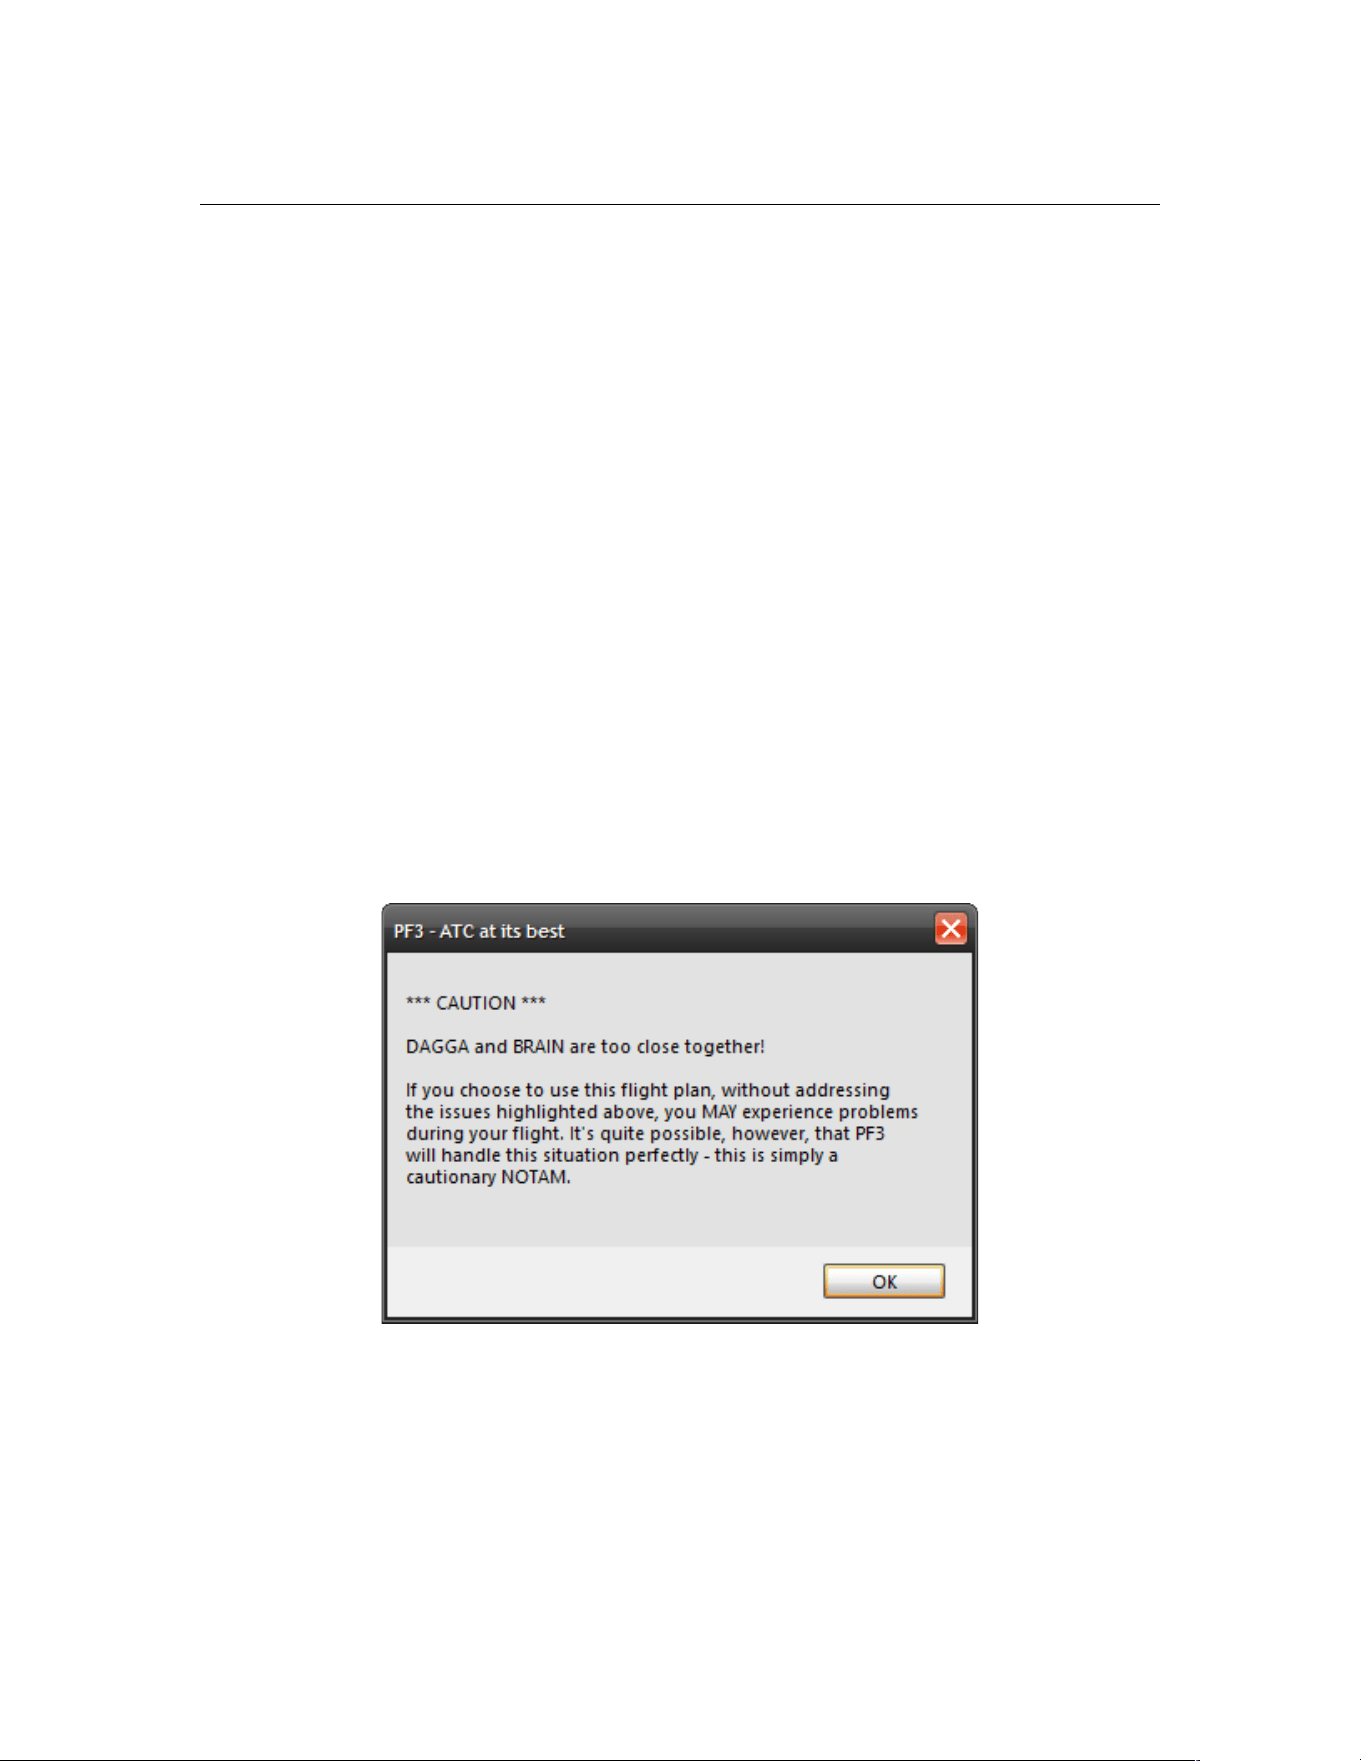
PF3 User Guide
you later decide you don't want the hold there just double-click the H to
remove it, or use the Delete Hold button.
Please Note: When you designate a Hold it will only occur if you are at or
below 10,000' at the holding point or are currently descending to 10,000' or
below. Also you will be at the holding point for anything from 5 to 20 minutes
so if you're in a rush to get your tea we would suggest you don't set a hold.
Finally, we come to a new feature for PF3 version 3.10... Activate waypoint
removal. When you select this option you can then click on any of the
waypoint numbers or names to remove/deactivate that waypoint from the list
and from your loaded flight plan. If you make a mistake you can click on the
number again to undo the remove operation.
So why would you want to remove a waypoint I hear you ask. Well as
mentioned earlier, PF3 doesn't remove any waypoints from your flight plan,
unlike earlier versions, but it does check to see if any of them are deemed to
be too close to each other or to your departure or destinations airport. Being
too close together 'could' result in your flight not being as smooth as it could
be, so we recommend you consider removing any such waypoints before
continuing. PF3 will warn you about these waypoints as soon as you select it
from the Load a Flightplan display. See the following example for a flight plan
loaded for EHAM to EGSS,
As you can see this is a cautionary NOTAM only and the choice is entirely
yours what you do with the information. But for the purpose of this exercise
we're going to address the point raised.
Page 96 of 212
Copyright © 2007-2024 by OnCourse Software
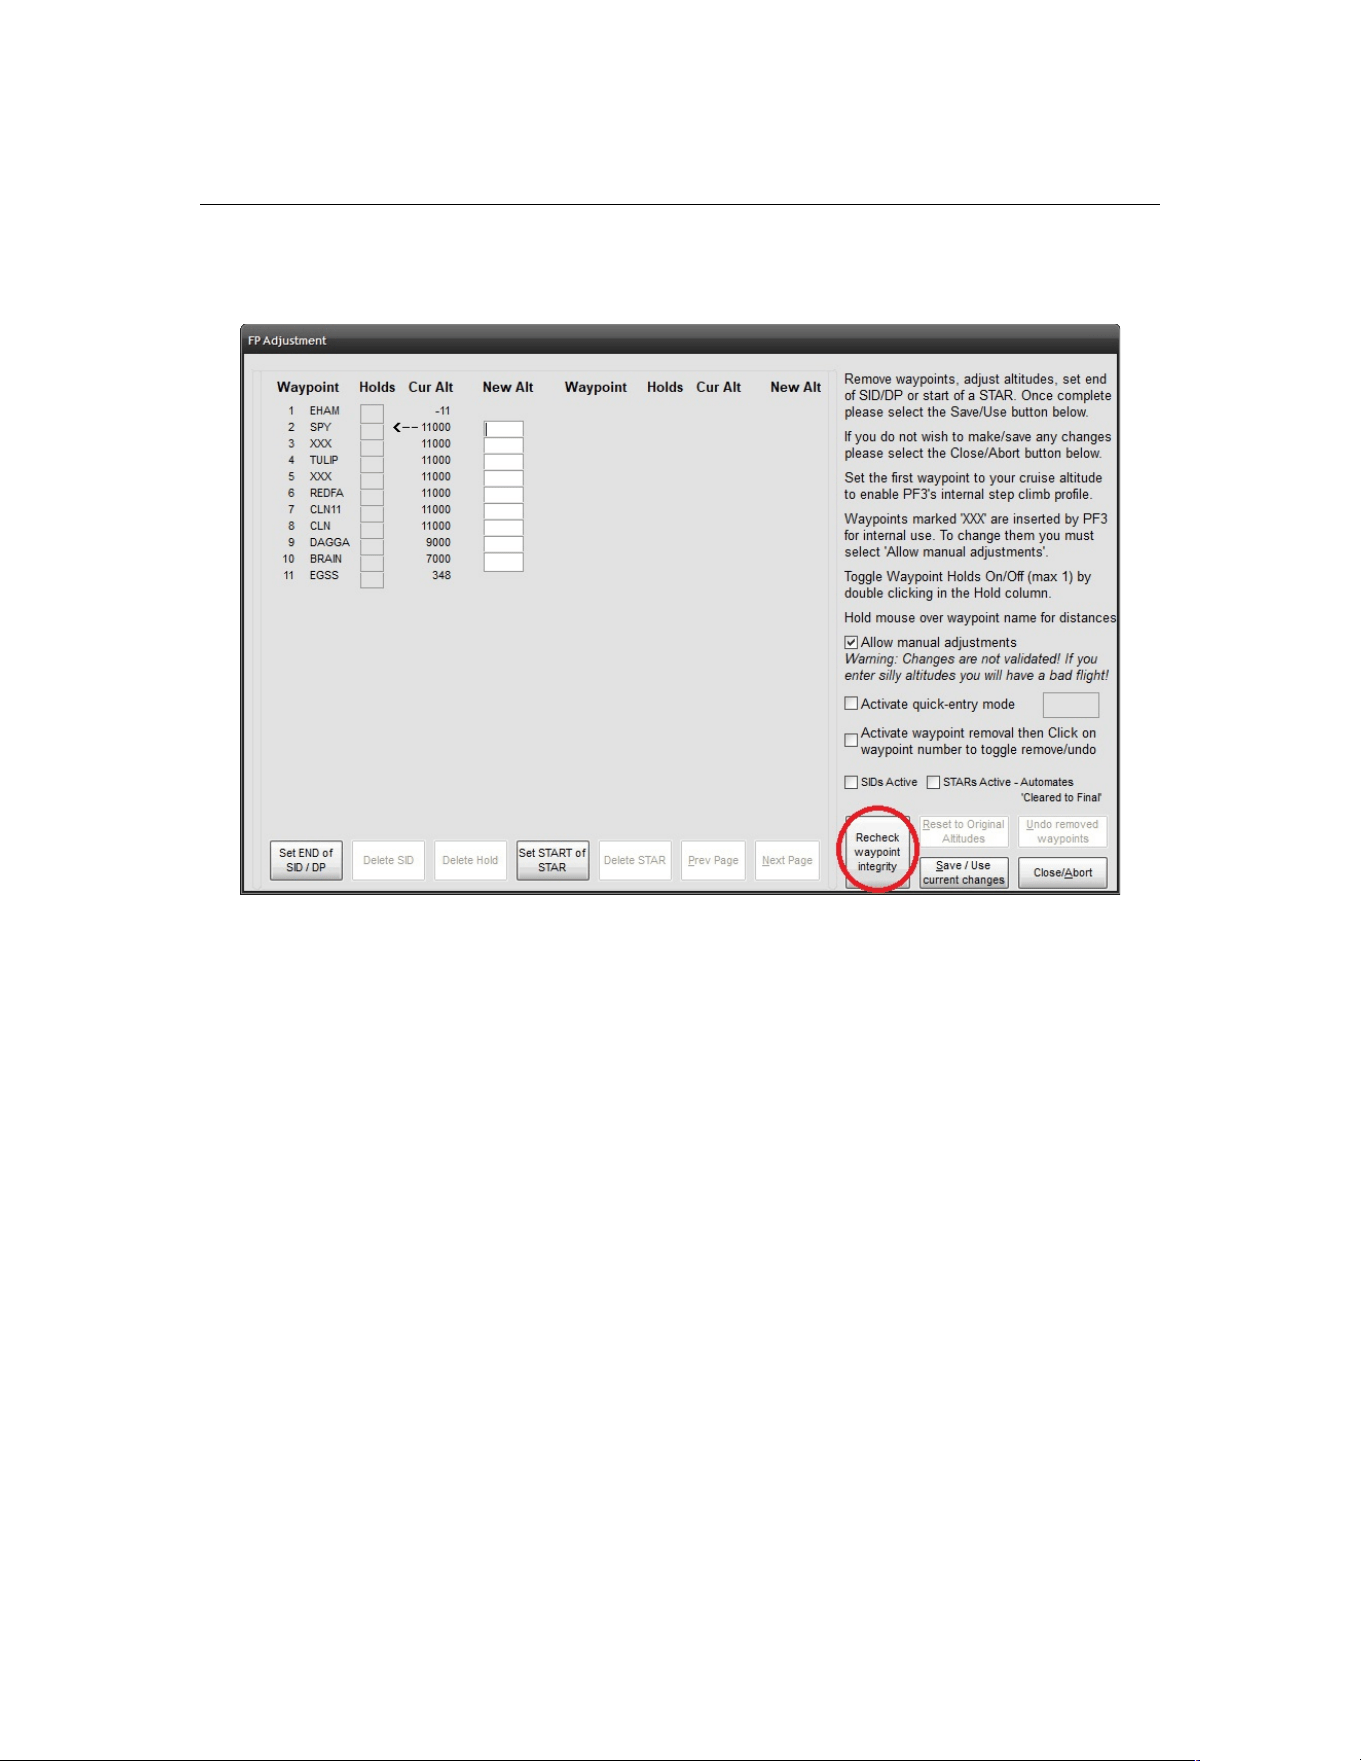
PF3 User Guide
So let's go back to the Adjust Altitudes section to continue our journey.
If you're anything like me, by the time you get back to this display you'll have
already forgotten what waypoints the NOTAM mentioned... which is why I
included this new button... Recheck waypoint integrity. Just hit the button
and your cautionary NOTAM is re displayed. Not only is this handy for those
with a short memory span but also for times when loading a long flight plan
with several notifications. Then, as you make your way through adjusting the
plan you can keep checking the current situation as the message is dynamic.
Please note: PFE doesn't actually 'change' your flight plan other than
internally. This is just a way for you to be able to get on with your flight by
simply removing those waypoints that 'may' cause an issue without having to
go back to your flight planner to do so.
Page 97 of 212
Copyright © 2007-2024 by OnCourse Software
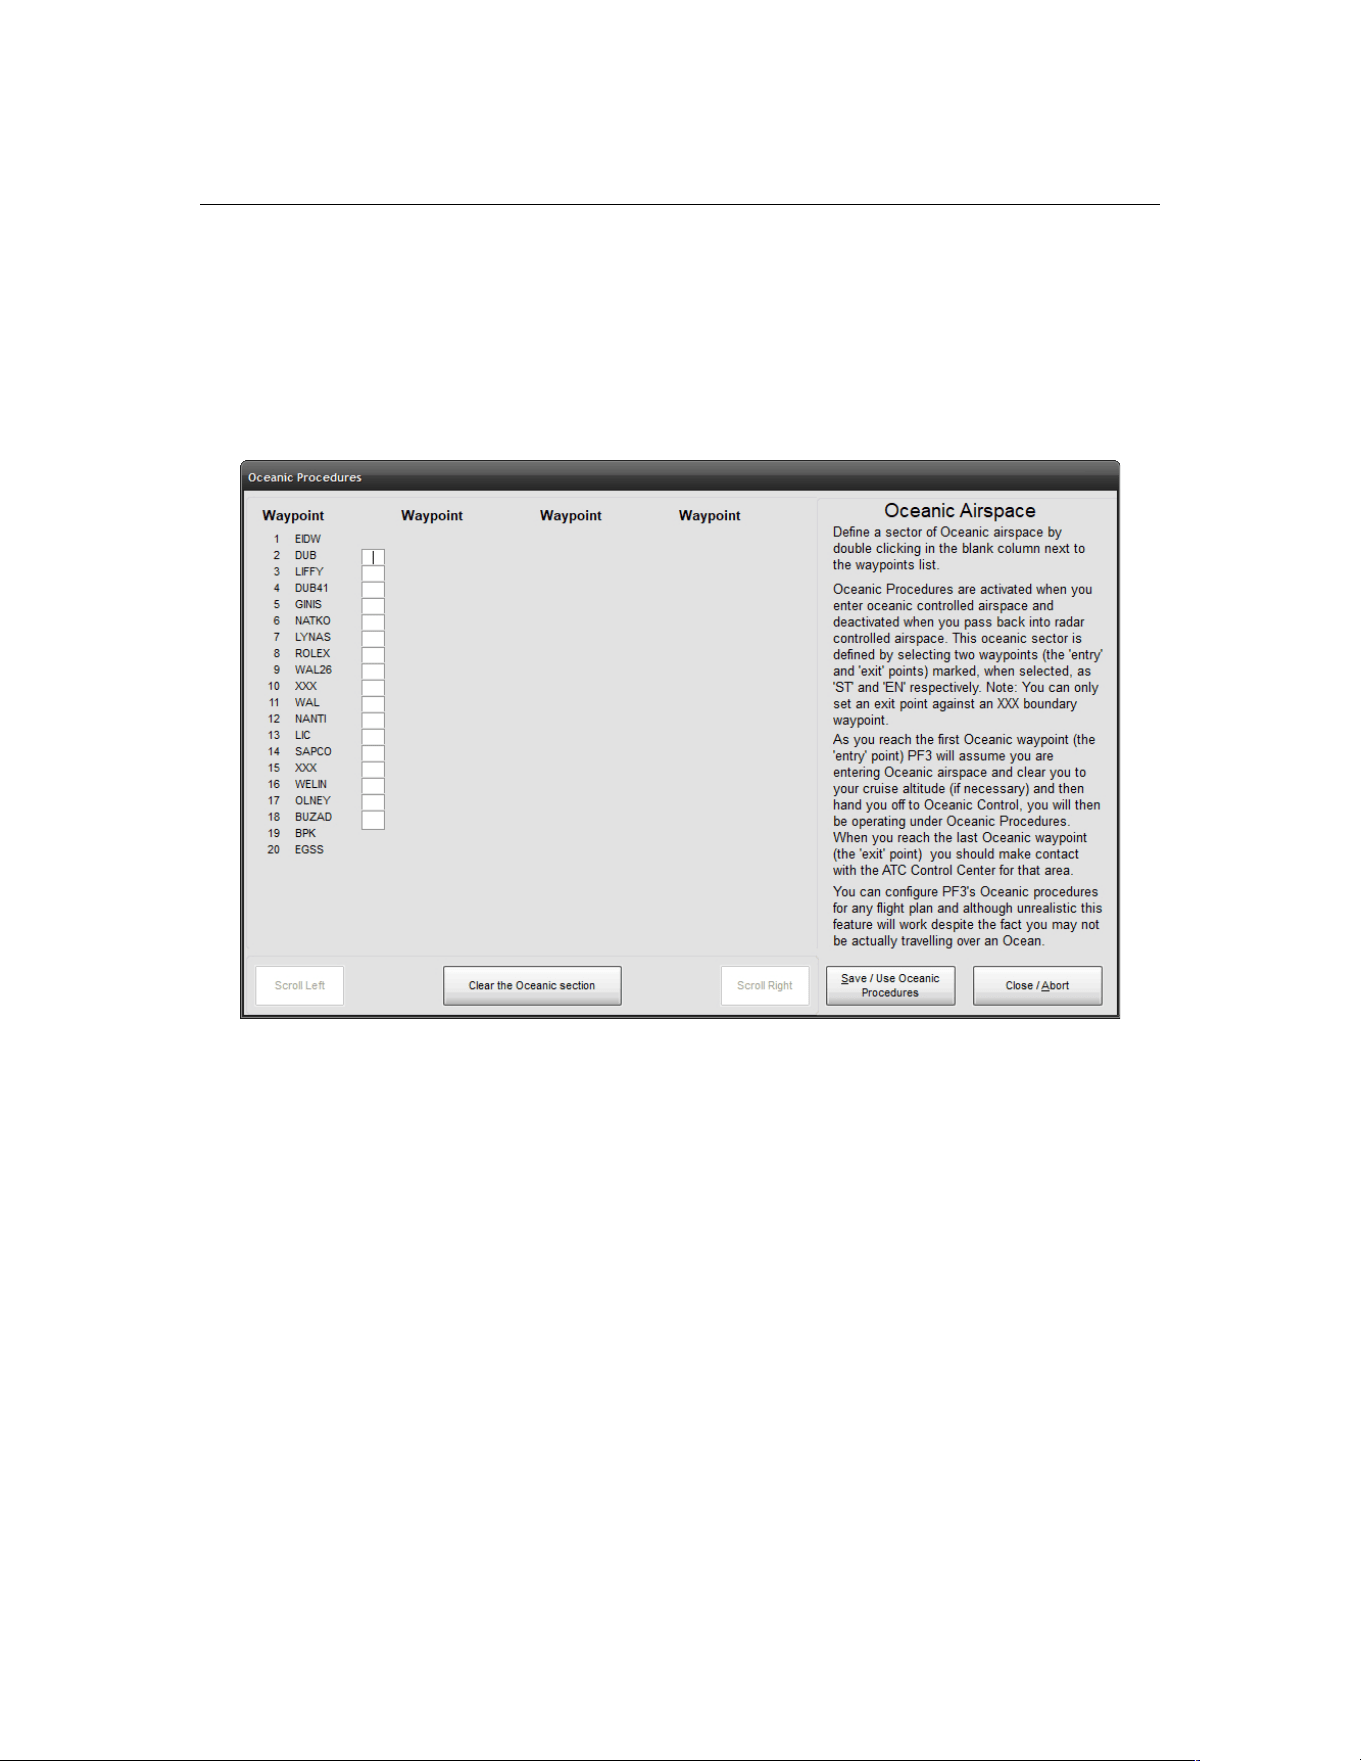
PF3 User Guide
7.1.30 Define Oceanic Airspace for the Selected Flight Plan
From the main menu display, once you’ve selected your flight and are ready
to connect, there is another option found just above the Waypoint
Adjustment's button named Define Oceanic Airspace for the Selected
ADV Flight File. Selecting this button will display the following screen:-
This feature expands on our North Track Atlantic Crossing procedures
between Shanwick/Gander control centers, which is handled automatically by
PF3. Following several user requests we also provide a means by which you
can define Oceanic Airspace to any of your flight plans and thereby operate
under Oceanic Procedure Control whilst flying through that defined area.
This is very different to our Shanwick/Gander feature, because that works
with actual control centers from your flight plan, whereas this new feature
requires the user to define the start and end points (using flight plan
waypoints) as to where the oceanic airspace is. Now, this can be as realistic
or unrealistic as you like. The flexibility of this new feature allows you to
define oceanic airspace to ANY flight plan, so you could in fact simulate an
oceanic crossing over land... but that's entirely up to you. And that is exactly
how I tested this feature during development, as I obviously did not wish to,
nor have the time to spend, actually flying over an ocean. So my tests were
always flying over the English channel from the UK to France, operating under
Oceanic Procedures whilst crossing the channel... it was fun!
You will see that this new screen is somewhat similar to the waypoint altitude
adjustments display screen, inasmuch as it lists each waypoint in your
Page 98 of 212
Copyright © 2007-2024 by OnCourse Software

PF3 User Guide
currently selected flight plan, beside which is a new column containing
open/blank text boxes.
Oceanic Procedures are activated when you enter oceanic controlled airspace
and deactivated when you pass back into radar controlled airspace. This
oceanic sector is defined by selecting two waypoints (the 'entry' and 'exit'
points) marked, when selected, as 'ST' and 'EN' respectively. You define the
sector simply by double clicking in the blank column next to the relevant
waypoint... firstly to mark the starting point and then to mark the end point.
During your flight, as you reach your first selected oceanic waypoint (the
'entry' point) PF3 will assume you are entering oceanic airspace and clear you
to your cruise altitude (if necessary) and then hand you off to Oceanic
Control, you will then be operating under Oceanic Procedures. This includes
simulated HF radio transmissions using real world SELCAL sounds when ATC
contact you. Your VCP will also radio through position reports at each
intersection/waypoint as you progress through the flight.
See section 11 for more details on these procedures and how they work in the
real world.
When you reach the last oceanic selected waypoint (the 'exit' point) PF3 will
assume you are leaving oceanic airspace and hand you back to the next radar
controlled facility.
Obviously we don't have the necessary data for worldwide oceanic control
areas, nor do we have any recorded oceanic control names (other than
Gander and Shanwick) so when flying under oceanic control in any other area
not covered by Gander/Shanwick the facility you tune to will simply be called
'Oceanic Control'.
7.1.31 PF3 Profiles
New to version 3.10.50 - This allows you to setup PF3 for various different
reasons... maybe you need a different setting when using PF3 for VFR and
IFR flights. Maybe you like a different setting per aircraft you use. Until now
you would have to make those settings prior to using PF3 for your flight. With
this new PF3 feature you can now create as many setup versions as you
wish. It's all pretty self explanatory when you start the process. Profiles are
accessed via either the main Options #1 page or the Options #2 Advance
Options page. This seemed the best idea as it would only be after making
changes to those options you would need to access the Profile section. The
currently loaded Profile name will also appear on the main PF3 screen just
above where the currently loaded flight plan appears.
Page 99 of 212
Copyright © 2007-2024 by OnCourse Software

PF3 User Guide
8. PF3 FEATURES IN MORE DETAIL
8.1 The TGS Gauge
PF3's unique TGS (Taxi Guidance System) provides full taxi instructions
to/from the runway. When configured to do so you will hear your VCP giving
instructions like… “next left into delta… bear right into bravo two… straight
on… gate two seven on the left…”, and you will also be able to see the general
direction of the next taxiway waypoint by using the optional (original) TGS
gauge, the all new TGS2 gauge or the standalone TGS Display program. If
you don't want to use either you could simply watch your FS heading bug.
The installation of this optional (original) gauge is explained fully in David
Leesley’s excellent tutorial – see section 22
New to PF3 version 3.10 is the TGS2 Gauge (see below for further details)
This is your basic TGS directional gauge. There are a couple of important
features that you should know:
1. Use of this gauge is entirely optional! Should you decide not to install
it, it is recommended you enable the HDG BUG option, which will
indicate the direction of the next taxi waypoint. Be aware this (heading
bug) feature may not work with all third party add-on aircraft.
2. The green arrow (gauge pointer) points directly towards your next taxi
waypoint. Remember you are responsible to avoid any intervening
traffic or buildings!
3. Below the gauge pointer is a number that represents the remaining
taxi waypoints to be crossed before reaching the runway/gate. This,
naturally, is a descending number. Number 1 will always be the
runway holding point or gate.
4. Down either side of the gauge pointer are 5 LED’s, which illuminate to
indicate the distance to the next taxiway waypoint. 5=Greater than
100 meters to go; 4=Less than 80 meters; 3=Less than 60 meters;
2=Less than 35 meters; 1=Less than 5 meters. If all the LED’s are
dark, you will possibly hear the audio prompt for the next turn (if
you’ve enabled this feature). PF3 will skip too many repetitive calls of
the same instruction (eg. turn left, turn left, turn left).
Page 100 of 212
Copyright © 2007-2024 by OnCourse Software
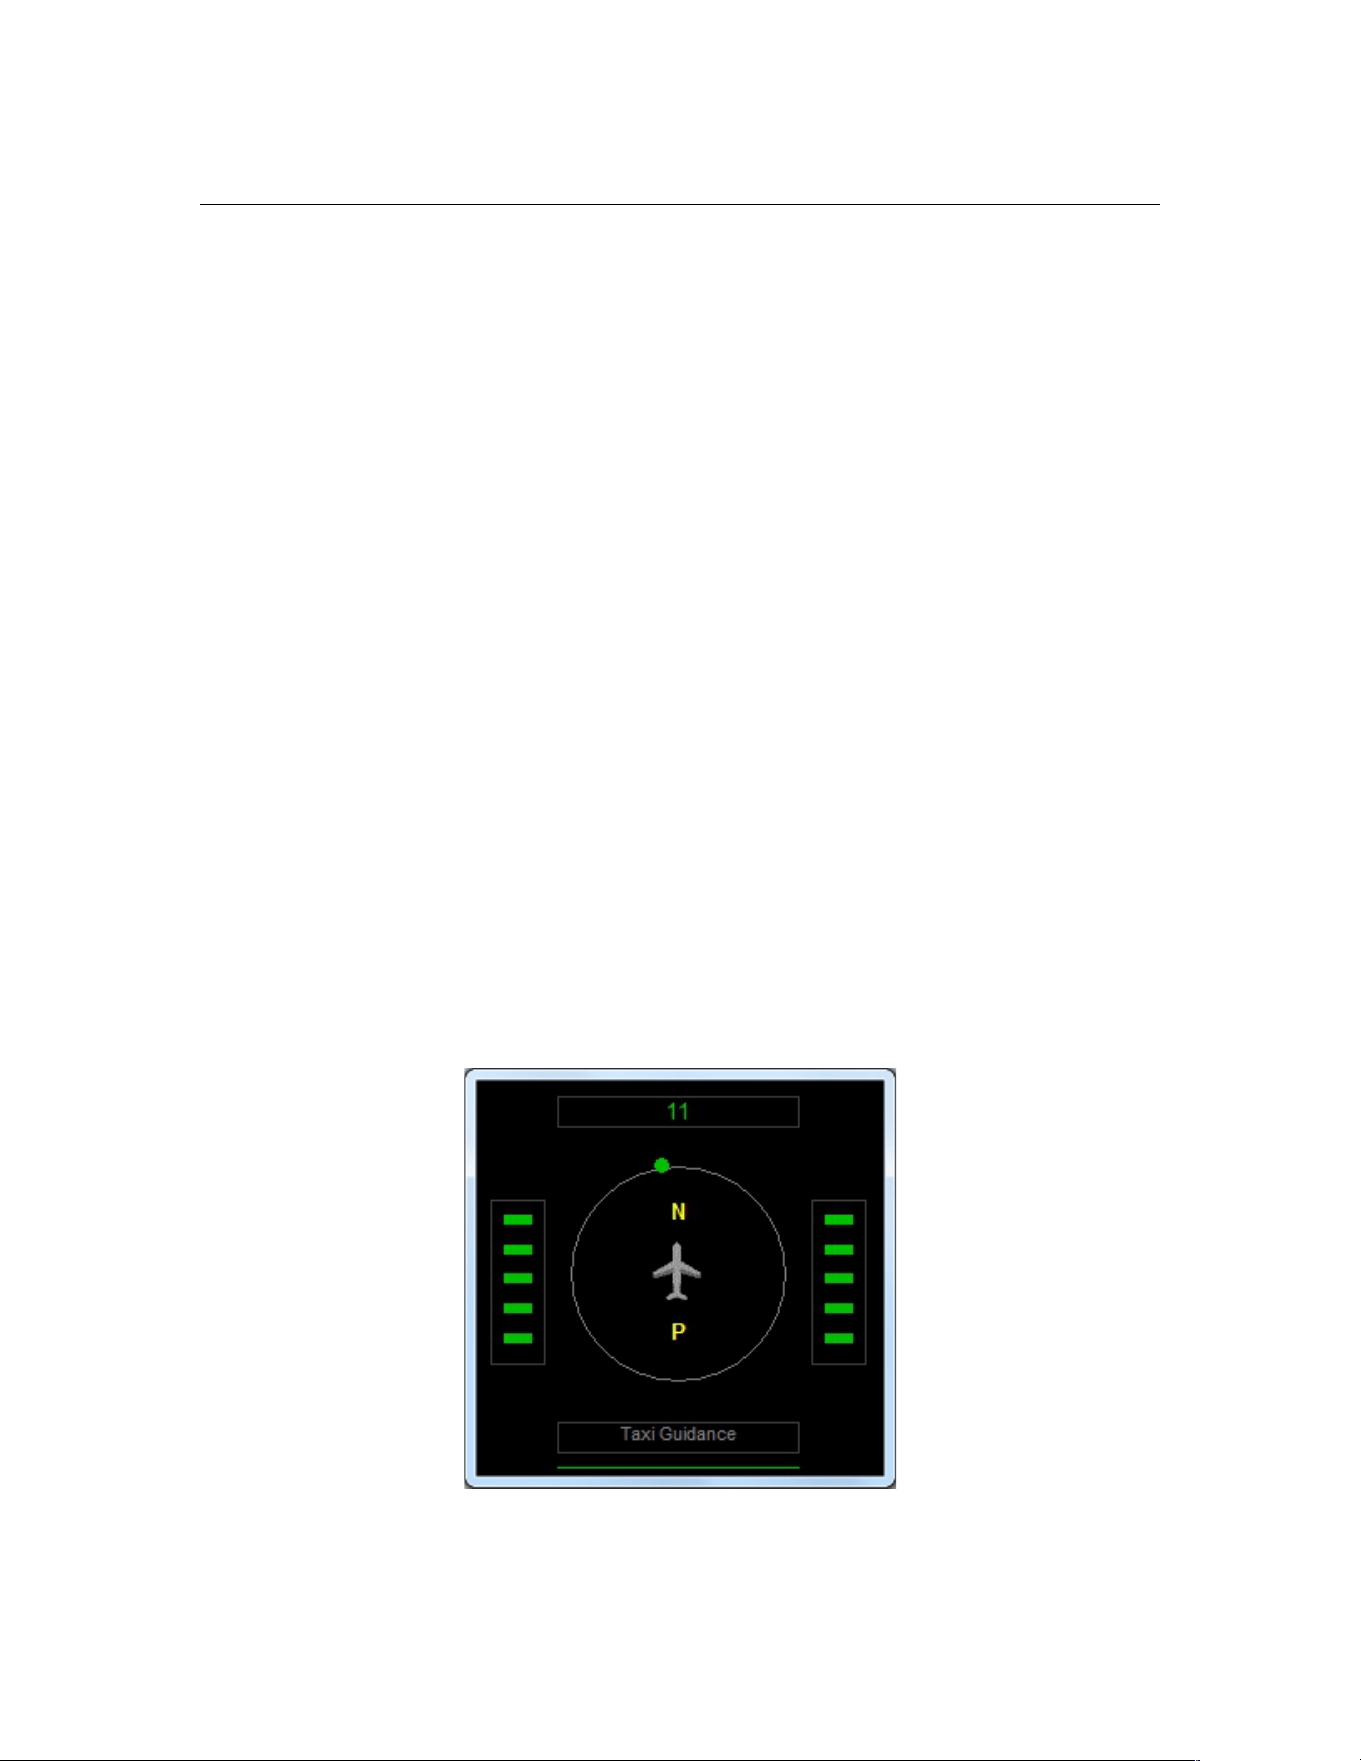
PF3 User Guide
Once installed and with TGS 'audio' enabled via options, you will be guided
along your taxi route accordingly. We cannot guarantee this to be 100%
accurate but would certainly like to think we get it right 99% of the time. We
obviously haven't tested this at all 24,000 + FS airports so you may find one
or two that cause TGS a problem, so don't forget your airport charts!
Please Note: If 'Use TGS' is ON then TGS runs automatically once you have
received your taxi instructions from ATC. Should you wish to deactivate TGS
at anytime, simply use the #1 hotkey. Should you hit this key by accident
whilst TGS is active just hit it again to reactivate. TGS will not actually catch
up, so if you are some way into your taxi route you will have to use the new
‘skip taxi waypoints’ hotkey mentioned in section 12.2.7
8.2 The Standalone TGS Display
Personally I have always found the original TGS Gauge a little temperamental,
whilst others use it extensively without issue... enter the standalone TGS
Display.
The TGS Display is ideally suited when running more than one pc or multiple
monitors. It is a standalone program and therefore can be run on any pc
provided you have WideFS/WideClient installed if running on a client.
It does not have to run on the same PC as FS nor PF3.... it is standalone!
The display can be resized to suit your own particular requirements and mine
sits nicely beside the Project Magenta MCP on a client pc.
Install it wherever you want.
You'll find this new program in the TGS_Gauge folder after installing PF3 and
is named TGS_Display.exe. The display also shows a little more than our
original gauge.
Above the little aircraft symbol is the name of the taxiway you are actually on
or about to turn onto. Also you can configure the display to show when you're
Page 101 of 212
Copyright © 2007-2024 by OnCourse Software
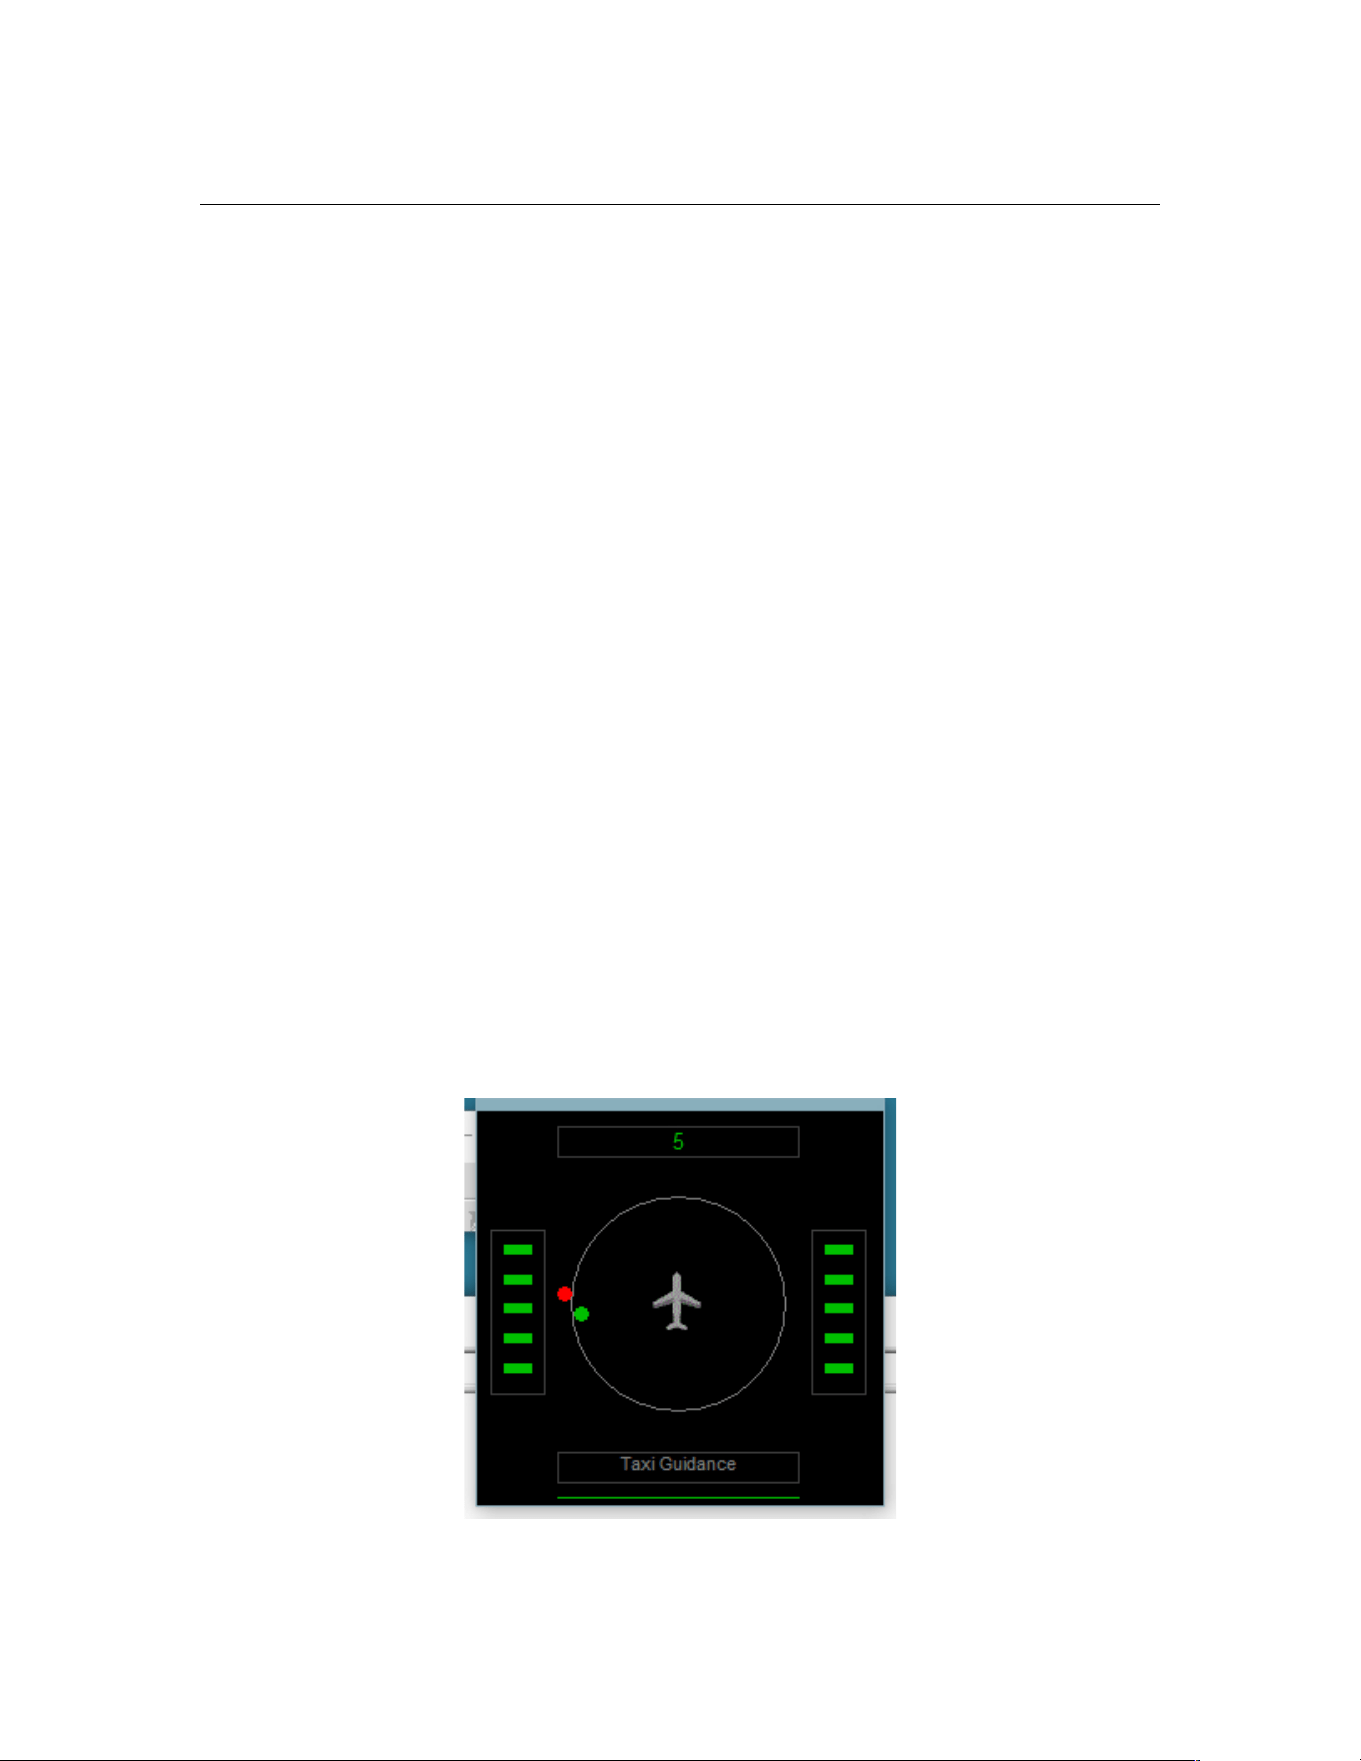
PF3 User Guide
braking or have the parking brakes on... rather than the annoying red/white
signs displayed in FS. To use this feature, after you've run the TGS Display at
least once, open the TGS_Display.INI file and add...
ShowBrakes=1
...to the [CONFIG] section. Once configured you will see BR for Brakes and
PB for Parking Brakes displayed at the top left/right of the display when
brakes are applied. There are of course other utilities available for download
which enable you to turn the FS message for brakes off, but I find this useful.
Just beneath the aircraft symbol is the name of the last taxiway you taxied
along.
That's it, you don't have to do anything else, other than remove the TGS
gauge from your panel.cfg files should you decide to use this replacement.
PF3 is configured to interact automatically with TGS in exactly the same way
as it did for the original TGS gauge. This is basically a replacement so nothing
else changes.
For fine tuning the position and size of the TGS Display you can use Shift +
Arrow Keys to move it and Ctrl + Arrow Keys to resize it.
New to 3.15.0 – We have added another indicator to the TGS display, in
addition to the relative position of the next taxi waypoint it now displays the
relative position of the one after the next. This is shown as a red dot. I find
this really helps and can now see exactly the direction I will need to be
turning, well ahead of time.
Page 102 of 212
Copyright © 2007-2024 by OnCourse Software
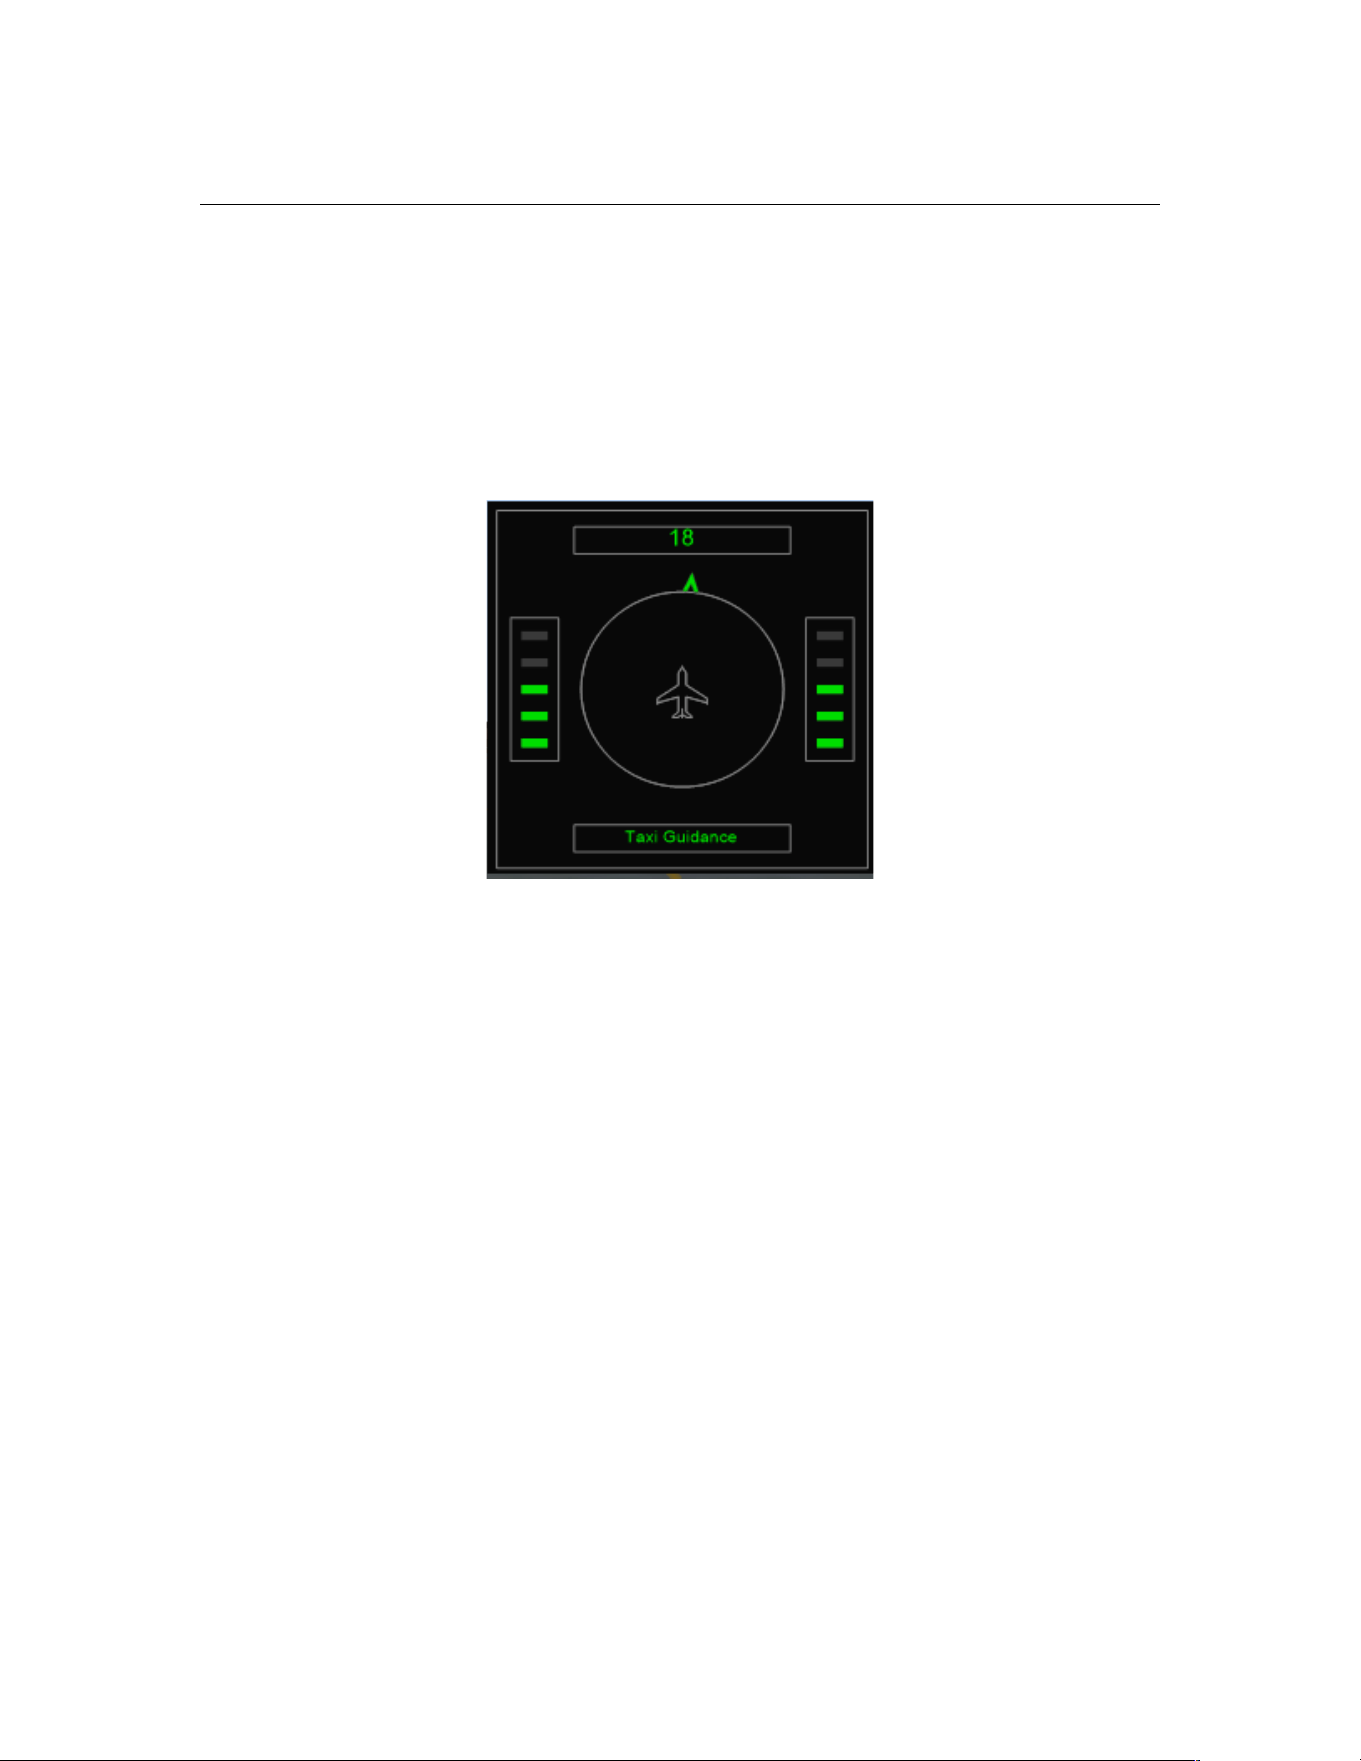
PF3 User Guide
8.3 The TGS2 Gauge
Our new TGS2 Gauge (written by Chris Koegler) look almost identical to our
standalone TGS Display utility. The main difference being it does not show
any brake indicators nor the relative direction to the next waypoint following
the current one (red dot). Other than that, functionality is the same. Here's
what it looks like. The gauge is designed to work in FS9, FSX and P3D only.
Sorry but it doesn't work in MSFS.
For my FS9 testing I added to the Panel.cfg as a separate window rather than
inserting it as a gauge, using the following and I think it looks/works really
well.
[Window07] <-- you have to assign your own number here
Background_color=2,2,2
size_mm=251,251
position=1
visible=0
window_size= 0.2, 0.3
ident=10101
gauge00=TGS2!TGS, 0,0,251,251
Page 103 of 212
Copyright © 2007-2024 by OnCourse Software

PF3 User Guide
8.4 Oceanic Procedures
PF3 automatically switches to Oceanic Procedures when flying to/from the US
(over the pond) and between Gander/Shanwick controlled areas. This includes
simulated HF radio transmissions using real world SELCAL sounds when ATC
contact you. Your VCP will also radio through position reports at each
intersection. See section 11 for more details on these procedures and how
they work in the real world plus the exciting features offered to allow you to
enable Oceanic Procedures anywhere in your flight sim world.
8.5 Traffic Advisories
PF3 provides full AI traffic advisories during your flight. When AI aircraft are
within the boundaries you set you will hear about them from ATC.
'...traffic at 2 o'clock, altitude 5,000, heading west two seven zero'
8.6 Requesting Higher/Lower Altitude
PF3 allows you to request a higher/lower altitude during your flight. This can
be achieved in a number of ways so you can use whichever method you find
easiest.
Method 1 - This is done by using the H and/or L default hotkeys. Obviously
H to request a higher altitude and L to request a lower altitude. All default
hotkeys can be changed to a keying sequence of your choice should you wish.
To make a request you hold down the relevant key (H or L) then press and
release one of the number keys (top row of keyboard)... which must be 1 thru
9... then release the H or L key.
The numbered key indicates how many 'thousands' of feet you want to climb
or descend. So, if you’re currently at 20,000' and wish to climb to 25,000' just
hold down the 'H' key then press and release the number '5' key. Equally, if
flying at 15,000' and you require an altitude of 12,000' you would hold down
the 'L' key then press and release the number 3 key. There is a 10% chance
your request will not be authorised.
You may also use the H or L key without pressing a numeric key to request to
to remain at your current altitude. This could be useful if you're having
difficulty climbing to the cleared altitude for some reason.
Method 2 - Requesting an ATC assigned altitude using Hotkeys 3 and 4.
These now simply request a lower or higher altitude respectively, whereas
they used to request a change due to clouds.
Method 3 – Requesting a specific altitude using Hotkeys 5 and 6. These now
allow you to request a specific altitude from ATC. Hotkey #5 used to be
'Request lower altitude due to turbulence' but now you will see a display,
similar to when requesting a change of runway, which will show you each
altitude below your current altitude in steps of 1000 and when you reach the
one you want just use the C\S\Y hotkey to make the request. Similarly,
Hotkey #6, which used to be 'Request higher altitude due to turbulence' now
displays each altitude above your current altitude in steps of 1000'.
Page 104 of 212
Copyright © 2007-2024 by OnCourse Software

PF3 User Guide
8.7 Auto Taxi Speed Control
PF3 provides a simple feature to assist you in maintaining a set ground speed
during taxi manoeuvres. This feature is part of the TGS system and is only
available when TGS is running (i.e. during your taxi to/from the runway).
Therefore, if you haven't turned the TGS feature ON then the Auto Taxi Speed
Control will not be available.
Once you have received taxi instructions from ATC all you need do is hit the
#8 hotkey to toggle this function on/off. A brief message will be displayed in
your message window to indicate if the feature is active or not.
To stop the speed control at anytime just hit the #8 hotkey again.
There are only three settings you have to configure to tweak this facility to
suit your own preference and these are fully described in section 7.1.26
8.8 AI Aircraft Conflict Monitoring
PF3 does its best to keep ground AI aircraft well away from your taxi path
to/from the runway. As you are aware, Flight Simulator controls all aspects of
AI traffic and there is very little third party programs like PF3 can actually do.
That said I believe we have produced a very good and workable solution.
To enable this new functionality you MUST have the options Use TGS and
Visual Guidance turned on (Main Menu Options #1).
How does it work... well... FS will still be controlling the AI aircraft and
although we know where each aircraft is, their ground speed and heading, we
have no way of knowing what their exact route is... unlike your aircraft, which
we know the exact route you should be taking provided you follow ATC
instructions and any TGS functionality you like to use. Because we don't know
the exact route the AI traffic will be taking we have to make some
assumptions... sometimes they're right but sometimes they're wrong... so
don't expect perfection and you won't be disappointed. Where have I heard
that before...?
Basically we set up a boundary along our taxi route, arcing at approximately
400 meters in front of your aircraft and from side to side at -90 to +90
degrees of your current heading. Any AI aircraft that seem to be moving
toward this boundary or actually entering it are stopped. They are then
restarted once they are deemed not to be on a conflicting path. This usually
occurs as you pass by their stationary location. Unfortunately, due to timing
issues and ground speed variations you may find an aircraft actually on your
taxiway that has been stopped (this may have occurred at the maximum
distance in front of you, perhaps even before you turned onto the actual
taxiway in question. Should this happen, and the aircraft is heading in the
same direction as you, simply slow your aircraft to a speed below the
threshold you set in PF3 options and the AI aircraft will begin moving again.
When you do this, any aircraft that PF3 has stopped will be automatically
restarted, so the aircraft in front of you will continue with their taxi which will
no longer cause you any issues and you can simply follow them. Whilst you
Page 105 of 212
Copyright © 2007-2024 by OnCourse Software

PF3 User Guide
are stationary no further monitoring will take place but it is resumed once you
start rolling again and reach the pre-set threshold speed.
Should an aircraft be on the same taxiway as you and heading straight
toward you then you don't have many options, other than turning onto the
grass (if there's room) or ZAPPING it. Personally I prefer to ZAP them and use
a feature of FSUIPC to do so. Details on how to set this up can be found in the
FSUIPC documentation. However, this ZAP feature does not work with MSFS,
or at least not at the time of writing this.
New to 3.22.0 - Previously, to prevent an aircraft taxiing in front of you
from stopping, you had to keep your speed below whatever you had it set to
in Options #2... the default was 10. This threshold meant whenever you went
above it CM would be monitoring traffic and stopping anything that might
cause a conflict, which works fine, except when following an aircraft on the
same route as you. Now, even when travelling above the threshold speed CM
will not stop any traffic immediately in front of you which is heading in the
same direction and within the parameters of a pre-set frontal cone. Of course
if the aircraft has to do a sharp turn to the left/right to enter another taxiway
that could mean it moves outside those parameters and therefore CM will
stop it. But now you only have to reduce your speed to below the threshold
and it will commence moving again, rather than having to actually stop. With
a little practice and the right threshold setting, adjusted to your own liking,
you can actually achieve a non stop taxi in a queue all the way to the
runway/gate
The Conflict Monitoring process is completely separate from PF3, which
allows for constant monitoring of AI traffic without the need to wait for PF3 to
do a 100+1 other things. A great deal of care has been taken to ensure there
is no noticeable hit on your processing power.
Starting with PF3 version 3.10 you will now hear ATC telling any AI Aircraft
stopped by the Conflict Monitor 'Hold position' or 'Continue taxi'
8.9 Other AI Traffic Detection
At your departure airport...
In addition to our Conflict Monitoring process PF3 will also monitor any
aircraft approaching the active runway. ATC will not issue instructions for you
to enter the active runway whilst there are any aircraft close by and on final
approach. The exact distance is set by default to 6 miles for Jet aircraft and 3
miles for smaller, prop, type aircraft. These distances, along with many other
PF3 options, are user configurable.
When lining up behind other aircraft on the taxiway you will be told something
like this:-
"Callsign, expect clearance in ten"
When next in line for takeoff you will be instructed to "Callsign, hold for
traffic" if there are any aircraft actually on the runway or on finals.
Page 106 of 212
Copyright © 2007-2024 by OnCourse Software

PF3 User Guide
When awaiting the arrival of another aircraft you will be instructed to
"Callsign, line up and wait" as soon as it's safe to do so after the other aircraft
has landed.
Once all other aircraft have left the active runway you will receive
takeoff/departure clearance.
En Route...
PF3 provides real-time, two-way, traffic advisories en-route, based on the AI
traffic flying nearby.
During your approach...
During the approach phase of your flight PF3 will attempt to prevent any
other aircraft from taxiing onto the active runway and should therefore
prevent any annoying go-arounds caused by such things. PF3 will also
attempt to handle traffic separation between you and AI aircraft on route to
the same airport and runway. However, due to interactive limitations with AI
traffic this feature is not very elegant so we basically only deal with traffic
behind you.
8.9.1 Additional Ground Control Monitoring
PF3 also monitors your taxi to/from the runway to ensure you don't enter an
active runway without clearance to do so. As in the real world you should not
cross any runway unless cleared to do so. With PF3, when reaching a runway
intersection, ATC will either clear you to cross or tell you to ‘Hold for traffic’
If you reach a runway intersection and hear nothing from ATC you should
HOLD SHORT of the runway! You may then request clearance to continue
your taxi by hitting hotkey #0 (zero), but you must be stationary and with
TGS ‘active’ for this request to work.
8.10 How we handle ATC Chatter Call Signs
PF3 provides an Airline ICAO feature for our ATC chatter function. This is for
those times when we don't find a match for the AI Traffic call sign (i.e. we
don't have one recorded), so we use the Airline's ICAO code and flight
number.
For instance, in the case of British Airways 1234 we use the call sign…
'Speedbird 1234'
…but if we didn't have that particular call sign we would use the British
Airways ICAO and the result would be
'Bravo Alpha Whiskey one two three four'
If we still couldn't find a match to get the ICAO then we would use the first
three characters of the airline name, so the result then would be
Page 107 of 212
Copyright © 2007-2024 by OnCourse Software

PF3 User Guide
'Bravo Romeo India one two three four'
8.11 Step Climbs and Descents
PF3 provides completely randomized stepped climbs and descents based on
your flight plan profile. This ensures no two flights, using the same
flight plan, are ever exactly the same.
Also, following extensive testing, we strongly recommend
you do not alter the waypoint altitudes pertaining to your
departure, up to and including your TOC. So, when you
see your waypoints listed with the very first waypoint
showing your cruise altitude it really is best to leave it as
it is and let PF3 handle everything for you.
8.12 En-Route Control Centres
PF3's ATC control zones have been completely reconfigured to ensure
boundaries are more accurate and some control centers that were never
active in previous versions will now be heard.
8.13 How we determine the Active Runway
When we need to know which runway to assign you PF3 will always use the
same runway currently being used by any detected AI aircraft. In the case
that there are currently no active AI aircraft we will then determine the
correct runway to use using the local weather conditions, in particular wind
direction.
Whenever we assign a runway using wind direction we always check
periodically up to a certain point to see if we can detect any AI aircraft landing
or taking off. If so ATC would then issue change of runway instructions.
E.g. 'Speedbird two six eight six... runway changed... expect vectors for....'
Assigning the correct runway is also subject to the user configurable settings
for individual runways whereby you may have configured a runway to be for
takeoff or landing only.
8.14 Designated Parking
PF3 also supports designated parking for your aircraft at any of the 24,000+
airports.
This new feature compliments PF3’s Full Taxi Guidance and Taxi Guidance
Systems… so now you can configure PF3 to ensure you are always sent to a
particular gate/parking location at specific airports.
Page 108 of 212
Copyright © 2007-2024 by OnCourse Software

PF3 User Guide
There are two stages to configure this new feature…. Stage #1 is very
simple, takes only a few seconds to complete and is mandatory… Stage #2
is slightly less simple, takes a few minutes to complete but is optional.
Stage #1 ensures you will always receive ATC instruction to the gate/parking
spot of your choice and Stage #2 ensures that particular location will be free
from AI aircraft parking in your reserved space!
8.14.1 Stage 1
Please Note: If you want to activate PF3’s Designated Parking feature, this
stage is mandatory!
From PF3’s main display page select Option #2, then Designated Parking
Control.
Type in the Airport ID (ICAO code) for the airport of your choice (i.e. EGGW
for London Luton) then hit enter. At this point, provided you have entered a
valid ICAO code, the ‘Airports Gates/Parking here…’ drop down list to the right
of the ICAO will change from ‘None’ to ‘Select Gate/Parking here…’
Now simply scroll down the list and highlight the gate/parking spot you wish
to reserve, then select SAVE
That’s it!
Next time you land at this airport ATC will give you full taxi instructions to
your chosen gate…. every time! But as mentioned earlier you may find
another aircraft already parked there when you arrive, which could be a little
embarrassing! To prevent that happening please see the following instructions
for Stage #2 to prevent this occurring.
8.14.2 Stage 2
Please Note: This section is entirely optional but it does ensure your
reserved gate/parking area will be vacant when you arrive!
For this method you will need a utility like AFCAD, AFX, ADE or similar
installed if using FS9 or FSX. At the time of writing we are unsure of any
utility you could use with P3D.
The following instructions pertain only to AFCAD. Also these
instructions relate to AFCAD version 2.21 so they may well be very
different if using a later version. (Does NOT work for MSFS)
Please follow AFCAD’s installation instructions and do not be put off by what
you see or read about this program… despite being a very powerful tool it is
remarkably easy to use. So let’s show you how….
For this example we will MODIFY an existing Parking Gate (50) at London
Luton Airport… ICAO code EGGW.
1. Open AFCAD, select File and Open Airport. After AFCAD completes its
initialisation search you will be able to enter the Airport ID (ICAO code)...
EGGW... then select OK. The EGGW airport plan with assigned parking
Page 109 of 212
Copyright © 2007-2024 by OnCourse Software

PF3 User Guide
should then appear. You can now use your mouse scroll wheel, the +/-
keys or the +/- icons on AFCAD’s toolbar to zoom in/out to make the
airport layout map larger/smaller.
2. Select the Parking Gate you want to modify. For this example it’s Gate 50
which is the one situated furthermost to the left of the displayed map.
You can make the selection in a number of ways… if you know exactly
where the parking spot is on the map simply double-click it or use a left-
click to highlight it then right-click and select Parking Properties… please
do ensure the popup window is the ‘Parking Properties’ one and not the
‘Link Properties’ display. If you’re not sure where the gate is situated on
the map please use the List menu in AFCAD to display all the available
gate/parking locations for this airport then double click the one you want,
which is Gate 50 for this example.
3. Whichever method you choose/prefer please ensure you have selected
the correct gate/parking spot. You can do this by checking for the
gate/parking name/number under the Identification label which is midway
down the properties display window. For this example it should be Gate
50.
4. Change the value displayed in the small box marked Radius to 10
5. Exit AFCAD and confirm you want to save these changes when prompted
to do so
6. If you haven’t already configured Gate 50 at EGGW within PF3 please do
so now.
That’s it!
What we have done is create a unique Parking Space and because of the very
small radius we chose it should restrict any AI Aircraft from using this
Designated Parking location. Next time you land at EGGW you will be
instructed by Ground Control to ‘…taxi to gate five zero…’
Obviously AFCAD allows you to do so much more and you could even create a
completely new gate/parking spot if you so wished, but that is beyond the
scope of this document and the author.
8.15 Resuming a Flight
Should you ever find you need to stop a flight midway through, or perhaps FS
crashed or even PF3 crashes (hush your mouth) mid-flight, PF3 allows you to
resume the flight, subject to certain conditions being met..
The first prerequisite is that you need to start FS running from the point of
failure, so you need a saved FS flight.
If your mid-flight stoppage was planned then one would assume you will have
saved the flight in question and therefore can reload it at anytime. This is the
easiest method and all you need to do after starting PF3 would be to select
the 'Resume Last Flight' button from the main menu, confirm that you wish to
resume your last flight and then follow the on-screen instructions (as detailed
below).
Page 110 of 212
Copyright © 2007-2024 by OnCourse Software
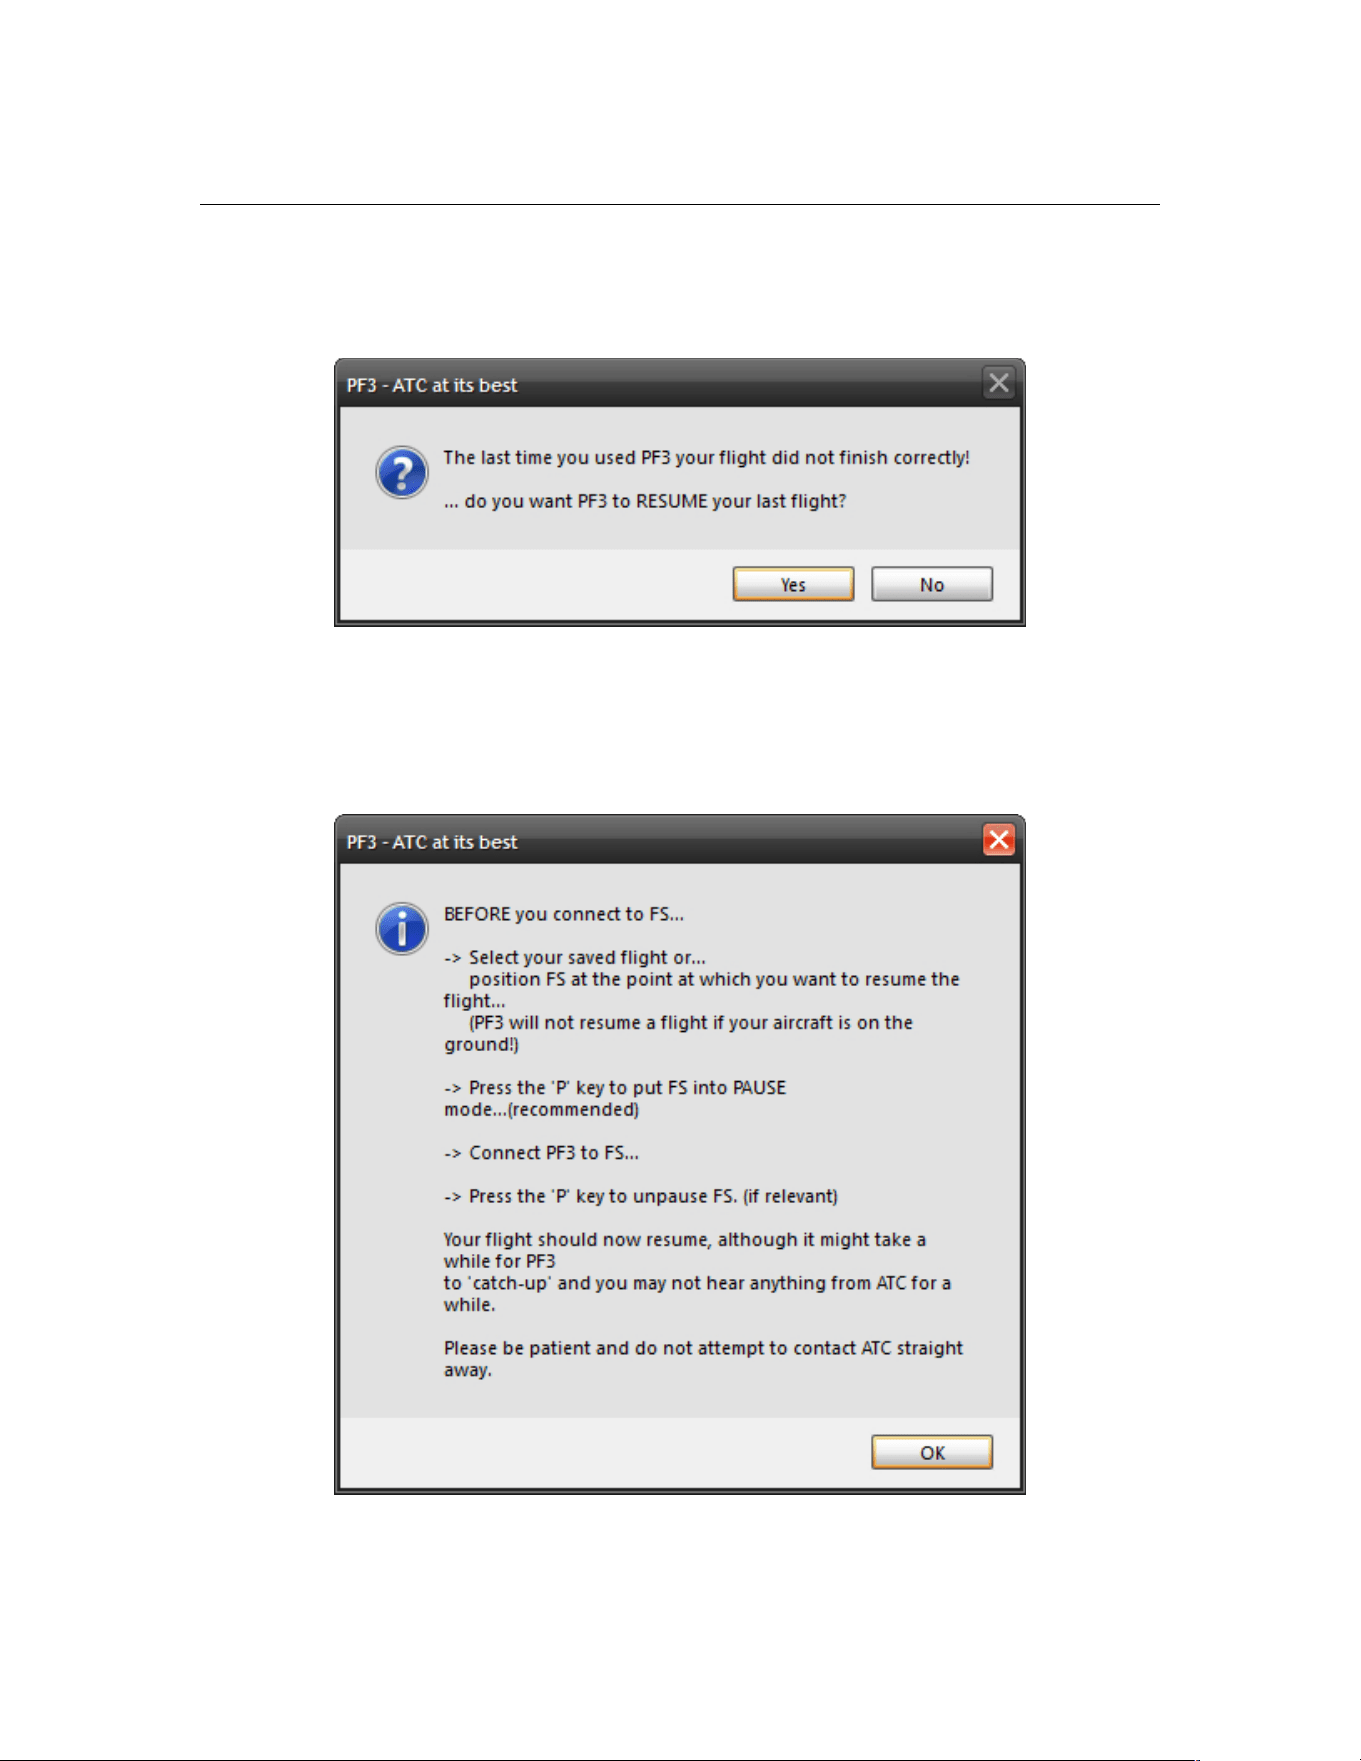
PF3 User Guide
If your flight stoppage was not planned and caused by an unforeseen error,
the next time you start PF3 you should be presented with the following
message giving you the option of restarting the flight from the point where it
stopped.
Once you confirm this message you need to follow the on-screen
instructions:-
Page 111 of 212
Copyright © 2007-2024 by OnCourse Software

PF3 User Guide
a) The first two instructions you should have already done so now you
should OK this message and then connect to FS
b) Once PF3 is connected to FS you should hit the ‘P’ key to take FS out
of PAUSE mode and the flight should continue from where it left off.
c) As the flight begins in this ‘restart’ mode things may be a little quiet as
PF3 plays catch-up. Please do not try contacting ATC immediately,
just give PF3 a little while and you should soon hear your PNF making
contact with ATC, this is just to ensure we initialise things properly.
This first communication you hear with ATC may sound slightly
inaccurate, but things should soon return to normal.
If the cause of your mid-flight failure was not planned and was due to FS
crashing (or some other program but obviously not PF3) , and you do not
have an FS saved flight situation file, then PF3’s resume facility will be of
little use, unless of course you are able to restart FS and position your aircraft
back at the point where the problem occurred, because in a restart situation
PF3 will always assume your flight is starting near to the same altitude and in
particular the same location as when the unplanned stoppage occurred, so
placing your aircraft at the wrong altitude or position could lead to a... er...
interesting flight.
Please Note: PF3 does not save your FS flights and to do so you will need to
use another utility, such as Pete Dowson’s Auto Save program, which by the
way is built into FSUIPC4 if you are using FSX
If the cause of the mid-flight failure was a PF3 problem (I guess we have to
cater for such improbabilities) then of course our restart data will be
available, so all you would have to do in this instance would be to Pause FS,
then restart PF3 and follow the instructions as shown above from item (b)
A few other things to remember about this feature –
PF3 only starts saving its own restart data after you receive initial vectoring
instructions from Departure Control and it stops at point of touchdown at your
destination airport. So restarting a flight on the ground is not available.
If you plan a mid-flight stoppage but then load a different flight plan before
resuming the previous flight, all of the previous flights data will be lost and
you will not be able to resume that particular flight. So you only have the one
shot at restarting the previous flight. If you choose NO from the initial
message your restart data will be zapped!
This option is OFF by default.
8.16 Visual Connection Indicator
There may be times when you are not sure if PF3 is still running, due to the
fact that everything seems to be a little quiet on the radio. One way of
ensuring PF3 is still connected and running is to check the navigation lights
on the aircraft picture displayed on PF3’s main menu, as they will flash
periodically whilst all is well.
Page 112 of 212
Copyright © 2007-2024 by OnCourse Software

PF3 User Guide
8.17 Interactive Support for FDC users
PF3 supports full interaction with OnCourse Software's FDC program.
Provided you are running the latest version of FDC, each program will be fully
aware of the other.
How they work together...
If FDC is currently playing a checklist and ATC initiate contact with YOU then
the checklist will automatically pause and resume once the transmission
from/to ATC is complete from both sides. However, if ATC is talking with
another AI aircraft the checklist will not pause but the volume of ATC will be
lowered, although that is optional.
Also, whereas FDC only has two transition altitude settings to work with it will
now use whatever you have configured in PF3. In addition to that FDC will be
made aware of the cruise altitude in your PF3 flight plan, which will make
some of the cruise altitude triggered calls more accurate and easier to
implement.
Various other program elements will be passed back and forth between the
programs to allow for further interaction both now and for future
enhancements…. So watch this space.
Please Note: PF3 and FDC do not have to be running on the same pc for this
interaction to work. Each program could be running on different client pcs,
with the main pc running FS and all connected via WideFS
Now I'm sure one of the questions asked will be “Do I have to do anything
special to get FDC and PF3 to ‘interact’?”
The answer is, NO! Provided you are running PF3 and the latest version of
FDC (3.14 at the time of writing) or later, interaction between the two
programs is automatic.
However, there are a few things I think need to be explained here plus I'll
show you how I've found it best to set things up for both systems to help
make them 'blend' together.
Firstly, it obviously sounds much better if your FDC co-pilot and PF3 VCP
sound the same.... so you have two choices.... well you have three if you
want to pretend you have a large flight deck and additional crew members...
FDC Voice set #11 and PF3 US Mid West Pilot #2 are both the same
author, Rick Schaefer.
The other option is to use an all new voice set we have had recorded for FDC
(see the FDC section of our website for download details) by the same author
of PF3's British Pilot 12. This new voice set has already been named as
voice set #16, as that is the optional FDC voice slot and one which should
already be vacant. Should you wish to replace one of the other voice sets
then you will have to rename the new one yourself. As mentioned earlier this
new FDC voice set matches PF3's British Pilot 12... the author is Graham
Jackson. Graham has also done many other voice sets for LevelD and PMDG,
Page 113 of 212
Copyright © 2007-2024 by OnCourse Software

PF3 User Guide
to name but a few.
For the sake of simplicity let's say your FDC Voice16 folder is empty... just
download and unzip the new voice set into your …\FDC\Wav\Voice16
folder and you're ready to go.
Run the programs and select either:
FDC Voice set #11 and PF3 Mid West Pilot #2 or
FDC Voice set #16 and PF3 British Pilot #12
I think FDC sound sets are slightly louder than PF3's so here's how I found
mine work best, but please remember these are my own personal
preferences. These controls do not have to be set this way for FDC/PF3
interaction to work.
FDC Volumes:-
Captain=10
Co-Pilot=10
PF3 Volumes:-
Set the VCP Volume one notch below maximum
Set the ATC volume 1 notch lower than the VCP volume
Set the background noise four notches down from maximum
Under TGS settings set TGS volume reduction to 50%
That's it!
8.18 ACARS ATIS
PF3 provides its own emulated ACARS ATIS data system. This uses the FS
kneeboard in FS9 and FSX but the new In-Sim windows in P3D and MSFS to
simulate receiving ATIS information for your destination airport via ACARS.
We actually use the Nobrief.htm file found in the ...\MainFS\UIRES folder for
FS9 and FSX, so if you already use one of the kneeboard browser type utilities
it is quite possible this feature will overwrite it.
PF3 ACARS is received by hitting Hotkey #2. This works at ANY time during
your flight with the following limitations. It does NOT work if tuned to FSS,
Multicom, Unicom or the destination Tower and once in contact with Approach
it reverts to its normal functionality, which is to request an instrument
approach. But you would normally have perused your destination ATIS long
before that. Also it does NOT work whilst TGS is active (as that uses the same
hotkey for skipping waypoints).
Page 114 of 212
Copyright © 2007-2024 by OnCourse Software

PF3 User Guide
Unlike the normal ATIS you receive via your VHF radio, which is limited in
PF3 to a distance of around 200 miles, there is no such limitation with the
digital ACARS display system.
Here’s an example of how this appears in FS9:-
And here's how it appears in P3D and MSFS:-
Page 115 of 212
Copyright © 2007-2024 by OnCourse Software
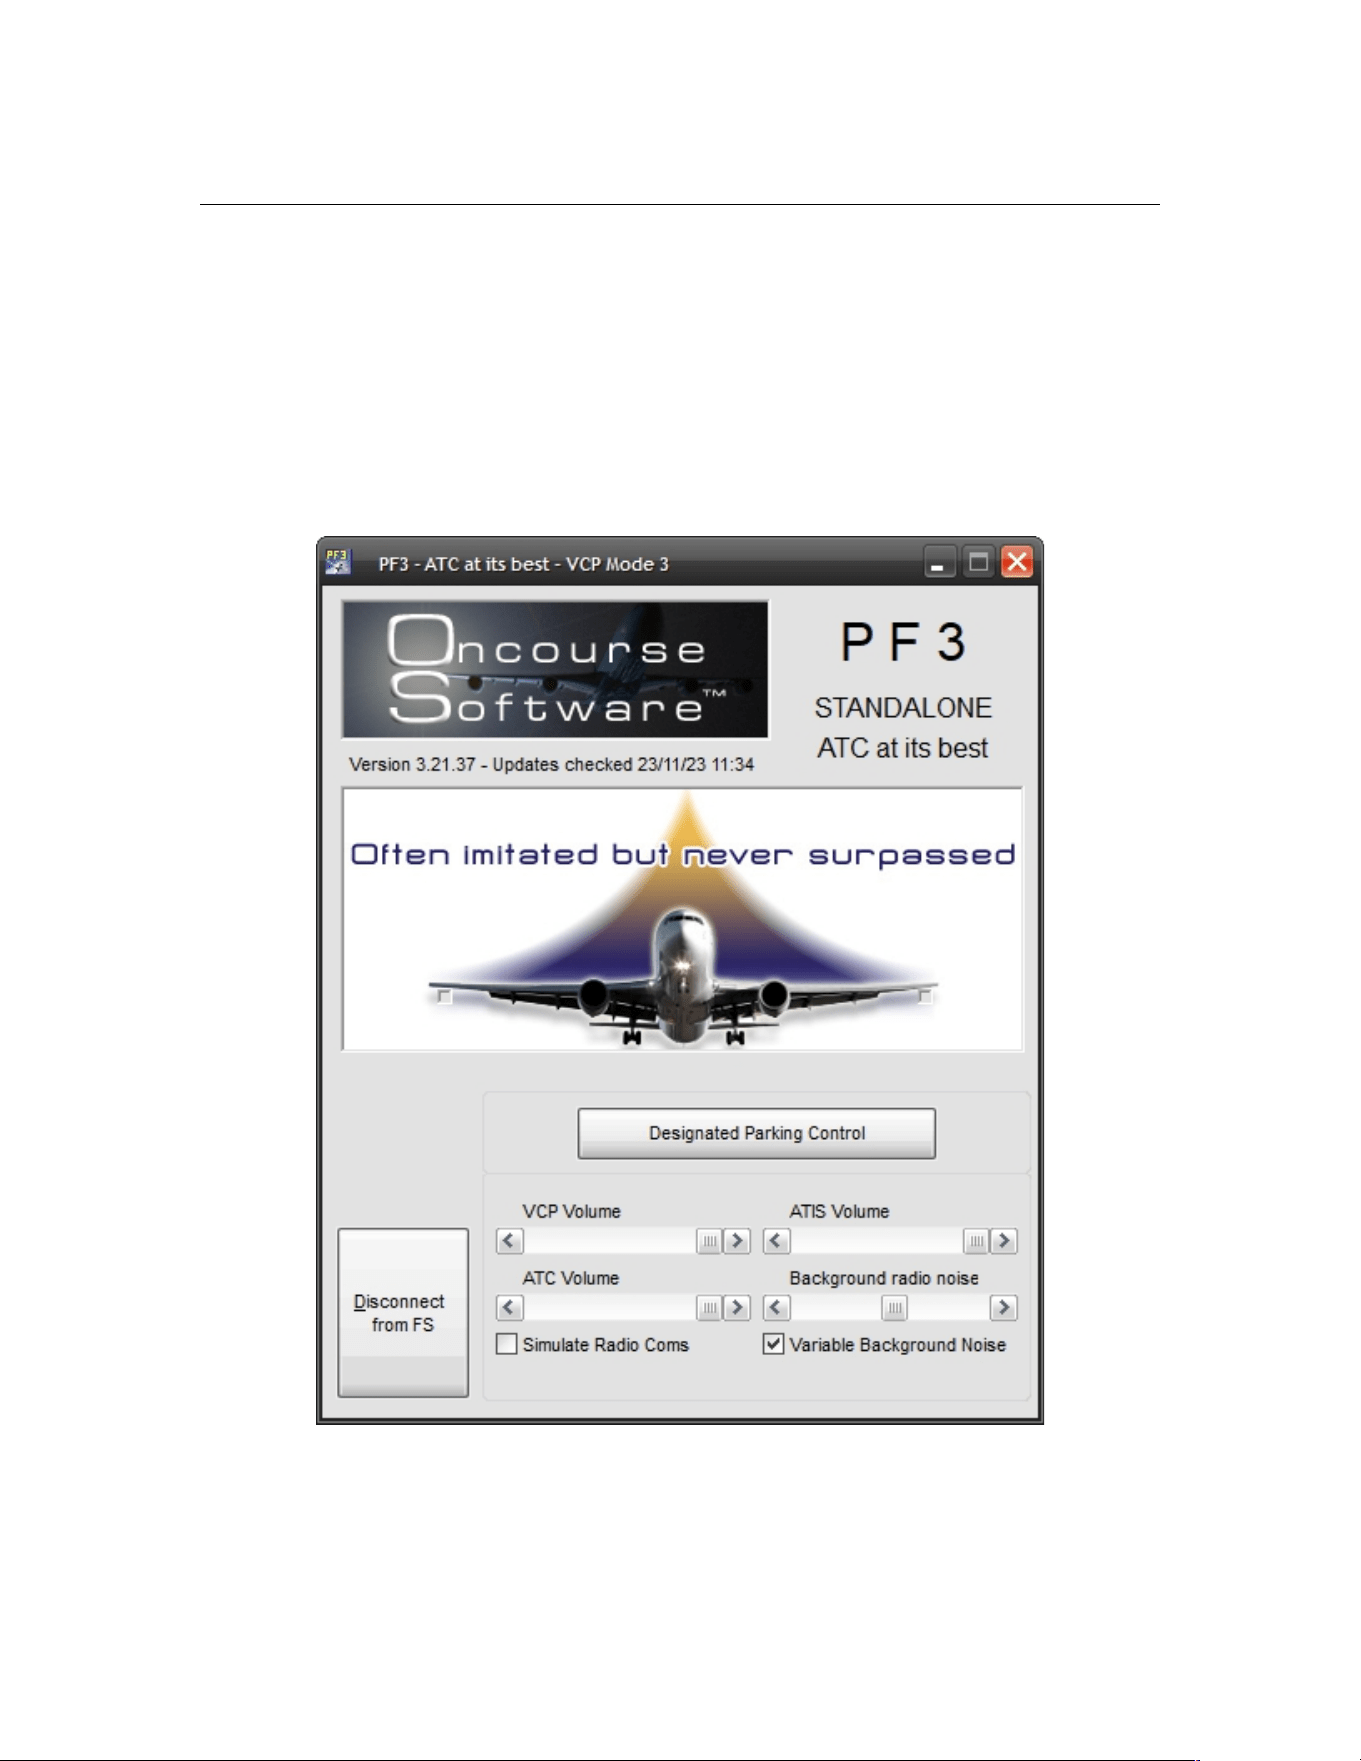
PF3 User Guide
New to version 3.10.12 you can now request a list of all current frequencies
by using the default hotkey #3, but only whilst at your departure airport and
not tuned to Unicom, Multicom or FSS.
8.19 In-Flight Volume Adjustment
With PF3 you can adjust the volume for ATIS, background noise, ATC or your
VCP at anytime during your flight, using the new overlay displayed on PFE3s
main menu display once you connect to FS.... see screen shot below.
Page 116 of 212
Copyright © 2007-2024 by OnCourse Software

PF3 User Guide
8.20 VFR Flights in PF3
VFR flight support has been completely revamped in this version (3.10) of
PF3 and we now offer two distinctly different types of VFR in the PF3 world.
8.20.1 Standard VFR
The normal (we call Standard) VFR flight where you are required to load and
follow a flightplan, flying from one waypoint to the next until finally reaching
your destination is much the same as it was in previous versions of PF3. The
main difference is the introduction or our new Radar Control facilities. Each of
the PF3 Control Center areas now have a Radar Control facility to cover that
same area when you're flying below the Control Centers altitude. The new
Radar Controls are also named, the same as the existing Control Centers. So
for instance, you can contact London Radar, Essex Radar, Berlin Radar, Los
Angeles Radar, Miami Radar or any of the 90 new control facilities.
In previous versions of PF3 Departure would hand you off to Approach, and
you would stay with them for the duration of your flight. In 3.10 Departure
will hand you off to the appropriate Radar Control. They in turn will hand you
off to the next Radar Control should your flight plan take you into another
control area. This will continue until you reach you last waypoint, at which
time Radar will hand you off to Approach.
8.20.2 VFR Free Flight
VFR Free Flight (or VFR FF) has been introduced for users to take full
advantage of the glorious visuals in the new and outstanding MSFS whilst still
being able to contact ATC as and when necessary. Of course this isn't only for
use with MSFS and VFR FF flights can be used in all flight simulators
supported by PF3.
So what is VFR FF exactly. Well, just like any other flight in PF3 you still have
to load a flight plan (containing at least one waypoint) but you will not be
required to follow it. You will not have to hit each waypoint and you will only
be expected to reach your destination. How you get there is entirely up to
you. You will not be handed off from one Radar Control to another if you
venture into other control areas, instead the radar service will be terminated
and it will be up to you if you wish to make contact with the next control
facility. The areas you fly through do not have to be areas in which your flight
plan would normally take you... it can be anywhere along the way and PF3
will detect within which area you are currently flying.
Departure control will terminate their service after your departure with the
following call:-
Call sign, radar service terminated, squawk nnnn
Page 117 of 212
Copyright © 2007-2024 by OnCourse Software

PF3 User Guide
At this point you can either continue your flight without further ATC contact
until you arrive at your destination or you may choose to contact the local
Radar Control for flight following or radar service (depending on the area
you're flying i.e. FAA or ICAO). If you don't know the frequency to tune to
simply tune to the default FSS frequency of 122.20 and hit Hotkey #5 to
request it. Then you can tune to it and make contact with the local Radar
Control. You'll remain with that Radar Control whilst you remain in their area,
but once you fly beyond that they will terminate their service in the same way
as Departure did and again it will be up to you what you do at that point.
When you get close to your destination you have a couple of options. If you're
already in touch with Radar Control then you simply have to hit Hotkey #1
which will trigger a handoff to Approach. If you're not currently tuned to
Radar Control then you can follow the instructions mentioned earlier to obtain
the correct frequency. In both cases you can also choose to tune directly to
Approach and contact them to advise of your landing intentions.
The correct Approach frequency can be found quite easily if you're using our
PF3 Display utility or better still the WEB Display utility, otherwise you would
be best to contact Radar Control and then hit Hotkey #1 to trigger the
handoff.
In Summary
You should contact Approach when you near the destination airport, whether
or not you have been getting enroute flight-following services. Once you are
in contact with Approach, you will be asked to report when you have the
airport in sight (Hotkey 8). When you report the field in sight, if the airport is
controlled, you will be handed to Tower (VCP should tune the frequency) and
Tower will tell you to report entering the pattern for the active runway
(Hotkeys 2, 3, 4). After landing you will be told to contact Ground.
If the destination airport is uncontrolled, when you report the field in sight,
Approach will terminate services and tell you to switch to advisory frequency
(i.e., Unicom). In PF3 the use of an advisory frequency is optional. You can
simply land on the runway of your choice and taxi at your discretion, or you
can look up the Unicom frequency for the airport and manually tune it and
use the hotkeys to announce your intentions to local traffic.
Whilst it may sound a little complicated, it really isn't. The whole idea of VFR
FF is to allow you to fly wherever you want and explore the area, then, when
you eventually decide you want to land you only have to hit a couple of keys
to be handed off to Approach.
Please note: As of version 3.10.50 VFR flight procedures, when flying in the
US (FAA regions), has been changed as we've been informed that 'Radar
Control' or a 'Named Radar Control' is not correct for the US and you would
normally be in contact with Tracon (Departure/Approach).
However, since this issue has not been raised before I have decided NOT to
make these changes the default nor are they obligatory. There is a new
option now on the Advanced Options and Tweaks page, under the MISC tab,
named 'No Radar Control in US'. If you select this option you will no longer be
able to contact or be handed off to our (new to 3.10) Radar Control facilities.
Page 118 of 212
Copyright © 2007-2024 by OnCourse Software

PF3 User Guide
Instead you will be in contact with various Approach facilities during your VFR
flight. When nearing your destination, or during a VFR FF flight when you use
Hotkey #1, you will be handed off to Approach on a different frequency in
readiness for landing. If you don't select this option then your VFR flights will
continue as they do now and PF3 will use the 'Named' Radar Control facilities
as it does now for both CAA and FAA regions.
8.21 Local Transition Altitudes
The way local transition altitudes (TA's) are handled has changed in this latest
release. If you have set a local TA for your departure airport, it will change to
the region’s TA at a distance of 30 miles from the airport, unless you are
flying a SID that is still active at that time in which case airport TA will remain
in effect until you complete your SID.
Destination airport TA is currently used once you reach the last waypoint and
that process will remain unchanged.
8.22 Failing to Contact the next ATC Facility
In the busy world of the flight deck you may sometimes find yourself
forgetting to check-in with the next ATC facility when handed off. In previous
versions of PF3 if you failed to contact the next Control Center your VCP
(regardless of which mode you have selected) would tune to the correct
frequency and make the initial call after a lapse of 3 minutes.
This feature now works with Departure, Control Center and Approach, with a
slight change to what happens.
If you don't check-in to one of these facilities when instructed to do so, after
a lapse of 1 minute one of the following will occur.
(a) if you haven't actually tuned to the new facility you will hear
'Callsign, contact 'facility name' on 123.45'
(b) if you tuned to the correct facility but just not actually 'checked-in' you
will hear
'Traffic at 'altitude' squawking 4567 contact 'facility name' on 123.45'
The same scenario will repeat after another minute (total lapsed time 2
minutes). Then, after a further 60 seconds (total time 3 minutes) your VCP
will tune to the correct facility and make contact with ATC, regardless of
whether you have the VCP mode on or off.
Page 119 of 212
Copyright © 2007-2024 by OnCourse Software

PF3 User Guide
9. SOME ATC INSTRUCTIONS
Here are some ATC instructions you may hear from time to time and what
they mean and what is expected of you if/when you receive them.
9.1 Descending from TOD at Pilot’s Discretion
ATC may give these descend instruction when reaching your TOD:-
'Call-sign descend to xxxx at pilots discretion'
or
'Call-sign, when ready descend flight level xxx'
This means you do NOT have to commence your descent immediately and
may do so at YOUR discretion. This additional feature will hopefully be useful
to those users who prefer to use their FMC's and have them programmed to
commence their descent from a certain position. However, as in the real
world, ATC may require you to descend earlier or later than you might be
hoping for, in which case you should comply.
9.2 Variable Take-off Instructions
With PF3 you may well be given a different takeoff instruction other than
always being told to 'fly runway heading'. At times you may be given another
heading to fly by Tower when you're cleared for takeoff... so listen carefully.
9.3 New Calls from Tower after landing
In PF3, after landing, you will be advised to 'contact ground when clear of the
active' and you will also be told which way to turn off the runway (left/right)
dependant on where the gate is to which you will eventually be instructed to
taxi to. So the call will go something like this:-
'Easy two one one, exit right at next available taxiway, contact ground
when clear of the active'.
PF3 will also try and determine that when you are actually clear of the
runway... this includes your tail section too, so please ensure you clear the
runway otherwise you will not be handed over to Ground control.
9.4 Entering a Holding Pattern
If you have a Hold selected for your flight plan this is the call you can expect
from ATC as you approach the holding point:-
“Easy 4, enter the hold at Bravo India Golf, descend to 6000, reduce
speed to 220, expect clearance in fifteen”
or it could be like this:-
Page 120 of 212
Copyright © 2007-2024 by OnCourse Software

PF3 User Guide
“Easy 4, at Bravo India Golf enter the hold, descend to 6000, reduce
speed to 220, expect clearance in fifteen”
You should receive this call as you're nearing the holding waypoint (usually
within 10 miles of it) and you will obviously be expected to enter the hold at
that point.
So what exactly do you have to do at this holding point. Well basically you
just have to hang around until ATC clear you to continue. For those that know
what they're doing they will have checked their charts and will fly a correct
holding pattern. For those that don't know what they're doing they will
probably zig zag about in the proximity of the holding point and hope for the
best.
At the very least this is what you should do if you don't know what you're
doing. Continue flying toward the next waypoint (the holding point) and as
you reach it turn 180 degrees so you are now flying away from it. Keep that
course for approximately 2 minutes then turn 180 degrees again to fly back
toward the holding point. Just keep doing that till ATC clear you from the
hold.
BUT, and there's always a BUT, there is one other thing you can do to make
life even easier, albeit not the correct way. Provided you have your VCP mode
set to 3 then your trusty co-pilot will fly the hold for you via the auto pilot and
you can just sit back and watch the scenery.
If you really would like to know how to do it the correct way I would guess
you could find such information online but for now that is about the extent of
my knowledge.
At some point (hopefully) ATC will clear you from the hold and set you on
your way. The call you hear will be something like this:-
“Easy 4, at Bravo India Golf resume own navigation, cleared to Echo
Golf Sierra Sierra”
So what does this mean? Well, when you get to the holding point (and when
you get this call you should already be heading toward it anyway) you should
resume your own navigation, which means follow the remaining part of your
flight plan and that you are in fact cleared to the next waypoint or perhaps
that's your destination airport.
9.5 Requesting ‘Direct to…’
With PF3 you can request ATC to approve a ‘direct to’ any waypoint in your
flight plan. This feature is activated using the same hotkey as you use to
toggle ground AI traffic detection on/off (the default key being C\S\D).
However, the original function of this hotkey is only available whilst your
aircraft is on the ground... once airborne this key is then used to request a
'Direct To' waypoint.
Hitting this key during your flight will not display the next waypoint in your
flight plan, as you should already be heading toward that one <G>, but the
Page 121 of 212
Copyright © 2007-2024 by OnCourse Software

PF3 User Guide
one following the next one. The message window display will also prompt you
to select ‘Y’ (C\S\Y) or ‘N’ (C\S\N).
If you choose No then the next waypoint in your flight plan, following the one
you just discarded, will be displayed with the same options.
Choosing yes you will hear "Call sign requesting direct to XXX" and ATC will
reply accordingly.
This feature is subject to a few conditions...
1. It is only available whilst you're airborne
2. It is only available until you're actually on route to the last waypoint in
your flight plan
3. It is not available until after you receive your final vector from
Departure and a 'Resume own navigation'
4. It is not available during Oceanic procedures
Page 122 of 212
Copyright © 2007-2024 by OnCourse Software

PF3 User Guide
10. DECLARING AN EMERGENCY
10.1 Overview
When processing the loaded flight plan PF3 will determine airports along your
route, that meet the same criteria as you may have setup in the PF3 Presets
section, to ensure ATC will always know the closest airport to you as you
progress through your flight plan.
During an emergency you will not be expected to choose an airport from a
display list, because you will probably have more things to be worrying about,
so ATC will handle that for you. All you really need to concentrate on is flying
the aircraft, whilst your VCP (if configured) could handle all radio
communication.
10.2 Mayday
PF3 “Pan, Pan, Pan” and all emergencies are declared as “Mayday”
To declare an emergency you just have to use the default hotkey sequence
Ctrl + Shift + E
You will hear your call:-
“Mayday, mayday, mayday, Easy 4 cannot make final destination, request
landing clearance”
If you are more than halfway to your destination the response from ATC will
be:-
“Easy 4, squawk 7700”
Shortly after ATC will give you the following instructions:-
“Easy 4, descend and maintain xxxx. The airport is ABC, nn miles, heading
nnn. Tower/Unicom frequency is 123.45”
If you are less than halfway to your original destination ATC will respond:-
“Easy 4, squawk 7700, can you make it back to your destination airport?”
At this point you will see the following message displayed in whatever
message window you are using:-
"C/S/Y for Yes - C/S/N for No"
You give the appropriate response by using the relevant default hotkey
sequence Ctrl+Shift+Y or Ctrl+Shift+N
Page 123 of 212
Copyright © 2007-2024 by OnCourse Software

PF3 User Guide
After this ATC will respond with the following:-
“Easy 4, descend and maintain xxxx. The airport is ABC, nn miles, heading
nnn. Tower/Unicom frequency is 123.45”
Once nearing the assigned airport you should contact Tower and they will
reply:-
“Easy 4, cleared to land, runway at pilot's discretion”
What this means is you are cleared to land on whatever runway you think you
can safely land
Page 124 of 212
Copyright © 2007-2024 by OnCourse Software

PF3 User Guide
11. OCEANIC PROCEDURES
11.1 About
Regular VHF COM Frequencies are only usable while you have line of sight.
Over the ocean aircraft will lose line of sight from the coast quickly and have
to move over to HF frequencies which do not have such limitations. HF radio
bounces off of the ionosphere and the only limitation on the distance that an
HF radio signal can travel is in the power of the radio transmitter. Therefore,
once out of line of site from any of the oceanic FIR's HF has to be used.
To couple that limitation, radar is also line of sight only. Once the aircraft is
out of line of site positive control ATC is no longer possible, therefore there is
no ATC over the Atlantic or Pacific flight routes. To ensure that traffic is
managed properly NATs and PATs are used to ensure that traffic is managed
by direction and altitude. However, each aircraft is responsible for
maintaining vertical and horizontal separation and advising the Oceanic FIR
on their position at regular intervals via HF.
HF radio is very noisy with white-noise always audible in the background and
will drive everyone crazy if they had to listen to that noise for countless hours
on end. The pilot can squelch the noise but in the same token will silence the
voice also, so that neither voice nor noise will be heard. Enter SELCAL.
SELCAL is a 4 letter code (two pairs) identifier that is slaved to every single
SELCAL equipped aircraft and the code stays the same until the aircraft is sold
and a new SELCAL code is acquired. Embedded in the SELCAL code is the
aircraft's registration and airline. SELCAL is directly connected to the
aircraft's HF radio and will turn down the squelch on the pilot’s radio and
allow oceanic radio to contact the pilot directly. Since each aircraft will have a
different SELCAL code, the communication is heard by the targeted aircraft
ONLY and other aircraft will NOT hear the communication... therefore there
is very little radio chatter over the oceans.
11.2 Oceanic COM Procedures
SELCAL and HF is only used with the Oceanic FIRs. For instance on an
aircraft flying a typical NAT from KJFK to EGKK will use SELCAL and HF
procedures with Gander Radio and Shanwick Radio. As a rule, all of the FIRs
with an "Oceanic" suffix are "radio" and it is a safe bet that they use HF and
SELCAL because they are out of line of sight and control only oceanic flights.
So, for instance, Gander Center will instruct the aircraft to contact Gander
Radio on HF radio frequency on xxxx.x or xxxxx.x
Once contact is made with Oceanic, make contact with airline call sign,
SELCAL code (i.e. AB-CD), Departure, Destination and registration number.
Oceanic will then read back and roger and then give the HF frequencies for
the route of flight which is typically a NAT or PAT. Oceanic will NOT hand off
Page 125 of 212
Copyright © 2007-2024 by OnCourse Software

PF3 User Guide
the aircraft as done over land therefore the pilot is responsible for changing
frequencies and advising the previous Oceanic that they are moving on.
During the time between changing frequencies, aircraft MUST contact Oceanic
during the following:
1 - Crossing a waypoint:
So it should sound like this
- Continental 50 Gander Radio, position report.
(series of beeps)
- Gander Radio Continental 50 go ahead
- Gander Radio Continental 50 at 20 North 30 West, FL 350, speed mach .83,
expect 50 North 30 West at 2351Z, 50 North 40 West next.
(series of beeps)
- Continental 50 Gander Radio (reads back), roger.
2 - If over 45 minutes since last contact and have not reached next waypoint.
3 - Changing flight level
4 - Deviating from flight path
This will all continue all the way across the pond until hitting Shanwick Radio,
where normal ATC will resume.
Page 126 of 212
Copyright © 2007-2024 by OnCourse Software

PF3 User Guide
12. DEFAULT HOTKEY DETAILS
12.1 How to use Hotkeys
The following default hotkeys are used to interact with PF3
Please remember you have to use Ctrl+Shift with each hotkey with the
exception of 0 thru 9, the PTT key and the H and L keys, as these only
require a single key press.
Eg. For Virtual C-Pilot mode use Ctrl+Shift+V but for initial check-in with
ATC you only need to use the ZERO key.
12.2 Hotkey Functionality Explained
12.2.1 Hotkey Ctrl + Shift + E
Use this key to declare an emergency during your flight. ATC will then direct
you to the nearest emergency airport if you can't make it back to your
departure airport.
This procedure will also require you to use the C\S\Y and/or C\S\N hotkeys
(explained later in this section) to answer certain questions from ATC
Please see section 10. for full details on declaring an emergency.
12.2.2 Hotkey Ctrl + Shift + =
You would use this key to ask ATC to 'Say Again' should you ever need them
to repeat their last instruction to you.
12.2.3 Hotkey Ctrl + Shift + \
This key is used to 'Roger/Readback' a call from ATC.
This is the backslash key which you will find at the lower left of a UK
keyboard. If you have any problems using this key, as it does tend to cause
problems on some keyboards you can easily change the default setting to
something else you may prefer.
Please see section 7.1.14 for full details regarding changing the hotkey
defaults
12.2.4 Hotkey Ctrl + Shift + C
This hotkey is used to toggle PF3's Closed Caption mode ON/OFF and can be
used at any time once you have connected to your flight sim
Page 127 of 212
Copyright © 2007-2024 by OnCourse Software

PF3 User Guide
12.2.5 Hotkey Ctrl + Shift + D
This is a multi-functional hotkey, dependant on the current mode of your
flight.
Whilst on the ground this will toggle PF3’s AI ground traffic detection on/off.
It’s ON by default but if you ever find yourself in the situation where PF3
believes there is an aircraft in front of you, and therefore will not clear you for
takeoff, you can use this keying sequence to clear your way.
Once airborne this hotkey is used to request a ‘Direct to….’ a particular
waypoint in your flight plan.
Please see section 9.5 for full details on requesting 'Direct to...'
12.2.6 Hotkey Ctrl + Shift + V
This hotkey is used to change the current Virtual Co-pilot mode during your
flight. Each time you use the key the VCP mode will change and a brief
message will be shown in the FS message window (or whatever message
window system you may be using) to show you which mode you have just
switched to.
For details regarding the actual VCP modes available and their usage please
see section 7.1.4
12.2.7 Hotkey Ctrl + Shift + W
This is a multi-functional hotkey dependant on the current mode of your
flight.
When TGS is active (during your taxi to/from) the runway this hotkey
provides the means to skip the next taxi waypoint. This was primarily
provided for those rare occasions where you may find your first or subsequent
taxi waypoints are behind you. Use of this hotkey alleviates the problem of
having to do a 180 degree turn at the start of your taxi.
New in 3.22.0 - Previously, after receiving taxi instructions at your departure
airport, if you wished to request another runway you would first have to use
Hotkey #1 to deactivate TGS. With this new change all you have to do is use
C\S\W and provided you have not already started taxiing it will deactivate
TGS automatically and then proceed with the runway change selection. Once
you've commenced taxiing C\S\W will revert to bumping the next taxi
waypoint
At your departure airport, after ATC has told you which runway to taxi to, you
can use this hotkey to request another runway.
During the approach to your destination airport, immediately after ATC has
told you which runway to expect for landing, you can use this hotkey to
request an alternative runway.
During your flight this hotkey can be used to Warp your aircraft to any
waypoint in your flight plan. This is useful for those times when you don’t
want to fly a long haul trip in real time.
Page 128 of 212
Copyright © 2007-2024 by OnCourse Software

PF3 User Guide
12.2.8 Hotkey ‘H’
This key is used to request a higher altitude during your flight.
Press and hold the H key then press and release one of the top row numeric
keys (1 thru 9) to request a higher altitude. So if you are currently cruising at
25,000’ and wish to climb to 30,000’ you would press and hold down the H
key then press and release the number 5 key (top row) to request 30,000’
(eg. 25,000’ + 5 * 1,000’ = 30,000’)
You may also use the H or L key without pressing a numeric key to request to
to remain at your current altitude. This could be useful if you're having
difficulty climbing to the cleared altitude for some reason.
12.2.9 Hotkey ‘L’
This key is used to request a lower altitude during your flight.
Press and hold the L key then press and release one of the top row numeric
keys (1 thru 9) to request a lower altitude. So if you are currently cruising at
25,000’ and wish to descend to 22,000’ you would press and hold down the L
key then press and release the number 3 key (top row) to request 22,000’
(eg. 25,000 – 3 x 1,000’ = 22,000’
You may also use the H or L key without pressing a numeric key to request to
to remain at your current altitude. This could be useful if you're having
difficulty climbing to the cleared altitude for some reason.
12.2.10 Hotkey Ctrl + Shift + Y
Indicates 'Yes' or 'Affirmative'
This key is used whenever you need to answer an ATC question or to confirm
you wish to choose a particular selection displayed in the FS message window
(or whatever message window system you may be using)
12.2.11 Hotkey Ctrl + Shift + N
Indicates 'No' or 'Negative'
This key is used whenever you need to answer an ATC question or to confirm
you do not wish to choose a particular selection displayed in the FS message
window (or whatever message window system you may be using)
12.2.12 Hotkey ESC
This key is used as your PTT (press to talk) switch when using a Voice
Recognition program alongside PF3. Basically it initiates a user configurable
number of seconds delay during which time you can talk to ATC without PF3
interrupting.
Page 129 of 212
Copyright © 2007-2024 by OnCourse Software

PF3 User Guide
12.2.13 Hotkey Ctrl+Shift+T
New to PF3 version 3.10 this key is used to toggle the new In-Sim Hotkey
display window between Current Hotkeys/Global Hotkeys/Off
12.2.14 Hotkey Ctrl+Shift+S
New to PF3 version 3.22.0 this key allows you to request an early descent
from ATC prior to reaching your TOD. However, this will only work if you have
reached your TOC and the altitude set in your flight plan for the waypoint
AFTER the one you're currently heading towards is less than that of the
current waypoint. There is also a 10% chance ATC will respond with 'Unable
at this time', otherwise you will be instructed to descend.
12.2.15 Hotkey '0' (zero)
A multifunctional key dependant on the ATC facility you're tuned to:-
Clearance
Used for initial check-in and to request clearances
Ground
Used for initial check-in and when you're ready to taxi
Tower
Used for initial check-in and when you're ready to taxi if there are no Ground
facilities at your airport.
Departure
Used to initially check-in or if flying VFR to request Flight Following
Center
Used to initially check-in or if flying VFR to request Flight Following
Approach
Used to initially check-in or if flying VFR to request Flight Following
FSS
Used to request they Open your flight plan
Multicom
used for initial check-in (not on the ground)
Unicom
Used for initial check-in (not on the ground)
Page 130 of 212
Copyright © 2007-2024 by OnCourse Software

PF3 User Guide
12.2.16 Hotkey ‘1’
A multifunctional key dependant on the ATC facility you're tuned to:-
Ground
If tuned to Ground Control and TGS is active this hotkey is used to turn TGS
off. Also, should you hit this key accidentally you may hit it again to toggle
TGS back on again, although if mid-way through your taxi you would then
have to use the Ctrl+Shift+W hotkey to skip those taxi waypoints you have
already passed because TGS will not play catch up.
Tower
If tuned to Tower, during the approach phase of your flight, this key is used
to initially check-in with the Tower controller for permission to land.
Control/Center and Approach
If tuned to Control Center or Approach this key is used to request a 'Cleared
to Finals...' approach. If accepted then ATC will Clear you to Finals on Pilot's
discretion which means you should now fly direct to the FAF and then make
contact with Tower once you are established on the ILS.
FSS
When tuned to an FSS frequency this hotkey is used to request they Close
your flight plan
Radar
When tuned to Radar Control this hotkey triggers handoff to Approach.
12.2.17 Hotkey ‘2’
A multifunctional key dependant on the ATC facility you're tuned to:-
Clearance
Use of this key sends an automatic request for an ACARS ATIS report for your
destination airport.
Ground
Use of this key sends an automatic request for an ACARS ATIS report for your
destination airport.
Tower
Used to Report Downwind
Departure
Use of this key sends an automatic request for an ACARS ATIS report for your
destination airport.
Center
Use of this key sends an automatic request for an ACARS ATIS report for your
destination airport.
Page 131 of 212
Copyright © 2007-2024 by OnCourse Software

PF3 User Guide
Approach
Request an instrument approach
FSS
Used to extend your ETA by 30 minutes
Multicom
Used to announce entering Downwind
Unicom
Used to announce entering Downwind
12.2.18 Hotkey '3'
A multifunctional key dependant on the ATC facility you're tuned to:-
Tower
Used to report turning Base
Departure
Request ATC assigned lower altitude
Center
Request ATC assigned lower altitude
Approach
Request ATC assigned lower altitude
FSS
Used to request weather advisories
Multicom
Used to announce turning Base
Unicom
Used to announce turning Base
12.2.19 Hotkey '4'
A multifunctional key dependant on which ATC facility you're tuned to:-
Tower
Used to report turning to Finals
Departure
Request ATC assigned higher altitude
Center
Request ATC assigned higher altitude
Page 132 of 212
Copyright © 2007-2024 by OnCourse Software

PF3 User Guide
Approach
Request ATC assigned higher altitude
FSS
Used to request the control center's frequency
Multicom
Used to announce turning to Finals
Unicom
Used to announce turning to Finals
12.2.20 Hotkey '5'
A multifunctional key dependant on the ATC facility you're tuned to:-
Ground
Used to announce you are clear of the runway and request taxi instructions
Tower
Used to request the option (touch 'n' go)
Departure
Request a specific lower altitude
Center
Request a specific lower altitude
Approach
Request a specific lower altitude
Multicom
Used to announce you are clear of the runway
Unicom
Used to announce you are clear of the runway
FSS
Used to request the Local Radar Control Frequency
12.2.21 Hotkey '6'
A multifunctional key dependant on the ATC facility you're tuned to:-
Ground
Used to request a radio check
Tower
Used to initially check in with Tower and request permission to takeoff
Page 133 of 212
Copyright © 2007-2024 by OnCourse Software

PF3 User Guide
Departure
Request a specific higher altitude
Center
Request a specific higher altitude
Approach
Request a specific higher altitude
FSS
Used to toggle your flight plan IFR/VFR
Multicom
Used to announce you are taking the runway
Unicom
Used to announce you are taking the runway
12.2.22 Hotkey '7'
A multifunctional key dependant on the ATC facility you're tuned to:-
Ground
Used to request the altimeter setting
Tower
Used to request field advisories
Departure
Used to request vectors
Center
Used to request vectors
Approach
Used to request vectors
FSS
Used to request airport advisories
Unicom
Used to request field advisories
12.2.23 Hotkey '8'
A multifunctional key dependant on the ATC facility you're tuned to:-
Ground
Used to toggle the Auto Taxi speed function (only when TGS is active)
Page 134 of 212
Copyright © 2007-2024 by OnCourse Software

PF3 User Guide
Tower
Used to report you are diverting to your alternate airport or pressed a second
time would cancel the diversion and revert to you landing at your original
destination.
Center
Used to report you're diverting to your alternate airport or pressed a second
time would cancel the diversion and revert to you landing at your original
destination. This key is also used to report airport in sight when relevant.
Approach
Used to report the airport is in sight
FSS
Used to amend your flight plan to land at the next available airport
Multicom
Used to announce you are leaving the area
Unicom
Used to announce you are departing the area
12.2.24 Hotkey '9'
This is a multifunctional key dependant on the ATC control facility you are
currently tuned to:-
Tower
Used to report a go-around/missed approach
Departure
Used to report your position
Center
Used to report your position
Approach
Used to report your position
FSS
Used to report your position
Page 135 of 212
Copyright © 2007-2024 by OnCourse Software
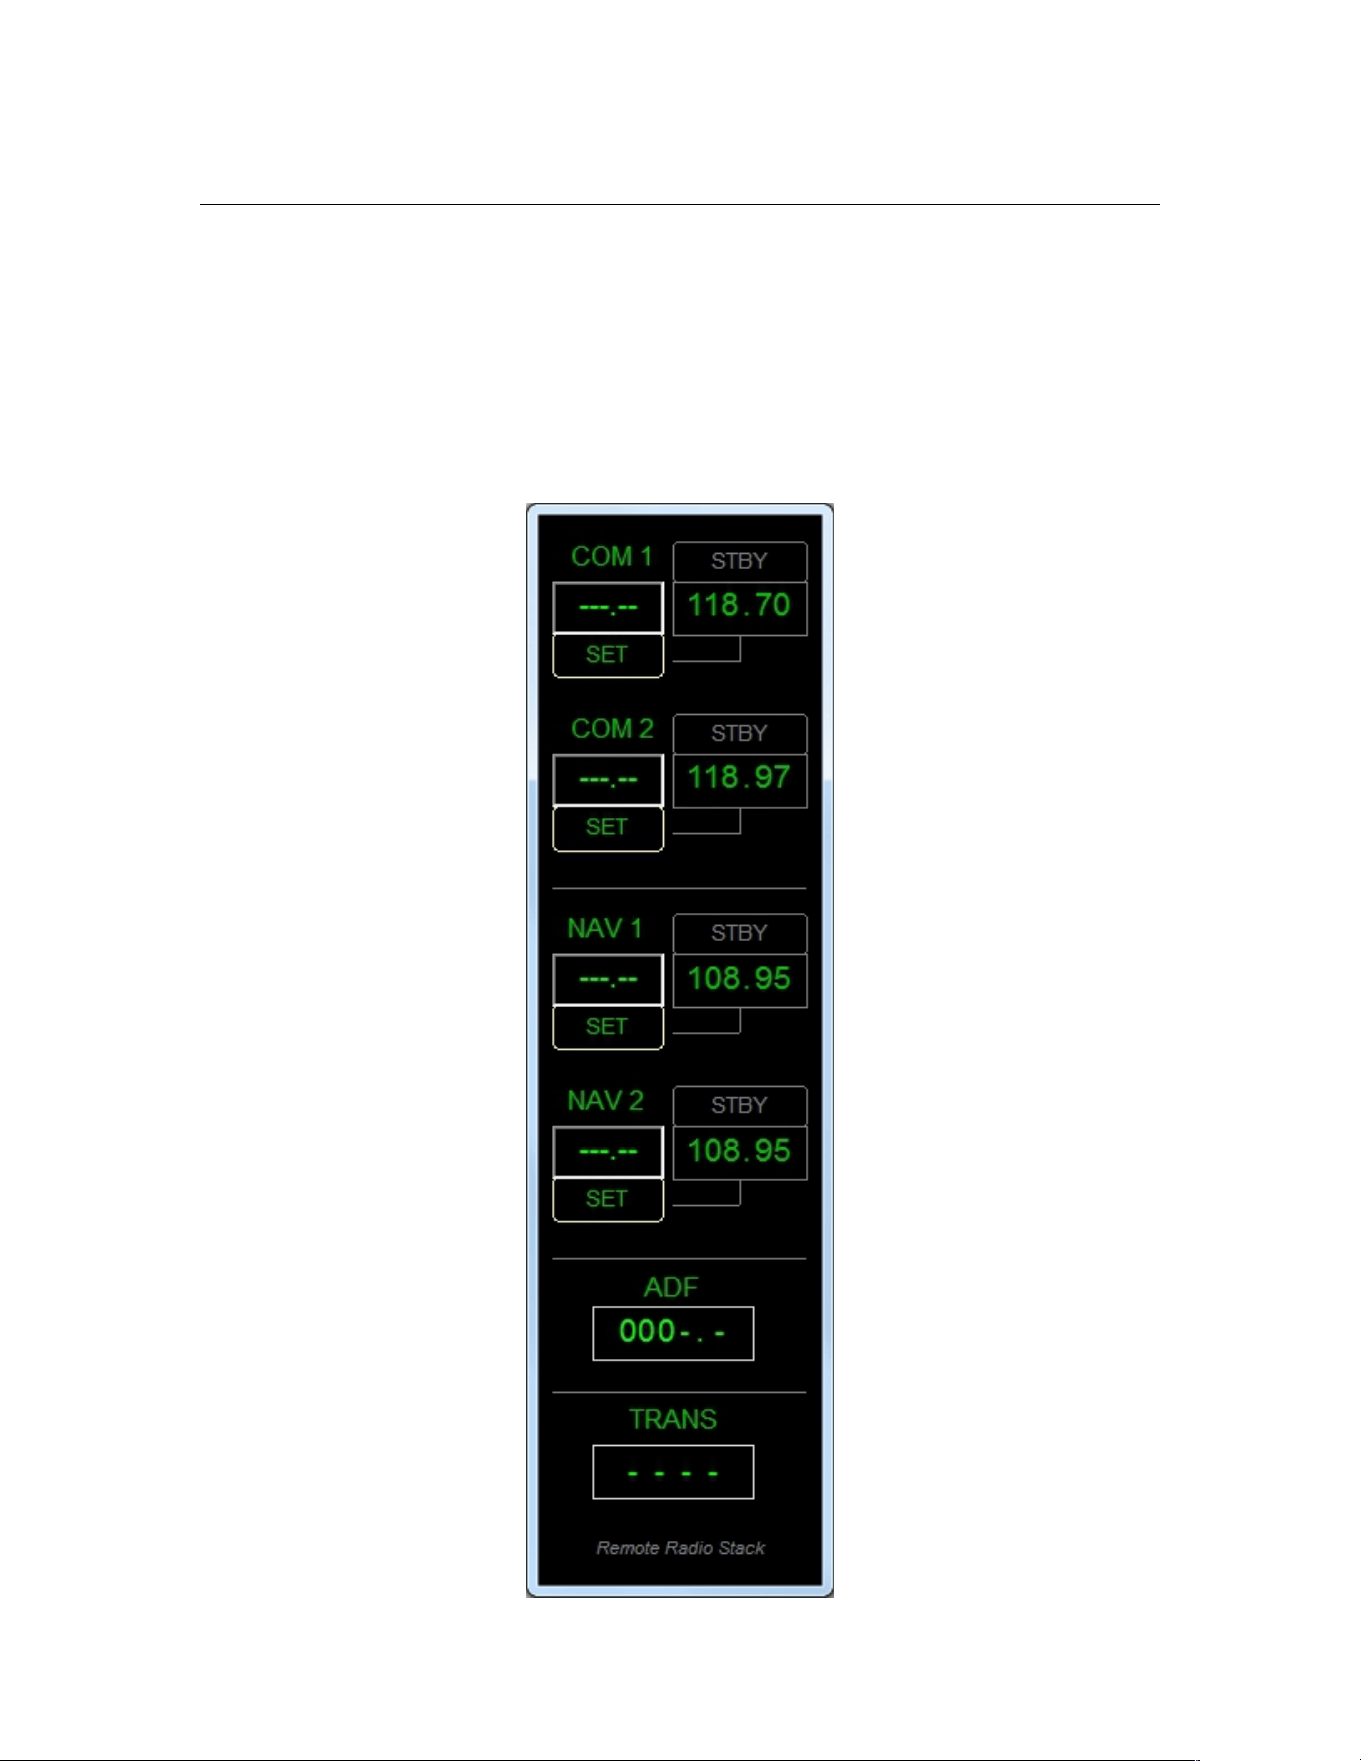
PF3 User Guide
13. REMOTE RADIO STACK PROGRAM
13.1 Overview
This program has nothing to do with PF3 and can even be used if PF3 is not
running. The idea for this came about when I expanded my flight sim system
by adding a TripleHead2Go, Project Magenta Software and several monitors. I
then found a need to be able to easily view/change my radios.
Page 136 of 212
Copyright © 2007-2024 by OnCourse Software

PF3 User Guide
The Remote Radio Stack program is supplied FREE with PF3 and can be found
in your PF3\PF3_Displayer folder. It can be installed on any pc and was
designed to be run on a client PC running the WideClient application from
WideFS.
Installation is simply copying the RemoteRadioStack.exe file to wherever
you wish to use it.
Just install It and run it... that's it!
Page 137 of 212
Copyright © 2007-2024 by OnCourse Software

PF3 User Guide
14. REMOTE TEXT PROGRAM
14.1 General
This FREE utility comes with PF3 and you will find it in your
...\PF3\PF3_Displayer folder.
This program is very much like the utility called Show Text by Rob van der
Wiele. However, developing our own utility allows us to add whatever features
we want and tailor it specifically for use with PF3. So, you will find
RemoteText has some additional PF3 specific added features.
RemoteText can only be used with PF3.
14.2 Installation
RemoteText can be installed on any PC which is on the same Network as PF3.
It does not require WideFS/WideClient. When you first run the program it will
ask you to enter the name or the IP address of the PC where PF3 is installed.
To ensure RemoteText functions correctly you will also have to turn Closed
Captions ON in the main Options #1 page of PF3.
Also, you need to activate RemoteText in PF3. To do this please see section
7.1.26
That's it!
14.3 Features
Here's a few of the available features. The main noticeable change is there is
no limit to the amount of text (within reason) you can have displayed., unlike
Show Text which was limited to the FSUIPC buffer of about 128 characters,
which is why long messages (or ATIS) had to be displayed on two of more
cycles.
With RemoteText you can:-
• Move and resize the window in the normal way
• Use Shift + arrow keys for minor movement
• Use Ctrl+Arrow keys for minor resizing
• You can change the main font
• You can change the text colour and background colour
• You can toggle the window border off/on
• You can add highlighted text/background colours which are displayed
only when ATC are talking to you
• You can show all ATC COMs or only show ATC COMs between you and
ATC
Page 138 of 212
Copyright © 2007-2024 by OnCourse Software

PF3 User Guide
• You can choose to suppress your COMs and only show ATC COMs.
For instance, you may decide you don't want to see closed caption text from
ATC when they are talking to other aircraft, or you may decide to see all ATC
chatter but then have the display suddenly change from green on black to
yellow on red to signify the message is for you (so pay attention).
Other options allow you to select that the last message from ATC to you
remains on the display until removed by another message. You can also
configure how many seconds to allow any other messages to remain
displayed.
Obviously this utility is only of use to those running more than one PC
although it could be used on a second monitor connected to your FS PC.
New to 3.8 – PF3 now supports the use of two instances of RemoteText on
the same network. All you need to do is ensure each instance uses it's own
unique Socket Port Number. This is configured in the Advanced Options and
INI File Tweaks. Please see section 7.1.26 Advanced Options and INI File
Tweaks for more details on configuring RemoteText
Page 139 of 212
Copyright © 2007-2024 by OnCourse Software
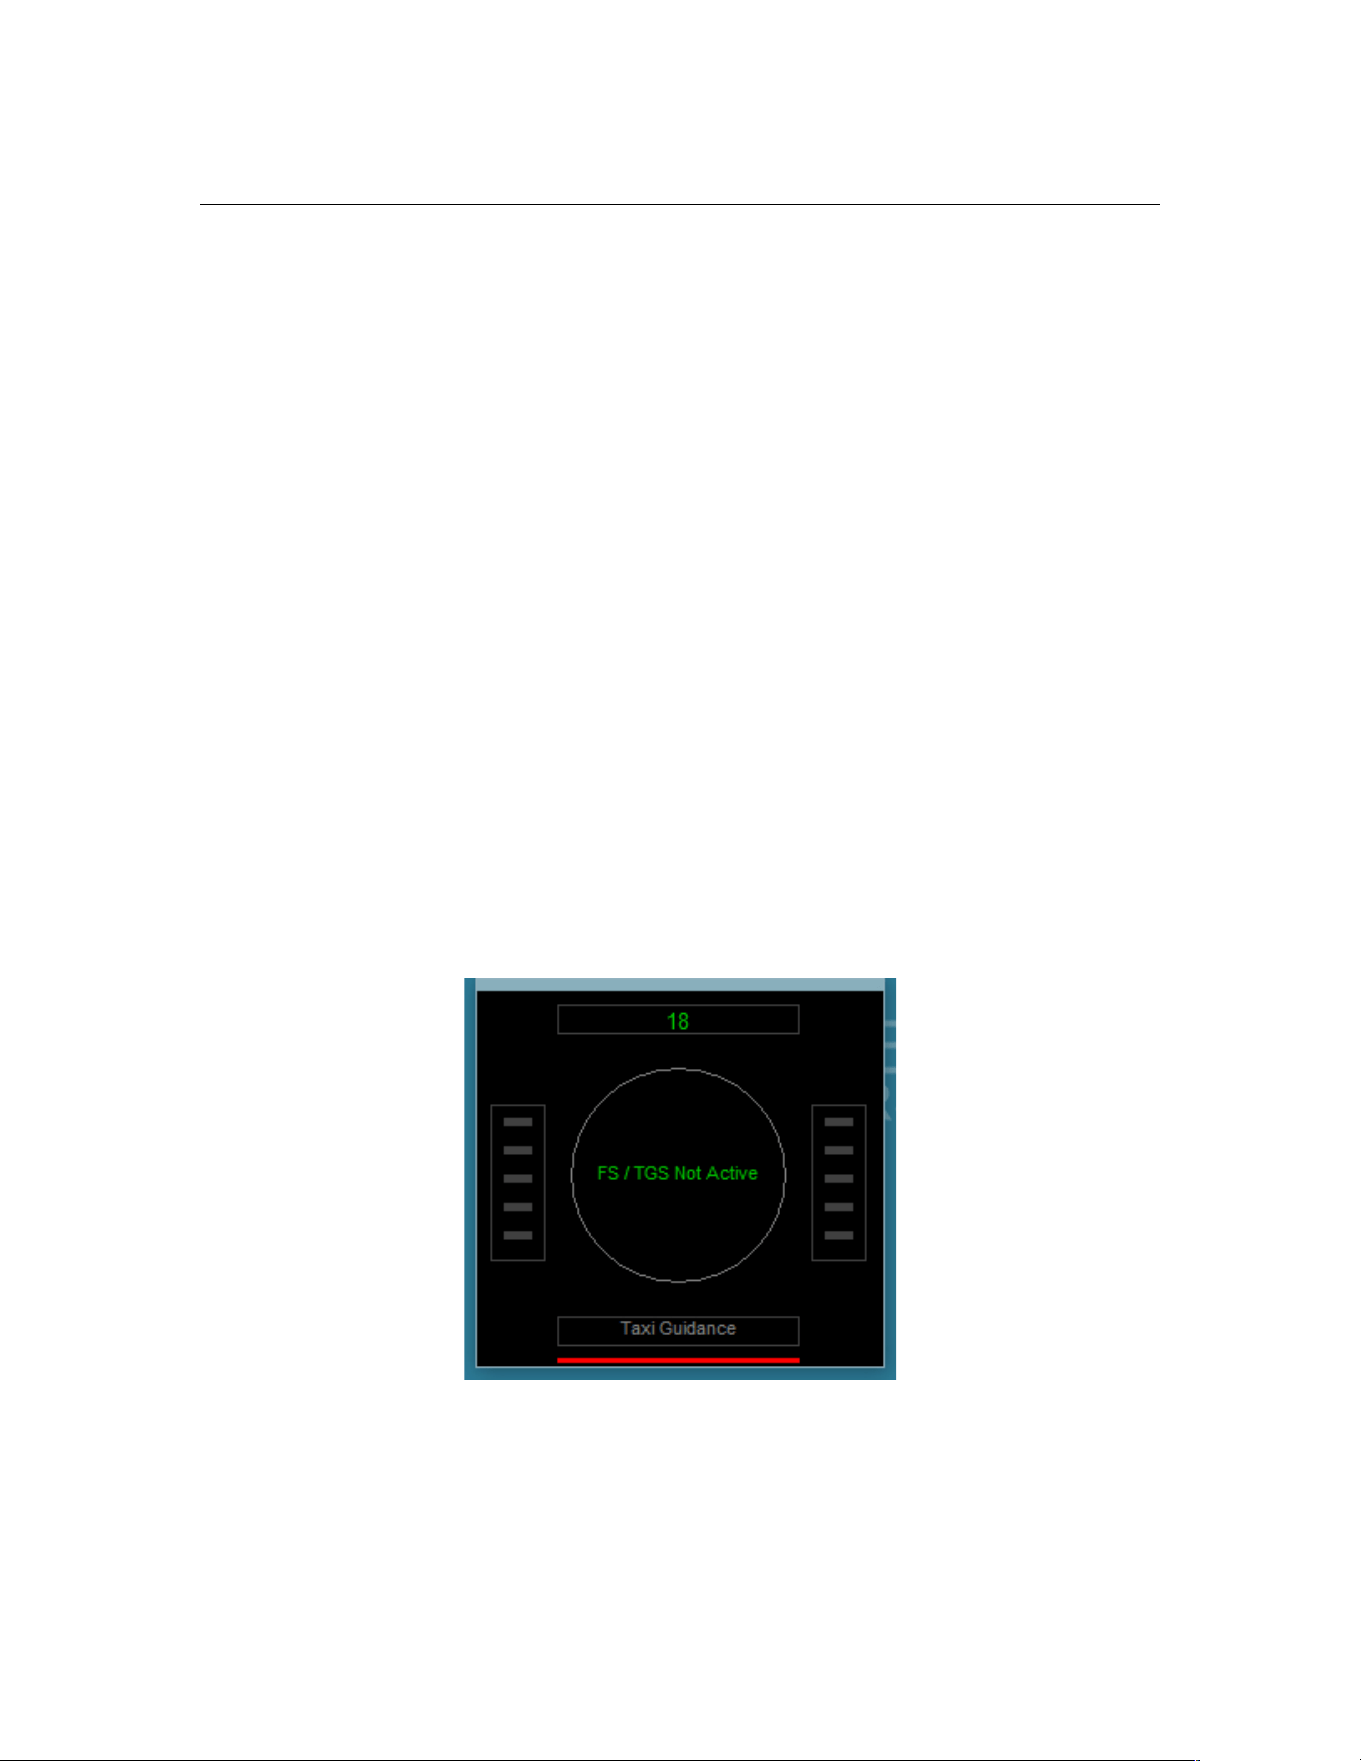
PF3 User Guide
15. TGS GAUGE REPLACEMENT PROGRAM
15.1 Overview
Personally I have always found the original TGS Gauge a little temperamental,
whilst others use it extensively without issue... enter the standalone TGS
Display.
15.2 The Program
The TGS Display is ideally suited when running more than one pc or multiple
monitors. It is a stand-alone program and therefore can be run on any pc
provided you have WideFS/WideClient installed if running on a client.
It does not have to run on the same PC as FS nor PF3.... it is stand-alone!
The display can be resized to suit your own particular requirements and mine
sits nicely beside the Project Magenta MCP on a client pc.
Install it wherever you want.
You'll find this new program in the TGS_Gauge folder after installing PF3 and
is named TGS_Display.exe
Oh yes, this display also shows a little more than our original gauge.
If you start TGS Display when PF3 or FS are not running it will look like this
The red bar at the bottom is in fact a dual indicator. The left half will show red
when not connected to PF3, it will show amber when connected but in idle
mode and green when connected and working. The right half will show red
when PF3 is not running and therefore the display utility is unable to link via
the TCP/IP port. It will show green when PF3 is running and the TCP link has
been enabled between the two programs.
Page 140 of 212
Copyright © 2007-2024 by OnCourse Software
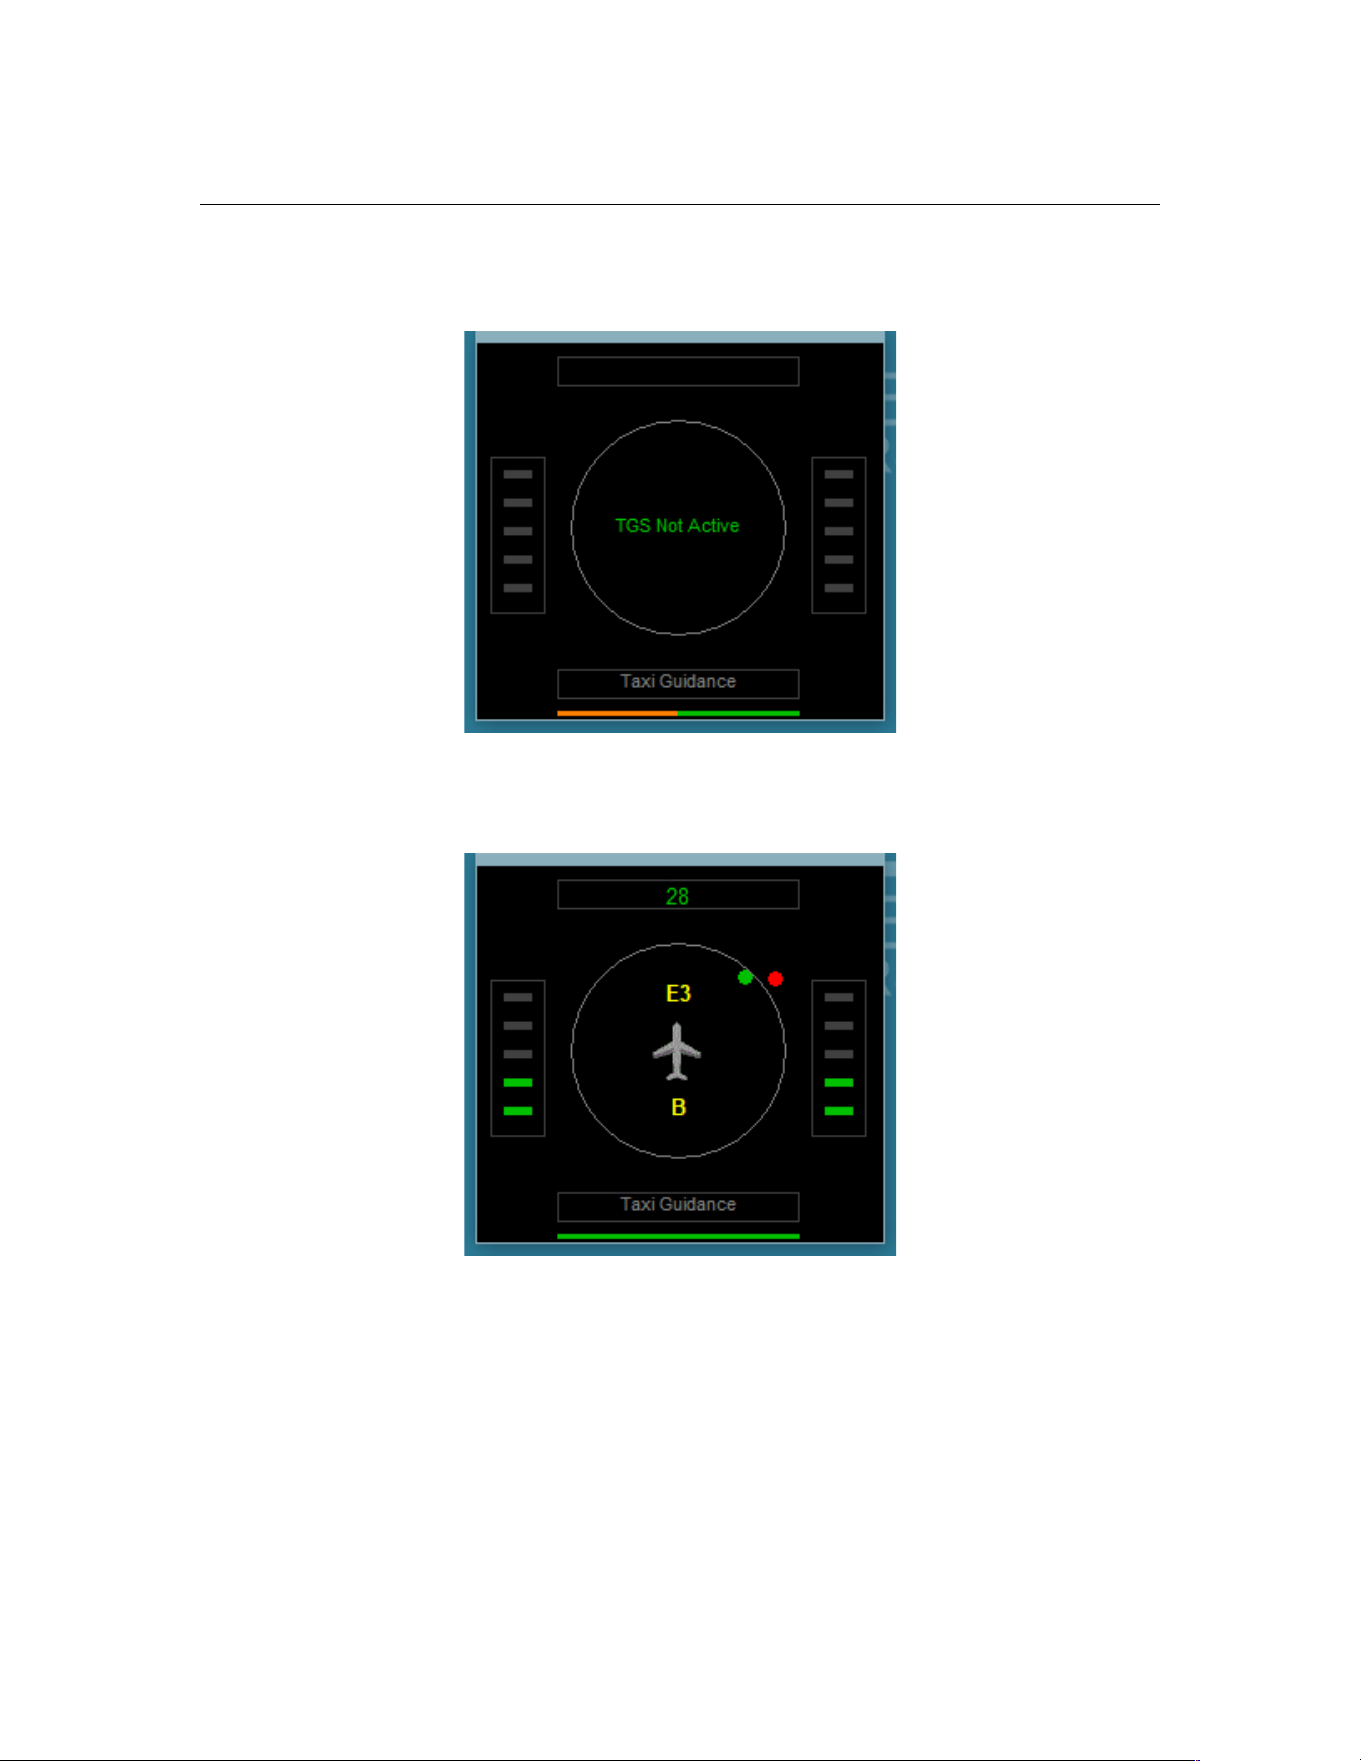
PF3 User Guide
The following shows we're still connected but the taxi guidance is complete, or
not yet begun, so TGS Display is in an idle state. A bit like me most of the
time!
The following shows PF3 Display is connected and the TCP port is enabled.
Above the little aircraft symbol is the name of the taxiway you are actually on
or about to turn onto, in the above display you would be on Echo 3 after
leaving taxiway Bravo, as shown by the indicator below the aircraft symbol.
The green dot shows the relative direction to your next taxi waypoint and the
red dot indicates the relative direction to the waypoint following the one you
are currently heading toward. This provides the info you need so there are no
sudden surprises to suddenly turn left/right. As in your actual flight plan,
taxiing is all about forward planning.
You can also configure the display to show when you're braking or have the
parking brakes set on... rather than the annoying red/white signs displayed in
Page 141 of 212
Copyright © 2007-2024 by OnCourse Software

PF3 User Guide
FSX and earlier. To use this feature, after you've run the TGS Display at least
once, open the TGS_Display.INI file and add...
ShowBrakes=1
...to the [CONFIG] section. Once configured you will see BR for Brakes and
PB for Parking Brakes displayed at the top left/right of the display when
brakes are applied. There are of course files available for download which
enable you to turn the FS message for brakes off.
That's it, you don't have to do anything else, other than remove the TGS
gauge from your panel.cfg files should you decide to use this replacement.
PF3 is configured to interact with TGS in exactly the same way as it did for
the original TGS gauge. This is basically a replacement so nothing else
changes.
For fine tuning the position and size of the TGS Display you can use Shift +
Arrow Keys to move it and Ctrl + Arrow Keys to resize it.
Page 142 of 212
Copyright © 2007-2024 by OnCourse Software

PF3 User Guide
16. PF3 DISPLAY UTILITY PROGRAM
16.1 General
This little program will display all the relevant PF3 hotkey commands
dependant on which ATC facility you are currently tuned to (eg. Ground,
Tower, etc). The utility will probably be more useful to those users running
more than one pc or multiple monitors, but it can also be used on a single pc
running FS/PF3, but if you're running FS in full screen mode you won't see it!
The display utility will be found in your ...\PF3\PF3_Displayer folder. Inside
this new folder you will see two files. One named PF3_Display.exe and one
named PF3_Disp.dat
To run PF3_Display simply double-click on it.
You may run this utility from any client PC and you don't need WideFS to do
so. When first running it you will be asked to enter the IP Address or
Computer name of the PC where PF3 will be running. If you're unsure about
IP Addresses or indeed how to find the name of your PC then all is not lost. If
you go to your PF3 folder you should find a small text file named
ComputerName.txt. Open it with Notepad and you'll see the name of you
computer. Enter that when prompted by PF3 and bingo, everything should
now work. You can run it from any folder provided you copy the PF3_Disp.dat
file over with the main PF3_Display.exe program.
PLEASE NOTE
A great alternative to this utility is the PF3 WEB Display program.
You'll find it installed into the following location:
…\PF3\PF3_Displayer\PF3_WEB_Display
You will also find all the necessary documentation on how to use this
great addition to PF3.
This program was written by my co-developer Martin Cockerell. It even works
in VR when using MSFX. Please check it out.
Page 143 of 212
Copyright © 2007-2024 by OnCourse Software
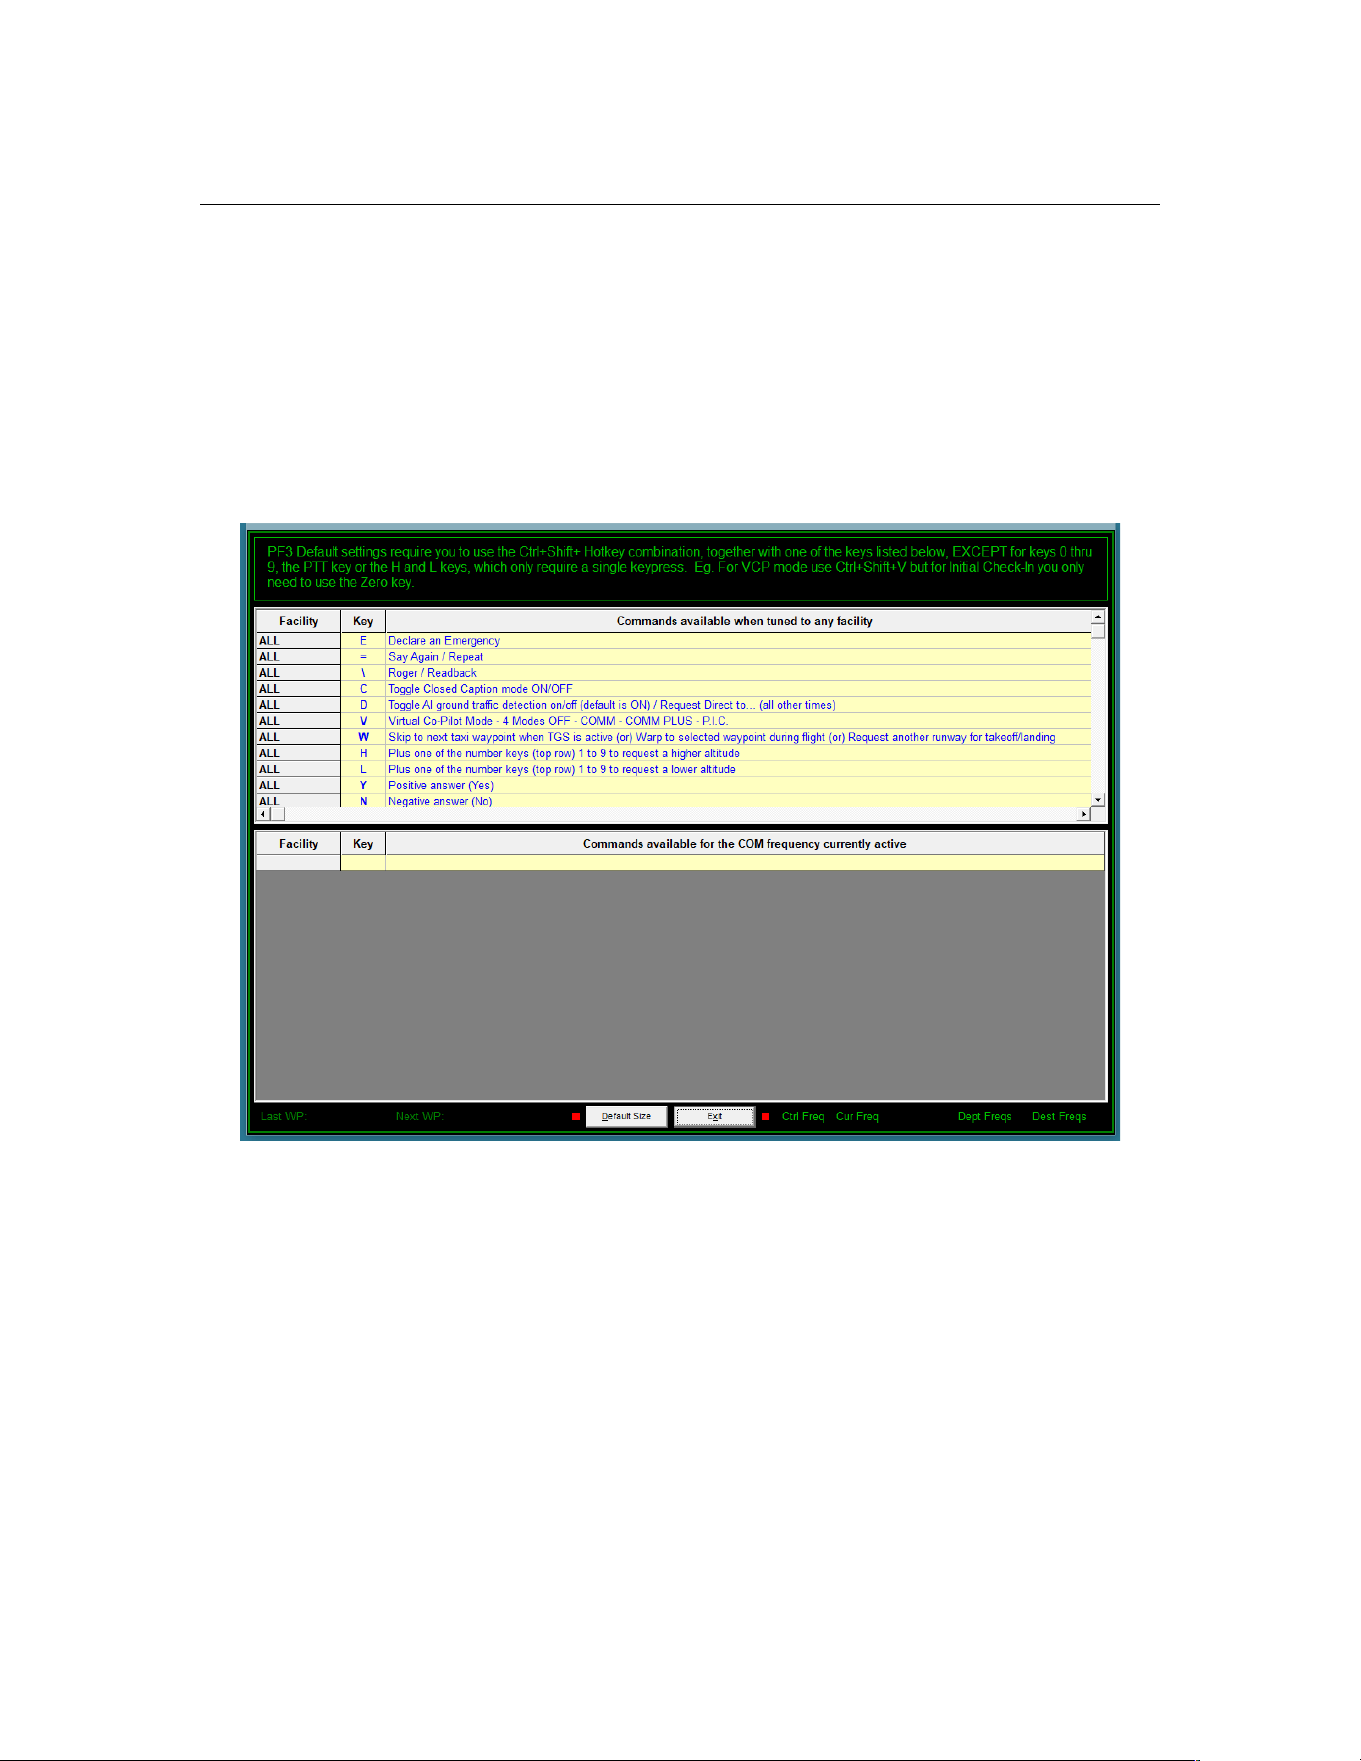
PF3 User Guide
16.2 The Program
After you run it you should see the following:-
As you can see the main screen is split into two main sections. The top half
shows those general keys which remain unchanged throughout your flight,
whereas the lower section is reserved for those hotkeys that changed
dependant on the facility you are currently tuned to. In the example below
you will notice two small red lights, one either side of the ‘exit’ button, these
indicate that the PF3_Display program has not yet made a connection with
PF3.
Page 144 of 212
Copyright © 2007-2024 by OnCourse Software
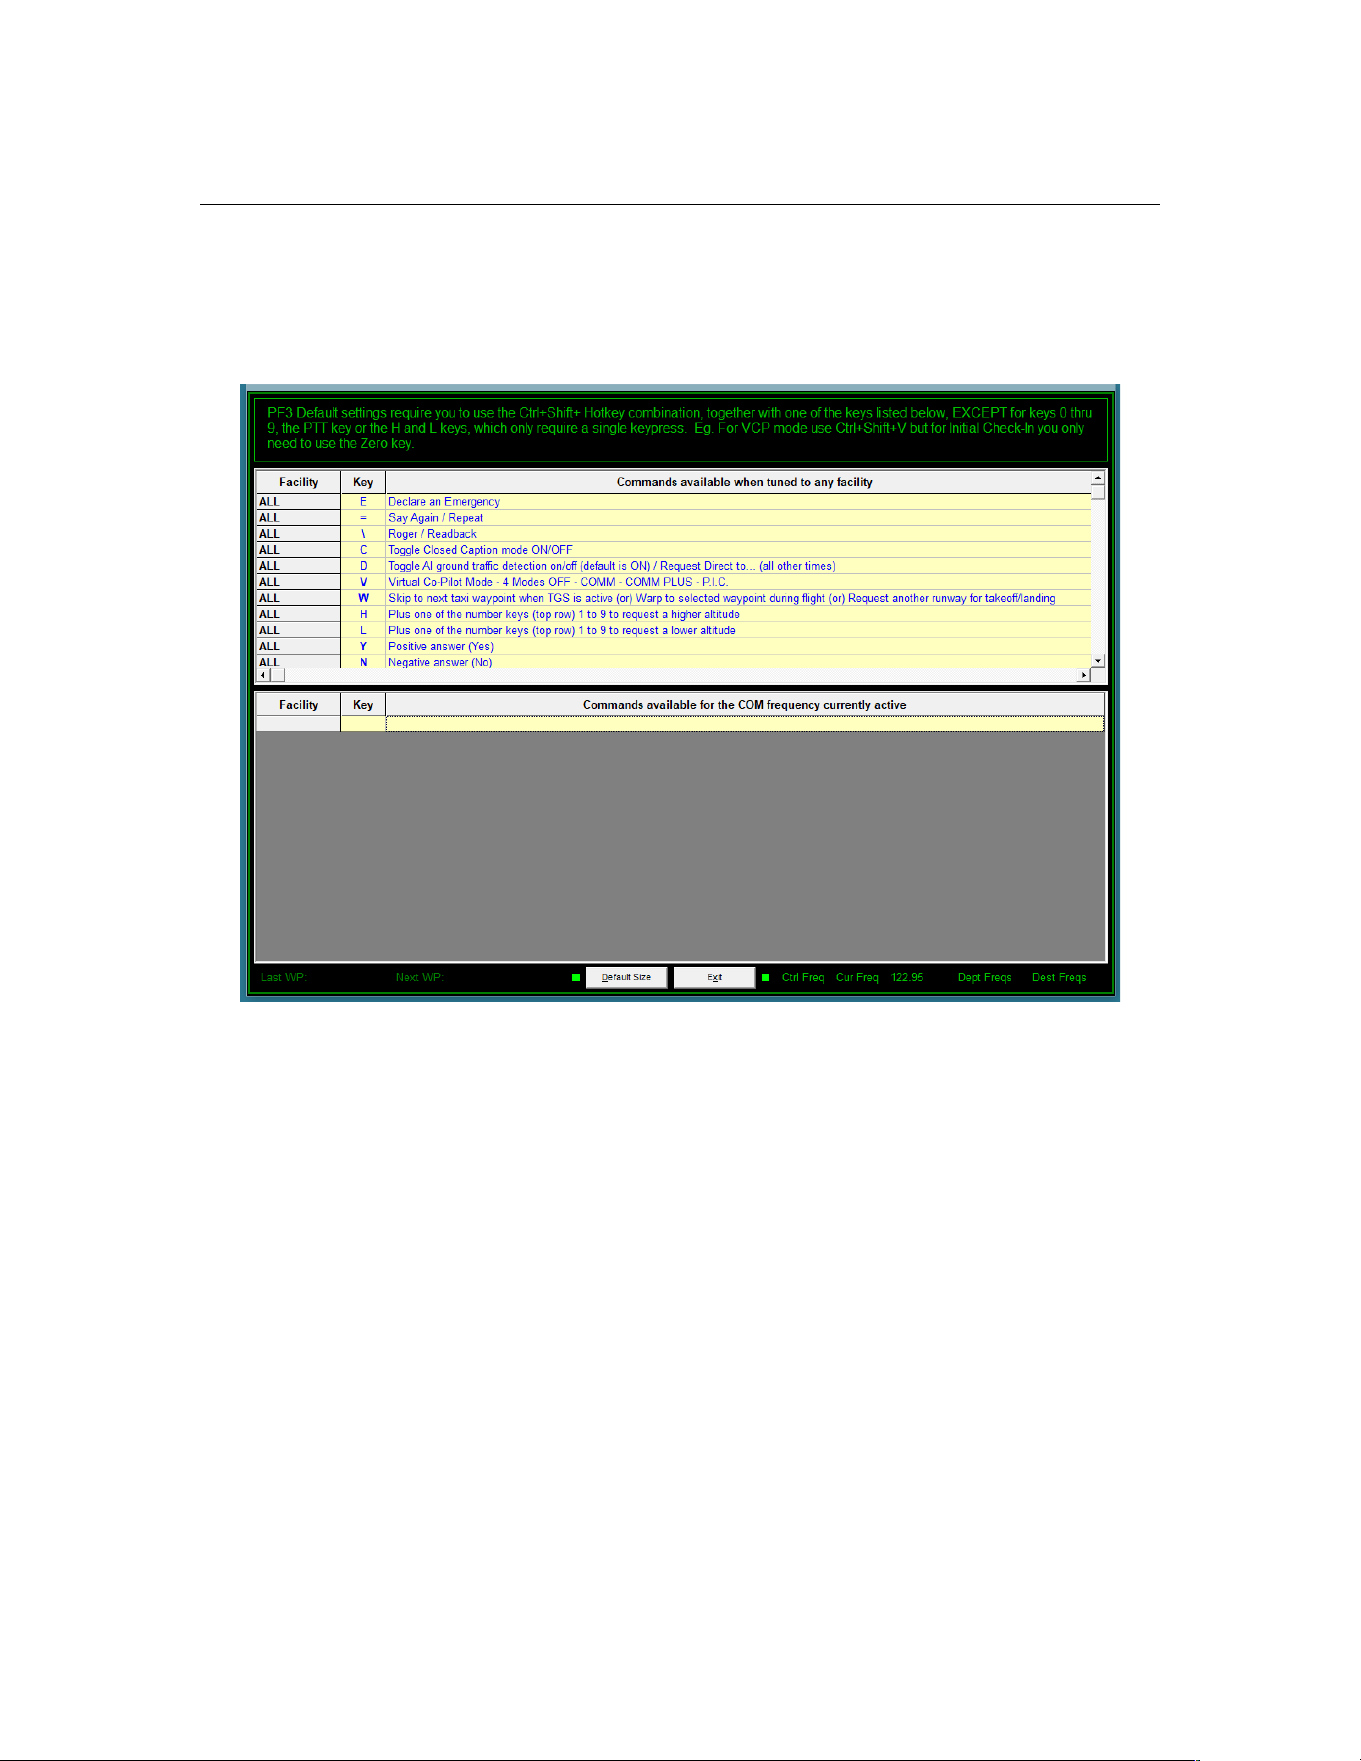
PF3 User Guide
Once PF3 is running and has actually 'connected' to your flight simulator
these indicator lights will turn green.
Page 145 of 212
Copyright © 2007-2024 by OnCourse Software
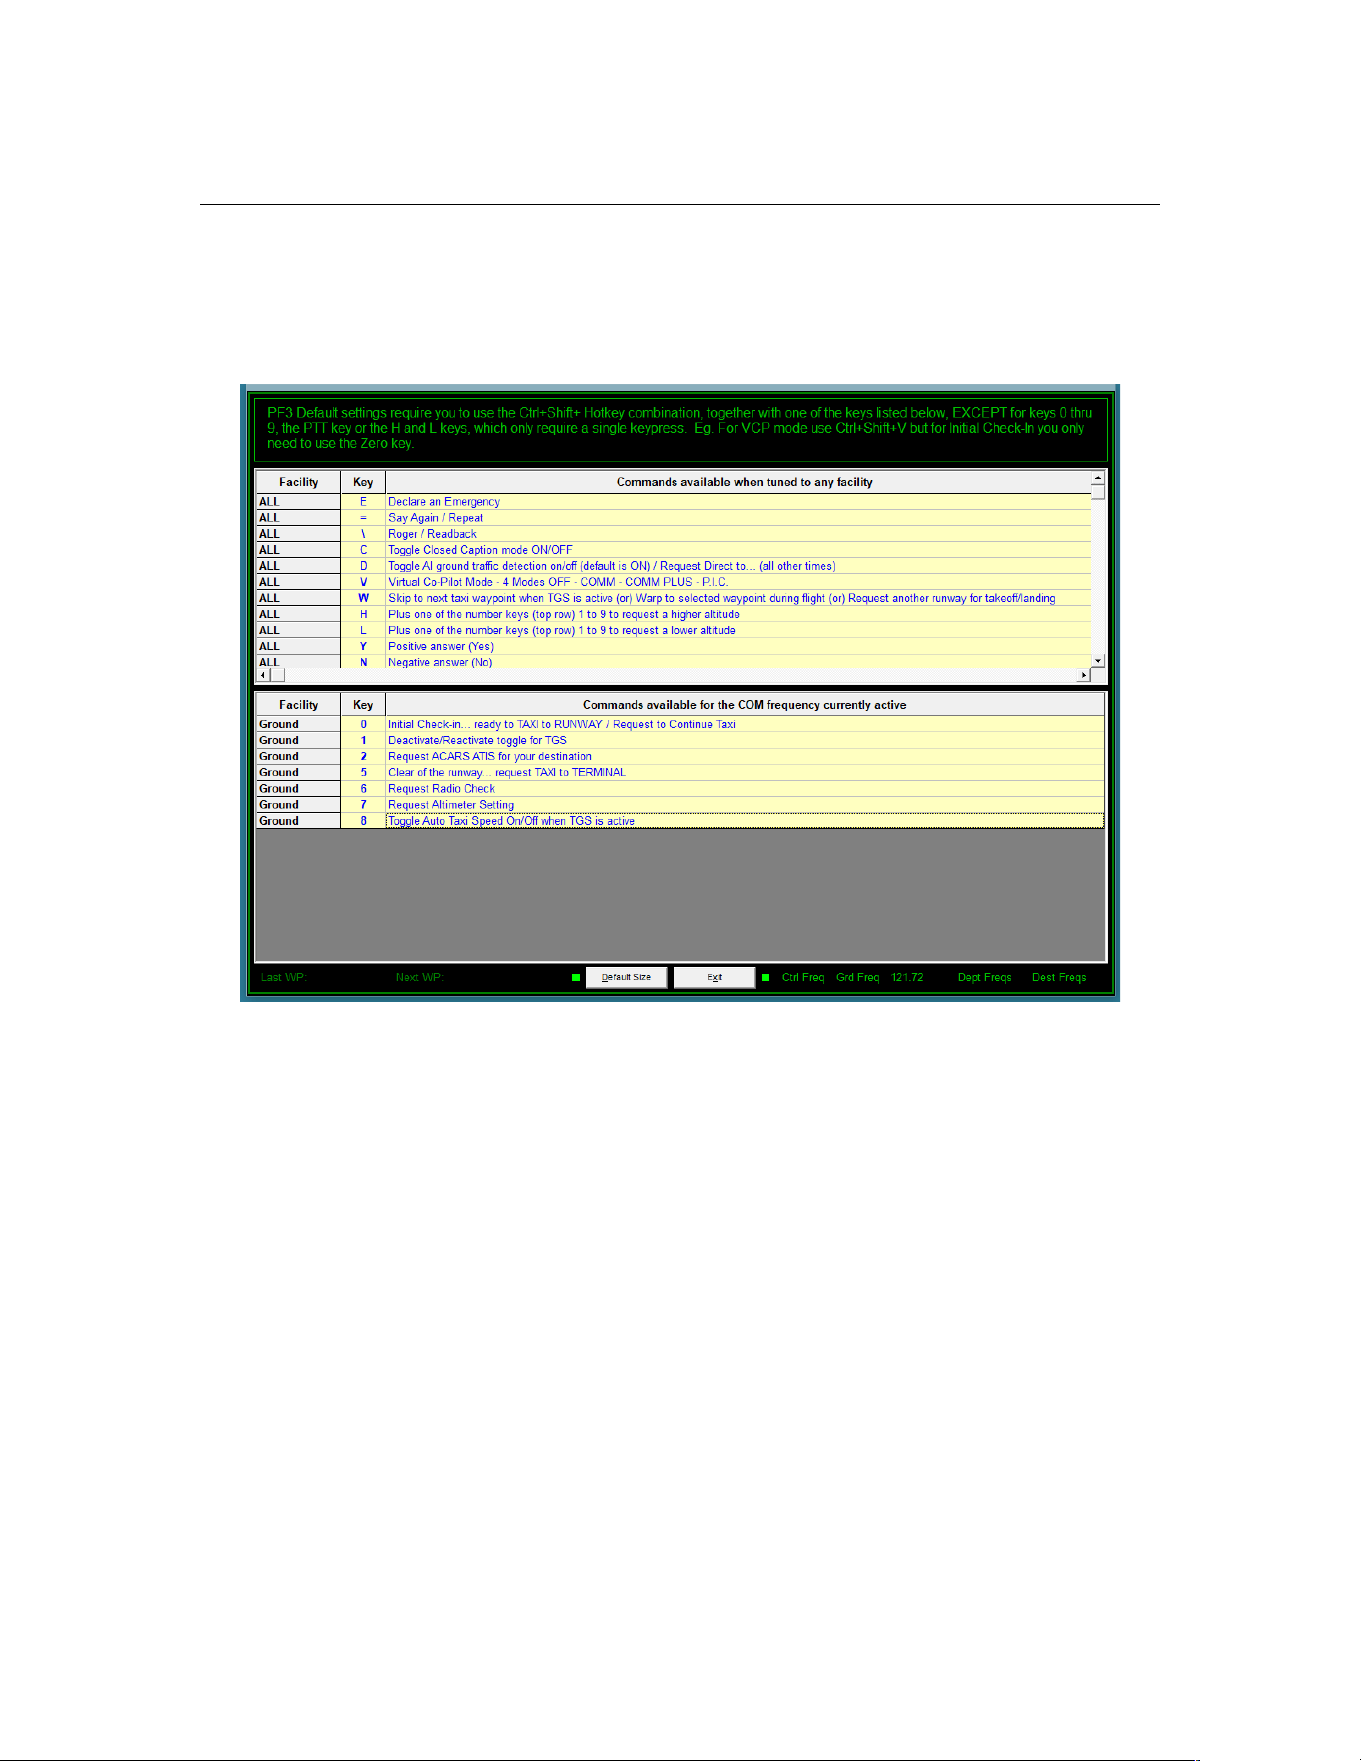
PF3 User Guide
The next change you will notice is when you tune the FS COM radio to an
active ATC facility. In the following example we've tuned to Ground Control:-
As you can see the lower section of the display now shows those keys which
are active when tuned to Ground control and what each of them is used for.
For contacting Ground control there are 7 active PF3 hotkeys. When you tune
to other ATC facilities this will change accordingly.
At the bottom of the display you will see some additional data:-
When you first start the program (and PF3) there will be no additional data
next to each of the labels. However, as your flight progresses so will the
information displayed in this area.
Last WP – will show the ICAO of the last waypoint in your flight plan
Next WP – will show the next waypoint in your flight plan
Ctrl Freq – selecting this label (left or right click) will popup a window
showing all the Control Center frequencies you will be handed off as your
flight progresses (assuming IFR). If you click inside this popup window the
display will toggle between showing Control Center frequencies and Radar
Control frequencies, the later being used for VFR flight (much more about
those later)
Page 146 of 212
Copyright © 2007-2024 by OnCourse Software

PF3 User Guide
nnn Freq - will show the frequency for the facility you are either currently
tuned to or should be tuned to and the label name (nnn) will change
accordingly. eg. Twr Freq, Grd Freq, etc.
Dept Freq – Nothing is actually displayed against this label at anytime during
your flight. However, if you right-click or left-click on the label you will be
presented with a small popup window showing all the relevant frequencies for
your departure airport.
Dest Freq – Nothing is actually displayed against this label at anytime during
your flight. However, if you right-click or left-click on the label you will be
presented with a small popup window showing all the relevant frequencies for
your destination airport.
16.3 Customising the Data File
If you have chosen to change any of your PF3 default hotkeys for different
keying sequences you will notice that the PF3 display utility does not reflect
those changes. However, it is fairly simply to change this display by editing
the PF3_Disp.dat file.
The default content of this file is shown in section 16.3.2 below
16.3.1 Changing the Data file
Let’s imagine you have changed the default hotkey #1 to use the Z. I know, I
know, highly unlikely, but this is just an example to show you what to change
in the file and what not to change.
For all those places where the hotkey #1 is shown (i.e. all facilities except
Clearance) you would need to change the ‘1’ to a ‘Z’
The line Ground,1,Deactivate/Reactivate toggle for TGS
Would become Ground,Z,Deactivate/Reactivate toggle for TGS
The line FSS,1,Request to Close Flight Plan
Would become FSS,Z,Request to Close Flight Plan
..and so on.
Remember, if you add the wrong character it will make no difference to PF3,
this is purely for display purposes only and nothing else.
Important Note:
There are two comma characters on each of the (facility) data lines within this
file and they must NOT be removed or moved. They delimit the hotkey from
the facility name and hotkey description.
If you change the hotkey usage do NOT… and I repeat DO NOT include any
comma characters within the description. If you do the PF3 Display utility will
simply not work, as it will not be able to read the data file correctly.
Page 147 of 212
Copyright © 2007-2024 by OnCourse Software

PF3 User Guide
16.3.2 Data File Content (default)
Please Note: Do NOT change anything marked in RED
Header:PF3 Default settings require you to use the Ctrl+Shift+ Hotkey combination, together
with one of the keys listed below, EXCEPT for keys 0 thru 9, the PTT key or the H and L keys,
which only require a single keypress. Eg. For VCP mode use Ctrl+Shift+V but for Initial Check-In
you only need to use the Zero key.
ALL,E,Declare an Emergency
ALL,=,Say Again / Repeat
ALL,\,Roger / Readback
ALL,C,Toggle Closed Caption mode ON/OFF
ALL,D,Toggle AI ground traffic detection on/off (default is ON) / Request Direct to... (all other
times)
ALL,V,Virtual Co-Pilot Mode - 4 Modes OFF - COMM - COMM PLUS - P.I.C.
ALL,W,Skip to next taxi waypoint when TGS is active (or) Warp to selected waypoint during flight
(or) Request another runway for takeoff/landing
ALL,H,Plus one of the number keys (top row) 1 to 9 to request a higher altitude
ALL,L,Plus one of the number keys (top row) 1 to 9 to request a lower altitude
ALL,Y,Positive answer (Yes)
ALL,N,Negative answer (No)
ALL,ESC,This is your PTT switch, used to initiate a pause in PF3 when using Voice Recognition
ALL,T,Toggle the Hotkeys window between Active Hotkeys/Global Hotkeys/Off
Clearance,0,Initial Check-in... request CLEARANCE
Clearance,2,Request ACARS ATIS for your destination
Clearance,3,Request ACARS Local Frequencies
Ground,0,Initial Check-in... ready to TAXI to RUNWAY / Request to Continue Taxi
Ground,1,Deactivate/Reactivate toggle for TGS
Ground,2,Request ACARS ATIS for your destination
Ground,3,Request ACARS Local Frequencies
Ground,5,Clear of the runway... request TAXI to TERMINAL
Ground,6,Request Radio Check
Ground,7,Request Altimeter Setting
Ground,8,Toggle Auto Taxi Speed On/Off when TGS is active
FSS,0,Request to Open Flight Plan / Obtain IFR clearance from uncontrolled airport
FSS,1,Request to Close Flight Plan
Page 148 of 212
Copyright © 2007-2024 by OnCourse Software

PF3 User Guide
FSS,2,Extend ETA by 30 minutes
FSS,3,Request Weather Advisories
FSS,4,Request Departure or Center Frequency
FSS,5,Request Local Radar Control Frequency
FSS,6,Change Flight Plan to IFR/VFR (toggle)
FSS,7,Request Airport Advisories
FSS,8,Amend Flight Plan to land at next available airport
FSS,9,Report Position
Multicom,0,Initial Check-in (in the air only)
Multicom,2,Announce entering DOWNWIND
Multicom,3,Announce turning BASE
Multicom,4,Announce turning FINAL
Multicom,5,Announce CLEAR of the RUNWAY
Multicom,6,Announce TAKING the RUNWAY
Multicom,8,Announce DEPARTING the AREA
Unicom,0,Initial Check-in (in the air only)
Unicom,2,Announce entering DOWNWIND
Unicom,3,Announce turning BASE
Unicom,4,Announce turning FINAL
Unicom,5,Announce CLEAR of the RUNWAY
Unicom,6,Announce TAKING the RUNWAY
Unicom,7,Request Field Advisories
Unicom,8,Announce DEPARTING the AREA
Tower,0,Initial Check-in... ready to TAXI to RUNWAY / Request to continue taxi
Tower,1,Initial Check-in for LANDING
Tower,2,Report entering DOWNWIND
Tower,3,Report turning BASE
Tower,4,Report turning FINAL
Tower,5,Request the Option (Touch 'n Go)/Clear of the runway... request Taxi to Terminal
Tower,6,Initial Check-in... ready for TAKEOFF
Tower,7,Request Field Advisories
Tower,8,Report going to ALTERNATE Airport
Tower,9,Report Go-Around/Missed-Approach
Tower,W,Request other Runway
Tower,N,Show another Runway
Tower,Y,Accept that Runway
Page 149 of 212
Copyright © 2007-2024 by OnCourse Software

PF3 User Guide
Departure,0,Initial Check-in (if VFR request Flight Following)
Departure,1,Request Cleared To Final At Pilot's Discretion/Trigger handoff to Approach (VFR Free
Flight only)
Departure,2,Request ACARS ATIS for your destination
Departure,3,Request lower altitude due to clouds
Departure,4,Request higher altitude due to clouds
Departure,5,Request lower altitude due to turbulence
Departure,6,Request higher altitude due to turbulence
Departure,7,Request vectors
Departure,9,Report position
Center,0,Initial Check-in (if VFR request Flight Following) *** Please note, this is the only key
available during Oceanic Flights and is used for checking in and position reports
Center,1,Request Cleared To Final At Pilot's Discretion
Center,2,Request ACARS ATIS for your destination
Center,3,Request lower altitude due to clouds
Center,4,Request higher altitude due to clouds
Center,5,Request lower altitude due to turbulence
Center,6,Request higher altitude due to turbulence
Center,7,Request vectors
Center,8,Toggle/Amend Flight Plan to land at Alternate/Origin (or) Report airport in sight
Center,9,Report position
Approach,0,Initial Check-in (if VFR request Flight Following)
Approach,1,Request Cleared To Final At Pilot's Discretion
Approach,2,Request an instrument approach
Approach,3,Request lower altitude due to clouds
Approach,4,Request higher altitude due to clouds
Approach,5,Request lower altitude due to turbulence
Approach,6,Request higher altitude due to turbulence
Approach,7,Request vectors
Approach,8,Report airport in sight
Approach,9,Report position
Radar,0,Initial Check-in (if VFR request Flight Following)
Radar,1,Trigger handoff to Approach (VFR Free Flight only)
Radar,2,Request ACARS ATIS for your destination
Radar,7,Request vectors
Page 150 of 212
Copyright © 2007-2024 by OnCourse Software

PF3 User Guide
Radar,8,Amend Flight Plan to land at Alternate (or) Report airport in sight
Radar,9,Report position
------DO NOT CHANGE OR INSERT ANYTHING BELOW THIS LINE------
[Config]
Version=8
Page 151 of 212
Copyright © 2007-2024 by OnCourse Software

PF3 User Guide
17. WHICH MESSAGE WINDOW TO USE?
17.1 What we recommend
To get the best possible message display from PF3 we recommend you use
our new In-Sim Captions window if using P3D or MSFS. For FS9 and FSX
users we recommend our FREE RemoteText program, which is included in
the PF3 installation and installed in the PF3_Displayer folder. However, this
does ideally require it to be running on another PC or at the very least using a
second monitor and we are aware that not all users would have such a setup.
17.2 Setting up RemoteText
Please see section 14 for full details regarding RemoteText.
17.3 Setting up the FSUIPC Message Window
If you only have the one PC, or simply don't wish to use RemoteText, please
see the following instructions on setting up the FSUIPC message window as
an alternative.
From your FS Add-ons menu select FSUIPC and then from the main FSUIPC
display page......
1. Select 'FSUIPC Multi-line Display Window’.
2. Deselect 'Hide all Single line messages'.
3. I also select the Misc. options tab and then select 'Scrolling
message to be in white' (but that's my own preference).
For more detailed information we recommend you check out the
documentation included with FSUIPC.
Page 152 of 212
Copyright © 2007-2024 by OnCourse Software

PF3 User Guide
18. USING VR SOFTWARE WITH PF3
18.1 Overview
There are no restrictions as to which Voice Recognition software you use with
PF3 and to the best of our knowledge there are no major compatibility issues
with any of them.
18.2 Setting up PF3
This section is aimed directly at how you must setup PF3 in order to use it
alongside voice recognition software. We neither have the time or knowledge
to describe how you should configure your VR program.
There are two methods you can use when using VR and each one requires a
slight different setup.
18.2.1 Using VR for all ATC communications
The first thing you need to do is go to the Main Menu Options #1 page and
select 'None' for the Pilot's voice. You will find further details on how to do
this in section 7.1.3 which you may already have read.
Next you need to select VCP mode 1, or even turn it off completely. Again you
will find details about this in section 7.1.4
The you have to activate the hotkey you will use as your PTT switch, the
default key is not activated when you first install PF3
Finally you have to set the PTT 'pause' interval on the Options #1 to a value
greater than zero.
When using VR to communicate with VR you need to press the PTT hotkey to
ensure PF3 waits X number of seconds to give you chance to speak directly
to ATC via your VR program.
18.2.2 Switching between using VR and your VCP for ATC communication
Unlike the previous method with this one you should not set the pilots voice
to None and if you do this method simply doesn't work. So please ensure you
have a pilots voice selected on the Options #1 page.
Next you must set your VCP mode to either 0 (zero) or 1. Again if you don't
this method will not work
From the Options #1 page please set your PTT pause interval to a value
greater than zero. You might have to experiment with the value used here.
Select the Auto Mute option which you will find on the Options #1 page just to
the right of the VCP mode selection options.
Page 153 of 212
Copyright © 2007-2024 by OnCourse Software

PF3 User Guide
Now, if you want to speak to ATC directly you should hit the PTT key followed
immediately after with the relevant ATC communications hotkey. You will not
hear your VCP talking to ATC provided you complete the keying sequence
before the PTT pause interval expires.
If you then decide you would like your VCP to chat with ATC you simply use
the relevant hotkey without using the PTT key, in which case you will hear
your VCP chatting to ATC
Page 154 of 212
Copyright © 2007-2024 by OnCourse Software

PF3 User Guide
19. TIME TO FLY
19.1 The PF3 Quick-Start Tutorial
Start your flight simulator, create a flight plan and place your aircraft at the
departure airport.
Start PF3, select Options #1 from the main menu and then set your CP Mode
to 3.This will tell your VCP to handle all frequency changes, COMs and adjust
the AP accordingly on ATC instructions and is by far the easiest way to get
used to the way PF3 works, without having to worry too much about the fine
detail.
Select Close to return to the main menu and then, assuming you have
previously read this user guide and configured PF3 to your liking, click the
Select a Flight Plan button and... yeah, you guessed it... select the flight plan
you've just created.
We won't go into adjusting waypoint altitudes during this quick-start tutorial
but you can read how to do that in section 7.1.29 at a later date.
Now select Connect to FS
You should see a couple of messages displayed on whichever message
window you chose to use.
Shortly after connecting to FS you will see a window popup showing all the
active facility frequencies available at your departure airport.
Dial in the frequency for Clearance (or Ground/Tower if not Clearance is not
available) then hit the default hotkey #0
You will now hear your VCP making initial contact with ATC and their
subsequent reply and instructions. Your VCP, as mentioned before, will handle
all COMs, etc., and you will shortly be handed off to Ground control and
receive your taxi instructions to the active runway.
Once cleared to taxi you should proceed to the runway as instructed. If you've
configured PF3's TGS system then you will hear your VCP guiding you along
each taxi way to the runway, much the same as your in-car navigation
system.
As you approach the runway you will be handed off to Tower control and your
VCP will then request permission to depart.
Shortly after takeoff you will be handed off to Departure control and will then
be given further instructions as they guide you away from the airport and
Page 155 of 212
Copyright © 2007-2024 by OnCourse Software

PF3 User Guide
toward your first waypoint. At some point you will be told you can 'Resume
own navigation' and at that point it is your responsibility to fly the correct
route according to your flight plan. It is not within the scope of this document
to tell you how to do this but you could use your FMC or GPS to handle
directional flight and let your VCP handle any altitude changes given by ATC
via your aircraft's auto-pilot. Suffice to say, PF3 does expect you to navigate
to each waypoint in your flight plan and you should certainly get to within a
couple of miles of each one before turning to the next.
Once you've reached your TOD ATC will start you on your descent. Eventually,
as you descend below the current Control Center's altitude you will be handed
off to Approach control. They will then vector you to your destination airport
and the active runway's FAF. Shortly after reaching the FAF you will be
handed off to Tower and hopefully then given permission to land.
Once on the ground Tower will tell you which direction to exit the runway (left
or right) and will then monitor your aircraft and wait until you are clear of the
active before handing you off to Ground control.
Ground control will give you taxi instructions to your assigned gate and the
TGS system will kick in again and you should then taxi to your assigned gate.
On arrival at the gate simply apply your parking brakes and PF3 interaction
will be complete.
So that’s about it… but we have only scratched the surface here and of course
using PF3 in this VCP mode makes your life a lot easier. If you later decide to
action all ATC communications yourself you will have to remember to listen
out to all ATC instructions to ensure you don’t miss one meant for you. Also
you will have to get used to Rogering all communications from ATC. It’s also
worth pointing out here that just as in the real world you should not expect
an instant response from ATC… they are busy guys (and gals) and have more
to worry about than just you!
Page 156 of 212
Copyright © 2007-2024 by OnCourse Software
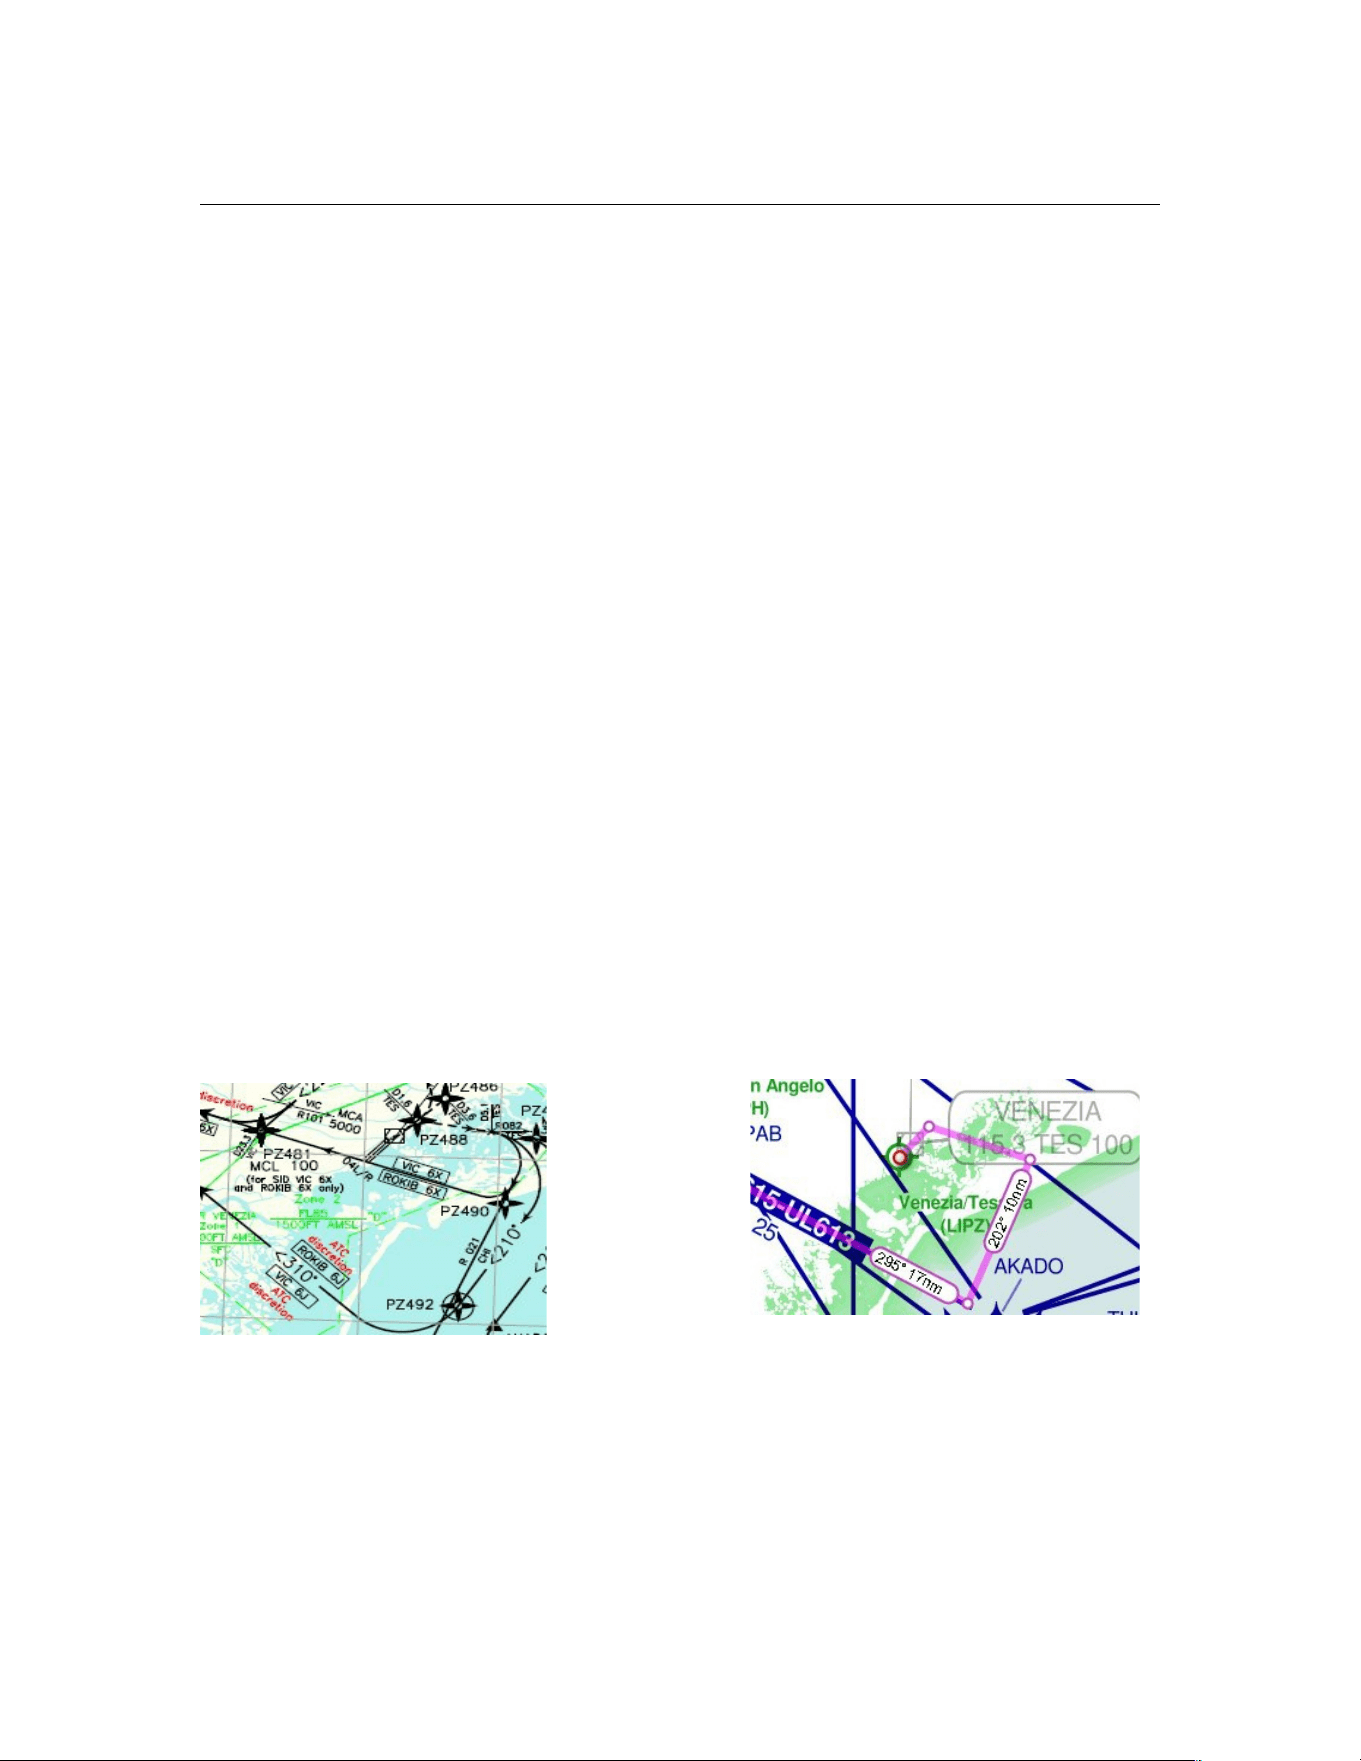
PF3 User Guide
20. HINTS AND TIPS
This section is where we try to explain how you do certain things in PF3.
Please note: Screen shots in these sections may look different than those in
the rest of the user guide, due to the author's personal choice of program
skin.
The first two sections (20.1 and 20.2) explain how to get the very best out of
PF3 by Nicholas Weber and covers flight planning and executing Holding
patterns. Nicholas was on the beta team for many years and was also an
Examiner for ENAC, The Italian Aviation Authority. Sadly Nicholas passed
away.
Section 20.5 was written by Daniel Katz, one of our longest serving Beta
testers and provides an insight into using SIDs and STARs in PF3.
20.1 Executing a Flight Plan
Whilst PF3 does an amazing job in providing a workable solution to any flight
plan thrown at it, it may not always be the best or the one that you are
looking for if the intention is to simulate a real life flight plan as closely as
possible. So, here are some tips and recommendations for you to achieve that
goal and get the best out of PF3.
Obviously the first step is to create an IFR flight plan from a good flight
planner or within FS9, FSX or P3D. A major enhancement in PF3 is its ability
to allow inclusion of a SID within the actual flight plan used for aircraft
navigation. So lets look at what PF3 is actually capable of.
This following shows the ROKIB 6J Departure from LIPZ Venezia Tessera.
As you can see it consists of tight turns and PF3 will actually vector you if
you wish. Something that was not possible at all in PFE. That said outside of
N. America all SIDs are flown by the aircraft and ATC rarely if ever vector
you.
Some of the waypoints will not be in the sim database but for FS9 one can
download 'Facility Editor' from the Avsim library:
Page 157 of 212
Copyright © 2007-2024 by OnCourse Software
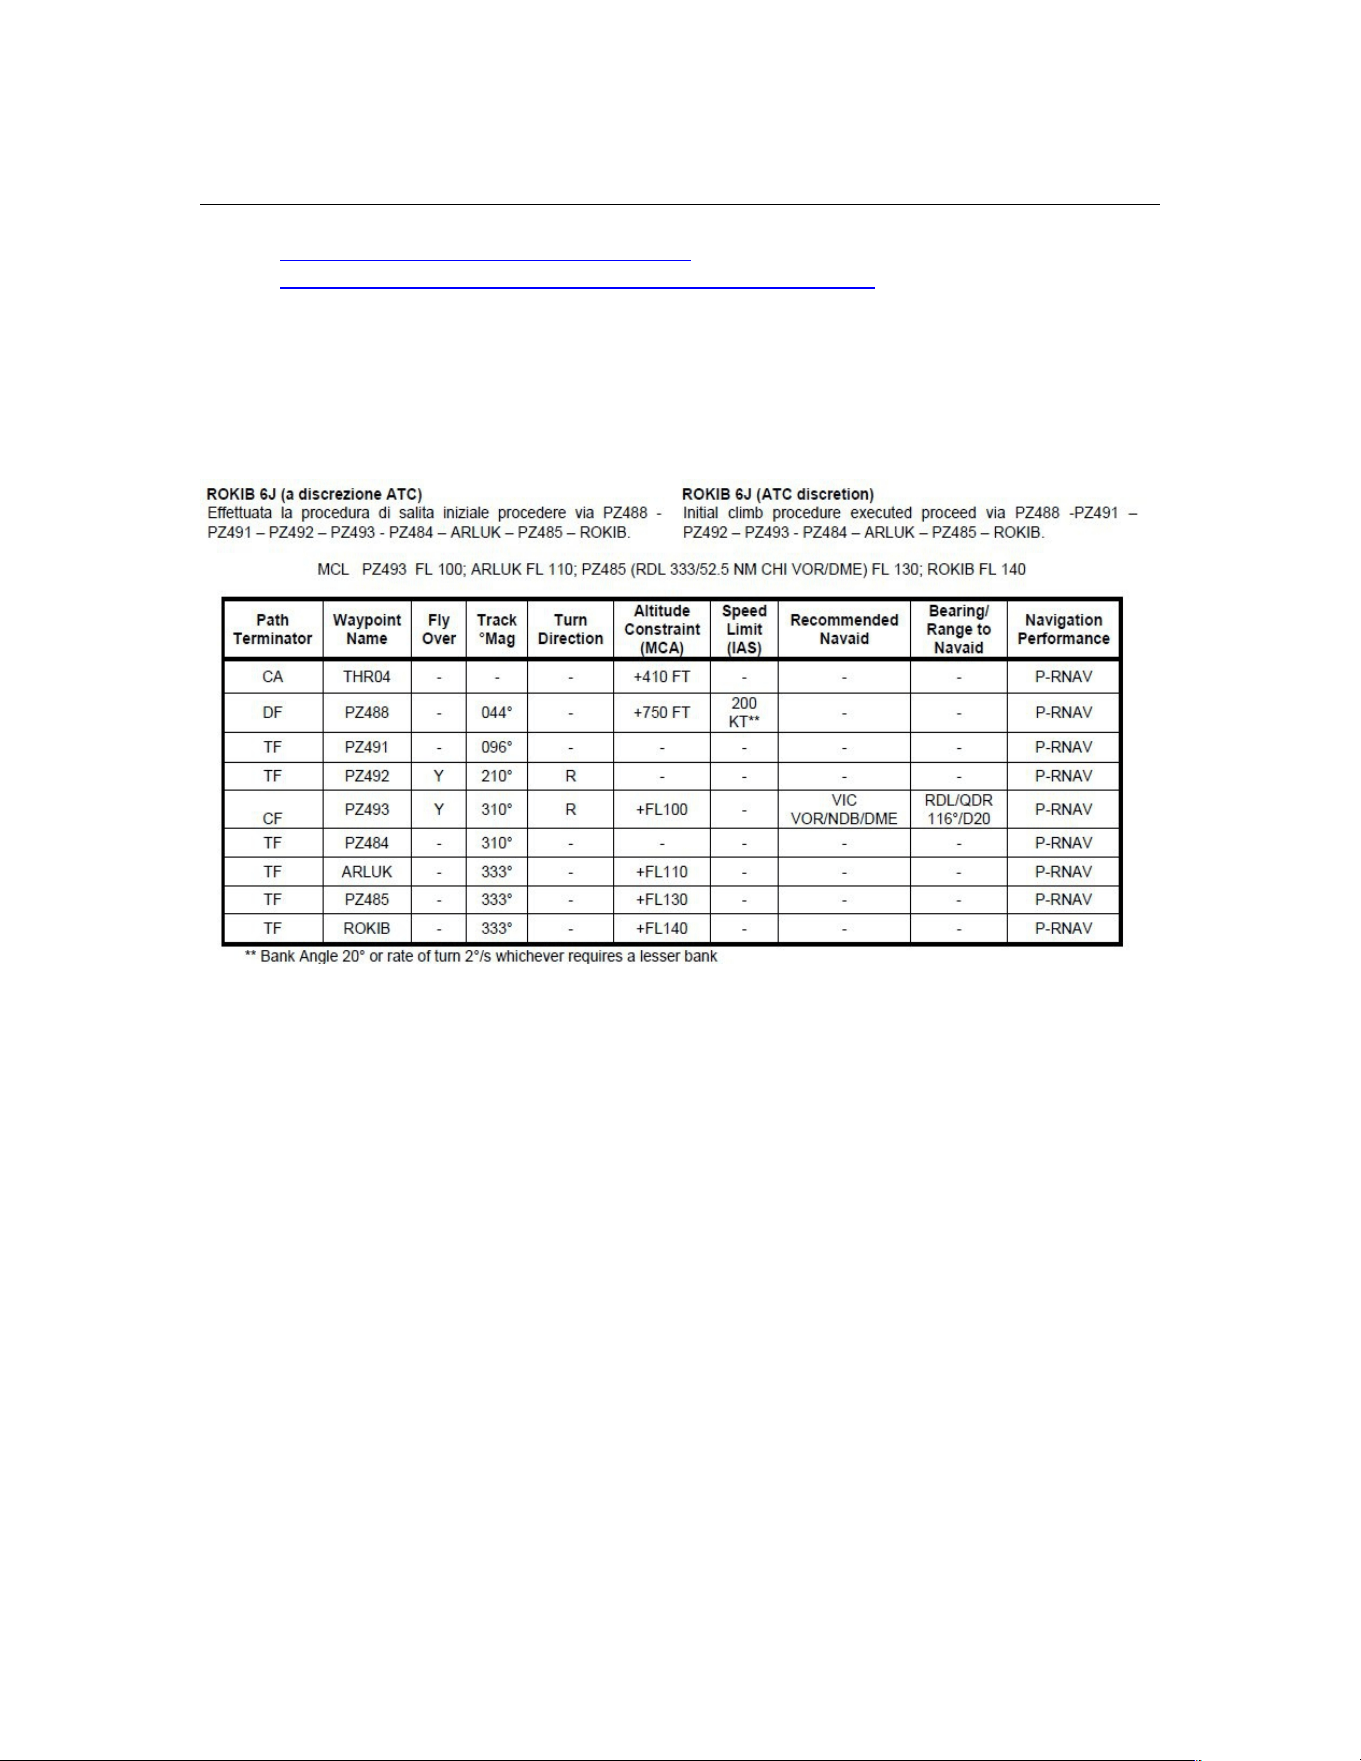
PF3 User Guide
http://library.avsim.net/search.php?
SearchTerm=facility+editor&CatID=root&Go=Search
You will see that it’s a relatively easy SID in that there are few constraints. All
the altitude constraints being at or above. So all you need to worry about is
your aircraft’s performance. In other words “Just how quickly can I get up to
FL140?”
This SID is in fact the first segment of a flight plan from Venezia to Innsbruck
LOWI. The entry STAR from Italian airspace at Innsbruck, BRENO 2A allows
for a change in wind direction (common in the Alpine valleys) giving the crew
the option to go for RWY 26 or circle to land RWY 08.
So in fact PF3 will accept a flight plan that includes a SID and a STAR as
integral parts. The only drawback currently is for flight plans that terminate in
areas that have high terrain as it is sometimes required to have waypoints
after the end of STAR waypoint. Therefore in these isolated cases it may be
necessary to create an additional flight plan for aircraft navigation as well.
That said PF3 still knows where you are and will issue the correct
instructions.
The entire flight PF3 plan for LIPZ to LOWI is thus:-
LIPZ–>PZ488–>PZ412–>D112I–>PZ492–>PZ493–>PZ484–>ARLUK–
>ROKIB–>GIKEB–EKPEB–>BRENO–>INN–>RTT–>RTT–>LOWI.
The aircraft navigation flight plan however, is thus:-
Page 158 of 212
Copyright © 2007-2024 by OnCourse Software
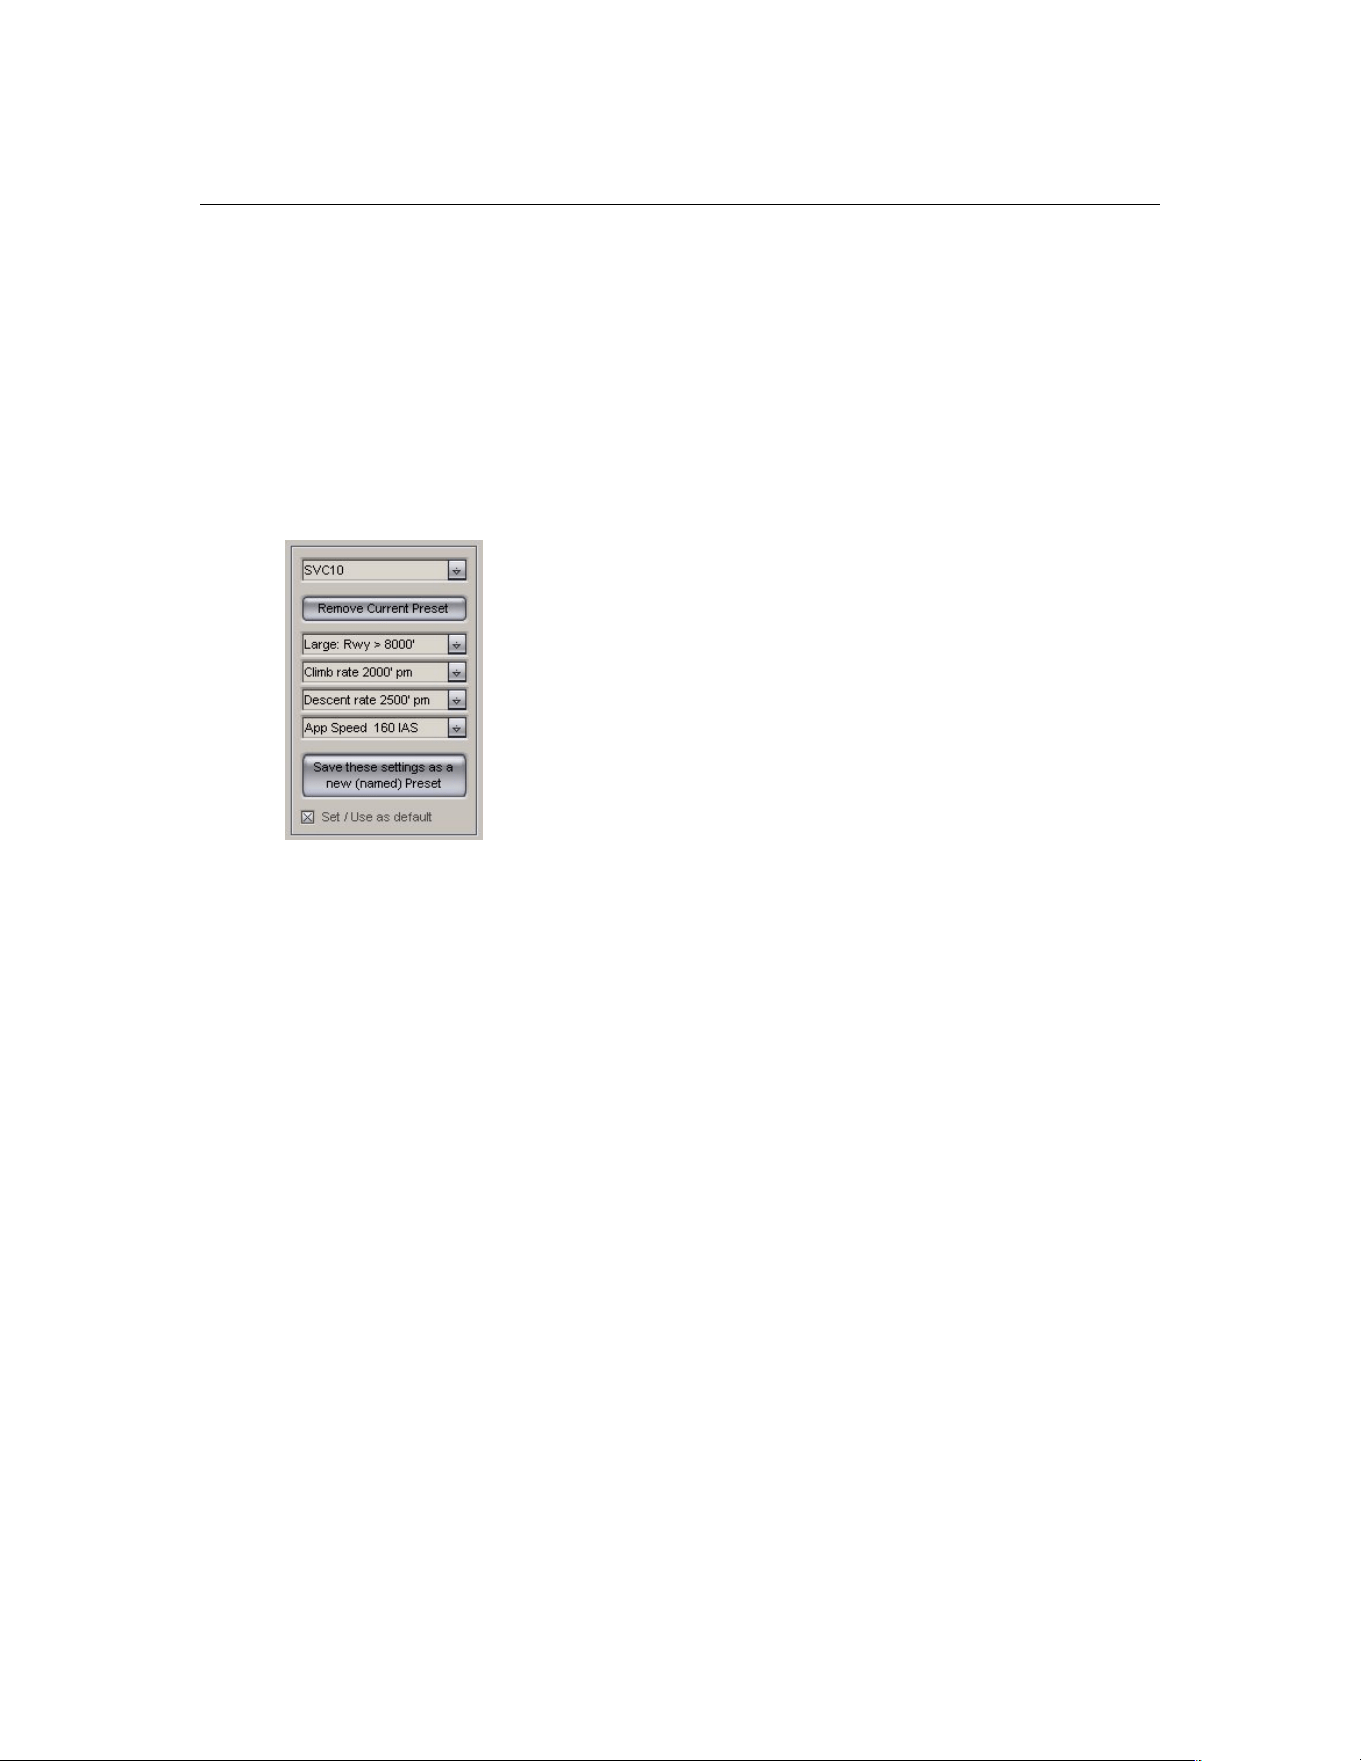
PF3 User Guide
LIPZ–>PZ488–>PZ412–>D112I–>PZ492–>PZ493–>PZ484–>ARLUK–
>ROKIB–>GIKEB–EKPEB–>BRENO–>INN–>RTT–>RTT–>AB–>INN–>LOJV8–
>LOWI.
The occurrence of RTT twice is because it is a published hold and if selected
PF3 will not only hold you there but will step down your altitude within the
hold as well! More on that later though when we examine how this flight plan
and others will look in PF3.
Now that the flight plan has been saved the next recommended step is to set-
up your aircraft profile. How to do this is documented in the User Manual, but
a key element is the Approach Speed setting. If
you do nothing PF3 takes the flaps-up stall speed
from the aircraft.cfg file. Changing the approach
speed in this profile box overrides that setting,
however. So why is it necessary? You will almost
always find in the aircraft flight/technical manual
recommendations for approach speed optima
depending on weight etc. These settings are fine
for an aircraft landing without ATC control or for
example at a military base. But for well frequented
civil airports the practice is quite different and PF3
will reflect that very well too. ATC at active civil
airports don’t surprisingly carry a pile of aircraft manuals so that they can
advise optimum speeds for each landing aircraft. Their main concern is safe
separation and wake turbulence. Most jet transports with the exception of
Concorde will have similar flight envelopes at low speeds. Some slightly better
than others. However they are all capable of safe flying speeds between
200kts and Vat+5.
ATC’s aim is to get as many aircraft down as safely and as quickly as possible.
So the slower you fly the closer you can be to other aircraft. There are three
stages; firstly to get you to reduce your speed from that of the STAR to one
that safely establishes you on the localiser without swanning all over the
landscape! This is typically 180kts. The second step is to reduce your speed to
safely capture the glide slope and this is typically 160kts. Which is what you
can see in the profile illustrated above. An aircraft landing at max auw
however might ask for a higher speed of 170kts as an extra safety margin
especially in windy conditions. The third phase - not advised by ATC - is your
own speed reduction in order to be at Vat+5/10/15 by screen height. This
phase is your personal responsibility. And in the real world ATC would likely
say '[Callsign] reduce speed to 160 to 6DME'. Thus giving you 6nm to slow
your aircraft down for landing. So my suggestion is to try this out as it is very
much real world practice. If you are flying a turbo-prop then take 10-15kts
off. If you are flying Concorde then set 190kts. If you are flying a piston
engine aircraft then these speed reductions don’t apply. Except in a real word
situation ATC would ask you to fly as fast as you can. This happened to me
many years ago when flying a TB into London Gatwick. I had to fly the glide-
slope at full throttle with a marked nose down attitude in order to descend. It
was quite interesting!
Page 159 of 212
Copyright © 2007-2024 by OnCourse Software
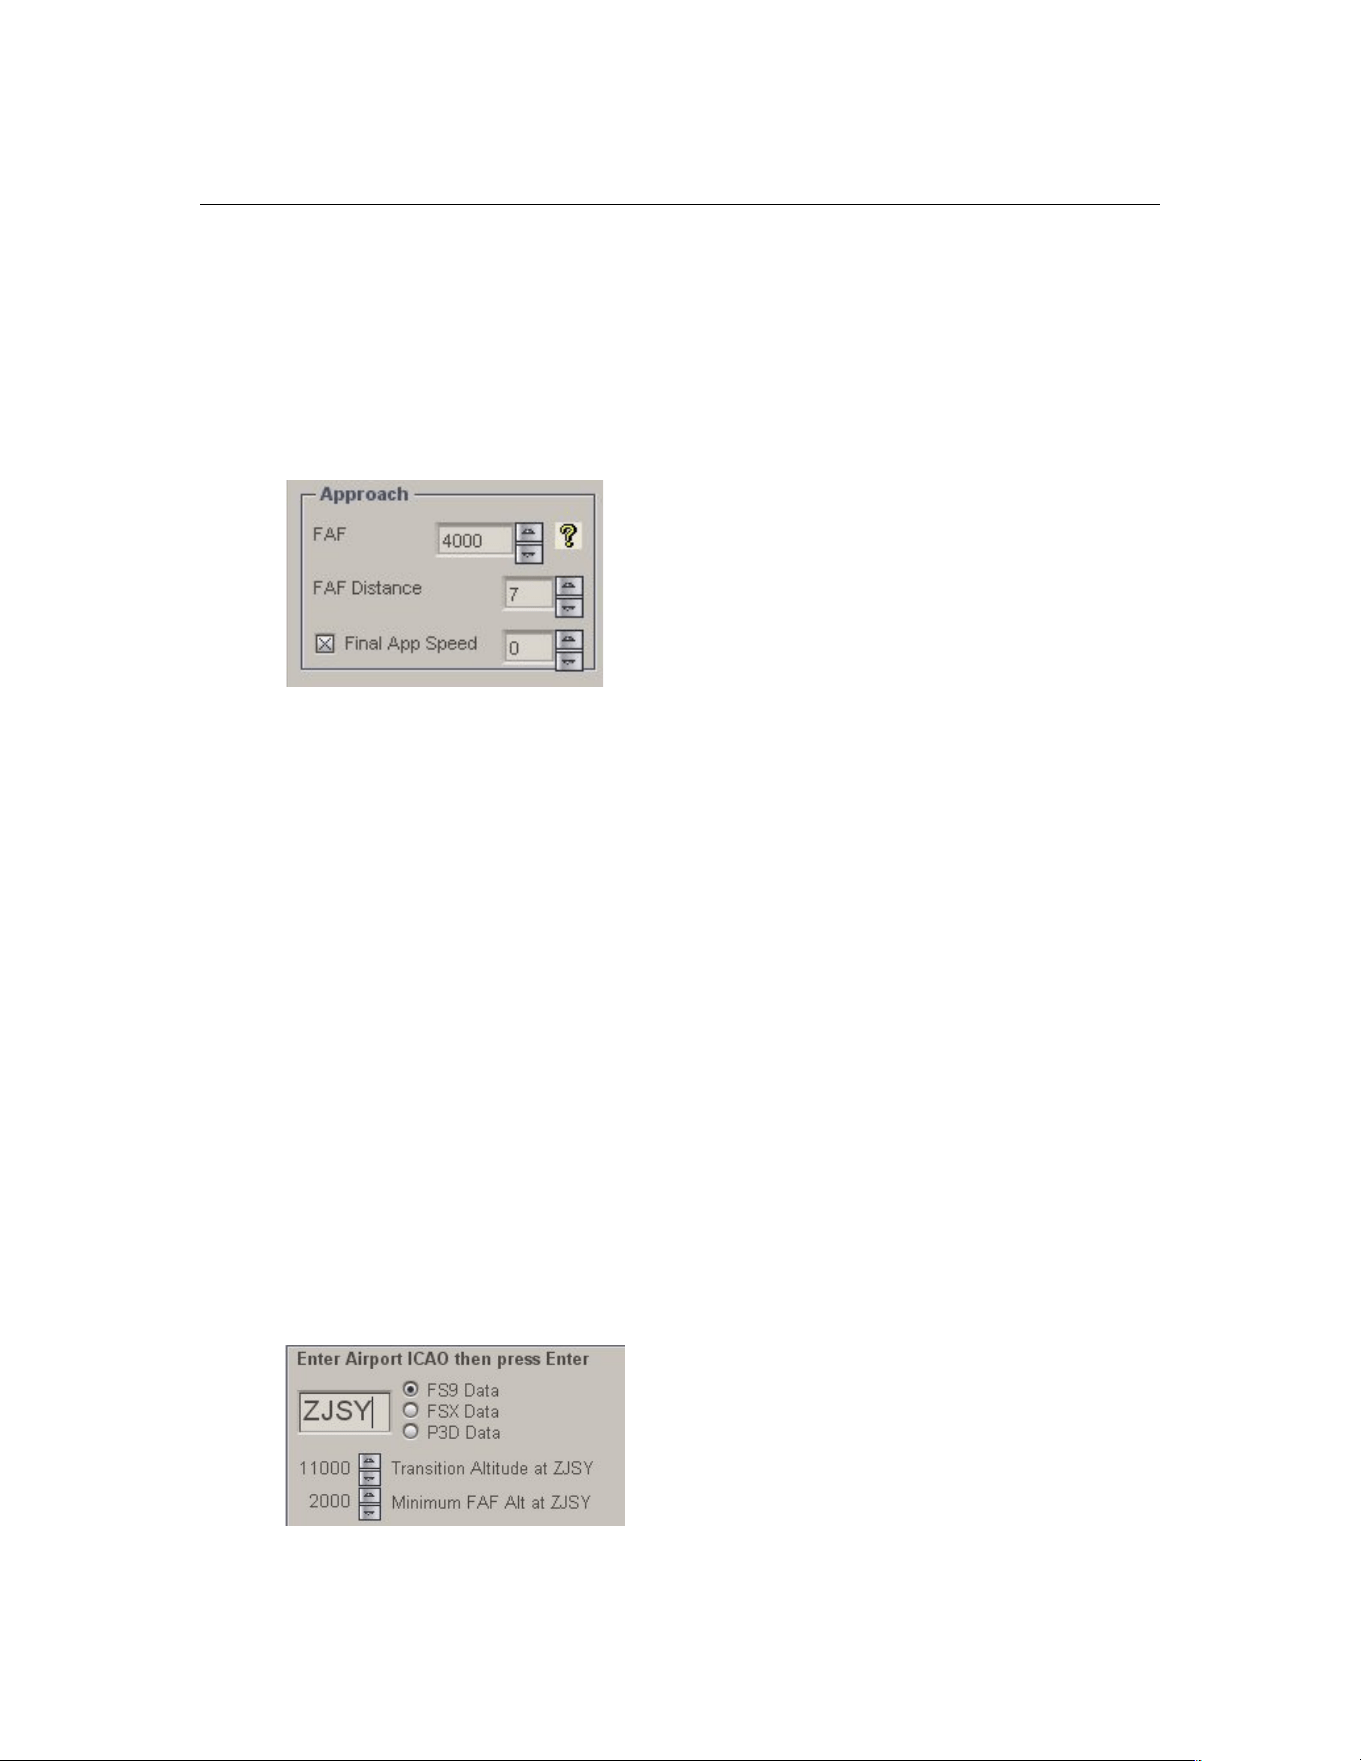
PF3 User Guide
The next step before getting PF3 to generate its flight plan is to check the
setting for the FAF/FAP height and distance. Which can be changed in the
“Advanced Options and INI file tweaks” selected by <Options #2>. Note that
the FAF/FAP height can also be changed in the SID/STARS page for the
specified airport ICAO code. These entries will override the setting on the
tweaks page. The FAF/FAP distance however can only be changed on the
tweaks page.
The setting for FAF distance is critical in that it
tells PF3 when to issue speed reduction calls.
So this needs to be checked and if necessary
changed to suite your destination.
PF3 calculates the FAF/FAP from the outer
marker or from the rwy threshold if there is no
OM shown on the AFCAD/ADE. It then
measures your distance from this point and
issues speed calls accordingly. The example shown on the left is the setting
for LIMF Torino Caselle. The airport has an elevation of 1,000ft and a glide
slope angle of 3deg. So the FAF/FAP altitude is set to 4,000ft. As far as the
FAF/FAP altitude goes I could just as easily set this in the SID/STAR page for
LIMF which would as has already been pointed out override any value input
here. But the FAF distance can only be set on this page. The LIMF OM is at
3.74nm so bearing in mind that a 3dg glide slope intersects a height of
3,000ft at 10miles, I need to add 6nm to the OM distance. Plus one i.e. 7,
gives me time to slow down before actual glide slope capture. At EGLL London
Heathrow the FAF distance would be between 5 and 8 depending on whether
the afcad shows an OM (my afcad doesn’t). Because the FAF/FAP altitude
would be 2,500ft QNH.
It’s important to remember that PF3 adds the value entered in the FAF box
on the tweaks page to the airport elevation for “safety” reasons. This figure
however, is overridden by the FAF/FAP value entered in the SID/STAR page
of the relevant airport. So the value entered on the SID/STAR page should
coincide with the altitude given on the relevant charts. Keep in mind that
altitude=QNH=above sea level. Not height, which equals above ground.
The final step before getting PF3 to generate its FPL profile is to tell it what
SIDs and STARs we want to use and then activate them. So click on the
SIDs /STARs button on PF3’s main panel. Then enter the ICAO code for the
departure airport.
From your charts choose the transition
altitude and FAF/FAP minimum altitude and
select them by pressing the up/down arrows.
In this case the numbers have been
converted from metres to feet for PF3. The
minimum FAF shown here overrides that on
PF3’s tweaks page and is the altitude the
PF3 controller on duty will descend you to at the end of the STAR approach.
Page 160 of 212
Copyright © 2007-2024 by OnCourse Software
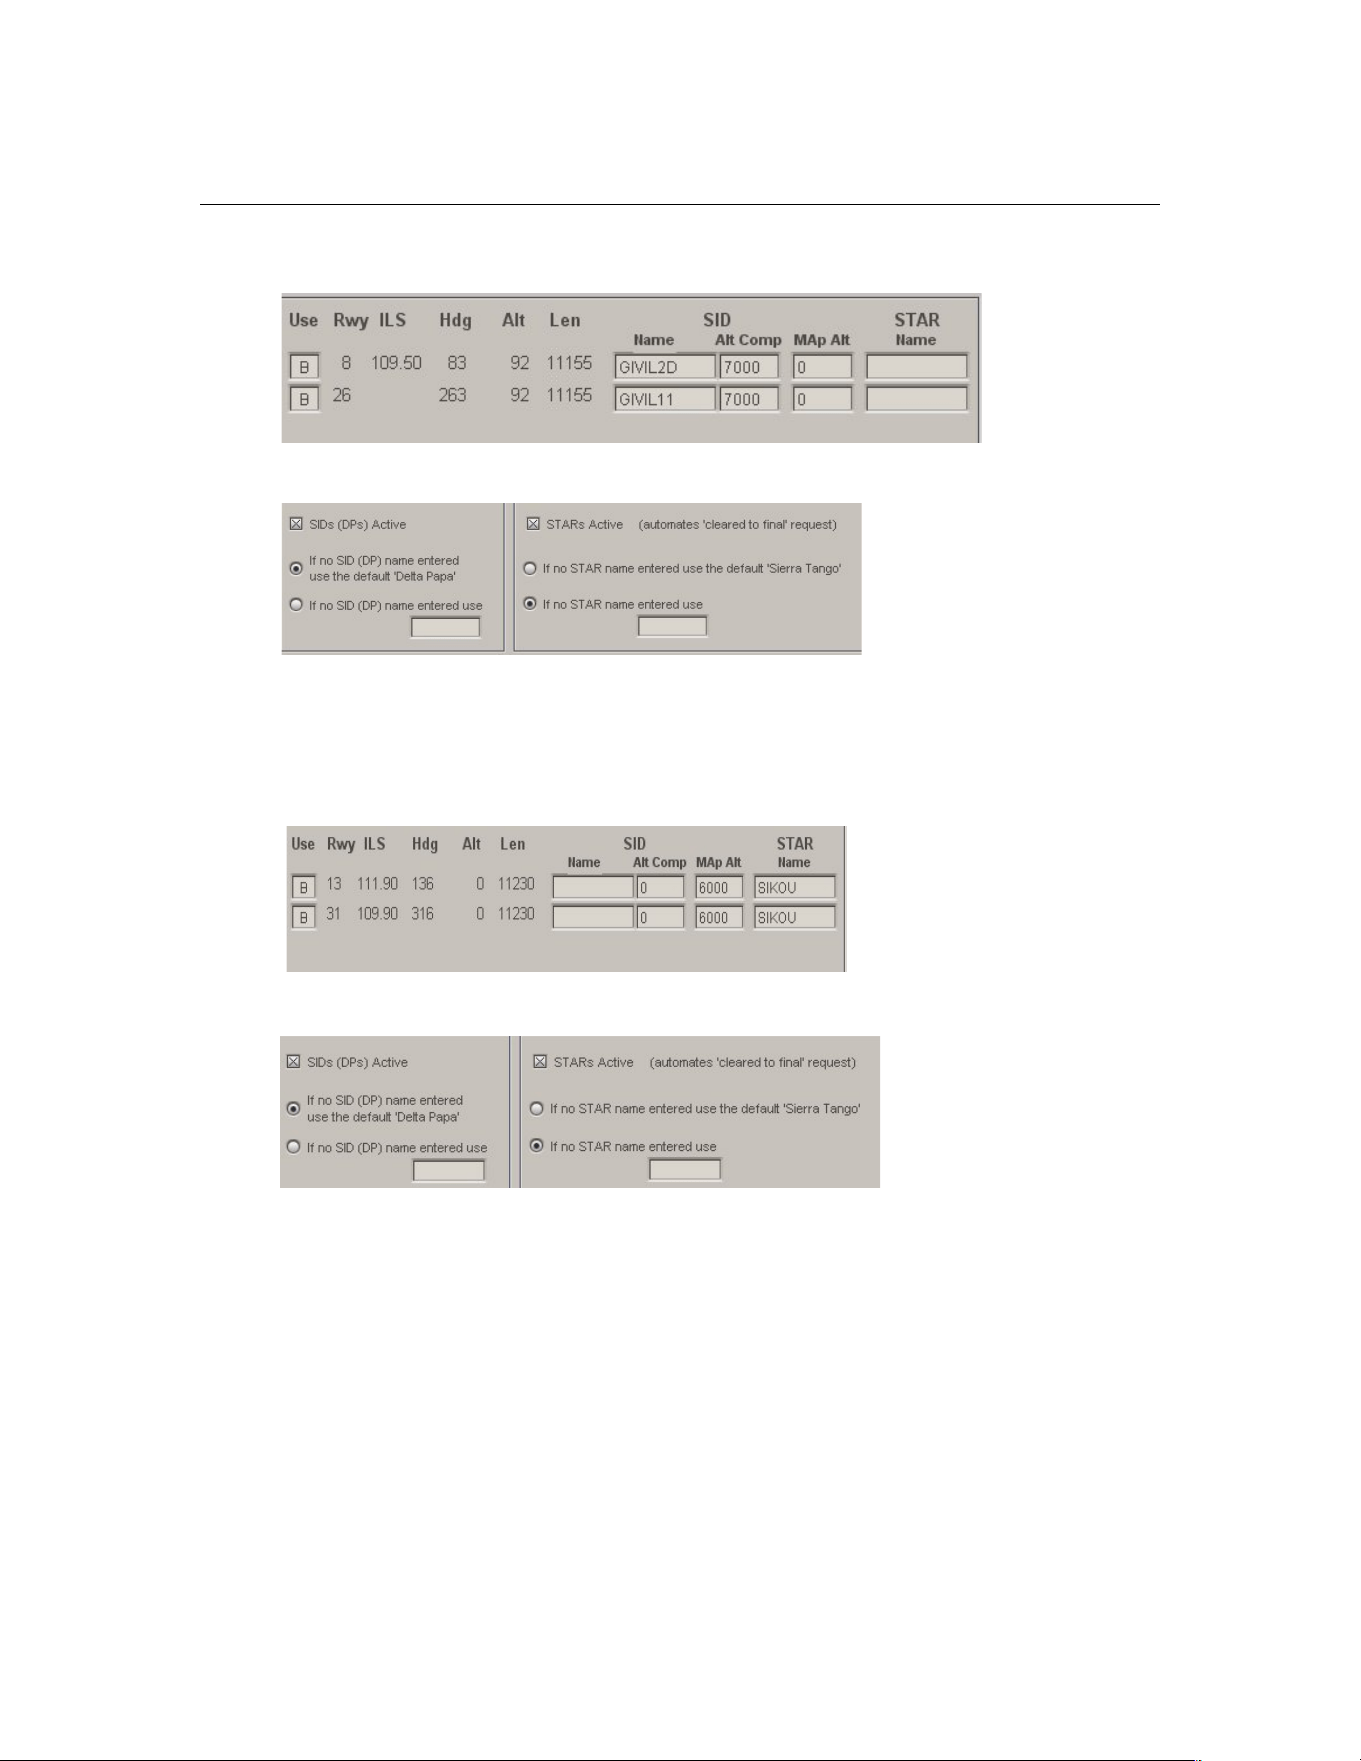
PF3 User Guide
Next, enter the SID name with a maximum of 7 characters with no spaces
followed by the SID altitude ceiling.
Finally
check the SIDs active box
For the STAR it is exactly the same process:-
Enter the name of the STAR and the missed approach altitude that the
controller will send you to.
Not forgetting to check the STARs active box!
So, we’ve created a flight plan file ready for PF3, checked our final approach
speed set our FAF/FAP distance and altitude and set-up our STARs and SIDs
in the relevant SID STAR pages. Accordingly, we’re ready now for PF3 to
generate its flight plan profile. Unfortunately PF3 won’t tell us automatically
what it’s done so we have to open the “Adjust Altitudes, SIDs STARs and
Holds” anyway to see what has been generated by PF3. Now you can see
why the previous steps were necessary as PF3's flight plan generation is in
fact the final step not the first!
Page 161 of 212
Copyright © 2007-2024 by OnCourse Software
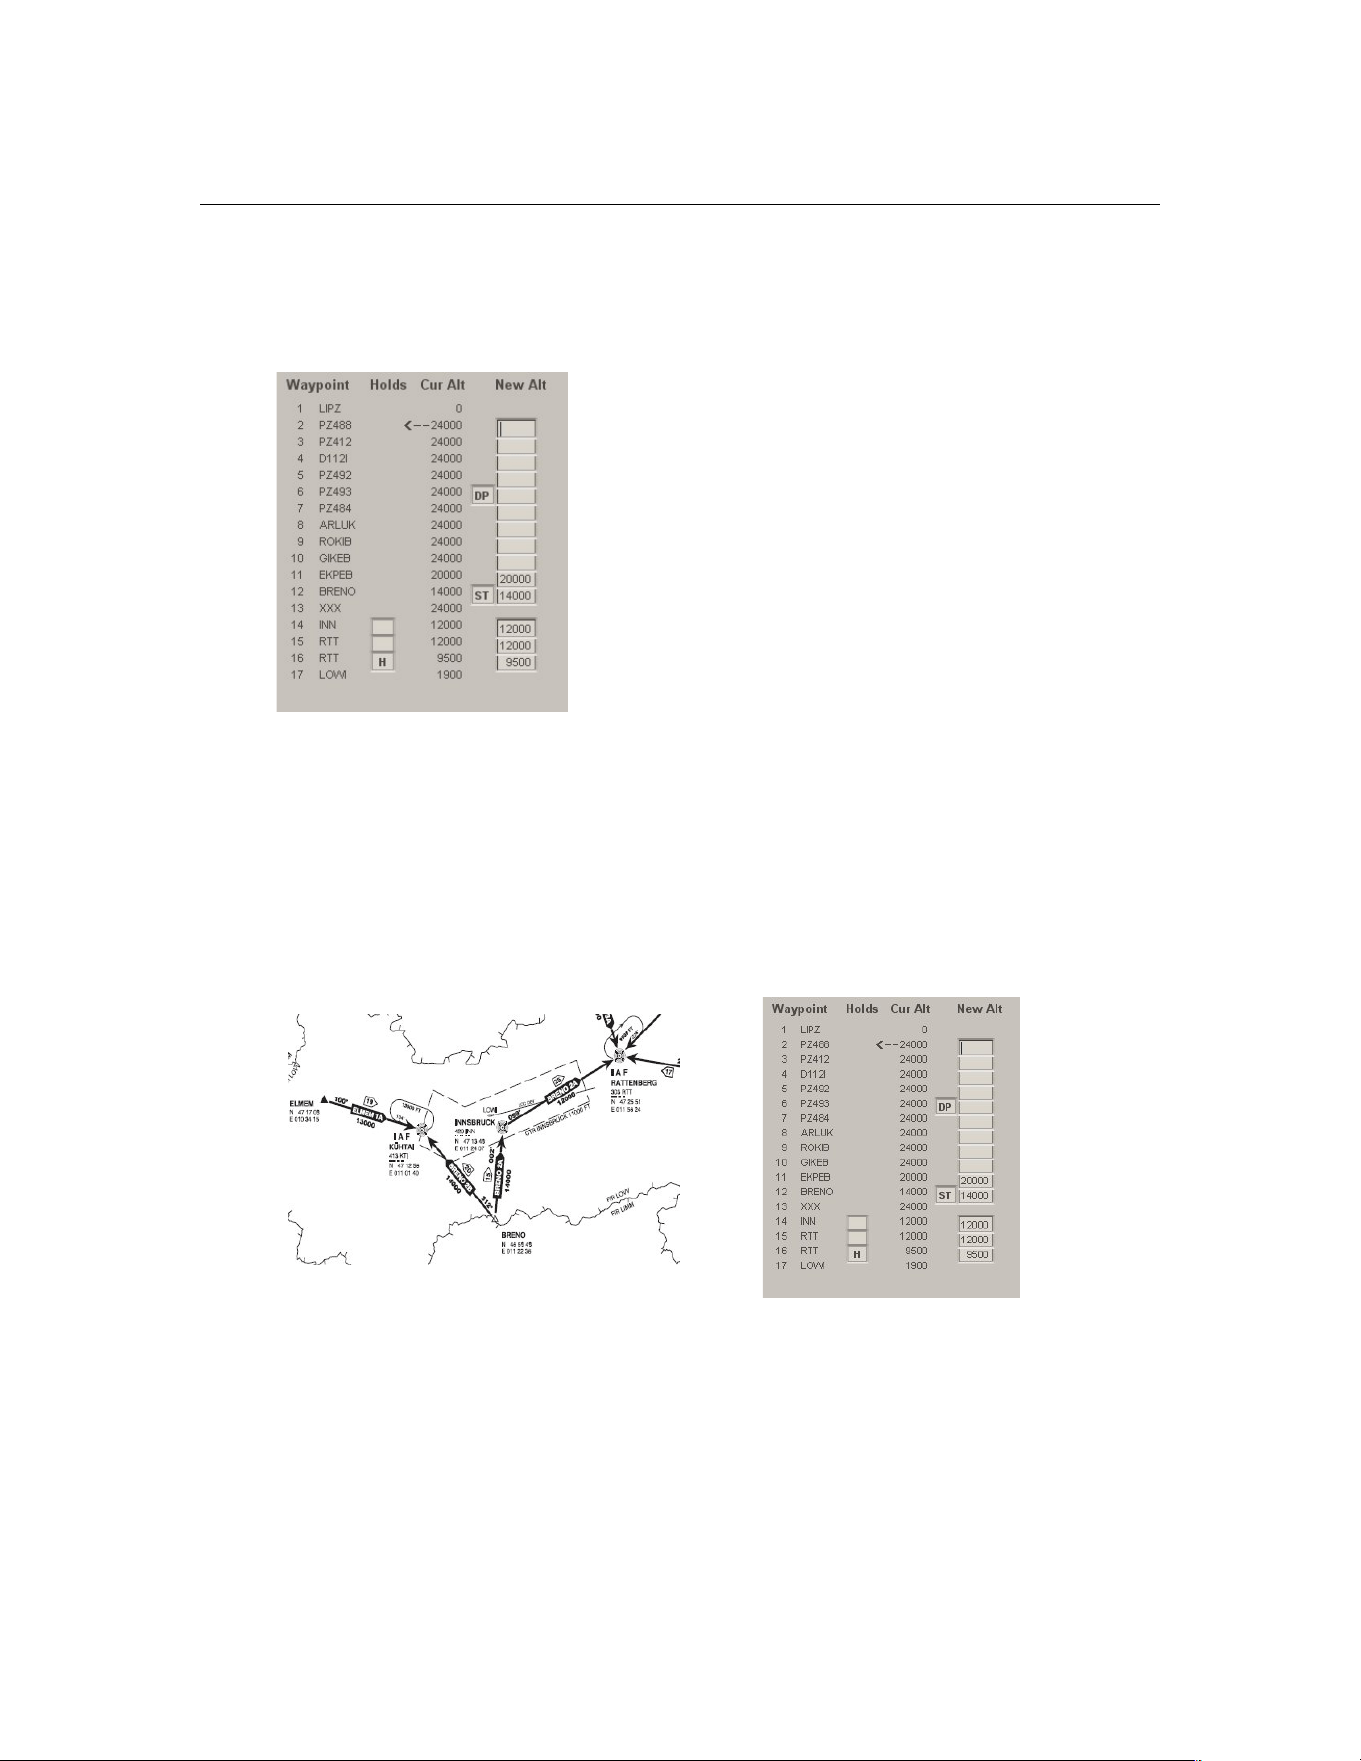
PF3 User Guide
Let’s look at some examples and I’ll show you how to refine them in order to
get a super accurate flight profile. Let’s start with the flight plan from the
beginning:-
LIPZ -> LOWI
Oh No! I don’t want to fly to FL240
within 3 miles after take-off! Don’t worry
you won’t. PF3 will step climb you nicely.
However you can of course override these
values as I’ll show you in a later example.
In this FPL these values are also overridden
by the insertion of “DP” and the selection of
the ROKIB 6J SID. Note that I have not
placed it against ROKIB in spite of ROKIB
being the end of the ROKIB 6J SID. Why
not? Because DP is actually the point where
I expect to be already at FL140 as
permitted by the SID. The values from
EKPEB are the same as the new ones because they were previous
adjustments that PF3 remembered. Waypoint 13 xxx is the boundary
between Italian and Austrian airspace.
“ST” is the start of the BRENO 2A STAR which is at FL140 so you can see I
have told PF3 to step down to FL200 at the previous waypoint. Note that
BRENO 2A takes me all the way to Rattenburg after having descended to
FL120.
At RTT I have a problem in that I am now at
FL120 but must turn round to intercept the localiser for RWY26 at FL95 or
9,500 QNH. So this is why I have entered RTT twice in the FPL. You can see in
this instance I have elected to hold at RTT. So PF3 will first tell me to hold
(Note that it is a published hold and not a discretionary hold so ATC will only
tell me to “hold at Romeo Tango Tango” giving me a speed limit and expected
release time) and then tell me to descend to 9,500ft. If I don’t elect to hold,
PF3 will nonetheless tell me to descend once I have reached RTT. Remember
in this instance because RTT is a hold I still have to execute the correct
procedural turns within its boundaries to get back to the localiser intercept
heading. If I wanted to fly to rwy08 I could have chosen BRENO 2B. But if
Page 162 of 212
Copyright © 2007-2024 by OnCourse Software
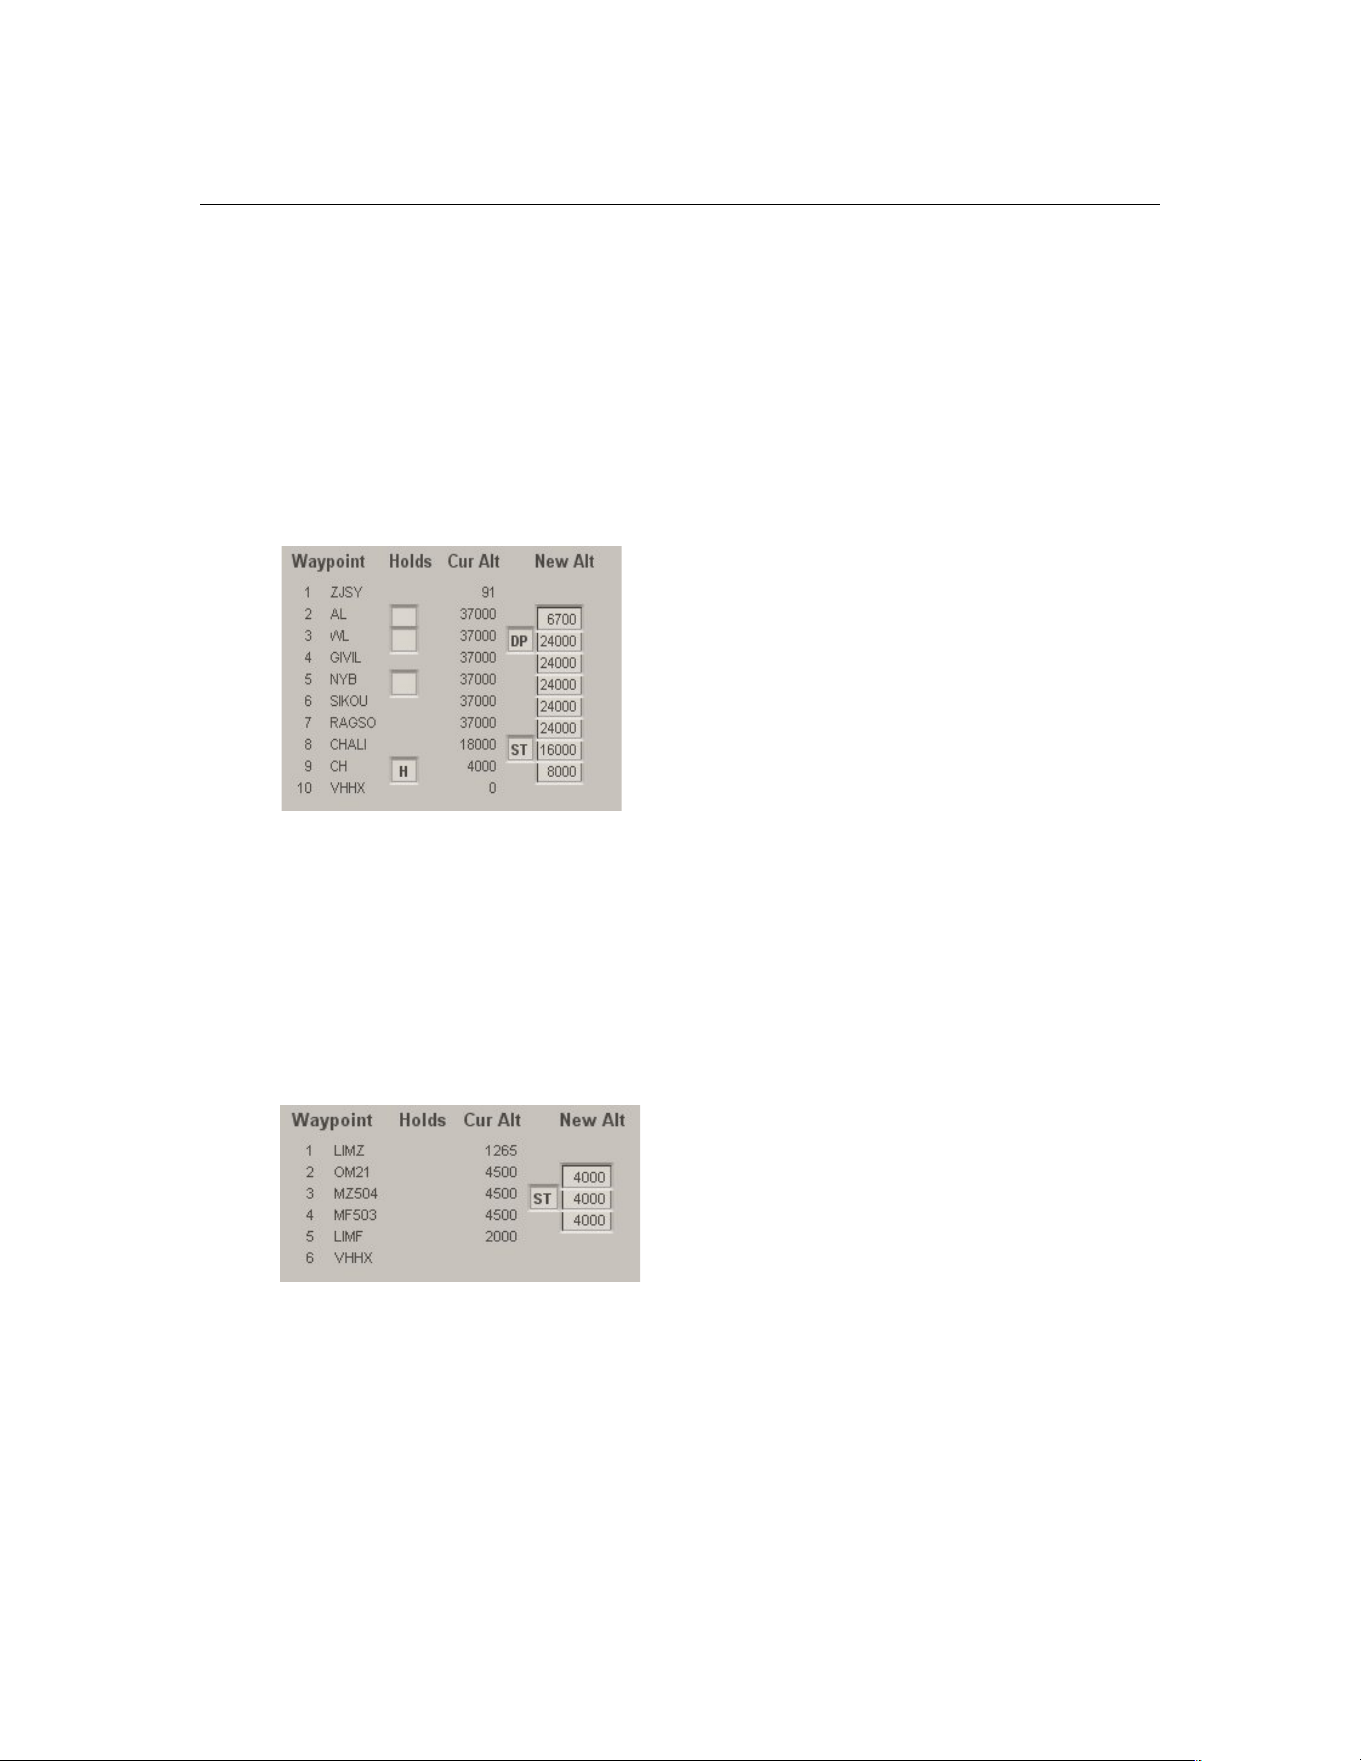
PF3 User Guide
there’s a runway change it’s a long flight from Kühtai to Rattenburg and then
back to Innsbruck. By the way, if you fly to Innsbruck in a 737 or Airbus or
equivalent sized aircraft, remember that you should fly with gear down and
flaps all the way from RTT and then full flaps before Absam. This is the
current airline practice. The difficulty is not surprisingly the circle to land
approach for RWY08, but it is in fact the missed approach procedure. So if
you are not capable of a full power 210 degree climbing turn at no more than
155kts executed within a radius of 1,700 metres then you are prohibited from
flying into Innsbruck.
ZJSY-> VHHX
Here’s a nice easy flight plan with a
popular destination. Departing from
Sanya, Hainan Island in China. The
flight time is about one and a half
hours including the holding time. The
main difference between this and the
previous flight plan is the constraint at
AL. I must fly to 2,000 metres and
wait for ATC clearance (PF3 doesn’t
do it yet, but it is on the wish list for
Russian, Chinese and associated state
ATCs to give altitudes in metres). Tip—at 2,600ft after take-off from rwy 08
go direct to waypoint 3. Set your FAF Distance to 14 and in the SID/STAR
page for VHHX set your FAF/FAP altitude to 4,500. Also make sure you check
that the METAR for VHHH has wind bearings of not less than 050deg and not
greater than 210deg otherwise rwy 31 will be in use. As an alternative set the
winds in the sim to 135deg 10 kts. A point to remember and why you must
set your FAF/FAP altitude to 4,500, is that once released from the holding
pattern at Cheung Chou ATC will clear you down to that altitude which is the
published figure for the Kai Tak IGS approach.
Here is an insanely short IFR flight
plan, but if the weather’s bad
necessary all the same. This FPL was
not possible in the old PFE! In the
SID/STAR page for LIMZ the
transition alt is 6,000, minimum FAF
is 4,000 and the SID for both rwy
03/21 is TOP7Q at 4,000ft. For LIMF set the same trans alt and FAF. The
STAR is VEROB1A. Check that the FAF distance in PF3’s Tweaks page is set
to 7.
If the weather’s bad go to your alternate! Yes, PF3 will vector you there!!
Page 163 of 212
Copyright © 2007-2024 by OnCourse Software
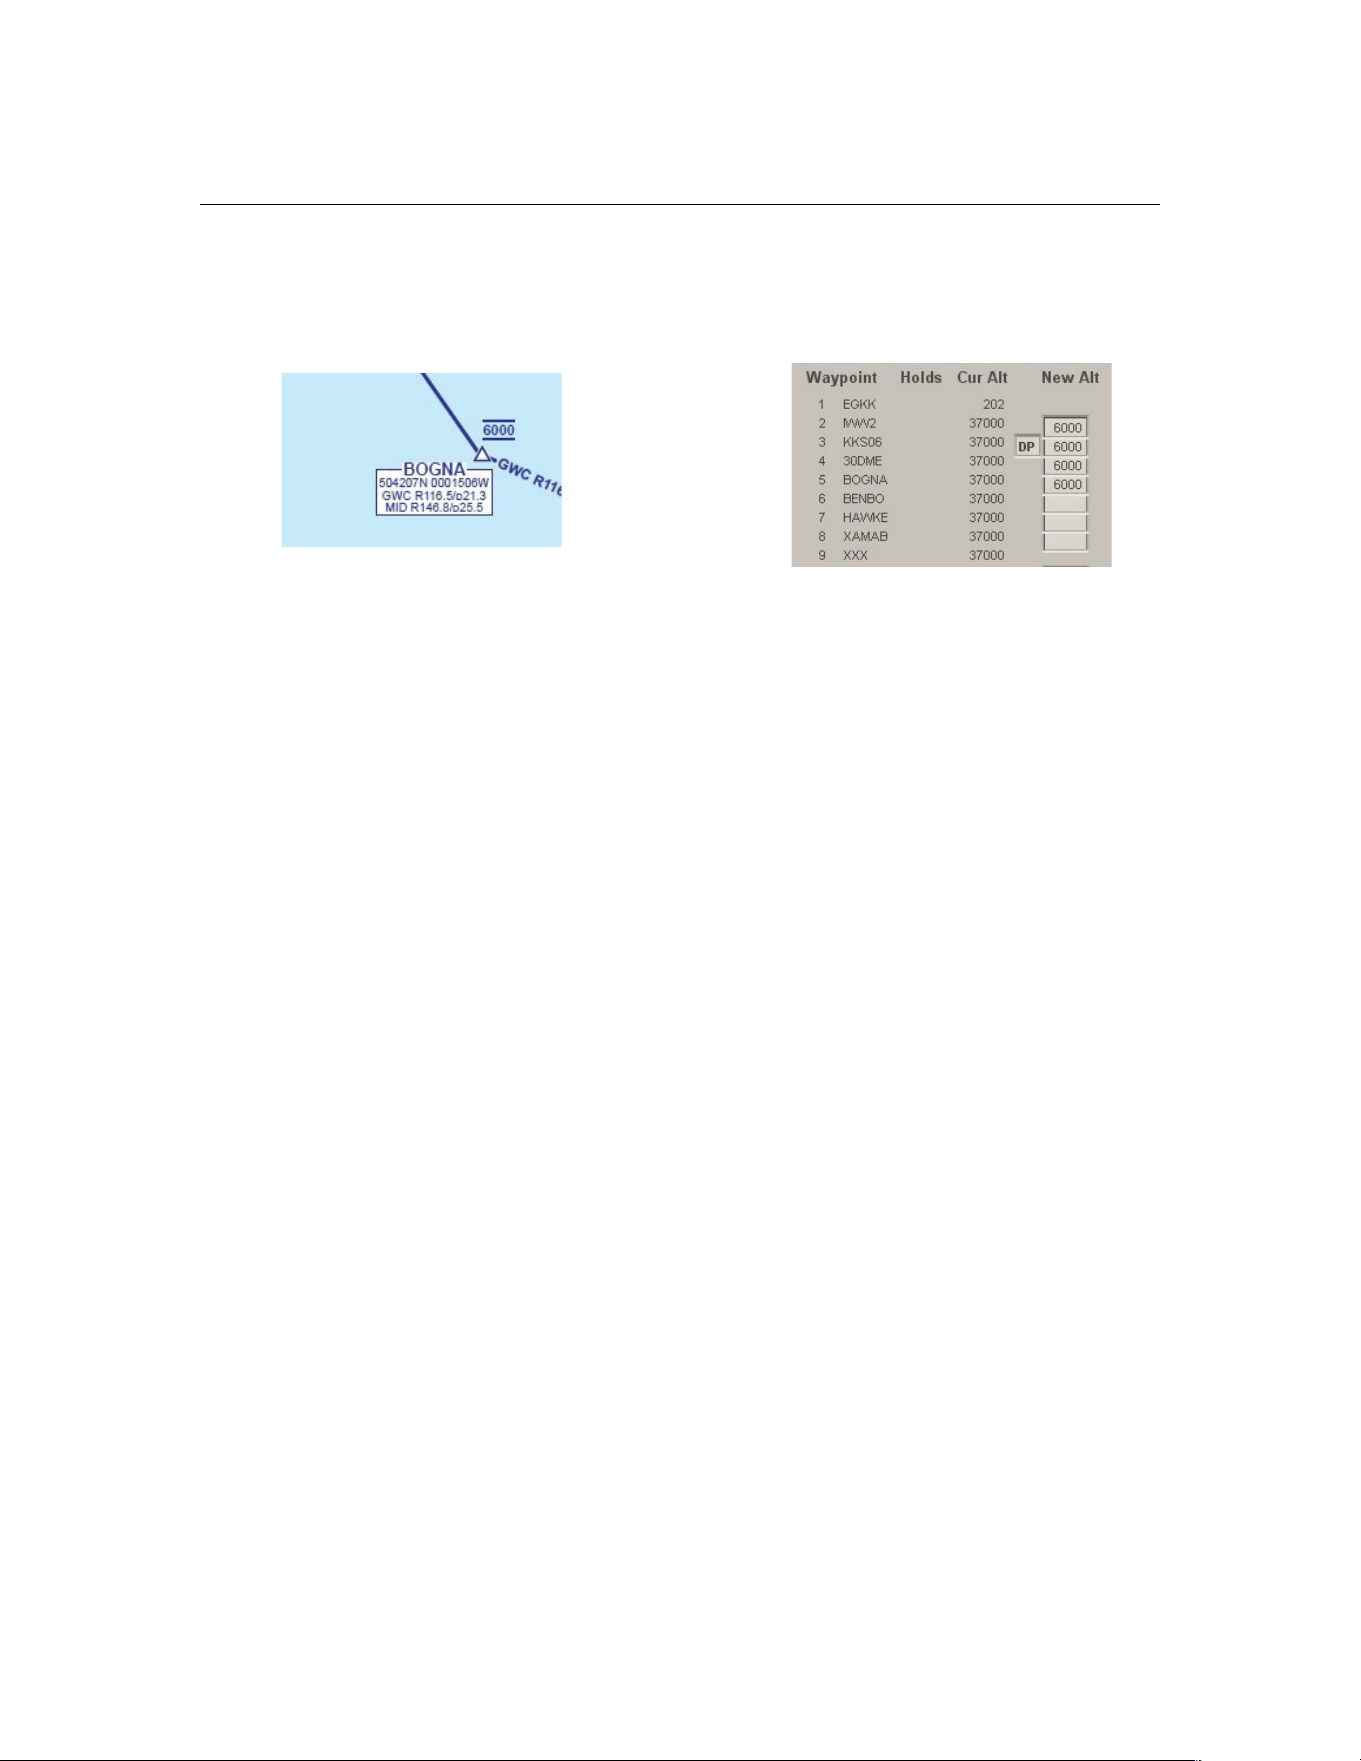
PF3 User Guide
This is the first part of a FPL from EGKK to LIMF. The routing has changed
since this was done. However this is an example of an altitude constraint all
the way to BOGNA. This is the BOGNA 1M SID and you can see I am
constrained to 6,000ft unless ATC release me, which PF3 may do too!
20.2 Holding Patterns
First let’s start by saying that there is already a lot of information regarding
how to fly holding patterns available on the Web. So, this review is just to
help you with the salient points in relation to PF3.
[Callsign] hold East on the 105 radial inbound to Mike Alpha Uniform maintain
Flight Level 195 expect Clearance at 50'
“What the 6th letter expletive deleted!” is the kind of comment one would expect
from most simmers who are not experienced pilots. To them it may as well be
a message from Mars. Well, this is how it was in PFE, and is an example of a
“Discretionary Hold”. Whereby ATC can hold you here, there or anywhere at
‘their’ pleasure, (though not yours). But, as a qualified pilot you must be
familiar with this method. Having said that, the majority of holding patterns
are published as part of a STAR, final approach or missed approach. So the
ATC instructions will therefore be much more understandable and clearer.
Whenever PFE issued a discretionary hold instruction, actually being held at a
published hold was as rare as a hen’s tooth. So rather pointless, seeing as the
majority of holding patterns are published. This has now been addressed in
PF3 with the added bonus being that the ATC instruction is also now simpler
and clearer.
“So, what do ‘I’ have to do?” you may ask. Well, you could, as has been
suggested in the User Manual just swan around for a bit until ATC release
you. That though is not such a good idea because in the process you will
almost certainly loose situational awareness and at the very least be at totally
the wrong heading or position to continue safely.
Page 164 of 212
Copyright © 2007-2024 by OnCourse Software
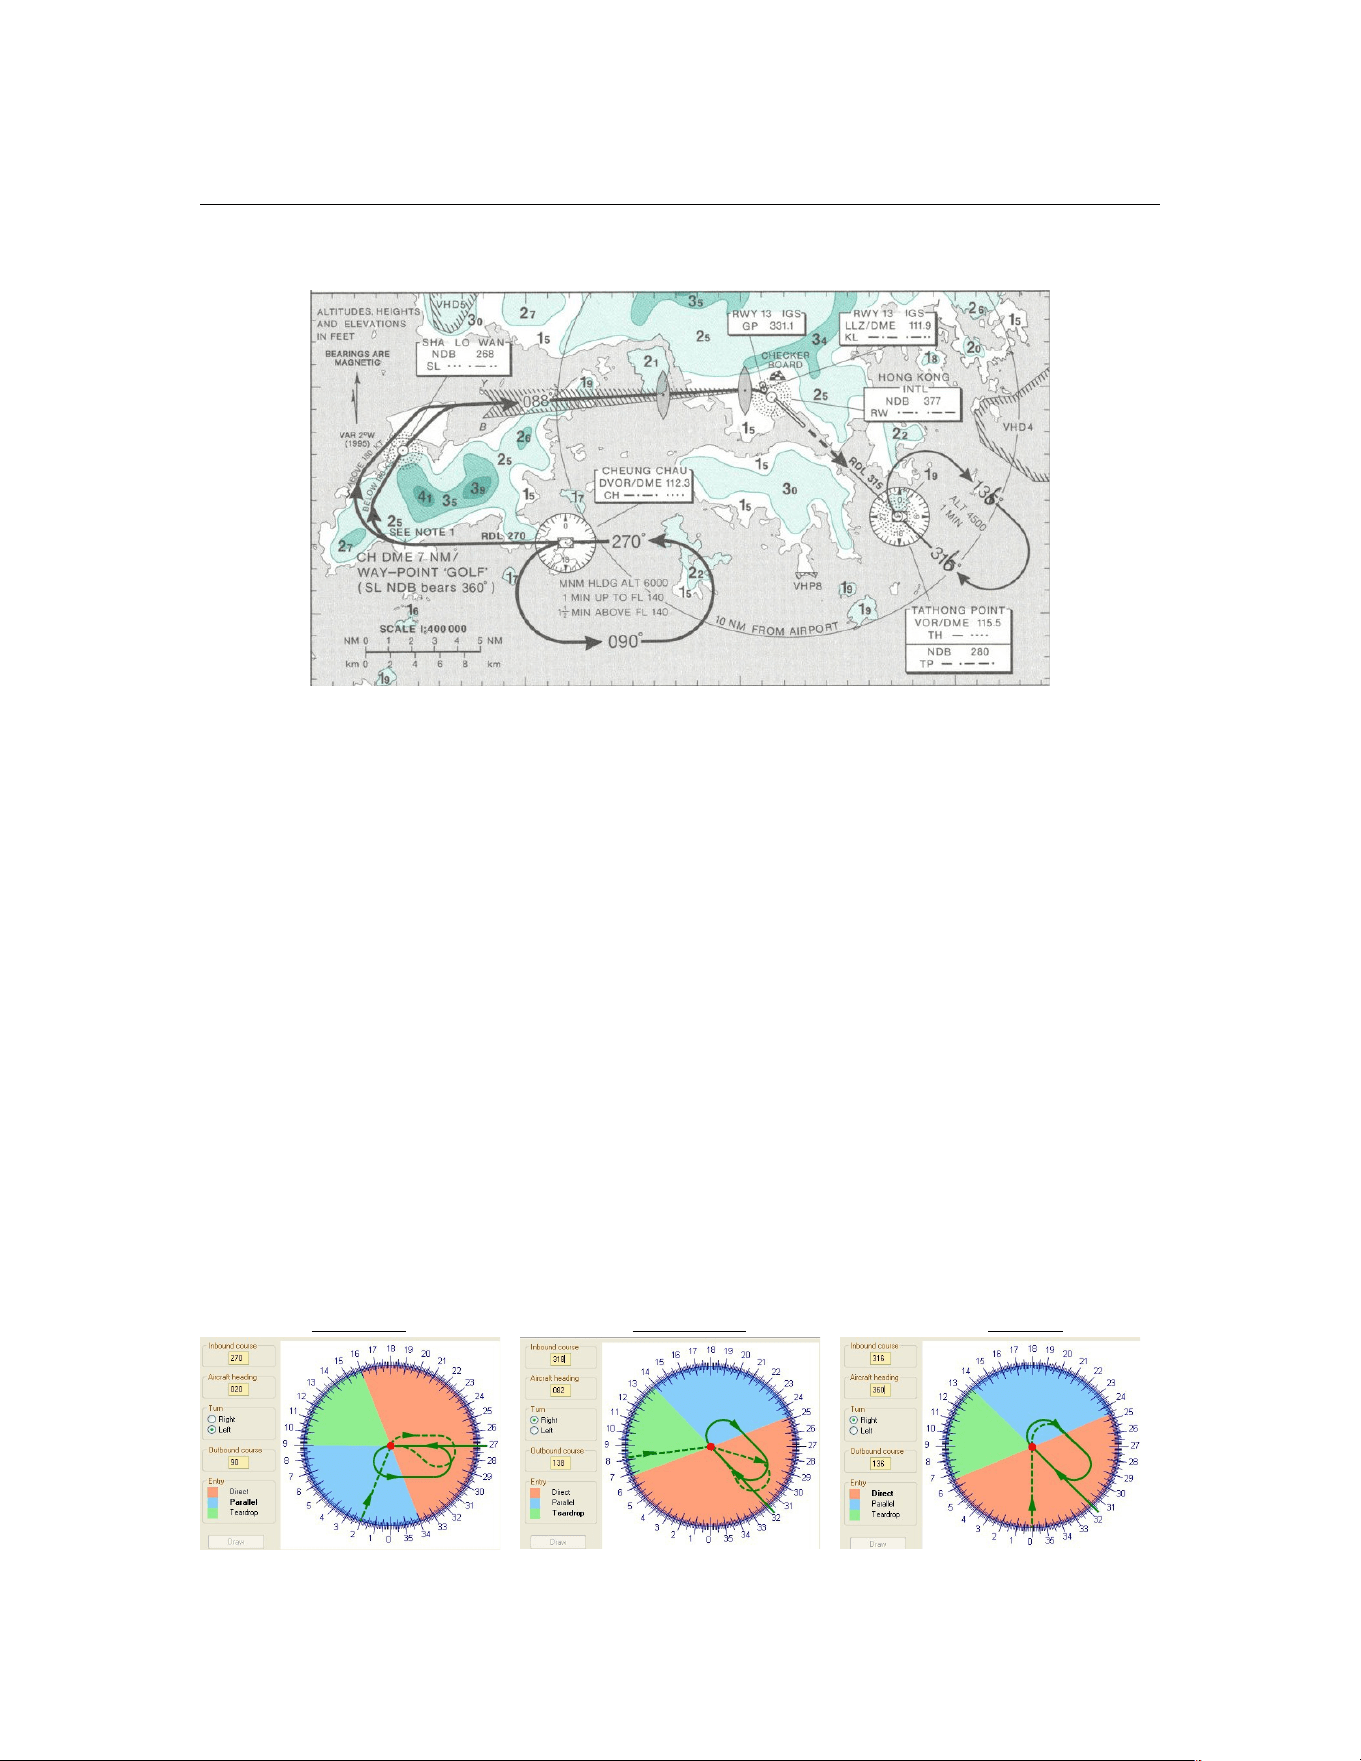
PF3 User Guide
Let’s then have a look at a typical published hold:-
Well, this is at least a start. It does contain important information, i.e. the
direction of flight, for how long and to what facility it is attached. In both
these cases the facility is a VOR. Holds can be at facilities such as VORs or
NDBs but also they can be at GPS fixes. Currently though PF3 only allows
holds at VORs and NDBs. Note also in this example that both holding patterns
contain the phrase ‘1min’. This is an instruction to fly one minute legs for both
the inbound leg going towards the facility and the outbound leg going away.
Don’t worry about 1½ minute legs. Because PF3 will only activate a hold at or
below 10,000ft.
To help pilots, holds are constructed out of set components. Imaginary Lego if
you like. Though some of these components can be varied. Which we’ll see a
little later on. The basic components are: an entry procedure, inbound leg,
outbound leg, procedural turns to and from the inbound leg, and an exit
point.
20.2.1 Entry Procedures
There are three types of entry procedure depending on the direction of your
approach to the holding pattern and whether it has left or right turns.
Parallel Teardrop Direct
Page 165 of 212
Copyright © 2007-2024 by OnCourse Software

PF3 User Guide
You can if you wish sit down and calculate which entry procedure might apply
to the hold that you are expecting. But it is much quicker to use a pattern
computer as I have done above. This one is a free download and can be found
here at:
http://www.flightutilities.com/HPC.aspx
Play around with it and you’ll begin to see how it’s done. In addition it is
useful also to have a pattern computer that also calculates the wind drift and
turn rate. For this I use adacalc.exe from here:
http://www.aero.sors.fr/adacalc.html
This will allow you to fly very accurate holds.
20.2.2 Inbound Leg
In a totally windless situation your heading and bearing will be the same and
therefore must be the same as published. In example 1 (left) above I must
aim for a bearing of 270deg even accounting for wind drift so that I pass
directly over the facility at the turn point. The timing for this leg in a calm
wind is 1 minute unless otherwise stated. Though the easiest method, is to do
all the crazy stuff on the outbound leg so that your inbound leg is always on
the nail so to speak.
20.2.3 Outbound Leg
Again, in calm conditions, this leg should be a direct reciprocal of the inbound
heading and again timed to 1 minute unless otherwise stated. I tend to fly
with a 1 minute outbound leg correcting for wind drift and then adjusting the
last part of the turn onto the inbound leg so that I am always on the correct
bearing toward the facility.
20.2.4 Procedural Turns
In calm conditions these are usually also 1 minute i.e. 3 degrees a second.
This is known as a rate one or standard rate turn. However, unless specifically
stated you can change the turn rate to suit the conditions. PF3 controllers will
request an entry and holding speed of 220kts for jet transports. At this speed
your bank angle will be all but 30 degrees each time you turn and that is
uncomfortable and unnerving for the passengers to experience every 60
seconds! It’s the same bank angle you need to turn onto finals for the rwy08
circle to land approach at Innsbruck! So, you are allowed to turn at a reduced
rate, e.g. half standard rate or limit the bank angle to 20 degrees. The latter
is best for jet transports because most autopilots are limited to a 20deg bank
angle. All it means is that you are flying a fatter sausage shape than
expected. And, as a spin-off you spend less time going round and round!
Page 166 of 212
Copyright © 2007-2024 by OnCourse Software
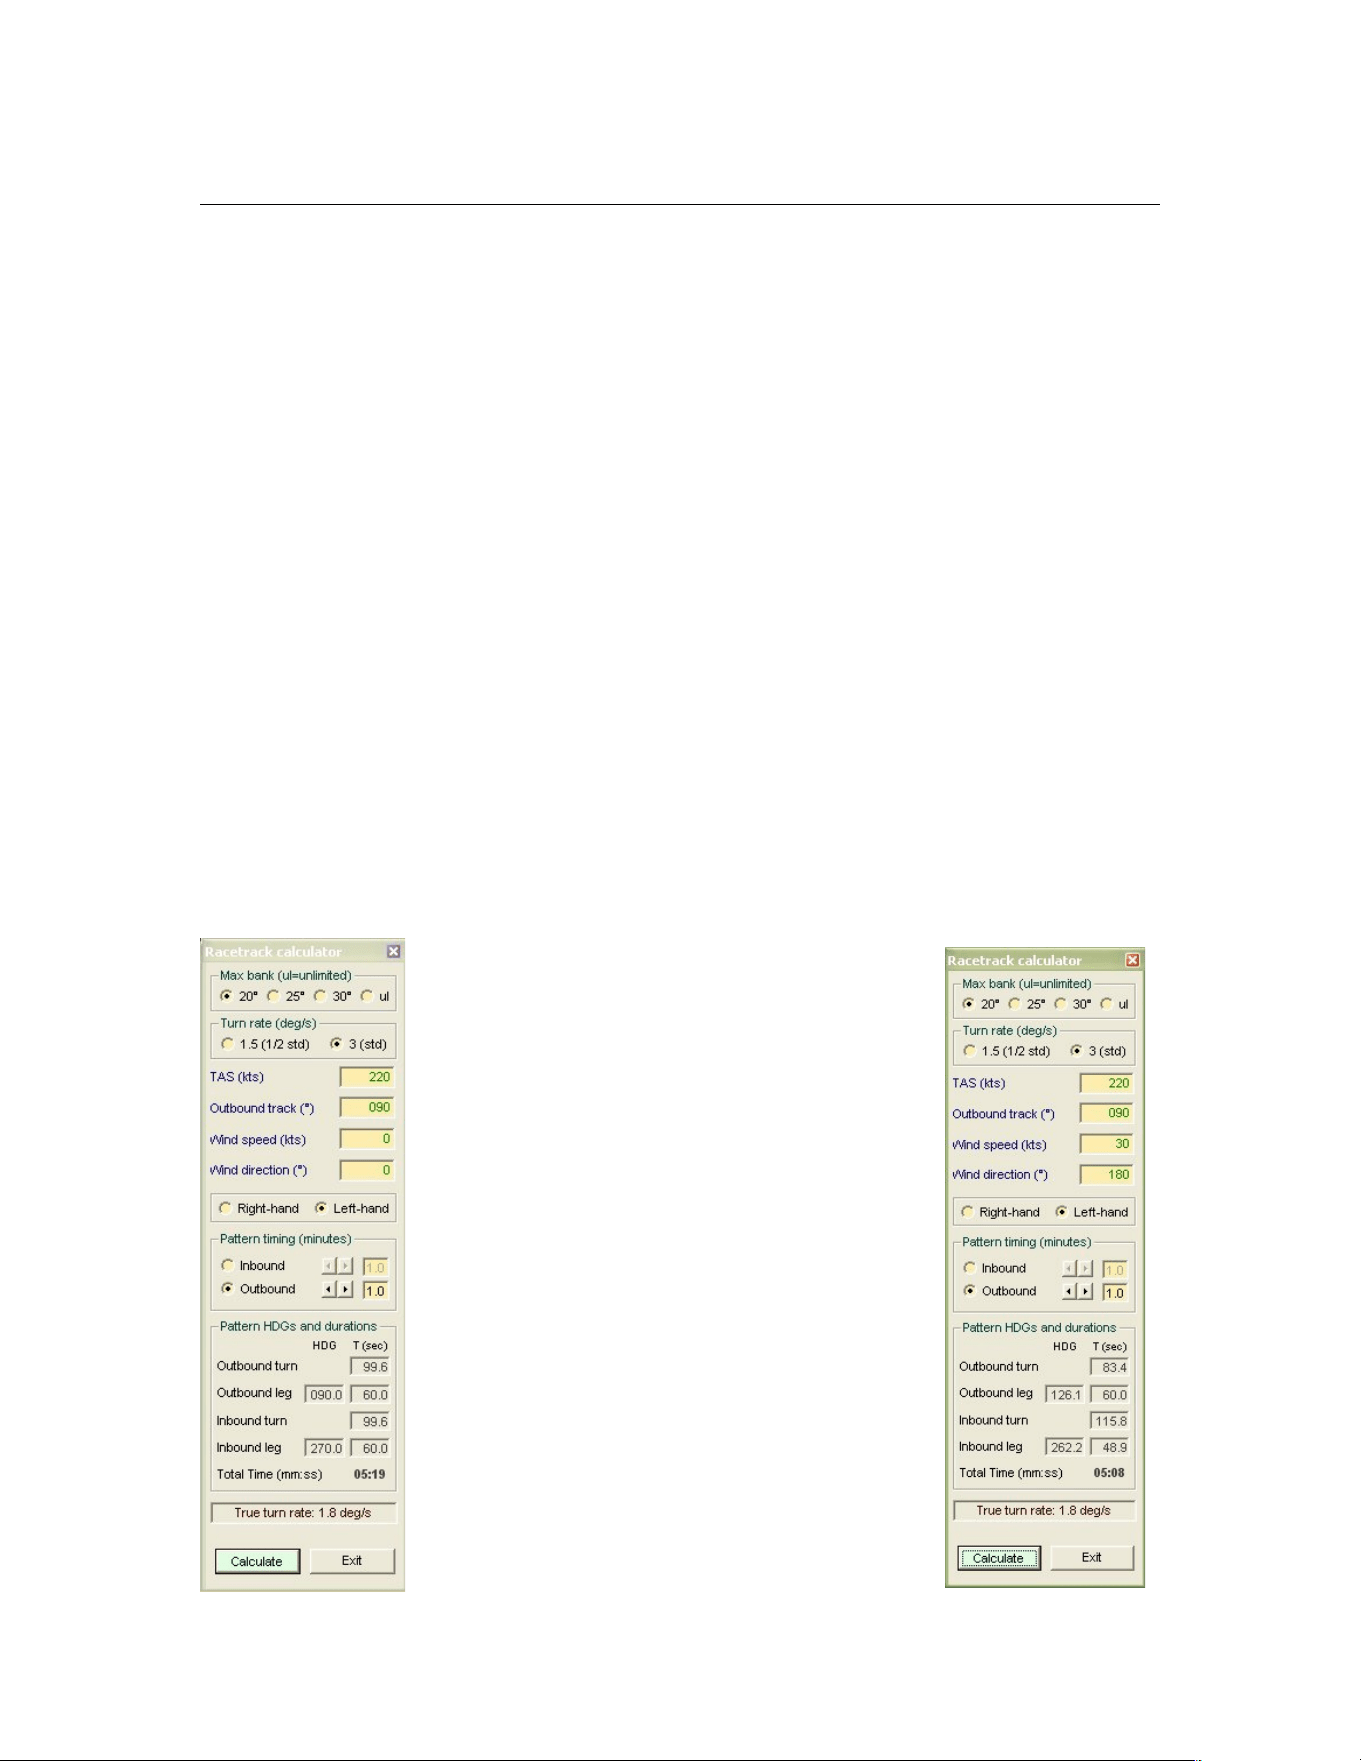
PF3 User Guide
20.2.5 Exit Point
You must always leave the pattern via the facility. Simple! Here is a typical RT
exchange between PF3 ATC and the aircraft about to be held.
Entry:-
ATC [callsign] at Romeo Tango Tango Enter the hold maintain Flight Level 120 expect
Clearance in 16
You Roger hold at Romeo Tango Tango maintain Flight Level 120 [callsign]
Exit:-
ATC [callsign] at Romeo Tango Tango resume own navigation cleared to Lima Oscar Whiskey
India
You at Romeo Tango Tango cleared to Lima Oscar Whiskey India resume own navigation
[callsign]
ATC [callsign] at Romeo Tango Tango maintain 9 thousand 5 hundred Cleared to final for
runway 8 at pilot's discretion Contact Tower on 120.1 when established.
You at Romeo Tango Tango maintain 9 thousand 5 hundred Cleared to final for runway 8 at
pilot's discretion Contact Tower on 120.1 when established. [callsign]
That, if I may say, is much simpler than the example shown at the beginning
and it is what controllers will say. So it’s accurate too.
Finally let’s look at examples where wind has an affect. In reality the ‘norm’!
The calculation on the left assumes no wind
at the CH Cheung Chau hold at Kai Tak. We
are flying at 220kts and our bank angle is
20deg. So in this perfect situation both the
inbound and outbound leg will be for one
minute. Notice however that the turns are
about 1 minute 40 seconds. So instead of
one revolution of the hold being 4 minutes
we take just over 5 minutes. Our headings
are spot on. Easy as cake as they say!
Now look what happens on the right when
we introduce a 30kt wind from the South.
Not unusual at Hong Kong! We have a
totally different situation. Everything has
changed except the outbound leg timing.
Look at the different effect of the tail wind
on the inbound leg and the headwind on the
outbound leg. A deviation of -8deg inbound
and +36deg on the outbound!!!! Notice
though that the time for one revolution of
the pattern is not dissimilar to no-wind on
the left. I highly recommend this tool!
Page 167 of 212
Copyright © 2007-2024 by OnCourse Software

PF3 User Guide
Again the intention of this commentary is not to give you a detailed lesson but
just to highlight the change in PF3 from PFE and to help you understand that
change and encourage you to practise holding patterns whenever you can.
Practise in low wind or calm conditions first though.
Finally, trust in PF3. Its controllers are well trained and will do their best to
issue instructions at convenient points. For example they will try to release
you from the hold on the inbound leg. I wish that happened more often in real
life!!!!
20.3 Uncontrolled Airports
Should you find yourself departing from an uncontrolled airport, without
Clearance, Tower or Ground control facilities you could be excused for asking
'how on earth do I obtain IFR clearance in such a situation'?
Well, here's how it works in PF3...
First you need to tune to FSS and hit hotkey #0, this is your 'wake up' call to
FSS... there could be a delay of up to 30 seconds so be patient, they're not
ATC controllers. Once they put their coffee down they will ask you to 'go
ahead' at which point, if you're using VCP mode 1, otherwise it will be
automatic, you can either hit the 'Roger' hotkey or hotkey #0 again.
On doing so your VCP will provide the necessary details regarding your flight
plan to FSS, after which they will clear you as filed, give you an initial altitude
and also the frequency for Departure, which of course you should contact
asap after takeoff. Obviously this new feature is only available when your are
at your departure airport.
20.4 Using PF3 with MCE
Over time we hope to expand on this particular section, so if there's anything
in particular you would like covered feel free to drop us an email and we'll see
what we can do.
Recently the MCE developers have offered a new feature that allows you to
have the MCE FO voice talking to PF3's ATC, making the whole experience
even more realistic. However, to use this new feature you would normally
have to turn the PF3 Closed Caption option 'on', and whilst this works just
fine some users prefer not to have to use closed captions. In view of this we
have worked with the MCE developers to provide an alternative way for them
to provide this exciting new feature.
As from PF3 version 3.5.0 there will be a new file created in the main PF3
folder, named PF3_MCE.INI. If you open this file using Notepad you will see
three entries name 'Active', 'Logged' and 'PF3Transmitting'. To activate this
new feature simply change the Active=0 to Active=1 and then save the file.
You don't have to do anything else but now, if you wish, you can turn off
Page 168 of 212
Copyright © 2007-2024 by OnCourse Software
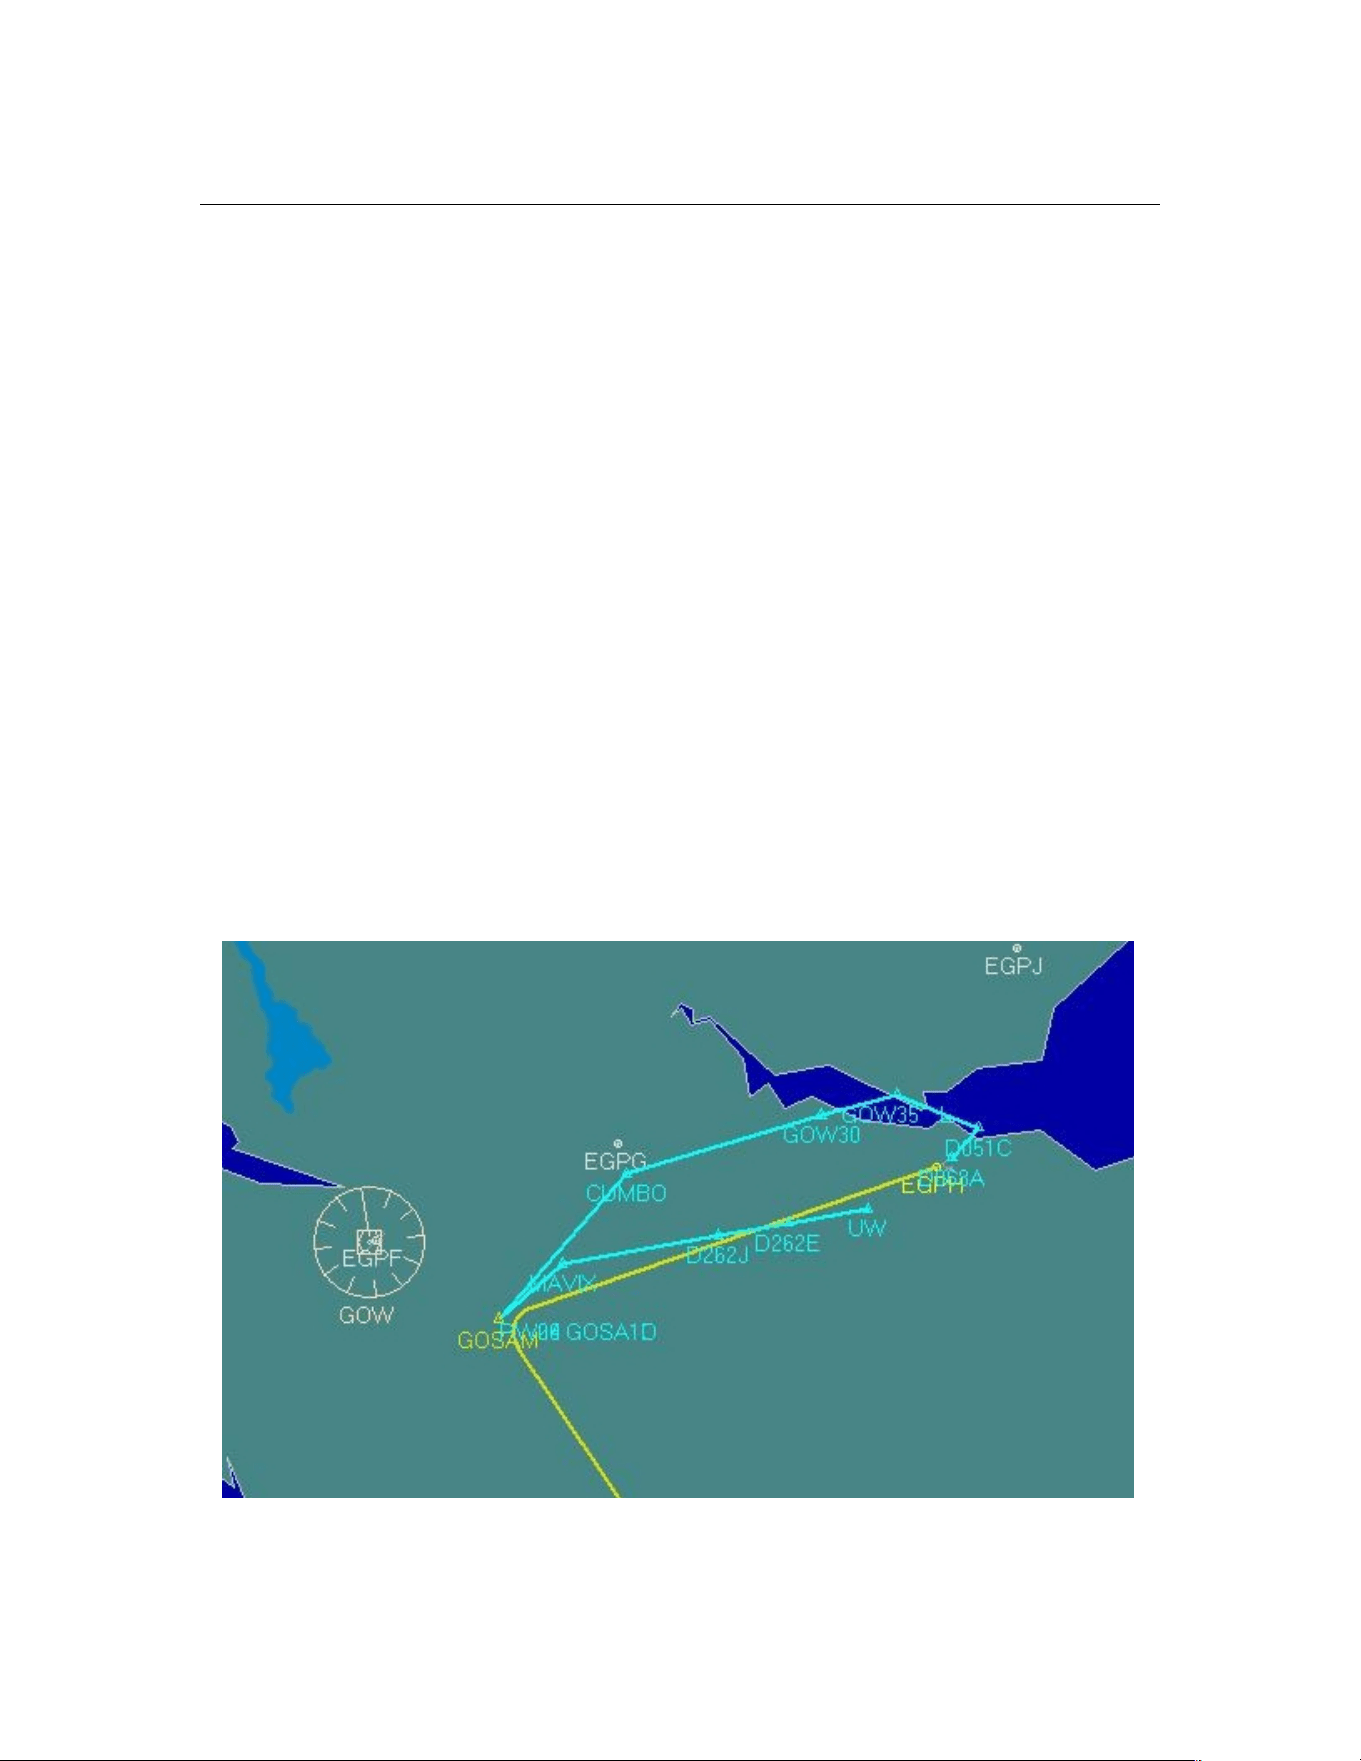
PF3 User Guide
PF3's closed captions and still enjoy the new MCE feature of hearing their FO
chatting with PF3's ATC.
With this option active all that happens is PF3 will write certain ATC
messages to a new file, created in your PF3/Logs folder, named
Clearance.log
20.5 A word about SID/STAR use in PF3
SIDs and STARs are optional in PF3, and there is no requirement to purchase
a subscription for navigational data to use the program. If you choose to use
SIDs and STARs, your flight planning technique will likely depend on the
geographical region where you are flying.
When flying in Europe and most ICAO regions it is usually best to leave the
SID and/or STAR out of the flight plan you load into PF3. The reason is that
SIDs/STARs in these regions are usually short and runway-specific; that is,
they depend on which runway is active at the time, and you often do not
know this information in advance. For example, departing EGPH with GOSAM
as your first waypoint, you can leave the SIDs box on the SID/STAR page
unchecked and allow PF3 to vector you to your first waypoint, or check the
SIDs box to turn off vectoring if you prefer to fly a departure procedure. If
you choose to fly a procedure rather than a vectored departure, you can fly it
by hand or load the appropriate procedure in your FMC based on the active
runway at the time of your departure.
In the U.S. and Canada, SIDs and STARs are usually much longer, often more
than one hundred miles long, and are used for multiple runways. When flying
Page 169 of 212
Copyright © 2007-2024 by OnCourse Software
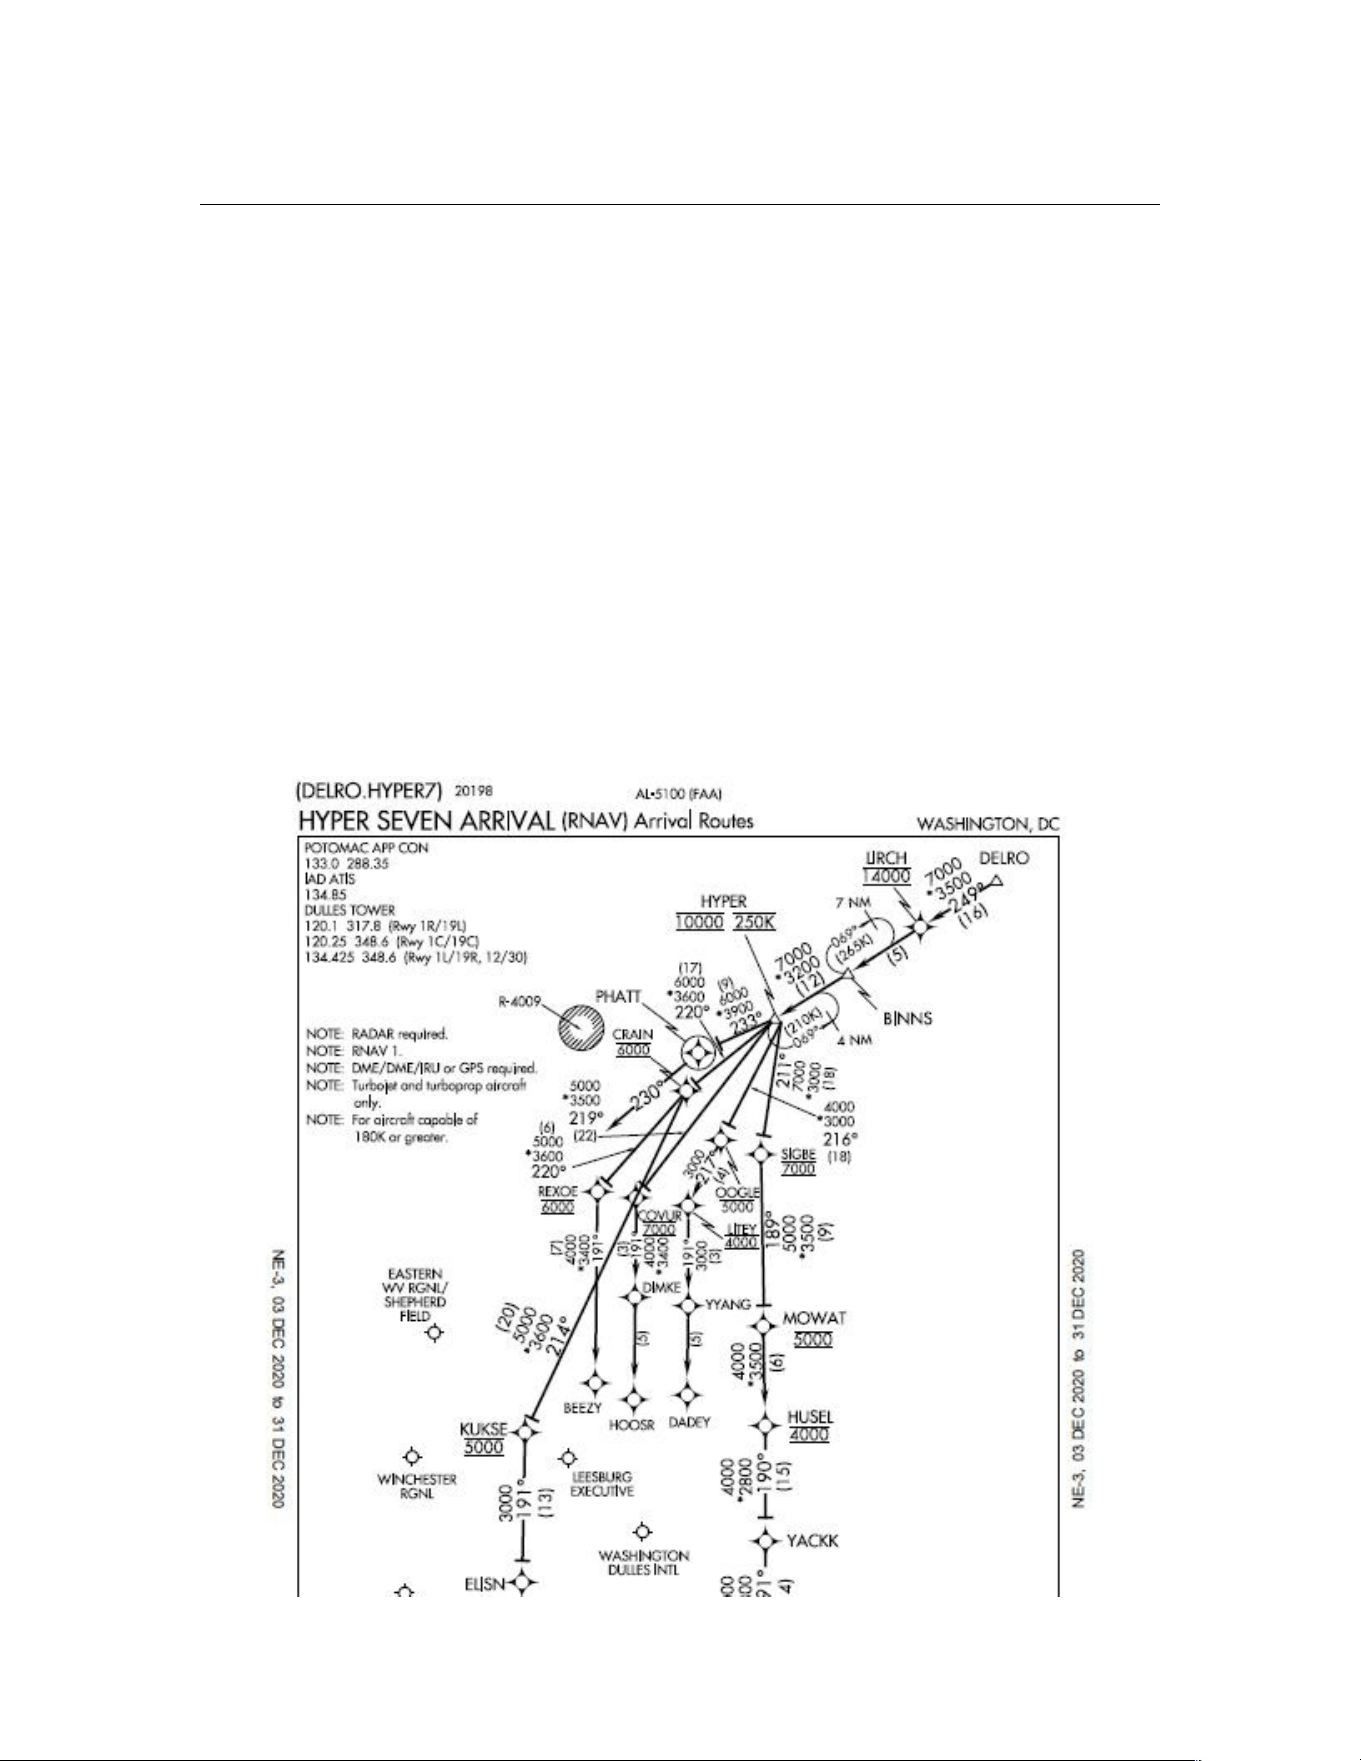
PF3 User Guide
in these areas you will probably want to include much of the SID/STAR (all
except parts close to the airport or that apply to a specific runway) in your
PF3 flight plan. Those who have flown on VATSIM are probably familiar with
this concept. When flying in Europe you usually do not file SIDs or STARs
with your flight plan; they are assigned by ATC when you get your runway
assignment. When flying in the U.S. and Canada you are expected to file
your SID and STAR as part of your flight plan.
In PF3 version 3.10 you can deactivate/exclude specific waypoints from your
flight plan (see section 7.1.29) before connecting to FS. This will come in
handy when you have included a long SID or STAR in your flight planner
output, but need to deactivate some waypoints because they are too close to
the airport or are runway-specific. For example, for the HYPER7 arrival,
handling arrivals into Washington Dulles from the northeast, you would most
likely include the STAR waypoints up to and including HYPER in your flight
plan, excluding any waypoints after HYPER. When you reach HYPER, which is
the last active waypoint in your flight plan, you can either allow PF3 to vector
you to the final approach course for the active runway, or request clearance
at pilot’s discretion which will disable vectoring and allow you to complete the
approach to the assigned runway using your FMC and/or by hand.
Page 170 of 212
Copyright © 2007-2024 by OnCourse Software

PF3 User Guide
The main function of the SID and STAR checkboxes at bottom of the
SID/STAR page is control of vectoring, before your first waypoint and after
your last. With the boxes unchecked, you will get vectors; if the boxes are
checked you will not, allowing you to fly from the runway to your first
waypoint (or from your last waypoint to the runway) using a procedure if you
wish. You can include STAR waypoints in your flight plan, as in the HYPER7
example, and leave the STARs box unchecked and PF3 will provide vectors
from your last waypoint to the active runway. If you check the STARs box
you will not get vectors after your last waypoint.
20.6 How to Reset PF3's Window Positions
With version 3.20.0 we've added a 'Reset' feature which will reset all the
currently saved PF3 window positions. So, if you used to display PF3 on a
second monitor, which has maybe died or been disconnected, you would be
able to drag PF3's main screen back onto your main monitor but any other
PF3 windows you try to display would not show, due to PF3 remembering the
last position each window was displayed.
This feature is initiated by right clicking on the aircraft picture on the PF3
Main screen... then selecting 'yes' to confirm you wish to proceed. Be
warned... there is no backout from this so if you wish to try it please make a
copy of your PF3.INI first.
20.7 How to turn off TGS messages (FS9, FSX only)
When using PF3's TGS (Taxi Guidance System) it will display various
messages on screen. Now, since version 3.20.0, following a user request, you
can now stop these messages appearing by following these simple
instructions.
To achieve this you will have to manually change the PF3.INI file as follows.
You can do this by opening the INI file using Window's Notepad or similar
editor.
Under the [TGS] section add the following line
NoDisplayMessages=1
Under the same section check the Captions entry, which should already be set
to 0
Captions=0
For P3D/MSFS users, if you wish to suppress your TGS messages or reroute
them, please see TGS Messages Override on Page 90
Page 171 of 212
Copyright © 2007-2024 by OnCourse Software

PF3 User Guide
20.8 Martin's tips on using the FMC with PF3
20.8.1 Using the new Flight Plan Filter option
A fair number of users like to generate flight plans which include a departure
procedure (SID) and/or an arrival procedure (STAR), using tools such as
SimBrief or Little NavMap.
PF3 does not handle the internal details of departure and arrival procedures
so in the past one of two methods had to be used to adapt the flight plan for
PF3:
1) Load the full flight plan into PF3 and use the adjustments page to
remove the extraneous detail.
2) Export a copy of the flight plan without the procedures, and load this
version into PF3.
Each method has its disadvantages, so a new Flight Plan Filter option has
been introduced.
The key feature is that PF3 will load a full (with procedures) flight plan and
adapt it automatically.
The following example shows how this new option works; we will use this
SimBrief flight plan:
(The waypoints that are relevant to PF3 are in red, the SID and STAR names
are highlighted)
EGSS/04 N0415F350 CLN5S CLN P44 RATLO M197 REDFA L620 SUVOX
Z718 OSN T511 UMVIS T463 NIE NIE27 EDDV/27R
Although runways are included, EGSS/04 and EDDV/27R, these may be
changed due to weather. Also, the planned cruise altitude is given – F350 is
Flight Level 350, 35,000 feet.
Page 172 of 212
Copyright © 2007-2024 by OnCourse Software

PF3 User Guide
This is the relevant data for the waypoints from the full flight plan:
EGSS +000348.00 Runway 04
D044A +003300.00 Departure CLN5S
D114N +009100.00 Departure CLN5S
D114Q +011100.00 Departure CLN5S
CLN21 +013200.00 Departure CLN5S
D265P +016000.00 Departure CLN5S
D265M +017400.00 Departure CLN5S
CLN +022800.00 Departure CLN5S
RATLO +029600.00
REDFA +035000.00
TACHA +035000.00
TULIP +035000.00
BASNO +035000.00
PAM +035000.00
NYKER +035000.00
ELPAT +035000.00
ARNEM +035000.00
SONEB +035000.00
OLDOD +035000.00
SUVOX +035000.00
OSN +035000.00
UMVIS +027400.00
NIE +019500.00 Arrival NIE27
DV502 +015200.00 Arrival NIE27
DV565 +007900.00 Arrival NIE27
EDDV +000183.00 Runway 27R
If we load the full flight plan into PF3 using the Flight Plan Filter this is what
we will see:
Page 173 of 212
Copyright © 2007-2024 by OnCourse Software
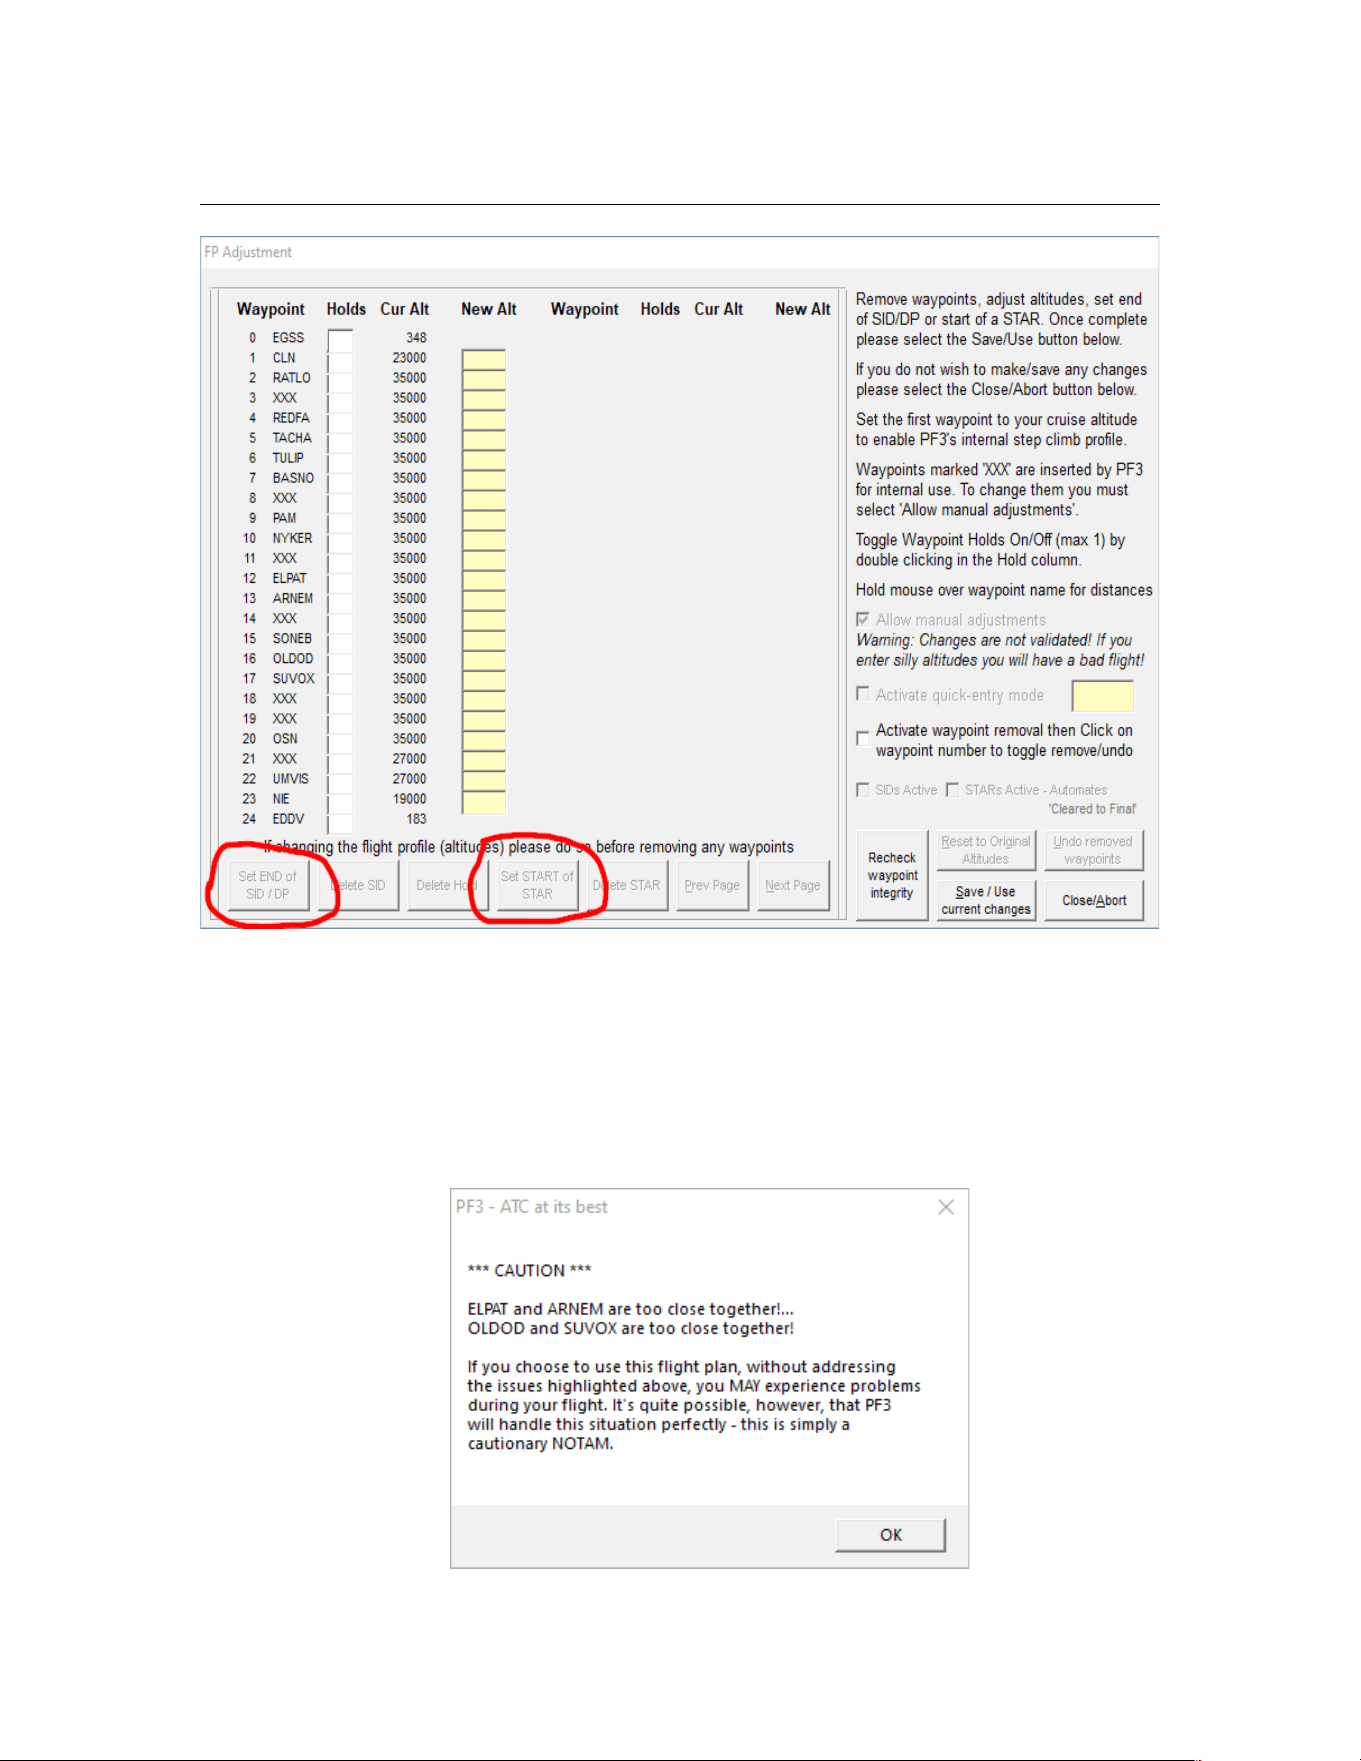
PF3 User Guide
PF3 has removed the internal SID waypoints, but has retained the SID exit point
and set its altitude from the flight plan; similarly, it has removed the internal
approach waypoints and set the entry point altitude from the flight plan. The ‘Set’
buttons are disabled, as assigning the DP and ST waypoints is handled internally
when using the Flight Plan Filter.
We still get the following NOTAM when we load the flight plan:
Page 174 of 212
Copyright © 2007-2024 by OnCourse Software
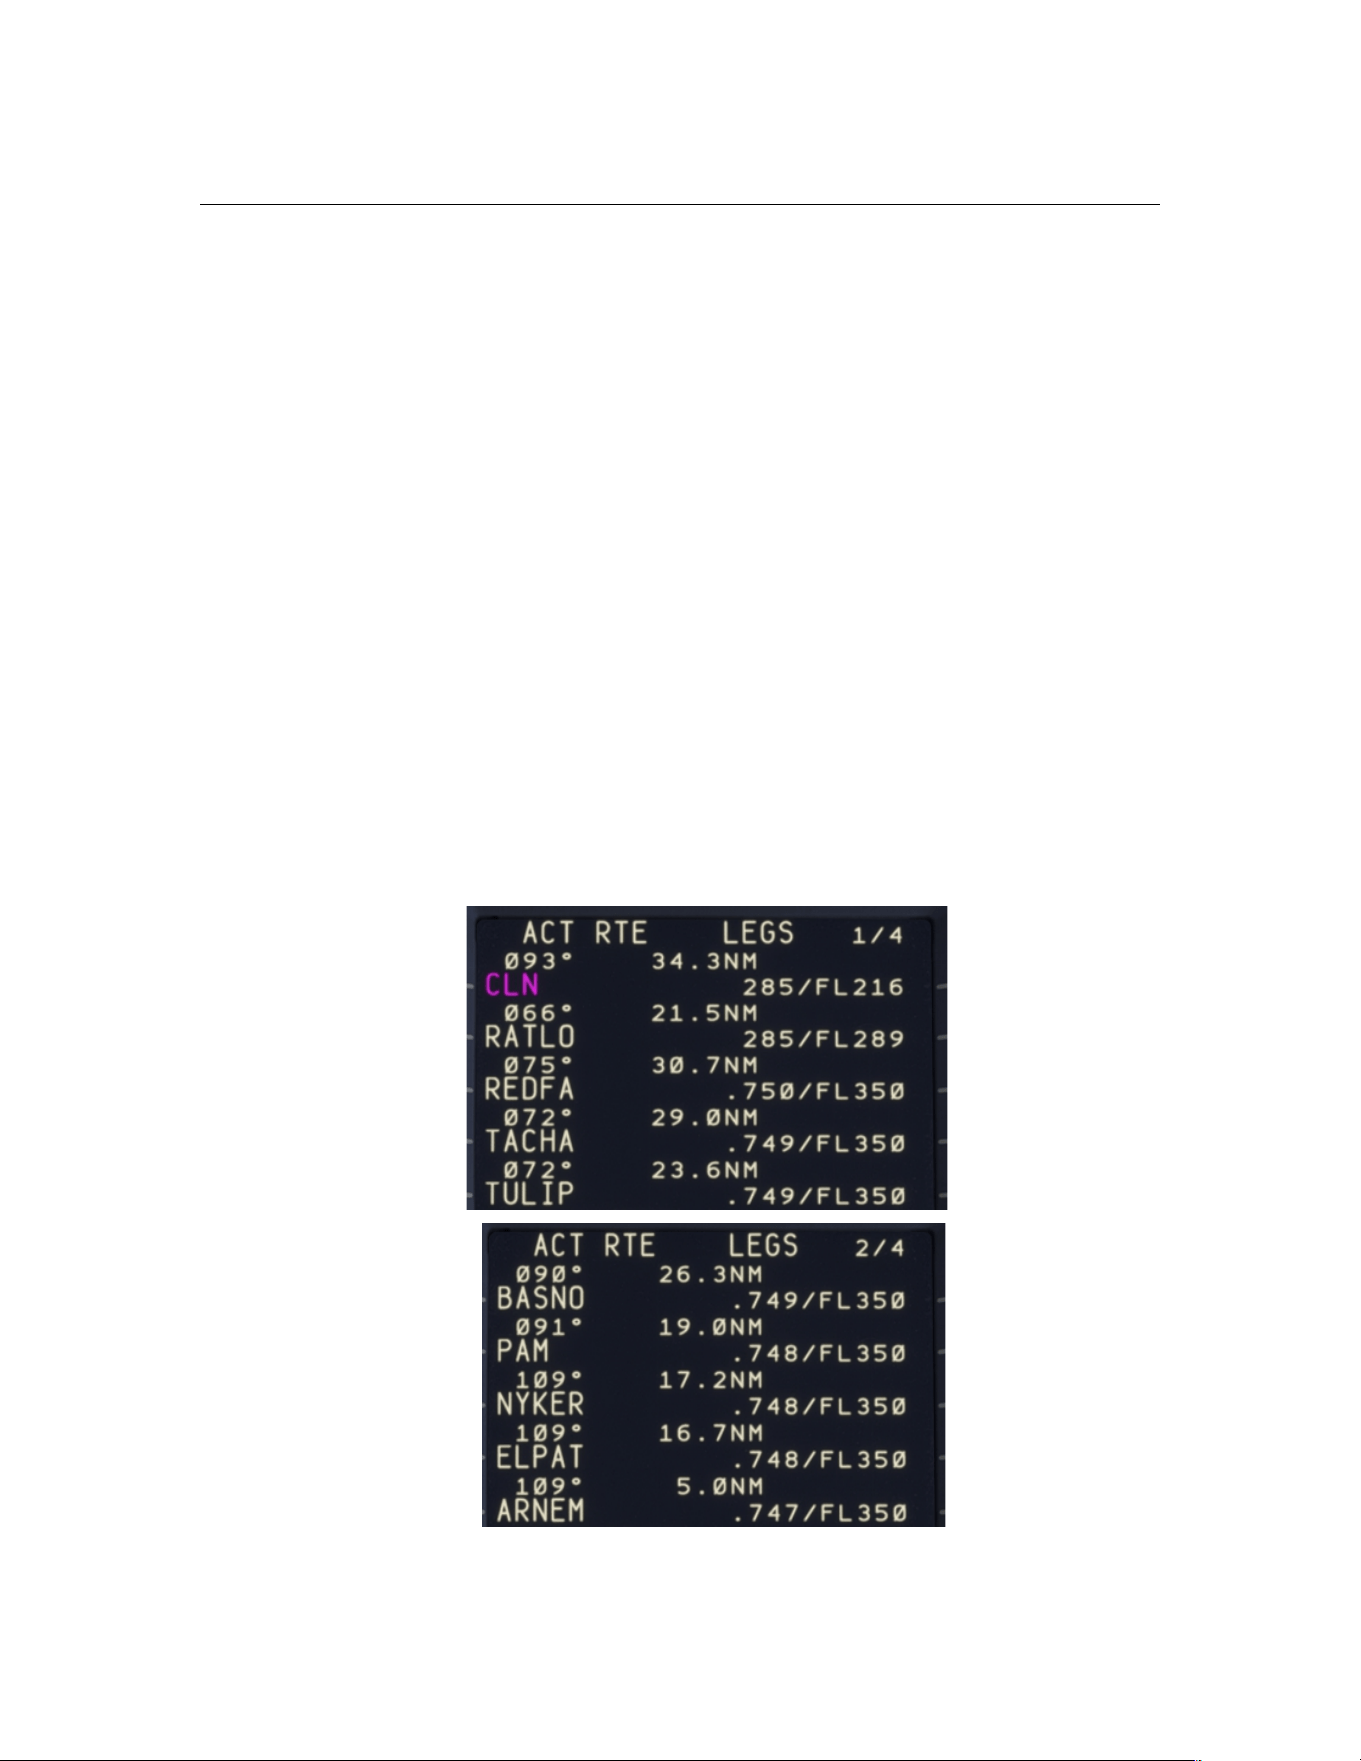
PF3 User Guide
Note: This would also have been seen if we loaded a No Proc version of this
flight plan; you may choose to ignore this message, or instead remove the
ELPAT and OLDOD waypoints.
The Flight Plan Filter option can be found on the Options #2/Advanced
Options page under ‘Misc’.
20.8.2 Using the same flight plan with an FMC
Now let’s look at how this same flight plan can be used with an aircraft FMC; I
am using the PMDG 737-600, but a similar approach can be used with other
aircraft, including the FBW Airbus A32NX.
The first thing to be aware of when loading a flight plan into the FMC is that it
strips any departure and approach procedures, retaining waypints between
the SID exit point and the STAR entry point (this is exactly what the PF3
Flight Plan Filter does). The key difference is that the FMC calculates
waypoint altitudes using its own data, including fuel, payload and other
operational parameters.
Here are the route legs that the FMC shows when the above flight plan is
initially loaded:
Page 175 of 212
Copyright © 2007-2024 by OnCourse Software
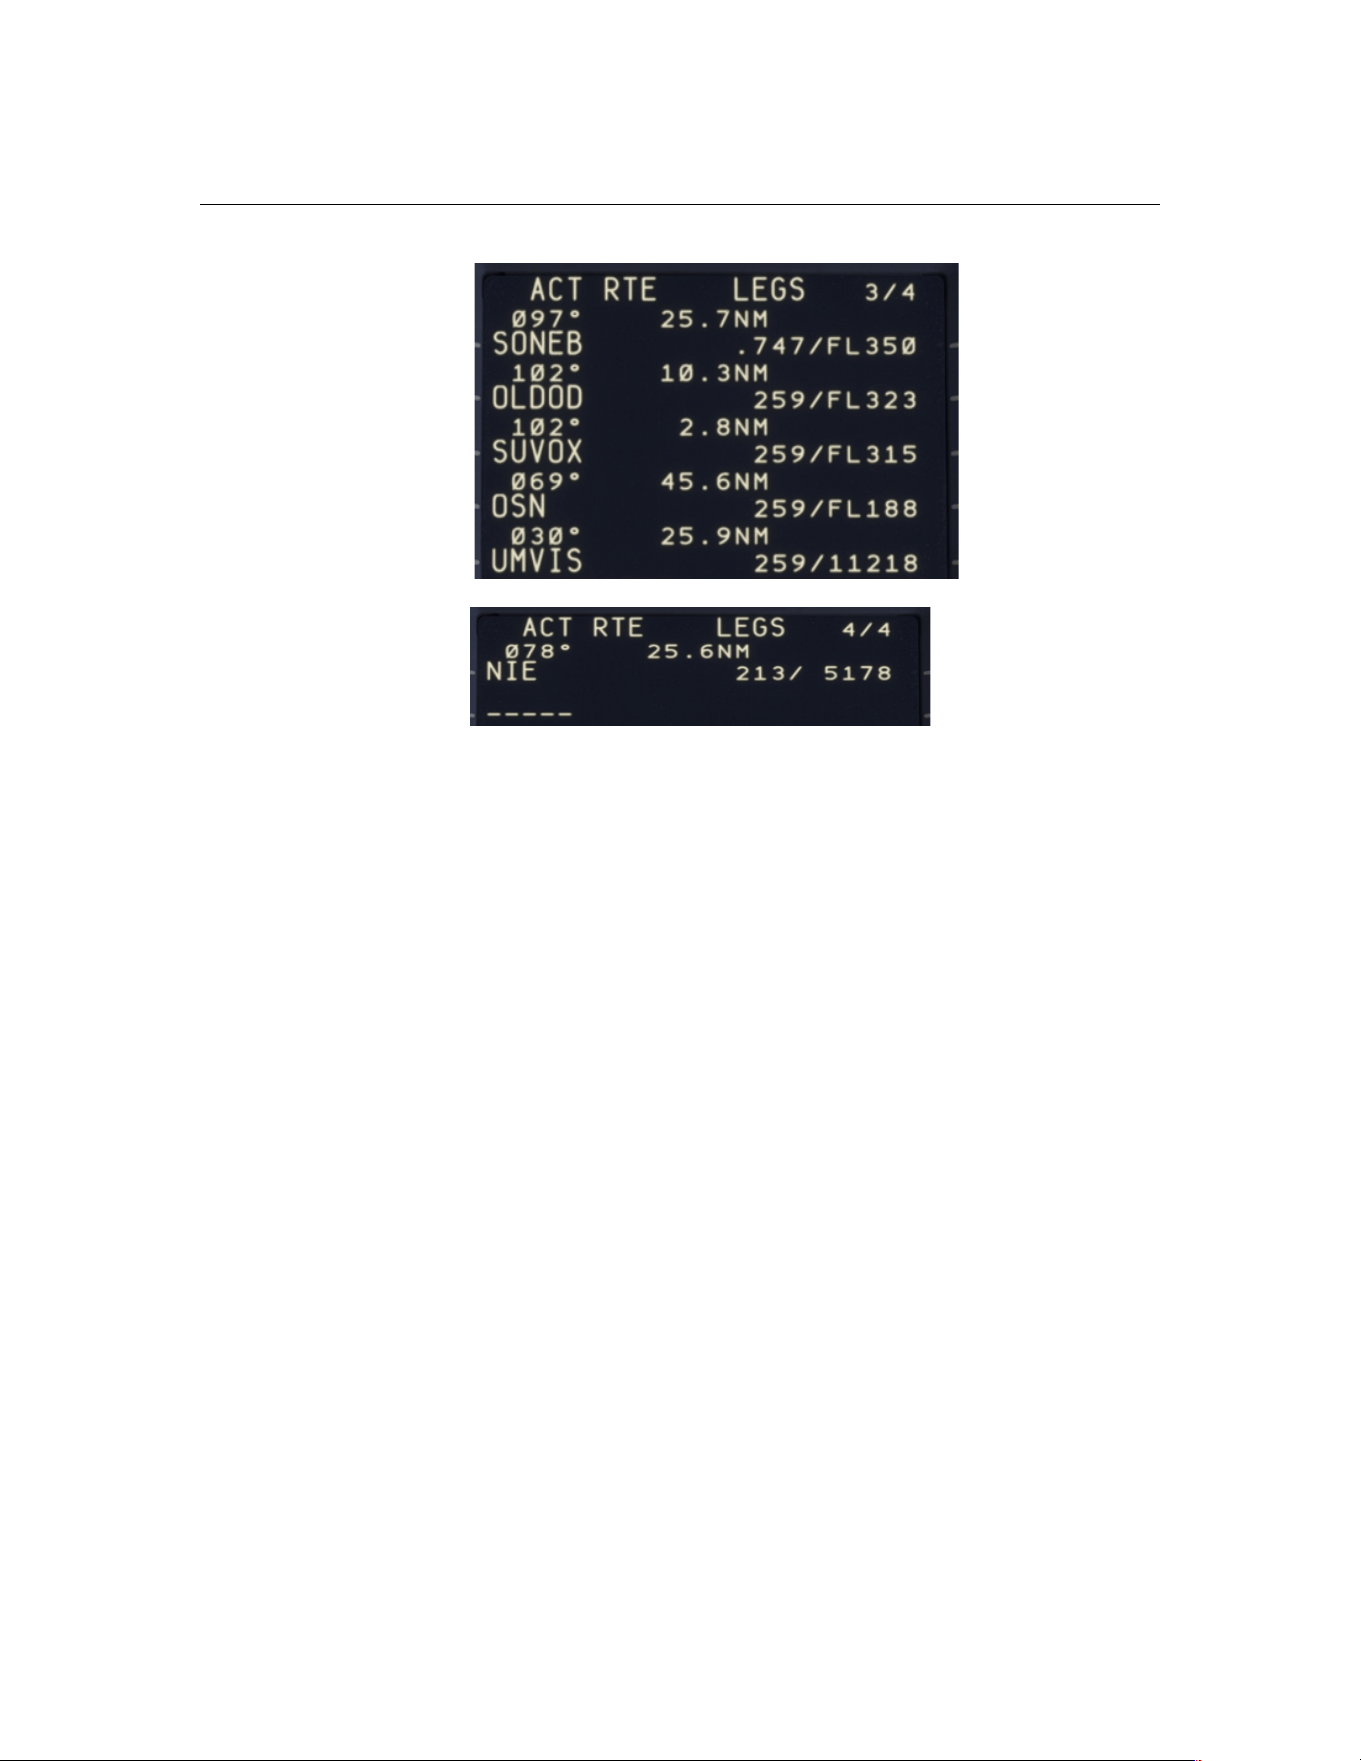
PF3 User Guide
One thing to note is that the descent begins earlier than the flight plan
shows; the FMC wants to follow an ‘economy descent’ trajectory, not the fixed
descent rate used by SimBrief Dispatcher.
Page 176 of 212
Copyright © 2007-2024 by OnCourse Software
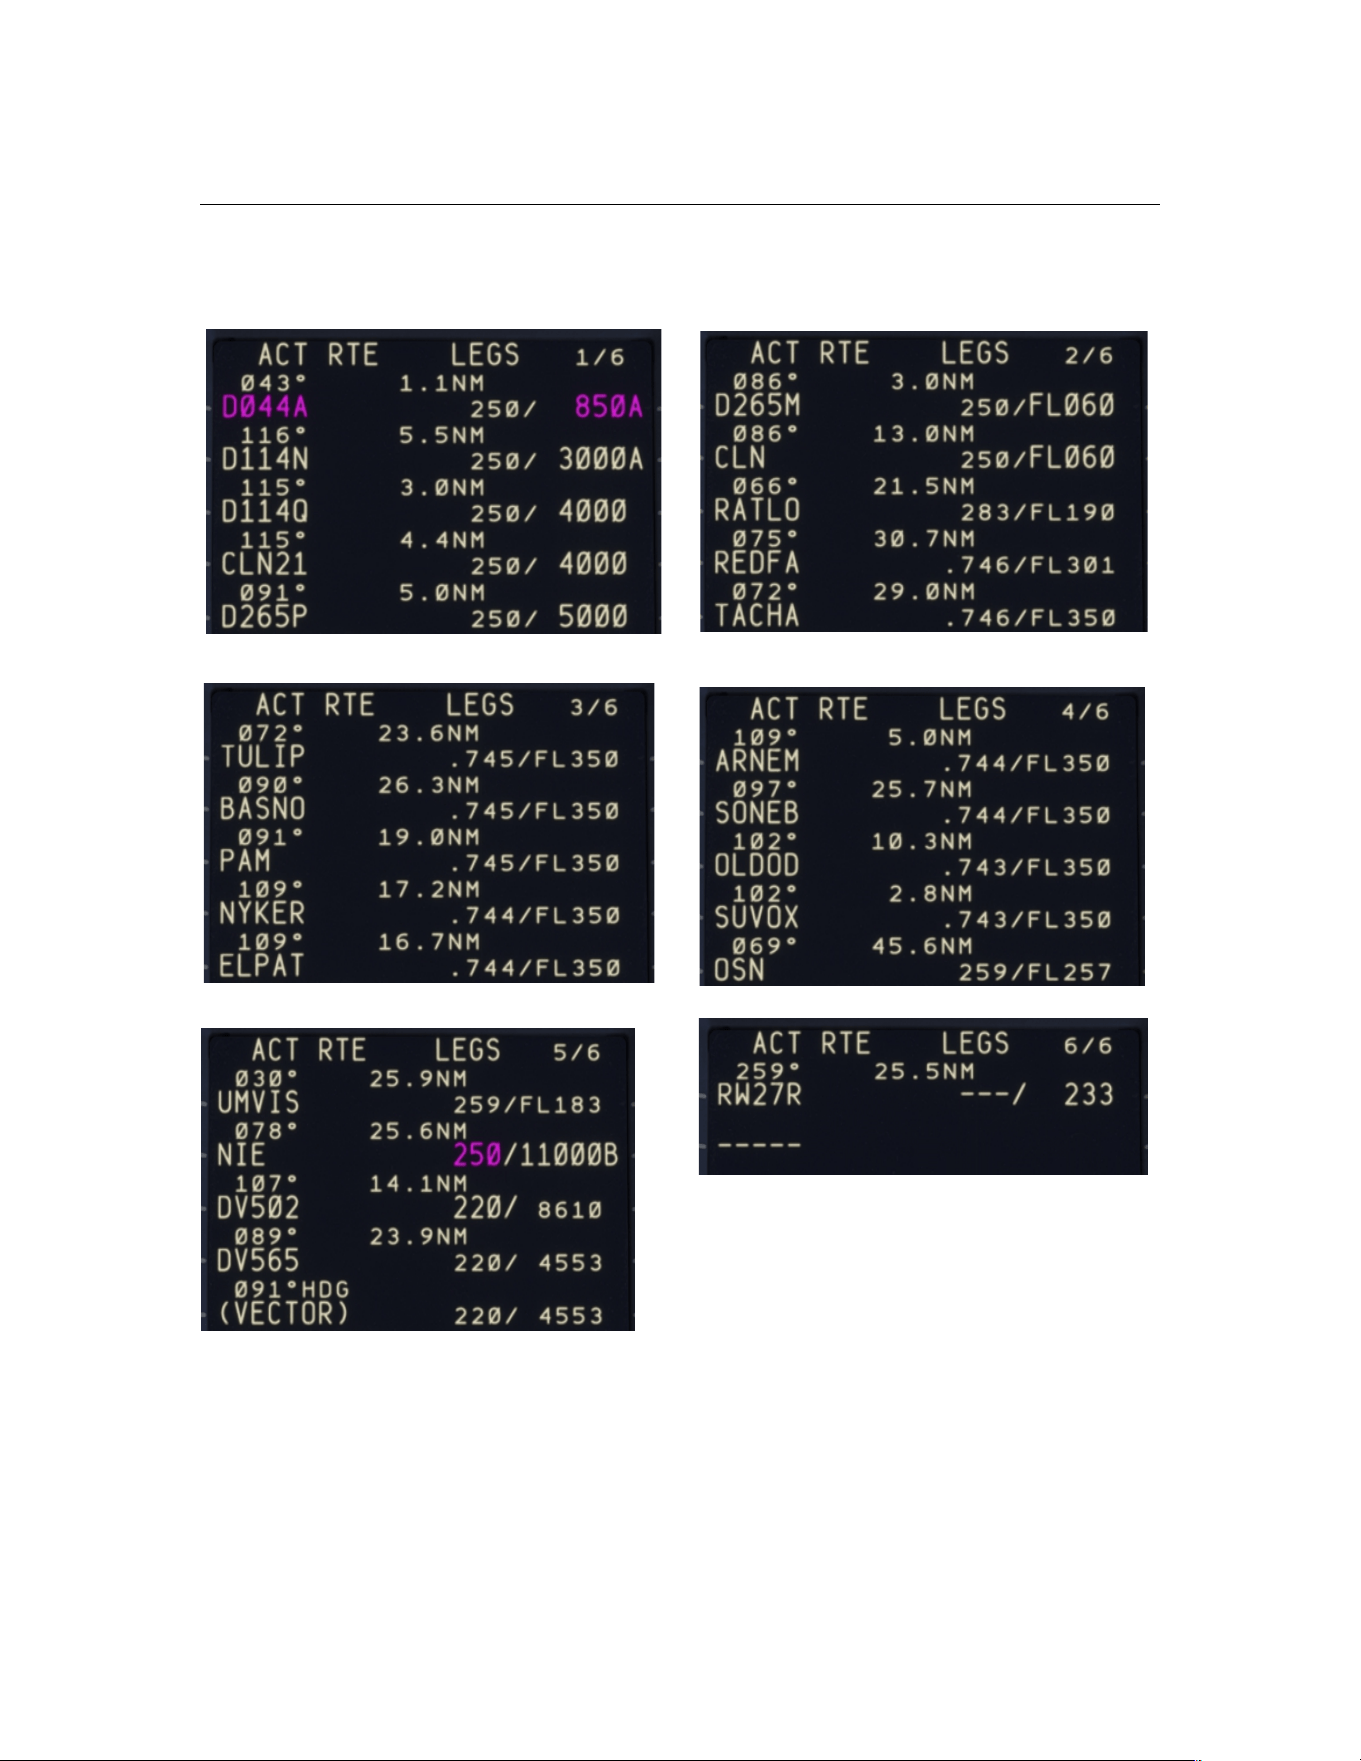
PF3 User Guide
If we now load the departure and arrival procedures for this flight plan into
the FMC we see this:
Page 177 of 212
Copyright © 2007-2024 by OnCourse Software

PF3 User Guide
A key thing to note here is that the FMC will be enforcing speed and altitude
restrictions during the departure procedure, notably a limit of 6000 feet at
CLN, rather than FL216 previously shown. This will in turn impact the climb,
so FL350 will be reached by TACHA rather than by REDFA.
Similarly, the descent begins later than with the base FMC flight plan; the
STAR entry point, NIE, has a restriction of below 11000 feet, rather than the
5178 feet previously calculated. However, this descent is still earlier than
shown in the loaded SimBrief flight plan and, again, the FMC will be enforcing
speed and altitude restrictions during the approach procedure.
We realise that PF3 is likely to always start the descent too late compared
with the TOD position calculated by the FMC the way that the Flight Plan Filter
is currently implemented; it is possible to request altitude changes during the
descent, but recognise that this is not at all realistic. We are developing a
better solution, but unfortunately this was not ready to be included in Release
3.22.0.
In the meantime, some users may prefer to load a ‘NoProc’ flight plan into
PF3 so that they can make the necessary altitude adjustments before
connecting to the simulator, as previously done.
Page 178 of 212
Copyright © 2007-2024 by OnCourse Software

PF3 User Guide
21. PF3 GENERAL FAQ SECTION
If you don't find the answer to your problem here please ensure you
check the PF3 FAQ section on our website for more up to date
information:
http://www.oncourse-software.co.uk/PF3_faqs.htm
Q: I can no longer hear any AI Traffic, neither in the air or on the ground.
A: Please check your FSUIPC.INI file and search for the entry
named ProvideAIData - This must be set to Yes eg.
ProvideAIData=Yes
Q: RemoteText is running but I can no longer see it on my monitor
A: This can happen if you previously ran RemoteText on another monitor
which is no longer connected, so basically RemoteText is displayed off-screen.
To reset this you need to do one of two things. (a) Reconnect your other
monitor, restart RemoteText and then reposition it back on your main monitor
or (b) Edit the Registry, if this is something you are confident in doing. The
settings will be found under:
HKEY_CURRENT_USER\Software\VB and VBA Program
Settings\RemoteText\frmMain
Once you've navigated to the correct location you will see 2 entries, one
named Default and the other LastSavedState. Simply delete
the LastSavedState value... you will need to confirm the warning message.
That's it. Next time you start RemoteText it will appear in the centre of your
main monitor, from where you can reposition it to your liking.
+ + + + + +
Q: When using MSFS and PF3's Auto Pause to pause the FS xx miles from
the runway, etc., how do you 'un-pause' the sim?
A: PF3 uses the 'Set Pause ON' facility so you need to bind keys or buttons
from within MSFS Controls to take advantage of this feature when using
MSFS. Look for 'Set Pause ON' and 'Set Pause Off'. Unfortunately you can't
configure a toggle key in MSFS for this pause mode.
+ + + + + +
Q: Doesn't matter what setting I try I just can't get the PF3 in-sim Captions
window to display
A: Please delete the Display.INI file from your main PF3 folder
Page 179 of 212
Copyright © 2007-2024 by OnCourse Software

PF3 User Guide
+ + + + + +
Q: PF3 doesn't seem to be running. I can see it on the taskbar but there's no
menu screen.
A: It would seem you have managed to somehow move PF3 off-screen.
Here's how to get it back. Hold your Shift key down and Right-click on the
PF3 taskbar icon, then select 'Move' from the popup menu. Release the Shift
key and use one of your keyboard Arrow keys. Now move your mouse and
PF3 should appear on screen again.
+ + + + + +
Q: Something went wrong and PF3 crashed... now I still have the In-Sim
ACARS and Captions windows showing on screen. How can I get rid of them.
A: Just re-start PF3 and the windows will be closed.
+ + + + + +
Q: When using P3D with Closed Captions 'ON' and an ATC message comes
through, P3D will jump to the foreground as the active window, even though
you may be using another program at the time.
A: This is probably due to you using the default P3D message window to
display captions. If you used our In-Sim Captions window or the RemoteText
utility (if you have a second monitor or PC) this shouldn't happen. Equally you
could use the FSUIPC ADVDisplay window for captions.
+ + + + + +
Q: My PF3 Display utility does not show any frequencies
A: Please check (a) you have a folder inside your main FS folder named
PF3_Displayer and if not please create one. (b) If you see the PF3_Displayer
folder please ensure it is not set as 'Read-Only'. The PF3 User Guide has full
details about this and where to find the correct location for MSFS users.
+ + + + + +
Q: I'm using FS2020 and don't hear any radio frequencies in 8.33Khx format.
Why?
A: Currently, as of version 3.10, PF3 doesn't support 8.33 format radio
frequencies. However, we plan to introduce them in our next release (3.11).
At that point we will be offering the option to use either the new 8.33Khz
format or the old 25Khz format. The later will obviously be favored by those
using hardware radios that do not support 8.33.
+ + + + + +
Page 180 of 212
Copyright © 2007-2024 by OnCourse Software

PF3 User Guide
Q: Just lately my co-pilot and ATC voices sound ok to start with but then the
voice volumes get very soft and almost inaudible. Per your FAQs, I've set
Sound, Communicatons to "Do nothing". This did not solve the problem.
A: Try toggling the windows communication setting to something other than
"do nothing", hit apply, and then switch it back to "do nothing" and then
selecting Apply should fix it. This may have to be repeated next time you start
Windows.
+ + + + + +
Q: When using P3D with Closed Captions 'ON' and an ATC message comes
through, P3D will jump to the foreground as the active window, even though
you may be using another program at the time.
A: This is probably due to you using the default P3D message window to
display captions. If you used our In-Sim Captions window or the RemoteText
utility (if you have a second monitor or PC) this shouldn't happen. Equally you
could use the FSUIPC ADVDisplay window for captions.
+ + + + + +
Q: Something went wrong and PF3 crashed... now I still have the In-Sim
ACARS and Captions windows showing on screen. How can I get rid of them.
A: Just re-start PF3 and the windows will be closed.
+ + + + + +
Q: I heard a controller and AI pilot using the same voice set. Surely this is a
bug?
A: No, it's not a bug. Although PF3 provides you with 119 voices sets they
are split into 26 geographic regions. Some regions may only have a couple of
voice sets available. To try and avoid this problem we use certain back-up
voice sets for each region, but even then we could run out of unused voices.
An easy way to avoid this problem occurring is to use PF3's Adjust Regional
Voice Sets Used to add additional back-up voice sets to the area you
experienced the problem.
+ + + + + +
Q: I was watching AI traffic and noticed an aircraft taking off before ATC gave
it instructions to do so
A: Well there are a couple of points to make here. Firstly, PF3 does NOT
control AI traffic, FS does that. Yes we can stop/start AI aircraft, even change
their heading to a degree (excuse the pun), amongst other things, but we
don't actually control AI traffic. Secondly, to take more control of AI traffic
would mean diverting processing away from PF3's many other tasks, so it's
really a question of balance. The third and final point is this, due to the fact
that PF3 is not in total control of AI traffic we have to react after the event.
Page 181 of 212
Copyright © 2007-2024 by OnCourse Software

PF3 User Guide
When PF3 detects an aircraft is taking of we give the command from ATC to
make it look like we're in control. It's all a matter of timing. Sometimes it will
look good, other times it won't. If you want to spend your time just watching
AI traffic and listening to ATC then PF3 is not the program you need and you
might just as well listen to the default ATC.
+ + + + + +
Q: I'm using P3D and I don't see the kneeboard display with the departure
airport ATC frequencies
A: That function is not available when using P3D, as it uses a different
method for displaying its kneeboard, which is not accessible at this time by
PF3.
+ + + + + +
Q: I'm using P3D and I can't seem to get the ACARS system to work at all.
A: That function is not available when using P3D, as it uses a different
method for displaying its kneeboard, which is not accessible at this time by
PF3.
+ + + + + +
Q: I saw a message about waypoints being too close. How do I know how
close they are?
A: If you go to the 'adjust waypoint altitudes' page and hover your mouse
over any waypoint it will show you the distance from your departure and
destination. You can use this information, together with some simple maths,
to determine the distance between waypoints.
+ + + + + +
Q: I sometimes get a warning that waypoints are too close together. What
does this mean and what should I do.
A: This is simply a cautionary message and you don't actually have to do
anything. PF3 is simply telling you that one or more waypoints are very close
to each other of your departure/destination airport. This will usually be okay
and PF3 will handle the situation correctly. However, if you do have problems
with the flight it could well be due to the close proximity of these flagged
waypoints. In which case it would be wise to perhaps change the flight plan
accordingly before taking your next flight.
+ + + + + +
Q: Sometimes PF3 ATC spills out the entire airline name rather than use the
call sign.... other times it's correct.
Page 182 of 212
Copyright © 2007-2024 by OnCourse Software

PF3 User Guide
A: The problem can occur when using Super Traffic Board and telling the
aircraft to 'depart now'. If you leave aircraft to depart at their correct times
this problem does not occur.
+ + + + + +
Q: Few seconds after starting PF3 it locks up and doesn't respond to
anything, I have to close it via task manager.
A: (1) Go to the main PF3 folder (2) Open the PF3.ini file (3) Look for
AutoUpdates=1 and change it to AutoUpdates=0 (4) Save the file
+ + + + + +
Q: PF3 has started to lock up on me and/or it takes an unusually long time
to respond.
A: If you are using multiple security protection programs try disabling the
default Windows Firewall. If that doesn't work try disabling the others one by
one, simply as process of elimination. Whatever system you use you must
ensure that the PF3.exe and Updates.exe programs have access to the
internet, which is required for the auto updates feature to work.
+ + + + + +
Q: Can PF3 be used on a networked pc?
A: Yes it can by using Pete Dowson's WideFS utility... available from
http://www.schiratti.com/dowson.html . When using PF3 on a networked PC
please remember to use the client's keyboard when making any changes to
PF3's options but use the main FS keyboard to communicate with ATC when
PF3 is connected to FS during your flight
+ + + + + +
Q: Why do I hear ATC calling the aircraft make rather than the actual airline
call sign?
A: Please check under the Technical Tab in FSUIPC (or look under the
GENERAL section the FSUIPC.INI file) and set the TCASid entry to FLIGHT.
Programs such as AIBlast and FSHotSeat appear to change these settings
which make them incompatible with PF3
+ + + + + +
Q: I tune to ATIS but all I hear is static noise... what's wrong?
A: One user found that this only occurred when using a particular aircraft. Try
the same frequency using another aircraft and if that does not help please
email support at [email protected]
+ + + + + +
Page 183 of 212
Copyright © 2007-2024 by OnCourse Software

PF3 User Guide
Q: When running Spyware Terminator it identifies and removes a file named
SCLabel.ocx. After that PF3 will not run!
A: Do NOT remove this file. It is NOT spyware and is an ActiveX control for
displaying most of the text that appears on the PF3 screens. Without it PF3
will NOT run! You can configure Spyware Terminator to ignore it rather than
remove it. If you have removed it you will need to reinstall PF3.
+ + + + + +
Q: I'm using Copilot Mode 2 but PF3 doesn't detect when I get near to the
active runway and so doesn't tell me to switch to the Tower.
A: PF3 waits for you to be within 700' feet of the active runway before
issuing a 'Contact Tower on...' command. If you happen to be taking off from
a position other than the end of the active runway you may well be more than
700' away from that detection point. Should this be the case you would need
to manually switch to the Tower frequency and then use Hotkey 6 to contact
Tower and request takeoff clearance.
+ + + + + +
Q: PF3 ATC routed me to fly right into a mountain.
A: In such hazardous areas it is vitally important to create a good flight plan
to ensure PF3 delivers safe approach vectoring. PF3 is not aware of
mountains or obstacles on your approach route so you, as the pilot,
must ensure you plan your flights correctly. Remember also that YOU
are the Captain in charge and if, during approach vectoring, you consider ATC
to be issuing a bad and dangerous turn you should ignore it and use the #1
hotkey to request a 'Cleared to Final Approach'.
+ + + + + +
Q: I never got handed over to any Control Center during my flight.
A: PF3 determines which control centers to hand you off to dependent on
your altitude (and geographic position of course). If you don't reach a center's
specified altitude you will remain under the control of a Departure or
Approach controller.
+ + + + + +
Q: PF3 is working and I can hear the controllers talking to me but I can't
hear the pilot's voice.
A: Check the PTT pause interval in PF3 options to ensure it is set to ZERO
(OFF)
+ + + + + +
Q: I'm using ActiveSky. ATC vectors me to land VFR on runway 21. At the
same time all AI were landing and departing runway 03, the opposite end.
Why?
Page 184 of 212
Copyright © 2007-2024 by OnCourse Software

PF3 User Guide
A: This can happen when using an external weather program such as
ActiveSky. PF3 ATC reads the weather and chooses the correct runway, but
Active Sky (or similar) may update the weather forcing a change of the active
runway. FS9/FSX ATC will change the active runway, but PF3 has already
made its choice, hence the incursion. To avoid this, it is necessary to use
the "suppression" options according to the type of flight/aircraft.
Using the New Route and Navigation Log will be helpful too. Please see your
ActiveSky manual for details and how to use these powerful features.
If you choose not to take these extra steps in ActiveSky, then using the
default FS9/FSX real weather instead of ActiveSky will prevent this issue from
happening while using PF3 ATC.
+ + + + + +
Q: The approach to my destination was rubbish. I was far too high when
cleared for the approach!
A: Adjust your flight plan descent profile in PF3. Remember, your flight
will only be as good as your flight planning, just as in the real world.
+ + + + + +
Q: After PF3 had a problem and crashed my Regional Settings appear to be
wrong and numbers are not being displayed correctly?
A: Restart PF3 then immediately close it using the Exit button - That should
reset your numeric regional settings to their original state.
Page 185 of 212
Copyright © 2007-2024 by OnCourse Software

PF3 User Guide
22. TGS GAUGE INSTALLATION INSTRUCTIONS
By Dave Leesley
22.1 How to Install the optional Gauge onto a panel
Please Note: Installation of this gauge is entirely optional and you
may want to read section 7.1.5 first, which explains all about PF3’s
Taxi Guidance System, prior to making your decision
I have hopefully made these instructions as clear and as easy to follow as
possible, as I’m hoping to avoid any “pulling of hair out” and “throttling the
living daylights out of your PC” because you can’t get it to work.
It’s very important that you read these instructions to avoid any unnecessary
problems and wasting valuable flying time so let’s begin installing the gauge
into Flightsim. It is always wise to save your work before altering any CFG
files so that if things don’t go as expected, you will be able to start again from
the beginning, and also when finished otherwise you will lose your changes.
.
Within your main PF3 folder you will see a folder named TGS_Gauge
containing the gauge files. As from PF3 version 2.6 the gauge named
TGS_Position_Tester is no longer required, so you may disregard and/or
even delete that file now if you wish. I would recommended you drag the file
named TGS.GAU to your desktop, as this will make life easier.
You also need the following line to put into your panel.cfg when the time is
right:
gauge??=TGS!TaxiGuidanceSystem, XXX, YYY, 100, 64,Autohide OFF
This line will be used later on in the tutorial and will need to go into your
panel.cfg, after everything is installed and POSITIONED correctly and not
before!
Time to put kettle on for a cup of coffee before we start (optional).
This Gauge was designed for the 2D Cockpit but will also work in
most Virtual Cockpits, although this tutorial will assume the former.
Now you are ready to begin!
First of all you need to find your Flightsim folder, by default located at
C:\Program Files\Microsoft Games\FS9 (or FSX) depending what sim you
want to use PF3 with, or wherever else you may have installed it on your
hard drive.
Okay, you have now found your Flightsim folder, let’s use FS 9 for this part.
Page 186 of 212
Copyright © 2007-2024 by OnCourse Software

PF3 User Guide
Open your FS folder, now look for the folder called Gauges. Now you will
need to go back and open your PF3 folder and Copy the gauge file tgs.gau
into your Gauges folder (or Drag and Drop if you prefer – easier if located on
your desktop as I suggested). It is important this gauges is in the Gauges
folder of FS. You may now close the Gauges folder as you don’t need it
anymore.
Now let’s move onto your Aircraft folder. Locate an aircraft into which you
wish to install the TGS gauge. Find the subfolder called Panel, open that
folder and find the panel.cfg file. MAKE A COPY and keep it in the panel
folder. This where you will now add the line from above by Copying and
Pasting:
gauge??=TGS!TaxiGuidanceSystem, XXX, YYY, 100, 64, 64,Autohide OFF
So we’ll use the default Boeing 737-400 Panel.cfg for this example.
For the default aircraft you need to find “Window00” as shown in this
example.
[Window00]
file=Main_640.bmp
file_1024=Main_1024.bmp
size_mm=640
position=7
visible=1
ident=MAIN_PANEL
gauge00=737-400!Airspeed, 0, 64
gauge01=737-400!Flaps, 586, 64
gauge02=737-400!Altimeter, 237, 45
gauge03=737-400!Vertical Speed, 238, 128
gauge04=737-400!Fuel Quantity, 236, 204
gauge05=737-400!Main Set, 335, 85
gauge06=737-400!OMI Lights, 1, 153
gauge07=737-400!Oil, 468, 85
gauge08=737-400!Clock, 17, 147
gauge09=737-400!RMI, 1, 211
gauge10=737-400!HSI, 86, 162
gauge11=737-400!ADI, 85, 39
gauge12=737-400!Gear Lever, 586, 217
gauge13=737-400!Nose Gear Light, 594, 180
gauge14=737-400!Left Gear Light, 579, 198
gauge15=737-400!Right Gear Light, 609, 198
gauge16=737-400!Reverser Unlocked Left, 354, 68
gauge17=737-400!Reverser Unlocked Right, 416, 68
gauge18=737-400!AT Lim, 385, 68
gauge19=737-400!Low Oil Left, 458, 68
Page 187 of 212
Copyright © 2007-2024 by OnCourse Software

PF3 User Guide
gauge20=737-400!Low Oil Right, 519, 68
gauge21=737-400!Start Valve Left, 489, 68
gauge22=737-400!Start Valve Right, 549, 68
gauge23=737-400!Flaps Ext, 609, 115
gauge24=737-400!Flaps Transit, 579, 115
gauge25=737-400!Autopilot, 336, 11
gauge26=737-400!Pitch Trim, 305, 144
gauge27=737-400!Aileron Trim Indicator, 242, 261
gauge28=737-400!Aileron Trim Switch, 248, 276
gauge29=737-400!Rudder Trim Indicator, 285, 261
gauge30=737-400!Rudder Trim Knob, 290, 276
gauge31=737-400!Nav GPS Switch, 306, 17
gauge32=737-400!Avionics Master Switch, 239, 300
gauge33=737-400!Autobrake, 581, 134
gauge34=SimIcons!Kneeboard Icon, 181, 10
gauge35=SimIcons!ATC Icon, 194, 10
gauge36=SimIcons!Compass Icon, 264, 10
gauge37=SimIcons!ECU Icon, 250, 10
gauge38=SimIcons!Map Icon, 208, 10
gauge39=SimIcons!Avionics Icon, 222, 10
gauge40=SimIcons!GPS Icon, 236, 10
Now Copy and Paste that line directly under gauge40, so the bottom line now
looks like this:
gauge39=SimIcons!Avionics Icon, 222, 10
gauge40=SimIcons!GPS Icon, 236, 10
gauge41= TGS!TaxiGuidanceSystem XXX, YYY, 100, 64,Autohide OFF
(Now SAVE it)
XXX and YYY and the co-ordinates on your FS screen, change them to 140,
130, 100 (leave 100 as it is). You should see the gauge on your screen, now
you can alter the co-ordinates as you please to find the right position in your
cockpit.
The last parameter (Autohide OFF) ensures the gauge remains visible at all
times. Should you prefer to have this gauge only popup when TGS is active
(during your taxi to/from the runway) you can changes this parameter to
Autohide ON
Now we move onto 3
rd
Party add-on aircraft such as PMDG, PSS, LevelD and
such. You will still need to do the same as above with the default aircraft,
except that the panel.cfg is slightly different from the default as in some add-
on aircraft you may have to use “Window01”. Anyone who has either PSS or
JustFlight’s Concorde will have to install it into “Window00”, and the CFG will
look like this:
//--------------------------------------------------------
[Window00]
Page 188 of 212
Copyright © 2007-2024 by OnCourse Software

PF3 User Guide
file=wiper.bmp
size_mm=2048,1536
(My example is PSS’s Concorde)
window_size_ratio=1.000
position=1
visible=1
ident=8100
render_3d_window=1
child_3d=1
gauge00=PSS-concorde!Wipers, 0,0,2048,756
gauge01=TGS!TaxiGuidanceSystem, 140, 130, 100, 64,Autohide OFF
If you install it into “Window01” it will be hidden completely, even though it
has more gauges, and I have noticed with PSS aircraft the gauge will be
shown in one position on the screen, even if you change the co-ordinates (it is
beyond our control - sorry).
Another example of a panel.cfg is Flight One’s ATR 72-500:
[Window00]
file=F1ATR_MAIN_W.bmp
size_mm=1024
window_size_ratio=1.000
position=0
visible=1
ident=MAIN_PANEL
window_size=1.000, 1.000
window_pos=0.000, 0.000
(There are 60 lines of gauges above this, left out for the sake of brevity)
gauge61=Atrvesi!stopvesi, 137,287,20,20
gauge62=Atrvesi!vesitimer, 209,280,20,20
gauge63=TGS!TaxiGuidanceSystem, 140, 130, 100, 64,Autohide OFF
The main thing you are looking for is “Window00” and/or Main Panel or
“Window01” and/or Headup. Again you should remember to SAVE any
changes to your CFG.
One very important note is that you must assign a number and co-ordinates
to your gauge or it won’t show up in FS.
Now we move onto this part installing into FSX:-
It’s very similar to installing into FS9 but the layout is just slightly different,
so here goes!
Page 189 of 212
Copyright © 2007-2024 by OnCourse Software

PF3 User Guide
When you have opened up you FSX folder, you will need to find your
Simobjects folder and Airplanes subfolder, and then the aircraft of your
choice. For this example we will use the default A321 Airbus Panel.cfg.
[Window00]
file_1024=airbus_a321_panel_background.bmp
file_1024_night=airbus_a321_panel_background_night.bmp
size_mm=1024
position=7
visible=1
ident=MAIN_PANEL
gauge00=Airbus_A321!altimeter_backup, 676,505
gauge01=Airbus_A321!annunciator_panel_1, 24,357
gauge02=Airbus_A321!attitude_backup, 651,628
gauge03=Airbus_A321!autopilot, 677,346
gauge04=Airbus_A321!hsi_backup, 517,609
gauge05=Airbus_A321!ias_backup, 581,506
gauge06=Airbus_A321!pfd, 23,521,215,214
gauge07=Airbus_A321!mfd, 264,521,215,214
gauge08=Airbus_A321!ecams,
788,521,215,214
gauge09=Airbus_A321!pfd_mfd_select_panel, 470,345
gauge10=TGS!TaxiGuidanceSystem, 140, 130, 100, 64,Autohide OFF
gauge26=SimIcons1024!ECU Icon, 790,
745
gauge27=SimIcons1024!Overhead Icon, 812, 745
gauge28=SimIcons1024!Kneeboard Icon, 834, 745
gauge29=SimIcons1024!ATC Icon, 856, 745
gauge30=SimIcons1024!Map Icon, 878, 745
gauge31=SimIcons1024!GPS Icon, 900, 745
gauge32=SimIcons1024!Radio Icon, 922, 745
gauge33=SimIcons1024!Other Controls Icon, 944, 745
gauge34=SimIcons1024!Engine Instruments Icon, 966, 745
gauge35=SimIcons1024!Clock Icon, 988, 745
gauge36=n_number_plaque!n_number_plaque, 258,429,67,19
This how I did it for this aircraft and it shows up on FS screen.
Now test your changes in FSX. When initially loading FS, as you would
normally you will be presented with a Warning Screen. It is warning you that
tgs.gau is from an unknown publisher and do you want to run it. If you want
to use it say YES and at the next warning screen again say YES, otherwise
you won’t be able to use it
We now move onto installing 3
rd
party aircraft. I’m choosing the LevelD 767-
300 panel.cfg for this one.
Page 190 of 212
Copyright © 2007-2024 by OnCourse Software

PF3 User Guide
[Window01]
file=B767forward.bmp
size_mm=1280, 680
position=6
visible=1
ident=12
zorder=2
gauge00=LVLD\B767main!light, 0, 0
gauge01=LVLD\B767Afds!Nav1, 535, 0
gauge02=LVLD\B767Afds!MCP, 736, 0
gauge03=LVLD\B767Afds!SMC, 824, 180
gauge04=LVLD\B767Afds!Autoland, 620, 163
gauge05=LVLD\B767Afds!MasterSwitch, 485, 37
gauge06=LVLD\B767Afds!RadarAltimeter, 561, 255
gauge07=LVLD\B767Afds!AltAlert, 722, 250
gauge08=LVLD\B767Afds!InstrSelect, 0, 398
gauge09=LVLD\B767Afds!GASwitch, 1075, 632
gauge10=LVLD\B767Afds!FOSwitch, 1105, 632
gauge11=LVLD\B767Afds!Gear, 1179, 224
gauge12=LVLD\B767Afds!Autobrakes, 769, 518
gauge13=LVLD\B767Afds!OMI, 703, 403
gauge14=LVLD\B767at!AT, 0, 0
gauge15=LVLD\B767FMC!FMS, 0, 0
gauge16=LVLD\B767FMC!XNAV, 0, 0
gauge17=LVLD\B767main!airspeedL, 92, 224, 168
gauge18=LVLD\B767main!altimeterL, 607, 245, 148
gauge19=LVLD\B767main!vsiL, 556, 406, 136
gauge20=LVLD\B767main!rmiL, 90, 404, 176
gauge21=LVLD\B767main!clockL, 547, 549, 146
gauge22=LVLD\B767ehsi!EHSI, 289, 408, 227,, CP
gauge23=LVLD\B767eadi!EADI, 291, 172, 221,, CP
gauge24=LVLD\B767eicas!EICAS, 934, 180, 225,, CP
gauge25=LVLD\B767leicas!LEICAS, 934, 409, 225,, CP
gauge26=LVLD\B767main!ecuL, 700, 601, 197
gauge27=LVLD\B767main!ENG, 767, 363
gauge28=LVLD\B767main!OILW, 790, 498, 95
gauge29=LVLD\B767main!ESW, 925, 629, 150
gauge30=LVLD\B767main!warn, 760, 239, 150
gauge31=LVLD\B767main!TRP, 1178, 168
gauge32=TGS!TaxiGuidanceSystem, 140, 130, 100, 64,Autohide OFF
The script is in bold to make it easier to find. You don’t need to add it in bold.
Again you are using either “Window00” or “Window01” depending on the type
of add-on aircraft you are using. Some high end 3
rd
party aircraft use two
panels like FlightOne’s ATR 72-500, and so it must be installed into the folder
called Panel not Panel W, as if you do you may not see the gauge. The
gauge installation is the same as FS9 as it is for FSX.
Page 191 of 212
Copyright © 2007-2024 by OnCourse Software

PF3 User Guide
22.2 Backing Up Your Hard Work
After you have installed your gauge to your favourite aircraft wouldn’t it be
nice to remember which "Window" you installed it in within your panel.cfg? So
what I have done is to create my own "Reference" of where the TGS resides.
I have done this so it will make life easier should I ever have to do a re-install
of flight sim. Here are some of my examples:
Basically what I have done is taken the "Window" where TGS resides and
condensed it, so when I come to reinstalling TGS I can instantly see where it
has to go, including the gauge number. All I have to do is copy and paste the
line into the panel.cfg of my aircraft.
You can make copies of these condensed windows and store them onto a
floppy using "notepad" of all your aircraft in your hangar.
Now I suggest you only do this if you feel comfortable in copy/pasting and
messing with your panel.cfg and as always make a copy of your panel.cfg
first, just in case you make an error.
Oh yes, I have deleted the lines of other gauges in the panel.cfg because I
really don't need them, all I want is to see where the TGS gauge fits in and
that is it!
Please see some example below.
22.2.1 This one is for a third party aircraft in FS9
PSS Airbus A330/A340
[Window01]
file=headup.BMP
size_mm=1024
visible=1
position=7
ident=MAIN_PANEL
gauge10=TGS!TaxiGuidanceSystem, 140, 130, 100
22.2.2 This is for the default Cessna in FS9:
[Window00]
file=panel_background_640.bmp
file_1024=panel_background_1024.bmp
size_mm=640
position=7
visible=1
Page 192 of 212
Copyright © 2007-2024 by OnCourse Software

PF3 User Guide
no_luminous=1
ident=MAIN_PANEL
gauge45=TGS!TaxiGuidanceSystem, 000, 000, 100
22.2.3 This is the default 737-800 FSX
[Window00]
file_1024=737-800_panel_background.bmp
file_1024_night=737-800_panel_background_night.bmp
size_mm=1024
position=7
visible=1
ident=MAIN_PANEL
gauge35=TGS!TaxiGuidanceSystem, 000, 000, 100
22.2.4 The default 747-400 in FSX
[Window00]
file_1024=747_Background_1024.bmp
size_mm=640
position=7
visible=1
ident=MAIN_PANEL
gauge58=TGS!TaxiGuidanceSystem, 000, 000, 100
22.2.5 Installing TGS into the PMDG747-400 Queen of the Skies for FSX.
Just locate Window01 of your panel.cfg and insert the line as shown in my
example.
This method is slightly different from the normal procedures of just installing
into the panel.cfg you also need to COPY the same line from your panel.cfg to
your VC panel.cfg to be able to see and use the gauge.
[Window01] // PMDG_MAIN_PANEL
file=747400_Main_Background_1600.bmp
file_1024=747400_Main_Background_1600.bmp
Page 193 of 212
Copyright © 2007-2024 by OnCourse Software

PF3 User Guide
size_mm=1600,1200
position=7
visible=1
ident=20
zorder=1
window_size= 1.000, 1.000
window_pos= 0.000, 0.000
background_color=0,0,0
gauge00=PMDG_747400_Main!Windshield,0,0,1600,451
gauge01=PMDG_747400_Main!GearLever, 1419,739,229,461
gauge02=PMDG_747400_Main!DSP, 0,684,809,125
gauge03=PMDG_747400_Main!PFDBg, 0,809,405,391
gauge04=PMDG_747400_Main!NDBg, 405,809,400,391
gauge05=PMDG_747400_Main!EICASBg, 1010,807,409,393
gauge06=PMDG_747400_Main!CRTScreen, 32,842,340,340,OUTBD CAPTAIN
CRT
gauge07=PMDG_747400_Main!CRTScreen, 436,844,340,340,INBD CAPTAIN
CRT
gauge08=PMDG_747400_Main!CRTScreen, 1046,842,340,340,UPPER CRT
gauge09=PMDG_747400_Main!EFIS,274,451,319,233
gauge10=PMDG_747400_Main!MCP,592,451,1059,233,MAIN
gauge11=PMDG_747400_Main!EICASCtrl,1010,684,409,123
gauge12=PMDG_747400_Main!MasterCaution, 125,451,149,233
gauge13=PMDG_747400_Main!GlareshieldEnd,0,451,125,233
gauge14=PMDG_747400_Main!SbyADI, 810,684,200,180
gauge15=PMDG_747400_Main!SbyAltimeter, 810,1032,200,168
gauge16=PMDG_747400_Main!SbySpeed, 810,864,200,168
gauge17=PMDG_747400_Main!AboveGear, 1419,684,229,55
gauge18=PMDG_747400_Main!Whiskey, 1308,0,92,54
//gauge19=PMDG_747400_Main!TestDIB,50,50,340,340
gauge20=TGS!TaxiGuidanceSystem, 500, 000, 100,AutohideOFF
Page 194 of 212
Copyright © 2007-2024 by OnCourse Software

PF3 User Guide
Please note: with any future PMDG release,if you cannot see the gauge in the
panel.cfg as described in my tutorial please install it in the VC panel.cfg as
well to see if that brings up the gauge.
================================================
================================================
========
Installing the TGS gauge into PMDG 747-400 Queen of the Skies for FS2004
Just locate Window01 of your panel.cfg and insert the line as shown in my
example.
This does NOT need to be installed into the VC panel.cfg
[Window01] // PMDG_MAIN_PANEL
file=747400_Main_Background_1600.bmp
file_1024=747400_Main_Background_1600.bmp
size_mm=1600,1200
position=7
visible=1
ident=20
window_size= 1.000, 1.000
window_pos= 0.000, 0.000
gauge00=PMDG_747400_Main!Windshield,0,0,1600,451
gauge01=PMDG_747400_Main!GearLever, 1419,739,229,461
gauge02=PMDG_747400_Main!DSP, 0,684,809,125
gauge03=PMDG_747400_Main!PFDBg, 0,809,405,391
gauge04=PMDG_747400_Main!NDBg, 405,809,400,391
gauge05=PMDG_747400_Main!EICASBg, 1010,807,409,393
gauge06=PMDG_747400_Main!CRTScreen, 32,842,340,340,OUTBD CAPTAIN
CRT
gauge07=PMDG_747400_Main!CRTScreen, 436,844,340,340,INBD CAPTAIN
CRT
gauge08=PMDG_747400_Main!CRTScreen, 1046,842,340,340,UPPER CRT
gauge09=PMDG_747400_Main!EFIS,274,451,319,233
Page 195 of 212
Copyright © 2007-2024 by OnCourse Software

PF3 User Guide
gauge10=PMDG_747400_Main!MCP,592,451,1059,233,MAIN
gauge11=PMDG_747400_Main!EICASCtrl,1010,684,409,123
gauge12=PMDG_747400_Main!MasterCaution, 125,451,149,233
gauge13=PMDG_747400_Main!GlareshieldEnd,0,451,125,233
gauge14=PMDG_747400_Main!SbyADI, 810,684,200,180
gauge15=PMDG_747400_Main!SbyAltimeter, 810,1032,200,168
gauge16=PMDG_747400_Main!SbySpeed, 810,864,200,168
gauge17=PMDG_747400_Main!AboveGear, 1419,684,229,55
gauge18=PMDG_747400_Main!Whiskey, 1308,0,92,54
gauge19=TGS!TaxiGuidanceSystem, 1500, 000, 100,AutohideOFF
Page 196 of 212
Copyright © 2007-2024 by OnCourse Software

PF3 User Guide
22.3 Installing the TGS Gauge into a Window
We are now giving you another option of installing this gauge rather than
having it fixed in one position in your panel. So again you need to open your
panel.cfg file of the aircraft you intend to add the gauge to.
If you would rather use this ‘window’ method than the ‘fixed’ position then
you will need to delete all entries in the gauge section (usually in window 00
or 01) relating to the TGS gauge in the panel.cfg, otherwise you will have 2
gauges in your panel.
22.3.1 Install the gauge into a window for the FS2004 default 747-400
// Panel Configuration File
// Boeing 747-400
// Copyright (c) 1999-2003 Microsoft Corporation. All rights reserved.
[Window Titles]
Window00=Main Panel
Window01=Radio Stack
Window02=GPS
Window03=Throttle Quadrant
Window04=Overhead Panel
Window05=Clock
Window06=Mini Panel
Window07=TGS ------------------Enter this line here.
…
…
…
[Window06]
position=7
size_mm=350,200
child_3d=1
background_color=0,0,0
ident=MINIPANEL
gauge00=Boeing747-400!Primary Flight Display, 0, 0
gauge01=Boeing747-400!Multi-Function Display, 177, 0
Then enter the following section below the last window section:-
[Window07]
Background_color=0,0,0
size_mm=100,100
window_size_ratio=1.000
position=7
visible=1
ident=5000
window_size_ratio=1.0
gauge00=TGS!TaxiGuidanceSystem, 0,0,100,100,Autohide OFF
Page 197 of 212
Copyright © 2007-2024 by OnCourse Software

PF3 User Guide
Now SAVE Your Work
You should now be able to see the gauge in your 2d cockpit. The gauge will
also be seen in Virtual Cockpit and Spot View (just go to Views/Instrument
Panel/TGS and make you place a tick is next to it.)
22.3.2 Install the gauge into a window for a 3
rd
party aircraft in FS2004
// Airbus Generic "340 Pro Panel"
// COPYRIGHT Phoenix Simulation Software 2003 (c)
[Window Titles]
Window00=Wipers
window01=VFR Panel
window02=IFR Panel
window03=MCDU
window04=Pedestal
window05=Big PFD
window06=Big ND
window07=Big upper ECAM
window08=Big lower ECAM
window09=GPS
Fixed Window37=OVERHEAD - USE KEYPAD 5
Window09=Reality XP Wx500 Radar - RXP_CONFIG_TOOL - DO NOT CHANGE
Window10=Reality XP DropStack
Window11=Extended Flight Info
Window12=Flight Info Icon
Window13=TGS ------------------Enter this line here.
…
…
Then enter the following section after the Window12 section:-
[Window13]
background_color=16,16,16
size_mm=50, 23
window_size_ratio=1.0
position=6
visible=1
ident=12013
gauge00=EFinfoH!Icon, 0, 0, 50, 23
[Window13]
Background_color=0,0,0
size_mm=100,100
window_size_ratio=1.000
position=7
visible=1
ident=5000
gauge00=TGS!TaxiGuidanceSystem, 0,0,100,100,Autohide OFF
Page 198 of 212
Copyright © 2007-2024 by OnCourse Software

PF3 User Guide
Now SAVE Your Work
22.3.3 Install the gauge into a window for a 3
rd
party aircraft in FSX
For this example we are using the PMDG 747-400X so again go to your
panel.cfg (simobjects/airplanes)
So again under windows titles add the following under your last window,
Window23=TGS
Now add this section under the last window section in the panel.cfg
[Window23]
Background_color=0,0,0
size_mm=100,100
window_size_ratio=1.000
position=7
visible=1
ident=5000
window_size_ratio=1.0
gauge00=TGS!TaxiGuidanceSystem, 0,0,100,100,Autohide OFF
Now SAVE Your Work
22.3.4 Install the gauge into a window for a default aircraft for FSX
For this example we will use the A321 Airbus
All you need to do is just add everything as before…
[Window Titles]
Window00=Main Panel
Window01=Radio Panel
Window02=GPS
Window03=Throttle Panel
Window04=Overhead Panel
Window05=Gear Panel
Window06=Clock
Window07=Glass Panel
Window08=PFD
Window09=MFD
Window10=Primary ECAMS
Window11=Secondary ECAMS
Window12=Mini Panel
Window13=TGS ------------------Enter this line here.
Page 199 of 212
Copyright © 2007-2024 by OnCourse Software

PF3 User Guide
Now add this section under the last window section in the panel.cfg
[Window13]
Background_color=0,0,0
size_mm=100,100
window_size_ratio=1.000
position=7
visible=1
ident=5000
window_size_ratio=1.0
gauge00=TGS!TaxiGuidanceSystem, 0,0,100,100,Autohide OFF
Now SAVE Your Work
22.3.5 A Few Useful Notes:
You can adjust the size_mm= to whatever size you want, personally I leave it
on the sizes shown in the previous examples.
Don’t forget to save any changes you make to the panel.cfg.
In some 3
rd
party aircraft you may need to re-load the gauge again to get it to
show, this depends on how complex the panel is. This is not a problem with
the TGS gauge file but unfortunately due to the fact that all 3
rd
party add-on
gauges are usually hidden behind your aircraft’s panel. Also with some 3
rd
party aircraft the gauge may be hidden behind the2D panel on startup, in
which case you may want to switch to Spot view or VC to adjust it, but this
mostly only occurs in FSX.
As with any changes you make to your panel.cfg it is advisable to make a copy of
your panel.cfg before making such changes.
Page 200 of 212
Copyright © 2007-2024 by OnCourse Software

PF3 User Guide
23. EXTENDED CONTROL SECTOR FILE
The control sector file used by PF3, which resides in the PF3\Data folder,
named CenterSectors.dat, holds numerous elements of data to define the ATC
control boundaries worldwide, along with other things such as the regional
voice accent to be used. There have been many anomalies discovered with
this data along the way and we have endeavoured to correct any problems
found as and when reported. However, one of our users, Christopher
Sargeant, took it upon himself to check all these elements and add any he
found missing, correcting any anomalies and adjusting overlaps and gaps
between the boundaries. An enormous task to say the least! Thankfully
Christopher chose to share his hard work with the rest of us and so the
Extended Control Sector file was born
The following is Christopher's overview
23.1 Overview
This revised CenterSectors.dat file essentially ports the default bvcf.bgl file
into the PF3 CSV format.
Data was gathered from stock files using PlanG and LittleNavMap.
Total number of sector records increased from 486 to 4191.
Improvements include:
o Removal of all gaps and overlaps worldwide.
o Much greater sector density particularly in USA, Canada, France,
Saharan Africa, Arabia, central and southeast Asia, India, China
and Australia.
o Better distribution of voice sets (i.e. no specification of “US Generic”
in Asia, etc.).
Modifications were made, where practical, to meet current FIR/UIR
boundaries as depicted in Navigraph charts. Some inaccuracies would
have caused significant effort to correct and as such were ignored;
however, it is generally accurate and representative.
o All worldwide ATC sectors are believed represented except ZJSA
Sanya, which is split mostly between VHHK Hong Kong and ZGZU
Guangzhou and not easily separated as it would require a rebuild of
several neighboring sector boundaries to match current charts.
No guarantee is made as to frequencies matching their current real world
counterparts.
Page 201 of 212
Copyright © 2007-2024 by OnCourse Software

PF3 User Guide
23.2 Argentina-Chile Antartic Penninsula Dispute
Default bvcf.bgl has overlapping sectors in this area. By default, the
Chilean claim is recognized out of convenience. If preferred, area can
easily be switched to Argentinian control by changing the frequency of
sector 4353 from 119.700 to 125.500.
23.3 Unused Sector Names
Almost all default PF3 sector names have been used. Several are not
included in situations where the sector layout in the bvcf.bgl file did not lend
itself to convenient subdivision and/or Navigraph Charts did not seem to
indicate usage of such sector name. These include the following, with the
most appropriate sector numbers for manual re-inclusion if desired:
25 East Midlands Center – 1527(?)
27 Essex Radar – 1523(?)
46 Maastricht Control – 1534-1535 or 1414
49 Manchester Control – 1524, 1527
64 Padova – 3155-3157
78 Sevilla – 3055-3056, 3060-3062
81 Stavanger – 1572, 1573
84 Trondheim – 1571, 1574, 1579(?)
Page 202 of 212
Copyright © 2007-2024 by OnCourse Software

PF3 User Guide
24. TGS GENERAL FAQ SECTION
Q “I can’t see my gauge”
A Have you installed the gauge into the correct folder?
Q ”I have installed the gauge into the folder and copy and pasted the line into
my CFG and I still can’t see the gauge”
A Have you assigned a gauge number and co-ordinates as shown in the
readme?
Q ”My gauge doesn’t work, the pointer or L.E.Ds don’t move or light up”
A Have you changed the line in panel.cfg to the correct one for the TGS.gau
or deleted the wrong gauge by mistake?
Q ”I have FS running and the gauge isn’t there, it’s not working”
A You won’t see the gauge, it’s hidden until you connect to PF3, unless you
use the Autohide OFF parameter in the PANEL.CFG file (see instructions
above)
Q ”I get the warning messages that do I trust it when I start FSX for the first
time after installing it”
A If you say Yes to both messages you will be able to use the gauge, if the
answer is NO because you are worried that the file
might be corrupt, you will not be able to use it.
Q ”I altered the panel.cfg and didn’t save changes, now it doesn’t work”
A You should always save your changes.
Q ”It won’t work in my Virtual Cockpit”
A Quite simply, it won’t as it’s only designed for the 2D Cockpit.
Q “The TGS Gauge doesn't show, even after receiving full taxi instructions?”
A That could be due to a number of reasons:-
1: You are using a 3rd party aircraft that needs to be re-loaded again and
hopefully the gauge will then show.
2: You are using 3rd party scenery addon with the settings very high, in
which case you may need to re-load your aircraft or turn some settings down,
especially with high end aircraft.
3: It may be hidden by another gauge, try relocating it using 000, 000 co-
ordinates as all 3rd party aircraft are different.
Well I hope you enjoy using the TGS gauge as much as I have enjoyed
putting this tutorial together!
Dave Leesley
Page 203 of 212
Copyright © 2007-2024 by OnCourse Software

PF3 User Guide
25. KNOWN ISSUES
25.1 Your Skin
No we're not trying to be personal, we mean your choice of PF3 skin.
As you must be aware of by now PF3 comes complete with an assortment of
different skins that can be applied to the program to change its look and feel.
Some are, shall we say, different, and others are really nice (in my opinion)
and besides they say a change is a good as a rest. So the nice folk at
OnCourse Software provide a means by which you can experience a rest!
Now that said, we have to be completely honest and say for some of our
testers these news skins did cause some problems... namely the GUI would
crash at random times when selecting different buttons. Personally I haven't
had the problem at all, but then I only run PF3 on my development rig which
comes complete with all the necessary, but more often unnecessary, gadgets,
gizmos and drivers that I've collected along the way and this machine is quite
old now. So not really a good test!
So, if you don't like the look of any of these skins or you're one of the
unfortunate users who have more than your fair share of skin related
problems, namely PF3 will simply disappear when you click on something
without even a goodbye message, we have provided a way for you to turn off
the skins completely.
Please see section 7.1.26 for further details
25.2 Senior Moments
Sorry... clean forgot what I was going to put here!
25.3 In the Unlikely Event
In the unlikely event that PF3 has a problem, that it's unable to recover from,
we want to know about it as soon as possible. In fact we'd like to know about
it as soon as it happens. No one likes it when something goes wrong but
unfortunately that's life and these things can and do happen. Our aim is to
ensure such things don't happen, ever, but there's this guy I know who goes
by the name of Murphy, who has a nasty habit of interfering when you least
expect it.
So, to make your life and ours a little easier PF3 will attempt to collate all the
information we need to investigate and fix the problem.
If such a problem should arise (thanks to Murphy) you should see the
following display:-
Page 204 of 212
Copyright © 2007-2024 by OnCourse Software
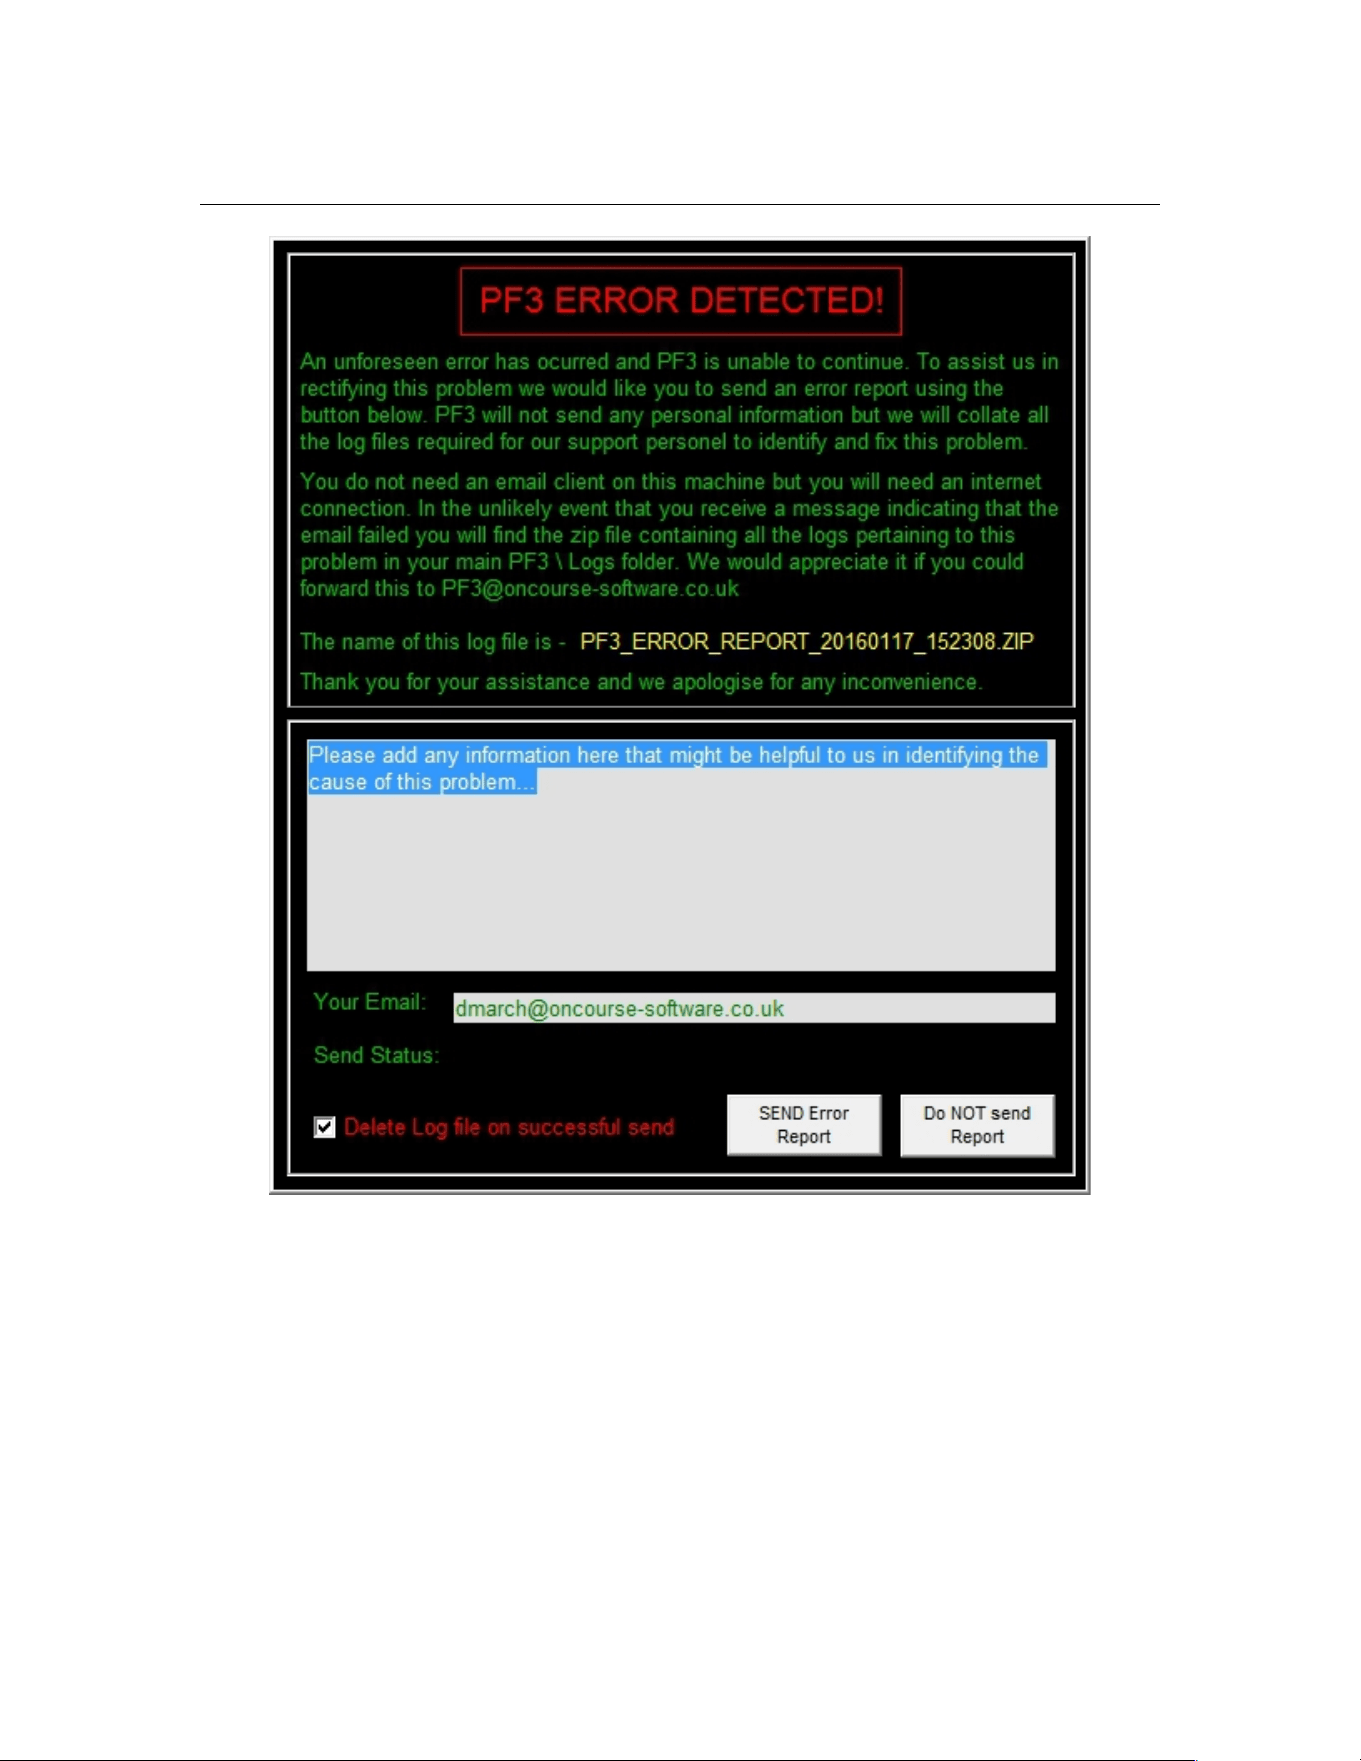
PF3 User Guide
As you can see this looks quite alarming, with the red title and black
background, but we didn't want you to miss it, although the clue that
something's amiss will probably be quite evident because PF3 will have gone
rather quiet.
The important thing to note here before going any further is the location PF3
has created the error log zip file... as shown on this message it can be found
in the ...PF3/Logs folder, should you need it.
You will also notice a grey box with some text already entered that starts
'Please add any information here that might be helpful' and it really would be
helpful if you would kindly add as much information here as you could,
regarding exactly how the error occurred. e.g. What you were doing, what
Page 205 of 212
Copyright © 2007-2024 by OnCourse Software

PF3 User Guide
you heard, what you saw, whereabouts in your flight you were at the time,
etc., etc.
Finally it would be nice to have YOUR email address so please do take the
time to enter it.
Then decide if you wish to save a copy of the error logs zip file or if you would
like to have it deleted once you have sent it to us, which you can do by
selecting the 'Delete log file...' option or not.
Then just hit the 'SEND Error Report' to email the zip file containing all the
various log files to us.
Please note: you do not require an email client on your PF3 computer for this
to work but you would need an internet connection. If you're running PF3 on
a PC with no internet connection then of course you would need to copy the
generated error log zip file to a PC with an email client and send it to us that
way.
Page 206 of 212
Copyright © 2007-2024 by OnCourse Software

PF3 User Guide
26. SUPPORT
The latest support information can be found on our website:
http://www.oncourse-software.co.uk/contactus.htm
Should you experience problems installing or using PF3 please ensure you
are using the most recent version before asking for assistance. You can easily
check you have the current release of PF3 by using the Check for Updates
button on the main menu.
Please Note: We only offer support for the latest released version of
our software and any requests for support for earlier versions will be
politely ignored.
All requests for PF3 support should initially be requested via our
support forum, unless instructed otherwise.
For support with PF3 please visit our support forum at:
http://www.ocs-support.co.uk/forums
The latest support information (with links to our forum) can always be found
by visiting our website:
http://www.oncourse-software.co.uk/contactus.htm
Page 207 of 212
Copyright © 2007-2024 by OnCourse Software

PF3 User Guide
27. CREDITS
I would like to thank the following for their help and support during the
development, testing and production of this and previous versions of PF3. We
have been really fortunate to also have a few real world experts on board for
this trip and their help and guidance has been invaluable. If I've missed
anyone it was not intentional.
27.1 Beta Testers
Bruce Leehan
Charlie Kettlewell
Daniel Katz
David Leesley
Kevin Hardy
Les Parson
Nicholas Weber
Patrick Maeyens
Peter Schluter
Radu Mares
Ralf Kessel
Stephen Molsher
Thomas Arendsen Hein
27.2 PF3 Program Design and Development
Dave March
Copyright (c) 2007-2024 OnCourse Software
27.3 PF3 Documentation
Dave March
David Leesley
Nicholas Weber
Daniel Katz
Martin Cockerell
27.4 Special Thanks…
Charlie Kettlewell – Voice set editing
Islam Elshaarawy - Geospatial programming
Pedro R – Voice set editing
Stephen Molsher - Voice set editing
Martin Cockerell – PF3's Audio output, Taxi route calculation, Updater and
the PF3 WEB Display utility, to name but a few
Page 208 of 212
Copyright © 2007-2024 by OnCourse Software

PF3 User Guide
27.5 Additional Work
Hazel March - Advertising, research and finance
Christopher Sargeant – Compiling the extended Control Sectors file, providing
a more accurate and detailed database of ATC control boundaries and also
correcting various anomalies.
Almost Last:
To you dear user, without whom there would be no PF3, thank you for your
continued support.
Last but not Least:
To my dear wife, Hazel, for all your help and support during this, my latest
journey.
Thank you darling. X
Page 209 of 212
Copyright © 2007-2024 by OnCourse Software

PF3 User Guide
28. COPYRIGHT AND LICENSING
28.1 Copyright
PF3 - Copyright (c) 2007-2024 by OnCourse Software
28.2 Acknowledgements
Any reference to trademarks, registered or otherwise, of Microsoft or Lockheed
Martin are hereby acknowledged.
28.3 Software License Agreement
NOTICE -- READ THIS BEFORE INSTALLING OR USING THE SOFTWARE.
INSTALLING AND USING THE SOFTWARE ACCOMPANYING THIS LICENSE INDICATES
YOUR ACCEPTANCE OF THESE TERMS AND CONDITIONS. READ ALL OF THE TERMS
AND CONDITIONS OF THIS LICENSE AGREEMENT PRIOR TO INSTALLING OR USING
THE SOFTWARE. IF YOU DO NOT ACCEPT THESE TERMS, YOU MUST DELETE THE
SOFTWARE FROM YOUR HARDWARE. PLEASE NOTE THAT YOU MAY NOT USE, COPY,
MODIFY OR TRANSFER THE SOFTWARE OR DOCUMENTATION OR ANY COPY, EXCEPT
AS EXPRESSLY PROVIDED IN THIS AGREEMENT.
IMPORTANT -- READ CAREFULLY: By installing PF3 (the "Software"), You
("Licensee") agree to be and are hereby bound by the terms of this Software License
Agreement (this "Agreement"). If Licensee does not agree to the terms of this
Agreement, Licensee must promptly destroy all copies of the Software and
accompanying documentation ("Documentation").
I. GRANT OF LICENSE:
ONCOURSE SOFTWARE hereby grants to Licensee a non-exclusive license to use the
Software and Documentation subject to the following terms:
Licensee agrees not to cause or permit the reverse engineering, disassembly, or
decompilation of the Software.
Licensee may: install the Software on one computer.
Licensee may not:
(i) use or permit other individuals to use the Software except under the terms
listed above;
(ii) modify, translate, reverse engineer, decompile, disassemble (except to the
extent that this restriction is expressly prohibited by law) or create derivative
works based upon the Software or Documentation;
(iii)copy the Software or Documentation (except as described above);
Page 210 of 212
Copyright © 2007-2024 by OnCourse Software

PF3 User Guide
(iv) rent, lease, sell, offer to sell, distribute, or otherwise transfer rights to the
Software or Documentation or
(v) remove any proprietary notices or labels on the Software or Documentation.
II. SOFTWARE:
This license does not grant Licensee any right to any enhancement or update of the
Software.
III. TITLE:
Title, ownership, rights, and intellectual property rights in and to the Software and
Documentation shall remain in ONCOURSE SOFTWARE and/or its suppliers and
licensors. The Software is protected by the copyright law of the United Kingdom and
international copyright treaties. Title, ownership rights, and intellectual property
rights in and to the content accessed through the Software, including the content
contained in the Software media demonstration files, is the property of the applicable
content owner and may be protected by applicable copyright or other law. This
license gives Licensee no rights to such content.
IV. DISCLAIMER OF WARRANTY:
THE SOFTWARE IS PROVIDED "AS IS" WITHOUT WARRANTY OF ANY KIND. TO THE
MAXIMUM EXTENT PERMITTED BY APPLICABLE LAW, ONCOURSE SOFTWARE AND
ITS LICENSORS AND SUPPLIERS FURTHER DISCLAIM ALL WARRANTIES, INCLUDING
WITHOUT LIMITATION ANY IMPLIED WARRANTIES OF MERCHANTABILITY, FITNESS
FOR A PARTICULAR PURPOSE, AND ON INFRINGEMENT. THE ENTIRE RISK ARISING
OUT OF THE USE OR PERFORMANCE OF THE SOFTWARE AND DOCUMENTATION
REMAINS WITH LICENSEE. TO THE MAXIMUM EXTENT PERMITTED BY APPLICABLE
LAW, IN NO EVENT SHALL ONCOURSE SOFTWARE OR ITS SUPPLIERS OR
LICENSORS BE LIABLE FOR ANY CONSEQUENTIAL, INCIDENTAL, INDIRECT,
SPECIAL, PUNITIVE, OR OTHER DAMAGES WHATSOEVER (INCLUDING, WITHOUT
LIMITATION, DAMAGES FOR LOSS OF BUSINESS PROFITS, BUSINESS
INTERRUPTION, LOSS OF BUSINESS INFORMATION, LOSS OF DATA OR OTHER
PECUNIARY LOSS) ARISING OUT OF THIS AGREEMENT OR THE USE OF OR
INABILITY TO USE THE SOFTWARE, EVEN IF ONCOURSE SOFTWARE OR ITS
SUPPLIERS OR LICENSORS HAVE BEEN ADVISED OF THE POSSIBILITY OF SUCH
DAMAGES.
V. TERMINATION:
This license shall terminate automatically if Licensee fails to comply with the
limitations described in this license. No notice shall be required from ONCOURSE
SOFTWARE to effectuate such termination. On termination Licensee must destroy all
copies of the Software and Documentation. Without limiting the foregoing,
ONCOURSE SOFTWARE may terminate this Agreement immediately for any breach
by Licensee of the Agreement.
Page 211 of 212
Copyright © 2007-2024 by OnCourse Software

PF3 User Guide
VI. ENTIRE AGREEMENT:
This Agreement constitutes the complete and exclusive agreement between
ONCOURSE SOFTWARE and Licensee with respect to the subject matter hereof and
supersedes all prior oral or written understandings, communications or agreements
not specifically incorporated herein. This Agreement may not be modified except in
writing duly signed by an authorized representative of ONCOURSE SOFTWARE and
Licensee.
VII. ASSIGNMENT:
Neither this Agreement nor any rights or obligations of Licensee hereunder may be
assigned by Licensee in whole or in part without the prior written approval of
ONCOURSE SOFTWARE. Any assignment in derogation of the foregoing shall be null
and void.
VIII. SEVERABILITY:
If any part of this Agreement is for any reason found to be unenforceable, all other
parts nevertheless remain enforceable as long as a party's rights under this
Agreement are not materially affected. In lieu of the unenforceable provision, the
parties will substitute or add as part of this Agreement a provision that will be as
similar as possible in economic and business objectives as was intended by the
unenforceable provision.
Page 212 of 212
Copyright © 2007-2024 by OnCourse Software