*Adapter only
included with
straight levers
* Adaptador sólo
se incluye con
palancas rectas
Additional tools (if needed)
Herramientas adicionales
(si es necesario)
wood block
bloque de
madera
Parts in the box
Piezas en la caja
Required tools
Herramientas necesarias
Top Latch
Pestillo superior
Deadbolt
Cerrojo
Top Strike
Placa superior
Screws and accessories
Tornillos y accesorios
Keys
Llaves
Bottom Latch
Pestillo inferior
Levers
Palancas
Bottom Strike
Placa inferior
A
H J M
F G
K L
B C
Not required for
all applications
No se requiere
para todas las
aplicaciones
R
P
Q
R
S T
A
21/8"
54 mm
1"
25 mm
A
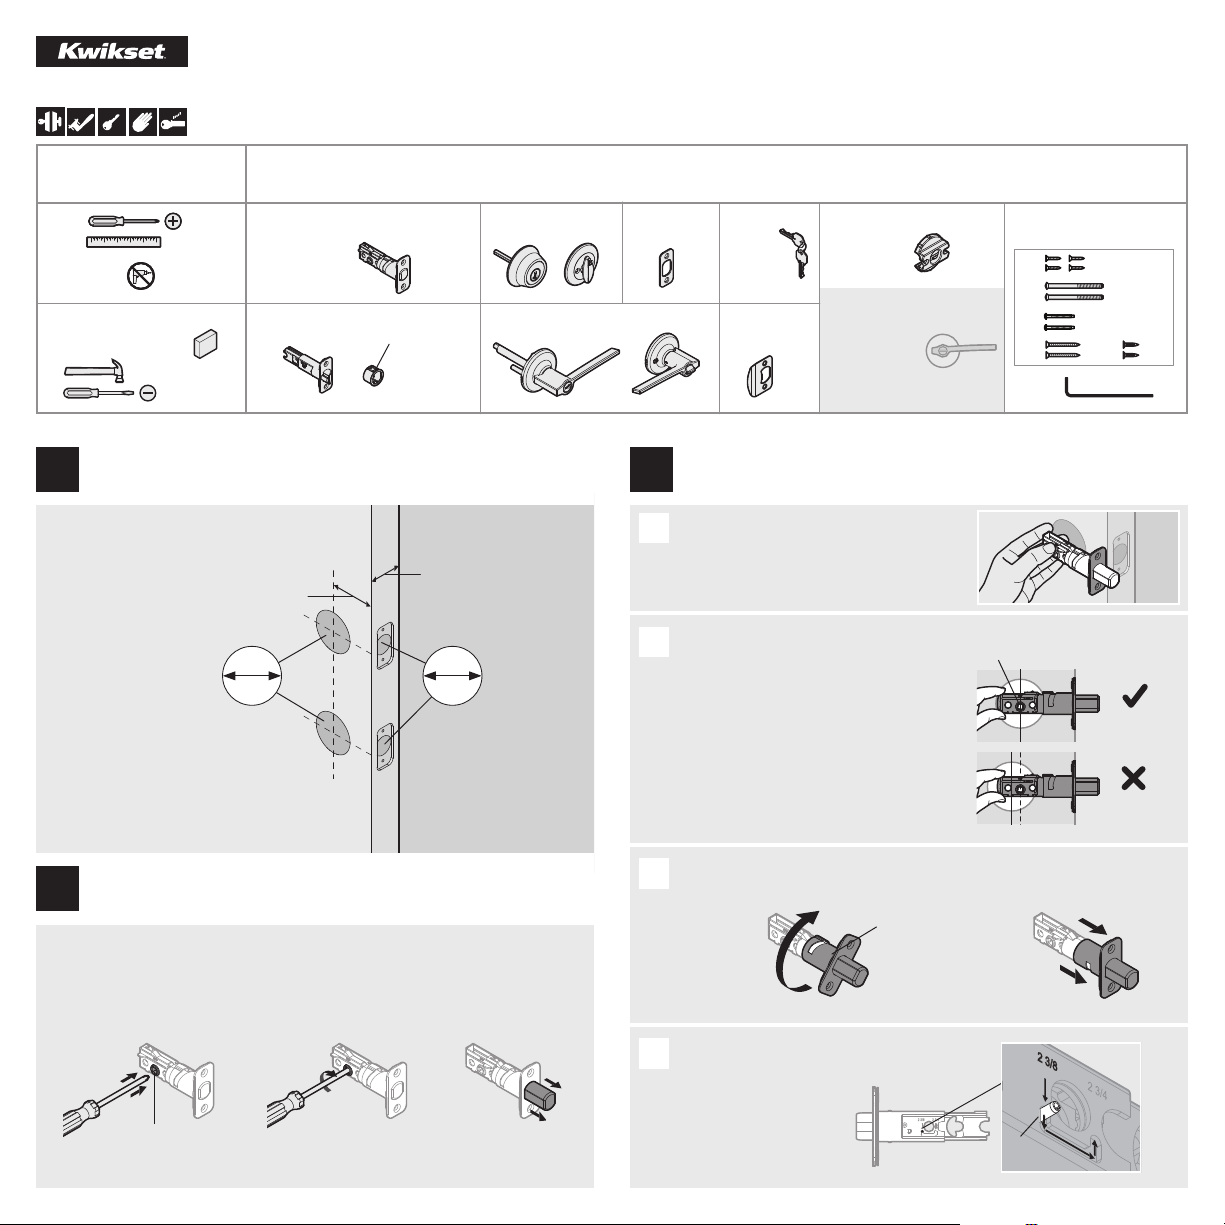
Insert screwdriver into D-shaped hole in
latch, and rotate to extend bolt.
Inserte un destornillador en el oriicio en forma de “D” en el
pestillo, y gire el destornillador para extender el perno.
If drilling a new door, use
the supplied template
on page 3 and the
complete door drilling
instructions available at
kwikset.com/doorprep
Si va a perforar una
puerta nueva, utilice la
plantilla suministrada
en la página 3 y las
instrucciones completas
para la perforación de la
puerta estan disponibles
en kwikset.com/doorprep
23/8" (60 mm)
or • o
23/4" (70 mm)
13/8"–21/4"*
35 mm–57 mm*
*Call Kwikset to order a
service kit for 21/4"
(57 mm) thick doors.
*Llame a Kwikset para pedir
un kit de servicio para puertas
gruesas con un espesor
de entre 57 mm (21/4").
Hold the top latch in front of the door hole, with
the latch face lush against the door edge.
Sostenga el pestillo superior en frente
del oriicio de la puerta, con la cara del
pestillo al ras con el borde de la puerta.
D-shaped hole
oriicio en forma de “D”
A
Prepare door and check dimensions
Prepare la puerta y revise las dimensiones
1
Extend top latch bolt
Extienda el perno del pestillo superior
2
Adjust latch length (if needed)
Ajuste la longitud de los pestillos (si es necesario)
3
A
If the D-shaped hole is centered in the door hole,
no adjustment is required. Proceed to step 4.
If the D-shaped hole is NOT centered, adjust
both latches. See “Top Latch Adjustment” (step
3C) and “Bottom Latch Adjustment” (step 3D).
Si el oriicio en forma de “D” está
centrado con el oriicio de la puerta, no
se requiere ajustarlo. Vaya al paso 4.
Si el oriicio en forma de “D” NO está
centrado, ajustar los dos pestillos. Consulte
“Ajuste del pestillo superior” (el paso 3C) y el
“Ajuste del pestillo inferior” (el paso 3D).
Top Latch Adjustment (only if needed)
Ajuste del pestillo superior (si es necesario)
D-shaped hole
oriicio en forma de “D”
not centered
no centrado
centered
centrado
Rotate the front of the
latch to extend it.
Gire la parte delantera del
pestillo para extenderlo.
180°
B
C
H
Grasp pin on both sides of latch
and move it to longer setting.
Mantenga el pasador en ambos
lados del pestillo, y moverlo a
la coniguración más largo.
pin
pasador
Bottom Latch Adjustment (only if needed)
Ajuste del pestillo inferior (si es necesario)
D
Installation Guide
Guía de instalación
18003275625
www.kwikset.com
63687001 Rev 01
690 RLVR P&T
V*
Adapter*
Adaptador*
U
1/4

interior
interior
C
Q (2x)
“UP” is on top
“UP” está en la
parte superior
P (2x)
P (2x)
A
H
J
Door edge
NOT chiseled
La puerta sin el
borde cincelado
Door edge
chiseled
La puerta con el
borde cincelado
or
o
Remove plates.
Elimine las
placas.
Install collar.
Instale el aro.
Slant of bolt
faces in direction
that door closes.
La inclinación del
perno del pestillo
queda en la dirección
que cierra la puerta.
Slant of bolt
faces in direction
that door closes.
La inclinación
del perno del
pestillo queda en
la dirección que
cierra la puerta.
2 tabs
2 lengüetas
Ensure collar snaps into place.
Pull to test for tight it.
Asegúrese de que el aro encaje en su sitio.
Jale para provar que este bien ajustado.
A
B
Install top
latch in
top hole.
Instale el
pestillo
superior en
el oriicio
superior.
Secure latch
with screws.
Fije el pestillo
con los tornillos.
A
exterior
exterior
B
Rotate torque blade to align
with D-shaped hole.
Gire la paleta de torsión para alinearla
con el oriicio en forma de “D”.
Install deadbolt exterior in top hole.
Instale el cerrojo exterior en el oriicio superior.
B
Install deadbolt interior.
Instale el cerrojo interior.
Install top latch
Instale el pestillo superior
4
Install bottom latch
Instale el pestillo inferior
5
Install deadbolt
Instale el cerrojo
6
Install adapter (if included in the box)
Instale el adaptador (si se incluye en la caja)
7
Install adapter* in
exterior door hole.
Instale el adaptador*
en el oriicio exterior
de la puerta.
exterior
exterior
V
*Adapter only included with straight levers.
* Adaptador sólo se incluye con palancas rectas.
door
frame
marco
door
frame
marco
2/4

Press latch bolt to
install EXTERIOR
lever.
K
exterior
exterior
Template
Plantilla
Template is only needed if new holes
must be drilled in the door.
La plantilla solo se necesita en
caso de que deba perforarse los
nuevos oriicios en la puerta.
23/8" (60 mm)
23/8" (60 mm)
51/2" (140 mm)
23/4" (70 mm)
23/4" (70 mm)
Backset • Distancia al centro
Backset • Distancia al centro
Centerline
Linea central
13/8" (35 mm)13/8" (35 mm)
13/4" (44 mm)13/4" (44 mm)
21/4" (57 mm)21/4" (57 mm)
Face of the door
Frente de la puerta
Face of the door
Frente de la puerta
Edge of the door
Borde de la puerta
Edge of the door
Borde de la puerta
Fold
Doble
Fold
Doble
Push up on lever base while
tightening screws to keep latch
horizontal and centered.
counter-clockwise
sentido antihorario
L
U
Find your lever
style in the chart
and determine if
your levers are
oriented correctly:
Encuentre su estilo
de palanca en el
gráico y determine
si sus palancas
están orientadas
correctamente:
If oriented incorrectly, remove
both levers and install them on
opposite sides of the door.
Si se orientan de forma incorrecta,
retire las dos palancas y coloquelas
en los lados opuestos de la puerta.
correct
correcto
incorrect
incorrecto
Install interior
lever base.
Instale la base
de palanca
interior.
If lever base won’t sit lush,
rotate turnbutton to align.
Si la base de palanca aún
no quedará al ras, gire el
botón para alinear.
Align round edges.
Alinee los bordes
redondos.
Tip: Pull lever slightly away from
door to see where screws insert.
Consejo: Tire la palanca de la
puerta un poco para ver donde
se insertan los tornillos.
R (2x)
Loosen the pre-installed set
screw to remove INTERIOR
lever. Do not remove set screw.
Aloje el tornillo de ijación
preinstalado para remover
la palanca INTERIOR. No
retire el tornillo de ijación.
clockwise
sentido horario
Instale la palanca
exterior y ajuste el
tornillo de ijación
preinstalado.
Install interior lever and tighten
pre-installed set screw.
U
Empuje hacia arriba
la base de palanca
mientras ajusta
los tornillos para
mantener el pestillo
en forma horizontal
y centrada.
Insert screws and
tighten by hand.
Inserte los tornillos y
aprietelos a mano.
unlocked
desbloqueado
L
Presione el perno
de retención para
instalar la palanca
EXTERIOR.
B
C
D
E
G
F
A
3/4
Install levers
Instale las palancas
8

Make sure hole for top
strike is drilled a minimum
of 1" (25 mm) deep.
Asegúrese de que el oriicio
de la placa superior se
perfore a un mínimo de 1"
(25 mm) de profundidad.
Install top strike.
Instale la placa superior.
Install bottom strike.
Instale la placa inferior.
A
B
C
D
1. If small bolt of bottom latch enters strike hole, reposition strike.
Si el perno pequeño del pestillo inferior entra al oriicio de la placa, reposicione la placa.
2. If latch is loose in the bottom strike, adjust the strike tab
so it grips the latch bolt better when the door is closed.
Si el pestillo queda suelto en la placa inferior, ajuste la
lengueta de la placa para que sujete mejor el perno de
retención cuando la puerta se encuentre cerrada.
small bolt in
strike hole
perno pequeño
está en el oriicio
de la placa
small bolt NOT
in strike hole
perno pequeño
NO está en el
oriicio de la placa
tab
lengueta
Close door, test latch operation and make adjustments as needed:
Cierre la puerta, pruebe el funcionamiento del pestillo y realice los ajustes necesarios :
S (2x)
T (2x)
F
M
4/4
Install strikes on door frame
Instale las placas en el marco de la puerta
9
WARNING: This Manufacturer advises that no lock can provide complete security by itself.
This lock may be defeated by forcible or technical means, or evaded by entry elsewhere on the
property. No lock can substitute for caution, awareness of your environment, and common
sense. Builder’s hardware is available in multiple performance grades to suit the application.
In order to enhance security and reduce risk, you should consult a qualiied locksmith or other
security professional.
ADVERTENCIA: Este Fabricante hace saber que no hay cerrojos que puedan proporcionar
completa seguridad por sí mismos. Puede hacerse que falle este cerrojo forzándolo o utilizando
medios técnicos, o puede evadirse entrando por otra parte de la propiedad. No hay cerrojos que
puedan hacer de sustitutos para la precaución, el estar al tanto del entorno, y el sentido común.
Pueden obtenerse piezas de ferretería de constructor con diversos grados de rendimiento para
ajustarse a la aplicación. Para realzar la seguridad y reducir los riesgos, debe consultar con un
cerrajero capacitado u otro profesional de seguridad.
Register your product at www.kwikset.com/productregistration
Rate your product at www.kwikset.com/reviews
Registre su producto en www.kwikset.com/productregistration
Clasiique su producto en www.kwikset.com/reviews
©2016 Spectrum Brands, Inc.