Loading ...
Loading ...
Loading ...

Page 8
Operating Instructions
COOKING:
1. Connect the appliance to the power outlet.
2. Once the induction range is properly connected, the unit will beep once and the light above the ON/OFF button will
blink, indicating power has been applied to the unit.
NOTE: If the power indicator light is not illuminated and the unit is plugged in, check the power cord connection.
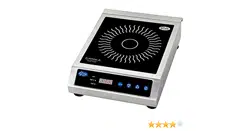
3. Place suitable Ferromagnetic cookware onto the center of the range.
NOTE: The cooktop’s surface will not heat up if the wrong type of cookware is applied or there is no cookware
placed on the unit.
NEVER place empty cookware on the appliance.
NOTE: The induction range will automatically power down if there is no functional operation within 2 hours.
4. Set ‘HEATING’
Press the ON/OFF button one time. The ‘HEATING’ indicator light will illuminate below the selected function.
NOTE: The default setting for this induction range is “Low” heat.
(Heat is the amount of power in WATTS applied to the cookware. Max wattage of this unit is 1800W - choose low,
medium, or high). Press the UP or DOWN “ ” to the desired heat range.
Press “FUNCTION” (f - key) to toggle between ‘HEATING’ and ‘TEMP. The indicator light under each function will
illuminate to indicate which function is ready to be set.
5. Set ‘TEMP’
Press the “FUNCTION” (f - key) to toggle to ‘TEMP’
Set the temperature ‘TEMP’. The ‘TEMP’ indicator light will illuminate below the selected function. Press UP
or DOWN “ ” to adjust the induction range to the desired temperature (from 150°F up to 450°F).
6. Set TIMER - ON, OFF, and RESET:
NOTE: If the TIMER is not set or not needed, the induction range will properly function in ‘ON’ mode up to
two hours.
Timer ON:
A. Press “SET TIME”. The indicator light will illuminate below the selection for ‘TIMER’ and the LED display will
show a visible number in the display window.
B. Press UP or DOWN “ ” to adjust the timer from 0-170 minutes.
NOTE: Press the UP/DOWN buttons repeatedly to set the timer minute by minute. Or, to move quickly
through the timer, press and hold the UP or DOWN “ ” button to the desired time. Once you have
reached the desired set time, the LED displayed number will blink. After a few seconds it will stop ashing
and the timer is then set.
IMPORTANT: In order for the timer to be running, the ‘TIMER’ Indicator light must be illuminated and the digital
display will have a visible number illuminated in the LED display window.
Loading ...
Loading ...
Loading ...