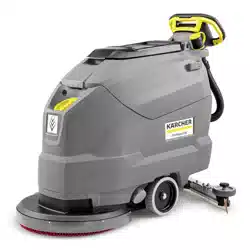
User ManualOperating and Functional Elements

Operator console

1. OFF
Device is switched off
2. Normal mode
Wet clean the floor and vacuum up dirt water.
3. Intense mode
Wet clean the floor and allow the deter- gent to react.
4. Vacuum mode
Suck in the dirt fleet.
5. Program selection switch
6. Display
Symbols on the machine

Before Startup
Unloading
→ Unscrew the screws from the middle board of the pallet.
→ Push down the device holding the push handle and pull out the middle board.
→ Remove the chocks in front of and next to the wheels.
→ Push down the device holding the push handle and push it forwards up to the edge of the pallet.
→ Lift the device off the pallet and set it on the floor.
Install batteries
Install the batteries (see "Care and Mainte- nance/Install and connect batteries").
Using batteries made by other manufacturers
We recommend using our batteries as de- scribed in chapter "Care and Maintenance/ Recommended batteries".
Charging battery
Note: The device is equipped with a safety mech- anism to prevent total discharge, i.e. when the permissible minimum capacity is reached, the brush motor and the turbine are switched off.
→ Drive the machine directly to the charg- ing station; avoid any steep gradients in the process.
DANGER
Danger of injury due to electric shock. Ob- serve the mains voltage and fuse protec- tion on the type plate of the device.
Charging process
Average charging time is approx. 10 -15 hours.
The appliance must not be used during the charging process.
DANGER
Danger of explosion
Prior to charging low-maintenance bat- teries
Remove waste water tank (see Chapter "Maintenance and care/Maintenance tasks/Removing the waste water tank").
This prevents the accumulation of hazard- ous gases underneath the tank during the charging process.
ATTENTION: Risk of damage. Do not clean the device with water while the tank is removed.
- Battery plug, appliance side
- Battery plug, battery side

→ Detach the battery plug on the unit side.
ATTENTION
Risk of damage!
- Do not connect the charger with the battery plug on the unit side.
- Only use a charger that is suitable for the installed battery type:

Note: Please read the operating instructions of the charger manufacturer, especially the chapters on safety instructions!
→ Connect the battery plug on the battery side with the charger.
→ Plug the mains plug of the charger into a power outlet.
→ Execute the charging process according to the information in the operating instructions of the charger.
→ Connect the battery plug on the device side with the battery plug on the battery side.
Low maintenance batteries (wet batteries)
WARNING
Danger of causticization!
- Adding water to the battery in its discharged state can cause the acid to leak.
- Use safety glasses while handling bat- tery acid and follow the safety instructions to avoid personal injury or damage to clothes.
- Should the acid spray on to the skin or clothes, rinse immediately with lots of water.
ATTENTION
Risk of damage!
- Use only distilled or desalinated water (EN 50272-T3) for filling the battery.
- Do not add any substances (so-called performance improving agents), else warranty claims will not be entertained.
- Replace batteries with the same battery type only.
Installing the Vacuum Bar
→ Insert the vacuum bar into the vacuum bar suspension in such a manner that the profiled sheet is positioned above the suspension.
→ Tighten the wing nuts.

→ Insert the suction hose.
Operation
DANGER
Risk of injury!
In dangerous situations, release the safety switch/drive lever.
Filling in detergents
Fresh water
→ Open the lock of the fresh water reservoir.
→ Fill fresh water (maximum 60 °C) until the lower edge of the filling nozzle.
→ Close the lock of the fresh water reservoir.
Detergent
WARNING
Risk of damage. Only use the recommended detergents. With other detergents, the operator bears the increased risk regarding the operational safety and danger of acci- dent.
Only use detergents that are free from sol- vents, hydrochloric acid and hydrofluoric acid.
Follow the safety instructions for using detergents.
Note: Do not use highly foaming detergents.
Recommended detergents:

→ Add the detergent to the fresh water reservoir.
Note: If the fresh water tank is empty, the cleaning head continues working without liquid supply.
Setting the water quantity
→ Adjust the water quantity using the regulating button according to the dirt on the floor covering.
Note: Carry out initial cleaning attempts with low water volume. Increase water volume step- by-step until the desired cleaning result is achieved.
Setting the Vacuum Bar
Oblique position
To improve the vacuuming result on tiled floors the vacuum bar can be turned to an oblique position of up to 5°.
→ Loosen the wing nuts.
→ Turn the vacuum bar.

→ Tighten the wing screws.
Inclination
If the vacuum result is unsatisfactory the inclination of the straight vacuum bar can be modified.
→ Adjust the rotary handle to incline the suction bar.
Height
The bend of the suction lips upon contact with the floor is influenced with the height adjustment.

→ Try adjusting the twist handles of the height adjustment until the best vacuuming result is achieved.
Cleaning
ATTENTION: Risk of damage to the floor covering. Do not operate the appliance on the spot.
→ Swivel the pedal for the transport chassis down.
→ Turn the program selection switch to the desired cleaning program.
Lower the vacuum bar
→ Pull the lever out and press it down; the vacuum bar is lowered.
Note:
- For cleaning tiled floors, adjust the straight suction bar in such a way that cleaning is not done at an angle of 90 degrees to the joints.
- The inclined position and the inclination of the suction bar can be adjusted to achieve better suction results (see "Adjusting the suction bar").
- If the waste water tank is full, the float closes the suction opening and the suction turbine runs at an increased speed. If this is the case, shut the vacuum off and drive to empty the waste water tank.
Shutting Down the Appliance
→ Release the safety switch.
→ Set the program selection switch to suction or vacuuming.
→ Briefly drive forward and suck of the remaining water.
→ Raise the vacuum bar.
→ Charge battery, if required.
Drain off dirt water
WARNING: Please observe the local provisions regarding the wastewater treatment.
→ Take the water discharge hose from the support and lower above a suited collection device.

→ Crush or bend the dosing equipment.
→ Open the lid of the dosing equipment.
→ Drain off the dirt water - regulate the water quantity by pressing or bending.
→ Rinse the waste water tank with clear water.
Drain off clean water

→ Unscrew the lock of the fresh water reservoir.
Transport
DANGER: Risk of injury! When loading or unloading the machine, it may only be operated on gradients up to the maximum value (see "Technical Specifications"). Drive slowly.
CAUTION
Risk of personal injury or damage! Mind the weight of the appliance during transport.
→ Lift the pedal for the transport chassis.
→ Use the pushing handle to push the appliance.

→ When transporting in vehicles, secure the appliance according to the guidelines from slipping and tipping over.
Storage
CAUTION: Risk of personal injury or damage! Consider the weight of the appliance when storing it. This appliance must only be stored in interior rooms.
Care and maintenance
DANGER: Risk of injury! Set the programme selector switch to "OFF" and pull the mains plug of the charger prior to performing any work on the appliance.
→ Drain and dispose of the dirt water and the residual fresh water.
Maintenance schedule
After each operation
ATTENTION: Risk of damage. Do not sluice the appliance with water and do not use aggressive detergents.
→ Drain off dirt water.
→ Rinse the waste water tank with clear water.
→ Clean the outside of the appliance with a damp cloth which has been soaked in mild detergent.
→ Check the fluff filter, clean if required.
→ Clean the vacuum lips and the wiping lips, check for wear and replace if required.
→ Check the brush for wear and replace if required (see "Maintenance tasks").
→ Charge the battery: If the charging state of the battery is un- der 50%, charge the battery fully and without interruption.
If the charging state of the battery is over 50%, only recharge the battery if the entire operation duration will be required when next used.
Weekly
→ When used regularly, charge the battery fully and without interruption at least once a week.
Monthly
→ Check battery poles for oxidation, brush off if necessary. Ensure that the connection cable sits firmly.
→ Clean the seals between waste water tank and cover and check for tightness, replace if required.
→ Clean sieve.
→ Check the acid density of the cells if the batteries are not maintenance-free batteries.
→ For long periods of disuse, only turn the device off when the battery is fully charged. Fully recharge the battery at least every month.
Yearly
→ Have the prescribed inspection carried out by the customer service.
Maintenance Works
Cleaning the sieve

→ Open the cover.
→ Turn cover the clockwise and remove it.
→ Remove and clean the sieve lying be- neath it.
→ Insert the sieve.
→ Replace the cover and lock it by turning it anti-clockwise.
→ Close cover.
Replace or turn vacuum lips

The vacuum lips must be replaced or reversed if they are worn down to the wear indicator.
→ Remove the vacuum bar.
→ Unscrew the star grips.

→ Remove the plastic parts.
→ Remove the vacuum lips.
→ Insert new or reversed vacuum lips.
→ Insert the plastic parts.
→ Screw in and tighten the star grips.
Replacing the disk brushes
→ Push down the device holding the push handle so that the cleaning head is raised.
→ Press the pedal for changing the brush- es downward beyond its resistance.

→ Pull the device towards the back so that the disc brush becomes accessible.
→ Place a new disc brush on the floor in front of the device.
→ Drive the device with the raised cleaning head over the new disc brush and lower the cleaning head. The brush locks into the drive.
Removing the waste water tank
→ Drain off dirt water.

→ Lift up the waste water tank and put it aside.
Batteries
Please observe the following warning notes when handling batteries:


DANGER: Risk of explosion. Do not place tools or the like on the battery, i.e. on the terminal poles and cell connectors. Risk of injury. Ensure that wounds never come into contact with lead. Always clean your hands after having worked with batteries.
Insert batteries and connect
→ Drain off dirt water.
→ Lift up the waste water tank and put it aside.
→ Pull out the battery plug.


Battery 6.654-290.0
1. Spacer
→ Insert the battery into the device as shown above.
→ Insert the spacer between the battery and the device on the side indicated in the illustration.
CAUTION: When the batteries are installed and removed, the stability of the appliance can be compromised; ensure a safe stance.
→ Connect pole using the enclosed connecting cable.
→ Connect the connection cable to the free battery poles (+) and (-).
ATTENTION: If the polarity is reversed (positive and negative terminals), the control electronics are destroyed. Pay attention to correct poles.
→ Place the waste water tank on the appliance.
Note: Charge the batteries before commissioning the appliance. See also "Charging the batteries".
Removing the batteries
→ Set the program selector switch to "OFF".
→ Pull out the battery plug.
→ Lift up the waste water tank and put it aside.
→ Clamp off the minus pole of the battery.
→ Clamp off the remaining cables from the battery.
→ Remove the support blocks or the foam pieces.
CAUTION: When the batteries are installed and removed, the stability of the appliance can be compromised; ensure a safe stance.
→ Remove the batteries.
→ Dispose of the used batteries according to the local provisions.
Maintenance contract
To ensure a reliable operation of the appliance maintenance contracts can be concluded with the competent Kärcher sales office.
Faults
DANGER: Risk of injury! Set the programme selector switch to "OFF" and pull the mains plug of the charger prior to performing any work on the appliance. → Drain and dispose of the dirt water and the residual fresh water.
Faults with display
ERR B
- Check if foreign objects block the brush; remove foreign object if required.
ERR T
LOW BAT
ERR TEMP
Allow device to cool down.
HandsOff
- Release the safety switch and wait until the operating hours or the battery status are displayed. Then operate the safety switch again.
ERR REL
- Set the programme selector switch to "OFF", release the safety switch, wait for 3 seconds, restart. If the event recurs, call Customer Service.
ERR PWM
Faults without display on the console
Appliance cannot be started
- Turn the program selection switch to the desired programme.
- Operate the safety switch.
- Insert battery plug.
- Check battery; charge it if required.
- Make sure that all battery terminals are connected.
Insufficient water quantity
- Check fresh water level, refill tank if necessary.
- Increase the water volume on the regulating knob for water volume.
- Clean sieve.
Insufficient vacuum performance
- Clean the seals between waste water tank and cover and check for tightness, replace if required.
- Wastewater reservoir is full; shut off the appliance and empty the wastewater reservoir
- Clean the fluff filter.
- Clean the vacuum lips on the vacuum bar, replace if required
- Check if the cover on the dirt water discharge hose is closed
- Check the setting of the vacuum bar.
- Check suction hose for blockages; clean if required.
- Check the suction hose for tightness; replace if required.
Insufficient cleaning result
- Check the brushes for wear, replace if required.
Brush does not turn
- Check if foreign objects block the brush; remove foreign object if required.
- If over-current switch in the electronics system has been triggered, turn programme selection switch to "OFF". Afterwards, set it back to the desired programme.
Vibrations during cleaning
You might need to use a softer brush.
In case of faults that cannot be remedied using the table below please contact the customer service.