1
RJ14-4-GB
CUSTOMER SERVICE: 888.315.6553 | customerservice@chefman.com
®
Coffee maker
GRIND & BREW
RJ14-4-GB

READ ALL INSTRUCTIONS BEFORE USE
For your safety and continued enjoyment of this product, always read the instruction manual before using.
Congratulations on your purchase!
Every Chefman product is manufactured to the highest standards of performance and
safety. We are confident that you will be so satisfied with your purchase that Chefman
will be your go-to company for appliances in the future.
Customer satisfaction is a key element of our company’s philosophy. The Chefman brand
exists to fill a void on retail shelves and in consumer kitchens for a truly value-focused
kitchen appliance. By questioning and adding value and innovation at every touch point
in the manufacturer to end user journey, Chefman provides home chefs with the tools
they need to achieve picture-perfect results with maximum efficiency. In addition to
manufacturing appliances that are dependable, affordable and built with intuitive features
to enhance your kitchen experience, we pride ourselves on providing top-of-the-line post
purchase support, which includes complimentary access to ClubChefman.com for product
tutorials, delicious recipes, how-to videos and access to our team of dedicated chefs.
Should a problem arise, each product is backed by a comprehensive manufacturer’s
1-year warranty, as well as, outstanding after-sales service support through our dedicated
customer service team. In the unlikely event that your product does not operate as
described in the manual, please feel free to call or email our helpline for assistance.
We understand that sometimes products can malfunction, so if you feel that your
appliance is not operating as it should, warranty claims can be made within one year
from the date of purchase when accompanied by a dated receipt.
This guarantee is in addition to your statutory rights; your statutory rights are not
affected. This limited warranty does not apply in cases of damage caused by accident,
improper use, abuse or force majeure.
This warranty gives you specific legal rights. Rights may vary depending on your state or
province of residence. Some locations do not allow limitations on implied warranties or
special incidental, or consequential damages, so the limitations may not apply to you. This
limited warranty will be invalidated if the appliance is tampered with in any way whatsoever.
Our telephone helpline (888) 315-6553 is available for questions or technical assistance
Monday through Friday, 9 am to 5 pm EST.
Customers can also receive support by emailing customerservic[email protected].

1 Introduction
2 Safety Instructions
5 Features
6 Operating Instructions
9 Cleaning and Maintenance
10 Troubleshooting
12 Tips
13 Notes
15 Terms and Conditions
16 Warranty Card
CONTENTS

1
RJ14-4-GB
INTRODUCTION
It’s no secret that great coffee stems from fresh, quality ingredients. With the
Chefman Grind & Brew, you can grind your coffee just before brewing it, preserving
the bean’s oils and flavors up until the very last moment. Use the included
measuring spoon to scoop the beans into the grind basket, select how many
scoops you’re brewing and fill the water tank with the corresponding amount.
Press START and the Grind & Brew will do the rest of the work for you. Within 30
seconds, it’ll grind the beans to an even, medium grind, ideal for brewing a rich,
robust pot of drip coffee. If you prefer to use already ground coffee, the Grind &
Brew can do that, too! Just select the "Grounds" setting.
The Chefman Grind & Brew is small, but it delivers big on taste. It’s also easy to
clean—twist off the grind basket, discard the grounds and rinse. If you’re not a
morning person, or if you constantly buy your coffee out, we have a feeling the
Grind & Brew might convert you!

2
RJ14-4-GB
READ ALL INSTRUCTIONS.
THIS APPLIANCE IS FOR HOUSEHOLD USE ON LY.
WARNING: When using electrical appliances especially when children are present, basic safety
precautions should always be followed to reduce the risk of fire, electric shock and/or injury to
persons, including the following:
• Read all instructions before use.
• Do not use this appliance for anything other than its intended use.
• Do not use outdoors or in a damp area.
• Do not place on or near a hot gas or electric burner, or in a heated oven.
• Do not let the appliance’s cord hang over the edge of a table or counter, or touch hot
surfaces.
• Do not operate appliance if it has a damaged cord or plug, or after the appliance
malfunctions or has been dropped or damaged in any manner. In such cases, call
Chefman Customer Service for assistance.
• To protect against fire, electrical shock and injury, do not immerse the cord, plug or
appliance in water or other liquids.
• To reduce the risk of fire or electric shock, do not remove the bottom cover of the
appliance. There are no user serviceable parts inside. Call Chefman Customer Service for
repair or replacement.
• The use of accessory attachments not recommended or provided by Chefman may
result in fire, electric shock or injury.
• The glass carafe is designed specifically for use with this appliance; it must never be
used on a range top.
• Never set the hot, glass carafe on a wet or cold surface.
• Do not use the carafe if it is cracked or has a weakened handle.
• Do not clean carafe with abrasive cleansers or materials.
• Check grind basket for presence of foreign objects before using.
• Do not touch hot surfaces. Use handles or knobs.
• Do not open lid when coffee is brewing. Hot steam may be released, which can result in
scalding and/or injury.
• Do not place hands, face or other body parts over the steam vent; steam is hot and may
cause burns.
• Do not cover steam vent with cloths or any other foreign objects.
• Never use your coffee maker without water in it. Only use fresh, cold water to brew
coffee.
• Never fill the water tank above the MAX level.
• Never put the carafe in an oven or microwave oven to warm coffee.
• Use caution when handling the carafe—just brewed coffee is very hot.
SAFETY INSTRUCTIONS
IMPORTANT SAFEGUARDS
3
RJ14-4-GB
• Close supervision is necessary when any appliances are being used by or near children.
• Allow to cool before putting on or taking off parts, and before cleaning the appliance.
• Do not clean carafe with cleansers, steel wool pads, or other abrasive materials.
• Handle carafe with care; it is very fragile.
• To disconnect the appliance, remove plug from wall outlet.
• Never place the empty or almost empty carafe on the warming plate when coffee maker
is still heating, or on any other hot surfaces.
• Unplug appliance from outlet when not in use and before cleaning.
• Never touch the hot parts of the appliance, including the warming plate and carafe. This
may cause residual coffee to burn.
• Allow appliance to cool before removing and cleaning parts.
• Only use the coffee grinder to grind roasted coffee beans. Grinding other substances,
such as nuts, spices or unroasted beans may dull the blade and cause poor grinding or
injury. It may also negatively affect the taste of brewed coffee.
SAVE THESE INSTRUCTIONS.
SAFETY INSTRUCTIONS
IMPORTANT SAFEGUARDS

4
RJ14-4-GB
SAFETY INSTRUCTIONS
WARNING: This appliance has a polarized plug (one blade is wider than the other). To reduce
the risk of electric shock, this plug is intended to fit into a polarized outlet only one way. If the
plug does not fit fully into the outlet, reverse the plug. If it still does not fit, contact a qualified
electrician. Do not attempt to modify the plug in any way.
SHORT CORD INSTRUCTIONS
A short power supply cord is provided to reduce the hazards resulting from
entanglement or tripping over a longer cord. Longer detachable power-supply cords or
extension cords are available and may be used if care is exercised in their use. If a longer
detachable power-supply extension cord is used:
1. The marked electrical rating of the cord set or extension cord should be at least as
great as the electrical rating of the appliance, and:
2. The cord should be arranged so that it will not drape over the countertop or tabletop
where it can be pulled on by children or tripped over unintentionally.
POWER CORD SAFETY TIPS
1. Never pull or yank on cord or the appliance.
2. To insert plug, grasp it firmly and guide it into outlet.
3. To disconnect appliance, grasp plug and remove it from outlet.
4. Before each use, inspect the line cord for cuts and/or abrasion marks. If any are found,
this indicates that the appliance should be serviced and the line cord replaced. Please
return it to an authorized service representative.
5. Never wrap the cord tightly around the appliance, as this could place undue stress on
the cord where it enters the appliance and cause it to fray and break.
DO NOT OPERATE APPLIANCE IF THE LINE CORD SHOWS ANY DAMAGE OR IF
APPLIANCE WORKS INTERMITTENTLY OR STOPS WORKING ENTIRELY.
CAUTION: To ensure continued protection against risk of electric shock, connect to
properly grounded outlets only.
IMPORTANT: During the first few minutes of initial use, you may notice smoke
and/or a slight odor. This is normal and should quickly disappear. It will not recur after
appliance has been used a few more times.
This appliance is not intended for use by persons (including children) with reduced
physical, sensory or mental capabilities, or lack of experience and knowledge, unless they
have been given supervision or instruction concerning use of the appliance by a person
responsible for their safety.
5
RJ14-4-GB
BEANS
3-4 SCOOPS
1-2 SCOOPS
BEANS
START
GROUNDS
OFF
Grind Basket:
Side View
Grind Basket:
Top View
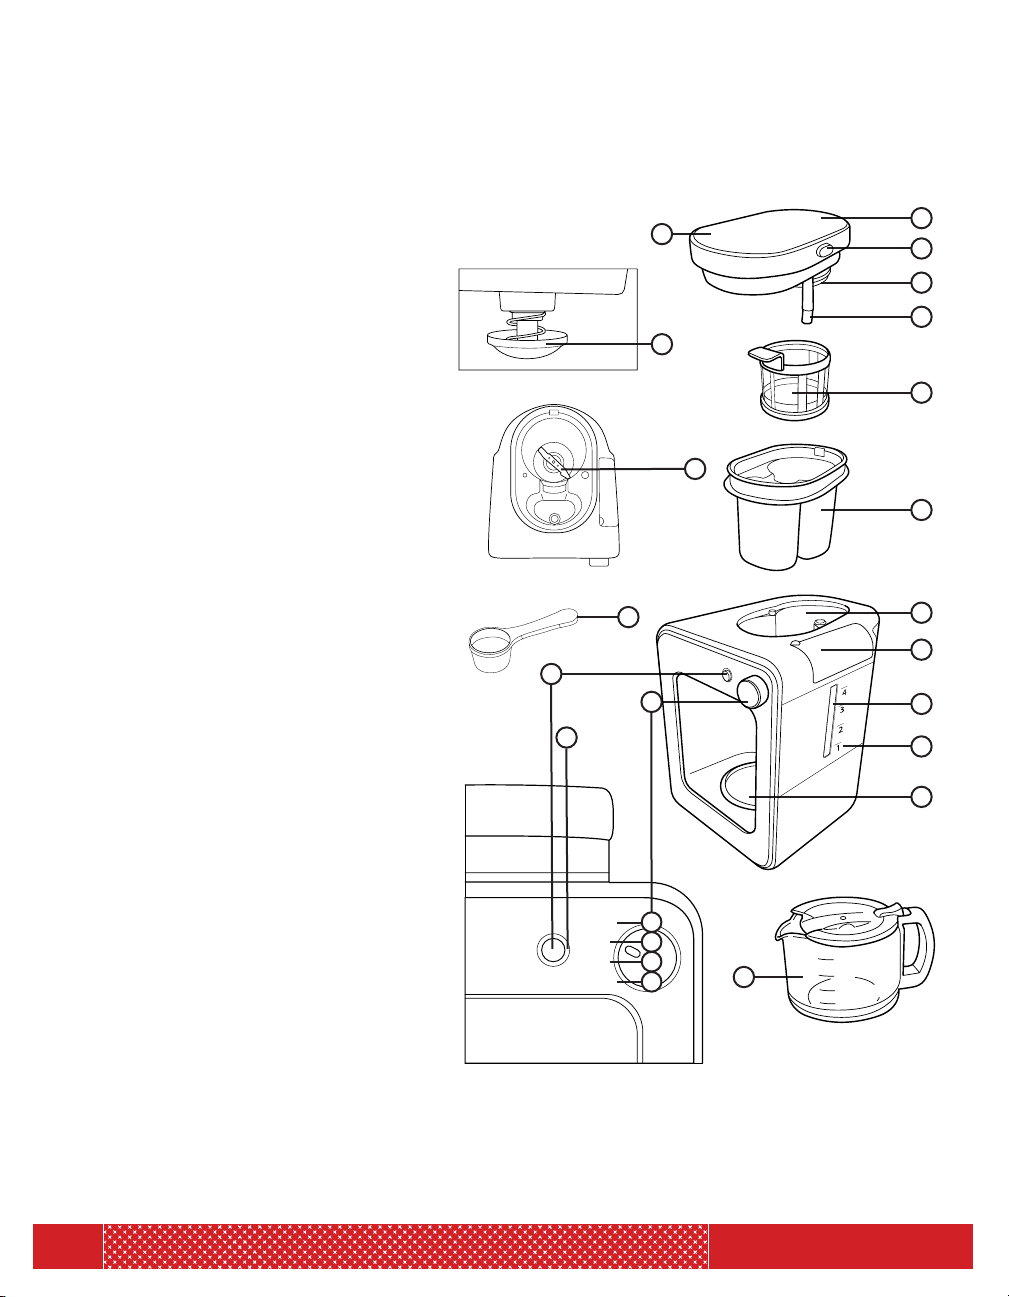
FEATURES
1. Steam Vent
2. Lid Release Button
3. Coffee Filter Lid
4. Water Pump Spout
5. Lid
6. Anti-Drip Valve
7. Coffee Filter
8. Blade
9. Grind Basket
10. Measuring Spoon (~1 tbsp)
11. Grind Basket Holder
12. Water Tank Lid
13. Water Tank
14. Water Tank Measurements
15. Warming Plate
16. Start Button
17. Control Dial
a. Beans (3-4 Scoops) Setting:
Use the control dial to select
this setting when using whole
coffee beans. May be used
with 3-4 scoops to make 3-4
cups of coffee.
b. Beans (1-2 Scoops) Setting:
Use the control dial to select
this setting when using whole
coffee beans. May be used
with 1-2 scoops to make 1-2
cups of coffee.
c. Grounds Setting:
Use the control dial to select
this setting when using
ground coffee beans. May be
used with 1-4 scoops to make
1-4 cups of coffee.
d. Off Setting
18. Indicator Light
19. Glass Coffee Carafe
1
2
3
4
7
9
12
11
13
14
15
5
19
8
6
16
18
17
10
1
3
2
4
(Removable for cleaning)
(1-4 cups)
a
b
c
d
6
RJ14-4-GB
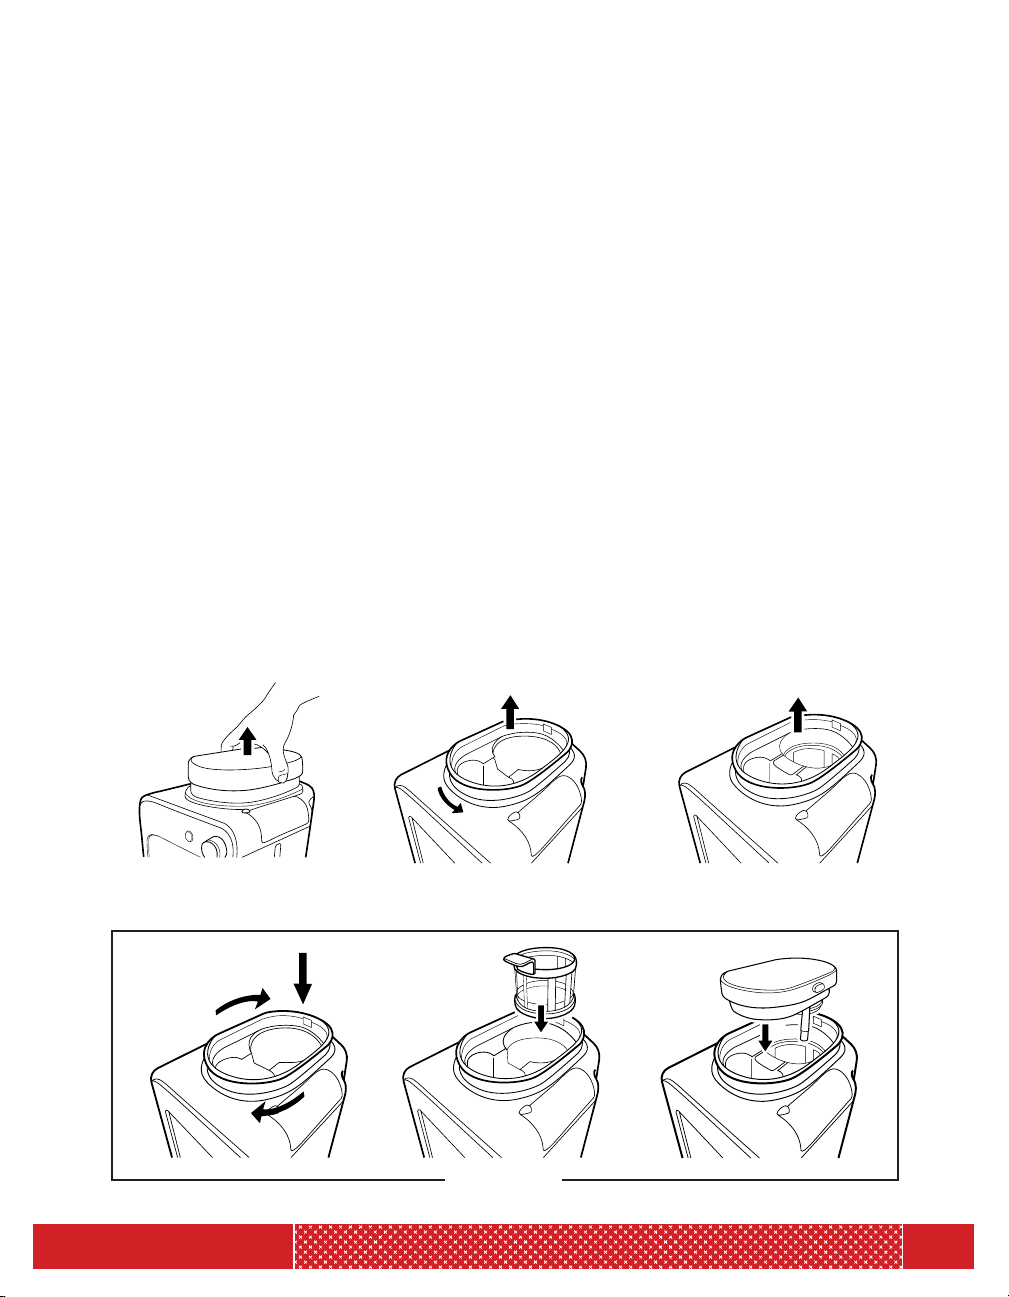
BEFORE FIRST USE
1. Read all instructions and follow them carefully.
2. Remove all packing materials and stickers from the inside and outside of the Coffee Maker.
Gently wipe down exterior with a damp cloth or paper towel. Never immerse the Coffee
Maker, its base, cord or plug in water or any other liquids. The electrical connections must
never come into contact with water or any other liquids.
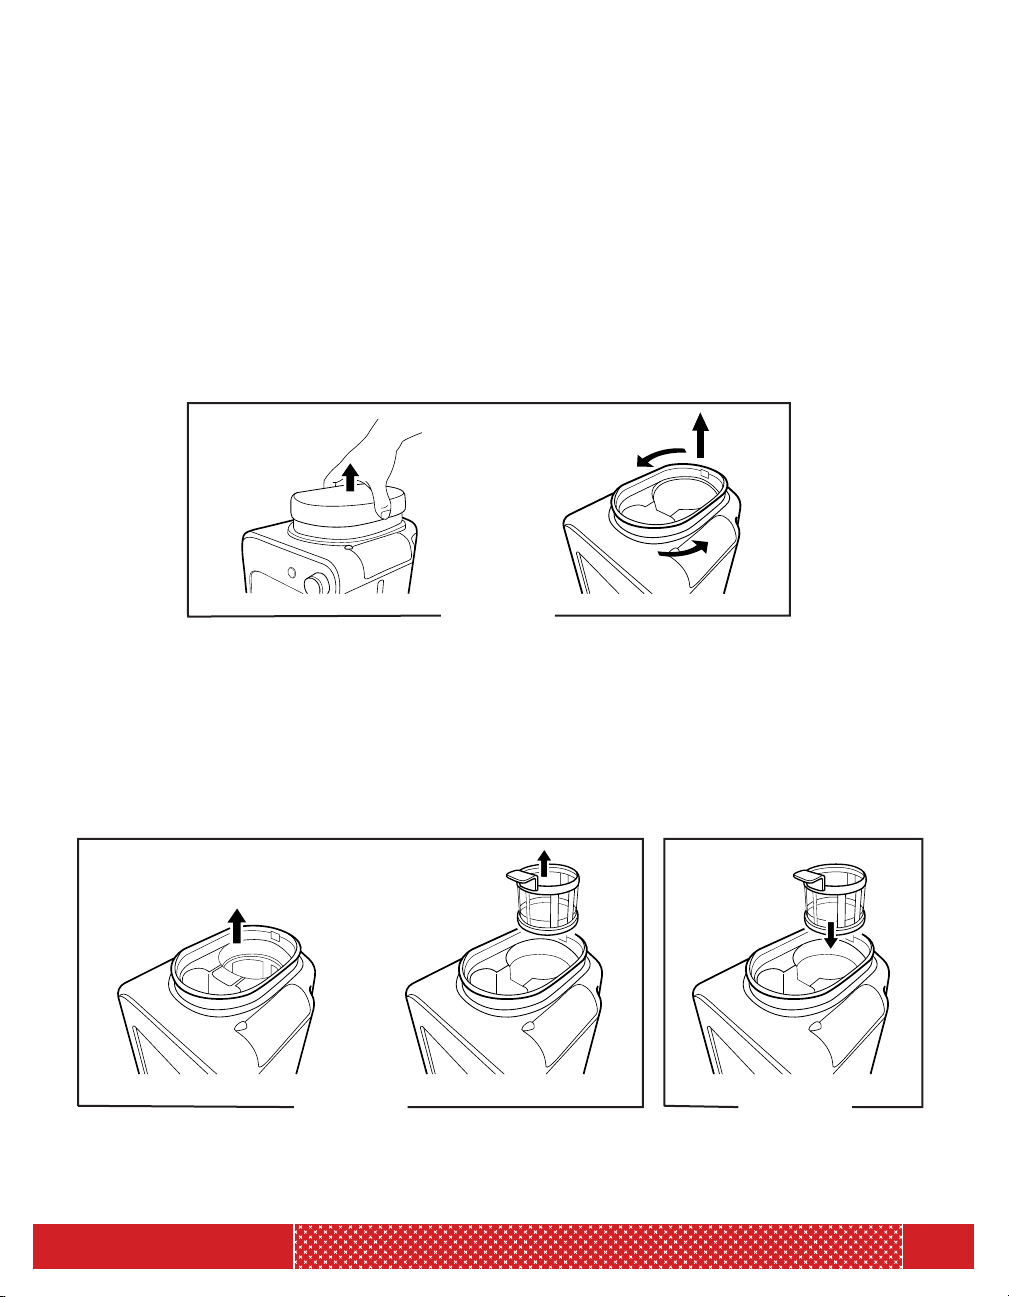
3. Press the lid release button and pull lid up to remove. (See Figure 1.)
4. Twist the grind basket to the right and lift to remove. (See Figure 2.)
5. Remove coffee filter by using the coffee filter’s handle to lift up and unsnap.
(See Figure 3.)
6. Wash all removable parts, except for the lid, with a sponge and warm, soapy water. Rinse
lid with water. Dry completely.
7. To reattach parts: A) Position the grind basket over the grind basket holder on a 45 degree
angle with the blade portion positioned in the back. Push the basket into the grind basket
holder; turn to the left to lock into place. Note: The Coffee Maker will not work if the grind
basket is not properly locked in place. B) Insert the coffee filter by positioning the coffee
filter’s handle toward the front of the Coffee Maker. Use the coffee filter’s handle to place
coffee filter into the back of the grind basket. Push down to snap into place. C) Close the
lid by placing the water pump spout into the hole on the right of the grind basket. Hold the
lid release button and push down until the lid is securely in place. (See Figure 4.)
8. Before brewing coffee for the first time, use the instructions below to brew a full, 4-cup
carafe of hot water with NO coffee beans or grounds. This will prime the Coffee Maker for
use and clean out any dust that may have accumulated before use.
OPERATING INSTRUCTIONS
(Figure 1) (Figure 2) (Figure 3)
(Figure 4)

7
RJ14-4-GB
HOW TO USE
1. Fill glass coffee carafe with desired amount of filtered water.
TIP: Use the water measurement markings on the carafe as a guide.
2. Open the water tank lid.
3. Use the carafe to carefully fill the water tank. Close the lid. Place carafe on the warming plate.
4. Press the lid release button and pull lid up to remove.
5. Ensure the coffee filter is securely snapped into place.
6. Place the desired amount of coffee beans or grounds into the back of the grind basket
where the blade and coffee filter are located. Put 1 scoop of whole coffee beans or ground
coffee per 1 cup of water into the back of the grind basket where the blade and coffee
filter are located. (The brewed, filtered coffee travels through the front portion of the
grind basket and into the carafe.)
7. Reattach the lid by placing the water pump spout into the hole on the right of the grind
basket. Hold the lid release button and push down until the lid is securely in place.
(See Figure 1.)
8. Use the control dial to select corresponding brew setting and amount. If using ground
coffee, use the “Grounds” setting. If using whole coffee beans, select the “Bean, 1-2
Scoops” setting or the “Bean, 3-4 Scoops” setting depending on the amount of beans or
grounds being used. The blue indicator light will illuminate.
9. Press the start button. Once START is selected, the blue indicator light will flash for the
duration of the grind (if using) and brew cycle. Once the Coffee Maker beeps three
times and the blue indicator light stops flashing, coffee is ready.
Warning: Do not place face, hands or any other body part over the steam vent while
coffee is brewing—steam is hot and can cause burns.
10. When blue indicator light stops flashing, carefully remove carafe from warming plate.
Warming plate will remain on and heated for up to 30 minutes.
Warning: Use caution when pouring coffee—it will be very hot!
11. Turn Coffee Maker off by setting the control dial to OFF.
12. Allow Coffee Maker to cool completely before cleaning.
OPERATING INSTRUCTIONS
8
RJ14-4-GB
OPERATING INSTRUCTIONS
HOW TO REMOVE AND REATTACH COFFEE FILTER
1. To remove coffee filter, use the coffee filter’s handle to lift up and unsnap.
(See Figure 6.)
2. To reattach coffee filter, position the coffee filter’s handle toward the front of
the Coffee Maker. Use the coffee filter’s handle to place coffee filter into the
back of the grind basket. Push down to snap into place. (See Figure 7.)
HOW TO REMOVE AND REATTACH GRIND BASKET
(NOTE: THE COFFEE MAKER WILL NOT WORK IF THE GRIND BASKET IS NOT PROPERLY LOCKED IN PLACE. )
1. To remove grind basket, first remove lid. Then twist the grind basket to the right
and lift to remove. (See Figure 5.)
2. To reattach grind basket, position the grind basket over the grind basket holder
on a 45 degree angle with the blade portion positioned in the back. Push the
basket into the grind basket holder; turn to the left to lock into place.
(Figure 5)
(Figure 6) (Figure 7)

9
RJ14-4-GB
CLEANING AND MAINTENANCE
CLEANING AND MAINTENANCE
1. After Coffee Maker cools completely, use the lid release button to remove lid.
2. Twist the grind basket to the right and lift to remove. Discard ground coffee.
Remove coffee filter by using the coffee filter’s handle to lift up and unsnap. Rinse
or wash all removable parts, except for the lid, with a sponge and warm, soapy
water. Rinse lid. Dry completely.
3. Rinse or wash Glass Coffee Carafe after every use.
4. Wipe down Coffee Maker’s housing and warming plate with a damp cloth or paper
towel as necessary.
DESCALING INSTRUCTIONS
For the best tasting coffee, descale the Coffee Maker regularly to remove any mineral
deposits that may accumulate over time. Descaling is recommended at least once a
month, or more regularly if your water is very hard.
HOW TO DESCALE
1. Fill water tank with 1/2 cup white vinegar and 3 1/2 cups water.
2. Place carafe on warming plate.
3. Use the control dial to select “Grounds" setting.
4. Press START.
5. Once the Coffee Maker beeps three times and the blue indicator light stops flashing,
discard brewed water mixture.
6. Repeat steps 1-5 two more times with 4 cups water at a time.
10
RJ14-4-GB
TROUBLESHOOTING
If you have a problem, you may find the solution in the table below. In case these
solutions can't solve your problem yet, please contact Chefman Customer Service for
assistance.
Problem Solution
The Coffee Maker does not work. 1. Ensure the voltage indicated on the appliance cor-
responds to the power outlet.
2. Make sure the Coffee Maker has been plugged in,
the control dial is set to the desired setting and you
have pressed START.
Water leaks out of the Coffee Maker. Ensure the water tank is not filled above the MAX
level.
The Coffee Maker produces a lot of noise during
working.
1. Ensure the water tank is not filled with hot water.
2. Ensure the Coffee Maker is placed on a flat, sturdy
surface.
3. The Coffee Maker needs to be descaled. See Desca-
ling Instructions on page 9.
There are coffee grounds in the carafe. 1. Ensure the grind basket did not overflow—it can
overflow when it contains too many coffee grounds.
2. Ensure carafe is positioned correctly under grind
basket.
3. Carafe may have been removed from warming plate
for more than 30 seconds while coffee was brewing.
4. Ensure coffee filter is not ripped or torn.
5. Ensure coffee filter is securely snapped into place.
Brewing takes longer than usual. The Coffee Maker needs to be descaled. See Descal-
ing Instructions on page 9.
The Coffee Maker switches off before the water
tank is empty.
The Coffee Maker needs to be descaled. See Descal-
ing Instructions on page 9.

11
RJ14-4-GB
TROUBLESHOOTING
If you have a problem, you may find the solution in the table below. In case these
solutions can not solve your problem yet, please contact Chefman Customer Service
for assistance.
The coffee doesn’t taste strong enough. 1. Increase amount of whole beans or coffee
grounds to 1 heaping scoop per 1 cup of water.
2. Try a darker roast coffee.
The coffee does not taste good. Do not leave brewed coffee on the warming plate
for too long, especially if it only contains a small
amount of coffee. It can continue to “cook” the
coffee and cause it to become bitter.
The coffee is not hot enough. 1. Ensure that the carafe is properly positioned on
the warming plate.
2. Brew a larger amount of coffee.
The carafe is difficult to place on or remove from
the warming plate.
1. Ensure that the carafe’s lid and grind basket are in
the correct position.
2. Carefully tilt the carafe a little to place it on or
remove from the warming plate.

12
RJ14-4-GB
HELPFUL TIPS
• A standard cup of coffee typically requires 1 scoop of whole beans or
ground coffee.
• For a stronger cup of coffee, use a heaping scoop of coffee beans or
grounds. For a weaker cup of coffee, use less.
• For best results, don’t reuse brewed coffee grounds.
• Rinse or wash removable parts after every use.
• Allow all removable parts to dry completely before reattaching them.
• Allow the Coffee Maker to dry completely by leaving the Coffee Maker’s lid
open after use.

13
RJ14-4-GB
NOTES
14
RJ14-4-GB
NOTES

15
RJ14-4-GB
CHEFMAN
®
warrants, subject to the conditions stated below, that from the date of purchase, this product will be free
from mechanical defects for a period of ONE (1) year. CHEFMAN
®
, at its option, will repair or replace this product found
to be defective during the warranty period. Should this product become defective by reason of improper workmanship
or material defect during the specified warranty period, CHEFMAN
®
will repair or replace the same effecting all necessary
parts replacements for a period of one year from the date of purchase. If product is no longer available we will replace it
with a product of equal value. Transportation charges on parts, or products in whole, submitted for repair or replacement,
under this warranty, must be borne by the purchaser. This warranty is void if the product is used for other than single-family
household use or subjected to any voltage and waveform other than as specified on the rating label (e.g., 120V ~ 60 Hz).
This warranty is available to consumers only. You are a consumer if you own a CHEFMAN
®
product that was purchased at
retail for personal, family or household use. Except as otherwise required under applicable law, this warranty is not available
to retailers or other commercial purchasers or owners.
CONDITIONS: This warranty is valid for the original USA and Canada retail purchaser from the date of initial retail
purchase and is not transferable. Keep the original sales receipt. Proof of purchase is required to obtain warranty service or
replacement. Dealers, service centers, or retail stores do not have the right to alter, modify or in any way, change the terms
and conditions of this warranty. Warranty registration is not necessary to obtain warranty on CHEFMAN
®
Products. Save
your proof of purchase receipt.
ABOUT YOUR PRODUCT WARRANTY: Most warranty repairs are handled routinely, but sometimes requests for warranty
service may not be appropriate. For example, warranty service would NOT apply if the product damage occurred because
of misuse, lack of routine maintenance, shipping, handling, 3rd party warehousing or improper installation. Similarly, the
warranty is void if the manufacturing date or the serial number on the product has been removed or the equipment has
been altered or modified. During the warranty period, the authorized service dealer, at its option, will repair or replace any
part that, upon examination, is found to be defective under normal use and service.
NORMAL WEAR: This warranty does not cover normal wear of parts or damage resulting from any of the following:
negligent use or misuse of the product; improper voltage or current; use contrary to the operation instructions; deviation
from instructions regarding storage and transportation; repair or alteration by anyone other than CHEFMAN
®
or an
authorized service center. Further, the warranty does not cover Acts of God, such as fire, flood, hurricanes and tornadoes.
CHEFMAN
®
shall not be liable for any incidental or consequential damages caused by the breach of any express or implied
warranty. Except to the extent prohibited by applicable law, any implied warranty of merchantability or fitness for a
particular purpose is limited in duration to the duration of the above warranty. Some states, provinces or jurisdictions do
not allow the exclusion or limitation of incidental of consequential damages or limitations on how long an implied warranty
lasts, so the above limitations or exclusion may not apply to you. This warranty gives you specific legal rights, and you may
also have other rights that vary from state to state or province to province.
HOW TO OBTAIN WARRANTY SERVICE: If your CHEFMAN
®
product should prove to be defective within the warranty
period, we will repair it, or if we think necessary, replace it. To obtain warranty service, simply email customerservice@
chefman.com or call our toll-free number 1-888-315-6553 for additional information from our Customer Service
Representatives, or send the defective product to Customer Service at Chefman, 200 Performance Drive, Mahwah, NJ
07495.
This warranty is effective for the time periods listed above and subject to the conditions provided for within this policy.
CALIFORNIA RESIDENTS ONLY:
California law provides that for In-Warranty Service, California residents have the option of returning a nonconforming
product (A) to the store where it was purchased or (B) to another retail store which sells CHEFMAN
®
products of the same
type. The retail store shall then, at its discretion, either repair the product, refer the consumer to an independent repair
facility, replace the product, or refund the purchase price less the amount directly attributable to the consumer’s prior
usage of the product. If the above two options do not result in the appropriate relief to the consumer, the consumer may
then take the product to an independent repair facility if service or repair can be economically accomplished. CHEFMAN
®
and not the consumer will be responsible for the reasonable cost of such service, repair, replacement, or refund for
nonconforming products under warranty.
CHEFMAN
®
is a registered trademark of RJ BRANDS, LLC.
TERMS & CONDITIONS
Limited Warranty

16
RJ14-4-GB
WARRANTY
Phone lines available Monday to Friday, 9am-5pm EST
1-YEAR LIMITED WARRANTY
Description of Malfunction:
Return your completed warranty card to:
RJ Brands
200 Performance Drive
Suite 207
Mahwah, NJ
07495
All data fields are required in order for us to process your request:
Model Number:
Full Name:
Address:
Phone:
Date of Purchase*:
Retail Store of Purchase:
*We recommend you keep the receipt with this warranty card
Email: (If applicable)
888.315.6553 cus[email protected]om
MODEL:
RJ14-4-GB
GRIND & BREW
GRIND & BREW
COFFEE maker
COFFEE maker
®

17
RJ14-4-GB
®
CHEFMAN.COM | @MYCHEFMAN