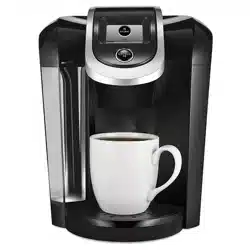
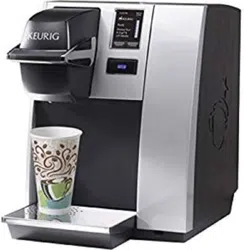
Keurig K150P Coffee Makers
Product's Documents
Below are documents related to this product, you can read online or download:
- Owner's manual - (English) Read Online | Download pdf
Keurig K-Cup K150 & K150P Brewer OWNER’S MANUAL

When using electrical appliances. basic safety precautions should be followed. including the following:
Helpful Hints
1. Plug the brewer into its own grounded outlet.
If the electric circuit is overloaded with other appliances. your brewer may not function properly. The brewer should be operated on its own circuit. separate from other appliances.
2. Keep your brewer turned “ON” at all times.
To brew a fresh cup of coffee. tea. hot cocoa. or other beverage anytime you want. we suggest you keep your brewer turned “ON” all the time.
However. the brewer is fully programmable so you can sett to turn on and off automatically to match your schedule. Or. if you prefer. set the brewer to automatically turn off after a period of time. Follow the simple instructions on pages
12-13 to make using the brewer convenient for you
3. For the best tasting gourmet coffee. tea. hot cocoa. or other beverage. Keurig recommends the use of filtered water in the brewer.
Wealso recommend the Omnipure Filter Kit. Keurig (#5572)
4. Customize Your Size. Flavor & Brew.
With the choice of over 250 varieties of K-Cup pods and 5 brew sizes (4 02. 6 oz. 802. 10 oz. and 12.02.) your Keurig brewer gives you endless options to customize the size. flavor. and brew that's perfect for you. For a strong. intense cup. select an Extra Bold K-Cup pod (with up to 30% more ground coffee than regular varieties] and brew the size that’s right for you. The smaller the brew size. the more intense the flavor in your cup. The larger the brew size. the less intense the flavor in your cup.
5. Brewing into a travel mug.
To brew into a travel mug. simply remove the Drip Tray Assembly and place the travel mug onthe Drip Tray Base
6. Descale the brewer regularly.
Please refer to pages 15 and 16 for instructions.
Unpacking the Brewer
1. Place the brewer box ona large steady surface (such as a table or countertop] or on the floor. Open the box.
2. Turn the box on its side with the front of the box face down.
3. Reach into the box and grasp the foam insert that contains the brewer.
4. Carefully pull the foam insert toward you and out of the box. The brewer will still be encased in the polyfoam and be on its side
5. Remove the top polyfoam packaging material.
6. Carefully lift brewer off of the bottom polyfoam and place it upright ona flat. steady surface.
7. Lift plastic bag off of brewer.
8. Record the serial number for this brewer on page 3 of this guide. The serial number can be found on the side of the brewer box or on the bottom of the brewer.
9. Place the brewer upright ona flat. steady surface. Remove tape holding Water Reservoir in place.
We recommend you save all packing materials in case future shipping of the product is necessary.
WARNING: Keep all plastic bags away from children.
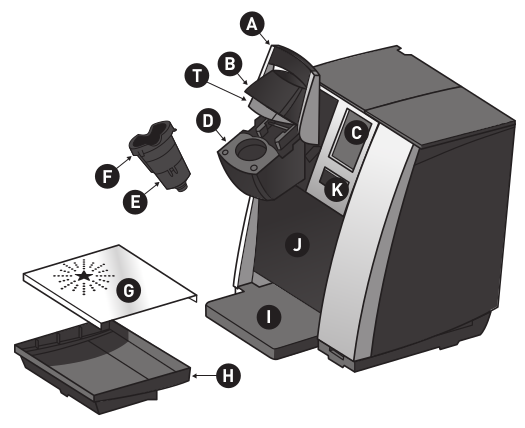
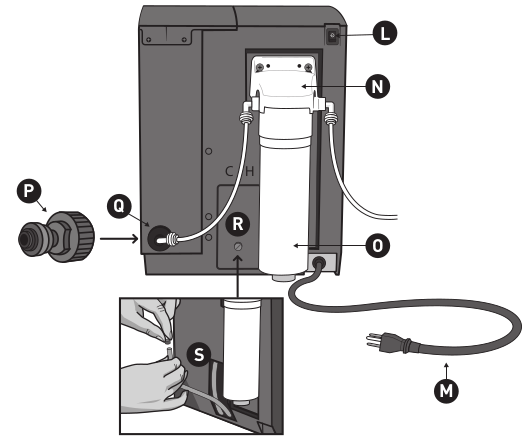
Back view with optional Omnipure KQ8A Water Filter #5572 connected.
A. Handle
B. Lid
C. LCD Screen
D. K-Cup Pod Assembly Housing
E. Funnel
F. K-Cup Pod Holder (Eand Fare the K-Cup Pod Holder Assembly)
G. Drip Tray Plate
H. Drip Tray
I. Drip Tray Base
J. Housing
K. BREW Button
L. Power Switch
M. Power Cord
N. Filter Mounting Bracket
O. Omnipure KA8A Water Filter #5572 (not included) (Nand O are the Filter Kit Assembly)
P. 3/4 Garden Hose Connector Part #50-201004-010 (not included)
Q. Brewer Inlet Connect
R. Drain Hatch and Knob
S. Drain Tubes and Plugs
T. Removable Puncture Plate
IMPORTANT: You cannot use your Keurig brewer until it has been set up for its first use.
NOTE: If the brewer has been exposed to temperatures below freezing. allow the brewer at least two hours to reach room temperature before brewing. A frozen or extremely cold brewer will not operate.
CAUTION: This brewer is designed to handle local water pressures from 40 psig up to 125 psig.
Consult a licensed plumber for water pressures in your area. Use plumbing fittings and tubing specified to withstand 125 psig.
WARNING: Keurig requires the use of an external water filter such as the Omnipure KQ8A Water
Filter. available from Keurig Green Mountain. Inc. (#5572). Failure to use a filter invalidates the brewer Warranty.
Plumbing Fitting Connections
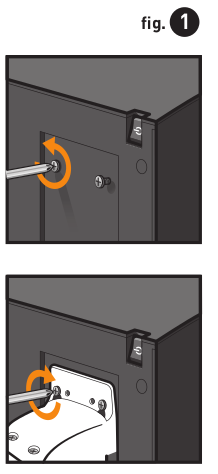
1. An external filter (Omnipure KQ8A Water Filter #5572) can be mounted on the rear surface of the brewer using the mounting screws provided [fig. 1} See back view of brewer on page 5.
2. Loosen the two mounting screws located on the upper-rear of the brewer and hang the Omnipure KQ8A Water Filter (#5572).
3. Tighten the two mounting screws (be careful not to over tighten)
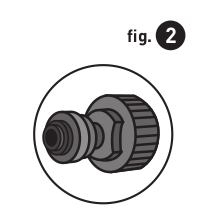
NOTE: The Omnipure KQ8A Water Filter (#5572) assembly comes with 1/4 FPT ports for both inlet and outlet and the plumbed water inlet to the brewer is 3/4 Male Garden Hose Thread (fig. 2) {Invensys solenoid valve). 1/4 OD LLDPE (Linear Low Density Polyethylene] tubing is recommended (NSF compliant between the filter assembly and the brewer. NSF compliant fittings are recommended such as High Density Polypropylene Type).
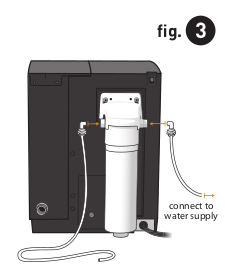
4. Connect the INLET’ port of the filter assembly to the local water supply (fig. 3)
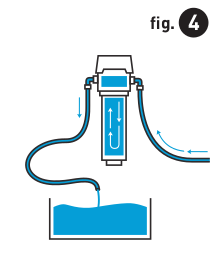
5. Connect a Long length of tubing to the EXIT
6. Port of the filter assembly. DO NOT CONNECT TOTHE BREWER YET.
The filter needs an initial flush to clear any carbon deposits. Route the long length of tubing from the EXIT port toa container or sink
7. Turn on water supply and allow at least 4 gallons of water to flush through the filter (fig. 4)
8. Turn off water supply.
9. Cut the tubing to proper length and connect to inlet plumbing port on the brewer by using water inlet valve 3/4 hose connector available from Keurig Green Mountain. Inc. Part #50-201004-010 {not included) [fig.5)

10. Turn on water supply.
Setting Up Your Brewer
1. Remove all pieces of packing tape from the brewer and Drip Tray. Remove the clear plastic film from the LCD Screen. Unwrap the Power Cord and plug the brewer into a grounded outlet. Ensure your brewer is plumbed (refer to page 4).
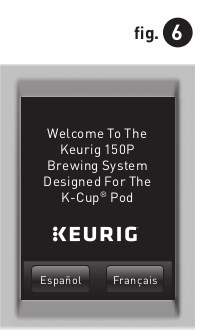
2. Turn the brewer on. the Power Switch is located at the top left hand side of the brewer on the back. The brewer's LCD Screen will display the power up welcome screen (fig. 6)
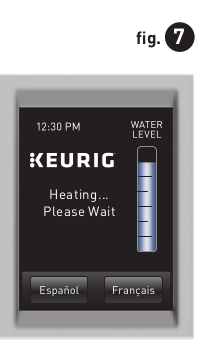
3. The brewer will automatically fill the internal water tank with water and then the water will be heated. This will take about 3 minutes.
During the heating period. “HEATING PLEASE WAIT” will be displayed on the LCD Screen (fig. 7)
4. Place a 10 oz. mug on the Drip Tray Plate. then lift and lower the Handle.
The BREW Button will now be illuminated. Press the BREW Button to start a cleansing brew. NOTE: A K-Cup pod should not be used for this sequence.
5. When the cleansing brew is complete. the brewer will go into its idle state and will be ready to brew your first K-Cup pod
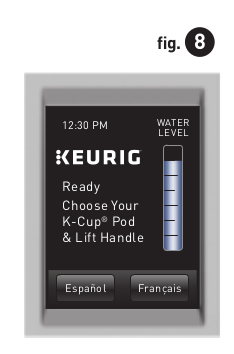
Ready to Brew Your First Cup
1. The LCD Screen will be in its idle state (fig. 8)
2. Lift the Handle. The K-Cup Pod Holder will open toward you (fig. 9)

3. Select a K-Cup pod
NOTE: Do not remove the foil lid or puncture the K-Cup pod. tal
4. Place a K-Cup pod in the K-Cup Pod Holder (fig. 10)
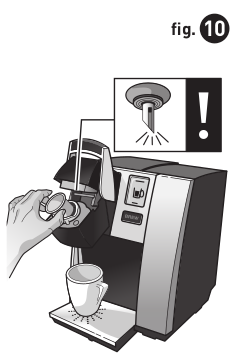
CAUTION: There are two sharp needles that puncture the K-Cup pod. one above the K-Cup Pod Holder and the other in the bottom of the K-Cup Pod Holder. To avoid risk of injury. do not put your fingers in the K-Cup Pod Assembly Housing. a
5. Lower the Handle to close the Lid over the K-Cup Pod Holder. (When it is closed completely. the BREW Button will flash up to 60 seconds.)
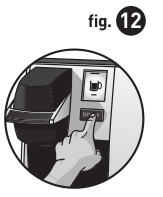
6. Place a mug on the Drip Tray Plate and select your brew size fig. 11]. then press BREW fig. 12)
NOTE: If you do not push the BREW Button in 60 seconds. the BREW Button will be disabled to prevent accidental activation. Re-activate the BREW Button by lifting and lowering the Handle completely.
7. There may be a short pause prior to coffee being dispensed. The entire brew process lasts for approximately 1 minute and ends with a burst of air to remove all liquid from the K-Cup pod.
CAUTION: There is extremely hot water in the K-Cup Pod Holder during the brew process.
To avoid risk of injury. do not lift the Handle or open the K-Cup Pod Assembly Housing during the brew process.
8. The end of brew is indicated by "KEURIG BREWED ENJOY".
9. Lift the Handle. remove and dispose of the used K-Cup pod
CAUTION: K-Cup” pod will be hot.
10. Enjoy your first cup of Keurig HOT gourmet coffee. tea. hot cocoa. or other beverage!
NOTE: After brewing a hot cocoa K-Cup pod. we recommend running a hot water brew cycle without a K-Cup pod.
11. Your brewer may display "HEATING PLEASE WAIT" as it heats water for the next brew cycle
Stopping the Brew Process
If you need to stop the brewing after the process has started. press and release the Power Switch to turn the brewer OFF.
The flow of coffee. tea. hot cocoa. or other beverage will stop and the heating element and the LCD Screen will shut off.
NOTE: You may get less coffee. tea. hot cocoa. or other beverage in your cup during your next brew.
We recommend that you perform a cleansing brew with water only after a terminated brew. Then your next brew will be the volume you have selected.
Adding Water
Your brewer has been configured at the factory to be direct plumbed. however. the brewer can also be converted into a pour over model with a Cold Water Tank Spare Part. To order. please call your Keurig Authorized Distributor.
Brewing Iced Beverages
Your iced tea and iced coffee taste best when fresh-brewed hot over ice.
1. Filla 16.02. mug (do not use glass) to the top with ice and place a K-Cup pod into your brewer.
2. Select your brew size. we recommend selecting a 6 oz. or 8 oz. brew. Press the BREW Button
3. Stir and enjoy!
IMPORTANT: Do not brew into a cup made of glass. Doing so may cause the glass to crack or break.
Brewing Hot Water
Your brewer is able to produce hot water for use in cooking. making soups. oatmeal. etc. Simply lift and lower the Handle on the brewer without adding a K-Cup pod. The BREW Button will flash. Be sure to have a mug on the Drip Tray Plate and then press the BREW Button.
Menu Controls
To enter the Menu Mode the brewer should be plugged in and the power must be off.
Press and hold your finger on the display for about 10 seconds while pressing and releasing the Power Switch [fig. 13).
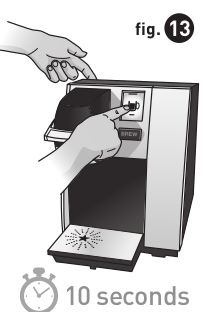
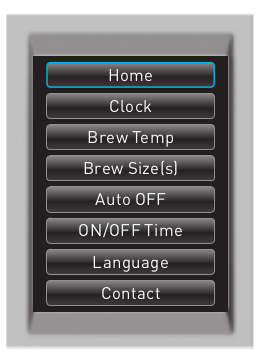
Once the Menu Screen appears [fig. 14) remove your finger.
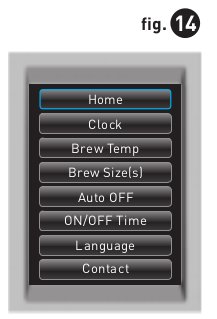
Press any line item to enter the set up for that particular feature. Please reference the Menu Navigation on page 10
If you are experiencing any problems with your brewer. please contact your Keurig Authorized Distributor.
Menu Mode Navigation
Home
Press “HOME” at any time to return your brewer to an idle state
Clock
Setting the clock is optional. To set the clock. follow the instructions on page 11
Brew Temp
The brew temperature is pre-set at 193°F. You do not have to program the brew temperature but you can adjust it up or down by 5°. Simply follow the instructions on page 11
Brew Size(s)
Five brew sizes are available: 4 oz. 6 0z. 8 oz. 10 oz. and 12 oz To program the brew sizes refer to page 12
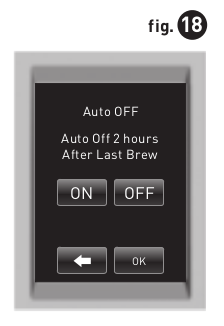
Auto OFF
Auto Off allows you to program your brewer to automatically turn off two hours after the last brew. Refer to page 12 for programming instructions.
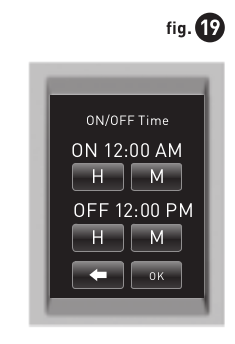
ON/OFF Time
You can leave your brewer on all the time and use the Power Switch to turn it off. Or you can program the brewer to automatically turn on or off at a specific time as shown on page 12.
Language
This brewer is shipped with English as the default language. To change the language. follow the instructions on page 13.
Contact
The contact setting features allows you to program the contact information you need for brewer support and help. To program. follow the instructions on page 13.
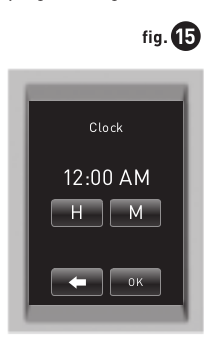
Setting the Clock
Setting the clock is optional. When the clock is set. the time will appear on the LCD Home Screen. NOTE: You must set the clock if you will be programming the Auto On/Off Time feature.
1. From the Menu Mode. press “CLOCK
2. The set clock screen will display “DISABLED” if the brewer is new or if electrical power has been interrupted
Press "DISABLED" to seta time. Press "H repeatedly to advance the hour in steps or hold it down to scroll through the hours quickly. When you have set the hour then press the "M" to set the minutes. press repeatedly to advance by a minute each time or keep it pressed to scroll quickly (fig. 15).
3. Press "OK" when you are finished. The clock is now set
4. The correct time should now be displayed on the LCD Home Screen
NOTE: If power is interrupted to the brewer. follow the procedure above to reset the time as the clock will not be visible. Brew size and brew temperature menu settings will be restored automatically. All other settings will be restored automatically after clockis set.
NOTE: To disable the clock. press the time. However. the On/Off’ time setting will also be disabled.
Programming Brew Temperature (188°- 198° F)
The brewer brews at a preset temperature of 193°F. You can adjust this temperature up or down by 5°. Simply follow the instructions below
1. From the Menu Mode. press “BREW TEMP. x
2. The LCD Screen will now display the Brew Temperature programming options [fig. 16). The temperature 193°F (initial setting) will be displayed at the top of the LCD Screen to indicate the current temperature setting
3. Press the + symbol to increase the temperature and the - symbol to lower the temperature one degree at time.
4. Once you have reached your desired brew temperature. press “OK.” The brew temperature is now programmed.
NOTE: At high altitudes (over 5. 00 feet) if boiling occurs. use the temperature adjustment (-5') to Lower the temperature.
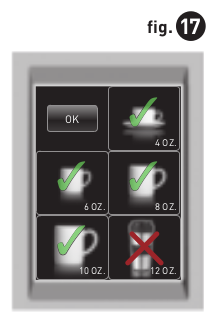
Programming Your Brew Size
All brew sizes are enabled in the default setting. If you want to disable any brew size. just press on the appropriate icons). Please follow instructions outlined below.
1. From the Menu Mode. press “SET BREW SIZE[S)
2. The LCD Screen will display all enabled brew sizes. To disable a brew size press the icon
The check mark will change to an “X’ indicating that the brew size is disabled (fig. 17). To enable a disabled size. press it again.
3. Once you have selected your desired brew sizels). press “OK.” The brew size(s) are now programmed.
NOTE: You can not delete all brew sizes. To enable a brew size you have already disabled. just press its icon and then press “OK.” The 8 oz. setting is the default brew size if all sizes have been disabled.
Programming On/Off Features
The brewer provides three modes so that you can enjoy gourmet coffee. tea. hot cocoa. or other beverage on your own schedule.
1. Leave the brewer “ON” all the time. The brewer can be left on all the time so that it is always ready to brew a fresh cup of gourmet coffee. tea. hot cocoa. or other beverage. To turn the brewer offat any time. simply press and release the Power Switch. Press and release the Power Switch again to restore power to the brewer. You will have to wait for the water to heat up before the brewer is ready to brew.
2. Program the brewer to “AUTO OFF.” The brewer can be programed to automatically turn off 2 hours after the last brew [fig. 18)
a. From the Menu Mode. press “AUTO OFF. The LCD Screen will now display the “AUTO OFF" programming option
b. To enable the “AUTO OFF" feature. press “ON.” "ENABLED" will appear on the screen and press “OK.” To disable the “AUTO OFF’ feature. press “OFF.” "DISABLED" will appear on the screenand press “OK.
3. Program the brewer for a specific On/Off Time. NOTE: To use this programming feature. the clock must be set to the correct time.
a. After setting the correct time [see “Setting The Clock” page 11). return to the Menu Mode and press "ON/OFF TIME.
b. To set the ON time. press “DISABLED. The display will change to a time of day. Press "H” to set the hours and “M” to set the minutes. Once the desired time is set. press "OK" to accept this time.
c. To set the OFF time. press “DISABLED. The display will change to a time of day. Press "H” to set the hours and “M” to set the minutes. Once the desired time is set. press "OK" to accept this time [fig. 19]
Language Settings
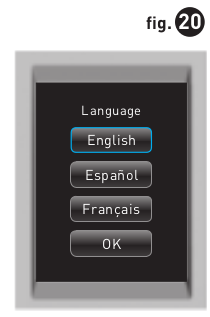
The brewer is shipped with English as the default language. To change the default to Francais or Espanol. follow the instructions outlined below.
Set Language
1. From the Menu Mode. press “LANGUAGE
2. The LCD Screen will now display the Language programming options [fig. 20)
3. Press the desired Language button. then press “OK” to confirm your selection
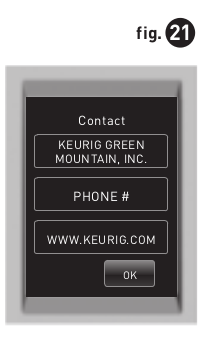
Contact Screen Settings
The contact screen is pre-programmed with the following information: Keurig Green Mountain. Inc. and www.Keurig.com
You can reprogram the brewer with your contact information. The contact screen will appear in the screen saver.
1. From the Menu Mode. press “CONTACT". The LCD Screen will display the Keurig default contact information [fig. 21)
2. Press the Upper [Company Name] Box. The Keypad will appear along with the current information (fig. 22). NOTE: Unless changed by the user. Keurig contact information will be present on the display.
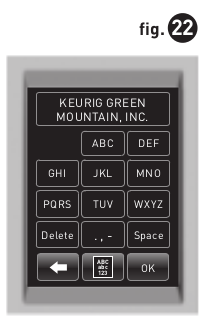
a. Press the Delete Key repeatedly to remove current information. Enter new information using the Keypad.
NOTE: To select Upper Case. Lower Case. Numerals. Upper Case Accents. Lower Case Accents. press the Keypad Change Key located at the bottom center of the screen.
b. Press "OK" to save your changes and return to the Main Contact Screen
NOTE: Pressing the Back Arrow Key will return to the Main Contact Screen without saving changes.
3. Press the Middle (Phone Number) Box. The Numeral Keypad Mode will appear along with the current information (fig. 23)
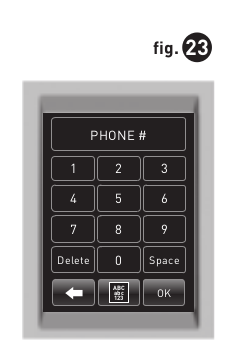
a. Delete current phone number. if any. and enter new information using the Keypad.
b. Press “OK” to save your changes and return to the Main Contact Screen
4. Press the Lower Box. This box can be customized to contain any information such as web/email address. contact name. etc (fig. 24)
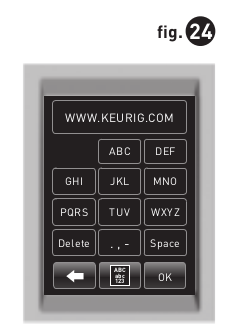
a. Delete or enter new information using the Keypad
b. Press “OK” to save your changes and return to the Main Contact Screen
c. In the Main Contact Screen (fig. 21). press “OK" to save the updated screen as the default and return to the Menu Screen
The brewer is now fully programmed. Press "HOME" on the Menu Screen to return your brewer to its idle state.
Cleaning External Parts
Regular cleaning of the brewer's external components is recommended. The following section provides instruction for standard cleaning procedures. For in-depth NSF certified instructions. please refer to the Cleaning and Sanitization Guide.
1. Never immerse the brewer in water or other liquids. The Housing and other external components may be cleaned with a damp. soapy. lint-free. non-abrasive cloth x
2. The Drip Tray can accumulate up to 12 oz. of overflow. The Drip Tray and Drip Tray Plate should be periodically inspected and rinsed clean To remove the Drip Tray Assembly. simply slide it toward you. keeping it level at all times to avoid spilling. The Drip Tray and Drip Tray Plate should not be placed in the dishwasher. They should be cleaned with a damp. soapy. lint-free. non-abrasive cloth and rinsed thoroughly.
Cleaning the K-Cup Pod Holder Assembly
1. Cleaning the Parts—The K-Cup Pod Holder Assembly can be placed onto the top shelf of a dishwasher.
NOTE: Use low temperature cycles in the dishwasher.
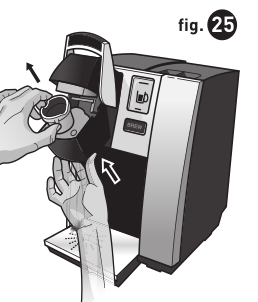
To remove the K-Cup Pod Holder Assembly from the brewer. open the cover by lifting the Handle.
Grasp the top of the K-Cup Pod Holder with one hand while pushing up on the bottom of the K-Cup Pod Holder from underneath with the other until it releases (fig. 25). After cleaning. align the K-Cup Pod Holder with the opening using the two frontribs as a guide. and snap ther into place from the top.
2. Cleaning the Funnel—The Funnel can be removed from the K-Cup Pod Holder by pulling on it until it pops off (fig. 26). The Funnel is dishwasher safe. To replace it. just snap it back onto the K-Cup Pod Holder.

3. Cleaning the Exit Needle—The exit needle is located on the inside bottorn of the K-Cup Pod Holder Assembly. Should a clog arise due to coffee grounds. it can be cleaned using a paper clip or similar tool. Remove the K-Cup Pod Holder Assembly and detach the Funnel. Insert the paper clip [as shown in fig. 26) into the exit needle to loosen the clog. then flush with fresh water. The K-Cup Pod Holder Assembly can be placed onto the top shelf of a dishwasher.
NOTE: Use low temperature cycles in the dishwasher.
4. Cleaning the Puncture Plate— The Puncture Plate can be removed by grasping the finger grips of either side and pulling forward [fig. 27]
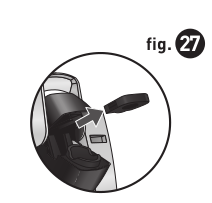
Once removed. spray the Puncture Plate with detergent. brush clean and rinse if necessary. Be sure to replace the Puncture Plate after cleaning to ensure proper brewer operation
CAUTION: There are sharp needles that puncture the K-Cup pod above the K-Cup Pod Holder and in the bottom of the K-Cup Pod Holder. To avoid risk of injury. do not put your fingers in the K-Cup Pod Assembly Housing.
Descaling Your Brewer
Depending on the mineral content of your water. calcium deposits or scale may build up in your brewer. Scale is non-toxic but if left unattended can hinder brewer performance. Regularly descaling your brewer every 3 to 6 months helps maintain the heating element. and other internal parts that come in contact with water. Calcium deposits may build up faster. making it necessary to descale more often
Before you begin. you will need a large ceramic mug. fresh water. Keurig Descaling Solution. and access toa sink. Do not use a paper cup
The following outlines the steps required to prepare the brewer before the descaling procedure:
1. Unplug the brewer from the power supply.
2. Disconnect or interrupt the external water supply feeding the brewer.
3. Drain the internal hot and cold water tank (refer to page 17).
4. Remove the two screws located on the back. top. left of the brewer. Remove the top cover to gain access to the cold water tank.
5. Pour the entire bottle of Keurig Descaling Solution into the opening. Then refill the empty bottle with bottled or filtered water and pour into the opening.
6. Reconnect the power supply.
7. Proceed with the descaling procedure on page 16
Descaling Procedure
STEP 1: FIRST DESCALING SOLUTION RINSE
+ Press the Power Switch to power on the brewer.
+ Place a large mug on the Drip Tray Plate and run a cleansing brew using the largest brew size. Do not add a K-Cup pod. Pour the contents of the mug into the sink.
STEP 2: SECOND DESCALING SOLUTION RINSE
+ Repeat the brew process without a K-Cup pod. until "ADD WATER” is indicated. Let the brewer stand for at least 30 minutes while still on
+ After 30 minutes. discard any residual solution through the drain tubes
STEP 3: FRESH WATER RINSE
+ Ensure the internal cold water tank is filled with fresh water.
+ Place a large mug on the Drip Tray Plate and run a cleansing brew using the largest brew size. Do not add a K-Cup pod. Pour the contents of the mug into the sink.
+ Repeat brew process until you have completed at least 12 brews using the largest brew size. You may need to refill the cold water tank at least one time during this process.
NOTE: The cleaning action of Keurig Descaling Solution may result ina foam dispensed from the brewer. This is natural. as the solution is reacting with the scale inside. For a brewer that is heavily scaled. the brewer may not fill properly after the descaler is added. If this occurs. you may see only a small or no output dispensed followed by the sound of air blowing out. If this occurs:
+ Turn off and unplug the brewer.
+ If there is Keurig Descaling Solution in the cold water tank. discard the contents through the drain tubes. (follow Draining the Brewer instructions on page 17). rinse the Water Reservoir thoroughly and refill with water.
+ Plug the brewer back in. power on. and repeat the Step 3 Fresh Water Rinse cycle. The brewer should begin to function normally as the solution is rinsed out and the scale is removed. If problem persists. allow the brewer to sit unplugged for at least 30 minutes before continuing with the rinse.
For further descale information please contact your Keurig Authorized Distributor.
Service
Beyond these recommended cleaning and maintenance procedures this brewer is not user serviceable. For service. please refer to the Warranty section of this guide.
Purging the Brewer
If your brewer has not been used for more than one week. you should purge the water from the internal water tank.
1. Follow Draining the Brewer instructions on page 17.
2. Once drained. re-connect brewer to power source and turn on.
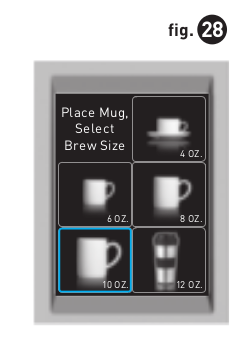
3. When the brewer indicates “READY. place a large mug on the Drip Tray Plate and select Large Mug [10 oz. serving) brew size from the Select Brew Size Menu [fig. 28]
4. Discard water.
5. Repeat steps 2-4 two more times to completely purge water from the internal water tank
Draining the Brewer
1. Turn off the brewer. unplug it. and allow the brewer to cool approximately 30 minutes.
2. Turn the brewer around so the back is facing out. Unscrew the small knob to release the back panel. remove the panel from the brewer. and set it aside. If the screw is tight. you may need to use a flathead screw driver.
3. Pull both the tubes downwards until the ends are free. Over a large pitcher. remove the plugs [fig. 29) and drain the water from the cold and hot water tanks. respectively.

CAUTION: If the brewer was not allowed to cool sufficiently. the water draining from the tube may be very hot. Recap the tube. NOTE: To avoid losing parts. when finished. re-insert the tube and screw the panel back onto the brewer.
If you need assistance with your brewer. please contact your Keurig Authorized Distributor.
Storage
Drain the internal water tank before storing and ensure that you store your brewer in a safe and frost free environment. It is suggested to store your brewer in the upright position. If you store the brewer in a cold environment. you run the risk of water freezing inside the brewer and causing damage. When you prepare to use it after storage. we recommend running three cleansing brews without a K-Cup pod. If you plan to move your brewer to a different location. turn the brewer off. unplug it and empty the internal water tank. If your brewer has been in an environment below freezing. please be sure to let it warm to room temperature for two hours before using.
Brewer does not have power
+ Plug the brewer into an independent outlet.
+ Check to be sure that it is plugged in securely.
+ Make sure that the brewer is powered on and LCD Screenis illuminated.
+ Reset circuit breaker if necessary.
+ Plug into a different outlet
Brewer will not brew
+ After placing the K-Cup pod in the K-Cup Pod Holder. make sure the Handle is pushed down securely and the LCD Screen reads “READY TO BREW’ with the BREW Button flashing. then press the BREW Button
+ The exit needle may be clogged [refer to page 15) LCD Messages
+ In plumbed mode. if the water flow has been interrupted. LCD Screenwill state "WATER FLOW INTERRUPTED. TO RESET. PLEASE PRESS BREW BUTTON Press BREW Button to resolve this issue.
+ If the messages persist after following these instructions. contact your Keurig Authorized Distributor.
Chlorine or mineral taste in coffee
+ Be sure to use filtered water. If you have any questions. contact your Keurig Authorized Distributor.
Brewing a partial cup
+ The exit needle may be clogged [refer to page 15).
+ Clean the K-Cup Pod Holder Assembly if necessary andrinse under faucet (refer to pages 14-15).
+ “Descale” the brewer [refer to pages 15-16].
+ If you have repeated the descale procedure on your brewer two times and it is still only brewing a partial cup. contact your Keurig Authorized Distributor.
The time is not displayed on the LCD Screen
+ The time will not be displayed on the LCD Screen unless you have set it. To set the clock. follow the procedure on page 11
+ If power is interrupted to the brewer. you will need to set the clock again using the procedure on page 11
Brewer shuts off or turns on automatically
+ Check to make sure that the Auto Off time and/or On/Off time features have not been set. To do this. enter the Menu Mode [page 9) and follow instructions to reset [page 12).
If any problems persist. contact your Keurig Authorized Distributor.