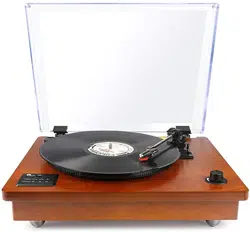
Classic Wooden Turntable
with Dust Cover
Instruction Manual/ Bedienungsanleitung/ Manuel d'instructions/
Manual de instrucciones/ 取扱説明書/ Manuale di istruzioni
1byone Products Inc.
1230 E Belmont Street, Ontario, CA 91761
Customer Service: +1 909-391-3888
www.1byone.com
01
EN
DE
FR
ES
JP
IT
BOX CONTENTS
Make sure the items listed below are included in the box:
PLEASE READ THIS INSTRUCTION MANUAL BEFORE USING THE TURNTABLE
Main Turntable Unit
Power Adapter
Instruction Manual
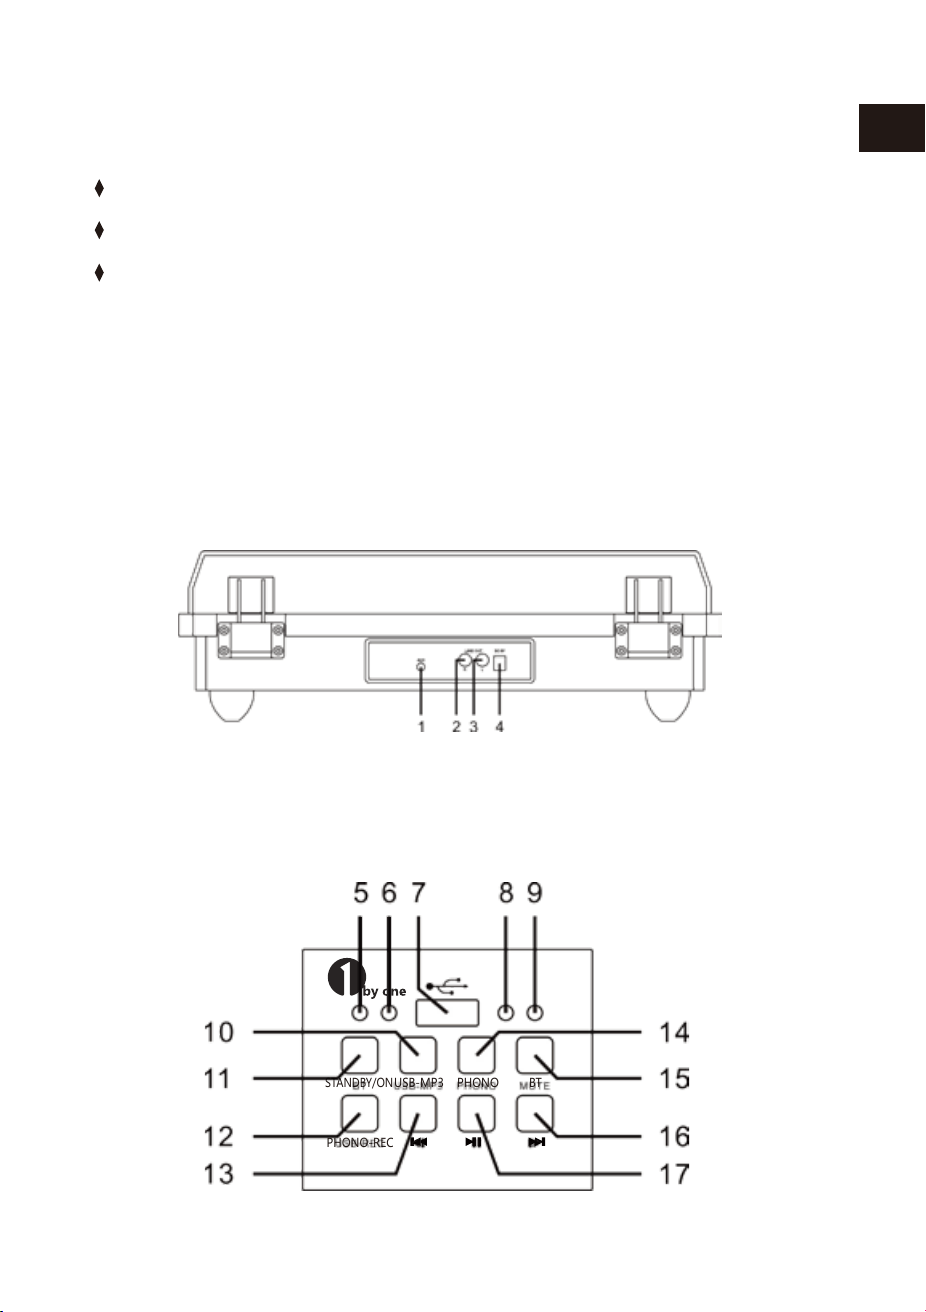
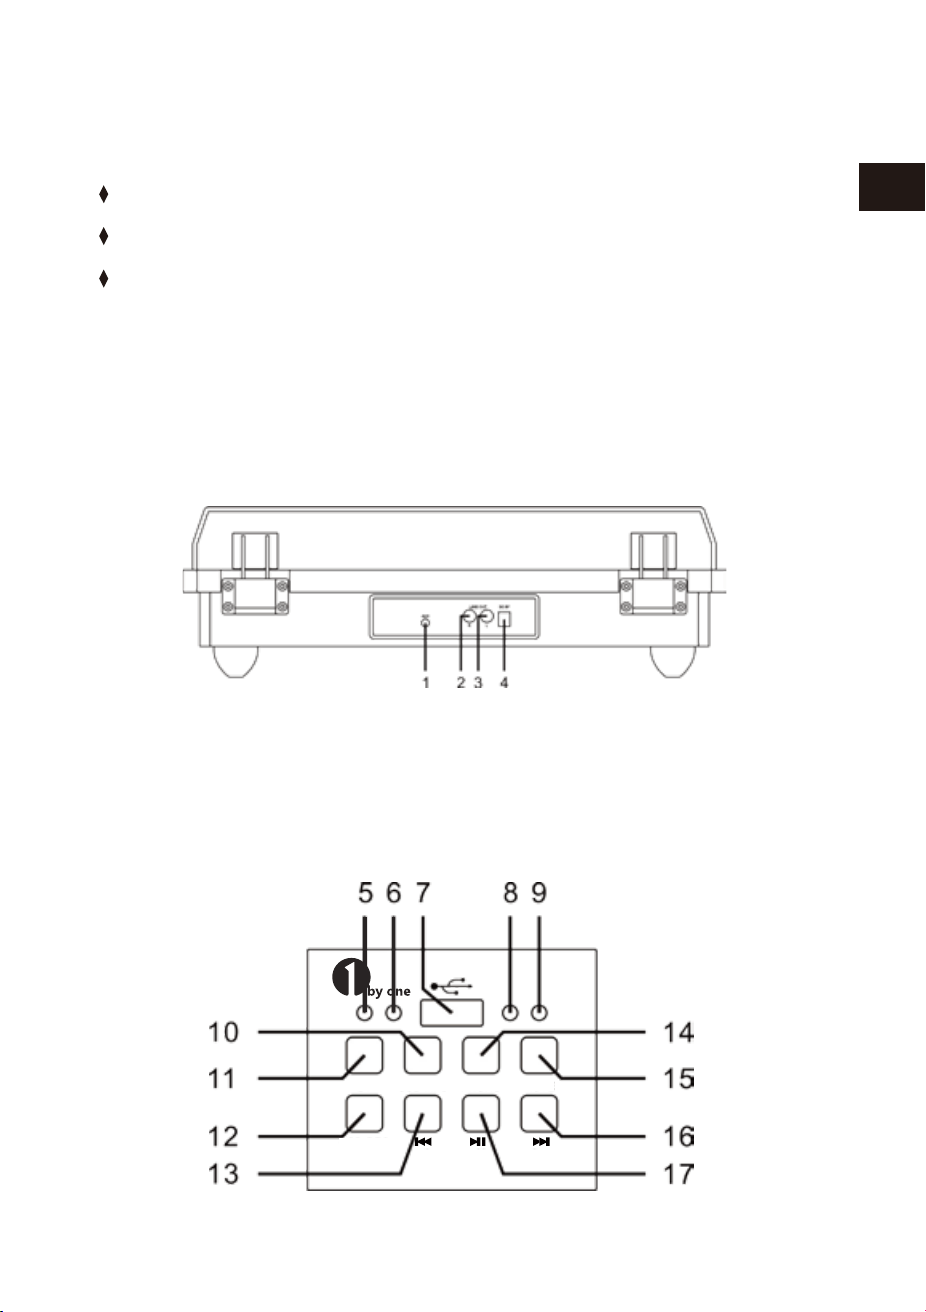
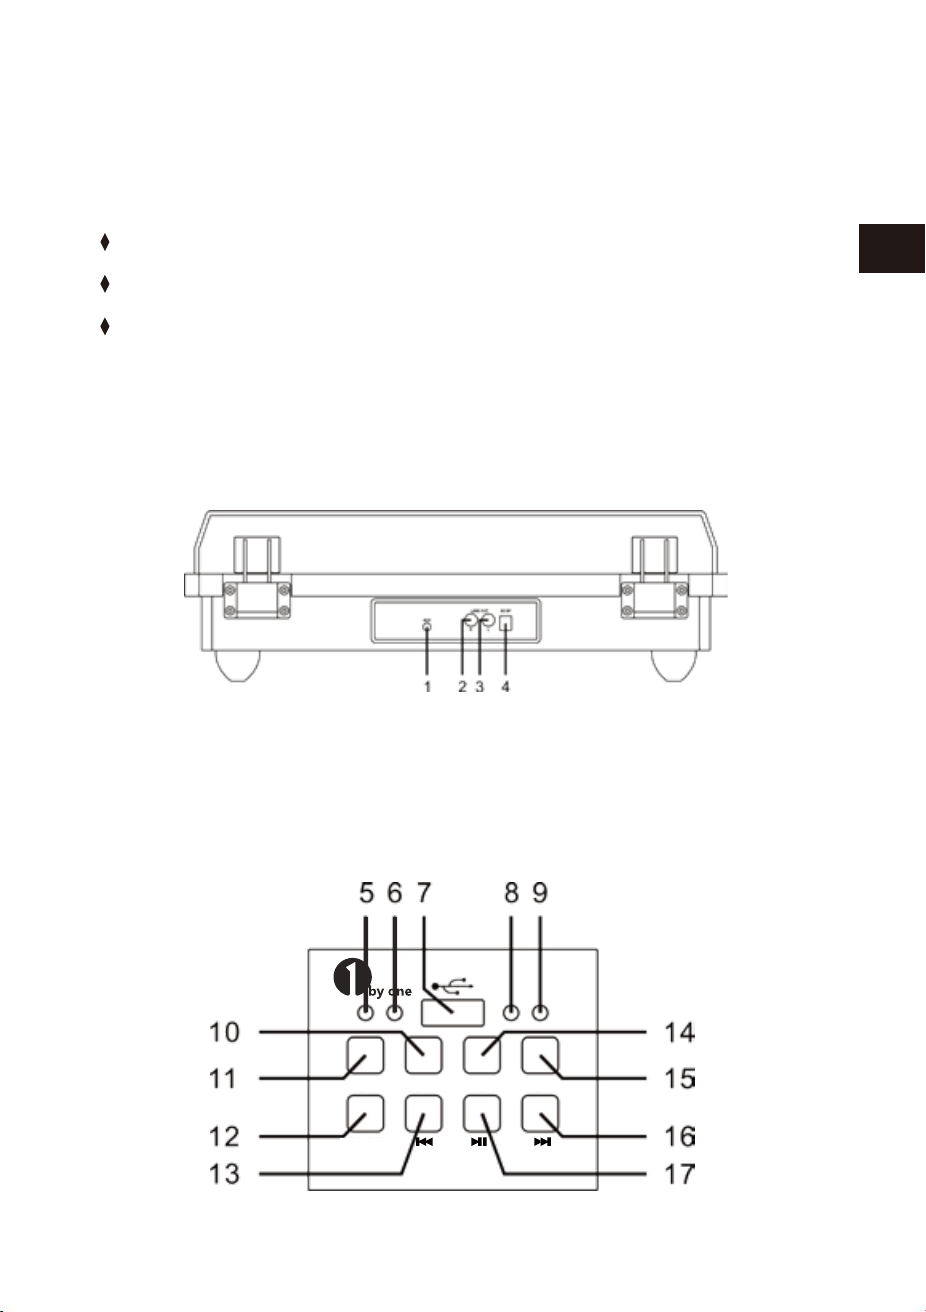
BACK PANEL
FRONT LEFT PANEL
1. AUX IN 2. LINE OUT R
3. LINE OUT L 4. DC 9V/2000 mA
STANDBY/ON
USB-MP3
PHONO
PHONO-REC
BT
02 03
EN
DE
FR
ES
JP
IT
EN
DE
FR
ES
JP
IT
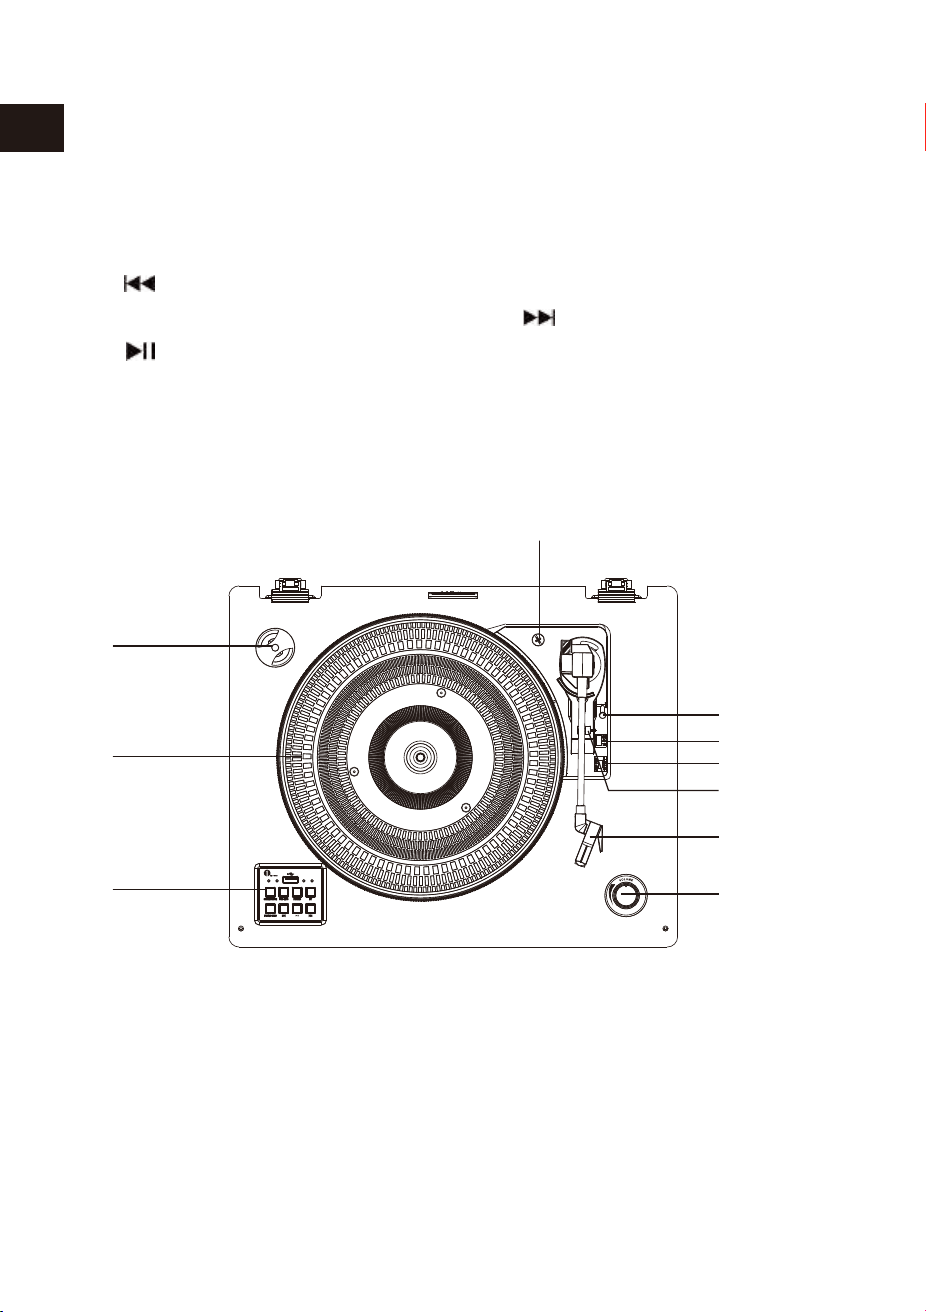
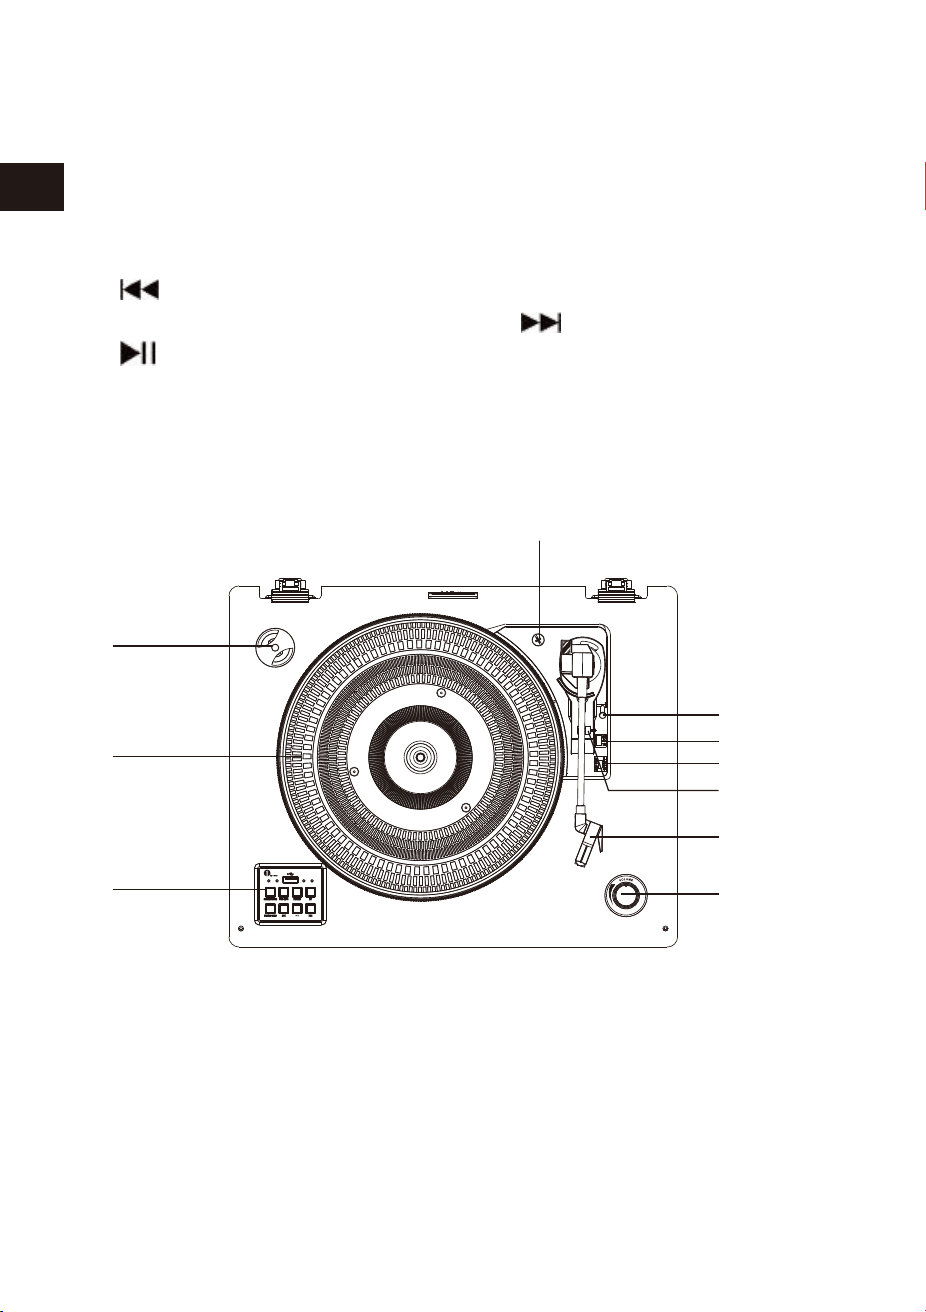
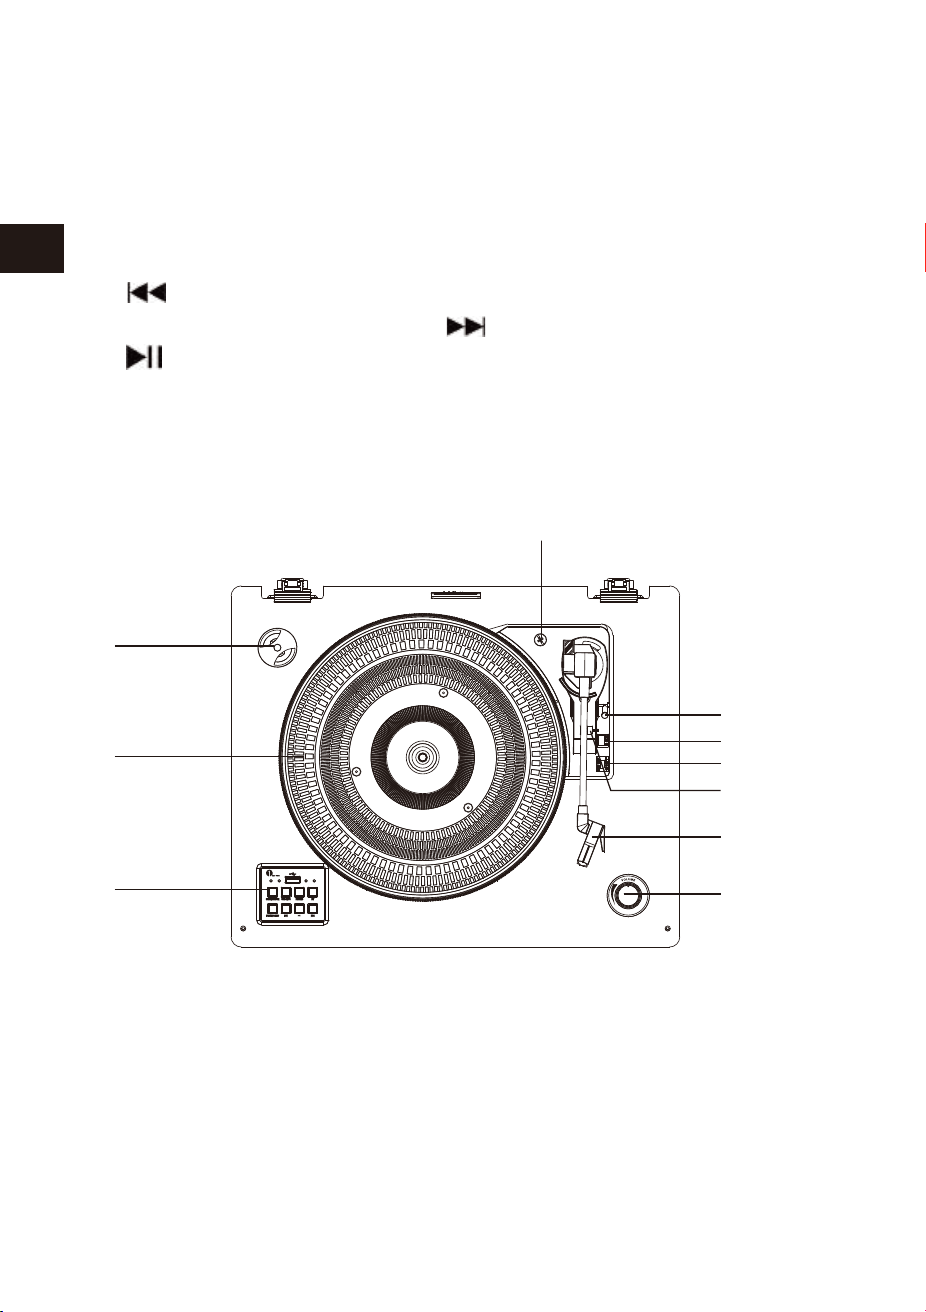
TURNTABLE PANEL
UNPACKING AND SETUP
5. STANDBY/ON INDICATOR 6. USB PLAYER INDICATOR
7. USB SOCKET 8. PHONO PLAYER/REC INDICATOR
9. BT INDICATOR 10. USB-MP3 PLAYER BUTTON
11. STANDBY/ON BUTTON 12. PHONO-REC BUTTON
13. BUTTON 14. PHONO PLAYER BUTTON
15. BT BUTTON 16. BUTTON
17. BUTTON
1. 45 RPM ADAPTER 2. TURNTABLE
3. CONTROL PANEL 4. TRANSIT SCREW CROSSING
5. LIFT LEVER 6. SPEED SELECTOR(33/45/78 RPM)
7. TONE ARM LOCK 8. TONE ARM WITH STYLUS
9. VOLUME DIAL 10. AUTO STOP CONTROL SWITCH
1. Carefully remove the turntable from the display package and remove all packing
material.
2. Unwind the AC adapter power cord and extend it to its full length.
4. Plug the power cord into your AC outlet.
3. Place the turntable on a stable, level surface in proximity to an AC outlet and
away from any strong magnetic fields.
5. Remove the opaque white plastic stylus cover from the phonograph stylus by
sliding it in the direction of the arrow.
6. Be cautious and gentle when removing this stylus cover, as damage to the stylus
is not covered by warranty.
7. Remove the twist-tie securing the tone arm during the shipment.
8. Release the tone arm lever lock.
POWERING ON THE UNIT
NOTE
1. Connect the AC Adapter to the AC POWER Socket on the back of the turntable.
2. Press the STANDBY/ON button , the STANDBY/ON indicator will turn off and PHONO
mode will power on.
3. When you have finished using the turntable, press the STANDBY/ON button again
and the voice message "POWER OFF" will confirm the turntable is off.
The turntable will automatically turn off without further instruction or signal for 15
minutes.
10
1
2
3
4
5
6
7
8
9

02 03
EN
DE
FR
ES
JP
IT
EN
DE
FR
ES
JP
IT
TURNTABLE PANEL
UNPACKING AND SETUP
5. STANDBY/ON INDICATOR 6. USB PLAYER INDICATOR
7. USB SOCKET 8. PHONO PLAYER/REC INDICATOR
9. BT INDICATOR 10. USB-MP3 PLAYER BUTTON
11. STANDBY/ON BUTTON 12. PHONO-REC BUTTON
13. BUTTON 14. PHONO PLAYER BUTTON
15. BT BUTTON 16. BUTTON
17. BUTTON
1. 45 RPM ADAPTER 2. TURNTABLE
3. CONTROL PANEL 4. TRANSIT SCREW CROSSING
5. LIFT LEVER 6. SPEED SELECTOR(33/45/78 RPM)
7. TONE ARM LOCK 8. TONE ARM WITH STYLUS
9. VOLUME DIAL 10. AUTO STOP CONTROL SWITCH
1. Carefully remove the turntable from the display package and remove all packing
material.
2. Unwind the AC adapter power cord and extend it to its full length.
4. Plug the power cord into your AC outlet.
3. Place the turntable on a stable, level surface in proximity to an AC outlet and
away from any strong magnetic fields.
5. Remove the opaque white plastic stylus cover from the phonograph stylus by
sliding it in the direction of the arrow.
6. Be cautious and gentle when removing this stylus cover, as damage to the stylus
is not covered by warranty.
7. Remove the twist-tie securing the tone arm during the shipment.
8. Release the tone arm lever lock.
POWERING ON THE UNIT
NOTE
1. Connect the AC Adapter to the AC POWER Socket on the back of the turntable.
2. Press the STANDBY/ON button , the STANDBY/ON indicator will turn off and PHONO
mode will power on.
3. When you have finished using the turntable, press the STANDBY/ON button again
and the voice message "POWER OFF" will confirm the turntable is off.
The turntable will automatically turn off without further instruction or signal for 15
minutes.
10
1
2
3
4
5
6
7
8
9

04 05
EN
DE
FR
ES
JP
IT
EN
DE
FR
ES
JP
IT
This turntable is full-sized, belt-driven, and plays 33, 45, and 78 RPM
records.
AUX-IN OPERATION
1. This turntable includes an auxiliary audio signal input jack for connecting external
audio devices like MP3 players, CD players, and older, non-dockable iPods so you can
listen to your external source through the turntable's speakers.
2. Use an audio cable (not included) with one 3.5 mm stereo connection on each
end of the cable.
3. Plug one end into the AUX-IN jack on the turntable and the other end to the Line
Out jack of the audio device.
4. Power on the turntable and audio device.
5. The volume level can be controlled through the turntable. Operate all the functions
on the auxiliary device as usual.
6. Please note that AUX-IN function is a first-priority function. Even if the indicator
light for USB-MP3/PHONO/BT is on, these functions won't work while the AUX-IN
function is in use. Please unplug the AUX-IN cable before using the USB-MP3/
PHONO/BT functions.
7. Remove the twist-tie securing the tone arm during the shipment.
8. Release the tone arm level lock.
5. When finish playing the song, put the LIFT LEVER gently backward to yourself, the
tone arm gently lifter onto the record. The song will stop playing.
6. At the end of the record, the TONE ARM will stop automatically. Put the LIFT LEVER
gently backward to yourself, the TONE ARM gently lifter onto the record.
7. Adjust the VOLUME control to set the volume as desired.
8. Press the STANDBY/ON button to turn off the system when you are done.
9. Please keep the dust cover open when playing a record.
PLAYING RECORDS
1. To turn the turntable on, press the STANDBY/ON button to set the volume to a low level.
2. Press the PHONO button to turn on phono mode. Please be sure that you have
removed the stylus cover from the stylus and have released the Tone arm lock.
3. Set the turntable speed switch to the appropriate speed of 33, 45 or 78 RPM. Set the
record on the turntable. If you are playing 45 RPM singles, place the 45 RPM
adapter on the center spindle.
4. Slide the AUTO STOP CONTROL switch to choose the auto stop function.
4. Press the USB-MP3 button with the blue light and you will hear the recorded music
from the USB.
PHONOGRAPH RECORDING OPERATION
1. Place a phono record on the turntable.
2. Plug a USB disk into the USB socket. Press the PHONO-REC button, the blue LED
indicator light will flash, meaning the recording has started.
3. Press the PHONO-REC button again when you are finished recording.
NOTE
1.PHONO-REC is only for phonograph recording.
2. PHONO-REC is for recording music from the phono record to a USB disk device(-
FAT32 format only).
NOTE
1. If the Line Out jack of your external device is connected, you only need to
adjust the volume control of this system.
2. Make sure the tone arm is securely locked to avoid any damage.
3. Press STANDBY/ON button to turn off the turntable when you are done. Don’t forget to
turn off the power on your external device as well.

06 07
EN
DE
FR
ES
JP
IT
EN
DE
FR
ES
JP
IT
4. Press the button to pause or play the track.
5. Press the STANDBY/ON button to turn off the turntable when you are done.
USB OPERATION
1. Press the USB-MP3 button to turn on USB mode. The blue indicator light will turn on.
2. Insert the USB device into the USB input on the turntable and the music tracks on
the USB device will start playing.
3. Press the or buttons to choose your desired track.
NOTE
1. The next time you turn on the device it will automatically connect to the last
Bluetooth playback device connected. If your Bluetooth playback does not
automatically reconnect to the device, you will need to manually re-establish the
connection to your Bluetooth device.
2. If you use a smartphone as your Bluetooth playback device, the audio file will
muted when there is an incoming call. Acceptance/termination of the call is carried
out via the smartphone. After finishing the call, music playback will resume
automatically.
LINE OUT OPERATION
1. A set of Line Out jacks is included to allow audio from BT, USB-MP3, and
PHONOGRAPH of this turntable to play on an external device.
2. Insert the audio cable (not included) into the turntable's Line Out socket.
3. Operate the turntable as usual.
4. In order to achieve the best sound, it is advised to set the turntable volume to a
minimal level.
5. The turntable's audio will then be played back through the external device.
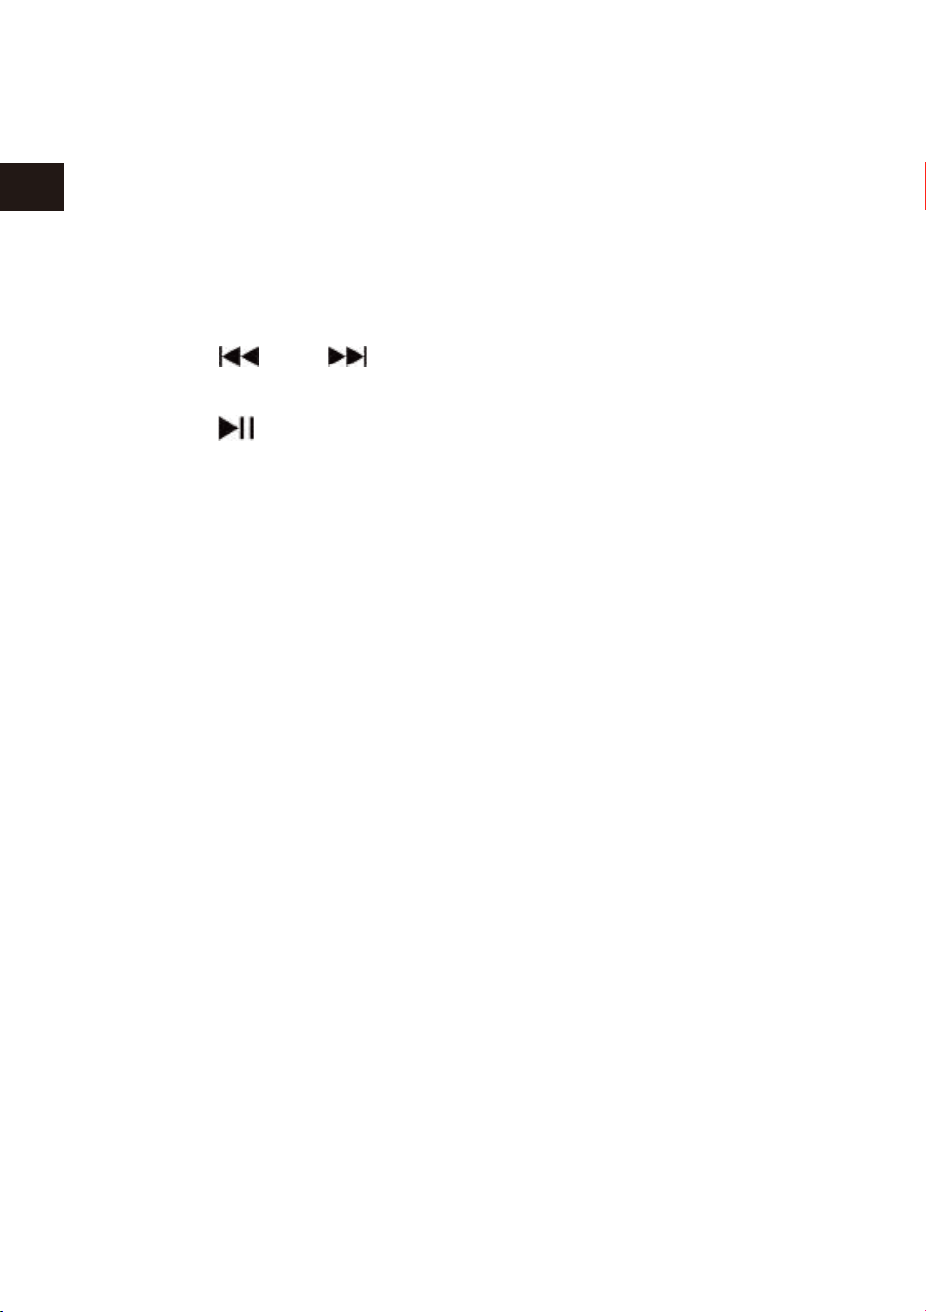
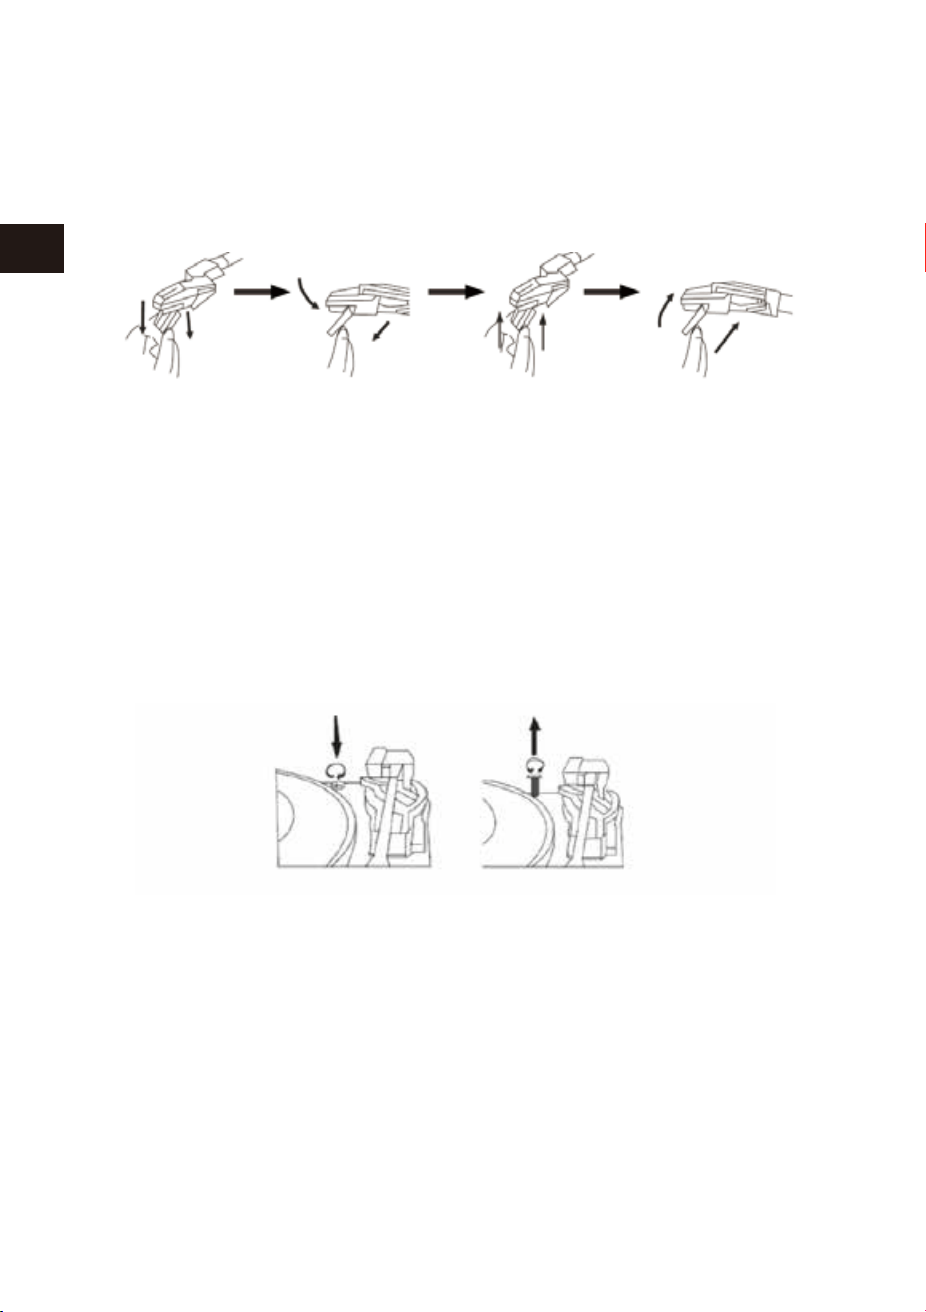
REPLACING THE STYLUS
1. Lift the tone arm off the tone arm lock.
It's suggested to replace the stylus after 400 hours of use.
Please follow the steps below to change the stylus:
2. At the front end of the tone arm, place the tip of your fingernail between the red
stylus holder and the black cartridge housing as shown. Press down down on the
red stylus holder until it separates from the cartridge housing.
3. Completely remove the red stylus holder with worn stylus and discard it.
4. Place the new red stylus holder with stylus under the cartridge housing. First, press
upward on the back side of the stylus holder, and then press up on the front edge
of the stylus holder until it snaps into place on the cartridge housing.
NOTE
1. USB-MP3 playing mode has a memory function. When reinserting
the same USB device, the last played track will be resumed.
2. This turntable is equipped with a USB socket that can play MP3/WMA files stored
on standard USB flash drives (compatible with USB version 2.0).
3. USB flash drives with more than 32GB memory may not be compatible.
4. Although this product is fully compatible with the USB 2.0 standard format, a small
percentage of USB flash drives might not be readable due to those device manu-
facturers’ non-compliance with full (official) USB standards.
BLUETOOTH OPERATION
1. Press the BT button on the front left panel to activate the BLUETOOTH function and
the blue LED light will be flashing.
3. Select the entry '1byone BS008' from the list of found devices on your Bluetooth
playback device. If pairing is successful, the LED light will stop flashing and stay on
Blue.
2. Set up the Bluetooth playback device so it searches for other Bluetooth devices.
4. Play your music through the connected device and enjoy.
REMOVING THE USB DRIVE
Please be sure the stop playback and turn the unit off before removing the USB
drive to avoid damage to the USB and the turntable.

06 07
EN
DE
FR
ES
JP
IT
EN
DE
FR
ES
JP
IT
4. Press the button to pause or play the track.
5. Press the STANDBY/ON button to turn off the turntable when you are done.
USB OPERATION
1. Press the USB-MP3 button to turn on USB mode. The blue indicator light will turn on.
2. Insert the USB device into the USB input on the turntable and the music tracks on
the USB device will start playing.
3. Press the or buttons to choose your desired track.
NOTE
1. The next time you turn on the device it will automatically connect to the last
Bluetooth playback device connected. If your Bluetooth playback does not
automatically reconnect to the device, you will need to manually re-establish the
connection to your Bluetooth device.
2. If you use a smartphone as your Bluetooth playback device, the audio file will
muted when there is an incoming call. Acceptance/termination of the call is carried
out via the smartphone. After finishing the call, music playback will resume
automatically.
LINE OUT OPERATION
1. A set of Line Out jacks is included to allow audio from BT, USB-MP3, and
PHONOGRAPH of this turntable to play on an external device.
2. Insert the audio cable (not included) into the turntable's Line Out socket.
3. Operate the turntable as usual.
4. In order to achieve the best sound, it is advised to set the turntable volume to a
minimal level.
5. The turntable's audio will then be played back through the external device.
REPLACING THE STYLUS
1. Lift the tone arm off the tone arm lock.
It's suggested to replace the stylus after 400 hours of use.
Please follow the steps below to change the stylus:
2. At the front end of the tone arm, place the tip of your fingernail between the red
stylus holder and the black cartridge housing as shown. Press down down on the
red stylus holder until it separates from the cartridge housing.
3. Completely remove the red stylus holder with worn stylus and discard it.
4. Place the new red stylus holder with stylus under the cartridge housing. First, press
upward on the back side of the stylus holder, and then press up on the front edge
of the stylus holder until it snaps into place on the cartridge housing.
NOTE
1. USB-MP3 playing mode has a memory function. When reinserting
the same USB device, the last played track will be resumed.
2. This turntable is equipped with a USB socket that can play MP3/WMA files stored
on standard USB flash drives (compatible with USB version 2.0).
3. USB flash drives with more than 32GB memory may not be compatible.
4. Although this product is fully compatible with the USB 2.0 standard format, a small
percentage of USB flash drives might not be readable due to those device manu-
facturers’ non-compliance with full (official) USB standards.
BLUETOOTH OPERATION
1. Press the BT button on the front left panel to activate the BLUETOOTH function and
the blue LED light will be flashing.
3. Select the entry '1byone BS008' from the list of found devices on your Bluetooth
playback device. If pairing is successful, the LED light will stop flashing and stay on
Blue.
2. Set up the Bluetooth playback device so it searches for other Bluetooth devices.
4. Play your music through the connected device and enjoy.
REMOVING THE USB DRIVE
Please be sure the stop playback and turn the unit off before removing the USB
drive to avoid damage to the USB and the turntable.
08 09
EN
DE
FR
ES
JP
IT
EN
DE
FR
ES
JP
IT
IMPORTANT!
TRANSPORTING THE SYSTEM
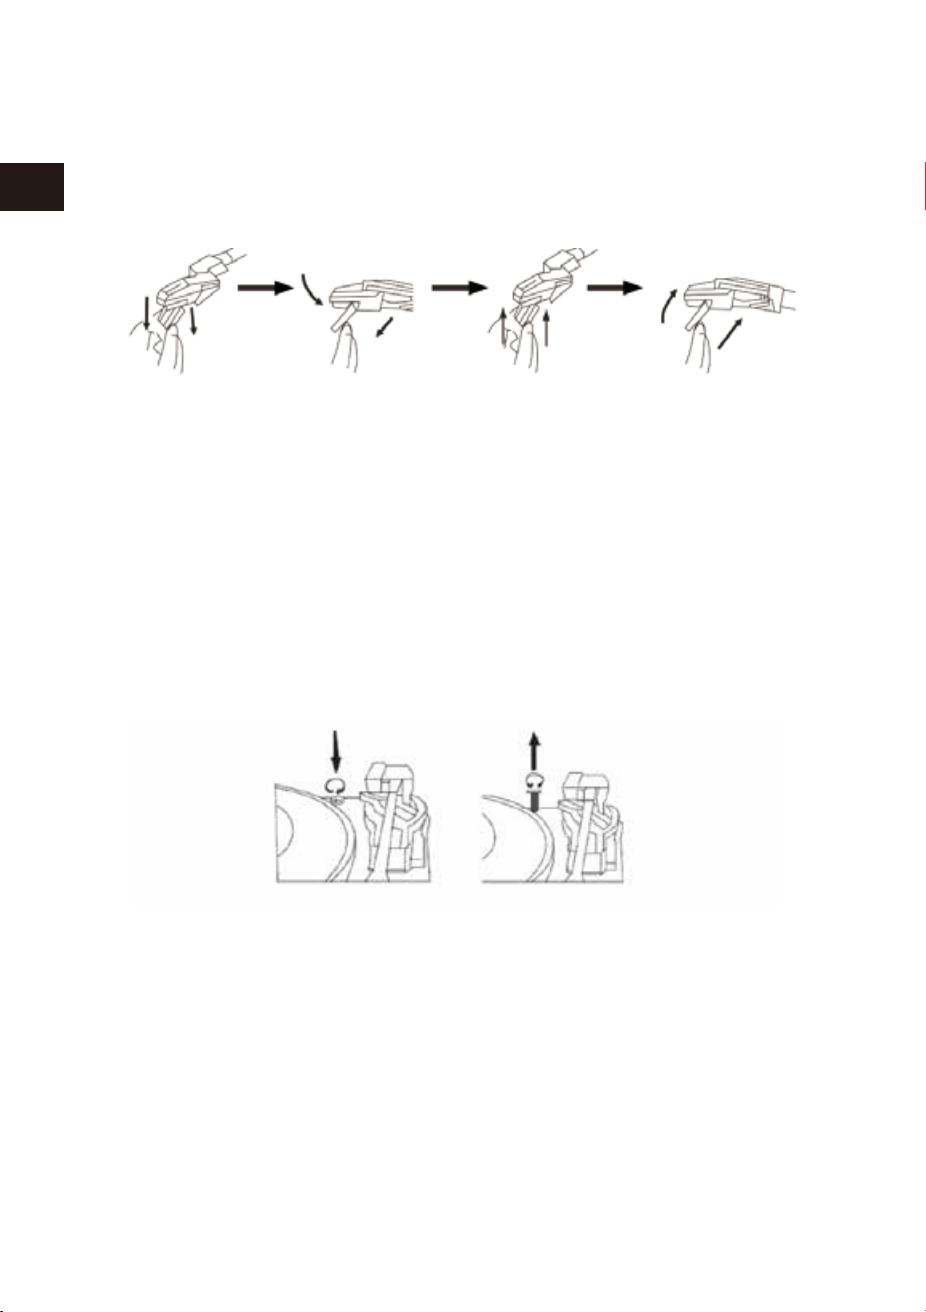
1. To protect the turntable from damage during transportation, a silver transit
screw is located on the upper right of the turntable platform.
2. Before playing, please use a screwdriver to turn the transit screw in a clockwise
direction (screw going down) completely to unlock the turntable.
3. To lock the turntable again for transportation, please turn screw in
a counter-clockwise direction.
CARE OF THE WOOD PANEL AND DUST COVER
1. Care of the turntable is the same as any piece of of furniture.
2. When the dust cover is dusty, you may wipe it using a soft, non-abrasive dust cloth.
3. If the wood panel becomes smudged with fingerprints, you may use any good
quality commercial dusting and polishing spray cleaner.
4. We recommend spraying the cleaner on a cloth, not directly on the
wooden panel.
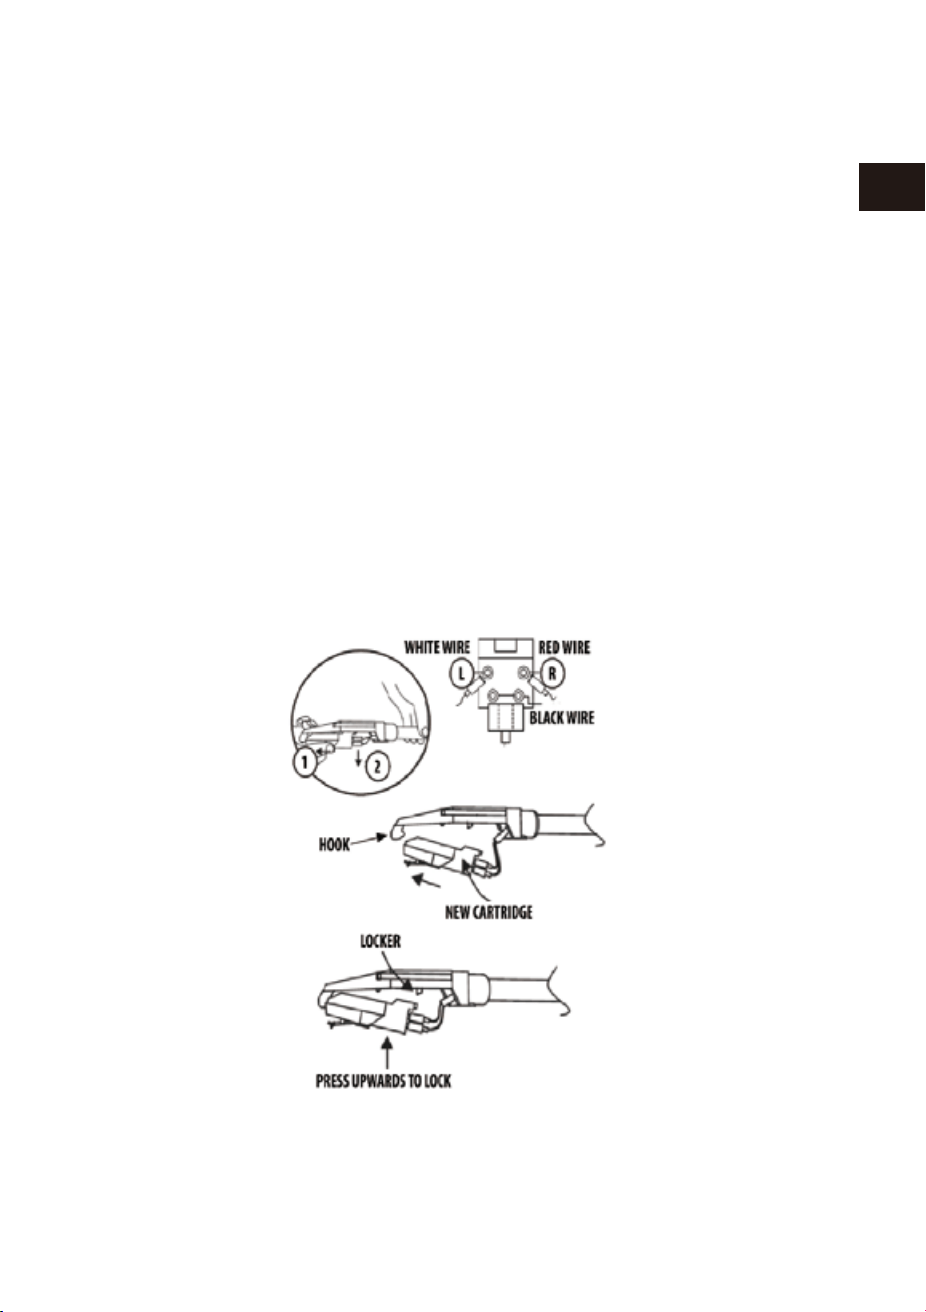
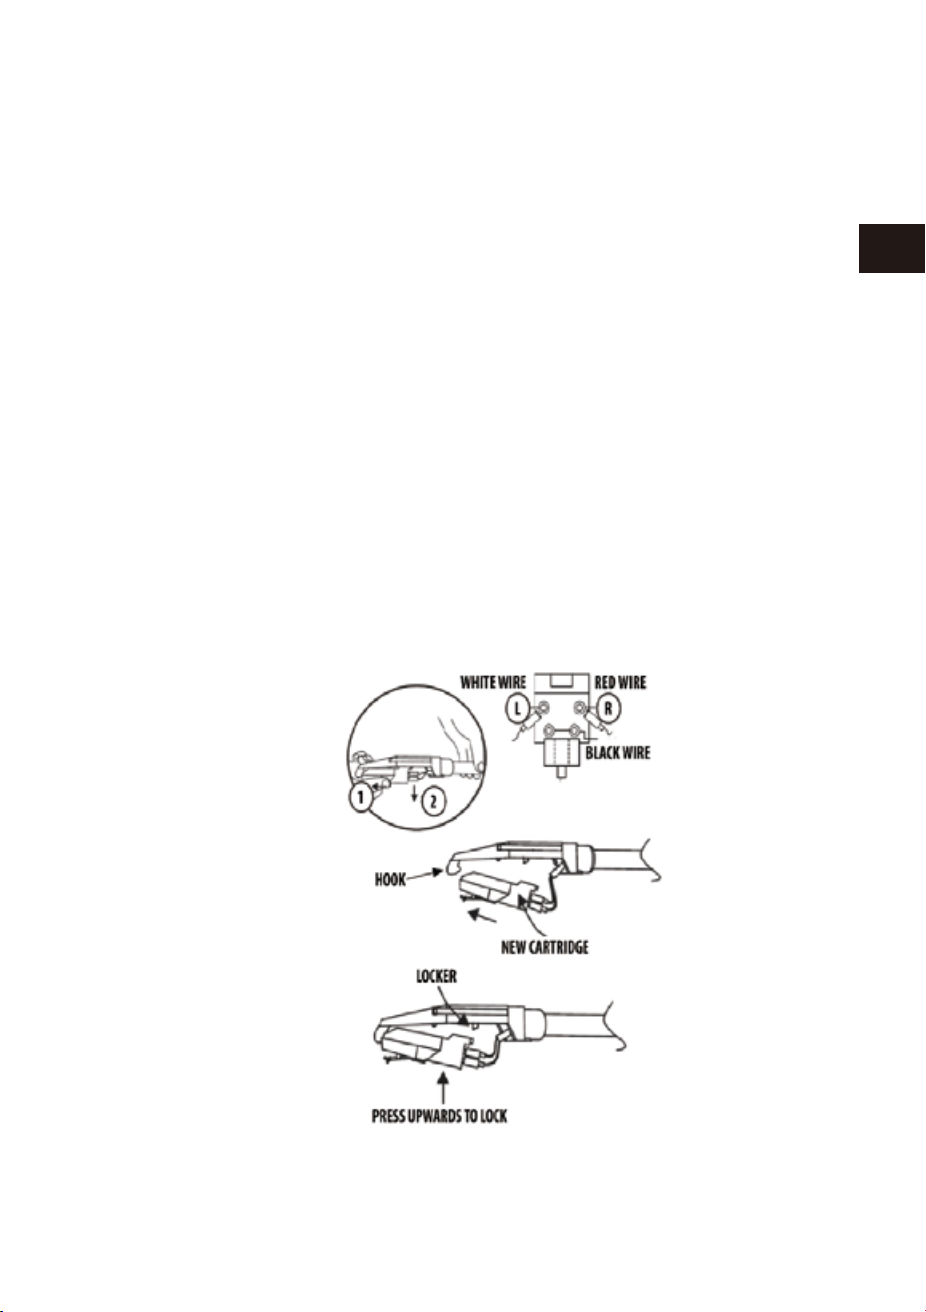
CARE AND MAINTENANCE
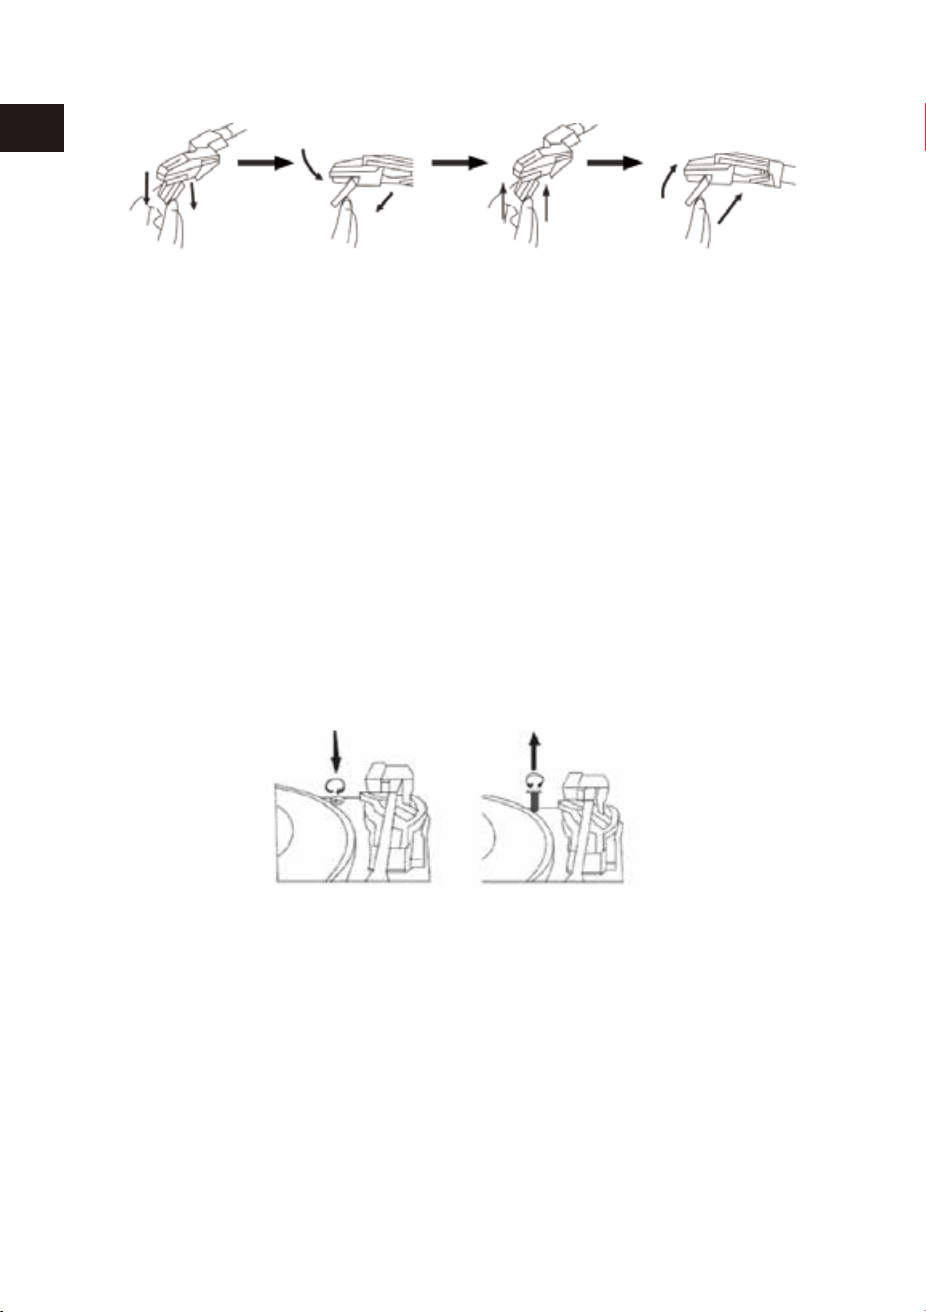
1. Gently lift off the tone arm from the tone arm lock.
2. Use your left hand to hold the tone arm and your right hand to hold
the rear portion of the cartridge. Then push the cartridge backwards and
downwards according to the direction as shown to separate the cartridge from
the tone arm.
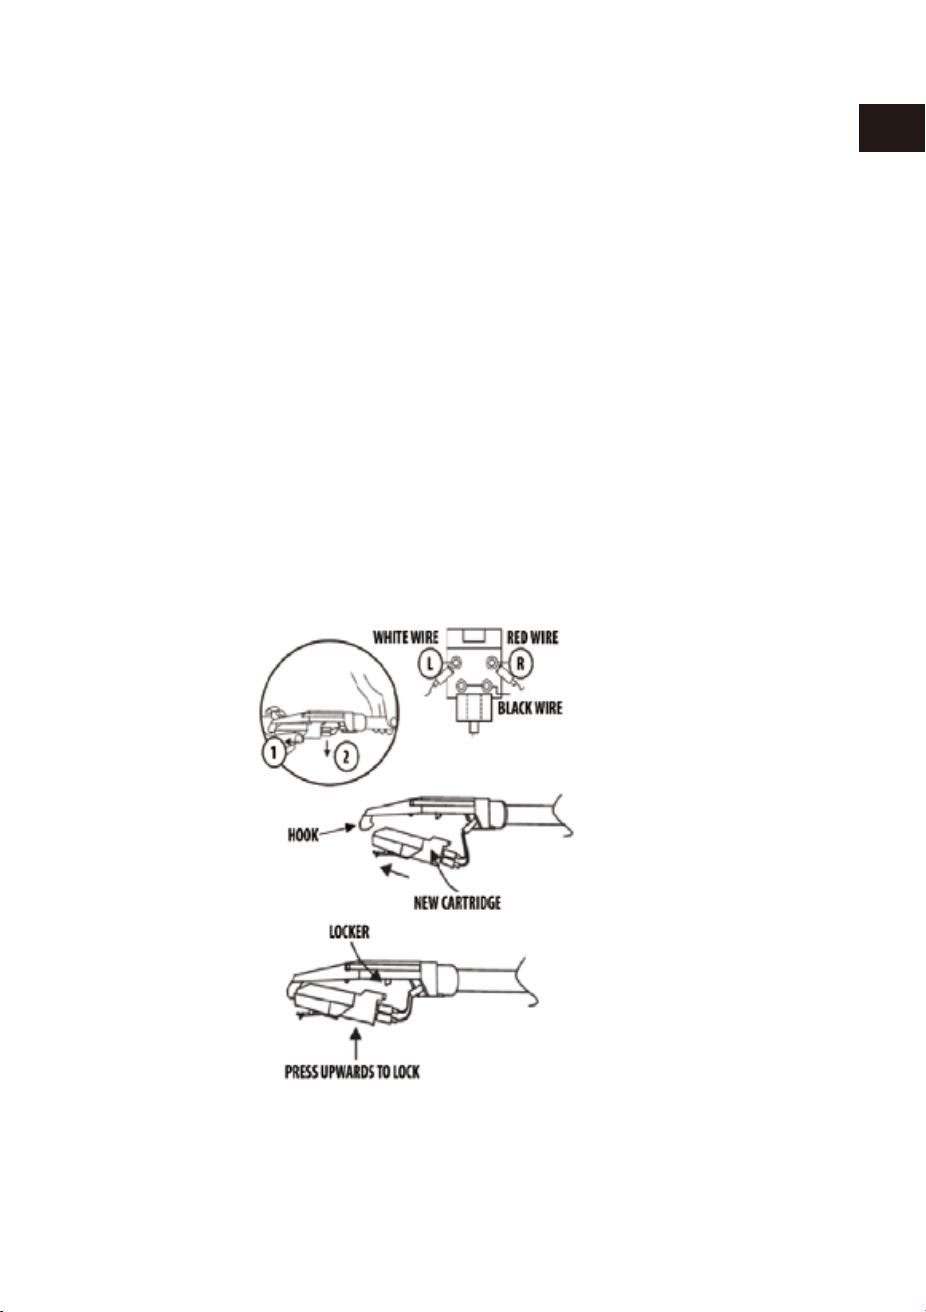
3. Using either a tweezer or your fingers, carefully unplug the terminals to the
new cartridge.
5. To re-install the new cartridge to the tone arm, first lock the front end of
the new cartridge on the hook of the tone arm.
6. Press the rear side of the new cartridge upwards to lock it on the tone arm.
4. Carefully connect the terminals to the new cartridge (not included).
TO REPLACE THE CARTRIDGE FROM THE TONE ARM PLEASE FOLLOW
THE PROCEDUCE BELOW.
CAUTION:
Please do not damage the stylus when installing the new cartridge.
08 09
EN
DE
FR
ES
JP
IT
EN
DE
FR
ES
JP
IT
IMPORTANT!
TRANSPORTING THE SYSTEM
1. To protect the turntable from damage during transportation, a silver transit
screw is located on the upper right of the turntable platform.
2. Before playing, please use a screwdriver to turn the transit screw in a clockwise
direction (screw going down) completely to unlock the turntable.
3. To lock the turntable again for transportation, please turn screw in
a counter-clockwise direction.
CARE OF THE WOOD PANEL AND DUST COVER
1. Care of the turntable is the same as any piece of of furniture.
2. When the dust cover is dusty, you may wipe it using a soft, non-abrasive dust cloth.
3. If the wood panel becomes smudged with fingerprints, you may use any good
quality commercial dusting and polishing spray cleaner.
4. We recommend spraying the cleaner on a cloth, not directly on the
wooden panel.
CARE AND MAINTENANCE
1. Gently lift off the tone arm from the tone arm lock.
2. Use your left hand to hold the tone arm and your right hand to hold
the rear portion of the cartridge. Then push the cartridge backwards and
downwards according to the direction as shown to separate the cartridge from
the tone arm.
3. Using either a tweezer or your fingers, carefully unplug the terminals to the
new cartridge.
5. To re-install the new cartridge to the tone arm, first lock the front end of
the new cartridge on the hook of the tone arm.
6. Press the rear side of the new cartridge upwards to lock it on the tone arm.
4. Carefully connect the terminals to the new cartridge (not included).
TO REPLACE THE CARTRIDGE FROM THE TONE ARM PLEASE FOLLOW
THE PROCEDUCE BELOW.
CAUTION:
Please do not damage the stylus when installing the new cartridge.
10 11
EN
DE
FR
ES
JP
IT
EN
DE
FR
ES
JP
IT
Inhalt der Verpackung
Stellen Sie bitte sicher, dass folgende Gegenstände vorhanden sind:
Lesen Sie diese Gebrauchsanweisung bevor Sie das Produkt benutzen
Plattenspieler
Stromadapter
Bedienungsanleitung
Rückseite
Vorderseite
1 AUX IN 2 LINE OUT R
3 LINE OUT L 4 DC 9V/2000 mA
STANDBY/ON
USB-MP3
PHONO
PHONO-REC
BT
SPECIFICATIONS
Specifications and functions connected to the continual improvement of the device
are subject to change without notice.
Operating voltage
Bluetooth specification
Supported storage
Output power
Dimensions (L*W*H)
Unit weight
DC9V/2000 mA
Version 2.1+EDR
USB
2 x 4W RMS
434 * 360 * 135.5 mm
4.38 kg
Disposal of the appliance
Under no circumstances should you dispose of the appliance in the
normal domestic waste. This product is subject to the provisions of
European Directive 2012/19/EU.
Dispose of the appliance via an approved disposal company or your municipal waste
facility. Please observe the currently applicable regulations. Please contact your waste
disposal centre if you are in any doubt.
Disposal
The packaging is made from environmentally friendly material and
can be disposed of at your local recycling plant.
12 13
EN
DE
FR
ES
JP
IT
EN
DE
FR
ES
JP
IT
Plattenspieler Beschreibung
5 Standby Lampe 6 USB Lampe
7 USB Anschluss 8 Plattenspieler Lampe
9 Bluetooth Lampe 10 USB-MP3 Player Knopf
11 Standby Knopf 12 USB Aufnahme Knopf
13 Knopf 14 Plattenspieler Knopf
15 Bluetooth Knopf 16 Knopf
17 Knopf
1. 45 RPM Adapter 2. Plattenspieler
3. Multifunktionspanel 4. Transportsicherung
5. Hebeschalter für Tonarm 6. Geschwindigkeitsauswahl
7. Tonarmschloss 8. Tonarm mit Nadel
9. Lautstärkeregler 10. Auto-Stop Schalter
Auspacken und Einstellen
1. Nehmen Sie das Gerät vorsichtig aus dem Display-Karton und entfernen Sie alle
Verpackungsmaterial aus dem Gerät.
2.Wickeln Sie die Netzteilbuchse ab und erweitern Sie es auf seine volle Länge.
3.Legen Sie das Gerät auf eine stabile, ebene Oberfläche, nahe eines Stroman-
schlusses und nicht direkt in einem starken Magnetfeld.
4. Schieben Sie den Auto-Stop Schalter, um die automatische Stoppfunktion
auszuwählen.
5.Verbinden Sie den Stecker mit Ihrer Steckdose.
6. Am Ende der Platte stoppt der Tonarm automatisch. Drücken Sie den Tonhebel
sanft zurückdamit sich der Tonarm automatisch sanft von der Platte hebt.
7.Bitte passen sie während dieses Schittes besonders auf die Nadel auf, da diese
nicht in der Garantie inbegriffen ist.
8.Entfernen Sie den Stemmdrat, der verwendet wurde, um den Tonarm während
des Transports zu schützen.
9.Lösen Sie das Tonarmschloss.
1. Schließen Sie das Netzteil an den Netzanschluss auf der Rückseite des Geräts an
2. Drücken Sie den Standby/AN Knopf, der Indikator wird sich abschalten und der
PHONO Modus wird sich aktivieren.
3. Drücken Sie die Taste STANDBY / ON erneut. Dies schaltet das Gerät mit
Sprachnachricht: „POWER OFF“ aus.
Gerät Einschalten
Hinweise:
Wenn sie 15 Minuten nach einer Auswahl der Funktion keine weiteren Eingaben
oder Aktionen durchführen, schaltet sich das Gerät von selbst aus.
10
1
2
3
4
5
6
7
8
9

14 15
EN
DE
FR
ES
JP
IT
EN
DE
FR
ES
JP
IT
1. Dieses Gerät bietet eine zusätzlichen Audiosignal-Eingang zum Anschluss
externer Audiogeräte wie MP3-Player, CD-Player und älteren iPods an, damit Sie
Ihre externen Quelle durch die Lautsprecher des Systems hören können.
2.Verwenden Sie dazu ein Audiokabel (nicht im Lieferumfang) mit einem
3,5-mm-Anschluss an jedem Ende des Kabels.
3.Stecken Sie ein Ende in die AUX-IN-Buchse am Hauptgerät und das andere Ende
an den Line-Out-Buchse des Audiogeräts.
4.Schalten Sie beide Geräte ein.
5.Die Lautstärke kann durch die Haupteinheit gesteuert werden. Betreiben Sie alle
Funktionen auf dem Zusatzgerät wie gewohnt.
6.Bitte beachten Sie, dass AUX-IN-Funktion die erste Priorität-Funktion ist. Obwohl
die Anzeige der USB-MP3 / PHONO / BT ein ist, aktivieren diese Funktionen nicht,
während AUX-IN-Funktion in Betrieb ist. Bitte ziehen Sie den AUX-IN-Kabel ab,
bevor Sie USB-MP3 / PHONO / BT-Funktion benutzen.
1.Dieses System ist ein orginalgröße, 3-Tempo, Riemenantrieb Plattenspieler, der
33,45 und 78 RPM Platten spielt.
2.Um das System einzuschalten, drücken Sie die Taste STANDBY / ON und dann
stellen Sie die Lautstärke auf ein niedriges Niveau ein.
3.Drücken Sie die Taste PHONO, um Phono-Modus aufzurufen. Bitte achten Sie
darauf, dass Sie die Nadelabdeckung vom Nadel entfernt haben und den Tonarm-
schloß gelöst haben.
4.Stellen Sie den Drehteller auf die entsprechende Geschwindigkeit ein: 33,45 oder
78 RPM. Legen die Platte auf den Plattenteller. Wenn Sie 45 RPM Singles spielen,
legen Sie den 45 RPM Adapter auf die Spindel.
5.Wenn Sie einen bestimmten Song spielen wollen, bewegen Sie den Tonarm auf
die Platte. Ziehen Sie den Lifthebel sanft nach vorne, um sich, den Tonarm
vorsichtig auf die untere Platte. Der Song wird abgespielt.
6.Wenn Sie fertig sind, nutzen Sie den Tonarmhebel um die Nadel vorschtig von der
Platte zu heben. Die Wiedergabe wird stoppen.
7.Drehen Sie am VOLUME schalter um die Lautstärke anzupassen.
8.Drücken Sie STANDBY/ON um das system auszuschalten, wenn Sie fetrig sind.
9.Heben Sie den Staubschutz bevor Sie eine Platte abspielen.
1. Plazieren Sie die Platte auf dem Teller.
2.Stecken Sie USB Stick in USB-Buchse. Drücken Sie dann die Taste PHONO-REC, die
blaue LED-Anzeige blitzt, es beginnt, die Musik aus Platte aufzunehmen.
3.Drücken Sie “PHONO-REC” wiederholt, um die Aufnahme zu beenden.
4.Drücken Sie die Taste USB-MP3, die blaue LED-Anzeige ist ein, Sie können die
aufgenommenen Musik in USB Stick hören.
AUX IN OPERATION
NOTE
1. Wenn die Line-Out-Buchse Ihres externen Gerätes angeschlossen ist, brauchen Sie
nur die Lautstärke des Gerätes einzustellen.
2.Stellen Sie sicher, dass Tonarm mit dem Tonarmschloss gesperrt werden, um
Beschädigungen zu vermeiden.
3.Drücken Sie die Taste STANDBY / ON, um das Gerät auszuschalten, wenn Sie fertig
sind. Vergessen Sie nicht Ihr externes Gerät ebenfalls auszuschalten.
Platten abspielen
Plattenaufname Operation
NOTE
1. PHONO-REC ist nur für Schallplatten geeignet.
2.PHONO-REC ist dafür nutzbar, Musik von einer PHONO Aufnahme auf einen USB Stick
(FAT32) zu kopieren.
16 17
EN
DE
FR
ES
JP
IT
EN
DE
FR
ES
JP
IT
1. Drücken Sie den USB-MP3 Knopf um den USB mode zu starten. Das LED Licht
wird aufleuchten.
2.Insert the USB device into the USB input on the system, the player will start
playing the tracks on the USB device.
3.Stecken Sie den USB-Stick in den USB input an dem Plattenspieler. Der Platten-
spieler wird beginnen die Lieder auf dem USB-Stick abzuspielen.
4.Drücken Sie “ ” oder “ ” um zum nächsten oder vorherigen Lied zu
wechseln.
5.Drücken Sie “ ” um das Lied zu pausieren.
6.Drücken Sie “STANDBY/ON” um den Plattenspieler nach Gebrauch auszuschalten.
USB Operation
Note
1. Der USB-MP3 Abspielmodus hat eine Memory-Funktion. Wenn Sie den USB-Sick
wiederholt anschließen, beginnt das Abspielen vom zuletzt gehörten Song.
2. Dieses Gerät ist mit einem USB Anschluss ausgestattet, der MP3/WMA Dateien
wiedergeben kann. (Kompatibel mit USB 2.0)
3. USB Speichergeräte mit mehr als 32GB können ggf. inkompatibel sein.
4. Obwohl das Produkt komplett komplatibel mit USB 2.0 ist, könnte es sein, dass
manche Hersteller keine offizielle USB Zertifizierung haben. Deswegen können
manche USB sticks ggf. Nicht erkann werden.
BLUETOOTH OPERATION
1. Drücken Sie den BT Knopf (Bluetooth) auf der Vorderseite und die blaue LED wird
anfangen zu blinken.
2.Starten Sie die Suche an ihrem Bluetooth Abspielgerät um nach dem Plattenspiel-
er zu suchen.
3.Wählen Sie den Eintrag “1byone BS008” auf der Liste der Bluetoothgerät aus.
Nachdem die Kopplung erfolgreich war, wird das LED Licht aufhören zu blinken
und nun blau leuchten.
4.Genießen Sie die Musik von ihrem angeschlossenen Abspielgerät.
Entfernen das USB Stick
Bitte stoppen Sie das Abspielen der Musik bevor sie den USB-Stick aus dem
Plattenspieler ziehen um Schäden an den Daten zu vermeiden.
Note
1. Das nächste mal, wenn Sie den Plattenspieler einschalten, wird es sich automatisch
mit dem letzten Bluetooth Gerät verbinden. Sollte sich der Plattenspieler nicht
direkt erneut Verbinden, wiederholen Sie die oben aufgelisteten Schritte zum
Verbinden.
2.Wenn sie ein Smartphone als Bluetoothgerät verwenden und Sie angerufen werden,
wird das Abspielen der Musik gestoppt. Das annehmen des Anrufes geschieht über
das Smartphone. Nachdem der Anruf beendet ist, wird die Musik wieder abgespielt.
Wir empfehlen die Nadel alle 400 Stunden zu wecheln um Schäden vorzubeugen.
Bitte befolgen Sie die nachfolgenen Schritte zum wecheln der Nadel:
1. Austausch des Nadelhalters.
2.Heben Sie den Tonarm durch den Hebeschalter.
3.Am vorderen Ende des Tonarmes können Sie einen spitzen Gegenstand oder Ihren
Fingernagel zwischen den roten Nadelhalter und die schwarze Kartusche (wie auf
dem Bild gezeigt) stecken und den roten Nadehalter nach unten drücken bis er
sich von der Kartusche löst.
4.Entfernen Sie den roten Nadelhalter mitsamt der Nadel.
·Dieser Plattenspieler verfügt über einen Line-Out Anschluss über den der Ton
direkt über eine andere Ausgabequelle abgespielt werden kann.
·Stecken sie das Audiokabel (nicht inklusive) in den passenden Line-Out anschluss
des Plattenspielers.
·Nutzen Sie den Plattenspieler wie gewohnt.
·Um den bestmöglichen Sound zu garantieren, stellen Sie den Plattenspieler auf
eine niedrige Lautstärke.
·Nun können Sie die Musik durch Ihre extern angeschlossene Soundanlage hören.
LINEOUT OPERATION
Austausch des Nadelhalters
18 19
EN
DE
FR
ES
JP
IT
EN
DE
FR
ES
JP
IT
IMPORTANT!
Transport des Gerätes
1. Um den Plattenspieler vor Schäden beim Transport zu schützen, festigen Sie die
silberne Transportsicherungsschraube in der oberen rechten Ecke.
2.Bevor Sie den Plattenspieler wieder benutzen, lockeren Sie die Schraube im
Uhrzeitgersinn.
1. Behandeln Sie das Gerät ähnlich wie ein Möbelstück.
2.Wenn der Staubschutz staubig ist, nutzen Sie ein Staubtuch um es zu reinigen.
3.Wenn der Holzteil des Gerätes von Fingerabdrücken oder Verunreinigungen
verschmutzt wurde, nutzen Sie ein poliertuch oder einen kommerziellen
Sprühreiniger zum polieren.
4.Wir empfehlen den Sprühreiniger auf das Tuch zu sprühen und nicht direkt auf
den Plattenspieler.
5.Platzieren Sie den neuen Nadelhalter unter der Kartusche und drücken Sie das
hintere Ende zuerst in die Kartusche. Drücken Sie den Nadelhalter danach komplett
nach oben gegen die Kartusche bis diese einrastet.
Behandeln der Holzteil und Staubschutz
Behandeln und INSTANDHALTUNG
1. Heben sie den Tonarm leicht von der Halterung.
2.Halten Sie mit der linken Hand den Tonarm und mit der rechten Hand die hintere
Seite der Kartusche. Drücken Sie die Kartusche zurück und runter, wie auf dem
Bild auf der linken Seite aufgezeigt um die Kartusche von dem Tonarm zu
trennen.
3.Nutzen Sie eine Pinzette oder ihre Finger um die Anschlüsse von der Kartusche
zu lösen.
4.Schließen Sie die Anschlüsse vorsichtig an der neuen Kartusche an.
5.Um die neue Kartusche einzusetzen, stellen Sie sichher dass sie die Kartusche
zuerst in dem Tonarm einharken.
6.Drücken Sie die hintere Seite der Kartusche nach oben bis es mit dem Tonarm
einrastet.
Um die Kartusche des Plattenspielers zu ersetzen, folgen Sie der
folgenden Anleitung.
ACHTUNG: Vermeiden Sie Beschädigung an der Nadel wenn sie die
neue Kartusche installieren.

20 21
EN
DE
FR
ES
JP
IT
EN
DE
FR
ES
JP
IT
CONTENU DE LA BOÎTE
Assurez-vous que les éléments énumérés ci-dessous sont inclus dans
la boîte:
LIRE INSTRUCTION DE SÉCURITÉ LE LIVRET AVANT D'UTILISER LE PRODUIT
Unité principale
Adaptateur
Manuel d'instruction
PANNEAU ARRIÈRE
AVANT GAUCHE PANNEAU
1 AUX IN 2 LINE OUT R
3 LINE OUT L 4 DC 9V / 2000 mA
STANDBY/ON
USB-MP3
PHONO
PHONO-REC
BT
SPEZIFIKATIONEN
Technische Daten und Funktionen können jederzeit ohne vorherige Ankündigung
geändert werden. Es ist mit einer kontinuierlichen Verbesserung des Gerätes verbunden.
Betriebsspannung
Bluetooth-Spezifikation
Unterstützte Speicher
Ausgangsleistung
Abmessungen (L * W * H)
Gewicht
DC9V/2000 mA
Version 2.1+EDR
USB
2 x 4W RMS
434 * 360 * 135.5 mm
4.38 kg
Gerät Entsorgen
Werfen Sie das Gerät keinesfalls in den normalen Hausmüll. Dieses
Produkt unterliegt der europäischen Richtlinie 2012/19/EU.
Entsorgen Sie das Gerät über einen zugelassenen Entsorgungsbetrieb oder über Ihre
kommunale Entsorgungseinrichtung. Beachten Sie die aktuell geltenden Vorschriften.
Setzen Sie sich im Zweifelsfall mit Ihrer Entsorgungseinrichtung in Verbindung.
Entsorgung
Die Verpackung besteht aus umweltfreundlichen Materialien, die Sie
über die örtlichen Recyclingstellen entsorgen können.
22 23
EN
DE
FR
ES
JP
IT
EN
DE
FR
ES
JP
IT
PANNEAU TOURNANT
5 Indicateur STANDBY / ON 6 Indicateur de LECTEUR USB
7 Prise USB 8 PHONO PLAYER / REC indicateur
9 Indicateur BT 10 Bouton PLAYER USB-MP3
11 Bouton STANDBY / ON 12 Bouton PHONO-REC
13 Bouton 14 PHONO PLAYER bouton
15 BT bouton 16 Bouton
17 Bouton
1 45 RPM Adaptateur 2 PLATINE
3 FONCTION BOUTON 4 TRANSIT VIS CROSSING
5 LEVIER DE LEVAGE 6 SÉLECTEUR DE VITESSE (33/45/78 RPM)
7 TONE bras de verrouillage 8 TONE ARM avec stylet
9 VOLUME BOUTON 10 INTERRUPTEUR DE CONTROLE AUTO STOP
Déballage et mise en place
1. Déballage et mise en place
2.Retirez délicatement l'unité du carton d'affichage et retirez tout matériau d'embal-
lage de l'appareil.
3.Détendez-vous la prise de l'adaptateur secteur et de l'étendre sur toute sa
longueur.
4.Mettre les hôtes sur une surface plane et stable, pratique à une prise secteur et
loin des régions magnétiques fortes
5.Branchez la fiche à votre prise de courant
6.Retirez le couvercle en plastique blanc opaque de stylet du stylet de phonog-
raphe en le glissant dans le sens de la flèche.
7.Pendant cette opération, faire attention à l'aide du stylet, parce que les dégâts de
stylet ne sont pas couverts par la garantie.
8.Retirez le lien torsadé qui a été utilisé pour fixer le bras de tonalité lors de l'expédi-
tion.
9.Relâchez le niveau de verrouillage du bras de lecture.
1. Branchez l'adaptateur secteur à l'AC Prise d'alimentation à l'arrière de l'appareil.
2.Presser sur le bouton STAND BY/ON, l’indicateur STAND BY/ ON s’arrêtera et le
mode PHONO se mettra en route.
3.POWER OFF.Lorsque vous avez fini d'utiliser le système, appuyez sur STANDBY /
ON à nouveau, éteignez l'appareil avec message vocal: POWER OFF.
MISE SOUS TENSION SUR L'APPAREIL
Notes
Lorsque sélectionnez une certaine fonction, mais sans autre instruction ou un signal
à l'unité pendant 15 minutes, l'appareil se met automatiquement hors tension.
10
1
2
3
4
5
6
7
8
9

24 25
EN
DE
FR
ES
JP
IT
EN
DE
FR
ES
JP
IT
1. Cette unité fournit une prise audio auxiliaire d'entrée de signal pour connecter
des périphériques audio externes comme les lecteurs MP3, lecteurs de CD et plus,
non-dock-mesure i pods, de sorte que vous pouvez écouter votre source externe
à travers les haut-parleurs de ce système.
2.Utilisez un câble audio (non inclus) avec une connexion stéréo de 3,5 mm à
chaque extrémité du câble.
3.Branchez une extrémité dans la prise AUX-IN sur l'unité principale et l'autre
extrémité à la prise line-out de périphérique audio.
4.Alimentation sur les deux appareils.
5.Le niveau de volume peut être contrôlé par l'unité principale. Exploiter toutes les
fonctions de l'appareil auxiliaire comme d'habitude.
6.S'il vous plaît noter que la fonction AUX IN est la première fonction de la priorité.
Même est sur la lumière d'indication de l'USB-MP3 / PHONO / BT, ces fonctions ne
fonctionne pas pendant AUX-IN fonction utilise. S'il vous plaît, débrancher le câble
AUX-IN avant d'utiliser USB-MP3 / PHONO / BT fonction.
2.Appuyez sur le bouton PHONO pour activer le mode phono. S'il vous plaît
assurez-vous que vous avez retiré le couvercle du stylet du stylet et avez libéré le
verrou du bras de tonalité.
3.Réglez le commutateur de vitesse platine à la vitesse appropriée: 33,45 ou 78 RPM.
Établir le record sur le plateau tournant. Si vous jouez 45 RPM célibataires, placer
l'adaptateur 45 RPM sur l'axe central.
4. Sélectionner la commande AUTO STOP CONTROL pour choisir la commande auto
stop.
5.Lorsque vous choisissez de jouer une certaine chanson, déplacez le bras de lecture
à l'enregistrement. Tirez le levier de levage doucement vers l'avant pour vous, le
bras de lecture en douceur inférieure sur le dossier. La chanson va commencer à
jouer.
6.A la fin du disque, le BRAS DE LECTURE s'arrête automatiquement. Faire douce-
ment revenir le LEVIER DE LEVAGE vers vous, le BRAS DE LECTURE se soulève
lentement sur le disque.
7.Ajustez la commande VOLUME pour régler le volume comme souhaité.
8.Appuyez sur STANDBY / ON pour éteindre le système lorsque vous avez terminé.
9.Durant l'enregistrement, la lecture, s'il vous plaît ouvrir le couvercle de la poussière.
Ce système comprend une pleine grandeur, 3 vitesses, plateau à entraînement
par courroie qui joue 33,45 et 78 RPM tours.
1.Pour activer le système, appuyez sur STANDBY / ON bouton et régler le volume à
un niveau faible.
1. Placez un disque phono sur le plateau.
2.Branchez la clé USB dans la prise USB. Puis appuyer sur le bouton PHONO-REC, le
voyant bleu d'indication est flash, il commence à enregistrer de la musique à partir
de l'enregistrement de phono.
3.Appuyez sur le bouton PHONO-REC à nouveau lorsque vous avez terminé
l'enregistrement.
4.Appuyez sur le bouton USB-MP3 avec la lumière bleu est allumée, vous pouvez
entendre la piste d'enregistrement sur la clé USB.
AUXIN OPÉRATION
Notes
1. Si la prise Line Out de votre appareil externe est connecté, vous suffit alors de
régler la commande de volume de ce système.
2.Faire bras que de tonalité est bien verrouillé au reste du bras de lecture pour éviter
tout dommage.
3.Appuyez sur STANDBY / ON pour éteindre l'appareil lorsque vous avez terminé. Ne
oublier pas de couper l'alimentation ainsi de votre appareil externe.
JOUER RECORDS
FONCTIONNEMENT PHONOGRAPH D'ENREGISTREMENT
Notes
1. PHONO-REC est seulement pour l'enregistrement de phonographe.
2.La commande PHONO-REC est dédiée à l’enregistrement de musique depuis le
phono à votre clé USB (uniquement le format FAT32 est supporté).

26 27
EN
DE
FR
ES
JP
IT
EN
DE
FR
ES
JP
IT
1. Appuyez sur le bouton USB-MP3 pour activer le mode USB avec indication LED
sur bleu.
2.Insérez le périphérique USB dans l'entrée USB sur le système, le joueur commence
à jouer les pistes sur le périphérique la clé USB.
3.Appuyez sur ou le boutons pour choisir la piste désirée.
4.Appuyez sur e bouton pour mettre en pause ou jouer de la piste.
5.Appuyez sur la touche STANDBY / ON pour éteindre l'appareil une fois terminé.
USB Opération
NOTES
1. Le mode de jeu USB-MP3 a la fonction de mémoire. Lorsque réinsérer le même
périphérique la clé USB, il reprendra la piste jouant de la dernière fois.
2. Cet appareil est équipé d'une USB prise qui peut lire les fichiers MP3 / WMA
stockés sur la clé usb standard (compatible avec la version USB 2.0)
3. Le flash USB avec plus de 32 Go de mémoire peut ne pas être compatible.
4. Ce produit est compatible avec USB 2.0 formats standard, un petit pourcentage
de conducteurs la clé usb pourrait ne pas être lisible, en raison du non-respect
de ces fabricants d'appareils de les normes usb complètes (officiel).
Buletooth Opération
1. Presser sur le bouton BT sur l’avant gauche du paneau pour activer la fonction
BLUETOOTH et la LED bleue clignotera.
2.Mettre en place le dispositif de lecture Bluetooth afin que les il recherche d'autres
périphériques Bluetooth.
3.Sélectionner '1byone BS008' dans la liste des appareils Bluetooth. Si la synchronisa-
tion est un succès, la lumière LED ne clignotera plus et restera bleue.
4.Profitez de votre musique à partir de votre appareil de lecture.
RETRAIT DU USB LECTEUR
S'il vous plaît être sûr que les lectures d'arrêt et éteindre l'appareil avant de retirer
la clé USB pour éviter d'endommager le port la clé USB et le système.
Notes
1. La prochaine fois que vous allumez l'appareil, il se connectera automatiquement au
dernier appareil de lecture Bluetooth connecté. Si votre lecture Bluetooth ne se
reconnecte pas automatiquement à l'appareil, vous devrez rétablir la connexion à
votre périphérique Bluetooth manuellement.
2.Si vous utilisez un téléphone intelligent que votre périphérique de lecture
Bluetooth, le fichier audio sera mis en sourdine quand il ya un appel entrant.
Acceptation / résiliation de l'appel est effectué par l'intermédiaire du téléphone
intelligent. Après avoir terminé l'appel, la lecture sera automatiquement prorogée.
1. Soulevez le bras de lecture off le reste du bras de lecture.
2.A l'extrémité avant du bras de tonalité, placez le bout de votre ongle entre le
porte-stylet rouge et le boîtier de la cartouche noire, comme indiqué, appuyez sur
le porte-stylet rouge jusqu'à ce qu'il se sépare du boîtier de la cartouche.
3.Supprimer complètement le porte-stylet rouge avec stylet usé et jetez-le.
Il est suggéré de remplacer le stylet après avoir joué plus de 400 heures.
S'il vous plaît suivre les étapes suivantes pour changer le stylet:
·Ce système comprend un ensemble de prise LINEOUT qui vous permettent de
jouer de la BT, USB-MP3 et PHONOGRAPH de ce système à un dispositif de lecture
externe.
·Insérez le câble audio (non fourni) dans la correspondance "LINE OUT" de l'unité.
·Utilisez l'appareil comme d'habitude.
·Afin d'atteindre le meilleur effet sonore, des conseils de régler le volume de l'unité
dans le niveau minimum.
·À travers les haut-parleurs de dispositifs de lecture externes, nous pouvons
entendre le son exporté de l'unité.
LINEOUT FONCTIONNEMENT
REMPLACEMENT DU STYLUS
28 29
EN
DE
FR
ES
JP
IT
EN
DE
FR
ES
JP
IT
IMPORTANT!
Le transport du système
1. Pour protéger la plaque tournante des dommages pendant le transport, une vis
de transit de ruban se trouve le coin supérieur droit de la plate-forme de plateau.
2.Avant de jouer, utiliser un tournevis pour tourner la vis de transport en commun
dans le sens horaire (vis descendre) complètement à déverrouiller la tourelle.
3.Pour verrouiller à nouveau la plaque tournante pour le transport, s'il vous plaît
tourner la vis dans le sens anti-horaire.
1. Entretien de l'appareil est le même que tout élément de meuble.
2.Lorsque le couvercle de la poussière est poussiéreux, vous pouvez l'essuyer avec
un chiffon à poussière doux, non-abrasif.
3.Si le panneau de bois est taché de traces de doigts, vous pouvez utiliser toute
dépoussiérage commerciale de bonne qualité et de polissage d'un spray
nettoyant.
4.Nous recommandons de pulvériser le nettoyant sur le tissu, pas directement sur
le panneau de bois.
4.Placez le nouveau porte-stylet rouge avec stylet sous le boîtier de cartouche. Tout
d'abord, appuyez vers le haut sur le côté arrière du support de stylet, puis appuyez
sur le bord avant du support de stylet jusqu'à ce qu'il se mette en place sur le boîtier
de la cartouche.
SOINS DU GROUPE DE BOIS ET HOUSSE
SOINS ET ENTRETIEN
1. Soulevez doucement le bras de lecture du reste du bras de lecture.
2.En utilisant votre main gauche pour tenir le bras de lecture et d'utiliser votre main
droite pour tenir la partie arrière de la cartouche. Ensuite, poussez la cartouche vers
l'arrière et vers le bas selon la direction, comme indiqué à la gauche de séparer la
cartouche du bras de tonalité.
3.En utilisant soit une pince à épiler ou vos doigts, débranchez soigneusement les
bornes de la nouvelle cartouche.
4.Insérez délicatement les bornes de la nouvelle cartouche (non inclus).
5.Pour ré-installer la nouvelle cartouche au bras de ton. S'il vous plaît d'abord
verrouiller l'extrémité avant de la nouvelle cartouche sur le crochet du bras de
tonalité.
6.Appuyez sur le côté arrière de la nouvelle cartouche vers le haut pour le verrouiller
sur le bras de lecture
Pour remplacer la cartouche DU BRAS DE LECTURE S'IL VOUS PLAÎT
SUIVEZ LE PROCEDUCE CI-DESSOUS.
ATTENTION: S'il vous plaît ne pas endommager le stylet lors de
l'installation de la nouvelle cartouche.
30 31
EN
DE
FR
ES
JP
IT
EN
DE
FR
ES
JP
IT
CONTENIDO
Asegúrese de que se incluyen los elementos en la caja:
LEA ESTAS INSTRUCCIONES DE SEGURIDAD ANTES DE USAR EL PRODUCTO
Unidad principal
Adaptador de corriente
Manual de instrucciones
PANEL TRASERO
PANEL IZQUIERDO DELANTERO
1 AUX IN 2 LINE OUT R
3 LINE OUT L 4 DC 9V/2000 mA
STANDBY/ON
USB-MP3
PHONO
PHONO-REC
BT
CARACTÉRISTIQUES
Spécifications et fonctions sont sujettes à modification sans préavis. Il est relié à
l'amélioration continue de l'appareil.
Tension de fonctionnement
Spécification Bluetooth
Stockage supportés
Puissance de sortie
Dimensions (L * W * H)
Unité de poids
DC9V/2000 mA
Version 2.1+EDR
USB
2 x 4W RMS
434 * 360 * 135.5 mm
4.38 kg
Mise au rebut de l'appareil
L'appareil ne doit en aucun cas être mis aux ordures ménagères
normales. Ce produit est assujetti à la directive européenne
2012/19/EU.
Eliminez l'appareil par l'intermédiaire d'une entreprise de traitement des déchets
autorisée ou via le service de recyclage de votre commune. Respectez la réglementa-
tion en vigueur. En cas de doute, veuillez contacter votre centre de recyclage.
Mise au rebut
L'emballage est réalisé à l'aide de matériaux écologiques qu'il est
possible de confier aux centres de recyclage proches de chez vous.
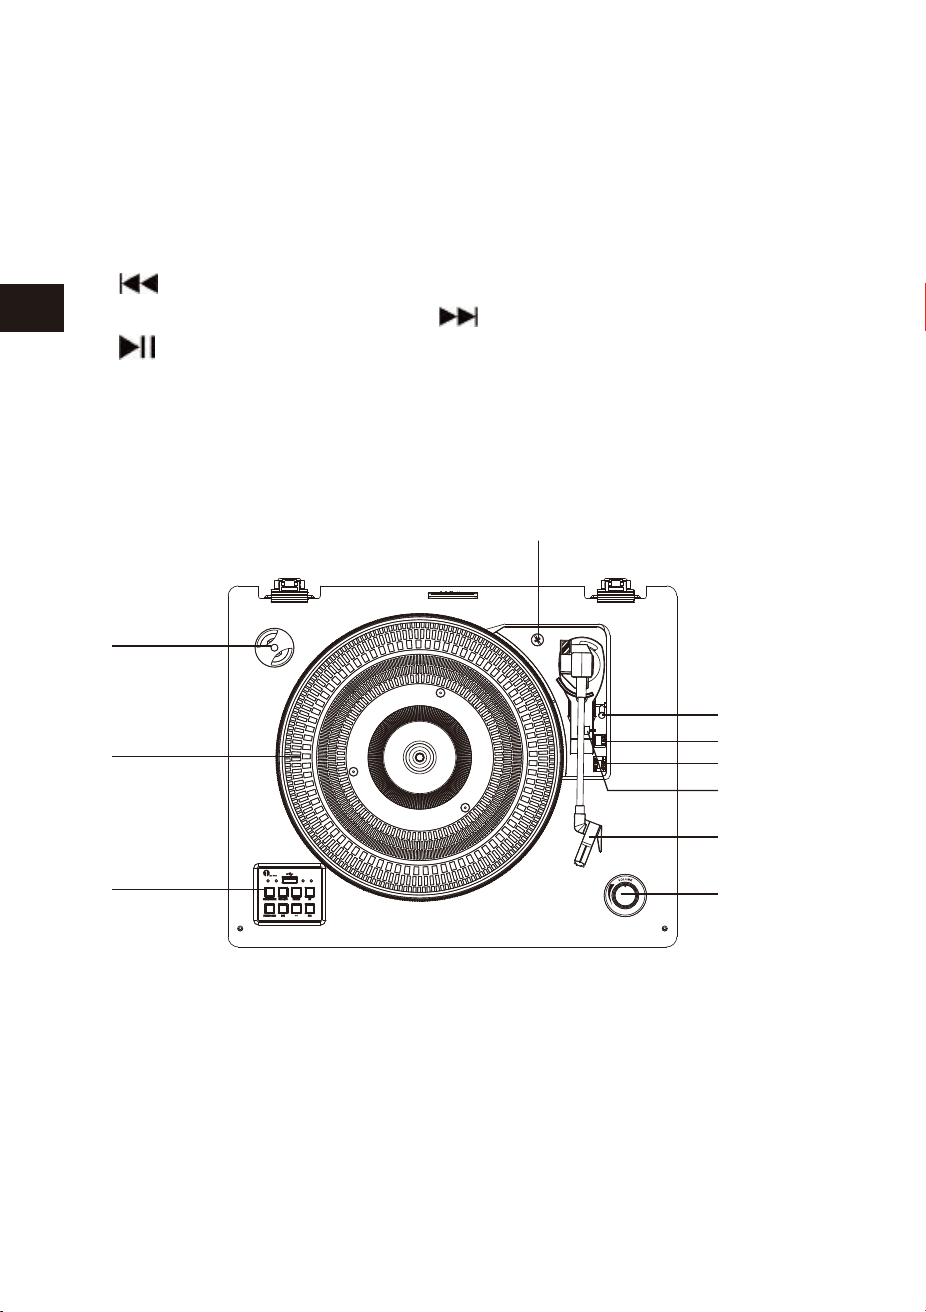
32 33
EN
DE
FR
ES
JP
IT
EN
DE
FR
ES
JP
IT
PANEL GIRADISCO
5 Indicador de STAND BY / ON 6 Indicador de REPRODUCTOR USB
7 USB enchufe 8 JUGADOR de PHONO / Indicador REC
9 Indicador de bluetooth 10 Botón de USB-MP3
11 Botón de STAND BY / ON 12 Botón de PHONO-REC
13 Botón 14 Botón de JUGADOR de PHONO
15 Botón de bluetooth 16 Botón
17 Botón
1 ADAPTADOR de 45 RPM 2 GIRADISCOS
3 BOTÓN DE FUNCIÓN DE PANEL 4 TORNILLO
5 PALANCA DE ELEVACIÓN
6 SELECTOR DE VELOCIDAD(33/45/78 RPM)
7 TONO ARM LOCK 8 BRAZO CON AGUJA
9 AJUSTE DE VOLUMEN
10 INTERRUPTOR DE CONTROL DE PARADA AUTOMÁTICA
Desembalaje y Arma
1. Saque la unidad principal de la caja con cuidado.
2. Extiende el adaptador de AC.
3. Coloque la unidad en una superficie estable y lejos de cualquier campo magnéti-
co fuerte.
4. Se conecta a la toma de AC
5. Saque la cubierta plástico blanco de la aguja de fonógrafo.
6. Se presta atención a la aguja, porque la garantía no soporta el daño de la aguja.
7. Se afloja el hilo twist-tie que está fijado en el brazo.
8. Suelte el bloqueo del brazo.
1. Conecte el adaptador AC a la enchufe de la parte trasera de la unidad.
2. Pulse el botón STANDBY/ON, el indicador STANDBY/ON se apagará y el modo
PHONO se encenderá.
3. Cuando no se utiliza el sistema, pulse STAND BY / ON otra vez, apague la unidad
con mensaje de voz: POWER OFF.
ENCENDIDO
Nota
Después de seleccionar alguna función, pero no hay la siguiente operación o señal,
15 minutos después, la unidad se apagará automáticamente.
10
1
2
3
4
5
6
7
8
9

34 35
EN
DE
FR
ES
JP
IT
EN
DE
FR
ES
JP
IT
1. Esta unidad ofrece la entrada de señal de audio auxiliar a través de conexión de
un dispositivo de audio externo como reproductores MP3 y reproductor de CD o
IPAD de versiones viejas.
2. Utilice un cable 3,5 mm de audio (no incluido).
3. Conecte un cable extremo a AUX-IN de la unidad principal y el otro extremo al
dispositivo de audio.
4. Se enciende los ambos dispositivos.
5. Se usa el botón de perilla para controlar el nivel de volumen .
6. Tenga en cuenta que la función AUX IN es la función de prioridad. Aunque la luz
de USB-MP3 / PHONO / BT está encendido, estas funciones no funcionan mientras
la función de AUX-IN está utilizando. Por favor, desconecte el cable de AUX-IN
antes de usar USB-MP3 / PHONO / BT.
Este sistema incluye un tamaño completo, 3 velocidades, mesa giratoria que
juega 33,45 y 78 RPM.
1. Pulse STAND BY / ON para encender el sistema, y ajuste el volumen del nivel bajo.
2. Pulse el botón PHONO para activar el modo de phono. Por favor, asegúrese de que
ha retirado la cubierta de la aguja y ha suelto el bloqueo del brazo.
3. Deslice el interruptor de control de parada automática para seleccionar la función
de parada automática.
4. Ajuste la velocidad adecuada del tocadisco: 33,45 o 78 RPM. Si usted está jugando
el disco de 45 RPM, coloca el adaptador de 45 RPM en el eje central.
5. Cuando usted elige una canción, mueva el brazo de tono en el disco. Tire la
palanca de elevación hacia adelante suavemente, el brazo está en el disco
suavemente.La canción empezará a reproducirse.
6. Al final del disco, el brazo se detendrá automáticamente. Mueva la palanca de
elevación suavemente hacia usted, el brazo levantará suavemente del registro.
7. Ajuste el botón para controlar el volumen.
8. Presione botón STAND BY / ON para apagarlo.
9. Durante la reproducción, por favor, abra la cubierta de polvo.
1. Ponga un disco fonográfico en el plato giratorio.
2. Inserte USB a enchufe. A continuación, pulse el botón PHONO-REC, el indicador de
LED azul va a flash, se inicia la grabación de la música .
3. Pulse el botón PHONO-REC de nuevo cuando termine de grabar.
4. Pulse el botón USB-MP3, el indicador de LED azul va a flash, se puede escuchar la
música que ha grabado en USB.
OPERACIÓN DE AUX IN
NOTA
1. Si Line out conecta al dispositivo externo, sólo tiene que ajustar el control de
volumen.
2. Asegúrese de que el blazo está bloqueado para evitar cualquier daño.
3. Presione botón STAND BY / ON para apagar la unidad cuando no se lo usa. No se
olvide de que desconecte la alimentación del dispositivo externo
REPRODUCCIÓN DE DISCOS
OPERACIÓN DE GRABACIÓN DE TOCADISCO
NOTA
1. La función de PHONO-REC es sólo para la grabación.
2. PHONO-REC sirve para grabar música del registro fonográfico a un dispositivo USB
(sólo en formato FAT32).

36 37
EN
DE
FR
ES
JP
IT
EN
DE
FR
ES
JP
IT
1. Pulse el botón USB-MP3 para activar el modo USB , el indicador de LED azul va a
encender.
1. Inserte el dispositivo USB, el jugador reproducirá automáticamente la canción.
1. Pulse los botones o para seleccionar la canción.
1. Pulse el botón para pausar o reproducir la canción.
1. Pulse el botón STAND BY / ON para apagar la unidad.
Operación de USB
Nota
1. El USB-MP3 tiene la función de memoria de juego. Al volver a insertar el mismo
USB, se reproducirá la última canción.
2. Esta unidad está equipada con una entrada USB que puede reproducir archivos
MP3/WMA almacenados en cualquier USB (compatible con la version USB 2.0)
3.Memorias USB con más de 32GB de memoria podrían no ser compatibles.
4.Aunque este producto es totalmente compatible con puertos USB 2.0 de
formato estandar, un pequeño porcentaje de puertos USB podrían no ser
legibles, debido al incumplimiento de las normas a la hora de fabricar USB con
el formato estandar por algunos fabricantes.
OPERACIÓN DE BLUETOOTH
1. Presione el botón BT en el panel frontal izquierdo para activar la función BLUE-
TOOTH y la luz LED azul parpadeará.
2. Se enciende el Bluetooth,y se busca el nombre.
3. Seleccione '1byone BS008' de la lista de dispositivos Bluetooth encontrados en su
dispositivo. Si el emparejamiento es exitoso, la luz LED dejará de parpadear y
permanecerá en azul.
4. Disfruta la música desde su dispositivo de reproducción.
Retirar USB DRIVE
Por favor, asegúrese de apagar la unidad antes de retirar USB drive para evitar los
daños.
Nota
1. La próxima vez se encienda el dispositivo ,se conectará automáticamente al
Bluetooth . Si el Bluetooth no conecta automáticamente al dispositivo, tendrá
que conectar al Bluetooth de forma manual.
2. Si se utiliza un teléfono inteligente con Bluetooth, el audio silencia cuando hay
una llamada entrante. Después de terminar la llamada, la reproducción continu-
ará automáticamente.
Te recomendamos que reemplazas la aguja de tacadiscos después de jugar más de
400 horas.
Por favor, siga los pasos siguientes para cambiar la aguja de tocadiscos:
1. Mueve el soporte de brazo y se lo levante.
2. En el extremo delantero del brazo, pone la uña en el soporte de aguja roja y la
cubierta negra,se puede ver dibujo abajo, presione el soporte de aguja roja hacia
abajo hasta que se separe de la cubierta negra.
3. Se mueve completamente el soporte de aguja roja .
4. Coloque el nuevo soporte de aguja roja abajo del eje. En primer lugar, presione la
parte trasera del soporte de aguja hacia arriba, y luego se eleva el borde frontal del
soporte de la aguja hasta que encaje la cubierta negra.
·Este sistema incluye un conjunto de conector de LINE-OUT que le permiten
jugar un dispositivo de reproducción externo desde BT, USB-MP3 y disco.
·Inserte el cable de audio (no incluido) al "LINE OUT".
·Utilice la unidad normal.
·Para lograr el mejor sonido, ajuste el volumen al mínimo.
·Podemos escuchar el sonido de la unidad con los altavoces de reproducción
externos.
OPERACIÓN DE LINE-OUT
CAMBIO DE LA AGUJA

38 39
EN
DE
FR
ES
JP
IT
EN
DE
FR
ES
JP
IT
¡IMPORTANTE!
TRANSPORTE DEL SISTEMA
1. Durante el transporte,se protege la plataforma giratoria, se usa un tornillo de
cruz que coloca en la parte superior derecha de la placa giratoria.
2. Antes de jugar, por favor, utilice un destornillador para girar el tornillo en sentido
horario para desbloquear el plato giratorio.
3. Si se necesita hacer transporte ,se bloquea el plato giratorio, gire el tornillo hacia
la izquierda.
1. Cuidado de cualquier pieza de la unidad.
2. Cuando la cubierta de polvo está sucia, es posible limpiar con un paño suave, no
abrasivo.
3. Si el panel de madera queda manchada con huellas dactilares, puede utilizar
cualquier spray de buena calidad para limpiarlo.
4. Se recomienda rociar el spray en el paño, no en el panel de madera directa-
mente.
CUIDADO DEL PANEL DE MADERA Y CUBIERTA DE POLVO
CUIDADO Y MANTENIMIENTO
1. Se levanta suavemente el brazo .
2. Se usa la mano izquierda para fijar el brazo y la mano derecho para fijar la parte
posterior del eje. A continuación, pulse el eje hacia atrás y abajo. Según el dibujo
debajo que se muestra la dirección, Se puede separar el eje del brazo desde la
parte izquierda.
3. Se usa la pinza o los dedos, saque los superiores del eje nuevo cuidadosamente.
4. Conecte a los terminales del nuevo eje con cuidado (no incluido).
5. Para volver a instalar el nuevo eje del brazo. En primer lugar por favor bloquea el
extremo frontal del eje nuevo.
6. Presione la parte trasera del nuevo eje hacia arriba hasta que bloquea en el
brazo.
SI SE REEMPLAZA EL EJE DEL BRAZO, POR FAVOR SIGA EL
PROCEDIMIENTO ABAJO.
ATENCIÓN: Por favor, no se daña la aguja al instalar el nuevo eje.
40 41
EN
DE
FR
ES
JP
IT
EN
DE
FR
ES
JP
IT
パッケージ 内 容
次の付属品がそろっているかを確認してください。
この取扱説明書をよくお読みのうえ、製品を安全にお使いください。
ターンテーブル
アダプター
取扱説明書
裏パネル
前の左側パネル
1オーディオ2R線ライン出力口
3L線ライン出力口4DC9V/2000mA
STANDBY/ON
USB-MP3
PHONO
PHONO-REC
BT
ESPECIFICACIÓN
Nuestro producto va a mejorar poco a poco.Si las especificaciones y funciones
van a cambiar sin previo aviso.
Voltaje de operación
Especificación de Bluetooth
Dispositivo compatible
Potencia de salida
Dimensiones
Peso
DC9V/2000 mA
Version 2.1+EDR
USB
2 x 4W RMS
434 * 360 * 135.5 mm
4.38 kg
Eliminación del producto
Bajo ninguna circunstancia se debe desechar este dispositivo en la
basura normal. Este producto está sujeto a las disposiciones de las
directivas europeas 2012/19/EU.
Elimine el dispositivo a través de una empresa o en un punto limpio. Por favor, observe
las normas actuales en desecho de productos. Contacte con el centro municipal de
desechos si tiene cualquier duda.
Eliminación
El embalaje está fabricado con material respetuoso con el medio
ambiente y puede ser desechado en su centro de reciclaje local.
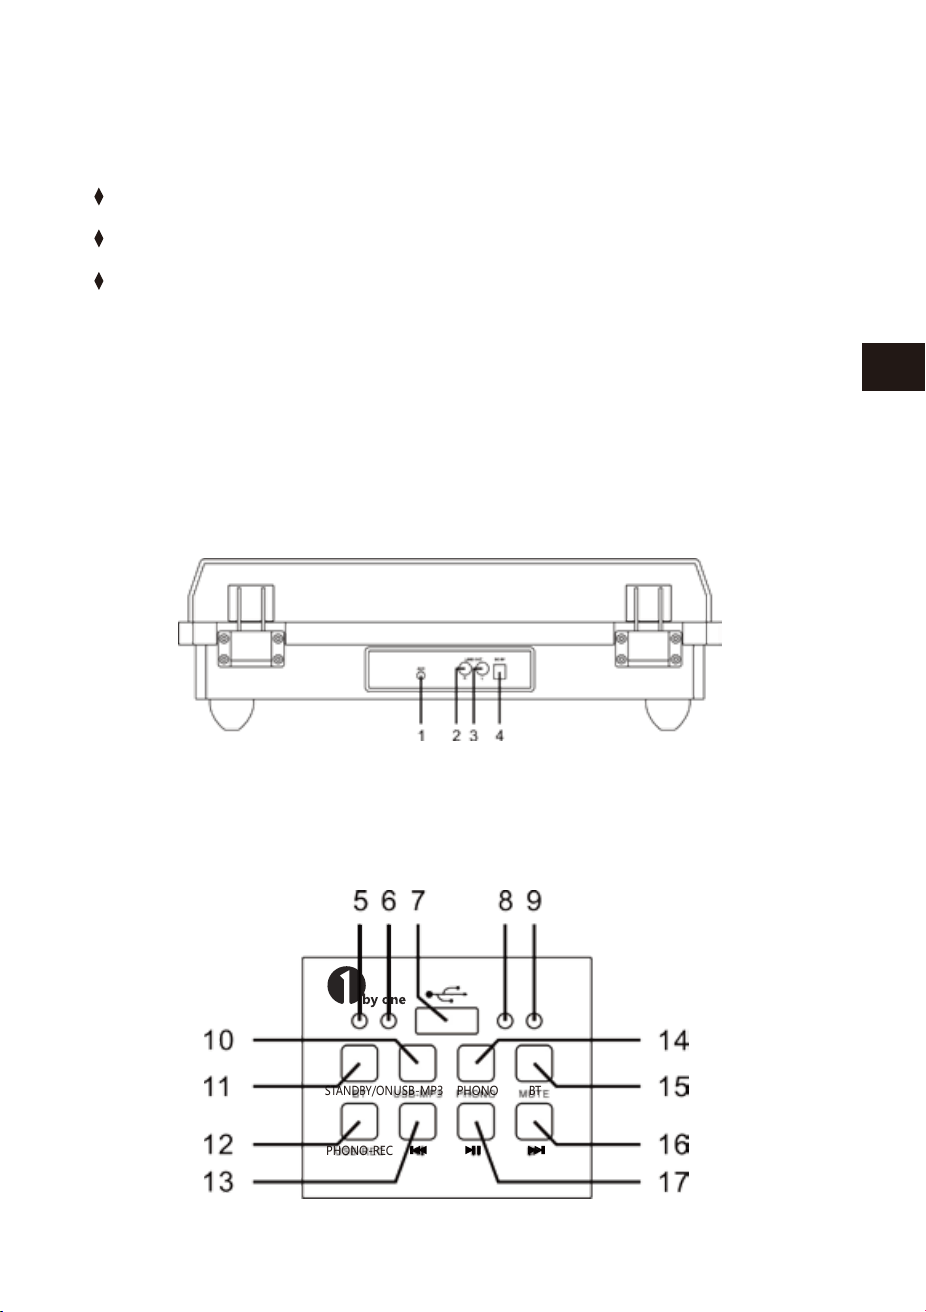
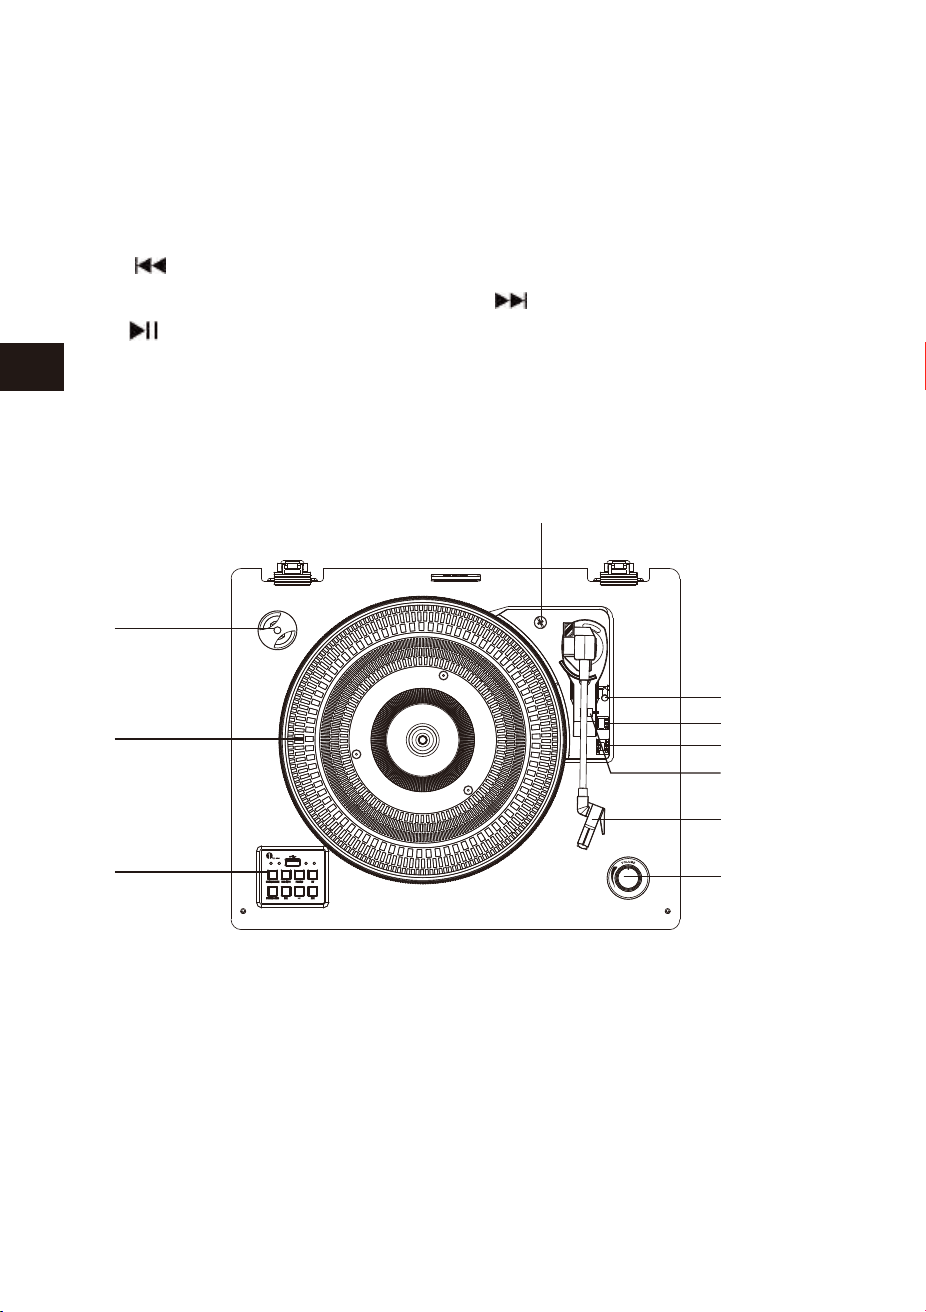
42 43
EN
DE
FR
ES
JP
IT
EN
DE
FR
ES
JP
IT
ターンテーブルパネル
設置について
5待機/ONランプ6USB放送指示器
7USBポート8レコードプレーヤー/RECランプ
9Bluetoothランプ10USBMP3プレーヤーのボタン
11待機/ONボタン12プレーヤー-RECボタン
13ボタン14プレーヤー再生ボタン
15Bluetoothボタン16ボタン
17ボタン
1.45RPMアダプター2.ターンテーブル
3.機能ボタンパネル4.クロス輸送ネジ
5.リフトレバー6.スピードセレクター(33/45/78RPM)
7.トーンアームロック8.スタイラストーンアーム
9.ボリュームコントロール10.自動停止コントロールスイッチ
1.お気を付けながら、全ての部品をパッケージ箱からお取り出して下さい。
2.ACアダプターを解け、それを、最大限まで伸ばして下さい。
3.電源のコンセントを挿入しやすいよう、プレーヤーをしっかり水平な場所に
設置して下さい。
4.電源プラグを接続して下さい。
5.ダストカバーを取り外し、レコード針(スタイラスチップ)矢印の方向にスラ
イドして下さい。
6.レコード針(スタイラスチップ)の破損は保証しませんので、操作中レコード
針(スタイラスチップ)をご注意して下さい。
7.出荷する時、トーンアームを確保する為のツイストバンドをお外して下さい。
8.トーンアームを離して下さい。
プレーヤーの電源について
注意
1.電源アダプターを接続機器後ろのコンセントに接続して下さい。
2.STANDBY/ONボタンを押すと、STANDBY/ONライトが暗くなり、PHONOモー
ドが自動的に起動します。
3.プレーヤーをお切りたい場合は、もう一度STANDBY/ONボタンを押して下さ
い。そうすると、POWEROFFの音声メッセージが出ます。
ある機能を選択し、15分以内に次のステップ指示や信号がない場合、設備は
自動的に閉鎖されます。
10
1
2
3
4
5
6
7
8
9

44 45
EN
DE
FR
ES
JP
IT
EN
DE
FR
ES
JP
IT
ホンシステムはフルサイズを含みます。33、45と78のRPMレコードテー
プドライブ转盘シェードが3つの回転速度がございます。
オーディオ操作
1.本機は、外部オーディオを接続する為の補助オーディオ信号入力ジャックを提
供しています。そうすると、本機のスピーカーを通して外部のオーディオMP3
プレーヤー、CDプレーヤーやipodsなどを聴くことができます。
2.3.5mmのステレオオーディオケーブルを使って、各先端のケーブルを接続し
て下さい。(3.5mmのステレオオーディオケーブルが付属しておりません)
3.ひとつの端子は本体のAUX-INに挿入り、もうひとつの端子は、オーディオ設備
の出力ジャックに接続して下さい。
4.電源はこの2つの設備を開きます。
5.ボリュームはメインユニットでコントロールが出来ます。補助装置のすべての
機能を操作できます。
6.AUXIN機能は主な機能です。例え、USB-MP3/PHONO/Bluetoothのランプ
がついているとしても、AUX-INが使用している限り、他の機能がご使用できな
い事をご注意ください。USB-MP3/PHONO/BT機能をご使用の前に、必ず
AUX-INを抜いてからご使用して下さい。
7.出荷する時、トーンアームを確保する為のツイストバンドをお外して下さい。
8.トーンアームを離して下さい。
再生記録
1.システムを開くには、STANDBY/ONボタンを押し、ボリュームを低いレベルに
設定して下さい。
2.再生ボタンを押し、プレーヤーモードを開いて下さい。又、レコード針(スタイラ
スチップ)がカバーから取り出したことをご確認して下さい。そして、トーンアー
ムをロックを解除して下さい。
3.ターンテーブルの速度を適当な33、45、78RPMの速度に設定して下さい。もし、
45RPMを設定する場合、45RPMアダプターをセンターに配置して下さい。
4.自動停止コントロールスイッチを滑らせ、自動停止機能を選択します。
5.ある曲を選択し、放送する場合は、トーンアームを移動して下さい。リフトレバ
ーを引いて、トーンアームをゆっくりと持ち上げレコードの方に置いて下さい。
そうすると、曲は放送開始します。
6.レコードの再生が終了後、トーンアームは自動的に停止します。リフトレバーを
ゆっくりと戻し、トーンアームをゆっくりとターンテーブルの上に持ち上げます。
7.音量コントロール設定には、必要な音量ボリュームを調整します。
8.終了後、STANDBY/ONボタンを押し、システムをオフにして下さい。
9.プレーヤーで放送する時、ダストカバーを開いてください。
レコード録音操作
1.ターンテーブルの上にレコードプレーヤーを置いて下さい。
2.USBメモリをUSBポートに差し込んで下さい。その後、PHONO-REC押しボタン
を押すと、青いLEDランプが光り、レコードから音楽の録音をスタートします。
3.録音が終わりましたら、PHONO-RECボタンを押して下さい。
4.USB-MP3ボタンを押し、青いランプが光りましたら、USBメモリースティック記
録した音楽を聴くことが出来ます。
注意
1.PHONO-RECはレコードプレーヤー録音だけです。
2.PHONO-RECは、フォノレコードからUSBディスクデバイスに音楽を録音す
るためのものです。(FAT32のみのUディスクをサポートする)
注意
1.もし外部機器のLINEOUTジャックに接続したら、本システムの音量を調整す
ることができます。
2.損害避ける為、確実にトーンアームをロックして下さい。
3.終わったら、待機/ONボタンを押し、プレーヤーを止めてください。又、外部
のデバイスも同じように電源をオフにしてください。

46 47
EN
DE
FR
ES
JP
IT
EN
DE
FR
ES
JP
IT
USB操作
1.USB-MP3ボタンを押して、青いLEDランプが表示されたら、USBモードをオン
にして下さい。
2.USBデバイスをシステム上のUSB入力に挿入して下さい。プレーヤーはUSBデ
バイス上の曲を放送開始です。
3.欲しい曲を選択する場合は、ボタン、もしくはボタンを押して下さい。
4.曲の停止または放送の場合は、ボタンを押して下さい。
注意
1.次回は、最後のBluetoothが設定していたペアを自動的に接続できます。もし、
Bluetoothが自動的に再接続されない場合は、もう一度Bluetoothの設定を行
って下さい。
2.スマートフォンのBluetoothを接続し放送としてご使用し、着信があった場合、
着信音のオーディオファイルをミュートになります。着信/呼び出しの中止はス
マートフォンを通して行って下さい。通話終了後、放送は自動的に続きます。
ラインアウト 操 作
1.このシステムはライン出力ジャックを含んでいます。このシステムの
Bluetooth、USB-MP3やレコードプレーヤーなどを外部設定を通して放送が出
来ます。
2.オーディオケーブルを(オーディオケーブルが付属しておりません)マッチング
“LINEOUT”のソケットユニットに挿入して下さい。
3.通常通り本機を操作して下さい。
4.最高の音効果を達成するには、最低レベルのボリュームを設定するのがお勧
めです。
5.外部の放送装置のスピーカーを通して、ユニットの音が聞こえます。
レコード針(スタイラスチップ)の交換
400時間以上レコードプレーヤーをお使いになりましたら、レコードの針(スク
ラッチ)交換することがお勧めです。
以下のステップに従って、レコードの針(スクラッチ)を交換して下さい。
1.トーンアームをロックして下さい。
2.トーンアームの先端、赤いレコードの針と黒カートリッジハウジングの間に(図
のように)カートリッジハウジングから分離されるまで、赤いレコードの針を押
して下さい。
3.完全に破損したレコードの針ホルダーを取り外し、お捨てて下さい。
4.カートリッジハウジングの下で、新しい赤スタイラスホルダーを置いてくださ
い。レコードの針ステントの背面に押し、カートリッジハウジングに填まるま
でスタイラスホルダーの前端に押して下さい。
注意
1.USB-MP3放送モードは記憶機能がございます。同じUSBデバイスを再度挿入
の時、一度に放送されたトラックを再開します。
2.本機ではUSBポートが搭載されていて、本機で標準USBフラッシュメモリを使
用しMP3/WMA音楽ファイルが再生することができます。(USB2.0と互換でき
る)
3.32GBを超える場合は、USBフラッシュメモリと互換的な相性が良くない可能性
があります。
4.この製品はUSB2.0の標準フォーマットと完全互換できると言っても、製品の
メーカーは完全なUSB製造スタンダード規格(オフィシャル)を守らないので、
USBフラッシュメモリのドライブの小さいな部分は読み取ることができません
可能性があります。
Bluetooth操作
1.前左側のBTボタンを押すと、BLUETOOTH機能を起動し、青色LEDランプが点
滅します。
2.Bluetooth放送設定をして下さい。そうすると、他のBluetoothを検索できます。
3.Bluetooth再生デバイスのリストから「1byoneBS008」を選択し、ペアリングが
成功したら、LEDランプが点滅から点灯にかわります。
4.プレーヤーの音楽を楽しめます。
U S Bドライブを取り外 す
USBのシステムへの損害を避ける為に、必ず放送を停止し、USBドライブを取り
外しUSBデバイスを停止して下さい。
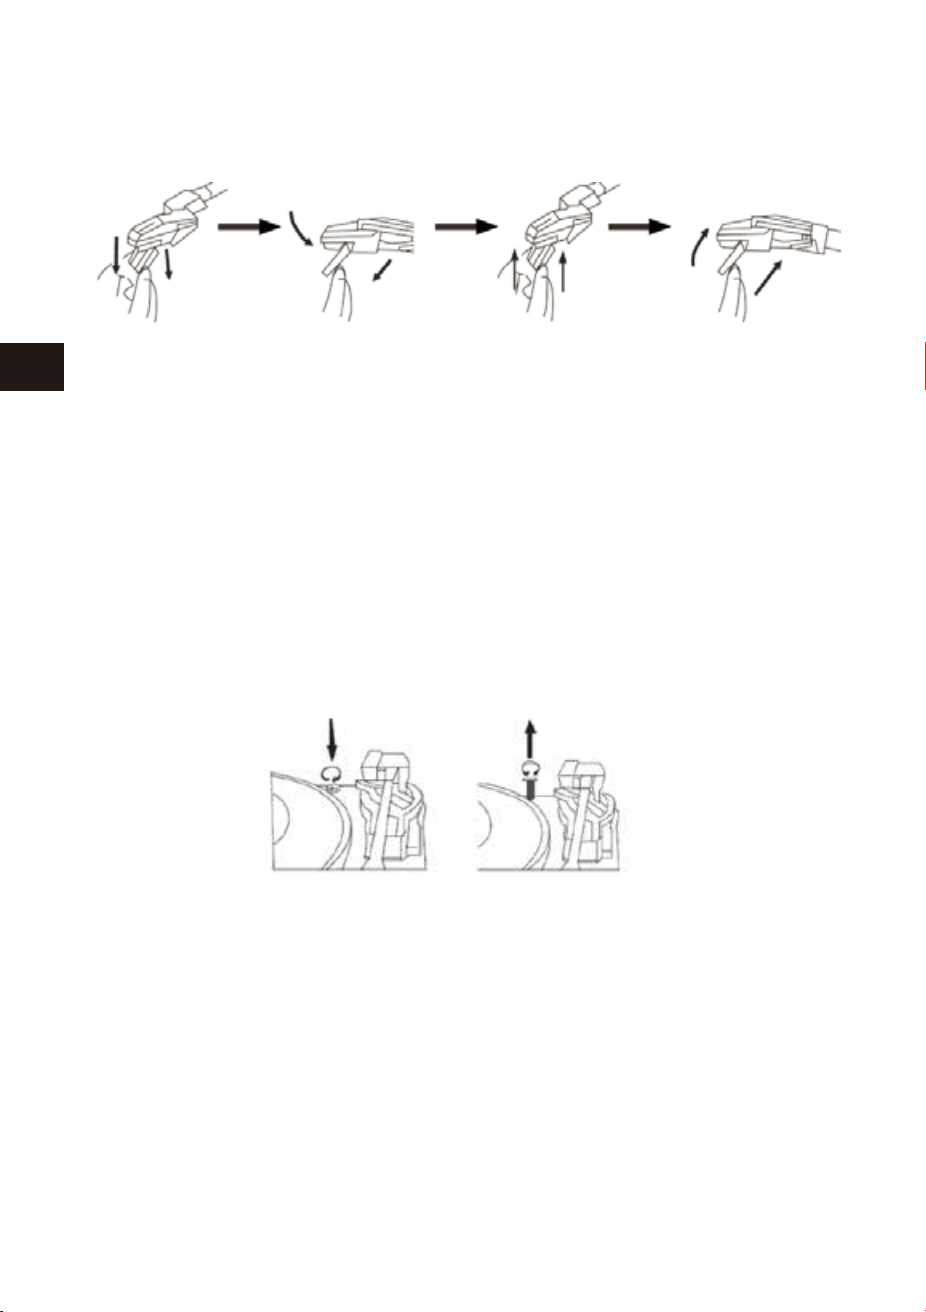
48 49
EN
DE
FR
ES
JP
IT
EN
DE
FR
ES
JP
IT
重 要!
運 輸システム
1.輸送中ターンテーブルの破壊を防ぐため、ネジがターンテーブルのプラットフ
ォーム右上に設置しています。
2.ご使用の前にドライバーでネジを時計回りに回転して下さい。(下りネジ)完全
にターンテーブルのロックを解除します。
3.再度運輸の為に、ターンテーブルをロックするには、ネジを逆時計回りに回転
して下さい。
注意
木質パネル及びダストカバーを保護して下さい。
1.レコードプレーヤーを守るように、他の部品も大事にして下さい。
2.ダストカバーにほこりがあった場合、柔らかい布で、軽く拭いて下さい。
3.もし木の板に指紋で汚れた場合、市販で販売している掃除用のスプレークリ
ーナーで軽く拭いて下さい。
4.提案としては、スプレークリーナーを直接に木の板にかけるではなく、布にか
けてから、木の板を拭いて下さい。
ケアとメンテナンス
1.ゆっくり、トーンアームロックからトーンアームを持ち上げます。
2.左手でトーンアーム押し、右手でカートリッジの後部を押さえて下さい。そして
方向によって(図のように)左から箱の方向に、トーンアームの後ろへ離れてから、
カートリッジを下に推進して下さい。
3.ピンセットや指などを使って、慎重に新しいカートリッジ端子を抜いてください。
4.気をつけてながら、端末を新しいカートリッジに接続して下さい。(包装ケースに
含まれない)
5.新しいカートリッジのトーンアームを設置するには、まず、カートリッジのトーン
アーム先端をロックしてください。
6.新しいカートリッジを押して、背面を上に向け、トーンアームをロックして下さい。
5.外部放送設備のスピーカーを通して、プレーヤーから出力の声が聞こえます。
トーンアームからカートリッジを交換する際に以下の手続に従って交換し
てくだ さ い 。
新しいカートリッジを取付ける時、レコード針(スタイラスチップ)を損壊しない
ようにして下さい。
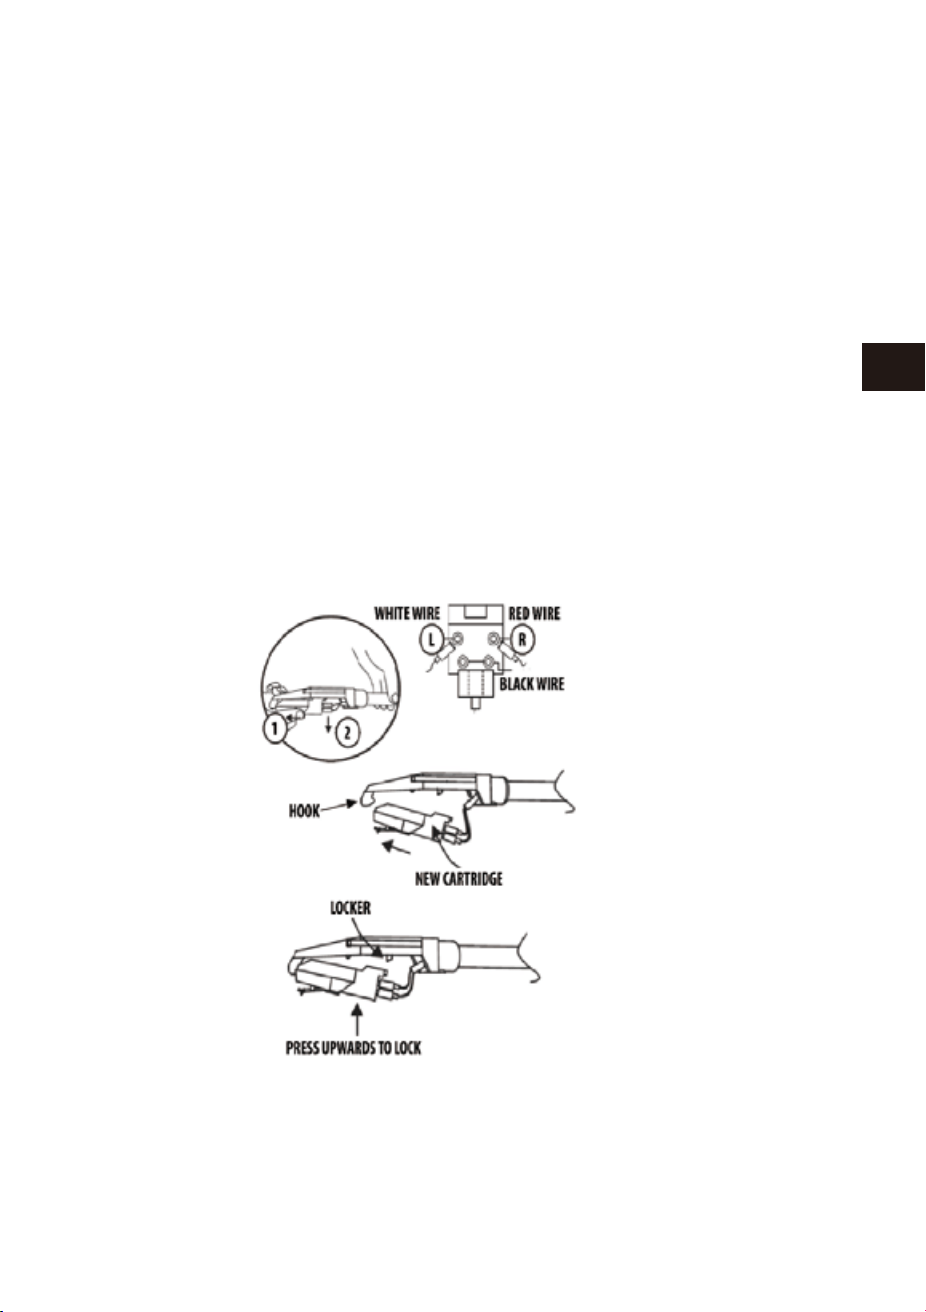
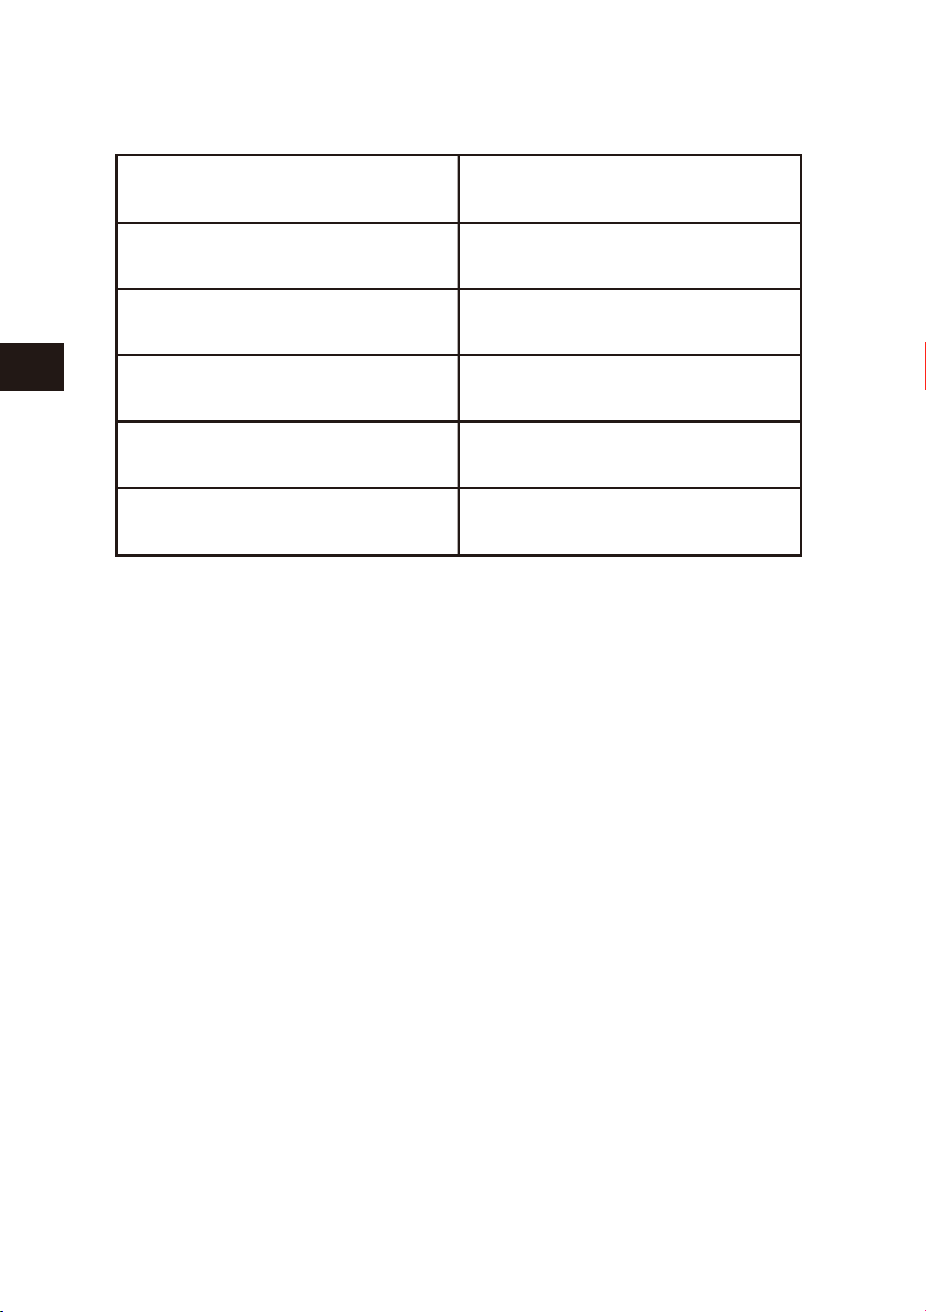
50 51
EN
DE
FR
ES
JP
IT
EN
DE
FR
ES
JP
IT
Contenuto della confezione
Assicurarsi che gli elementi elencati di seguito sono inclusi nella scatola:
LEGGERE IL LIBRETTO DI ISTRUZIONI DI SICUREZZA PRIMA DI
UTILIZZARE IL PRODOTTO
Unità principale
Adattatore di alimentazione
Manuale di istruzioni
RETRO
FRONTE - SINISTRO
1 AUX IN 2 LINE OUT R
3 LINE OUT L 4 DC 9V/2000 mA
STANDBY/ON
USB-MP3
PHONO
PHONO-REC
BT
仕様
仕様および外観は、改良のため、予告なく変更することがありますが、ご了承く
ださい。
動作電圧
Bluetooth仕様
サポートストレージ
出力パワー
外形寸法(長*幅*高)
単位重量
DC9V/2000mA
バージョン2.1+EDR
USB
2×4WRMS
434*360*135.5mm
4.38kg
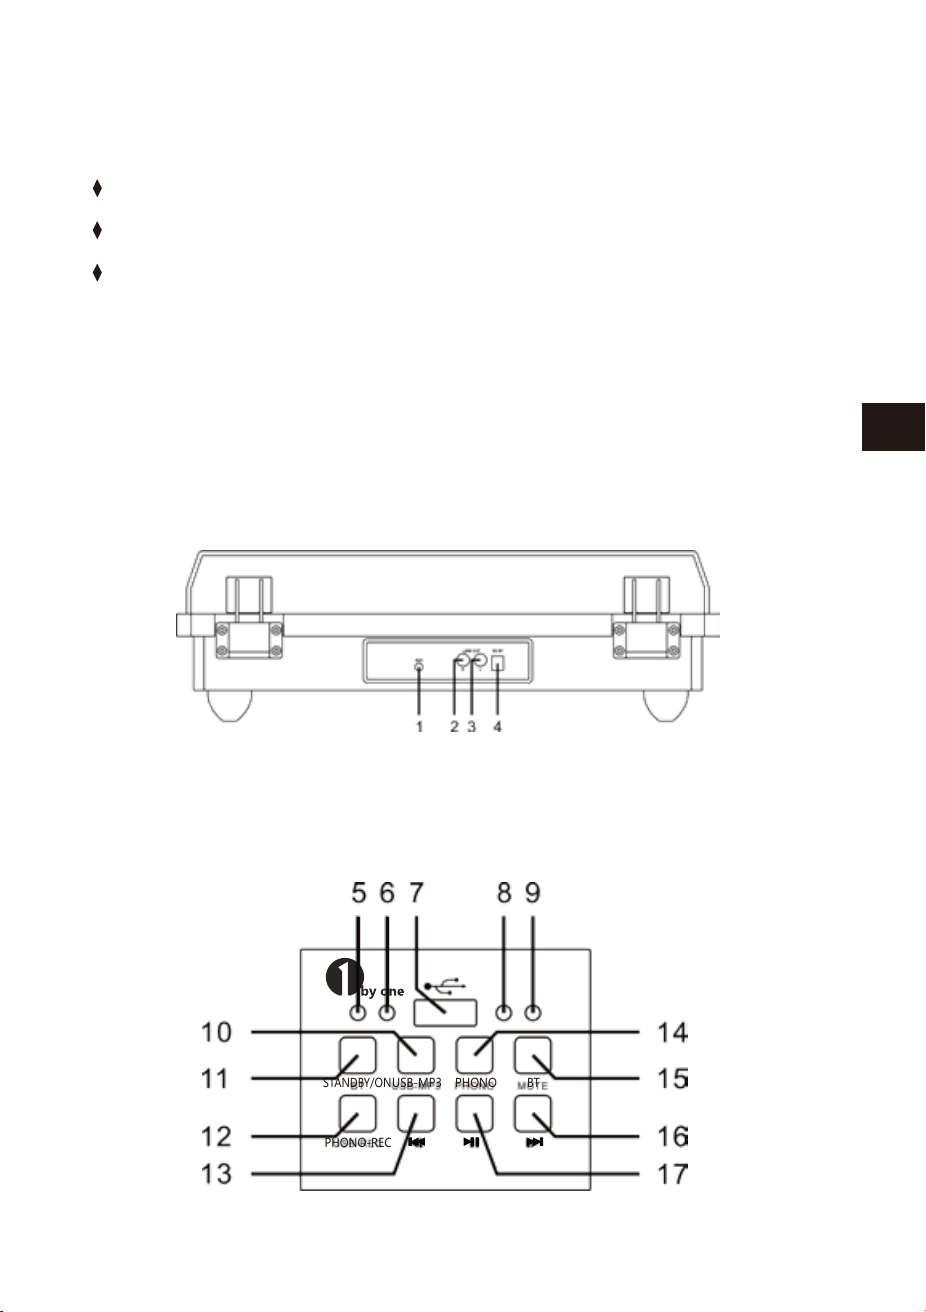
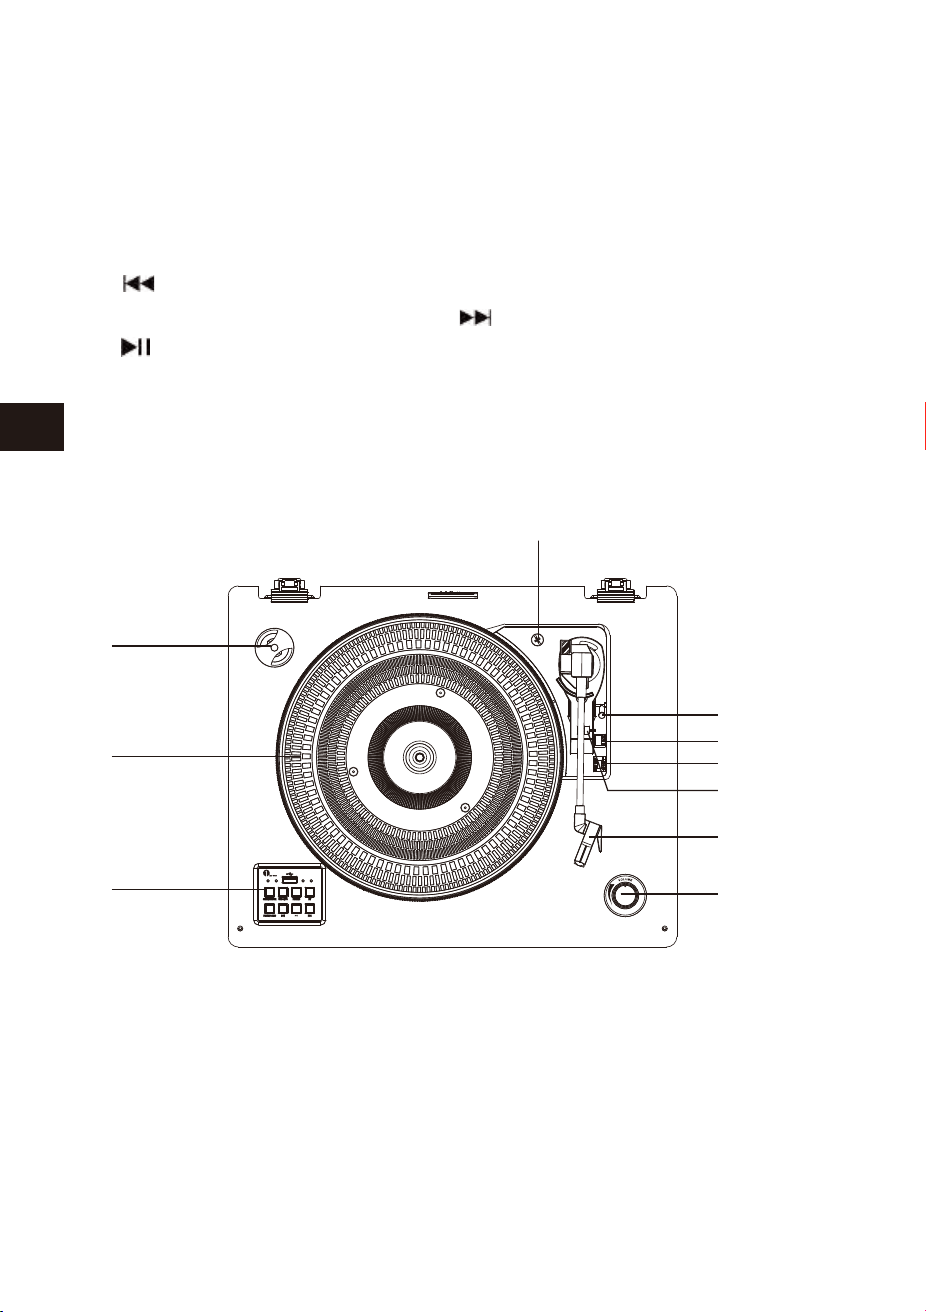
52 53
EN
DE
FR
ES
JP
IT
EN
DE
FR
ES
JP
IT
Pannello del Giradischi
DISIMBALLAGIO E IMPOSTAZIONI
5 Spia di STANDYBY/ON 6 Spia USB PLAYER
7 Porta USB 8 Spia PHONO PLAYER/REC
9 Spia BT 10 Tasto USB-MP3 PLAYER
11Tasto STANDBY/ON 12 Tasto PHONO-REC
13 Tasto 14 Tasto PHONO PLAYER
15 Tasto BT 16 Tasto
17 tasto
1 45 RPM Adattatore 2 Giradischi
3 Tasti funzione 4 Vite di Blocco
5 Leva di Sollevamento 6 Selettore di Velocita’
7 BLOCCO DEL BRACCIO 8 BRACCIO
9 VOLUME 10 Interruttore Spegnimento Automatico
1. Con attenzione rimuovere l'unità dalla scatola e rimuovere tutto il materiale
di imballaggio.
2. Estende il cavo di alimentazione.
3. Collocare l'unità su una superficie piana e stabile, comoda alla presa di
corrente e lontano da campi magnetici forti.
4. Collegare la spina alla presa di corrente
5. Rimuovere il coperchio di plastica bianco opaco dal fonografo facendolo
scorrere nella direzione della freccia.
6. Durante questa operazione prestare attenzione alla puntina, perché il
danno alla puntina non è coperto da garanzia.
7. Rimuovere il laccio che è stato utilizzato per bloccare il braccio durante la
spedizione.
8. Rimuovere il blocco del braccio.
Accendere l’unita’
NOTA
1. Collegare l'adattatore alla presa AC sul retro dell'unità.
2.Premere il tasto STANDBY/ON, l’indicatore STANDBY/ON si spegnerà e la
modalità PHONO si accenderà.
3.Al termine dell'utilizzo, premere nuovamente il tasto STANDBY/ON, spegne-
re e sentirai un messaggio vocale: POWER OFF.
Senza istruzioni o segnali, dopo 15 minuti, l'unità si spegne automaticamente.
10
1
2
3
4
5
6
7
8
9

54 55
EN
DE
FR
ES
JP
IT
EN
DE
FR
ES
JP
IT
Questo sistema include un giradischi full-size, 3 velocità, trasmissione a
cinghia che riproduce 33, 45 e 78 giri record.
Aux in funzione
1.Questa unità e’ dotata di un jack di ingresso del segnale audio per dispositivi
come lettori MP3, lettori CD, etc. per ascoltare la musica da una fonte esterna
attraverso gli altoparlanti.
2.Utilizzare un cavo audio (non incluso) con un connettore da 3,5 m.
3.Collegare un'estremità alla presa AUX-IN sull'unità principale e l'altra
estremità alla presa del dispositivo audio.
4.Accendi i due dispositive.
5.ll livello del volume può essere controllato attraverso l'unità principale.
6.Si prega di notare che quando la funzione AUX IN è attiva,le funzioni
USB-MP3/CD/ PHONO / BT non sono attive.
7. Rimuovere il laccio che è stato utilizzato per bloccare il braccio durante la
spedizione.
8. Rilasciare il blocco del braccio.
Attivare il giradischi
1.Per attivare il sistema, premere il tasto STANDBY/ON e impostare il volume
ad un livello basso.
2.Premere il tasto PHONO per attivare la modalità phono. Accertarsi di aver
rimosso il coperchio della puntina e sia stato rimosso il blocco del braccio.
3.Impostare la velocità giradischi appropriate: 33, 45 o 78 giri/min. Impostare
la registrazione sul giradischi. Se stai usando singoli 45, è possibile posizion-
are l'adattatore 45 giri sull'asse centrale.
4.Scorri l'INTERRUTTORE PER STOP AUTOMATICO per selezionare la funzione
stop automatico.
5.Quando si sceglie far suonare una certa canzone, spostare il braccio al disco.
Tirare delicatamente in avanti la leva di sollevamento e posizionarla sul
discod. La canzone inizia la riproduzione.
6. Alla fine della riproduzione, il BRACCIO si fermerà automaticamente. Delicat-
amente, riporta manualmente la LEVA indietro, alza il BRACCIO dal disco.
7.Regolare il controllo VOLUME per impostare il volume come desiderato.
8.Premere il tasto STANDBY/ON per spegnere il sistema, quando hai finito.
9.Quando il giradischi e’ attivo, si prega di aprire il coperchio antipolvere.
Funzioni di registrazione
1. Inserire un disco sul giradischi.
2. Inserire la chiavetta USB nella presa USB. Quindi premere il tasto PHO-
NO-REC e la spia LED blu inizia a memorizzare la musica dal record phono.
3. Quando hai terminato la registrazione, premere nuovamente il tasto
PHONO-REC.
4. Premere il tasto USB-MP3 con luce blu accesa per ascoltare la registrazione
sulla chiavetta USB.
NOTA
1. Phono-REC e’ solo per la registrazione del fonografo.
2. PHONO-REC serve per registrare la musica da phono a una pennetta USB
(solo di formato FAT32).
NOTA
1.Se il Jack Line Out del dispositivo esterno è collegato, è possibile regolare
solo il volume di sistema.
2.Assicurarsi che il braccio sia ben fissato per evitare danni.
3.Premere il tasto STANDBY/ON per spegnere l'unità. Non dimenticate di
spegnere anche il dispositivo esterno.
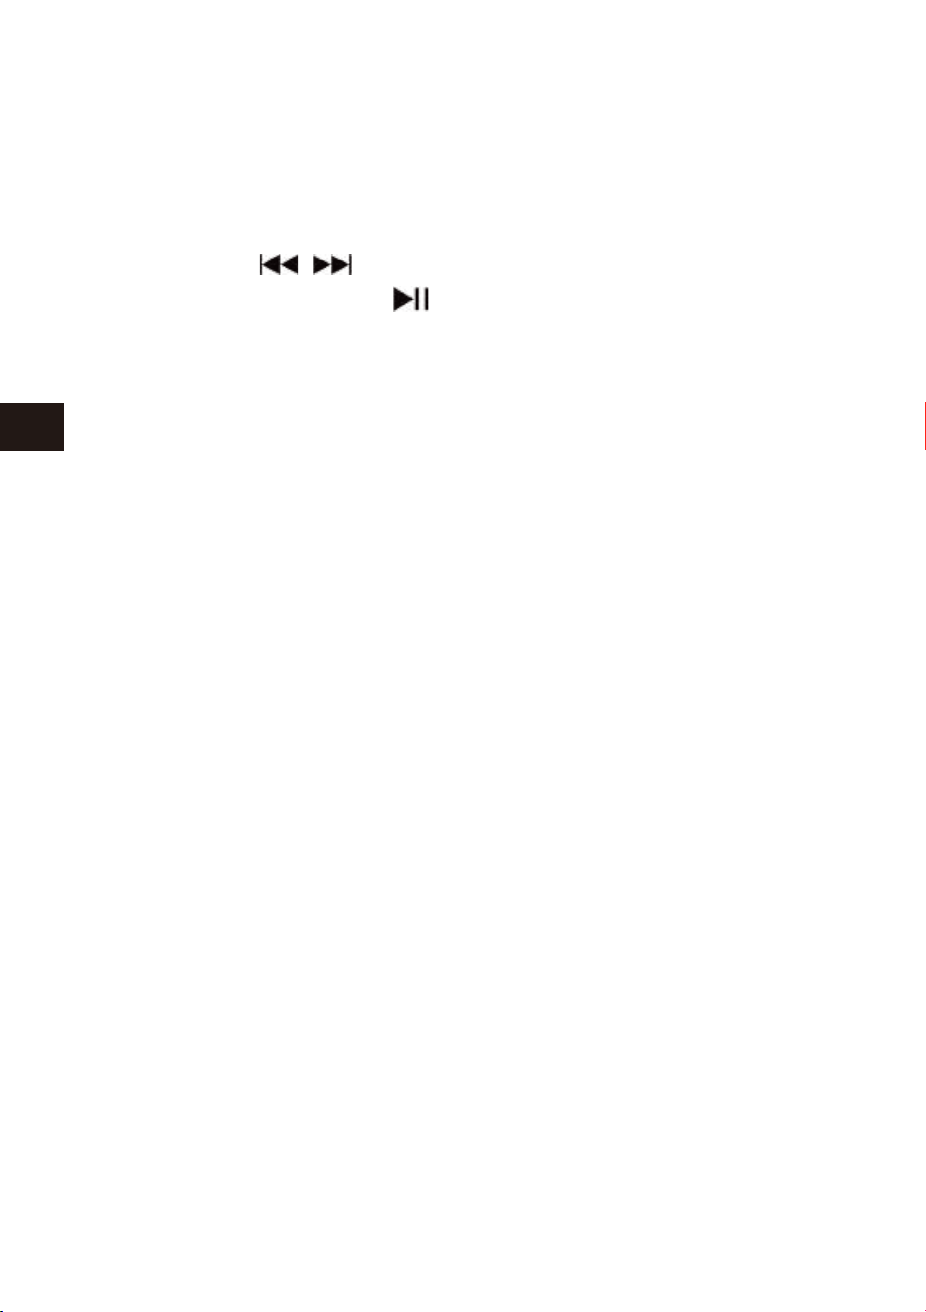
56 57
EN
DE
FR
ES
JP
IT
EN
DE
FR
ES
JP
IT
Utilizzo USB
1. Premere il tasto USB-MP3 per attivare la modalità di USB. La spia LED blue si
accende.
2. Inserire il dispositivo USB nell'ingresso USB e il music player inizierà la
riproduzione dei brani.
3. Premere il tasti per scegliere il brano desiderato.
4.Premere il tasto pausa o play per eseguire il brano.
5.Premere il tasto Standby/On per spegnere l’unita’.
NOTA
1. La prossima volta che si accende il dispositivo, esso si connette automatica-
mente all'ultimo dispositivo collegato. Se non si riconnette automatica-
mente, sara’necessario ristabilire la connessione al dispositivo Bluetooth
manualmente.
2.Se si utilizza uno smartphone come dispositivo di riproduzione Bluetooth,
l’audio verrà disattivato quando arriva una chiamata. Dopo aver terminato
la chiamata, la riproduzione verrà proseguita automaticamente.
Collegamento con Spinotto
1. Il LINEOUT jack consente di eseguire la musica su un altro dispositivo.
2. Inserire lo spinotto nella porta.
3. Attivare l’unita’.
4. Impostare il volume al minimo per un migliore suono.
5. Ascoltiamo la musica attraverso gli altoparlanti the dispositivo collegato.
Sostituire la puntina-stilo
Si consiglia di sostituire la puntina dopo 400 ore di utilizzo.
Seguire i seguenti passi per sostituire la puntina:
1. Alzare il braccio.
2. All'estremità anteriore del braccio, posizionare la punta della tua unghia tra il
portastilo rosso e l'alloggiamento della cartuccia nera come mostrato.
Premere il portastilo rosso finché si separa dall'alloggiamento della cartuccia.
3. Rimuovere il Portastilo usato.
4.Collocare il nuovo portstilo sotto l'alloggiamento della cartuccia. Premere
verso l'alto sul lato posteriore del portastilo e quindi premere sul bordo
anteriore dello stilo fino a quando scatta in posizione sull'alloggiamento
della cartuccia.
NOTA
1.La modalità di riproduzione USB-MP3 ha la funzione di memoria. Quando
viene reinserito lo stesso dispositivo USB, l’unita’ riprende il brano dall'ultima
volta.
2. Questa unita’e’ dotata di una presa USB che puo’ riprodurre file MP3/WMA
memorizzati su memorie flash standard USB (compatibili con USB versione
2.0)
3. I dispositive USB flash con piu’ di 32GB di memoria potrebbero non essere
compatibili.
4. Anche se questo prodotto è pienamente compatibile con i formati standard
USB 2.0, alcuni driver flash USB potrebbero non essere leggibili, a causa della
non-conformita’con gli standard.
Funzioni Bluetooth
1.Premere il tasto BT sulla pannello anteriore sinistro per attivare il BLUE-
TOOTH e la luce LED blu lampeggerà.
2. Impostare il dispositivo Bluetooth in modalita’ ricerca.
3. Selezionare il nome ‘1byone BS008’ dalla lista dei dispositivi individuati dal
tuo dispositivo Bluetooth di riproduzione. Se l’abbinamento avviene con
successo, la luce LED smetterà di lampeggiare e rimarrà di colore blu.
4. Ascolta la musica
Rimuovere il Dispositivo USB
Assicurarsi che le riproduzioni musicali siano terminate e spegnere l'unità
prima di rimuovere il dispositivo USB per evitare di danneggiare il dispositivo
USB e il sistema.
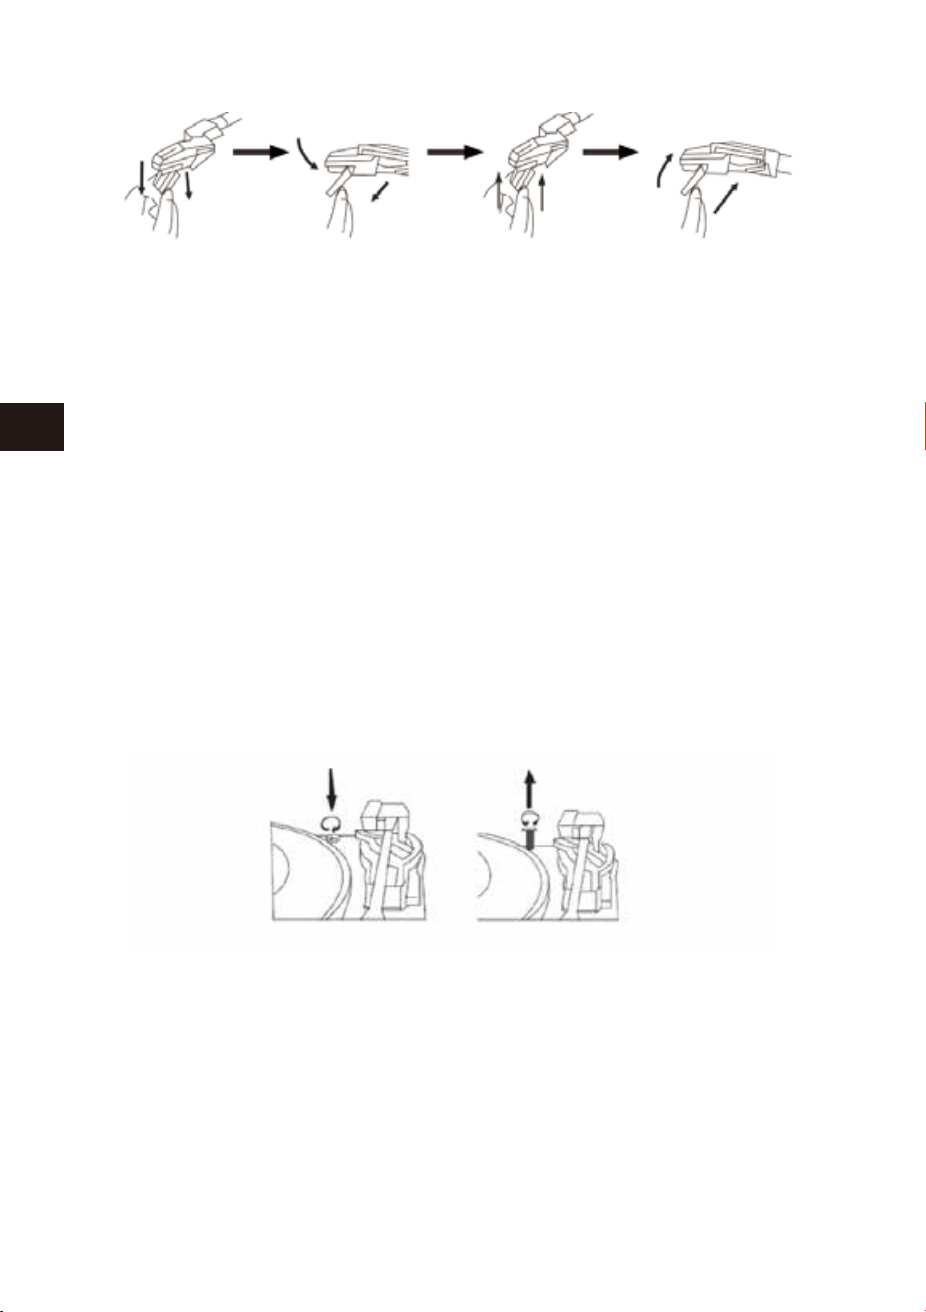
58 59
EN
DE
FR
ES
JP
IT
EN
DE
FR
ES
JP
IT
Importante
Precauzioni del Trasporto
1.Per proteggere il giradischi durante il trasporto abbiamo bloccato il giradis-
chi con un vite di blocco situata in alto a destra della piattaforma del
giradischi.
2.Prima di azionare il giradischi, svitare la vite con un cacciavite e sbloccare il
giradischi.
3.Per bloccare il giradischi nuovamente per il trasporto, si prega di avvitare la
vite in senso antiorario.
Pulizia
1.Pulisci il giradischi come ogni altro dispositivo.
2.Rimuovi la polvere con un panno morbid.
3.Pulisci il telaio in legno con un normale detergente spray.
4.Spruzza il detergente sul panno.
Manutenzione
1.Alzare delicatamente il braccio.
2.Utilizzando la mano sinistra, tenere fermo il braccio e usare la mano destra
per tenere la parte posteriore della cartuccia. Quindi spingere la cartuccia
verso il basso e indietro per separare la cartuccia dal braccio.
3.Con attenzione usando una pinzetta o con le dita, scollegare i terminali.
4.Collegare i terminali per la nuova cartuccia (non inclusa).
5.Per re-installare la nuova cartuccia al braccio, bloccare la parte frontale della
nuova cartuccia sul gancio del braccio.
6.Premere il lato posteriore della nuova cartuccia verso l'alto per bloccarla sul
braccio.
PER SOSTITUIRE LA CARTUCCIA DAL BRACCIO SI PREGA DI SEGUIRE
LA SEGUENTE PROCEDURA.
Attenzione:
Non danneggiare la puntina quando si installa la cartuccia.
61
EN
DE
FR
ES
JP
IT
To ensure speedy handling of your
issue, please call or email us for
assistance.
Phone: +1 909-391-3888
(Mon-Fri 9:00am - 6:00pm PST)
Email: [email protected]
US
To ensure speedy handling of your
issue, please email us for assistance.
Email: [email protected]
CA
To ensure speedy handling of your
issue, please call or email us for
assistance.
Phone: +44 158 241 2681
(Mon-Fri 9:00am - 6:00pm UTC)
Email: [email protected]
UK
Für eine zügige Bearbeitung ihres
Problems, melden Sie sich bei uns wie
folgt.
Email: [email protected]
DE
Per supporto immediato in caso di
bisogno, la invitiamo a contattarci via
email.
Email: [email protected]
IT
お客様の問題が直ちに解決されるため、
ぜひメールにて弊社までご連絡ください。
Eメール:[email protected]
JP
Pour vous assurez une assistance
rapide en cas de problème, veuillez
envoyer un e-mail.
Email: [email protected]
FR
Para garantizar una rápida atención
de su problema, favor envíenos un
email para ayudarle.
Email: [email protected]
ES
Customer Service/Kundenservice/Service Clients
Atención al cliente/Assistenza Clienti/カスタマーサービス
60
Specifiche Tecniche
Tensione di lavoro
Tipologia Bluetooth
Sistemi d’archiviazione
Potenza in uscita
Dimensioni(L*W*H)
Peso
DC 9V/2000 mA
Version 2.1+EDR
USB
2 x 4W RMS
434 * 360 * 135.5 mm
4.38 kg
Smaltimento dell’elettrodomestico
Non gettare mai l’elettrodomestico tra i normali rifiuti domestici.
Lo smaltimento di questo prodotto è regolato dalla direttiva europea
2012/19/EU.
Per lo smaltimento dell’elettrodomestico, contattare un’agenzia di smaltimento
specializzata o il comune. Si invita a rispettare le norme vigenti sullo smaltimento dei
rifiuti. Contattare il centro smaltimento rifiuti della propria aria per informazioni e
assistenza.
SMALTIMENTO
La confezione è fatta di materiale riciclabile e può essere smaltita
nell’apposita raccolta differenziata.

Classic Wooden Turntable
with Dust Cover
Instruction Manual/ Bedienungsanleitung/ Manuel d'instructions/
Manual de instrucciones/ 取扱説明書/ Manuale di istruzioni
1byone Products Inc.
1230 E Belmont Street, Ontario, CA 91761
Customer Service: +1 909-391-3888
www.1byone.com