
Loading ...
Loading ...
Operation Guide 5637
7. Press D to toggle the target alarm between on (On displayed) and off (OFF
displayed).
x The indicator TGT will be displayed in the Stopwatch Mode while the target
time is on.
8. After all the settings are the way you want, press A to exit the setting screen.
To use the target time alarm
1. Reset the stopwatch to all zeros and then press D.
This will cause TGT to flash on the display.
2. Now you can perform the same operations as those in the steps on page E-26.
(1) (2) (4)
(3)
Start Target time
E-29
To set a target time
1. Reset the stopwatch to all zeros.
2. Hold down A until the flashing SET Hold indicator
disappears from the display and the hour digit
starts to flash. Release A after the hour digit starts
to flash.
3. Use D (+) and B (–) to change the hour setting.
x Holding down either button scrolls at high speed.
x For a target time of 24 hours, set 00hours
00minutes.
4. Press C to switch to the minutes setting.
5. Use D (+) and B (–) to change the minutes setting.
x Holding down either button scrolls at high speed.
6. Press C to display the target time alarm on/off
setting.
Hours
Target Time operation in
progress
E-28
Note
x Once started, elapsed time measurement continues until you press D to stop
it, even if you change to a different mode and even if the stopwatch reaches the
elapsed time maximum limit.
Using the Target Time Alarm
You can set a target time in the range of one minute to 24 hours, in units of one
minute.
A beeper will sound for 10 seconds when the elapsed timing of the stopwatch
reaches the target time.
E-27
To perform an elapsed time operation
D
D D D B
Start Stop (Resume) (Stop) Reset
To pause at a split time
D
B B D B
Start Split
(SPL displayed)
Split release Stop Reset
To measure two finishes
D B D B B
Start Split
(SPL displayed)
First runner finishes.
Display time of first
runner.
Stop
Second runner
finishes.
Split release
Display time of
second runner.
Reset
E-26
2. Now you can perform the same operations as those shown on page E-26.
Entering from Another Mode (including the Timekeeping Mode)
Press C as many times as necessary to navigate to the Stopwatch Mode as shown
on page E-11.
x To enter from the Timekeeping Mode using this method, press C four times.
x This will display the stopwatch screen in the same status as it was the last time you
exited the Stopwatch Mode. However, if you exited with a split time displayed, the
split time operation will be released when you return.
E-25
To enter the Stopwatch Mode
You can enter the Stopwatch Mode using any one of the methods below.
Entering Directly from the Timekeeping Mode
If the stopwatch was reset to all zeros the last time you used it, a new elapsed time
operation will start as soon as you enter the Stopwatch Mode.
See page E-26 for information about measuring an elapsed time.
1. In the Timekeeping Mode, press D.
This will result in one of the following, depending on the status of the stopwatch the
last time you exited the Stopwatch Mode.
x If reset (stopped at 0:00 00"00): Timing starts.
One-press timing start from the Timekeeping Mode (direct timing start from the
Timekeeping Mode)
x If an ongoing timing operation is paused: Timing remains paused.
x If an ongoing timing operation is in progress*: Timing continues to be performed.
* An ongoing stopwatch timing operation continues even if you navigate to
another mode from the Stopwatch Mode.
E-24
Using the Stopwatch
The stopwatch measures elapsed time, split times, and two finishes.
x The measurement range of the stopwatch is 23 hours, 59minutes, 59.99 seconds.
Elapsed time returns to zero automatically and timing continues from there when
the maximum limit is reached.
Seconds
Minutes
Hours
Minutes
1/100 Second
E-23
Note
x Resetting the seconds to 00 while the current count is in the range of 30 to
59causes the minutes to be increased by 1.
x The watch’s built-in full automatic calendar makes allowances for different month
lengths and leap years. Once you set the date, there should be no reason to
change it except after you have the watch’s battery replaced.
x The day of the week changes automatically when the date changes.
E-22
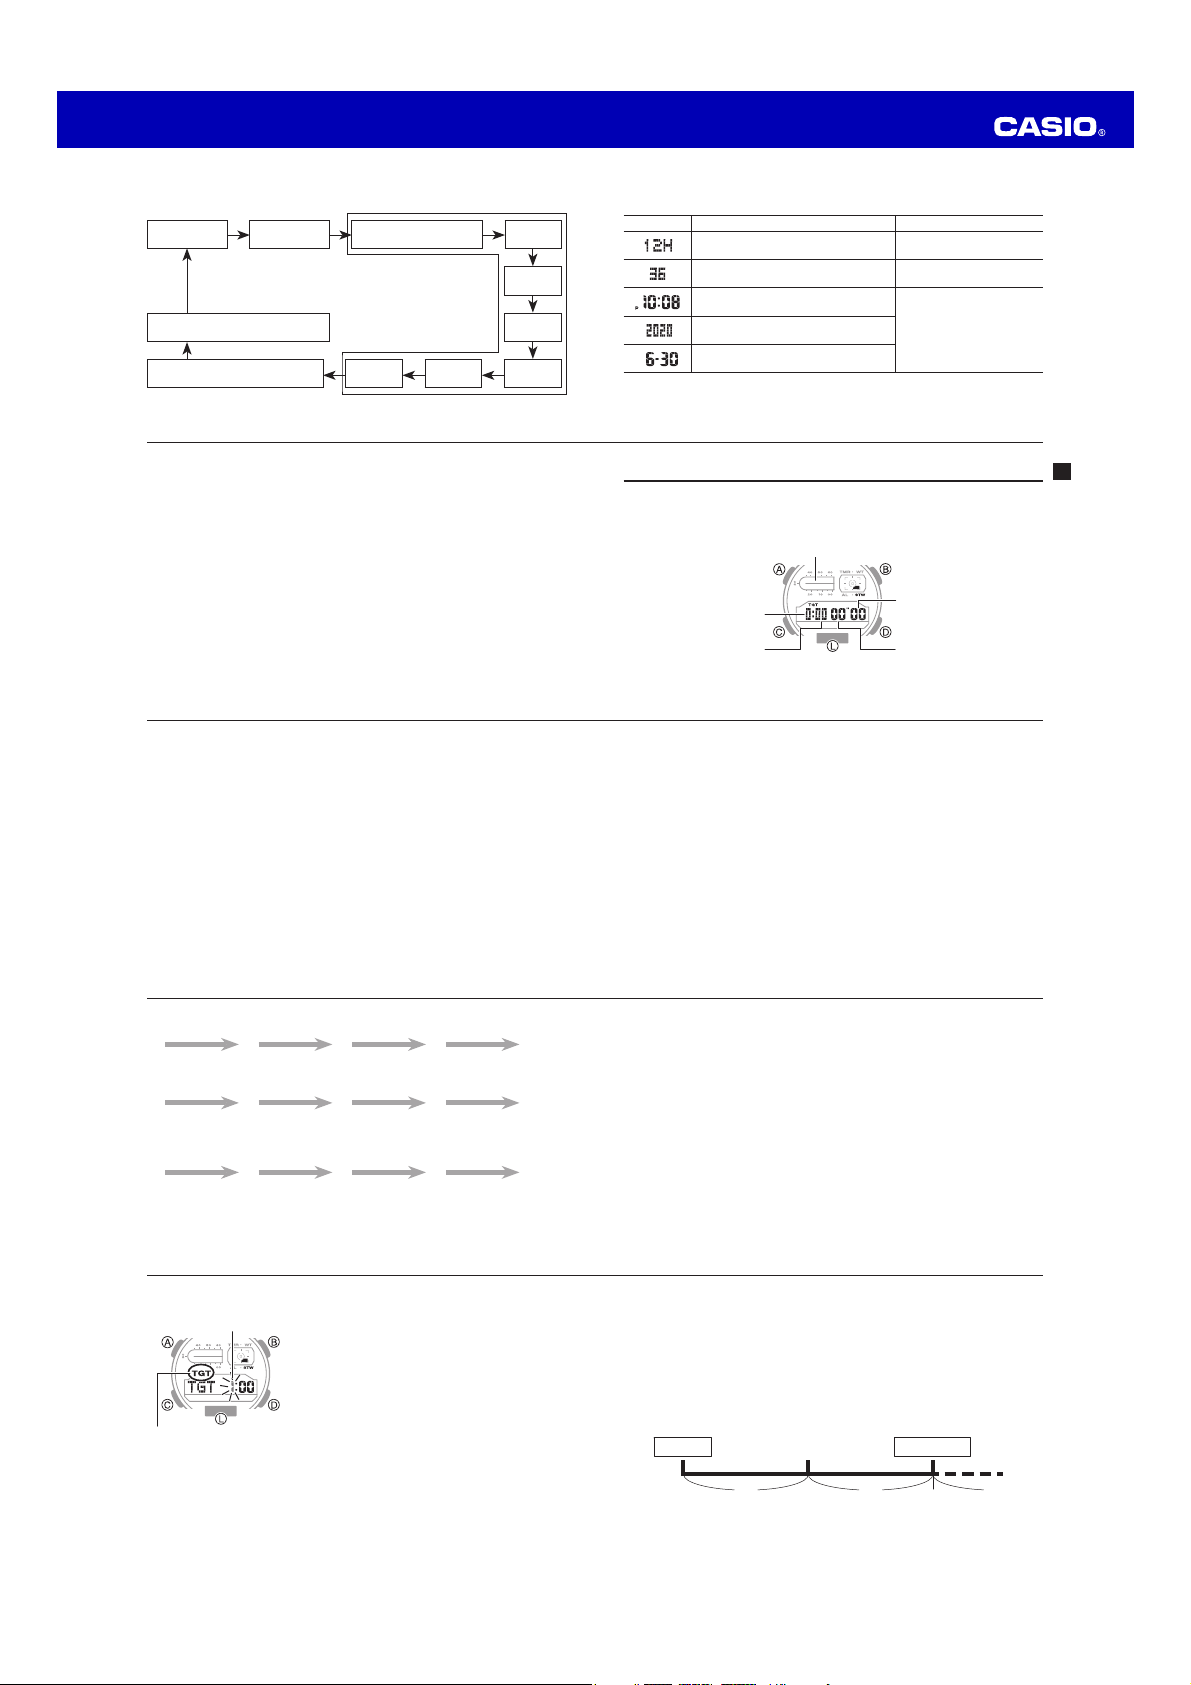
3. When the timekeeping setting you want to change is flashing, perform the
operation described below.
Screen To do this: Do this:
Toggle between 12-hour (12H) and 24-hour
(24H) timekeeping
Press D.
Reset the seconds to 00
Press D.
Change the hour or minute
Use D (+) and B (–) to
change these settings.
x Holding down either button
scrolls at high speed.
Change the year
Change the month or day
4. Press A to exit the setting mode.
E-21
2. Press C to move the flashing in the sequence shown below to select the other
settings.
Home City
(page E-16)
C
DST
(page E-18)
C
12/24-Hour Format
C
Seconds
C
C
Hour
C
Illumination Duration
(page E-46)
Minute
C
C
Button Operation Tone On/Off
(page E-51)
C
Day
C
Month
C
Year
E-20
Loading ...
Loading ...
Loading ...