
Quickstart Guide (English)
Box Contents
Charge Time Plus Power Adapter Quickstart Guide / Safety and Warranty Manual
Support
For the latest information about this product (documentation, technical specifications, system requirements,
compatibility information, etc.) and product registration, visit ionaudio.com.
Features
Top Panel
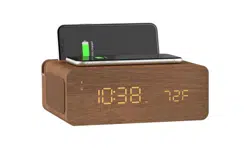
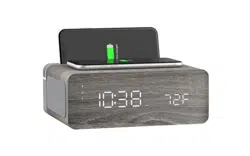
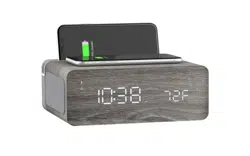
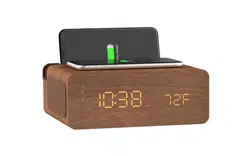
1. Qi Charging Pad: Place your Qi-compatible device here
to wirelessly charge it.
2. Phone Cradle: Use this slot to rest a phone upright.
Note: Resting tablets in the cradle is not recommended.
3. Alarm Button: Press and hold this button for 2 seconds
to adjust the alarm time. Tap this button to briefly
display the current alarm time.
4. Clock Button: Press and hold this button for 2 seconds
to adjust the time.
5. Left Button (◄): Tap this button to skip to the previous
track on a connected device. To turn off the alarm, first
tap the Alarm button to show the current alarm time that
is set, and while that is showing, tap the (◄) or (►)
buttons to toggle the Alarm on or off.
6. Right Button (►): Tap this button to skip to the next track on a connected device. To set the clock
format to 12 Hour or 24 Hour, hold both the (◄) and (►) buttons for 2 seconds.
7. Play/Pause Button: Tap this button to play, pause, or resume audio from a connected device. Press
and hold this button to disconnect a Bluetooth device.
8. Minus Button (-): Tap or hold this button to decrease the volume.
9. Plus Button (+): Tap or hold this button to increase the volume.
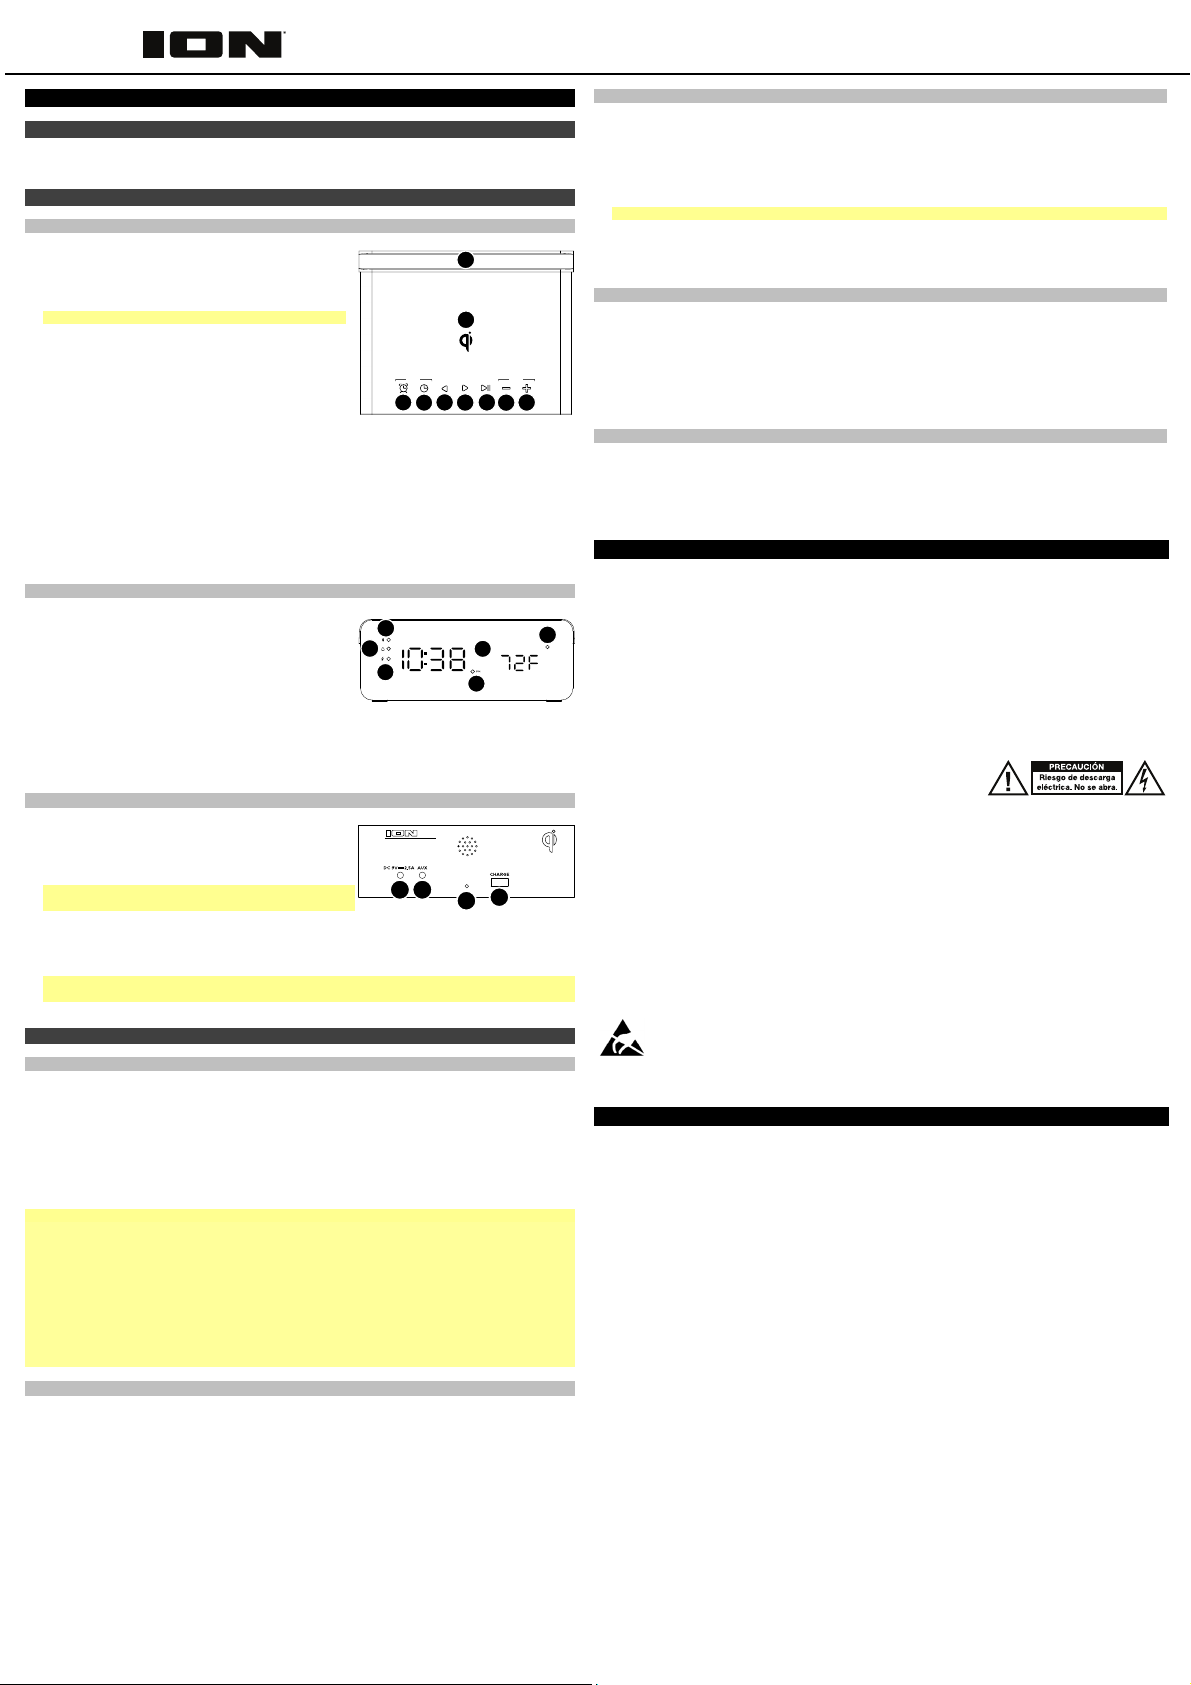
Front Panel
1. Bluetooth LED: This LED will be lit solid when a
Bluetooth device is connected.
2. Alarm LED: This LED will be lit solid when an alarm is
enabled.
3. Qi LED: When a Qi-compatible device is charging, this
LED will be lit solid green. If a charging connection
cannot be established, the LED will flash. If the charging
area cannot detect a Qi-compatible device at all, the
LED will not be lit.
4. Display: Shows the current time, alarm time, sleep sound timer, or temperature.
5. PM LED: This LED will be lit to indicate PM time.
6. Microphone: This microphone will pick up your voice when receiving calls on a connected device.
Rear Panel
1. Power Input: Use the included power adapter to
connect this input to a power outlet.
2. Aux Input: This stereo 1/8” (3.5 mm) input can be used
to connect a CD player, MP3 player, or other audio
source.
Note: Only one audio source (Bluetooth or Aux) can play
at a time.
3. Temperature Gauge: This gauge will take the current
temperature to show on the display.
4. USB Charge Port: Connect a device's charge cable here to charge it. You can simultaneously charge
one device using the wireless Qi pad and one device using the wired charge port.
Note: Playing music may reduce the rate of charging per device. Using both the USB charge port and
Qi charging pad simultaneously may reduce the rate of charge.
Operation
Using the Qi Charging Pad
To wirelessly charge your Qi-compatible device, place it on Charge Time Plus in the Qi charging area.
When a successful charging connection is made, the Qi LED will be lit green and remain solid to indicate the
device is charging.
If the charging area cannot establish a charging connection with a device, the Qi LED will flash green to alert
you. Depending on the device, it may be necessary to move the device to a specific location on the top
panel of Charge Time Plus to successfully connect. This is normal for Qi charging pads.
If the charging area cannot detect any Qi-compatible device, the Qi LED will not be lit.
Note:
• Do not leave non-Qi compatible devices in the charging area for extended periods, as this may reduce
the lifetime of the Qi charging capabilities.
• Do not place metallic objects, magnetic objects, or credit cards on the Qi landing pad. These will
interfere with the Qi charging.
• Some thick protective cases may inhibit the device from Qi charging.
• If your phone vibrates, it might shift off the Qi landing pad. It is encouraged to turn off ‘vibrate’ while Qi
charging.
• Qi charging may not engage if the device is simultaneously connected to a USB port.
• It is normal for your phone to get warmer while charging. To extend the lifespan of your battery, if the
battery gets too warm, certain phones may have software designed to limit charging above 80
percent.
• It is recommended to charge in a cool location to optimize charging times.
Using the Alarm
To set the alarm:
1. Press and hold the Alarm button for 2 seconds. The hours' digits on the display will flash.
2. Tap the Left (◄) and Right (►) buttons to set the desired hour.
3. Tap the Alarm button to switch to the minutes' digits, which will flash on the display.
4. Tap the Left (◄) and Right (►) buttons to set the desired minutes.
5. Press and hold the Alarm button to confirm the alarm time.
To briefly display the alarm time, tap the Alarm button at any time.
To enable or disable the alarm, tap the Alarm button, and then immediately tap the Left (◄) or Right (►)
button.
When the alarm is sounding:
• Press and hold the Alarm button to turn off the alarm. This does not disable or "snooze" the alarm; the
alarm time will be saved and repeat at the same time the following day.
• Press the Minus (-) or the Plus (+) button to snooze the alarm. The alarm will repeat again after 9
minutes.
Setting the Sleep Sounds
1. Press and hold the Alarm and Clock buttons to enter the ambient sound selection mode. The front panel of the
clock (where the temperature is usually) will change to show the duration that the sound will play (0 =
continuous, 15, 30, 45, or 60 minutes).
2. Select from one of the five sounds using the Left (◄) and Right (►) buttons.
3. Adjust the duration settings by tapping the Clock button repeatedly to cycle through the options. The area
where the temperature usually is will show the number that represents which sound you are on.
4. To turn off a sound while it is playing, press and hold the Alarm and Clock buttons.
Note: When sleep sounds are playing, Bluetooth pairing will be disconnected.
While a sleep sound is playing, the time will be displayed, and the sleep sound number will be displayed in the area
where the temperature usually is. If the sound is on a timer, once the time has expired, that area will show the
temperature again.
Adjusting the Display
Brightness: Press the Minus (-) and Plus (+) buttons at the same time to cycle through the brightness settings for
the display: low, medium, and high.
Clock Format: Press and hold the Left (◄) and Right (►) buttons to toggle between the 12/24 clock format.
Temperature: Press the Alarm and Clock buttons at the same time to toggle between Celsius and Fahrenheit
temperatures.
Receiving Phone Calls
If your phone is connected via Bluetooth, Charge Time Plus can receive calls through the built-in microphone. When
there is an incoming call, you will hear a ringing through the speakers. Tap Play/Pause to answer an incoming call.
To end a phone call, tap the Play/Pause button. To reject an incoming call, press and hold Play/Pause.
Connecting a Bluetooth Device
To connect a Bluetooth device:
1. Turn on your Bluetooth device.
2. If it is not already on, turn on Charge Time Plus by connecting the power input to a power outlet using the
included power adapter.
3. If you have previously paired a Bluetooth device, Charge Time Plus will reconnect automatically.
If you have not connected a device previously, Charge Time Plus will automatically enter pairing mode.
4. Navigate to your Bluetooth device’s setup screen, find Charge Time Plus and connect.
Note: If your device requires a passcode or PIN, enter 0000.
5. The Bluetooth LED will light up solid when it is "paired."
If your Bluetooth device is not able to connect to Charge Time Plus, press and hold the Play/Pause button to
break previous Bluetooth connections and reset the Bluetooth module.
6. Start playback from your Bluetooth device.
IMPORTANT: If a device is connected to the auxiliary input, Bluetooth pairing will be turned off. Disconnect the
device to re-enter Bluetooth pairing mode.
To disconnect a connected Bluetooth device, press and hold the Play/Pause button.
Technical Specifications (English)
Output Power
20 W (2 x 10 W peak)
Bluetooth Specifications Version: 5.0
Range: Up to 50 feet / 15.25 meters
Types of Ambient Sounds
Babbling brook, ocean waves, rain, rain with forest sounds, wind.
USB Charging Port
+5 V, 1 A
Qi Charging Rate
10 W
Power Adapter
9 VDC, 2.5 A, center-positive
Dimensions
(width x depth x height)
7.3” x 5.7” x 2.8” / 185 x 145 x 70 mm
Weigh
t
1.55 lb. / 0.70 kg
Trademarks & Licenses (English)
ION Audio is a trademark of ION Audio, LLC, registered in the U.S. and other countries. The Bluetooth word mark and logos are
owned by the Bluetooth SIG, Inc. and any use of such marks by ION Audio is under license. The ‘Qi’ symbol is a trademark of
the Wireless Power Consortium. All other product names, company names, trademarks, or trade names are those of their
respective owners.
ionaudio.com/support
For technical support.
Para soporte técnico.
ionaudio.com/warranty
For complete warranty information.
Para información completa sobre la garantía.
Charge Time Plus
Manual Version 1.2
SOUNDS
SNOOZE
1
2
53 4
7
6
8 9
1
2
4
5
6
3
1
2
3
4
CHARGE TI ME PLUS
iSP99SA
Safety Instructions (English)
1. Read these instructions. Keep these instructions. Heed all warnings. Follow all instructions. 2. Do not defeat the safety purpose of the
polarized or grounding-type plug (if applicable). A polarized plug has two blades with one wider than the other. A grounding type plug has two
blades and a third grounding prong. The wide blade or the third prong is provided for your safety. If the provided plug does not fit into your
outlet, consult an electrician for replacement of the obsolete outlet. 3. Protect the power cord from being walked on or pinched particularly at
plugs, convenience receptacles, and the point where they exit from the apparatus. 4. Unplug this apparatus during lightning storms. 5. Power
Sources (if applicable): This product should be connected to a power supply only of the type described in these operating instructions, or as
marked on the unit. 6. (If applicable) When moving or not using the appliance, secure the power cord (e.g., wrap it with a cable tie). Be careful
not to damage the power cord. Before using it again, make sure the power cord has not been damaged. If the power cord has been damaged
at all, bring the unit and cord to a qualified service technician for repair or replacement as specified by the manufacturer. 7. Warning (if
applicable): Excessive sound pressure (high volumes) from headphones can cause hearing loss.
8. Warning (if applicable): Please refer to any important information (e.g., electrical, safety, etc.) printed on the exterior bottom enclosure or
rear panel before installing or operating the product.
CAUTION: TO REDUCE THE RISK OF ELECTRIC SHOCK, DO NOT REMOVE ANY COVER. NO
USER-SERVICEABLE PARTS INSIDE. REFER SERVICING TO QUALIFIED SERVICE
PERSONNEL ONLY.
NOTICE CONCERNING FCC REGULATIONS: You are cautioned that changes or modifications not expressly approved by the part
responsible for compliance could void the user’s authority to operate the equipment. This equipment has been tested and found to comply
with the limits for a Class B digital device, pursuant to part 15 of the FCC rules. These limits are designed to provide reasonable protection
against harmful interference in a residential installation. This equipment generates uses and can radiate radio frequency energy and, if not
installed and used in accordance with the instructions, may cause harmful interference to radio communications. However, there is no
guarantee that interference will not occur in a particular installation. If this equipment does cause harmful interference to radio or television
reception, which can be determined by turning the equipment off and on, the user is encouraged to try to correct the interference by one or
more of the following measures: (a) reorient or relocate the receiving antenna; (b) move this unit; (c) increase the separation between the
equipment and receiver; (d) connect the equipment into an outlet on a circuit different from that to which the receiver is connected; (e) be sure
that all cables are properly shielded, using a choke or ferrite where appropriate; (f) consult the dealer or an experienced radio/television
technician for help.
This device complies with Part 15 of the FCC rules. Operation is subject to the following two conditions: (1) this device may not cause harmful
interference, and (2) this device must accept any interference received, including interference that may cause undesired operation.
This device complies with Innovation, Science and Economic Development Canada’s licence-exempt RSSs. Operation is subject to the
following two conditions: (1) This device may not cause interference; and (2) This device must accept any interference, including interference
that may cause undesired operation of the device.
FCC Radiation Exposure Statement: This equipment complies with FCC radiation exposure limits set forth for an uncontrolled environment.
This equipment should be installed and operated with a minimum distance of 20 cm between the radiator and your body.
ESD / EFT Warning: This unit may contain a microcomputer for signal processing and control functions. In very rare situations,
severe interference, noise from an external source, or static electricity may cause it to lock up. In the unlikely event that this should
happen, turn off the unit, wait at least five seconds, and then turn it back on again.
In an environment with radio frequency interference, the unit may malfunction and resume normal operation after removal of the interference.
For best audio quality, avoid using this device in a high RF-radiated environment.
Ajuste de los sonidos para dormir
1. Mantenga pulsados los botones Alarm y Clock para entrar al modo de selección de sonidos de ambiente. El
panel delantero del reloj (en donde se suele visualizar la temperatura) cambiará para mostrar la duración del
sonido que se reproducirá (0 = continuo, 15, 30, 45 o 60 minutos).
2. Seleccione uno de los cinco sonidos utilizando los botones izquierda (◄) y derecha (►).
3. Modifique los ajustes de duración tocando el botón Clock repetidamente para recorrer las opciones. El área en
donde se suele visualizar la temperatura mostrará el número que representa el sonido seleccionado.
4. Para apagar un sonido mientras se está reproduciendo, mantenga pulsado los botones Alarm y Clock.
Nota: Mientras se estén reproduciendo sonidos para dormir, se desactivará el apareamiento Bluetooth.
Mientras se está reproduciendo un sonido para dormir, se mostrará la hora, y el número de sonido para dormir
aparecerá en el área en donde suele mostrarse la temperatura. Si el sonido tiene un temporizador, una vez
agotado el tiempo, dicha área mostrará la temperatura nuevamente.
Ajuste de la pantalla
Brillo: Pulse los botones más y menos al mismo tiempo para alternar entre los ajustes de brillo de la pantalla: alto,
medio y bajo.
Formato del reloj: Mantenga pulsado los botones izquierda (◄) y derecha (►) para conmutar entre los formatos
de 12 y 24 horas del reloj.
Temperatura: Pulse los botones Alarm y Clock (reloj) al mismo tiempo para alternar entre temperaturas
expresadas en grados Celsius y grados Fahrenheit.
Recepción de llamadas telefónicas
Si su teléfono está conectado mediante Bluetooth, el Charge Time Plus puede recibir llamadas a través de su
micrófono integrado. Cuando reciba una llamada entrante, escuchará un tono de llamada a través de los altavoces.
Toque Play/Pause (Reproducir/Pausa) para atender una llamada entrante. Para finalizar una llamada, toque el
botón Play/Pause. Para rechazar una llamada entrante, mantenga pulsado Play/Pause.
Guía de inicio rápido (Español)
Contenido de la caja
Charge Time Plus, Adaptador de alimentación, Guía de inicio rápido / Manual sobre la seguridad y garantía
Funcionamiento
Panel superior
1. Base de carga Qi Coloque aquí su teléfono inteligente
(smartphone) compatible con Qi para cargarlo de forma
inalámbrica.
2. Soporte para teléfono Utilice este soporte para mantener
su teléfono de forma vertical.
Nota: No se recomienda colocar tabletas en este soporte.
3. Botón de alarma: Mantenga pulsado este botón durante 2
segundos para ajustar la hora de la alarma. Pulse este
botón para mostrar brevemente la hora actual de la alarma.
4. Botón del reloj: Mantenga pulsado este botón durante 2
segundos para ajustar la hora.
5. Botón izquierda (◄): Para de apagar la alarma, primero
toque el botón Alarm para visualizar la hora de la alarma
actualmente establecida y mientras la visualiza, toque los
botones (◄) o (►) para activar o desactivar la alarma.
Toque este botón para retroceder a la pista anterior de un
dispositivo conectado.
6. Botón derecha (►): Para ajustar el reloj a un formato de 12 horas o 24 horas, mantenga pulsados ambos
botones (◄) y (►) durante 2 segundos. Toque este botón para avanzar a la pista siguiente de un
dispositivo Bluetooth conectado.
7. Botón de reproducción/pausa: Toque este botón para reproducir, poner en pausa o reanudar el audio
proveniente de un dispositivo conectado. Mantenga pulsado este botón para desconectar un dispositivo
Bluetooth apareado.
8. Botón menos (-): Toque o mantenga pulsado este botón para disminuir el volumen.
9. Botón más (+): Mantenga pulsado este botón para aumentar el volumen.
Panel frontal
1. LED de Bluetooth: Este LED permanecerá encendido cuando
se conecte un dispositivo Bluetooth.
2. LED de alarma: Este LED permanecerá encendido cuando haya
una alarma programada.
3. LED Qi: Cuando se está cargando un dispositivo compatible
con Qi, este LED permanecerá iluminado de color verde. Si no
se puede establecer una conexión de carga, el LED parpadeará.
Si el área de carga no puede detectar un dispositivo compatible
con Qi en lo absoluto, el LED permanecerá apagado.
4. Pantalla: Muestra la hora actual, la hora de la alarma, temporizador de sonido para dormir, o la
temperatura.
5. LED PM: Este LED se encenderá para indicar una hora postmeridiano (PM).
6. Micrófono: Este micrófono captará su voz cuando atienda llamadas desde un dispositivo conectado.
Panel trasero
1. Alimentación: Utilice el adaptador de corriente incluido para
conectar esta entrada a un tomacorriente.
2. Entrada auxiliar: Esta entrada estéreo de 3,5 mm (1/8 pulg.)
se puede utilizar para conectar un reproductor de CD, un
reproductor de MP3 u otra fuente de audio.
Nota: Sólo se puede reproducir una fuente de audio
(Bluetooth o auxiliar) a la vez.
3. Indicador de temperatura: Este indicador medirá la
temperatura actual y la mostrará en la pantalla.
4. Puerto de carga USB: Conecte aquí el cable de carga de su dispositivo para cargarlo. Se pueden cargar
simultáneamente un dispositivo mediante la base de carga inalámbrica Qi y otro a través de un cable
conectado al puerto de carga.
Nota: Es posible que reproducir música disminuya la velocidad de carga de los dispositivos. Utilizar
simultáneamente el puerto de carga USB y la base de carga Qi puede reducir la velocidad de carga.
Funcionamiento
Uso de la base de carga Qi
Para cargar de forma inalámbrica su dispositivo compatible con Qi, colóquelo en Charge Time Plus en la
zona de carga Qi. Una vez realizada una conexión de carga exitosa, el LED Qi se iluminará de color verde y
permanecerá encendido para indicar que el dispositivo se está cargando.
Si el área de carga no puede establecer una conexión de carga con un dispositivo, el LED Qi parpadeará para
notificarlo. Dependiendo del dispositivo, es posible que sea necesario moverlo hacia una ubicación específica
en el panel superior del Charge Time Plus para que se conecte de forma exitosa. Esto es normal en las bases
de carga Qi.
Si el área de carga no puede detectar un dispositivo compatible con Qi, el LED Qi no se encenderá.
Nota:
• No deje dispositivos compatibles con Qi en el área de carga durante períodos prolongados ya que esto
podría disminuir la vida útil de las capacidades de carga Qi.
• No coloque objetos metálicos, magnéticos ni tarjetas de crédito en la base de carga Qi. Esto interferirá con
el proceso de carga Qi.
• Es posible que algunas fundas protectoras gruesas impidan que el dispositivo se cargue mediante Qi.
• Si su teléfono vibra, es posible que se desplace la base de carga Qi. Se recomienda desactivar la función
de vibración durante la carga Qi.
• Es posible que la carga Qi no se active si el dispositivo también está conectado a un puerto USB.
• Es normal que su teléfono se caliente durante la carga. Para extender la vida útil de su batería, algunos
teléfonos cuentan con un software diseñado para limitar el nivel de carga al 80% si la batería se calienta
demasiado.
Uso de la alarma
Cómo programar la alarma:
1. Mantenga pulsado el botón Set durante 2 segundos. Las unidades de medida parpadearán en la pantalla.
2. Toque los botones izquierda (◄) y derecha (►) para ajustar la hora deseada.
3. Toque el botón Alarm (alarma) para pasar a los dígitos que indican los minutos, los cuales parpadearán en
la pantalla.
4. Toque los botones izquierda (◄) y derecha (►) para ajustar la hora deseada.
5. Mantenga pulsado el botón Alarm para confirmar la hora de la alarma.
Para mostrar brevemente la hora de la alarma, toque el botón Alarm (alarma) en cualquier momento.
Para activar o desactivar la alarma, toque el botón Alarm e inmediatamente toque el botón izquierda (◄) o
derecha (►).
Cuando la alarma está sonando:
• Mantenga pulsado el botón Alarm para apagarla. Esto no la desactiva ni posterga; la hora de la alarma
quedará guardada y se repetirá a la misma hora al día siguiente.
• Presione los botón Menos (-) o el Más (+) para postergar la alarma. La alarma sonará nuevamente en 9
minutos.
ionaudio.com/support
For technical support.
Para so
p
orte técnico.
ionaudio.com/warranty
For complete warranty information.
Para información com
p
leta sobre la
g
arantía.
Charge Time Plus
Manual Version 1.2
SOUNDS
SNOOZE
1
2
53 4
7
6
8 9
1
2
4
5
6
3
1
2
3
4
CHARGE TI ME PLUS
iSP99SA
Instrucciones de seguridad (Español)
1. Lea estas instrucciones. Conserve estas instrucciones. Preste atención a las advertencias. Siga todas las instrucciones.
2. No anule la función de seguridad del enchufe tipo polarizado o con conexión a tierra (si es aplicable). Un enchufe polarizado
tiene dos patillas, una más ancha que la otra. Un enchufe de tipo de conexión a tierra tiene dos patillas y una clavija de puesta
a tierra. La patilla ancha o la tercera clavija son para su seguridad. Si el enchufe provisto no entra en su tomacorriente,
consulte a un electricista y solicítele el reemplazo del tomacorriente obsolete. 3. Proteja el cable de alimentación de modo
que no lo pisen ni quede estrangulado, particularmente en los enchufes, tomacorrientes y el punto donde sale del equipo.
4. Desenchufe este equipo durante las tormentas eléctricas. 5. Suministro eléctrico (si es aplicable): Conecte este producto
solamente a un suministro eléctrico del tipo que se describe en estas instrucciones de operación o según se indique en la
unidad. 6. (Si es aplicable) Cuando traslade o no use el artefacto, sujete el cable de alimentación (por ejemplo, envuélvalo con
un precinto). Tenga cuidado de no dañar el cable de alimentación. Antes de usarlo nuevamente, asegúrese de que el cable de
alimentación no esté dañado. Si dicho cable presenta algún daño, lleve la unidad y el cable a un técnico de servicio calificado
para reparación o reemplazo según lo especifique el fabricante. 7. Advertencia (si aplica): Para evitar daños potenciales al
oído, no escuche a niveles elevados de volumen durante períodos prolongados. 8. Advertencia (si aplica): Antes de instalar u
operar el producto, consulte toda la información importante (como la relativa a electricidad, seguridad, etc.) impresa en la
envuelta inferior exterior o el panel trasero.
PRECAUCIÓN: PARA REDUCIR EL RIESGO DE DESCARGA ELÉCTRICA NO QUITE
NINGUN TAPADERO. DENTRO DE LA UNIDAD NO HAY COMPONENTES ÚTILES
PARA EL UTILIZADOR. PARA EL SERVICIO SE DEBE DIRIGIRSE SOLAMENTE AL
PERSONAL DE SERVICIO CUALIFICADO.
AVISO SOBRE LAS REGULACIONES DEL FCC (Federal Communications Commission): Este equipo genera y usa energía
de radiofrecuencia y puede causar interferencia en la recepción de radio y de televisión si no la opera estrictamente según los
procedimientos detallados en este manual de operación.
Esta unidad cumple con las reglas de aparatos informáticos de Clase B en conformidad con las especificaciones en la
Subparte J o Parte 15 de las Reglas FCC, que están diseñadas para proporcionar una protección razonable contra tal
interferencia en una instalación residencial. Sin embargo, no existen garantías de que no ocurrirá una interferencia en una
instalación específica. Si la unidad causa interferencia en alguna recepción de radio o de televisión, intente reducirla realizando
uno o más de los siguientes métodos: (a) reposicione la otra unidad y/o su antena ; (b) mueva esta unidad ; (c) deje más
espacio entre esta unidad y la(s) otra(s) unidad(es); (d) enchufe esta unidad a una toma de corriente alterna diferente para que
esté en un circuito diferente al de los demás equipos ; (e) asegúrese que todos los cables estén blindados correctamente,
usando un inductor o ferrite cuando sea adecuado. Esta nota está en conformidad con la Sección 15.838 de las Reglas de
FCC.
Declaración sobre exposición a las radiaciones según normas de la FCC: Este equipo cumple los límites de exposición a
la radiación establecidos por la FCC para un ambiente no controlado. Este equipo debe instalarse y hacerse funcionar a una
distancia mínima de 20 cm entre el radiador y el cuerpo del usuario.
Advertencia ESD/EFT: Este producto puede contener un microprocesador para el procesamiento de las señales y
las funciones de control. En situaciones excepcionales, las interferencias acusadas, el ruido de una fuente externa
o la electricidad estática pueden hacer que se bloquee. En el caso poco probable de que esto suceda, apagar el
producto, esperar cinco segundos y volver a encenderlo.
En un ambiente con interferencia de radiofrecuencia, la unidad puede funcionar incorrectamente y reanudar el funcionamiento
normal después de la desaparición de la interferencia.
Consignes de sécurité (Français)
Cet appareil est conforme aux CNR exemptes de licence d'Industrie Canada. Son fonctionnement est soumis aux deux
conditions suivantes : ( 1 ) Ce dispositif ne peut causer d'interférences ; et ( 2 ) Ce dispositif doit accepter toute interférence , y
compris les interférences qui peuvent causer un mauvais fonctionnement de l'appareil.