TO REDUCE THE RISK OF FIRE. ELECTRIC SHOCK. OR INJURY TO PERSONS. OBSERVE THE FOLLOWING:
1. Use this unit only in the manner intended by the manufacturer.
If you have questions. contact the manufacturer at the address or telephone number on the back page.
2. Before servicing or cleaning unit. switch power off at service panel and lock the service disconnecting means to prevent power from being switched on accidentally. When the service disconnecting means cannot be locked. securely fasten a prominent warning device. such as a tag. to the service panel.
3. Installation work and electrical wiring must be done by a qualifi ed person(s) in accordance with all applicable codes and standards. including fi re-rated construction codes and standards.
4. Suffi cient air is needed for proper combustion and exhausting of gases through the fl ue (chimney) of fuel burning equipment to prevent backdrafting. Follow the heating equipment manufacturer’s guideline and safety standards such as those published by the National Fire Protection Association (NFPA). and the American Society for Heating. Refrigeration and Air
Conditioning Engineers (ASHRAE). and the local code authorities.
5. When cutting or drilling into wall or ceiling. do not damage electrical wiring and other hidden utilities.
6. Ducted fans must always be vented to the outdoors.
7. To reduce the risk of fi re. use only metal ductwork.
8. Do not install this product with the activating switch directly behind a burner or element. Minimum distance between the switch and the edge of the burner should be 4 inches.
9. Loose-fi tting or hanging clothing should never be worn when operating this appliance. They may be ignited by burners/ elements on cooktop.
10. Children should not be left alone or unattended in the area where this appliance is in use.
11. This unit must be grounded.
12. When applicable local regulations comprise more restrictive installation and/or certifi cation requirements. the aforementioned requirements prevail on those of this document and the installer agrees to conform to these at his own expense.
TO REDUCE THE RISK OF A RANGE TOP GREASE FIRE:
a) Never leave surface units unattended at high settings. Boil overs cause smoking and greasy spillovers that may ignite.
Heat oils slowly on low or medium settings.
b) Always turn hood ON when cooking at high heat or when cooking fl aming foods.
c) Clean ventilating fans frequently. Grease should not be allowed to accumulate on fan or fi lter.
d) Use proper pan size. Always use cookware appropriate for the size of the surface element.
WARNING
TO REDUCE THE RISK OF INJURY TO PERSONS IN THE EVENT OF A RANGE TOP GREASE FIRE. OBSERVE THE FOLLOWING:
1. SMOTHER FLAMES with a close-fi tting lid. cookie sheet. or metal tray. then turn off the burner. BE CAREFUL TO PREVENT BURNS. If the fl ames do not go out immediately. EVACUATE AND CALL THE FIRE DEPARTMENT.
2. NEVER PICK UP A FLAMING PAN - You may be burned.
3. DO NOT USE WATER. including wet dishcloths or towels a violent steam explosion will result.
4. Use an extinguisher ONLY if:
- A. You know you have a Class ABC extinguisher. and you already know how to operate it.
- B. The fi re is small and contained in the area where it started.
- C. The fi re department is being called.
- D. You can fi ght the fi re with your back to an exit. Based on “Kitchen Fire Safety Tips” published by NFPA.
Before You Begin
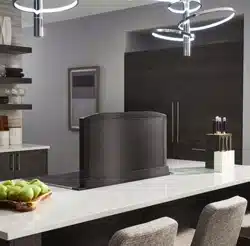
Due to its fl exible design, this downdraft system can be used to exhaust airborne contaminants when cooking with a variety of gas or electric cooking appliances - including cooktops, rangetops, slide-in ranges and free-standing ranges.
It can be mounted in island, peninsula, or conventional wall locations. The blower (purchase separately) and electrical panel can be mounted to the downdraft unit, inside the cabinet, or in a convenient remote location.
This unit can be easily installed following these basic steps:
- Cut out the countertop opening.
- Mount the unit in the cabinet.
- Install the blower and electrical panel.
- Connect the ductwork and electrical.
- Install the trim.
- Install the cooking appliance.
Taking Measurements
Refer to the cooktop installation instructions for dimensions of cooktop, countertop cut-out, and cabinet requirements. However, it is recommended that oversized cabinets be used for easier installation. Custom island designs need to account for deeper cabinets - especially when installed with a range in front of the downdraft or when mounting the blower behind the downdraft. You must also plan for an access door.
Cooktop depth can vary greatly from one to another. This may cause the fi t of these two appliances to be rather tight. Pay special attention to the areas of potential interference highlighted below. A countertop with (A) a raised lip and/or (B) a backsplash may not allow enough fl at countertop for a proper installation. Note that 2-3/4" of fl at countertop is required behind cooktop and that 2-7/8" is necessary between the back edge of the cooktop and the inside of cabinet back.
-976831.png)
CAUTION
1. For indoor use only.
2. For general ventilating use only. Do not use to exhaust hazardous or explosive materials and vapors.
3. To avoid motor bearing damage and noisy and/or unbalanced impellers. keep drywall spray. construction dust. etc. off power unit.
4. Clean fi lters and grease-laden surfaces frequently.
5. Do not repair or replace any part of this appliance unless specifi cally recommended in this manual. All other servicing should be done by a qualifi ed technician.
6. Please read specifi cation label on product for further information and requirements.
7. When installing. servicing or cleaning the unit. it is recommended to wear safety glasses and gloves.
8. To reduce the risk of fi re and electric shock. install this downdraft only with blower models shown below. Other blower models cannot be substituted. (Blowers sold separately).
Planning
Due to its fl exible design. this downdraft system can be used to exhaust airborne contaminants when cooking with a variety of gas or electric cooking appliances - including cooktops. rangetops. slide-in ranges and free-standing ranges.
It can be mounted in island. peninsula. or conventional wall locations. The blower (purchase separately) and electrical panel can be mounted to the downdraft unit. inside the cabinet. or in a convenient remote location.
This unit can be easily installed following these basic steps:
• Cut out the countertop opening.
• Mount the unit in the cabinet.
• Install the blower and electrical panel.
• Connect the ductwork and electrical.
• Install the trim.
• Install the cooking appliance.
Note: the high level of air fl ow of this appliance may affect the gas fl ame on some types of gas cooktops. This is NORMAL and will cause no harm. but can be corrected by lowering the speed of the blower.
Gas Cooktop Seal Kit is recommended for use with all gas cooktops. The kit creates a seal between the cooktop and the lower cabinet. Includes trim bracket and trim seal. See Optional Accessories section.
Taking Measurements
• Refer to the cooktop installation instructions for dimensions of cooktop. countertop cut-out. and cabinet requirements.
However. it is recommended that oversized cabinets be used for easier installation. Custom island designs need to account for deeper cabinets - especially when installed with a range in front of the downdraft or when mounting the blower behind the downdraft. You must also plan for an access door.
• Cooktop depth can vary greatly from one to another. This may cause the fi t of these two appliances to be rather tight.
Pay special attention to the areas of potential interference highlighted below. A countertop with (A) a raised lip and/or (B) a backsplash may not allow enough fl at countertop for a proper installation. Note that 2-3/4" of fl at countertop is required behind cooktop and that 2-7/8" is necessary between the back edge of the cooktop and the inside of cabinet back.
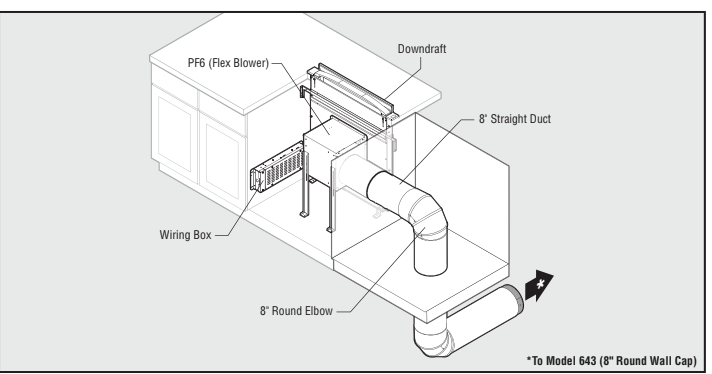
Front Exhaust with Flex Blower (through cabinet)
CAUTION
All electrical wiring should be done by a qualifi ed person(s) in accordance with all applicable codes and standards.
• This downdraft blower using the Flex Blower (purchase separately) draws 3.0 Amps and requires a 120 VAC. 60 Hz circuit.
• The unit has a 30 in. long power cord with a 3-pronged plug.
Plan to provide a grounded outlet in a location which will allow the unit’s power cord to reach.
• Install electrical box according to local codes.
Note: The unit electrical panel can be installed in remote location (as show below) to help reach the outlet (see page 16).
CAUTION
All electrical wiring should be done by a qualifi ed person(s) in accordance with all applicable codes and standards.
• If using a remote blower (purchase separately). the system draws 6.0 Amps (max.) and requires a 120 VAC.
60 Hz circuit.
• The unit has a 30 in. long power cord with a 3-pronged plug.
Plan to provide a grounded outlet in a location which will allow the unit’s power cord to reach.
• Install electrical box according to local codes.
Note: The unit electrical panel can be installed in remote location (as shown below) to help reach the outlet (see page 16).
Optional Accessories
-727384.png)