Welcome to
User Manual

2 ellume·lab User Manual
User Manual
1 Ellume Contact Information
–––––––––––––––––––––––––––––––––––––––––––––––
4
2 Safety
–––––––––––––––––––––––––––––––––––––––––––––––––––––––––––––––––––––––– 4
2.1 Universal Labels and Symbols 4
2.2 Warnings & Safety Precautions 4
3 Icons & Symbols
–––––––––––––––––––––––––––––––––––––––––––––––––––––––––––
7
4 Introduction
–––––––––––––––––––––––––––––––––––––––––––––––––––––––––––––––
8
4.1 Intended Use 8
4.2 Package Contents 8
4.2.1 ellume∙labAccessories 8
4.3 Calibration and Quality Control (QC) 8
4.3.1 ellume∙lab 8
4.3.2 External Quality Controls 9
5 Display & Features
–––––––––––––––––––––––––––––––––––––––––––––––––––––––––
9
5.1 Display & Features 9
5.2 Power On/Off 10
5.3 Standby 10
5.4 Volume Control 10
5.5 Display 10
6 ellume∙labAccountRegistration
––––––––––––––––––––––––––––––––––––––––––
10
6.1 Registrationofellume∙lab&Administrator 10
6.2 UserAccountSetup 10
6.2.1 AccountSetup 11
6.3 ellume∙labAccount 11
6.3.1 Log in to ellume·lab 11
6.3.2 Users&Administrators 11
6.3.3 Administrators 11
6.4 Your PIN 12
6.4.1 Changing your PIN 12
6.4.2 Forgot PIN 12
6.5 Forgot / Change Password 12
Contents

3ellume·lab User Manual
7 ellume·lab Device
––––––––––––––––––––––––––––––––––––––––––––––––––––––––––
12
7.1 ellume·lab Device Setup 12
7.2 Inital User Setup 13
7.3 Subsequent User Setup 13
7.4 72-hour Security Lock Out 13
7.5 SwitchingUserProles 14
7.6 Home Screen & Operation 14
7.7 Charging 14
7.7.1 Charging (dock) 14
7.7.2 Charging (cable only) 14
8 Software & Security
––––––––––––––––––––––––––––––––––––––––––––––––––––––––
15
8.1 Software Updates 15
8.2 Security 15
9 eStick
––––––––––––––––––––––––––––––––––––––––––––––––––––––––––––––––––––––––15
10 DiagnosticTesting
–––––––––––––––––––––––––––––––––––––––––––––––––––––––––
16
10.1 Icons 16
10.2 Diagnostic Test Preparation 16
10.3 Performing Two Tests 17
11 InterpretingTestResults
–––––––––––––––––––––––––––––––––––––––––––––––––––
17
11.1 Icons 17
11.2 Patient Test Result 18
11.3 External Control Test Result 18
11.4 Test Errors 18
12 PreviousResults
–––––––––––––––––––––––––––––––––––––––––––––––––––––––––––
18
12.1 Icons 19
13 Settings
––––––––––––––––––––––––––––––––––––––––––––––––––––––––––––––––––––
19
13.1 Screen Brightness 19
13.2 NoticationVolume 19
13.3 Change Wi-Fi Connection 19
13.4 Modify Date/Time 20
13.5 About 20
14 Maintenance&Cleaning
–––––––––––––––––––––––––––––––––––––––––––––––––––
20
14.1 Cleaning 20
14.2 ellume∙labUsefulLife 21
14.3 ellume∙labDeviceDisposal 21
15 TechnicalSpecications
–––––––––––––––––––––––––––––––––––––––––––––––––––
21
16 Troubleshooting
–––––––––––––––––––––––––––––––––––––––––––––––––––––––––––
22
16.1 Restarting 22
16.2 Ordering, Inquiries & Complaints 22
17 AdditionalInformation
–––––––––––––––––––––––––––––––––––––––––––––––––––––
22
4 ellume·lab User Manual
1 Ellume Contact Information
Contact Ellume customer support:
Tel:1-888-919-0779
Email:support@ellumelab.com
Website: www.ellumelab.com
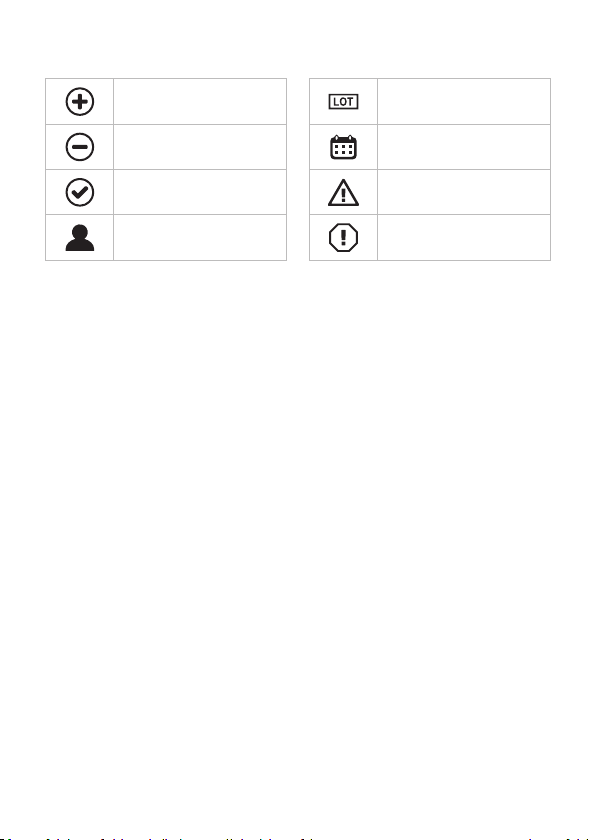
2 Safety
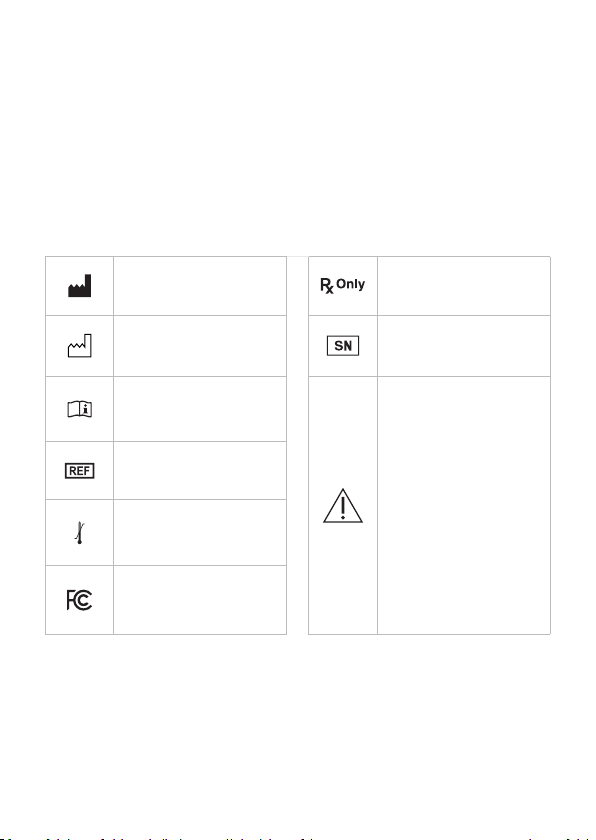
2.1 Universal Labels and Symbols
Manufacturer
Prescription use only
Date of manufacture
Serial number
Consult Instructions
For Use
CAUTION
Consult
accompanying
documents.
WARNING
Indicates a hazardous
situation, which if not
avoided, could result in
injury to the operator
(e.g. electrical shock)
Catalog number
Temperature
limitation
Declaration of
conformity
2.2 Warnings&SafetyPrecautions
The ellume·lab is designed to ensure safe and reliable operation, when used in
accordance with this User Manual. If the ellume·lab is used in ways other than
specied in this manual,safety ofthe operator and reliability of results may be
compromised.Allwarningsandprecautionsmustbefollowedtoavoidpersonal
injury or damage to the device.

5ellume·lab User Manual
Minimizetheriskofpersonalinjury:
• Remove the ellume·lab from the charging dock or unplug the charging cable
before performing a test.
• Do not immerse the ellume·lab in water or cleaning solutions. See Section 14
‘Maintenance and Cleaning’ for cleaning procedures.
• The ellume·lab must be charged using an approved electrical socket and
appropriatechargingcableandregion-specicadapter.
Minimizetheriskofdamagetotheellume·lab:
• Handle with care.
• Do not drop.
• Do not expose to moisture, dust, extreme humidity, long periods of direct
sunlight or extreme temperatures.
• Store between 59°F - 95°F (15°C - 35°C).
• Do not expose to severe shock or vibration.
• Use with approved ellume·lab tests only. Using non-approved test cartridges,
test kit components, chargers, cables, and accessories will impact device
function and void warranty.
• Incorrect use of the ellume·lab charger, charging dock and charging cable
may damage the device.
• Routinely clean the device using disinfecting wipes containing isopropyl
alcohol (70% minimum). Off-the-shelf wipes (e.g. Clinell Wipes) have been
validated for routine cleaning of the ellume·lab. See Section 14 ‘Maintenance
and Cleaning’ for cleaning procedures.
• Fordeep cleaning withintheellume·lab testing ports(e.g. foruid spills),a
cleaning solution with a minimum of 10% bleach is required. Ensure cleaning
solutions do not come into contact with the electrical contacts within the
ePorts. See Section 14 ‘Maintenance and Cleaning’ for cleaning procedures.
• Do not clean the ellume·lab with unapproved products.
• Do not open or disassemble the ellume·lab.
• Do not use if charging cable and/or charging dock are damaged.
• Please follow all precautions.

6 ellume·lab User Manual
Minimizetheriskofinfectionfromcontactwiththeellume·lab:
• The ellume·lab requires cleaning after every test or potential contact with
infectious substances. See Section 14 ‘Maintenance and Cleaning’ for cleaning
procedures.
Minimizetheriskofcontaminationoftheellume·lab:
• Consider and treat all patient samples as infectious/biohazardous material.
• Dispose of specimens and patient samples in accordance with federal, state,
and local requirements.
• Clean the ellume·lab as per Section 14 ‘Maintenance and Cleaning’ prior to use,
storage, transport, or disposal.
• Ensureyouhavereceivedspecictraininginspecimencollectionandhandling
procedures before using the ellume·lab.
• Wear appropriate personal protective equipment (PPE) including gloves,
protective clothing and eye protection when handling patient samples.
Otherprecautionsandadditionalinformation:
• The ellume·lab may inuencethesurroundingenvironment due to itsWi-Fi
connectivity.
• The ellume·lab has been validated for use of up to 5000 eStick insertions per
testing port. Do not use the device for more than the recommended number
of eStick insertions.
• The device is designed in accordance with international electrical safety
standards (IEC 61010-1, IEC 61010-2-101, and IEC 60601-1-2). This equipment has
been designed and tested to CISPR11 Class B.
• This device complies with Part 15 of the FCC Rules. Operation is subject to the
following conditions:
1. This device may not cause interference; and
2. This device must accept any interference, including interference that may
cause undesired operation of the device
3. This equipment has been tested and found to comply with the limits for a
Class B digital device, pursuant to Part 15 of the FCC Rules. These limits are
designed to provide reasonable protection against harmful interference in a
residential installation. This equipment generates, uses, and can radiate radio

7ellume·lab User Manual
frequency energy and, if not installed and used in accordance with the
instructions, may cause harmful interference to radio communications.
However, there is no guarantee that interference will not occur in a particular
installation. If this equipment does cause harmful interference to radio or
television reception, which can be determined by turning the equipment off
and on, the user is encouraged to try to correct the interference by one or
more of the following measures:
a. Reorient or relocate the receiving antenna.
b. Increase the separation between the equipment and receiver.
c. Connect the equipment into an outlet on a circuit different from that
to which the receiver is connected.
d. Consult the dealer or an experienced radio/TV technician for help.
Warning:AnychangesormodicationsnotapprovedbyEllumecouldvoid
the user’s authority to operate this equipment.
3 Icons & Symbols
Wi-Fi on Warning / Error
Wi-Fi unavailable Time
Battery status Patient Test
Battery low Control Test
Battery charging Previous Results
3G/4G unavailable Settings
3G/4G connected Positive Result
Next
Negative Result
Back (to previous screen) Result as Expected
Cancel Quality Review Needed

8 ellume·lab User Manual
4 Introduction
4.1 Intended Use
The ellume·lab is a handheld digital diagnostic device intended for use by
healthcare professionals at the point of care. It is used in combination with the
ellume·labsuiteofrapidinvitrodiagnostic(IVD)teststodetectspecicmarkersof
infectiousdiseases.PleaserefertotheIVD-specicInstructionsForUseprovided
with each authorized test kit for details of their intended use.
The ellume∙lab alsoprovides educational contentanddigitalservices througha
wide range of applications.
4.2 PackageContents
The ellume·lab product box contains:
• 1 x ellume·lab
• 1 x charging adapter
• 1 x ellume·lab USB charging cable
• 1 x User Manual
• 1 x Quick Start Guide
Checktheellume·labpackagecontentstoconrmallcontentsareincludedand
have no signs of damage or defects. Use the ellume·lab with approved ellume·lab
tests only. Using non-approved test cartridges, test kit components, chargers,
cables, and accessories will impact on device function and void warranty.
Please contact the Ellume Customer Support on 1-888-919-0779 for all inquiries.
Additionalinformationcanbefoundatwww.ellumelab.com.
4.2.1 ellume∙labAccessories
The accessories (charging cable and charging adapter) supplied are for use with
the ellume·lab only and may vary depending on region. Do not use ellume∙lab
accessories with other medical or electronic devices.
4.3 Calibration and Quality Control (QC)
4.3.1 ellume∙lab
The ellume∙lab does not require calibration from the user. When an eStick is
inserted, it automatically performs a series of self-tests and calibration checks.
9ellume·lab User Manual
4.3.2 External Quality Controls
Please refer to the printed Instructions for Use (IFU) and Quick Reference
Instructions (QRI) in each test carton for further information on performing
External Quality Controls.
5 Display & Features
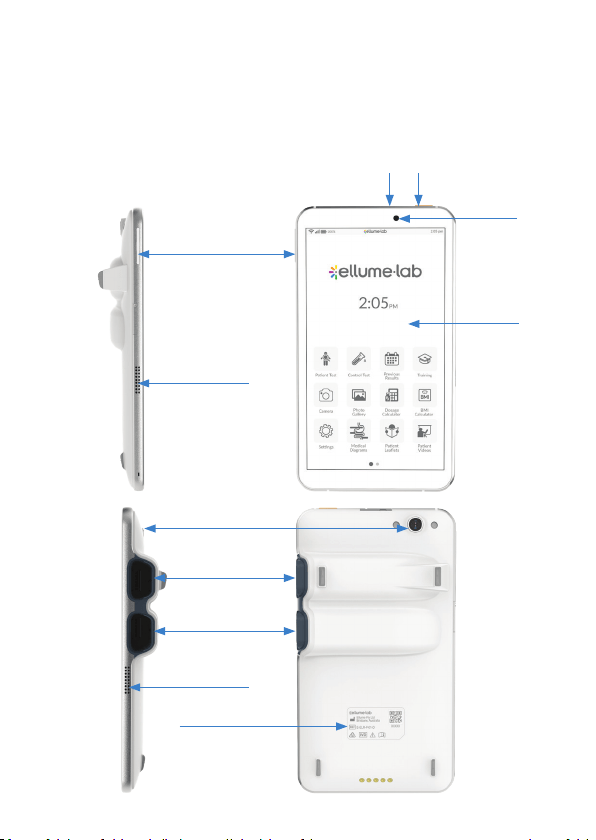
5.1 Display & Features
Back
Front
Volume control
eStick port (top)
Rear camera
eStick port (bottom)
Screen
Front
camera
Charging port Power button
Speaker
Speaker
Compliance label
Right
Left

10 ellume·lab User Manual
5.2 PowerOn/Off
Toturnontheellume∙lab,tapandholdthePowerbuttonlocatedonthetopright
side of the device for 2-3 seconds. To turn off, hold the Power button, then tap the
Power off icon on the screen.
5.3 Standby
Toputtheellume∙labonstandby,tapthePowerbuttonlocatedonthetopright
side of the device. To take off standby, tap the Power button again. The ellume·lab
display will automatically go on standby after being inactive for 5 minutes. The
ellume·lab will not automatically go on standby during a test, while in the Patient
Test app or while in the Control Test app.
5.4 Volume Control
The volume buttons are located on the left side of the device. Tap the top of the
button to increase volume, and the bottom of the button to decrease volume.
5.5 Display
Theellume∙labtouchscreenisfullyinteractiveandissensitivetohumantouchor
interaction with any stylus designed for use with a capacitive touch screen.
6 ellume∙labAccountRegistration
6.1 Registrationofellume∙lab&Administrator
The ellume lab has been registered to a medical clinic and the administrator
account has been setup by an Ellume representative. For security, it is required that
user accounts be created and registered with Ellume through the online
registration link, recevied via email. If you are experiencing issues with account
registration or cannot set up your device, please contact your device administrator
or Ellume customer support on 1-888-885-6121 or at [email protected].
6.2 UserAccountSetup
To ensure security and regulatory compliance, creation and use of individual user
accounts are required. User accounts can be added by the administrator via portal.
ellumecloud.com. New users who have been approved by the administrator will
receive a welcome invitation email from noreply@ellumelab.com.

11ellume·lab User Manual
6.2.1 AccountSetup
1. Follow the link in the welcome email to complete your account registration
2. Enter your personal details
3. Enter your password and security question
* Your password will be required to login to your account. This can be done
through portal.ellumecloud.com, or on the ellume·lab device
4. Select your display icon and color
Ifyouareanewuserandareattemptingtologintoanellume∙lab,youmustrstbe
added and authorized by your administrator. Please contact your administrator or
send a request (see section 7.2)
6.3 ellume·labAccount
Once you have completed your account registration, you can log in to the ellume·lab
using your email address and password.
6.3.1 Logintoellume·lab
1. Turn on by pressing the power button
2. From the log in screen, tap the Refresh button, located beneath Switch User
* You may need to swipe right from the login screen to locate the Refresh button.
6.3.2 Users&Administrators
Your account can be used to manage and edit your details and security settings.
Go to:
1.Account
2. Settings
To log out of your account, go to:
1.Account
2. Logout
6.3.3 Administrators
Administrator access includes ellume·labuser list management.Administrators
can view, invite, add, delete and manage ellume·lab users. Go to:
1. Management
2. Manage user list

12 ellume·lab User Manual
6.4 YourPIN
YourPINisinitiallysetupwhenloggingintotheellume·labforthersttime.
6.4.1 ChangingyourPIN
You can change your PIN through your account settings.
6.4.2 ForgotPIN
1. Tap ‘Forgot PIN’ from the ellume·lab lock screen
2. Login with account password and set new PIN
6.5 Forgot/ChangePassword
Your account password can be changed through your account at
https://portal.ellumecloud.com.A password resetcan also be requested fromthe
ellume·labdevicebyselecting‘Forgotpassword’fromtheloginscreen.Apassword
reset link will be emailed to you.
7 ellume∙labDevice
7.1 ellume·lab Device Setup
1.Fullychargetheellume∙labbeforeinitialuse
2.Turnontheellume∙labbytappingthepowerbuttonfor2-3seconds
3. Tap Get Started on the welcome page
4. Connect to secure Wi-Fi network
a. Select the Wi-Fi network from the list and enter the password if required.
If the preferred Wi-Fi network is not in the list, it can be manually added
byselectingAddnetwork
b. Input the Wi-Fi network name
c. Select the security type
d. Enter password if required and tap Connect.
e. Tap Nex t
5. Check registration details and tap Next

13ellume·lab User Manual
7.2 Initial User Setup
1.SelectauserfromthelistorAddNewUser
*Onlyellume∙labadministratorsareauthorizedtoaddnewusers.Toaddanew
user, please contact your administrator by tapping the Request Now button.
2. Enter the account password and tap Next
* Use your account password that was setup during the user account setup
(section 6.2). If you forget your password, it can be reset using the ellume·lab
online portal.
3. Enter your PIN and tap Set
* If you have already set up your PIN through the ellume·lab portal or on another
ellume·lab device, you will not be prompted to set up your PIN again. Please use
your existing PIN.
*PIN cannot contain four repeating or sequential digits.
4. Re-enter your PIN and tap Finish
7.3 Subsequent User Setup
Ifyouradministratorhasaddedyouraccount,youcanndyournameatthebottom
of the screen on the sign in page under ‘Switch user’.
1. Find your username and icon on the screen or by sliding the user icons to the
right
2. Tap your user icon and complete the account set up process
* If your name is not on the user list, select ‘New User’ and complete the new user
request email form. Your administrator will be required to authorize your
account before you can complete the full setup process.
7.4 72-hourSecurityLockOut
If your account has been inactive for 72 hours or longer, you will be required to
enter your account password and PIN.
1. Tap your user icon, then tap Login
2. Enter your account password
3. Enter your PIN

14 ellume·lab User Manual
7.5 SwitchingUserProles
The current active user will always appear on the lock screen. To switch user
proles.
1. Scroll through the list of users on the lock screen
2. Select your user icon and enter your password and PIN
*Alluserdataisprivateandcannotbeviewedbyotherusers.
7.6 HomeScreen&Operation
The home screen is the main screen of the ellume∙lab interface for accessing
diagnostic features and digital applications. It contains icons such as Patient Test,
Control Test, Previous Results and more. You can also access all digital applications
from the home screen.
7.7 Charging
Fully charge the ellume·lab prior to rst use. Use only ellume∙lab approved
accessories. Unapproved accessories may cause damage to the device.
7.7.1 Charging(dock)
1. Connect the USB charging cable to the charging adaptor
2. Plug the charging adaptor into an approved socket and turn on
3. Insert the end of the USB charging cable into the charging dock USB port
4. Place the ellume·lab into the charging dock and ensure charging pins are
aligned. The charging symbol will appear in the top left corner of the screen
7.7.2 Charging(cableonly)
1. Connect the USB charging cable to the charging adaptor
2. Plug the charging adaptor into an approved socket and turn on
3. Remove the ellume·lab charging port cover. Insert the end of the USB
charging cable into the ellume·lab charging port. The charging symbol will
appear in the top left corner of the screen
Charging port Charging port
open
Charging port
with cable

15ellume·lab User Manual
8 Software & Security
8.1 Software Updates
The ellume·lab will receive software updates and perform the auto update function
during off-peak times, usually between 12am to 6am. The ellume·lab must be
connected to Wi-Fi for updates to occur. Leave the ellume·lab plugged into the
charging cable, or in the chargingcradle overnightto ensure thereis sufcient
battery for updates.
You can manually check for, and download updates by:
1. Tap the Setting icon from the Home Screen
2. Tap Check For Updates
3. Wait for updates to install and tap the Back button to exit
8.2 Security
While using the ellume·lab, it is recommended to follow safe cyber security
practices, including:
1.Alwaysconnecttheellume·labtoaknown,securenetwork.Donotconnectto
public Wi-Fi networks
2. Do not use ellume·lab for medical record keeping purposes. Data should be
entered into external patient medical records
3. Do not attempt to change the operating system, settings or side load
applications. Detection of system changes and unauthorized applications will
immediately notify Ellume
4.Allusersarerequiredtoregisterandusethesamecredentialstologintothe
ellume·lab
5. Change your password and PIN frequently
9 eStick
The ellume·lab diagnostics range uses individual test kits. Each test kit contains
various accessories and an eStick, a single-use test cartridge that is inserted into
the ellume·lab. More information can be found in the printed Instructions for Use
(IFU) and Quick Reference Instructions (QRI) in each test carton.
Test tube holder
(select tests only)
Sample port Finger grip

16 ellume·lab User Manual
10 DiagnosticTesting
10.1 Icons
10.2 DiagnosticTestPreparation
1. Ensure the ellume·lab is turned on and charged to a minimum of 20% battery
2. Tap the Patient Test or Control Test icon from the home screen and follow the
on-screen instructions. More information can be found in the printed
Instructions for Use (IFU) and Quick Reference Instructions (QRI) in each test
carton.
* The remaining testing process has been clinically validated for each ellume·lab
test and corresponding external controls.
Caution:
• Do not press the power button while testing.
• Only remove the eStick and test kit components from the packaging
immediately before testing.
• The eStick must be used within 60 minutes from insertion into the ellume·lab.
The eStick will expire and become unusable if no sample is loaded within 60
minutes from insertion.
• Keeptheellume·labatwhiletestingisinprogress.Rotatingthedevicewhile
performing a test will prompt a warning message.
• Do not expose the ellume·lab to unstable lighting conditions while testing. If a
warningisdisplayed,removetheellume·labandeStickfromuctuatinglight
sources.
Patient Test Control Test
Previous Results Training
Flat surface
Position while
performing test
17ellume·lab User Manual
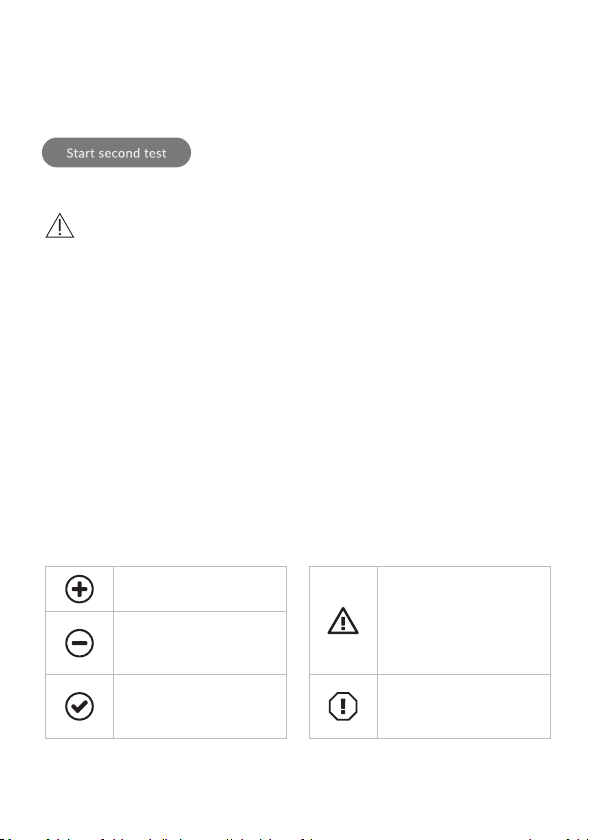
10.3 PerformingTwoTests
The ellume·lab is designed with two testing ports, allowing the user to perform
two patient tests simultaneously or two control tests simultaneously. To perform
two tests:
1. Begin a single Patient Test or a single Control Test by
selecting the relevant icon from the Home Screen
2. Once the testing screen has been launched, tap the
Start second test button at any time to begin a
second test
Caution:
• Only perform two patient tests simultaneously OR two control tests
simultaneously.
*A Patient Test and Control Test must not be performed
simultaneously.
• While performing two tests, you can toggle between them by tapping the
eStick image on-screen next to the relevant testing port. It is recommended
to perform the test steps of each test sequentially (complete the test steps of
the single test, and once it is analyzing, begin performing the next test steps).
• AneStickmayonlyberemovedoncearesultisdisplayed.Donotremovethe
eStick while a test is in progress.
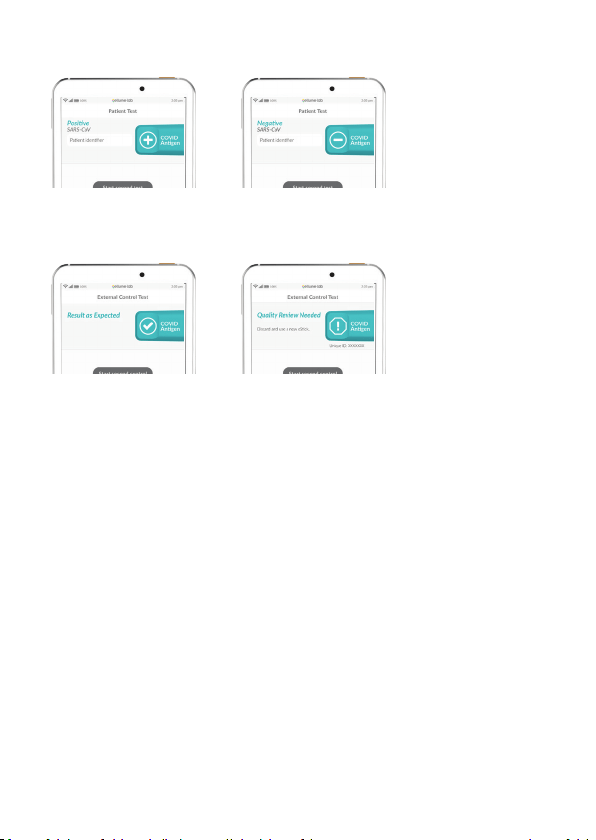
11 InterpretingTestResults
11.1 Icons
Positive Result for
Patient Test
• Used test
• Test error
• eStick has expired
• eStick past expiration
date
Negative Result for
Patient Test
External Quality Control
Result as expected
External Quality Control
Review needed
18 ellume·lab User Manual
11.2 PatientTestResult
Patient test results are displayed on-screen after the test has completed.
11.3 ExternalControlTestResult
External control results are displayed on-screen after the test has completed.
11.4 TestErrors
Atestresultwilldisplaythetesterrortype,thefollowupactionfortheuserand
additional information. More information can be found in the printed Instructions
for Use (IFU) and Quick Reference Instructions (QRI) in each test carton.
12 PreviousResults
Previous results can be accessed by tapping the Previous Results icon from the
Home Screen. The Previous Results app contains:
• Patient Results tab, listing patient results by the most recent testing time/
date
• External Controls tab, listing external control results by the most recent
testing time/date
• Search function, allowing users to search for a result using key words
19ellume·lab User Manual
12.1 Icons
13 Settings
The system settings can be accessed from the Home Screen by tapping the
settings icon.
13.1 ScreenBrightness
Drag the slider to the left to decrease the screen brightness and to the right to
increase the screen brightness.
13.2 NoticationVolume
Dragtheslidertothelefttodecreasethenoticationvolumeandtotherightto
increasethenoticationvolume.
13.3 ChangeWi-FiConnection
*You may require assistance from your network administrator.
1. From the Home Screen tap the Settings Icon
2. Tap Wi-Fi connection
3. Turn the Wi-Fi on by toggling the on/off switch in the top right corner
4. Select the preferred Wi-Fi network from the list and enter the password (if
required). If the preferred Wi-Fi network is not listed, it can be manually added
byselecting+AddNetwork
a. Input the Wi-Fi network name (SSID)
b. Select the security type
c. Enter password (if required)
d. Tap Save
Positive Result for
Patient Test
LOT number
Negative Result for
Patient Test
Test date
External Quality Control
Result as expected
Test error
Patient name
External Quality Control
Review needed

20 ellume·lab User Manual
5. The ellume·lab should now be connected to the new Wi-Fi network. This can
beconrmedbycheckingthatinthelistofnetworkstheWi-FiONiconisnext
to the network name
6. Tap the Back button in the top left-hand corner to return to the Settings menu
13.4 ModifyDate/Time
It is recommended that:
•AutomaticDate&Timebesettousenetwork-providedtime
•AutomatictimezonebesettoOff,and
• You select your local time zone from the list
To switch between 12 and 24-hour time, toggle the Use 24-hour format switch.
13.5 About
Displays the serial number and the software version number of the ellume·lab.
14 Maintenance&Cleaning
14.1 Cleaning
The ellume·lab should be routinely cleaned:
• Routinely clean the device using disinfecting wipes containing isopropyl
alcohol (70% minimum). Off-the-shelf wipes (e.g. Clinell Wipes) have been
validated for routine cleaning of the ellume·lab.
• By wiping each surface for at least 30 seconds
•Aftereachuse
• Each time a test is processed, and
•Afterthedevicehasbeenhandled
The ellume·lab testing ports should be deep cleaned:
• Using cleaning solutions with a minimum of 10% bleach
• By wiping inside each ePort for at least 30 seconds
•IftherehasbeenaspillofuidorliquidswithintheePort
Caution:
• Do not use non-approved cleaning solutions as they may harm the device.
• Ensure cleaning solutions do not contact the electrical contacts within the
testing ports.

21ellume·lab User Manual
14.2 ellume∙labUsefulLife
The ellume·lab has been validated for use of up to 5,000 eStick insertions per testing
port.
Caution:
• Do not use the device for more than the recommended number of eStick
insertions.
14.3 ellume∙labDeviceDisposal
The ellume·lab contains an internal Lithium Ion battery and should be disposed of
according to local regulations.
15 TechnicalSpecications
Dimensions 7.28 x 4.06 x 1.22 inches
Weight 13.76 ounces
Power Supply Input
ellume·lab:
5V
2A
ChargingDockAdapter:
100~240VAC;50~60Hz
[
Power Supply Maximum Rated Power
]
USB-C Input 5V
2A
Display 6.95-inch diagonal – Touch screen
Operating environment
59°F – 95°F
[
15°C – 35°C
]
, 20% – 90% RH
(non-condensing)
Shipping
-4°F – 131°F
[
-20°C – 55°C
]
, 20% – 90% RH
(non-condensing)
Storage 59°F – 95°F
[
15°C – 35°C
]

22 ellume·lab User Manual
16 Troubleshooting
16.1 Restarting
If the ellume·lab is unresponsive, press and hold the Power button for more than 4
seconds and tap Restart on-screen.
16.2 Ordering,Inquiries&Complaints
For customer support, contact Ellume customer support on 1-888-919-0779 or at
support@ellumelab.com or visit www.ellumelab.com.
Testsystemproblemsmayalsobereported totheFDAthroughtheMedWatch
medical products safety reporting program (phone: 1-800-FDA (332)-1088; fax:
1-800-FDA(332)-0178;online:http://www.fda.gov/medwatch).
Information correct as of June 30 2021.
17 AdditionalInformation
Ellume Limited
57 Didsbury St, East Brisbane,
Qld 4169, Australia
www.ellume.com

23ellume·lab User Manual
When used with Ellume’s Emergency Use Authorized ellume·lab COVID Antigen test:
For in vitro diagnosticuseonly.Forprescriptionuseonly.ThisproducthasnotbeenFDAclearedorapprovedbuthas
beenauthorizedbyFDAunder an EmergencyUseAuthorization (EUA) forusebyauthorizedlaboratories;useby
laboratoriescertiedundertheCLIA,42U.S.C.§263a,thatmeettherequirementstoperformmoderatecomplexity,
high complexity, or waived tests. This test is authorized for use at the Point of Care (POC), i.e., in patient care settings
operating under a CLIA Certicate of Waiver, Certicate of Compliance, or Certicate of Accreditation. The
emergency use of this test product is only authorized for the duration of the declaration that circumstances exist
justifying the authorization of emergency use of in vitro diagnostic tests for detection and/or diagnosis of COVID-19
underSection564(b)(1)oftheAct,21U.S.C.§360bbb-3(b)(1),unlessthedeclarationisterminatedofauthorizationis
terminatedorrevokedsooner.ThetestproductisauthorizedonlyforthedetectionofproteinsfromSARS-CoV-2,not
for any other viruses or pathogens.

www.ellumelab.com
D0999970C
© ellume·lab is a trademark of Ellume Limited.
For Emergency Use Authorizaon (EUA) only
and for in vitro diagnosc use when used with
EUA-authorized ellume·lab test kits.