User Manual Thermostat
IMPORTANT INSTRUCTIONS
This product must be installed by a qualified electrician.
In order to avoid fire, shock or death, shut off power supply at the circuit breaker or fuse before wiring.
Before you begin:
- Verify that the heating appliance that is being connected is within the specified load range.
- Confirm voltage is within the device rating.
- For wiring, use copper conductors only.
- Mount on a certified electrical box only.
Keep this user’s guide in a safe place for future reference.
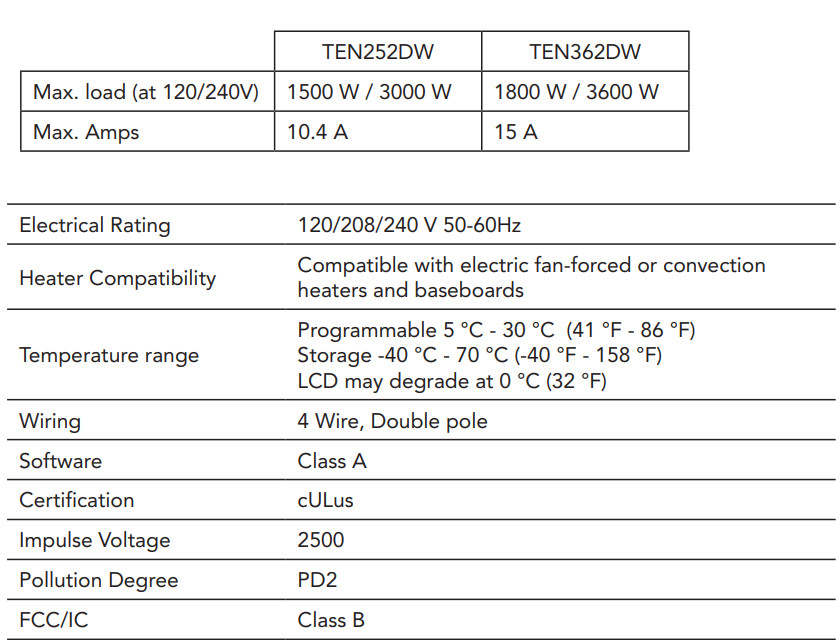
TECHNICAL SPECIFICATIONS
INSTALLATION
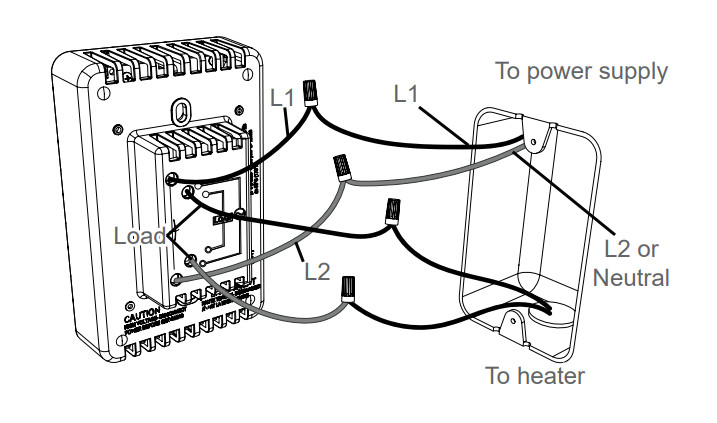
WIRING INSTRUCTIONS
- Connect the black ‘L1’ thermostat wire to the live supply wire.
- 240V: Connect the red ‘L2’ thermostat wire to the other live supply wire. 120V: Connect the red ‘L2’ thermostat wire to the neutral supply wire.
- Connect the black ‘Load’ wire to the live heater wire.
- 240V: Connect the red ‘Load’ thermostat wire to the other heater wire. 120V: Connect the red ‘Load’ thermostat wire to the neutral heater wire.
MOUNTING THE THERMOSTAT
The thermostat should be mounted after the wiring connections have been connected.
- Remove the small screw at the bottom of the thermostat using a Philips #1 screwdriver.
- Carefully insert a small flat head screwdriver in the slot between the faceplate and the gray bezel, and gently pry apart.
- Position the thermostat over the junction box, and secure it using the two supplied screws.
- Note: The protruding box on the back of the thermostat should be recessed in the junction box.
- Reinstall the faceplate and insert the previously removed screw.
- Remove the protective film before use.

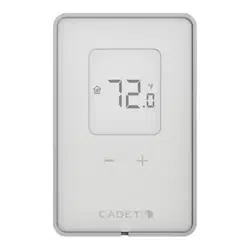
CONTROL
DISPLAY
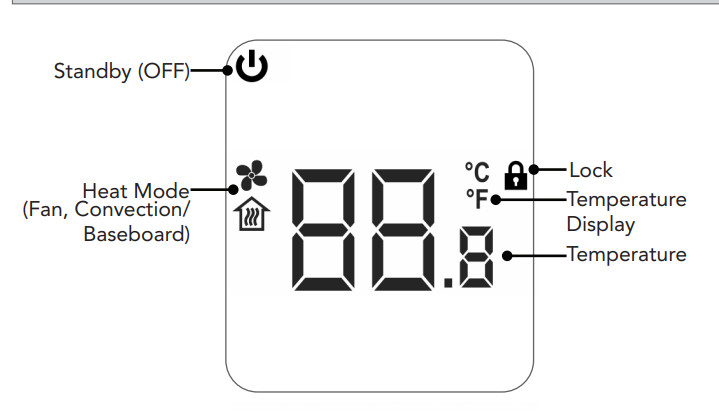
Temperature Display
To convert the temperature display:
- Press + and - at the same time.
- Press - once. °C or °F will flash.
- Press + to change the temperature display.
- The display will blink for 3 seconds before returning to the main screen.
Heat Mode
Select the mode that applies to your heater: If the incorrect setting is chosen, your heater may short cycle or hold an inconsistent temperature.
- Press + and - at the same time.
- Press - twice.
 or
or  will flash.
- Press + to change the heat mode.
- Select for fan-forced heaters or for convection heaters (including baseboard heaters.)
- The display will blink for 3 seconds before returning to the main screen.
FUNCTIONS
Setting the Temperature
The display will show the ambient temperature, except during temperature adjustment, in which case it will show the set temperature. To adjust the set temperature:
- Use + or - to select the desired temperature.
- The display will blink for 3 seconds before returning to the main screen.
In case of loss of power, the thermostat will retain the temperature setting.
Lock Function
Use the lock function to prevent the settings from being changed inadvertently.
To enable:
- Press + and - at the same time.
- Press - 4 times. The
 icon will appear.
- Press + to enable the lock function. The display will blink for 3 seconds before returning to the main screen.
The icon will remain visible to indicate that the lock function is enabled.
To disable, press and hold + and -.
Standby (OFF)
Use the standby function to turn the heater off indefinitely.
- Press + and - at the same time.
- Press - 3 times. The
 icon will blink.
- Press + to enable the standby function. The will remain solid to indicate that it is enabled.
- The display will blink for 3 seconds before returning to the main screen.
The will remain visible, indicating that the standby function is enabled. To disable, press and hold + and -.