Home
Bookmarks
Home
Miele
Miele 41KRE030USA User Manual
Page 58
User Manual - Page 58
For 41KRE030USA.
Page 58/84
Page 1
Page 2
Page 3
Page 4
Page 5
Page 6
Page 7
Page 8
Page 9
Page 10
Page 11
Page 12
Page 13
Page 14
Page 15
Page 16
Page 17
Page 18
Page 19
Page 20
Page 21
Page 22
Page 23
Page 24
Page 25
Page 26
Page 27
Page 28
Page 29
Page 30
Page 31
Page 32
Page 33
Page 34
Page 35
Page 36
Page 37
Page 38
Page 39
Page 40
Page 41
Page 42
Page 43
Page 44
Page 45
Page 46
Page 47
Page 48
Page 49
Page 50
Page 51
Page 52
Page 53
Page 54
Page 55
Page 56
Page 57
Page 58
Page 59
Page 60
Page 61
Page 62
Page 63
Page 64
Page 65
Page 66
Page 67
Page 68
Page 69
Page 70
Page 71
Page 72
Page 73
Page 74
Page 75
Page 76
Page 77
Page 78
Page 79
Page 80
Page 81
Page 82
Page 83
Page 84
Contents
Table of Contents
Search
Previous
Next
Bookmarks
Loading ...
Loading ...
Loading ...
es - Descripción del aparat
o
58
Loading ...
Loading ...
Loading ...
<
55
56
57
58
59
60
>
File type: PDF
File name: 64139152_41kre030usa.pdf
File size: 2.92 MB
File Language: English
Pages: 84
Author: Miele
Published: 2020-11-18
Updated: 2023-06-21
Download File
Table of Contents
×
Title page
1
Contents
2
Contents
3
IMPORTANT SAFETY INSTRUCTIONS
4
READ ALL INSTRUCTIONS BEFORE USING THIS APPLIANCE
4
Correct use
4
Safety with children
5
WARNING To reduce the risk of fire, electric shock or injury:
5
Technical safety
6
Cleaning
7
Proper use
8
Accessories
9
California Proposition 65
9
THE FOLLOWING WARNING IS REQUIRED BY THE STATE OF CALIFORNIA FOR CALIFORNIA RESIDENTS ONLY:
9
SAVE THESE INSTRUCTIONS
9
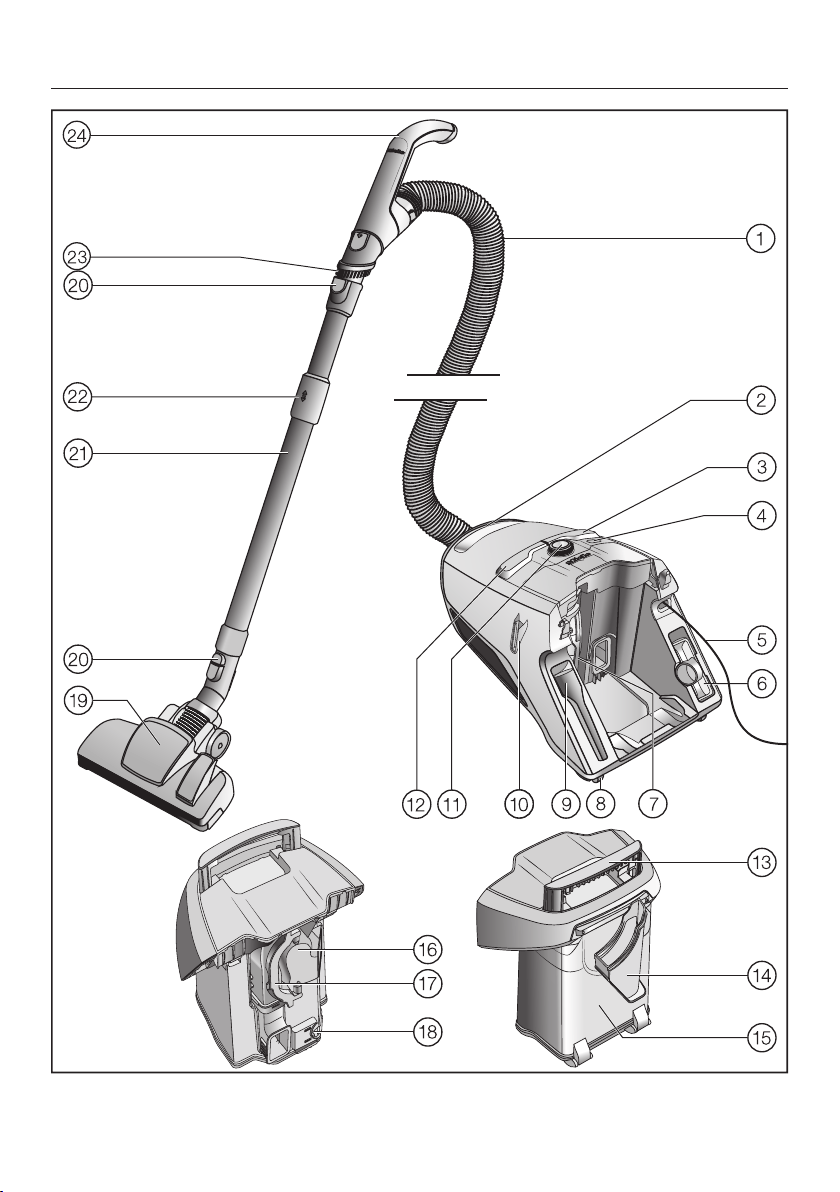
Appliance description
10
Caring for the environment
12
Disposal of the packing material
12
Disposal of your old appliance
12
References to illustrations
13
Preparing for use
13
Attaching the suction hose (Fig. 01)
13
Disconnecting the suction hose (Fig. 02)
13
Connecting the suction hose to the handle (Fig. 03)
13
Connecting the handle to the wand (Fig. 04)
13
Adjusting the telescopic wand (Fig. 05)
13
Connecting the telescopic wand to the floorhead/floorbrush (Fig. 06)
13
Adjusting the floorhead (Fig. 07 + 08)
13
Using the accessories supplied (Fig. 09)
14
Dusting brush integrated in the Eco Comfort handle (Fig. 10)
14
Reversible floorhead (Fig. 11)
14
Floorbrush Parquet Twister with swiveling head (SBB 300-3)
14
Use
15
Power cord
15
Unwinding the cord (Fig. 12)
15
Rewinding the power cord (Fig. 13)
15
Turning the vacuum cleaner on and off (Fig. 14)
15
Selecting the suction power
15
Rotary dial (Fig. 15)
15
Opening the air inlet valve (Fig. 16)
15
During vacuuming
16
Parking, transport and storage
16
Park system for pauses during vacuuming (Fig. 19)
16
Park system for storage (Fig. 20)
16
Maintenance
17
17
Emptying the dust container (Fig. 21 - 26)
17
Cleaning the dust container
17
Cleaning the filter frame (Fig. 27 + 28)
17
Cleaning the fine dust filter
17
Starting the ComfortClean self-cleaning function manually (Fig. 29)
17
When to change the thread catchers?
18
How to replace the thread lifters (Fig. 30 + 31)
18
Cleaning the roller on the AllTeQ floorhead (Fig. 32)
18
Cleaning and care
18
Vacuum cleaner and accessories
18
Frequently Asked Questions
19
Frequently asked questions
20
20
Cleaning the pre-filter (Fig. 33 + 34)
20
Cleaning the fine dust filter manually (Fig. 35 - 40)
20
Technical Service
20
Contact in case of fault
20
Warranty
21
Optional accessories
21
Purchasing accessories
21
Floor tools / Brushes
21
AllergoTeQ floorhead (SBDH 285-3)
21
TurboTeQ Turbobrush (STB 305-3)
21
Parquet Twister floorbrush with swiveling head (SBB 300-3)
21
Floorbrush Parquet Twister XL with swiveling head (SBB 400-3)
21
Other accessories
22
MicroSet accessory case (SMC 20)
22
Turbo XS hand turbo brush (STB 20)
22
Universal brush (SUB 20)
22
Radiator brush (SHB 30)
22
Mattress tool (SMD 10)
22
Crevice nozzle, 12" (300Â mm) (SFD 10)
22
Crevice nozzle, 22" (560Â mm) (SFD 20)
22
Upholstery nozzle, 7 1/2" (190Â mm) (SPD 10)
22
Limited Warranty - Vacuum Cleaners USA
23
Leere Seite
75
Leere Seite
77
Leere Seite
76
Search:
×
Search