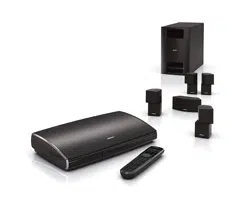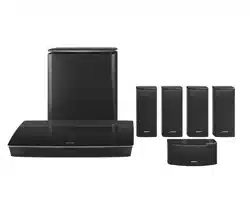
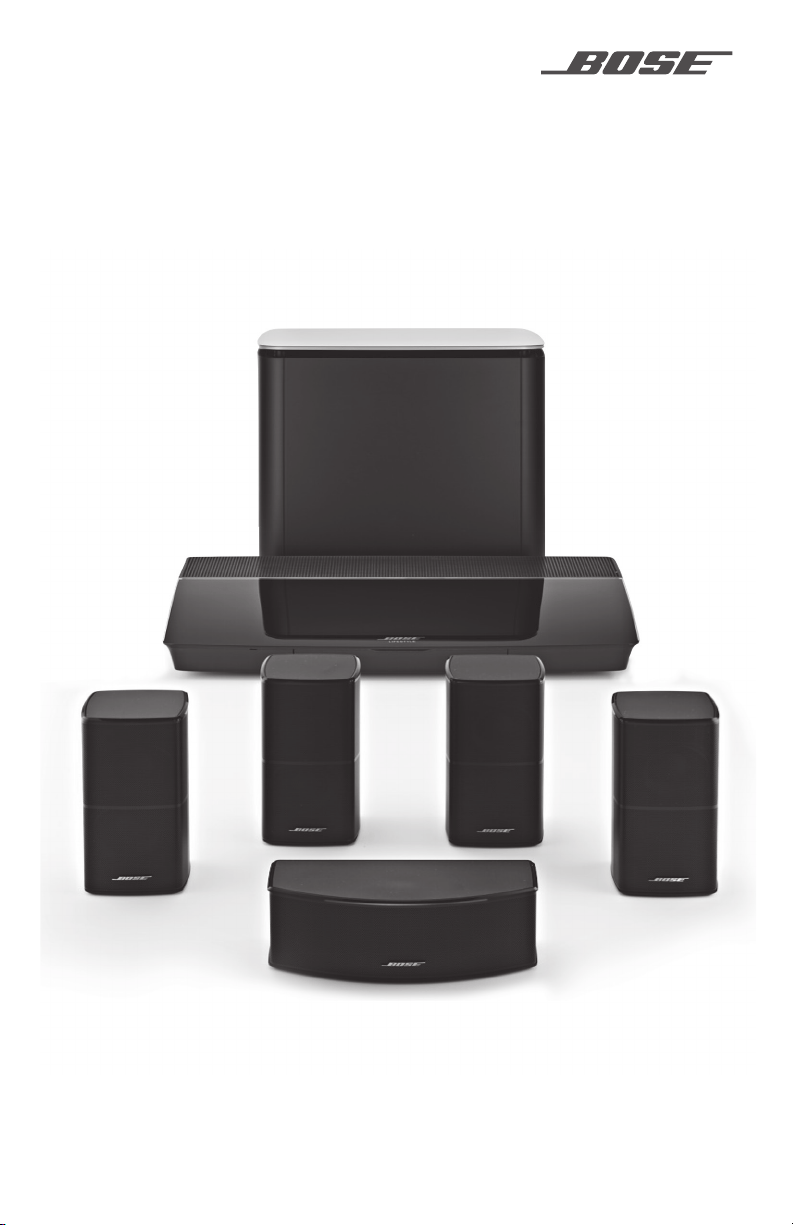
LIFESTYLE
®
600
HOME ENTERTAINMENT SYSTEM
OWNER'S GUIDE • GUÍA DEL USUARIO • NOTICE D’UTILISATION
2 - ENGLISH
IMPORTANT SAFETY INSTRUCTIONS
Please read and keep all safety, security, and use instructions.
For more information about your Lifestyle
®
600 home Entertainment System, visit:
global.Bose.com/Support/LS600
Bose Corporation hereby declares that this product is in compliance with the essential requirements and other relevant
provisions of Directive 2014/53/EU and all other applicable EU directive requirements.
The complete declaration of conformity can be found at: www.Bose.com/compliance
Important Safety Instructions
1. Read these instructions.
2. Keep these instructions.
3. Heed all warnings.
4. Follow all instructions.
5. Do not use this apparatus near water.
6. Clean only with a dry cloth.
7. Do not block any ventilation openings. Install in accordance with the manufacturer’s instructions.
8. Do not install near any heat sources such as radiators, heat registers, stoves, or other apparatus (including amplifiers) that produce
heat.
9. Protect the power cord from being walked on or pinched particularly at plugs, convenience receptacles, and the point where they
exit from the apparatus.
10. Only use attachments/accessories specified by the manufacturer.
11. Unplug this apparatus during lightning storms or when unused for long periods of time.
12. Refer all servicing to qualified personnel. Servicing is required when the apparatus has been damaged in any way, such as
power-supply cord or plug is damaged, liquid has been spilled or objects have fallen into the apparatus, the apparatus has been
exposed to rain or moisture, does not operate normally, or has been dropped.
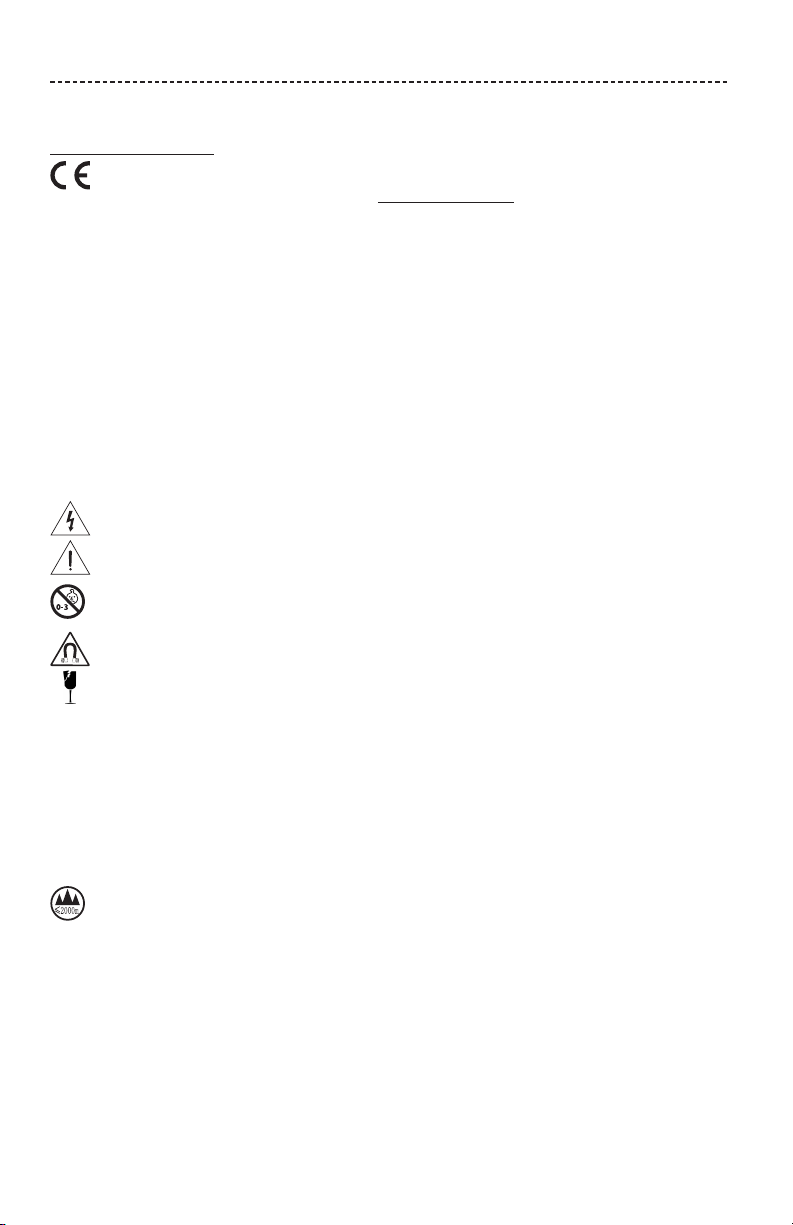
This symbol on the product means there is uninsulated, dangerous voltage within the product enclosure that may present a risk
of electrical shock.
This symbol means there are important operating and maintenance instructions in this guide.
Contains small parts which may be a choking hazard. Not suitable for children under age 3.
This product contains magnetic material. Consult your physician on whether this might aect your implantable medical device.
This product contains a tempered glass surface. Use caution to avoid impact. In the event of breakage, use care in handling
broken glass.
• To reduce the risk of fire or electrical shock, do NOT expose this product to rain, liquids or moisture.
• Do NOT expose this product to dripping or splashing, and do not place objects filled with liquids, such as vases, on or near the product.
• Keep the product away from fire and heat sources. Do NOT place naked flame sources, such as lighted candles, on or near the product.
• Do NOT make unauthorized alterations to this product.
• Do NOT use a power inverter with this product.
• Do NOT use in vehicles or boats.
• The speaker wire and interconnect cables included with this system are not approved for in-wall installation. Please check your local
building codes for the correct type of wire and cable required for in-wall installation.
• Use this product only with the power supply provided.
• Where the mains plug or an appliance coupler is used as the disconnect device, the disconnect device shall remain readily operable.
仅适用于 2000m 以下地区安全使用
Use at altitude less than 2000 meters only.
• Due to ventilation requirements, Bose does not recommend placing the product in a confined space such as in a wall cavity or in an
enclosed cabinet.
• Do not place or install the bracket or product near any heat sources, such as fireplaces, radiators, heat registers or other apparatus
(including amplifiers) that produce heat.
• The product label is located on the bottom of the console.

ENGLISH - 3
REGULATORY INFORMATION
NOTE: This equipment has been tested and found to comply with the limits for a Class B digital device, pursuant to Part 15 of the FCC
Rules. These limits are designed to provide reasonable protection against harmful interference in a residential installation. This equipment
generates, uses, and can radiate radio frequency energy and, if not installed and used in accordance with the instructions, may cause
harmful interference to radio communications. However, there is no guarantee that interference will not occur in a particular installation.
If this equipment does cause harmful interference to radio or television reception, which can be determined by turning the equipment o
and on, the user is encouraged to try to correct the interference by one or more of the following measures:
• Reorient or relocate the receiving antenna.
• Increase the separation between the equipment and receiver.
• Connect the equipment into an outlet on a circuit dierent from that to which the receiver is connected.
• Consult the dealer or an experienced radio/TV technician for help.
Changes or modifications not expressly approved by Bose Corporation could void the user’s authority to operate this equipment.
This device complies with part 15 of the FCC Rules and with ISED Canada license-exempt RSS standard(s). Operation is subject to the
following two conditions: (1) This device may not cause harmful interference, and (2) this device must accept any interference received,
including interference that may cause undesired operation.
This device for operation in the 5150 - 5250 MHz is only for indoor use to reduce the potential for harmful interference to co-channel
mobile satellite systems.
This device complies with FCC and ISED Canada radiation exposure limits set forth for general population.
This equipment should be installed and operated with a minimum distance of 20 cm between radiator and your body.
This transmitter must not be co-located or operating in conjunction with any other antenna or transmitter.
Management Regulation for Low-power Radio-frequency Devices
Article XII
According to “Management Regulation for Low-power Radio-frequency Devices” without permission granted by the NCC, any company,
enterprise, or user is not allowed to change frequency, enhance transmitting power or alter original characteristic as well as performance
to an approved low power radio-frequency devices.
Article XIV
The low power radio-frequency devices shall not influence aircraft security and interfere legal communications; If found, the user shall
cease operating immediately until no interference is achieved. The said legal communications means radio communications operated in
compliance with the Telecommunications Act.
The low power radio-frequency devices must be susceptible with the interference from legal communications or ISM radio wave radiated
devices.
The product, in accordance with the Ecodesign Requirements for Energy Related Products Directive 2009/125/EC, is in compliance with
the following norm(s) or document(s): Regulation (EC) No. 1275/2008, as amended by Regulation (EU) No. 801/2013.
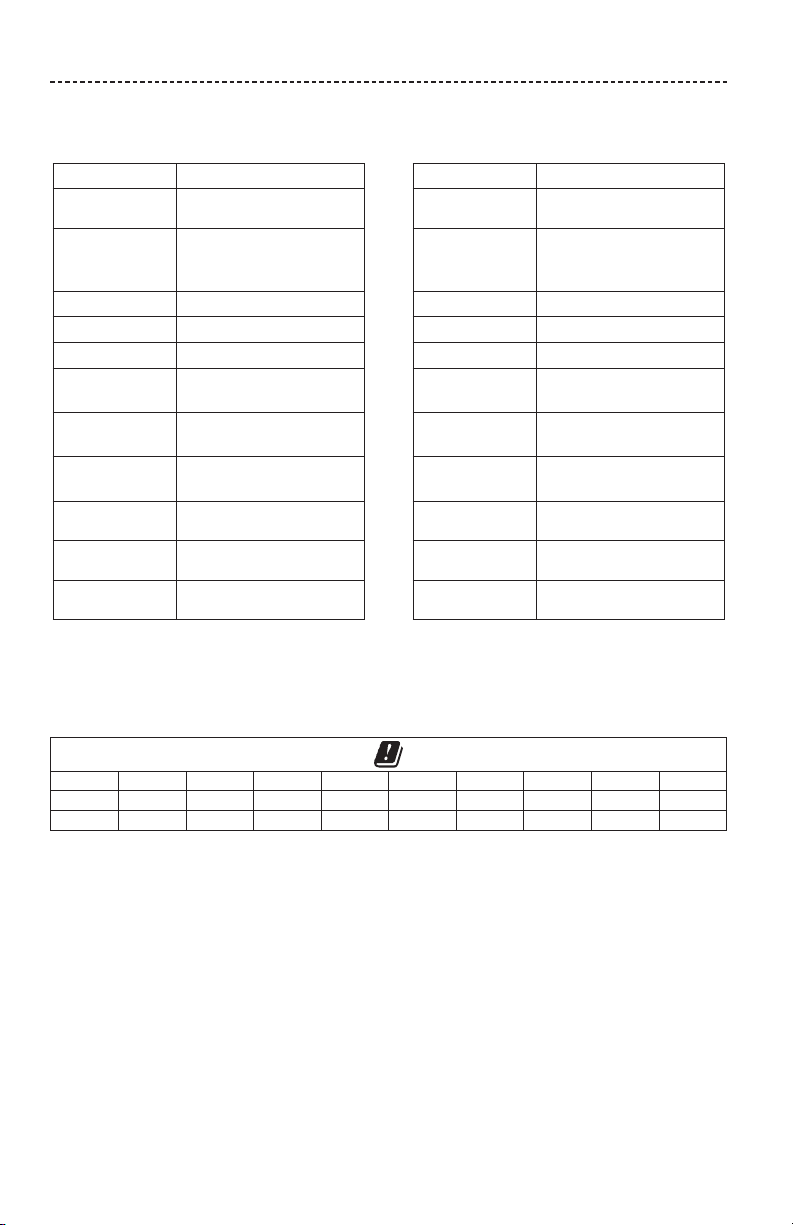
Required Power State Information
Power Modes
Standby Networked Standby
Power consumption in specified power mode, at 230V/50Hz
input
≤
0.5 W all network types
≤
2.0 W
Time after which equipment is automatically switched into
mode
< 2.5 hours
≤
20 minutes
Power consumption in networked standby if all wired network
ports are connected and all wireless network ports are
activated, at 230V/50Hz input
N/A
≤
2.0 W
Network port deactivation/activation procedures. Deactivating
all networks will enable standby mode.
Wi-Fi: Deactivate by pressing and holding the Source button on the console for 10
seconds. Repeat to activate Wi-Fi®.
Bluetooth: Deactivate by clearing the pairing list via the on-screen menu, the remote
screen, or the SoundTouch application. Activate by pairing with a Bluetooth® source.
Ethernet: Deactivate by removing the Ethernet cable. Activate by inserting the Ethernet
cable.
4 - ENGLISH
REGULATORY INFORMATION
External Power Supply Technical Information
The external power supply provided with the product, in accordance with the Ecodesign Requirements for Energy Related Products
Directive 2009/125/EC, is in compliance with the following norms(s) or documents(s): Commission Regulation (EU) 2019/1782.
For Europe:
Frequency bands of operation 2400 to 2483.5 MHz, 5150 to 5350 MHz, and 5470 to 5725 MHz.
Maximum transmit power less than 20 dBm EIRP.
Maximum transmit power is below regulatory limits such that SAR testing is not necessary and exempt per applicable regulations.
This device is restricted to indoor use when operating in the 5150 to 5350 MHz frequency range in all EU Member States listed in the table.
BE DK IE UK FR CY SK HU AT SE
BG DE PT EL HR LV LT MT PL
CZ EE FI ES IT RO LU NL SI
Manufacturer Bose Products B.V.
Commercial registration
number
36037901
Address
Gorslaan 60
1441 RG Purmerend
The Netherlands
Model identifier S088AP44001252
Input voltage 100V-240V
Input AC frequency 50Hz/60Hz
Output voltage
44V DC
10V DC
Output current
1.3A
3.3A
Output power
55W
33W
Average active
eciency
88.6%
Eciency at low load
(10%)
87.2%
No-load power
consumption
0.11W
Manufacturer Bose Products B.V.
Commercial registration
number
36037901
Address
Gorslaan 60
1441 RG Purmerend
The Netherlands
Model identifier PSM88W-213
Input voltage 100V-240V
Input AC frequency 50Hz/60Hz
Output voltage
44V DC
10V DC
Output current
1.3A
3.3A
Output power
55W
33W
Average active
eciency
88.0%
Eciency at low load
(10%)
79.0%
No-load power
consumption
0.17W
ENGLISH - 5
REGULATORY INFORMATION
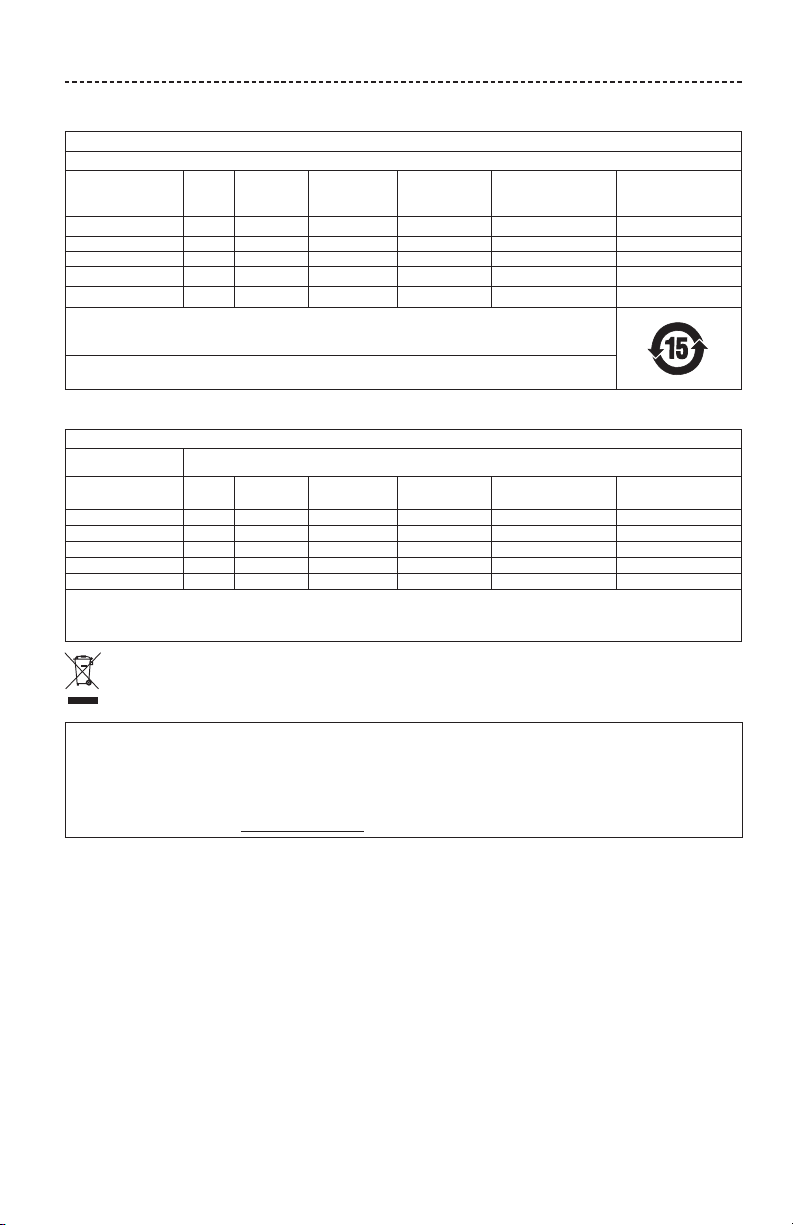
China Restriction of Hazardous Substances Table
Names and Contents of Toxic or Hazardous Substances or Elements
Toxic or Hazardous Substances and Elements
Part Name
Lead
(Pb)
Mercury
(Hg)
Cadmium
(Cd)
Hexavalent
(CR(VI))
Polybrominated
Biphenyl
(PBB)
Polybrominated
diphenylether
(PBDE)
PCBs X O O O O O
Metal Parts X O O O O O
Plastic Parts O O O O O O
Speakers X O O O O O
Cables X O O O O O
This table is prepared in accordance with the provisions of SJ/T 11364.
O: Indicates that this toxic or hazardous substance contained in all of the homogeneous materials for this part is below the limit
requirement of GB/T 26572.
X: Indicates that this toxic or hazardous substance contained in at least one of the homogeneous materials used for this part is
above the limit requirement of GB/T 26572.
Taiwan Restriction of Hazardous Substances Table
Equipment name: Bose® Lifestyle® 600 home entertainment system, Type designation: 420128, 420132, 421088
Restricted substances and its chemical symbols
Unit Lead (Pb) Mercury (Hg) Cadmium (Cd)
Hexavalent
chromium (Cr+6)
Polybrominated biphenyls
(PBB)
Polybrominated diphenyl
ethers (PBDE)
PCBs
- ○ ○ ○ ○ ○
Metal Parts
- ○ ○ ○ ○ ○
Plastic Parts
○ ○ ○ ○ ○ ○
Speakers
- ○ ○ ○ ○ ○
Cables
- ○ ○ ○ ○ ○
Note 1: “○” indicates that the percentage content of the restricted substance does not exceed the percentage of reference value
of presence.
Note 2: The “−” indicates that the restricted substance corresponds to the exemption.
This symbol means the product must not be discarded as household waste, and should be delivered to an appropriate collection
facility for recycling. Proper disposal and recycling helps protect natural resources, human health and the environment. For more
information on disposal and recycling of this product, contact your local municipality, disposal service, or the shop where you
bought this product.
Please complete and retain for your records
The serial and model numbers are located on the side of the carton.
Serial number: __________________________________________________________________________________
Model number: __________________________________________________________________________________
Please keep your receipt with your owner’s guide. Now is a good time to register your Bose product.
You can easily do this by going to global.Bose.com/register
Date of Manufacture: The eighth digit in the serial number indicates the year of manufacture; “0” is 2010 or 2020.
China Importer: Bose Electronics (Shanghai) Company Limited, Part C, Plant 9, No. 353 North Riying Road, China (Shanghai) Pilot Free
Trade Zone
EU Importer: Bose Products B.V., Gorslaan 60, 1441 RG Purmerend, The Netherlands
Taiwan Importer: Bose Taiwan Branch, 9F-A1, No.10, Section 3, Minsheng East Road, Taipei City 104, Taiwan.
Phone number: +886-2-2514 7676
Mexico Importer: Bose de México, S. de R.L. de C.V. , Paseo de las Palmas 405-204, Lomas de Chapultepec, 11000 México, D.F.
Phone number: +5255 (5202) 3545
6 - ENGLISH
LEGAL INFORMATION
Security Information
This product is capable of receiving automatic security updates from Bose. To receive automatic security updates, you must
complete the product setup process in the SoundTouch® App and connect the product to the Internet. If you do not complete
the setup process, you will be responsible for installing security updates that Bose makes available.
License Disclosures
You can view the license disclosures that apply to the software packages included with your home theater system through the
SoundTouch app or by using your product's IP address.
SoundTouch app
1. From within the app, select Y > Settings > About > Legal.
2. Select the applicable license type.
IP address
1. Obtain your product’s IP address using one of the following methods:
• SoundTouch app: From within the app, select Y > Settings > About. Select your home theater system to view the IP address.
• Wireless router: Refer to your router owner’s guide for more information.
• System: On the remote, press the SETUP button. In the UNIFY menu, select System Info > Network to view the IP address.
2. On a device connected to your wireless network, open a browser window.
3. Go to <IP address>/licenses.pdf to view the applicable license disclosures.
Apple and the Apple logo are trademarks of Apple Inc., registered in the U.S. and other countries. App Store is a service mark of
Apple Inc.
Android, Google Play, and the Google Play logo are trademarks of Google LLC.
Amazon, Amazon Music, Kindle, Fire and all related logos are trademarks of Amazon, Inc. or its aliates.
The Bluetooth
®
word mark and logos are registered trademarks owned by Bluetooth SIG, Inc. and any use of such marks by Bose
Corporation is under license.
Manufactured under license from Dolby Laboratories. Dolby and the double-D symbol are registered
trademarks of Dolby Laboratories.
For DTS patents, see http://patents.dts.com. Manufactured under license from DTS, Inc. DTS, the Symbol, DTS and the
Symbol together, Digital Surround, and the Digital Surround logo are registered trademarks or trademarks of DTS, Inc.
in the United States and/or other countries.
© DTS, Inc. All Rights Reserved.
The terms HDMI and HDMI High-Definition Multimedia Interface, and the HDMI logo are trademarks or registered
trademarks of HDMI Licensing Administrator, Inc.
iHeartRadio is a registered trademark of iHeartMedia, Inc.
Deezer is a registered trademark of Blogmusik SAS.
This product is protected by certain intellectual property rights of Microsoft. Use or distribution of such technology outside of this product
is prohibited without a license from Microsoft.
The N-Mark is a trademark or registered trademark of NFC Forum, Inc. in the United States and in other countries.
Pandora, the Pandora logo, and the Pandora trade dress are trademarks or registered trademarks of Pandora Media, Inc. used with
permission.
SiriusXM Internet Radio subscription sold separately and available only to those at least 18 years of age residing in the U.S. and Puerto
Rico. To subscribe to SiriusXM Internet Radio in the U.S., U.S. customers should visit www.sirius.com or call 1-888-539-7474.
SiriusXM and all related marks and logos are trademarks of Sirius XM Radio Inc. and its subsidiaries. All rights reserved.
SoundTouch and the wireless note design are registered trademarks of Bose Corporation in the U.S. and other countries.
This product incorporates Spotify software which is subject to third-party licenses found here:
www.spotify.com/connect/third-party-licenses
Spotify is a registered trademark of Spotify AB.
Designed with UEI Technology
™
. Under License from Universal Electronics, Inc. © UEI 2000-2016
Wi-Fi is a registered trademark of Wi-Fi Alliance
®
.
Windows is a registered trademark of Microsoft Corporation in the United States and other countries.
Bose Corporation Headquarters: 1-877-230-5639
©2020 Bose Corporation. No part of this work may be reproduced, modified, distributed or otherwise used without prior written
permission.

ENGLISH - 7
CONTENTS
Getting Started
Unpacking ............................................................................................................................. 10
Layer 1 ............................................................................................................................ 11
Layer 2 ........................................................................................................................... 11
Layer 3 .......................................................................................................................... 12
Layer 4 ........................................................................................................................... 12
Placement guidelines .......................................................................................................... 13
Sample system placement ................................................................................................. 14
Setting Up the System
UNIFY® system overview..................................................................................................... 15
UNIFY® setup ........................................................................................................................ 16
Using the Remote Control
Remote control overview ................................................................................................... 17
Using the SOURCE button ................................................................................................. 18
Function buttons .................................................................................................................. 18
Adjusting volume ................................................................................................................. 18
Using the MORE button ...................................................................................................... 18
The AV OUTPUT menu ........................................................................................................ 18
The AV SETTINGS menu ..................................................................................................... 19
Remote glow button ........................................................................................................... 19
SoundTouch® App Setup
Download and install the SoundTouch® app ................................................................... 20
SoundTouch® Owner’s Center ............................................................................................ 20
Existing SoundTouch® Users
Add the system to an existing account ............................................................................ 21
Connect the system to a new network ............................................................................ 21
Preset Personalization
Set a preset ........................................................................................................................... 22
Play a preset ......................................................................................................................... 22
Set a preset using your remote control ........................................................................... 22
Select a preset using your remote control ...................................................................... 22

8 - ENGLISH
CONTENTS
Bluetooth® Technology
Choosing your pairing method ................................................................................. 23
Connect your mobile device .............................................................................................. 23
Pair a device with NFC ........................................................................................................ 24
Control your connected mobile device from the remote control ............................... 24
Connect using the Bluetooth feature on your mobile device ...................................... 24
Connect using your remote control .................................................................................. 25
Disconnect a mobile device ............................................................................................... 25
Pair another mobile device ................................................................................................ 25
Reconnect a device ............................................................................................................. 25
Clear the system's Bluetooth pairing list ......................................................................... 25
Advanced Features
Disabling Wi-Fi® capability ................................................................................................. 26
Re-enabling Wi-Fi capability ............................................................................................. 26
Updating the system software ......................................................................................... 26
Getting System Information
System status indicators ..................................................................................................... 27
Console LED indicator ................................................................................................ 27
Acoustimass® wireless bass module LED indicator ............................................... 28
Wireless receiver LED indicator ................................................................................ 28
Care and Maintenance
Cleaning ................................................................................................................................. 29
Customer service ................................................................................................................. 29
Limited warranty .................................................................................................................. 29
Technical information .......................................................................................................... 29
SERVICE connector ............................................................................................................. 29
Troubleshooting
Common solutions ............................................................................................................... 30
Setting up your IR emitter .................................................................................................. 33
Checking for sound ............................................................................................................. 34

ENGLISH - 9
CONTENTS
Appendix A: Installation Reference
Front console panel ............................................................................................................. 35
Front Headphones/AUX input ................................................................................... 35
Front HDMI™ input ....................................................................................................... 35
Back console panel .............................................................................................................. 35
Connecting an AC-2 adapter ............................................................................................. 36
Installing the front speakers ............................................................................................... 37
What you need: ............................................................................................................ 37
Connecting the front speakers to the console ............................................................... 38
Installing the rear speakers ................................................................................................ 39
What you need: ............................................................................................................ 39
Identifying switch settings on wireless receivers ........................................................... 40
Connecting the rear speakers ............................................................................................ 40
Connecting the rear speakers to power .......................................................................... 41
Mounting your speakers ..................................................................................................... 41
Appendix B: System Maintenance
Replacing the remote control’s batteries ........................................................................ 42
Appendix C: Alternate Wired Setup
Unable to pair the Acoustimass® wireless bass module with the console ................. 43
Unable to pair the wireless receivers with the console (rear speakers) ..................... 43

10 - ENGLISH
GETTING STARTED
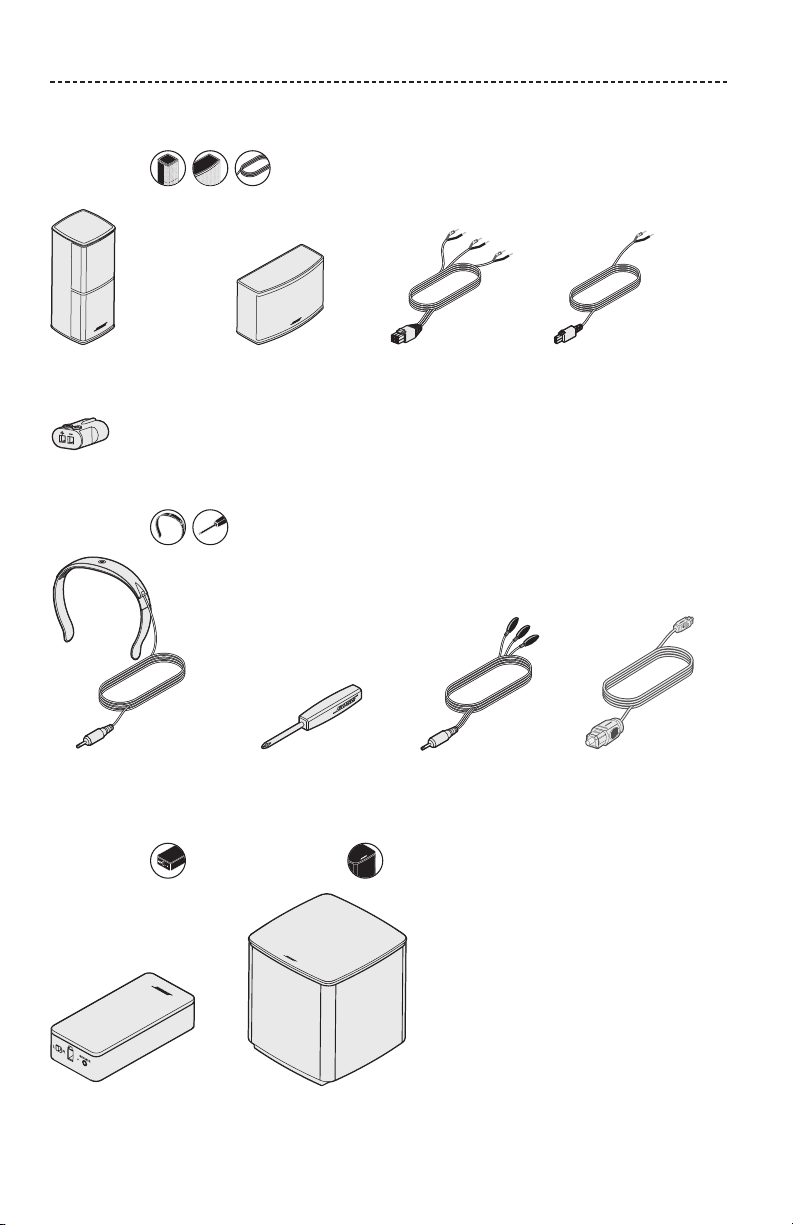
Unpacking
The parts of your new Lifestyle® Home Entertainment System are packaged in four
layers, some of which contain multiple boxes of components. Each box is marked by
icons to indicate its contents.
Note: If part of the system is damaged or the glass on your console or Acoustimass®
wireless bass module is broken, do not use it. Contact your authorized Bose®
dealer or Bose customer service.
Layer 1
Layer 2
Layer 3
Layer 4
ENGLISH - 11
GETTING STARTED
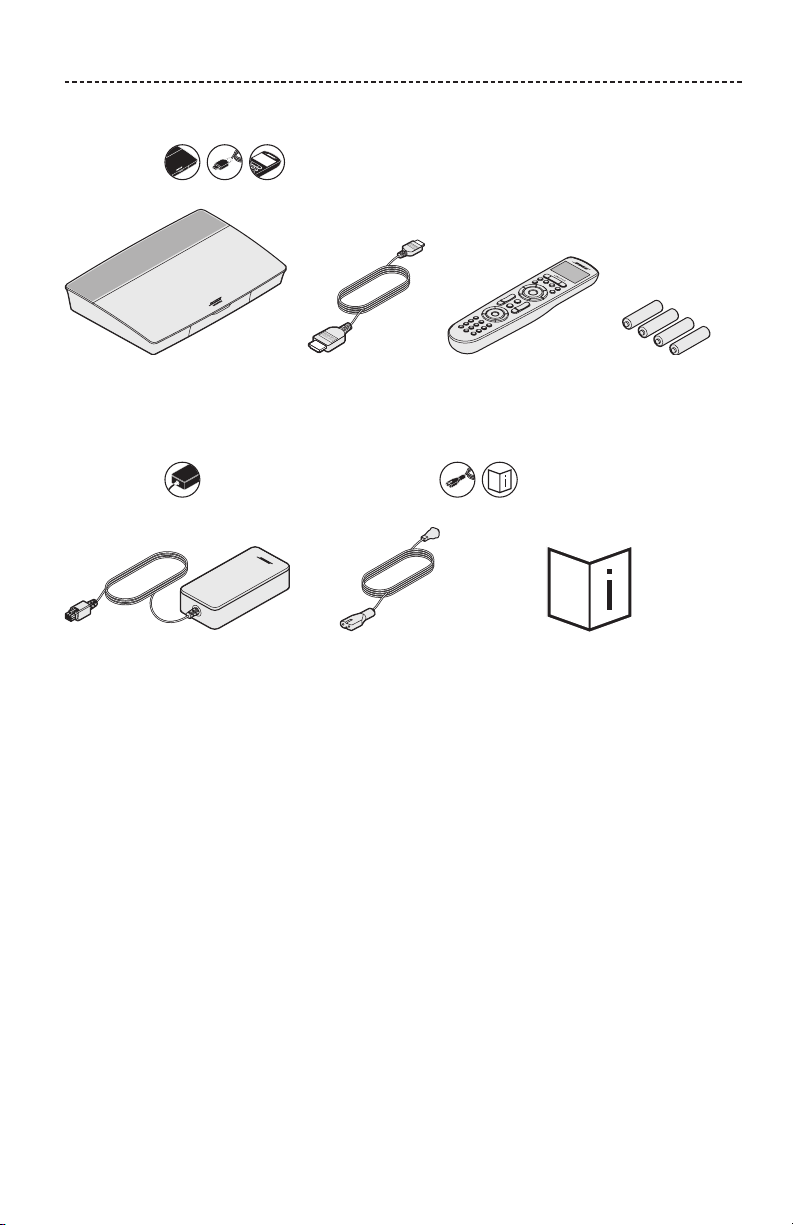
Layer 1
From box :
Console (1) HDMI™ cable (1) Universal remote
control (1)
AA batteries (4)
Layer 2
From box : From box :
Console power supply (1) Power cords (4)* Owner’s guide (1)
*May ship with multiple power cords. Use the power cord for your region.
12 - ENGLISH
GETTING STARTED
Layer 3
From box :
Jewel Cube® speakers (4) Jewel Cube®
center speaker (1)
Front speaker cable (1) Rear speaker cables (2)
AC-2 adapters (5)
From box :
ADAPTiQ® headset (1) Screwdriver (1) IR emitter (1) Optical cable (1)
Layer 4
From box : From box :
Wireless receivers (2) Acoustimass® wireless bass module (1)

ENGLISH - 13
GETTING STARTED
Placement guidelines
To avoid interference, keep other wireless equipment 1 – 3 ft. (0.3 – 0.9 m) away from
the system. Place your system outside of and away from metal objects and direct
heat sources.
Component Recommended placement
Console
• Place the console near your components. The recommended placement
is near your TV.
• Do NOT place the TV or any other components on top of your console.
• Place your console in a well-ventilated area.
• Make sure there is an AC (mains) outlet nearby.
Note: Until your system is completely installed, keep the control console
positioned for easy access to its rear connector panel.
Acoustimass®
wireless bass
module
• Stand the bass module on its rubber feet along the same wall as your
TV, or along any other wall in the front third of the room.
• Choose a stable and level surface. Vibration can cause the bass module
to move, particularly on smooth surfaces like marble, glass or highly
polished wood.
• Keep the front side of the bass module at least 3 in. (8 cm) from any
other surface. Blocking the port on the bottom of this side can aect
acoustic performance.
• Make sure there is an AC (mains) outlet nearby.
Front speakers
• Place one speaker to the left and one speaker to the right of the TV.
• If placing the speakers in an enclosed bookcase shelf, position them at
the front edge of the shelf.
Center speaker
• Place the center speaker on a stable and level surface directly above or
below your TV.
Rear speakers/
wireless receivers
• Place the rear speakers toward the back of the room behind the viewers
at ear height (when seated) or higher, if possible.
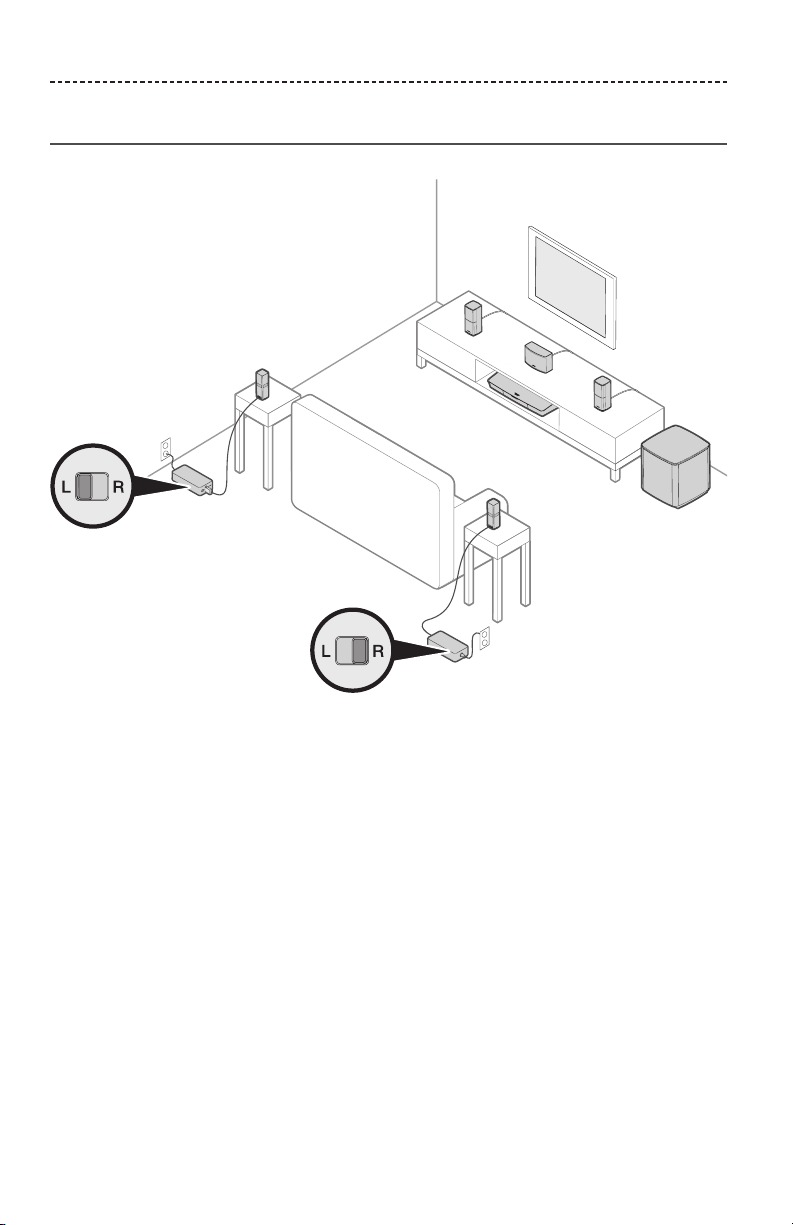
• Confirm that the switch on one wireless receiver is set to L (left).
• Confirm that the switch on the other wireless receiver is set to R (right).
• Facing the TV, place the speaker and L wireless receiver on the left side
of the room.
• Facing the TV, place the speaker and R wireless receiver on the right
side of the room.
• Make sure there is an AC (mains) outlet near each wireless receiver.
14 - ENGLISH
GETTING STARTED
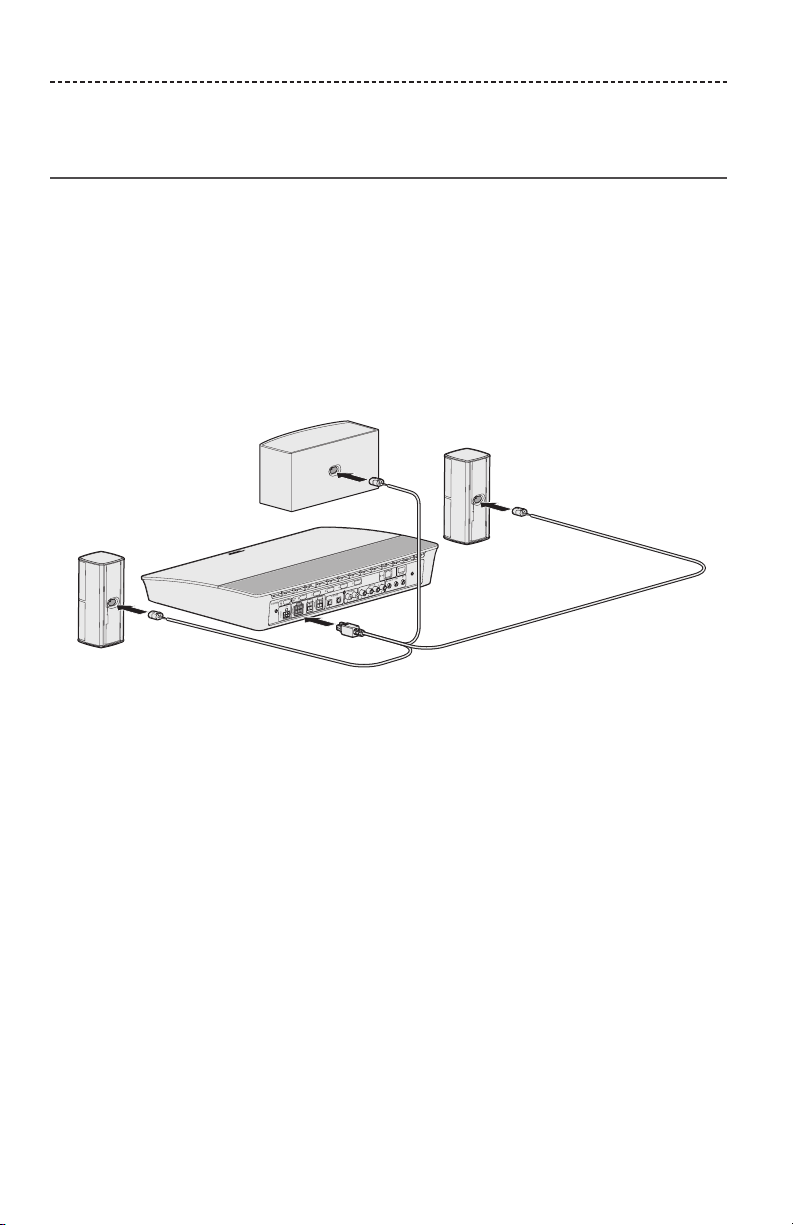
Sample system placement

ENGLISH - 15
SETTING UP THE SYSTEM
UNIFY
®
system overview
The UNIFY intelligent integration system guides you through the initial process of
setting up and configuring your system. It helps you choose the correct cables and
inputs and programs the Bose® remote control to operate your connected devices.
Note: Before you begin, make sure you have one hour set aside for system setup.
Menu item What you can do
Bluetooth Setup Manage your Bluetooth devices.
Device Management Add another device or accessory to your system.
Network Setup Connect your system to your home network.
Software Update Perform a system software update.
Power Macro
Customize the Power button on your remote control to power on/o
your system, TV and another HDMI source simultaneously.
Auto-o Disable your system from powering o automatically when there is no
signal after 20 minutes.
Headphone
Connector
Set the default usage of your front headphones/AUX input
(see page 35).
CEC Settings Adjust the CEC functionality of your console.
• Default On: CEC is enabled
• Alternate On: Prevents CEC-enabled devices from changing the
currently selected source
• O: CEC is turned o
ADAPTiQ® Start the ADAPTiQ audio calibration process. Once completed, this
menu option disables or enables ADAPTiQ.
TV Remote Setup Program your remote to control your TV.
Advanced TV
Audio Setup
Learn more about HDMI (ARC) and set up your preferred usage.
Speaker Management Revisit your system's speaker setup or add an additional Acoustimass®
wireless bass module.
Language Select Change the language of the on-screen display.
Tutorial A series of optional procedures to help guide you through the system’s
key features, such as SoundTouch®.
Exit Close the UNIFY menu.

16 - ENGLISH
SETTING UP THE SYSTEM
UNIFY
®
setup
The following steps are part of the initial UNIFY setup process:
Step Objective
Pair the remote control Connect the system's remote control to the console.
Choose language Select your language from the on-screen list.
Connect to network Select and connect to your home Wi-Fi network or Ethernet.
Software update Update system software to provide the most current functionality.
Wired speakers Connect the front speakers to the console.
Wireless speakers Connect the rear speakers and Acoustimass® wireless bass module to
the console.
TV remote Set up the system's remote control to control your TV.
Adding devices Connect your additional sources.
ADAPTiQ® setup Customizes the sound of the system to the acoustics of your listening
area.
Tutorial A series of optional procedures to help guide you through the rest of
your system’s features, such as SoundTouch®.
After completing the initial setup, you can access the UNIFY menu at any time to
change your system setup and configuration. Press the button on the remote
control to start UNIFY setup.
ENGLISH - 17
USING THE REMOTE CONTROL
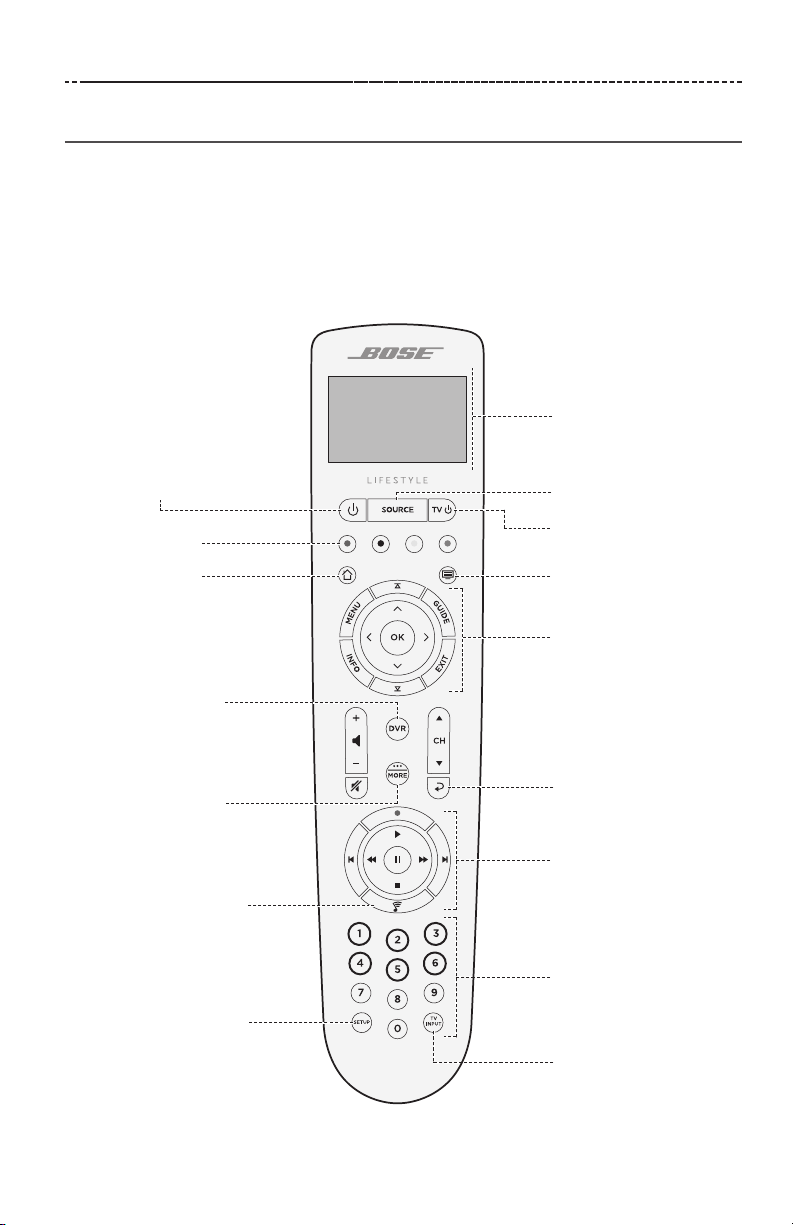
Remote control overview
The Bose® advanced RF (radio frequency) remote control works from anywhere in your
room without requiring you to aim the remote control at the console.
The remote control's display is an essential part of your Lifestyle® experience. It guides
you through your sources and system settings.
Note: The Bose remote control does not control functions specific to devices that are
connected to the front HDMI™ input.
Provides access to
connected sources
Powers on/o your
Bose® system
Display
Powers on/o your TV
Displays additional
device-specific
controls
Previous channel,
chapter or selection
Changes TV's input
Numeric keypad.
Numbers 1 - 6 can
play SoundTouch®
presets.
Navigation pad
Playback controls
Function buttons
(see page 18)
Teletext mode
Launches the UNIFY®
setup menu
Opens SoundTouch®
Home button
Controls the DVR
functionality of
your cable box
18 - ENGLISH
USING THE REMOTE CONTROL
Using the SOURCE button
The button is used to switch between connected sources. Access sources using
the navigation pad on your remote control.
Once a source is highlighted, press OK to select it.
Function buttons
The red, green, yellow and blue buttons on the remote control correspond with the
color-coded function buttons on your cable/satellite box or teletext functions.
• Cable/satellite box functions: refer to your cable/satellite box owner’s guide.
• Teletext functions: correspond with color-coded page numbers, headings or
shortcuts on a teletext display.
Adjusting volume
To see your volume level, refer to your remote control's display.
• Press + to increase the volume.
• Press – to decrease the volume.
• Press to mute or unmute the audio.
Note: If you still hear audio from your TV’s speakers after setting up your system,
disable the speakers through your TV’s settings menu.
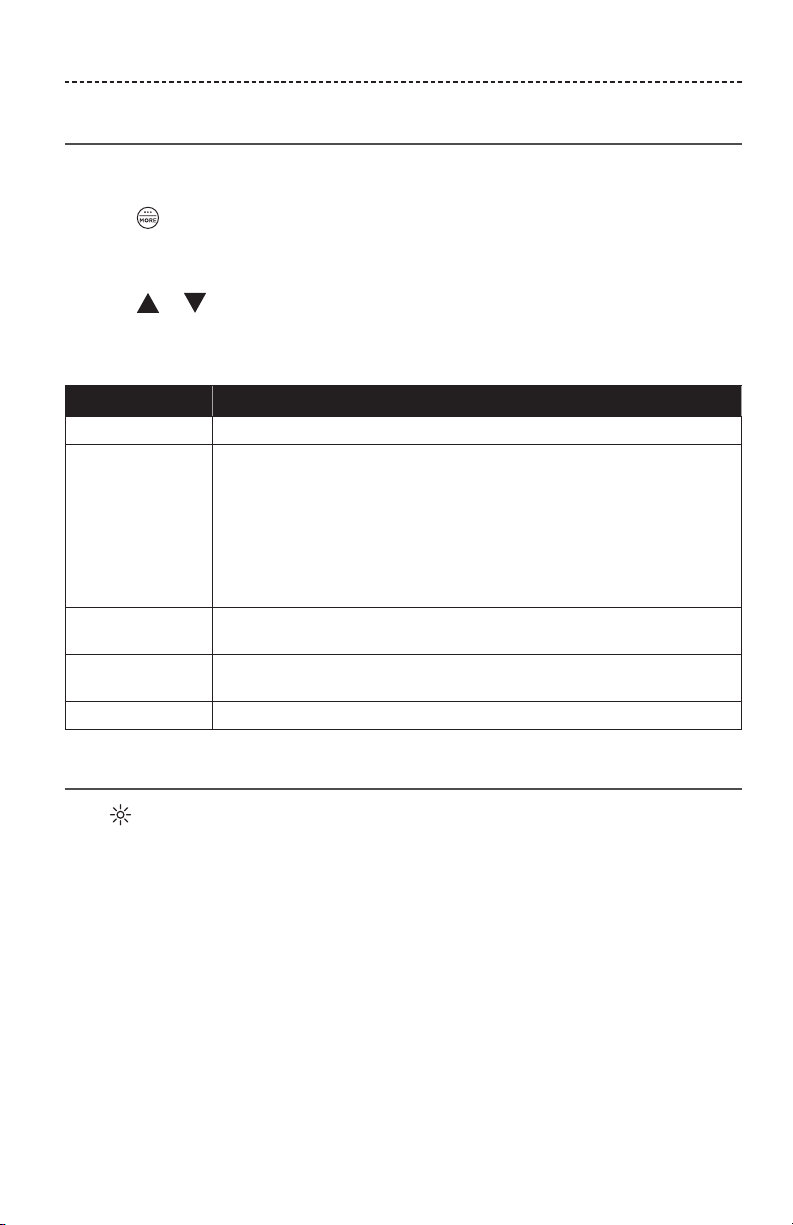
Using the MORE button
The MORE button lets you access additional selections through the remote control's
display that pertain to your currently-selected source, as well as other system control
functionality.
1. Press .
2. Press or to select a function on your remote control's display.
3. Press OK.
The AV OUTPUT menu
The AV OUTPUT menu displays the current video resolution, frame rate, audio format
and number of audio channels for the currently selected source.
1. Press on your remote control.
2. Select AV OUTPUT.
3. Press the OK button.
4. Press EXIT.
ENGLISH - 19
USING THE REMOTE CONTROL
The AV SETTINGS menu
The AV SETTINGS menu lets you adjust certain system settings. The number of items
that appear depends on the currently-selected source. To access the menu:
1. Press on your remote control.
2. Select AV SETTINGS.
3. Press the OK button to display the AV SETTINGS menu for the current source.
4. Press or to highlight the option you want to change.
5. Press OK to select the setting.
6. Press EXIT when done.
AV setting Objective
SYSTEM AV Adjust your system's treble, bass, center and surround audio levels.
SOURCE AV • AUDIO:
- Dialogue mode enhances speech clarity.
- Movie mode provides balanced playback for most listening situations.
- Night mode adjusts dialog and volume during loud scenes.
- Music mode provides optimized playback for music.
• AV SYNC: Adjust the timing between your device's audio and video.
• AUDIO TRACK: Select between multiple language tracks.
NOTIFICATION Enables a flash on your remote control's display to notify you when an
input is required.
RESTORE
DEFAULTS
Restores your audio to default values.
REMOTE INFO Displays your remote control's serial number and software version.
Remote glow button
Press on the rear of the remote control to illuminate the button backlighting for dark
viewing situations.
20 - ENGLISH
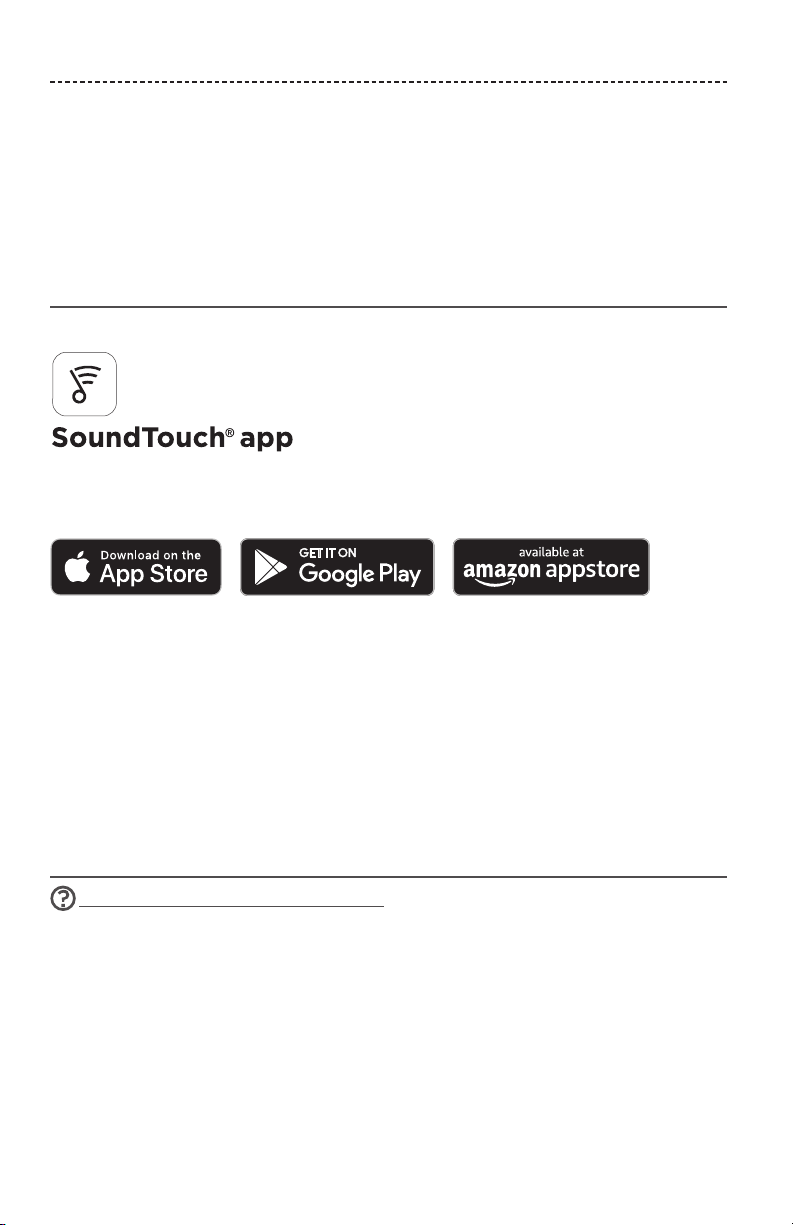
SOUNDTOUCH® APP SETUP
The SoundTouch® app lets you set up and control SoundTouch® from your smartphone,
tablet or computer. Using the app, your smart device acts as a remote for your console.
From the app, you can manage your SoundTouch® settings, add music services, explore
local and global Internet radio stations, set and change presets and stream music. New
features are added periodically.
Note: If you have already set up SoundTouch® for another system, see page 21.
Download and install the SoundTouch
®
app
On your smartphone or tablet, download the Bose® SoundTouch® app.
• Apple users: download from the App Store
• Android™ users: download on the Google Play™ store
• Amazon Kindle Fire users: download from the Amazon Appstore for Android
Follow the instructions in the app to complete setup, including adding the system to
your Wi-Fi network, creating a S oundTouch® account, adding a music library and using
music services.
Once you set up the system on your home Wi-Fi network, you can control it from any
smartphone or tablet on the same network.
Tip: You must use the same SoundTouch® account for all devices connected to your
console.
Note: If you have already added your system to your Wi-Fi network, select SYSTEM
ALREADY ON NETWORK when prompted in the app.
SoundTouch
®
Owner’s Center
global.Bose.com/Support/LS600
This website provides access to the owner support center, which includes: owner’s
manuals, articles, tips, tutorials, a video library, and the owner community where you
can post questions and answers.

ENGLISH - 21
EXISTING SOUNDTOUCH® USERS
Add the system to an existing account
If you have already set up SoundTouch® on another system, you do not need to
download the SoundTouch® app again.
From within the app, select > Settings > Add or Reconnect Speaker.
The app guides you through setup.
Connect the system to a new network
If your network information changes, add your system to your new network. You can do
this by putting your system into setup mode.
1. From within the app, select > Settings > System Speaker and select
your system.
2. Select CONNECT SPEAKER.
The app guides you through setup.

22 - ENGLISH
PRESET PERSONALIZATION
You can personalize six presets to your favorite streaming music services, stations,
playlists, artists, albums or songs from your music library. You can access your music, at
any time, with a simple touch of a button using the SoundTouch® app.
Before using presets, note the following:
• You can set presets from the app and the remote control.
• If the preset source is your music library, make sure the computer storing your music
library is on and connected to the same network as the SoundTouch® console.
• You cannot set presets to a Bluetooth stream or cabled mobile device.
Set a preset
1. Stream music using the app.
2. While the music is playing, press and hold a preset in the app.
Play a preset
Once you personalize your presets, press a preset in the app to play it.
Set a preset using your remote control
1. Press the on your remote control to access the SoundTouch source.
2. Press and hold a number (from 1 – 6) on the numeric keypad to assign a new preset.
A tone notifies you that a new preset has been set.
Select a preset using your remote control
1. Assign your favorite stations as presets within the app.
2. Press the SoundTouch® button on your remote control to switch to the
SoundTouch source.
3. Select a preset by pressing a number (from 1 – 6) on the numeric keypad.
ENGLISH - 23
BLUETOOTH TECHNOLOGY
Bluetooth wireless technology lets you stream music from Bluetooth smartphones,
tablets, computers or other devices to your console. Before you can stream music from
a mobile device, you must connect the mobile device with your console.
Choosing your pairing method
You can pair your mobile device with the console using Bluetooth wireless technology
or Near Field Communication (NFC).
What is NFC?
NFC is a technology that enables devices to establish wireless communication with each
other by simply tapping the devices together. Refer to your device owner’s guide to see
if your model supports NFC.
If your device does not support NFC or if you
are unsure:
Follow the instructions for “Connect your
mobile device.”
If your device supports NFC: Follow the instructions for “Pair a device with
NFC” on page 24.
Note: If your device supports Bluetooth pairing via NFC, you can use either pairing
method.
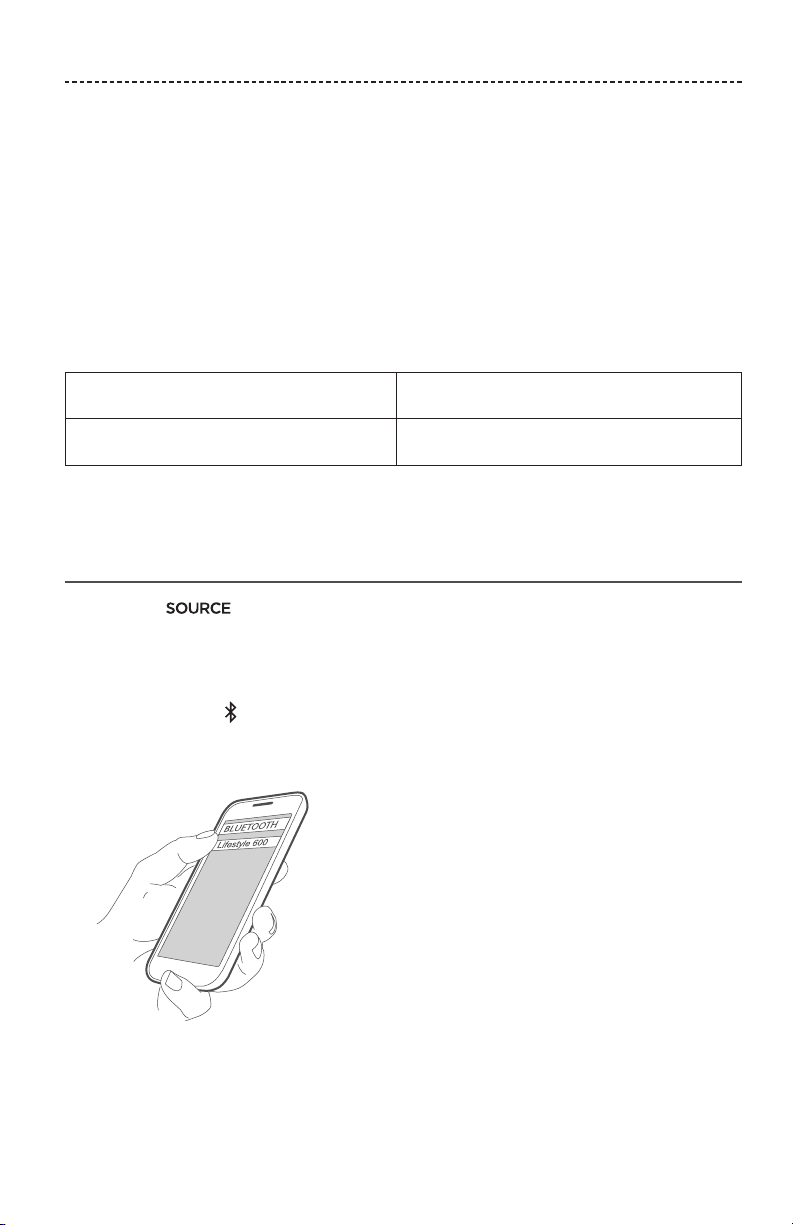
Connect your mobile device
1. Press the button on your remote control and select Bluetooth on your
remote control's display.
2. Follow the on-screen instructions to place your console in pairing mode.
3. From within the SoundTouch® app, select your system from the device tray.
4. Select Bluetooth .
5. Select CONNECT.
6. Select your Lifestyle® system from the mobile device list.
Tip: Look for the name you entered for your system in the app. If you didn’t name
your system, the default name appears.
Once connected, your system's name appears connected in the device list.
24 - ENGLISH
BLUETOOTH TECHNOLOGY
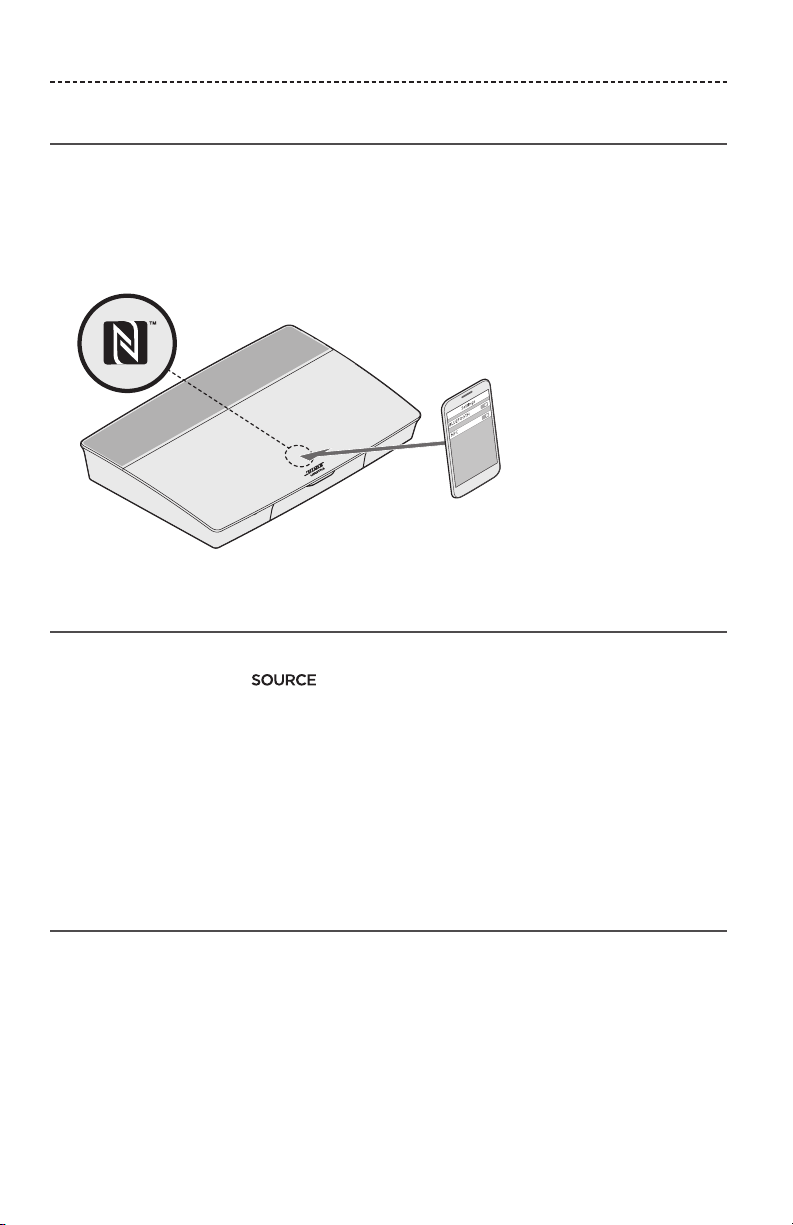
Pair a device with NFC
1. With your system powered on, unlock your device and turn on the Bluetooth and
NFC features. Refer to your device owner’s guide to learn more about these features.
2. Gently tap the NFC touchpoint on your mobile device to the area above the Bose®
logo on the top of your Lifestyle® console.
Your mobile device may prompt you to accept pairing.
Control your connected mobile device
from the remote control
Once paired, you can use the remote control to access your connected mobile devices.
Select Bluetooth from the menu. To connect a device, see page 23.
You can use the remote to control the following subset of Bluetooth features on
your system:
• Pair and connect devices.
• View available artist information.
• Control playback (play, pause, stop, skip to the next track, etc.).
• Clear the pairing list.
Connect using the Bluetooth feature on
your mobile device
1. On your mobile device, turn on the Bluetooth feature.
Tip: The Bluetooth menu is usually found in the Settings menu.
2. Select your system from the mobile device list.
ENGLISH - 25
BLUETOOTH TECHNOLOGY
Connect using your remote control
You can stream audio from a device to your console.
1. Turn on the Bluetooth feature on your device.
2. On your remote control, choose the Bluetooth source through the menu.
The console connects to the last device that streamed music to the system.
3. On the device, play music.
Disconnect a mobile device
Turn o the Bluetooth feature on your mobile device.
Pair another mobile device
To pair another device, press the button and select Bluetooth Setup
(see page 15).
Reconnect a device
• When powered on, the console tries to reconnect with the most recently
connected device.
Note: The device must be within range and powered on.
• If your device supports NFC, gently tap the NFC touchpoint on your mobile device to
the area above the Bose® logo on the top of your console.
Clear the system's Bluetooth pairing list
From within the app, select > Settings > Speaker Settings > Select Speaker >
Bluetooth® > Clear Bluetooth® Pairing List > Clear.
The pairing list clears.
You can also clear your system's pairing list on the console.
1. Press the button.
2. Select Bluetooth Setup.
3. Select Clear Bluetooth pairing list.

26 - ENGLISH
ADVANCED FEATURES
Disabling Wi-Fi capability
1. Press and hold your console's button for 10 seconds.
2. Release the button.
Re-enabling Wi-Fi capability
Your system's Wi-Fi automatically re-enables when powering on your system.
Updating the system software
If your system is connected to your home network, it checks for software updates every
time the system is used. If an update is available, it begins downloading automatically.
If an update was fully downloaded, on-screen text prompts you when powering down
the console that it is ready to be installed. Your system shuts down automatically after
installation.

ENGLISH - 27
GETTING SYSTEM INFORMATION
System status indicators
The front of the console has an LED indicator that shows system status. The LED glows
according to system state.
Console LED indicator
Indicator activity System state
O System is o
Blinking white System is powering on
Solid white System powered on
Blinking amber Downloading system software update
Solid amber No network connection
Solid red Firmware error - contact Bose® customer service

28 - ENGLISH
GETTING SYSTEM INFORMATION
Acoustimass® wireless bass module LED indicator
Indicator activity System state
Blinking amber Ready to pair
Solid white Connected to the console
Solid amber (dim) Disconnected from the console
Blinking white Downloading system software update
Blinking red Firmware error - contact Bose® customer service
Wireless receiver LED indicator
Indicator activity System state
Blinking amber Ready to pair
Solid white Connected to the console
Solid amber (dim) Disconnected from the console
Blinking white Downloading system software update
Blinking red Firmware error - contact Bose® customer service
ENGLISH - 29
CARE AND MAINTENANCE
Cleaning
Do not allow liquids to spill onto the system or into any openings.
• Clean the exterior of the system with the provided cleaning cloth or another soft,
dry cloth.
• Do not use any sprays near the system.
• Do not use any solvents, chemicals or cleaning solutions containing alcohol, ammonia
or abrasives.
• Do not allow objects to drop into any openings.
Customer service
For additional help using the system:
• Visit global.Bose.com/Support/LS600
• Contact Bose® customer service.
Limited warranty
The system is covered by a limited warranty. Visit our website at
global.Bose.com/warranty for details of the limited warranty.
To register your product, visit global.Bose.com/register for instructions.
Failure to register will not aect your limited warranty rights.
Technical information
U.S.A./Canada/International:
• Console: 10VDC 3.3A, 44VDC 1.25A
• Wireless receivers: 100–240V 50/60 Hz, 30W
• Acoustimass® wireless bass module: 100–240V 50/60 Hz, 180W
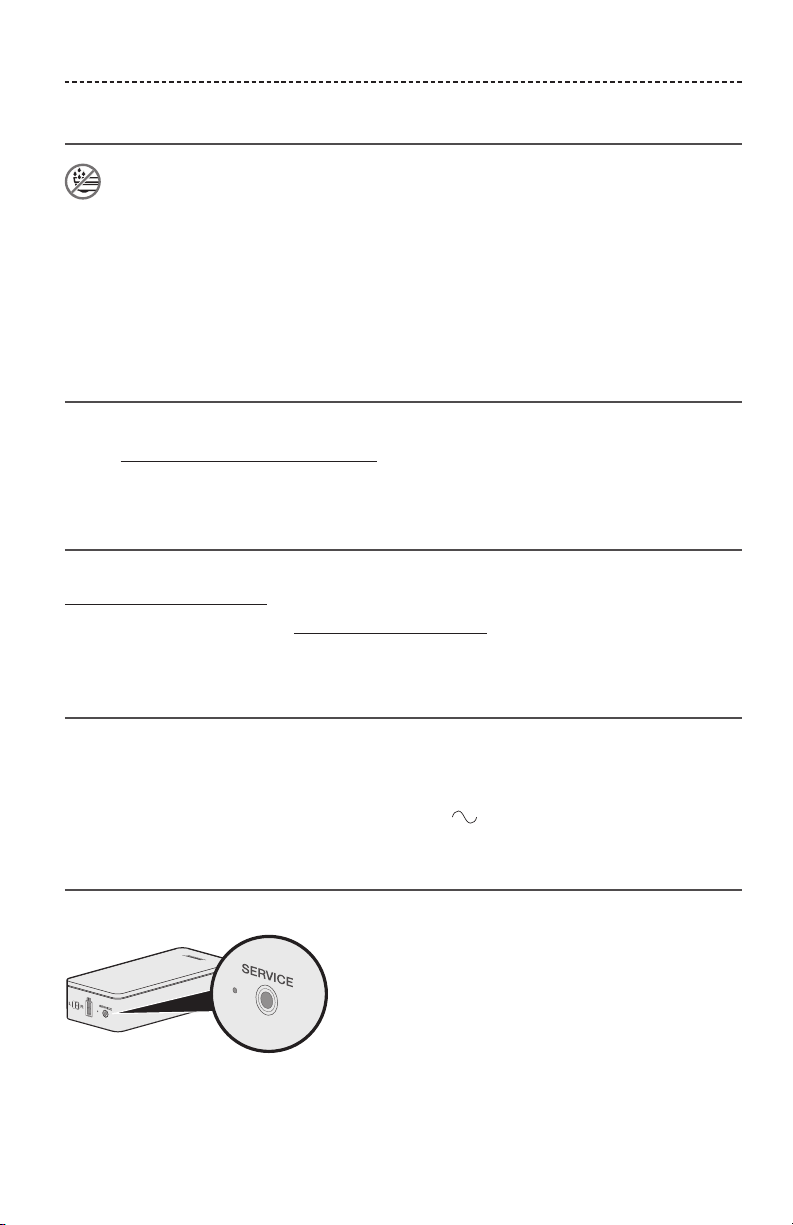
SERVICE connector
The SERVICE connector is for service use only. Do not insert any cables into this
connector.
30 - ENGLISH
TROUBLESHOOTING
If you experience problems with your home entertainment system:
• Make sure that all system components are connected to an AC (mains) outlet.
• Secure all cables.
• Check the state of system status indicators (see page 27).
• Move the system away from possible interference (wireless routers, cordless phones,
televisions, microwaves, etc.).
• Verify the system is within the recommended range of wireless router or mobile
device for proper operation.
If you could not resolve your issue, see the table below to identify symptoms and
solutions to common problems. If you are unable to resolve your issue, contact Bose®
customer service.
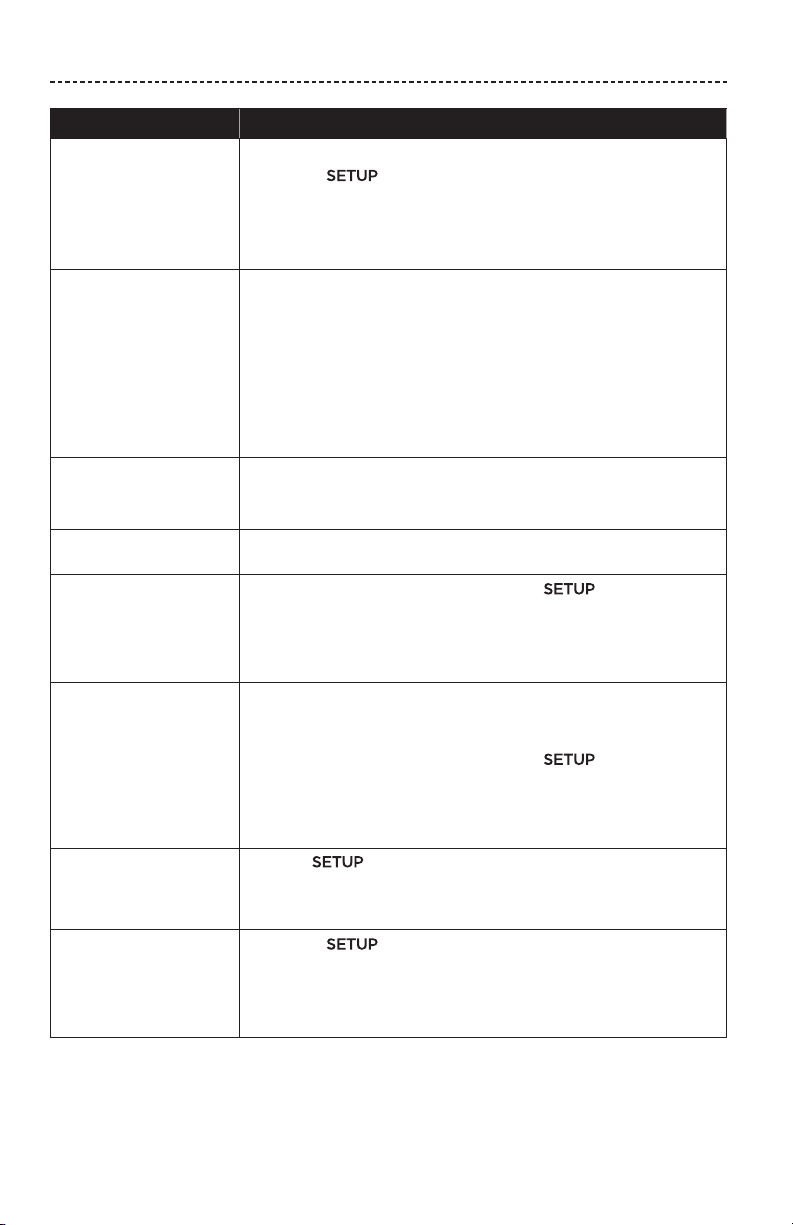
Common solutions
The following table lists symptoms and possible solutions to common problems.
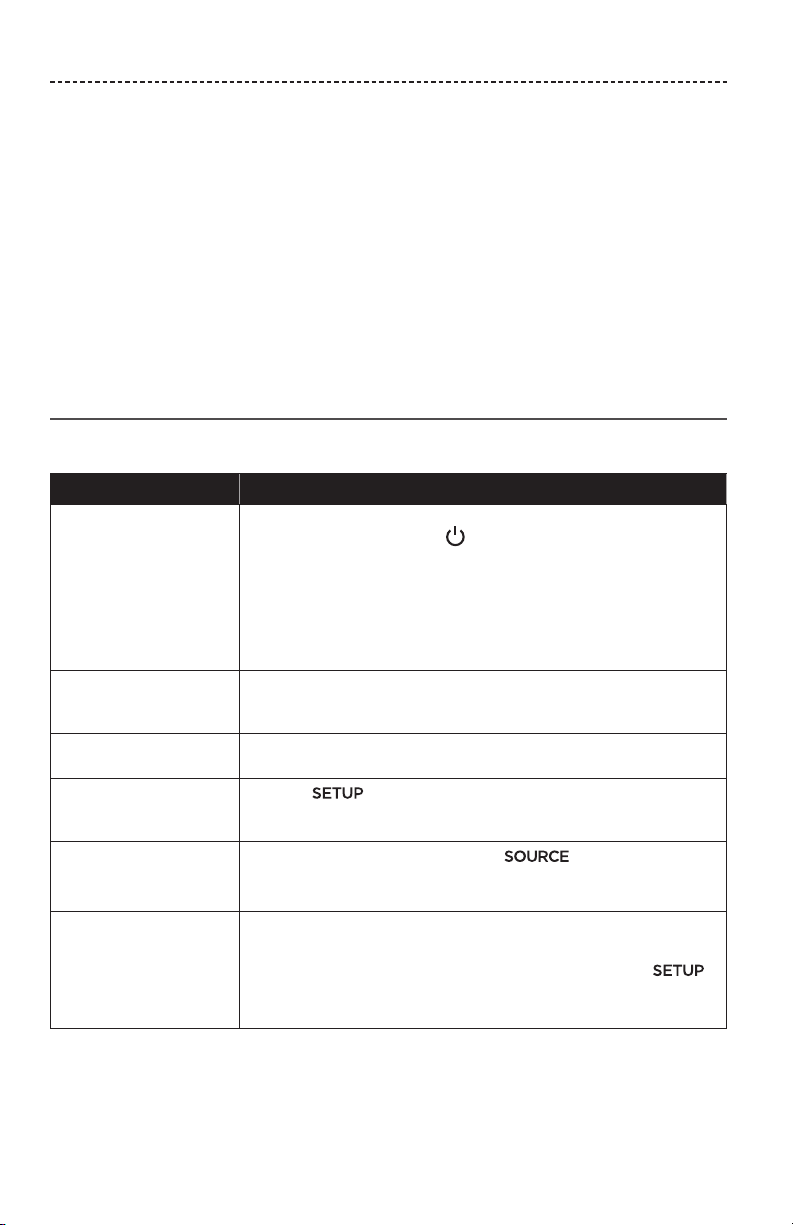
Symptom Solution
The system is not
responding to initial
operation of remote
control
• Power on the control console manually from the front of the unit by
pressing the Power button .
• Press any button on your remote control. The system status
indicator on the control console should blink with each press.
• Make sure the remote control's batteries are installed correctly and
do not need replacement (see page 42).
• Unplug the power cord for the console, wait 30 seconds and plug it
firmly into a live AC (mains) outlet.
The remote does not
control a device added
during initial setup
Connect your IR emitter (see page 33).
The TV is still playing
sound
Disable your TV speakers through your TV's settings menu.
Poor video connection
from a source
Press the button on the control console and select your
device’s setup options. Follow the on-screen instructions to change a
video connection.
System does not respond • Select a connected device from the menu.
• Unplug the power cord for the console, wait 30 seconds and plug it
firmly into a live AC (mains) outlet.
Problems related to
HDMI (ARC)
Make sure that the system's HDMI™ cable is inserted into a connector
on your TV labeled ARC or Audio Return Channel.
If your TV does not have an HDMI ARC connector, press the
button on the remote control and select Advanced TV Audio
Settings from the UNIFY® menu (see page 15).
ENGLISH - 31
TROUBLESHOOTING
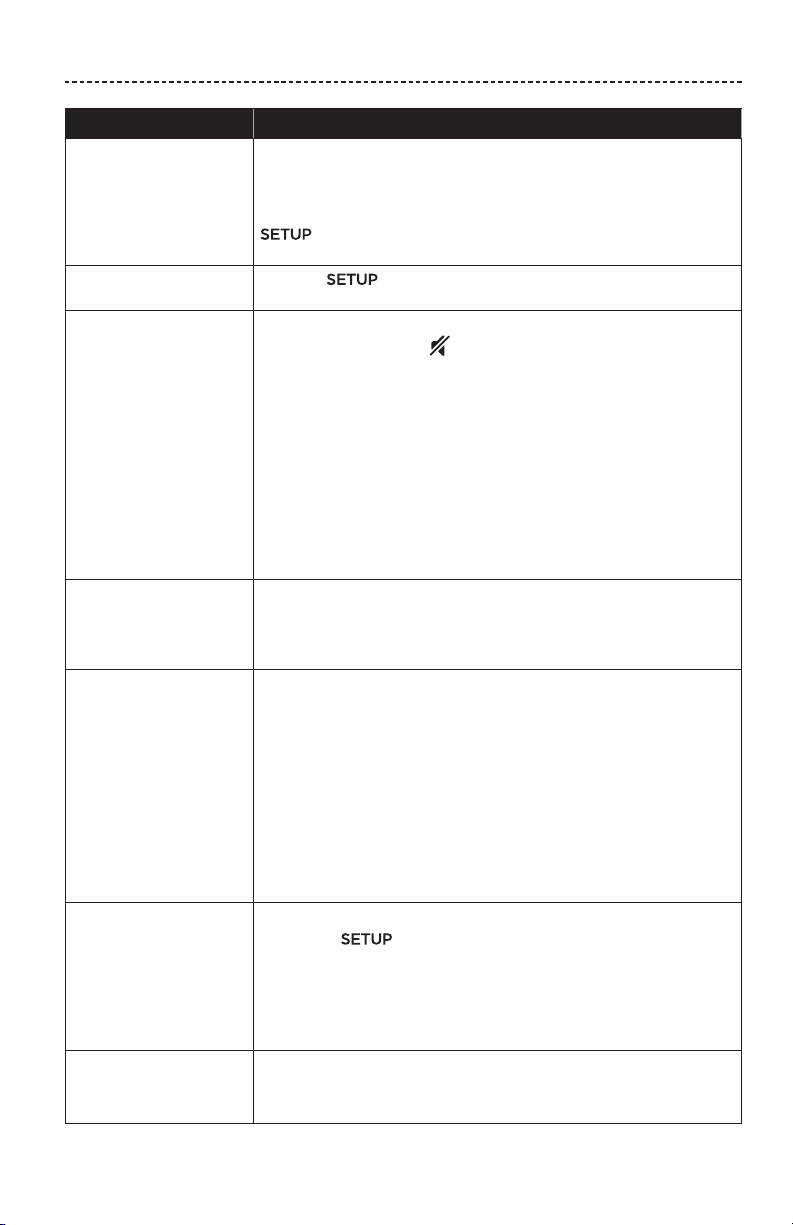
Symptom Solution
Problems related to CEC If the console is connected to your TV’s HDMI ARC connector, make
sure that Consumer Electronics Control (CEC) is enabled in your TV
system menu. Your TV may refer to CEC by a dierent name.
For more information, refer to your TV owner’s guide or press the
button on the remote control and select CEC Settings from
the UNIFY® menu (see page 15).
A connected device
switches on its own
Press the button on the remote control and select Alternate
On from the CEC Settings UNIFY® menu item (see page 15).
No sound from the
system
• Increase the volume.
• Press the Mute button on the remote control to make sure the
system is not muted.
• Make sure you have selected the correct source.
• Cycle through and test dierent sources.
• Make sure that the HDMI™ cable is inserted into a connector on
your TV labeled ARC or Audio Return Channel. If your TV does
not have an HDMI ARC connector, use a secondary audio cable in
addition to the HDMI cable.
• If using a secondary audio cable, insert the cable into a connector
on your TV labeled Output or OUT.
• Unplug the power cord for the console, wait 30 seconds and plug it
firmly into a live AC (mains) outlet.
Cannot complete
network setup
• Select the correct network name and enter password
(case sensitive).
• Connect to the network using an Ethernet cable.
• Restart your modem and router.
Cannot complete
SoundTouch® setup
• Connect the mobile device and the system to the same
Wi-Fi network.
• If you have already added your system to your Wi-Fi network,
select SYSTEM ALREADY ON NETWORK when prompted in
the app.
• Enable Wi-Fi on the mobile device you are using for setup.
• Test your internet connection.
• Restart your mobile device.
• Restart your modem and router.
• Uninstall the app, reinstall the app, reset the system and restart
setup.
Acoustimass® wireless
bass module status LED
is a solid amber (dim)
• Follow the on-screen troubleshooting prompts.
• Press the button on the control console or your remote and
select Speaker Management to rerun setup (see page 15).
• Connect the bass module using a 3.5 mm stereo c able
(see page 43).
• Unplug the power cord for the Acoustimass, wait 30 seconds and
plug it firmly into a live AC (mains) outlet.
Bass is too heavy or low • Adjust the bass setting of the system (see page 19).
• Run ADAPTiQ® audio calibration (see page 16).
• Move the bass module away from nearby walls and corners.
32 - ENGLISH
TROUBLESHOOTING
Symptom Solution
The wireless receiver
status LEDs are solid
amber (dim)
• Follow the on-screen troubleshooting prompts.
• Press the button on the control console or your remote and
rerun the UNIFY® setup (see page 16).
• Unplug the power cords for the receivers, wait 30 seconds and
plug them firmly into a live AC (mains) outlet.
• Make a wired connection to your rear speakers (see page 43).
Sound is distorted • Cycle through and test dierent sources.
• Reduce the volume output level from any devices connected to the
control console.
• Make sure the audio input cable from your source device is
connected and not damaged.
• If you have not previously run ADAPTiQ®, select ADAPTiQ® from
the UNIFY® menu (see page 15).
• Unplug the power cord for the console, wait 30 seconds and plug it
firmly into a live AC (mains) outlet.
No sound from a
connected device
• Power on the device.
• Cycle through and test dierent sources.
• Refer to the device owner’s manual.
No TV picture, but audio
is heard
Make sure the TV video input selection is correct for the video source.
A connected device
is not responding
consistently to remote
commands
• Try setting up the device again. Press the button on the
control console. Select the device options and follow the on-screen
instructions to set up the device again.
• Replace your remote’s batteries (see page 42).
• Set up your IR emitter (see page 33).
Intermittent audio
dropouts heard on
coaxial digital audio
devices
• Confirm that the audio cable is properly connected to the console
and the coaxial digital audio device.
• Cycle through and test dierent sources.
• Try setting up the device again. Press the button on the
control console. Select the coaxial digital audio device options and
follow the on-screen instructions to set up the device again.
• Unplug the power cord for the console, wait 30 seconds and plug it
firmly into a live AC (mains) outlet.
Not all remote buttons
have the desired function
while controlling a TV or
source device.
Press the button on your remote control and select
TV Remote Setup > Advanced setup.
Connecting to a new
network or dierent
network
• Press the button and select Network Setup.
• If your network information has changed or to connect your system
to another network, refer to the SoundTouch® in-app help.
• If having problems connecting wirelessly, connect to the network
using an Ethernet cable.
ENGLISH - 33
TROUBLESHOOTING
Symptom Solution
Cannot play Bluetooth
audio
On your system:
• Pair a mobile device using the Bluetooth SOURCE screen.
• Clear the system’s pairing list using the remote control:
- In the Bluetooth source, press the MORE button on
your remote.
- Select Clear Pairing List.
• Try pairing a dierent mobile device.
On your mobile device:
• Disable and re-enable the Bluetooth feature.
• Remove the system from the Bluetooth menu. Pair again.
• Refer to your device’s documentation.
• See “No sound from the system” on page 31.
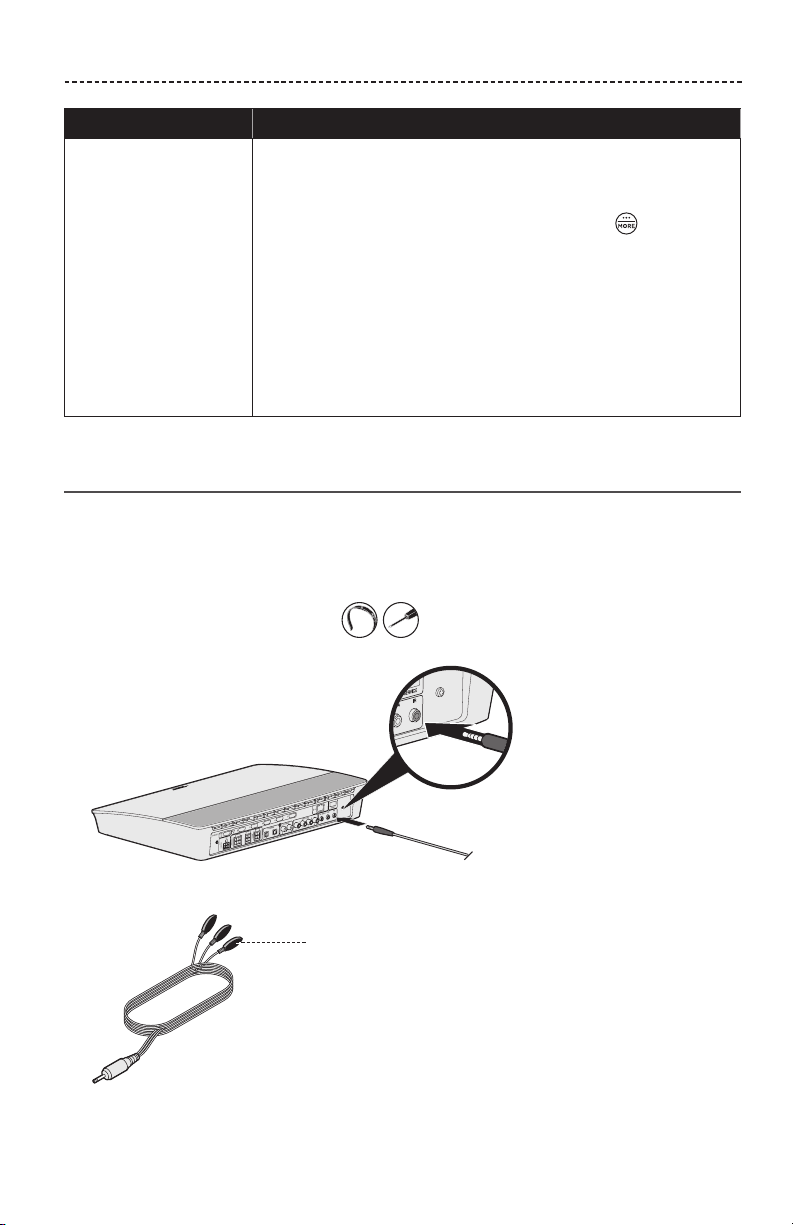
Setting up your IR emitter
If you are having issues with the responsiveness of your remote and your connected
devices, Bose® recommends using the provided IR emitter.
Note: Use the IR emitter only if you are having remote control issues from a third party
device.
1. Remove the IR emitter from box .
2. Insert the emitter into the IR connector on the back of the console.
3. Remove three adhesive pads from the plastic sheet included with the emitter and
place them on the flat bottoms of the three emitter beads.
4. Remove the plastic backing from the adhesive pads.
Emitter bead

34 - ENGLISH
TROUBLESHOOTING
5. Place the three IR beads into the cabinet housing your device or directly in front of
the device itself.
6. Test the responsiveness of your remote. If problems still exist, reposition the IR
beads and test again.
Checking for sound
1. Power on your TV.
2. If you are using a cable/satellite box or other secondary source:
• Power on this source.
• If your secondary source is connected to your TV, select the appropriate TV input.
3. Power on your console.
You should hear sound coming from the bass module.
Note: If you do not hear sound from the bass module, see “Troubleshooting” on
page 31.
ENGLISH - 35
APPENDIX A: INSTALLATION REFERENCE
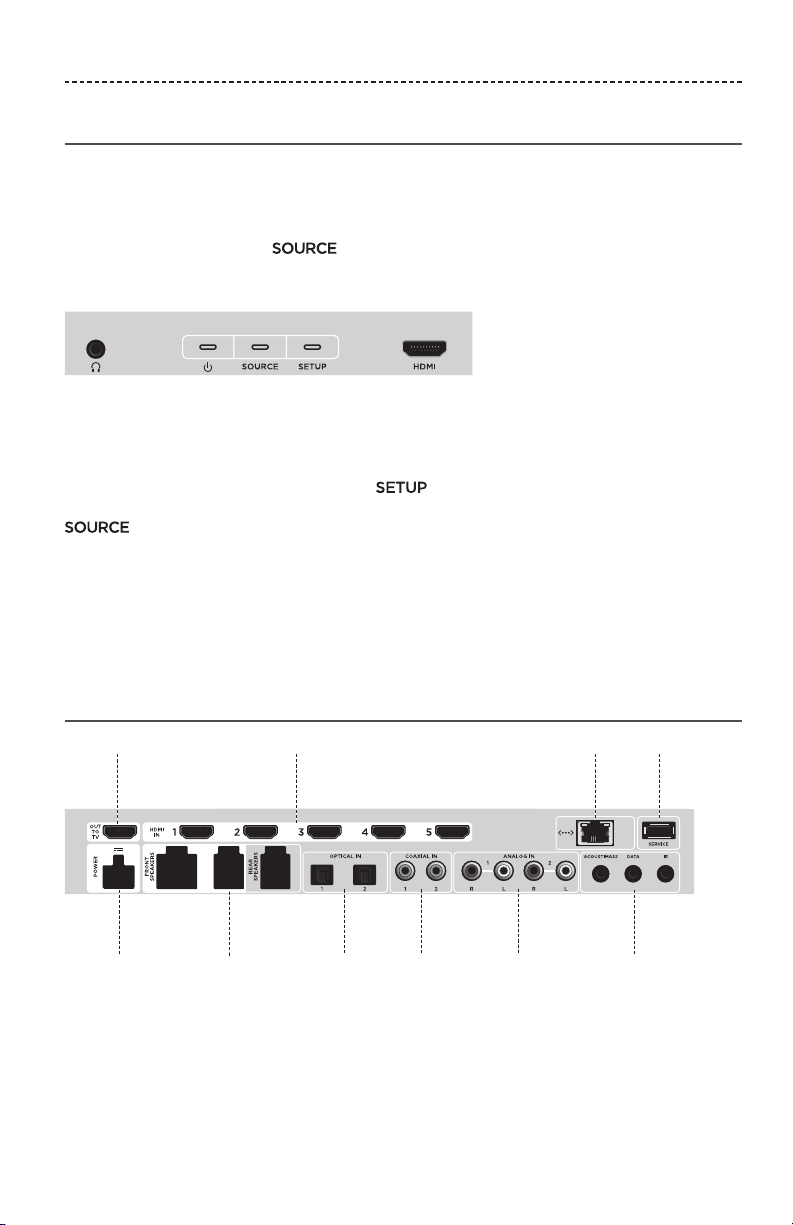
Front console panel
The front of the console has the following inputs:
• Headphones
• HDMI™ input
These inputs appear in the menu as AUX IN and HDMI (Front) when a device is
connected. They can be used to connect digital cameras, video cameras, media players
and your preferred mobile device.
Front Headphones/AUX input
You can use this 3.5 mm input with your headphones, or as an audio option with your
favorite mobile device. The headphone setting is the default option.
To use this input as an AUX IN, press the button on your remote control and
select Headphone Connector from the on-screen display. Select AUX IN from the
menu when a device is connected.
Front HDMI™ input
You can use this input for devices that have an HDMI output.
Note: The Bose remote control does not control functions specific to devices that are
connected to the front HDMI™ input.
Back console panel
HDMI™ Ethernet Service
Speaker
connectors
Optical Coaxial
Analog
HDMI™ (ARC)
Power
Troubleshooting
36 - ENGLISH
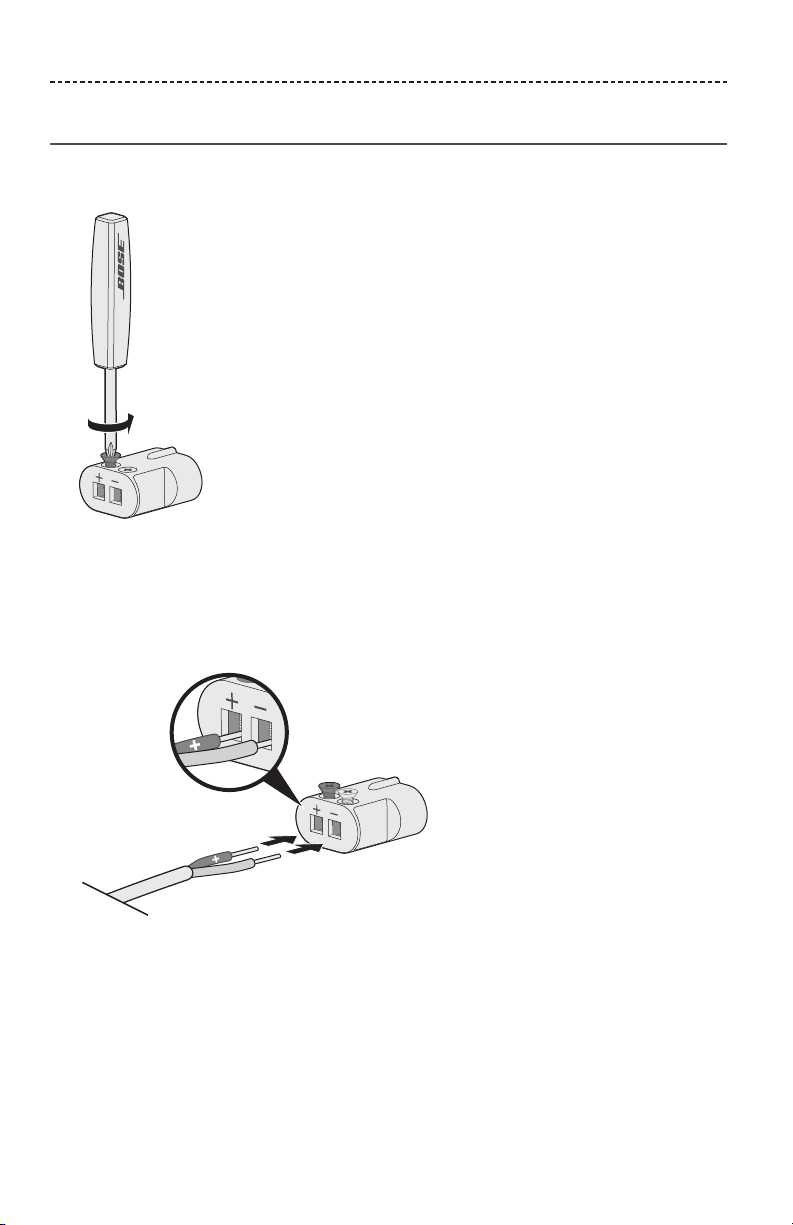
Connecting an AC-2 adapter
1. Using the screwdriver, turn the screws to the left (counterclockwise) to loosen the
wire terminals.
2. For front speakers: Insert the bare ends of the four-pin cable into the adapter by
placing the red wire marked L+, C+ or R+ into the red terminal ( + ) and the plain
wire into the plain silver terminal ( – ).
For rear speakers: Insert the bare ends of the two-pin cable into the adapter by
placing the red wire marked + into the red terminal ( + ) and the plain wire into the
plain silver terminal ( – ).
Note: Be sure to only insert the bare ends of each exposed wire to avoid clamping
the wire’s insulation.
3. Using the screwdriver, turn the screws right (clockwise) to secure the wires into
the terminals.
4. Repeat steps 1 – 4 to connect the other adapter.
APPENDIX A: INSTALLATION REFERENCE

ENGLISH - 37
APPENDIX A: INSTALLATION REFERENCE
Installing the front speakers
UNIFY® setup guides you through the initial installation of your front speakers during
the “Wired speakers” step (see page 16).
If you are moving your system but have already completed setup, refer to the following
instructions in order to reassemble the rear portion of your home entertainment system.
CAUTION: Do not connect your speakers while your console is connected to an
AC (mains) adapter.
What you need:
From box :
Jewel Cube® speakers (2) Jewel Cube® center
speaker (1)
AC-2 adapters (3) Front speaker cable (1)
From box :
Screwdriver (1)
38 - ENGLISH
APPENDIX A: INSTALLATION REFERENCE
Connecting the front speakers to
the console
1. Connect the AC-2 adapters to the bare ends of the speaker wire. See “Connecting an
AC-2 adapter” on page 36.
2. Insert the adapter connected to the wire marked L+ into the speaker on the left
of your TV.
3. Insert the adapter connected to the wire marked R+ into the speaker on the right
of your TV.
4. Insert the adapter connected to the wire marked C+ into the center speaker.
5. Connect the remaining end of the six-pin cable into the six-pin FRONT SPEAKERS
connector on the back of your console.
Note: The four-pin FRONT SPEAKERS connector on the back of your console is
not used.
ENGLISH - 39
Installing the rear speakers
UNIFY® setup guides you through the initial installation of your rear speakers during the
“Wireless speakers” step (see page 16).
If you are moving your system but have already completed setup, refer to the following
instructions in order to reassemble the rear portion of your home entertainment system.
Note: If you are unable to pair your rear speakers to the console, you can also connect
them directly to the system using a custom speaker cable (not provided).
For further instruction, see page 43.
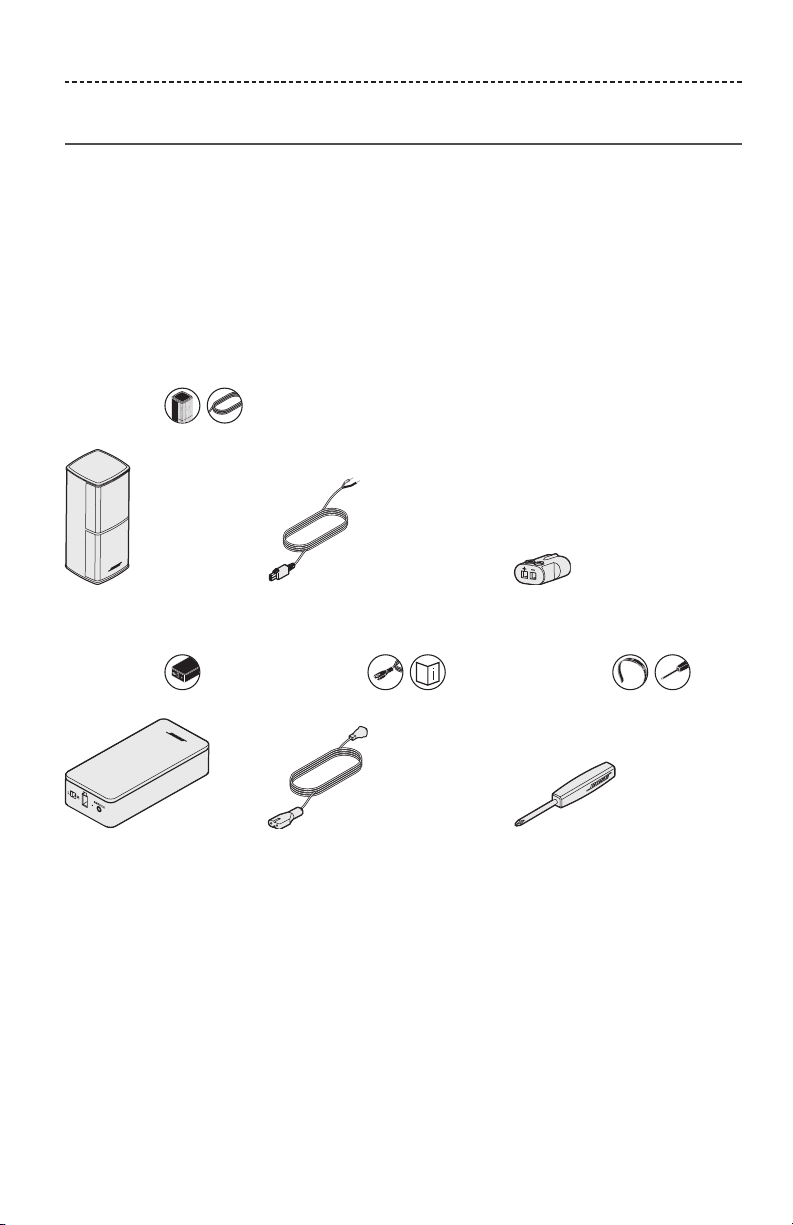
What you need:
From box :
Jewel Cube® speakers (2) Rear speaker cables (2) AC-2 adapters (2)
From box : From box : From box :
Wireless receivers (2) Power cords (2) Screwdriver (1)
APPENDIX A: INSTALLATION REFERENCE
40 - ENGLISH
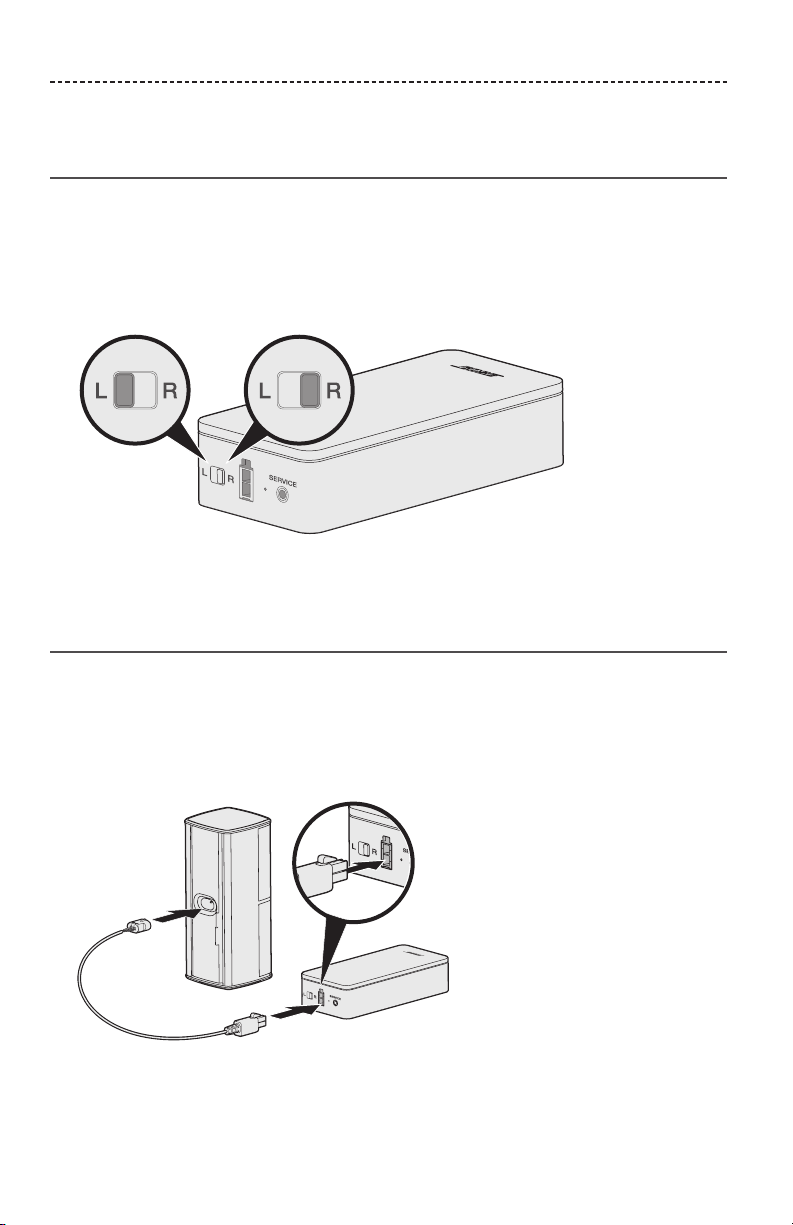
Identifying switch settings on wireless
receivers
Your rear speakers connect to wireless receivers to communicate with the console. The
receivers come preset to a left and right channel out of the box. You can use the switch
on the front of the receiver to adjust the channel settings.
1. Confirm that the switch on one wireless receiver is set to L (left).
2. Confirm that the switch on the other wireless receiver is set to R (right).
Note: Make sure that one wireless receiver is always set to L (left) and the other is set
to R (right).
Connecting the rear speakers
1. Connect the AC-2 adapters to the bare ends of the speaker wire. See “Connecting an
AC-2 adapter” on page 36.
2. Insert the adapter into the back of your speaker.
3. Insert the other end of the two-pin cable into your wireless receiver.
You hear or feel a click.
4. Repeat steps 1 – 3 to connect your other speaker.
APPENDIX A: INSTALLATION REFERENCE
ENGLISH - 41
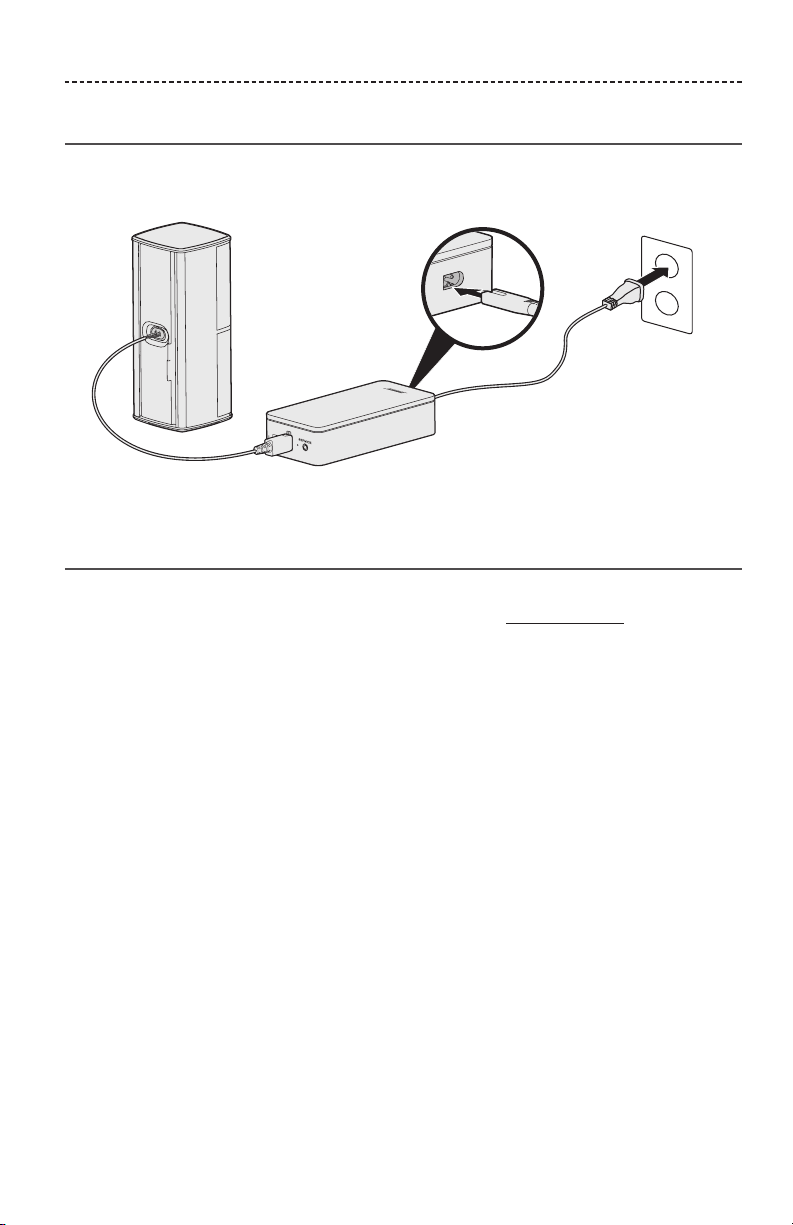
APPENDIX A: INSTALLATION REFERENCE
Connecting the rear speakers to power
1. Connect one end of the power cord into your wireless receiver.
2. Plug the other end of the power cord into an AC (mains) outlet.
3. Repeat steps 1 and 2 to set up your other speaker.
Mounting your speakers
You can mount the speakers on wall brackets, floor stands or table stands. To purchase
these accessories, contact your local Bose® dealer or visit www.Bose.com
CAUTIONS:
• Only use Bose hardware to mount the speakers. Using unauthorized mounts may
damage your Bose system and its components.
• The speaker wire and interconnect cables included with this system are not approved
for in-wall installation. Please check your local building codes for the correct type of
wire and cable required for in-wall installation.
42 - ENGLISH
APPENDIX B: SYSTEM MAINTENANCE
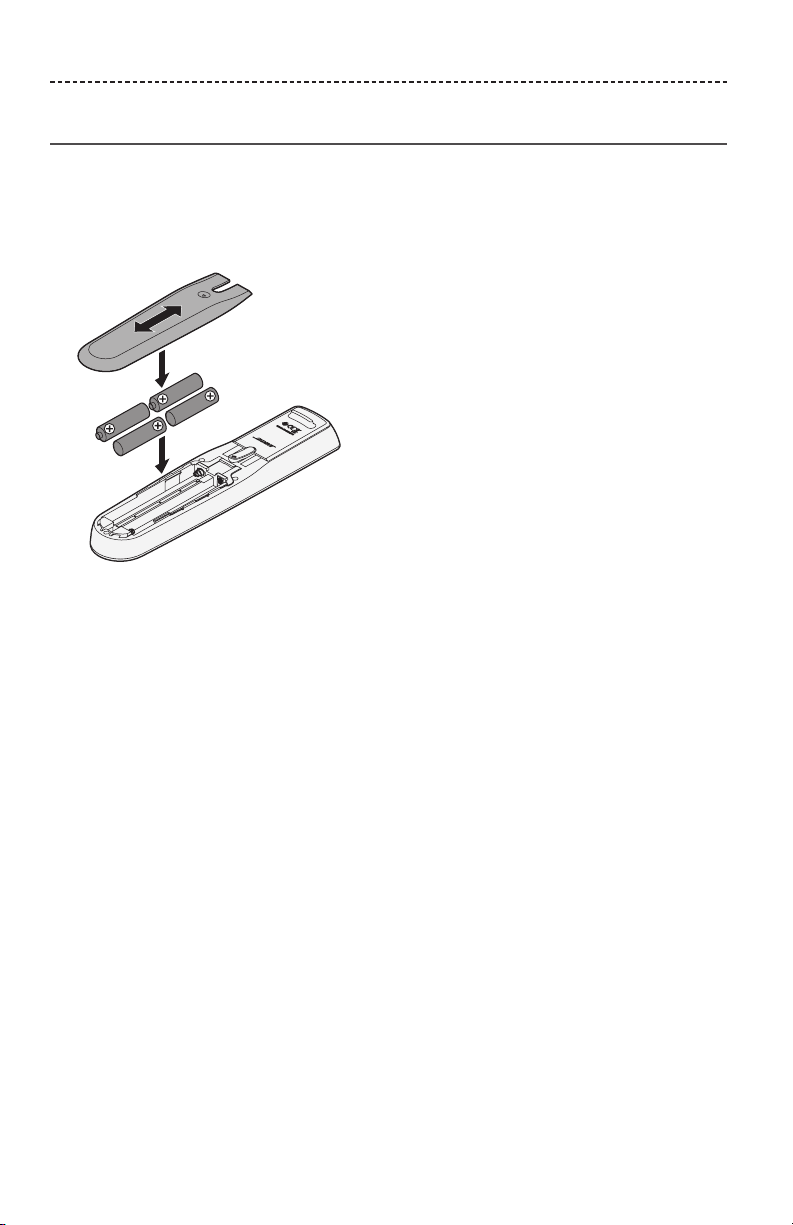
Replacing the remote control’s batteries
Replace all four batteries when there is a noticeable decrease in range.
1. Slide open the battery compartment cover on the back of the remote control.
2. Install four AA (IEC LR6) 1.5V batteries. Match the + and – symbols on the batteries
with the + and – markings inside the compartment.
3. Slide the battery compartment cover back into place.

ENGLISH - 43
APPENDIX C: ALTERNATE WIRED SETUP
Unable to pair the Acoustimass
®
wireless
bass module with the console
If you are having issues wirelessly connecting your bass module to your console, you
can also connect it using a 3.5 mm stereo cable (not provided).
Note: If you do not have a 3.5 mm stereo cable, contact your authorized Bose® dealer
or Bose customer service.
To install the 3.5 mm stereo cable:
1. On your remote control, press SETUP.
2. Select Speaker Management.
3. Follow the on-screen instructions until “The following steps will show you how to set
up your bass module” message displays.
4. Press , then follow the on-screen instructions to finish setup.
Unable to pair the wireless receivers with
the console (rear speakers)
If you are unable to pair your rear speakers to the console, you can also connect them
directly to the system using a custom speaker cable (not provided). Use this method
only if you are having issues wirelessly connecting your rear speakers to your console.
Note: To receive the speaker cable, contact your authorized Bose® dealer or Bose
customer service.
To install the speaker cable:
1. On your remote control, press SETUP.
2. Select Speaker Management.
3. Follow the on-screen instructions until “The following steps will show you how to set
up your rear speakers” message displays.
4. Press , then follow the on-screen instructions to finish setup.
CAUTION: Do not use any unauthorized wiring to connect the speakers to your Bose
system. Using unauthorized wires may damage your Bose system and its
components.

©2020 Bose Corporation
100 The Mountain Road, Framingham, MA 01701-9168 USA AM799911-0030 Rev. 00