
www.klarstein.com
BIGGIE SMALL
Einkochautomat
Preserving Machine
Olla pasteurizadora
Stérilisateur
Pastorizzatore
10029824


3
DE
Sehr geehrter Kunde,
wir gratulieren Ihnen zum Erwerb Ihres Gerätes. Lesen Sie
die folgenden Hinweise sorgfältig durch und befolgen Sie
diese, um möglichen Schäden vorzubeugen. Für Schäden,
die durch Missachtung der Hinweise und unsachgemäßen
Gebrauch entstehen, übernehmen wir keine Haftung.
Scannen Sie den folgenden QR-Code, um Zugri auf die
aktuellste Bedienungsanleitung und weitere Informationen
rund um das Produkt zu erhalten.
INHALTSVERZEICHNIS
Sicherheitshinweise 4
Vor dem ersten Betrieb 4
Geräteübersicht 5
Bedienung 6
Einkochtabelle 10
Reinigung und Pege 11
Hinweise zur Entsorgung 12
Hersteller & Importeur (UK) 12
TECHNISCHE DATEN
Artikelnummer 10029824
Stromversorgung 220-240 V ~ 50/60 Hz
English 13
Español 23
Français 33
Italiano 43

4
DE
SICHERHEITSHINWEISE
VORSICHT
Verbrennungsgefahr! Das Gerät wird während der Benutzung heiß.
Fassen Sie nur die Regler und Gri e an, damit Sie sich nicht
verbrennen.
• Überprüfen Sie das Gerät und das Netzkabel regelmäßig auf Schäden.
Benutzen Sie das Gerät nicht, wenn das Netzkabel oder das Gerät beschädigt
ist.
• Wenn Sie das Gerät nicht mehr benutzen, schalten Sie es aus und ziehen Sie
den Stecker aus der Steckdose. Lassen Sie das Gerät vollständig abkühlen,
bevor Sie es reinigen und verstauen.
• Stellen Sie das Gerät auf eine stabile, ebene und hitzeunemp ndliche
Arbeits äche. Lassen Sie um das Gerät herum mindestens 20 cm Platz zu
Wänden und anderen Geräten.
• Tauchen Sie das Gerät niemals komplett in Wasser oder andere Flüssigkeiten,
andernfalls könnten die elektrischen Teile beschädigt werden.
• Kinder ab 8 Jahren, psychisch, sensorisch und körperlich eingeschränkte
Menschen dürfen das Gerät nur benutzen, wenn sie vorher von einer für
sie verantwortlichen Aufsichtsperson ausführlich mit den Funktionen und
den Sicherheitsvorkehrungen vertraut gemacht wurden und die damit
verbundenen Risiken verstehen.
• Versuchen Sie nicht das Gerät selbst zu reparieren. Reparaturen dürfen nur
von quali zierten Fachkräften durchgeführt werden.
• Bewegen Sie das Gerät nicht, solange es in Betrieb ist. Seien Sie sehr
vorsichtig, wenn Sie Geräte mit heißen Flüssigkeiten bewegen.
• Benutzen Sie keine anderen, als die mitgelieferten Zubehörteile.
Hinweis: Um eingekochtes Fleisch und Gemüse sicher zu genießen, kochen
Sie diese Lebensmittel grundsätzlich zweimal ein: Die zweite Erhitzung nach
mindestens 24 Stunden. Mehr Infos dazu nden Sie unter: https://www.bzfe.de/
inhalt/einkochen-1348.html (Bundeszentrum für Ernährung)
VOR DEM ERSTEN BETRIEB
1. Bevor Sie den Kocher das erste Mal benutzen, lassen sie einmal frisches
Wasser aufkochen, um Staub und Produktionsrückstände zu entfernen. Füllen
Sie dafür 6 Liter Wasser ein und stellen Sie den Thermostat auf MAX.
2. Um den Kocher zu starten, stellen Sie den TIMER auf 60 Minuten. Wenn Die
Zeit abgelaufen ist, geht das Gerät automatisch aus.
3. Lassen Sie das Gerät abkühlen und entfernen Sie das Wasser.
4. Sie können den Kocher jetzt benutzen.
5
DE
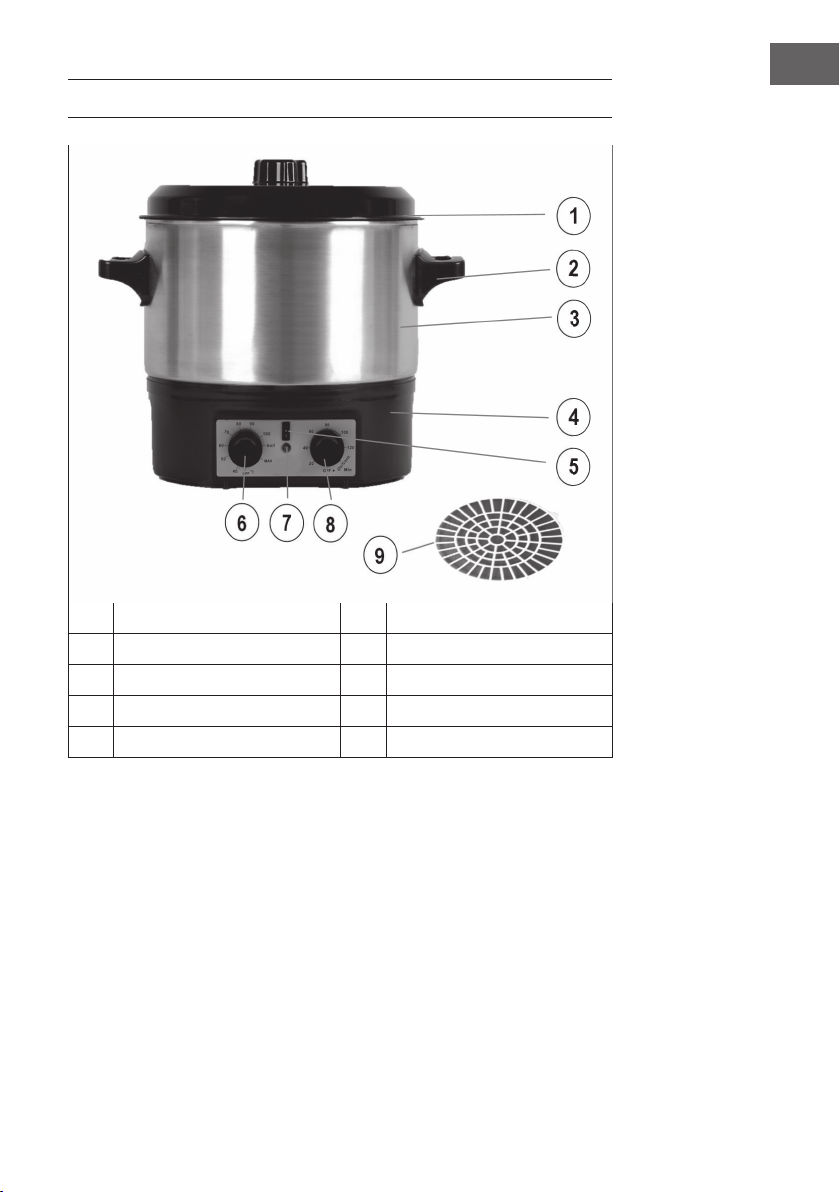
GERÄTEÜBERSICHT
1 Gehäusedeckel 6 Thermostat-Knopf
2 Grie 7 Kontrollleuchte
3 Edelstahl-Topf 8 Zeitschaltuhr
4 Gehäuse-Unterteil 9 Einlegrost
5 Ein/Aus-Schalter

6
DE
BEDIENUNG
Das Gerät kann sowohl zum Einkochen von Lebensmitteln, als auch zum Erhitzen
von Wasser und anderen Flüssigkeiten benutzt werden.
Allgemeines
• Das Gerät ist vielseitig verwendbar: zum Einkochen, Kochen, Wärmen im
Wasserbad, Zubereitung von heißen Getränken, Blanchieren von Gemüse usw.
• Dicküssige, zum Anbrennen neigende Speisen müssen langsam unter
ständigem Rühren erwärmt werden.
• Sollte ihr Gerät einmal leer kochen, verhindert ein zusätzlicher
Sicherheitsschalter eine Überhitzung. Gerät dann gut abkühlen lassen,
bevor wieder Wasser nachgefüllt wird, sonst besteht Verbrennungsgefahr
durch heißen Wasserdampf. Außerdem kann dadurch die Email-Oberäche
beschädigt werden. Beim ersten Gebrauch kann Geruch entstehen, der sich
nach kurzer Betriebsdauer verliert.
Fassungsvermögen
Das Gerät hat einen Inhalt von 20 Litern. Der Flüssigkeitspegel darf bis max. 4 cm
unter den oberen Gehäuserand reichen.
Wichtige Hinweise
• Aus hygienischen Gründen sollte das Gerät einmal ausgekocht werden.
• Dazu ca. 4 Liter Wasser einfüllen, Thermostat auf Max. stellen, über die
Zeitschaltuhr wird das Gerät eingeschaltet. Dazu den Einschaltknopf im
Uhrzeigersinn auf ca. 60 Min einstellen. Nach der eingestellten Zeit schaltet
das Gerät automatisch ab. Nach dem Abkühlen ist das Gerät einsetzbar.
Hinweise zum Einkochen
• Unter Einkochen versteht man die Konservierung von Lebensmitteln ohne
chemische Konservierungsmittel. Die erzeugte Hitze tötet die im Einmachgut
vorhandenen Keime ab. Gleichzeitig wird durch den entstehenden Unterdruck
das Einmachglas keimfrei und luftdicht verschlossen. Je nach Art und
Masse des Einkochgutes unterscheidet man zwischen Sterilisieren und
Pasteurisieren. Beim Sterilisieren wird das Einkochgut auf mindestens 100°C
erhitzt. Beim Pasteurisieren liegt die Erhitzungstemperatur bei 80°C.
• Für den Hausgebrauch ist das Pasteurisieren ausreichend. Es werden
entsprechende Einmachgläser mit Schraubverschluss oder Verschlusskappen
mit Gummiringen benötigt.

7
DE
Um eingekochtes Fleisch und Gemüse sicher zu genießen, kochen Sie diese
Lebensmittel grundsätzlich zweimal ein: Die zweite Erhitzung nach mindestens
24 Stunden. Mehr Infos dazu nden Sie unter: https://www.bzfe.de/inhalt/
einkochen-1348.html (Bundeszentrum für Ernährung)
Gerät ein- und ausschalten
1. Stellen Sie den Temperaturregler auf die gewünschte Temperatur. Stellen Sie
den Ein/Aus-Schalter auf „I“.
2. Drehen Sie die Zeitschaltuhr gegen den Uhrzeigersinn auf Dauerbetrieb
(Cont.). Das Gerät heizt sich auf. Die Kontrollleuchte geht an und signalisiert,
dass die Heizung aktiv ist.
3. Sobald die eingestellte Temperatur erreicht ist ertönt ein Signalton und die
Kontrollleuchte erlischt. Der Signalton zeigt an, dass die nun Einkochzeit (siehe
Einkochtabelle) eingestellt werden muss. Drehen Sie dazu die Zeitschaltuhr im
Uhrzeigersinn auf die gewünschte Zeit.
4. Die Temperatur wird nun auf dem eingestellten Wert gehalten. Die
Temperaturleuchte erlischt, leuchtet aber immer mal wieder auf wenn der
eingestellte Wert unterschritten wird und das Gerät nachheizt. Eine konstante
Temperatur ist wichtig für die Qualität des Einkochguts.
5. Wenn die Einkochzeit abgelaufen ist schaltet das Gerät automatisch ab.
8
DE
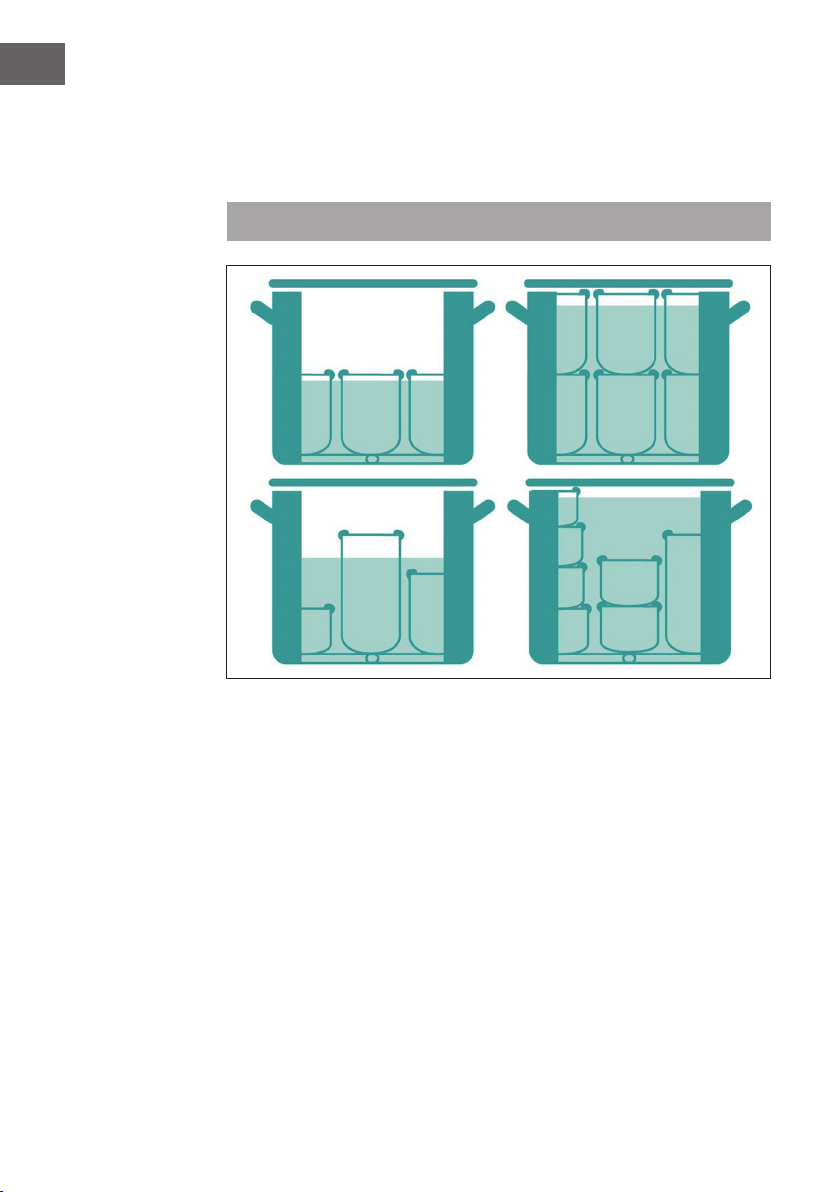
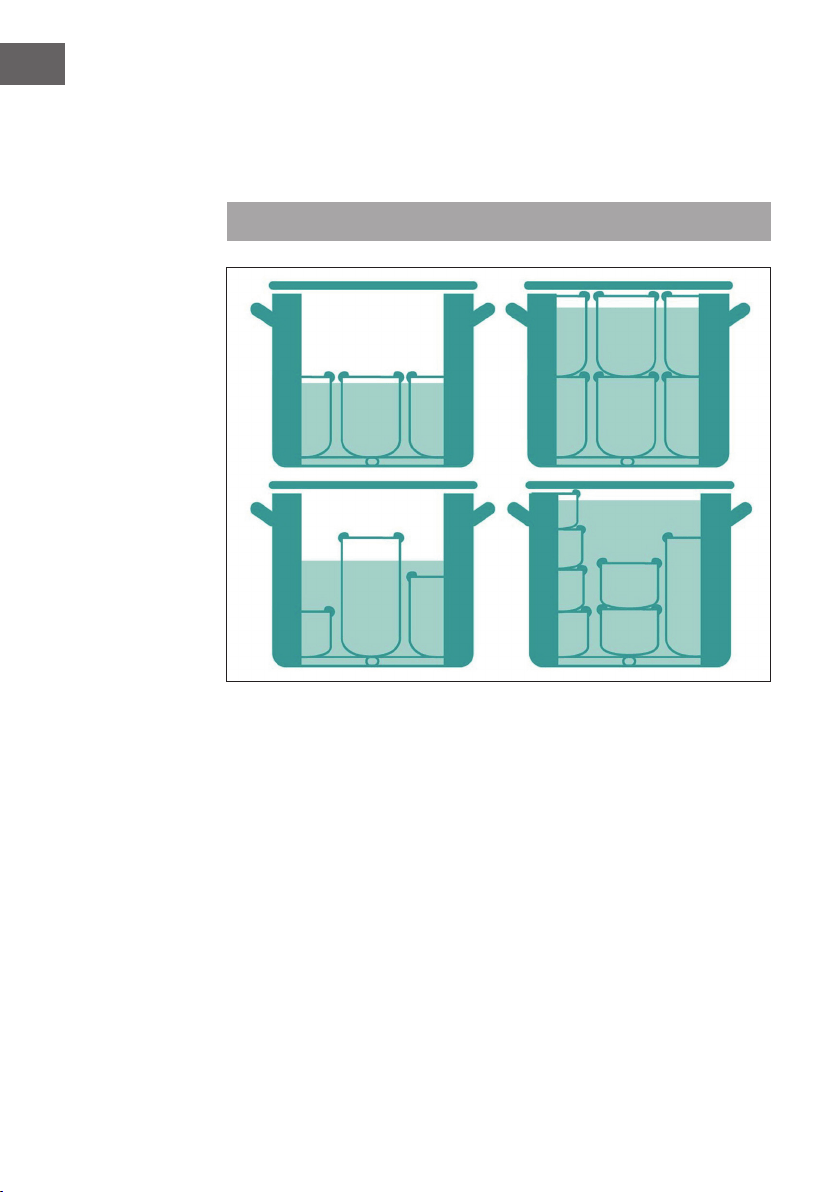
Einkochen
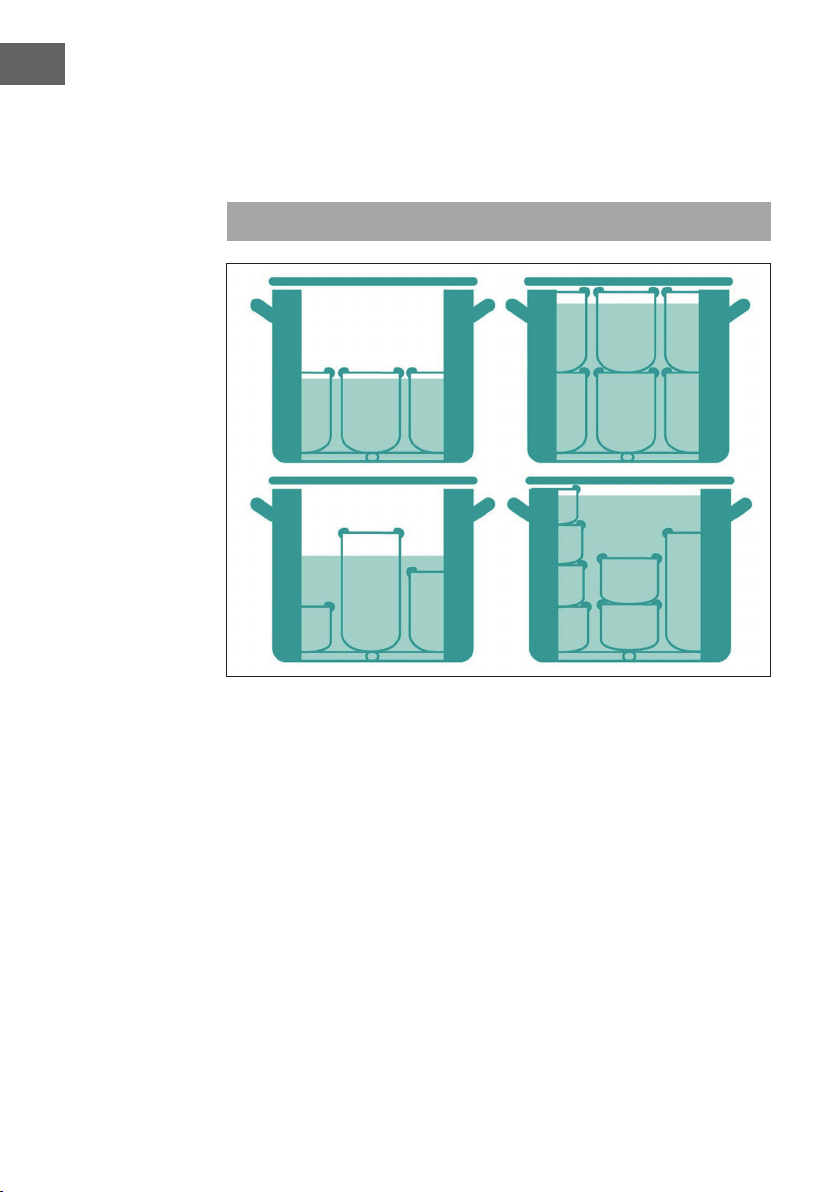
1. Legen Sie den Einlegerost in den Kocher.
2. Füllen Sie die Lebensmittel in Gläser und schließen Sie die Gläser.
3. Stapeln Sie die Gläser, wie auf der Abbildung dargestellt, auf den Einlegerost.
Hinweis: Bei kleineren Gläsern passen entsprechend mehr Gläser in das Gerät.
4. Füllen Sie so viel Wasser in den Kocher, dass das höchste Glas zu
3
⁄4 mit Wasser
bedeckt ist. Überschreiten Sie dabei nicht die Maximalmarkierung.
5. Setzen Sie den Deckel auf und schalten Sie den Hauptschalter ein (ON). Bitte
beachten Sie, dass ein Timer eingestellt sein muss, damit das Gerät mit dem
Aufheizen beginnt. Je nach Füllstand und Zieltemperatur kann dies bis zu
90min dauern. Sobald die eingestellte Temperatur erreicht ist, wechselt das
Gerät automatisch vom Heizmodus in den Warmhaltemodus.
6. Stellen Sie dann die Temperatur und Zeit gemäß der Einkochtabelle ein. Die
dort angegebene Zeit gilt ab dem Punkt, an dem die Zieltemperatur erreicht
ist. Der Timer beachtet bauartbedingt die niedrigere Temperatur während der
Aufwärmzeit nicht.

9
DE
7. Nachdem die eingestellte Zeit abgelaufen ist, geht der Kocher automatisch
aus und ein Signalton ertönt.
8. Drehen Sie den Thermostat aus und stellen Sie den Hauptschalter auf OFF,
bevor Sie den Stecker aus der Steckdose ziehen.
9. Stellen Sie das Gerät ins Waschbecken oder eine Wanne und lassen Sie das
Wasser ab, indem Sie den Zapfhahn nach unten drücken. Lassen Sie das Gerät
dann abkühlen.
10. Nachdem das Gerät abgekühlt ist, entnehmen Sie die Gläser mit
Ofenhandschuhen oder einer Zange, da sie noch lange heiß sind. Lassen Sie
die Gläser komplett abkühlen.
10
DE
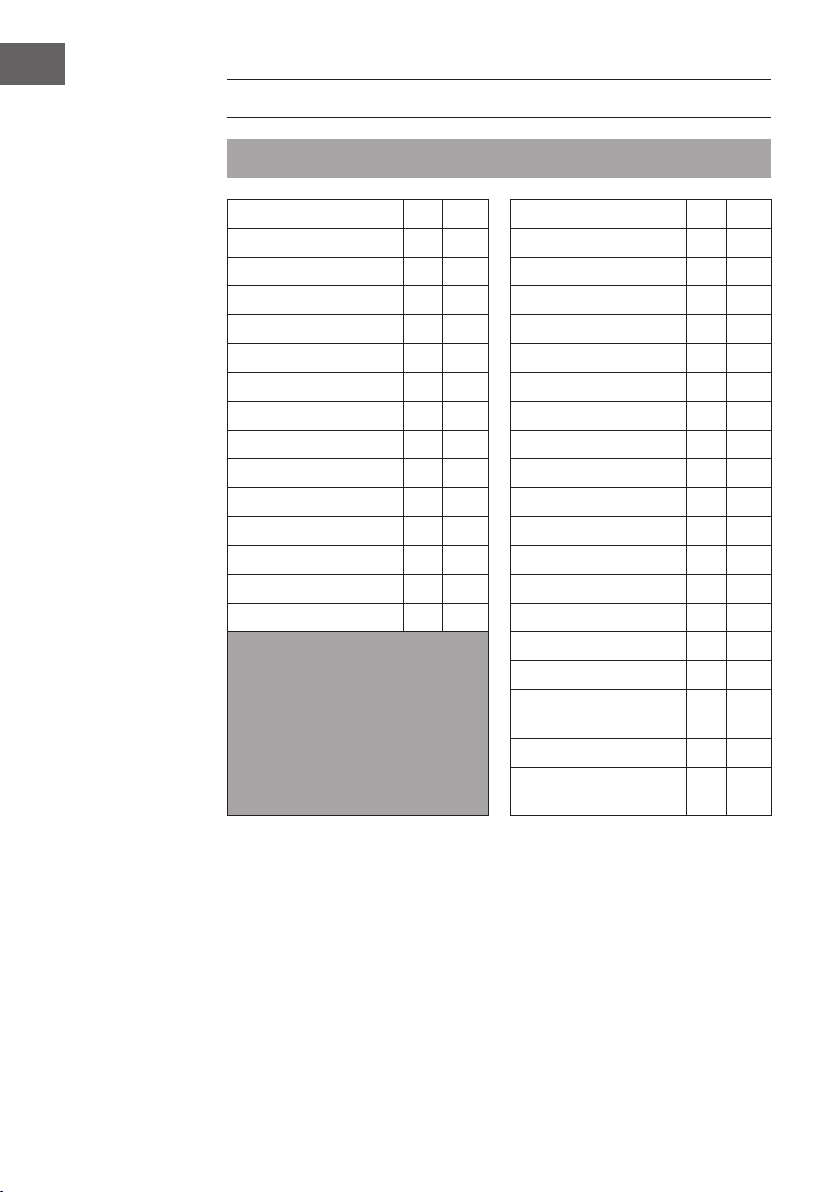
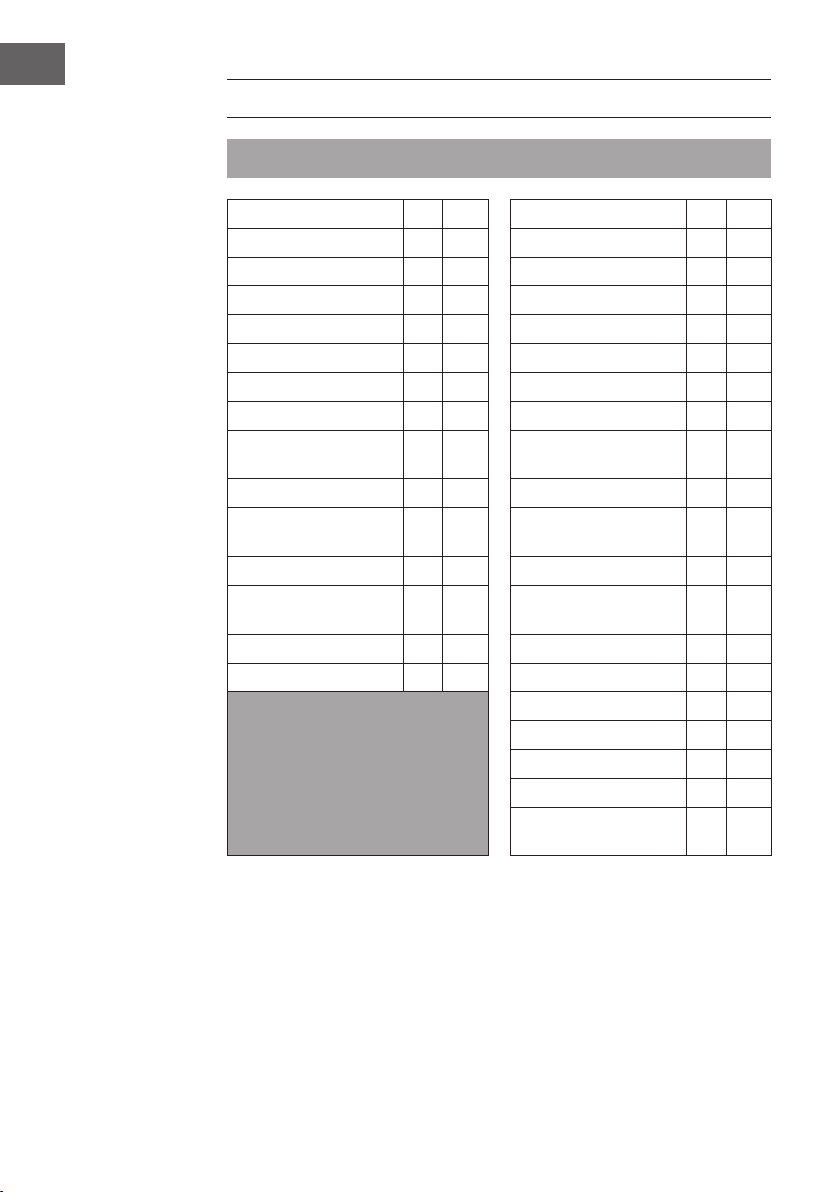
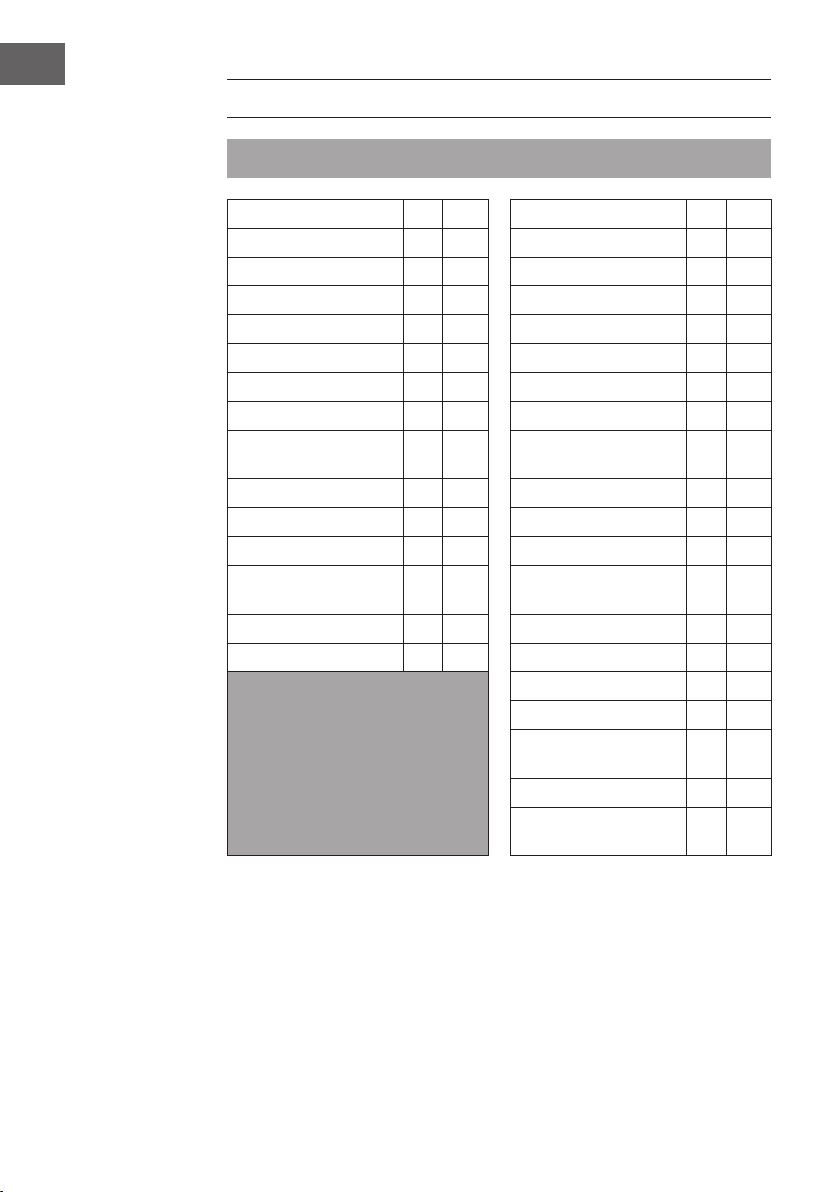
EINKOCHTABELLE
Hinweis: Bei diesen Angaben handelt es sich um Empfehlungen.
Obst °C Min Gemüse °C Min
Äpfel weich / hart 90 30 Blumenkohl 100 90
Apfelmus 90 30 Spargel 100 120
Kirschen 80 30 Erbsen 100 120
Birnen weich / hart 90 30 Möhren / Karotten 100 90
Erdbeeren / Brombeeren 80 25 Gewürzgurken 90 30
Rhabarber 100 30 Kürbis 90 30
Himbeeren / Stachelbeeren 80 30 Kohlrabi 100 90
Johannis- / Preiselbeeren 90 25 Rosenkohl / Rotkohl 100 120
Aprikosen 90 30 Sellerie 100 120
Mirabellen / Renekloden 90 30 Pilze 100 110
Prsiche 90 30 Bohnen 100 120
Paumen / Zwetschgen 90 30 Tomaten / Tomatenmark 90 30
Quitten 95 25
Heidelbeeren 85 25 Fleisch °C Min
Hinweis: Die Einmachgläser sind nach
dem Einkochen heiß. Benutzen Sie eine
Zange oder Ofenhandschuhe, um die
Gläser zu entnehmen. Bewahren Sie
Eingemachtes trocken, kühl und dunkel
auf.
Braten am Stück 100 120
Fleischbrühe 100 60
Wild, Geügel
durchgebraten
100 75
Gulasch durchgebraten 100 75
Hackeisch Wurstmasse
(roh)
100 110

11
DE
Erhitzen von Flüssigkeiten
Hinweis: Wenn Sie Flüssigkeiten erhitzen, darf der Kocher maximal bis 5 cm
unter dem oberen Rand befüllt werden. Andernfalls könnte Flüssigkeit beim
Erhitzen auslaufen.
1. Geben Sie das gewünschte Getränk oder Wasser in den Kocher.
2. Setzen Sie den Deckel auf, schalten Sie das Gerät ein und stellen Sie die
gewünschte Temperatur ein. Sobald die gewünschte Temperatur erreicht ist,
wechselt der Kocher automatisch in den Warmhaltemodus.
3. Rühren Sie das Getränk regelmäßig um, damit sich die Hitze gleichmäßig
verteilt.
4. Wenn Sie das Getränk abfüllen möchten, halten Sie einen Becher unter den
Zapfhahn und drücken Sie den Hahn nach unten. Wenn der Becher voll ist,
lassen Sie den Zapfhahn wieder los.
Hinweis: Benutzen Sie den Zapfhahn nicht, wenn Sie Flüssigkeiten mit Stücken
(Fruchtpunsch, Suppe) erhitzen. Andernfalls könnte er verstopfen.
REINIGUNG UND PFLEGE
• Lassen Sie das Gerät vor der Reinigung komplett abkühlen.
• Ziehen Sie vor der Reinigung immer den Netzstecker.
• Reinigen Sie den Topfboden mit einer weichen Bürste oder einem feuchten
Tuch. Verwenden Sie niemals spitze oder harte Gegenstände, um die
Oberäche nicht zu beschädigen.
• Wischen Sie das Gehäuse mit einem feuchten, weichen Tuch ab. Reiben Sie es
anschließend mit einem trockenen Tuch ab.

12
DE
HINWEISE ZUR ENTSORGUNG
Wenn es in Ihrem Land eine gesetzliche Regelung
zur Entsorgung von elektrischen und elektronischen
Geräten gibt, weist dieses Symbol auf dem Produkt oder
auf der Verpackung darauf hin, dass dieses Produkt
nicht im Hausmüll entsorgt werden darf. Stattdessen
muss es zu einer Sammelstelle für das Recycling von
elektrischen und elektronischen Geräten gebracht
werden. Durch regelkonforme Entsorgung schützen
Sie die Umwelt und die Gesundheit Ihrer Mitmenschen
vor negativen Konsequenzen. Informationen zum
Recycling und zur Entsorgung dieses Produkts,
erhalten Sie von Ihrer örtlichen Verwaltung oder Ihrem
Hausmüllentsorgungsdienst.
HERSTELLER & IMPORTEUR (UK)
Hersteller:
Chal-Tec GmbH, Wallstraße 16, 10179 Berlin, Deutschland.
Importeur für Großbritannien:
Chal-Tec UK limited
Unit 6 Riverside Business Centre
Brighton Road
Shoreham-by-Sea
BN43 6RE
United Kingdom
13
EN
Dear Customer,
Congratulations on purchasing this device. Please read the
following instructions carefully and follow them to prevent
possible damages. We assume no liability for damage
caused by disregard of the instructions and improper use.
Scan the QR code to get access to the latest user manual
and more product information.
CONTENT
Safety Instructions 14
Befor rst Use 14
Product Overview 15
Operation 16
Cooking Table 20
Cleaning and Care 21
Disposal Considerations 22
Manufacturer & Importer (UK) 22
TECHNICAL DATA
Item number 10029824
Power supply 220-240 V ~ 50/60 Hz

14
EN
SAFETY INSTRUCTIONS
CAUTION
Risk of burns! The unit becomes hot during use. Only touch the
controls and handles so that you do not burn yourself.
• Check the appliance and the power cord regularly for damage. Do not use the
unit if the power cord or the appliance is damaged.
• When not in use, turn o the power and unplug the appliance. Allow the
appliance to cool completely before cleaning and storing.
• Place the appliance on a stable, level and heat-resistant surface. Allow at least
20 cm of space around the appliance to walls and other equipment.
• Never completely immerse the appliance in water or other liquids, as this may
damage the electrical parts.
• This device may be only used by children 8 years old or older and persons with
limited physical, sensory and mental capabilities and / or lack of experience
and knowledge, provided that they have been instructed in use of the device
by a responsible person who understands the associated risks.
• Do not attempt to repair the appliance yourself. Repairs may only be carried
out by quali ed specialists.
• Do not move the appliance while it is in operation. Be very careful when
moving equipment with hot liquids.
• Do not use any accessories other than those supplied.
Note: Note: To enjoy boiled meat and vegetables safely, always boil these foods
twice: The second heating after at least 24 hours. You can nd more information
about this at: https://www.bzfe.de/inhalt/einkochen-1348.html (Federal Centre
for Nutrition)
BEFOR FIRST USE
1. Before using the cooker for the rst time, boil fresh water to remove dust and
production residues. Add 6 litres of water and set the thermostat to MAX.
2. To start the cooker, set the TIMER to 60 minutes. When the time has elapsed,
the appliance switches o automatically.
3. Allow the appliance to cool down and remove the water.
4. You can now use the cooker.

15
EN
PRODUCT OVERVIEW
1 Housing cover 6 Thermostat button
2 Handles 7 Warning light
3 Stainless steel pot 8 Timer
4 Housing lower part 9 Grid insert
5 On / o switch

16
EN
OPERATION
The appliance can be used both for boiling food and for heating water and other
liquids.
General
• The appliance can be used in many ways: for preserving, cooking, heating in a
water bath, preparing hot beverages, blanching vegetables, etc.
• Thick foods that tend to burn must be heated slowly with constant stirring.
• Should your appliance ever boil empty, an additional safety switch prevents
overheating. Allow the appliance to cool down thoroughly before relling with
water, otherwise there is a risk of burns from hot steam. This can also damage
the enamel surface. Odor may occur during rst use, but will disappear after a
short period of operation.
Capacity
The unit has a capacity of 20 liters. The liquid level may reach up to max. 4 cm
below the upper edge of the housing.
Important notes
• For hygienic reasons, the unit should be boiled once.
• To do this, ll in approx. 4 liters of water, set the thermostat to max. and
switch the unit on using the timer. To do this, set the switch-on knob clockwise
to approx. 60 min. After the set time, the unit switches o automatically. After
cooling down, the device can be used.
Notes on preserving
• Preserving is the process of preserving food without the use of chemical
preservatives. The heat generated kills the germs present in the preserved
food. At the same time, the resulting vacuum seals the preserving jar germ-
free and airtight. Depending on the type and mass of the preserving material,
a distinction is made between sterilization and pasteurization. In sterilization,
the food is heated to at least 100°C. In pasteurization, the temperature is
lower than in sterilization. For pasteurization, the heating temperature is 80°C.
• Pasteurization is sucient for household use. Appropriate canning jars with
screw caps or caps with rubber rings are required.

17
EN
To enjoy boiled meat and vegetables safely, always boil these foods twice: The
second heating after at least 24 hours. You can nd more information about
this at: https://www.bzfe.de/inhalt/einkochen-1348.html (Federal Centre for
Nutrition)
Switching the device on and o
1. Set the thermostat to the desired temperature Set the on / o switch to „I“.
2. Turn the switch counterclockwise to continuous operation (Cont.). The device
will heat up. The indicator light will come on, signaling that the heater is
active.
3. Once the set temperature is reached, the device will sound a beep and the
indicator light will turn o. The beep indicates that the cooking time (see
Preserves Table) must now be set. Turn to the timer clockwise to the desired
time.
4. The temperature is then held at the set value. The temperature light will
go out, but every now and then will light up again when the temperature
falls below the set value and the device must heat up again. A constant
temperature is important for the quality of the preserve.
5. When the cooking time has elapsed the device switches o automatically.

18
EN
Boiling
1. Place the rack in the cooker.
2. Fill the food into jars and close the jars.
3. Stack the jars on the rack as shown in the illustration.
Note: For smaller glasses, more glasses will t into the device.
4. Fill the cooker with enough water to cover the highest glass of 3⁄4 with water.
Do not exceed the maximum mark.
5. Put on the lid and turn on the main switch (ON). Please note that a timer must
be set for the appliance to start heating. Depending on the ll level and target
temperature, this can take up to 90 minutes. As soon as the set temperature is
reached, the appliance automatically switches from heating mode to warm-
keeping mode.
6. Then set the temperature and time according to the cooking table. The time
indicated there applies from the point at which the target temperature is
reached. The timer does not take into account the lower temperature during
the warm-up time due to the design.

19
EN
7. After the set time has elapsed, the cooker automatically switches o and a
signal tone sounds.
8. Turn o the thermostat and set the main switch to OFF before unplugging the
appliance.
9. Place the appliance in the sink or tub and drain the water by pressing the tap
down. Let the appliance cool down.
10. After the appliance has cooled down, remove the glasses with oven gloves or
pliers as they will be hot for a long time. Allow the glasses to cool completely.
20
EN
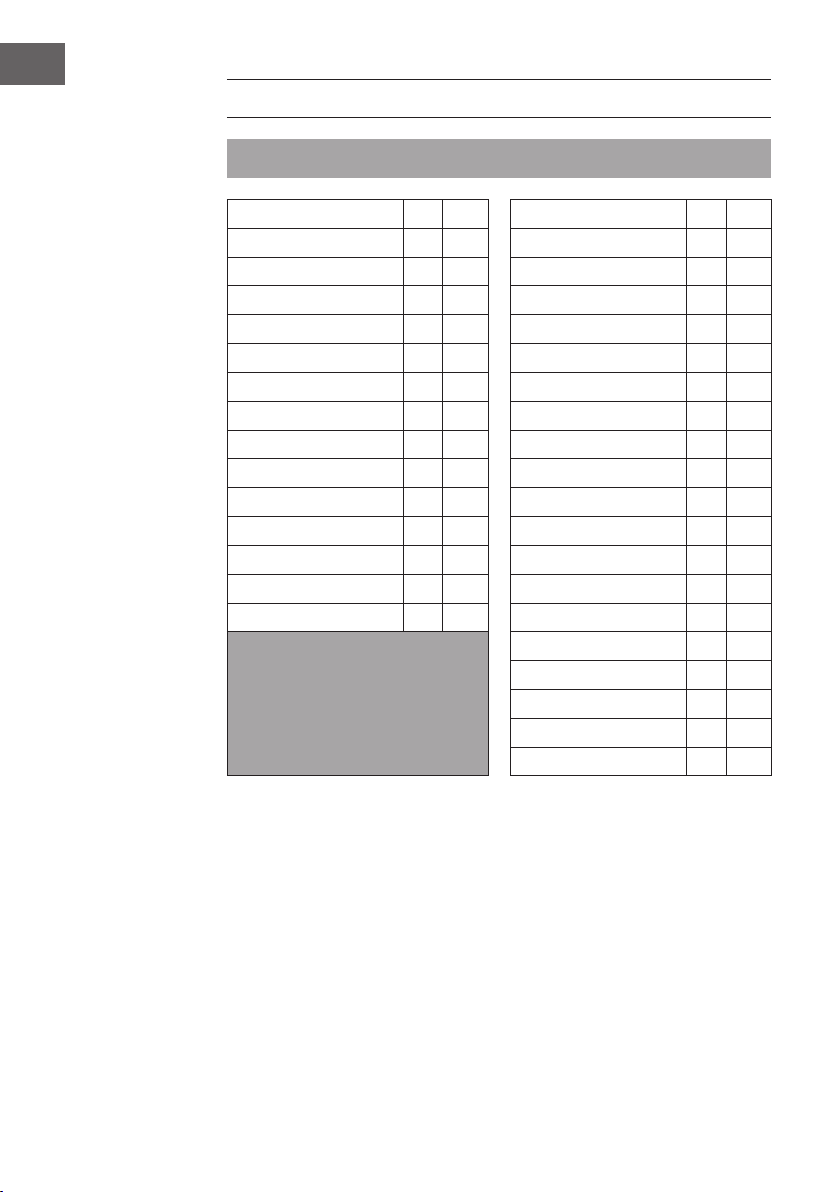
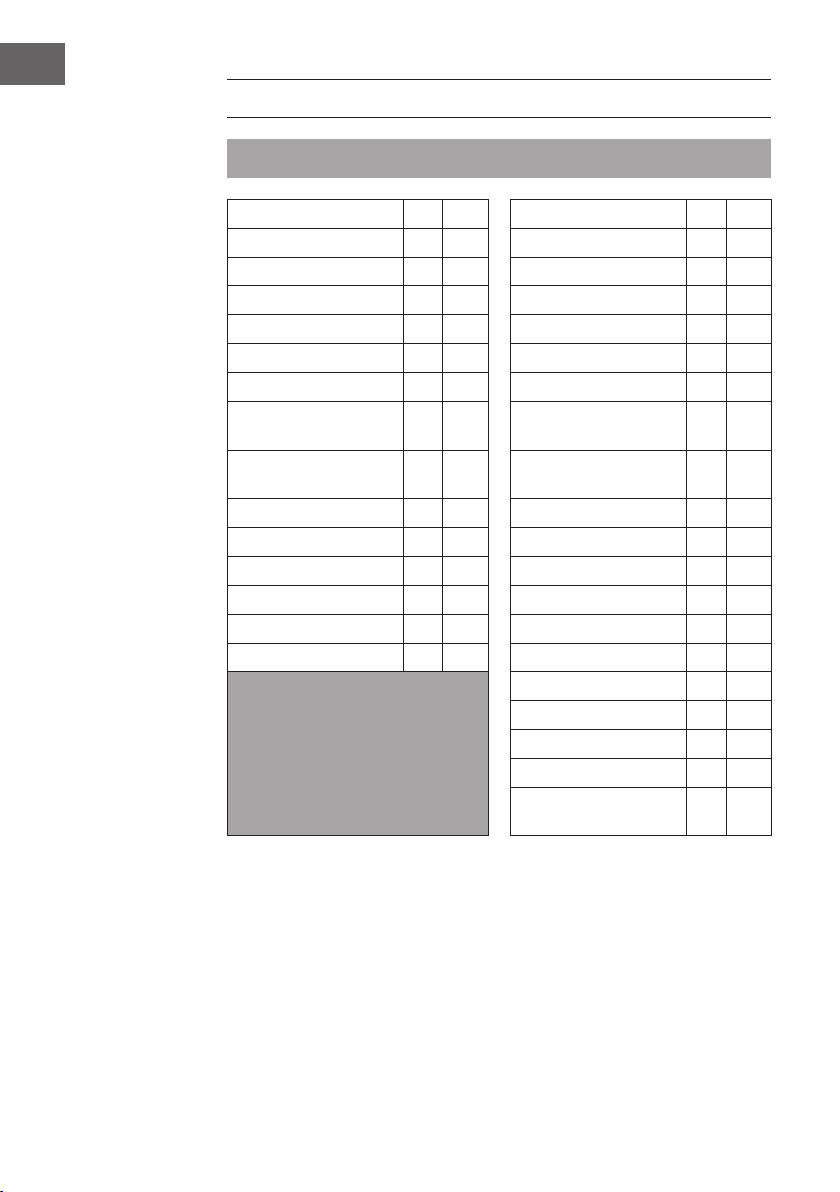
COOKING TABLE
Note: This information is recommendations.
Fruit °C Min Vegetables °C Min
Apples soft / hard 90 30 Asparagus 100 90
Apple sauce 90 30 Beans 100 120
Apricots 80 30 Brussels sprouts / cabbage 100 120
Blueberries 90 30 Carrots 100 90
Cherries 80 25 Cauliower 90 30
Currants / cranberries 100 30 Celery 90 30
Mirabelles / greengages 80 30 Kohlrabi 100 90
Peaches 90 25 Mushrooms 100 120
Pears soft / hard 90 30 Peas 100 120
Plums / prunes 90 30 Pickled gherkins 100 110
Quince 90 30 Pumpkin 100 120
Raspberries / gooseberries 90 30 Tomatoes / tomato paste 90 30
Rhubarb 95 25
Strawberries / blackberries 85 25 Meat °C Min
Note: The preserving jars are hot after
boiling. Use pliers or oven gloves to
remove the jars. Keep preserves dry,
cool and dark.
Game / poultry, well-done 100 120
Meat broth 100 60
Meat, well-done 100 75
Minced sausage meat, raw 100 75
Roast meat, well-done 100 110

21
EN
Heating Liquids
Note: When heating liquids, do not ll the stove more than 5 cm below the top
edge, otherwise liquid may leak during heating.
1. Add the desired drink or water to the stove.
2. Put on the lid, switch on the appliance and set the desired temperature. When
the desired temperature is reached, the stove automatically switches to warm
mode.
3. Stir the drink regularly to distribute the heat evenly.
4. If you want to ll the drink, hold a cup under the tap and push the tap down.
When the cup is full, release the tap.
Note: Do not use the tap when heating liquids with pieces (fruit punch, soup).
Otherwise it may clog.
CLEANING AND CARE
• Allow the unit and the unit to cool down completely before cleaning.
• Always unplug the appliance before cleaning.
• Clean the bottom of the pot with a soft brush or a damp cloth. Never use
sharp or hard objects to avoid damaging the surface.
• Wipe the case with a damp, soft cloth. Then wipe with a dry cloth.

22
EN
DISPOSAL CONSIDERATIONS
If there is a legal regulation for the disposal of electrical
and electronic devices in your country, this symbol on the
product or on the packaging indicates that this product
must not be disposed of with household waste. Instead,
it must be taken to a collection point for the recycling
of electrical and electronic equipment. By disposing of
it in accordance with the rules, you are protecting the
environment and the health of your fellow human beings
from negative consequences. For information about the
recycling and disposal of this product, please contact your
local authority or your household waste disposal service.
MANUFACTURER & IMPORTER (UK)
Manufacturer:
Chal-Tec GmbH, Wallstrasse 16, 10179 Berlin, Germany.
Importer for Great Britain:
Chal-Tec UK limited
Unit 6 Riverside Business Centre
Brighton Road
Shoreham-by-Sea
BN43 6RE
United Kingdom

23
ES
Estimado cliente,
Le felicitamos por la adquisición de este producto. Lea
atentamente las siguientes instrucciones y sígalas para evitar
posibles daños. No asumimos ninguna responsabilidad
por los daños causados por el incumplimiento de las
instrucciones y el uso inadecuado. Escanee el siguiente
código QR para obtener acceso a la última guía del usuario
y más información sobre el producto:
ÍNDICE
Indicaciones de seguridad 24
Antes del primer uso 24
Vista general del aparato 25
Funcionamiento 26
Tabla de preparación 30
Limpieza y cuidado 31
Indicaciones sobre la retirada del aparato 32
Fabricante e importador (Reino Unido) 32
DATOS TÉCNICOS
Número de artículo 10029824
Alimentación 220-240 V ~ 50/60 Hz

24
ES
INDICACIONES DE SEGURIDAD
ATENCIÓN
Riesgo de quemaduras. El aparato alcanza temperaturas elevadas
durante su uso. Agarre el aparato solamente por las asas o por el
regulador para evitar que se queme.
• Compruebe regularmente el aparato y el cable de alimentación para detectar
posibles daños. No utilice la olla si el cable de alimentación o el aparato
mismo está dañado.
• Si no utiliza el aparato, apáguelo y desconecte el enchufe de la toma de
corriente. Deje que el aparato se enfríe completamente antes de limpiarlo o
guardarlo.
• Coloque el aparato sobre una super cie nivelada, estable y resistente a
altas temperaturas. Instale el aparato a una distancia de aprox. 20 cm de las
paredes.
• No sumerja el aparato en agua u otros líquidos, ya que puede dañar las piezas
eléctricas.
• Este aparato puede ser utilizado por niños mayores de 8 años y personas con
discapacidades físicas, sensoriales y mentales y/o con falta de experiencia
y conocimientos, siempre y cuando hayan sido instruidos sobre el uso del
aparato y comprendan los peligros y riesgos asociados.
• No intente reparar el aparato usted mismo. Solamente un personal técnico
cuali cado debe llevar a cabo las reparaciones.
• No mueva el aparato mientras está en marcha. Tenga mucho cuidado cuando
mueva el aparato con líquidos calientes.
• Utilice únicamente los accesorios suministrados.
Nota: Para disfrutar de la carne y verduras conservadas con total tranquilidad,
debe siempre hervir estos alimentos dos veces. Hiérvalos por segunda vez
después de al menos 24 horas. Para más información, visite la página del
Centro federal de nutrición alemán: https://www.bzfe.de/inhalt/einkochen-1348.
html
ANTES DEL PRIMER USO
1 Antes de utilizar el aparato por primera vez, hierve agua fresca para retirar
cualquier polvo o residuo de producción. Para ello, añada 6 l de agua y
con gure el termostato a MAX.
2 Para empezar a hervir el agua, con gure el TEMPORIZADOR a 60 minutos.
Una vez transcurrido el tiempo, el aparato se apaga automáticamente.
3 Deje que el aparato se enfríe y vacíe el agua.
4 Ahora puede utilizar la olla pasteurizadora.

25
ES
VISTA GENERAL DEL APARATO
1 Tapa de la carcasa 6 Botón del termostato
2 Asa 7 Indicador luminoso
3 Recipiente de acero inoxidable 8 Temporizador
4 Parte inferior de la carcasa 9 Parrilla interior
5 Interruptor on/o

26
ES
FUNCIONAMIENTO
El aparato es apto tanto para hervir alimentos como para calentar el agua y otros líquidos.
General
• El aparato tiene distintos usos: conservar, cocinar, calentar al baño María,
preparar bebidas calientes, escaldar verduras, etc.
• Los platos espesos que tienden a quemarse deben calentarse a fuego lento y
removerse constantemente.
• Si utiliza su aparato vacío, un interruptor de seguridad adicional evita que se
produzca un sobrecalentamiento. Deje enfriar el aparato antes de llenarlo de
agua; de lo contrario, existe el riesgo de provocarse quemaduras causadas
por el vapor de agua caliente. Además, la supercie puede dañarse. En el
primer uso pueden generarse olores que desaparecerán transcurrido un
breve periodo de tiempo a partir de su encendido.
Capacidad
El aparato tiene una capacidad de 20 litros. El nivel de líquido puede situarse como
máximo a 4 cm por debajo del borde de la carcasa.
Indicaciones importantes
• Por motivos de higiene, el aparato debe esterilizarse una vez.
• Para ello, llénelo con 4 litros de agua, coloque el termostato al máximo y el
aparato se encenderá. Gire el botón de encendido en el sentido de las agujas
del reloj hasta el valor 60 minutos. Cuando transcurra el tiempo seleccionado,
el aparato se apaga automáticamente. Cuando se haya enfriado, el aparato
estará listo para usarse.
Indicaciones para conservar alimentos
• En este proceso se conservarán alimentos sin sustancias químicas. El calor
generado mata todas las bacterias en el alimento en conserva. Al mismo
tiempo, gracias a presión existente en el tarro, este se queda cerrado
herméticamente y esterilizado. Dependiendo del tipo y de la cantidad
de alimento que deseemos conservar, podemos hablar de procesos de
esterilización y pasteurización. En la esterilización, el alimento se calienta
hasta al menos 100 °C. En el proceso de pasteurización la temperatura de
calentamiento es de 80 °C.
• Para un uso doméstico, la pasteurización es suciente. Necesitará tarros de
conservas con cierre de rosca o tapas herméticas con anillas de goma.

27
ES
Para disfrutar de la carne y las verduras hervidas de forma segura, hierva
siempre estos alimentos dos veces: El segundo calentamiento después de al
menos 24 horas. Puede encontrar más información al respecto en: https://www.
bzfe.de/inhalt/einkochen-1348.html (Centro Federal de Nutrición)
Encender y apagar el aparato.
1. Ajuste el regulador de temperatura a la temperatura deseada. Coloque el
interruptor on/o en „I“.
2. Gire el botón del temporizador en el sentido contrario de las agujas del
reloj para un funcionamiento sin pausa (Cont.). El aparato comienza a
calentar. El indicador luminoso se enciende para señalizar que la función de
calentamiento está activa.
3. Cuando se haya alcanzado la temperatura seleccionada, se emitirá un pitido
y el indicador luminoso se apaga. La señal auditiva indica que el tiempo de
cocción (consulte tabla de conservas) debe congurarse. Para ello, gire el
botón del temporizador en el sentido de las agujas de reloj hasta el tiempo
deseado.
3. La temperatura se mantendrá en el valor seleccionado. El indicador de la
temperatura se apaga pero vuelve a encenderse siempre que la temperatura
actual sea inferior al valor seleccionado, momento en que el aparato volverá
a calentar. Una temperatura constante es importante para la calidad del
alimento que se desea conservar.
5. Cuando haya transcurrido el tiempo de cocción, el aparato se apaga
automáticamente.
28
ES
Hervir alimentos
1. Introduzca la rejilla en el interior.
2. Llene los tarros con los alimentos deseados y ciérrelos.
3. Coloque los tarros sobre la rejilla como se ilustra a continuación.
Nota: Para tarros más pequeñas, caben más gafas en el dispositivo.
4. Llene la estufa con suciente agua para cubrir el vaso más alto de 3⁄4 con
agua. No exceda la marca máxima.
5. Colocar la tapa y conectar el interruptor principal (ON). Tenga en cuenta que se
debe congurar un temporizador para que el aparato comience a calentarse.
Dependiendo del nivel de llenado y de la temperatura objetivo, esto puede
tardar hasta 90 minutos. En cuanto se alcanza la temperatura ajustada,
el aparato cambia automáticamente del modo de calefacción al modo de
mantenimiento del calor.
6. A continuación, ajuste la temperatura y el tiempo de acuerdo con la tabla de
cocción. La hora allí indicada se aplica a partir del momento en que se alcanza
la temperatura objetivo. El temporizador no tiene en cuenta la temperatura
más baja durante el tiempo de calentamiento debido al diseño.

29
ES
7. Una vez transcurrido el tiempo elegido, el aparato se apaga automáticamente
y emite un pitido.
8. Apague el termostato y pulse el interruptor de encendido/apagado (OFF)
antes de desconectar el enchufe de la toma de corriente.
9. Coloque el aparato en un lavabo y abra el grifo para vaciar el agua. Deje que el
aparato se enfríe por completo.
10. Una vez enfriado el aparato, retire los tarros con una manopla o unas
pinzas, ya que estos aún estarán calientes. Deje que los tarros se enfríen por
completo.
30
ES
TABLA DE PREPARACIÓN
Atención: Estos datos son simplemente recomendaciones.
Fruta °C min Verdura °C min
Manzana tierna/dura 90 30 Colior 100 90
Compota de manzana 90 30 Espárrago 100 120
Cereza 80 30 Guisante 100 120
Pera tierna/dura 90 30 Zanahorias 100 90
Fresas/Moras 80 25 Pepinillos en vinagre 90 30
Ruibarbo 100 30 Calabaza 90 30
Frambuesas/Grosellas 80 30 Colinabo 100 90
Grosellas/Arándano rojo 90 25 Col de Bruselas/Col
lombarda
100 120
Albaricoque 90 30 Apio 100 120
Ciruelas amarillas/Ciruelas
claudias
90 30 Seta 100 110
Melocotón 90 30 Judía 100 120
Ciruelas 90 30 Tomates/Tomate
concentrado
90 30
Membrillo 95 25
Arándanos 85 25 Carne °C Min
Atención: el tarro de conserva está
caliente después del proceso. Utilice unas
pinzas o manoplas para retirar los tarros.
Conserve los tarros en un lugar seco,
fresco y a la sombra.
Carne asada en trozos 100 120
Caldo de carne 100 60
Ave asada 100 75
Bien cocido 100 75
Carne picada para
salchichas (cruda)
100 110

31
ES
Calentar líquidos
Atención: cuando caliente líquidos, llene el aparato hasta un máximo de 5 cm
por debajo del borde superior; de lo contrario, el líquido podría rebosar.
1. Vierta en la olla el agua o la bebida deseada.
2. Coloque la tapa, encienda el aparato y elija la temperatura deseada.
Tan pronto como se alcance la temperatura elegida, el aparato cambia
automáticamente al modo «Mantener caliente».
3. Remueva con frecuencia el líquido para que el calor se distribuya de manera
uniforme.
4. Si desea embotellar la bebida, coloque una botella debajo del grifo y apriete la
llave del grifo. Cuando la botella se llene, suelte la llave del grifo.
Atención: no abra el grifo si calienta líquidos con trozos de alimentos, como
fruta, verdura, etc., ya que puede obstruirlo.
LIMPIEZA Y CUIDADO
• Deje que el dispositivo se enfríe antes de limpiarlo.
• Desenchufe el aparato antes de limpiarlo.
• Limpie el fondo del recipiente con un cepillo de cerdas blandas o con un paño
húmedo.
• Nunca utilice objetos alados o duros, ya que podría dañar la supercie.
• Limpie la carcasa con un paño suave y húmedo. Séquela con un paño seco.
32
ES
INDICACIONES SOBRE LA RETIRADA DEL APARATO
Si en su país existe una disposición legal relativa a la
eliminación de aparatos eléctricos y electrónicos, este
símbolo estampado en el producto o en el embalaje
advierte que no debe eliminarse como residuo doméstico.
En lugar de ello, debe depositarse en un punto de
recogida de reciclaje de aparatos eléctricos y electrónicos.
Una gestión adecuada de estos residuos previene
consecuencias potencialmente negativas para el medio
ambiente y la salud de las personas. Puede consultar más
información sobre el reciclaje y la eliminación de este
producto contactando con su administración local o con
su servicio de recogida de residuos.
FABRICANTE E IMPORTADOR (REINO UNIDO)
Fabricante:
Chal-Tec GmbH, Wallstraße 16, 10179 Berlín, Alemania.
Importador para Gran Bretaña:
Chal-Tec UK limited
Unit 6 Riverside Business Centre
Brighton Road
Shoreham-by-Sea
BN43 6RE
United Kingdom

33
FR
Chère cliente, cher client,
Toutes nos félicitations pour l’acquisition de ce nouvel
appareil. Veuillez lire attentivement et respecter les
instructions de ce mode d’emploi an d’éviter d’éventuels
dommages. Nous ne saurions être tenus pour responsables
des dommages dus au non-respect des consignes et à la
mauvaise utilisation de l’appareil. Scannez le QR-Code
pour obtenir la dernière version du mode d‘emploi et des
informations supplémentaires concernant le produit :
SOMMAIRE
Consignes de sécurité 34
Avant la première utilisation 34
Aperçu de l‘appareil 35
Utilisation 36
Tableau de stérilisation 40
Nettoyage et entretien 41
Informations sur le recyclage 42
Fabricant et importateur (UK) 42
FICHE TECHNIQUE
Numéro d'article 10029824
Alimentation 220-240 V ~ 50/60 Hz

34
FR
CONSIGNES DE SÉCURITÉ
ATTENTION
Risque de brûlure ! l‘appareil devient très chaud pendant
l‘utilisation. Ne touchez qu‘aux boutons de réglage et aux poignées
pour ne pas vous brûler.
• Véri ez régulièrement que l‘appareil et le cordon d‘alimentation ne sont pas
endommagés. N‘utilisez pas l‘appareil si le cordon d‘alimentation ou l‘appareil
sont endommagés.
• Lorsque vous n‘utilisez pas l‘appareil, éteignez-le et débranchez-le de la prise.
Laissez l‘appareil refroidir complètement avant de le nettoyer et de le ranger.
• Placez l‘appareil sur une surface stable, plane et résistante à la chaleur.
• Prévoyez au moins 20 cm d‘espace autour entre l‘appareil et les murs et autres
appareils.
• Ne plongez jamais complètement l‘appareil dans l‘eau ou d‘autres liquides,
sous peine d‘endommager les composants électriques.
• Cet appareil peut être utilisé par des enfants de 8 ans ou plus et des
personnes ayant des capacités physiques, sensorielles et mentales limitées
et / ou dénuées d‘expérience et de connaissances, à condition d‘avoir été
instruits au fonctionnement de l‘appareil par une personne responsable et
d‘en comprendre les risques associés.
• N‘essayez pas de réparer l‘appareil vous-même. Les réparations ne doivent
être e ectuées que par des spécialistes quali és.
• Ne déplacez pas l‘appareil en cours de fonctionnement. Faites très attention
lorsque vous déplacez des appareils contenant des liquides chauds.
• Ne pas utiliser d’autres accessoires que ceux fournis.
Note: Pour pro ter de la viande et des légumes en conserve en toute sécurité,
faites cuire ces aliments deux fois par principe : deuxième cuisson après au
moins 24 heures. Pour plus d‘informations, rendez-vous sur : https://www.bzfe.
de/inhalt/einkochen-1348.html (Centre fédéral de nutrition)
AVANT LA PREMIÈRE UTILISATION
1 Avant d‘utiliser le cuiseur pour la première fois, faites-y bouillir une fois de
l‘eau fraîche pour éliminer la poussière et les résidus de production en usine.
Versez pour cela 6 litres d‘eau et réglez le thermostat sur MAX.
2 Pour allumer le cuiseur, réglez la MINUTERIE sur 60 minutes. Lorsque le temps
est écoulé, l‘appareil s‘éteint automatiquement.
3 Laissez l‘appareil refroidir et videz l‘eau.
4 Vous pouvez maintenant utiliser le cuiseur.

35
FR
APERÇU DE L‘APPAREIL
1 Couvercle 6 Bouton du thermostat
2 Poignée 7 Témoin lumineux
3 Marmite en acier 8 Minuteur
4 Socle de l’appareil 9 Grille de support
5 Interrupteur marche/arrêt

36
FR
UTILISATION
Vous pouvez utiliser l‘appareil pour la cuisson d‘aliments ainsi que pour chauer
de l‘eau et d‘autres liquides.
Généralités
• L’appareil peut être utilisé à des ns diverses : mettre des aliments en
conserve, cuire des aliments, cuire au bain-marie, préparer des boissons
chaudes, blanchir les légumes etc.
• Réchauer les mets consistants ou susceptibles de brûler en les remuant
lentement et constamment.
• Si l’appareil chaue à vide, un dispositif de sécurité intégré se déclenche
contre la surchaue. Laisser ensuite l’appareil refroidir avant de le remplir
d’eau pour éviter tout risque de brûlure liée au dégagement de vapeurs. De
plus, la surface en émail pourrait être endommagée. Lors de la première
utilisation, une odeur peut se dégager qui se dissipe rapidement.
Contenance
L’appareil de mise en conserve a une contenance de 20 L. Le niveau du liquide
contenu doit se trouver au minimum à 4 cm en-dessous du rebord de la marmite.
Consignes importantes
• Pour des raisons d’hygiène, faire bouillir de l’eau dans l’appareil avant
utilisation.
• Pour cela, y verser environ 4 litres d’eau, régler le thermostat sur Max., mettre
l’appareil en marche en activant le minuteur. Tourner le bouton de réglage
dans le sens des aiguilles d’une montre et le positionner sur 60 minutes. Une
fois ce temps écoulé, l’appareil s’éteint automatiquement. L’appareil est prêt à
l’emploi après s’être refroidi.
Remarques sur la mise en conserve
• Cet appareil permet la conservation des aliments sans nécessiter le recours à
des conservateurs chimiques. La chaleur produite élimine les germes présents
dans les bocaux. Les bocaux sont alors libérés de leurs germes et sont rendus
hermétiques grâce à la pression exercée. La conservation des aliments
dépend de leur type et de leur volume et peut être réalisée selon le procédé
de stérilisation ou de pasteurisation. La stérilisation requiert de chauer les
aliments à mettre en conserve à 100 °C. Une température de 80 °C est requise
pour la pasteurisation.
• La pasteurisation est susante pour l’usage domestique. Des bocaux
de conservation équipés d’un système de verrouillage et d’un bouchon
d’étanchéité avec joints en caoutchouc sont nécessaires.

37
FR
Pour proter de la viande et des légumes bouillis en toute sécurité, faites
toujours bouillir ces aliments deux fois : Le deuxième chauage après au moins
24 heures. Vous trouverez de plus amples informations à ce sujet sur le site
suivant : https://www.bzfe.de/inhalt/einkochen-1348.html (Centre fédéral de la
nutrition)
Allumer et éteindre l’appareil
1. Régler le thermostat sur la température souhaitée. Mettre l’interrupteur
marche/arrêt sur « I ».
2. Tourner le bouton du minuteur dans le sens inverse des aiguilles d’une
montre et sélectionner le fonctionnement continu (Cont.). L’appareil se met à
chauer. Le témoin lumineux s’allume pour indiquer que l’appareil chaue.
3. Une fois que la température paramétrée est atteinte, un signal sonore retentit
et le témoin lumineux s’éteint. Le signal sonore indique qu’il faut à présent
sélectionner le temps de cuisson (cf. tableau des cuissons). Pour cela, tourner
le minuteur dans le sens des aiguilles d’une montre et sélectionner le temps
souhaité.
4. La température est à présent maintenue à la valeur paramétrée. Le témoin
lumineux de température s’éteint, mais se rallume de temps à autre lorsque
la température redescend sous la valeur paramétrée et l’appareil chaue de
nouveau. Une température constante est nécessaire à la qualité de la mise en
conserve.
5. Une fois le temps paramétré écoulé, l’appareil s’arrête automatiquement.

38
FR
Pour conre
1. Placez la grille insert dans le cuiseur.
2. Versez les aliments dans des bocaux et fermez-les.
3. Empilez les bocaux sur la grille comme indiqué sur l‘illustration.
Remarque : Pour les bocauxs plus petites, il y aura plus de place dans l‘appareil.
4. Remplissez le poêle avec susamment d‘eau pour couvrir d‘eau le verre le
plus haut de 3⁄4. Ne dépassez pas la marque maximale.
5. Mettre le couvercle et mettre en marche l‘interrupteur principal (ON). Veuillez
noter qu‘une minuterie doit être réglée pour que l‘appareil commence à
chauer. Selon le niveau de remplissage et la température de consigne, cela
peut prendre jusqu‘à 90 minutes. Dès que la température réglée est atteinte,
l‘appareil passe automatiquement du mode chauage au mode chauage.
6. Réglez ensuite la température et la durée en fonction de la table de cuisson.
L‘heure indiquée s‘applique à partir du moment où la température de
consigne est atteinte. La minuterie ne tient pas compte de la température plus
basse pendant le temps de préchauage en raison de la conception.

39
FR
7. Une fois la durée dénie écoulée, le stérilisateur s‘arrête automatiquement et
émet un bip.
8. Éteignez le thermostat et réglez l‘interrupteur principal sur OFF avant de
débrancher la che de la prise.
9. Placez l‘appareil dans l‘évier ou dans une baignoire et vidangez l‘eau en
poussant le robinet vers le bas. Laissez l‘appareil refroidir.
10. Une fois l‘appareil refroidi, retirez les bocaux avec des gants ou des pinces, car
ils restent chauds longtemps. Laissez les bocaux refroidir complètement.
40
FR
TABLEAU DE STÉRILISATION
Remarque : Les informations suivantes sont des recommandations.
Fruits °C Min Légumes °C Min
Pommes douces / dures 90 30 Chou-eur 100 90
Compote de pommes 90 30 Asperges 100 120
Cerises 80 30 Pois 100 120
Poires douces / dures 90 30 Carottes / Carottes 100 90
Fraises / mûres 80 25 Cornichons 90 30
Rhubarbe 100 30 Citrouille 90 30
Framboises / groseilles à
maquereau
80 30 Chou-rave 100 90
Groseilles / canneberges 90 25 Chou de Bruxelles / chou
rouge
100 120
Abricots 90 30 Céleri 100 120
Mirabelles / Reines Claude 90 30 Champignons 100 110
Pêches 90 30 Haricots 100 120
Prunes / quetsches 90 30 Tomates / purée de tomates 90 30
Coing 95 25
Myrtilles 85 25 Viande °C Min
Remarque : Les bocaux de conservation
sont chauds après ébullition. Utilisez
des pinces ou des gants de cuisine pour
retirer les pots. Gardez les conserves au
sec, au frais et à l‘abri de la lumière.
Rôti en une seule pièce 100 120
Bouillon de viande 100 60
Gibier, volaille rôtie 100 75
Goulasch rôti 100 75
Saucisse de viande hachée
(crue)
100 110

41
FR
Pour réchauer des liquides
Remarque : Lorsque vous chauez des liquides, vous pouvez remplir le
stérilisateur jusqu‘à 5 cm au maximum en dessous du bord supérieur. Sinon, le
liquide pourrait déborder pendant le chauage.
1. Versez la boisson ou l‘eau souhaitée dans le stérilisateur.
2. Mettez le couvercle en place, allumez l‘appareil et réglez la température
souhaitée. Une fois que la température souhaitée est atteinte, le stérilisateur
passe automatiquement en mode de réchauage.
3. Mélangez la boisson régulièrement an que la chaleur soit distribuée
uniformément.
4. Si vous souhaitez servir la boisson, mettez une tasse sous le robinet et
appuyez sur ce dernier. Lorsque la tasse est pleine, relâchez le robinet.
Remarque : N‘utilisez pas le robinet lorsque vous chauez des liquides
contenant des morceaux (punch aux fruits, soupe). Sinon, il pourrait se boucher.
NETTOYAGE ET ENTRETIEN
• Laissez l‘appareil refroidir complètement avant de le nettoyer.
• Débranchez toujours le cordon d’alimentation avant de nettoyer l‘appareil.
• Nettoyez le fond de la cuve avec une brosse douce ou un chion humide.
N‘utilisez jamais d‘objets pointus ou durs pour éviter d‘endommager la
surface.
• Essuyez le boîtier avec un chion doux et humide. Puis essuyez-le avec un
chion sec.

42
FR
INFORMATIONS SUR LE RECYCLAGE
S‘il existe une réglementation pour l‘élimination ou le
recyclage des appareils électriques et électroniques dans
votre pays, ce symbole sur le produit ou sur l‘emballage
indique que cet appareil ne doit pas être jeté avec les
ordures ménagères. Vous devez le déposer dans un point
de collecte pour le recyclage des équipements électriques
et électroniques. La mise au rebut conforme aux règles
protège l‘environnement et la santé de vos semblables
des conséquences négatives. Pour plus d‘informations
sur le recyclage et l‘élimination de ce produit, veuillez
contacter votre autorité locale ou votre service de
recyclage des déchets ménagers.
FABRICANT ET IMPORTATEUR (UK)
Fabricant :
Chal-Tec GmbH, Wallstraße 16, 10179 Berlin, Allemagne.
Importateur pour la Grande Bretagne :
Chal-Tec UK limited
Unit 6 Riverside Business Centre
Brighton Road
Shoreham-by-Sea
BN43 6RE
United Kingdom
43
IT
Gentile cliente,
La ringraziamo per aver acquistato il dispositivo. La
preghiamo di leggere attentamente le seguenti istruzioni
per l’uso e di seguirle per evitare possibili danni. Non ci
assumiamo alcuna responsabilità per danni scaturiti da una
mancata osservazione delle avvertenze di sicurezza e da
un uso improprio del dispositivo. Scansionare il codice QR
seguente, per accedere al manuale d’uso più attuale e per
ricevere informazioni sul prodotto:
INDICE
Istruzioni di sicurezza 44
Avvertenze per il primo utilizzo 44
Panoramica generale 45
Utilizzo 46
Tabella dei tempi di cottura 50
Pulizia e cura 51
Avviso di smaltimento 52
Produttore e importatore (UK) 52
DATI TECNICI
Numero articolo 10029824
Alimentazione 220-240 V ~ 50/60 Hz

44
IT
ISTRUZIONI DI SICUREZZA
ATTENZIONE
Pericolo di ustione! Il dispositivo diventa bollente durante l’utilizzo.
A errare solo il regolatore e i manici per evitare ustioni.
• Controllare sistematicamente che il dispositivo e il cavo d’alimentazione siano
integri. In caso contrario non vanno utilizzati.
• Quando il dispositivo non viene più utilizzato è necessario spegnerlo e
staccare la spina dalla presa elettrica. Lasciare che il dispositivo si ra reddi
completamente prima di pulirlo e riporlo.
• Appoggiare il dispositivo su una super cie stabile, piana e che non tema il
calore. Il dispositivo deve essere posizionato a una distanza di almeno 20 cm
dalle pareti o da altre apparecchiature.
• Non immergere in acqua o in altri liquidi, in quanto le parti elettriche
potrebbero subire danni.
• Questo dispositivo può essere utilizzato da bambini a partire da 8 anni
e da persone con limitate capacità siche e psichiche o con conoscenza
ed esperienza limitate, solo se sono stati istruiti sulle modalità d’uso e
comprendono i rischi e i pericoli connessi.
• Non provare a riparare il dispositivo autonomamente. Le riparazioni vanno
svolte solo da tecnici quali cati.
• Non spostare il dispositivo durante il funzionamento. Prestare molta
attenzione durante la movimentazione dell’apparecchiatura contenente liquidi
bollenti.
• Utilizzare esclusivamente gli accessori forniti in dotazione.
Nota: Per gustare in piena sicurezza conserve a base di carne e verdure,
procedere sempre alla doppia cottura: il secondo processo di riscaldamento
almeno 24 ore dopo. Per maggiori informazioni, consultare la seguente pagina
web: https://www.bzfe.de/inhalt/einkochen-1348.html (Centro federale per
l‘alimentazione).
AVVERTENZE PER IL PRIMO UTILIZZO
1 Se si utilizza il bollitore per la prima volta far bollire dell’acqua fresca per
rimuovere polvere e residui di lavorazione. Riempire 6 litri d’acqua e regolare il
termostato su MAX.
2 Per azionare il bollitore impostare il TIMER su 60 minuti. Allo scadere del
tempo il dispositivo si spegnerà automaticamente.
3 Lasciar ra reddare il dispositivo e rimuovere l’acqua.
4 Ora è possibile utilizzare il bollitore.

45
IT
PANORAMICA GENERALE
1 Coperchio 6 Manopola termostato
2 Impugnatura 7 Spia di controllo
3 Pentola in acciaio inossidabile 8 Timer
4 Parte inferiore 9 Griglia
5 Interruttore on/o

46
IT
UTILIZZO
Il dispositivo può essere utilizzato sia per la cottura di alimenti sia per l’ebollizione
dell’acqua e di altri liquidi.
Utilizzo generale
• Il dispositivo può essere utilizzato per scopi diversi: per mettere in conserva,
riscaldare a bagnomaria, preparare bevande calde, sbollentare le verdure ecc.
• Gli alimenti più consistenti che tendono a bruciarsi devono essere riscaldati
lentamente e girati costantemente.
• Un apposito interruttore di sicurezza impedisce al dispositivo di surriscaldarsi
in caso questo venga azionato senza contenuto al suo interno. Se ciò si
verica, far rareddare completamente il dispositivo prima di aggiungere
altra acqua per non scottarsi con il vapore acqueo e non danneggiare la
supercie smaltata. Al primo utilizzo è possibile che si formino degli odori che
svaniscono dopo qualche tempo con l’utilizzo.
Capacità
Il dispositivo ha una capacità di 20 litri. Assicurarsi che il livello del liquido sia
massimo 4 cm al di sotto del bordo superiore dell’alloggiamento.
Avvertenze importanti
• Per motivi igienici, è necessario prima sterilizzare il dispositivo.
• Per fare ciò, versare 6 litri di acqua e impostare il termostato su max; il
dispositivo si accende tramite il timer. Ruotare la manopola di accensione
in senso orario e posizionarla su 60 min. Scaduto il tempo impostato, il
dispositivo si spegne automaticamente. Attendere che il dispositivo si
rareddi prima di utilizzarlo di nuovo.
Note sulla messa in conserva
• Per messa in conserva si intende la conservazione di alimenti senza additivi
chimici. Il calore prodotto uccide i germi presenti. Allo stesso tempo il vasetto
da conserva viene sigillato ermeticamente. A seconda del tipo di alimenti
conservati, si parla di sterilizzazione e di pastorizzazione. Con la sterilizzazione
gli alimenti vengono riscaldati ad almeno 100°C. Con la pastorizzazione la
temperatura di riscaldamento è di 80°C.
• Per l’utilizzo domestico la pastorizzazione è suciente. Sono necessari vasetti
da conserva con tappo a vite e guarnizione in gomma.

47
IT
Per gustare la carne e le verdure bollite in modo sicuro, fate sempre bollire
questi alimenti due volte: Il secondo riscaldamento dopo almeno 24 ore.
Ulteriori informazioni su questo tema sono disponibili all‘indirizzo: https://www.
bzfe.de/inhalt/einkochen-1348.html (Centro federale per l‘alimentazione)
Accendere e spegnere il dispositivo
1. Impostare la manopola per la temperatura sulla temperatura desiderata.
Posizionare l’interruttore on/o su “I”.
2. Ruotare il timer in senso antiorario e posizionarlo sul funzionamento continuo
(Cont). Il dispositivo inizia a riscaldare. La spia di controllo si accende e segnala
che la funzione di riscaldamento è attiva.
3. Appena viene raggiunta la temperatura impostata, il dispositivo emette un
segnale acustico e la spia di controllo si spegne. Il segnale acustico avvisa
che è necessario impostare il tempo (vedere la tabella). Per fare ciò, ruotare il
timer in senso orario sul tempo desiderato.
4. La temperatura viene mantenuta sul valore impostato. La spia della
temperatura si spegne e si riaccende quando si supera il valore impostato; il
dispositivo continua a riscaldare. Una temperatura costante è importante per
la qualità degli alimenti.
5. Il dispositivo si spegne automaticamente allo scadere del tempo.
48
IT
Come fare per cuocere
1. Inserire la griglia nel bollitore.
2. Inserire gli alimenti in barattoli e chiuderli.
3. Impilare i barattoli sulla griglia come indicato in gura.
Nota: per gli barattoli più piccoli, più barattoli si inseriscono nel dispositivo.
4. Riempire la stufa con acqua a sucienza per coprire con acqua il vetro più alto
di 3⁄4. Non superare il segno massimo.
5. Mettere il coperchio e accendere l‘interruttore principale (ON). Si prega
di notare che per avviare il riscaldamento dell‘apparecchio è necessario
impostare un timer. A seconda del livello di riempimento e della temperatura
nominale, possono essere necessari no a 90 minuti. Non appena viene
raggiunta la temperatura impostata, l‘apparecchio passa automaticamente
dalla modalità di riscaldamento alla modalità di conservazione a caldo.
6. Impostare quindi la temperatura e l‘ora secondo il piano di cottura. Il tempo
ivi indicato si applica a partire dal punto in cui viene raggiunta la temperatura
nominale. Il timer non tiene conto della temperatura più bassa durante il
tempo di riscaldamento a causa del design.

49
IT
7. Allo scadere del tempo impostato il bollitore si spegne automaticamente ed
emette un segnale acustico.
8. Spegnere il termostato e premere l’interruttore su OFF prima di togliere la
spina dalla presa di corrente.
9. Mettere il dispositivo nel lavandino o in una vasca e scaricare l’acqua
premendo il dispenser verso il basso. Lasciare quindi che si rareddi.
10. Dopo che il dispositivo si è rareddato togliere i barattoli con guanti da
forno o una pinza, dato che c’è il rischio che rimangano caldi ancora a lungo.
Lasciare che i barattoli si rareddino del tutto.
50
IT
TABELLA DEI TEMPI DI COTTURA
Nota: Queste indicazioni sono puramente indicative.
Frutta °C Min Verdura °C Min
Mele morbide / dure 90 30 Cavolori 100 90
Mousse di mele 90 30 Asparagi 100 120
Ciliegie 80 30 Piselli 100 120
Pere morbide / dure 90 30 Carote 100 90
Fragole / more 80 25 Cetrioli sott’aceto 90 30
Rabarbaro 100 30 Zucche 90 30
Lamponi / uva spina 80 30 Cavoli rapa 100 90
Ribes / mirtilli rossi 90 25 Cavolini di Bruxelles/cavoli
rossi
100 120
Albicocche 90 30 Sedano 100 120
Mirabelle / susina Claudia 90 30 Funghi 100 110
Prugne 90 30 Fagioli 100 120
Susine 90 30 Pomodori/polpa di
pomodoro
90 30
Mele cotogne 95 25
Mirtilli 85 25 Carne °C Min
Nota: I barattoli sono bollenti dopo
l’ebollizione. Utilizzare guanti da forno o
una pinza per toglierli. Tenere la conserva
in un luogo fresco, asciutto e al riparo
dalla luce.
Arrosto in parti 100 120
Brodo di carne 100 60
Cacciagione/pollame
arrosto
100 75
Gulasch arrosto 100 75
Carne trita con impasto di
salsiccia (cruda)
100 110

51
IT
Bollire i liquidi
Nota: Quando si scaldano i liquidi il bollitore può essere riempito al massimo
no a 5 cm sotto il bordo. In caso contrario c’è il pericolo che del liquido
fuoriesca durante la bollitura.
1. Mettere la bevanda desiderata o l’acqua nel bollitore.
2. Chiudere con il coperchio, accendere il dispositivo e impostare la temperatura
desiderata. Nel momento in cui si raggiunge la temperatura impostata il
bollitore passa automaticamente alla modalità di mantenimento in caldo.
3. Mescolare la bevanda regolarmente in modo tale che il calore si propaghi in
maniera uniforme.
4. Se si vuole travasare la bevanda mettere un bicchiere sotto il dispenser e
premere il rubinetto verso il basso. Rilasciare il dispenser quando il bicchiere è
pieno.
Nota: Non utilizzare il dispenser quando si riscaldano liquidi con pezzi
(spremute, zuppe). In caso contrario si potrebbe ostruire.
PULIZIA E CURA
• Prima di iniziare le operazioni di pulizia lasciar rareddare completamente il
dispositivo.
• Togliere sempre la spina prima di pulire il dispositivo.
• Pulire il fondo della pentola con una spazzola morbida o un panno umido.
Non utilizzare mai oggetti duri o acuminati per non danneggiare la supercie.
• Pulire l’esterno del bollitore con un panno umido e morbido. Dopodiché
asciugarlo con un panno asciutto.

52
IT
AVVISO DI SMALTIMENTO
Se nel proprio paese si applicano le regolamentazioni
inerenti lo smaltimento di dispositivi elettrici ed
elettronici, questo simbolo sul prodotto o sulla confezione
segnala che questi prodotti non possono essere
smaltiti con i riuti normali e devono essere portati a
un punto di raccolta di dispositivi elettrici ed elettronici.
Grazie al corretto smaltimento dei vecchi dispositivi si
tutela il pianeta e la salute delle persone da possibili
conseguenze negative. Informazioni riguardanti il riciclo
e lo smaltimento di questi prodotti si ottengono presso
l’amministrazione locale oppure il servizio di gestione dei
riuti domestici.
PRODUTTORE E IMPORTATORE (UK)
Produttore:
Chal-Tec GmbH, Wallstraße 16, 10179 Berlino, Germania.
Importatore per la Gran Bretagna:
Chal-Tec UK limited
Unit 6 Riverside Business Centre
Brighton Road
Shoreham-by-Sea
BN43 6RE
United Kingdom