

2
Quickstart Guide (English)
Introduction
1. Make sure all items listed in the Box Contents are included in the box. Look in the box under the
foam sheet for the speaker stand rubber feet, speaker stand mounting knob, power cable, and
microphone.
2. Read safety instruction booklet before using the product.
3. Study the connection diagram.
4. Make sure all input devices such as microphones, CD players, or digital media players are turned
off and volume settings are set at “zero.”
5. Connect all devices as shown.
6. Switch everything on in the following order:
• audio input sources (i.e. microphones, instruments, CD players)
• Total PA Plus
7. When turning off, always reverse this operation:
• Total PA Plus
• any input devices
Box Contents
Total PA Plus
Microphone with Cable
Telescoping Speaker Stand
Remote Control
Power Cable (IEC)
Quickstart Guide
Safety Instructions & Warranty Information Booklet
Support
For the latest information about this product (system requirements, compatibility information, etc.)
and product registration, visit ionaudio.com.
Caution: Do not expose Total PA Plus to rain or stand in water.
3
iPA69
Quick Setup
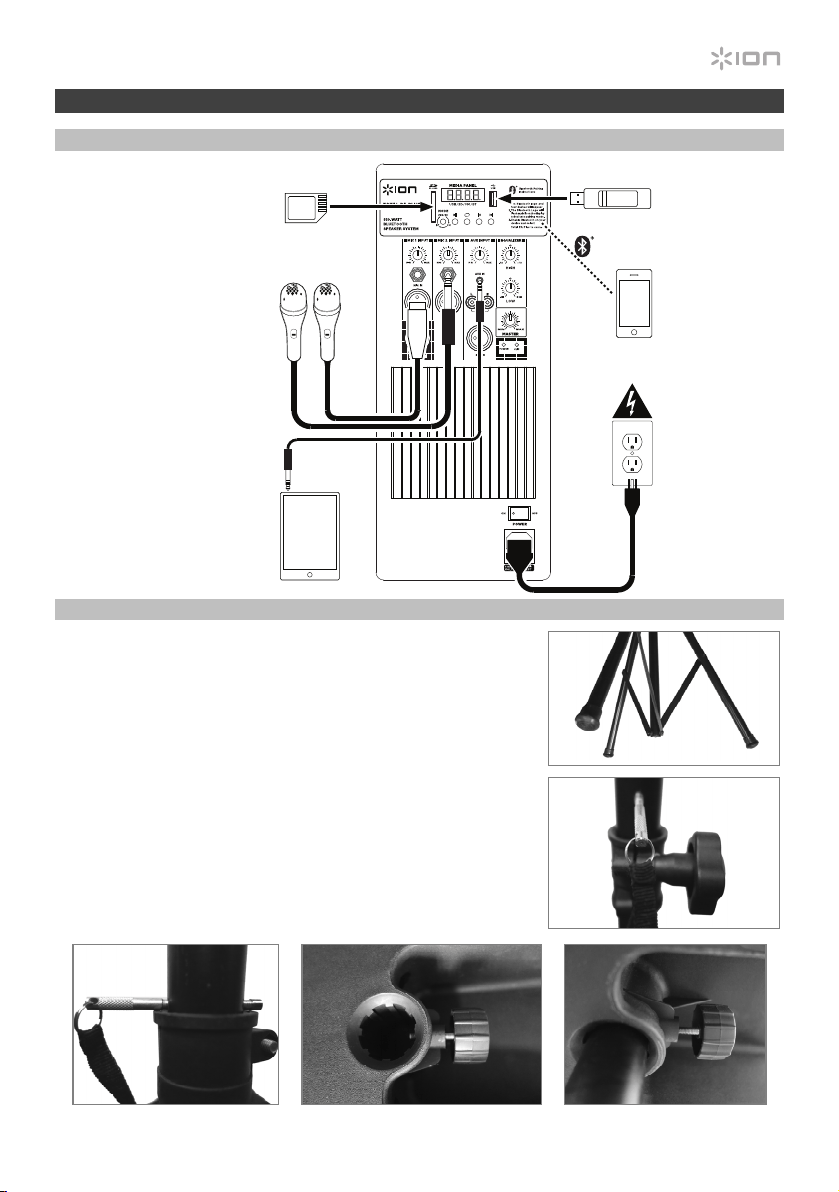
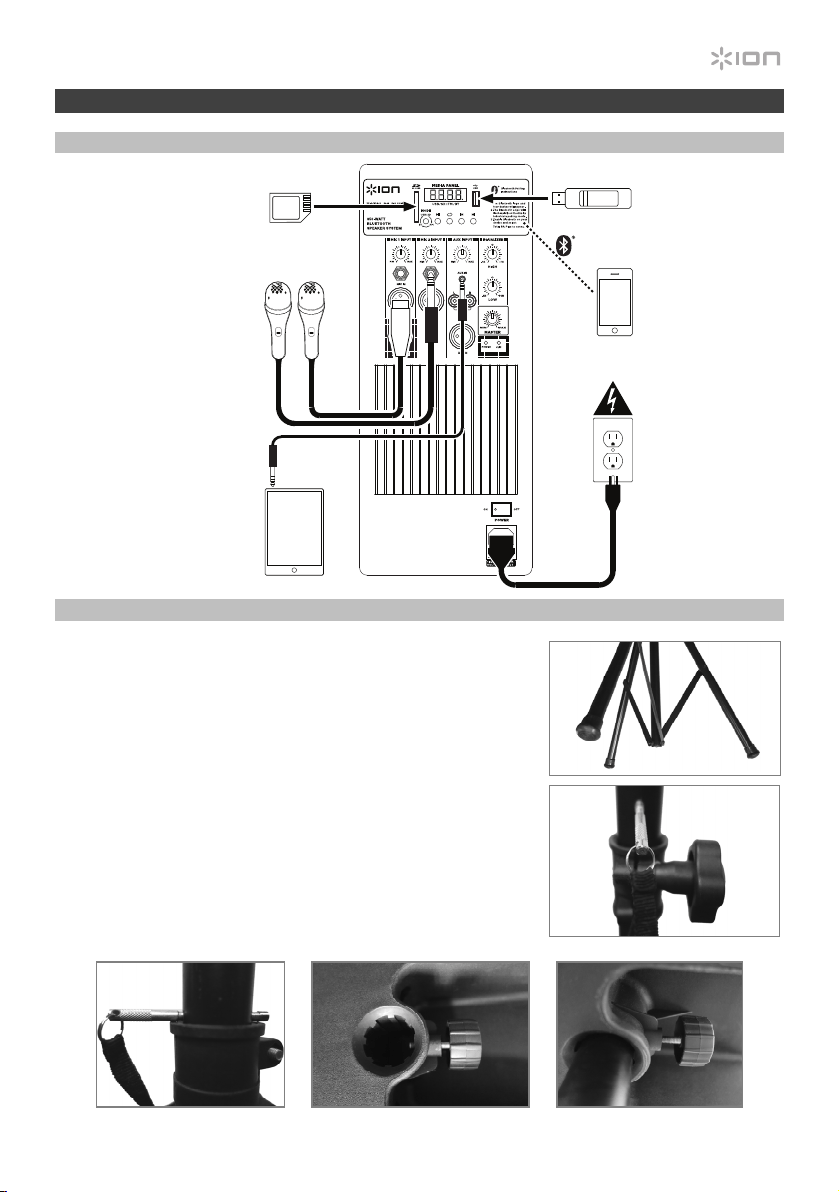
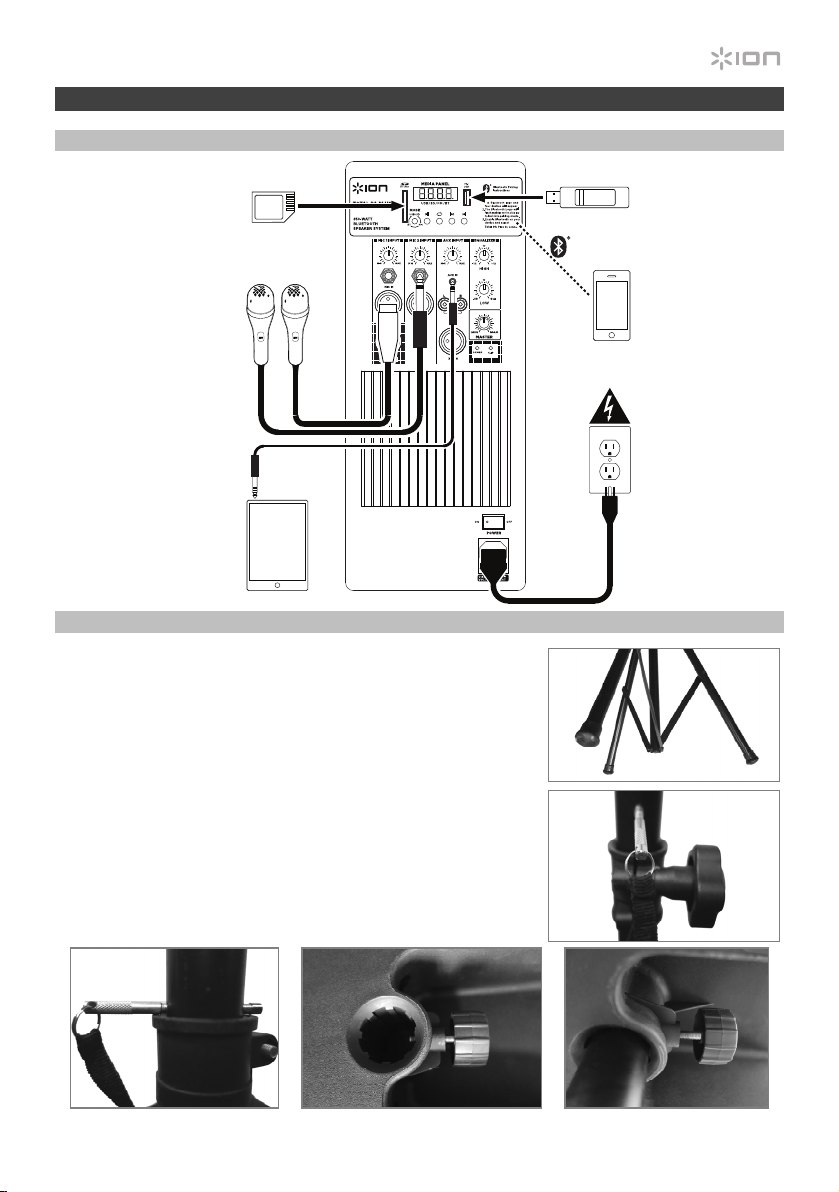
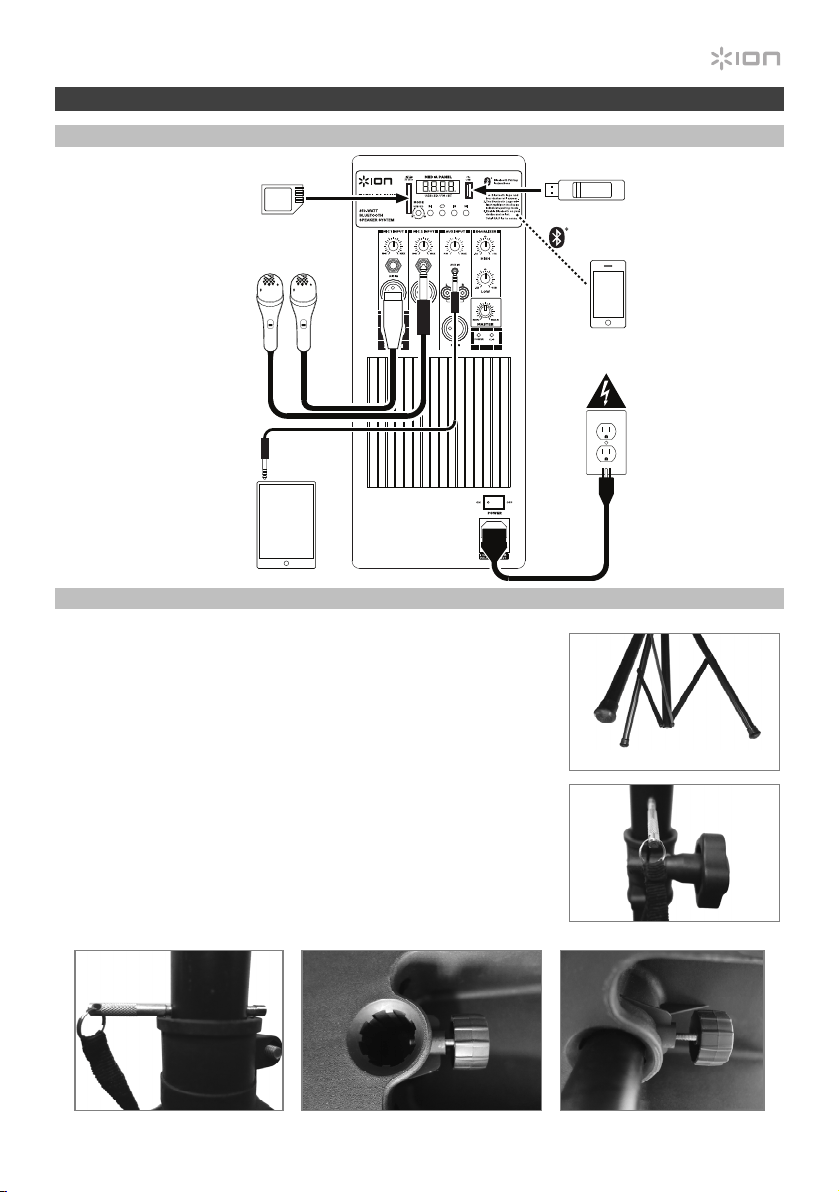
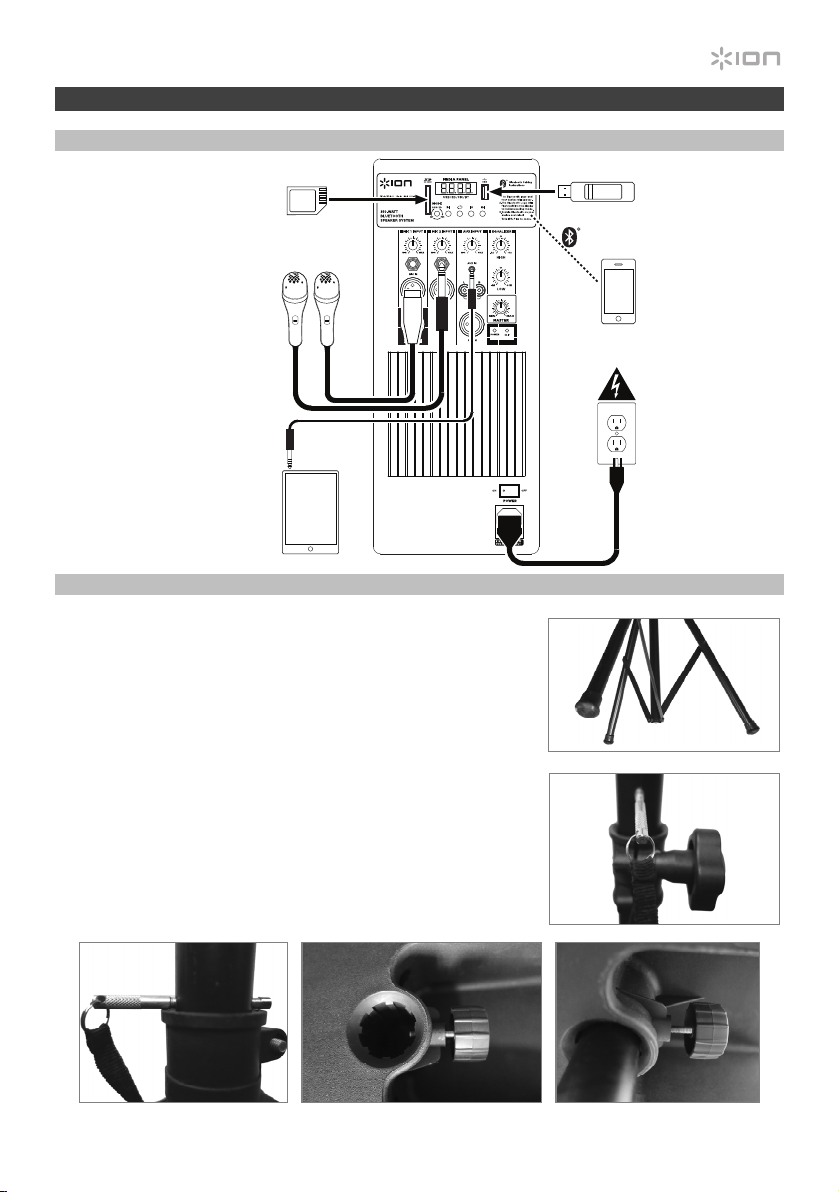
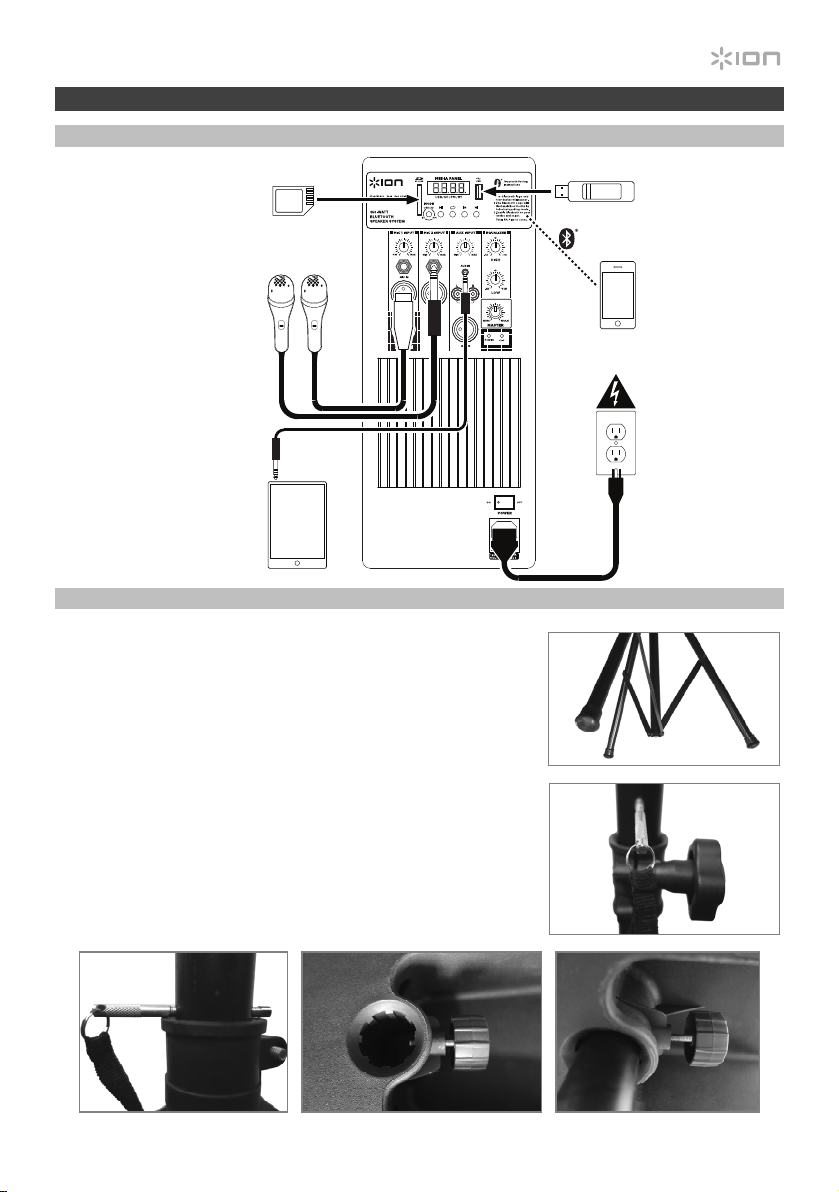
Connection Diagram
Speaker Stand Installation
1. Fully extend the speaker stand tripod legs on a flat, stable
surface. Look in the box contents under the foam sheet for the
rubber feet and speaker stand mounting knob.
2. Raise the mounting pole up to the appropriate height needed
and tighten the side adjustment knob.
3. Insert the pin into the bottom pin-hole so the mounting pole
stays at your set height.
4. On Total PA Plus, adjust the bottom knob counter-clockwise
so the screw is not blocking the opening.
5. Line up the Total PA Plus mounting hole with the speaker stand
pole and place on the pole.
6. Tighten the mounting knob clockwise on Total PA Plus.
3 45/6
Items not listed under
Introduction > Box Contents
are sold separately.
2
1
Tablet
Microphones
SD Card
USB drive
Smartphone
Power
4
Features
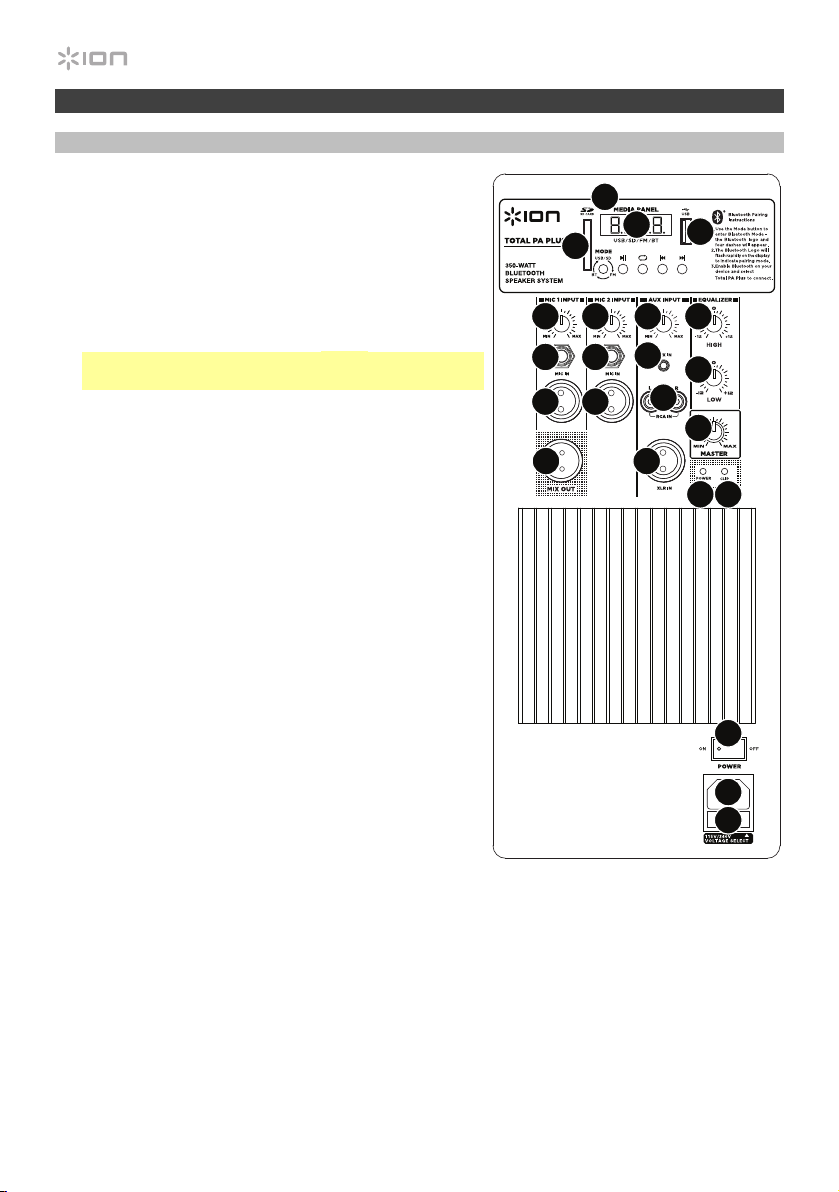
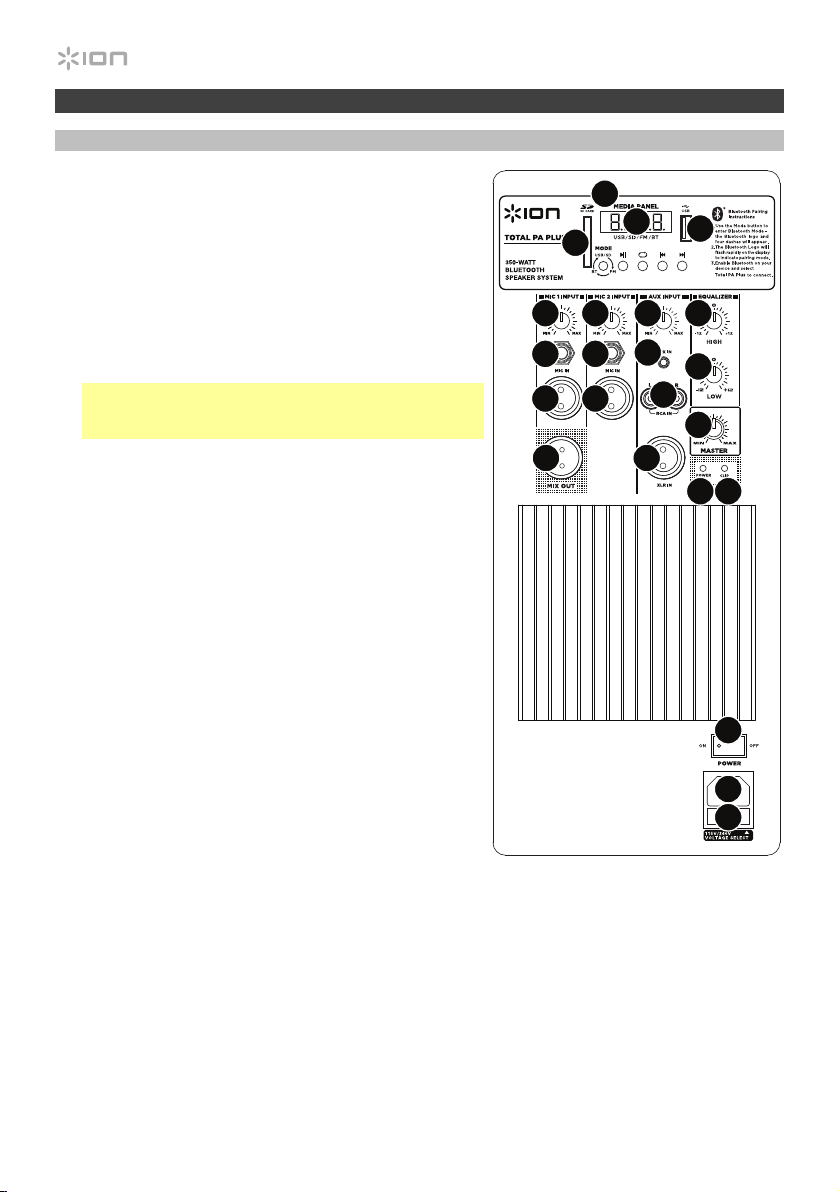
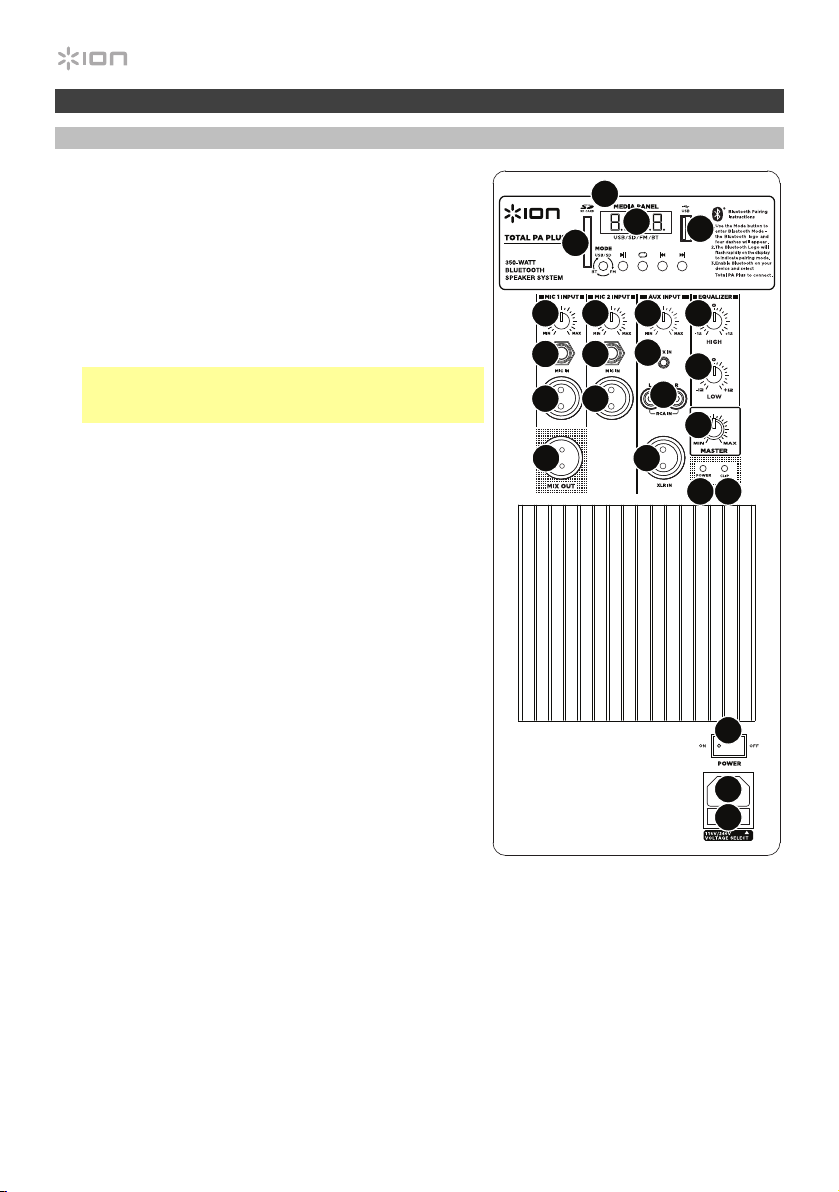
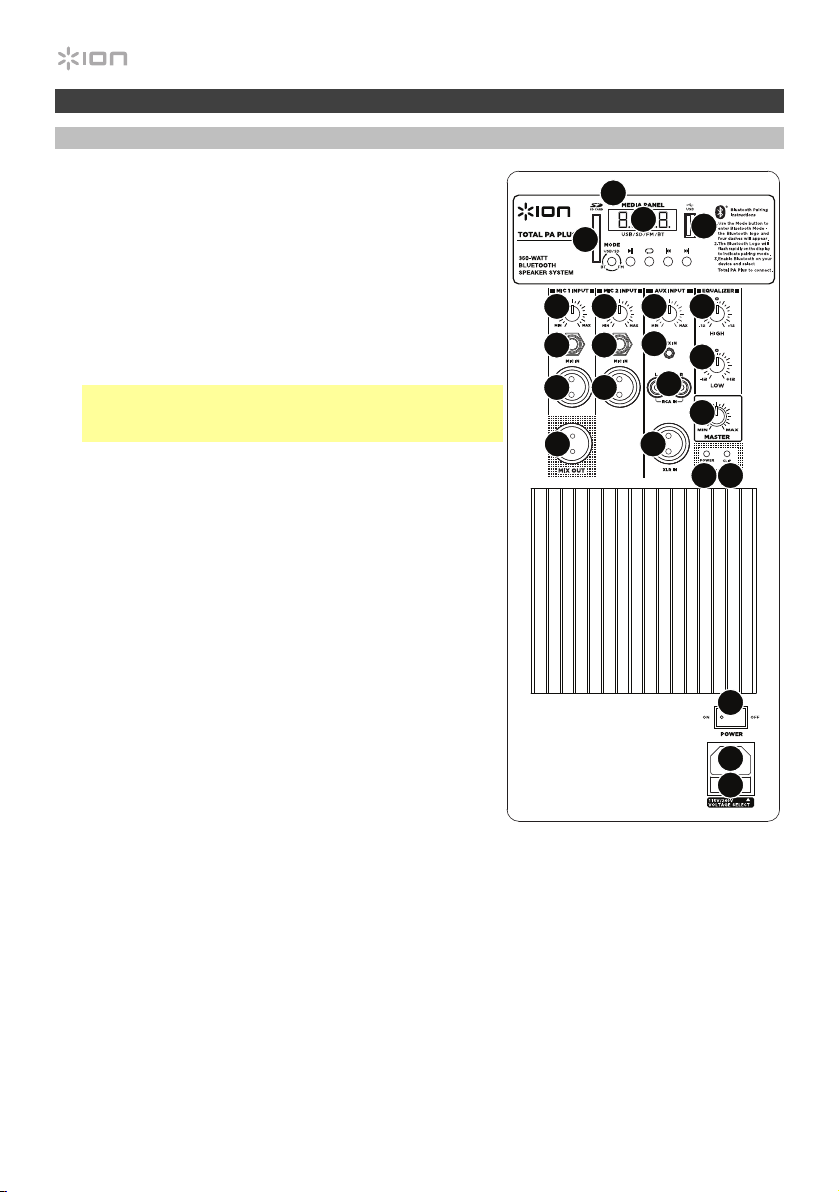
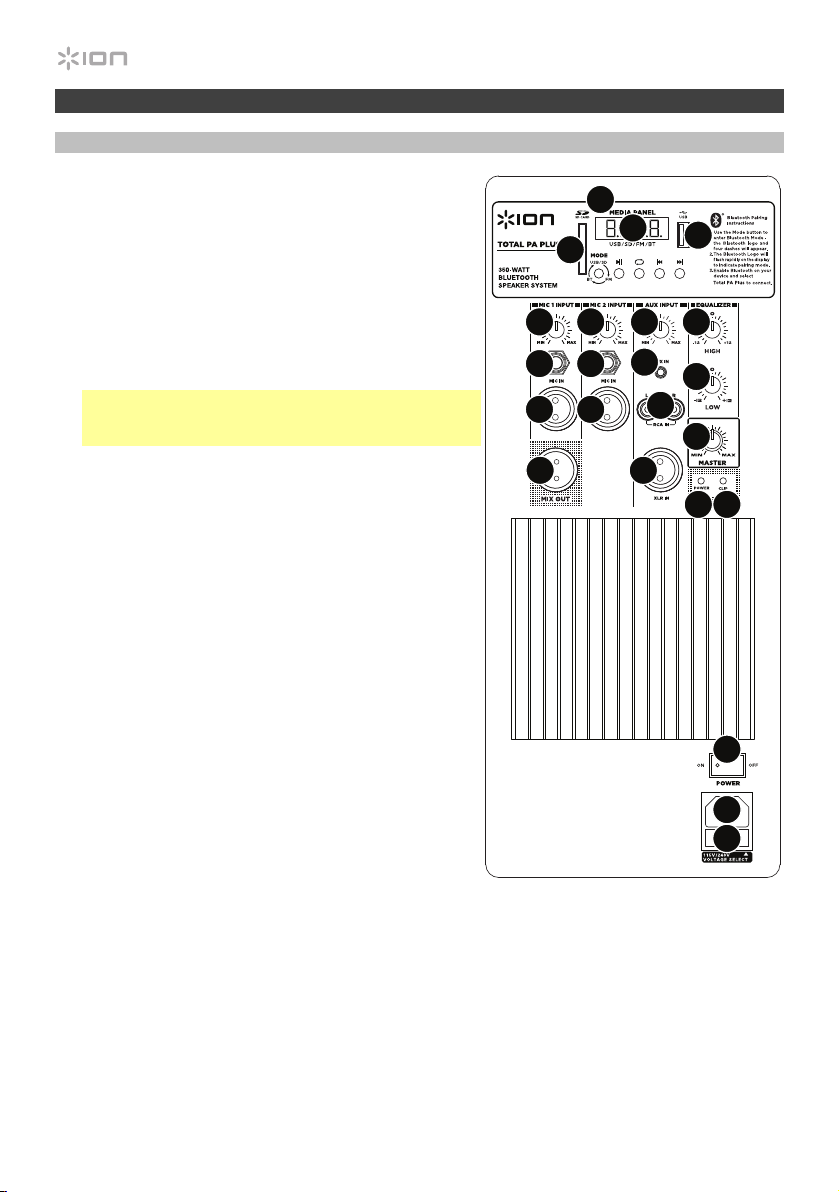
Rear Panel
1. Media Panel: Controls for the Bluetooth, SD, USB,
and FM radio sources. The Media Panel Mode source
symbol will illuminate when that source is playing.
2. USB Port: Connect your USB flash drive to play music.
3. SD Card Slot: Insert your SD card here.
4. LED Display: Displays the media panel modes for
Bluetooth, FM radio, USB and Aux.
Note: The display comes with a plastic protector on it.
Remove this for optimal viewing.
5. Mic Input (1/4”/6.35 mm & XLR): Connect a dynamic
microphone to the 1/4” (6.35 mm) or XLR inputs.
Control the volume of the inputs using the Mic Input
Volume knobs.
6. Mic Input Volume: Turn this knob to adjust the input
volume of the mic input.
7. Aux Input (1/8”/3.5 mm): Connect a CD player, digital
media player, or other audio source to this 1/8” (3.5
mm) stereo auxiliary input. Control the volume using
the Aux Input Volume knob.
8. XLR Input (XLR): Connect a line-level mixer or musical
instrument to this XLR line-level input. Control the
volume using the Aux Input Volume knob. Use this line-
level input when linking together two Total PA Plus units.
9. RCA Inputs: Connect a CD player, digital media
player, mixer, or other media source to these inputs.
Control the volume using the Aux Input Volume knob.
10. Aux Input Volume: Turn this knob to adjust the input
volume of the Aux input, XLR input, and RCA inputs.
11. Mix Out (XLR): Connect this XLR output to another
active (powered) speaker. The level of the output is
controlled by the Mic Input Volume, Aux I
nput
Volume, and Master Volume.
12. High EQ: Increases or decreases the high (treble) frequencies for mic inputs, line input, and
media panel sources at a range between -12dB to + 12dB.
13. Low EQ: Increases or decreases the low (bass) frequencies for Mic Input, Line Input, and media
panel sources at a range between -12dB to + 12dB.
14. Power LED: Indicates whether Total PA Plus is powered on or off.
15. Clip LED: This LED will flash red if the signal from the inputs or media panel source is clipping. If
this happens, decrease the setting of the Mic Input Volume knob, Aux Input Volume knob, or
Master Volume knob.
iPA69
1
2
3
4
5
5
5
9
8
5
7
10
11
12
13
14 15
17
18
19
16
66
5
16. Master Volume: Turn this knob to adjust the overall output volume of the loudspeaker.
17. Power Cable Input (IEC): Insert the included power cable here to power the unit.
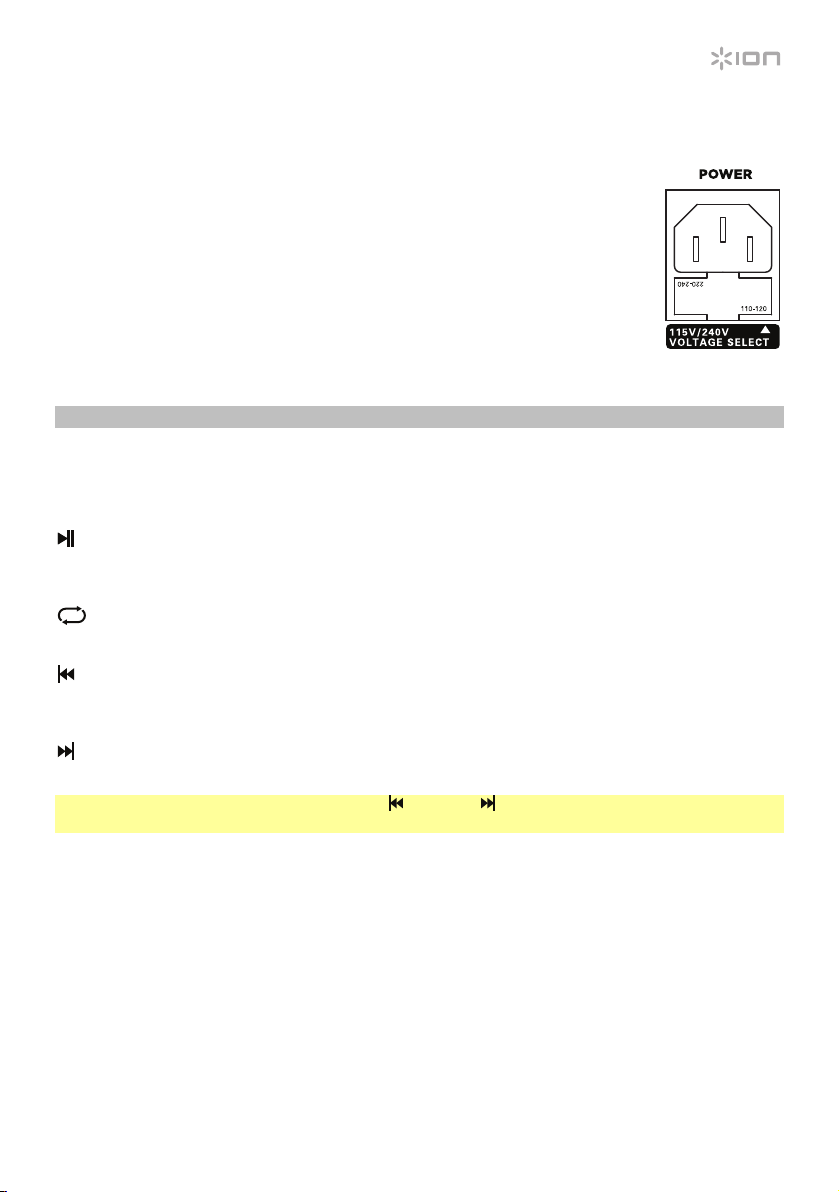
18. Fuse: The orientation of the fuse holder determines the current voltage setting
of Total PA Plus. The current setting is shown above the white triangle ():
110–120 V or 220–240 V. If you use Total PA Plus in a region with a different
voltage, change the voltage setting by removing the fuse holder, inverting it,
and reinserting it.
If the unit’s fuse is broken, remove the fuse holder and replace the broken fuse
with one with the same rating (printed on the fuse holder). Using a fuse with an
incorrect rating can damage the unit and/or fuse.
19. Power Switch: Turns Total PA Plus on or off.
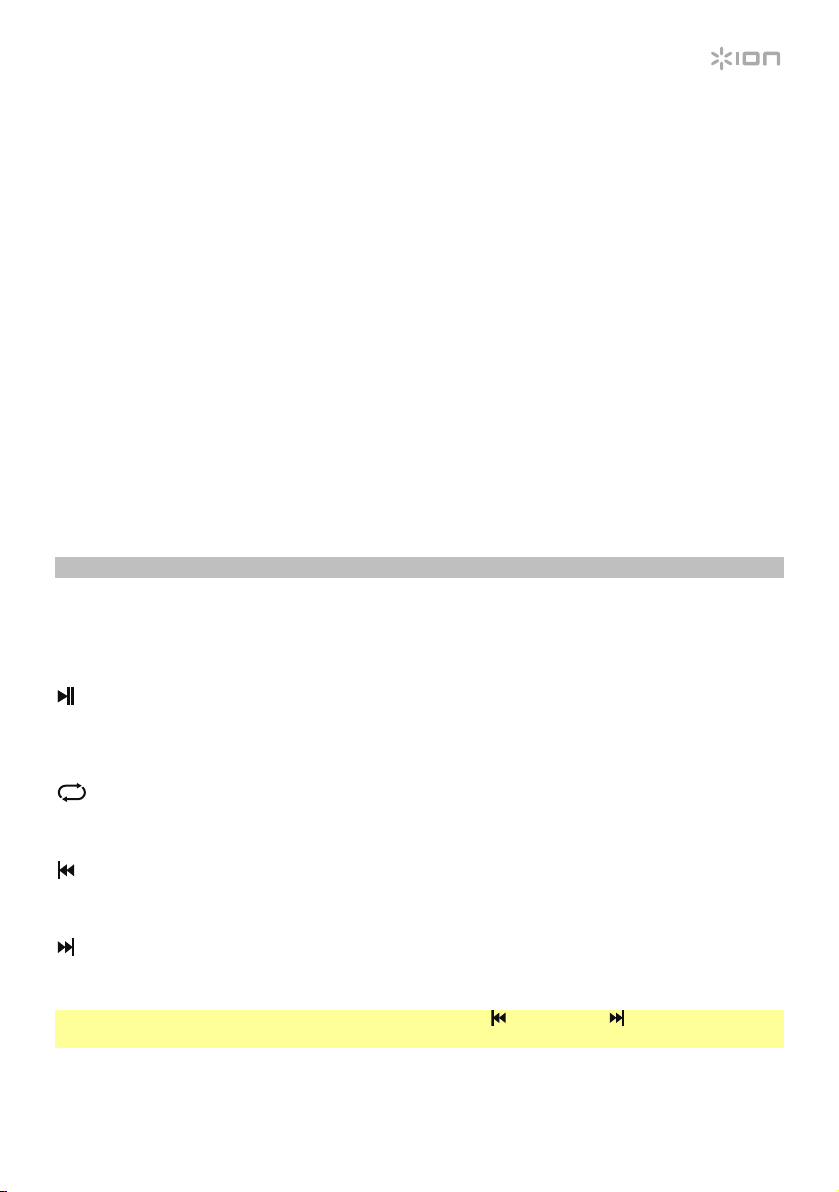
Media Panel
Media Panel Functions:
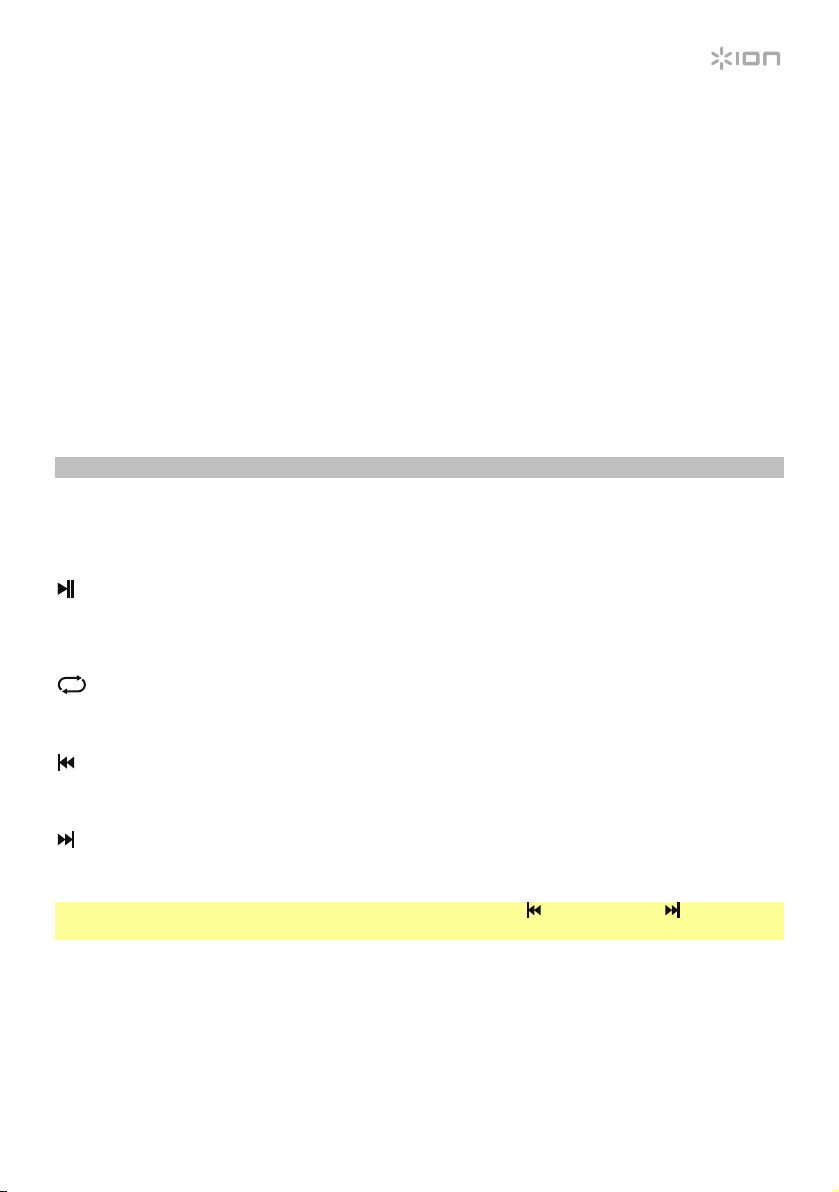
MODE Mode: Switches modes from Bluetooth, FM radio, SD, USB, and Aux.
Play/Pause: Play/pause the USB, SD, or Bluetooth source. Press and hold Play/Pause for 2
seconds to begin the preset auto-store function. This jumps to the lowest station (87.5) and
then travels through the bandwidth to auto-store the strongest stations as presets.
Repeat: Repeat all of the tracks (ALL), repeat all of the tracks in the folder (FoLd), repeat the
current playing USB or SD track (ONE), or shuffle the track order (rAn).
Previous: Navigates through USB and SD tracks. Plays the previous USB, SD, or Bluetooth
track, or tunes the radio down one preset when pressed once. Hold the button down to seek
back through radio stations.
Next: Plays the next USB, SD, or Bluetooth track, or tunes the radio up one preset when
pressed once. Hold the button down to seek forward through radio stations.
Note: In some apps, pressing the Previous ( ) or Next ( ) buttons may go to another playlist or
music genre.
6
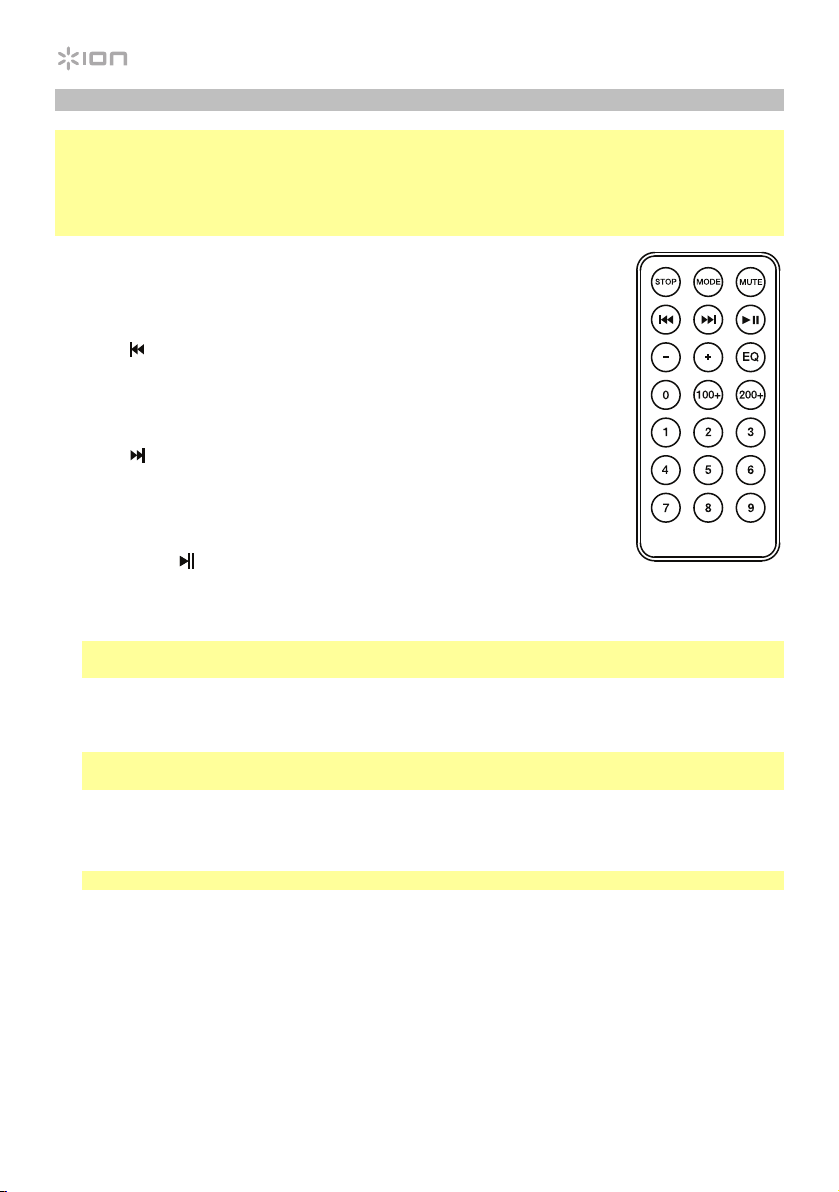
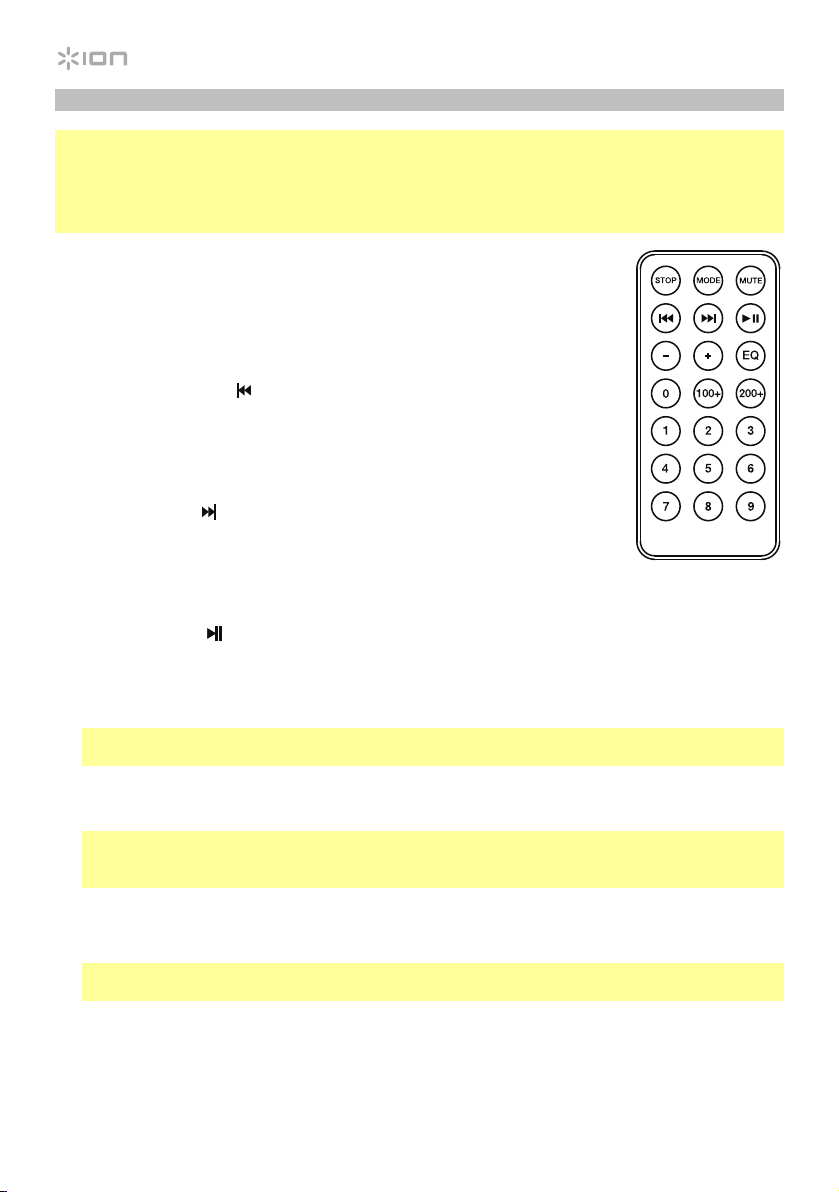
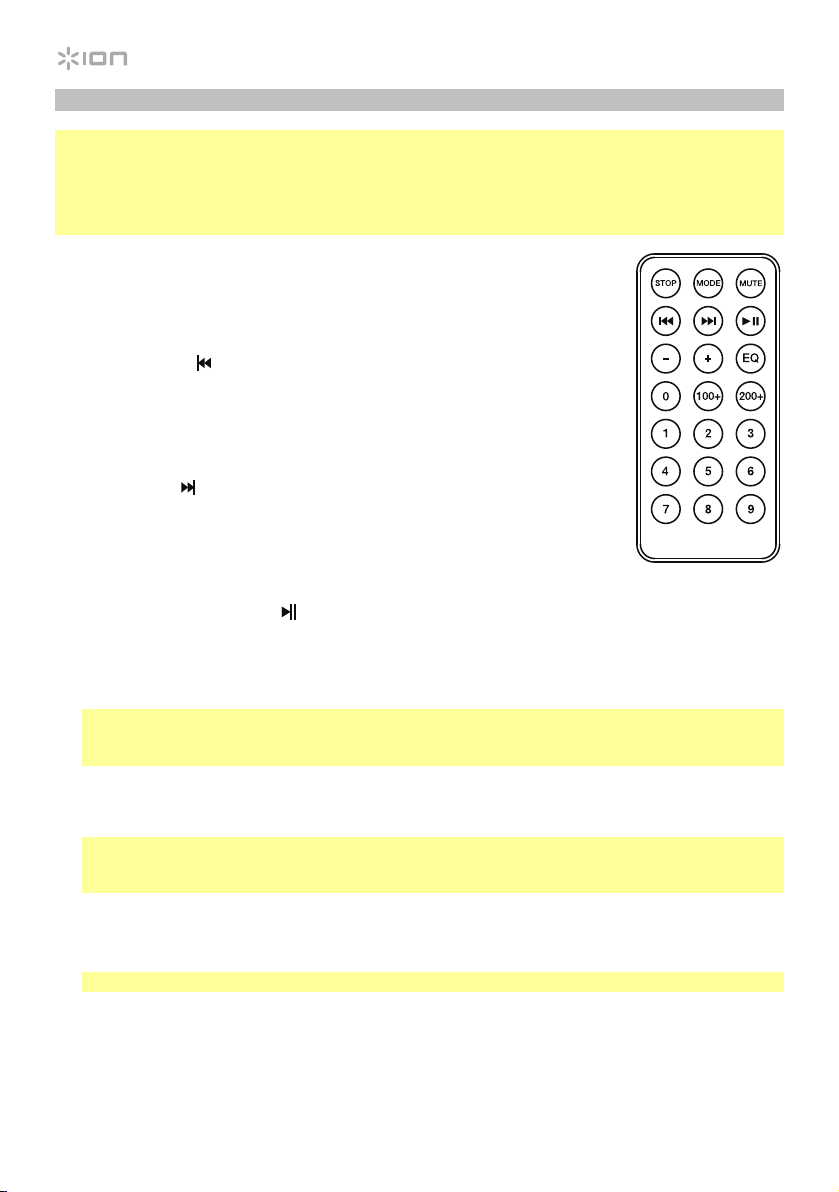
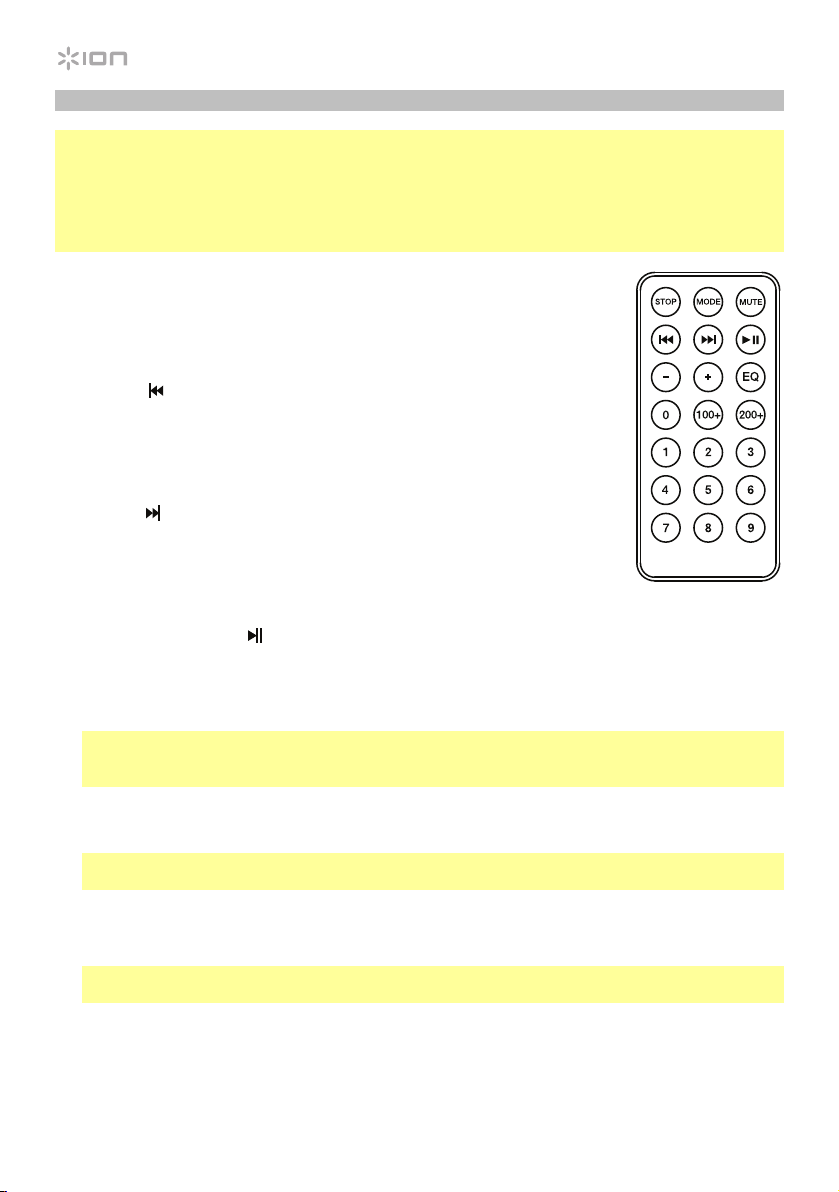
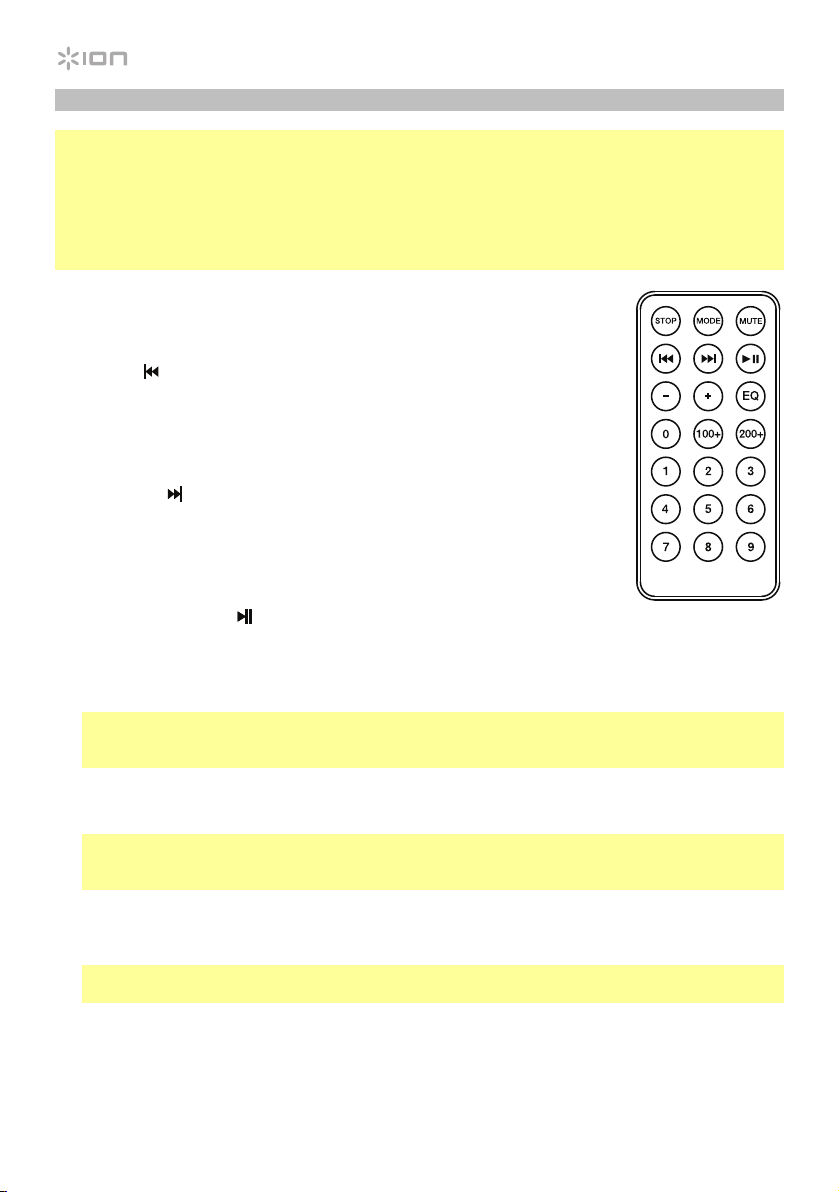
Media Panel Remote
Note: Aim the remote straight at the front of the speaker woofer. Room lighting and battery life can
affect the operating range of the remote control.
Note: In order to use the remote control for the first time, first pull out the tab attached to the battery
compartment. To change the remote battery, follow the diagram located on the back of the remote.
Use a 3V DC CR2032 lithium button cell battery for replacement.
1. Stop: Stops the media panel source from playing.
2. Mode: Selects the media panel source: USB, SD, Bluetooth, or FM radio.
3. Mute: Silences the music playback on media panel sources.
4. Prev (
): Goes to the previous USB or SD card track. When listening to
Bluetooth sources, pressing Prev in some apps may go to another playlist
or music genre. When listening to the FM radio, press the Prev button once
to skip back through the FM stations and hold the button down to seek
back through the channel presets.
5. Next (
): Advances to the next USB or SD card track. When listening to
Bluetooth sources, pressing Next in some apps may go to another playlist
or music genre. When listening to the FM radio, press the Next button once
to tune the radio down one preset and hold the button down to seek
forward through the channel presets.
6. Play/Pause (
): Plays or pauses the USB, SD, or Bluetooth media panel
source. Press and hold Play/Pause for 2 seconds to begin the preset auto-
store function. This jumps to the lowest station (87.5) and then travels
through the FM band to auto-store the strongest stations as presets.
Note: Files are played from the USB or SD source first by alphabetical order of what is on the
root level, then alphabetical by folder, and then alphabetical by the track name.
7. Vol –: Decreases the media panel source volume.
8. Vol +: Increases the media panel source volume.
Note: The remote volume only affects the media panel source and works together with the
physical media panel volume knob on the unit’s rear panel.
9. EQ: Selects one of the following digital EQ presets to use with a media panel source: Bass (BAS),
Pop (POP), Vocal (VOC), Jazz (JA2), Classical (CLA), Country (COU), No EQ (OFF, factory default
setting).
Note: The digital EQ only works for Bluetooth, USB flash drive, and SD card sources.
10. 100+: Jumps ahead by 100 tracks.
11. 200+: Jumps ahead by 200 tracks.
12. Number Keys: Provides channel selection for FM radio stations, and track selection for USB/SD
card sources.

7
Pairing a Bluetooth Device
1. Turn on your Bluetooth device.
2. Power on Total PA Plus.
3. Select Bluetooth Mode which appears as _ _ _ _
using the Mode button and Total PA Plus will
go into pairing mode to search for Bluetooth devices.
4. Navigate to your Bluetooth device’s setup screen, find Total PA Plus, and connect.
Note: Users should consider updating their device’s OS if experiencing trouble with pairing or
playing music.
To disconnect pairing, turn off Bluetooth on your device or select Forget this device from your
device.
Troubleshooting
If the sound is distorted: Try lowering the volume control of your sound source or musical
instrument. Also, try to reduce the overall volume of Total PA Plus.
If there is too much bass: Try adjusting the tone or EQ control from Total PA Plus or your sound source
to lower the bass level. This will allow you to play the music louder before clipping (distortion) occurs.
If there is a high-pitched whistling noise when using a microphone: This is probably feedback.
Point the microphone away from the speaker.
If you can’t hear the microphone over the music volume: Turn down the music volume from your
source.
When I press Previous (
) or Next ( ), it doesn’t increment to the next FM station: Short
presses of the button will jump to presets. Hold the button down to seek to the next station.
If the radio station channel is flashing: The unit is currently muted. Unmute to stop the flashing
and resume playback.
If the Bluetooth logo is flashing rapidly: The unit is currently in pairing mode.
If the Bluetooth logo is flashing slowly: A device is paired, but the music is muted. Unmute to stop
the flashing and resume playback.
The USB track number (Example: 001) is flashing slowly: The USB drive music playback is muted.
Unmute to stop the flashing and resume playback.
The LCD shows “NONE”: The unit is in USB/SD mode, but there is no USB drive attached or no SD
card inserted.

8
Guía de inicio rápido (Español)
Introducción
1. Asegúrese de que todos los artículos indicados en Contenido de la caja estén incluidos en ella.
Localice las patas de goma del soporte del altavoz, la perilla de montaje del soporte del altavoz,
el cable de alimentación y el micrófono en la caja bajo la hoja de espuma de poliestireno.
2. Lea el folleto de instrucciones de seguridad antes de utilizar el producto.
3. Estudie el diagrama de conexión.
4. Asegúrese de que todos los dispositivos de entrada tales como micrófonos y reproductores de
CD o reproductores de otros medios digitales estén apagados y con el control de volumen en
“cero”.
5. Conecte todos los dispositivos como se muestra.
6. Encienda todo en el siguiente orden:
• fuentes de entrada de audio (por ejemplo, micrófonos, instrumentos, reproductores de CD)
• Total PA Plus
7. Al apagar, realice siempre esta operación en forma inversa:
• Total PA Plus
• cualquier otro dispositivo de entrada
Contenido de la caja
Total PA Plus
Micrófono con cable de micrófono
Soporte de altavoz telescópico
Control remoto
Cable de corriente (IEC)
Guía de inicio rápido
Folleto de instrucciones de seguridad e información sobre la garantía
Soporte
Para obtener la información más completa acerca de este product (los requisitos del sistema,
compatibilidad, etc) y registro del producto, visite ionaudio.com.
Precaución: No exponga el Total PA Plus a lluvia ni lo coloque en agua.
9
iPA69
Instalación rápida
Diagrama de conexión
Instalación del soporte de altavoz
1. Extienda completamente las patas del trípode del soporte del
altavoz sobre una superficie plana y estable. Localice las patas
de goma y la perilla de montaje del soporte del altavoz en los
contenidos de la caja bajo la hoja de espuma de poliestireno.
2. Extienda el poste de montaje hasta la altura necesaria y apriete
la perilla de ajuste del costado.
3. Inserte la clavija en el orificio inferior de manera que el poste de
montaje permanezca a la altura necesaria.
4. En el Total PA Plus, ajuste la perilla inferior en el sentido
contrario a las agujas del reloj de manera tal que el tornillo no
bloquee la apertura.
5. Alinee el orificio de montaje del Total PA Plus con el poste del
soporte del altavoz y colóquelo en el poste.
6. Apriete la perilla de montaje en el Total PA Plus en el sentido
de las agujas del reloj.
3 45/6
2
1
Los elementos que no se
enumeran en Introducción >
Contenido de la caja se
venden por separado.
Tableta
Micrófonos
Tarjeta SD
Unidad flash
USB
Teléfono
inteligente
(smartphone)
Alimentación
10
Características
Panel trasero
1. Panel de medios: Controles para fuentes de
Bluetooth, SD, USB y radio FM radio. El símbolo de
fuente del modo panel de medios se iluminará cuando
se esté reproduciendo esa fuente.
2. Puerto USB: Conecte su unidad flash USB para
reproducir música.
3. Ranura para tarjeta SD: Inserte su tarjeta SD aquí.
4. Pantalla: Muestra los modos del panel de medios para
Bluetooth, radio FM, USB y auxiliar.
Nota: La pantalla viene con un protector de plástico
adherido. Quítelo para visualizar el LCD de manera
óptima.
5. Entradas micrófono (6,35 mm/1/4 pulg. y XLR):
Conecte un micrófono dinámico a las entradas de XLR
o 6,35 mm (1/4 pulg.). Controle el volumen de las
entradas XLR y 6,35 mm (1/4 pulg.) mediante la perilla
de volumen de entradas micrófono.
6. Volumen de entradas micrófono: Gire esta perilla
para ajustar el volumen de las entradas micrófono.
7. Entrada auxiliar (3,5 mm/1/8 pulg.): Conecte a esta
entrada auxiliar estéreo de 3,5 mm (1/8 pulg.) un
reproductor de CD, un reproductor de medios digitales
u otra fuente de audio. Controle el volumen de salida
mediante la perilla de volumen de entrada auxiliar.
8. Entrada línea (XLR): Conecte un nivel de línea
mezclador o instrumento musical a esta entrada XLR
de nivel de línea. Controle el volumen de la salida
mediante la perilla volumen de entrada auxiliar.
Utilice esta entrada de nivel de línea para vincular dos
unidades Total PA Plus entre sí.
9. Entradas RCA: Conecte a estas entradas un
reproductor de CD, un reproductor de medios
digitales, un mezclador u otras fuentes de medios.
Controle el volumen de salida mediante la perilla
volumen de entrada auxiliar.
10. Volumen de entrada auxiliar: Gire esta perilla para ajustar el volumen de la entrada auxiliar, la
entrada línea y las entradas RCA.
11. Salida de mezcla (XLR): Conecte esta salida XLR a otro altavoz activo (alimentado). El nivel de
esta salida se controla mediante el ajuste de volumen de entradas micrófono, volumen de
entrad
a auxiliar y volumen maestro.
iPA69
1
2
3
4
5
5
5
9
8
5
7
10
11
12
13
14 15
17
18
19
16
66
11
12. Ecualización de agudos: Aumenta o disminuye las frecuencias altas (agudos) para las entradas
micrófono y línea y las fuentes del panel de medios en un rango entre -12 dB y +12 dB.
13. Ecualización de graves: Aumenta o disminuye las frecuencias bajas (graves) para las entradas
micrófono y línea y las fuentes del panel de medios en un rango entre -12 dB y +12 dB.
14. LED de encendido: Indica si el Total PA Plus está encendido o apagado.
15. LED de recorte: Este LED destella con luz roja si la señal de las entradas o de la entrada del
panel de medios se está recortando. Si este ocurre, disminuya el ajuste de las perillas de
volumen de entradas micrófono, volumen de entrada auxiliar o volumen maestro.
16. Volumen maestro (Master Volume): Gire esta perilla para ajustar el volumen de salida del
altavoz Total PA Plus.
17. Entrada del cable de corriente (IEC): Inserte aquí el cable de corriente incluido para alimentar
la unidad.
18. Fusible: Si el fusible de la unidad está roto, levante esta lengüeta para reemplazar el fusible.
Reemplácelo por un fusible con especificación apropiada (impresa debajo de la entrada del
cable de alimentación de la unidad). Si utiliza un fusible de especificación incorrecta, puede
dañarse la unidad y/o el fusible.
19. Interruptor de encendido/apagado: Enciende y apaga el Total PA Plus.
Panel de medios
Funciones del panel de medios:
MODE Modo: Conmuta entre los modos Bluetooth, radio FM, SD, USB y Aux.
Reproducir/Pausa: Reproducir/hacer pausa en la fuente USB, SD o Bluetooth. Mantenga
pulsado reproducir/pausa durante 2 segundos para iniciar la función de autoguardado del
preset. Esto salta hasta la estación más baja (87,5) y avanza por la banda de FM para
guardar las estaciones más fuertes como presets.
Repetir: Repetir todas las pistas (ALL), repetir todas las pistas en la carpeta (FoLd), repetir
la pista USB o SD que está sonando actualmente (ONE) o entremezclar el orden de los
temas (rAn).
Anterior: Navega a través de las pistas de USB y SD. Reproduce la pista de USB, SD o
Bluetooth anterior o sintoniza el preset de radio anterior cuando se lo pulsa una vez.
Mantenga pulsado el botón para recorrer las estaciones de radio hacia atrás.
Siguiente: Reproduce la pista de USB, SD o Bluetooth siguiente o sintoniza el preset de
radio siguiente cuando se lo pulsa una vez. Mantenga pulsado el botón para recorrer las
estaciones de radio hacia adelante.
Nota: En algunas aplicaciones, pulsar los botones Anterior ( ) o Siguiente ( ) hará que vaya a otra
lista de reproducción o género musical.

12
Control remoto del panel de medios
Nota: El símbolo de fuente del modo panel de medios se iluminará cuando se esté reproduciendo
esa fuente. La iluminación de la sala y la vida útil de la pila pueden afectar al alcance operacional del
control remoto.
Nota: A fin de usar el control remoto por primera vez, extraiga primero la lengüeta fijada al
compartimiento de las pilas. Para cambiar la batería del control remoto, siga el diagrama ubicado en
el reverso del mismo. Utilice una pila de celda tipo botón de litio CR2032 de 3V CC como reemplazo.
1. Detener: Detiene la reproducción de la fuente del panel de medios.
2. Modo: Selecciona la fuente del panel de medios: USB, SD, Bluetooth o
radio FM.
3. Silenciar: Silencia la reproducción de música de las fuentes del panel de
medios.
4. Anterior (
): Retrocede a la pista anterior del USB o tarjeta SD. Al
escuchar de fuentes Bluetooth, pulsar Anterior en algunas aplicaciones
puede hacer que vaya a otra lista de reproducción o género musical.
Cuando escucha radio FM, pulse el botón Anterior una vez para saltar por
las estaciones de radio FM hacia atrás y mantenga este botón pulsado
para recorrer los presets de canales hacia atrás.
5. Siguiente (
): Avanza a la pista siguiente del USB o tarjeta SD. Al
escuchar de fuentes Bluetooth, pulsar Siguiente en algunas aplicaciones
puede hacer que vaya a otra lista de reproducción o género musical.
Cuando escucha radio FM, pulse el botón Siguiente una vez para saltar
por las estaciones de radio FM hacia adelante y mantenga este botón
pulsado para recorrer los presets de canales hacia adelante.
6. Reproducción/Pausa (
): Reproduce/hace pausa en la fuente de USB, SD o Bluetooth del
Media Panel. Mantenga pulsado reproducir/pausa durante 2 segundos para iniciar la función de
autoguardado del preset. Esto salta hasta la estación más baja (87,5) y avanza por la banda de
FM para guardar las estaciones más fuertes como presets.
Nota: Los archivos se reproducen desde la fuente USB o SD primero alfabéticamente según el
contenido de la raíz, luego alfabéticamente según la carpeta y luego alfabéticamente según el
nombre de la pista.
7. Volumen –: Disminuye el volumen de la fuente del panel de medios.
8. Volumen +: Aumenta el volumen de la fuente del panel de medios.
Nota: El volumen del control remoto solo afecta la fuente del panel de medios y funciona junto
con la perilla de volumen físico del panel de medios en el panel trasero de la unidad.
9. Ecualizador: Selecciona uno de los siguiente presets de ecualizador digital para utilizar con una
fuente del panel de medios: Graves (BAS), Pop (POP), Vocal (VOC), Jazz (JA2), Clásica (CLA),
Country (COU), Sin ecualización (OFF, ajuste predeterminado de fábrica)
Nota: El ecualizador digital solamente funciona para fuentes Bluetooth, unidades de memoria
USB y tarjetas SD.
10. 100+: Saltar 100 pistas hacia adelante.
11. 200+: Saltar 200 pistas hacia adelante.
12. Teclas numéricas: Permite la selección de canales para estaciones de radio FM y la selección
de pistas para fuentes de tarjeta SD/USB.

13
Apareamiento de un dispositivo Bluetooth
1. Encienda su dispositivo Bluetooth.
2. Encienda el Total PA Plus.
3. Seleccione el modo Bluetooth que aparece como _ _ _ _
utilizando el botón Mode y el Total PA
Plus se pondrá en modo de apareamiento para buscar dispositivos Bluetooth.
4. Navegue a la pantalla de configuración de su dispositivo Bluetooth, busque Total PA Plus y
conecte.
Nota: Los usuarios deben considerar la actualización del sistema operativo (OS) de su
dispositivo si experimentan problemas con el apareamiento o la reproducción de música.
Para desconectar el apareamiento, apague el Bluetooth de su dispositivo o seleccione Olvidar
este dispositivo (Forget this device) en su dispositivo.
Solución de problemas
Si el sonido está distorsionado: Pruebe bajando el control de volumen de su fuente de sonido o
instrument musical. Pruebe también reduciendo el volumen general del Total PA Plus.
Si los graves son demasiado fuertes: Intente ajustando el control de tono o ecualización de su
Total PA Plus o fuente de sonido para reducir el nivel de graves. De esta forma podrá reproducir la
música con más volumen antes de que se produzca el recorte (distorsión).
Si hay un silbido agudo cuando se usa un micrófono: Probablemente sea realimentación. Apunte
el micrófono apartándolo del altavoz.
Si no puede oír el micrófono por arriba del volumen de la música: Disminuya el volumen de la
música en su fuente.
Cuando pulso Anterior (
) o Siguiente ( ) no pasa a la siguiente estación FM: Con pulsaciones
breves de este botón se salta a los presets. Mantenga pulsado este botón para buscar la estación
siguiente.
Si el canal de la estación de radio parpadea: la unidad está silenciada. Anule el silenciamiento
para detener el parpadeo y continuar la reproducción.
Si el logo Bluetooth parpadea rápidamente: la unidad está en modo de apareamiento.
Si el logo Bluetooth parpadea lentamente: el dispositivo está apareado, pero la música está
silenciada. Anule el silenciamiento para detener el parpadeo y continuar la reproducción.
El n° de pista USB (Por ejemplo: 001) parpadea lentamente: la reproducción de música de la unidad
USB está silenciada. Anule el silenciamiento para detener el parpadeo y continuar la reproducción.
Aparece “NONE” en el LCD: la unidad está en modo USB/SD, pero no hay ninguna unidad USB o
tarjeta SD insertada.

14
Guide d’utilisation rapide (Français)
Présentation
1. Assurez-vous que tous les articles énumérés dans le Contenu de la boîte de ce guide sont
inclus dans la boîte. Dans la boîte, sous la feuille de polystyrène se trouvent les pieds en
caoutchouc et le bouton du support de l’enceinte, le câble d’alimentation et le microphone.
2. Veuillez lire le livret des consignes de sécurité avant d’utiliser le produit.
3. Veuillez examiner le schéma de connexion.
4. Veuillez vous assurer que tous les appareils d’entrée tels que microphones, lecteurs de disques
compacts ou lecteurs multimédia numériques raccordés sont éteints et que leur volume est à
« zéro ».
5. Veuillez raccorder tous les appareils comme indiqué sur le schéma.
6. Mettez tous les appareils sous tension dans l’ordre suivant :
• sources d’entrée audio (p. ex., microphones, instruments, lecteurs de disques compacts)
• Total PA Plus
7. Pour mettre hors tension, toujours inversez l’opération :
• Total PA Plus
• sources d’entrée audio
Contenu de la boîte
Total PA Plus
Microphone avec câble
Support télescopique
Télécommande
Câble d’alimentation (IEC)
Guide d’utilisation rapide
Consignes de sécurité et information concernant la garantie
Assistance
Pour les dernières informations concernant ce produit (la configuration système minimale requise, la
compatibilité, etc) et l’enregistrement du produit, veuillez visitez le site ionaudio.com.
Mise en garde : Ne pas exposer le Total PA Plus aux intempéries ou reposer dans l’eau.
15
iPA69
Démarrage rapide
Schéma de connexion
Installation du support pour enceinte
1. Déployez entièrement les pieds du support sur une surface plate
et stable. Dans la boîte, sous la feuille de polystyrène se trouvent
les pieds en caoutchouc et le bouton du support de l’enceinte.
2. Allongez la perche télescopique du support à la hauteur
appropriée et serrez la vis latérale.
3. Introduisez la goupille dans le trou inférieur de la perche afin
qu’elle demeure à la hauteur désirée.
4. Serrez la vis inférieure de la Total PA Plus dans le sens
antihoraire afin qu’elle ne bloque pas l’ouverture.
5. Alignez le trou de fixation de la Total PA Plus à la perche du
support et placez l’enceinte sur la perche.
6. Serrez la vis de fixation de la Total PA Plus dans le sens horaire.
3 45/6
2
1
Les éléments qui ne figurent
pas dans Présentation >
Contenu de la boîte sont
vendus séparément.
Tablette
Microphones
Carte mémoire SD
Clé USB
Téléphone
intelligente
(smartphone)
Alimentation

16
Caractéristiques
Panneau arrière
1. Panneau des médias : Commandes pour les sources
Bluetooth, SD, USB et la radio FM. Le symbole du
panneau des médias s’allume lorsque cette source est
en cours de lecture.
2. Port USB : Ce port permet de brancher une clé USB
pour écouter de la musique.
3. Emplacement pour carte mémoire SD : Inserez une
carte SD dans cet emplacement.
4. Écran : Affiche les modes de fonctionnement de
l’enceinte : Bluetooth, radio FM, USB et auxiliaire.
Remarque : Un film de protection en plastique
recouvre l’écran. Retirez-le pour un affichage optimal.
5. Entrées microphone (6,35 mm et XLR) : Ces entrées
permettent de brancher un microphone
électrodynamique. Le volume des entrées XLR et
6,35 mm est commandé par le bouton volume des
entrées microphone.
6. Volume des entrées microphone : Ces commandes
permettent d’ajuster le volume des entrées du
microphone.
7. Entrée auxiliaire (3,5 mm) : Cette entrée stéréo
3,5 mm permet de brancher un lecteur de disques
compacts, un lecteur multimédia ou autres sources
audio. Le niveau de cette entrée est commandé par le
bouton volume d’entrée auxiliaire.
8. Entrée ligne (XLR) : Cette entrée à niveau ligne et XLR
permet de brancher une niveau ligne console de
mixage ou un instrument de musique. Le niveau de
cette entrée est commandé par le bouton volume
d’entrée auxiliaire. Utilisez cette entrée à niveau ligne
afin de relier deux enceintes Total PA Plus.
9. Entrées RCA : Ces entrées permettent de brancher un lecteur de disques compacts, un lecteur
multimédia, une console de mixage ou autres sources audio. Le niveau de ces entrées est
commandé par le bouton volume d’entrée auxiliaire.
10. Volume d’entrée auxiliaire : Cette commande permet d’ajuster le volume d’entrée auxiliare,
entrée ligne et entrées RCA.
11. Sortie mix (XLR) : Cette sortie XLR permet de brancher une autre enceinte amplifiée. Le volume
est commandé par les réglages volume des entrées microphone, volume d’entrée auxiliaire
et volume principal.
12. Égalisation des hautes fréquences : Augmente ou diminue les hautes fréquences pour les
sources des entrée
s microphone, ligne et panneau des médias entre -12 dB à +12 dB.
iPA69
1
2
3
4
5
5
5
9
8
5
7
10
11
12
13
14 15
17
18
19
16
66
17
13. Égalisation des basses fréquences : Augmente ou diminue les basses fréquences pour les
sources des entrées microphone, ligne et panneau des médias entre -12 dB à +12 dB.
14. Témoin d’alimentation DEL : Indique si l’enceinte Total PA Plus est sous ou hors tension.
15. Témoin d’écrêtage : En présence d’écrêtage du signal des entrées ou du panneau des médias,
le voyant DEL clignote. Pour remédier à l’écrêtage, diminuez le réglage des boutons volume des
entrées microphone, volume d’entrée auxiliaire et volume principal.
16. Volume principal : Cette commande permet d’ajuster le volume principal du haut-parleur Total
PA Plus.
17. Câble d’alimentation (IEC) : Branchez le câble d’alimentation inclus ici afin d’alimenter l’appareil.
18. Fusible : Si le fusible de l’appareil est endommagé, soulevez cette languette afin de remplacer le
fusible. Remplacez-le par un fusible de calibre approprié (imprimé sous l’entrée d’alimentation de
l’appareil). L’utilisation d’un fusible de calibre inapproprié pourrait endommager l’appareil et/ou le
fusible.
19. Interrupteur d’alimentation : Cet interrupteur met la Total PA Plus sous et hors tension.
Panneau des médias
Fonctions du panneau des médias :
MODE Mode : Permet de changer le mode de fonctionnement : Bluetooth, radio FM, carte SD, USB
et auxiliaire.
Lecture/Pause : Cette touche permet de lancer ou d’interrompe la lecture de la source
Bluetooth, USB ou de la carte SD. Maintenez la touche de lecture/pause pendant 2
secondes afin d’amorcer la fonction d’enregistrement automatique des stations préréglées.
Ceci permet de balayer la bande FM, en commencer par la station radio la plus basse (87,5),
afin d’enregistrer les stations ayant un signal plus fort.
Répéter : Cette touche permet de répéter toutes les pistes (ALL), toutes les pistes dans le
dossier (FoLd), la piste en cours (ONE), ou toutes les pistes de manière aléatoire (rAn) de la
source USB ou de la carte SD en cours de lecture.
Précédente : Cette touche permet de parcourir les pistes USB et SD. Cette touche permet
de faire jouer la piste USB, SD ou Bluetooth précédente, ou de passer au préréglage radio
précédent lorsqu’enfoncée une fois. Maintenez la touche enfoncée afin de parcourir les
stations de radio précédentes.
Suivante : Cette touche permet de faire jouer la piste USB, SD ou Bluetooth suivante, ou de
passer au préréglage radio suivant lorsqu’enfoncée une fois. Maintenez la touche enfoncée
afin de parcourir les stations de radio suivantes.
Remarque : Dans certaines applications, les touches piste précédente ( ) et piste suivante ( )
permettent de passer à la liste de lecture ou le genre de musique suivant ou précédent.
18
Télécommande du panneau des médias
Remarque : Pointez la télécommande vers le haut-parleur d’extrêmes graves de l’enceinte. L’éclairage
de la pièce et la charge de la pile peuvent affecter la plage de fonctionnement de la télécommande.
Remarque : Avant d’utiliser la télécommande pour la première fois, retirez la languette du
compartiment à pile. Pour changer la pile de la télécommande, suivez le schéma situé à l’arrière de
la télécommande. Utilisez une pile de rechange au lithium CR2032 de 3 V CC.
1. Stop : Cette touche permet d’arrêter la lecture de la source du panneau
des médias.
2. Mode : Cette touche permet de sélectionner la source du panneau des
médias : USB, SD, Bluetooth ou radio FM.
3. Mute : Cette touche permet de mettre en sourdine le signal audio des
sources du panneau des médias.
4. Piste précédente (
) : Cette touche permet de passer à la piste
précédente de la source USB ou de la carte SD. Sur des sources
Bluetooth, cette touche permet de passer à d’autres listes de lecture ou de
genre musical, selon l’application. Durant l’écoute de la radio FM, appuyer
une fois sur cette touche permet de passer à la station FM précédente et la
maintenir enfoncée permet de passer au canal préréglé précédent.
5. Piste suivante (
) : Cette touche permet de passer à la piste suivante de
la source USB ou de la carte SD. Sur des sources Bluetooth, cette touche
permet de passer à d’autres listes de lecture ou de genre musical, selon
l’application. Durant l’écoute de la radio FM, appuyer une fois sur cette
touche permet de passer à la station FM suivante et la maintenir enfoncée
permet de passer au canal préréglé suivant.
6. Lecture/Pause (
) : Cette touche permet de lancer ou d’interrompe la lecture de la source
Bluetooth, USB ou de la carte SD du panneau des médias. Maintenez la touche de
lecture/pause/d’appel-réponse pendant 2 secondes afin d’amorcer la fonction d’enregistrement
automatique des stations préréglées. Ceci permet de balayer la bande FM, en commencer par la
station radio la plus basse (87,5), afin d’enregistrer les stations ayant un signal plus fort.
Remarque : Les fichiers sont lus de la source USB et de la carte SD en ordre alphabétique, en
partant du répertoire racine, puis du dossier et ensuite par le nom de la piste.
7. Vol – : Cette touche permet de diminuer le volume de la source du panneau des médias.
8. Vol + : Cette touche permet d’augmenter le volume de la source du panneau des médias.
Remarque : Les commandes volume de la télécommande affectent uniquement le volume de la
source du panneau des médias et fonctionnent conjointement avec le bouton volume matériel du
panneau des médias du panneau arrière de l’appareil.
9. EQ : Cette touche permet de sélectionner un des préréglages d’égalisation numérique suivants à
utiliser avec une source du panneau des médias: Basses (BAS), Pop (POP), Voix (VOC), Jazz
(JA2), Classique (CLA), Country (COU), Aucune égalisation appliquée (OFF, réglages d’usine).
Remarque : L’égalisation numérique fonctionne uniquement pour les sources Bluetooth, les clés
USB et les cartes SD.
10. 100+ : Cette touche permet d’effectuer un saut de 100 pistes.
11. 200+ : Cette touche permet d’effectuer un saut de 200 pistes.
12. Touches numériques : Ces touches permettent de sélectionner le canal pour les stations de
radio FM et de sélectionner les pistes des clés USB et des cartes SD.

19
Jumelage d’un appareil Bluetooth
1. Mettez votre appareil Bluetooth sous tension.
2. Mettez l’enceinte Total PA Plus sous tension.
3. À l’aide de la touche Mode, sélectionnez le mode Bluetooth ( _ _ _ _
devrait s’afficher) afin que
la Total PA Plus passe en mode jumelage et recherche les appareils Bluetooth.
4. Accédez à l’écran de configuration de votre appareil Bluetooth, recherchez Total PA Plus et
lancez le jumelage.
Remarque : Veuillez mettre à jour le système d’exploitation de votre appareil si vous éprouvez
des problèmes durant le jumelage ou lors de la lecture de musique.
Pour supprimer la connexion, désactivez la fonction Bluetooth sur votre appareil ou sélectionnez
Oublier cet appareil.
Dépannage
Lorsqu’il y a de la distorsion : Essayez de diminuer le volume sur l’appareil d’entrée audio ou
l’instrument de musique. Essayez également de diminuer le volume de la Total PA Plus.
Lorsqu’il y a trop de basses fréquences : Essayez de régler le niveau de tonalité et d’égalisation de
la Total PA Plus ou de la source d’entrée audio afin de diminuer le niveau des basses fréquences.
Cela vous permettra d’augmenter le volume de la musique avant que l’écrêtage se produise.
Lorsqu’il y a un sifflement aigu lors de l’utilisation d’un microphone : Ceci est probablement
causé par la rétroaction (effet Larsen). Dirigez le microphone loin de l’enceinte.
Si vous ne pouvez entendre le microphone à cause du volume trop élevé de la musique :
Baissez le volume de la musique provenant de la source.
Lorsque j’appuie sur la touche piste précédente (
) ou piste suivante ( ), le module ne passe
pas à la station FM suivante : Appuyer sur les touches permet de sauter au préréglage suivant ou
précédent. Maintenir la touche enfoncée permet de rechercher la station de radio suivante ou
précédente.
Si le canal de la station de radio clignote : l’appareil est en mode en sourdine. Désactivez la mise
en sourdine afin d’arrêter le clignotement et reprendre la lecture.
Si le logo Bluetooth clignote rapidement : l’appareil est en mode de jumelage.
Si le logo Bluetooth clignote lentement : un appareil est jumelé, mais la musique a été mise en
sourdine. Désactivez la mise en sourdine afin d’arrêter le clignotement et reprendre la lecture.
Le numéro de piste USB (exemple : 001) clignote lentement : la lecture de la musique de la
source USB a été mise en sourdine. Désactivez la mise en sourdine afin d’arrêter le clignotement et
reprendre la lecture.
Si l’écran à cristaux liquides affiche « NONE » : l’appareil est en mode d’USB/SD, mais aucune clé
USB ou carte SD n’est insérée dans l’appareil.
20
Guida rapida (Italiano)
Introduzione
1. Assicurarsi che tutti gli elementi elencati nel paragrafo Contenuti della confezione siano
contenuti nella confezione stessa. Guarda nella scatola sotto il foglio in polistirolo per trovare i
piedini in gomma del supporto dell’altoparlante, la manopola di montaggio del supporto
dell’altoparlante, il cavo di alimentazione e il microfono.
2. Leggere attentamente il libretto delle istruzioni di sicurezza prima di utilizzare il prodotto.
3. Studiare lo schema dei collegamenti.
4. Assicurarsi che tutti i dispositivi di ingresso quali microfoni, lettori CD o lettori digitali siano spenti
e che i relativi volumi siano su “zero”.
5. Collegare tutti i dispositivi come illustrato.
6. Accendere tutto nel seguente ordine:
• Sorgenti di ingresso audio (microfoni, strumenti, lettori CD)
• Total PA Plus
7. Al momento dello spegnimento, invertire questa operazione spegnendo:
• Total PA Plus
• Qualsiasi dispositivo di ingresso
Contenuti della confezione
Total PA Plus
Microfono con cavo
Supporto telescopico per altoparlante
Telecomando
Cavo di alimentazione (IEC)
Guida rapida
Istruzioni di sicurezza e garanzia
Assistenza
Per conoscere le ultime informazioni in merito a questo prodotto (i requisiti di sistema complete,
compatibilità, ecc) e per la registrazione del prodotto, recarsi alla pagina ionaudio.com.
Attenzione! Non esporre il Total PA Plus alla pioggia né immergerlo in acqua.
21
iPA69
Inizio rapido
Schema dei collegamenti
Installazione del support per altoparlante
1. Allungare interamente le gambe del supporto a tripode per
altoparlante su una superficie pianeggiante e stabile. Guarda i
contenuti della confezione sotto il foglio in polistirolo per trovare i
piedini in gomma e la manopola di montaggio del supporto
dell’altoparlante.
2. Sollevare il palo di montaggio all’altezza necessaria e stringere la
manopola di regolazione laterale.
3. Inserire il perno nell’apposito foro in basso in modo che il palo
rimanga all’altezza stabilita.
4. Sul Total PA Plus, regolare la manopola inferiore in senso antiorario in
modo che la vite non blocchi l’apertura.
5. Allineare il foro di montaggio del Total PA Plus al palo di supporto
dell’altoparlante e collocarlo sul palo.
6. Stringere la manopola di montaggio in senso orario a livello del
Total PA Plus.
3 45/6
2
1
Elementi non elencati sotto
Introduzione > Contenuti
della confezione
sono
venduti separatamente.
Tablet
Microfoni
Scheda SD
Drive flash
USB
Telefono
intelligente
(smartphone)
Alimentazione
22
Caratteristiche
Pannello posteriore
1. Pannello dei media: comandi per le fonti Bluetooth,
SD, USB, e radio FM. Quando la fonte viene riprodotta,
il simbolo della modalità Media Panel si accende.
2. Porta USB: collegare qui il drive flash USB per
riprodurre musica.
3. Slot scheda SD: inserire la scheda SD a questo livello.
4. Display: mostra a display le modalità del pannello dei
media per Bluetooth, radio FM, USB e Aux.
Nota bene: Il display è fornito con una protezione in
plastica. Rimuovere la protezione per una visualizzazione
ottimale del display.
5. Ingressi microfono (6,35 mm/1/4” e XLR): collegare
un microfono dinamico agli ingressi da XLR o da 6,35
mm (1/4”). Regolare il volume degli ingressi XLR e da
6,35 mm (1/4”) servendosi della manopola volume dei
ingressi microfono.
6. Volume dei ingressi microfono: girare queste manopole
per regolare il volume dei ingressi microfono.
7. Ingresso Aux (3,5 mm/1/8”): collegare un lettore CD,
un lettore di media digitali o altre fonti audio a questo
ingresso ausiliario stereo da 3,5 mm (1/8”). Regolare il
volume di uscita servendosi della manopola volume di
ingresso ausiliario.
8. Ingresso linea (XLR): collegare il livello di linea mixer o
uno strumento musicale a questo ingresso XLR a livello
di linea. Regolare il volume di uscita servendosi della
manopola volume di ingresso ausiliario. Utilizza
questo ingresso a livello di linea per collegare due unità
Total PA Plus.
9. Ingressi RCA: collegare un lettore CD, un lettore di
media digitale, un mixer, o altre fonti di media a questi
ingressi. Regolare il volume di uscita servendosi della manopola volume di ingresso ausiliario.
10. Volume di ingresso ausiliario: girare queste manopole per regolare il volume di ingresso ausiliario.
11. Uscita mix (XLR): collegare questa uscita XLR a un altro altoparlante attivo (alimentato). Il livello
dell’uscita è controllato dall’impostazione di volume dei ingressi microfono, volume di
ingresso ausiliario o volume principale.
12. High EQ: aumenta o diminuisce le frequenze alte (acute) per i
ngresso microfono, ingresso
linea e fonti del pannello dei media in un intervallo compreso tra -12dB e +12dB.
13. Low EQ: aumenta o diminuisce le frequenze basse (bassi) per ingresso microfono, ingresso
linea e fonti del pannello dei media in un intervallo compreso tra -12dB e +12dB.
iPA69
1
2
3
4
5
5
5
9
8
5
7
10
11
12
13
14 15
17
18
19
16
66
23
14. LED di alimentazione: indica se il Total PA Plus è acceso o è spento.
15. LED clip: questo LED lampeggia di rosso se il segnale dagli ingressi o dal pannello dei media
salta. Se ciò dovesse accadere, abbassare l’impostazione della manopola volume dei ingressi
microfono, volume di ingresso ausiliario o volume principale.
16. Volume principale: girare questa manopola per regolare il volume principale del altoparlante
Total PA Plus.
17. Ingresso cavo di alimentazione (IEC): per alimentare l’apparecchio, inserire a questo livello il
cavo di alimentazione in dotazione.
18. Fusibile: se il fusibile dell’apparecchio è rotto, sollevare questa linguetta per sostituirlo. Sostituire
il fusibile con uno dalla tensione nominale adeguata (stampata sotto l’ingresso per il cavo di
alimentazione dell’apparecchio). L’utilizzo di un fusibile dalla tensione nominale errata può
danneggiare l’apparecchio e/o il fusibile.
19. Interruttore on/off (accensione/spegnimento): accende o spegne il Total PA Plus.
Pannello dei media
Funzioni pannello dei media:
MODE Modalità: Commuta le modalità tra Bluetooth, radio FM, SD, USB e Aux.
Riprodurre/interrompere: Riprodurre/interrompere momentaneamente la riproduzione della
fonte USB, SD o Bluetooth. Tenere premuto Riprodurre/interrompere per 2 secondi per
avviare la funzione di memorizzazione automatica dei preset. Questa passa alla stazione più
bassa (87,5) e scorre lungo la banda FM per memorizzare automaticamente le stazioni dal
segnale più forte come predefinite.
Ripete: Ripete tutte le tracce (ALL), ripete tutte le tracce nella carella corrente (FoLd
)
, ripete
la traccia USB o SD attualmente riprodotta (ONE), o mischia l’ordine delle tracce in maniera
casuale (rAn).
Precendente: Naviga tra le tracce USB e SD. Riproduce la traccia USB, SD, o Bluetooth,
oppure sintonizza la radio di un preset se premuto una volta. Tenere premuto il tasto per
cercare tra le stazioni radio.
Successivo: Riproduce la traccia USB, SD, o Bluetooth successiva, oppure sintonizza la
radio di un preset se premuto una volta. Tenere premuto il tasto per cercare in avanti tra le
stazioni radio.
Nota bene: in alcune app, la pressione del tasto Precendente ( ) o Successivo ( ) può far
passare a un’altra playlist o a un altro genere musicale.
24
Telecomando pannello dei media
Nota bene: Puntare il telecomando verso la parte anteriore del woofer dell’altoparlante. l’illuminazione
della stanza e la durata della batteria possono influenzare la portata operativa del telecomando.
Nota bene: per poter utilizzare il telecomando per la prima volta, prima estrarre la linguetta fissata
allo scomparto batterie. Per sostituire la batteria del telecomando, seguire lo schema situato sul retro
del telecomando. Servirsi di una batteria 3V CC CR2032 al litio.
1. Stop: Interrompe la riproduzione della fonte del pannello dei media.
2. Mode: Seleziona la fonte del pannello dei media: USB, SD, Bluetooth, o
radio FM.
3. Mute: Silenzia la riproduzione della musica dalle fonti del pannello dei media.
4. Precendente (
): Passa alla traccia precedente presente su USB o
scheda SD. Quando si ascoltano fonti Bluetooth, la pressione di
Precendente in alcune app può passare a un’altra playlist o a un altro
genere musicale. Quando si ascolta la radio FM, premere il tasto
Precendente una volta per saltare indietro lungo le stazioni FM e tenerlo
premuto per scorrere indietro tra i canali predefiniti.
5. Successivo (
): Passa alla traccia successiva presente su USB o scheda
SD. Quando si ascoltano fonti Bluetooth, la pressione di Successivo in
alcune app può passare a un’altra playlist o a un altro genere musicale.
Quando si ascolta la radio FM, premere il tasto Successivo una volta per
sintonizzare la radio di un preset e tenerlo premuto per scorrere avanti tra i
canali predefiniti.
6. Riprodurre/interrompere (
): Riproduce o interrompe momentaneamente la riproduzione della
fonte USB, SD, o Bluetooth del pannello dei media. Tenere premuto Riprodurre/interrompere
per 2 secondi per avviare la funzione di memorizzazione automatica dei preset. Questa passa alla
stazione più bassa (87,5) e scorre lungo la banda FM per memorizzare automaticamente le
stazioni dal segnale più forte come predefinite.
Nota bene: i file vengono riprodotti dalla fonte USB o SD innanzitutto in ordine alfabetico di
quanto si trova nella directory principale, quindi in ordine alfabetico per cartella, quindi in ordine
alfabetico per traccia.
7. Vol –: Riduce il volume della fonte del pannello dei media.
8. Vol +: Aumenta il volume della fonte del pannello dei media.
Nota bene: Il volume del telecomando influisce solo sulla fonte del pannello dei media e funziona
unitamente alla manopola del volume vera e propria presente sul pannello posteriore
dell’apparecchio.
9. EQ: Seleziona uno dei seguenti preset EQ digitali da utilizzarsi con una fonte del pannello dei
media: Bass (BAS), Pop (POP), Vocal (VOC), Jazz (JA2), Classica (CLA), Country (COU), Nessuna
EQ (OFF, impostazione predefinita di fabbrica)
Nota bene: l’EQ digitale funziona unicamente per Bluetooth, drive USB flash e schede SD.
10. 100+: Avanza di 100 tracce.
11. 200+: Avanza di 200 tracce.
12. Tasti numerici: Garantisce la scelta di canale per stazioni radio FM e la scelta delle tracce per
USB/schede SD.

25
Allineamento di un dispositivo Bluetooth
1. Accendere il dispositivo Bluetooth.
2. Accendere il Total PA Plus.
3. Selezionare la modalità “Bluetooth” che compare come _ _ _ _
utilizzando il tasto Mode e il
Total PA Plus entrerà in modalità di allineamento per cercare dispositivi Bluetooth.
4. Navigare nella schermata di configurazione del dispositivo Bluetooth, trovare Total PA Plus e
collegarlo.
Nota bene: gli utenti dovrebbero aggiornare il loro sistema operativo in caso di problemi con
l’accoppiamento o con la riproduzione di musica.
Per annullare l’allineamento, spegnere il Bluetooth sul dispositivo o selezionare Dimentica
dispositivo (Forget this device) sul dispositivo.
Risoluzione di problemi
Il suono è distorto: provare ad abbassare il volume della propria fonte audio o dello strumento
musicale. Inoltre, provare a ridurre il volume complessivo del Total PA Plus.
Eccessivi bassi: provare a regolare la tonalità o il comando EQ sul Total PA Plus o a livello della
fonte audio per abbassare il livello dei bassi. Ciò permetterà di suonare la musica più forte prima che
salti (che si verifichi distorsione).
Se quando si utilizzano i microfoni si verifica un fischio ad alto pitch: si tratta probabilmente di
ritorno. Puntare il microfono lontano dall’altoparlante.
Se non si sente il microfono al di sopra della musica: abbassare il volume della musica dalla fonte.
Quando premo Precendente (
) o Successivo ( ) non passa alla prossima stazione FM: brevi
pressioni del tasto farà passare ai preset. Tenere premuto il tasto per cercare la stazione successiva.
Se il canale della stazione radio lampeggia: l’apparecchio è attualmente silenziato. Annullare la
funzione di silenziamento per interrompere il lampeggio e riprendere la riproduzione.
Se il logo Bluetooth lampeggia rapidamente: l’apparecchio è attualmente in modalità di collegamento.
Se il logo Bluetooth lampeggia lentamente: un dispositivo è collegato, ma la riproduzione della
musica è silenziata. Annullare la funzione di silenziamento per interrompere il lampeggio e riprendere
la riproduzione.
Il numero di traccia USB track (ad es.: 001) lampeggia lentamente: la riproduzione di musica dal
drive USB è silenziata. Annullare la funzione di silenziamento per interrompere il lampeggio e
riprendere la riproduzione.
Sullo schermo LCD compare la scritta “NONE” (nessuno): l’apparecchio è in modalità USB/SD,
ma non vi è alcun drive USB collegato né scheda SD inserita.

26
Schnellstart-Anleitung (Deutsch)
Einführung
1. Stellen Sie sicher, dass alle im Lieferumfang aufgelisteten Teile in der Verpackung enthalten sind.
In der Schachtel unter dem Styropor-Blatt finden Sie die Gummifüße für die Lautsprecherstative,
den Montageknopf der Lautsprecherstative, das Netzkabel und das Mikrofon.
2. Lesen Sie zuerst die Sicherheitshinweise, bevor Sie das Produkt verwenden.
3. Werfen Sie einen Blick auf die Anschlussübersicht.
4. Stellen Sie sicher, dass alle Eingabegeräte wie Mikrofone, CD-Player oder digitale Wiedergabegeräte
ausgeschaltet sind und deren Lautstärke auf „Null“ steht.
5. Verbinden Sie alle Geräte wie angegeben.
6. Schalten Sie alles in folgender Reihenfolge ein:
• Audio-Eingangsquellen (z.B. Mikrofone, Instrumente, CD/MP3-Player)
• Total PA Plus
7. Beim Ausschalten gehen Sie in umgekehrter Reihenfolge vor:
• Total PA Plus
• alle Eingabegeräte
Lieferumfang
Total PA Plus
Mikrofon mit Mikrofonkabel
Teleskoplautsprecherständer
Fernbedienung
Netzkabel (IEC)
Schnellstart-Anleitung
Sicherheitshinweise & Garantieinformationen
Kundendienst
Für aktuelledie neuesten Informationen zu diesem Produkt (Systemanforderungen, Informationen zur
Kompatibilität etc.) und zur Produktregistrierung besuchen Sie ionaudio.com.
Achtung: Setzen Sie Total PA Plus niemals Regen oder stehendem Wasser aus.
27
iPA69
Schnelles Einrichten
Anschlussdiagramm
Montage der Lautsprecherständer
1. Fahren Sie die Stativbeine des Lautsprecherständers auf einer
ebenen, stabilen Oberfläche aus. In der Schachtel unter dem
Styropor-Blatt finden Sie die Gummifüße und den
Montageknopf für die Lautsprecherstative.
2. Ziehen Sie die Montagestange bis zur benötigten Höhe heraus
und sichern Sie die Stange mit dem seitlichen Einstellknopf.
3. Stecken Sie den Stift in das untere Loch, so dass die
Montagestange auf Ihrer eingestellten Höhe bleibt.
4. Drehen Sie den unteren Drehknopf am Total PA Plus gegen den
Uhrzeigersinn, so dass die Schraube die Öffnung nicht blockiert.
5. Richten Sie das Loch zur Aufnahme des Boxenständers des
Total PA Plus auf den Lautsprecherständer aus und setzen Sie
es auf die Stange.
6. Ziehen Sie den Befestigungsknopf des Total PA Plus im
Uhrzeigersinn an.
3 45/6
2
1
Teile, die nicht im
Einführung > Lieferumfang
angegeben sind, sind
separat erhältlich.
Tablet
Mikrofone
SD-Karte
USB-Stick
Smartphone
Steckdose
28
Funktionen
Rückseite
1. Medien-Panel: Bedienelemente für Bluetooth, SD, USB,
und FM-Radioquellen. Das Symbol des Medien-Panel-
Modus wird leuchten, wenn diese Quelle wiedergegeben
wird.
2. USB-Port: Schließen Sie Ihren USB-Stick an, um Musik
zu spielen.
3. SD-Kartensteckplatz: Legen Sie Ihre SD-Karte ein.
4. Anzeige: Zeigt die Medien-Panel-Modi für Bluetooth, FM-
Radio, USB und Aux an.
Hinweis: Die Anzeige wird mit einem Kunststoffschutzfilm
ausgeliefert. Entfernen Sie diesen Film, um die Anzeige
optimal zu nutzen.
5. Mikrofon-Eingang: (6,35mm und XLR): Schließen Sie ein
dynamisches Mikrofon an die XLR- oder 6,35mm-Eingänge
an. Regeln Sie die Lautstärke der XLR, und 6,35mm-
Eingänge mit dem Mikrofon-Eingang Lautstärkeregler.
6. Mikrofon-Eingangslautstärke: Drehen Sie diesen Regler,
um die Lautstärke der Mikrofon-Eingänge einzustellen.
7. Aux-Eingang (3,5mm): Schließen Sie einen CD-Player,
digitalen Medien-Player oder eine andere Audioquelle an
diesen 3,5mm Aux-Stereoeingang an. Regeln Sie die
Lautstärke mit dem Aux-Eingangs Lautstärkeregler.
8. Line-Eingang (XLR): Schließen Sie einen Line-Eingang
an Mixer oder ein Musikinstrument an diesen XLR Line-
Eingang an. Regeln Sie die Lautstärke mit dem Aux-
Eingangs Lautstärkeregler. Mit diesem Line-Eingang
können zwei Total PA Plus-Einheiten verknüpft werden.
9. Cinch-Eingänge: Schließen Sie einen CD-Player, einen
digitalen Medien-Player, Mixer oder eine andere
Medienquelle an diese Eingänge an. Regeln Sie die
Lautstärke mit dem Aux-Eingangs Lautstärkeregler.
10. Aux-Eingangslautstärke: Drehen Sie diesen Regler, um
die Lautstärke der Aux-Eingänge, Line-Eingang und Cinch-Eingänge einzustellen.
11. Mix Out (XLR): Verbinden Sie diesen XLR-Ausgang mit einem anderen aktiven (mit Strom
versorgten) Lautsprecher. Der Ausgangspegel wird durch die Lautstärkeeinstellungen jedes Kanals
geregelt: Mikrofon-Eingangslautstärke, Aux-Eingangslautstärke und Hauptlautstärke.
12. High-EQ: Hebt oder senkt die hohen Frequenzen (Höhen) für Mikrofon-Eingang, Line-Eingang
und Medien-Panelquellen in
einem Bereich von -12 dB bis +12 dB.
13. Low-EQ: Hebt oder senkt die niedrigen Frequenzen (Bass) für Mikrofon-Eingang, Line-Eingang
und Medien-Panelquellen in einem Bereich von -12 dB bis +12 dB.
iPA69
1
2
3
4
5
5
5
9
8
5
7
10
11
12
13
14 15
17
18
19
16
66
29
14. Power-LED: Zeigt an, ob Total PA Plus ein- oder ausgeschaltet ist.
15. Clip-LED: Diese LED blinkt rot, wenn das Signal von den Eingängen oder von der Medien-
Panelquelle übersteuert. Wenn dies passiert, verringern Sie die Einstellung von Mikrofon-
Eingangslautstärke, Aux-Eingangslautstärke und Hauptlautstärke.
16. Hauptlautstärke: Mit diesem Regler stellen Sie die Hauptlautstärke des Total PA Plus
Lautsprecher ein.
17. Stromkabeleingang (IEC): Schließen Sie das mitgelieferte Stromkabel hier an, um das Gerät mit
Strom zu versorgen.
18. Sicherung: Wenn die Sicherung des Geräts beschädigt ist, heben Sie diese Lasche an, um die
Sicherung zu ersetzen. Ersetzen Sie sie mit einer Sicherung, die einen geeigneten Sicherungswert
besitzt (siehe Aufdruck unter dem Netzkabeleingang des Geräts). Die Verwendung einer Sicherung
mit falschem Sicherungswert kann das Gerät und/oder Sicherung beschädigen.
19. Ein-/Ausschalter: Schaltet Total PA Plus ein oder aus.
Medien-Panel
Funktionen des Medien-Panels
MODE Modus: Wechselt zwischen den Modi von Bluetooth, FM-Radio, SD, USB und Aux.
Wiedergabe/Pause: Spielen Sie/Pausieren Sie die USB, SD oder Bluetooth-Quelle. Halten
Sie Wiedergabe/Pause 2 Sekunden lang gedrückt, um die automatische Speicherfunktion
für Presets zu aktivieren. Damit schaltet das Gerät auf den niedrigsten Sender (87,5) und
bewegt sich durch das FM-Band, um die stärksten Sender als Presets zu speichern.
Wiederholen: Wiederholen Sie alle Tracks (ALL), wiederholen Sie alle Tracks im Aktuellen
Ordner (FoLd), wiederholen Sie den aktuell wiedergegebenen USB- oder SD-Track (ONE)
oder wiederholen Sie die Tracks in zufälliger Reihenfolge (rAn).
Zurück: Navigiert durch USB- und SD-Tracks. Spielt den vorherigen USB, SD- oder
Bluetooth-Track oder schaltet das Radio bei einmaligem Drücken eine Voreinstellung nach
unten. Halten Sie die Taste gedrückt, um die Radiosender rückwärts zu durchsuchen.
Weiter: Gibt den nächsten USB-, SD- oder Bluetooth-Track wieder oder schaltet das Radio
bei einmaligem Drücken eine Voreinstellung nach unten. Halten Sie die Taste, um vorwärts
durch die Sender zu suchen.
Hinweis: In einigen Apps kann es sein, dass das Drücken von Zurück ( ) oder Weiter ( ) auf eine
andere Wiedergabeliste oder ein anderes Musik-Genre schaltet.
30
Fernbedienung für das Medien-Panel
Hinweis: Richten Sie die Fernbedienung direkt auf die Vorderseite des Woofers. Die Zimmerbeleuchtung
und die Lebensdauer der Batterie können die Reichweite der Fernbedienung beeinträchtigen.
Hinweis: Um die Fernbedienung zum ersten Mal zu verwenden, ziehen Sie zuerst den Streifen aus
dem Batteriefach heraus. Um die Batterie der Fernbedienung zu wechseln, sehen Sie sich das
Diagramm auf der Rückseite der Fernbedienung an. Als Ersatz verwenden Sie eine 3V DC CR2032
Lithium-Knopfzelle.
1. Stopp: Stoppt die Wiedergabe des Medien-Panels.
2. Modus: Wählt die Medien-Panelquelle aus: USB, SD, Bluetooth oder FM-
Radio.
3. Stummschalten: Schaltet die Musikwiedergabe der Medien-Panelquellen
stumm.
4. Zurück (
): Springt zum vorherigen USB- oder SD-Karten-Track. Bei der
Wiedergabe von Bluetooth-Quellen kann es in einigen Apps sein, dass das
Drücken von Zurück auf eine andere Wiedergabeliste oder ein anderes
Musik-Genre schaltet. Wenn Sie FM-Radio hören, drücken Sie einmal auf
die Taste Zurück, um rückwärts durch die FM-Sender zu blättern. Halten
Sie die Taste gedrückt, um durch die Kanaleinstellungen zu blättern.
5. Weiter (
): Springt zum nächsten USB- oder SD-Karten-Track. Bei der
Wiedergabe von Bluetooth-Quellen kann es in einigen Apps sein, dass das
Drücken von Weiter auf eine andere Wiedergabeliste oder ein anderes
Musik-Genre schaltet. Beim Hören von FM-Radio, drücken Sie einmal die
Taste Weiter, um eine Voreinstellung nach unten zu schalten. Halten Sie
die Taste gedrückt, um vorwärts durch die Kanaleinstellungen zu suchen.
6. Wiedergabe/Pause (
): Die Quelle via USB, SD oder Bluetooth-Medien-Panel wird
wiedergegeben oder pausiert. Halten Sie Wiedergabe/Pause 2 Sekunden lang gedrückt, um die
automatische Speicherfunktion für Presets zu aktivieren. Damit schaltet das Gerät auf den
niedrigsten Sender (87,5) und bewegt sich durch das FM-Band, um die stärksten Sender als
Presets zu speichern.
Hinweis: Die Dateien via USB oder SD-Karte werden in alphabetischer Reihenfolge abgespielt,
und zwar wird zunächst alles auf der Root-Ebene abgespielt. Anschließend erfolgt die
Wiedergabe alphabetisch nach Ordner und alphabetisch nach Track-Namen.
7. Vol –: Reduziert das Quellenvolumen des Medien-Panels.
8. Vol +: Erhöht das Quellenvolumen des Medien-Panels.
Hinweis: Die Remote-Lautstärke betrifft nur die Medien-Panelquelle und arbeitet zusammen mit
dem physischen Medien-Panel-Lautstärkeregler auf der Rückseite des Geräts.
9. EQ: Wählt eine der folgenden digitalen EQ-Presets für die Verwendung mit einer Medien-Panel-
Quelle aus: Bass (BAS), Pop (POP), Gesang (VOC), Jazz (JA2), Klassische Musik (CLA),
Country (COU) und Kein EQ (OFF, Werkseinstellung).
Hinweis: Der digitale EQ funktioniert nur mit Bluetooth-, USB-Laufwerken und SD-Karten als
Quellen.
10. 100+: Springt um 100 Tracks nach vorne.
11. 200+: Springt um 200 Tracks nach vorne.
12. Zifferntasten: Bietet Kanalauswahl für FM-Radiosender und Track-Auswahl für USB/SD-
Kartenquellen.
31
Koppeln eines Bluetooth-Geräts
1. Schalten Sie Ihr Bluetooth-Gerät ein.
2. Schalten Sie Total PA Plus ein.
3. Wählen Sie den Bluetooth-Modus aus, der als _ _ _ _
aufscheint, indem Sie die Modus-Taste
drücken. Total PA Plus wechselt dann in den Koppel-Modus, um nach Bluetooth-Geräten zu suchen.
4. Navigieren Sie zum Setup-Bildschirm Ihres Bluetooth-Geräts, suchen Sie Total PA Plus und
verbinden Sie die Geräte.
Hinweis: Anwender sollten eine OS-Aktualisierung Ihres Geräts in Betracht ziehen, wenn es beim
Koppeln oder bei der Musikwiedergabe zu Problemen kommt.
Um die Geräte zu trennen, schalten Sie Bluetooth auf Ihrem Gerät aus oder wählen Sie auf Ihrem
Gerät Dieses Gerät ignorieren (Forget this Device).
Allgemeinhinweis zur Konformitätserklärung: Hiermit erklären wir, daß sich das Gerät Total PA Plus in Übereinstimmung mit
den grundlegenden Anforderungen der europäischen Richtlinie 1999/5/EG befindet. Die vollständige EG Konformitätserklärung
kann unter folgender Adresse angefordert werden:
inMusic GmbH
Harkortstrasse 12-32
40880 Ratingen
Germany
Fehlerbehebung
Der Ton klingt verzerrt: Drehen Sie den Lautstärkeregler an Ihrer Tonquelle oder dem
Musikinstrument zurück. Versuchen Sie auch, das Gesamtvolumen des Total PA Plus zu reduzieren.
Zu viel Bass: Versuchen Sie, den Ton- oder EQ-Regler des Total PA Plus oder Ihrer Tonquelle
anzupassen, um den Bass zu verringern. Dies ermöglicht Ihnen, die Musik lauter abzuspielen, bevor
der Klang verzerrt.
Bei der Verwendung von Mikrofonen tritt einer hoher Pfeifton auf: Hier handelt es sich
wahrscheinlich um einen Rückkopplungseffekt. Richten Sie es so ein, dass die Mikrofone vom
Lautsprecher wegzeigen.
Wenn das Mikrofon im Vergleich zur Musik zu leise eingestellt ist: Verringern Sie die
Musiklautstärke Ihrer Quelle.
Wenn ich Zurück (
) oder Weiter ( ) drücke, wird nicht zum nächsten FM-Sender gewechselt:
Kurzes Drücken der Taste wechselt die Voreinstellungen. Halten Sie die Taste gedrückt, um den
nächsten Sender zu suchen.
Wenn die Radiostation blinkt: die Einheit ist derzeit stumm geschaltet. Heben Sie die
Stummschaltung auf, um das Blinken zu stoppen und die Wiedergabe fortzusetzen.
Wenn das Bluetooth-Logo schnell blinkt: das Gerät befindet sich derzeit im Koppel-Modus.
Wenn das Bluetooth-Logo langsam blinkt: ein Gerät wurde verbunden, aber die Musik ist stumm
geschaltet. Heben Sie die Stummschaltung auf, um das Blinken zu stoppen und die Wiedergabe
fortzusetzen.
Der USB-Track # (Beispiel: 001) blinkt langsam: die Musikwiedergabe des USB-Laufwerks ist
stumm geschaltet. Heben Sie die Stummschaltung auf, um das Blinken zu stoppen und die
Wiedergabe fortzusetzen.
Die LCD-Anzeige zeigt „KEINE“: das Gerät ist zwar im USB/SD-Modus, es wurde jedoch kein
USB-Laufwerk angeschlossen bzw. keine SD-Karte eingelegt.
32
Snelstartgids (Nederlands)
Introductie
1. Zorg ervoor dat alle artikelen, opgesomd in Inhoud van de doos, zich in de doos bevinden. Kijk
in het doos onder het Piepschuim blad voor de luidsprekerstandaard rubbervoetjes,
luidsprekerstandaard montage knop, voedingskabel, en een microfoon.
2. Lees de veiligheidsvoorschriften vooraleer het product te gebruiken.
3. Bestudeer het aansluitschema.
4. Zorg ervoor dat alle invoerapparaten, zoals microfoons, cd-spelers of digitale mediaspelers
uitgeschakeld zijn en dat het volume op “nul” staat.
5. Sluit alle apparaten aan zoals afgebeeld.
6. Zet alles aan in deze volgorde:
• geluidsbronnen (bijv. microfoons, instrumenten, cd-spelers)
• Total PA Plus
7. Doe bij het uitschakelen steeds het omgekeerde:
• Total PA Plus
• alle invoerapparaten
Inhoud van de doos
Total PA Plus
Microfoon met microfoonkabel
Uitschuifbare luidsprekerstand
Afstandsbediening
Stroomkabel (IEC)
Snelstartgids
Veiligheidsvoorschriften & boekje met garantie-informatie
Ondersteuning
Voor de laatste informatie over dit product (systeemvereisten, compatibiliteitsinformatie, enz.) en
productregistratie, bezoek ionaudio.com.
Let op: Total PA Plus niet blootstellen aan regen of in water plaatsen.
33
iPA69
Snelstart
Aansluitschema
De luidsprekerstand installeren
1. Vouw de benen van het luidsprekerstatief volledig uit op een vlak
en stabiel oppervlak. Kijk in de inhoud van de doos onder het
Piepschuim blad voor de rubbervoetjes en luidsprekerstandaard
montage knop.
2. Til de staander op tot de vereiste hoogte en draai de regelknop
op de zijkant vast.
3. Plaats de pin in het onderste pingaatje, zodat de staander op de
ingestelde hoogte blijft staan.
4. Draai de onderste knop op de Total PA Plus linksom, zodat de
schroef de opening niet blokkeert.
5. Plaats de montageopening van de Total PA Plus op één lijn met
de staander van het luidsprekerstatief en plaats het apparaat
op de staander.
6. Draai de montageknop op de Total PA Plus rechtsom vast.
3 45/6
2
1
Artikelen die niet zijn
opgesomd in Introductie >
Inhoud van de doos
worden
afzonderlijk verkocht.
Tabletcomputer
Microfoons
SD-kaart
USB-stick
Smartphone
Stroom
34
Kenmerken
Achterpaneel
1. Mediapaneel: Bedieningsknoppen voor geluidsbronnen
van Bluetooth, SD-kaart, USB-stick en FM-radio. Het
modussymbool van de mediapaneelbron gaat branden
wanneer deze bron wordt afgespeeld.
2. USB-poort: Sluit hier uw USB-stick aan om muziek af
te spelen.
3. SD-kaartsleuf: Plaats hier uw SD-kaart.
4. Scherm: Geeft de modi van het mediapaneel weer:
Bluetooth, FM-radio, USB en Aux.
Opmerking: Het scherm is voorzien van een plastic
beschermfolie. Verwijder dit folie voor een optimale
kijkervaring.
5. Microfoon (6,35 mm en XLR): Sluit een dynamische
microfoon aan op de XLR- of 6,35 mm ingangen.
Regel het volume van de XLR en 6,35 mm ingangen
met de microfoon ingangsvolume knop.
6. Microfoon ingangsvolume: Draai aan deze knop om
het ingangsvolume van het microfoon kanaal te regelen.
7. Aux-ingang (3,5 mm): Sluit op deze stereo aux-ingang
van 3,5 mm een cd-speler, digitale mediaspeler of
andere geluidsbron aan. Regel het uitgangsvolume met
de Aux-ingangsvolume knop.
8. Lijnniveau-ingang (XLR): Sluit op deze XLR-ingang op
lijnniveau een lijnniveau mixer of muziekinstrument aan.
Regel het uitgangsvolume met de Aux-ingangsvolume
knop. Maak gebruik van deze line-level input bij het
koppelen van twee Total PA Plus units.
9. RCA-ingangen: Sluit op deze ingangen een cd-speler,
digitale mediaspeler, mixer of andere mediabron aan.
Regel het uitgangsvolume met de Aux-ingangsvolume
knop.
10. Aux-ingangsvolume: Draai aan deze knop om het
volume van het Aux-ingang, lijnniveau-ingang en
RCA-ingangen te regelen.
11. Mix Out-uitgang (XLR): Sluit deze XLR-uitgang aan op een andere actieve luidspreker (met
versterker). Het uitgangsniveau wordt geregeld door de volume-instelling van elk kanaal
(microfoon ingang volume, Aux-ingang volume, en hoofdvolume).
12. EQ Hoog: Verhoogt of verlaagt de hoge (treble) frequenties voor microfoon ingang, Aux-ingang
en m
ediapaneelbronnen binnen een bereik van -12dB tot +12dB.
13. EQ Laag: Verhoogt of verlaagt de lage (bas) frequenties voor microfoon ingang, Aux-ingang en
mediapaneelbronnen binnen een bereik van -12dB tot +12dB.
iPA69
1
2
3
4
5
5
5
9
8
5
7
10
11
12
13
14 15
17
18
19
16
66
35
14. Stroom-LED: Geeft aan of Total PA Plus aan of uit staat.
15. Clip-LED: Deze LED begint rood te knipperen als het signaal van de ingangen of de bron van het
mediapaneel overstuurd wordt. Als dat gebeurt, verlaag dan de instelling van volumeknop
microfoon ingang volume, Aux-ingang volume, of hoofdvolume.
16. Hoofdvolume: Draai aan deze knop om het hoofdvolume van de Total PA Plus-luidspreker aan
te passen.
17. Ingang voor stroomkabel (IEC): Sluit de meegeleverde stroomkabel hierop aan om het apparaat
van stroom te voorzien.
18. Zekering: Als de zekering van het apparaat kapot is, til dan dit klepje op om de zekering te
vervangen. Vervang deze door een zekering van passende waarde (afgedrukt onder de
stroomkabelingang van het apparaat). Een zekering met onjuiste waarde kan het apparaat en/of
de zekering beschadigen.
19. Aan/uit-schakelaar: Zet Total PA Plus aan of uit.
Mediapaneel
Mediapaneelfuncties
MODE Modus: Schakelt om tussen de verschillende modi: Bluetooth, FM-radio, SD-kaart, USB en Aux.
Afspelen/Pauzeren: Speelt de mediapaneelbron af van USB, SD-kaart of Bluetooth. Houd
de knop Afspelen/Pauzeren 2 seconden lang ingedrukt om de automatische opslagfunctie
van voorinstellingen te starten. Dit springt naar de laagste zender (87,5) en doorloopt de
hele FM-band om automatisch de sterkste zenders te programmeren.
Herhaling: Herhaal alle nummers (ALL), herhaal alle nummers in de huidige map (FoLd
)
,
herhaal het nummer dat momenteel van USB of SD wordt afgespeeld (ONE) of speel de
nummers in willekeurige volgorde (rAn).
Vorige: Bladert door de nummers op USB-stick en SD-kaart. Indien eenmalig ingedrukt: speelt
het vorige nummer af van de USB-stick, SD-kaart, Bluetooth of het vorige geprogrammeerde
radiostation. Houd de knop ingedrukt om achterwaarts te zoeken door de radiozenders.
Volgende: Speelt wanneer eenmaal ingedrukt het volgende nummer af op USB-stick, SD-
kaart of Bluetooth of selecteert de volgende geprogrammeerde radiozender. Houd de knop
ingedrukt om voorwaarts door de radiozenders te bladeren.
Opmerking: In sommige apps kunnen de knoppen Vorige ( ) of Volgende ( ) een andere
afspeellijst of muziekgenre oproepen.
36
Afstandsbediening mediapaneel
Opmerking: Richt de afstandsbediening recht op de voorkant van de woofer van de luidspreker. De
verlichting in de kamer en de levensduur van de batterij kunnen het werkingsbereik van de
afstandsbediening beïnvloeden.
Opmerking: Om de afstandsbediening voor de eerste keer te gebruiken, moet u het lipje uit het
batterijcompartiment trekken. Volg voor het vervangen van de batterij van de afstandsbediening het
diagram op de achterkant van de afstandsbediening. Gebruik als vervangbatterij een 3V DC CR2032
lithium knoopbatterij.
1. Stop: Stopt het afspelen van de mediapaneelbron.
2. Modus: Selecteert de mediapaneelbron: USB, SD, Bluetooth, of FM-radio.
3. Dempen: Dempt de muziek die op de mediapaneelbron wordt afgespeeld.
4. Vorige (
): Gaat naar het vorige nummer op USB of de SD-kaart. Bij het
beluisteren van audiobronnen over Bluetooth roept het indrukken van de
knop Vorige in sommige apps een andere afspeellijst of muziekgenre op.
Druk bij het beluisteren van de FM-radio eenmalig op de knop Vorige om
terug te bladeren door de radiostations en houd de knop ingedrukt om
achteruit te zoeken door de geprogrammeerde zenders.
5. Volgende (
): Gaat vooruit naar het volgende nummer op USB of SD-
kaart. Bij het luisteren naar audiobronnen via Bluetooth, roept het
indrukken van Volgende mogelijk een andere afspeellijst of muziekgenre
op. Druk bij het luisteren naar de FM-radio een keer op de knop Volgende
om de vorige geprogrammeerde zender te beluisteren en houd deze knop
ingedrukt om vooruit te bladeren door de geprogrammeerde zenders.
6. Afspelen/Pauzeren (
): Speelt de mediapaneelbron af van USB, SD-kaart
of Bluetooth. Houd de knop Afspelen/Pauzeren 2 seconden lang
ingedrukt om de automatische opslagfunctie van voorinstellingen te
starten. Dit springt naar de laagste zender (87,5) en doorloopt de hele FM-
band om automatisch de sterkste zenders te programmeren.
Opmerking: Bestanden van een USB-stick of SD-kaart worden eerst afgespeeld in alfabetische
volgorde, op basis van de inhoud van de hoofdmap, daarna alfabetisch per map en ten slotte
alfabetisch op basis van de naam van het nummer.
7. Vol –: Verlaagt het volume van de geluidsbron op het mediapaneel.
8. Vol +: Verhoogt het volume van de geluidsbron op het mediapaneel.
Opmerking: De volumeknop op de afstandsbediening verandert het volume van de
mediapaneelbron, samen met de fysieke volumeknop op het mediapaneel, op het achterpaneel
van het apparaat.
9. EQ: Selecteert één van de volgende digitale EQ-voorinstellingen, toepasbaar op een geluidsbron
van het mediapaneel: Bas (BAS), Pop (POP), Stem (VOC), Jazz (JA2), Klassiek (CLA),
Country (COU) en Geen EQ (OFF, standaard fabrieksinstelling).
Opmerking: De digitale EQ werkt alleen voor bronnen afkomstig van Bluetooth, USB-flashstation
of SD-geheugenkaart.
10. 100+: bladert 100 nummers vooruit.
11. 200+: bladert 200 nummers vooruit.
12. Cijfers: Biedt kanaalkeuze van FM-radiostations en nummerkeuze voor bronnen van USB-station
of SD-geheugenkaart.
37
Een Bluetooth-apparaat koppelen
1. Zet uw Bluetooth-apparaat aan.
2. Zet Total PA Plus aan.
3. Selecteer Bluetooth-modus, dat verschijnt als _ _ _ _
bij gebruik van de Modus-knop gaat Total
PA Plus in koppelingsmodus en zoekt het naar Bluetooth-apparaten.
4. Navigeer naar het instelscherm van uw Bluetooth-apparaat, zoek naar Total PA Plus en maak
verbinding.
Opmerking: Gebruikers die problemen ondervinden met het koppelen of het afspelen van
muziek moeten overwegen het besturingssysteem van hun apparaat bij te werken.
Om de koppeling te verbreken: schakel Bluetooth uit op uw apparaat of selecteer dit apparaat
vergeten (Forget this device) op uw apparaat.
Problemen oplossen
Het geluid is vervormd: Probeer het volumeniveau van uw geluidsbron of muziekinstrument te
verlagen. Probeer ook het algemene volume van Total PA Plus te verlagen.
Er zijn teveel bassen: Probeer de toon- of EQ-bedieningsknop op Total PA Plus of uw geluidsbron
bij te regelen om het basniveau te verlagen. Dit stelt u in staat de muziek luider te zetten vooraleer
“afgeknipte” (vervormde) klanken optreden.
Er is een hoge fluitende pieptoon bij het gebruik van een microfoon: Dit is waarschijnlijk
feedback. Richt de microfoon weg van de luidspreker.
Als het geluid van de microfoon niet boven de muziek uitkomt: Verlaag het volume van de
muziek van uw geluidsbron.
Wanneer ik druk op Vorige (
) of op Volgende ( ) gaat het apparaat niet naar de volgende FM-
zender: Een korte druk op de knop springt naar de voorinstellingen. Houd de knop ingedrukt om
naar de volgende zender te zoeken.
Als het radiostation blijft knipperen: het apparaat is momenteel gedempt. Hef het dempen op om
het geknipper stop te zetten en het afspelen te hervatten.
Als het Bluetooth-logo snel knippert: het apparaat bevindt zich momenteel in koppelingsmodus.
Als het Bluetooth-logo traag knippert: een apparaat is gekoppeld, maar de muziek is gedempt.
Hef het dempen op om het geknipper stop te zetten en het afspelen te hervatten.
Het titelnummer op USB (voorbeeld: 001) knippert traag: het afspelen van muziek van het USB-station
wordt gedempt. Hef het dempen op om het geknipper stop te zetten en het afspelen te hervatten.
Op het LCD-scherm staat “NONE” te lezen: het apparaat bevindt zich in USB/SD-modus, maar er
is geen USB-station aangesloten, noch een SD-kaart ingebracht.

38
Appendix (English)
Technical Specifications
Output Power
350 W (Peak), 175 W (RMS)
Max SPL (@ 1 m)
116 dB peak, 110 dB continuous C-weighted, free space
Low Frequency
15” (381 cm) woofer, 2” (51 mm) voice coil
High Frequency
1” (25 mm)-exit ferrite compression driver, 1” (25 mm) voice coil
Crossover
2.2 kHz
Frequency Response
55 Hz – 20 kHz (+3 dB)
Frequency Range
45 Hz – 22 kHz (@ -10 dB)
Horn Coverage
80/100° H x 60° V, nominal (@ -6 dB)
Input
Gain Range: -∞ to +10 dB (microphone/line)
Max Input Level: +10 dBu
Impedance: 22 KΩ
External Controls
Channel volume, master volume, power on/off with LED, clip limiter with
LED, 2-band equalizer, mode, play/pause, repeat, previous track, next track
Connectors
(3) XLR inputs (2 dynamic microphone/line, 1 line)
(2) 1/4” (6.35 mm) TRS inputs
(1) 1/8” (3.5 mm) TRS input
(1) stereo RCA input pair
(1) XLR mix output
(1) SD card slot
(1) USB port (host)
(1) IEC power connection
Bluetooth* Profile: A2DP
Module: Bluetooth 2.1+EDR, compatible under 3.0
Speed: 3 Mbps
Range: Up to 100 feet / 30.5 meters
USB/SD Card Audio: Music playback from USB drive or SD card
Supported File System: FAT32
Supported File Types: MP3, WAV, WMV
Maximum File Size: > 16 GB
Maximum USB Drive / SD Card Capacity: > 16 GB
Protection Features
Over-excursion, thermal, short-circuit protection
Power Speaker: 100 VAC, 110–120 VAC, or 220–240 VAC; 50/60 Hz
Remote Control: 3 VDC CR2032 lithium button cell battery

39
Cabinet
Trapezoidal with floor monitor capability; injection-molded polypropylene
with perforated steel grille
Transport: 3 handles, 2 wheels
Mounting: Integrated pole socket (36 mm diameter)
Dimensions
(height x width x depth)
27.0” x 17.4” x 14.2”
686 x 442 x 361 mm
Weight
(speaker only)
35.0 lbs.
15.9 kg
Specifications are subject to change without notice.
* Bluetooth range is affected by walls, obstructions, and movement. For optimal performance, place
the product in the center of the room so it is unobstructed by walls, furniture, etc.
FCC ID: Y4O-iPA69
This device complies with Part 15 of the FCC rules. Operation is subject to the following two conditions: (1) this
device may not cause harmful interference, and (2) this device must accept any interference received, including
interference that may cause undesired operation. Shielded cables must be used with this unit to ensure compliance
with the Class B FCC limits.
Trademarks & Licenses
ION Audio is a trademark of ION Audio, LLC, registered in the U.S. and other countries.
The Bluetooth word mark and logos are owned by the Bluetooth SIG, Inc. and any use of such marks
by ION Audio is under license.
SD is a registered trademark of SD-3C, LLC.
All other product or company names are trademarks or registered trademarks of their respective owners.