Loading ...
45° in each direction from centre, and tilted in a range of 45°
while suspended from a wall or ceiling.
!
NOTE: The hardware for mounting the hanger bracket to
the wall or ceiling is not included.
CAUTION: When turning and/or tilting the heater do not
block the exhaust opening.
1. Locate a stud or other sui-
table support and install han-
ger bracket on wall or ceiling.
Select a location where the
control knob can be easily
reached.
2. Insert carriage bolt into square
opening of heater handle.
3. Slide spacer over the carriage
bolt shaft and insert in han-
ger bracket opening and hold
them in position.
4. Slide lock washer and thread
on T-Handle onto carriage
bolt, turning to tighten.
Over Temp
Surchauffe
Temperatura
Excesiva
Power On
En marche
Encedido
O
Low
High
In keeping with our policy of continuous product improvement, we reserve the right to make changes without notice.
© 2016 Dimplex North America Limited
1367 Industrial Road Cambridge ON Canada N3H 4W3
1-888-346-7539 www.dimplex.com
Warranty
Dimplex Electric Heaters are tested and inspected prior to shipment and are
guaranteed free from defect to the purchaser of each new product. Any part
which proves to be defective in material or workmanship under normal use
within one year will be repaired or replaced without charge. The Company
will not be responsible for any expense incurred for installation, removal from
service, or transportation costs. Any such defect should be brought to the
attention of the Dealer where the product was purchased and is authorized to
repair or replace within the terms of this warranty.
The Company’s only obligation under this warranty will be at its sole option
to repair or replace any part proving defective or to refund the purchase price
thereof.
The owner/user assumes all other risks, if any, including the risk of any direct,
indirect or consequential loss or damage arising out of the use of or inability
to use the product.
The warranty will not apply if, in the sole judgment of the Company, damage
or failure has resulted from accident, alteration, misuse, abuse, incorrect
installation, or operation on an incorrect power source.
The foregoing is in lieu of all other warranties expressed, implied, or statutory,
and the Company neither assumes, nor authorizes any person to assume for
it any other obligation, or liability in connection with said product.
WARNING: Disconnect power before attempting any main-
tenance or cleaning to reduce the risk of re, electric shock or
damage to persons.
CAUTION: Allow at least 30 minutes for the heater to cool
before attempting any maintenance or cleaning.
!
NOTE: This heater should not be operated with an ac-
cumulation of dust or dirt on or in the unit, as this can cause
a build up of heat and eventual damage. For this reason the
heater must be inspected regularly, depending upon condi-
tions and at least at yearly intervals.
To clean the exterior surface, use a solution of water and mild
detergent, apply with damp sponge. Wipe dry with a dry cloth.
DO NOT plug heater into outlet until it has dried thoroughly.
Maintenance
WARNING: This heater must be properly installed before it
is used.
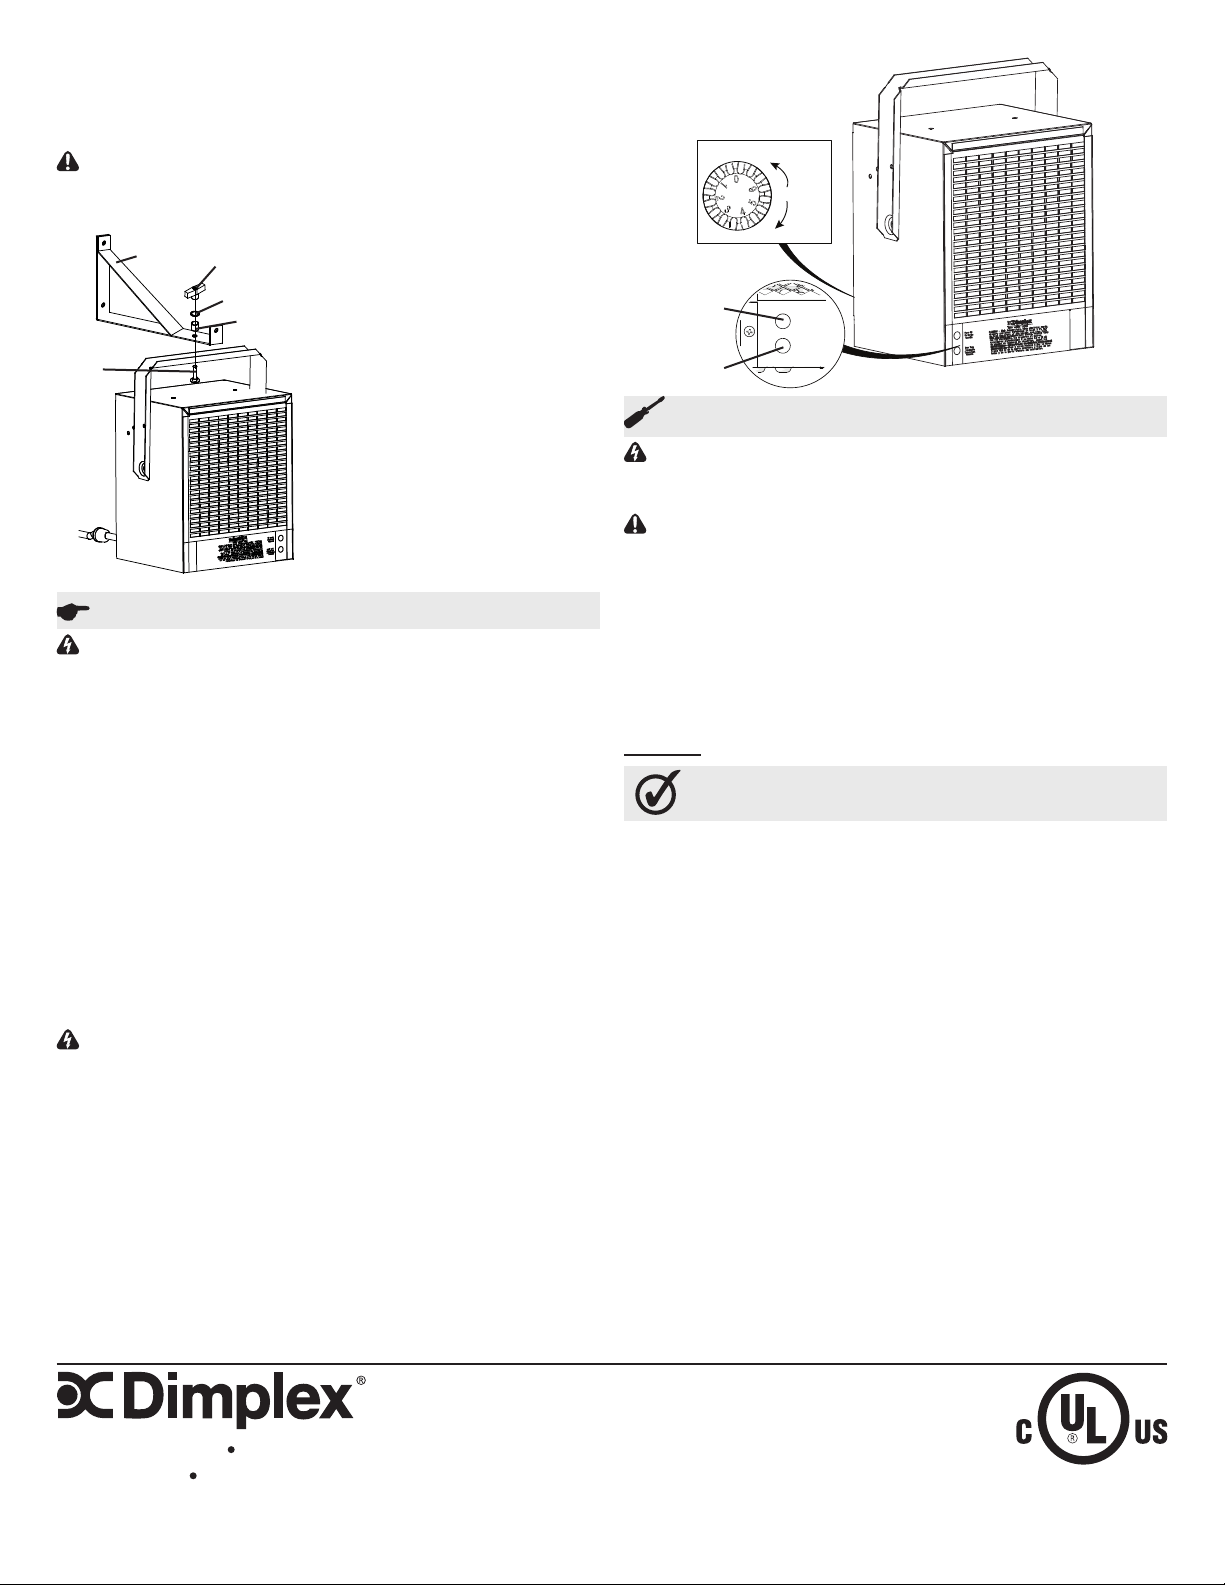
SETTING THE THERMOSTAT
1. Before connecting or disconnecting plug, turn knob fully
counterclockwise. (Figure 4)
2. Heater is equipped with a thermostat. To adjust temperature
to your individual requirements, turn thermostat control knob
clockwise all the way to turn heater on. The yellow power
light will illuminate. When room reaches desired temperature,
turn thermostat knob counterclockwise until you hear click.
Leave in this position to maintain room temperature at this
setting. For additional heat, turn clockwise until you hear
click again and heater will turn on. To shut heater off turn
thermostat knob counterclockwise all the way. The yellow
power indicator light will turn off.
!
NOTE: Heater is equipped with a fan delay to dissipate
residual heat from the element. Heater fan will run for a brief
period after heater has reached room temperature.
WARNING: Should the heater overheat, an automatic cut
out will turn the heater off and it will not come back on with-
out being reset. It can be reset by unplugging the unit and
waiting 5 minutes before plugging the unit back in.
If you need to continuously reset the heater, unplug the
unit and contact a licenced electrician. DO NOT USE THE
HEATER UNTIL THE CAUSE OF THE BROBLEM IS DE-
TERMINED AND FIXED.
Operation
Air In
Air Out
Hanger
Bracket
Carriage
Bolt
Spacer
Lock
Washer
T-Handle
Figure 3
Figure 4
Red light
Yellow light