Loading ...
Loading ...
Loading ...
2
USING YOUR CLEANER
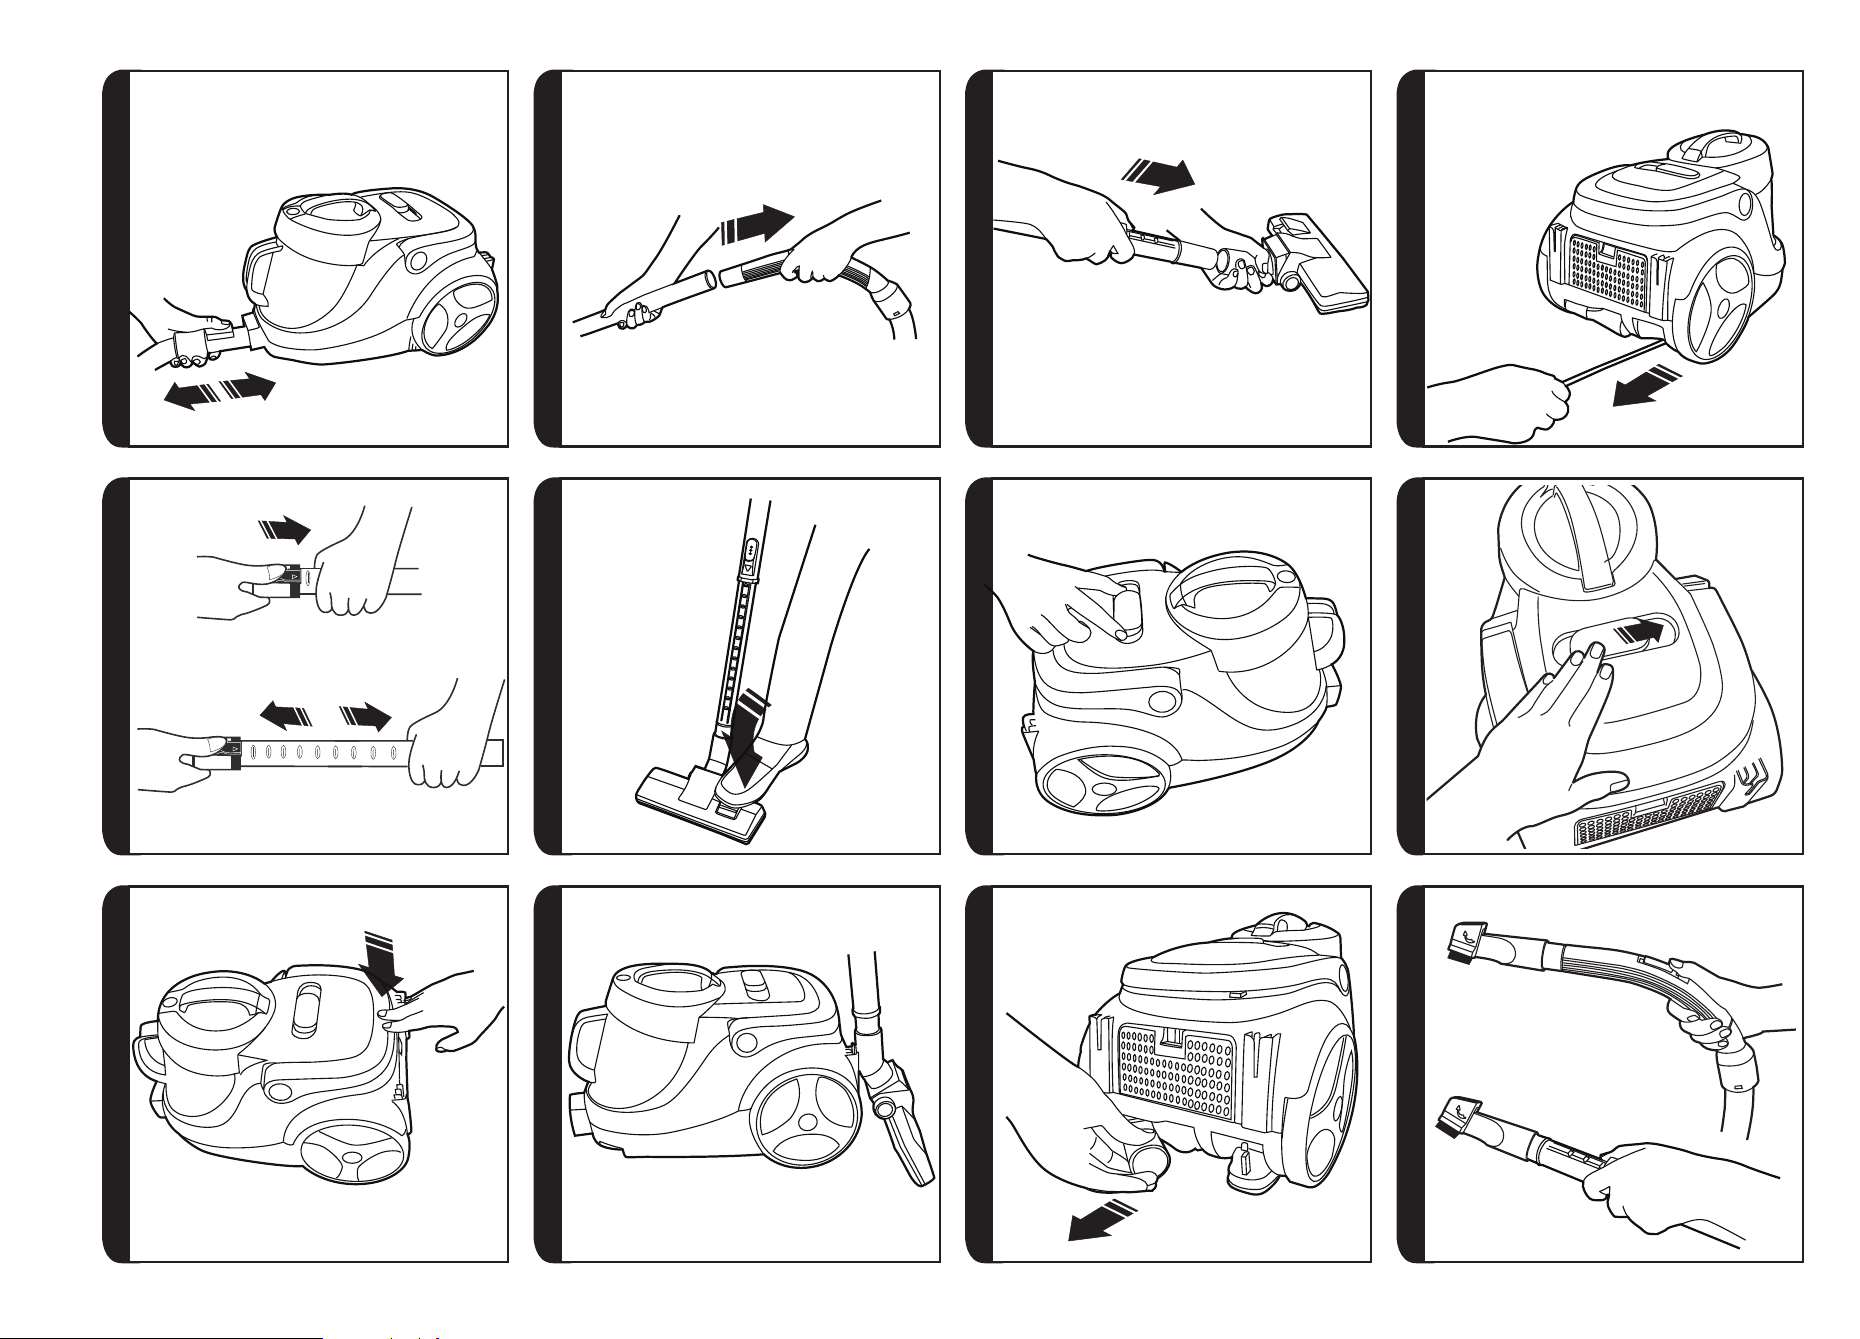
1. Extract power cord and plug it into the power supply. Do not pull the cord beyond the
red marker. [5]
2. Adjust the telescopic tube* to the desired height by moving the telescopic tube
adjuster* up and raise or lower the hose handle to the most comfortable cleaning
position. [6]
3. Select the type of surface to be cleaned by pressing the pedal in the nozzle. [7]
Hard Floor – Brushes are lowered to protect the floor.
Carpet – Brushes are raised for the deepest clean.
4. Switch the cleaner on by sliding the On-Off control to the ON position. [8]
5. Adjust the power level by further sliding the On-Off / variable power control* slider on
cleaner mainbody. [9]
6. Switch off at the end of use by sliding the On-Off control to the OFF position. Unplug
and press the carry handle/cord rewind button to wind the power cord back into the
cleaner. [10]
7. To store your cleaner adjust telescopic tube* to the lowest height setting and park the
nozzle in the park position on the cleaner main body. [11]
ACCESSORIES AND NOZZLES
To obtain the best performance and energy eciency
it is recommended that the correct
nozzles are used for the main cleaning operations. These nozzles are indicated in the diagrams
by the letters GP, HF or CA.
A nozzle type GP can be used to clean both carpet and hard oor.
A nozzle type HF is suitable for use only on hard oor.
A nozzle of type CA is suitable for use only on carpet.
The other nozzles are accessories for specialist cleaning tasks and are recommended for
occasional use only.
All accessories can be fitted to the end of the handle or the end of the tube.
2 in 1 Accessory
Remove the 2in1 accessory from the rear of the cleaner [12] and fit onto the end of the
handle. [13]
Crevice Tool – For corners and hard to reach areas. [1U]
Dusting Brush – For bookshelves, frames, keyboards and other delicate areas. To extend
the brushes push the button on the body of the tool. [1U]
Pet Hair Remover Mini Turbo Nozzle* - Use the mini turbo nozzle on stairs or for deep
cleaning on textile surfaces and other hard to clean areas. Particularly suitable for pet hairs
removal. [1V]
Allergen Remover Mini Turbo Nozzle* – Use the mini turbo nozzle on stairs or for deep
cleaning on textile surfaces and other hard to clean areas, particularly suitable for allergen
removal. [1W]
Grand Turbo Nozzle* –
Use the turbo nozzle for deep cleaning on carpets. [1X]
GETTING TO KNOW YOUR CLEANER
A. Cleaner main body
B. Dust container
C. Dust container front handle*
D. Dust container top handle
E. Dust container release button
F. On-o / power control* slider
G. Cleaner carry handle / cord rewind button
H. Parking slots
I. Exhaust lter
J. Hose
K. Hose release button
L. Handle
M. Suction control
N. Standard tube*
O. Telescopic tube*
P. Telescopic tube adjuster
Q. Carpet and Floor nozzle(GP)**
R. Surface selector pedal**
S. Pre motor lter
T. Pre motor lter mesh*
U. 2 In 1 accessory
V. Pet hair remover mini turbo nozzle*
W. Allergen remover mini turbo nozzle*
X. Grand turbo nozzle*
Y. Parquet Nozzle*
ASSEMBLING YOUR CLEANER
Remove all components from the packaging.
1. Connect the hose to the cleaner main body, ensuring it clips and locks into position. To
release: simply press the button on the hose end and pull. [2]
2. Connect the handle to the tube upper end. [3]
3. Connect the tube lower end to the carpet and floor nozzle. [4]
*Certain Models Only ** Certain models only, nozzles may vary according to model
Q1. Carpet Nozzle (CA)**
Q2. Hard Floor Nozzle (HF)**
Loading ...