Before you use your Crock-Pot® slow cooker, remove all packaging components and wash the lid and stoneware with warm soapy water and dry thoroughly.
ASSEMBLY
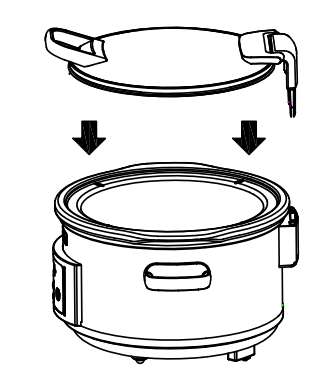
1. Place the cooking bowl into the heating base.
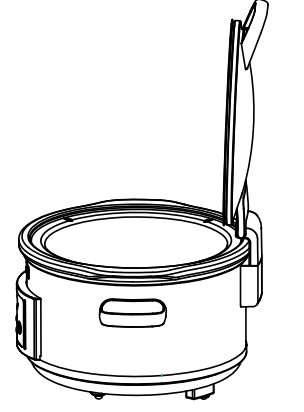
2. Attach the lid by inserting the hinge mechanism into the hinge slot at the rear of the heating base.
IMPORTANT NOTES: Some countertop and table surfaces are not designed to withstand the prolonged heat generated by certain appliances. Do not set the heated unit on a surface that may be damaged by heat. We recommend placing an insulated pad or suitably sized trivet under your slow cooker to prevent possible damage to the surface. Please use caution when placing your stoneware on a ceramic or smooth glass cook top stove, countertop, table, or other surface. Due to the nature of the stoneware, the rough bottom surface may scratch some surfaces if caution is not used. Always place protective padding under stoneware before placing it on a table or countertop. During initial use of this appliance, some slight smoke or odour may be detected. This is normal with many heating appliances and will not recur after a few uses.
HOW TO USE YOUR SLOW COOKER
1. Place the stoneware into the heating base, add your ingredients into the stoneware and cover with the lid. Plug in your slow cooker.
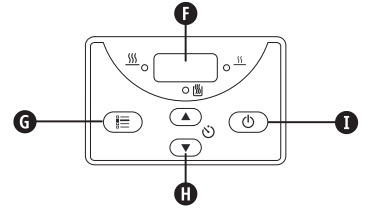
2. Select the temperature setting using the temperature select button G. The high temperature light or low temperature light will come on.
NOTE: The KEEP WARM setting is ONLY for keeping food that has already been cooked warm. DO NOT cook on the WARM setting. We do not recommend using the WARM setting for more than 4 hours.
3. Press the timer up/down buttons H to select a cooking time. The time can be set in increments of 30 minutes up to 20 hours. Select the time based on the length of time indicated in the recipe. The time will begin to count down in one minute increments.
4. When cooking has finished, your slow cooker will automatically switch to the KEEP WARM setting and the keep warm light will come on.
5. To stop cooking, press the standby button I. Follow steps 2 and 3 above to return to cooking. To turn your slow cooker OFF, unplug it from the supply socket.
USAGE NOTES
• If the mains power has been interrupted (power cut), the display and lights will flash when the power is restored. All the slow cooker settings will have been lost. As a result, the food may be unsafe to eat. If you are unaware of how long the power was off, we suggest you discard the food inside.
• If desired, you can manually switch to the KEEP WARM setting when your recipe has finished cooking.
• To avoid over or under-cooking, always fill the stoneware ½ to ¾ full and conform to the recommended cooking times.
• Do not overfill the stoneware. To prevent spillover, do not fill the stoneware higher than ¾ full.
• Always cook with the lid on for the recommended time. Do not remove the lid during the first two hours of cooking to allow the heat to build up efficiently.
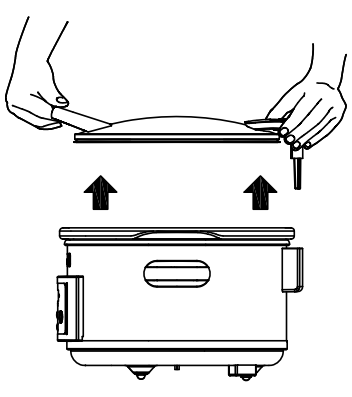
• Always wear oven gloves when handling the lid or stoneware.
• Unplug when cooking has finished and before cleaning.
• The removable stoneware is ovenproof. Do not use removable stoneware on a gas burner, electric hob or under a grill.
GUIDE TO ADAPTING RECIPES
This guide is designed to help you adapt your own and other recipes for your slow cooker. Many of the normal preparatory steps are unnecessary when using your slow cooker. In most cases all ingredients can go into your slow cooker at once and cook all day. General:
• Allow sufficient cooking time.
• Always cook with the lid on.
• For best results and to prevent food from drying or burning, always ensure an adequate amount of liquid is used in the recipe
PASTA AND RICE:
• For best results, use long grain rice unless the recipe states otherwise. If the rice is not cooked completely after the suggested time, add an extra 1 to 1½ cups of liquid per cup of cooked rice and continue cooking for 20 to 30 minutes.
• For best pasta results, add the pasta to the slow cooker during the last 30 to 60 minutes of cook time.
BEANS:
• Dried beans, especially red kidney beans, should be boiled before adding to a recipe.
• Fully cooked canned beans may be used as a substitute for dried beans.
VEGETABLES:
• Many vegetables benefit from slow cooking and are able to develop their full flavour. They tend not to overcook in your slow cooker as they might in your oven or on your hob.
• When cooking recipes with vegetables and meat, place vegetables into the cooking bowl before meat. Vegetables usually cook more slowly than meat in the slow cooker and benefit from being partially immersed in the cooking liquid.
• Place vegetables near the sides or bottom of the cooking bowl to help cooking.
MILK:
• Milk, cream, and sour cream break down during extended cooking. When possible, add during the last 15 to 30 minutes of cooking.
• Condensed soups may be substituted for milk and can cook for extended times.
SOUPS:
• Some recipes call for large amounts of water/stock. Add the soup ingredients to the cooking bowl first then add water/ stock only to cover. If a thinner soup is desired, add more liquid when serving.
MEATS:
• Trim fat, rinse well, and pat meat dry with paper towels.
• Browning meat beforehand allows fat to be drained off before slow cooking and also adds greater depth of flavour.
• Meat should be positioned so that it rests in the cooking bowl without touching the lid.
• For smaller or larger cuts of meat, alter the amount of vegetables or potatoes so that the cooking bowl is always ½ to ¾ full.
• The size of the meat and the recommended cook times are just estimates and can vary depending upon the specific cut, type, and bone structure. Lean meats such as chicken or pork tenderloin tend to cook faster than meats with more connective tissue and fat such as brisket or pork shoulder. Cooking meat on the bone versus boneless will increase required cook times.
• Cut meat into smaller pieces when cooking with precooked foods such as beans, or light vegetables such as mushrooms, diced onion, aubergine, or finely minced vegetables. This enables all food to cook at the same rate.
FISH:
• Fish cooks quickly and should be added at the end of the cooking cycle during the last fifteen minutes to one hour of cooking.
LIQUID:
• It might appear that slow cooker recipes only have a small quantity of liquid in them but the slow cooking process differs from other cooking methods in that the added liquid in the recipe will almost double during the cooking time. If you are adapting a recipe for your slow cooker from a conventional recipe, please reduce the amount of liquid before cooking.
CLEANING
ALWAYS unplug your slow cooker from the electrical outlet, and allow it to cool before cleaning.
CAUTION: Never immerse the heating base, power cord or plug in water or any other liquid.
• The lid and stoneware can be washed in the dishwasher or with hot, soapy water. Do not use abrasive cleaning compounds or scouring pads. A cloth, sponge, or rubber spatula will usually remove residue. To remove water spots and other stains, use a non-abrasive cleaner or vinegar.
• As with any fine ceramic, the stoneware and lid will not withstand sudden temperature changes. Do not wash the stoneware or lid with cold water when they are hot.
• The outside of the heating base may be cleaned with a soft cloth and warm, soapy water. Wipe dry. Do not use abrasive cleaners.
• No other servicing should be performed.
• Note: After cleaning allow the stoneware to air dry before storing.
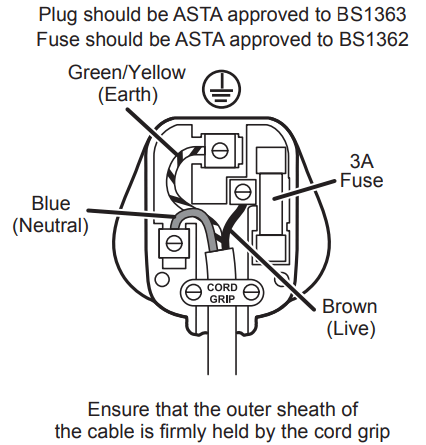
FITTING A PLUG
This appliance must be earthed. If the plug is not suitable for the socket outlets in your home, it can be removed and replaced by a plug of the correct type. If the fuse in a moulded plug needs to be changed, the fuse cover must be refitted. The appliance must not be used without the fuse cover fitted. If the plug is unsuitable, it should be dismantled and removed from the supply cord and an appropriate plug fitted as detailed. If you remove the plug it must not be connected to a 13 amp socket and the plug must be disposed of immediately. If the terminals in the plug are not marked or if you are unsure about the installation of the plug please contact a qualified electrician.
IMPORTANT SAFEGUARDS
This appliance can be used by children aged from 8 years and above and persons with reduced physical, sensory or mental capabilities or lack of experience and knowledge if they have been given supervision or instruction concerning use of the appliance in a safe way and understand the hazards involved. Children shall not play with the appliance. Cleaning and user maintenance shall not be made by children unless they are older than 8 and supervised. Keep the appliance and its cord out of the reach of children aged less than 8 years.
Parts of the appliance are liable to get hot during use. If the supply cord is damaged, it must be replaced by the manufacturer, its service agent or similarly qualified persons in order to avoid a hazard. Never use this appliance for anything other than its intended use. This appliance is for household use only. Do not use this appliance outdoors.
This appliance generates heat during use. Adequate precaution must be taken to prevent the risk of burns, scalds, fires or other damage to persons or property caused whilst in use or during cooling.
Use oven gloves or a cloth and beware of escaping steam when opening or removing the lid.
Always ensure that hands are dry before handling the plug or switching on the appliance.
Always use the appliance on a stable, secure, dry and level surface.
The heating base of the appliance must not be placed on or near any potentially hot surfaces (such as a gas or electric hob).
Do not use the appliance if it has been dropped, if there are any visible signs of damage or if it is leaking.
Ensure the appliance is switched off and unplugged from the supply socket after use and before cleaning.
Always allow the appliance to cool before cleaning or storing.
Never immerse the heating base, power cord or plug in water or any other liquid.
Never let the power cord hang over the edge of a worktop, touch hot surfaces or become knotted, trapped or pinched.
NEVER attempt to heat any food item directly inside the base unit. Always use the removable cooking bowl.
Some surfaces are not designed to withstand the prolonged heat generated by certain appliances. Do not set the appliance onto a surface that may be damaged by heat. We recommend placing an insulating pad or trivet under the appliance to prevent possible damage to the surface.
The slow cooker lid is made of tempered glass. Always inspect the lid for chips, cracks or any other damage. Do not use the glass lid if it is damaged, as it may shatter during use.
No unfortunately it doesn't have a delayed start time. I cook the meal on the low setting for around 7/8 hours then the crockpot automatically switches to the keep warm setting which can be up to four hours, it doesn't recommend using any longer than that. So really in total that would be 11/12 hours. I do always check the recipe times just to be safe. It is a fantastic piece of equipment and the food is delicious.
#2 Can I leave the pot on all day ie, from 7.30am until 7.30pm - won’t all the water evaporate, even on low heat?
I have never had it on that long however it shouldn't be a problem because the lid is air sealed and no liquid has ever evaporated from mine. You can set it in increments of 30mins then when it's finished cooking it turns itself to warm for approx 1hour. I've cooked many things in mine and all have been a success!
#3 Can you open it during the cooking time to check? And adjust the timer or heat setting once it's started cooking to allow to heat let out when opened?
Yes you can lift the lid while cooking. To do any sort of adjustment, you would have to cancel and start again. I suppose it you took into account what had already happened regarding cooking time , you would be OK. Better to decide in the beginning what time/heat you will need.

 or low temperature light
 will come on.
 is ONLY for keeping food that has already been cooked warm. DO NOT cook on the WARM setting. We do not recommend using the WARM setting for more than 4 hours.