Loading ...
Loading ...
Loading ...
4
BEFORE USING FOR THE FIRST TIME
• Remove any labels, stickers or packaging from the steam station and iron soleplate.
• Remove the water tank and rinse with clean water.
• Beforeusingtheironforthersttime,orifit’snotbeenusedforalongtime,ironascrappiece
of cotton or linen to remove any accumulated residues.
• Theironmaygiveoffanodourandsmallamountofvapourwhenswitchedonforthersttime.
This is normal and will stop as the element cures.
FILLING
You may fill the water tank with tap-water, however if you live in a hard water area, you should use
distilled water (not chemically descaled or softened water).
If you buy distilled water, check it is marked as suitable for use in irons.
• Remove the water tank by pulling it away from the body of the steam station using the grip on
the front of the water tank.
• Fill the water tank to the MAX mark. Do not exceed the MAX mark.
• Retthewatertankintothebaseunit.
PREPARATION
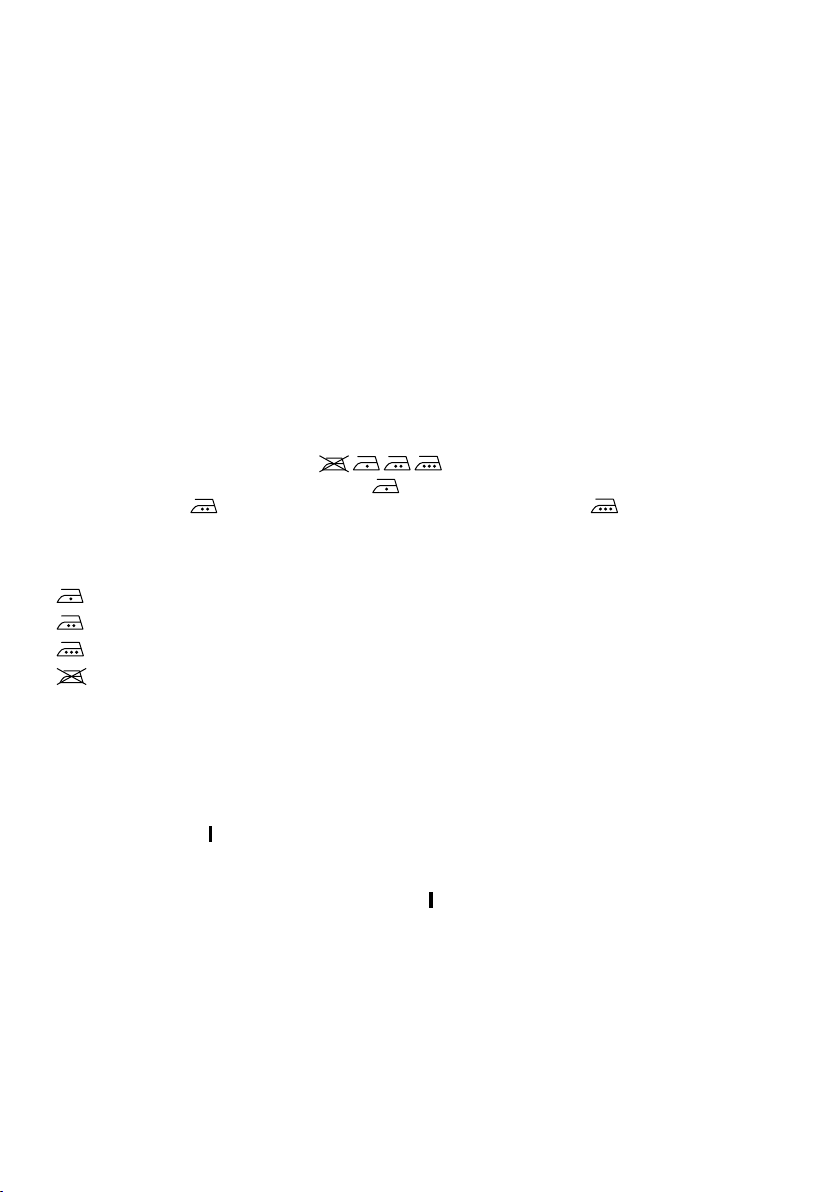
• Check for textile care symbols ( ) on items to be ironed.
• Iron fabrics needing low temperatures
rst,thenthosethatneedmedium
temperatures
,andnishwiththoseneedinghightemperatures .
TEMPERATURE SETTING GUIDE
LABEL MARKING TEMPERATURE DOT SETTING
cool - nylon, acrylics, polyester, synthetics •
warm - wool, polyester mixtures, silk • •
hot - cotton, linen • • • / max
do not iron
NOTE: If the instructions on the fabric label differ from this guide, follow the instructions on the label.
SWITCHING ON
• Sit the iron on top of the base unit.
• Plug the power cord into the wall power outlet.
• Turn the temperature control dial to bring the desired setting on the dial
next to the mark
.
• Use the steam control to select the amount of steam you want, varying between low
4
BEFORE FIRST USE
• Remove any labels, stickers or packaging from the iron and soleplate.
• Before using the iron for the rst time, or if it’s not been used for a long time, iron a scrap piece of
cotton (an old towel is ideal) to remove any accumulated residues.
• Don’t worry if the iron smokes a bit at rst, it will soon stop as the manufacturing residues evaporate.
FILLING/REFILLING
You may use the iron with tap-water, but if you live in a hard water area, you should use distilled water (not
chemically descaled or softened water).
If you buy distilled water, check that it’s suitable for use in irons.
1. Remove the reservoir by pulling it away from the body of the steam generator using the grip on the
front of the reservoir .
2. Fill the reservoir to the max mark. Do not exceed the max mark.
3. Ret the reservoir into the base unit.
PRELIMINARY SETTINGS
1. Put the iron on top of the base unit.
2. Put the plug into the power socket (switch the socket on, if it’s switchable).
3. Turn the unit on by setting the on/o button to I.
4. Turn the temperature control to bring the setting you require next to the mark. The thermostat light
will ash until the iron has reached its desired temperature. Once the temperature has been reached
the light will remain on.
5. Use the steam control to select the amount of steam you want
( m= low, l= medium, h= high).
TEMPERATURE SELECTION GUIDE
1. Check for textile care symbols (i j k l).
2. Iron fabrics needing low temperatures rst, then those that need medium temperatures , and nish
with those needing high temperatures (or max).
3. Turn the temperature control to bring the setting you require next to the mark.
If the instructions on the fabric label dier from this guide, follow the instructions on the label.
L
abel marking
Dot setting
j cool – nylon, acrylics, polyester
•
k warm – wool, polyester mixtures
• •
l hot – cotton, linen
• • •/max
i do not iron
When the soleplate reaches operating temperature, the thermostat light will stay permanently on.
STEAM IRONING
1. If you intend to use steam, the temperature setting must be at
l
or higher.
2. Use the steam control to select the amount of steam you want
( m= low, l= medium, h= high).
3. Squeeze the steam button to produce steam, release it to stop.
NOTE: When you rst start your steam station and pull the trigger for steam ironing, there will be a
delay as your steam station pumps water from the reservoir to prime the system. This is normal
and may take 20-30 seconds. This will also happen after relling the reservoir.
to high
steam
4
BEFORE FIRST USE
• Remove any labels, stickers or packaging from the iron and soleplate.
• Before using the iron for the rst time, or if it’s not been used for a long time, iron a scrap piece of
cotton (an old towel is ideal) to remove any accumulated residues.
• Don’t worry if the iron smokes a bit at rst, it will soon stop as the manufacturing residues evaporate.
FILLING/REFILLING
You may use the iron with tap-water, but if you live in a hard water area, you should use distilled water (not
chemically descaled or softened water).
If you buy distilled water, check that it’s suitable for use in irons.
1. Remove the reservoir by pulling it away from the body of the steam generator using the grip on the
front of the reservoir .
2. Fill the reservoir to the max mark. Do not exceed the max mark.
3. Ret the reservoir into the base unit.
PRELIMINARY SETTINGS
1. Put the iron on top of the base unit.
2. Put the plug into the power socket (switch the socket on, if it’s switchable).
3. Turn the unit on by setting the on/o button to I.
4. Turn the temperature control to bring the setting you require next to the mark. The thermostat light
will ash until the iron has reached its desired temperature. Once the temperature has been reached
the light will remain on.
5. Use the steam control to select the amount of steam you want
( m= low, l= medium, h= high).
TEMPERATURE SELECTION GUIDE
1. Check for textile care symbols (i j k l).
2. Iron fabrics needing low temperatures rst, then those that need medium temperatures , and nish
with those needing high temperatures (or max).
3. Turn the temperature control to bring the setting you require next to the mark.
If the instructions on the fabric label dier from this guide, follow the instructions on the label.
L
abel marking
Dot setting
j cool – nylon, acrylics, polyester
•
k warm – wool, polyester mixtures
• •
l hot – cotton, linen
• • •/max
i do not iron
When the soleplate reaches operating temperature, the thermostat light will stay permanently on.
STEAM IRONING
1. If you intend to use steam, the temperature setting must be at
l
or higher.
2. Use the steam control to select the amount of steam you want
( m= low, l= medium, h= high).
3. Squeeze the steam button to produce steam, release it to stop.
NOTE: When you rst start your steam station and pull the trigger for steam ironing, there will be a
delay as your steam station pumps water from the reservoir to prime the system. This is normal
and may take 20-30 seconds. This will also happen after relling the reservoir.
.
• Turn the unit on by setting the On/Off button to
.
• Thethermostatlightwillashuntiltheironhasreacheditsdesiredtemperature.Oncethe
temperature has been reached the light will remain as solid blue.
• The temperature indicator light will cycle ON and OFF as the thermostat operates to maintain
temperature.
AUTO SHUT-OFF
• Iftheironhasnotbeenusedwithin8minutes,theblueindicatorlightwillashcontinuously
and the unit will shut down.
• To switch on again, lift up the iron, tilt it forward and press the steam trigger.
• No settings are lost during auto shut-off
Loading ...
Loading ...
Loading ...