
Loading ...
Loading ...
Loading ...
ProTeam Owner's Manual / Manual del propietario de ProTeam / Mode d’emploi ProTeam – 5
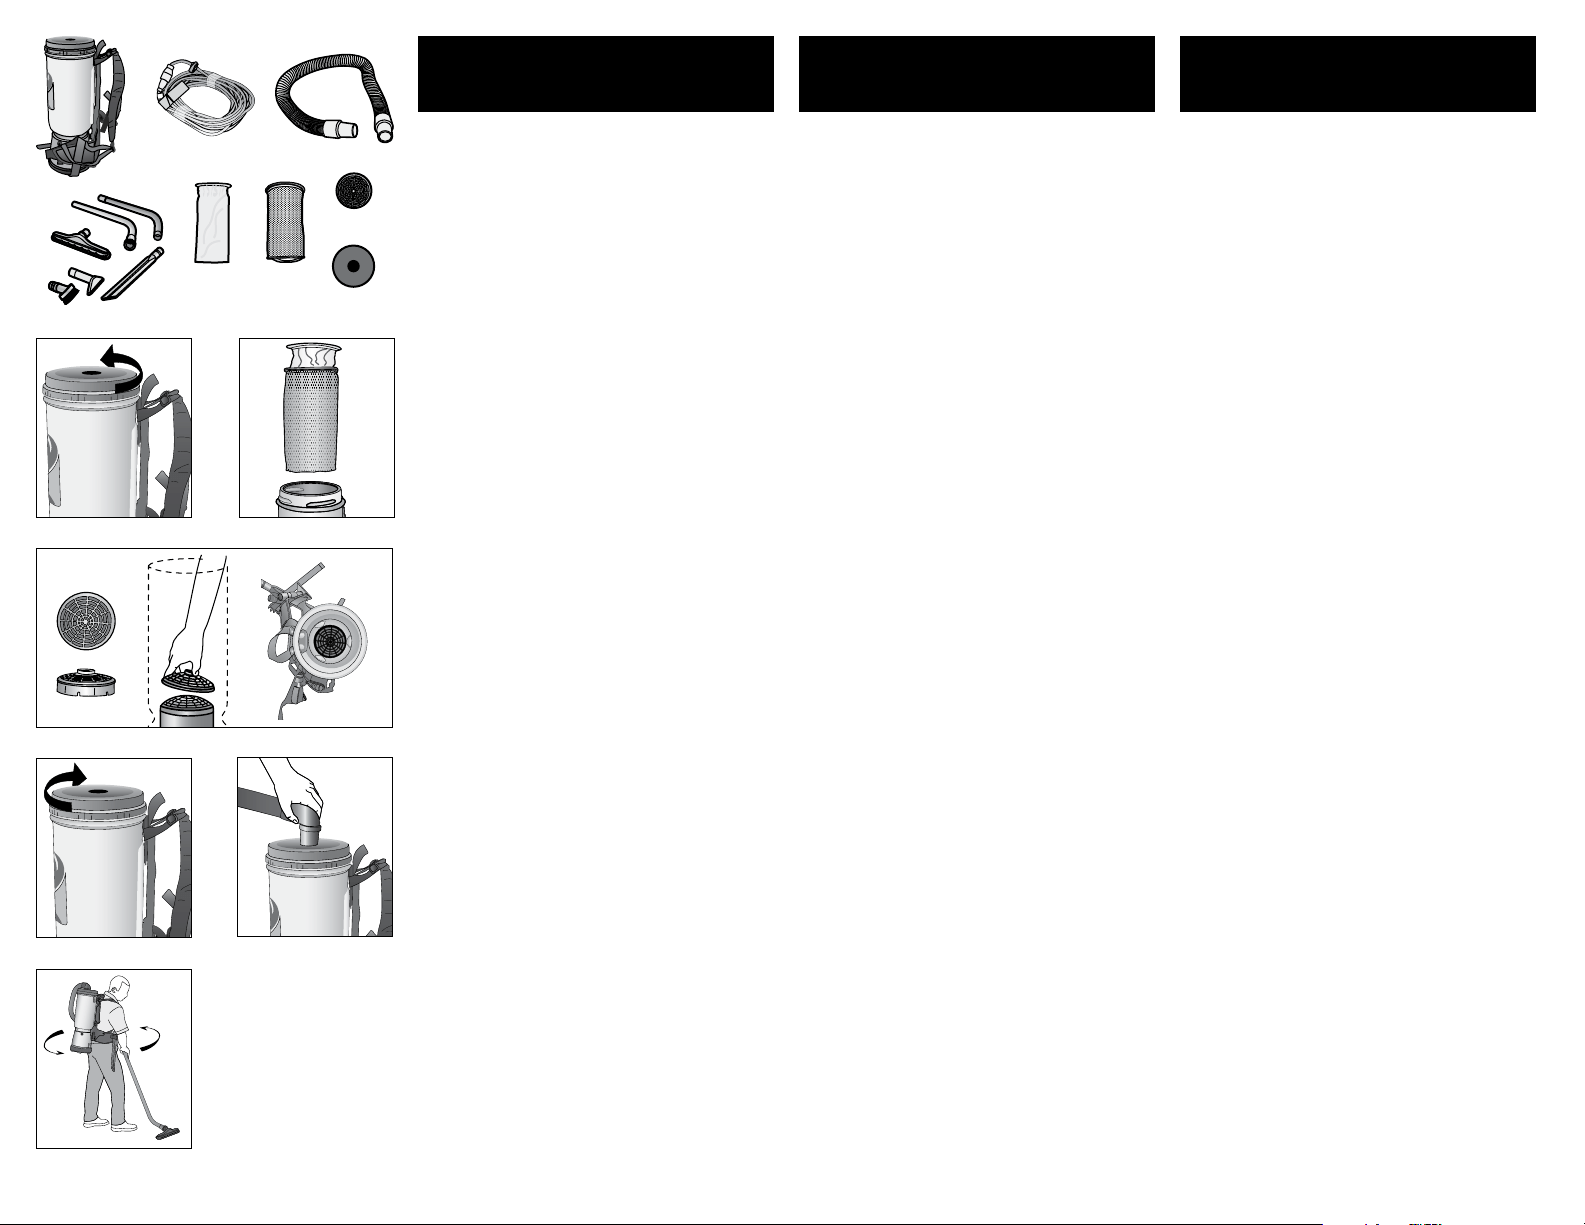
OVERVIEW OF COMPONENTS
• Vacuum(1)
• ExtensionCord(2)
• Hose(3)
• Accessories(4)
• InterceptMicroFilter(5)
• MicroClothFilter(6)
• DomeFilter(7)
• ExhaustFilter(8)
QUICK START
1. Unscrew the cap on the top of the vacuum unit
(Figure A).
2. Remove filters (Figure B).
3. Check to make sure the Dome Filter did not shift
during shipping (Figure C).
4. Replace the Intercept Micro Filter and the Micro
Cloth Filter into the vacuum (Figure B).
5. Replace the cap (Figure D).
6. Push the hose into the cap opening (Figure E).
(1) (2) (3)
(4) (5) (6) (8)
(7)
Figure A
Figure C
Figure B
Figure D Figure E
DESCRIPCIÓN GENERAL DE
COMPONENTES
• Aspiradora(1)
• Cabledeextensión(2)
• Manguera(3)
• Accesorios(4)
• Intercept Micro Filter (5)
• Microfiltrodetela(6)
• Filtrodedomo(7)
• Filtrodeescape(8)
INTRODUCCIÓN
1. Desatornille la tapa en la parte superior de la unidad
(Figure A).
2. Retire los filtros (Figure B).
3. Revise para asegurarse de que el filtro de domo no
se movió durante el envío (Figure C).
4. Cambie el filtro Intercept Micro Filter y el microfiltro
de tela en la aspiradora (Figure B).
5. Cambie la tapa (Figure D).
6. Presione la manguera en el orificio de la tapa
(Figure E).
OVERVEIW DES COMPOSANTS
• Aspirateur(1)
• Cordond’extension(2)
• Boyau(3)
• Accessoires(4)
• MicrofiltreIntercept (5)
• Microfiltreentissu(6)
• Filtreendôme(7)
• Filtredesortie(8)
DÉMARRAGE RAPIDE
1. Dévissez le couvercle supérieur de l’aspirateur
(Figure A).
2. Retirez les filtres (Figure B).
3. Vériezqueleltreendômen’apasbougédurant
l’expédition (Figure C).
4. Installez le microfiltre Intercept et le microfiltre en
tissu dans l’aspirateur (Figure B).
5. Remettez le couvercle en place (Figure D).
6. Insérez le tuyau dans l’orifice du couvercle (Figure E).
Figure F
PROPER VACUUMING MOTION FOR
LARGE AREAS
1. Begin with the wand parallel to your body.
2. Draw the top of the wand in toward your waist and
twist at the waist walking backward or forward, in a
side-to-side motion (Figure F).
3. The motion is similar to mopping and keeps the
upper body and arms from tiring.
BACKPACK ERGONOMICS
• Theweightofthevacuumshouldbeevenly
distributed on your hips.
• Adjustthepaddedwaistbeltandshoulderstraps
for a custom fit.
• Thebackpackshaveaventilatedbackplatetokeep
the operator cool.
• Theon/offswitchisconvenientlylocatedonthe
waist belt of the backpack vacuums. Use pocket on
waist belt to avoid damage to the switch cord.
• Usetheproperattachmentsforthejob.ProTeamhas
attachments to perform most jobs without requiring
you to bend over or get into difficult positions.
MOVIMIENTO DE ASPIRACIÓN
ADECUADO PARA ÁREAS GRANDES
1. Comience con el tubo paralelo a su cuerpo.
2. Lleve la parte superior del tubo hacia su cintura y gire
la cintura mientras camina hacia atrás o hacia delante,
con un movimiento de lado a lado (Figure F).
3. El movimiento es similar a trapear y evita que la parte
superior del cuerpo y los brazos se cansen.
ERGONOMÍA DE LA MOCHILA
• Elpesodelaaspiradoradebedistribuirse
uniformemente sobre las caderas.
• Ajusteelcinturónacolchadoylascorreasdelos
hombros para un ajuste personalizado.
• Lasmochilascuentanconunaplacaposterior
ventilada para mantener fresco al operador.
• Elinterruptordeencendido/apagadoestáubicado
convenientemente en la correa de la cintura de
las aspiradoras tipo mochila. Utilice bolsillo en el
cinturón de cintura para evitar daños a la cuerda del
interruptor.
• Uselosaccesoriosadecuadosparaeltrabajo.
ProTeam tiene accesorios para realizar la mayoría
de los trabajos sin que deba doblarse o adoptar
posiciones difíciles.
COMMENT PASSER L’ASPIRATEUR
SUR UNE GRANDE SURFACE
1. Placez le tube d’aspiration parallèlement à
votre corps.
2. Tirez le haut du tube vers votre taille, puis tournez
votre taille pendant que vous marchez vers l’arrière
ou l’avant, en effectuant un mouvement de
va-et-vient latéral (Figure F).
3. Ce mouvement est semblable à celui utilisé pour
passer la vadrouille et diminue la fatigue du haut du
corps et des bras.
ERGONOMIE DE L’ASPIRATEUR
DORSAL
• Lepoidsdel’aspirateurdevraitêtreréparti
uniformément sur vos hanches.
• Réglezleceinturonrembourréetlesbandoulières
pour un confort optimal.
• L’aspirateurdorsalestdotéd’uneplaquearrière
ventilée qui aide à garder l’utilisateur au frais.
• Lecommutateurmarche/arrêtsesituesurle
ceinturon de l’aspirateur dorsal. Utiliser la poche sur
la ceinture de taille pour éviter des dommages à la
corde de commutateur.
• Utilisezlesaccessoiresconvenantautravailà
effectuer. ProTeam offre des accessoires adaptés
à la plupart des travaux et conçus pour vous
éviter de vous pencher ou d’adopter une position
inconfortable.
BacKpacK
operatIon
mocHILa
operacIÓn
dorsaL
opératIon
Loading ...
Loading ...
Loading ...