M4-EX, M4T-EX, M8-EX, M8T-EX, M8C-EX, M8DBS-EX INSTRUCTIONS - English
M4-EX, M4T-EX, M8-EX, M8T-EX, M8C-EX, M8DBS-EX INSTRUCCIONES - Español
Make sure you have the right surge protector to protect your electronic equipment. Panamax makes protectors for almost every type of electronic equipment. Surge protectors that
may look identical from the outside can be very different on the inside. It is very important to use the surge protector designed for your application.
small rectangular bracket with a grounding
interface. This bracket replaces the small
triangular wall-mount bracket that comes
with the AC base unit and is needed only
when add-on modules are being installed.
More information can be obtained on the
Panamax website or by calling our
Customer Support Department.
ADDING SIGNAL-LINE MODULES
(Optional):
Some connected equipment may have
more signal-lines than can be protected by
the base unit alone. Panamax offers a line
of add-on signal-line modules (sold sepa-
rately) for these situations. Each module
includes installation instructions and a
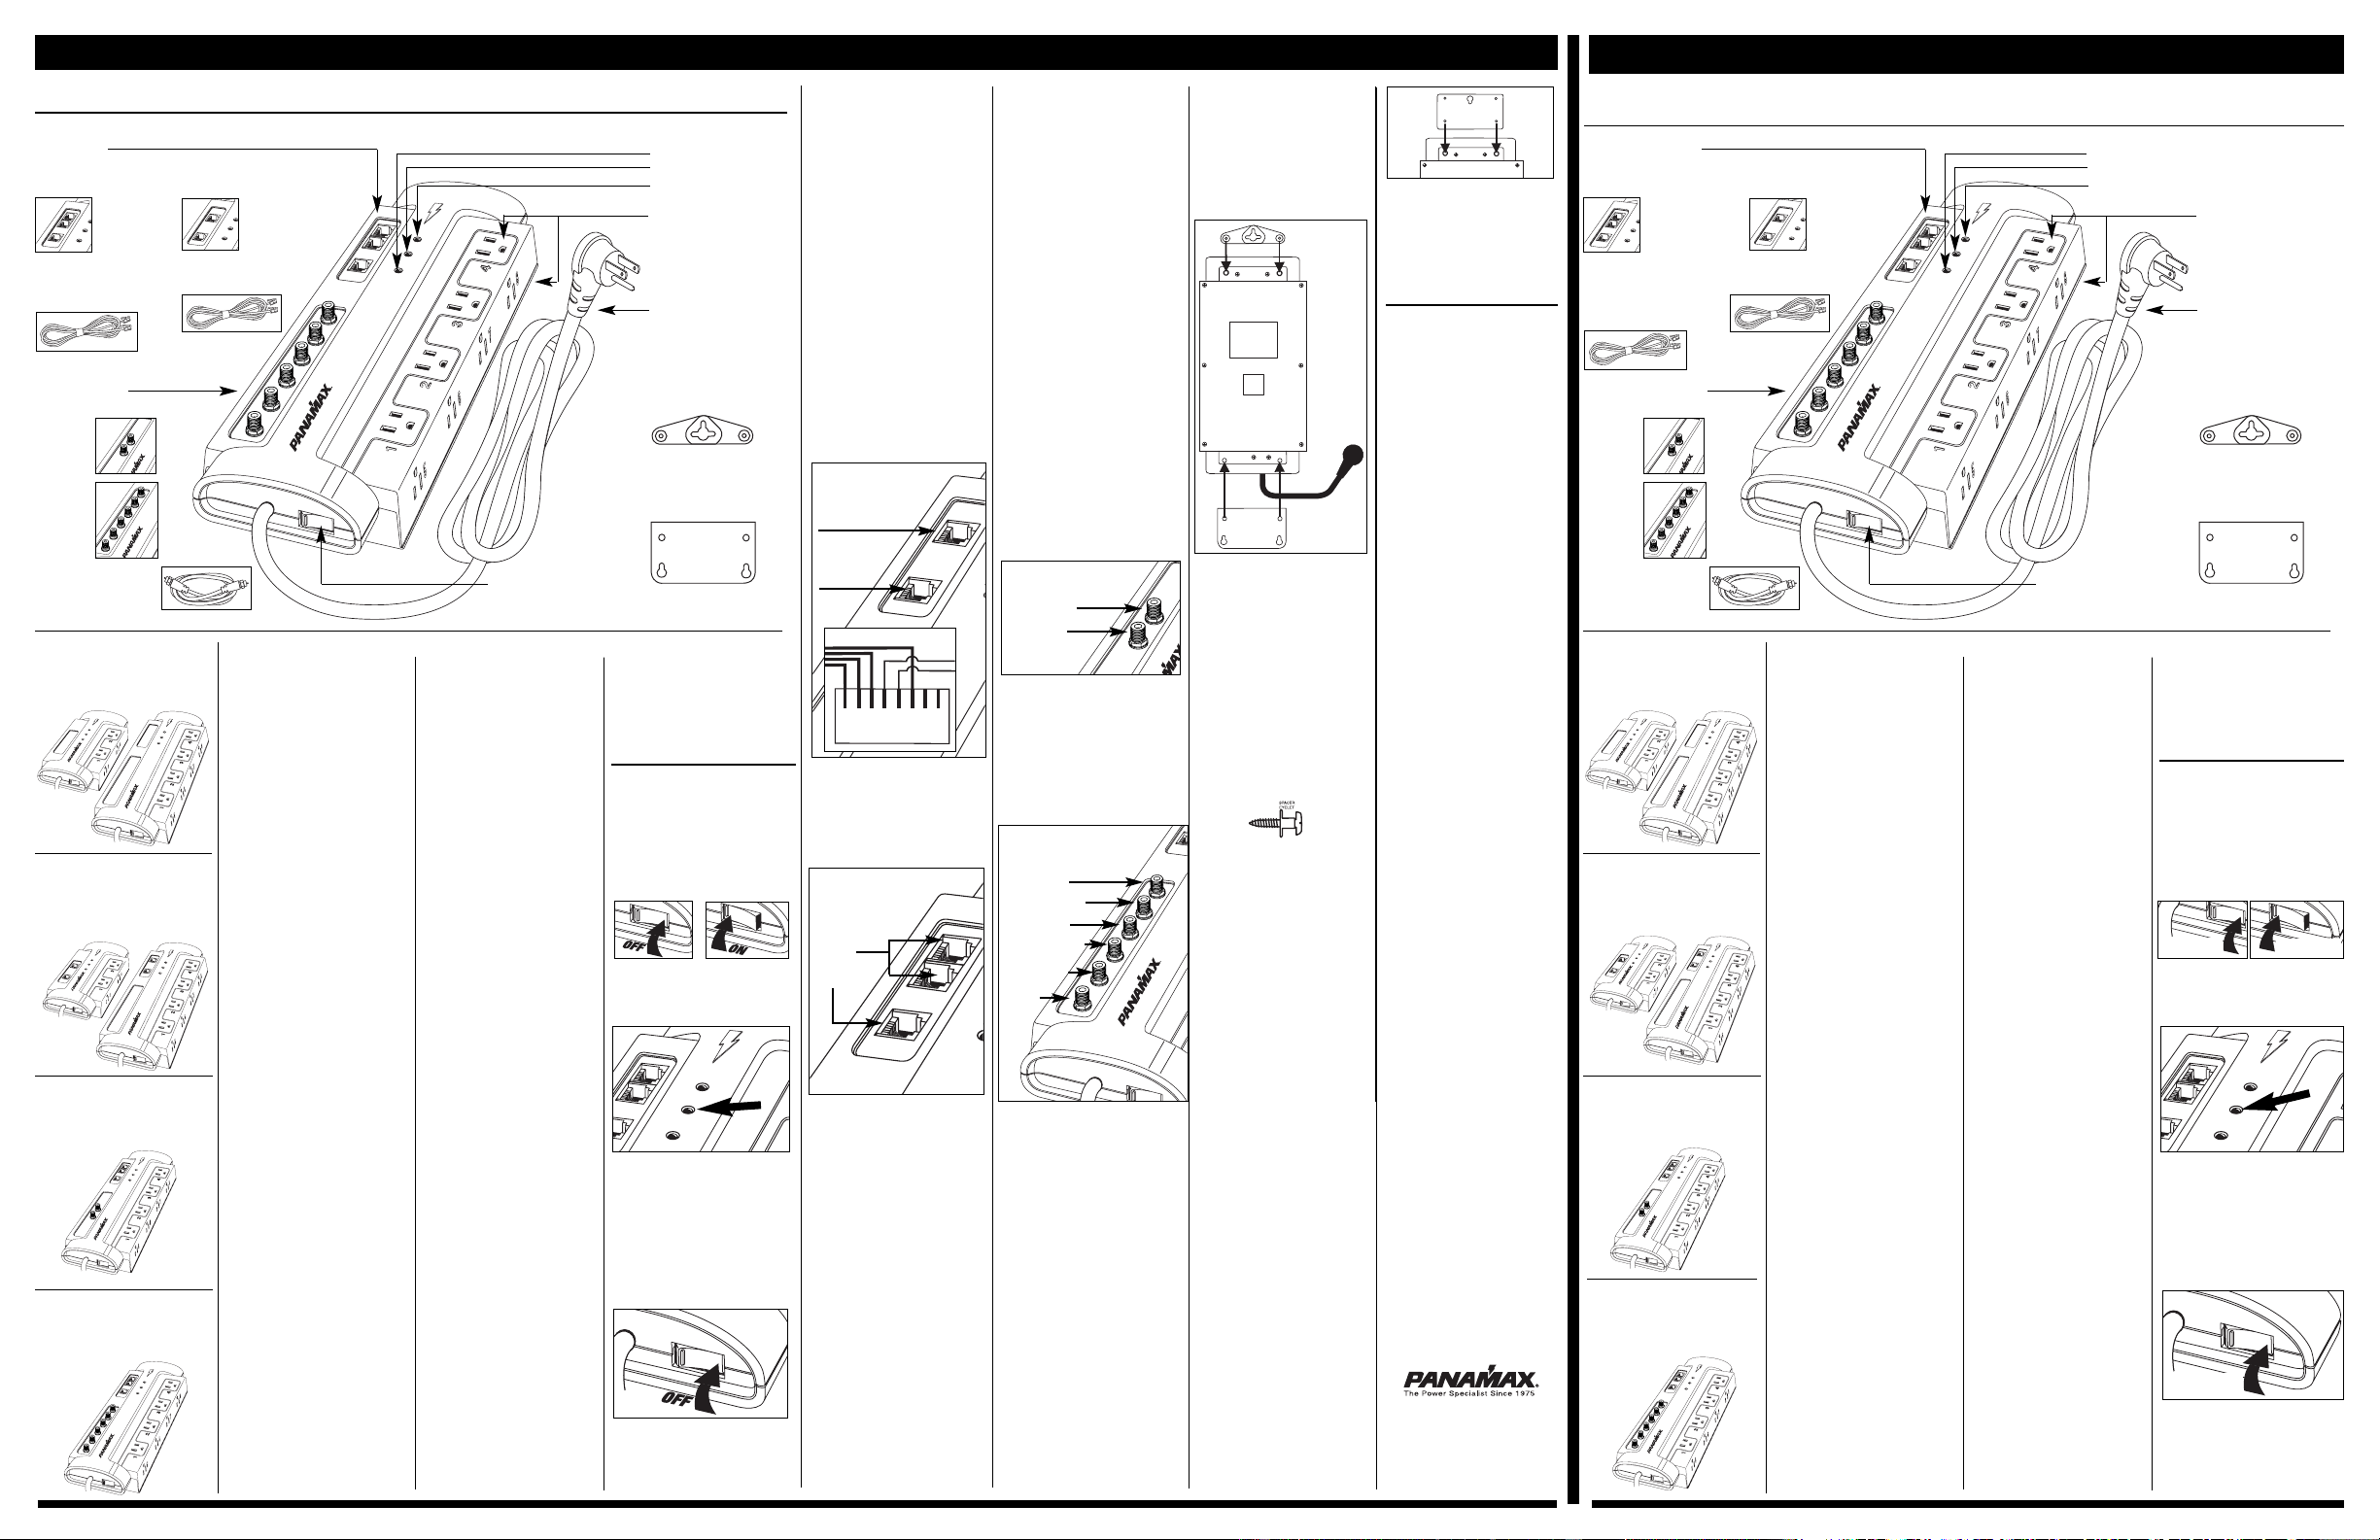
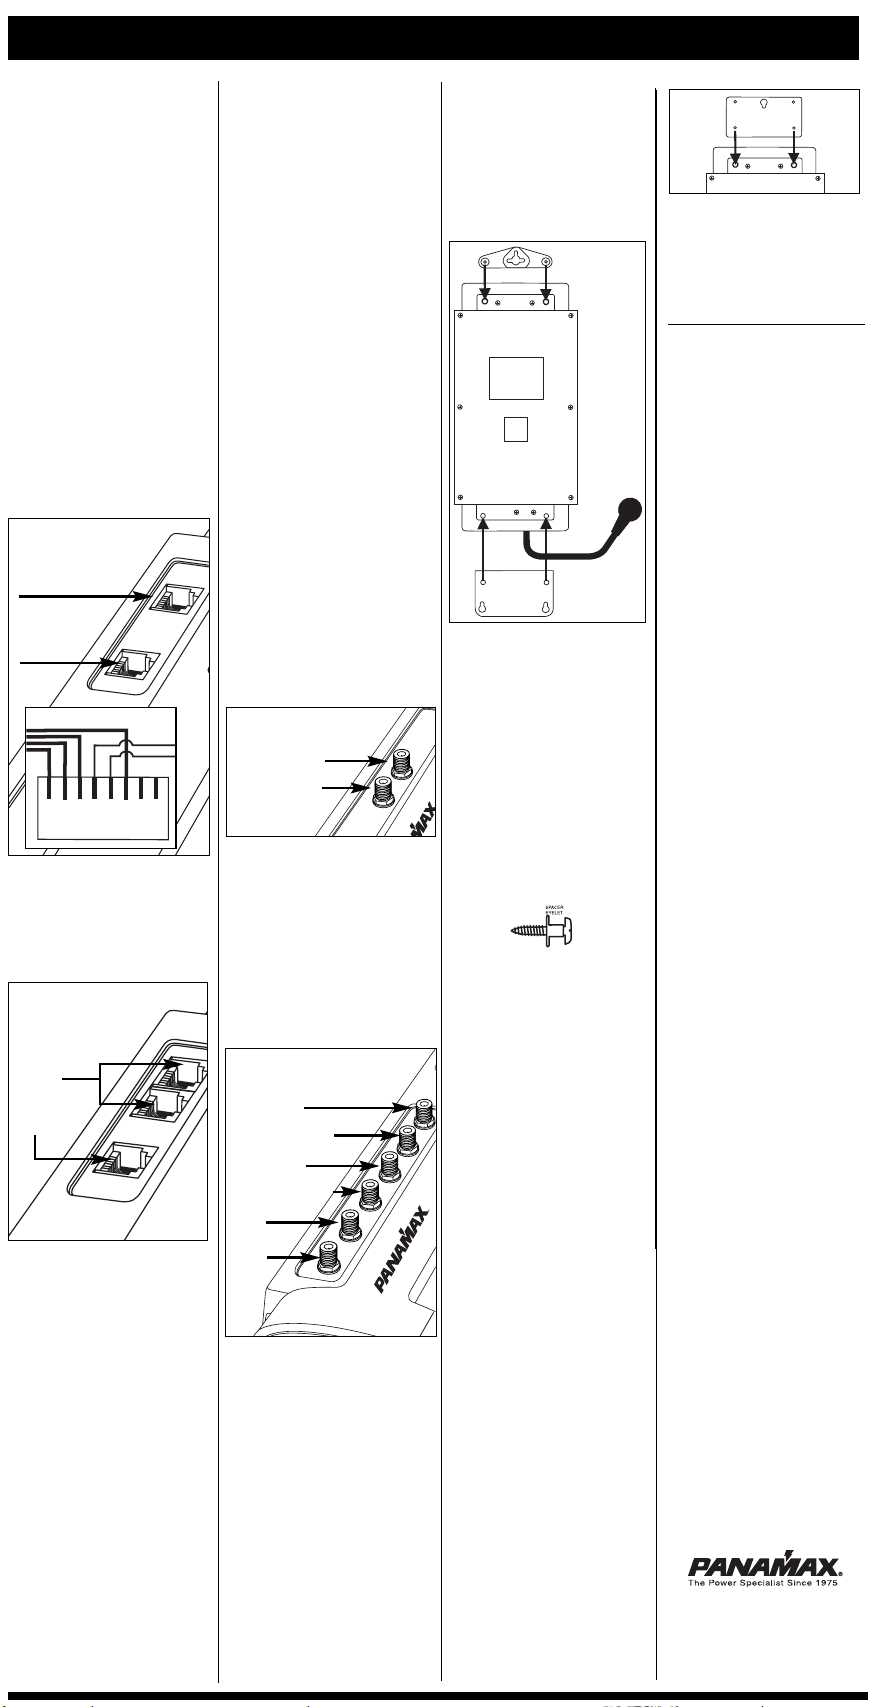
WALL MOUNTING (optional):
The small triangular bracket with one
"key-hole" is for the top end of the unit.
This bracket mounts directly to the back
of the unit with the #8-32 x 5/16”
machine screws, then to the wall with one
of the #6-20 x 3/4” pan-head screws and
spacer eyelets (drywall anchors optional).
The large rectangular bracket with two
"key-holes" is for the bottom, line-cord
end of the unit. It mounts directly to the
unit with the thread-forming screws, then
to the wall with the other two #6 pan-head
screws and spacer eyelets (drywall
anchors optional).
Mounting procedure:
1. Mount both brackets to the unit with
the appropriate screws.
2. Determine the mounting location on
the wall and mark the position for the top
mounting screw.
3. Place a spacer eyelet on one of the #6
pan-head screws with the flared end of the
eyelet toward the wall. Drive the screw into
the wall (use the included drywall anchors
for hollow walls) at the marked location,
leaving the eyelet exposed.
4. Position the key-hole on the unit's top
mounting bracket over the eyelet/screw
and slide the unit down to lock the screw-
head into the bracket.
5. Mark the location for the two lower
mounting screws (in the narrow portion of
the key-holes) and drive the screws into
the wall using the other 2 spacer eyelets
like in step #3. The included drywall
anchors should be used for mounting on
hollow walls.
6. Position the protector over the 3 eye-
lets/screws and slide the unit down to lock
it into place.
7. Using the above procedure allows easy
removal of the unit by sliding the unit up to
disengage the brackets from the
eyelets/screws.
TROUBLESHOOTING–
If you are having problems with your surge
protector, read this section.
The “Power On/Protection OK” LED
is not lit, there is no AC power to my
equipment, or my equipment does-
n’t turn on.
• Make sure that the protector is plugged
into a working AC outlet.
• Check all AC power connections.
• Make sure that the protector and con-
nected equipment are turned on.
• If using the DC Trigger input, verify that
the source equipment is providing the
proper DC voltage signal.
• Verify that the “Unsafe Voltage” LED is
not lit. If it is on, the incoming line voltage
is either too high or too low and has been
disconnected from your connected equip-
ment.
• Check to see if the circuit breaker on the
surge protector (combination power
switch/circuit breaker) needs to be reset
(press “ON” to reset).
• If you still have no power, the protector
may be damaged. Contact Panamax (web-
site or Customer Support Department) for
replacement.
There is no audio or video for my TV,
stereo or VCR.
• Check the coaxial connections, making
sure they are correctly and securely
installed.
• Bypass the coaxial connectors. If your
picture returns, the protector is damaged.
Contact Panamax (website or Customer
Support Department) for replacement.
• If you still have no picture, a problem
with your cable provider’s signal may exist.
My fax machine, modem or tele-
phone has AC power but still does
not work.
• Check to see if your connected equip-
ment is receiving a dial tone.
• If not, bypass the surge protector’s phone
jacks to see if the protector is damaged.
• If your dial tone returns, the protector is
damaged. Contact Panamax (website or
Customer Support Department) for
replacement.
• If you still have no dial tone, a problem
with the phone company’s lines may exist.
The Panamax circuit breaker dis-
connects AC power from the con-
nected equipment.
• You have exceeded the ampere rating for
your surge protector. As a temporary fix,
disconnect one or more pieces of equip-
ment. Ask your Panamax dealer about
additional Panamax protectors that may be
required.
800-472-5555
www.panamax.com
INS7925 REV. C 11/05
P
O
W
E
R
O
N
P
R
O
T
EC
T
IO
N
O
K
GROUND OK
U
NS
AFE VOLTAGE
POWER
LED Indicators
Unsafe Voltage LED
Ground OK LED
Power ON, Protection OK LED
Phone Jacks
Coax Connectors
(M8C-EX & M8DBS-EX)
Includes Phone Cable (4 ft.)
(M8C-EX, M8DBS-EX
M4T-EX and M8T-EX)
Includes Cat 5 Cable (4 ft.)
(M4T-EX and M8T-EX)
ON/OFF Power Switch and
Circuit Breaker Combo
8 ft. AC Power Cord
Right Angle with
45 Degree Offset Plug
8 AC Outlets
(M4-EX and M4T-EX
Four AC Outlets)
Top and Bottom
Mounting Brackets
(Screws and Spacer
Eyelets included)
M8DBS-EX
One CATV
and
Two Satellite
Connectors
RG-6 Coax Cables
(M8C-EX, One Cable
and M8DBS-EX, Two Cables)
M8C-EX
One CATV
Connector
P
O
W
E
P
R
O
T
E
C
T
G
R
O
U
N
D
O
K
U
N
S
A
F
E
V
O
L
T
A
G
E
P
O
W
P
R
O
T
E
C
G
R
OU
N
D
O
K
U
N
S
A
F
E
V
O
L
T
A
G
E
Phone Line Splitter RJ-11
(M8C-EX and M8DBS-EX)
Telco and LAN Connector RJ-45
(M4T-EX and M8T-EX)
P
O
W
E
R
O
N
P
R
O
T
E
C
T
I
O
N
O
K
G
R
O
U
N
D
O
K
U
N
S
A
F
E
V
O
L
T
A
G
E
P
O
W
E
R
O
N
P
R
O
T
E
C
T
I
O
N
O
K
G
R
O
U
N
D
O
K
U
N
S
A
F
E
V
O
L
T
A
G
E
P
O
W
E
R
P
O
W
E
R
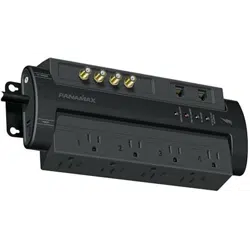
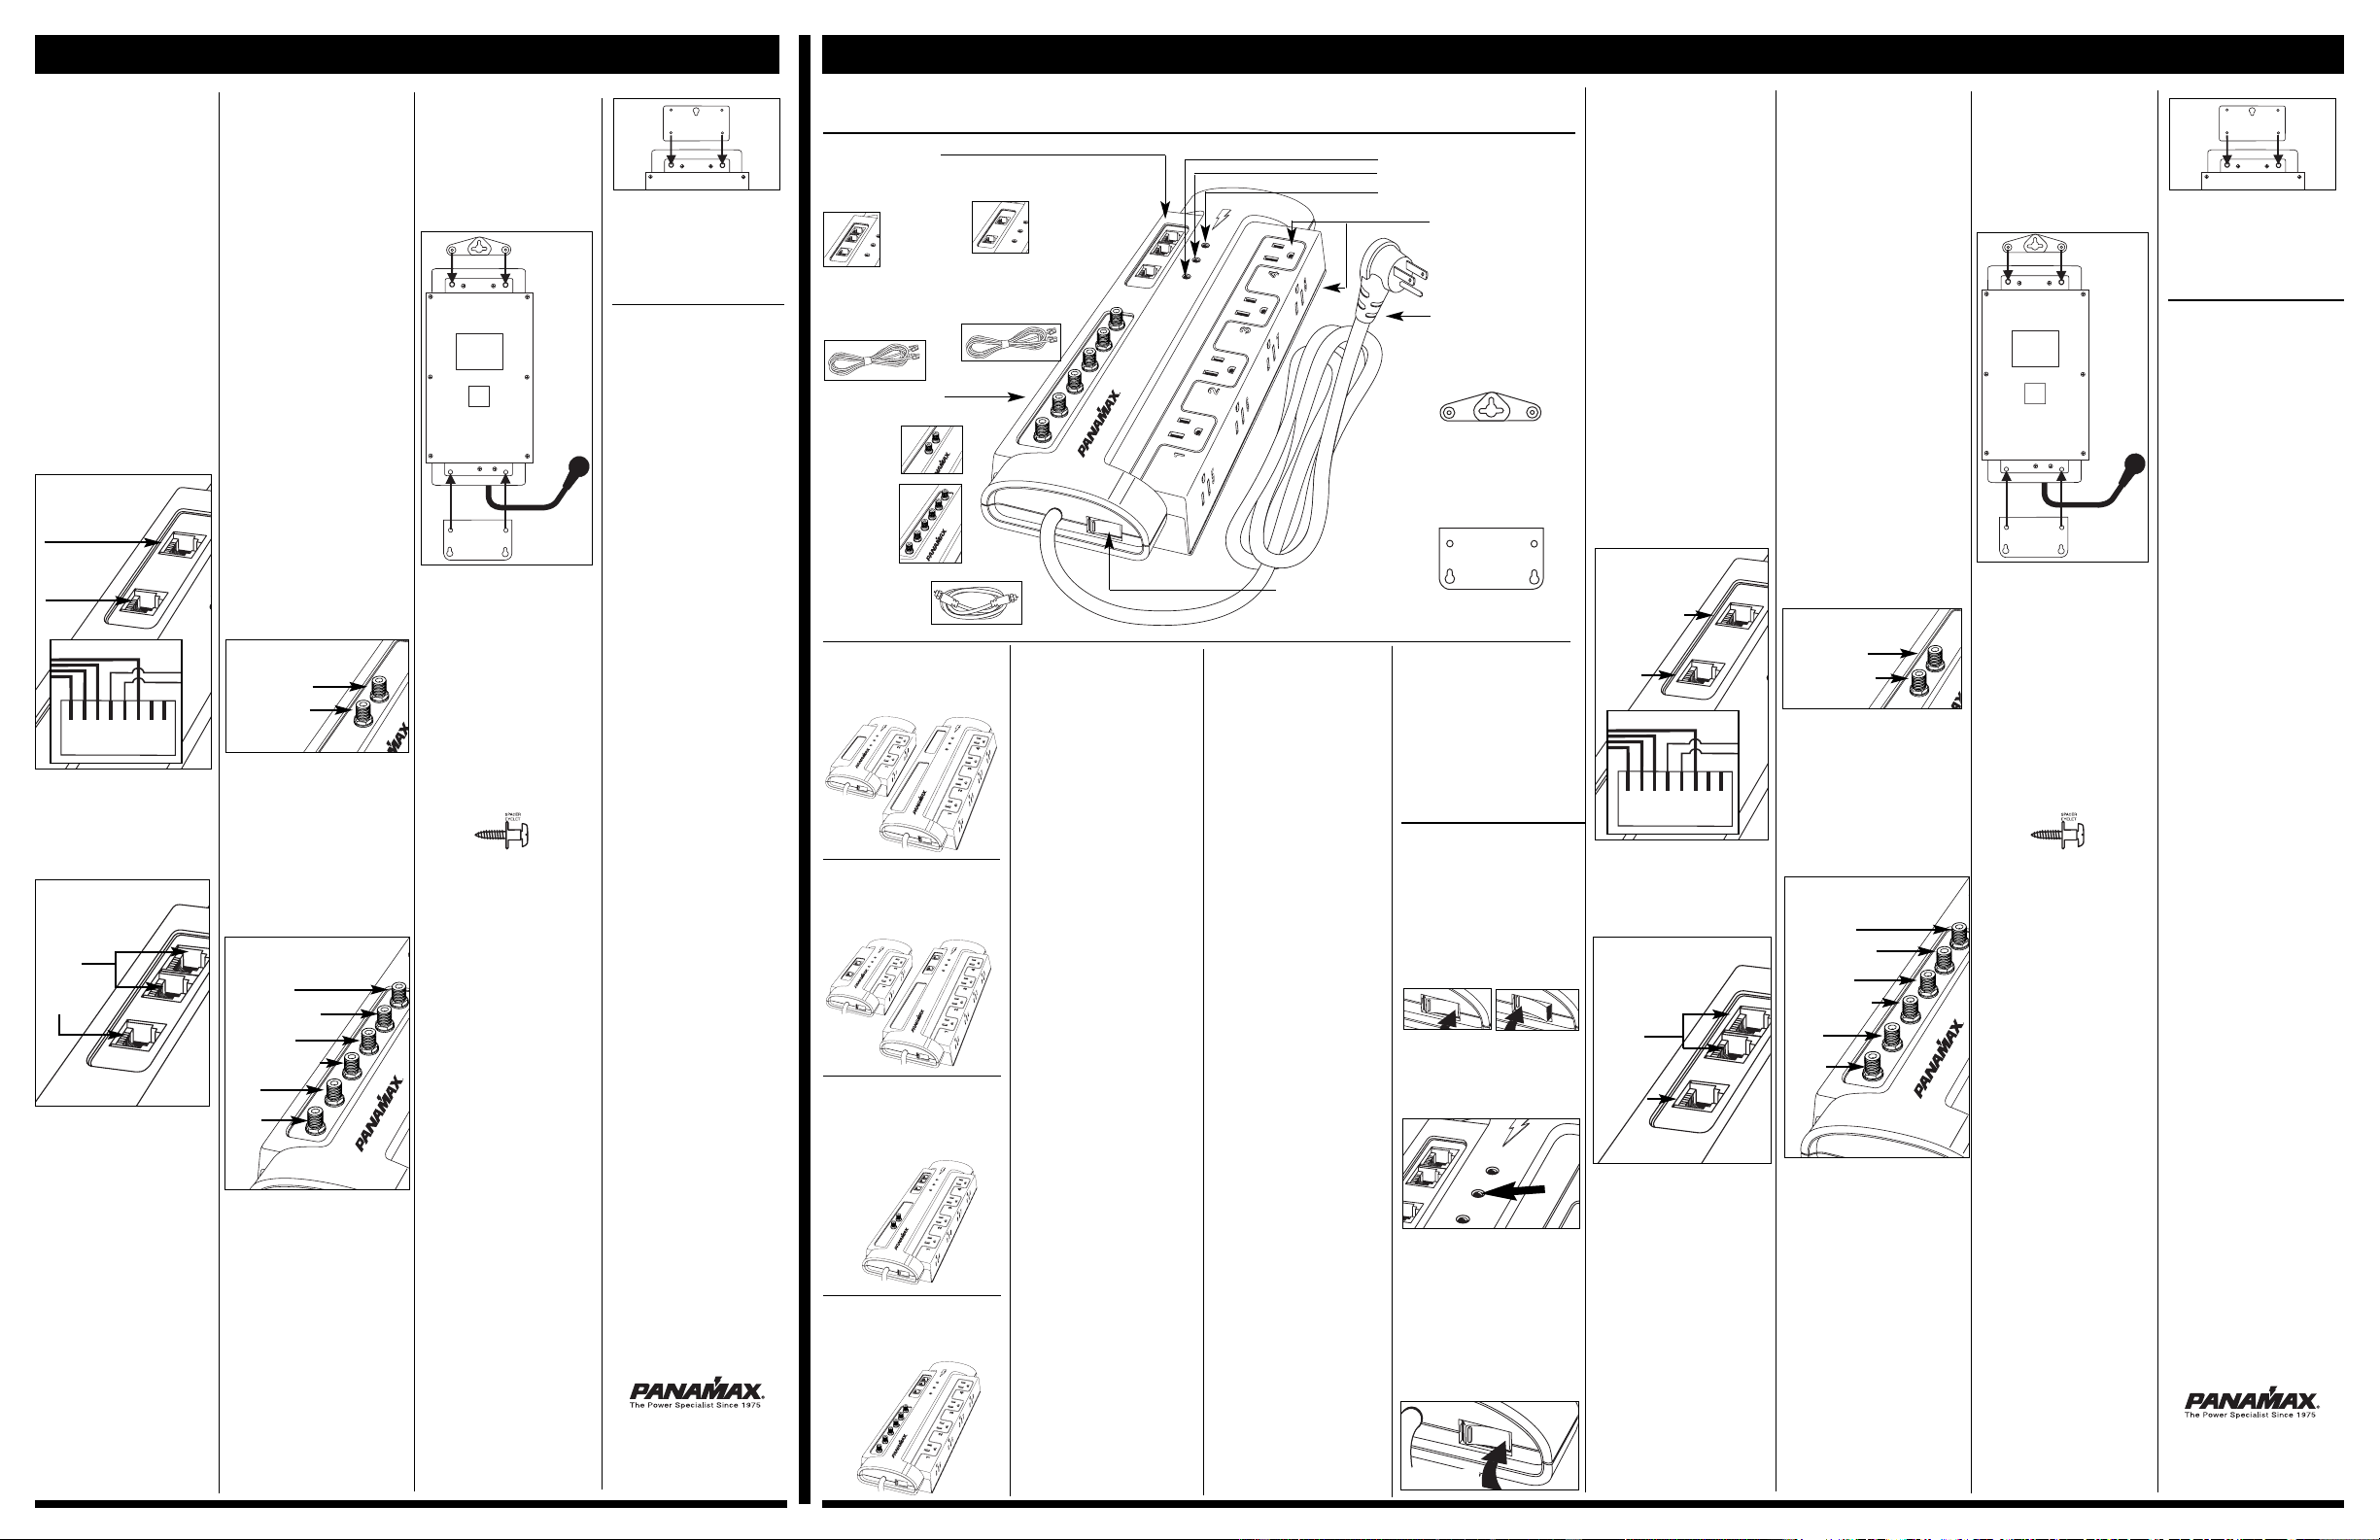
M4-EX & M8-EX – Provides surge,
under-voltage and over-voltage protection
for AC-only electronic devices with no
other connections.
PO
W
ER O
N
PROTECTIO
N O
K
G
R
O
U
N
D
O
K
U
N
S
A
F
E
V
O
L
T
A
G
E
P
O
W
E
R
P
O
W
E
R
O
N
P
R
O
T
E
C
T
I
O
N
O
K
G
R
O
U
N
D
O
K
U
N
S
A
F
E
V
O
L
T
A
G
E
P
O
W
E
R
O
N
P
R
O
T
E
C
T
I
O
N
O
K
G
R
O
U
N
D
O
K
U
N
S
A
F
E
V
O
L
T
A
G
E
P
O
W
E
R
P
O
W
E
R
POWER ON
PROTECTION OK
G
R
O
U
N
D
O
K
U
N
S
A
F
E
V
O
L
T
A
G
E
POWER
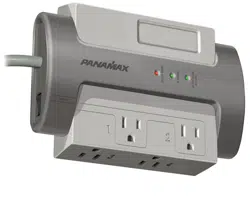
M8DBS-EX – Adds coaxial (Satellite TV
and CATV, off-air antenna or cable modem)
and telephone line protection to the AC
power protection capabilities of the base
model.
M8C-EX – Adds coaxial (CATV, off-air
antenna or cable modem) and telephone
line protection to the AC power protection
capabilities of the base model.
M4T-EX & M8T-EX – Adds telephone
and Ethernet line protection to the AC
power protection capabilities of the base
model.
Depending upon the model selected,
these units have either 4 or 8 AC outlets.
All of the AC outlets are controlled by the
combination power switch/circuit breaker.
These models feature Panamax’s patented
SurgeGate-EX™ circuitry for over and
under voltage protection. This circuitry
continuously monitors the power and pro-
tects against damage caused by
brownouts (under-voltages) and sustained
over-voltages. It automatically discon-
nects the power to your connected equip-
ment when either of these conditions are
detected, then re-connects it when the
power returns to a safe level.
In addition, these models have 3 diagnos-
tic LEDs for maximum safety. They are
designated as
follows:
1. POWER ON, PROTECTION OK –
(green) normally ON; indicates that the
surge protector is functioning properly
and that all connected equipment is pro-
tected. Also indicates that the power
switch is turned ON.
2. GROUND OK – (green) normally ON;
indicates that the wall outlet is properly
wired and grounded.
3. UNSAFE VOLTAGE – (red) normally
OFF; when lit, indicates that incoming
voltages are unsafe and the surge protec-
tor has disconnected the power to your
connected equipment.
The M4/M8-EX family has been designed
with flexibility and expansion in mind. All
of these models will accept add-on sig-
nal-line protection modules in the event
that your installation has more signal-
lines than can be protected with one
of the above units. More information is
available on our website
(www.panamax.com) or from our
Customer Support Department
(800-472-5555; 7:30AM – 4:30PM PST).
If you have any questions about which
protector is best for your application,
please check our website (www.pana-
max.com) or contact Panamax Customer
Support.
PROPERLY CONNECTING YOUR
SURGE
PROTECTOR
To completely protect your equipment
from surges, every wire leading into or
out of the equipment you want to protect
must be connected to the appropriate
Panamax surge protector. Damaging
lightning and power surges can enter
your system through any AC power or
signal-line (phone line, grounding wires,
coax cables, modem cables, LAN cables,
etc.) connected to your electronic equip-
ment.
The Panamax $5,000,000 Connected
Equipment Protection Policy is void if any
wire leading into or out of the equipment
is not properly connected to the appropri-
ate Panamax surge protector(s). The
surge protector must also be plugged into
a properly wired and grounded outlet.
Please see the warranty for details or con-
tact the Panamax Customer Support
Department with questions.
IMPORTANT SAFETY POINTS
Panamax surge protectors and the con-
nected equipment must be indoors, in a
dry location and in the same building.
Although your Panamax protector is very
durable, its internal components are not
isolated from the environment. Do not
install any Panamax product near heat
emitting appliances such as a radiator or
heat register.
Do not install this product where exces-
sive
moisture is present; for example near a
bathtub, sink, pool, basement floor, fish
tank, etc.
It is not uncommon for a building to be
improperly grounded. In order to protect
your equipment, Panamax products must
be plugged into a properly wired and
grounded 3-wire outlet. Additionally,
building wiring and grounding must con-
form to applicable NEC (USA) or CEC
(Canada) codes for the Panamax protec-
tion policy to be valid.
Do not use 2-blade adapters or any other
“power strips” with this product. Use
only Panamax extension cords if a longer
cord is required.
INSTALLATION (AC Power):
1. Turn OFF the power to all equipment
that will be plugged into the unit.
2. Make sure that the ON/OFF switch is in
the OFF position (see figure). Plug the unit
into the wall outlet and then turn it ON.
POWER ON
PROTECTION OK
GROUND OK
UNSAFE VOLTAGE
4. Plug the equipment to be protected into
the Panamax unit and one at a time, turn
each piece of connected equipment ON
and check for correct operation.
5. Turn OFF the unit and all connected
equipment before connecting any signal-
lines or installing any add-on signal line
modules.
3. Verify that the green “Ground OK” LED
is lit, indicating that the wall outlet is
properly wired and grounded.
NOTE to TV ANTENNA, SATELLITE
DISH and CATV INSTALLERS:
Articles 810.21 and 820.40 of the NEC pro-
vide specific guidelines for proper ground-
ing, and in particular, specify that the cable
ground shall be connected to the grounding
system of the building, as close to the point
of cable entry as practical.
Asegúrese de que tiene el protector contra sobrecargas de tensión correcto para proteger su equipo electrónico. Panamax fabrica protectores para casi todo tipo de equipo electrónico.
Protectores contra sobrecarga de tensión pueden ser idénticos por afuera pero ser muy diferentes por adentro. Es importante usar el protector contra sobrecarga diseñado para su
equipo.
P
O
W
E
R
O
N
P
R
O
T
EC
T
IO
N
O
K
GROUND OK
UNSA
FE VO
LT
AGE
POW
ER
Indicadores LED (díodos emisores de luz)
voltaje peligroso LED
Puesto a tierra OK LED
Encendido, Protección OK LED
Enchufes de teléfono
Conectores coaxiales
(M8C-EX & M8DBS-EX)
Incluye cable telefónico
(4pies)
(M8C-EX, M8DBS-EX
M4T-EX and M8T-EX)
Incluye cable CATV 5 (4 pies)
(M4T-EX and M8T-EX)
Cortacircuito/ conmutador
combinado de
encendido/apagado
Un cable de 8 pies CA
Enchufe angulado a 45 grados
8 tomacorrientes CA
(M4-EX and M4T-EX,
4 tomacorrientes CA))
Soportes Superior e
inferior para montaje
(Tornillos y Ojetes espaciadores
incluídos)
M8DBS-EX
Un conector
CATV y dos
para satélite
Cables coaxiales RG-6
(M8C-EX, un cable
and M8DBS-EX, dos cables)
M8C-EX
Un conector
CATV
P
O
W
E
P
R
O
T
E
C
T
G
R
O
U
N
D
O
K
U
N
S
A
F
E
V
O
L
T
A
G
E
P
O
W
P
R
O
T
E
C
G
R
OU
N
D
OK
U
N
S
A
F
E
V
O
L
T
A
G
E
Separador de cable de teléfono, RJ-11
(M8C-EX and M8DBS-EX)
Conector Telco y LAN, RJ-45
(M4T-EX and M8T-EX)
P
O
W
E
R
O
N
P
R
O
T
E
C
T
I
O
N
O
K
G
R
O
U
N
D
O
K
U
N
S
A
F
E
V
O
L
T
A
G
E
P
O
W
E
R
O
N
P
R
O
T
E
C
T
I
O
N
O
K
G
R
O
U
N
D
O
K
U
N
S
A
F
E
V
O
L
T
A
G
E
P
O
W
E
R
P
O
W
E
R
M4-EX & M8-EX – Provee protección
contra sobrecargas, sobretensión y subten-
sión para aparatos electrónicos de CA sin
ninguna otra conexión.
POW
ER ON
PR
OTECTION OK
G
R
O
U
N
D
O
K
U
N
S
A
F
E
V
O
L
T
A
G
E
P
O
W
E
R
P
O
W
E
R
O
N
P
R
O
T
E
C
T
I
O
N
O
K
G
R
O
U
N
D
O
K
U
N
S
A
F
E
V
O
L
T
A
G
E
P
O
W
E
R
O
N
P
R
O
T
E
C
T
I
O
N
O
K
G
R
O
U
N
D
O
K
U
N
S
A
F
E
V
O
L
T
A
G
E
PO
W
E
R
P
O
W
E
R
POWER ON
PROTECTION OK
G
R
O
U
N
D
O
K
U
N
S
A
F
E
V
O
L
T
A
G
E
POWER
M8DBS-EX – Añade protección para los
cables coaxiales (TV de satélite y CATV,
antena o modem por cable) y cable de
teléfono a las capacidades de protección
de CA del modelo base.
M8C-EX – Añade protección para los
cables coaxiales (CATV, antena o modem
por cable) y cable de teléfono a las capaci-
dades de protección de CA del modelo base.
M4T-EX & M8T-EX – Añade protección
para los cable de teléfono y ethernet a las
capacidades de protección de CA del
modelo base.
Dependiendo del modelo seleccionado,
estas unidades tiene 4 u 8 tomacorrientes
de CA. Todos los tomacorrientes de CA
son controlados por la combinación de
corta circuito/conmutador. Estos modelos
tienen la circuitería SurgeGate-EX™, el cual
Panamax tiene bajo patente, para protec-
ción contra subtensión y sobretensión. Este
circuito continuamente monitorea la electri-
cidad y protege contra daño causado por la
reducción de tensión de línea y sobreten-
sión continua. Automáticamente desconec-
ta la electricidad a su equipo conectado
cuando cualquiera de estas condiciones es
detectada, y entonces lo reconecta cuando
la electricidad ha regresado a un nivel pru-
dente.
Además, estos modelos tiene 3 díodos
emisores de luz (LED) para seguridad máxi-
ma. Están nombrados como sigue:
1. POWER ON, PROTECTION OK –
(verde) normalmente ON; indica que el pro-
tector está funcionando correctamente y que
todo el equipo conectado está protegido.
También indica que está encendido.
2. GROUND OK – (tierra OK) – (verde) nor-
malmente ON; indica que el tomacorriente de
la pared está correctamente alambrado y
puesto a tierra.
3. UNSAFE VOLTAGE – (voltaje peligroso)
– (rojo) normalmente OFF; cuando está
encendida, es una luz intermitente que indica
que el voltaje es inseguro y que el protector
ha desconectado su equipo conectado.
La familia M4/M8-EX ha sido diseñada,
teniendo en mente, flexibilidad y expansión.
Todos estos modelos aceptan módulos de
protección de línea de señal adicionales en el
evento que su instalación tenga más líneas
de señales que necesiten protección con una
de la unidades nombradas. Más información
está a su disposición en nuestro sitio web
(www.panamax.com) o de nuestro departa-
mento de cuidado del cliente (800-472-5555;
7:30 am-4:30 PM tiempo pacífico).
Si tiene alguna pregunta sobre cual protector
es el mejor para su equipo, favor de ir a nue-
stro sitio web (www.panamax.com) o pón-
gase en contacto con nuestro departamento
de cuidado del cliente.
Conectando su protector contra
sobrecargas de tensión correcta-
mente
Para proteger su equipo completamente de
sobrecargas, cada alambre que sale o entra
del equipo que usted quiere proteger debe
ser conectado al protector de sobrecargas
de tensión indicado. Relámpagos dañinos
y sobrecargas de tensión pueden entrar a
su sistema por cualquier línea de señal
(línea telefónica, alambres de tierra, cables
coaxiales, cables modem, cables red de
área local (LAN), etc.) o corriente alterna
que estén conectados a su equipo elec-
trónico.
La garantía de $5,000,000 de protección de
equipo conectado de Panamax es nula si
cualquier alambre entrando o saliendo del
equipo no está correctamente conectado al
protector(es) contra sobrecargas de tensión
indicado. El protector contra sobrecargas
de tensión también debe ser enchufado a
un tomacorriente alambrado correctamente
y puesto a tierra. Favor de leer la garantía
para detalles o si tiene preguntas llame al
departamento de atención del cliente de
Panamax.
Puntos importantes de seguridad
Los protectores contra sobrecargas de ten-
sión y el equipo conectado deben estar
adentro en un local seco y en el mismo
edificio. Aunque su protector Panamax es
duradero, sus componentes internos no
están aislados del ambiente. No instale
ningún producto de Panamax cerca de
aparatos que emitan calor tal como un
radiador o contador térmico. No instale
este producto donde haya humedad exces-
siva tal como una tina, fregadero, piscina,
en el piso de un sótano, pescera, etc.
Es común que un edificio no esté correcta-
mente conectado a tierra. Para proteger su
equipo, los productos de Panamax deberán
ser directamente enchufados a un tomacor-
riente CA de 3-alambres con conexión a
tierra. Adicionalmente, el alambrado del
edificio y conexión a tierra deberán confor-
marse a los códigos NEC (EEUU) o CEC
(Canada) para que la póliza de protección
de Panamax sea válida.
No use adaptadores de 2-cuchillas o
cualquier otro “cintas de energía” con este
producto. Sólo use cables de extensión de
Panamax si requiere un cable más largo.
Instalación (CA):
1. Apague todo el equipo que va a ser
conectado a la unidad.
2. Asegúrese que el protector esté apagado y
que esté en la posición OFF (vea el dibujo).
Enchufe la unidad al enchufe en la pared y
encienda.
POWER ON
PROTECTION OK
GROUND OK
U
NSAFE VOLTAGE
4. Enchufe el equipo que va a proteger a la
unidad Panamax y uno por uno, encienda
cada una de las piezas de equipo conectado
y vea si están operando correctamente.
5. Apague la unidad y todo el equipo conec-
tado antes de conectar cualquier línea de
señal o instalando módulos adicionales de
línea de señal
3. Verifique que el LED verde “Ground OK”
esté prendido, esto indica que el enchufe en
la pared está correctamente alambrado y
puesto a tierra.
Una nota para instaladores de antenas
de televisión, satélite, y cable:
Artículos 810.21 y 820.40 del código NEC
provee guías especifícas a como conectar a
tierra correctamente, y en particular, especifi-
ca quel cable de tierra será conectado al sis-
tema de tierra del edificio, lo más cercano a
la entrada del cable que sea posible.
UN
SAF
INSTALLATION (Telephone or LAN
Lines):
IMPORTANT: Note the position of the
LINE and EQUIP jacks on the Panamax
unit. LINE is for the line connection that
comes from the wall or floor jack.
EQUIP is for the line connection to your
connected equipment. The protection
circuit will only function if connected
properly. Reversed connections will
pass the signal to the connected equip-
ment but will also prevent the protection
circuitry from working and will invalidate
the Panamax Connected Equipment
Protection Policy.
1. Make sure the Panamax protector and
all connected equipment is turned OFF.
2. Take the incoming telephone or LAN
line and plug it into the appropriate LINE
jack on the protector. The line should
now be connected between the wall and
the Panamax unit.
3. Plug a telephone or LAN line into the
EQUIP jack and then plug the other end
into the equipment to be protected.
4. Turn On the protector and the con-
nected equipment. Verify that each piece
of connected equipment is receiving
power and signal.
The M4T-EX and M8T-EX provide both
telephone and LAN protection on one set
of RJ-45 (RJ-11 compatible) jacks. The
telephone circuit uses pins 4 & 5 while
the LAN circuit uses pins 1, 2, 3 & 6.
Adaptors or custom cables (not includ-
ed) must be used when utilizing both
protection circuits at the same time.
The M8C-EX and M8DBS-EX provide
protection for one telephone line. A
built-in line splitter allows the one pro-
tected line to be used with two pieces of
equipment.
U
N
S
A
LINE (in)
EQUIP (2 out
jacks with
splitter)
LINE (in)
EQUIP (out)
M4T-EX and M8T-EX
M8C-EX and M8DBS-EX
RJ-45
1 2 3 4 5 6 7 8
LAN
TEL
INSTALLATION (Coaxial Lines):
IMPORTANT: Note the position of the
LINE and EQUIP jacks on the Panamax
unit. LINE is for the line connection that
comes from the wall or floor jack. EQUIP
is for the line connection to your connected
equipment.
Panamax offers two types of coaxial line
protection;
1) Satellite TV
2) Cable TV (CATV), Off-air antenna or
Cable modem
Each one is optimized for the specific appli-
cation and can not be used with the other.
Detailed information may be found on the
Panamax website (www.panamax.com).
NOTE: The CATV/Off-Air Antenna protec-
tion circuit in these models is bi-direction-
al and has been designed to work with
cable TV systems that send pay-per-view
ordering information to the cable company
over the coaxial line.
The M8C-EX provides protection for one
CATV, off-air antenna or cable modem line.
It is not compatible with Satellite TV.
When used with diplexers, this protection
circuit must be placed between the diplexer
and the TV or VCR; it will not protect the
diplexer.
LINE (in)
EQUIP (out)
M8C-EX
The M8DBS-EX provides protection for
one CATV, off-air antenna line or cable
modem and two Satellite TV lines. These
are not interchangeable. Make sure that
your equipment is connected to the proper
jacks. When used with diplexers, this pro-
tection circuit must be placed between the
diplexer and the Satellite receiver; it will
not protect the diplexer.
1. Make sure the Panamax protector and
all connected equipment is turned OFF.
2. Connect the coaxial cable from the
CATV system, antenna, or Satellite dish to
the appropriate LINE connector on the
Panamax protector.
3. Connect a coaxial cable from the
EQUIP jack on the protector to appropriate
input jack on your TV, VCR, cable modem
or Satellite receiver.
4. Repeat steps 2 & 3 for all additional
coaxial lines.
POWER
CATV
(in)
EQUIP (out)
SATELLITE (in)
M8DBS-EX
EQUIP (out)
SATELLITE (in)
EQUIP (out)
Encendido
Apagado
Apagado
M4-EX, M4T-EX, M8-EX, M8T-EX, M8C-EX, M8DBS-EX INSTRUCTIONS - English
M4-EX, M4T-EX, M8-EX, M8T-EX, M8C-EX, M8DBS-EX INSTRUCCIONES - Español
Make sure you have the right surge protector to protect your electronic equipment. Panamax makes protectors for almost every type of electronic equipment. Surge protectors that
may look identical from the outside can be very different on the inside. It is very important to use the surge protector designed for your application.
small rectangular bracket with a grounding
interface. This bracket replaces the small
triangular wall-mount bracket that comes
with the AC base unit and is needed only
when add-on modules are being installed.
More information can be obtained on the
Panamax website or by calling our
Customer Support Department.
ADDING SIGNAL-LINE MODULES
(Optional):
Some connected equipment may have
more signal-lines than can be protected by
the base unit alone. Panamax offers a line
of add-on signal-line modules (sold sepa-
rately) for these situations. Each module
includes installation instructions and a
WALL MOUNTING (optional):
The small triangular bracket with one
"key-hole" is for the top end of the unit.
This bracket mounts directly to the back
of the unit with the #8-32 x 5/16”
machine screws, then to the wall with one
of the #6-20 x 3/4” pan-head screws and
spacer eyelets (drywall anchors optional).
The large rectangular bracket with two
"key-holes" is for the bottom, line-cord
end of the unit. It mounts directly to the
unit with the thread-forming screws, then
to the wall with the other two #6 pan-head
screws and spacer eyelets (drywall
anchors optional).
Mounting procedure:
1. Mount both brackets to the unit with
the appropriate screws.
2. Determine the mounting location on
the wall and mark the position for the top
mounting screw.
3. Place a spacer eyelet on one of the #6
pan-head screws with the flared end of the
eyelet toward the wall. Drive the screw into
the wall (use the included drywall anchors
for hollow walls) at the marked location,
leaving the eyelet exposed.
4. Position the key-hole on the unit's top
mounting bracket over the eyelet/screw
and slide the unit down to lock the screw-
head into the bracket.
5. Mark the location for the two lower
mounting screws (in the narrow portion of
the key-holes) and drive the screws into
the wall using the other 2 spacer eyelets
like in step #3. The included drywall
anchors should be used for mounting on
hollow walls.
6. Position the protector over the 3 eye-
lets/screws and slide the unit down to lock
it into place.
7. Using the above procedure allows easy
removal of the unit by sliding the unit up to
disengage the brackets from the
eyelets/screws.
TROUBLESHOOTING–
If you are having problems with your surge
protector, read this section.
The “Power On/Protection OK” LED
is not lit, there is no AC power to my
equipment, or my equipment does-
n’t turn on.
• Make sure that the protector is plugged
into a working AC outlet.
• Check all AC power connections.
• Make sure that the protector and con-
nected equipment are turned on.
• If using the DC Trigger input, verify that
the source equipment is providing the
proper DC voltage signal.
• Verify that the “Unsafe Voltage” LED is
not lit. If it is on, the incoming line voltage
is either too high or too low and has been
disconnected from your connected equip-
ment.
• Check to see if the circuit breaker on the
surge protector (combination power
switch/circuit breaker) needs to be reset
(press “ON” to reset).
• If you still have no power, the protector
may be damaged. Contact Panamax (web-
site or Customer Support Department) for
replacement.
There is no audio or video for my TV,
stereo or VCR.
• Check the coaxial connections, making
sure they are correctly and securely
installed.
• Bypass the coaxial connectors. If your
picture returns, the protector is damaged.
Contact Panamax (website or Customer
Support Department) for replacement.
• If you still have no picture, a problem
with your cable provider’s signal may exist.
My fax machine, modem or tele-
phone has AC power but still does
not work.
• Check to see if your connected equip-
ment is receiving a dial tone.
• If not, bypass the surge protector’s phone
jacks to see if the protector is damaged.
• If your dial tone returns, the protector is
damaged. Contact Panamax (website or
Customer Support Department) for
replacement.
• If you still have no dial tone, a problem
with the phone company’s lines may exist.
The Panamax circuit breaker dis-
connects AC power from the con-
nected equipment.
• You have exceeded the ampere rating for
your surge protector. As a temporary fix,
disconnect one or more pieces of equip-
ment. Ask your Panamax dealer about
additional Panamax protectors that may be
required.
800-472-5555
www.panamax.com
INS7925 REV. C 11/05
P
O
W
E
R
O
N
P
R
O
T
EC
T
IO
N
O
K
GROUND OK
U
NS
AFE VOLTAGE
POWER
LED Indicators
Unsafe Voltage LED
Ground OK LED
Power ON, Protection OK LED
Phone Jacks
Coax Connectors
(M8C-EX & M8DBS-EX)
Includes Phone Cable (4 ft.)
(M8C-EX, M8DBS-EX
M4T-EX and M8T-EX)
Includes Cat 5 Cable (4 ft.)
(M4T-EX and M8T-EX)
ON/OFF Power Switch and
Circuit Breaker Combo
8 ft. AC Power Cord
Right Angle with
45 Degree Offset Plug
8 AC Outlets
(M4-EX and M4T-EX
Four AC Outlets)
Top and Bottom
Mounting Brackets
(Screws and Spacer
Eyelets included)
M8DBS-EX
One CATV
and
Two Satellite
Connectors
RG-6 Coax Cables
(M8C-EX, One Cable
and M8DBS-EX, Two Cables)
M8C-EX
One CATV
Connector
P
O
W
E
P
R
O
T
E
C
T
G
R
O
U
N
D
O
K
U
N
S
A
F
E
V
O
L
T
A
G
E
P
O
W
P
R
O
T
E
C
G
R
OU
N
D
O
K
U
N
S
A
F
E
V
O
L
T
A
G
E
Phone Line Splitter RJ-11
(M8C-EX and M8DBS-EX)
Telco and LAN Connector RJ-45
(M4T-EX and M8T-EX)
P
O
W
E
R
O
N
P
R
O
T
E
C
T
I
O
N
O
K
G
R
O
U
N
D
O
K
U
N
S
A
F
E
V
O
L
T
A
G
E
P
O
W
E
R
O
N
P
R
O
T
E
C
T
I
O
N
O
K
G
R
O
U
N
D
O
K
U
N
S
A
F
E
V
O
L
T
A
G
E
P
O
W
E
R
P
O
W
E
R
M4-EX & M8-EX – Provides surge,
under-voltage and over-voltage protection
for AC-only electronic devices with no
other connections.
PO
W
ER O
N
PROTECTIO
N O
K
G
R
O
U
N
D
O
K
U
N
S
A
F
E
V
O
L
T
A
G
E
P
O
W
E
R
P
O
W
E
R
O
N
P
R
O
T
E
C
T
I
O
N
O
K
G
R
O
U
N
D
O
K
U
N
S
A
F
E
V
O
L
T
A
G
E
P
O
W
E
R
O
N
P
R
O
T
E
C
T
I
O
N
O
K
G
R
O
U
N
D
O
K
U
N
S
A
F
E
V
O
L
T
A
G
E
P
O
W
E
R
P
O
W
E
R
POWER ON
PROTECTION OK
G
R
O
U
N
D
O
K
U
N
S
A
F
E
V
O
L
T
A
G
E
POWER
M8DBS-EX – Adds coaxial (Satellite TV
and CATV, off-air antenna or cable modem)
and telephone line protection to the AC
power protection capabilities of the base
model.
M8C-EX – Adds coaxial (CATV, off-air
antenna or cable modem) and telephone
line protection to the AC power protection
capabilities of the base model.
M4T-EX & M8T-EX – Adds telephone
and Ethernet line protection to the AC
power protection capabilities of the base
model.
Depending upon the model selected,
these units have either 4 or 8 AC outlets.
All of the AC outlets are controlled by the
combination power switch/circuit breaker.
These models feature Panamax’s patented
SurgeGate-EX™ circuitry for over and
under voltage protection. This circuitry
continuously monitors the power and pro-
tects against damage caused by
brownouts (under-voltages) and sustained
over-voltages. It automatically discon-
nects the power to your connected equip-
ment when either of these conditions are
detected, then re-connects it when the
power returns to a safe level.
In addition, these models have 3 diagnos-
tic LEDs for maximum safety. They are
designated as
follows:
1. POWER ON, PROTECTION OK –
(green) normally ON; indicates that the
surge protector is functioning properly
and that all connected equipment is pro-
tected. Also indicates that the power
switch is turned ON.
2. GROUND OK – (green) normally ON;
indicates that the wall outlet is properly
wired and grounded.
3. UNSAFE VOLTAGE – (red) normally
OFF; when lit, indicates that incoming
voltages are unsafe and the surge protec-
tor has disconnected the power to your
connected equipment.
The M4/M8-EX family has been designed
with flexibility and expansion in mind. All
of these models will accept add-on sig-
nal-line protection modules in the event
that your installation has more signal-
lines than can be protected with one
of the above units. More information is
available on our website
(www.panamax.com) or from our
Customer Support Department
(800-472-5555; 7:30AM – 4:30PM PST).
If you have any questions about which
protector is best for your application,
please check our website (www.pana-
max.com) or contact Panamax Customer
Support.
PROPERLY CONNECTING YOUR
SURGE
PROTECTOR
To completely protect your equipment
from surges, every wire leading into or
out of the equipment you want to protect
must be connected to the appropriate
Panamax surge protector. Damaging
lightning and power surges can enter
your system through any AC power or
signal-line (phone line, grounding wires,
coax cables, modem cables, LAN cables,
etc.) connected to your electronic equip-
ment.
The Panamax $5,000,000 Connected
Equipment Protection Policy is void if any
wire leading into or out of the equipment
is not properly connected to the appropri-
ate Panamax surge protector(s). The
surge protector must also be plugged into
a properly wired and grounded outlet.
Please see the warranty for details or con-
tact the Panamax Customer Support
Department with questions.
IMPORTANT SAFETY POINTS
Panamax surge protectors and the con-
nected equipment must be indoors, in a
dry location and in the same building.
Although your Panamax protector is very
durable, its internal components are not
isolated from the environment. Do not
install any Panamax product near heat
emitting appliances such as a radiator or
heat register.
Do not install this product where exces-
sive
moisture is present; for example near a
bathtub, sink, pool, basement floor, fish
tank, etc.
It is not uncommon for a building to be
improperly grounded. In order to protect
your equipment, Panamax products must
be plugged into a properly wired and
grounded 3-wire outlet. Additionally,
building wiring and grounding must con-
form to applicable NEC (USA) or CEC
(Canada) codes for the Panamax protec-
tion policy to be valid.
Do not use 2-blade adapters or any other
“power strips” with this product. Use
only Panamax extension cords if a longer
cord is required.
INSTALLATION (AC Power):
1. Turn OFF the power to all equipment
that will be plugged into the unit.
2. Make sure that the ON/OFF switch is in
the OFF position (see figure). Plug the unit
into the wall outlet and then turn it ON.
POWER ON
PROTECTION OK
GROUND OK
UNSAFE VOLTAGE
4. Plug the equipment to be protected into
the Panamax unit and one at a time, turn
each piece of connected equipment ON
and check for correct operation.
5. Turn OFF the unit and all connected
equipment before connecting any signal-
lines or installing any add-on signal line
modules.
3. Verify that the green “Ground OK” LED
is lit, indicating that the wall outlet is
properly wired and grounded.
NOTE to TV ANTENNA, SATELLITE
DISH and CATV INSTALLERS:
Articles 810.21 and 820.40 of the NEC pro-
vide specific guidelines for proper ground-
ing, and in particular, specify that the cable
ground shall be connected to the grounding
system of the building, as close to the point
of cable entry as practical.
Asegúrese de que tiene el protector contra sobrecargas de tensión correcto para proteger su equipo electrónico. Panamax fabrica protectores para casi todo tipo de equipo electrónico.
Protectores contra sobrecarga de tensión pueden ser idénticos por afuera pero ser muy diferentes por adentro. Es importante usar el protector contra sobrecarga diseñado para su
equipo.
P
O
W
E
R
O
N
P
R
O
T
EC
T
IO
N
O
K
GROUND OK
UNSA
FE VO
LT
AGE
POW
ER
Indicadores LED (díodos emisores de luz)
voltaje peligroso LED
Puesto a tierra OK LED
Encendido, Protección OK LED
Enchufes de teléfono
Conectores coaxiales
(M8C-EX & M8DBS-EX)
Incluye cable telefónico
(4pies)
(M8C-EX, M8DBS-EX
M4T-EX and M8T-EX)
Incluye cable CATV 5 (4 pies)
(M4T-EX and M8T-EX)
Cortacircuito/ conmutador
combinado de
encendido/apagado
Un cable de 8 pies CA
Enchufe angulado a 45 grados
8 tomacorrientes CA
(M4-EX and M4T-EX,
4 tomacorrientes CA))
Soportes Superior e
inferior para montaje
(Tornillos y Ojetes espaciadores
incluídos)
M8DBS-EX
Un conector
CATV y dos
para satélite
Cables coaxiales RG-6
(M8C-EX, un cable
and M8DBS-EX, dos cables)
M8C-EX
Un conector
CATV
P
O
W
E
P
R
O
T
E
C
T
G
R
O
U
N
D
O
K
U
N
S
A
F
E
V
O
L
T
A
G
E
P
O
W
P
R
O
T
E
C
G
R
OU
N
D
OK
U
N
S
A
F
E
V
O
L
T
A
G
E
Separador de cable de teléfono, RJ-11
(M8C-EX and M8DBS-EX)
Conector Telco y LAN, RJ-45
(M4T-EX and M8T-EX)
P
O
W
E
R
O
N
P
R
O
T
E
C
T
I
O
N
O
K
G
R
O
U
N
D
O
K
U
N
S
A
F
E
V
O
L
T
A
G
E
P
O
W
E
R
O
N
P
R
O
T
E
C
T
I
O
N
O
K
G
R
O
U
N
D
O
K
U
N
S
A
F
E
V
O
L
T
A
G
E
P
O
W
E
R
P
O
W
E
R
M4-EX & M8-EX – Provee protección
contra sobrecargas, sobretensión y subten-
sión para aparatos electrónicos de CA sin
ninguna otra conexión.
POW
ER ON
PR
OTECTION OK
G
R
O
U
N
D
O
K
U
N
S
A
F
E
V
O
L
T
A
G
E
P
O
W
E
R
P
O
W
E
R
O
N
P
R
O
T
E
C
T
I
O
N
O
K
G
R
O
U
N
D
O
K
U
N
S
A
F
E
V
O
L
T
A
G
E
P
O
W
E
R
O
N
P
R
O
T
E
C
T
I
O
N
O
K
G
R
O
U
N
D
O
K
U
N
S
A
F
E
V
O
L
T
A
G
E
PO
W
E
R
P
O
W
E
R
POWER ON
PROTECTION OK
G
R
O
U
N
D
O
K
U
N
S
A
F
E
V
O
L
T
A
G
E
POWER
M8DBS-EX – Añade protección para los
cables coaxiales (TV de satélite y CATV,
antena o modem por cable) y cable de
teléfono a las capacidades de protección
de CA del modelo base.
M8C-EX – Añade protección para los
cables coaxiales (CATV, antena o modem
por cable) y cable de teléfono a las capaci-
dades de protección de CA del modelo base.
M4T-EX & M8T-EX – Añade protección
para los cable de teléfono y ethernet a las
capacidades de protección de CA del
modelo base.
Dependiendo del modelo seleccionado,
estas unidades tiene 4 u 8 tomacorrientes
de CA. Todos los tomacorrientes de CA
son controlados por la combinación de
corta circuito/conmutador. Estos modelos
tienen la circuitería SurgeGate-EX™, el cual
Panamax tiene bajo patente, para protec-
ción contra subtensión y sobretensión. Este
circuito continuamente monitorea la electri-
cidad y protege contra daño causado por la
reducción de tensión de línea y sobreten-
sión continua. Automáticamente desconec-
ta la electricidad a su equipo conectado
cuando cualquiera de estas condiciones es
detectada, y entonces lo reconecta cuando
la electricidad ha regresado a un nivel pru-
dente.
Además, estos modelos tiene 3 díodos
emisores de luz (LED) para seguridad máxi-
ma. Están nombrados como sigue:
1. POWER ON, PROTECTION OK –
(verde) normalmente ON; indica que el pro-
tector está funcionando correctamente y que
todo el equipo conectado está protegido.
También indica que está encendido.
2. GROUND OK – (tierra OK) – (verde) nor-
malmente ON; indica que el tomacorriente de
la pared está correctamente alambrado y
puesto a tierra.
3. UNSAFE VOLTAGE – (voltaje peligroso)
– (rojo) normalmente OFF; cuando está
encendida, es una luz intermitente que indica
que el voltaje es inseguro y que el protector
ha desconectado su equipo conectado.
La familia M4/M8-EX ha sido diseñada,
teniendo en mente, flexibilidad y expansión.
Todos estos modelos aceptan módulos de
protección de línea de señal adicionales en el
evento que su instalación tenga más líneas
de señales que necesiten protección con una
de la unidades nombradas. Más información
está a su disposición en nuestro sitio web
(www.panamax.com) o de nuestro departa-
mento de cuidado del cliente (800-472-5555;
7:30 am-4:30 PM tiempo pacífico).
Si tiene alguna pregunta sobre cual protector
es el mejor para su equipo, favor de ir a nue-
stro sitio web (www.panamax.com) o pón-
gase en contacto con nuestro departamento
de cuidado del cliente.
Conectando su protector contra
sobrecargas de tensión correcta-
mente
Para proteger su equipo completamente de
sobrecargas, cada alambre que sale o entra
del equipo que usted quiere proteger debe
ser conectado al protector de sobrecargas
de tensión indicado. Relámpagos dañinos
y sobrecargas de tensión pueden entrar a
su sistema por cualquier línea de señal
(línea telefónica, alambres de tierra, cables
coaxiales, cables modem, cables red de
área local (LAN), etc.) o corriente alterna
que estén conectados a su equipo elec-
trónico.
La garantía de $5,000,000 de protección de
equipo conectado de Panamax es nula si
cualquier alambre entrando o saliendo del
equipo no está correctamente conectado al
protector(es) contra sobrecargas de tensión
indicado. El protector contra sobrecargas
de tensión también debe ser enchufado a
un tomacorriente alambrado correctamente
y puesto a tierra. Favor de leer la garantía
para detalles o si tiene preguntas llame al
departamento de atención del cliente de
Panamax.
Puntos importantes de seguridad
Los protectores contra sobrecargas de ten-
sión y el equipo conectado deben estar
adentro en un local seco y en el mismo
edificio. Aunque su protector Panamax es
duradero, sus componentes internos no
están aislados del ambiente. No instale
ningún producto de Panamax cerca de
aparatos que emitan calor tal como un
radiador o contador térmico. No instale
este producto donde haya humedad exces-
siva tal como una tina, fregadero, piscina,
en el piso de un sótano, pescera, etc.
Es común que un edificio no esté correcta-
mente conectado a tierra. Para proteger su
equipo, los productos de Panamax deberán
ser directamente enchufados a un tomacor-
riente CA de 3-alambres con conexión a
tierra. Adicionalmente, el alambrado del
edificio y conexión a tierra deberán confor-
marse a los códigos NEC (EEUU) o CEC
(Canada) para que la póliza de protección
de Panamax sea válida.
No use adaptadores de 2-cuchillas o
cualquier otro “cintas de energía” con este
producto. Sólo use cables de extensión de
Panamax si requiere un cable más largo.
Instalación (CA):
1. Apague todo el equipo que va a ser
conectado a la unidad.
2. Asegúrese que el protector esté apagado y
que esté en la posición OFF (vea el dibujo).
Enchufe la unidad al enchufe en la pared y
encienda.
POWER ON
PROTECTION OK
GROUND OK
U
NSAFE VOLTAGE
4. Enchufe el equipo que va a proteger a la
unidad Panamax y uno por uno, encienda
cada una de las piezas de equipo conectado
y vea si están operando correctamente.
5. Apague la unidad y todo el equipo conec-
tado antes de conectar cualquier línea de
señal o instalando módulos adicionales de
línea de señal
3. Verifique que el LED verde “Ground OK”
esté prendido, esto indica que el enchufe en
la pared está correctamente alambrado y
puesto a tierra.
Una nota para instaladores de antenas
de televisión, satélite, y cable:
Artículos 810.21 y 820.40 del código NEC
provee guías especifícas a como conectar a
tierra correctamente, y en particular, especifi-
ca quel cable de tierra será conectado al sis-
tema de tierra del edificio, lo más cercano a
la entrada del cable que sea posible.
UN
SAF
INSTALLATION (Telephone or LAN
Lines):
IMPORTANT: Note the position of the
LINE and EQUIP jacks on the Panamax
unit. LINE is for the line connection that
comes from the wall or floor jack.
EQUIP is for the line connection to your
connected equipment. The protection
circuit will only function if connected
properly. Reversed connections will
pass the signal to the connected equip-
ment but will also prevent the protection
circuitry from working and will invalidate
the Panamax Connected Equipment
Protection Policy.
1. Make sure the Panamax protector and
all connected equipment is turned OFF.
2. Take the incoming telephone or LAN
line and plug it into the appropriate LINE
jack on the protector. The line should
now be connected between the wall and
the Panamax unit.
3. Plug a telephone or LAN line into the
EQUIP jack and then plug the other end
into the equipment to be protected.
4. Turn On the protector and the con-
nected equipment. Verify that each piece
of connected equipment is receiving
power and signal.
The M4T-EX and M8T-EX provide both
telephone and LAN protection on one set
of RJ-45 (RJ-11 compatible) jacks. The
telephone circuit uses pins 4 & 5 while
the LAN circuit uses pins 1, 2, 3 & 6.
Adaptors or custom cables (not includ-
ed) must be used when utilizing both
protection circuits at the same time.
The M8C-EX and M8DBS-EX provide
protection for one telephone line. A
built-in line splitter allows the one pro-
tected line to be used with two pieces of
equipment.
U
N
S
A
LINE (in)
EQUIP (2 out
jacks with
splitter)
LINE (in)
EQUIP (out)
M4T-EX and M8T-EX
M8C-EX and M8DBS-EX
RJ-45
1 2 3 4 5 6 7 8
LAN
TEL
INSTALLATION (Coaxial Lines):
IMPORTANT: Note the position of the
LINE and EQUIP jacks on the Panamax
unit. LINE is for the line connection that
comes from the wall or floor jack. EQUIP
is for the line connection to your connected
equipment.
Panamax offers two types of coaxial line
protection;
1) Satellite TV
2) Cable TV (CATV), Off-air antenna or
Cable modem
Each one is optimized for the specific appli-
cation and can not be used with the other.
Detailed information may be found on the
Panamax website (www.panamax.com).
NOTE: The CATV/Off-Air Antenna protec-
tion circuit in these models is bi-direction-
al and has been designed to work with
cable TV systems that send pay-per-view
ordering information to the cable company
over the coaxial line.
The M8C-EX provides protection for one
CATV, off-air antenna or cable modem line.
It is not compatible with Satellite TV.
When used with diplexers, this protection
circuit must be placed between the diplexer
and the TV or VCR; it will not protect the
diplexer.
LINE (in)
EQUIP (out)
M8C-EX
The M8DBS-EX provides protection for
one CATV, off-air antenna line or cable
modem and two Satellite TV lines. These
are not interchangeable. Make sure that
your equipment is connected to the proper
jacks. When used with diplexers, this pro-
tection circuit must be placed between the
diplexer and the Satellite receiver; it will
not protect the diplexer.
1. Make sure the Panamax protector and
all connected equipment is turned OFF.
2. Connect the coaxial cable from the
CATV system, antenna, or Satellite dish to
the appropriate LINE connector on the
Panamax protector.
3. Connect a coaxial cable from the
EQUIP jack on the protector to appropriate
input jack on your TV, VCR, cable modem
or Satellite receiver.
4. Repeat steps 2 & 3 for all additional
coaxial lines.
POWER
CATV
(in)
EQUIP (out)
SATELLITE (in)
M8DBS-EX
EQUIP (out)
SATELLITE (in)
EQUIP (out)
Encendido
Apagado
Apagado
M4-EX, M4T-EX, M8-EX, M8T-EX, M8C-EX, M8DBS-EX
INSTRUCCIONES - Español, (continued)
M4-EX, M4T-EX, M8-EX, M8T-EX, M8C-EX, M8DBS-EX INSTRUCTIONS - Français
Este soporte reemplaza el soporte trian-
gular pequeño que viene con la unidad
base CA y es necesario solo cuando
módulos adicionales estan siendo instala-
dos. Puede obtener más información del
sitio web Panamax o llamando nuestro
departamento de cuidado del cliente.
Añadiendo módulos de línea de
señal (opcional):
Es posible que haya equipo conectado
que tenga mas líneas de señal que la
unidad base pueda proteger. Panamax
ofrece una línea accesorios de módulos
de línea de señal (que se compran sepa-
radamente) para este tipo de situacion.
Cada módulo incluye instrucciones de
instalación y un soporte pequeño rectan-
gular con un interfaz de tierra.
Montaje en la pared (opcional):
El soporte pequeño triangular con un
“hoyo de llave” es para la parte superior de
la unidad. Este soporte se monta directa-
mente a la parte trasera de la unidad con
los tornillos #8-32 x 5/16”, y entonces a la
pared con uno de los tornillos #6-20 x _”
y ojete separador (sujetadores de mam-
postería es opcional).
El soporte grande rectangular con dos
“hoyos de llave” es para la parte inferior
donde se localizan el cable de la unidad.
Se monta directamente a la unidad con
los tornillos de rosca, y entonces se
monta a la pared con los dos otros
tornillos #6 y ojete separador (sujetadores
de mampostería es opcional).
Procedimiento para montaje:
1. Monte los soportes a la unidad con
los tornillos correctos.
2. Determine a donde va a montar la
unidad en la pared y marque la posición
para el tornillo superior.
3. Ponga un ojete separador, con la parte
acampanada hacia la pared, uno de los
tornillos #6. Atornille la unidad a la
pared (usando los sujetadores de mam-
postería para paredes huecas) donde
marcó, dejando el ojete expuesto.
4. Coloque el hoyo de llave en el soporte
superior de la unidad sobre el
ojete/tornillo y deslize la unidad hacia
bajo hasta que el tornillo este sujeto al
soporte.
5. Marque la posición para los dos
tornillos inferiores (en al parte angosta de
los hoyos de llave) y atornillelo a la pared
usando los otros dos ojetes separadores
como hizo en el paso #3. Los sujeata-
dores de mampostería incluídos deben
ser usados para montaje sobre paredes
huecas.
6. Coloque el protector sobre los 3
ojetes/tornillos y deslize la unidad hasta
que quede sujeto en lugar.
7. Usando este procedimiento permite
que la unidad pueda ser quitado fácil-
mente deslizandolo hacia arriba para
soltar los soportes de los ojetes/tornillos.
Resolviendo problemas
Si usted está teniendo problemas con su
protector contra sobrecargas de tensión, lea
esta sección
El díodo emisor de luz (LED) “Power
ON, Protection OK” no está prendi-
do, no hay corriente alterna (CA) a
mi equipo, o mi equipo no enciende.
• Asegúrese que el protector está enchufa-
do a un tomacorriente CA que esté funcio-
nando.
• Revise todas las conexiones AC
• Asegúrese que el protector y el equipo
esten encendidos.
• Verifique que el díodo emisor de luz
(LED) “Unsafe Voltage” no esté prendido.
Si está prendido, el voltaje que está entran-
do es demasiado alto o bajo y ha sido
desconectado de su equipo conectado.
• Revise el corta circuito en el protector (el
cortacircuito/conmutador combinado) para
ver si necesita ser reconectado (presione
“ON” para reconectar).
• Si todavía no enciende, el protector
puede estar dañado. Póngase en contacto
con Panamax (ya sea por el sitio web o el
departamento de cuidado al cliente) para
reemplazar el protector.
No hay audio o video de mi televisor,
stereo o grabadora de video
• Revise las conexiones coaxiales, asegu-
randose de que estén instaladas correcta-
mente y bien sujetadas.
• Derive los conectores coaxiales. Si la
imágen regresa, el protector está dañado.
Póngase en contacto con Panamax (ya sea
por el sitio web o el departamento de
cuidado al cliente) para un reemplazo.
• Si todavía no tiene una imágen, es posi-
ble que exista un problema con la señal de
su proveedor de cable.
Mi fax, modem, o teléfono están
conectados al protector pero no fun-
cionan.
• Revise para ver si su equipo conectado
está recibiendo tono de marcar.
• Si no, derive el echufe de teléfono del
protector para ver si el protector está daña-
do.
• Si el tono de marcar regresa, el protector
está dañado. Póngase en contacto con
Panamax (ya sea por el sitio web o el
departamento de cuidado al cliente) para un
reemplazo.
• Si todavía no tiene tono de marcar, es
posible que exista un problema con la línea
de teléfono.
El corta circuito de Panamax
desconectó la CA del equipo
conectado.
• Usted ha excedido la capacidad nominal
de amperios de su protector contra sobre-
cargas de tensión. Para un arreglo tempo-
ral, desconecte una o más piezas de
equipo. Preguntele a su representante
Panamax sobre protectores Panamax adi-
cionales que requiera. .
800-472-5555
www.panamax.com
INS7925 REV. C 11/05
U
N
S
Instalación (Teléfono o líneas de red
de área local (LAN) :
IMPORTANTE: Note la posición de los
enchufes LINE y EQUIP en la unidad
Panamax. LINE es para la conexión de
línea que viene del enchufe en la pared o el
piso. EQUIP es la conexión de línea para
su equipo conectado. El circuito de pro-
tección sólo funcionará si está correcta-
mente conectado. Conexiones en reversa
pasarán la señal al equipo conectado pero
también no permitirá que el circuito fun-
cione y esto hará que la Garantía de
Protección de Equipo Conectado de
Panamax sea inválida.
1. Aségurese que el protector Panamax y
todo el equipo conectado esté apagado.
2. Tome el cable de teléfono o red de área
local (LAN) y enchúfelo al enchufe correcto
(LINE) en el protector. El cable debe estar
conectado entre la pared y la unidad
Panamax.
3. Enchufe el cable de teléfono o red de
área local (LAN) al enchufe EQUIP y
entonces enchufe la otra punta al equipo
que va ser protegido.
4. Encienda el protector y el equipo conec-
tado. Verifique que cada pieza del equipo
conectado esté recibiendo electricidad y
señal.
Las unidades M4T-EX y M8T-EX proveen
protección para teléfono y red de área local
en un juego de enchufes RJ-45 (que es RJ-
11 compatible). El circuito de teléfono usa
patillas 4 y 5 mientras el circuito de red de
área local usa las patillas 1, 2, 3 y 6.
Adaptadores o cables hechos de encargo
(no incluídos) deben ser usados cuando se
utilizan los dos circuitos de protección al
mismo tiempo.
NOTA: El circuito de protección de
CATV/Antena fuera de aire en estos mode-
los es bi-direccional y ha sido diseñado
para funcionar con sistemas de cable TV
que envían información para ordenar pro-
gramación de pagar y ver a la compañía de
cable por medio de la línea coaxial.
Las unidades M8C-EX y M8DBS-EX
provee protección para una línea de telé-
fono. Un separador incorporado permite
que la línea protegida pueda ser usada por
dos piezas de equipo.
U
N
S
A
LINE
(entrada)
EQUIP ( 2
salidas con
divisor)
LINE
(entrada)
EQUIP (salida)
M4T-EX and M8T-EX
M8C-EX and M8DBS-EX
RJ-45
1 2 3 4 5 6 7 8
LAN
TEL
Instalación (Líneas Coaxiales):
IMPORTANTE: Note la posición de los
enchufes LINE y EQUIP en la unidad
Panamax. LINEes para la conexión de línea
que viene del enchufe en la pared o el piso.
EQUIP es la conexión de línea para su
equipo conectado.
Panamax ofrece dos tipos de protección para
líneas coaxiales:
1) Televisión por Satélite
2) Televisión por cable, antenas fuera de aire
o modem por cable.
Cada uno está optiminizado para una apli-
cación especifíca y no puede ser usado con
el otro. Puede encontrar información más
detallada en el sitio web de Panamax
(www.panamax.com)
El M8C-EX provee protección para un cable
CATV, antena, o modem por cable. No es
compatible con TV de satélite. Cuando
diplexores son usados, este circuito de
protección debe puesto entre el diplexor y
el TV o videograbadora; el diplexor no será
protegido.
LINE (entrada)
EQUIP (salida)
M8C-EX
El M8DBS-EX provee protección para un
cable CATV, antena, o modem por cable y
dos cables para TV de satélite.. Estos no son
intercambiables. Asegúrese de que su
equipo esté conectado a los enchufes correc-
tos. Cuando diplexores son usados, este cir-
cuito de protección debe puesto entre el
diplexor y el receptor de satélite; el diplexor
no será protegido
1. Asegúrese que el protector Panamax y
todo el equipo conectado esté apagado.
2. Conecte el cable coaxial del sistema
CATV, antena o satélite al conector LINE en
el protector Panamax.
3.Conecte un cable coaxial del conector
EQUIP en el protector al enchufe en su TV,
VCR, receptor de satélite, o modem de
cable.
4. Repita pasos 2 y3 para toda línea coaxial
adicional.
O
W
E
R
CATV
(entrada)
EQUIP
(salida)
SATELLITE (entrada)
M8DBS-EX
EQUIP (salida)
SATELLITE (entrada)
EQUIP (salida)
Ce support remplace celui utilisé pour le
montage mural qui est inclus avec l’unité
CA de base et il est uniquement nécessaire
lorsque des modules d’appoint sont
rajoutés. Pour plus d’information, veuillez
visiter le site Web de Panamax ou commu-
niquer avec le Service à la clientèle
Ajout de modules d’appoint de
lignes de signaux (optionnels) :
Il se peut que les appareils branchés com-
portent plus de lignes de signaux qu’un
limiteur peut protéger. Pour ces situations,
Panamax offre une gamme de modules
d’appoint pour augmenter le nombre de
lignes de signaux protégé (vendus séparé-
ment). Chaque module comprend des
instructions pour l’installation ainsi qu’un
petit support rectangulaire doté d’une inter-
face de mise à la terre.
Montage mural (optionnel) :
Le petit support triangulaire avec encoche
en trou de serrure se fixe à l’extrémité
supérieure de l’appareil. Ce support se fixe
au dos du limiteur à l’aide de vis de
mécanique n° 8 (32 x 5/16 po) et ensuite
au mur à l’aide d’une des vis à tête tron-
conique n° 6 (20 x _ po) et d’entretoises
d’espacement (vis d’ancrage optionnelles).
Le grand support rectangulaire avec deux
encoches en trou de serrure se fixe à l’ex-
trémité inférieure, côté du câble d’alimenta-
tion de l’appareil. Ce support se fixe au
limiteur à l’aide de vis auto-taraudeuses et
ensuite au mur à l’aide des deux autres vis
à tête tronconique n° 6 et d’entretoises d’e-
spacement (vis d’ancrage optionnelles).
Montage :
1. Fixez les deux supports au limiteur avec
les vis appropriées.
2. Déterminez l’endroit où vous désirez
installer le limiteur et indiquez l’emplace-
ment de la vis de montage pour l’extrémité
supérieure.
3. Placez une entretoise d’espacement sur
l’une des vis à tête tronconique n° 6 en
maintenant le bout évasé vers le mur.
Visez la vis dans le mur (utilisez des vis
d’ancrage pour les murs creux) à l’endroit
du point de repère, laissant l’entretoise
exposée.
4. Positionnez l’encoche en trou de serrure
sur le support pour l’extrémité supérieure
vis-à-vis l’entretoise et la vis et insérez
ensuite l’encoche du support sur la tête de
la vis.
5. Indiquez la position des deux vis de
montage inférieures (dans la plus petite
portion des encoches en trou de serrure) et
visez-les dans le mur en utilisant les deux
autres entretoises d’espacement tel
qu’indiqué dans l’étape 3.
6. Positionnez le limiteur vis-à-vis les 3
entretoises et les vis et insérez-les ensuite
dans les encoches pour fixer le limiteur en
place.
7. Le montage tel que décrit ci-dessus
permet de retirer facilement le limiteur en
ôtant simplement les supports des entre-
toises et des vis.
Dépannage – Si vous éprouvez des diffi-
cultés avec votre limiteur de surtension,
consultez cette rubrique
Le témoin “sous tension et protec-
tion OK” est éteint, mes appareils
ne sont pas alimentés de courant
alternatif, ou mes appareils ne s’al-
lument pas.
• Assurez-vous que le limiteur est branché
dans une prise de courant AC fonctionnelle.
• Vérifiez toutes les connexions d’alimenta-
tion électrique
• Assurez-vous que le limiteur et les
appareils qui lui sont raccordés sont sous
tension.
• Assurez-vous que le témoin DEL de ten-
sion dangereuse est éteint. S’il est allumé,
la tension secteur entrante est soit trop
élevée ou trop basse et l’alimentation à vos
appareils protégés a été coupée.
• Vérifiez si le disjoncteur sur le limiteur
de surtension (combiné interrupteur
marche/arrêt et disjoncteur) doit être réen-
clenché (appuyez sur Marche (ON) pour le
réenclencher).
• Si vous n’avez toujours pas de courant, il
se peut que le limiteur soit endommagé.
Veuillez communiquer avec Panamax, via le
site Web ou le Service à la clientèle, afin
d’obtenir un remplacement.
Le téléviseur, la chaîne stéréo ou le
magnétoscope ne reçoit pas de sig-
nal audio ou vidéo.
• Vérifiez les connexions coaxiales, elles
doivent être branchées correctement et
solidement.
• Contournez les connecteurs coaxiaux. Si
le signal vidéo se rétablit, le limiteur est
endommagé. Veuillez communiquer avec
Panamax, via le site Web ou le Service à la
clientèle, afin d’obtenir un remplacement.
• Si vous n’avez toujours pas de signal
vidéo, il est possible que le problème soit
lié au signal du fournisseur de câblodistrib-
ution.
Le télécopieur, modem ou téléphone
reçoit du courant mais ne fonctionne
pas.
• Vérifiez si les appareils protégés ont une
tonalité
• Si non, contournez les prises télé-
phoniques du limiteur pour vérifier s’il est
endommagé.
• Si la tonalité est rétablie, le limiteur est
endommagé. Veuillez communiquer avec
Panamax, via le site Web ou le Service à la
clientèle, afin d’obtenir un remplacement.
• Si vous n’avez toujours pas de tonalité, il
est possible que le problème soit lié aux
lignes du fournisseur de services télé-
phoniques.
Le disjoncteur du limiteur de surten-
sion Panamax coupe le courant
alternatif aux appareils qui lui sont
raccordés.
• Vous avez dépassé l’intensité nominale
de votre limiteur de surtension. Une solu-
tion temporaire est de débrancher un ou
plusieurs appareils du limiteur de surten-
sion. Consultez votre revendeur, il est pos-
sible que vous ayez besoin de limiteurs
Panamax additionnels.
800-472-5555
www.panamax.com
INS7925 REV. C 11/05
U
N
Installation (Lignes téléphoniques
et LAN) :
IMPORTANT: Prenez note de la position
des prises ligne (LINE) et équipement
(EQUIP) sur le limiteur Panamax. La prise
ligne (LINE) sert à la ligne provenant de la
prise murale ou au sol. La prise
équipement (EQUIP) sert au branchement
des appareils que vous désirez protéger.
Le circuit de protection ne fonctionne que
s’il est branché correctement. Si le
branchement est inversé, le signal est
acheminé vers les appareils, cependant le
circuit de protection ne fonctionne pas et
la garantie de Panamax sur les appareils
branchés sera invalide
1. Assurez-vous que le limiteur Panamax
et les appareils qui lui sont raccordés sont
hors tension.
2. Insérez la ligne téléphonique ou LAN
entrante dans la prise ligne (LINE) appro-
priée sur le limiteur. La ligne devrait
maintenant être branchée entre le mur et le
limiteur Panamax.
3. Insérez une ligne téléphonique ou LAN
dans la prise équipement (EQUIP) et
ensuite branchez l’autre extrémité du câble
à l’appareil que vous désirez protéger.
4. Mettez le limiteur et tous les appareils
branchés sous tension. Assurez-vous que
chaque appareil est alimenté et qu’il reçoit
un signal.
Le limiteur M4T-EX et M8T-EX offre une
protection pour ligne téléphonique et LAN
sur un jeu de prises RJ-45 (RJ-11 com-
patible). Les adaptateurs ou les câbles
spéciaux (non inclus) doivent être utilisés
lorsque les deux circuits de protection
sont utilisés en même temps
Les limiteurs M8C-EX et M8DBS-EX offre
la protection pour une ligne téléphonique.
Un diviseur intégré au limiteur permet de
brancher deux appareils à la ligne télé-
phonique protégée.
U
N
S
A
Prise équipement
(EQUIP)
(2 sortie avec
diviseur)
Prise ligne
(LINE)
(entrée)
Prise ligne
(LINE)
(entrée)
Prise équipement
(EQUIP) (sortie)
M4T-EX and M8T-EX
M8C-EX and M8DBS-EX
RJ-45
1 2 3 4 5 6 7 8
LAN
TEL
Installation (Câbles coaxiaux) :
IMPORTANT: Prenez note de la position des
prises ligne (LINE) et équipement (EQUIP)
sur le limiteur Panamax. La prise ligne
(LINE) sert à la ligne provenant de la prise
murale ou au sol. La prise équipement
(EQUIP) sert au branchement des appareils
que vous désirez protéger.
Panamax offre deux types de protection des
câbles coaxiaux ;
1) Système satellite
2) Câblodistribution, antenne de télévision
standard ou modem câble.
Chaque ligne est optimisée pour une appli-
cation spécifique et ne peut être utilisée avec
l’autre application. Pour de plus amples
détails, visitez le site Web de Panamax
(www.panamax.com)
NOTE: Le circuit de protection Câble/
Antenne dans ces modèles est bidirection-
nel et a été conçu pour être compatible
avec les systèmes de télévision par câble
afin d’acheminer au câblodistributeur par
ligne coaxiale toute l'information néces-
saire à la commande de télé à la carte.
Le M8C-EX offre une protection pour une
ligne de câblodistribution, d’antenne de
télévision standard ou pour un modem
câble. Il n’est pas compatible avec les sys-
tèmes satellite. Lorsque le limiteur est util-
isé avec des duplexeurs, le circuit de protec-
tion doit être placé entre le duplexeur et le
téléviseur ou le magnétoscope.
EQUIP (sortie)
Le M8DBS-EX offre une protection pour une
ligne de câblodistribution, d’antenne de
télévision standard ou pour un modem câble
et pour deux lignes pour système satellite.
Ces prises ne sont pas interchangeables.
Assurez-vous que les appareils sont
branchés aux prises appropriées. Lorsque le
limiteur est utilisé avec des duplexeurs, le
circuit de protection doit être placé entre le
duplexeur et le récepteur satellite; le limiteur
ne protégera pas le duplexeur.
1. Assurez-vous que le limiteur Panamax et
les appareils qui lui sont raccordés sont
hors tension.
2. Branchez le câble coaxial du système de
câblodistribution, d’antenne ou de satellite à
la prise ligne (LINE) appropriée sur le limi-
teur Panamax.
3. Branchez un câble coaxial de la prises
équipement (EQUIP) du limiteur à la prise
appropriée de votre téléviseur, magnéto-
scope, récepteur satellite ou de votre
modem câble.
4. Répétez les étapes 2 et 3 pour brancher
des câbles coaxiaux supplémentaires.
P
O
W
E
R
Câble-
distribution
(entrée)
EQUIP
(sortie)
SATELLITE (entrée)
M8DBS-EX
EQUIP (sortie)
SATELLITE (entrée)
EQUIP (sortie)
Veuillez vous assurer que le limiteur de surtension convient à votre équipement électronique. Panamax fabrique des limiteurs convenant pratiquement à tous types d’équipement élec-
tronique. Les limiteurs de surtension peuvent sembler identiques de l'extérieur, mais à l'intérieur ils peuvent être tout à fait différents. Il est très important d’utiliser le limiteur de
surtension conçu spécifiquement pour votre application.
P
O
W
E
R
O
N
P
R
O
T
E
C
T
IO
N
O
K
GROUND OK
U
NSA
FE VOLTAGE
POW
ER
Témoins DEL
Témoin DEL de tension dangereuse
Témoin DEL de mise à la terre OK
Témoin DEL de sous tension et protection OK
Prises téléphoniques
Connecteurs coaxiaux
(M8C-EX et M8DBS-EX)
Câble téléphonique
(4 pi) inclus
(M8C-EX, M8DBS-EX
M4T-EX et M8T-EX)
Câble de catégorie 5
(4 pi) inclus
(M4T-EX et M8T-EX)
Combiné interrupteur
MARCHE/ARRÊT et
disjoncteur
Câble d’alimentation CA
de 8 pieds
Angle droit avec prise décalée
à 45 degré
8 prises d’alimentation CA
(M4-EX et M4T-EX, 4 prises AC
Outlets)
Supports de montage
supérieur et inférieur
(Vis et entretoises d’espacement
incluses)
M8DBS-EX
Un connecteur de
câblodistribution
et deux con-
necteurs pour
système satellite
Câbles coaxiaux RG-6
(M8C-EX, un câble et
M8DBS-EX, deux câbles
M8C-EX
Un connecteur de
câblodistribution
P
O
W
P
R
O
T
E
C
T
G
R
O
U
N
D
O
K
U
N
S
A
F
E
V
O
L
T
A
G
E
P
O
W
P
R
O
T
E
C
G
R
O
U
N
D O
K
U
N
S
A
F
E
V
O
L
T
A
G
E
Prise équipement (EQUIP) (RJ-11
sortie avec diviseur)
(M8C-EX et M8DBS-EX)
Telco and LAN Connector RJ-45
(M4T-EX et M8T-EX)
P
O
W
E
R
O
N
P
R
O
T
E
C
T
I
O
N
O
K
G
R
O
U
N
D
O
K
U
N
S
A
F
E
V
O
L
T
A
G
E
P
O
W
E
R
O
N
P
R
O
T
E
C
T
I
O
N
O
K
G
R
O
U
N
D
O
K
U
N
S
A
F
E
V
O
L
T
A
G
E
P
O
W
E
R
P
O
W
E
R
M4-EX et M8-EX – Protègent les
appareils électroniques à tension alternative,
sans autres connexions, contre les varia-
tions, la sous-tension et la surtension.
PO
W
ER O
N
PROTECTIO
N O
K
G
R
O
U
N
D
O
K
U
N
S
A
F
E
V
O
L
T
A
G
E
P
O
W
E
R
P
O
W
E
R
O
N
P
R
O
T
E
C
T
I
O
N
O
K
G
R
O
U
N
D
O
K
U
N
S
A
F
E
V
O
L
T
A
G
E
P
O
W
E
R
O
N
P
R
O
T
E
C
T
I
O
N
O
K
G
R
O
U
N
D
O
K
U
N
S
A
F
E
V
O
L
T
A
G
E
P
O
W
E
R
P
O
W
E
R
POWER ON
PROTECTION OK
G
R
O
U
N
D
O
K
U
N
S
A
F
E
V
O
L
T
A
G
E
POWER
M8DBS-EX – En plus de la protection du
modèle de base, ce limiteur offre la protec-
tion de ligne téléphonique et coaxiale
(Système satellite, câblodistribution, antenne
de télévision standard
ou modem câble).
M8C-EX – En plus de la protection du
modèle de base, ce limiteur offre la protec-
tion de ligne téléphonique et coaxiale
(Câblodistribution, antenne de télévision
standard ou modem câble)..
M4T-EX et M8T-EX – En plus de la pro-
tection du modèle de base, ces limiteurs
offrent la protection de ligne téléphonique et
d’Ethernet.
Ces appareils sont dotés de 4 ou de 8 pris-
es CA, selon le modèle sélectionné. Toutes
ces prises CA sont commandées par un
combiné interrupteur marche/arrêt et dis-
joncteur. Ces modèles sont dotés de cir-
cuits brevetés SurgeGate-EX™ de Panamax
pour la protection contre la surtension et la
sous-tension. Ces circuits surveillent con-
tinuellement le courant et protègent les
appareils contre les dommages causés par
les baisses de tension et les surtensions
prolongées. Le limiteur coupe automa-
tiquement le courant vers vos appareils
branchés lorsqu’une de ces situations est
détectée et ce jusqu’à ce que le courant
redevienne normal.
De plus, ces modèles de limiteur ont 3
témoins de diagnostic DEL pour une sécu-
rité accrue. L’assignation de ces témoins
est la suivante :
1. Sous tension et protection OK –
(vert) en temps normal ce témoin est
allumé, il indique que le limiteur de surten-
sion fonctionne correctement, qu’il est sous
tension et qu’il protège les appareils qui lui
sont raccordés. Indique également que
l’appareil est mis sous tension.
2. Mise à la terre OK – (vert) en temps
normal ce témoin est allumé, il indique que
la prise de courant murale est correctement
câblé et mise à la terre.
3. Tension dangereuse – ((rouge) en
temps normal ce témoin est éteint, s’il s’al-
lume c’est que la tension d’arrivée est dan-
gereuse et que le limiteur de surtension a
temporairement coupé le courant en vue de
protéger vos appareils.
Par sa conception, la gamme de produits
M4/M8-EX prévoit la flexibilité et l’expan-
sion. Tous les modèles de la gamme
acceptent les modules d’appoint pour aug-
menter la capacité de protection des lignes
de signaux dans l’éventualité qu’un limiteur
ne soit pas suffisant pour protéger toute
votre installation. Pour plus d’information,
veuillez visiter notre site Web (www.pana-
max.com) ou communiquer avec le Service
à la clientèle au 800-472-5555 entre 7h30
et 16h30 HNP).
Si vous avez besoin d’aide dans la sélec-
tion du produit qui convient le mieux à
votre application, veuillez consulter notre
site Web (www.panamax.com) ou commu-
niquez avec le Service à la clientèle.
Raccordement correct du limiteur de
surtension
Pour assurer la protection complète de vos
appareils contre les surtensions, chaque fil
entrant ou sortant des appareils à protéger
doit être raccordé à un limiteur de surten-
sion Panamax convenable à ces appareils.
Les effets endommageant de la foudre et
des surtensions peuvent atteindre votre
système via toutes les entrées de courant
alternatif et toutes les lignes de signaux
(lignes téléphoniques, fils de mise à la
terre, câbles coaxiaux, câbles modem,
câbles LAN, etc.) raccordées à votre
équipement électrique.
La garantie de 100,000 $ sur les appareils
branchés deviendra invalide si quelque fil
que soit, entrant ou sortant des appareils,
n’est pas raccordé correctement à un limi-
teur de surtension Panamax convenable.
Le limiteur de surtension doit être branché
dans une prise de courant correctement
câblée et mise à la terre. Veuillez consulter
la garantie pour plus de détails, si vous
avez des questions, veuillez communiquer
avec le Service à la clientèle.
Avis de sécurité important
Les limiteurs de surtension Panamax ainsi
que les appareils qui lui sont raccordés
doivent être à l’intérieur, dans un emplace-
ment sec et dans le même bâtiment.
Quoique votre limiteur Panamax est très
résistant, les composants internes ne sont
pas à l’épreuve de l’environnement. Les
produits Panamax ne doivent pas être
installés en proximité d’appareils qui émet-
tent de la chaleur tels que des radiateurs
ou les registres d’air chaud. Ce produit ne
doit pas être installé dans un endroit
humide tel que proche d’une baignoire, un
lavabo, une piscine, un plancher de sous-
sol, un aquarium etc.
Il arrive fréquemment que le câblage d’un
bâtiment ne soit pas correctement mis à la
terre. Afin de bien protéger vos appareils,
les produits Panamax doivent être branchés
dans des prises de courant à 3 broches
correctement câblées et mises à la terre.
De plus, pour que la garantie Panamax soit
valide le câblage et la mise à la terre du
bâtiment doivent être conformes aux
normes NEC (É.U.) ou CEC (Canada).
N’utilisez pas d’adaptateurs à deux broches
ou autres limiteurs avec ce produit. S’il est
nécessaire d’utiliser une rallonge élec-
trique, utilisez uniquement celle de marque
Panamax.
Installation (Alimentation CA) :
1. Assurez-vous que tous les appareils qui
seront branchés au limiteur sont hors ten-
sion.
2. Assurez-vous que le commutateur
Marche/Arrêt (ON/OFF) est en position d’ar-
rêt (voir l’illustration). Branchez le limiteur
à la prise de courant murale et mettez-le
sous tension.
POWER ON
PROTECTION OK
GROUND OK
U
NSAFE VOLTAGE
4. Branchez tous les appareils que vous
désirez protéger au limiteur Panamax,
ensuite les mettre sous tension un à la fois
et vérifiez qu’ils fonctionnent correctement
ON and check for correct operation.
5. Assurez-vous de mettre le limiteur ainsi
que tous les appareils qui lui sont raccordés
hors tension avant de brancher des lignes
de signaux ou avant l’installation de module
de ligne de signal d’appoint.
3. Assurez-vous que le témoin vert de Mise
à la terre OK (Ground OK) est allumé, indi-
quant que la prise de courant murale est
correctement câblée et mise à la terre.
Note à l’intention des installateurs
d’antenne de télévision, de système
satellite et de câblodistribution :
Ce rappel à pour objet de souligner l’article
810.21 et 820.40 de la norme NEC qui
prévoit des directives spécifiques concernant
la mise à la terre, notamment, la norme exige
que la mise à la terre du câble soit raccordée
au système de mise à la terre du bâtiment et
qu’elle soit située aussi proche que possible
du point d’entrée du câble.
EN MARCHE
ARRÊT
ARRÊT
Prise ligne (LINE)
(entrée)
M8C-EX
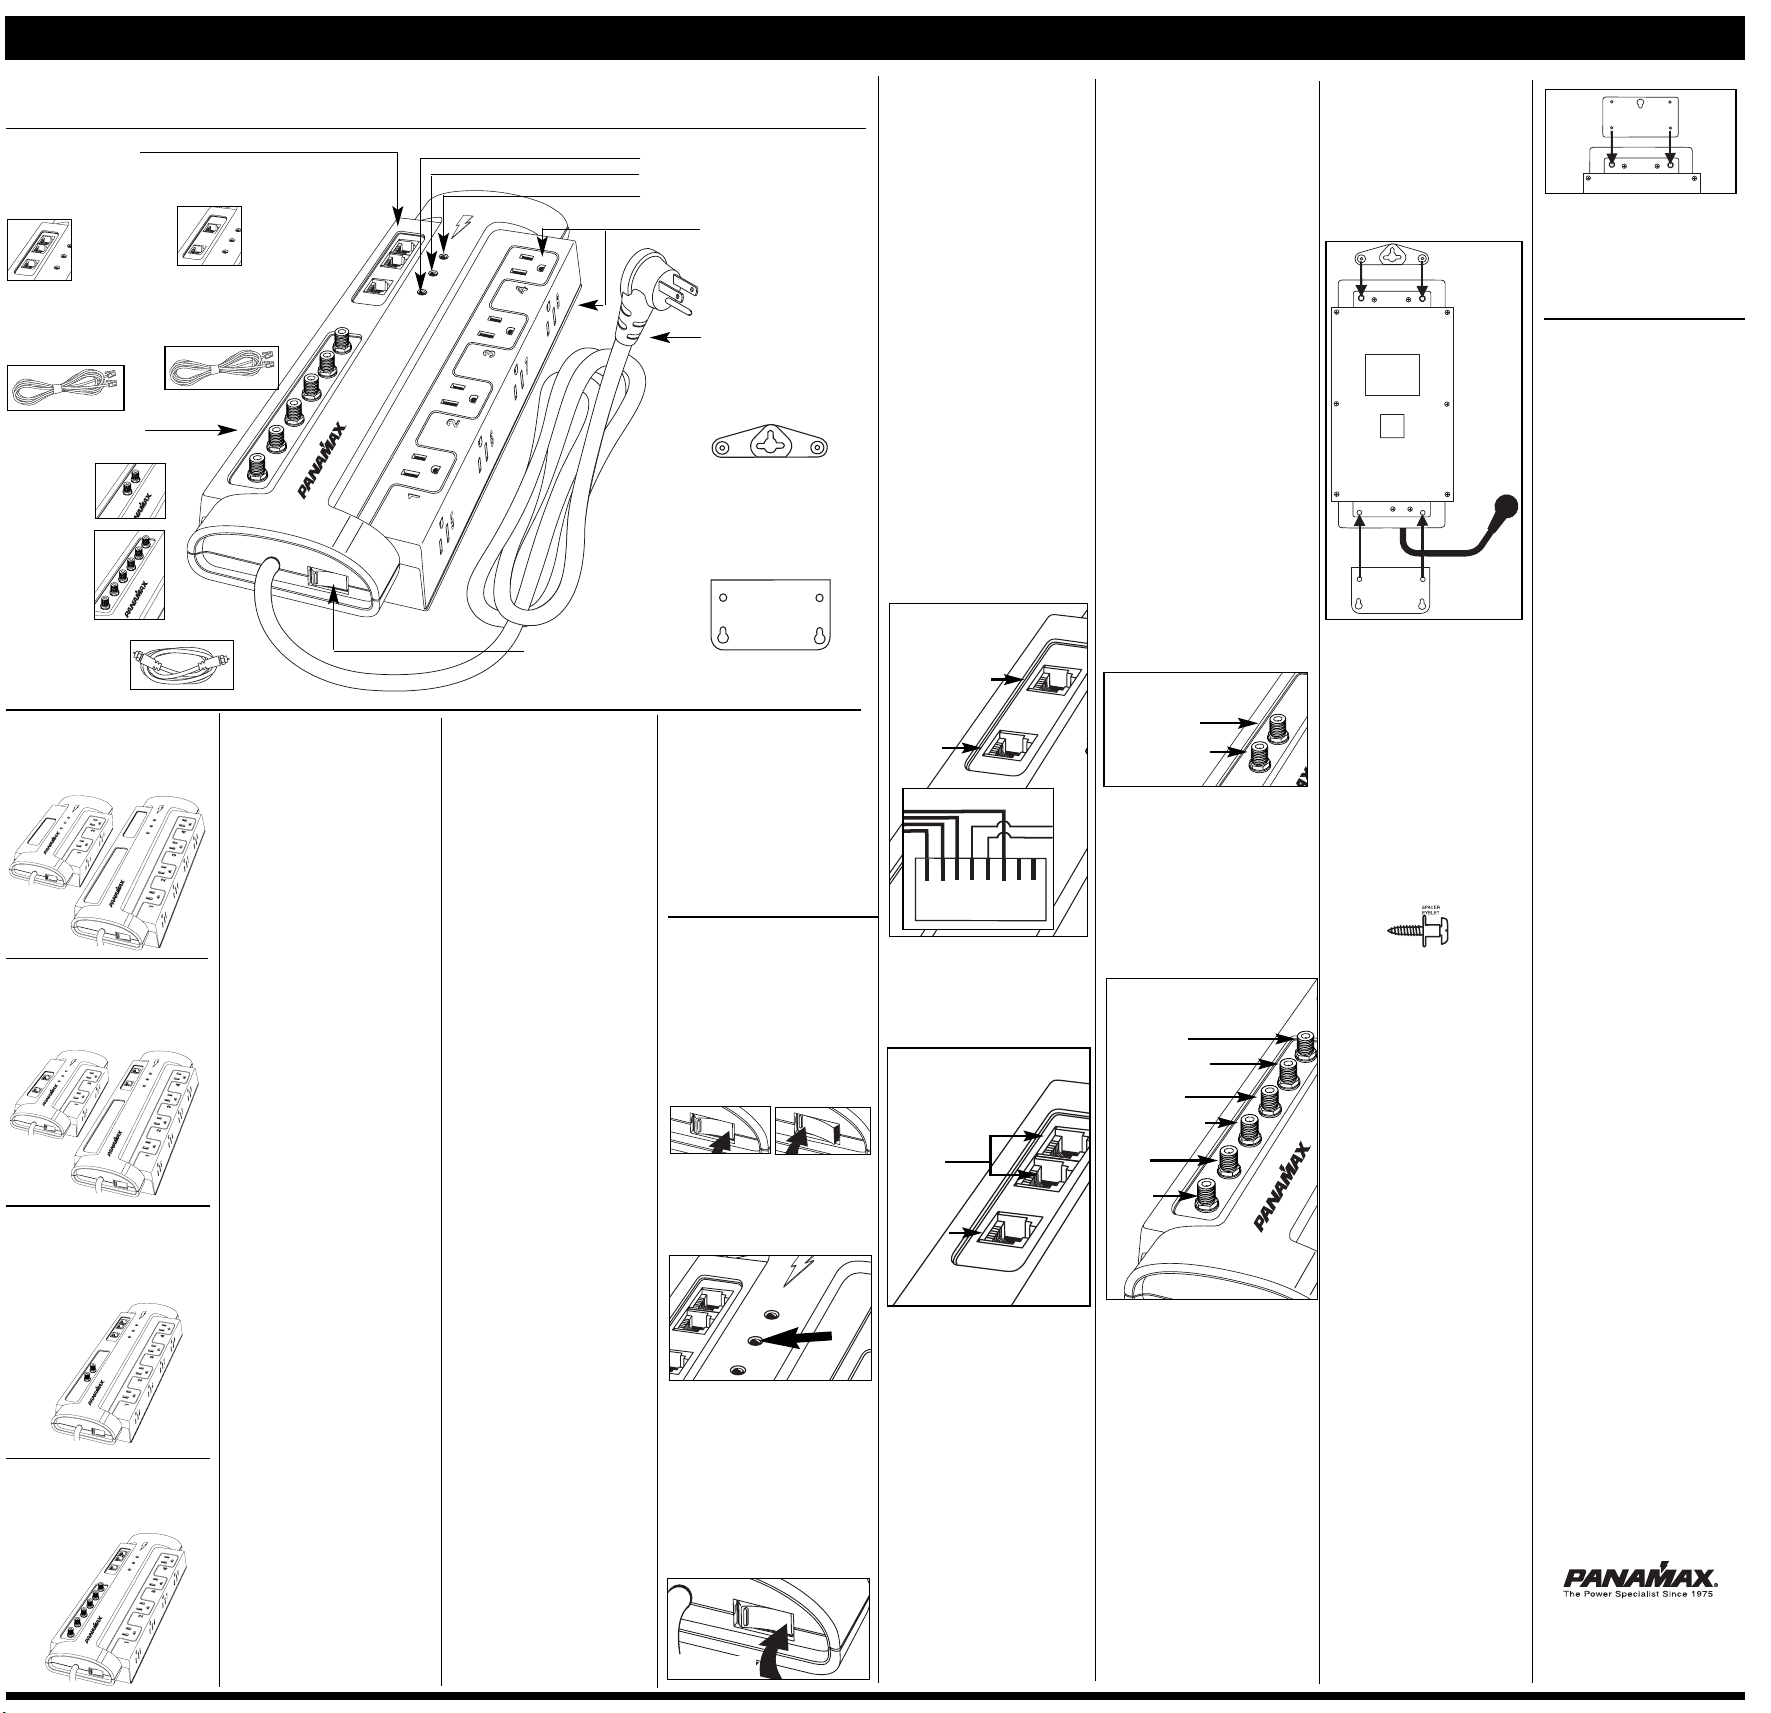