Loading ...
Loading ...
Loading ...
9
A
C
B
15”
4-3/4”
(36”, 42”)
11-13/16”
(48”,54”,60”)
17-11/16”
(36”) 25-1/4”, (42”) 31-3/16”
(48”) 19-1/16”, (54”) 25-1/16”
(60”) 30-7/8”
C/L
24" min.
2
1
Duct Cover
Bracket
(48”) 37-3/16”, (54”) 43-1/8”, (60”) 49”
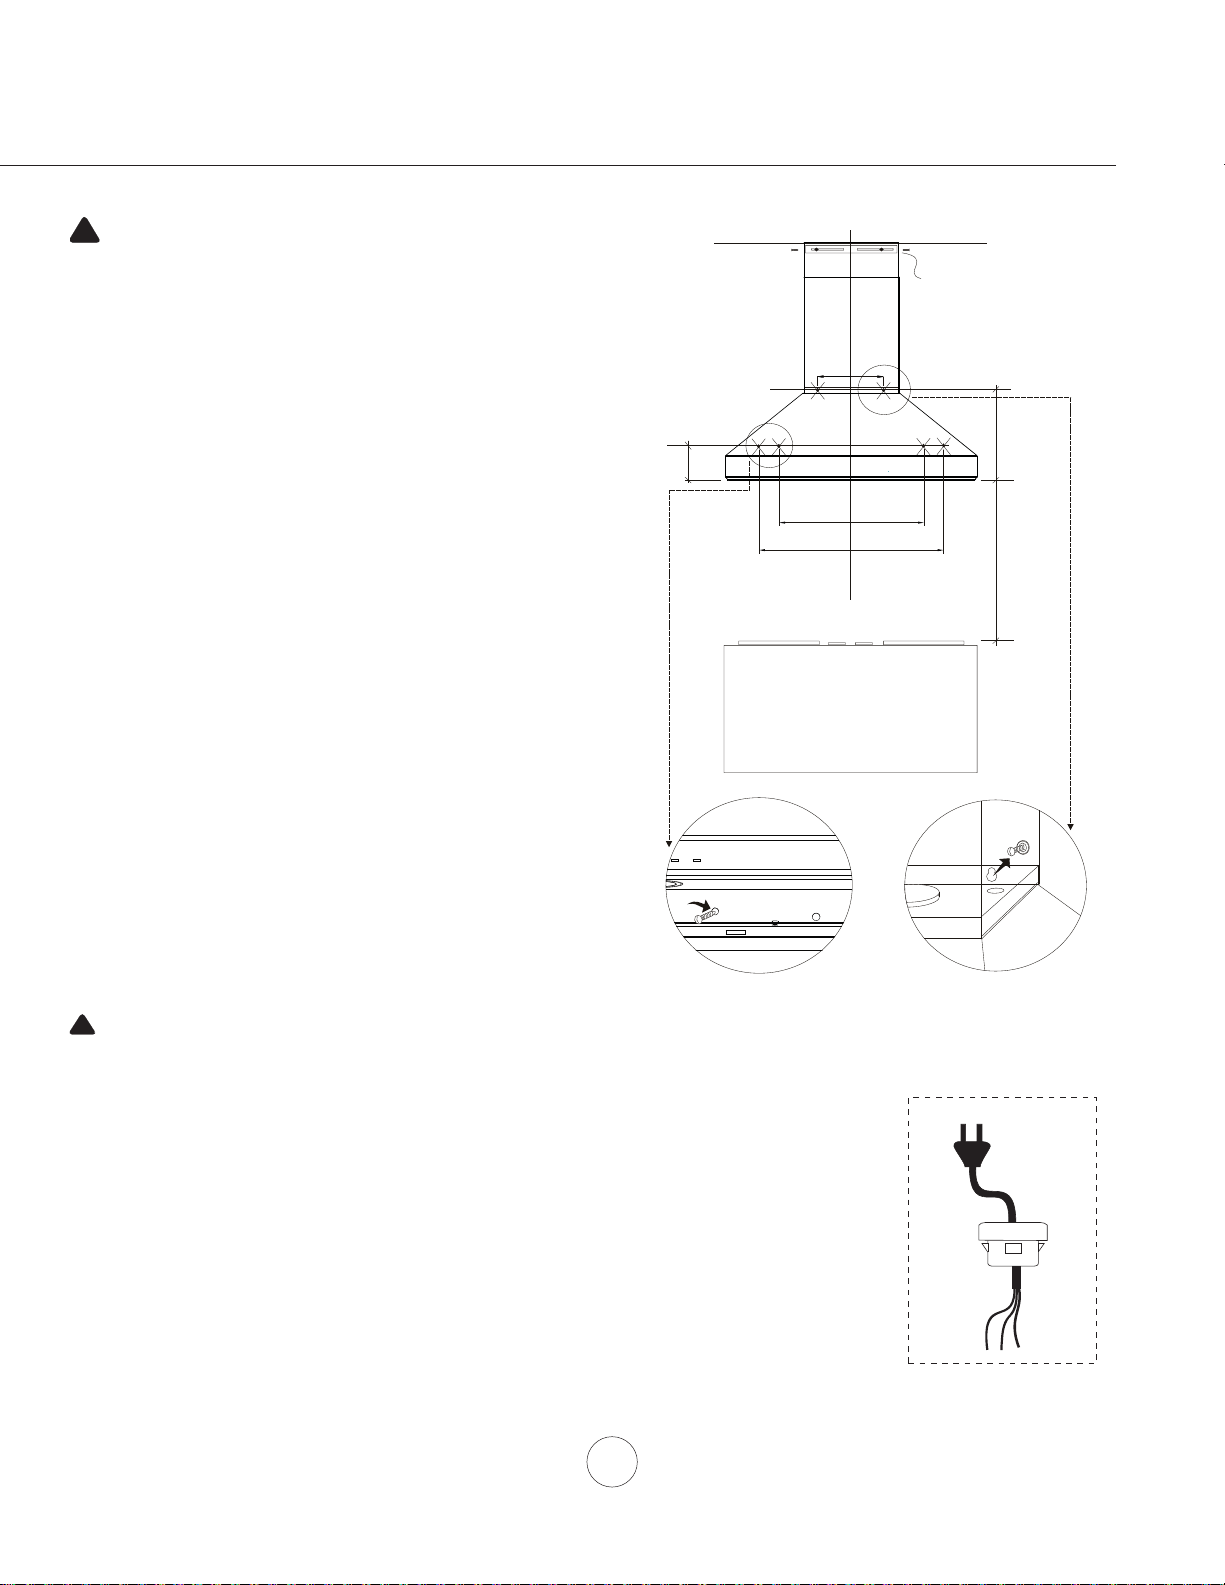
Installation – Mounting the Range Hood
0HDVXUHIURPUDQJHWRSWRKRRGERWWRPDQGPDUNOLQH$´
PLQLPXPIURPUDQJHWRS
2. Plum and mark center line.
0DUNPRXQWLQJKHLJKWOLQH%´IURPOLQH$
0DUNPRXQWLQJKHLJKWOLQH&´IURPOLQH$
5. Mark mounting spread from C/L on line B and C according to
diagram.
)DVWHQ[´VFUHZVLQWRVWXGVRQOLQH%)DVWHQRU
[´VFUHZVLQWRVWXGVRQOLQH&'RQRWIDVWHQVFUHZVDOOWKH
way, leave approxamately 3/8” exposed. Note: wood blocking
may need to be added behind the drywall if no studs are
present. Wall anchors may also be used but check local
codes for compliance. Failure to use suitable wall anchors
and screws to hold the weight of the hood could result in
personal injury or damage to cooking surface or counter.
7. Install round duct collar with backdraft damper to top or rear of
KRRGE\0[VFUHZV
8. If ducting hood through rear of hood body, cut duct access hole in
wall and prepair ducting.
+DQJKRRGRQWRZDOOPRXQWHGVFUHZVDQGWLJKWHQ),*$
&HQWHUDQGDWWDFKGXFWFRYHUEUDFNHWWRZDOOEHORZFHLOLQJRUVRI¿W
XVLQJ[´VFUHZV
11. Prepair and connect electrical and install duct work and duct tape.
12. Power up hood and check for leaks around duct tape.
13. Place telescopic duct covers onto hood and extend inner
WRSGXFWFRYHUXSZDUGVDQGVHFXUHWRGXFWFRYHUEUDFNHW
XVLQJ0[VFUHZV
CAUTION: At least two installers are required
due to the weight and size of the hood.
!
WARNING: Electrical wiring must be done by a qualified person(s) in
accordance with all applicable codes and standards. This range hood must be
properly grounded. Turn off electrical power at service entrance before wiring.
!
Cable Lock
Warning:
For personal safety, remove house fuse or open circuit breaker before beginning installation. Do not
use extension cord or adaptor plug with this appliance.
Follow national electrical codes or prevailing local codes and ordinances.
Electrical Supply:
This appliance requires a 120V 60Hz electrical supply, and connected to an individual, properly
gounded brand circuit, protected by a 15 or 20 ampere circuit breaker or time delay fuse. Wiring must
be 2 wire w/ground. Please refer to Electrical Diagram labeled on product.
Cable Lock:
$FDEOHORFNLQJFRQQHFWRUQRWVXSSOLHGPLJKWDOVREHUHTXLUHGE\ORFDOFRGHV&KHFNZLWKORFDO
requirements and codes, purchase and install appropriate connector if necessary.
Loading ...
Loading ...
Loading ...