Loading ...
-3-
Installing batteries
Open the bat tery compar tm ent o f the receiv er and inser t two “AAA ” batt er ie s with
correct polarity. Open the battery compartment of the transmitter and insert two“AAA”
batteries with correct polarity.
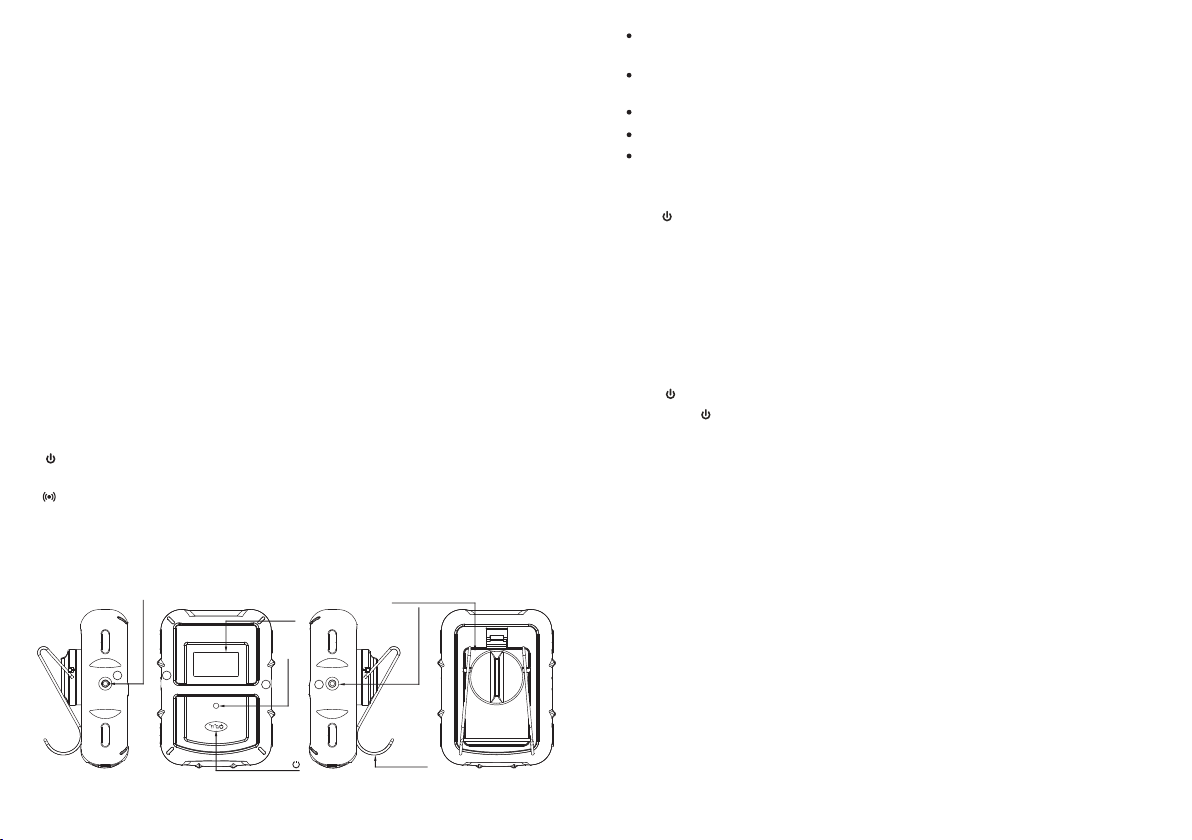
BATTERY COMPARTMENT – Holds 2 AAA batteries.
1 FOOD – Plug-in for stainless steel FOOD probe.
2 BARBECUE –Plug-in for stainless steel BARBECUE probe.
Button
-2-
Buttons
LCD (Liquid Crystal Display) – displays temperature of both FOOD and
It will automatically switch between FOOD and BARBECUE displays.
BARBECUE.
WIRE STAND – Allows you to stand the receiver on tabletop or it can be
used as a hanger.
reversed and
Transmitter Features
ºF/ºC/
1
2 2
1
Sensor socket hole
LCD
TX LED
Battery Compartment
Sensor socket hole
WIRE STAND
Turn On/Off Unit
Press /SYNC button on the receiver to turn on/off the receiver;
Press ºF/ºC button on the transmitter to turn on/off the transmitter./
1. HI/HR – In THERMOMETER MODE, press once to display the maximum set BARBECUE
/oven/smoker temperature setting. To increase temperature, press and hold button
until the digits flash, then press once to increase to your desired BARBECUE/oven/
smoker temperature. To increase temperature faster, press and hold for 2 seconds
to increase by 10 ºF per second. In TIMER MODE, when the TIMER stops, press once
to increase the Hour. Press and hold for 2 seconds to increase by 10 hours per second.
2. LO/MIN – In THERMOMETER MODE, press once to display the minimum set BARBECUE
/oven/smoker temperature setting. To increase temperature, press and hold until the
digits flash, then press once to increase to your desired BARBECUE/oven/smoker
temperature. To increase temperature faster, press and hold for 2 seconds to increase
by 10 ºF per second. In TIMER MODE, when the TIMER stops, press once to increase
the MINUTE. Press and hold for 2 seconds to increase by 10 minutes per second.
3. MODE/LIGHT – Press once to turn on the LCD back light which will last for 5 seconds.
Press a nd hold for 2 seconds to select TH ERMOMETER MODE or T IMER MODE.
When wanting to save your selected temperature, press once to save temp setting.
4. HI/CLEA R – In THERMOMETER MODE, press once to display the current FOOD
temperature setting. To increase temperature, press and hold until the digits flash, then
press once to increase to your desired FOOD temperature. To increase temperature
faster, press and hold for 2 seconds to increase by 10 ºF per second. In TIMER MODE,
when the timer stops, press once clear the timer setting back to 0:00.
5. START/STOP –In TIMER MODE, press once to start or stop the timer countdown or
count up.
6. /SYNC – Press once to turn ON/OFF the receiver. Press and hold for 2 seconds
synchronize/pair with transmitter.
to
7. /ºF/ºC- press once to activate/deactivate the temperature alarm. Press and hold
it for 2 seconds to select receiver temperature display in ºC or ºF.
Synchronize/Pair Transmitter and Receiver
The transmitter and receiver need to be synchronized or paired before using. There are
two ways to do so:
Option 1:
a. Insert the stainless steel probes into the corresponding plugs in the transmitter.
Note: The FOOD probe is 6 inches long with pointed end while the BARBECUE probe
is 3 inches long with a grill rack clip.
b. Open the battery compartment of transmitter and insert two “AAA” batteries. The
transmitter will show the current temperature on its LCD display and automatically
keep sending the temperature reading to the receiver for synchronization/pairing.
c. Then open the battery compartment of receiver and insert two “AAA” batteries. The
receiver will enter Synchronization mode which will last for 120 seconds. The display
shows “---” and it is flashing.
d. Wait for a moment until the temperature reading shows on the receiver display, it
means the synchronization/Pairing is complete. Your professional remote cooking
thermometer is ready for use.
Note: The transmitter and receiver are only required to be synchronized/paired
once whenever batteries of the receiver or transmitter are replaced.
º /
select the transmitter temperature display in ºC or ºF.
F/ºC – Press once to turn ON/OFF the transmitter. Press and hold for 2 seconds to
Loading ...
Loading ...
Loading ...