
Loading ...
Loading ...
Loading ...
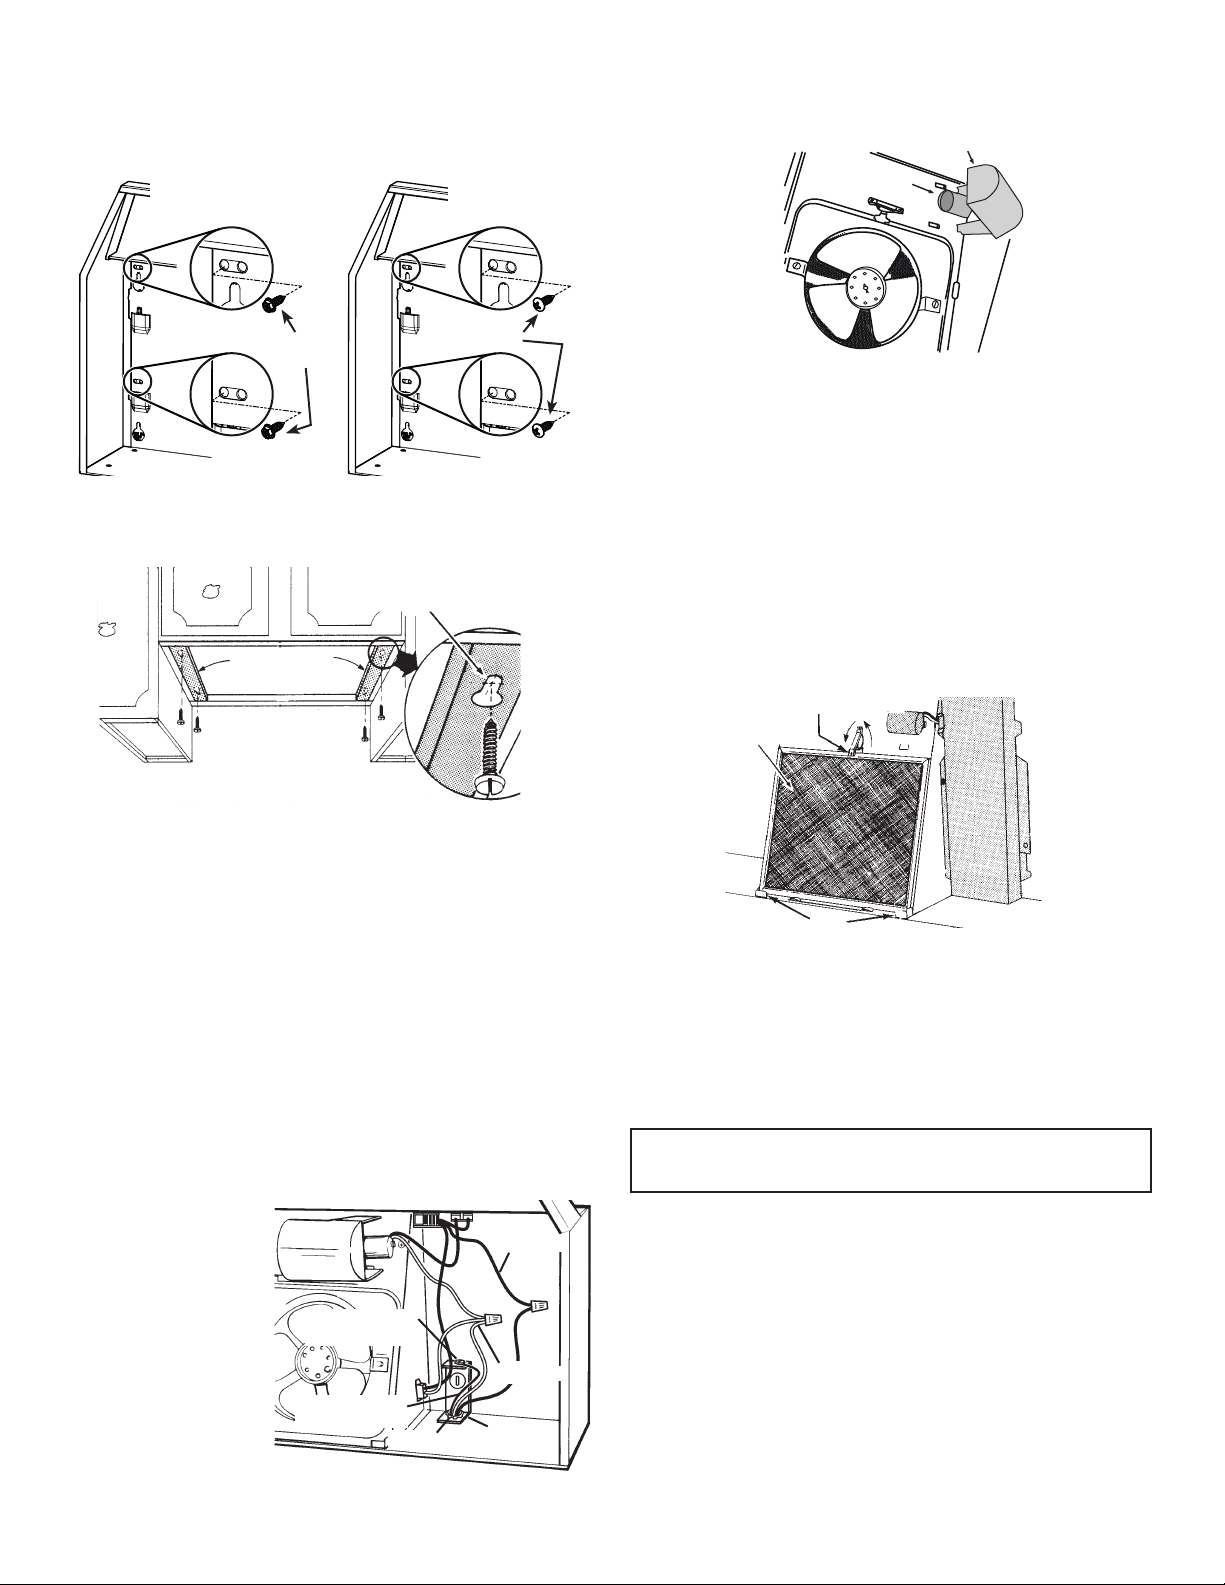
For framed cabinet, secure the hood to the EZ1 brackets using
4 no. 8-18 x 1/2” metal screws (included). Insert 2 screws per side, in the
slots.
For frameless cabinet, secure the hood to the cabinet using 4 no. 8 x 5/8”
round head wood screws (included). Insert 2 screws per side, in the slots.
STANDARD INSTALLATION
1. Hold hood up against cabinet bottom and trace keyhole slots onto cabinet
bottom or filler strips.
2. Screw the four supplied screws for mounting the hood into the exact center
of the narrow end of the keyhole slots marked underneath the cabinet.
Allow 3/8" of the screws to project, so the hood can be fitted into place.
3. Run electric wiring through hole drilled in wall or cabinet. Split wiring for
6" and run the house power cable into the hood through the strain relief
previously installed. Attach power cable to the hood.
4. Position hood so that:
a.) Large part of keyhole slots fit over hood mounting screws.
b.) Damper/duct connector slides into ductwork (BUEZ0 hoods only)
5. Adjust hood so that hood front is flush with cabinet frame.
6. Tighten hood mounting screws firmly.
CONNECT THE WIRING
WARNING: TURN OFF THE PROPER CIRCUIT AT THE SERVICE
ENTRANCE BEFORE WIRING THIS RANGE HOOD. ALL ELECTRICAL
CONNECTIONS MUST BE MADE IN ACCORDANCE WITH LOCAL
CODES, ORDINANCES, OR NATIONAL ELECTRICAL CODE. IF YOU ARE
UNFAMILIAR WITH METHODS OF INSTALLING ELECTRICAL WIRING,
SECURE THE SERVICES OF A QUALIFIED ELECTRICIAN.
1. Make electrical
connection using wire
nuts to connect WHITE
wire to WHITE, BLACK
wire to BLACK, and
GREEN or bare wire
to GREEN ground
screw provided.
2. Replace wiring box
cover and screw, taking
care not to pinch wires.
KEYHOLE SLOT OUTLINE
FILLER
STRIPS
FRAMELESS
CABINET
FRAMED
CABINET
WOOD
SCREWS
METAL
SCREWS
4
FINALIZE THE INSTALLATION
1. Install light bulb (75 watts maximum). For easier installation, squeeze
plastic lens and remove it from hood. Remember to reinstall lens.
2. Turn on power and check operation of fan and light. Make sure that
damper operates freely (BUEZ0 hoods only).
USE AND CARE
SWITCHES
The fan and light are each controlled by a rocker switch. The light switch has
two positions, “ON” and “OFF”. The fan switch has three positions - “HIGH”,
“LOW” and “OFF”. ( “OFF” is the middle position.)
FILTERS
BUEZ0, BUEZ2 Hoods Only:
Remove aluminum filter by turning filter retainer to one side. Filter should
be washed once a month in a hot detergent solution. Aluminum filters are
dishwasher safe. When installing filter, make sure that filter slides under
retaining tabs on back of fan housing. Turn filter retainer so that arrows on
retainer point toward front and back of hood.
BUEZ1 Hoods Only:
The BUEZ1 hood is equipped with a ductfree filter. Remove filter by turning
filter retainer to one side. (see illustration above) The ductfree filter is not
washable, and will last up to twelve months with normal use. Replace the filter
when colored side becomes noticeably dirty or discolored.
When installing filter, make sure that filter slides under retaining tabs on back
of fan housing. MAKE SURE THAT COLORED SIDE OF FILTER IS NEXT
TO FAN WHEN FILTER IS INSTALLED. Turn filter retainer so that arrows
on retainer point toward front and back of hood.
WARNING
ALWAYS DISCONNECT ELECTRIC POWER BEFORE SERVICING
RANGE HOOD.
CLEANING
Clean your hood with a mild detergent suitable for painted surfaces. DO NOT
USE ABRASIVE CLOTH, STEEL WOOL PADS OR SCOURING POWDERS.
Fan assembly is permanently lubricated, and never needs oiling. Clean
motor with a damp cloth and grease-cutting detergent when a heavy coating
of grease has accumulated.
BLACK WIRES
STAR LOCKNUT
GREEN
GROUND SCREW
GROUND WIRE (BARE
OR GREEN WIRE)
WHITE WIRES
GROUNDING
BRACKET
SOCKET
FILTER RETAINER
TABS
FILTER
Loading ...
Loading ...
Loading ...