
www.CookWithKenyon.com
ALL SEA SONS® ELEC TRIC GRILL
OWNERS MANUAL
..............................................................................................................
Quick Start Tips ...............................................................................................................
Stuffed French Toast .......................................................................................................
.............................................................................................................
Package Contents ...........................................................................................................
Electrical Requirements .................................................................................................
Countertop Installation ...................................................................................................
Drain Connection ...........................................................................................................
Outlet Location ...............................................................................................................
Final Preparations Prior to Use ......................................................................................
Touch Control .................................................................................................................
Power Cord ....................................................................................................................
Grill Parts .......................................................................................................................
Lid Removal ...................................................................................................................
.............................................................................................................
Kenyon International, Inc.
8 Heritage Park Road
P.O. Box 925
Clinton, CT 06413 USA
Phone: 860-664-4906
Fax: 860-664-4907
www.CookWithKenyon.com
2
1. Read ALL instructions prior to using product.
2. Do not touch hot surfaces. Use handles or knobs.
3. To protect against electrical shock, do not immerse cord or plugs in water or other liquid.
4. Close supervision is necessary when any appliances are used near children.
5. Unplug from outlet when not in use and before cleaning. Allow to cool before putting on or taking off parts.
6. Do not operate appliance with a damaged power cord or plug. If the appliance malfunctions, discontinue use
and contact the nearest authorized appliance dealer or the factory for examination, repair or adjustment.
7. The use of accessory attachments not supplied by the manufacturer of the appliance may cause injuries.
8. When used as a portable grill, store indoors when not in use. When used as a built-in grill, suitable shelter
must be provided to prevent direct exposure to rain. Covers available.
9. Do not let cord hang over edge of table or counter, or touch hot surfaces.
10. Do not place on or near a hot gas or electric burner, or in a heated oven.
11. Extreme caution must be used when moving an appliance containing hot oil or other hot liquids.
12.Alwaysattachplugtoappliancerst,thenplugcordintothewalloutlet.Todisconnect,turnanycontrolto
“off”, then remove plug from wall outlet.
13. Do not use appliance for other than intended use.
14. Always place a minimum of two (2) cups of water in disposable drip tray prior to grilling.
15. Never leave children alone - children should not be left unattended around the grill at any time.
16. Allow the grill to cool before taking off cooking grates, disposable drip tray or lids.
17. Fuel, such as charcoal briquettes, are not to be used with this appliance.
18.Ensuregrillisinstalledperinstructionsandproperlygroundedbyaqualiedelectrician.
19. Do not replace or attempt to repair any part of the grill, unless otherwise noted in this manual.
All other service is to be performed by a factory authorized technician.
20.Donotusewatertoextinguishagreasere,usedrychemicalreextinguisher.
21.Donotstoreammablematerialsnearthegrill.
22.Donotwearloosettingorhangingapparelwhenusingthegrill.
23. The appliance is not to be used by persons (including children) with reduced physical, sensory or mental
capabilities, or lack of experience and knowledge, unless they have been given supervision or instruction.
3
4
R E M O V E & R E A D P R I O R T O G R I L L I N G
w w w . C o o k W i t h K e n y o n . c o m | 8 6 0 . 6 6 4 . 4 9 0 6 |
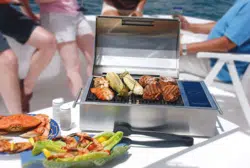
T h an k y ou f o r p u rc h a s in g t h e W o rl d ’ s F i n e s t A ll Se a s o n s ® E l e c t r i c G ri l l ! T h e r e ar e a f e w s im p l e
s t ep s y ou c a n t a k e t o e n s u r e yo u r go o d d ec i s i o n wi l l l e a d t o y ea r s o f W or ld - C l a s s G r i l l i n g :
Q U I C K S T A R T T I P S
to purchase recipe books, cooking utensils,
griddles, grill covers, and more!
VI S I T O U R WE BS I T E
1.
2.
3.
4.
5.
6.
7.
8.
Remove grate(s) and drip tray(s), clean both.
Inse rt the drip tray(s) into the bottom of grill. Make sure the burner brackets are not
resting on the drip tray(s).
Always fill the drip tray(s) with 2 cups of liquid. Water will work, but why not try beer
or wine to add flavor to your favorite food. Then re-install cooking grate.
Depending on model, either hardwire your Kenyon All Seasons® Grill or plug it directly into
an outlet, do not use extension cords.
Preheat grill with the lid closed for 5 - 7 minutes on des ired heat setting for type of food:
Close lid and cook. Enjoy the best grilled fo od you have ever tasted!
Once your grilling session is complete, grab a wet paper towel and wipe down your grate.
Once cool, place grate/griddle in the dishwasher along with the dirty dishes so that it’s
ready for its next tour of duty!
While the grate is in the wash, don’t forget to clean out the drip tray contents.
This is an important step in preventing a grease fire.
-Vegetables 3-4 bars
-Chicken, pork and fish 4-5 bars
-Hamburgers 6-7 bars
-Steak 7-8 bars
1. Before using your grill, remove the cooking grate and drip tray from the grill. Wash the grill with
warm soapy water using a non-abrasive cloth. USE ONLY HIGH TEMP PLASTIC UTENSILS
WHEN GRILLING. Visit our web site to purchase a set of high quality
stainless steel/high temp plastic grill utensils, www.cookwithkenyon.com.
2. Make sure the drip tray is inserted all the way into the bottom of grill and
electric element brackets are resting on the element support bracket.
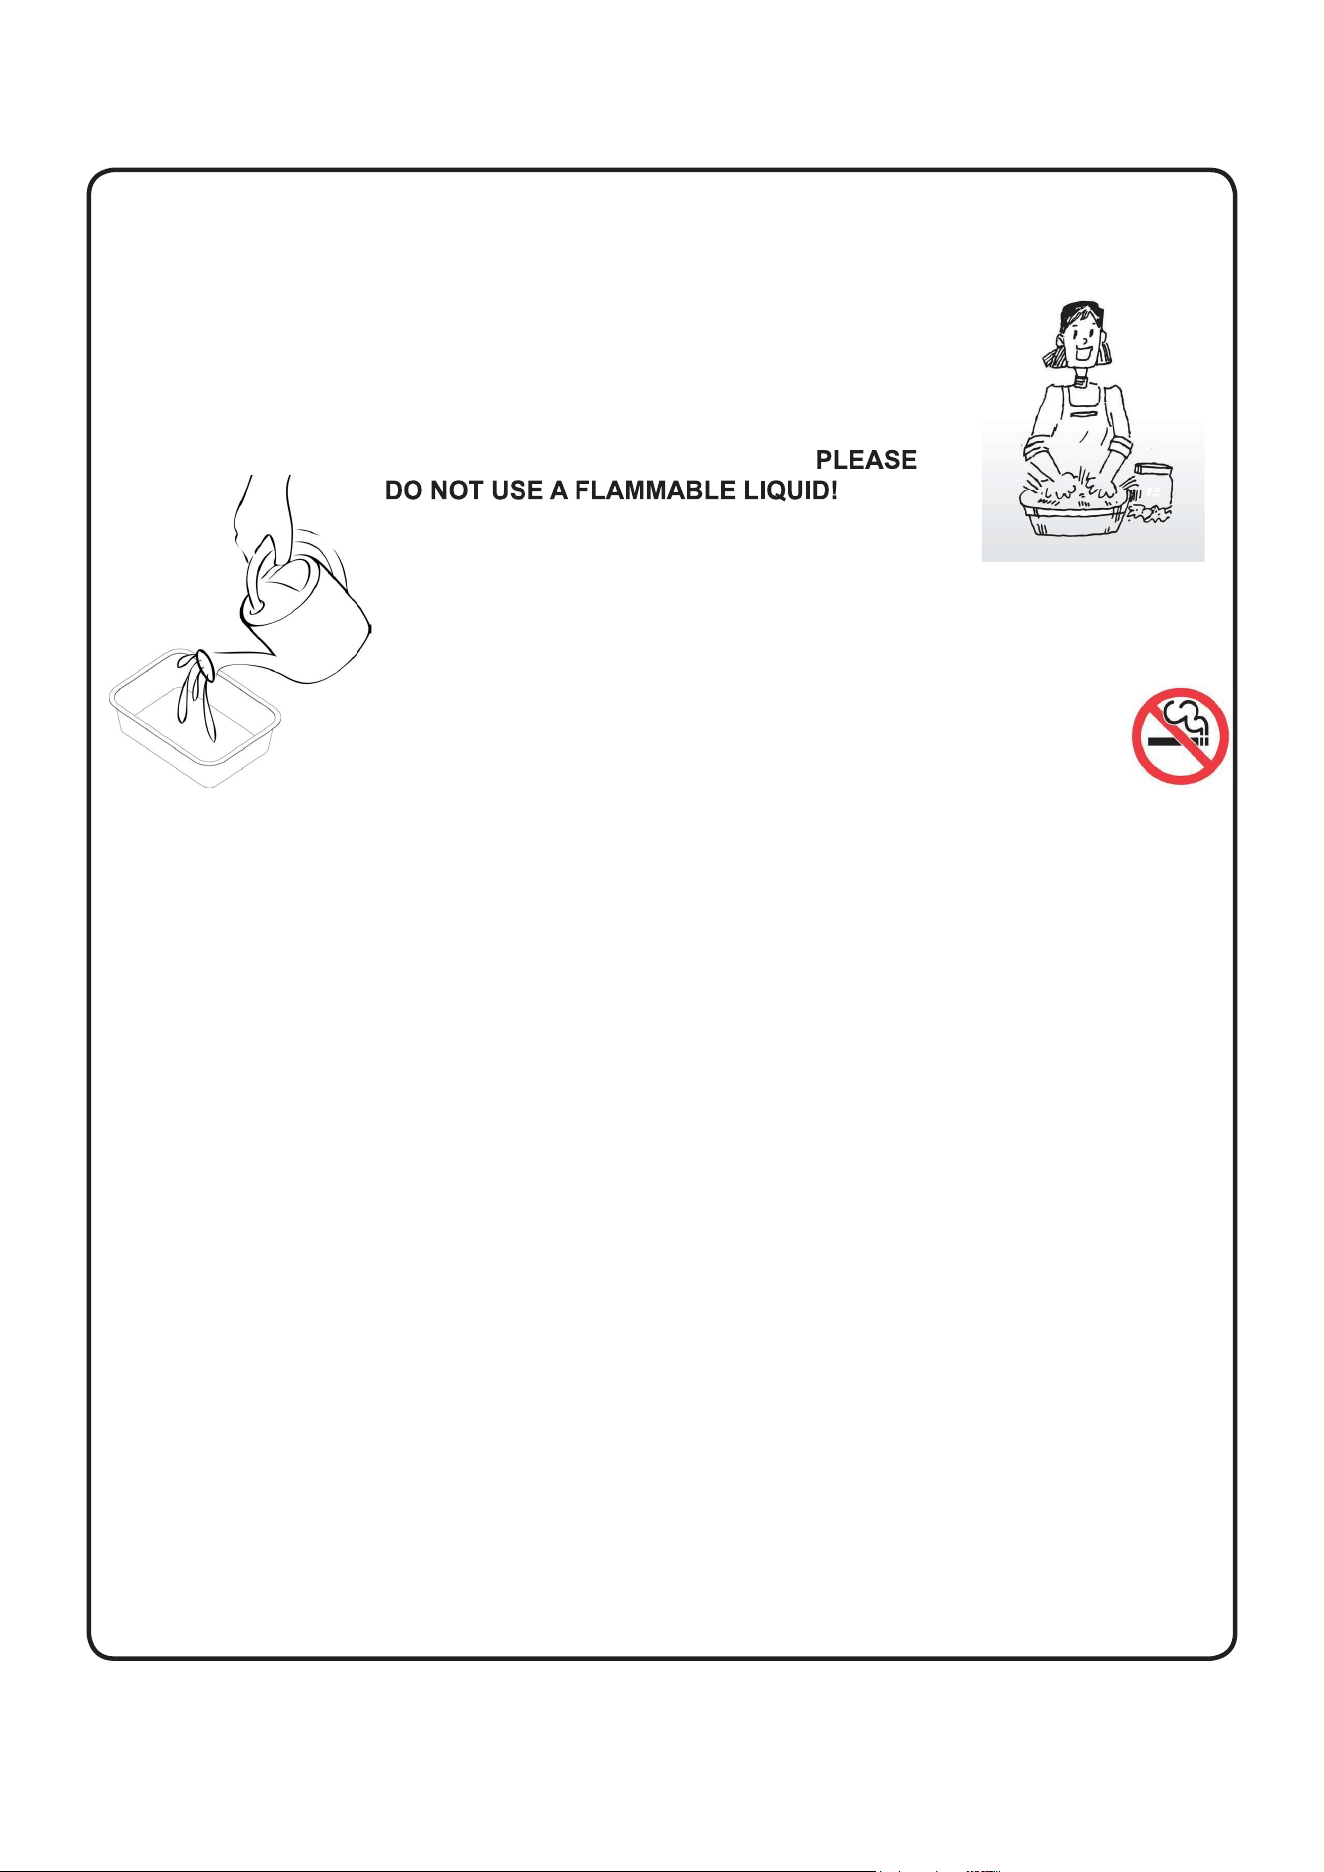
3.Coverthebottomofthedriptraywithaliquid.Waterisne.
Doing so
would ruin your cookout. Using apple juice if you are
grillingporkaddsaniceavortothemeat.Acanof
limesodaiswonderfulifyouaregrillingsh.Just
remember always add liquid to the drip tray prior to grilling.
4. To keep your grill smoke free, always clean the grilling surface after
each use. Simply wash with warm soapy water using a
non-abrasive cloth or place in your dishwasher. Empty the drip
tray and wipe with a damp paper towel. The drip tray can be used
multiple times before replacement is necessary.
5. Place your cooking grate or optional griddle (part #B96000) onto the element with drip tray
installed. Use the griddle for foods such as eggs, pancakes or my favorite - stuffed french toast!
6. Preheat grill with lid closed for 5 to 7 minutes on desired heat setting for type of food.
• Steak 7-8 bars
• Hamburgers 6-7 bars
• Chicken,porkandsh4-5bars
• Vegetables 3-4 bars
7. Close the lid and cook. Enjoy the best grilled food you have ever tasted!
8. Clean up. Take a few pieces of paper towel and place on the grilling surface. Pour about one
ounce of water on the towel and then using your high temperature nylon tongs, swab the paper
toweling back and forth to loosen up the residue from your grilling. Throw the paper towel away
and wipe the grate off with a dry paper towel.
9.Oncethegratehascooledsufciently,removethegrateandplaceinyourdishwasherfora
thorough cleaning.
10. With the grate removed, lift up the electric element and remove the drip tray. Empty the
contents of the drip tray in an appropriate place. Wipe the tray out with a dry paper towel and
reuse the tray. The tray can last for several uses.
11. Every 7-8 uses, you may want to wash the lid. They can be placed in your dishwasher and
run on the pots & pans cycle. This will restore your grill to its original pristine look.
5
12.Tocleanthegrill,rstbesurethecookingsurfacehascooledenoughtohandle.Then
remove the grate, lift up the electric element until it locks in the up position, then the drip tray.
13. Wipe the stainless steel surfaces with a damp cloth to remove any residue from previous
grilling sessions.
14. Your Kenyon grill comes with a sample bottle of stainless steel cleaner.
Use this cleaner once a month to protect the stainless.
15. The touch control area is ceramic glass which is sealed from the effects
of rain, snow and ice. To clean the glass, use a glass cleaner and soft towel.
If stains appear, use a ceramic glass cleaner which can be found in your local
grocery store.
6
16 slices Thin Sliced Bread “any kind but not the white stuff”
1 lb. Cream Cheese (softened)
½ cup Peach Preserves (or your favorite)
4 T. Butter
French Toast Batter:
5 Large eggs thoroughly beaten
1 cup Milk
1 T. Cinnamon, ground
½ t. Allspice, ground
½ t. Coriander, ground
2 oz. Water (Dark Rum, Optional)
In a large bowl, place the eggs and beat with a wire whisk. Add the milk and beat again
until incorporated. In a separate smaller bowl pour water or Rum (if you prefer) and add dry
ingredients, mix thoroughly. Once the dry ingredients have been mixed, add to the egg and milk
mixture and beat again until mixed. By doing this you avoid the clumps that come with making
batter.
Method of Preparation:
This will require the use of your griddle. Preheat your ‘All Seasons
®
Grill’ on medium high heat
(6 bars) for approximately ten minutes.
Once the cream cheese has softened, mix with the peach preserves. Divide equally onto eight
slices of bread and spread evenly. Place the remaining eight slices on top to make a sandwich.
When your griddle has been preheated, add two tablespoons of butter and move around to coat
the griddle. Reserve the rest of the butter for the remaining pieces of French Toast. Take the
sandwichanddipintothemixtureandipitovertocoatbothsidesofyourbread.
Quickly do this to three more “sandwiches”. You will now have four pieces of stuffed French Toast
on your griddle.
Be careful not to burn. Flip the sandwiches over and continue cooking until both sides are
browned nicely.
At this point you either serve with some nicely warmed maple syrup and butter, or you can keep
warminalowovenuntilyounishtheremainingpiecesofFrenchToast.
7
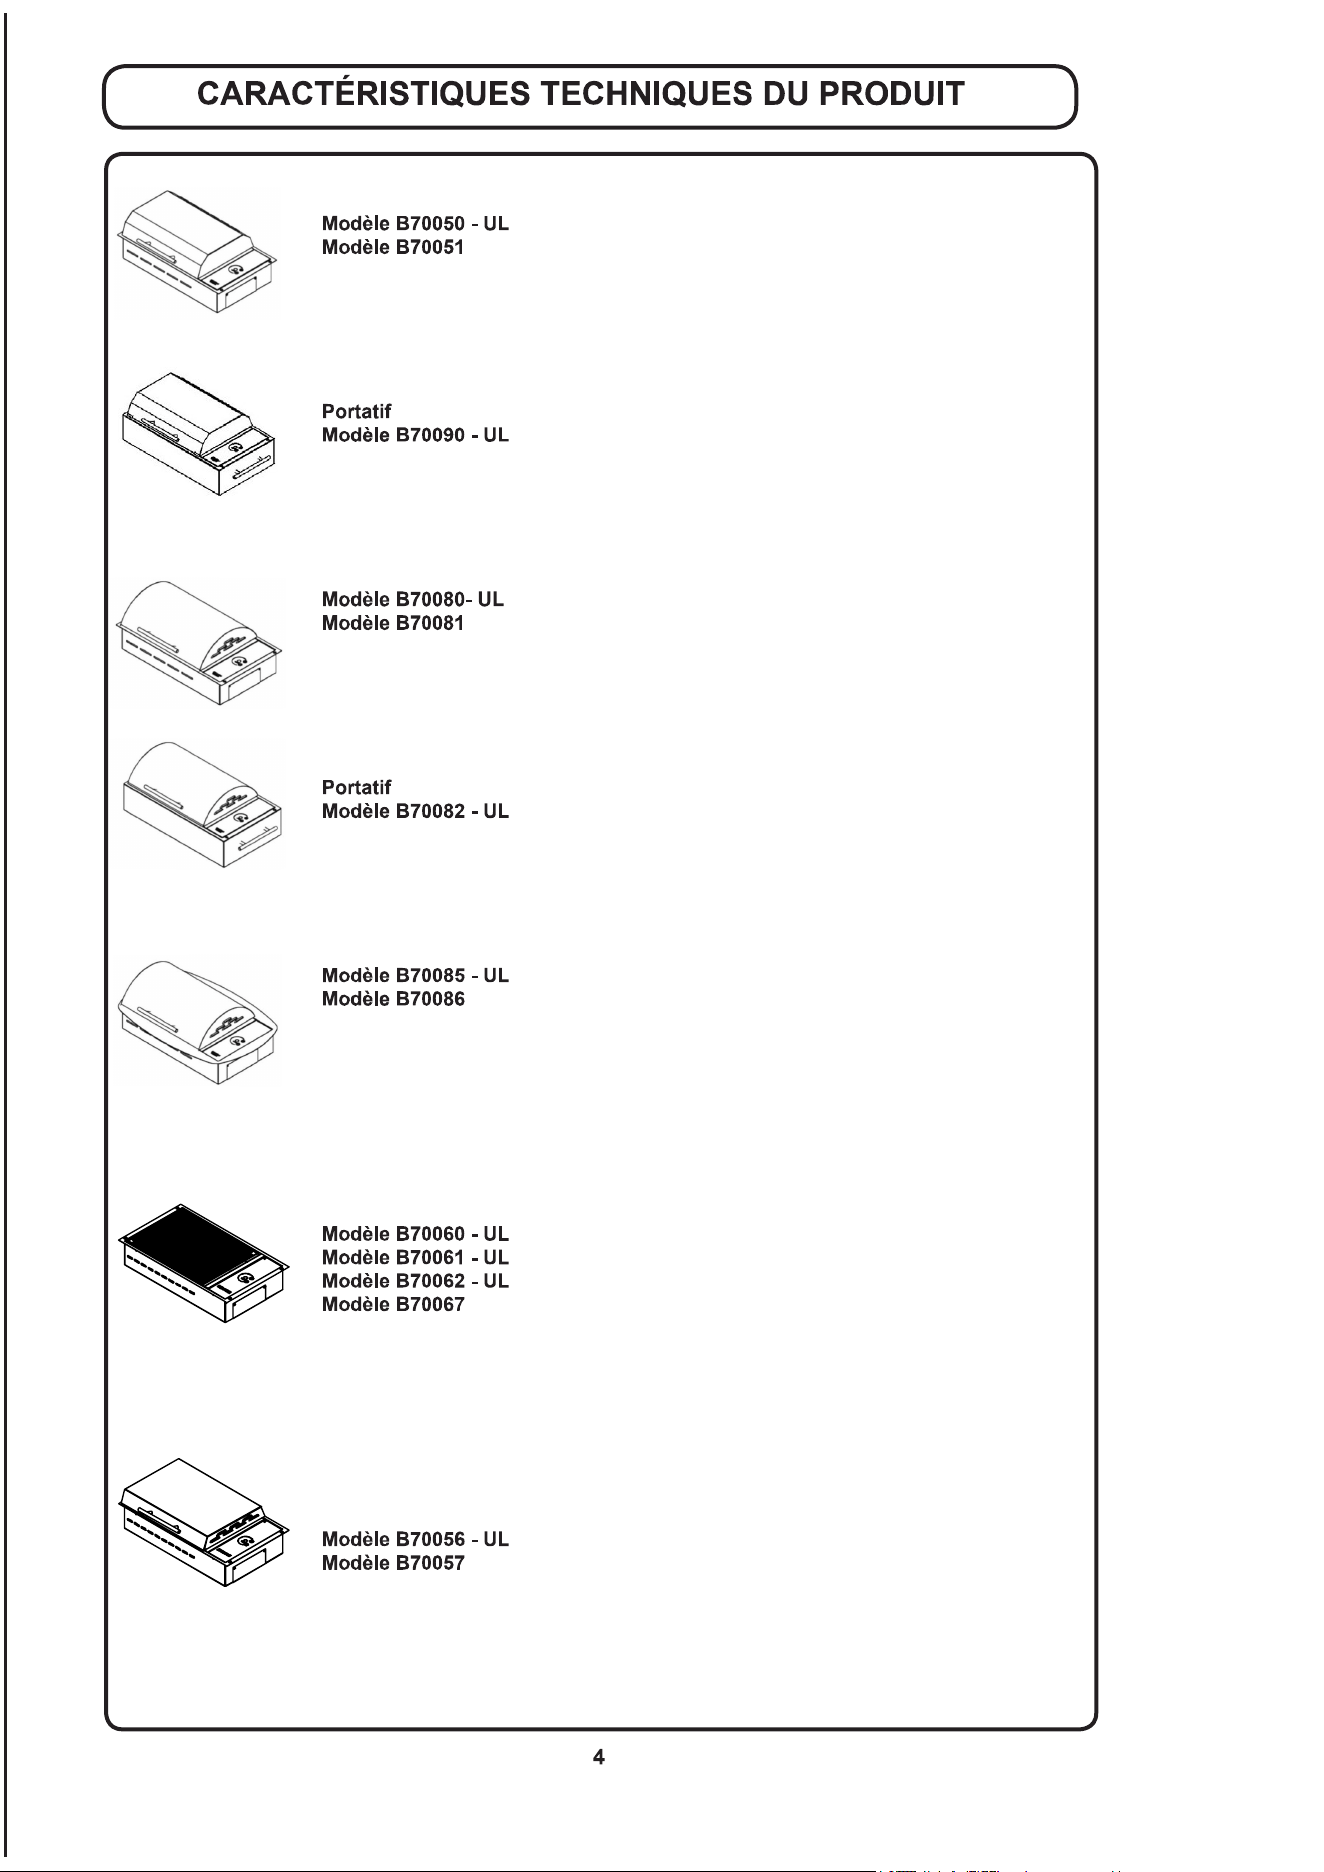
Frontier
- 120V AC - 1300 WATTS - 11 AMPS
- 240V AC - 1300 WATTS - 6 AMPS
Overall dimensions: 21” x 12” x 4” (7 3/8” with lid)
533mm x 305mm x 102mm (187mm with lid)
Depthdoesnotincludedraintting
Cutout dimensions: 19 3/4” x 11 5/8” with 1/4” radius corners
501.6mm x 296mm with 6mm radius corners
- - 120V AC - 1300 WATTS - 11 AMPS
Overall dimensions: 21” x 12” x 8 5/8”
533mm x 305mm x 219mm
Floridian
- - 120V AC - 1300 WATTS - 11 AMPS
- 240V AC - 1300 WATTS - 6 AMPS
Overall dimensions: 21” x 12” x 4” (8 1/8” with lid)
533mm x 305mm x 102mm (206mm with lid)
Depthdoesnotincludedraintting
Cutout dimensions: 19 3/4” x 11 5/8” with 1/4” radius corners
501.6mm x 296mm with 6mm radius corners
- - 120V AC - 1300 WATTS - 11 AMPS
Overall dimensions: 21” x 12” x 9 3/8”
533mm x 305mm x 238mm
Rio
- 120V AC - 1300 WATTS - 11 AMPS
- 240V AC - 1300 WATTS - 6 AMPS
Overall dimensions: 23” x 15 5/8” x 4” (8 1/8” with lid)
584mm x 397mm x 102mm (206mm with lid)
Depthdoesnotincludedraintting
Cutout dimensions: 19 3/4” x 11 5/8” with 1/4” radius corners
501.6mm x 296mm with 6mm radius corners
No Lid
- 120V AC - 1300 WATTS - 11 AMPS
- 240V AC - 1300 WATTS - 6 AMPS
- 120V AC - 1300 WATTS - 11 AMPS
- 240V AC - 1300 WATTS - 6 AMPS
Overall dimensions: 21” x 12” x 4”
533mm x 305mm x 102mm
Depthdoesnotincludedraintting
Cutout dimensions: 19 3/4” x 11 5/8” with 1/4” radius corners
501.6mm x 296mm with 6mm radius corners
Half Height Lid
- 120V AC - 1300 WATTS - 11 AMPS
- 240V AC - 1300 WATTS - 6 AMPS
Overall dimensions: 21” x 12” x 4” (6 1/4” with lid)
533mm x 305mm x 102mm (159mm with lid)
Depthdoesnotincludedraintting
Cutout dimensions: 19 3/4” x 11 5/8” with 1/4” radius corners
501.6mm x 296mm with 6mm radius corners
8
Thisisageneralmanualforalltouchcontrolgrills.Yourmodelnumbermaynotbe
listedbuttheoperationandfunctionsarethesame.
Your All Seasons
®
Grill is assembled and ready for use. Before you use the grill write your unit’s
serial number here for future reference: _________________. The serial number can be found
on the short side of the grill at the end with the glass control panel. The serial number consists of
six digits.
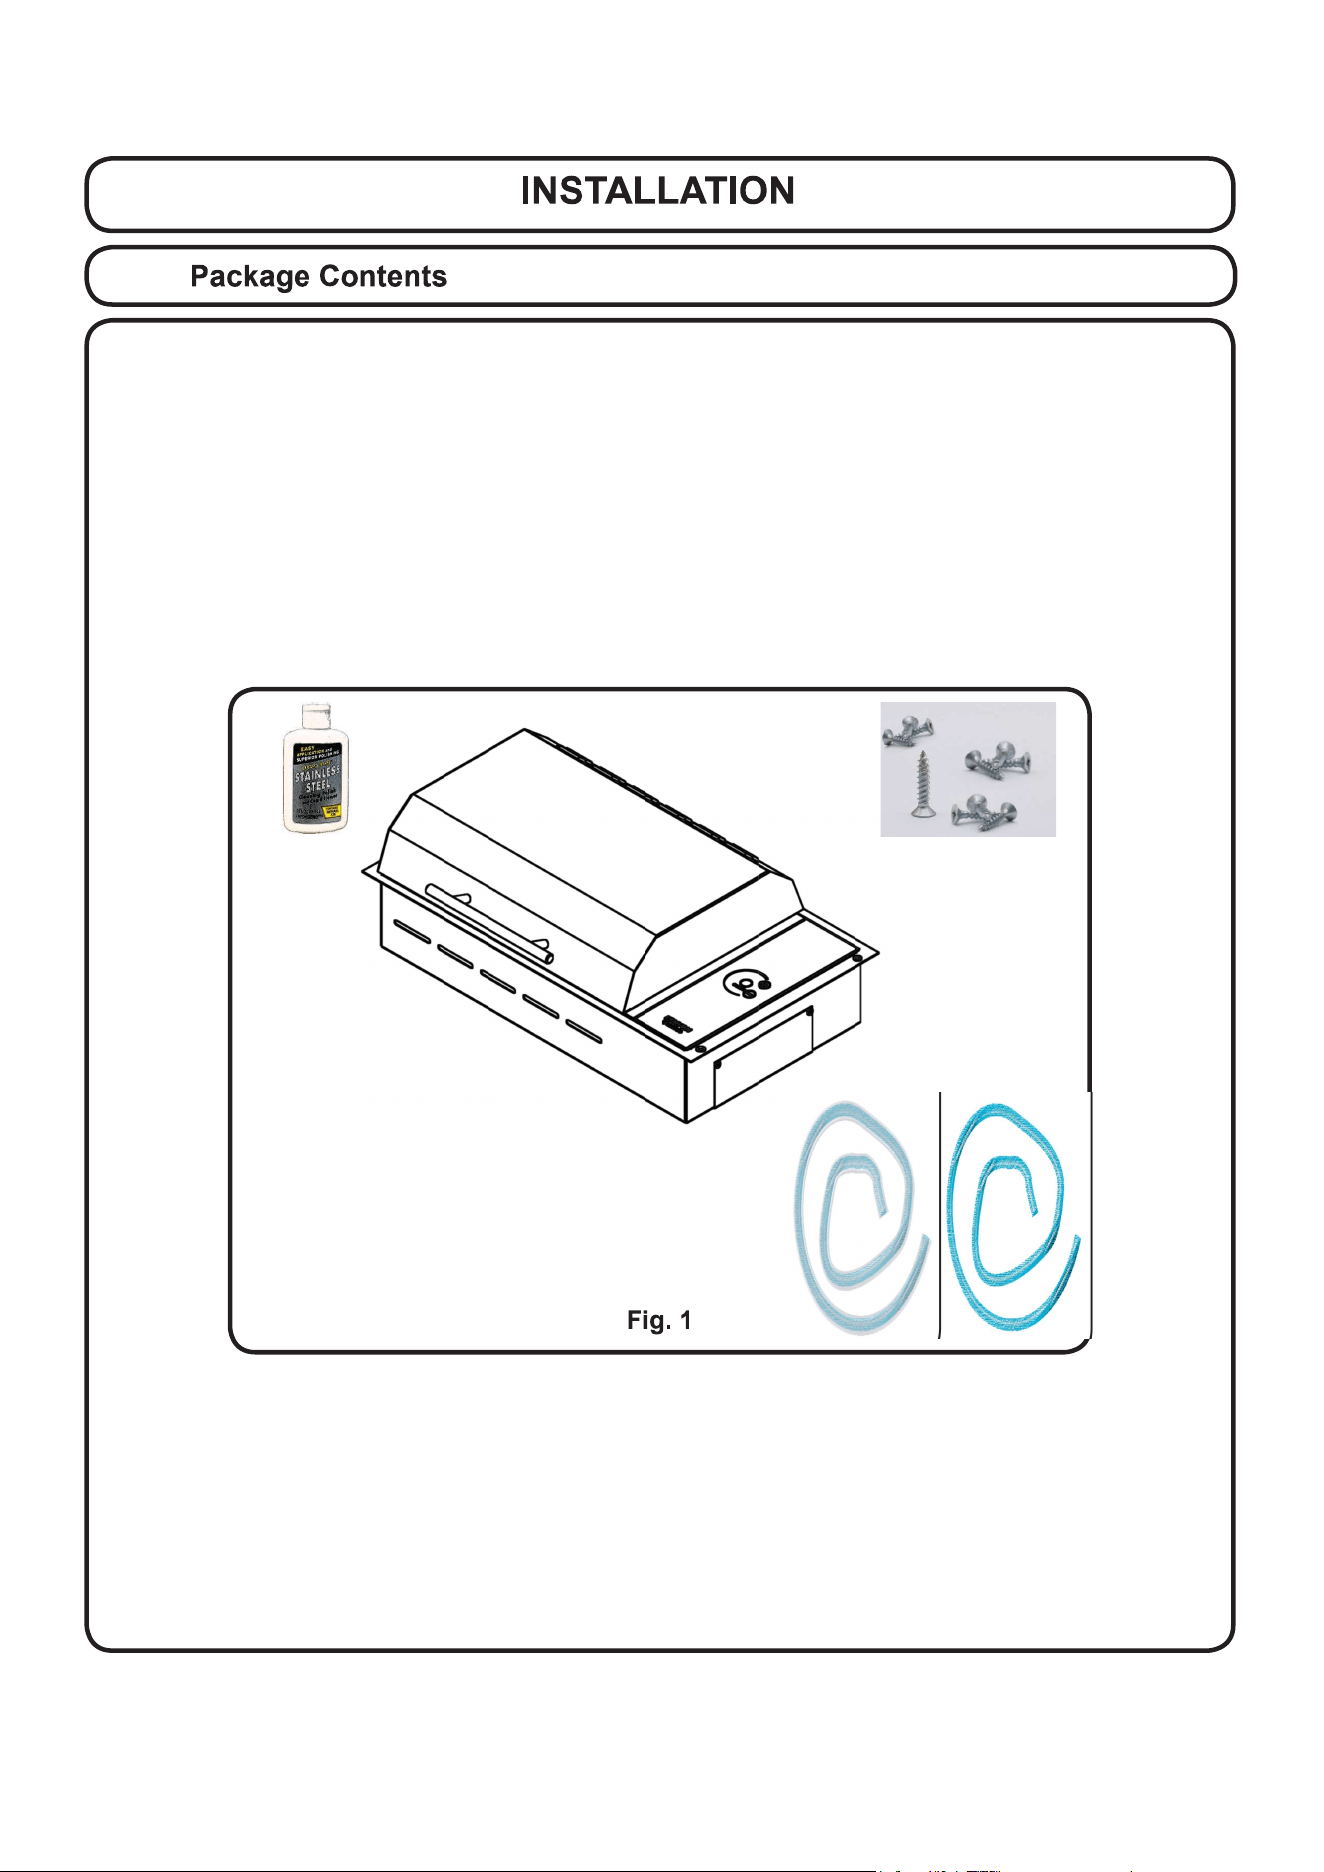
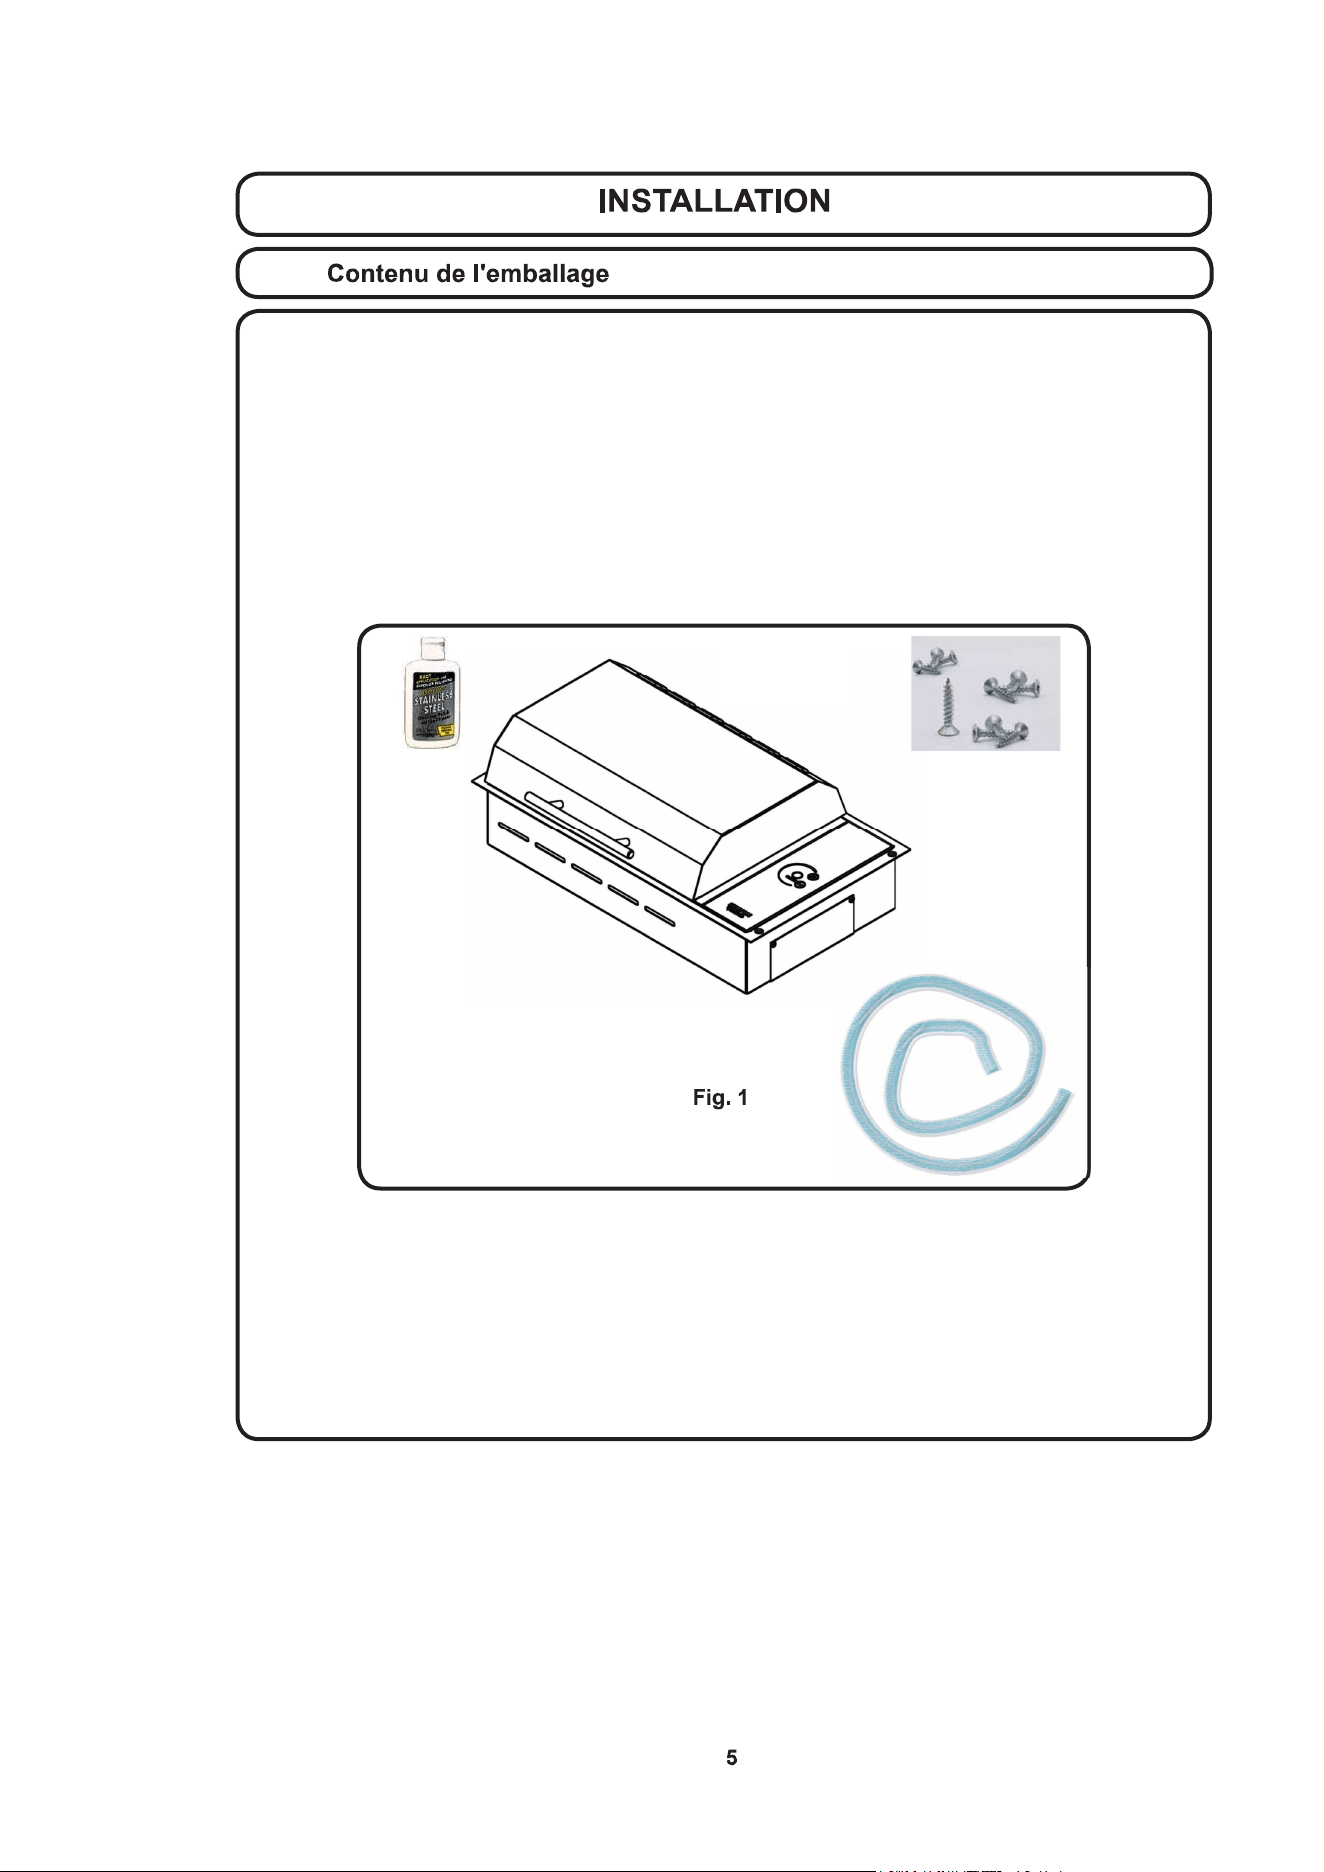
Included in the shipping container is the All Seasons
®
Grill, four (4) mounting screws, three (3)
feetofdrainhose,elbowttinganddrainhoseforbuilt-inonly,manualandstainlesssteel
cleaner.Portablegrilldrainttingcomeswithaplug.Ifportablegrillownerswouldliketoinstall
elbowttingandhoseinsteadofplugpleasecontactKENYON.Ifanycomponentsaremissingor
damaged, call KENYON immediately.
9
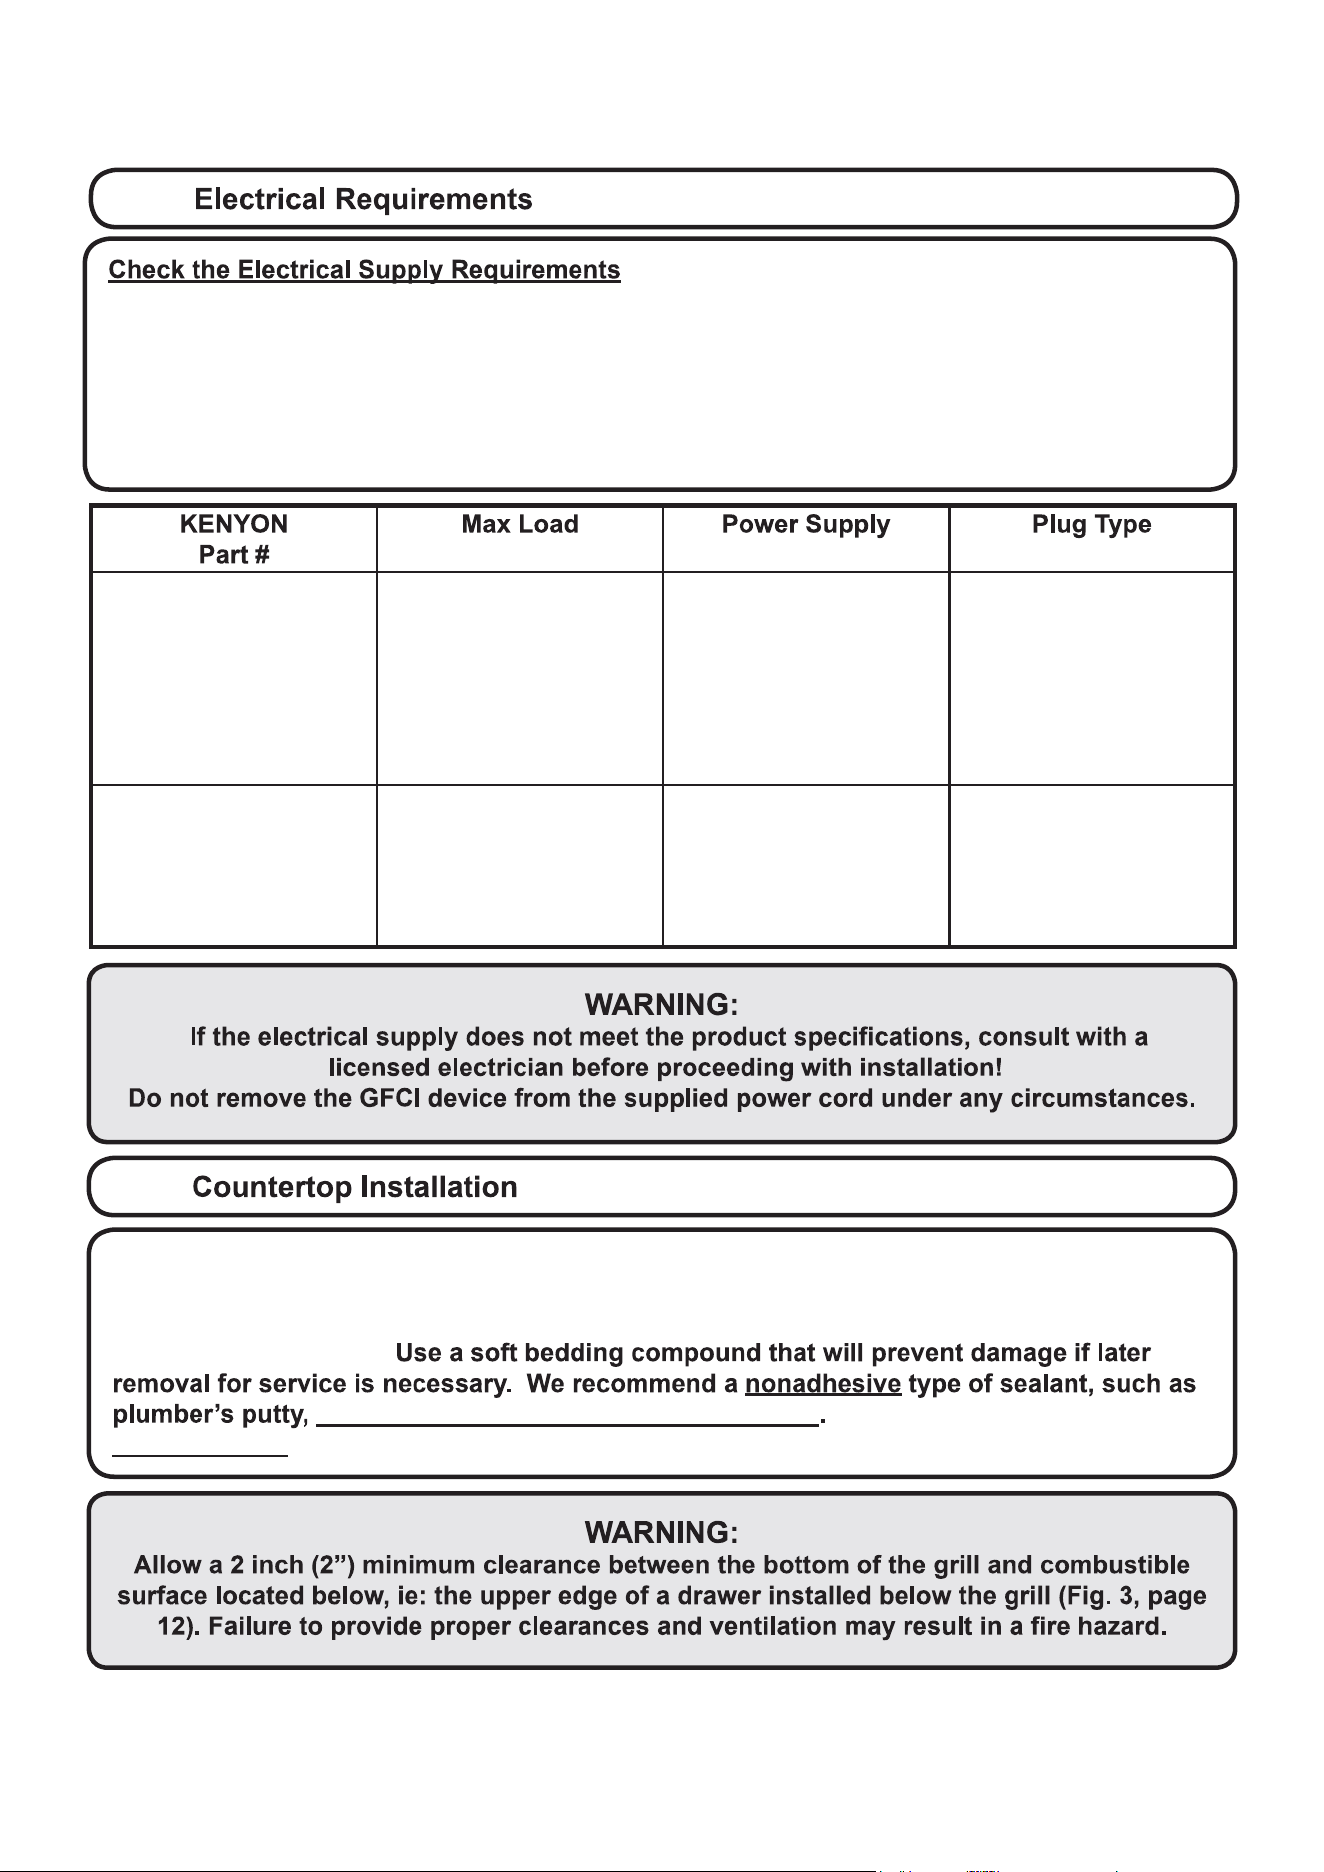
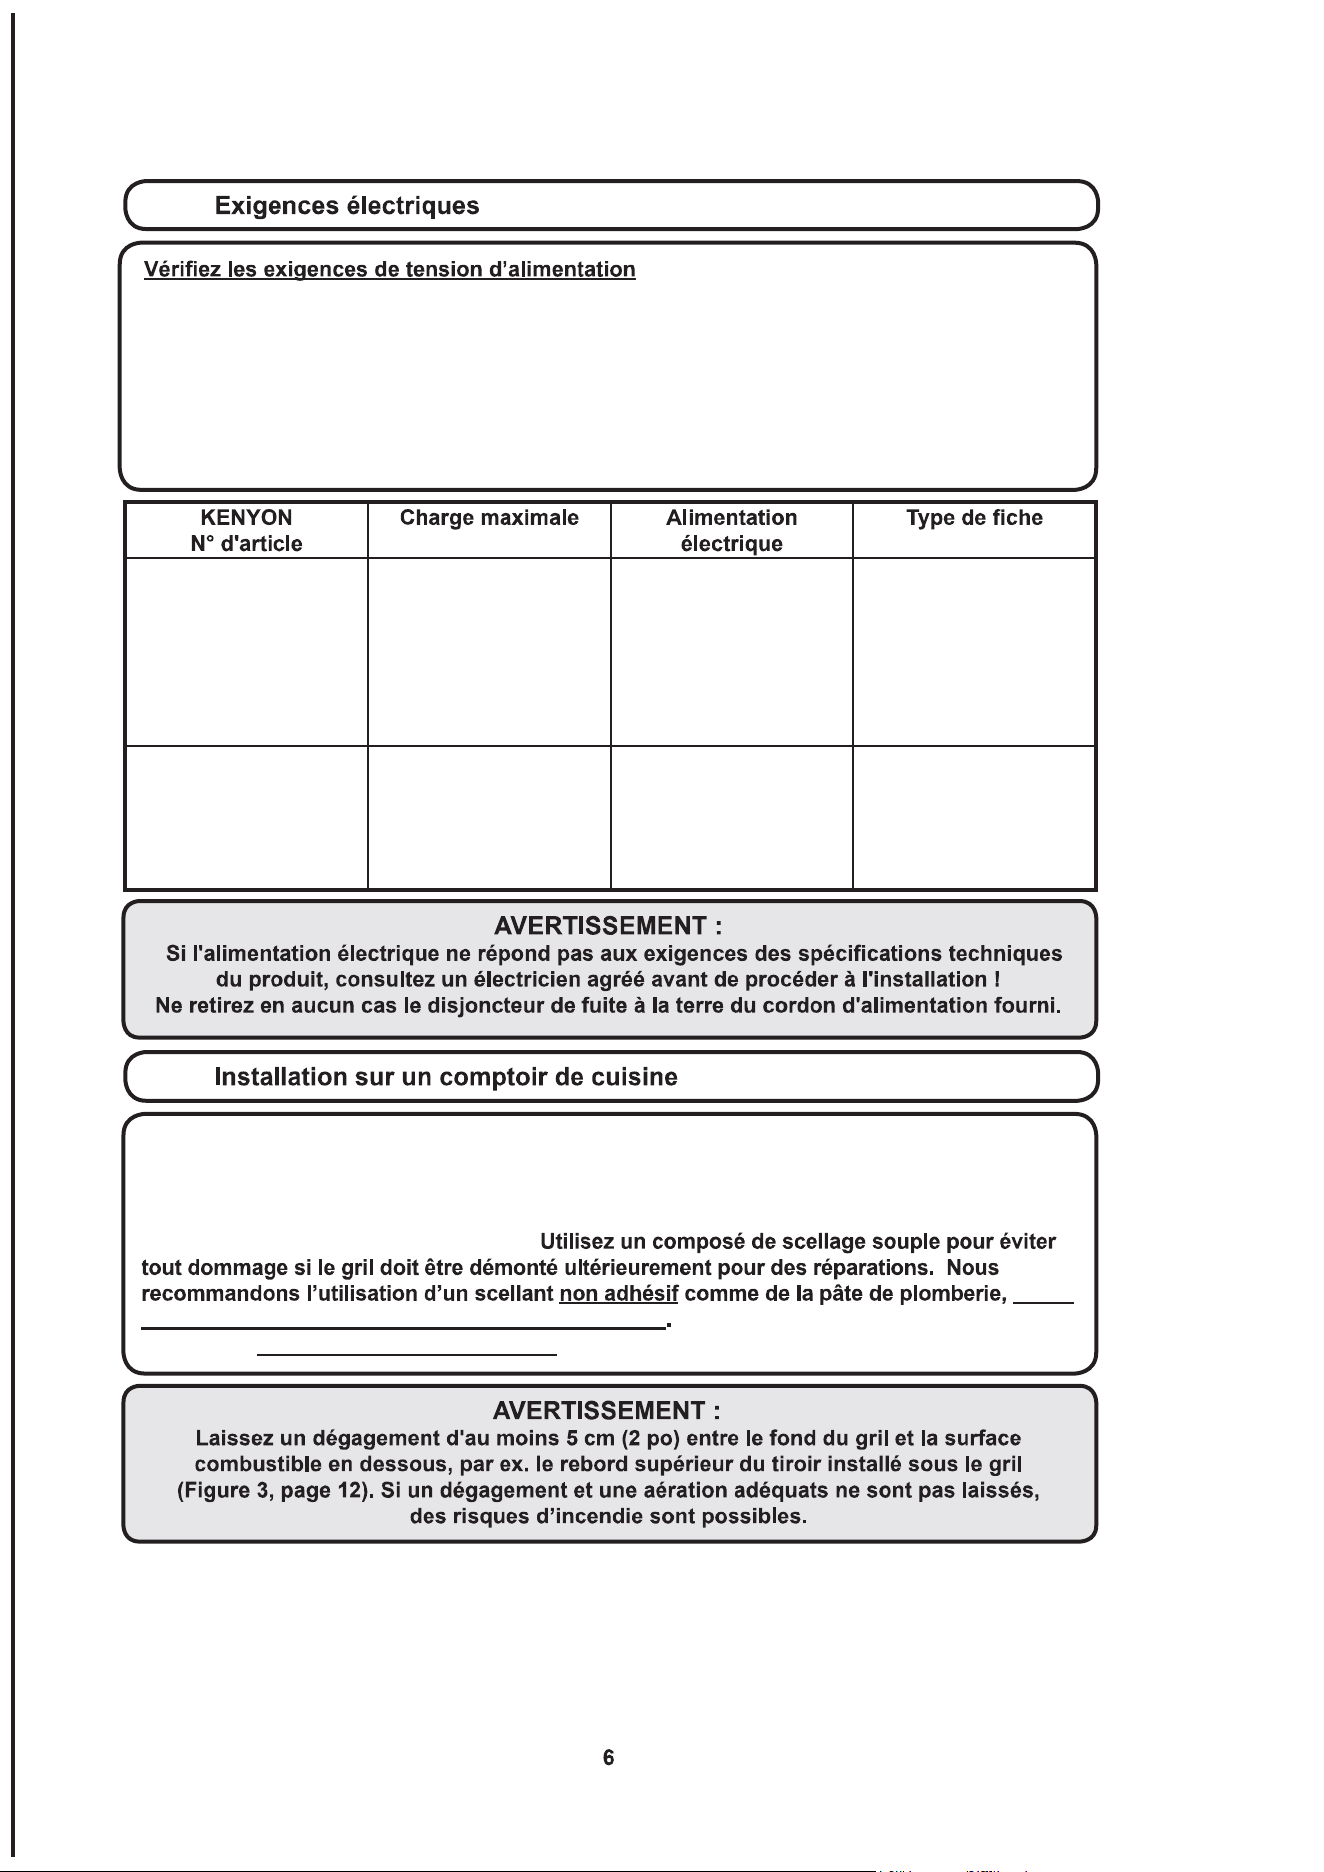
This product must be installed in accordance with national, state and local electric codes. The
following table provides the correct voltage, amperage and frequency that must be supplied to the
grill.
The supply must be from an individual grounded circuit that is protected by a circuit breaker and
ratedperthespecicationsforthemodelasshowninthetablebelow.
Your All Seasons
®
Grillissuppliedwithafactoryinstalledpolishedstainlesssteelangethat
acceptsfourovalheadwoodscrewsformounting.Thetrimangeofthegrillisdesignedtohold
theunitrmlyinplaceinthecountertop.Ifdesired,youmaysealtheedgeofthecountertop
beneaththetrimange.
maximum compressed thickness of 1/16” Silicone may be used to seal the
glass edge only, if desired.
10
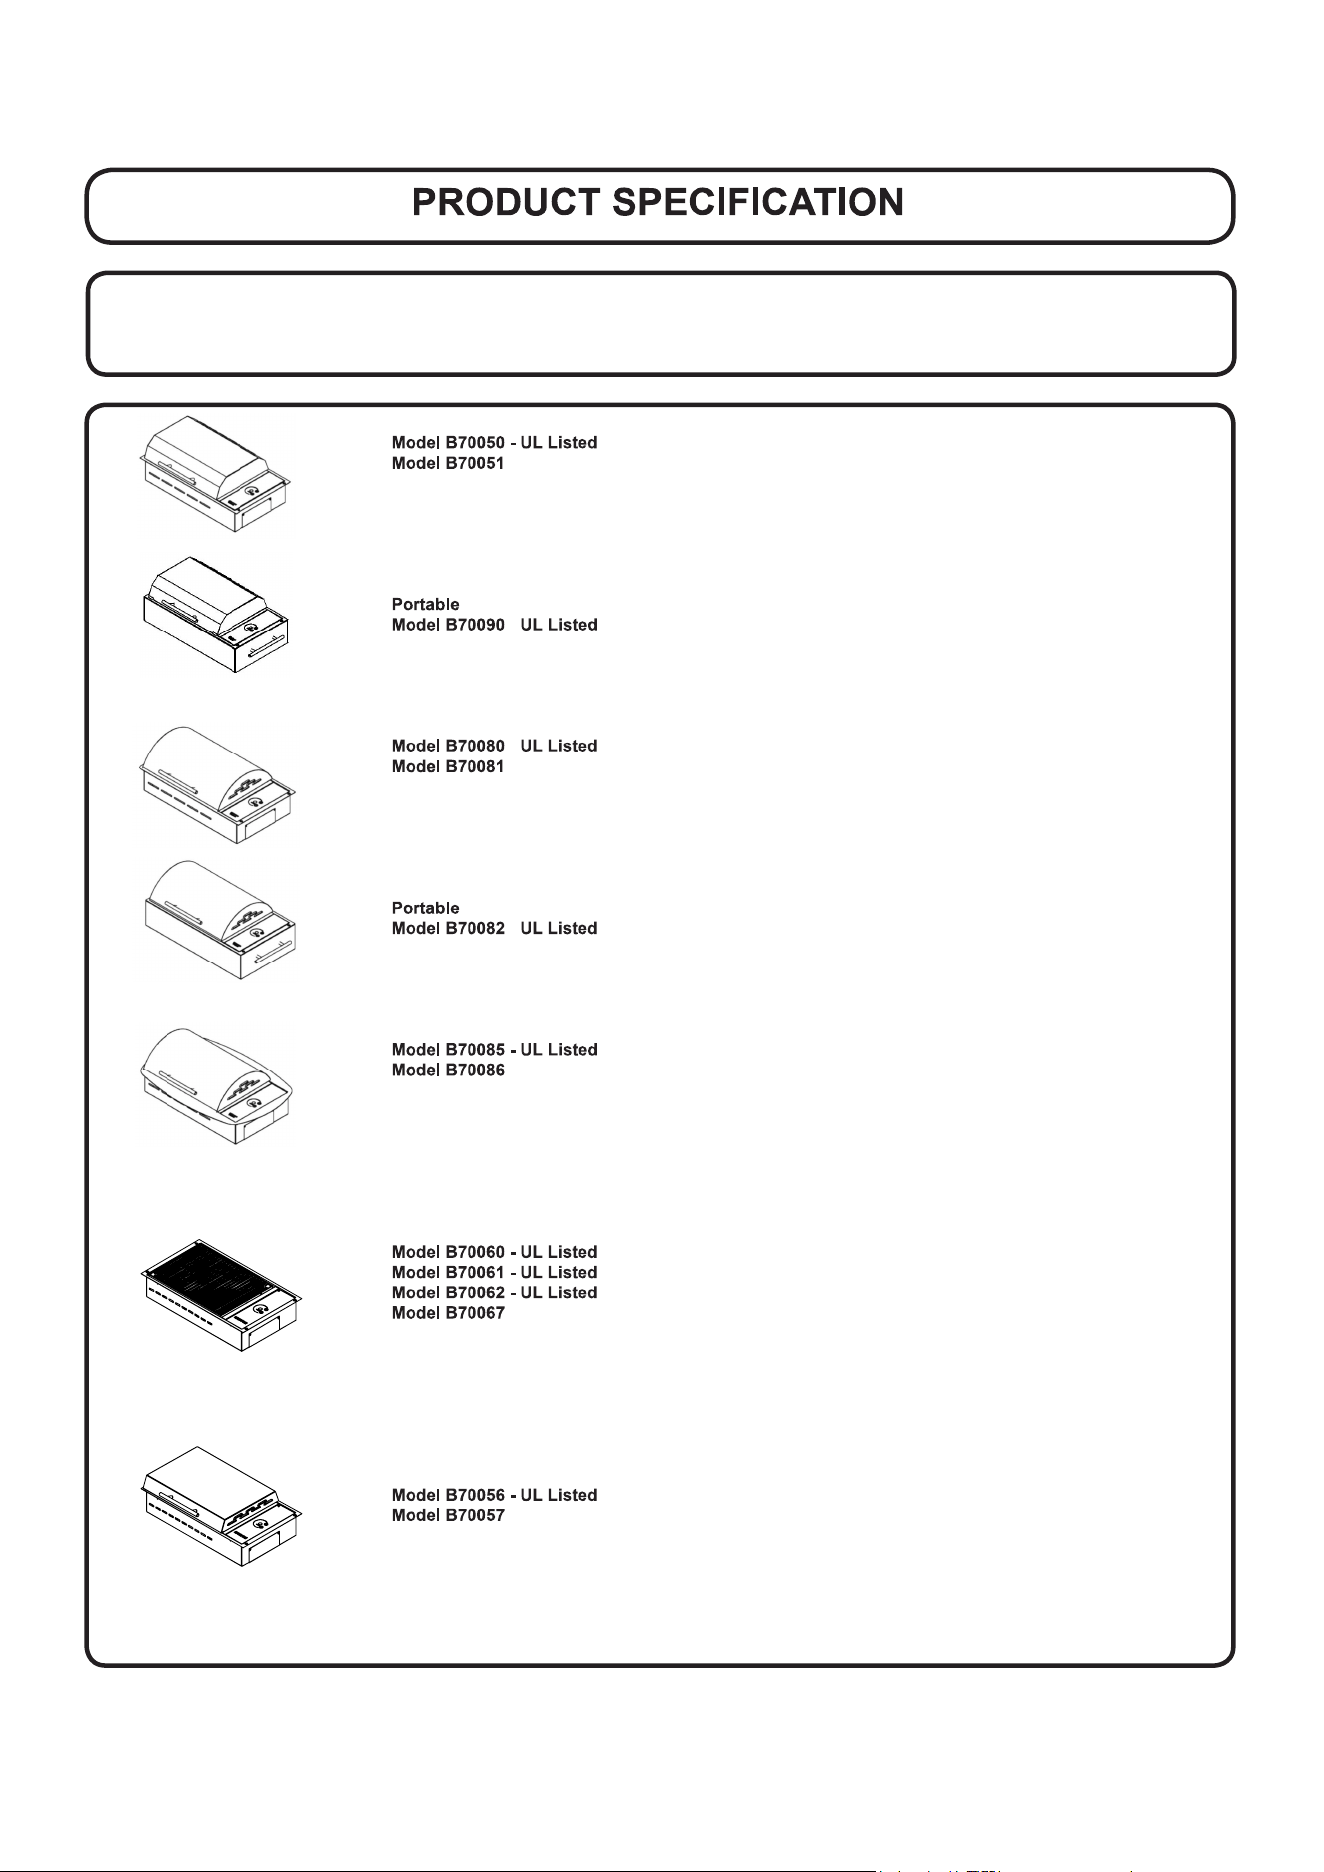
B70050
B70056
B70060
B70062
B70080
B70082
B70085
B70090
1300 Watts 120V AC 11A 60Hz 3 prong grounded
cord with GFCI
B70051
B70057
B70061
B70067
B70081
B70086
1300 Watts 240V AC 6A 60Hz 3 wire cord no plug
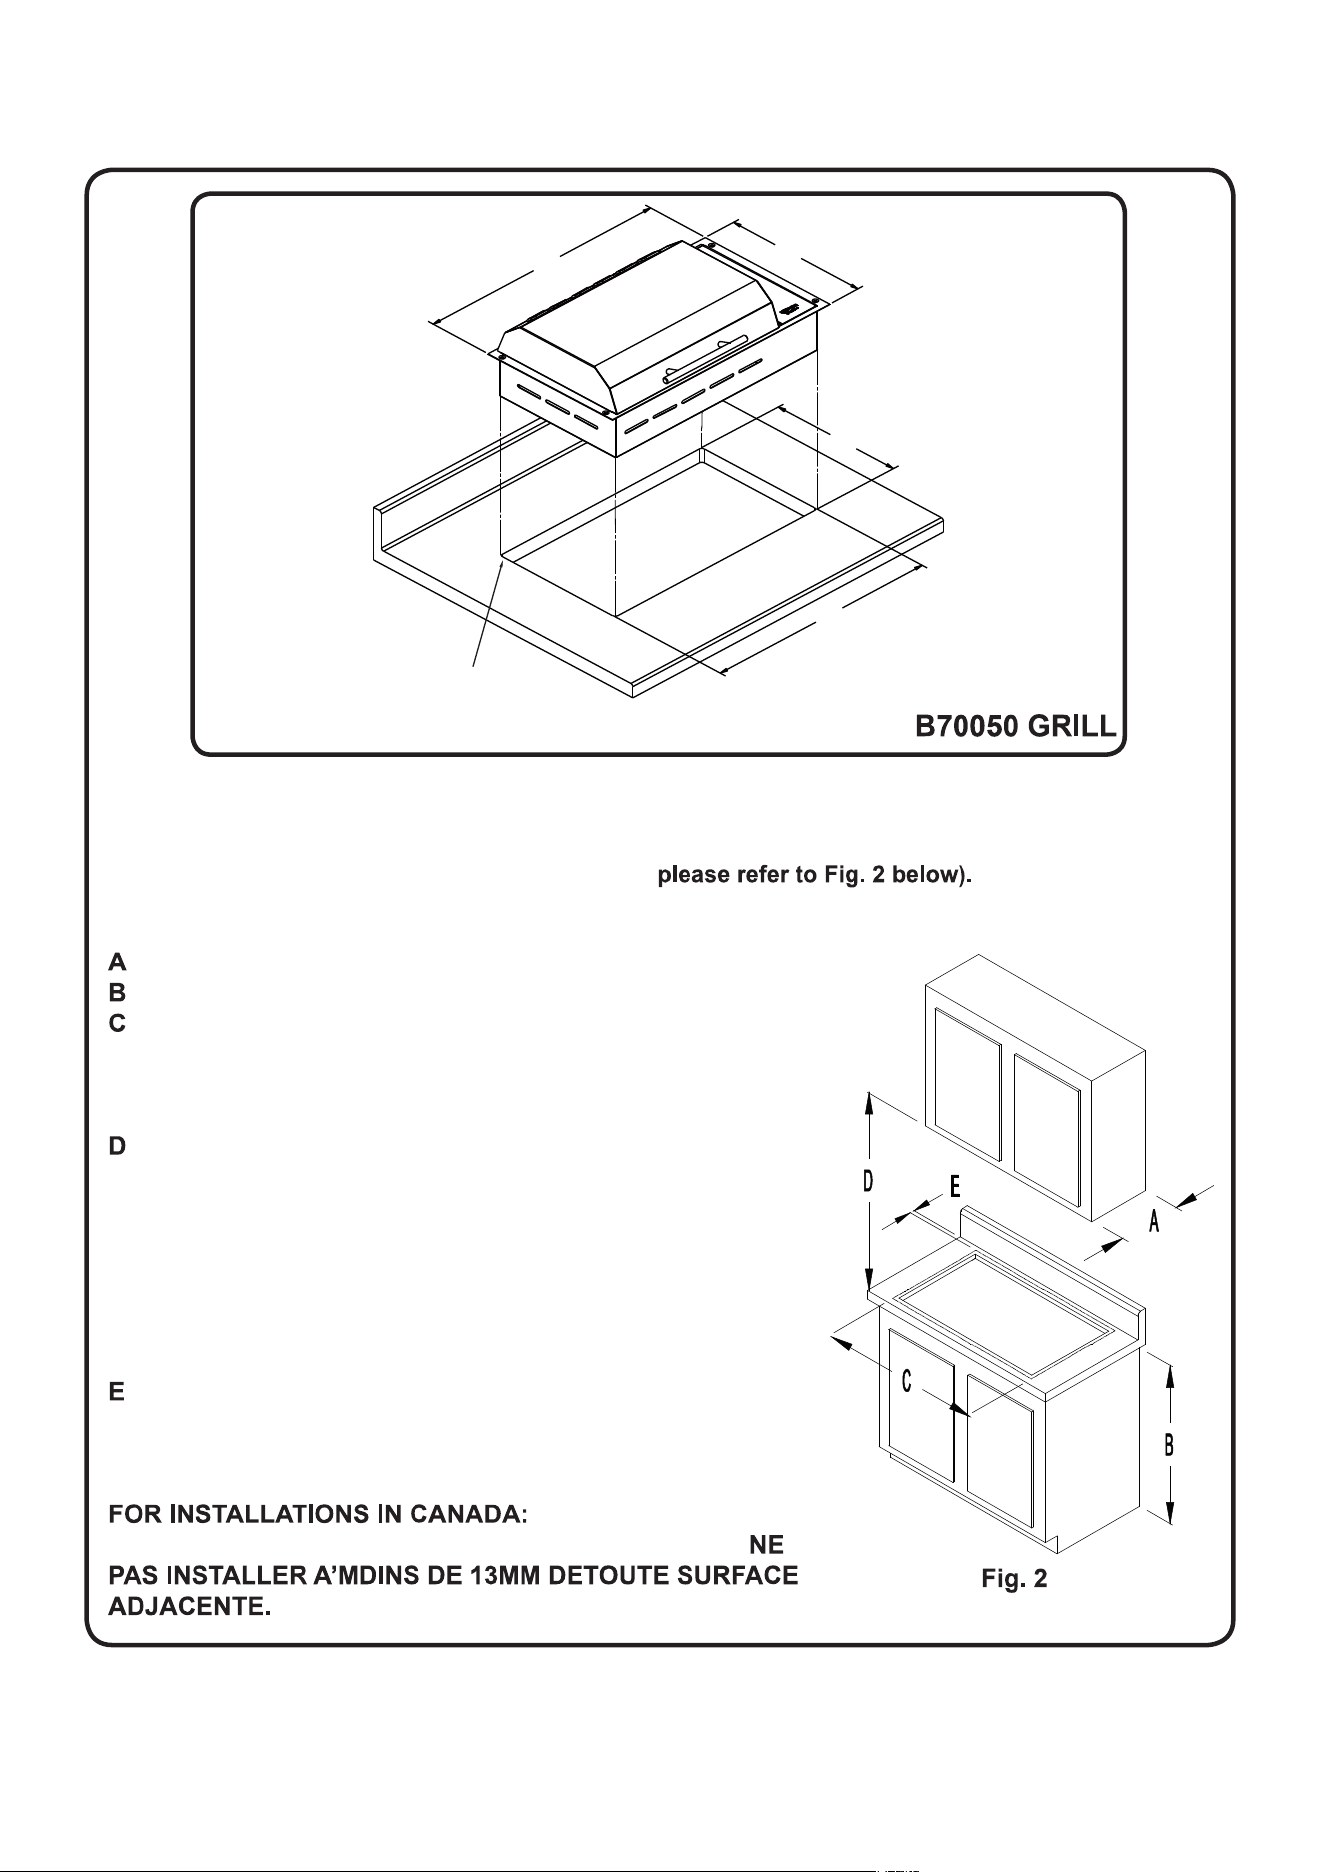
Please read this section prior to making cutout for the grill.
It is important to plan ahead for installation of the grill, keeping the
following dimensions in mind (
- 13 inches maximum depth of overhead cabinets
-36inchesisminimumheightofcountertopaboveoor
-Theminimumatcountertopsurfacethatthegrillwill
rest upon must be equal to or greater than the overall
grill dimensions (refer to the page 8 for overall
grill dimensions).
- 30 inches minimum clearance between the top of the
grill and the bottom of an unprotected wood or metal
cabinet or 24 inch minimum clearance when the
bottom of wood or metal cabinet is protected by not less
than1/4inchthickameretardantmillboardcoveredwith
not less than No. 28 MSG sheet steel, 0.015 inch thick
stainless steel, 0.024 inch thick aluminum or 0.020 inch
thick copper.
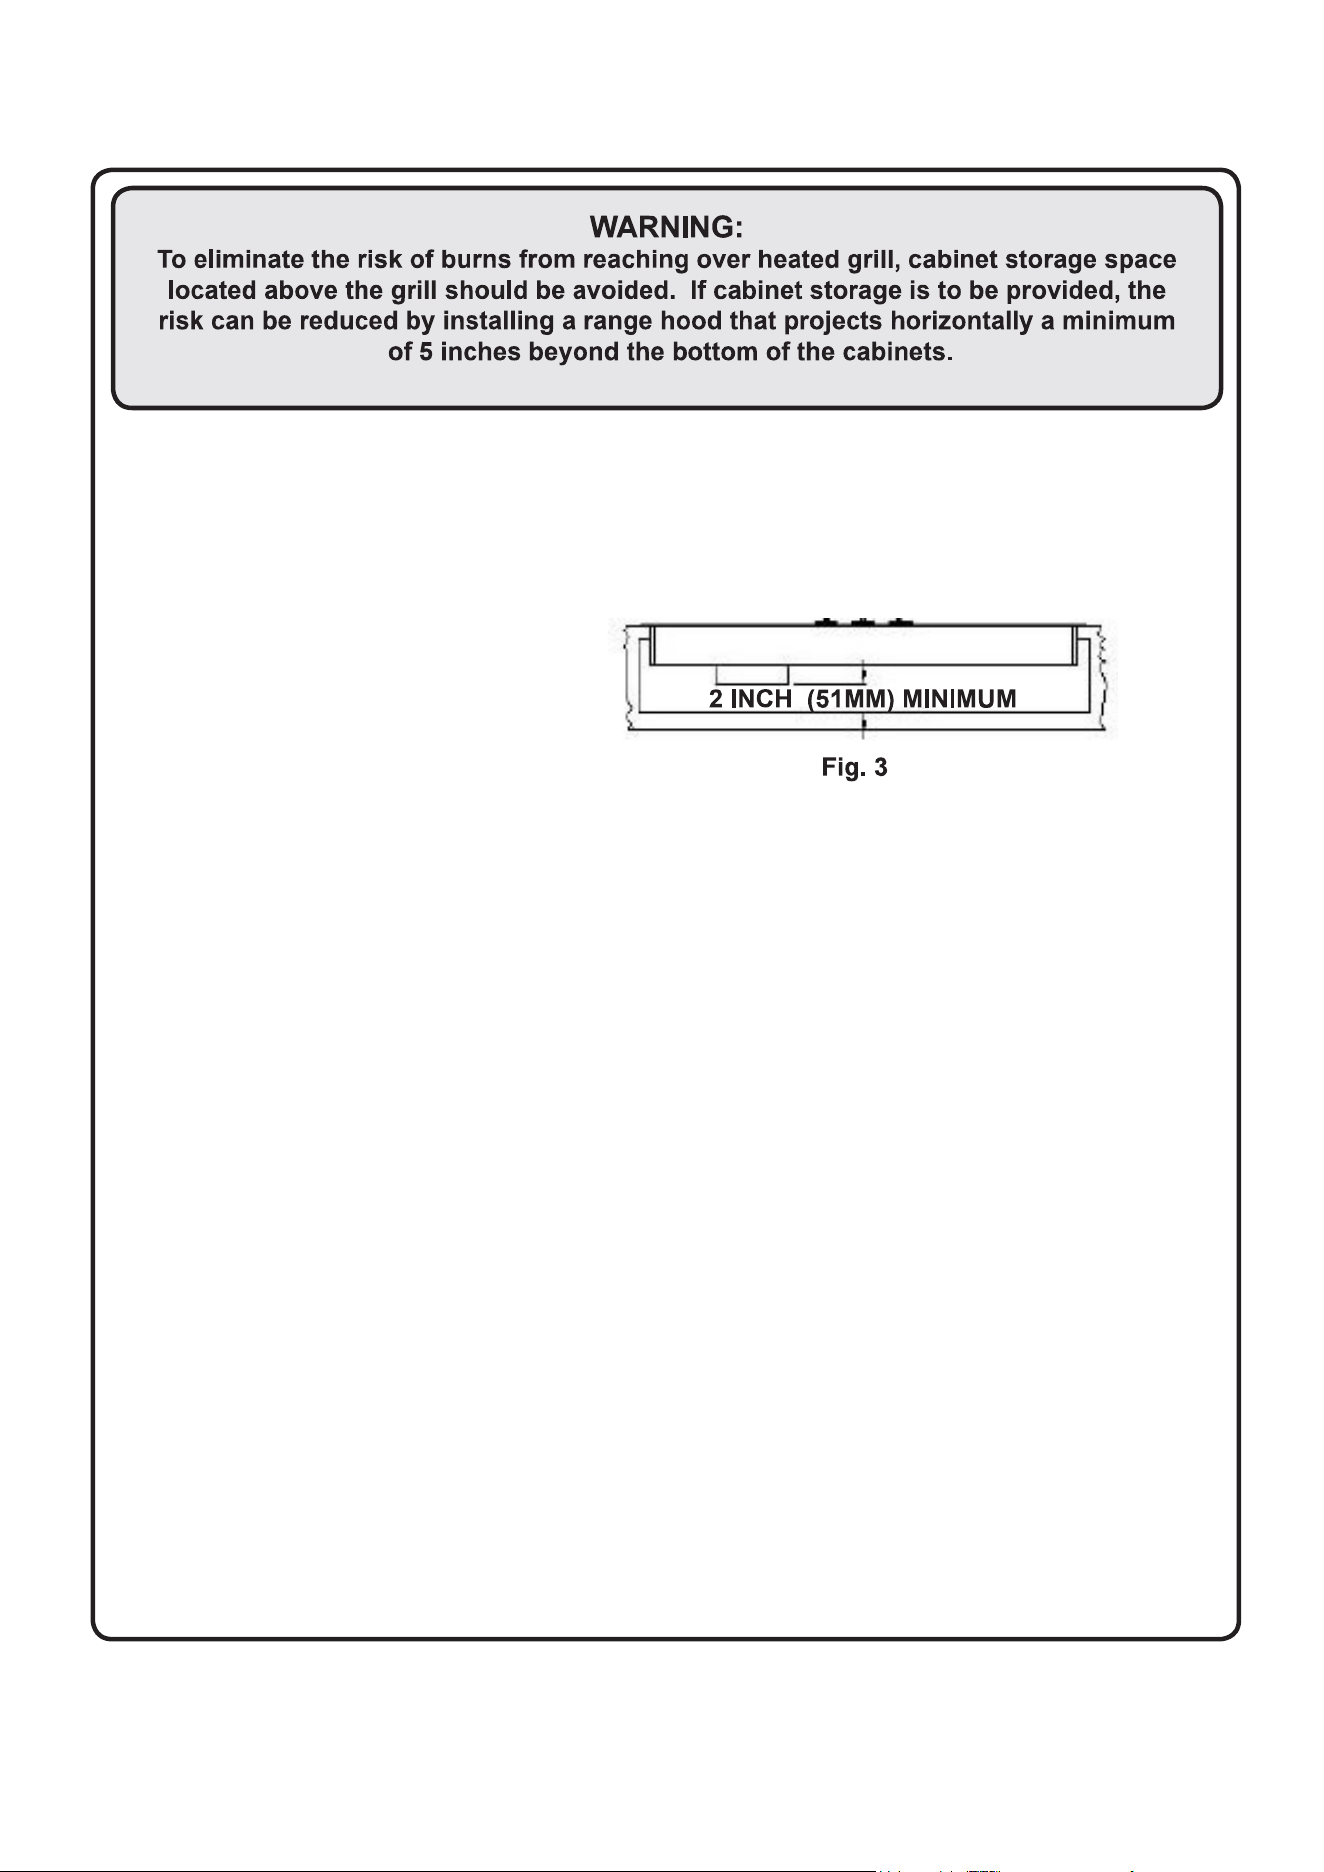
- 4 inches minimum from backsplash of countertop to edge of
grill (refer to the page 8 for overall grill dimensions).
1-1/2 inches minimum from front of counter to grill.
“Do Not Install Closer
Than 1/2 Inch (13mm) From Any Adjacent Surface”, and
21”
12”
11 5/8”
19 3/4”
1/4” corner
radius
Countertop Cutout DIMENSIONS
11
Before making the countertop cutout, check for clearance. Check to see that the grill will clear the
front and side walls of the base cabinet. Also check for proper clearance to the back splash so
that the lid can open fully.
Adequate ventilation of the space below the countertop must be provided to ensure proper
operation of the grill. Heat transferred from the grill bottom pan during operation will overheat an
improperly ventilated area.
When making countertop cutout, radius the corner to help prevent cracking of the countertop
material. A 1/4 inch radius is typical, but follow the countertop manufacturer’s instructions
regarding the minimum radius and any reinforcements required to prevent damage to the
countertop over time.
If your countertop is made of solid surface material you will need to check with the manufacturer
forspecicrecommendationsforcooktop&grillinstallationinstructions.Mostsolidsurface
countertop manufacturers require additional corner supports to prevent damage to the countertop.
Use the included screws to secure the grill to the countertop. Be careful not to over-tighten the
screws.Useanacryliccaulktosealtheangetothecountertop.
If your countertop is made of stone you will need to use an acrylic latex to mount the grill in place.
Put a large bead of caulk around the cutout opening and put the grill in place. Wipe away any
excess caulk, use water to remove the excess caulk. Allow the caulk to dry for a minimum of 24
hours without any moisture being allowed to come in contact with the caulk. Do not use the screws
that came with your grill. The caulk will hold the grill securely. Do not use a caulk which contains
silicone as this will stain the stone.
12
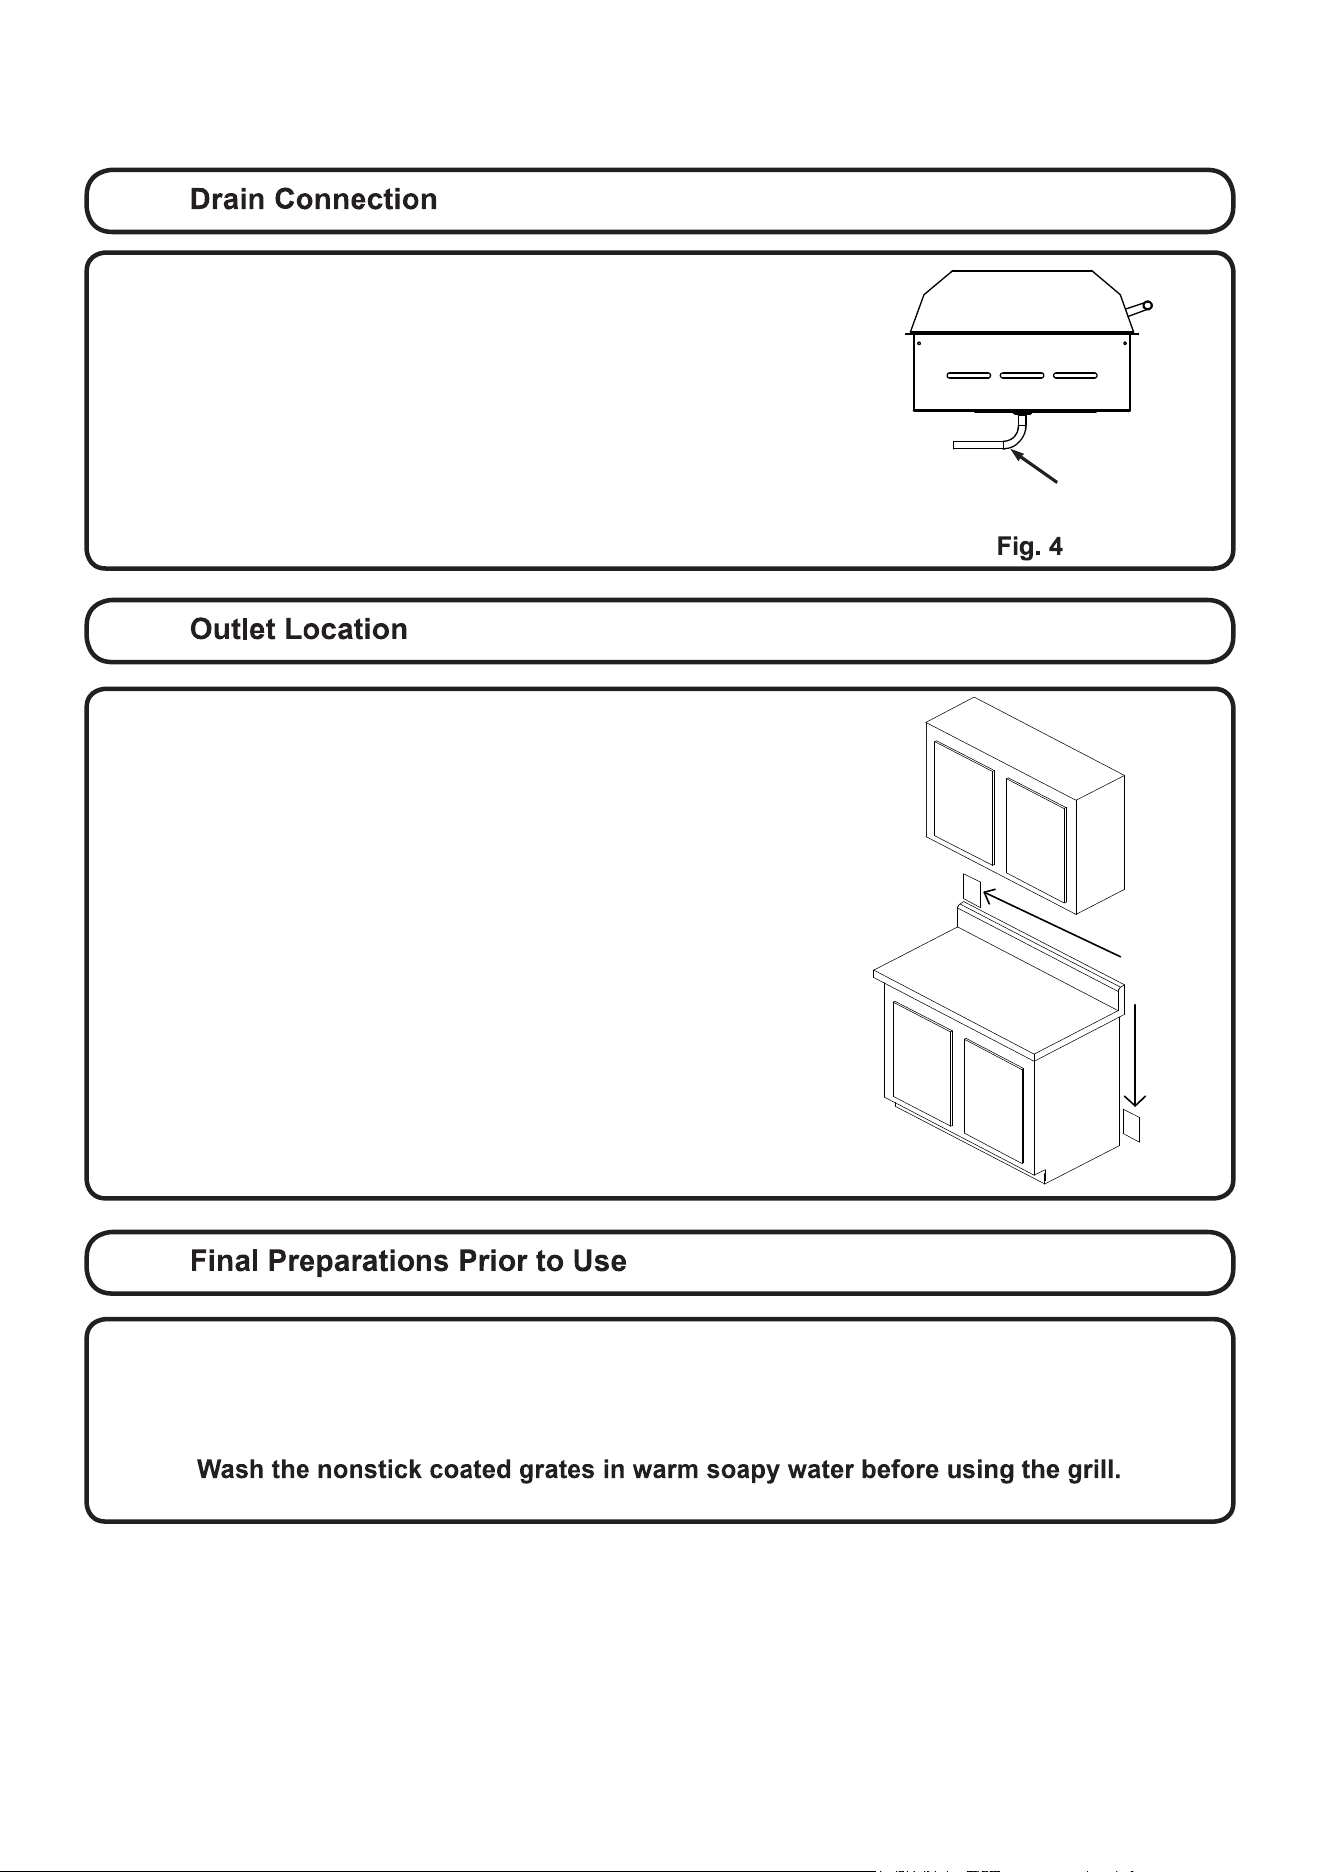
Be sure the electrical outlet intended for the grill is in an easily
accessible location. This allows the user to easily plug and unplug
the grill. This is necessary to ensure safe cleaning and storage of
the grill.
Suggested
Outlet
Locations
For your convenience, the grill is equipped with a 1/8” NPT brass pipe
ttingand90ºbrasselbowwhichyoucanattachthe1/4”IDexible
hose that came with your grill. The portable version of the grill comes
withabrasspipepluginstalledinthedraintting.Ifyouareusingyour
grillasaportableunit,savethehoseand90ºbrassttingforpossible
installation in the future.
Drainttingfor1/4”IDhose
Removetheprotectiveplasticlmfromthelid,trimangeandglasspanel.Cleanthegrillbefore
youuseitforthersttime.Athoroughcleaningwithastainlesssteelorglasscleanerwillremove
anytracesofplasticlmadhesivesandmanufacturingoils.
13

DO NOT USE WATER ON GREASE FIRES
Smotherreorameorusedrychemicalorfoam-typeextinguisher.
USE ONLY DRY POT HOLDERS
Moist or damp pot holders on hot surfaces may result in burns from steam. Do not let pot holder touch
the grate or element of the grill. Do not use a towel or other bulky cloth in place of a pot holder.
DO NOT COOK ON BROKEN GRILL GRATE OR GRIDDLE
If the grate should break, grease and oils may come into direct contact with the electric element and
createariskofelectricshockorre.ContactanauthorizedservicecenterorKENYONCustomer
Care immediately at (860) 664-4906.
CLEAN GRILL WITH CAUTION
If a wet sponge or cloth is used to wipe spills on a hot cooking surface, be careful to avoid steam
burns. Some cleaners produce noxious fumes if applied to a hot surface. Read the cleaner label for
details prior to using.
DO NOT TOUCH HEATING ELEMENT OR GRATE
The heating element and grate will be hot for some time after cooking. These components should be
allowed to cool and then be handled with care and caution while cleaning, as they may be hot enough
to cause severe burns.
CLEAN GRILL AFTER EACH USE
This appliance is equipped with a removable, disposable drip pan. This pan be removed and
cleaned after each and EVERY use. Do not allow grease to accumulate between cooking. The grease
panandbafetray be used when cooking on the grill. Excessive grease may spill over into the
interiorofthegrill,voidingyourwarrantyandposingarehazard.
High heat setting may cause heavy smoking and ignite grease.
DO NOT CLEAN UNIT WITH PRESSURIZED WATER
Never clean the grill with any form of pressurized water or other types of cleaners. Doing so will void
the warranty and may pose a serious risk of electric shock. Always clean the grill with a cloth and a
stainless steel or glass surface cleaner.
STORAGE
When used as a portable grill, store indoors when not in use. When used as a built-in grill,
suitable shelter must be provided to prevent direct exposure to rain. Covers available at
www.cookwithkenyon.com
TO PREVENT SMOKE
To prevent the contents of the grease pan from smoking, place 2 cups of water (or enough to cover
the bottom of the pan) in the grease pan before cooking.
DO NOT USE POTS OR OTHER BAKEWARE ON THE GRILL
KEEP THESE INSTRUCTIONS WITH THE GRILL FOR FUTURE REFERENCE
14
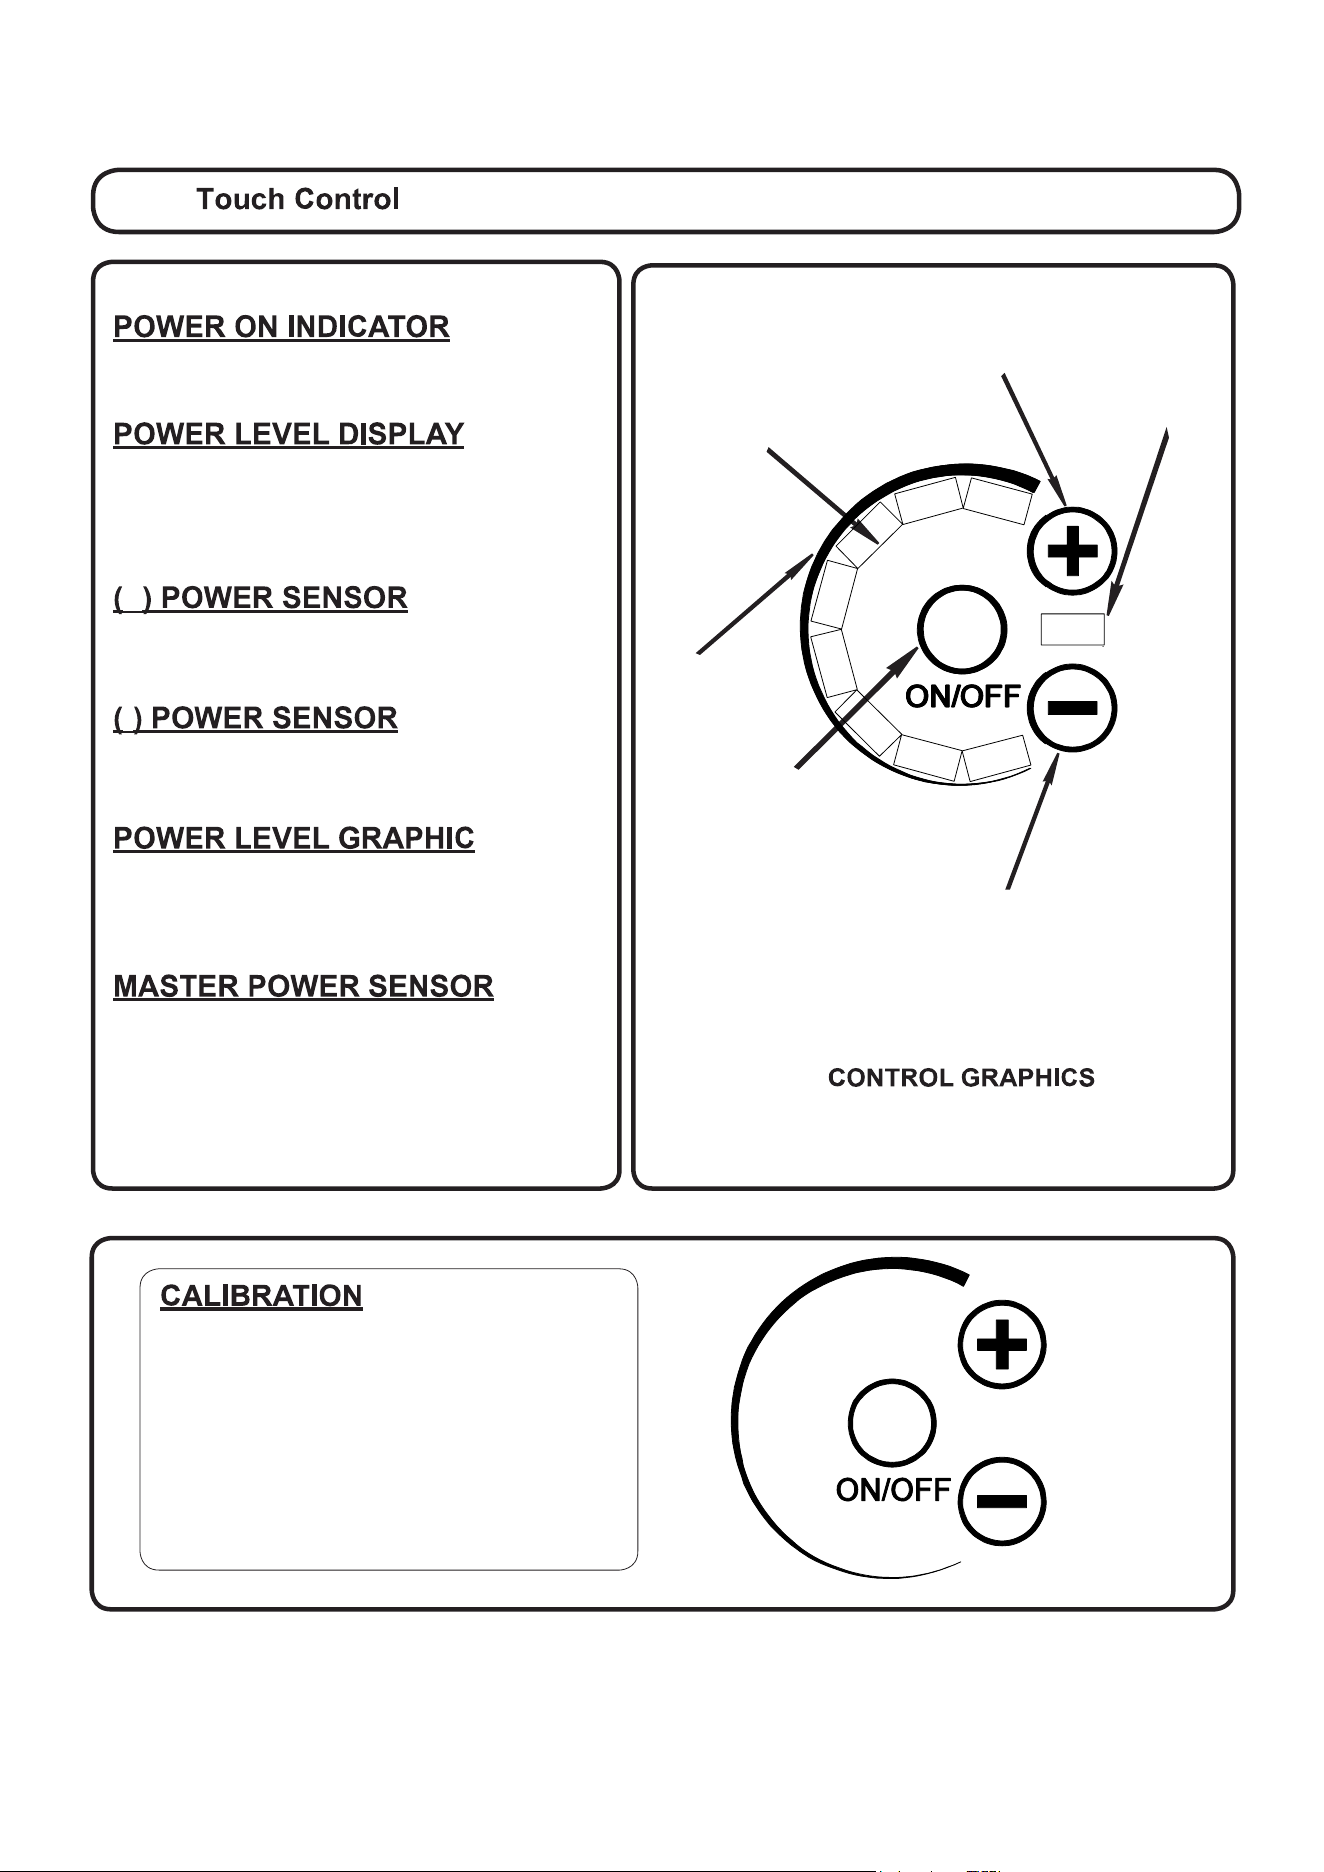
This display indicates whether the grill is ON
or OFF.
Digital display indicates heat output of grill.
The indicator lamps follow the sweep of the
screened graphic. There are eight possible
heat levels.
+
Touching this sensor will increase the heat
output of the grill in increments of one.
-
Touching this sensor will decrease the heat
output of the grill in increments of one.
Depicts the level of heat output by the ele-
ment. The line sweeps from thin to thick,
indicating low to high power.
This is the main power control for the grill.
Touching this with the grill OFF will activate the
controller and turn the grill ON. Touching this
sensor with the grill on will shut the grill OFF.
POWER LEVEL
DISPLAY
MASTER
POWER SENSOR
POWER LEVEL
GRAPHIC
POWER ON
INDICATOR
(-) POWER
SENSOR
(+) POWER
SENSOR
15
Upon application of electrical power to the
grill, the controller will run a self-calibration
process. The controller will then sound an
audibleconrmationtoneandthedisplaywill
brieyilluminate.Thegrillisnowreadytobe
used. Forpropercalibrationtheglassabove
thecontrollermustbeclearofanydebris.
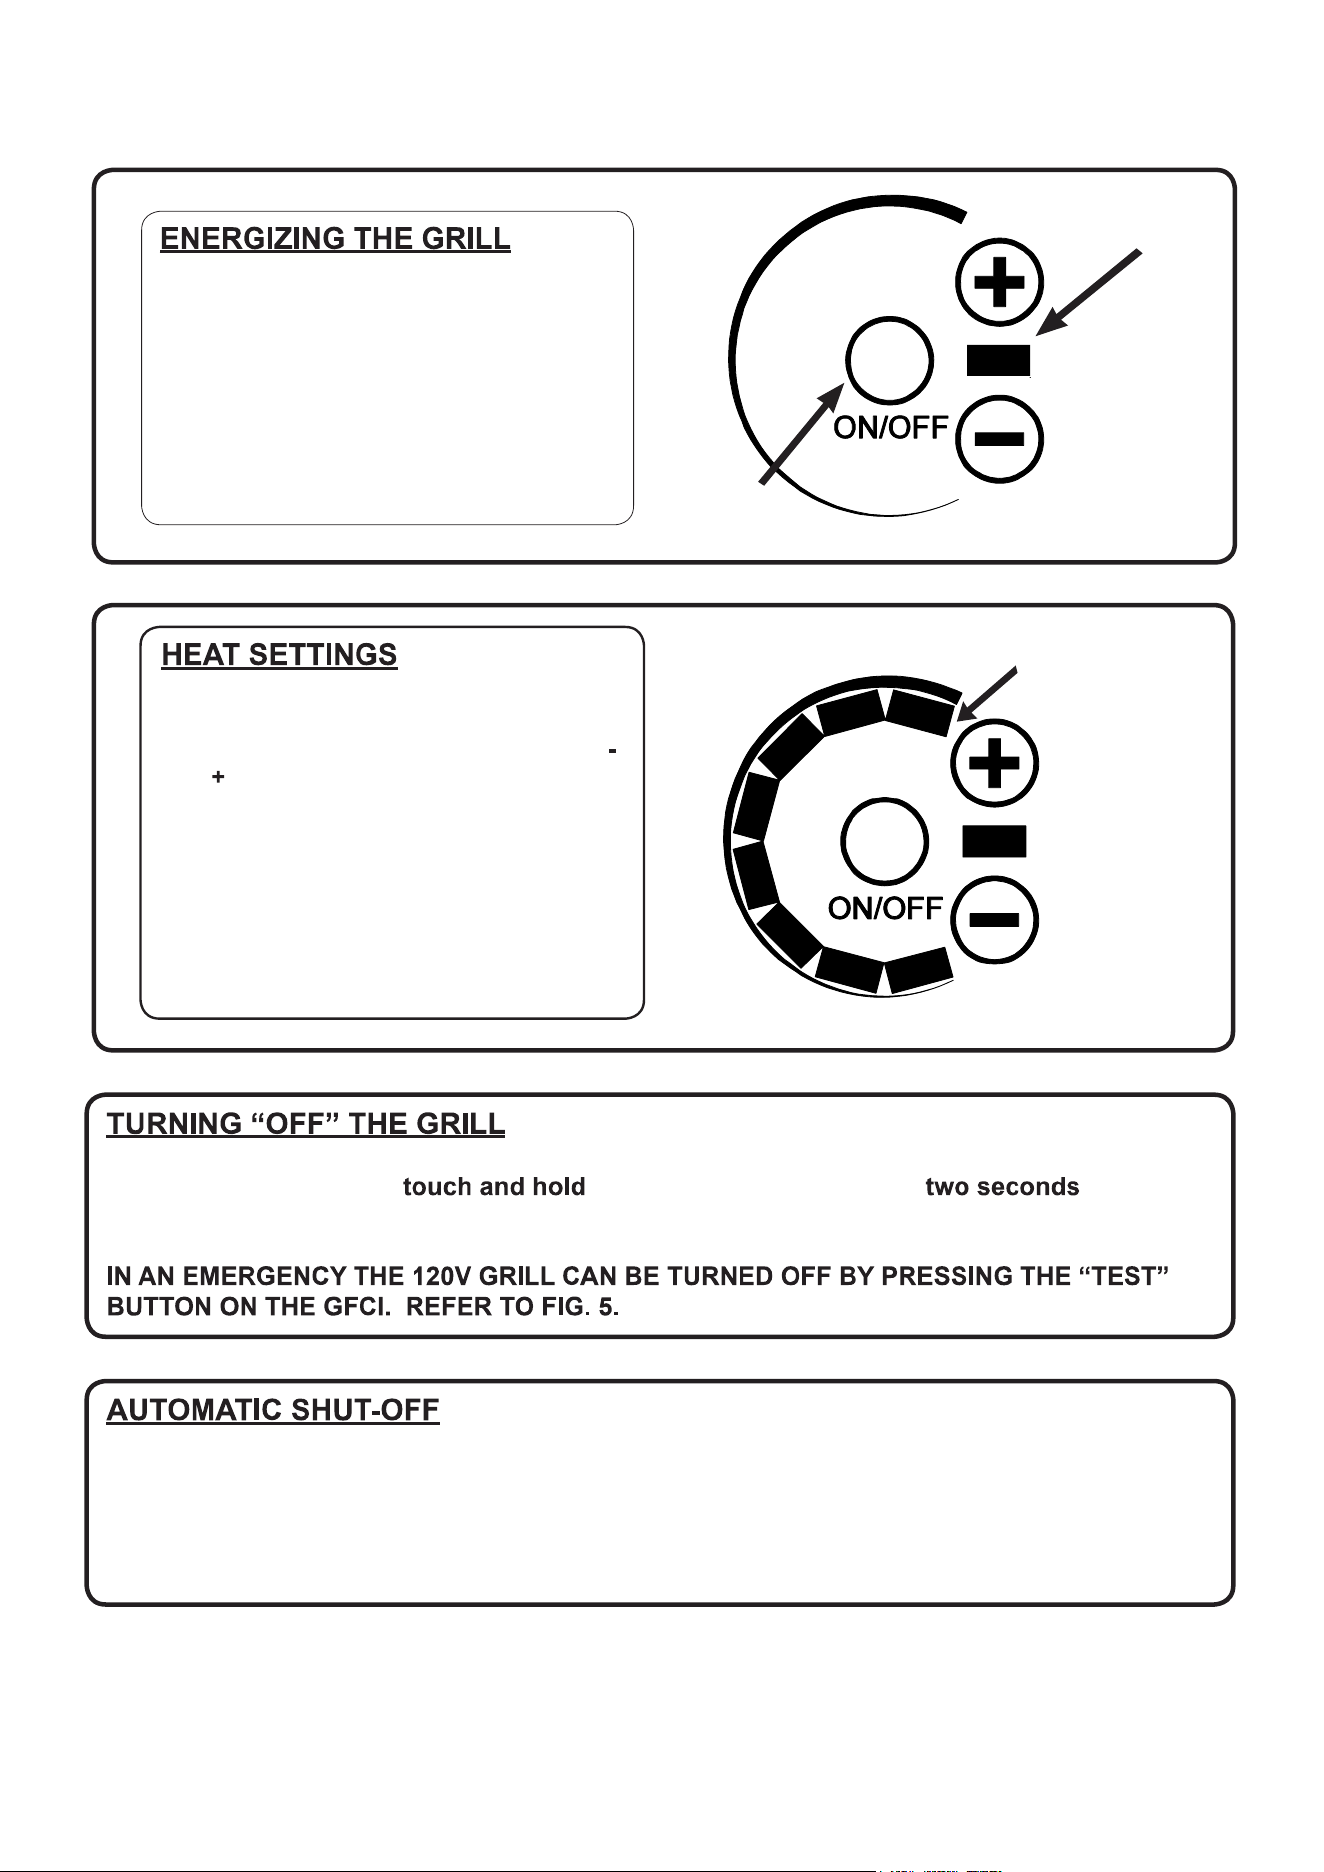
To turn the grill ON, touch and hold the Master
Power Sensor for two seconds. The controller
will then beep and the Power On Indicator
will illuminate.
POWER ON
INDICATOR
MASTER
POWER SENSOR
POWER LEVEL
DISPLAY (HEAT
SETTING 8
SELECTED)
Your KENYON grill has 8 different heat set-
tings, from 1 through 8, selected using the ( )
and ( ) sensors. The heat setting is displayed
as shown at the right. The heating element
cycles at different time intervals to vary the
heat level. As the setting is increased, the heat-
ing element will remain on for a longer period,
increasing the cooking temperature of the grill.
16
To turn off the grill, simply the Master Power Sensor for .
The controller will de-energize and shut off the heating element.
The electronic control of your KENYON grill has been programmed with safety in mind and features
an automatic shut-off. The grill is programmed to shut down after a predetermined time after being
energized (see table below). The control will also shut off if it reaches a preset temperature limit. If
this occurs, allow the grill to cool down for 20-30 minutes.
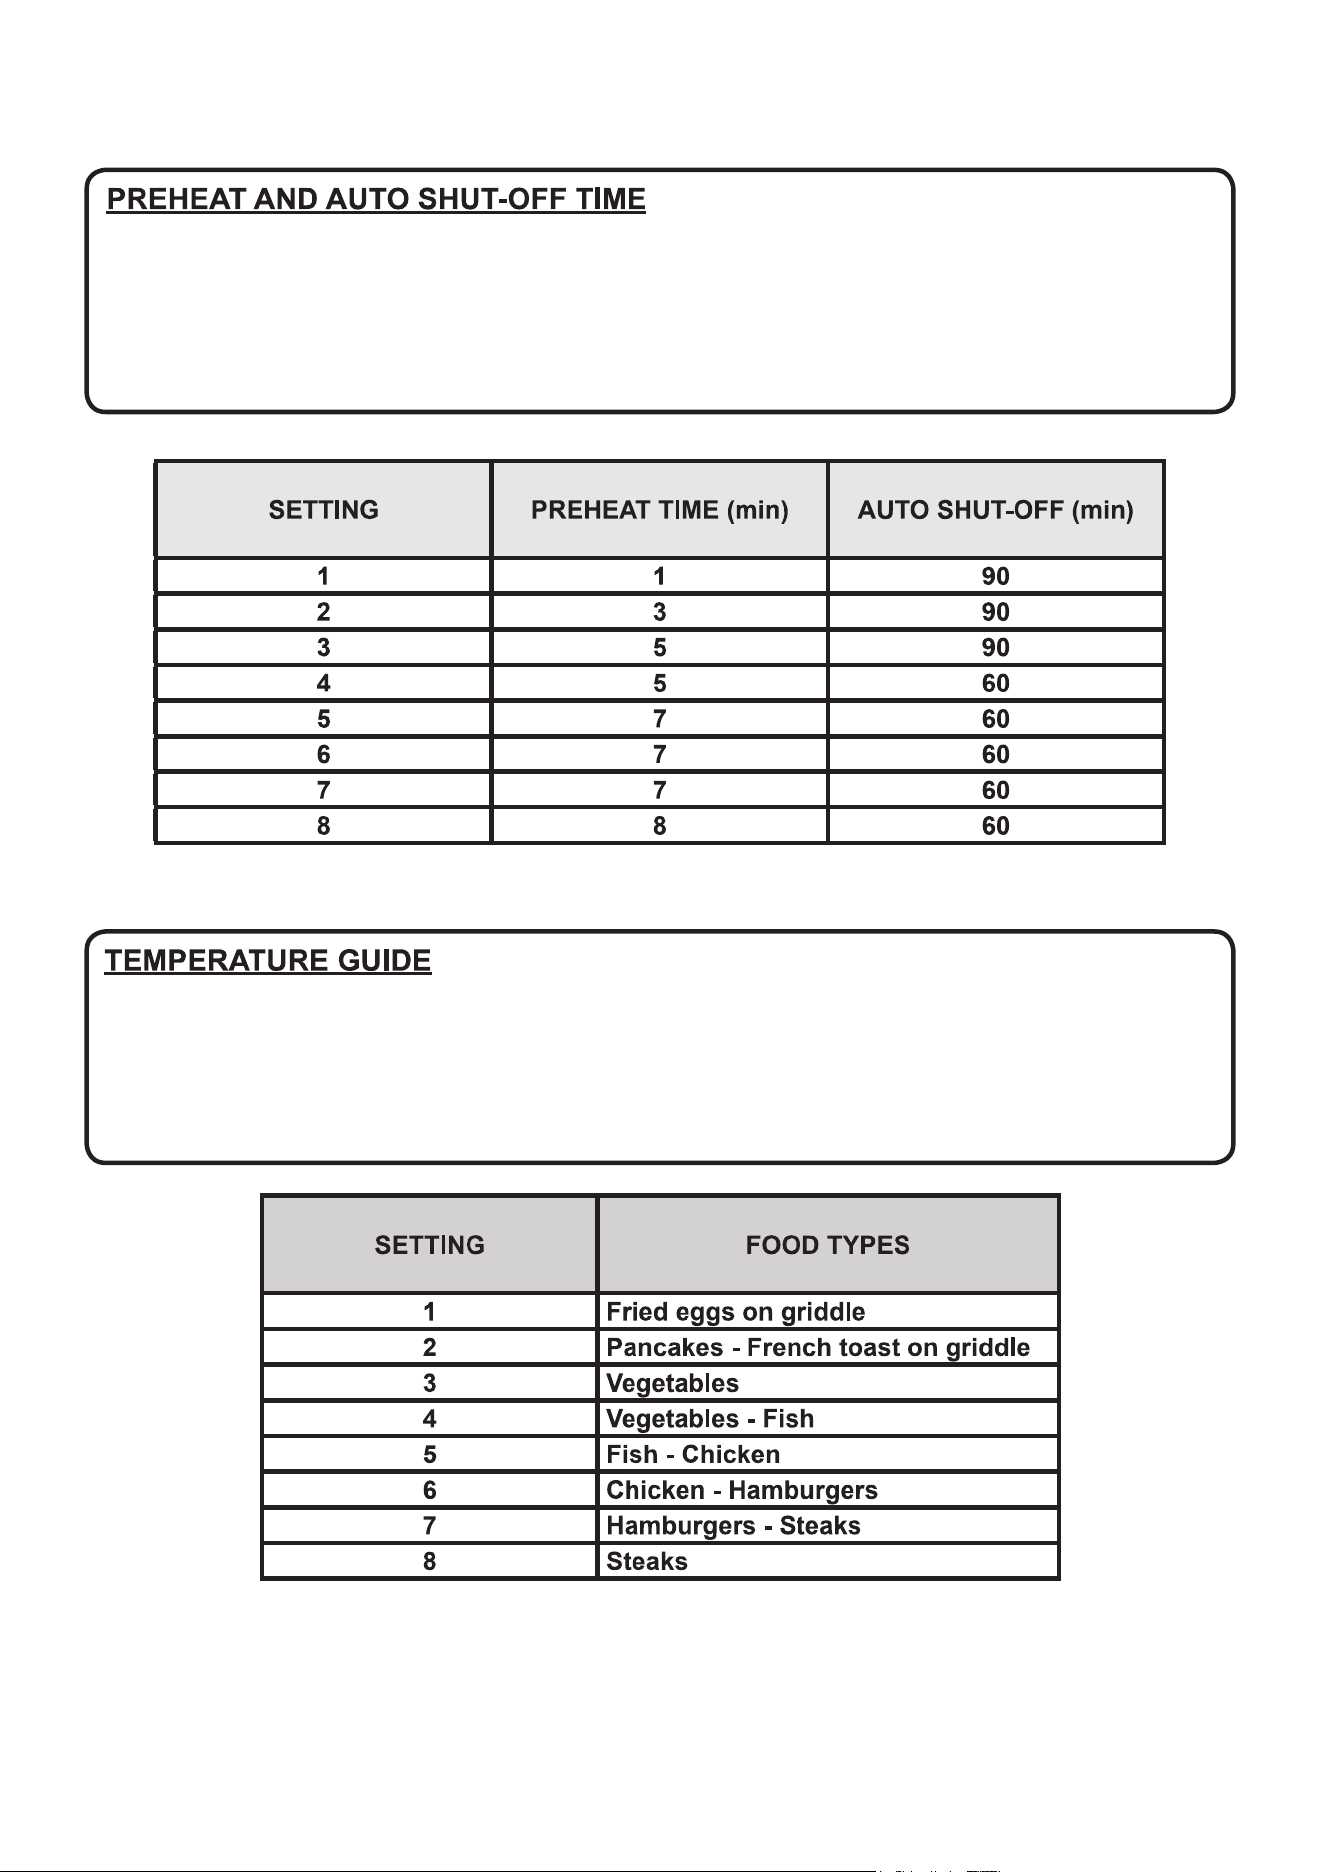
The grill control has a preheat function which applies full power for a set amount of time for each
power setting selected. This preheat function brings the grate/griddle to the desired grilling
temperature quicker thus allowing you to begin grilling quicker. The table below provides the
preheat time and auto shut-off time for each power setting.
17
The following is meant to be a guideline. Individual results may vary depending on conditions.
Factors such as wind, and outside temperatures, food temperature when placed on grill can affect
cooking times. The grill is designed and engineered for optimal cooking performance with the lid
down or closed.
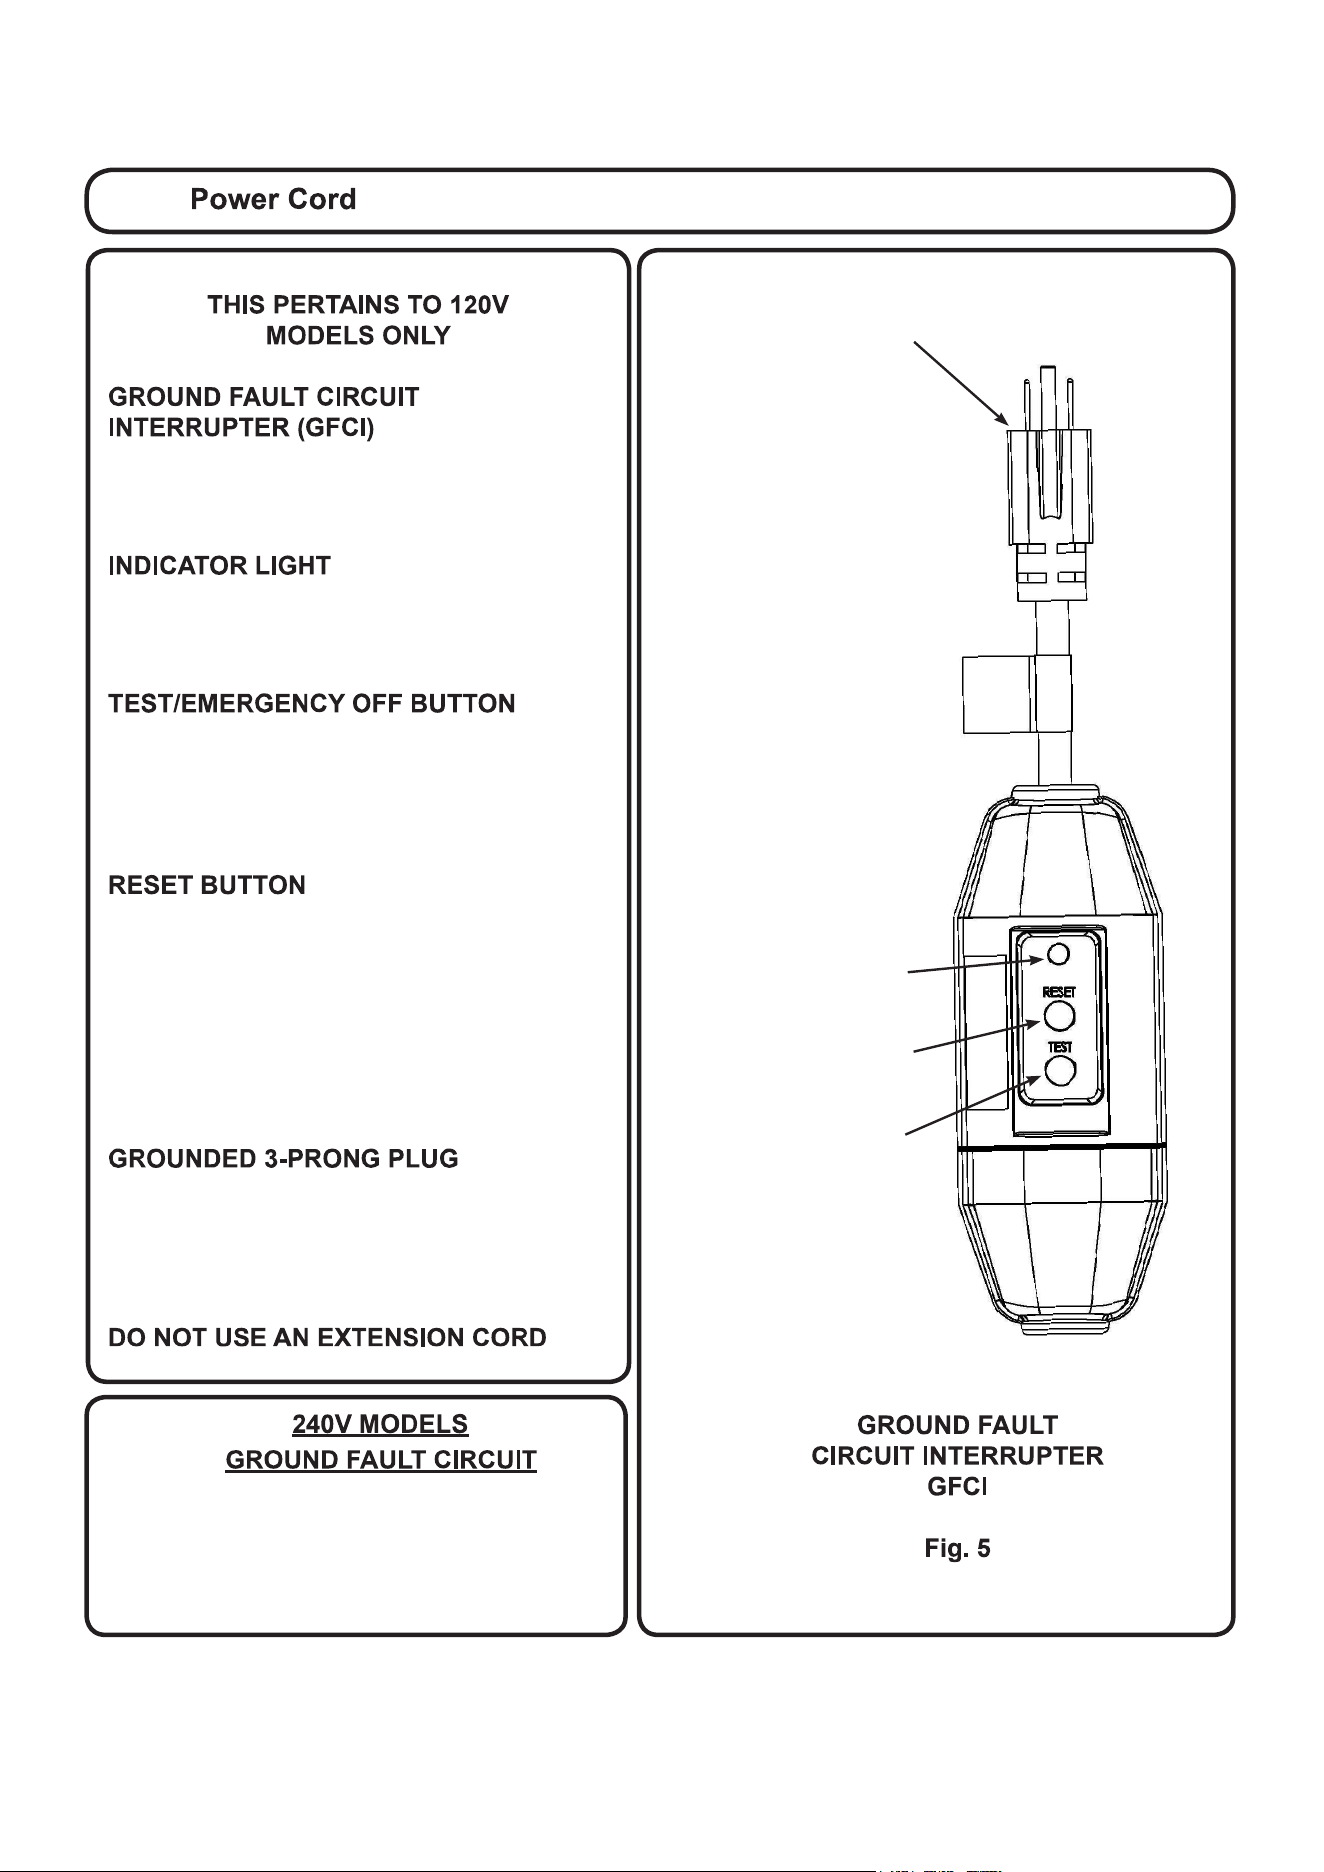
RESET
BUTTON
GROUNDED 3-PRONG PLUG
INDICATOR
LIGHT
TEST
BUTTON
The supply voltage circuit (240V) should
be equipped with a ground fault circuit
interrupter. Check local codes for
compliance.
The GFCI is a safety device designed to
protect the user from any electrical shock
hazard.
The indicator light will stay illuminated when
electrical power is applied and indicates that
the GFCI is working properly.
Pressing this button will test the GFCI.
The indicator light will go out and electrical
power will not be supplied to the grill. The
GFCI should be tested monthly.
Pressing this button will reset the GFCI to
its normal function. The indicator lamp will
illuminate and electrical power will be
supplied to the grill. If the indicator lamp
does not illuminate, the GFCI has detected
a malfunction. Unplug the GFCI from the
receptacle and do not use the grill.
CAUTION - To ensure continued protection
against risk of electric shock, the GFCI must
be plugged into a properly grounded
receptacle.
18
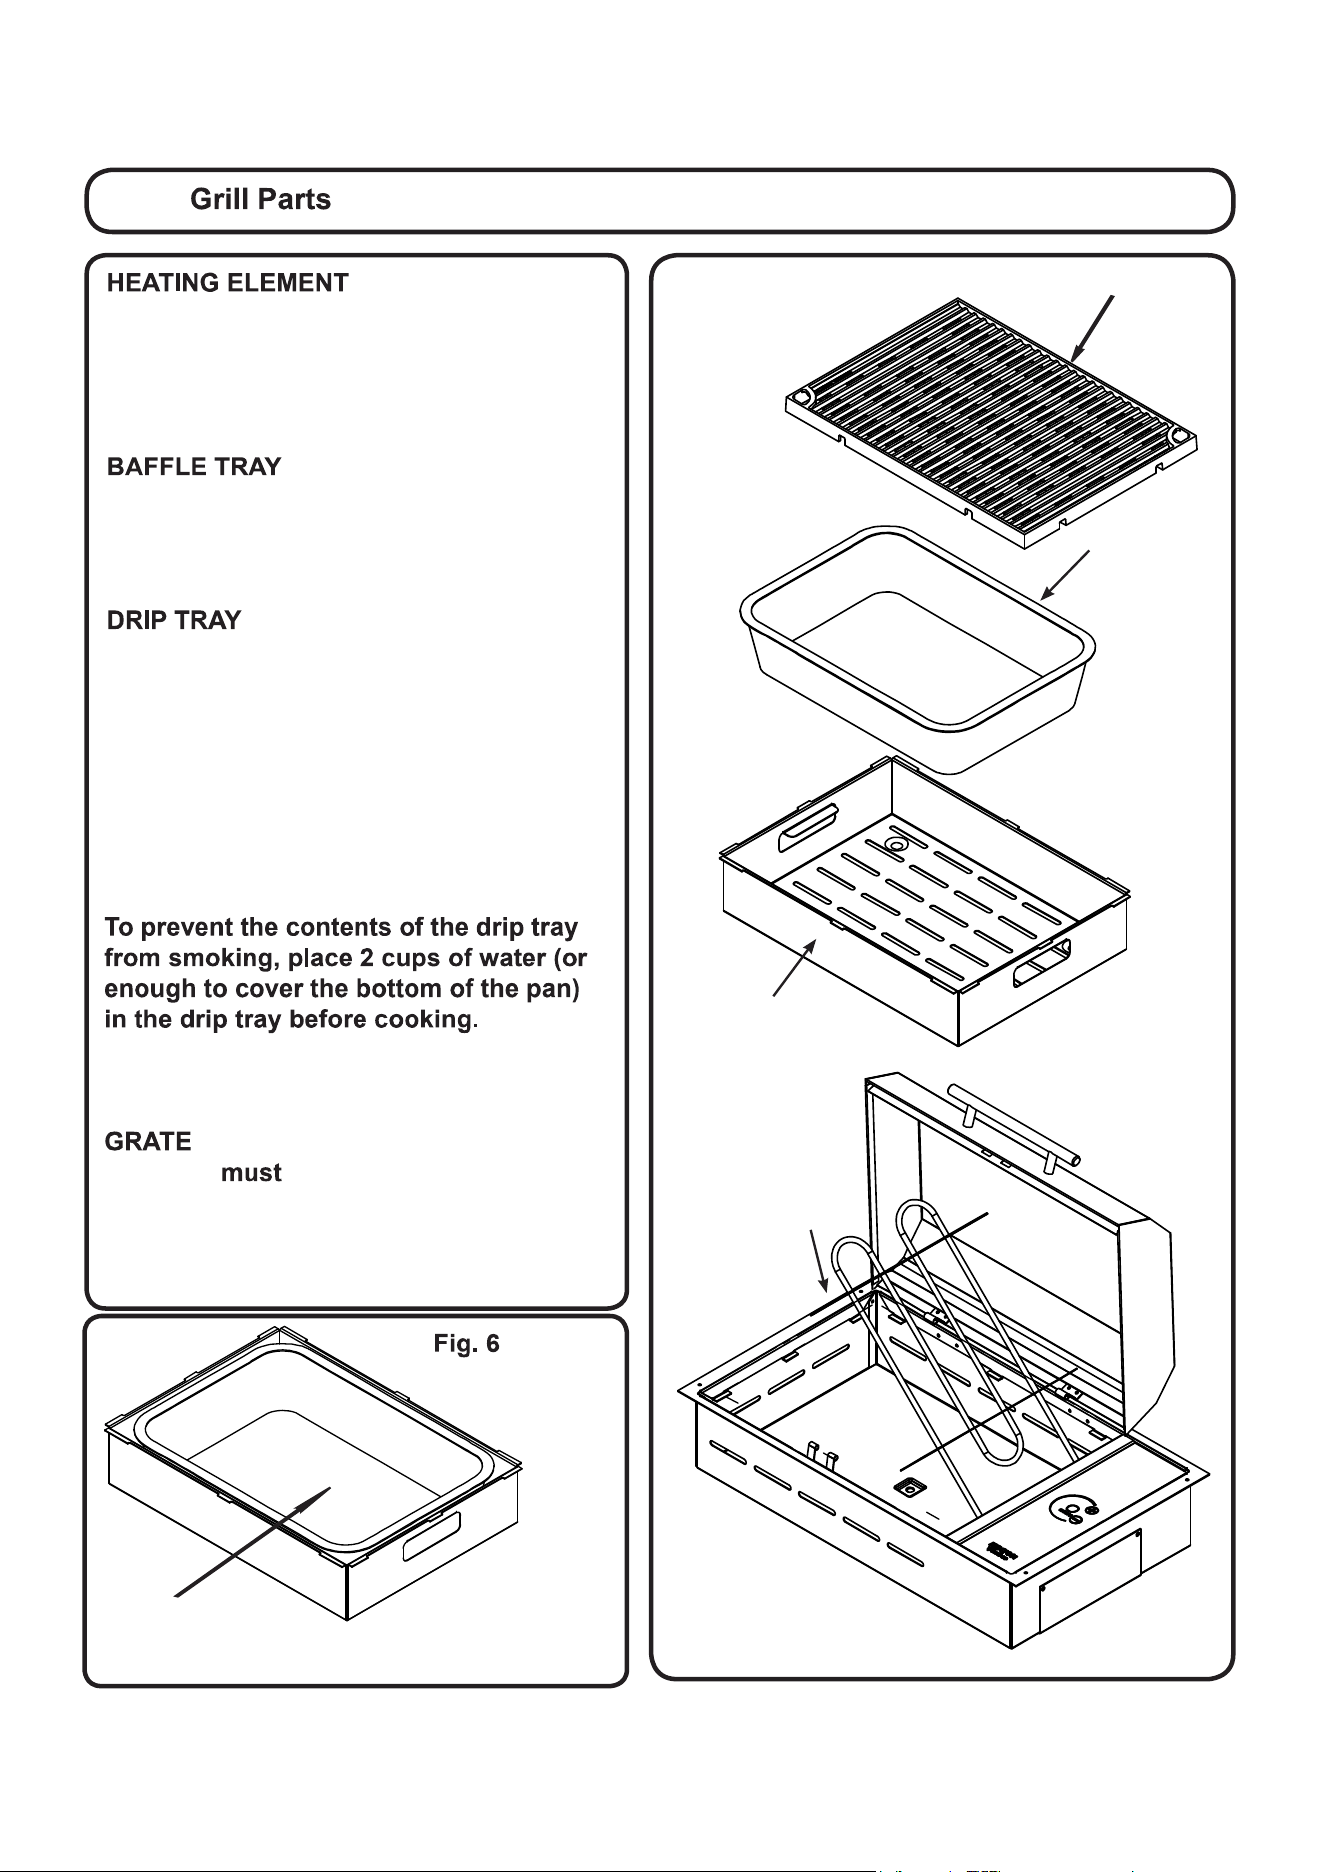
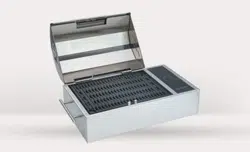
GRATE
BAFFLE
TRAY
DRIP TRAY
HEATING
ELEMENT
The heating element is designed to pivot as
showntoremove/replacethebafetrayand
drip tray. It will stay in the up position. To put
down apply slight downward pressure.
Thebafetraysupportsthedriptray,
heating element and grate and must always
be used when operating the grill.
The disposable drip tray collects all the fat
and juices created during the cooking
process. The drip tray must be emptied
after each use. When replacing the drip tray,
position the drip tray so that it is completely
containedinsidethebafetrayandinsuring
that the side or the rim of the drip tray does
notprotrudeoutsideofthebafetray.
(see Fig. 6)
The
replacement for the disposable drip tray is
Kenyon part #B96001.
The grate be cleaned after every use.
The grate has a nonstick coating for ease of
cleaning. Wash the grate after each use in
warm soapy water.
DRIP TRAY MUST BE CONTAINED
INSIDE OF BAFFLE TRAY AS SHOWN
19
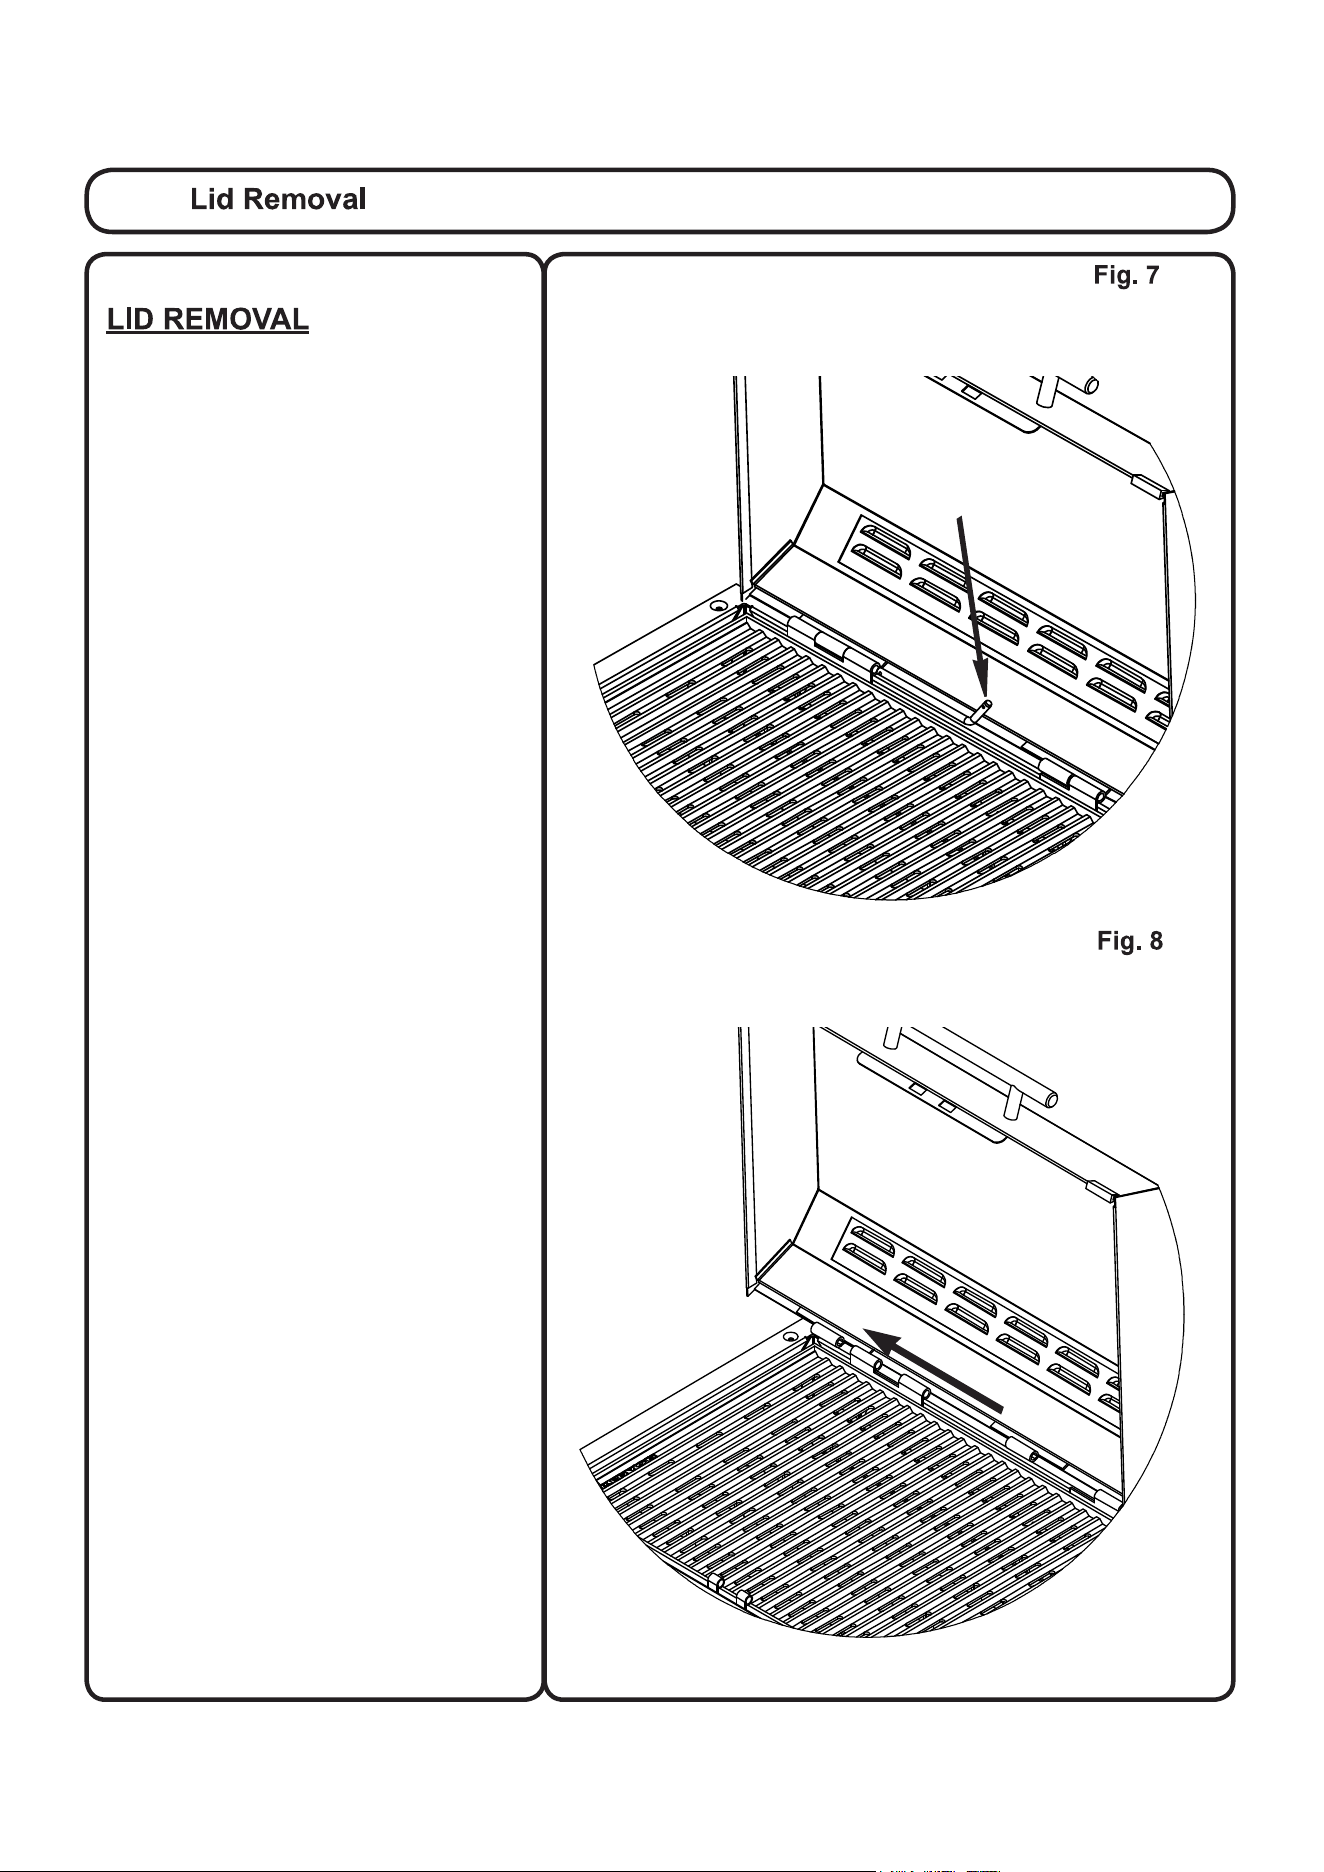
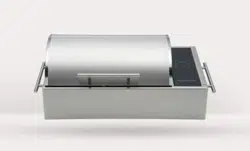
The grill lid is removable for cleaning. To
remove the lid, slide the quick release
pin out of the hinge.
(see Fig. 7)
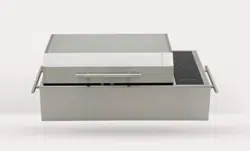
With the quick release pin removed,
grasp the lid, lifting on the left side to
clear the hinge and slide it the left until
clear of the hinge pin on the right. (see
Fig. 8) Once the lid is removed, it can
be washed in warm, soapy water.
QUICK RELEASE
PIN
20

21
KENYON
Statementof
Warranty
KenyonInternational,Inc(the“Company”)warrantsitsproductsinnormalusagetobefreeofdefectsin
materialsandworkmanshipsubjecttotheconditionsandlimitationsbelow.
Anypart,whichprovestobedefectiveinnormalusageduringthewarrantyperiodwillberepairedorreplacedbythe
Company.
InorderforproducttobecoveredunderthiswarrantyitmustbereturnedtotheCompanyforevaluation.Please
contactkenyonservice@cookwithkenyon.comforreturninstructions.
ThiswarrantycoverscertainproductsbuiltbytheCompanyandissubjecttothefollowingconditionsand
limitations:
1. TheCompany’sliabilityshallbelimitedtorepairorreplacement(choiceofremedyatCompany’soption)of
electroniccomponentsasmaybedefectiveinmaterialsorworkmanship.Thisliabilityislimitedtothreeyearsfrom
thedateoforiginalinstallationor42monthsfrominvoicedate,whichevercomesfirst;thiswarrantycoversparts
andlaboratpre-approvedrates.Stainlesssteeliswarrantedwithalifetimeguaranteetoberustfreewhencared
formonthlyasoutlinedinowner’smanual.Ifcorrosionbegins,contacttheCompanywithphotoevidenceof
corrosionforreplacementcomponents.
2. DeterminationofsuitabilityoftheproductfortheusecontemplatedbytheBuyeristhesole
responsibilityoftheBuyerandtheCompanyshallhavenoresponsibilityinconnectionwithsuch
suitability.
3. TheCompanyshallnotbeliableforanydamageresultingfrom:
•failuresduetouseoftheproductinapplicationsforwhichtheyarenotintended;
•failuresduetocorrosion,wearandtear,abuse,neglect,improperinstallationormaintenance;
•failuresduetobreakageofglass,accidentalorotherwise.
4. TheCompanyshallberesponsibleforgroundshippingchargestothelocationoftheappliance(home)
withintheContinentalUnitedStatesandCanada.Anyduties,expressorspecialshippingchargesare
attheexpenseoftheBuyer.
5. AlllaborallowedbytheCompanyunderthiswarrantymustbepre-authorizedandperformedbyanAuthorized
KenyonInternationalServiceCenter,unlessotherwisespecifiedinwritingbytheCompany.
THEREARENOOTHERWARRANTIESOFMERCHANTABILITY,FITNESSFORPURPOSEORANY
OTHERKIND,EXPRESSEDORIMPLIEDANDNONESHALLBEIMPLIEDBYLAW.Thedurationofanysuchwarranties
thatareneverthelessimpliedbylawforthebenefitofaconsumer,shallbelimitedtoaperiodofthreeyearsfromoriginal
purchasebytheuser.Somecountriesdonotallowlimitationsonhowlonganimpliedwarrantylasts,sothislimitationmay
notapplytoyou.
THECOMPANYSHALLNOTBELIABLEFORCONSEQUENTIALORINCIDENTALDAMAGESARISINGFROMTHE
BREACHOFTHISWARRANTY,WHETHEREXPRESSED,IMPLIEDORSTATUTORY.Somecountriesorstatesdonot
allowexclusionorlimitationofconsequentialorincidentaldamagessothislimitationorexclusionmaynotapplytoyou.
THISWARRANTYGIVESYOUSPECIFICLEGALRIGHTSANDYOUMAYALSOHAVEOTHERLEGALRIGHTSTHAT
MAYVARYFROMCOUNTRYTOCOUNTRYANDSTATETOSTATE.
KenyonInternational,Inc.
P.O.Box925•8HeritageParkRoad•Clinton,CT06413USA
Phone(860)664-4906FAX:(860)664-4907
1. Lisez TOUTES les instructions avant d’utiliser le produit.
2. Ne touchez pas aux surfaces brûlantes. Utilisez les poignées ou les boutons.
3.Pourvousprotégercontrelesélectrocutions,nesubmergezpaslecordonouleschesdansl’eau
ou dans tout autre type de liquide.
4. Une surveillance étroite est nécessaire lorsque des appareils électroménagers sont utilisés à
proximité d’enfants.
5. Débranchez la prise de courant de l’appareil lorsque qu’il n’est pas utilisé ou avant de le nettoyer.
Laissez-le refroidir avant d’y poser ou d’en retirer des pièces.
6.Nefaitespasfonctionnerunappareildontlecordond’alimentationoulachesontendommagés.
Si l’appareil ne fonctionne pas correctement, cessez de l’utiliser et contactez le détaillant
d’électroménagers agréé ou le fabricant le plus près de chez vous pour faire examiner, réparer et
régler l’appareil.
7. L’utilisation d’accessoires qui n’ont pas été fournis par le fabricant de l’appareil peut causer
des blessures.
8. Si le produit est utilisé comme gril portatif, rangez-le à l’intérieur lorsque vous ne vous en servez
pas.Sileproduitestutilisécommegrilencastré,unabriconvenabledoitêtreprévuandele
protéger contre la pluie directe. Des housses sont disponibles.
9. Ne laissez pas le cordon pendre par-dessus le bord de la table ou du comptoir de cuisine et ne
le laissez pas entrer en contact avec des surfaces brûlantes.
10. Ne placez pas l’appareil sur ou près d’un brûleur électrique ou à gaz.
11. Vous devez faire preuve d’une extrême prudence lorsque vous déplacez un appareil contenant
de l’huile brûlante ou d’autres liquides brûlants.
12.Brancheztoujoursenpremierlachedansl’appareil,puisensuitebranchezlecordon
d’alimentation dans la prise murale. Pour le débrancher, mettez toutes les commandes sur « Arrêt »,
puisretirezlachedelaprisemurale.
13.N’utilisezpasl’appareilàdesnsautresquecellesprévues.
14. Versez toujours au moins deux (2) tasses d’eau dans le plateau d’égouttage jetable avant de faire
griller des aliments.
15. Ne laissez jamais des enfants seuls. Il ne faut jamais laisser des enfants sans surveillance
autour du gril.
16. Laissez le gril refroidir avant d’enlever les grilles de cuisson, le plateau d’égouttage jetable
ou les couvercles.
17. Des combustibles, tels que des briquettes de charbon, ne doivent pas être utilisés dans cet appareil.
18. Assurez-vous que le gril est installé conformément aux instructions et qu’il est correctement mis
àlaterreparunélectricienqualié.
19. Ne remplacez pas et n’essayez pas de réparer une pièce quelconque du gril, à moins
d’indications contraires dans ce manuel.
Tous les autres travaux d’entretien doivent être effectués par un technicien d’usine autorisé.
20. N’essayez pas d’éteindre un incendie de graisse avec de l’eau, utilisez un extincteur
d’incendie chimique.
21.Nerangezpasdematériauxinammablesàproximitédugril.
R E M O V E & R E A D P R I O R T O G R I L L I NG
w w w . C o o k W i t h K e n y o n . c o m | 8 6 0 . 6 6 4 . 4 9 0 6 |
T h a nk y ou f or p ur c h as i n g th e W o r l d ’ s F i ne s t A ll Se as o ns ® E l ec tr i c Gr il l ! T h e re a r e a f e w si m p l e
s t ep s y ou c a n t ak e to e ns u r e yo ur g oo d de c is i o n w i l l l e a d to y ea r s o f W o rl d- C l a s s Gr il l i n g:
Q U I C K S T A R T T I P S
to purchase re cipe books, cook ing ute nsils,
griddles, grill covers, and more!
V I SI T O U R WE B SIT E
1.
2.
3.
4.
5.
6.
7.
8.
Remove g rate(s) and drip tray(s), clean both.
Inse rt the drip tray(s) into the bottom of grill. Make sure the burner b rackets are not
resting on the drip tray (s).
Always fill the drip tray(s) with 2 cups of liquid. Water will work, but why not try beer
or wine to add flavor to your fav orite food . Then re-install c ooking grate.
Depending on model, either har dwire your Kenyon All Seasons® Grill or plug it directly into
an o utlet, do not use ext ension cords.
Preheat grill w ith the lid closed for 5 - 7 minutes on desired heat setting for type of food:
Close lid and cook. Enjoy the best grilled food you have ever tasted!
Once your grilling session is complete, gr ab a wet paper towel and wi pe down your grate.
Once cool, place grate/griddle in the dish washer along with the dirty dishes so that it’s
ready for its next tour of duty!
While the grate is in the wash, don’t forget to clean out the drip tray contents.
This is an important step in preventing a grease fire.
-Vege tables 3-4 bars
-Chick en, pork and fish 4-5 bars
-Hamburgers 6 -7 b ars
-Steak 7-8 bars
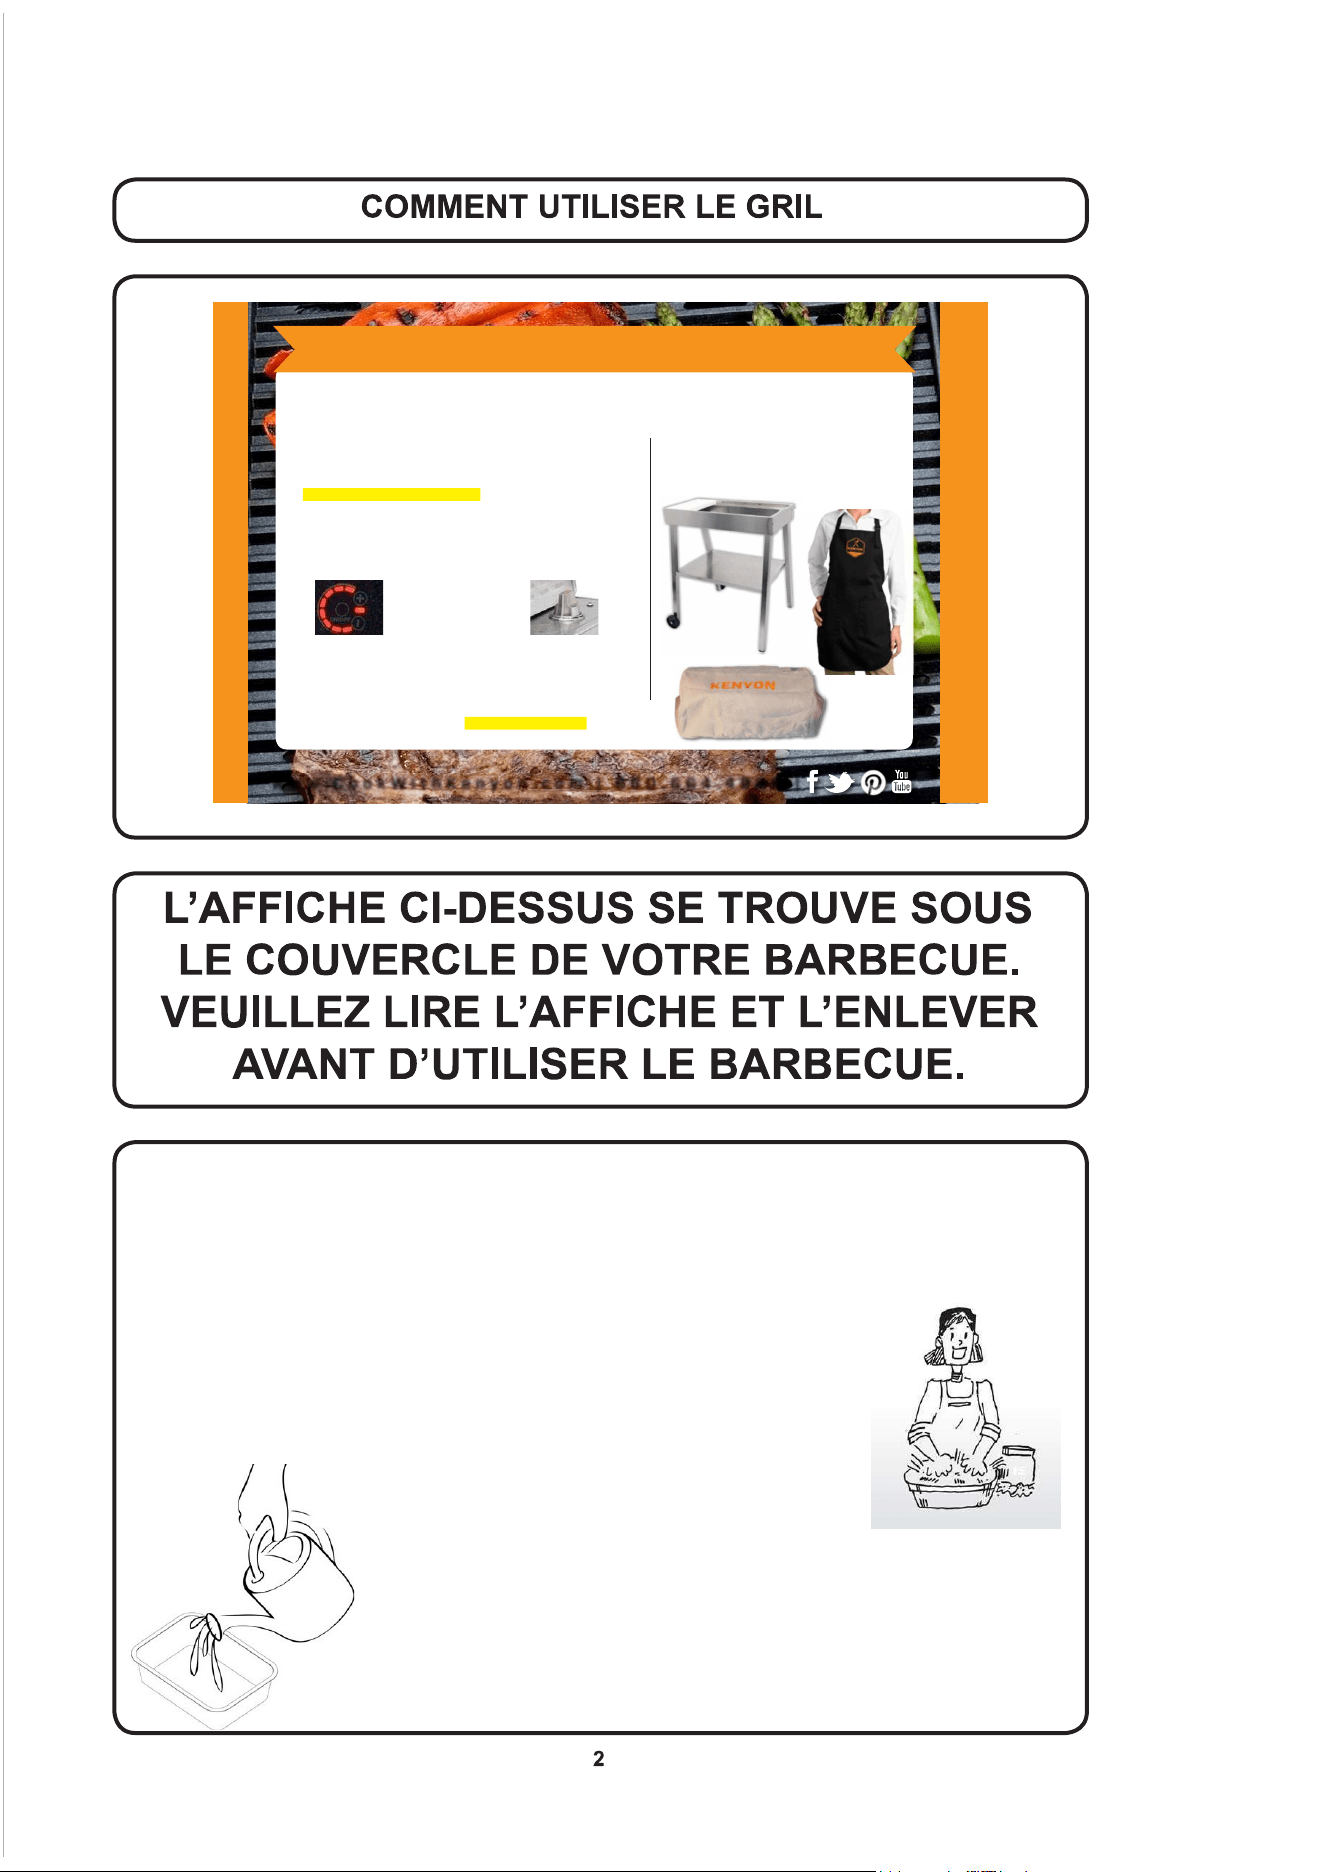
1. Avant d'utiliser votre gril, retirez la grille de cuisson et le plateau d'égouttage du gril. Lavez
le gril avec de l'eau chaude savonneuse et un tissu non abrasif. UTILISEZ UNIQUEMENT DES
USTENSILES EN PLASTIQUE POUR TEMPÉRATURE ÉLEVÉE LORSQUE VOUS FAITES
CUIRE DES ALIMENTS. Rendez-vous sur notre site internet www.cookwithkenyon.com pour
acheter un ensemble d'ustensiles en plastique et en acier inoxydable pour gril pour température
élevée.
2. Assurez-vous que le plateau d'égouttage est inséré sur tout son long
aubasdugriletquelespattesdexationdel'élémentchauffantsontbien
poséessurlespattesdexationdusupportdel'élément.
3. Recouvrez le fond du plateau d'égouttage de liquide. L'eau convient.
N'UTILISEZ PAS DE LIQUIDES INFLAMMABLES !
Autrement vous détruirez votre barbecue. Ajoutez
du jus de pomme lorsque vous faites griller du porc
pour donner une bonne saveur à la viande. Une canette de boisson
gazeuse au citron est excellente si vous faites griller du poisson. Essayez
toutes les boissons que vous aimez boire. Seulement n'oubliez pas de
verser du liquide dans le plateau d'égouttage avant de faire griller un
aliment.
4. Pour éviter la fumée lorsque vous utilisez votre gril, nettoyez toujours la surface de cuisson
après chaque utilisation. Lavez-la simplement avec de l'eau chaude et savonneuse, et un tissu
non abrasif ou lavez-la au lave-vaisselle. Videz le plateau d'égouttage et essuyez-le avec une
serviette en papier humide. Le plateau d'égouttage peut être utilisé plusieurs fois avant d'être
remplacé.
5. Placez votre grille de cuisson ou la plaque optionnelle (article n° B96000) sur l'élément
chauffant après avoir installé le plateau d'égouttage. Servez-vous de la plaque optionnelle pour
préparer des aliments tels que des œufs, des crêpes ou mon plat préféré, des pains dorés farcis !
6. Préchauffez le gril de 5 à 7 minutes à température élevée (8 barres allumées). Réglez la
température selon le type d'aliment.
• Bifteck 7 à 8 barres
• Hamburgers 6 à 7 barres
• Porc et poisson 4 à 5 barres
• Légumes 3 à 4 barres
7. Fermez le couvercle et faites cuire. Savourez les meilleurs aliments grillés jamais dégustés !
8.Nettoyer.C'esttrèsfacilecommevousallezlevoir.Aprèsquelegrilsoitsufsammentrefroidi
pour que vous puissiez y toucher, prenez quelques morceaux de serviette en papier et placez-les
sur la surface de cuisson. Versez environ une once d'eau sur les serviettes en papier et ensuite, à
l'aide des pinces en nylon pour température élevée, frottez avec les serviettes en papier en faisant
desmouvementsversl'avantetversl'arrièreandedétacherlesrésiduscolléssurvotregril.Jetez
les serviettes en papier à la poubelle et essuyez la grille à l'aide d'une serviette sèche en papier.
9.Unefoislagrillesufsammentrefroidie,enlevez-laetplacez-laaulave-vaissellepourun
lavage en profondeur.
10. Après avoir retiré la grille, soulevez l’élément chauffant et retirez le plateau d’égouttage.
Videz le contenu du plateau d’égouttage à un endroit approprié, prenez soin de ne pas le vider
sur la pelouse de vos voisins. Essuyez le plateau avec une serviette sèche pour le réutiliser. Le
plateau peut être utilisé plusieurs fois.
11. Au bout de 7 – 8 utilisations, vous devriez laver le couvercle. Vous pouvez le placer au lave-
vaisselle et le laver au cycle casseroles et poêles. Cela redonnera à votre gril son apparence
parfaite d’origine.
12.Avantdelaverlegril,assurez-vousquelasurfacedecuissonestsufsammentrefroidiepour
que vous puissiez la manipuler. Retirez ensuite la grille, soulevez l’élément chauffant jusqu’à ce
qu’il soit verrouillé en position haute, puis ensuite retirez le plateau d’égouttage.
13. Essuyez la surface en acier inoxydable à l’aide d’un linge humide pour
enlever tous les résidus des cuissons antérieures.
14. Votre gril Kenyon comprend une bouteille échantillon de produit nettoyant
pour acier inoxydable. Utilisez ce produit nettoyant une fois par mois pour
conserver l’apparence neuve de votre gril.
15. Le tableau de commandes électronique est en vitrocéramique ce qui le
rend étanche et le protège ainsi contre la pluie, la neige et la glace. Nettoyez la vitre à l’aide
d’un nettoyant à vitre et d’un linge doux. Si des tâches se forment, utilisez un nettoyant à
vitrocéramique que vous pouvez vous procurer à l’épicerie près de chez vous.
Frontier
– 120 V c.a. – 1300 W – 11 A
– 240 V c.a. – 1300 W – 6 A
Dimensions générales : 533 mm x 305 mm x 102 mm (187 mm avec le couvercle)
21 po x 12 po x 4 po (7 3/8 po avec le couvercle)
La profondeur ne comprend pas le raccord d'évacuation
Dimensions de découpe : 501,6 mm x 296 mm avec coins arrondis de 6 mm
19 3/4 po x 11 5/8 po avec coins arrondis de 1/4 po
– 120 V c.a. – 1300 W – 11 A
Dimensions générales : 533 mm x 305 mm x 219 mm
21 po x 12 po x 8-5/8 po
Floridian
– 120 V c.a. – 1300 W – 11 A
– 240 V c.a. – 1300 W – 6 A
Dimensions générales : 533 mm x 305 mm x 102 mm (206 mm avec le couvercle)
21 po x 12 po x 4 po (8-1/8 po avec le couvercle)
La profondeur ne comprend pas le raccord d'évacuation
Dimensions de découpe : 501,6 mm x 296 mm avec coins arrondis de 6 mm
19 3/4 po x 11 5/8 po avec coins arrondis de 1/4 po
– 120 V c.a. – 1300 W – 11 A
Dimensions générales : 533 mm x 305 mm x 238 mm
21 po x 12 po x 9-3/8 po
Rio
– 120 V c.a. – 1300 W – 11 A
– 240 V c.a. – 1300 W – 6 A
Dimensions générales : 584 mm x 397 mm x 102 mm (206 mm avec le couvercle)
23 po x 15 5/8 po x 4 po (8-1/8 po avec le couvercle)
La profondeur ne comprend pas le raccord d'évacuation
Dimensions de découpe : 501,6 mm x 296 mm avec coins arrondis de 6 mm
19 3/4 po x 11 5/8 po avec coins arrondis de 1/4 po
No Lid
– 120 V c.a. – 1300 W – 11 A
– 240 V c.a. – 1300 W – 6 A
– 120 V c.a. – 1300 W – 11 A
– 240 V c.a. – 1300 W – 6 A
Dimensions générales : 533 mm x 305 mm x 102 mm
21 po x 12 po x 4 po
La profondeur ne comprend pas le raccord d’évacuation
Dimensions de découpe : 501,6 mm x 296 mm avec coins arrondis de 6 mm
19 3/4 po x 11 5/8 po avec coins arrondis de 1/4 po
Half Height Lid
– 120 V c.a. – 1300 W – 11 A
– 240 V c.a. – 1300 W – 6 A
Dimensions générales : 533 mm x 305 mm x 102 mm (159 mm avec le couvercle)
21 po x 12 po x 4 po (6-1/4 po avec le couvercle)
La profondeur ne comprend pas le raccord d’évacuation
Dimensions de découpe : 501,6 mm x 296 mm avec coins arrondis de 6 mm
19 3/4 po x 11 5/8 po avec coins arrondis de 1/4 po
Votre gril All Seasons
®
est assemblé et prêt à être utilisé. Avant d'utiliser votre gril, inscrivez le
numéro de série de l'appareil ici pour référence ultérieure : _________________. Vous pouvez
trouver le numéro de série sur le côté court du gril, à l'extrémité où est situé le panneau de
commande vitré. Le numéro de série est composé de six caractères.
Le conteneur dans lequel est livré le gril All Seasons
®
comprend les articles suivants : quatre (4)
vis de montage, un tuyau d'évacuation de 0,9 m (3 pieds), un raccord coudé ou un bouchon de
vidange selon le modèle portatif ou encastré, un manuel d'instructions et un produit nettoyant pour
acier inoxydable. Si un des composants est manquant ou endommagé, appelez immédiatement
KENYON.
L’installation de ce produit doit être conforme aux codes électriques nationaux, régionaux et
locaux. Le tableau ci-dessous indique la tension, l'intensité de courant et la fréquence requises
pour alimenter le gril.
Le gril doit être alimenté par un circuit individuel mis à la terre et protégé par un disjoncteur. La
capacitéducircuitdoitcorrespondreauxspécicationstechniquesdumodèle,tellesqu'indiquées
dans le tableau ci-dessous.
Votre gril All Seasons
®
est fourni avec une collerette d'encastrement en acier inoxydable poli
installée en usine qui est prévue pour un montage avec des vis à bois à tête fraisée bombée. La
collerette d'encastrement du gril est conçue de sorte à maintenir l'appareil fermement en place
dans le comptoir de cuisine. Si vous le souhaitez, vous pouvez sceller le bord du comptoir de
cuisine sous la collerette d'encastrement.
d'une
épaisseur comprimée maximale de 1,6 mm (1/16 po) Si désiré, de la silicone peut être utilisée
pour sceller uniquement les bords de la vitre.
B70050
B70056
B70060
B70062
B70080
B70082
B70085
B70090
1300 W
120 V c.a. 11 A 60 Hz
Câble avec mise à la
terre à 3 broches avec
disjoncteur de fuite
à la terre
B70051
B70057
B70061
B70067
B70081
B70086
1300 W
240 V c.a. 6 A 60 Hz
Cordonà3ls
sansche
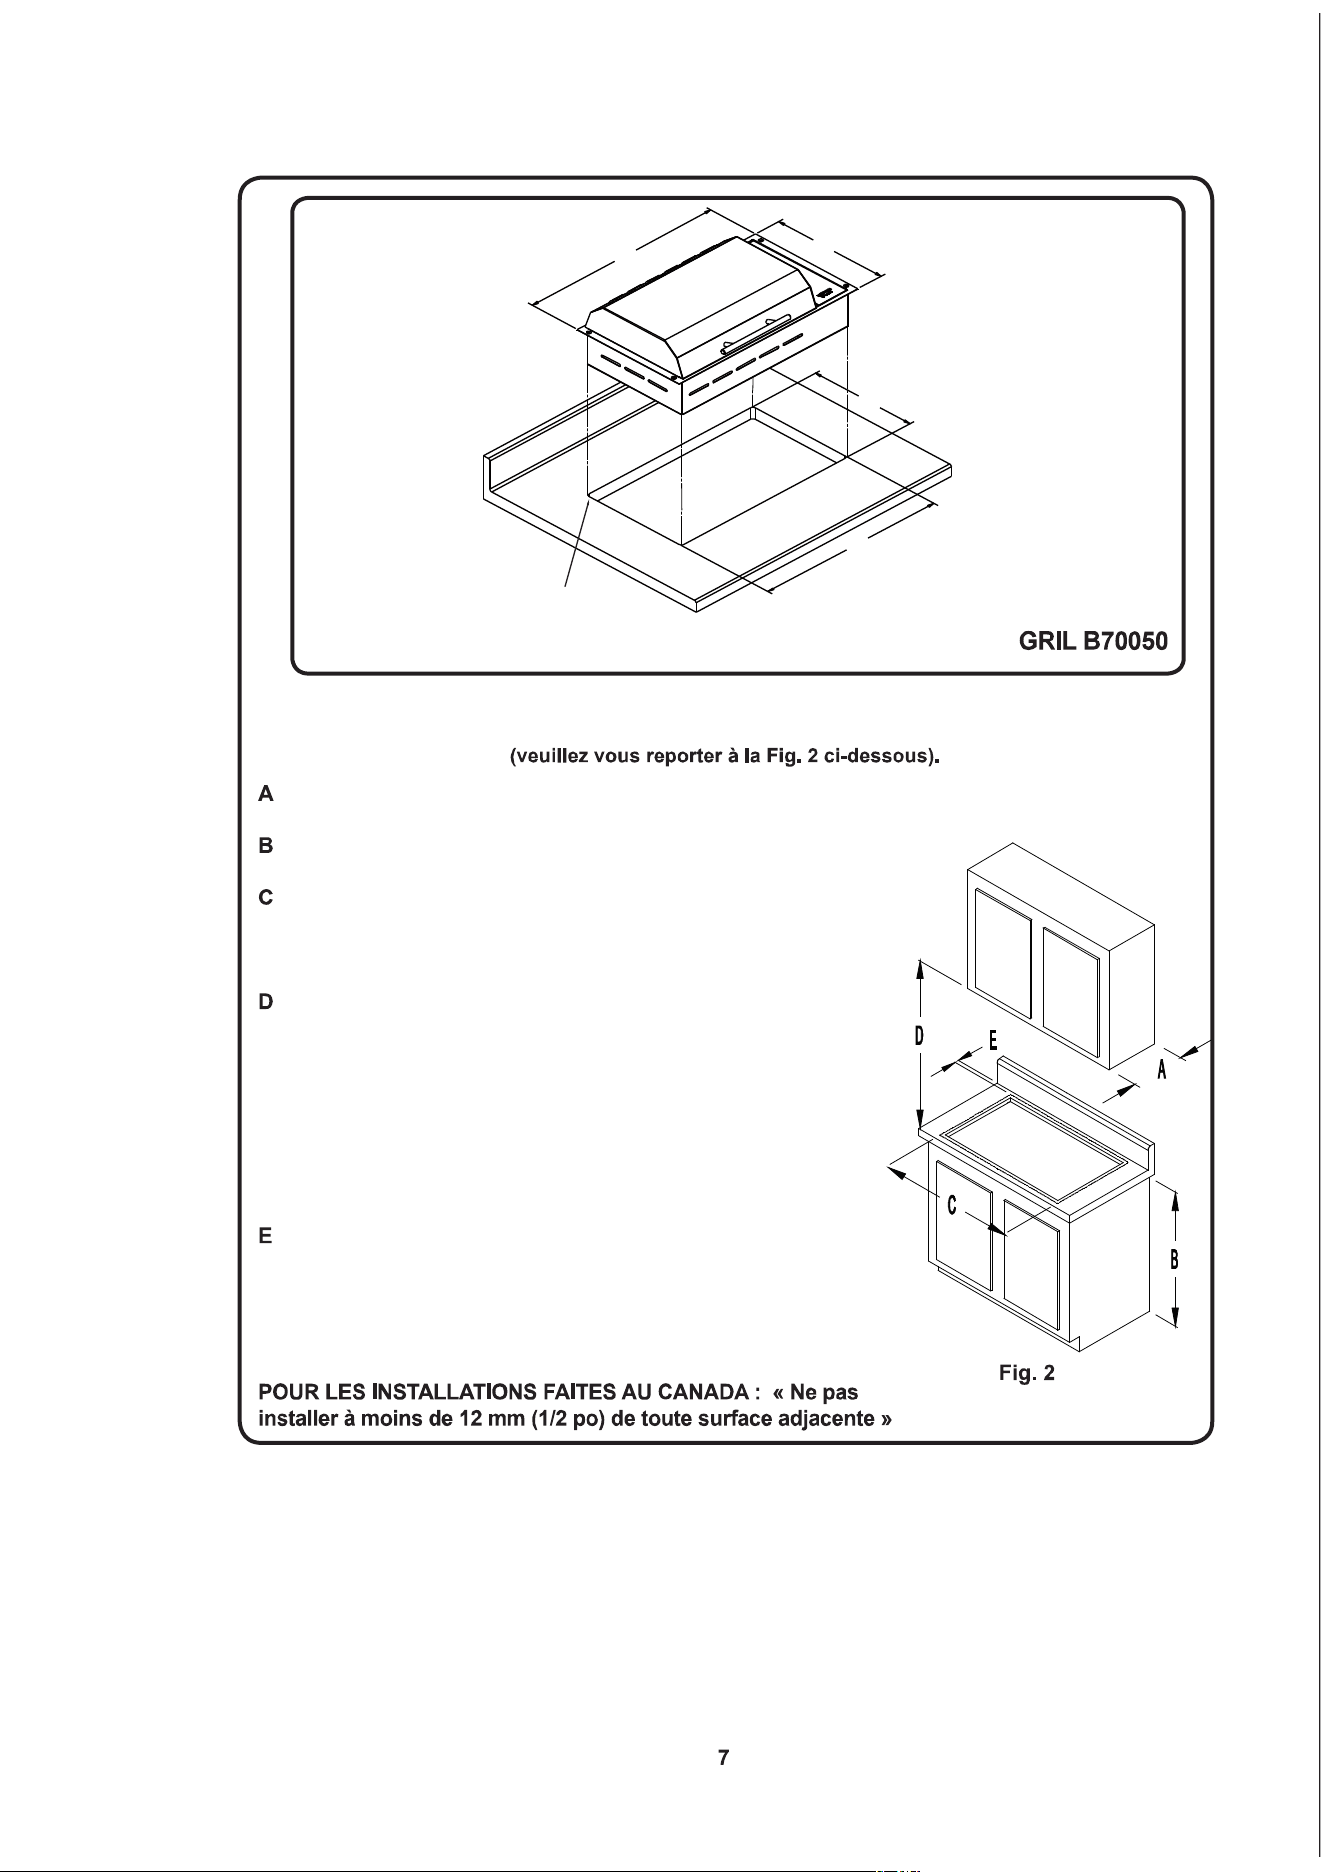
Veuillez lire cette partie avant de découper l'endroit où le gril sera installé.
Ilestimportantdeplanierl’installationdugril,gardantàl'espritlesdimensionssuivantes
– Armoires de rangement supérieures d’une profondeur
maximale de 33 cm (13 po)
– 91,4 cm (36 po) est la distance minimale entre le dessus du
comptoir et le plancher
– La surface minimale du comptoir de cuisine sur lequel le gril
sera posé doit être égale ou supérieure aux dimensions
générales du gril (reportez-vous à la page 8 pour connaître les
dimensions générales du gril).
– Dégagement d'au moins 76,2 cm (30 po) entre le dessus
du gril et la partie inférieure d'une armoire en bois ou en métal
non protégé ou un dégagement de 61 cm (24 po) si le fond de
l’armoire de rangement en bois ou en métal est protégé par un
celloderme ignifuge d’une épaisseur minimale de 0,6 cm (1/4 po)
recouvert d’une feuille d’acier d'un calibre d'au moins N° 28 MSG,
d'acier inoxydable d'une épaisseur d'au moins 0,38 mm (0,015 po),
d'aluminium d'une épaisseur d'au moins 0,61 mm (0,024 po)
ou de cuivre d'une épaisseur de 0,51 mm (0,020 po).
– Une distance minimale de 10,2 cm (4 po) entre le dosseret
du comptoir de cuisine et le rebord du gril (reportez-vous à la
page 8 pour connaître les dimensions générales du gril).
Distance minimale de 3,8 cm (1,5 po) entre le devant du
comptoir de cuisine et le gril.
53,3 cm (21 po)
30,5 cm (12 po)
29,5 cm (11 5/8 po)
50,2 cm (19 3/4 po)
0,6 cm (1/4 po)
coins arrondis
DIMENSIONS de la partie découpée dans le comptoir de cuisine
Avantdefaireladécoupeducomptoir,vérieztouslesdégagements.Assurez-vousdelaisserun
dégagementsufsantentrelegriletlesparoisavantsetlatéralesdel'armoireinférieure.Assurez-
vouségalementdeprévoirundégagementadéquatpourledosseretandepouvoirouvrirle
couvercle au complet.
Une aération appropriée en dessous du comptoir de cuisine doit être prévue pour assurer le
bon fonctionnement du gril. La chaleur émise par le fond du gril pendant son fonctionnement
entraînera la surchauffe de cette zone
sielleestinsufsammentaérée.
Lorsquevousdécoupezlecomptoirdecuisine,prévoyezunrayonauxcoinsand'éviterla
ssurationdumatériaudontlecomptoirestfabriqué.Unrayonde6mm(1/4po)estgénéralement
utilisé, mais suivez les instructions du fabricant du comptoir de cuisine relatives au rayon minimal
etauxrenfortsrequispouréviterquelecomptoirnesubissedesdommagesauldutemps.
Si votre comptoir de cuisine est fabriqué en matériau solide, demandez au fabricant les
recommandations particulières concernant l'installation d'une table de cuisson et un gril. Pour
la plupart des surfaces solides de comptoir, les fabricants exigent des supports de coins
supplémentairesand'éviterd'endommagerlecomptoirdecuisine.Servez-vousdesvisfournies
pourxerlegrilaucomptoirdecuisine.Faitesattentiondenepastropserrerlesvis.Scellezla
collerette d'encastrement au comptoir de cuisine à l'aide d'un matériau d'étanchéité en acrylique.
Si votre comptoir de cuisine est fabriqué en pierre, vous devrez utiliser un latex en acrylique
pour installer le gril en place. Posez un cordon épais de matériau d'étanchéité autour de la partie
découpée et placez le gril. Essuyez et enlevez l'excédent de matériau d'étanchéité en utilisant de
l'eau. Laissez sécher le matériau d'étanchéité pendant au moins 24 heures en prenant garde de
ne pas permettre à l'humidité d'entrer en contact avec le matériau d'étanchéité. N'utilisez pas les
vis fournies avec votre gril. Le matériau d'étanchéité retiendra fermement en place le gril. N'utilisez
pas de matériau d'étanchéité à base de silicone car cela tâchera la pierre.
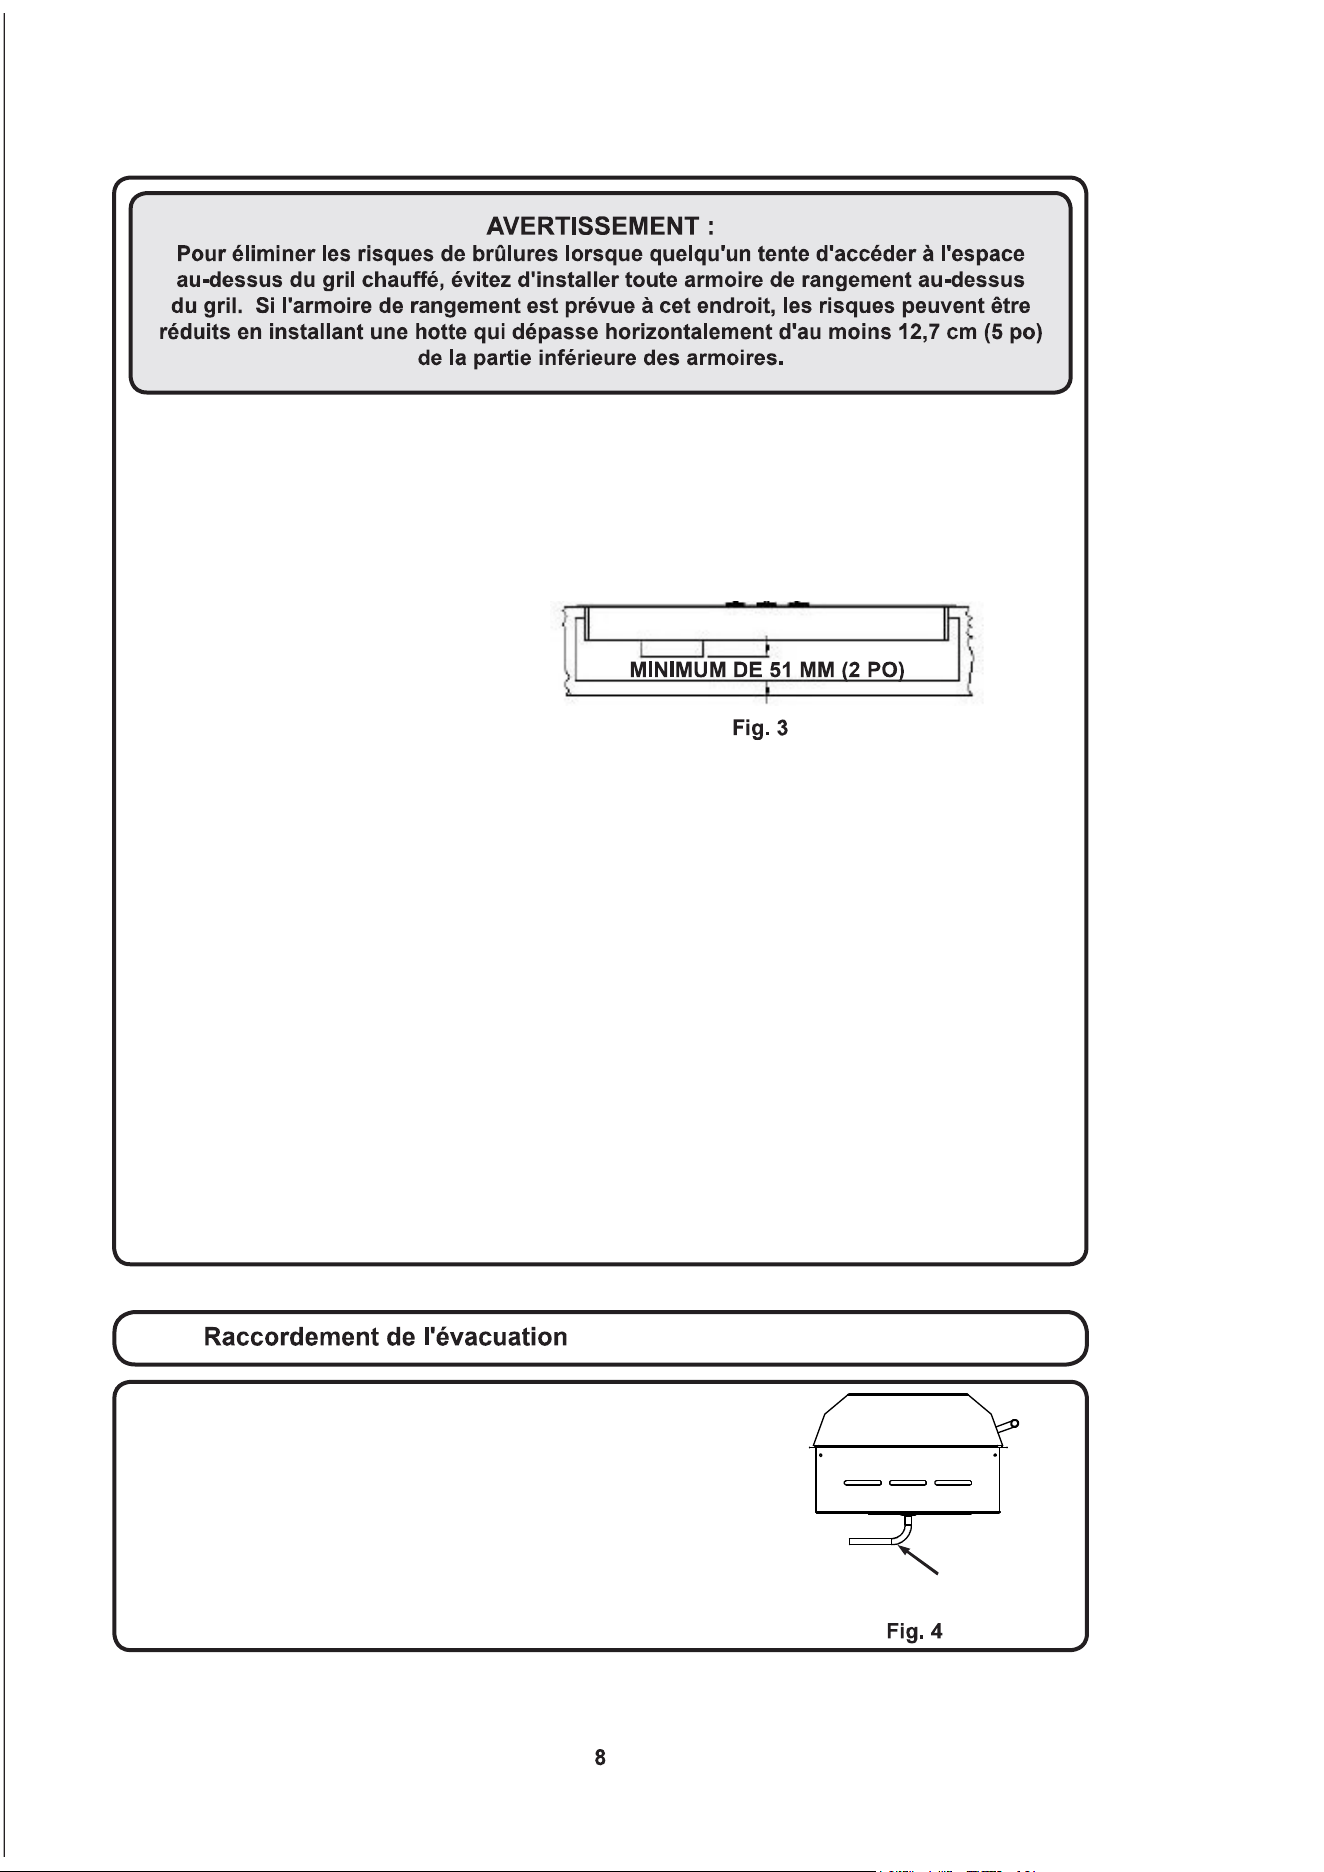
Pour vous faciliter la tâche, le gril est muni d'un raccord de
tuyauterie en laiton de 3 mm (1/8 po) NPT et d'un raccord coudé à
90ºenlaitonauquelvouspouvezraccorderletuyauexiblede
6 mm (1/4 po) de diamètre
intérieur fourni avec votre gril. Le modèle portatif du gril comprend
unbouchonletéenlaitonmontédansleraccordd'évacuation.Si
vous prévoyez utiliser votre gril comme appareil portatif, conservez
letuyauetleraccordà90ºpouruneinstallationéventuelle.
Raccord d'évacuation pour tuyau d'un
diamètre intérieur de 6 mm (1/4 po)
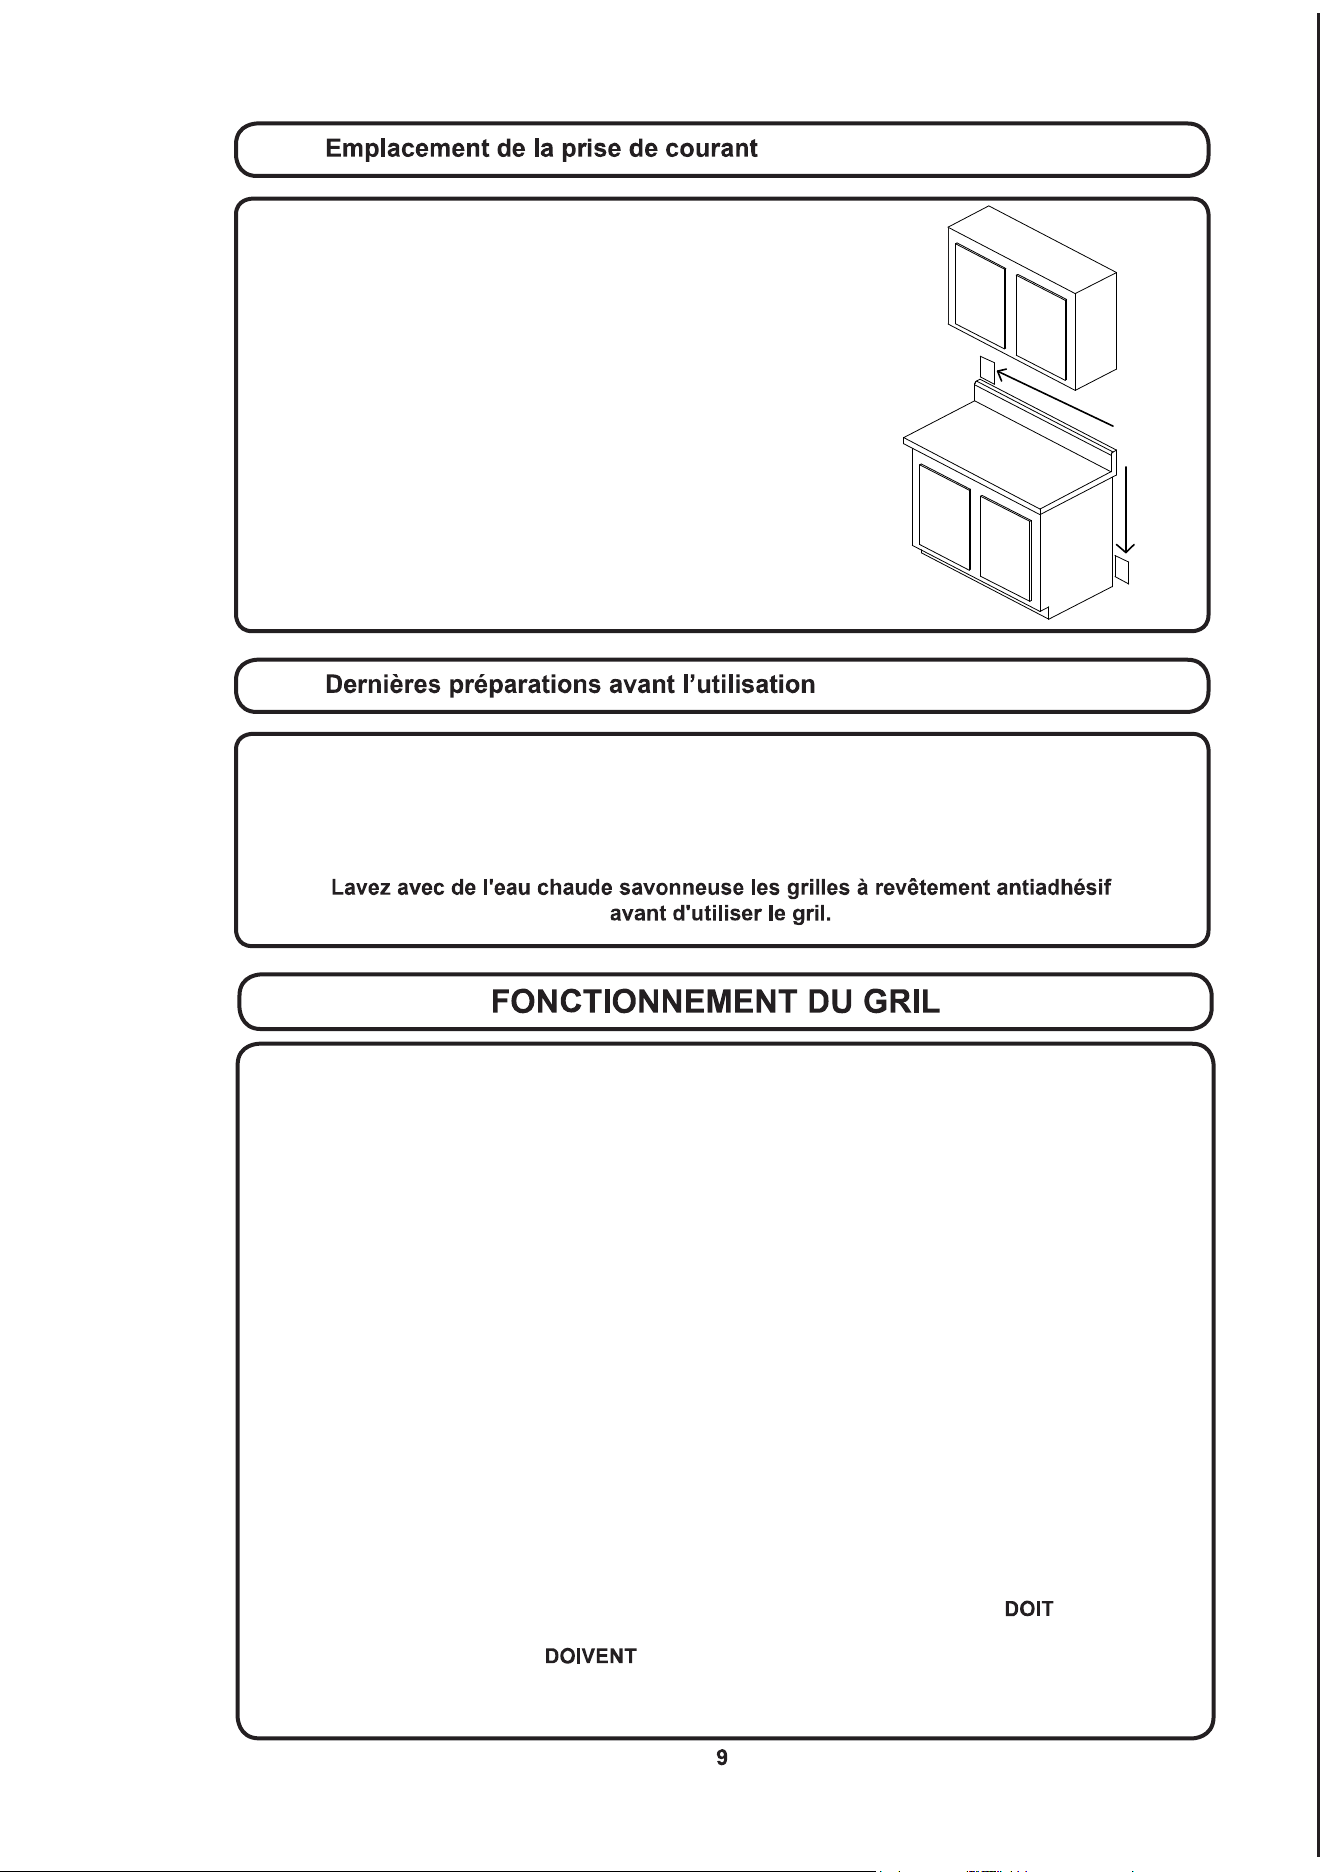
Assurez-vous que la prise de courant prévue pour le gril
se trouve à un endroit facilement accessible. Cela permet à
l’utilisateur de brancher et de débrancher facilement le gril.
Un tel montage est nécessaire pour assurer un nettoyage
et un rangement sécuritaires du gril.
emplacements
de prises
suggérés
Retirez la pellicule protectrice en plastique du couvercle, de la collerette d'encastrement et du
panneau vitré. Nettoyez le gril avant la première utilisation. Un nettoyage en profondeur avec
un nettoyant à acier inoxydable ou à vitre permettra d'enlever toute trace d'adhésif laissée par
la pellicule en plastique, ainsi que les huiles de fabrication.
N'ESSAYEZ JAMAIS D'ÉTEINDRE UN INCENDIE DE GRAISSE AVEC DE L'EAU
Étouffezlefeuoulesammesouutilisezunextincteuràpoudrechimiqueouàmousse.
N’UTILISEZ QUE DES POIGNÉES ISOLANTES SÈCHES
La vapeur produite par des poignées mouillées ou humides pourrait causer des brûlures. Ne laissez
pas la poignée entrer en contact avec la grille ou l'élément chauffant du gril. N’utilisez pas de serviette
ou de linge épais au lieu de poignées de cuisine.
NE CUISINEZ JAMAIS SUR UNE GRILLE OU PLAQUE DE GRIL ENDOMMAGÉE
Si la grille se brise, la graisse et l'huile pourraient entrer en contact direct avec l'élément chauffant,
créant ainsi des risques d'électrocution ou d'incendie. Communiquez immédiatement avec un centre
de service autorisé ou avec le Service d’assistance à la clientèle de KENYON au (860) 664-4906.
NETTOYEZ LE GRIL AVEC PRUDENCE
Si vous utilisez une éponge ou un linge humide pour essuyer les déversements sur la surface de cuisson
chaude, prenez garde de ne pas subir de brûlure de vapeur. Certains produits nettoyant produisent des
émanations nocives lorsqu’appliqués sur une surface chaude. Lisez l’étiquette du produit avant de l’utiliser.
NE TOUCHEZ PAS LES ÉLÉMENTS CHAUFFANTS OU LA GRILLE
L'élément chauffant et la grille resteront brûlants pendant un certain temps après la cuisson. Il faut
laisser refroidir ces composants avant de les manipuler soigneusement et prudemment pendant le
nettoyage car ils peuvent être brûlants au point de causer de graves brûlures.
NETTOYEZ LE GRIL APRÈS CHAQUE UTILISATION
Cet appareil est muni d'un plateau d'égouttement amovible et jetable. Ce plateau être enlevé
et nettoyé après CHAQUE utilisation. Ne laissez pas la graisse s'accumuler entre les cuissons. La
cuvetteetleplateaudéecteur être utilisés lorsque le gril est utilisé pour de la cuisson. Un
excédent de graisse pourrait se répandre à l'intérieur du gril, annulant par ceci votre garantie et créant
des risques d'incendie.
NE LAISSEZ JAMAIS SANS SUPERVISION UN GRIL LORSQU'IL EST RÉGLÉ À
TEMPÉRATURE ÉLEVÉE
Unréglagedetempératureélevéepeutgénérerunegrandequantitédefuméeetenammerlagraisse.
NE NETTOYEZ PAS L'APPAREIL AVEC DE L'EAU SOUS PRESSION
Ne nettoyez jamais le gril avec de l'eau ou d'autres types de nettoyants sous pression. Autrement, la
garantie sera annulée et des risques graves d'électrocution pourraient être créés. Nettoyez toujours le
gril avec un linge et un produit nettoyant pour acier inoxydable ou pour vitre.
ENTREPOSAGE
Si le produit est utilisé comme gril portatif, rangez-le à l'intérieur lorsque vous ne vous en servez pas.
Sileproduitestutilisécommegrilencastré,unabriconvenabledoitêtreprévuandeleprotéger
contre la pluie directe. Des housses sont disponibles.
POUR ÉVITER LA FUMÉE
Pour éviter que les accumulations dans la cuvette à graisse ne produisent de la fumée, versez 2
tassesd'eau(ouunequantitésufsantepourrecouvrirlefondduplateau)danslacuvetteàgraisse
avant d'entreprendre la cuisson.
N'UTILISEZ PAS DE CASSEROLES OU D'AUTRES PLATS SUR LE GRIL
VEUILLEZ GARDER CE MANUEL D'INSTRUCTIONS PRÈS DU GRIL POUR RÉFÉRENCE ULTÉRIEURE
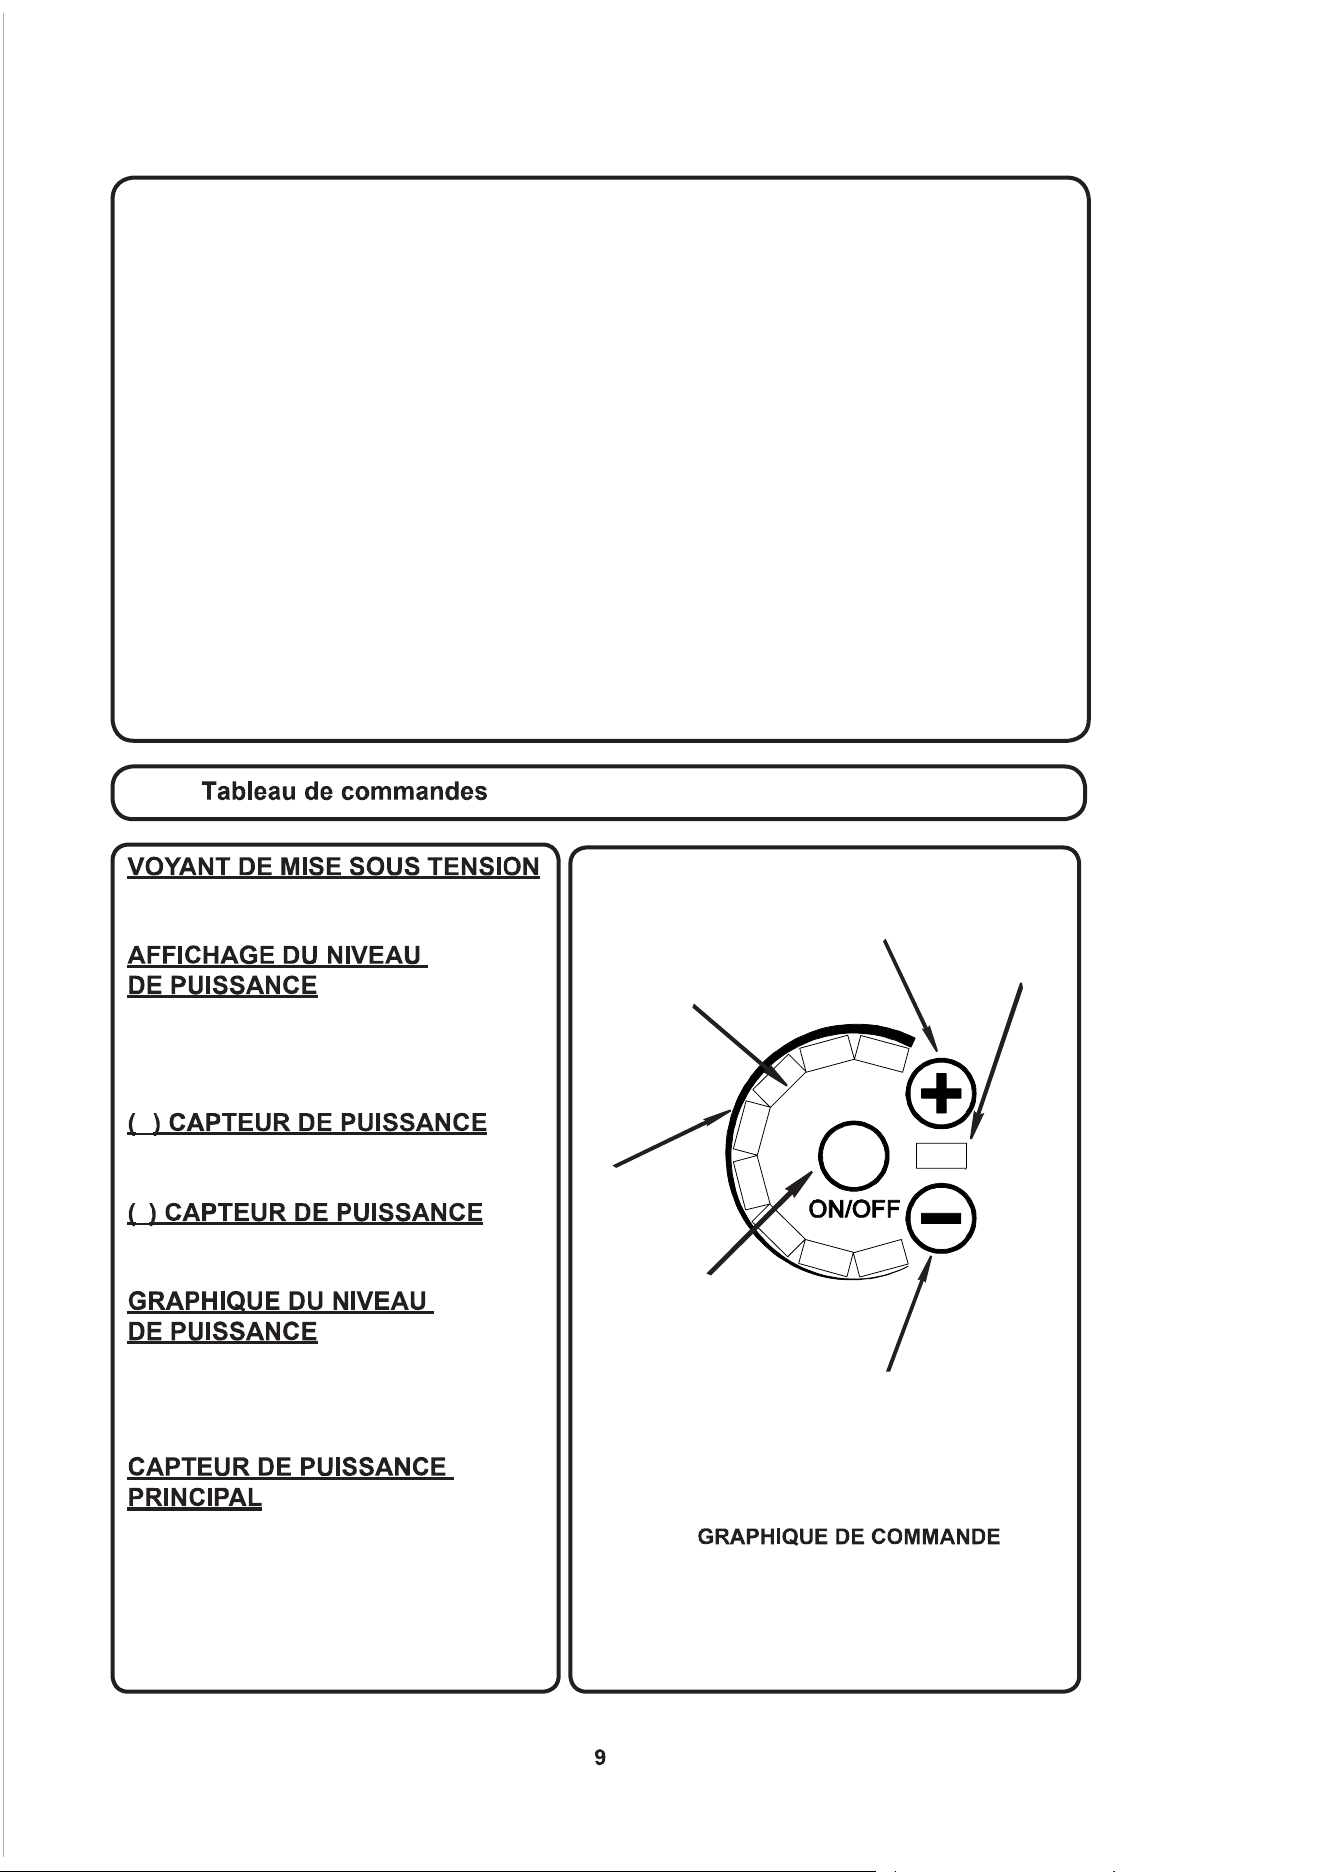
L'afcheurindiquesilegrilestenposition
MARCHE ou ARRÊT.
L'afcheurindiquelapuissancecaloriquedu
gril. Les voyants lumineux suivent la trajectoire
desgraphiquesafchésàl'écran.Huitniveaux
de puissance sont possibles.
+
Sivoustouchezcecapteur,lapuissancecalorique
du gril sera augmentée par incrément de un.
–
Si vous touchez ce capteur, la puissance
caloriquedugrilseraréduiteparincrémentdeun.
Illustreleniveaudepuissancecalorique
générée par l'élément chauffant. La ligne
passe de mince à épaisse, indiquant par ceci
une puissance faible à élevée.
Il s'agit de la commande de puissance principale
du gril. Si vous appuyez sur cette touche lorsque
le gril est en position ARRÊT, alors le contrôleur
sera activé et le gril sera mis sous tension. Si
vous appuyez sur cette touche lorsque le gril
est en position MARCHE, alors le gril sera mis
hors tension.
AFFICHAGE DU
NIVEAU DE
PUISSANCE
CAPTEUR DE
PUISSANCE
PRINCIPAL
GRAPHIQUE
DU NIVEAU
DE PUISSANCE
VOYANT
DE MISE
SOUS
TENSION
(–) CAPTEUR
DE PUISSANCE
(+) CAPTEUR
DE PUISSANCE

Lorsque le gril est mis sous tension, le
contrôleur lancera un processus d'auto-
calibrage. Le contrôleur émettra un son de
conrmationetl'écrans'allumerapendant
un bref instant. Le gril est maintenant prêt
à être utilisé.
Pour mettre le gril en MARCHE, appuyez et
maintenez enfoncé le Capteur de puissance
principal pendant 2 secondes. Le contrôleur
émettra alors un bip et le voyant de mise sous
tension s'allumera.
VOYANT DE MISE
SOUS TENSION
CAPTEUR DE
PUISSANCE
PRINCIPAL
AFFICHAGE DU
NIVEAU DE
PUISSANCE
(CHALEUR
RÉGLÉE À 8)
Votre gril KENYON offre huit (8) réglages de
température différents, de 1 à 8, que vous
pouvez choisir à l'aide des capteurs ( ) et
( ). Le réglage de température est afché
tel qu'illustré à droite. L'élément chauffant
s'allume et s'éteint à différents intervalles de
temps pour faire varier le niveau de chaleur.
Plus le réglage est augmenté, plus longtemps
l'élément chauffant restera allumé, augmen-
tant ainsi la température de cuisson du gril.
Pour arrêter le gril, simplement le Capteur de puissance principal
.
Le contrôleur sera mis hors tension et il éteindra l'élément chauffant.
La commande électronique de votre gril KENYON a été programmée en gardant la sécurité à l'esprit
et elle comprend une fonction d'arrêt automatique. Le gril est programmé pour s'arrêter après un
délai prédéterminé suivant la mise sous tension (voir le tableau ci-dessous). La commande arrêtera
égalementl'appareils'ilatteintunetempératurelimiteprédénie.Sicelaseproduit,laissezlegril
refroidir pendant 20 à 30 minutes.
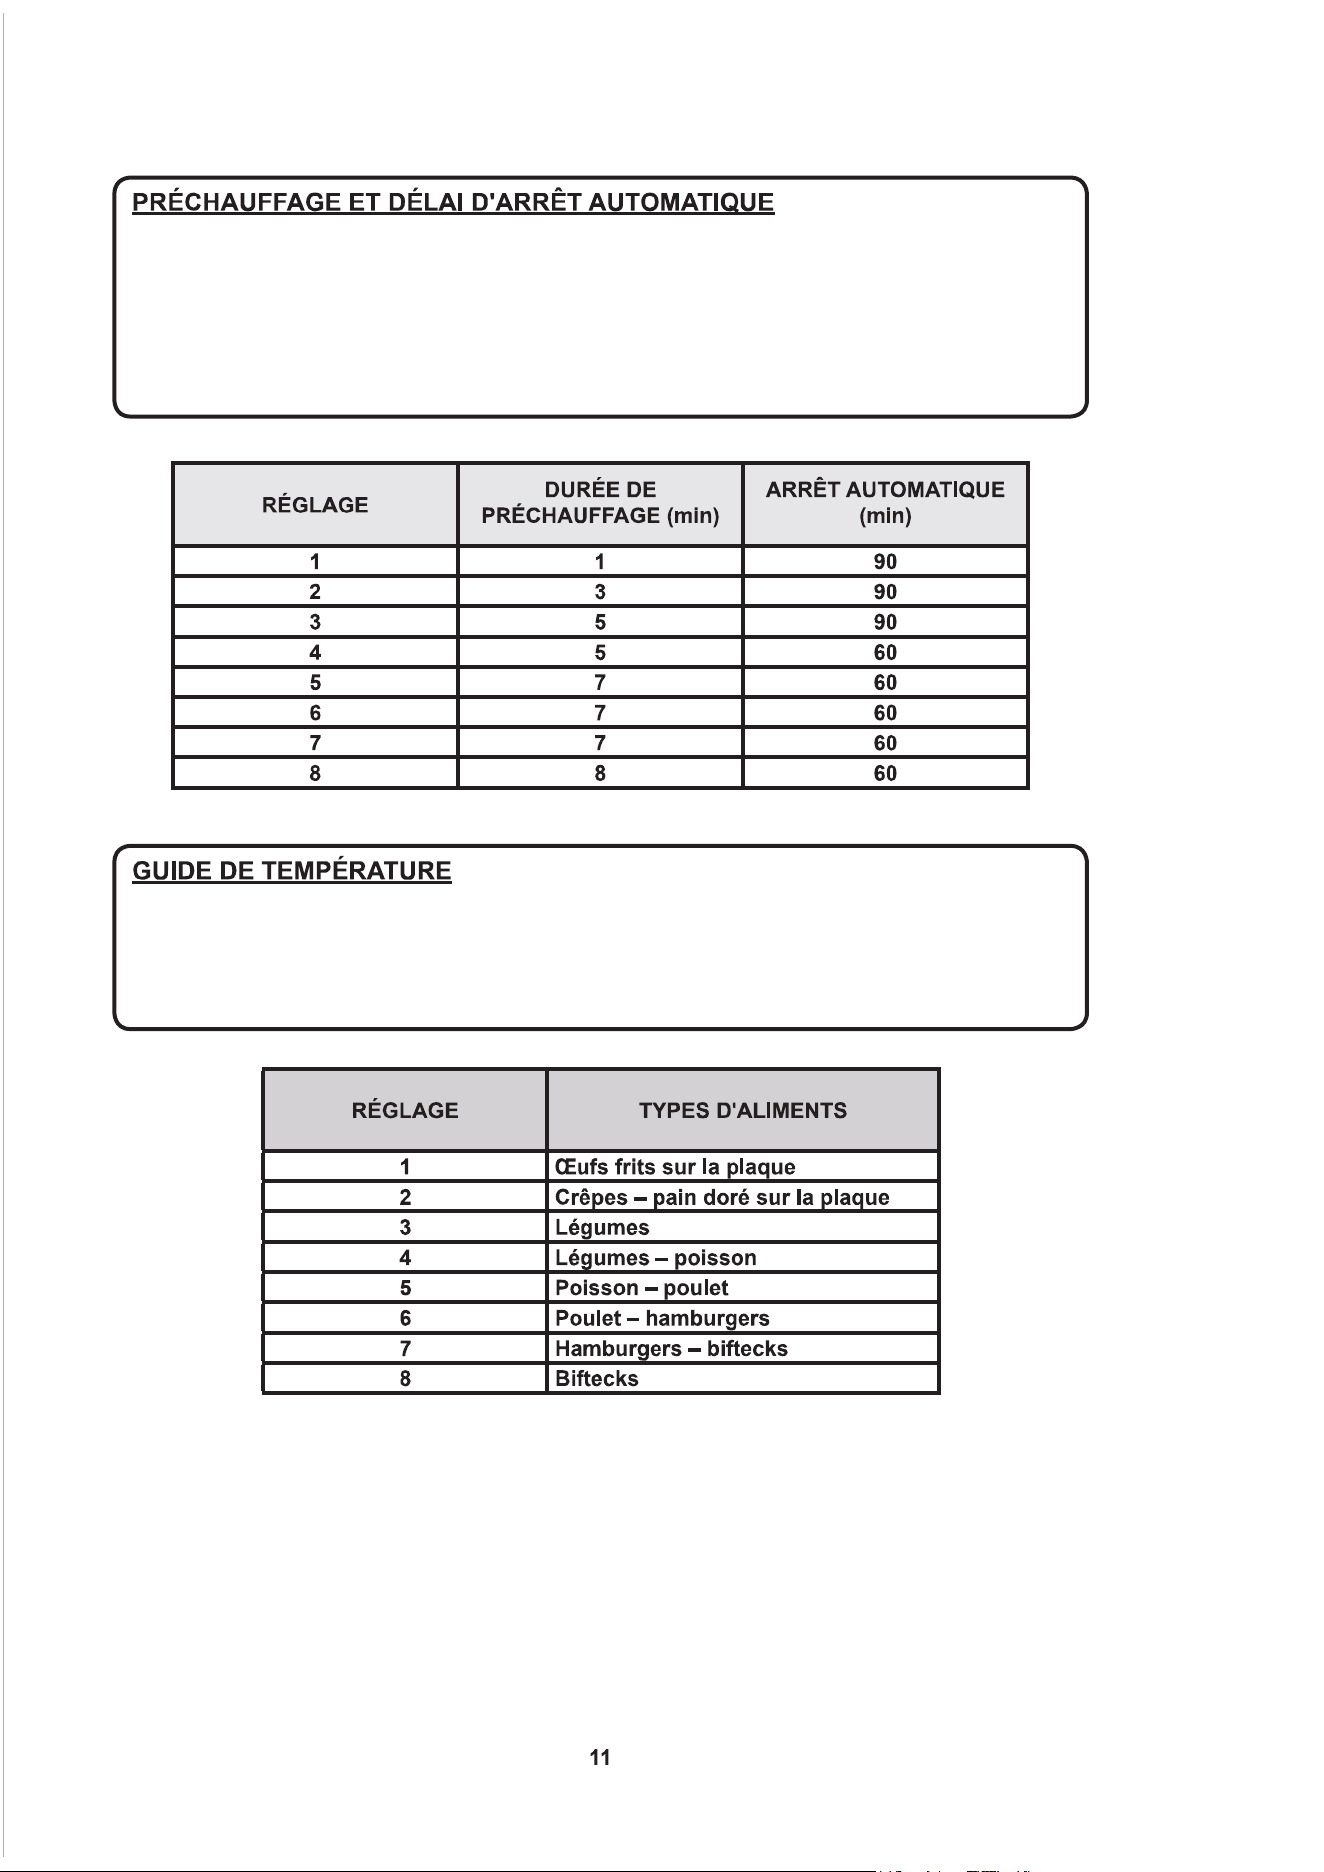
La commande du gril est dotée d'une fonction de préchauffage qui applique la pleine puissance
pendant une durée de temps déterminée pour chacun des réglages de puissance sélectionnés.
Cette fonction de préchauffage porte à la température de cuisson souhaitée la grille/plaque
plus rapidement, vous permettant ainsi de commencer à cuisiner plus vite. Le tableau ci-
dessous indique les durées de préchauffage et les délais d'arrêt automatique de chaque réglage de
puissance.
Les informations suivantes sont données à titre informatif. Des facteurs tels que le vent, les
températures extérieures, la température des aliments qui sont placés sur le gril peuvent avoir
une incidence sur la durée de cuisson. Le gril est conçu et prévu pour assurer les meilleurs
résultats de cuisson lorsque le couvercle est abaissé ou fermé.
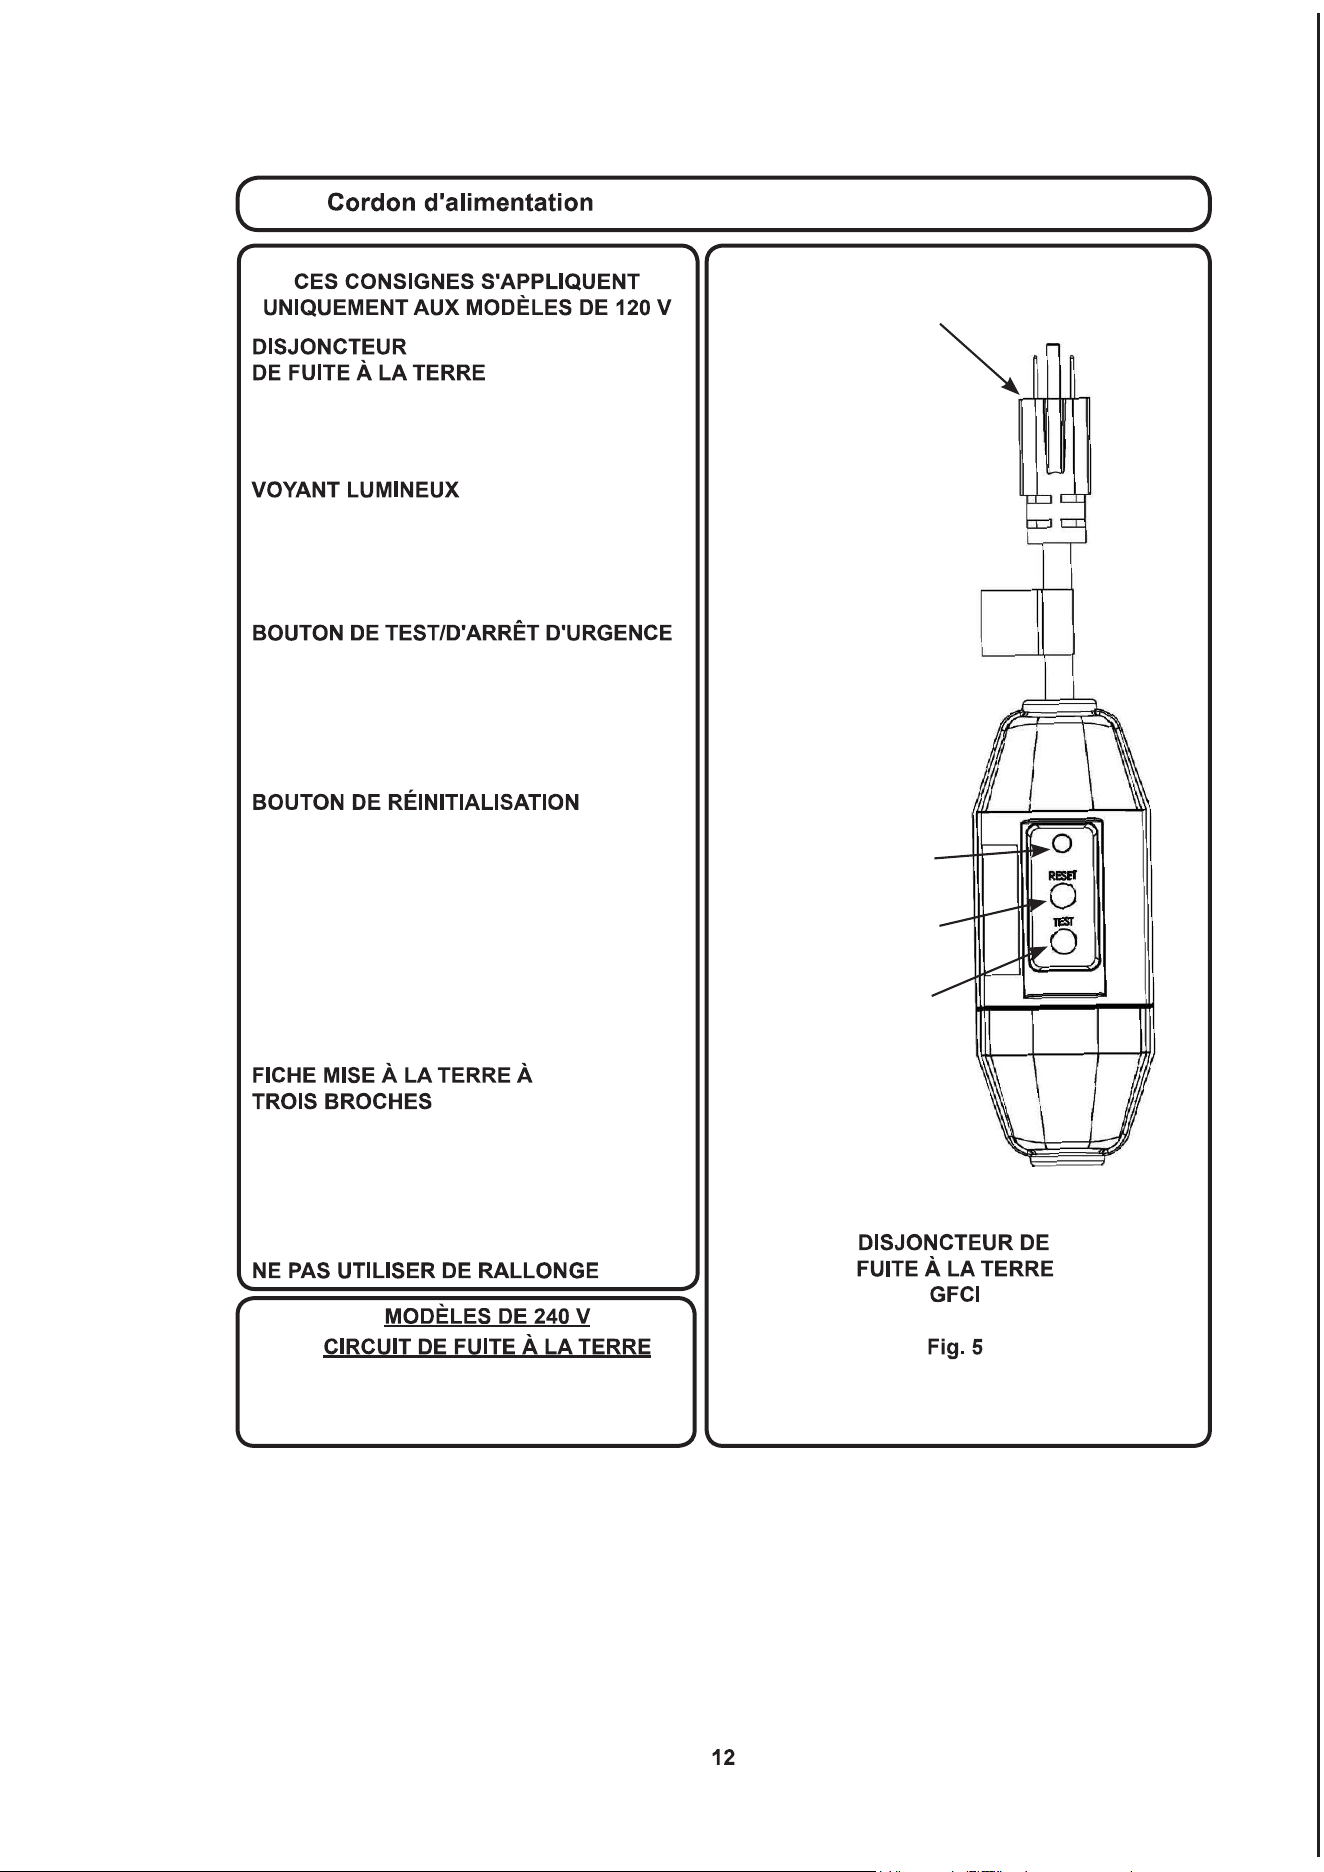
BOUTON
DE RÉINITIALISATION
FICHE MISE À LA TERRE À TROIS BROCHES
VOYANT
LUMINEUX
BOUTON
DE TEST
Le circuit d’alimentation électrique (240 V) de-
vrait être muni d'un interrupteur de fuite à la
terre.Vériezlaconformitéauxcodeslocaux.
Le disjoncteur de fuite à la terre est un
dispositif conçu pour protéger l'utilisateur
contre les risques d'électrocution.
Le voyant lumineux restera allumé pendant
que l'appareil est sous tension et il indique
que le disjoncteur de fuite à la terre
fonctionne correctement.
Pour tester le disjoncteur de fuite à la terre,
appuyez sur ce bouton. Le voyant lumineux
s'éteindra et le gril sera mis hors tension. Il
est conseillé de tester le disjoncteur de fuite
à la terre tous les mois.
Pour réinitialiser le disjoncteur de fuite à la
terre à son fonctionnement normal, appuyez
sur ce bouton. Le voyant lumineux s'allumera
et le gril sera mis sous tension. Si le voyant
lumineuxnes'allumepas,celasignieque
le disjoncteur de fuite à la terre a détecté
un dysfonctionnement. Débranchez le
disjoncteur de fuite à la terre depuis la prise
de courant et n'utilisez pas le gril.
ATTENTION : Pour assurer une protection
continue contre les risques d'électrocution,
le disjoncteur de fuite à la terre doit être
branché dans une prise de courant
correctement mise à la terre.
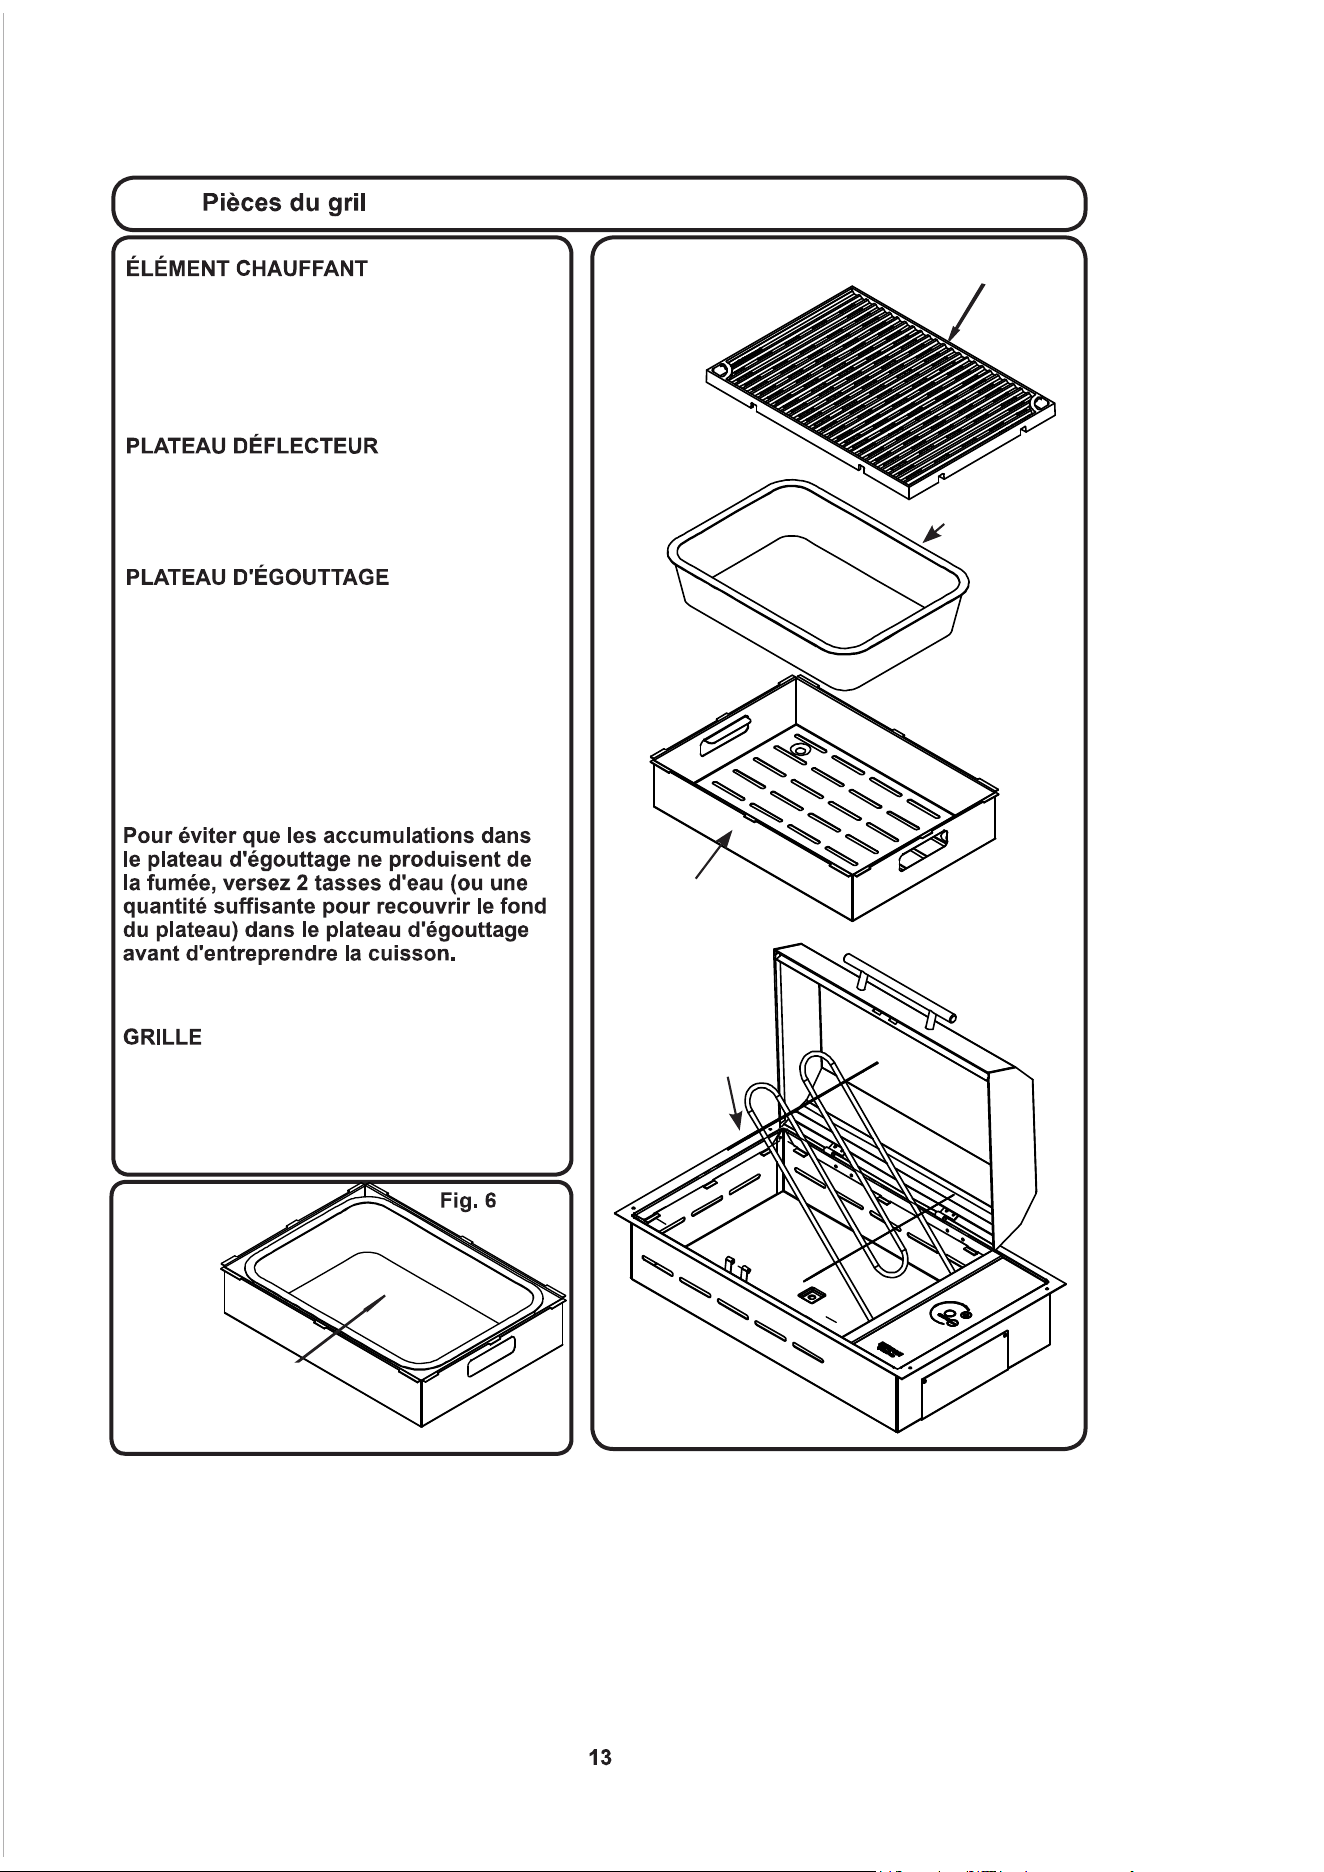
GRILLE
PLATEAU
DÉFLECTEUR
PLATEAU
D'ÉGOUTTAGE
ÉLÉMENT
CHAUFFANT
L'élément chauffant est conçu de sorte à
pouvoirpivoter,telqu'illustré,andeper-
mettrederetirer/remplacerleplateaudéec-
teur et le plateau d'égouttage. Il restera en
position haute. Pour l'abaisser, poussez-le
doucement vers le bas.
Leplateaudéecteursupporteleplateau
d'égouttage, l'élément chauffant et la grille,
et il doit être utilisé à chaque fois que vous
faites fonctionner le gril.
Le plateau d'égouttage jetable ramasse tout
le gras et le jus produit lors de la cuisson.
Le plateau d'égouttage doit être vidé après
chaque utilisation. Lorsque vous remplacez
le plateau d'égouttage, placez-le de sorte
à ce qu'il soit complètement à l'intérieur du
plateaudéecteuretassurez-vousqueles
côtés ou le bord du plateau d'égouttage ne
dépassentpasduplateaudéecteur.
(voir Fig. 6)
Le numé-
ro d'article de la pièce de remplacement du
plateau d'égouttage est B96001.
La grille doit être nettoyée après chaque
utilisation. La grille est recouverte d'un revê-
tement antiadhésif pour faciliter le nettoyage.
Lavez la grille après chaque utilisation avec
de l'eau chaude et savonneuse.
LE PLATEAU
D'ÉGOUTTAGE
DOIT ÊTRE PLACÉ
ÀL'INTÉRIEUR DU
PLATEAU DÉFLECTEUR TEL QU'ILLUSTRÉ

Le couvercle du gril peut être démonté
et lavé. Pour retirer le couvercle, faites
glisser la goupille de démontage rapide
à l'extérieur de la charnière.
(voir Fig. 7)
Après avoir dégagé la goupille de
démontage rapide, saisissez le
couvercle, soulevez-le du côté gauche
pour dégager la charnière et faites-le
glisser vers la gauche jusqu'à ce qu'il
soit dégagé de la charnière à droite.
(voir Fig. 8) Une fois le couvercle retiré,
vous pouvez le laver avec de l'eau
chaude et savonneuse.
GOUPILLE DE
DÉMONTAGE RAPIDE

KENYON
Déclarationdegarantie
KenyonInternational,Inc.(la«Société»)garantitquesesproduits,dansdesconditionsnormalesd'utilisation,sontexemptsdetout
défautdematériauetdefabrication,sousréservedesconditionsetlimitationsci-dessous.
Toutepièces'avérantdéfectueusedansdesconditionsnormalesd'utilisationpendantlapériodedegarantieseraréparéeou
remplacéeparlaSociété.
Pourêtrecouvertparlaprésentegarantie,leproduitdoitêtreretournéàlaSociétéàdesfinsdevérification.Veuillez
contacterkenyonservice@cookwithkenyon.compourobtenirlesinstructionsrelativesauxretours.
Laprésentegaranties'appliqueàcertainsproduitsfabriquésparlaSociétéetestassujettieauxconditionset
limitationssuivantes:
1. LaresponsabilitédelaSociétéselimiteàlaréparationouauremplacement(actioncorrectiveàladiscrétiondela
Société)descomposantsélectroniquesdontlesmatériauxoulafabrications'avèrentdéfectueux.Cetteresponsabilitéest
limitéeàtroisanssuivantladated’installationd'origineouà42moissuivantladatedefacturation,selonlapremière
occurrence;laprésentegarantiecouvrelespiècesetlamain-d’œuvreàuntauxprofessionnelpréapprouvé.L'acier
inoxydableestgarantiàviecontrelarouillelorsqu'ilestentretenumensuellement,commeindiquédanslemanuel
d'utilisation.Sileprocessusdecorrosionestentamé,veuillezcontacterlaSociétéetluifaireparvenirdesphotosàtitre
depreuvespourobtenirdescomposantsderechange.
2. L'adéquationduproduitàl’usageenvisagéparl’Acheteurrelèvedelaseuleresponsabilitédel’Acheteur,etlaSociéténe
peutêtretenueresponsabledecettedécision.
3. LaSociéténepeutêtretenueresponsabledesdommagesdécoulantde:
•défaillancescauséesparl’utilisationduproduitdansdesapplicationspourlesquellesiln’apasétéprévu;
•défaillancescauséesparlacorrosion,l’usure,uneutilisationabusive,oubienunmontageouentretieninadéquat;
•défaillancescauséesparlebrisdeverre,accidentelouautre.
4. LaSociétéestresponsabledesfraisd’expéditionderetourparvoieterrestrejusqu'aupropriétairedel’appareildansles
limitesducontinentnord-américain(États-UnisetCanada).Touslesautresfraisdedouane,deserviceexpressoude
livraisonspécialesontfacturésàl'Acheteur.
5. TouslestravauxautorisésparlaSociétéenvertudelaprésentegarant iedoiventêtrepréalablementautoriséset
effectuésparlepersonneld’uncentredeserviceKenyonInternationalagréé,saufindicationcontraireécritedela
Société.
AUCUNEAUTREGARANTIEDEQUALITÉMARCHANDE,DECONFORMITÉAUXBESOINSOUDETOUTEAUTRENATURE,
EXPLICITEOUIMPLICITE,N'ESTSTIPULÉEOUPRÉSUMÉEPARLALOI.Laduréedesgarantiesprésuméesnéanmoinsparla
loipourprotégerlesconsommateursseralimitéeàtroisansàcompterdeladated’achatparl'utilisateur.Certainspaysne
permettentpasleslimitationsdeduréedesgarantiesimplicites,parconséquentilestpossiblequelaprésentelimitationne
s’appliquepasdansvotrecas.
LASOCIÉTÉNEPEUTÊTRETENUERESPONSABLEDETOUTDOMMAGECONSÉCUTIFOUINDIRECTRÉSULTANTD’UNE
VIOLATIONDEGARANTIE,QU’ELLESOITEXPLICITE,IMPLICITEOUPRÉVUEPARLALOI.CertainspaysouÉtatsne
permettentpasl’exclusionoulalimitationdedommagesconsécutifsouindirects,parconséquentilestpossiblequelaprésente
exclusionoulimitationnes’appliquepasdansvotrecas.
LAPRÉSENTEGARANTIEVOUSCONFÈREDESDROITSLÉGAUXPRÉCISETILSEPEUTQUEVOUSBÉNÉFICIIEZ
D’AUTRESDROITSLÉGAUXENFONCTIONDEVOTREPAYSOUÉTAT.
KenyonInternational,Inc.
P.O.Box925•8HeritageParkRoad•Clinton,CT06413USA
Téléphone:(860)664-4906-Fax:(860)664-4907
1. Die Bedienungsanleitung vor der Inbetriebnahme des Produkts bitte VOLLSTÄNDIG lesen.
2.HeißeOberächenichtberühren.GriffeoderKnäufestetsbenutzen.
3. Zum Schutz vor einem elektrischen Schlag, Netzkabel oder Stecker nicht in Wasser oder andere
Flüssigkeitentauchen.
4.GerätenurunterständigerAufsichtverwenden,wennKinderinderNähesind.
5.NetzsteckerausderSteckdoseziehen,wenndasGerätnichtverwendetwirdodergereinigt
werdensoll.Abkühlenlassen,bevorGeräteteileaufgesetztoderentferntwerden.
6.Gerätnichtbenutzen,wennNetzkabeloder-steckerbeschädigtsind.TritteineStörungauf,die
BenutzungdesGerätsunterbrechenunddennächstenautorisiertenGerätehändlerbzw.dasWerk
kontaktieren,umeineÜberprüfung,ReparaturoderJustierungzuveranlassen.
7.DerEinsatzvonZubehör,dasnichtdurchdenGeräteherstellerbereitgestelltwird,kannzu
Verletzungenführen.
8.WirddasGerätalstragbarerGrillverwendet,dasGerätnachderBenutzungimmerimHaus
lagern. Wird der Grill fest eingebaut, dann muss eine geeignete Vorrichtung zum Schutz vor Regen
vorgesehenwerden.Abdeckungensindverfügbar.
9.DasNetzkabeldarfnichtanderKantedesTischsbzw.derArbeitsplatteherunterhängenoder
heißeOberächenberühren.
10.NichtaufoderindieNäheeinerheißenGas-oderElektroherdplatteoderineinenerhitztenOfenstellen.
11.ÄußersteVorsichtistbeimBewegeneinesGerätsgeboten,dasheißesFettodersonstigeheiße
Flüssigkeitenenthält.
12.DasNetzkabelimmerzuerstansGerätanschließenundanschließendindieSteckdose
einstecken.ZumAusschaltendesGerätsalleBedienungselementeausschalten(„OFF“)und
anschließend den Netzstecker aus der Steckdose ziehen.
13.DasGerätausschließlichfürdendafürvorgesehenenZweckverwenden.
14. Vor dem Grillen immer mindestens zwei (2) Tasse Wasser in die austauschbare Auffangwanne geben.
15.Kinderniemalsunbeaufsichtigtlassen.KinderniemalsohneAufsichtinderNähedesGrillslassen.
16.DenGrillabkühlenlassen,bevorRoste,dieaustauschbareWanneoderderDeckelentferntwerden.
17.KeineZündmittelwieHolzkohlebrikettsfürdiesesGerätverwenden.
18.DerGrillmussgemäßderAnleitungmontiertundeingebautunddurcheinenqualizierten
Elektrikerordnungsgemäßgeerdetwerden.
19.BestandteiledesGrillsnichteigenmächtigaustauschenoderreparieren,wennindieser
Bedienungsanleitungnichtausdrücklichdaraufhingewiesenwird.
AlleanderenWartungs-undReparaturarbeitenmüssendurchvomHerstellerautorisierteTechniker
durchgeführtwerden.
20.FettbrändenichtmitWasser,sondernmiteinenchemischenTrockenfeuerlöscherlöschen.
21.EntzündlicheMaterialiennichtinderNähedesGrillsaufbewahren.
22.BeiderBenutzungdesGrillskeineweiteoderhängendeKleidungtragen.
RE M O V E & R E A D P R I O R T O G R I L L I NG
w w w . C o o k W i t h K e n y o n . c o m | 8 6 0 . 6 6 4 . 4 9 0 6 |
T h a n k yo u fo r p u rc ha s i ng t h e W o rl d ’s F i ne s t Al l S e a s o n s ® E le ct r ic Gr i ll ! T h e r e a r e a fe w s i m pl e
st e p s yo u c a n ta k e t o e n s ur e y ou r go o d d e c i s i o n w il l l e a d t o ye a rs o f W o r ld - C l a ss G r i ll in g:
Q U I C K S T A R T T I P S
to pu rchase recipe books, cook ing ute nsils,
grid dles , g ri ll covers, an d more!
VIS I T O U R W E B S IT E
1.
2.
3.
4.
5.
6.
7.
8.
Remove grate(s) and drip tray(s), clean both.
Insert the drip tray(s) into the bottom of grill. Make sure the burner brackets are not
resting on the drip tray(s).
Always fill the drip tray(s) with 2 cups of liquid. Wate r will work, but w hy not try beer
or wine to add flavor to your favorite food. Then re-install cooking grate.
Depending on model, either hardwire your Kenyon All Seasons® Grill or plug it directly into
an outlet, do not use extension cords.
Preheat grill w ith the lid closed for 5 - 7 minutes on desired heat setting for typ e of food:
Close lid and cook. Enjoy the best grilled food you have ever tasted!
Once your gri lling session is complete, grab a wet paper tow el and wi pe down your grate.
Once cool, pla ce grate/griddle in the dishwash er along with the dirty dishes so that it’s
ready for its next tour of duty!
While the grate is in the wash, don’t forget to clean out the drip tray conten ts.
This is an imp ortant step in preventing a grease fire.
-Vegetables 3-4 bars
-Chicken, pork and fish 4-5 bars
-Hamburgers 6 -7 bars
-Steak 7-8 bars
1. Vor der Benutzung des Grills den Rost und die Auffangwanne vom Grill entfernen. Den
GrillmitwarmemSeifenwasserundeinemnichtscheuerndenSpültuchwaschen.ZUM
GRILLEN AUSSCHLIESSLICH GRILLBESTECK AUS HITZEBESTÄNDIGEM KUNSTSTOFF
VERWENDEN.HochwertigesGrillbesteckausEdelstahloderhitzebeständigemKunststoffkann
auf unserer Website bestellt werden: www.cookwithkenyon.com.
2.DieAuffangwannemussvollständigindenGrilleingesetztwerdenund
dieelektrischenHeizelementemüssenrichtigaufdenHalternfürdasElement
auiegen.
3.DenBodenderAuffangwannemitFlüssigkeit
bedecken.WasseristeinegeeigneteFlüssigkeit.
UNTER KEINEN UMSTÄNDEN EINE BRENNBARE
FLÜSSIGKEITVERWENDEN!Daswürde
das Grillerlebnis ruinieren. Beim Grillen von
SchweineeischkanndasFleischaromadurchdieVerwendungvon
Apfelsaft verfeinert werden. Eine Dose Lemon Soda eignet sich zum
VerfeinernvongegrilltemFisch.JedesGetränkkannalsFlüssigkeit
verwendet werden. Bitte beachten: Vor dem Grillen immer
Flüssigkeit in die Auffangwanne geben.

4.UmRauchbildungzuvermeiden,dieGrilloberächestetsnachderBenutzungreinigen.
EinfachmitwarmemSeifenwasserundeinemnichtscheuerndenSpültuchwaschen
oderinderSpülmaschinereinigen.DieAuffangwanneausleerenundmiteinemfeuchten
Papierküchentuchabwischen.DieAuffangwannekannmehrmalsbenutztwerden,bevor
sie ausgetauscht werden muss.
5. Den Rost oder das optionale Grillblech (Artikel-Nr. B96000) bei eingesetzter Auffangwanne auf
dasElementsetzen.DasBlechfürdieZubereitungvonEiern,Pfannkuchenoderdembeliebten
French Toast verwenden.
6.Grillfür5bis7MinutenaufhöchsterStufe(8Leuchtbalken)vorheizen.Entsprechendder
zuzubereitendenSpeisedieHeizeinstellungauswählen.
• Steak 7–8 Leuchtbalken
• Hamburger 6–7 Leuchtbalken
• SchweineeischundFisch4–5Leuchtbalken
• Gemüse3–4Leuchtbalken
7.DenDeckelschließenundSpeisenkochenlassen.JetztdasbestegegrillteEssenaller
Zeiten genießen!
8.DenGrillreinigen.DieReinigungistäußersteinfachundwirdimFolgendenerklärt.Nachdem
derGrillabgekühltistundgefahrlosberührtwerdenkann,einigePapierküchentücheraufdie
Grilloberächelegen.Jetztca.zweiEsslöffelWasseraufeinTuchgebenundanschließendmithilfe
derhitzebeständigenKunststoff-GrillzangedasPapierhin-undherschieben,umGrillrestezulösen.
DasPapierküchentuchwegwerfenunddenRostmiteinemtrockenenPapiertuchabwischen.
9.SobaldderRostausreichendabgekühltist,denRostabnehmenundinderSpülmaschine
gründlichreinigen.
10. Ist der Rost entfernt, das elektrische Heizelement anheben und die Auffangwanne
entfernen.DenInhaltderAuffangwanneordnungsgemäßentleeren;derNachbarsgartenistkein
geeigneterEntsorgungsort.DieWannemiteinemtrockenenPapierküchentuchauswischenund
wiederverwenden. Die Wanne kann mehrmals verwendet werden.
11. Der Deckel sollte nach jeder siebten oder achten Benutzung gereinigt werden. Der Deckel
kanninderSpülmaschineimProgrammfürTöpfeundPfannengereinigtwerden.Sosiehtder
Grill wieder wie neu aus.
12.UmdenGrillzureinigen,mussdieOberächezunächstabgekühltseinundgefahrlosberührt
werdenkönnen.NundenRostentfernen,daselektrischeHeizelementanheben,bisesinder
senkrechten Stellung einrastet, und die Auffangwanne herausheben.
13.DieEdelstahl-OberächemiteinemfeuchtenTuchabwischen,umGrillrestezuentfernen.
14.DerKenyon-GrillwirdmiteinerProbierascheEdelstahl-Reinigungsmittel
geliefert. Das Reinigungsmittel einmal im Monat verwenden, damit der
Grill immer wie neu aussieht.
15.DasGlaskeramikbedienfeldfürdieSensortastenbedienung(TouchControl)ist
vollständigvorUmwelteinüssenwieRegen,SchneeundFrostgeschützt.Fürdie
ReinigungeinenGlasreinigerundeinweichesTuchverwenden.Fleckenkönnen
mithilfeeineshandelsüblichenGlaskeramikreinigersausdemSupermarkt
entfernt werden.

Frontier
- 120 V AC - 1300 WATT - 11 AMPERE
- 240 V AC - 1300 WATT - 6 AMPERE
Gesamtabmessungen: 533 mm x 305 mm x 102 mm (21 Zoll x 12 Zoll x 4 Zoll)
(187 mm (7 3/8 Zoll) mit Deckel)
TiefeohneAbussarmatur
Ausschnittmaße: 501,6 mm x 296 mm (19 3/4 Zoll x 11 5/8 Zoll)
mit 6-mm (1/4 Zoll) Radius-Ecken
- 120 V AC - 1300 WATT - 11 AMPERE
Gesamtabmessungen: 533 mm x 305 mm x 219 mm
(21 Zoll x 12 Zoll x 8 5/8 Zoll)
Floridian
- 120 V AC - 1300 WATT - 11 AMPERE
- 240 V AC - 1300 WATT - 6 AMPERE
Gesamtabmessungen: 533 mm x 305 mm x 102 mm (21 Zoll x 12 Zoll x 4 Zoll )
(206 mm (8 1/8 Zoll) mit Deckel)
TiefeohneAbussarmatur
Ausschnittmaße: 501,6 mm x 296 mm (19 3/4 Zoll x 11 5/8 Zoll)
mit 6-mm (1/4 Zoll)-Radius-Ecken
- 120 V AC - 1300 WATT - 11 AMPERE
Gesamtabmessungen: 533 mm x 305 mm x 238 mm
(21 Zoll x 12 Zoll x 9 3/8 Zoll)
Rio
- 120 V AC - 1300 WATT - 11 AMPERE
- 240 V AC - 1300 WATT - 6 AMPERE
Gesamtabmessungen: 584 mm x 397 mm x 102 mm (23 Zoll x 15 5/8 Zoll x 4 Zoll)
(206 mm (8 1/8 Zoll) mit Deckel)
TiefeohneAbussarmatur
Ausschnittmaße: 501,6 mm x 296 mm (19 3/4 Zoll x 11 5/8 Zoll)
mit 6 mm (1/4 Zoll)-Radius-Ecken
No Lid
– 120 V AC - 1300 WATT - 11 AMPERE
– 240 V AC - 1300 WATT - 6 AMPERE
– 120 V AC - 1300 WATT - 11 AMPERE
- 240 V AC - 1300 WATT - 6 AMPERE
Gesamtabmessungen: 533 mm x 305 mm x 102 mm (21 Zoll x 12 Zoll x 4 Zoll )
TiefeohneAbussarmatur
Ausschnittmaße: 501,6 mm x 296 mm (19 3/4 Zoll x 11 5/8 Zoll)
mit 6-mm (1/4 Zoll)-Radius-Ecken
Half Height Lid
- 120 V AC - 1300 WATT - 11 AMPERE
- 240 V AC - 1300 WATT - 6 AMPERE
Gesamtabmessungen: 533 mm x 305 mm x 102 mm (21 Zoll x 12 Zoll x 4 Zoll )
(159 mm (6 1/4 Zoll) mit Deckel)
TiefeohneAbussarmatur
Ausschnittmaße: 501,6 mm x 296 mm (19 3/4 Zoll x 11 5/8 Zoll)
mit 6-mm (1/4 Zoll)-Radius-Ecken
Der All Seasons
®
Grill wird montiert und gebrauchsfertig geliefert. Vor dem Gebrauch
dieSeriennummerdesGerätshiereintragenundaufbewahren:_________________.
DieSeriennummerbendetsichanderschmalenSeitedesGrillsamEndemitdem
Glasbedienfeld. Die Seriennummer besteht aus sechs Ziffern.
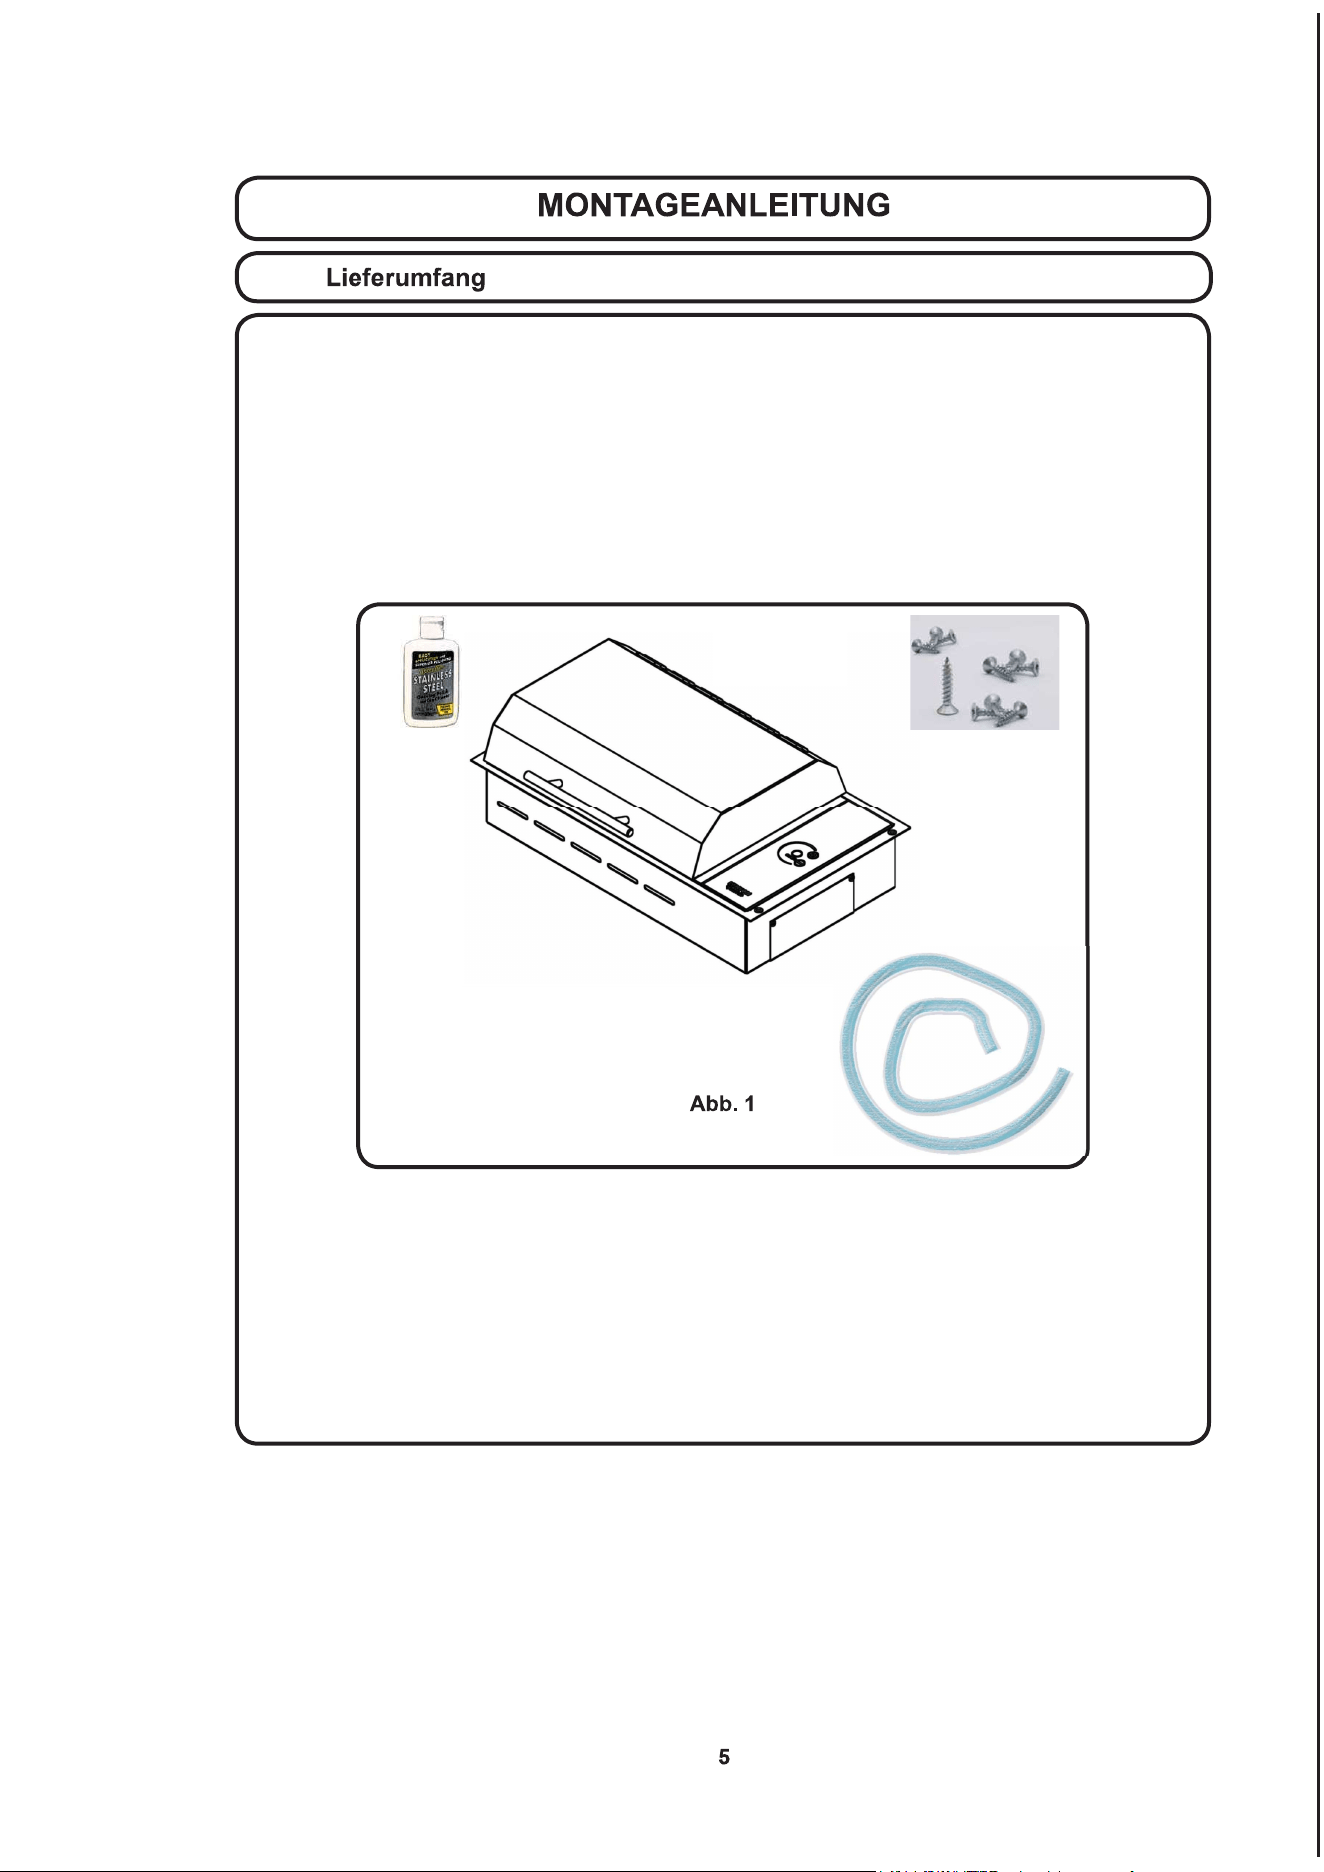
Im Lieferumfang enthalten sind: All Seasons
®
Grill, vier (4) Befestigungsschrauben, 91 cm
(drei(3)Fuß)langerAbussschlauch,WinkelanschlussoderAblassschraube(abhängigvon
Ausführung:tragbaroderfesteingebaut),BedienungsanleitungundEdelstahl-Reinigungsmittel.
Fallsetwasfehltoderbeschädigtist,wendenSiesichbittesoforttelefonischanKENYON.
Die Installation dieses Produkts muss entsprechend den geltenden nationalen, landesweiten
undörtlichenVorschriftenerfolgen.InderfolgendenTabellesinddiekorrektenSpannungs-,
Stromstärke-undFrequenzwerteaufgeführt,andiederGrillangeschlossenwerdenmuss.
DieStromversorgungmussübereinenseparatgeerdetenStromkreiserfolgen,derdurcheinen
LeitungsschutzschalterabgesichertundfürdieSpezikationendereinzelnenModelle,wieinder
folgendenTabelleangeführt,ausgelegtist.
Der All Seasons
®
Grill wird mit einem ab Werk angebrachten Flansch aus poliertem Edelstahl
fürvierLinsenholzschraubengeliefert.DerRand-FlanschdesGrillssolldasGerätfestinder
Arbeitsplatte sichern. Auf Wunsch kann die Arbeitsplattenkante unter dem Rand-Flansch abgedichtet
werden. EineweicheDichtungsmasseverwenden,umSchädenbeimAusbauendesGerätzu
einemspäterenZeitpunkt(z.B.zuReparaturzwecken)zuvermeiden.Empfohlenwirdeinenicht-
klebende Dichtungsmasse (z. B. Kitt) mit einer maximalen Stärke im komprimierten Zustand
von 1,58 mm Silikon darf nur zur (optionalen) Abdichtung der Glaskante verwendet werden.
B70050
B70056
B70060
B70062
B70080
B70082
B70085
B70090
1300 Watt 120 V AC 11 A 60 Hz
3-poliges geerdetes
Kabel mit
FI-Schutzschalter
B70051
B70057
B70061
B70081
B70067
B70086
1300 Watt 240 V AC 6 A 60 Hz
Dreiadriges Kabel
ohne Stecker
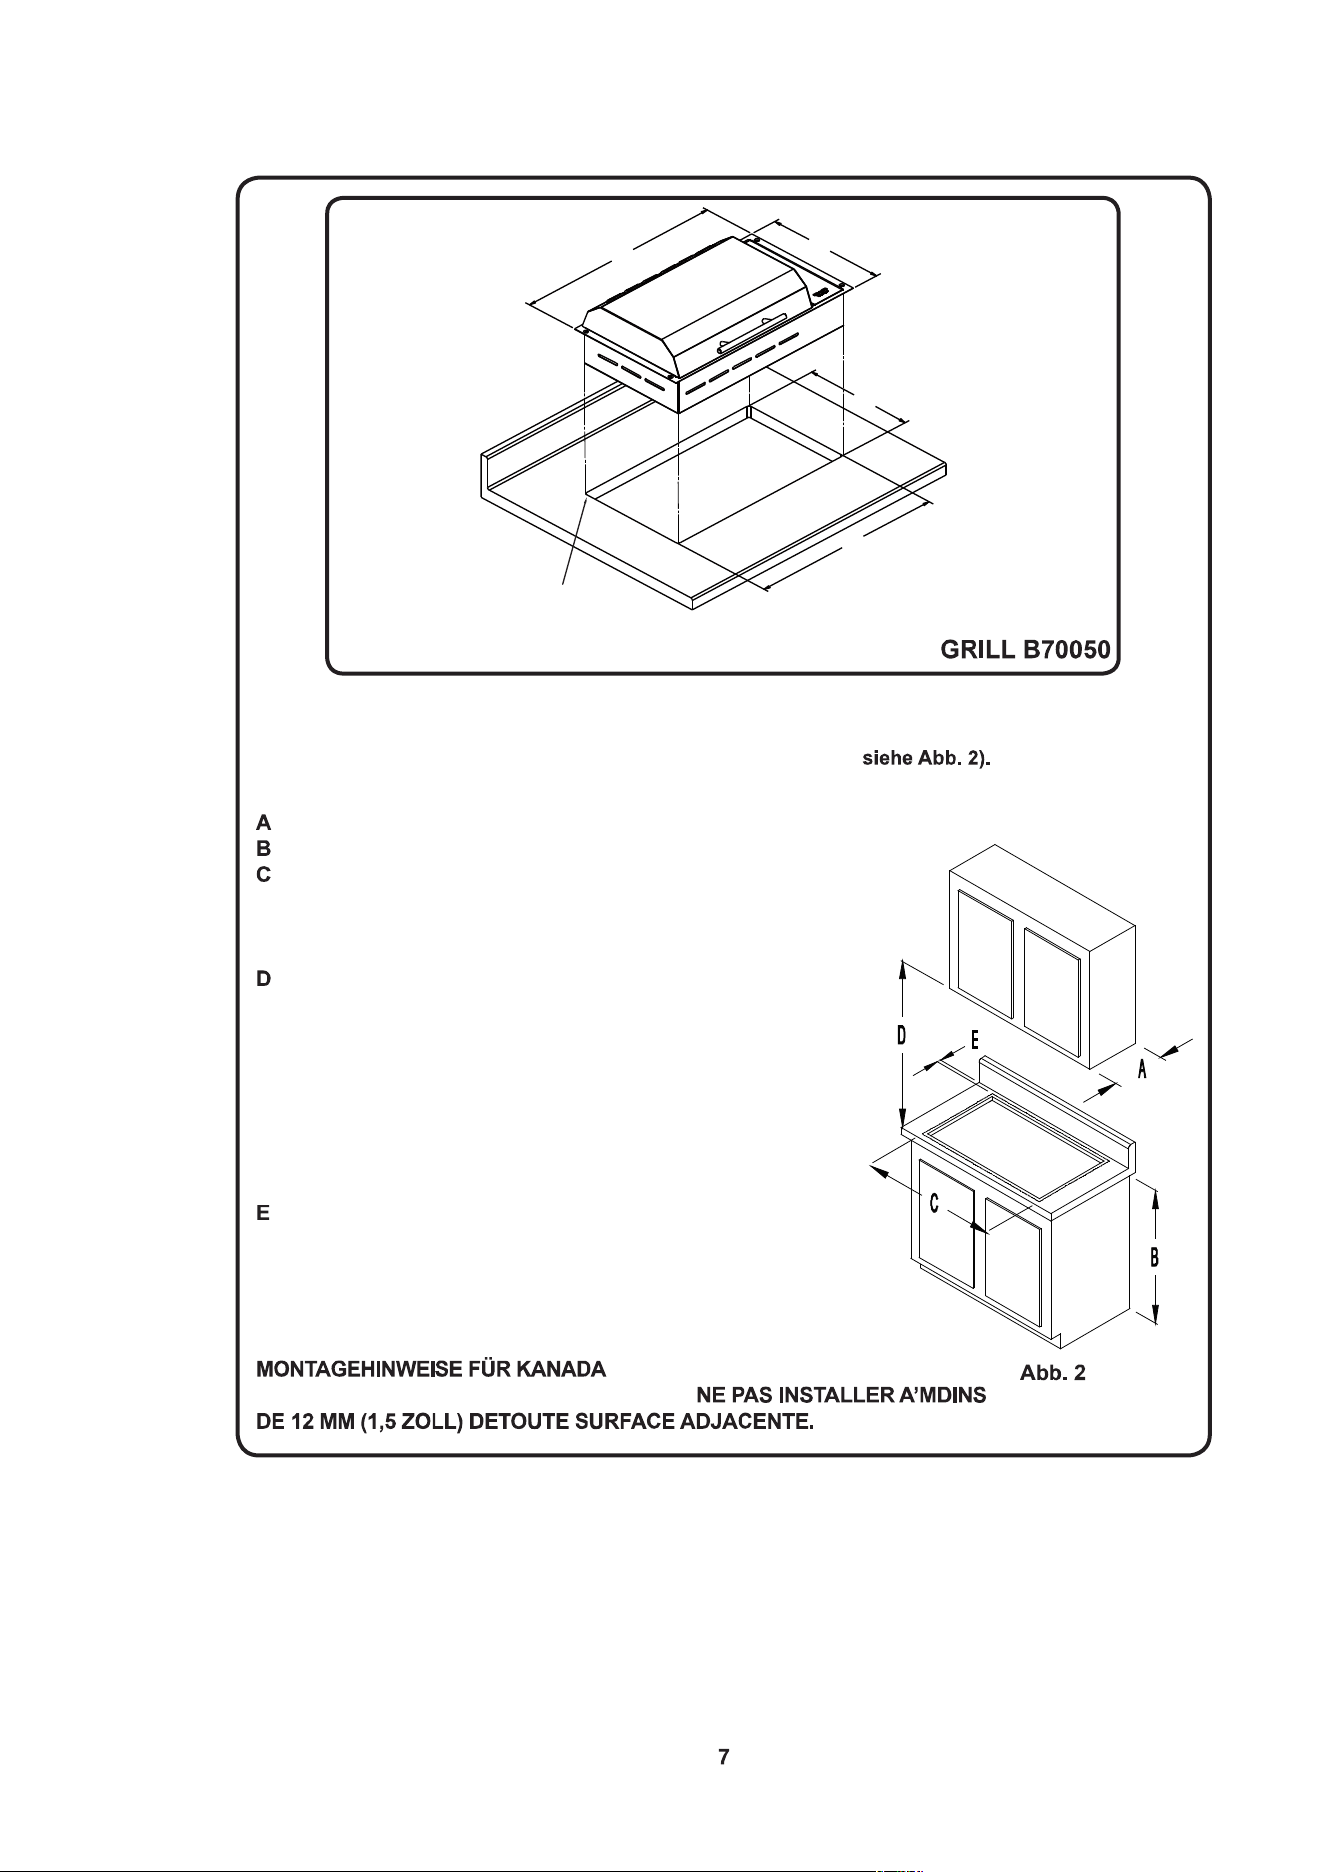
Dieses Kapitel bitte durchlesen, bevor die Arbeitsplatte für den Grill ausgeschnitten wird.
EineguteVorausplanungfürdenEinbaudesGrillsistsehrwichtig.
Dabei die folgenden Abmessungen beachten (
–MaximaleTiefedarüberhängenderSchränke:33cm(13Zoll)
–MindesthöhederArbeitsplatteüberdemFußboden:91,4cm(36Zoll)
– Die Mindestabmessungen der ebenen Arbeitsplatte, auf
derderGrillplatziertwird,müssengleichgroßoder
größerseinalsdieGesamtabmessungendesGrills
(GesamtabmessungenfürdenGrillaufSeite8).
– Mindestens 76,2 cm (30 Zoll) Zwischenraum zwischen der
OberkantedesGrillsundderUnterkanteeinesungeschützten
Holz- oder Metallschranks bzw. 61 cm (24 Zoll)
Mindestzwischenraum,wenndieuntereFlächedesHolz-
oder Metallschranks durch mindestens 0,6 cm (1/4 Zoll) starke
ammhemmendePappegeschütztist,diemindestensmit
Nr. 28 MSG Stahlblech, 0,38 mm (0,015 Zoll) starkem
Edelstahl, 0,61 mm (0,024 Zoll) starkem Aluminium oder
0,51 mm (0,020 Zoll) starkem Kupfer beschichtet ist.
– Mindestens 10,2 cm (4 Zoll) Abstand zwischen der
Spritzschutzkante der Arbeitsplatte und dem Grillrand
(Gesamtabmessungen des Grills auf Seite 8).
Mindestabstand von 3,8 cm (1,5 Zoll) zwischen der
Vorderseite der Arbeitsplatte und dem Grill.
„DenGrillnichtnäherals12mm(1/2Zoll)
zuallenangrenzendenFlächenmontieren“und
53,3 cm (21 Zoll)
30,5 cm (12 Zoll)
29,5 cm (11 5/8 Zoll)
50,2 cm (19 3/4 Zoll)
0,6 cm (1/4 Zoll)
Eckenradius
Arbeitsplatten-AUSSCHNITTMASSE
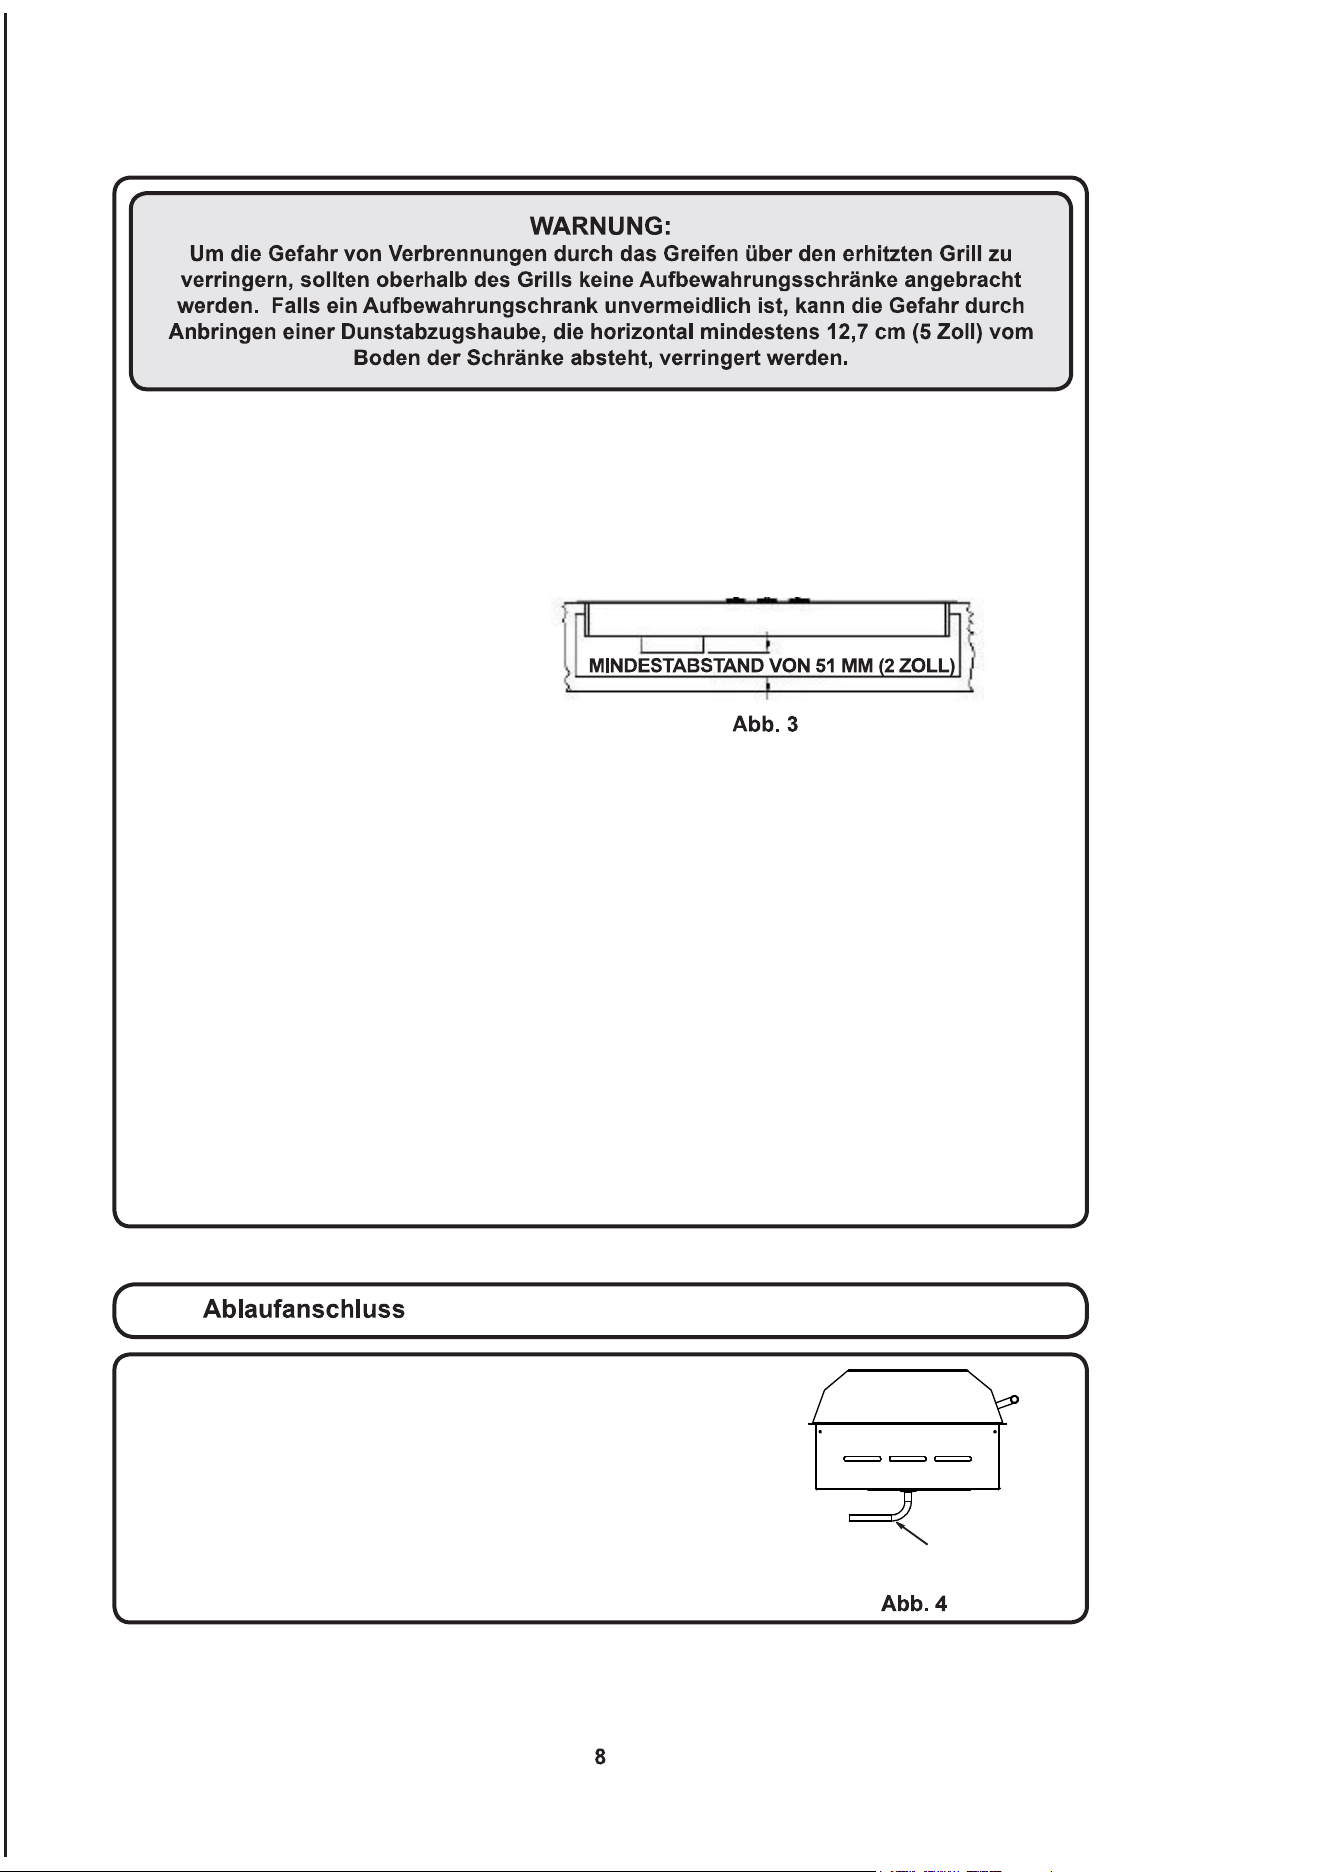
VordemAusschneidenderArbeitsplattedieAbständeüberprüfen.VomGrillmusseinausreichender
AbstandzudenVorder-undSeitenwändendesUnterschranksbestehen.EbenfallsdenAbstand
zurSpritzschutzkanteüberprüfen,damitsichderDeckelvollständigöffnenlässt.
UnterhalbderArbeitsplattemussausreichendeBelüftungmöglichsein,damitderGrill
ordnungsgemäßfunktioniert.BeiungenügenderBelüftungkannsichwährenddesBetriebsdurch
dievomunterenGrillkastenabgegebeneWärmederBereichumdenGrillübermäßigerhitzen.
BeimAusschneidenderArbeitsplatteschützenabgerundeteEckenvorRissenimArbeitsplatten-
Material.ÜblichisteinEckradiusvonca.6,35mm(1/4Zoll).DennochmüssendieAnweisungen
desHerstellerszumMindesradiusundallenerforderlichenverstärkendenMaßnahmenbeachtet
werden,umlangfristigeSchädenanderArbeitsplattezuvermeiden.
BestehtdieArbeitsplatteausMineralwerkstoff,dannmüssendiespezischenEmpfehlungenzum
Einbau des Grills in die Arbeitsplatte beim Hersteller eingeholt werden. Die meisten Hersteller
vonMineralwerkstoff-Arbeitsplattenweisendaraufhin,dasszusätzlicheverstärkendeMaßnahmen
fürdieEckenerforderlichsind,umSchädenanderArbeitsplattezuvermeiden.DenGrillmitden
mitgelieferten Schrauben an der Arbeitsplatte befestigen. Die Schrauben nicht zu sehr festdrehen.
Den Flansch an der Arbeitsplatte mit Acryl-Dichtmasse abdichten.
Besteht die Arbeitsplatte aus Stein, dann muss Acryllatex verwendet werden, um den Grill zu be-
festigen.AnderÖffnungdieDichtmassegroßzügigrundherumverteilenunddenGrilleinsetzen.
ÜberschüssigeDichtmasseabwischenunddenRestmitWasserbeseitigen.DieDichtmassemin-
destens 24 Stunden lang trocknen lassen. Es darf keine Feuchtigkeit an die Dichtmasse gelangen.
Nicht die mitgelieferten Schrauben verwenden. Der Grill wird durch die Dichtmasse sicher befes-
tigt. Keine silikonbasierte Dichtmasse verwenden, da diese Flecken auf der Steinplatte verursacht.
Der Grill ist mit einem 3 mm (1/8-Zoll)-NPT-Messingrohranschluss
und 90°-Winkelanschluss aus Messing ausgestattet, sodass der
mitgelieferteexibleSchlauchmiteinemDurchmesservon6mm
(1/4Zoll)angeschlossenwerdenkann.DiesetragbareAusführung
des Grills ist mit einer in den Ablaufanschluss eingebauten
Messingrohrverschlussschraube ausgestattet. Wird der Grill als
tragbareAusführungverwendet,dannsolltenderSchlauchundder
90°-WinkelanschlussausMessingfüreinenmöglichenEinbaudes
GrillszueinemspäterenZeitpunktaufgehobenwerden.
Ablaufanschluss
fürSchlauchmiteinemDurch-
messer von 6 mm (1/4 Zoll).
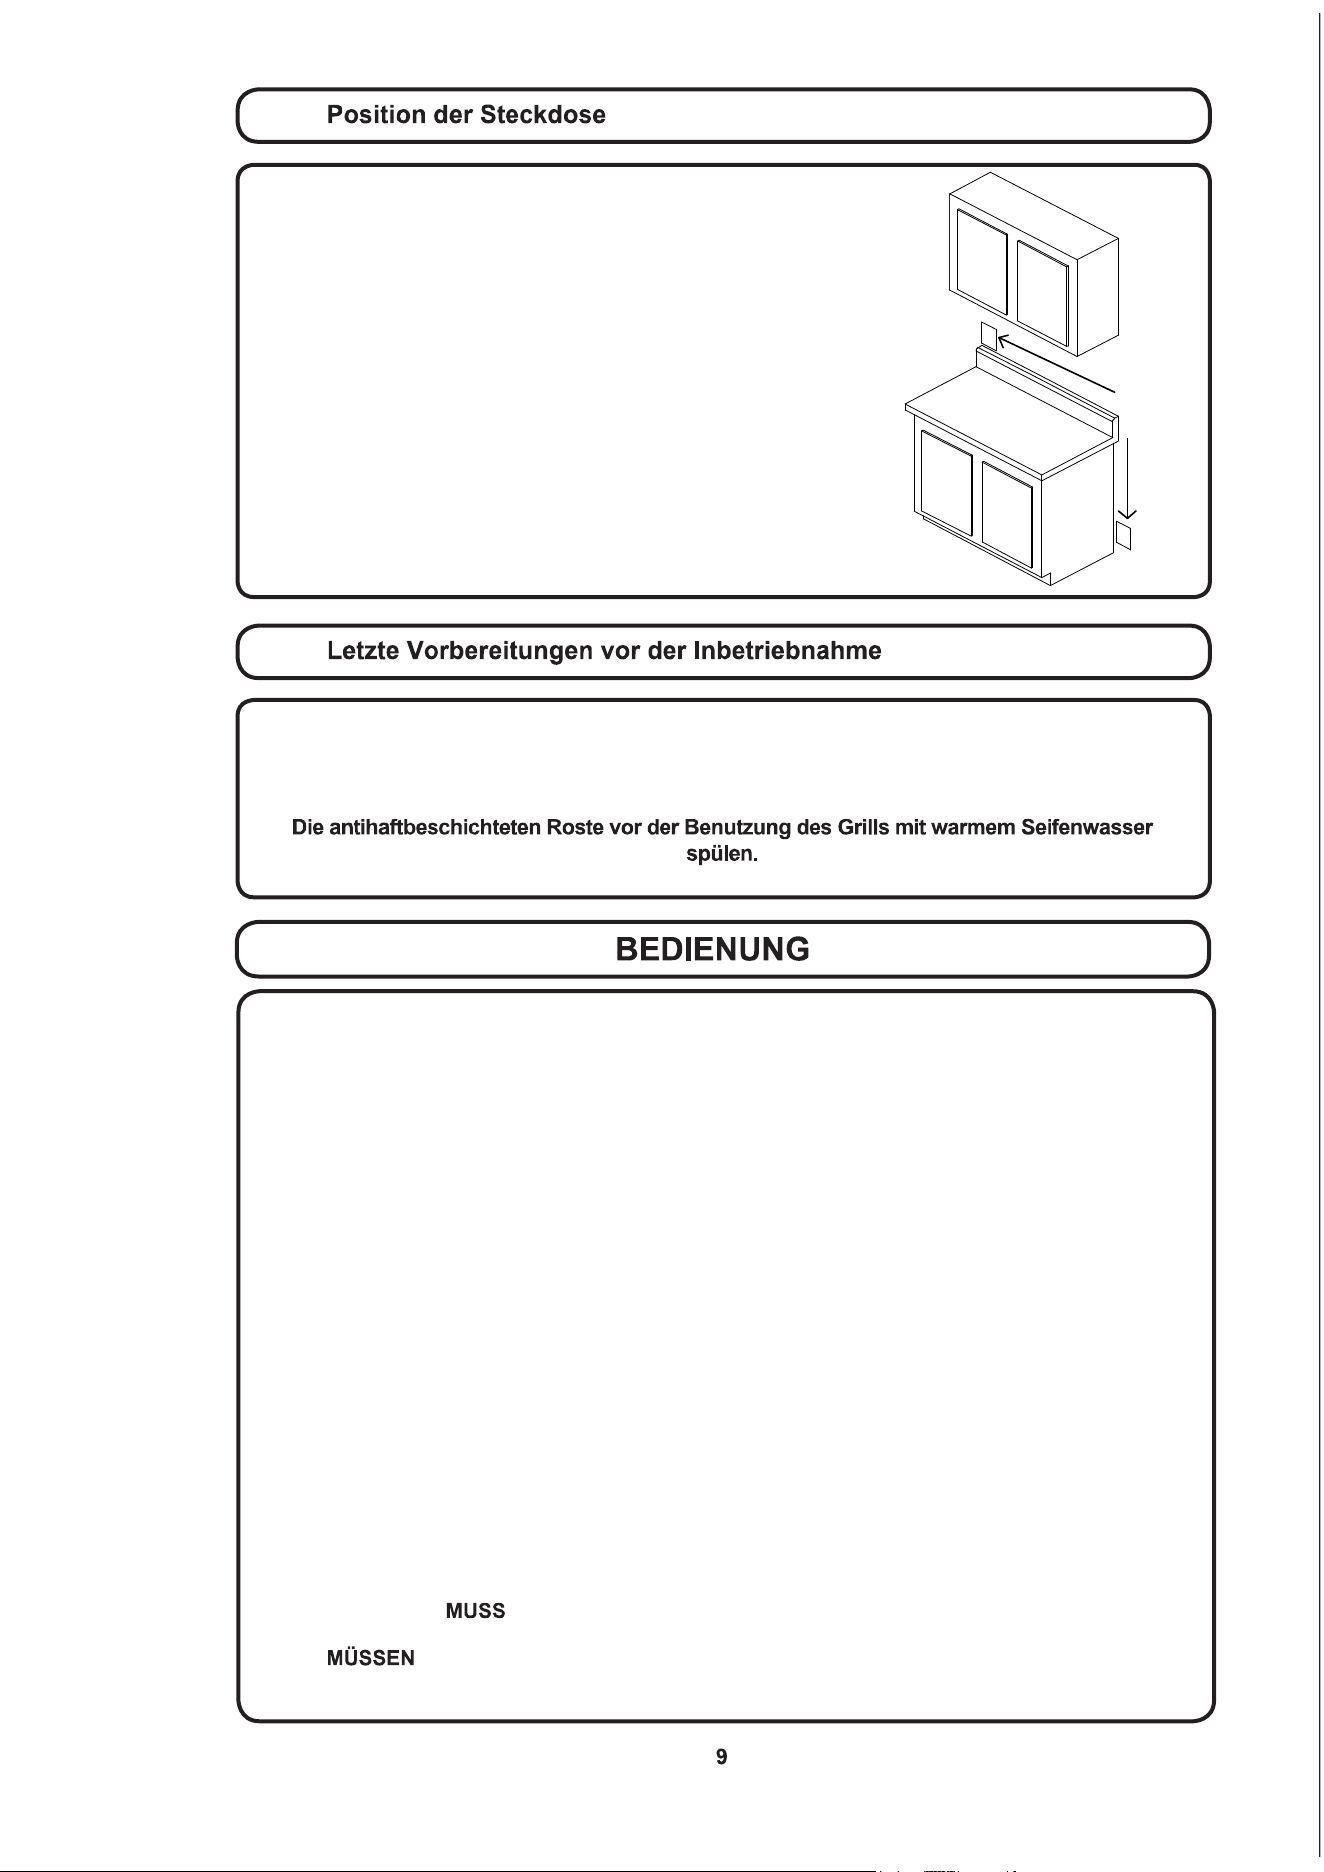
Die Steckdose, an die der Grill angeschlossen werden soll, sollte
sichaneinergutzugänglichenStellebenden.Sokannder
Benutzer den Grill problemlos ein- und ausstecken. Dadurch
wird die Sicherheit bei der Reinigung und Aufbewahrung
des Grills sichergestellt.
Empfohlene
Positionen
der
Steckdose
Die Schutzfolie vom Deckel, Rand-Flansch und dem Glasfeld abziehen. Den Grill vor dem
erstmaligenGebrauchreinigen.EinegründlicheReinigungmiteinemEdelstahl-oderGlaskeramik-
Reinigungsmittel entfernt restliche Spuren des Folienklebers und produktionsbedingte Ölspuren.
LÖSCHEN SIE FETTBRÄNDE NIEMALS MIT WASSER
DasFeueroderdieFlammeerstickenodereinenchemischenTrockenfeuerlöscheroderSchaumfeu-
erlöscherverwenden.
AUSSCHLIESSLICH TROCKENE TOPFLAPPEN VERWENDEN
FeuchteodernasseTopappenkönnenaufheißenOberächenzuVerbrennungendurchWasser-
dampfführen.TopappendürfennichtmitdemRostoderHeizelementdesGrillsinBerührungkom-
men.KeineHandtücheroderdickerenStoffeanstatteinesTopappensverwenden.
NIEMALS AUF EINEM BESCHÄDIGTEN GRILLROST ODER -BLECH GRILLEN ODER KOCHEN
SolltedasRostbrechen,könnenFetteundÖledirektmitdemelektrischenHeizelementinBerührungkom-
men,waszueinemelektrischenSchlagoderFeuerausbruchführenkönnte.BeieinemSchadenunverzüglich
ein autorisiertes Service-Center oder den Kundendienst von KENYON unter (860) 664-4906 kontaktieren.
GRILL VORSICHTIG REINIGEN
FallseinnasserSchwammodereinnassesTuchverwendenwird,umVerschüttetesaufeinerheißen
Kochplatte zu entfernen, den Wasserdampf vermeiden, um keine Verbrennungen zu riskieren. Einige
ReinigungsmittelerzeugengiftigeDämpfe,wennsiemiteinerheißenOberächeinBerührungkom-
men. Vor der Verwendung eines Reinigungsmittels das Etikett lesen.
HEIZELEMENT UND ROST NICHT BERÜHREN
DasHeizelementundderRostbleibennachderBenutzungdesGrillsfüreinigeZeitheiß.DieseGrill-
Komponentensolltenzunächstabkühlenundanschließendvorsichtiggereinigtwerden,dasieunter
Umständennochheißgenugsind,umschwereVerbrennungenzuverursachen.
GRILL NACH JEDEM GEBRAUCH REINIGEN
DiesesGerätverfügtübereineaustauschbareAuffangwanne,diezumReinigenentnommenwerden
kann. Diese Wanne nachJEDEMGebrauchausdemGrillentferntundgereinigtwerden.Es
darfsichkeinFettübermehrereBenutzungendarinabsetzen.DieAuffangwanneundderinnereGrill-
kasten beimGrillenimmerverwendetwerden.GelangtüberschüssigesFettindasInnere
desGrills,erlischtnichtnurdieGewährleistung,sondernesbestehtauchBrandgefahr.
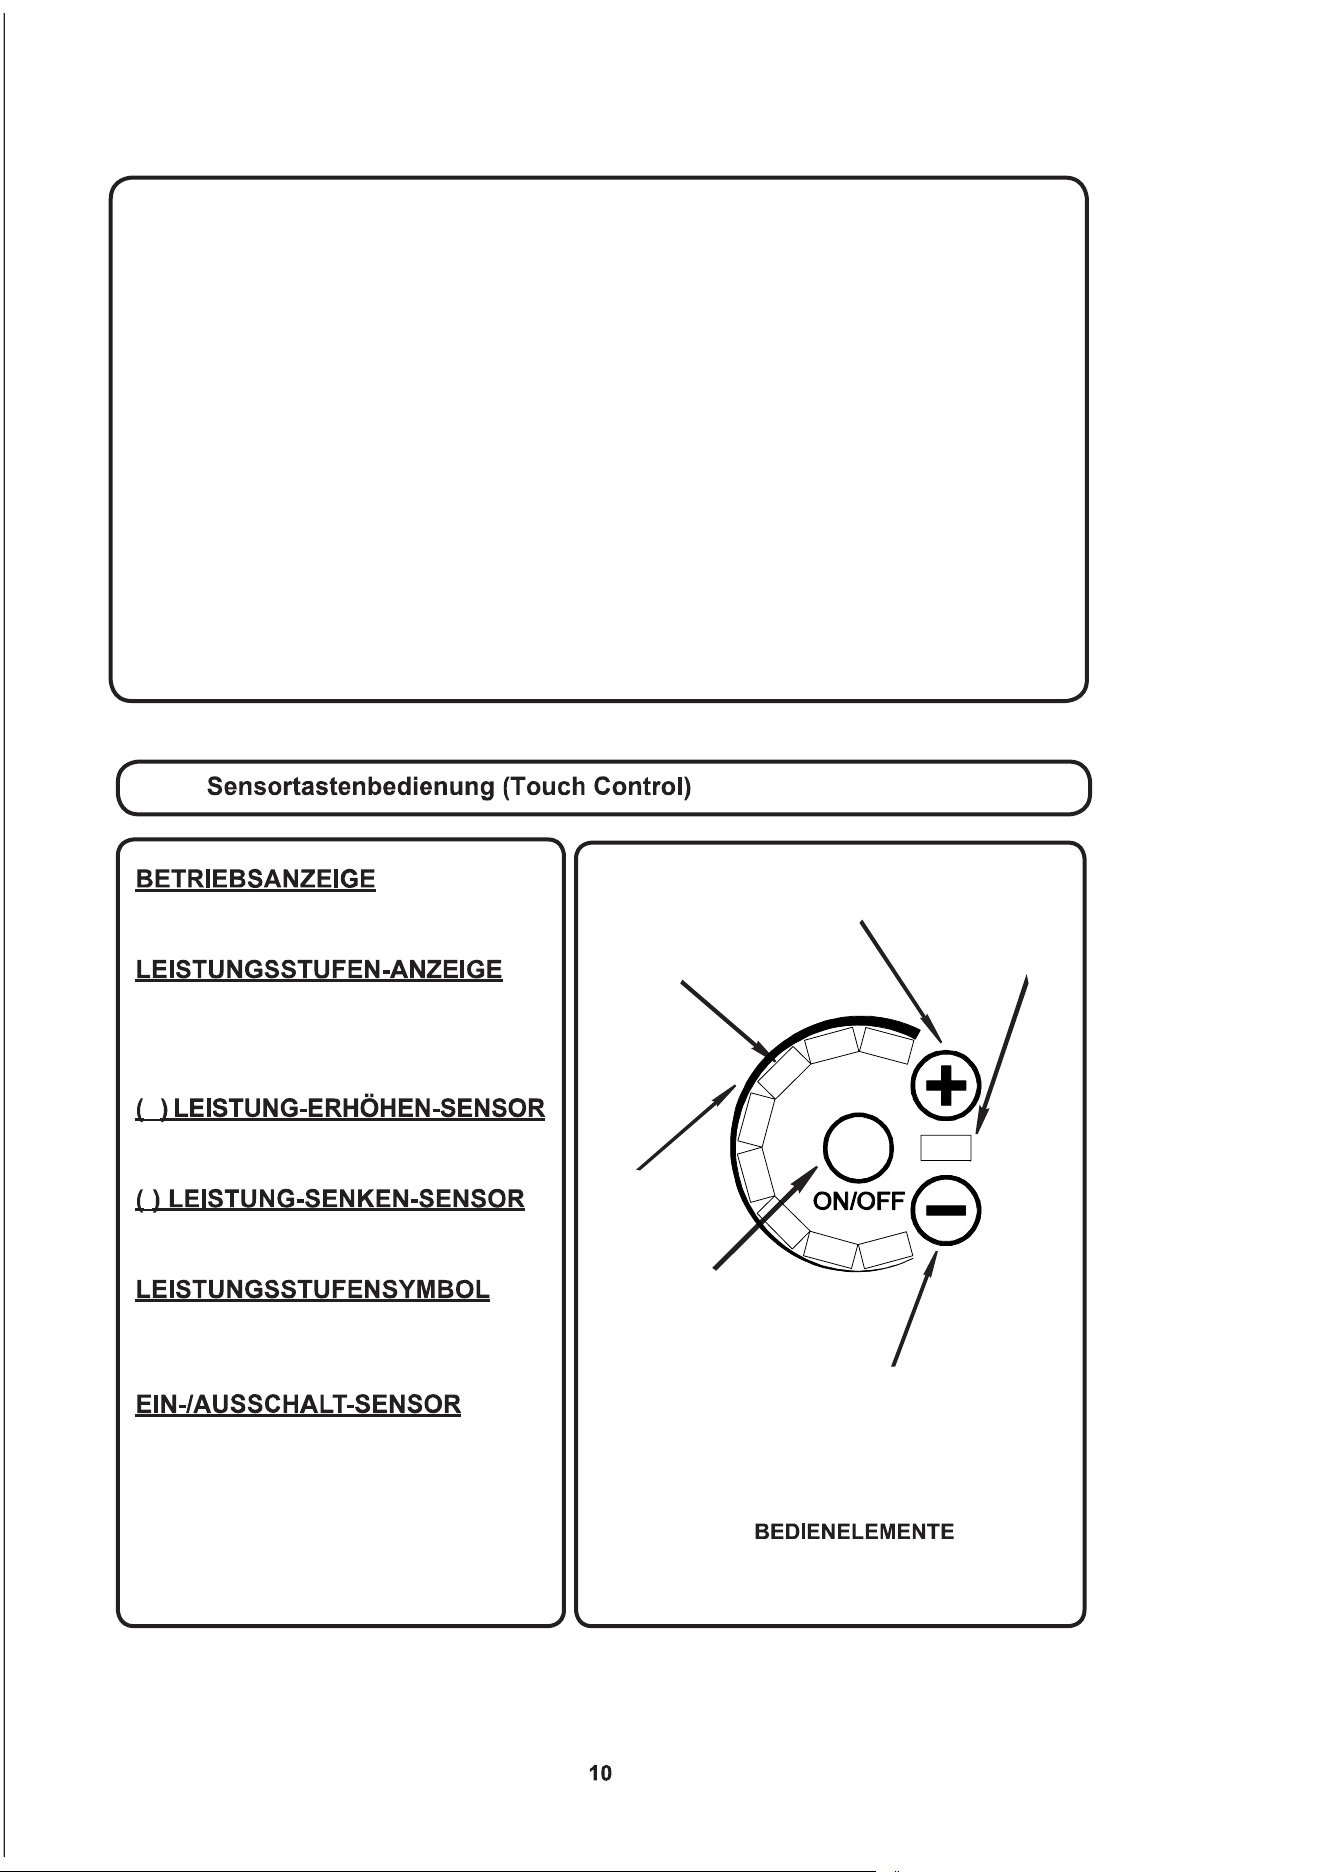
DEN GRILL BEI HOHEN HEIZEINSTELLUNGEN NIEMALS UNBEAUFSICHTIGT LASSEN
BeihohenHeizeinstellungenkannsichstarkerRauchbildenundFettentzünden.
DAS GERÄT NIEMALS MIT DRUCKWASSER REINIGEN
Den Grill niemals mit Druckwasser gleich welcher Art und von der Anleitung abweichenden Reini-
gungsutensilienreinigen.DasführtnichtnurzumErlischenderGewährleistung,sondernkannzudem
einen elektrischen Schlag zur Folge haben. Den Grill immer mit einem Tuch und einem Edelstahl-
oder Glaskeramik-Reiniger reinigen.
LAGERUNG
WirddasGerätalstragbarerGrillverwendet,dasGerätnachderBenutzungimmerimHaus
lagern. Wird der Grill fest eingebaut, dann muss eine geeignete Vorrichtung zum Schutz vor Regen
vorgesehenwerden.Abdeckungensindverfügbar.
RAUCHBILDUNG VERMEIDEN
Damit der Inhalt der Auffangwanne keine Rauchbildung verursacht, vor dem Grillen zwei Tassen Was-
serindieAuffangwannegeben(bzw.einfachdenBodenderWannemitFlüssigkeitbedecken).
KEINE TÖPFE ODER SONSTIGES BACKZUBEHÖR AUF DEN GRILL STELLEN
DIESE ANLEITUNG ZUM SPÄTEREN NACHSCHLAGEN GEMEINSAM MIT DEM GRILL AUFBEWAHREN.
Diese Anzeige zeigt an, ob der Grill ein- oder
ausgeschaltet ist.
Die digitale Anzeige zeigt die Heizleistung des
Grillsan.DieAnzeigelämpchensindentlang
desbogenförmigenSymbolsangeordnet.Es
gibt acht verschiedene Heizstufen.
+
Durch Berühren dieser Sensortaste wird die
HeizleistungdesGrillsumeineStufeerhöht.
-
DurchBerührendieserSensortastewirddie
Heizleistung des Grills um eine Stufe gesenkt.
Zeigt die Heizleistungsstufe des Heizelements
an.DiebogenförmigeLiniewirdmitzuneh-
mender Leistung immer dicker.
Dies ist die Ein-/Ausschalttaste des Grills.
Wird diese Sensortaste im ausgeschalteten
Zustandberührt,dannwirddasBedienfeld
aktiviert und der Grill eingeschaltet. Wird
diese Sensortaste im eingeschalteten Zustand
berührt,dannwirdderGrillausgeschaltet.
LEISTUNGSSTUFEN-
ANZEIGE
EIN-/AUSSCHALT-
SENSOR
LEISTUNGS-
STUFEN-
SYMBOL
BETRIEBSANZEIGE
(-) LEISTUNG-SENKEN-SENSOR
(+) LEISTUNG-ERHÖHEN-SENSOR
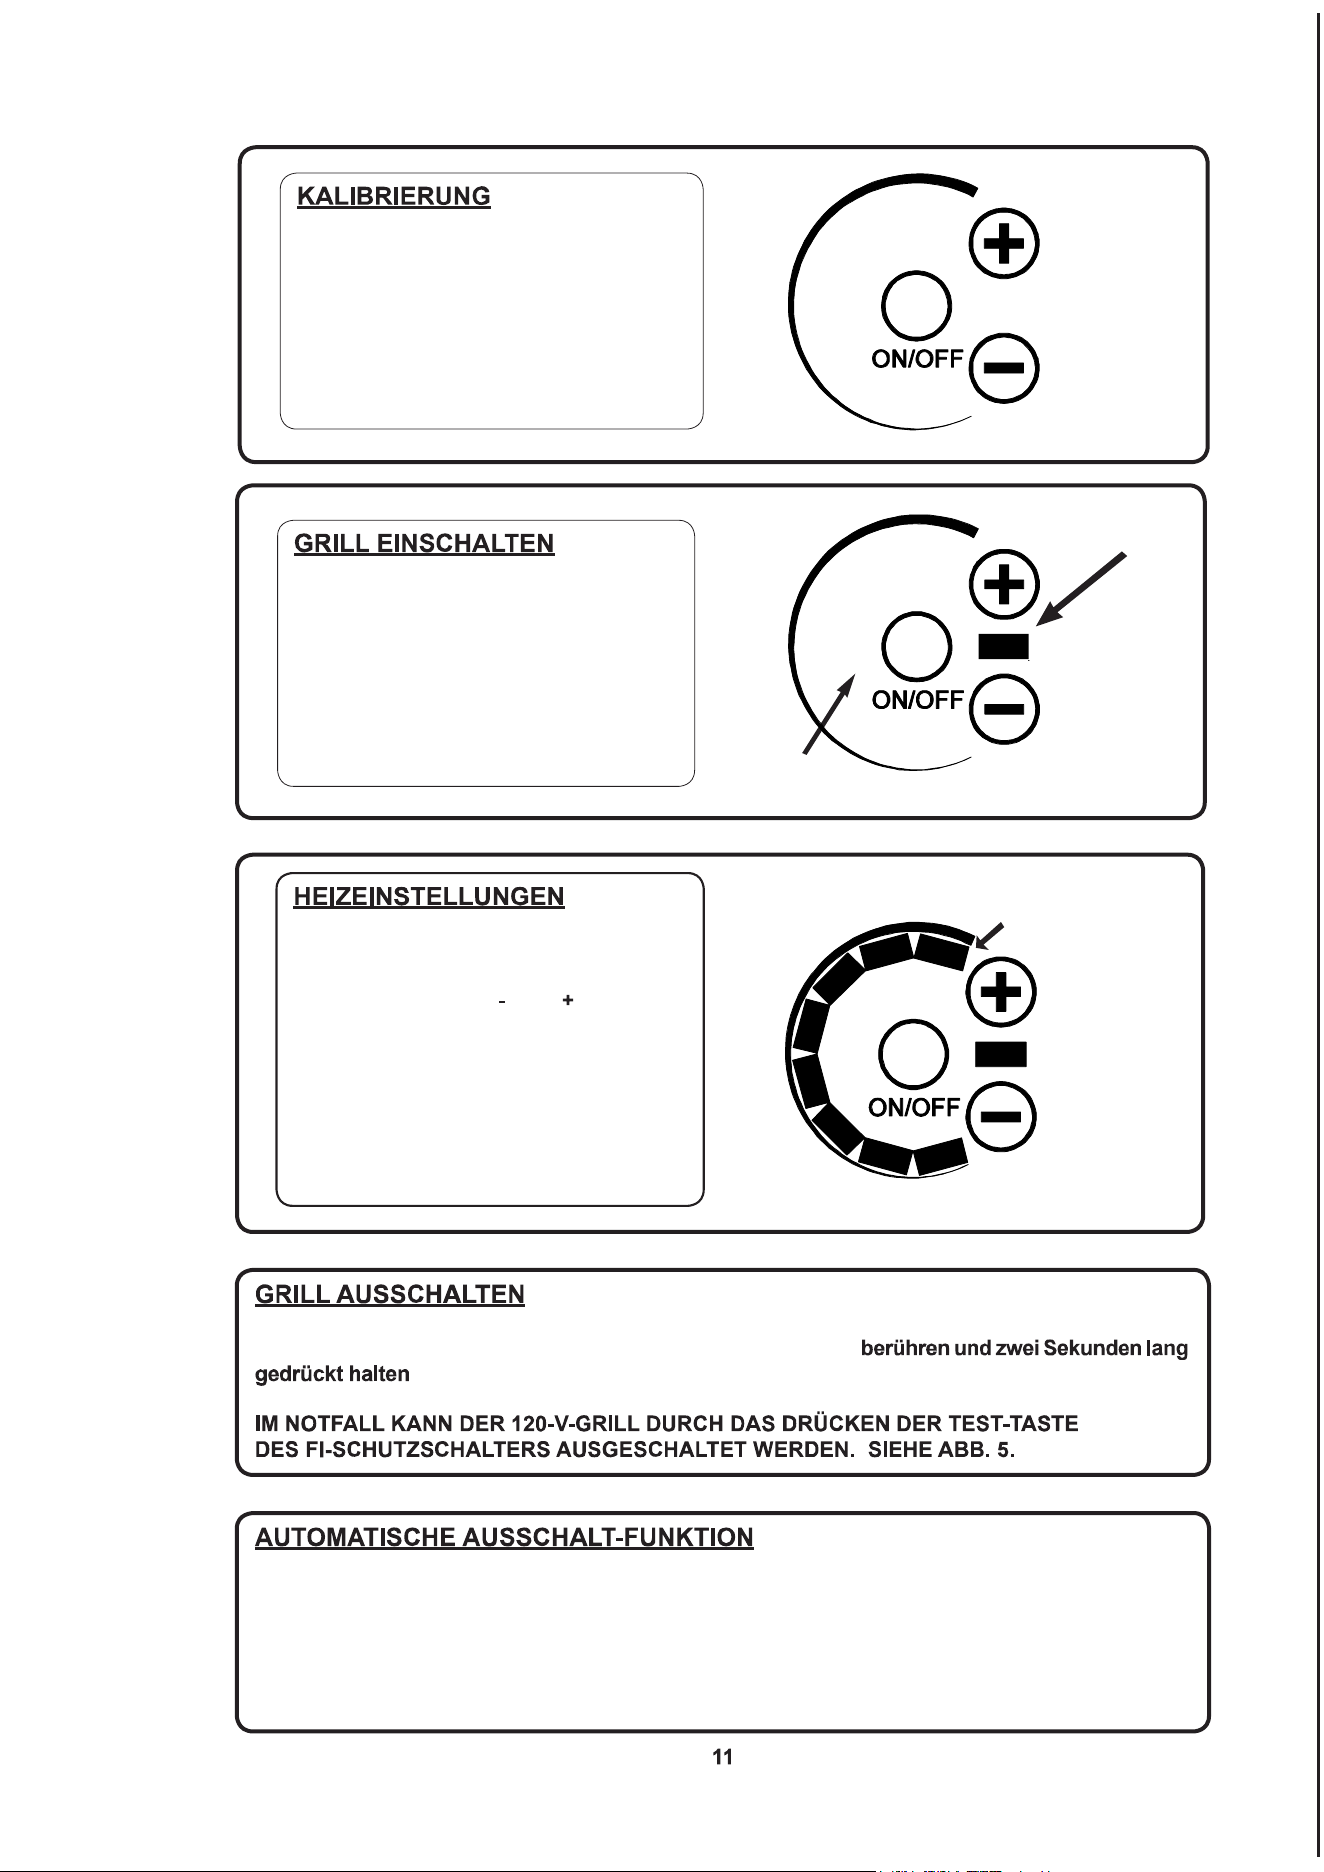
Das Bedienfeld startet beim Einschalten
des Grills einen Selbstkalibrierungsprozess.
DasBedienfeldgibteinenBestätigungston
ab und die Anzeige leuchtet kurz auf. Der
Grill ist nun betriebsbereit.
Um den Grill einzuschalten, die Ein-/
Aussc halt-Sensortaste zwei Sekunden
lang berühren. Das Bedienfeld gibt einen
BestätigungstonabunddieBetriebsanzeige
leuchtet auf.
EIN-/AUSSCHALT-
SENSOR
BETRIEBSANZEIGE
DerKENYON-Grillverfügtüber8verschiedene
Heizeinstellungen (Heizstufe 1 bis 8), die mit-
hilfe der Sensortasten ( ) und ( )ausgewählt
werdenkönnen.DieHeizeinstellungwird,wie
rechts abgebildet, angezeigt. Das Heizelement
durchläuftinverschiedenenZeitintervallenei-
nenZyklus,umdieHeizstufezuändern.Beim
ErhöhenderEinstellungbleibtdasHeizelement
füreinelängerePeriodeeingeschaltet,sodass
sichdieGrilltemperaturerhöht.
Um den Grill auszuschalten, einfach die Ein-/Ausschalt-Sensortaste
. Das Bedienfeld wird spannungslos geschaltet und das Heizelement ausgeschaltet.
DieelektronischeSteuerungdesKENYON-GrillswurdefürmaximaleSicherheitprogrammiertund
verfügtübereineautomatischeAusschalt-Funktion.DerGrillistdaraufprogrammiert,sichnachdem
Einschalten nach einer bestimmten Zeit auszuschalten (siehe folgende Tabelle). Die Steuerung
schaltet den Grill zudem beim Erreichen einer vorbestimmten Temperaturgrenze aus. Wenn dies
passiert,denGrill20bis30Minutenabkühlenlassen.
LEISTUNGSSTUFEN-ANZEIGE
(HEIZEINSTELLUNG
8 AUSGEWÄHLT)
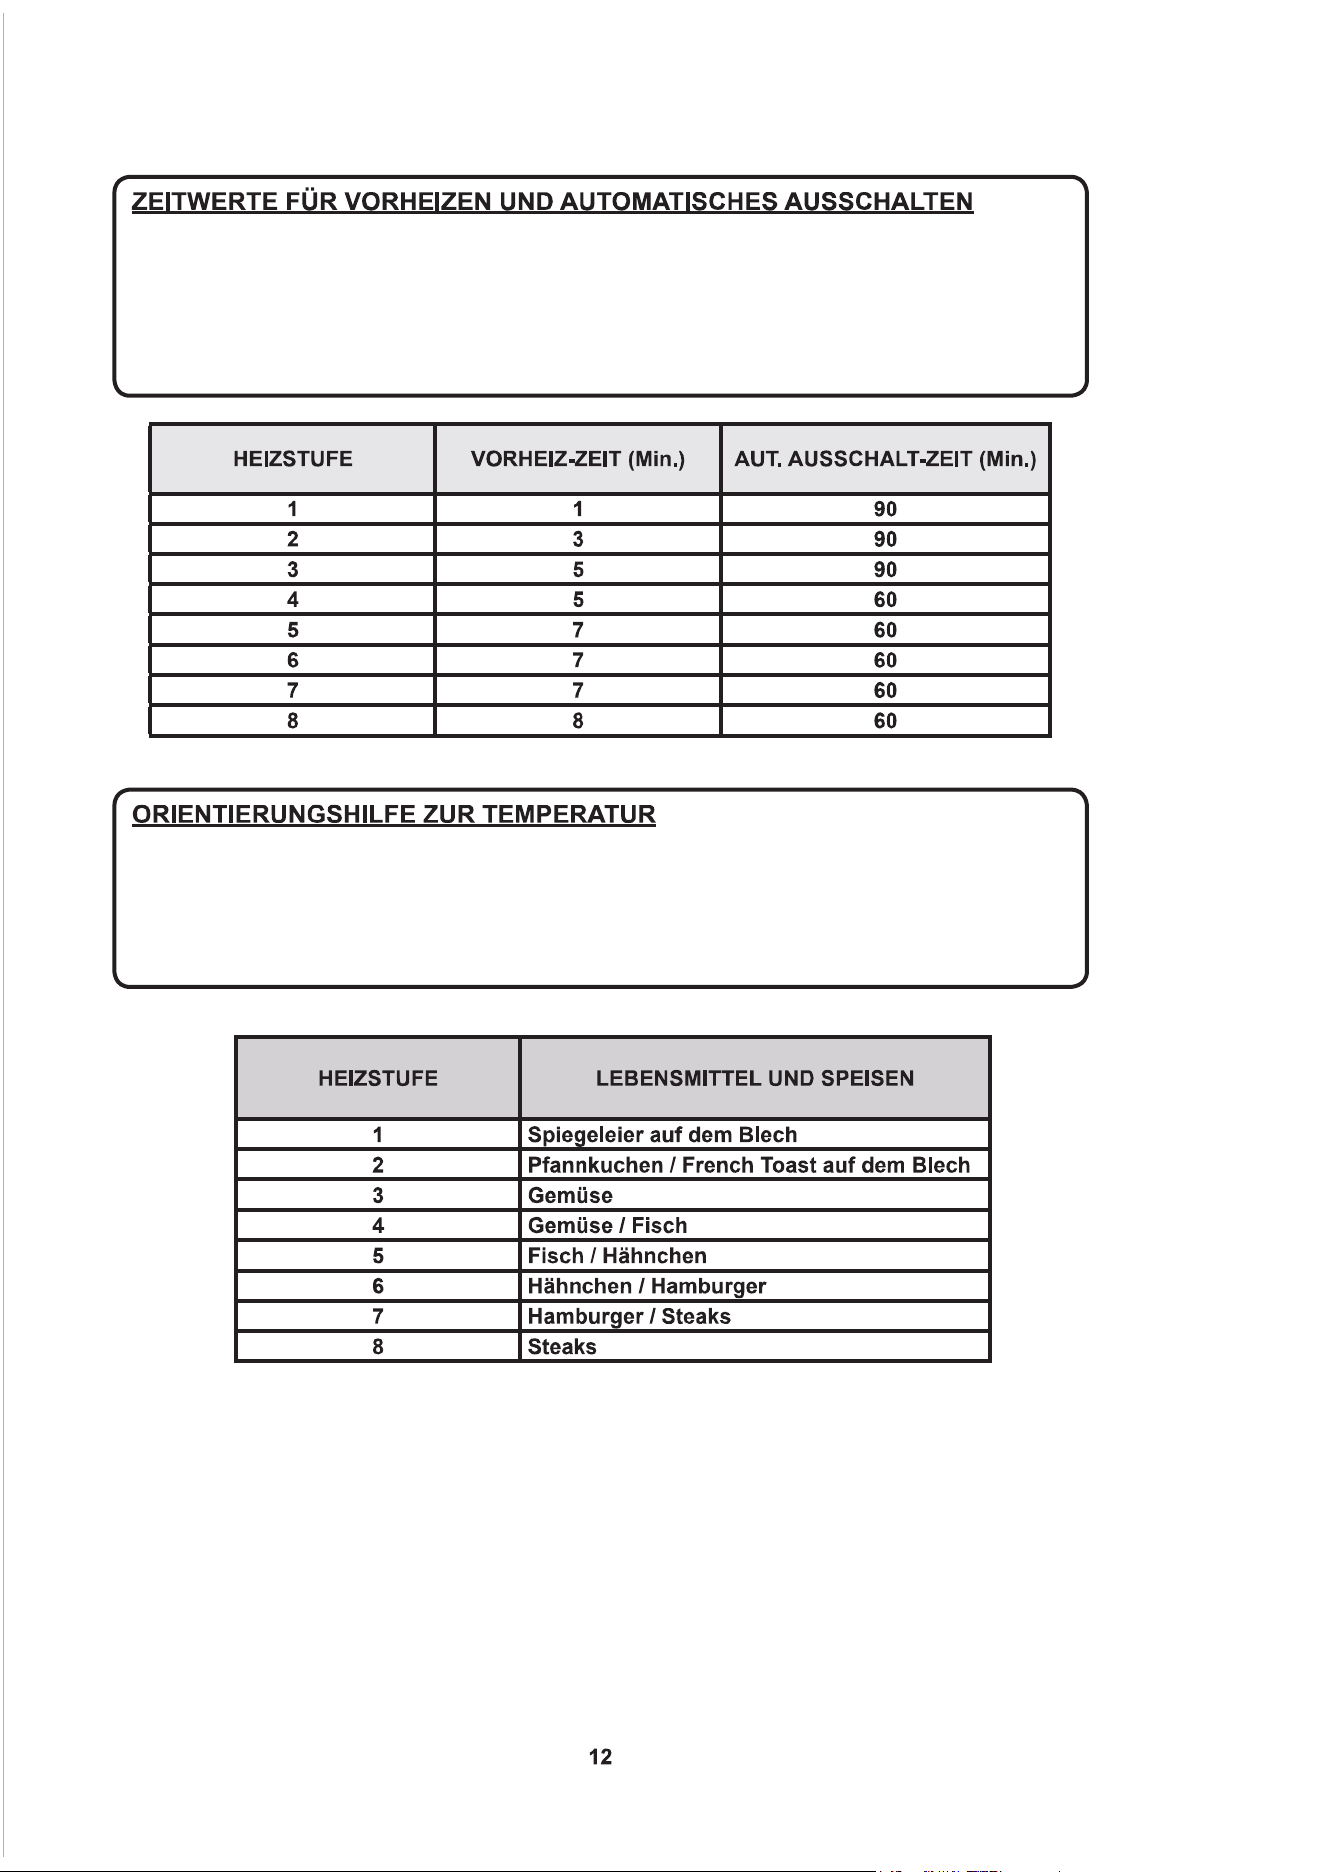
DieGrillsteuerungverfügtübereineVorheizfunktion,beiderderGrillaufjederLeistungsstufefür
einen bestimmten Zeitraum mit voller Leistung arbeitet. Diese Vorheizfunktion heizt den Rost/
dasBlechschnelleraufdiegewünschteTemperaturauf,sodassschnellermitdemGrillenbegon-
nenwerdenkann.InderfolgendenTabellesinddieZeitwertefürdasVorheizenunddieautoma-
tischeAusschalt-FunktionfürjedeLeistungsstufeaufgeführt.
Die folgenden Angaben sollen lediglich als Orientierungshilfe dienen. Faktoren wie
Windbedingungen, Außentemperatur und Lebensmitteltemperatur zu Beginn des Grillens
könnendieZubereitungszeitenbeeinussen.DerGrillwurdefüreineoptimaleKochleistung
bei (fast) geschlossenem Deckel entwickelt und konstruiert.
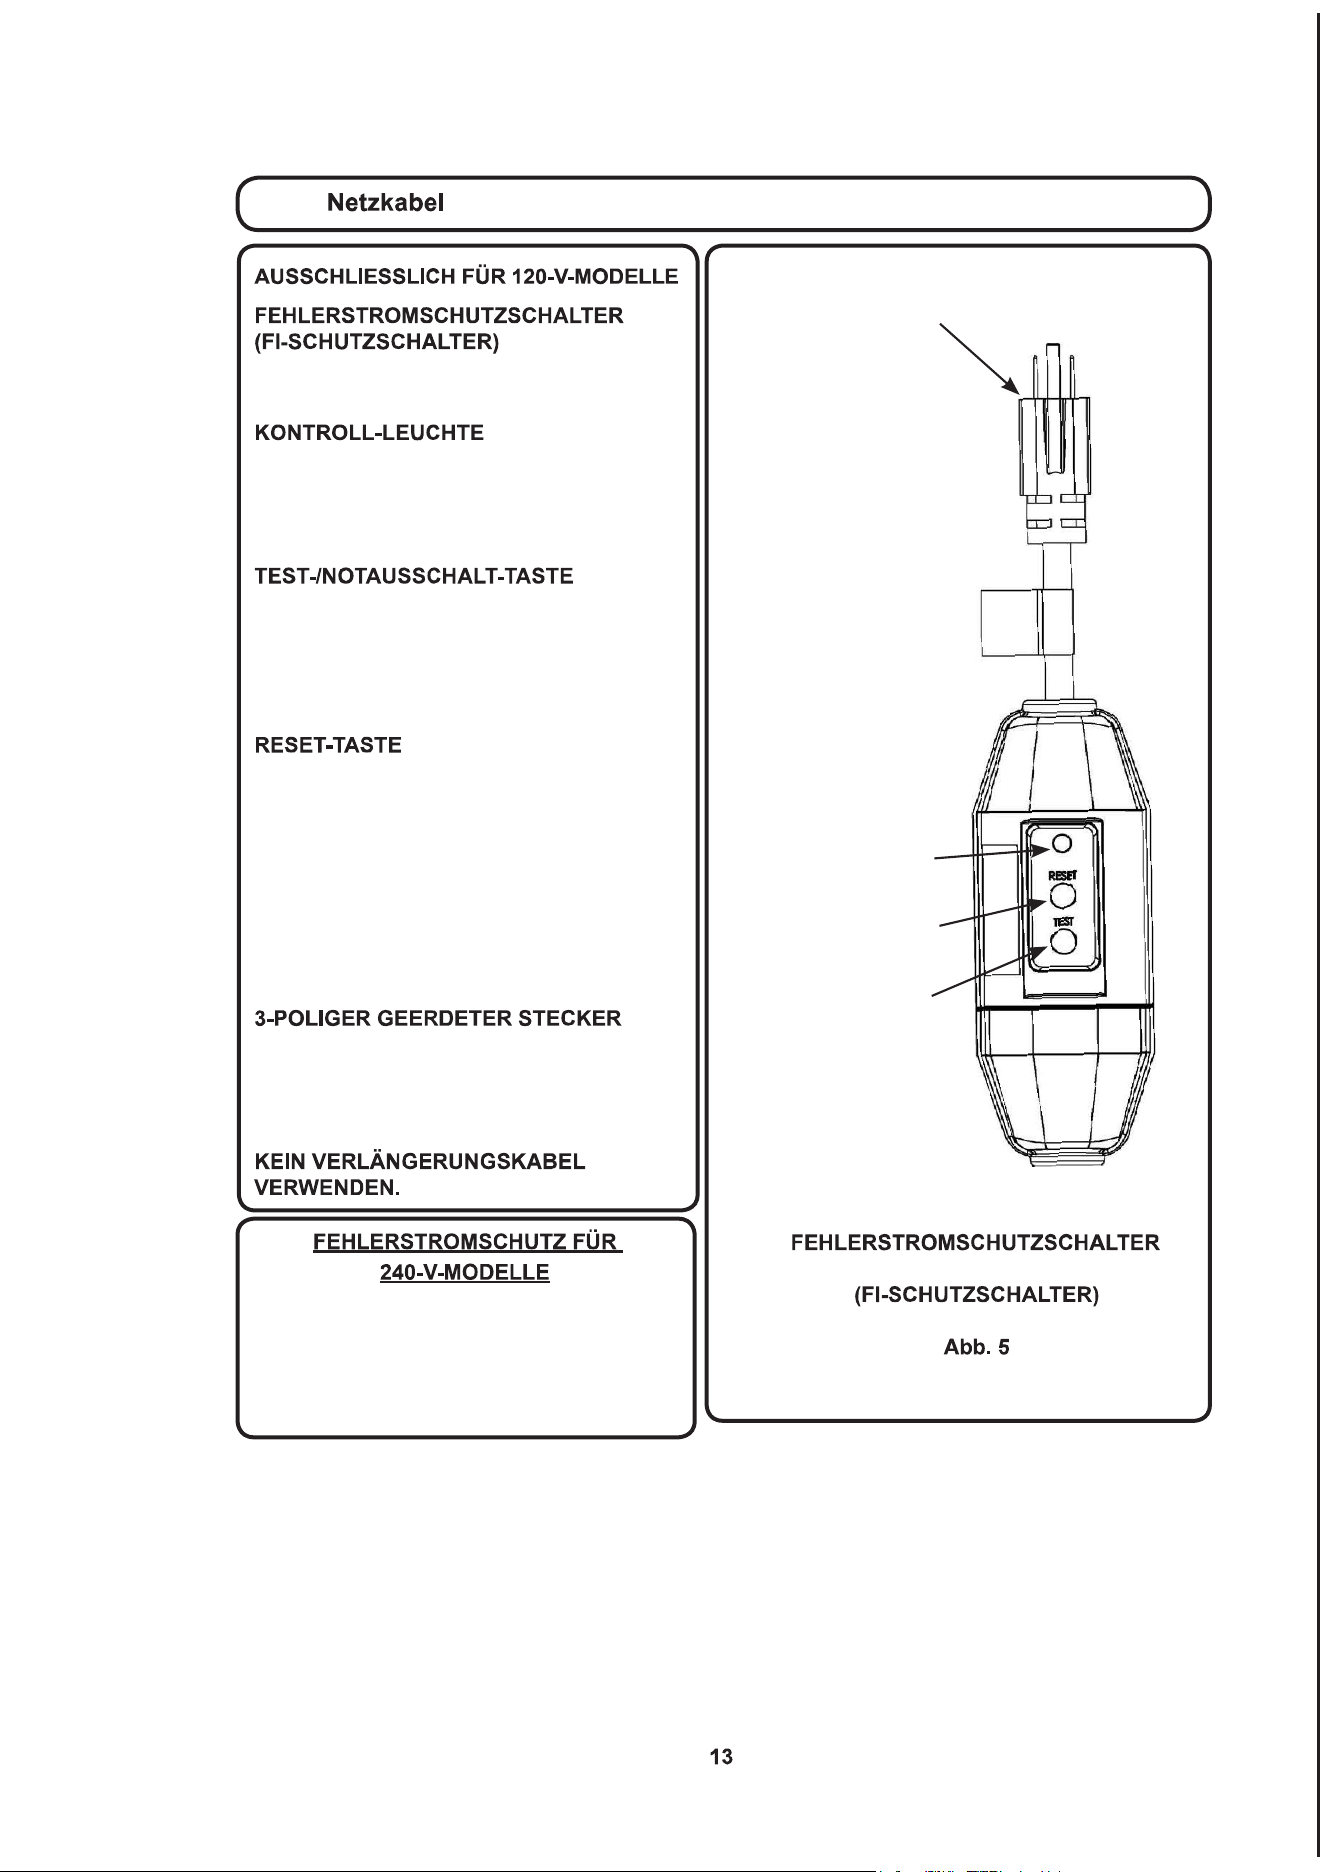
RESET-
TASTE
3-POLIGER GEERDETER STECKER
KONTROLL-
LEUCHTE
TEST-
TASTE
Der Stromkreis bei einer Netzspannung
von 240 V sollte mit einem Fehlerstrom-
schutzschalter ausgestattet sein. Bitte die
BestimmungenvorOrtprüfen,umdieEin-
haltungderVorschriftenzugewährleisten.
Der FI-Schutzschalter ist eine Sicherheits-
vorrichtungzumSchutzvorStromunfällen.
DieKontroll-Leuchteleuchtet,währenddas
GerätmitStromversorgtwirdundzeigtan,
dassderFI-Schutzschalterordnungsgemäß
funktioniert.
DurchDrückendieserTastewirdderFI-
Schutzschalter getestet. Die Kontroll-Leuchte
schaltet sich aus und die Stromversorgung
zum Grill wird unterbrochen. Der FI-Schutz-
schalter sollte monatlich getestet werden.
DurchDrückendieserTastenimmtderFI-
Schutzschalter wieder seine normale Funk-
tion auf. Die Kontroll-Leuchte leuchtet auf
und der Grill wird wieder mit Strom versorgt.
Leuchtet die Kontroll-Leuchte nicht auf,
dann wurde durch den FI-Schutzschalter
eineStörungentdeckt.DenFI-Schutzschal-
ter aus der Steckdose ausstecken und den
Grill nicht benutzen.
VORSICHT: Damit ein durchgehender
SchutzvorStromunfällenbesteht,mussder
FI-Schutzschalterineineordnungsgemäß
geerdete Steckdose eingesteckt sein.
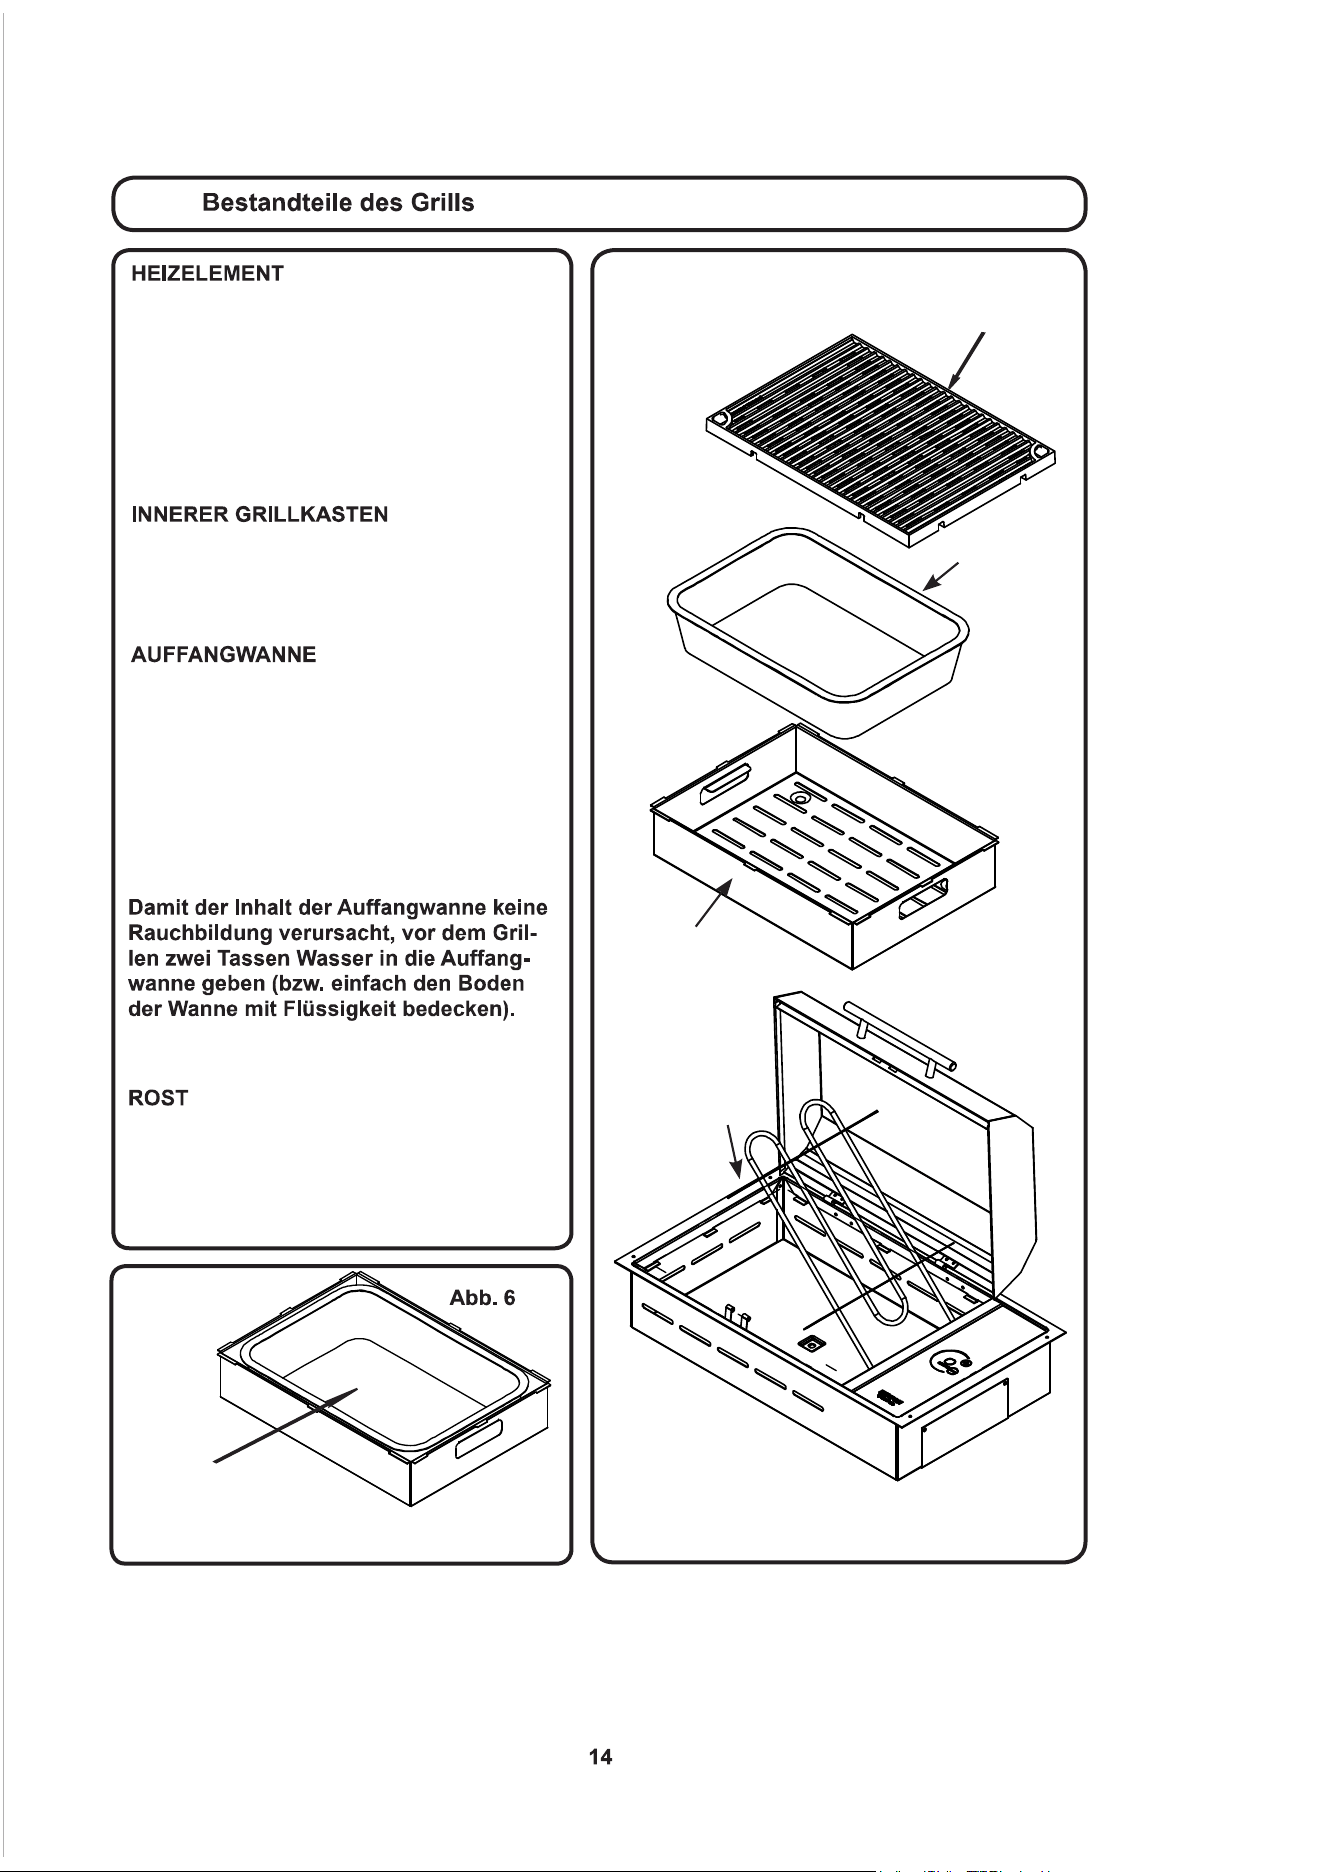
ROST
INNERER
GRILLKASTEN
AUFFANGWANNE
HEIZELEMENT
DieKonstruktiondesHeizelementsermög-
licht es, das Element wie in der Abbildung
durch Anheben zu drehen, um den inneren
Grillkasten und die Auffangwanne entnehmen/
austauschenzukönnen.Esrastetineiner
senkrechten Stellung ein. Um es in die Aus-
gangsstellung zu bringen, leichten Druck
ausüben.
DerinnereGrillkastenistderTrägerfürdie
Auffangwanne, das Heizelement und den Rost
und muss beim Grillen immer verwendet
werden.
DieaustauschbareAuffangwannefängtFette
undFlüssigkeitenauf,diebeimGrillenund
Kochen entstehen. Die Auffangwanne muss
nach jedem Gebrauch ausgeleert werden.
Beim Wiedereinsetzen darauf achten, dass
dieAuffangwannevollständigindeninneren
GrillkasteneingesetztwirdundihreRänder
nichtüberdieKastenwändeherausragen
(siehe Abb. 6).
Die Kenyon-Artikel-Nr. zum Bestellen einer
Ersatz-Auffangwanne lautet B96001.
Der Rost muss nach jedem Gebrauch gerei-
nigt werden. Seine Antihaftbeschichtung er-
leichtert die Reinigung. Den Rost nach jedem
Gebrauch in warmem Seifenwasser reinigen.
DIE AUFFANGWANNE
MUSS, WIE ABGEBILDET,
KORREKT IN DEN INNEREN
GRILLKASTEN EINGESETZT WERDEN.

DerGrilldeckellässtsichfürdie
Reinigung entfernen. Um den Deckel
abzunehmen, einfach den Stift aus
dem Scharnier ziehen. (siehe Abb. 7).
Erst wenn der Stift entfernt wurde, den
Deckel auf der linken Seite anheben,
umdasScharnierzulösenundnach
links schieben, bis sich der Deckel vom
rechtenScharnierstiftgelösthat(siehe
Abb. 8). Sobald der Deckel entfernt
wurde, kann er in warmem Seifenwas-
ser gereinigt werden.
SCHARNIER-
STIFT

KENYON
Déclarationdegarantie
KenyonInternational,Inc.(la«Société»)garantitquesesproduits,dansdesconditionsnormalesd'utilisation,sontexemptsdetout
défautdematériauetdefabrication,sousréservedesconditionsetlimitationsci-dessous.
Toutepièces'avérantdéfectueusedansdesconditionsnormalesd'utilisationpendantlapériodedegarantieseraréparéeou
remplacéeparlaSociété.
Pourêtrecouvertparlaprésentegarantie,leproduitdoitêtreretournéàlaSociétéàdesfinsdevérification.Veuillez
contacterkenyonservice@cookwit hkenyon.compourobtenirlesinstructionsrelativesauxretours.
Laprésentegaranties'appliqueàcertainsproduitsfabriquésparlaSociétéetestassujettieauxconditionset
limitationssuivantes:
1. LaresponsabilitédelaSociétéselimiteàlaréparationouauremplacement(actioncorrectiveàladiscrétiondela
Société)descomposantsélectroniquesdontlesmatériauxoulafabrications'avèrentdéfectueux.Cetteresponsabilitéest
limitéeàtroisanssuivantladated’installationd'origineouà42moissuivantladatedefacturation,selonlapremière
occurrence;laprésentegarantiecouvrelespiècesetlamain-d’œuvreàuntauxprofessionnelpréapprouvé.L'acier
inoxydableestgarantiàviecontrelarouillelorsqu'ilestentretenumensuellement,commeindiquédanslemanuel
d'utilisation.Sileprocessusdecorrosionestentamé,veuillezcontacterlaSociétéetluifaireparvenirdesphotosàtitre
depreuvespourobtenirdescomposantsderechange.
2. L'adéquationduproduitàl’usageenvisagéparl’Acheteurrelèvedelaseuleresponsabilitédel’Acheteur,etlaSociéténe
peutêtretenueresponsabledecettedécision.
3. LaSociéténepeutêtretenueresponsabledesdommagesdécoulantde:
•défaillancescauséesparl’utilisationduproduitdansdesapplicationspourlesquellesiln’apasétéprévu;
•défaillancescauséesparlacorrosion,l’usure,uneutilisationabusive,oubienunmontageouentretieninadéquat;
•défaillancescauséesparlebrisdeverre,accidentelouautre.
4. LaSociétéestresponsabledesfraisd’expéditionderetourparvoieterrestrejusqu'aupropriétairedel’appareildansles
limitesducontinentnord-américain(États-UnisetCanada).Touslesautresfraisdedouane,deserviceexpressoude
livraisonspécialesontfacturésàl'Acheteur.
5. TouslestravauxautorisésparlaSociétéenvertudelaprésentegarantiedoiventêtrepréalablementautoriséset
effectuésparlepersonneld’uncentredeserviceKenyonInternationalagréé,saufindicationcontraireécritedela
Société.
AUCUNEAUTREGARANTIEDEQUALITÉMARCHANDE,DECONFORMITÉAUXBESOINSOUDETOUTEAUTRENATURE,
EXPLICITEOUIMPLICITE,N'ESTSTIPULÉEOUPRÉSUMÉEPARLALOI.Laduréedesgarantiesprésuméesnéanmoinsparla
loipourprotégerlesconsommateursseralimitéeàtroisansàcompterdeladated’achatparl'utilisateur.Certainspaysne
permettentpasleslimitationsdeduréedesgarantiesimplicites,parconséquentilestpossiblequelaprésentelimitationne
s’appliquepasdansvotrecas.
LASOCIÉTÉNEPEUTÊTRETENUERESPONSABLEDETOUTDOMMAGECONSÉCUTIFOUINDIRECTRÉSULTANTD’UNE
VIOLATIONDEGARANTIE,QU’ELLESOITEXPLICITE,IMPLICITEOUPRÉVUEPARLALOI.CertainspaysouÉtatsne
permettentpasl’exclusionoulalimitationdedommagesconsécutifsouindirects,parconséquentilestpossiblequelaprésente
exclusionoulimitationnes’appliquepasdansvotrecas.
LAPRÉSENTEGARANTIEVOUSCONFÈREDESDROITSLÉGAUXPRÉCISETILSEPEUTQUEVOUSBÉNÉFICIIEZ
D’AUTRESDROITSLÉGAUXENFONCTIONDEVOTREPAYSOUÉTAT.
KenyonInternational,Inc.
P.O.Box925•8HeritageParkRoad•Clinton,CT06413USA
Téléphone:(860)664-4906-Fax:(860)664-4907
1. Leggere TUTTE le istruzioni prima di utilizzare questo prodotto.
2.Nontoccarelesuperciroventi.Usarelemaniglieolemanopole.
3. Evitare di immergere i cavi o le spine all’interno di acqua o liquido per proteggersi dal rischio di
scosse elettriche.
4. È necessaria una stretta sorveglianza quando le apparecchiature vengono utilizzate in presenza di bambini.
5. Staccare la spina dalla presa di corrente quando non in uso e prima di procedere alle operazioni di
pulizia. Lasciar raffreddare prima di applicare o rimuovere i componenti.
6. Non azionare l’apparecchiatura se il cavo di alimentazione o la spina sono danneggiati. In caso di
malfunzionamento dell’apparecchiatura, interrompere l’utilizzo e contattare il rivenditore autorizzato più
vicinool’aziendapereseguireveriche,riparazionioregolazioni.
7. L’utilizzo di componenti accessori non forniti dal produttore può causare danni.
8. Se usato come grill portatile, custodire all’interno quando non in uso. Se usato come grill integrato,
è necessario utilizzare una protezione adeguata per prevenire l’esposizione diretta alla pioggia. Sono
disponibili coperture.
9. Non lasciare che i cavi pendano dal bordo del tavolo o del banco o che entrino in contatto con le
superciroventi.
10. Non posizionare sopra o nelle vicinanze di un fornello elettrico o all’interno di un forno caldo.
11. È necessario prestare la massima attenzione durante lo spostamento di un’apparecchiatura
contente olio o liquidi bollenti.
12. Collegare sempre la spina prima all’apparecchiatura e successivamente collegare il cavo alla
presa sul muro. Per scollegare, spegnere tutti i comandi portandoli sulla posizione “off” e rimuovere la
spina dalla presa sul muro.
13. Non utilizzare l’apparecchiatura per scopi diversi da quelli a cui è destinata.
14. Versare sempre dell’acqua, minimo due (2) tazze, all’interno della vaschetta di raccolta prima di
iniziare a utilizzare il grill.
15. Non lasciare mai i bambini da soli - i bambini devono essere sorvegliati in ogni istante nelle
vicinanze del grill.
16. Lasciar raffreddare il grill prima di rimuovere la griglia di cottura, la vaschetta di raccolta o il coperchio.
17. I combustibili, come il carbone, non devono essere utilizzati con questa apparecchiatura.
18. Assicurarsi che il grill sia stato installato seguendo le istruzioni e che sia stata eseguita la messa a
terraadeguatadapartediunelettricistaqualicato.
19. Non sostituire o provare a riparare nessuno dei componenti del grill, a meno che non sia scritto in
questo manuale.
Tutta la manutenzione deve essere eseguita da parte di un tecnico autorizzato dal produttore.
20.Nonutilizzareacquaperestinguereammeoriginatedagliolidicucina,utilizzareagentichimici
per lo spegnimento del fuoco a secco.
21.Nonconservarematerialiinammabilinellevicinanzedelgrill.
22. Durante l’utilizzo del grill non indossare indumenti larghi o abbigliamento con parti pendenti.
R E M O V E & R E A D P R I O R T O G R I L L I N G
w w w . C o o k W i t h K e n y o n . c o m | 8 6 0 . 6 6 4 . 4 9 0 6 |
T h a nk y ou f or p ur c h as i n g th e W o r l d ’ s F i ne s t A ll Se as o ns ® E l ec tr i c Gr il l ! T h e re a r e a f e w si m p l e
s t ep s y ou c a n t ak e to e ns u r e yo ur g oo d de c is i o n w i l l l e a d to y ea r s o f W o rl d- C l a s s Gr il l i n g:
Q U I C K S T A R T T I P S
to purchase re cipe books, cook ing ute nsils,
griddles, grill covers, and more!
V I SI T O U R WE B SIT E
1.
2.
3.
4.
5.
6.
7.
8.
Remove g rate(s) and drip tray(s), clean both.
Inse rt the drip tray(s) into the bottom of grill. Make sure the burner b rackets are not
resting on the drip tray (s).
Always fill the drip tray(s) with 2 cups of liquid. Water will work, but why not try beer
or wine to add flavor to your fav orite food . Then re-install c ooking grate.
Depending on model, either har dwire your Kenyon All Seasons® Grill or plug it directly into
an o utlet, do not use ext ension cords.
Preheat grill w ith the lid closed for 5 - 7 minutes on desired heat setting for type of food:
Close lid and cook. Enjoy the best grilled food you have ever tasted!
Once your grilling session is complete, gr ab a wet paper towel and wi pe down your grate.
Once cool, place grate/griddle in the dish washer along with the dirty dishes so that it’s
ready for its next tour of duty!
While the grate is in the wash, don’t forget to clean out the drip tray contents.
This is an important step in preventing a grease fire.
-Vege tables 3-4 bars
-Chick en, pork and fish 4-5 bars
-Hamburgers 6 -7 b ars
-Steak 7-8 bars
1. Prima di utilizzare il grill, rimuovere la griglia di cottura e la vaschetta di raccolta. Pulire il grill
con acqua tiepida saponata utilizzando un panno morbido. UTILIZZARE SOLTANTO UTENSILI
RESISTENTI ALLE ALTE TEMPERATURE DURANTE L’UTILIZZO DEL GRILL. Per acquistare
un set completo di utensili di alta qualità in acciaio inossidabile/plastica resistente alle alte
temperature, visitate il nostro sito www.cookwithkenyon.com.
2. Assicurarsi che la vaschetta di raccolta sia completamente inserita alla
base del grill e che le staffe dell’elemento elettrico siano appoggiate alla
staffa di sostegno dell’elemento.
3. Coprire la base della vaschetta di raccolta con del
liquido. L’acqua va bene. NON UTILIZZARE LIQUIDI
INFIAMMABILI! In questo modo si rischia di rovinare
l’apparecchiatura per cucinare. L’utilizzo dell’aceto
di mele durante la cottura del maiale può aggiungere un sapore gustoso
alla carne. Una lattina di soda al lime può essere un tocco fantastico
per la cottura del pesce. È possibile provare con ogni tipo di bevanda di
proprio gradimento. Ricordarsi sempre di aggiungere liquido nella
vaschetta di raccolta prima di utilizzare il grill.
4. Per evitare il rischio di fumi, pulire sempre la griglia di cottura dopo ogni utilizzo.
Pulire il grill con acqua tiepida saponata utilizzando un panno morbido oppure lavare in
lavastoviglie. Svuotare la vaschetta di raccolta e pulire con un panno di carta umido. La
vaschetta di raccolta può essere usata molte volte prima che sia necessario sostituirla.
5. Posizionare la griglia di cottura o la piastra opzionale (codice n.B96000) sull’elemento con la
vaschetta di raccolta già installata. Usare la piastra per alimenti come le uova, le frittelle o il mio
piatto preferito - il toast alla francese!
6. Scaldare il grill per 5 - 7 minuti al massimo (8 tacche illuminate). Regolare le impostazioni del
calore in base al tipo di alimento.
• Bistecche 7-8 tacche.
• Hamburger 6-7 tacche.
• Maiale e pesce 4-5 tacche.
• Verdure 3-4 tacche.
7. Chiudere il coperchio e cucinare. Gusta il migliore cibo grigliato mai provato prima!
8. Pulizia. Operazione facile e veloce da imparare. Una volta che il grill si è raffreddato ed è
possibiletoccarlo,ricoprirelasuperciedicotturacondeipannidicarta.Bagnareipannidicarta
con 30 gr. (1 oz) d’acqua e tamponare in avanti e indietro utilizzando le pinze in nylon resistenti
alle alte temperature per ammorbidire i residui rimasti sul grill. Gettare il panno di carta e pulire la
griglia con un panno di carta asciutto.
9. Una volta raffreddata completamente, rimuovere la griglia e metterla in lavastoviglie per un
lavaggio accurato.
10. Una volta rimossa la griglia, sollevare l’elemento elettrico e rimuovere la vaschetta di
raccolta. Svuotare il contenuto della vaschetta di raccolta in un luogo adeguato, non gettarlo nel
giardino del vicino. Asciugare la vaschetta con un panno di carta e riutilizzare la vaschetta. La
vaschetta può durare per numerosi utilizzi.
11. È possibile lavare il coperchio ogni 7-8 utilizzi. Può essere lavato in lavastoviglie con il
programma per le pentole. Questo riporterà il grill al suo aspetto pulito originale.
12.Perprocedereallapuliziadelgrillassicurarsiprimachelasuperciedicotturasiafredda
abbastanzaperesseretoccata.Rimuoverelagriglia,sollevarel’elementoelettriconoa
bloccarlo in posizione sollevata, quindi, rimuovere la vaschetta di raccolta.
13.Pulirelesuperciinacciaioinoxconunpannoumidoperrimuoveretuttiiresiduidellacottura
precedente.
14.IlgrillKenyonèdotatodiuncampionediaconeperpulirel’acciaioinox.
Utilizzareilaconeunavoltaalmesepermantenereilgrillcomenuovo.
15. L’area dei comandi è vetroceramica sigillata per la protezione contro la pioggia,
la neve e il ghiaccio. Per pulire il vetro, utilizzare un detergente per vetri e un
panno morbido. In caso di macchie, utilizzare un detergente per vetroceramica
commerciale acquistabile al supermercato di zona.
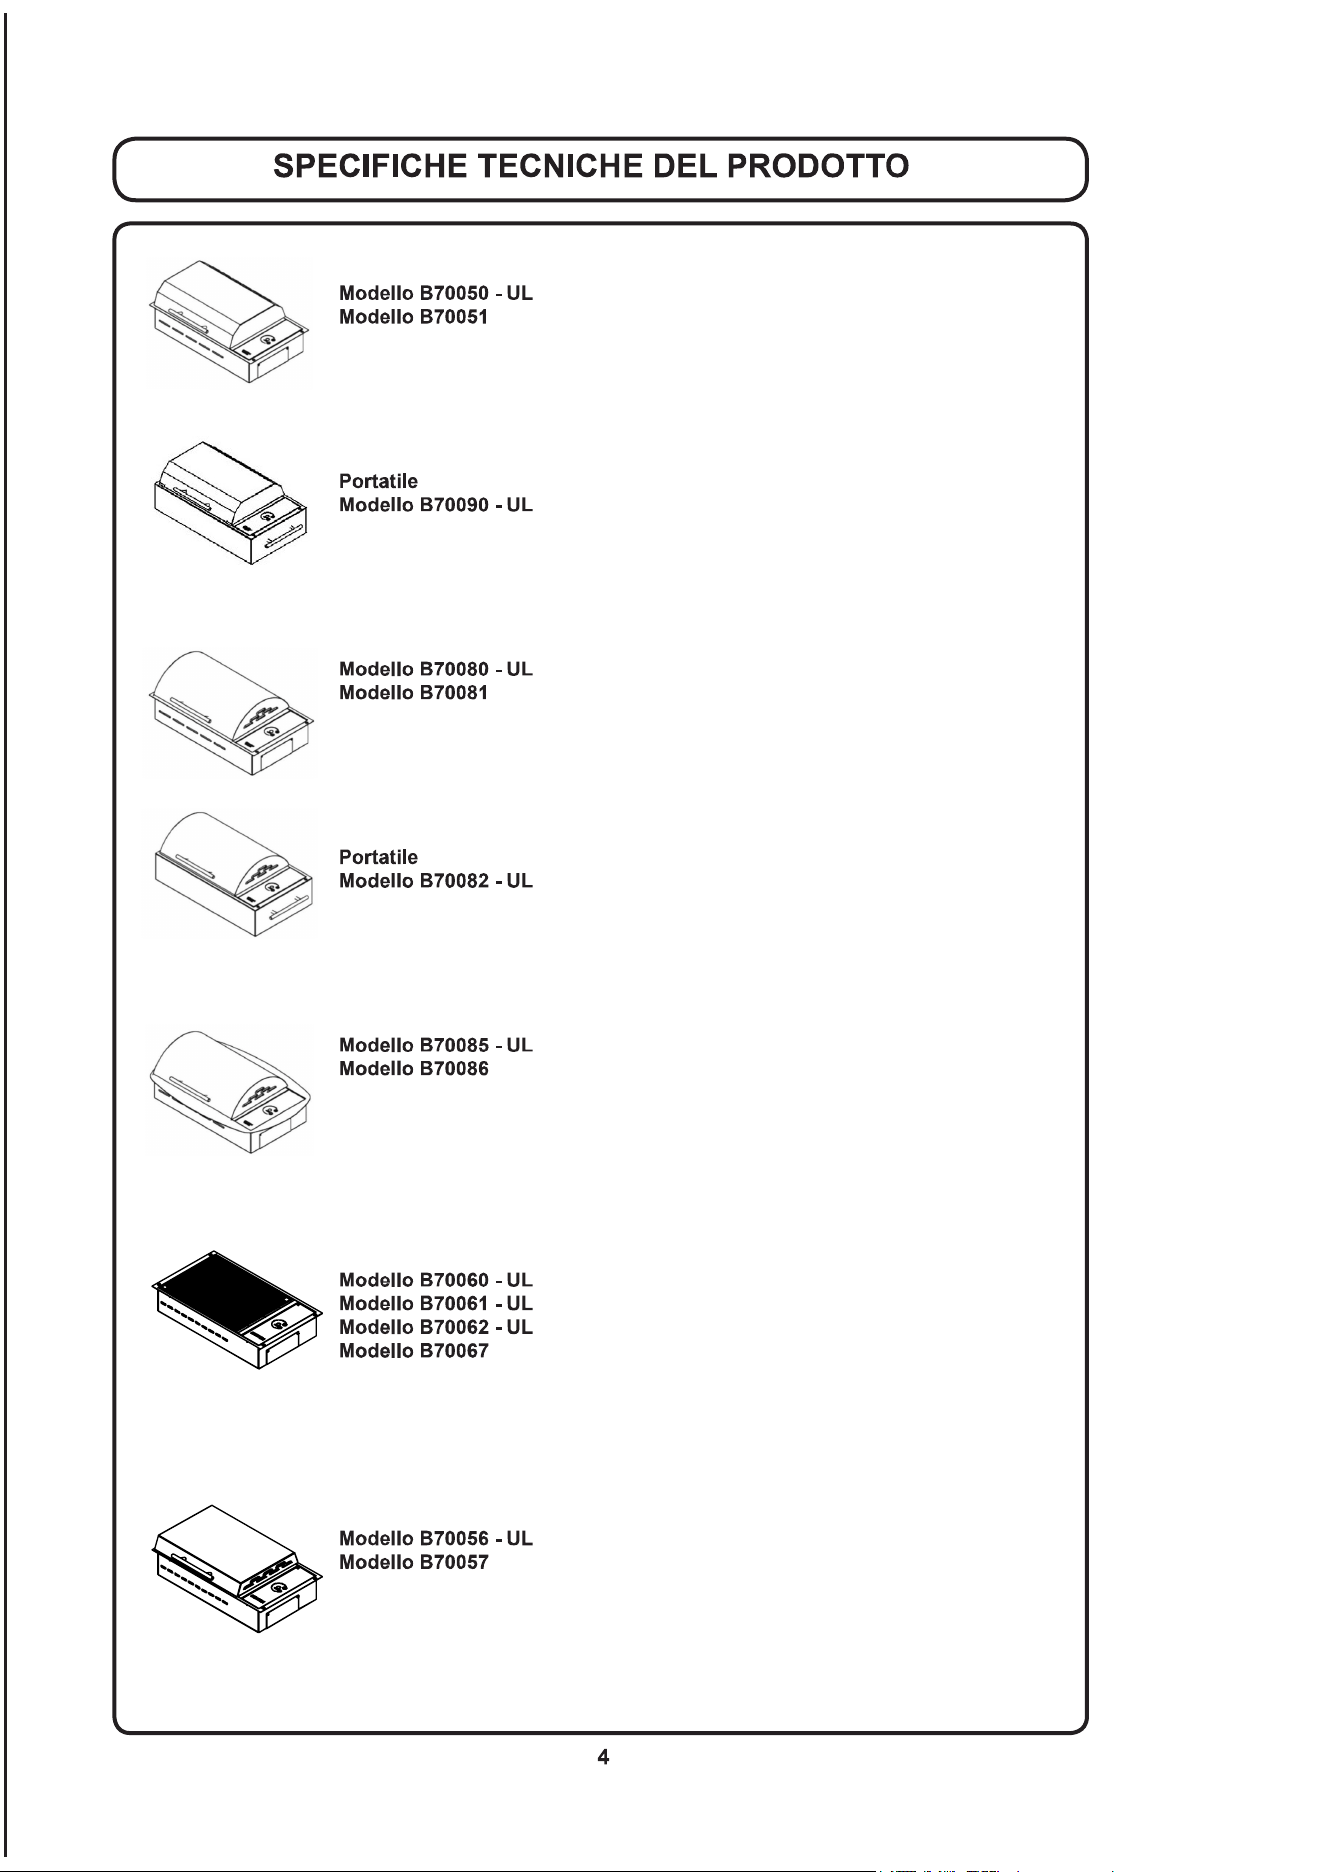
Frontier
- 120 VCA - 1300 WATT - 11 AMPERE
- 240 VCA - 1300 WATT - 6 AMPERE
Dimensioni complessive: 533 mm x 305 mm x 102 mm (21 poll. x 12 poll. x 4 poll.)
(187 mm (7 3/8 di poll.) con il coperchio)
La profondità non include il raccordo del tubo di scarico
Dimensioni sagoma: 501,6 mm x 296 mm (19 3/4 poll. x 11 5/8 poll.)
con raggio 6 mm (1/4 poll.) sugli angoli
- 120 VCA - 1300 WATT - 11 AMPERE
Dimensioni complessive: 533 mm x 305 mm x 219 mm
(21 poll. x 12 poll. x 8 5/8 poll.)
Floridian
- 120 VCA - 1300 WATT - 11 AMPERE
- 240 VCA - 1300 WATT - 6 AMPERE
Dimensioni complessive: 533 mm x 305 mm x 102 mm (21 poll. x 12 poll. x 4 poll.)
(206 mm (8 1/8 di poll.) con il coperchio)
La profondità non include il raccordo del tubo di scarico
Dimensioni sagoma: 501,6 mm x 296 mm (19 3/4 poll. x 11 5/8 poll.)
con raggio 6 mm (1/4 poll.) sugli angoli
- 120 VCA - 1300 WATT - 11 AMPERE
Dimensioni complessive: 533 mm x 305 mm x 238 mm
(21 poll. x 12 poll. x 9-3/8 poll.)
Rio
- 120 VCA - 1300 WATT - 11 AMPERE
- 240 VCA - 1300 WATT - 6 AMPERE
Dimensioni complessive: 584 mm x 397 mm x 102 mm (23 poll. x 15 poll. x 4 poll.)
(206 mm (8 1/8 di poll.) con il coperchio)
La profondità non include il raccordo del tubo di scarico
Dimensioni sagoma: 501,6 mm x 296 mm (19 3/4 poll. x 11 5/8 poll.)
con raggio 6 mm (1/4 poll.) sugli angoli
No Lid
– 120 VCA - 1300 WATT - 11 AMPERE
– 240 VCA - 1300 WATT - 6 AMPERE
– 120 VCA - 1300 WATT - 11 AMPERE
- 240 VCA - 1300 WATT - 6 AMPERE
Dimensioni complessive: 533 mm x 305 mm x 102 mm (21 poll. x 12 poll. x 4 poll.)
La profondità non include il raccordo del tubo di scarico
Dimensioni sagoma: 501,6 mm x 296 mm (19 3/4 poll. x 11 5/8 poll.)
con raggio 6 mm (1/4 poll.) sugli angoli
Half Height Lid
- 120 VCA - 1300 WATT - 11 AMPERE
- 240 VCA - 1300 WATT - 6 AMPERE
Dimensioni complessive: 533 mm x 305 mm x 102 mm (21 poll. x 12 poll. x 4 poll.)
(159 mm (6 1/4 di poll.) con il coperchio)
La profondità non include il raccordo del tubo di scarico
Dimensioni sagoma: 501,6 mm x 296 mm (19 3/4 poll. x 11 5/8 poll.)
con raggio 6 mm (1/4 poll.) sugli angoli
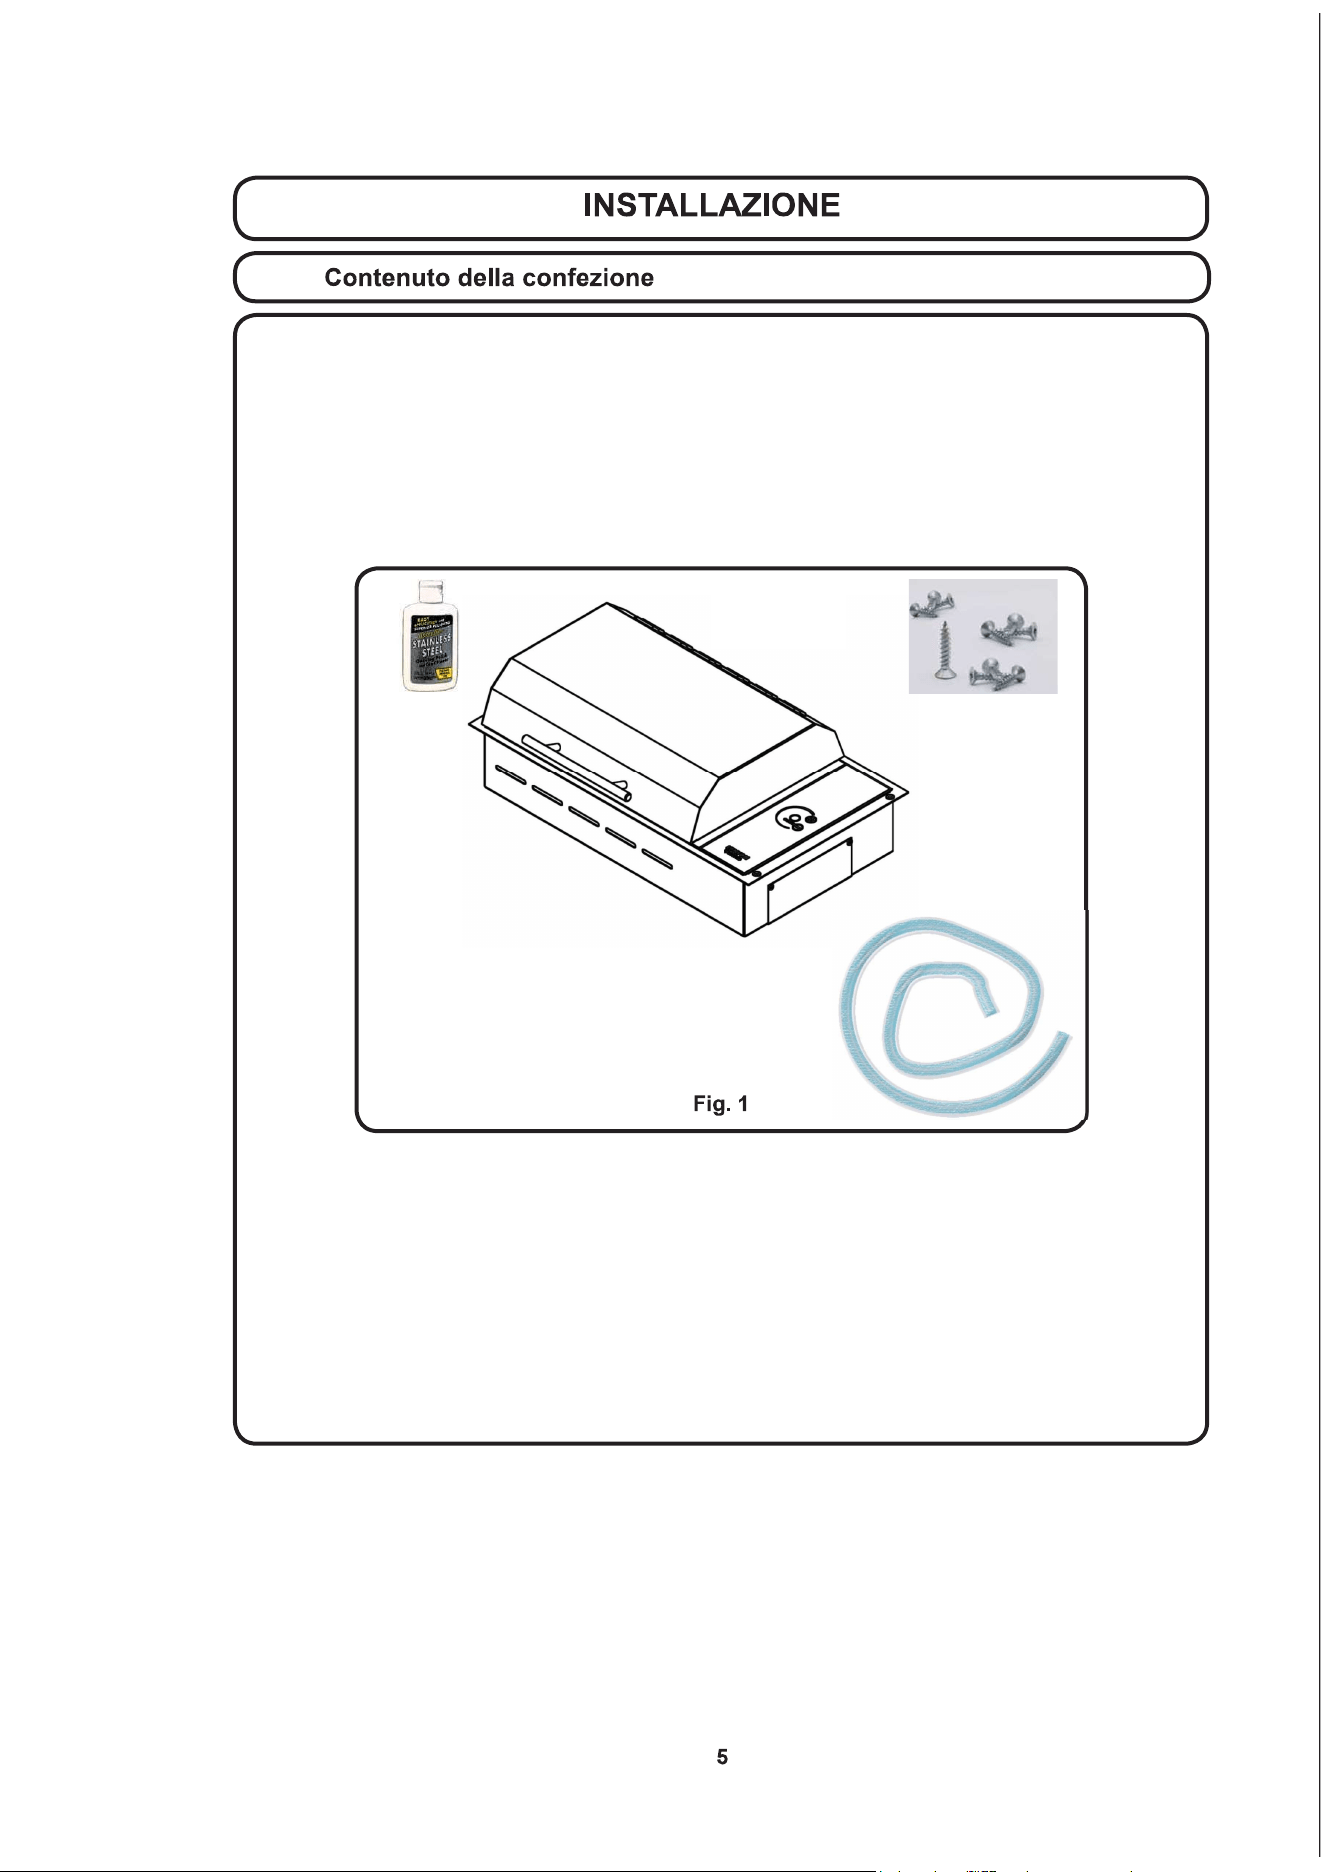
Il grill All Seasons
®
è montato e pronto per l’uso. Prima di utilizzare il grill, scrivere il numero
seriale del prodotto qui per l’utilizzo in futuro: _________________. Il numero seriale si trova sul
latocortodelgrillallanedelpannellodeicomandiinvetro.Ilnumeroserialeècostituitodasei
cifre.
Nel contenitore di imballaggio di All Seasons
®
Grill vi sono quattro (4) viti di montaggio, un tubo
di scarico da 0,9 m (3 piedi), un raccordo a gomito o un attacco per lo scarico a seconda del mo-
dello portatile o integrato, un manuale e un detergente per l’acciaio inox. Se alcuni componenti
fossero mancanti o danneggiati, contattare immediatamente KENYON.
Questo prodotto deve essere installato conformemente alle normative elettriche nazionali,
regionali e locali. La seguente tabella indica i corretti valori di tensione, amperaggio e frequenza
speciciperilgrill.
L’alimentazione deve provenire da un singolo circuito correttamente collegato a terra, protetto da
unsalvavitaeconformeallespecichedeimodelliindicatinellatabellasoprariportata.
Il grill All Seasons
®
vienefornitoconunaangiainacciaioinoxlucidatosucui
èpossibileinstallarequattrovitialegnoatestaovale.Laangiadelgrillèprogettatapertenere
l’unità saldamente in posizione sul piano di lavoro. Se si desidera, è possibile sigillare il bordo
delpianodilavorosottolaangia.
con spessore
massimo compresso di 1,6 mm (1/16 di pollice) Se lo si desidera, è possibile usare silicone
solo per sigillare il bordo del vetro.
B70050
B70056
B70060
B70062
B70080
B70082
B70085
B70090
1300 Watt 120 VCA 11A 60Hz
spinotto a 3 con
messa a terra cavo
con interruttore
differenziale
B70051
B70057
B70061
B70067
B70081
B70086
1300 Watt 240 VCA 6A 60Hz
cavoa3li
senza spina
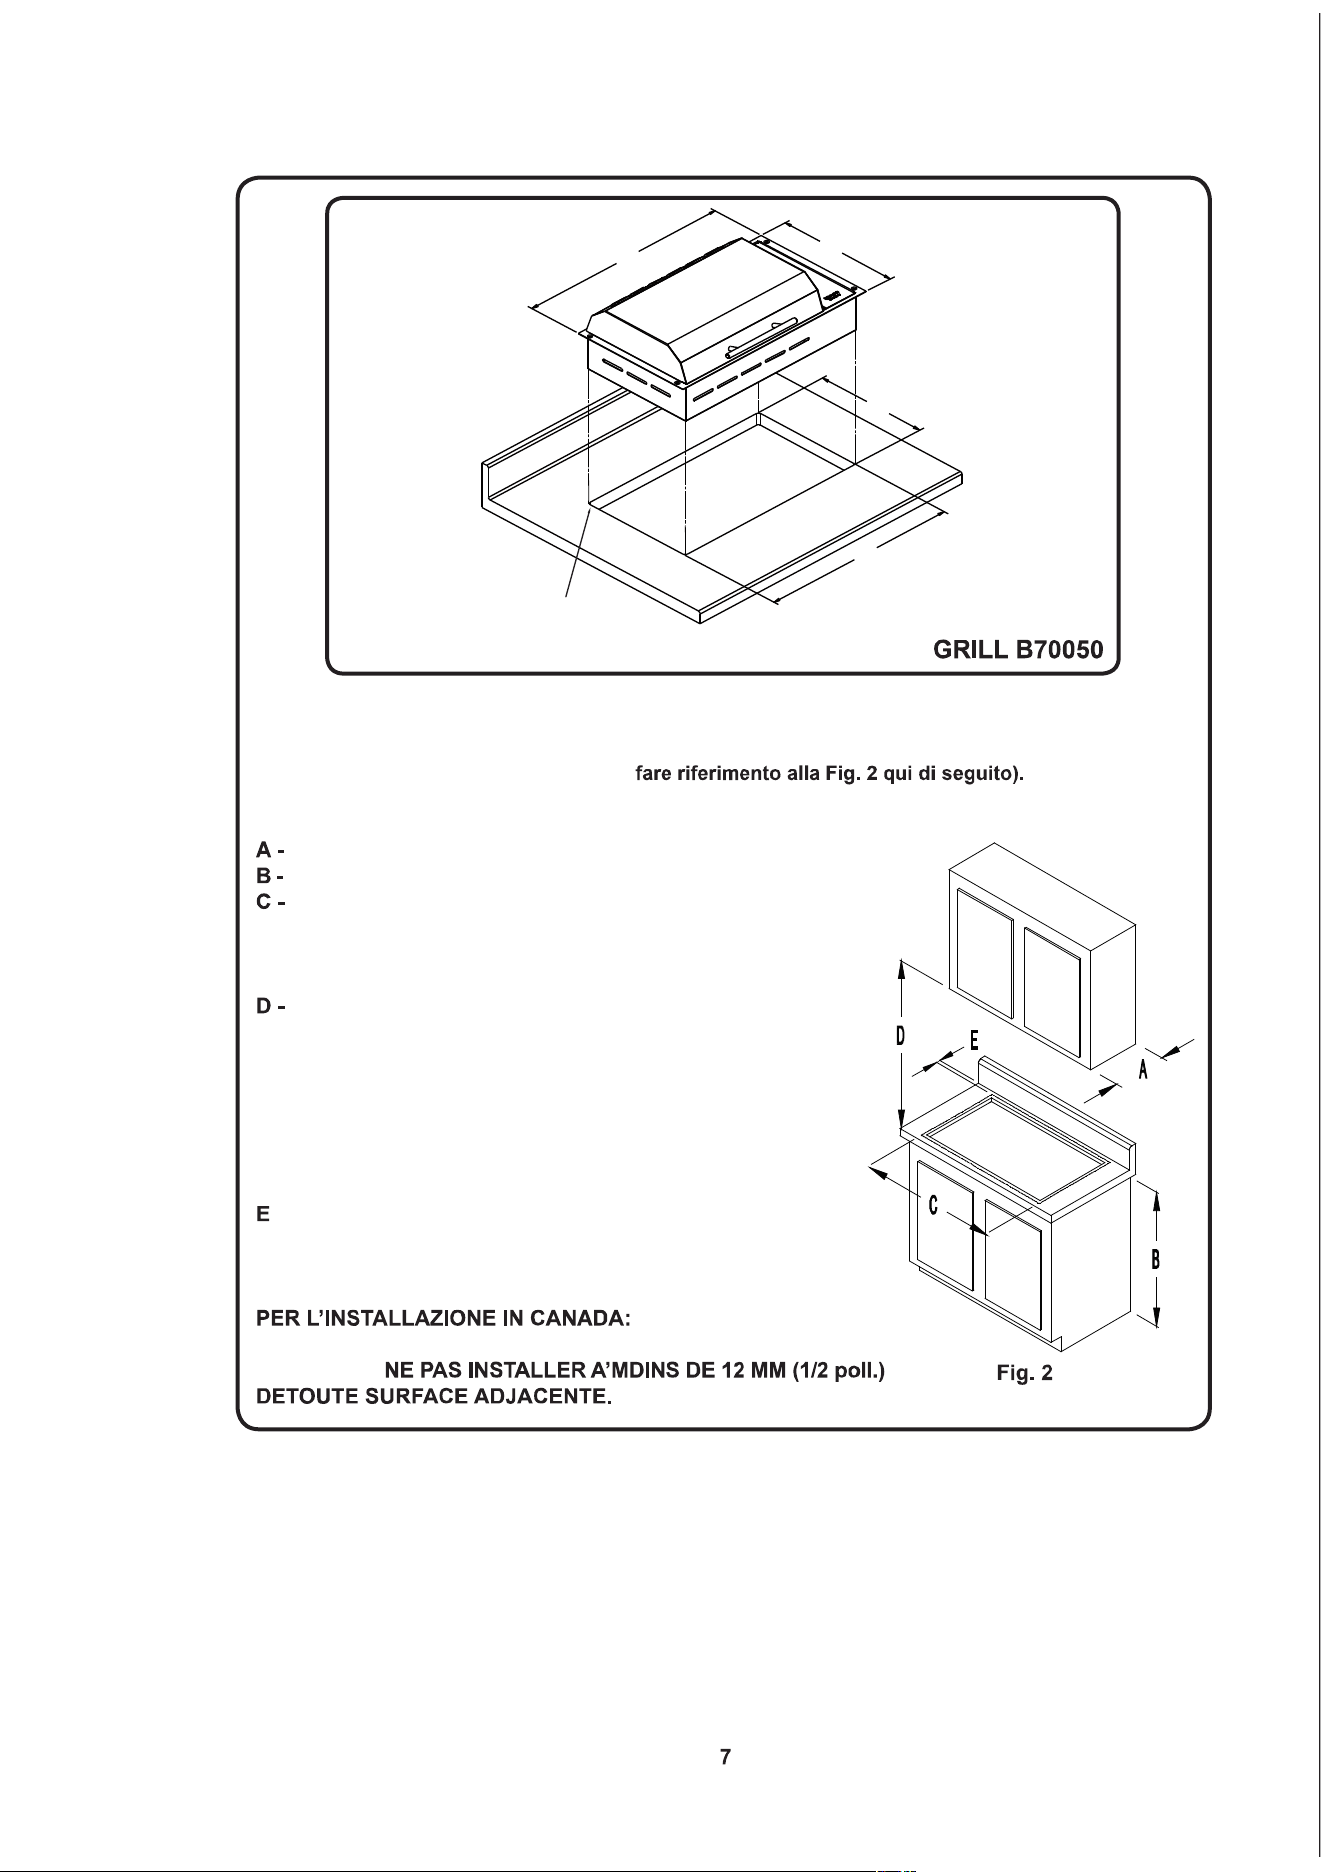
Leggere attentamente questo paragrafo prima di preparare la sagomatura per il grill.
Èimportantepianicareinanticipoillavorodiinstallazionedelgrill,tenendoinconsiderazione
le seguenti dimensioni (
33 cm (13 poll.) di profondità massima per i pensili
91,4 cm (36 poll.) di altezza minima da terra per il piano di lavoro
Lasupercieminimasucuiilpianodilavorodelgrillpuò
appoggiarsi deve essere pari o superiore alle
dimensioni totali del grill (fare riferimento a pagina 8 per
le dimensioni totali del grill).
Distanza minima di 76,2 cm (30 poll.) tra la parte superiore
del grill e la parte inferiore del pensile in legno o metallo
non schermato oppure 61 cm (24 poll.) di spazio se la parte
inferioredelpensileèschermatadaunalastraantiammadi
almeno 0,6 cm (1/4 di poll.) coperta da una lastra in acciaio
inossidabile n. 28 MSG spessa almeno 0,38 mm (0,015 poll.),
una lastra in alluminio da 0,6 mm (0,024 poll.) oppure
una lastra di rame spessa 0,5 mm (0,020 poll.).
- 10,2 cm (4 poll.) dal paraschizzi del piano di lavoro al bordo del
grill (fare riferimento a pagina 8 per le dimensioni totali).
3,8 cm (1,5 poll.) minimo dalla parte frontale al banco del grill.
“Non installare a una
distanzasuperioredi12mm(1/2poll.)daqualunquesupercie
adiacente”, e
53,3 cm (21 poll.)
30,5 cm (12 poll.)
29,5 cm (11 5/8")
50,2 cm (19 3/4 poll.)
0,6 cm (1/4 poll.)
raggio spigolo
DIMENSIONI della sagoma del piano di lavoro
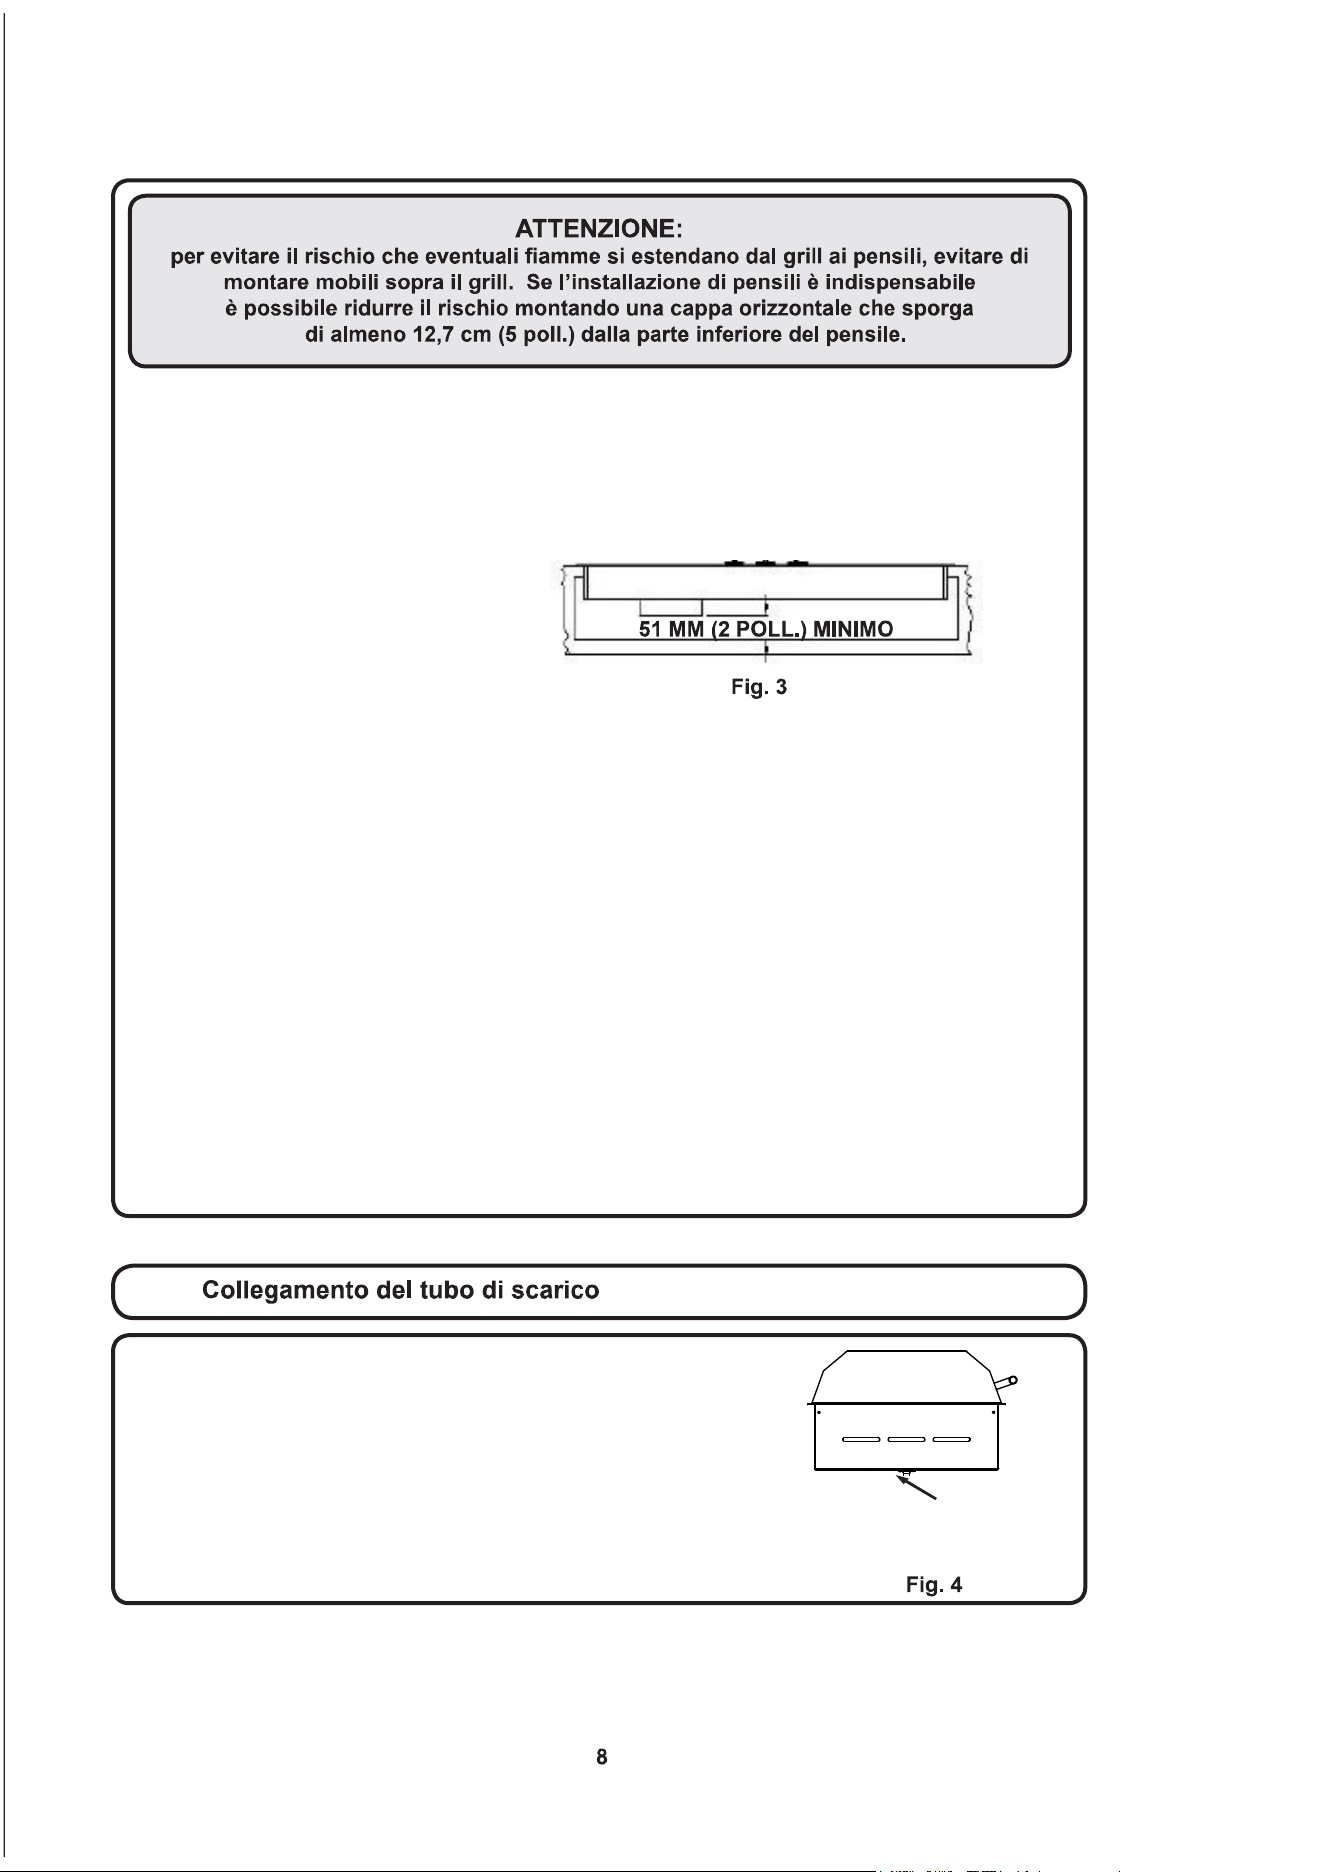
Primadisagomareilpianodilavoro,controllarechelospaziosiasufciente.Controllareche
il grill possa entrare nello spazio del pensile alla base. Controllare anche che lo spazio del
paraschizzi sia adeguato in modo tale che il coperchio si possa aprire completamente.
La corretta ventilazione dello spazio sotto il piano di lavoro è necessaria per assicurare il corretto
funzionamentodelpianocottura.Incasodiventilazioneinsufciente,ilcaloretrasferitodalfondo
del pannello inferiore del piano cottura causerà un surriscaldamento.
Durante la sagomatura del piano di lavoro, eseguire una curvatura di raccordo sull’angolo per evitare
la rottura del materiale del piano di lavoro. In genere la curva può essere di 6 mm (1/4 di poll.), bisogna
comunque seguire le istruzioni del produttore del piano di lavoro relative alla curva minima e a
tutte le misure di rinforzo necessarie per evitare danneggiamenti al piano di lavoro con il passare
del tempo.
Seilpianodilavoroèfattodiunasuperciedimaterialecompositoènecessariovericarecon
il produttore se esistono raccomandazioni particolari per l’installazione del piano di lavoro e del
grill.Moltiproduttoridipianidilavoroconsuperciinmaterialecompositoprevedonochevengano
realizzati supporti angolari aggiuntivi per evitare danneggiamenti al piano di lavoro. Utilizzare le viti
incluseperssareilgrillalpianodilavoro.Fareattenzioneanonstringereeccessivamenteleviti.
Utilizzareunsigillanteacrilicoperunirelaangiaalpianodilavoro.
Seilpianodilavoroèinpietra,sarànecessarioutilizzareunlatticeacrilicoperssareilgrill.
Passare un ampio strato di sigillante sul bordo della sagoma e posizionare il grill. Eliminare il
sigillante in eccesso, utilizzare l’acqua per rimuovere il sigillante. Lasciar asciugare il sigillante per
almeno 24 ore evitando che entri in contratto con qualsiasi fonte di umidità. Non utilizzare le viti
fornite con il grill. Il sigillante basterà a sostenere saldamente il grill. Non utilizzare sigillanti che
contengono silicone perché potrebbero macchiare la pietra.
Per comodità, il grill è dotato di un raccordo idraulico in rame da
3 mm (1/8 di poll.) NPT (National Pipe Thread) e un raccordo a gomito
da90°cheèpossibilecollegarealessibileda6,4mm(1/4dipoll.)
di diametro interno fornito con il grill. La versione portatile del grill è
dotata di un tappo in rame per tubature installato sul raccordo del tubo
di scarico. Se il grill viene usato come elemento portatile, conservare
ilessibileeilraccordoda90°perun’eventualeinstallazioneinfuturo.
Raccordoperilessibileda
6 mm (1/4 di poll.) di diametro interno
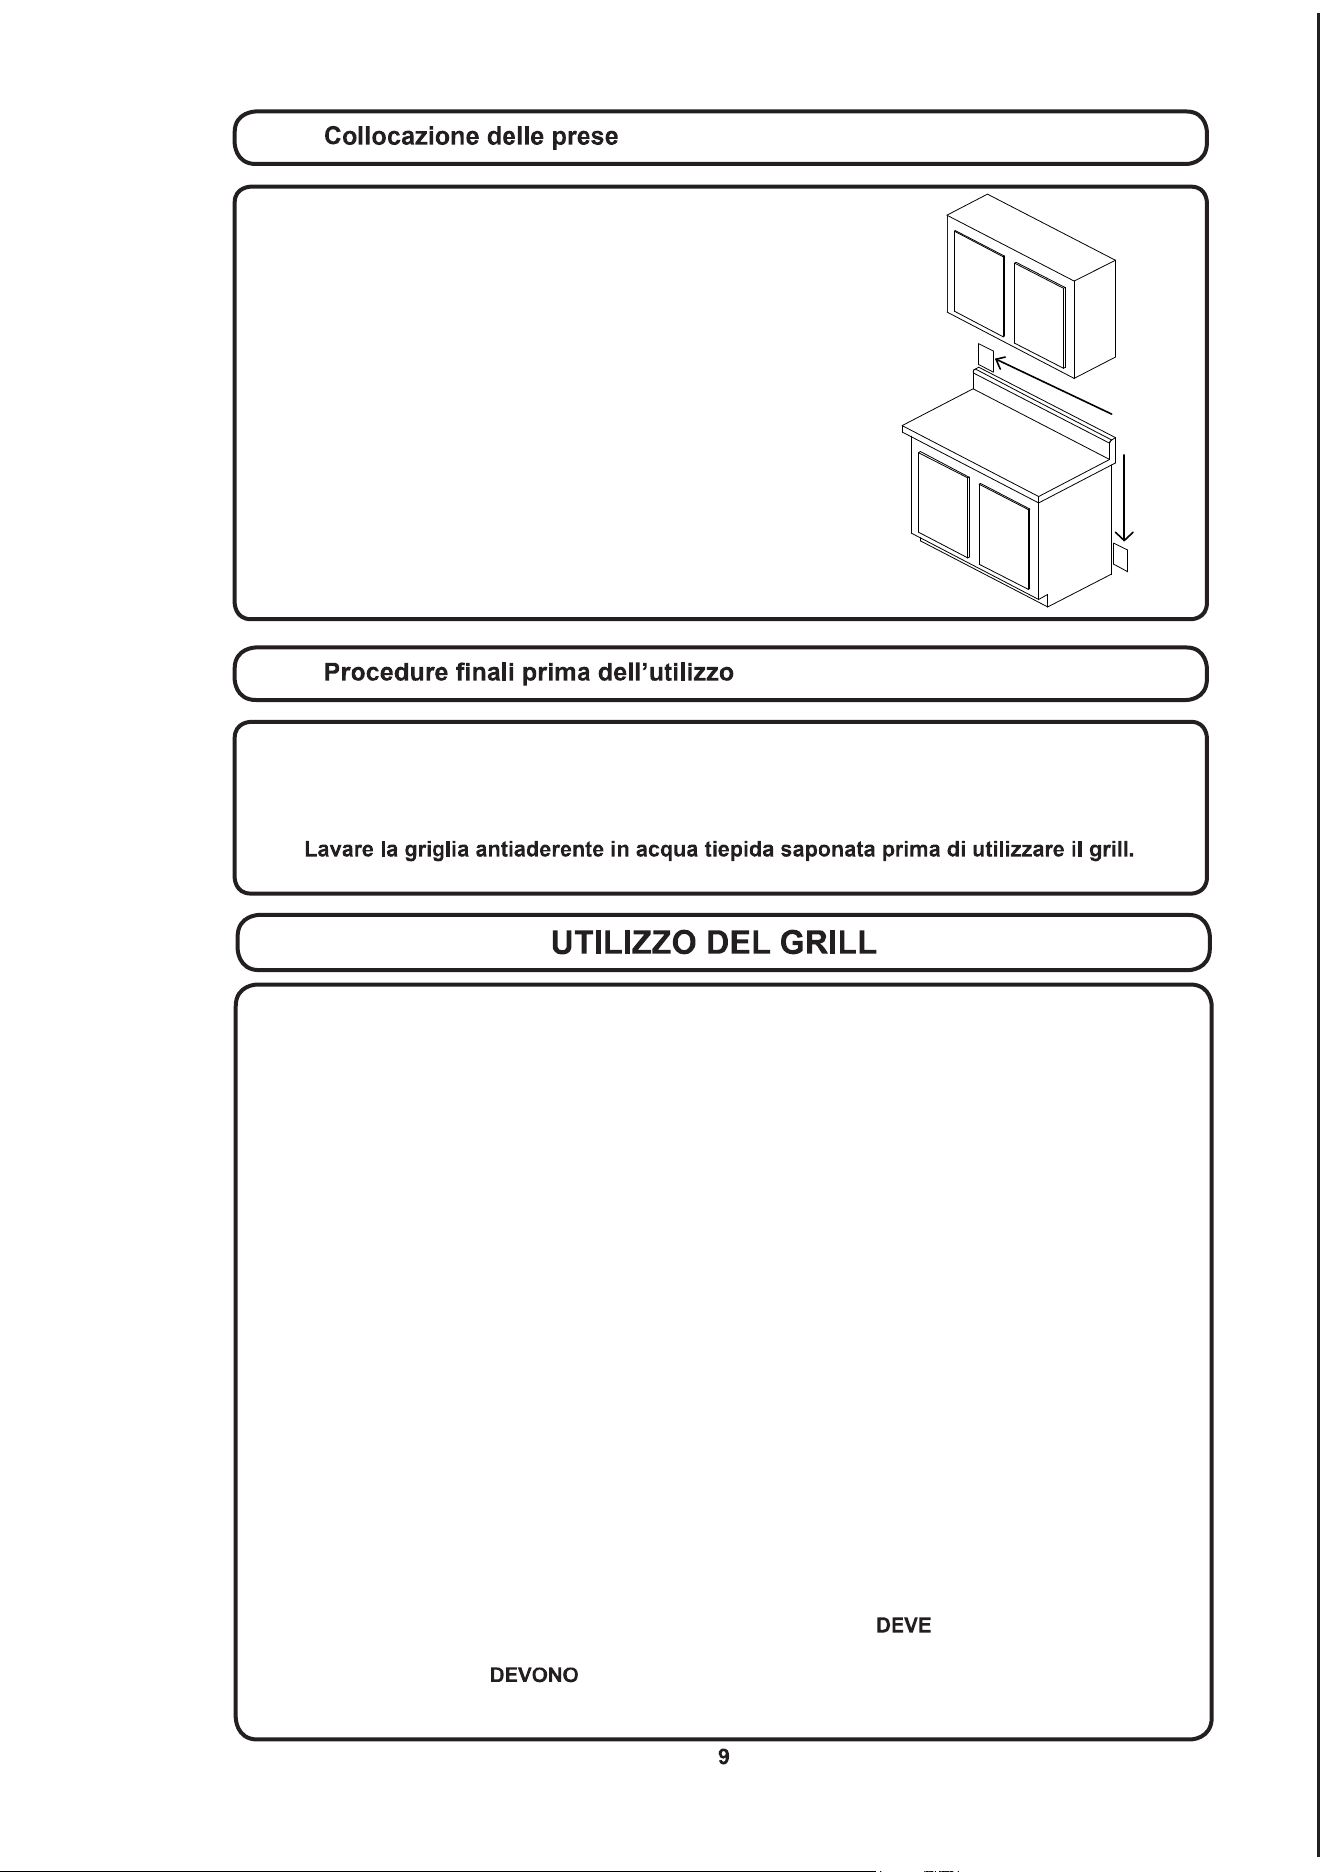
Assicurarsi che le prese che si intendono utilizzare per il grill siano in
una posizione facilmente accessibile. Questo permette all’utente
di attaccare e staccare il grill con facilità e assicura la pulizia
e la conservazione in sicurezza del grill.
Posizione
consigliata
per l'uscita
Rimuoverelapellicolainplasticadalcoperchio,dallaangiaedalpannellodivetro.Pulireilgrill
prima di utilizzarlo per la prima volta. La pulizia accurata con un prodotto per acciaio inox o vetro
rimuove ogni traccia di plastica adesiva e oli di lavorazione.
NON TENTARE MAI DI SPEGNERE LE FIAMME CAUSATE DALLA COMBUSTIONE DI
OLIO O GRASSO USANDO ACQUA
Soffocarelaammaoppureutilizzareunestintoreapolverechimicaoaschiuma.
USARE ESCLUSIVAMENTE PRESINE ASCIUTTE
Presineumideobagnatesusupercicaldepotrebberogenerarevaporeustionante.Evitareilcontatto
tra le presine e la griglia o altri componenti del grill. Non usare mai asciugamani o altri panni ingom-
branti al posto delle presine.
NON USARE IL GRILL SE LA GRIGLIA O LA PIASTRA SONO DANNEGGIATI
La rottura della griglia può provocare il contatto diretto di grasso e olio con i componenti elettrici e cre-
are il rischio di scosse elettriche o incendi. Contattare subito un centro assistenza autorizzato oppure
il servizio clienti KENYON al numero (860) 664-4906.
PULIRE IL GRILL CON CAUTELA
Se si utilizza una spugna o un panno bagnato per pulire i liquidi caduti sul piano cottura, fare molta
attenzione al vapore che potrebbe generarsi e causare ustioni alla pelle. Alcuni detergenti generano
fuminociviseapplicatisusupercicalde.Leggereleavvertenzesull’etichettadeldetergenteprimadi
usare il prodotto.
NON TOCCARE LA SERPENTINA RISCALDANTE O LA GRIGLIA
La serpentina riscaldante e la griglia rimangono roventi per un po' di tempo dopo la cottura. Bisogna
attendere che questi componenti si raffreddino e successivamente maneggiarli con cura e cautela
durante la pulizia perché potrebbero essere ancora abbastanza caldi da causare ustioni gravi.
PULIRE ILGRILL DOPO OGNI UTILIZZO
Questa apparecchiatura è dotata di una teglia di scolo. Questa teglia essere rimossa e pulita
dopo OGNI utilizzo. Evitare che il grasso si accumuli tra una cottura e l’altra. La teglia raccogli grasso e
la vaschetta di protezione essere usate durante le operazioni di cottura con il grill. Il grasso in
eccesso può schizzare all’interno del grill rendendo nulla la garanzia e creando il rischio di incendi.
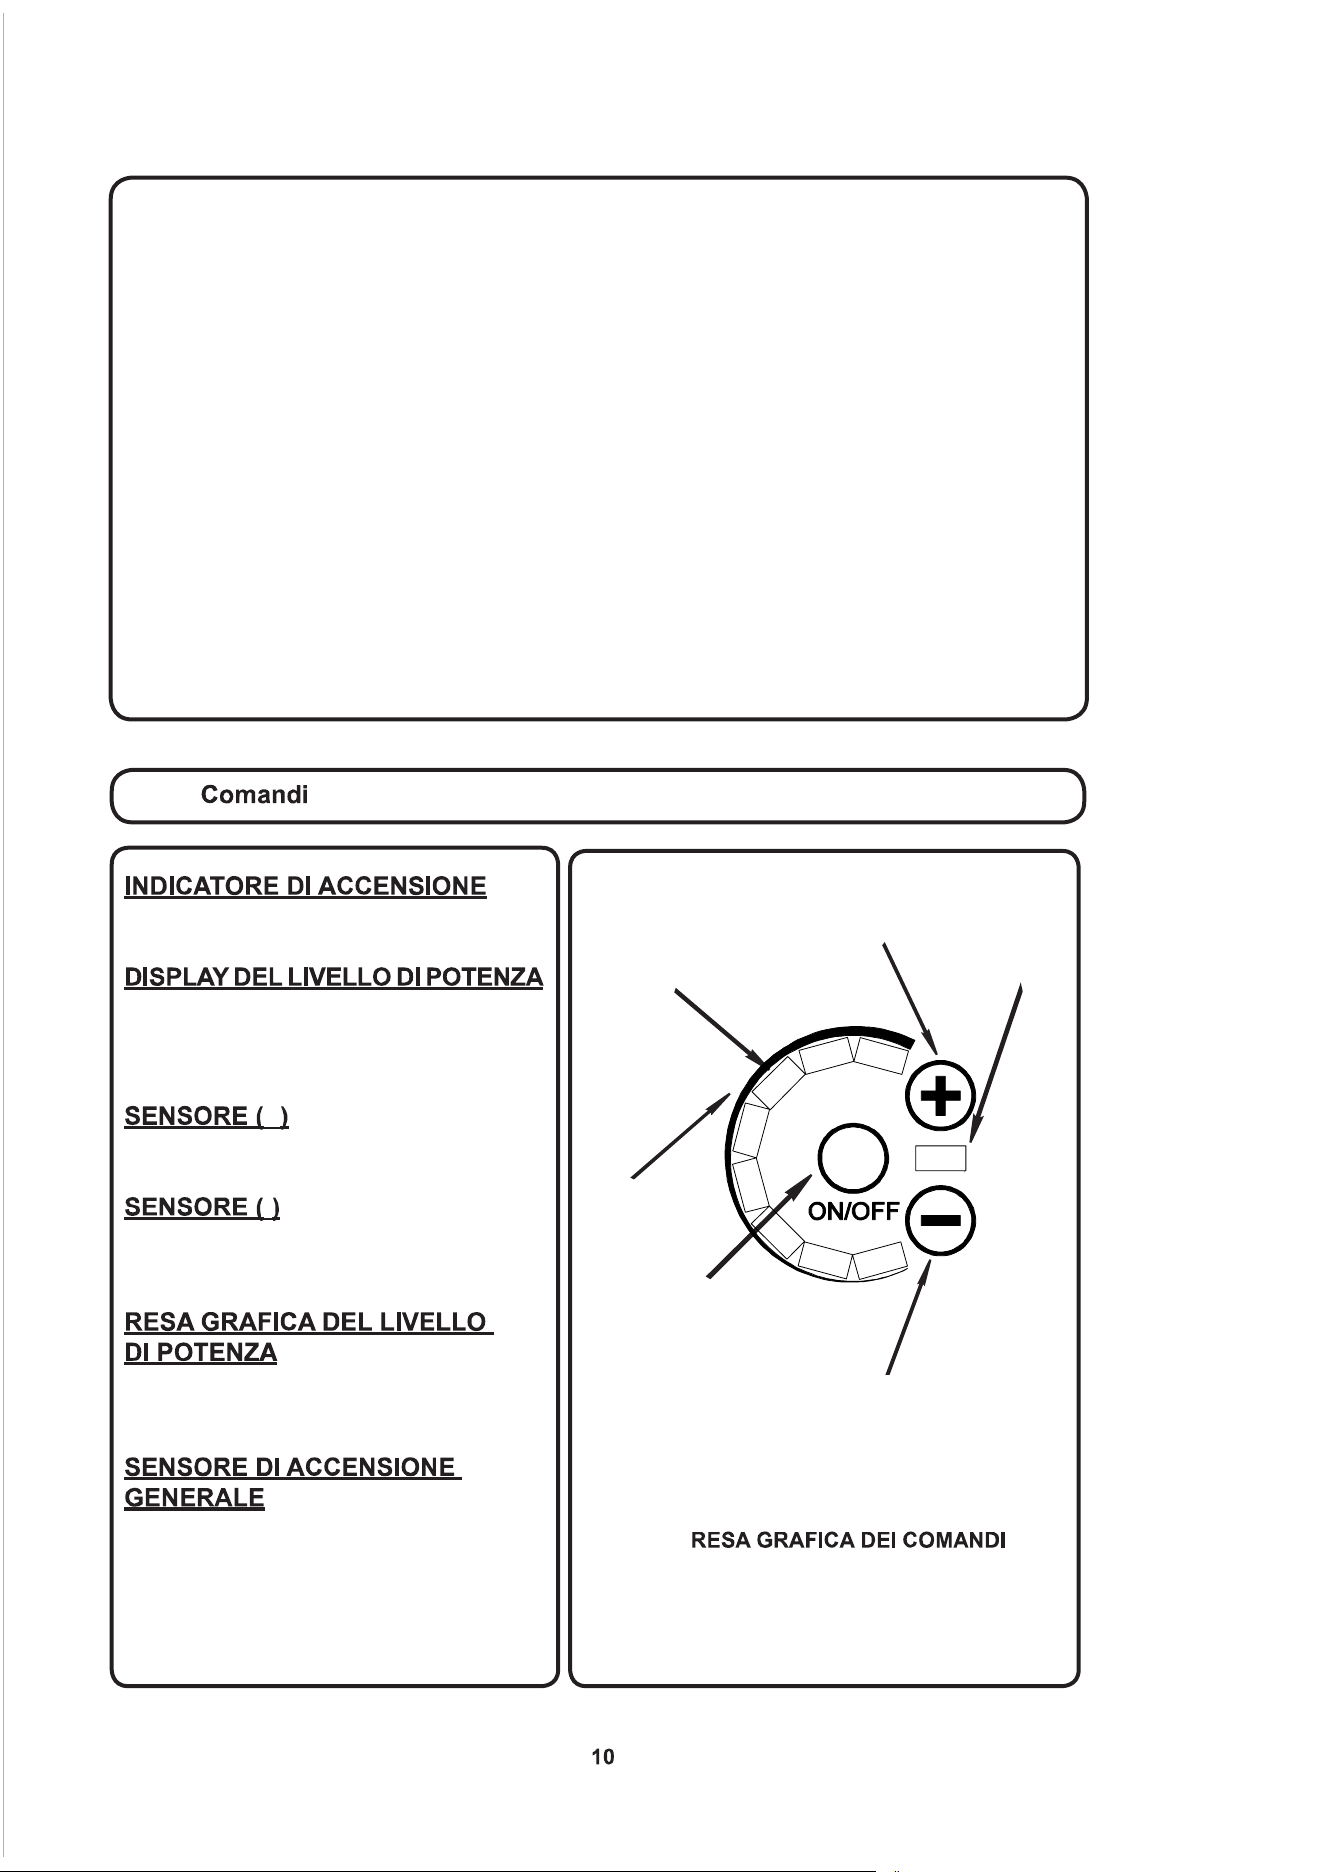
NON LASCIARE MAI IL GRILL INCUSTODITO SE IMPOSTATO AL MASSIMO DEL CALO-
RE
L’impostazione al massimo del calore può causare la produzione di fumo e la combustione dei grassi.
NON PULIRE L’UNITÀ CON ACQUA PRESSURIZZATA
Non pulire mail il grill con nessun tipo di acqua pressurizzata o altri tipi di agenti pulenti. Questo può
comportare l’annullamento della garanzia e provocare un alto rischio di scosse elettriche. Pulire sem-
pre grill con un panno e un detergente per acciaio inox o vetro.
CONSERVAZIONE
Se usato come grill portatile, custodire all’interno quando non in uso. Se usato come grill integrato, è
necessario utilizzare una protezione adeguata per prevenire l’esposizione diretta alla pioggia. Sono
disponibili coperture.
PREVENZIONE DEI FUMI
Per prevenire i fumi provenienti dal grasso contenuto nella teglia, versare 2 tazze di acqua (o quanto
basta per coprire il fondo della teglia) sulla teglia raccogli grasso prima di procedere con la cottura.
NON UTILIZZARE PENTOLE O ALTRI RECIPIENTI PER LA COTTURA SUL GRILL
CONSERVARE QUESTE ISTRUZIONI CON IL GRILL PER POTERLE CONSULTARE IN FUTURO.
Questo indicatore segnala se il grill è acceso
o spento.
Il display digitale indica la potenza emessa dal
grill. Le spie dell’indicatore seguono la curva
dellagracamostratasulloschermo.Cisono
otto livelli di calore selezionabili.
+
Toccando questo sensore si aumenta il calore
emesso dal grill con incrementi progressivi di uno.
-
Toccando questo sensore si riduce il calore
emesso dal grill diminuendo progressivamente
la potenza di uno.
Riproduce il livello di calore emesso
dall’elemento. La linea si allarga da sottile
a spessa, indicando la potenza da bassa a alta.
Questo è il comando principale del grill. Toccando
questo comando quando il grill è impostato
su spento si attiva il comando principale e si
accende il grill. Toccando questo comando
quando il grill è impostato su acceso si spegne
il grill.
DISPLAY DEL
LIVELLO DI POTENZA
SENSORE DI
ACCENSIONE
GENERALE
RESA GRAFICA
DEL LIVELLO
DI POTENZA
INDICATORE DI
ACCENSIONE
SENSORE (-)
SENSORE (+)
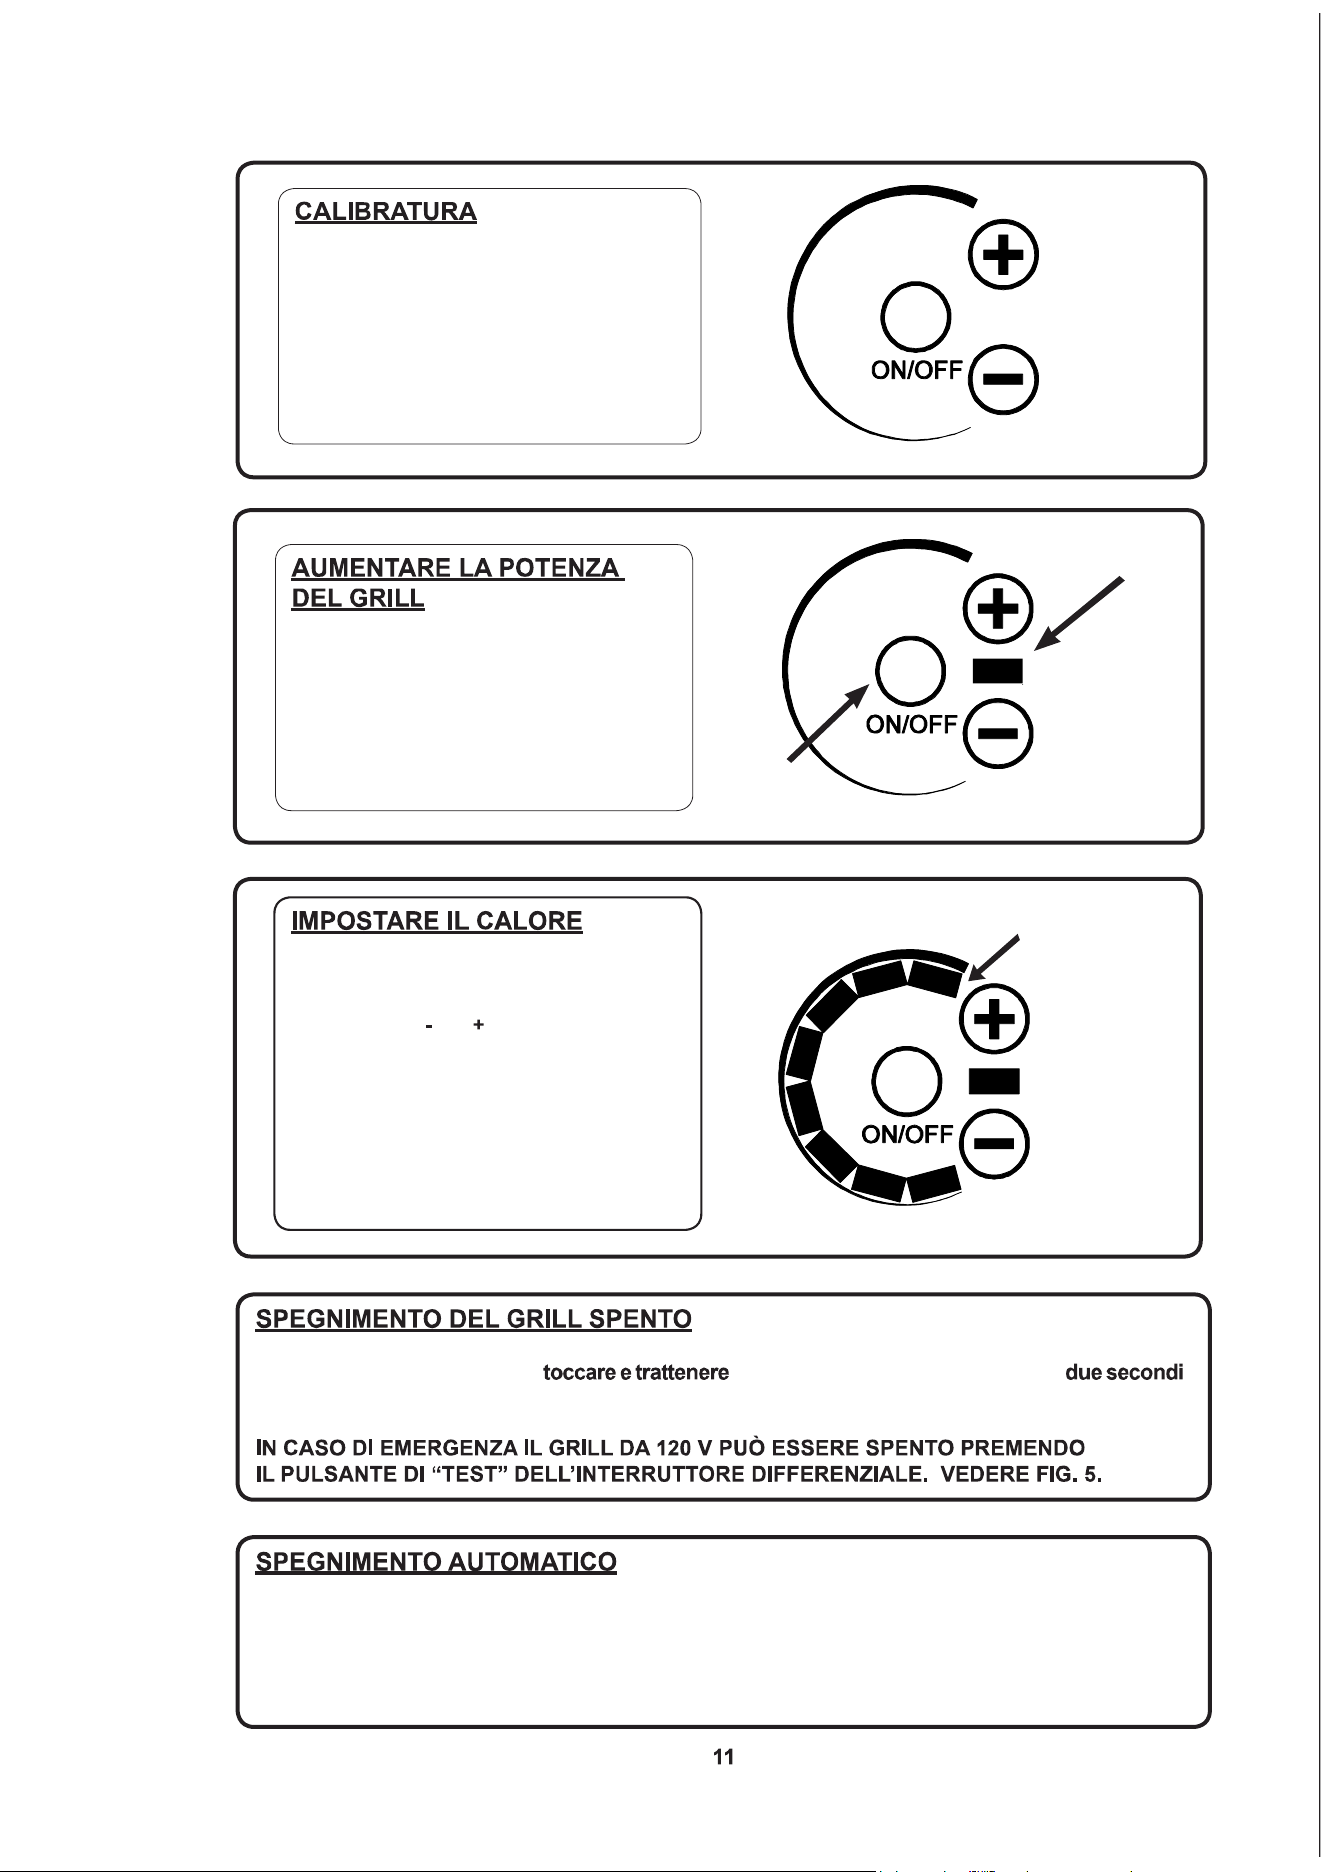
DISPLAY DEL LIVELLO
DI POTENZA
(SELEZIONE
DELL’IMPOSTAZIONE
DI CALORE 8)
Non appena viene fornita alimentazione
elettrica al grill, il comando principale
esegue un processo di auto calibratura. Il
comando principale emette quindi un suono
di conferma e il display si illumina per un
istante. Il grill è ora pronto per l’uso.
Per accendere il grill, toccare e trattenere
il sensore di accensione generale per due
secondi. Il comando principale emette un
segnale acustico e l’indicatore di accensione
si illumina.
SENSORE DI
ACCENSIONE
GENERALE
INDICATORE DI
ACCENSIONE
Il grill KENYON ha 8 impostazioni di calore
diverse, da 1 a 8, che è possibile selezionare
con i sensori ( ) e ( ). Le impostazioni del
calore vengono visualizzate come mostrato
qui a destra. La serpentina riscaldante ha dei
cicli di accensione a intervalli di tempo diversi
per variare il livello di calore. Aumentando le
impostazioni, la serpentina riscaldante resta
accesa per un periodo più lungo aumentando
la temperatura di cottura del grill.
Perspegnereilgrill,èsufciente il sensore di accensione generale per .
Il comando principale toglie l’alimentazione e spegne la serpentina riscaldante.
Il comando elettronico del grill KENYON è stato programmato pensando alla sicurezza e dispone di
spegnimento automatico. Il grill è programmato per spegnersi dopo un periodo di tempo prestabilito
dopo che è stato alimentato (vedere la tabella che segue). Il comando inoltre si spegne se raggiun-
ge un limite di temperatura preimpostato. Se succede, lasciar raffreddare il grill per 20-30 minuti.
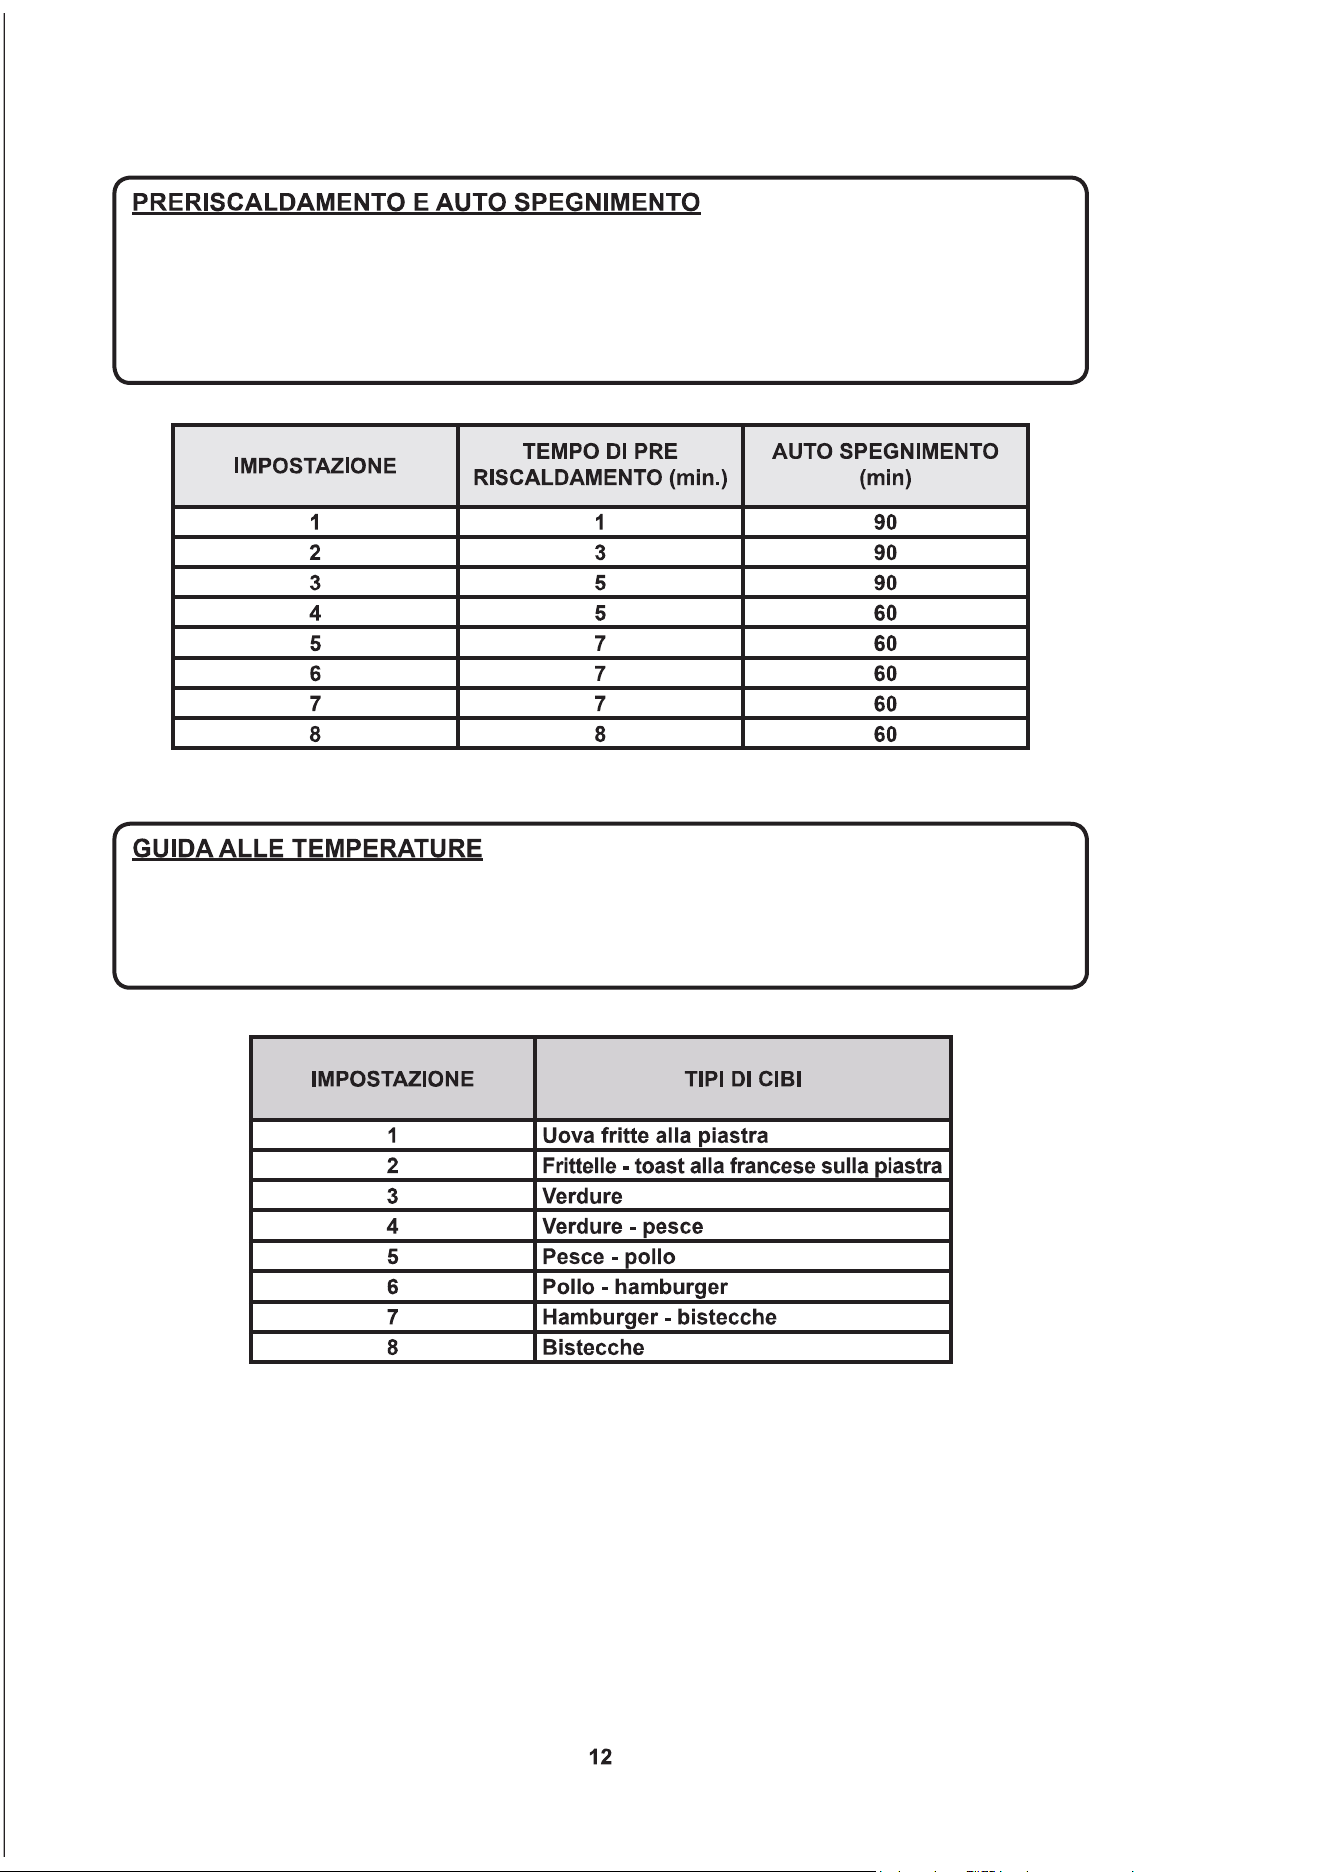
Il comando del grill ha una funzione di preriscaldamento che fornisce il massimo della potenza
per un dato periodo di tempo per ciascuna delle impostazioni di potenza selezionate. Questa
funzione di preriscaldamento porta la griglia/piastra alla temperatura di cottura desiderata
permettendo di iniziare a usare il grill velocemente. La tabella che segue fornisce i
tempi di preriscaldamento e auto spegnimento per ciascuna impostazione di calore.
Quanto segue è inteso come una linea guida. I fattori come il vento, le temperature esterne, la
temperaturadelciboposizionatosulgrillpossonoinuiresuitempidicottura.Ilgrillèprogettato
e costruito per avere prestazioni ottimali di cottura a coperchio chiuso o aperto.
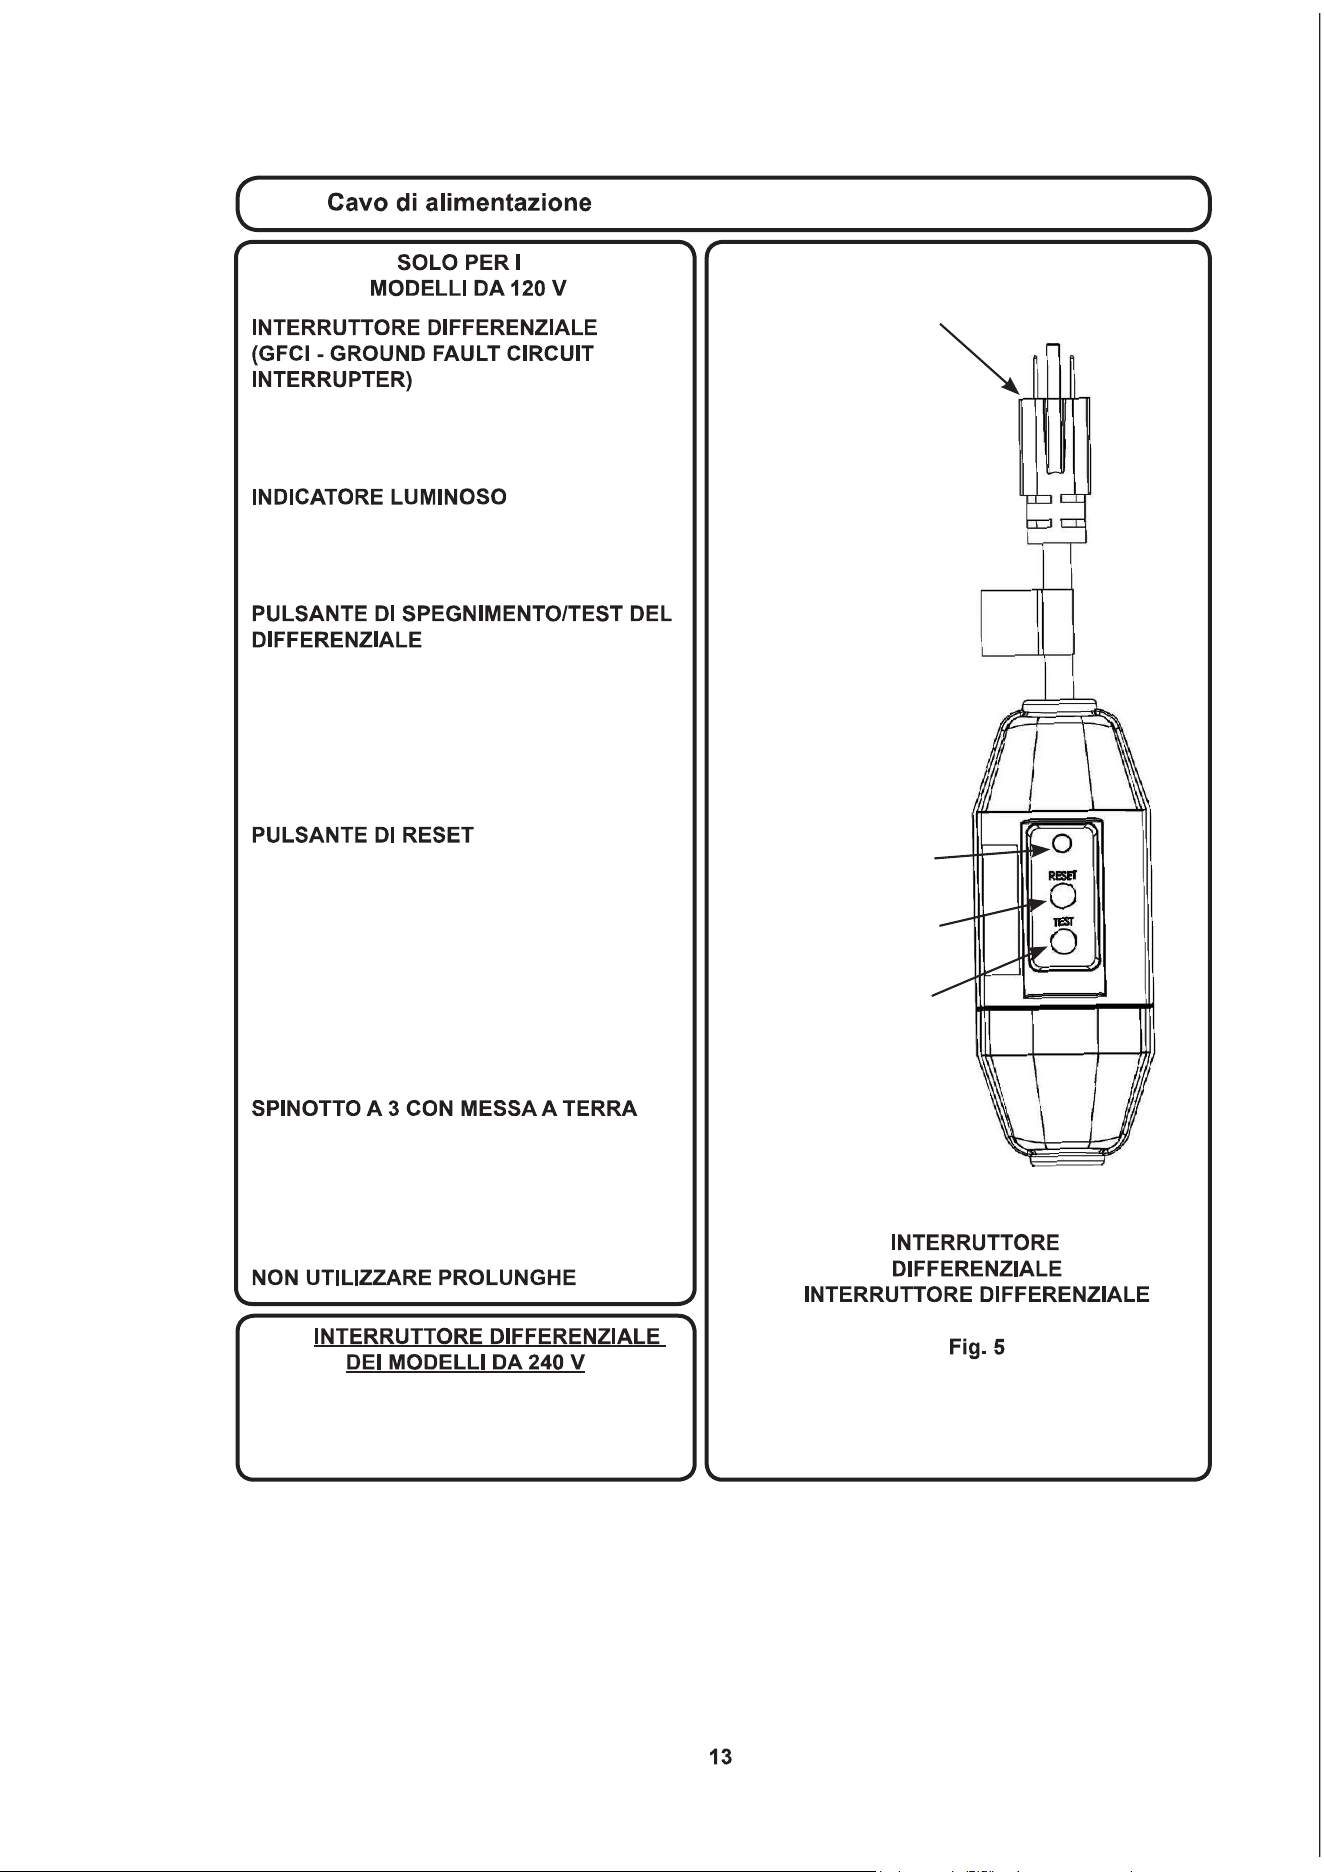
PULSANTE
DI RESET
SPINOTTO A 3 CON MESSA A TERRA
INDICATORE
LUMINOSO
PULSANTE
DI TEST
Il circuito di tensione di alimentazione (240 V)
deve disporre di un interruttore differenziale.
Vericareicodicilocalidiconformità.
L’interruttore differenziale è un dispositivo
di sicurezza progettato per proteggere gli
utenti dal rischio di scosse elettriche.
L’indicatore luminoso si accende quando si
fornisce elettricità e indica che l’interruttore
differenziale funziona correttamente.
Premendo questo pulsante è possibile
testare l’interruttore differenziale.
L’indicatore luminoso si spegne mentre
viene interrotta la corrente elettrica diretta al
grill. L’interruttore differenziale deve essere
testato ogni mese.
Premendo questo pulsante è possibile
ripristinare le funzioni normali
dell’interruttore differenziale. L’indicatore
luminoso si accende e la corrente elettrica
viene fornita al grill. Se l’indicatore luminoso
non si accende, l’interruttore differenziale ha
individuato un malfunzionamento. Staccare
l’interruttore differenziale dalla presa e
evitare di utilizzare grill.
ATTENZIONE - Per garantire una
protezione continua contro il rischio di
scosse elettriche, l’interruttore differenziale
deve essere collegato a una presa
adeguatamente messa a terra.
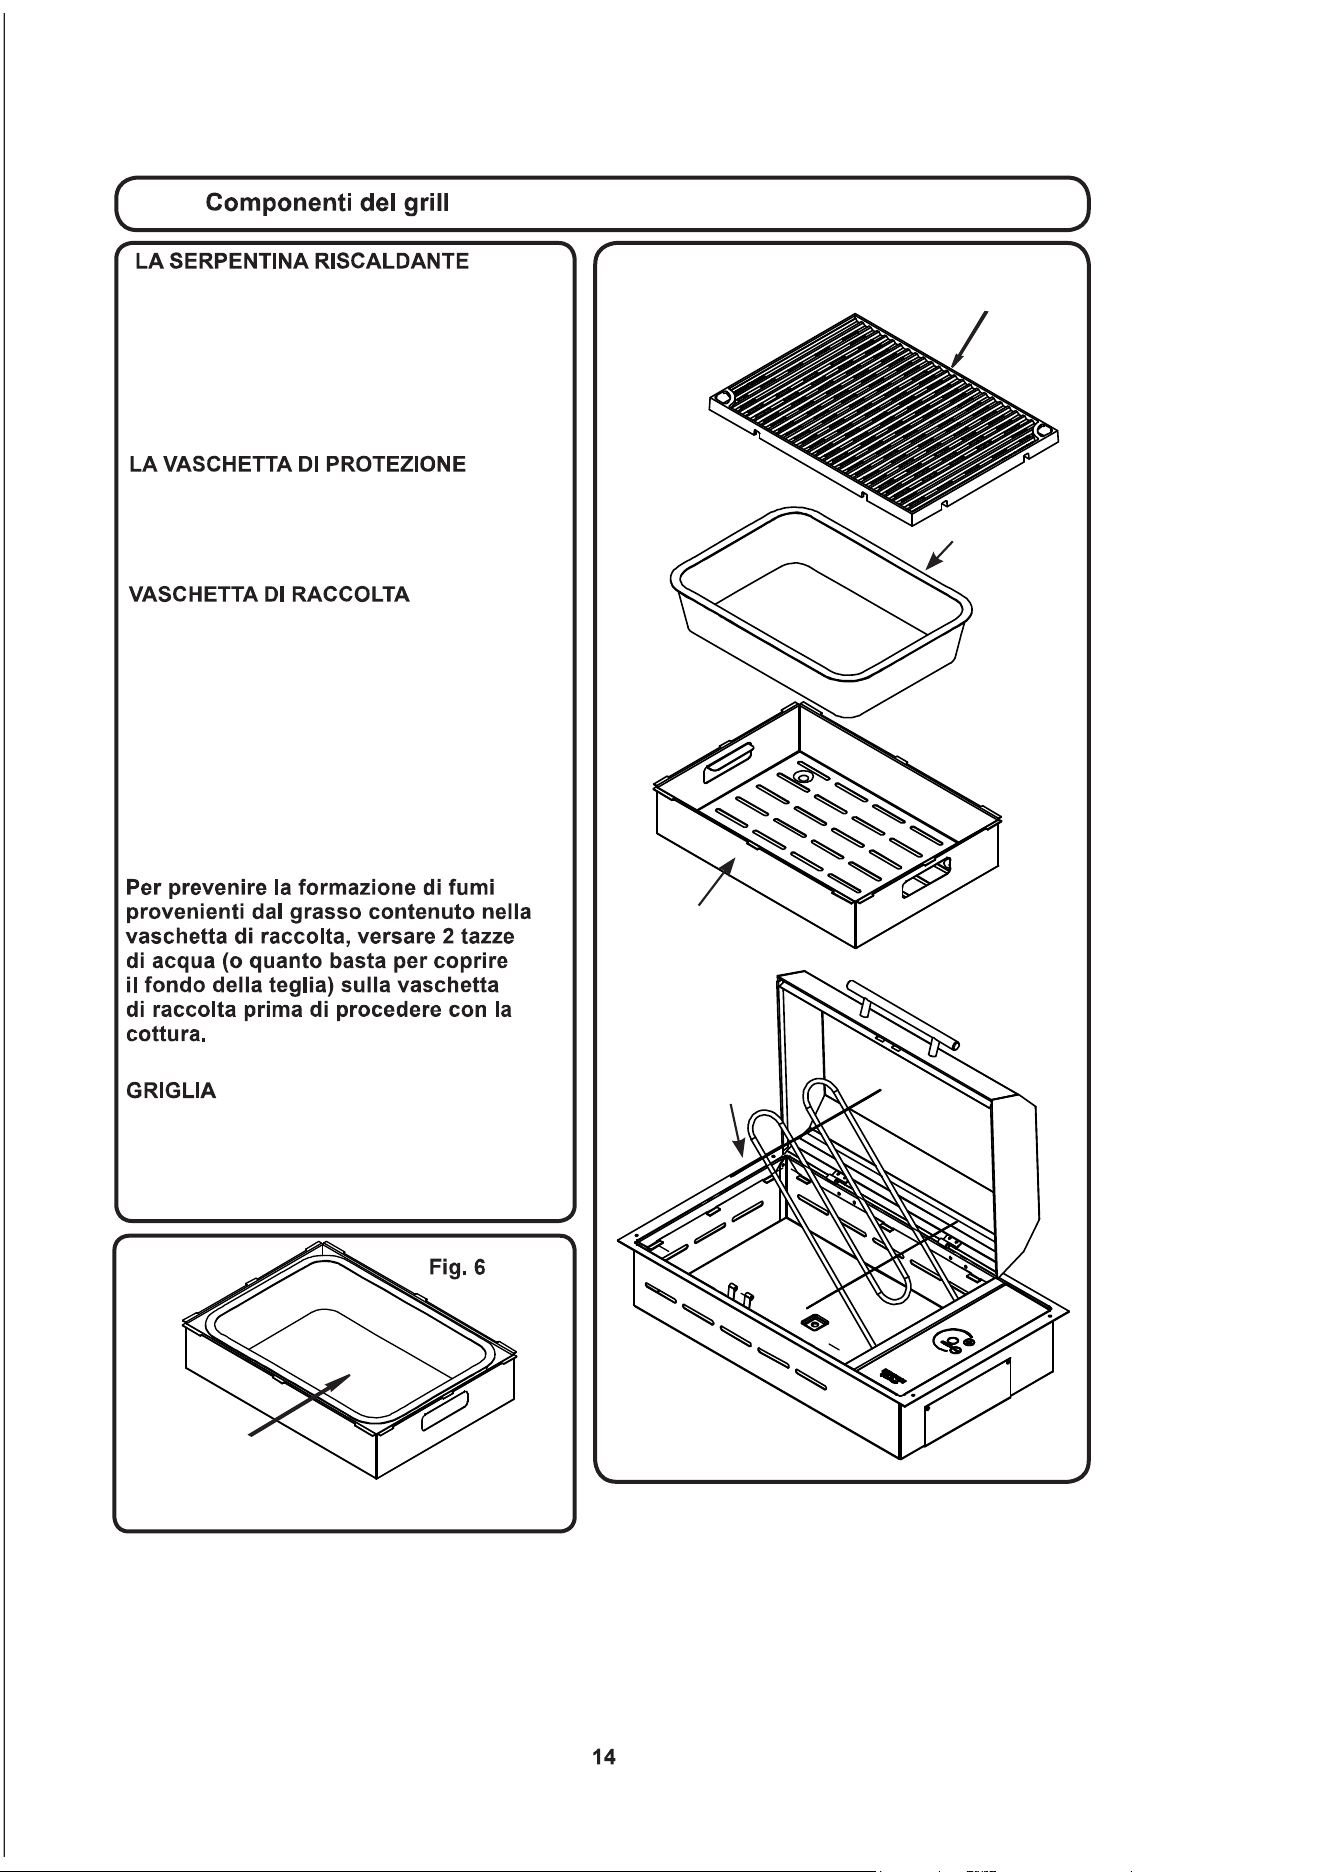
GRIGLIA
VASCHETTA DI
PROTEZIONE
VASCHETTA
DI RACCOLTA
SERPENTINA
RISCALDANTE
La serpentina riscaldante è progettata per
ruotare come mostrato per agevolare la
rimozione e la sostituzione della vaschetta
di protezione e della vaschetta di raccolta.
Rimane in posizione sollevata. Per abbassarla
applicare una leggera pressione verso il
basso.
La vaschetta di protezione sostiene la
vaschetta di raccolta, la serpentina riscaldante
e la griglia e devono essere sempre utilizzate
durante il funzionamento del grill.
La vaschetta di raccolta raccoglie tutti i grassi
e i liquidi che si creano durante la cottura. La
vaschetta di raccolta deve essere svuotata
dopo ogni utilizzo. Durante il riposizionamento
della vaschetta di raccolta, posizionarla
in modo tale che venga completamente
contenuta dalla vaschetta di protezione e
vericandocheilbordolateraledellavaschetta
di raccolta non fuoriesca dalla vaschetta di
protezione.
(vedere Fig. 6)
Il codice di sostituzione della
vaschetta di raccolta è n.B96001.
La griglia deve essere pulita dopo ogni utilizzo.
Lagrigliahaunasupercieantiaderenteper
facilitare le operazioni di pulizia. Lavare la griglia
dopo ogni utilizzo con acqua tiepida saponata.
LA VASCHETTA
DI RACCOLTA DEVE
ESSERE CONTENUTA ALL’INTERNO DELLA
VASCHETTA DI PROTEZIONE COME MOSTRATO
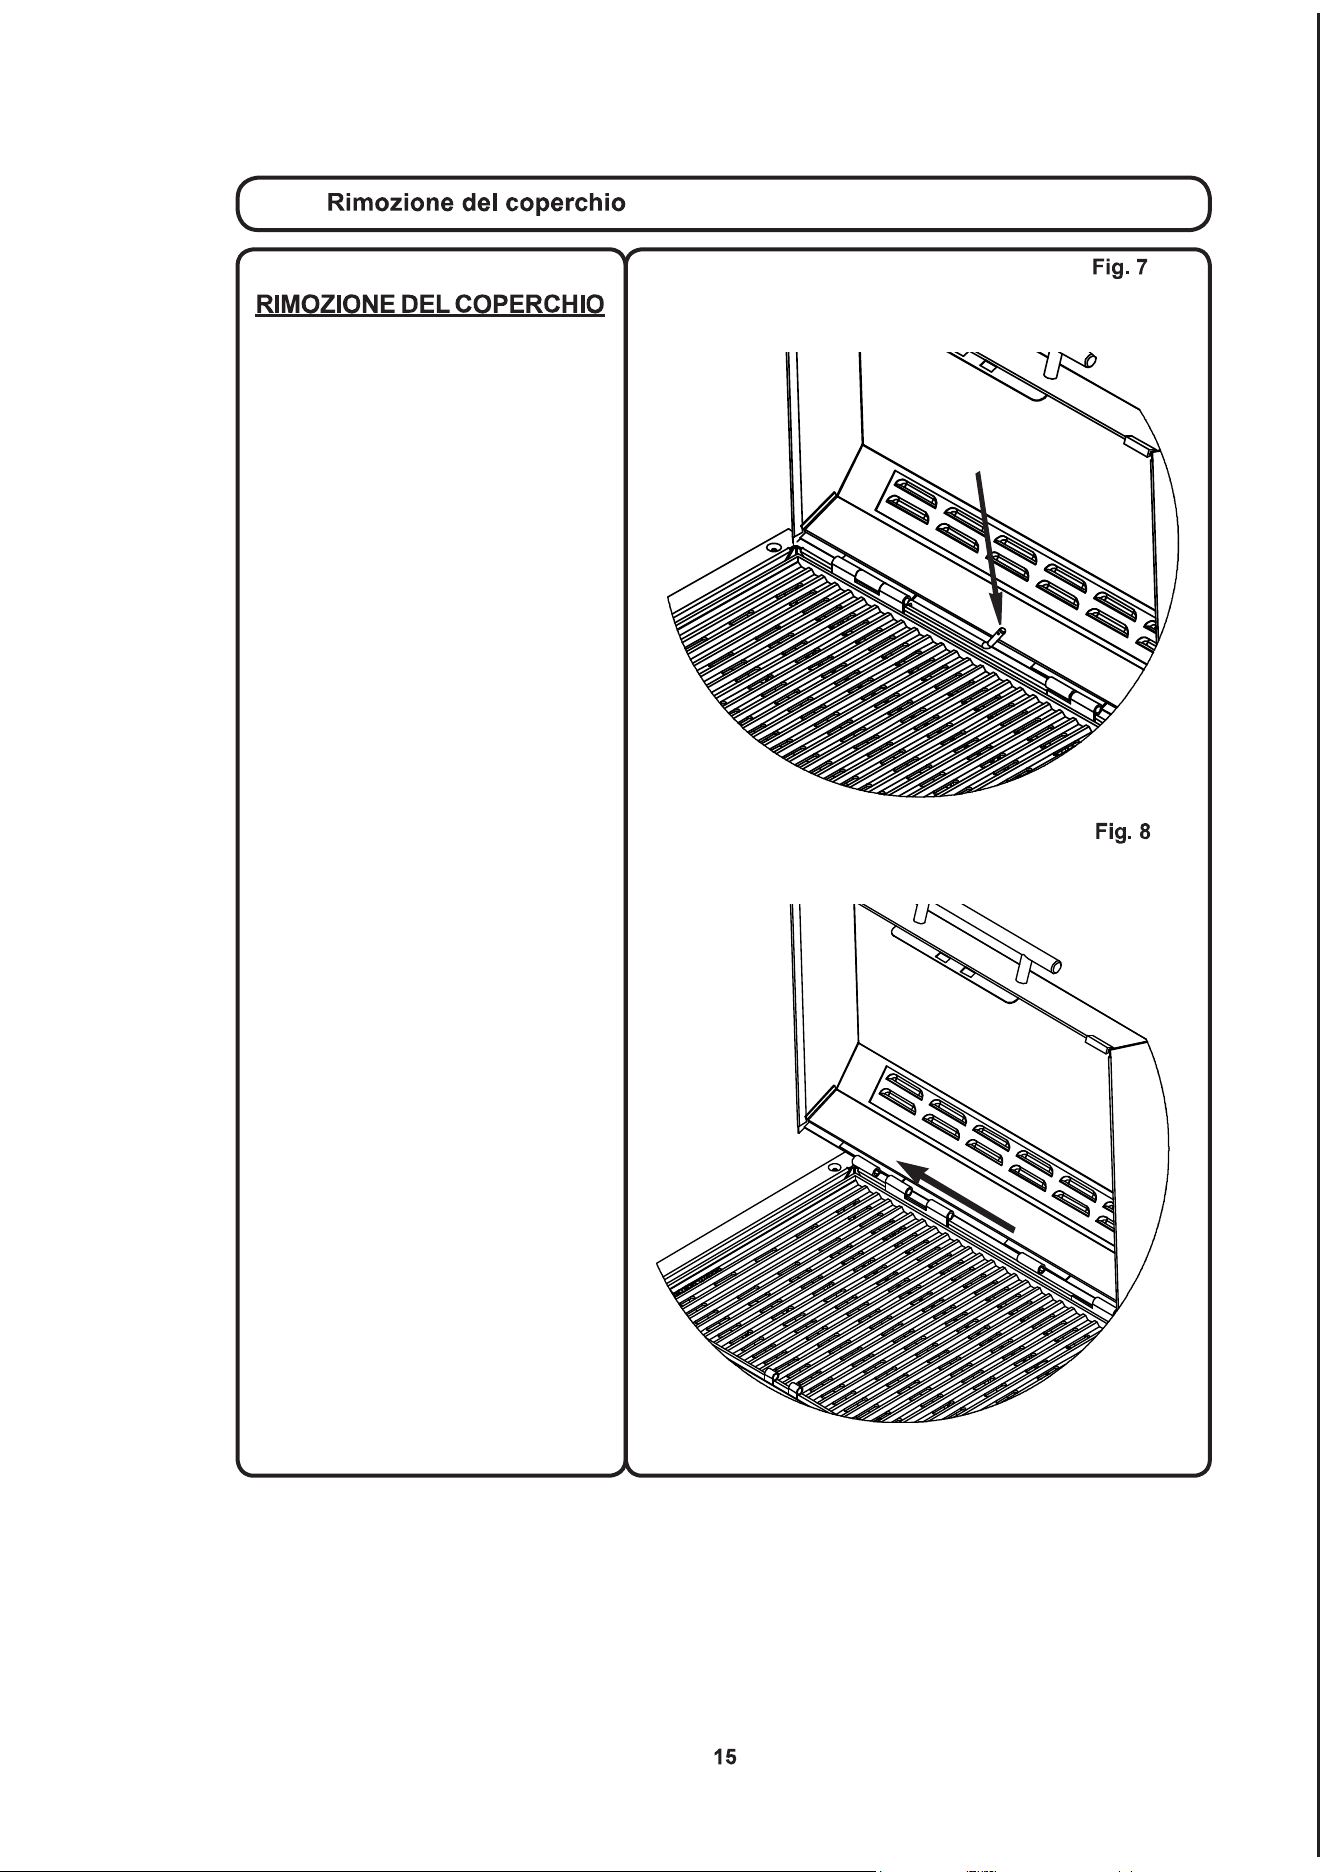
Il coperchio del grill può essere rimosso
per pulirlo. Per rimuovere il coperchio,
slareilpernoasganciorapidodal
cardine (vedere Fig. 7).
Una volta rimosso il perno a sgancio
rapido, afferrare il coperchio e sollevare
il lato sinistro per liberare il cardine e
farscivolareversosinistranoall’estra-
zione del perno di destra (vedere Fig.
8). Una volta rimosso, il coperchio può
essere lavato con acqua saponata
tiepida.
PERNO
A SGANCIO RAPIDO

KENYON
Dichiarazionedigaranzia
KENYONInternational,Inc.(“Azienda”)garantiscecheisuoiprodottisonoliberidadifetti
neimaterialienellarealizzazioneinbaseallecondizionieallelimitazionidescrittediseguito.
Leparticherisultanodifettoseperunusonormaleduranteilperiododellagaranziasarannoriparateosostituitedall’Azienda.
Affinchéipr odottisianocopertidallapresentegaranzia,devonoessererestituitiall’Aziendaperscopidivalutazione.
Contattarekenyonservice@cookwithkenyon.comperleistruzionidirestituzione.
Lagaranziacopredeterminatiprodotticostruitidall’Aziendaedèsoggettaallecondizioniealle
limitazioniriportatediseguito:
1. Laresponsabilitàdell’Aziendaèlimitataallariparazioneoallasostituzione(adiscrezionedell’Azienda)deicomponenti
elettronicichepotrebberopresentaredifettidiproduzione.Dettaresponsabilitàèlimitataaunperiododitreannidalla
datadellaprimainstallazioneo42mesidalladatadellafattura,inbaseaqualedataèlaprecedente;questagaranzia
coprelepartieillavoroatariffepre-approvate.L’acciaioinossidabileègarantitoavitacontrolaruggine,apattoche
vengaeffettuatalamanutenzionemensilecomeindicatonelmanualeutente.Sesiriscontracorrosione,contattare
l’Aziendainviandounafotografiachedimostrilacorrosioneperricevereicomponentidiricambio.
2. Ladeterminazionediadeguatezzadelprodottoperl’utilizzocontemplatodall’acquirentespettaesclusivamente
all’acquirenteel’Aziendanondovràavereresponsabilitàconnesseataleadeguatezza.
3. L’Aziendanonsaràresponsabileperdannirisultantida:
•guastidovutiall’utilizzononcontemplatodeiprodotti;
•guastidovutiacorrosione,usura,abuso,negligenzaoinstallazioneomanutenzionenonadeguate;
•guastidovutiallarotturadelvetro,accidentaleodialtrotipo.
4. L’Aziendaètenutaalpagamentodellespesedispedizionepressoilluogodell’elettrodomestico(abitazione)
entroilimitidegliStatiUnitiedelCanada.Altrespesedispedizioneespresseospecialisono
acaricodell’acquirente.
5. Tuttoillavoroconsentitodall’Aziendasecondolapresentegaranziadeveesserepre-autorizzatoedeseguitodauncentro
assistenzaKenyonInternationalautorizzato,salvoquandodiversamentespecificatoinformascrittadall’Azienda.
NONESISTONOALTREGARANZIEDICOMMERCIABILITÀ,ADEGUATEZZAPERCERTISCOPIOALTRE
GARANZIEESPRESSEOIMPLICITECHENONPOSSONOESSEREIMPLICITEPERLEGGE.Ladurataditaligaranzieimplicite
perleggeabeneficiodelconsumatoreèlimitataaunperiododitreannidalladataoriginalediacquistodapartedell’acquirente.
AlcuniPaesinonconsentonolimitazionidelladuratadellagaranzia,pertantodettalimitazionepotrebbenonessereapplicabile.
L’AZIENDANONDEVEESSERERITENUTARESPONSABILEPERDANNICONSEQUENZIALIOINCIDENTALIDERIVANTI
DALLAVIOLAZIONEDELLAPRESENTEGARANZIAESPRESSA,IMPLICITAOSTATUTARIA.Alcunipaesiostatinon
consentonol’esclusioneolalimitazionedidannifortuitioaccidentali,pertantotalelimitazioneoesclusionepotrebbenonessere
applicabile.
LAPRESENTEGARANZIAFORNISCEDIRITTILEGALISPECIFICI,TUTTAVIASIPOTREBBEAVVALERSIANCHEDIALTRI
DIRITTILEGALICHEVARIANODAPAESEAPAESEEDASTATOASTATO.
KenyonInternational,Inc.
P.O.Box925•8HeritageParkRoad•Clinton,CT06413USA
Telefono(860)664-4906FAX:(860)664-4907
Invigoredal1/1/2019
1. Leia TODAS as instruções antes de usar o produto.
2. Não toque em superfícies quentes. Use alças ou puxadores.
3. Para proteção contra choque elétrico, não submerja o cabo de alimentação e os plugues na água
ou em qualquer outro líquido.
4. Mantenha sempre supervisão rigorosa ao usar qualquer aparelho próximo de crianças.
5. Desconecte da tomada quando não estiver em uso e antes de limpar. Deixe esfriar antes de
montar ou desmontar as peças.
6.Nãoopereoaparelhoseocabodealimentaçãoouospluguesestiveremdanicados.Emcasode
mau funcionamento do aparelho, descontinue o uso e entre em contato com o distribuidor autorizado
mais próximo ou com a fábrica para diagnósticos, reparos ou ajustes.
7. O uso de acessórios não fornecidos pelo fabricante deste aparelho pode resultar em lesões.
8. Se for usado como um grill portátil, guarde em local fechado quando não estiver em uso. Se for
usado como um grill embutido, forneça proteção adequada para evitar exposição direta à chuva.
Capas disponíveis.
9. Não deixe o cabo de alimentação sobre as quinas da mesa ou bancada, ou sobre superfícies quentes.
10. Não coloque sobre ou próximo de fogão elétrico ou a gás, ou em um forno quente.
11. Deve-se ter extrema cautela ao mover um aparelho contendo óleo quente ou outros líquidos quentes.
12. Sempre conecte o plugue primeiro no aparelho, depois conecte o cabo de alimentação na tomada da
parede. Para desconectar, desligue todos os controles, depois remova o plugue da tomada da parede.
13.Nãouseoaparelhoparaoutrosns.
14. Sempre deixe um mínimo de duas (2) xícaras de água na bandeja coletora de resíduos antes de
grelhar.
15.Nuncadeixecriançassozinhas-criançasnuncadevemcarsemsupervisãoemtornodogrill.
16. Deixe que o grill esfrie antes de retirar as grelhas, a bandeja de resíduos descartável ou as tampas.
17. Combustíveis, como briquetes de carvão, não devem ser usados com este aparelho.
18.Certique-sedequeogrillsejainstaladodeacordocomasinstruçõeseaterrado
adequadamenteporumeletricistaqualicado.
19. Não substitua ou tente reparar qualquer peça do grill, salvo outra indicação neste manual.
Todos os outros serviços devem ser realizados por um técnico autorizado de fábrica.
20. Não use água para apagar fogo causado por gordura, utilize extintor de pó químico seco.
21.Nãoarmazenemateriaisinamáveispróximosaogrill.
22. Não use trajes com folga ou soltos ao usar o grill.
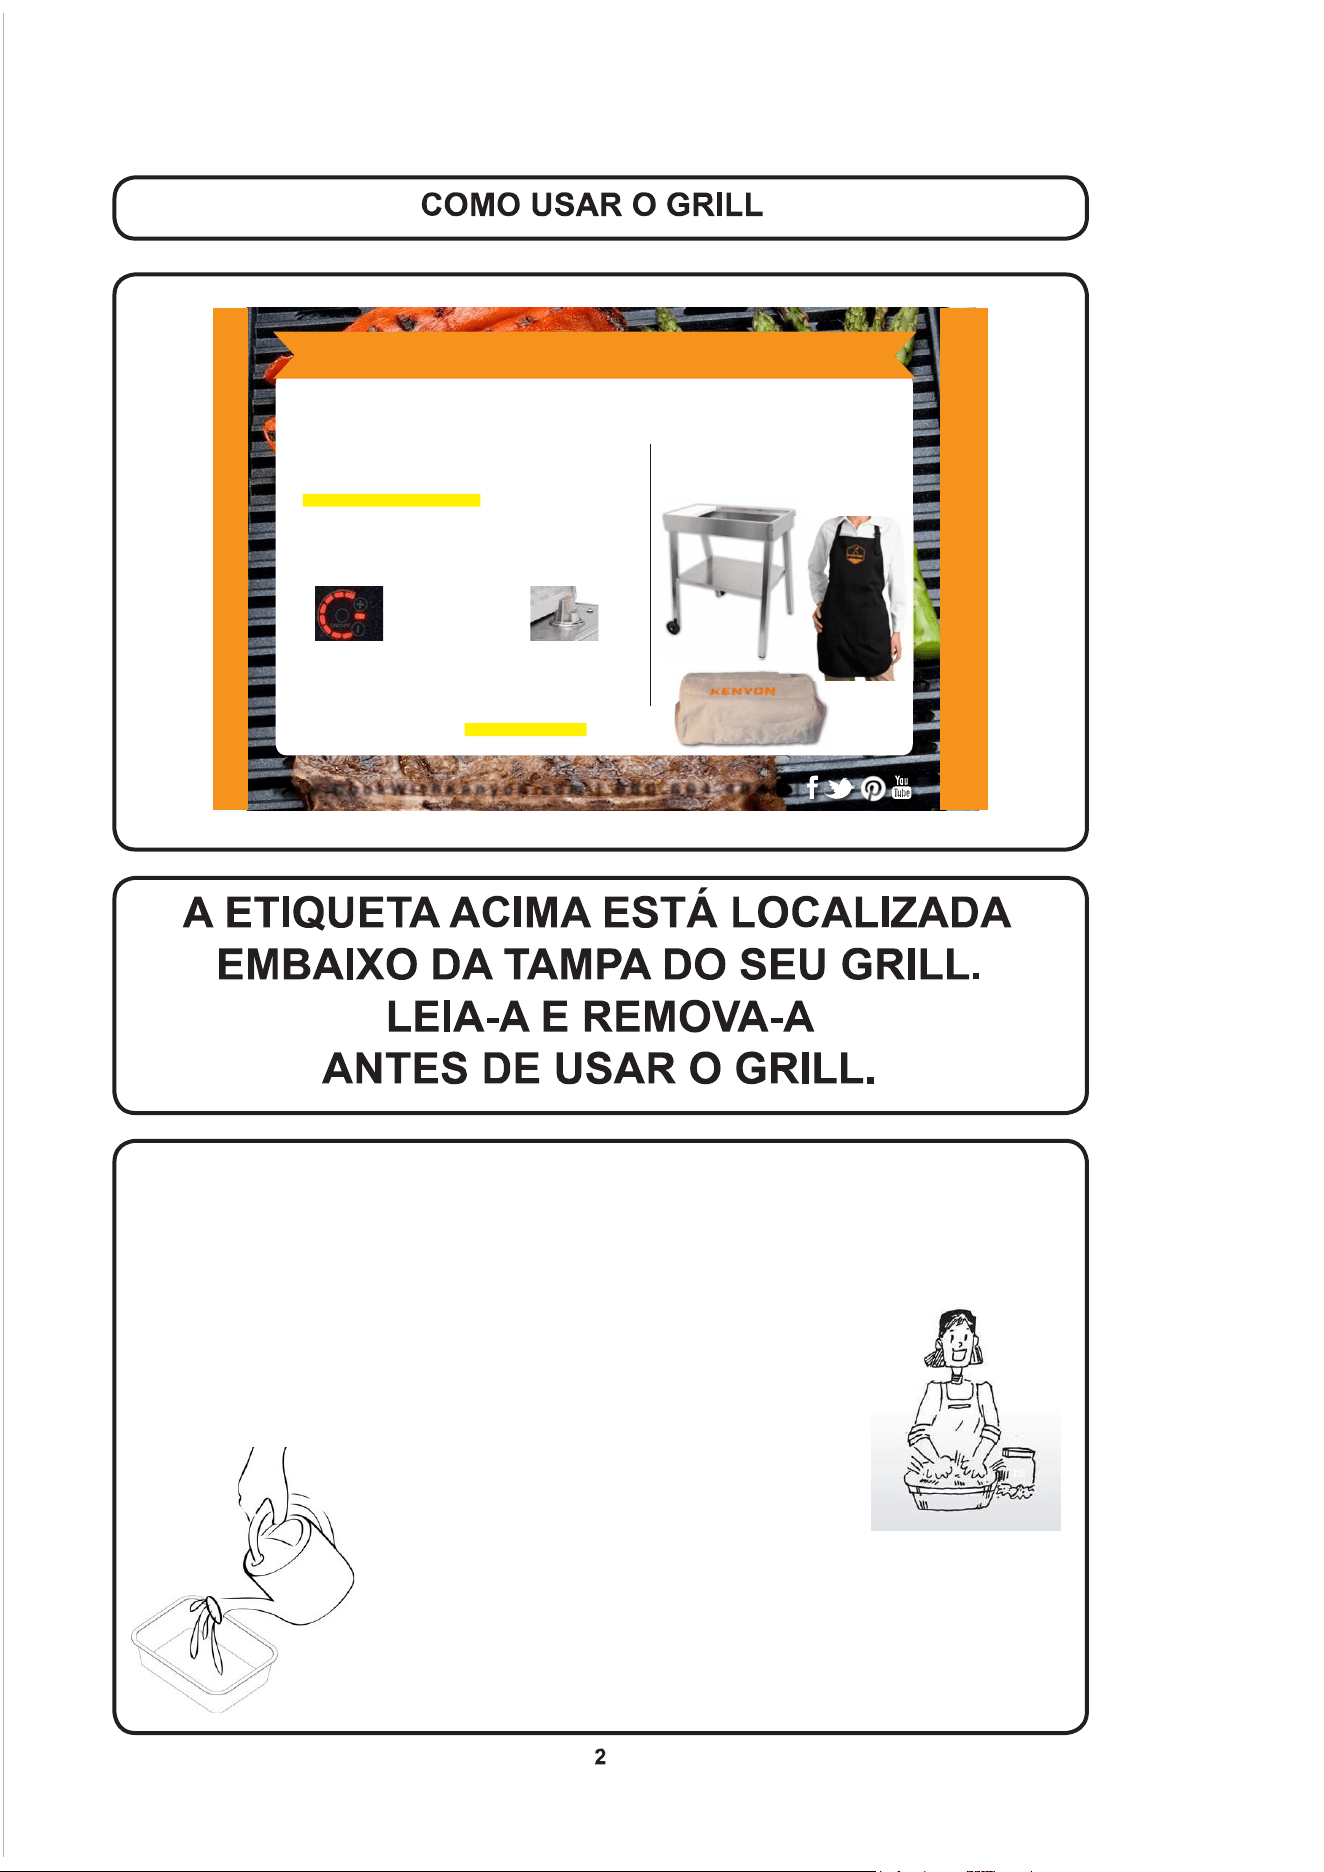
R E M O V E & R E A D P R I O R T O G R I L L I NG
w w w . C o o k W i t h K e n y o n . c o m | 8 6 0 . 6 6 4 . 4 9 0 6 |
T h a nk y ou f or p ur c h as i n g th e W o r l d ’ s F i ne s t A ll Se as o ns ® E l ec tr i c Gr il l ! T h e re a r e a f e w si m p l e
s t ep s y ou c a n t ak e to e ns u r e yo ur g oo d de c is i o n w i l l l e a d to y ea r s o f W o rl d- C l a s s Gr il l i n g:
Q U I C K S T A R T T I P S
to purchase re cipe books, cook ing ute nsils,
griddles, grill covers, and more!
V I SI T O U R WE B SIT E
1.
2.
3.
4.
5.
6.
7.
8.
Remove g rate(s) and drip tray(s), clean both.
Inse rt the drip tray(s) into the bottom of grill. Make sure the burner b rackets are not
resting on the drip tray (s).
Always fill the drip tray(s) with 2 cups of liquid. Water will work, but why not try beer
or wine to add flavor to your fav orite food . Then re-install c ooking grate.
Depending on model, either har dwire your Kenyon All Seasons® Grill or plug it directly into
an o utlet, do not use ext ension cords.
Preheat grill w ith the lid closed for 5 - 7 minutes on desired heat setting for type of food:
Close lid and cook. Enjoy the best grilled food you have ever tasted!
Once your grilling session is complete, gr ab a wet paper towel and wi pe down your grate.
Once cool, place grate/griddle in the dish washer along with the dirty dishes so that it’s
ready for its next tour of duty!
While the grate is in the wash, don’t forget to clean out the drip tray contents.
This is an important step in preventing a grease fire.
-Vege tables 3-4 bars
-Chick en, pork and fish 4-5 bars
-Hamburgers 6 -7 b ars
-Steak 7-8 bars
1. Antes de usar seu grill, remova a grelha e a bandeja de resíduos do grill. Lave o grill com
água morna e sabão com um pano não abrasivo. USE APENAS UTENSÍLIOS PLÁSTICOS
PARA ALTA TEMPERATURA AO GRELHAR. Acesse nosso site para comprar um jogo de
utensílios plásticos para alta temperatura ou de aço inoxidável de alta qualidade, através do
www.cookwithkenyon.com.
2.Certique-sedequeabandejaderesíduossejainseridaatéomna
parte inferior do grill e que os encaixes da resistência elétrica estejam
acoplados no suporte de encaixe da resistência.
3. Cubra o fundo da bandeja com um líquido. Pode ser água. NÃO UTILIZE
LÍQUIDOS INFLAMÁVEIS! Fazer isso arruinaria
seu churrasco. Usar suco de maçã ao grelhar carne
de porco acrescenta um aroma agradável à carne.
Uma lata de soda limonada é maravilhosa se estiver
grelhando um peixe. Experimente com qualquer tipo de líquido que você
goste de beber. Apenas lembre-se de sempre adicionar líquido na
bandeja de resíduos antes de grelhar.
4. Para manter seu grill sem fumaça, sempre deixe a superfície da grelha limpa após cada uso.
Simplesmente lave com água morna e sabão com um pano não abrasivo ou coloque em sua
máquina de lavar louças. Esvazie a bandeja de resíduos e seque com um papel toalha seco. A
bandeja de resíduos pode ser usada várias vezes antes de ser necessário substituí-la.
5. Coloque sua grelha ou chapa opcional (código do produto B96000) na resistência com a
bandeja de resíduos instalada. Use a chapa para alimentos tais como ovos, panquecas ou
minha favorita - rabanada recheada!
6. Pré-aqueça o grill por 5 a 7 minutos em intensidade alta (8 barras iluminadas) Ajuste a
intensidade do calor para o tipo de comida.
• Bife de 7 a 8 barras
• Hambúrguer de 6 a 7 barras
• Porco ou peixe de 4 a 5 barras
• Verduras de 3 a 4 barras
7. Fecha a tampa e cozinhe. Aproveite a melhor comida grelhada que você já comeu!
8. Faça a limpeza. Esta é uma tarefa simples, conforme o mostrado a seguir. Depois que o grill
tiver esfriado ao toque, pegue algumas folhas de papel toalha e coloque na superfície da grelha.
Coloque em torno de 30 ml de água no papel toalha e em seguida, usando seu pegador de
carne de náilon para alta temperatura, esfregue o papel toalha para frente e para trás para soltar
os resíduos da sua grelha. Descarte o papel toalha e seque a grelha com um papel toalha seco.
9.Assimqueagrelhaesfriarosuciente,removaagradeecoloqueemsuamáquinadelavar
louça para uma obter limpeza completa.
10. Com a grelha removida, levante a resistência elétrica e remova a bandeja de resíduos.
Esvazie o conteúdo da bandeja de resíduos em um lugar apropriado. Não jogue no gramado de
seus vizinhos Seque a bandeja com um papel toalha seco e reutilize a bandeja. A bandeja pode
ser usada várias vezes.
11. A cada 7 ou 8 usos, você pode precisar lavar a tampa. Ela pode ser colocada em sua máquina
de lavar louça no modo para tigelas e panelas. Isto vai devolver ao seu grill a aparência original.
12.Paralimparogrill,primeiroveriqueseasuperfíciedagrelhaesfriouobastanteparao
manejo.Emseguida,removaagrelha,levantearesistênciaelétricaatéquequetravadana
posição levantada, depois a bandeja de resíduos.
13. Seque as superfícies de aço inoxidável com um pano úmido para remover quaisquer
resíduos das sessões de grelhados anteriores.
14. Seu grill Kenyon vem junto com um frasco de produto de limpeza para aço
inoxidável de amostra.Use esse produto de limpeza uma vez por mês para manter
seu grill com aparência de novo.
15. A área de controle de tela de toque é de vidro cerâmico com vedação contra o
efeito de chuvas, neve e gelo. Para limpar o vidro, use um detergente limpador de
vidros e uma toalha macia. Se aparecerem manchas, use um limpador de vidro cerâmico, que
pode ser encontrado em um supermercado perto da sua casa.
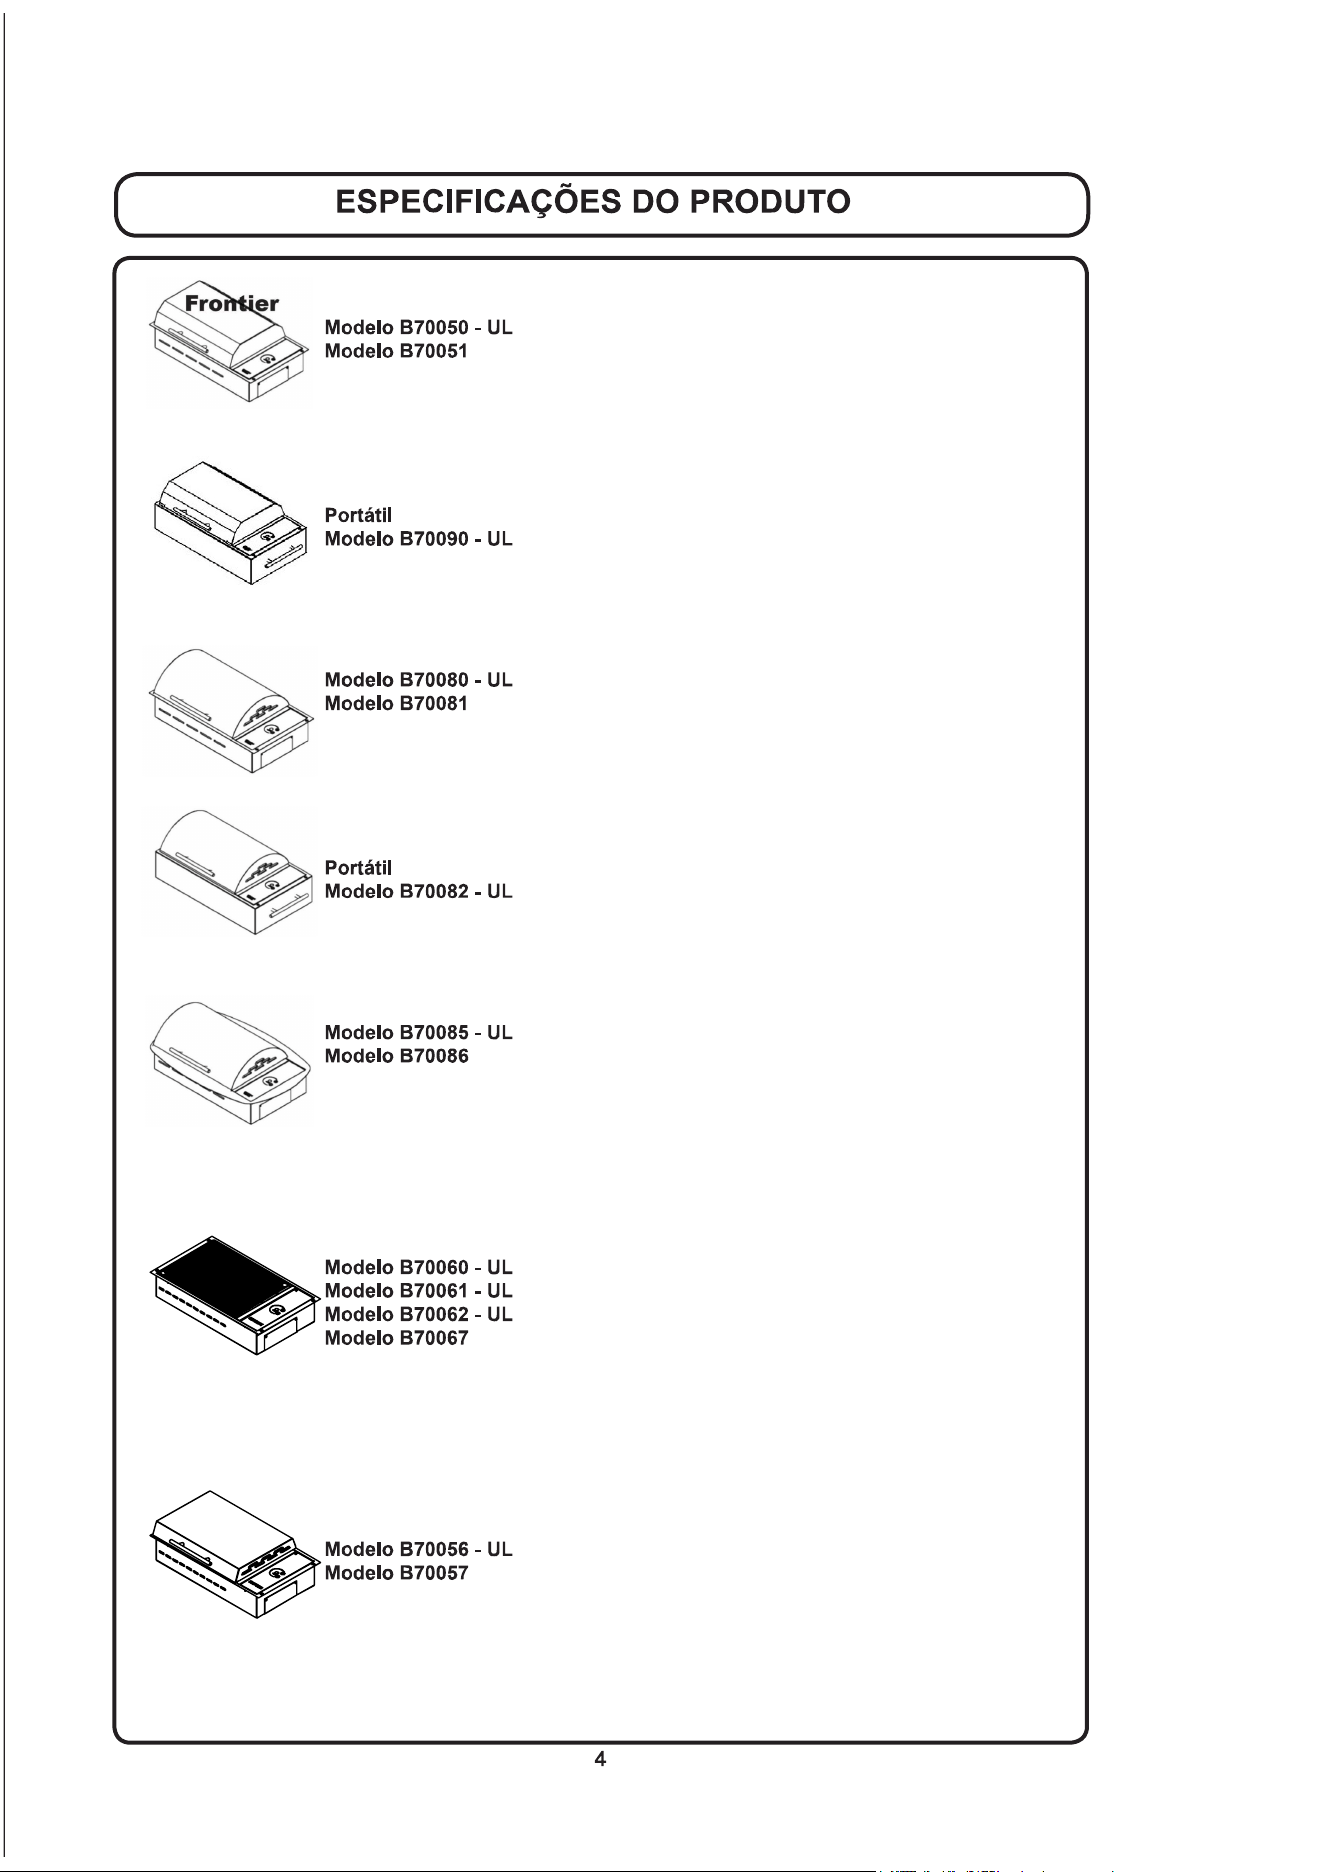
Frontier
- 120 V CA - 1300 WATTS - 11 A
- 240 V CA - 1300 WATTS - 6 A
Dimensões totais: 533 mm x 305 mm x 102 mm (187 mm com a tampa)
21 pol x 12 pol x 4 pol (7 3/8 pol com a tampa)
O comprimento não inclui a conexão do dreno
Dimensões do recorte: 501,6 mm x 296 mm com cantos arredondados de 6 mm
19 3/4 pol x 11 5/8 pol com cantos arredondados de 1/4 pol
- 120 V CA - 1300 WATTS - 11 A
Dimensões totais: 533 mm x 305 mm x 219 mm
21 pol x 12 pol x 8 5/8 pol
Floridian
- 120 V CA - 1300 WATTS - 11 A
- 240 V CA - 1300 WATTS - 6 A
Dimensões totais: 533 mm x 305 mm x 102 mm (206 mm com a tampa)
21 pol x 12 pol x 4 pol (8 1/8 pol com a tampa)
O comprimento não inclui a conexão do dreno
Dimensões do recorte: 501,6 mm x 296 mm com cantos arredondados de 6 mm
19 3/4 pol x 11 5/8 pol com cantos arredondados de 1/4 pol
- 120 V CA - 1300 WATTS - 11 A
Dimensões totais: 533 mm x 305 mm x 238 mm
21 pol x 12 pol x 9 3/8 pol
Rio
- 120 V CA - 1300 WATTS - 11 A
- 240 V CA - 1300 WATTS - 6 A
Dimensões totais: 584 mm x 397 mm x 102 mm (206 mm com a tampa)
23 pol x 15 5/8 pol x 4 pol (8 1/8 pol com a tampa)
O comprimento não inclui a conexão do dreno
Dimensões do recorte: 501,6 mm x 296 mm com cantos arredondados de 6 mm
19 3/4 pol x 11 5/8 pol com cantos arredondados de 1/4 pol
No Lid
– 120 V CA - 1300 WATTS - 11 A
– 240 V CA - 1300 WATTS - 6 A
– 120 V CA - 1300 WATTS - 11 A
- 240 V CA - 1300 WATTS - 6 A
Dimensões totais: 533 mm x 305 mm x 102 mm
21 pol x 12 pol x 4 pol
O comprimento não inclui a conexão do dreno
Dimensões do recorte: 501,6 mm x 296 mm com cantos arredondados de 6 mm
19 3/4 pol x 11 5/8 pol com cantos arredondados de 1/4 pol
Half Height Lid
- 120 V CA - 1300 WATTS - 11 A
- 240 V CA - 1300 WATTS - 6 A
Dimensões totais: 533 mm x 305 mm x 102 mm (159 mm com a tampa)
21 pol x 12 pol x 4 pol (6 1/4 pol com a tampa)
O comprimento não inclui a conexão do dreno
Dimensões do recorte: 501,6 mm x 296 mm com cantos arredondados de 6 mm
19 3/4 pol x 11 5/8 pol com cantos arredondados de 1/4 pol
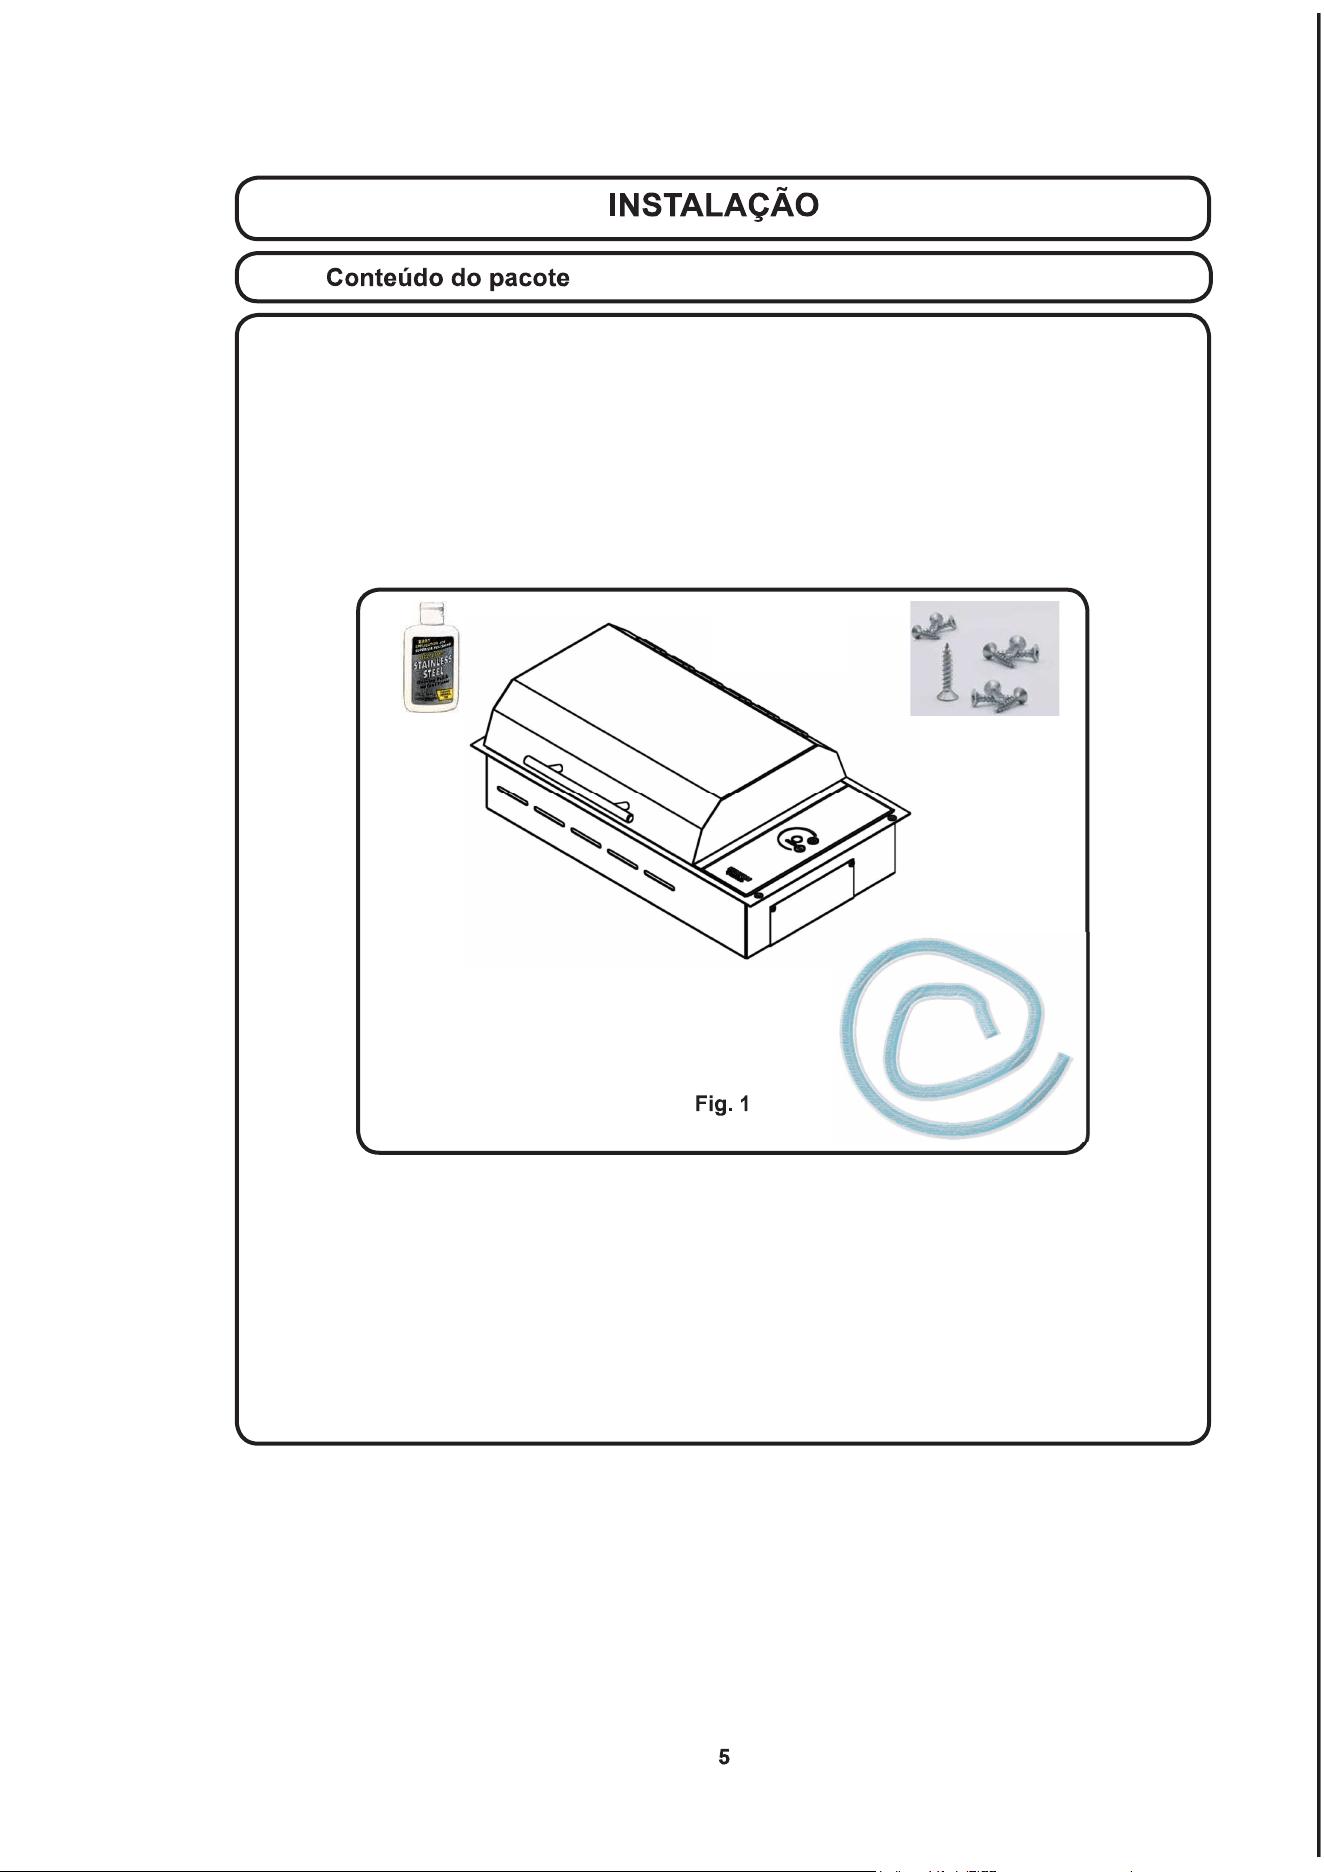
O seu Grill All Seasons
®
Grill já vem montado e pronto para uso. Antes de usar o grill, escreva
aqui o número de série da sua unidade para referência futura: _________________. O número
de série pode ser encontrado na lateral curta do grill na extremidade junto ao painel de controle
de vidro. O número de série consiste de seis dígitos.
No conteúdo da embalagem você encontrará o Grill All Seasons
®
, quatro (4) parafusos de
montagem, 0,9 m (3 pés) de mangueira de dreno, cotovelo ou bujão de dreno, dependendo
se o grill for portátil ou embutido, manual e produto de limpeza de aço inoxidável. Se algum
componenteestiverfaltandooudanicado,ligueparaKENYONimediatamente.
Este produto deve ser instalado de acordo com os códigos elétricos nacionais, estaduais e
municipais. A tabela que segue fornece a tensão, corrente e frequência corretas que devem ser
supridas para o grill.
A alimentação deve ser de um circuito aterrado independente protegido por um disjuntor e
classicadodeacordocomasespecicaçõesparaomodeloconformeomostradonatabelaabaixo.
Seu Grill Seasons
®
éfornecidodefábricacomumangedeaçoinoxidávelpolidoqueaceita
quatroparafusosdecabeçaovalparamontagem.Aguarniçãodoangedogrillfoiprojetada
paraseguraaunidadermementenolugarnabancada.Sedesejar,poderávedarabordada
bancadasobaguarniçãodoange.
espessura máxima com resistência à compressão de
1,6 mm (1/16 pol) O silicone pode ser usado para vedar apenas a borda do vidro, se desejado.
B70050
B70056
B70060
B70062
B70080
B70082
B70085
B70090
1300 Watts 120 V CA 11 A 60 Hz
plugue de 3 pinos
aterrado cabo
com GFCI
B70051
B70057
B70061
B70067
B70081
B70086
1300 Watts 240 V CA 6 A 60 Hz cabo de três
condutores sem plugue
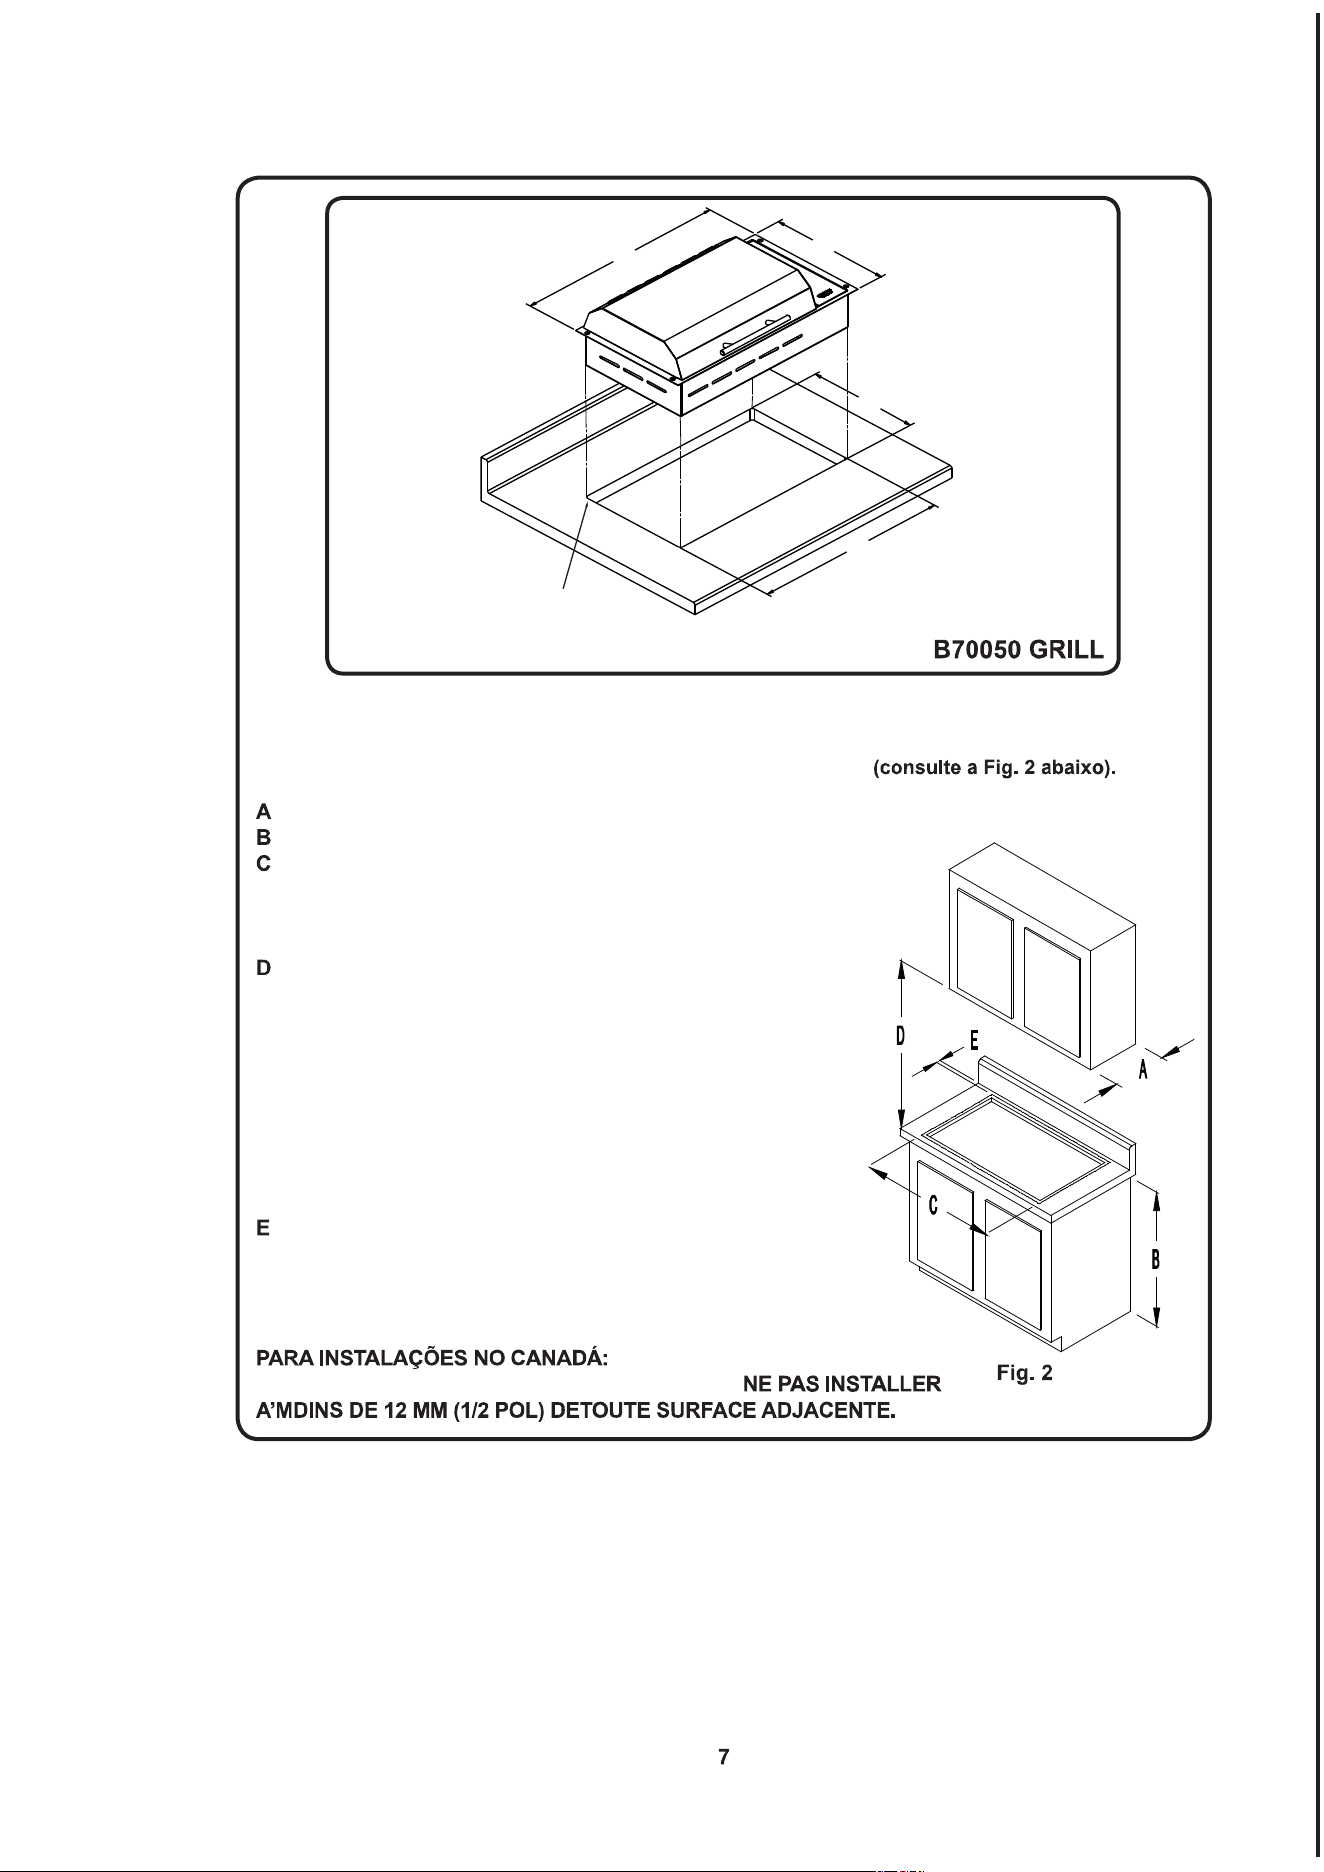
Leia esta seção antes de fazer o recorte para o grill.
É importante planejar com antecedência para a instalação do grill, mantendo as
seguintes dimensões em mente
- 33 cm (13 pol) de comprimento máximo dos armários acima
- 91,4 cm (36 pol) de altura mínima da bancada acima do piso
- Asuperfícielisamínimadabancadaemqueogrillcará
apoiado deve ser igual ou superior às dimensões
totais do grill (consulte a página 8 para obter as
dimensões totais do grill).
- 76,2 cm (30 pol) de folga mínima entre a parte de cima do
grill e a parte de baixo de um armário de madeira ou metal
desprotegido ou uma folga mínima de 61 cm (24 pol) quando
a parte de baixo do armário de madeira ou metal está
protegida com papel cartão com tratamento antichama
com espessura mínima de 0,6 cm (1/4 pol) e revestida
com chapa metálica de aço inoxidável MSG No. 28,
0,38 mm (0,015 pol) de espessura de aço inoxidável,
0,61 mm (0,024 pol) de espessura de alumínio ou
0,51 mm (0,020 pol) de espessura de cobre.
- 10,2 cm (4 pol) no mínimo da rodabanca da bancada
à borda do grill (consulte a página 8 para obter as
dimensões totais do grill). 3,8 cm (1,5 pol) no mínimo a
partir da frente da bancada ao grill.
“Não instale mais próximo do que
12 mm (1/2 pol) de qualquer superfície adjacente”, e
53,3 cm (21 pol)
30,5 cm (12 pol)
29,5 cm (11 5/8 pol)
50,2 cm (19 3/4 pol)
0,6 cm (1/4 pol)
dimensão do canto
DIMENSÕES do recorte da bancada
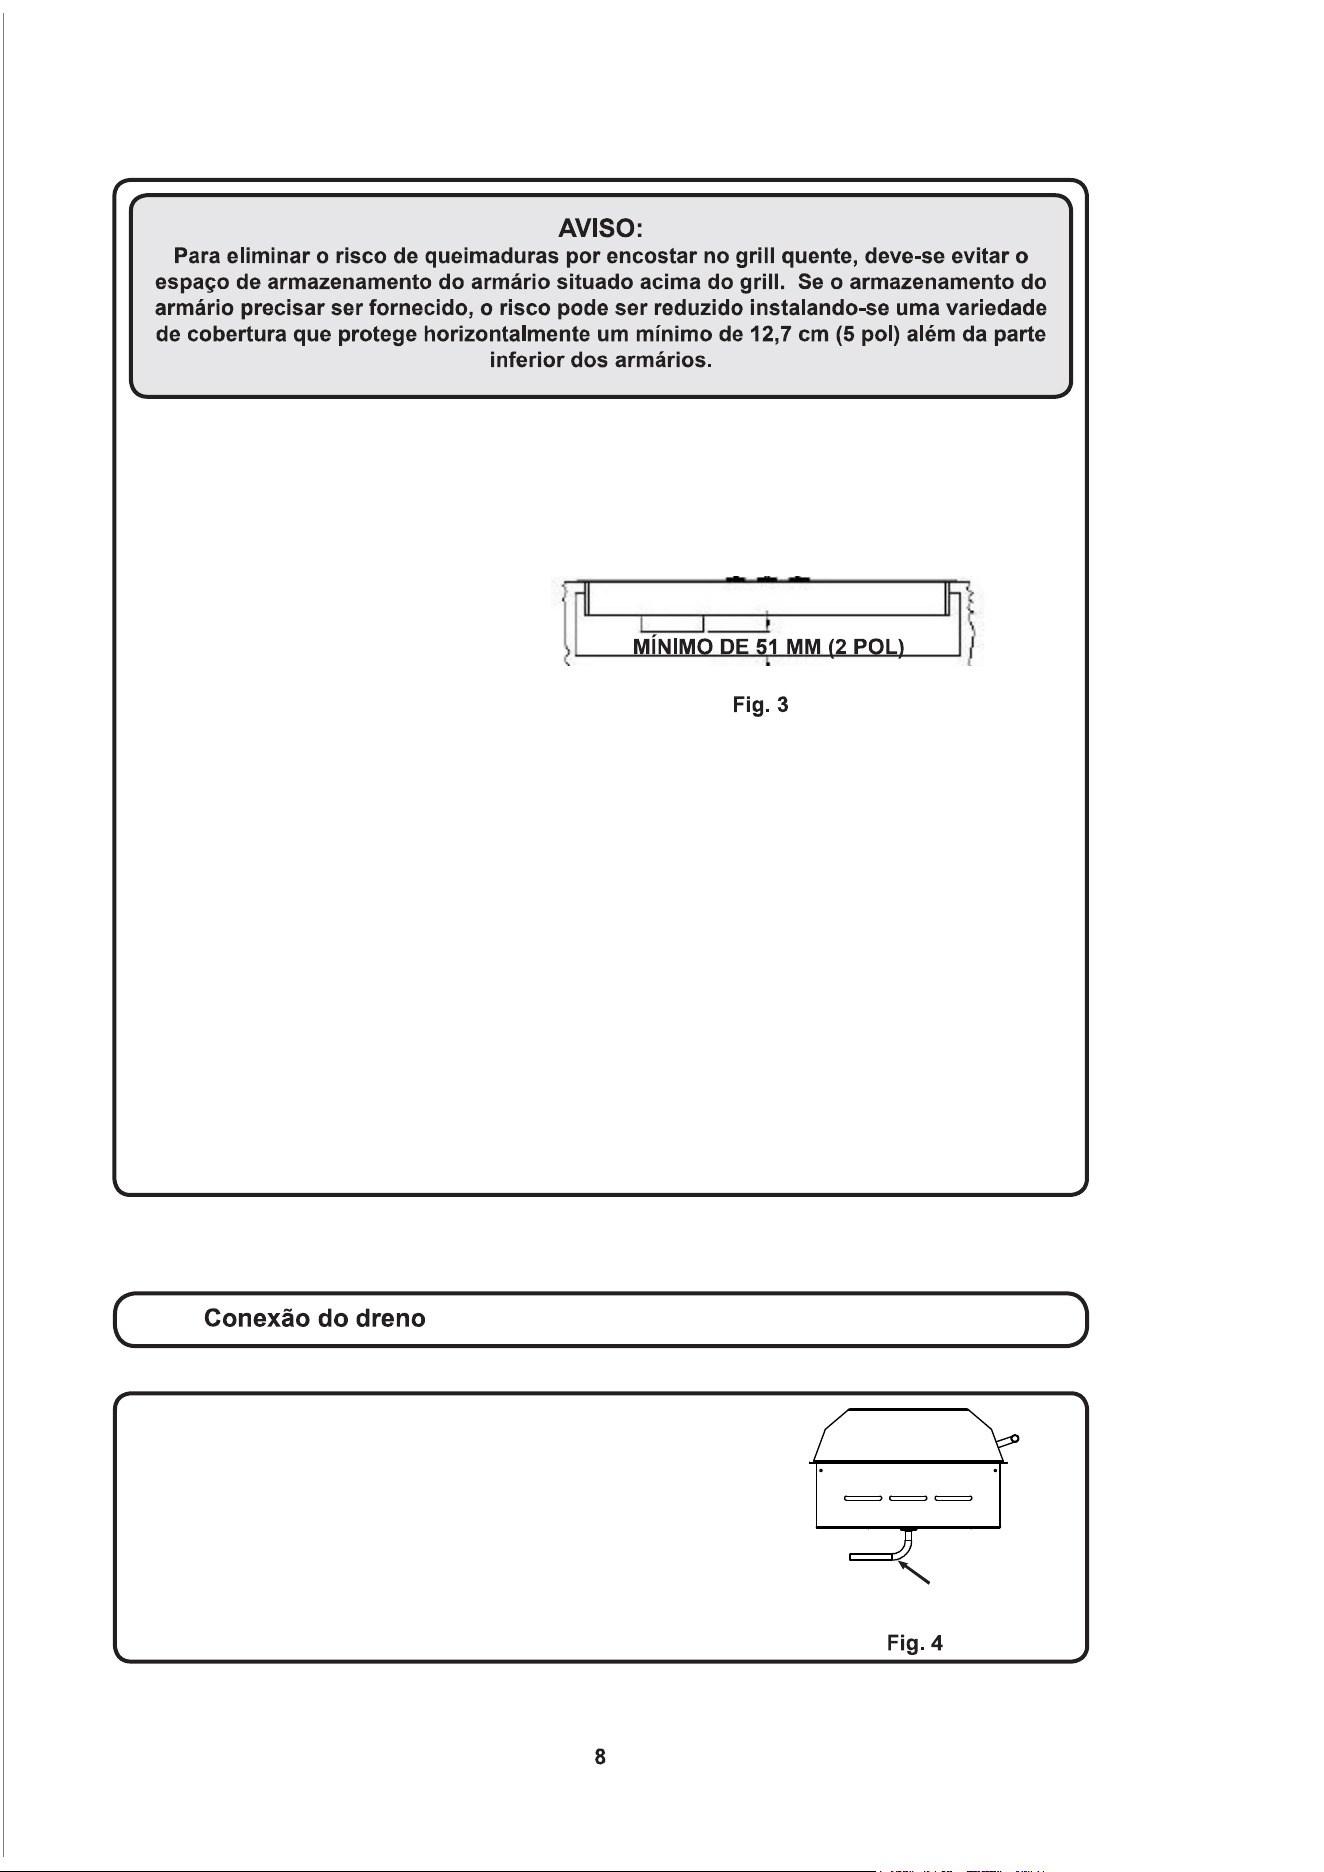
Antesdefazerorecortedabancada,veriqueasfolgas.Certique-sedequeogrillteráfolgas
das paredes frontais e laterais do armário base. Além disso, garanta a folga adequada da
rodabanca para que a tampa possa abrir completamente.
Deve-se fornecer ventilação adequada no espaço abaixo da bancada para garantir a operação
adequada do grill. O calor transferido do fundo da panela do grill durante a operação vai superaquecer
um área ventilada inadequadamente.
Ao fazer o recorte da bancada, arredonde o canto para ajudar a prevenir rachaduras no material
da bancada. Um raio de 6 mm (1/4 pol) é o típico, mas siga as instruções do fabricante da
bancada sobre o raio mínimo e qualquer tipo de reforço necessário para evitar danos à bancada
com o tempo.
Seasuabancadaéfeitadematerialcomsuperfíciesólida,vocêprecisarávericarcomo
fabricanteasrecomendaçõesespecícasparaasinstruçõesdeinstalaçãodefogõesegrelhas.
A maioria dos fabricantes de bancada com superfície sólida requerem suportes de canto adicionais
para evitar danos à bancada. Use os parafusos inclusos para prender o grill à bancada. Cuidado
paranãoapertardemaisosparafusos.Useumselanteacrílicoparavedaroangenabancada.
Se a sua bancada for feita de pedra, você precisará usar um látex acrílico para montar o grill no
lugar.Apliqueumleteespessodeselanteemvoltadaaberturadorecorteecoloqueogrillno
lugar. Remova qualquer excesso de selante, use água para fazer esta remoção. Deixe o selante
secar por no mínimo 24 horas sem permitir contato do mesmo com qualquer umidade. Não utilize
osparafusosquevieramcomoseugrill.Oselanteprenderáogrillcomrmeza.Nãouseselante
que contenha silicone, pois esse manchará a pedra.
Para a sua conveniência, o grill é equipado com uma conexão de
latão com rosca NPT de 3 mm (1/8 pol) e cotovelo de de latão de
90ºparaconectaramangueiraexívelcomDIde6mm(1/4pol)
que vem com o grill. A versão portátil do grill vem com um bujão
de latão instalado no encaixe do dreno. Se estiver usando seu grill
como uma unidade portátil, guarde a mangueira e a conexão de
latãode90ºparaumapossívelinstalaçãonofuturo.
Conexão do dreno para a
mangueira com DI de 6 mm (1/4 pol)
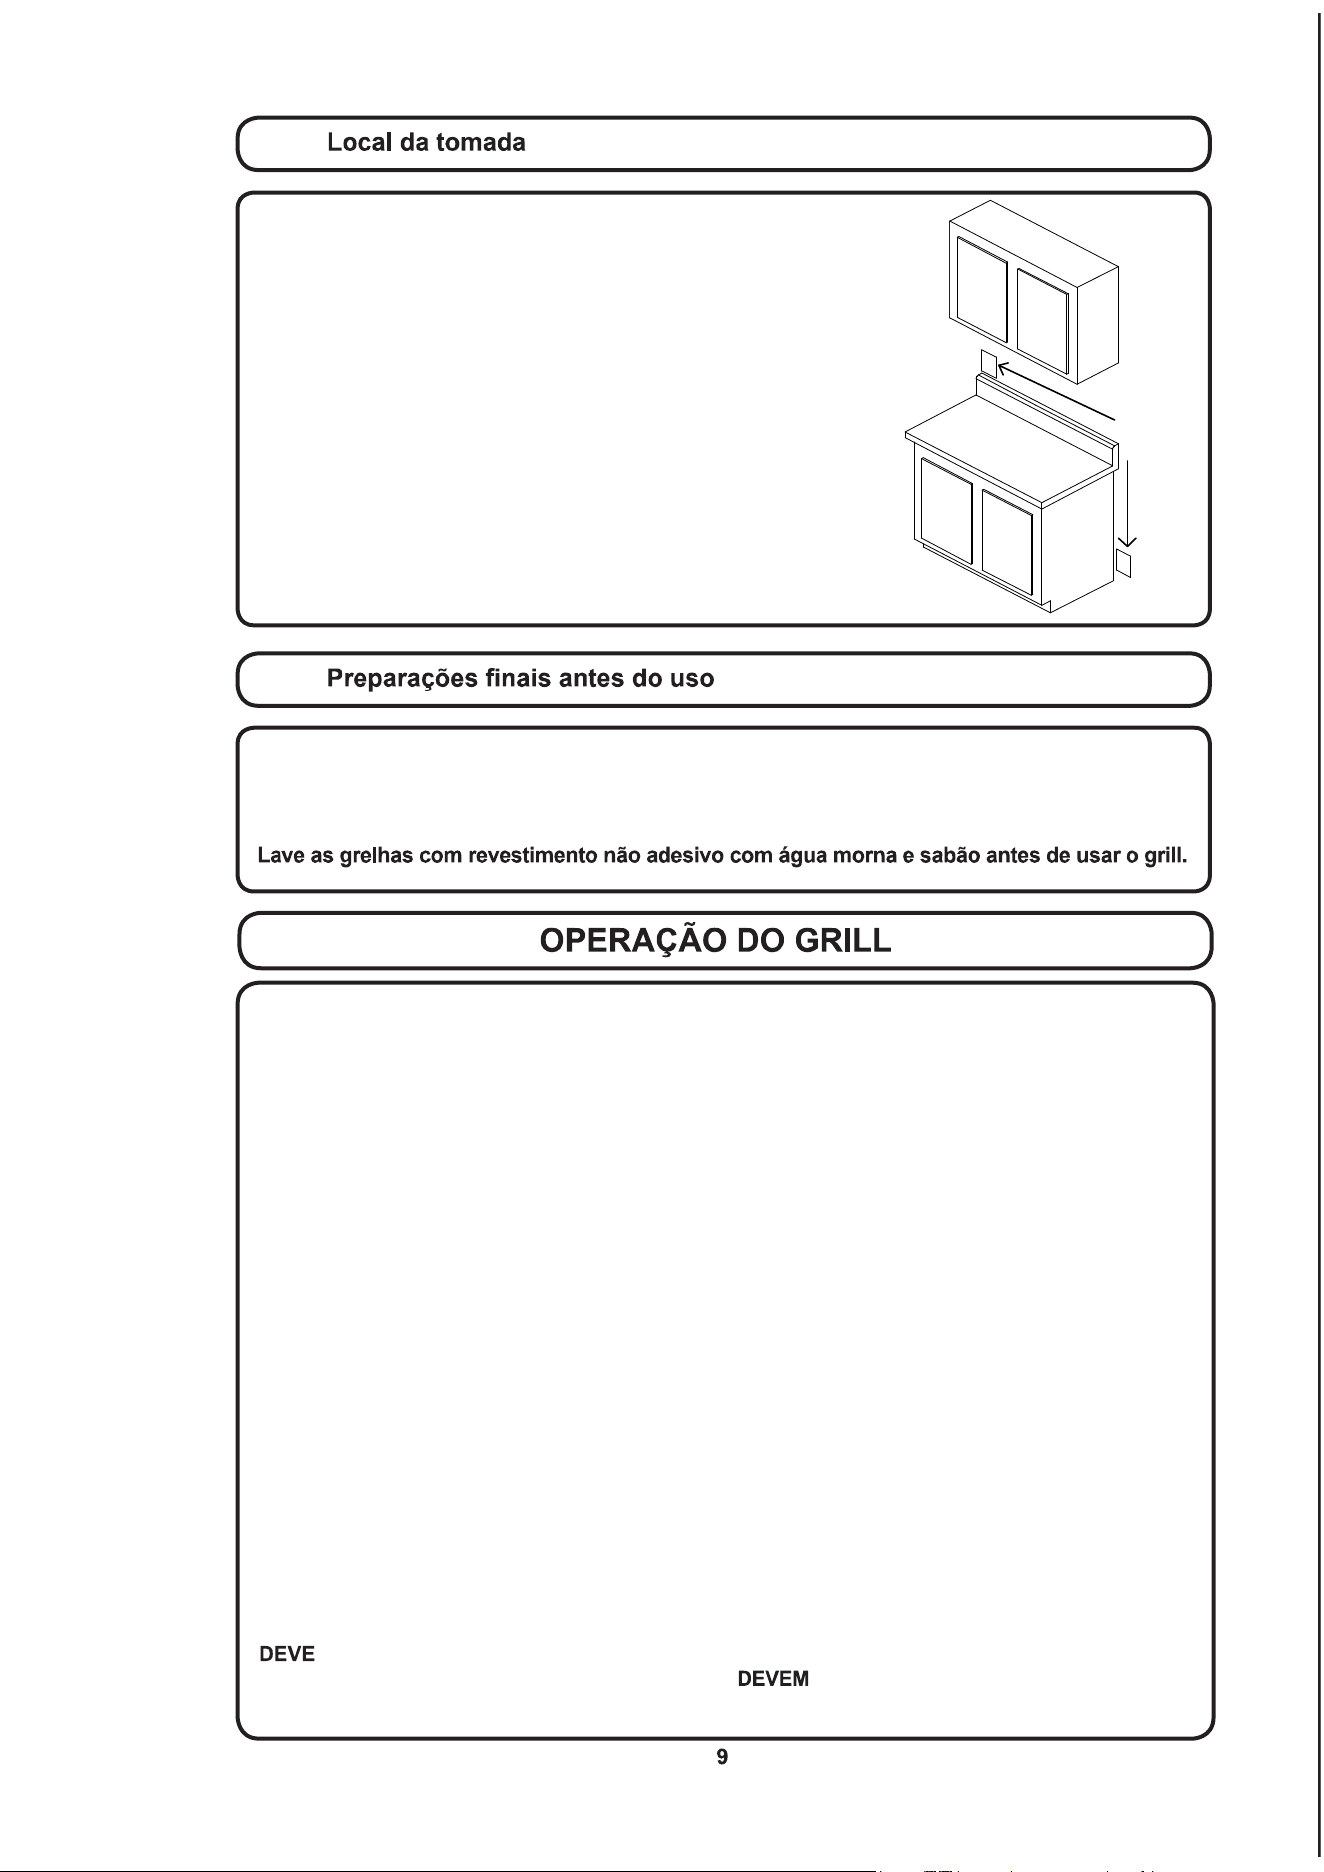
Certique-sequeatomadaelétricadestinadaparaogrillesteja
em um local de fácil acesso. Isso permitirá que o usuário conecte
e desconecte o grill com facilidade. Isso é necessário para
garantir a limpeza e o armazenamento seguro do grill.
Sugestões
de loc ais
de tomadas
Removaapelículaplásticaprotetoradatampa,daguardadoangeedopaineldevidro.
Limpe o grill antes do primeiro uso. Uma limpeza completa com o produto de limpeza para aço
inoxidável ou vidro removerá quaisquer resíduos da película adesiva e óleos do fabricante.
NÃO USE ÁGUA PARA APAGAR O FOGO CAUSADO PELA GORDURA
Abafe o fogo ou chama, ou use extintor de incêndio de pó químico seco ou de espuma.
USE APENAS DESCANSOS PARA PANELA SECOS
Usar descansos para panela molhados ou úmidos em superfícies quentes pode resultar em
queimaduras causadas pelo vapor. Não deixe que o descanso para panela encoste na grelha ou na
resistência do grill. Não use uma toalha ou outro pano volumoso no lugar de um descanso para panela.
NÃO COZINHE EM UMA GRELHA OU CHAPA QUEBRADA
Se a grelha estiver quebrada, a gordura ou óleo poderá entrar em contato direto com a resistência
elétrica e criar um risco de choque elétrico ou fogo. Entre em contato com o centro de serviço ao
cliente autorizado ou Atendimento ao Cliente da KENYON imediatamente pelo telefone (860) 664-
4906.
LIMPE O GRILL COM CUIDADO
Se uma esponja ou pano molhado for usado para limpar resíduos em uma superfície quente, tome
cuidado para evitar queimaduras por vapor. Alguns produtos de limpeza produzem fumaças nocivas
quando aplicados à superfície quente. Leia o rótulo do produto de limpeza para obter informações
antes de usá-lo.
NÃO TOQUE A RESISTÊNCIA ELÉTRICA OU A GRELHA
A resistência e a grelha permanecerão quentes por um tempo depois de usadas para cozinhar.
Estes componentes devem esfriar primeiro e depois podem ser manipulados com cuidado e atenção
durantealimpeza,poispodemestarquentesosucienteparacausarqueimadurasgraves.
LIMPE O GRILL APÓS CADA USO
Este aparelho está equipado com uma bandeja coletora removível e descartável. Esta bandeja
ser removida e limpa após TODO e qualquer uso. Não permita que a gordura se acumule
entreoscozimentos.Asbandejascoletoraedeetora ser usadas ao grelhar no grill. O excesso
de gordura pode penetrar no interior do grill, anulando sua garantia e oferecendo riscos de incêndio.
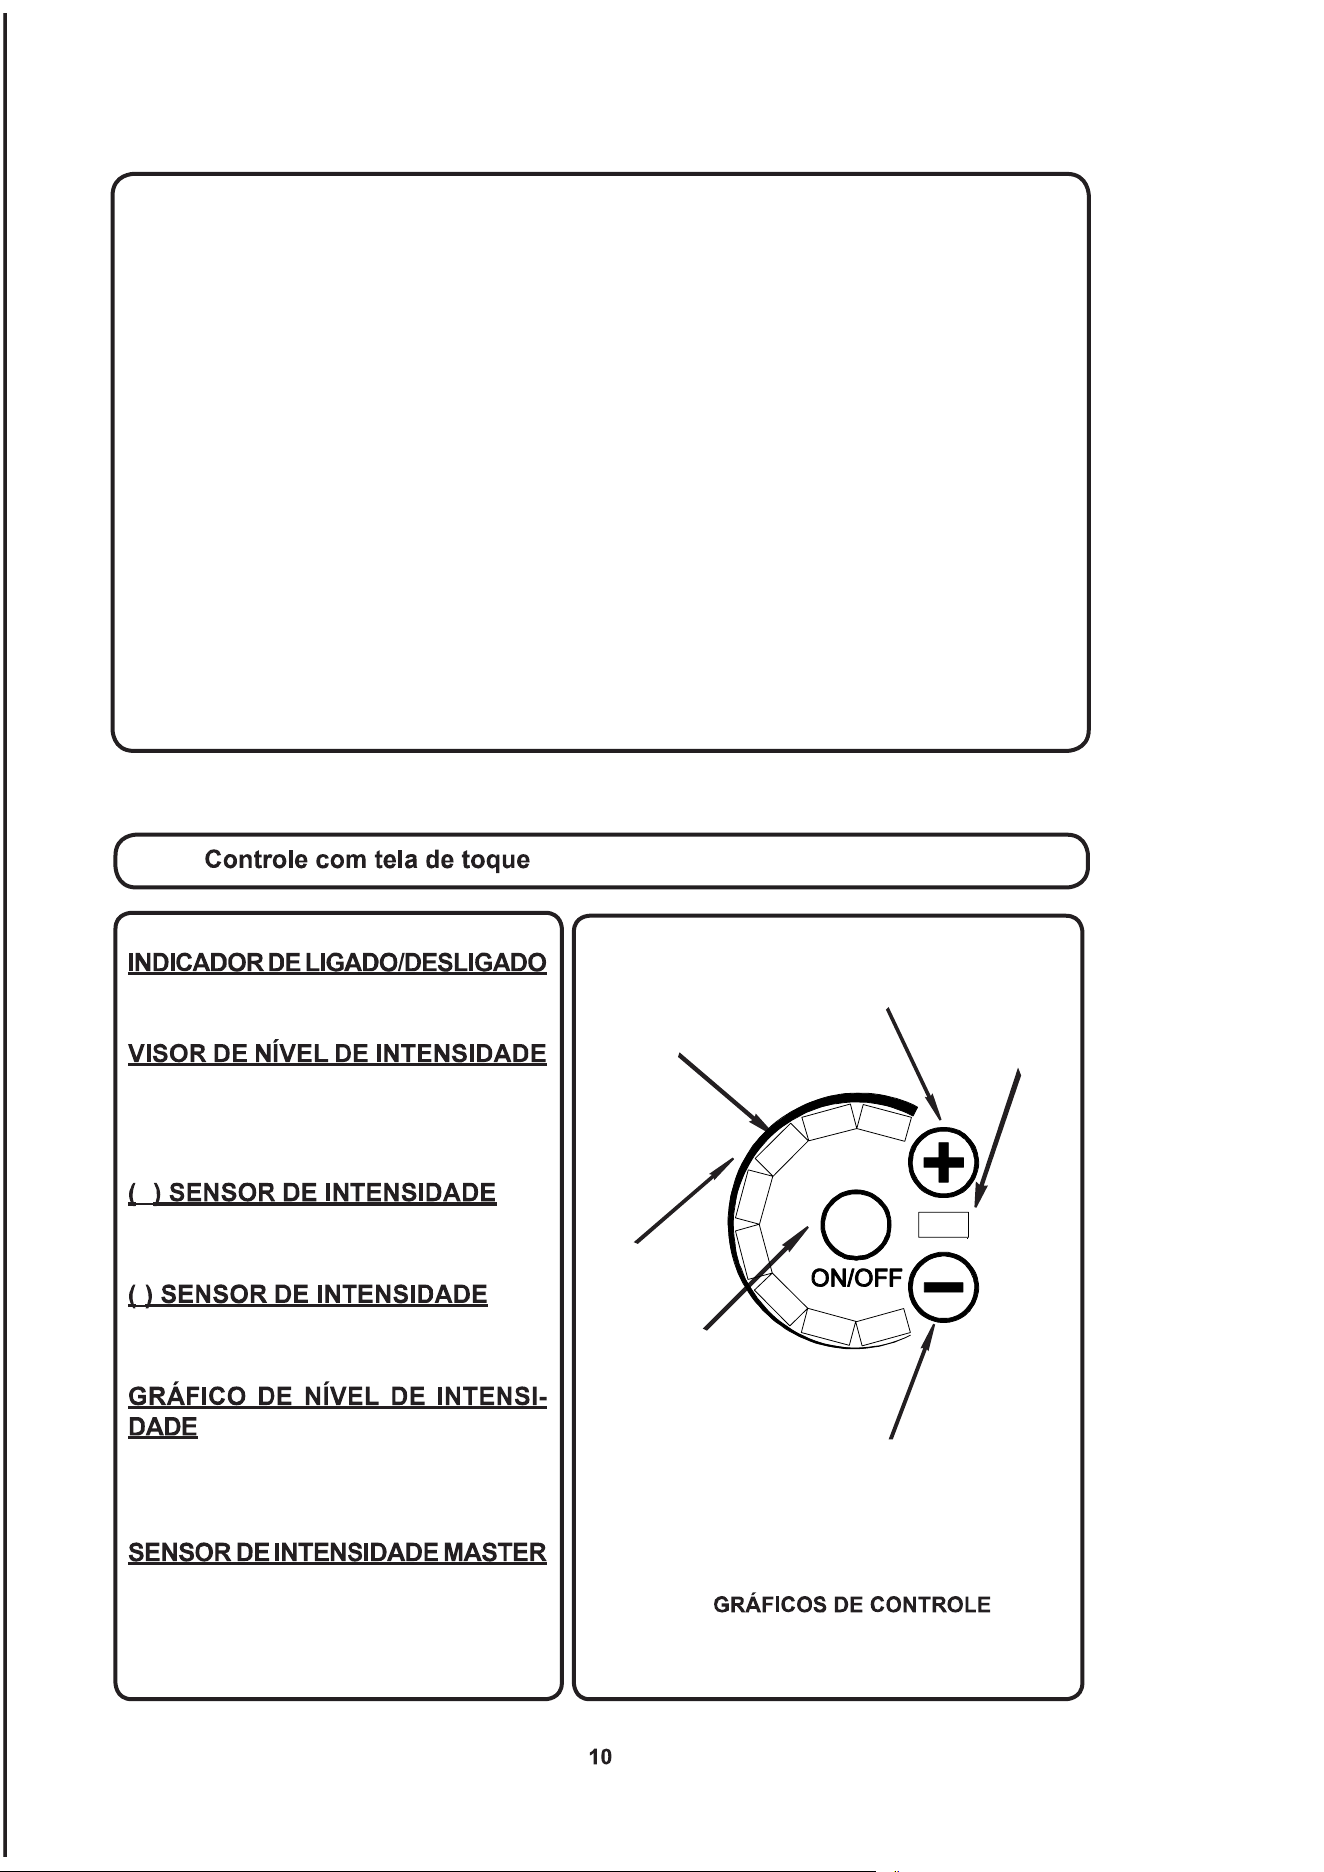
NUNCA DEIXE O GRILL SEM SUPERVISÃO QUANDO EM ALTA TEMPERATURA
A alta temperatura pode causar fumaça e incendiar a gordura.
NÃO LIMPE A UNIDADE COM ÁGUA PRESSURIZADA
Nunca limpe o grill com qualquer forma de água pressurizada ou outros tipos de produtos de
limpeza. Fazer isso anulará a garantia e pode oferecer sério risco de choque elétrico. Sempre limpe
o grill com um pano e um produto de limpeza de superfície para aço inoxidável ou vidro.
ARMAZENAMENTO
Se for usado como um grill portátil, guarde em local fechado quando não estiver em uso. Se for
usado como um grill embutido, forneça proteção adequada para evitar exposição direta à chuva.
Capas disponíveis.
PARA EVITAR FUMAÇA
Para evitar a formação de fumaça na bandeja coletora, coloque 2 xícaras de água (ou a quantidade
sucienteparacobrirofundodabandeja)nabandejaantesdegrelhar.
NÃO USE PANELAS OU OUTROS UTENSÍLIOS DE COZINHA NO GRILL
GUARDE ESTAS INSTRUÇÕES COM O GRILL PARA REFERÊNCIA FUTURA.
Este visor indica se o grill está ligado ou desli-
gado.
Visor digital que indica a intensidade de
calor do grill. As lâmpadas do indicador
acompanhamavariaçãodográconatela.
Existem oito níveis de calor possíveis.
+
Tocar neste sensor aumentará a intensidade de
calor do grill em um ponto a mais.
-
Tocar neste sensor diminuirá a intensidade de
calor do grill em um ponto a menos.
Exibe o nível da intensidade de calor pela
resistência.Estalinhavariadenoagrosso,
indicando intensidade de baixa para alta.
Este é o controle de intensidade principal para
o grill. Tocar nele com o grill DESLIGADO
ativará o controle e LIGARÁ o grill. Tocar nele
com o grill LIGADO DESLIGARÁ o grill.
VISOR DE NÍVEL
DE INTENSIDADE
SENSOR DE
INTENSIDADE MASTER
GRÁFICO DE
NÍVEL DE
INTENSIDADE
INDICADOR
DE LIGADO/
DESLIGADO
(-) SENSOR
DE INTENSIDADE
(+) SENSOR
DE INTENSIDADE
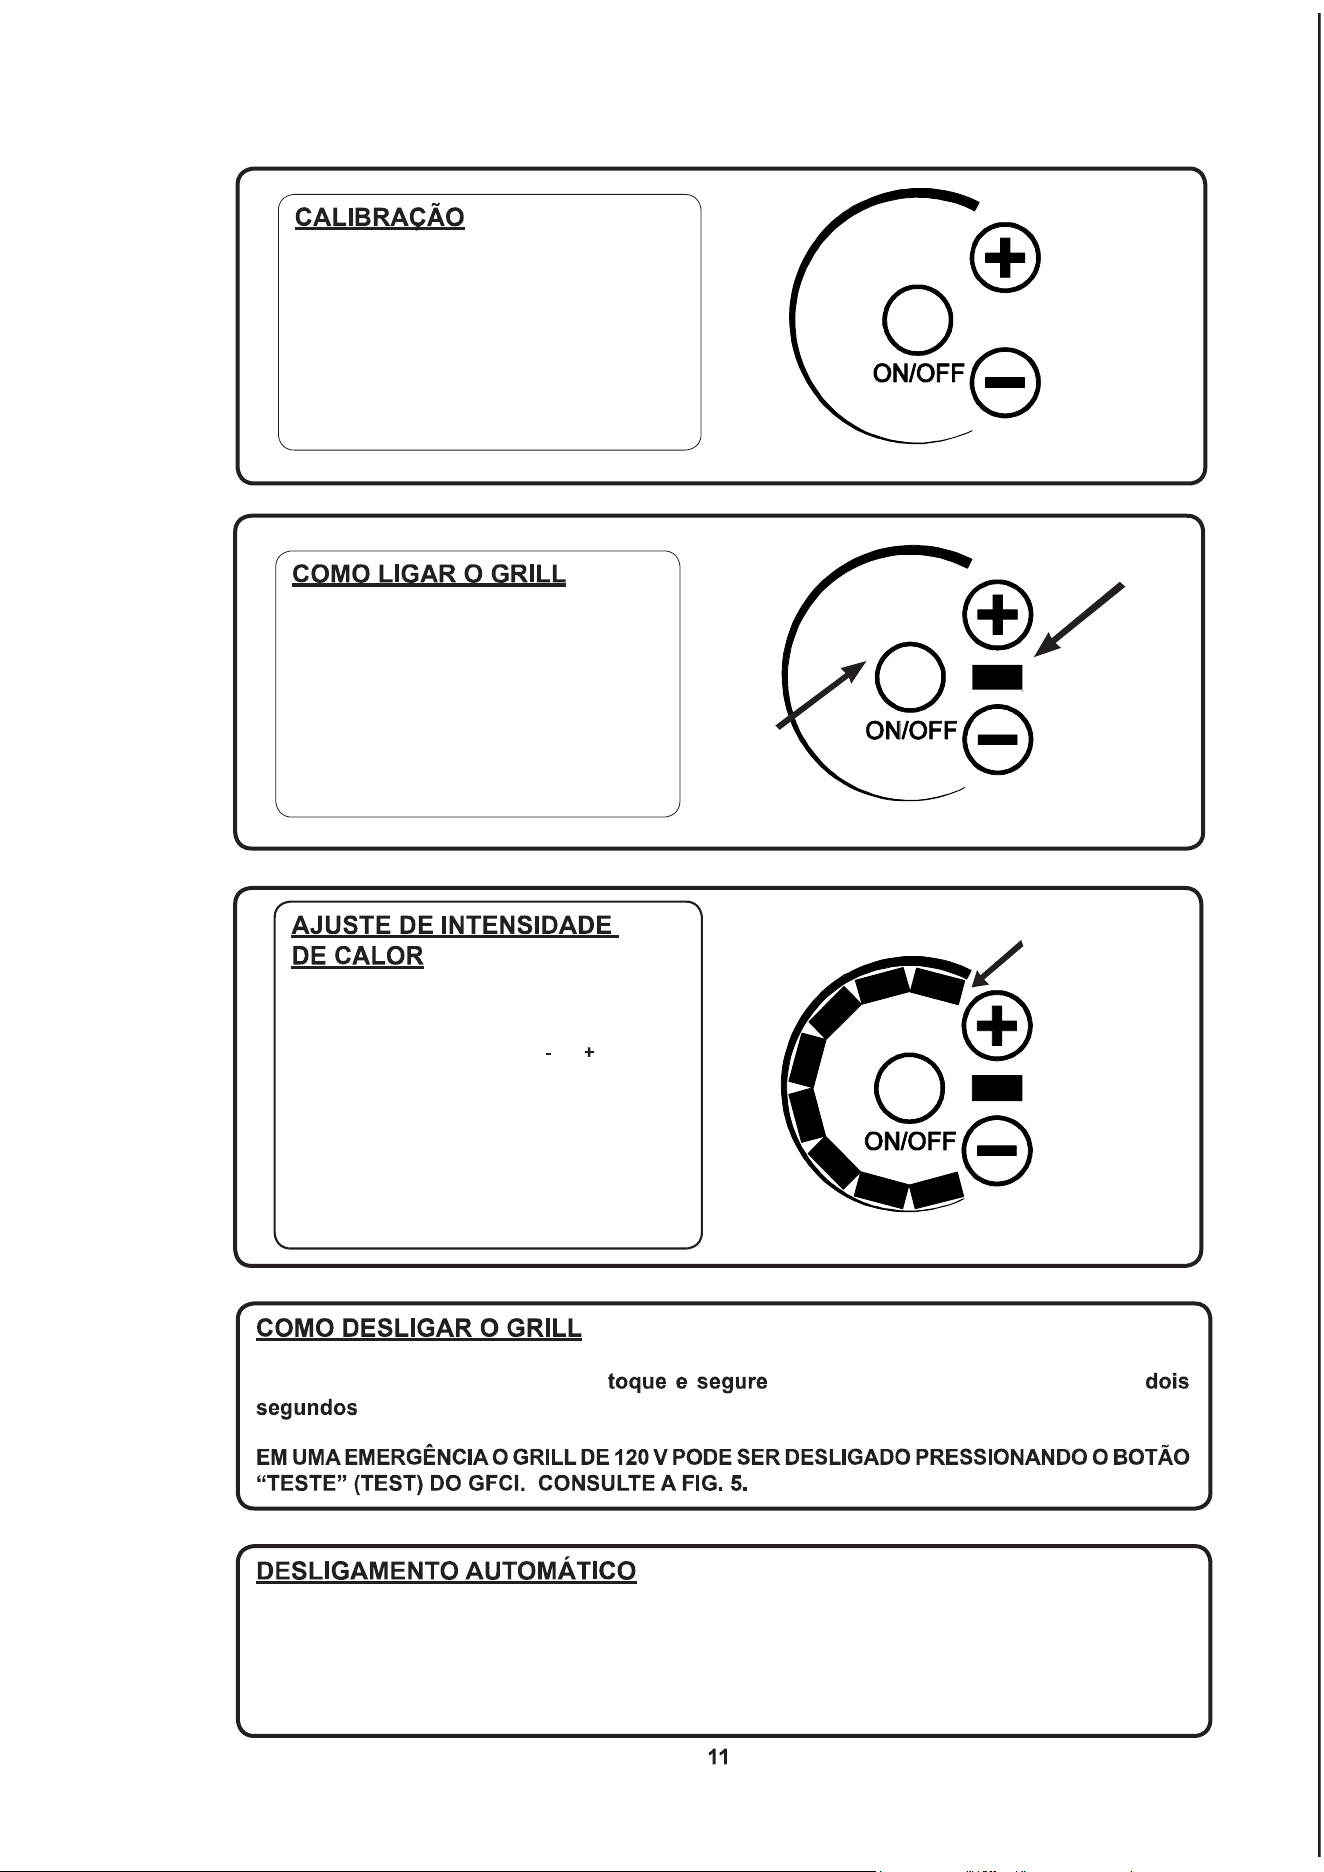
Na aplicação de energia elétrica ao grill,
o controlador ativará um processo de
autocalibração. Em seguida, o controlador
soaráumaconrmaçãosonoraeovisor
acenderá brevemente. Agora, o grill está
pronto para uso.
Para ligar o grill, toque e segure o Sensor
de Intensidade Master por dois segundos.
O controlador vai então soar um bipe e o
Indicador de Ligado/Desligado acenderá.
INDICADOR DE
LIGADO/DESLIGADO
SENSOR DE
INTENSIDADE
MASTER
GRÁFICO DE NÍVEL
DE INTENSIDADE
(INTENSIDADE
DE CALOR 8
SELECIONADA)
Seu grill KENYON possui 8 ajustes de inten-
sidade de calor diferentes, de 1 a 8, selecio-
nados através dos sensores ( ) e ( ). O ajuste
de intensidade de calor é exibido conforme
ilustrado à direita. A resistência de aqueci-
mento alterna a intervalos de tempo diferentes
para variar os níveis de calor. À medida em
que a intensidade aumenta, a resistência per-
manece ligada por mais tempo, aumentando
a temperatura de cozimento do grill.
Para desligar o grill, simplesmente o Sensor de Intensidade Master por
. O controlador vai desenergizar e desligar a resistência.
O controle eletrônico do seu grill KENYON foi programado com a segurança em mente e possui um
recurso de desligamento automático. O grill é programado para desligar automaticamente em um
tempo pré-determinado após ser ligado (consulte a tabela abaixo). O controle também deligará caso
alcance um limite pré-ajustado de temperatura. Se isto ocorrer, deixe o grill esfriar por 20 a 30 minutos.
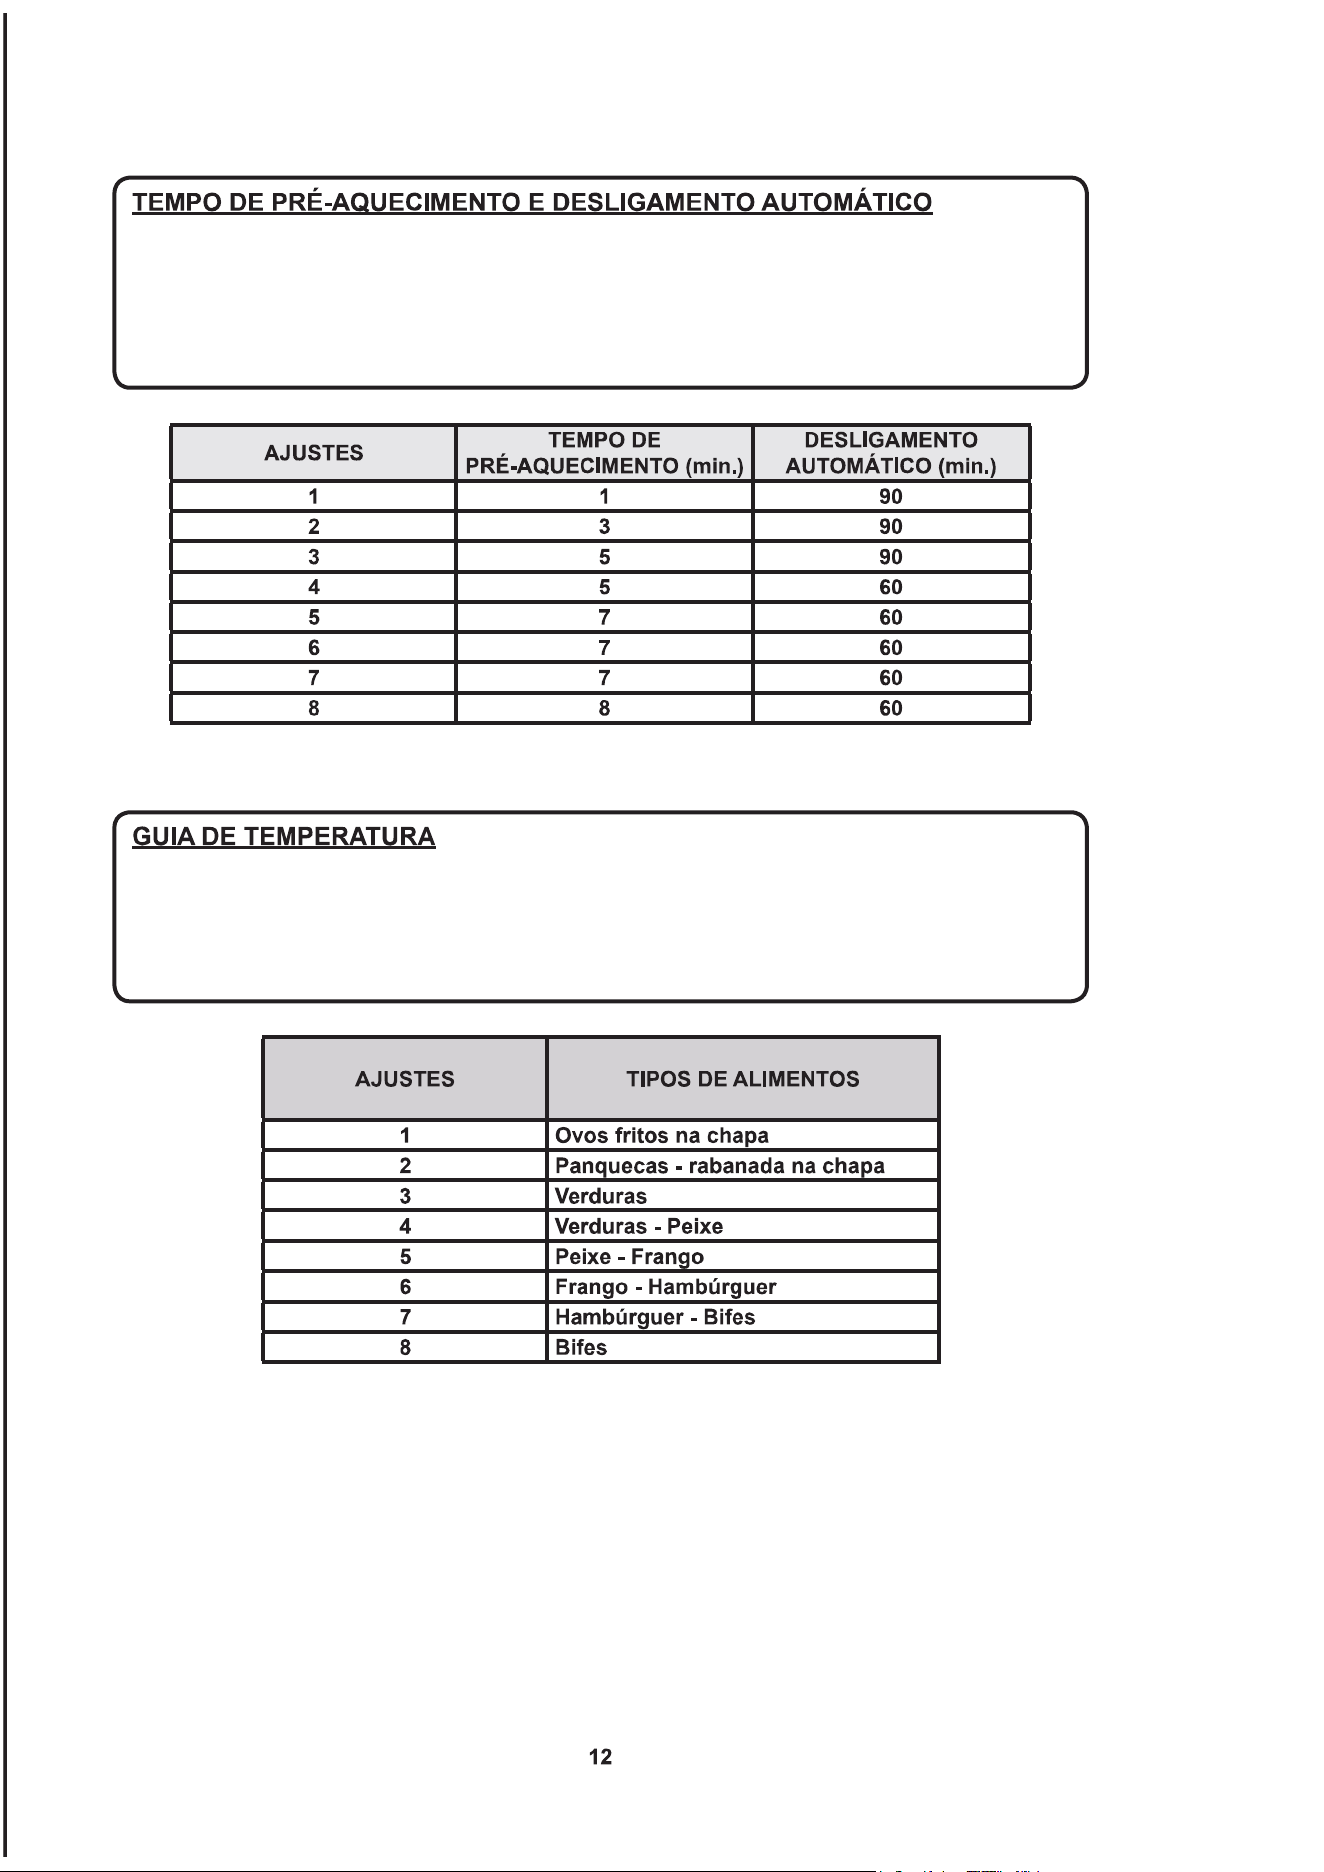
O controle do grill possui uma função de pré-aquecimento que aplica potência total por um
tempo determinado para cada ajuste de potência selecionado. Essa função de pré-aquecimento
aquece a grelha/chapa à temperatura desejada mais rápido, permitindo um grelhado mais
rápido. A tabela abaixo fornece o tempo de pré-aquecimento e o tempo de desligamento
automático para cada ajuste de potência.
O que segue serve como um guia para orientação. Fatores tais como vento, temperatura
ambiente, temperatura do alimento colocado no grill podem afetar os tempos de cozimento.
O grill foi desenvolvido e projetado para alcançar um ótimo desempenho de cozimento com
a tampa baixa ou fechada.
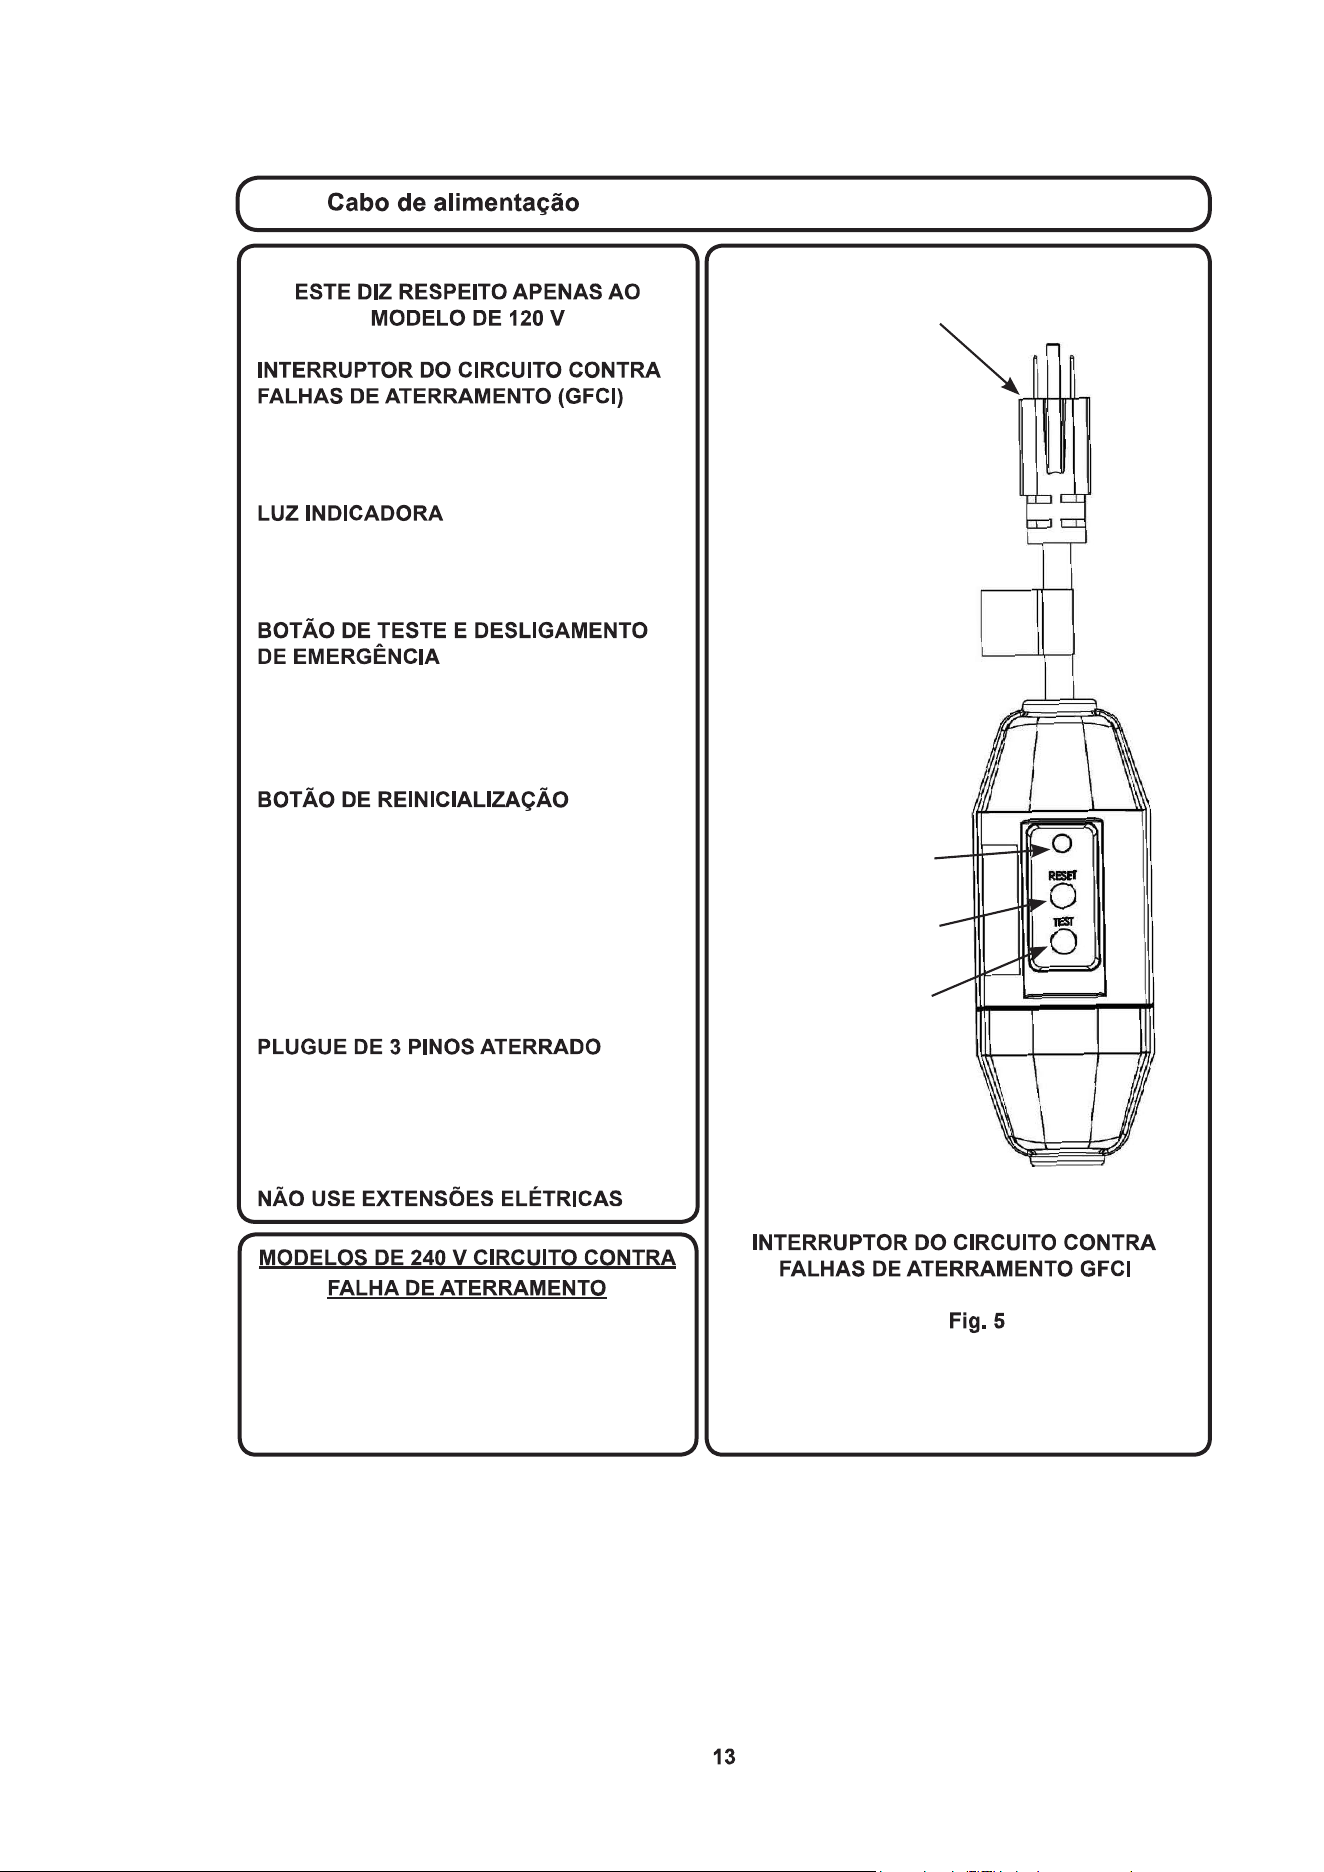
BOTÃO DE
REINICIALIZAÇÃO
PLUGUE DE 3 PINOS ATERRADO
LUZ
INDICADORA
BOTÃO DE
TESTE
O circuito de tensão de alimentação (240
V) deve estar equipado com um interruptor
de circuito contra falhas de aterramento.
Veriqueoscódigoslocaisparaconformi-
dade.
O GFCI é um dispositivo projetado para
proteger o usuário contra qualquer risco de
choque elétrico.
Aluzindicadoracaráacesaquandoa
energia elétrica for aplicada e indica que o
GFCI está funcionando adequadamente.
Pressionar esse botão testará o GFCI. A luz
indicadora apagará e a energia elétrica não
será fornecida para o grill. O GFCI deve ser
testado mensalmente.
Pressionar esse botão vai reinicializar o
GFCI para a sua função normal. A lâmpada
indicadora acenderá e o energia elétrica
será fornecida para o grill. Se a lâmpada
indicadora não acender, o GFCI detectou
algum problema de funcionamento. Des-
conecte o GFCI do soquete e não utilize
o grill.
CUIDADO - Para garantir proteção con-
tínua contra riscos de choque elétrico, o
GFCI deve se conectado em um soquete
com aterramento adequado.
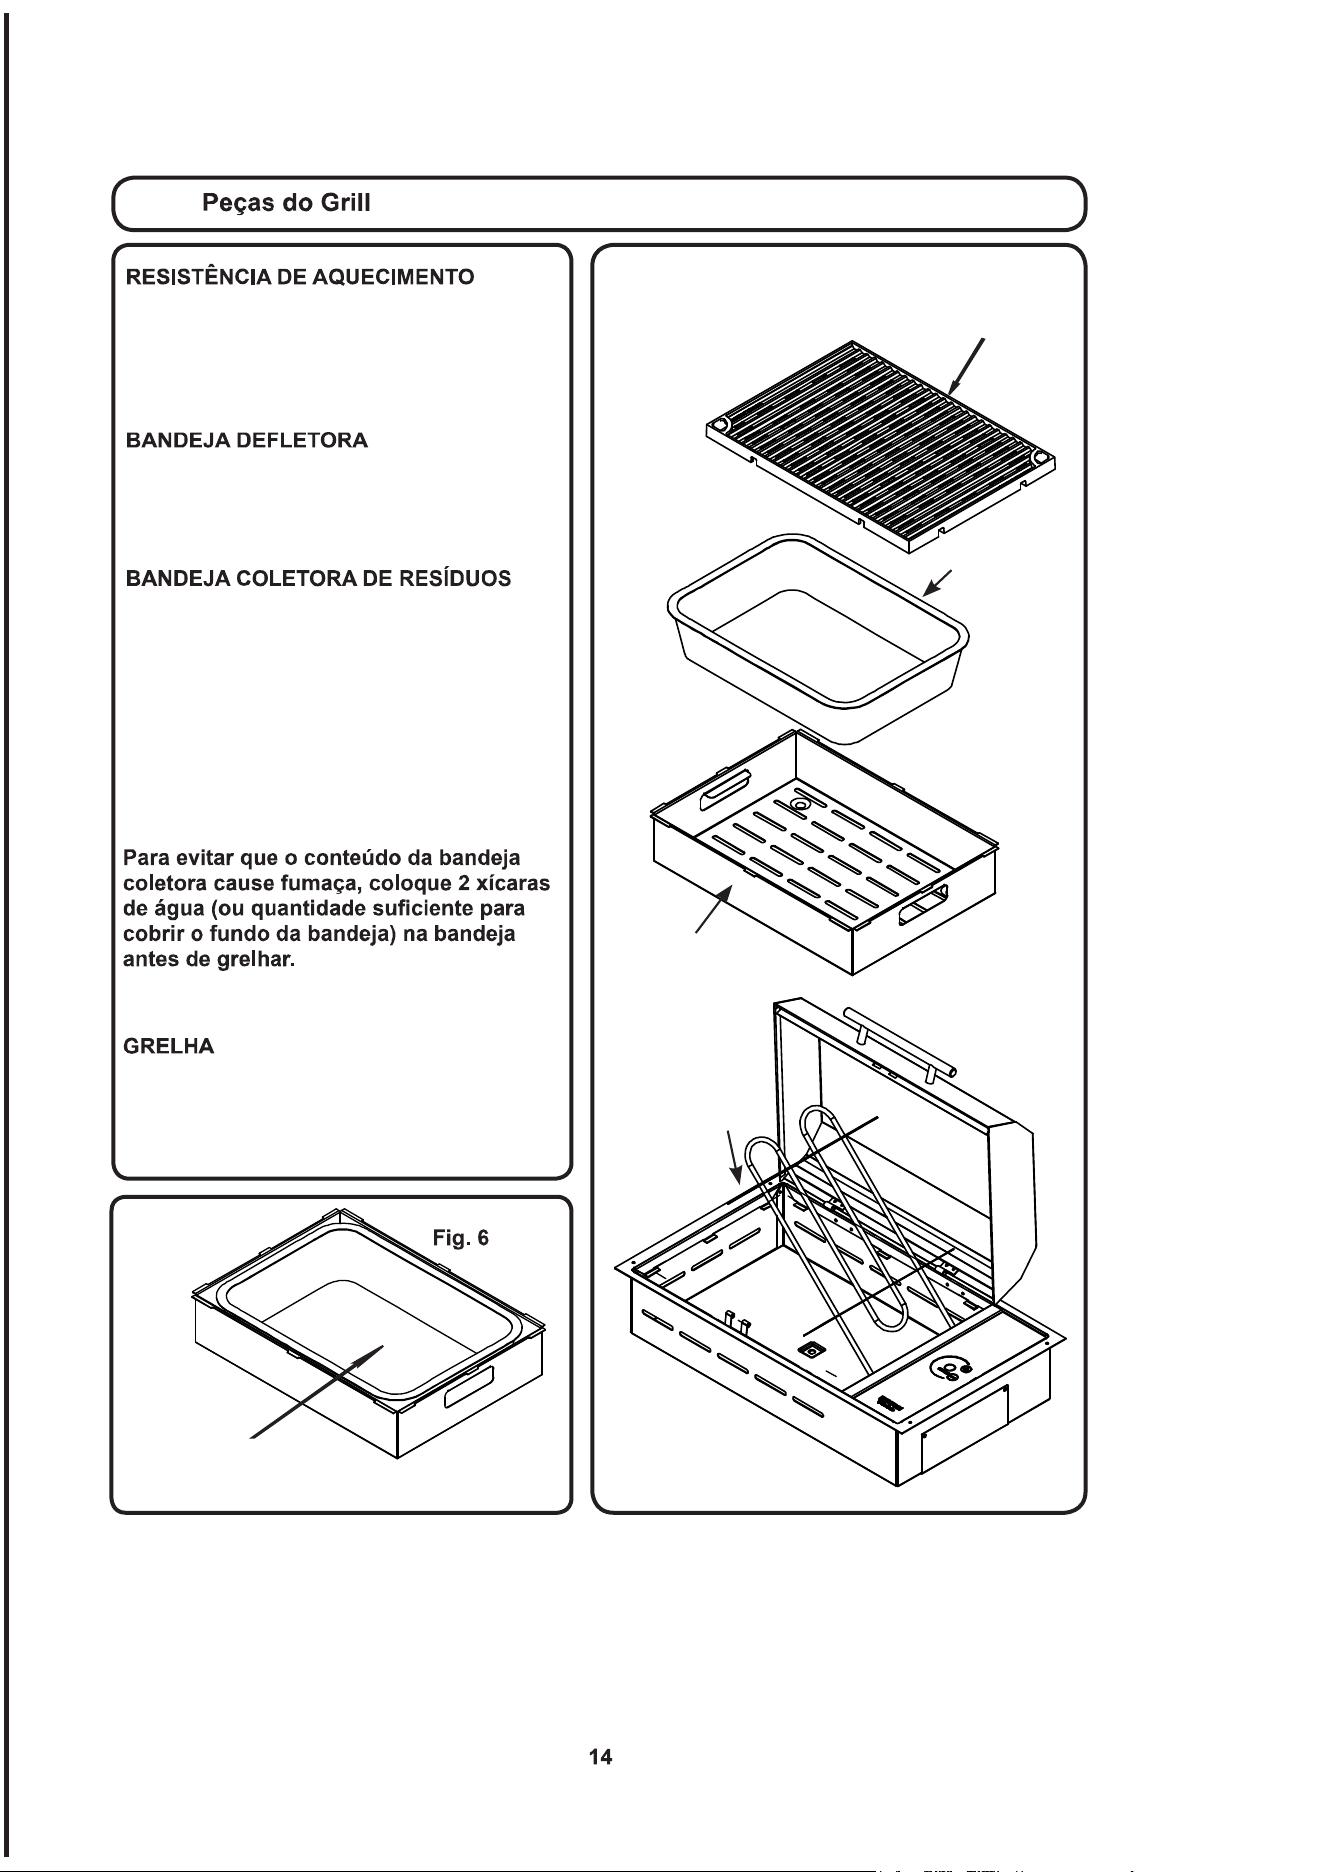
GRELHA
BANDEJA
DEFLETORA
BANDEJA
COLETORA
DE RESÍDUOS
RESISTÊNCIA
DE AQUECIMENTO
A resistência de aquecimento foi projetada
para encaixar-se no eixo conforme ilustrado
para remover/substituir a bandeja coletora e
reetora.Elacaráparacima.Paraabaixar
aplique pressão leve para baixo.
Abandejadeetoraapoiaabandejacoletora
de resíduos, a resistência de aquecimento e
a grelha, e sempre deve ser usada ao operar
o grill.
A bandeja coletora descartável coleta todos
os resíduos gerados durante o processo de
cozimento. A bandeja coletora deve ser es-
vaziada após cada uso. Ao recolocar a ban-
deja coletora, posicione a bandeja de forma
quequecompletamentepresadentroda
bandejadeetora,assegurando-sedeque
alateralouabordadabandejanãoque
projetadaparaforadabandejadeetora.
(consulte a Fig. 6)
O código do produto para
substituir a bandeja coletora descartável da
Kenyon é B96001.
A grelha deve ser limpa após cada uso. A
grelha possui um revestimento não adesivo
para facilitar a limpeza. Lave a grelha após
cada uso com água morna e sabão.
ABANDEJA
COLETORA DEVE FICAR DENTRO DA BAN-
DEJADEFLETORACONFORMEILUSTRADO
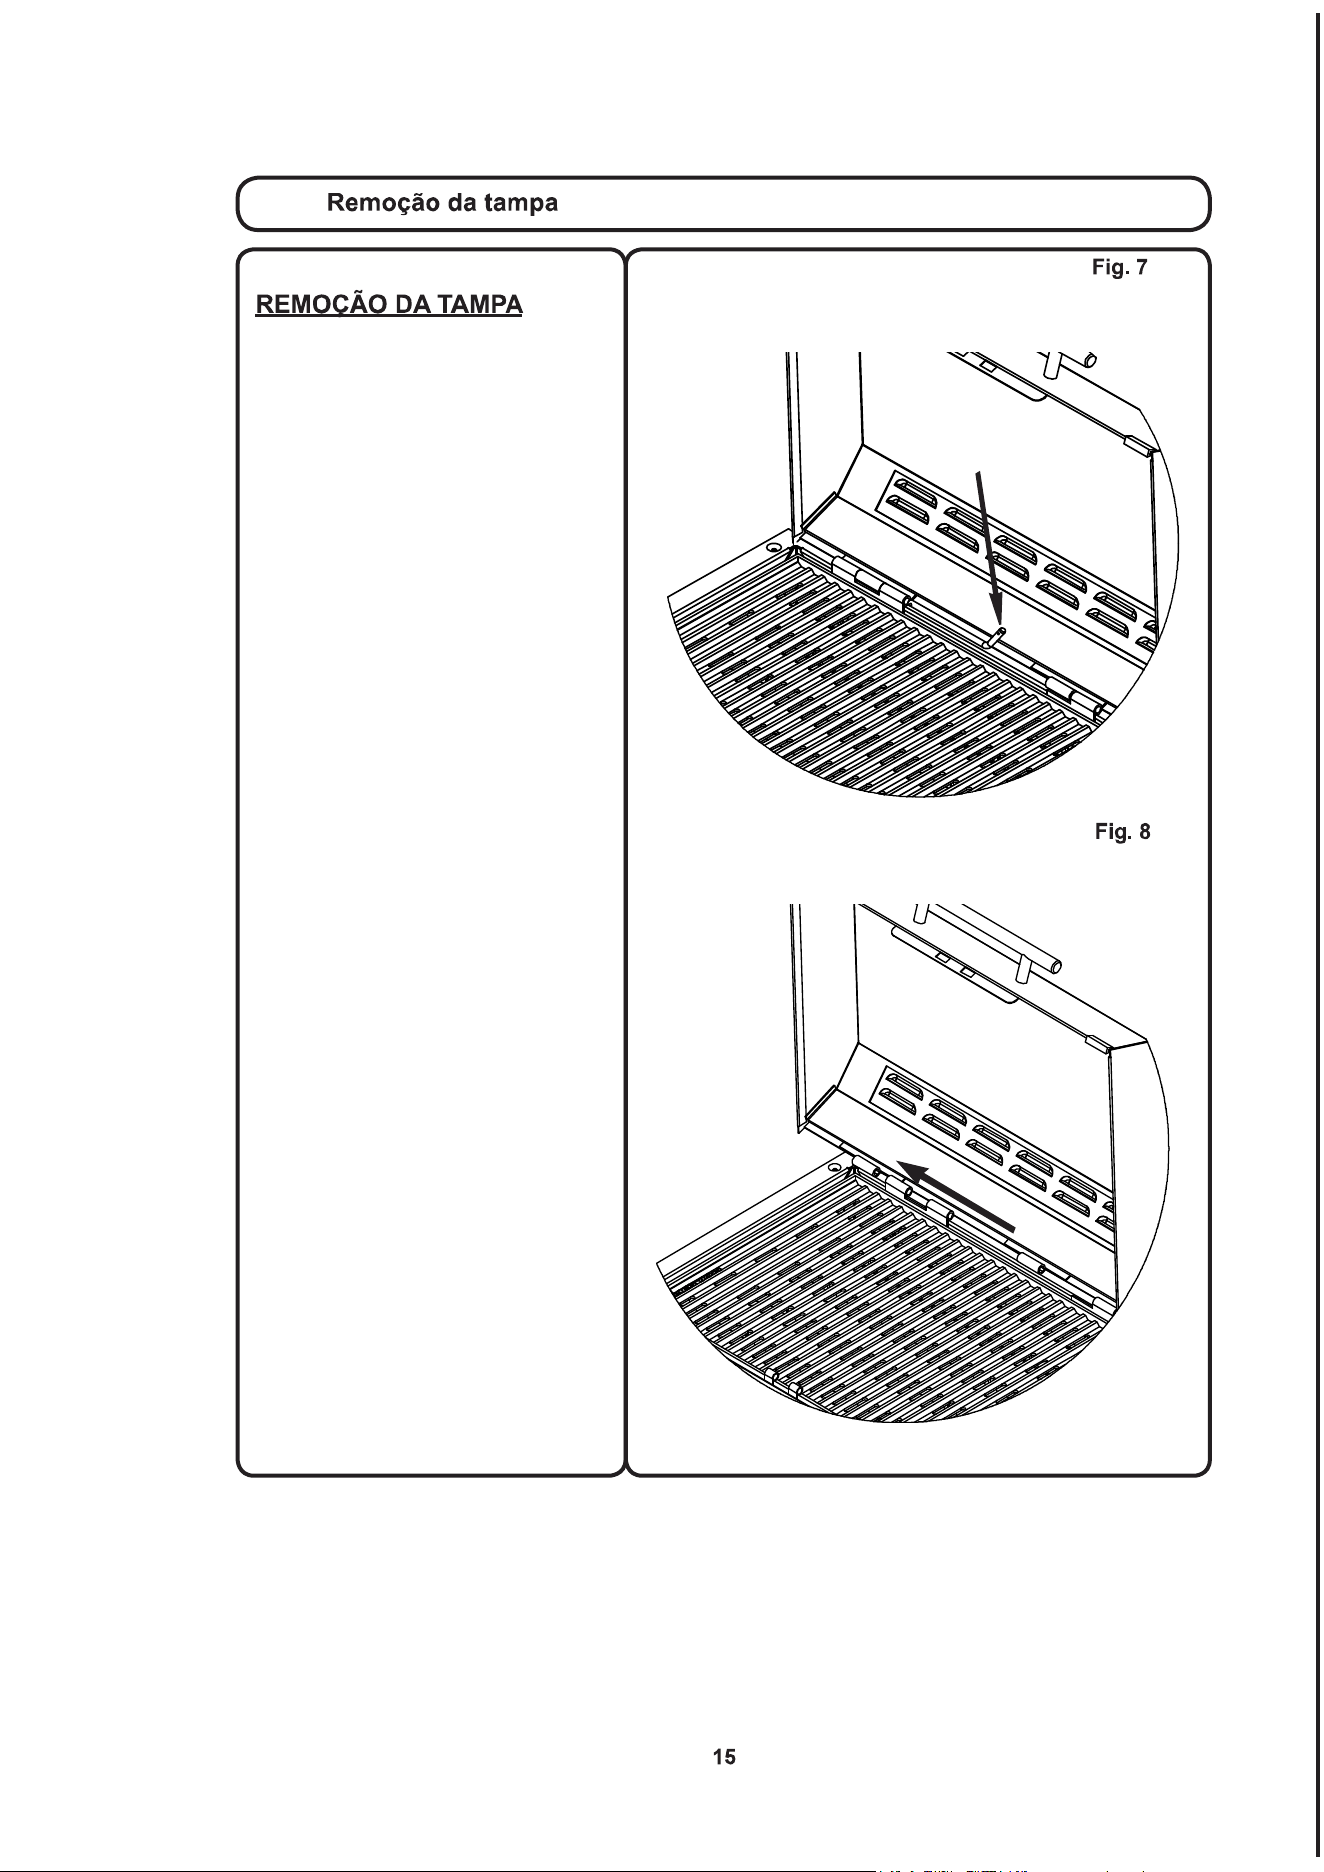
A tampa do grill pode ser removida
para limpeza. Para remover a tampa,
deslize o pino de liberação rápida da
dobradiça.
(consulte a Fig. 7)
Com o pino de liberação rápida
removido, segure a tampa no lado
esquerdo para tirá-la da dobradiça, e
deslize-a até sair do pino da dobradiça
à direita. (consulte a Fig. 8) Uma vez
removida, a tampa pode ser lavada
com água morna e sabão.
PINO DE
LIBERAÇÃO
RÁPIDA

KENYON
DeclaraçãodeGarantia
AKenyonInternational,Inc(a“Empresa”)garantequeesteproduto,sobusonormal,estáisentodedefeitosreferentesa
materiaisemãodeobranascondiçõeselimitaçõesabaixo.
Qualquerpeçacomcomprovaçãodedefeitosobusonormalduranteoperíododagarantiaseráreparadaousubstituídapela
Empresa.
Paraqueoprodutosejacobertoporestagarantia,eledeveserdevolvidoàEmpresaparaavaliação.Entreemcontato
comkenyonservice@cookwithkenyon.comparaobterinstruçõesdedevolução.
EstagarantiaabrangedeterminadosprodutosfeitospelaEmpresaeestásujeitaàsseguintescondiçõese
limitações:
1. AresponsabilidadedaEmpresaestálimitadaaoreparoousubstituição(aescolhadasoluçãoécritériodaEmpresa)de
componenteseletrônicosquepossamestarcomdefeitoemmateriaisoumãodeobra.Essaresponsabilidadeélimitada
atrêsanosapartirdadatadainstalaçãooriginalou42mesesapartirdadatadafatura,oqueocorrerprimeiro;esta
garantiacobrepeçasemãodeobraataxaspré-aprovadas.Oaçoinoxidáveléasseguradocomumagarantiavitalícia
paraserlivredeferrugemquandotratadomensalmente,conformedescritonomanualdoproprietário.Secomeçara
ocorrercorrosão,entreemcontatocomaempresacomprovasfotográficasdecorrosãoparaasubstituiçãodos
componentes.
2. AdeterminaçãodaconformidadedoprodutoparaousocontempladopeloCompradorédeexclusiva
responsabilidadedoCompradoreaEmpresanãoteráqualquerresponsabilidadeemconexãocomtal
conformidade.
3. AEmpresanãoseráresponsávelporquaisquerdanoscomoresultadode:
•falhasdevidoaousodoprodutoemaplicaçõesindevidas;
•falhasdevidoàcorrosão,desgaste,abuso,negligência,instalaçãooumanutençãoinadequada;
•falhasdevidoàquebradovidro,acidentalounão.
4. AEmpresaseráresponsávelpelastaxasdetransporteterrestreatéolocaldoaparelho(casa)
noterritóriodosEstadosUnidoseCanadá.Quaisquerimpostos,taxasdeenvioexpressoouespecialsão
deresponsabilidadedoComprador.
5. TodamãodeobrapermitidapelaEmpresasobestagarantiadeveserpré-autorizadaerealizadapeloCentrodeServiço
InternacionalAutorizadodaKenyon,salvooutraindicaçãoespecificadaeporescritoporpartedaEmpresa.
NÃOEXISTEMOUTRASGARANTIASDECOMERCIALIZAÇÃO,ADEQUAÇÃOÀFINALIDADEOUQUALQUER
OUTROTIPO,EXPRESSOOUIMPLÍCITO,ENENHUMADEVESERIMPLICADAPELALEI.Aduraçãodequalquerumadestas
garantiasquedefatosãoimplicadaspelaleiparaobenefíciodeumconsumidordeveserlimitadaaumperíododetrêsanosa
partirdacompraoriginalpelousuário.Algunspaísesnãopermitemlimitaçõesquantoàduraçãodeumagarantiaimplícita;
portanto,essalimitaçãopodenãoseaplicaravocê.
AEMPRESANÃOSERÁRESPONSÁVELPORDANOSCONSEQUENCIAISOUACIDENTAISDECORRENTESDAQUEBRA
DESTAGARANTIA,SEJADEFORMAEXPRESSA,IMPLÍCITAOULEGAL.Algunspaísesouestadosnãopermitemaexclusão
oulimitaçãodedanosconsequenciaisouacidentais,assimnestecasoestalimitaçãoouexclusãonãoseaplicaavocê.
ESTAGARANTIAPROPORCIONAAVOCÊDIREITOSLEGAISESPECÍFICOSEPODEINCLUIROUTROSDIREITOSLEGAIS
DEPENDENDODOPAÍSOUESTADO.
KenyonInternational,Inc.
P.O.Box925•8HeritageParkRoad•Clinton,CT06413USA
Telefone:(860)664-4906FAX:(860)664-4907
Emvigorapartirde1/1/2019
1. Lea TODAS las instrucciones antes de usar el producto.
2.Notoquelassuperciescalientes.Uselasasasolosperillas.
3. Protéjase contra descarga eléctrica, no sumerja el cable ni los enchufes en agua ni en ningún
otro líquido.
4. Es necesaria supervisión de cerca cuando cualquier electrodoméstico se usa cerca de niños.
5. Desenchufe el electrodoméstico de la toma cuando no esté en uso y antes de limpiarlo.
Deje que se enfríe antes de agregar o retirar partes.
6. No opere el electrodoméstico con un cable o un enchufe dañado. Si el electrodoméstico funciona
mal, deje de utilizarlo y contacte con el distribuidor de electrodomésticos autorizado más cercano o
con la fábrica para que lo revisen, reparen o ajusten.
7. El uso de accesorios no suministrados por el fabricante del electrodoméstico puede
ocasionar lesiones.
8. Al usarlo como grill portátil, guárdelo bajo techo cuando no esté en uso. Al usarlo como grill
integrado, hay que colocarlo en un lugar resguardado para que no esté directamente expuesto a la
lluvia. Hay cubiertas disponibles.
9.Nodejequeelcablecuelgueporelbordedelamesaoelmostrador,niquetoquesuperciescalientes.
10. No lo coloque sobre o cerca de un hornillo de gas o eléctrico caliente o sobre un horno calentado.
11. Debe tener mucho cuidado al mover un electrodoméstico que contenga aceite caliente u otros
líquidos calientes.
12. Conecte siempre primero el enchufe en el electrodoméstico antes de enchufarlo en la toma de
corriente. Para desconectarlo, coloque todos los controles en posición apagado y saque el enchufe
de la toma de corriente.
13. No use el electrodoméstico para usos distintos al uso para el que está concebido.
14. Vierta siempre un mínimo de dos (2) tazas de agua en una bandeja de goteo desechable antes
de operar el grill.
15. Nunca deje a los niños solos: los niños no deberían dejarse alrededor del grill sin la supervisión
de un adulto en ningún momento.
16. Deje que el grill se enfríe antes de sacar la parrilla de cocción, la bandeja de goteo desechable o
las tapas.
17. Con este electrodoméstico no hay que usar combustible, como briquetas de carbón.
18. Asegúrese de que el grill sea instalado según las instrucciones y conectado debidamente a tierra
porunelectricistacalicado.
19. No reemplace ni intente reparar ninguna pieza del grill, salvo que así se indique en este manual.
Todas las demás reparaciones tienen que ser llevadas a cabo por un técnico autorizado por el fabricante.
20. No use agua para apagar un incendio provocado por grasa, use un extintor de polvo químico seco.
21.Noguardematerialesinamablescercadelgrill.
22. No utilice ropa suelta ni accesorios colgantes al usar el grill.
RE M O V E & R E A D P R I O R T O G R I L L I N G
w w w . C o o k W i t h K e n y o n . c o m | 8 6 0 . 6 6 4 . 4 9 0 6 |
T h a nk y ou f or p ur c h as i n g th e W o r l d ’ s F i ne s t A ll Se as o ns ® E l ec tr i c Gr il l ! T h e re a r e a f e w si m p l e
s t ep s y ou c a n t ak e to e ns u r e yo ur g oo d de c is i o n w i l l l e a d to y ea r s o f W o rl d- C l a s s Gr il l i n g:
Q U I C K S T A R T T I P S
to purchase re cipe books, cook ing ute nsils,
griddles, grill covers, and more!
V I SI T O U R WE B SIT E
1.
2.
3.
4.
5.
6.
7.
8.
Remove g rate(s) and drip tray(s), clean both.
Inse rt the drip tray(s) into the bottom of grill. Make sure the burner b rackets are not
resting on the drip tray (s).
Always fill the drip tray(s) with 2 cups of liquid. Water will work, but why not try beer
or wine to add flavor to your fav orite food . Then re-install c ooking grate.
Depending on model, either har dwire your Kenyon All Seasons® Grill or plug it directly into
an o utlet, do not use ext ension cords.
Preheat grill w ith the lid closed for 5 - 7 minutes on desired heat setting for type of food:
Close lid and cook. Enjoy the best grilled food you have ever tasted!
Once your grilling session is complete, gr ab a wet paper towel and wi pe down your grate.
Once cool, place grate/griddle in the dish washer along with the dirty dishes so that it’s
ready for its next tour of duty!
While the grate is in the wash, don’t forget to clean out the drip tray contents.
This is an important step in preventing a grease fire.
-Vege tables 3-4 bars
-Chick en, pork and fish 4-5 bars
-Hamburgers 6 -7 b ars
-Steak 7-8 bars
1. Antes de usar su grill, saque la parrilla de cocción y la bandeja de goteo del grill. Lave el
grill con agua caliente y jabón usando un paño no abrasivo. AL ASAR A LA PARRILLA, USE
SOLO UTENSILIOS DE PLÁSTICO PARA ALTA TEMPERATURA. Visite nuestro sitio web para
comprar un juego de utensilios de alta calidad para el grill, hechos de acero
inoxidable/plástico para alta temperatura, www.cookwithkenyon.com.
2. Asegúrese de que la bandeja de goteo esté insertada completamente
hasta el fondo del grill y que los soportes de los elementos eléctricos
reposan sobre el soporte de apoyo para elementos.
3. Cubra el fondo de la bandeja de goteo con un
líquido. Se puede usar agua. ¡NO USE UN LÍQUIDO
INFLAMABLE! Hacerlo arruinaría la barbacoa. Usar
jugo de manzana al asar cerdo añade un agradable sabor a la carne.
Una lata de gaseosa con lima va estupenda si está asando pescado.
Pruebe cualquier tipo de líquido que le guste tomar. Simplemente
recuerde añadir siempre líquido a la bandeja de goteo antes de asar
a la parrilla.
4.Paraquenoseproduzcahumo,limpiesiemprelasuperciedelaparrilladespuésde
cada uso. Simplemente lave con agua caliente y jabón usando un paño no abrasivo o
colóquela en el lavavajillas. Vacíe la bandeja de goteo y límpiela con una toalla de papel
húmeda. La bandeja de goteo se puede usar varias veces antes de que sea necesario
reemplazarla.
5.Coloquelaparrilladecocciónoplanchaopcional(nºdepiezaB96000)enelelementoconla
bandeja de goteo instalada. Use la plancha para alimentos como los huevos, panqueques o mi
plato favorito: ¡tostadas francesas rellenas!
6. Precaliente el grill durante 5 a 7 minutos a fuego alto (8 barras iluminadas). Regule el ajuste
de calor según el tipo de alimento.
• Bistec 7-8 barras
• Hamburguesas 6-7 barras
• Cerdo y pescado 4-5 barras
• Verduras 3-4 barras
7. Cierre la tapa y ase. ¡Disfrute de la mejor comida a la parrilla que jamás haya probado!
8. Limpie el grill. Esto es fácil de hacer, como pronto descubrirá. Una vez que el grill se haya
enfriadoaltacto,tomeunaspocastoallasdepapelycolóquelassobrelasuperciedelaparrilla
de cocción. Vierta aproximadamente una onza de agua en las toallas de papel y luego, usando
suspinzasdenylonparaaltatemperatura,froteconlastoallasdepapelparaaojarlosresiduos
de su grill. Tire las toallas de papel y limpie la parrilla con una toalla de papel seca.
9.
Unavezquelaparrillasehayaenfriadolosuciente,retírelaycolóquelaensulavavajillas
para limpiarla a fondo.
10. Con la parrilla retirada, levante el elemento eléctrico y saque la bandeja de goteo. Vacíe
el contenido de la bandeja de goteo en un lugar adecuado, evite verterlo en el césped de su
vecino. Limpie la bandeja con una toalla de papel seca y reutilice la bandeja. La bandeja puede
durar para varios usos.
11. Lave la tapa cada 7-8 usos. La puede colocar en su lavavajillas y lavar con el ciclo para ollas
y sartenes. Esto hará que su parrilla se vea como nueva.
12.Paralimpiarelgrill,asegúreseprimerodequelasuperciedecocciónsehayaenfriadolo
sucientecomoparatocarla.Acontinuaciónretirelaparrilla,levanteelelementoeléctricohasta
que encaje en la posición levantada y saque la bandeja de goteo.
13.Limpielassuperciesdeaceroinoxidableconunpañohúmedopararetirarcualquierresiduo
de usos anteriores.
14. Su grill Kenyon viene con una botella de muestra de limpiador para acero
inoxidable. Use este limpiador una vez al mes para que su grill se siga viendo
como nuevo.
15. El área de control táctil es vidrio de cerámica que está sellado para que no
le afecten los efectos de la lluvia, la nieve o el hielo. Para limpiar el vidrio, use
un limpiador de cristales y un trapo suave. Si aparecen manchas, use un
limpiador de vidrio de cerámica que pueda comprar en su supermercado local.
16rebanadas Panrebanadono“decualquiertipoquenoseablanco”
0,45 kg (1 lb.) Queso crema (suavizado)
½ taza Conserva de melocotón (o su favorita)
4 cdas. de mantequilla
Empanado de las tostadas francesas:
5 Huevos grandes completamente batidos
1 taza de leche
1 cda. de canela molida
½ ctda. de pimienta inglesa molida
½ cdta. de cilantro molido
60 ml (2 oz.) de agua (ron dorado, opcional)
En un bol grande, bata los huevos con un batidor de alambre. Agregue la leche y bata de nuevo
hastaqueseincorpore.Enunbolmáspequeñoporseparadoviertaelaguaoron(silopreere)
y agregue los ingredientes secos, mezcle bien. Después de mezclar los ingredientes secos,
agréguelos a la mezcla de huevos y leche y bata de nuevo hasta que esté bien mezclado. De
esta manera se evita los grumos que se producen al preparar el empanado.
Método de preparación:
Para ello será necesario el uso de su plancha. Precaliente su “grill All Seasons
®
” a fuego medio
alto (6 barras) durante unos diez minutos.
Una vez que el queso crema se haya suavizado, mézclelo con la conserva de melocotón.
Divida en partes iguales sobre ocho rebanadas de pan y extiéndalo de forma uniforme. Coloque
las ocho rebanadas restantes encima para hacer un sándwich. Cuando su plancha se haya
precalentado, agregue dos cucharadas de mantequilla y muévalas para cubrir la plancha.
Reserve el resto de la mantequilla para las tostadas francesas restantes. Tome el sándwich y
sumérjalo en la mezcla, dele la vuelta para cubrir ambos lados del pan.
Hágalo rápidamente con tres “sándwiches” más. Ahora tendrá cuatro tostadas francesas rellenas
en su plancha.
Tenga cuidado de no quemarse. Dele la vuelta a los sándwiches y continúe cocinando hasta que
ambos lados se hayan tostado bien.
Ahora puede servirlas con jarabe de maple calentado en su punto y mantequilla o puede
colocarlas en un horno a baja temperatura para que sigan calientes hasta que termine de
preparar las tostadas francesas que quedan.
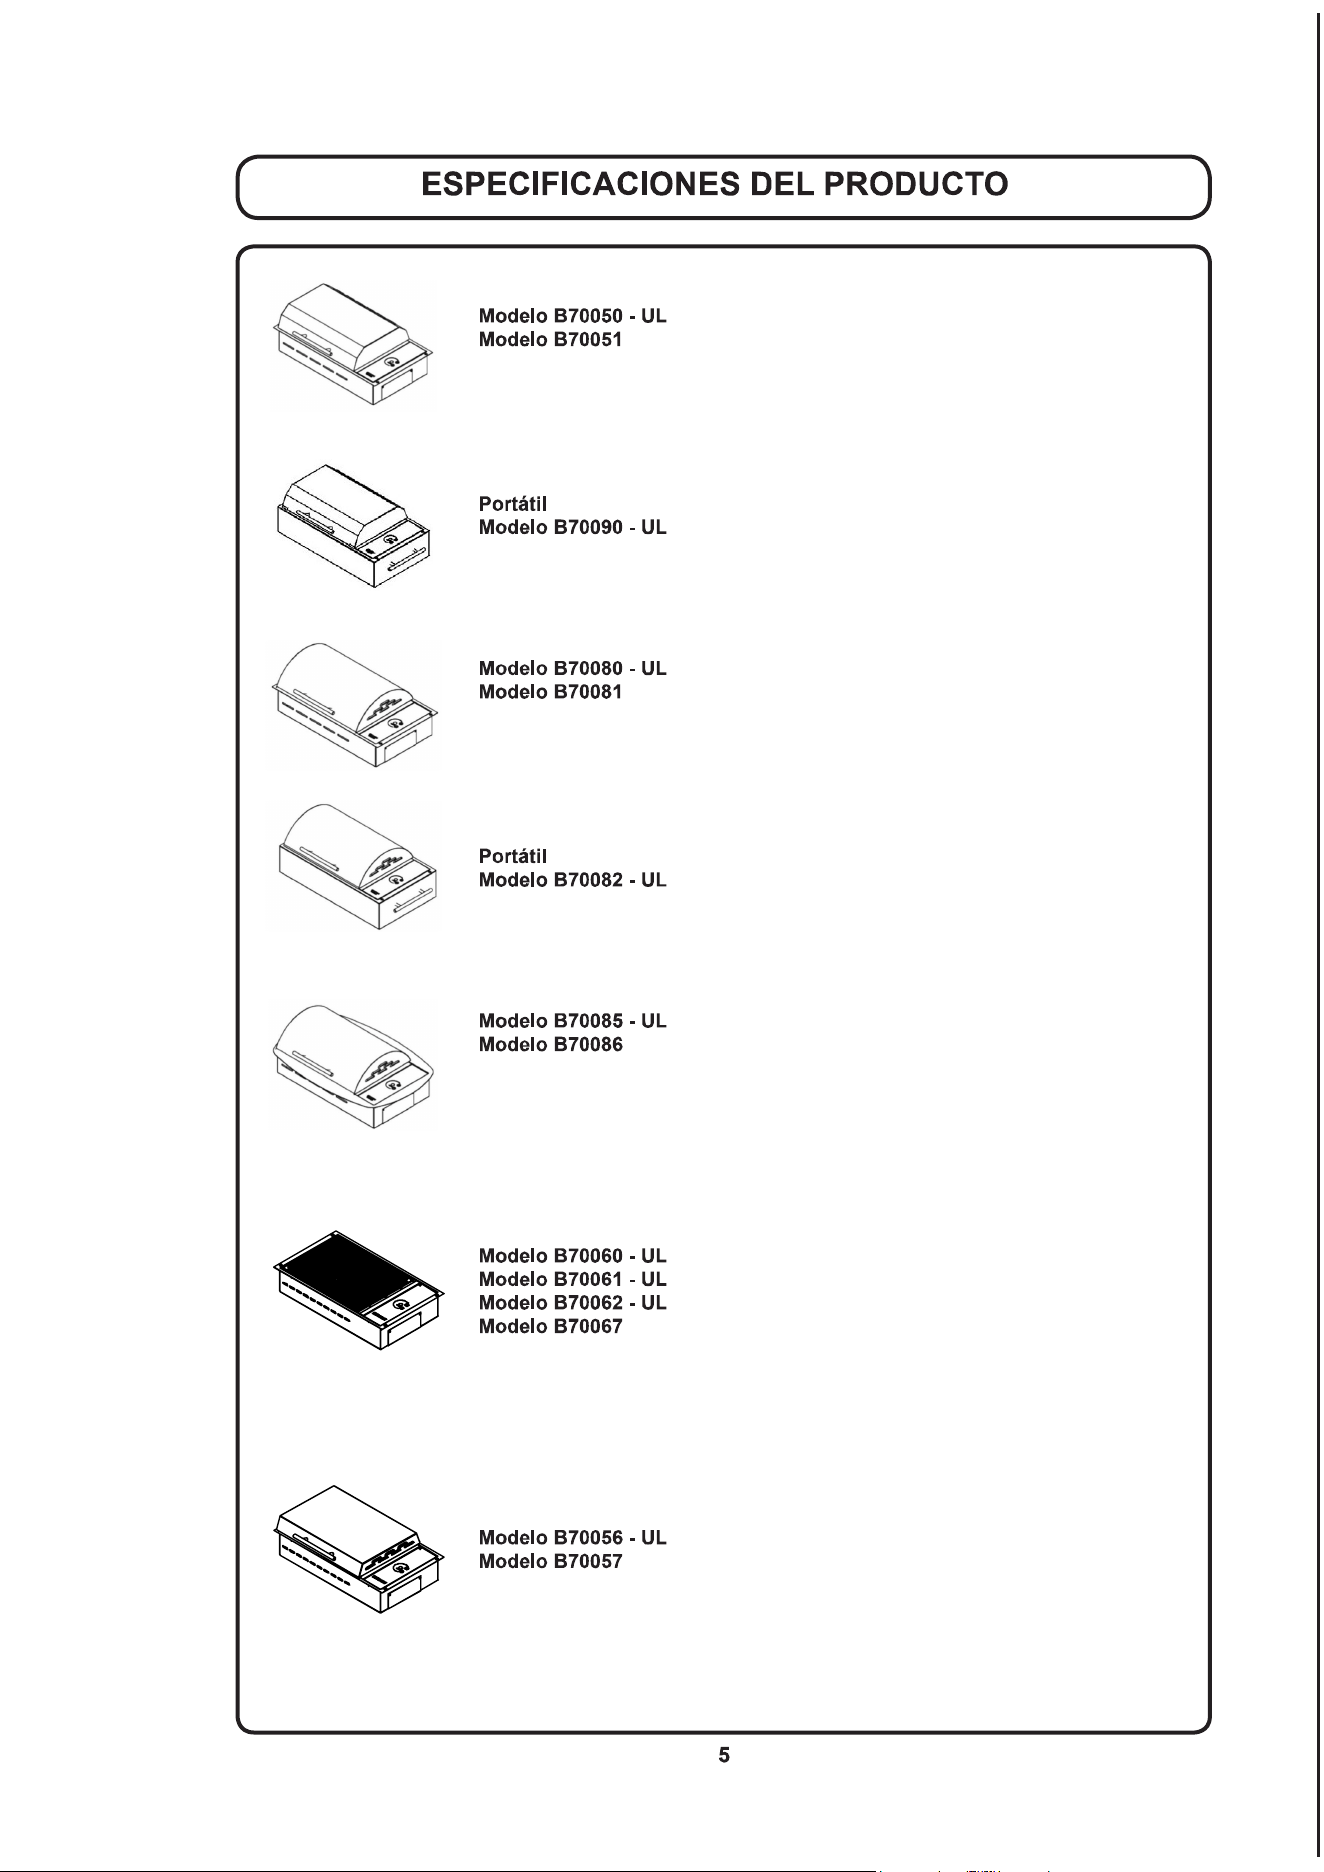
Frontier
- 120 V CA - 1300 W - 11 A
- 240 V CA - 1300 W - 6 A
Dimensiones generales: 533 mm x 305 mm x 102 mm (187 mm con tapa)
21” x 12” x 4” (7 3/8” con tapa)
Laprofundidadnoincluyeelracordedesagüe
Dimensiones de corte: 501,6 mm x 296 mm con esquinas de 6 mm de radio
19 3/4” x 11 5/8” con esquinas de un 1/4” de radio
- 120 V CA - 1300 W - 11 A
Dimensiones generales: 533 mm x 305 mm x 219 mm
21” x 12” x 8 5/8”
Floridian
- 120 V CA - 1300 W - 11 A
- 240 V CA - 1300 W - 6 A
Dimensiones generales: 533 mm x 305 mm x 102 mm (206 mm con tapa)
21” x 12” x 4” (8 1/8” con tapa)
Laprofundidadnoincluyeelracordedesagüe
Dimensiones de corte: 501,6 mm x 296 mm con esquinas de 6 mm de radio
19 3/4” x 11 5/8” con esquinas de un 1/4” de radio
- 120 V CA - 1300 W - 11 A
Dimensiones generales: 533 mm x 305 mm x 238 mm
21” x 12” x 9 3/8”
Rio
- 120 V CA - 1300 W - 11 A
- 240 V CA - 1300 W - 6 A
Dimensiones generales: 584 mm x 397 mm x 102 mm (206 mm con tapa)
23” x 15 5/8” x 4” (8 1/8” con tapa)
Laprofundidadnoincluyeelracordedesagüe
Dimensiones de corte: 501,6 mm x 296 mm con esquinas de 6 mm de radio
19 3/4” x 11 5/8” con esquinas de un 1/4” de radio
No Lid
– 120 V CA - 1300 W - 11 A
– 240 V CA - 1300 W - 6 A
– 120 V CA - 1300 W - 11 A
- 240 V CA - 1300 W - 6 A
Dimensiones generales: 533 mm x 305 mm x 102 mm
21” x 12” x 4”
Laprofundidadnoincluyeelracordedesagüe
Dimensiones de corte: 501,6 mm x 296 mm con esquinas de 6 mm de radio
19 3/4” x 11 5/8” con esquinas de un 1/4” de radio
Half Height Lid
- 120 V CA - 1300 W - 11 A
- 240 V CA - 1300 W - 6 A
Dimensiones generales: 533 mm x 305 mm x 102 mm (159 mm con tapa)
21” x 12” x 4” (6 1/4” con tapa)
Laprofundidadnoincluyeelracordedesagüe
Dimensiones de corte: 501,6 mm x 296 mm con esquinas de 6 mm de radio
19 3/4” x 11 5/8” con esquinas de un 1/4” de radio

Su grill All Seasons
®
viene montado y listo para usar. Antes de usar el grill anote el número de
serie de su unidad aquí para consultas futuras: _________________. El número de serie se
puede encontrar en el lado corto del grill en el extremo del panel de control de vidrio. El número
de serie consta de seis dígitos.
La caja de envío contiene el grill All Seasons
®
, cuatro (4) tornillos de montaje, 0,9 m (3 pies) de
mangueradedesagüe,unracoracodadoountapóndedesagüedependiendodesiesportátil
o integrado, el manual y limpiador para acero inoxidable. Si hay un componente dañado, o falta
alguno, llame inmediatamente a KENYON.

Este producto deberá instalarse de conformidad con los códigos eléctricos nacionales, estatales
y locales. En la tabla siguiente se proporciona el voltaje, amperaje y frecuencia que se deberán
suministrar al grill.
La alimentación deberá provenir de un circuito individual conectado a tierra que esté protegido
porundisyuntoryconcapacidadnominalconformealasespecicacionesdelmodeloquese
muestran en la tabla a continuación.
Su grill All Seasons
®
viene de fábrica con una brida de acero inoxidable pulido que
acepta cuatro tornillos de madera de cabeza ovalada para el montaje. La brida de acabado del
grillestádiseñadapararetenerrmementelaunidadensulugarenelmostrador.Silodesea,
puede sellar el borde del mostrador por debajo de la brida de acabado.
reducción de espesor máximo a compresión de 1,6 mm (1/16 pulg.) Puede usar silicona
para sellar solo el borde de vidrio, si lo desea.
B70050
B70056
B70060
B70062
B70080
B70082
B70085
B70090
1300 W 120 V CA 11 A 60 Hz
Cable con conexión a
tierra con enchufe de
3 terminales con ICFT
B70051
B70057
B70061
B70067
B70081
B70086
1300 W 240 V CA 6 A 60 Hz
Cable de 3 hilos
sin enchufe
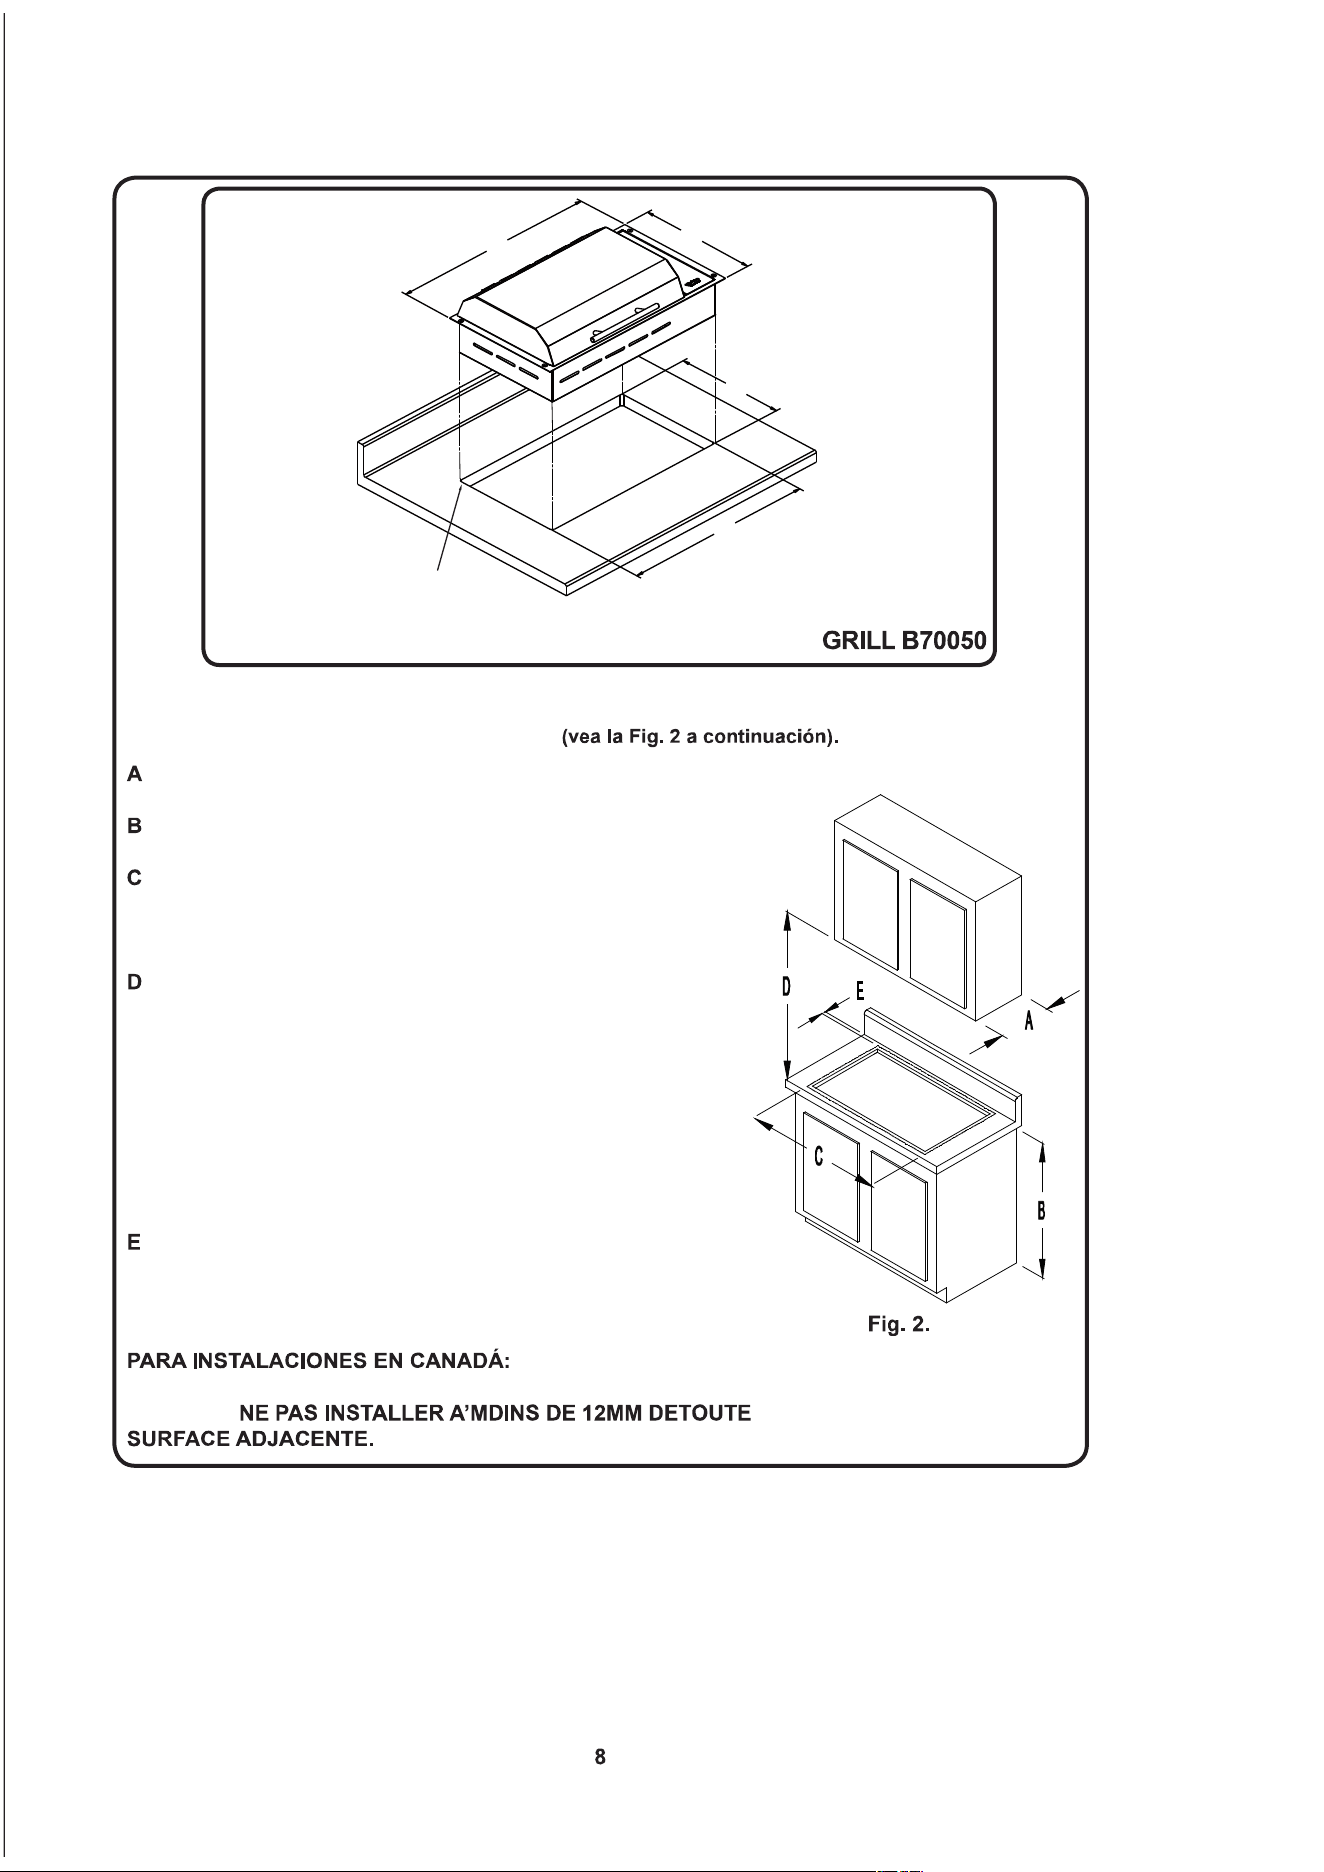
Leer esta sección antes de hacer el hueco para el grill.
Es importante planear con antelación la instalación del grill, teniendo presentes las
siguientes dimensiones
- 33 cm (13 pulgadas) de profundidad como máximo para
armarios altos
- 91,4 cm (36 pulgadas) como altura mínima del mostrador
a partir del piso
-Lasupercieplanamínimadelmostradorsobrelaque
descansará el grill deberá ser igual o mayor que las
dimensiones generales del grill (consulte en la
página 8 las dimensiones generales del grill).
- 76,2 cm (30 pulg.) de espacio libre como mínimo entre la parte
superior del grill y el fondo de cualquier armario de madera
o metal no protegido o 60,9 cm (24 pulgadas) de separación
como mínimo si el fondo del armario de madera o metal está
protegido con un cartón ignífugo de no menos de 0,6 cm
(1/4 de pulg.) de espesor recubierto, como mínimo, con una
lámina de 28 MSG (calibre estándar del fabricante) de
0,38 mm (0,015 pulg.) de acero inoxidable, 0,61 mm
(0,024 pulg.) de aluminio o 0,51 mm (0,020 pulg.) de cobre.
- 10,2 cm (4 pulg.) como mínimo del protector contra salpicaduras
del mostrador al borde del grill (consulte en la página 8 las
dimensiones generales del grill). 3,8 cm (1,5 pulg.) como mínimo
desde la parte delantera del mostrador hasta el grill.
“No instalar a una
distanciainferiora12mm(1/2pulg.)decualquiersupercie
contigua” y
53,3 cm ( 21 pulg.)
30,5 cm (12 pulg.)
29,5 cm (11 5/8 pulg.)
50,2 cm (19 3/4 pulg.)
0,6 cm (1/4 pulg.)
radio de la esquina
DIMENSIONES de corte para el hueco en el mostrador
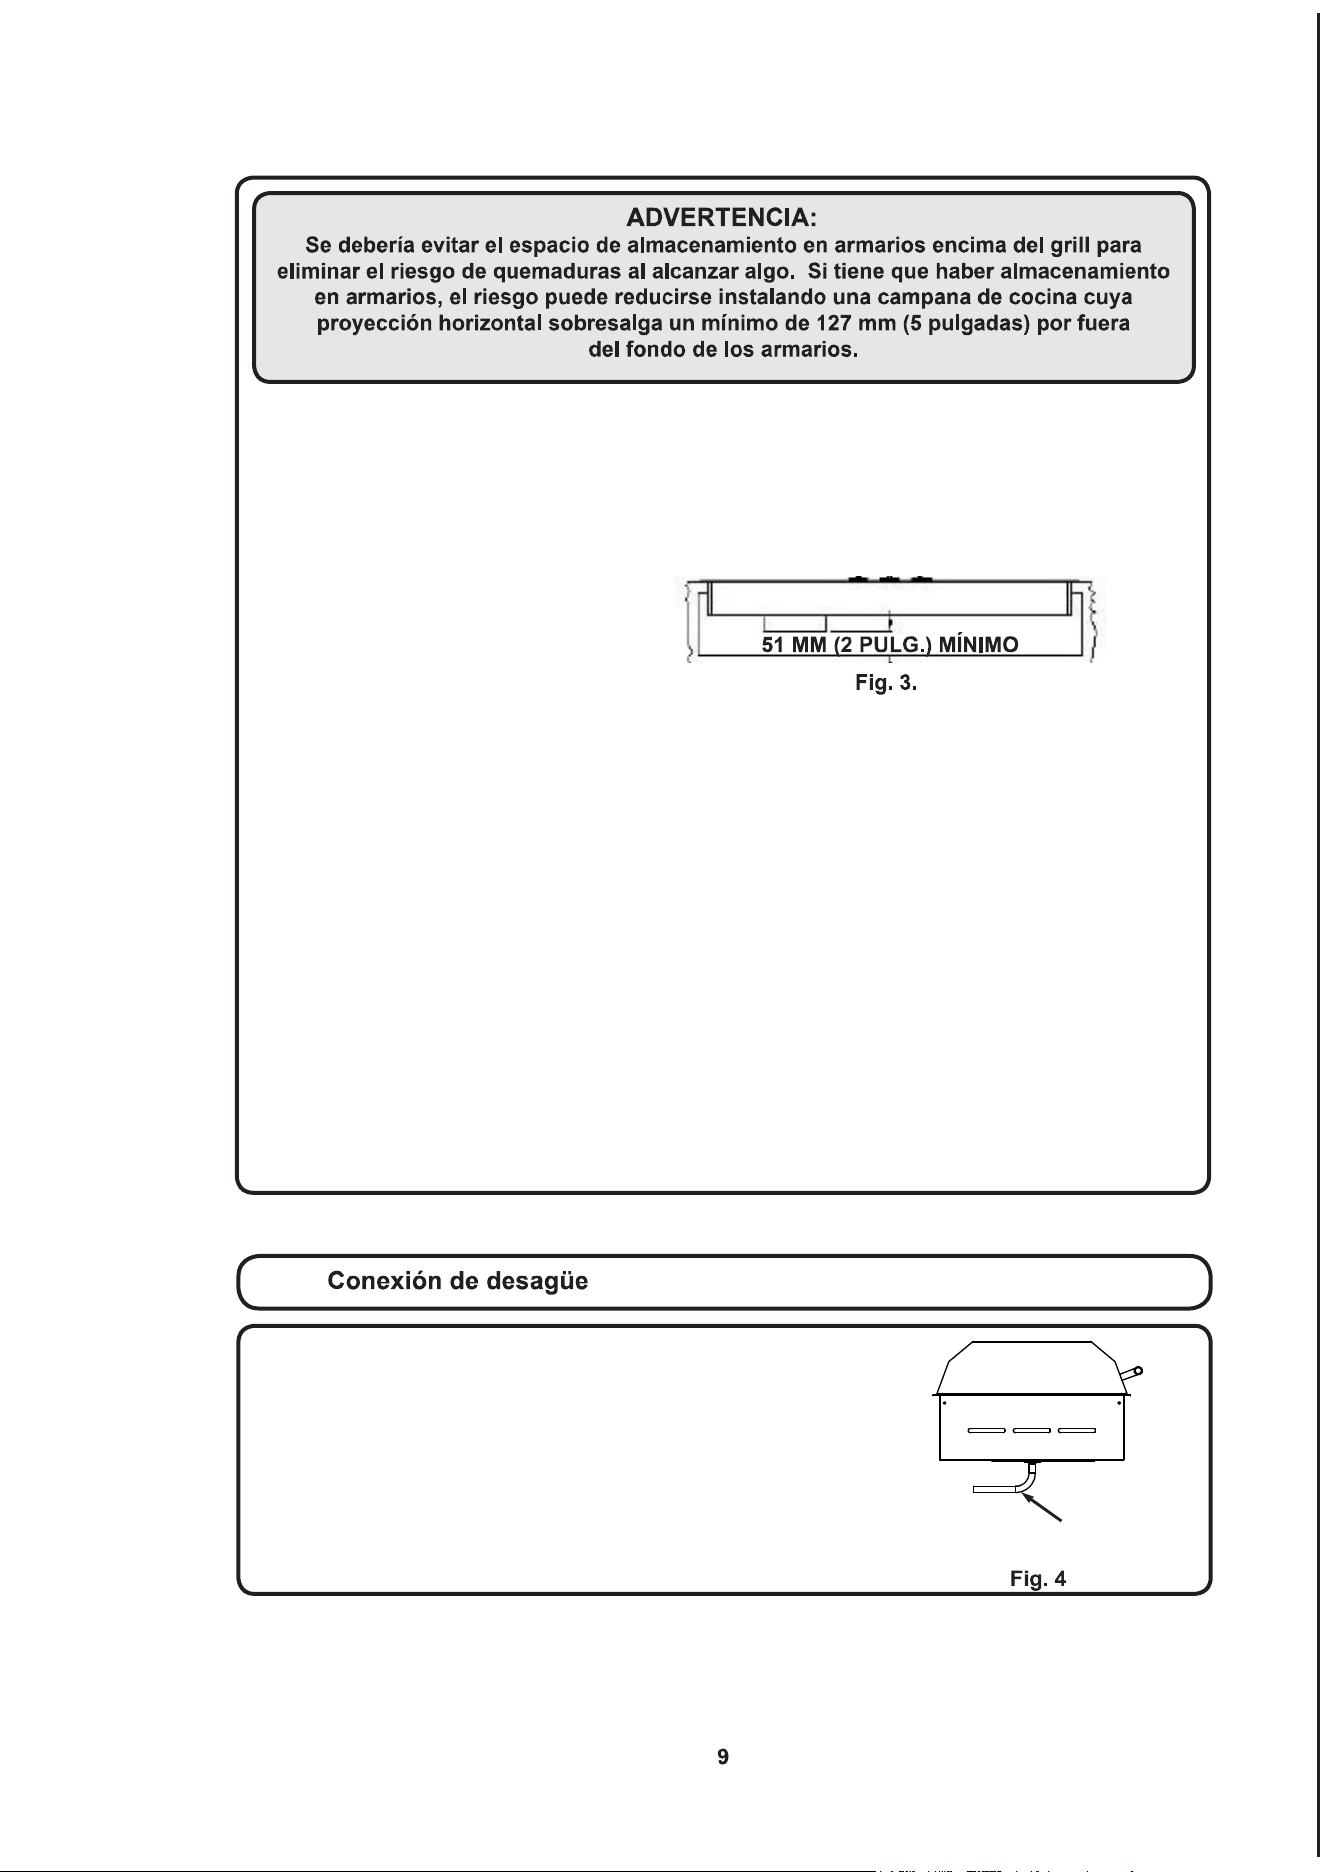
Antes de hacer un hueco en el mostrador, compruebe la holgura o espacio libre.Compruebe
que el grill pasará por la pared frontal y las paredes laterales del armario de base. Compruebe
también que el espacio hasta el protector contra salpicaduras sea correcto para que la tapa se
pueda abrir por completo.
Debe facilitarse ventilación adecuada al espacio debajo del mostrador para asegurar la debida
operación del grill. El calor que transmite la bandeja al fondo del grill durante su operación
recalentará cualquier área mal ventilada.
Al cortar el hueco en el mostrador, corte la esquina en radio para ayudar a evitar que el mostrador
se agriete. Un radio de 6 mm (1/4 de pulg.) es lo normal, pero siga las instrucciones del fabricante
del mostrador con respecto al radio mínimo y acerca de cualquier refuerzo necesario para
prevenir daños en el mostrador con el paso del tiempo.
Si su mostrador está hecho de material macizo necesitará comprobar con el fabricante si existen
recomendacionesespecícasparalasinstruccionesdeinstalacióndelaplacadecocinayelgrill.
Lamayoríadefabricantesdemostradoresdesuperciemacizarequierensoportesadicionales
enlasesquinasparaprevenirdañosenelmostrador.Uselostornillosincluidosparajarelgrill
al mostrador. Tenga cuidado de no apretar demasiado los tornillos. Use una masilla acrílica para
sellar la brida en el mostrador.
Si su mostrador está hecho de piedra, necesitará usar un látex acrílico para montar el grill en su
lugar. Aplique una línea grande de masilla alrededor de la apertura cortada y coloque el grill en
su lugar. Retire cualquier exceso de masilla, use agua para retirar la masilla en exceso. Deje que
la masilla se seque durante un mínimo de 24 horas sin permitir que se moje. No use los tornillos
que vinieron con su grill. La masilla retendrá el grill de forma segura. No use masilla que contenga
silicona, ya que esto manchará la piedra.
Para su comodidad, el grill está equipado con un racor para tuberías
delatónde3mm(1/8pulg.NPT)yuncododelatónde90ºque
puedeacoplaralamangueraexibledeunD.I.de6mm(1/4pulg.)
que vino con su grill. La versión portátil del grill viene con un tapón de
tuberíadelatóninstaladoenelracordedesagüe.Siestáusandosu
grill como unidad portátil, guarde la manguera y el racor de latón de
90ºparainstalaciónposibleenelfuturo.
Racordedesagüeparamanguera
con un D.I. de 6 mm (1/4 pulg.)
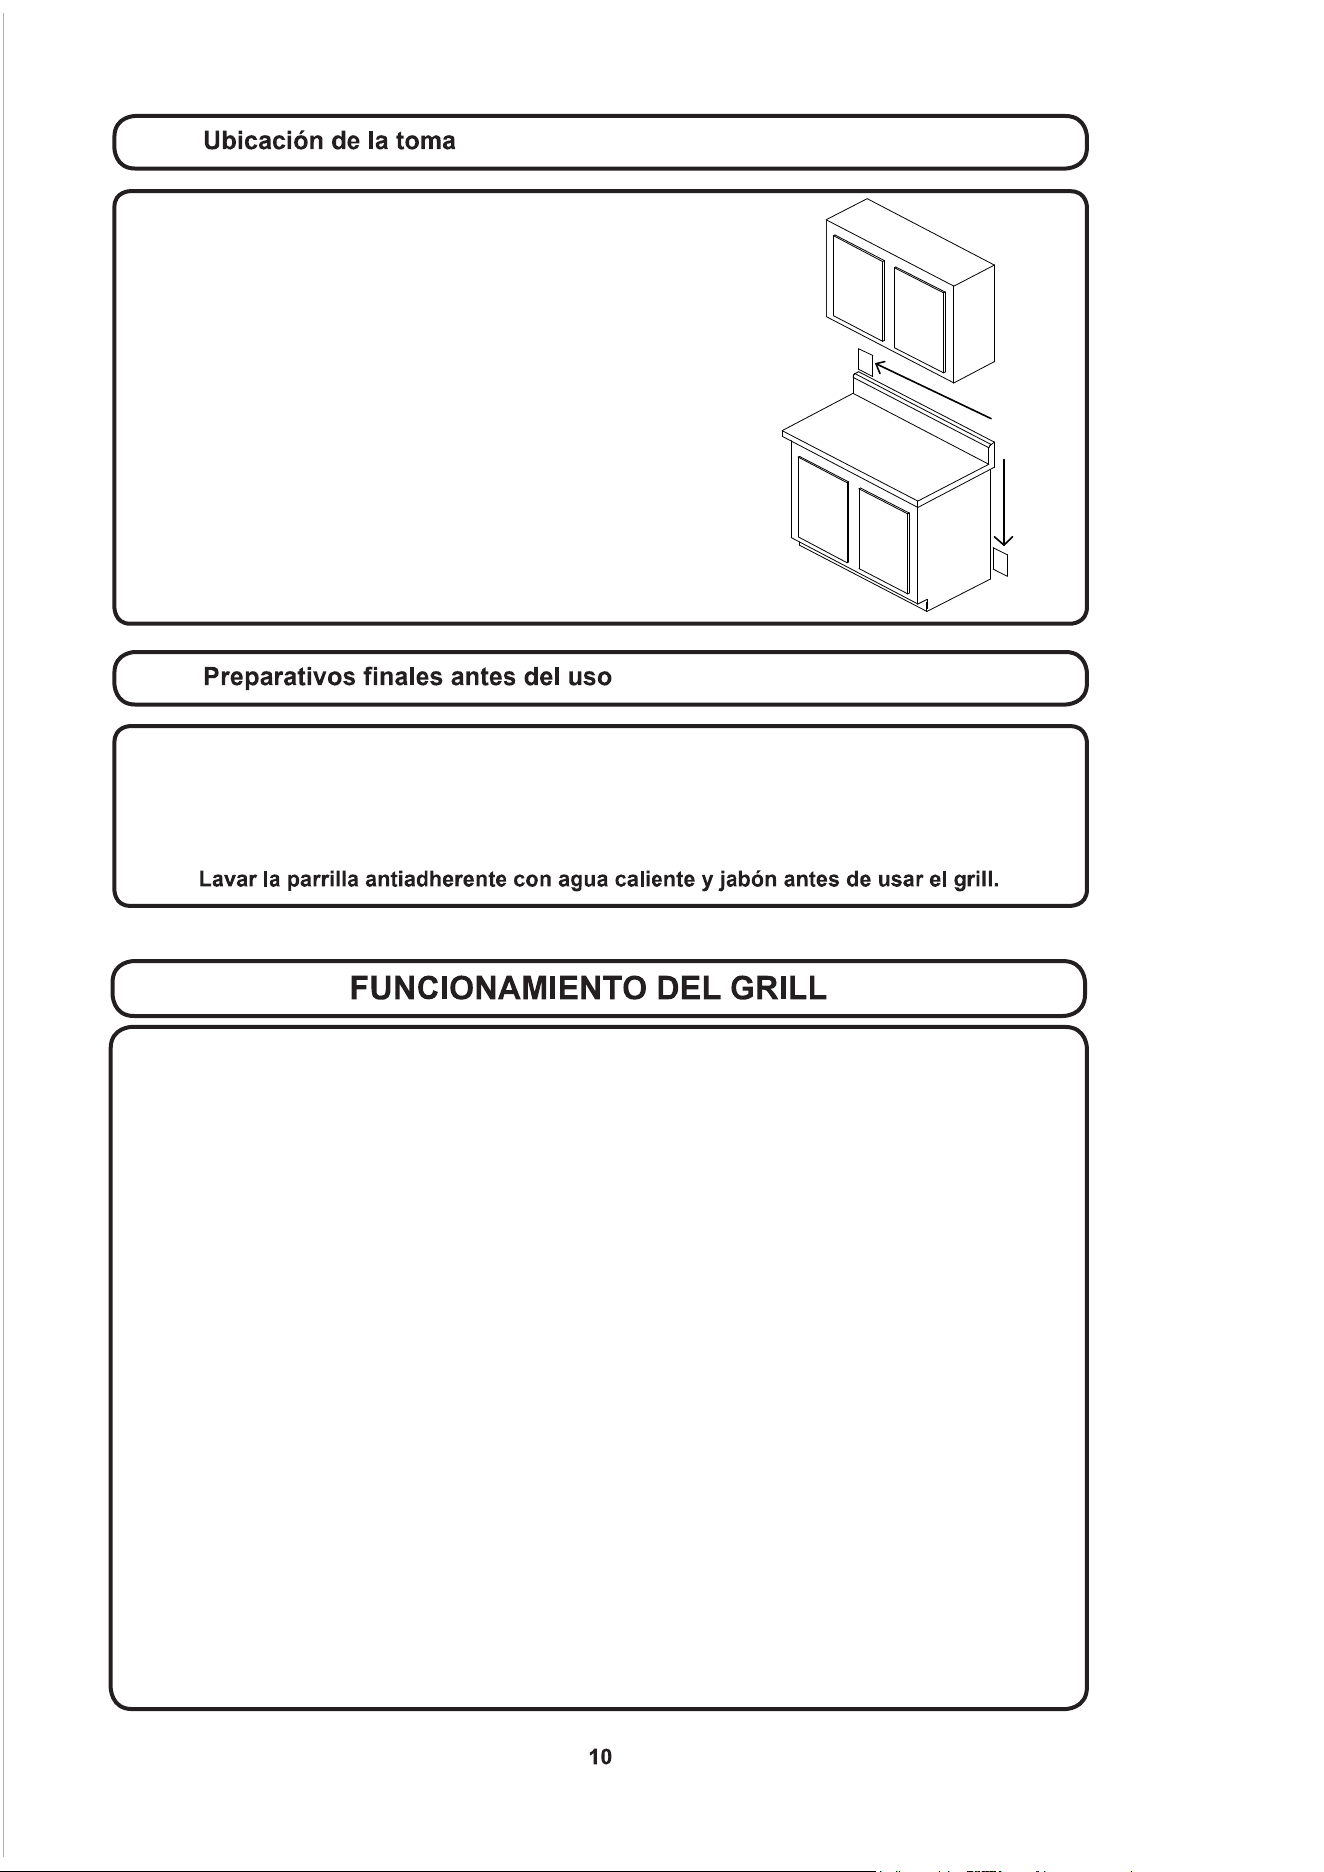
Asegúrese de que la toma de corriente destinada al grill esté en un
lugar de fácil acceso. Esto permite al usuario enchufar y desenchufar
fácilmente el grill. Es necesario asegurarse de limpiar y guardar de
manera segura el grill.
Ubicación
de la toma
sugerida
Quite la película de plástico protectora de la tapa, la brida de acabado y el panel de vidrio.
Limpie el grill antes de usarlo por primera vez. Una limpieza a fondo con un limpiador para acero
inoxidable o vidrio retirará cualquier resto de adhesivo de la película de plástico y de los aceites
de fabricación.
NO USAR AGUA EN FUEGOS PROVOCADOS POR GRASA
Cubrir el fuego o la llama, o usar extintor de polvo químico seco o de espuma.
USAR SOLO AGARRAOLLAS SECOS
Losagarraollashúmedosomojadoscolocadosencimadelassuperciescalientespuedenproducir
quemaduras por el vapor. No dejar que el agarraollas toque la parrilla o elemento del grill. No usar
toallas ni ningún otro paño grande en lugar de un agarraollas.
NO COCINAR EN UN GRILL O UNA PARRILLA O PLANCHA ROTAS
Si la parrilla se rompiera, la grasa y los aceites podrían entran en contacto directo con el elemento
eléctrico y crear un riesgo de descarga eléctrica o incendio. Comunicarse inmediatamente con un
centro de servicio autorizado o llamar a Atención al Cliente de KENYON al (860) 664-4906.
LIMPIAR EL GRILL CON PRECAUCIÓN
Siseusaunaesponjaopañoparalimpiarlosderramessobreunasuperciedecoccióncaliente,
tener mucho cuidado para evitar quemaduras por el vapor. Algunos limpiadores producen humos
nocivosalaplicarlosaunasuperciecaliente.Leerlaetiquetadellimpiadorantesdeusarlo.
NO TOCAR EL ELEMENTO TÉRMICO O LA PARRILLA
El elemento térmico y la parrilla estarán calientes durante algún tiempo después de cocinar. Se debería
dejar que estos componentes se enfríen y a continuación se pueden manipular con cuidado y precaución
durantelalimpieza,yaquepuedenestarsucientementecalientescomoparaprovocarquemaduras.
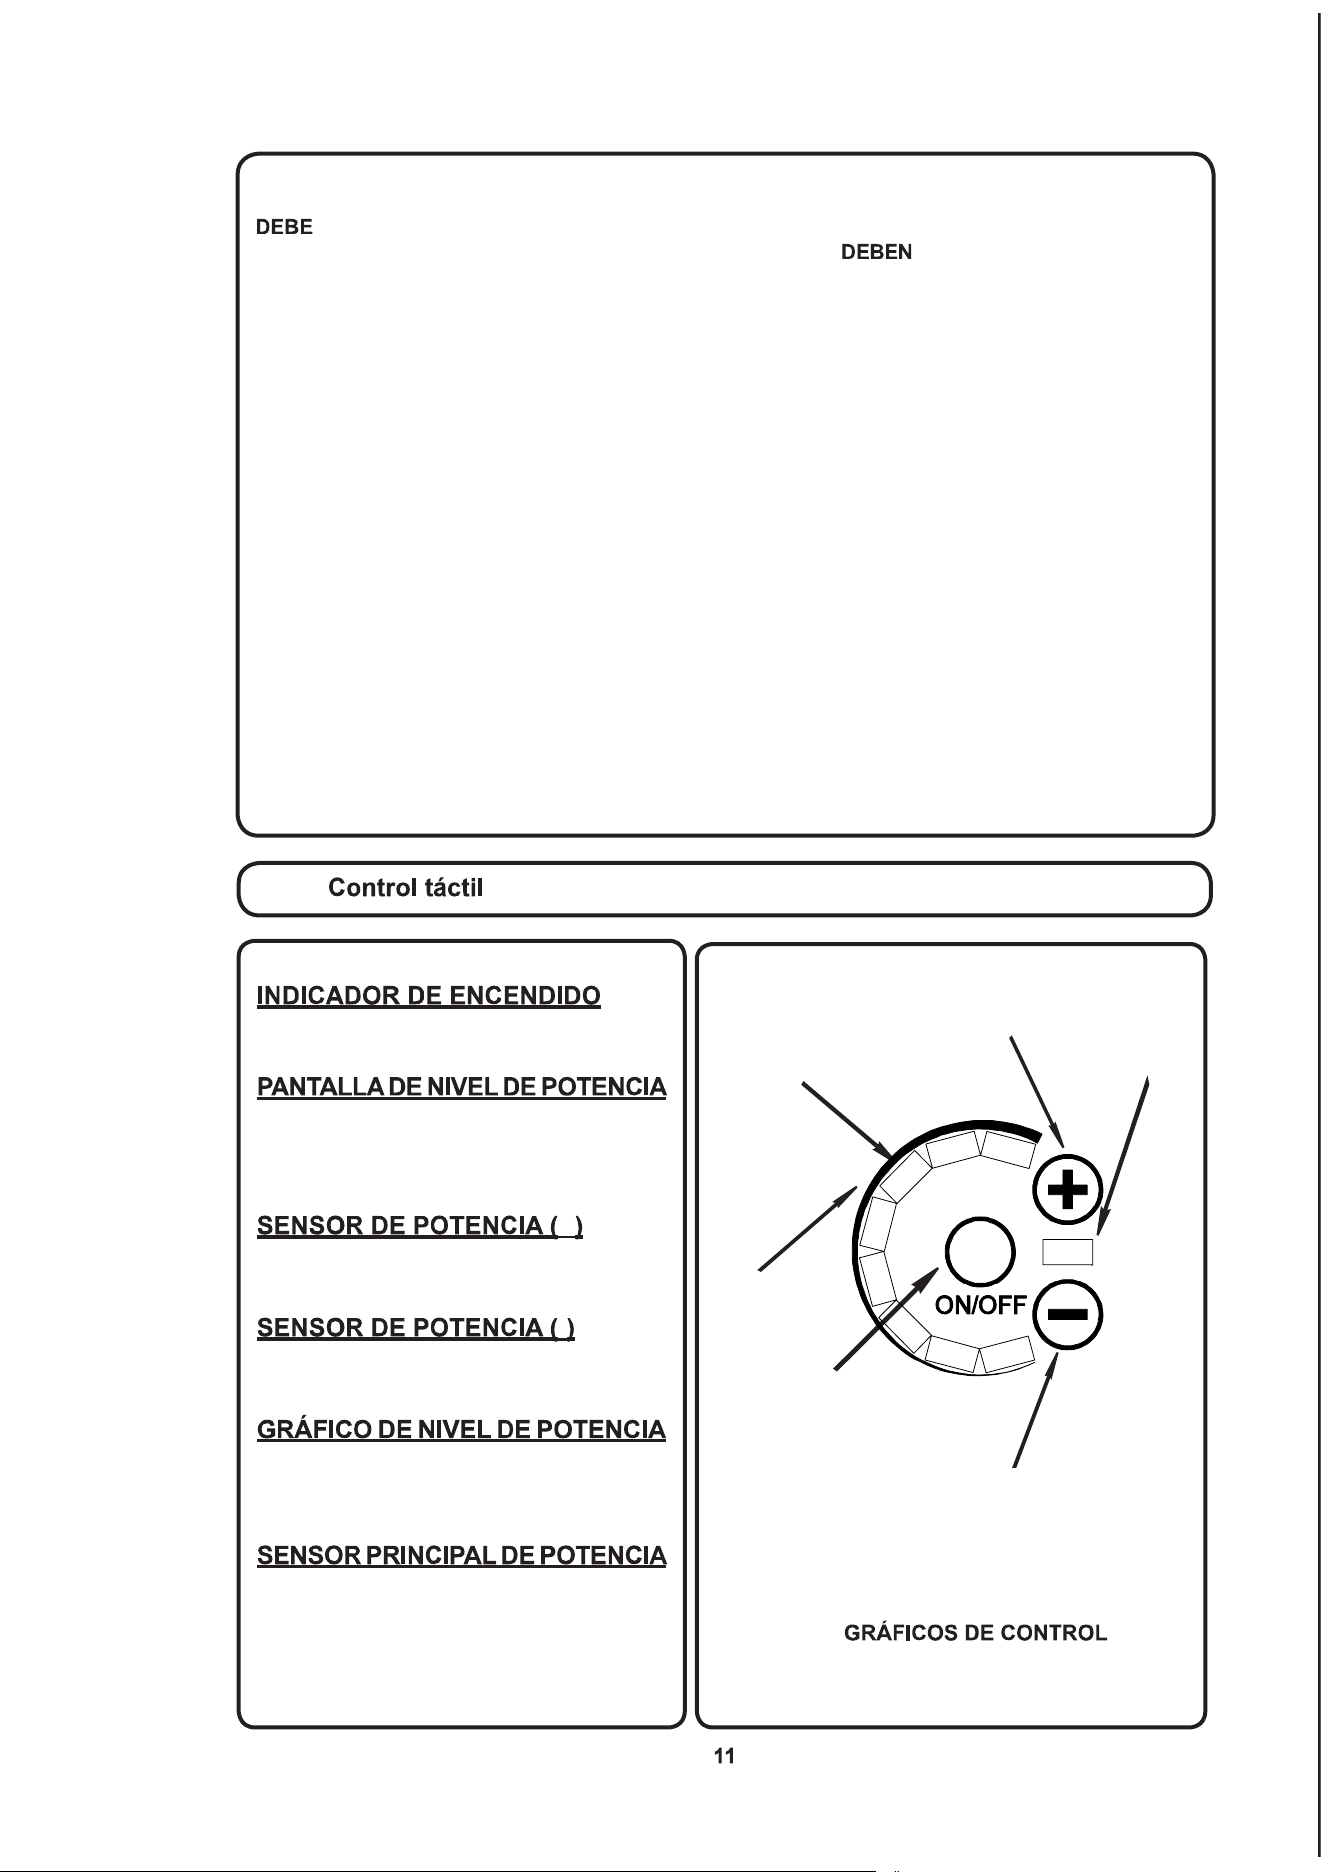
LlMPIAR EL GRILL DESPUÉS DE CADA USO
Este electrodoméstico está equipado con una bandeja de goteo extraíble y desechable. Esta bandeja
extraerse y limpiarse después de CADA uso. No permitir que la grasa se acumule entre
sesionesdecocina.Labandejadegrasaylabandejadeectora usarse al cocinar en el grill.
Una cantidad excesiva de grasa puede derramarse en el interior del grill, anulando la garantía y
ocasionando un peligro de incendio.
NO DEJAR NUNCA EL GRILL SIN VIGILANCIA CUANDO ESTÉ PUESTO A FUEGO ALTO
El ajuste de fuego alto puede provocar mucho humo y encender la grasa.
NO LIMPIAR LA UNIDAD CON AGUA PRESURIZADA
No limpie el grill con ningún tipo de agua presurizada u otros tipos de limpiadores. Si lo hace, anulará
la garantía y puede ocasionar un grave riesgo de descarga eléctrica. Limpiar siempre el grill con un
pañoyunlimpiadordesuperciesdeaceroinoxidableovidrio.
ALMACENAMIENTO
Al usarlo como grill portátil, guárdelo bajo techo cuando no esté en uso. Al usarlo como grill integrado,
hay que colocarlo en un lugar resguardado para que no esté directamente expuesto a la lluvia. Hay
cubiertas disponibles.
PARA PREVENIR EL HUMO
Para prevenir que el contenido de la bandeja de grasa despida humo, vierta dos tazas de agua (o
sucienteparacubrirelfondodelabandeja)enlabandejadegrasaantesdecocinar.
NO USAR OLLAS NI OTROS MOLDES EN EL GRILL
CONSERVAR ESTAS INSTRUCCIONES CON EL GRILL PARA CONSULTAS FUTURAS
Esta pantalla indica si el grill está encendido
o apagado.
La pantalla digital indica lo alto o bajo
que está el fuego del grill. Las lámparas
indicadorassiguenelbarridodelgrácoen
pantalla. Hay ocho niveles de fuego posibles.
+
Tocar este sensor aumentará el fuego
del grill en incrementos de uno.
-
Tocar este sensor reducirá el fuego del grill en
incrementos de uno.
Muestra el nivel de fuego por elemento. La
líneavadegruesaana,indicandofuego
lento a fuego alto.
Este es el mando principal de potencia para
el grill. Tocarlo con el grill apagado activará el
controlador y encenderá el grill. Tocarlo con el
grill encendido apagará el grill.
PANTALLA
DE NIVEL DE
POTENCIA
SENSOR PRINCIPAL
DE POTENCIA
GRÁFICO
DE NIVEL
DE POTENCIA
INDICADOR DE
ENCENDIDO
SENSOR DE
POTENCIA (-)
SENSOR DE
POTENCIA (+)
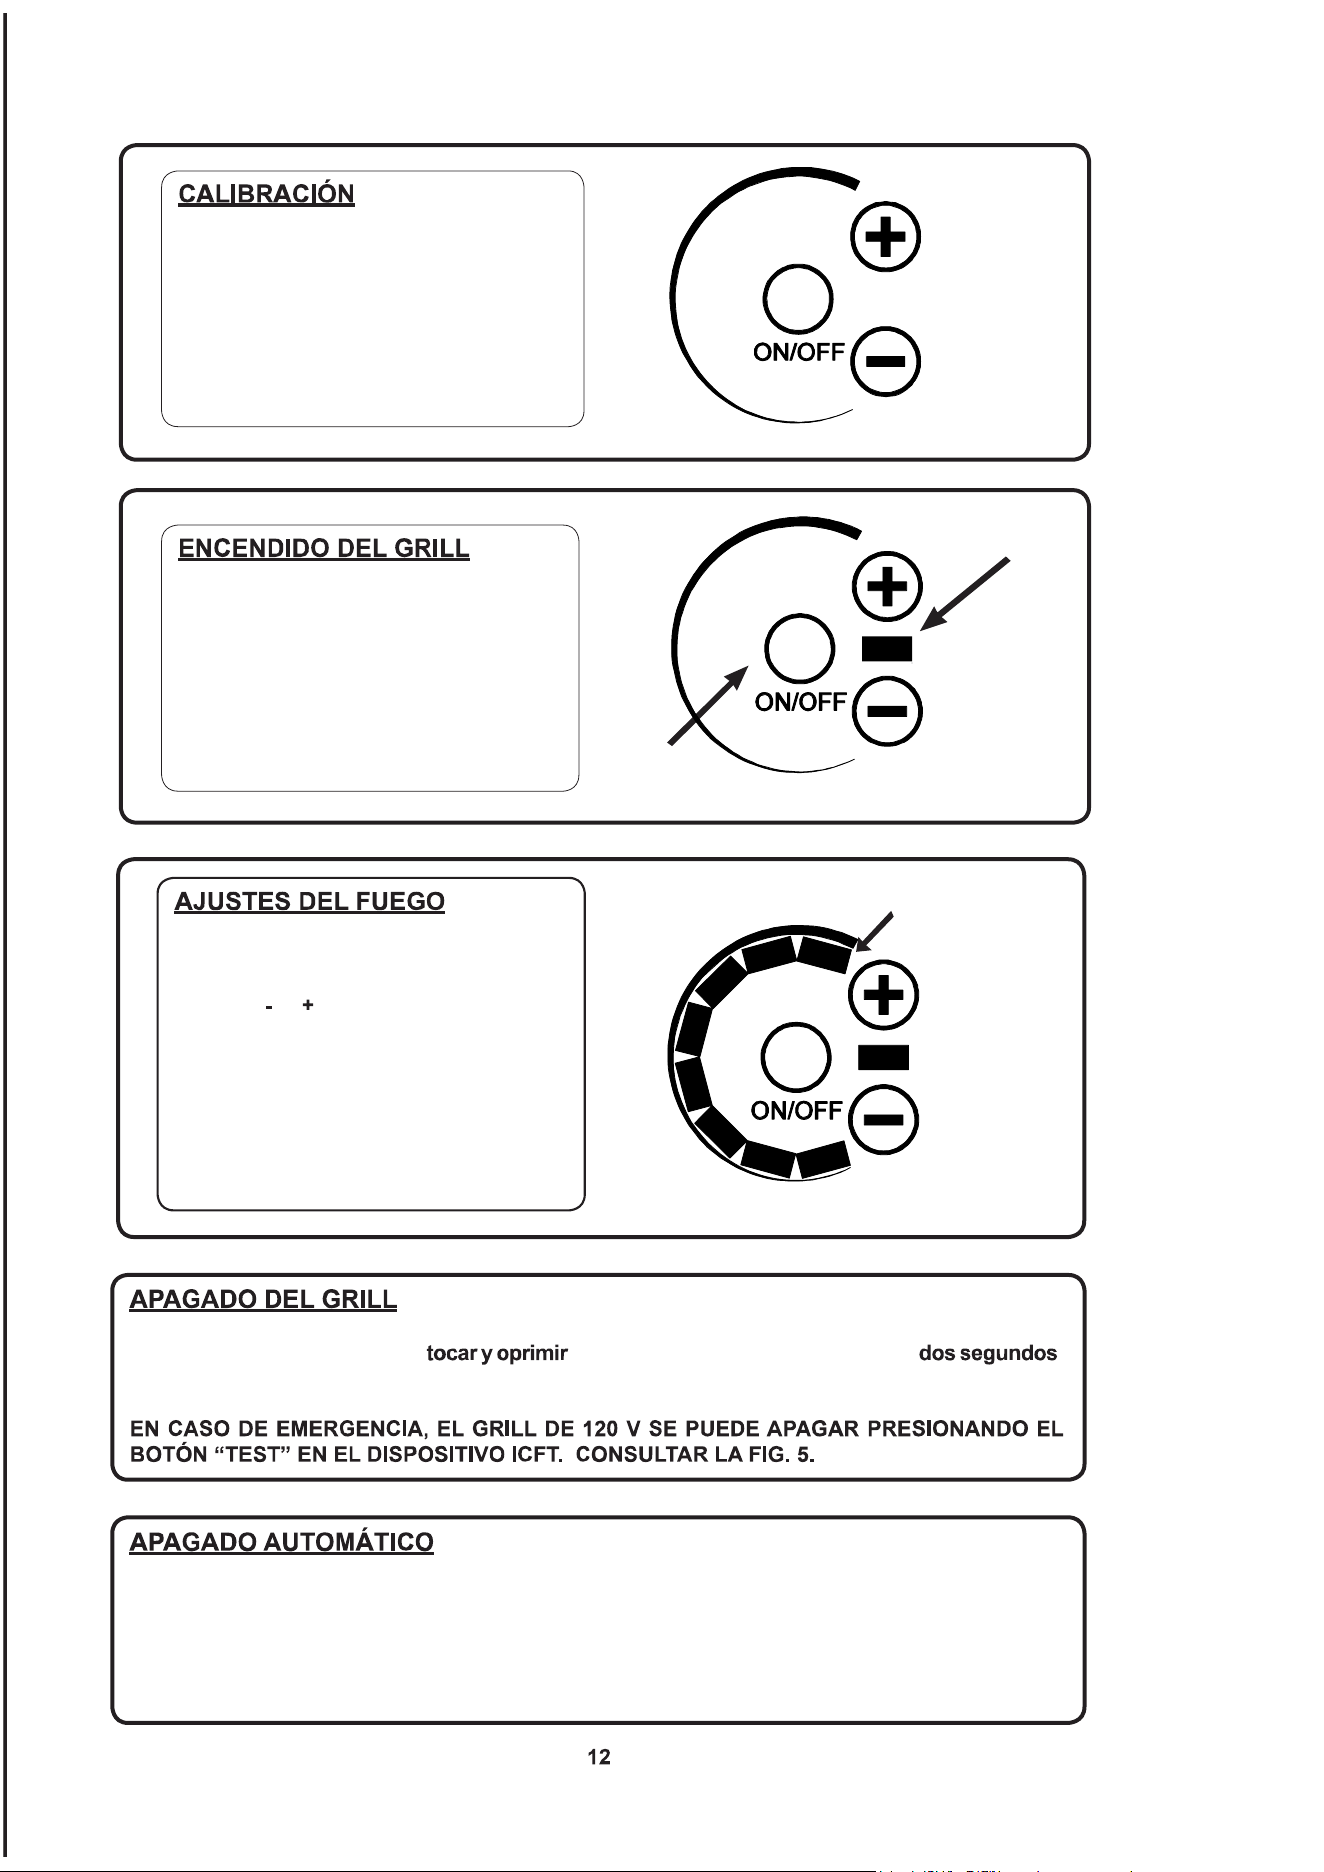
GRÁFICO DE NIVEL
DE POTENCIA
(AJUSTEDEFUEGO8
SELECCIONADO)
Tras encender el grill, el controlador
ejecutará un proceso de autocalibración.
A continuación el controlador emitirá un
tonodeconrmaciónaudibleylapantalla
se iluminará brevemente. Ahora el grill está
listo para ser utilizado.
Para encender el grill, tocar y mantener opri-
mido el sensor principal de potencia durante
dos segundos. Entonces el controlador pitará
y el indicador de encendido se iluminará.
SENSOR
PRINCIPAL DE
POTENCIA
INDICADOR
DE ENCENDIDO
Su grill KENYON tiene 8 ajustes de fuego
diferentes, del 1 al 8, y se seleccionan con los
sensores ( ) y ( ). El ajuste de fuego se mues-
tra como se indica a la derecha. El elemento
térmico se enciende y se apaga a diferentes
intervalos de tiempo para variar el nivel de
fuego. A medida que el ajuste se aumenta,
el elemento térmico permanecerá encendido
durante un período más prolongado, aumen-
tando la temperatura a la que el grill cocina.
Para apagar el grill, simplemente el sensor principal de potencia durante .
El controlador se desconectará y apagará el elemento térmico.
El control electrónico de su grill KENYON ha sido programado pensando en la seguridad y cuenta
con un apagado automático. El grill está programado para apagarse después de un tiempo
predeterminado de haber estado encendido (ver la tabla a continuación). El control también se
apagará cuando alcance un límite de temperatura preestablecido. Si esto ocurre, dejar que el grill
se enfríe durante 20-30 minutos.
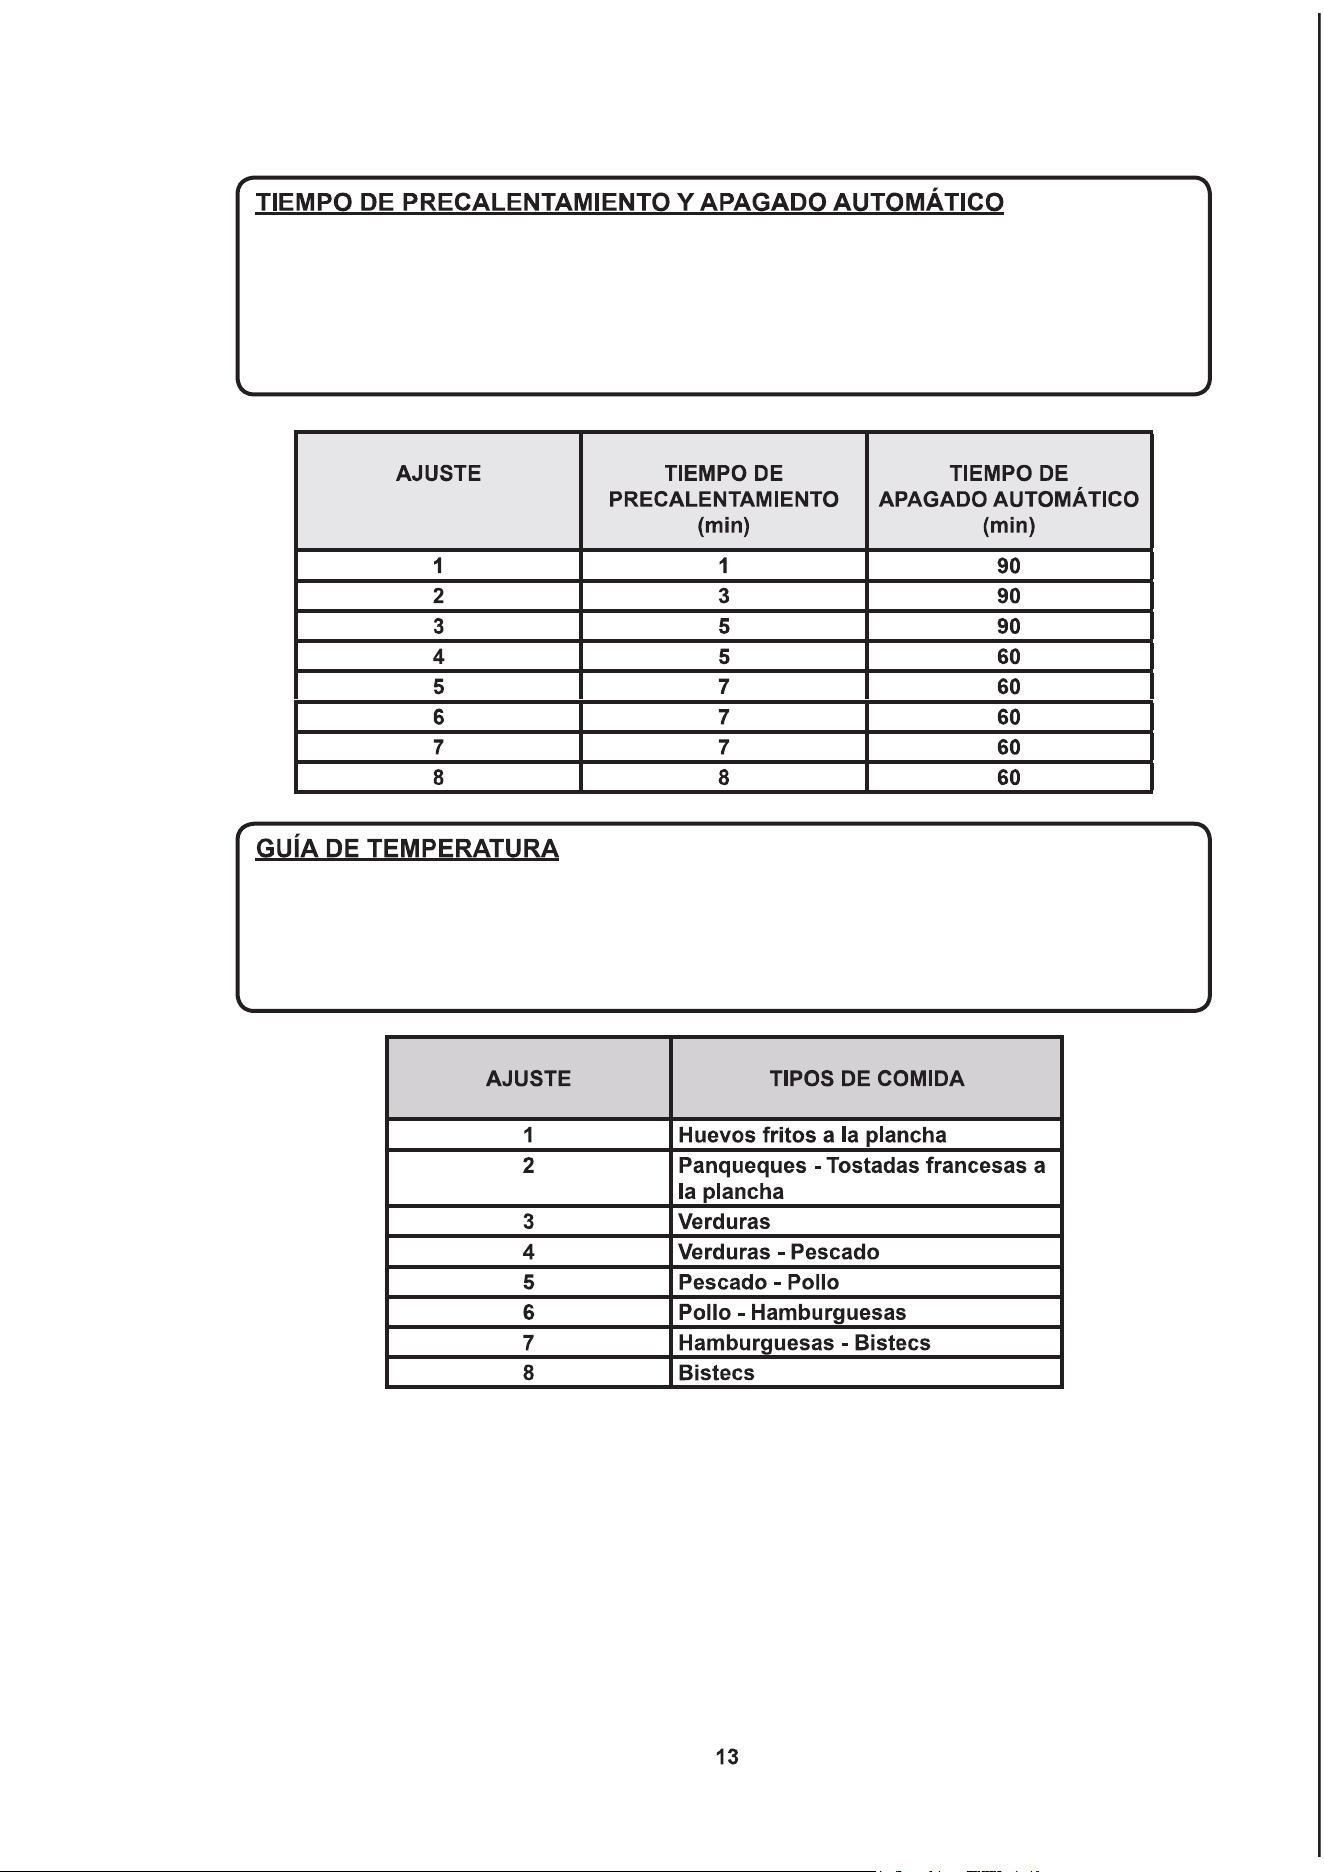
El control del grill tiene una función de precalentamiento que aplica potencia completa durante
una cantidad de tiempo preestablecida para cada ajuste de fuego seleccionado. Esta función
de precalentamiento coloca la parrilla/plancha en la temperatura deseada para asar más rápido,
permitiendo así que usted pueda empezar a asar antes. La siguiente tabla proporciona el tiem-
po de precalentamiento y el tiempo de apagado automático para cada ajuste de fuego.
La siguiente información está destinada a ser una guía. Factores tales como el viento y la
temperatura exterior, la temperatura de los alimentos al ser colocados en el grill pueden afectar
los tiempos de cocción. El grill está diseñado y fabricado para cocinar con un rendimiento
óptimo con la tapa bajada o cerrada.
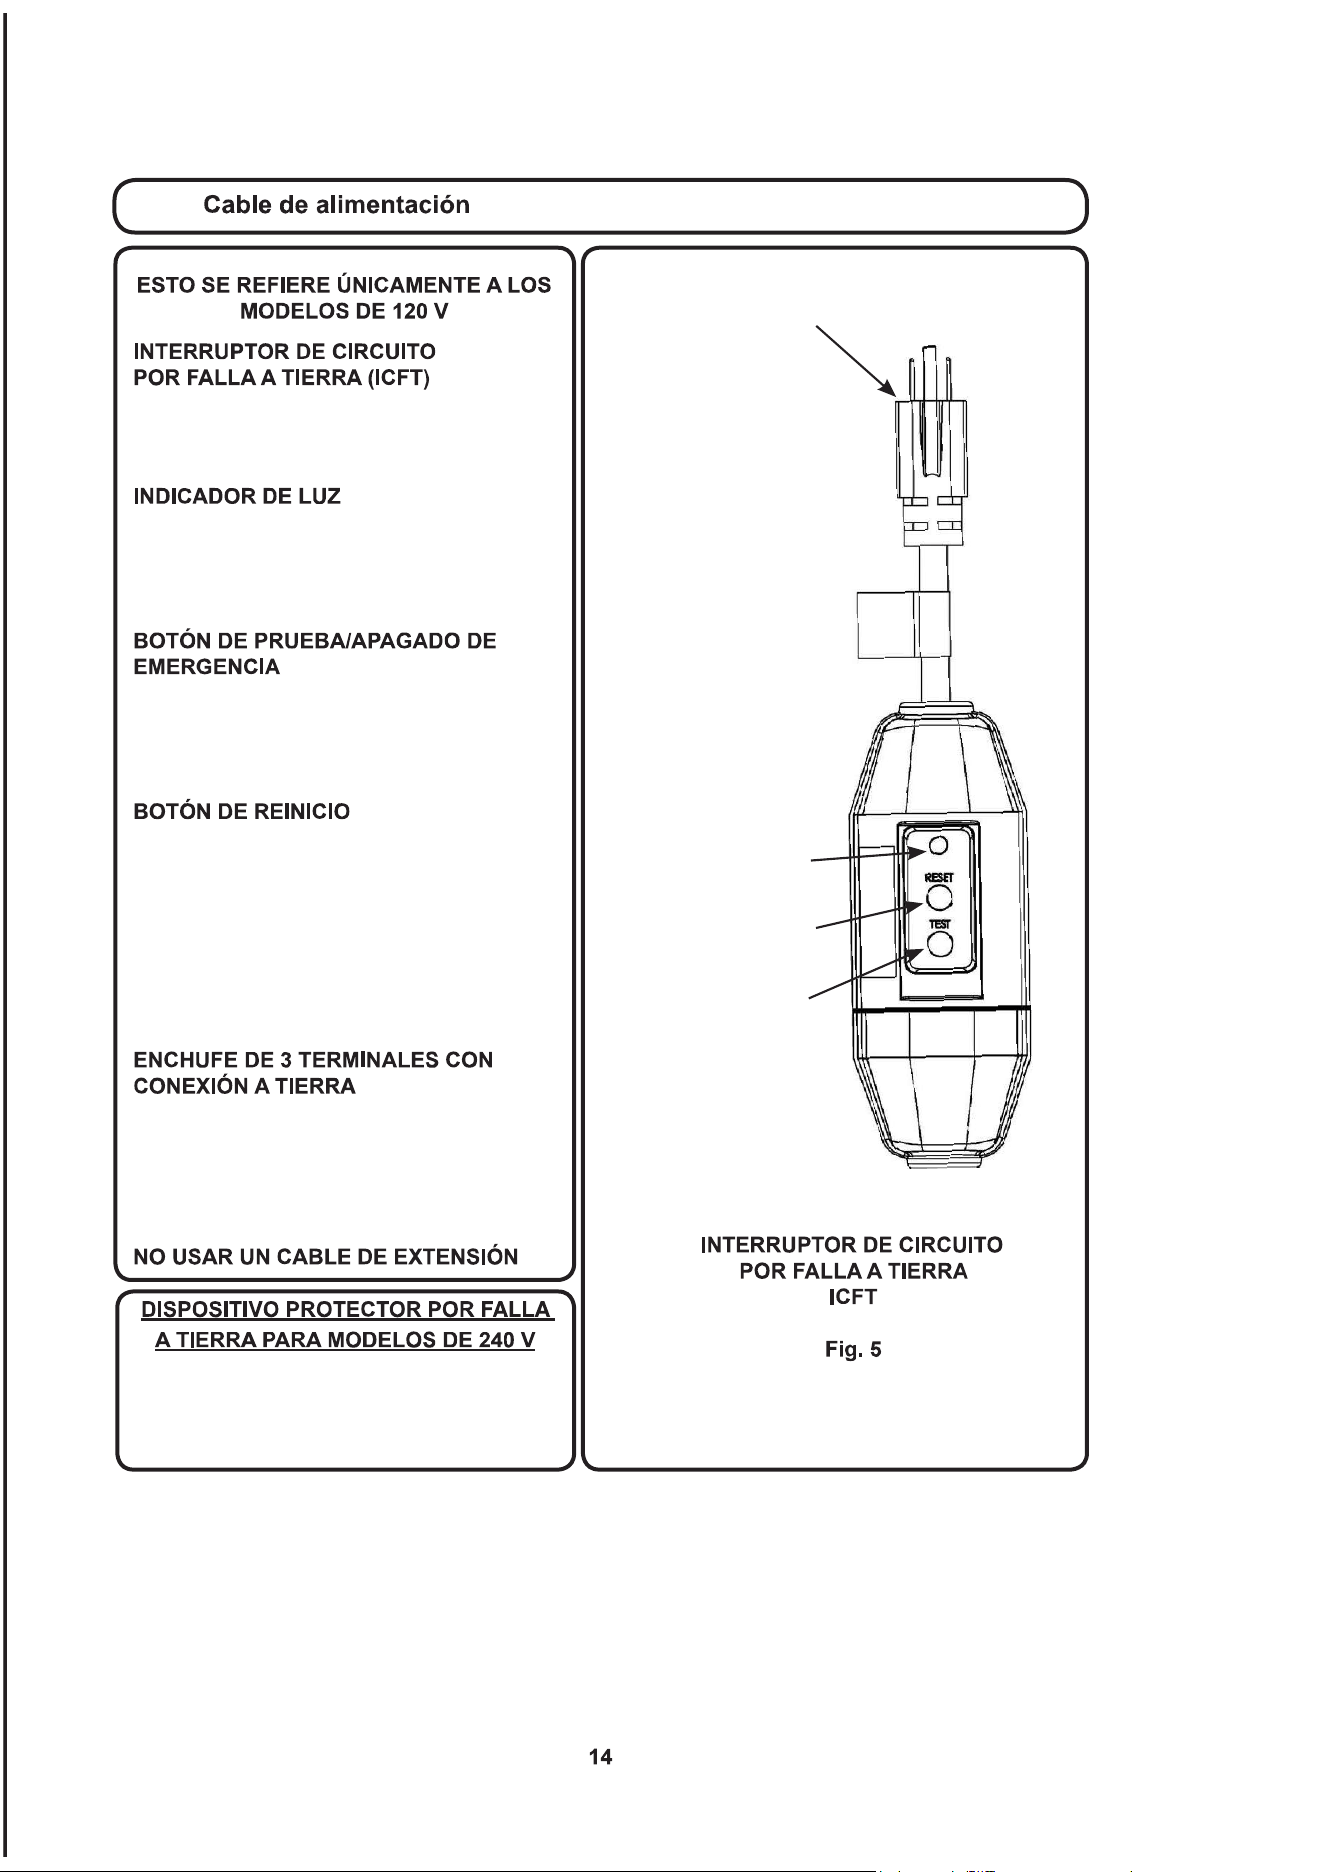
BOTÓN
DE REINICIO
ENCHUFE DE 3 TERMINALES
CON CONEXIÓN A TIERRA
INDICADOR
DE LUZ
BOTÓN
DE PRUEBA
El circuito de voltaje de alimentación (240 V)
debería contar con un dispositivo protector
porfallaatierra.Vericarlosrequisitosde
cumplimiento normativo en los códigos locales.
El ICFT es un dispositivo de seguridad
diseñado para proteger al usuario de
cualquier peligro de descarga eléctrica.
El indicador de luz permanecerá iluminada
cuando se aplique corriente eléctrica
e indica que el ICFT está funcionando
correctamente.
Presionar este botón comprobará el ICFT.
El indicador de luz se apagará y no se
suministrará corriente eléctrica al grill. El
ICFT debería ser probado cada mes.
Presionar este botón devolverá el ICFT
a su funcionamiento normal. La lámpara
indicadora se iluminará y se suministrará
corriente eléctrica al grill. Si la lámpara
indicadora no se ilumina, el ICFT ha
detectado una falla de funcionamiento.
Desenchufar el ICFT del receptáculo y no
usar el grill.
PRECAUCIÓN - Para garantizar una
protección continua contra el riesgo de
descarga eléctrica, el ICFT debe estar
enchufado en una toma debidamente
conectada a tierra.
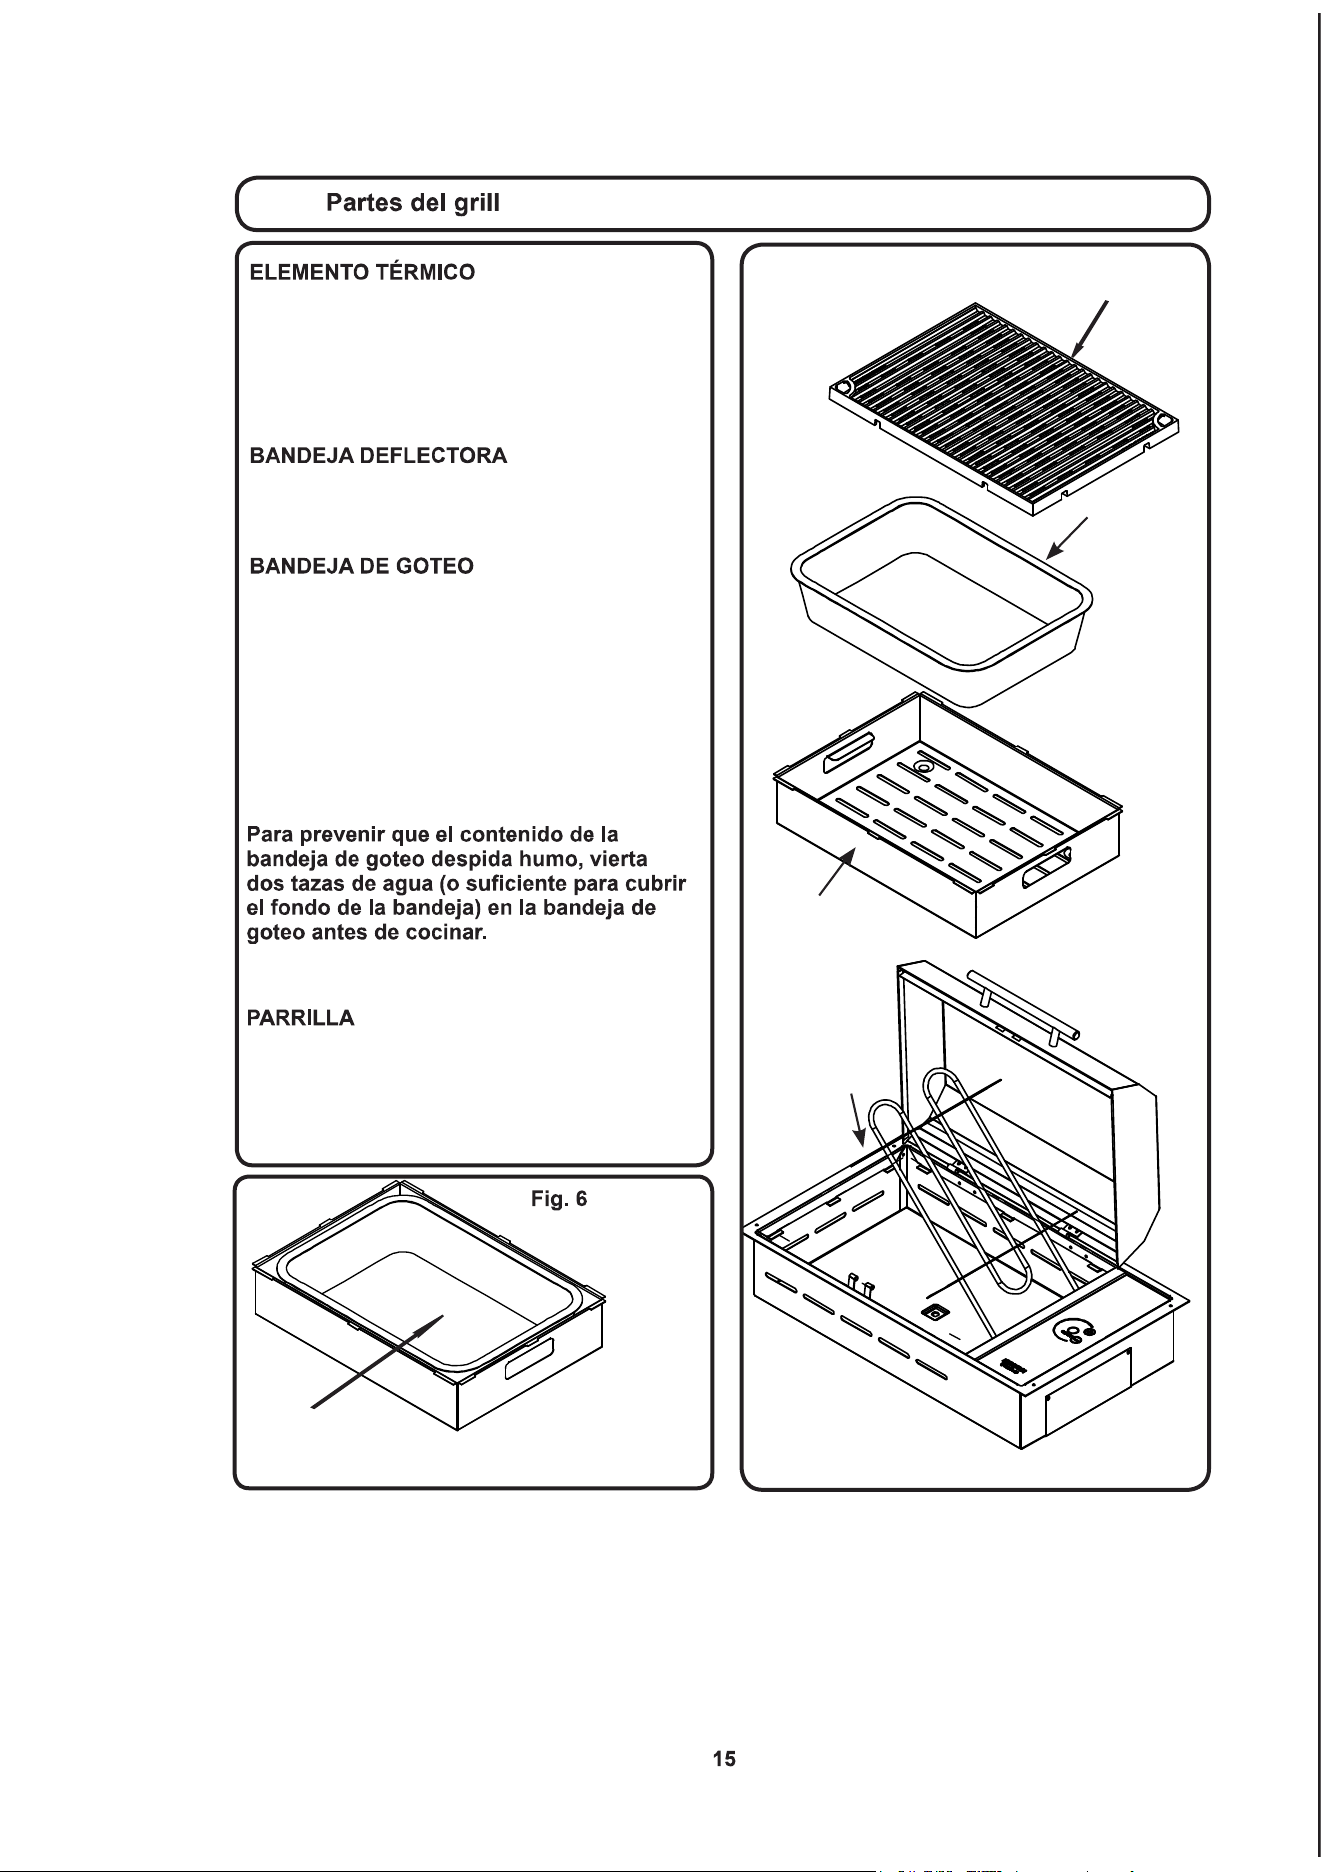
PARRILLA
BANDEJA
DEFLECTORA
BANDEJA
DE GOTEO
ELEMENTO
TÉRMICO
El elemento térmico está diseñado para
pivotarcomosemuestraconelndeextraer/
reemplazarlabandejadeectoraylabandeja
de goteo. Permanecerá en la posición de
arriba. Para bajarlo aplique una ligera presión
hacia abajo.
Labandejadeectorasoportalabandejade
goteo, el elemento térmico y la parrilla y se
debe usar siempre al operar el grill.
La bandeja de goteo desechable recoge
toda la grasa y los jugos creados durante
el proceso de cocción. La bandeja de goteo
debe vaciarse después de cada uso. Al
reemplazar la bandeja de goteo, colocarla de
manera que esté completamente dentro de
labandejadeectorayasegurándosedeque
el lado o el borde de la bandeja de goteo no
sobresaleporfueradelabandejadeectora.
(ver la Fig. 6)
El reemplazo para la
bandeja de goteo desechable de Kenyon es la
piezanºB96001.
La parrilla debe limpiarse después de
cada uso. La parrilla tiene un revestimiento
antiadherente para facilitar la limpieza. Lavar la
parrilla después de cada uso con agua caliente
y jabón.
LABANDEJADE
GOTEO DEBE ESTAR DENTRO DE LA BAN-
DEJADEFLECTORACOMOSEMUESTRA
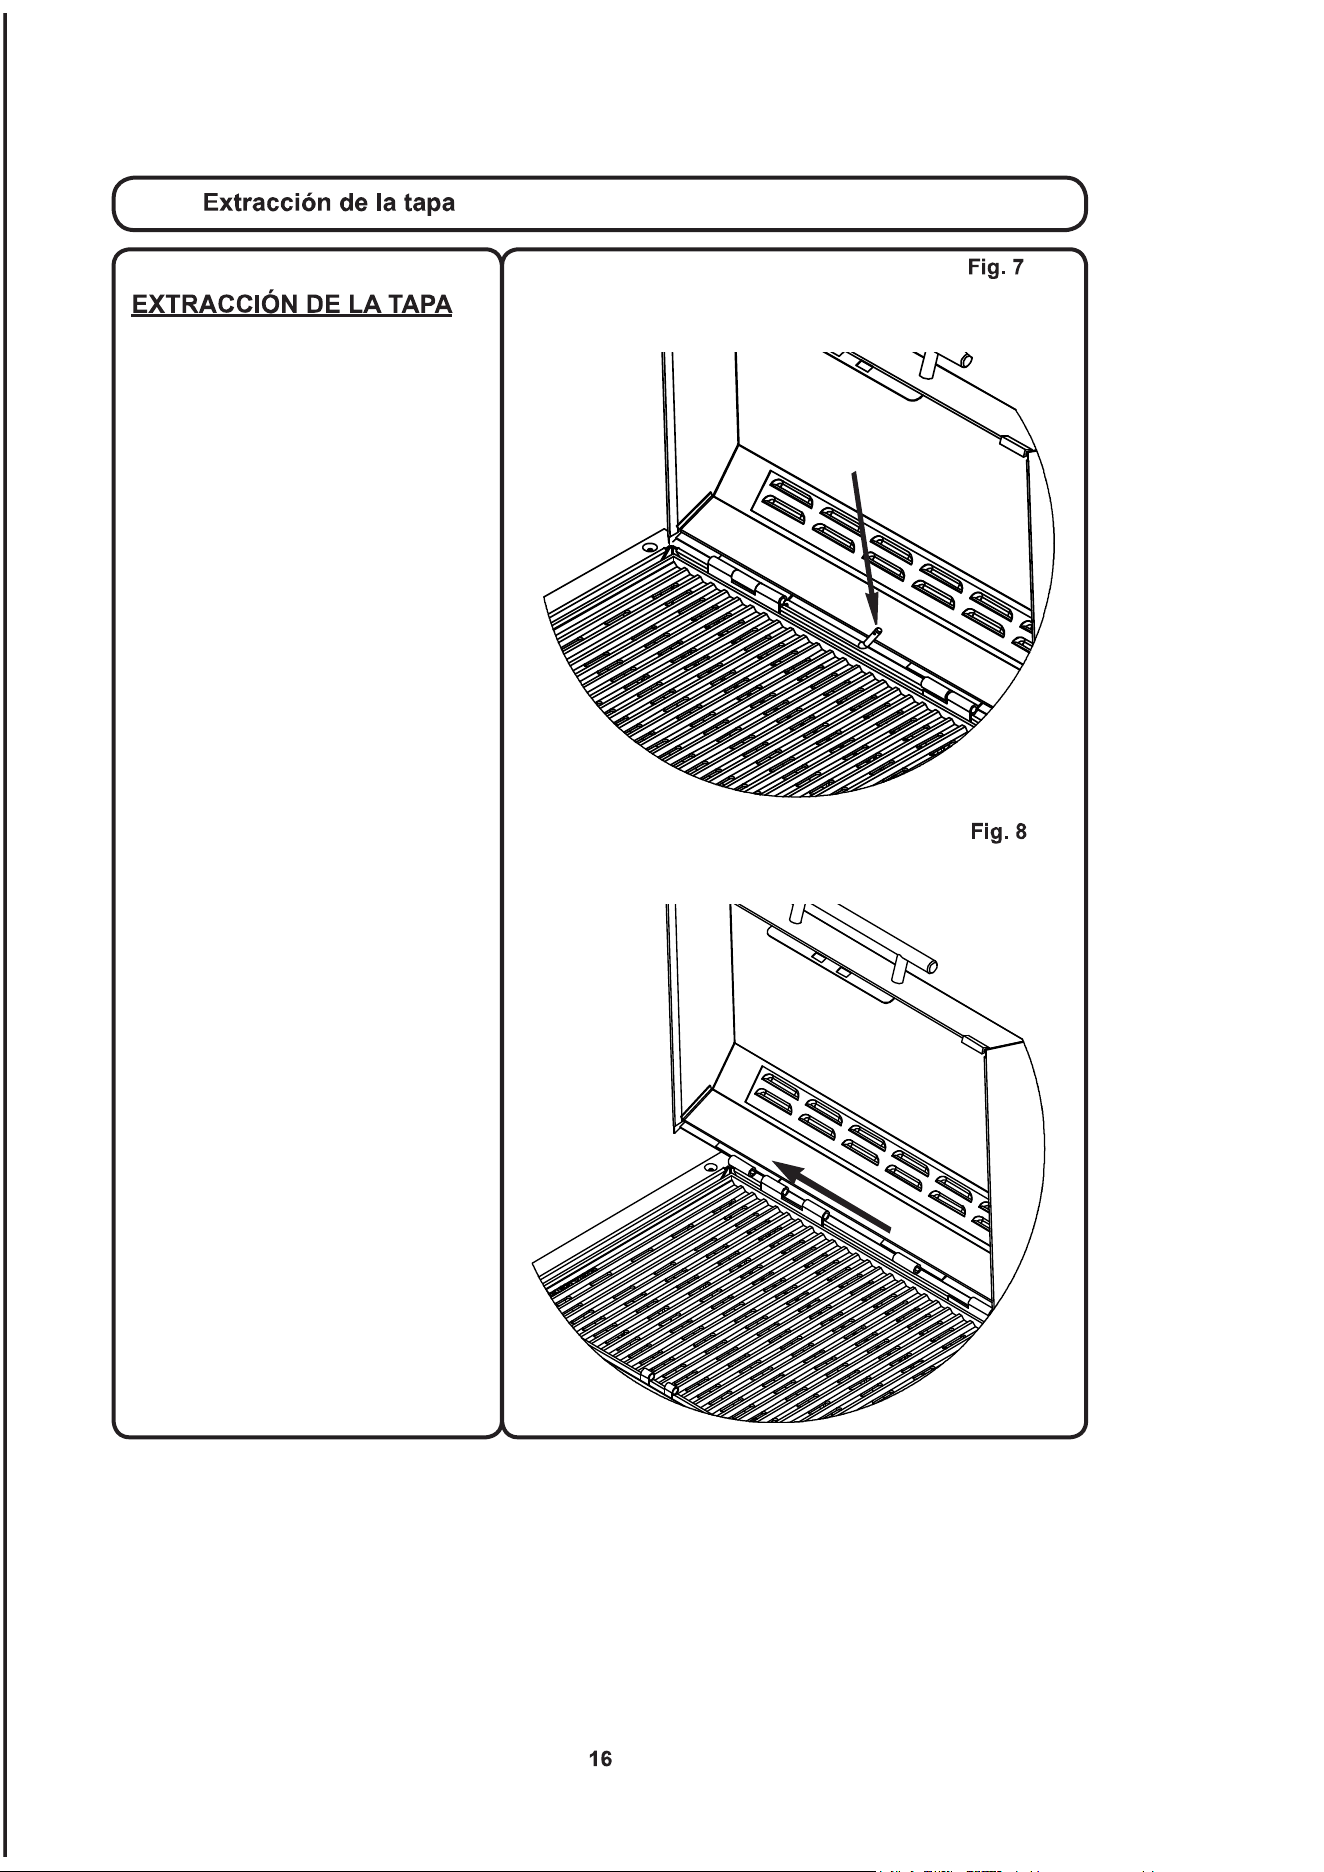
La tapa del grill se puede extraer
para su limpieza. Para extraer la tapa,
deslice el pasador de liberación rápida
para sacarlo de la bisagra.
(ver la Fig. 7).
Con el pasador de liberación rápida
retirado, agarrar la tapa, levantándola
por el lado izquierdo para salvar la
bisagra y deslizarla hacia la izquierda
hasta haber salvado el pasador de la
bisagra a la derecha (ver la Fig. 8).
Una vez que la tapa se haya extraído
se puede lavar con agua y jabón.
PASADOR DE
LIBERACIÓN RÁPIDA

KENYON
Declaracióndegarantía
KENYONInternational,Inc(la“Compañía”)garantizaqueesteproductonotengadefectosdematerialesnimanodeobraensuuso
normal,sujetoalascondicionesylimitacionesacontinuación.
LaCompañíarepararáoreemplazarátodapiezaquesepruebeestédefectuosaensuusonormalduranteelperíododegarantía.
Conelfindequeelproductoestécubiertobajoestagarantía,debeserdevueltoalaCompañíaparasuevaluación.
Comuníqueseakenyonservice@cookwithkenyon.comparaobtenerlasinstruccionesdedevolución.
EstagarantíacubreciertosproductosfabricadosporlaCompañíayestásujetaalassiguientescondicionesylimitaciones:
1. LaresponsabilidaddelaCompañíaselimitaráalareparaciónoreemplazo(elecciónderemedioaopcióndela
Compañía)decomponenteselectrónicosenlamedidaenquepuedantenerdefectosdematerialesomanodeobra.Esta
responsabilidadselimitaatresañosapartirdelafechadeinstalaciónoriginaloa42mesesdesdelafechadelafactura,
loqueocurraprimero;estagarantíacubrepiezasymanodeobraatarifasaprobadaspreviamente.Elaceroinoxidable
tieneunagarantíadeporvidacontraelóxidocuandosecuidamensualmentesegúnsedescribeenelmanualdel
propietario.Sicomienzalacorrosión,comuníqueseconlaCompañíaconevidenciafotográficadelacorrosiónpara
recibircomponentesdereemplazo.
2. LadeterminacióndelaidoneidaddelproductoparaelusocontempladoporelCompradoresresponsabilidad
exclusivadeesteúltimoylaCompañíanotendráningunaresponsabilidadencuantoalamisma.
3. LaCompañíanoseharáresponsabledeningúndañoaconsecuenciade:
•fallasdebidasalusodelproductoenaplicacionesparalasquenofueconcebido;
•fallasdebidasacorrosión,desgaste,maluso,negligencia,instalaciónomantenimientoindebidos;
•fallasdebidoaroturadevidrio,accidentalodeotromodo.
4. LaCompañíaasumirálaresponsabilidaddelosgastosdeembarqueterrestrehastaellugardelelectrodoméstico
(domicilio)dentrodeEstadosUnidoscontinentalyCanadá.Todoslosimpuestosogastosqueresultendelembarque
urgenteoespecialcorreránacargodelComprador.
5. TodamanodeobrapermitidaporlaCompañíabajoestagarantíadebeestarautorizadapreviamenteydebeser
ejecutadaporuncentrodeservicioautorizadoporKenyonInternational,exceptoquelaCompañíaloespecifiquepor
escritodeotramanera.
NOSEDANINGUNAOTRAGARANTÍADECOMERCIABILIDADNIIDONEIDADPARAUNFINENPARTICULARNIDE
OTROTIPO,EXPRESAOIMPLÍCITANININGUNAOTRADEBERÁSERIMPLICADAPORLALEY.Laduracióndecualquierade
talesgarantíasqueesté,sinembargo,implicadaporlaleyenbeneficiodelconsumidor,selimitaráaunperíododetresañosa
partirdelacompraoriginalporpartedelusuario.Algunospaísesnopermitenlimitacionesenloreferentealtiempoquedeberá
durarunagarantíaimplícita,demodoquepuedeserqueestalimitaciónnoseapliqueensucaso.
LACOMPAÑÍANOSERÁRESPONSABLEDENINGÚNDAÑOEMERGENTENIINCIDENTALQUESURJAPOR
CONTRAVENCIÓNDEESTAGARANTÍA,YASEAEXPRESA,IMPLÍCITAOESTATUARIA.Algunospaísesoestadosno
permitenlaexclusiónolimitacióndedañosconsecuentesniincidentales,demodoquepuedequeestalimitaciónoexclusiónnose
apliqueensucaso.
ESTAGARANTÍALEDAAUSTEDDERECHOSLEGALESESPECÍFICOSYESPOSIBLEQUEUSTEDTENGATAMBIÉN
OTROSDERECHOSLEGALES,LOSQUEPUEDENDIFERIRENTREPAÍSESOESTADOS.
KenyonInternational,Inc.
P.O.Box925•8HeritageParkRoad•Clinton,CT06413USA
Teléfo no:(860)664-4906FAX:(860)664-4907