Instructions for Use EN
Istruzioni di uso IT
1MCFY
1630881-b

2
EN
Contents
Safety Information .............................................................................................................................. 3
Safety Instructions ............................................................................................................................. 7
The advantages of microwaves ......................................................................................................... 8
Description of your oven .................................................................................................................... 9
Description of Functions .................................................................................................................. 10
Basic controls ................................................................................................................................... 11
Basic Functions ................................................................................................................................ 13
Special functions .............................................................................................................................. 18
Using the Browning Plate ................................................................................................................ 21
When the oven is working... ............................................................................................................. 22
Defrosting .......................................................................................................................................... 23
Cooking with a microwave oven ..................................................................................................... 25
Cooking with the Grill ....................................................................................................................... 27
Roasting and baking......................................................................................................................... 30
What kind of ovenware can be used? ............................................................................................. 32
Oven Cleaning and Maintenance ..................................................................................................... 34
What should I do if the oven doesn’t work? ................................................................................... 36
Technical characteristics ................................................................................................................. 37
Installation instructions ................................................................................................................... 38
Installation ......................................................................................................................................... 76
Dear Customer,
Thank you for choosing this BARAZZA product.
We ask you to read the instructions in this booklet very carefully as this will allow you to get the best
results from using it.
KEEP THE DOCUMENTATION OF THIS PRODUCT FOR FUTURE REFERENCE.
Always keep the instruction manual handy. If you lend the appliance to someone else give them
the manual as well!
The user manual is also available for download at www.barazzasrl.it

3
EN
Safety Information
Before the installation and use of the appliance, carefully read
the supplied instructions. The manufacturer is not responsible if an
incorrect installation and use causes injuries and damages. Always
keep the instructions with the appliance for future reference.
CHILDREN AND VULNERABLE PEOPLE SAFETY
Warning! Risk of suffocation, injury or permanent disability.
This appliance can be used by children aged from 8 years and
above and persons with reduced physical, sensory or mental
capabilities or lack of experience and knowledge if they are
supervised by an adult or a person who is responsible for their
safety.
Do not let children play with the appliance.
Keep all packaging away from children.
Warning: Keep children away from the appliance when it
operates or when it cools down. Accessible parts are hot.
If the appliance has a child safety device, we recommend that
you activate it. Children under 3 years must not be left
unsupervised in the vicinity of the appliance.
Cleaning and user maintenance shall not be made by children
without supervision.
GENERAL SAFETY
This appliance is intended to be used in household and similar
applications such as:
– staff kitchen areas in shops, offices and other working
environments;
– farm houses;
– by clients in hotels, motels and other residential environments;
– bed and breakfast type environments.
Internally the appliance becomes hot when in operation. Do not
touch the heating elements that are in the appliance. Always use
oven gloves to remove or put in accessories or ovenware.

4
EN
Safety Information
Warning: Do not heat liquids and other foods in sealed
containers. They are liable to explode.
Only use utensils that are suitable for use in microwave ovens.
When heating food in plastic or paper containers, keep an eye on
the appliance due to the possibility of ignition.
The appliance is intended for heating food and beverages. Drying
of food or clothing and heating of warming pads, slippers,
sponges, damp cloth and similar may lead to risk of injury,
ignition or fire.
Warning! The oven cannot be used if:
- The door is not closed correctly;
- The door hinges are damaged;
- The surfaces of the contact between the door and the oven front
are damaged;
- The door window glass is damaged;
- There is frequent electrical arcing inside the oven even though
there is no metal object inside.
The oven can only be used again after it has been repaired by a
Technical Assistance Service technician.
If smoke is emitted, switch off or unplug the appliance and keep
the door closed in order to stifle any flames.
Microwave heating of beverages can result in delayed eruptive
boiling. Care must be taken when handling the container.
The contents of feeding bottles and baby food jars shall be stirred
or shaken and the temperature checked before consumption, in
order to avoid burns.
Eggs in their shell and whole hard-boiled eggs should not be
heated in the appliance since they may explode, even after
microwave heating has ended.
INSTALLATION
The electrical installation is to be set up so that the appliance can
be isolated from the mains with a minimum 3mm all-pole contact
separation.

5
EN
Safety Information
Suitable separation devices include e.g. cutouts, fuses (screw
fuses are to be taken out of the holder), RCD’s and contactors.
This installation must comply with current regulations.
If the electrical connection is done through a plug and this
remains accessible after installation, then it is not necessary to
provide the mentioned separation device.
Protection against electric shock must be provided by the
electrical installation
Warning: The oven must be earthed.
CLEANING
The appliance should be cleaned regularly and any food deposits
removed.
Failure to maintain the appliance in a clean condition could lead
to deterioration of the surface that could adversely affect the life
of the appliance and possibly result in a hazardous situation.
Do not use harsh abrasive cleaners or sharp metal scrapers to
clean the glass door since they can scratch the surface, which
may result in shattering of the glass.
Do not use a steam cleaner to clean the appliance.
The door contact surfaces (the front of the cavity and the inside
part of the doors) must be kept very clean in order to ensure the
oven functions correctly.
Please follow the instructions regarding cleaning in the section
"Oven Cleaning and Maintenance".
REPAIRS
Warning: Before maintenance cut the power supply.
Warning: Only a competent person can carry out any service or
repair operation that involves the removal of a cover which gives
protection against exposure to microwave energy.
Warning: If the door or door seals are damaged, the appliance
must not be operated until it has been repaired by a competent
person.

6
EN
Safety Information
If the power cable is damaged it should be substituted by the
manufacturer, authorized agents or technicians qualified for this
task in order to avoid dangerous situations. Furthermore, special
tools are required for this task.
Repair and maintenance work, especially of current carrying
parts, can only be carried out by technicians authorized by the
manufacturer.
7
EN
Safety Instructions
Warning! Do not heat pure alcohol or
alcoholic drinks in the microwave. FIRE
RISK!
Beware!
To avoid food overheating or burning it is
very important not to select long time periods
or power levels that are too high when
heating small quantities of food. For example,
a bread roll can burn after 3 minutes if the
power selected is too high.
For toasting, use just the grilling function and
watch the oven all the time. It you use a
combined function to toast bread it will catch
fire in a very short time.
Make sure you never catch the power cables
of other electrical appliances in the hot door
or the oven. The cable insulation may melt.
Danger of short-circuiting!
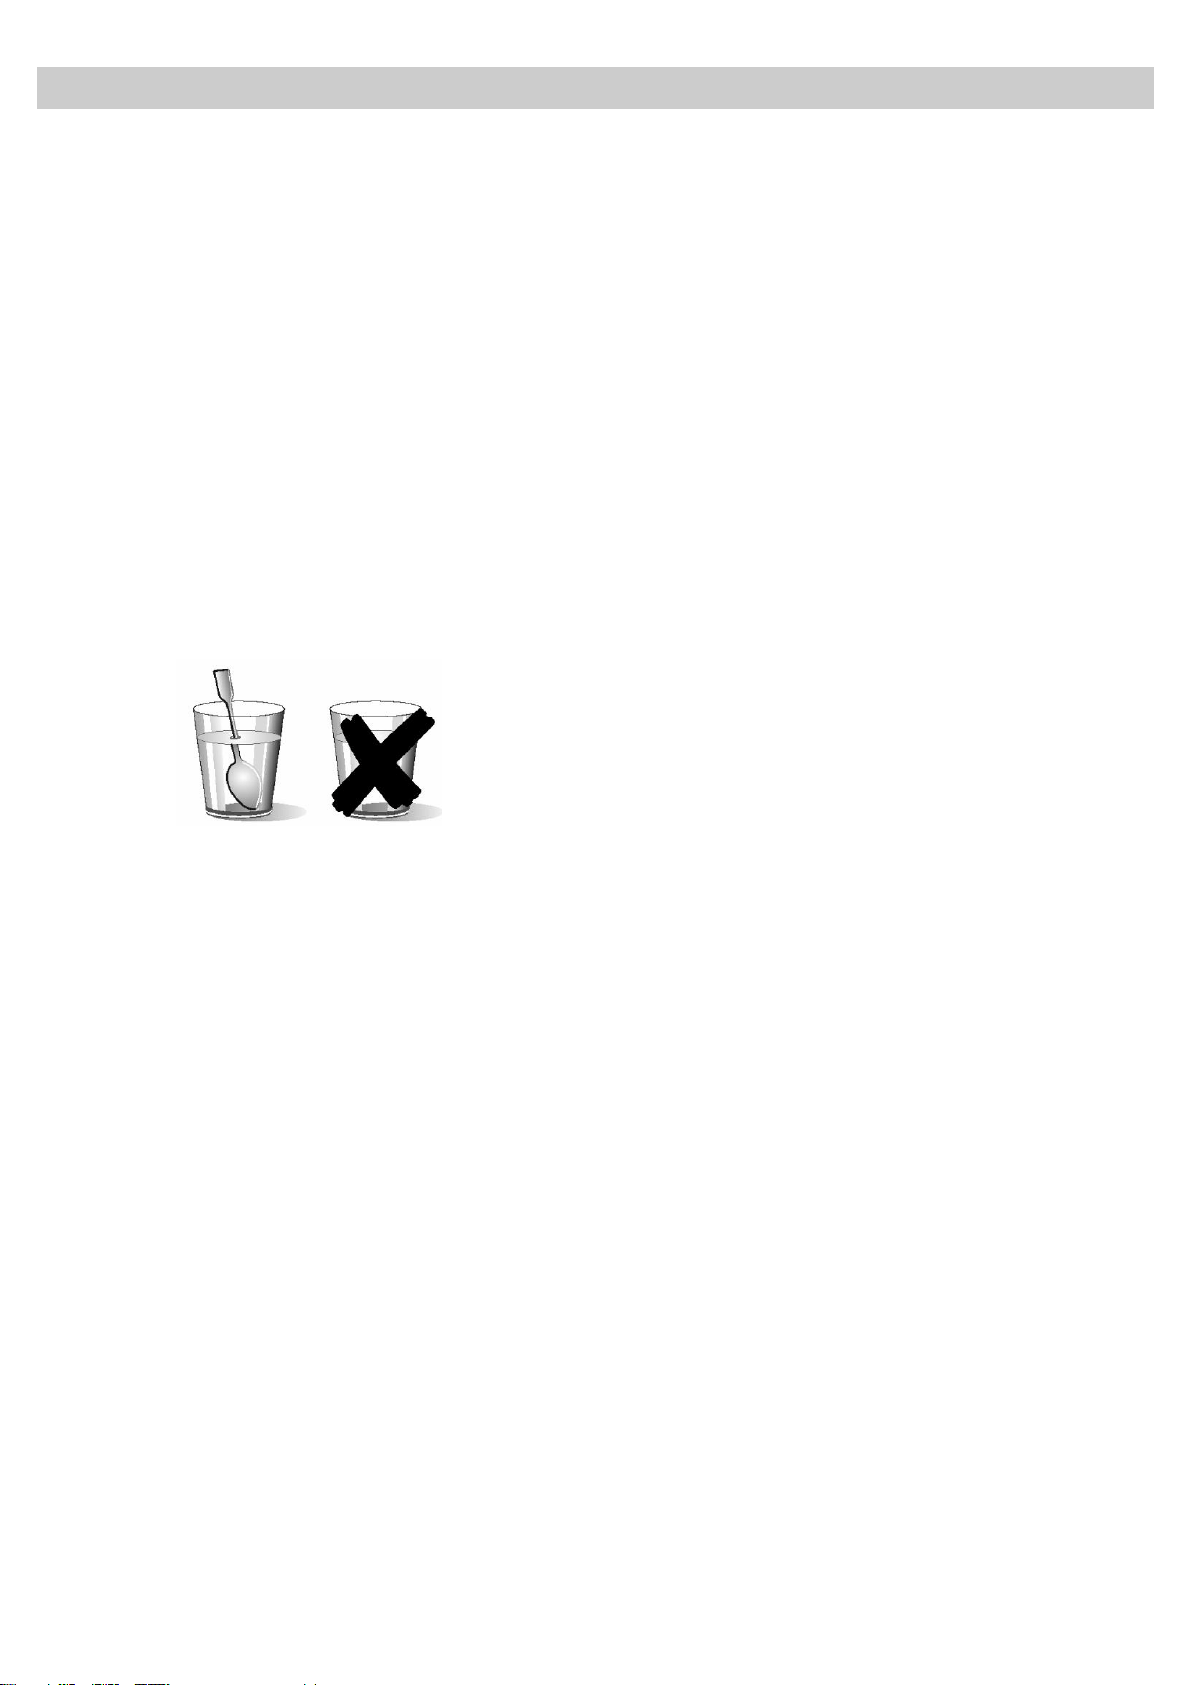
Take care when heating liquids!
When liquids (water, coffee, tea, milk, etc.)
are nearly at boiling point inside the oven and
are taken out suddenly, they may spurt out of
their containers.
DANGER OF INJURIES AND BURNS!
To avoid that type of situation when heating
liquids, put a teaspoon or glass rod inside the
container.
Avoid damaging the oven or other
dangerous situations by following these
instructions:
Do not switch on the oven without the
turntable support, the turntable ring and the
respective plate being in place.
Never switch on the microwave when it is
empty. If there is no food inside there may be
an electrical overcharge and the oven could
be damaged.
RISK OF DAMAGE!
For carrying out oven programming tests put
a glass of water inside the oven. The water
will absorb the microwaves and the oven will
not be damaged.
Do not cover or obstruct the ventilation
openings.
Use only dishes suitable for microwaves.
Before using dishes and containers in the
microwave, check that these are suitable
(see the section on types of dishes).
Never remove the mica cover on the ceiling
of the oven interior! This cover stops fat and
pieces of food damaging the microwave
generator.
Do not keep any inflammable object inside
the oven as it may burn if the oven is
switched on.
Do not use the oven as a pantry.
Do not use the oven for frying as it is
impossible to control the temperature of oil
heated by microwaves.
Do not lean or sit on the open oven door.
This may damage the oven, especially in the
hinge zone. The door can bear a maximum
weight of 8 kg.
The turntable and the grills can bear a
maximum load of 8 kg. To avoid damaging
the oven, do not exceed this load.
8
EN
The advantages of microwaves
In conventional ovens, heat radiated by electrical
elements or gas burners slowly penetrates the
food from outside to inside. On account of this
there is a major amount of energy is wasted
heating the air, the oven components and the food
containers.
In a microwave oven, heat is generated by the
food itself and the heat travels from inside to
outside. No heat is lost to the air, the walls of the
oven cavity or the dishes and containers (if these
are suitable for use in microwave oven), in other
words, only the food is heated.
Microwave ovens have the following advantages:
1. Shorter cooking times; in general these are
up to 3/4 less than the time required for
conventional cooking.
2. Ultra-fast food defrosting, thus reducing the
danger of bacterial development.
3. Energy savings.
4. Conservation of the nutritional value of foods
due to the shorter cooking times.
5. Easy to clean.
How a microwave oven works
In a microwave oven there is a high tension valve
called a magnetron which converts electrical
energy into microwave energy. These
electromagnetic waves are channelled to the
interior of the oven through a wave guide and
distributed by a metallic spreader or through a
turntable.
Inside the oven the microwaves propagate in all
directions and are reflected by the metal walls,
uniformly penetrating the food.
Why food heats up
Most foods contain water and water molecules
vibrate when subjected to microwaves.
The friction between molecules produces heat
which raises the temperature of the food, de-
freezing it, cooking it or keeping it hot.
Since the heat arises inside the food:
This can be cooked with little or no liquid or
fats/oils;
De-freezing, heating or cooking in a
microwave oven is quicker than in a
conventional oven;
The vitamins, minerals and nutritional
substances in the food are conserved;
The natural colour and aroma of the food are
unchanged.
Microwaves pass through china, glass, cardboard
or plastic but do not go through metal. For this
reason, metal containers or ones with metal parts
must not be used in a microwave oven.
Microwaves are reflected by metal...
... but go through glass and china...
... and are absorbed by foods.
9
EN
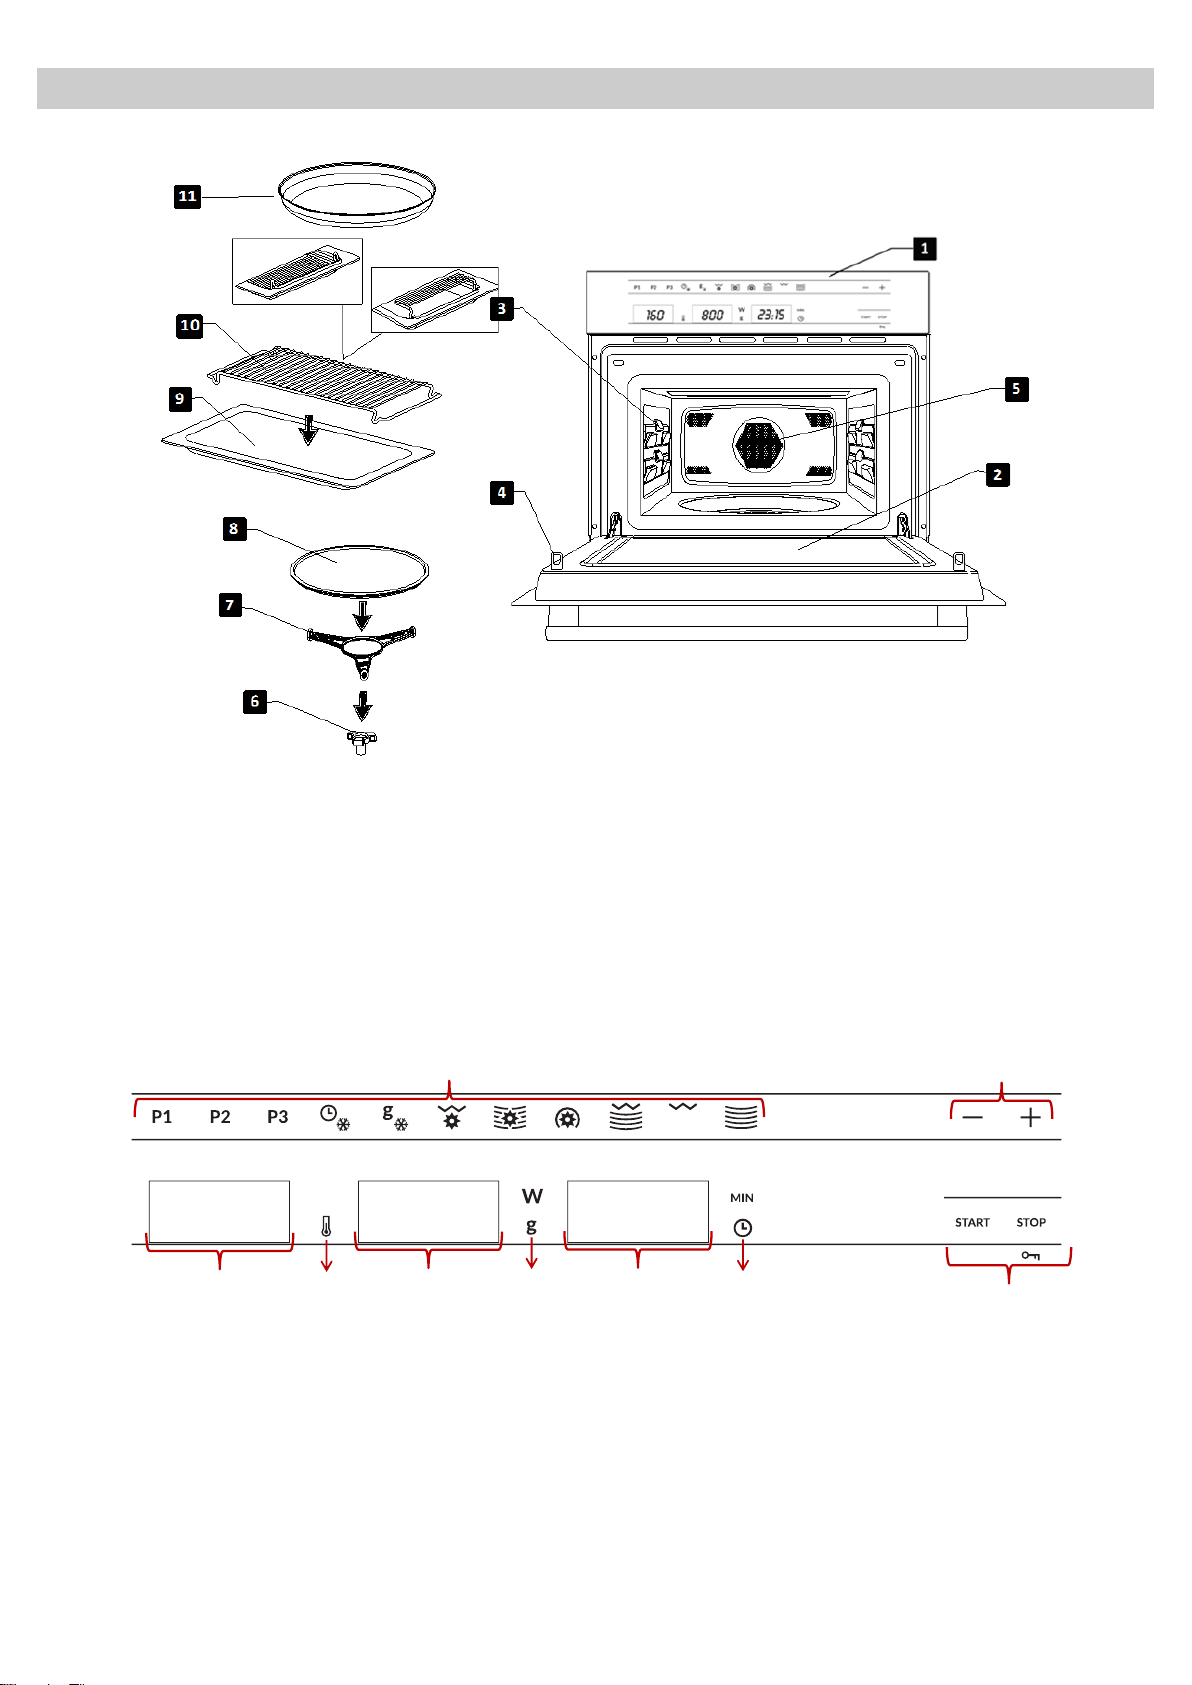
Description of your oven
1.
Function lights
4a.
Power/Weight indication lights
2.
Function selection key
5.
Clock/ Time selection key
3.
Oven Temperature selection key
5a.
Clock/ Time indication lights
3a.
Oven Temperature indication light
6.
Start and Stop/ Safety blocking keys
4.
Power/Weight selection key
23:15
1
2
6
5
4
3
800
160
3a
4a
5a
1. Control panel
6. Turntable support
2. Door window glass
7. Turntable ring
3. Lateral supports
8. Turntable plate
4. Catches
9. Rectangular Glass tray
5. Hot Air Output
10. Rectangular Rack
11. Browning Plate
10
EN
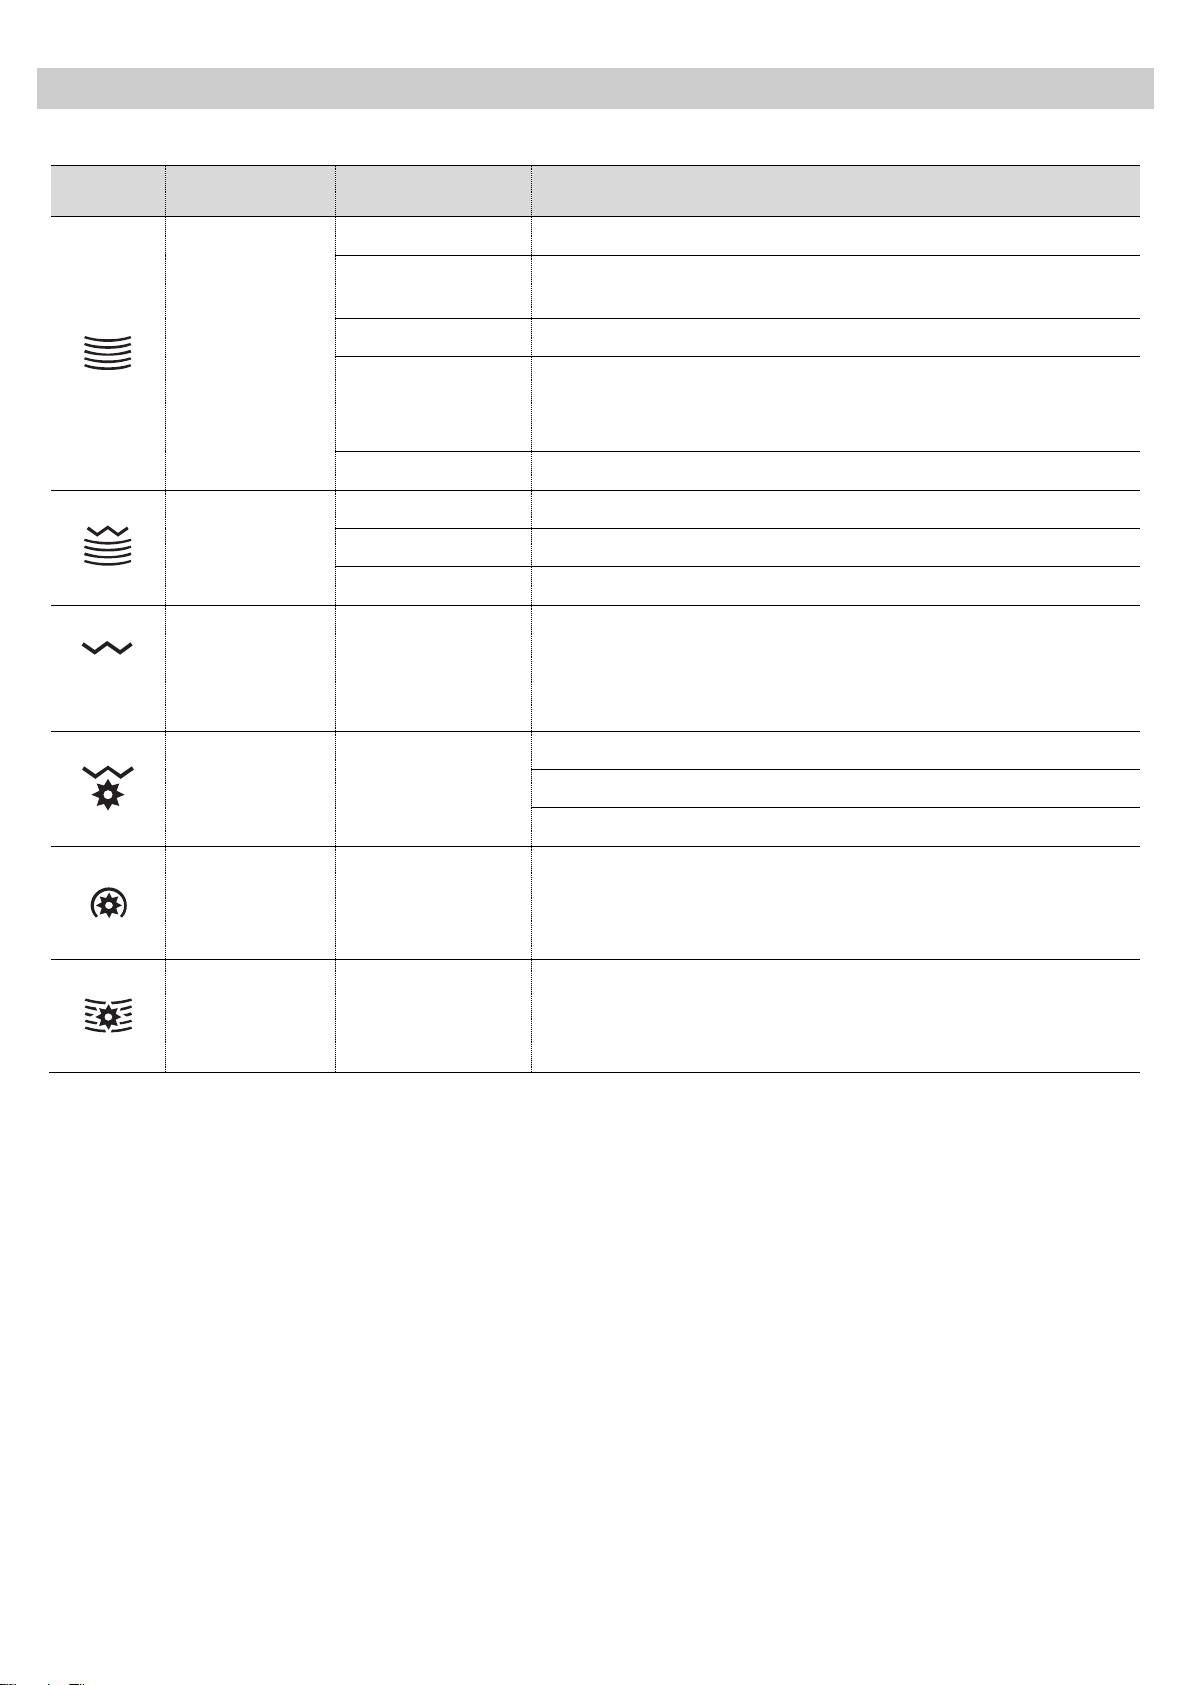
Description of Functions
Symbol
Function
Microwave Power
Output
Foods
Microwave
200 W
Slow defrosting for delicate foods; keeping food hot.
400 W
Cooking with little heat; boiling rice.
Rapid defrosting, heating baby food.
600 W
Heating and cooking food.
800 W
Cooking vegetables and food.
Cooking and heating carefully.
Heating and cooking small portions of food.
1000 W
Rapidly heating liquids.
Microwave
+ Grill
200 W
Toasting food.
400 W
Grilling poultry and meat.
600 W
Cooking pies and cheese-topped dishes.
Grill
Grilling food.
Grill + Fan
---
Grilling meat and fish.
Grilling poultry.
Potatoes – deep-frozen, defrosting and roasting.
Hot-Air
---
Roasting and baking.
Microwaves +
Hot-Air
200-600 W
Quick meat, fish and poultry roasting.
Baking cakes.
11
EN
Basic Controls
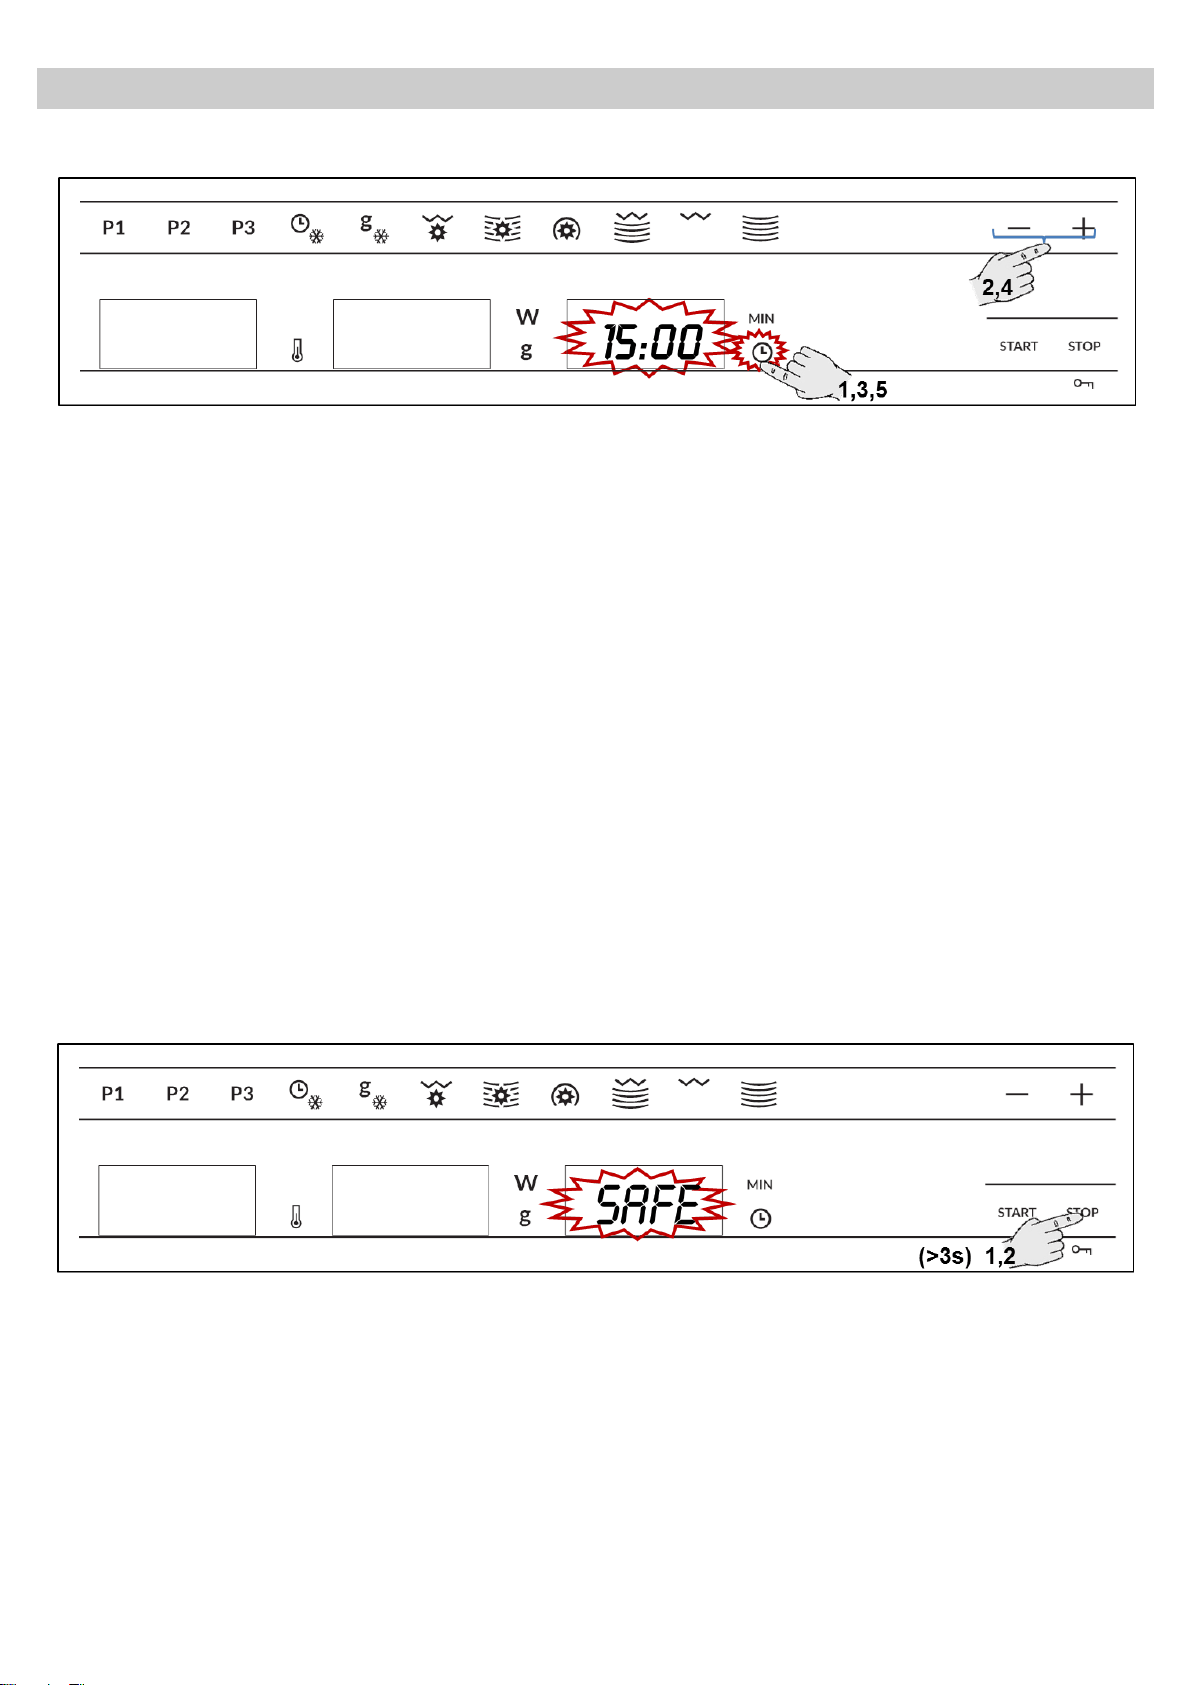
Setting the clock
After your microwave oven is first plugged in or
after a power failure, the clock display will flash to
indicate that the time shown is not correct. To set
the clock, proceed as follows:
1. Press the Clock key. The hour numbers will
start to flash.
2. Press key “-” and “+” to set the hours.
3. Press again the Clock key to set the minutes.
The minute numbers will start to flash.
4. Press key “-” and “+” to set the minutes.
5. To finish, press the Clock key again.
Hiding/Displaying the Clock
If the clock display disturbs you, you can hide it by
pressing the Clock key for 3 seconds. The dots
that separate the hours and minutes will flash but
the rest of the clock display will be hidden.
If you want to see the clock display again, press
the Clock key again for 3 seconds.
Safety blocking
The oven functioning can be blocked (for
example, to stop it being used by children).
1. To block the oven, press the Stop key for 3
seconds. You will hear a sound signal and the
display will show the word “SAFE”. The oven is
blocked in this state and cannot be used.
2. To unblock the oven, press the Stop key
again for 3 seconds. You will hear a sound
signal and the display will show the time
again.

12
EN
Basic Controls
Stopping the rotating plate
1. To stop the rotating plate, press the “+” key and
the “Stop” key at the same time
2. To start plate rotation again, press the “+” Key
and the “Stop” key at the same again.
13
EN
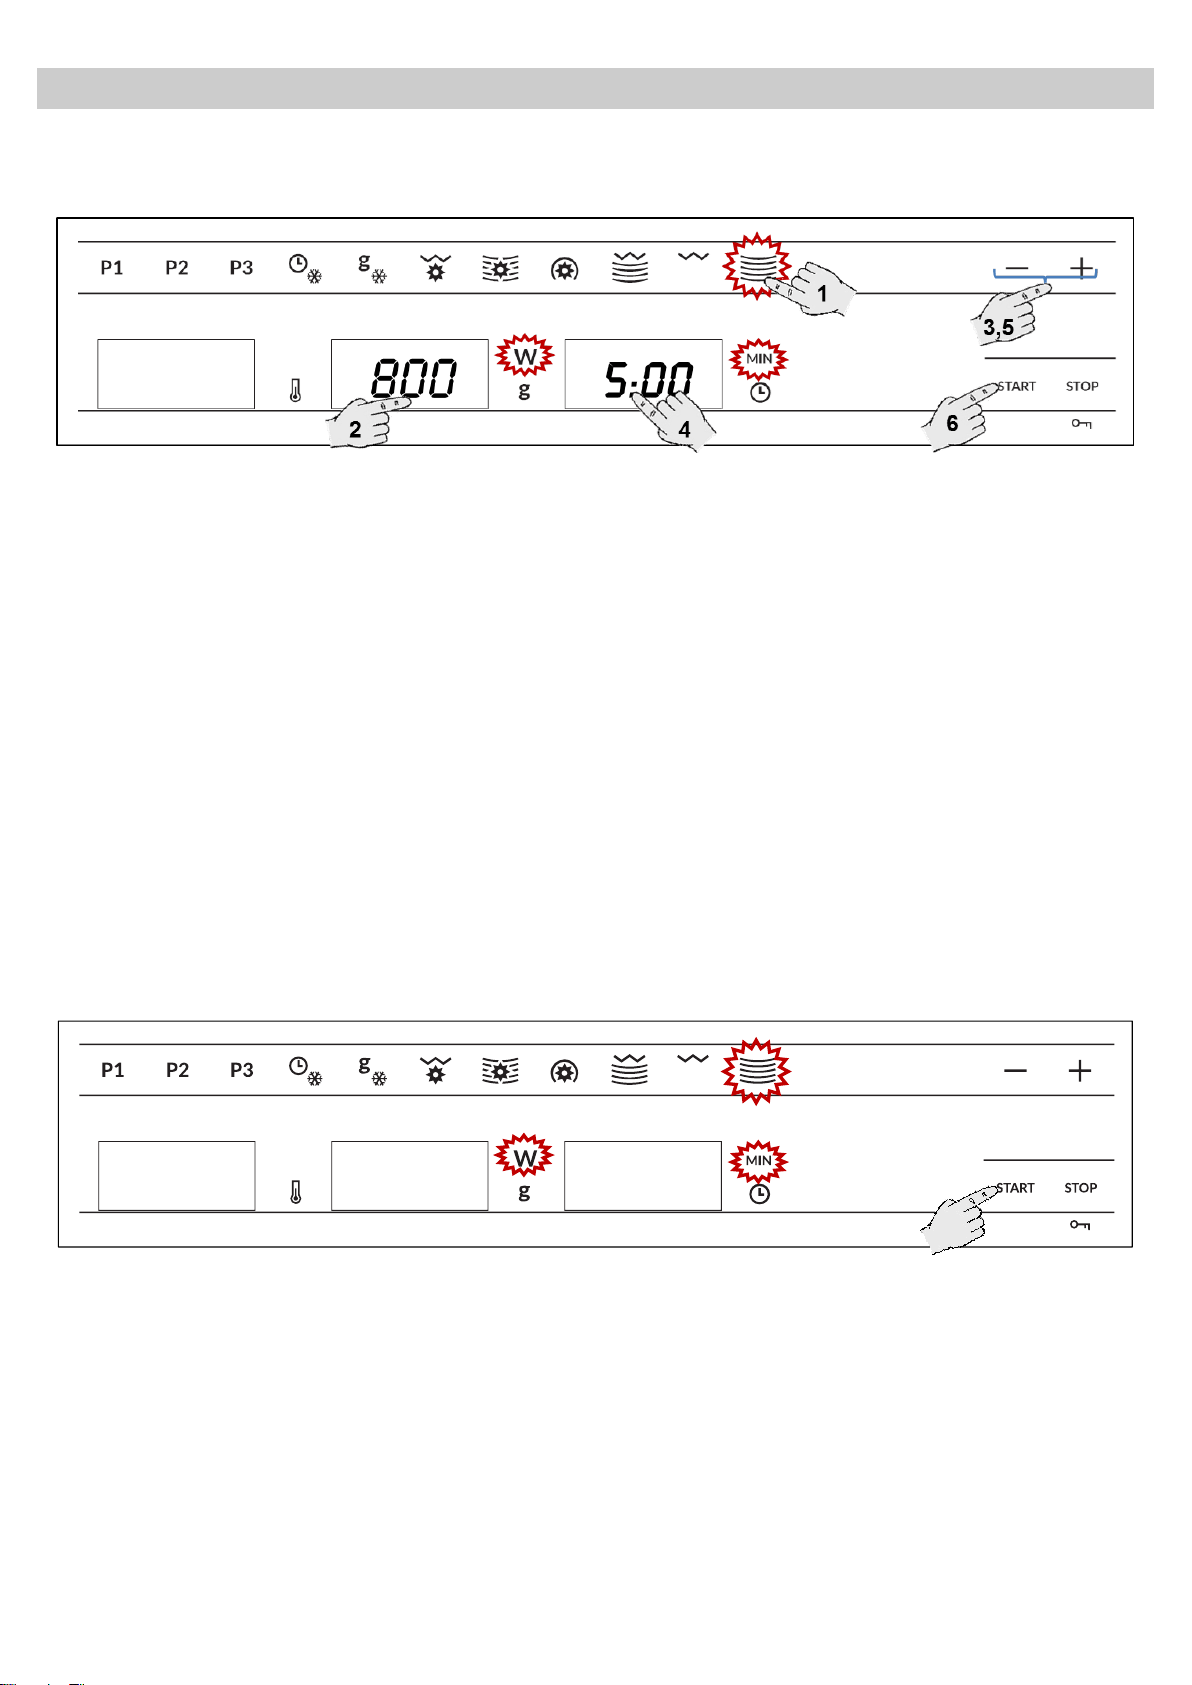
Basic Functions
Microwave oven
Use this function to cook and heat vegetables, potatoes, rice, fish and meat.
1. Press the Microwave function key. The
function key lights up.
2. Press the Power Selection key to change the
microwave power. The respective light will start
to flash. If you do not press this key, the oven
operates at 800 W power.
3. To change the microwave power press key “-”
and “+”.
4. Press the Time Selection key to change the
operating time. The correspondent light will
start to flash.
5. Press key “-” and “+”, to change the function
time (e.g. 1 minute).
6. Press the START key. The oven will start to
operate
NOTE: When 1000 W power is selected, the
operating time is limited to a maximum of 15
minutes.
Microwave oven – Quick Start
Use this function to rapidly heat foods with high water content, such as water, coffee, tea or thin soup.
1. Press the Start key. The oven starts to operate
in the Microwave function at maximum power
for 30 seconds.
2. If you want to increase the operating time press
the Start key again. Each time you press this
key the operating time will be increased by 30
seconds.
NOTE: When 1000 W power is selected, the
operating time is limited to a maximum of 15
minutes.
00:30
1000
1,2
14
EN
Basic Functions
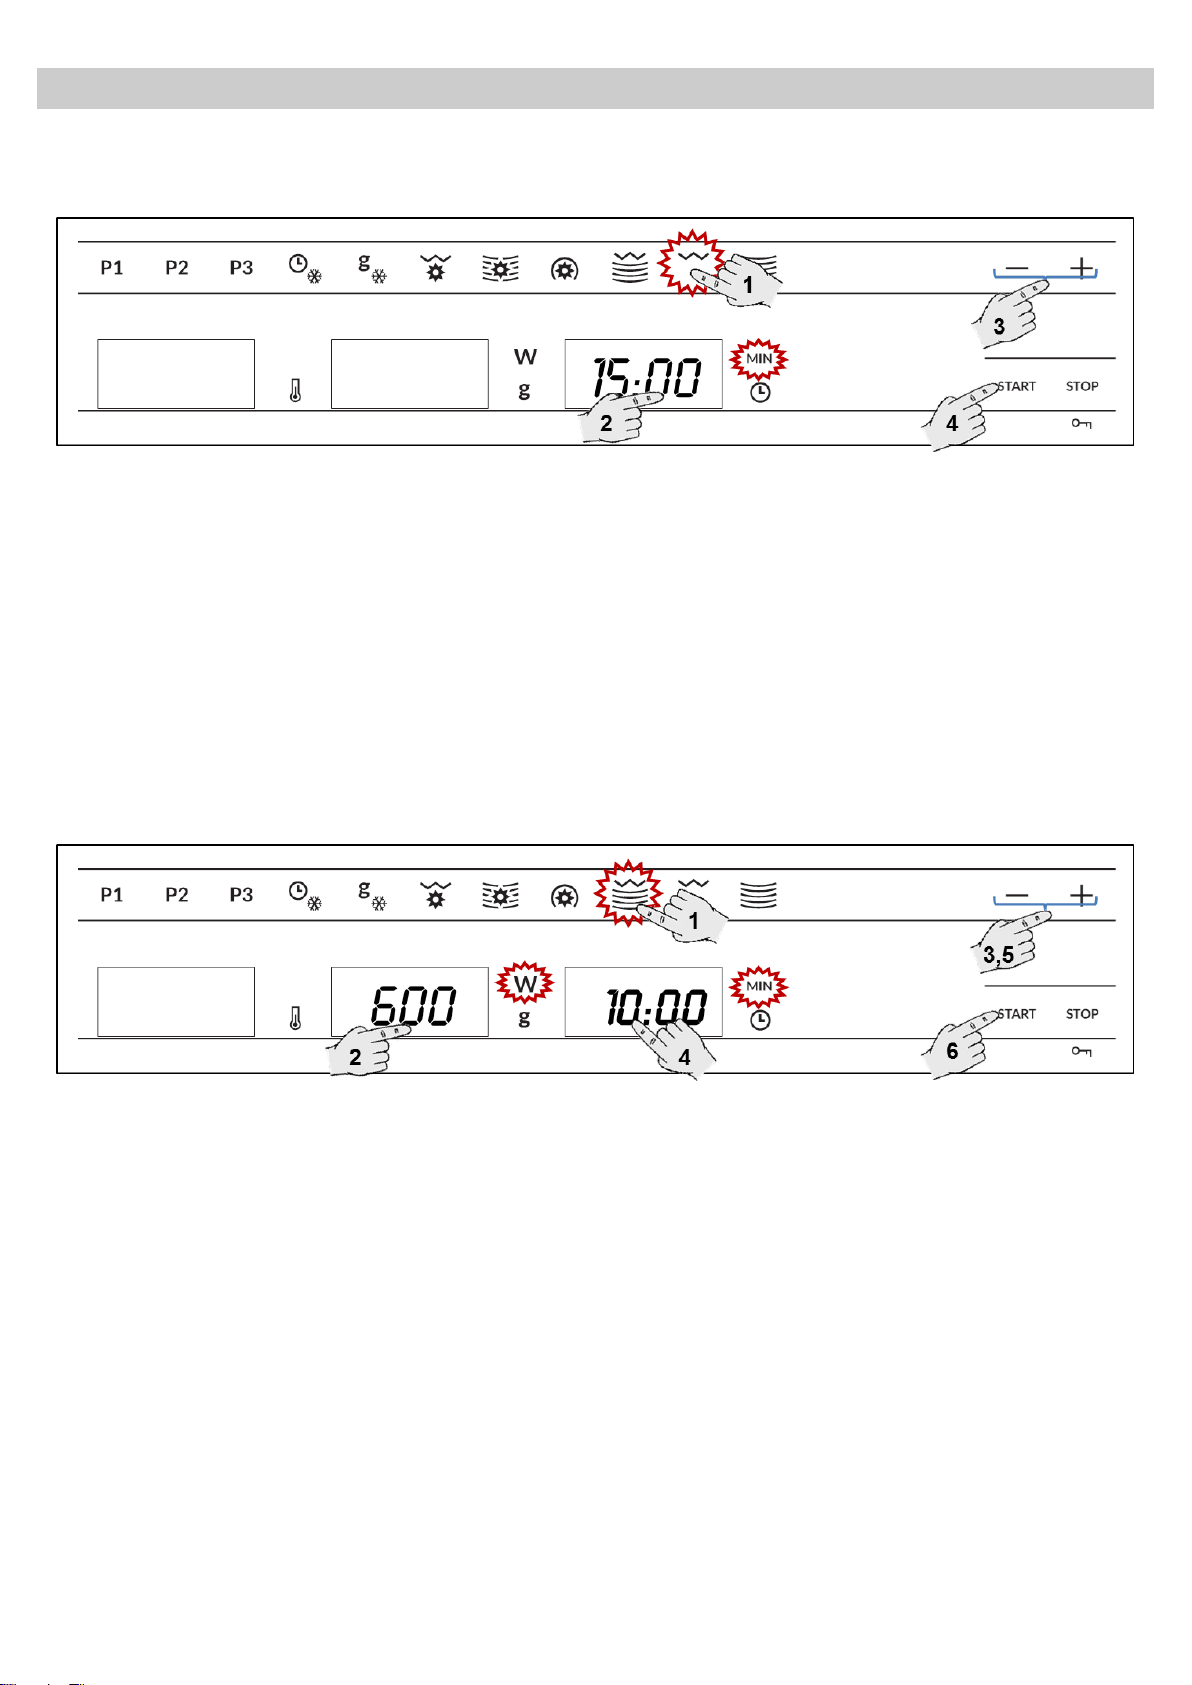
Grill
Use this function to brown the top of food quickly.
1. Press the function key Grill. The function key
lights up.
2. Press the Time Selection key to change the
operating time. The correspondent light will
start to flash.
3. Press key “-” and “+”, to change the function
time (e.g. 15 minutes).
4. Press the Start key. The oven will start to
operate.
Microwave + Grill
Use this function to cook lasagne, poultry, roast potatoes and toasted foods.
1. Press the function key Microwave + Grill. The
function key lights up.
2. Press the Power Selection key to change the
microwave power. The respective light will
flash. If you do not press this key, the oven
operates at 600 W power.
3. To change the microwave power press key “-”
and “+”.
4. Press the Time Selection key to change the
operating time. The respective light will start to
flash.
5. Press key “-” and “+”, to change the function
time (e.g. 10 minutes).
6. Press the Start key. The oven will start to
operate.
NOTE: In combined mode, the microwave oven
power is limited to 600 W.
15
EN
Basic Functions
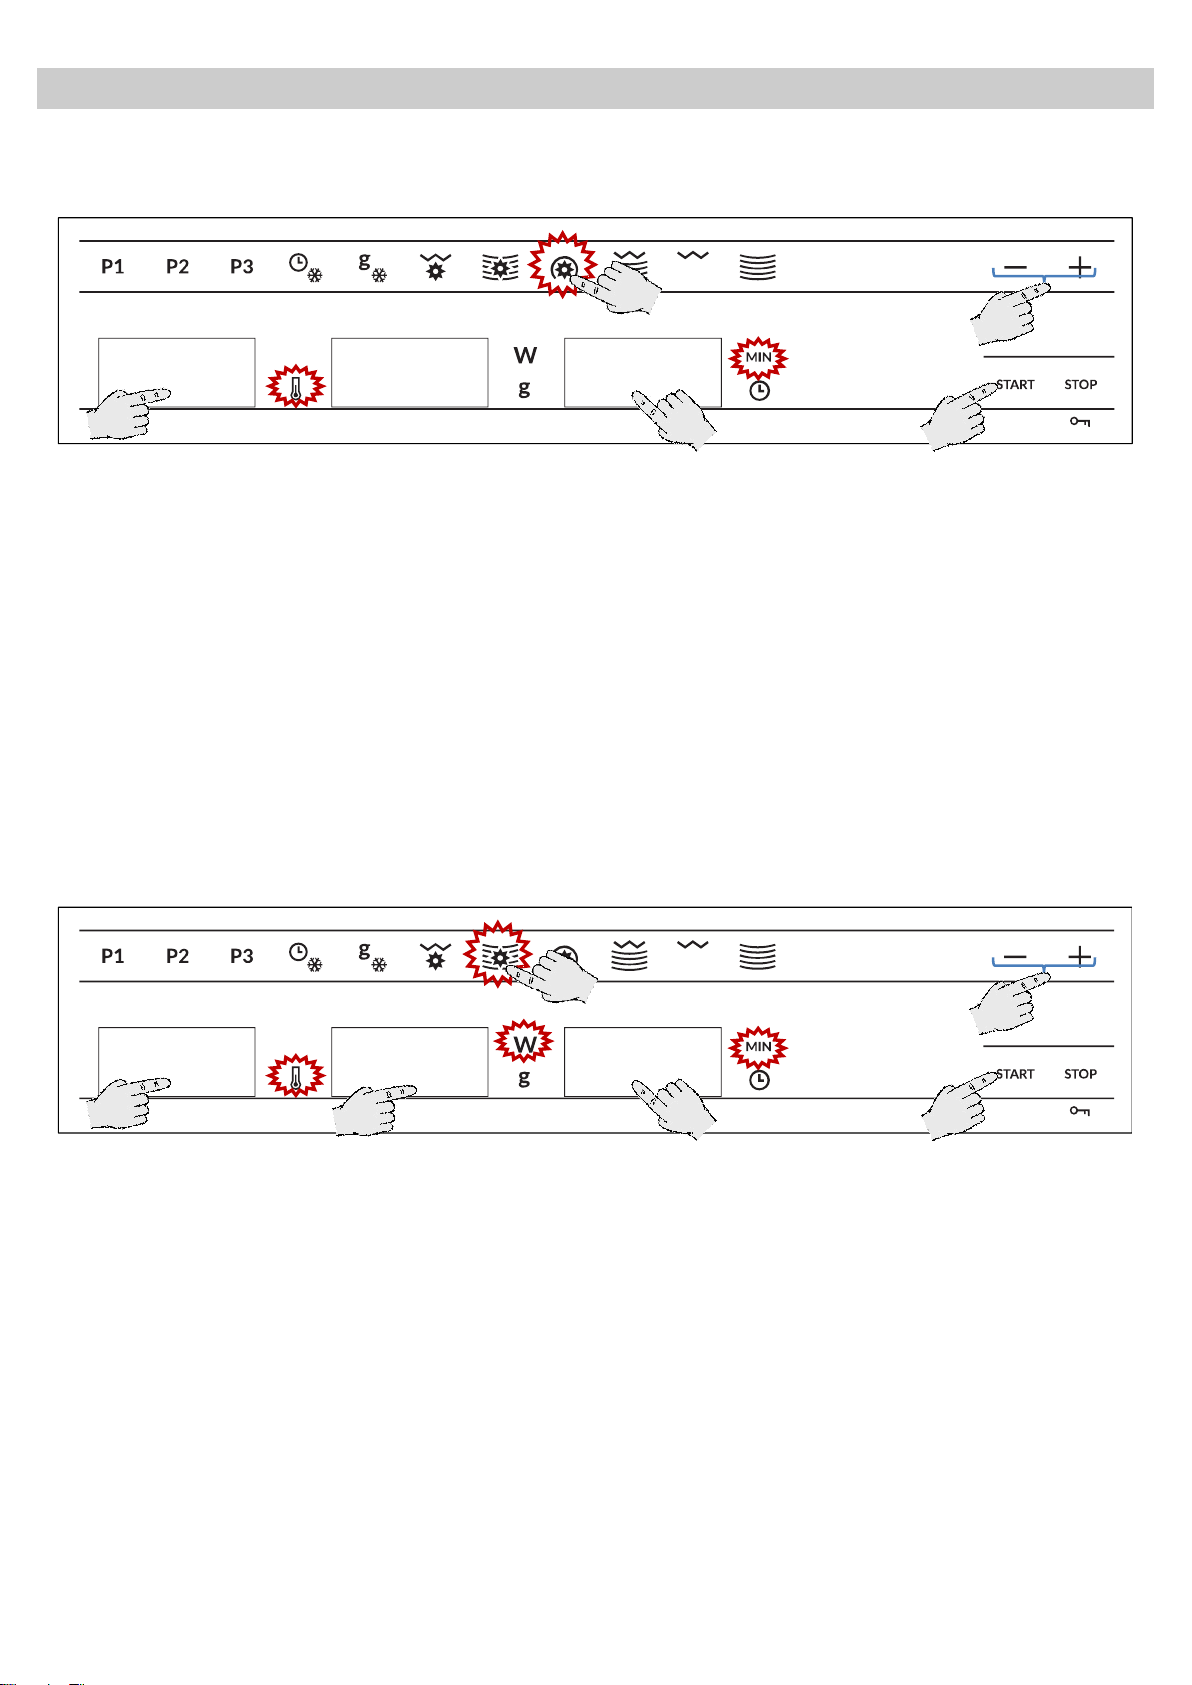
Hot air
Use this function to bake and roast.
1. Press the function key Hot air. The function
key lights up.
2. Press the Temperature Selection key to
change the temperature. The respective light
will flash. If you do not press this key, the
oven operates at 160 ºC.
3. To change the temperature press key “-” and
“+”.
4. Press the Time Selection key to change the
operating time. The respective light will start
to flash.
5. Press key “-” and “+”, to change the function
time (e.g. 12 minutes).
6. Press the Start key. The oven will start to
operate.
Microwave + Hot air
Use this function to bake and roast
1. Press the function key Microwave + Hot air.
The function key lights up.
2. Press the Temperature Selection key to
change the temperature. The respective light
will flash. If you do not press this key, the
oven operates at 160 ºC.
3. To change the microwave power press the
“-“ and “+” keys.
4. Press the Power Selection key to change
the power. The respective light will start to
flash. If you do not press this key, the oven
operates at 400 W.
5. Press key “-” and “+”, to change the
temperature.
6. Press the Time Selection key to change the
operating time. The respective light will start
to flash.
7. Press key “-” and “+”, to change the function
time (e.g. 12 minutes).
8. Press the Start key. The oven will start to
operate,
NOTE: In combined mode, the microwave
oven power is limited to 600 W.
20:00
160
4
1
3,5
6
2
20:00
400
160
6
4
1
3,5,7
8
2
16
EN
Basic Functions
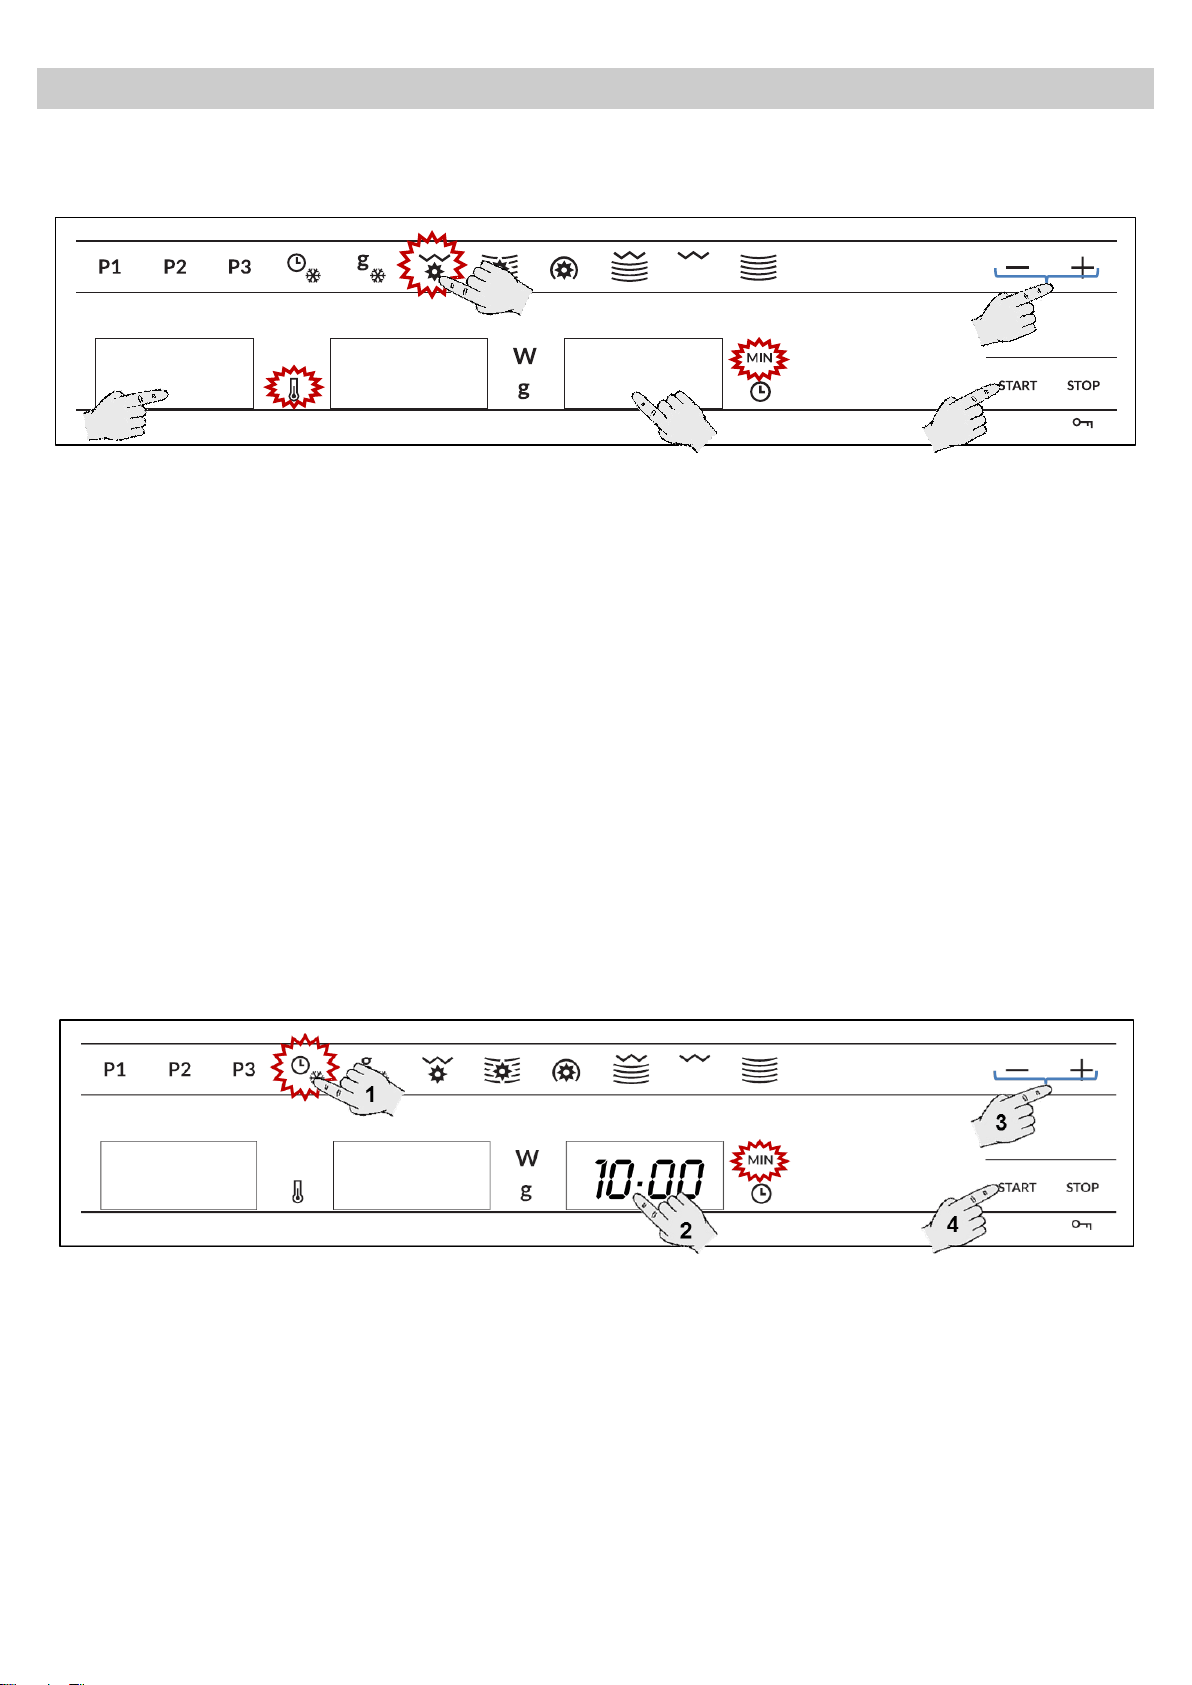
Grill with Fan
Use this function for crispy roast meat, fish, poultry or French fries
1. Press the function key Grill with Fan. The
function key lights up.
2. Press the Temperature Selection key to
change the temperature. The respective light
will flash. If you do not press this key, the
oven operates at 160 ºC.
3. To change the temperature press key “-” and
“+”.
4. Press the Time Selection key to change the
operating time. The respective light will start
to flash
5. Press key “-” and “+”, to change the function
time (e.g. 12 minutes).
6. Press the Start key. The oven will start to
operate.
Defrosting by time (manual)
Use this function to defrost any type of food quickly.
1. Press the function key Defrosting by time.
The function key lights up.
2. Press the Time Selection key to change the
function time. The respective light will flash.
3. Press key “-” and “+”, to change the function
time (e.g. 10 minutes).
4. Press the Start key. The oven will start to
operate.
20:00
160
4
1
3,5
6
2
17
EN
Basic Functions
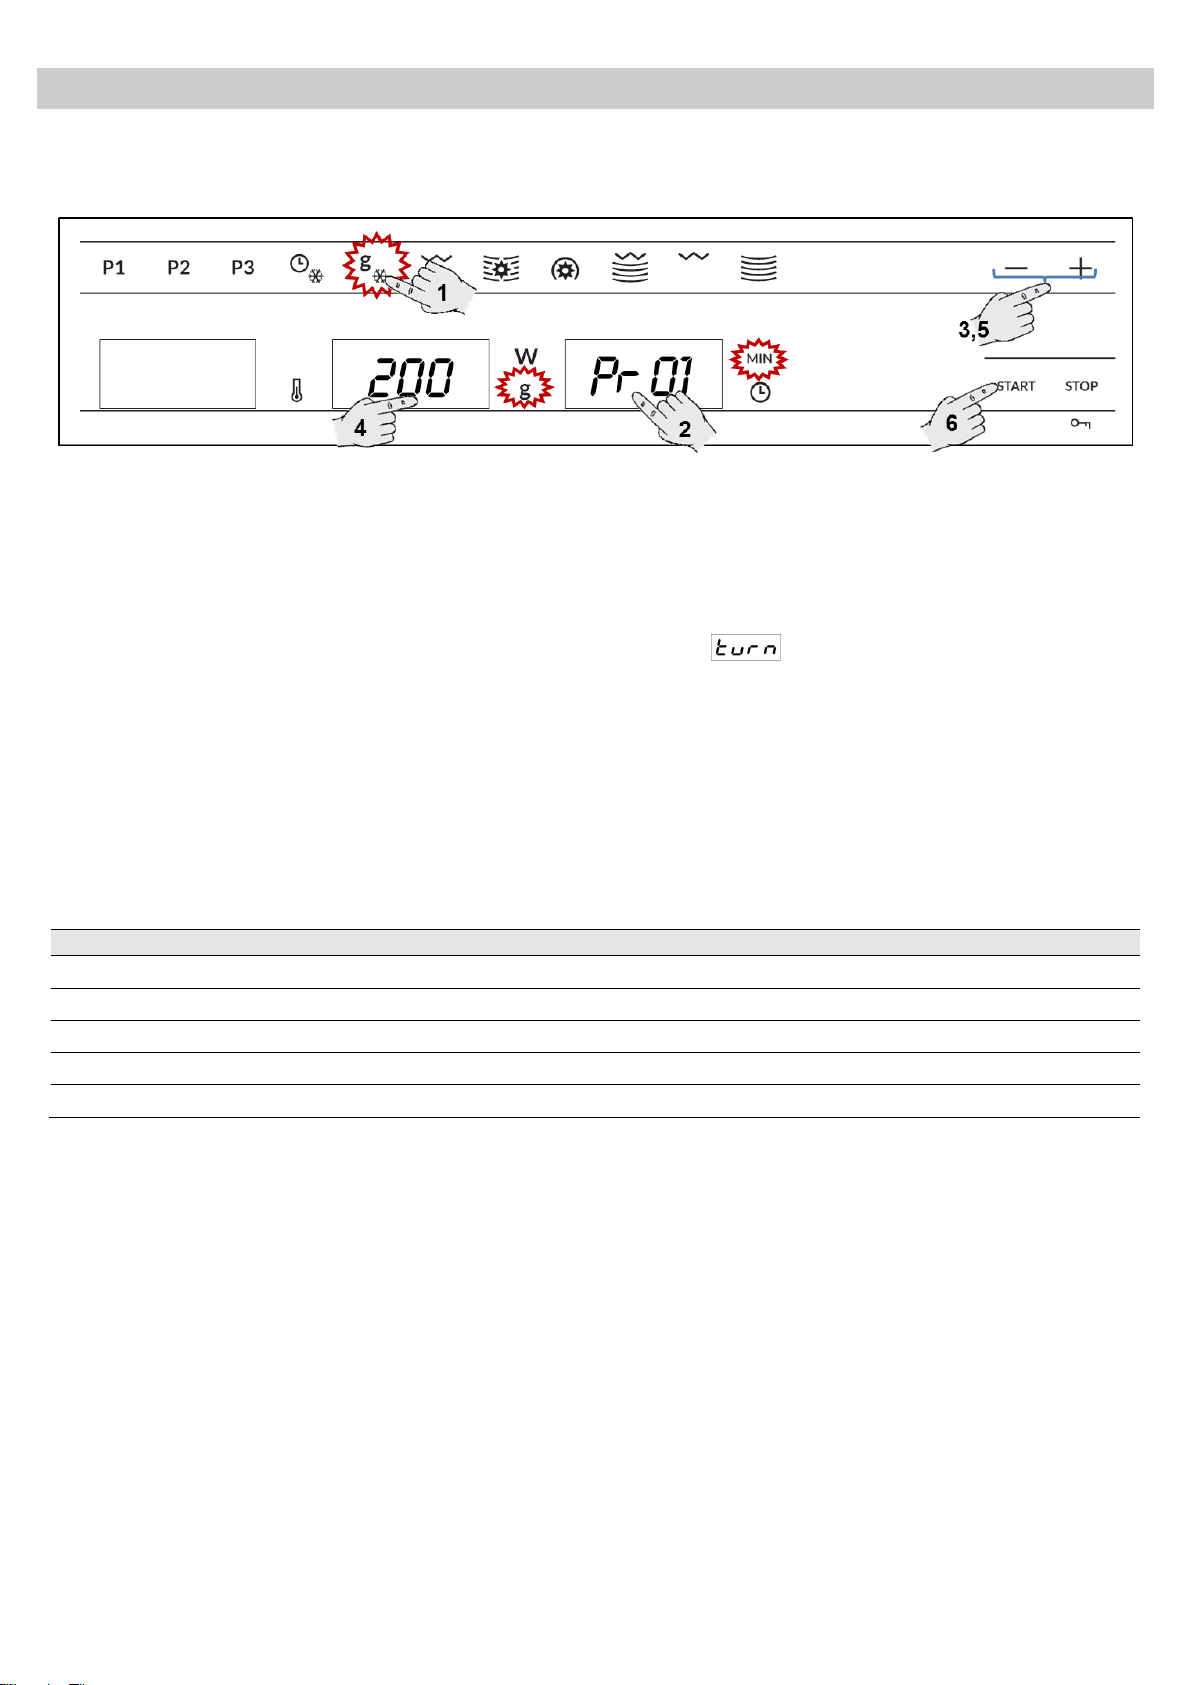
Defrosting by weight (automatic)
Use this function to defrost meat, poultry, fish, fruit and bread quickly.
1. Press the function key Defrosting by
weight. The function key lights up.
2. Press the Food Type selection key to
change the food type. The respective lights
will flash.
3. Press key “-” and “+”, to change the
programme, e.g. “Pr 01” (see following
table).
4. Press the Weight Selection key to define
the food weight. The respective light will
flash.
5. Press key “-” and “+”, to change the weight.
6. Press the Start key. The oven will start to
operate.
Note: Turn the food whenever the oven lets out
a sound signal and the display flashes the
word: .
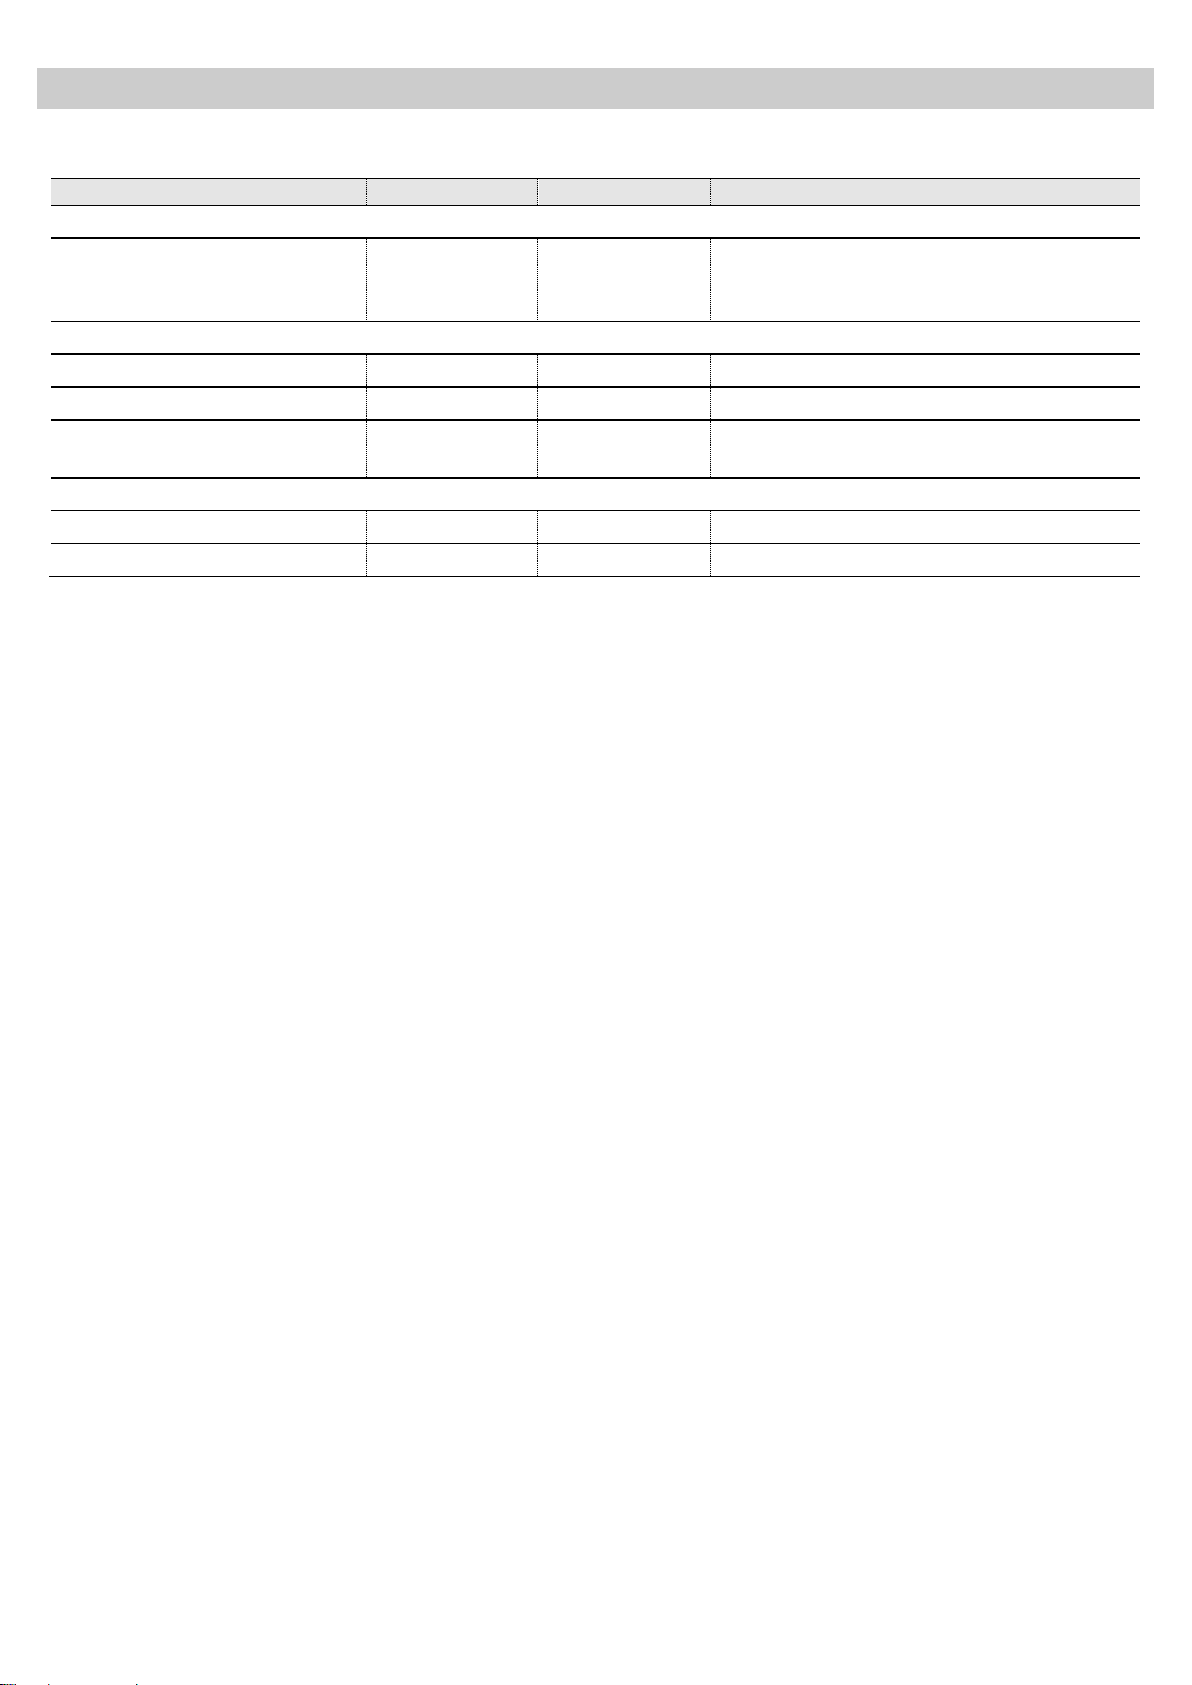
The following table shows the defrosting by weight function programmes, indicating weight intervals, and
defrosting and standing times (in order to ensure the food is of a uniform temperature).
Programme
Food
Weight (g)
Time (min)
Standing time (min)
Pr 01
Meat
100 – 2000
2 – 43
20 – 30
Pr 02
Poultry
100 – 2500
2 – 58
20 – 30
Pr 03
Fish
100 – 2000
2 – 40
20 – 30
Pr 04
Fruit
100 – 500
2 – 13
10 – 20
Pr 05
Bread
100 – 800
2 – 19
10 – 20
Important Note: see “General instructions for defrosting”.
18
EN
Special functions
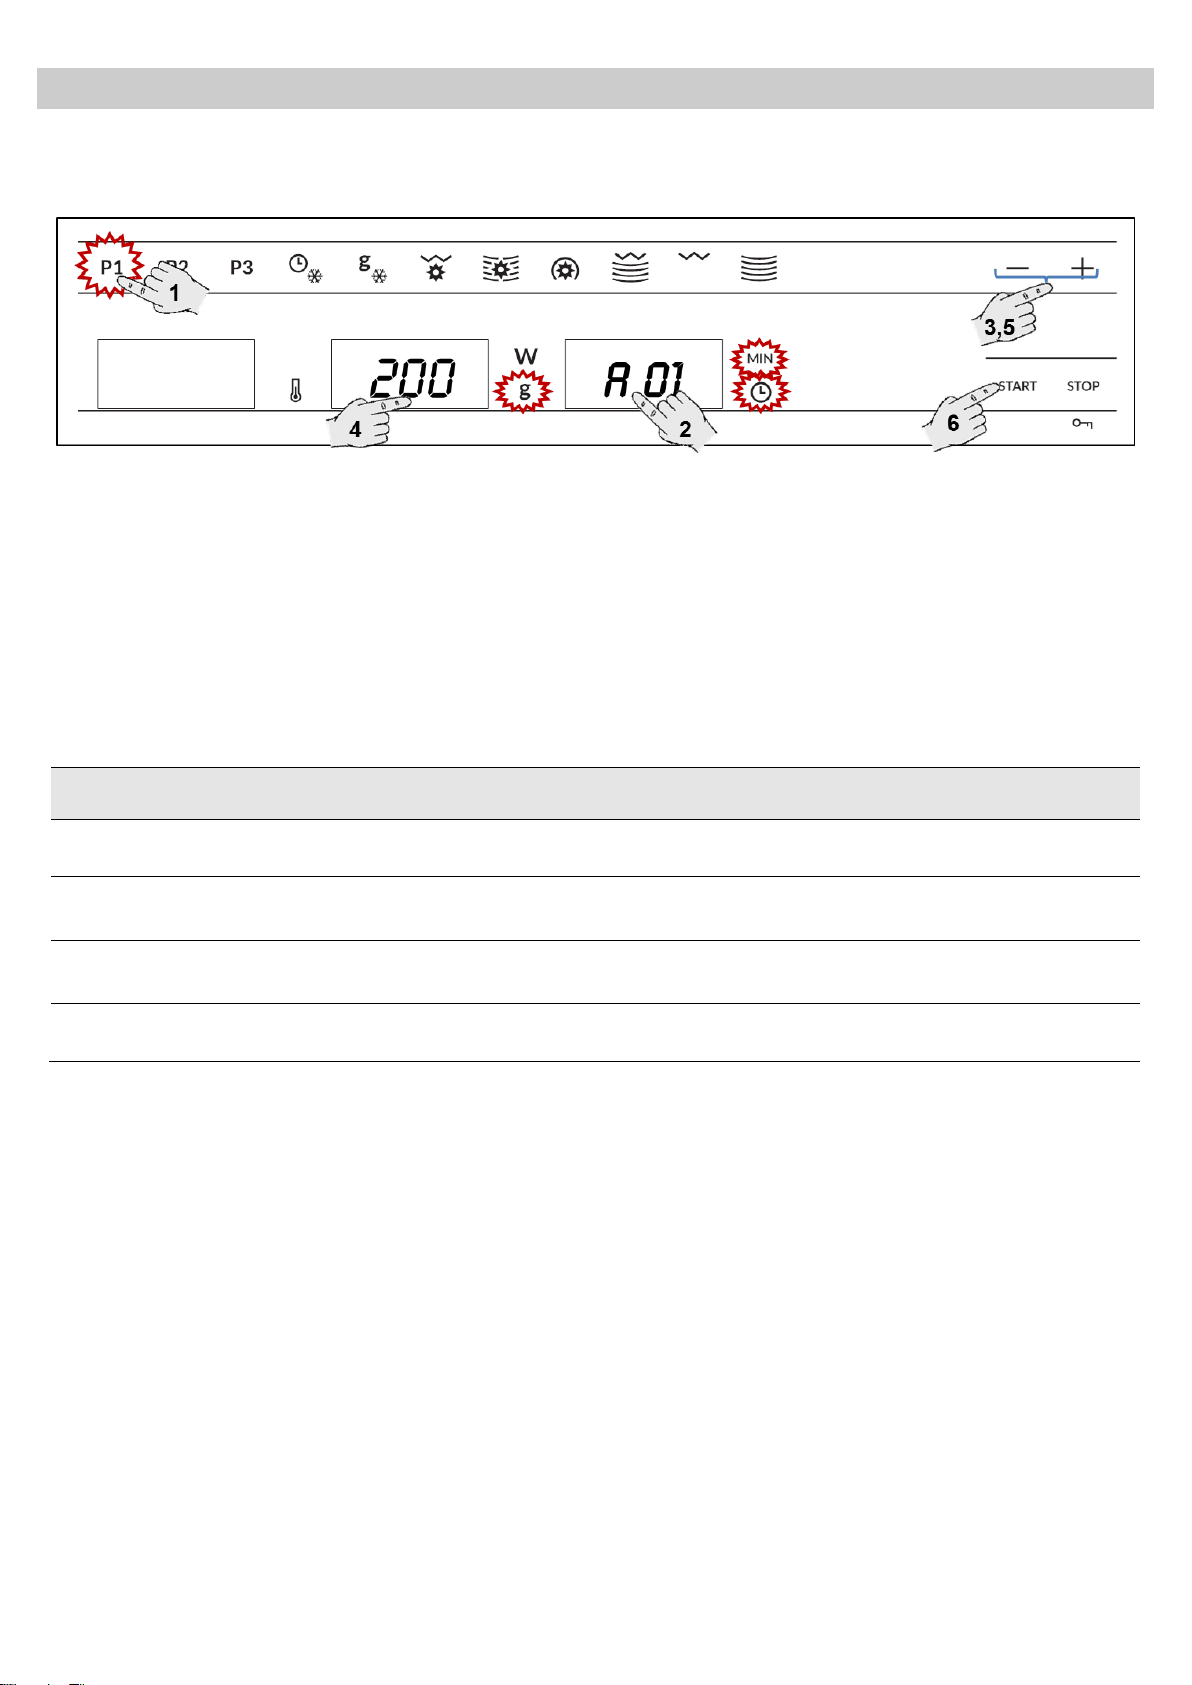
Special Function P1: Heating food
Use this function to heat various types of food.
1. Press the function key Special function P1.
The function key lights up.
2. Press the Food Type selection key to
change the food type. The respective lights
will flash.
3. Press key “-” and “+”, to change the
programme, e.g. “A 01” (see following table).
4. Press the Weight Selection key to define
the food weight. The respective light will
flash.
5. Press key “-” and “+”, to change the weight.
6. Press the Start key. The oven will start to
operate.
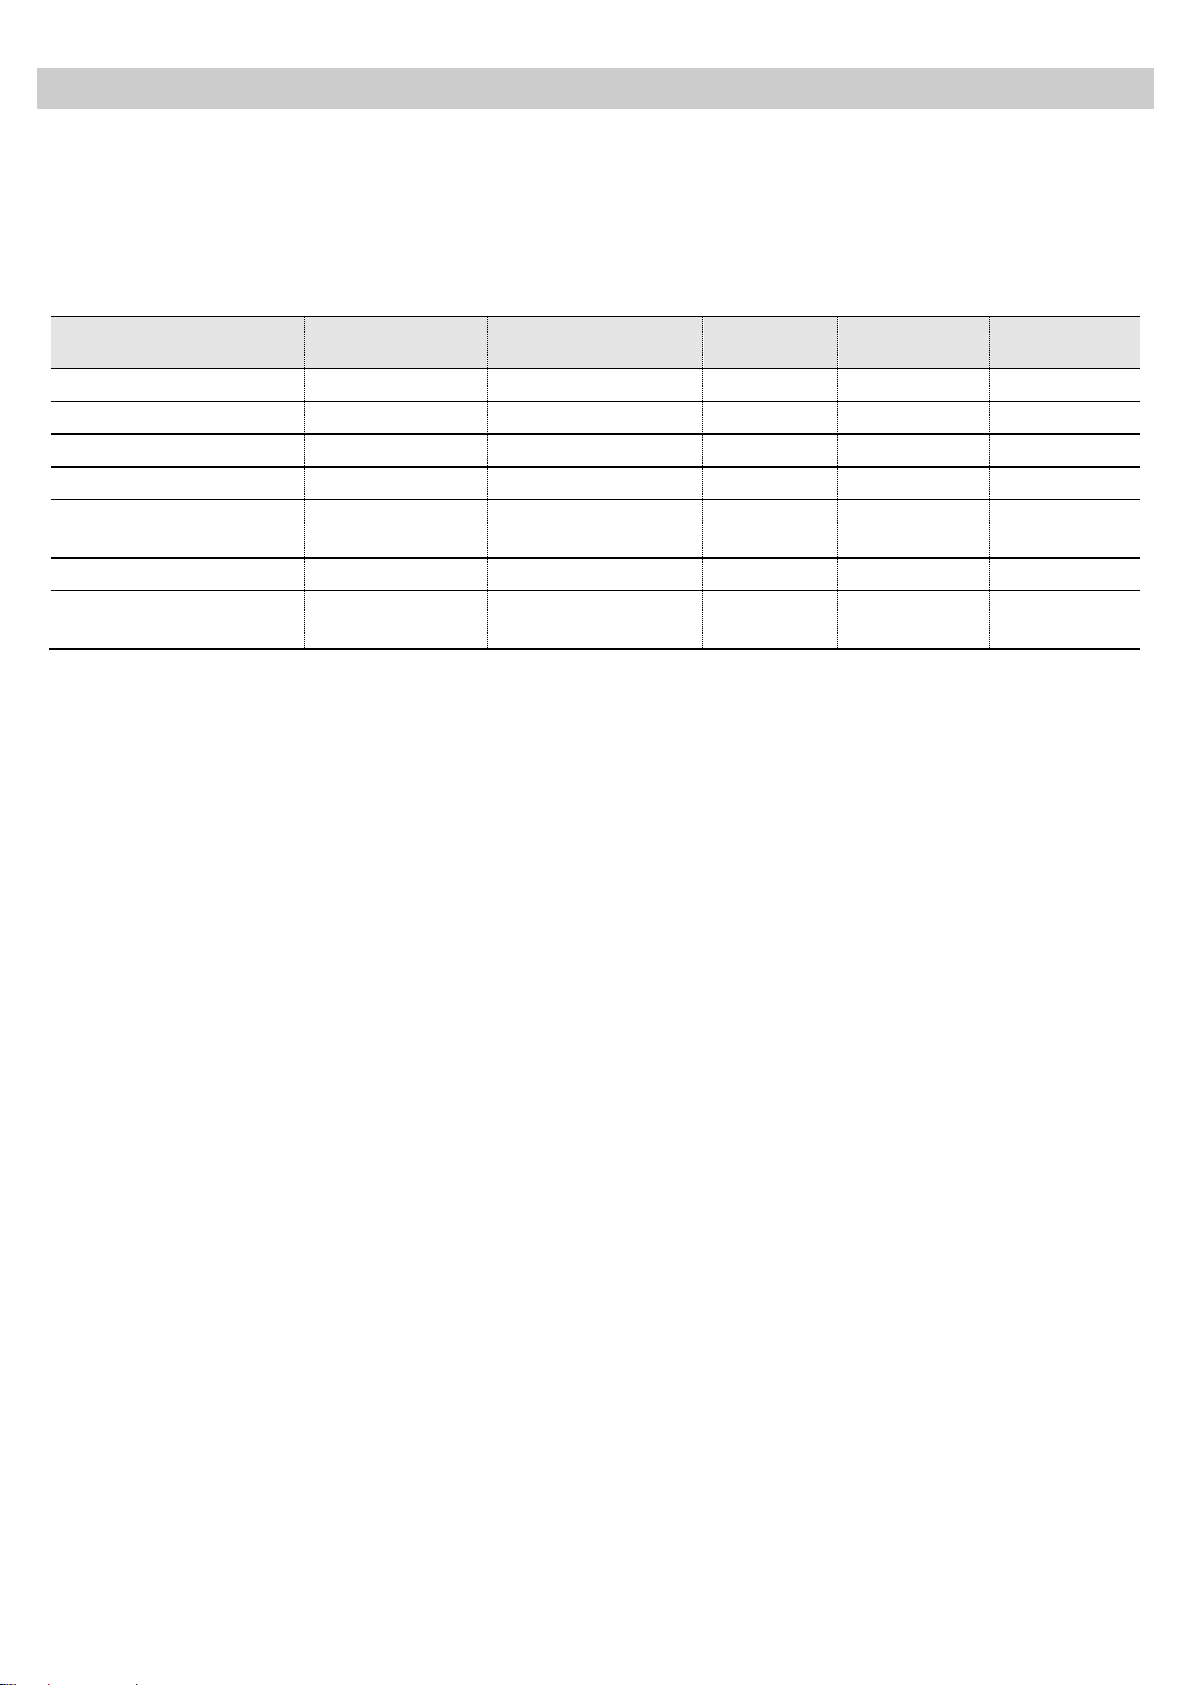
The following table shows the Special Function P1 programmes, indicating weight intervals, and
defrosting and standing times (in order to ensure the food is of a uniform temperature).
Programme
Food
Weight (kg)
Time (min)
Standing time
(min)
A 01
Soup
200 – 1500
3 – 15
Turn 1-2 x, keep
covered, 1-2 min.
A 02
Pre-prepared dishes
dense food
200 – 1500
3 – 20
Turn 1-2 x, keep
covered, 1-2 min.
A 03
Pre-prepared dishes
e.g. goulash
200 – 1500
3 – 18
Turn 1-2 x, keep
covered, 1-2 min.
A 04
Vegetables
200 – 1500
2,6 – 14
Turn 1-2 x, keep
covered, 1-2 min.
Important Notes:
Always use dishes for use in the
microwave oven and a lid or cover to avoid
loss of liquids.
Stir or mix the foods several times during
heating.
The time required to heat the food will
depend on its initial temperature. Food
taken straight from the fridge will take
longer to heat up than food that is at room
temperature. If the food temperature is not
what is wanted, select a greater or lesser
weight next time you heat up the food.
After heating, stir the food or shake the
container and then leave the food to stand for
some time to allow the temperature to become
uniform throughout the food.
Warning! After heating the container may be very
hot. Although microwaves do not heat up most
containers, these may heat up through heat
transmission from food.
19
EN
Special functions
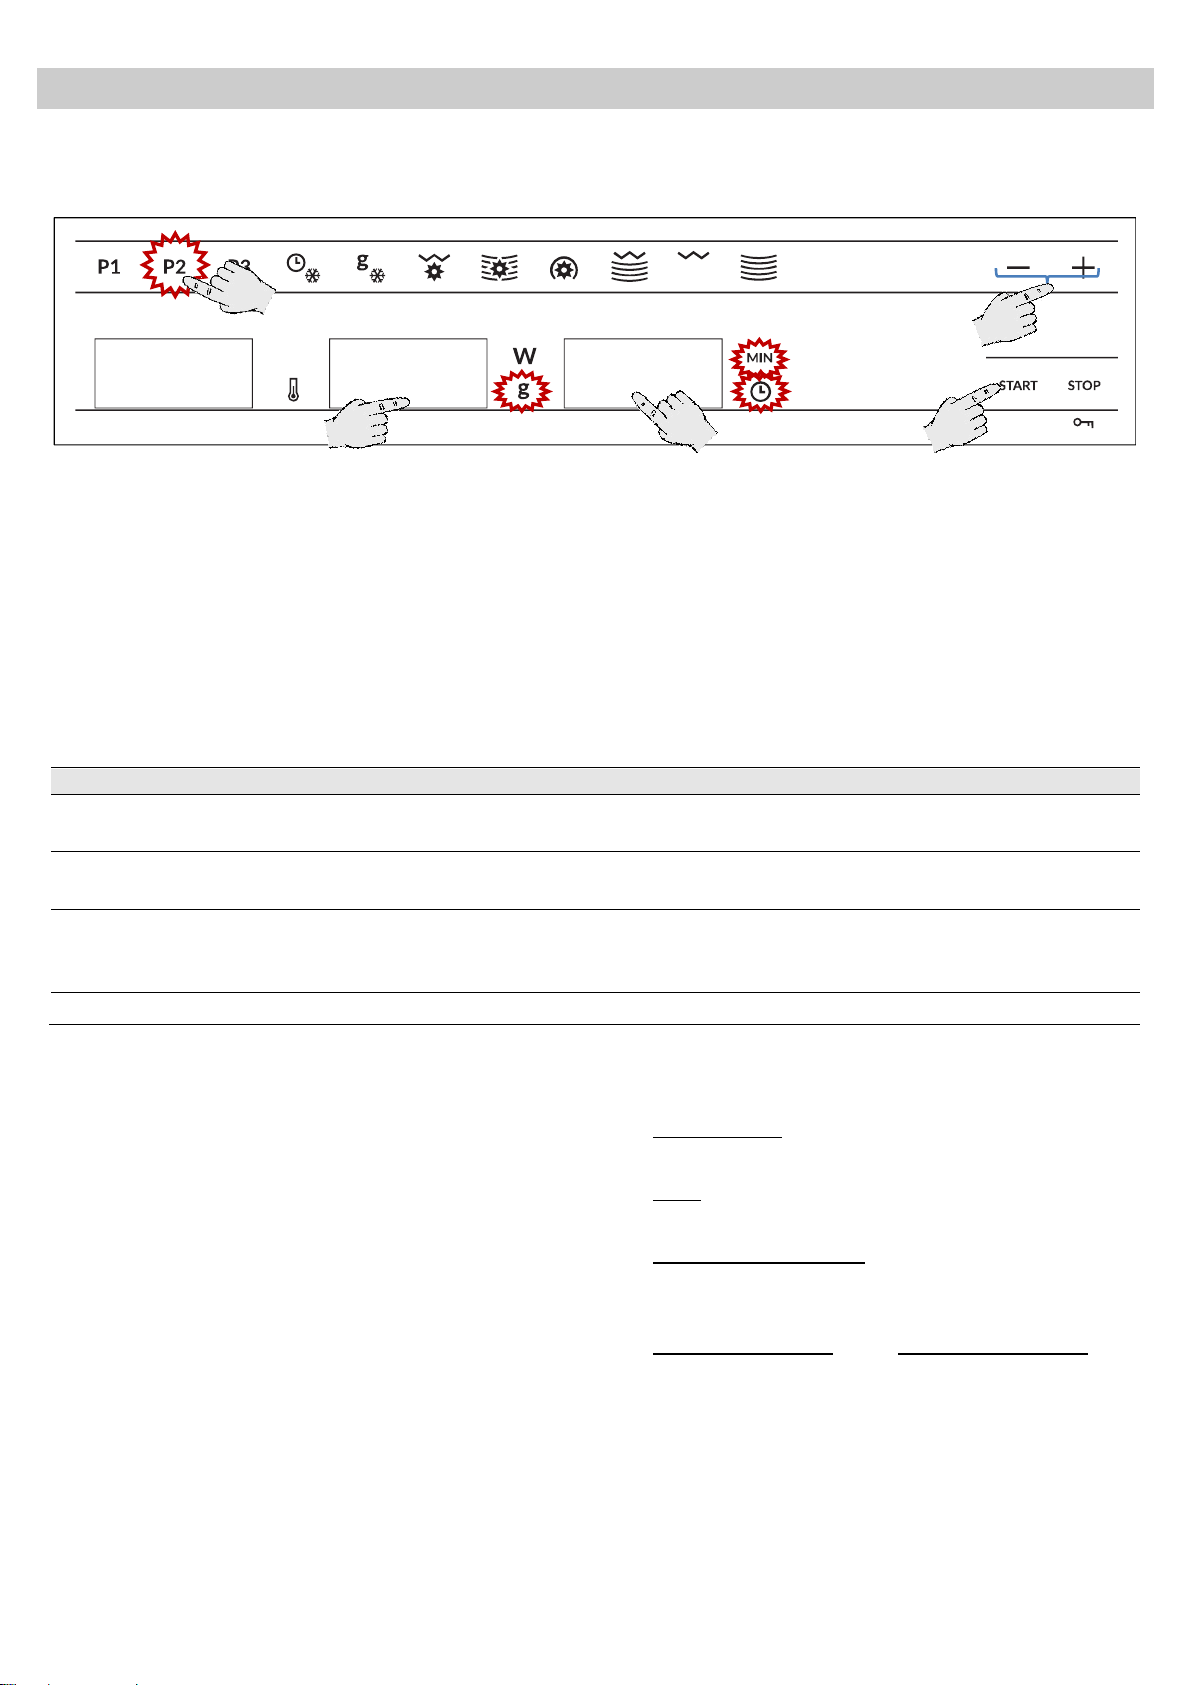
Special Function P2: Cooking
Use this function to cook fresh food.
1. Press the function key Special function P2.
The function key lights up.
2. Press the Food Type selection key to
change the food type. The respective lights
will flash.
3. Press key “-” and “+”, to change the
programme, e.g. “b 01” (see following table).
4. Press the Weight Selection key to define
the food weight. The respective light will
flash.
5. Press key “-” and “+”, to change the weight.
6. Press the Start key. The oven will start to
operate.
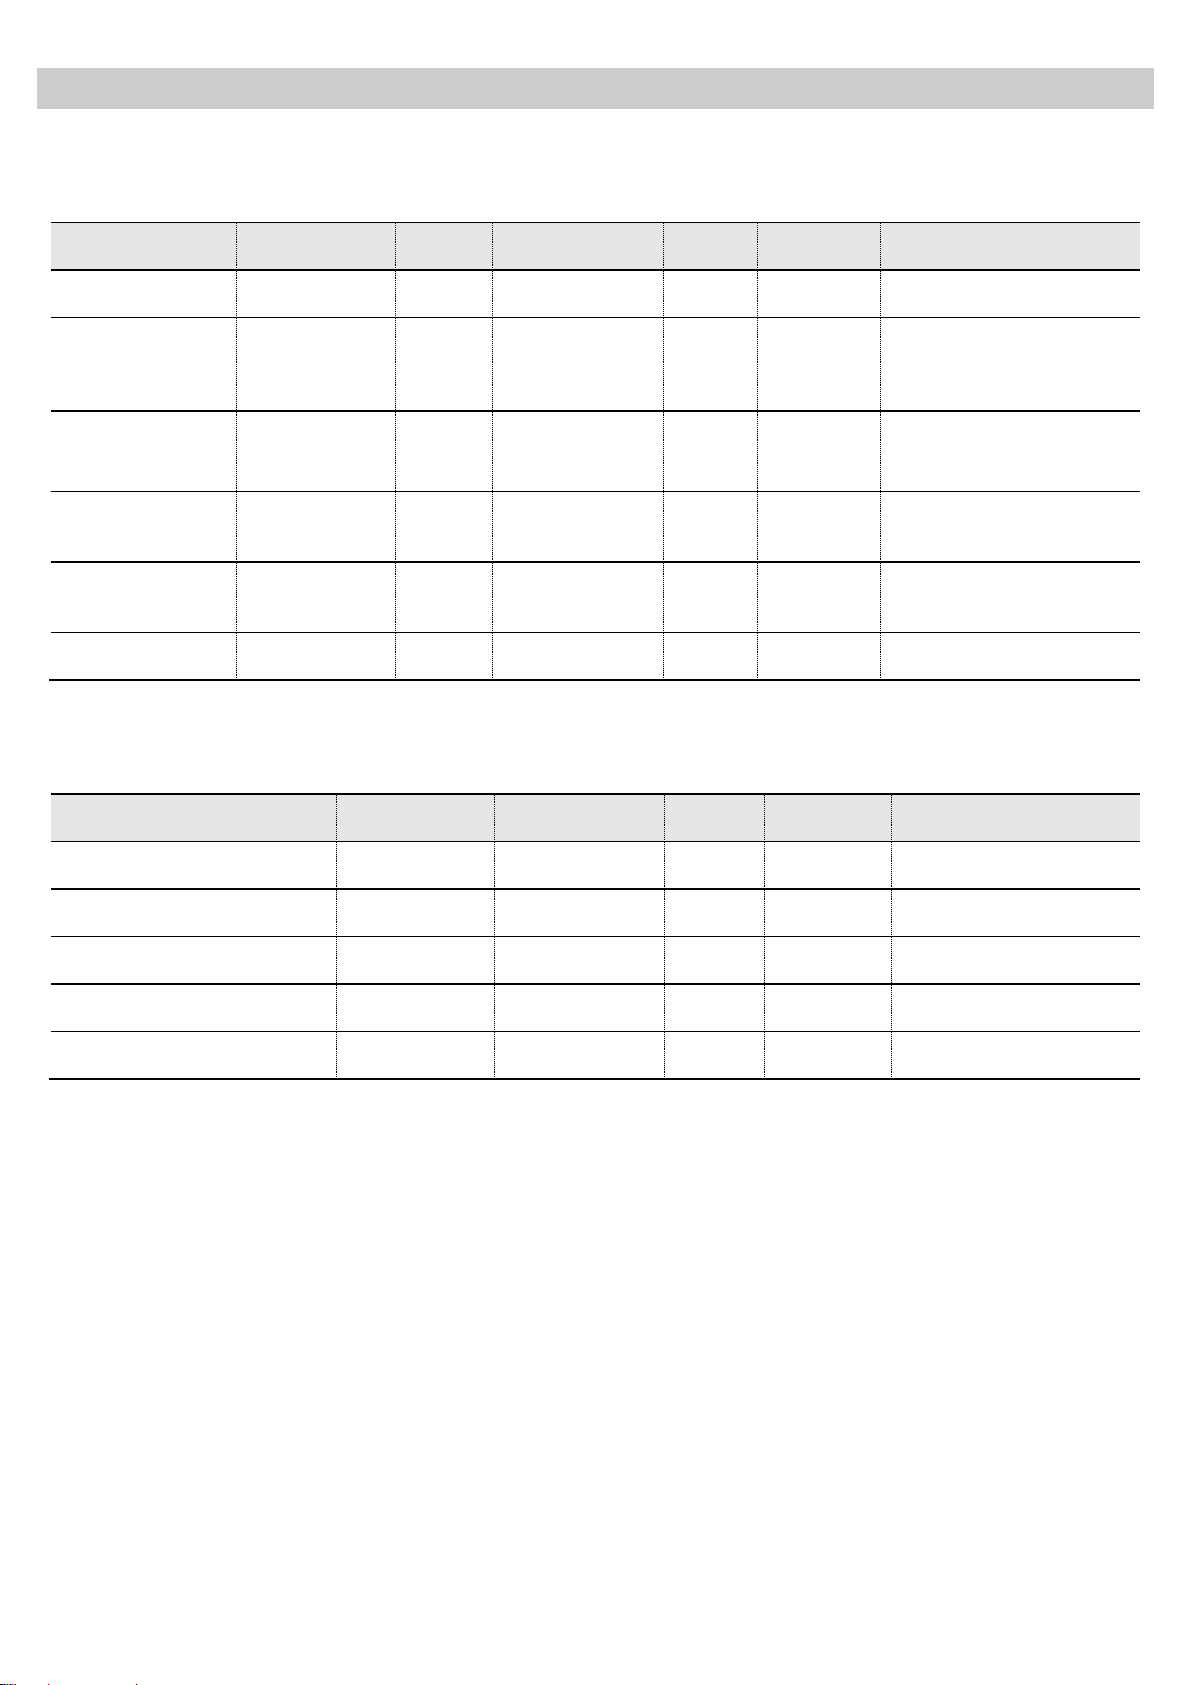
The following table shows the Special Function P2 programmes, indicating weight intervals, and
defrosting and standing times (in order to ensure the food is of a uniform temperature).
Programme
Food
Weight (kg)
Time (min)
Note
b 01
Potatoes
200 – 1000
4 – 17
Turn 1-2 x, keep
covered
b 02
Vegetables
200 – 1000
4 – 15
Turn 1-2 x, keep
covered
b 03
Rice
200 – 500
13 – 20
One part rice, two
parts water, keep
covered
b 04
Fish
200 – 1000
4 – 13
Keep covered
Important Notes:
Always use dishes for use in the
microwave oven and a lid or cover to avoid
loss of liquids.
Stir or mix the foods several times during
heating.
Warning! After heating, the container may be
very hot. Although microwaves do not heat up
most containers, these may heat up through
heat transmission from food.
Preparation instructions:
Fish pieces – Add 1 to 3 soup spoons of water
or lemon juice.
Rice – Add water equivalent to twice or three
times the quantity of rice.
Unpeeled potatoes – Use potatoes of the
same size. Wash them and prick the skin
several times. Do not add water.
Peeled potatoes and Fresh vegetables– Cut
into pieces of the same size. Add a soup
spoon of water for every 100 g of vegetables,
and salt to taste.
b 01
200
2
4
1
3,5
6
20
EN
Special functions
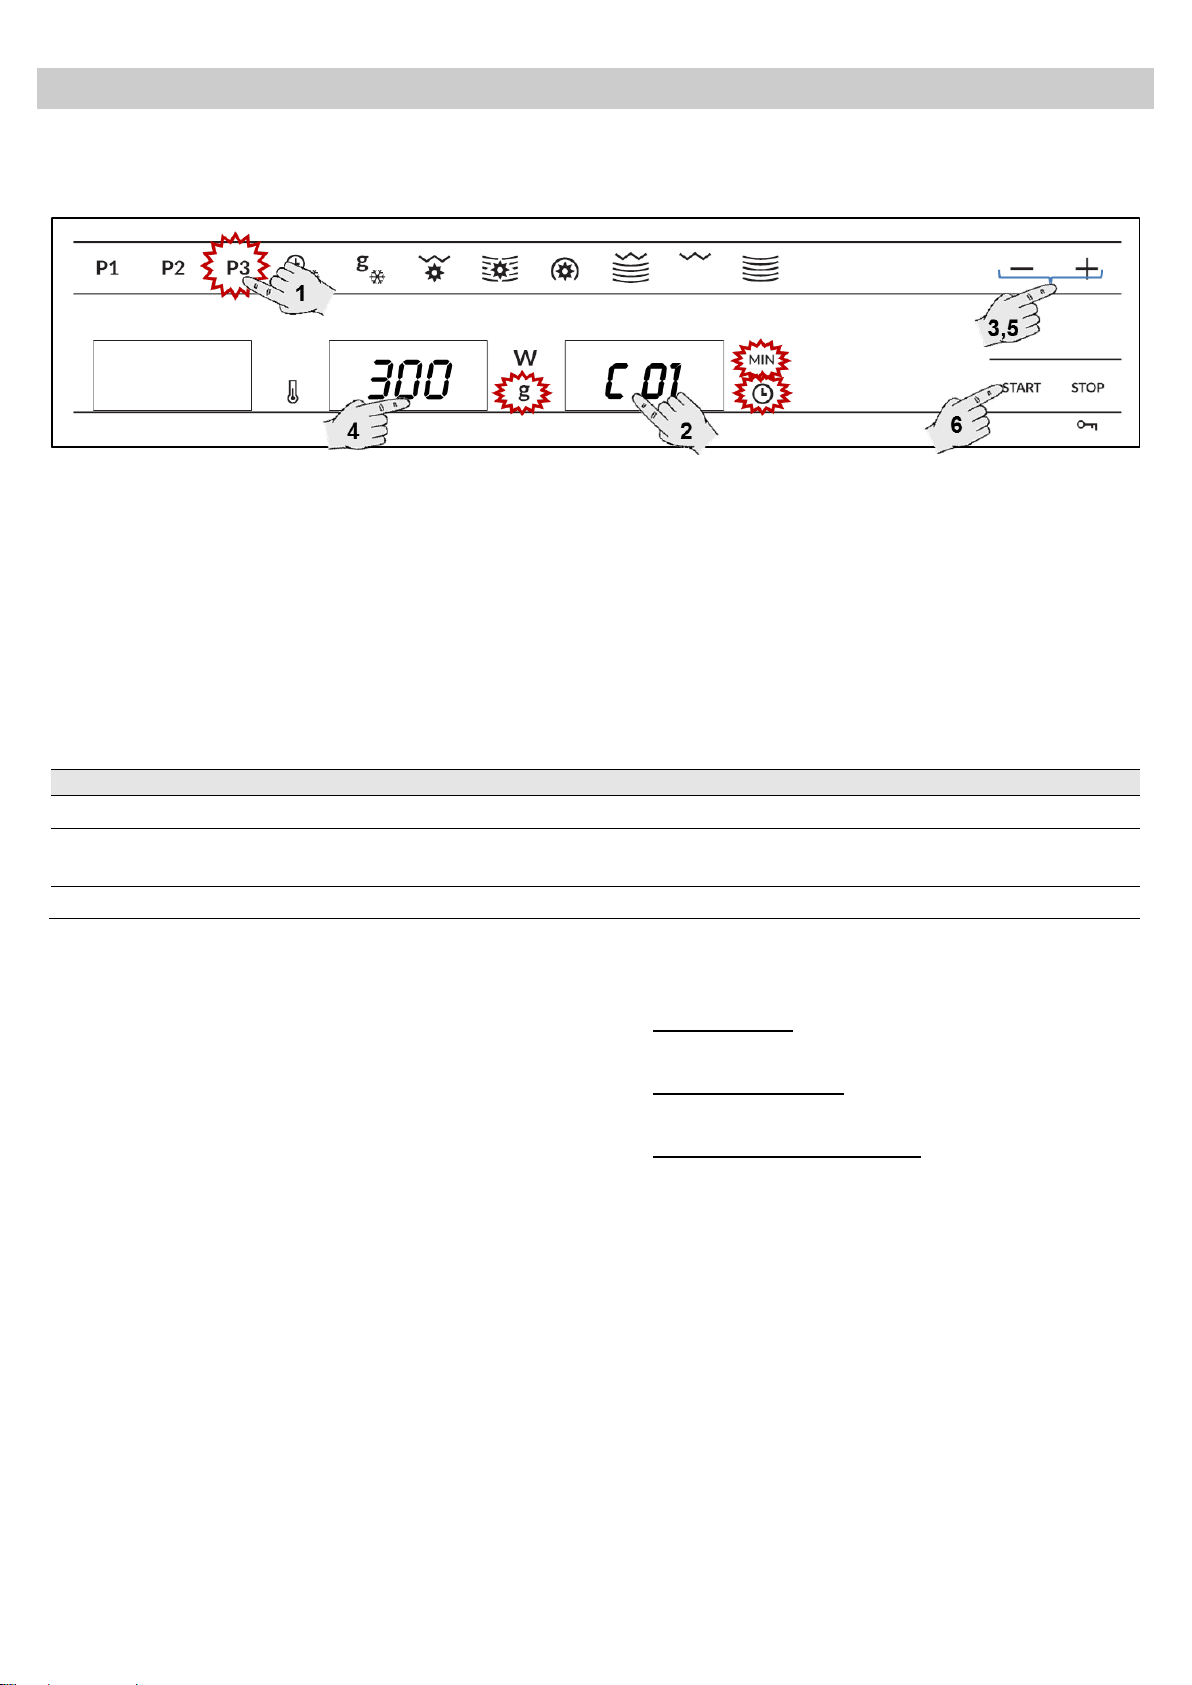
Special Function P3: Defrosting & Toasting
Use this function to cook and toast various types of food.
1. Press the function key Special function P3.
The function key lights up.
2. Press the Food Type selection key to
change the food type. The respective lights
will flash.
3. Press key “-” and “+”, to change the
programme, e.g. “C 01” (see following table).
4. Press the Weight Selection key to define
the food weight. The respective light will
flash.
5. Press key “-” and “+”, to change the weight.
6. Press the Start key. The oven will start to
operate.
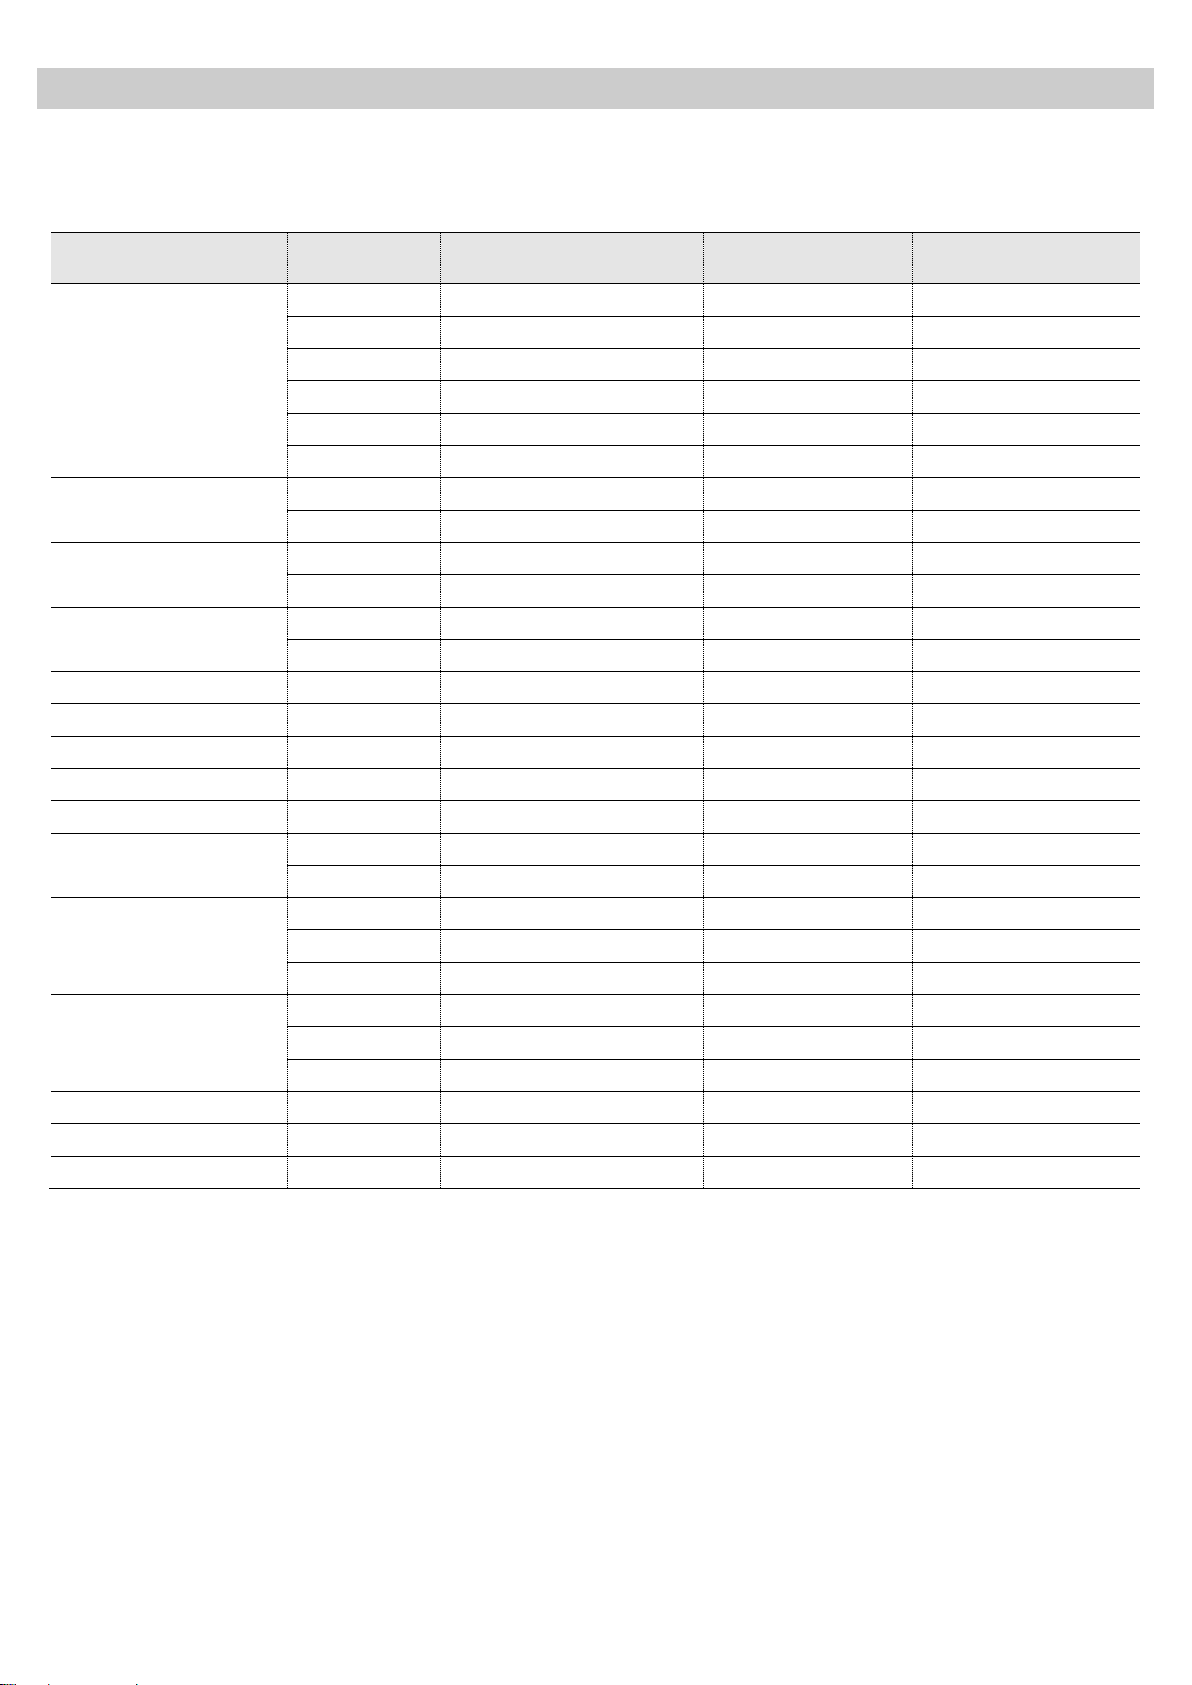
The following table shows the Special Function P3 programmes, indicating weight intervals, and
defrosting and standing times (in order to ensure the food is of a uniform temperature).
Programme
Food
Weight (kg)
Time (min)
Note
C 01
Pizza
300 – 550
8 – 12
Rack
C 02
Deep frozen food
350 – 500
8 – 14
Turn 1 x, keep
covered
C 03
Potato dishes, frozen
200 – 450
10 – 12
Glass plate
Important Notes:
Always use dishes that are suitable for
microwaving and heat resistant (eg baking
dishes). The oven produces very high
temperatures. For programme C 02 always
use a lid, to prevent loss of liquids.
Warning! After heating, the container may be
very hot. Although microwaves do not heat most
containers, they can get very hot due to heat
transfer
Preparation instructions:
Frozen pizza – Use pre-cooked frozen pizzas
and pizzas-rolls.
Deep-frozen food – Use lasagne, cannelloni,
prawn soufflé, all frozen. Keep covered.
Potato dishes, frozen – Chips, potato
croquettes and fried potatoes must be suitable
for preparation in the oven.

21
EN
Using the Browning Plate
Normally when cooking food, such as pizzas or
pies, on a grill or in a microwave oven, the dough
or pastry becomes soggy. This can be avoided by
using a browning plate. As a high temperature is
reached quickly on the bottom of the browning
plate, the crust turns crisp and brown.
The browning plate can also be used for bacon,
eggs, sausages, etc.
VERY IMPORTANT NOTES:
Use oven gloves at all times as the browning
plate will become very hot.
Never place the browning plate in the oven
without the glass plate.
Do not place any recipients on the browning
plate that are not heat-resistant (plastic bowls
for example).
How to cook with the browning plate:
1. Preheat the browning plate by selecting
the Microwave and Grill function for 3 to 5
minutes with a 600 W microwaves power
level.
2. Brush the browning plate with oil in order
to brown the food nicely.
3. Place the fresh or frozen food directly on
the browning plate.
4. Place the browning plate on the glass
turntable in the microwave oven.
5. Select the Microwaves and Grill function
and the cooking time as described below.
VERY IMPORTANT NOTES:
As the browning plate has a Teflon layer, if you
use it incorrectly, it can be damaged.
Never cut the food on the plate. Remove the
food from the plate prior to cutting.
Cleaning:
The best way to clean the browning plate is to
wash it with hot water and detergent and rinse off
with clean water. Do not use a scrubbing brush or
a hard sponge otherwise the top layer will be
damaged.
Food
Weight
Cooking
Time
Standing Time
Recommendation
Pizza
200 g
4 - 5 min
---
If the pizza is thin.
If the pizza is high increase the time
by 1 – 2 minutes
300 g
5 - 6 min
---
400 g
7 – 8 min
---
Quiches and
Pies
200 g
3 – 4 min
2 – 3 min
300 g
5 - 6 min
2 – 3 min
Hamburgers
150 - 200
8 - 10 min
5 – 8 min
Turn 2 x
Oven chips
400 g
6 -8 min
---
Turn 1 x

22
EN
When the oven is working...
Interrupting a cooking cycle
You can stop the cooking process at any time by
pressing the Stop key once or by opening the
oven door.
In both cases:
Microwave emission is stopped immediately.
The grill is de-activated but is still very hot.
Danger of burning!
The timer stops and the display shows the
remaining amount of operating time.
If you wish, at this time you can:
1. Turn or stir the food to ensure it will be
evenly cooked.
2. Change the process parameters.
3. Cancel the process by pressing the Stop
key.
To restart the process, close the door and press
the Start key
Altering parameters
The operating parameters (time, weight, power,
etc.) can only be altered when the cooking
process has been interrupted by proceeding as
follows:
1. To alter the time, press key “-” and “+”. The
new time defined is immediately valid.
2. To alter the power, press the Power
Selection key. The display and respective
light start to flash. Alter the parameter by
pressing the “-” and “+” keys and confirm by
pressing the Power Selection key again.
Cancelling a cooking cycle
If you wish to cancel the cooking process, press
the Stop key for 3 seconds.
You will then hear a beep and the time will appear
on the display.
End of a cooking cycle
At the end of the process you will hear three
beeps and the display will show the word “End”.
The beeps are repeated every 30 seconds until
the door is opened or the Stop key is pressed.
23
EN
Defrosting
The table below shows different defrosting and
standing times (in order to ensure the food
temperature is evenly distributed) for different types
and weights of food, plus recommendations.
Food
Weight (g)
Defrosting time (min)
Standing time
(min)
Recommendation
Portions of meat,
veal, beef, pork
100
2-3
5-10
Turn once
200
4-5
5-10
Turn once
500
10-12
10-15
Turn twice
1000
21-23
20-30
Turn twice
1500
32-34
20-30
Turn twice
2000
43-45
25-35
Turn three times
Goulash
500
8-10
10-15
Turn twice
1000
17-19
20-30
Turn three times
Minced meat
100
2-4
10-15
Turn once
500
10-14
20-30
Turn twice
Sausages
200
4-6
10-15
Turn once
500
9-12
15-20
Turn twice
Poultry (portions)
250
5-6
5-10
Turn once
Chicken
1000
20-24
20-30
Turn twice
Poularde
2500
38-42
25-35
Turn three times
Fish fillet
200
4-5
5-10
Turn once
Trout
250
5-6
5-10
Turn once
Prawns
100
2-3
5-10
Turn once
500
8-11
10-20
Turn twice
Fruit
200
4-5
5-10
Turn once
300
8-9
5-10
Turn once
500
11-14
10-20
Turn twice
Bread
200
4-5
5-10
Turn once
500
10-12
10-15
Turn once
800
15-17
10-20
Turn twice
Butter
250
8-10
10-15
Cream cheese
250
6-8
10-15
Creams
250
7-8
10-15

24
EN
Defrosting
General instructions for defrosting
1. When defrosting, use only dishes that are
appropriate for microwaves (china, glass,
suitable plastic).
2. The defrost function by weight and the tables
refer to the defrosting of raw food.
3. The defrosting time depends on the quantity
and thickness of the food. When freezing
food keep the defrosting process in mind.
Distribute the food evenly in the container.
4. Distribute the food as best as possible inside
the oven. The thickest parts of fish or
chicken drumsticks should be turned towards
the outside. You can protect the most
delicate parts of food with pieces of
aluminium foil. Important: The aluminium
foil must not come into contact with the oven
cavity interior as this can cause electrical
arcing.
5. Thick portions of food should be turned
several times.
6. Distribute the frozen food as evenly as
possible since narrow and thin portions
defrost more quickly than the thicker and
broader parts.
7. Fat-rich foods such as butter, cream cheese
and cream should not be completely
defrosted. If they are kept at room
temperature they will be ready to be served
in a few minutes. With ultra-frozen cream, if
you find small pieces of ice in it, you should
mix these in before serving.
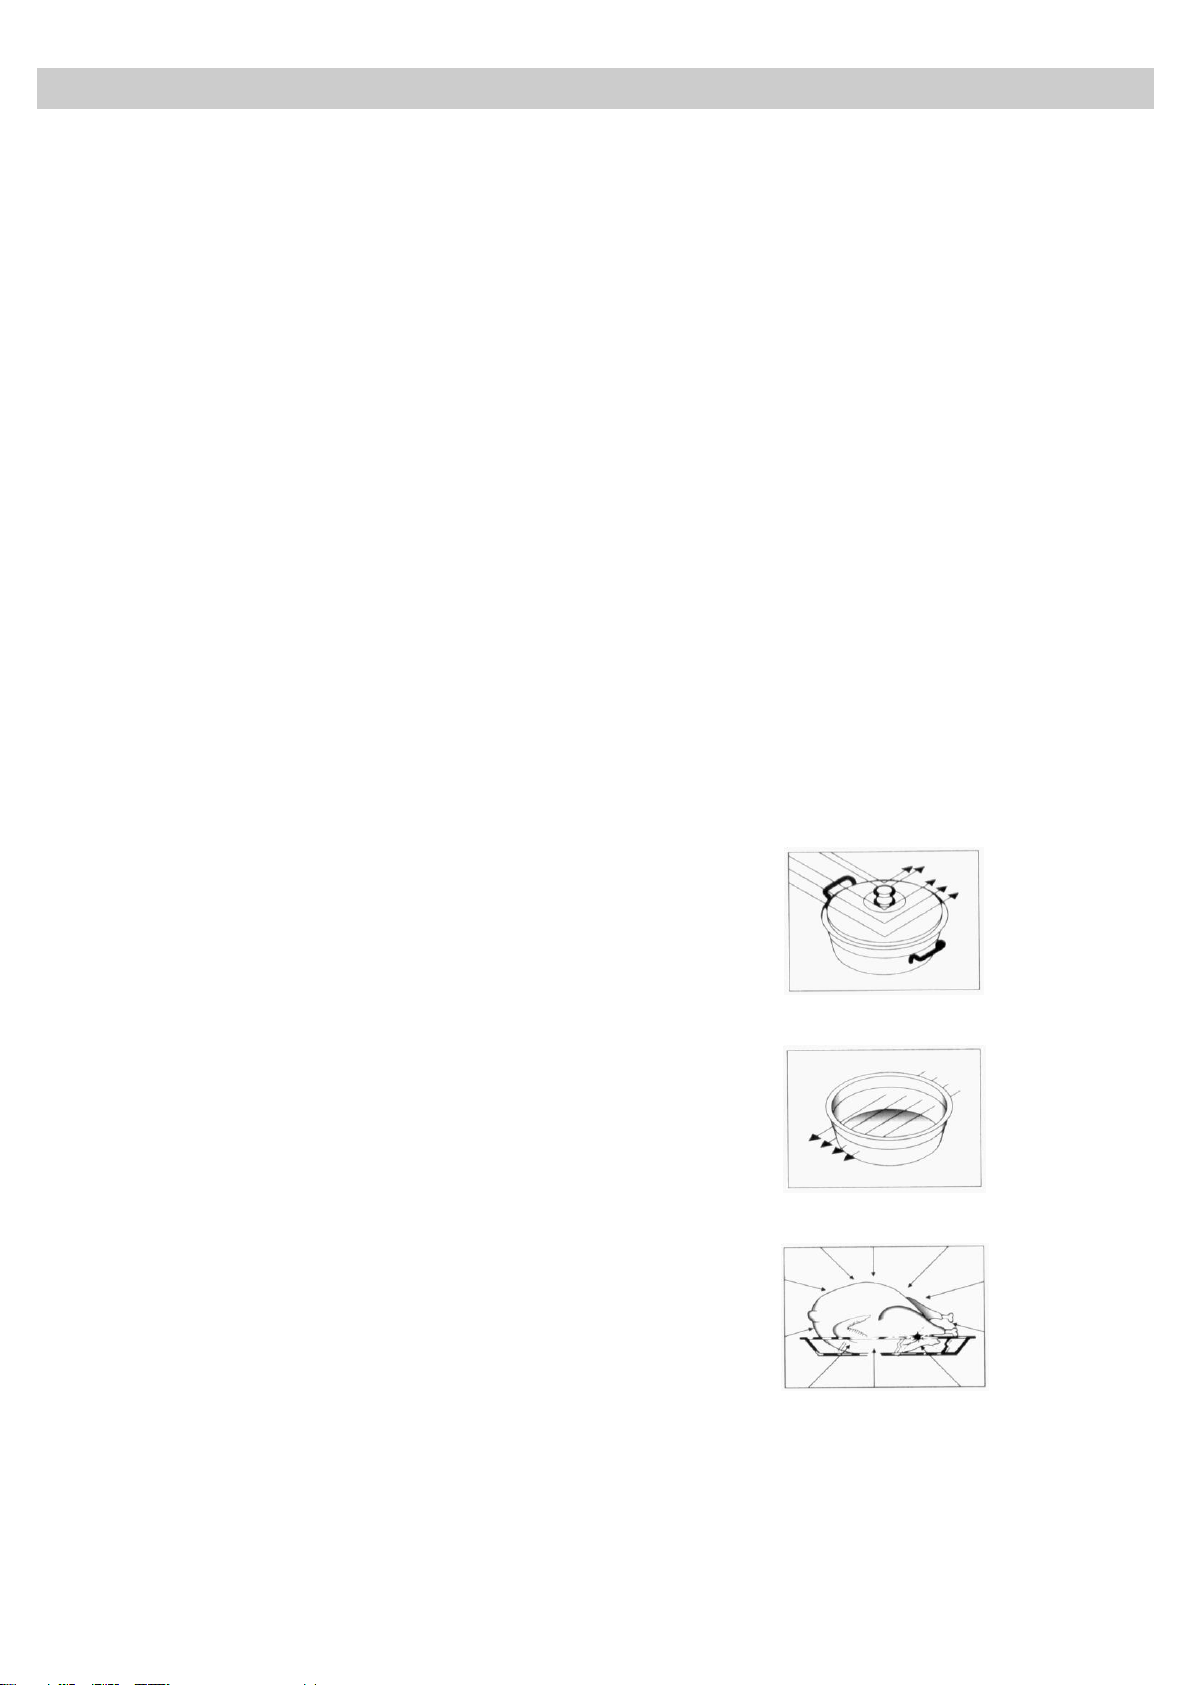
8. Place poultry on an upturned plate so that the
meat juices can run off more easily.
9. Bread should be wrapped in a napkin so that
it does not become too dry.
10. Turn the food at regular intervals.
11. Remove frozen food from its wrapping and do
not forget to take off any metal twist-tags. For
containers that are used to keep frozen food
in the freezer and which can also be used for
heating and cooking, all you need to do is
take off the lid. For all other cases you should
put the food into containers that are suitable
for microwave use.
12. The liquid resulting from defrosting, principally
that from poultry, should be discarded. In no
event should such liquids be allowed to come
into contact with other foods.
13. Do not forget that by using the defrosting
function you need to allow for standing time
until the food is completely defrosted.

25
EN
Cooking with a microwave oven
Warning! Read the section “Microwave Safety”
before cooking with your microwave.
Follow these recommendations when cooking with
your microwave:
Before heating or cooking foods with peel or
skin (e.g. apples, tomatoes, potatoes,
sausages) prick them so that they do not
burst. Cut the food up before starting to
prepare it.
Before using a container or dish make sure
that it is suitable for microwave use (see the
section on types of ovenware).
When cooking food with very little moisture
(e.g. defrosting bread, making popcorn,
etc.) evaporation is very quick. The oven
then works as if it was empty and the food
may burn. The oven and the container may
be damaged in such a situation. You should
therefore set just the cooking time necessary
and you must keep a close eye on the
cooking process.
It is not possible to heat large quantities of
oil (frying) in the microwave.
Remove pre-cooked food from the
containers they come in since these are not
always heat resistant. Follow the food
manufacturer’s instructions.
If you have several containers, such as
cups, for example, set them out uniformly on
the turntable plate.
Do not close plastic bags with metal clips.
Use plastic clips instead. Prick the bags
several times so that the steam can escape
easily.
When heating or cooking foods, check that
they reach at least a temperature of 70°C.
During cooking, steam may form on the
oven door window and may start to drip.
This situation is normal and may be more
noticeable if the room temperature is low.
The oven’s safe working is not affected by
this. After you have finished cooking, clean
up the water coming from the condensation
When heating liquids, use containers with
a wide opening, so that the steam can
evaporate easily.
Prepare the foods as per the instructions and
keep in mind the cooking times and power levels
indicated in the tables.
Keep in mind that the figures given are only
indicative and can vary depending on the initial
state, temperature, moisture and type of food. It is
advisable to adjust the times and power levels to
each situation. Depending on the exact
characteristics of the food you may need to
increase or shorten the cooking times or increase
or decrease the power levels.
Cooking with microwaves...
1. The greater the amount of food, the longer the
cooking time. Keep in mind that:
Double the quantity » double the time
Half the quantity » half the time
2. The lower the temperature, the longer the
cooking time.
3. Foods containing a lot of liquid heat up more
quickly.
4. Cooking will be more uniform if the food is
evenly distributed on the turntable. If you put
dense foods on the outside part of the plate and
less dense ones on the centre of the plate, you
can heat up different types of food simultaneously.
5. You can open the oven door at any time. When
you do this the oven switches off automatically.
The microwave will only start working again when
you close the door and press the start key.
6. Foods that are covered require less
cooking time and retain their characteristics
better. The lids used must let microwaves
pass through and have small holes that
allow steam to escape.

26
EN
Cooking with a microwave oven
Tables and suggestions – Cooking vegetables
Food
Quantity (g)
Addition of
liquids
Power
(Watt)
Time
(min.)
Standing
Time (min.)
Instructions
Cauliflower
Broccoli
Mushrooms
500
300
250
100ml
50ml
25ml
800
800
800
9-11
6-8
6-8
2-3
2-3
2-3
Cut into slices.
Keep covered
Turn once
Peas & carrots
Frozen carrots
300
250
100ml
25ml
800
800
7-9
8-10
2-3
2-3
Cut into chunks or
slices. Keep
covered
Turn once
Potatoes
250
25ml
800
5-7
2-3
Peel and cut into
equal sized pieces.
Keep covered
Turn once
Paprika
Leek
250
250
25ml
50ml
800
800
5-7
5-7
2-3
2-3
Cut into chunks or
slices Keep covered
Turn once
Frozen Brussel
sprouts
300
50ml
800
6-8
2-3
Keep covered
Turn once
Sauerkraut
250
25ml
800
8-10
2-3
Keep covered
Turn once
Tables and suggestions – Cooking fish
Food
Quantity (g)
Power
(Watt)
Time (min.)
Standing
Time (min.)
Instructions
Fish fillets
500
600
10-12
3
Cook covered over. Turn after half
of cooking time.
Whole fish
800
800
400
2-3
7-9
2-3
Cook covered over. Turn after half
of cooking time. You may wish to
cover up the small edges of the
fish.

27
EN
Cooking with the Grill
WARNING: Accessible parts may become hot
when the grill is in use. Children should be kept
away.
For good results with the grill, use the
Rectangular Rack supplied with the oven. It must
be placed over the Rectangular Glass Tray in two
possible positions that give different heights for
grilling (see below picture).
Fit the rectangular rack in such a way that it
doesn’t come into contact with the metal
surfaces of the oven cavity since if it does
there is a danger of electric arcing which may
damage the oven.
IMPORTANT POINTS:
1. When the microwave grill is used for the
first time there will be some smoke and a
smell coming from the oils used during oven
manufacture.
2. The oven door window becomes very hot
when the grill is working. Keep children
away.
3. When the grill is operating, the cavity walls
and the rectangular rack become very hot.
You should use oven gloves.
4. If the grill is used for extended period of
time it is normal to find that the elements
will switch themselves off temporarily due to
the safety thermostat.
5. Important! When food is to be grilled or
cooked in containers you must check that
the container in question is suitable for
microwave use. See the section on types of
ovenware!
6. When the grill is used it is possible that
some splashes of fat may go onto the
elements and be burnt. This is a normal
situation and does not mean there is any
kind of operating fault.
7. After you have finished cooking, clean the
interior and the accessories so that cooking
remains do not become encrusted.
28
EN
Cooking with the Grill
Tables and suggestions – Grill without microwave
Type of food
Quantity (g)
Time (min.)
Instructions
Fish
Bass
Sardines/gurnard
800
6-8 fish.
18-24
15-20
Spread lightly with butter. After half of
cooking time turn and spread with
seasoning.
Meat
Sausages
6-8 units
22-26
Prick after half cooking time and turn.
Frozen hamburgers
3 units
18-20
Prick after half cooking time.
Spare rib (approx. 3 cm thick)
400
25-30
Brush with oil. After half of cooking time,
baste and turn.
Others
Toast
4 units
1½-3
Watch toasting. Turn
Toasted sandwiches
2 units
5-10
Watch toasting.
Heat up the grill beforehand for 2 minutes. Unless
indicated otherwise, use the rectangular rack. The
times shown are merely indicative and can vary
as a function of the composition and quantity of
the food, as well as the final condition wished for.
Fish and meat taste great if, before grilling, you
brush them with vegetable oil, spices and herbs
and leave to marinate for a few hours. Only add
salt after grilling.
Sausages will not burst if you prick them with a
fork before grilling.
After half the grilling time has passed, check on
how the cooking is going and, if necessary, turn
the food over or brush it with some oil.
The grill is especially suitable for cooking thin
portions of meat and fish. Thin portions of meat
only need to be turned once, but thicker portions
should be turned several times. In the case of fish,
you should join the two ends, putting the tail in its
mouth, and then put the fish on the rectangular
rack.
29
EN
Cooking with the Grill
Tables and suggestions – Microwave + Grill
The microwave + grill function is ideal for cooking
quickly and, at the same time, browning foods.
Furthermore, you can also grill and cook cheese
covered food.
The microwave and the grill work simultaneously.
The microwave cooks and the grill toasts.
Food
Quantity (g)
Dish
Power
(Watt)
Time (min.)
Standing
time (min.)
Cheese topped pasta
500
Low dish
400
12-17
3-5
Cheese topped potatoes
800
Low dish
600
20-22
3-5
Lasagne
approx. 800
Low dish
600
15-20
3-5
Grilled cream cheese
approx. 500
Low dish
400
18-20
3-5
2 fresh chicken legs
(grilled)
200 each
Low dish
400
10-15
3-5
Chicken
approx. 1000
Low and wide dish
400
35-40
3-5
Cheese topped onion
soup
2 x 200 g cups
Soup bowls
400
2-4
3-5
Before using a dish in the microwave oven make
sure that it is suitable for microwave use. Only use
dishes or containers that are suitable for
microwave use.
The dish to be used in the combined function
must be suitable for microwave and grill use. See
the section on types of ovenware!
Keep in mind that the figures given are merely
indicative and can vary as a function of the initial
state, temperature, moisture and type of food.
If the time is not enough to brown the food well,
put it under the grill for another 5 or 10 minutes.
Please follow the standing times and don’t forget
to turn the meat pieces.
Unless indicated to the contrary, use the turntable
plate for cooking.
The values given in the tables are valid when the
oven cavity is cold (it is not necessary to pre-heat
the oven).
30
EN
Roasting and baking
Table and advices – Preparing meat and cake
Microwave / Hot air
Food
Quantity
(g)
Power
(W)
Temperature
ºC
Time
(Min.)
Standing
time (min.)
Instructions
Roast beef
1000-1500
400
200
30-40
20
Do not put lid on container
Turn once
Pork loin / Cutlet or
bones
Pork roast
800-1000
200
180-190
50-60
20
Do not put lid on container
Turn once
Whole chicken
1000/1200
400
200
30-40
10
Do not put lid on container.
Turn the chicken chest
down. Turn once.
Half chicken
500-1000
400
200
25-35
10
Do not put lid on container.
Turn the the pieces with
skin down. Turn once.
Roast loin of veal
1500/2000
200
180
60-65
20
Do not put lid on container.
Turn once or twice. After
turning keep it without lid
Beef topside
1500-1800
200
200
80-90
20
Do not put lid on container.
Turn once or twice
Microwave / Baking
Pastry
Power
(W)
Temperature
ºC
Time
(Min.)
Standing
time (min.)
Instructions
Chocolate– cherry pie
200
200
30
5-10
Turntable, small grill,
Springform, Ø 28 cm
Cheesecake with fruit
400
180
40-45
5-10
Turntable, small grill,
Springform, Ø 28 cm
Apple pie
200
185
40-45
5-10
Turntable, small grill,
Springform, Ø 28 cm
Cheese cake with streusel
400
180
40-50
5-10
Turntable, small grill,
Springform, Ø 26 cm
Nuts cake
200
170
30-35
5-10
Turntable,
Cake tin
Advice to roast - bake
Turn the pieces of meat halfway through the
cooking time. When the roasted meat is ready
you should let it stand for 20 minutes in the oven
with this switched off and closed. This will ensure
the juices in the meat are well distributed.
The roasting temperature and time required
depends on the type and amount of meat being
cooked.
If the weight of the meat to be roasted does not
appear on the table choose the settings for the
weight immediately below and extend the
cooking times.
Advice on ovenware
Check that the ovenware fits inside the oven.
Hot glass containers should be put on a dry
kitchen cloth. If such containers are put on a cold
or wet surface the glass may crack and break.
Use oven gloves to take the ovenware out of the
oven.

31
EN
Baking
Table and advices – baking/hot air
Type
Container
Level
Temperature
Time (min.)
Walnut cake
Spring-form type tin
Turntable
170/180
30/35
Fruit tart
Spring-form type tin Ø 28 cm
Turntable
150/160
35/45
Ring cake
Spring-form type tin
Turntable
170/190
30/45
Piquant cakes e.g. Pizza
made with potatoes
Runde Glasform
Turntable
160/180
50/70
Sponge cake
Spring-form type tin Ø 26 cm
Turntable
160/170
40/45
Jelly roll
Glass griddle
1
110
35/45
Cherry pie
Glass griddle
1
170/180
35/45
Advice on cake baking ware
The most commonly used type of baking ware is
black metal tins. If you are also going to use the
microwave, use glass, ceramic or plastic baking
ware. These must be able to withstand
temperatures up to 250ºC. If you use these types
of baking ware the cakes are not browned as
much.
Advice on how to bake cakes
Different amounts and types of pastry require
different temperatures and baking times. Try low
settings first of all and then, if necessary, use
higher temperatures next time. A lower
temperature will result in more uniform baking.
Always put the cake tray in the centre of the
turntable.
Baking suggestions
How to check if the cake is properly cooked
Start sticking a tooth pick in the highest part of the
cake 10 minutes before the end of the baking
time. When no dough sticks to the tooth pick the
cake is ready.
If the cake is very dark on the outside
Next time choose a lower temperature and let the
cake bake for a longer time.
If the cake is very dry
Make small holes in the cake with a tooth pick
after baking has finished. Then sprinkle the cake
with some fruit juice or alcoholic drink. Next time
increase the temperature by about 10º and reduce
the baking time.
If the cake does not come free when turned
Let the cake cool down for 5 to 10 minutes after
baking and it will come out of the tin more easily.
If the cake still does not come free run a knife
carefully around the edges. Next time grease the
cake tin well.
Advice on saving energy
When you are making more than one cake, it is
advisable to bake them in the oven one after the
other when the oven is still hot. This lets you
reduce the baking time for the second and later
cakes.
It is preferable to use dark coloured baking ware -
painted or enamelled black – since such baking
tins absorb heat better.
When dealing with long baking times, you can
switch the oven off 10 minutes before the end of
the time and make use of the residual heat to
complete the baking.
.

32
EN
What kind of ovenware can be used?
Microwave function
For the microwave function, keep in mind that
microwaves are reflected by metal surfaces.
Glass, china, clay, plastic, and paper let
microwaves pass.
For this reason, metal pans and dishes or
containers with metal parts or decorations
cannot be used in the microwave. Glass ware
and clay with metallic decoration or content
(e.g. lead crystal) cannot be used in microwave
ovens.
The ideal materials for use in microwave ovens
are glass, refractory china or clay, or heat
resistant plastic. Very thin, fragile glass or china
should only be used for short period of times (e.g.
heating).
Hot food transmits heat to the dishes which can
become very hot. You should, therefore, always
use an oven glove!
How to test ovenware you want to use
Put the item you want to use in the oven for 20
seconds at maximum microwave power. After that
time, if it is cold and just slightly warm, it is
suitable to use. However, if it heats up a lot or
causes electric arcing it is not suitable for
microwave use.
Grill or Hot air function
In the case of the Grill or Hot Air function, the
ovenware must be resistant to temperature of at
least 300°C.
Plastic dishes are not suitable for use in the grill.
Combined functions
In the combined functions, the ovenware used
must be suitable for use in both the microwave
and the grill.
Aluminium containers and foil
Pre-cooked food in aluminium containers or in
aluminium foil can be put in the microwave if the
following aspects are respected:
Keep in mind the manufacturer’s
recommendations written on the packaging.
The aluminium containers cannot be more
than 3 cm high or come in contact with the
cavity walls (minimum distance 3 cm). Any
aluminium lid or top must be removed.
Put the aluminium container directly on top
of the turntable plate. If you use the
rectangular rack, put the container on a
china plate. Never put the container directly
on the rectangular rack!
The cooking time is longer because the
microwaves only enter the food from the top.
If you have any doubts, it is best to use only
dishes suitable for microwave use.
Aluminium foil can be used to reflect
microwaves during the defrosting process.
Delicate food, such as poultry or minced
meat, can be protected from excessive heat
by covering the respective
extremities/edges.
Important: aluminium foil cannot come into
contact with the cavity walls since this may
cause electrical arcing.
Lids
We recommend you use glass or plastic lids or
cling film since:
1. This will stop excessive evaporation (mainly
during very long cooking times);
2. The cooking times are shorter;
3. The food does not become dry;
4. The aroma is preserved.
The lid should have holes or openings so that no
pressure develops. Plastic bags must also be
opened. Baby feeding bottles or jars with baby
food and similar containers can only be heated
without their tops / lids otherwise they can burst.

33
EN
What kind of ovenware can be used?
Table of Ovenware
The table below gives you a general idea of what type of ovenware is suitable for each situation.
Operating mode
Type of
ovenware
Microwave
Grill / Hot Air
Combined
Functions
Defrosting /
heating
Cooking
Glass and china 1)
Home use, not flame resistant, can
be used in dish washer
yes
Yes
no
no
Glazed china
Flame resistant glass and china
yes
Yes
yes
yes
China, stone ware 2)
Unglazed or glazed without metallic
decorations
yes
Yes
no
no
Clay dishes 2)
Glazed
Unglazed
yes
no
yes
no
no
no
no
no
Plastic dishes 2)
Heat resistant to 100°C
Heat resistant to 250°C
yes
yes
no
yes
no
no
no
no
Plastic films 3)
Plastic film for food
Cellophane
no
yes
no
yes
no
no
no
no
Paper, cardboard, parchment 4)
yes
No
no
no
Metal
Aluminium foil
Aluminium wrappings 5)
Accessories
yes
no
yes
no
yes
yes
yes
yes
yes
no
yes
no
1. Without any gold or silver leaf edging; no
lead crystal.
2. Keep the manufacturer’s instructions in
mind!
3. Do not use metal clips for closing bags.
Make holes in the bags. Use the films only to
cover the food.
4. Do not use paper plates.
5. Only shallow aluminium containers without
lids/tops. The aluminium cannot come into
contact with the cavity walls.

34
EN
Oven Cleaning and Maintenance
Cleaning is the only maintenance normally
required.
Warning! Your microwave oven should be
cleaned regularly, with all food remains being
removed. If the microwave is not kept clean its
surfaces may deteriorate, reducing the oven’s
working life and possibly resulting in a
dangerous situation.
Warning! Cleaning should be done with the
oven power switched off. Take the plug out of
the socket or switch off the oven’s power
circuit.
Do not use harsh abrasive cleaners or sharp
metal scrapers to clean the oven door glass
since they can scratch the surface, which may
result in shattering of the glass.
Do not use aggressive or abrasive cleaning
products, scourers that scratch surfaces or
sharp objects, since stains may appear.
Do not use high pressure or stream jet
cleaning appliances.
Front surface
Normally you just need to clean the oven with a
damp cloth. If it is very dirty, add a few drops of
dishwashing liquid to the cleaning water.
Afterwards, wipe the oven with a dry cloth.
Immediately remove lime, fat, starch or egg white
stains. Corrosion can occur under these stains.
Do not let any water get inside the oven.
Oven interior
After each time the oven is used, clean the inside
walls with a damp cloth since this is the easiest
way to remove splashes or spots of food that may
have stuck to the inside.
To remove dirt that is harder to shift, use a non-
aggressive cleaning product. Do not use oven
sprays or other aggressive or abrasive
cleaning products.
Always keep the door and the oven front very
clean to ensure that the door opens and
closes properly.
Make sure water does not enter the microwave
ventilation holes.
Regularly take out the turntable plate and the
respective support and clean the cavity base,
especially after any liquid spillage.
Do not switch on the oven without the
turntable and the respective support being in
place.
If the oven cavity is very dirty, put a glass of water
on the turntable and switch on the microwave
oven for 2 or 3 minutes at maximum power. The
steam released will soften the dirt which can then
be cleaned easily using a soft cloth.
Unpleasant odours (e.g. after cooking fish) can be
eliminated easily. Put a few drops of lemon juice
in a cup with water. Put a spoonful of coffee in the
cup to avoid the water boiling over. Heat the water
for 2 to 3 minutes at maximum microwave power.
35
EN
Oven Cleaning and Maintenance
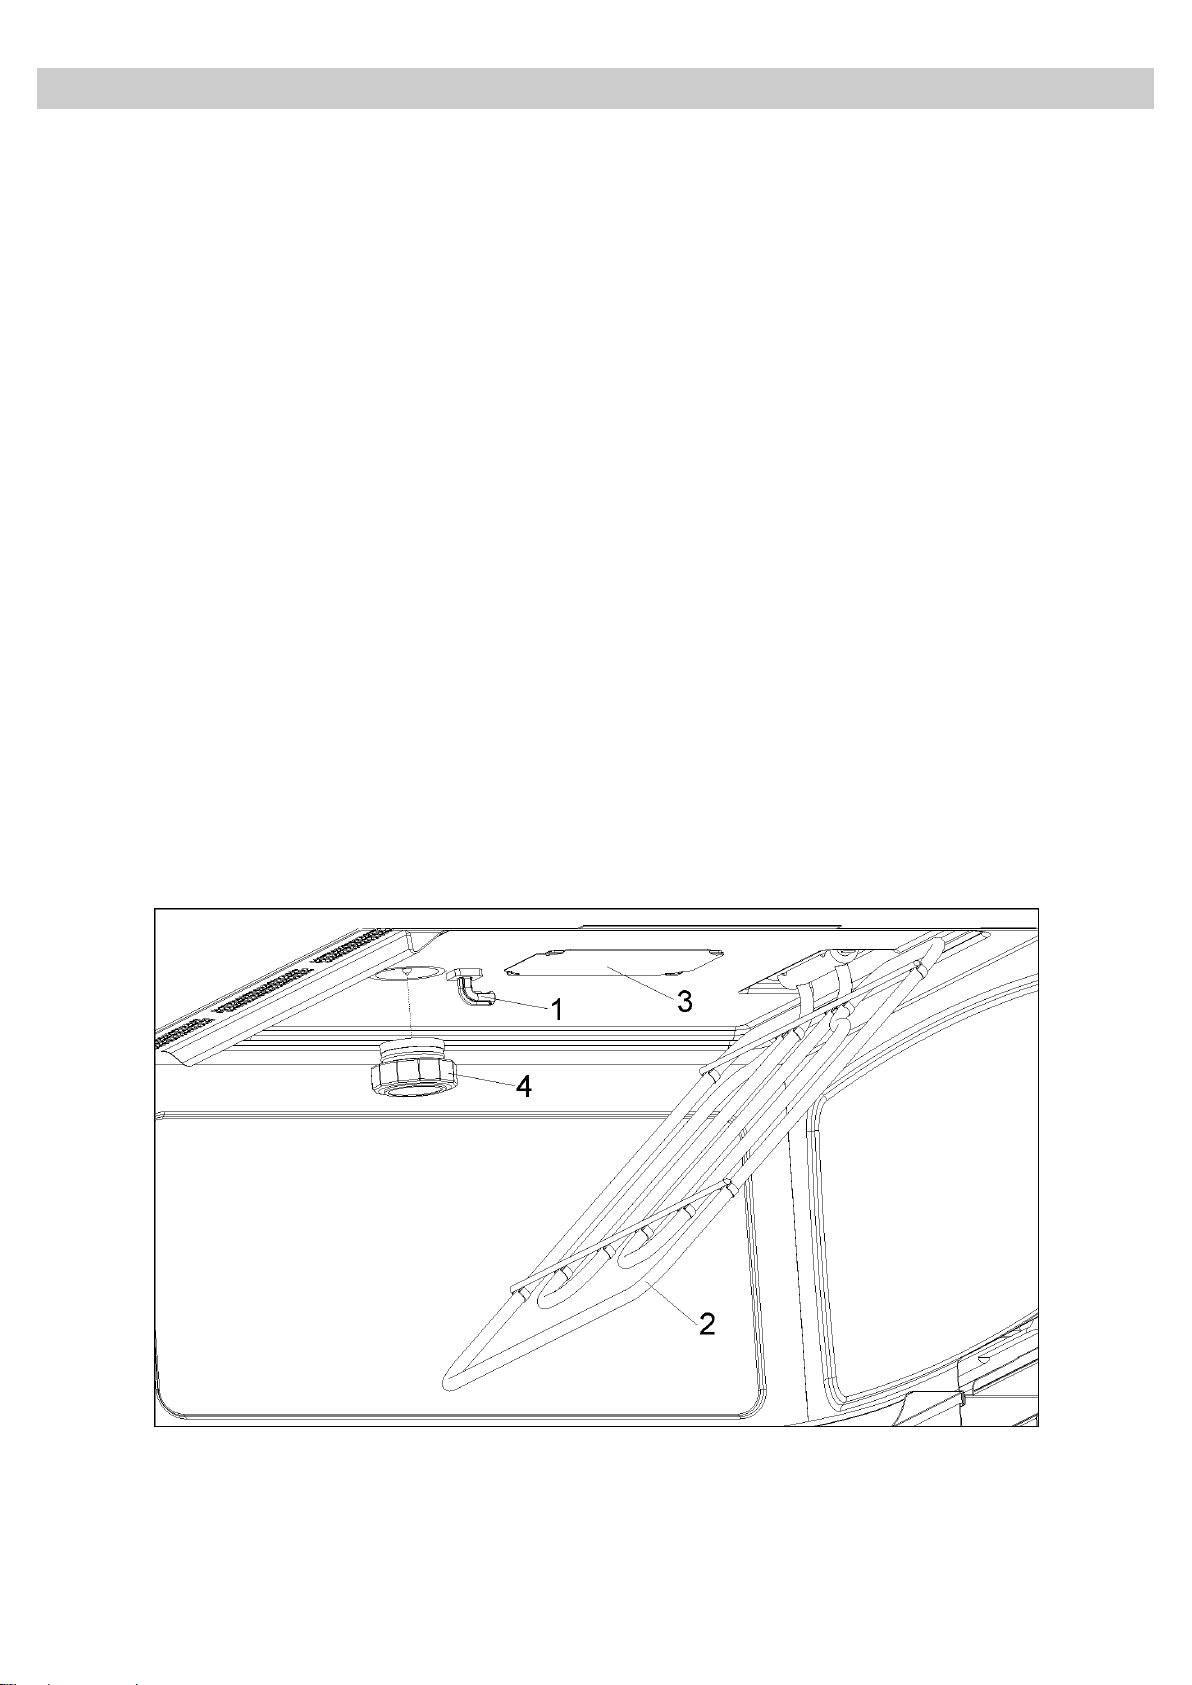
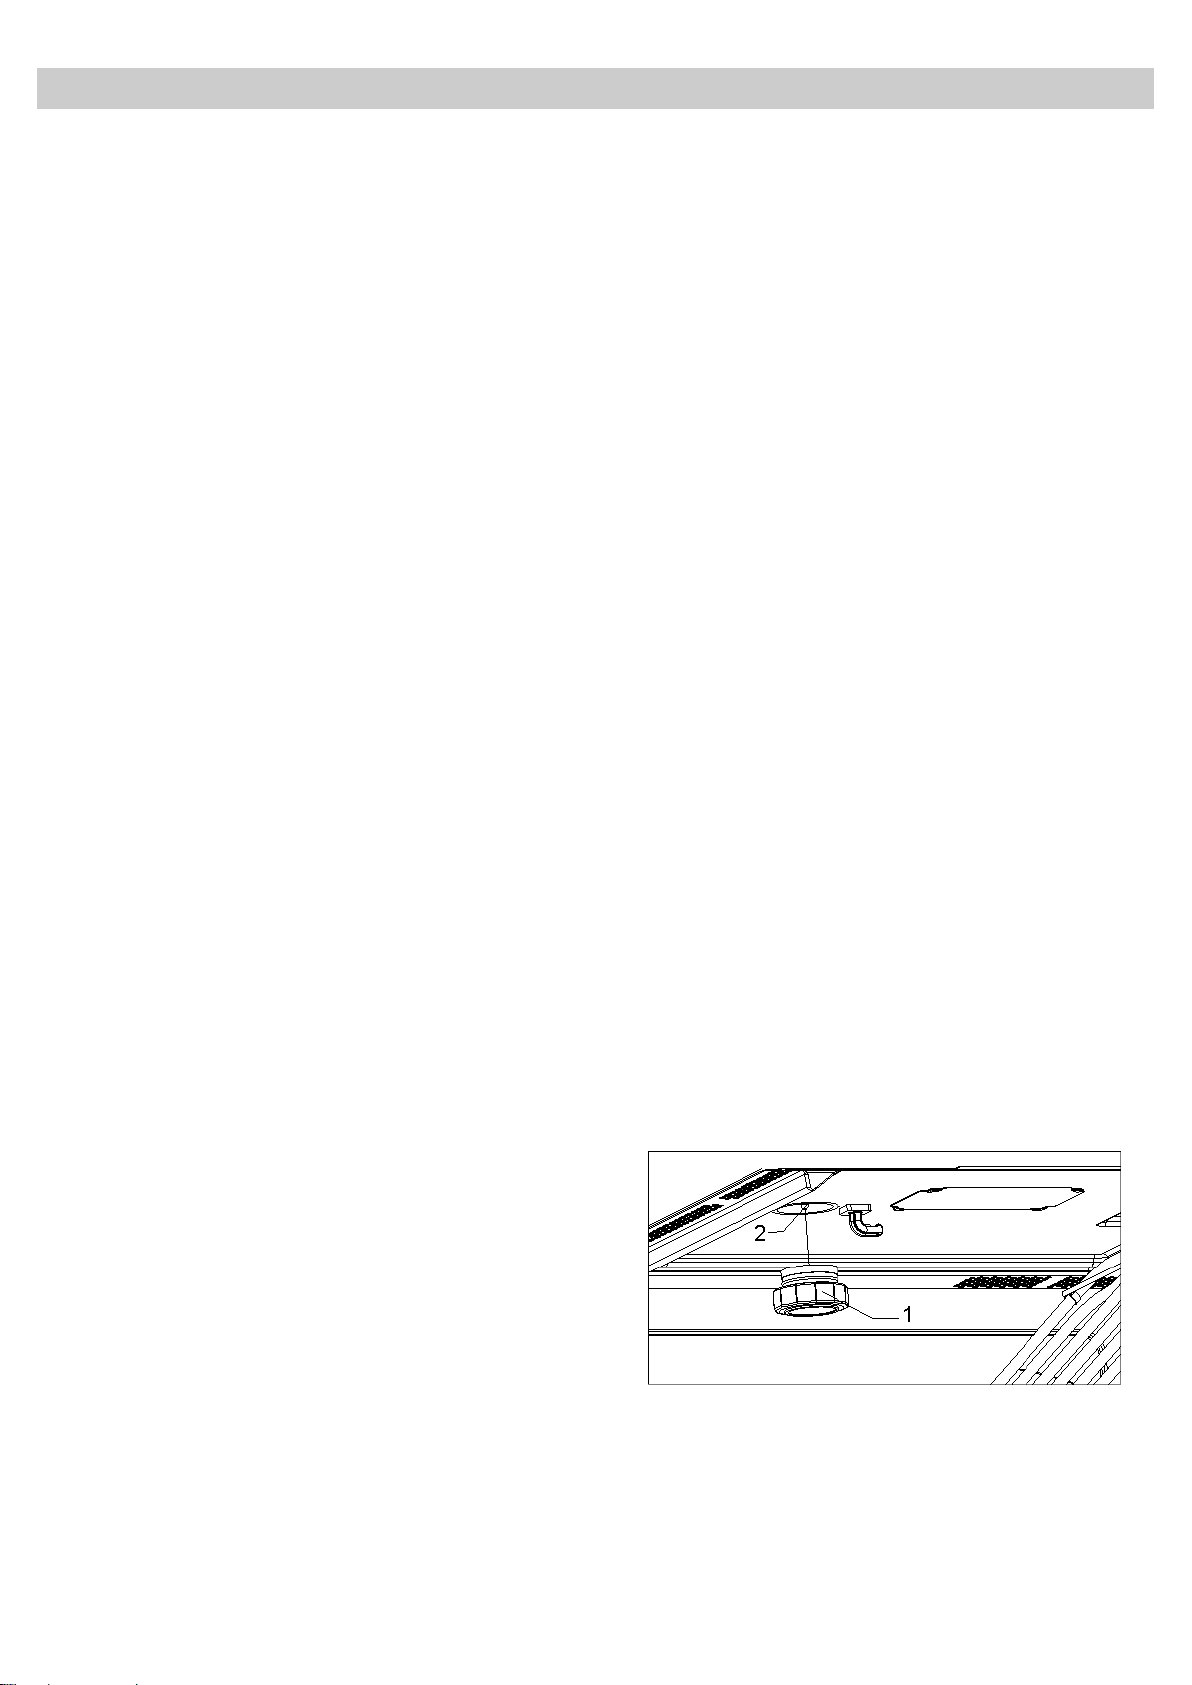
Oven ceiling
If the oven ceiling is dirty, the grill can be lowered
to make cleaning easier.
To avoid the danger of burning, wait until the
grill is cold before lowering it. Proceed as
follows:
1. Turn the grill support by 180º (1).
2. Lower the grill gently (2). Do not use
excessive force as this may cause
damage.
3. After cleaning the ceiling, put the grill (2)
back in its place, carrying out the previous
operation.
IMPORTANT WARNING: The grill heating
element support (1) may fall when it is rotated. If
this happens, insert the grill heating element
support (1) into the slot in the ceiling of the cavity
and rotate it 90º to the grill heating element
support (2) position.
The mica cover (3) located in the ceiling must
always be kept clean. Any food remains that
collect on the mica cover can cause damage or
provoke sparks.
Do not use abrasive cleaning products or
sharp objects.
To avoid any risk, do not remove the mica
cover.
The glass lamp cover (4) is located on the oven
ceiling and can be removed easily for cleaning.
For this you just need to unscrew it and clean it
with water and dishwashing liquid.
Accessories
Clean the accessories after each use. If they are
very dirty, soak them first of all and then use a
brush and sponge. The accessories can be
washed in a dish washing machine.
Make sure that the turntable plate and the
respective support are always clean. Do not
switch on the oven unless the turntable and the
respective support are in place.
36
EN
What should I do if the oven doesn’t work?
WARNING! Any type of repair must only be
done by a specialised technician. Any repair
done by a person not authorised by the
manufacturer is dangerous.
You do not need to contact Technical Assistance
to resolve the following questions:
The display is not showing! Check if:
- The time indication has been switched off
(see section on Basic Settings).
Nothing happens when I press the keys!
Check if:
- The Safety Block is active (see section on
Basic Settings).
The oven does not work! Check if:
- The plug is correctly fitted in the socket.
- The oven’s power is switched on.
- The door is completely closed. The door
should close with an audible click.
- There are any foreign bodies between the
door and the cavity front.
When the oven is operating I can hear some
strange noises! Check if:
- There is any electrical arcing inside the oven
caused by foreign metallic objects (see
section on type of ovenware).
- The ovenware is touching the oven walls.
- There are any loose items of cutlery or
cooking tools inside the oven.
The food doesn’t heat up or heats very
slowly! Check if:
- You have inadvertently used metal
ovenware.
- You have selected the correct operating
times and power level.
- The food you have put inside the oven is a
larger amount or colder than you usually put
in.
The food is too hot, dried out or burnt!
Check if you selected the correct operating
time and power level.
I hear some noises after the cooking
process is finished! This is not a problem.
The cooling fan keeps on working for some
time. When the temperature has dropped
sufficiently, the fan will switch itself off.
The oven switches on but the interior
light does not go on! If all the functions
work properly it is probable that the lamp
has blown. You can keep on using the oven.
Substitution of light bulb
WARNING: Ensure that the appliance is switched
off before replacing the lamp to avoid the
possibility of electric shock.
To substitute the light bulb, proceed as follows:
- Disconnect the oven from the power supply.
Take the plug out of the socket or switch off
the oven’s power circuit.
- Unscrew and remove the glass light cover
(1).
- Remove the halogen light bulb (2). Warning!
The bulb may be very hot.
- Fit a new 12V / 10W halogen bulb. Warning!
Do not touch the light bulb surface
directly with your fingers because you
may damage the bulb. Follow the lamp
manufacturer’s instructions.
- Screw the glass light cover into place (1).
- Connect the oven again to the power supply.
37
EN
Technical characteristics
Specifications
AC Voltage ..................................................................................... (see characteristics plate)
Power required ............................................................................... 3400 W
Grill power. ..................................................................................... 1500 W
Hot air power .................................................................................. 1600W
Microwave output power. ................................................................ 1000 W
Microwave frequency… .................................................................. 2450 MHz
Exterior dimensions (WHD). ....................................................... 595 455 542 mm
Interior dimensions (WHD). ........................................................ 420 210 390 mm
Oven capacity. ................................................................................ 38 ltr
Weight ............................................................................................ 35 kg
Environmental protection
Disposal of the packaging
The packaging bears the Green Dot mark.
Dispose of all the packaging materials such as
cardboard, expanded polystyrene and plastic
wrapping in the appropriate bins. In this way you
can be sure that the packaging materials will be
re-used. Keep all packaging away from small
children as it may present suffocation/choking
hazard.
Disposal of equipment no longer used
According to European Directive 2002/96/EC on
the management of waste electrical and
electronic equipment (WEEE), home electrical
appliances should not be put into the normal
systems for disposal of solid urban waste.
Outdated appliances should be collected
separately to optimise component material
recovery and recycling rates and to prevent
potential harm to human health and the
environment. The symbol of a rubbish container
superimposed by a diagonal cross should be put
on all such products to remind people of their
obligation to have such items collected
separately.
Consumers should contact their local authorities
or point of sale and request information on the
appropriate places to leave their old home
electrical appliances.
Before disposing of your appliance, render it
non-usable by pulling out the power cable,
cutting it off and disposing of it.
38
EN
Installation instructions
Before installation
Check that the input voltage indicated on the
characteristics plate is the same as the voltage
of the power outlet you are going to use.
Open the oven door and take out all the
accessories and remove the packing material.
Do not remove the mica cover on the ceiling of
the interior! This cover stops fat and pieces of
food damaging the microwave generator.
Warning! The front surface of the oven may be
wrapped with a protective film. Before using
the oven for the first time, carefully remove this
film, starting on the inside.
Make sure that the oven is not damaged in
any way. Check that the oven door closes
correctly and that the interior of the door and the
front of the oven opening are not damaged. If
you find any damage contact the Technical
Assistance Service.
DO NOT USE THE OVEN if the power cable or
the plug are damaged, if the oven does not
function correctly or if it has been damaged or
dropped. Contact the Technical Assistance
Service.
Put the oven on a flat and stable surface. The
oven must not be put close to any sources of
heat, radios or televisions.
During installation, make sure that the power
cable does not come into contact with any
moisture or objects with sharp edges behind
the oven. High temperatures can damage the
cable.
Warning: after the oven is installed you must
make sure you can access the plug.
After installation
The oven is equipped with a power cable and a
plug for single phase current.
If the oven is to be installed on a permanent
basis it should be installed by a qualified
technician. In such a case, the oven should be
connected to a circuit with an all-pole circuit
breaker with a minimum separation of 3 mm
between contacts.
WARNING: THE OVEN MUST BE EARTHED.
The manufacturer and retailers do not accept
responsibility for any damage that may be
caused to people, animals or property if these
installation instructions are not observed..
The oven only functions when the door is
closed correctly.
After the first use, clean the inside of the oven
and the accessories, following the cleaning
instructions given in the section “Oven cleaning
and maintenance”.
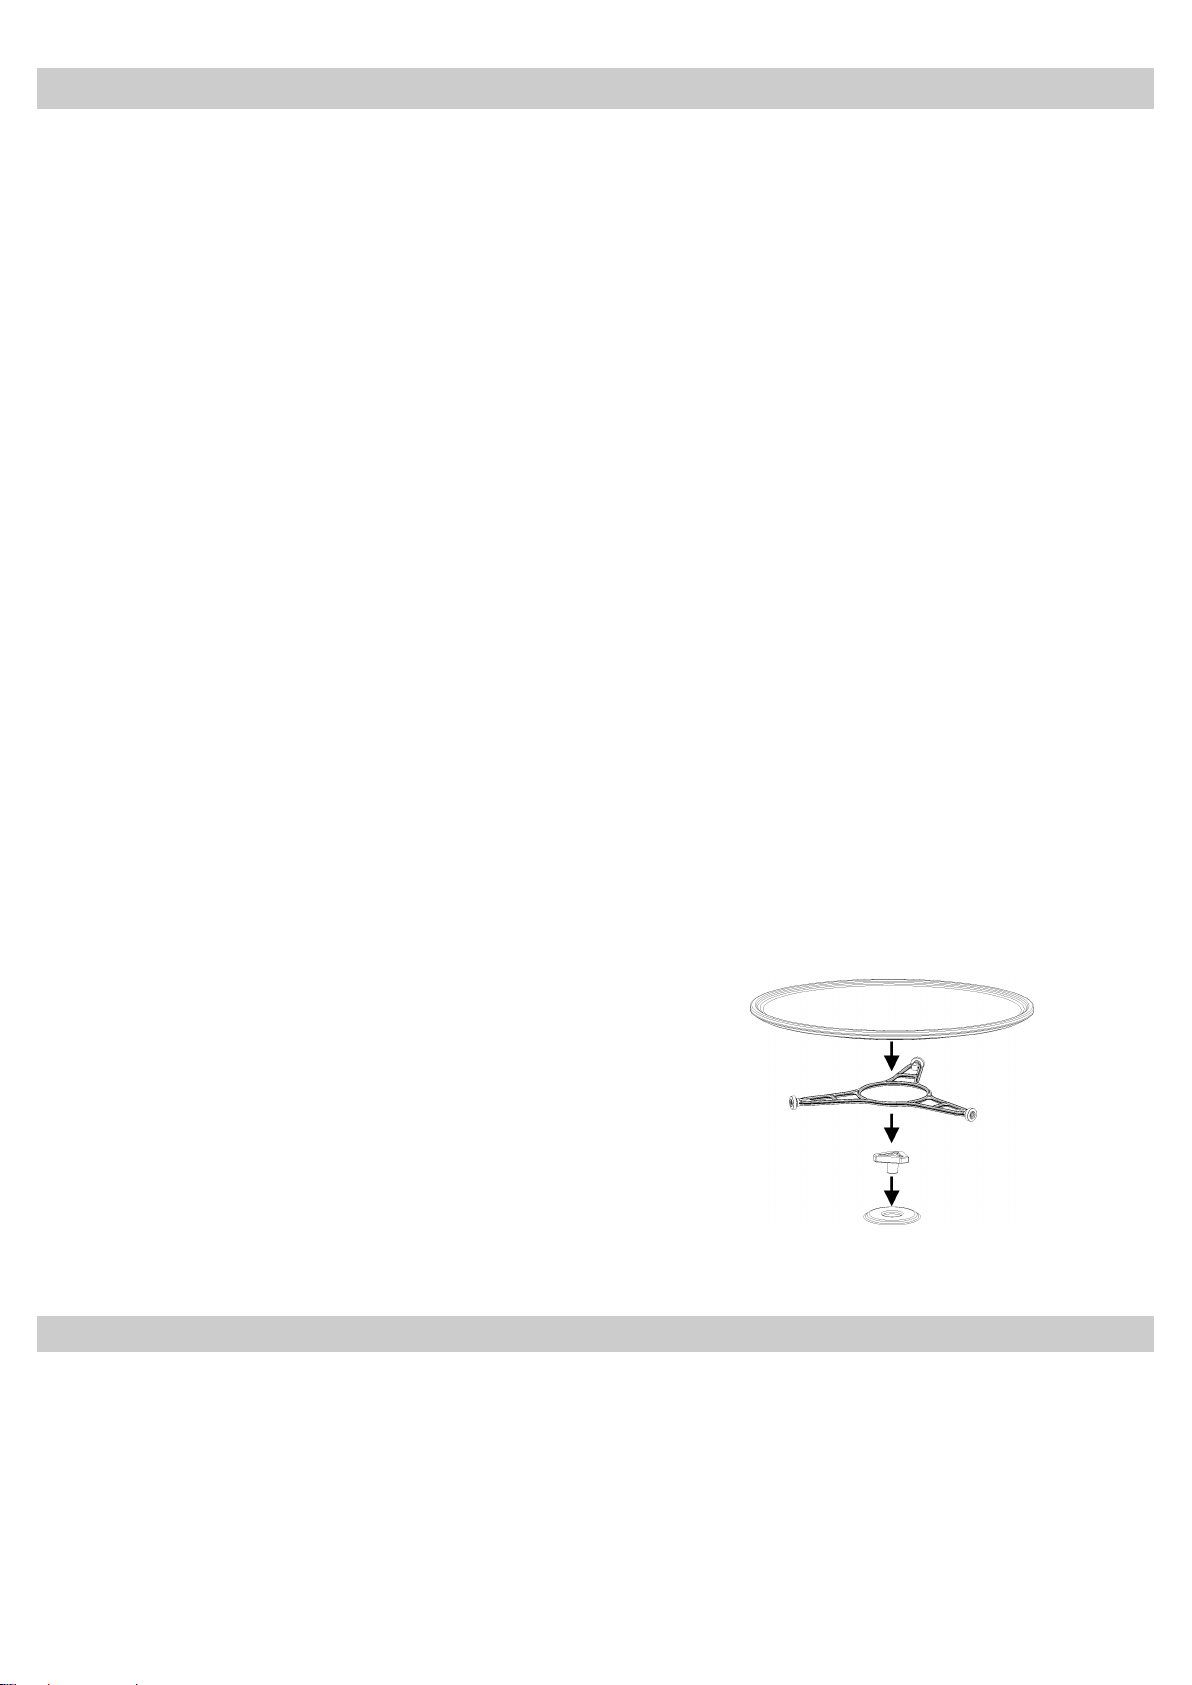
Fit the Turntable support in the centre of the
oven cavity and put the Turntable ring and the
Turntable plate on top, making sure they slot in.
Whenever you use the microwave, the turntable
plate and the respective accessories must be
inside and correctly fitted. The turntable plate
can rotate in both directions.
During installation, follow the instructions supplied separately.

39
IT
Indice
Informazioni per la sicurezza ........................................................................................................... 40
Istruzioni di sicurezza ...................................................................................................................... 44
I vantaggi delle microonde ............................................................................................................... 45
Descrizione dell'apparecchio........................................................................................................... 46
Impostazioni preliminari ................................................................................................................... 48
Funzioni base .................................................................................................................................... 50
Programmi speciali ........................................................................................................................... 55
Utilizzo del piatto di doratura ........................................................................................................... 58
Durante il funzionamento... .............................................................................................................. 59
Scongelare ........................................................................................................................................ 60
Cucinare con le microonde .............................................................................................................. 62
Cuocere con il grill ........................................................................................................................... 64
Arrostire e cuocere ........................................................................................................................... 67
Stoviglie adatte per le microonde ................................................................................................... 69
Pulizia e manutenzione .................................................................................................................... 71
Guasti, cosa fare? ............................................................................................................................. 73
Dati tecnici ......................................................................................................................................... 74
Istruzioni di montaggio .................................................................................................................... 75
Incasso .............................................................................................................................................. 76
Caro Cliente,
Grazie per aver scelto questo prodotto BARAZZA.
La preghiamo di leggere molto attentamente le istruzioni contenute in questo libretto al fine di poter
ottenere i migliori risultati possibili.
CONSERVI LA DOCUMENTAZIONI DI QUESTO PRODOTTO PER IL FUTURO.
Conservare queste istruzioni per l'uso sempre a portata di mano e consegnarle ad un eventuale
futuro utilizzatore al quale si è ceduto l'apparecchio!
Il manual d’uso è disponibili per il download anche alla pagina www.barazzasrl.it

40
IT
Informazioni per la sicurezza
Leggere attentamente le istruzioni fornite prima di installare e
utilizzare l'apparecchiatura. Il produttore non è responsabile se
un'installazione ed un uso non corretto dell'apparecchiatura
provocano lesioni e danni. Tenere sempre le istruzioni a portata di
mano in caso di necessità durante l'utilizzo."
SICUREZZA DEI BAMBINI E DELLE PERSONE VULNERABILI
AVVERTENZA! Rischio di soffocamento, lesioni o invalidità
permanente.
Questa apparecchiatura può essere usata da bambini a partire
dagli 8 anni e da adulti con limitate capacità fisiche, sensoriali o
mentali o con scarsa esperienza o conoscenza sull'uso
dell'apparecchiatura, se sorvegliati o se sono stati istruiti
relativamente all'uso dell'apparecchiatura e hanno capito i rischi
coinvolti.
Non consentire ai bambini di giocare con l'apparecchiatura.
Tenere i materiali di imballaggio al di fuori della portata dei
bambini.
AVVERTENZA:Tenere i bambini lontano dall'apparecchiatura
durante il funzionamento o raffreddamento. Le parti accessibili
sono incandescenti.
Se l’apparecchiatura dispone di un dispositivo di sicurezza per i
bambini, consigliamo di attivarlo. Tenere lontani
dall'apparecchiatura i bambini incustoditi sotto i 3 anni.
La pulizia e gli interventi di manutenzione non devono essere
eseguiti dai bambini senza supervisione..
AVVERTENZE DI SICUREZZA GENERALI
L'apparecchiatura è destinata all'uso domestico e applicazioni
simili, tra cui:
– cucine di negozi, uffici e altri ambienti di lavoro;
– fattorie;
– da clienti di hotel, motel e altri ambienti residenziali;
– nei bed and breakfast.

41
IT
Informazioni per la sicurezza
All'interno l'apparecchiatura si scalda mentre è in funzione. Non
toccare le resistenze dell'apparecchiatura. Servirsi sempre degli
appositi guanti da forno per estrarre o inserire accessori o
pentole resistenti al calore..
AVVERTENZA: Non si devono riscaldare liquidi o altri alimenti in
contenitori sigillati perché potrebbero esplodere.
Usare solo utensili adatti all'uso in forno a microonde
Quando si riscaldano o cuociono alimenti in recipienti di plastica,
carta, controllare il forno per evitare il rischio di incendio
L'apparecchiatura è destinata alla cottura di alimenti e bevande.
L'asciugatura di alimenti e capi di vestiario e il riscaldamento di
compresse riscaldanti, pantofole, spugne, panni umidi e simili
può comportare il rischio di lesione, accensione o incendio.
Attenzione! L'apparecchio non deve essere utilizzato se:
- lo sportello non si chiude correttamente,
- le cerniere dello sportello sono danneggiate,
- le superfici di contatto tra sportello e frontale sono danneggiate,
- il vetro dello sportello è danneggiato,
- nel vano cottura si creano spesso scintille senza che siano
presenti oggetti metallici.
L'apparecchio può essere di nuovo utilizzato, solo dopo che è
stato riparato da un tecnico del Servizio Assistenza.
Se viene emesso del fumo, spegnere l'apparecchiatura o
disinserire la spina del cavo di alimentazione e tenere la porta
chiusa per soffocare le eventuali fiamme.
Il riscaldamento a microonde di bevande può provocare
un'ebollizione ritardata con fuoriuscita della bevanda fare quindi
attenzione quando si manipola il contenitore.
Agitare o scuotere il contenuto dei biberon e dei vasetti di
alimenti per bambini e controllarne la temperatura prima del
consumo per evitare scottature
Non riscaldare nell'apparecchiatura le uova con il guscio e le
uova sode intere
in quanto potrebbero esplodere, anche successivamente alla
fase di

42
IT
Informazioni per la sicurezza
riscaldamento con il forno a microonde.
INSTALLAZIONE
Nell’installazione elettrica di questo apparecchio è necessario
disporre di un dispositivo che consenta di separare l’apparecchio
dalla rete con un’ampiezza dei contatti di almeno 3 mm in tutti i
poli. Per dispositivi di separazione adatti si intendono per es.
interruttori automatici, fusibili (i fusibili a vite devono essere
rimossi dalla presa), interruttori per corrente di guasto e
contattori. Questa installazione deve essere conforme alle
normative vigenti.
Se il collegamento elettrico avviene con spina e questa rimane
accessibile dopo l'installazione, non è necessario fornire il
dispositivo di separazione menzionato.
Protezione contro le scosse elettriche deve essere assicurata
attraverso il cablaggio (collegamento a terra).
La protezione contro il contatto diretto deve essere garantita dal
modo di integrazione.
AVVERTENZA! Il forno deve essere assolutamente collegato a
terra.
PULIZIA
Pulire l'apparecchiatura regolarmente e togliere eventuali residui
di cibo.
Non mantenendo l'apparecchiatura in condizioni pulite si può
provocare il deterioramento della superficie, pregiudicare la
durata dell'apparecchiatura e si possono creare delle situazioni di
pericolo
Non utilizzare detergenti abrasivi o raschietti di metallo per pulire
il vetro della porta per non rigare la superficie e causare la rottura
del vetro.
Non usare una pulitrice a vapore per pulire l'apparecchiatura.

43
IT
Informazioni per la sicurezza
Per un corretto funzionamento del forno, le superfici di contatto
dello sportello (la parte frontale del vano cottura e la parte interna
degli sportelli) devono essere mantenute sempre perfettamente
pulite.
Seguire le istruzioni per la pulizia fornite nella sezione "Pulizia e
manutenzione del forno.
RIPARAZIONI
AVVERTENZA: Prima di eseguire qualsiasi intervento di
manutenzione, scollegare l'apparecchiatura dalla rete elettrica.
AVVERTENZA: Qualsiasi intervento di servizio o riparazione che
preveda lo smontaggio di un coperchio previsto per proteggere
dall'esposizione all'energia a microonde va eseguito
esclusivamente da una persona competente.
AVVERTENZA: Se la porta o le guarnizioni della porta sono
danneggiate, il forno non deve essere messo in funzione finché
non è stato riparato da una persona competente.
Se il cavo di alimentazione è danneggiato, deve essere sostituito
dal produttore, da un tecnico autorizzato o da una persona
qualificata per evitare situazioni di pericolo.
Le operazioni di riparazione e manutenzione, in particolare quelle
relative ai componenti elettrici, possono essere eseguite solo da
tecnici autorizzati dal fabbricante.
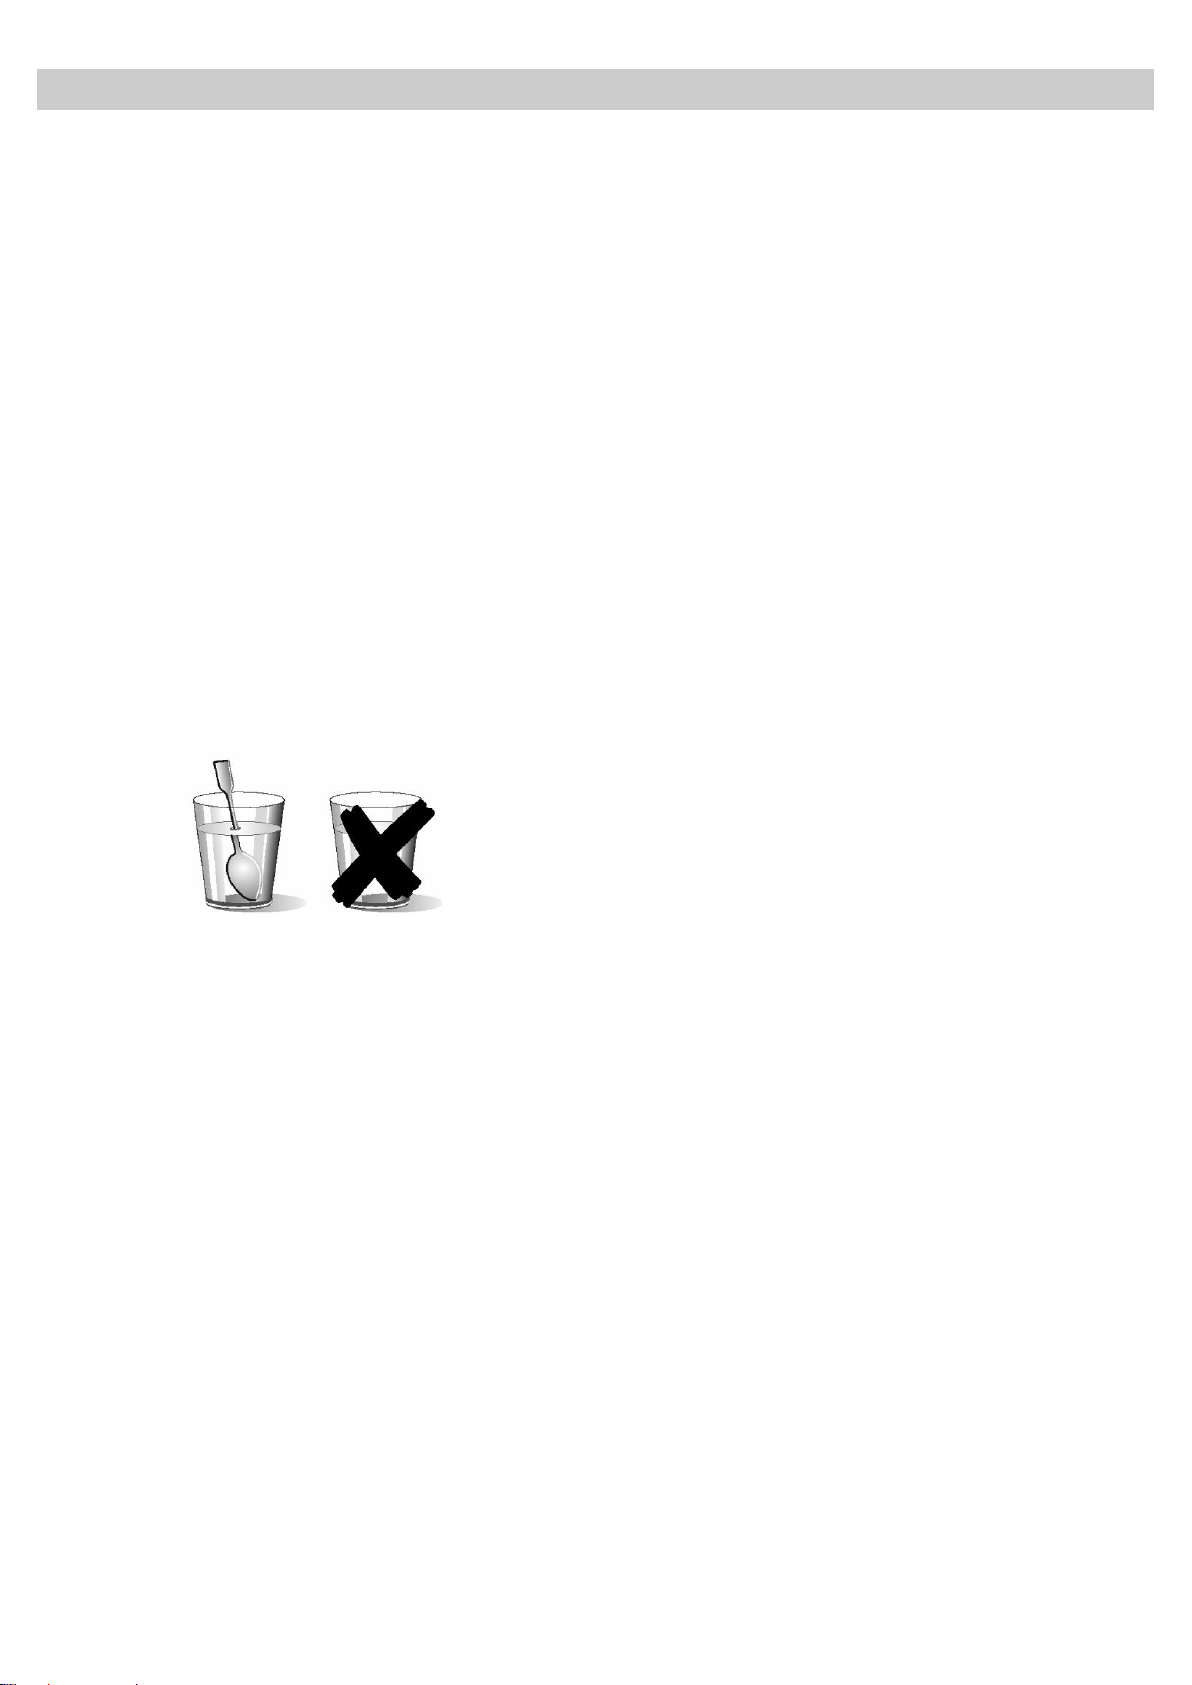
44
IT
Istruzioni di sicurezza
Attenzione! Non riscaldare alcool puro o
bevande alcoliche nel forno a microonde.
PERICOLO D'INCENDIO!
Prudenza!
Per evitare che, durante il riscaldamento di
piccole quantità di cibo, gli alimenti si
riscaldino troppo e magari si infiammino, non
selezionare tempi di riscaldamento o livelli di
potenza troppo elevati. Il pane, per esempio,
può bruciarsi dopo soli 3 minuti se viene
impostata una potenza troppo alta.".
Utilizzare la funzione grill soltanto per gratinare.
Controllare puntualmente il forno. Se si utilizza
la modalità di funzionamento combinato per il
grill, fare attenzione al tempo.
Attenzione! Accertarsi che i cavi di
alimentazione di altri elettrodomestici non
entrino in contatto con lo sportello caldo del
forno. Il materiale isolante del cavo potrebbe
fondersi. Pericolo di corto circuito!.
Fare attenzione quando si riscaldano
alimenti liquidi!
Quando si estraggono dal forno alimenti liquidi
(p.e. acqua, caffè, the, latte, ecc.) che stanno
per raggiungere il punto di bollitura, si corre il
rischio che trabocchino. PERICOLO DI
FERIMENTI E SCOTTATURE!
Per evitare un tale inconveniente, mettere un
cucchiaino o una bacchetta di vetro nel
recipiente che li contiene.
Evitare danni al forno o altre situazioni
pericolose attenendosi alle seguenti istruzioni:
Prima di mettere in funzione il forno, assicurarsi
che il perno, l'anello di scorrimento e il relativo
piatto girante si trovino nel vano cottura.
Non accendere mai il forno a microonde se
vuoto. In assenza di vivande al suo interno, il
forno può sovraccaricarsi: PERICOLO DI
DANNI!
Inserire un bicchiere d'acqua nel forno per
verificarne la programmazione. L'acqua
assorbe le microonde e l'apparecchio non si
danneggia.
Non coprire o intasare i fori e le fessure
d'aerazione.
Utilizzare solo recipienti adatti al microonde.
Prima di utilizzare stoviglie e recipienti nel
forno, verificarne l'idoneità (vedi capitolo
Stoviglie adatte al microonde"").
Non rimuovere la copertura di mica applicata
sulla superficie superiore del vano cottura.
Questa copertura evita che il grasso e i resti di
cottura possano danneggiare il generatore del
microonde.
Non conservare nessun tipo di oggetti
infiammabili nel forno perché si potrebbero
incendiare, se si dovesse accendere
l'apparecchio.
Non utilizzare l'apparecchio come dispensa.
Non utilizzare il forno per friggere in olio,
perché non è possibile controllare la
temperatura dell'olio sotto l'influsso delle
microonde.
Non appoggiarsi né sedersi sullo sportello del
forno aperto. Il forno potrebbe danneggiarsi, in
particolare nella zona delle cerniere. Lo
sportello può tollerare un peso non superiore a
8 kg.
Le rastrelliere possono tollerare un carico
massimo di 8 kg. Per evitare di danneggiare il
forno, non superare tale carico.
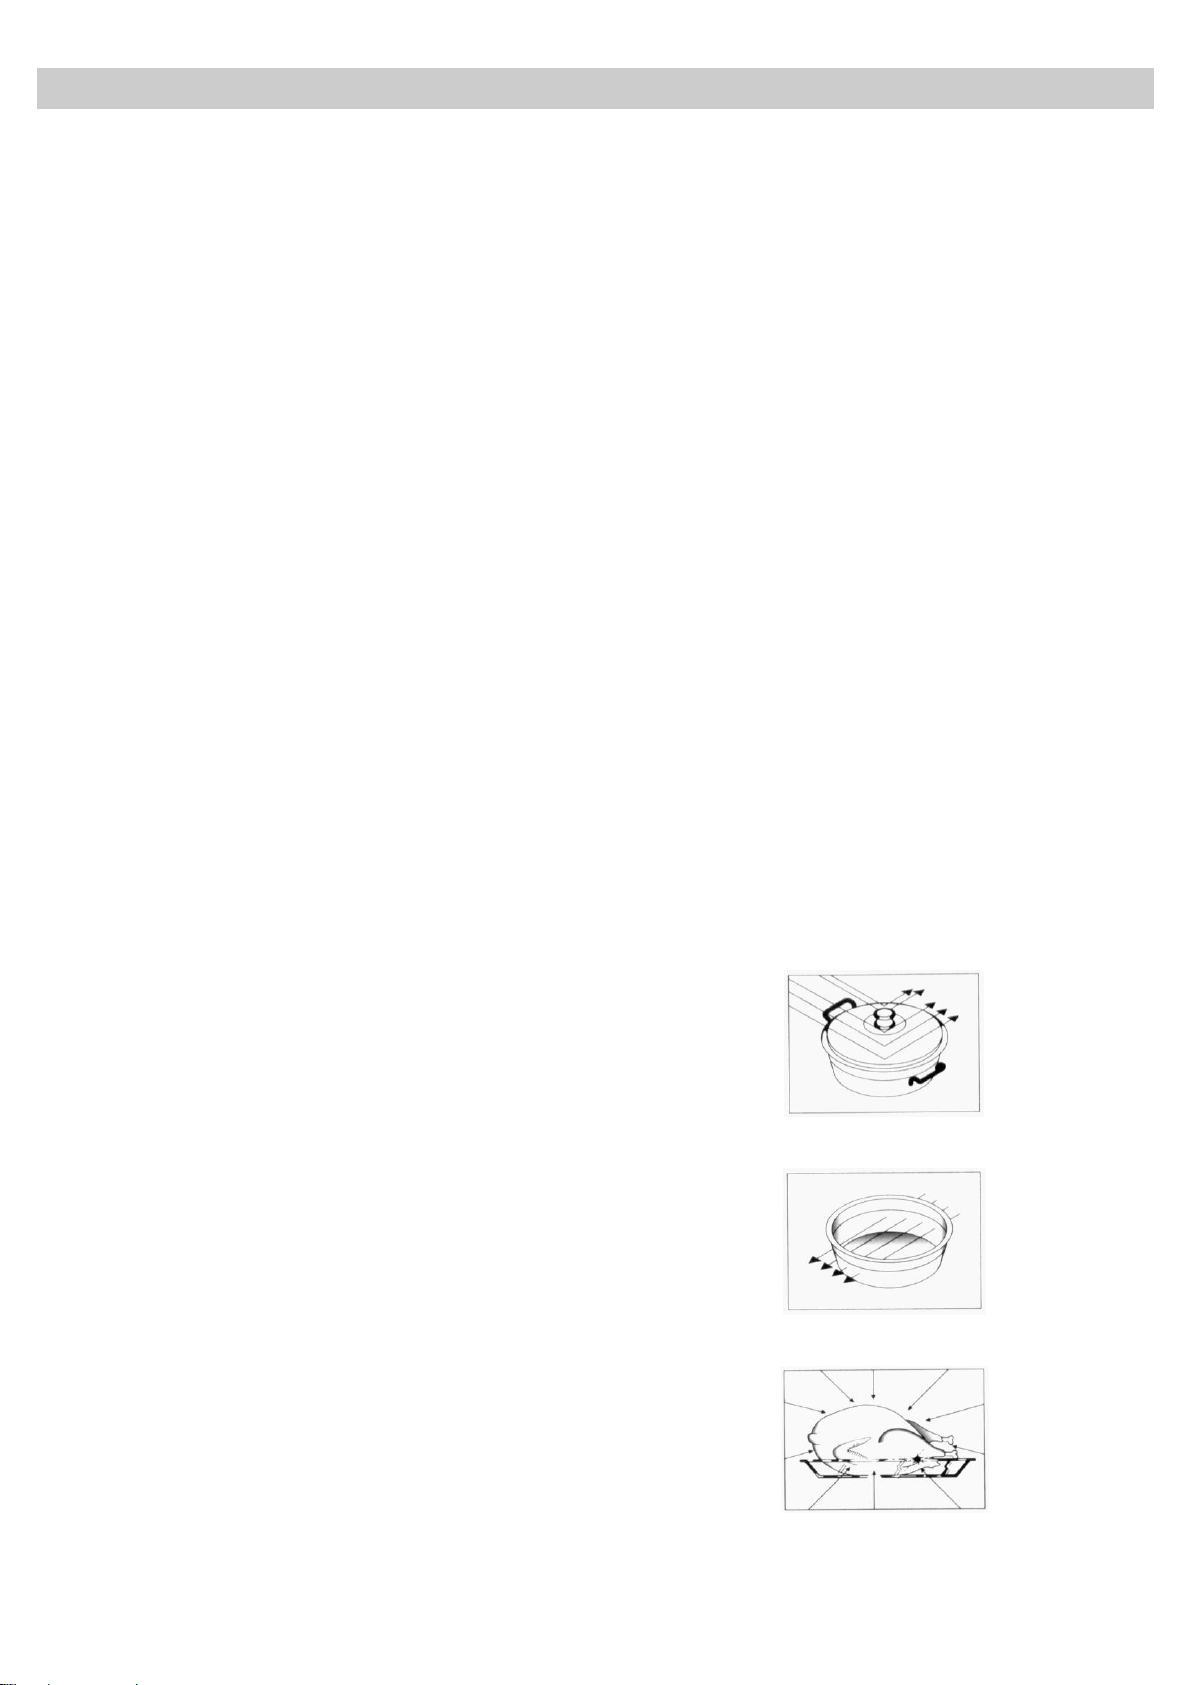
45
IT
I vantaggi delle microonde
Nelle normali cucine il calore generato dalle
resistenze di riscaldamento o dal bruciatore a gas
penetra lentamente nella pietanza dall'esterno
verso l'interno. La perdita di calore provocata dal
riscaldamento dell'aria, dei componenti del forno e
dei recipienti è pertanto molto elevata.
Negli apparecchi a microonde, invece, è il cibo
stesso che si riscalda e il calore viene quindi
trasportato dall'interno verso l'esterno. In questo
modo il calore non viene disperso nell'aria, sulle
pareti del vano cottura o del recipiente (sempre
che questo sia adatto al microonde); vengono
riscaldate infatti solo le pietanze.
Gli apparecchi a microonde presentano quindi i
seguenti vantaggi:
1. Tempi di cottura ridotti: circa ¾ di tempo in
meno rispetto a quello necessario per una
cottura convenzionale.
2. Velocissimo scongelamento di alimenti:
diminuisce la possibilità che si formino
batteri.
3. Risparmio energetico.
4. Mantenimento del valore nutritivo
dell'alimento grazie alla riduzione del tempo
di cottura.
5. Di facile pulizia.
Funzionamento del forno a microonde
Nell'apparecchio a microonde è presente un tubo
termoionico, il cosiddetto magnetron, che
trasforma la corrente elettrica in onde
elettromagnetiche (in microonde). Queste onde
elettromagnetiche vengono trasportate all'interno
dell'apparecchio da un conduttore a onde e sono
distribuite da uno spanditore metallico o da un
piatto girevole.
All'interno dell'apparecchio le microonde si
espandono in tutte le direzioni, vengono riflesse
dalle pareti metalliche e penetrano uniformemente
nelle pietanze.
Perché gli alimenti si riscaldano.
Gli alimenti sono composti prevalentemente
d'acqua, le cui molecole sono messe in
movimento dalle microonde.
L'attrito che si forma tra le molecole produce
calore, il quale aumenta la temperatura
dell'alimento, lo scongela, lo cucina o lo riscalda.
Poiché il calore viene generato all'interno
dell'alimento:
diventa possibile cucinarlo senza aggiunta, o
con un'aggiunta minima, di liquidi o grassi;
i tempi di scongelamento, riscaldamento o
cottura nel forno a microonde sono minori
rispetto a quelli necessari con un forno
tradizionale,
le vitamine, i minerali e le sostanze nutritive
rimangono intatti;
il colore naturale e il sapore della pietanza
non sono soggetti a variazioni.
Le microonde possono penetrare in recipienti di
porcellana, vetro, cartone o plastica, ma non in
quelli di metallo. Non utilizzare pertanto recipienti
di metallo o con elementi in metallo nel forno a
microonde.
Le microonde vengono riflesse dal metallo,...
... penetrano nei recipienti di vetro e porcellana...
... e vengono quindi assorbite dal cibo.
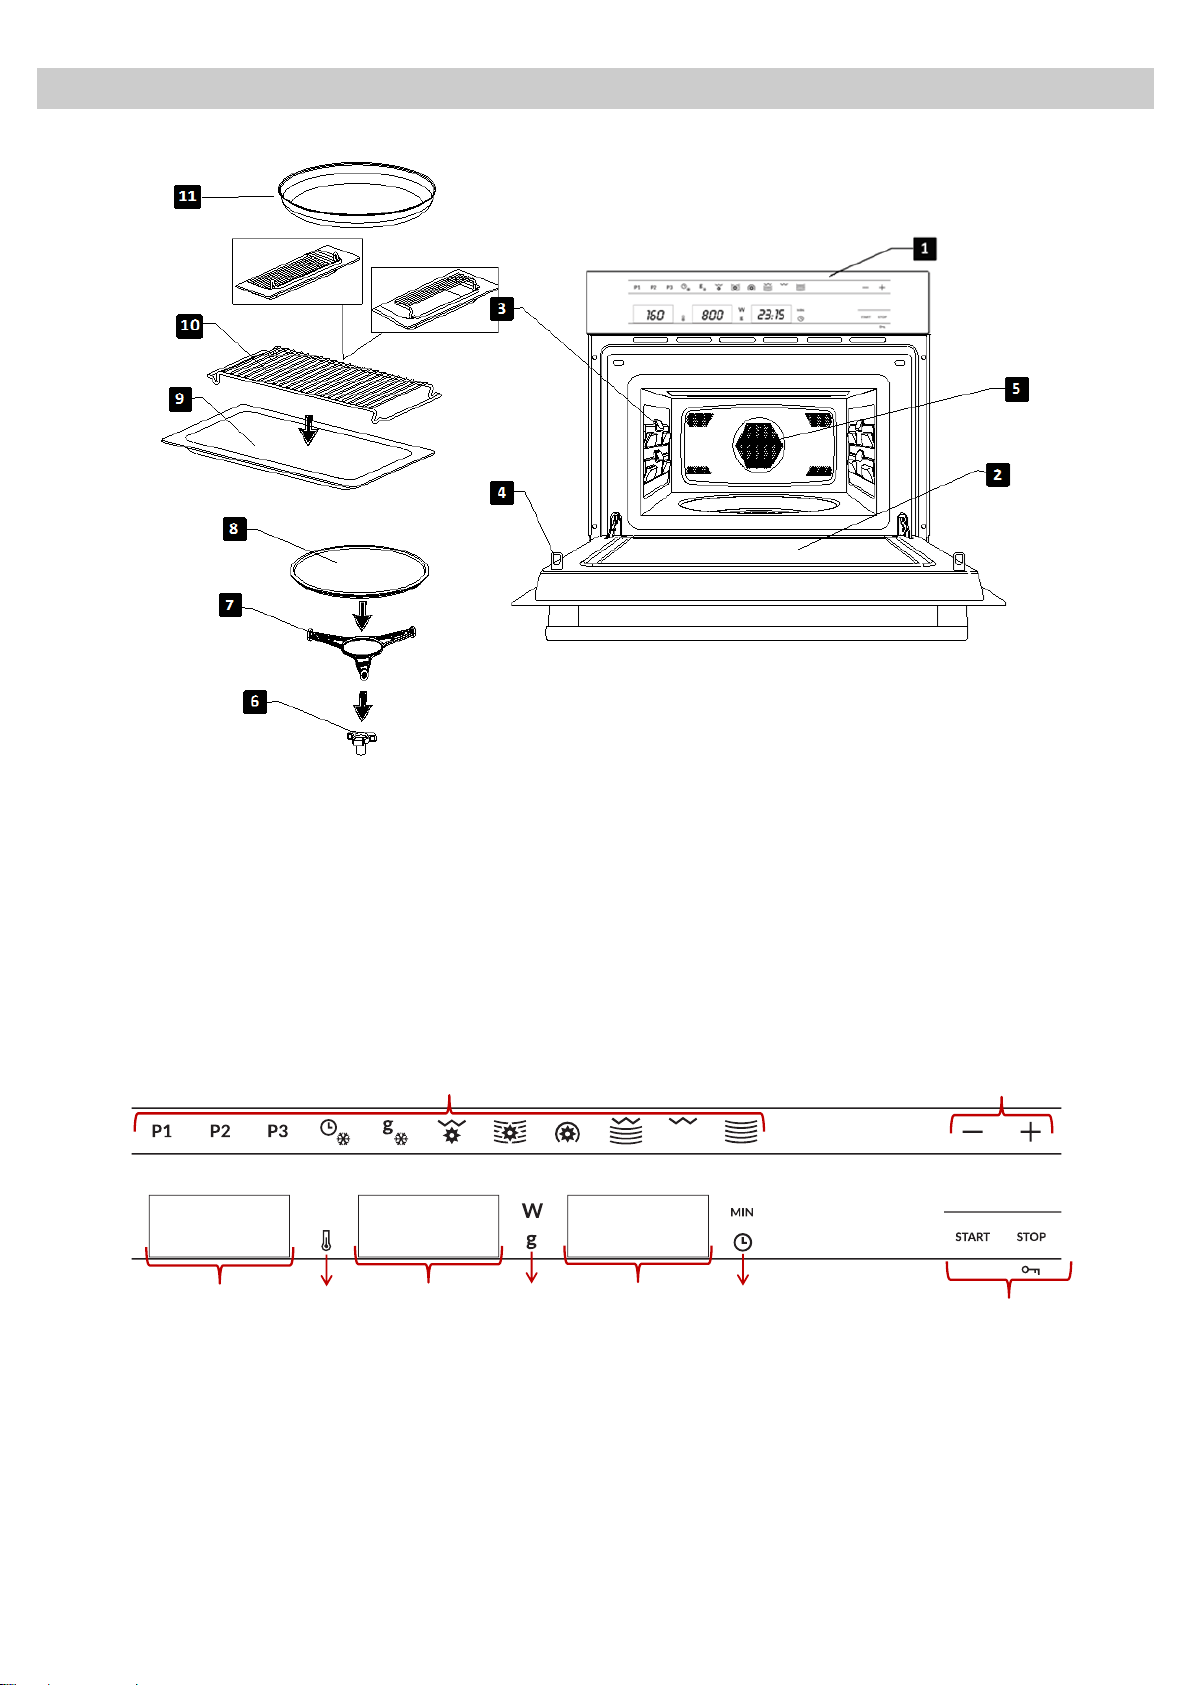
46
IT
Descrizione dell'apparecchio
1. Pannello di controllo
6. Supporto del piatto girevole
2. Vetro della finestra
7. Anello del piatto girevole
3. Supporti Laterali
8. Piatto girevole
4. Linguetta
9. Vassoio di vetro
5. Uscita Aria Calda
10. Griglia rettangolare
11. Piatto di doratura
1.
Segnalatori di funzioni
4a.
Segnalatore di Peso / Potenza
2.
Selettore di funzioni
5.
Selettore/ Display di Ora / Durata
3.
Selettore/ Display di Temperatura
5a.
Segnalatore di Ora / Durata
3a.
Segnalatore di Temperatura
6.
Tasto Start / Stop / Blocco
4.
Selettore/ Display di Peso/ Potenza
di sicurezza
23:15
1
2
6
5
4
3
800
160
3a
4a
5a
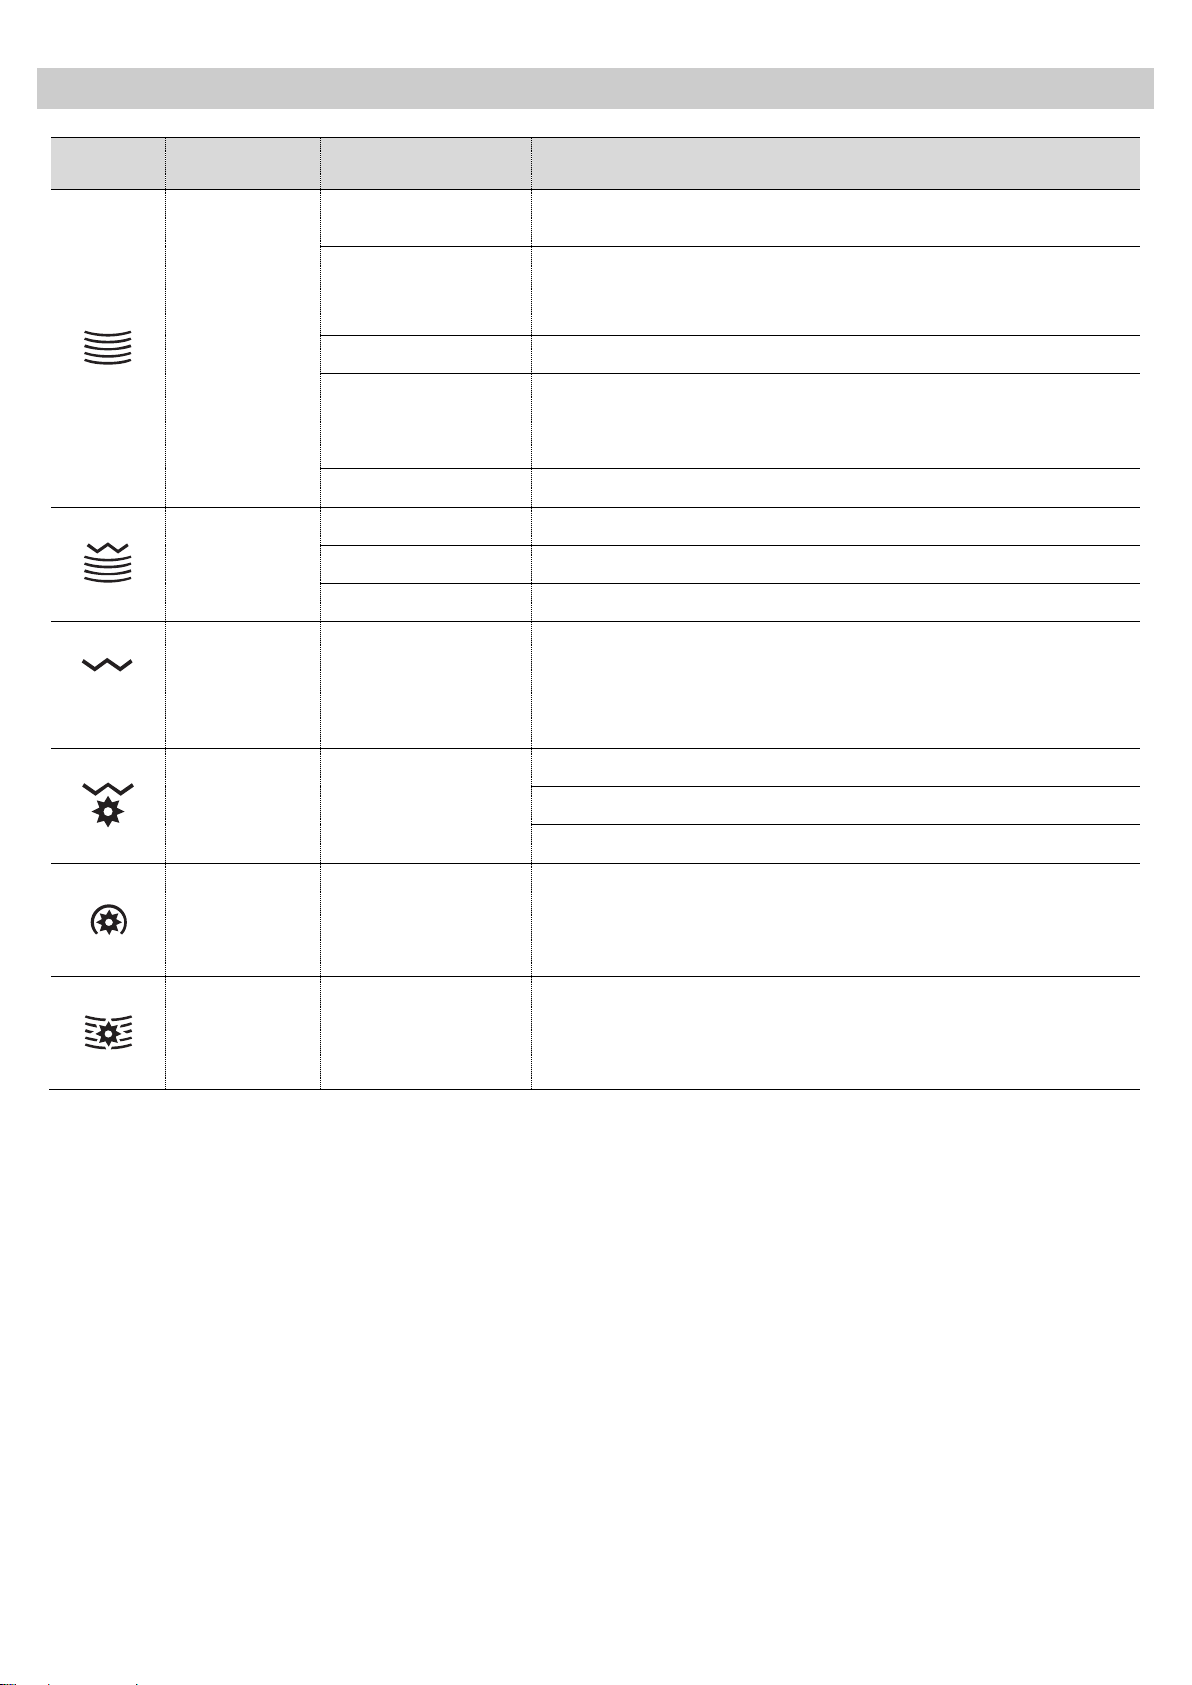
47
IT
Descrizione delle modalità di funzionamento
Simbolo
Funzione
Potenza d'uscita
microonde
Alimenti
Microonde
200 W
Scongelare lentamente i cibi delicati; per scongelare e
proseguire la cottura a bassa potenza.
400 W
Cucinare carni, pesce e riso.
Scongelare velocemente piccole quantità e cibi per neonati
quali, ad es., biberon.
600 W
Riscaldare e cucinare cibi.
800 W
Cucinare verdure e patate.
Cucinare gratinati e piatti preparati.
Scongelare e cucinare piccole quantità.
1000 W
Riscaldare liquidi.
Microonde +
Grill
200 W
Gratinare toast.
400 W
Grigliare pollame e carne.
600 W
Cottura di vol-au-vent e sformati.
Grill
---
Grigliare.
Grill +
Aria calda
---
Grigliare carne e pesce, pezzature piccole.
Grigliare pollame.
Patate – scongelare e rosolare cibi surgelati.
Aria calda
---
Arrostire e cuocere.
Microonde +
Aria calda
200-600 W
Arrostire rapidamente carne, pesce e pollame.
Cuocere torte umide ed asciutte.
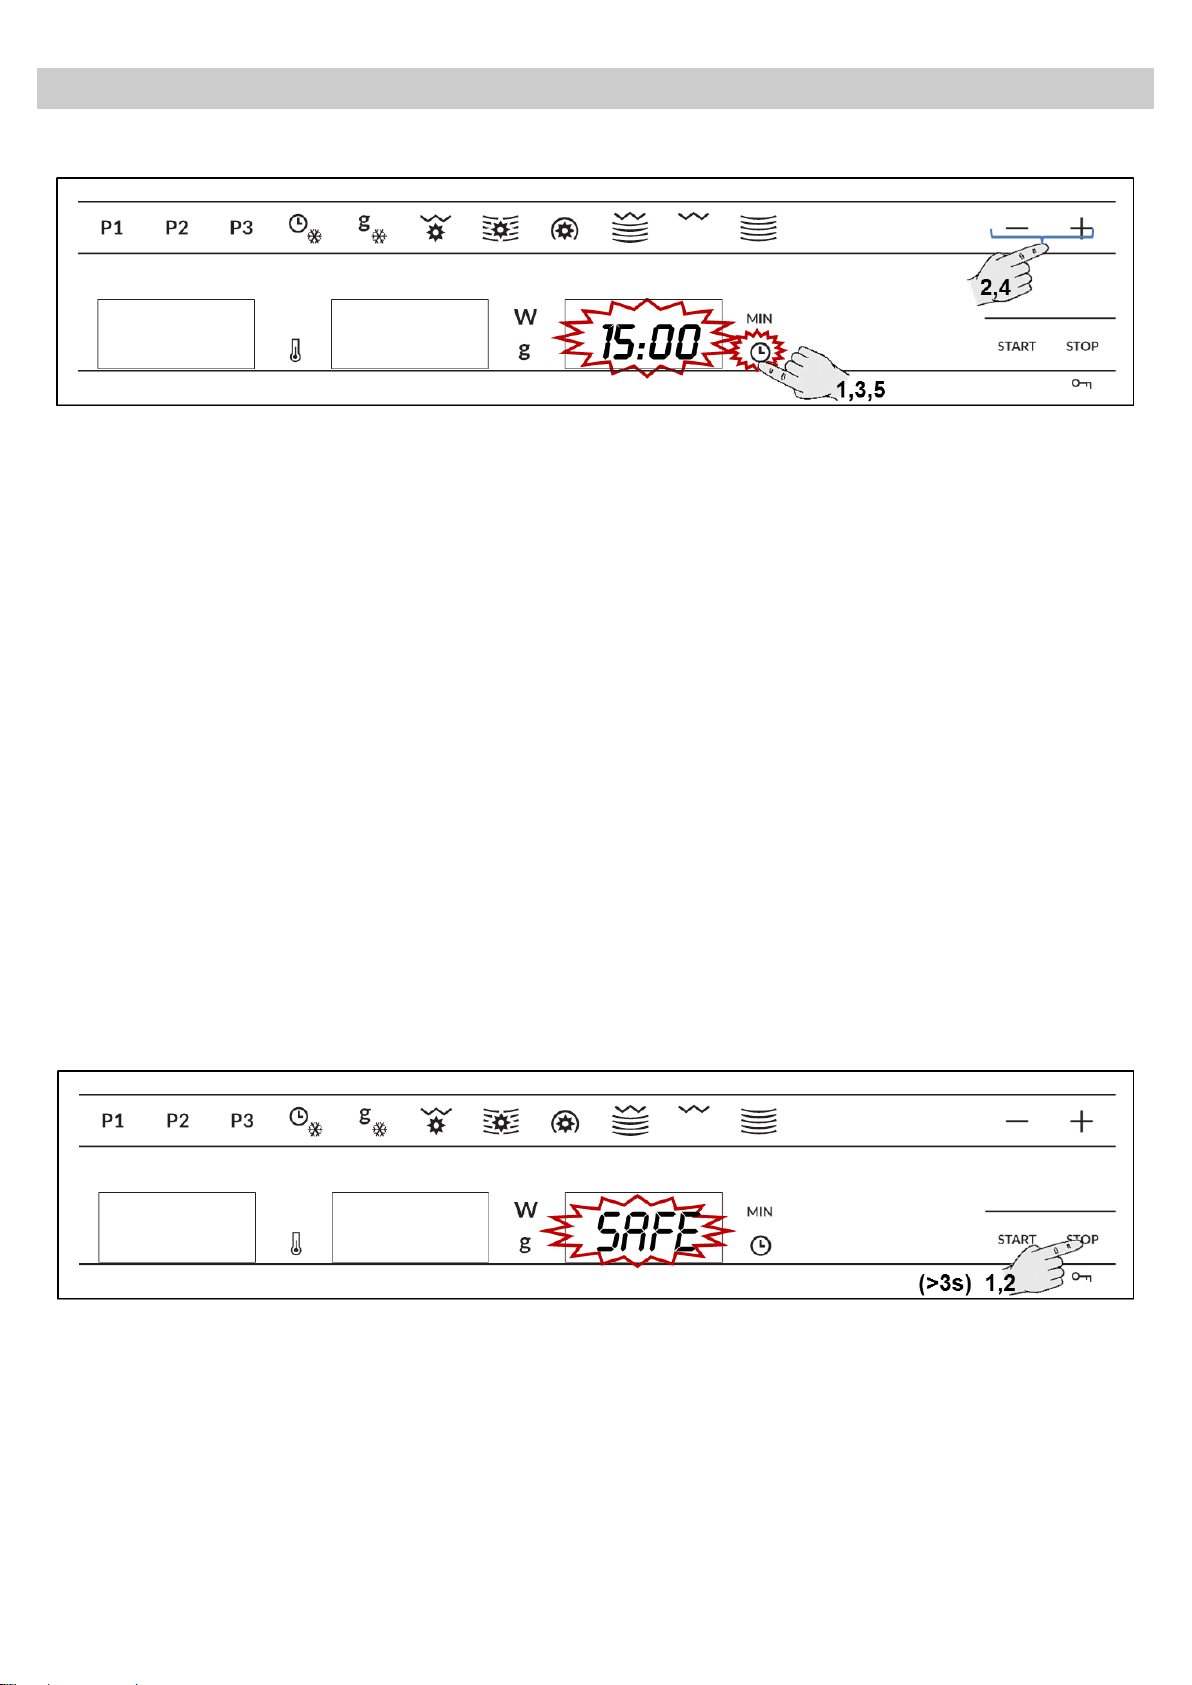
48
IT
Impostazioni preliminari
Impostazione dell'orologio
Quando l'ora indicata non è corretta, il display
dell'orologio lampeggia (p.e. dopo che si è
collegato il forno alla rete elettrica o dopo una
caduta di corrente). Per selezionare l'ora esatta
procedere nel seguente modo:
1. Premere il pulsante dell’Orologio. I numeri
delle ore iniziano a lampeggiare.
2. Premere i pulsanti “-” e “+” per impostare le
ore.
3. Premere di nuovo il pulsante dell’Orologio per
impostare i minuti, che continuano a
lampeggiare.
4. Premere i pulsanti “-” e “+” per impostare i
minuti.
5. Per concludere, premere di nuovo il pulsante
dell’Orologio.
Oscurare l'ora
Se il display dell'ora dovesse infastidire, lo si può
oscurare tenendo premuto il tasto
OROLOGIO/TIMER per tre secondi. I due punti
che separano le ore dai minuti continuano a
lampeggiare mentre l'orologio rimane oscurato.
Per riattivare il display, premere di nuovo per tre
secondi il tasto OROLOGIO/TIMER.
Blocco di messa in funzione
Il funzionamento dell'apparecchio può essere
bloccato per impedirne, per esempio, un utilizzo
improprio da parte dei bambini.
1. Per attivare la funzione "Blocco di messa in
funzione" tenere premuto il tasto STOP per 3
secondi, al termine dei quali verrà emesso
un segnale acustico e a display verrà
visualizzato “SAFE” (sicuro). L'apparecchio è
così bloccato e non può essere utilizzato in
alcun modo.
2. Si disattiva il blocco di messa in funzione,
tenendo premuto il tasto STOP per 3
secondi, al termine dei quali verrà emesso
un segnale acustico e a display verrà di
nuovo visualizzata l'ora.

49
IT
Impostazioni preliminari
Fermare il piatto girevole
1.Per fermare il piatto girevole, premere
contestualmente i tasti “+” e “Stop”.
2. Per ripristinare il funzionamento del piatto,
premere di nuovo contestualmente i tasti “+” e
“Stop”.
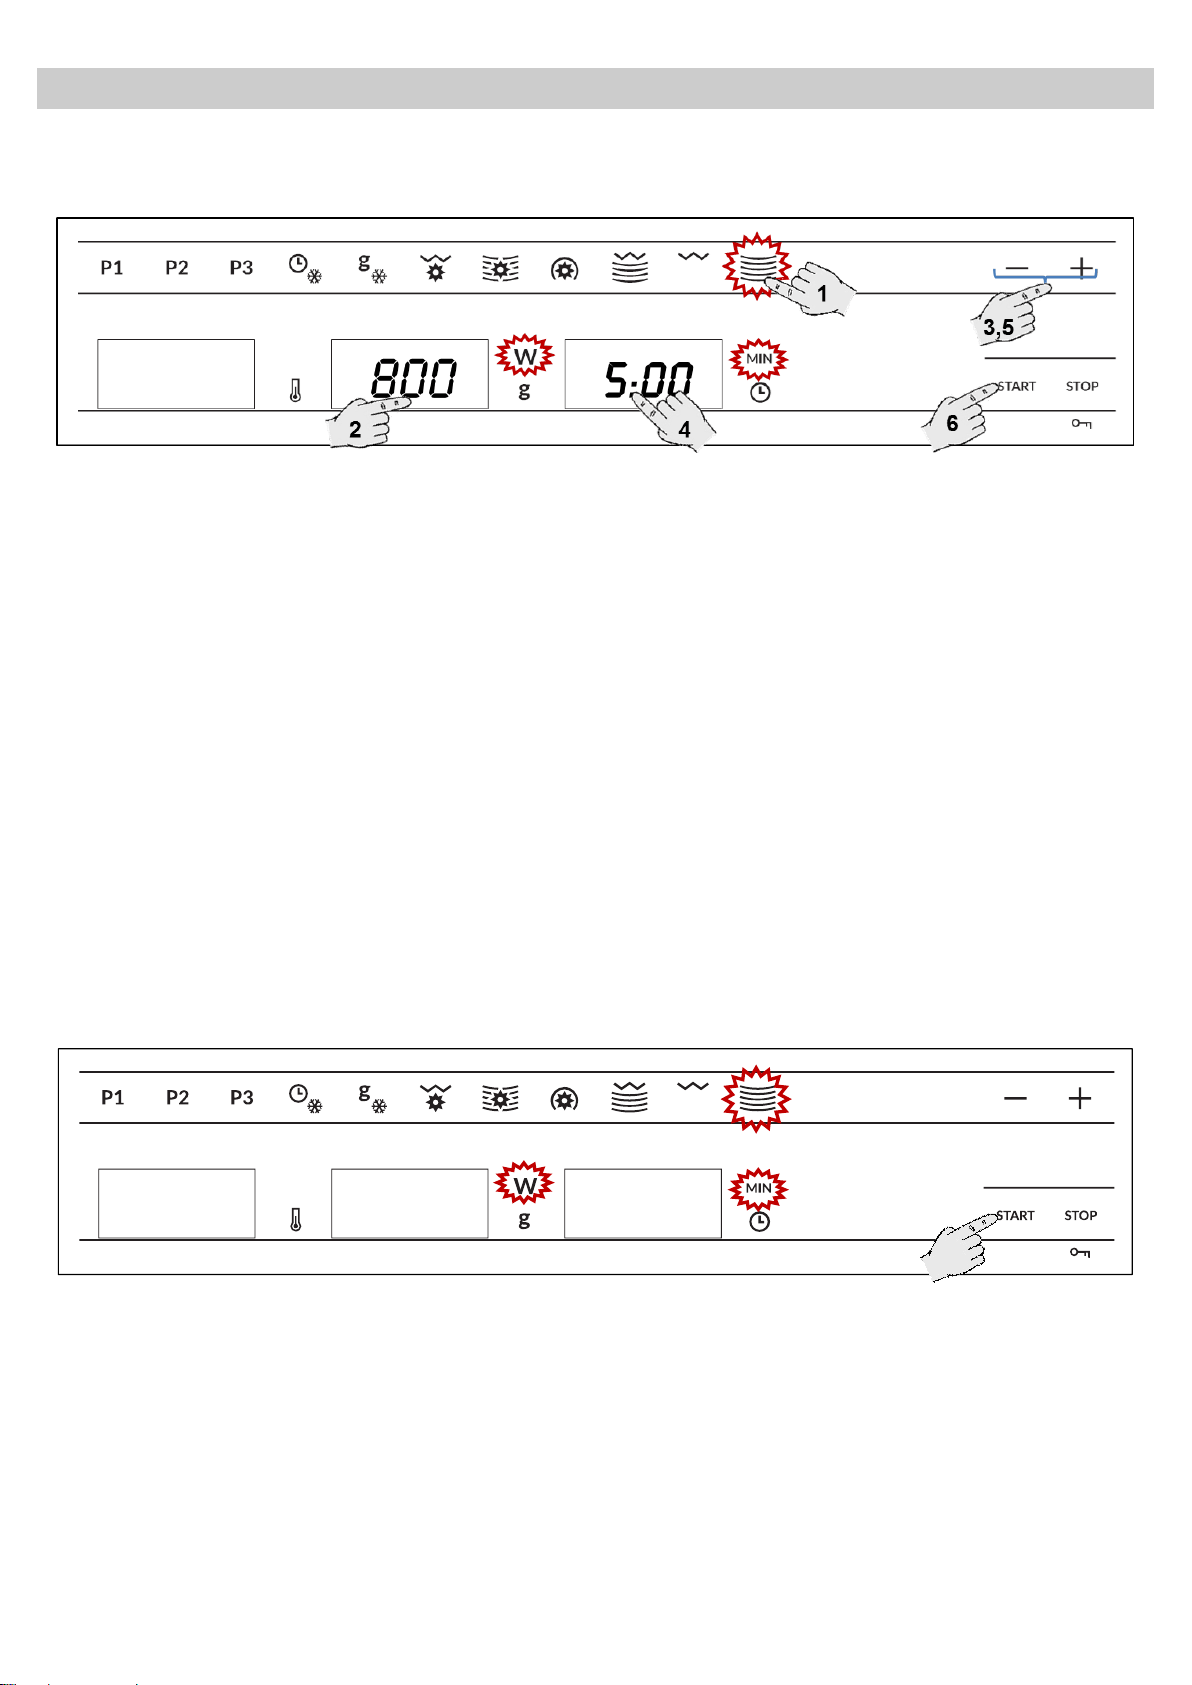
50
IT
Funzioni base
Microonde
Questa funzione può essere utilizzata per cucinare o riscaldare verdure, patate, riso, pesce o carne.
1. Premere il pulsante della funzione
Microonde. Il tasto corrispondente si
accende.
2. Premere il pulsante Impostazione Potenza.
Il segnalatore pertinente lampeggerà. Se non
si preme tale pulsante, il forno funzionerà
alla potenza di 800 W.
3. Premere i pulsanti “-” e “+” per impostare la
potenza del microonde.
4. Premere il pulsante Impostazione Tempo
per selezionare il tempo di funzionamento. Il
rispettivo segnalatore rimane in funzione.
5. Premere i pulsanti “-” e “+” per impostare il
tempo di funzionamento preteso, (per
esempio 1 minuto).
6. Premere il pulsante Start. Il forno comincia a
funzionare.
NOTA: se si seleziona una potenza pari a 1000
W, la durata di funzionamento non può
superare i 15 minuti.
Microonde – Avvio rapido
Questa funzione può essere utilizzata per riscaldare alimenti ad elevata percentuale liquida come
acqua, caffè, the e brodi.
1. Premere il tasto START. L'apparecchio inizia
a funzionare a potenza massima nella
modalità “Funzionamento con sole
microonde” per 30 secondi.
2. Se si desidera prolungare la durata di
funzionamento, premere di nuovo il tasto
START. Ogni volta che si preme il tasto, si
prolunga la durata di funzionamento di 30
secondi.
NOTA: se si seleziona una potenza pari a 1000
W, la durata di funzionamento non può
superare i 15 minuti.
00:30
1000
1,2
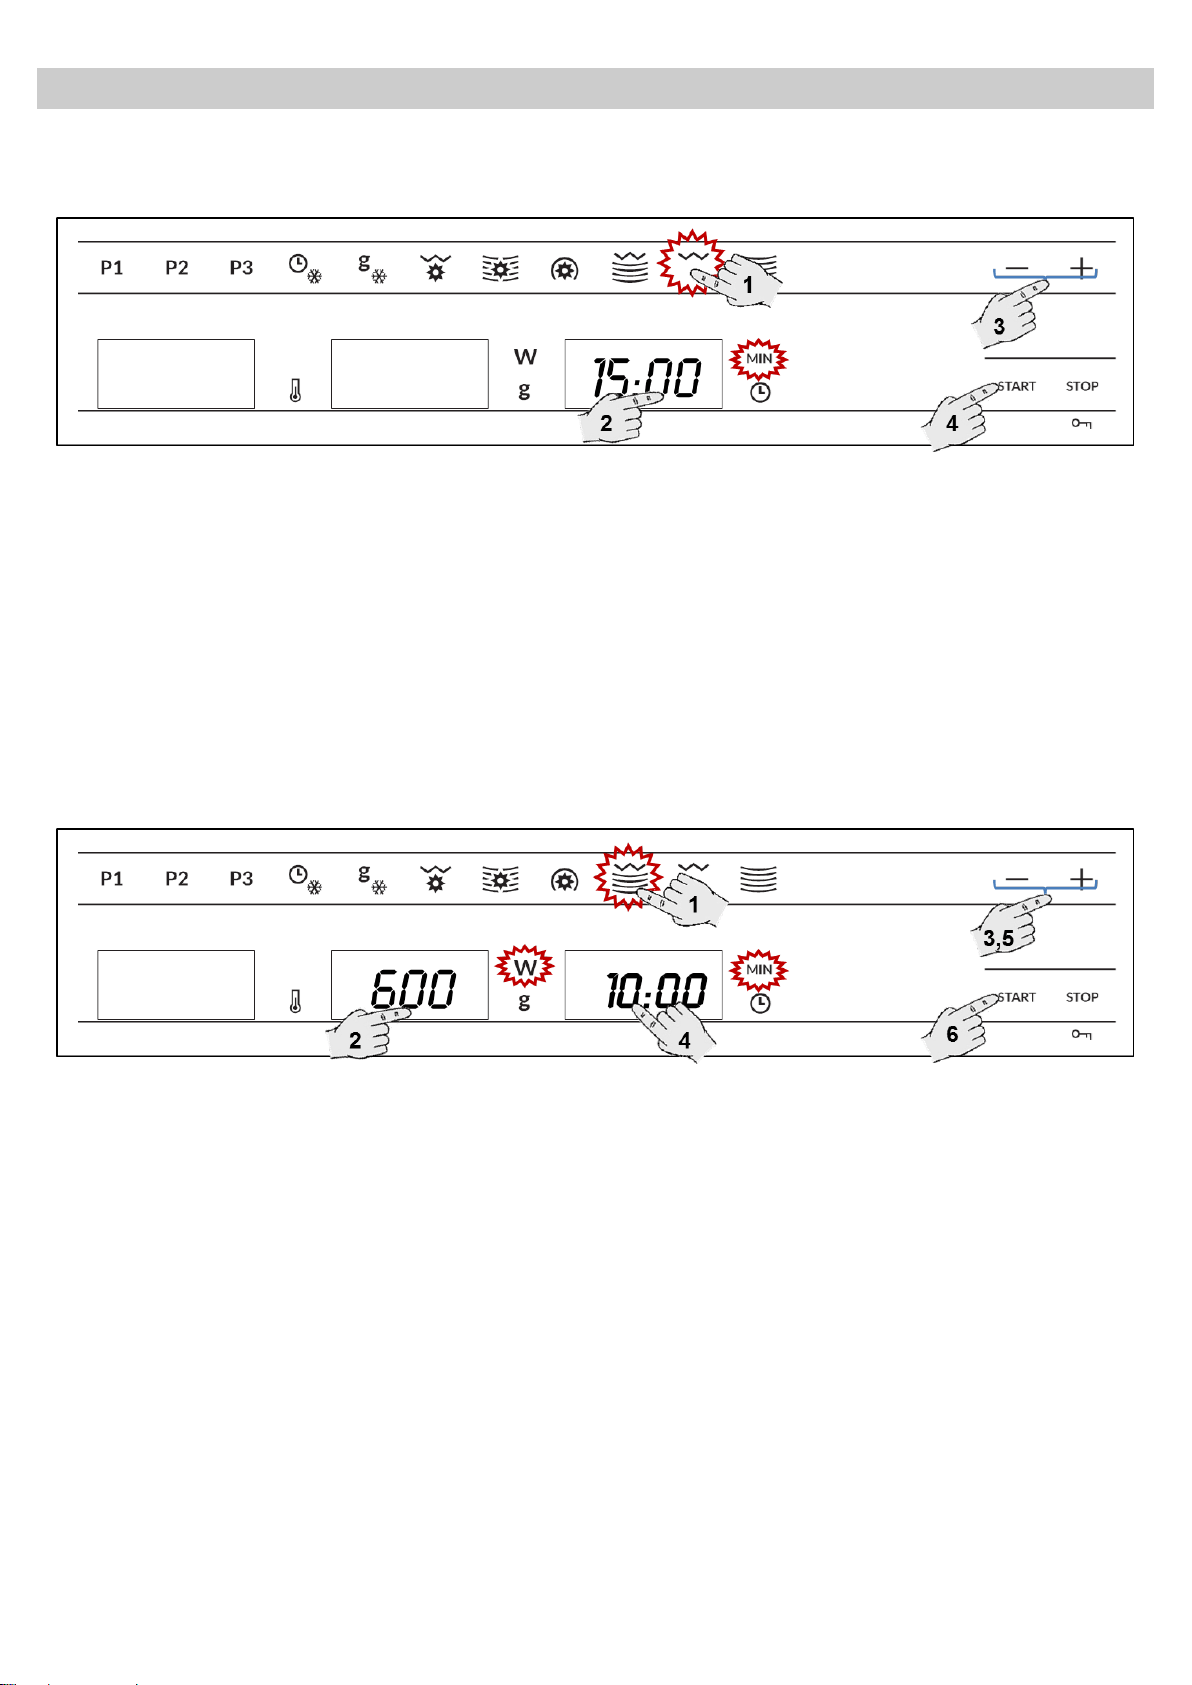
51
IT
Funzioni base
Grill
Questa funzione può essere utilizzata per rosolare velocemente la superficie delle vivande.
1. Premere il pulsante de funzione Grill. Il tasto
della funzione si accende.
2. Premere il pulsante Impostazione Tempo per
cambiare il tempo di funzionamento. Il rispettivo
segnalatore rimane in funzione.
3. Premere i pulsanti “-” e “+” per impostare il
tempo preteso (per esempio 15 minuti).
4. Premere il pulsante Start. Il forno comincia a
funzionare.
Microonde + Grill
Questa funzione può essere utilizzata per cucinare lasagne, pollame, patate arrosto e sformati.
1. Premere il pulsante della funzione Microonde
+ Grill. Il tasto della funzione si accende.
2. Premere il pulsante Impostazione Potenza,
per modificare la potenza del microonde. Il
rispettivo segnalatore rimane in funzione. Se
non si preme tale pulsante, il forno funzionerà
alla potenza di 600 W.
3. Premere i pulsanti “-” e “+” per impostare la
potenza pretesa.
4. Premere il pulsante Impostazione Tempo per
cambiare il tempo di funzionamento. Il rispettivo
segnalatore rimane in funzione.
5. Premere i pulsanti “-” e “+” per impostare il
tempo di funzionamento preteso (per esempio
10 minuti).
6. Premere il pulsante Start. Il forno comincia a
funzionare.
NOTA: Nella funzione combinata la potenza
delle microonde è limitata a 600 W.
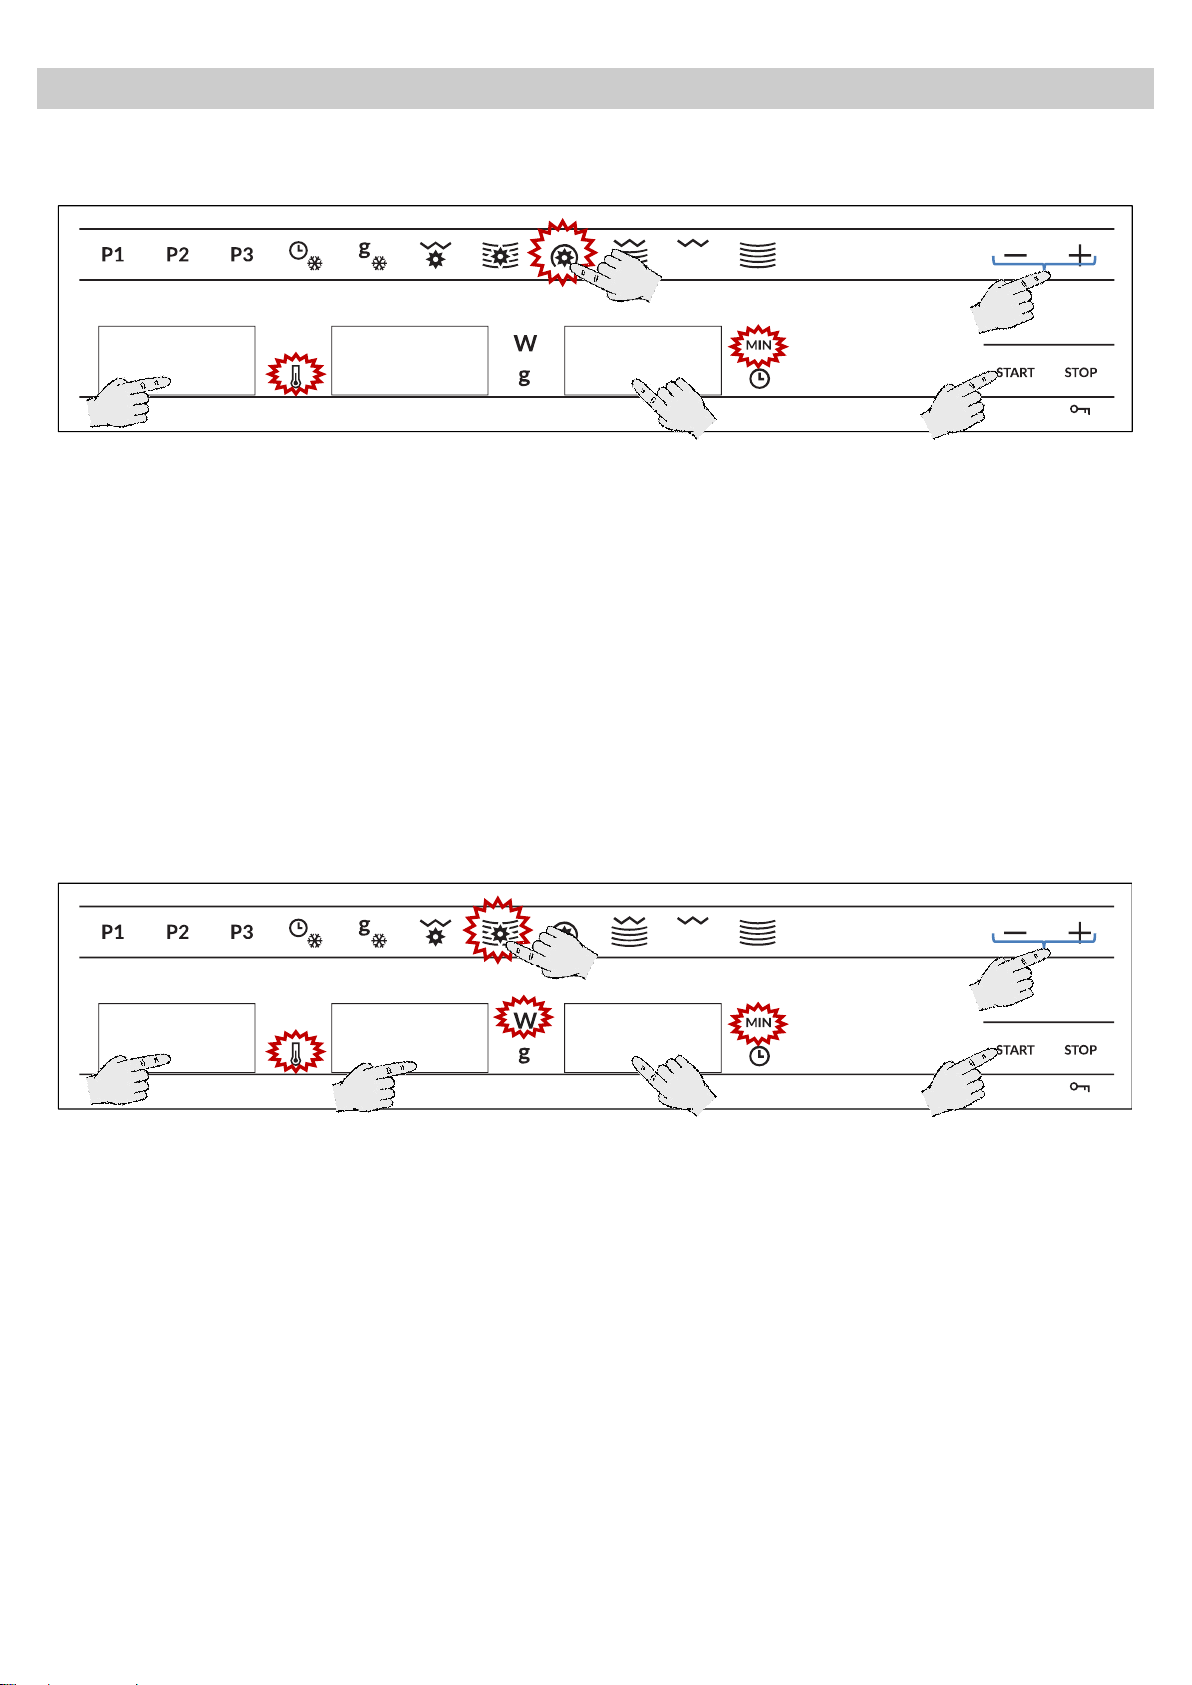
52
IT
Funzioni base
Aria calda
Utilizzare questa funzione per cuocere ed arrostire.
1. Premere il pulsante della funzione Aria
calda. Il tasto della funzione si accende.
2. Premere il pulsante Impostazione
Temperatura, per alterare la potenza del
microonde. Il rispettivo segnalatore rimane in
funzione. Se non si preme tale pulsante, il
forno funzionerà alla potenza di 160ºC.
3. Premere i pulsanti “-” e “+” per impostare la
temperatura pretesa.
4. Premere il pulsante Impostazione Tempo
per cambiare il tempo di funzionamento
preteso. Il rispettivo segnalatore rimane in
funzione.
5. Premere i pulsanti “-” e “+” per impostare il
tempo di funzionamento preteso (per
esempio 12 minuti).
6. Premere il pulsante Start. Il forno comincia a
funzionare.
Microonde + Aria calda
Utilizzare questa funzione per cuocere ed arrostire.
1. Premere il pulsante della funzione
Microonde + Aria calda. Il tasto della
funzione si accende.
2. Premere il pulsante Impostazione
Temperatura, per alterare la temperatura. Il
rispettivo segnalatore rimane in funzione. Se
non si preme tale pulsante, il forno
funzionerà alla potenza di 160ºC.
3. Premere i pulsanti “-” e “+” per impostare la
temperatura pretesa.
4. Premere il pulsante Impostazione Potenza,
per modificare la potenza del microonde. Il
rispettivo segnalatore rimane in funzione. Se
non si preme tale pulsante, il forno
funzionerà alla potenza di 400 W.
5. Premere i pulsanti “-” e “+” per impostare la
potenza pretesa.
6. Premere il pulsante Impostazione Tempo
per cambiare il tempo di funzionamento
preteso. Il rispettivo segnalatore rimane in
funzione.
7. Premere i pulsanti “-” e “+” per impostare il
tempo di funzionamento preteso (per
esempio 12 minuti).
8. Premere il pulsante Start. Il forno comincia a
funzionare
NOTA: Durante il funzionamento combinato, la
potenza delle microonde è limitata a 600 W.
20:00
160
4
1
3,5
6
2
20:00
400
160
6
4
1
3,5,7
8
2
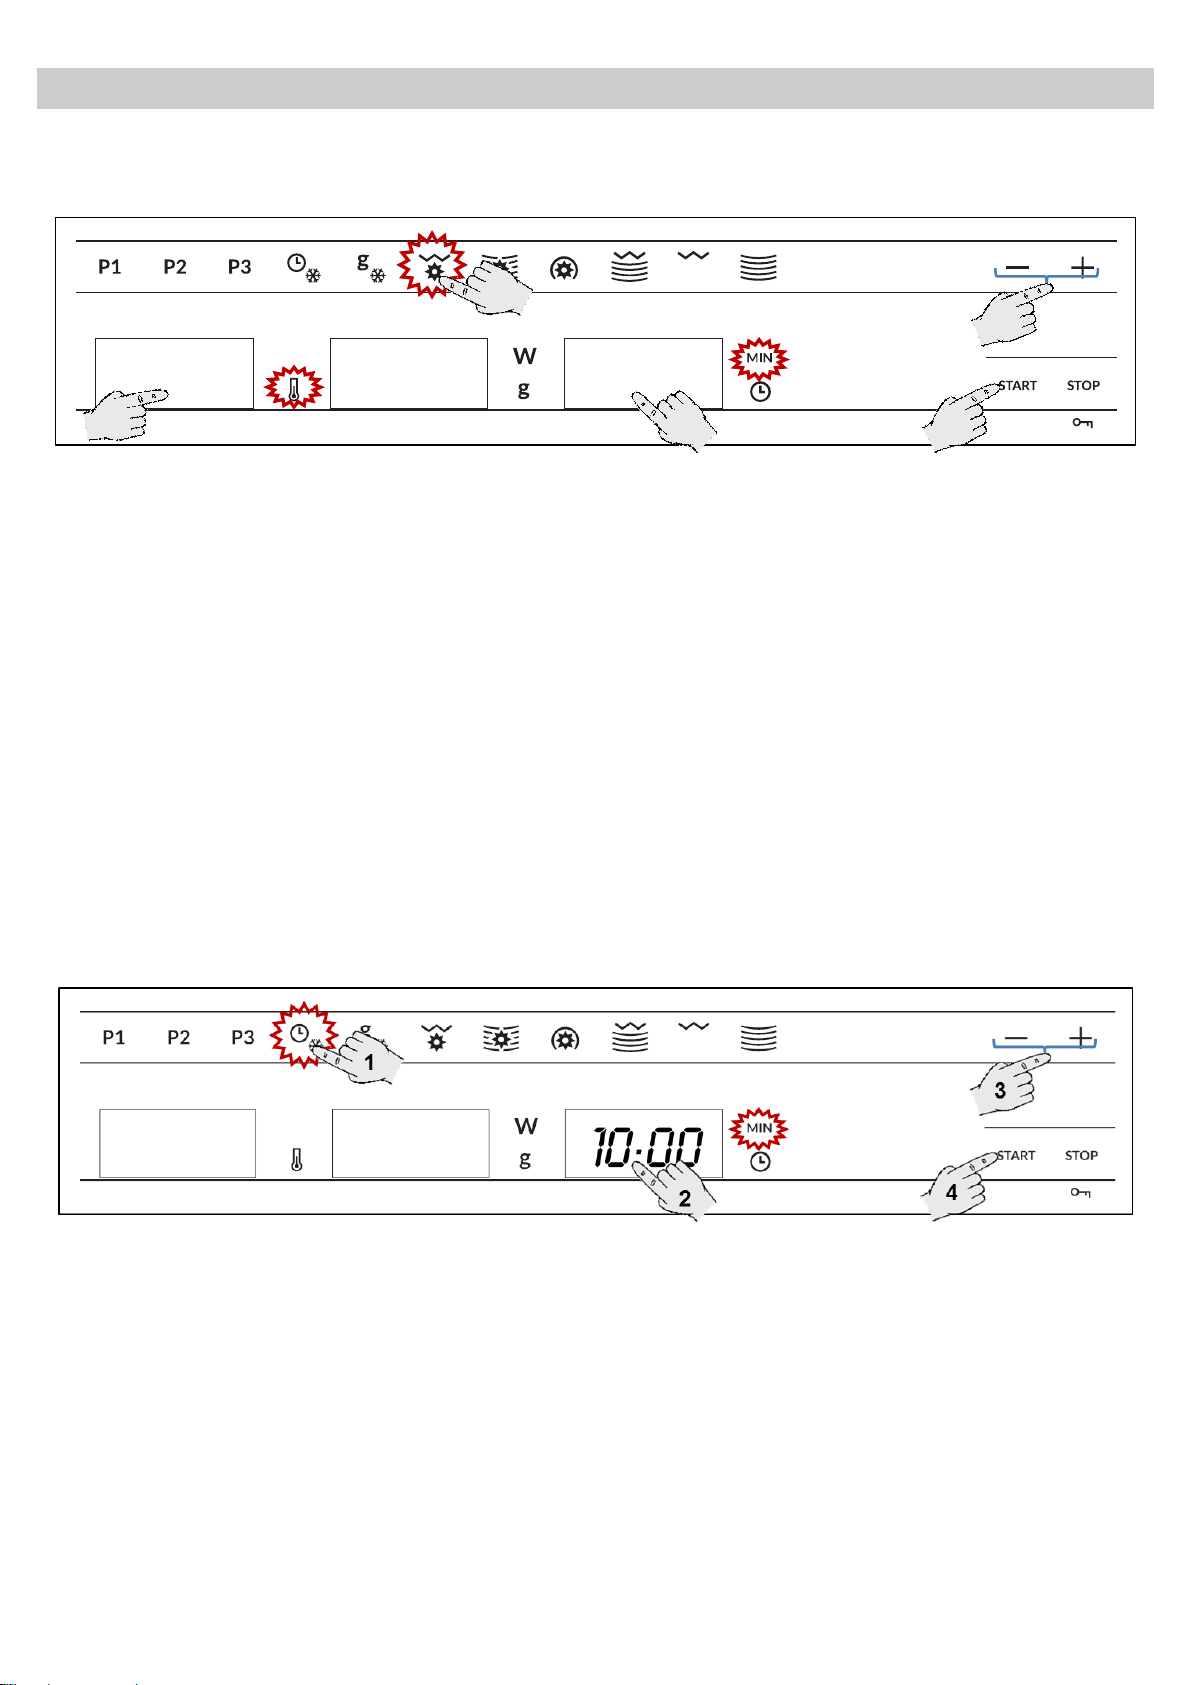
53
IT
Funzioni base
Grill + Aria calda
Utilizzare questa funzione per rosolare carne, pesce, pollame o patatine fritte.
1. Premere il pulsante della funzione Grill +
Aria calda. Il tasto della funzione si
accende.
2. Premere il pulsante Impostazione
Temperatura, per alterare la temperatura. Il
rispettivo segnalatore rimane in funzione. Se
non si preme tale pulsante, il forno
funzionerà alla potenza di 160ºC.
3. Premere i pulsanti “-” e “+” per impostare la
temperatura pretesa.
4. Premere il pulsante Impostazione Tempo
per cambiare il tempo di funzionamento
preteso. Il rispettivo segnalatore rimane in
funzione.
5. Premere i pulsanti “-” e “+” per impostare il
tempo di funzionamento preteso (per
esempio 12 minuti).
6. Premere il pulsante Start. Il forno comincia a
funzionare.
Scongelamento manuale in base al tempo
Questa funzione può essere utilizzata per scongelare velocemente qualsiasi tipo di alimento.
1. Premere il pulsante della funzione
Scongelamento per Tempo. Il tasto della
funzione si accende.
2. Premere il pulsante Impostazione del
Tempo per scegliere il tempo di
funzionamento. Il rispettivo segnalatore
rimane in funzione.
3. Premere i pulsanti “-” e “+” per impostare il
tempo di funzionamento preteso (per
esempio 10 minuti).
4. Premere il pulsante Start. Il forno comincia a
funzionare.
20:00
160
4
1
3,5
6
2
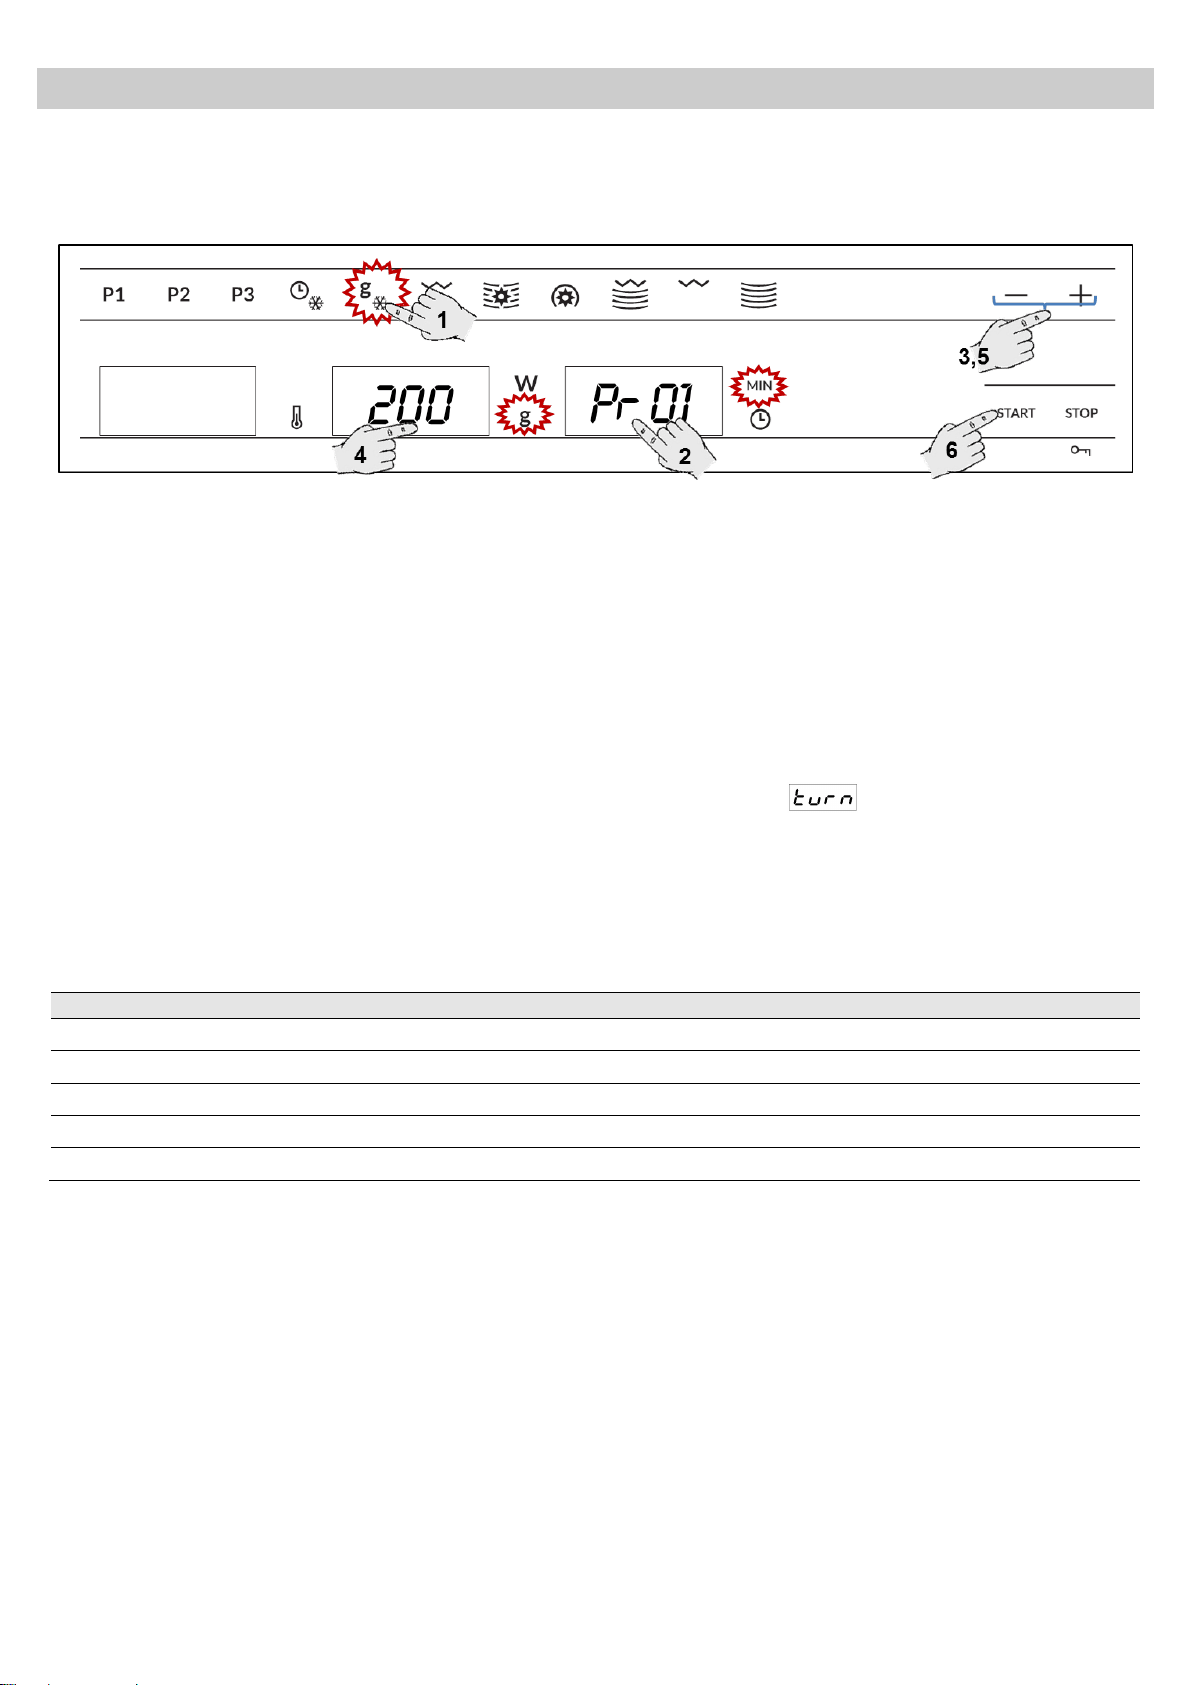
54
IT
Funzioni base
Scongelamento automatico in base al peso
Questa funzione può essere utilizzata per scongelare velocemente carne, pollame, pesce, frutta o
pane.
1. Premere il pulsante della funzione
Scongelamento per Peso. Il tasto della
funzione si accende.
2. Premere il pulsante de Selezione del Tipo
di Alimento per scegliere il tipo di alimento.
Il segnalatore pertinente lampeggerà.
3. Premere i pulsanti “-” e “+” per impostare il
tempo preteso, per esempio “Pr 01” (vedere
la tabella sotto).
4. Premere il pulsante Impostazione Peso per
alterare il peso dell’alimento. Il rispettivo
segnalatore rimane in funzione.
5. Premere i pulsanti “-” e “+” per impostare il
peso preteso.
6. Premere il pulsante Start. Il forno comincia a
funzionare.
Nota: Girare gli alimenti non appena il forno
emette un segnale acustico e a display viene
visualizzato: .
Nella seguente tabella sono riportati i programmi della funzione "Scongelamento automatico in base al
peso" con l'indicazione, in relazione al peso, degli intervalli di tempo per lo scongelamento e per il riposo
dei diversi alimenti (il tempo di riposo permette la distribuzione uniforme della temperatura all'interno
dell'alimento).
Programma
Alimento
Peso (g)
Tempo (min.)
Tempo di riposo (min.)
Pr 01
Carne
100 – 2000
2 – 43
20 – 30
Pr 02
Pollame
100 – 2500
2 – 58
20 – 30
Pr 03
Pesce
100 – 2000
2 – 40
20 – 30
Pr 04
Frutta
100 – 500
2 – 13
10 – 20
Pr 05
Pane
100 – 800
2 – 19
10 – 20
Nota importante: vedi “Indicazioni generali di scongelamento”.
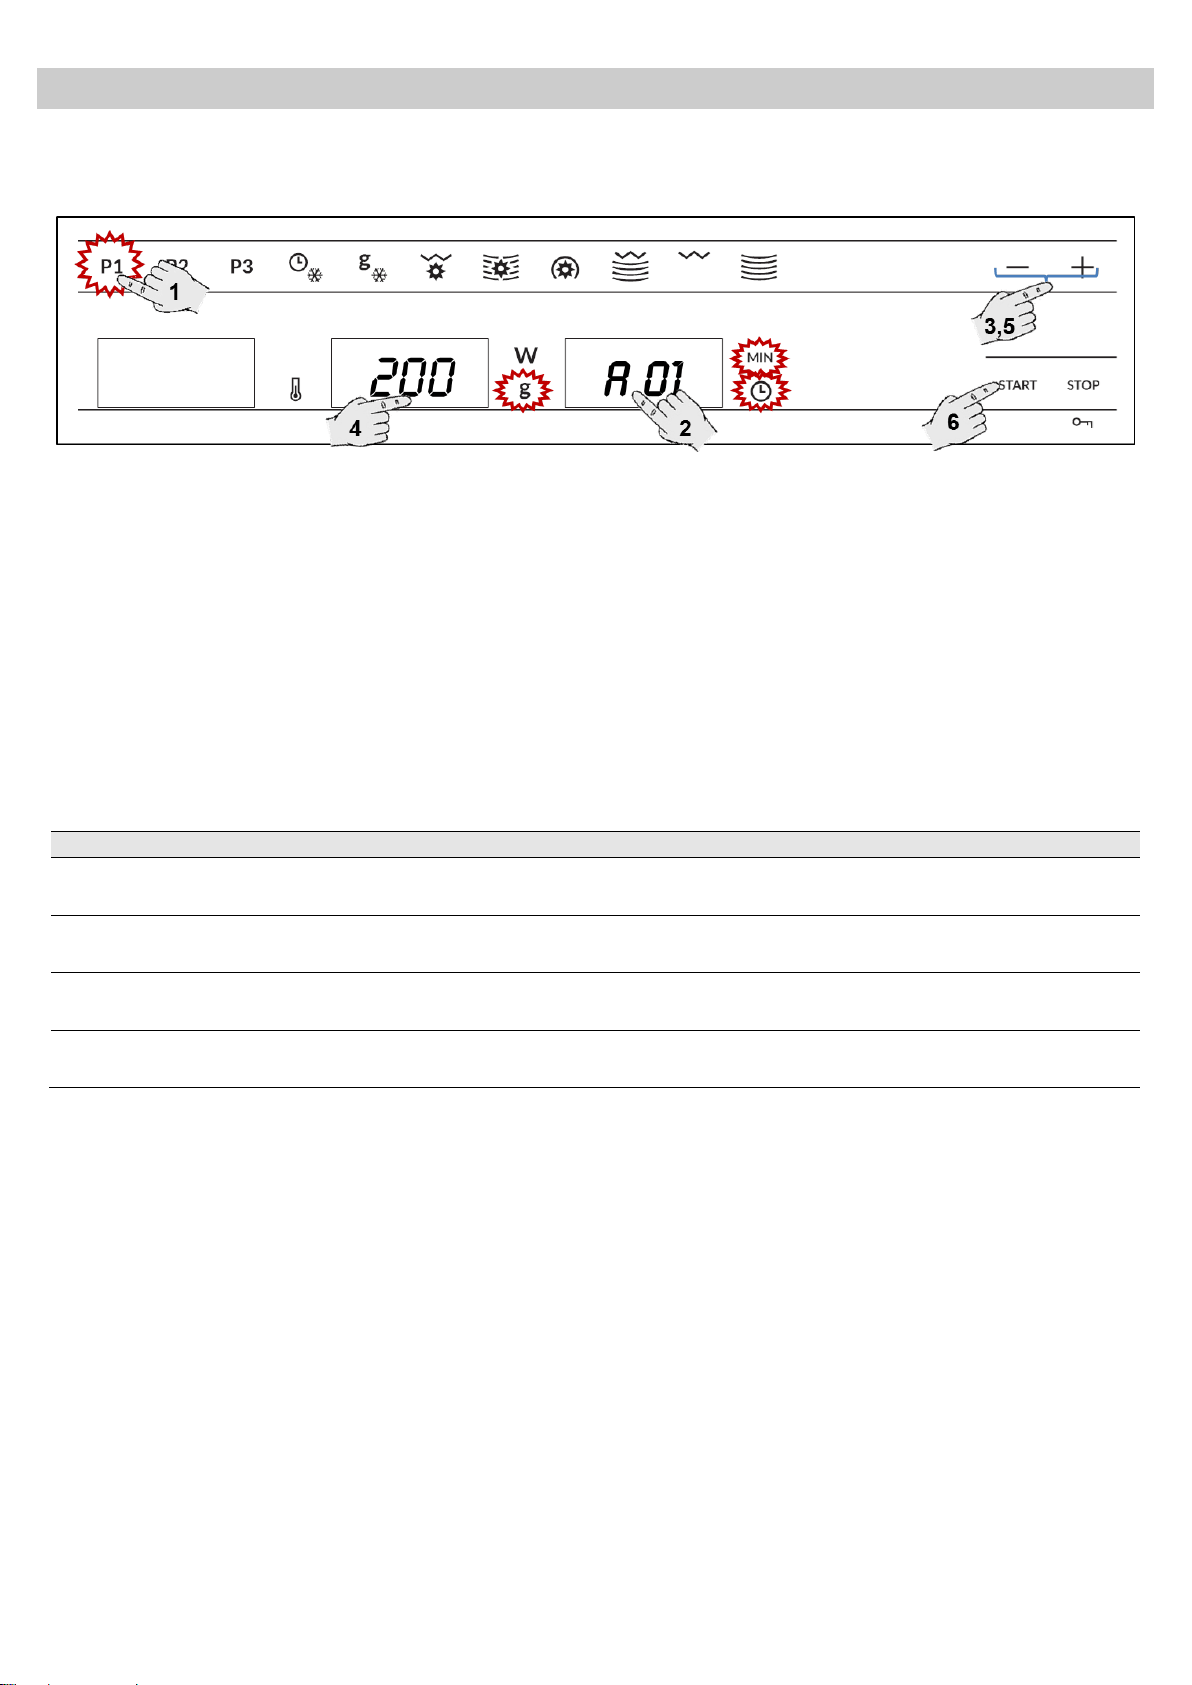
55
IT
Programmi speciali
Programma P1 - Riscaldare le pietanze
Questo programma può essere utilizzato per riscaldare diversi tipi di alimenti.
1. Premere il pulsante della funzione Speciale
P1. Il tasto della funzione si accende.
2. Premere il pulsante de Selezione del Tipo
di Alimento per scegliere il tipo di alimento.
Il segnalatore pertinente lampeggerà.
3. Premere i pulsanti “-” e “+” per impostare il
tempo preteso, per esempio “A 01” (vedere
la tabella sotto).
4. Premere il pulsante Impostazione Peso per
alterare il peso dell’alimento. Il rispettivo
segnalatore rimane in funzione.
5. Premere i pulsanti “-” e “+” per impostare il
peso preteso.
6. Premere il pulsante Start. Il forno comincia a
funzionare.
Nella seguente tabella sono riportati i programmi della funzione speciale P1 con l'indicazione, in
relazione al peso, degli intervalli di tempo per lo scongelamento e per il riposo dei diversi alimenti (il
tempo di riposo permette la distribuzione uniforme della temperatura all'interno dell'alimento).
Programma
Alimenti
Peso (g)
Tempo (min.)
Nota
A 01
Minestre
200 – 1500
3 – 15
Girare 1 – 2 volte, con
coperchio
A 02
Piatti pronti; Ingredienti compatti
200 – 1500
3 – 20
Girare 1 – 2 volte, con
coperchio
A 03
Piatti pronti; p.e. spezzatino
200 – 1500
3 – 18
Girare 1 – 2 volte, con
coperchio
A 04
Verdure
200 – 1500
2,6 – 14
Girare 1 – 2 volte, con
coperchio
Note importanti
Utilizzare sempre recipienti adatti per le
microonde e un coperchio per evitare che
le parti liquide possano traboccare.
Durante il riscaldamento mescolare o
girare la pietanza più volte.
Il tempo necessario al riscaldamento
dell'alimento dipende dalla sua
temperatura di partenza. Gli alimenti che
sono appena stati tolti dal frigorifero hanno
bisogno di tempi di riscaldamento più
lunghi rispetto a quelli conservati a
temperatura ambiente. Se la temperatura
della pietanza non dovesse corrispondere a
quella desiderata, selezionare la volta
successiva un peso maggiore o minore. Al
termine del riscaldamento mescolare le
pietanze. Lasciarle quindi riposare per
permettere al calore di distribuirsi
uniformemente.
Attenzione! Al termine del riscaldamento il
recipiente potrebbe essere molto caldo. Le
microonde non surriscaldano generalmente i
recipienti, che però possono essere riscaldati dal
calore trasmesso dalle vivande che contengono.

56
IT
Programmi speciali
Programma P2 - Cuocere le pietanze
Questo programma può essere utilizzato per cuocere alimenti freschi.
1. Premere il pulsante della funzione Speciale
P2. Il tasto della funzione si accende.
2. Premere il pulsante de Selezione del Tipo
di Alimento per scegliere il tipo di alimento.
Il segnalatore pertinente lampeggerà.
3. Premere i pulsanti “-” e “+” per impostare il
tempo preteso, per esempio “b 01” (vedere la
tabella sotto).
4. Premere il pulsante Impostazione Peso per
alterare il peso dell’alimento. Il rispettivo
segnalatore rimane in funzione.
5. Premere i pulsanti “-” e “+” per impostare il
peso preteso.
6. Premere il pulsante Start. Il forno comincia a
funzionare.
Nella seguente tabella sono riportati i programmi della funzione speciale P2 con l'indicazione, in
relazione al peso, degli intervalli di tempo per lo scongelamento e per il riposo dei diversi alimenti (il
tempo di riposo permette la distribuzione uniforme della temperatura all'interno dell'alimento).
Programma
Alimenti
Peso (g)
Tempo
(min.)
Nota
b 01
Patate
200 – 1000
4 – 17
Girare 1 – 2 volte,
Con coperchio
b 02
Verdure
200 – 500
4 – 15
Girare 1 – 2 volte,
Con coperchio
b 03
Riso
200 – 1000
13 – 20
Rapporto riso/acqua: 1 a 2
b 04
Pesce
200 – 1000
4 – 13
Con coperchio
Note importanti
Utilizzare sempre recipienti con coperchio
adatti alle microonde per evitare che le
parti liquide possano traboccare.
Durante il riscaldamento mescolare o
girare la pietanza più volte.
Attenzione! Al termine della cottura il
recipiente potrebbe essere molto caldo. Le
microonde non surriscaldano
generalmente i recipienti, che però
possono essere riscaldati dal calore
trasmesso dalle vivande che contengono.
Indicazioni di cottura
Pesce intero – Aggiungere da 1 a 3 cucchiai
d'acqua o di succo di limone.
Riso – Per ogni pugno di riso aggiungere la
doppia quantità d'acqua.
Patate con buccia – Cuocere patate di
grandezza uguale dopo averle lavate ed aver
bucherellato più volte la buccia. Aggiungere da
1 a 3 cucchiai d'acqua.
Patate sbucciate e verdure fresche – Tagliarle
in pezzi di uguali dimensioni e aggiungere un
cucchiaio d'acqua per ogni 100 g di verdura;
salare a piacere.
b 01
200
2
4
1
3,5
6
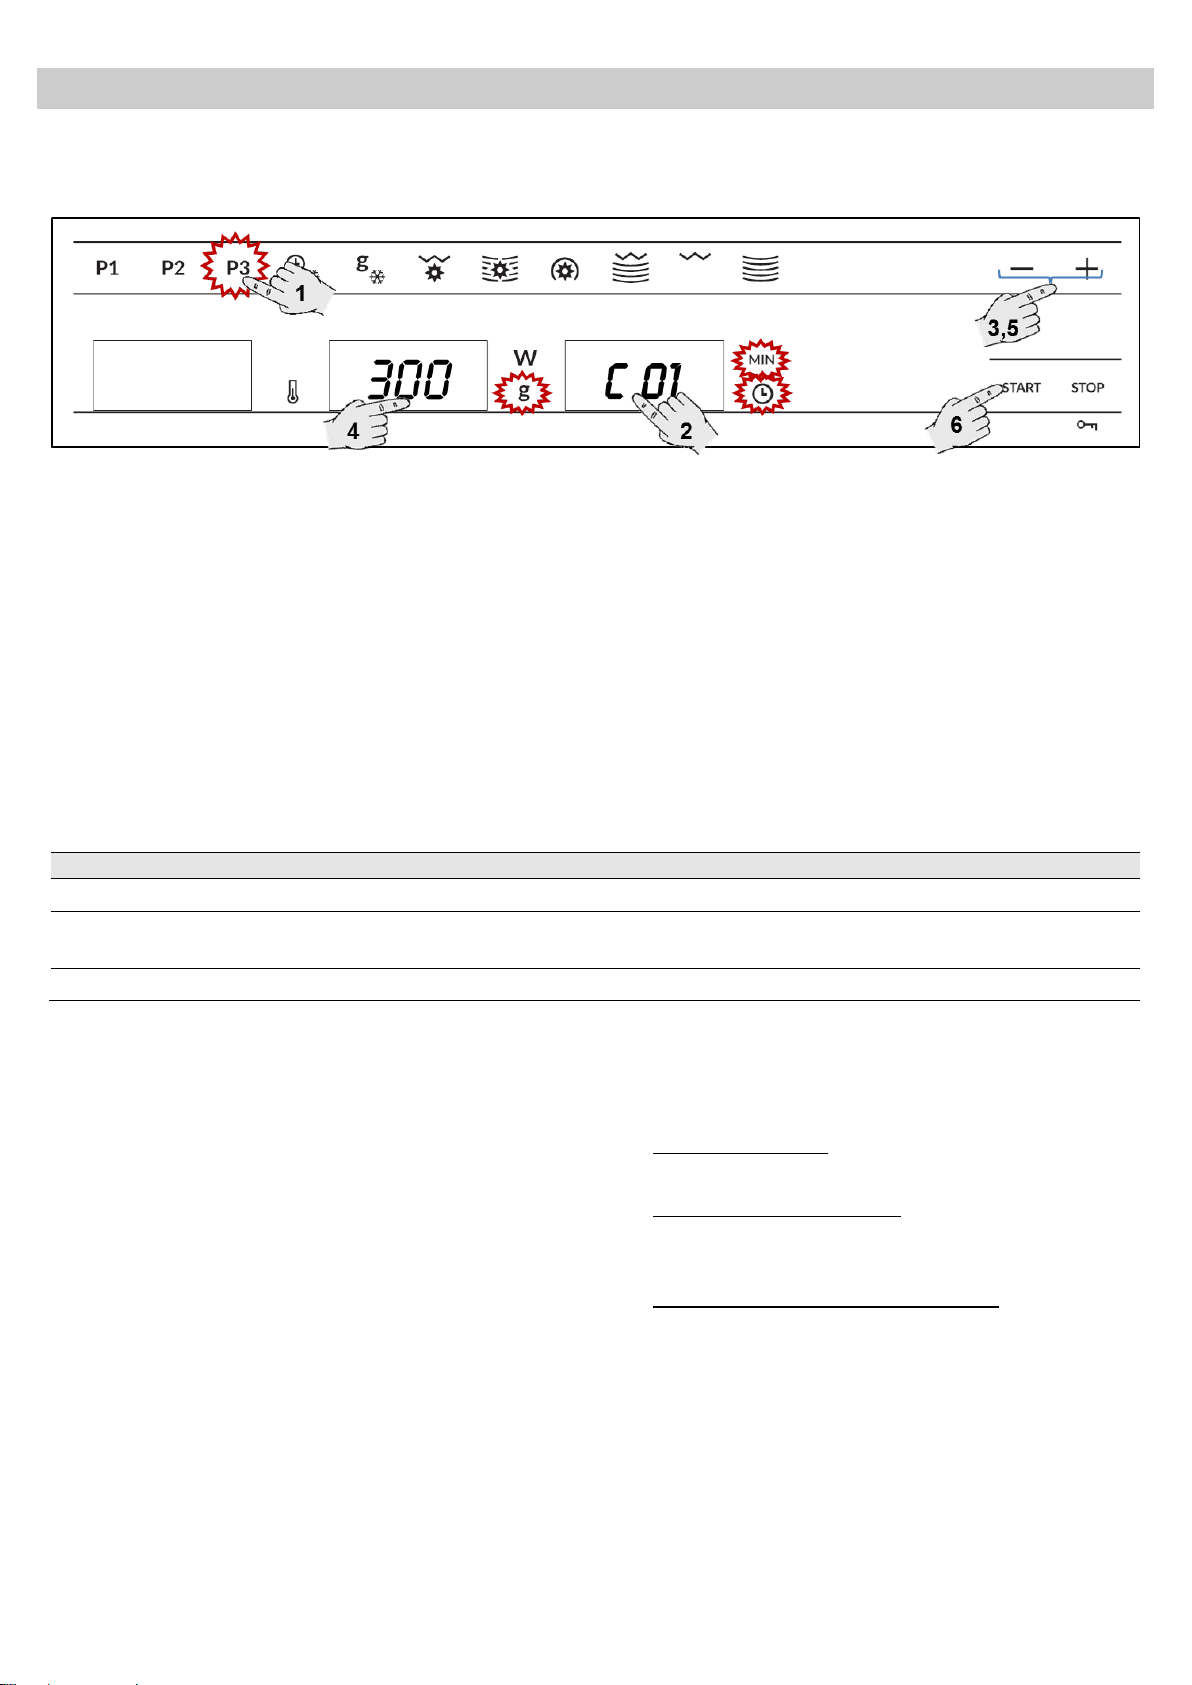
57
IT
Programmi speciali
Programma P3 - Scongelare e cuocere
Questo programma può essere utilizzato per scongelare e poi cucinare diversi tipi di alimenti.
1. Premere il pulsante della funzione Speciale
P3. Il tasto della funzione si accende.
2. Premere il pulsante de Selezione del Tipo
di Alimento per scegliere il tipo di alimento.
Il segnalatore pertinente lampeggerà.
3. Premere i pulsanti “-” e “+” per impostare il
tempo preteso, per esempio “C 01” (vedere
la tabella sotto).
4. Premere il pulsante Impostazione Peso per
alterare il peso dell’alimento. Il rispettivo
segnalatore rimane in funzione.
5. Premere i pulsanti “-” e “+” per impostare il
peso preteso.
6. Premere il pulsante Start. Il forno comincia a
funzionare.
Nella seguente tabella sono riportati i programmi della funzione speciale P3 con l'indicazione, in
relazione al peso, degli intervalli di tempo per lo scongelamento e per il riposo dei diversi alimenti (il
tempo di riposo permette la distribuzione uniforme della temperatura all'interno dell'alimento).
Programma
Alimenti
Peso (g)
Tempo (min.)
Nota
C 01
Pizza
300 – 550
8 – 12
Griglia
C 02
Piatti pronti
350 – 500
8 – 14
Girare 1 volte,
con coperchio
C 03
Prodotti a base di patate
200 – 450
10 – 12
Vassoio in vetro
Note importanti
Utilizzate stoviglie adatte al microonde e
resistenti al calore (ad esempio le apposite
pirofile). Con il grill si ottengono
temperature molto elevate. Con il
programma C 02 utilizzate sempre un
coperchio per evitare la fuoriuscita di
liquidi.
Attenzione! Al termine della cottura il recipiente
potrebbe essere molto caldo. Sebbene le
microonde non riscaldino la maggior parte dei
contenitori, questi potrebbero diventare molto
caldi a causa del calore trasmesso dalla
resistenza del grill.
Indicazioni di cottura
Pizza, surgelata – Cuocere pizze o baguette
precotte e surgelate.
Piatti pronti, surgelati – Cuocere lasagne,
cannelloni, sformati di gamberetti surgelati.
Coprire sempre con il coperchio.
Piatti a base di patate, surgelati – Le patatine
fritte, le crocchette di patate e le patate saltate
in padella devono essere adatte alla cottura a
microonde.

58
IT
Utilizzo del piatto di doratura
Normalmente, durante la cottura di cibi quali pizze
o torte su un grill o in un forno a microonde, la
pasta diventa molle e umida. Questo problema
può essere evitato utilizzando un piatto di
doratura. Poiché, sul fondo del piatto di doratura
la temperatura può aumentare rapidamente, la
crosta diventa croccante e dorata.
Il piatto di doratura può anche essere utilizzato
per bacon, uova, salsicce, ecc..
NOTE MOLTO IMPORTANTI:
Poiché la temperatura del piatto di doratura
diventerà molto alta, indossare sempre dei
guanti da forno;
Non posizionare mai il piatto di doratura nel
forno qualora manchi il piatto di vetro;
Non posizionare alcun recipiente non
resistente al calore (ad esempio tazze di
plastica) sul piatto di doratura.
Modalità di cottura con il piatto di doratura:
1. Preriscaldare il piatto di doratura
selezionando la funzione Microonde e
Grill per 3-5 minuti a un livello di potenza
microonde di 600 W;
2. Pennellare il piatto di doratura con olio in
modo tale da garantire una leggera
doratura dei cibi;
3. Posizionare l’alimento fresco o congelato
direttamente sul piatto di doratura;
4. Posizionare il piatto di doratura sul piatto
girevole di vetro nel forno a microonde;
5. Selezionare la funzione Microonde e Grill
e il tempo di cottura come di seguito
descritto.
NOTE MOLTO IMPORTANTI:
Poiché il piatto di doratura prevede uno strato in
Teflon, usandolo in modo errato potrebbe
danneggiarsi. Non tagliare mai gli alimenti
direttamente sul piatto. Togliere gli alimenti dal
piatto prima di tagliarli.
Pulizia:
Il modo migliore per pulire il piatto di doratura
consiste nel lavarlo con acqua calda e detergente,
quindi risciacquarlo con acqua pulita. Non pulirla
utilizzando spazzole o spugne dure che
potrebbero danneggiare lo strato superiore.
Alimento
Peso
Tempo di
cottura
Tempo di
sosta
Raccomandazione
Pizza
200 g
4 - 5 min
---
Se la pizza é sottile.
Se la pizza é alta aumentare il tempo
di cottura di 1 – 2 minuti
300 g
5 - 6 min
---
400 g
7 – 8 min
---
Quiche e
Torte
200 g
3 – 4 min
2 – 3 min
300 g
5 - 6 min
2 – 3 min
Hamburger
150 - 200
8 - 10 min
5 – 8 min
Girare per 2 volte.
Patate al
forno
400 g
6 -8 min
---
Girare per 1 volta.

59
IT
Durante il funzionamento...
Interruzione di un procedimento di
cottura
Il procedimento di cottura può essere interrotto in
un qualsiasi momento premendo il tasto
START/STOP o aprendo lo sportello del forno.
Automaticamente
non vengono più irradiate le microonde,
si disattiva il grill, che rimane però molto
caldo (pericolo di scottature!),
si blocca il timer e a display viene visualizzato
il tempo di cottura rimanente.
A questo punto diventa possibile
1. girare o mescolare le pietanze per rendere
uniforme il procedimento di cottura,
2. modificare i parametri del procedimento,
3. interrompere il procedimento premendo il
tasto START/STOP.
Chiudere lo sportello e premere il tasto
START/STOP per riavviare il procedimento di
cottura.
Modifica dei parametri
I parametri di funzionamento (p.e. tempo, peso,
potenza) solo possono essere modificati quando il
processo di cottura è stato interrotto da una delle
seguenti azioni:
1. Girare la manopola in una direzione
qualsiasi per modificare la durata di cottura;
il nuovo tempo impostato viene subito
memorizzato.
2. Premere il tasto POTENZA/PESO per
modificare la potenza o il peso; iniziano a
lampeggiare le relative spie. Modificare i
parametri girando la manopola in una
direzione qualsiasi e selezionare il valore
desiderato premendo di nuovo il tasto
POTENZA/PESO.
Annullare un procedimento di cottura
Per annullare un procedimento di cottura,
premere il tasto START/STOP per 3 secondi.
Se il procedimento era già stato interrotto e lo si
desidera ora annullare, premere il tasto
START/STOP per altri 3 secondi.
Viene quindi emesso un segnale acustico e a
display viene visualizzata l'ora.
Termine di un procedimento di cottura
Al termine di un procedimento di cottura vengono
emessi 3 segnali acustici e a display viene
visualizzata la parola “End”.
Queste segnalazioni acustiche vengono ripetute
ogni 30 secondi fino a quando non si apre lo
sportello o non si preme il tasto START/STOP.
60
IT
Scongelare
Nella seguente tabella sono indicati i tempi
necessari per lo scongelamento di diversi
alimenti in base al loro peso e i rispettivi tempi di
riposo (utili per la distribuzione uniforme del
calore nelle vivande); le indicazioni sono seguite da
alcuni consigli utili.
Alimenti
Peso (g)
Tempo di
scongelamento (min.)
Tempo di riposo
(min.)
Consigli
Pezzo di carne intera,
maiale, manzo, vitello,
selvaggina
100
2-3
5-10
Girare una volta
200
4-5
5-10
Girare una volta
500
10-12
10-15
Girare 2 volte
1000
21-23
20-30
Girare 2 volte
1500
32-34
20-30
Girare 2 volte
2000
43-45
25-35
Girare 3 volte
Spezzatino
500
8-10
10-15
Girare 2 volte
1000
17-19
20-30
Girare 3 volte
Carne macinata
100
2-4
10-15
Girare 2 volte
500
10-14
20-30
Girare 3 volte
Salciccia arrosto
200
4-6
10-15
Girare una volta
500
9-12
15-20
Girare 2 volte
Pollame intero o a
pezzi
250
5-6
5-10
Girare una volta
Pollo
1000
20-24
20-30
Girare 2 volte
Pollastrello
2500
38-42
25-35
Girare 3 volte
Filetto di pesce
200
4-5
5-10
Girare una volta
Trota
250
5-6
5-10
Girare una volta
Granchio
100
2-3
5-10
Girare una volta
500
8-11
15-20
Girare 2 volte
Frutta
200
4-5
5-10
Girare una volta
300
8-9
5-10
Girare una volta
500
11-14
10-20
Girare 2 volte
Pane
200
4-5
5-10
Girare una volta
500
10-12
10-15
Girare una volta
800
15-17
10-20
Girare 2 volte
Burro
250
8-10
10-15
Ricotta
250
6-8
10-15
Panna
250
7-8
10-15

61
IT
Scongelare
Indicazioni generali di scongelamento
1. Per scongelare gli alimenti utilizzare solo
stoviglie adatte alle microonde (porcellana,
vetro o plastica idonea).
2. La funzione "Scongelamento in base al
peso" e i valori indicati nelle tabelle si
riferiscono allo scongelamento di cibi crudi.
3. La durata dello scongelamento dipende dalla
quantità e dalla spessore dell'alimento. Dato
da considerare quando si preparano gli
alimenti prima di metterli nel congelatore. Si
consiglia quindi di suddividere gli alimenti in
piccole porzioni a seconda della grandezza
del recipiente.
4. Distribuire gli alimenti all'interno del vano
cottura in modo che le parti più grosse (p.e.
di pesce o le cosce di pollo) siano rivolte
verso l'esterno. Le parti più sottili possono
essere protette ricoprendole con una
pellicola d'alluminio. Importante: la pellicola
di alluminio non deve toccare le pareti del
forno, perché potrebbero altrimenti formarsi
delle scintille.
5. I pezzi più spessi devono essere girati più
volte.
6. Distribuite gli alimenti surgelati il più
uniformemente possibile nel forno, perché le
parti più sottili si scongelano più
velocemente di quelle più spesse.
7. Gli alimenti più ricchi di grassi, come p.e. il
burro, il formaggio morbido o la panna, non
devono essere scongelati completamente,
perché il loro scongelamento viene
proseguito a temperatura ambiente.
Mescolare la panna congelata prima
dell’uso.
8. Il pollame deve essere appoggiato su un
piatto ribaltato per permettere il deflusso del
liquido che si forma durante lo
scongelamento.
9. Il pane deve invece essere arrotolato in un
tovagliolo per evitare che si secchi troppo.
10. Girare gli alimenti a intervalli regolari.
11. Togliere gli alimenti surgelati dalla loro
confezione e non dimenticarsi di rimuovere le
clip metalliche. Se gli alimenti dovessero
essere contenuti in vaschette adatte al
surgelamento e alla cottura o riscaldamento a
microonde, è necessario rimuoverne solo il
coperchio. In caso contrario appoggiare le
pietanze in recipienti adatti alle microonde.
12. Il liquido che si forma, soprattutto durante lo
scongelamento di pollame, deve essere
buttato via e non deve assolutamente entrare
in contatto con gli altri alimenti.
13. Non dimenticarsi che la funzione di
scongelamento prevede anche un tempo di
riposo durante il quale l'alimento si scongela
completamente.

62
IT
Cucinare con le microonde
Attenzione! Leggere attentamente il capitolo
"Indicazioni di sicurezza" prima di utilizzare il
forno a microonde.
Attenersi alle seguenti indicazioni durante la
cottura con le microonde.
Prima di riscaldare o cucinare alimenti con
buccia o pelle (p.e. mele, pomodori, patate,
salsicce), bucherellarli affinché non scoppino.
Tagliare gli alimenti a pezzi prima di iniziare a
cucinarli nel forno.
Prima di utilizzare un recipiente, assicurarsi che
sia adatto alle microonde (vedi capitolo
"Stoviglie adatte alle microonde").
Durante la preparazione di alimenti a basso
livello di umidità (p.e. scongelamento di
pane, cottura di pop-corn, ecc.) avviene una
rapida emissione di vapore. Il forno funziona
così a vuoto, la pietanza potrebbe bruciarsi e
danneggiare così l'apparecchio e il contenitore
in cui si trova. Impostare quindi un tempo di
preparazione assolutamente necessario e
controllare il procedimento.
Nel forno a microonde non è possibile
riscaldare grandi quantità di olio (friggere).
Togliere i piatti pronti dalla loro confezione
perché questa non è sempre resistente al
calore. Attenersi alle istruzioni fornite dal
produttore.
Se si vogliono mettere nel forno più
contenitori, p.e. delle tazze, disporli
uniformemente sul piatto girevole.
Non chiudere mai i sacchetti di plastica con clip
di metallo, utilizzare quelle di plastica.
Bucherellare più volte il sacchetto per
permettere al vapore di uscirne.
Assicurarsi che gli alimenti raggiungano una
temperatura di almeno 70°C durante la loro
cottura o riscaldamento.
Durante la cottura potrebbe formarsi condensa
sullo sportello del forno ed eventualmente
sgocciolare verso il basso. La formazione di
condensa è normale ed è ancora più
accentuata quando la temperatura ambiente è
bassa. La sicurezza del forno non ne viene
compromessa. Al termine della cottura
asciugare l'acqua di condensa.
Quando si riscaldano liquidi, utilizzare
contenitori con grandi aperture che
permettano la fuoriuscita del vapore.
Preparare gli alimenti attenendosi alle istruzioni, ai
tempi di cottura e ai livelli di potenza indicati nelle
tabelle.
Considerare comunque che i valori riportati sono
puramente indicativi e che possono essere
modificati a seconda dello stato di partenza, della
temperatura, dell'umidità e del tipo di alimento da
cuocere. Si consiglia di modificare i tempi di
cottura e i livelli di potenza in base alle singole
necessità. A seconda del tipo di alimento può
rendersi necessario prolungare o ridurre i tempi di
cottura, o aumentare o diminuire il livello di
potenza.
Cottura nel forno a microonde
1. Quanto maggiore la quantità di alimenti,
tanto più lungo sarà il tempo di cottura.
Ricordarsi sempre che
doppia quantità = durata raddoppiata
mezza quantità = durata dimezzata
2. Quanto minore sarà la temperatura, tanto più
lunga sarà la durata di cottura.
3. Gli alimenti liquidi si riscaldano più
velocemente.
4. La disposizione corretta degli alimenti sul
piatto girevole ne facilita la cottura uniforme.
Si possono cuocere contemporaneamente
alimenti di struttura diversa disponendo
quelli più compatti sul bordo del piatto e
quelli meno compatti nel suo centro.
5. Lo sportello del forno può essere aperto in
qualsiasi momento. L'apparecchio si spegne
automaticamente. Il forno rinizia a funzionare
dopo che si è richiuso lo sportello e si è
premuto di nuovo il tasto START/STOP.
6. La maggior parte degli alimenti deve essere
protetta con un coperchio, per poterne
mantenere il livello di umidità e il sapore
tipico. Il coperchio deve essere adatto alle
microonde ed avere dei fori che permettano
la fuoriuscita del vapore.
63
IT
Cucinare con le microonde
Tabelle e consigli – Preparazione delle verdure
Alimenti
Quantità (g)
Quantità di
liquido da
aggiungere
Potenza
(Watt)
Tempo
(min.)
Tempo di
riposo
(min.)
Suggerimenti
Cavolfiore
Broccoli
Funghi
500
300
250
100 ml
50 ml
25 ml
800
800
800
9-11
6-8
6-8
2-3
2-3
2-3
Dividere in rosette. Tagliare a
fette. Con coperchio.
Piselli e carote,
carote surgelate
300
250
100 ml
25 ml
800
800
7-9
8-10
2-3
2-3
Tagliare a fette o a dadini. Con
coperchio.
Patate
250
25 ml
800
5-7
2-3
Pelare e tagliare a pezzi di
uguale dimensioni. Con
coperchio.
Peperoni
Porro
250
250
25 ml
50 ml
800
800
5-7
5-7
2-3
2-3
Tagliare a pezzi o a listarelle.
Con coperchio.
Cavolo di
Bruxelles,
surgelato
300
50 ml
800
6-8
2-3
Con coperchio.
Crauti
250
25 ml
800
8-10
2-3
Con coperchio.
Tabelle e suggerimenti– Preparazione del pesce
Alimenti
Quantità (g)
Potenza
(Watt)
Tempo
(min.)
Tempo di
riposo
(min.)
Suggerimenti
Filetto di pesce
500
600
10-12
3
Con coperchio. A metà del tempo di cottura
girare.
Pesce intero
800
800
400
2-3
7-9
2-3
Con coperchio. A metà del tempo di cottura
girare. Se necessario, proteggere con pellicola
di alluminio le estremità sottili del pesce.
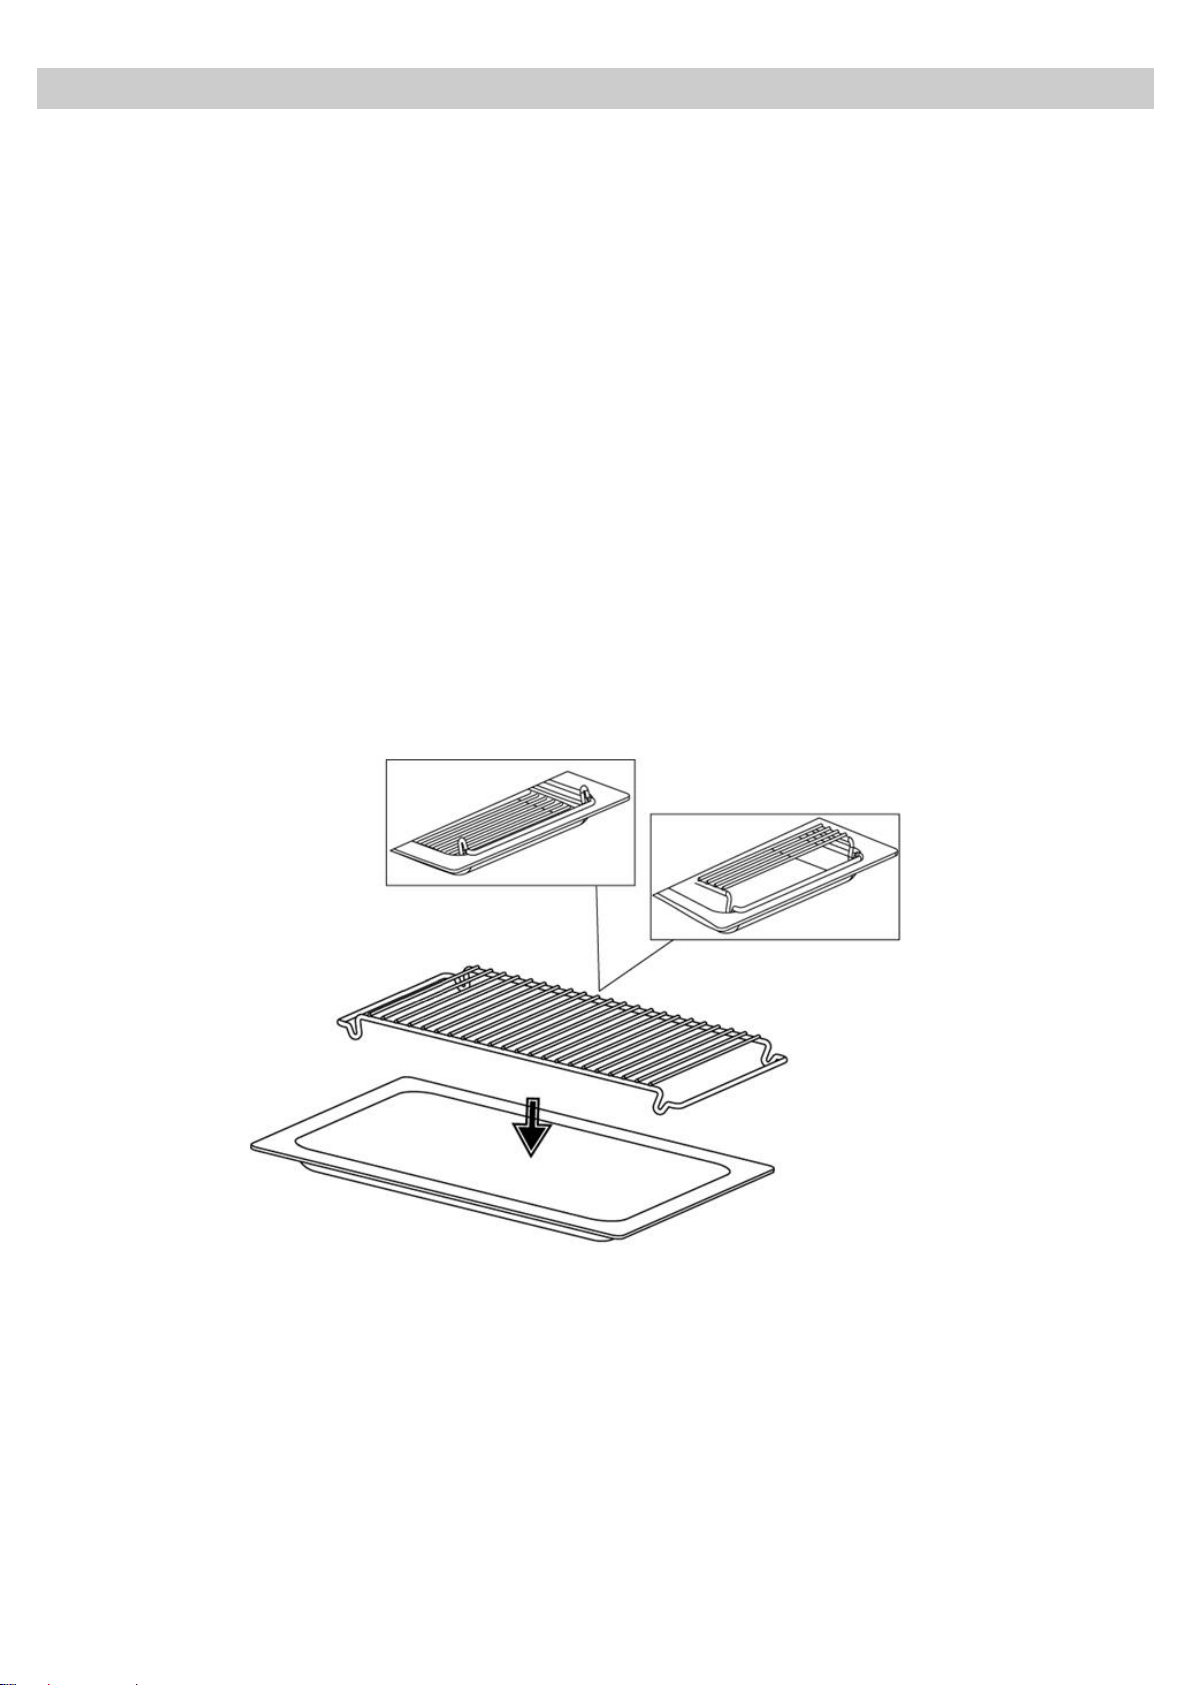
64
IT
Cuocere con il grill
Utilizzare la griglia in dotazione per ottenere buoni
risultati di cottura con il grill.
Sistemare la griglia nel forno in modo che non
tocchi le superfici metalliche del vano cottura,
perché altrimenti potrebbero formarsi delle
scintille che potrebbero danneggiare
l'apparecchio.
Avvertenze importanti
1. Quando si mette in funzione il grill per la
prima volta, è possibile che si formino fumo
e cattivo odore, provocati dall'utilizzo di oli
durante la produzione del forno.
2. Il vetro dello sportello si surriscalda durante
il funzionamento del forno. Tenere lontani i
bambini quando il forno è in funzione!
3. Anche le pareti del vano cottura si
surriscaldano molto durante la cottura con il
grill. Si consiglia pertanto l'utilizzo di guanti
da cucina per prelevare le pietanze dal
forno.
4. Generalmente, quando il grill viene fatto
funzionare per periodi di tempo prolungati, le
sue resistenze vengono momentaneamente
disattivate dal termostato di sicurezza.
5. Importante! Se le pietanze vengono cotte o
grigliate in contenitori, assicurarsi che questi
siano adatti alle microonde. Vedi capitolo
"Stoviglie adatte alle microonde".
6. Durante l'utilizzo del grill spruzzi di grasso
potrebbero macchiare le resistenze e
bruciarsi. È normale e non pregiudica il
funzionamento.
7. Pulire il vano cottura e gli utensili dopo ogni
utilizzo per impedire allo sporco di
incrostarsi.

65
IT
Cuocere con il grill
Tabelle e suggerimenti – Grill senza microonde
Alimenti
Quantità (g)
Tempo (min.)
Suggerimenti
Pesce
Orata
Sardine/caponi
800
6-8 pezzi
18-24
15-20
Ungere leggermente con il burro. Girare a
metà tempo di cottura e speziare.
Carne
Salsicce
6-8 pezzi
22-26
A metà del tempo di cottura bucherellare e
girare.
Hamburger, surgelati
3 pezzi
18-20
Girare 2 o 3 volte.
Costata (dallo spessore di circa
3 cm)
400
25-30
A metà del tempo di cottura aggiungere olio
e girare.
Pane
Pane tostato
4 pezzi
1½-3
Controllare la tostatura.
Sandwich al forno
2 pezzi
5-10
Controllare la cottura.
Preriscaldare il grill per 2 minuti. In assenza di
indicazioni contrarie, utilizzare la griglia per la
cottura. Sistemare la griglia su un piatto che
raccolga l'acqua e il grasso di cottura.
I tempi di cottura riportati sono puramente
indicativi e possono essere modificati in base alla
quantità e al tipo di pietanza che si vuole
preparare. Si possono preparare carne e pesce
dall'ottimo sapore, se prima di grigliarli li si unge
con olio vegetale, li si spezia e li si lascia marinare
per alcune ore. Salare solo dopo che sono stati
grigliati.
Non si corre il rischio che le salsicce scoppino, se
le si bucherella con una forchetta prima della
cottura.
A metà procedimento di cottura iniziare a
controllarlo e girare le pietanze.
Il grill è particolarmente adatto per la cottura di
pezzi sottili di carne e pesce. I pezzi di carne
sottili devono essere girati solo una volta, mentre
quelli più spessi più volte.

66
IT
Cuocere con il grill
Tabelle e suggerimenti – Combinazione microonde con grill
La combinazione microonde con grill è ideale per
preparare velocemente le pietanze e per dorarle
contemporaneamente. Gli alimenti possono anche
essere gratinati.
Le microonde e il grill funzionano
contemporaneamente: le microonde cuociono e il
grill tosta.
Ricette
Quantità (g)
Stoviglie
Potenza
(Watt)
Tempo (min.)
Tempo di
riposo (min.)
Sformato di pasta
500
piane
400
12-17
3-5
Sformato di patate
800
piane
600
20-22
3-5
Lasagne
circa 800
piane
600
15-20
3-5
Sformato di ricotta
circa 500
piane
400
18-20
3-5
2 cosce di pollo fresche
(sulla griglia)
200 g l'una
piane
400
10-15
3-5
Pollo
circa 1000
piane e ampie
400
35-40
3-5
Zuppa di cipolle
gratinata
2 tazze da 200
scodelle
400
2-4
3-5
Prima di utilizzare stoviglie e contenitori vari,
assicurarsi che siano adatti alle microonde.
Utilizzare esclusivamente recipienti adatti.
I recipienti che vengono utilizzati per la modalità di
cottura combinata, devono essere adatti sia alla
cottura con le microonde sia a quella con il grill.
Vedi capitolo "Stoviglie adatte alle microonde".
I valori riportati nella tabella sono puramente
indicativi e possono variare a seconda dello stato
di partenza, della temperatura, dell'umidità e del
tipo di alimento scelto.
Se il tempo di cottura non è stato sufficiente per
dorare la pietanza come desiderato, attivare la
funzione "Grill" per altri 5 o 10 minuti.
Osservare i tempi di riposo e girare i pezzi di
carne e pollame.
In assenza di indicazioni contrarie, utilizzare il
piatto girevole per la cottura.
I valori indicati nelle tabelle si riferiscono ad un
vano cottura freddo (non è necessario
preriscaldarlo).
67
IT
Arrostire e cuocere
Tabelle e suggerimenti – Preparazione di carne e torte
Microonde / Aria calda
Alimento
Quantità (g)
Potenza
(Watt)
Temperatura
ºC
Tempo
(min)
Tempo di
riposo
(min)
Suggerimenti
Roastbeef
1000-1500
400
200
30-40
20
Recipiente senza coperchio,
girare 1x
Lombata di maiale/
Costolette od ossa
Maiale arrosto
800-1000
200
180-190
50-60
20
Recipiente senza coperchio,
girare 1x
Pollo, intero
1000/1200
400
200
30-40
10
Recipiente senza coperchio.
Parte del petto verso il
basso. Girare 1x.
Pollo a pezzi
500-1000
400
200
25-35
10
Recipiente senza coperchio.
Sistemare i pezzi con la
pelle verso il basso. Girare
1X.
Vitella arrosto
1500/2000
200
180
60-65
20
Recipiente con coperchio
girare 1-2x, dopo aver
girato, continuare con la
cottura senza coprire.
Carne di manzo
arrosto
1500-1800
200
200
80-90
20
Recipiente con coperchio,
girare 1-2x
Microonde / Cottura
Alimento
Potenza
(Watt)
Temperatura ºC
Tempo
(min)
Tempo di riposo
(min)
Suggerimenti
Torta al cioccolato/ciliegia
200
200
30
5-10
Piatto girevole, grata
piccola, Stampo con
cerniera, Ø 28 cm
Cheessecake con frutta
400
180
40-45
5-10
Piatto girevole, grata
piccola, Stampo con
cerniera, Ø 28 cm
Crostata di mele
200
185
40-45
5-10
Piatto girevole, grata
piccola, Stampo con
cerniera, Ø 28 cm
Cheesecake con streusel
400
180
40-50
5-10
Piatto girevole, grata
piccola, Stampo con
cerniera, Ø 26 cm
Torta alle noci
200
170
30-35
5-10
Piatto girevole,
Stampo con cono
Consigli per arrostire
Girare i pezzi di carne a metà cottura. Quando
l’arrosto sarà pronto, lasciarlo riposare per altri 20
minuti a forno spento e chiuso. In tale modo, il
succo della carne si spargerà meglio.
La temperatura ed il tempo di arrosto dipendono
dal tipo di alimento e dalla relativa grandezza.
Nel caso in cui il peso dell’arrosto non figuri in
tabella, scegliere la segnalazione corrispondente
al peso immediatamente inferiore e prolungare il
tempo.
Consigli sulle stoviglie
Controllare che il recipiente ci stia all’interno del
forno
Recipienti di vetro caldi devono essere sistemati
sopra un panno da cucina asciutto. Se tali
recipienti sono sistemati su una superficie fredda
o bagnata il vetro potrà fendere o spaccare. Usare
delle prese per togliere i recipienti del forno.

68
IT
Cuocere
Tabelle e suggerimenti – Cuocere/ Aria calda
Alimento
Recipiente
Piano
Temperatura
Tempo (Min.)
Torta alle noci
Stampo con cono
Piatto girevole
160
50-60
Tarte de fruta
Stampo con cerniera Ø 28 cm
Piatto girevole
160
55-60
Plumcake
Stampo con cono
Piatto girevole
160
55-65
Crostate salate
Stampo rotondo in vetro
Piatto girevole
190-200
40-60
Torta di pan di Spagna
Stampo con cerniera Ø 26 cm
Piatto girevole
160
30-40
Tronco
Tortiera in vetro
1
200
12-15
Torta alle ciliegie
Tortiera in vetro
1
180-190
40-50
Consigli sugli stampi per torte
Gli stampi più usati sono quelli neri in metallo. Se
si usa in aggiunta il microonde, si devono usare
stampi per torte in vetro, ceramica o plastica. Detti
stampi devono essere resistenti a temperature
fino ai 250ºC. Se si usano questo tipo di stampi, le
torte rimarranno meno tostate.
Consigli su come cuocere torte
La temperatura e la cottura della torta dipendono
dalla qualità e quantità della pasta. Tentare prima
con una temperatura più bassa ed in seguito, se
necessario, regolare su un valore più elevato. Ad
una temperatura più bassa si riuscirà ad ottenere
una tostatura più uniforme. Sistemare sempre lo
stampo al centro del vassoio o sul piatto girevole.
Suggerimenti per cuocere
Come controllare se la torta è cotta:
Infilare uno stecchino nella parte più alta della
torta. Se la pasta non rimarrà attaccata allo
stecchino, la torta sarà pronta.
La torta diventa troppo scura
Cuocere ad una temperatura più bassa con un
tempo più lungo.
La torta risulta troppa asciutta:
Fare diversi fori con uno stecchino sulla torta già
pronta. Di seguito, innaffiare con succo od una
bevanda alcolica. In una prossima volta,
aumentare la temperatura di cottura in circa 10º
con un tempo più corto.
La torta non si stacca quando si capovolge:
Lasciare raffreddare la torta, a cottura ultimata,
durante 5 - 10 minuti, in tale modo, la torta si
stacca più facilmente dallo stampo. Nel caso in
cui la torta continuasse a non staccarsi, passare
accuratamente con un coltello per i bordi. In una
prossima volta, imburrare bene lo stampo.
Consigli per risparmiare energia
Quando si fa più di una torta, si consiglia di
infornarle una dopo l’altra. In tale modo si
approfitta il calore residuale del forno e si riduce il
tempo di cottura delle torte successive.
Utilizzare di preferenza stampi scuri, colorati o
smaltati in nero, visto che assorbono meglio il
calore.
In caso di tempi di cottura più lunghi si potrà
staccare il forno circa 10 minuti prima del tempo
previsto ed, in questo modo, approfittare il calore
residuale per ultimare la cottura.

69
IT
Stoviglie adatte per le microonde
Funzione microonde
Quando si utilizza la funzione Microonde non
dimenticarsi che queste vengono riflesse dalle
superfici metalliche, mentre il vetro, la porcellana,
la terraglia, la plastica e la carta si lasciano
attraversare.
Pertanto non utilizzare con le microonde
pentole e stoviglie di metallo o recipienti con
elementi o decorazioni metalliche. Non
utilizzare nemmeno stoviglie di vetro e terraglia
con decorazioni o riporti metallici (p.e. cristallo al
piombo).
Le stoviglie o i recipienti ideali per la cottura nel
forno a microonde sono il vetro pirofilo, la
porcellana o la terraglia, così come la plastica
termoresistente. Utilizzare stoviglie di vetro e
porcellana molto sottili e fragili solo per tempi di
cottura brevi, p.e. solo per riscaldare.
I cibi caldi trasmettono il calore alle stoviglie, che
possono così surriscaldarsi. Utilizzare pertanto
sempre una presina per prelevare le pietanze dal
forno.
Test stoviglie
Sistemare le stoviglie per 20 secondi nel forno e
accenderlo alla massima potenza. Se le stoviglie
rimangono fredde o si riscaldano solo
leggermente, significa che sono adatte alle
microonde. Se invece si dovessero riscaldare
troppo o dovessero formarsi scintille, significa che
non sono adatte.
Grill o Aria calda
Se si utilizza la funzione Grill o Aria calda le
stoviglie devono essere resistenti a temperature di
almeno 300°C.
Le stoviglie di plastica non sono adatte alla
cottura con il grill.
Funzioni combinate
Se si utilizza il funzioni combinate bisogna
utilizzare stoviglie adatte ad entrambe le due
modalità di cottura.
Contenitori e pellicole di alluminio
I piatti pronti contenuti in recipienti di alluminio o
avvolti in pellicole di alluminio possono essere
cotti nel forno a microonde, se si osservano le
seguenti indicazioni.
Osservare le indicazioni fornite dal produttore e
riportate sulla confezione.
I contenitori di alluminio non devono avere una
profondità superiore ai 3 cm e non devono
toccare le pareti del vano cottura (distanza
minima: 3 cm). Rimuovere i coperchi di
alluminio.
Sistemare il contenitore di alluminio
direttamente sul piatto girevole. Se si utilizza la
griglia, sistemare il recipiente su un piatto di
porcellana. Non appoggiare mai il contenitore
direttamente sulla griglia.
I tempi di cottura si prolungano perché le
microonde possono penetrare nelle pietanze
solo dall'alto. In caso di dubbi utilizzare
stoviglie conosciute che sono adatte alle
microonde.
Si può utilizzare la pellicola di alluminio durante
la modalità di scongelamento per riflettere le
microonde. Permette, per esempio, di
proteggere le parti delicate di alimenti come
pollame o carne macinata mentre li si scongela.
Importante! Il foglio di alluminio non deve
toccare le pareti del vano cottura, perché
altrimenti si potrebbero formare delle scintille.
Coperchio
Si consiglia l'utilizzo di coperchi di vetro, plastica o
pellicola trasparente, perché in questo modo
1. si evita un'eccessiva fuoriuscita di vapore
(soprattutto con tempi di cottura molto
lunghi);
2. si accelera il processo di cottura;
3. si impedisce che gli alimenti si essicchino;
4. si conserva l'aroma delle pietanze.
I coperchi non devono essere a tenuta stagna, per
evitare che si formi qualsiasi tipo di pressione. I
sacchetti di plastica devono presentare aperture
uniformi. I biberon, i vasetti con alimenti per
neonati e contenitori simili non devono essere
riscaldati con il coperchio perché altrimenti si
corre il rischio che scoppino.

70
IT
Stoviglie adatte per le microonde
Tabella - Stoviglie
La seguente tabella offre un quadro generale di quali tipi di stoviglie siano adatte ai diversi tipi di cottura.
Modo di
funzionamento
Tipo stoviglie
Microonde
Grill / Aria
calda
Funzioni
combinate
Scongelare /
riscaldare
Cuocere
Vetro e porcellana 1)
Adatte alla casa, non termoresistenti,
possono essere lavate nella
lavastoviglie.
sì
sì
no
no
Ceramica smaltata
Vetro termoresistente e porcellana
sì
sì
sì
sì
Ceramica e stoviglie in terraglia 2)
Non smaltate o smaltate ma senza
decorazioni metalliche
sì
sì
no
no
Stoviglie di terracotta 2)
smaltate
non smaltate
sì
no
sì
no
no
no
no
no
Stoviglie di plastica 2)
termoresistenti fino a 100°C
termoresistenti fino a 250°C
sì
sì
no
sì
no
no
no
no
Pellicole di plastica 3)
Pellicole per alimenti
Cellofan
no
sì
no
sì
no
no
no
no
Carta, cartone e pergamena 4)
sì
no
no
no
Metallo
Pellicola di alluminio
Confezioni di alluminio 5)
Accessori
sì
no
sì
no
sì
sì
sì
sì
sì
no
sì
sì
1. Senza bordo dorato o argentato e senza
cristallo al piombo.
2. Attenersi alle indicazioni del produttore!
3. Non utilizzare clip metalliche per chiudere i
sacchetti. Bucherellare i sacchetti. Utilizzare
le pellicole solo per coprire.
4. Non utilizzare piatti di carta.
5. Esclusivamente confezioni piane di alluminio
senza coperchio. L'alluminio non deve
toccare le pareti del vano cottura.

71
IT
Pulizia e manutenzione
La pulizia rappresenta generalmente l'unico tipo di
manutenzione necessaria.
Attenzione! Il forno a microonde deve essere
pulito regolarmente provvedendo alla rimozione di
tutti i resti di cottura. Se il forno non viene
mantenuto pulito correttamente, la sua superficie
si potrebbe danneggiare, riducendo così i tempi
di durata dell'apparecchio e creando,
eventualmente, situazioni pericolose.
Attenzione! Prima di iniziare la pulizia staccare
l'apparecchio dall'alimentazione di rete.
Togliere la spina dalla presa o disattivare il
circuito di alimentazione dell'apparecchio.
Non utilizzare detergenti aggressivi o prodotti
abrasivi, spugne abrasive e neppure oggetti
appuntiti, perché potrebbero macchiare
l'apparecchio.
Non utilizzare apparecchi di pulizia a
pressione o a getto di vapore.
Frontale dell'apparecchio
È sufficiente pulire il frontale dell'apparecchio con
un panno umido. Nel caso dovesse essere
particolarmente sporco, aggiungere un paio di
gocce di detergente all'acqua di pulizia. Asciugare
quindi l'apparecchio con un panno asciutto.
Per la pulizia di apparecchi con frontale di
alluminio utilizzare un detergente delicato per
vetro e un panno morbido e senza pelucchi. Pulire
la superficie in senso orizzontale e non facendo
pressione.
Rimuovere immediatamente resti di calcare,
grasso, amido e bianco d'uovo. Queste macchie
potrebbero corrodere l'apparecchio.
Evitare che defluisca dell'acqua all'interno
dell'apparecchio.
Vano cottura
Dopo ogni utilizzo pulire le pareti interne con un
panno umido, perché in questo modo è più facile
eliminare spruzzi e resti di cibo, prima che si
incrostino.
Utilizzare un detergente non aggressivo per
rimuovere le incrostazioni più tenaci. Non
utilizzare spray per forni o detergenti
aggressivi o abrasivi.
Assicurarsi che lo sportello e il frontale siano
sempre molto puliti, al fine di assicurare il
funzionamento perfetto dell'apparecchio.
Evitare che penetri acqua nelle fessure e nei fori
di aerazione del microonde.
Pulire regolarmente il fondo del vano cottura,
specialmente se vi si sono depositati liquidi,
rimuovendo il piatto girevole e il suo supporto (con
tanto di perno).
Non accendere l'apparecchio senza aver prima
reinserito il piatto con il suo supporto.
Se il vano cottura dovesse essere molto sporco,
appoggiare un bicchiere d'acqua sul piatto
girevole e far funzionare il forno alla massima
potenza per circa 2 o 3 minuti. Il vapore che si
forma ammorbidisce le macchie di sporco, che
possono poi essere facilmente rimosse con un
panno morbido.
Per neutralizzare facilmente eventuali odori
sgradevoli (p.e. quelli dopo la preparazione del
pesce), aggiungere un paio di gocce di succo di
limone o di aceto all'acqua di una tazza che sarà
poi messa nel forno e riscaldata per 2 o 3 minuti a
potenza massima (mettere un cucchiaino nella
tazza per evitare un ritardo di bollitura).

72
IT
Pulizia e manutenzione
Superficie superiore del vano cottura
Se dovesse essersi sporcata la superficie
superiore interna dell'apparecchio, smontare il grill
per facilitarne la pulizia.
Prima di sganciare il grill aspettare che si sia
raffreddato per evitare il rischio di scottature.
Procedere quindi come segue:
1. Ruotare di 180° il supporto del grill (1).
2. Abbassarlo quindi con cautela (2). Non fare
troppa forza perché si rischia altrimenti di
danneggiare l'apparecchio.
3. Dopo aver provveduto alla pulizia della
superficie, riportare il grill (2) nella sua
posizione originaria procedendo nella
sequenza inversa.
AVVISO IMPORTANTE: Il supporto del grill (1)
può cadere durante la rotazione. In questo caso
inserire il supporto del grill (1) nel foro che si trova
sulla parte superiore della cavità e ruotarlo di 90º
fino alla posizione di supporto per il grill (2).
La copertura (3) che si trova sulla superficie
superiore, deve essere sempre pulita. Resti di
cottura che dovessero accumularsi sulla copertura
potrebbero generare scintille o essere la causa di
danni all'apparecchio.
Non utilizzare detergenti abrasivi o oggetti
appuntiti.
La rimozione della copertura potrebbe creare
situazioni pericolose.
Il vetro per la copertura della luce (4) si trova sul
cielo dell'apparecchio e può essere rimosso
facilmente per essere pulito. Rimuovere il vetro di
copertura svitandolo e pulirlo con acqua e
detergente per piatti.
Accessori
Pulire gli accessori dopo ogni utilizzo. In caso
dovessero essere molto sporchi, metterli prima in
ammollo e quindi lavarli con una spazzola o una
spugna. Gli accessori possono essere lavati nella
lavastoviglie.
Assicurarsi che il piatto rotante e il suo supporto
siano sempre puliti. Non accendere mai
l'apparecchio senza aver prima reinserito il piatto
con il suo supporto.

73
IT
Guasti, cosa fare?
ATTENZIONE! Qualsiasi tipo di riparazione
deve essere effettuato solo da personale
specializzato. Qualsiasi riparazione che non
venga eseguita da personale autorizzato dalla
casa produttrice potrebbe rivelarsi pericolosa.
I seguenti guasti possono essere rimossi
dall'utente senza che sia necessario l'intervento
del Servizio Assistenza.
Il display è oscurato! Controllare se
- si è disattivata l'indicazione dell'ora (vedi
capitolo "Impostazioni base").
Premendo i tasti non si attiva nessuna
funzione! Controllare se
- si è attivato il blocco di messa in funzione
(vedi capitolo "Impostazioni base").
L'apparecchio non funziona! Controllare
se
- la spina è correttamente inserita nella presa,
- è attivo il circuito di alimentazione del forno,
- lo sportello è chiuso bene (lo sportello scatta
quando si chiude),
- degli elementi estranei si trovano tra
sportello e frontale del vano interno.
Durante il funzionamento del forno si
sentono rumori strani! Controllare se
- vengono generate scintille all'interno del
forno a causa della presenza di elementi
estranei di metallo (vedi capitolo "Stoviglie
adatte");
- le stoviglie toccano le pareti del vano cottura;
- nel vano cottura si trovano spiedini o
cucchiai.
Le pietanze non si riscaldano o si
riscaldano molto lentamente! Controllare
se
- si sono utilizzate inavvertitamente stoviglie
metalliche;
- il tempo di funzionamento e il livello di
potenza impostati sono corretti;
- il cibo sistemato nel vano cottura è in
quantità maggiore o è più freddo del solito.
Le pietanze sono diventate troppo calde,
si sono seccate o bruciate! Controllare se
si sono impostati un tempo di funzionamento
e un livello di potenza corretti.
Al termine del procedimento di cottura si
sente un rumore! Non si tratta di un guasto.
Al termine di una modalità di funzionamento
la ventola di raffreddamento rimane accesa
fino a quando la temperatura non è scesa a
sufficienza.
Il forno funziona ma non si accende la
luce interna! Se tutti i programmi
funzionano correttamente, significa che la
lampadina si è probabilmente bruciata. Si
può continuare ad utilizzare il forno.
Sostituzione della lampadina
Procedere come qui di seguito indicato per
sostituire la lampadina.
- Staccare l'apparecchio dall'alimentazione
elettrica. Togliere la spina dalla presa o
interrompere il circuito di alimentazione
dell'apparecchio.
- Svitare la copertura della luce (1).
- Rimuovere la lampada alogena (2).
Attenzione! La lampadina può essere
molto calda!
- Inserire una nuova lampada alogena da 12V
/ 10W. Attenzione! Non toccare mai il
vetro della lampadina direttamente con le
dita perché la si potrebbe danneggiare.
Attenersi alle indicazioni del produttore della
lampadina.
- Avvitare il vetro di copertura della lampadina
(1).
- Riallacciare l'apparecchio all'alimentazione
di corrente.
74
IT
Dati tecnici
Dati tecnici
Tensione (CA) ................................................................................. (vedi targhetta)
Potenza richiesta ............................................................................ 3400 W
Potenza del grill.... .......................................................................... 1500 W
Potenza dell’aria calda .................................................................... 1600 W
Potenza erogata, microonde. .......................................................... 1000 W
Frequenza del microonde … ........................................................... 2450 MHz
Dimensioni esterne (LxAxP) ............................................................ 595 455 542 mm
Dimensioni vano cottura (LxAxP) .................................................... 420 210 390 mm
Capacità forno. ................................................................................ 32 l
Peso ................................................................................................ 35 kg
Il Suo contributo alla salvaguardia dell'ambiente
Smaltimento dell'imballaggio
L'imballaggio è contrassegnato dal logo "Punto
Verde".
Utilizzare i contenitori appositi per smaltire tutti i
materiali dell'imballaggio come cartone,
polistirolo espanso e pellicole protettive. Si
assicura così il riciclaggio dei materiali
d'imballaggio.
Smaltimento di apparecchiature dismesse
La norma europea 2002/96/EC su apparecchi
elettrici ed elettronici dismessi (WEEE, Waste
Electrical and Electronic Equipment) vieta lo
smaltimento di elettrodomestici come rifiuti
residuali.
Gli apparecchi in disuso devono pertanto essere
recuperati separatamente dagli altri rifiuti per
ottimizzare la percentuale di recupero e
riciclaggio dei materiali di cui sono composti e
per evitare possibili danni alla salute delle
persone e all'ambiente. Il simbolo del cassonetto
barrato deve essere applicato su tutti i prodotti
per sottolineare che devono essere smaltiti
separatamente.
L'utilizzatore deve mettersi in contatto con gli
enti locali competenti o con i nostri punti vendita
per informarsi sul luogo di raccolta di vecchi
elettrodomestici più vicino.
Prima di procedere allo smaltimento rendere
sicuro l'apparecchio, staccando il cavo di
alimentazione, tagliandolo e smaltendolo quindi,
a sua volta, adeguatamente.
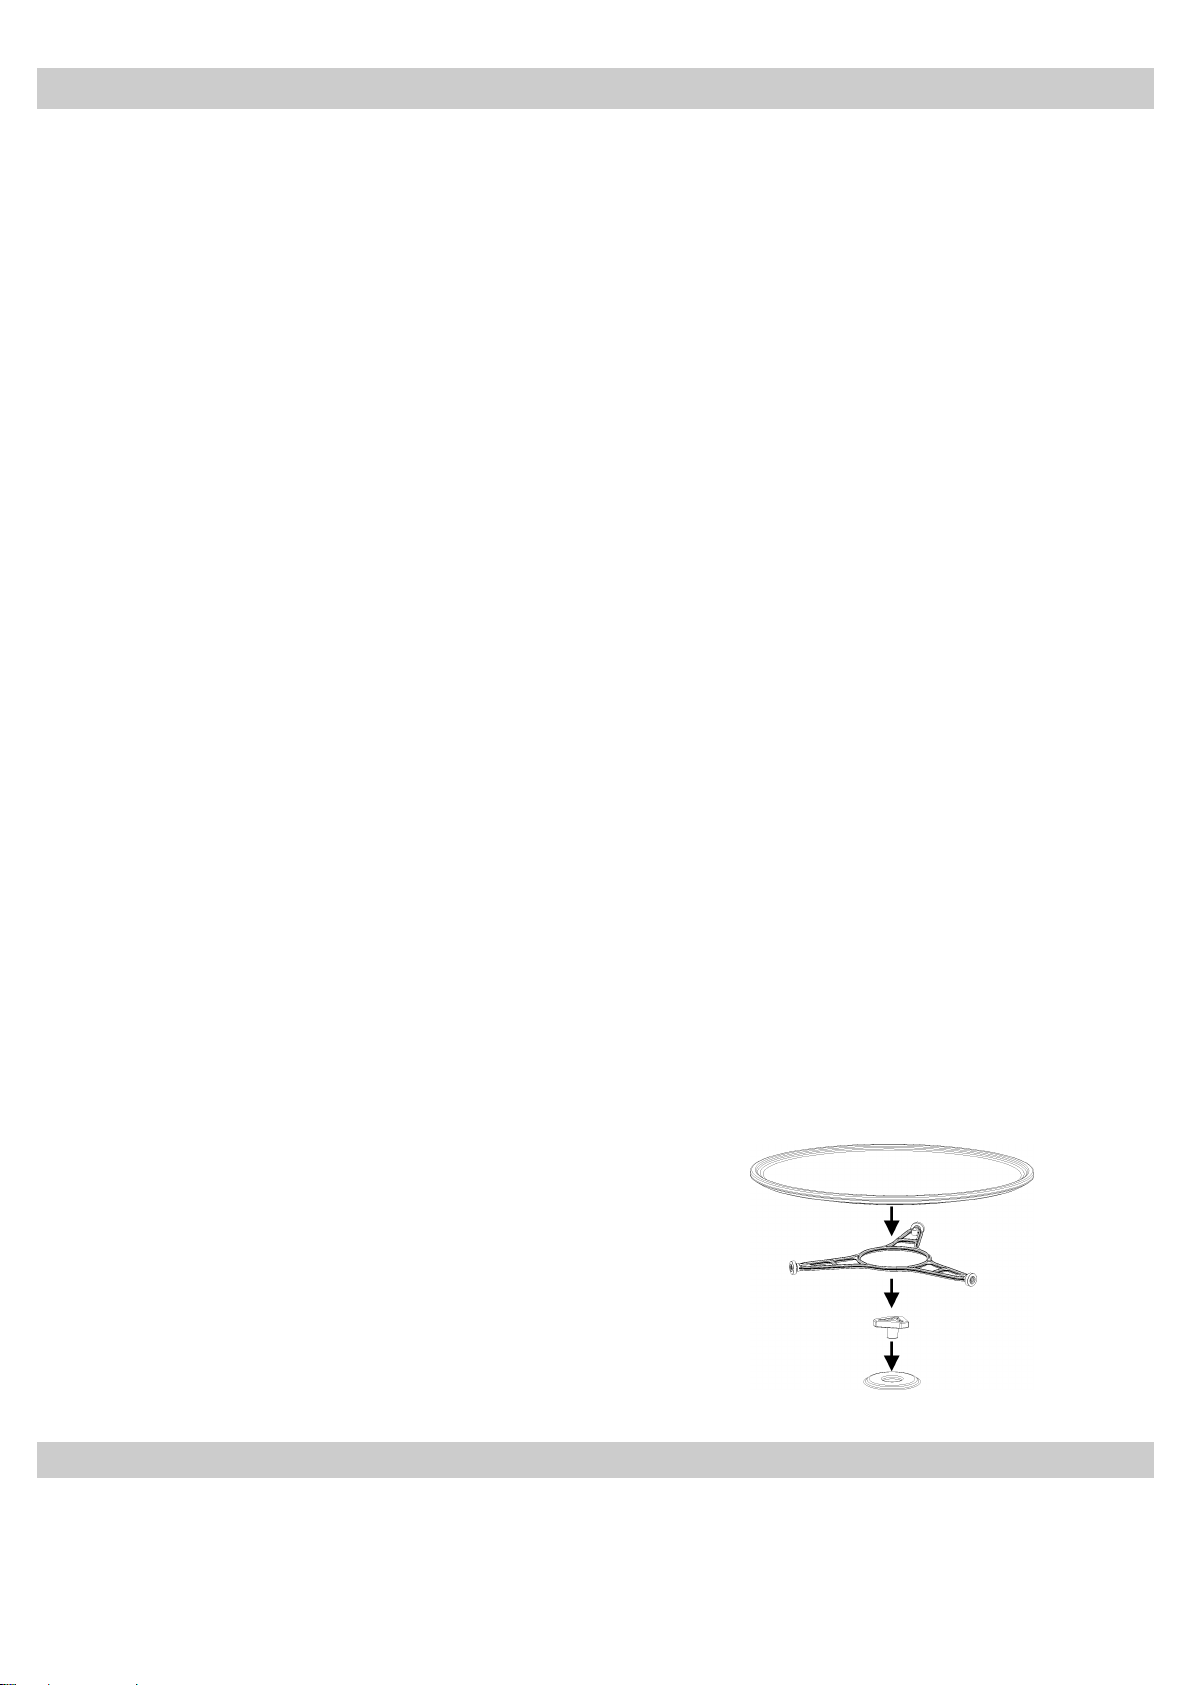
75
IT
Istruzioni di montaggio
Prima dell'installazione
Assicurarsi che la tensione di alimentazione
indicata sulla targhetta dati corrisponda a quella
della vostra rete elettrica.
Aprire lo sportello, rimuovere tutti gli accessori
e il materiale d'imballaggio.
Non rimuovere la copertura di mica applicata
sulla superficie superiore del vano cottura.
Questa copertura evita che il grasso e i resti di
cottura danneggino il generatore di microonde.
Attenzione! Il frontale dell'apparecchio potrebbe
essere ricoperto da un film protettivo.
Rimuovere la protezione con cautela prima della
prima messa in funzione, iniziando a staccarla
partendo dal basso.
Assicurarsi che l'apparecchio non sia
danneggiato. Verificare che lo sportello si
chiuda correttamente e che la parete interna
dello sportello, così come il frontale del vano
interno, non siano danneggiati. In presenza di
danni informare il Servizio Assistenza Tecnica.
NON UTILIZZARE L'APPARECCHIO se il cavo
d'alimentazione o la spina dovessero essere
danneggiati, se l'apparecchio non dovesse
funzionare correttamente, se si dovesse essere
danneggiato o se dovesse essere caduto. In tal
caso mettersi in contatto con il Servizio
Assistenza Tecnica.
Appoggiare l'apparecchio su una superficie
piana e stabile. L'apparecchio non deve essere
messo nelle vicinanze di radiatori, radio e
televisori.
Durante l'installazione assicurarsi che il cavo
di alimentazione non entri mai in contatto
con umidità, oggetti appuntiti e con il lato
posteriore dell'apparecchio, le cui elevate
temperature lo potrebbero danneggiare.
Attenzione! Sistemare l'apparecchio in modo
da poter raggiungere con facilità la spina.
Dopo l'installazione
L'apparecchio è dotato di un cavo di
alimentazione e di una spina per corrente
monofase.
Qualora il tipo di montaggio non dovesse
rendere accessibile la presa, far eseguire
l'installazione da un tecnico specializzato.
Questo tipo di incasso prevede infatti il
collegamento ad un circuito d'alimentazione
tramite un ruttore per tutti i poli con una distanza
minima di 3 mm tra i contatti.
ATTENZIONE! IL PRESENTE APPARECCHIO
DEVE ESSERE ASSOLUTAMENTE
COLLEGATO A TERRA.
Il produttore e il rivenditore declinano ogni
responsabilità per eventuali danni a persone,
animali o cose, dovuti alla mancata osservanza
delle presenti istruzioni di montaggio.
L'apparecchio funziona solo quando lo
sportello è perfettamente chiuso.
Pulire il vano cottura e gli accessori prima del
primo impiego attenendosi alle indicazioni di
pulizia riportate al capitolo "Pulizia e
manutenzione".
Inserire il perno al centro del vano cottura ed
appoggiare l'anello di scorrimento e il piatto
girevole in modo che scatti. Ogni qual volta
venga utilizzato il forno a microonde, è
necessario che sia il piatto girevole sia gli
appositi accessori siano correttamente disposti
all'interno del vano cottura. Il piatto girevole
può ruotare in tutte e due le direzioni.
Durante l'installazione attenersi a quanto contenuto nelle istruzioni allegate.
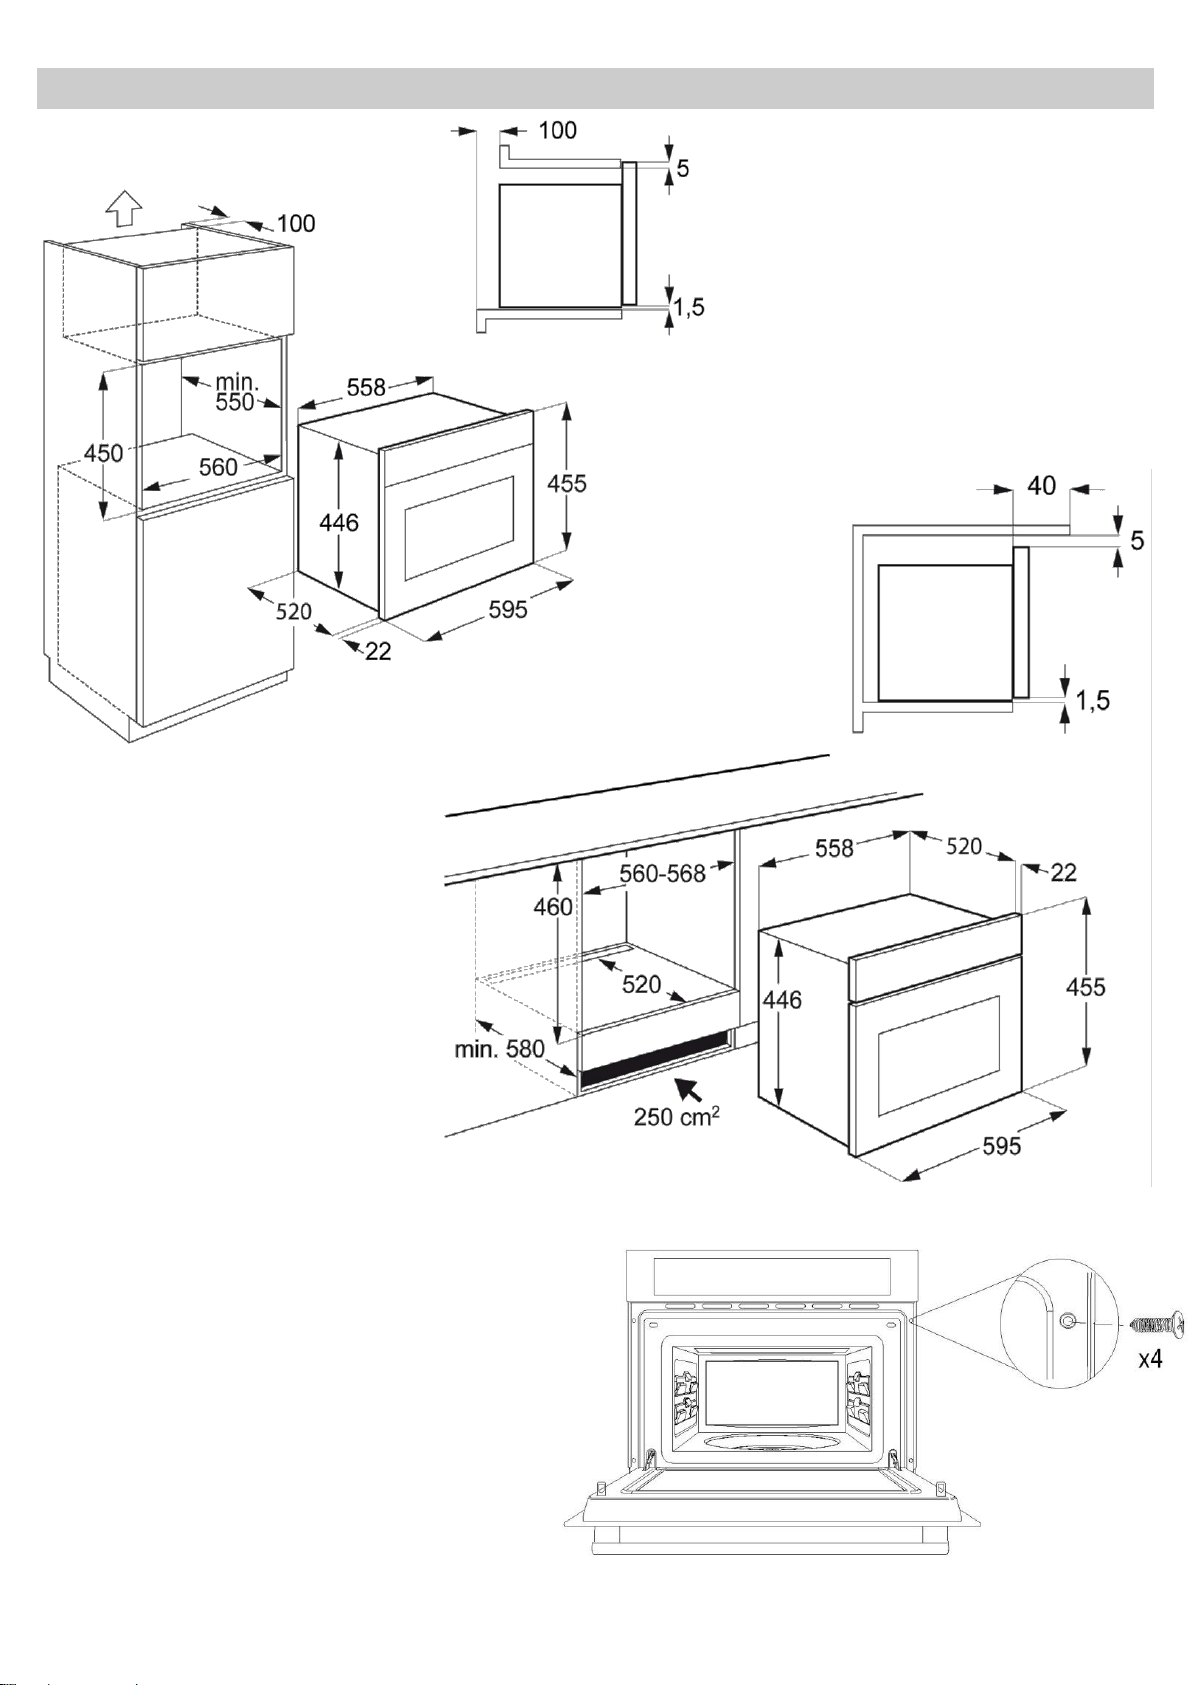
Installation / Incasso
EN
Push oven completely into the cabinet
and centre it.
Open microwave door and fasten the
appliance to the cabinet using the four
screws provided. Insert the screws
through the front holes.
IT
Inserire il microonde nella nicchia ed
allinearlo.
Aprire lo sportello del microonde e
fissare l'apparecchio al mobile da
cucina con le quattro viti allegate,
come indicato nel disegno.


