For more information, see the pages in parentheses.
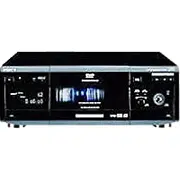
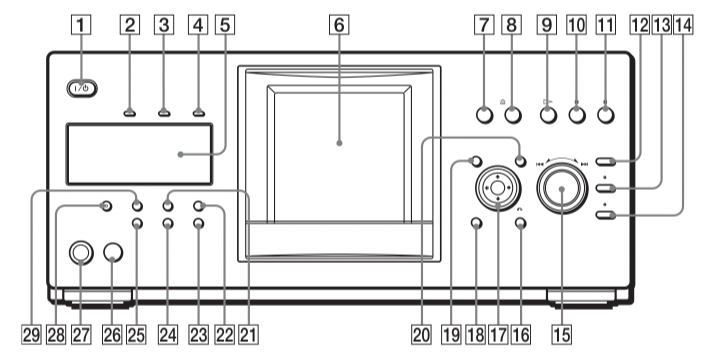
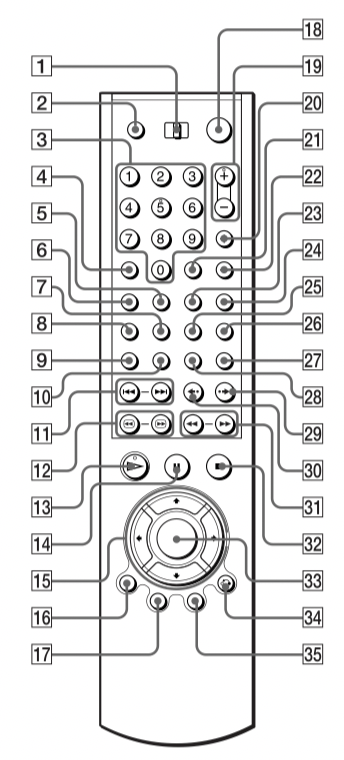
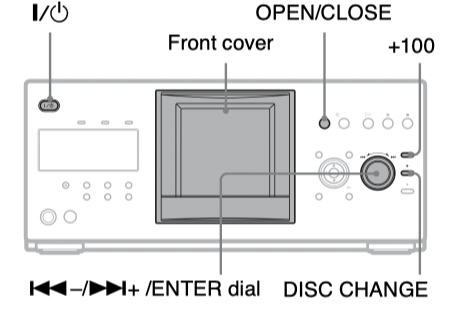
Front panel
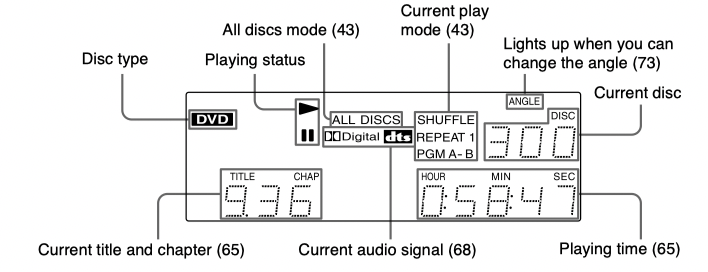
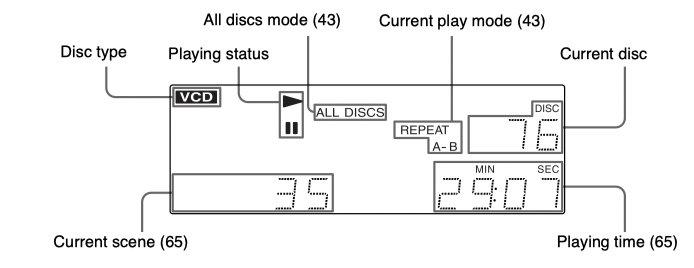
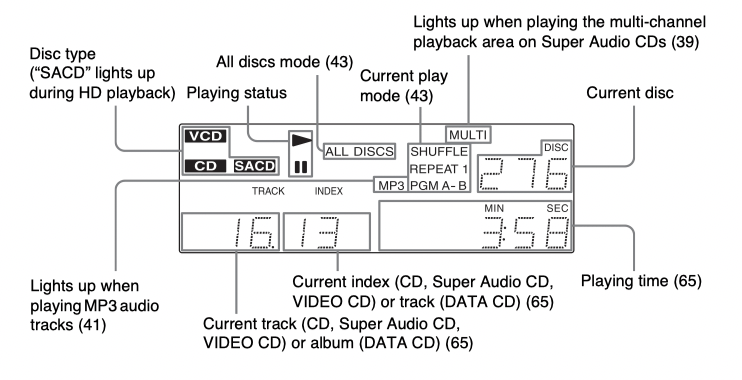
Front panel display
When playing back a DVD VIDEO/DVD-RW
When playing back a VIDEO CD with Playback Control (PBC) (40)
When playing back a CD, Super audio CD, DATA CD (MP3 audio), or VIDEO CD (without PBC)
To turn off the front panel display
Press FL OFF on the player. The front panel display turns off, and the FL OFF indicator on the player lights up.
Hint: You can adjust the lighting of the front panel display by setting “DIMMER” in “CUSTOM SETUP” (page 89).
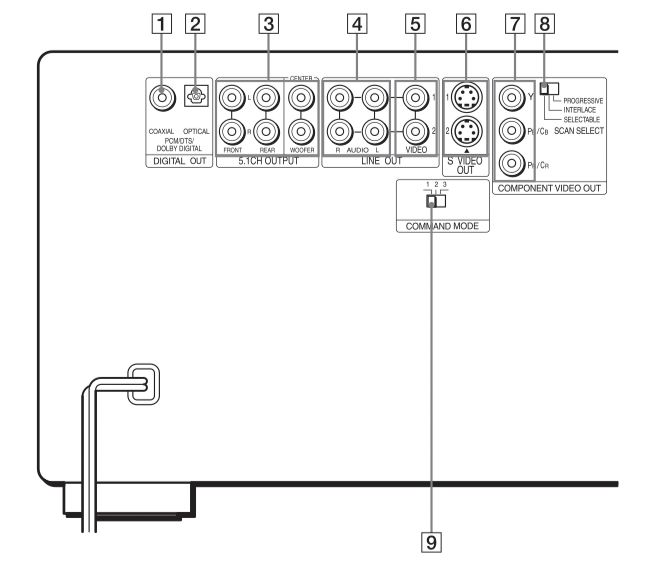
Rear panel
DIGITAL OUT (COAXIAL) jack (24) (25) (26)
DIGITAL OUT (OPTICAL) jack (24) (25) (26)
5.1CH OUTPUT jacks (26)
LINE OUT AUDIO L/R 1/2 jacks (23) (24) (25)
LINE OUT VIDEO 1/2 jacks (19)
S VIDEO OUT 1/2 jacks (19)
COMPONENT VIDEO OUT (Y, PB/ CB, PR/CR) jacks (19)
COMPONENT VIDEO OUT/SCAN SELECT switch (87)
COMMAND MODE switch (18)
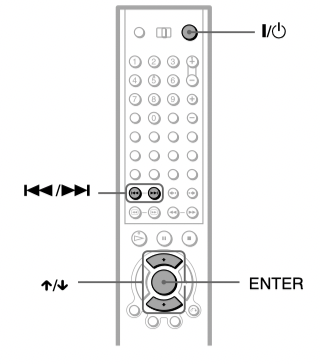
Remote
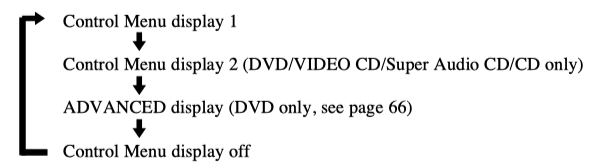
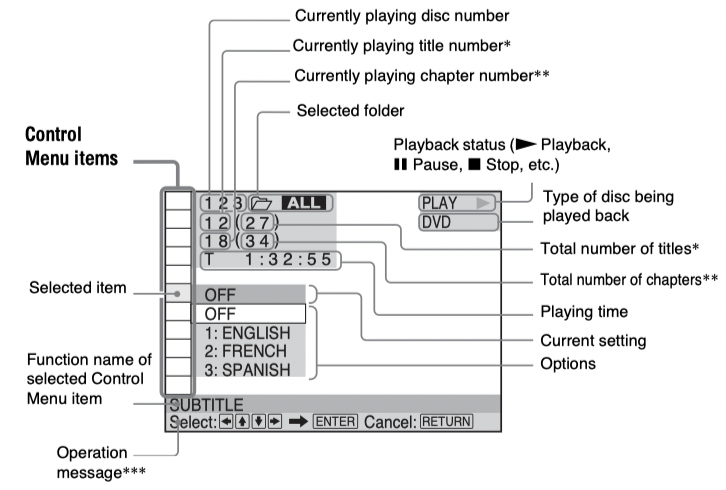
Guide to the Control Menu Display
Use the Control Menu to select a function and to view related information. After sliding the TV/ DISC EXPLORER/DVD switch to DVD, press DISPLAY/FILE repeatedly to turn on or change the Control Menu display as follows:
Hint: You can skip the ADVANCED display by setting “OFF” under “ADVANCED” in the Control Menu (page 66).
Control Menu
The Control Menu display 1 and 2 will show different items depending on the disc type. For details, see the pages in parentheses.
Example: Control Menu display 1 when playing a DVD VIDEO
* Displays the scene number for VIDEO CDs (PBC is on), track number for VIDEO CDs/Super Audio CDs/CDs, album number for DATA CDs.
** Displays the index number for VIDEO CDs/Super Audio CDs/CDs, MP3 audio track number for DATA CDs.
*** Displays the DISC MEMO or CD Text when the disc contains title information.
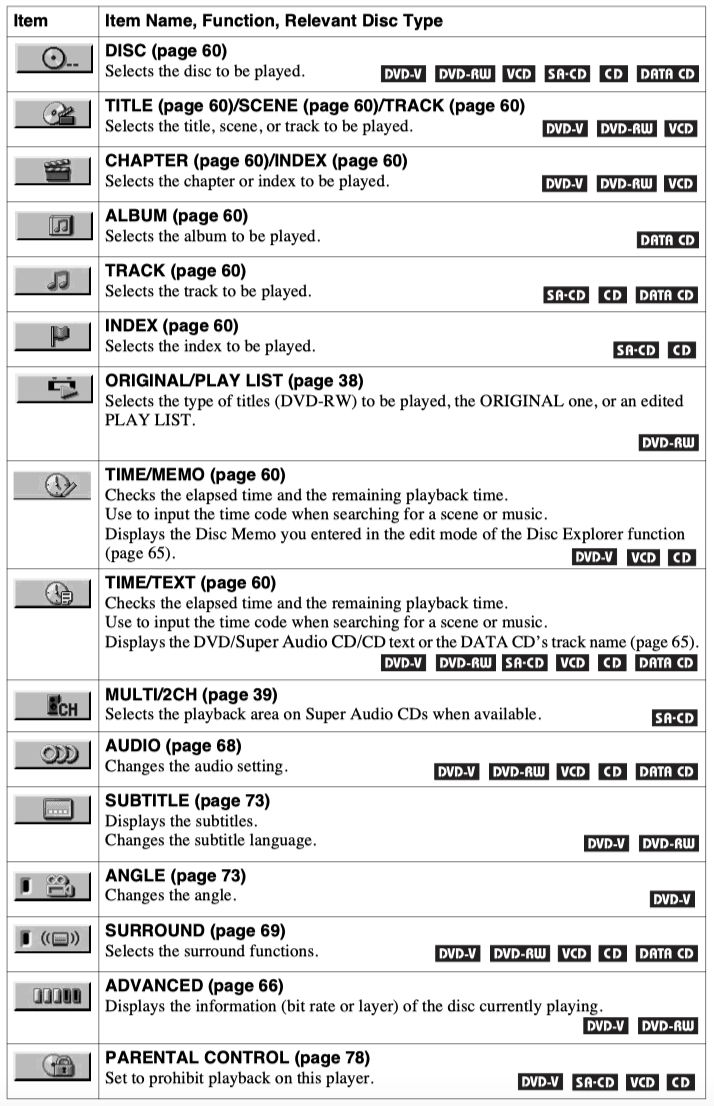
List of Control Menu items
Hint: The Control Menu icon indicator lights up in green when you select any item except “OFF.” (“SURROUND,” “PROGRAM,” “SHUFFLE,” “REPEAT,” “A-B REPEAT,” “BNR,” and “DIGITAL VIDEO ENHANCER” only). The “ANGLE” indicator lights up in green only when the angles can be changed. The “CUSTOM PICTURE MODE” indicator lights up in green when any setting other than “STANDARD” is selected.
Hooking Up the Player
Follow steps 1 to 6 to hook up and adjust the settings of the player.
Notes
• Plug cords securely to prevent unwanted noise.
• Refer to the instructions supplied with the components to be connected.
• You cannot connect this player to a TV that does not have a video input jack.
• Be sure to disconnect the power of each component before connecting.
Step 1: Unpacking
Check that you have the following items:
• Audio/video cord (pinplug × 3 pinplug × 3) (1)
• Remote commander (remote) (1)
• Size AA (R6) batteries (2)
Step 2: Preparing the Remote
You can control the player using the supplied remote. Insert two Size AA (R6) batteries by matching the and ends on the batteries to the markings inside the compartment. When using the remote, point it at the remote sensor on the player.
Notes
• Do not leave the remote in an extremely hot or humid place.
• Do not drop any foreign object into the remote casing, particularly when replacing the batteries.
• Do not expose the remote sensor to direct sunlight or lighting apparatus. Doing so may cause a malfunction.
• If you do not use the remote for an extended period of time, remove the batteries to avoid possible damage from battery leakage and corrosion.
When you have more than one Sony DVD player
If the supplied remote interferes with your other Sony DVD player, set the command mode for this player and the supplied remote to one that differs from the other Sony DVD player.
The default command mode setting for this player and the supplied remote is DVD1.
1. Slide the COMMAND MODE switch on the remote to select the command mode (DVD 1, DVD 2, or DVD 3) so that the setting for the remote differs from the other DVD players.
For example, if other DVD players respond to the default command mode setting for the supplied remote (DVD 1), set the remote to DVD 2 or DVD 3.
2. Slide the COMMAND MODE switch on the rear of the player so it matches that of the supplied remote.
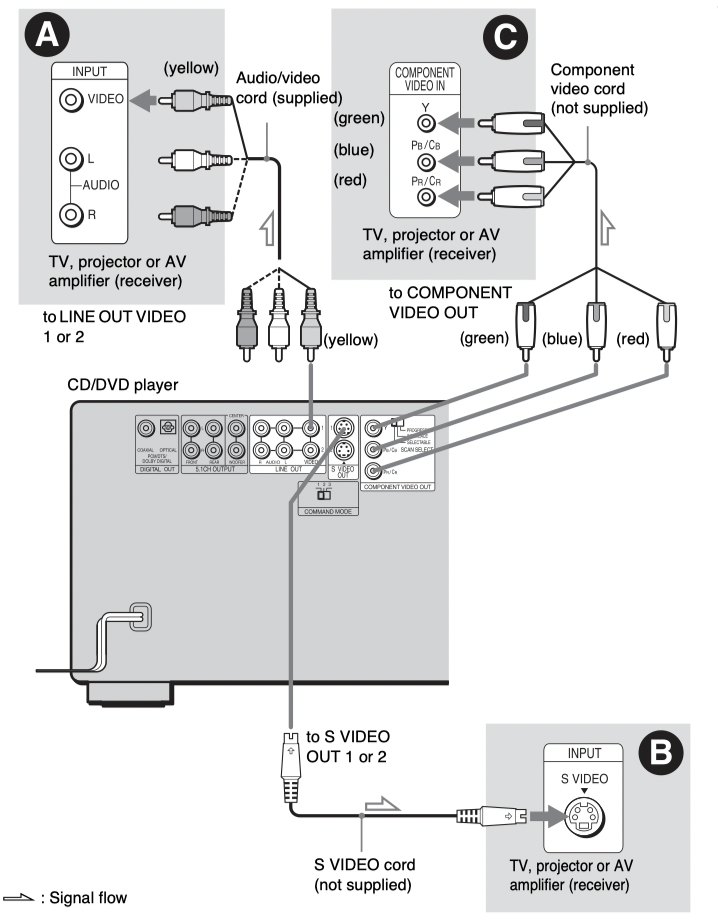
Step 3: Connecting the Video Cords
Connect this player to your TV monitor, projector, or AV amplifier (receiver) using a video cord. Select one of the patterns A through C, according to the input jack on your TV monitor, projector, or AV amplifier (receiver). In order to view progressive signal pictures with a compatible TV, projector, or monitor, you must use pattern C.
A. If you are connecting to a video input jack
Connect the yellow plug of the audio/video cord (supplied) to the yellow (video) jacks. You will enjoy standard quality images.
Use the red and white plugs to connect to the audio input jacks (page 23). (Do this if you are connecting to a TV only.)
B. If you are connecting to an S VIDEO input jack
Connect an S VIDEO cord (not supplied). You will enjoy high quality images.
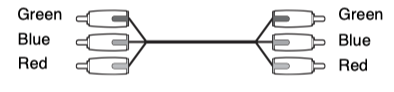
C. If you are connecting to a monitor, projector, or AV amplifier (receiver) having component video input jacks (Y/PB /PR )
Connect the component via the COMPONENT VIDEO OUT jacks using a component video cord (not supplied) or three video cords (not supplied) of the same kind and length. You will enjoy accurate color reproduction and high quality images. If your TV accepts progressive 480p format signals, you must use this connection and set “COMPONENT OUT” in “SCREEN SETUP” to “PROGRESSIVE” (page 87).
To change the aspect ratio for the connected TV
Depending on the disc and the TV type (standard 4:3 screen TV or wide screen TV), the image may not fit the TV screen. If this happens, change the aspect ratio (page 87).
Notes
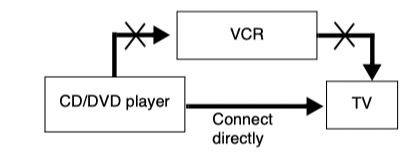
• Connect the player directly to the TV. If you pass the player signals via the VCR, you may not receive a clear image on the TV screen.
• Consumers should note that not all high definition television sets are fully compatible with this product and may cause artifacts to be displayed in the picture. In case of 480 progressive scan picture problems, it is recommended that the user switch the connection to the ‘standard definition’ output. If there are questions regarding our TV set compatibility with this model 480p DVD player, please contact our customer service center.
Step 4: Connecting the Audio Cords
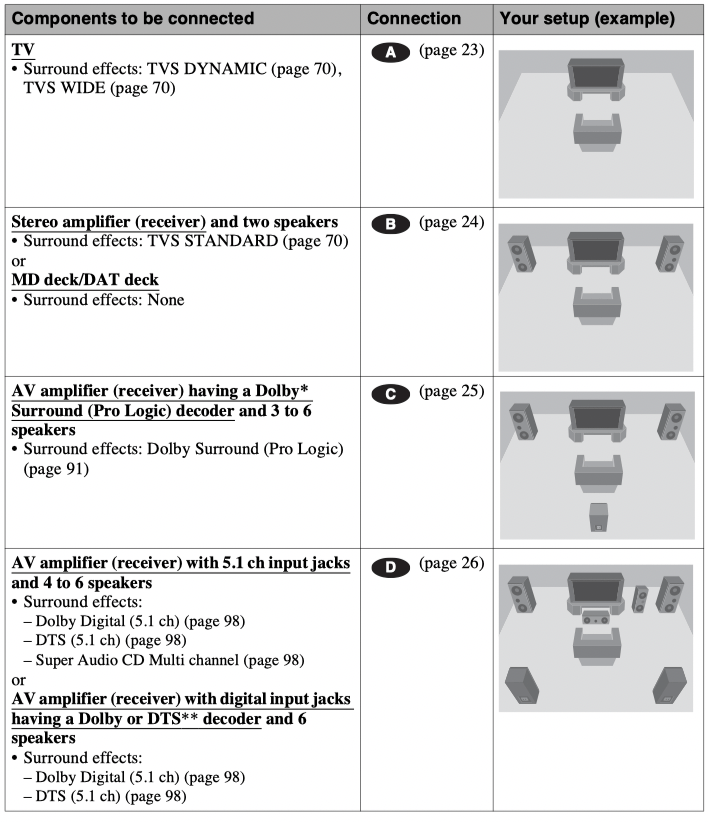
Refer to the chart below to select the connection that best suits your system. Be sure to also read the instructions for the components you wish to connect.
Select a connection
Select one of the following connections, A through D.
Hint: If you have an AV amplifier that conforms to the 96 kHz sampling frequency, use connection D
* Manufactured under license from Dolby Laboratories. “Dolby,” “Pro Logic,” and the double-D symbol are trademarks of Dolby Laboratories.
**“DTS” and “DTS Digital Surround” are registered trademarks of Digital Theater Systems, Inc.
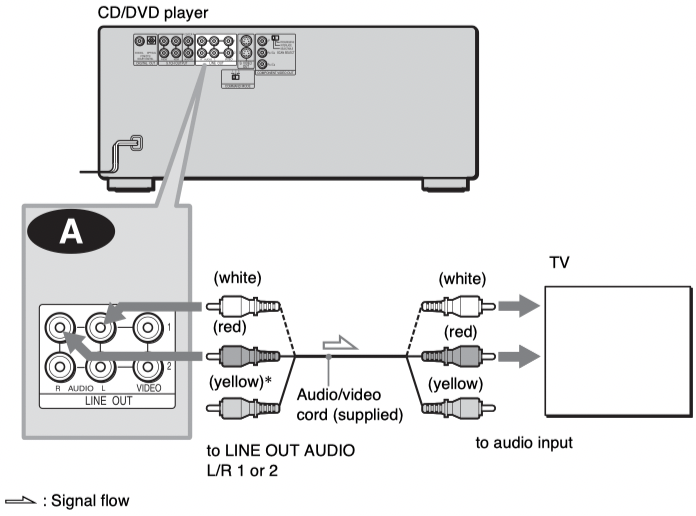
A. Connecting to your TV
This connection will use your TV’s speakers for sound.
* The yellow plug is used for video signals (page 19).
Hint: Then connecting to a monaural TV, use a stereomono conversion cord (not supplied). Connect the LINE OUT AUDIO L/R 1 or 2 jacks to the TV’s audio input jack.
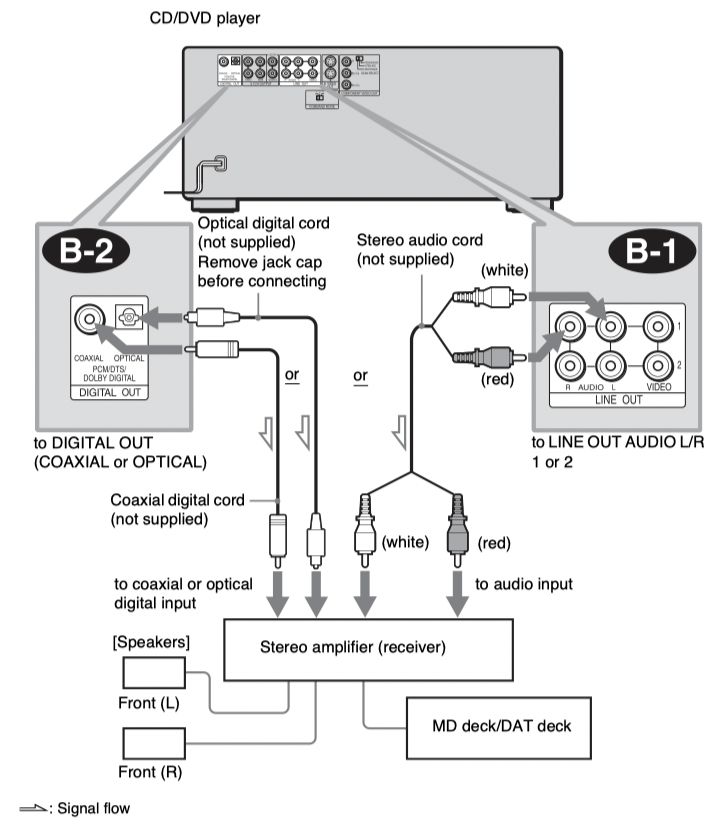
B. Connecting to a stereo amplifier (receiver) and 2 speakers/Connecting to an MD deck or DAT deck
If the stereo amplifier (receiver) has audio input jacks L and R only, use B-1 . If the amplifier (receiver) has a digital input jack, or when connecting to an MD deck or DAT deck, use B-2 . In this case, you can also connect the player directly to the MD deck or DAT deck without using your stereo amplifier (receiver).
Hint: To realize better surround sound effects, make sure that your listening position is in between your speakers.
Note: Super Audio CD audio signals are not output from the digital jack.
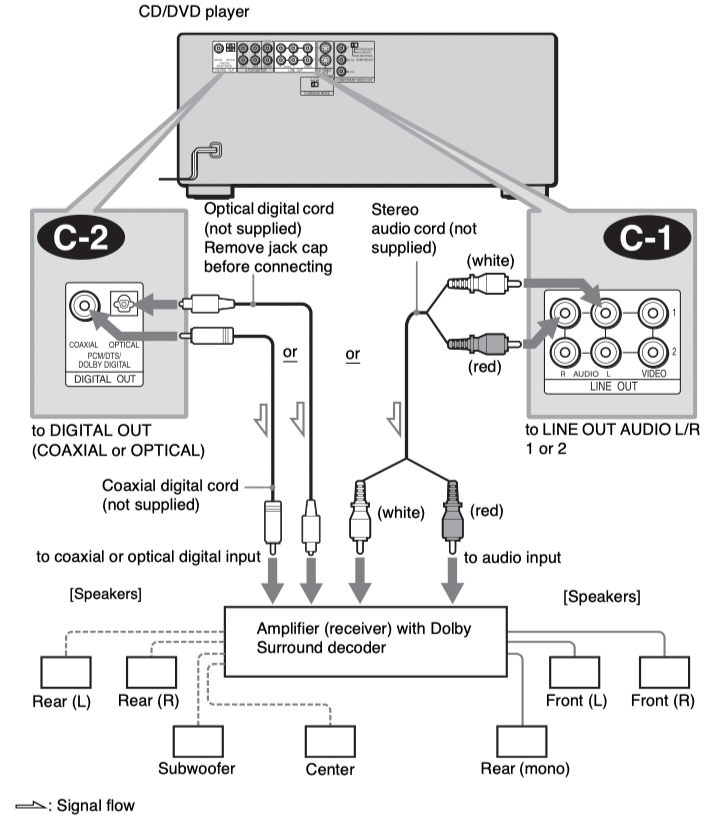
C.Connecting to an AV amplifier (receiver) having a Dolby Surround (Pro Logic) decoder and 3 to 6 speakers
You can enjoy the Dolby Surround effects only when playing Dolby Surround audio or multichannel audio (Dolby Digital) discs.
If your amplifier (receiver) has L and R audio input jacks only, use C-1 . If your amplifier (receiver) has a digital input jack, use C-2 .
Hint: For correct speaker location, refer to the operating instructions of the amplifier (receiver).
Notes
• When connecting 6 speakers, replace the monaural rear speaker with a center speaker, 2 rear speakers and a subwoofer.
• Super Audio CD audio signals are not output from the digital jack.
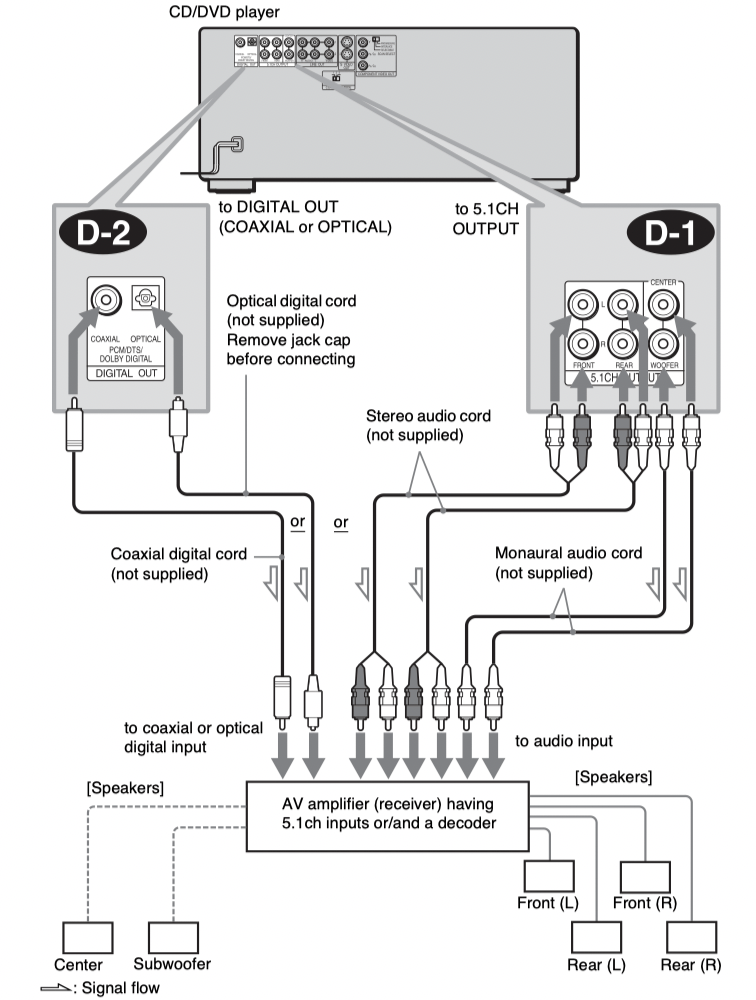
D. Connecting to an AV amplifier (receiver) with 5.1 ch input jacks and/or a digital input jack and 4 to 6 speakers
If your AV amplifier (receiver) has 5.1 channel inputs, use D-1 .
If you want to use the Dolby Digital, or DTS decoder function on your AV amplifier (receiver), connect to its digital jack using D-2 . With the following connections, you can enjoy a more realistic audio presence in the comfort of your own home.
D-1 : Connecting to the 5.1ch input jacks
You can enjoy 5.1ch surround sound using the internal Dolby Digital, DTS, or Super Audio CD Multi decoder of this player. (when 6 speakers are connected, set “SURROUND” to “OFF.”)
You can also enjoy Dolby Surround (Pro Logic) sound, or surround sounds using various “SURROUND” modes (page 69).
D-2 : Connecting to a digital jack
This connection will allow you to use the Dolby Digital, or DTS decoder function of your AV amplifier (receiver). You are not able to enjoy the surround sound effects of this player.
Hints
• For correct speaker placement, refer to the instructions of the connected components.
• To enhance the sound performance:
– Use high-performance speakers.
– Use front, rear, and center speakers of the same size and performance.
– Place the subwoofer between the left and right front speakers.
• Use connection D-2 when connecting to 7 or more speakers (6.1ch or more).
Notes
For connection D-2
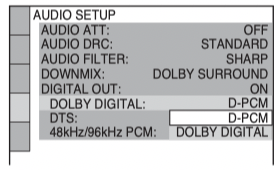
• After you have completed the connection, be sure to set “DOLBY DIGITAL” to “DOLBY DIGITAL” and “DTS” to “DTS” in Quick Setup (page 28).
• When you connect an amplifier (receiver) that conforms to the 96kHz sampling frequency, set “48kHz/96kHz PCM” in “AUDIO SETUP” to “96kHz/24bit” (page 91).
• Super Audio CD audio signals are not output from the digital jack.
Step 5: Connecting the Power Cord
Plug the power cords of the player and TV into an AC outlet.
Step 6: Quick Setup
Follow the steps below to make the minimum number of basic adjustments for using the player. To skip an adjustment, press . To return to the previous adjustment, press .
1. Turn on the TV.
2. Press.
3. Switch the input selector on your TV so that the signal from the player appears on the TV screen.
“Press [ENTER] to run QUICK SETUP” appears at the bottom of the screen. If this message does not appear, select “QUICK” under “SETUP” in the Control Menu to run Quick Setup (page 86).
4. Press ENTER before inserting a disc.
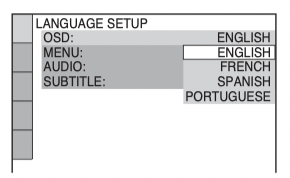
The Setup Display for selecting the language used in the on-screen display appears.
5. Press to select a language.
The player uses the language selected here to display the menu and subtitles as well.
6. Press ENTER.
The Setup Display for selecting the aspect ratio of the TV to be connected appears.
7. Press to select the setting that matches your TV type.
◆ If you have a 4:3 standard TV
• 4:3 LETTER BOX or 4:3 PAN SCAN (page 87)
◆ If you have a wide-screen TV or a 4:3 standard TV with a wide-screen mode
• 16:9 (page 87)
8. Press ENTER.
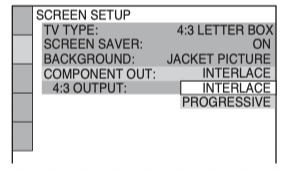
The Setup Display for selecting the type of video signal appears.
9. Press to select the type of signals you wish to output to your TV.
Select “PROGRESSIVE” only if you have made video connection C (page 19) and wish to view progressive video signals.
◆ Interlace format TV (standard TV)
• INTERLACE (page 87)
◆ Progressive format TV
• PROGRESSIVE (page 87)
10. Press ENTER.
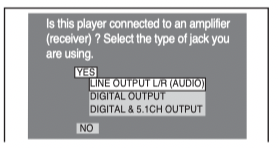
The Setup Display for selecting the type of jack used to connect your amplifier (receiver) appears.
11. Press to select the type of jack (if any) you are using to connect to an amplifier (receiver), then press ENTER.
Choose the item that matches the audio connection you selected on pages 23 to 26 ( A through D ).
A
• If you connect just a TV and nothing else, select “NO.” Quick Setup is finished and connections are complete.
B-1 C-1
• Select “LINE OUTPUT L/R (AUDIO).” Quick Setup is finished and connections are complete.
B-2 C-2 D-2
• Select “DIGITAL OUTPUT.” The Setup Display for “DOLBY DIGITAL” appears.
D-1 or both D-1 and D-2
• Select “DIGITAL&5.1CH OUTPUT.” The display for “DOLBY DIGITAL” appears.
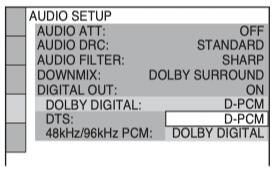
12. Press to select the type of Dolby Digital signal you wish to send to your amplifier (receiver).
Choose the signal that matches the audio connection you selected on pages 24 to 26 ( B through D ).
B-2 C-2
• D-PCM (page 91)
D-2
• DOLBY DIGITAL (only if the amplifier (receiver) has a Dolby Digital decoder) (page 91)
13.Press ENTER.
“DTS” is selected.
14. Press to select the type of DTS signal sent to your amplifier (receiver).
Choose the item that matches the audio connection you selected on pages 24 to 26 ( B through D ).
B-2 D-2
• D-PCM (page 91)
C-2
• DTS (only if the amplifier (receiver) has a DTS decoder) (page 91)
15. Press ENTER.
◆ When “DIGITAL OUT” is selected in step 11
• Quick Setup is finished and connections are complete.
◆ When “DIGITAL & 5.1CH OUTPUT” is selected in step 11
• The Setup Display for “SPEAKER SETUP” appears.
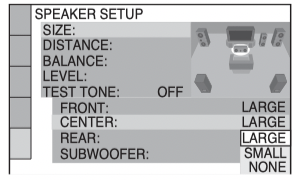
16. Press to select the size of the center speaker.
If no center speaker is connected, select “NONE” (page 92).
17.Press ENTER. “REAR” is selected.
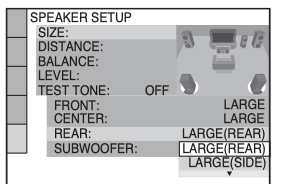
18. Press to select the size of the rear speakers.
If no rear speaker is connected, select “NONE.”
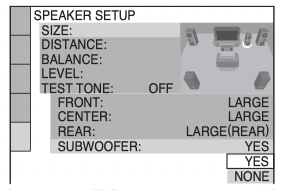
19. Press ENTER. “SUBWOOFER” is selected.
20. Press to select whether or not you have connected a subwoofer.
21. Press ENTER. Quick Setup is finished. All connections and setup operations are complete.
Enjoying the surround sound effects
To enjoy the surround sound effects of this player or your amplifier (receiver), set the following items as described below for the audio connection you selected on pages 24 to 26 ( B through D ). Each of these is the default setting and does not need to be adjusted when you first connect the player. See page 85 for using the Setup Display.
Audio connection (pages 23 to 26)
A
• No additional settings are needed.
B-1 C-1
• Set “DOWNMIX” to “DOLBY SURROUND” (page 91).
B-2 C-2 D-2
• Set “DOWNMIX” to “DOLBY SURROUND” (page 91).
• Set “DIGITAL OUT” to “ON” (page 91).
D-1
• Set “DISTANCE,” “BALANCE,” and “LEVEL” according to the connected speakers (page 92).
Hints
• For connections B-1 C-1 D-1 If the sound distorts even when the volume is turned down, set “AUDIO ATT” to “ON” (page 90). • For connections B-2 C-2 D-2 Set “48kHz/96kHz PCM” to “96kHZ/24bit” only if you connect an amplifier (receiver) that conforms to the 96 kHz sampling frequency (page 91).
Playing Discs
Inserting Discs
You can insert up to 400 discs into this player.
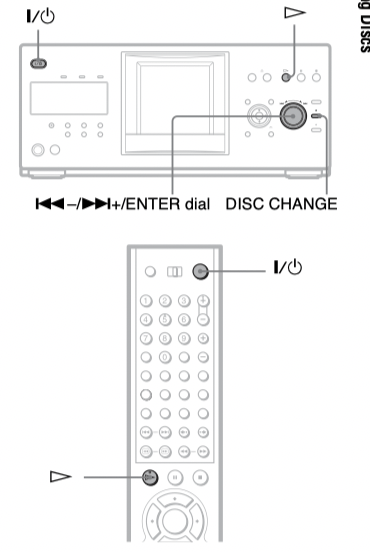
1. Press.
The player turns on.
2. Press OPEN/CLOSE.
The front cover opens.
3. Press DISC CHANGE. The DISC CHANGE indicator lights up. 4 While checking the disc slot number indicated on the front panel display or by the slot, turn the . ENTER dial until you find the disc slot where you want to insert a disc.
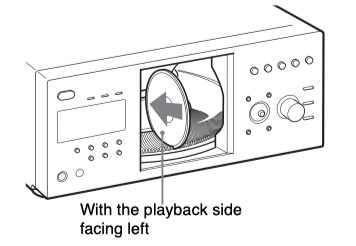
5. Insert a disc. Gently place the disc all the way into the slot and do not release the disc until it is completely seated. Make sure you have inserted the disc into each slot at a right angle to the rotary table. If the disc is not put in straight, it may damage the player or the disc.
6. Repeat steps 4 and 5 to insert more discs.
7. Press OPEN/CLOSE. The front cover closes. The rotary table turns and the disc slot selected in step 4 is set to the playing position.
Hint: In step 4, you can select a disc slot number by skipping 10 slots. After sliding the TV/DISC EXPLORER/DVD switch to DISC EXPLORER or DVD, press DISC SKIP +/– on the remote. 10 disc slots before or after the current disc slot number will be skipped. To skip 100 slots, press +100 on the player.
Notes
Do not turn the turntable by hand.
Do not reach inside of the turntable compartment. Always follow the correct steps for inserting and removing discs.
When transporting the player, remove all discs from the player. Failure to remove the discs may cause damage to the player.
When closing the front cover, be careful not to let anything get caught between the door and the player.
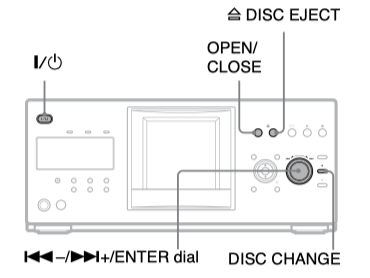
To remove discs
1. Press OPEN/CLOSE.
2. Press DISC CHANGE.
3. While checking the disc slot number indicated on the front panel display or by the slot, turn the . dial until you find the disc you want to remove.
4. Press DISC EJECT. The loading guide rises so that you can remove the disc easily.
5. Remove the disc.
6. Repeat steps 3 to 5 to remove other discs.
7. Press OPEN/CLOSE. The front cover closes.
Hint: You can remove the current disc by directly pressing DISC EJECT on the player.
Playing Discs
Depending on the disc, some operations may be different or restricted.
Refer to the operating instructions supplied with your disc.
1. Turn on your TV.
2. Press.
The player turns on.
3. Switch the input selector on your TV so that the signal from the player appears on the TV screen.
◆ When using an amplifier (receiver)
Turn on the amplifier (receiver) and select the appropriate channel so that you can hear sound from the player.
4. Press . The player starts playing the selected disc. Adjust the volume on the TV or the amplifier (receiver).
Depending on the disc, a menu may appear on the TV screen. For DVD VIDEOs, see page 37. For VIDEO CDs, see page 40.
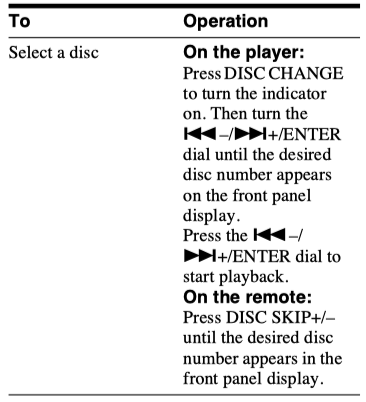
To change the disc
Press DISC CHANGE to turn the indicator on. Then turn the ENTER dial until the desired disc number appears on the front panel display.
Press the ENTER dial to start playback.
To turn off the player
Press. The player enters standby mode.
Hints
You can have the player turn off automatically whenever you leave it in stop mode for more than 30 minutes. To turn on this function, set “AUTO POWER OFF” in “CUSTOM SETUP” to “ON” (page 89).
For details on the types of MP3 audio tracks that you can play on this player, or on their playback order, see “Selecting and Playing an MP3 Audio Track” on page 41.
You can select to play a disc from a list of all the discs inserted in the player. For details, see “Displaying the Disc Information” (page 49).
Note: Super Audio CD audio signals are not output from the digital output jack.
Additional operations
* DVD VIDEO/DVD-RW/DVD-R only
** DVD VIDEO/DVD-RW/DVD-R/DVD+RW only
Hints
The Instant Replay function is useful when you want to review a scene or dialog that you missed.
The Instant Search function is useful when you want to pass over a scene that you don’t want to watch.
Notes
You may not be able to use the Instant Replay or Instant Search function with some scenes.
The Instant Replay function does not work with DVD+RWs.
Locking the front cover (Child Lock)
You can lock the front cover to prevent children from opening it.
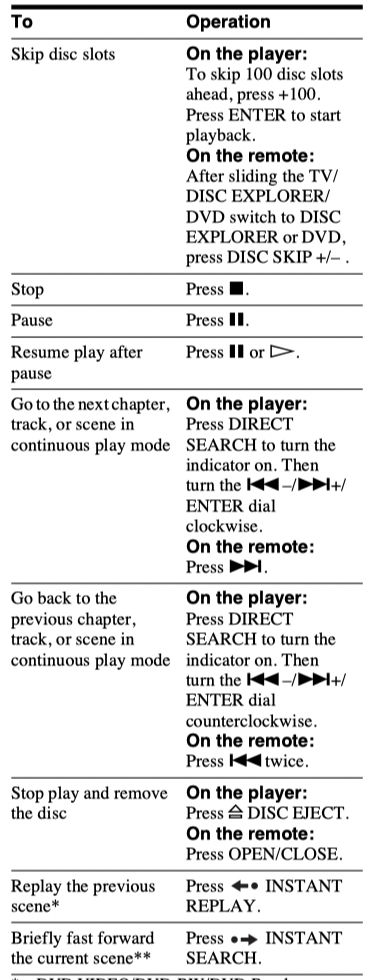
When the player is in standby mode, press RETURN, ENTER, and then on the remote.
The player turns on and “LOCKED” appears on the front panel display.
The OPEN/CLOSE button on the player and the remote do not work while the Child Lock is set.
To unlock the front cover
When the player is in standby mode, press RETURN, ENTER, and then again.
Note
Even if you select “RESET” under “SETUP” in the Control Menu (page 86), the front cover remains locked.
Resuming Playback From the Point Where You Stopped the Disc (Resume Play)
The player remembers the point where you stopped the disc, even if you press and the player enters standby mode.
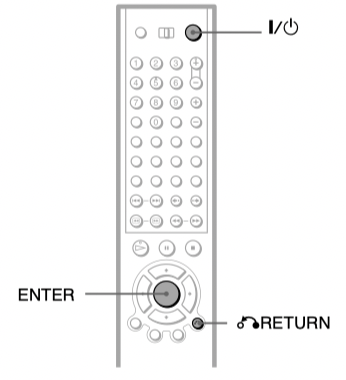
1. While playing a disc, press to stop playback. “RESUME” appears on the front panel display.
2. Press. The player starts playback from the point where you stopped the disc in step 1.
Hint: To play from the beginning of the disc, press twice, then press .
Notes
The point where you stopped playing is cleared when:
– you change the play mode. – you open the front cover. – you change the slot. – you disconnect the power cord.
Using the DVD’s Menu
A DVD is divided into long sections of a picture or a music feature called “titles.” When you play a DVD which contains several titles, you can select the title you want using the TOP MENU/EDIT button.
When you play DVDs that allow you to select items such as the language for the subtitles and the language for the sound, select these items using the MENU/SORT button.
1. Select a disc (page 34).
2. Press TOP MENU/EDIT or MENU/ SORT. The disc’s menu appears on the TV screen. The contents of the menu vary from disc to disc.
3. Press or the number buttons to select the item you want to play or change.
4. Press ENTER.
Hint: You can also display the disc’s menu by pressing TOP MENU or MENU on the player.
Selecting “ORIGINAL” or “PLAY LIST” on a DVDRW
Some DVD-RWs in VR (Video Recording) mode have two types of titles for playback: originally recorded titles (ORIGINAL) and edited titles created on recordable DVD players (PLAY LIST). You can select the type of titles to be played.
1. Select a disc (page 34).
2. Press DISPLAY/FILE while the player is in stop mode.
The Control Menu appears.
3. Press to select(ORIGINAL/PLAY LIST), then press ENTER.
The options for “ORIGINAL/PLAY LIST” appear.
4. Press to select the setting.
• PLAY LIST: plays the titles created from “ORIGINAL.”
• ORIGINAL: plays the titles originally recorded.
5. Press ENTER.
To turn off the Control Menu
Press DISPLAY/FILE repeatedly until the Control Menu is turned off.
Note
Repeat Play and A-B Repeat Play do not work across “ORIGINAL” and “PLAY LIST” titles.
Troubleshooting
If you experience any of the following difficulties while using the player, use this troubleshooting guide to help remedy the problem before requesting repairs. Should any problem persist, consult your nearest Sony dealer.
Power
The power is not turned on.
Check that the AC power cord is connected securely.
Picture
There is no picture/picture noise appears.
Re-connect the connecting cord securely.
The connecting cord is damaged.
Check the connection to your TV (page 19) and switch the input selector on your TV so that the signal from the player appears on the TV screen.
The disc is dirty or flawed.
If the picture output from your player goes through your VCR to get to your TV or if you are connected to a combination TV/ VIDEO player, the copy-protection signal applied to some DVD programs could affect picture quality. If you still experience problems even when you connect your player directly to your TV, try connecting your player to your TV’s S VIDEO input (page 19).
You have set “COMPONENT OUT” in “SCREEN SETUP” to “PROGRESSIVE” even though your TV cannot accept the signal in progressive format. In this case, set the COMPONENT VIDEO OUT/SCAN SELECT switch on the rear panel of the player to INTERLACE. “COMPONENT OUT” in “SCREEN SETUP” is automatically set to “INTERLACE,” and reset the COMPONENT VIDEO OUT/ SCAN SELECT switch to SELECTABLE. Normally leave the switch in this position when using the COMPONENT VIDEO OUT jacks.
Even if your TV is compatible with progressive format 480p signals, the image may be affected when you set “COMPONENT OUT” to “PROGRESSIVE.” In this case, set “COMPONENT OUT” to “INTERLACE.”
The picture does not fill the screen, even though the aspect ratio is set in “TV TYPE” under “SCREEN SET UP.”
The aspect ratio of the disc is fixed on your DVD.
Sound
There is no sound.
Re-connect the connecting cord securely.
The connecting cord is damaged.
The player is connected to the wrong input jack on the amplifier (receiver) (page 24, 25, 26).
The amplifier (receiver) input is not correctly set.
The player is in pause mode or in Slow-motion Play mode.
The player is in fast forward or fast reverse mode.
If the audio signal does not come through the DIGITAL OUT (COAXIAL or OPTICAL) jack, check the audio settings (page 91).
Super Audio CD audio signals are not output from the digital jack.
Sound distortion occurs.
Set “AUDIO ATT” in “AUDIO SETUP” to “ON” (page 90).
The volume is low.
The volume is low on some DVDs. The volume may improve if you set “AUDIO DRC” to “TV MODE” (page 90).
Set “AUDIO ATT” in “AUDIO SETUP” to “OFF” (page 90).
The surround effect is difficult to hear when playing a Dolby Digital, or DTS sound track.
Check the speaker connections and settings (page 26, 28, 91).
5.1 channel sound is not recorded on the disc being played.
The sound only comes from the center speaker.
Depending on the disc, the sound may come from the center speaker only.
Operation
The remote does not function.
The batteries in the remote are weak.
There are obstacles between the remote and the player.
The distance between the remote and the player is too far.
The remote is not pointed at the remote sensor on the player.
The COMMAND MODE switch setting on the remote does not match the setting on the player (page 18).
The disc does not play.
The disc is skewed.
The player cannot play certain discs (page 6)
The region code on the DVD does not match the player.
Moisture has condensed inside the player (page 3).
The player cannot play a recorded disc that is not correctly finalized (page 7).
The MP3 audio track cannot be played (page 41).
The DATA CD is not recorded in an MP3 format that conforms to ISO9660 Level 1/ Level 2 or Joliet.
The MP3 audio track does not have the extension “.MP3.”
The data is not formatted in MP3 even though it has the extension “.MP3.”
The data is not MPEG1 Audio Layer 3 data.
The player cannot play audio tracks in MP3PRO format.
“Copyright lock” appears and the screen turns blue when playing a DVD-RW.
Images taken from digital broadcasts, etc., may contain copy protection signals, such as complete copy protection signals, single copy signals, and restriction-free signals. When images that contain copy protection signals are played, a blue screen may appear instead of the images. It may take awhile for the player to look for playable images.
The title of the MP3 audio album or track is not correctly displayed.
The player can only display numbers and alphabet. Other characters are displayed as “*.”
The disc does not start playing from the beginning.
Program Play, Shuffle Play, Repeat Play, or A-B Repeat Play has been selected (page 43).
Resume play has taken effect (page 36).
The player starts playing the disc automatically.
The disc features an auto playback function.
“AUTO PLAY” in “CUSTOM SETUP” is set to “ON” (page 89).
Playback stops automatically.
While playing discs with an auto pause signal, the player stops playback at the auto pause signal.
Some functions such as Stop, Search, Slow-motion Play, Repeat Play, Shuffle Play, or Program Play cannot be performed.
Depending on the disc, you may not be able to do some of the operations above. Refer to the operating manual that comes with the disc.
The language for the sound track cannot be changed.
Try using the DVD’s menu instead of the direct selection button on the remote (page 37).
Multilingual tracks are not recorded on the DVD being played.
The DVD prohibits the changing of the language for the sound track.
The subtitle language cannot be changed or turned off.
Try using the DVD’s menu instead of the direct selection button on the remote (page 37).
Multilingual subtitles are not recorded on the DVD being played.
The DVD prohibits the changing of subtitles.
The angles cannot be changed.
Try using the DVD’s menu instead of the direct selection button on the remote (page 37).
Multi-angles are not recorded on the DVD being played.
The angle can only be changed when the “ANGLE” indicator lights up on the front panel display (page 10).
The DVD prohibits changing of the angles.
The player does not operate properly.
When static electricity, etc., causes the player to operate abnormally, unplug the player.
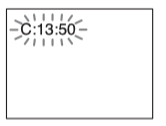
5 numbers or letters are displayed on the screen and on the front panel display.
The self-diagnosis function was activated. (See the table on page 97.)
The front cover does not open and “LOCKED” appears on the front panel display.
Child Lock is set (page 35).
The front cover does not open and “TRAY LOCKED” appears on the front panel display.
Contact your Sony dealer or local authorized Sony service facility.
“Data error” appears on the TV screen when playing a DATA CD.
The MP3 audio track you want to play is broken.
The data is not MPEG1 Audio Layer 3 data.
Self-diagnosis Function
(When letters/numbers appear in the display)
When the self-diagnosis function is activated to prevent the player from malfunctioning, a five-character service number (e.g., C 13 50) with a combination of a letter and four digits appears on the screen and the front panel display. In this case, check the following table.
First three characters of the service number
Cause and/or corrective action
C 13
The disc is dirty.
Clean the disc with a soft cloth (page 8).
C 31
The disc is not inserted correctly.
Re-insert the disc correctly.
C 32
The front cover automatically opens and the player enters standby mode.
Check that there is nothing wrong inside the rotary table, such as a fallen disc. After you have checked the inside of the rotary table and resolved any possible problems, press .
E XX (xx is a number)
To prevent a malfunction, the player has performed the self-diagnosis function.
Contact your nearest Sony dealer or local authorized Sony service facility and give the 5character service number. Example: E 61 10
I'm sure you can, if I understand daisy chaining. But, your remote only accepts and acknowledges a few sources. Translation?You've been able to listen to multiple discs, sip the champagne and now you have to get up and do something

 when you select any item except “OFF.” (“SURROUND,” “PROGRAM,” “SHUFFLE,” “REPEAT,” “A-B REPEAT,” “BNR,” and “DIGITAL VIDEO ENHANCER” only). The “ANGLE” indicator lights up in green only when the angles can be changed. The “CUSTOM PICTURE MODE” indicator lights up in green when any setting other than “STANDARD” is selected.
 pinplug × 3) (1)
 and
and  ends on the batteries to the markings inside the compartment. When using the remote, point it at the remote sensor
 on the player.


 . To return to the previous adjustment, press
  .
.
 .
.
 to select a language.
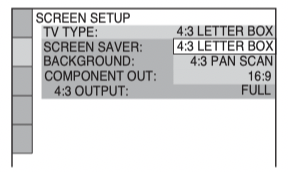


 ENTER dial until you find the disc slot where you want to insert a disc.
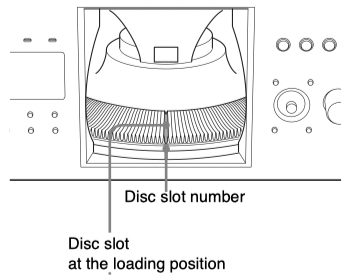
 dial until you find the disc you want to remove.
 DISC EJECT. The loading guide rises so that you can remove the disc easily.
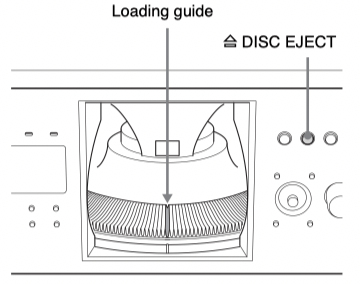
 . The player starts playing the selected disc. Adjust the volume on the TV or the amplifier (receiver).
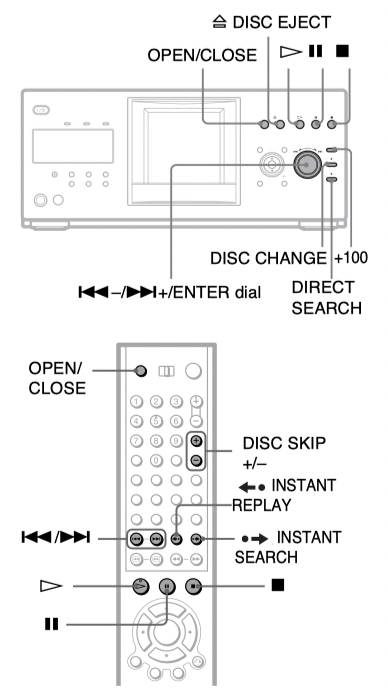
 RETURN, ENTER, and then
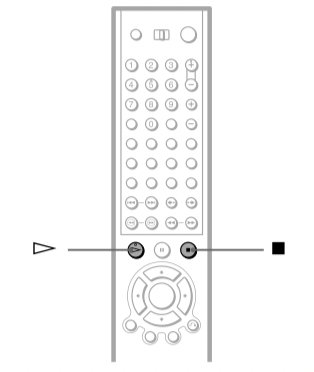
 to stop playback. “RESUME” appears on the front panel display.
 twice, then press
  .
.
 or the number buttons to select the item you want to play or change.
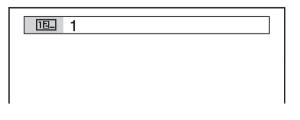

 (ORIGINAL/PLAY LIST), then press ENTER.
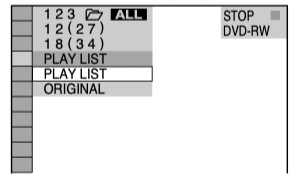
 Check that the AC power cord is connected securely.