
OWNER’S MANUAL
MANUEL DE L’UTILISATEUR
MANUAL DEL PROPIETARIO
DISHWASHER MAINTENANCE ......3
DISHWASHER LOADING TIPS ........4
DISHWASHER CARE ....................... 5
DISHWASHER SETTING MENU ......6
ERROR CODES ................................7
Error codes / blinking lights ..................7
INSTALLATION REQUIREMENTS ...8
Tools and parts .....................................8
Location requirements ........................10
Product and cabinet opening
dimensions: .........................................11
Drain requirements .............................12
Water supply requirements ................. 12
Electrical requirements .......................12
INSTALLATION INSTRUCTIONS ...13
Prepare cabinet opening—
new utilities .........................................13
Install optional moisture barrier -
recommended for wood countertops ...13
Electrical connection ..........................14
Prepare dishwasher ............................15
Remove access panel and insulation ....15
Disconnect and remove drip tray
assembly .............................................15
Connect water line to ll valve ............ 16
Connect ll hose to ll valve ...............17
Drain hose connection ........................ 17
Power cord connection .......................17
Install door handle
(on some models) ...............................19
Place dishwasher in cabinet ...............20
Custom panel installation
(custom panel models only) ................ 21
Choose anchor attachment method ... 21
Final installation check........................22
Secure dishwasher in cabinet
opening ............................................... 23
Connect water line to house
shut-off valve ......................................24
Connect drain hose ............................24
Complete installation ..........................26
Check operation .................................27
Install access panels ...........................27
If dishwasher does not operate ..........28
ENTRETIEN DU
LAVE-VAISSELLE ........................... 30
CONSEILS DE CHARGEMENT
DU LAVE-VAISSELLE .................... 31
ENTRETIEN DU
LAVE-VAISSELLE ........................... 32
MENU DE RÉGLAGE DU
LAVE-VAISSELLE: ......................... 33
CODES D’ANOMALIES ..................34
Codes d’anomalies/témoins
qui clignotent ......................................34
EXIGENCES D’INSTALLATION .....35
Outils et pièces ...................................35
Exigences d’emplacement .................37
Dimensions d’ouverture du produit
et de l’armoire: ................................... 38
Exigences d’évacuation ......................39
Spécications de l’alimentation
en eau .................................................39
Spécicationsélectriques ...................39
INSTRUCTIONS D’INSTALLATION ...40
Préparation de l’ouverture
d’encastrement de l’armoire –
nouveaux raccordements de service ... 40
Installer la barrière anti-humidité
en option – recommandée pour
les comptoirs en bois .........................40
Raccordement électrique....................41
Préparation du lave-vaisselle .............. 42
Retrait du panneau d’accès
et de l’isolation ...................................42
Débrancher et enlever le plateau
d’écoulement ......................................42
Branchement de l’arrivée d’eau
à la valve de distribution ..................... 43
Branchement du tuyau de remplissage
à la valve de distribution ..................... 44
Raccord du tuyau de vidange .............45
Branchement du cordon
d’alimentation .....................................45
Installer la poigne de porte
(sur certains modèles) .........................47
Placer le lave-vaisselle dans l’armoire ... 48
Installation du panneau personnalisé
(modèles avec panneau personnalisé
seulement) ..........................................49
Choix de l’option de xation ............... 49
Vérication nale de l’installation ........50
Fixation du lave-vaisselle dans
l’ouverture d’encastrement
de l’armoire .........................................51
Branchement de l’arrivée d’eau
au robinet d’arrêt de la maison ........... 52
Raccordement du tuyau de vidange ...52
Terminer l’installation ..........................54
Contrôle du fonctionnement ...............55
Installation des panneaux d’accès .....55
Si le lave-vaisselle ne fonctionne pas ...56
MANTENIMIENTO DE
LA LAVAVAJILLAS .........................58
CONSEJOS PARA CARGAR
LA LAVAVAJILLAS .........................59
CUIDADO DE LA LAVAVAJILLAS ... 60
MENÚ DE AJUSTES DE
LA LAVAVAJILLAS: ........................61
CÓDIGOS DE ERROR ....................62
Códigos de error / Luces
parpadeantes ......................................62
REQUISITOS DE INSTALACIÓN ... 63
Herramientas y piezas ........................63
Requisitos de ubicación .....................65
Dimensiones del producto
y de la abertura del gabinete: .............66
Requisitos de desagüe .......................67
Requisitos de suministro de agua ......67
Requisitos eléctricos...........................67
INSTRUCCIONES
DE INSTALACIÓN ..........................68
Preparación de la abertura del
gabinete: instalaciones nuevas ...........68
Instalación opcional de la barrera
contra la humedad (recomendado
para los mostradores de madera) .......68
Conexión eléctrica ..............................69
Prepare la lavavajillas ..........................70
Retire el panel de acceso
y el aislante ........................................70
Desconecte y retire el ensamblaje
de la bandeja de goteo ....................... 70
Conecte la tubería de agua
a la válvula de llenado.........................71
Conecte la manguera de llenado
a la válvula de llenado.........................72
Conexiones de la manguera
de desagüe .........................................73
Conexión del cable de alimentación ...73
Instale la manija de la puerta
(en algunos modelos) ..........................75
Coloque la lavavajillas en el gabinete . 76
Instalación del panel a la medida
(en modelos con paneles a la medida
solamente) ..........................................77
Selección del método de sujeción
de anclaje ............................................77
Vericación nal de la instalación ....... 78
Asegure la lavavajillas en la abertura
del gabinete ........................................79
Conexión de tubería de agua a
manguera de válvula de cierre
del hogar ............................................. 80
Conecte la manguera de desagüe ......80
Complete la instalación ......................82
Verique el funcionamiento .................83
Instale los paneles de acceso .............83
Si la lavavajillas no funciona ...............84
TABLE OF CONTENTS / TABLE DES MATIÈRES / ÍNDICE
W11323304E
2
SAVE THESE INSTRUCTIONS
IMPORTANT SAFETY INSTRUCTIONS
WARNING: When using the dishwasher, follow basic precautions, including the following:
Read all instructions before using the dishwasher.
Use the dishwasher only for its intended function.
Use only detergents or rinse agents recommended for use in a
dishwasher, and keep them out of the reach of children.
When loading items to be washed:
1) Locate sharp items so that they are not likely to damage the
door seal; and
2) Load sharp knives with the handles up to reduce the risk of
cut-type injuries.
Do not wash plastic items unless they are marked “dishwasher
safe” or the equivalent. For plastic items not so marked, check
the manufacturer's recommendations.
Do not touch the heating element during or immediately after use.
Do not operate the dishwasher unless all enclosure panels are
Do not leave the dishwasher open when not loading or unloading
dishes.
properly in place.
Do not tamper with controls.
Do not abuse, sit on, or stand on the door, lid, or dish racks of the
dishwasher.
Do not use replacement parts that have not been recommended
by the manufacturer (e.g. parts made at home using a 3D printer).
Under certain conditions, hydrogen gas may be produced in a
hot water system that has not been used for two weeks or
more. HYDROGEN GAS IS EXPLOSIVE. If the hot water system
has not been used for such a period, before using the
dishwasher turn on all hot water faucets and let the water flow
from each for several minutes. This will release any
accumulated hydrogen gas. As the gas is flammable, do not
smoke or use an open flame during this time.
Remove the door or lid to the washing compartment
when removing an old dishwasher from service or
discarding it.
This product is intended for residential use only.
This product is not intended for use by persons (including
children) whose physical, sensory, or mental capacities are
different or reduced, or who lack experience or knowledge,
unless such persons are supervised or trained in the operation of
the apparatus by a person responsible for your safety.
To reduce the risk of injury, do not allow children to play in or
on the dishwasher.
GROUNDING INSTRUCTIONS
SAVE THESE INSTRUCTIONS
■
For a grounded, cord-connected dishwasher:
The dishwasher must be grounded. In the event of a
malfunction or breakdown, grounding will reduce the risk of
electric shock by providing a path of least resistance for
electric current. The dishwasher is equipped with a cord
having an equipment-grounding conductor and a grounding
plug. The plug must be plugged into an appropriate outlet
that is installed and grounded in accordance with all local
codes and ordinances.
WARNING: Improper connection of the equipment-
grounding conductor can result in a risk of electric shock.
Check with a qualified electrician or service representative if
you are in doubt whether the dishwasher is properly
grounded. Do not modify the plug provided with the
dishwasher; if it will not fit the outlet, have a proper outlet
installed by a qualified electrician.
■
For a permanently connected dishwasher:
The dishwasher must be connected to a grounded metal,
permanent wiring system, or an equipment-grounding
conductor must be run with the circuit conductors and
connected to the equipment-grounding terminal or lead on
the dishwasher.

3
DISHWASHER MAINTENANCE
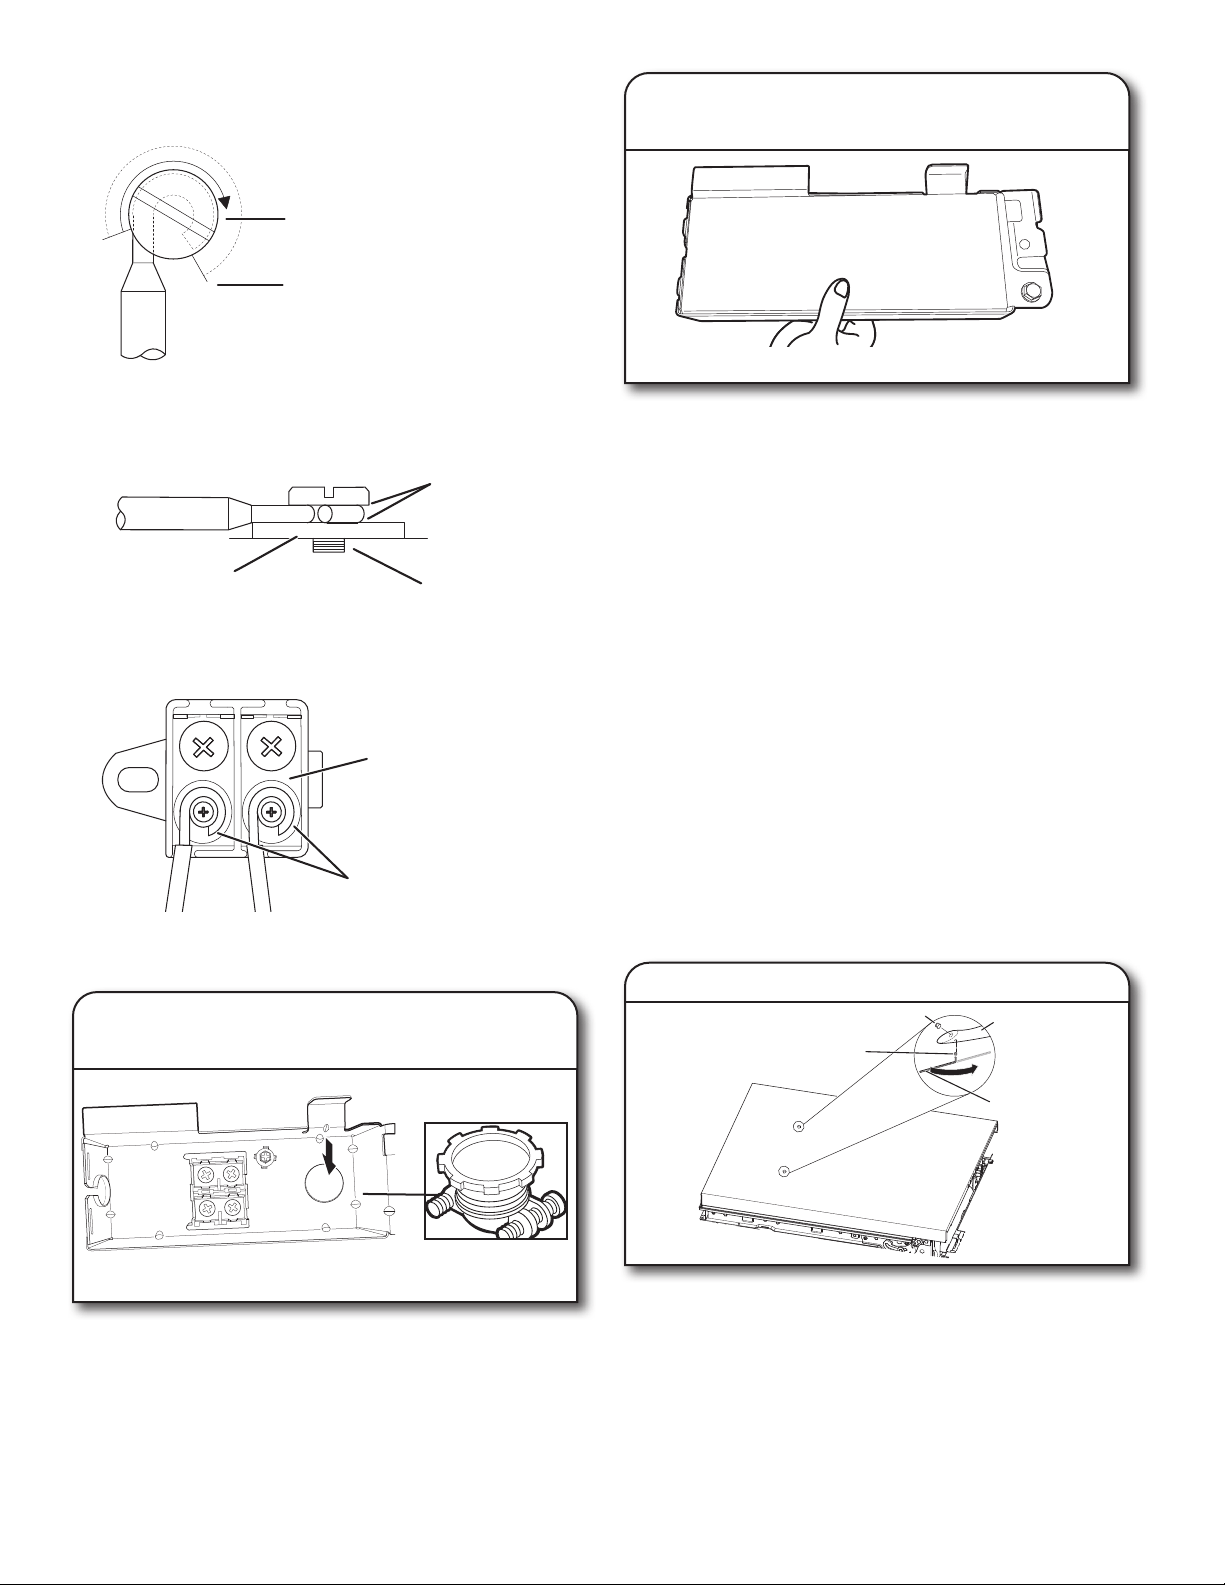
Detergents
High-quality premeasured tablets and packs are recommended
for improved performance.
Quality tablets and packs have been proven better than powder,
liquid, or gel detergents at reducing lming on dishes. Using
tablets and packs over time will start to reduce or eliminate white
lm. They are suitable for all water hardness and soil levels. Also,
by using a rinse aid, you can minimize repeat buildup of white
lm (not all packs and tablets contain rinse aid). Always place
premeasured detergents in main compartment and close lid.
The Pre-Wash indicator on the dispenser lid is for customers
who use powder or gel detergent and wish to add an amount of
detergent to the Pre-Wash cycle. The volume of detergent added
here is approximately 8 cubic centimeters, if lled full and level.
Any detergent added here would be immediately added to the
wash when the cycle starts versus detergent inside the dispenser
which is added during the main wash cycle.
NOTE: Follow instructions on the package when using other
dishwasher detergent types.
■ Use automatic dishwasher detergent only. Add detergent just
before starting a cycle.
■ Fresh automatic dishwasher detergent results in better
cleaning. Store tightly closed detergent container in a cool, dry
place.
■ Extremely hard water mineral deposits (15 grains per U.S.
gallon or more) can cause damage to your dishwasher and
make it difcult to achieve good results. A water softener is
recommended to avoid damage and achieve good results.
■ For more details about powders, liquids, and gels and hard
water conditions consult the brand website.
Rinse aid
Using rinse aid will optimize your drying and wash performance.
This dishwasher is specically designed to be used with rinse aid
for improved drying performance and controlling buildup of hard
water deposits. Rinse aid needs to be added to the product every
1 to 3 months depending on usage.
Refer to the Quick Start Guide or brand website for information
about lling the rinse aid dispenser.
Cycle Selection and Energy
Efcient dishwashers run longer to save water and energy,
just as driving a car slower saves on gas. Typical cycle time
is approximately 2
1
/
2
hours, but can take less or signicantly
more time depending on your selections and incoming water
temperature and amount of food soils on the dishes. For
optimum performance the dishwasher should be connected to a
120 °F (49° C) hot water supply.
If you rst press the Start button, the main sensor cycle with
heated drying will be automatically selected. This cycle senses
the soil amount, and toughness of soil, to adjust the cycle for
improved cleaning.
Sanitize or Sani
Sanitizes dishes and glassware in accordance with NSF
International NSF/ANSI Standard 184 for Residential
Dishwashers. Certied residential dishwashers are not intended
for licensed food establishments. Only sanitizing cycles have
been designed to meet the requirements of the NSF/ANSI
184 performance standard for soil removal and for sanitization
efcacy. There is no intention, either directly or indirectly, that
all cycles on a NSF/ANSI 184 certied dishwasher meet the
NSF/ANSI 184 performance standard for soil removal and for
sanitization efcacy. The Sani Rinse indicator glows at the end
of the cycle if the Sani Rinse option was successfully completed.
If the indicator does not activate, it is probably due to the cycle
being interrupted.
Tip Over Hazard
Do not use dishwasher until completely installed.
Do not push down on open door.
Doing so can result in serious injury or cuts.
WARNING
4
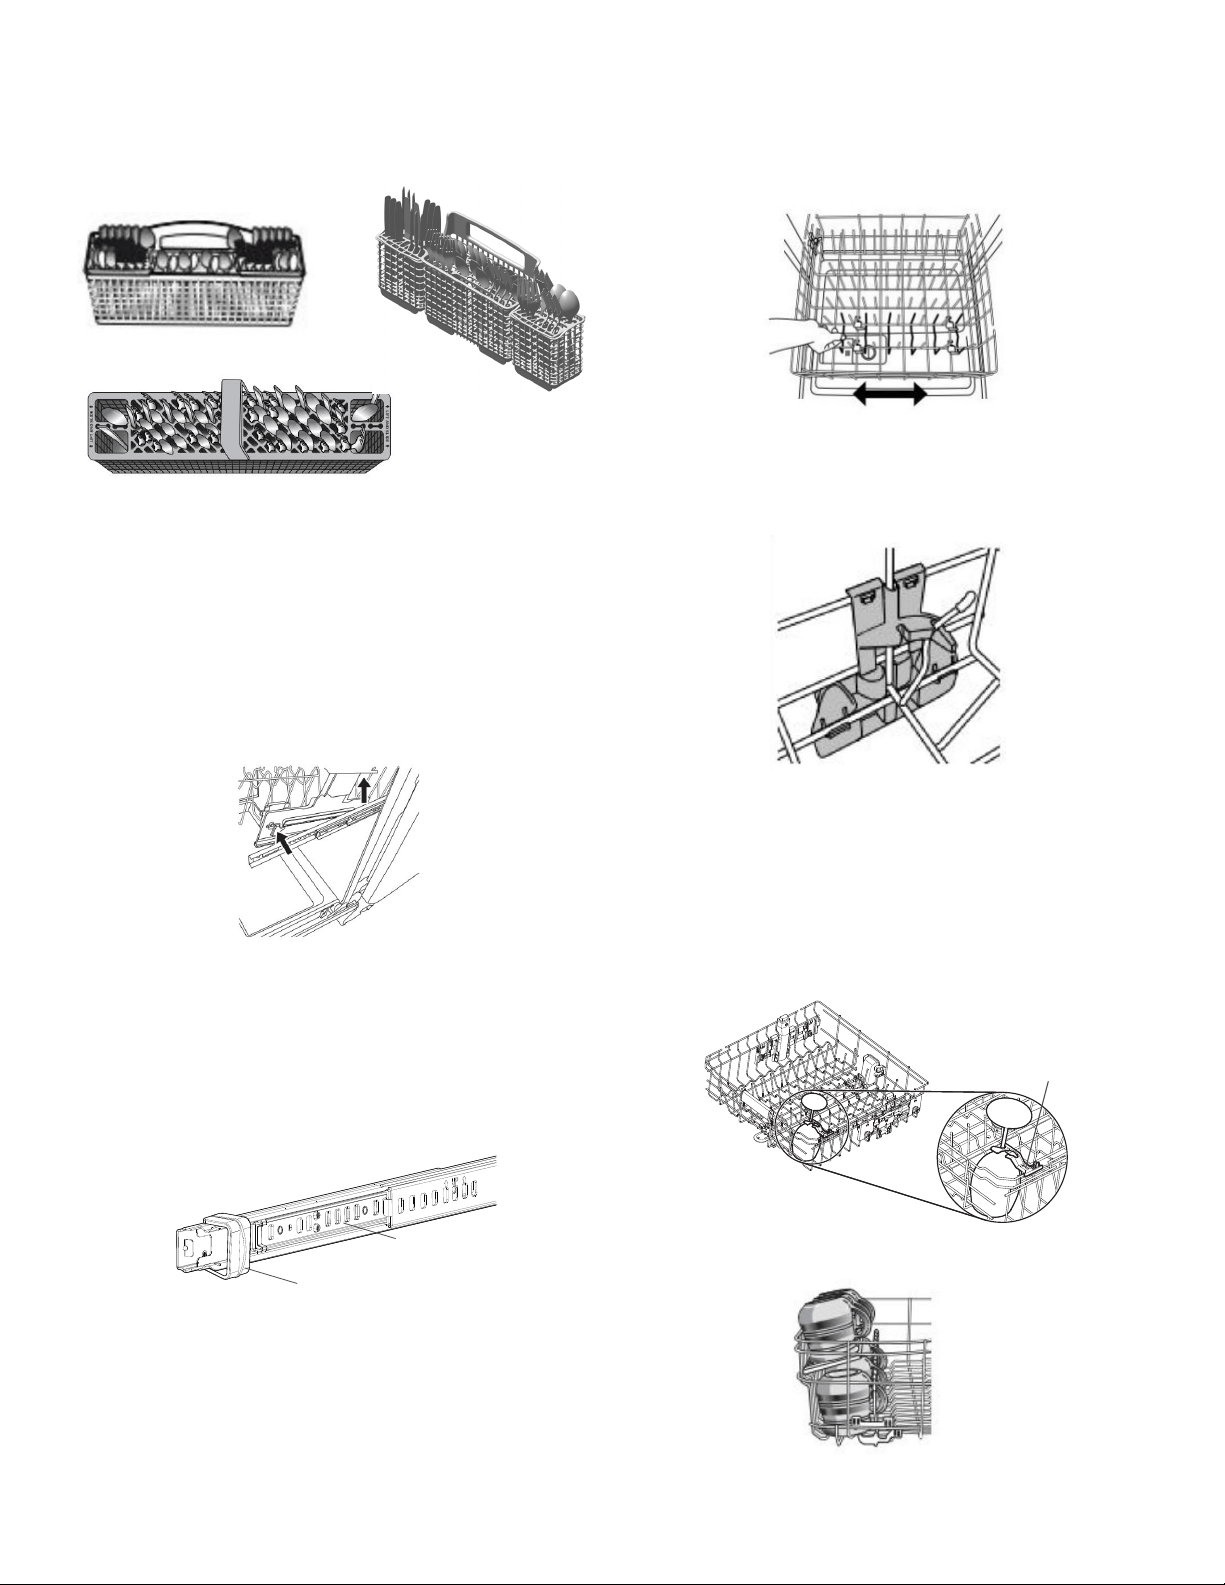
DISHWASHER LOADING TIPS
NOTE: Features are model specic. Your dishwasher may not have all features described. See Quick Start Guides for possible
dishwasher loading patterns for all dish racks.
Silverware Baskets
Use silverware basket lids to provide optimal spacing and best
cleaning performance.
NOTE: If your silverware does not t into the designated slots,
open the lids (Style 1/3) or lift on the ends of the lids and pull to
remove (Style 2). Mix silverware types to keep them separated.
Load knives down, forks up, and alternate spoons for best
cleaning results.
Removing Upper Racks
In order to make space for tall items, your upper racks are
removable. The manner in which to remove will depend on
whether the rack is mounted with Style 1 or Style 2. Remove
dishes prior to removing any racks.
To remove the rack, pull the rack forward about halfway out of
the tub. On one side, press the tab on the track in and pull up
the front end of the rack, out of the track. Then repeat this step
on the other side to completely remove the front end of the rack.
Then remove the rack by pulling the back end out using a forward
and upward motion.
To replace the rack, Push back of rack into rail rst and then push
front down.
To remove the rack, pull the rack out until it stops. On the left and
right side of the rack, push the plastic track stops on the front of
the rail sideways to open them. Pull out the rack.
To replace the rack, push the rack back onto the rails. Push the
track stops closed.
Sliding Bowl Tines
The sliding bowl tines allow you to easily load bowls of multiple
sizes. Grab the moveable tine row in the lower rack and slide into
the desired position.
Fold Down Tines
Fold down tines allow you to optimize the spacing in the rack.
Fold down tines might be in the lower rack , the second level rack
and/or third level rack depending on your model. To fold or unfold
the tine, hold the tine nearest the clip at the end of the tine row
and gently push it past the stop on the clip and in the direction
you want to fold it.
Stemware Holder
Use the stemware holders to support wine glasses and other
stemware. Push them up to rotate them out of the way when not
needed.
Cup Shelf
Use the cup shelf to hold additional cups or small items. Push up
to fold out of the way when not needed.
Style 1
Style 2
Style 1
Style 2
Stemware
Holder
Rack
Track Stop
Style 3
5
DISHWASHER CARE
Interior Cleaning
Many detergents may leave white spots or a white residue on
dishware and on the interior of the dishwasher. Over time this
residue can become unsightly and could affect dishwasher
performance. Use of a dishwasher cleaning product such as
affresh
®
Dishwasher Cleaner can help to remove the residue.
Monthly use of affresh
®
Dishwasher Cleaner is recommended to
help maintain the dishwasher. Follow package directions.
NOTE: We recommend the use of high-quality, premeasured
detergent tablets or packs and the use of rinse aid for dishwasher
cleaning and daily care.
Countertop Air Gap
If you have a drain air gap, check and clean it if the dishwasher
isn't draining well.
Extended Time Without Use
To Reduce Risk of Property Damage During Vacation or
Extended Time Without Use
■ When you will not be using the dishwasher during the summer
months, turn off the water and power supply to the dishwasher.
■ Make sure the water supply lines are protected against freezing
conditions. Ice formations in the supply lines can increase
water pressure and cause damage to your dishwasher or
home.
■ Damage from freezing is not covered by the warranty.
■ When storing your dishwasher in the winter, avoid water
damage by having your dishwasher winterized by authorized
service personnel.
Exterior Cleaning
Clean the exterior of dishwasher with a soft, damp cloth and mild
detergent. Avoid using abrasive cleaning products on the exterior
of the dishwasher. Abrasive cleaning products can damage the
nish.
Troubleshooting
The brand website listed on the Quick Start Guide has detailed
information to troubleshoot most problems customers encounter.
This information may save you the cost of a service call.
Foreign Object Cup
If the Foreign Object Cup is full the Quick Start Guide or the
brand website listed on the Quick Start Guide has detailed
information about how to empty it.
6
DISHWASHER SETTING MENU:
Follow the below instructions to enter into the menu to change your current settings.
Menu
Display Text
(if display is
present)
LED Pattern (no display)
What this setting does
Default
Setting
PROWASH
OR
SENSOR
TOUGH OR
COOKWARE
NORMAL
Rinse Aid Level A X Adjust amount of rinse aid dispensed
Rinse Aid Level
sub-menu
A 0 X X X 0 mL - rinse aid off
A 1 X 1.3 mL
A 2 X 2.6 mL
A 3 X X 3.9 mL X
A 4 X 5.2 mL
A 5 X X 5.2 mL
A 6 X X 5.2 mL
Sound Level S X X Turn sound On and Off
Sound Level
sub-menul
S 1 X Sound On X
S 0 X Sound Off
Light in Tub L X Turn the inner light on and off (if present)
Lights in Tub
sub-menul
L 1 X Light in Tub ON when door is opened X
L 0 X Light in Tub OFF when door is opened
Kosher
Consumer
Friendly mode
E X X
Turn Kosher Consumer Friendly mode
On and Off
E 1 X Turn mode ON
E 0 X Turn mode OFF X
Factory Reset r X X X Factory Reset
1. Press and hold the “Hi Temp” button for 5 seconds until “Hi Temp” and “Dry” lights turn on.
2. Press the “Start/Resume” button within 2 seconds. If you do not press Start within 2 seconds, then the display will turn off and you
will need to start over and go back to step 1.
a. For Models with a Display, an “A” will show in the display to indicate Rinse Aid Level.
b. For Non-display models,“Tough or Cookware” light will turn on to indicate Rinse Aid Level.
3. To go to a feature other than Rinse Aid Level, press the “Cycle” button or “Normal” button (depending on model) to move to the
feature you would like to change (Sound Level, Light in Tub, Kosher Friendly, Factory Reset, Rinse Aid Level). See the table for what
is shown on the display to indicate these features.
4. Press the “Start/Resume” button to select the feature and enter the sub-menu. The display will change to show the current setting
of the feature. (For example, if you selected Sound Level and you haven’t changed it before, then S1 will show for display models
and sensor will light for non-display models.)
5. Press “Cycle” button or “Normal” button (depending on model) to change the value of the feature setting. (For example, if you want
to turn the sound off, then press the “Cycle” or “Normal” button and S0 shows on display models or “pots and pans” lights for non-
display models.)
6. Press the “Start/Resume” button to conrm the new selection. The feature setting will not be changed until the “Start/Resume”
button is pressed.
The dishwasher will return to the Off state when the Start button is pressed.
To exit the customer settings menu at any time, press the “Cancel” button, or wait 30 seconds without pressing any buttons.
NOTE: To see the current setting of a feature, follow steps 1-4. When the “Start/Resume” button is pressed in step 4, the dishwasher
will show the current setting. Press the “Cancel” button to exit without making any changes.
NOTE: If you enter into a Feature Setting Page and need to go back to the Main Menu Press “Cancel” and proceed to step 1.
NOTE: To exit “Kosher Consumer Friendly Mode” at any time, press the “Cancel” button or you can wait 75 hours.
Kosher Consumer Friendly Mode: When turned on, will disable all of the buttons on the dishwasher except for the cancel key, and
disable the light inside the tub (if equipped) for a time period of 75 hours. If this mode is turned on during a cycle, then the status lights
at the end of cycle will not turn off when the door is opened and then re-closed. To exit this mode, press the “Cancel” button, or wait
75 hours.

7
ERROR CODES
ERROR CODES / BLINKING LIGHTS
Issue
Code Shown
(7 Seg Display)
(if present)
Code Shown on
Front Panel LED *
(# blinks, Pause, #
blinks)
What will happen? What to do?
Dishwasher fails
to operate ll valve
correctly
F1E1
1 Pause 1 Pause -
pause, repeat
Drain sequence
will begin, machine
operation will be
prevented
Turn off water to unit (if possible).Turn
off power to unit. If the water cannot
be turned off, DO NOT turn off power
and keep door closed. Press Cancel
key one time to silence alarm tone. Call
service.
Motor controller
failure
F1E2
1 Pause 2 Pause,
repeat
Cycle ends Call service
No water present at
dishwasher
H2O
8 Pause 1 Pause -
pause, repeat
Cycle is paused
Ensure ll hose is connected to
product. Ensure water supply is turned
ON. Press Start to resume cycle. If
alarm still present, call service.
Wash motor failure F7E1/F7E2
7 Pause 1 Pause,
repeat/7 Pause 2
Pause, repeat
Cycle ends Call service
Dishwasher
overlls
F8E4
8 Pause 4 Pause -
pause, repeat
Drain sequence
will begin, machine
operation will be
prevented
For Professional Installers
Turn off water to unit (if possible). Turn
off power to unit. If the water cannot
be turned off, DO NOT turn off power
and keep door closed. Press Cancel
key one time to silence alarm tone. Call
service.
For Self Installers
■ Press CANCEL button twice or cycle
power. This may clear the issue.
■ Check to see if the wire connector is
connected to the oat switch on the
drip tray. See step 46. If the wire is
off, reconnect and then hit the cancel
button twice.
■ Check to see if there is any water in
the drip tray. If water is in the drip
tray, remove the water and reinstall
the drip tray. Make sure to connect
the wiring to the oat. Step 46.
Check to see where water may have
leaked into the drip tray. (Check the
water inlet ttings in steps 15 and 16
to see if they are leaking)
■ If water was in the tray and no leaks
were found, run the product on the
shortest installation cycle while
checking for leaks. The access panel
should be off to observe any leaks.
■ If problem still exists, call for service.
Fill valve stuck on F8E5
8 Pause 5 Pause -
pause, repeat
Drain sequence
will begin, machine
operation will be
prevented
Turn off water to unit (if possible).Turn
off power to unit. If the water cannot
be turned off, DO NOT turn off power
and keep door closed. Press Cancel
key one time to silence alarm tone. Call
service.
Dishwasher will not
drain
F9E1
9 Pause 1 Pause -
pause, repeat
Cycle ends
If drain hose is connected to a garbage
disposal, conrm that drain hose is not
clogged and disposal plug has been
knocked out. If unit still will not drain,
call service.
Water present
under dishwasher
FAE5
10 Pause 5 Pause -
pause, repeat
Cycle ends Call service.
User interface
service
communication
fault
F6E1
6 Pause 1 Pause -
pause, repeat
Product will not able to
start or resume cycles
Call service.
8
INSTALLATION REQUIREMENTS
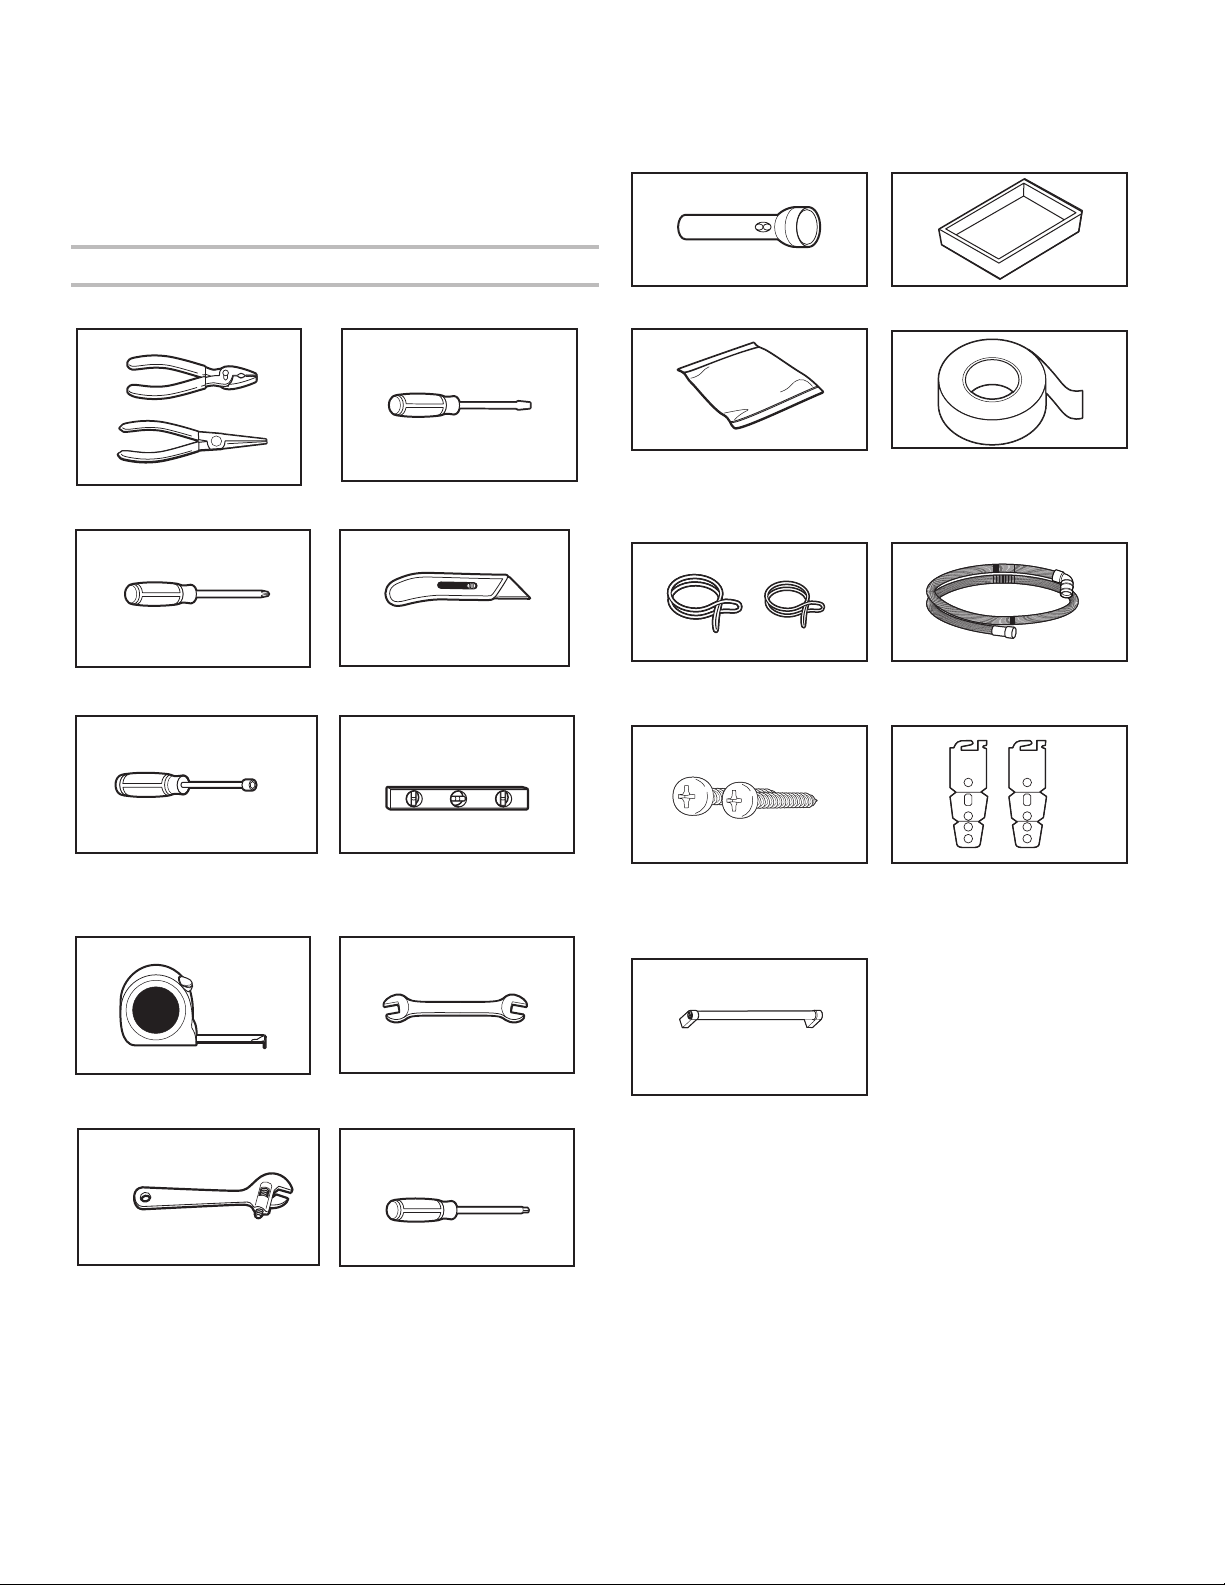
TOOLS AND PARTS
Gather the recommended tools and parts before starting
installation. Read and follow the instructions provided with
thetools listed here.
All Installations
Tools Needed:
Pliers Flat-blade screwdriver
Phillips screwdriver Utility knife
5/16" (7.9 mm) and
1/4" (6.4 mm) nut drivers or
hex sockets
Small level
Measuring tape or ruler 5/8" (15.9 mm) open-end
wrench
10" adjustable wrench that
opens to 1
1
/
8
" (29 mm)
Torx
†
T20 and, if installing
custom front panels, Torx T15
screwdrivers
Other Useful Items You May Need:
Flashlight Shallow pan
Bath towel Masking, or duct tape
Parts Supplied:
Drain hose clamps (2)
(1 large/red and 1 small/silver)
Drain hose
#8 x 1/2" (12.7 mm) Phillips-
head screws (2)
Undercounter mounting
brackets (2)
Make sure all parts are included in the literature package.
Door handle (on some models)
†TORX, T15, and T20 are trademarks of Acument Intellectual Properties, LLC.
9
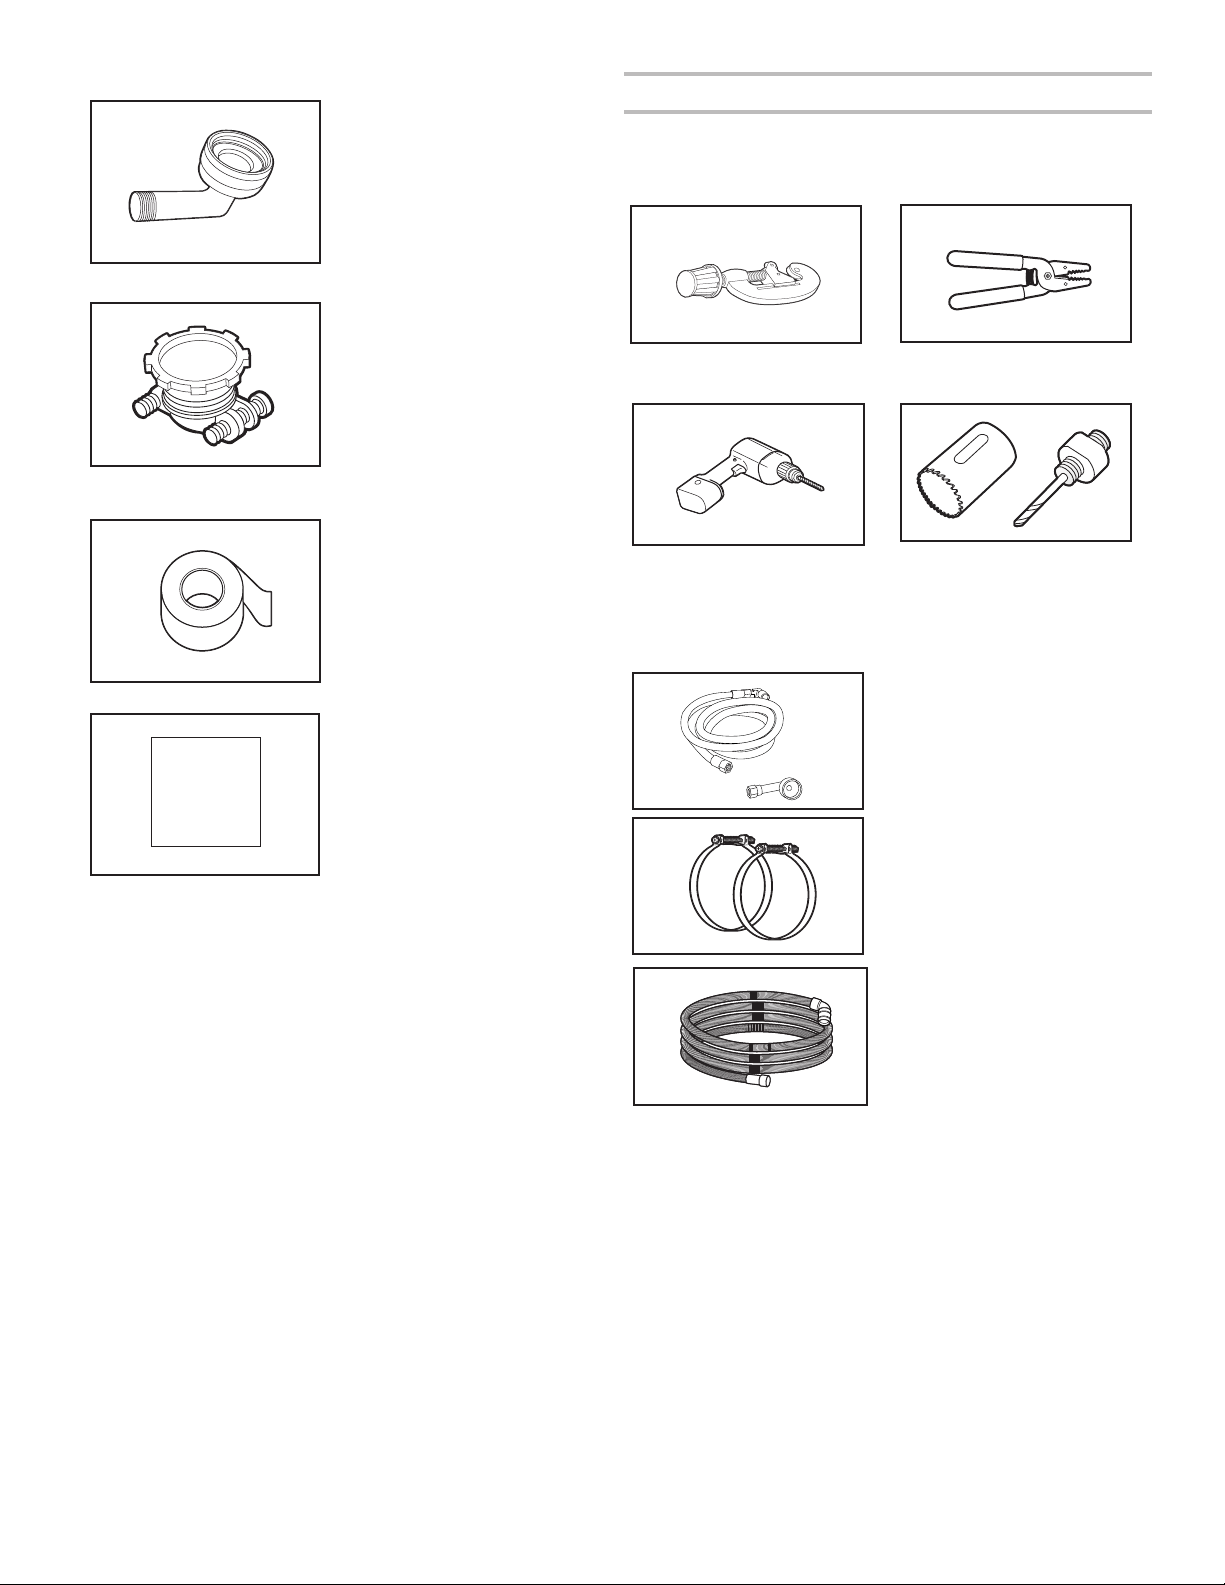
Other Parts Needed (not provided):
3/8" (9.5 mm) Compression x
3/4" (19 mm) Hose Fitting
with rubber seal and 90°
elbow (required to properly
connect household water line
to the dishwasher.)
Part no: W10685193
Household Wiring (Metallic)
Strain Relief to t 7/8"
(22 mm) hole (required to
properly secure household
wiring to the dishwasher
terminal box.)
Part no: 4396672
NOTE: Use only UL Listed/
CSA Approved parts.
Optional Accessory Parts Available:
Moisture Barrier Tape
NOTE: Moisture barrier tape
is an optional, added level
of protection if installing a
dishwasher under a wooden
countertop. Recommended
but not required for wooden
countertop.
Part no: 4396277
Side Panel Kit
For enclosing the side of the
dishwasher when installing it
at the end of your cabinetry
(Whirlpool part number varies
with color).
Call us at our toll-free number or visit the brand website listed in
the Quick Start Guide for accessory and part information.
First-Time Installations
Check local codes. Check existing electrical supply. See the
“Electrical Requirements” section. It is recommended that
electrical connections be made by a licensed electrical installer.
Additional Tools Needed:
Small tubing cutter Wire stripper
Cordless drill 1/2" (12.7 mm), 3/4" (19 mm),
and 1
1
/
2
" (38 mm) hole saw
bits
Additional Parts Needed (not provided):
Copper Tubing (3/8" O.D.
suggested) or Flexible
Braided WaterSupply Line
Kit. Kitincludes braided hose
and 3/8" compression x
3/4"hosetting.
Part no: W10278635RP
Screw-Type Clamps 1
1
/
2
"- 2"
(38 mm - 50 mm) (3maximum)
Optional-Longer Drain Hose
(Maximum length 12 ft (3.7 m)
NOTE: Must meet AHAM/
IAPMO test standards, t 1"
(25 mm) drain connection,
and be resistant to heat and
detergent.
Part no: W11381654
NOTE: If using a exible braided hose, replace inlet hose after
5years to reduce the risk of hose failure. Record hoseinstallation
or replacement dates on the hose for futurereference.
NOTE: Be sure to purchase only Whirlpool factory-certied
parts and accessories for your appliance. Your installation may
require additional parts. To order, refer to the contact information
referenced in your Quick Start Guide.
10
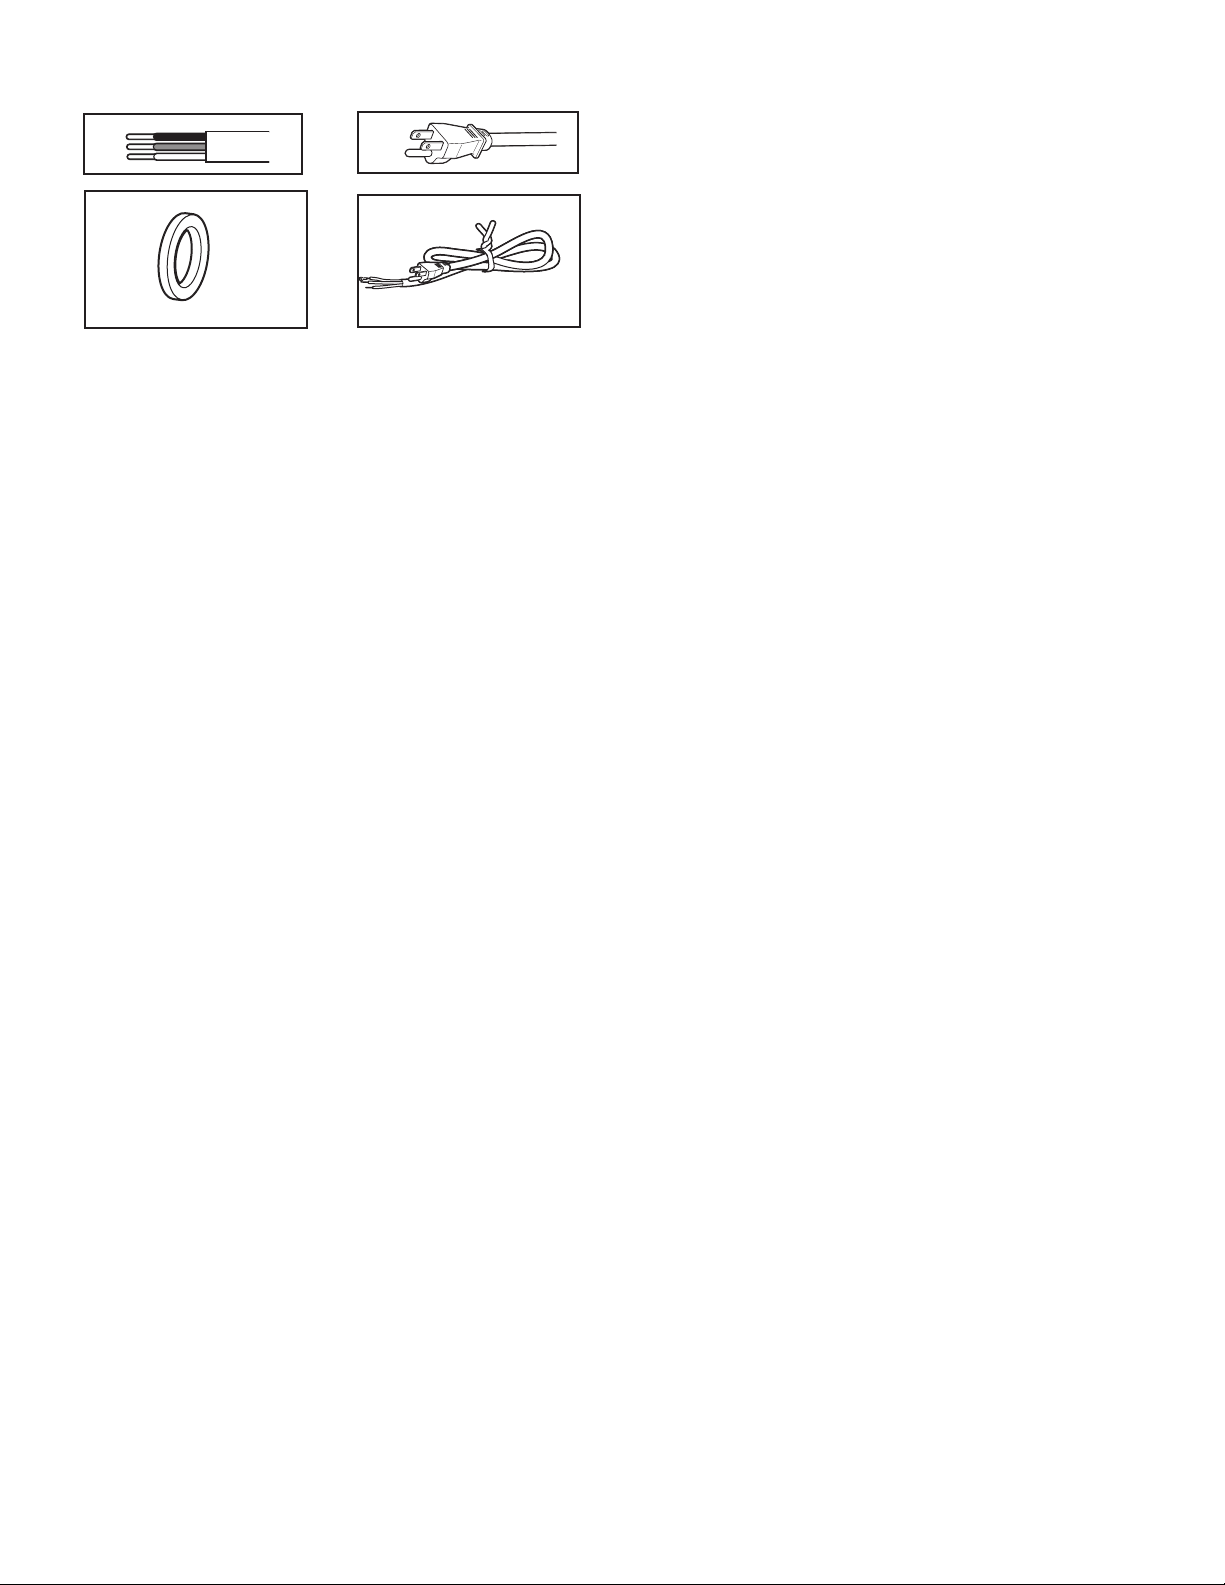
For Direct Wire For Power Cord
Cabinet G
rommet
For 1
1
/
2
" (38 mm) hole in
cabinet.
NOTE: Required for metal
cabine
ts
Power Cord Ki
t
Kit typically includes
power cord, metallic strain
relief,grommet.
(Whirlpool Part Number
Cord Kit - Straight -
W11365011
Cord Kit - Right Angle -
W11365014)
Call us at our toll-free number or visit the brand website listed in
the Quick Start Guide for accessory and part information.
NOTE: Be sure to purchase only Whirlpool factory-certied
parts and accessories for your appliance. Your installation may
require additional parts. To order, refer to the contact information
referenced in your Quick Start Guide.
LOCATION REQUIREMENTS
Dishwasher must be fully enclosed (top, sides, back, and oor)
upon installation. A side panel kit is available from your dealer for
installing your dishwasher at the end of your cabinetry.
An optional moisture barrier accessory is also available for
installing underneath a wooden countertop.
Check location where dishwasher will be installed. The location
must provide:
■ Convenient access for loading and unloading dishes. Corner
locations require a 2" (5.1 cm) minimum clearance between
the side of the dishwasher door and the wall or cabinet.
■ Easy access to water, electricity, and drain:
■ Grounded electrical supply is required.
■ This dishwasher has a water heating feature and also
requires a connection to a hot water supply line.
■ Make sure pipes, wires and drain hose are within the
shaded area shown in the “Product and Cabinet Opening
Dimensions” section.
■ Do not run drain lines, water lines, or electrical wiring where
they can interfere with or contact dishwasher motor or legs.
■ Shelter dishwasher and water lines leading to dishwasher
against freezing. Damage from freezing is not covered by the
warranty.
NOTE: If dishwasher will be left unused for a period of time
or in a location where it may be subject to freezing, have it
winterized by authorized service personnel.
■ If installed in new construction, ush the water supply line of
debris before connecting it to the ll valve. If it is not ushed,
debris from the water supply could plug the ll valve screen.
■ A square opening for proper operation and appearance.
■ The cabinet front to be perpendicular to oor.
■ Level oor.
Helpful Tip: If oor at front of opening is not level with oor at
rear of opening, shims may be used to level dishwasher.
NOTE: To avoid shifting during dishwasher operation, shims
must be securely attached to the oor.
■ The location where the dishwasher will be installed must
provide clearance between motor and ooring. Motor should
not touch the oor.
■ Do not install dishwasher over carpeted ooring.

11
PRODUCT AND CABINET OPENING DIMENSIONS:
.
B
A
C
D
E
23
7
/8"
(60.4 cm)
30"
(76.2 cm)
30"
(76.2 cm)
24½"
(62.6 cm)
3/4"
(1.9 cm)
3¾"
(9.7 cm)
20
13
/16"
(52.9 cm)
33
5
/8"
(85.4 cm)
minimum with
legs removed
3
1
/2" - 4
1
/2"
(8.4 cm - 10.6 cm)
A. Insulation may be compressed (not used on all models).
B. For panel-ready models, dishwasher depth is 24"
(61.0 cm), not including the 3/4" (1.9 cm) custom door
panel.
C. Door handles may protrude forward of the face of the
dishwasher, varies by model.
Check that all surfaces have no protrusions
that would prohibit dishwasher installation.
33
5
/8" minimum
(85.4 cm) minimum
21"
(53.4 cm)
3"
(7.6 cm)
4"
(10.2 cm)
24"
(62.0 cm)
2"
(5.1 cm)
6¼"
(15.9 cm)
NOTE: Shaded areas
of cabinet walls
show where utility
connections may be
installed.
D. Measured from the lowest point on the underside of
the countertop. May be reduced to 33
5
/8" minimum
(85.4 cm) minimum by removing the feet and perforated
area of insulation (blanket) on dishwasher.
E. Minimum, measured from narrowest point of opening.
12
DRAIN REQUIREMENTS
■ A new drain hose is supplied with your dishwasher. If drain
hose is not long enough, use a new drain hose with a
maximum length of 12 ft (3.7 m) that meets all current AHAM/
IAPMO test standards, is resistant to heat and detergent, and
ts the 1" (2.5 cm) drain connector of the dishwasher.
NOTE: Do not connect multiple drain hoses together.
■ Make sure to connect drain hose to waste tee or disposer
inlet above drain trap in house plumbing and 20" (50.8 cm)
minimum above the oor. It is recommended that the drain
hose either be looped up and securely fastened to the
underside of the counter or be connected to an air gap.
■ Make sure to use an air gap if the drain hose is connected to
house plumbing lower than 20" (50.8 cm) above suboor or
oor.
Use of air gap
■ If required, the air gap should be installed in accordance with
the air gap installation instructions. When you are connecting
the air gap, a rubber hose (not provided) will be needed to
connect to the waste tee or disposer inlet.
■ Use 1/2" (1.3 cm) minimum I.D. drain line ttings.
WATER SUPPLY REQUIREMENTS
■ This dishwasher has a water heating feature and also requires
a connection to a hot water supply line.
■ A hot water line with 20 psi to 120 psi (138 kPa to 862 kPa)
water pressure can be veried by a licensed plumber.
■ 120°F (49°C) water at dishwasher.
■ 3/8" (0.95 cm) O.D. copper tubing with compression tting or
exible braided water supply line.
NOTE: 1/2" (1.3 cm) minimum plastic tubing is not
recommended.
■ A 90° elbow with 3/4" (0.95 cm) hose connection with rubber
washer.
■ Do not solder within 6" (15.2 cm) of the water inlet valve.
■ If installed in new construction, make sure the house water
supply lines have been ushed prior to connecting the
dishwasher to remove any debris that may exist in the supply
line.
NOTE: If replacing an existing dishwasher, it is recommended
to install a new water line and drain hose (supplied) with the
new dishwasher.
ELECTRICAL REQUIREMENTS
Be sure that the electrical connection and wire size are adequate
and in conformance with the National Electrical Code,
ANSI/NFPA 70 - latest edition, and all local codes and
ordinances.
A copy of the above code standards can be obtained from:
National Fire Protection Association
1 Batterymarch Park
Quincy, MA 02169-7471
You Must Have:
■ 120 V, 60 Hz, AC only, 15 A or 20 A, fused electrical supply
■ Copper wire only
■ A maximum of 2 eld wiring supply conductors (12 AWG
largest size) plus 1 grounding conductor are permitted in the
terminal box.
We Recommend:
■ A time-delay fuse or circuit breaker.
Circuit Requirements:
■ The dishwasher may be installed on the same circuit as a
garbage disposal providing that the branch circuit cannot
exceed rated circuit load and must comply with all governing
codes and regulations such as but not limited to National
Electrical Code, ANSI/NFPA 70 - latest edition.
■ No electrical connections other than the dishwasher power
and ground connections can be made inside of the dishwasher
terminal box.
If connecting dishwasher with a power supply cord:
■ Use UL Listed power cord kit marked for use with
dishwasher.
■ Plug into a grounded 3 prong outlet. Outlet must
meet all local codes and ordinances.
If connecting dishwasher with direct wiring:
■ Use exible, armored, or nonmetallic sheathed
copper wire with grounding wire that meets the wiring
requirements for your home and local codes and
ordinances.
■ Use a UL Listed/CSA Approved metallic
strain relief.
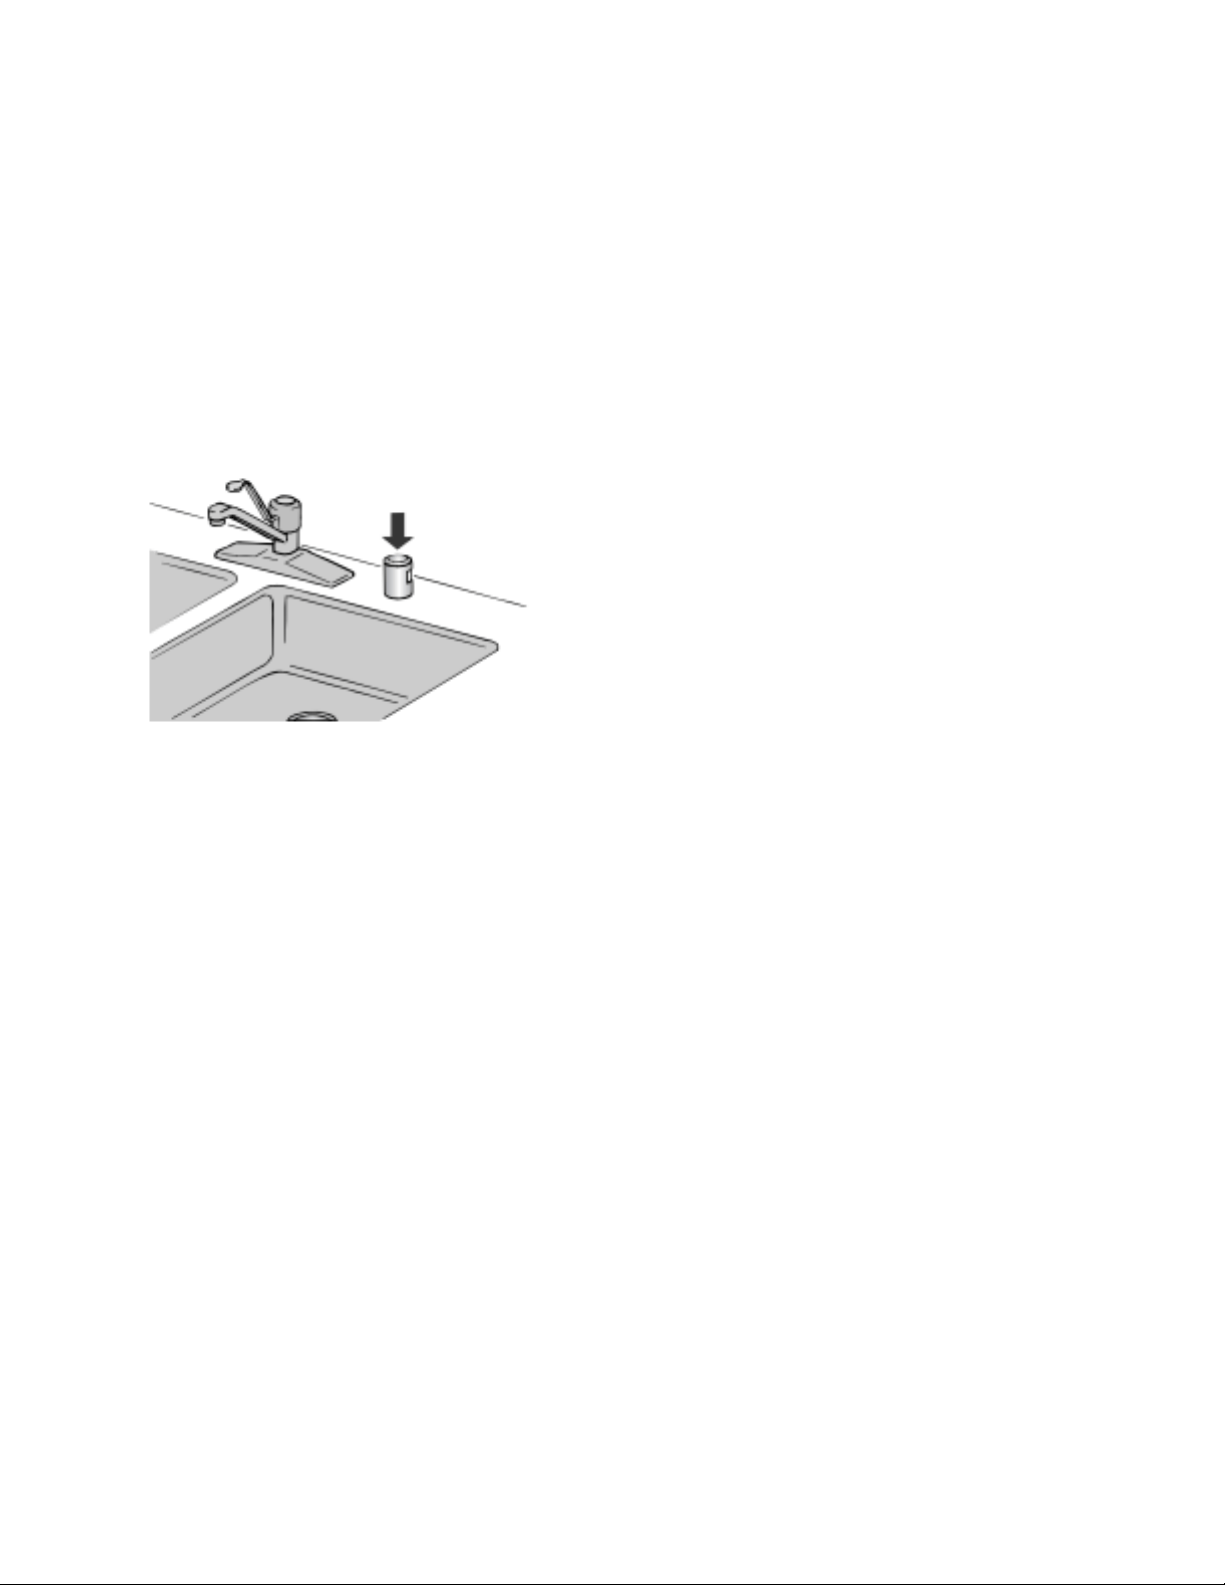
Air gap
13
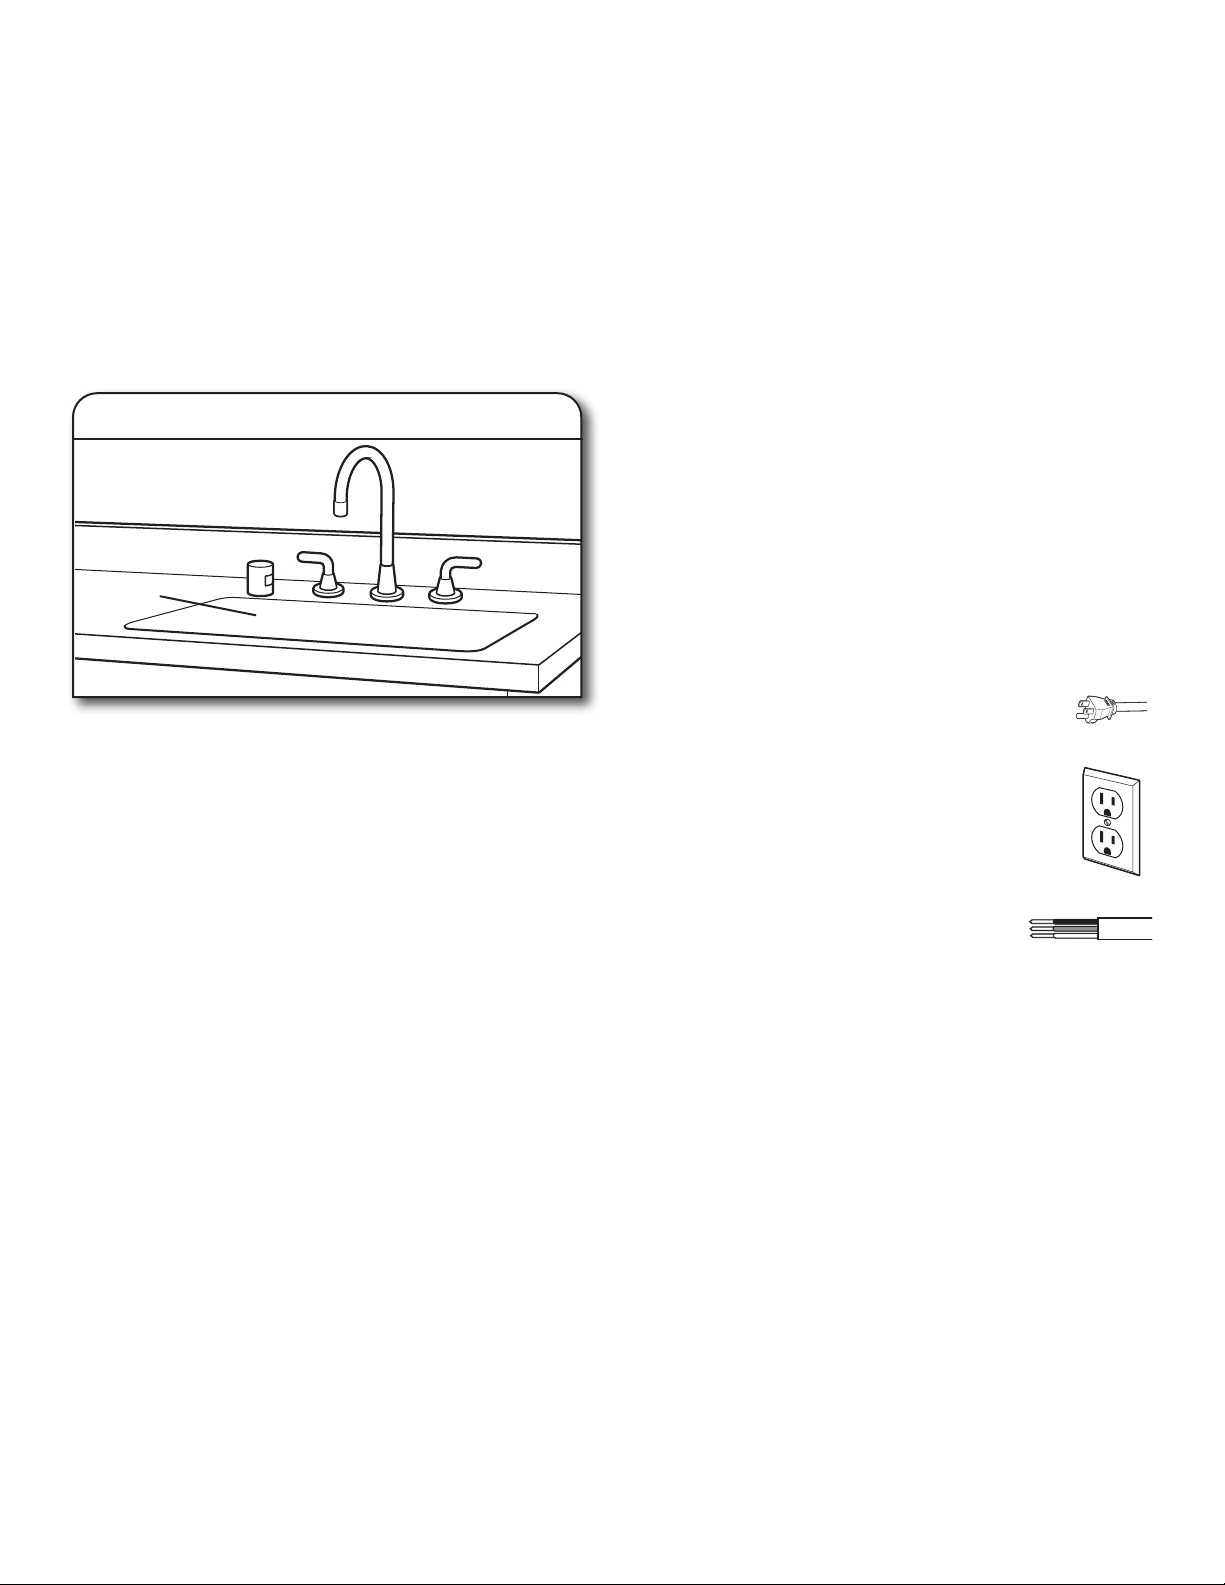
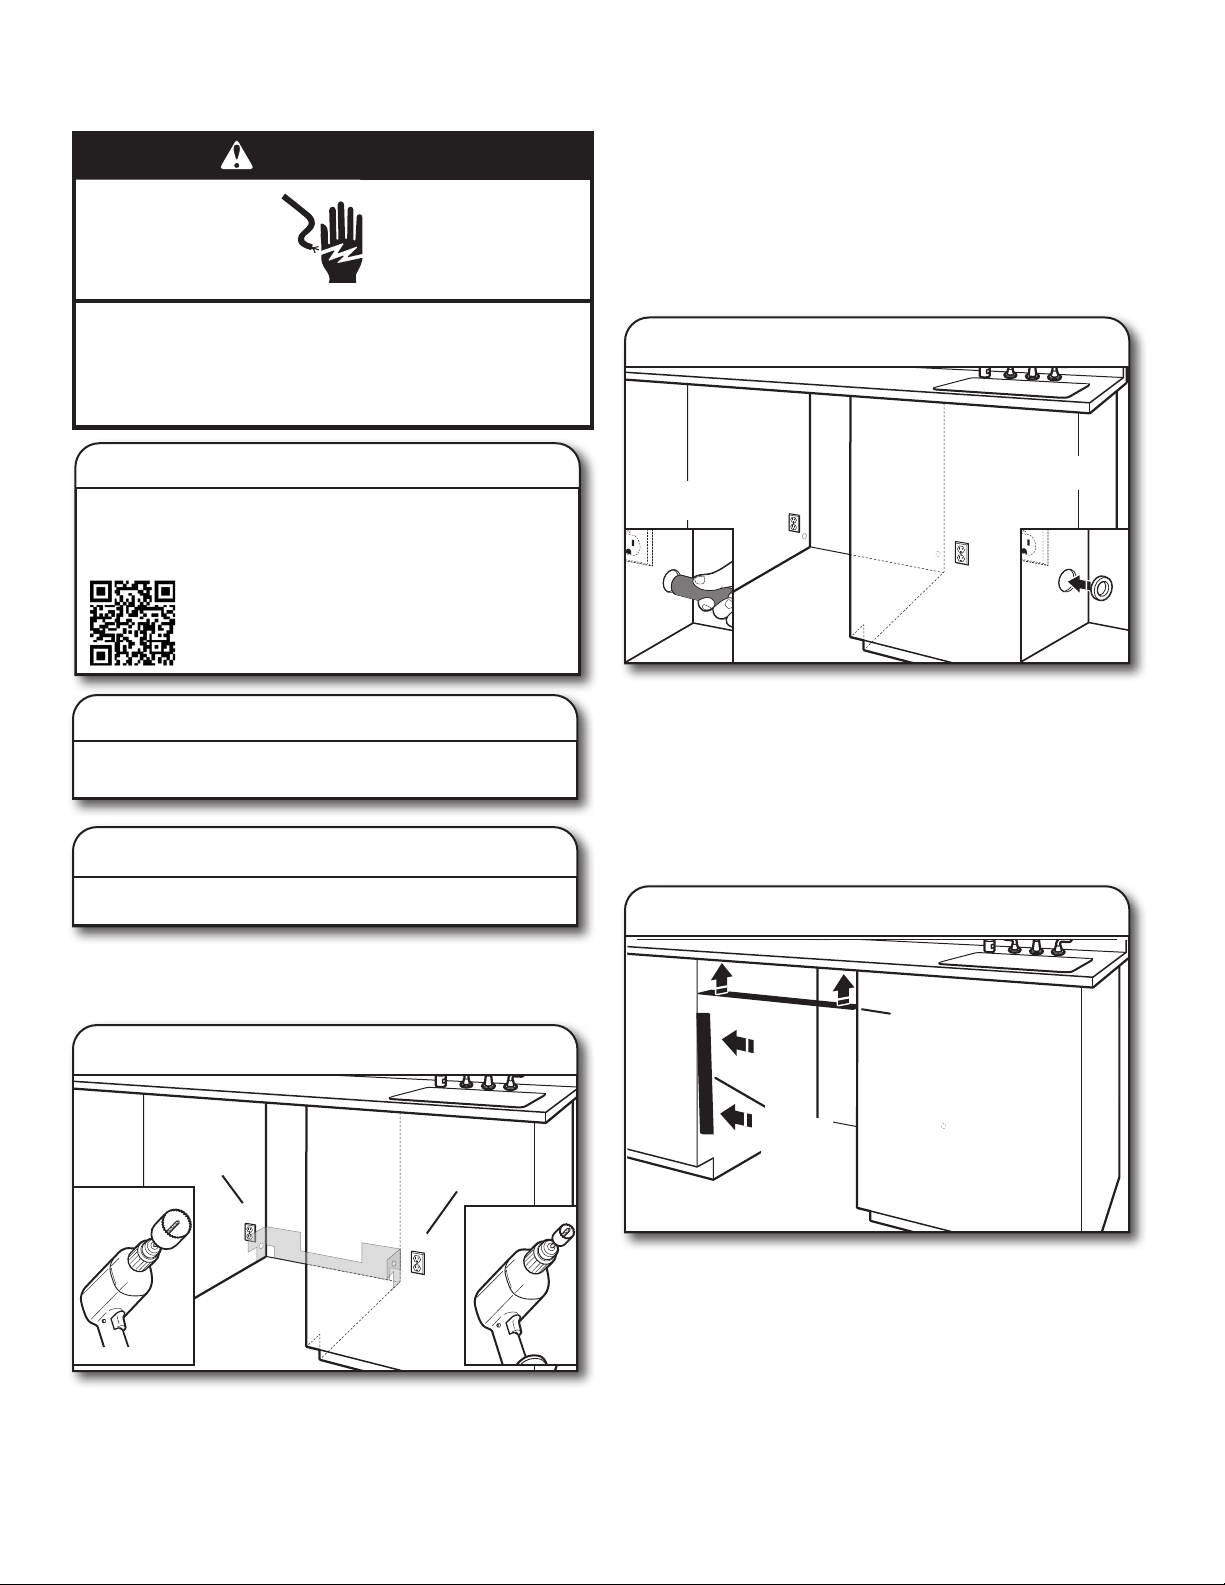
INSTALLATION INSTRUCTIONS
3. Shut off water supply
Shut off the water supply to the dishwasher.
PREPARE CABINET OPENING—
NEW UTILITIES
The power-supply receptacle for the appliance shall be installed
in a cabinet or on a wall adjacent to the undercounter space in
which the appliance is to be installed.
NOTE: Refer to the “Product and Cabinet Opening Dimensions”
section for the correct hole placement and dimensions of the
shaded area.
Drill a 1½
"
(3.8 cm) drain hose hole in the side or rear of cabinet,
depending on location of drain hose routing and drain hose
connection location.
Drill a 1/2" (1.27 cm) water supply hose hole in the side or rear
of cabinet, depending on location of water supply routing and
connection location
Drill a 1½" (3.8 cm) electrical conduit hole in the right-hand side
or rear of cabinet.
Wood cabinet: Sand the hole until smooth.
Metal cabinet: Cover edges of hole with grommet included with
power cord kit.
Helpful Tip: Wiring the dishwasher will be easier if you route
the cable into the cabinet opening from the right-hand side.
INSTALL OPTIONAL MOISTURE BARRIER -
RECOMMENDED FOR WOOD COUNTERTOPS
Moisture barrier/wood shims
Moisture
barrier
Make sure the area under the cabinet is clean and dry for
installation of the moisture barrier. Remove the backing of the
moisture barrier, and apply to underside of the countertop along
the front edge of the counter.
NOTE: The use of this moisture barrier is recommended but not
required.
NOTE: Install wood shims if side anchoring and the gap between
the sides of the cabinet and sides of the dishwasher are greater
than 1/2" (1.27 cm) on each side or are greater than the length of
the side anchor screws.
WARNING
Disconnect electrical power at the fuse box or circuit
breaker box before installing dishwasher.
Failure to do so can result in death or electrical shock.
Electrical Shock Hazard
1. Sand holes smooth
Wood
Cabinet
Metal
Cabinet
2. Disconnect power
Disconnect electrical power at the fuse box or circuit
breaker box before installing dishwasher.
4. Drill hole locations—new construction
Optional
location
Preferred
location
1½"
(3.8 cm)
1/2"
(1.27 cm)
Install
wood
shims
1. Video Installation
Video of installation steps can be found online at whirlpool.
com in the “Service & Support” section “How To’s & FAQ.
The video can be found at
http://www.kaltura.com/tiny/ro00v
14
5. Built-up oors – add shims as needed
Note: The wood runners that come with the shipping base work
well for shims.
Built-up oors: If the kitchen oor is higher than the cabinet
opening’s oor - for example, the kitchen oor tile does not
extend into the cabinet opening - add shims, as needed, in the
area shown to bring cabinet oor up to same level as the kitchen
oor.
NOTE: Shims must be securely attached to oor to avoid
movement when the dishwasher is in use.
Cut insulation blanket along perforation for cabinet opening
height of 33
5
/8" (85.4 cm). For other cabinet opening heights, do
not cut the insulation blanket.
ELECTRICAL CONNECTION
– For Direct Wire, begin with Step 7
– For Power Cord, wait until Step 18
If installing with direct wire, route the cable as shown. Do not
connect the wire to the product at this time. This connection will
be made later, after the unit is installed into the cabinet opening.
Route cable from power supply through cabinet hole. (Cable
must extend to the right front side of cabinet opening.) Tape
cable to the oor in area shown. This will prohibit cable from
moving when dishwasher is moved into cabinet opening.
6. If installing into a 33
5
/8" (85.4 cm)
opening
6”
(15.2 cm)
7. Direct wire – route cable
Shim
15
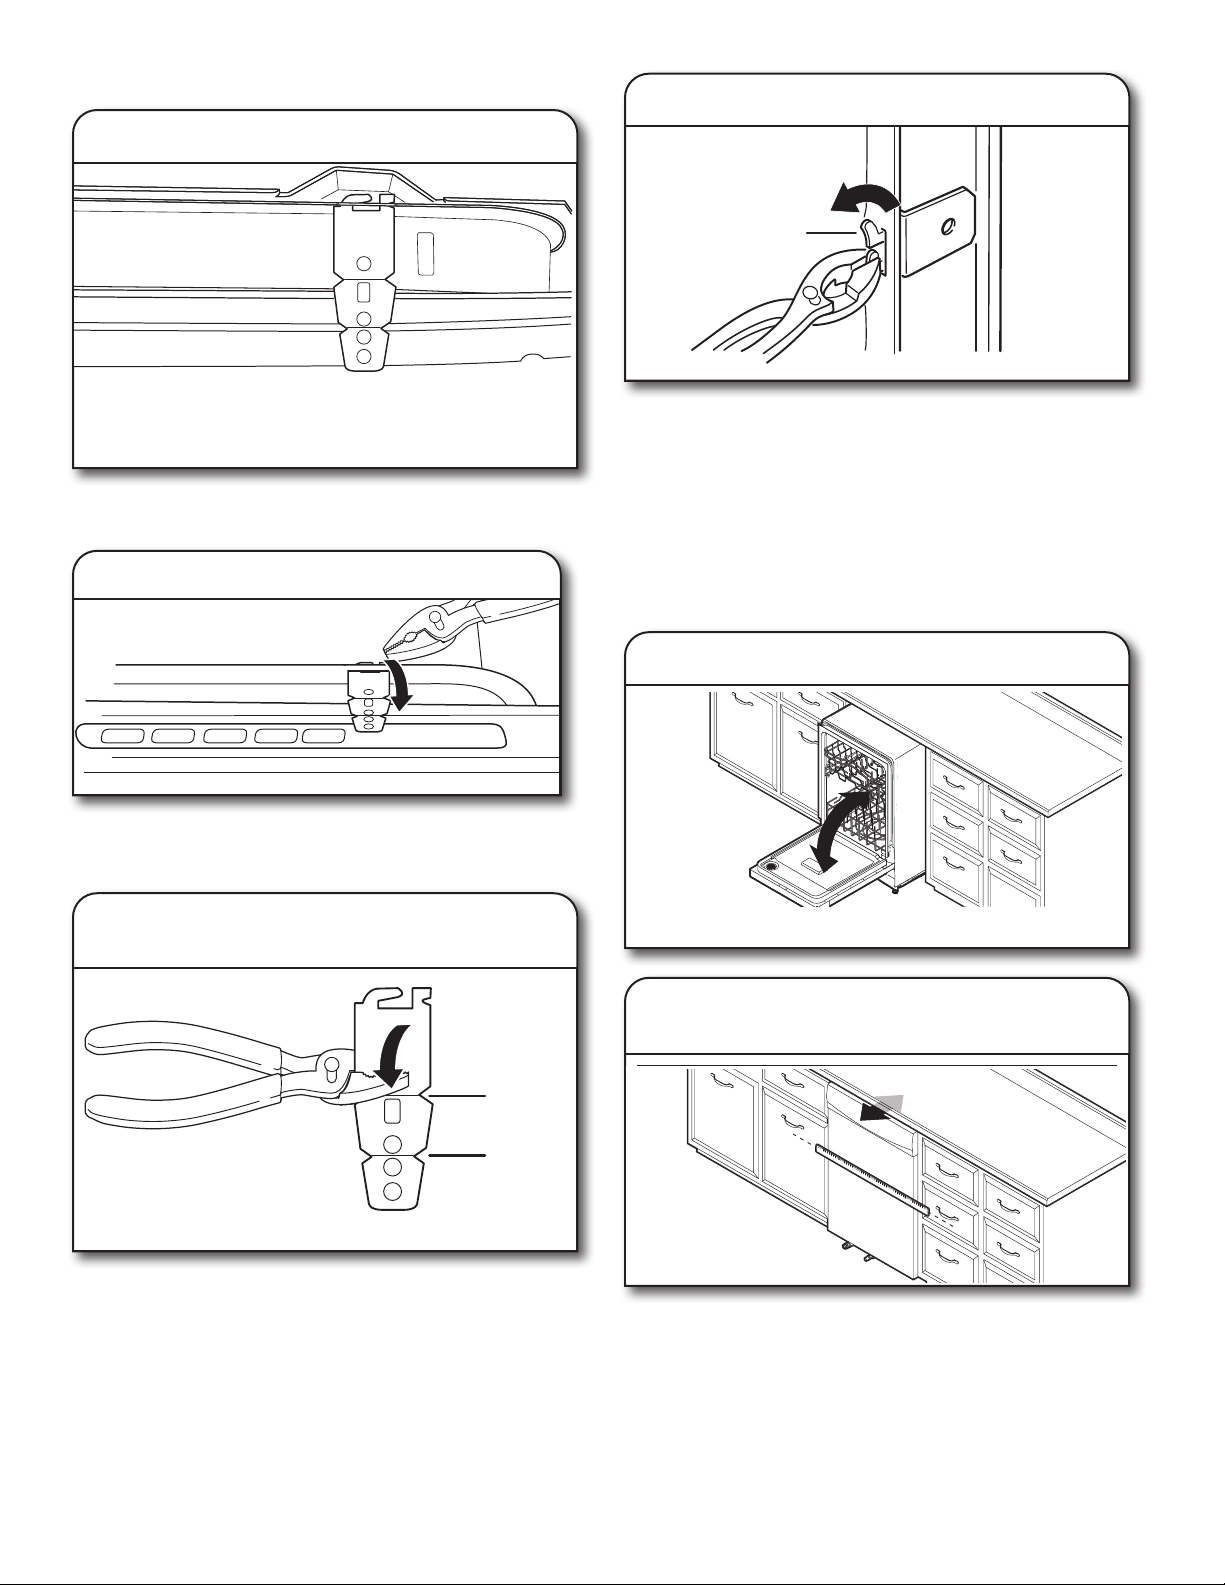
PREPARE DISHWASHER
Helpful Tip: Remove all internal shipping material, drain hose,
installation kit, and handle (if included,) before laying on it’s back,
and do not remove lm on the door at this time.
Place cardboard under dishwasher until installed
in cabinet opening to avoid damaging oor covering.
Using two or more people, grasp sides of dishwasher door frame,
and place the dishwasher on its back.
Do not use the door panel as a worktable without rst covering
it with a towel to avoid scratching the door panel.
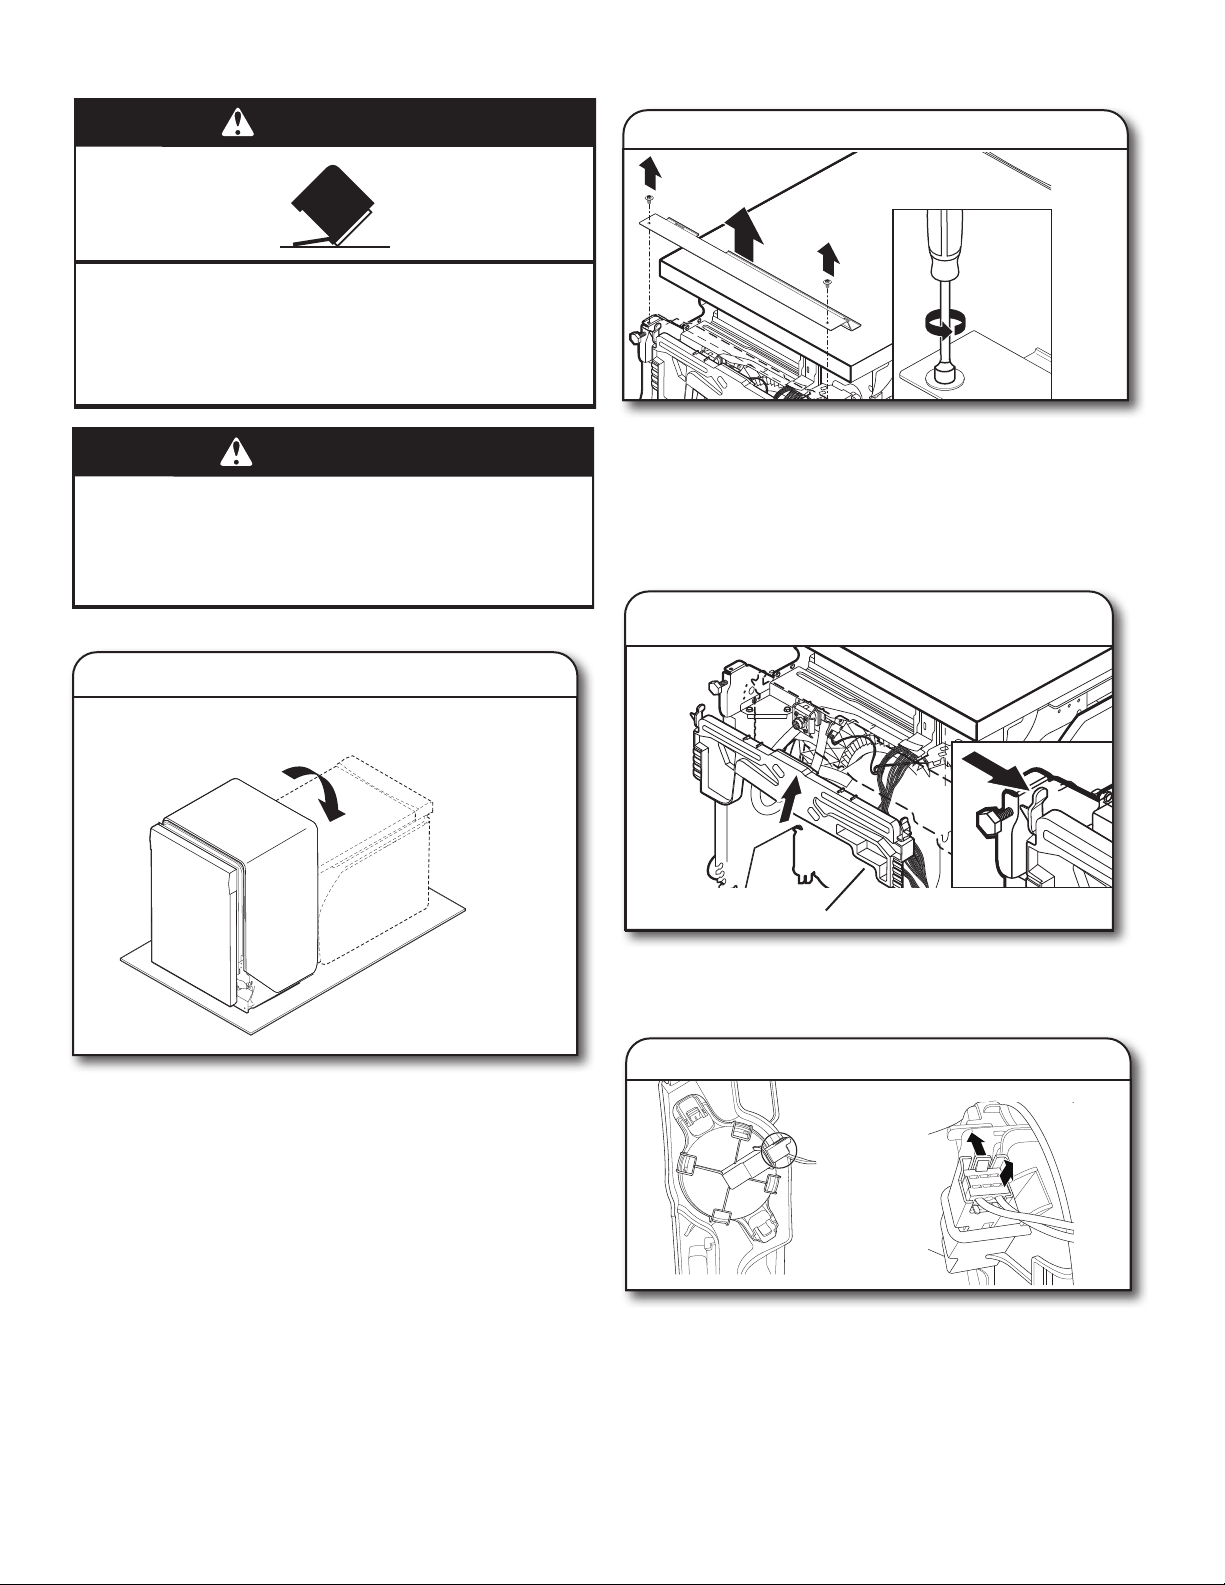
REMOVE ACCESS PANEL AND INSULATION
Using a 5/16" (7.9 mm) nut driver, remove the two screws
attaching access panels to dishwasher. Once the screws are
removed push the access panel toward the top of the product to
unhook it and then remove it.
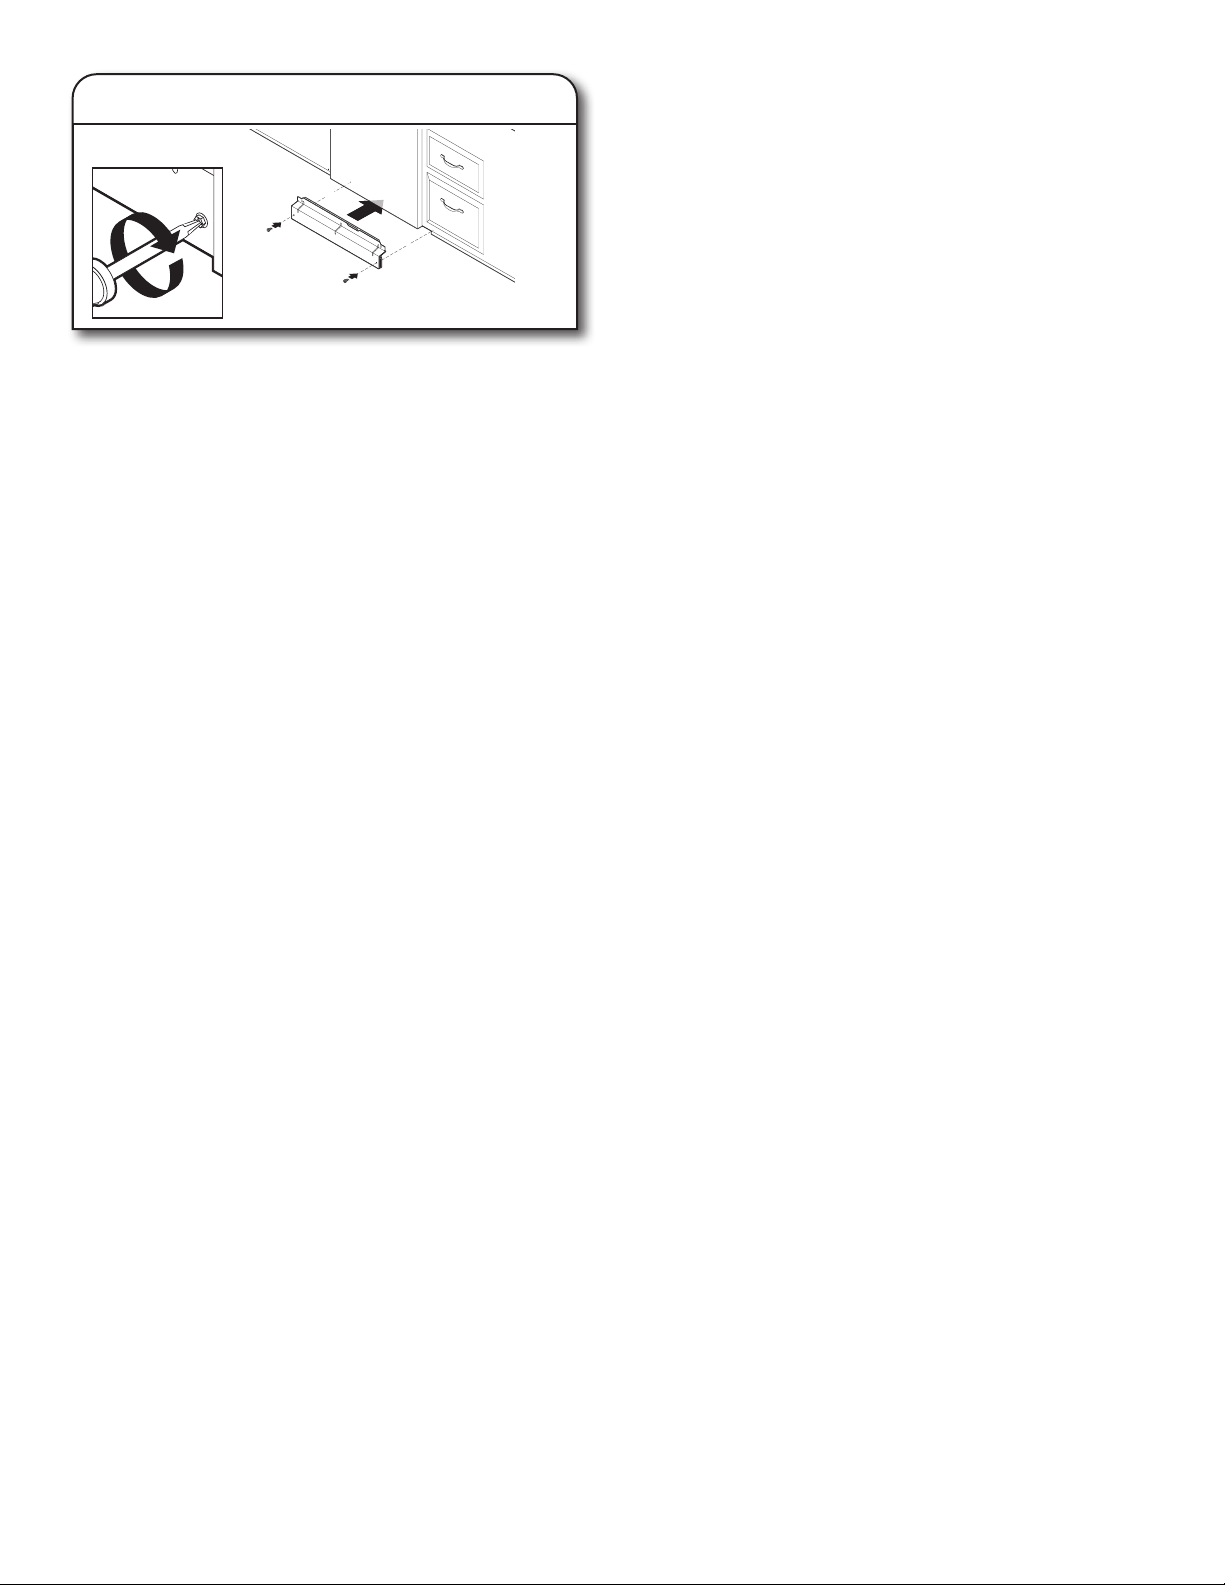
DISCONNECT AND REMOVE DRIP TRAY
ASSEMBLY
10a. Remove drip tray assembly
To remove the drip tray assembly, press the snap at each side
of the plastic tray in toward the center of the product and pull
toward yourself. Be sure not to pull too far or too hard as the oat
switch wire is still connected at this time.
10b. Remove oat switch wire
To remove the oat switch wire, gently push the connector latch
tab (1) and then pull the connector (2) out of the housing. The
oat itself should not be removed from the tray.
NOTE: Do not reinstall drip tray until instructed.
WARNING
Excessive Weight Hazard
Use two or more people to move and install
dishwasher.
Failure to do so can result in back or other injury.
WARNING
Tip Over Hazard
Do not use dishwasher until completely installed.
Do not push down on open door.
Doing so can result in serious injury or cuts.
8. Put the dishwasher on its back
9. Remove access panels
10. Remove
access
panel
Drip tray assembly
1
2
16
Measure the height of cabinet opening from the underside of the
countertop to the oor where the dishwasher will be installed.
Be sure to measure the lowest point on the underside of the
countertop and the highest point on the oor.
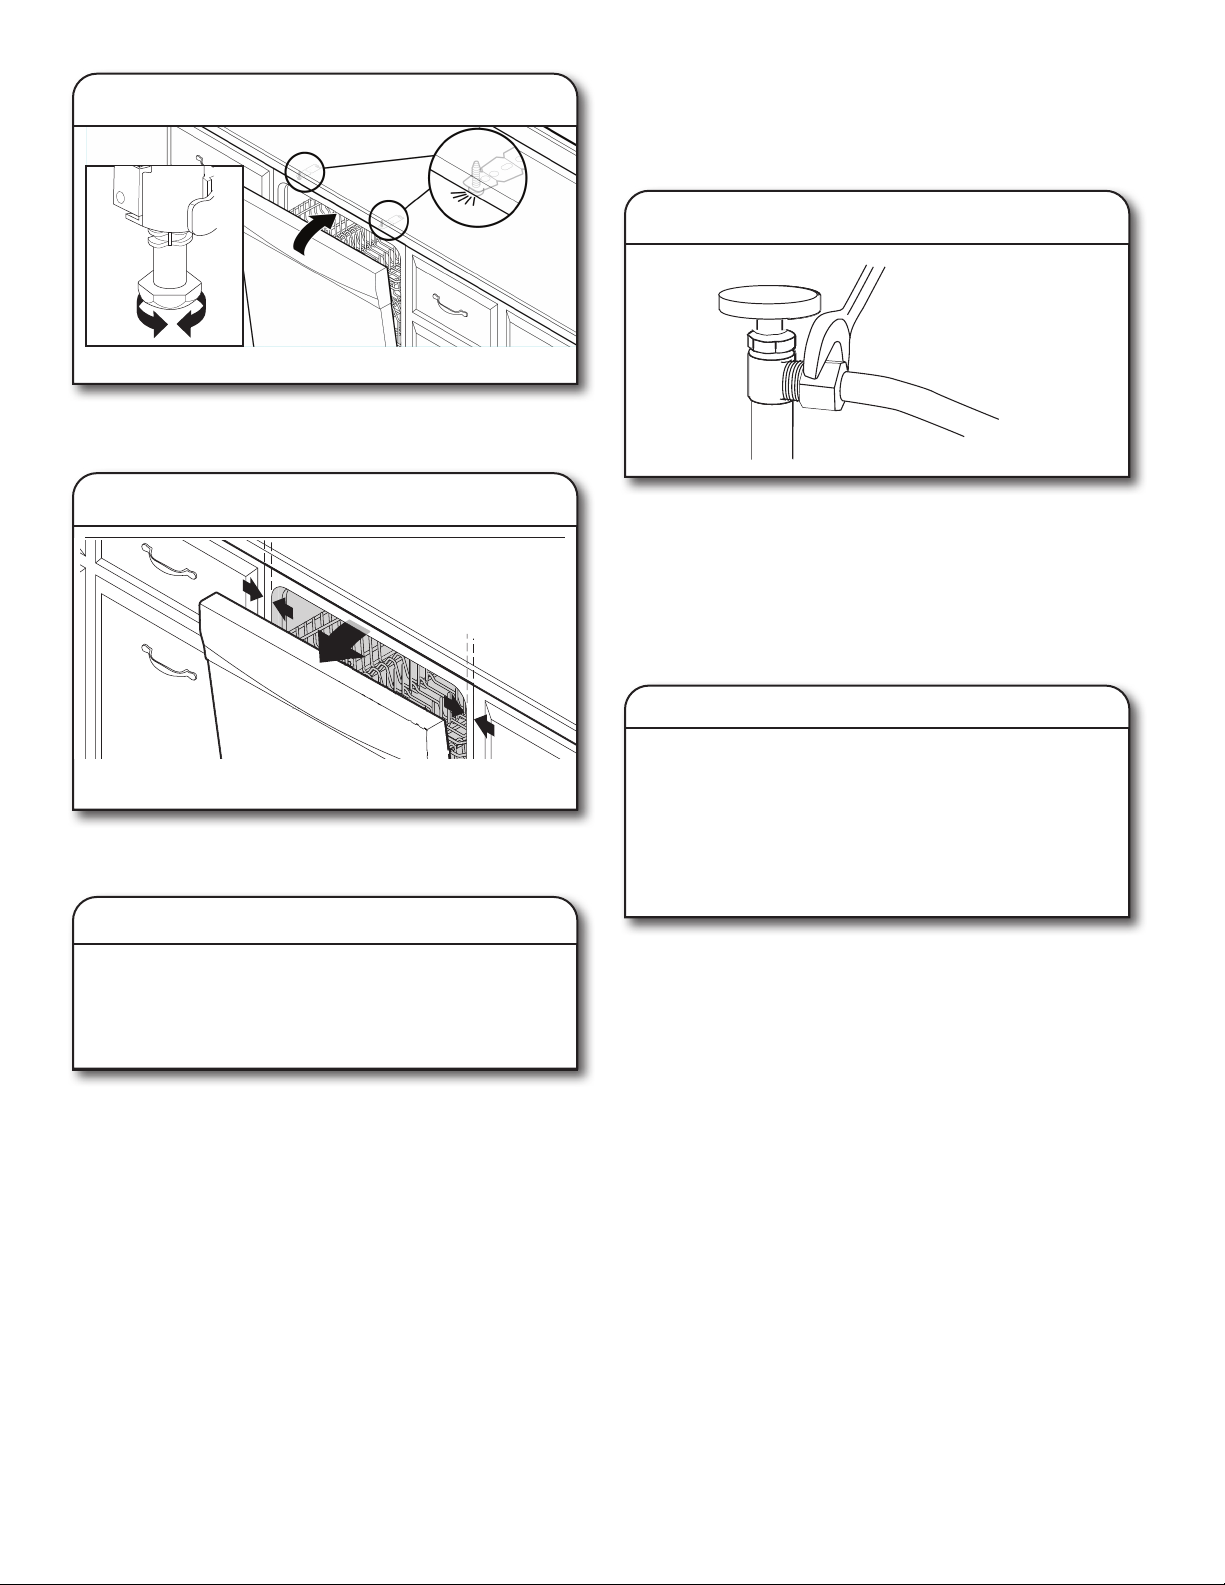
Use wrench to initially loosen leveling legs if needed.
Adjust all four leveling legs to the same height by rotating each
foot clockwise or counterclockwise as needed.
The unit comes with the legs set for a 33
5
/8" (85.4 cm) height
installation. If your opening height is 34½" (87.6 cm), you would
therefore need to raise all four legs by 7/8" (2.22 cm).
NOTE: Adjust rear leg height rst before moving unit into the cut
out.
Legs can be removed if necessary for tight installations.
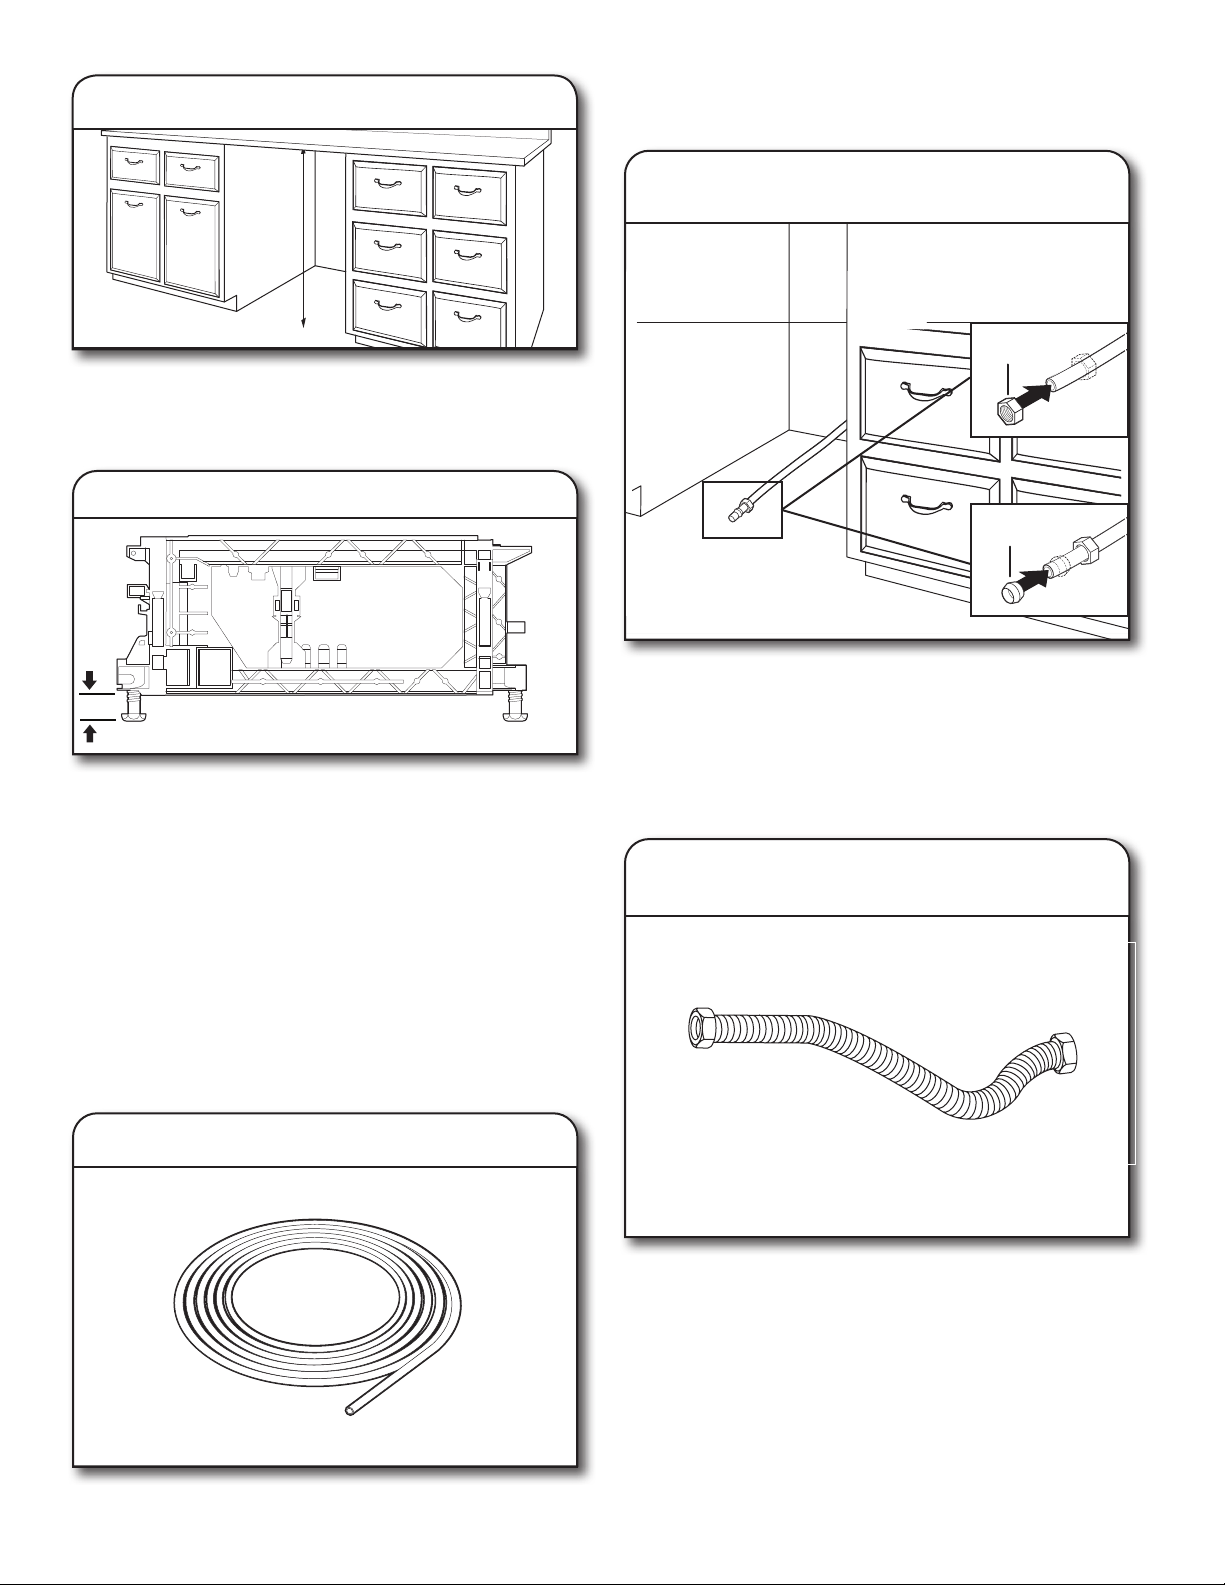
CONNECT WATER LINE TO FILL VALVE
– For Copper line, begin with Step 12
– For Flexible line, begin with Step 14
If using copper tubing, measure overall length of copper tubing
required to reach the water supply, cut to length, and attach with
compression ttings.
Nut
Ferrule
13. Slide nut and ferrule onto tubing
(copper tubing only)
opper tubing only: Put the tubing into the 90° elbow tting as
far as it will go. (The copper tubing bends and kinks easily.) Push
the nut and ferrule forward and tighten it, so that it sits right up
against elbow threads.
NOTE: To avoid vibration during operation, route the water
supply line so that it does not touch the dishwasher base, frame,
or motor. If using copper tubing, skip step 14 and go to 15.
14. Flexible line
Flexible braided line: Conrm the exible braided line is long
enough.
Get 3/8" compression x 3/4" hose tting with 90° elbow. Connect
the 3/8" compression tting of the 90° elbow tting to the water
supply line. Attach such that the 3/4" connection is facing
upward as shown below.
11. Measure cabinet opening
Leveling leg adjustment
12. Copper Water Line
17
15. Add 90° elbow tting to the water
supply line
CONNECT FILL HOSE TO FILL VALVE
16. Tighten 90° elbow tting to valve
Be sure rubber washer is properly seated in tting. Slide the
3/4" (19 mm) tting of the 90° elbow up to the valve and hand
tighten it to avoid cross-threading. Hand tighten until the coupling
is tight.
Using pliers, check the tightness of the coupling. An additional
1/4 to 1/2 turn may be required to seal the rubber gasket. Route
ll hose out the rear left side of unit.
NOTES:
■ Do not use tape with compression ttings.
■ Do not over-tighten. Damage to the coupling can result.
■ Route water supply line out rear of unit before setting unit up.
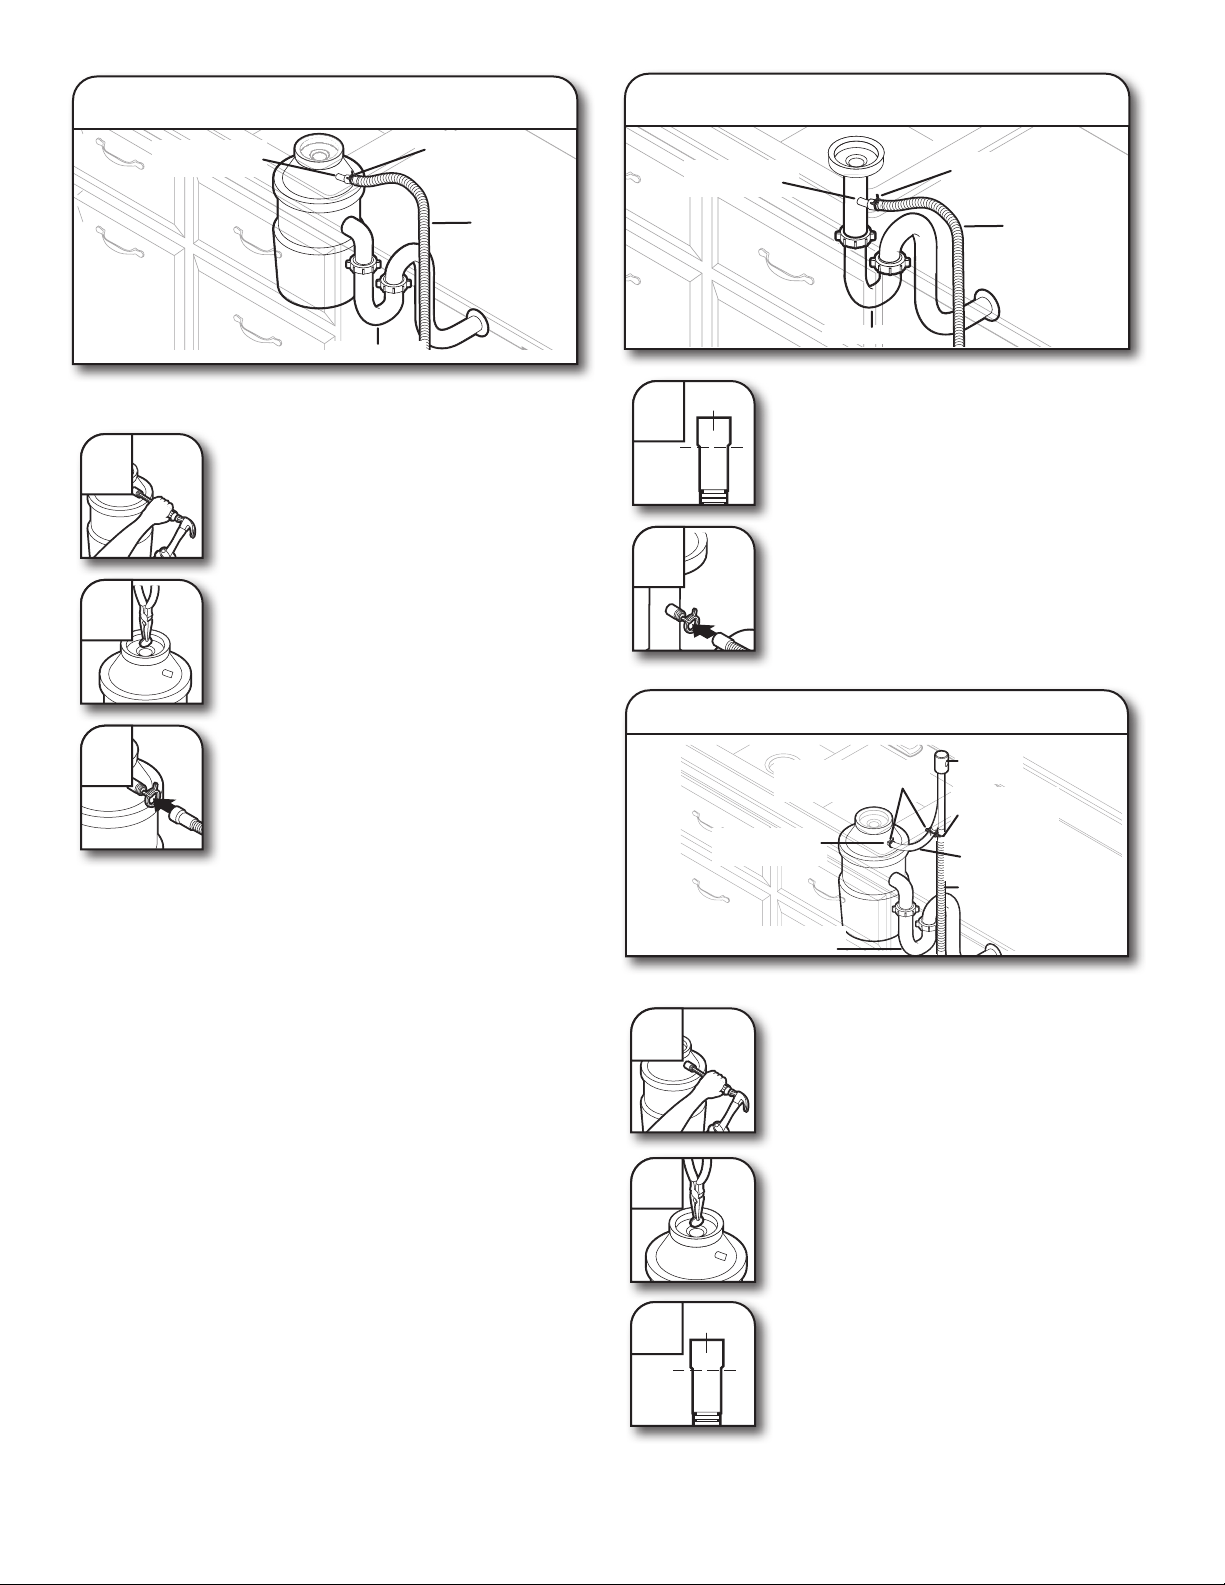
DRAIN HOSE CONNECTION
Put provided silver clamp over elbow end of drain hose. Then
push the hose onto the drain port (being sure to push all the way
on) with the hose facing underneath the dishwasher. Using pliers,
squeeze open the drain hose clamp and slide it over the elbow to
ensure the hose is attached in place. Route the hose out of the
back of the product.
NOTE:
■ If the hose is installed with the rubber elbow facing out, the
drain hose may become kinked causing slow or incomplete
draining in tight cabinet installations.
■ There may be a plastic plug in the drain port for shipping
purposes where you will connect the drain hose. Remove
this plug before installing drain hose, if present.
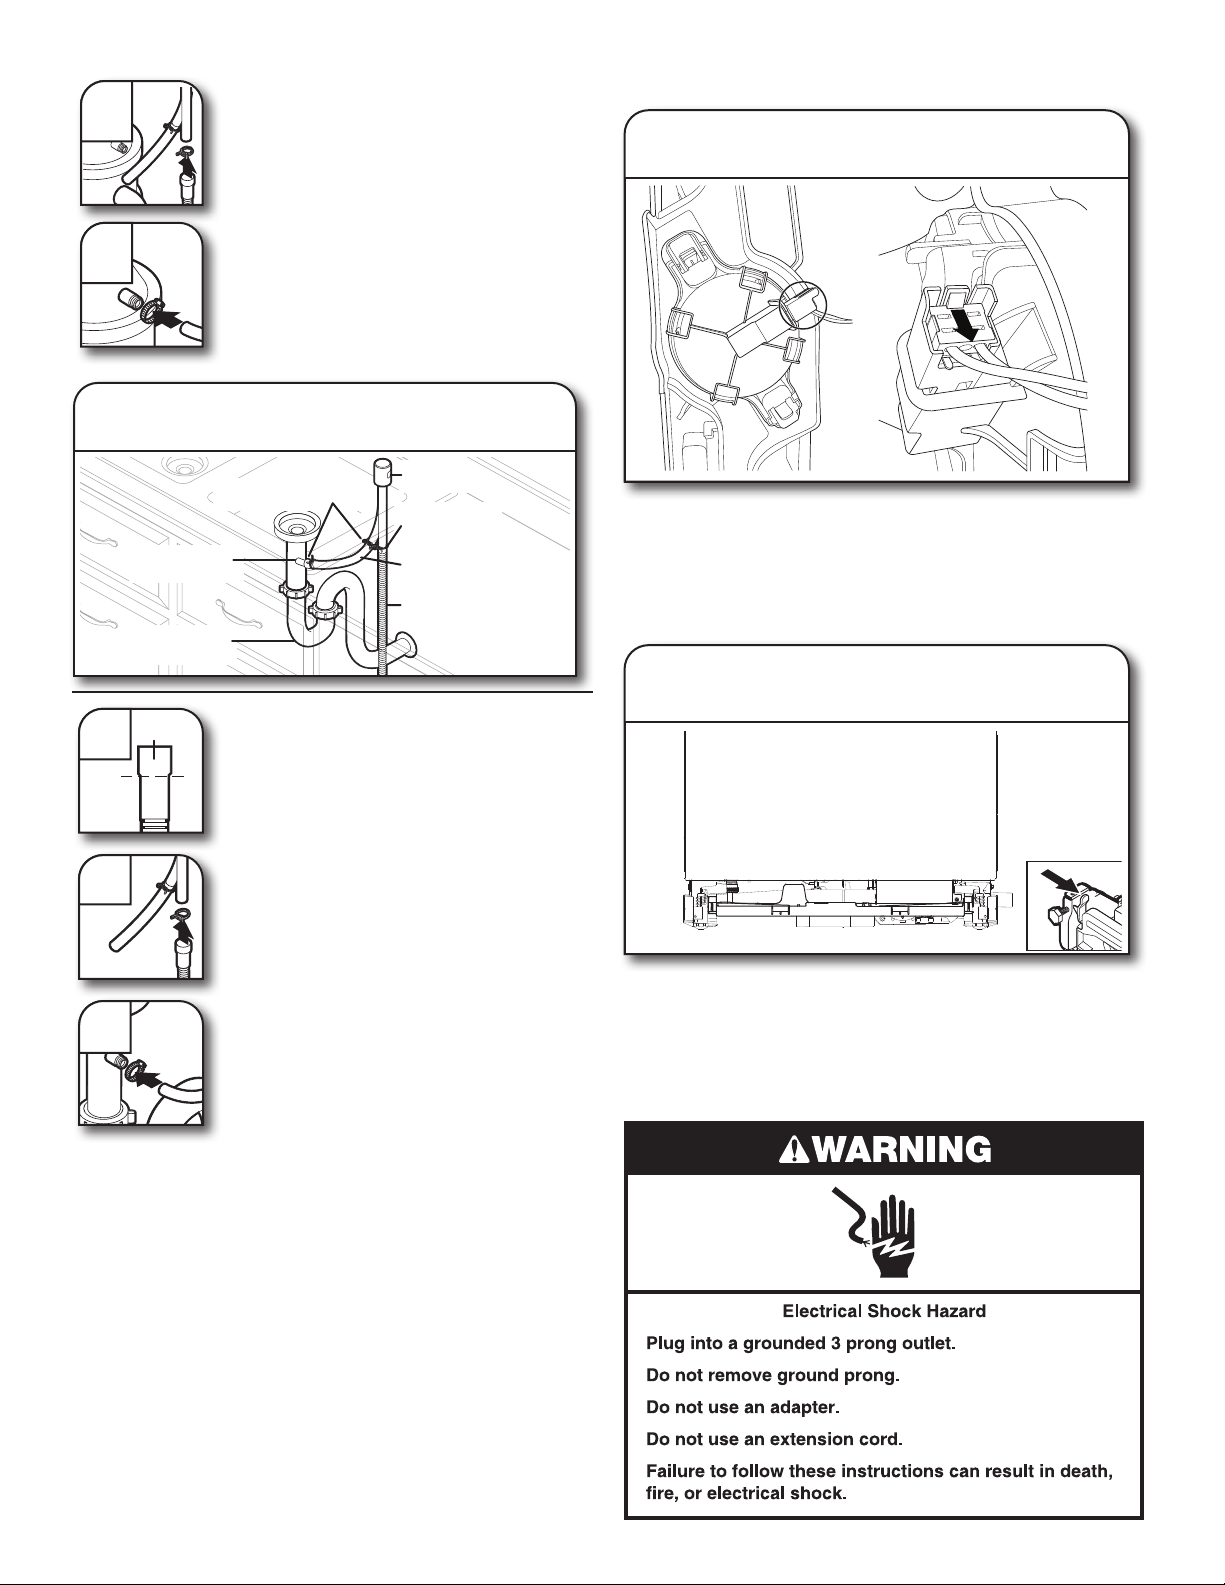
POWER CORD CONNECTION
NOTE: If installing a product with direct wiring, proceed to Step
25, wait to install wiring until after Step 44 when the unit has been
installed in the cabinet opening.
Select UL Listed/CSA Approved power cord for the Dishwasher.
Power Cord Ki
t
Kit typically includes power cord, metallic strain relief,grommet.
(Whirlpool Part Number Cord Kit - Straight - W11365011
Cord Kit - Right Angle - W11365014)
Terminal
box
Drain Hose Location
17. Connect drain hose
Elbow tting
18. Remove terminal box
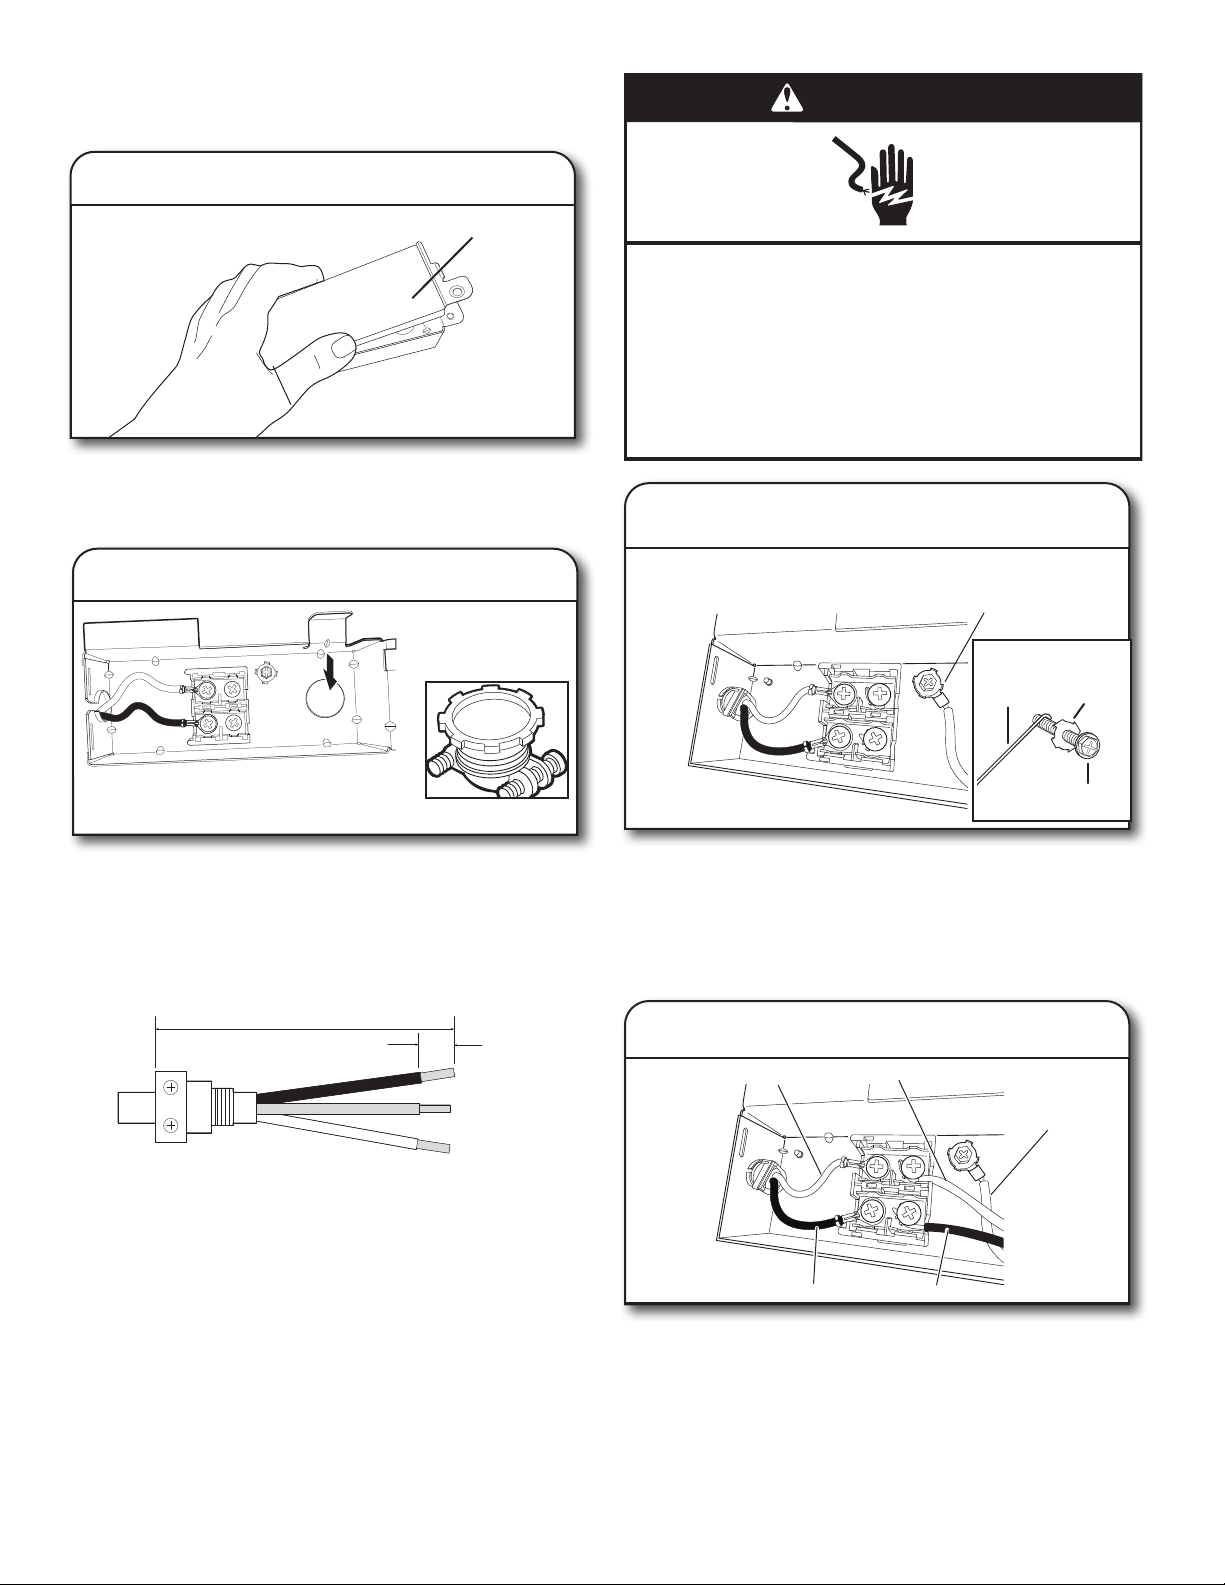
18
To remove the terminal box, depress the plastic latch, slide the
box toward the left of the unit along the metal tube and rotate the
left side of the box forward. Make sure that the product wiring is
still attached within the terminal box.
Using 1/4" (6.4 mm) nut driver remove the screw holding the
terminal box cover. Remove the cover by lifting it out of the box.
Keep the cover for later use.
Install a UL Listed/CSA Approved metallic strain relief. Make
sure screw heads are facing up when tightening conduit nut.
Strain relief is provided with the power cord kit.
Suggested wire length relative to strain relief
WARNING
Electrical Shock Hazard
Electrically ground dishwasher.
Connect ground wire to green ground connector in
terminal box.
Do not use an extension cord.
Failure to follow these instructions can result in death,
fire, or electrical shock.
21. Connect ground wire
Route power cord through strain relief in the back of the terminal
box. Remove the ground connector screw on the raised oor
inside the box and place it through the ring terminal of the green
ground wire of power cord. If wire has no ring terminal, bend a
loop in the end of the wire. See below gures for detailed graphics
to properly terminate product to home wiring. Reattach and tighten
the ground connector screw to the raised oor of the box.
To connect wires with ring terminals, remove the screws from the
terminal block, place the screw through the ring terminals, and
reattach screws back into the terminal block.
To connect wires without ring terminals, remove the screws from
the terminal block. Bend a loop in the end of the wires. Push the
screws through the loop. See below gures for detailed graphics
to properly terminate product to home wiring. Return the screws to
the terminal block. Tighten the screws.
19. Remove terminal box cover
Terminal
box cover
20. Install strain relief
22. Connect remaining wires
0.75" - 1"
(19 mm - 25 mm)
4
1
/2"
(114.3 mm)
Washer
Ground
screw
Ground
wire
Ground
connector screw
White wire
Black wire
Black wire
Ground wire
White wire
19
NOTE: Pre-tinned wires should not be used when connecting to
the terminal block. Ensure black is aligned with black and white is
aligned with white in the terminal block.
Strip insulation and wrap wire
23. Secure cord or wire in strain relief
Tighten strain relief screws to secure cord.
24. Reinstall terminal box cover and wires
Place wires inside terminal box. Replace the cover by inserting
the hooks of the terminal cover into the slots in the oor of the
terminal box and sliding the cover tight against the back wall
where wires come in. Make sure wires are tucked inside the box
and not pinched by the cover.
Put the terminal box back on the crossbar and push to the right
so terminal box snaps into the plastic side member.
NOTES:
■ Do not plug cord into an outlet until instructed to do so.
■ Once the terminal box has been remounted on the dishwasher,
tuck any excess length or slack over nearby components to
help keep them off the oor.
■ Route cord out the rear of the dishwasher so that it does not
touch dishwasher motor or lower part of dishwasher tub.
■ A maximum of 2 power cord supply conductors (12 AWG
largest size) plus 1 grounding conductor are permitted in the
terminal box.
IMPORTANT: No additional connections other than dishwasher
power connection are to be made inside the dishwasher terminal
box.
INSTALL DOOR HANDLE
(ON SOME MODELS)
25. Install door handle
IMPORTANT: Do not scratch the front panel during this
procedure. If door panel has a protective lm, peel lm back past
the point of the handle studs before installing handle. Handle is
easiest to install while unit is on its back.
Wire wrapped two-thirds around
Wire wrapped three-quaters around
Figure: 1
Figure: 2
Figure: 3
Snug Contact
Screw Post
Contact Surface
Contact surface
The stripped wire should always
have a 2/3 to 3/4 wrap around
the screw threads
Hex key
Handle
Setscrew
(in bottom
of handle)
Mounting stud
20
Remove the door handle and hex key from the packaging.
Setscrews are already installed in the handle. Place handle on
mounting studs with the setscrews facing down. Push the door
handle tightly against the door. Insert the short end of the hex key
into the setscrews. Tighten the setscrews 1/4 turn past snug.
Retain hex key with Installation Instructions.
PLACE DISHWASHER IN CABINET
WARNING
Excessive Weight Hazard
Use two or more people to move and install
dishwasher.
Failure to do so can result in back or other injury.
26. Stand dishwasher upright
Using two or more people, stand the dishwasher up.
NOTE: Do not install kick plate until instructed to do so.
Dishwasher may t tightly into cabinet opening. Do not remove
insulation blanket—the blanket reduces the sound level.
IMPORTANT: Do not kink or pinch water line, drain hose, power
cord, or direct wire between dishwasher and cabinet. Remove
cardboard from under dishwasher (if used).
Install Foam Side Shields (on some models)
Install the foam side shields on both the right and left sides of the
dishwasher. There are three attachment points on each side.
■ Attachment 1: Locate the slit on the side shield and attach it
to the hook on the side of the dishwashwe. (See gure 1)
■ Attachment 2: Use the other slit on the side shield and attach
it to the hook on the front of the dishwasher. (See gure 2)
■ Attachment 3: Align the rectangular hole in the side shield
with the toe panel screw hole. Insert the Toe Panel Screw
(see gure 3) and Loosely tighten it to hold it in place until
the Toe Panel is installed.
■ Tuck the lower ends of the side shields under the
dishwasher. (See fugures 4 and 5)
Figure: 1
Figure: 2
Figure: 3
Figure: 4 Figure: 5

21
NOTE: Route water supply, drain hose, and power cord out the
rear of the dishwasher. If your product has insulation around the
bottom, route these lines through the slits in that insulation in the
rear of the product.
27. Move dishwasher close
to cabinet opening
Route the utilities through the holes in the cabinet, and pull
the slack out at the same time as the dishwasher is pushed into
the cabinet.
28. Route power cord
If using a power cord, make sure to route the end through hole
in cutout before sliding dishwasher into the cabinet opening.
29. Secure insulation blanket
NOTE: Make sure insulation blanket is secured at both left and
right rear corners before pushing into cabinet opening to keep the
blanket from bunching up in a tight tting cabinet. The blanket
can be secured by pulling the insulation down toward the bottom
of the product and ensuring the hooks on the side members grab
onto the slots in the insulation blanket.
6"
(15.2 cm)
30. Move dishwasher all but 6" (15.2 cm)
into cabinet opening
■ Place Top Foam Sound Insulation (on some models)
• Snug the top foam into the slot on the top collar of the
dishwasher as shown in the gure.
NOTE: Leave unit about 6" (15.2 cm) out from cabinet in order
to install anchor brackets.
NOTE: Pull slack out of utilities at the same time the dishwasher
is pushed into the cabinet opening to avoid any kinks.
CUSTOM PANEL INSTALLATION
(CUSTOM PANEL MODELS ONLY)
For custom panel installation, refer to the Custom Panel
Installation Instruction Sheet included in the literature package.
Complete custom panel installation before proceeding to the
“Choose Anchor Attachment Method” section.
CHOOSE ANCHOR ATTACHMENT METHOD
IMPORTANT: The dishwasher must be secured to the cabinet
as one of the nal steps. Prepare the dishwasher for this by
attaching the 2 brackets found in the parts bag to the dishwasher.
– For countertops that are wood, laminate or another similar
surface: use Countertop Attachment and go to Step 32.
– For countertops that are marble, granite, or another hard
surface: use Side Attachment and go to Step 33.
NOTE: If the gap between the top of the door and the underside
of the counter top is tight (less than 1/4" [6.35 mm]), we suggest
using Side Attachment to keep from scratching the User Interface
or console with the anchor screws.
Water
line
Drain
hose
Cable
Secure
blanket
Insulation
blanket
31. Pull slack from utilities
22
Countertop Attachment:
Remove the brackets from the package, and insert into the open
slots on the left- and right-hand top of the dishwasher collar as
shown.
Counter top attachment
Using pliers, bend/twist tab to lock the brackets in place.
Side Attachment:
Break off the end of the bracket along the scored line using
pliers. Use sandpaper to smooth any burrs.
34. Install bracket for Side Attachment
Push bracket into slot on the side of dishwasher, and bend tab in
toward the side of the dishwasher so that it keeps the bracket in
place. Repeat this step for the other side of the dishwasher.
NOTE: Install wood shims to the inside of the cabinets if the gap
between the sides of the cabinet and the sides of the dishwasher
are greater than 1/2" (1.3 cm) on each side.
NOTE: Do not attach the dishwasher. This will be done later.
FINAL INSTALLATION CHECK
35. Open and close door
36. Align front of dishwasher with front of
cabinet doors
Align front of dishwasher door panel with front of cabinet doors.
You may need to adjust alignment to be even with your cabinets.
32. Insert bracket
Tabs must point
to the right.
32a.
33. Break end of bracket for side
attachment
Top score
line for
stainless
steel tubs
Bottom
score line
for plastic
tubs
Bend
tabs
23
37. Check for plumb and adjust legs if
needed
■ Check that leveling legs are rmly against the oor. Close and
latch the door and place level against the front panel. Check
that dishwasher is centered from front to back in the opening.
If needed, adjust leveling leg until dishwasher is plumb. Repeat
for other side of dishwasher.
■ With dishwasher plum check that racks do not roll out on their
own when you open the door. Adjust front level legs until racks
no longer roll unless you pull them.
Helpful Tip: Push up on front of dishwasher to raise dishwasher
off the ground to adjust front legs. With some installations, it may
be easier to adjust the front leg using a 7 mm hex head socket
or adjustable wrench. If the gap between the top of the door and
the underside of the counter top is tight (less than 1/4" [6 mm]),
we suggest side anchoring to keep from scratching the User
Interface or console.
Level front legs
38. Check level side to side and adjust
legs if needed
Place level against top front opening of tub. Check that
dishwasher is level from side to side. If dishwasher is not level,
adjust front legs up or down until dishwasher is level.
SECURE DISHWASHER IN CABINET
OPENING
39. Double-check dishwasher alignment
in cabinet opening
Check that dishwasher is still level front to back and side-to-side
in the cabinet opening.
Open dishwasher door and place towel over pump assembly and
spray arm of dishwasher. This will keep screws from falling into
pump area when you are securing dishwasher to cabinet.
Open dishwasher door to prepare for securing the dishwasher
to the countertop or side cabinet.
NOTES:
■ The dishwasher must be secured to keep it from shifting when
the door is opened or closed.
■ Do not drop screws into bottom of dishwasher.
■ Locate brackets installed in the “Choose Anchor Attachment
Method” section, either on top or on the sides of the dishwasher.
■ If countertop anchoring: Secure dishwasher to the countertop
with two Phillips-head screws (included).
■ If side anchoring: Drill 7/32" pilot holes in cabinet to avoid
splitting the wood. Secure dishwasher to cabinet with two
Philips-head screws (included). Remove second rack for
easier access. See the Dishwasher Loading Tips section for
instructions on how to remove the second rack if needed.
Screw to side
cabinet
40. Secure dishwasher
Optional methodPreferred method
24
41. Check door clearance
IMPORTANT: Check that top of door does not contact screws,
brackets, or countertop. If it does, adjust leveling legs or use the
side attachment option.
42. Check inner spacing
Open door and check that space between dishwasher cabinet
opening and tub is equal on both sides. If spacing is not equal,
loosen bracket screws and shift tub. Tighten bracket screws.
43. Direct Wire Connection
CONNECT WATER LINE TO HOUSE
SHUT-OFF VALVE
NOTE: If using a exible braided hose, replace inlet hose after 5
years to reduce the risk of hose failure. Record hose installation
or replacement dates on the hose for future reference.
44. Attach water supply line
Attach the water supply line (copper tubing or exible braided
line) to the hot water line using a connection conguration that is
in compliance with local codes and ordinances. The water supply
to the dishwasher should have a manual shut-off valve located
under the sink. Turn water valve on after attaching water supply
line.
CONNECT DRAIN HOSE
45. Connect drain hose
IMPORTANT: The drain hose connection of the disposer or a
waste tee must be made before the drain trap and at least
20" (50.8 cm) above the oor where the dishwasher will be
installed.
Helpful Tip: To reduce vibration of the hose, keep the hose away
from the oor.
NOTE: Use the red clamp provided to connect the drain hose to
the customer connection - plumbing or garbage disposal.
Connect drain hose to waste tee or waste disposer using
one of the following options:
■ Option A: Waste disposer – no air gap
■ Option B: No waste disposer – no air gap
■ Option C: Waste disposer – with air gap
■ Option D: No waste disposer – with air gap
To complete direct wire connection. Complete Steps 18 to
24 in this installation guide.
Once complete, return here to Step 44 to complete Product
Installation.
25
Option A: Waste disposer—no air gap
Disposer inlet
Large drain
hose clamp
Drain hose
Drain trap
Helpful Tip: Remove disposer knockout plug.
1
1. Using a hammer and screwdriver, knock
plug into disposer.
2
2. Use needle-nose pliers to remove plug.
3
3. Attach drain hose to disposer inlet with
large drain hose clamp (provided). Use
pliers to squeeze clamp open and move
into position.
Option B: No Waste disposer—no air gap
Waste tee
Large drain
hose clamp
Drain hose
Drain trap
1
Rubber
end
1. Fit rubber end of drain hose
towastetee.
2
2. Attach rubber end of drain hose to
waste tee with a large drain hose clamp
(provided). Use pliers to squeeze clamp
open and move into position.
Helpful Tip: Remove disposer knockout plug.
1. Using a hammer and screwdriver, knock
plug into disposer.
2. Use needle-nose pliers to remove plug.
3. Connect rubber end of drain hose
toairgap.
Option C: Waste disposer – with air gap
Large drain
hose clamp
Drain hose
Screw-type clamps
Air gap
Rubber hose
connector
Drain trap
Disposer inlet
1
2
Rubber
end
3
26
4
4. Attach drain hose to air gap with large
drain hose clamp (provided). Use pliers
to squeeze clamp open and move into
position.
5
5. Use a rubber hose (not provided) with
screw-type clamps to connect from air
gap to disposer inlet.
1. Connect rubber end of drain hose
toairgap.
2. Attach drain hose to air gap with large
drain hose clamp (provided). Use pliers
to squeeze clamp open and move into
position.
3. Use a rubber hose (not provided) with
screw-type clamps (not provided) to
connect from waste tee to air gap.
Option D: No waste disposer –
withairgap
Large drain
hose clamp
Drain hose
Screw-type clamps
Air gap
Rubber hose
connector
Drain trap
Waste tee
1
Rubber
end
2
3
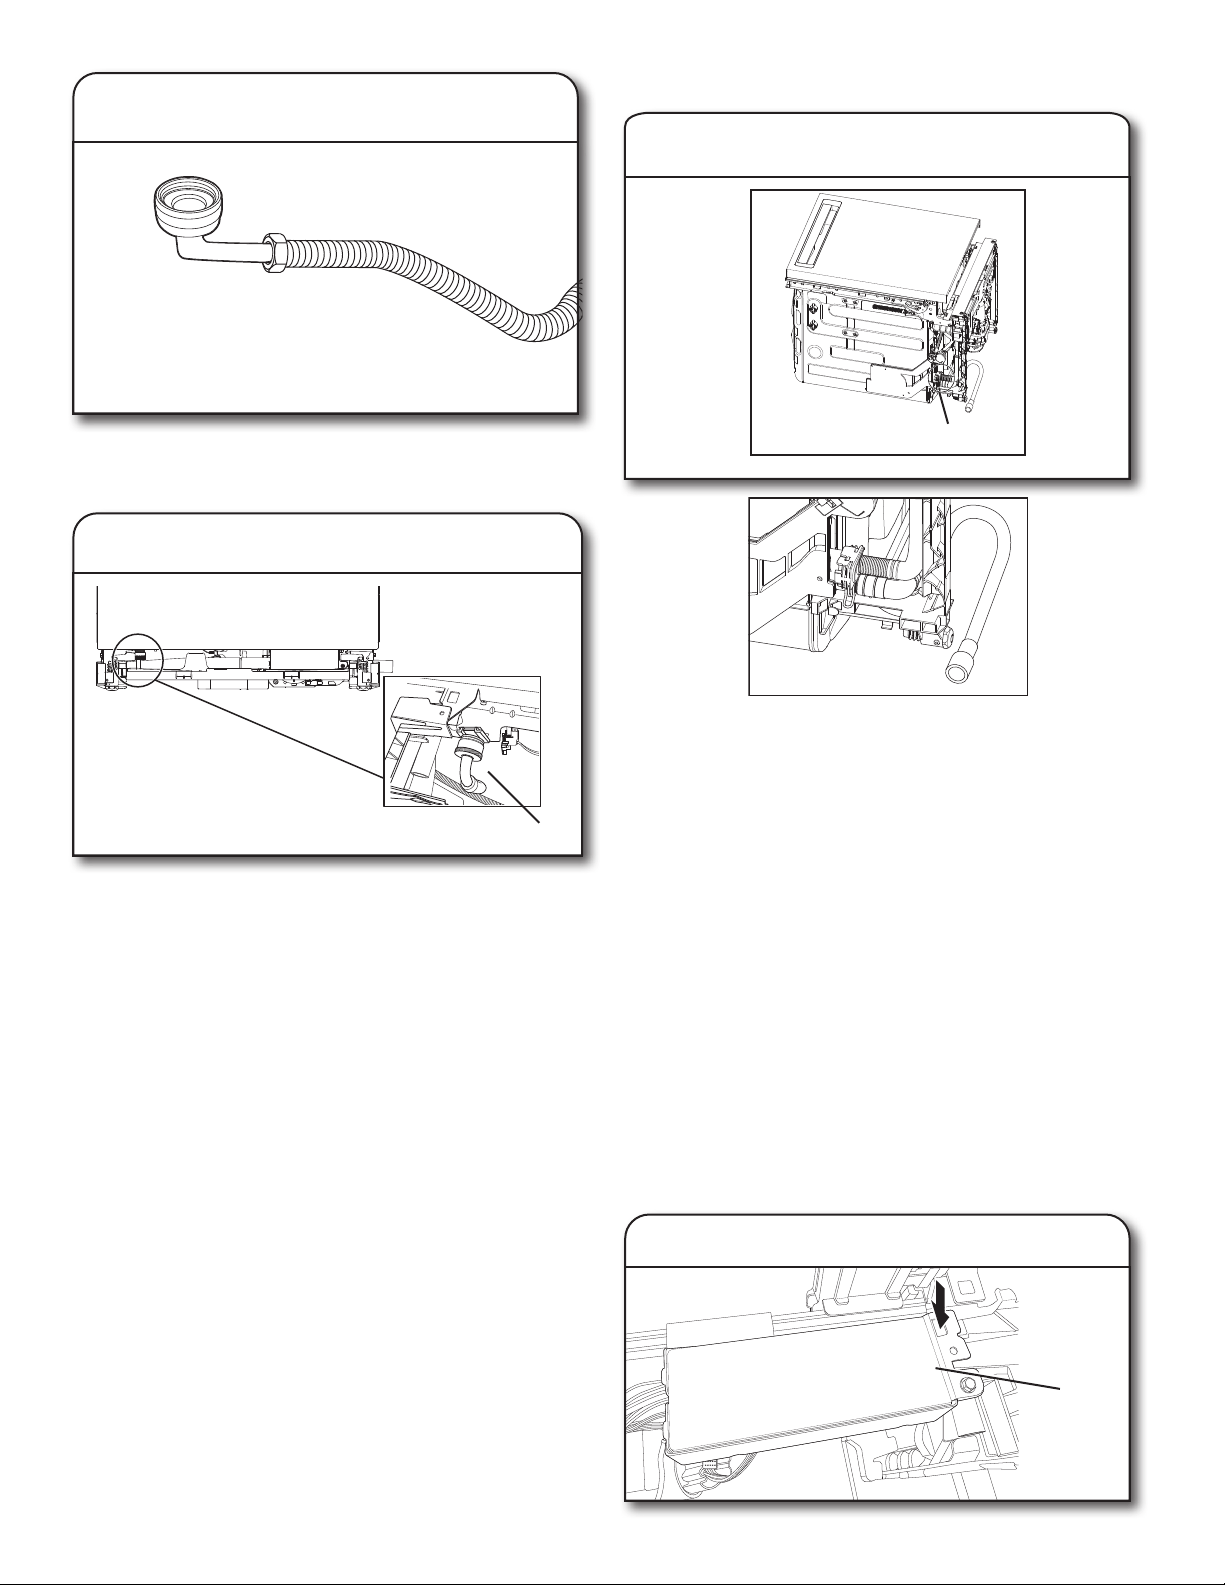
COMPLETE INSTALLATION
Check that the power supply wire or cord does not touch
dishwasher motor or the lower part of the dishwasher tub.
Reconnect oat switch by aligning connector removed in Step 10
with the connector housing and pushing in until the locking tab is
visible over the back of the connector.
NOTE: Before replacing the dip tray, ensure that there is no water
present in the tray.
To replace drip tray, align with snaps in side members and push
in toward unit. It is important that the black hoses are above the
drip tray on both ends once it is pushed all of the way in.
46. Reconnect oat switch
47. Replace drip tray
27
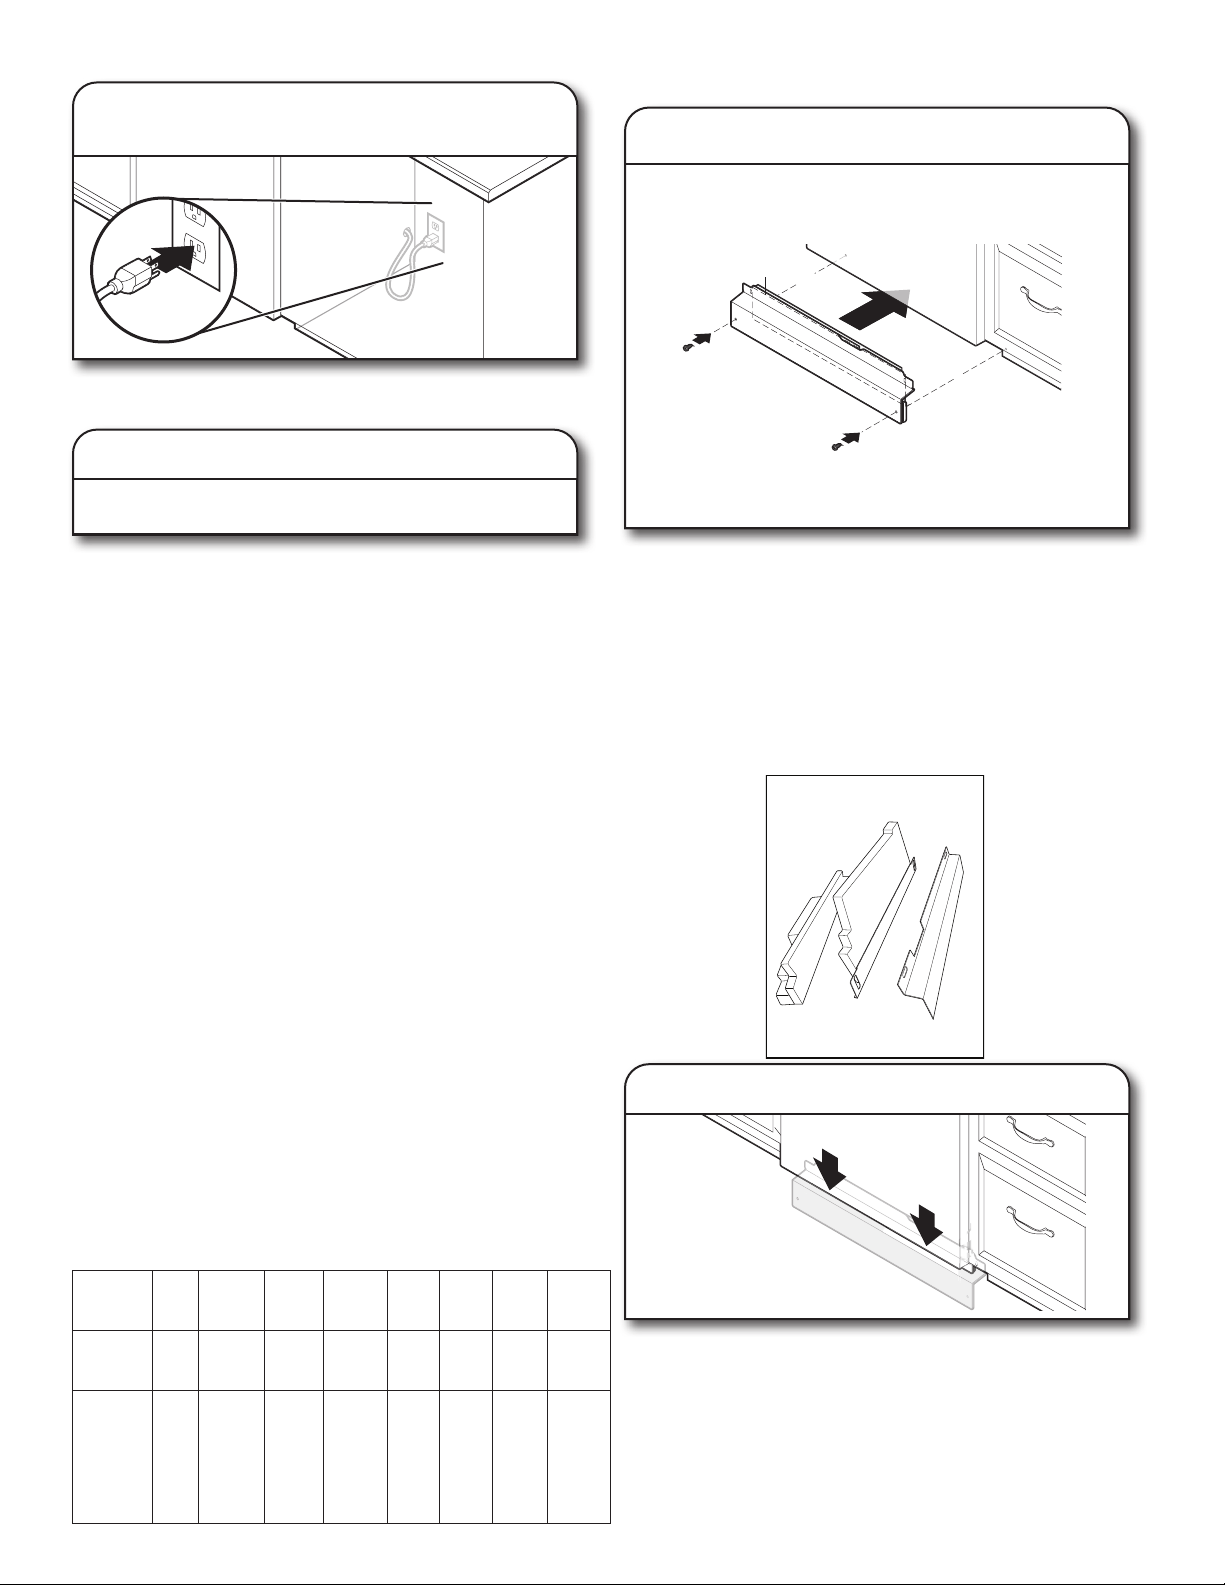
48. Power supply cord—Plug into
a grounded 3 prong outlet
Plug into a grounded 3 prong outlet.
49. Reconnect power
Reconnect electrical power at the fuse box or circuit
breaker box.
NOTE: With the access panel off, start the dishwasher and allow
it to complete the shortest Installation Cycle while checking unit
for leaks. See instructions on this manual under Check Operations
section.
CHECK OPERATION
■ Read the dishwasher Quick Start Guide that came with your
dishwasher.
■ Check that all parts have been installed and no steps were
skipped. Check that you have all tools used.
■ Run the Installation Cycles as follows (Note that it can be
benecial to run this with the access panel removed in order
to look for presence of water under the unit. If running in this
state, the oat switch wire MUST still be connected to the oat
switch.)
■ If the dishwasher is not working properly, disconnect power
or unplug dishwasher and refer to the “If Dishwasher Does Not
Operate” section.
■ Press any 3 keys (except Delay or Cancel) in the sequence
1-2-3-1-2-3-1-2-3 with no more than 1 second between key
presses to enter the Installation cycle then press button #2.
■ Close the door and the cycle will start.
■ All LEDs turn on immediately upon receiving entry sequence.
■ A tone may play depending on the model.
■ The cycle will pause when the door is opened and resume
when closed.
■ No Start/Resume key press required to resume.
■ The installation cycle may last several minutes.
■ Press Cancel key to exit installation cyle mode. The product
will exit this mode after 10 minutes or if power is removed from
the appliance.
■ If any error codes or blinking lights are found, see Error Code
section in this Manual prior to calling for service.
NOTE: It is normal for the drain pump to sound loud upon the
rst run since no water is present in the system.
Numeric
Display
All
LEDs
on 1 2 3 4
5
(Some
models 6 7
Approximate
interval
Time 0:01
0:30
(Maximum
5:00) 2:00 0:20 0:20 0:20 0:30
1:00
(Maximum
5:00)
Machine
Action
Pause
Initial
Drain
Fill 3.8
L+
Wash
motor
pulses
Wash+
Dispenser
(Middle
spray
pulses
arm)
Wash+
Fan
(Ceiling
spray
arm)
Wash+
Third
Level
Rack. If
present
in this
model
Wash+
Heater
(Lower
spray
arm)
Drain
Pracess
INSTALL ACCESS PANELS
Insulation
(on some models)
50. Reinstall access panels and fasteners
Place the toe panel behind the access panel against the
dishwasher leg. If insulation is included on this model, make sure
insulation does not interfere with the oat assembly. Push the
access panel up toward the top of the product so that it hangs on
the hooks on the plastic side members.
■ Reinstall the toe/access panel assembly, with side shield
between the toe/access panel assembly and the side member.
Align the rectangular slot in the foam and assemble the toe/
access panel assembly to the unit using the screw.
NOTE: Remove lm on door Score around door for easier
removal.
Check that the lower edge of the access panel touches the oor.
Adjust if necessary.
51. Check access panel edge
28
Use a 5/16" nut driver to reinstall the screws through the holes in
the access panels.
IF DISHWASHER DOES NOT OPERATE
First try the solutions suggested here to possibly avoid the cost
of a service call.
■ Has the circuit breaker tripped or the house fuse blown?
■ Is the door closed tightly and latched?
■ Has the cycle been set correctly to start the dishwasher?
■ Is the water turned on?
■ Is the oat switch wire under the product connected to the oat
switch?
■ Make sure control lock is not on.
If none of these possible solutions work, please see the Quick
Start Guide for service contact information.
52. Reinstall access panels
29
Risque possible de décès ou de blessure grave si vous ne
suivez pas immédiatement les instructions.
Risque possible de décès ou de blessure grave si vous
ne suivez pas les instructions.
Tous les messages de sécurité vous diront quel est le danger potentiel et vous disent comment réduire le risque de blessure et
ce qui peut se produire en cas de non-respect des instructions.
Votre sécurité et celle des autres est très importante.
Nous donnons de nombreux messages de sécurité importants dans ce manuel et sur votre appareil ménager. Assurez-vous de
toujours lire tous les messages de sécurité et de vous y conformer.
AVERTISSEMENT
DANGER
Voici le symbole d’alerte de sécurité.
Ce symbole d’alerte de sécurité vous signale les dangers potentiels de décès et de blessures graves à vous
et à d’autres.
Tous les messages de sécurité suivront le symbole d’alerte de sécurité et le mot “DANGER” ou
“AVERTISSEMENT”. Ces mots signifient :
■
Pour un lave-vaisselle relié à la terre, branché
avec un cordon :
Le lave-vaisselle doit être relié à la terre. En cas d'un
mauvais fonctionnement ou d'une panne, la mise à
terre réduira le risque d'un choc électrique en
fournissant le moins de résistance pour le courant
électrique. Le lave-vaisselle est équipé d'un cordon
avec un conducteur pour relier les appareils à la
terre. La fiche doit être branchée sur une prise
appropriée, installée et reliée à la terre conformément
aux codes et règlements locaux.
AVERTISSEMENT :
La connexion incorrecte du conducteur
pour relier les appareils à la terre peut causer le risque de choc
électrique. Vérifier avec un électricien compétent ou un représentant
de service si vous avez des doutes si le lave-vaisselle est
correctement relié à la terre. Ne pas modifier la fiche fournie avec le
lave-vaisselle; si elle n'entre pas dans la prise, faire installer une prise
appropriée par un électricien compétent.
■
Pour un lave-vaisselle branché en permanence :
Le lave-vaisselle doit être branché à un système d'installation
électrique permanent en métal relié à la terre, ou un conducteur pour
relier les appareils à la terre doit être relié avec les conducteurs du
circuit et branché à une borne pour relier les appareils à la terre ou au
cordon d'alimentation électrique avec le lave-vaisselle.
INSTRUCTIONS DE MISE À LA TERRE
CONSERVEZ CES INSTRUCTIONS
CONSERVERCESINSTRUCTIONS
IMPORTANTESINSTRUCTIONSDESÉCURITÉ
AVERTISSEMENT:
Lorsdel’utilisationdecelave‐vaisselle,ilconvient d’observercertainesprécautionsfondamentales,dont:
Liretouteslesinstructionsavantd’utiliserlelave‐vaisselle.
Utiliserlelave‐vaisselleuniquementpourlaverdelavaisselle.
Utiliserseulementdesdétergentsetagentsderinçage
recommandéspour leslave‐vaisselle.Gardercesproduits
horsdelaportéedesenfants.
Lorsduchargementd’articlesàlaver:
1)Placerlesarticlescoupantspourqu’ilsnerisquentpas
d’endommagerle jointdelaporte;et
2)Placerlescouteauxpoignéeverslehautpourréduire
lesrisquesde blessure.
Nepaslaverd’articlesenplastique,saufs’ilestindiqué«lavable
aulave‐vaisselle»ouunementionéquivalente. Pourlesarticles
enplastiquequinesontpasainsiidentifiés,vérifierles
recommandationsdufabricant.
Nepastoucherlesélémentschauffantspendantou
immédiatementaprès l’utilisation.
Nepasmettreenmarchelelave‐vaissellesiunpanneaude
l’enceinten’est pascorrectementinstallé.
Nepaseffectuerd’interventionnonautoriséesurlescommandes.
Ne pas laisser le lave-vaisselle ouvert si aucune vaisselle n’est
chargée ou déchargée.
Nepasabuserde,s’asseoirsurousemettredeboutsurlaporte,
le couvercleoulespaniersàvaisselledulave‐vaisselle.
Nepasutiliserdepiècesderemplacementquin’ontpasété
recommandéesparlefabricant(c.‐à‐d.,piècesfabriquéesà
la maisonà l’aided’uneimprimante3D).
Pourréduirelesrisquesdeblessure,nepaslaisserlesenfants
jouerdans ouprèsdulave‐vaisselle.
Danscertainesconditions,unsystèmed’eauchaudequin’apas
étéutilisé depuis2semainesoupluspeutproduiredel’hydrogène.
L’HYDROGÈNE ESTUNGAZEXPLOSIF.Silesystèmed’eau
chaudeestrestéinutilisé pendantunetellepériode,ouvrirtousles
robinetsd’eauchaudeetlaisser l’eaus’enécoulerpendant
plusieurs minutesavantd’utiliserlelave‐vaisselle.Cecilibéreratoute
accumulationd’hydrogène.Legazest inflammable:nepasfumer
ouutiliseruneflammenuedurantcette période.
Ce produit est conçu uniquement pour un usage résidentiel.
Ce produit ne convient pas à une utilisation par des personnes (y
compris des enfants) dont les capacités physiques, sensorielles ou
mentales sont différentes ou réduites ou qui ne possèdent pas
l’expérience ou les connaissances, à moins d’être supervisées ou
d’avoir reçu des instructions concernant l’utilisation de l’appareil par
une personne responsable de leur sécurité.
Enleverlaporteoulecouvercleducompartimentdelavage
lorsqu’on cessed’utiliserunvieuxlave‐vaisselleouqu’onlejette.

30
ENTRETIEN DU LAVE-VAISSELLE
Détergents
Pour de meilleurs résultats, utiliser des pastilles et des sachets
prémesurés de qualité supérieure.
Il est prouvé que les pastilles ou sachets de qualité réduisent
plus efficacement la formation de pellicule sur la vaisselle que
les détergents liquides, en poudre ou en gel. Grâce à l’utilisation
régulière de pastilles et sachets, la pellicule blanche commencera
à diminuer ou à disparaître. Ces formats conviennent
parfaitement, peu importe la dureté de l’eau et le niveau de
saleté. L’utilisation d’un agent de rinçage peut aussi contribuer à
réduire la formation de pellicule blanche (les pastilles et sachets
ne contiennent pas tous un agent de rinçage). Toujours placer les
détergents prémesurés dans le compartiment principal et fermer
le couvercle.
Le témoin de prélavage situé sur le dessus du couvercle du
distributeur convient aux personnes qui utilisent un détergent
en poudre ou en gel et qui souhaitent ajouter une quantité de
détergent au programme de prélavage. La quantité de détergent
ajoutée ici est d’environ 8 cm
3
, si rempli au complet et de niveau.
Tout détergent ajouté ici sera immédiatement distribué pour le
lavage lorsque le programme commence, ce qui n’est pas le cas
du détergent se trouvant dans le distributeur, lequel est ajouté
pendant le programme de lavage principal.
REMARQUE: Lors de l’utilisation d’un autre type de détergent,
procéder conformément aux instructions indiquées sur
l’emballage.
■ Utiliser uniquement du détergent pour lave-vaisselle
automatique. Verser le détergent juste avant de démarrer un
programme.
■ Pour de meilleurs résultats de lavage, il est recommandé
d’utiliser un détergent à lave-vaisselle automatique frais.
Conserver le récipient du détergent bien fermé dans un lieu sec
et frais.
■ Les dépôts minéraux provenant d’une eau très dure (au moins
15 grains par gallon américain) peuvent endommager le lave-
vaisselle et rendre un bon nettoyage difficile. On recommande
l’emploi d’un adoucisseur d’eau pour éviter tout dommage et
obtenir de bons résultats.
■ Pour obtenir plus de renseignements sur les détergents en
poudre, liquides ou en gel et sur la présence d’eau dure,
consulter le site Web de la marque.
Agent de rinçage
Utiliser un agent de rinçage pour une performance de lavage et
de séchage optimale. Afin d’améliorer la performance de séchage
et de limiter l’accumulation de dépôts d’eau dure, ce lave-
vaisselle est spécifiquement conçu pour être utilisé avec un agent
de rinçage. L’agent de rinçage doit être ajouté au produit tous les
1 à 3 mois, selon l’utilisation.
Consulter le guide de démarrage rapide ou le site Web de la
marque pour obtenir des renseignements au sujet du remplissage
du distributeur d’agent de rinçage.
Sélection du programme et de la consommation
d’énergie
Les lave-vaisselle éconergiques fonctionnent plus longtemps
pour économiser de l’eau et de l’énergie, tout comme une vitesse
de conduite réduite permet d’économiser du carburant. La durée
normale d’un programme est d’environ 2
1
/
2
heures, mais ce
temps peut varier en fonction des sélections effectuées, de la
température de l’eau à l’entrée et du niveau de saleté des plats.
Pour obtenir un rendement optimal, le lave-vaisselle devrait être
raccordé à une canalisation d’eau chaude à 120°F (49°C).
Si on appuie d’abord sur le bouton Start (mise en marche) le
programme avec capteur principal et séchage avec chaleur sera
automatiquement sélectionné. Ce programme détecte la quantité
et la dureté de la saleté afin de modifier le programme pour
obtenir un nettoyage de qualité.
Sanitize ou Sani (assainissement)
Assainit la vaisselle et la verrerie conformément à la norme
internationaleNSF/ANSI184 pour lave-vaisselle à usage
domestique. Les lave-vaisselle à usage domestique certifiés ne
sont pas destinés aux établissements de restauration agréés.
Seuls les programmes d’assainissement ont été conçus pour
répondre aux exigences de la norme NSF/ANSI184 pour
l’élimination de la saleté et l’efficacité de l’assainissement. Tous
les programmes d’un lave-vaisselle homologué NSF/ANSI184
n’ont pas été conçus dans l’objectif direct ou indirect de
répondre aux exigences de la norme NSF/ANSI184 pour
l’élimination de la saleté et l’efficacité de l’assainissement. À la
fin du programme, le témoin indicateur Sani Rinse (rinçage avec
assainissement) s’allume si l’option Sani Rinse (rinçage avec
assainissement) a fonctionné correctement. Si le témoin ne
s’active pas, cela est probablement dû au fait que le programme
a été interrompu.
Risque de basculement
Ne pas utiliser le lave-vaisselle jusqu’à ce qu’il soit complètement installé.
Ne pas appuyer sur la porte ouverte.
Le non-respect de ces instructions peut causer des blessures graves ou des coupures.
AVERTISSEMENT
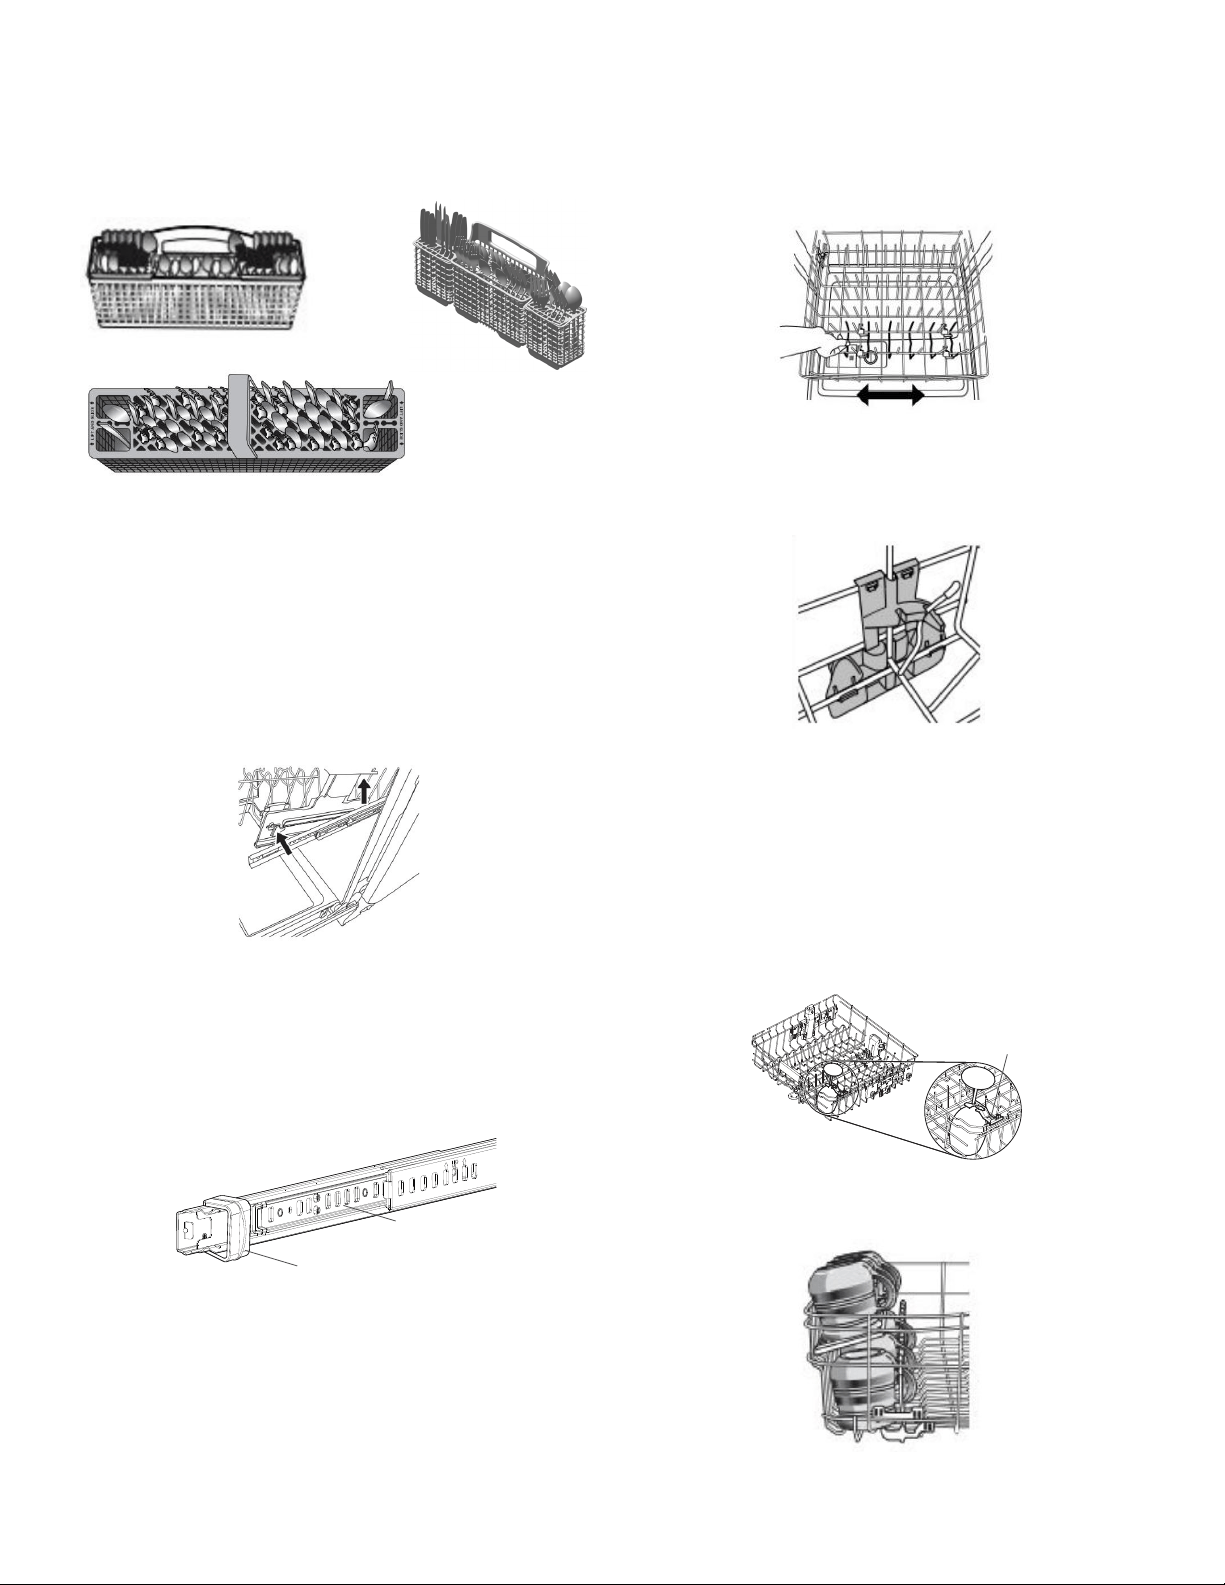
31
CONSEILS DE CHARGEMENT DU LAVE-VAISSELLE
REMARQUE: Les caractéristiques sont spécifiques aux modèles. Votre lave-vaisselle peut ne pas comporter toutes les
caractéristiques indiquées. Voir les guides de démarrage rapide pour connaître les moyens de chargement possibles du lave-vaisselle
pour tous les paniers à vaisselle.
Panier à couverts
Utiliser les couvercles du panier à couverts pour fournir
un espace optimal et le meilleur rendement de nettoyage.
REMARQUE: Si vos couverts ne conviennent pas aux encoches
prévues, ouvrir les couvercles (style1/3) ou soulever les bouts
des couvercles et les tirer pour les enlever (style2). Varier les
types de couverts pour les maintenir séparés. Pour de meilleurs
résultats de lavage, charger les couteaux vers le bas, les
fourchettes vers le haut et alterner la position des cuillères.
Enlever les paniers supérieurs
Pour faire de l’espace pour les grands articles, les paniers du
haut sont amovibles. La façon de les enlever dépend du style1
ou 2 d’installation. Retirer les plats avant d’enlever les paniers.
Pour retirer un panier, le tirer à moitié à l’extérieur de la cuve.
D’un côté, appuyer sur l’onglet de la glissière et tirer l’avant du
panier hors des glissières. Répéter ensuite cette étape de l’autre
côté pour retirer complètement l’avant du panier. Enlever ensuite
le panier en tirant l’arrière vers l’avant et le haut.
Pour replacer un panier, le repousser sur les rails, puis abaisser le
devant.
Pour enlever un panier, le tirer jusqu’à ce qu’il s’arrête. Sur les
côtés gauche et droit du panier, pousser sur les côtés les butées
d’arrêt en plastique situées à l’avant des rails pour les ouvrir.
Retirer le panier.
Pour replacer un panier, le replacer sur les rails. Refermer les
butées des rails.
Tiges coulissantes pour bols
Les tiges coulissantes pour bols permettent de facilement
charger des bols de tailles différentes. Tenir la rangée de tiges du
panier inférieur et la faire glisser à la position souhaitée.
Tiges rabattables
Les tiges rabattables permettent d’optimiser l’espace dans le
panier. Les tiges rabattables peuvent se situer dans le panier
inférieur, du milieu ou supérieur, selon le modèle. Pour coucher
ou redresser les tiges, tenir la tige le plus près possible de la
pince située à la fin d’une rangée et la pousser doucement au-
delà de la butée de la pince, dans la direction souhaitée.
Porte-verres à pied
Utiliser le porte-verres à pied pour les verres à vin et autres verres
à pied. Les pousser vers le haut pour qu’ils ne dérangent pas
lorsqu’ils ne sont pas utilisés.
Tablettes pour tasses
Utiliser la tablette pour laver plus de tasses ou de petits articles. Les
pousser vers le haut pour les replier lorsqu’ils ne sont pas utilisés.
Style1
Style2
Style1
Style2
Porte-verres à pied
Pannier
Buttée
Style3
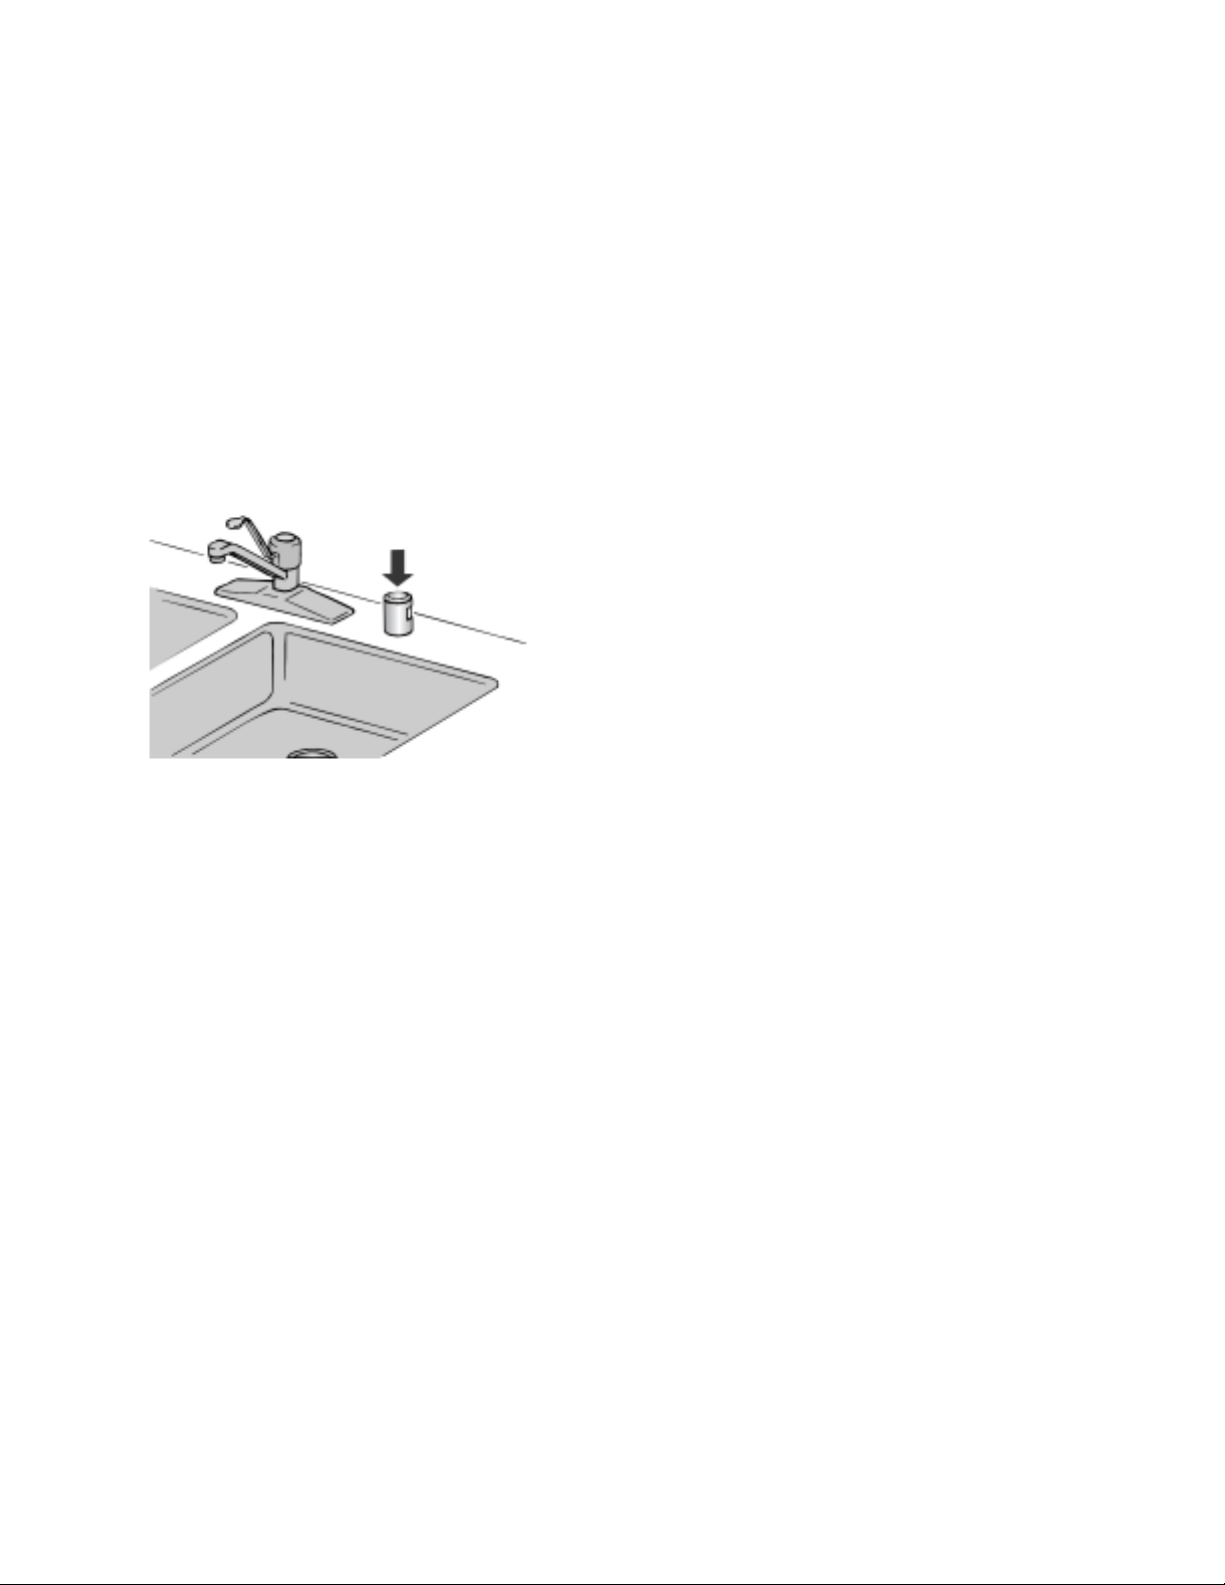
32
ENTRETIEN DU LAVE-VAISSELLE
Nettoyage de l’intérieur
Plusieurs détergents peuvent laisser des taches ou résidus
blancs sur la vaisselle ou l’intérieur du lave-vaisselle. Avec le
temps, ces résidus peuvent devenir indésirables et nuire au bon
fonctionnement du lave-vaisselle. Utiliser un produit comme
le nettoyant pour lave-vaisselle affresh
®
peut aider à éliminer
ces résidus. Une utilisation mensuelle du nettoyant pour lave-
vaisselle affresh
®
est recommandé pour aider à entretenir le lave-
vaisselle. Suivre les indications sur l’emballage.
REMARQUE: Nous recommandons des pastilles ou des sachets
de détergent prémesuré de grande qualité, ainsi que de l’agent
de rinçage pour effectuer le nettoyage du lave-vaisselle et pour
une utilisation quotidienne.
Brise-siphon de comptoir
Inspecter et nettoyer le dispositif anti-refoulement, le cas
échéant, si le lave-vaisselle ne se vidange pas correctement.
Période d’inutilisation prolongée
Pour réduire le risque de dommages matériels durant les
vacances ou une période d’inutilisation prolongée
■ Si l’on n’utilise pas le lave-vaisselle pendant l’été, couper
l’arrivée d’eau et l’alimentation électrique du lave-vaisselle.
■ S’assurer que les tuyaux d’alimentation en eau sont protégés
contre le gel. La formation de glace dans les canalisations
d’arrivée d’eau peut entraîner une élévation de la pression en
eau et endommager le lave-vaisselle ou le domicile.
■ La garantie de l’appareil ne couvre pas les dommages
imputables au gel.
■ Lors du remisage du lave-vaisselle pendant l’hiver, éviter tout
dommage lié à l’eau en faisant hivériser le lave-vaisselle par un
fournisseur de services agréé.
Nettoyage des surfaces externes
Nettoyer l’extérieur du lave-vaisselle avec un chiffon doux
et humide et un détergent doux. Ne pas utiliser de produits
nettoyants abrasifs sur la surface extérieure du lave-vaisselle.
Les produits de nettoyage abrasifs peuvent endommager le fini.
Dépannage
Le site Web de la marque indiqué dans le guide de démarrage
rapide propose des informations détaillées pour dépanner
la majorité des problèmes que rencontrent les clients. Ces
informations peuvent aider à économiser le coût d’une
intervention de dépannage.
Tasse à corps étrangers
Si la tasse à corps étrangers est pleine, le guide de démarrage
rapide ou le site Web de la marque mentionné dans le guide de
démarrage rapide donnent des renseignements détaillés sur la
façon de la vider.
33
MENU DE RÉGLAGE DU LAVE-VAISSELLE:
Suivre les instructions suivantes pour accéder au menu et modifier les réglages actuels.
Menu
Affiche le
texte (s’il y a
un affichage)
Motif de DEL (s’il n’y a pas
d’affichage)
Ce que ce réglage fait
Réglage
par défaut
PROWASH
(lavage
Pro) OU
SENSOR
(capteur)
TOUGH
(tenace) OU
COOKWARE
(ustensiles
de cuisine)
NORMAL
Niveau d’agent
de rinçage
A X
Règle la quantité d’agent de rinçage
distribuée
Sous-menu de
niveau d’agent
de rinçage
A 0 X X X 0mL – pas d’agent de rinçage
A 1 X 1,3mL
A 2 X 2,6mL
A 3 X X 3,9mL X
A 4 X 5,2mL
A 5 X X 5,2mL
A 6 X X 5,2mL
Niveau sonore S X X Met en marche et arrête le son
Sous-menu de
niveau sonore
S1 X Sound On (sons activés) X
S0 X Sound Off (sons désactivés)
Éclairage dans
la cuve
L X
Met en marche et éteint l’éclairage
interne (si présent)
Sous-menu
d’éclairage dans
la cuve
L1 X
La lampe de la cuve s’allume lorsque la
porte est ouverte
X
L0 X
La lampe de la cuve s’éteint lorsque la
porte est fermée
Mode cachère
E X X
Met en marche et éteint le mode
cachère
E1 X Activation du mode
E0 X Arrête le mode X
Rétablissement
des paramètres
d’usine
r X X X
Rétablissement des paramètres d’usine
1. Maintenir enfoncé le bouton «Hi Temp» (température élevée) pendant 5 secondes, jusqu’à ce que les témoins «Hi Temp»
(température élevée) et «Dry» (séchage) s’allument.
2. Appuyer sur le bouton « Start/Resume » (mise en marche/reprise) dans les 2 secondes. Si on n’appuie pas sur le bouton de mise en
marche dans les 2 secondes, l’affichage s’éteindra et il faudra recommencer à l’étape1.
a. Pour les modèles avec écran, un «A» s’affichera pour indiquer le niveau d’agent de rinçage.
b. Pour les modèles sans écran, le témoin «Tough» (tenace) ou «Cookware» (ustensiles de cuisson) s’illuminera pour indiquer le
niveau d’agent de rinçage.
3. Pour accéder à une caractéristique autre que le niveau d’agent de rinçage, appuyer sur le bouton «Cycle» (programme) ou
«Normal» (selon le modèle) pour passer à la caractéristique à modifier (niveau sonore, lampe de la cuve, Cachère, réinitialisation
aux paramètres d’usine et niveau d’agent de rinçage). Consulter le tableau pour savoir ce qui s’affiche à l’écran pour indiquer ces
caractéristiques.
4. Appuyer sur le bouton «Start/Resume» (mise en marche/reprise) pour sélectionner la caractéristique et accéder au sous-menu.
L’écran changera pour afficher le réglage actuel de la caractéristique. (Par exemple, si Sound Level [niveau sonore] est sélectionné,
mais que le niveau sonore n’a jamais été modifié, S1 s’affichera pour les modèles avec écran et Sensor [capteur] s’illuminera pour
les modèles sans écran.)
5. Appuyer sur le bouton «Cycle» (programme ou «Normal» Cselon le modèle) pour modifier la valeur du réglage de la
caractéristique. (Par exemple, pour éteindre le son, appuyer sur le bouton «Cycle» [programme] ou «Normal». S0 s’affichera sur
les modèles avec écran ou le témoin «Pots and pans» (casseroles et poêles) s’allumera sur les modèles sans écran.)
6. Appuyer sur le bouton «Start/Resume» (mise en marche/reprise) pour confirmer la nouvelle sélection. Le nouveau réglage de
caractéristique ne sera pas enregistré si on n’appuie pas sur le bouton «Start/Resume» (mise en marche/reprise).
Le lave-vaisselle reviendra à l’état d’arrêt après avoir appuyé sur le bouton Start (mise en marche).
Pour quitter le menu des réglages du client, appuyer sur le bouton «Cancel» (annuler) ou attendre 30 secondes sans toucher aucun
bouton.
REMARQUE: Pour afficher le réglage actuel d’une caractéristique, suivre les étapes1 à 4. Lorsqu’on appuie sur le bouton «Start/
Resume» (mise en marche/reprise) à l’étape4, le lave-vaisselle affiche le réglage actuel. Appuyer sur le bouton «Cancel» (annuler)
pour quitter sans faire de modification.

34
REMARQUE: Pour revenir au menu principal après avoir accédé à une page de réglage de caractéristique, appuyer sur «Cancel» et
poursuivre avec l’étape1.
REMARQUE: Pour quitter le «mode cachère», appuyer sur le bouton «Cancel» (annuler) ou attendre 75heures.
Mode cachère: Lorsque ce mode est activé, il désactive tous les boutons du lave-vaisselle sauf la touche Cancel (annuler) et
désactive la lampe à l’intérieur de la cuve (si présente) pour une période de 75 heures. Si le mode est activé pendant un programme,
les témoins d’état ne s’éteindront pas à la fin du programme lorsque la porte est ouverte, puis refermée. Pour quitter ce mode,
appuyer sur le bouton «Cancel» (annuler) ou attendre 75heures.
CODES D’ANOMALIES
CODES D’ANOMALIES/TÉMOINS QUI CLIGNOTENT
Problème
Code affiché
(affichage à 7
segments)
(si présent)
Code affiché sur le
panneau avant à DEL*
(No qui clignote, pause, no
qui clignote)
Que se passera-t-il? Quoi faire?
Le lave-vaisselle ne
parvient pas à bien
faire fonctionner
l’électrovanne
F1E1
1 pause, 1 pause - pause,
répétition
La séquence de vidange
s’amorce, ce qui
empêche la machine de
fonctionner
Fermer l’arrivée d’eau (si possible). Fermer
l’alimentation électrique. S’il est impossible
de fermer l’arrivée en eau, NE PAS fermer
l’alimentation électrique et garder la porte
fermée. Appuyer sur la touche Cancel
(annuler) une fois pour arrêter l’alarme
sonore. Faire un appel de service.
Défaillance de la
commande du moteur
F1E2 1 pause, 2 pauses, répétition Le programme prend fin Faire un appel de service
Il n’y a pas d’eau
dans le lave-vaisselle
H2O
8 pauses, 1 pause - pause,
répétition
Le programme est en
pause
S’assurer que le tuyau de remplissage
est branché au produit. S’assurer que
l’alimentation en eau est ouverte. Appuyer
sur Start (mise en marche) pour reprendre
le programme. Si l’alarme est toujours
présente, faire un appel de service.
Défaillance du moteur
de lavage
F7E1/F7E2
7 pause, 1 pauses,
répétition/7 pause, 2 pauses,
répétition
Le programme prend fin Faire un appel de service
Le lave-vaisselle se
remplit trop
F8E4
8 pauses, 4 pause - pause,
répétition
La séquence de vidange
s’amorce, ce qui
empêche la machine de
fonctionner
Pour les installateurs professionnels
Fermer l’arrivée d’eau (si possible). Fermer
l’alimentation électrique. S’il est impossible
de fermer l’arrivée en eau, NE PAS fermer
l’alimentation électrique et garder la porte
fermée. Appuyer sur la touche Cancel
(annuler) une fois pour arrêter l’alarme
sonore. Faire un appel de service.
Pour les installateurs autonomes
■ Appuyer deux fois sur le bouton de
CANCEL ou réinitialiser la mise sous
tension. Cela peut résoudre le problème.
■ Vérier si le connecteur de l est
connecté au contacteur du otteur sur le
plateau d’égouttement. Voir l’étape 46.
Si le l est déconnecté, le reconnecter,
puis appuyer deux fois sur le bouton
d’annulation.
■ Vérier s’il y a de l’eau dans le bac
d’égouttement. S’il y a de l’eau dans
le bac d’égouttement, enlever l’eau
et réinstaller le bac d’égouttement.
S’assurer de connecter le câblage au
otteur. Étape 46. Vérier où l’eau peut
avoir fui dans le bac d’égouttement.
(Vérier les raccords d’entrée d’eau aux
étapes 15 et 16 pour voir s’ils fuient)
■ Si de l’eau était dans le bac et qu’aucune
fuite n’a été détectée, mettre le produit
en marche sur le programme le plus
court de l’installation tout en recherchant
les fuites. Le panneau d’accès doit être
enlever pour observer toute fuite.
■ Si le problème continu, faire un appel de
service.
L’électrovanne reste
coincée ouverte
F8E5
8 pauses, 5 pause - pause,
répétition
La séquence de vidange
s’amorce, ce qui
empêche la machine de
fonctionner
Fermer l’arrivée d’eau (si possible). Fermer
l’alimentation électrique. S’il est impossible
de fermer l’arrivée en eau, NE PAS fermer
l’alimentation électrique et garder la porte
fermée. Appuyer sur la touche Cancel
(annuler) une fois pour arrêter l’alarme
sonore. Faire un appel de service.
Le lave-vaisselle ne
se vidange pas
F9E1
9 pauses, 1 pause - pause,
répétition
Le programme prend fin
Si le tuyau de vidange est raccordé à un
broyeur à déchets, vérifier qu’il n’est pas
obstrué et que l’opercule d’obstruction a
été enlevé. Si l’appareil ne vidange toujours
pas, faire un appel de service.
Il y a de l’eau sous le
lave-vaisselle
FAE5
10 pauses, 5 pause - pause,
répétition
Le programme prend fin Faire un appel de service.
Défaillance de la
communication
d’entretien de
l’interface utilisateur
F6E1
6 pauses, 1 pause - pause,
répétition
Le produit ne permet pas
de lancer ou de reprendre
un programme
Faire un appel de service.
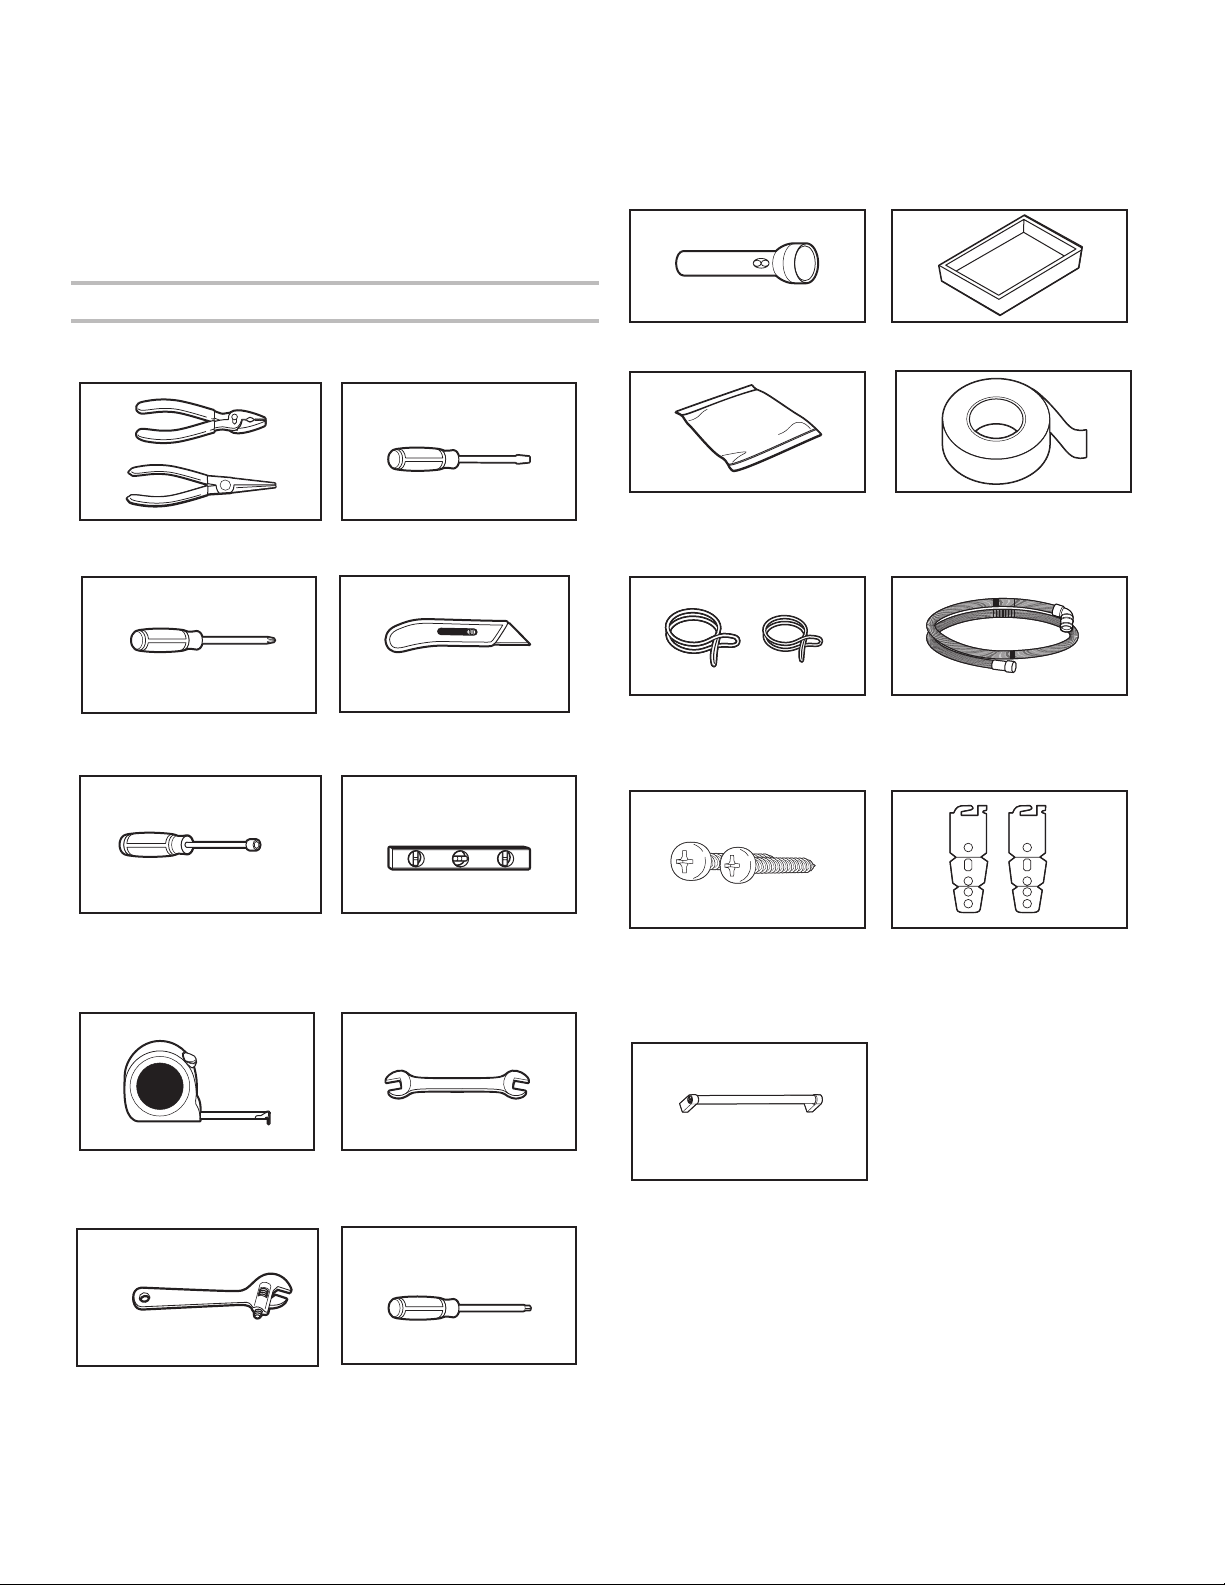
35
EXIGENCES D’INSTALLATION
OUTILS ET PIÈCES
Rassembler les outils et composants nécessaires avant
d’entreprendre l’installation. Lire et observer les instructions
fournies avec les outils de la liste ci-dessous.
Toutes les installations
Outils requis:
Pince Tournevis à tête plate
Tournevis cruciforme
Couteau utilitaire
Tourne-écrou ou clé à douille
de 5/16 po (7,9mm) et 1/4 po
(6,4mm)
Petit niveau
Mètre-ruban ou règle
Clé ouverte de 5/8 po
(15,9mm)
Clé à molette de 10po qui
s’ouvre de 1
1
/
8
po (29mm)
Tournevis Torx
†
T20 et, si des
panneaux avant personnalisés
sont installés, TorxT15
Autres articles utiles pouvant être nécessaires:
Lampe de poche Plat peu profond
Serviette de bain Ruban adhésif pour conduit ou
de marquage
Pièces fournies:
Brides pour tuyau de
décharge (2) (1 grande/rouge
et 1 petite/argentée)
Tuyau d’évacuation
Tournevis cruciforme
no8 x 1/2 po (12,7mm) (2)
Supports de fixation (au-
dessous du comptoir) (2)
S’assurer que toutes les pièces sont comprises avec le sachet
de documentation.
Poignée de porte (sur certains modèles)
†TorxT15 et T20 sont des marques déposées de Acument Intellectual Properties, LLC.
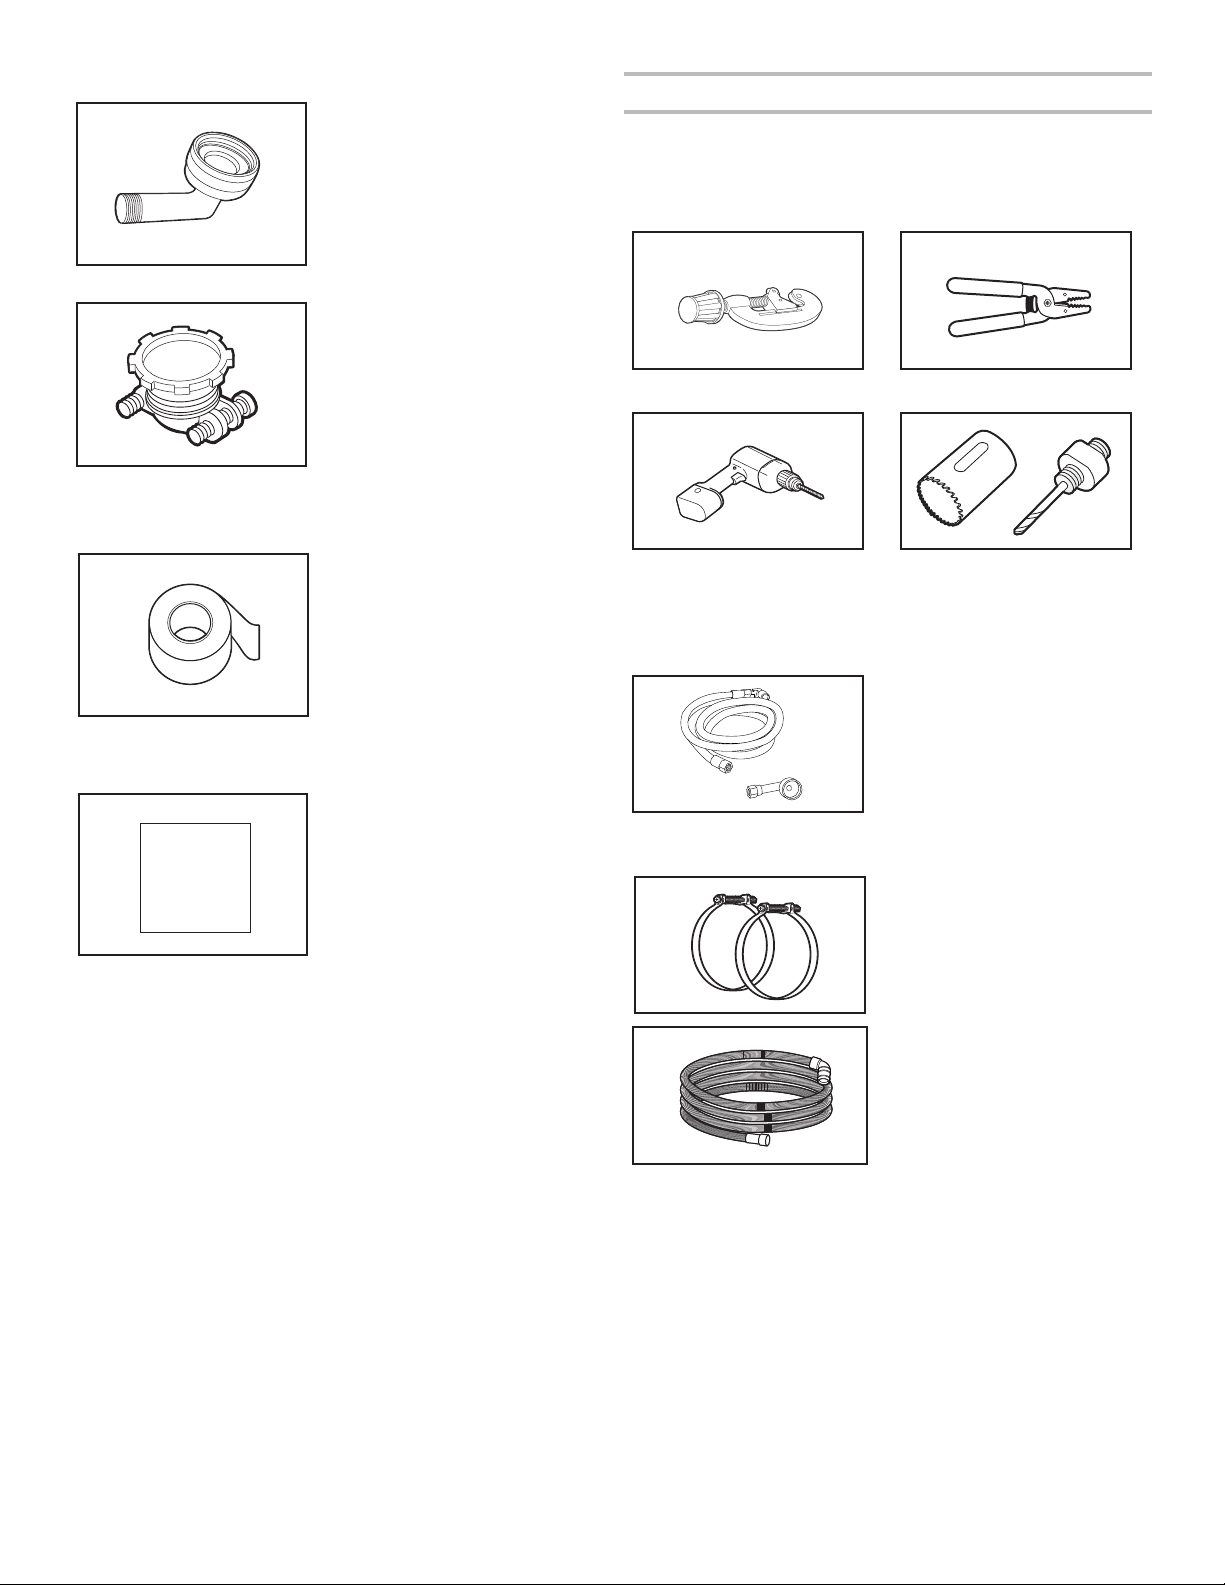
36
Autres pièces nécessaires (non fournies):
Raccord de tuyau coudé
à 90° de 3/4 po (19mm) x
3/8po (9,5mm) d’extrémité
de compression avec joint
caoutchouc (nécessaire pour
raccorder correctement la
canalisation d’eau du domicile
au lave-vaisselle).
No de pièce: W10685193
Serre-câbles métallique
pour câblage du domicile qui
convient à l’orifice de 7/8po
(22mm) (nécessaire pour
raccorder correctement le
câble du domicile au boîtier de
connexion du lave-vaisselle).
No de pièce: 4396672
REMARQUE: Utiliser
uniquement des pièces
homologuées UL ou CSA.
Accessoires facultatifs offerts:
Ruban de barrière
anti-humidité
REMARQUE: Le ruban de
barrière anti-humidité ajoute
une protection facultative
supplémentaire si le lave-
vaisselle est installé sous
un plan de travail en bois.
Recommandé, mais non
requis pour les plans de travail
en bois.
No de pièce: 4396277
Ensemble de panneaux
latéraux
Pour fermer le côté du lave-
vaisselle lorsqu’il est installé
à l’extrémité de l’armoire (le
numéro de pièce Whirlpool
varie en fonction de la
couleur).
Nous contacter au numéro sans frais ou visiter le site Web de
la marque identifié dans le guide de démarrage rapide pour
obtenir des informations sur les accessoires et les pièces.
Première installation
Consulter les codes locaux. Vérifier l’alimentation électrique
existante. Voir la section «Spécifications électriques». Il est
recommandé de faire réaliser tous les raccordements électriques
par un électricien qualifié agréé.
Outillage supplémentaire nécessaire:
Petit coupe-tube Pince à dénuder
Perceuse sans fil Scie-cloche de 1/2po
(12,7mm), 3/4po (19mm) et
1
1
/
2
po (38mm)
Pièces supplémentaires nécessaires (non fournies):
Tube de cuivre (diamètre
externe de 3/8po suggéré)
ou ensemble de canalisation
d’arrivée d’eau flexible à
tresse d’acier. L’ensemble
inclut un tuyau tressé et une
bague de compression de
3/8 po x un adaptateur à tuyau
de 3/4po.
No de pièce: W10278635RP
Bride à vis de 1
1
/
2
po à
2po (38mm à 50mm)
(3maximum)
Plus long tuyau de vidange
optionnel d’une longueur
maximale de 12pi (3,7m)
REMARQUE: Doit être
conforme à toutes les normes
de test AHAM/IAPMO,
convenir à des raccordements
de vidange de 1po (25mm)
et être résistant à la chaleur et
aux détergents.
No de pièce: W11381654
REMARQUE: Si l’on utilise un tuyau flexible tressé, remplacer
le tuyau d’alimentation après 5ans d’utilisation pour réduire le
risque de défaillance du tuyau. Inscrire la date d’installation ou de
remplacement du tuyau sur celui-ci, pour référence ultérieure.
REMARQUE: S’assurer d’acheter uniquement des pièces et des
accessoires Whirlpool certifiés par le fabricant de l’appareil. Il
se peut que l’installation nécessite des pièces supplémentaires.
Pour commander, consulter les coordonnées indiquées dans le
guide de démarrage rapide.

37
Pour les installations à
raccordement direct
Pour un cordon
d’alimentation
Passe-câble d’
armoire
Pour trou de 1
1
/
2
po (38mm)
dans l’armoire.
REMARQUE: Requis pour les
armoires en méta
l
Ensemble pour cordon
d’alimentatio
n
L’ensemble comprend
habituellement un cordon
d’alimentation, un serre-
câbles métallique et un œillet.
(Numéro de pièce Whirlpool
Trousse avec cordon – droit –
W11365011
Trousse avec cordon – angle
droit – W11365014)
Nous contacter au numéro sans frais ou visiter le site Web de la
marque identifié dans le guide de démarrage rapide pour obtenir
des informations sur les accessoires et les pièces.
REMARQUE: S’assurer d’acheter uniquement des pièces et des
accessoires Whirlpool certifiés par le fabricant de l’appareil. Il
se peut que l’installation nécessite des pièces supplémentaires.
Pour commander, consulter les coordonnées indiquées dans le
guide de démarrage rapide.
EXIGENCES D’EMPLACEMENT
L’appareil doit être entièrement encastré (sur le dessus, les côtés,
à l’arrière et au sol) dès l’installation. Un ensemble de panneaux
latéraux est disponible chez votre marchand pour l’installation du
lave-vaisselle à l’extrémité d’une rangée d’armoires.
Une barrière anti-humidité en option est également offerte pour
l’installation sous un plan de travail en bois.
Inspecter l’emplacement d’installation du lave-vaisselle. Il doit
comporter les caractéristiques suivantes:
■ Accès facile pour chargement et déchargement de la vaisselle.
Dans le cas de l’installation dans un angle, on doit pouvoir
établir un dégagement de 2po (5,1cm) ou plus entre le côté
de la porte du lave-vaisselle et le mur ou l’armoire.
■ Facilité d’accès aux canalisations d’eau et d’évacuation et à la
source d’électricité:
■ Une source d’électricité avec liaison à la terre est nécessaire.
■ Ce lave-vaisselle est doté d’une fonction de chauffage de
l’eau et doit être raccordé à la canalisation d’alimentation en
eau chaude.
■ Veiller à ce que les canalisations d’eau et d’évacuation et
les câbles électriques se trouvent dans les limites de la zone
marquée en gris illustrée dans la section «Dimensions du
produit et de l’emplacement d’installation».
■ Ne pas placer de canalisation d’évacuation, canalisation
d’eau ou câblage électrique à un endroit où cela susciterait
interférence ou contact avec les pieds ou les moteurs du
lave-vaisselle.
■ Protéger du gel le lave-vaisselle et les canalisations d’eau
qui l’alimentent. La garantie de l’appareil ne couvre pas les
dommages imputables au gel.
REMARQUE: Si le lave-vaisselle ne doit pas être utilisé
pendant une période prolongée ou s’il est laissé à un endroit
qui pourrait être exposé au gel, veiller à faire exécuter les
opérations de préhivernage par un technicien compétent.
■ S’il est installé dans une nouvelle construction, enlever tout
débris de l’arrivée d’eau avant de la brancher à la valve de
distribution. Les débris qui ne sont pas enlevés de l’eau
pourraient obturer le filtre de la valve de distribution.
■ Une ouverture carrée offrant l’esthétique appropriée et
permettant un fonctionnement correct.
■ La façade des armoires perpendiculaire au plancher.
■ Plancher de niveau.
Conseil utile: S’il y a un écart de niveau sur le plancher entre
l’avant et l’arrière de l’emplacement d’installation, il pourrait
être nécessaire d’utiliser des cales pour établir l’aplomb de
l’appareil.
REMARQUE: Pour éviter tout déplacement des cales durant
le fonctionnement du lave-vaisselle, les cales doivent être
solidement fixées au plancher.
■ À l’emplacement d’installation du lave-vaisselle, on doit
pouvoir établir le dégagement approprié entre le moteur et le
plancher. Les moteurs ne doivent pas toucher le plancher.
■ Ne pas installer le lave-vaisselle par-dessus un tapis.
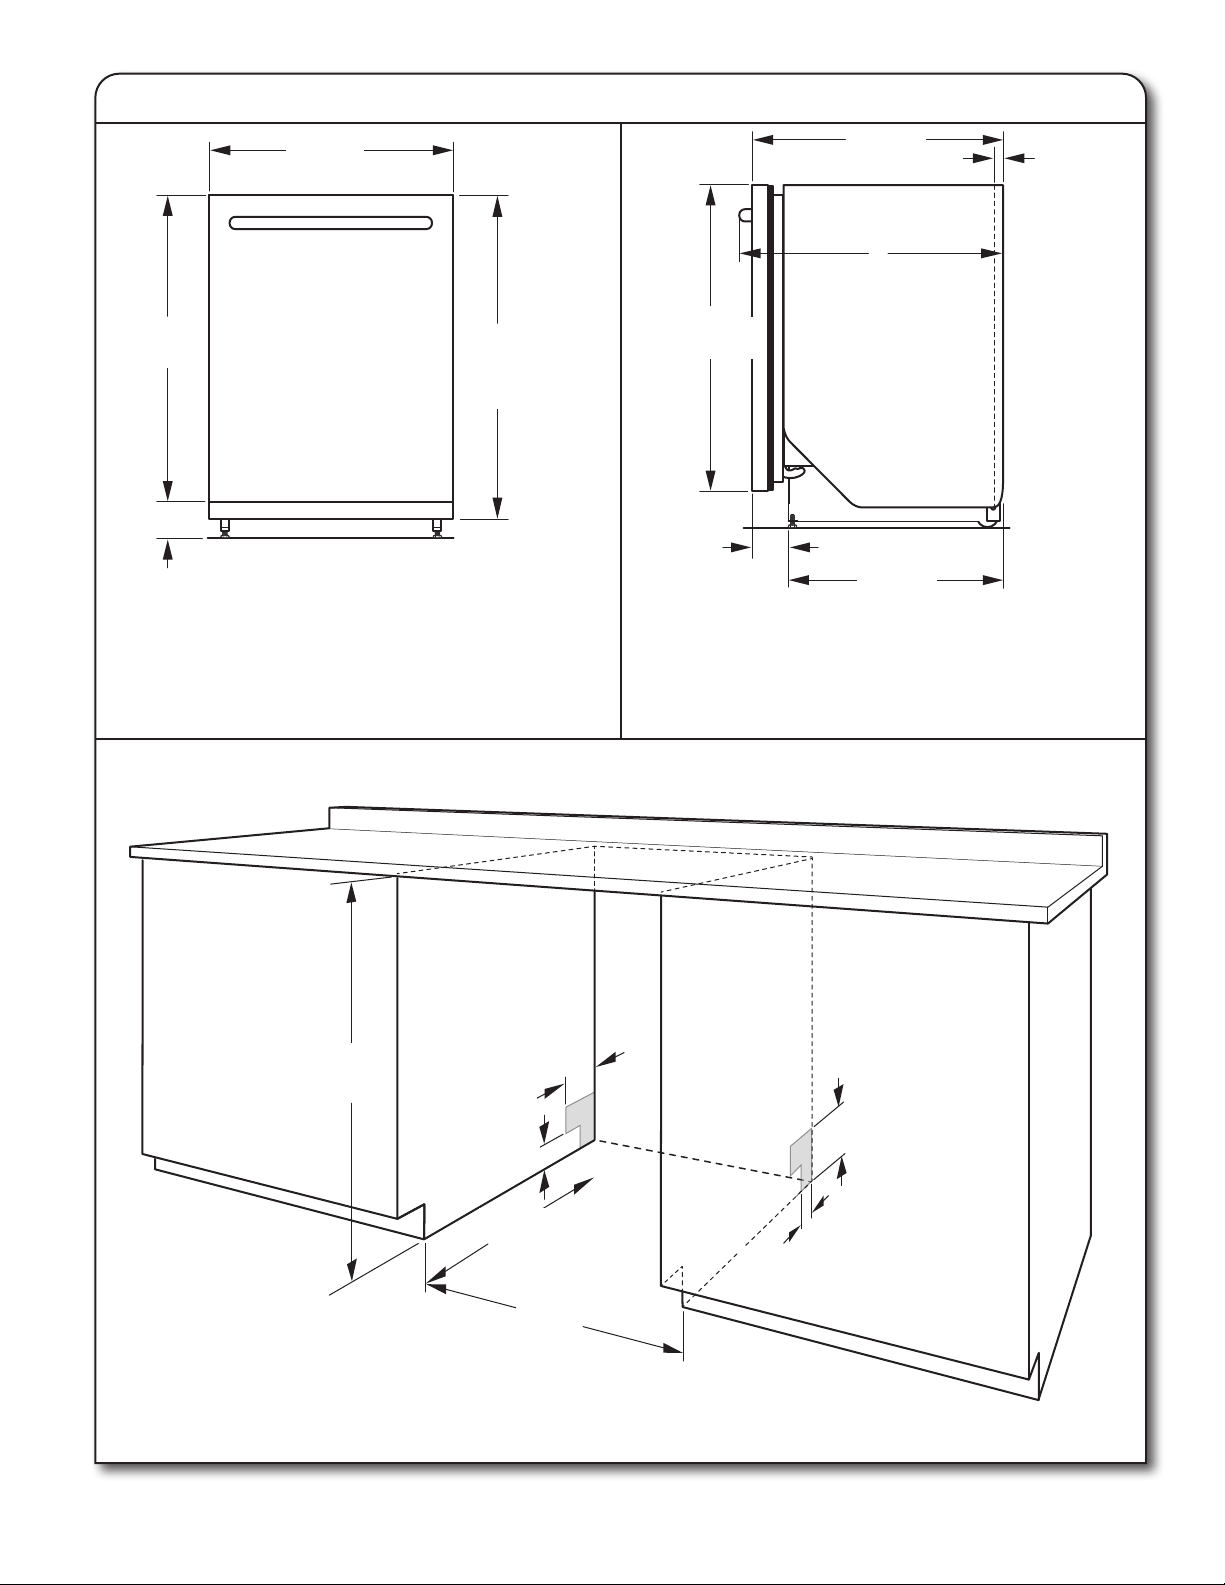
38
DIMENSIONS D’OUVERTURE DU PRODUIT ET DE L’ARMOIRE:
.
B
A
C
D
E
23
7
/8po
(60,4cm)
30po
(76,2cm)
30po
(76,2cm)
24½po
(62,6cm)
3/4po
(1,9cm)
3¾po
(9,7cm)
20
13
/16po
(52,9cm)
33
5
/8po
(85,4cm)
minimales
avec pieds
enlevés
3
1
/2 po à 4
1
/2po
(8,4cm à 10,6cm)
A. L’isolant peut être comprimé (utilisé sur certains modèles).
B. Pour les modèles avec panneaux prêts à installer, la
profondeur du lave-vaisselle est de 24po (61,0cm) – sans
le panneau de porte personnalisé de 3/4po (1,9cm).
C. Les poignées de porte peuvent dépasser vers la façade
du lave-vaisselle; varie selon le modèle.
Vérifier que toutes les surfaces n’ont aucune aspérité qui
empêcherait l’installation du lave-vaisselle.
33
5
/8po minimales
(85,4cm) minimales
21po
(53,4cm)
3po
(7,6cm)
4po
(10,2cm)
24po
(62,0cm)
2po
(5,1cm)
6¼po
(15,9cm)
REMARQUE: Les
zones grisées des
parois de l’armoire
indiquent les endroits
où les raccordements
électriques peuvent
être installés.
D. Mesure depuis le point le plus bas de la face
inférieure du comptoir. Cette dimension peut être réduite à
33
5
/8 po (85,4 cm) en retirant les pieds du lave-vaisselle et en
perforant l’isolant (couverture isolante) de l’appareil.
E. Dimension minimale mesurée au point le plus étroit de
l’ouverture.
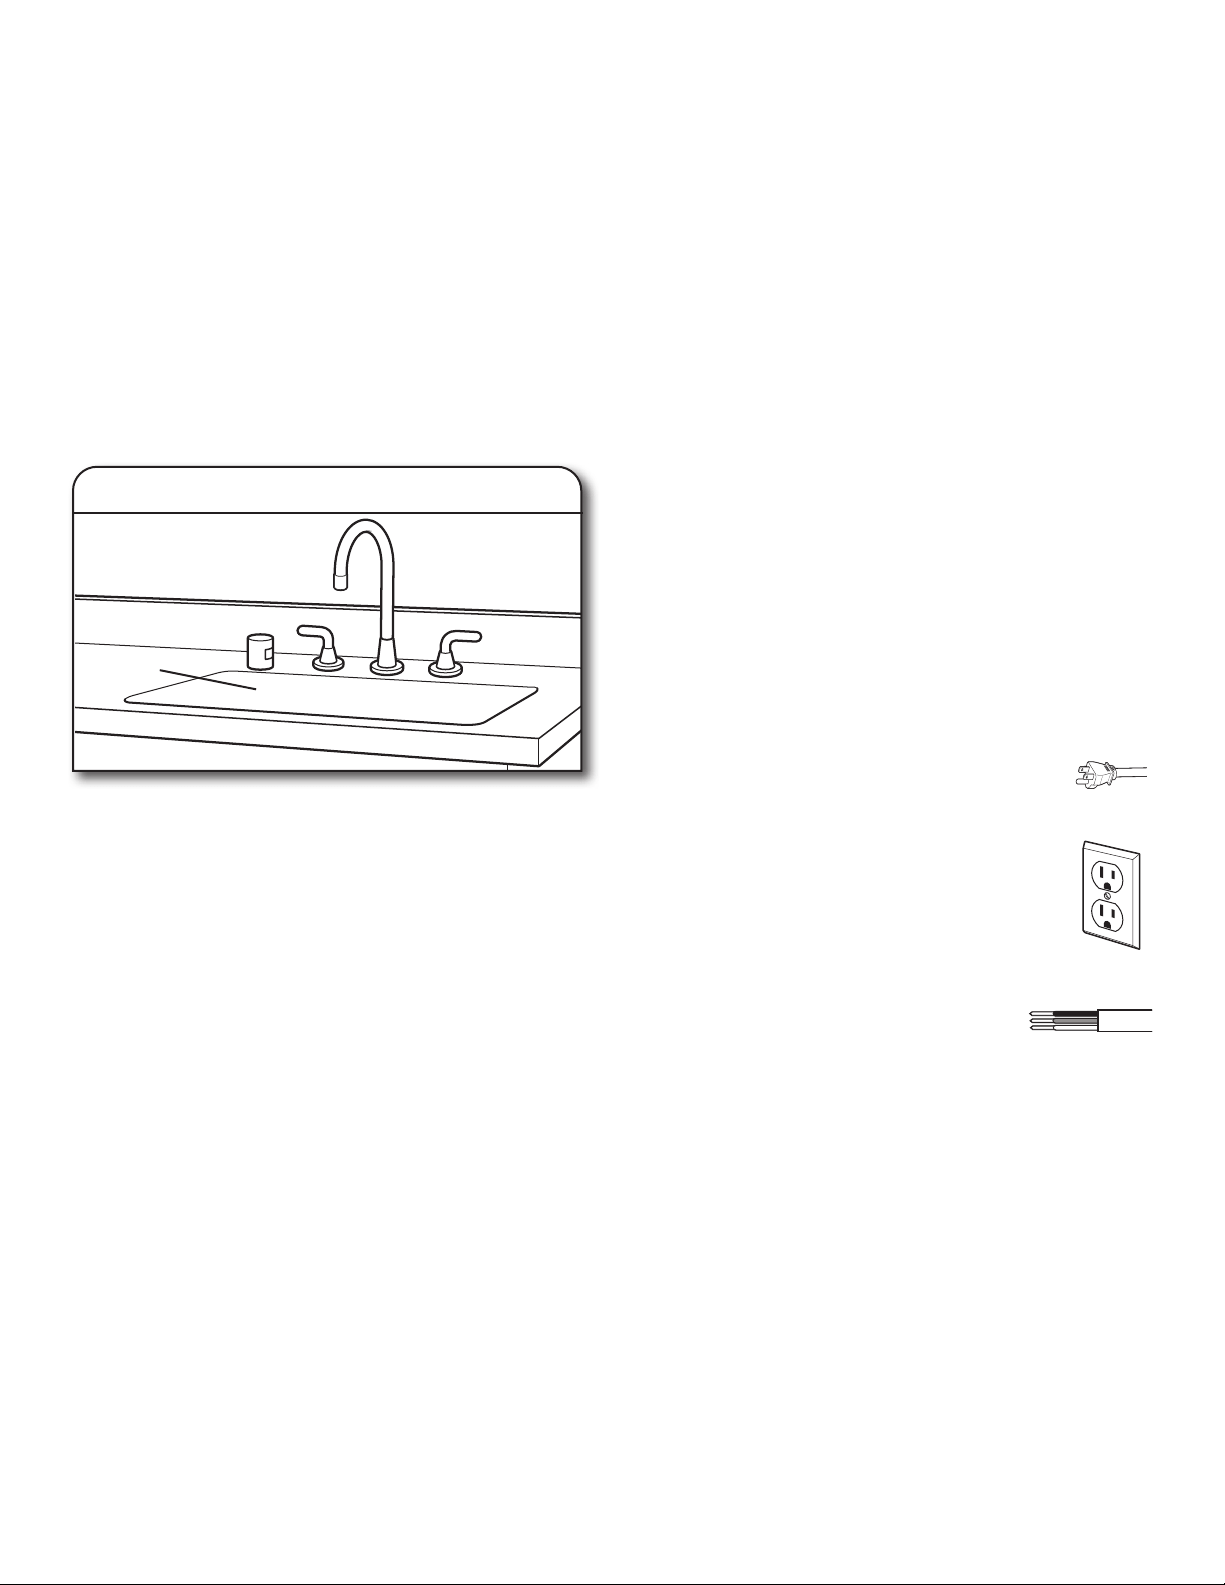
39
EXIGENCES D’ÉVACUATION
■ Un tuyau d’évacuation neuf est fourni avec le lave-vaisselle.
Si le tuyau d’évacuation n’est pas suffisamment long, utiliser
un tuyau d’évacuation neuf d’une longueur maximale de 12pi
(3,7m) satisfaisant à toutes les normes de test AHAM/IAPMO
en vigueur, qui soit résistant à la chaleur et au détergent et qui
convienne au raccord d’évacuation de 1po (2,5cm) du lave-
vaisselle.
REMARQUE: Ne pas raccorder plusieurs tuyaux de vidange.
■ Veiller à raccorder le tuyau d’évacuation à la canalisation
d’égout en T ou au raccord de broyeur à déchets en amont
du siphon du circuit de plomberie du domicile, et à au moins
20po (50,8cm) au-dessus du sol. On recommande de lover
le tuyau d’évacuation et de le fixer solidement sur la face
inférieure du comptoir ou de le raccorder à un dispositif de
brise-siphon.
■ Utiliser un dispositif de brise-siphon si le tuyau d’évacuation
est raccordé au circuit de plomberie du domicile à moins de
20po (50,8cm) au-dessus du sous-plancher ou du plancher.
Utiliser un brise-siphon
■ Si nécessaire, le dispositif de brise-siphon doit être installé
conformément aux instructions d’installation de ce dernier.
Lors du raccordement du dispositif de brise-siphon à la
canalisation d’égout en T ou au raccord de broyeur à déchets,
un tuyau en caoutchouc (non fourni) sera nécessaire.
■ Utiliser des raccords de canalisation d’évacuation de diamètre
intérieur de 1/2po (1,3cm) minimum.
SPÉCIFICATIONS DE L’ALIMENTATION EN
EAU
■ Ce lave-vaisselle est doté d’une fonction de chauffage de l’eau
et doit être raccordé à la canalisation d’alimentation en eau
chaude.
■ Une canalisation d’eau chaude, sous pression de 20 lb/po
2
à 120lb/po
2
(138 kPa à 862kPa), peut être inspectée par un
plombier certifié.
■ Température de 120°F (49°C) à l’entrée du lave-vaisselle.
■ Tube de cuivre de 3/8 po (0,95cm) de diamètre externe avec
raccord de compression ou canalisation d’alimentation en eau
flexible à tresse d’acier.
REMARQUE: L’emploi d’un tuyau de plastique d’un minimum
de 1/2 po (1,3cm) n’est pas recommandé.
■ Raccord coudé à 90° avec raccord de tuyau de 3/4 po
(0,95cm) et rondelle de caoutchouc.
■ Ne pas souder à moins de 6po (15,2cm) de l’électrovanne
d’admission d’eau.
■ S’il est installé dans une nouvelle construction, vous assurer
que l’entrée d’eau de la maison a été nettoyée avant
d’effectuer le branchement au lave-vaisselle pour en enlever
les débris possibles.
REMARQUE: S’il remplace un lave-vaisselle existant, il est
recommandé d’installer une nouvelle entrée d’eau et vider le
tuyau de vidange (fourni) avec le nouveau lave-vaisselle.
SPÉCIFICATIONSÉLECTRIQUES
S’assurer que le raccordement électrique est adéquat et
conforme au code national de l’électricité, ANSI/NFPA 70 –
dernière édition, et à tous les codes et règlements locaux en
vigueur.
Pour obtenir un exemplaire des normes des codes ci-dessus,
contacter:
National Fire Protection Association
1 Batterymarch Park
Quincy, MA 02169-7471
Il vous faut:
■ Alimentation de 120 V CA à 60Hz et protégée par un fusible de
15 A ou 20 A
■ Conducteurs de cuivre uniquement
■ Un maximum de deux conducteurs d’alimentation (calibre
12AWG maximum) plus un conducteur de mise à la terre est
autorisé dans le boîtier de connexion.
Nous recommandons:
■ L’utilisation d’un fusible ou disjoncteur temporisé.
Spécifications du circuit:
■ Le lave-vaisselle peut être installé sur le même circuit que le
broyeur à déchets en s’assurant que ce circuit ne dépasse pas
la charge nominale et qu’il respecte les normes et codes dont,
mais ne se limitant pas, au au code national de l’électricité,
ANSI/NFPA70 – dernière édition.
■ Aucun autre raccordement électrique que ceux des
conducteurs d’alimentation et de mise à la terre du lave-
vaisselle ne peuvent être effectués à l’intérieur du boîtier de
connexion du lave-vaisselle.
Pour le raccordement du lave-vaisselle avec
un cordon d’alimentation électrique:
■ Utiliser un cordon d’alimentation (homologation UL)
conçu pour utilisation avec un lave-vaisselle.
■ Brancher l’appareil sur une prise à 3 alvéoles reliée à
la terre. La prise doit être conforme à tous les codes
et règlements locaux.
Pour le raccordement direct du lave-vaisselle:
■ Utiliser des conducteurs de cuivre gainés non
métalliques ou blindés souples avec conducteur de
liaison à la terre qui satisfassent aux exigences de
l’installation électrique du domicile, et qui
soient conformes aux prescriptions des
codes et règlements locaux.
■ Utiliser un serre-câbles homologué UL ou
CSA.
Brise-
siphon
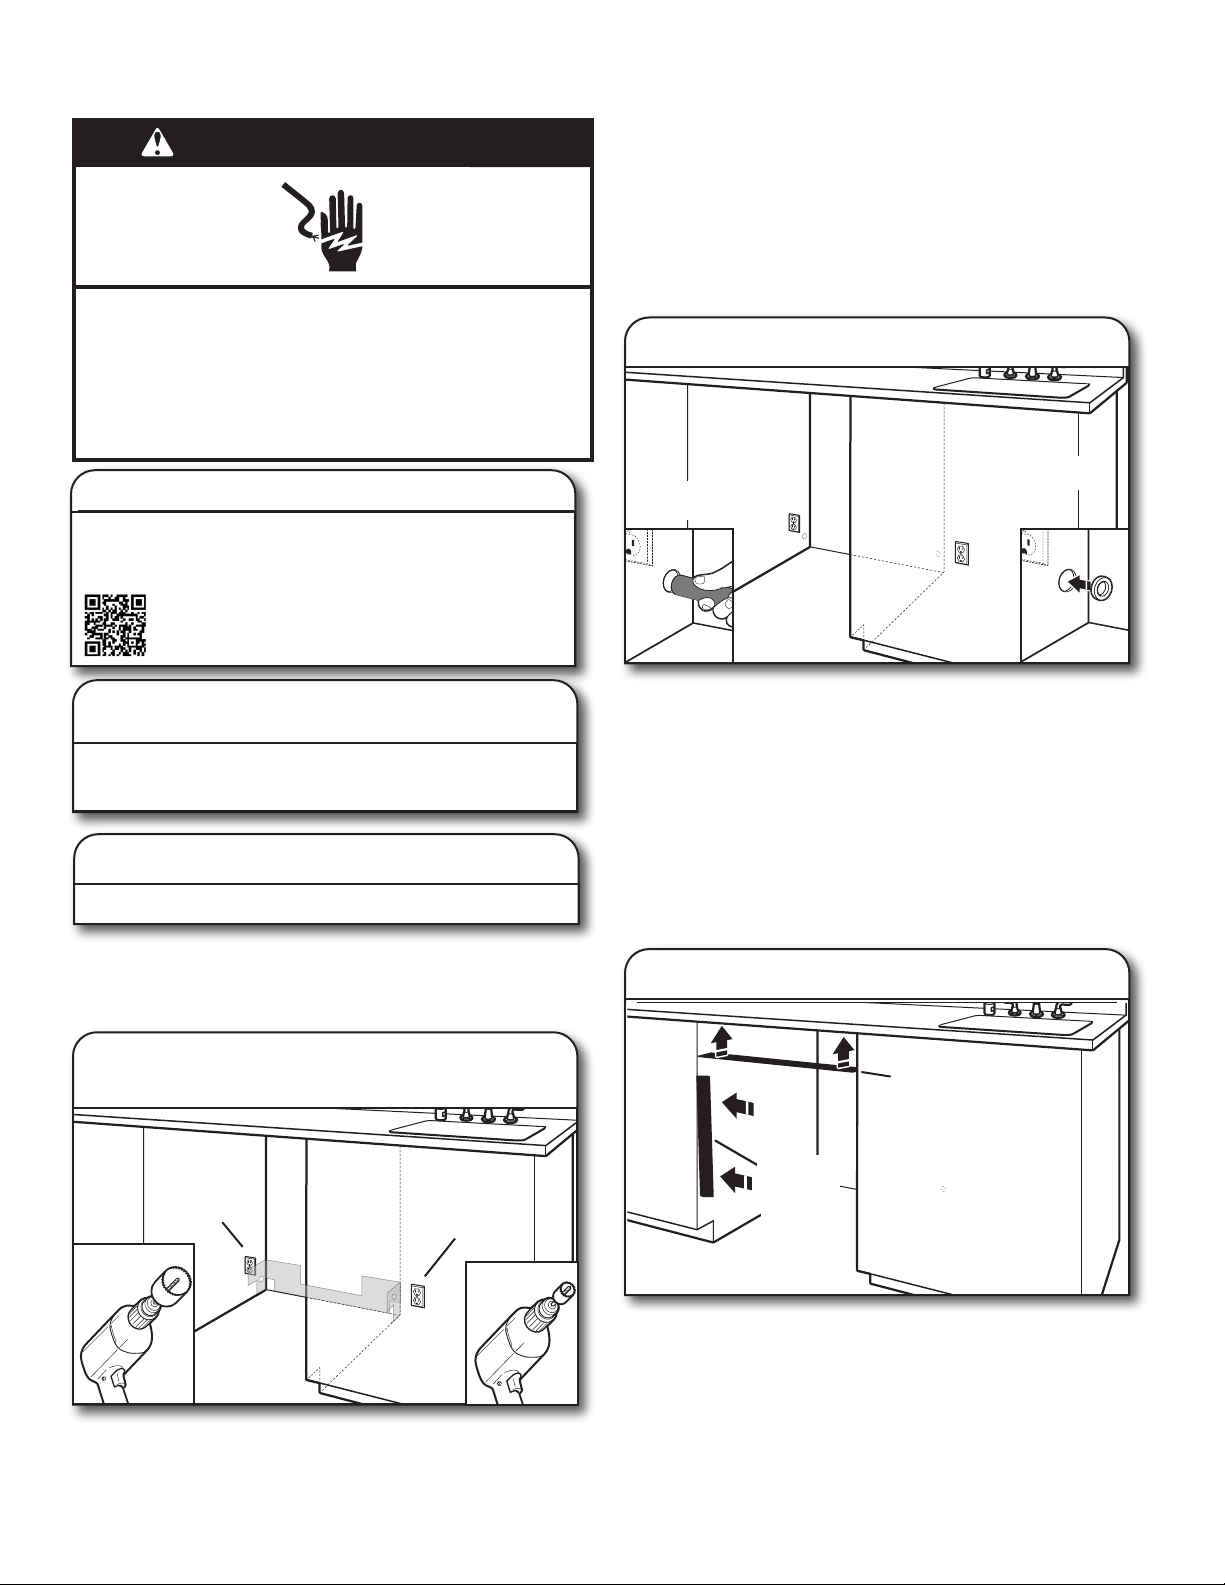
40
1. Instalación de video
INSTRUCTIONS D’INSTALLATION
PRÉPARATION DE L’OUVERTURE
D’ENCASTREMENT DE L’ARMOIRE –
NOUVEAUX RACCORDEMENTS DE SERVICE
La prise d’alimentation de l’appareil doit être installée dans une
armoire ou au mur adjacent, dans l’espace sous le comptoir où
l’appareil sera installé.
REMARQUE: Consulter la section «Dimensions du produit et
de l’emplacement d’installation» pour connaître l’emplacement
exact des trous et les dimensions des zones grises.
Percer un trou de 1½po (3,8cm) pour le tuyau de vidange sur le
côté ou l’arrière de l’armoire, en fonction de la position du tuyau
de vidange et de son emplacement de connexion.
Percer un trou de 1/2po (1,27cm) pour le tuyau d’arrivée d’eau
sur le côté ou l’arrière de l’armoire, en fonction de la position du
tuyau d’arrivée d’eau et de son emplacement de connexion
Percer un trou de 1 ½po (3,8cm) pour le câblage électrique sur
le côté droit ou à l’arrière de l’armoire.
Armoire de bois: Poncer le trou jusqu’à obtenir une surface
lisse.
Armoire métallique: Couvrir le contour du trou avec l’œillet
fourni avec l’ensemble du cordon d’alimentation.
Conseil utile: Le raccordement au lave-vaisselle sera plus
facile si on achemine le câble par le côté droit de l’ouverture
d’encastrement de l’armoire.
INSTALLER LA BARRIÈRE ANTI-HUMIDITÉ
EN OPTION – RECOMMANDÉE POUR LES
COMPTOIRS EN BOIS
Barrière anti-humidité/cales en bois
Barrière anti-
humidité
Veiller à ce que la zone se trouvant sous l’armoire soit propre et
sèche avant d’installer la barrière anti-humidité. Ôter la protection
de la barrière anti-humidité et appliquer la barrière sur le dessous
du comptoir, le long de la rive avant du comptoir.
REMARQUE: L’utilisation de cette barrière anti-humidité est
recommandée, mais non obligatoire.
REMARQUE: Utiliser des cales en bois si la fixation de côté et
l’espacement entre les côtés de l’armoire et du lave-vaisselle
sont supérieurs à 1/2 po (1,27cm) de chaque côté ou supérieur à
la longueur des vis d’ancrage.
1. Poncer pour obtenir des tours lisses
Armoire
de bois
Armoire
métallique
AVERTISSEMENT
Risque de choc électrique
Interrompre l'alimentation électrique avant d'installer
le lave-vaisselle (au niveau du tableau de distribution -
fusible ou disjoncteur)
Le non-respect de cette instruction peut causer
un décès ou un choc électrique.
Une vidéo des étapes de l’installation est accessible en ligne au
whirlpool.com dans les sections «Service & Support» (service
et soutien), «How To’s» (comment faire) et «FAQ». Voir la
vidéo sur http://www.kaltura.com/tiny/ro00v.
Emplacement
souhaité
Emplacement
optionnel
1 ½po
(3,8cm)
Installation
des cales
en bois
2. Déconnecter la source de courant
électrique
Interrompre l’alimentation électrique au tableau de
distribution (fusible ou disjoncteur) avant d’installer le
lave-vaisselle.
3. Couper l’arrivée d’eau
Fermer l’approvisionnement en eau du lave-vaisselle.
1/2po
(1,27 cm)
4. Emplacement des trous à percer –
nouvelle construction
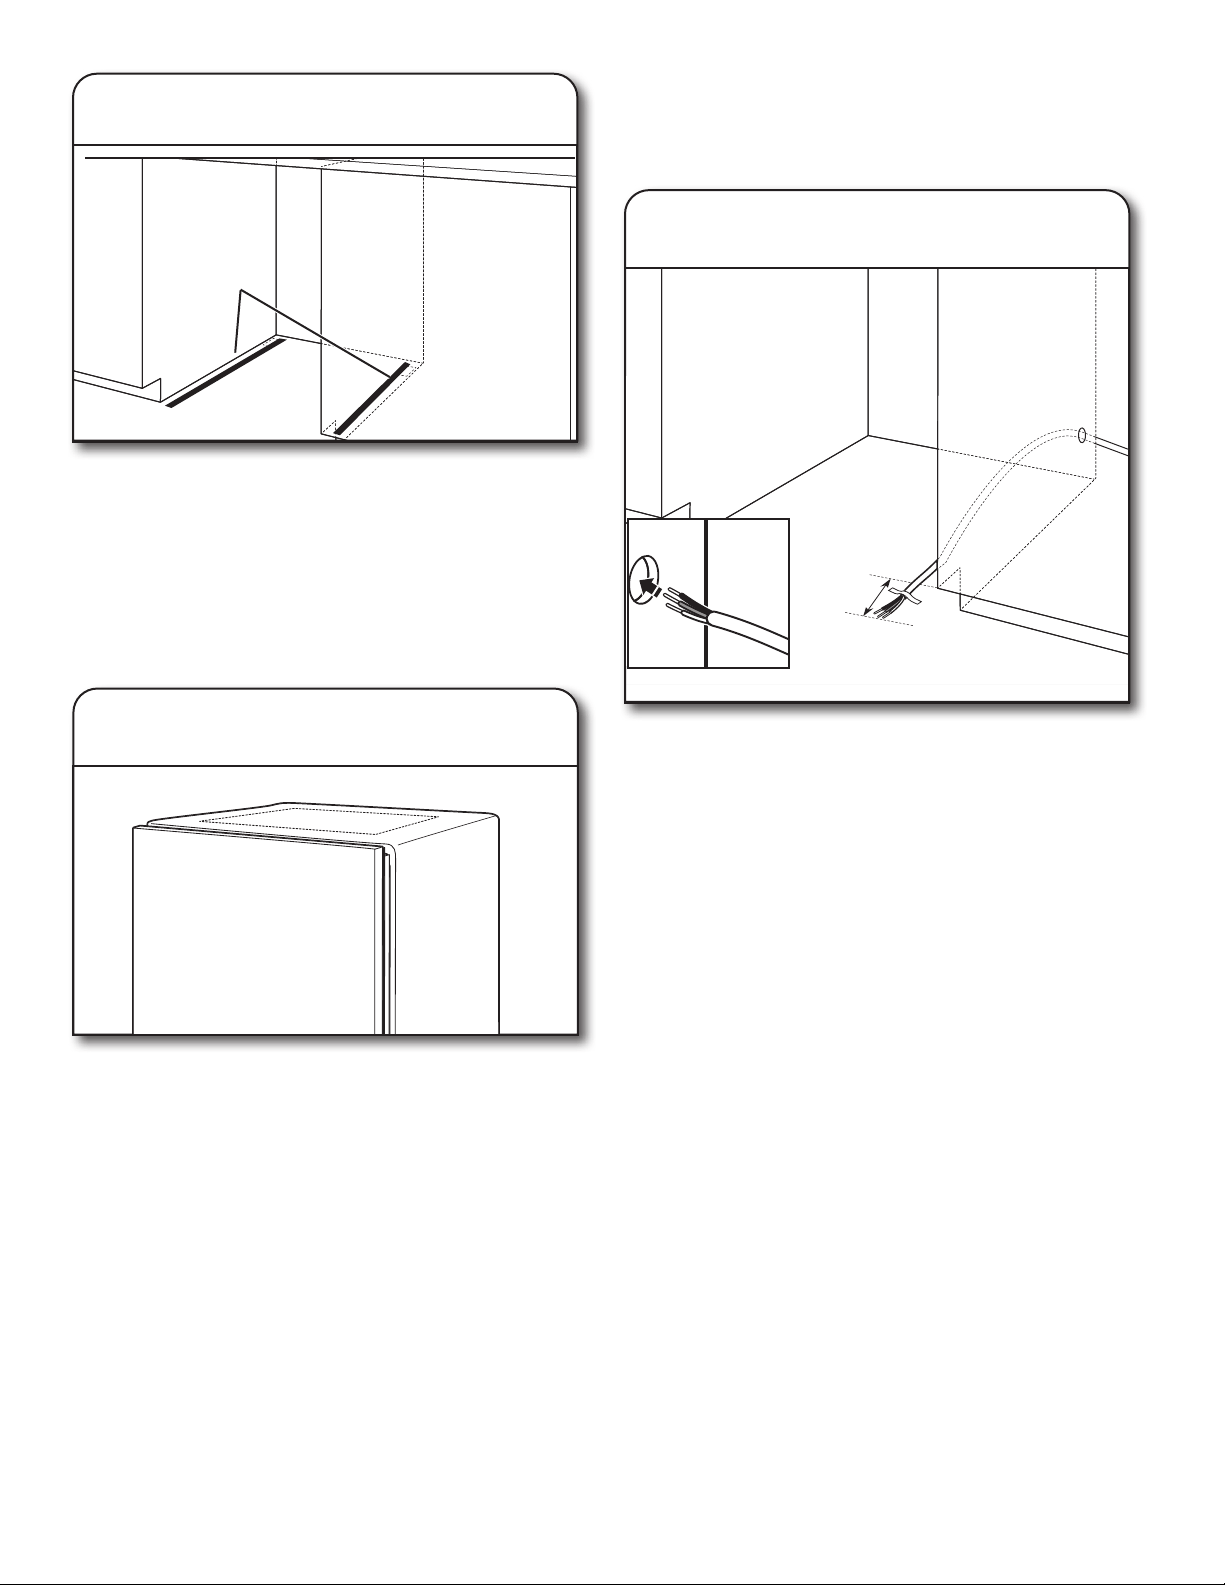
41
5. Surélever le plancher – ajouter des
cales au besoin
Remarque: Les profilés de bois qui accompagnent avec la base
d’expédition peuvent servir de cales.
Surélever le plancher: Si le plancher de la cuisine est plus
élevé que le plancher de l’ouverture de l’armoire (par exemple,
le carrelage du plancher de la cuisine n’arrive pas jusque dans
l’ouverture de l’armoire), ajouter des cales selon le besoin dans la
zone indiquée pour surélever le plancher de l’armoire à la même
hauteur que le plancher de la cuisine.
REMARQUE: Pour éviter tout déplacement des cales durant le
fonctionnement du lave-vaisselle, les cales doivent être
solidement fixées au plancher.
Découper la plaque d’insonorisation le long des perforations
pour une ouverture d’armoire d’une hauteur de 33
5
/8po
(85,4cm). Pour les autres hauteurs d’ouverture d’armoire, ne
pas découper.
RACCORDEMENT ÉLECTRIQUE
–Pour un raccordement direct, commencer à l’étape7
–Pour un cordon d’alimentation, attendre jusqu’à
l’étape18
Passer le câble comme indiqué pour un raccordement direct. Ne
pas brancher pour l’instant le câble au produit. Ce branchement
sera effectué plus tard, une fois que l’appareil sera installé dans
l’ouverture de l’armoire.
Acheminer le câble de l’alimentation électrique à travers le trou
dans l’armoire. (le câble doit dépasser par le côté avant droit
de l’ouverture d’encastrement de l’armoire.) Fixer le câble au
plancher avec du ruban adhésif dans la zone indiquée. Cela
empêchera le câble de bouger lors du déplacement du lave-
vaisselle dans l’ouverture de l’armoire.
6. Si installé dans une ouverture
de 33
5
/8po (85,4cm)
6 po
(15,2 cm)
7. Raccordement direct – position du
câble
Cale
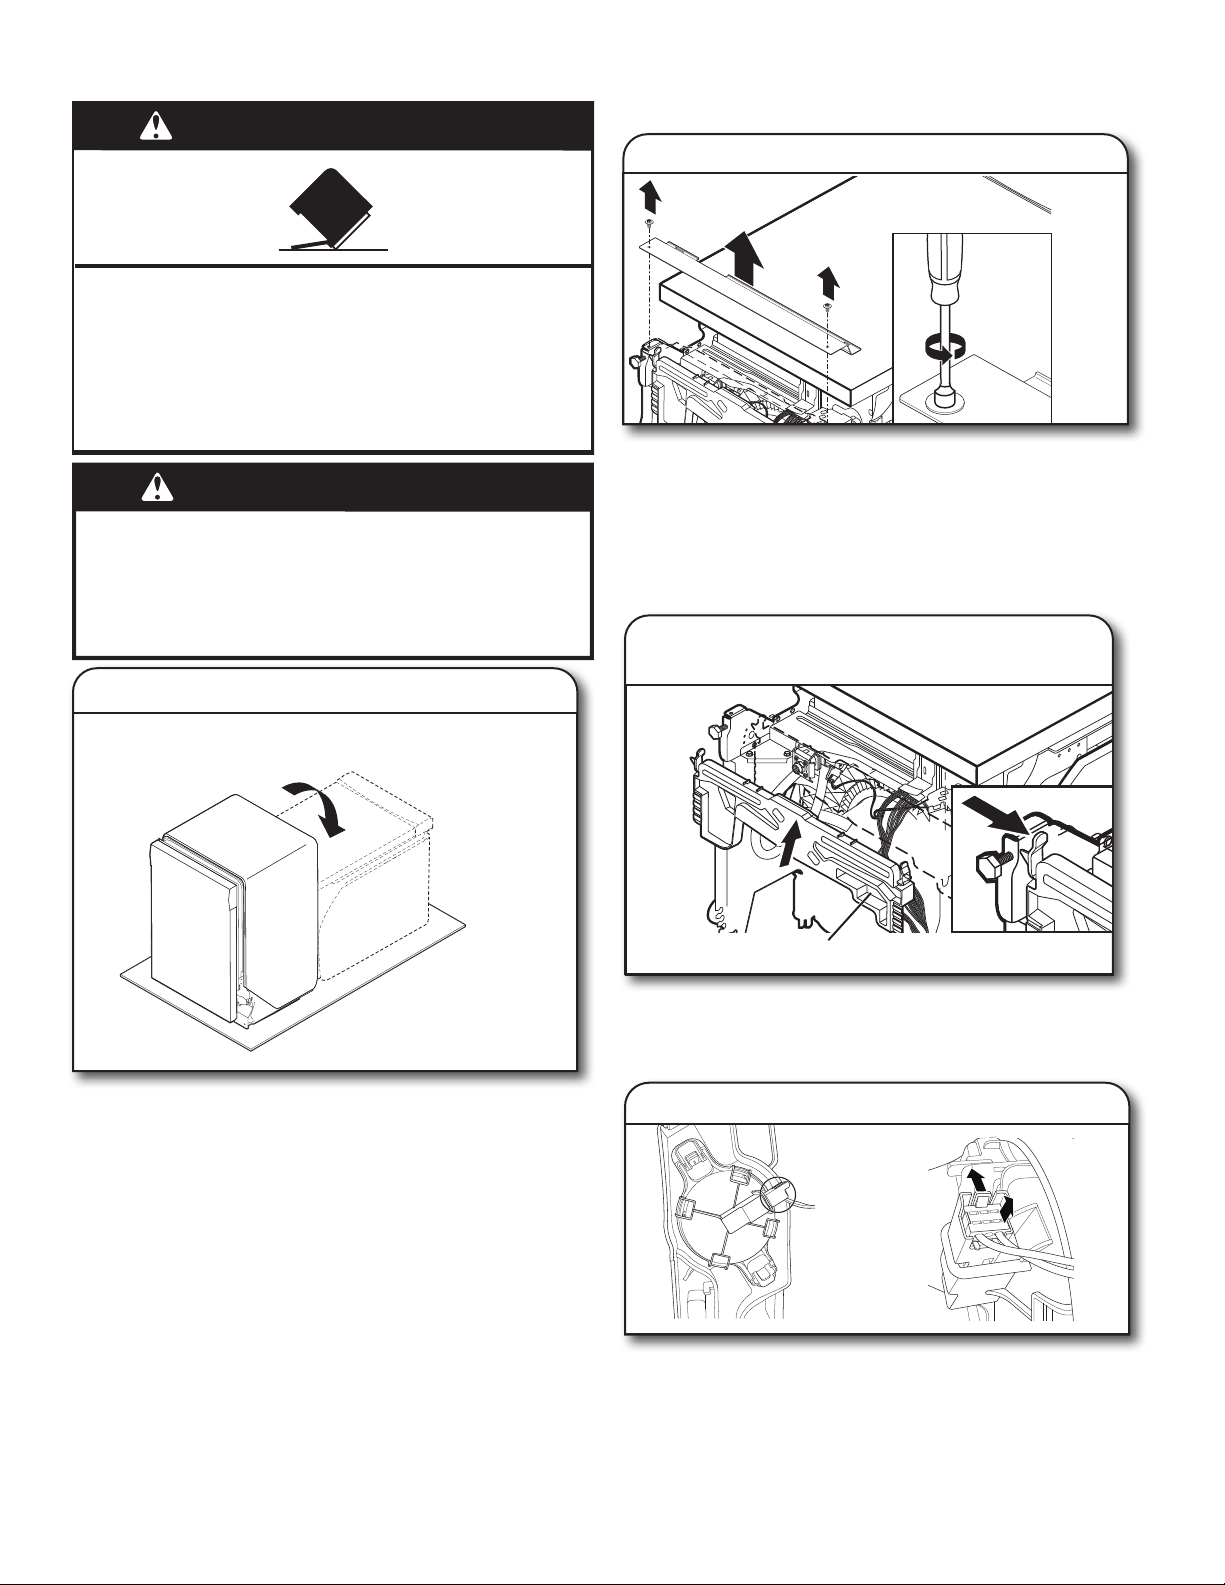
42
PRÉPARATION DU LAVE-VAISSELLE
Conseil utile : Retirer tout le matériel d’expédition interne,
le tuyau de vidange, la trousse d’installation et la poignée (si
incluse), avant de le coucher sur le dos. Ne pas retirer la pellicule
de la porte pour le moment.
Placer une feuille de carton sous le lave-vaisselle jusqu’à son
installation dans l’ouverture d’encastrement de l’armoire pour
éviter d’endommager le revêtement de sol.
À l’aide d’au moins deux personnes, saisir les côtés de
l’encadrement de la porte du lave-vaisselle et placer le lave-
vaisselle sur le dos.
Afin d’éviter d’érafler le panneau de porte, ne pas se servir
du panneau de porte comme planche de travail sans l’avoir
recouvert d’une serviette au préalable.
RETRAIT DU PANNEAU D’ACCÈS ET DE
L’ISOLATION
À l’aide d’un tourne-écrou de 5/16 po (7,9 mm), ôter les deux vis
fixant les panneaux d’accès au lave-vaisselle. Après avoir enlevé
les vis, pousser le panneau d’accès vers le haut du produit pour
le déverrouiller, puis l’enlever.
DÉBRANCHER ET ENLEVER LE PLATEAU
D’ÉCOULEMENT
10a. Enlever le plateau d’écoulement
Pour retirer le plateau d’écoulement, appuyer vers l’intérieur sur
les boutons situés de chaque côté du plateau en plastique et
tirer vers vous. Faire attention de ne pas tirer trop loin ou trop fort
puisque le fil du contacteur à flotteur est toujours branché.
10b. Retirer le fil du contacteur à flotteur
Pour retirer le fil du contacteur à flotteur, pousser doucement sur
l’onglet de fermeture du connecteur (1), puis tirer le connecteur
(2) à l’extérieur du boîtier. Le flotteur ne devrait pas être enlevé du
plateau.
REMARQUE: Ne pas installer le plateau d’égouttement avant
d’en être instruit.
AVERTISSEMENT
Risque du poids excessif
Utiliser deux personnes ou plus pour déplacer et
installer le lave-vaisselle.
Le non-respect de cette instruction peut causer une
blessure au dos ou d'autre blessure.
Risque de basculement
Ne pas utiliser le lave-vaisselle jusqu’à ce qu’il soit
complètement installé.
Ne pas appuyer sur la porte ouverte.
Le non-respect de ces instructions peut causer des
blessures graves ou des coupures.
AVERTISSEMENT
8. Placer le lave-vaisselle sur son dos
9. Retrait des panneaux d’accès
Plateau d’égouttement
1
2
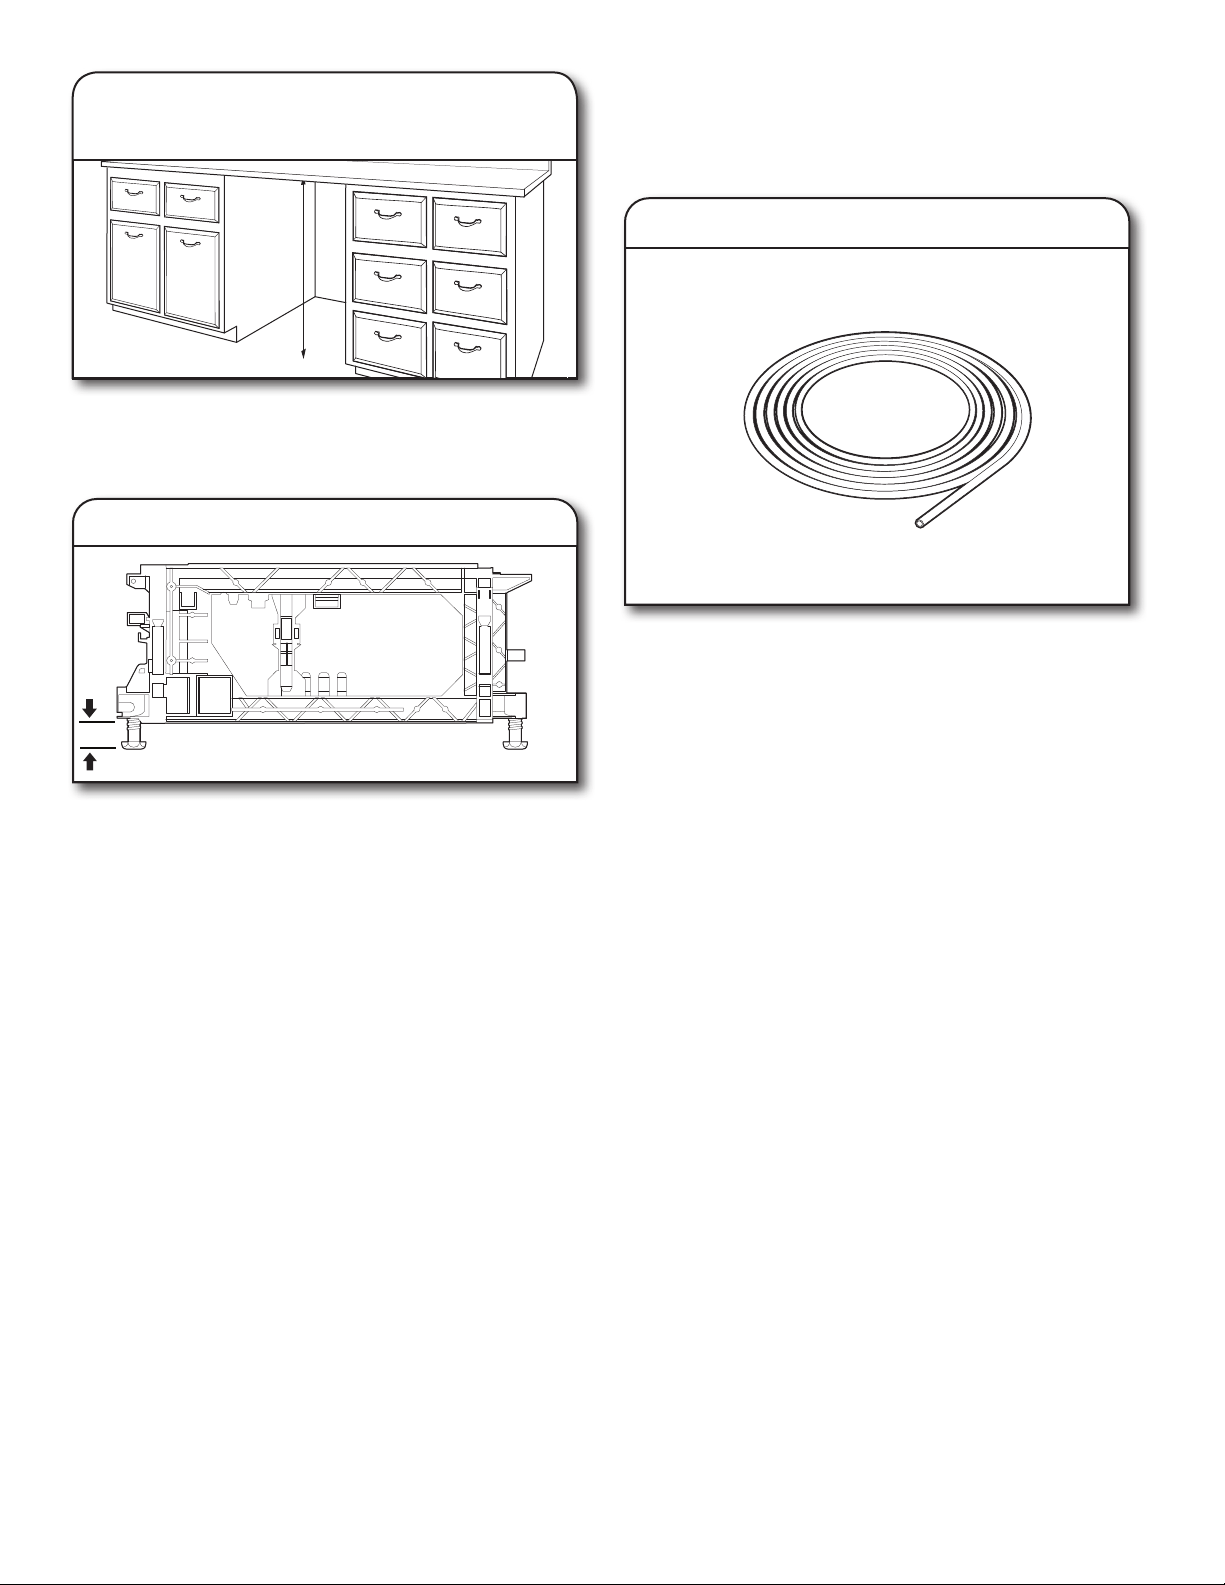
43
RETRAIT DU PANNEAU D’ACCÈS ET DE
L’ISOLATION
À l’aide d’un tourne-écrou de 5/16 po (7,9 mm), ôter les deux vis
fixant les panneaux d’accès au lave-vaisselle. Après avoir enlevé
les vis, pousser le panneau d’accès vers le haut du produit pour
le déverrouiller, puis l’enlever.
DÉBRANCHER ET ENLEVER LE PLATEAU
D’ÉCOULEMENT
10a. Enlever le plateau d’écoulement
Pour retirer le plateau d’écoulement, appuyer vers l’intérieur sur
les boutons situés de chaque côté du plateau en plastique et
tirer vers vous. Faire attention de ne pas tirer trop loin ou trop fort
puisque le fil du contacteur à flotteur est toujours branché.
10b. Retirer le fil du contacteur à flotteur
Pour retirer le fil du contacteur à flotteur, pousser doucement sur
l’onglet de fermeture du connecteur (1), puis tirer le connecteur
(2) à l’extérieur du boîtier. Le flotteur ne devrait pas être enlevé du
plateau.
REMARQUE: Ne pas installer le plateau d’égouttement avant
d’en être instruit.
9. Retrait des panneaux d’accès
Mesurer la hauteur libre de l’espace d’installation, sous le
comptoir où le lave-vaisselle sera installé. Vous assurer de
mesurer le point le plus bas sous le comptoir et le point le plus
sur le sol.
Utiliser une clé pour desserrer les pieds de nivellement
(au besoin).
Réglez les quatre pieds de nivellement à la même hauteur en
faisant tourner chaque pied dans le sens horaire ou antihoraire
(au besoin).
L’appareil est accompagné d’un ensemble de pieds qui permet
une hauteur d’installation de 33
5
/8 po (85,4 cm). Si la hauteur de
l’ouverture est de 34 ½ po (87,6 cm), il faudra relever les quatre
pieds de 7/8 po (2,22 cm).
REMARQUE: Ajuster la hauteur des pieds arrière avant de
déplacer l’appareil dans la découpe.
Les pieds peuvent être enlevés si l’installation est serrée.
BRANCHEMENT DE L’ARRIVÉE D’EAU À LA
VALVE DE DISTRIBUTION
–Pour un tuyau en cuivre, commencer à l’étape12
–Pour un tuyau flexible, commencer à l’étape14
Si on utilise un tuyau en cuivre, mesurer la longueur de tuyau en
cuivre nécessaire pour atteindre l’alimentation en eau, couper à
cette longueur et fixer les raccords de compression.
11. Mesure de l’ouverture
d’encastrement
Réglage des pieds de nivellement
12. Conduite d’eau en cuivre

44
Canalisation en cuivre uniquement: Insérer la canalisation
dans le raccord coudé de 90° aussi loin que possible. (La
canalisation en cuivre se plie et s’écrase facilement.) Glisser
l’écrou et la virole vers l’avant et serrer pour que l’ensemble
repose contre les filets du coude.
REMARQUE: Pour réduire les vibrations durant le
fonctionnement, acheminer la canalisation d’alimentation en eau
de telle manière qu’elle ne touche pas la base, le châssis ou le
moteur de l’appareil. Si une canalisation en cuivre est utilisée,
passer l’étape14 et poursuivre à l’étape15.
14. Tuyau flexible
Tuyau flexible à tresse d’acier: Vérifier que le tuyau flexible à
tresse d’acier est suffisamment long.
Prendre le raccord de tuyau coudé à 90° de 3/8 po x 3/4 po.
Brancher le raccord de tuyau coudé à 90° de 3/8 po à l’arrivée
d’eau. Le fixer de façon à ce que le raccord de 3/4 po soit orienté
vers le haut, comme illustré ci-dessous.
BRANCHEMENT DU TUYAU DE REMPLISSAGE
À LA VALVE DE DISTRIBUTION
16. Raccorder le raccord coudé de 90°
à la valve
Raccord coudé
S’assurer que la rondelle de caoutchouc est correctement
installée dans le raccord. Enfiler le raccord de3/4po (19mm) du
coude à 90° jusqu’au robinet et serrer à la main pour éviter de
visser de travers. Serrer à la main jusqu’à ce que le raccord soit
serré.
À l’aide d’une pince, vérifier l’étanchéité du raccord. Un serrage
supplémentaire de 1/4 à 1/2 tour peut être nécessaire pour
sceller le joint d’étanchéité en caoutchouc. Passer le tuyau par le
côté arrière gauche de l’unité.
REMARQUES:
■ Ne pas utiliser de ruban avec les raccords de compression.
■ Ne pas serrer excessivement. Le raccord risque d’être
endommagé.
■ Passer la canalisation d’alimentation en eau par l’arrière de
l’appareil avant de régler l’appareil.
Écrou
Virole
13. Enfiler l’écrou et la virole sur le tube
(tube de cuivre uniquement)
15. Raccorder le raccord coudé de 90° à
la canalisation d’alimentation en eau
Pour retirer le boîtier de raccordement, appuyer sur le fermoir
en plastique, glisser la boîte vers la gauche de l’appareil contre
le tube de métal et faire tourner le côté gauche de la boîte vers
l’avant. S’assurer que le câblage du produit reste attaché dans le
boîtier de raccordement.
À l’aide d’un tourne-écrou de 1/4 po (6,4mm), retirer la vis fixant
le couvercle du boîtier de raccordement. Retirer le couvercle en le
soulevant du boîtier. Conserver le couvercle pour utilisation
ultérieure.
Installer un serre-câbles métallique (homologation UL/CSA).
S’assurer que les têtes de vis soient orientées vers le haut lors du
serrage de l’écrou à conduit.
Un serre-câbles est fourni dans l’ensemble du cordon
d’alimentation.
Longueur de câble suggérée en lien avec le serre-câbles
19. Ôter le couvercle de la boîte de
connexion
Couvercle
du
boîtier de
connexion
20. Installation du serre-câbles
4
1
/2 po
(114,3mm)
0,75po à 1po
(19mm à 25mm)
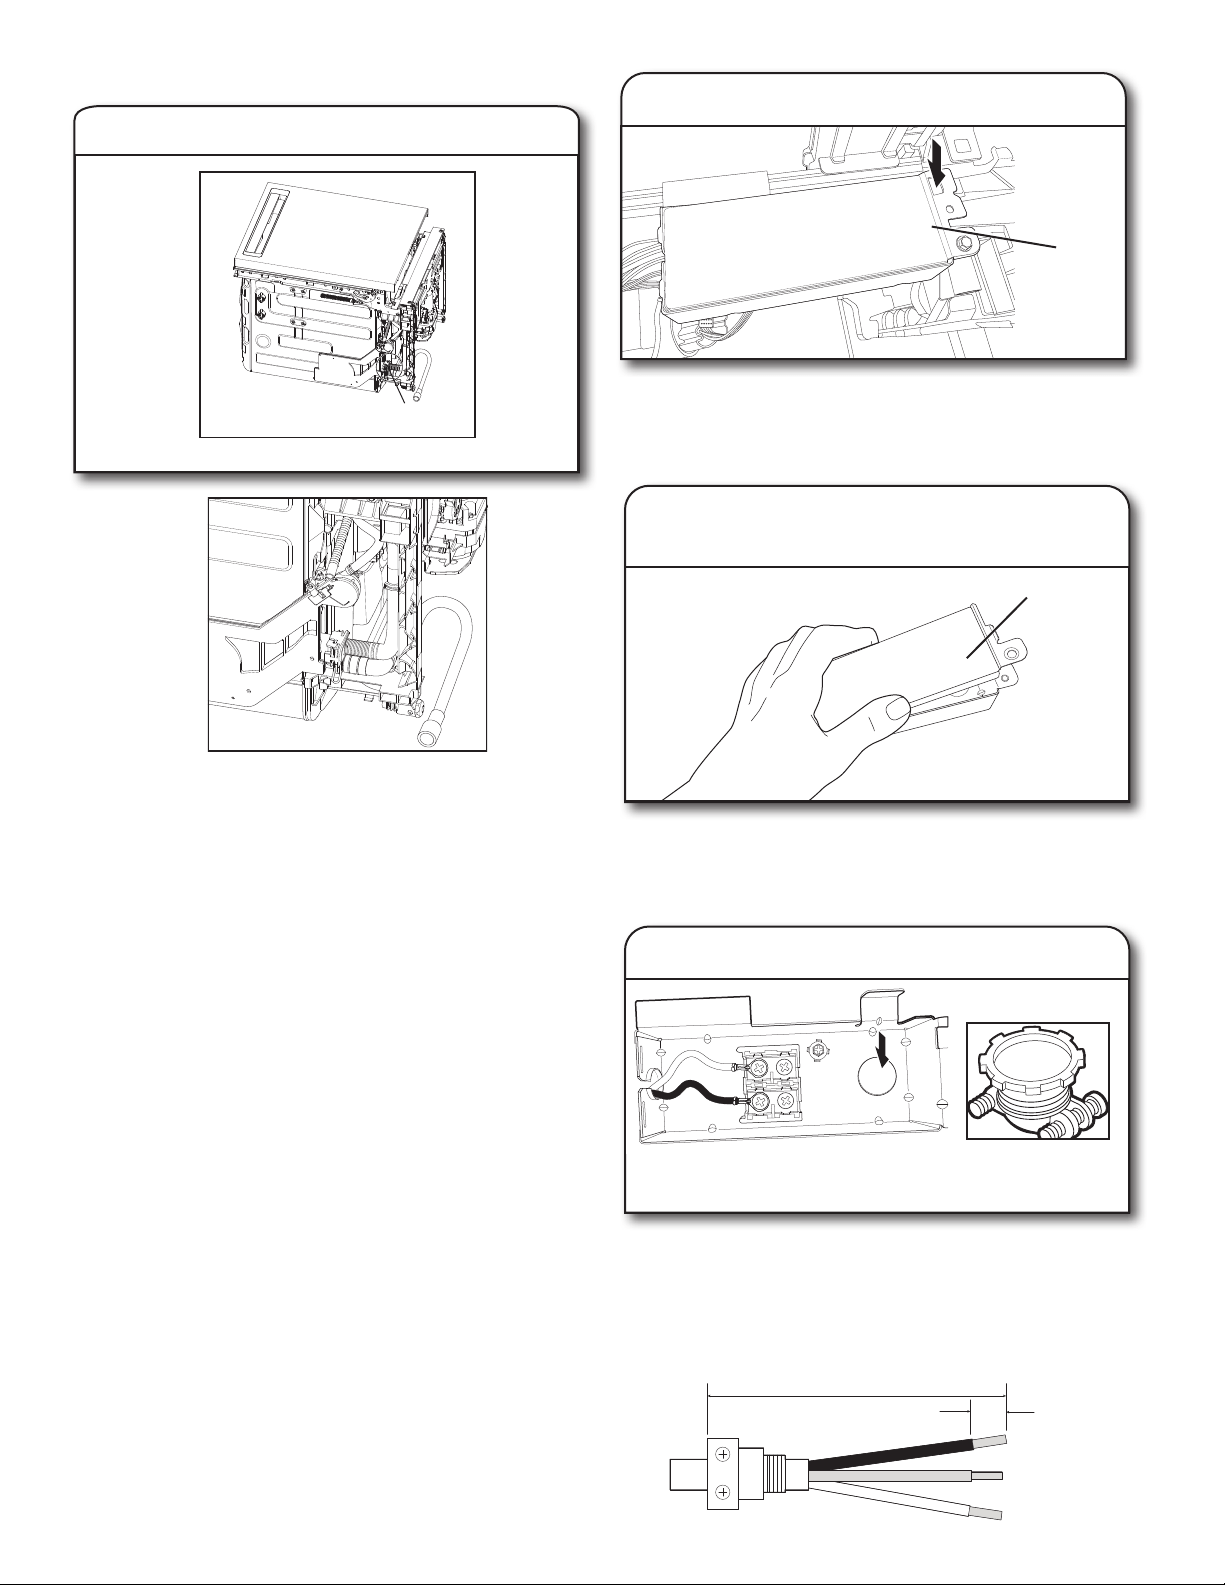
45
RACCORD DU TUYAU DE VIDANGE
Placer la bride argent sur l’extrémité coudée du tuyau de vidange.
Pousser ensuite le tuyau sur l’orifice de vidange (en veillant à
pousser à fond) avec le tuyau face sous le lave-vaisselle. À l’aide
d’une pince, ouvrir la bride du tuyau de vidange et la glisser sur le
coude pour s’assurer que ce tuyau est bien fixé en place. Passer
le tuyau par l’arrière du produit.
REMARQUE:
■ Si le tuyau est installé avec le coude en caoutchouc qui
fait face vers l’extérieur, le tuyau d’évacuation pourrait se
déformer, ce qui pourrait ralentir ou interrompre la vidange
dans les installations serrées.
■ Pour des raisons d’expédition, il peut y avoir un bouchon
de plastique dans le port de vidange où le drain de vidange
sera raccordé. Retirer, s’il est présent, ce bouchon avant
d’installer le tuyau de vidange.
BRANCHEMENT DU CORDON
D’ALIMENTATION
REMARQUE: Si le produit est installé avec un câble direct,
passer à l’étape 25, attendre d’installer le câblage après l’étape
44, une fois l’appareil placé dans l’ouverture de l’armoire.
Utiliser un cordon d’alimentation homologué UL/CSA pour le lave-
vaisselle.
Ensemble pour cordon d’alimentatio
n
L’ensemble comprend habituellement un cordon d’alimentation,
un serre-câbles métallique et un œillet.
(Numéro de pièce Whirlpool de la trousse avec cordon – droit –
W11365011
trousse avec cordon – angle droit – W11365014)
Pour retirer le boîtier de raccordement, appuyer sur le fermoir
en plastique, glisser la boîte vers la gauche de l’appareil contre
le tube de métal et faire tourner le côté gauche de la boîte vers
l’avant. S’assurer que le câblage du produit reste attaché dans le
boîtier de raccordement.
À l’aide d’un tourne-écrou de 1/4 po (6,4mm), retirer la vis fixant
le couvercle du boîtier de raccordement. Retirer le couvercle en le
soulevant du boîtier. Conserver le couvercle pour utilisation
ultérieure.
Installer un serre-câbles métallique (homologation UL/CSA).
S’assurer que les têtes de vis soient orientées vers le haut lors du
serrage de l’écrou à conduit.
Un serre-câbles est fourni dans l’ensemble du cordon
d’alimentation.
Longueur de câble suggérée en lien avec le serre-câbles
Emplacement du tuyau de vidange
17. Raccordement du tuyau de vidange
19. Ôter le couvercle de la boîte de
connexion
Couvercle
du
boîtier de
connexion
20. Installation du serre-câbles
4
1
/2 po
(114,3mm)
0,75po à 1po
(19mm à 25mm)
Boîtier de
raccordement
18. Retirer le boîtier de raccordement
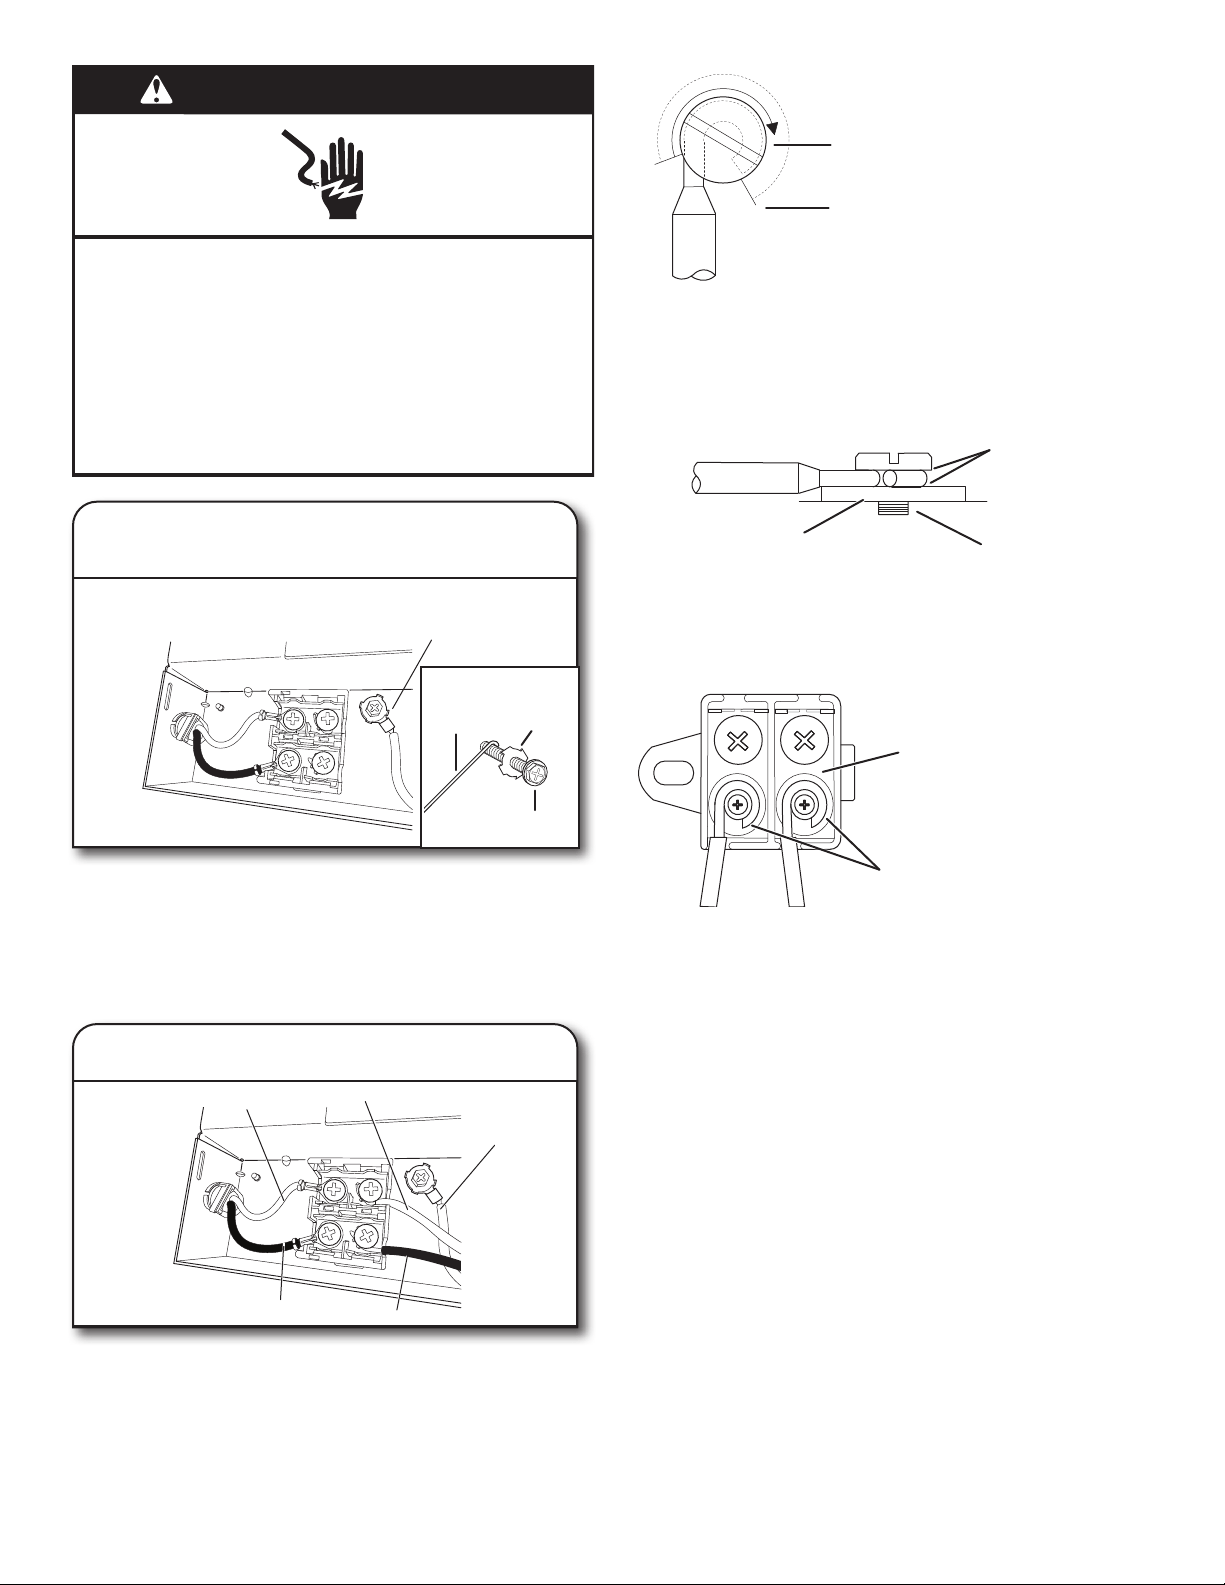
46
Passer le cordon d’alimentation dans le serre-câbles situé à
l’arrière du boîtier de raccordement. Retirer la vis de liaison à la
terre du plancher surélevé à l’intérieur du boîtier et la placer à
travers la borne en anneau de la vis verte de mise à la terre du
cordon d’alimentation. Si le fil ne comporte pas de borne en
anneau, plier une boucle au bout du fil. Voir le schéma détaillé
ci-dessous sur la façon de terminer correctement le câblage du
produit à la maison. Rattacher et serrer la vis de liaison à la terre
sur le plancher surélevé du boîtier.
Pour brancher les fils aux cosses rondes, retirer les vis du bornier,
passer les vis à travers les cosses rondes, puis les revisser au
bornier.
Pour connecter des fils sans bornes à anneau, retirer les vis du
bornier. Plier une boucle à l’extrémité des fils. Pousser les vis à
travers la boucle. Voir le schéma détaillé ci-dessous sur la façon
de terminer correctement le câblage du produit à la maison.
Remettre les vis dans le bornier. Serrer les vis.
REMARQUE: Des fils préétamés ne devraient pas être utilisés
pour le raccordement au bornier. S’assurer que le fil noir est aligné
avec le fil noir et que le fil blanc est aligné avec le fil blanc dans le
bornier.
Dénuder l’isolation et enrouler le l
AVERTISSEMENT
Risque de choc électrique
Relier le lave-vaisselle à la terre d’une méthode
électrique.
Brancher le fil relié à la terre au connecteur vert relié à
la terre dans la boîte de la borne.
Ne pas utiliser un câble de rallonge.
Le non-respect de ces instructions peut causer
un décès, un incendie ou un choc électrique.
21. Connecter le conducteur de liaison
à la terre
22. Connecter les conducteurs restants
Fil enroulé aux deux tiers autour
Fil enroulé aux trois quarts autour
Illustration: 1
Contact serrés
Tige de la vis
Surface de contact
Illustration: 2
Surface de contact
Le fil dénudé doit toujours être
enroulé de 2/3 ou 3/4 autour
des filets de vis
Illustration: 3
Conducteur
de terre
Vis de mise
à la terre
Rondelle
Vis du connecteur
de mise à la terre
Conducteur noir
Conducteur blanc
Conducteur blanc
Conducteur noir
Conducteur
de terre
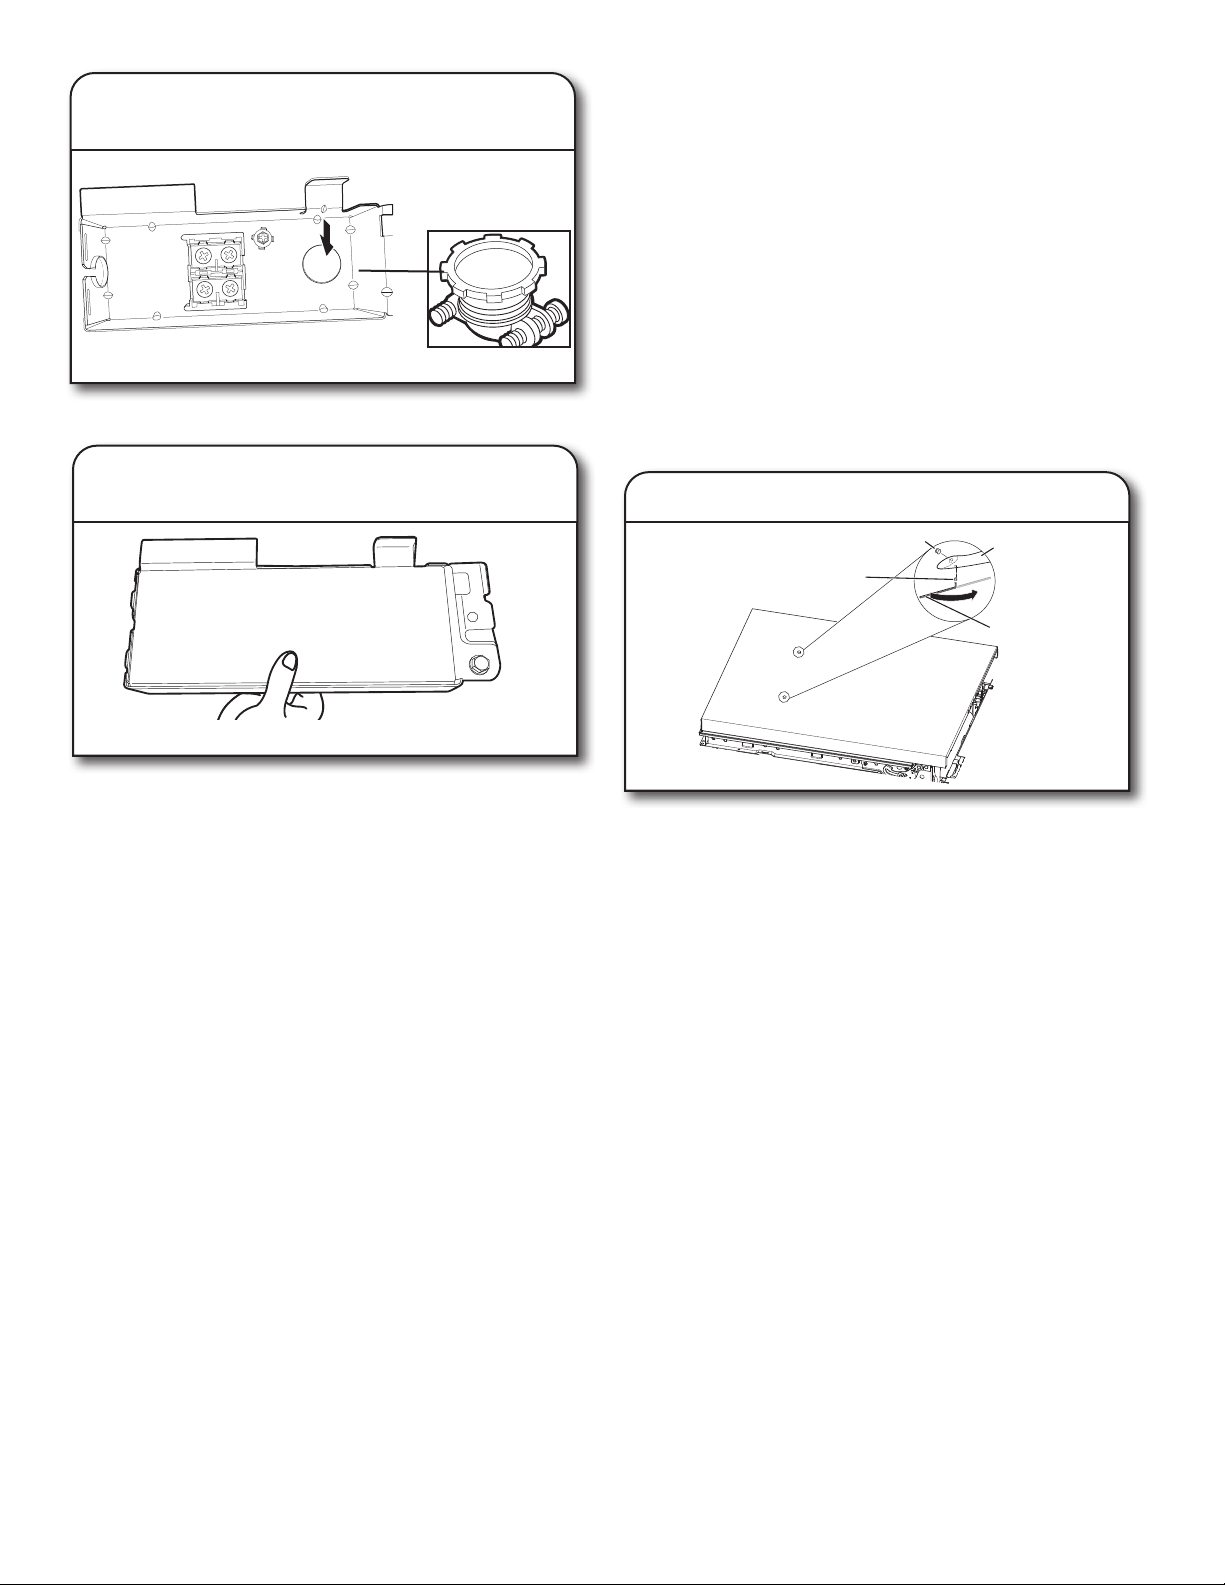
47
Resserrer les vis du serre-câbles pour fixer le cordon.
Placer les conducteurs à l’intérieur du boîtier de connexion.
Remettre le couvercle en place en insérant les crochets du
couvercle du boîtier de connexion dans les encoches du fond du
boîtier de connexion, et en enfilant le couvercle bien serré contre
le mur arrière où passent les câbles. S’assurer que les câbles
sont bien logés à l’intérieur du boîtier et ne sont pas coincés sous
le couvercle.
Replacer le boîtier de raccordement sur le croisillon et le pousser
vers la droite pour que le boîtier de raccordement se fixe à la
partie latérale en plastique.
REMARQUES:
■ Ne pas brancher le cordon dans une prise avant d’en avoir
reçu l’instruction.
■ Une fois le boîtier de raccordement réinstallé dans le lave-
vaisselle, glisser tout excédant de fils sur les composants à
proximité pour aider à ce qu’ils ne touchent pas au sol.
■ Passer le cordon par l’arrière du lave-vaisselle pour qu’il ne
touche pas le moteur du lave-vaisselle ou la partie inférieure de
la cuve du lave-vaisselle.
■ Un maximum de 2 cordons d’alimentation (calibre 12AWG
maximum) plus 1 conducteur de mise à la terre est autorisé
dans le boîtier de connexion.
IMPORTANT: Aucune autre connexion que celle du
raccordement d’alimentation du lave-vaisselle ne peut être
effectuée à l’intérieur du boîtier de raccordement du lave-
vaisselle.
INSTALLER LA POIGNE DE PORTE
(SUR CERTAINS MODÈLES)
IMPORTANT: Ne pas érafler le panneau avant au cours de ce
processus. SI le panneau de porte est muni d’une pellicule de
protection, l’enlever jusqu’au point de fixation de la poignée
avant d’installer cette dernière. La poignée est plus facile à
installer lorsque l’appareil est sur le dos.
Retirer les poignées de porte et la clé à tête hexagonale de leur
emballage. Des vis de blocage sont préinstallées sur la poignée.
Placer la poignée sur les poteaux de colombage avec les vis
de blocage orientées vers le bas. Pousser la poignée de porte
fermement en appui contre la porte. Insérer le côté court de la clé
à tête hexagonale dans les vis de blocage. Serrer les vis de 1/4
de tour au-delà de la butée.
Conserver la clé à tête hexagonale avec les instructions d’installation.
23. Fixer le cordon ou le l dans le
serre-câbles
24. Réinstaller le couvercle et les fils
du boîtier de raccordement
25. Installation de la poignée de porte
Goujon de montage
Poignée
Clé à tête
hexagonale
Vis de calage (au
fond de la poignée)
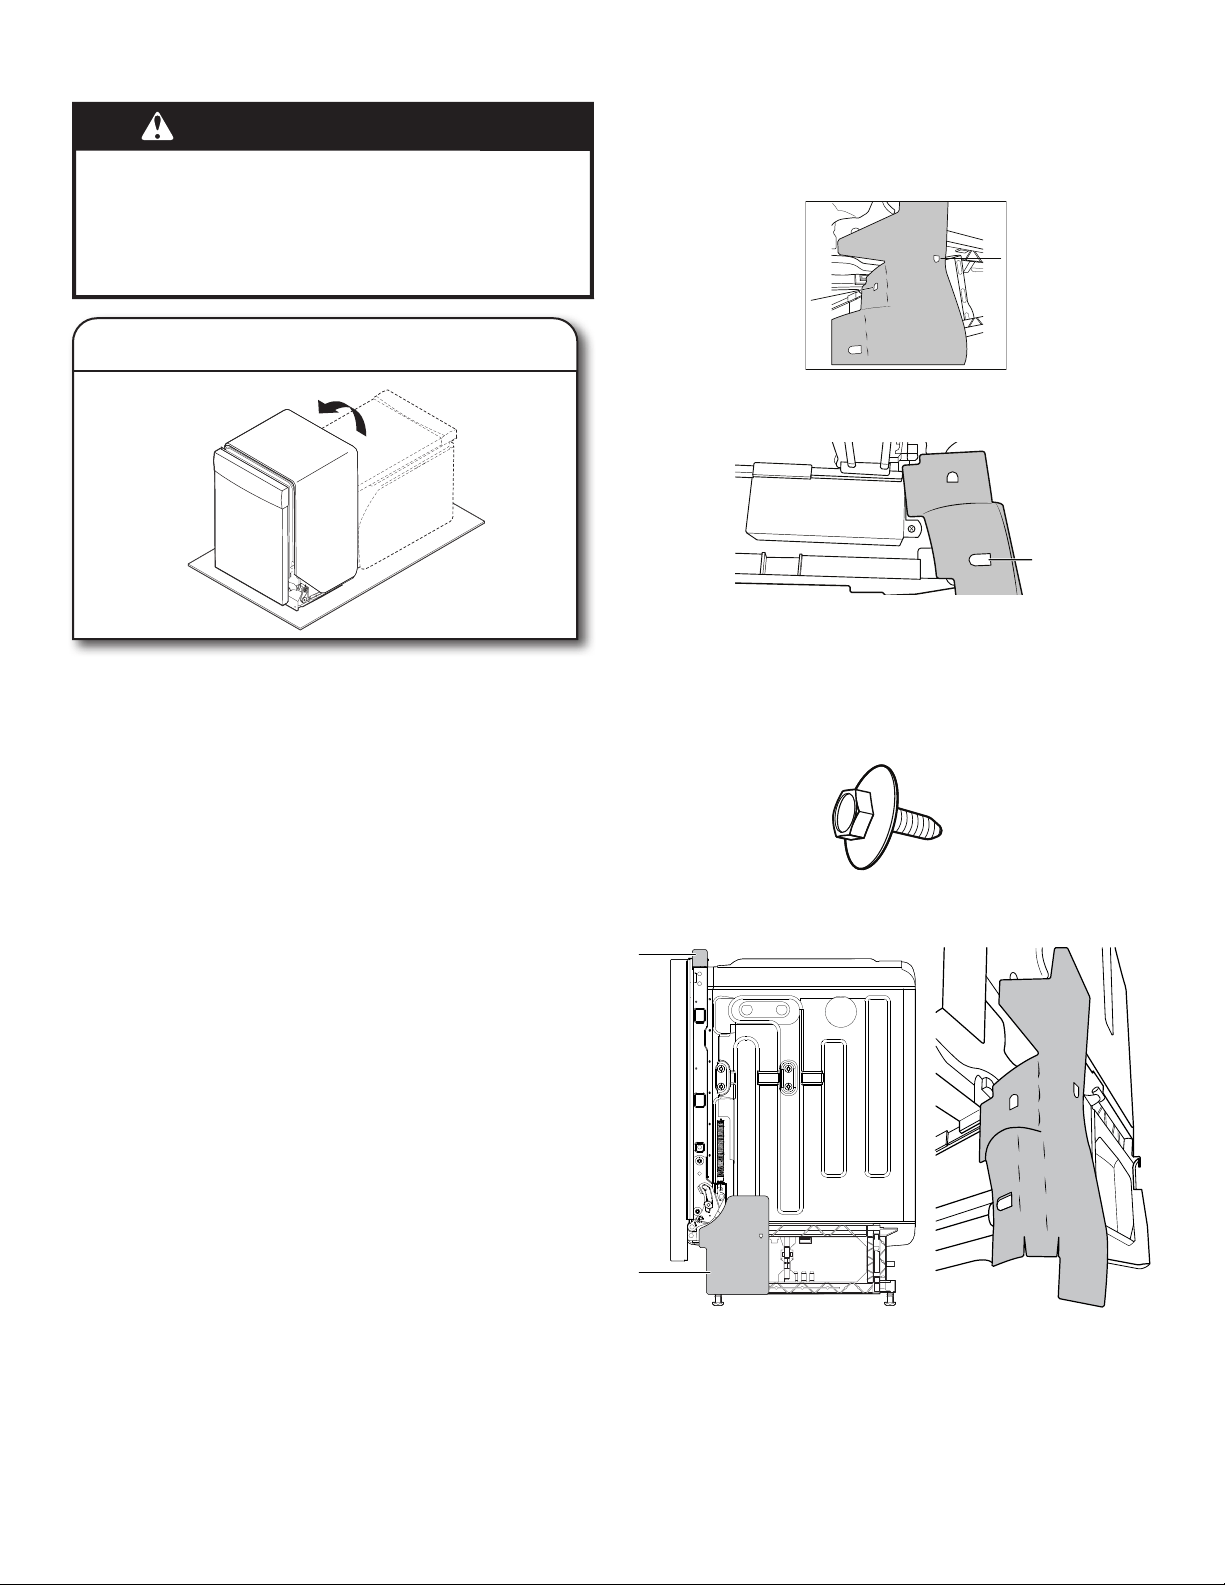
48
PLACER LE LAVE-VAISSELLE DANS L’ARMOIRE
AVERTISSEMENT
Risque du poids excessif
Utiliser deux personnes ou plus pour déplacer et
installer le lave-vaisselle.
Le non-respect de cette instruction peut causer une
blessure au dos ou d'autre blessure.
26. Redresser le lave-vaisselle
À l’aide d’au moins deux personnes, mettre le lave-vaisselle en
position verticale.
REMARQUE: Ne pas installer le garde-pieds avant d’en avoir
reçu l’instruction.
Le lave-vaisselle peut s’adapter parfaitement dans l’ouverture
d’encastrement. Ne pas enlever le garnissage d’insonorisation/
isolation – il réduit le niveau sonore.
IMPORTANT: Veiller à ne pas coincer la canalisation de cuivre,
le tuyau d’évacuation, le cordon d’alimentation ou le câble de
raccordement direct entre le lave-vaisselle et l’armoire. Enlever la
feuille de carton placée sous le lave-vaisselle (si utilisée).
Installer les gaines latérales en mousse (sur certains
modèles)
Installer les gaines latérales en mousse sur les côtés gauche et droit
du lave-vaisselle. Il y a trois points de fixation de chaque côté.
■ Fixation1: Trouver la fente sur la gaine latérale et la fixer sur le
crochet situé sur le côté du lave-vaisselle. (Voir l’illustration1)
■ Fixation2: Trouver l’autre fente de la gaine latérale et la fixer
au crochet situé à l’avant du lave-vaisselle. (Voir l’illustration2)
■ Fixation3: Aligner le trou rectangulaire de la gaine latérale avec
le trou de vis du panneau inférieur. Insérer la vis du panneau
inférieure (voir l’illustration 3) et visser sans serrer pour maintenir
le tout en place jusqu’à ce que le panneau inférieur soit installé.
■ Glisser la partie inférieure des gaines latérales sous le
lave-vaisselle. (Voir les illustrations4 et 5)
Illustration: 1
Illustration: 2
Illustration: 3
Illustration: 4 Illustration: 5
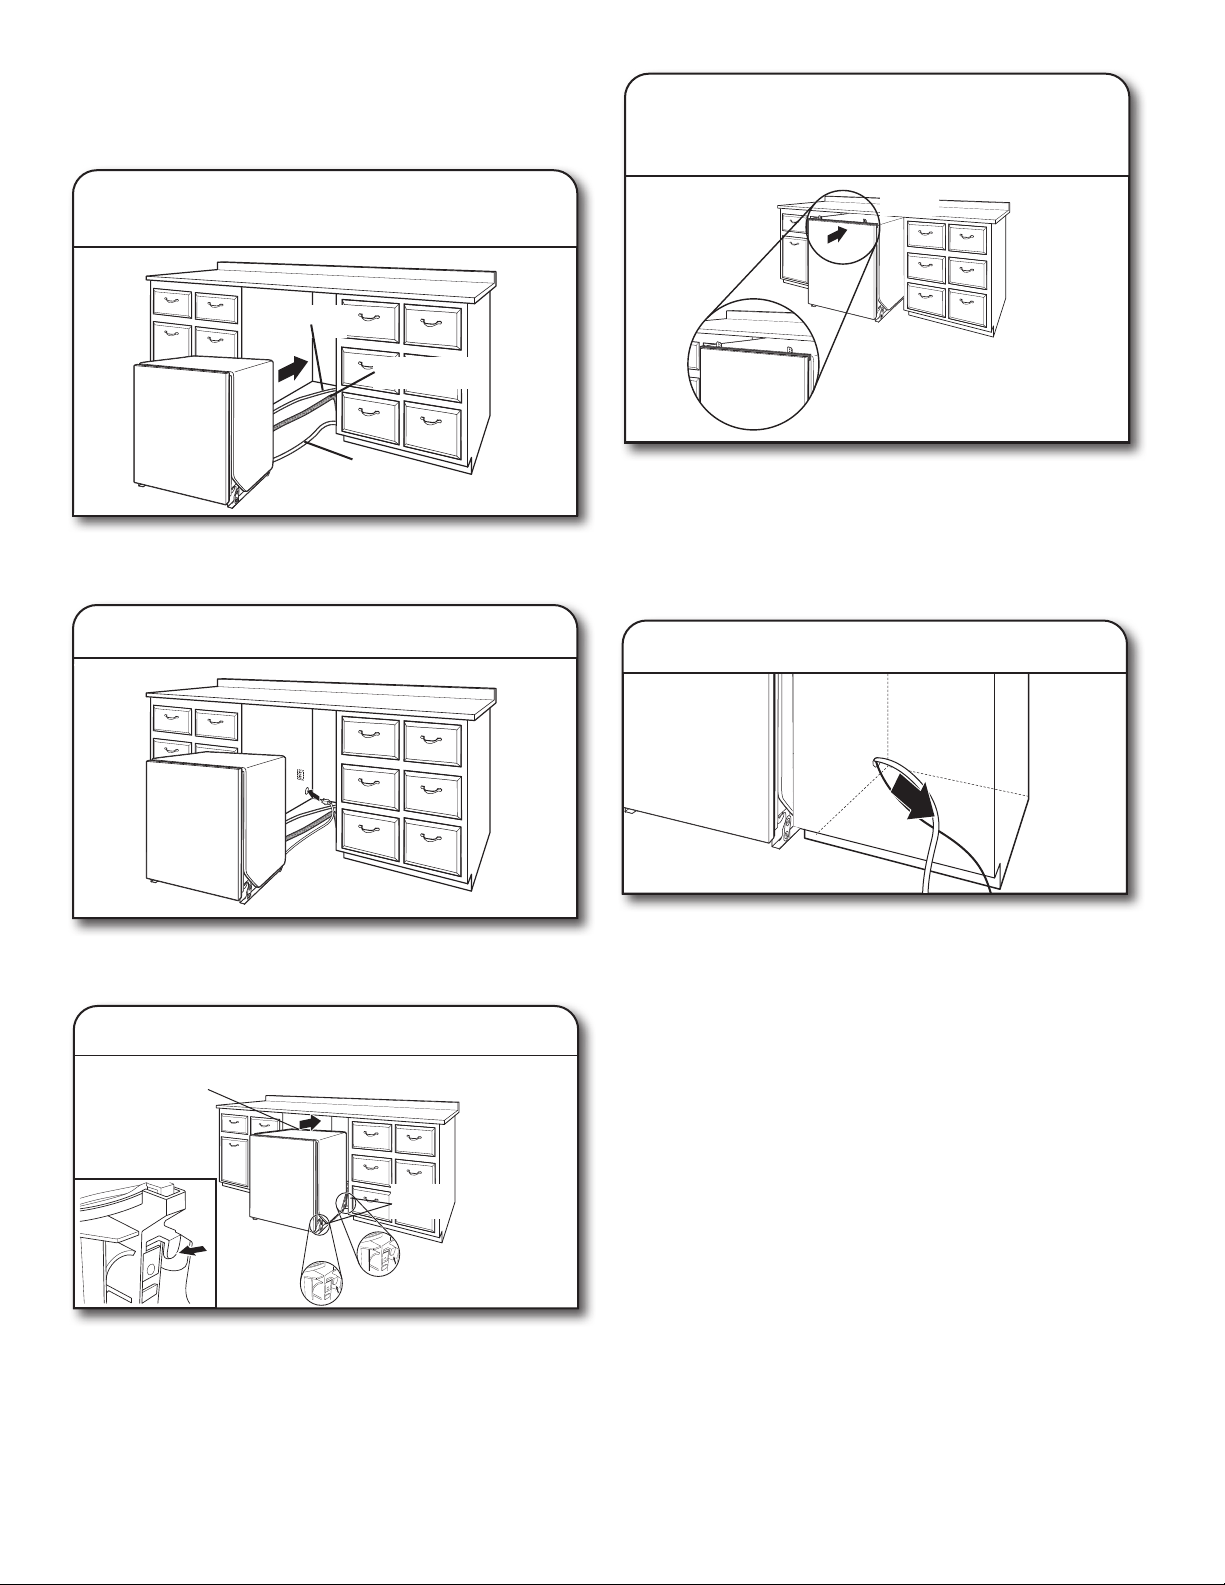
49
29. Fixer la plaque d’insonorisation
REMARQUE: Passer l’arrivée d’eau, le tuyau de vidange et le
cordon d’alimentation par l’arrière du lave-vaisselle. Si le produit
est muni d’une isolation autour de la base, passer ces cordons
dans les fentes de l’isolation situées à l’arrière du produit.
Passer les raccordements par les trous du cabinet et tirer
l’excédent en même temps que le lave-vaisselle est positionné
dans son espace.
En cas d’utilisation d’un cordon d’alimentation, veiller à faire
passer l’extrémité de celui-ci dans le trou de l’ouverture
découpée avant de pousser le lave-vaisselle à sa place.
REMARQUE: S’assurer que l’insonorisation est bien fixée aux
coins arrière gauche et droit avant de pousser le lave-vaisselle en
place pour qu’elle ne s’entasse pas lorsque l’espace est restreint.
La plaque peut être fixée en tirant l’isolation vers le bas du
produit et en s’assurant que les crochets sur les côtés de la pièce
sont insérés dans les fentes de la plaque d’isolation.
6 po
(15.2 cm)
30. Insérer le lave-vaisselle en laissant
6 po (15,2cm) dépasser de l’avant
des armoires
■ Placer la mousse d’isolation sonore du haut (sur certains
modèles)
• Glisser la mousse du haut dans la fente située sur le
collet supérieur du lave-vaisselle, comme indiquer dans
l’illustration.
REMARQUE: Laisser sortir environ 6po (15,2cm) de l’armoire
pour permettre l’installation des supports d’ancrage.
REMARQUE: Tirer l’excédent en même temps que le lave-
vaisselle est poussé en place dans son ouverture pour éviter la
formation de coudes.
INSTALLATION DU PANNEAU PERSONNALISÉ
(MODÈLES AVEC PANNEAU PERSONNALISÉ
SEULEMENT)
Pour l’installation du panneau personnalisé, consulter les
instructions d’installation du panneau personnalisé incluse
dans le sac de documents. Terminer l’installation du panneau
personnalisé avant de continuer avec la section «Choix de
l’option de fixation».
CHOIX DE L’OPTION DE FIXATION
IMPORTANT: Le lave-vaisselle doit être fixé à l’armoire lors de
l’une des étapes finales. Préparer le lave-vaisselle pour cette
opération en y fixant les deux attaches placées dans le sachet de
pièces.
- Pour une surface de travail en bois, stratifiée ou une autre
surface semblable, utiliser les fixations pour plan de travail, puis
passer à l’étape32.
- Pour une surface de travail en marbre, granite ou une autre
surface semblable, utiliser les fixations pour les côtés, puis
passer à l’étape33.
REMARQUE: SI l’espace entre le haut de la porte et le dessous
du plan de travail est petit (moins de 1/4po [6,35mm]), il est
suggéré d’utiliser les fixations de côtés pour éviter de rayer
l’interface utilisateur ou la console avec les vis de fixation.
27. Déplacer le lave-vaisselle près de
l’ouverture d’encastrement
28. Faire passer le cordon d’alimentation
31. Tirer l’excédent des raccordements
Canalisation
d’eau
Tuyau
d’évacuation
Câble
Fixer la
plaque
Plaque
d’insonorisation
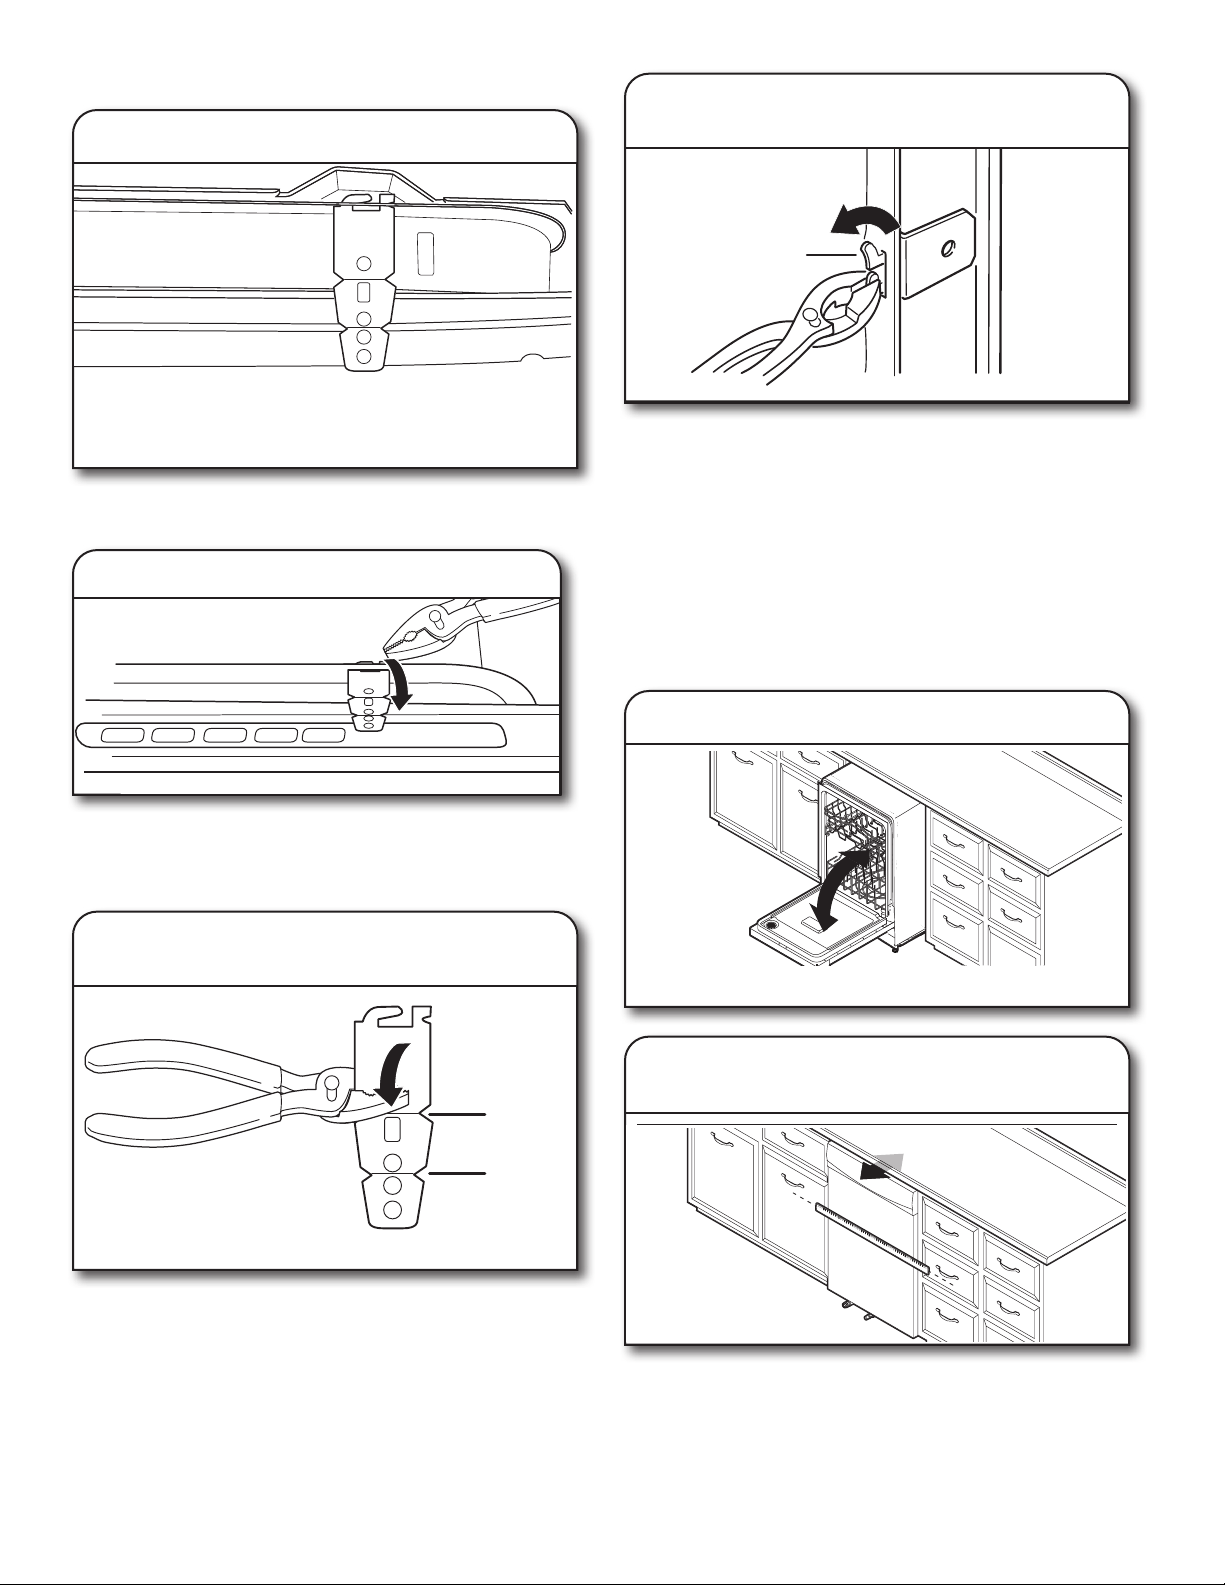
50
Fixation à la surface de travail:
Retirer les brides de l’emballage et les insérer dans les fentes
ouvertes sur les côtés supérieurs droit et gauche du collet du
lave-vaisselle, comme indiqué.
Fixation au comptoir
À l’aide des pinces, plier/tordre la languette pour verrouiller les
brides en place.
Fixation sur les côtés:
Briser l’extrémité de la bride le long des pointillés à l’aide de
pinces. Utiliser un papier à poncer pour éliminer les bavures.
34. Installer le support pour une fixation
latérale
Enfoncer la bride dans la fente sur le côté du lave-vaisselle et
replier la languette vers le côté du lave-vaisselle pour maintenir
la bride en place. Répéter cette étape pour l’autre côté du lave-
vaisselle.
REMARQUE: Utiliser des cales en bois si l’espace entre les
côtés de l’armoire et du lave-vaisselle est supérieur à 1/2po
(1,3cm) de chaque côté.
REMARQUE: Ne pas fixer le lave-vaisselle. Cette étape sera
effectuée plus tard.
VÉRIFICATION FINALE DE L’INSTALLATION
35. Ouvrir et fermer la porte
36. Aligner l’avant du lave-vaisselle avec
les portes des armoires
Aligner l’avant du panneau de porte du lave-vaisselle avec les
portes des armoires. Il faudra peut-être ajuster l’alignement de
celui-ci pour qu’il soit en affleurement avec les armoires.
32. Insérer les brides
Les languettes doivent
être orientées vers la
droite.
32a.
33. Briser le bout du support pour
une fixation latérale
Plier les
languettes
Ligne de
l’entaille
supérieure
pour les
cuves
en acier
inoxydable
Ligne de
l’entaille
inférieure
pour les
cuves en
plastique
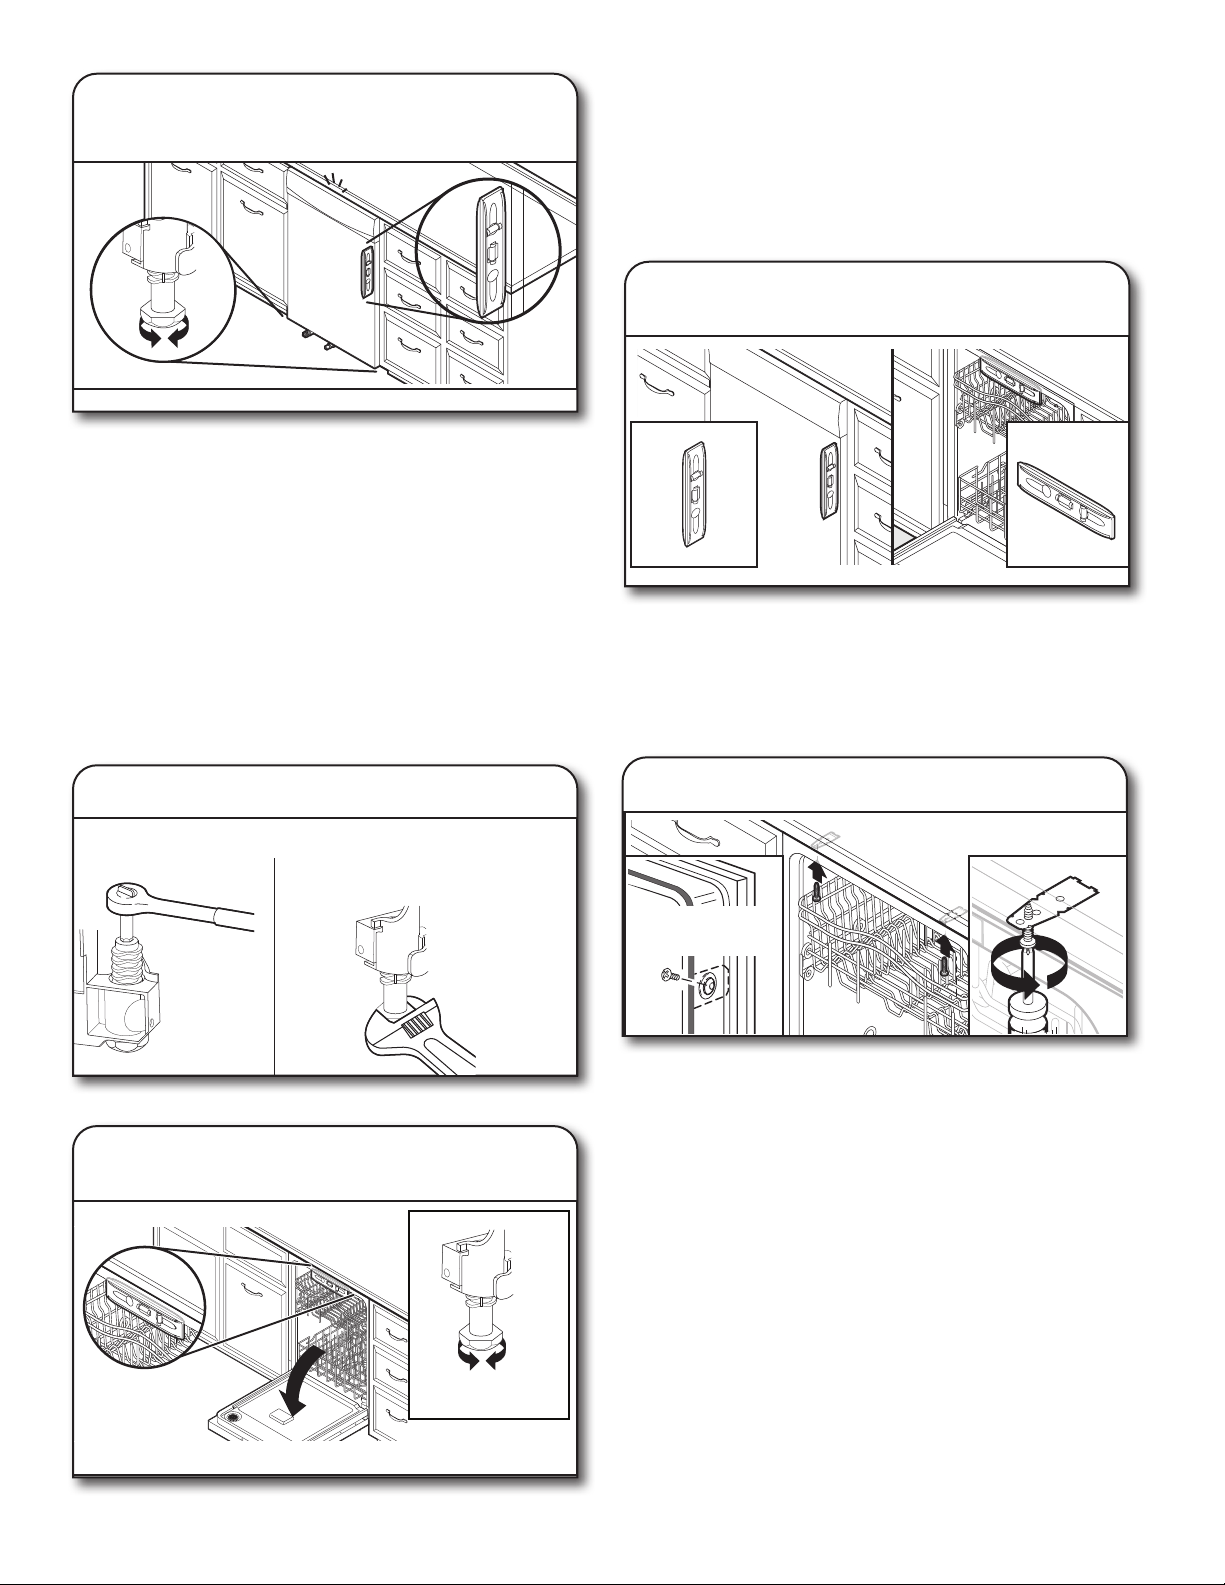
51
37. Vérifier l’aplomb et régler les pieds
au besoin
■ Vérifier que chaque pied de réglage de l’aplomb est fermement
en appui sur le sol. Fermer et verrouiller la porte; placer un niveau
contre le panneau avant. Vérifier que le lave-vaisselle est centré
de l’avant vers l’arrière dans l’ouverture. Si nécessaire, régler le
pied de nivellement jusqu’à ce que le lave-vaisselle soit d’aplomb.
Répéter ces opérations pour l’autre côté du lave-vaisselle.
■ Une fois le niveau du lave-vaisselle réglé, vérifier que les
paniers ne sortent pas par eux-mêmes lorsque la porte est
ouverte. Régler les pieds de nivellement avant jusqu’à ce que
les paniers ne sortent plus, sauf s’ils sont tirés.
Conseil utile: Pousser contre l’avant du lave-vaisselle pour
le soulever et pouvoir ajuster les pieds avant. Pour certaines
installations, il peut être plus facile de régler le pied avant à l’aide
d’une clé à douille hexagonale ou une clé à molette de 7mm. SI
l’espace entre le haut de la porte et le dessous du plan de travail est
petit (moins de 1/4 po [6mm]), il est suggéré d’utiliser les fixations
de côtés pour éviter de rayer l’interface utilisateur ou la console.
Mettre de niveau les pieds avant
38. Vérifier le niveau de gauche à droite
et régler les pieds au besoin
Placer le niveau contre la partie supérieure de l’ouverture avant de
la cuve. Vérifier l’aplomb transversal de l’appareil. Si le lave-vaisselle
n’est pas d’aplomb, régler la hauteur des pieds avant vers le haut ou
vers le bas jusqu’à ce que le lave-vaisselle soit d’aplomb.
FIXATION DU LAVE-VAISSELLE DANS
L’OUVERTURE D’ENCASTREMENT DE
L’ARMOIRE
39. Vérifier de nouveau l’alignement
du lave-vaisselle avec l’ouverture
Vérifier que le lave-vaisselle est toujours d’aplomb d’avant en
arrière et transversalement dans l’ouverture d’encastrement de
l’armoire.
Ouvrir la porte du lave-vaisselle, placer une serviette sur la
pompe et le bras d’aspersion du lave-vaisselle. Ceci empêchera
les vis de tomber dans la pompe lors de la fixation du lave-
vaisselle à l’armoire.
Ouvrir la porte du lave-vaisselle pour préparer la fixation de
l’appareil au comptoir ou au côté de l’armoire.
REMARQUES:
■ Le lave-vaisselle doit être immobilisé pour l’empêcher de
basculer lors de l’ouverture ou de la fermeture de la porte.
■ Ne pas faire tomber de vis au fond du lave-vaisselle.
■ Localiser les supports installés à la section «Choix de l’option
de fixation», soit sur le dessus ou les côtés du lave-vaisselle.
■ Pour une fixation à la surface de travail: Fixer le lave-
vaisselle au comptoir au moyen de deux vis cruciformes
(comprises).
■ Pour une fixation sur les côtés: Percer des avant-trous
de 7/32po dans l’armoire pour éviter toute fente dans le
bois. Fixer le lave-vaisselle à l’armoire au moyen de deux
vis cruciformes (comprises). Retirer le deuxième panier
pour faciliter l’accès. Consulter la section des conseils de
chargement du lave-vaisselle pour obtenir des instructions sur
la façon de retirer le deuxième panier (au besoin).
Screw to side
cabinet
40. Fixer le lave-vaisselle
Méthode optionnelleMéthode souhaitée
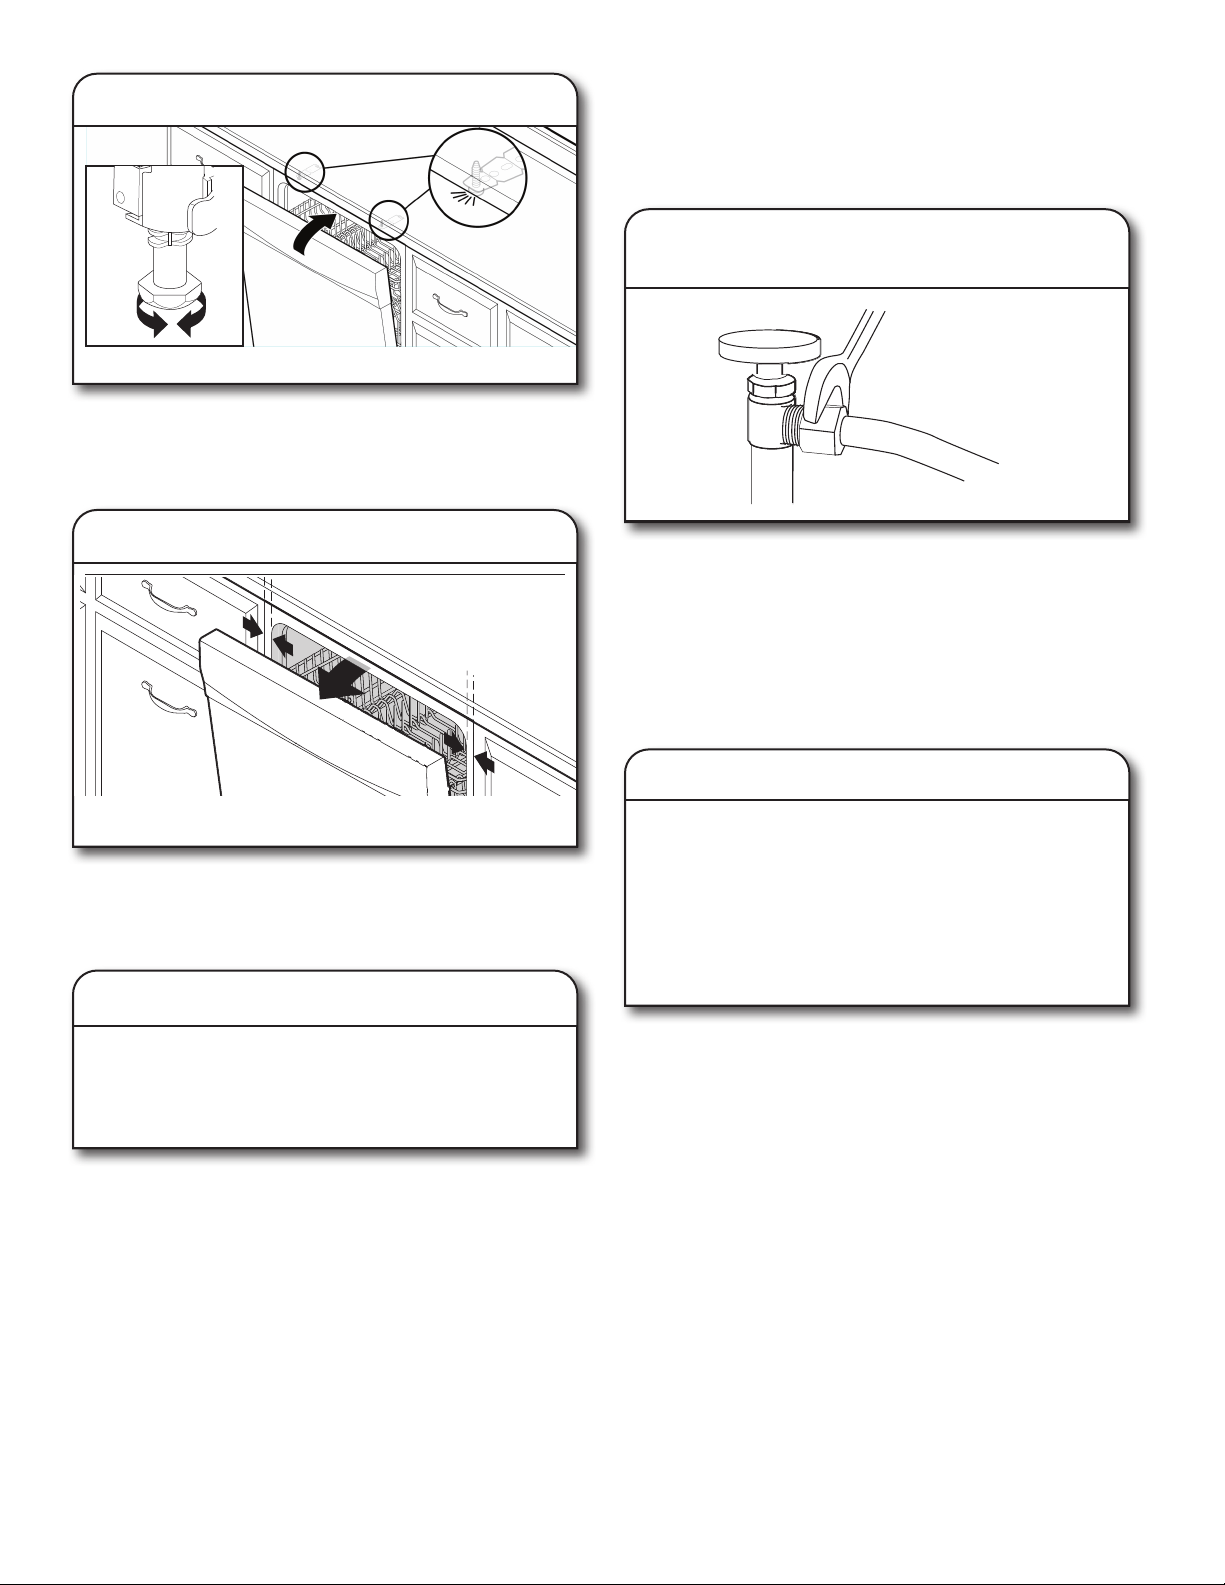
52
41. Contrôler l’ouverture de la porte
IMPORTANT: Vérifier qu’il n’y a aucun contact entre le sommet
de la porte et les vis, les brides ou le plan de travail. Si un tel
contact se produit, régler le niveau des pattes ou utiliser l’option
de fixation sur les côtés.
42. Vérifier l’espace intérieur
Ouvrir la porte et vérifier que la distance entre l’ouverture de
l’armoire pour l’installation du lave-vaisselle et la cuve est la même
des deux côtés. Si l’espace n’est pas identique des deux côtés,
desserrer les vis des brides d’arrimage et déplacer légèrement la
cuve. Resserrer les vis de brides.
43. Méthode de raccordement direct
BRANCHEMENT DE L’ARRIVÉE D’EAU AU
ROBINET D’ARRÊT DE LA MAISON
REMARQUE: Si l’on utilise un tuyau flexible tressé, remplacer
le tuyau d’alimentation après 5ans d’utilisation pour réduire le
risque de défaillance du tuyau. Inscrire la date d’installation ou de
remplacement du tuyau sur celui-ci, pour référence ultérieure.
44. Fixer la canalisation d’alimentation
en eau
Fixer la canalisation d’alimentation en eau (tube de cuivre ou
canalisation flexible à tresse d’acier) à la canalisation d’eau
chaude à l’aide d’une configuration de raccordement qui soit
conforme à tous les codes et règlements locaux. La canalisation
d’alimentation en eau raccordée au lave-vaisselle doit comporter
un robinet d’arrêt manuel situé sous l’évier. Ouvrir la valve d’eau
après avoir raccordé la canalisation d’alimentation en eau.
RACCORDEMENT DU TUYAU DE VIDANGE
45. Raccordement du tuyau de vidange
IMPORTANT: Le raccordement du tuyau d’évacuation à la
canalisation d’égout en T ou au raccord de broyeur à déchets
doit être réalisé en amont du siphon du circuit d’évacuation et
à au moins 20po (50,8cm) au-dessus du plancher de l’espace
d’installation du lave-vaisselle.
Conseil utile: Afin de minimiser les vibrations du tuyau, le tenir à
distance du plancher.
REMARQUE: Utiliser la bride rouge incluse pour raccorder le
tuyau de renvoi du lave-vaisselle à la plomberie ou au broyeur à
déchets du client.
Employer l’une des options suivantes pour raccorder le
tuyau d’évacuation sur un raccord T ou sur un broyeur à
déchets:
■ Option A: Broyeur de déchets – sans brise-siphon
■ Option B: Sans broyeur de déchets – sans brise-siphon
■ Option C: Broyeur de déchets – avec brise-siphon
■ Option D: Sans broyeur de déchets – avec brise-siphon
Pour effectuer le raccordement direct. Effectuer les
étapes18 à 24 du guide d’installation.
Une fois terminée, revenir dans ce document à l’étape44
pour terminer l’installation du produit.
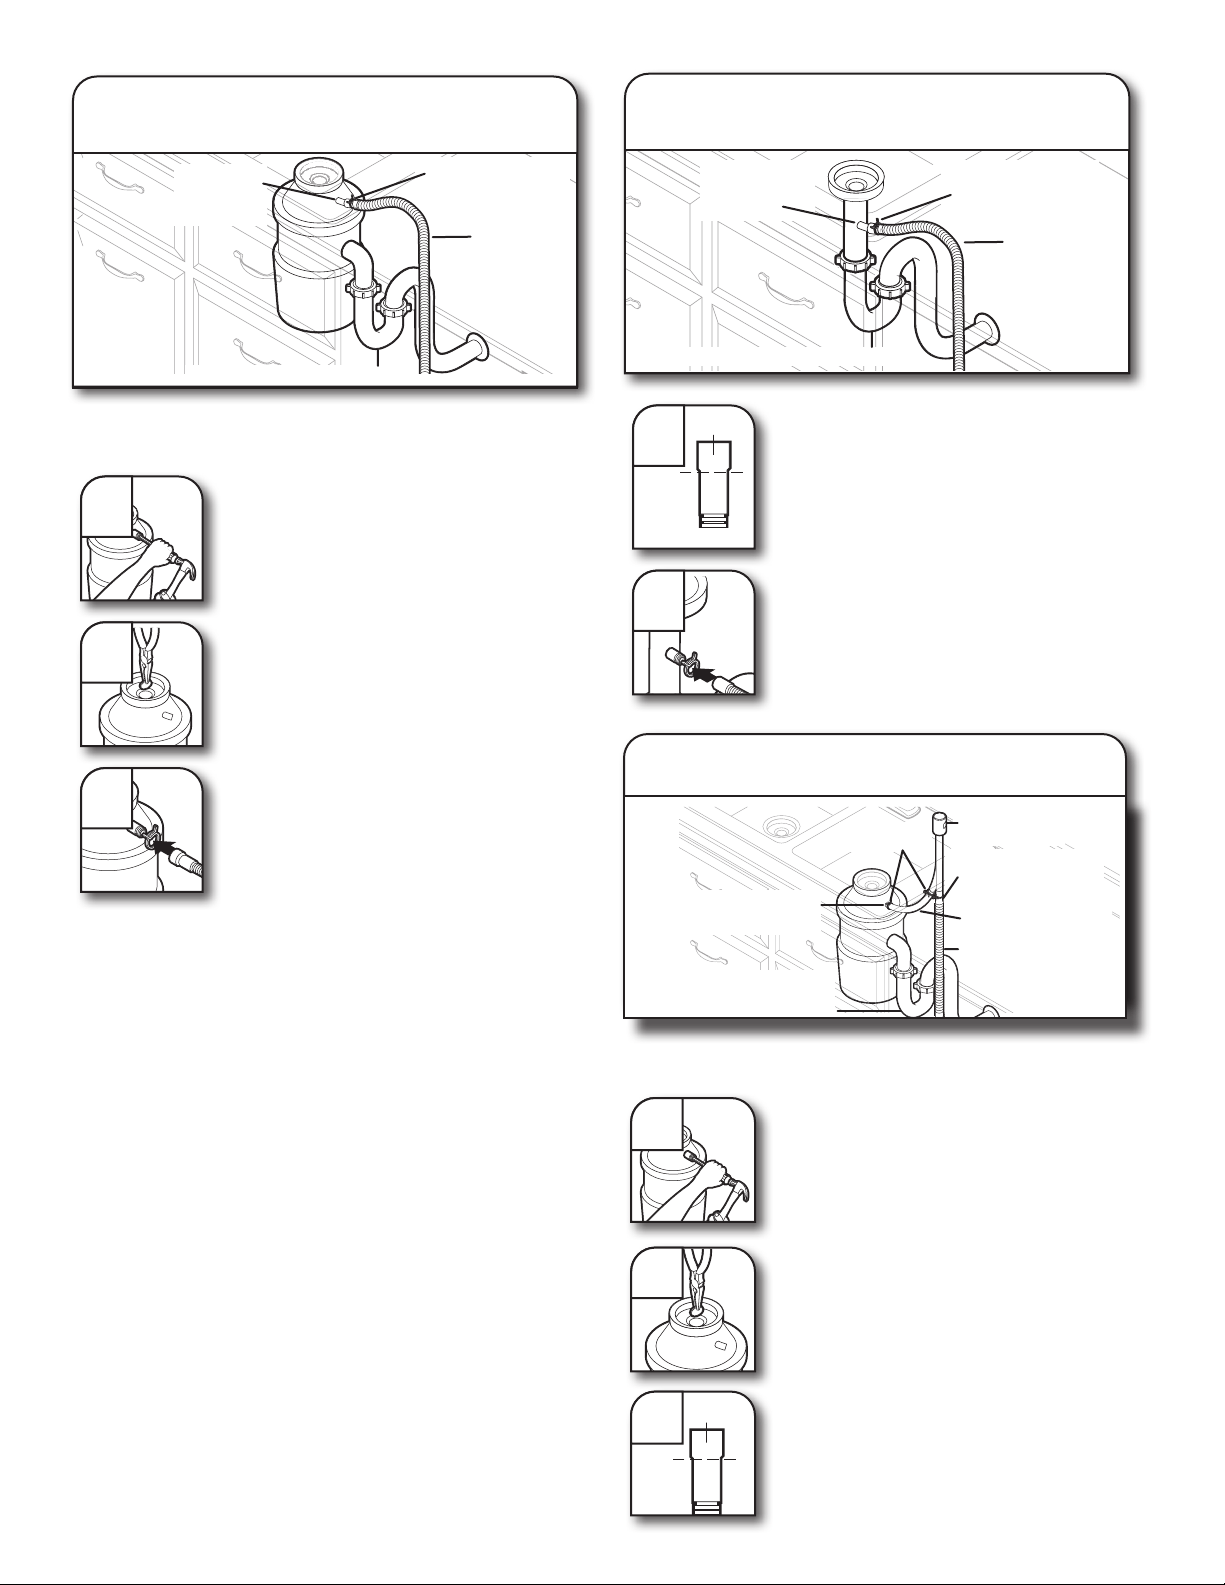
53
Option A: Broyeur de déchets – sans
brise-siphon
Entrée du
broyeur à
déchets
Bride pour gros
tuyau de vidange
Tuyau
d’évacuation
Siphon du circuit d’évacuation
Conseil utile: Ôter l’opercule escamotable du broyeur à
déchets.
1
1. À l’aide d’un marteau et d’un tournevis,
enfoncer le bouchon d’obturation dans le
broyeur à déchets.
2
2. Retirer le bouchon d’obturation à l’aide
de pinces à pointe biseautée.
3
3. Fixer le tuyau d’évacuation sur le raccord
de broyeur à déchets à l’aide de la
grosse bride de tuyau d’évacuation
(fournie). À l’aide de pinces, serrer
la bride pour l’ouvrir et la mettre en
position.
Option B: Sans broyeur de déchets –
sans brise-siphon
Tuyau
d’évacuation
en T
Bride pour gros
tuyau de vidange
Tuyau
d’évacuation
Siphon du circuit d’évacuation
1
Embout
en
caout-
chouc
1. Raccorder l’extrémité en caoutchouc
du tuyau d’évacuation à la canalisation
d’égout en T.
2
2. Fixer l’extrémité du tuyau d’évacuation en
caoutchouc à la canalisation d’égout en
T à l’aide d’une grosse bride pour tuyau
d’évacuation (fournie). À l’aide de pinces,
serrer la bride pour l’ouvrir et la mettre en
position.
Conseil utile: Ôter l’opercule escamotable du broyeur à
déchets.
1. À l’aide d’un marteau et d’un tournevis,
enfoncer le bouchon d’obturation dans le
broyeur à déchets.
2. Retirer le bouchon d’obturation à l’aide
de pinces à pointe biseautée.
3. Raccorder l’extrémité en caoutchouc du
tuyau d’évacuation au dispositif de brise-
siphon.
Option C: Broyeur de déchets – avec
brise-siphon
Bride pour gros
tuyau de vidange
Tuyau d’évacuation
Bride à vis
Brise-siphon
Raccord de tuyau
en caoutchouc
Siphon du circuit
d’évacuation
Entrée du broyeur
à déchets
1
2
3
Embout
en
caout-
chouc
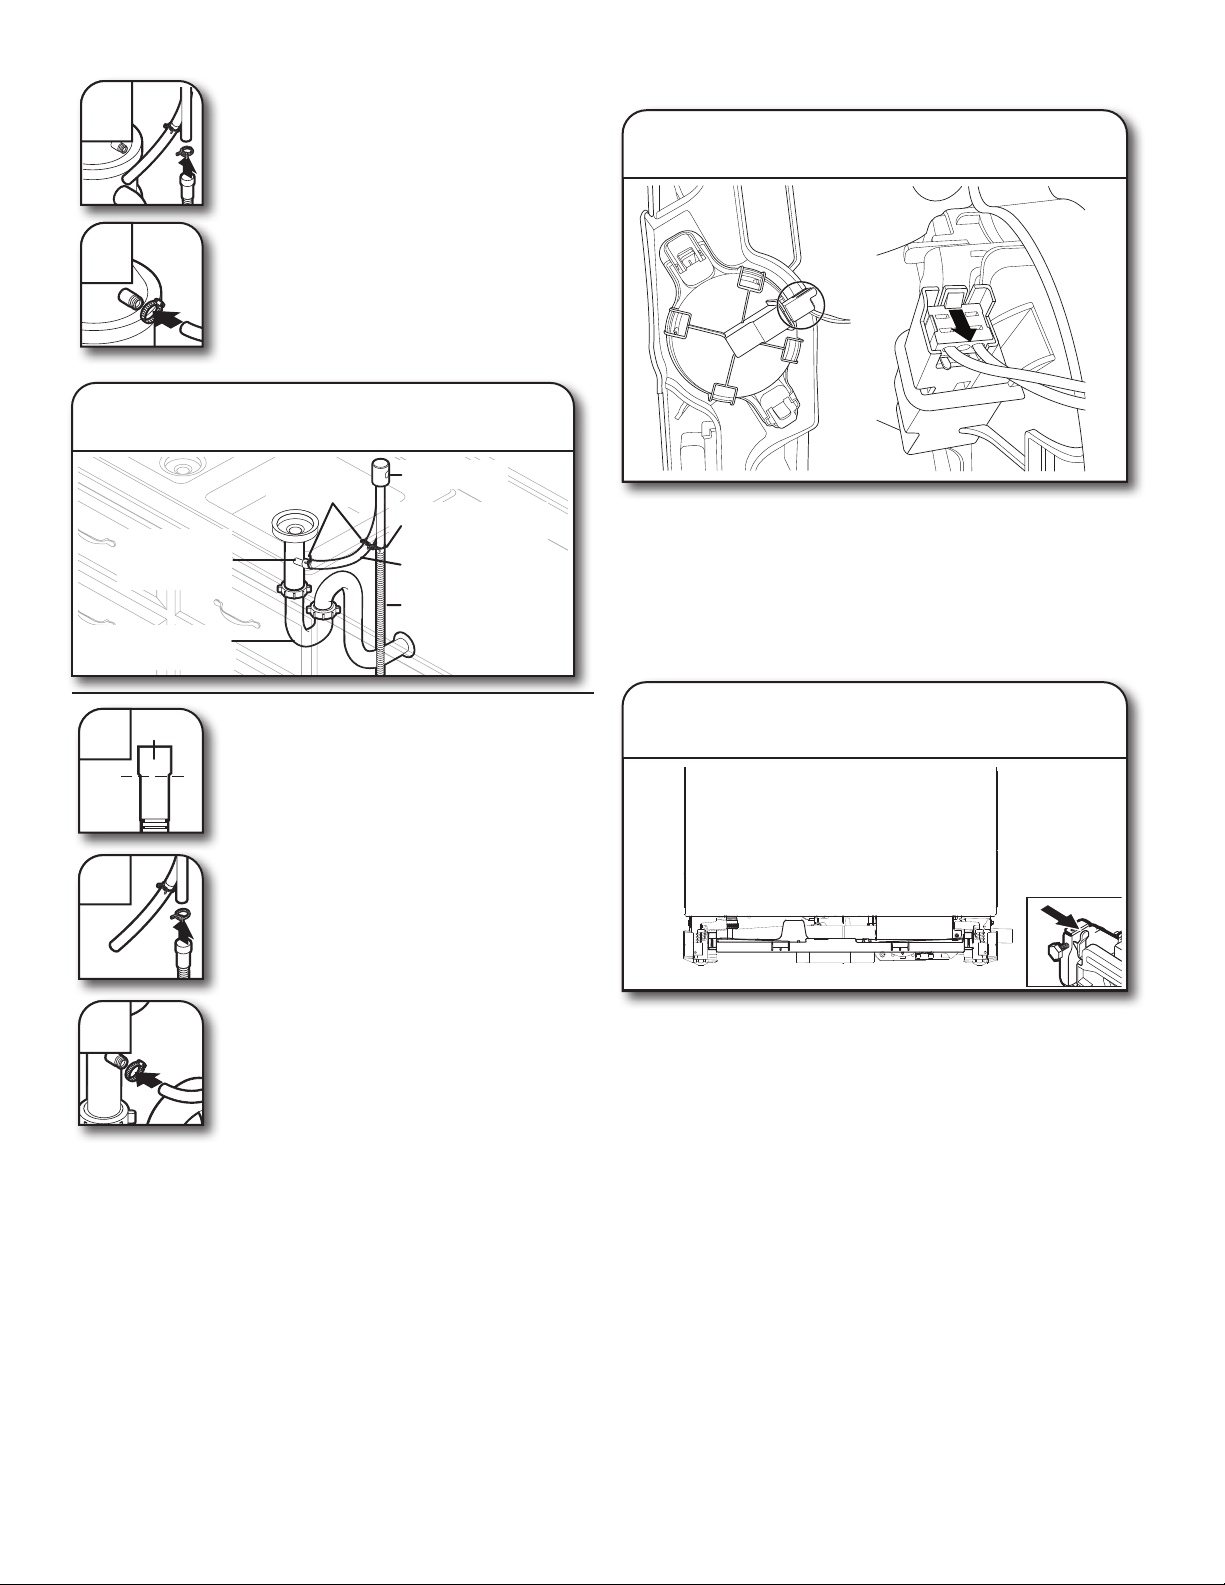
54
4
4. Fixer le tuyau d’évacuation sur le
dispositif de brise-siphon à l’aide de
la grosse bride de tuyau d’évacuation
(fournie). À l’aide de pinces, serrer
la bride pour l’ouvrir et la mettre en
position.
5
5. Utiliser un tuyau en caoutchouc
(non fourni) et une bride à vis pour le
raccordement du dispositif de brise-
siphon à l’entrée du broyeur à déchets.
1. Raccorder l’extrémité en caoutchouc du
tuyau d’évacuation au dispositif de brise-
siphon.
2. Fixer le tuyau d’évacuation sur le
dispositif de brise-siphon à l’aide de
la grosse bride de tuyau d’évacuation
(fournie). À l’aide de pinces, serrer
la bride pour l’ouvrir et la mettre en
position.
3. Utiliser un tuyau en caoutchouc (non
fourni) et une bride à vis (non fournie)
pour le raccordement de la canalisation
d’égout en T au dispositif de brise-
siphon.
Option D: Sans broyeur de déchets –
avec brise-siphon
Bride pour gros
tuyau de vidange
Tuyau d’évacuation
Bride à vis
Brise-siphon
Raccord de tuyau
en caoutchouc
Siphon du circuit
d’évacuation
Tuyau
d’évacuation
en T
1
Embout
en
caout-
chouc
2
3
TERMINER L’INSTALLATION
Vérifier l’absence de tout contact entre le conducteur ou le
cordon d’alimentation et le moteur du lave-vaisselle ou la partie
inférieure de la cuve du lave-vaisselle.
Rebrancher le contacteur à flotteur en alignant le connecteur
enlevé à l’étape10 et le boîtier du connecteur, puis en le
poussant jusqu’à ce que l’onglet de verrouillage soit visible
par-dessus le dos du connecteur.
REMARQUE: Avant de remettre en place le plateau d’écoulement,
s’assurer qu’il n’y a pas d’eau dans le plateau.
Pour replacer le plateau, l’aligner avec les boutons dans
parties latérales et le pousser vers l’intérieur de l’appareil. Il est
important que les tuyaux noirs se situent au-dessus du plateau
d’écoulement aux deux bouts une fois le plateau bien en place.
46. Reconnecter le contacteur à flotteur
47. Réinstaller le plateau d’écoulement
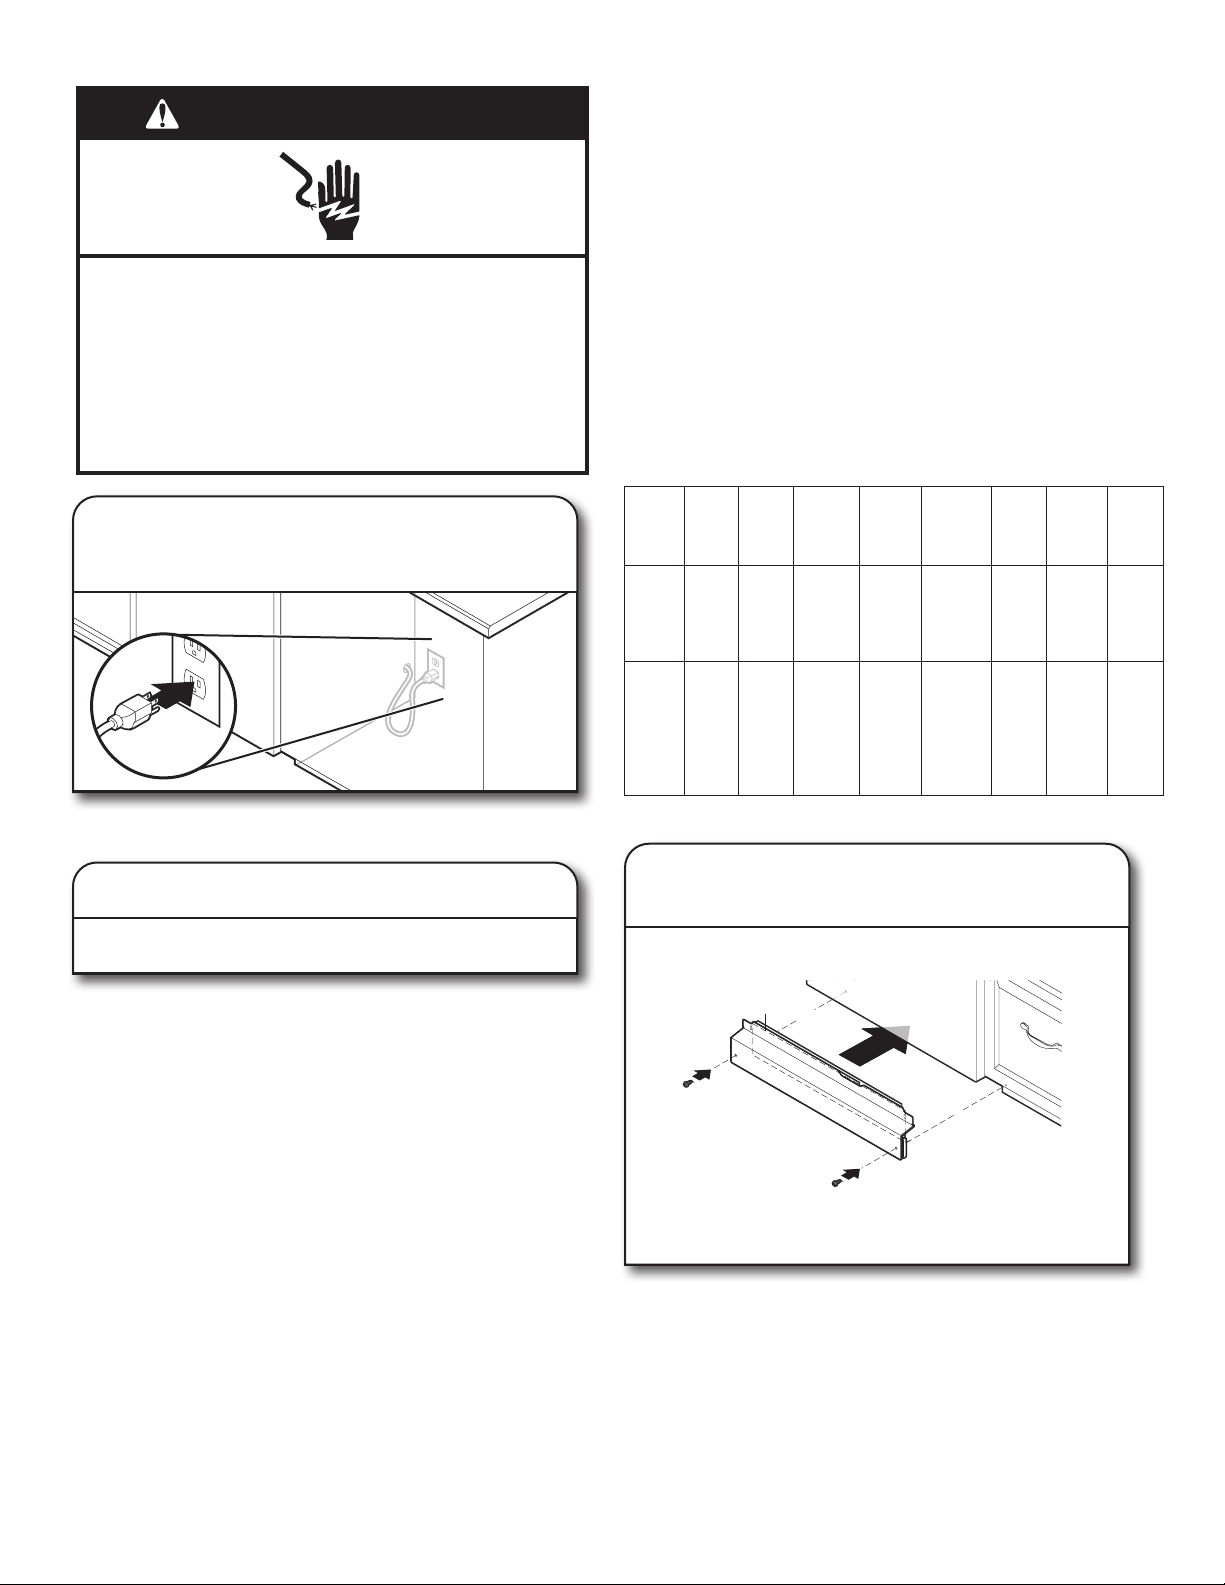
55
AVERTISSEMENT
Risque de choc électrique
Brancher sur une prise à 3 alvéoles reliée à la terre.
Ne pas enlever la broche de liaison à la terre.
Ne pas utiliser un adaptateur.
Ne p as ut il i se r un câble de rallonge.
Le non-respect de ces instructions peut causer
un décès, un incendie ou un choc électrique.
48. Cordon d’alimentation électrique
– brancher dans une prise à trois
alvéoles reliée à la terre
Brancher l’appareil sur une prise à 3 alvéoles reliée à la terre.
49. Rétablir l’alimentation électrique
Reconnecter l’alimentation électrique du tableau de
distribution (fusible ou disjoncteur).
REMARQUE: Avec le panneau d’accès fermé, mettre le lave-
vaisselle en marche et le laisser effectuer complètement le
programme de lavage le plus court, tout en vérifiant qu’il n’y a pas
de fuites. Consulter les instructions de ce manuel dans la section
«Vérifier le fonctionnement».
CONTRÔLE DU FONCTIONNEMENT
■ Lire le guide de démarrage rapide du lave-vaisselle compris
avec le lave-vaisselle.
■ Vérifier que toutes les pièces ont été installées et qu’aucune
étape n’a été omise. Vérifier la présence de tous les outils.
■ Lancer les programmes d’installation comme indiqué (il peut
être avantageux de lancer ces programmes lorsque le panneau
d’accès n’est pas réinstallé pour vérifier qu’il n’y a pas d’eau
sous l’appareil. Si le programme est lancé dans cet état, le
fil de contacteur à flotteur DOIT toujours être branché au
contacteur à flotteur.)
■ Si le lave-vaisselle ne fonctionne pas correctement,
déconnecter la source de courant électrique ou débrancher le
lave-vaisselle et consulter la section «Si le lave-vaisselle ne
fonctionne pas».
■ Appuyer sur 3 touches (sauf Delay [mise en marche différée] et
Cancel [annuler])dans une séquence1-2-3-1-2-3-1-2-3 en ne
laissant pas plus de 1 seconde entre les touches pour accéder
au programme d’installation, puis appuyer sur le bouton no2.
■ Fermer la porte, le programme se mettra en marche.
■ Toutes les DEL s’allument immédiatement une fois la séquence
d’entrée terminée.
■ Selon le modèle, une tonalité peut se faire entendre.
■ Le programme se met sur pause lorsque la porte est ouverte et
reprend lorsqu’elle est fermée.
■ Aucun appui nécessaire sur la touche Start/Resume (mise en
marche/reprise) pour reprendre le programme de diagnostic.
■ Le programme d’installation peut prendre plusieurs minutes.
■ Appuyer sur la touche Cancel (annuler) pour quitter le mode de
programme d’installation. Le produit quittera ce mode après 10
minutes ou si l’alimentation électrique est coupée.
■ Si des codes d’erreur ou des témoins clignotants sont
détectés, se reporter à la section Codes d’erreur de ce manuel
avant de faire un appel pour dépannage.
REMARQUE: Il est normal pour la pompe de vidange de faire
beaucoup de bruit lors de la première utilisation puisqu’il n’y a
pas d’eau dans le système.
Affichage
numérique
Toutes
les DEL
sont
allumées 1 2 3 4
5
(certains
modèles 6 7
Temps
d’inter-
valle
approxi-
matif 0:01
0:30
(Maximum
5:00) 02:00 00:20 00:20 00:20 00:30
1:00
(Maximum
5:00)
Action
de ma
machine
Pause
Vidange
initiale
Remplissage
de 3,8L +
impulsions
du moteur
de lavage
Lavage +
distribution
(impulsion
du bras
d’aspersion
du milieu)
Lavage +
ventilateur
(bras
d’aspersion
du plafond)
Lavage +
panier du
troisième
niveau. Si
présent
sur ce
modèle
Lavage +
élément
chauffant
(bras
d’aspersion
inférieur)
Procédure
de
vidange
INSTALLATION DES PANNEAUX D’ACCÈS
Isolation
(sur certains modèles)
50. Réinstaller les panneaux d’accès
et les dispositifs de fixation
Placer le panneau d’accès contre le pied du lave-vaisselle. Si
le modèle comprend une isolation, s’assurer que l’isolation ne
cause aucune interférence avec le flotteur. Pousser le panneau
d’accès vers le haut du produit pour qu’il soit suspendu aux
crochets sur le côté en plastique.
■ Réinstaller le panneau inférieur/d’accès avec la gaine latérale
entre le panneau inférieur/d’accès et la membrane latérale.
Aligner la fente rectangulaire de la mousse et du panneau
inférieur/d’accès avec l’appareil en utilisant un tournevis.
REMARQUE: Retirer la pellicule de la porte, commencer avec le
contour de la porte pour faciliter la procédure.
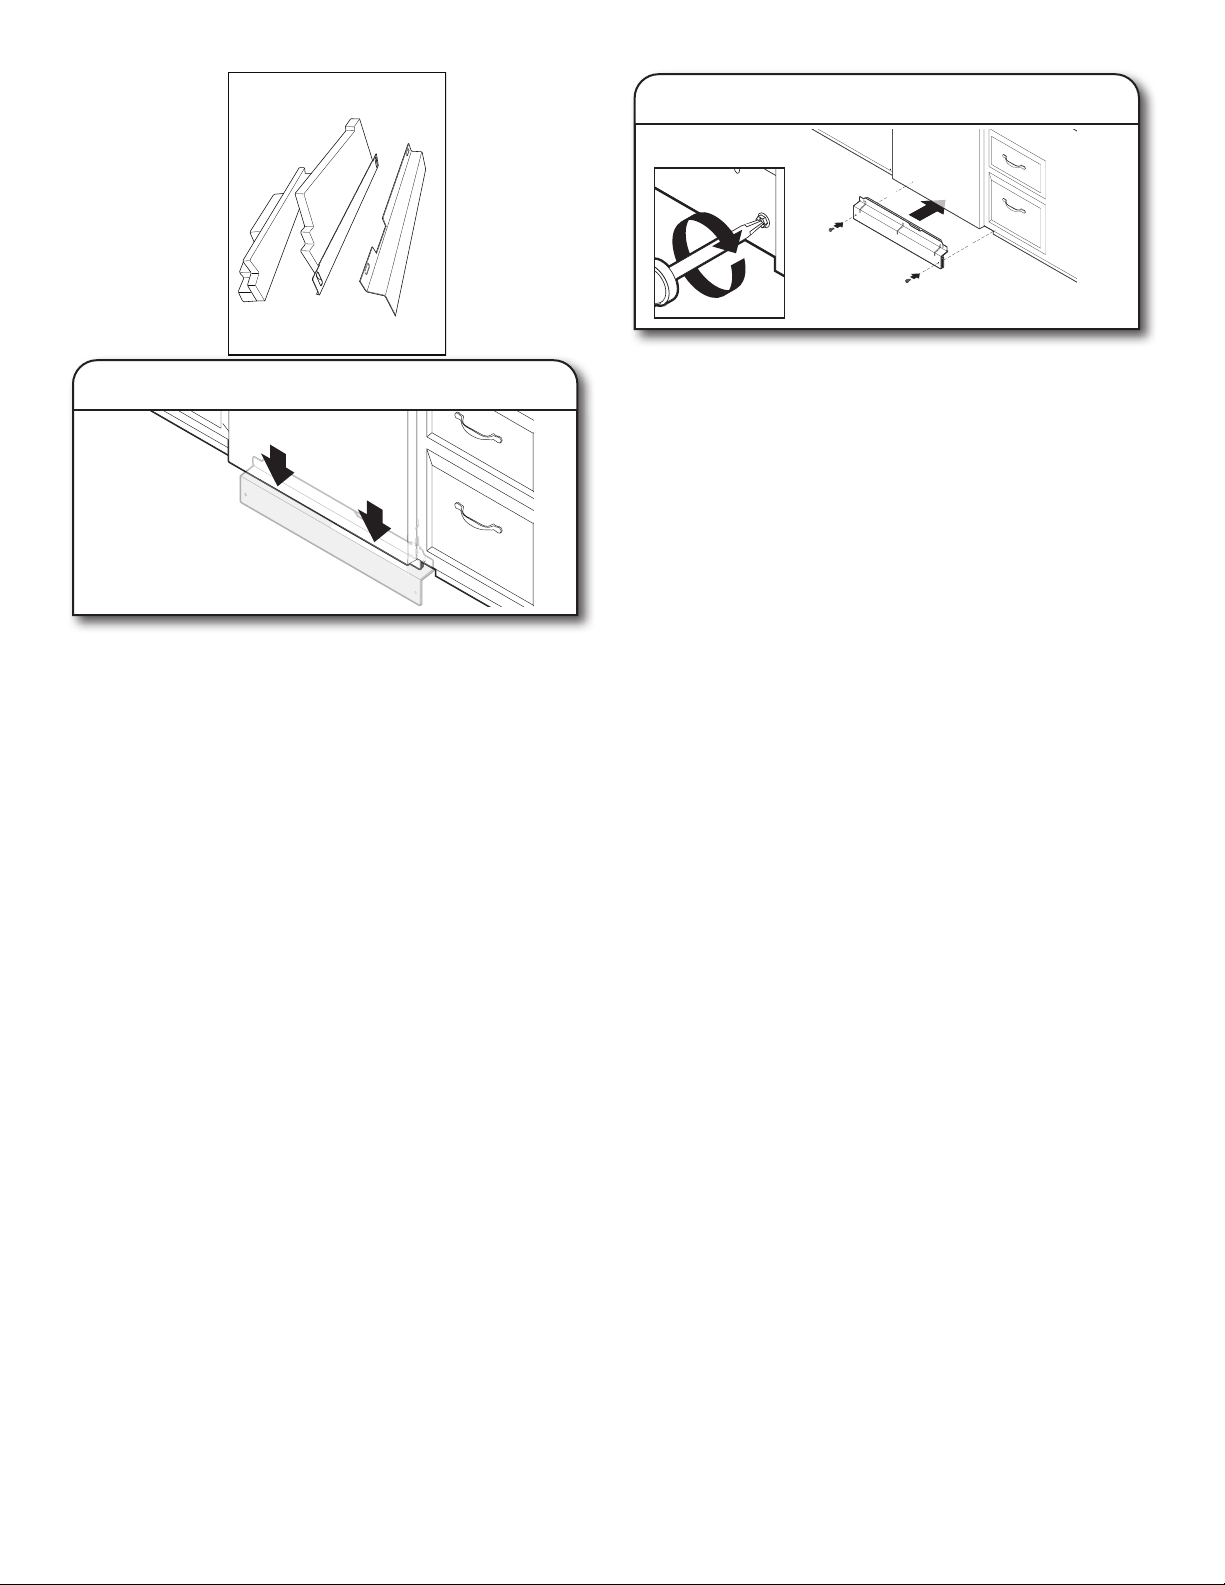
56
Vérifier que la rive inférieure du panneau d’accès est au contact
du plancher. La réajuster au besoin.
À l’aide d’un tourne-écrou de 5/16po, réinstaller les vis à travers
les trous des panneaux d’accès.
SI LE LAVE-VAISSELLE NE FONCTIONNE PAS
Essayer d’abord les solutions suggérées ici pour éviter le coût
d’une intervention de dépannage.
■ Un disjoncteur est-il ouvert ou un fusible grillé?
■ La porte est-elle bien fermée et enclenchée?
■ Le programme a-t-il été correctement sélectionné pour que le
lave-vaisselle puisse se mettre en marche?
■ L’arrivée d’eau est-elle ouverte?
■ Le fil du contacteur à flotteur sous le produit est-il branché au
contacteur à flotteur?
■ Vérifier que le verrouillage des commandes n’est pas activé.
Si aucune de ces solutions ne fonctionne, consulter le guide de
démarrage rapide pour obtenir les coordonnées pour demander
un entretien.
52. Réinstaller les panneaux d’accès
51. Inspecter le bord du panneau d’accès
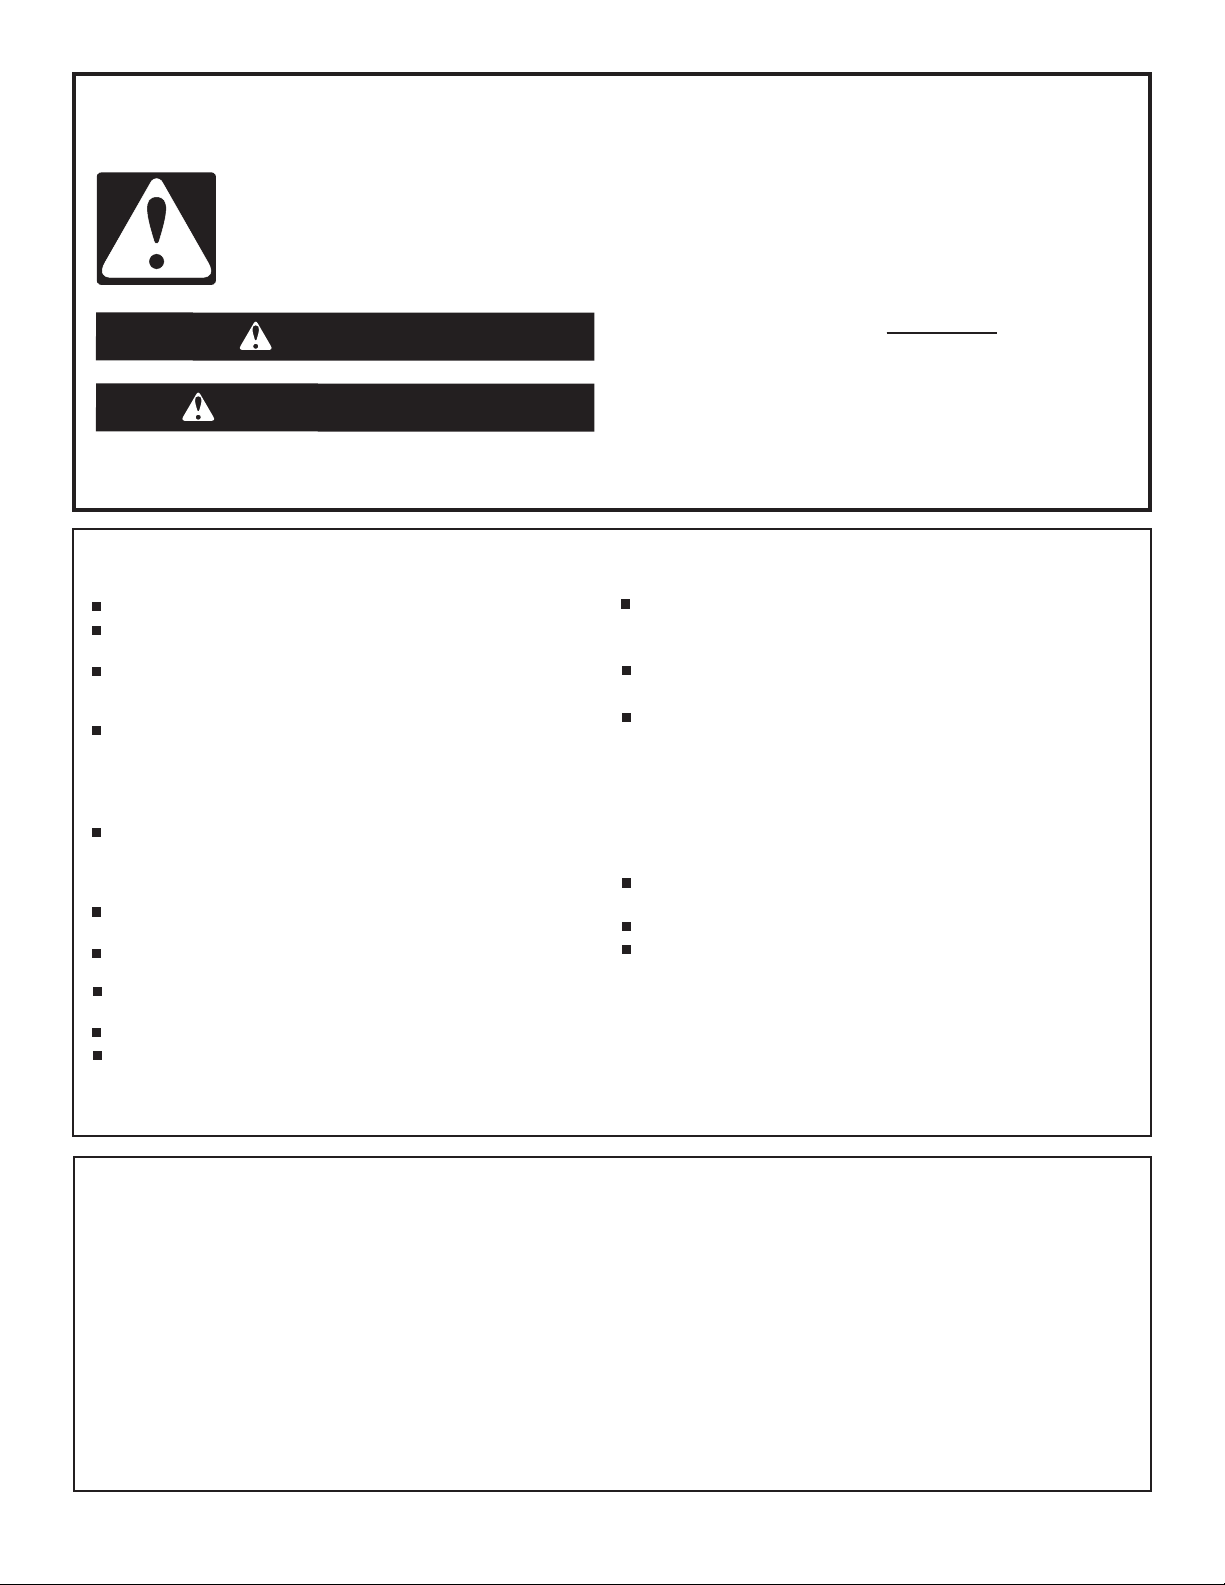
57
Si no sigue las instrucciones de inmediato, usted puede
morir o sufrir una lesión grave.
Si no sigue las instrucciones, usted puede morir o sufrir
una lesión grave.
Todos los mensajes de seguridad le dirán el peligro potencial, le dirán cómo reducir las posibilidades de sufrir una lesión y lo que
puede suceder si no se siguen las instrucciones.
Su seguridad y la seguridad de los demás es muy importante.
Hemos incluido muchos mensajes importantes de seguridad en este manual y en su electrodoméstico. Lea y obedezca siempre
todos los mensajes de seguridad.
ADVERTENCIA
PELIGRO
Este es el símbolo de alerta de seguridad.
Este símbolo le llama la atención sobre peligros potenciales que pueden ocasionar la muerte o una lesión a
usted y a los demás.
Todos los mensajes de seguridad irán a continuación del símbolo de advertencia de seguridad y de la palabra
“PELIGRO” o “ADVERTENCIA”. Estas palabras significan:
GUARDEESTASINSTRUCCIONES
INSTRUCCIONESIMPORTANTESDESEGURIDAD
ADVERTENCIA:Cuandouselalavavajillas,tomemedidasdeprecauciónbásicas,comolassiguientes:
Leatodaslasinstruccionesantesdeusarlalavavajillas.
Uselalavavajillassolamenteparalafunciónparalaquefue
diseñada.
Usesolodetergentesoagentesdeenjuaguerecomendados
parausoen unalavavajillasymanténgaloslejosdelalcancede
losniños.
Cuandocargueelementosparalavar:
1)Coloqueloselementosafiladosdetalmaneraquenodañen
elsellode lapuerta;y
2)Coloqueloscuchillosafiladosconlosmangoshaciaarriba
parareducirel riesgodesufrircortes.
Nolaveelementosdeplásticoamenosquellevenunavisode
“seguro paralavavajillas”oequivalente. Sitaleselementosde
plásticonotieneneseaviso,consultelas recomendacionesdel
fabricante.
Notoqueelelementocalefactorduranteniinmediatamente
después del uso.
Nohagafuncionarlalavavajillasamenosquetodoslospaneles
dela carcasaesténcolocadosdebidamenteensulugar.
No deje el lavavajillas abierto cuando no esté cargando o descargando
platos.
Notratedeforzarloscontroles.
Nosometaaabuso,sesienteniseparesobrelapuerta,latapa
olas canastasdeplatosdelalavavajillas.
Nousepiezasderepuestoquenohayansidorecomendadaspor
elfabricante(porejemplo,piezashechasencasaconuna
impresora3D).
Parareducirelriesgodelesiones,nopermitaquelosniños
jueguendentro nisobrelalavavajillas.
Enciertascondiciones,puedegenerarsegashidrógenoenun
sistemadeaguacalientequenosehausadoporunperíodode
dossemanasomás.EL GASHIDRÓGENOESEXPLOSIVO.Sino
sehausadoelaguacalientedurantedichoperíodo,antesdeusar
lalavavajillas,abratodoslosgrifosdeagua calienteydejeque
corraelaguaporvariosminutos.Estoliberarátodoel gas
hidrógenoquesehayaacumulado.Debidoalainflamabilidadde
dicho gas,nofumeniuseunallamaabiertaduranteestelapso.
Este producto ha sido desarrollado únicamente para uso residencial.
Este producto no ha sido desarrollado para ser usado por personas
(incluidos niños) con capacidad física, sensorial o mental diferente o
reducida, o con falta de experiencia o conocimiento, a menos que lo
hagan bajo supervisión o siguiendo las instrucciones relativas al uso
del aparato, a cargo de una persona responsable por su seguridad.
Quitelapuertaolatapadelcompartimientodelavadocuando
retirede serviciounalavavajillasviejaoladescarte.
INSTRUCCIONES DE CONEXIÓN A TIERRA
GUARDE ESTAS INSTRUCCIONES
■
Para una lavavajillas con cable eléctrico y conexión a tierra:
La lavavajillas debe estar conectada a tierra. En caso de
funcionamiento defectuoso o avería, la conexión a tierra reduce
el riesgo de choque eléctrico al establecer una ruta de menor
resistencia para la corriente eléctrica. La lavavajillas viene
equipada con un cable eléctrico que tiene un conductor para
conexión a tierra y un enchufe con conexión a tierra. El enchufe
debe ser conectado a un contacto apropiado que esté instalado
y conectado a tierra de acuerdo con todos los códigos y
ordenanzas locales.
ADVERTENCIA: La conexión inadecuada del conductor
de conexión a tierra puede resultar en riesgo de choque eléctrico.
Pregunte a un electricista calificado o a un agente de servicio si
no está seguro si la lavavajillas está adecuadamente conectada
a tierra. No modifique el enchufe que viene con la lavavajillas.
Si no cabe en el contacto, pida que un electricista calificado
instale un contacto apropiado.
■
Para lavavajillas con conexión permanente:
Esta lavavajillas debe estar conectada a un sistema de
cableado de metal permanente, conectado a tierra, o se debe
tender un conducto para la conexión a tierra del equipo con los
conductores de circuito y conectado a la terminal de tierra del
equipo o al conductor de suministro de la lavavajillas.

58
MANTENIMIENTO DE LA LAVAVAJILLAS
Detergentes
Se recomienda usar pastillas y paquetes previamente medidos
de alta calidad para mejorar el rendimiento.
Está comprobado que las pastillas y los paquetes de alta calidad
son más eficaces que los detergentes en polvo, líquidos o en gel
para reducir las películas residuales en la vajilla. Al usar pastillas
y paquetes, las películas blancas comenzarán a reducirse o
a eliminarse con el tiempo. Son adecuados para todos los
niveles de dureza y de suciedad. Además, al usar un agente de
enjuague, se puede minimizar la acumulación repetida de película
blanca (no todos los paquetes y las pastillas contienen agente
de enjuague). Coloque siempre los detergentes previamente
medidos en el compartimiento principal y cierre la tapa.
El indicador de prelavado en la tapa del dispensador es para
clientes que usan detergente en polvo o gel y desean añadir
una cantidad de detergente al ciclo de prelavado. El volumen
de detergente que se añade aquí es de aproximadamente 8
centímetros cúbicos, si se llena completamente. Cualquier
detergente que se añada aquí se agregará inmediatamente
al lavado cuando inicio el ciclo versus el detergente dentro
del dispensador, el cual se añada durante el ciclo principal de
lavado.
NOTA: Siga las instrucciones del paquete cuando use otros tipos
de detergente para lavavajillas.
■ Use únicamente detergentes para lavavajillas automáticas.
Agregue el detergente justo antes de comenzar el ciclo.
■ El detergente para lavavajillas automáticas produce mejores
resultados cuando está fresco. Guarde el detergente bien
cerrado en un lugar fresco y seco.
■ Los residuos minerales del agua extremadamente dura
(15 granos por galón de EE.UU. o más) pueden dañar su
lavavajillas y hacer difícil que se obtengan buenos resultados.
Se recomienda usar un ablandador de agua para evitar daños
y obtener buenos resultados.
■ Para obtener más información acerca de los detergentes en
polvo, líquidos y en gel, y sobre las condiciones de agua dura,
consulte el sitio web de la marca.
Agente de enjuague
Al usar agente de enjuague, se optimizará el desempeño
de lavado y secado. Esta lavavajillas ha sido diseñada
específicamente para usarse junto con agente de enjuague,
para obtener un mejor desempeño de secado y controlar la
acumulación de depósitos de agua dura. El agente de enjuague
se debe agregar al producto cada 1 a 3 meses dependiendo del
uso.
Consulte la Guía de inicio rápido o el sitio web de la marca para
obtener información sobre cómo llenar el depósito de agente de
enjuague.
Selección de ciclo y uso de energía
Las lavavajillas eficientes funcionan por más tiempo para ahorrar
agua y energía, de la misma manera que ahorra gasolina cuando
conduce un automóvil más despacio. El tiempo normal de un
ciclo es de aproximadamente 2
1
/
2
horas, pero puede demorar
menos o bastante más según sus selecciones, la temperatura
del agua de entrada y la cantidad de suciedad de alimentos en
la vajilla. Para un desempeño óptimo, la lavavajillas debe estar
conectada a un suministro de agua caliente de 120°F (49°C).
Si primero presiona el botón Start (Inicio), se seleccionará
automáticamente el ciclo principal con sensor que tiene función
de secado con calor. El ciclo detecta la cantidad de suciedad y
su resistencia para ajustar el ciclo para una mejor limpieza.
Sanitize o Sani (Higienizado)
Higieniza los platos y la cristalería según el estándar 184 de
NSF International NSF/ANSI para lavavajillas domésticas. Las
lavavajillas domésticas certificadas no han sido diseñadas para
establecimientos con licencia para alimentos. Solo los ciclos de
higienización fueron diseñados para cumplir los requisitos del
estándar de rendimiento NSF/ANSI 184 para eliminación de la
suciedad y eficacia de la higienización. No existe la intención,
de forma directa o indirecta, de que todos los ciclos de una
lavavajillas con certificación NSF/ANSI 184 cumplan el estándar
de rendimiento NSF/ANSI 184 para eliminación de la suciedad
y eficacia de la higienización. El indicador Sani Rinse (Enjuague
sanitario) se ilumina al final del ciclo si la opción Sani Rinse
(Enjuague sanitario) se completó con éxito. Si no se activa el
indicador, posiblemente se deba a que se interrumpió el ciclo.
Peligro de Vuelco
No use la lavavajillas antes de estar completamente instalada.
No se apoye en la puerta abierta.
No seguir estas instrucciones puede ocasionar heridas serias o cortaduras.
ADVERTENCIA
59
CONSEJOS PARA CARGAR LA LAVAVAJILLAS
NOTA: Las funciones son específicas del modelo. Es posible que no se describan todas las funciones de su lavavajillas. Consulte las
Guías de inicio rápido para ver posibles patrones de carga para todas las canastas de la lavavajillas.
Canastilla para cubiertos
Use las tapas de la canastilla para cubiertos para proveer
espacios óptimos y el mejor desempeño de limpieza.
NOTA: Si sus cubiertos no caben dentro de los espacios
designados, abra las tapas (estilo 1/3) o levante los extremos de
las tapas y tire para quitarlas (estilo 2). Mezcle los diferentes tipos
de cubiertos para mantenerlos separados. Coloque los cuchillos
hacia abajo, los tenedores hacia arriba y alterne las cucharas
para obtener mejores resultados de limpieza.
Quitar las canastas superiores
Las canastas superiores son removibles para poder hacer
espacio para todos los elementos. La manera en que se quitan
dependerá de si la canasta está montada según el estilo 1 o el
estilo 2. Retire la vajilla antes de quitar cualquiera de las
canastas.
Para quitar la canasta, tírela hacia afuera de la lavavajillas hasta
la mitad. En un lado, presione la lengüeta en el riel y tire hacia
arriba el extremo delantero de la canasta para sacarla del riel.
Luego, repita este paso en el otro lado para quitar por completo
el extremo frontal de la canasta. Extraiga la canasta tirando el
extremo posterior hacia fuera con un movimiento hacia adelante
y atrás.
Para volver a colocar la canasta, coloque la parte trasera de la
canasta en el riel y luego empuje la parte frontal hacia abajo.
Para quitar la canasta, tire hacia afuera hasta que haga tope.
A ambos lados de la canasta, mueva los topes de plástico en el
frente del riel hacia el costado para abrirlos. Quite la canasta.
Para volver a colocarla, vuelva a colocar la parte trasera de la
canasta en los rieles. Vuelva a cerrar los topes.
Puntas para tazones deslizables
Las puntas para tazones deslizables le permiten cargar tazones
de diferentes tamaños con facilidad. Tome la línea de puntas móvil
que está en la canasta inferior y deslícela a la posición deseada.
Puntas plegables
Las puntas plegables le permiten optimizar el espacio en la
canasta. Estas pueden encontrarse en la canasta inferior, en la
de segundo nivel y/o en la de tercer nivel, según su modelo. Para
plegar o desplegar las puntas, tome la punta que está más cerca
del sujetador al final de la línea de puntas y empújela suavemente
pasando el tope del sujetador en la dirección en que desea doblarla.
Soporte para copas
Use estos soportes para colocar copas de vino y de otro tipo.
Levántelos y gírelos para moverlos cuando no los necesite.
Estante para tazas
Use el estante para tazas para colocar más tazas u otros
elementos pequeños. Levántelos y pliéguelos para moverlos
cuando no los necesite.
Estilo 1
Estilo 2
Estilo 3
Estilo 1
Estilo 2
Soporte para copas
Estante
Tope del riel

60
CUIDADO DE LA LAVAVAJILLAS
Limpieza del interior
Muchos detergentes pueden dejar manchas blancas o un residuo
blanco en la vajilla y en el interior de la lavavajillas. Con el tiempo,
este residuo se puede volver antiestético y afectar el rendimiento
de la lavavajillas. El uso de un producto de limpieza para
lavavajillas como el limpiador para lavavajillas affresh
®
puede
ayudar a remover el residuo. Se recomienda el uso mensual del
limpiador para lavavajillas affresh
®
para ayudar a mantener la
lavavajillas. Siga las instrucciones del paquete.
NOTA: Recomendamos el uso de pastillas o paquetes de
detergente previamente medido de alta calidad y el uso de
agente de enjuague para la limpieza y el cuidado diario de la
lavavajillas.
Purga de aire de mostrador
Si tiene una purga de aire de desagüe, revísela y límpiela si la
lavavajillas no está desaguando bien.
Período prolongado sin uso
Para reducir el riesgo de daños a la propiedad durante
vacaciones o tiempo prolongado sin uso
■ Cuando no vaya a usar la lavavajillas durante los meses de
verano, cierre el suministro de agua y de electricidad a la
lavavajillas.
■ Asegúrese de que las tuberías de suministro de agua estén
protegidas contra congelamiento. La formación de hielo en las
tuberías de suministro puede aumentar la presión del agua y
dañar la lavavajillas o la casa.
■ Los daños ocasionados por congelamiento no están cubiertos
por la garantía.
■ Cuando guarde la lavavajillas en el invierno, evite daños por el
agua y haga que personal de servicio autorizado acondicione
la lavavajillas para el invierno.
Limpieza del exterior
Limpie el exterior de la lavavajillas con un paño suave y húmedo,
y un detergente suave. Evite el uso de limpiadores abrasivos en
el exterior de la lavavajillas. Los productos de limpieza abrasivos
pueden dañar el acabado.
Solución de problemas
El sitio web de la marca que figura en la Guía de inicio rápido
contiene información detallada para solucionar la mayoría de
los problemas con que los clientes se pueden encontrar. Esta
información le podría ahorrar el costo de una llamada al servicio
técnico
Taza para objetos extraños
Si la taza para objetos extraño está llena, puede encontrar
información detallada sobre cómo vaciarla en la Guía de inicio
rápido o en el sitio web de la marca listado en dicha Guía.
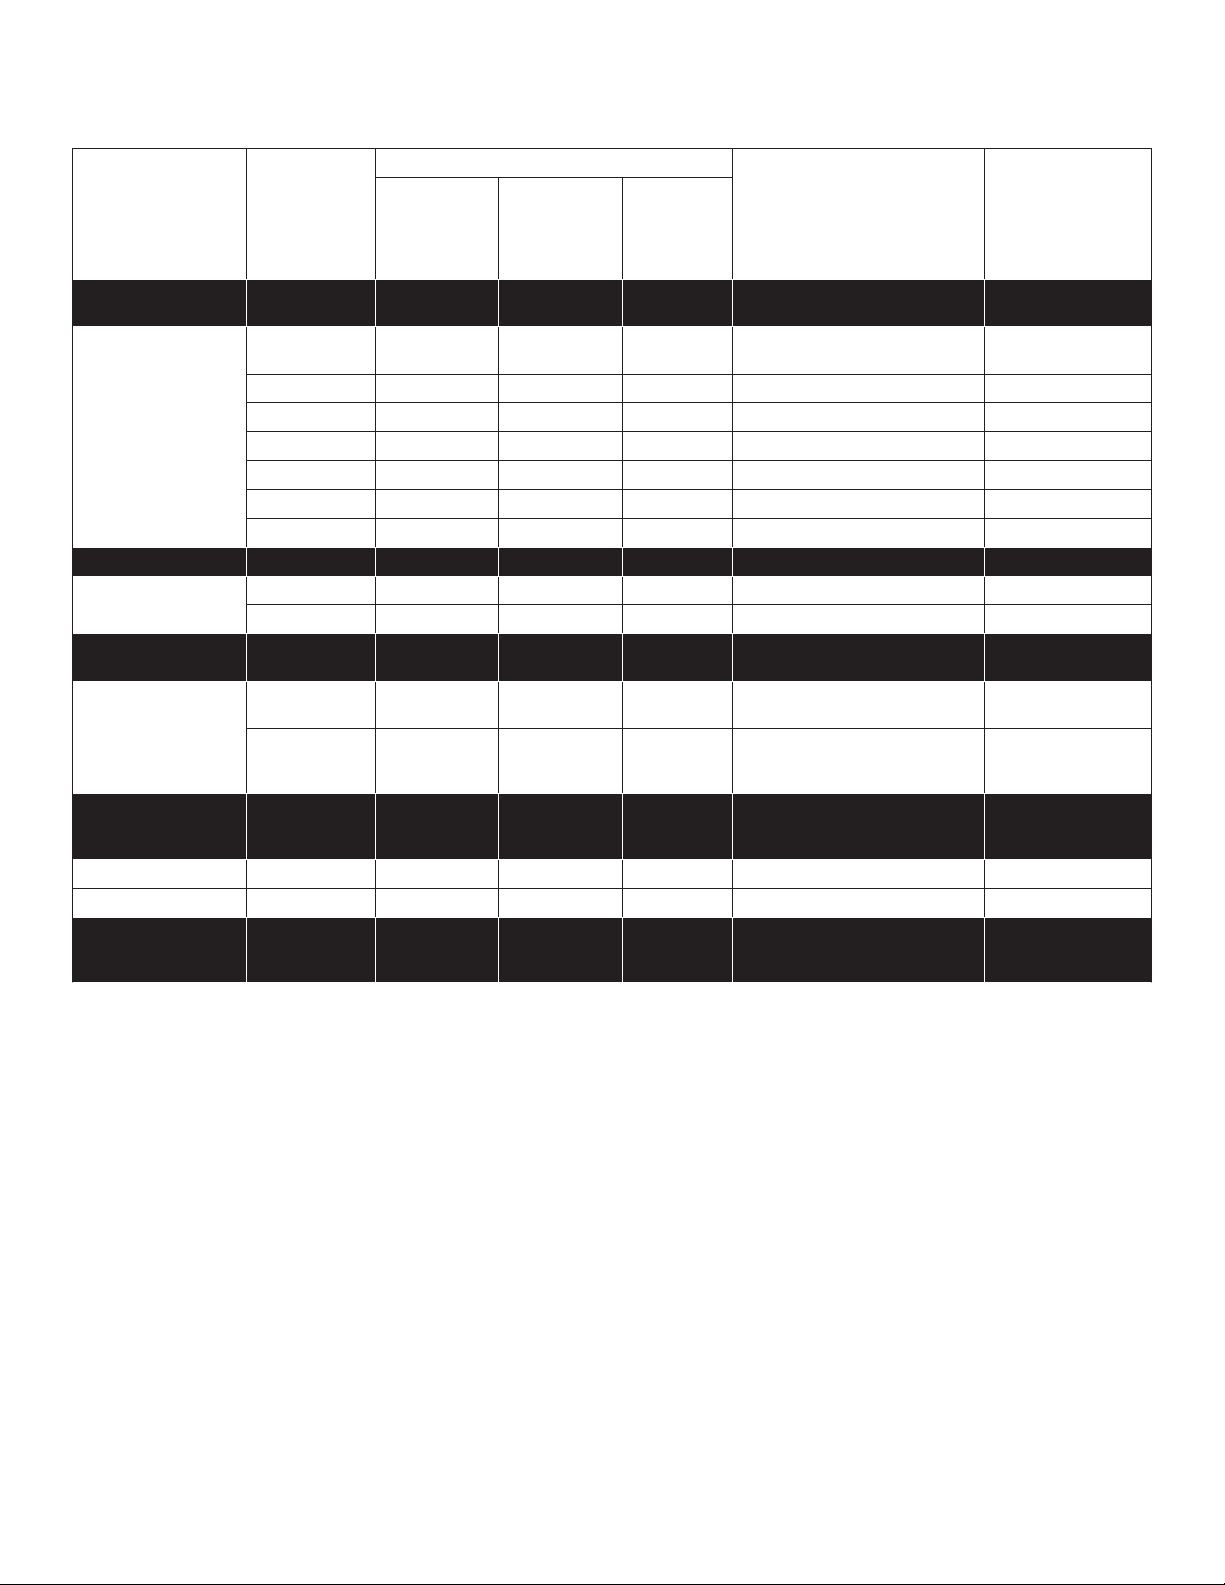
61
MENÚ DE AJUSTES DE LA LAVAVAJILLAS:
Para cambiar los ajustes actuales, siga las instrucciones a continuación para ingresar en el menú.
Menú
Texto en
pantalla
(si hay una
pantalla)
Patrón de luces LED (si no hay pantalla)
Lo que hace este ajuste
Ajuste
predeterminado
PROWASH
OR SENSOR
(Lavado
profesional
o sensor)
TOUGH OR
COOKWARE
(Intenso o
utensilios
de cocina)
NORMAL
(Normal)
Nivel del agente de
enjuague
A X
Ajusta el cantidad de agente
de enjuague que se usa
Submenú del
nivel de agente
de enjuague
A 0 X X X
0 ml - agente de enjuague
desactivado
A 1 X 1,3 ml
A 2 X 2,6 ml
A 3 X X 3,9 ml X
A 4 X 5,2 ml
A 5 X X 5,2 ml
A 6 X X 5,2 ml
Nivel de sonido S X X Activar y desactivar el sonido
Submenú del nivel
de sonidol
S 1 X Sonido encendido X
S 0 X Sonido apagado
Luz en la tina
L X
Enciende y apaga la luz
interna (si la hay)
Submenú de luz
en la tinal
L 1 X
La luz en la tina se enciende
cuando se abre la puerta
X
L 0 X
La luz en la tina está
apagada cuando se abre
la puerta
Modo Apto para el
consumidor Kosher E X X
Enciende y apaga el modo
Apto para consumidor
Kosher
E 1 X Enciende el modo
E 0 X Apaga el modo X
Restablecimiento
a los valores de
fábrica
r X X X
Restablecimiento a los
valores de fábrica
1. Mantenga presionado el botón “Hi Temp” (Alta temperatura) por 5 segundos hasta que se enciendan las luces de “Hi Temp”
(Alta temperatura) y “Dry” (Seco).
2. Presione el botón “Start/Resume” (Inicio/Reanudar) en menos de 2 segundos. Si no presiona el botón Start (Inicio) en menos de
2 segundos, la pantalla se apagará y deberá volver a empezar y repetir el paso 1.
a. En los modelos con pantalla, se mostrará una “A” para indicar el nivel de agente de enjuague.
b. En los modelos que no tengan pantalla, se encenderá la luz de “Tough or Cookware” (Intenso o utensilios de cocina) para
indicar el nivel de agente de enjuague.
3. Para ver una función que no sea Nivel de agente de enjuague, presione el botón “Cycle” (Ciclo) o “Normal” (Normal) (esto depende
del modelo) para seleccionar la función que le gustaría cambiar (Nivel de sonido, Luz en la tina, Apto para el consumidor Kosher,
Restablecimiento a los valores de fábrica, Nivel de agente de enjuague). Consulte la tabla para ver lo que se muestra en la pantalla
para indicar estas funciones.
4. Presione el botón “Start/Resume” (Inicio/Reanudar) para seleccionar la función e ingresar al submenú. La pantalla cambiará para
mostrar el ajuste actual de la característica. (Por ejemplo, si seleccionó el Nivel de agente de enjuague y no lo ha cambiado antes,
se mostrará S1 en los modelos con pantalla y se encenderá el sensor en los modelos que no tienen pantalla).
5. Presione el botón “Cycle” (Ciclo) o “Normal” (Normal) (dependiendo del modelo) para cambiar el valor del ajuste de la función.
(Por ejemplo, si desea apagar el sonido, presione el botón “Cycle” (Ciclo) o “Normal” (Normal) y se mostrará S0 en los modelos con
pantalla o se enciende el ícono “pots and pans” (ollas y sartenes) en los modelos sin pantalla).
6. Presione el botón “Start/Resume” (Inicio/Reanudar) para confirmar la nueva selección. El ajuste de la función no se modificará hasta
que se haya presionado el botón “Start/Resume” (Inicio/Reanudar).
La lavavajillas volverá al estado apagado cuando se haya presione el botón “Start” (Inicio).
Para salir del menú de ajustes de cliente en cualquier momento, presione el botón “Cancel” (Cancelar) o espere 30 segundos sin
presionar ningún botón.
NOTA: Para ver el ajuste actual de una función, siga los pasos 1-4. Cuando se presiona el botón “Start/Resume” (Inicio/Reanudar) en
el paso 4, la lavavajillas mostrará el ajuste actual. Presione el botón “Cancel” (Cancelar) para salir sin hacer ningún cambio.

62
NOTA: Si ingresa en una página de ajuste de funciones y necesita volver al menú principal, presione “Cancel” (Cancelar) y continué con el
paso 1.
NOTA: Para salir del modo Apto para el consumidor Kosher en cualquier momento, presione el botón “Cancel” (Cancelar) o espere 75 horas.
Modo Apto para el consumidor Kosher: Cuando se enciende este modo, se deshabilitarán todos los botones de la lavavajillas excepto
la tecla Cancel (Cancelar), así como la luz en la tina (si se incluye) durante 75 horas. Si se enciende este modo durante un ciclo, las luces
de estado al final del ciclo no se apagarán cuando se abra y se vuelva a cerrar la puerta. Para salir del modo, presione el botón “Cancel”
(Cancelar) o espere 75 horas.
CÓDIGOS DE ERROR
CÓDIGOS DE ERROR / LUCES PARPADEANTES
Problema
Código que se
muestra
(7 segundos en
pantalla)
(si la hay)
Código que se muestra
en los LED del panel
frontal *
(# parpadeos, Pausa, #
parpadeos)
¿Qué sucederá? ¿Qué hacer?
No funciona
correctamente la
válvula de llenado de
la lavavajillas
F1E1
1 Pausa 1 Pausa - pausa,
repetir
Comenzará la secuencia
de desagüe, se evitará
el funcionamiento de la
máquina
Corte el suministro de agua hacia la unidad
(si se puede). Corte el suministro de energía
hacia la unidad. Si el agua no se puede
cortar, NO corte el suministro de energía,
y mantenga la puerta cerrada. Presione la
tecla Cancel (Cancelar) una vez para silenciar
el tono de la alarma. Llame para solicitar
servicio técnico.
Falla del controlador
del motor
F1E2 1 Pausa 2 Pausa, repetir Termina el ciclo Llame para solicitar servicio técnico
No hay agua presente
en la lavavajillas
H2O
8 Pausa 1 Pausa - pausa,
repetir
Se pausará el ciclo
Asegúrese de que la manguera de llenado
esté conectada al producto. Asegúrese de
que el suministro de agua esté conectado
Presione Start (Inicio) para reanudar el ciclo.
Si la alarma sigue presente, llame al servicio
técnico.
Falla del motor de
lavado
F7E1/F7E2
7 Pausa 1 Pausa, repetir/7
Pausa 2 Pausa, repetir
Termina el ciclo Llame para solicitar servicio técnico
La lavavajillas de
sobrellena
F8E4
8 Pausa 4 Pausa - pausa,
repetir
Comenzará la secuencia
de desagüe, se evitará
el funcionamiento de la
máquina
Para instaladores profesionales
Corte el suministro de agua hacia la unidad
(si se puede). Corte el suministro de energía
hacia la unidad. Si el agua no se puede
cortar, NO corte el suministro de energía,
y mantenga la puerta cerrada. Presione la
tecla Cancel (Cancelar) una vez para silenciar
el tono de la alarma. Llame para solicitar
servicio técnico.
Para auto instaladores
■ Presione el botón CANCEL dos veces o
potencia de ciclo. Esto podría resolver el
problema.
■ Revise si el conector del cable está
conectado al interruptor otante en la
bandeja de goteo. Consulte el paso 46.
Si el cable está desconectado, vuelva a
conectarlo y presione el botón cancelar
dos veces.
■ Revise si hay agua en la bandeja de goteo.
Si la hay, quite el agua y vuelva a instalar la
bandeja de goteo. Asegúrese de conectar
el cable al otante. Paso 46. Revise si se
ltró agua a la bandeja de goteo. (Revise
los empalmes de la entrada de agua en los
pasos 15 y 16 para ver si tienen fugas)
■ Si hay agua en la bandeja, pero no se
encontraron fugas, ponga a funcionar el
ciclo más corto en el producto y revise
si hay fugas mientras este se ejecuta. El
panel de acceso debe estar apagado para
poder observar si hay fugas.
■ Si el problema persiste, solicite servicio
técnico.
Válvula de llenado
trabada
F8E5
8 Pausa 5 Pausa - pausa,
repetir
Comenzará la secuencia
de desagüe, se evitará
el funcionamiento de la
máquina
Corte el suministro de agua hacia la unidad
(si se puede). Corte el suministro de energía
hacia la unidad. Si el agua no se puede
cortar, NO corte el suministro de energía,
y mantenga la puerta cerrada. Presione la
tecla Cancel (Cancelar) una vez para silenciar
el tono de la alarma. Llame para solicitar
servicio técnico.
La lavavajillas no
desagua
F9E1
9 Pausa 1 Pausa - pausa,
repetir
Termina el ciclo
Si la manguera de desagüe está conectada
a un triturador de basura, confirme que la
manguera no esté tapada y que el tapón
de desechos se haya quitado. Si la unidad
todavía no desagua, llame para solicitar
servicio.
Hay agua debajo de la
lavavajillas
FAE5
10 Pausa 5 Pausa -
pausa, repetir
Termina el ciclo Llame para solicitar servicio técnico.
Falla de comunicación
con el servicio de
interfaz de usuario
F6E1
6 Pausa 1 Pausa - pausa,
repetir
El producto no podrá
iniciar o reanudar ciclos
Llame para solicitar servicio técnico.

63
REQUISITOS DE INSTALACIÓN
HERRAMIENTAS Y PIEZAS
Reúna todas las herramientas y piezas recomendadas antes de
comenzar la instalación. Lea y siga las instrucciones provistas
con las herramientas enumeradas aquí.
Todas las instalaciones
Herramientas necesarias:
Alicate Destornillador de cabeza plana
Destornillador Phillips Cuchillo para uso general
Llave de cubo hexagonal
o llave de tuercas de 5/16"
(7,9mm) y 1/4" (6,4mm)
Nivel pequeño
Cinta de medir o regla
Llave de extremo abierto de
5/8" (15,9mm)
Llave ajustable de 10" que se
abra hasta 1
1
/
8
" (29mm)
Destornilladores Torx
†
T20 y, si
se instalan paneles frontales a
la medida, Torx T15
Otros elementos útiles que puede necesitar:
Linterna Bandeja llana
Toalla de baño Cinta para ductos o cinta
adhesiva protectora
Piezas suministradas:
Abrazaderas para manguera
de desagüe (2)
(1 grande/roja y 1
pequeña/plateada)
Manguera de desagüe
Tornillos de cabeza Phillips N°
8 x 1/2" (12,7mm) (2)
Soportes de montaje bajo el
mostrador (2)
Compruebe que se hayan incluido todas las piezas en el
paquete con el material impreso.
Manija de la puerta (en algunos modelos)
†TORX, T15 y T20 son marcas comerciales de Acument Intellectual Properties, LLC.

64
Otras piezas requeridas (no proporcionadas):
Racor de manguera con
conexión de compresión
de 3/8" (9,5 mm) x 3/4"
(19 mm) con junta de goma y
codo de 90° (necesario para
conectar de forma adecuada
la tubería de agua del hogar a
la lavavajillas).
Pieza N°: W10685193
Protector de cables
(de metal) para cableado
doméstico que encaje en
un orificio de 7/8" (22mm)
(necesario para fijar de forma
correcta el cableado del hogar
a la caja de terminales de la
lavavajillas).
Pieza N°: 4396672
NOTA: Utilice solo piezas con
certificación UL/homologación
CSA.
Piezas opcionales disponibles:
Cinta de barrera contra la
humedad
NOTA: La cinta de barrera
contra la humedad es un
nivel de protección adicional
y opcional para la instalación
de una lavavajillas bajo un
mostrador de madera. Se
recomienda, pero no es un
requisito excluyente para los
mostradores de madera.
Pieza N°: 4396277
Kit de panel lateral
Para cubrir el lado de la
lavavajillas al instalarla en el
extremo de un conjunto de
gabinetes (el número de pieza
Whirlpool varía según el color).
Llámenos a nuestro número gratuito o visite la página web de
la marca mencionada en la Guía de inicio rápido para obtener
información sobre las piezas y accesorios.
Instalaciones nuevas
Verifique los códigos locales. Compruebe el suministro eléctrico
existente. Consulte la sección “Requisitos eléctricos”. Se
recomienda que todas las conexiones eléctricas sean realizadas
por un instalador eléctrico matriculado.
Herramientas adicionales necesarias:
Cortador de tubos pequeño Pelacables
Taladro inalámbrico Sierras perforadoras de 1/2"
(12,7mm), 3/4" (19mm), and
1
1
/
2
" (38mm)
Herramientas adicionales requeridas (no proporcionadas):
Tubería de cobre (se sugiere
un diámetro externo de 3/8")
o kit de línea trenzada flexible
de suministro de agua. El kit
incluye la manguera trenzada
y el racor de manguera con
conexión de compresión de
3/8" x 3/4".
Pieza N°: W10278635RP
Abrazaderas de tipo tornillo
de 1
1
/
2
"- 2" (38 mm - 50 mm)
(máximo 3)
Opcional: Manguera de
desagüe más larga (Longitud
máxima 12 pies (3,7m))
NOTA: Debe cumplir con los
estándares de comprobación
AHAM/IAPMO, ser compatible
con una conexión de desagüe
de 1" (25mm) y ser resistente
al calor y al detergente.
Pieza N°: W11381654
NOTA: Si se utiliza una manguera trenzada flexible, sustituya la
manguera de entrada después de 5 años para reducir el riesgo
de fallas. Para consulta en el futuro, anote en la manguera la
fecha de instalación o la fecha de reposición.
NOTA: Asegúrese de comprar únicamente piezas y accesorios
Whirlpool certificados de fábrica para su electrodoméstico. Su
instalación puede requerir piezas adicionales. Para pedirlas,
consulte la información de contacto que figura en la Guía de
inicio rápido.
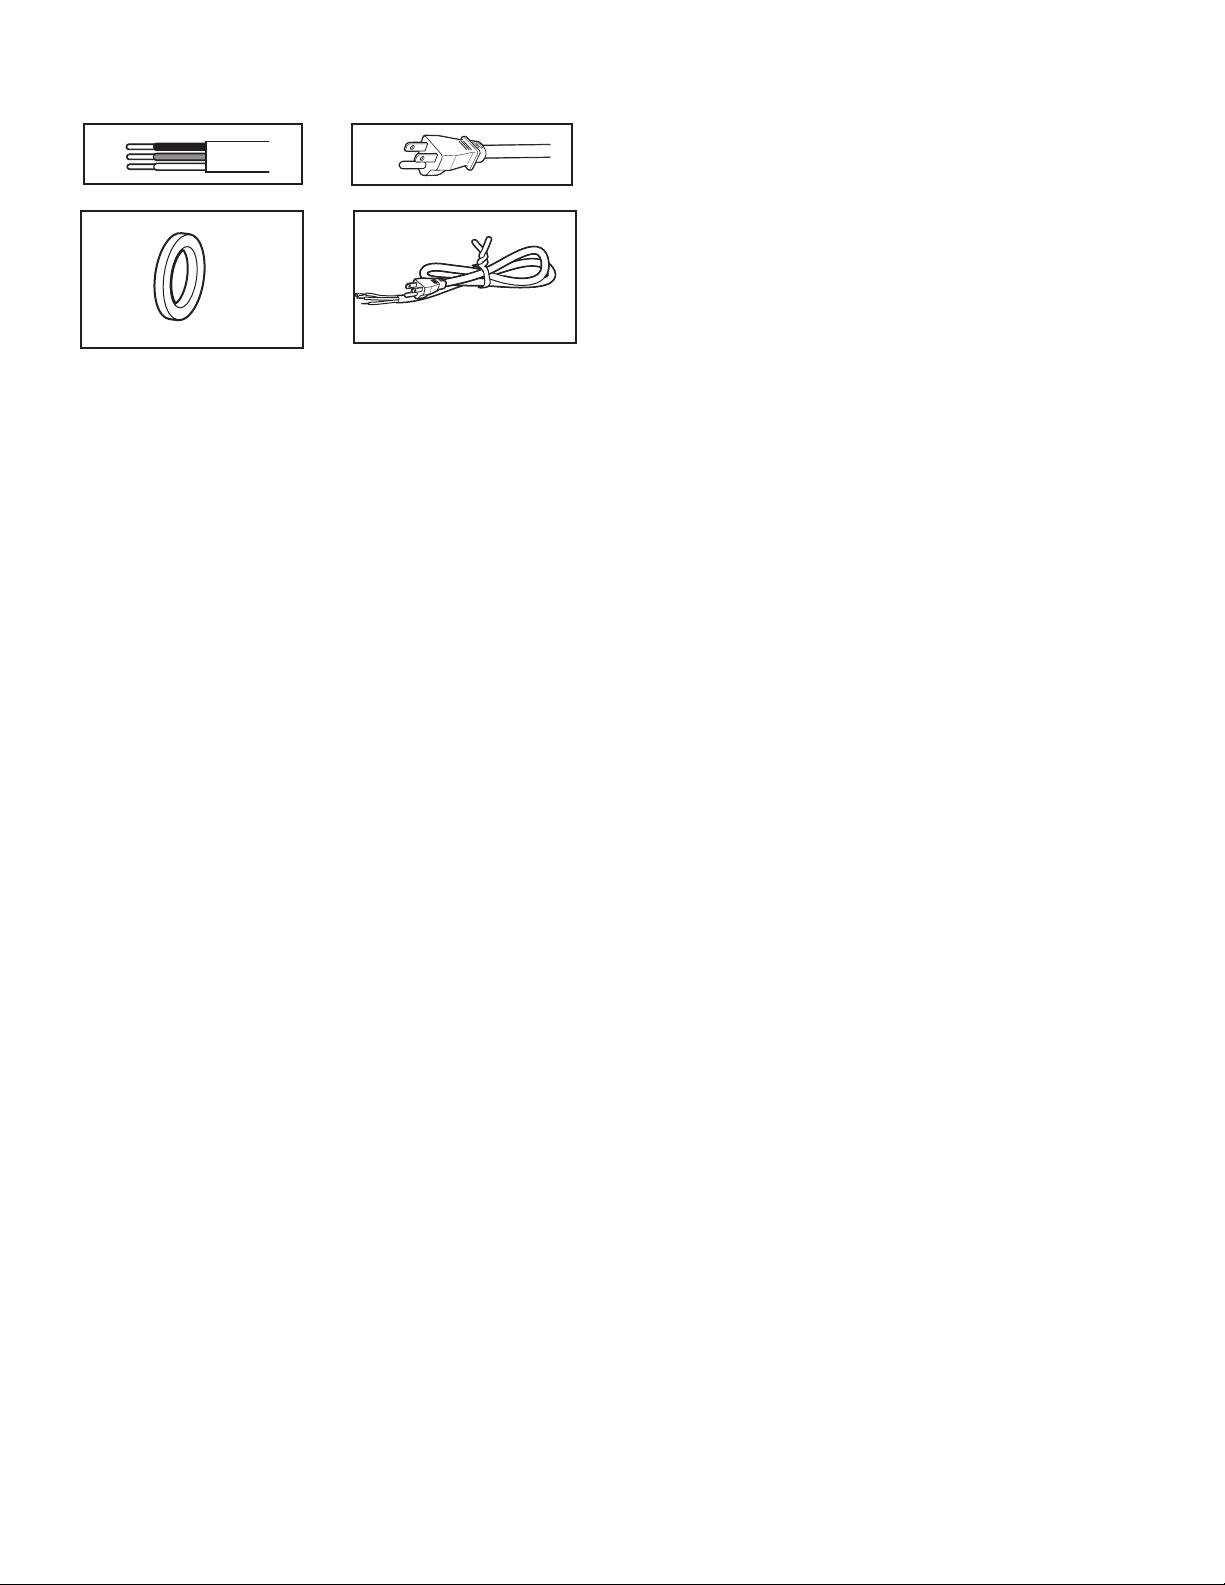
65
Para cable directo Para cable de
alimentación
Pasacables de
gabinete
Para orificio de 1
1
/
2
" (38 mm)
en el gabinete.
NOTA: Requerido para
gabinetes de
metal
Kit de cable de alimentación
El kit incluye generalmente
el cable de alimentación,
protector de cables de metal,
pasacables.
(Número de pieza de Whirlpool
Kit de cables - Recto -
W11365011
Kit de cables - Ángulo recto -
W11365014)
Llámenos a nuestro número gratuito o visite la página web de
la marca mencionada en la Guía de inicio rápido para obtener
información sobre las piezas y accesorios.
NOTA: Asegúrese de comprar únicamente piezas y accesorios
Whirlpool certificados de fábrica para su electrodoméstico. Su
instalación puede requerir piezas adicionales. Para pedirlas,
consulte la información de contacto que figura en la Guía de
inicio rápido.
REQUISITOS DE UBICACIÓN
La lavavajillas debe estar totalmente enclaustrada (cara superior,
lateral, posterior e inferior) tras la instalación. Un kit de panel
lateral está disponible mediante el distribuidor para la instalación
de la lavavajillas en un extremo del conjunto de gabinetes.
También está disponible un accesorio de barrera contra la
humedad opcional para la instalación bajo un mostrador de
madera.
Revise la ubicación donde se instalará la lavavajillas. La ubicación
debe ofrecer:
■ Un acceso adecuado para cargar y descargar la vajilla. Las
ubicaciones en esquinas requieren de un espacio libre mínimo
de 2" (5,1cm) entre el lado de la puerta de la lavavajillas y la
pared o el gabinete.
■ Un acceso fácil a los sistemas de agua, electricidad y desagüe:
■ Se requiere un suministro eléctrico conectado a tierra.
■ Esta lavavajilla tiene una función de calentamiento de agua
y también requiere una conexión a una tubería de suministro
de agua caliente.
■ Compruebe que las tuberías, los cables y el desagüe estén
dentro de la zona sombreada que se muestra en la sección
“Dimensiones del producto y de la abertura del gabinete”.
■ No pase las tuberías de desagüe, de agua o el cableado
eléctrico por donde puedan interferir o hacer contacto con el
motor o las patas de la lavavajillas.
■ Proteja la lavavajillas y las tuberías de agua que van a la
lavavajillas contra el congelamiento. Los daños ocasionados
por congelamiento no están cubiertos por la garantía.
NOTA: Si no se va a utilizar la lavavajillas durante un tiempo
o si se encuentra en un punto donde pueda sufrir riesgo
congelación, solicite a personal de servicio autorizado que la
acondicione para el invierno.
■ Si se instala en una construcción nueva, enjuague la tubería
de suministro de agua para eliminar residuos antes de
conectarla a la válvula de llenado. Si no se enjuaga, los
residuos del suministro de agua pueden obstruir el filtro de la
válvula de llenado.
■ Una abertura cuadrada para tener un funcionamiento y una
apariencia adecuados.
■ La parte frontal del gabinete debe estar perpendicular respecto
al piso.
■ Piso nivelado.
Consejo útil: Si el piso frente a la abertura no está nivelado
con el piso detrás de la abertura, se pueden utilizar
suplementos para nivelar la lavavajillas.
NOTA: Para evitar que se muevan durante el funcionamiento
de la lavavajillas, los suplementos deben estar sujetos
firmemente al piso.
■ La ubicación donde se instalará la lavavajillas debe proveer
espacios libres entre el motor y el piso. El motor no debe tocar
el piso.
■ No instale la lavavajillas sobre pisos alfombrados.
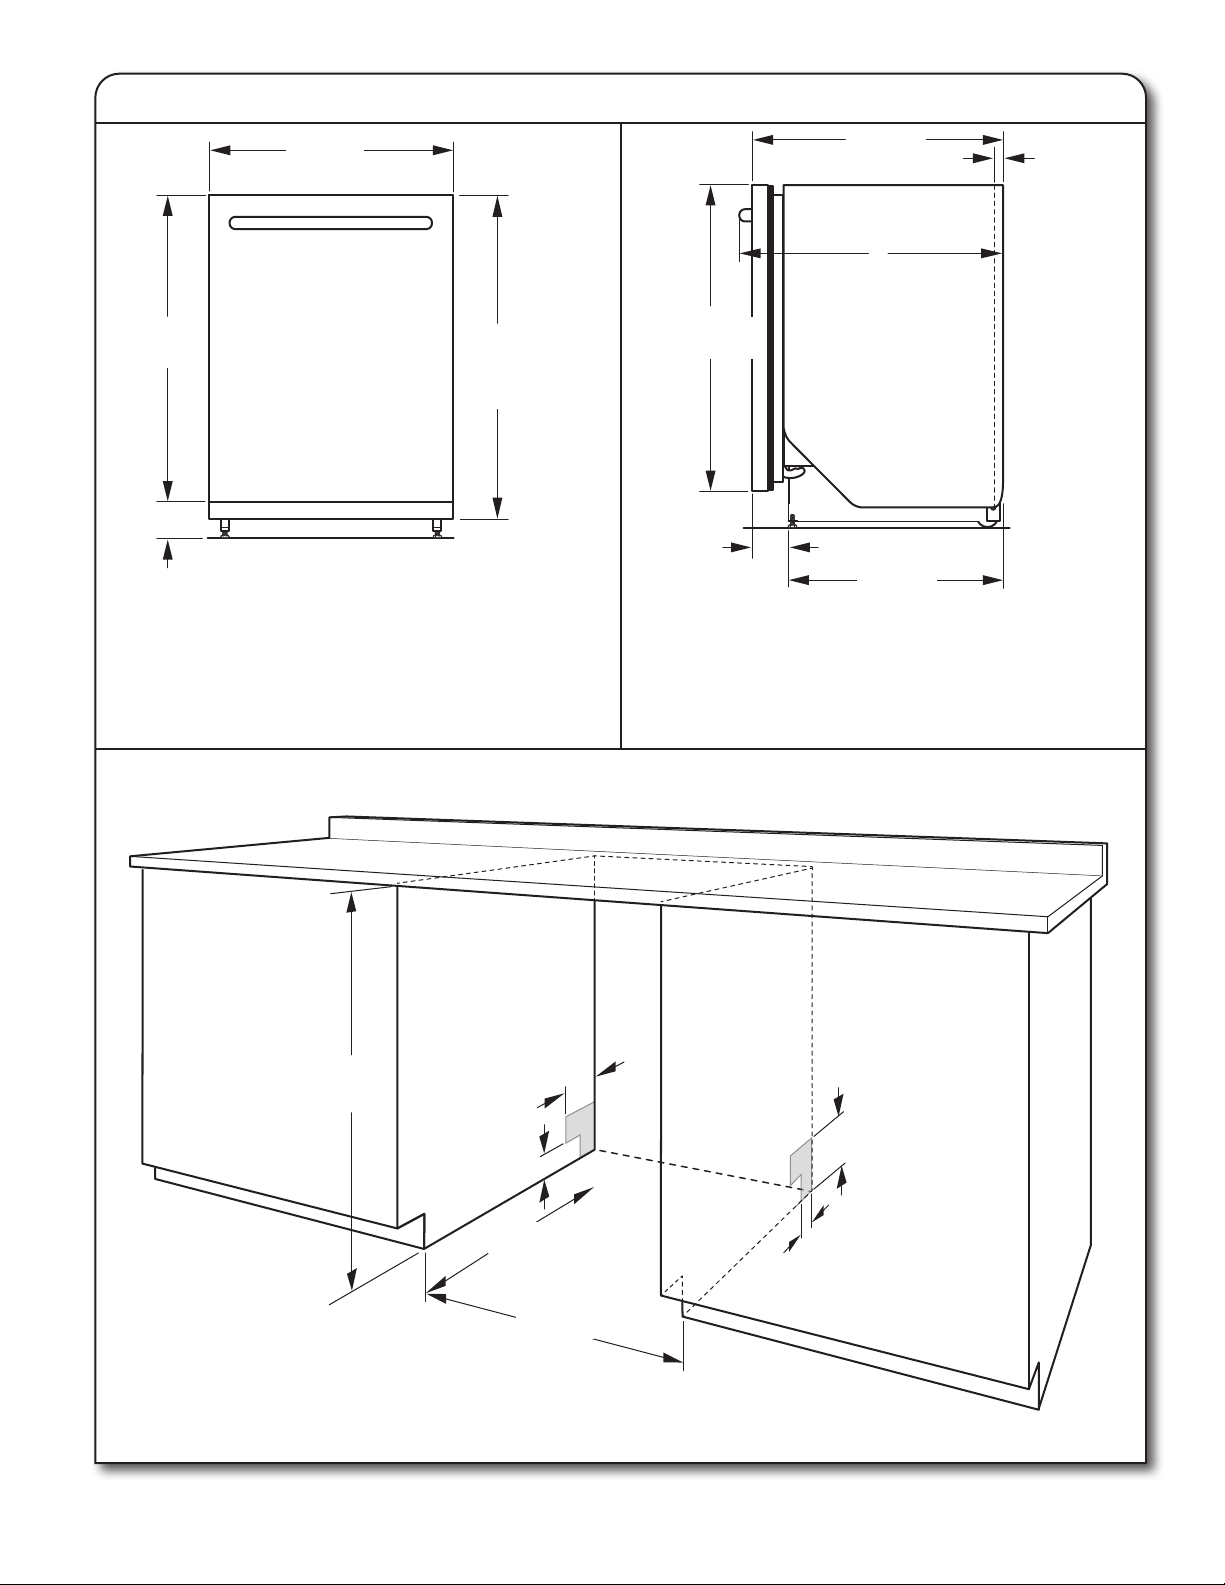
66
DIMENSIONES DEL PRODUCTO Y DE LA ABERTURA DEL GABINETE:
.
B
A
C
D
E
23
7
/8"
(60,4 cm)
30"
(76,2 cm)
30"
(76,2 cm)
24½"
(62,6 cm)
3/4"
(1,9 cm)
3¾"
(9,7 cm)
20
13
/16"
(52,9 cm)
33
5
/8"
(85,4 cm)
mínimo sin
las patas
3
1
/2" - 4
1
/2"
(8,4 cm - 10,6 cm)
A. El aislante puede estar comprimido (no se utiliza en todos
los modelos).
B. Para los modelos adaptables para la instalación de paneles,
la profundidad de la lavavajillas es de 24" (61,0cm) sin incluir
el panel de la puerta a la medida de 3/4" (1,9cm).
C. Las manijas de la puerta pueden sobresalir del frente de
la lavavajillas dependiendo del modelo.
Revise todas las superficies para asegurarse de que no
hayan protuberancias que pudieran impedir la instalación
de la lavavajillas.
33
5
/8" mínimo
(85,4 cm) mínimo
21"
(53,4 cm)
3"
(7,6 cm)
4"
(10,2 cm)
24"
(62,0 cm)
2"
(5,1 cm)
6¼"
(15,9 cm)
NOTA: Las áreas
sombreadas de las
paredes del gabinete
muestran dónde
se pueden instalar
las conexiones de
servicio.
D. Medido desde el punto más bajo del lado inferior del mostrador.
Se puede reducir a 33
5
/8" (85,4 cm) retirando las patas y el área
perforada del aislante (manta) en la lavavajillas.
E. Mínimo, medido desde el punto más angosto de la abertura.
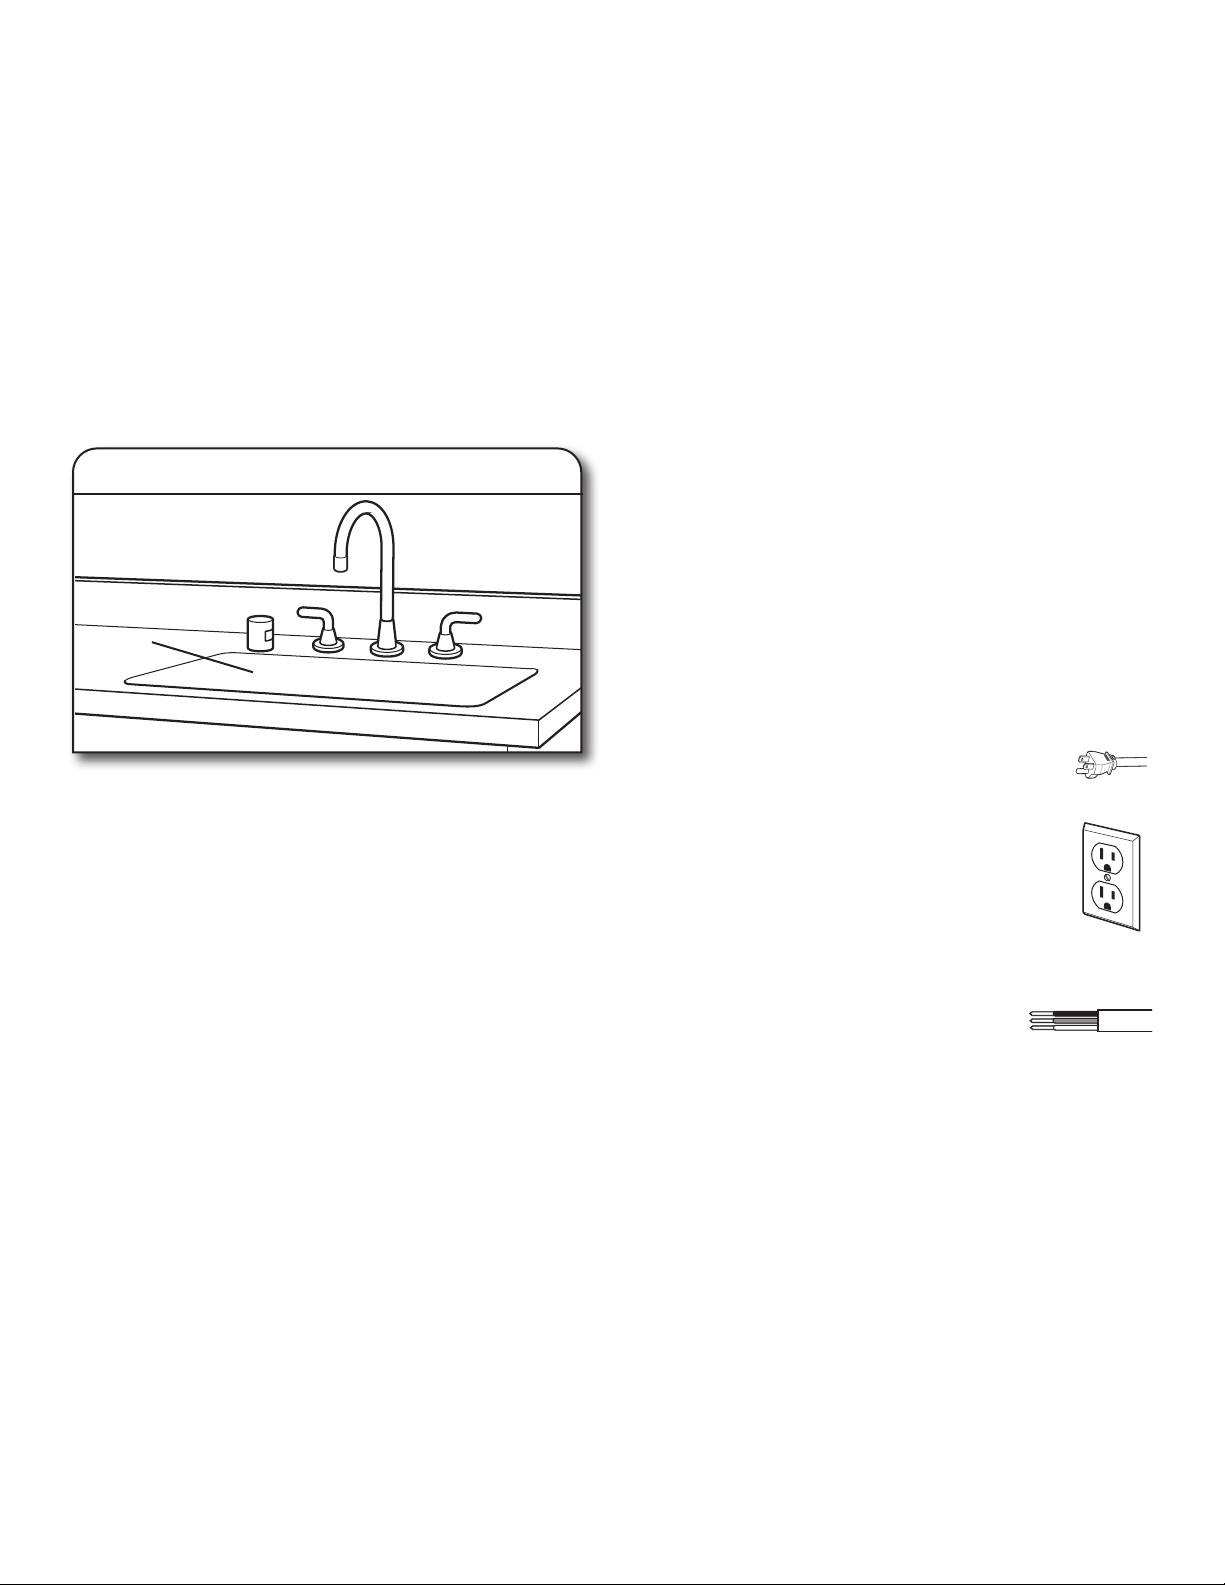
67
REQUISITOS DE DESAGÜE
■ Se provee una manguera nueva de desagüe con su lavavajillas.
Si la manguera de desagüe no es lo suficientemente larga,
utilice una manguera de desagüe nueva con una longitud
máxima de 12 pies (3,7m) que cumpla con todos los
estándares de comprobación actuales de AHAM/IAPMO,
que sea resistente al calor y al detergente, y que encaje en el
conector de desagüe de 1" (2,5cm) de la lavavajillas.
NOTA: No conecte múltiples mangueras de desagüe juntas.
■ Asegúrese de conectar la manguera de desagüe al colector de
residuos en “T” o a la entrada del colector de residuos sobre
el sifón de desagüe en la plomería de la casa, y a un mínimo
de 20" (50,8cm) por encima del piso. Se recomienda que la
manguera de desagüe se enrolle y fije con firmeza a la parte
inferior del mostrador o que se conecte a una purga de aire.
■ Asegúrese de utilizar una purga de aire si la manguera de
desagüe está conectada a la plomería de la casa a una altura
menor de 20" (50,8cm) sobre el contrapiso o el piso.
Uso de la purga de aire
■ Si se requiere, la purga de aire se debe instalar siguiendo las
instrucciones de instalación de la misma. Al conectar la purga
de aire, se requiere una manguera de goma (no proporcionada)
para conectarla al tubo de residuos en “T” o la entrada del
colector de residuos.
■ Use accesorios para tuberías de desagüe con un diámetro
interior de 1,3cm (1/2") mínimo.
REQUISITOS DE SUMINISTRO DE AGUA
■ Esta lavavajilla tiene una función de calentamiento de agua y
también requiere una conexión a una tubería de suministro de
agua caliente.
■ Una tubería de agua caliente con presión de agua de 20 psi a
120 psi (de 138 kPa a 862 kPa), que pueda ser verificada por
un plomero autorizado.
■ Agua a 120°F (49°C) en la lavavajillas
■ Tubería de cobre con un diámetro externo de 3/8" (0,95cm)
con racor con conexión de compresión o tubería de suministro
de agua trenzada flexible.
NOTA: No se recomienda usar tubería de plástico de 1/2"
(1,3cm) mínimo.
■ Un codo de 90° con una conexión de manguera de 3/4"
(0,95cm) con una arandela de goma.
■ No suelde a una distancia menor de 6" (15,2cm) de la válvula
de entrada del agua.
■ Si la instalación se realiza en una construcción nueva,
asegúrese de enjuagar las tuberías de suministro de agua
domésticas antes de conectar la lavavajillas para eliminar
cualquier residuo presente en la tubería de suministro.
NOTA: Si se va a reemplazar una lavavajillas existente, se
recomienda instalar una nueva tubería de agua y manguera de
desagüe (suministradas) con la nueva lavavajillas.
REQUISITOS ELÉCTRICOS
Asegúrese de que la conexión eléctrica y el tamaño del cable
sean adecuados y cumplan con el Código nacional eléctrico,
ANSI/NFPA 70, su edición más reciente, y con todos los códigos
y las ordenanzas locales.
Puede obtener una copia de las normas de los códigos antes
indicados en:
National Fire Protection Association
1 Batterymarch Park
Quincy, MA 02169-7471
Usted debe tener:
■ Un suministro eléctrico de 120V, 60Hz., CA solamente,
con fusibles de 15 A o 20A
■ Solamente cable de cobre
■ Se permite un máximo de 2 conductores de suministro de
cable en sitio (tamaño máximo: 12AWG) y 1 conductor de
conexión a tierra en la caja de terminales.
Se recomienda:
■ Un fusible retardador o un disyuntor.
Requisitos del circuito:
■ La lavavajillas se puede instalar en el mismo circuito que el
triturador de basura siempre y cuando el circuito derivado no
exceda la carga calculada del circuito y cumpla con todos los
códigos y regulaciones vigentes, como, por ejemplo, la edición
más reciente del Código nacional eléctrico, ANSI/NFPA 70.
■ No se puede realizar ninguna otra conexión eléctrica dentro de
la caja de terminales de la lavavajillas más que la conexión a
tierra y la de suministro eléctrico de esta.
Si va a conectar la lavavajillas con un cable
de suministro eléctrico:
■ Use un cable de suministro de energía con
certificación UL para uso con lavavajillas.
■ Conecte el producto a un tomacorriente de 3
terminales con conexión a tierra. El tomacorriente
debe cumplir con todos los códigos y ordenanzas
locales.
Si va a conectar la lavavajillas con cableado directo:
■ Utilice un cable de cobre flexible, blindado o con una
funda no metálica con un cable de conexión a tierra
que cumpla con los requisitos de cableado para su hogar y
con los códigos y ordenanzas locales.
■ Utilice un protector de cables con
certificación UL/homologación CSA.
Purga
de aire
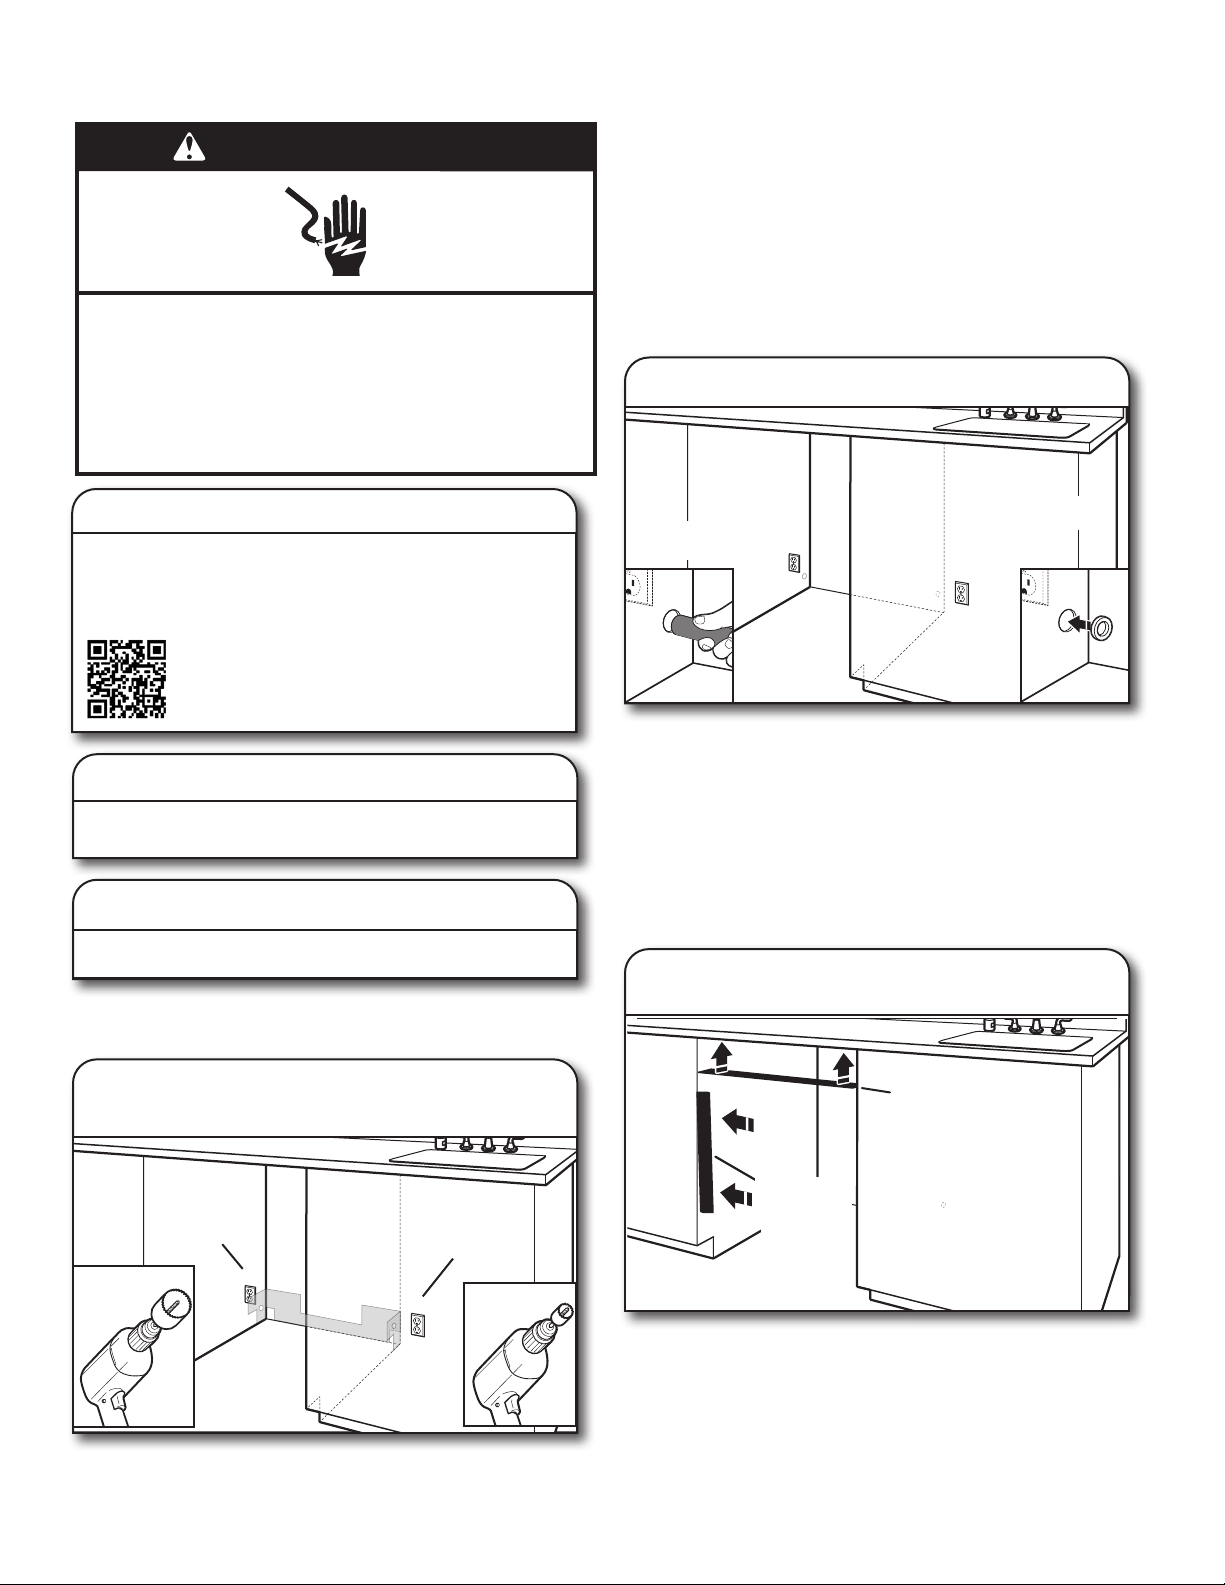
68
INSTRUCCIONES DE INSTALACIÓN
PREPARACIÓN DE LA ABERTURA DEL
GABINETE: INSTALACIONES NUEVAS
El receptáculo del suministro de energía para el electrodoméstico
debe instalarse en un gabinete o pared adyacente al espacio
debajo del mostrador donde se instalará el electrodoméstico.
NOTA: Consulte la sección “Dimensiones del producto y de la
abertura del gabinete” para la ubicación correcta del orificio y las
medidas de la zona sombreada.
Taladre un orificio para la manguera de desagüe de 1½" (3,8cm)
en la parte trasera o lateral del gabinete, dependiendo de la
ubicación del paso de la manguera de desagüe y de la conexión
a la manguera de desagüe.
Taladre un orificio para la manguera de suministro de agua
de 1/2" (1,27cm) en la parte trasera o lateral del gabinete
dependiendo de la ubicación del paso de la manguera de
suministro de agua y de la ubicación de la conexión.
Taladre un orificio de 1½" (3,8cm) para el cable eléctrico en la
parte derecha o trasera del gabinete.
Gabinete de madera: Lije el orificio hasta que quede liso.
Gabinete de metal: cubra los bordes del orificio con el
pasacables incluido en el kit del cable de alimentación.
Consejo útil: Será más fácil conectar la lavavajillas si dirige el
cable dentro de la abertura del gabinete desde el lado derecho.
INSTALACIÓN OPCIONAL DE LA BARRERA
CONTRA LA HUMEDAD (RECOMENDADO PARA
LOS MOSTRADORES DE MADERA)
Suplementos para barrera contra
la humedad/madera
Barrera contra
la humedad
Compruebe que la zona bajo el gabinete está limpia y seca para
la instalación de la barrera contra la humedad. Retire la parte
trasera de la barrera contra la humedad y aplique a la parte
inferior del mostrador a lo largo del borde delantero.
NOTA: se recomienda el uso de esta barrera contra la humedad,
pero no es un requisito obligatorio.
NOTA: Instale suplementos de madera si el anclaje lateral y
el espacio entre los lados del gabinete y de la lavavajillas son
superiores a 1/2" (1,27cm) a cada lado, o si son superiores a la
longitud de los tornillos de anclaje laterales.
1. Lije los orificios hasta que queden lisos
Gabinete
de madera
Gabinete
de metal
ADVERTENCIA
Peligro de Choque Eléctrico
Desconecte el suministro de energía en la caja de
fusibles o cortacircuitos antes de instalar
la lavavajillas.
No seguir esta instrucción puede ocasionar la muerte o
choque eléctrico.
2. Desconecte el suministro eléctrico
Desconecte el suministro eléctrico en la caja de fusibles
o la caja de cortacircuitos antes de instalar la lavavajillas.
3. Cierre el suministro de agua
Cierre el suministro de agua a la lavavajillas.
4. Perfore orificios en el lugar
de la nueva instalación
Ubicación
opcional
Ubicación
recomendada
1½"
(3,8 cm)
1/2"
(1,27 cm)
Instale los
suplementos
de madera
1. Desconecte el suministro eléctrico
Puede encontrar un video con los pasos de instalación en
línea en whirlpool.com, en el apartado “How To’s & FAQ”
(Instrucciones y preguntas frecuentes) bajo la sección
“Service & Support” (Servicio y soporte). Puede ver el video
en http://www.kaltura.com/tiny/ro00v.
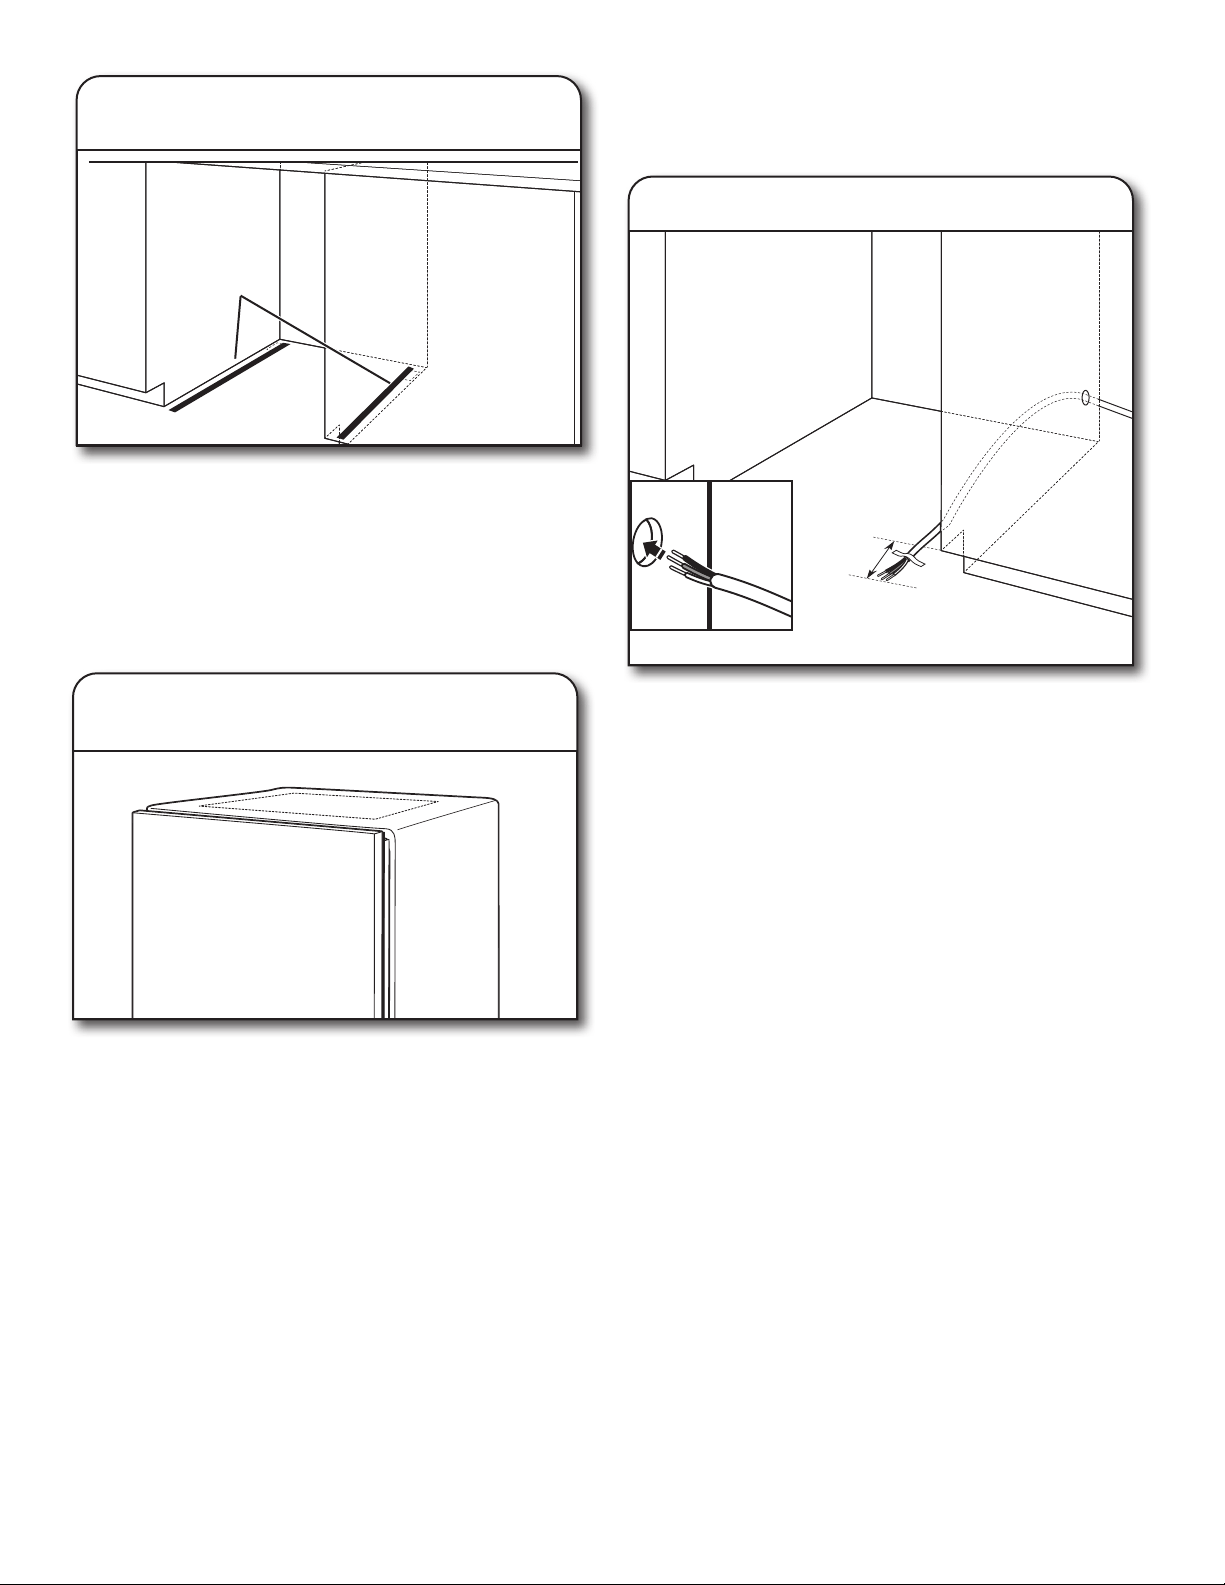
69
5. Pisos armados: añada suplementos
según sea necesario
Nota: Los soportes de madera que vienen con la base de
embalaje funcionan bien como suplementos.
Pisos armados: Si el piso de la cocina es más alto que el piso
de la abertura del gabinete, por ejemplo, si las baldosas del piso
de la cocina no se extienden hasta el interior de la abertura del
gabinete, añada suplementos según sea necesario en la zona
que se muestra para elevar la lavavajillas hasta el mismo nivel del
piso de la cocina.
NOTA: Los suplementos se deben sujetar al piso con firmeza
para evitar el movimiento cuando la lavavajillas esté en uso.
Recorte la manta aislante a lo largo de la línea de puntos para
una altura de abertura de gabinete de 33
5
/8" (85,4cm). Para
otras alturas de gabinete, no recorte la manta aislante.
CONEXIÓN ELÉCTRICA
– Para un cable directo, continúe con el paso 7
– Para un cable de alimentación, espere al paso 18
Para la instalación con cable directo, disponga el cable como se
indica. No conecte el cable al producto en este momento. Esta
conexión se debe realizar después, luego de que la unidad esté
instalada en la abertura del gabinete.
Lleve el cable desde el suministro de energía y páselo por el
orificio del gabinete. (El cable se debe extender hacia el lado
derecho de la parte frontal de la abertura del gabinete). Pegue el
cable al piso con cinta adhesiva en la zona indicada. Esto evitará
que se mueva al colocar la lavavajillas dentro de la abertura del
gabinete.
6. Si se va a instalar en una abertura
de 33
5
/8" (85,4cm)
6”
(15,2 cm)
7. Cable directo: paso del cable
Espaciador
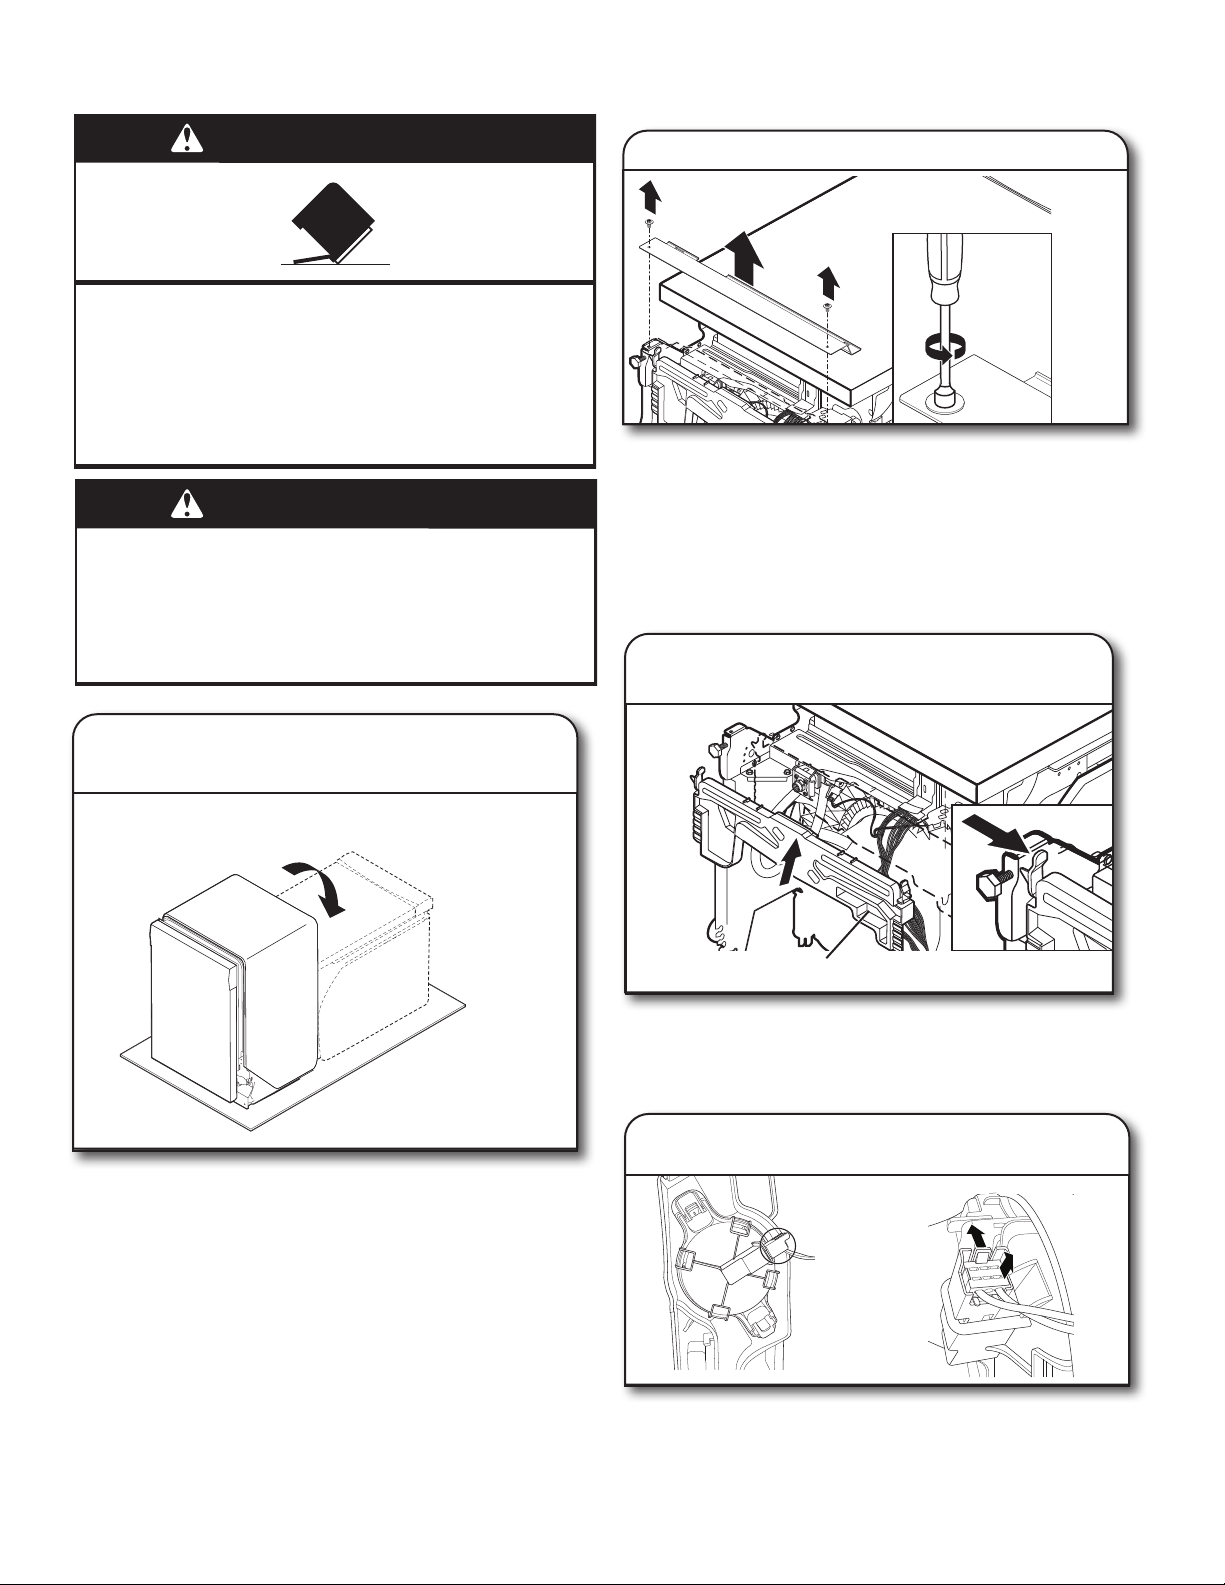
70
PREPARE LA LAVAVAJILLAS
Consejo útil: Retire todo el material interno de embalaje, la
manguera de desagüe, el kit de instalación y el mango (si está
incluido) antes de colocarlo en su parte posterior, y no quite la
película de la puerta en este momento.
Coloque un cartón debajo de la lavavajillas y no lo quite hasta
que la misma quede instalada en la abertura del gabinete, para
evitar daños al revestimiento del piso.
Con la ayuda de dos o más personas, sujete los lados del marco
de la puerta de la lavavajillas y apoye la lavavajillas sobre su
parte posterior.
No utilice el panel de la puerta como mesa de trabajo sin antes
cubrirlo con una toalla para no rayar el mismo.
RETIRE EL PANEL DE ACCESO
Y EL AISLANTE
Utilice una llave de tuercas de 5/16" (7,9 mm) para retirar los dos
tornillos que fijan los paneles de acceso a la lavavajillas. Una vez
que se hayan retirado los tornillos, mueva el panel de acceso
hacia la parte superior del producto para desengancharlo, y
luego retírelo.
DESCONECTE Y RETIRE EL ENSAMBLAJE
DE LA BANDEJA DE GOTEO
10a. Retire el ensamblaje de la bandeja
de goteo
Para retirar el ensamblaje de la bandeja de goteo, presione los
broches en los laterales de la bandeja de plástico hacia el centro
del producto y tire en dirección a usted. Asegúrese de no tirar
demasiado ni con tanta fuerza, ya que el cable del interruptor
flotante aún está conectado en este momento.
10b. Retire el cable del interruptor
flotante
Para quitar el cable del interruptor flotante, empuje suavemente
la lengüeta del conector (1) y luego tire del conector (2) para
sacarlo de la carcasa. El flotante en sí no debe sacarse de la
bandeja.
NOTA: No vuelva a instalar la bandeja de goteo hasta que se
indique.
ADVERTENCIA
Peligro de Peso Excesivo
Use dos o más personas para mover e instalar
la lavavajillas.
No seguir esta instrucción puede ocasionar una
lesión en la espalda u otro tipo de lesiones.
Peligro de Vuelco
No use la lavavajillas antes de estar completamente
instalada.
No se apoye en la puerta abierta.
No seguir estas instrucciones puede ocasionar heridas
serias o cortaduras.
ADVERTENCIA
8. Ponga la lavavajillas en su parte
posterior
9. Quite los paneles de acceso
Ensamblaje de la bandeja de goteo
1
2

71
RETIRE EL PANEL DE ACCESO
Y EL AISLANTE
Utilice una llave de tuercas de 5/16" (7,9 mm) para retirar los dos
tornillos que fijan los paneles de acceso a la lavavajillas. Una vez
que se hayan retirado los tornillos, mueva el panel de acceso
hacia la parte superior del producto para desengancharlo, y
luego retírelo.
DESCONECTE Y RETIRE EL ENSAMBLAJE
DE LA BANDEJA DE GOTEO
10a. Retire el ensamblaje de la bandeja
de goteo
Para retirar el ensamblaje de la bandeja de goteo, presione los
broches en los laterales de la bandeja de plástico hacia el centro
del producto y tire en dirección a usted. Asegúrese de no tirar
demasiado ni con tanta fuerza, ya que el cable del interruptor
flotante aún está conectado en este momento.
10b. Retire el cable del interruptor
flotante
Para quitar el cable del interruptor flotante, empuje suavemente
la lengüeta del conector (1) y luego tire del conector (2) para
sacarlo de la carcasa. El flotante en sí no debe sacarse de la
bandeja.
NOTA: No vuelva a instalar la bandeja de goteo hasta que se
indique.
9. Quite los paneles de acceso
Mida la altura de la abertura del gabinete desde la parte inferior
del mostrador hasta el piso donde se va a instalar la lavavajillas.
Asegúrese de medir desde el punto más bajo del lado inferior del
mostrador y desde el punto más elevado del piso.
Use una llave para aflojar las patas niveladoras al principio de ser
necesario.
Ajuste las cuatro patas niveladoras a la misma altura; gírelas
hacia la derecha o izquierda según lo necesite.
La unidad viene con las patas establecidas para una instalación
de una altura de 33
5
/8" (85,4 cm). Si la altura de su abertura es de
34½” (87,6 cm), deberá elevar todas las patas 7/8" (2,22 cm).
NOTA: Ajuste la altura de la pata trasera antes de mover la
unidad hacia el espacio.
Las patas se pueden sacar si es necesario en caso de
instalaciones en espacios reducidos.
CONECTE LA TUBERÍA DE AGUA A LA
VÁLVULA DE LLENADO
– Para una tubería de cobre, continúe con el paso 12
– Para una tubería flexible, continúe con el paso 14
Si se utiliza una tubería de cobre, determine la longitud total
de la tubería de cobre necesaria para llegar al suministro de
agua, corte a la longitud necesaria y conecte con racores de
compresión.
11. Mida la abertura del gabinete
Ajuste de pata niveladora
12. Tubería de agua de cobre
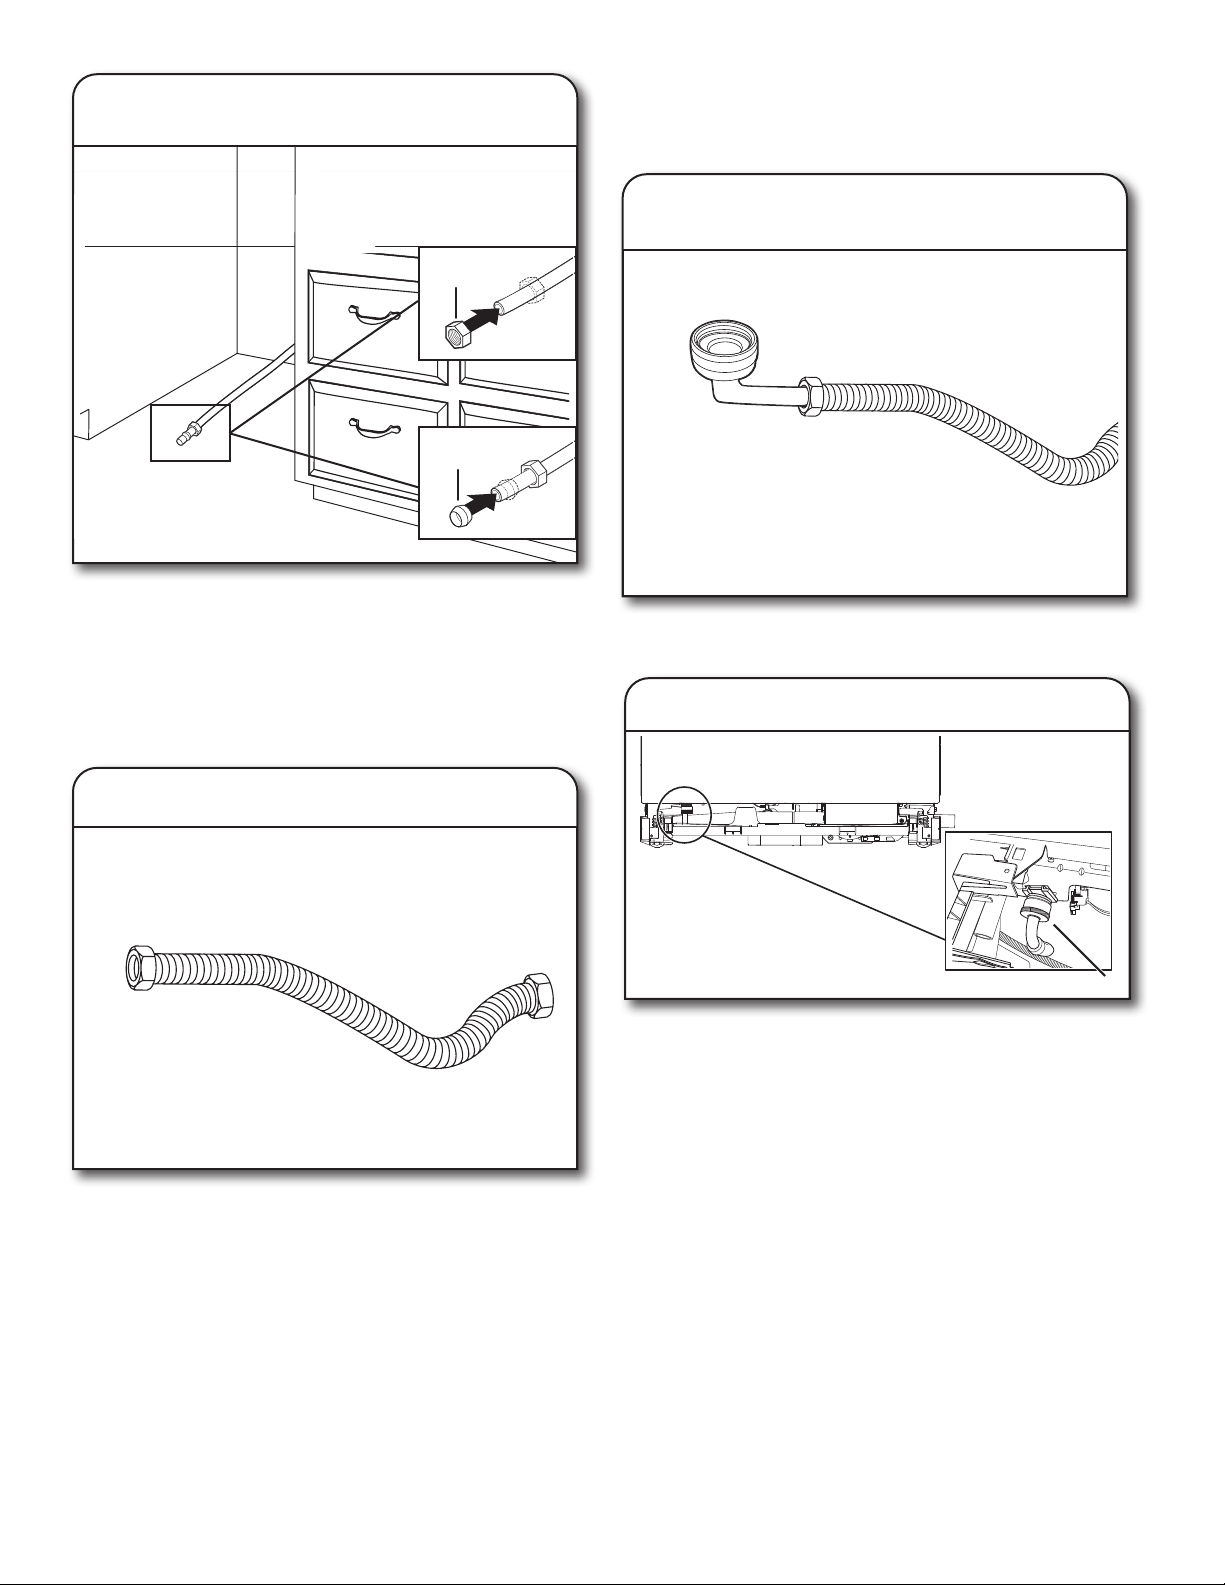
72
Solo tubería de cobre: Coloque la tubería en el codo de 90°
hasta donde sea posible. (La tubería de cobre se dobla y retuerce
con facilidad). Empuje la tuerca y la férula hacia adelante y
ajuste, de modo que quede justo contra la rosca del codo.
NOTA: Para evitar vibraciones durante el funcionamiento,
disponga la tubería de suministro de agua de modo que no toque
la base, el marco o el motor de la lavavajillas. Si está usando una
tubería de cobre, saltee el paso 14 y vaya al paso 15.
Tubería trenzada flexible: Compruebe que la tubería trenzada
flexible posea la longitud suficiente.
Utilice un racor de manguera con conexión de compresión de
3/8" x 3/4" con un codo de 90 º. Conecte el racor de compresión
de 3/8" del codo de 90° a la tubería de suministro de agua. Fíjelo
de modo que la conexión de 3/4" quede mirando hacia arriba
como se mostró anteriormente.
CONECTE LA MANGUERA DE LLENADO
A LA VÁLVULA DE LLENADO
16. Ajuste el codo de 90° en la válvula
Codo
Compruebe que la arandela de goma está encajada debidamente
en el conector. Deslice el racor de 3/4" (19mm) del codo de 90°
hacia la válvula, y ajuste a mano para no dañar la rosca. Ajuste a
mano hasta que el acoplamiento quede fijado.
Utilice alicates para comprobar que el acoplamiento está
apretado. Puede que sea necesario entre 1/4 y 1/2 giro adicional
para sellar la junta de goma. Pase la manguera de llenado por el
lado izquierdo de la parte trasera de la unidad.
NOTAS:
■ No use cinta con los conectores de compresión.
■ No apriete en exceso. Se puede dañar el acoplamiento.
■ Pase la tubería de suministro de agua hacia la parte posterior
de la unidad antes de instalarla.
Tuerca
Férula
13. Deslice la tuerca y la férula sobre la
tubería (solamente tubería de cobre)
14. Tubería flexible
15. Agregue el codo de 90° a la tubería
de suministro de agua
Para retirar la caja de terminales, presione la traba de plástico,
deslice la caja hacia la izquierda de la unidad a lo largo del
tubo de metal y gire el lado izquierdo de la caja hacia adelante.
Asegúrese de que el cableado del producto aún esté conectado
dentro de la caja de terminales.
Con una llave de tuercas de 1/4" (6,4mm) retire el tornillo que
sostiene la cubierta de la caja de terminales. Levante la cubierta
de la caja para retirarla. Guarde la cubierta para usarla más tarde.
Instale un protector de cables con certificación UL/homologación
CSA. Compruebe que las cabezas de los tornillos están orientadas
hacia arriba al apretar la tuerca de la tubería.
Se proporciona un protector de cables con el kit de cable de
alimentación.
La longitud del cable sugerida depende del protector
de cables
18. Retire la caja de terminales
19. Quite la cubierta de la caja de terminales
Cubierta de
la caja de
terminales
20. Instale el protector de cables
4
1
/2" (114,3 mm)
0.75" - 1"
(19 mm - 25 mm)
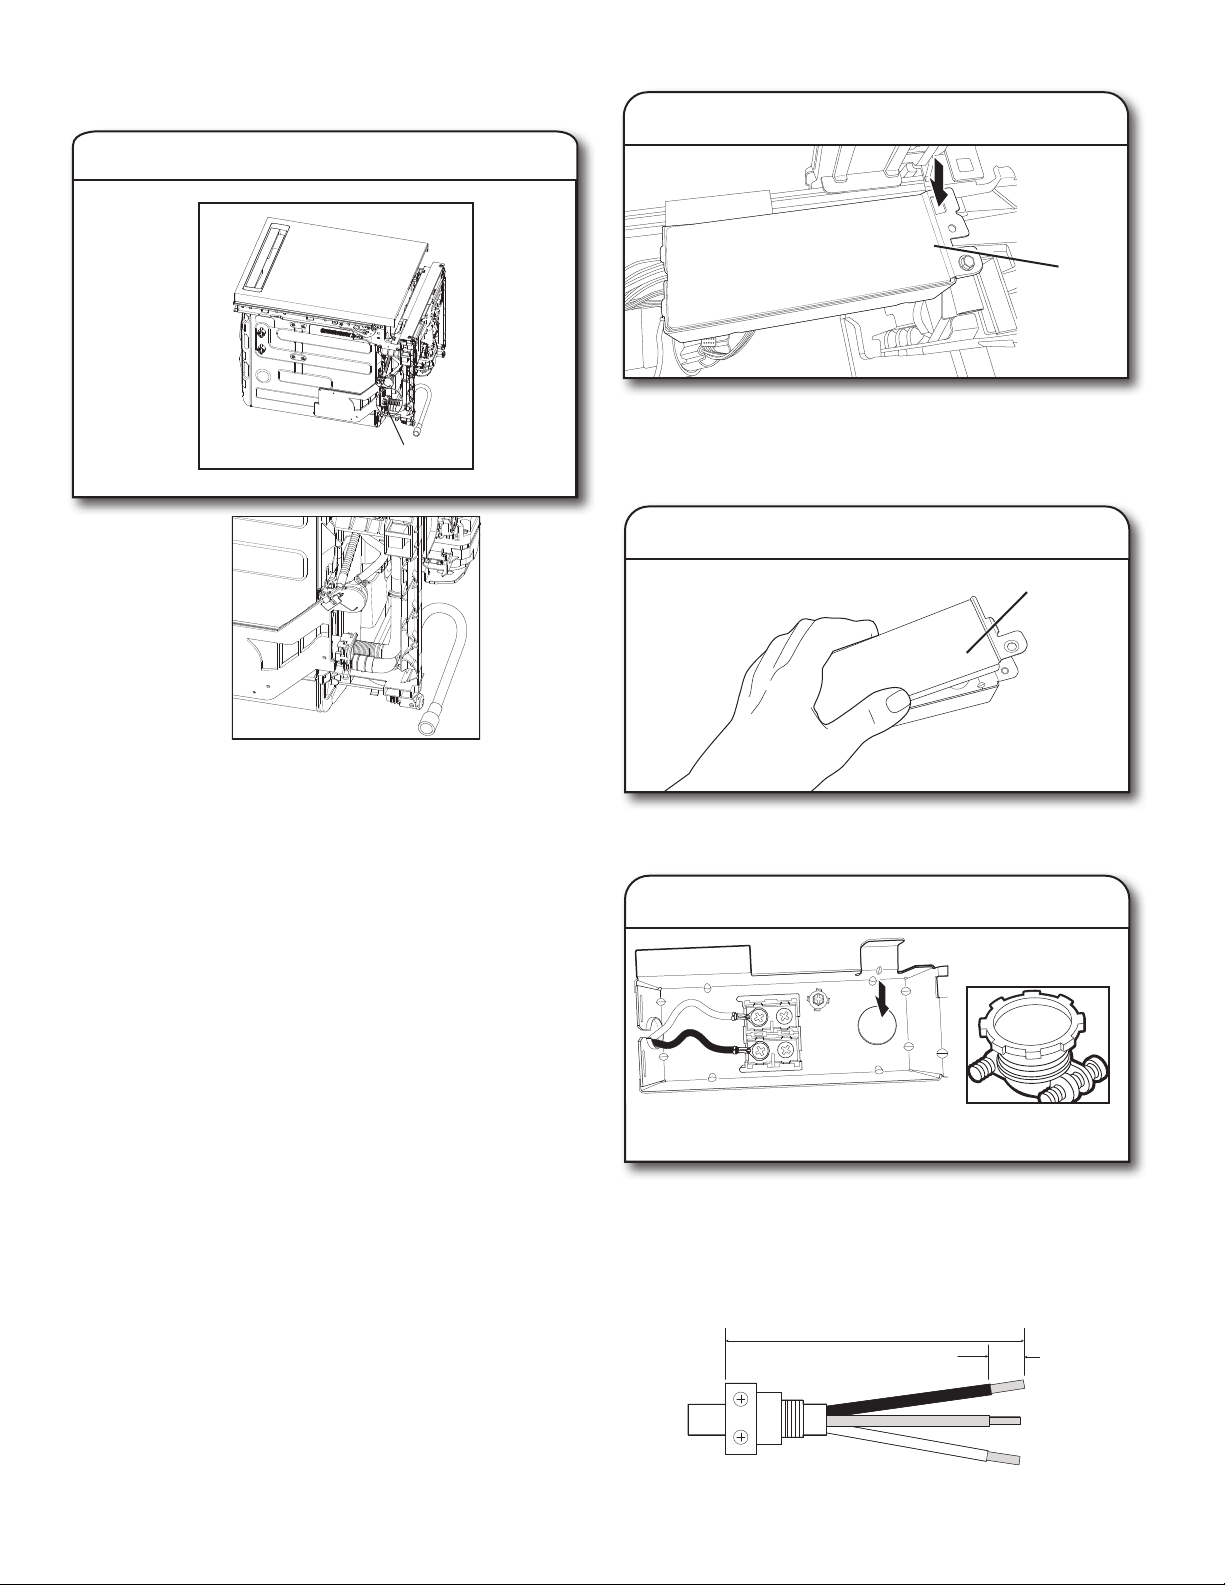
73
Caja de
terminales
CONEXIONES DE LA MANGUERA
DE DESAGÜE
Coloque la abrazadera plateada proporcionada sobre el extremo
del codo de la manguera de desagüe. Luego, empuje la manguera
hacia el puerto de desagüe (asegúrese de empujarla hasta que
haga tope), esta debe estar mirando hacia la parte inferior de la
lavavajillas. Apriete con unas pinzas para abrir la abrazadera y
deslícela sobre el codo para asegurar que la manguera quede en
su lugar. Pase la manguera por la parte trasera del producto.
NOTA:
■ Si la manguera de desagüe se instala con el codo de goma
mirando hacia afuera, puede que esta se retuerza y haga
que el desagüe sea más lento o no se complete cuando la
instalación se realiza en gabinetes con espacio reducido.
■ Puede que haya un tapón de plástico en el puerto de
desagüe para el envío, donde se conectará la manguera
de desagüe. Si está incorporado, retire este tapón antes de
instalar la manguera de desagüe.
CONEXIÓN DEL CABLE DE ALIMENTACIÓN
NOTA: Si va a instalar el producto con un cableado directo,
proceda al paso 25, espere a instalar el cableado hasta después
del paso 44, cuando la unidad ya esté instalada en la abertura del
gabinete.
Seleccione conectores de rosca con certificación
UL/homologación CSA para uso en lavavajillas.
Kit de cable de alimentación
El kit incluye generalmente el cable de alimentación, protector de
cables de metal, pasacables.
(Número de pieza de Whirlpool W11365011 para kit de cables -
recto y W11365014 para kit de cables - ángulo recto)
NOTA: Pase la manguera de desagüe por la parte posterior de
la unidad antes de ponerla de pie. Prosiga con el paso 18. Si
va a instalar el producto con un cableado directo, espere hasta
después del paso 44, cuando la unidad ya esté instalada en la
abertura del gabinete
Para retirar la caja de terminales, presione la traba de plástico,
deslice la caja hacia la izquierda de la unidad a lo largo del
tubo de metal y gire el lado izquierdo de la caja hacia adelante.
Asegúrese de que el cableado del producto aún esté conectado
dentro de la caja de terminales.
Con una llave de tuercas de 1/4" (6,4mm) retire el tornillo que
sostiene la cubierta de la caja de terminales. Levante la cubierta
de la caja para retirarla. Guarde la cubierta para usarla más tarde.
Instale un protector de cables con certificación UL/homologación
CSA. Compruebe que las cabezas de los tornillos están orientadas
hacia arriba al apretar la tuerca de la tubería.
Se proporciona un protector de cables con el kit de cable de
alimentación.
La longitud del cable sugerida depende del protector
de cables
Ubicación de la manguera de desagüe
17. Conecte la manguera de desagüe
18. Retire la caja de terminales
19. Quite la cubierta de la caja de terminales
Cubierta de
la caja de
terminales
20. Instale el protector de cables
4
1
/2" (114,3 mm)
0.75" - 1"
(19 mm - 25 mm)
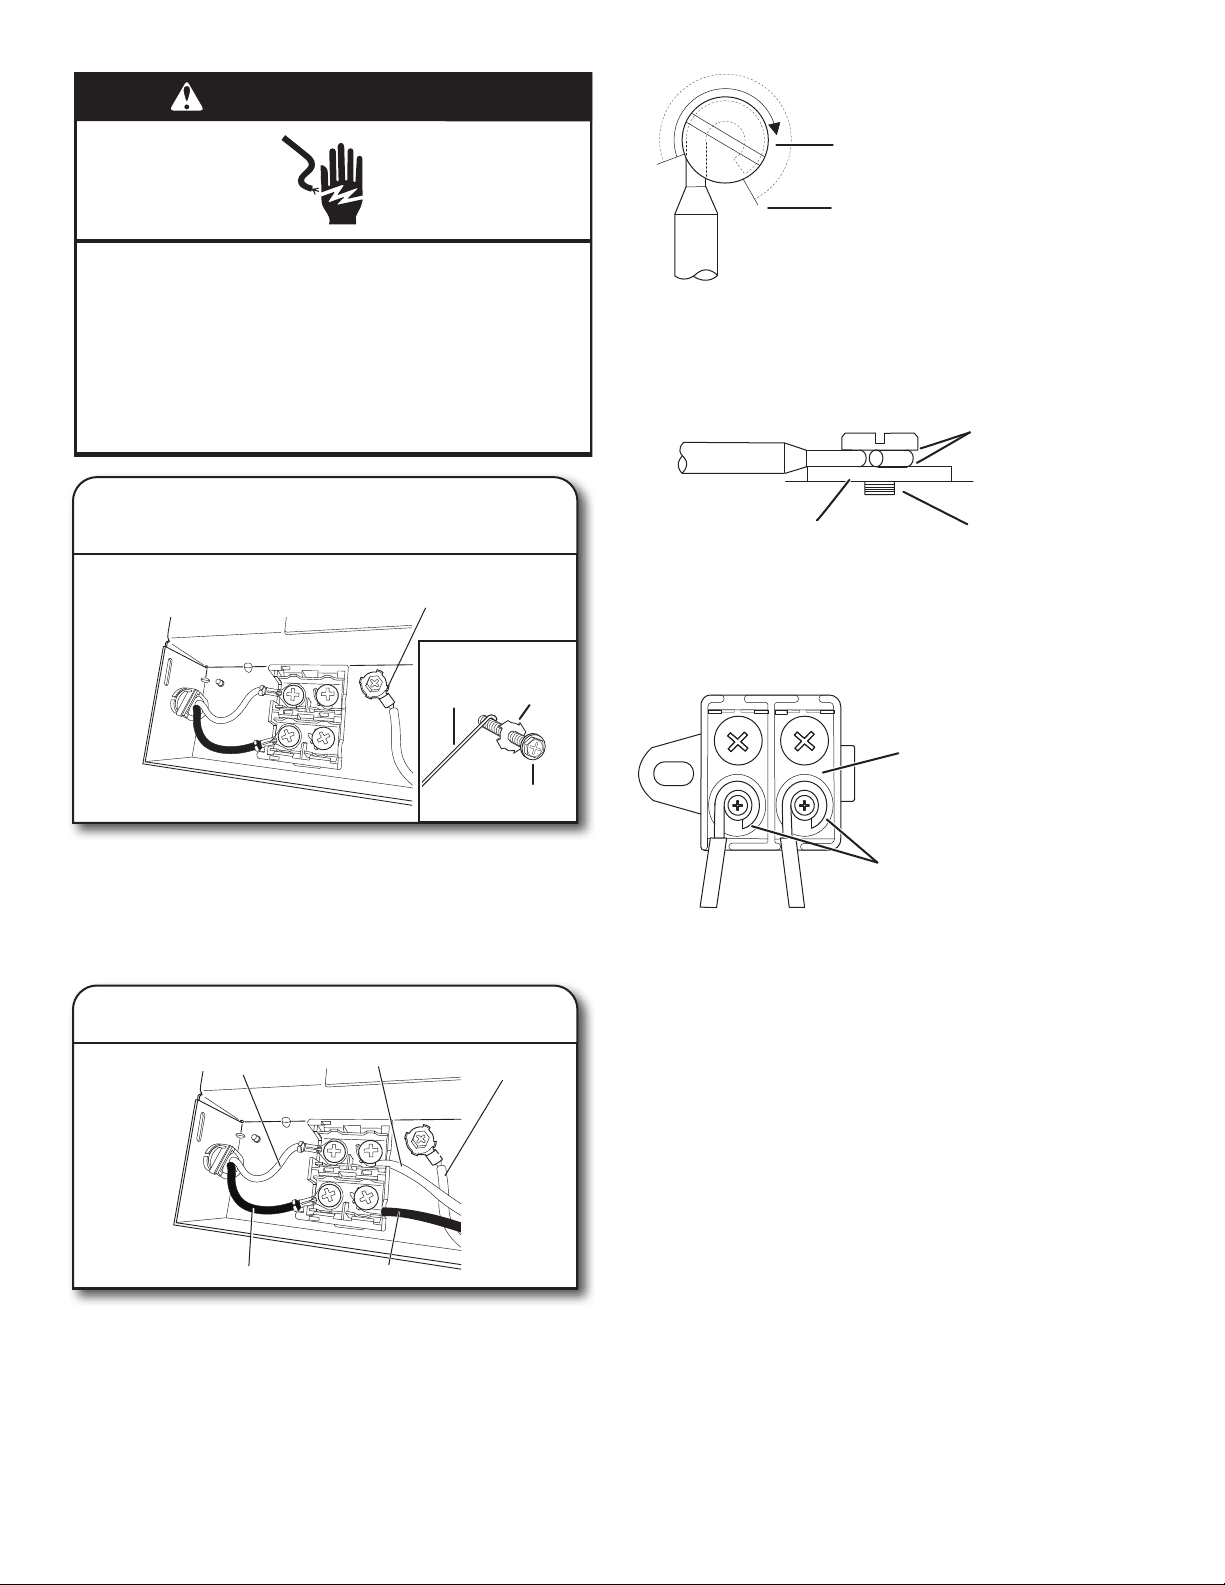
74
Pase el cable de alimentación por el protector de cables en la
parte posterior de la caja de terminales. Retire el tornillo del
conector a tierra en la superficie elevada dentro de la caja y pásela
por el terminal de anillo del cable a tierra verde del cable de
alimentación. Si el cable no tiene terminal de anillo, doble un bucle
en el extremo del cable. Consulte las figuras de abajo para ver los
gráficos detallados para terminar adecuadamente el producto al
cableado del hogar. Reinstale y ajuste el tornillo del conector a
tierra a la superficie elevada de la caja.
Para conectar los cables con terminales de anillo, retire los tornillos
del bloque de terminales, coloque el tornillo a través de las
terminales de anillo y vuelva a ajustarlos en el bloque de terminales.
Para conectar los cables sin terminales de anillo, retire los tornillos
del bloque de terminales. Forme un lazo con el extremo de los
cables. Pase los tornillos por el lazo. Consulte las figuras de abajo
para ver los gráficos detallados para terminar adecuadamente el
producto al cableado del hogar. Vuelva a colocar los tornillos en el
bloque de terminales. Ajuste los tornillos.
NOTA: Los cables previamente estañados no se deben usar para
conectar al bloque de terminales. Asegúrese de que el negro esté
alineado con el negro y el blanco esté alineado con el blanco en el
bloque de terminales.
Pele el aislamiento y envuelva el cable
ADVERTENCIA
Peligro de Choque Eléctrico
Conecte a tierra la lavavajillas.
Conecte el alambre de conexión a tierra al conector
verde de conexión a tierra en la caja de terminales.
No use un cable eléctrico de extensión.
No seguir estas instrucciones puede ocasionar
la muerte, incendio o choque eléctrico.
21. Conecte el cable a tierra
22. Conecte los cables restantes
Alambre envuelto en dos tercios
Alambre envuelto en tres cuartos
Figura: 1
Contacto ajustados
Poste de tornillo
Supercie de contacto
Figura: 2
Supercie de contacto
El cable pelado siempre debe
tener una envoltura de 2/3 a 3/4
alrededor de las roscas de los
tornillos
Figura: 3
Cable de
conexión
a tierra
Tornillo de conexión
a tierra
Arandela
Tornillo del conector
de conexión a tierra
Cable blanco
Cable blanco
Cable negro
Cable negro
Cable de
conexión a
tierra
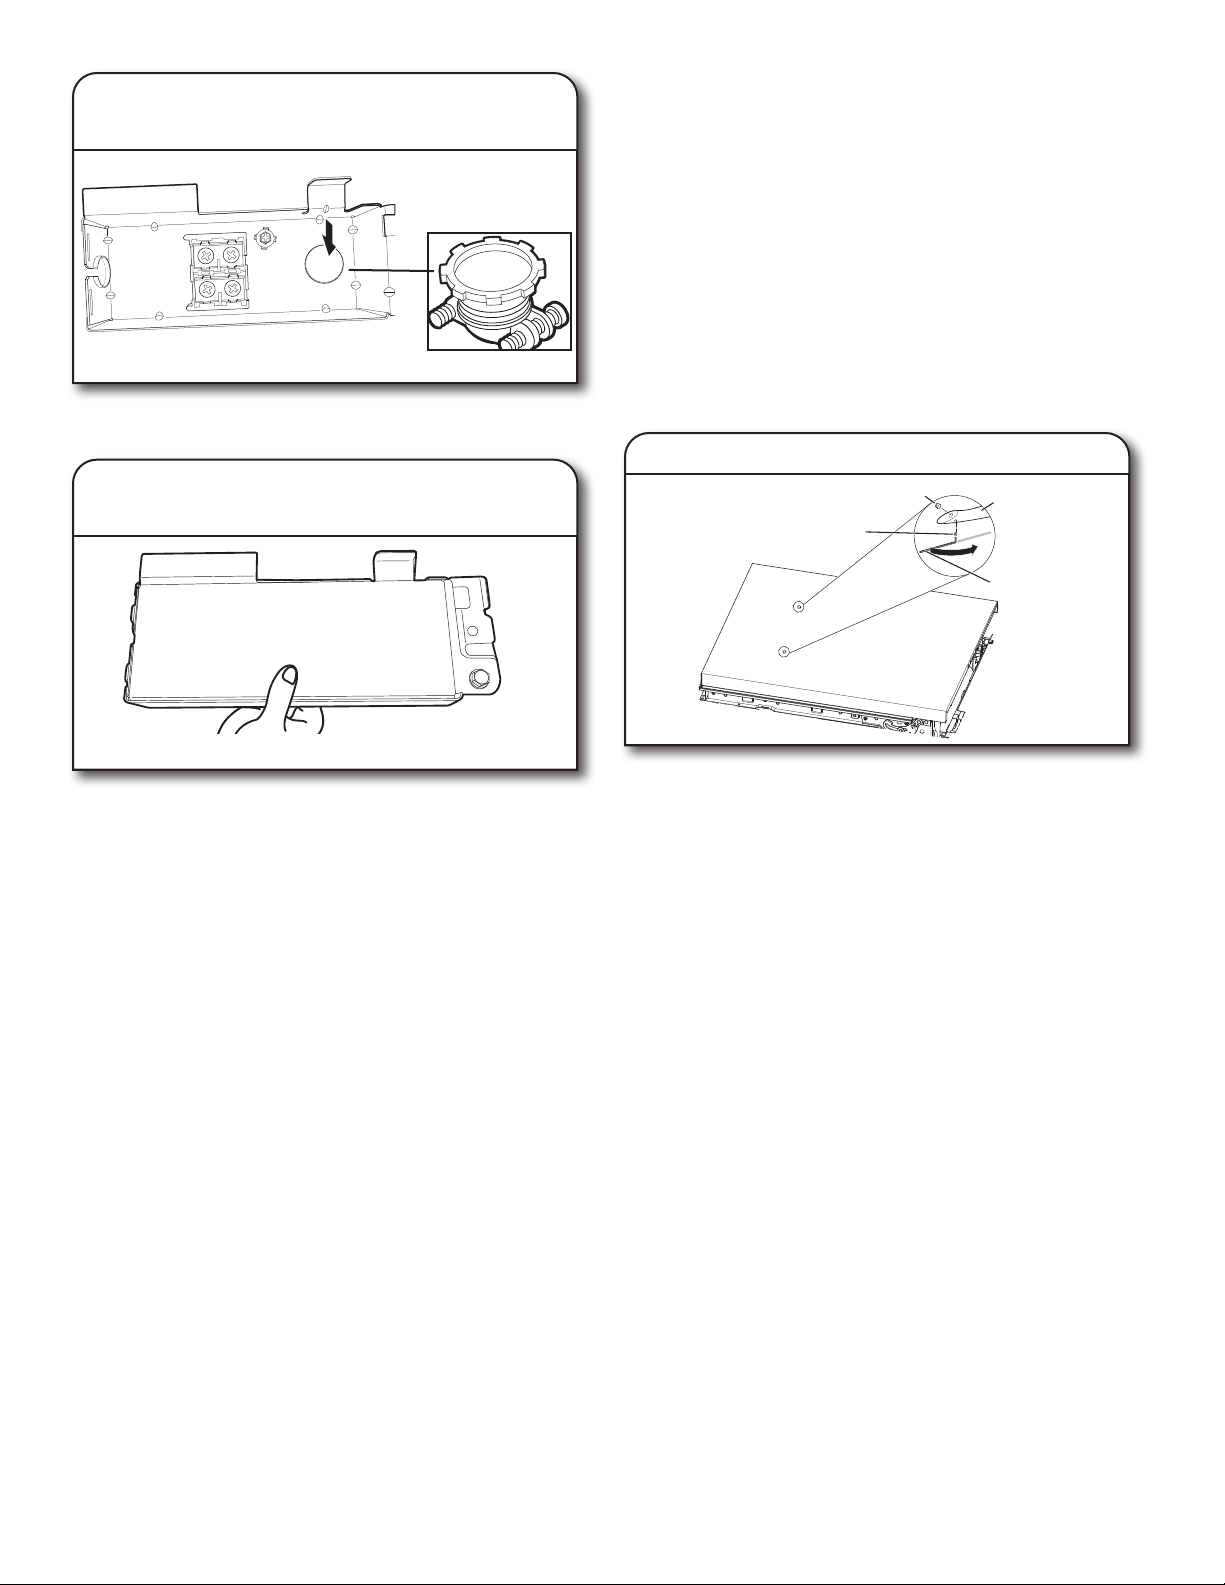
75
Apriete los tornillos del protector de cables para asegurar el cable.
24. Vuelva a instalar la cubierta de la caja
de terminales y los cables
Coloque los cables dentro de la caja de terminales. Sustituya
la cubierta insertando los enganches de la cubierta de la caja
de terminales en los orificios de la parte inferior de la caja de
terminales, y deslice la cubierta apretándola contra la pared inferior
donde se introducen los cables. Compruebe que los cables están
dentro de la caja y no aprisionados contra la cubierta.
Vuelva a colocar la caja de terminales en la barra transversal y
empuje hacia la derecha para que la caja de terminales encaje en
el componente lateral de plástico.
NOTAS:
■ No enchufe el cable a una toma hasta que se le indique.
■ Después de reinstalar la caja de terminales en la lavavajillas,
coloque el sobrante o la parte floja de los cables sobre los
componentes cercanos para mantenerlos alejados del piso.
■ Pase el cable por la parte posterior de la lavavajillas de forma que
no toque el motor o la parte inferior de la tina de la lavavajillas.
■ Se permite un máximo de 2 conductores de suministro
de cable de alimentación (tamaño máximo: 12AWG) y 1
conductor de conexión a tierra en la caja de terminales.
IMPORTANTE: No se debe realizar ninguna otra conexión eléctrica
dentro de la caja de terminales de la lavavajillas más que la conexión
eléctrica de esta.
INSTALE LA MANIJA DE LA PUERTA
(EN ALGUNOS MODELOS)
25. Instale la manija de la puerta
IMPORTANTE: No raye el panel frontal durante este
procedimiento. Si el panel frontal tiene una película protectora,
despéguela más allá del punto de los pernos de la manija antes
de instalarla. Es más fácil instalar la manija si la unidad está
apoyada sobre la parte posterior.
Retire la manija de la puerta y la llave hexagonal del embalaje.
Los tornillos de ajuste ya están instalados en la manija. Coloque
la manija sobre los pernos de montaje con los tornillos de ajuste
orientados hacia abajo. Presione con firmeza la manija contra
la puerta. Inserte el extremo corto de la llave hexagonal en los
tornillos de ajuste. Apriete los tornillos de ajuste 1/4 de giro
adicional tras apretarlos.
Conserve la llave hexagonal con las instrucciones de instalación.
23. Fije el cable en el protector de cables
Manija
Llave hexagonal
Tornillo de ajuste
(en la base de la
manija)
Perno de montaje
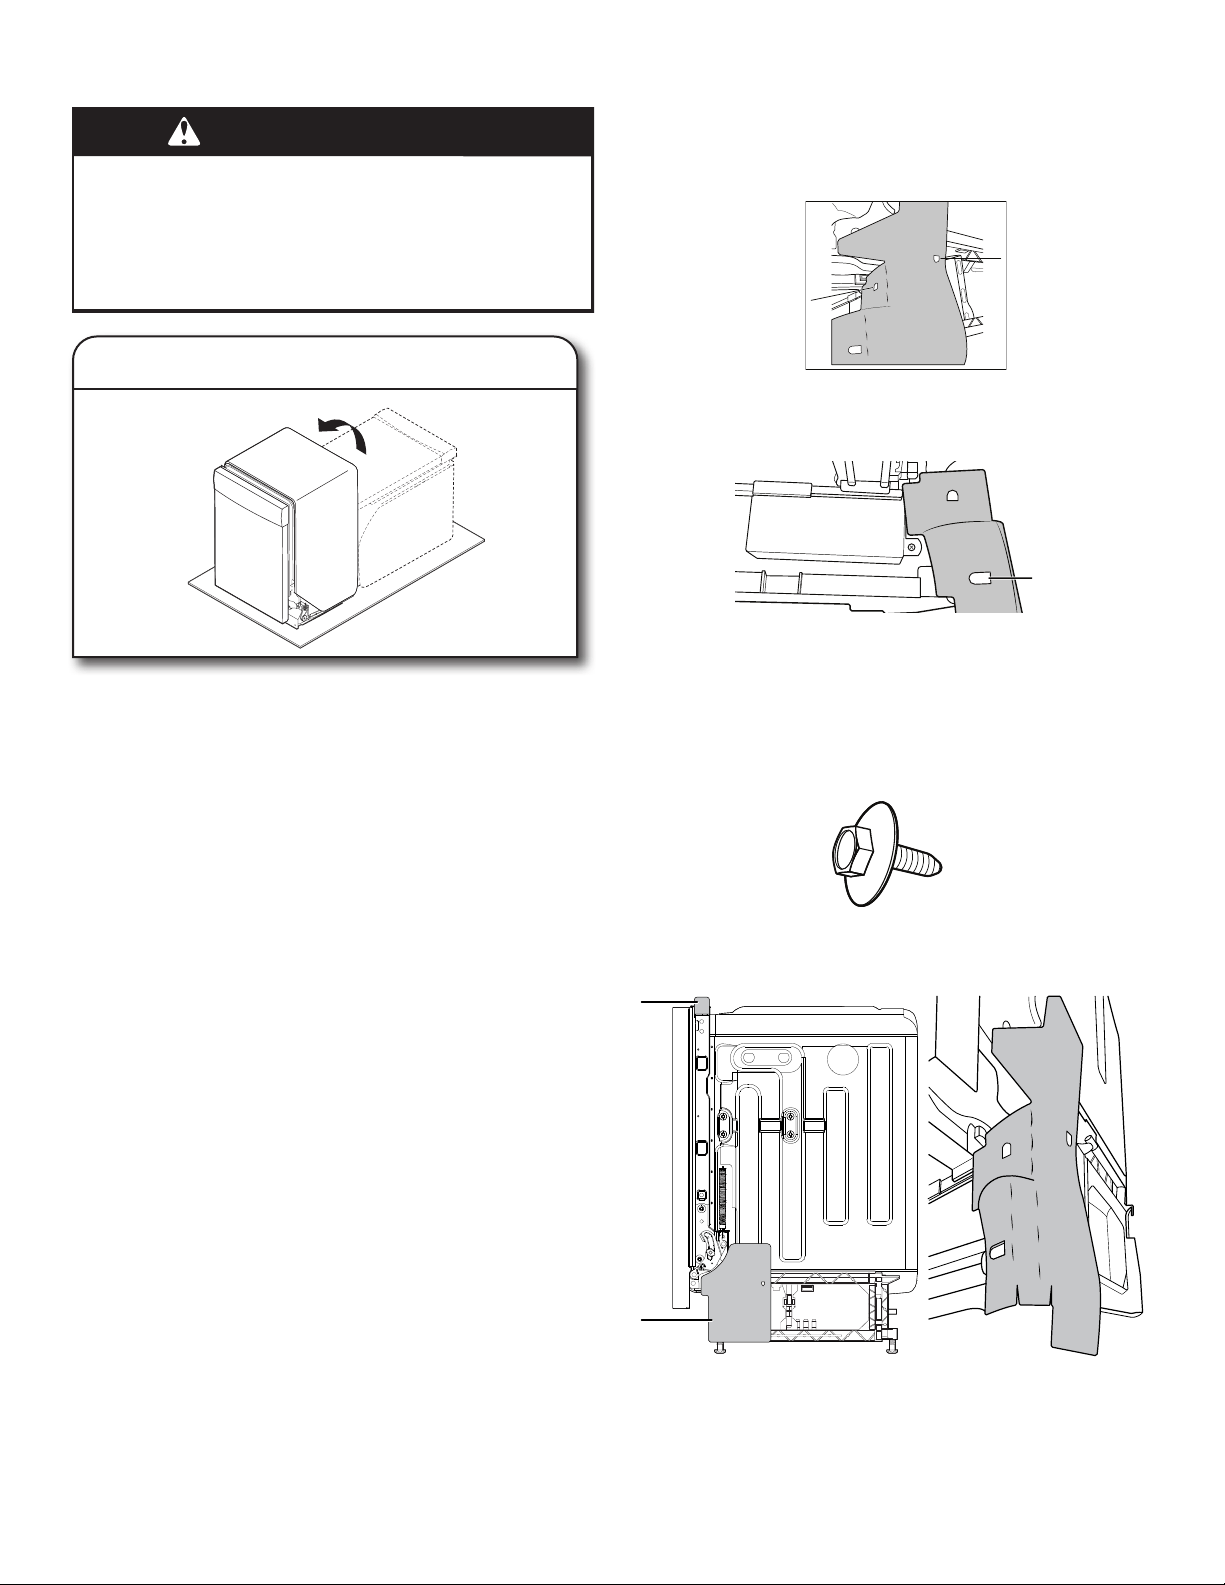
76
COLOQUE LA LAVAVAJILLAS EN EL GABINETE
ADVERTENCIA
Peligro de Peso Excesivo
Use dos o más personas para mover e instalar
la lavavajillas.
No seguir esta instrucción puede ocasionar una
lesión en la espalda u otro tipo de lesiones.
26. Ponga la lavavajillas de pie
Con la ayuda de dos o más personas, ponga la lavavajillas en
posición vertical.
NOTA: No instale la placa de protección hasta que se le indique.
La lavavajillas puede calzar estrechamente en la abertura del
gabinete. No quite la manta aislante, ya que la misma reduce el
nivel de sonido.
IMPORTANTE: No retuerza ni apriete la tubería de agua, la
manguera de desagüe, el cable de alimentación o el cable directo
entre la lavavajillas y el gabinete. Quite el cartón que está debajo
de la lavavajillas (si se usó).
Coloque los paneles laterales de espuma (en algunos
modelos)
Coloque los paneles laterales de espuma a ambos lados de la
lavavajillas. Hay tres puntos de sujeción en cada lado.
■ Sujeción 1: Ubique el corte en el panel lateral y sujételo al
gancho del lado de la lavavajillas. (Consulte la Figura 1)
■ Sujeción 2: Use el otro corte en el panel lateral y sujételo al
gancho en la parte delantera de la lavavajillas. (Consulte la
Figura 2)
■ Alinee el orificio rectangular en el panel lateral con el orificio
de tornillo en el panel de pie. Inserte el tornillo del panel de
pie (consulte la figura 3) y apriételo ligeramente para
mantenerlo en su lugar hasta que el panel de pie esté
instalado.
■ Coloque los extremos inferiores de los paneles laterales
debajo de la lavavajillas. (Consulte las figuras 4 y 5)
Figura: 1
Figura: 2
Figura: 3
Figura: 4 Figura: 5
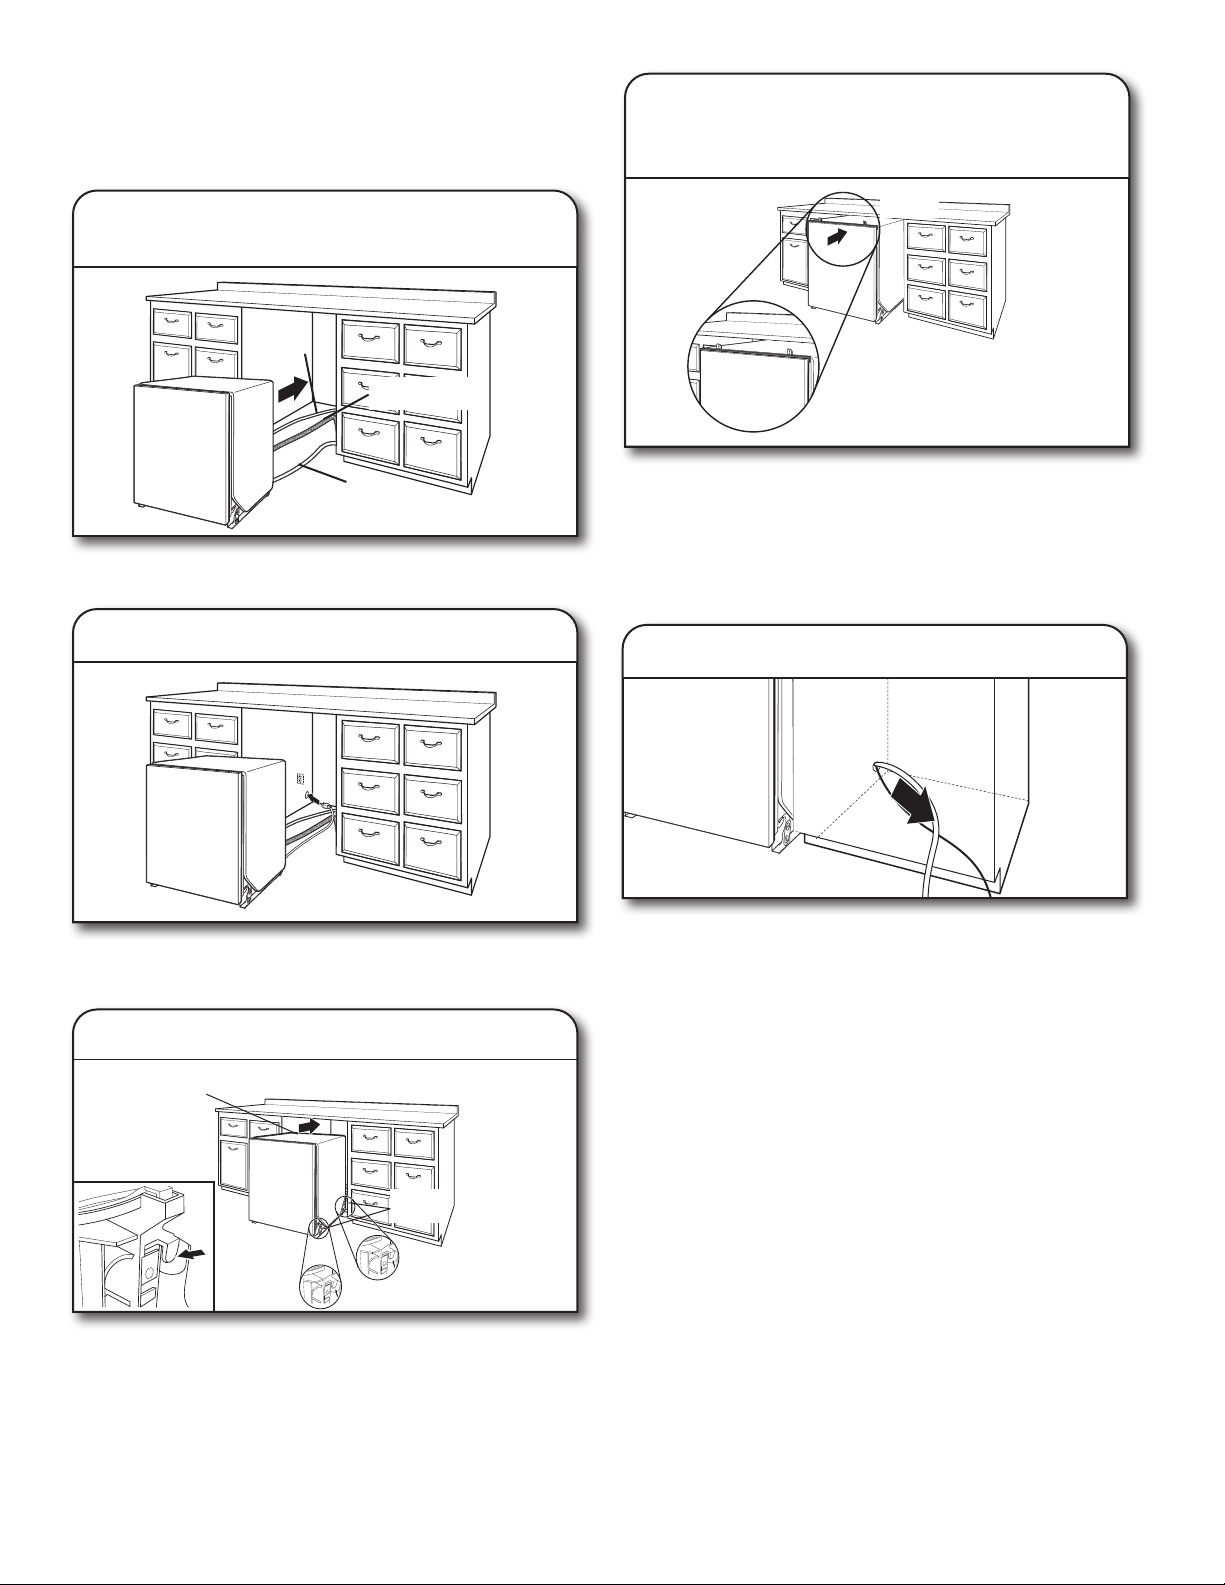
77
NOTA: Pase el suministro de agua, la manguera de desagüe y
el cable de alimentación por la parte trasera de la lavavajillas.
Si su producto tiene un aislante por la parte inferior, pase estas
líneas por los cortes que tiene el aislante en la parte trasera del
producto.
27. Mueva la lavavajillas cerca
de la abertura del gabinete
Pase los elementos a través de los orificios en el gabinete y tire
para tensarlos mientras se introduce la lavavajillas en el gabinete.
28. Pase el cable de alimentación
Si se utiliza un cable de alimentación, asegúrese de pasar el
extremo por el orificio en la parte recortada antes de deslizar la
lavavajillas en la abertura del gabinete.
29. Fije la manta aislante
NOTA: Compruebe que la manta aislante está fijada a las
esquinas izquierda y derecha trasera antes de empujar a la
abertura del gabinete para evitar que la manta se pliegue en un
gabinete estrecho. La manta se puede fijar tirando el aislante
hacia abajo en dirección a la parte inferior del producto y
asegurando que los ganchos en los componentes laterales se
enganchen en las ranuras que están en la manta aislante.
6"
(15.2 cm)
30. Introduzca la lavavajillas en la
abertura del gabinete dejando que
sobresalgan 6" (15,2cm)
■ Coloque el aislante de sonido de espuma para la parte superior
(en algunos modelos)
• Ajuste la espuma para la parte superior en la ranura del
cuello superior de la lavavajillas como se muestra en la
figura.
NOTA: Deje que la unidad sobresalga unas 6" (15,2cm) del
gabinete para instalar los soportes de anclaje.
NOTA: Tire de los elementos de suministro para tensarlos
mientras se introduce la lavavajillas en la abertura del gabinete
para evitar dobleces.
INSTALACIÓN DEL PANEL A LA MEDIDA
(EN MODELOS CON PANELES A LA MEDIDA
SOLAMENTE)
Para la instalación del panel a la medida, consulte la hoja de
Instalación del panel a la medida incluida con el material de
lectura. Complete la instalación del panel a la medida antes
de pasar a la sección “Selección del método de sujeción de
anclaje”.
SELECCIÓN DEL MÉTODO DE SUJECIÓN DE
ANCLAJE
IMPORTANTE: Fijar la lavavajillas al gabinete debe ser uno
de los últimos pasos. Prepare la lavavajillas para este proceso
fijando a la lavavajillas los 2 soportes que se encuentran en la
bolsa de piezas.
– Para los mostradores de madera, laminados o de otra
superficie similar, realice una Sujeción al mostrador:
vaya al paso 32.
– Para los mostradores de mármol, granito u otra superficie dura,
realice una Sujeción lateral: vaya al paso 33.
NOTA: Si el espacio entre la parte superior de la puerta y la parte
inferior del mostrador es estrecho (inferior a 1/4" [6,35 mm]), se
recomienda realizar la Sujeción lateral para no rayar la interfaz del
usuario o consola con los tornillos de anclaje.
Fije la
manta
Manta
aislante
31. Tire del cableado flojo de los servicios
Tubería
de agua
Manguera
de desagüe
Cable
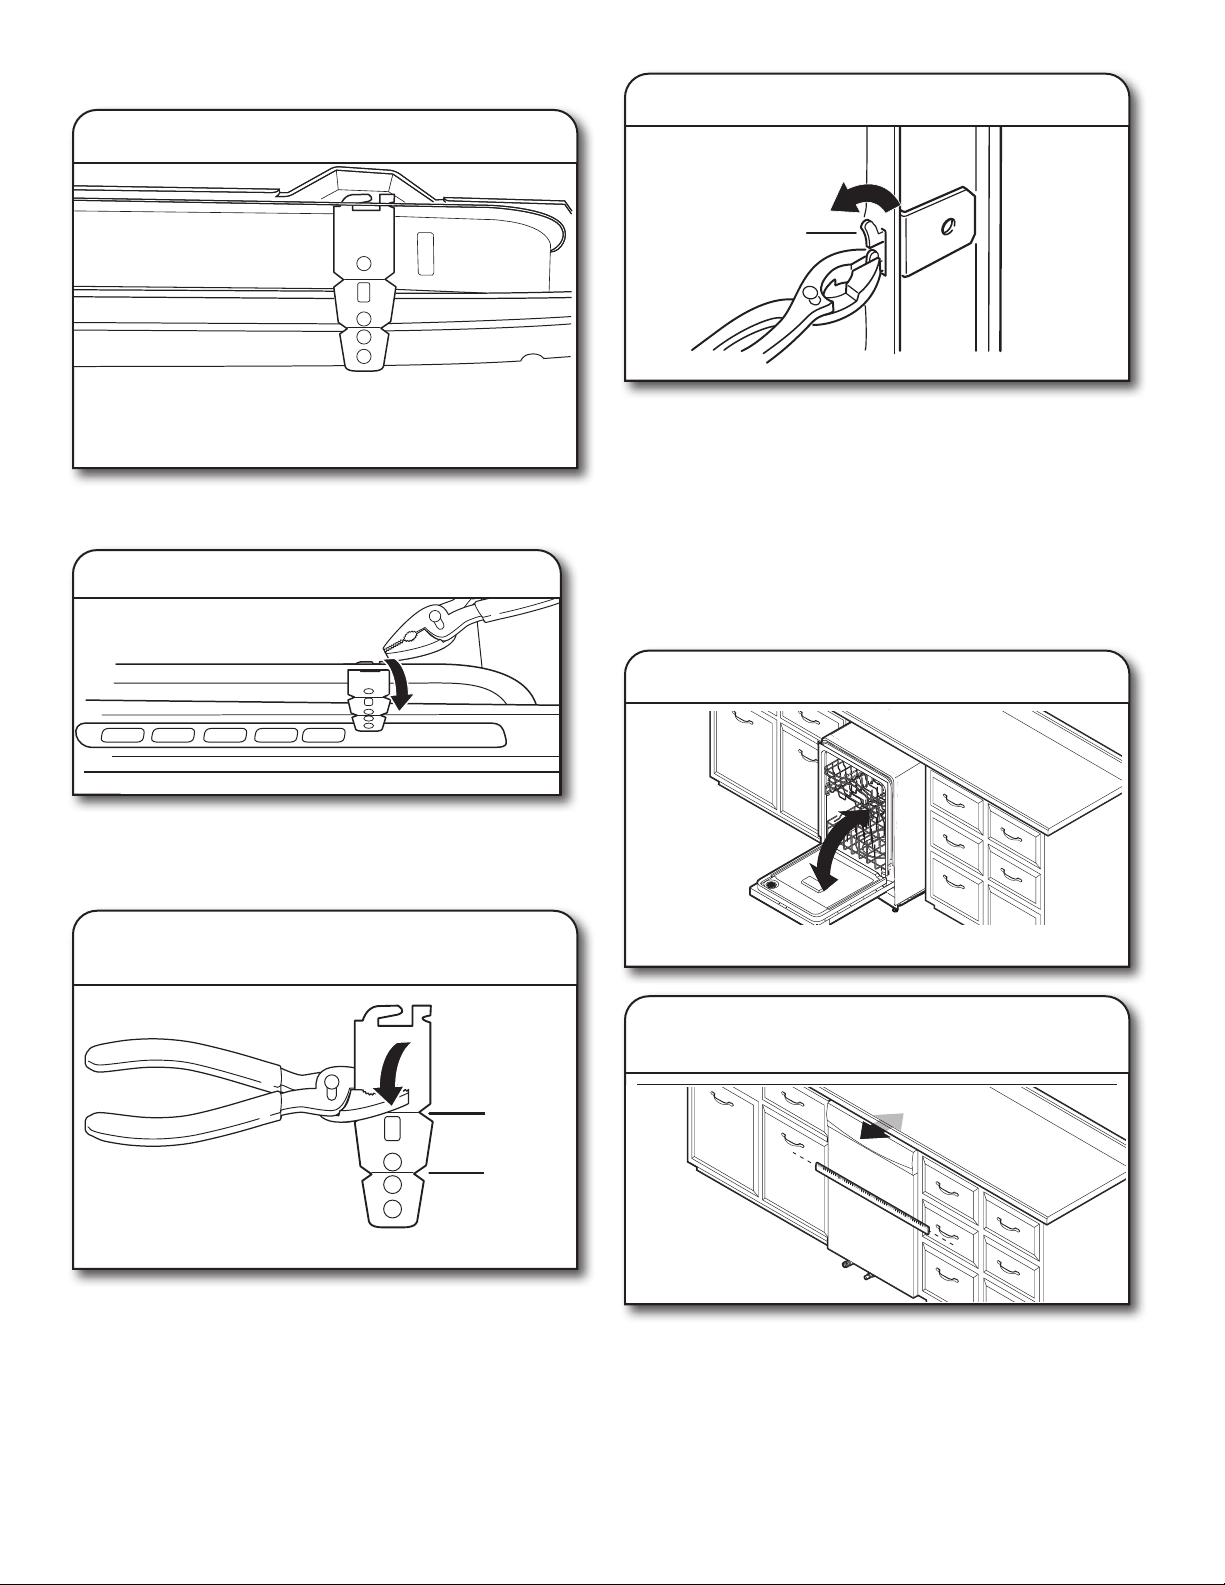
78
Sujeción al mostrador:
Retire los soportes del paquete e insértelos en las ranuras
abiertas de la parte superior izquierda y derecha del collar de la
lavavajillas como se muestra.
Sujeción al mostrador
Utilice alicates para doblar/torcer la lengüeta y bloquear los
soportes en su posición.
Sujeción lateral:
Use pinzas para romper el extremo del soporte a lo largo de la
línea marcada. Use lijas para alisar todas las rebabas.
34. Instale el soporte para la sujeción lateral
Empuje el soporte en la ranura del lado de la lavavajillas y doble
la lengüeta hacia dentro y hacia el lado de la lavavajillas para
mantener el soporte en su lugar. Repita este paso para el otro
lado de la lavavajillas.
NOTA: Instale suplementos de madera en el interior del gabinete
si el espacio entre los lados del gabinete y de la lavavajillas es
superior a 1/2" (1,3cm) en cada lado.
NOTA: No fije la lavavajillas. Esto se hará luego.
VERIFICACIÓN FINAL DE LA INSTALACIÓN
35. Abra y cierre la puerta
36. Alinee el frente de la lavavajillas con
el frente de las puertas del gabinete
Alinee la parte frontal del panel de la puerta de la lavavajillas
con la parte frontal de las puertas del gabinete. Tal vez necesite
ajustar el alineamiento para que quede pareja con los gabinetes.
32. Inserte el soporte
Las lengüetas
deben mirar
hacia la derecha.
32a.
33. Rompa el extremo del soporte
para la sujeción lateral
Doble las
lengüetas
Línea de
marcado
superior
para
modelos
con tina
de acero
inoxidable
Línea de
marcado
inferior
para tinas
de plástico
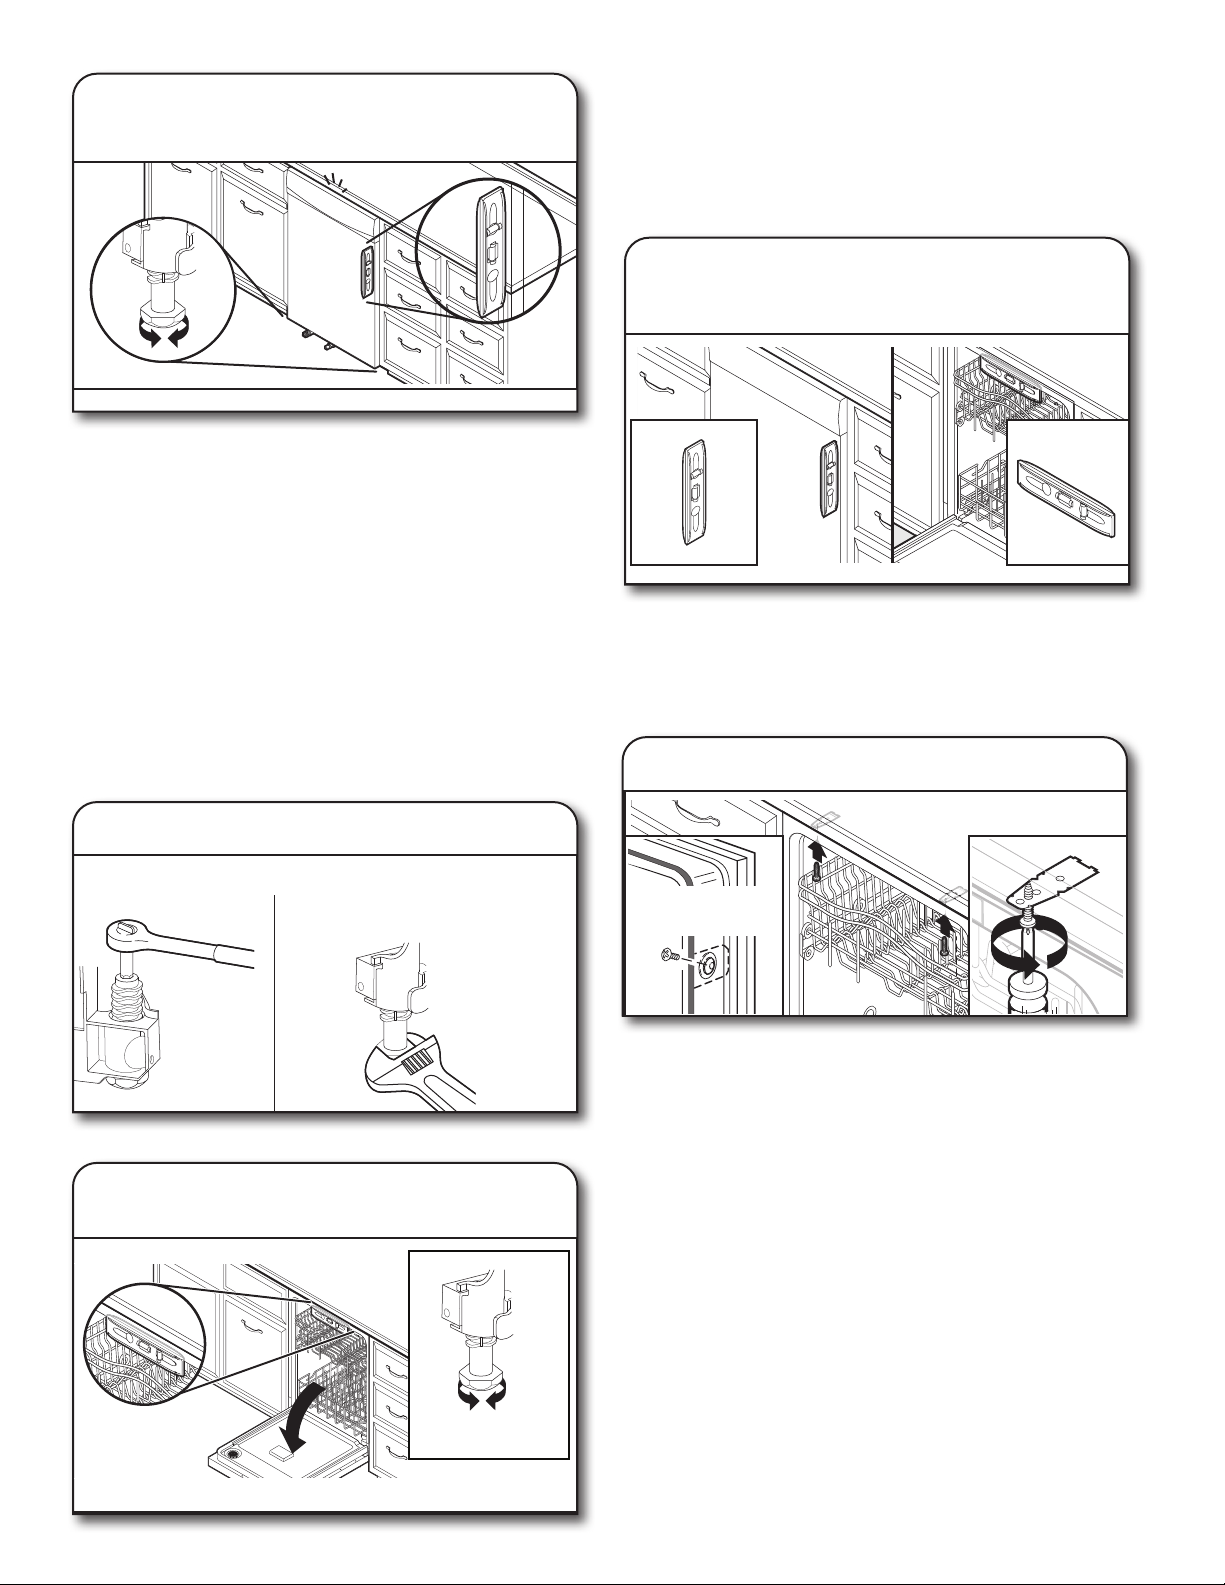
79
37. Compruebe la verticalidad y ajuste
las patas si es necesario
■ Revise que las patas niveladoras estén firmes contra el piso.
Cierre y trabe la puerta y coloque el nivel contra el panel
frontal. Verifique que la lavavajillas esté centrada de frente
hacia atrás en la abertura. Si es necesario, ajuste la pata
niveladora hasta que la lavavajillas esté completamente
vertical. Repita el procedimiento para el otro lado de la
lavavajillas.
■ Una vez que la lavavajillas esté a plomo, revise que las
canastas no salgan rodando solas cuando abra la puerta.
Ajuste las patas niveladoras frontales hasta que las canastas
no rueden a menos que usted tire de ellas.
Consejo útil: Levante la parte frontal de la lavavajillas para
separarla del piso y ajustar las patas frontales. En algunas
instalaciones, puede ser más sencillo ajustar la pata delantera
con una llave de cubo hexagonal de 7 mm o con una llave
ajustable. Si el espacio entre la parte superior de la puerta y la
parte inferior del mostrador es estrecho (inferior a 1/4" [6 mm]),
se recomienda realizar la sujeción lateral para no rayar la interfaz
del usuario o consola.
Nivele las patas frontales
38. Verifique la nivelación de lado a lado
y regule las patas si es necesario
Coloque el nivel contra la abertura superior frontal de la tina.
Revise que la lavavajillas esté nivelada de lado a lado. Si la
lavavajillas no está nivelada, suba o baje las patas frontales hasta
que la lavavajillas esté nivelada.
ASEGURE LA LAVAVAJILLAS EN LA
ABERTURA DEL GABINETE
39. Compruebe otra vez el alineamiento
de la lavavajillas con la abertura del
gabinete
Compruebe que la lavavajillas siga nivelada de frente hacia atrás
y de lado a lado en la abertura del gabinete.
Abra la puerta de la lavavajillas y coloque una toalla sobre el
ensamblaje de la bomba y el brazo pulverizador de la lavavajillas.
Esto evitará que los tornillos se caigan en el área de la bomba
cuando fije la lavavajillas al gabinete.
Abra la puerta de la lavavajillas como preparativo para fijar la
lavavajillas al mostrador o al lado del gabinete.
NOTAS:
■ la lavavajillas se debe fijar para que no se mueva al abrir o
cerrar la puerta.
■ No deje que los tornillos caigan al fondo de la lavavajillas.
■ Localice los soportes instalados en la sección “Selección de
método de fijación de anclaje”, bien en la parte superior o los
lados de la lavavajillas.
■ Para el anclaje al mostrador: fije la lavavajillas al mostrador
con dos tornillos Phillips (proporcionados).
■ Para el anclaje lateral: taladre orificios de guía de 7/32" en
el gabinete para no agrietar la madera. Fije la lavavajillas al
gabinete con dos tornillos Phillips (proporcionados). Retire la
canasta del segundo nivel para facilitar el acceso. Consulte
la sección “Consejos para cargar la lavavajillas” para ver
instrucciones sobre cómo retirar la canasta del segundo nivel
si es necesario.
Screw to side
cabinet
40. Fije la lavavajillas
Método optativoMétodo preferido
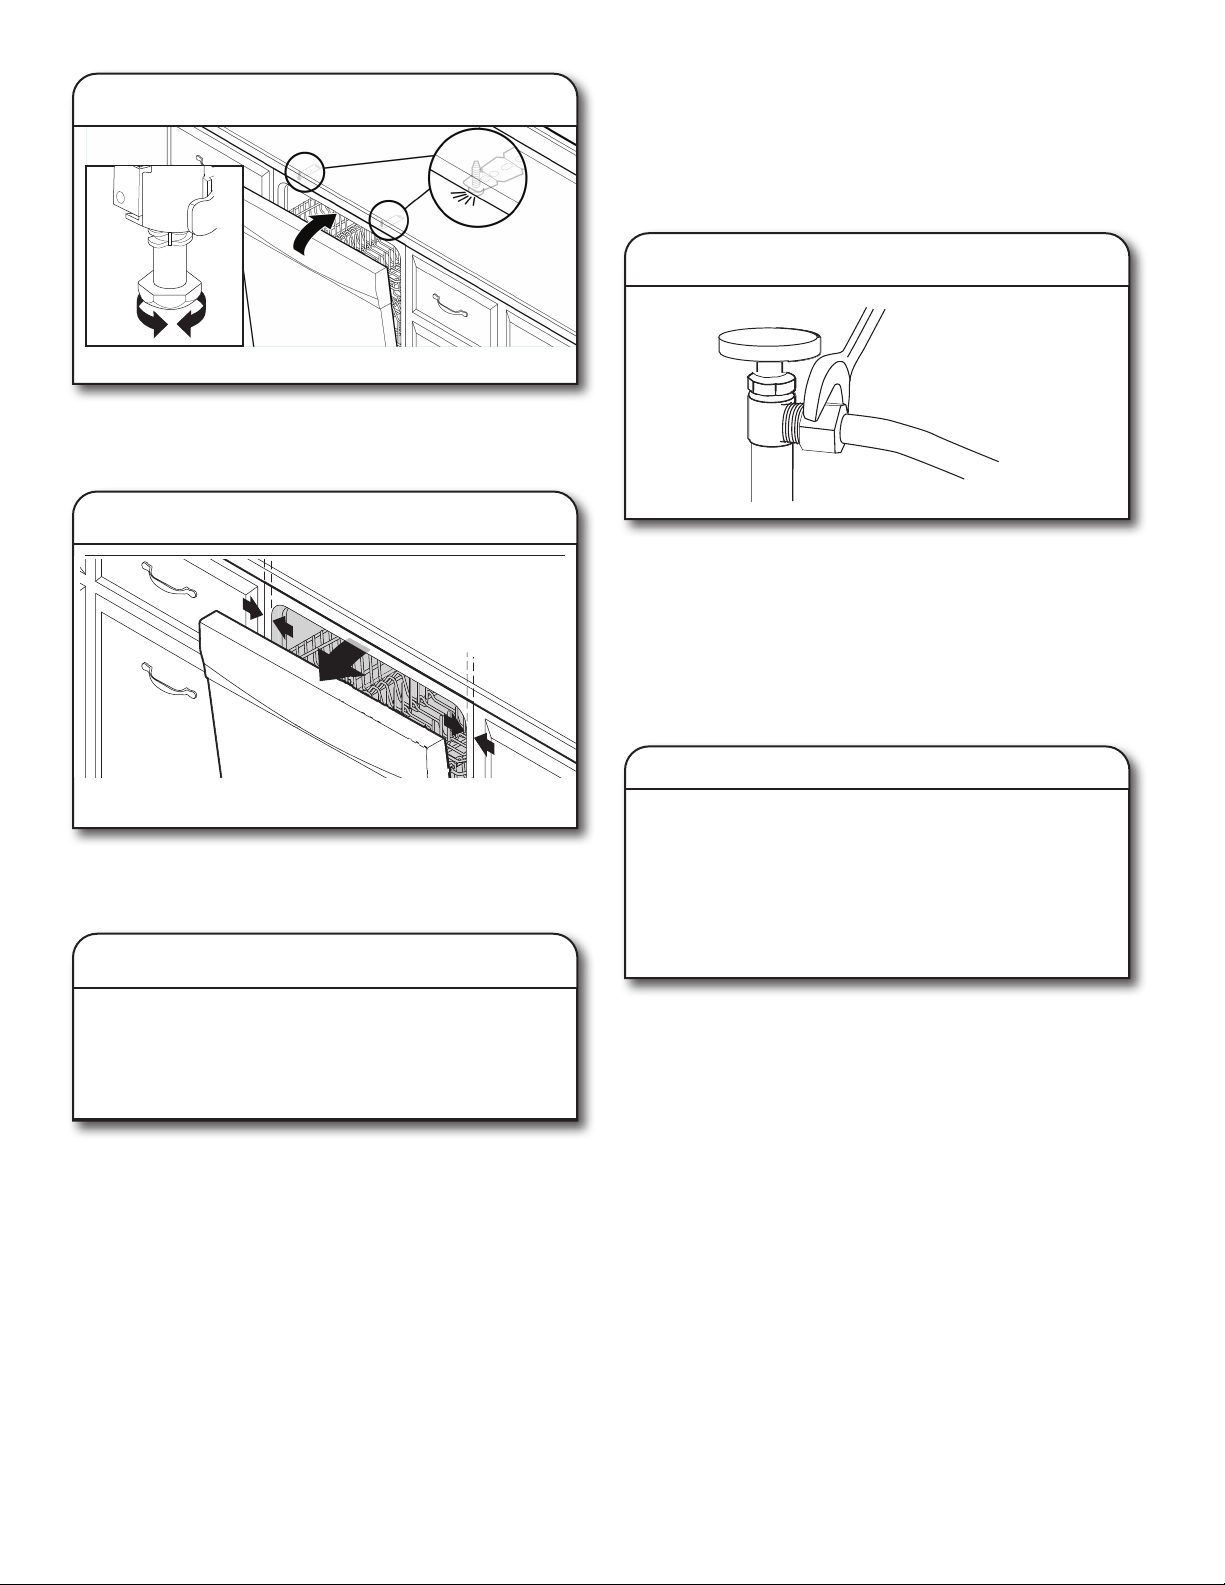
80
41. Compruebe el espacio de la puerta
IMPORTANTE: Revise que la parte superior de la puerta no
haga contacto con los tornillos, los soportes o el mostrador. En
caso contrario, ajuste las patas niveladoras o utilice la opción de
sujeción lateral.
42. Compruebe el espacio interior
Abra la puerta y compruebe que el espacio entre la abertura del
gabinete de la lavavajillas y la tina sea igual en ambos lados. Si los
espacios no son iguales, afloje los tornillos del soporte y mueva la
tina. Ajuste los tornillos del soporte.
43. Conexión por cable directo
CONEXIÓN DE TUBERÍA DE AGUA A
MANGUERA DE VÁLVULA DE CIERRE DEL
HOGAR
NOTA: Si se utiliza una manguera trenzada flexible, sustituya la
manguera de entrada después de 5 años para reducir el riesgo
de fallas. Para consulta en el futuro, anote en la manguera la
fecha de instalación o la fecha de reposición.
44. Fije la tubería de suministro de agua
Fije la tubería de suministro de agua (tubería de cobre o tubería
trenzada flexible de suministro de agua) a la tubería de suministro
de agua caliente mediante una conexión que cumpla con
los códigos y ordenanzas locales. El suministro de agua a la
lavavajillas deberá tener una válvula de cierre manual ubicada
debajo del lavadero. Abra la válvula de agua después de fijar la
tubería de suministro de agua.
CONECTE LA MANGUERA DE DESAGÜE
45. Conecte la manguera de desagüe
IMPORTANTE: la conexión de la manguera de desagüe del
colector de residuos o del tubo de residuos en “T” se debe realizar
antes de la purga de aire y como mínimo a 20" (50,8cm) por
encima del piso donde se instalará la lavavajillas.
Consejo útil: Para reducir la vibración de la manguera,
manténgala lejos del piso.
NOTA: Use la abrazadera roja proporcionada para conectar
la manguera de desagüe a la conexión del cliente: plomería o
triturador de basura.
Conecte la manguera de desagüe al tubo de residuos en
“T” o al colector de residuos mediante una de las siguientes
opciones:
■ Opción A: Colector de residuos - sin purga de aire
■ Opción B: Sin colector de residuos - sin purga de aire
■ Opción C: Colector de residuos - con purga de aire
■ Opción D: Sin colector de residuos - con purga de aire
Para completar la conexión de cable directo. Complete los
pasos 18 a 24 que aparecen en esta guía de instalación.
Una vez completados, vuelva al paso 44 para completar la
instalación del producto.
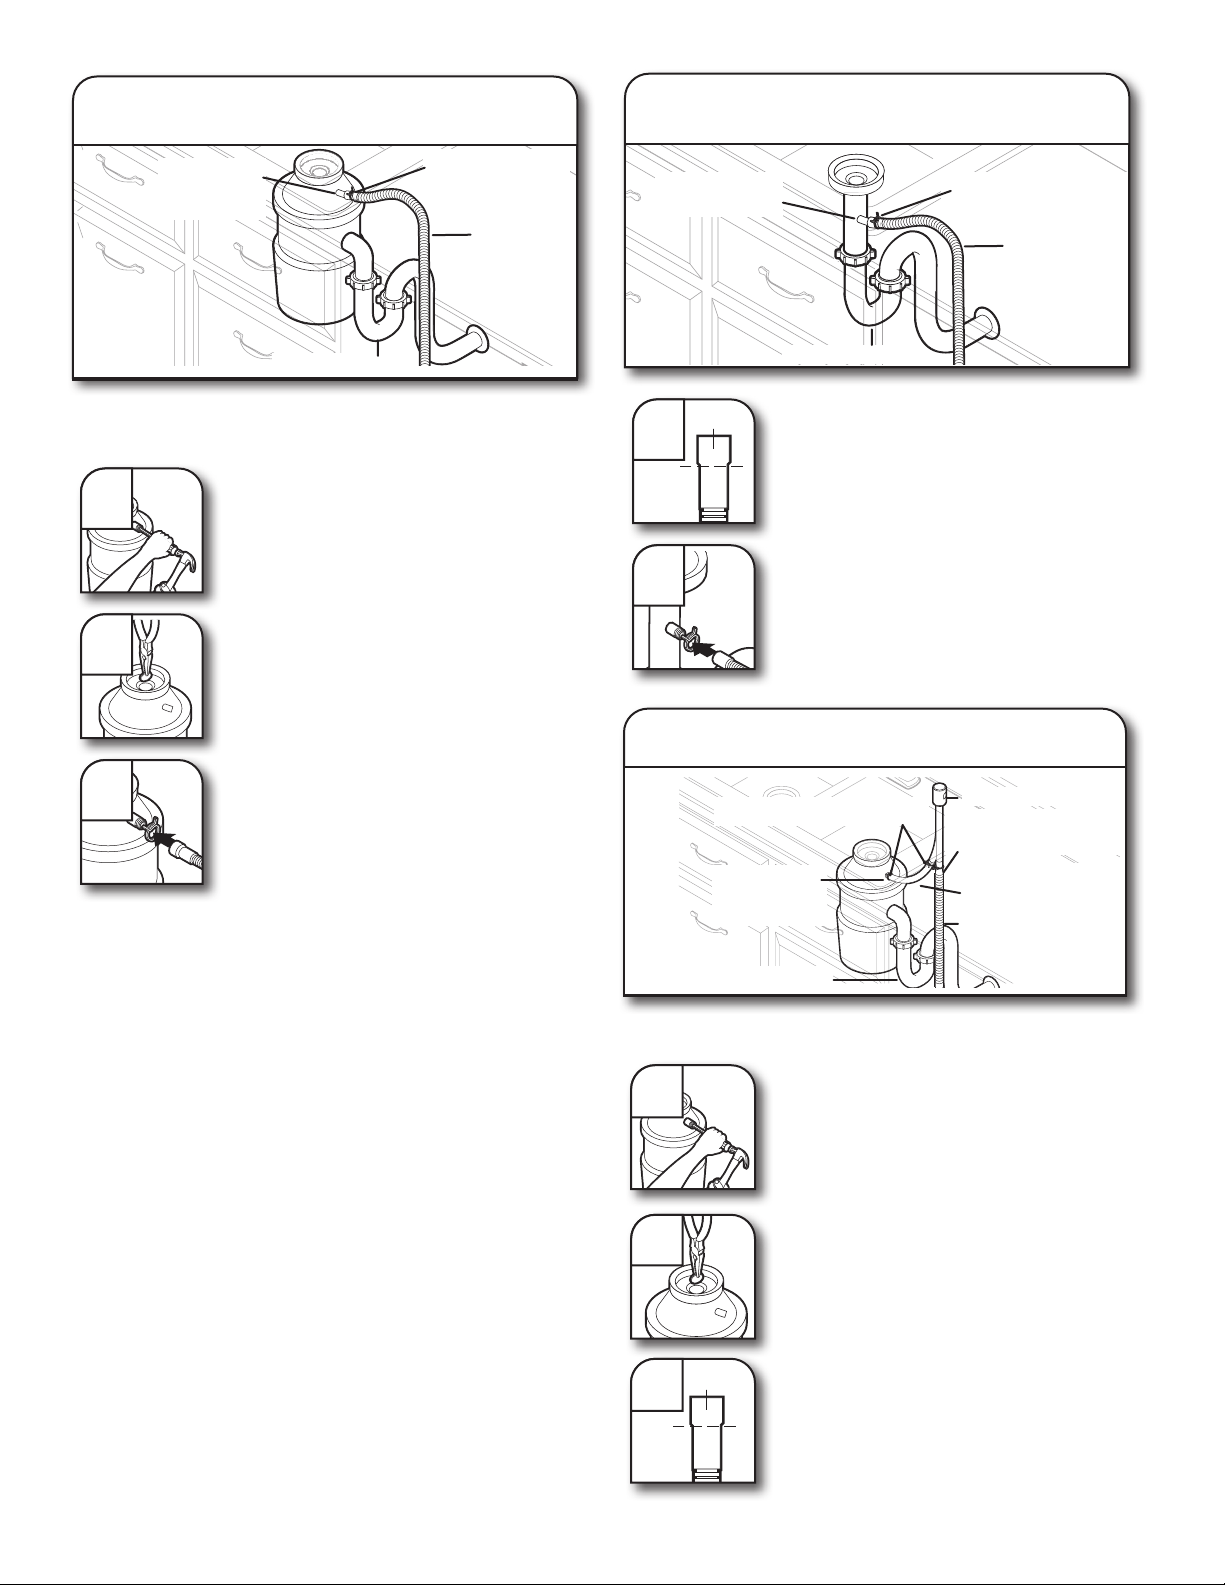
81
Opción A: Colector de residuos - sin
purga de aire
Entrada del
colector de
residuos
Abrazadera grande
de manguera de
desagüe
Manguera
de desagüe
Sifón de desagüe
Consejo útil: Retire el tapón de abertura del colector de
residuos.
1
1. Golpee el tapón del colector de residuos
con un martillo y un destornillador.
2
2. Utilice alicates de punta fina para quitar
el tapón.
3
3. Fije la manguera de desagüe a la
entrada del colector de residuos con una
abrazadera grande para manguera de
desagüe (proporcionada). Utilice pinzas
para abrir la abrazadera y moverla hacia
su posición.
Opción B: Sin colector de residuos -
sin purga de aire
Tubo de
residuos en “T”
Abrazadera grande de
manguera de desagüe
Manguera
de desagüe
Sifón de desagüe
1
Extremo
de
goma
1. Conecte el extremo de goma de la
manguera de desagüe al tubo de
residuos en “T”.
2
2. Fije el extremo de goma de la manguera
de desagüe al tubo de residuos en “T” con
una abrazadera grande para manguera de
desagüe (proporcionada). Utilice pinzas
para abrir la abrazadera y moverla hacia
su posición.
Consejo útil: Retire el tapón de abertura del colector de residuos.
1. Golpee el tapón del colector de residuos
con un martillo y un destornillador.
2. Utilice alicates de punta fina para quitar
el tapón.
3. Conecte el extremo de goma de la
manguera de desagüe a la purga de aire.
Opción C: Colector de residuos - con
purga de aire
Abrazadera grande de
manguera de desagüe
Manguera de
desagüe
Abrazaderas de tipo tornillo
Purga de aire
Conector de
manguera de goma
Sifón de desagüe
Entrada del
colector de
residuos
1
2
3
Extremo
de
goma

82
4
4. Fije la manguera de desagüe a la purga
de aire con la abrazadera grande para
manguera de desagüe (proporcionada).
Utilice pinzas para abrir la abrazadera y
moverla hacia su posición.
5
5. Use una manguera de goma (no
provista) con las abrazaderas tipo
tornillo para conectarlas desde la purga
de aire hasta la entrada del colector de
residuos.
1. Conecte el extremo de goma de la
manguera de desagüe a la purga de aire.
2. Fije la manguera de desagüe a la purga
de aire con la abrazadera grande para
manguera de desagüe (proporcionada).
Utilice pinzas para abrir la abrazadera y
moverla hacia su posición.
3. Utilice una manguera de goma
(no proporcionada) con las abrazaderas
de tipo tornillo (no proporcionadas) para
conectarlas desde el tubo de residuos en
“T” hasta la purga de aire.
Opción D: Sin colector de residuos -
con purga de aire
Abrazadera grande
de manguera de
desagüe
Manguera de
desagüe
Abrazaderas de tipo tornillo
Purga de aire
Conector de
manguera de goma
Sifón de desagüe
Tubo de residuos
en “T”
1
Extre-
mo de
goma
2
3
COMPLETE LA INSTALACIÓN
Compruebe que el cable de suministro eléctrico no entra en contacto
con el motor o con la parte inferior de la tina de la lavavajillas.
Vuelva a conectar el interruptor flotante alineando el conector
que se retiró en el paso 10 con la carcasa del conector y
empujándolo hasta que la lengüeta de traba se pueda ver sobre
la parte trasera del conector.
NOTA: Antes de volver a colocar la bandeja de goteo, asegúrese
de que no haya agua en la bandeja.
Para volver a colocar la bandeja de goteo, alinee los broches en los
componentes laterales y presione hacia la unidad. Es importante que
las mangueras negras estén arriba de la bandeja de goteo en ambos
extremos una vez que esta se haya insertado del todo.
46. Vuelva a conectar el interruptor
flotante
47. Vuelva a colocar la bandeja de goteo
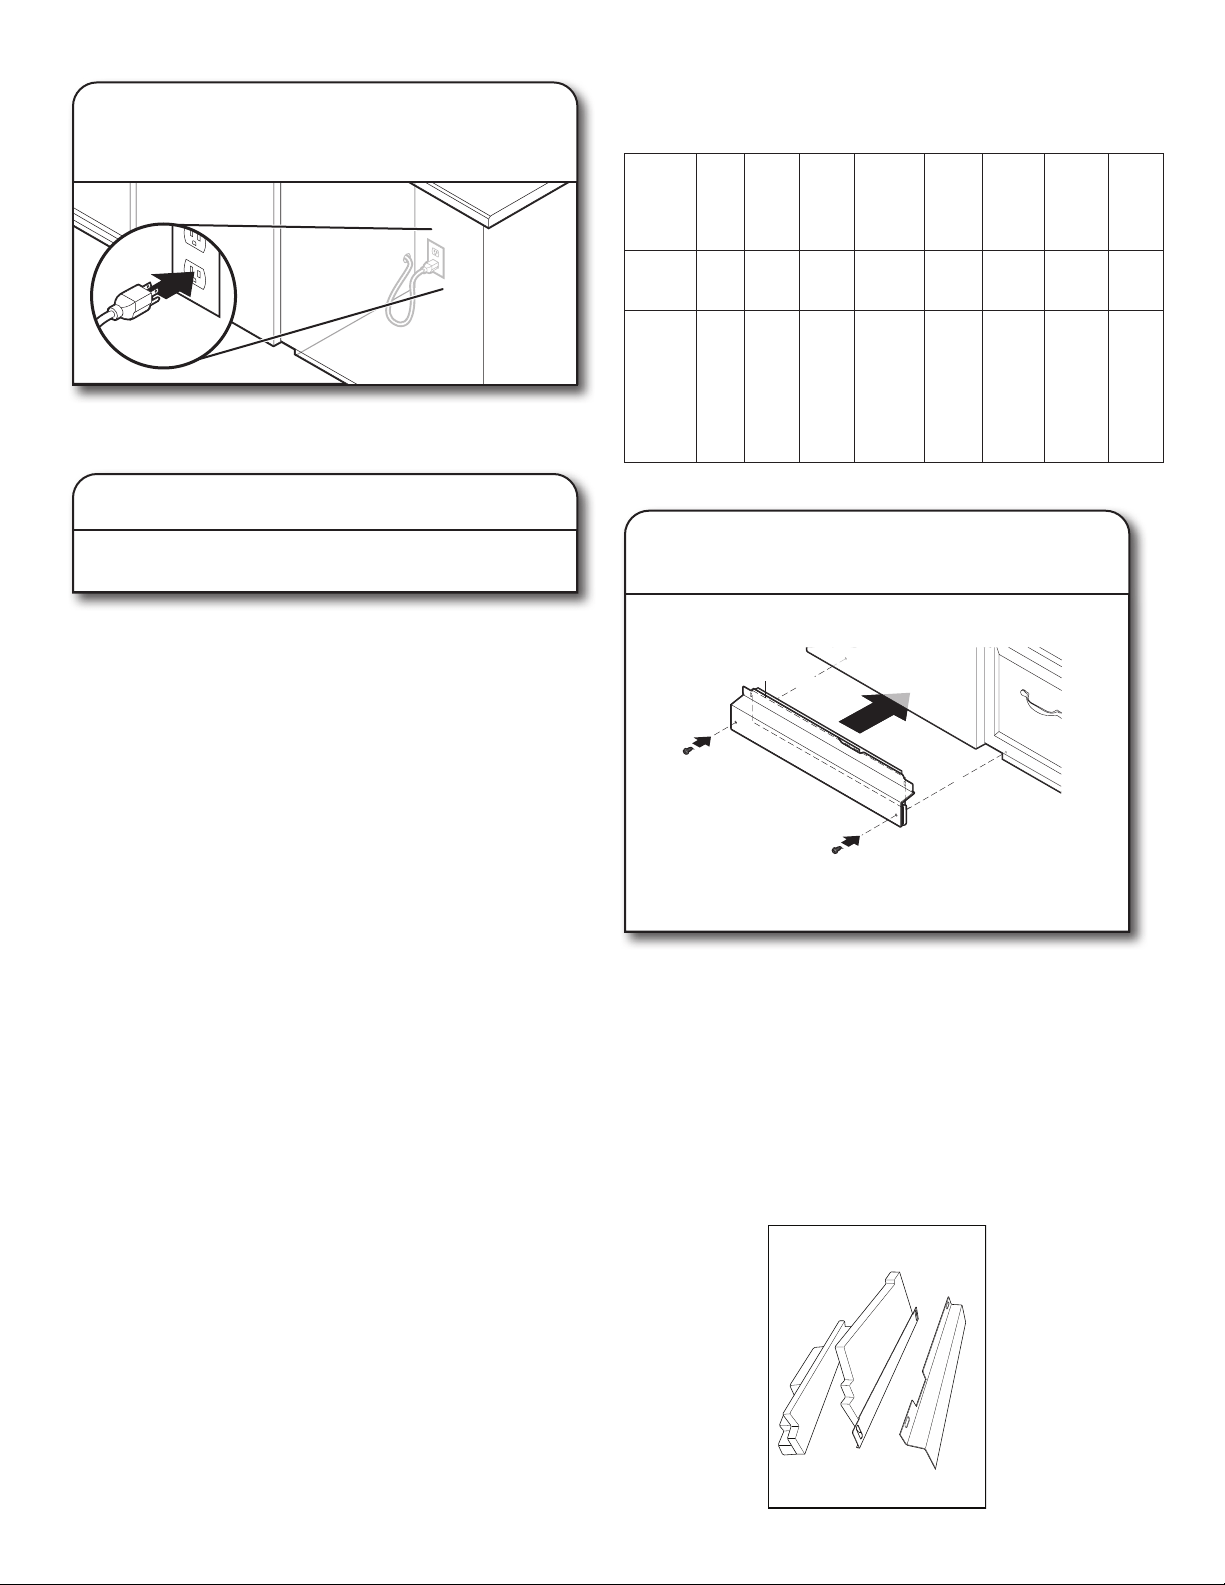
83
48. Cable de suministro eléctrico:
enchúfelo en un tomacorriente de 3
terminales con conexión a tierra.
Conecte el producto a un tomacorriente de 3 terminales con
conexión a tierra.
49. Reconecte el suministro eléctrico
Reconecte el suministro de energía en la caja de fusibles o
la caja de cortacircuitos.
NOTA: Con el panel de acceso retirado, ponga la lavavajillas
en marcha y deje que complete el ciclo de instalación más
corto. Verifique que no haya fugas en la unidad. Consulte las
instrucciones de este manual bajo la sección “Verifique el
funcionamiento”.
VERIFIQUE EL FUNCIONAMIENTO
■ Consulte la Guía de inicio rápido de la lavavajillas
proporcionada con la lavavajillas.
■ Compruebe que se hayan instalado todas las piezas y que no
se haya omitido ningún paso. Verifique que tenga todas las
herramientas utilizadas.
■ Haga funcionar el ciclo de instalación como se indica a
continuación (tenga en cuenta que puede ser mejor hacerlo
funcionar sin el panel de acceso colocado para poder ver si
aparece agua debajo de la unidad. Si se lo hace funcionar
de esta manera, el cable del interruptor flotante DEBE seguir
conectado al interruptor flotante).
■ Si la lavavajillas no funciona de forma adecuada, desconecte el
suministro de energía o desenchufe la lavavajillas y consulte la
sección “Funcionamiento inadecuado de la lavavajillas”.
■ Presione 3 teclas cualquiera (excepto Delay (Retraso) o Cancel
(Cancelar)) en una secuencia de 1-2-3-1-2-3-1-2-3 con no más
de 1 segundo de diferencia entre cada toque de tecla para
ingresar al ciclo de instalación. Luego, presione el botón #2.
■ Cierre la puerta y el ciclo iniciará.
■ Todas las luces LED se encienden inmediatamente al recibir la
secuencia de ingreso.
■ Puede que suene un tono, dependiendo del modelo.
■ El ciclo se pausará cuando la puerta se abra y se reanudará
cuando se cierre.
■ No hace falta tocar las teclas Start/Resume (Inicio/Reanudar)
para reanudar.
■ El ciclo de instalación puede demorar varios minutos.
■ Presione la tecla Cancel (Cancelar) para salir del modo de
instalación. El producto saldrá de este modo luego de 10
minutos o si se desconecta el suministro de electricidad del
electrodoméstico.
■ Si aparece algún mensaje de error o hay luces que
parpadean,consulte la sección Códigos de error de este
manual antes de solicitar servicio técnico.
NOTA: Es normal que la bomba de desagüe haga un sonido
fuerte la primera vez que trabaja, ya que no hay agua en el
sistema.
Pantalla
numérica
Todos
los
LED
encen-
didos 1 2 3 4
5
(algunos
modelos) 6 7
Intervalo
de tiempo
aproximado 0:01
0:30
(máximo
5:00) 2:00 0:20 0:20 0:20 0:30
1:00
(máximo
5:00)
Acción de
la máquina
Pausa
Desagüe
inicial
Llene
con 3,8 l
+ pulsos
del
motor de
lavado
Lavado +
dispensador
(brazo de
pulsos
rociador
medio)
Lavado +
ventilador
(brazo
rociador
del
techo)
Lavado +
canasta
del tercer
nivel.
Si está
incluida
en este
modelo
Lavado +
calentador
(brazo
rociador
inferior)
Proceso
de
desagüe
INSTALE LOS PANELES DE ACCESO
Aislamiento
(en algunos modelos)
50. Vuelva a instalar los paneles de
acceso y los elementos de sujeción
Coloque el panel de pie detrás del panel de acceso contra
la pata de la lavavajillas. Si el aislante está incluido en este
modelo, asegúrese de que este no interfiera con el ensamblaje
del flotante. Mueva el panel de acceso hacia arriba hacia la
parte superior del producto de modo que quede colgado en los
ganchos de los componentes de plástico laterales.
■ Reinstale el ensamblaje del panel de acceso/de pie, con el
panel lateral entre el ensamblaje del panel de acceso/de pie y
el miembro lateral. Alinee la ranura rectangular en la espuma
e instale el ensamblaje del panel de acceso/de pie a la unidad
con el tornillo.
NOTA: Retire la película en el marcado de la puerta alrededor de
esta para realizarlo más fácilmente.
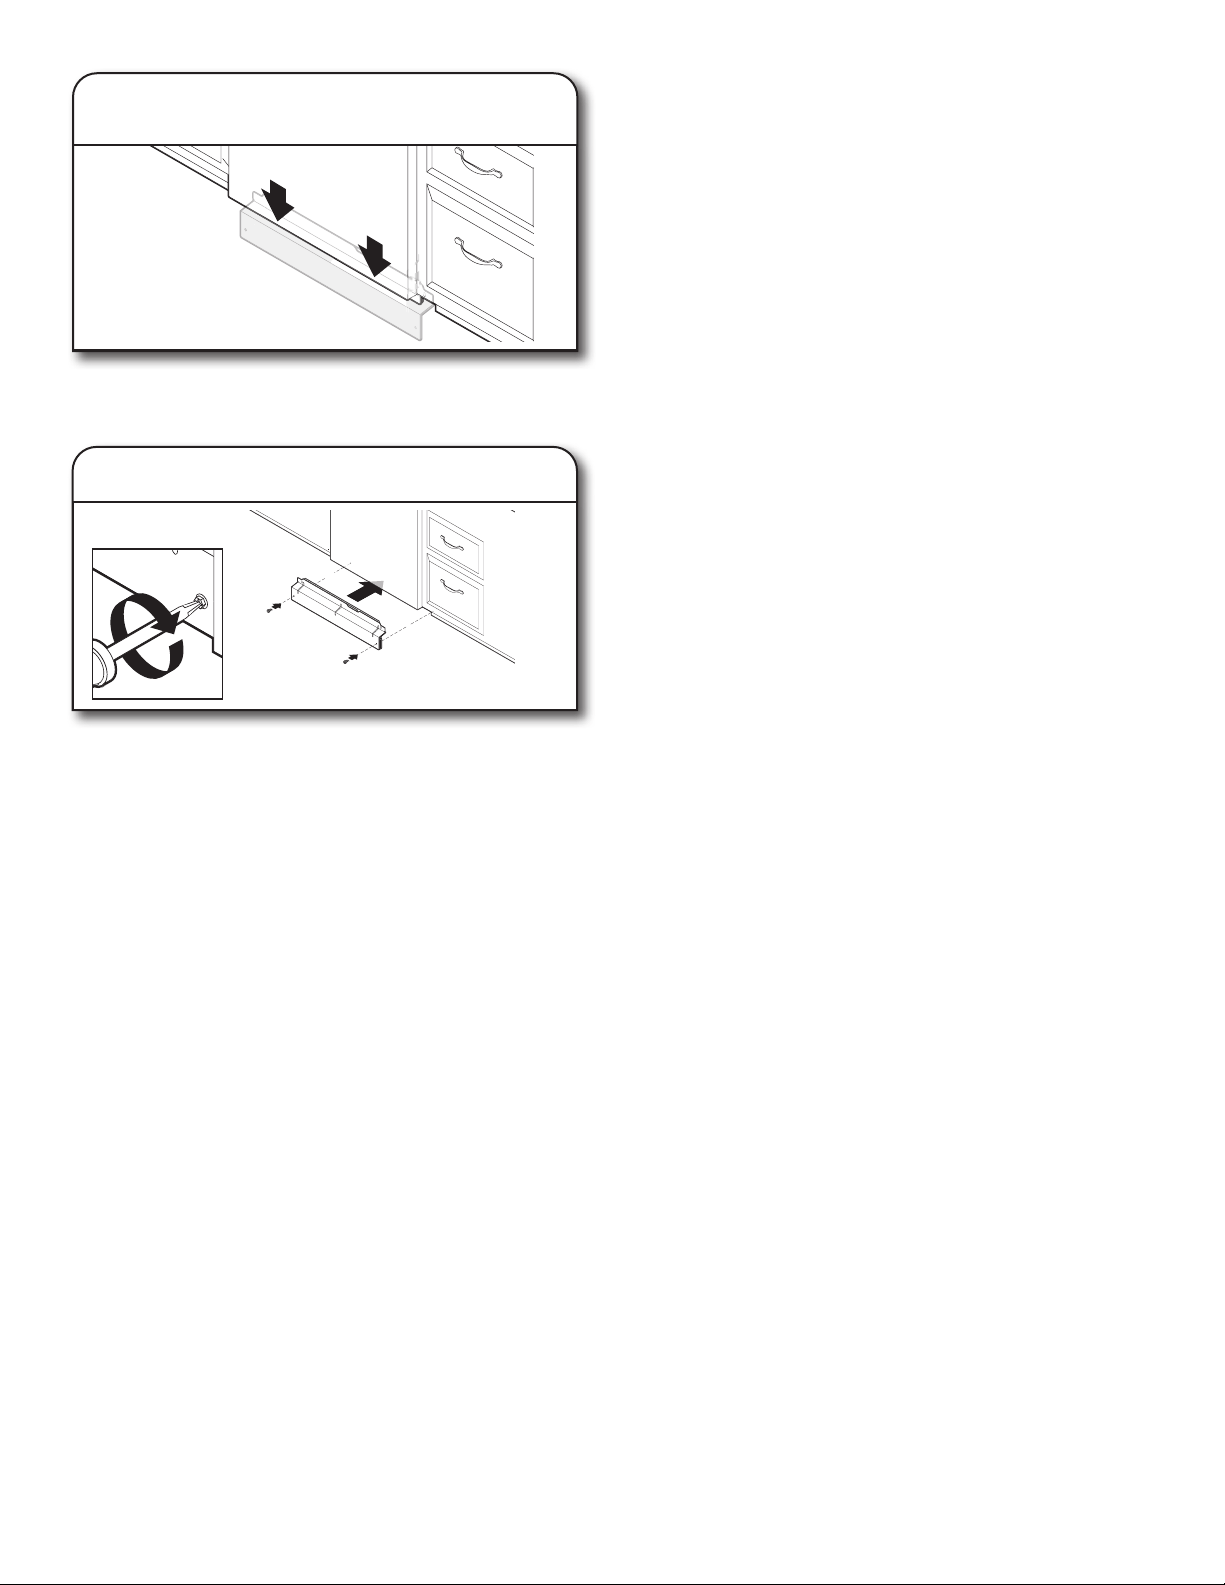
84
Compruebe que el borde inferior del panel de acceso esté en
contacto con el piso. Ajústelo si es necesario.
Use una llave de tuercas de 5/16" para volver a instalar los
tornillos a través de los orificios en los paneles de acceso.
SI LA LAVAVAJILLAS NO FUNCIONA
Pruebe primero las soluciones aquí sugeridas; tal vez, podría
evitarse el costo de llamar al servicio técnico.
■ ¿Se ha disparado el cortacircuitos o se ha quemado el fusible
de la casa?
■ ¿Se ha cerrado y trabado bien la puerta?
■ ¿Se ha seleccionado correctamente el ciclo para poner en
marcha la lavavajillas?
■ ¿Está abierta la llave del agua?
■ ¿El cable del interruptor flotante debajo del producto está
conectado al interruptor flotante?
■ Asegúrese de que Control Lock (Bloqueo de controles) esté
desactivado.
Si no funciona ninguna de estas soluciones, consulte la Guía de
inicio rápido para obtener la información de contacto del servicio
técnico.
51. Compruebe el borde del panel
de acceso
52. Vuelva a instalar los paneles de acceso

85
NOTES

86
NOTES

87
NOTES

W11323304E
®
/™ ©2021 All rights reserved.
Tous droits réservés.
Todos los derechos reservados.
10/21