User Manual for Coffee Brewer
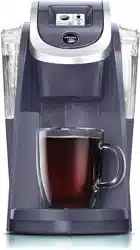
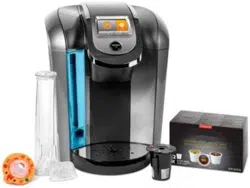
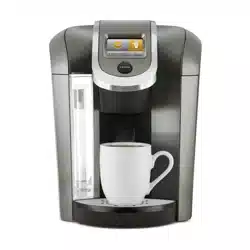
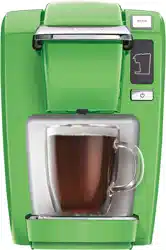
FEATURES

| A. Water Reservoir Lid |
|
G. Brew Head |
| B. Water Reservoir |
|
H. Power Cord |
| C. Top Housing |
|
I. Drip Tray Plate |
| D. Touch Display/Power Button |
|
J. Drip Tray |
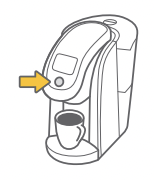
| E. Brew Button |
|
K. Pod Holder |
| F. Handle |
|
L. Housing (K and L are the Pod Holder Assembly) |
| M. Base |
|
|
TOUCH DISPLAY CONTROLS
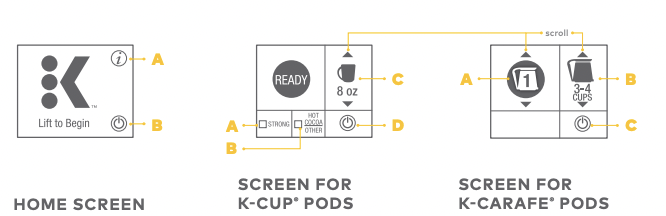
HOME SCREEN
A. Settings Button
B. Power Button
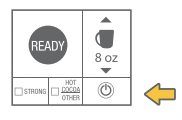
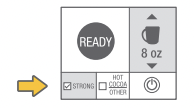
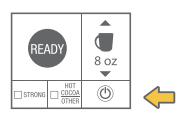
SCREEN FOR K-CUP® PODS
A. STRONG (only available for coffee)
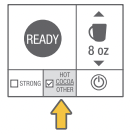
B. HOT COCOA/OTHER (for select non-coffee beverages)
C. Brew Size
D. Power Button
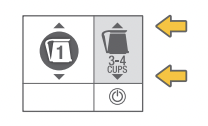
SCREEN FOR K-CARAFE® PODS
A. KEURIG BREW™ Setting 1
B. Brew Size
C. Power Button
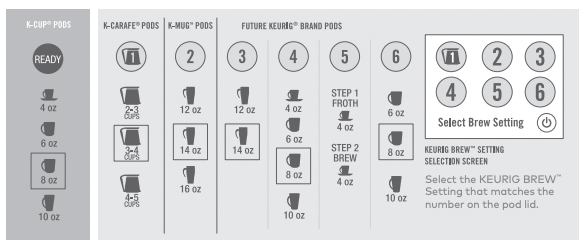
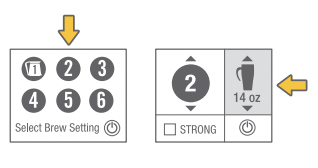
BREW SETTINGS (OUTLINE INDICATES DEFAULT SIZE)
QUICK TIPS & TO DOS
QUICK TIPS
 With your Keurig® Plus Series brewer, you can brew a single cup or a full carafe.
TO DO
Register your brewer at Keurig. We’ll send you a special “thank you” when you do. Subject to availability and assortment/count will vary.
Join Club Keurig™ for special savings on Keurig® brand pods when purchased on Keurig
LET’S GET BREWING!
SETUP
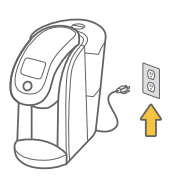
1. Place the brewer on a counter and plug into a grounded outlet.
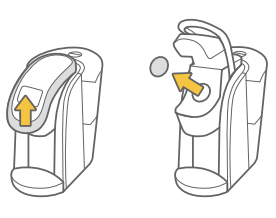
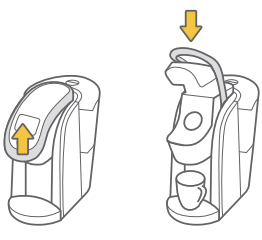
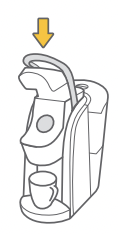
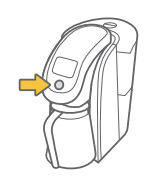
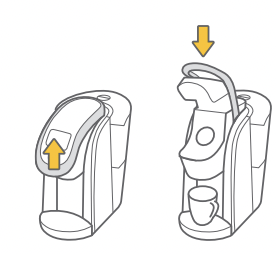
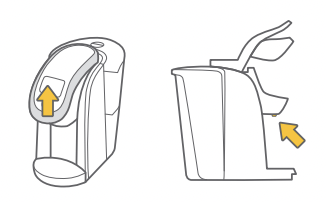
2. Lift the Handle, remove and discard the shipping disk.
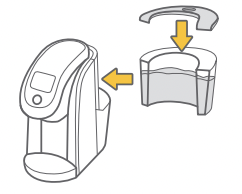
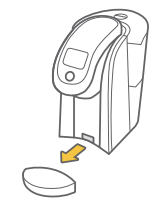
3. Remove the Water Reservoir and rinse. While removed, fill with bottled or filtered water, and return to the brewer. Be sure to fill below the MAX FILL line and above the MIN FILL line.
NOTE: The reservoir only needs to be removed and filled for the initial set up. After the first fill, you can refill the Water Reservoir either while it is attached to the brewer or removed.
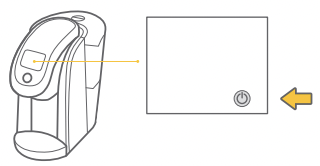
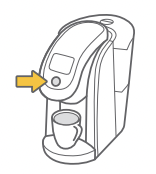
4. Press the Power Button and wait for preheating to complete, about three minutes.
CLEANSING BREW
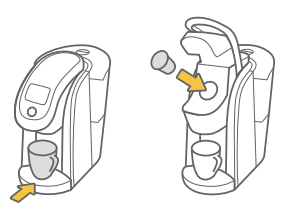
1. To begin a cleansing brew, place a 12 ounce mug on the Drip Tray.
2. Lift and lower the Handle. Do not place a Keurig® brand pod in the Pod Holder.
3. Select a 8 ounce Brew Size and press the Brew Button.
4. You are now ready to use your brewer!
BREW YOUR FIRST K-CUP® POD
1. Place a mug on the Drip Tray. Select a K-Cup® pod, place firmly in the Pod Holder.
NOTE: Do not remove the foil lid or puncture the K-Cup® pod.
2. Lower the Handle.
CAUTION: There are sharp needles that puncture the K-Cup® pod above and below the Pod Holder. To avoid injury, do not put your fingers in the Pod Holder.
3. Select a Brew Size. Select STRONG if desired. (STRONG setting is for coffee.)
Press HOT COCOA/OTHER for select cocoa and other beverages as noted on the instructions on the K-Cup® pod packaging.
4. Press the Brew Button and enjoy your first cup!
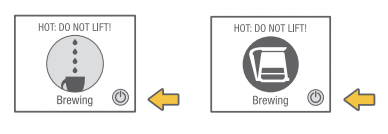
CAUTION: There is extremely hot water in the K-Cup® pod during the brew process. To avoid injury, do not lift the Handle during the brew process.
BREW YOUR FIRST K-CARAFE® POD
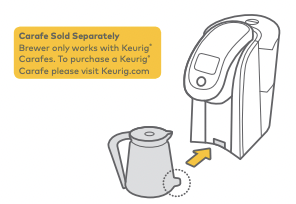
1. Make sure the Keurig® Carafe is empty. Remove the Drip Tray and insert the Keurig® Carafe securely in its place.
NOTE: Do not remove the foil lid or puncture the K-Carafe® pod.
NOTE: Refer to page 22 for Keurig® Carafe operation.
2. Select a K-Carafe® pod, place firmly in the Pod Holder and lower the Handle.
CAUTION: There are sharp needles that puncture the K-Carafe® pod above and below the Pod Holder. To avoid injury, do not put your fingers in the Pod Holder.
3. Select a Brew Size.
NOTE: Make sure the number on the Touch Display matches the number of the K-Carafe® pod you’re brewing in the pod holder.
4. Press the Brew Button and enjoy your first carafe of coffee!
CAUTION: There is extremely hot water in the K-Carafe® pod during the brew process. To avoid injury, do not lift the Handle during the brew process.
BREW YOUR FIRST K-MUG™ POD
1. Remove Drip Tray and securely insert an empty travel mug.
2. Select a K-Mug™ pod, place firmly in the Pod Holder and lower the Handle.
CAUTION: There are sharp needles that puncture the K-Mug™ pod above and below the Pod Holder. To avoid injury, do not put your fingers in the Pod Holder.
3. Select the brew size you would like under brew setting #2.
4. Press the Brew Button and enjoy your first travel mug of coffee!
CAUTION: There is extremely hot water in the K-Mug™ pod during the brew process. To avoid injury, do not lift the Handle during the brew process.
DISPENSING HOT WATER INTO A MUG
1. Place a mug on the Drip Tray. Lift and lower the Handle without a pod.
2. Select your Brew size.
3. Press the Brew Button.
4. When the brew process is complete, the Touch Display will indicate Enjoy!

SETTINGS MENU
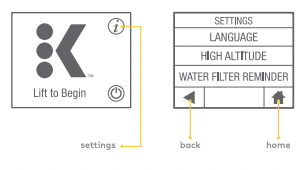
ACCESS SETTINGS
Explore everything your Keurig® Plus Series brewer has to offer by accessing the SETTINGS menu. From the home screen, select the Settings Button.
Use the arrows to scroll through the menu. To exit, press the back button.
Press the back button to return to the SETTINGS menu or press the HOME button to return to the home screen. Your settings will be automatically saved.
 |
CHOOSE LANGUAGE
Press English, Spanish, or French to select the LANGUAGE.
Press the back button to return to the SETTINGS menu or press the HOME button to return to the home screen. Your settings will be automatically saved.
|
TIPS & MAINTENANCE

|
|
ENABLE HIGH ALTITUDE
To ensure your brewer works properly at higher altitudes (5,000 feet), ENABLE the HIGH ALTITUDE mode.
Press the back button to return to the SETTINGS menu or press the HOME button to return to the home screen. Your settings will be automatically saved.
|
 |
|
ENABLE WATER FILTER REMINDER
If you are using a Keurig® Water Filter, select ENABLE to activate the WATER FILTER REMINDER notices.
Press the back button to return to the SETTINGS menu or press the HOME button to return to the home screen. Your settings will be automatically saved.
Refer to page 29 for more information
|
CARING FOR YOUR BREWER
 |
|
CLEANING THE BREWER EXTERIOR
Keep your Keurig® Plus Series brewer looking its best by cleaning the exterior from time to time. Just clean with a damp, soapy, lint-free, non-abrasive cloth. Never immerse the brewer in water or other liquids.
|
 |
|
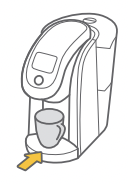
CLEANING THE DRIP TRAY
The Drip Tray can accumulate up to 8 ounces of overflow. The Drip Tray and the Drip Tray Plate should occasionally be rinsed clean. To remove the Drip Tray, simply slide it toward you, keeping it level at all times to avoid spilling. Clean with a damp, soapy, lint-free, non-abrasive cloth.
|
 |
|
CLEANING THE WATER RESERVOIR AND THE WATER RESERVOIR LID
Clean the Water Reservoir and the Water Reservoir Lid with a damp, soapy, lint-free, non-abrasive cloth and rinse thoroughly.
Do not dry the inside of the Water Reservoir with a cloth as lint may remain. Be sure to rinse the Water Reservoir thoroughly after cleaning to ensure that no cleaning solutions remain as they may contaminate the water supply in the brewer. DO NOT PLACE THESE ITEMS IN THE DISHWASHER.
|
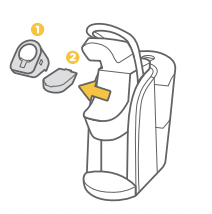
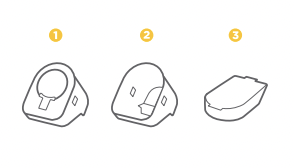
CLEANING THE POD HOLDER
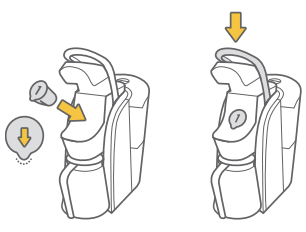
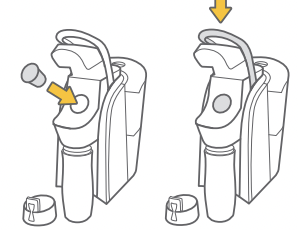
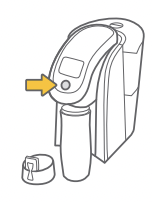
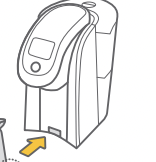
1. Lift the Handle. Push up while grabbing the sides of the Pod Holder Assembly. Pull away from the brewer.
CAUTION: Sharp needles. Do not put fingers in chamber.
2. Pull out the Pod Holder Assembly (1) and Base (2).
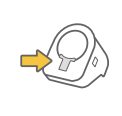
3. Press the release buttons on both sides of the Pod Holder Assembly.

Separate the Pod Holder from the Housing.
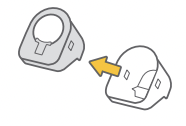
4. Clean the Pod Holder (1), Housing (2), and Base (3) with a damp, soapy, lint-free, non-abrasive cloth and rinse thoroughly.
CARING FOR YOUR BREWER: HOW TO USE A BREWER MAINTENANCE ACCESSORY
CLEANING THE BREWER ENTRANCE NEEDLE
Having trouble brewing? You may have coffee grounds stuck in the brewer’s Entrance Needle. Use a paper clip to clean both holes of the exit needle. You may have to tilt the brewer to get a better view. Please remember the needles are sharp,so proceed with caution.
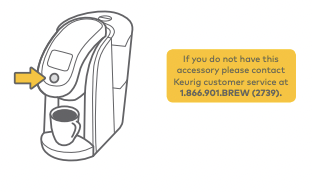
NOTE: Please reach out to Keurig customer service to get a Brewer Maintenance Accessory if you desire
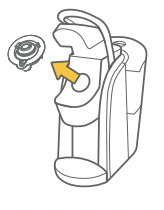
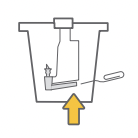
1. Please ensure the brewer is powered off. With the printed text on your Brewer Maintenance Accessory facing up, fill silicon bulb with water.
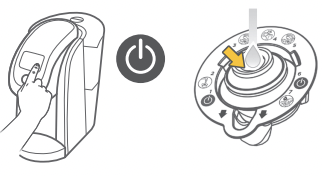
2. Lift Handle, properly place Brewer Maintenance Accessory in Pod Holder with printed arrows pointing down.
Warning: Avoid sharp needles.
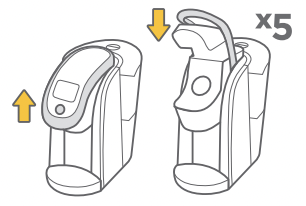
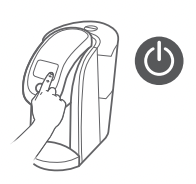
3. Raise and lower the Handle five times to loosen and remove any coffee grounds retained in your brewer’s Entrance Needle.
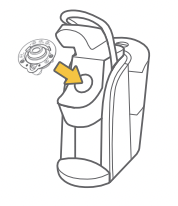
4. Remove Brewer Maintenance Accessory from Pod Holder.
Warning: Avoid sharp needles.
5. Once you have removed the Brewer Maintenance Accessory from the brewer, power the brewer back on.
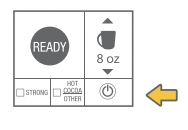
6. Place a 12-ounce mug on the Drip Tray and perform a cleansing brew (refer to page 11 for how to perform a 8 ounce cleansing brew).
7. Brew your favorite Keurig® K-Cup® pod and enjoy!
CARING FOR YOUR BREWER
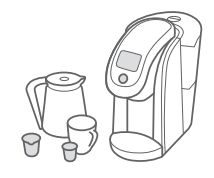
KEURIG® CARAFE OPERATION
The unique Keurig® Carafe was specifically designed for use with the Keurig® Plus Series brewer. To connect the Keurig® Carafe to the brewer, make sure the Keurig® Carafe is securely inserted into the brewer. The Keurig® Plus Series brewer contains a sensory system that determines when the Keurig® Carafe is in place and it is safe to begin brewing. If the Keurig® Carafe is not in place or is incorrectly inserted, the brewing process will not begin. If the Keurig® Carafe is removed during brewing, brewing will stop. To maintain the ideal combination of taste, freshness, and temperature, we recommend preheating the Keurig® Carafe. To preheat the Keurig® Carafe, fill it with hot water for approximately 30 seconds and then pour out entirely prior to placing the Keurig® Carafe into the brewer.
CAUTION:
• Make sure the Keurig® Carafe is empty before each use.
• After brewing, the Keurig® Carafe will contain extremely hot liquid. Take care when pouring from the Keurig® Carafe. Never place your hand over the Keurig® Carafe where hot steam is venting. Never allow children to use the Keurig® Carafe or operate the brewer without adult supervision. Press the Power Button to terminate the brew process. Follow the instructions on the Touch Display before removing the Keurig® Carafe. The brewer will return to the home screen. Remove and discard the used K-Carafe® pod.
• There is extremely hot water in the Pod Holder during the brew process.
• To avoid risk of injury, do not lift the Handle during the brewing process.
• HAND-WASH ONLY. DO NOT SUBMERGE. DO NOT MICROWAVE.
NOTE: CARAFE NOT INCLUDED WITH BREWER.

CLEANING THE EXIT NEEDLE
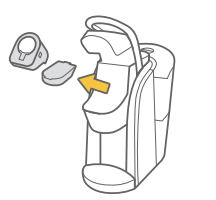
1. If a clog arises in the Exit Needle, push the lever of the Pod Holder to reveal the Exit Needle.
2. Use a paper clip or similar tool to loosen the clog. Rinse thoroughly with hot water.
3. After all the pieces are cleaned,place the Base then the Pod Holder ssembly into the Brew Head. lower the Handle.
CAUTION: Sharp needles. Do not put fingers in chamber.
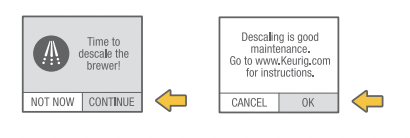
TIME TO DESCALE THE BREWER
Depending on the mineral content of your water, calcium deposits or scale may build up in your brewer, this is why we recommend using bottled or filtered water. Scale is non-toxic but if left unattended can hinder brewer performance. Regularly descaling your brewer every three to six months helps maintain the heating element, and other internal parts that come in contact with water. Calcium deposits may build up faster, making it necessary to descale more often.
You should promptly descale when the Touch Display indicates “Time to descale the brewer!” However, even if this is not indicated, you should continue to descale your brewer every three to six months.
DESCALING YOUR BREWER
Before you begin, you will need a large mug, fresh water, Keurig® Descaling Solution, and access to a sink. Do not use a paper cup.
- Empty the water from the Water Reservoir. If there is a Keurig® Water Filter, remove and set aside.
STEP 1: FIRST DESCALING SOLUTION RINSE
- Press and hold the Power Button to power the brewer off.
- Pour the entire bottle of Keurig® Descaling Solution into the Water Reservoir. Then fill the empty bottle with water and pour into the Water Reservoir. Press and hold the Power Button to turn the brewer back on.
- Place a large mug on the Drip Tray and run a cleansing brew by lifting and lowering the Handle, selecting a 10 ounce Brew Size and pressing the Brew Button. The brewer will stop dispensing after 10 ounces. Do not use a Keurig brand pod. Pour the contents of the mug into the sink.
STEP 2: SECOND DESCALING SOLUTION RINSE
- Repeat the cleansing brew process until the Touch Display indicates “More Water Please.” Let the brewer stand for at least 30 minutes while still on.
- After 30 minutes, discard any residual solution and rinse the Water Reservoir thoroughly.
STEP 3: FRESH WATER RINSE
- Ensure the Water Reservoir is filled with fresh water to and not beyond the MAX FILL line.
- Place a large mug on the Drip Tray and run a cleansing brew. Pour the contents of the mug into the sink.
- Repeat the cleansing brew process at least 12 times. You may need to refill the Water Reservoir at least one time during this process.
NOTE: If “Time to descale the brewer!” is still indicated after completing the procedure, repeat the descaling procedure above.
The cleaning action of Keurig® Descaling Solution may result in a foam dispensed from the brewer. This is natural, as the solution is reacting with the scale inside. For a brewer that is heavily scaled, the brewer may not fill properly after the descaler is added. If this occurs, you may see only a small or no output dispensed followed by the sound of air blowing out. If this occurs:
- Turn off and unplug the brewer.
- If there is Keurig® Descaling Solution in the Water Reservoir, discard the contents, rinse the Water Reservoir thoroughly and refill with bottled or filtered water.
- Plug the brewer back in, power on, and repeat STEP 3: FRESH WATER RINSE (refer to page 10). The brewer should begin to function normally as the solution is rinsed out and the scale is removed. If the problem persists, allow the brewer to sit unplugged for at least 30 minutes then continue with the fresh water rinse.
RECYCLING K-CARAFE® POD CUPS
|
The plastic cups of K-Carafe® pods can be recycled wherever #5 plastic is accepted. #5 plastic may not be recyclable in your community today, so please check locally with your municipality or waste hauler, or visit KeurigRecycling for more information

|
|
1. Once brewing is complete, lift the Handle and carefully remove the K-Carafe® pod by holding the outer rim.
CAUTION: The K-Carafe® pod will be hot after brewing. Use caution when removing. Allow it to cool completely before handling.

|
|
2. Once cool, separate the lid and filter from the cup. The filter will adhere to the lid.

|
|
3. Once separated, discard the lid and the attached filter. Recycle your K-Carafe® pod’s plastic cup wherever #5 plastic is accepted.

|
STOPPING THE BREW PROCESS
FOR K-CUP® PODS AND K-CARAFE® PODS (KEURIG BREW™ SETTING 1)
To stop the brewing process, press and hold the Power Button for one second. Remove and dispose of any used pod. Brewing a used pod is not recommended.
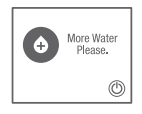
ADDING WATER
Your Keurig® Plus Series brewer will indicate when the water level in the Water Reservoir is low and you will not be able to brew. The brewer will only indicate “More Water Please.” if there is not enough to complete your brew. For example: A Keurig® Carafe will require more water than a 10 ounce mug.
WATER FILTER ALERT
Your brewer is designed to deliver the perfect cup time after time, year after year. To keep it working at peak performance, your Keurig® Plus Series brewer will let you know when it needs a little attention.
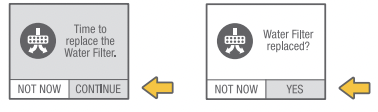
TIME TO REPLACE THE KEURIG® WATER FILTER (VISIT KEURIG.COM TO PURCHASE)
Your brewer will indicate “Time to replace the Water Filter.” after every 1,000 ounces or two months. Once you’ve replaced the Keurig® Water Filter, press YES to reset the WATER FILTER REMINDER notices.
BREWER ALERTS
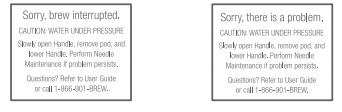
SORRY, BREW INTERRUPTED
Your brewer will indicate “Sorry, brew interrupted” if there is a problem brewing. To clear the problem, slowly lift and lower the Handle, remove the pod, and attempt a cleansing brew see page 11).
SORRY, THERE IS A PROBLEM
If the brewer indicates “Sorry, there is a problem,” coffee grounds may be stuck in the Entrance Needle. To release the clogged Needle ,please refer to the instructions on page 20
TROUBLESHOOTING
BREWER DOES NOT HAVE POWER
- Plug the brewer into an independent outlet without dimmer control.
- Check to be sure that the brewer is plugged in securely.
- Plug the brewer into a different outlet.
- Reset your home’s circuit breaker if necessary.
- Press and hold the Power Button and ensure the Touch Display is illuminated.
BREWER WILL NOT BREW
- After placing a pod in the Pod Holder, make sure the Handle is lowered completely and the Touch Display displays the appropriate brew screen. Follow the brewing instructions in SECTION 1 (refer to pages 10 – 11).
- If the Touch Display indicates “More Water Please.” add water to the Water Reservoir or make sure the Water Reservoir is seated properly in its Base.
- If the Touch Display indicates “More Water Please.” even after refilling, remove the Water Reservoir and empty the water. Then thoroughly clean (refer to page 18). Fill the Water Reservoir to the MAX FILL line, return it to the brewer and ensure it is seated properly in its Base.
- The Pod Holder may need to be cleaned (refer to pages 19) or the brewer may need to be descaled (refer to pages 25 – 26).
- If you have completed the above procedure two times and this situation persists, contact Customer Service at 1.866.901.BREW (2739).
BREWER BREWS ONLY A PARTIAL CUP
- Clean the Pod Holder if necessary (refer to page 19).
- The Water Reservoir may have been removed during brewing. Replace the Water Reservoir and perform a cleansing brew (refer to page 11) without a pod.
- Descale the brewer (refer to pages 25 – 26).
- If you have repeated the descale procedure on your brewer two times and it is still only brewing a partial cup, contact Customer Service at 1.866.901.BREW (2739).
THE TOUCH DISPLAY INDICATES “MORE WATER PLEASE.”
- If the water level is not low, remove the Water Reservoir and empty the water. Then thoroughly clean (refer to page 18). Fill the Water Reservoir to the MAX FILL line, return it to the brewer, and ensure it is seated properly in its Base.
THE TOUCH DISPLAY INDICATES “SORRY, BREW INTERRUPTED.” OR “SORRY, THERE IS A PROBLEM.”
- These screens indicate there are coffee grounds stuck in the Entrance Needle. Use caution and slowly lift the Handle and remove the pod from the brewer. To release the clogged needle, please refer to the instructions on page 20.