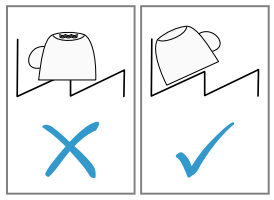
After unpacking all parts, check for any damage in transit and completeness of the delivery. If you have any complaints, contact the dealer who sold you the appliance or our Customer Service.
Note: The appliance was tested at the factory to check it is in working order. It is possible that water has left marks on the appliance. These marks will disappear after the first wash cycle.
The delivery consists of the following:
Dishwasher
Operating instructions
Installation Instructions
Warranty
Installation material
Mains cable
Installing and connecting the appliance
You can position your built-under or integrable appliance in a fitted kitchen between wooden and plastic walls. If you subsequently install your dishwasher as a free-standing appliance, you must stop it from tipping over, e.g. by screwing it to the wall or installing it under a continuous worktop that is securely connected to adjacent cabinets.
Follow the safety instructions.
Follow the instructions for electrical connection.
Check the Scope of supply and the condition of the appliance.
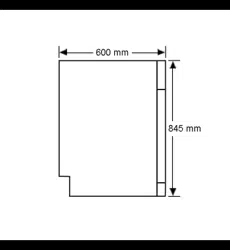
Consult the installation instructions for the installation dimensions required.
Make the appliance level using the height-adjustable feet. Make sure that the appliance is standing on the floor securely.
Install the drainage connection.
Install the drinking water connection.
Connect the appliance to the power supply.
Drainage connection
Connect your appliance to drainage connection so dirty water is discharged via the wash cycle.
Installing the drainage connection
Consult the installation instructions supplied for the steps required here.
Connect the wastewater hose to the outlet connection of the siphon using the enclosed parts.
When doing so, check that the wastewater hose is not kinked, crushed or twisted.
Also check that there is no cover in the drainage system preventing the wastewater from being discharged.
Drinking water connection
Connect your appliance to a drinking water connection.
Installing the drinking water connection
Note: If you are replacing the appliance, you must use a new water supply hose.
Consult the installation instructions supplied for the steps required here.
Connect the appliance to the drinking water connection using the enclosed parts. Observe the Technical data.
When doing so, check that the drinking water connection is not kinked, crushed or twisted.
Electrical connection
Connect your appliance to the power supply.
Connecting the appliance to the electricity supply
Notes
Follow the Safety instructions
Please note that the water safety system is only functional if there is a power supply.
Insert the non-heating appliance plug of the power cable into the appliance.
Insert the mains plug of the appliance into a nearby socket. The connection data for the appliance can be found on the rating plate.
Check that the mains plug is inserted properly.
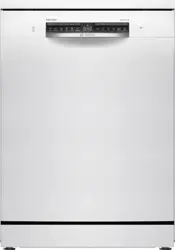
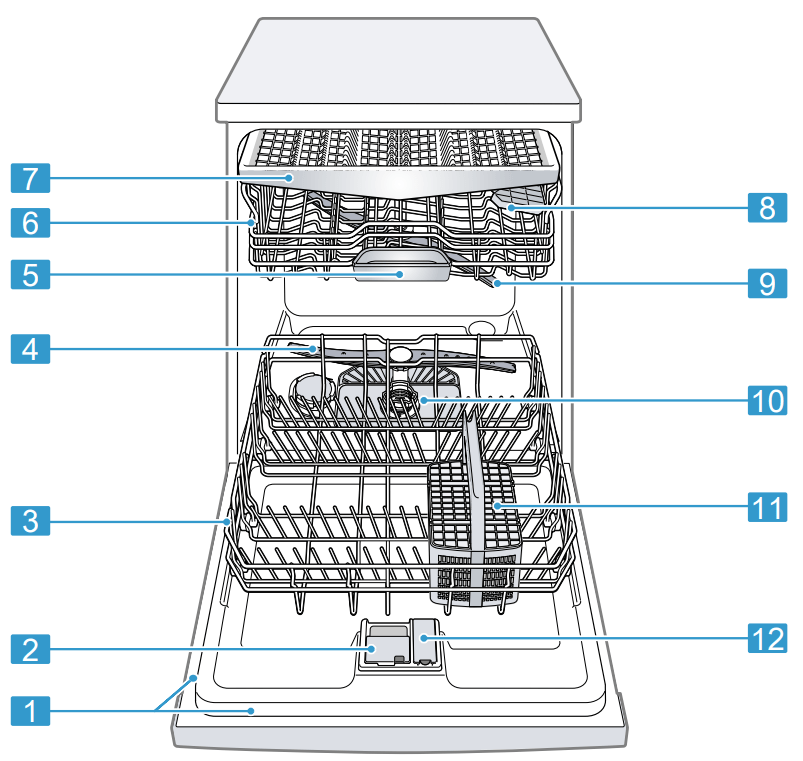
Familiarising yourself with your appliance
Appliance
Rating plate
Detergent dispenser
Bottom basket
Lower spray arm
Tablet collecting arm
Top basket
Cutlery drawer
Cutlery shelf
Upper spray arm
Filter system
Cutlery basket
Dispenser for rinse aid
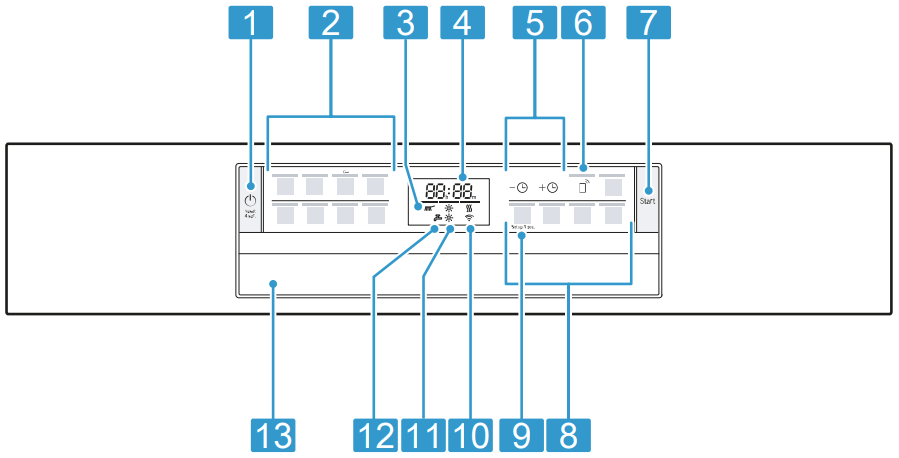
Controls
You can use the control panel to configure all functions of your appliance and to obtain information about the operating status.
With some buttons you can perform different functions.
ON/OFF button and reset button.
Programme buttons
Programme sequence display
Display
Timer programming and setting buttons
Remote Start
Start button
Programme buttons and additional functions
Step 3 sec. button
WLAN display
Rinse aid refill indicator
Water supply display
Door opener
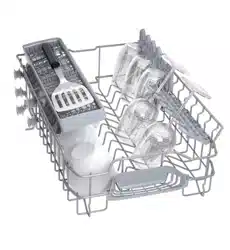
Features
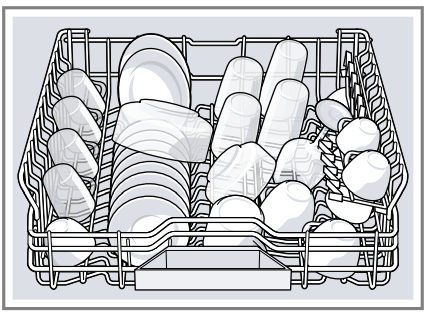
Top basket
Arrange cups and glasses in the top basket.
You can adjust the height of the top basket to make room for larger items of tableware.
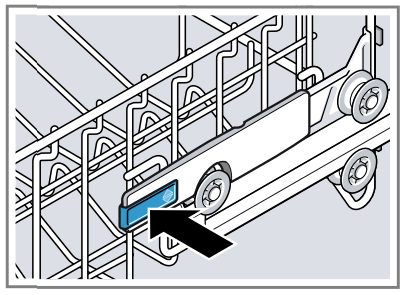
Adjusting top basket with side levers
To wash large items of tableware in the baskets, adjust the shelf position of the top basket.
1. Pull out the top basket.
2. To prevent the basket from suddenly dropping down, hold the side of the basket by the top edge.
3. Press in the levers on the right and left on the outside of the basket.
The basket can then slip down slightly.
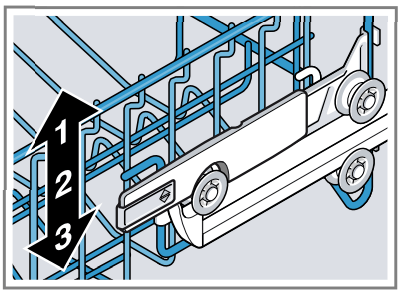
4. Raise or lower the basket evenly to the right level.
Check that the basket is level on both sides.
5. Slide the basket back in.
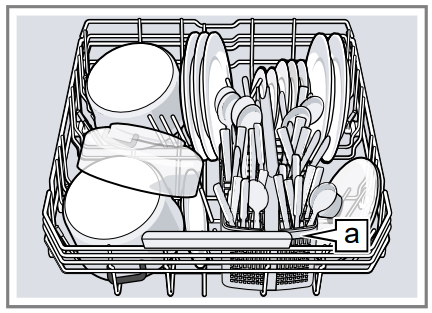
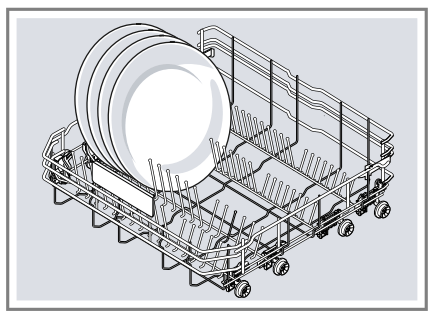
Bottom basket
Arrange pans and plates in the bottom basket.
a. Cutlery basket
Large plates up to a diameter of 31 cm can be arranged in the bottom basket as shown.
Cutlery basket
Arrange cutlery in the cutlery basket, always without sorting it and with the sharp points downwards.
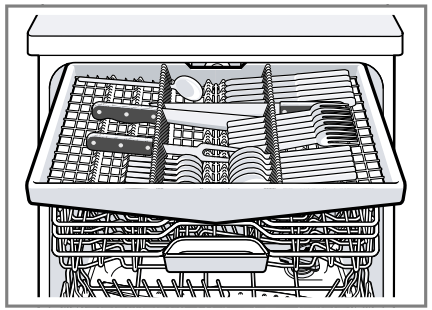
Cutlery drawer
Arrange cutlery in the cutlery drawer.
Arrange cutlery with the points and sharp edges downwards.
Etagere
Use the cutlery shelf and space underneath for small cups and glasses or for large items of cutlery, e.g. cooking spoons or serving cutlery.
If you do not need the cutlery shelf, you can fold it up.
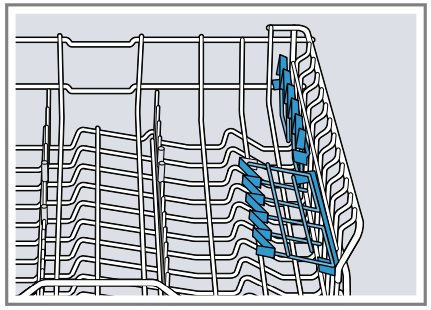
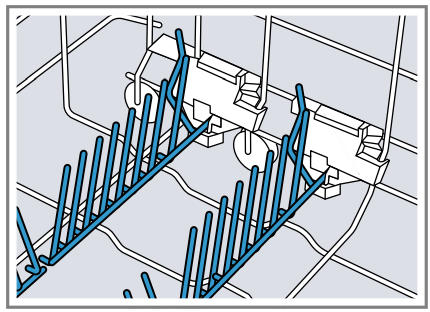
Folding prongs
Use the folding prongs to position tableware securely, e.g. plates.
You can fold the prongs down to position pans, bowls and glasses better.
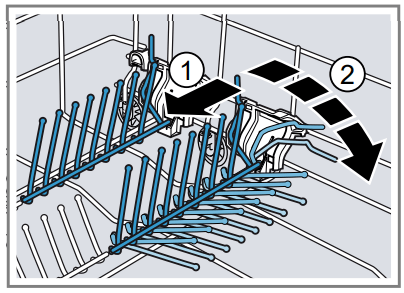
Folding down prongs
If you do not need the prongs, fold them down.
1. Push the lever forwards (1) and fold down the prongs (2) .
2. To use the prongs again, fold them back up.
The prongs audibly click into position.
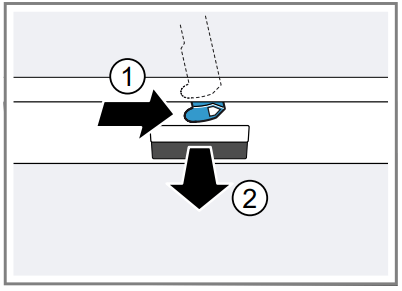
Baking sheet spray head
Use the baking sheet spray head to clean large items of tableware, e.g. trays, grilles and plates.
Arrange max. 2 baking sheets and 2 grilles as shown to ensure that the spray jet can reach all parts.
Note: Check that the appliance is always operated with the top basket or the baking sheet spray head.
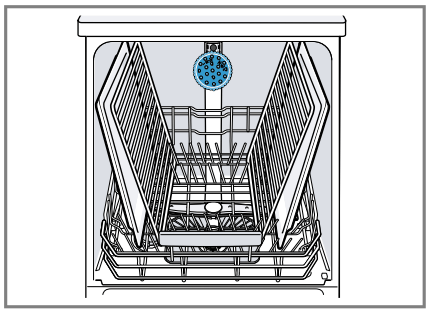
Inserting baking sheet spray head
Use the baking sheet spray head instead of the top basket to clean large trays, grilles and plates.
1. Remove top basket.
2. Insert the baking sheet spray head in the holder (1) and turn to the right (2).
The baking sheet spray head clicks into position.
Removing baking sheet spray head
If you no longer require the baking sheet spray head, remove it from the appliance.
1. Turn the baking sheet spray head anticlockwise and remove from the holder.
2. Insert the top basket in the appliance.
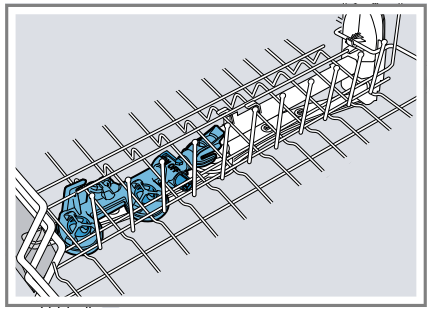
Extra Clean Zone
Use the Extra Clean Zone in the top basket to clean soiled tableware thoroughly, e.g. muesli bowls.
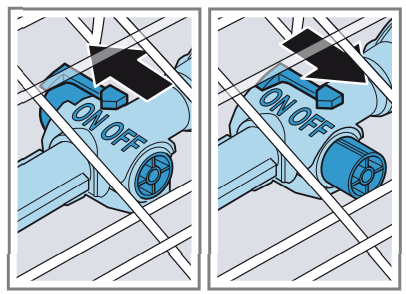
Selecting Extra Clean Zone
Note: Consumption will increase if you operate your appliance with the Extra Clean Zone switched on.
1. Pull out the top basket.
2. Set the slider to ON or OFF.
3. Push in the top basket.
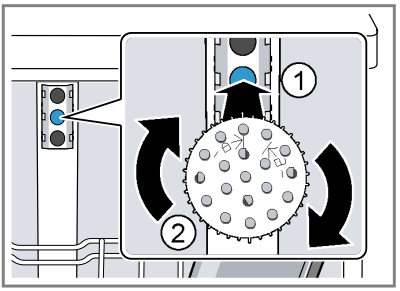
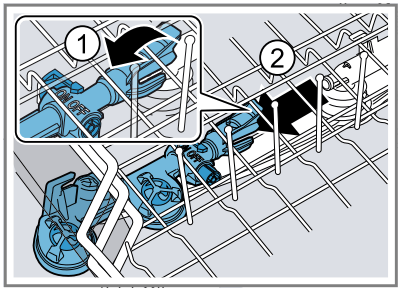
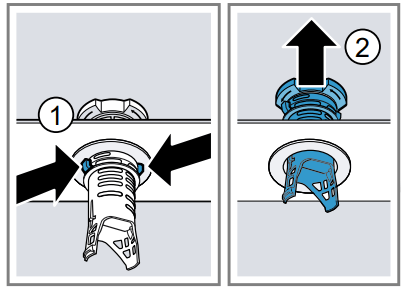
Cleaning Extra Clean Zone
Limescale and soiling from the dishwashing water can block the nozzles.
Note: Always operate the appliance with the Extra Clean Zone fitted.
1. Pull out the top basket.
2. Pull the tab on the Extra Clean Zone up (1) and forwards (2).
3. Set the slider to ON.
4. Clean under running water.
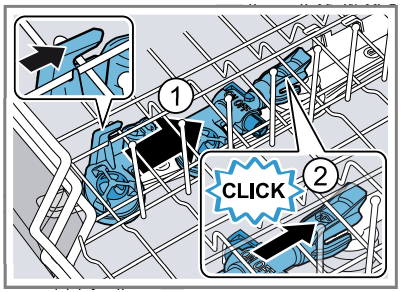
5. Place the Extra Clean Zone in the top basket and lock in place (1).
Check that the mounts are in the correct position.
The Extra Clean Zone audibly clicks into position (2).
6. Push in the top basket.
Basic operation
Opening appliance door
1. If the childproof lock is not activated, open the appliance door.
2. If the childproof lock is activated, press the catch of the lock to the right and open the appliance door .
Switching on the appliance
Press
The programme last selected and the additional function last selected will be set by default. If you do not perform any actions on the appliance for 10 minutes, the appliance will automatically switch off.
Setting a programme
To adjust the wash cycle to the soiling level of the tableware, select a suitable programme.
Press the right programme button.
The programme is set and the programme button flashes.
The remaining running time of the programme appears on the display.
Setting additional functions
You can set additional functions to complete the washing programme selected.
Note: The additional functions which can be used depend on the programme selected.
Press the button for the relevant additional function.
The additional function is set and the additional function button flashes.
Setting timer programming
You can delay the start of the programme by up to 24 hours.
1. Press or
"00h:01m" appears on the display.
2. Use or to set the required start time for the programme.
3. Press Start
This activates time preselection.
Tip: To deactivate timer programming, press or repeatedly until "00h:00m" appears in the display.
Starting the programme
Press Start.
The programme has ended when the display shows "00h:00m".
Notes
If you want to add more tableware while the appliance is running, do not use the tablet collecting tray as a handle for the top basket. You might touch the partially dissolved tablet.
You can only change a programme when running if you cancel it.
The appliance switches off automatically 1 minute after the end of the programme to save energy. If you open the appliance door immediately after the programme has ended, the appliance will switch off after 4 seconds.
Tip: To assist the drying, we recommend that the door will be partially opened after the cycle.
Activating button lock
The button lock prevents the appliance from being operated accidentally or incorrectly while running.
Press for approx. 3 seconds.
The button lock is activated and will be automatically deactivated at the end of the programme.
The display shows "CL" when the appliance is running.
The button lock remains activated with a power failure.
Deactivate button lock
Press for approx. 3 seconds.
Interrupting programme
Note: When you open the appliance door once the appliance has heated up, leave the door slightly ajar for a few minutes and then close it. This will help prevent excess pressure building up in the appliance and stop the appliance door bursting open.
1. Press .
The programme is saved and the appliance switches off.
2. Press to resume the programme.
Terminate programme
To end a programme early or to switch from a programme that has already started, you will need to cancel it first.
Press Reset 4 sec. for approx. 4 seconds.
All displays light up.
As soon as the displays are off, the display shows "00h:01m" and the residual water is pumped out.
The programme is cancelled and ends after approx. 1 minute.
Switching off appliance
Press
Tip: If you press during the wash cycle, the programme currently running will be interrupted. When you switch the appliance back on, the programme continues automatically.
Cleaning and servicing
Cleaning the tub
WARNING Risk of harm to health!
Using detergents containing chlorine may result in harm to health.
Never use detergents containing chlorine.
Remove any coarse soiling in the interior with a damp cloth.
Add detergent to the detergent dispenser.
Select the programme with the highest temperature.
Start the programme without tableware.
Cleaning products
Only use suitable cleaning products to clean your appliance.
Tips on appliance care
Follow the tips on appliance care to make sure your appliance functions properly at all times.
Action
Benefit
Wipe the door seals, the front of the dishwasher and the control panel regularly using a damp cloth and washing-up liquid.
This ensures the parts of the appliance will remain clean and hygienic.
If the appliance is not going to be used for a while, leave the door slightly ajar.
This will prevent unpleasant odours.
Machine Care
Deposits, e.g. from remnants of food and limescale, can cause your appliance to malfunction. To avoid such faults and reduce odours, we recommend cleaning your appliance at regular intervals.
Machine Care combined with machine care products and machine cleaners is the right programme for the care of your appliance.
Tip: You can get our tested and approved Dishwasher Care and Machine Cleaner for Dishwashers online at https://www.bosch-home.com/ store or from customer service. Machine Care is a programme which removes various deposits in one washing cycle. Cleaning takes place in two phases:
Phase
Removal of
Detergent
Placement
1
Grease and limescale
Liquid machine care product or machine descaler in powder form.
Appliance interior, e.g. bottle hung in the cutlery basket or powder in the interior.
2
Food remnants and deposits
Machine cleaner
Detergent dispenser
To ensure optimum cleaning performance, the programme doses the detergents independently of each another during the relevant cleaning phase. Correct placement of the detergents is necessary here. Run Machine Care without tableware if the indicator for Machine Care lights up on the control panel or if advised to do so by the display. The indicator will go out after you have run Machine Care. If your appliance does not have a reminder function, we recommend performing Machine Care every 2 months.
Running Machine Care
Run the Machine Care programme if the indicator for Machine Care lights up on the control panel or if advised to do so by the display.
Notes
Run the Machine Care programme without any tableware in the dishwasher.
Only use machine care products and machine cleaners specially designed for dishwashers.
Make sure that there are no aluminium parts, e.g. extractor hood grease filters or aluminium pans, in the interior of the appliance.
If you have not run Machine Care after 3 washing cycles, the indicator for Machine Care will go out automatically.
For optimum cleaning performance, ensure the correct placement of cleaners.
Follow the safety instructions given on the packagings of the machine care products and machine cleaners.
Activate the Extra Clean Zone
Remove any coarse soiling in the interior with a damp cloth.
Clean the filters.
Place the machine care product in the appliance interior. Only use machine care products specially designed for dishwashers.
Pour the machine cleaner into the detergent dispenser until it is filled completely. Do not place any additional machine cleaner in the appliance interior.
Press .
Press Start.
Machine Care is run.
Once the programme has ended, the indicator for Machine Care goes out.
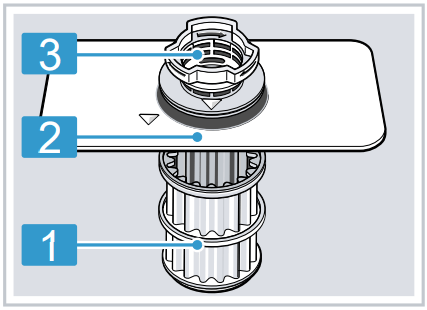
Filter system
The filter system removes coarse soiling from the dishwashing cycle.
Micro filter
Fine filter
Coarse filter
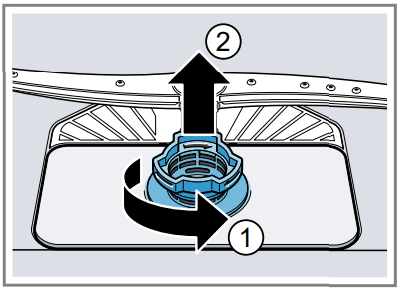
Cleaning filters
Soiling in the dishwashing water may block the filters.
1. After each wash check the filters for residue.
2. Turn the coarse filter anticlockwise (1) and remove the filter system (2) . ‒ Check that no foreign objects fall into the sump.
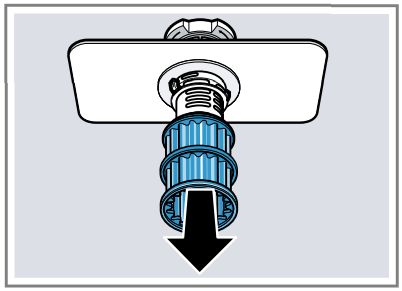
3. Pull down the micro filter to remove.
4. Press the locking catches (1) together and lift the coarse filter out (2).
5. Clean the filter elements under running water. Carefully clean the rim of dirt between the coarse and the fine filter.
6. Re-assemble the filter system. Make sure that the locking catches on the coarse filter click into position.
7. Insert the filter system into the appliance and turn the coarse filter clockwise. Make sure that the arrow markings match up.
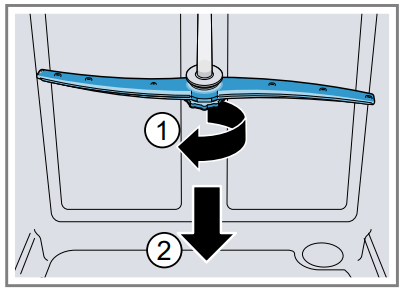
Cleaning spray arms
Limescale and soiling in the dishwashing water may block the nozzles and bearings on the spray arms. Clean the spray arms regularly.
1. Unscrew the upper spray arm (1) and pull down to remove (2).
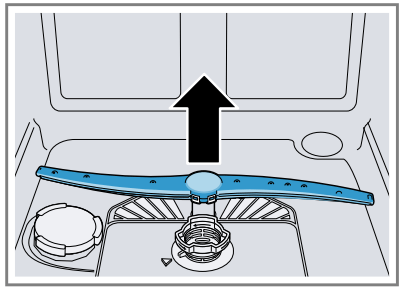
2. Pull up the lower spray arm to remove.
3. Check the outlet nozzles on the spray arms for blockages under running water and remove any foreign bodies.
4. Insert the lower spray arm.
The spray arm clicks into position.
5. Insert the upper spray arm and screw it firmly in place.
Troubleshooting
WARNING Risk of electric shock!
Improper repairs are dangerous.
Repairs to the appliance should only be carried out by trained specialist staff.
Only use genuine spare parts when repairing the appliance.
If the power cord of this appliance is damaged, it must be replaced with a special connection cable, which is available from the manufacturer or his Customer Service.
Error code / Fault display / Signal
Fault
Cause
Troubleshooting
E:20-60 lights up alternately
. Appliance has detected calcified heating element.
Descale the appliance.
Operate the appliance with the water softening system.
E:30-00 will light up alternately.
Water protection system is activated.
Turn off the water tap
E:31-00 will light up alternately
Water protection system is activated.
Turn off the water tap
E:34-00 will light up alternately
Water is continuously running into the appliance.
Turn off the water tap
E:32-00 will light up alternately or indicator for water supply lights up.
Supply hose is kinked.
Install the supply hose without kinks.
Water tap is turned off.
Turn on the water tap.
E:32-00 will light up alternately or indicator for water supply lights up.
Water tap is jammed or furred up
Turn on the water tap. The flow rate must be at least 10 l/ min when the water supply is open.
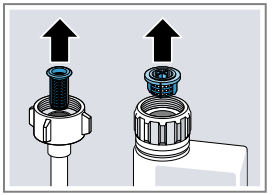
The filters in the water connection of the supply or AquaStop hose are blocked
1. Switch off the appliance.
2. Pull out the mains plug.
3. Turn off the water tap.
4. Unscrew the water connection.
5. Remove the filter from the supply hose
6. Clean the filter.
7. Re-insert the filter in the supply hose.
8. Screw the water connection back on.
9. Check the water connection for leaks.
10. Restore the power supply.
11. Switch the appliance on.
E:92-40 will light up alternately.
Filters are soiled or blocked.
Clean the filters
E:61-03 will light up alternately. Water is not drained.
Wastewater hose is blocked or kinked.
Reposition the wastewater hose without kinks.
Remove residues
Siphon connection is still sealed.
Check the connection to the siphon and open if necessary.
Cover of the wastewater pump is loose.
Secure the cover of the "Wastewater pump "
E:61-02 will light up alternately.
Wastewater pump is blocked.
Clean the wastewater pump.
E:61-02 will light up alternately.
Cover of the wastewater pump is loose
Secure the cover of the "Wastewater pump "
E:90-01 will light up alternately.
Mains voltage is too low
This is not a fault on the appliance.
1. Contact an electrician.
2. Have the mains voltage and electrical installation checked by an electrician.
A different error code appears in the display window.
E:01-00 to E:90-10
A technical fault is present.
1. Press .
2. Unplug the appliance or switch off the fuse.
3. Wait at least 2 minutes.
4. Insert the mains plug of the appliance in a socket or switch on the fuse.
5. Switch the appliance on.
6. If the problem occurs again:
Press .
Turn off the water tap.
Pull out the mains plug.
Contact "Customer Service"
Washing results
Fault
Cause
Troubleshooting
Tableware is not dry
No rinse aid used or dosage set too low.
1. Add Rinse aid
2. Set the amount of rinse aid to be dispensed.
Programme or programme option has no drying phase, or the drying phase is too brief.
Select a programme with drying, e.g. intensive, strong or ECO programme.
Some option buttons decrease the drying result, e.g varioSpeed.
Tableware is not dry.
Water collects in recesses of the tableware or cutlery
Position tableware at an angle where possible.
The combined detergent used has a poor drying performance.
Use rinse aid to improve drying performance.
Use a different combined detergent with a better drying performance.
Extra Dry not activated to improve drying performance.
Activate Extra Dry.
Tableware removed too early or drying process not yet ended.
Wait until the programme ends.
Only remove tableware 30 minutes after the programme has ended.
Rinse aid used has a limited drying performance.
Use a name-brand rinse aid. Eco products may have limited effectiveness.
Plastic tableware is not dry
Not a fault. As plastic does not store heat so well, it also does not dry as well.
No remedial action possible.
Cutlery is not dry
Cutlery not arranged properly in the cutlery basket or cutlery drawer.
Droplets can form on the cutlery contact points.
1. "Arrange cutlery individually where possible."
2. Avoid points of contact.
Appliance interior still wet after wash cycle.
Not a fault. The condensation drying principle causes water droplets in the tub – they are indeed desirable here. The moisture in the air condenses on the inside walls, runs off and is pumped out.
No action required
Remnants of food on tableware.
Tableware is placed too close together or basket is overfilled.
Arrange tableware with sufficient space in between. The spray jets must reach the surfaces of the tableware.
Avoid points of contact.
Spray arm nozzles are blocked.
Clean the "Spray arms"
Spray arm rotation is blocked.
Arrange tableware so that it does not obstruct spray arm rotation.
Filters are soiled.
Clean the filters.
Filters are inserted incorrectly and/or not engaged.
Insert the filters properly.
2. Engage the filters
Washing programme selected too weak.
Select a more intensive washing programme
Adjust the sensitivity of the sensors
Tableware has been precleaned too intensely. The sensors chose a weaker programme. Stubborn soiling cannot be entirely removed
Only remove large remnants of food and do not prerinse tableware.
Adjust the sensitivity of the sensors.
Tall narrow receptacles in corner areas are not rinsed adequately.
Do not position tall narrow receptacles at too great an angle or in corner areas.
Top baskets on right and left are not set to same height.
Set the top baskets on the left and right to the same level.
Detergent residue in the appliance
Lid of the detergent dispenser is blocked by items of tableware parts and will not open.
Arrange tableware in the top basket tableware so the tab collecting tray is not obstructed by tableware. Items of tableware are blocking the dispenser lid.
Do not place tableware or fragrance dispensers in the tablet collecting tray.
The lid of the detergent dispenser is blocked by the tab and will not open.
Position the tab in the detergent dispenser crosswise, not vertically.
Detergent residue in the appliance
Tabs are used in the quick or short programme. Dissolving time of the tab is not attained.
Select a more intensive Programme or use Powder detergent.
Washing effect and dissolving performance are reduced after a prolonged storage time or detergent is very lumpy
Change your "detergent"
Water marks on plastic parts.
Due to laws of physics droplet formation on plastic surfaces is unavoidable. After drying water marks are visible.
Select a more intensive programme.
Position tableware at an angle.
Use rinse aid.
Wipeable or water-soluble coatings are present inside the appliance or on the door
Detergent substances are deposited there. These coatings cannot generally be removed with chemicals.
Change your "detergent"
Clean the appliance mechanically.
Stubborn white coatings are present on tableware, inside the appliance or the door.
Detergent substances are deposited there. These coatings cannot generally be removed with chemicals
Change your "detergent"
Clean the appliance mechanically.
Too little detergent is being used.
Increase the amount of detergent used or change "Detergent "
Washing programme selected too weak.
Select a more intensive washing programme.
Adjust the sensitivity of the sensors
Tea residue or lipstick marks on tableware.
Washing temperature is too low.
Select a programme with a higher washing temperature.
Too little detergent is being used or is unsuitable.
Use a suitable “Detergent ” and follow the manufacturer's instructions for the amount to be used.
Tableware has been precleaned too intensely. The sensors chose a weaker programme. Stubborn soiling cannot be entirely removed.
Only remove large remnants of food and do not prerinse tableware.
Adjust the sensitivity of the sensors.
Coloured coatings (blue, yellow, brown) that are difficult or impossible to remove are present inside the appliance or on stainless steel tableware.
The formation of films is due to substances contained in vegetables (cabbage, celery, potatoes, noodles, etc.) or tap water (manganese).
Clean the appliance. You can remove deposits with "Mechanical cleaning" or a machine cleaning product. It may not always be possible to completely remove deposits but they are harmless to health.
The formation of films is due to metal components on silver or aluminium tableware.
Clean the appliance. You can remove deposits with "Mechanical cleaning" or a machine cleaning product. It may not always be possible to completely remove deposits but they are harmless to health.
Plastic parts inside the appliance are discoloured.
Plastic parts inside the appliance may become discoloured during the life of the dishwasher.
Discolouration can come about and will not impair functioning of the appliance.
Plastic parts are discoloured.
Washing temperature is too low
Select a programme with a higher washing temperature.
Tableware has been precleaned too intensely. The sensors chose a weaker programme. Stubborn soiling cannot be entirely removed.
Only remove large remnants of food and do not prerinse tableware.
Adjust the sensitivity of the sensors.
Removable streaks are present on glasses, glassware with a metallic appearance and cutlery.
Amount of rinse aid to be dispensed is set too high.
Set the rinse aid system to a lower setting.
No rinse aid has been added.
Adding rinse aid
Detergent residue is present in the final rinse. Lid of the detergent dispenser is blocked by tableware items and will not open fully.
Arrange tableware in the top basket tableware so the tab collecting tray is not obstructed by tableware. Items of tableware are blocking the dispenser lid.
Do not place tableware or fragrance dispensers in the tablet collecting tray
Removable streaks are present on glasses, glassware with a metallic appearance and cutlery.
Tableware has been precleaned too intensely. The sensors chose a weaker programme. Stubborn soiling cannot be entirely removed.
Only remove large remnants of food and do not prerinse tableware.
Adjust the sensitivity of the sensors.
Irreversible clouding of glassware.
Glasses are not dishwasherproof, only suitable for dishwashers.
Use dishwasher-proof glasses. Glasses are usually only suitable for use in a dishwasher, i.e. long-term wear or long-term changes must be expected.
Avoid a lengthy steam phase (standing time after wash cycle ends).
Use a programme with a lower temperature.
Use detergent with a glass protection component.
Rust spots on cutlery
Cutlery is not sufficiently rust-resistant. Knife blades are often more severely affected.
Use rust-resistant tableware.
Cutlery may also rust if washed together with rusting items.
Do not wash rusting items.
Detergent residue is present in the detergent dispenser or the tablet collecting tray
Spray arms were blocked by tableware so detergent was not rinsed out.
Check that the spray arms are not blocked and can rotate freely
Detergent dispenser was damp when detergent was added.
Only add detergent to a detergent dispenser when dry.
Excessive formation of foam occurs.
Hand washing-up liquid is present in dispenser for rinse aid.
Immediately add rinse aid to the dispenser.
Rinse aid has been spilled.
Remove the rinse aid with a cloth.
Detergent or appliance care product used causes excessive foaming.
Change the brand of detergent.
Home Connect problem
Fault
Cause
Troubleshooting
Connection to home network is not established.
WLAN on router is not active.
Check the wireless network connection of your router.
WLAN display is flashing.
Connection to home network is not available.
Activate the wireless network connection on your router.
Home Connect cannot be implemented correctly.
Home Connect set incorrectly.
Please consult the documents supplied for Home Connect.
Technical fault is present.
Please consult the information about support in the documents supplied for Home Connect.
Information on display panel
Fault
Cause
Troubleshooting
Refill indicator for rinse aid lights up.
Insufficient rinse aid.
Add "Rinse aid"
Set the amount of rinse aid to be dispensed.
Refill indicator for rinse aid does not light up
Rinse aid system is switched off.
Set the amount of rinse aid to be dispensed.
Malfunctions
Fault
Cause
Troubleshooting
Water is left in the appliance at the end of the programme.
Filter system or area under the filters is blocked.
Clean the "Filters"
Clean the "Wastewater pump"
Programme has not yet ended.
Wait until the programme ends or cancel the programme with Reset.
Appliance cannot be switched on or operated.
Software update is taking place.
Wait until the software update has finished.
Appliance functions have failed.
Pull out the mains plug or switch off the fuse.
Wait at least 2 minutes.
Connect the appliance to the power supply.
Switch the appliance on.
Appliance does not start.
The mains fuse has tripped
Check the relevant fuse.
Mains cable is not inserted.
Check whether the socket works.
Check whether the mains cable is properly inserted in the socket and on the rear of the appliance.
Appliance door is not closed properly.
Close the appliance door
Programme starts automatically.
You did not wait until programme ended.
Terminate programme
Appliance stops during the programme or cuts out.
Appliance door is not closed properly.
Close the appliance door.
Power and/or water supply has been interrupted.
Check the power supply.
Check the water supply.
Top basket is pressing against inner door and preventing appliance door from being closed securely
Check whether the rear panel of the appliance is being pressed in by a socket or hose holder that has not been removed.
Arrange the tableware so that no parts project beyond the basket and prevent the appliance door from closing properly.
Mechanical damage
Fault
Cause
Troubleshooting
Appliance door cannot be closed.
Door lock has been activated.
Close the appliance door with greater force.
Door cannot be closed due to installation method.
Check whether the appliance has been installed properly.
When closed, the appliance door, its decor or attached parts should not knock against adjacent cabinets or the worktop.
Lid on the detergent dispenser cannot be closed.
Detergent dispenser or lid are blocked by sticky detergent residue.
Remove detergent residue.
Noise
Fault
Cause
Troubleshooting
Filling valves making knocking noises.
Caused by the domestic installation. No appliance fault present. Does not affect functioning of the appliance.
Can only be remedied in the domestic installation.
Knocking or rattling noise.
Spray arm is striking tableware.
Arrange tableware so that the spray arms do not strike tableware.
With a small load the water jets directly strike against the tub.
Distribute the tableware evenly.
Load the appliance with more tableware.
Light items of tableware move about during the wash cycle.
 and reset button.


 or
or 
 for approx. 3 seconds.
 .
.
 .
.
 .
.