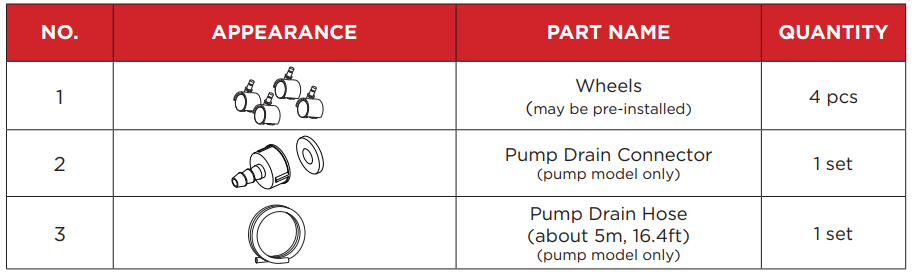
Note: Some accessories are not in bucket, please find it in packaging.
NO.
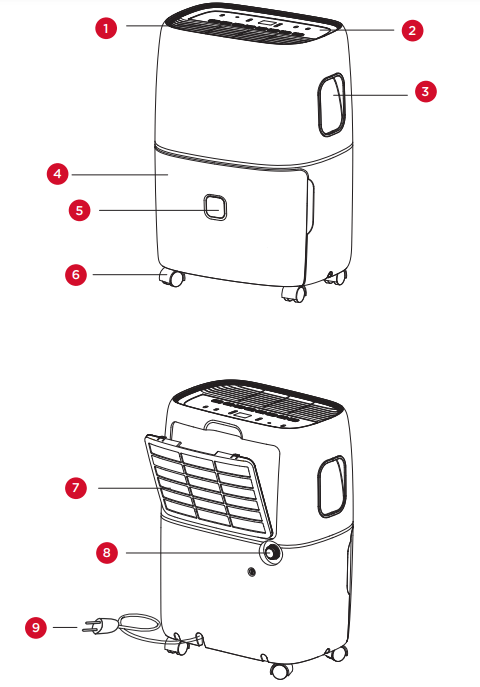
COMPONENT DESCRIPTION
1
Air outlet
2
Control panel
3
Handle
4
Bucket
5
Water level view window
6
Wheels
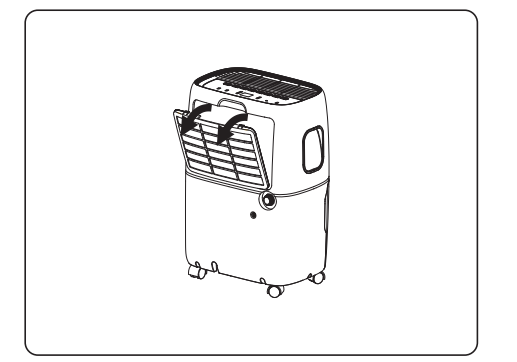
7
Air intake grille
8
Drainage holes
9
Power cord
Note: All the illustrations in this manual are for explanatory purposes only. Your appliance may be slightly different.
Let’s get started!
Step 1: Testing
Do not use outdoors.
Place the unit on a smooth level surface.
Allow at least 12 -18 inches of clearance on all sides of the unit.
Place the unit in a space where the temperature will not fall below 41 degrees Fahrenheit.
The dehumidifier must be operated in an enclosed area to be most effective, such as a basement.
Close all doors, windows, and other outside openings to the room.
Step 2: Installation
There are two sizes of cabinet
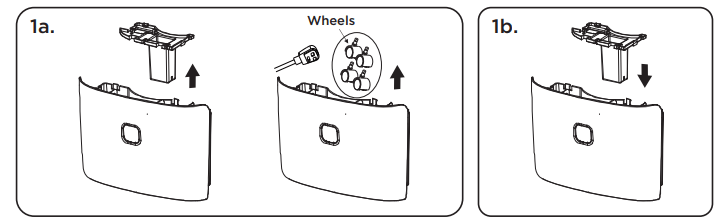
For the smaller cabinet:
Before use, please remove the accessories from the bucket
1a. Remove the bucket from appliance.
1b. Open the cover, take out the accessories. (Fig 1a).
1c. Reinstall the cover, correctly put the bucket back into the appliance (Fig 1b)
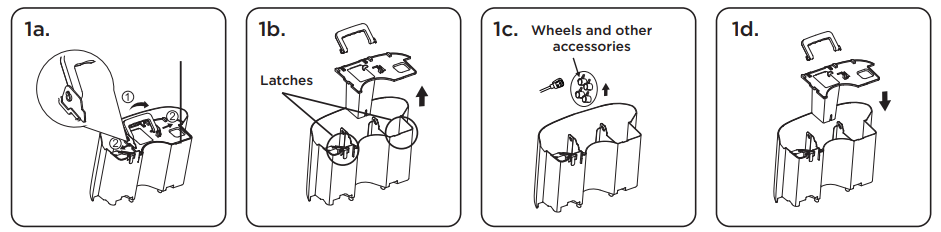
For the bigger cabinet:
Before use, please remove the accessories from the bucket
1a. Remove the bucket from appliance. Note: Not all models have handles (Fig 1a).
1b. Make sure to release the cover by pushing in the two latches at the top of the bucket(Fig 1b).
1c. Open the cover, take out the accessories. (Fig 1c).
1d. Reinstall the cover, correctly put the bucket back into the appliance (Fig 1d).
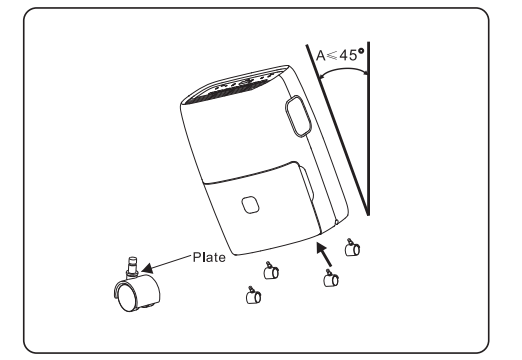
Step 3: Install the Wheels
Tilt the unit no more than 45° and forcibly insert the wheels. Make sure the plate of the wheels is flush against the bottom of the unit. If the appliance has pre-installed wheels, this step can be skipped.
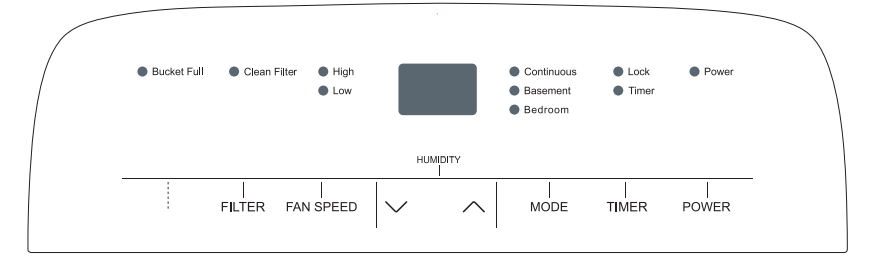
How to Control Your Dehumidifier
All the basics you need to know!
When first operating the dehumidifier, run it in Continuous mode for 24 hours.
Press the Power button once to manually turn the unit on. Press the Power button once more to turn the unit off.
Humidity Selection – Press the “down” or “up” buttons to choose the desired relative humidity. Once the preferred humidity is selected, the display will show the actual room % humidity. Each press of the same button will change the desired room humidity by 5%. The room humidity is selectable from 35% - 80%, or continuous. The until will cycle on and off to maintain the humidity level chosen on the digital display. If you want the dehumidifier to operate continuously regardless of the room humidity, press the mode button until you see “CO” on the digital display. This will enable continuous operation and the “Continuous” indicator will light up on the control panel.
Fan Speed – press the Fan Speed button to cycle through the different fan speeds (High, Low). The fan speed can be visually distinguished by the fan speed indicators on the control panel.
Timer Auto On – Press the Timer button. Once the Timer indicator begins to flash, press the up and down arrows to choose how long the unit waits before turning on (set time from 0.5 to 24 hours).When you have the desired time displayed on the screen, wait 5 seconds for the command to register and the timer light to turn on. Press the Timer button again to cancel the Timer, and the light will disappear
Timer Shut Off – When the appliance is running, select the Timer button. Once the Timer indicator begins to flash, press the up and down arrows to choose how long the unit waits before turning off (set time from 0.5 to 24 hours). When you have the desired time displayed on the screen, wait 5 seconds for the command to register and the timer light to turn on.
Bucket Full – When the water bucket is full, the unit will automatically shut off, make a beeping noise and the bucket full indicator will light up. The dehumidifier will not function until the water bucket is emptied and placed back in the unit.
Child Lock Mode – To lock the control panel, press and hold the timer button for 3 seconds when the unit is ON. When locked, the lock indicator will light up. Press and hold the TIMER button for 3 seconds to unlock the control panel.
Pre-Set Mode – Press the Mode button to choose from the preset options of Bedroom (55% RH), Basement (45% RH), or Continuous Mode.
Clean Filter - The Clean Filter LED will light up after 250 hours of use as a reminder to clean the filter. Remove the filter from the back of the unit by using your thumbs to press down on the filter tabs directly above the filter. Clean the filter with warm, soapy water. Dry thoroughly before replacing the filter. Once the filter is completely dry, place the filter back in the unit and press the FILTER button to reset the filter indicators.
For model(s) with PUMP
Internal Pump Mode – The internal pump allows the unit to operate without having to empty the bucket and requires the installation of the included pump drain hose kit (do not use a garden hose). While the unit is Off, to install the hose, remove the drain cap on the back of the unit. The pump mode operation will pump water up to 16 feet lengthwise using the hose included. Force the hose on to the pump adapter and turn the adapter clockwise on to the threaded connection on the back of the unit. Once securely installed, lead the drain hose to a nearby drain, sink, or out of a window. Turn on the dehumidifier and press the Pump button to activate the internal pump. The “Pump” LED indicator should illuminate.
Note: The pump will not engage until the bucket is almost full of water.
WiFi App Installation
(for WiFi models only)
Step 1: Download and Install the TCL Home+ App
Using the camera function on your smartphone, please scan the QR code below to be directed to the TCL Home+ page. If your phone does not have a QR scanner, download one from the app store or manually type in the URL below in your smartphone’s web browser. Then, download and launch the app.
Note: The App only supports the 2.4 GHz WiFi channel (all routers have a 2.4 GHz band). Please connect to the 2.4 GHz band before you begin the app setup process.
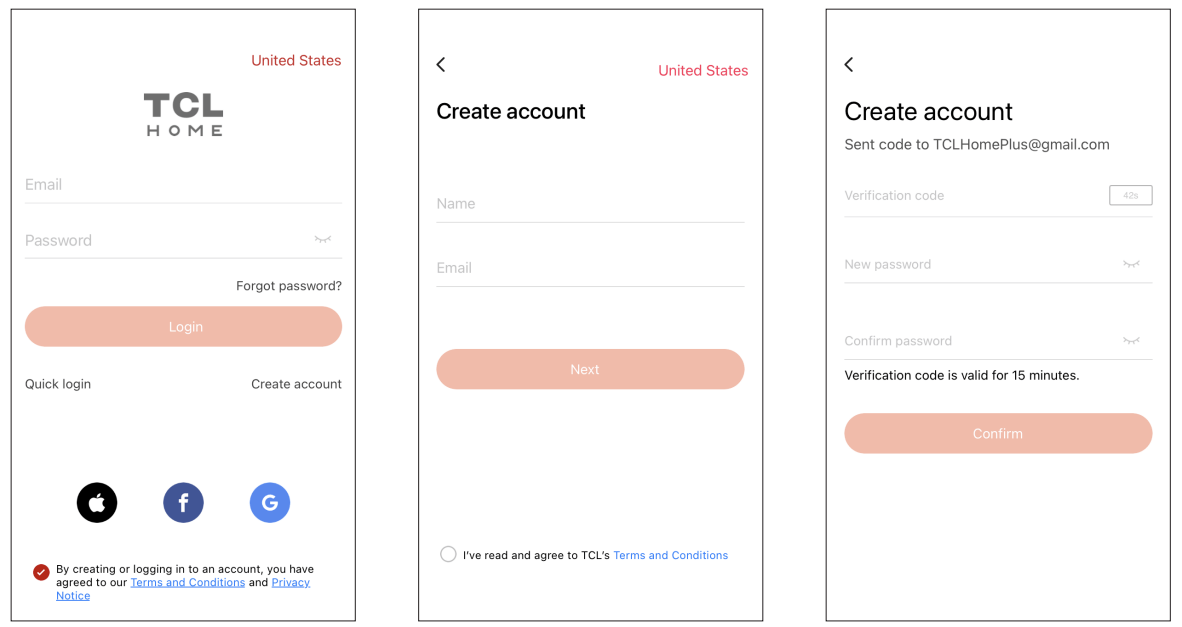
Step 2: Create an Account
Once you have opened the app, select “Create account.” You will then be sent a verification code to your email. Input the code and continue.
Step 3: Add Your Device
Select the “Add Device” button and follow the in-app instructions to complete the setup.
Troubleshooting
Having trouble completing installation? Don’t worry, it’s usually an easy fix.
PROBLEM
POSSIBLE CAUSES
SOLUTIONS
Dehumidifier does not start
The dehumidifier is unplugged.
• Make sure the dehumidifier plug is pushed completely into the outlet.
The fuse is blown/circuit breaker is tripped
• Check the house fuse/circuit breaker box and replace the fuse or reset the breaker.
Dehumidifier has reached its pre-set level or the bucket is full
• The dehumidifier automatically turns off when either condition occurs. Change to a lower setting or empty the water bucket. The bucket must be replaced properly for the dehumidifier to operate.
Bucket is not in the proper position
• The bucket must be in place and securely inserted for the dehumidifier to operate.
Power failure
• There is a protective time delay (up to 3 min.) to prevent tripping of the compressor overload. For this reason, the unit may not start normal dehumidification for 3 min. after it is powered back on.
Dehumidifier does not dry the air as it should
Not enough time allowed for unit to remove moisture
• When first installed, allow at least 24 hours to reach the desired dryness/humidity level.
Airflow is restricted
• Make sure there are no curtains, blinds , or furniture blocking the front or back of the dehumidifier.
Dirty filter
• Clean the filter. See the Cleaning and Care Section of the manual.
The Humidity Control may not be set low enough
• For drier air, press the v button to lower the humidity setting percentage in the room set the dehumidifier to CO for maximum dehumidification.
Doors and windows may not be closed tightly
• Check that all doors, windows, and other openings are securely closed.
Clothes dryer may be blowing moist air into the room
• Install the dehumidifier away from the dryer. The dryer should be vented outside.
Room temperature is too low
• Moisture removal is best at higher room temperatures. Lower room temperatures will reduce the moisture removal rate. This model is designed to operate at temperatures above 41° F (5°C).
TCL Home+ App loses connectivity to AC during setup
Wireless router may be too far from AC
• Relocate wireless router closer to AC.
Network error
• Restart wireless router, AC, and mobile device
TCL Home+ App cannot find AC
Network error
• Restart wireless router, AC, and mobile device
App & AC are not on the same 2.4GHz channel
• Confirm your device is connected to the 2.4GHz channel.
Router blocking TCL Home+ App
• Verify App is not being blocked by the router’s firewall.
Incorrect WiFi Password
• Reinput and verify WiFi password.
Unable to find or connect to Wireless Network
App may need permission to location
• Give TCL Home+ App permission to Location in phone settings.