
1byone Products Inc.
1230 E Belmont Street, Ontario, CA, USA 91761
Customer Service: +1 909-391-3888
www.1byonebros.com
Made in China
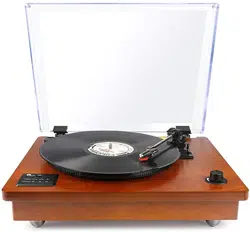
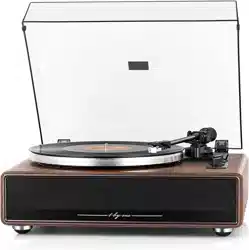
HIGH FIDELITY BELT DRIVE TURNTABLE
Instruction Manual

1byone Products Inc.
1230 E Belmont Street, Ontario, CA, USA 91761
Customer Service: +1 909-391-3888
www.1byonebros.com
Made in China
HIGH FIDELITY BELT DRIVE TURNTABLE
Instruction Manual

1
EN
DE
FR
ES
IT
Introduction
Thank you for purchasing 1byone High Fidelity Belt Drive Turntable. This instruction
manual contains important information about safety, usage and disposal. Use the
product as described and keep this manual for future reference. If you sell this
turntable or pass it on, also give this manual to the new owner.
Safety Instructions
Read and understand this entire manual before using this product. Keep these
instructions for future reference.
1. Do not use the turntable near water.
2. Only connect the turntable to a power outlet type as indicated on the marking
label or in the "Specifications" section of this instruction manual.
3. The turntable has a polarized plug (one pin is wider than the other). To reduce the
risk of electric shock, this plug is intended to fit into a polarized outlet in only one
orientation. If the plug does not fit fully into the outlet, reverse the plug. If it still
does not fit, contact a qualified electrician. Do not attempt to modify the plug in
any way.
4. Protect the power cord from being walked on or pinched, particularly at the power
plug, at the point of connection between the plug and outlet and at the point of
connection between the power cable and speaker.
5. Do not overload wall outlets or extension cords as this will be a fire hazard and may
cause electric shock.
6. Never push objects of any kind into the turntable through openings as they may
touch dangerous voltage points or short out parts that could result in a fire or
electric shock. Never spill liquid of any kind on the product.
7. Do not attempt to service the turntable yourself as opening or removing body
panels may expose you to dangerous voltage or other hazards. Refer all servicing to
qualified service personnel.
8. Changes or modifications to the turntable not expressly approved by the party
responsible for compliance could void the user’s authority to operate the product.
9. Do not use attachments not recommended by the manufacturer as they may cause
hazards.
10. Only place on a flat, sturdy table or use with the cart, stand, tripod or
bracket as specified by the manufacturer or sold with the turntable.
When a cart is used, use caution when moving the cart/turntable
combination to avoid injury from tip-over.
2 3
EN
DE
FR
ES
IT
EN
DE
FR
ES
IT
11. Slots and openings in the cabinet are provided for ventilation and to ensure
reliable operation of the product and to protect it from overheating. Do not block
or cover these openings.
12. Unplug the product during lightning storms or when unused for long periods of
time.
COMPLIANCE WITH FCC REGULATIONS
This device complies with Part 15 of FCC rules. Operation is subject to the following
two conditions:
(1) This device may not cause harmful interference, and
(2) This device must accept any interference received, including interference that may
cause undesired operation.
This equipment has been tested and found to comply with the limits for a Class
B digital device, pursuant to Part 15 of the FCC rules. These limits are designed to
provide reasonable protection against harmful interference in a residential installation.
This equipment generates, uses and can radiate radio frequency energy and, if not
installed and used in accordance with the instructions, may cause harmful interference
to radio communications. However, there is no guarantee that interference will not
occur in a particular installation.
If this equipment does cause harmful interference to radio or television reception,
which can be determined by turning the equipment off and on, the user is
encouraged to try to correct the interference by one or more of the following
measures:
• Reorient or relocate the receiving antenna.
• Increase the separation between the equipment and receiver.
• Connect the equipment into an outlet on a circuit different from that to which the
receiver is connected.
• Consult the dealer or an experienced radio/TV technician for help.
WARNING: Changes or modifications to this unit not expressly approved by the party
responsible for compliance could void the user's authority to operate the equipment.
WARNING:
Cancer and Reproductive Harm - http://www.P65Warnings.ca.gov
For more information go to http://www.1byonebros.com/Compliance/Prop65
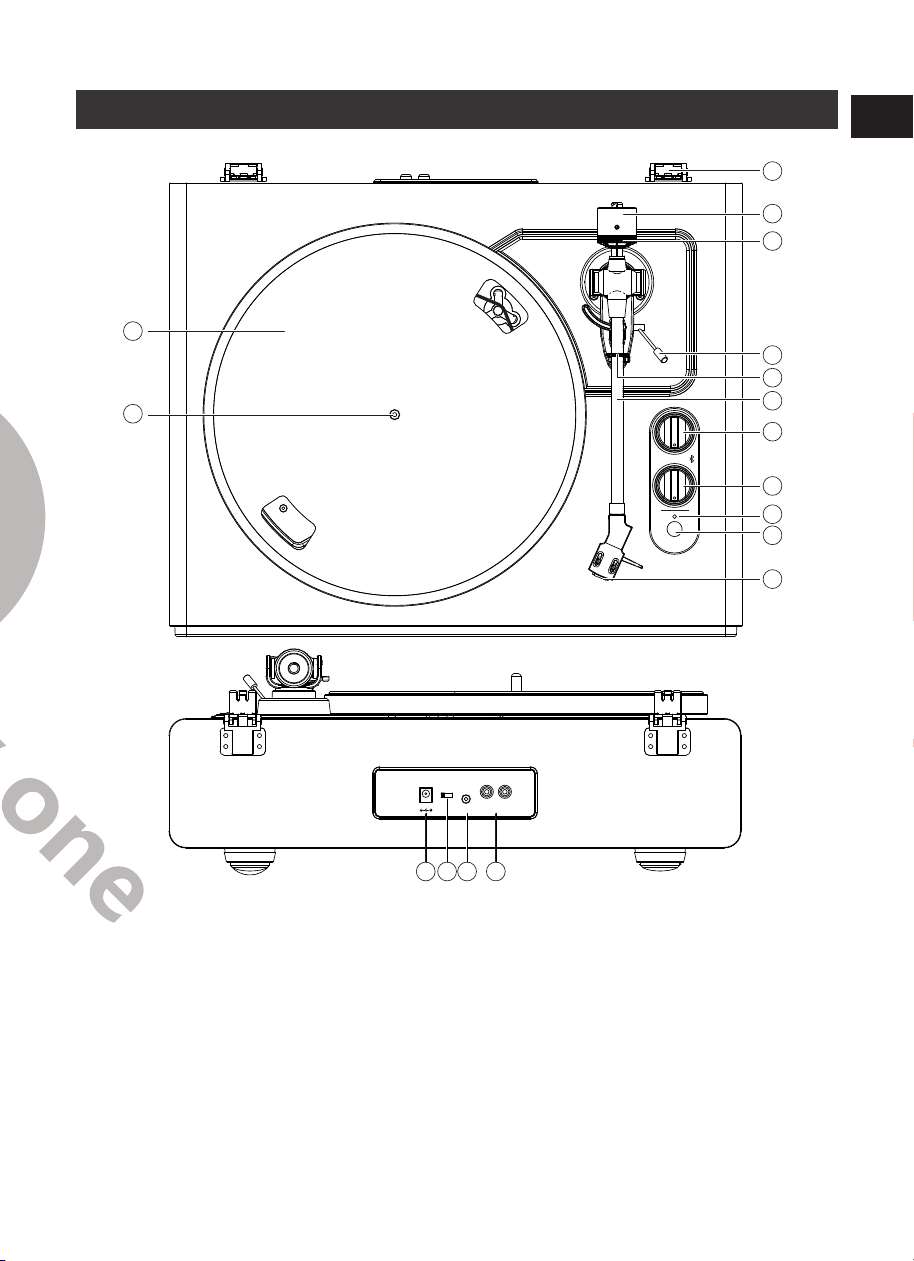
Product Description
R
AUX OUTAUX IN
PHONE
DC12V
LINE OUT
L
1 2 3 4
5
17
16
6
7
8
9
10
11
12
13
14
15
45 33
START
- +
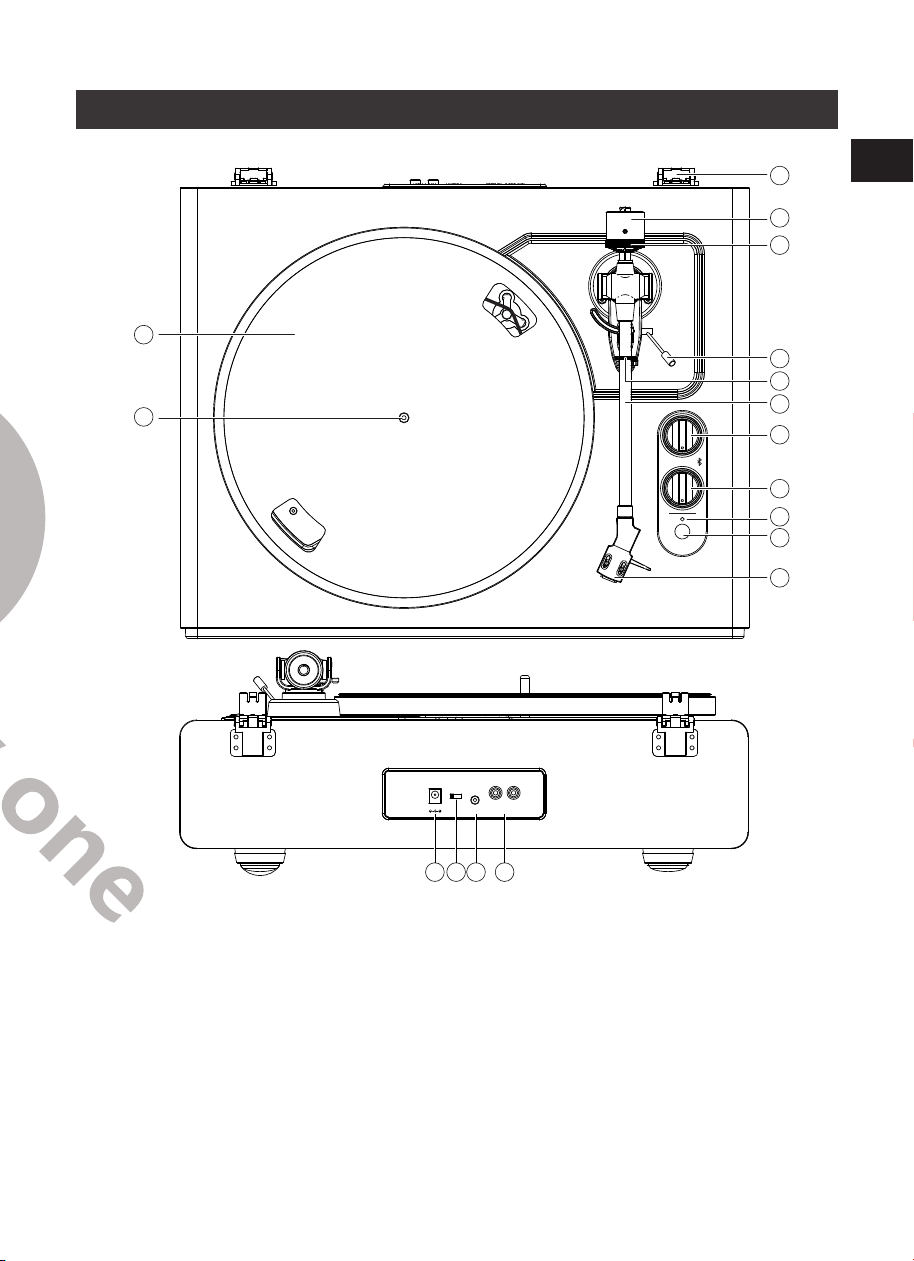
1. DC INPUT Jack
2. Phono & Line Out Switch
3. AUX IN Jack
4. Phono & Aux Out Jacks
5. Lid Hinge
6. Counterweight
7. Tracking Force Dial
8. Tonearm Lift Lever
9. Tonearm Clip
10. Tonearm
11. Function Knob
12. Volume Control
13. Indicator
14. START Button
15. Stylus
16. Turntable Platter
17. Turntable Spindle
2 3
EN
DE
FR
ES
IT
EN
DE
FR
ES
IT
11. Slots and openings in the cabinet are provided for ventilation and to ensure
reliable operation of the product and to protect it from overheating. Do not block
or cover these openings.
12. Unplug the product during lightning storms or when unused for long periods of
time.
COMPLIANCE WITH FCC REGULATIONS
This device complies with Part 15 of FCC rules. Operation is subject to the following
two conditions:
(1) This device may not cause harmful interference, and
(2) This device must accept any interference received, including interference that may
cause undesired operation.
This equipment has been tested and found to comply with the limits for a Class
B digital device, pursuant to Part 15 of the FCC rules. These limits are designed to
provide reasonable protection against harmful interference in a residential installation.
This equipment generates, uses and can radiate radio frequency energy and, if not
installed and used in accordance with the instructions, may cause harmful interference
to radio communications. However, there is no guarantee that interference will not
occur in a particular installation.
If this equipment does cause harmful interference to radio or television reception,
which can be determined by turning the equipment off and on, the user is
encouraged to try to correct the interference by one or more of the following
measures:
• Reorient or relocate the receiving antenna.
• Increase the separation between the equipment and receiver.
• Connect the equipment into an outlet on a circuit different from that to which the
receiver is connected.
• Consult the dealer or an experienced radio/TV technician for help.
WARNING: Changes or modifications to this unit not expressly approved by the party
responsible for compliance could void the user's authority to operate the equipment.
WARNING:
Cancer and Reproductive Harm - http://www.P65Warnings.ca.gov
For more information go to http://www.1byonebros.com/Compliance/Prop65
Product Description
R
AUX OUTAUX IN
PHONE
DC12V
LINE OUT
L
1 2 3 4
5
17
16
6
7
8
9
10
11
12
13
14
15
45 33
START
- +
1. DC INPUT Jack
2. Phono & Line Out Switch
3. AUX IN Jack
4. Phono & Aux Out Jacks
5. Lid Hinge
6. Counterweight
7. Tracking Force Dial
8. Tonearm Lift Lever
9. Tonearm Clip
10. Tonearm
11. Function Knob
12. Volume Control
13. Indicator
14. START Button
15. Stylus
16. Turntable Platter
17. Turntable Spindle
4 5
EN
DE
FR
ES
IT
EN
DE
FR
ES
IT
Included Items
Before installing the turntable, check the package contents to ensure all parts below
are included and free of visible damage. Please retain the original packaging materials
for exchange or return purposes.
1) Turntable Unit
2) Power Adapter
3) Turntable Lid
4) Slip Mat
5) Platter with Belt
6) Counterweight
7) Cartridge Alignment Protractor
8) 45 RPM Adapter
9) Instruction Manual
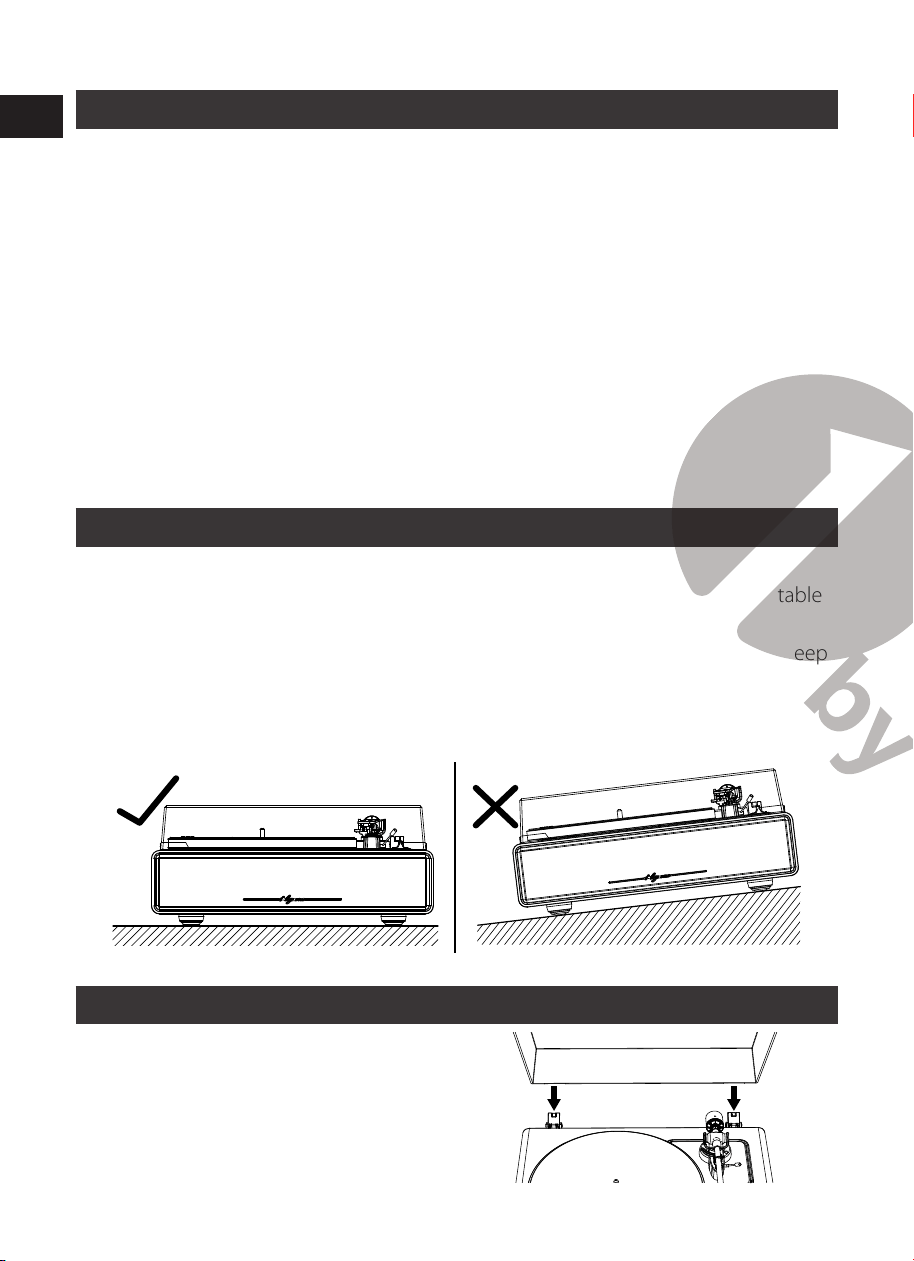
Installing the turntable
• Mount the turntable on a level surface.
• To avoid the effects of vibrations and acoustic pressure, do not mount the turntable
next to items such as speakers.
• The turntable may pick up radio static if placed next to a radio. Therefore, try to keep
the turntable away from transmission devices such as radios.
• If the turntable is near equipment (cell phone, etc.) that emits strong radio waves,
noise may occur.
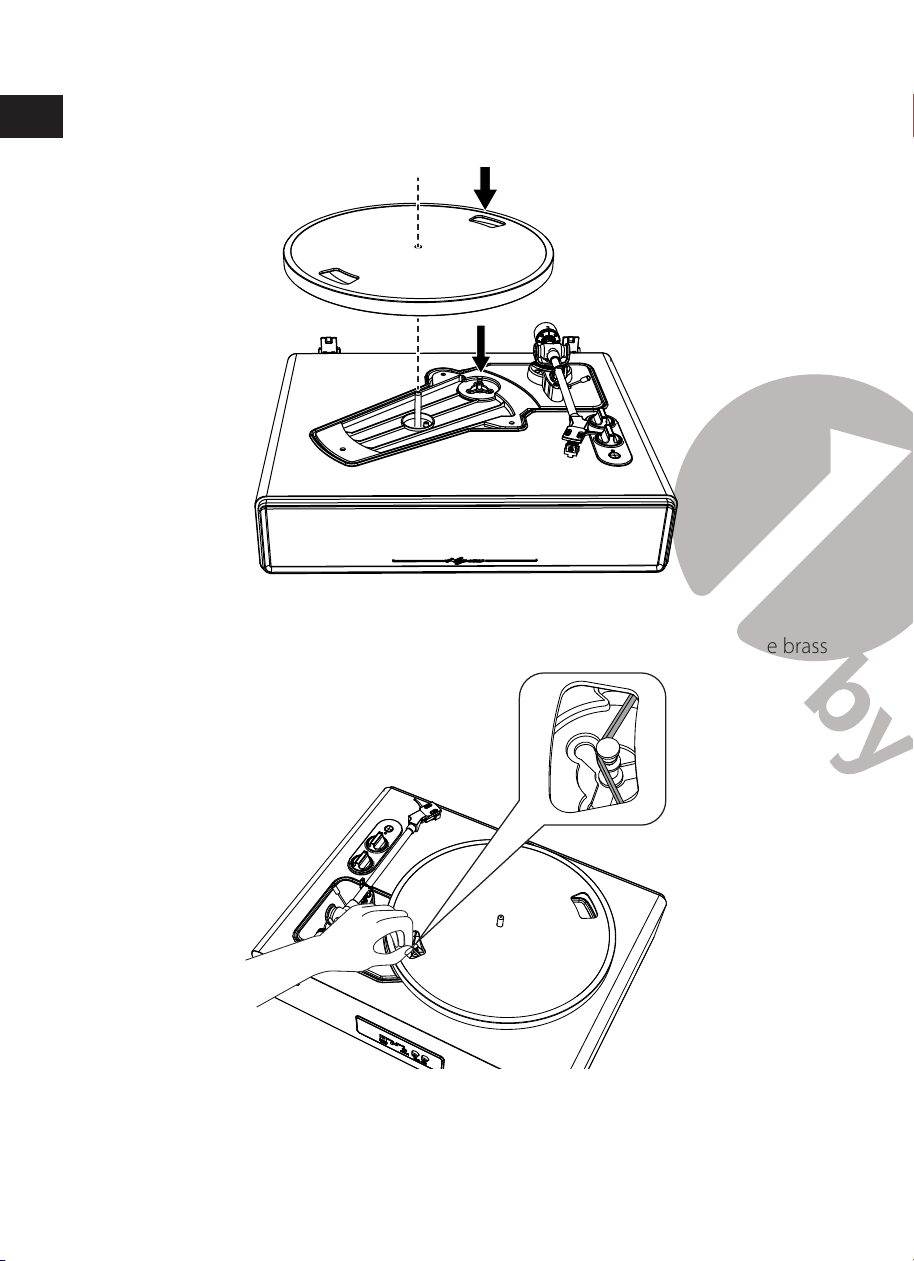
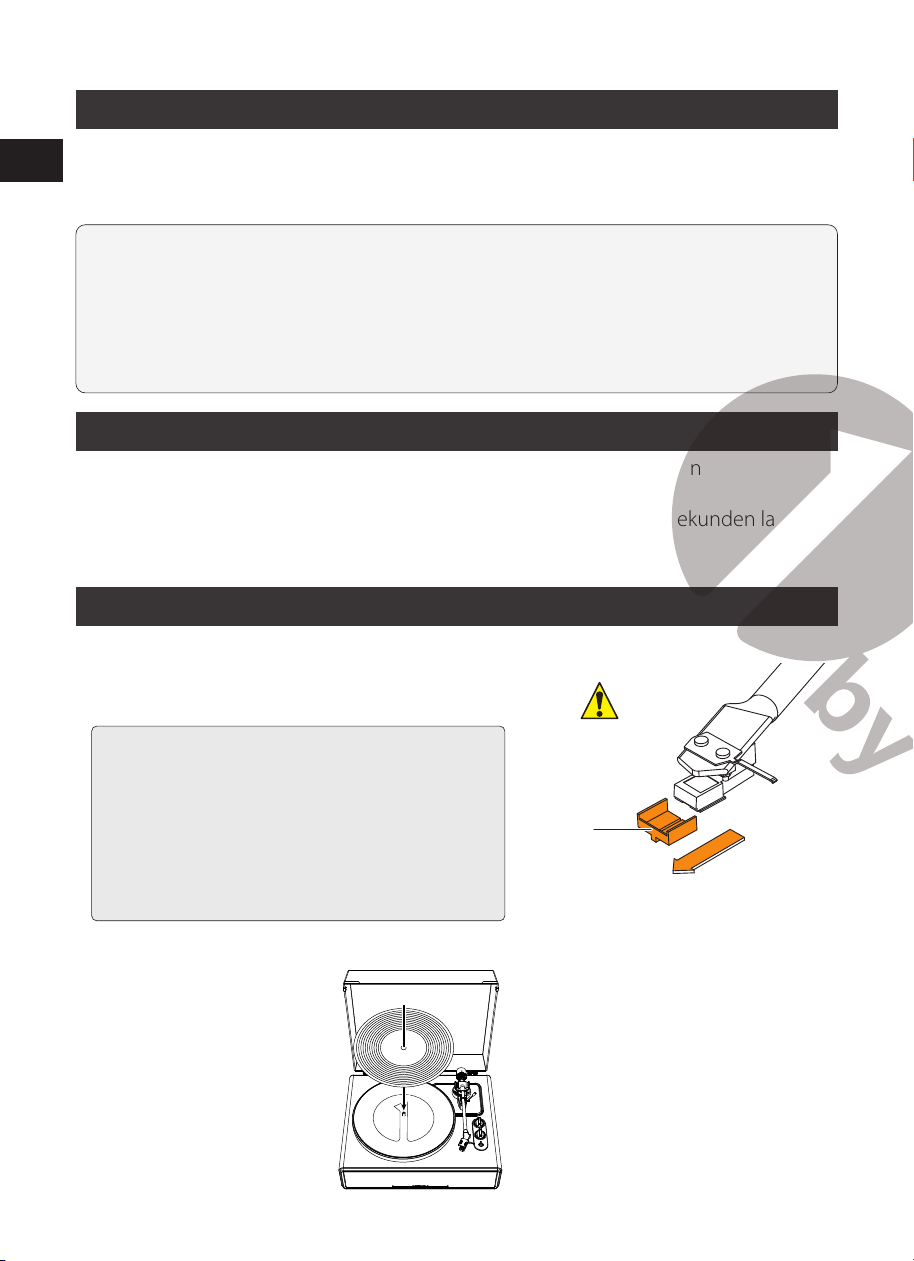
Installing the Lid
Insert the hinge pockets of the lid onto
the hinges of the turntable.
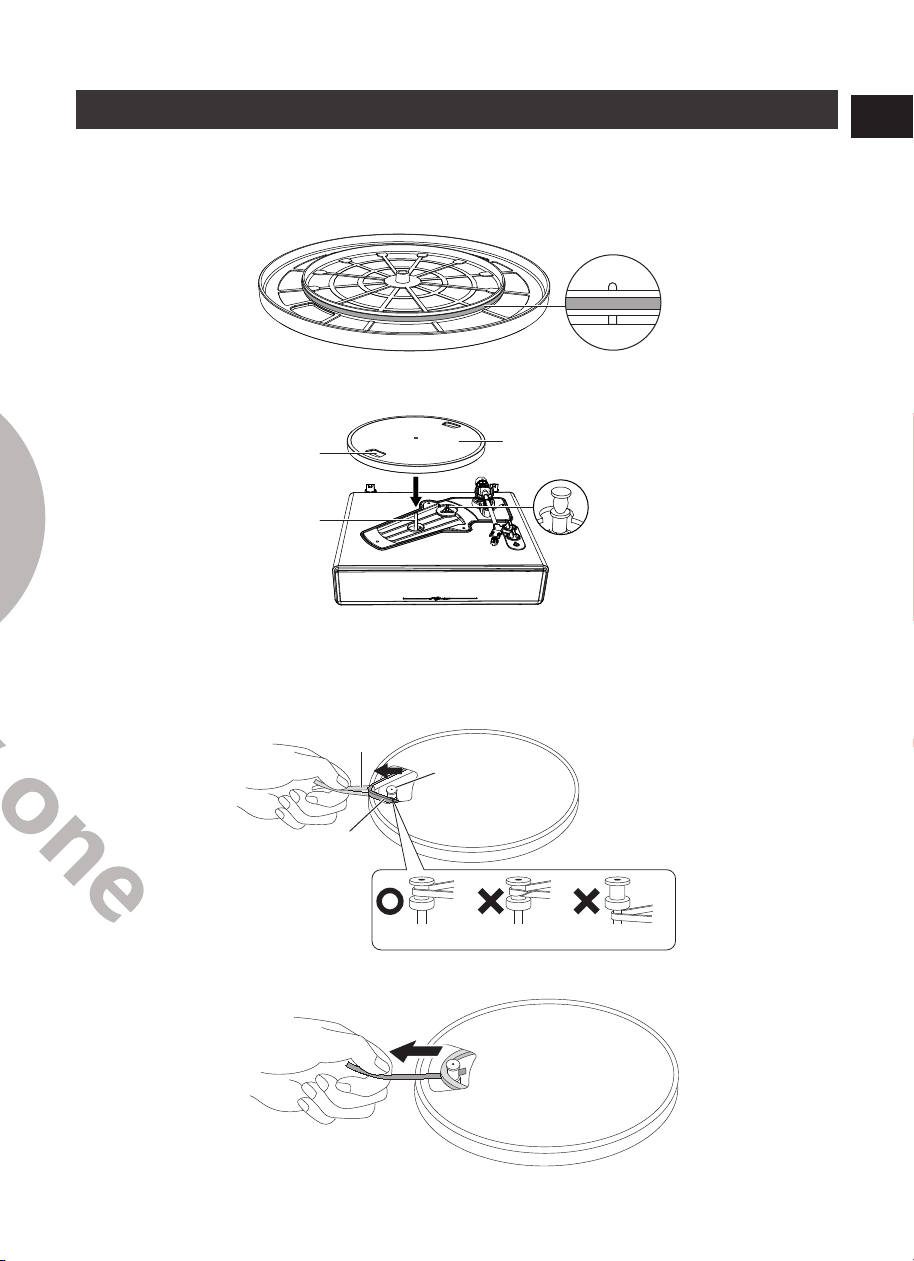
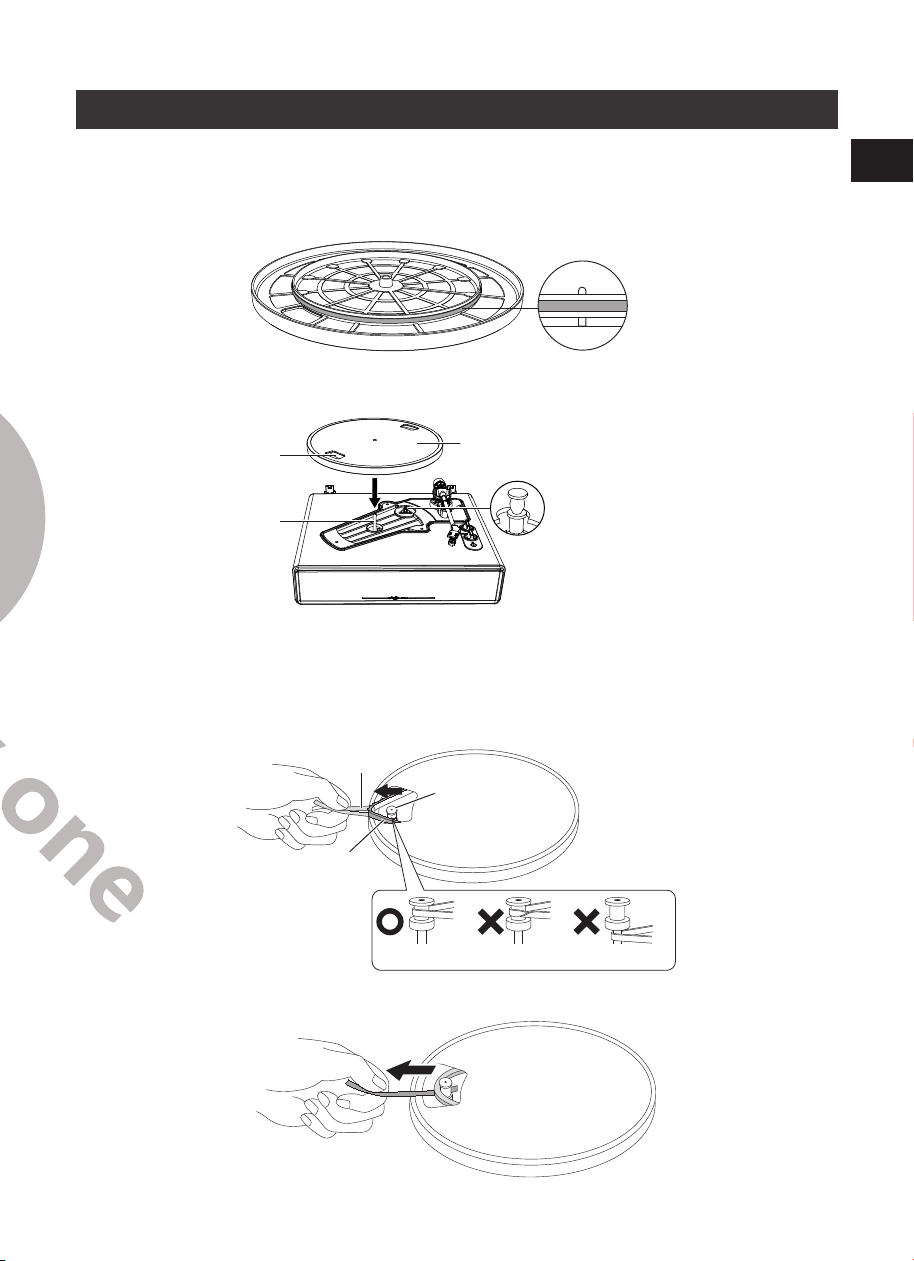
Turntable Platter and Belt Setup
1. Turn the platter over and check the belt position.
Make sure that the drive belt is looped in the middle of the circle. The drive belt
located too high or too low in this circle may cause the drive belt to fall off or speed
to be unstable.
2. Set the platter on the spindle.
Make sure the platter is fully seated on the spindle.
Opening
Platter
Spindle
Motor Pulley
3. Place the belt on the motor pulley.
Align one of the platter openings with the motor pulley, and while pulling both
ends of the red ribbon that comes attached to the belt, place the belt on the motor
pulley, as per the diagram. When doing this, be careful not to twist the belt.
Hook
Belt
Motor Pulley
Straight Twisted Wrong location
4. Remove the red ribbon from the belt.
4 5
EN
DE
FR
ES
IT
EN
DE
FR
ES
IT
Included Items
Before installing the turntable, check the package contents to ensure all parts below
are included and free of visible damage. Please retain the original packaging materials
for exchange or return purposes.
1) Turntable Unit
2) Power Adapter
3) Turntable Lid
4) Slip Mat
5) Platter with Belt
6) Counterweight
7) Cartridge Alignment Protractor
8) 45 RPM Adapter
9) Instruction Manual
Installing the turntable
• Mount the turntable on a level surface.
• To avoid the effects of vibrations and acoustic pressure, do not mount the turntable
next to items such as speakers.
• The turntable may pick up radio static if placed next to a radio. Therefore, try to keep
the turntable away from transmission devices such as radios.
• If the turntable is near equipment (cell phone, etc.) that emits strong radio waves,
noise may occur.
Installing the Lid
Insert the hinge pockets of the lid onto
the hinges of the turntable.
Turntable Platter and Belt Setup
1. Turn the platter over and check the belt position.
Make sure that the drive belt is looped in the middle of the circle. The drive belt
located too high or too low in this circle may cause the drive belt to fall off or speed
to be unstable.
2. Set the platter on the spindle.
Make sure the platter is fully seated on the spindle.
Opening
Platter
Spindle
Motor Pulley
3. Place the belt on the motor pulley.
Align one of the platter openings with the motor pulley, and while pulling both
ends of the red ribbon that comes attached to the belt, place the belt on the motor
pulley, as per the diagram. When doing this, be careful not to twist the belt.
Hook
Belt
Motor Pulley
Straight Twisted Wrong location
4. Remove the red ribbon from the belt.
6 7
EN
DE
FR
ES
IT
EN
DE
FR
ES
IT
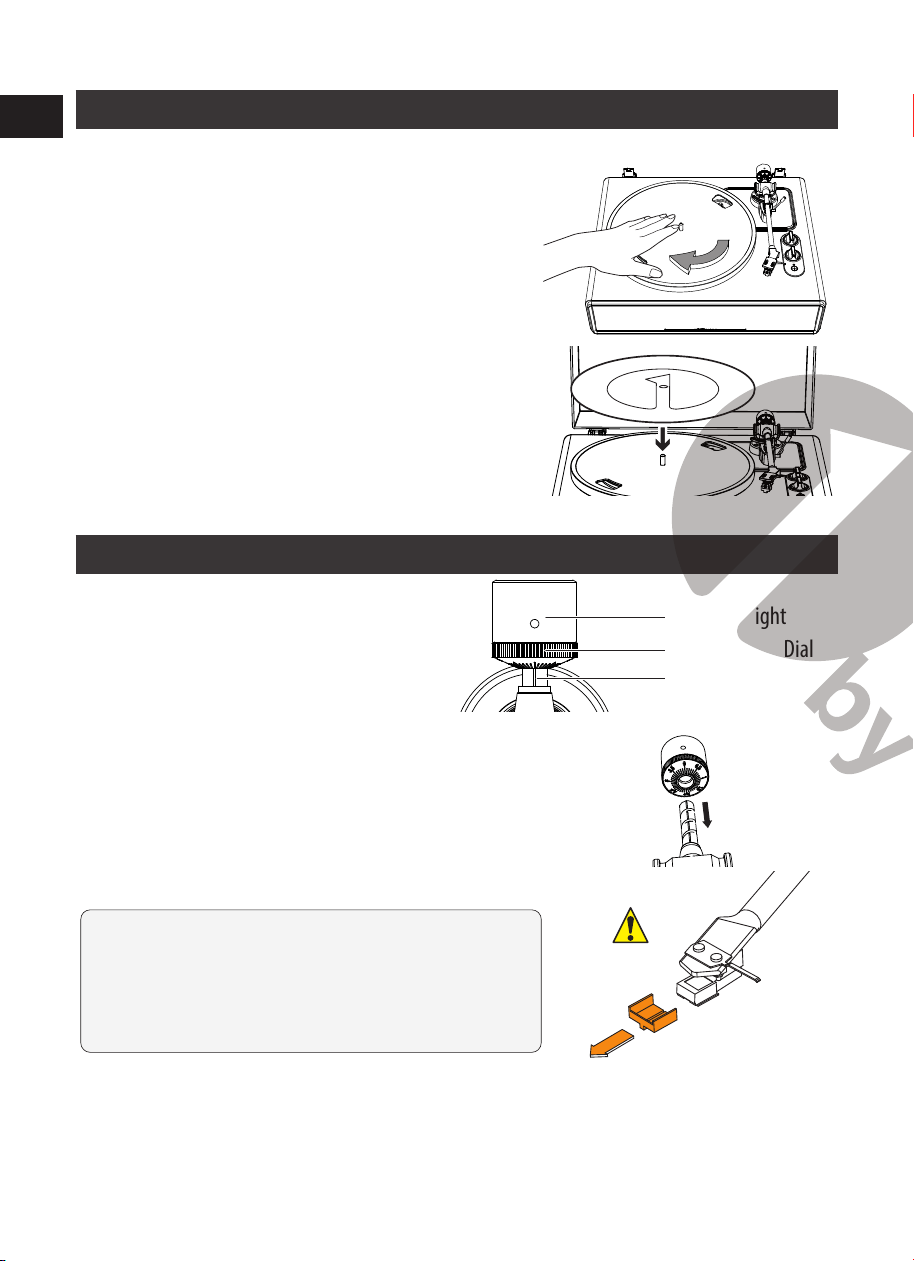
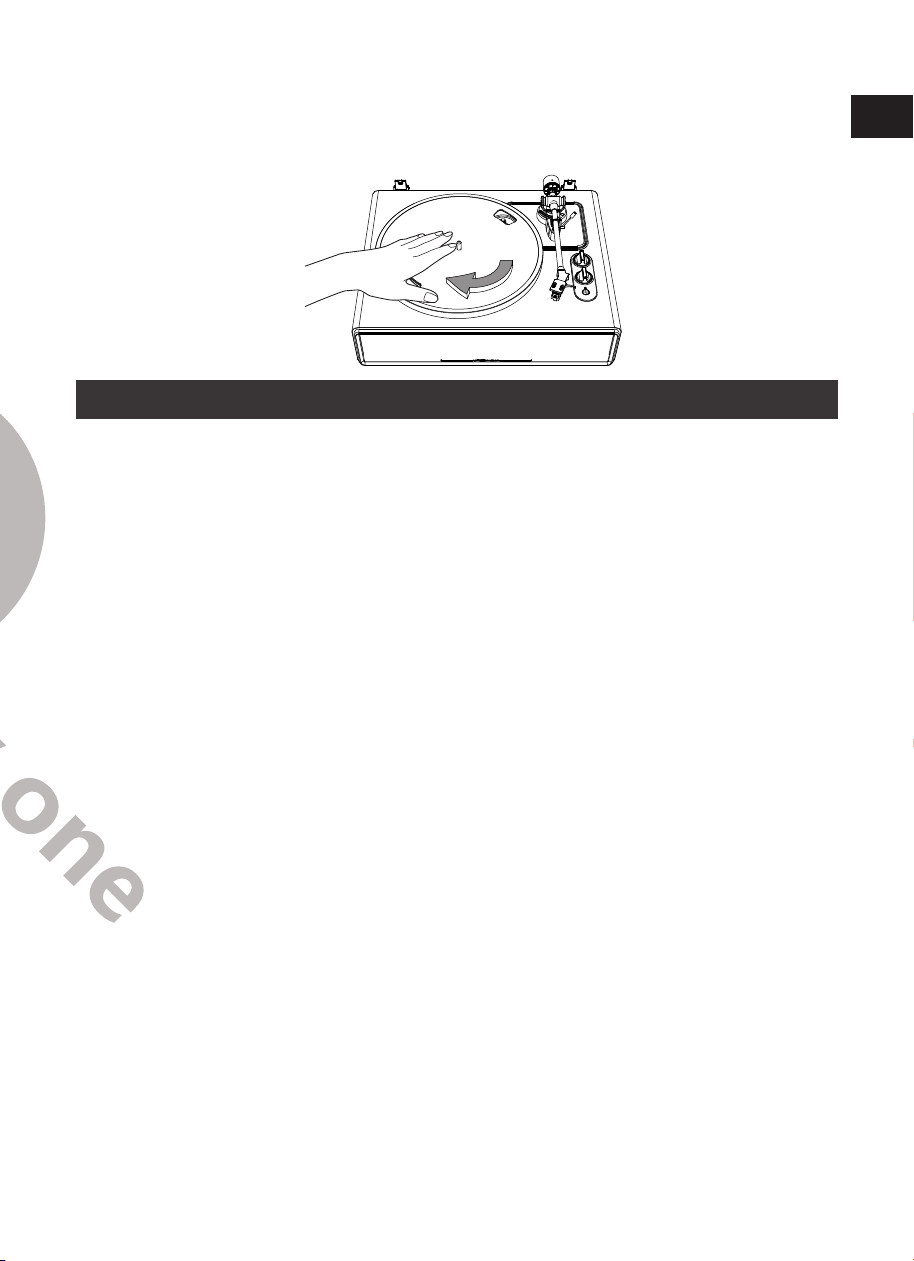
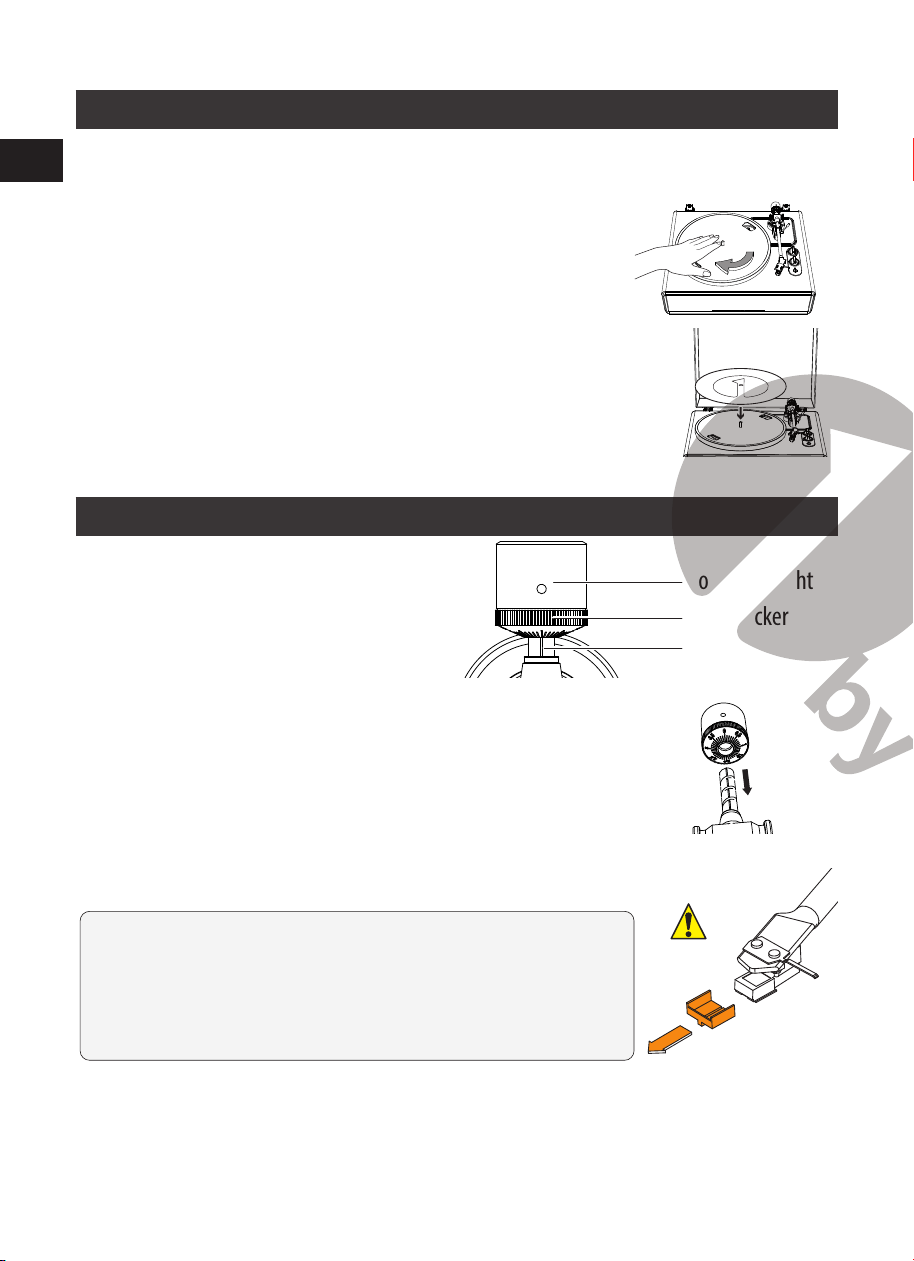
Rotating the Platter
1. Using your hands, slowly rotate
the platter ten times in a clockwise
direction (Figure 1).
2. This step is for resetting the auto
mechanism, getting rid of any twists in
the belt and making sure the belt rides
smoothly along the drive rim on the
underside of the platter.
3. Place the slip mat on top of the platter.
Make sure the 1byone logo on the mat
is facing up (Figure 2).
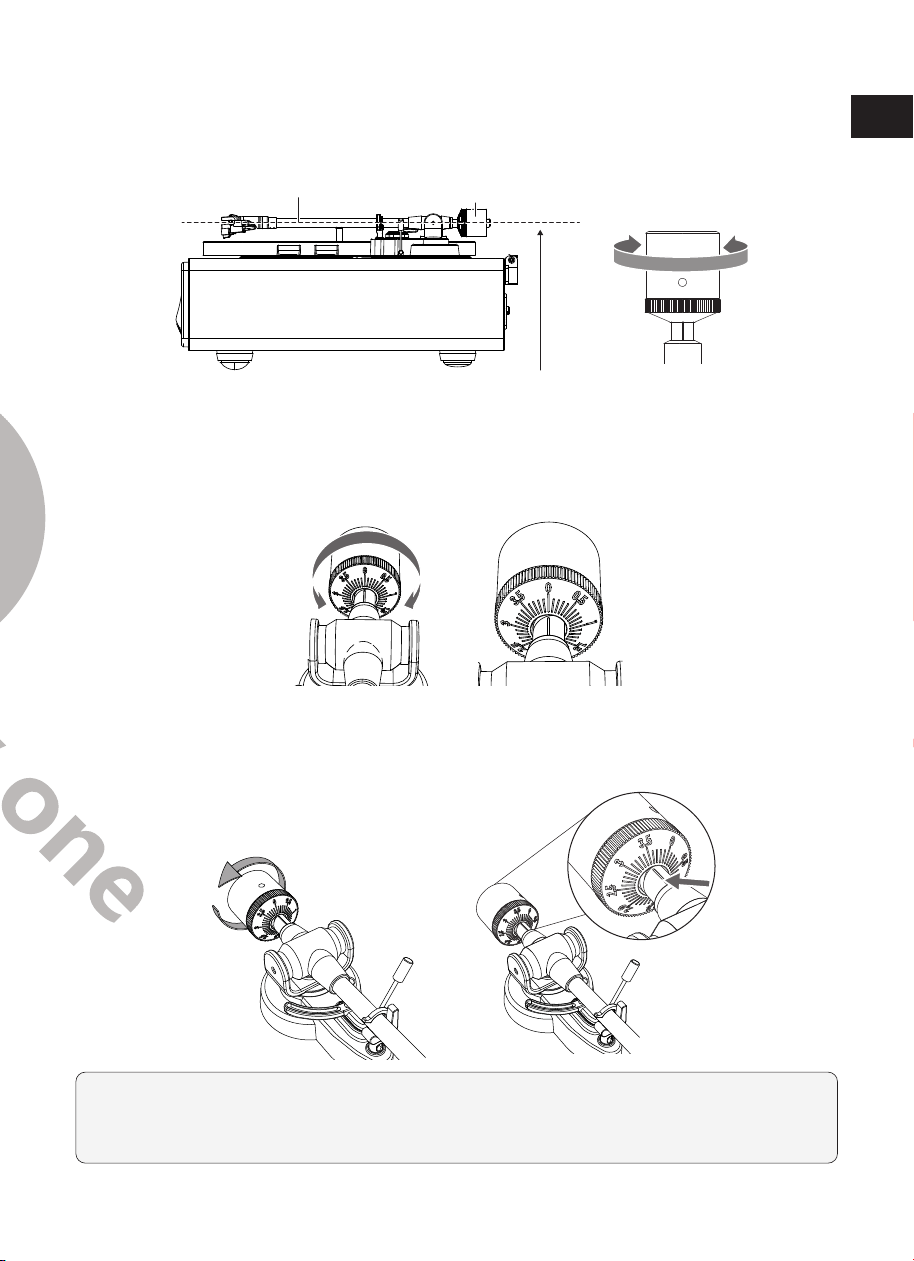
Cartridge Tracking Force Adjustment
The supplied Counterweight is suitable
for cartridges weighing between 3.0-6.0g.
Counterweight
Center Line
Tracking Force Dial
1. Gently push and turn the counterweight onto the
rear of the tonearm (with the dial facing toward the
front of the turntable).
2. Pull the protector straight forward to remove it.
NOTE: Applying a downward force may cause
the stylus to come off the body. Only low volume
is outputted if the stylus has come off, or is about
to come off, so refer to “Replacing the stylus” to
reattach the stylus correctly.
3. Remove the tie-wrap and unlock the tonearm.
4. Lower the tonearm lift lever and position the cartridge in the space between the
tonearm rest and platter.
5. Carefully rotate the counterweight until the tonearm achieves a neutral balance.
The tonearm should return to this balanced position if it is moved up or down. This
adjustment must be done carefully.
Tonearm
Counterweight
Adjust so that tonearm is level and neutrally balanced
6. Once the tonearm is correctly balanced, return the tonearm to its rest. Without
moving the position of the counterweight, gently rotate the tracking force dial until
the zero is in line with black center line on the rear of the tonearm. Check to make
sure the tonearm is still neutrally balanced.
7. Finally, rotate the counterweight and tracking force dial together counterclockwise
(as seen from the front) to adjust the tracking force according to the cartridge
manufacturer’s recommendations.
Note: Each mark on the scale represents 0.
1
g. The recommended tracking force for
the factory-installed cartridge is 3.5g±0.5g. Carefully rotate the tracking force dial.
When “3.5” is centered over the black line on the top of the tonearm
,
please stop.
Figure 1
Figure 2
6 7
EN
DE
FR
ES
IT
EN
DE
FR
ES
IT
Rotating the Platter
1. Using your hands, slowly rotate
the platter ten times in a clockwise
direction (Figure 1).
2. This step is for resetting the auto
mechanism, getting rid of any twists in
the belt and making sure the belt rides
smoothly along the drive rim on the
underside of the platter.
3. Place the slip mat on top of the platter.
Make sure the 1byone logo on the mat
is facing up (Figure 2).
Cartridge Tracking Force Adjustment
The supplied Counterweight is suitable
for cartridges weighing between 3.0-6.0g.
Counterweight
Center Line
Tracking Force Dial
1. Gently push and turn the counterweight onto the
rear of the tonearm (with the dial facing toward the
front of the turntable).
2. Pull the protector straight forward to remove it.
NOTE: Applying a downward force may cause
the stylus to come off the body. Only low volume
is outputted if the stylus has come off, or is about
to come off, so refer to “Replacing the stylus” to
reattach the stylus correctly.
3. Remove the tie-wrap and unlock the tonearm.
4. Lower the tonearm lift lever and position the cartridge in the space between the
tonearm rest and platter.
5. Carefully rotate the counterweight until the tonearm achieves a neutral balance.
The tonearm should return to this balanced position if it is moved up or down. This
adjustment must be done carefully.
Tonearm
Counterweight
Adjust so that tonearm is level and neutrally balanced
6. Once the tonearm is correctly balanced, return the tonearm to its rest. Without
moving the position of the counterweight, gently rotate the tracking force dial until
the zero is in line with black center line on the rear of the tonearm. Check to make
sure the tonearm is still neutrally balanced.
7. Finally, rotate the counterweight and tracking force dial together counterclockwise
(as seen from the front) to adjust the tracking force according to the cartridge
manufacturer’s recommendations.
Note: Each mark on the scale represents 0.
1
g. The recommended tracking force for
the factory-installed cartridge is 3.5g±0.5g. Carefully rotate the tracking force dial.
When “3.5” is centered over the black line on the top of the tonearm
,
please stop.
Figure 1
Figure 2
8 9
EN
DE
FR
ES
IT
EN
DE
FR
ES
IT
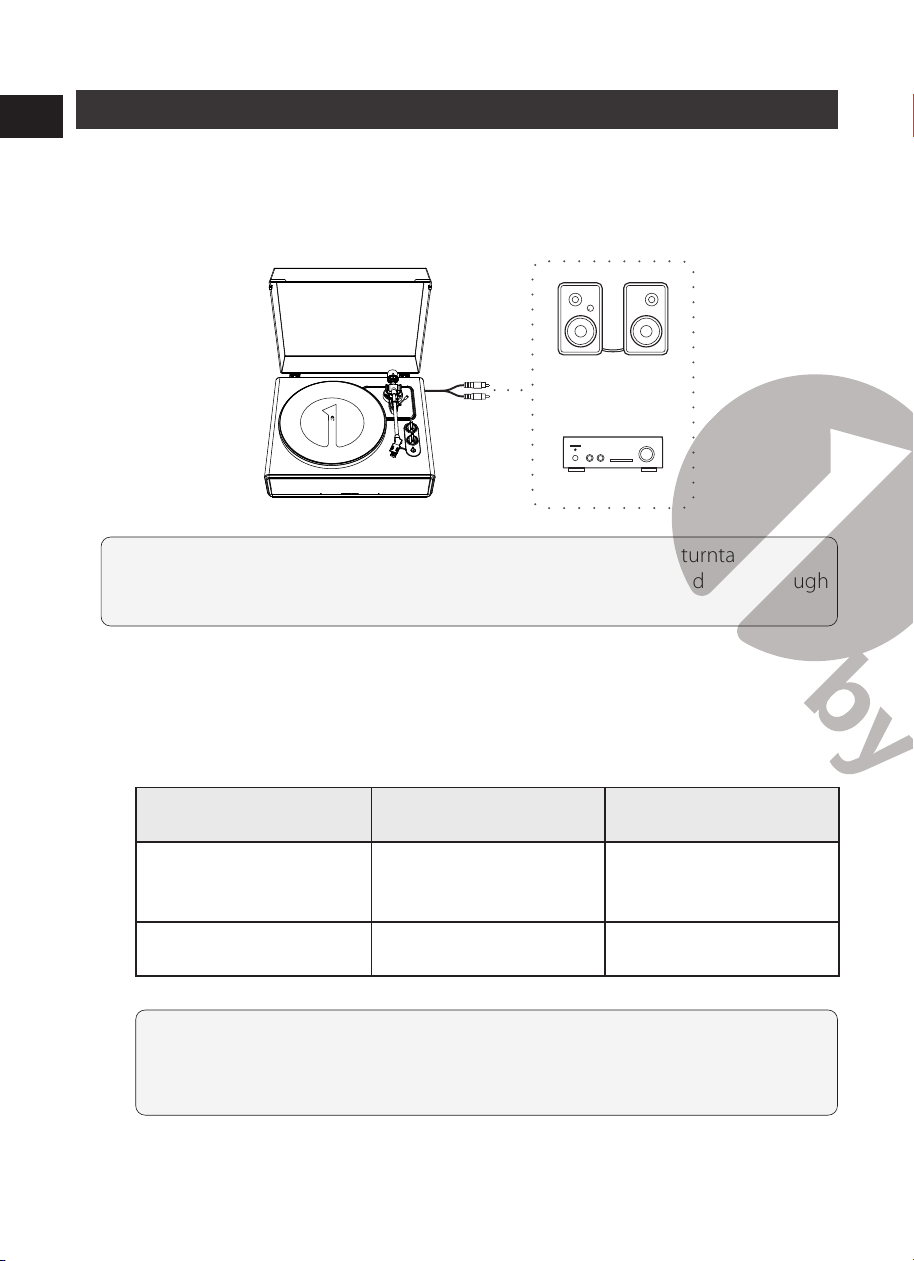
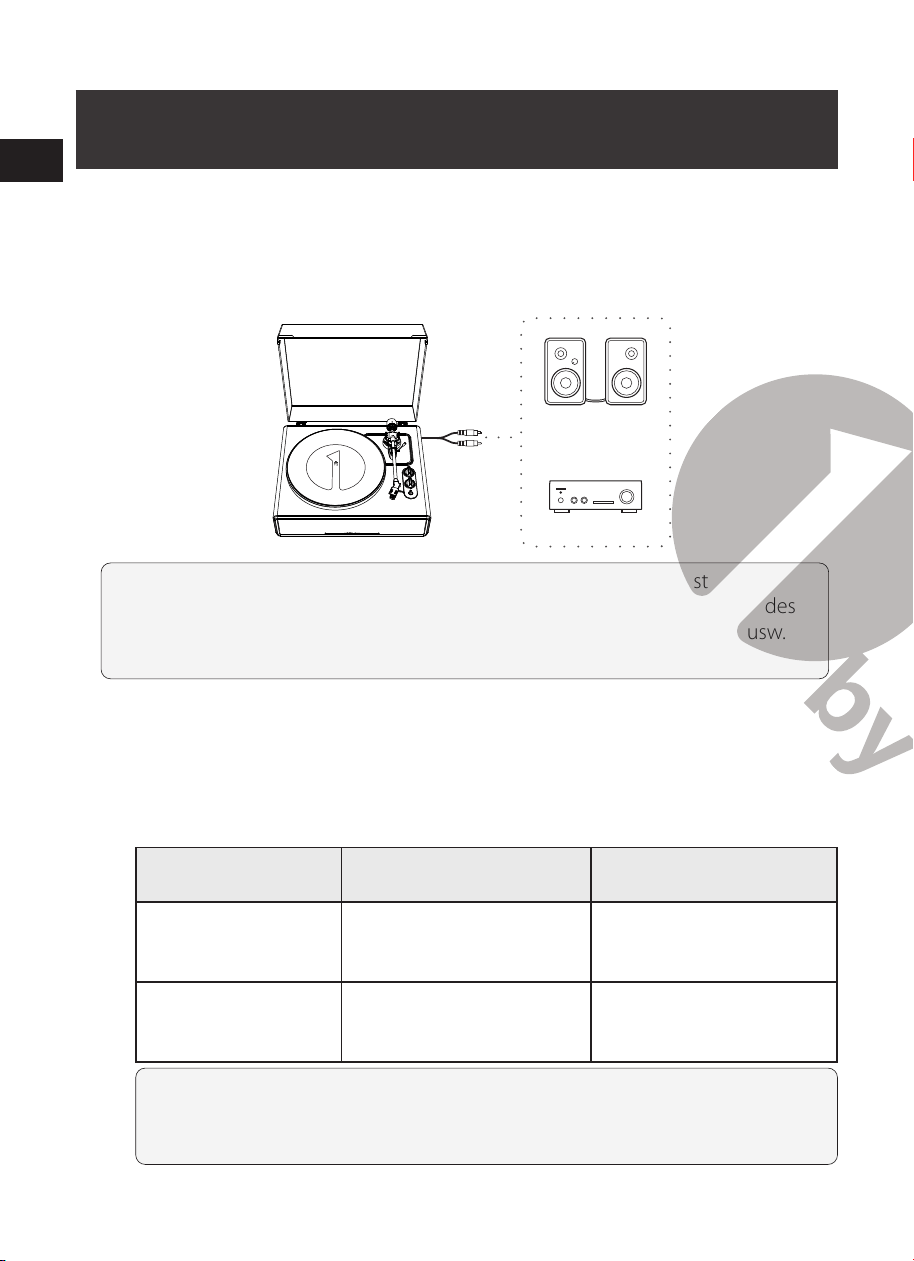
Connection to External Speaker with RCA Audio Cable
This turntable includes 4 built-in speakers and a built-in phone equalizer.
If you wish to use your own amplifier or speakers, please follow the instructions
below:
RCA wired connection
Active Speakers
or
Amplifier
NOTE: In order to achieve the best sound, it is advised to set the turntable
volume to a minimal level. Then the turntable's audio will be played back through
your own amplifier, speakers, etc.
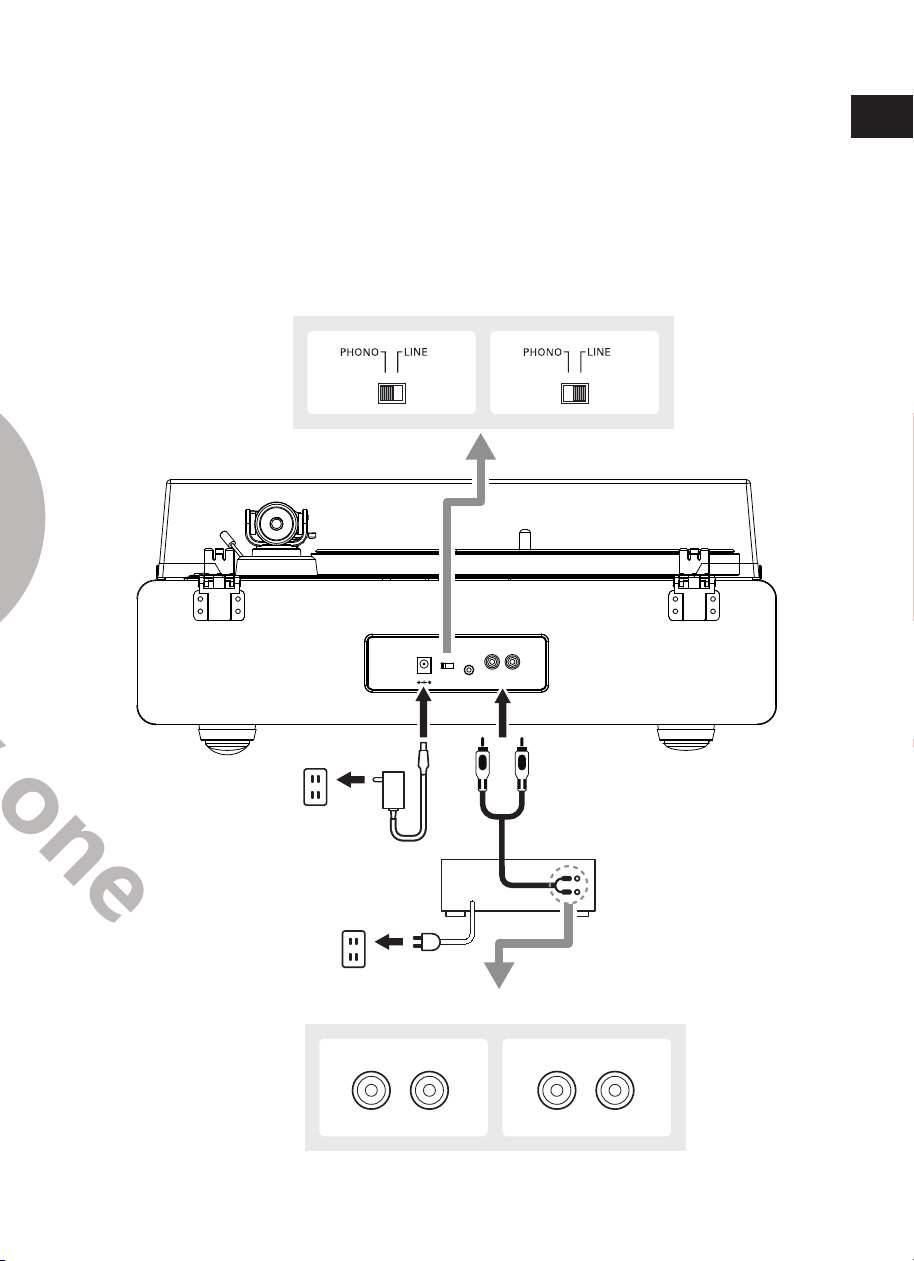
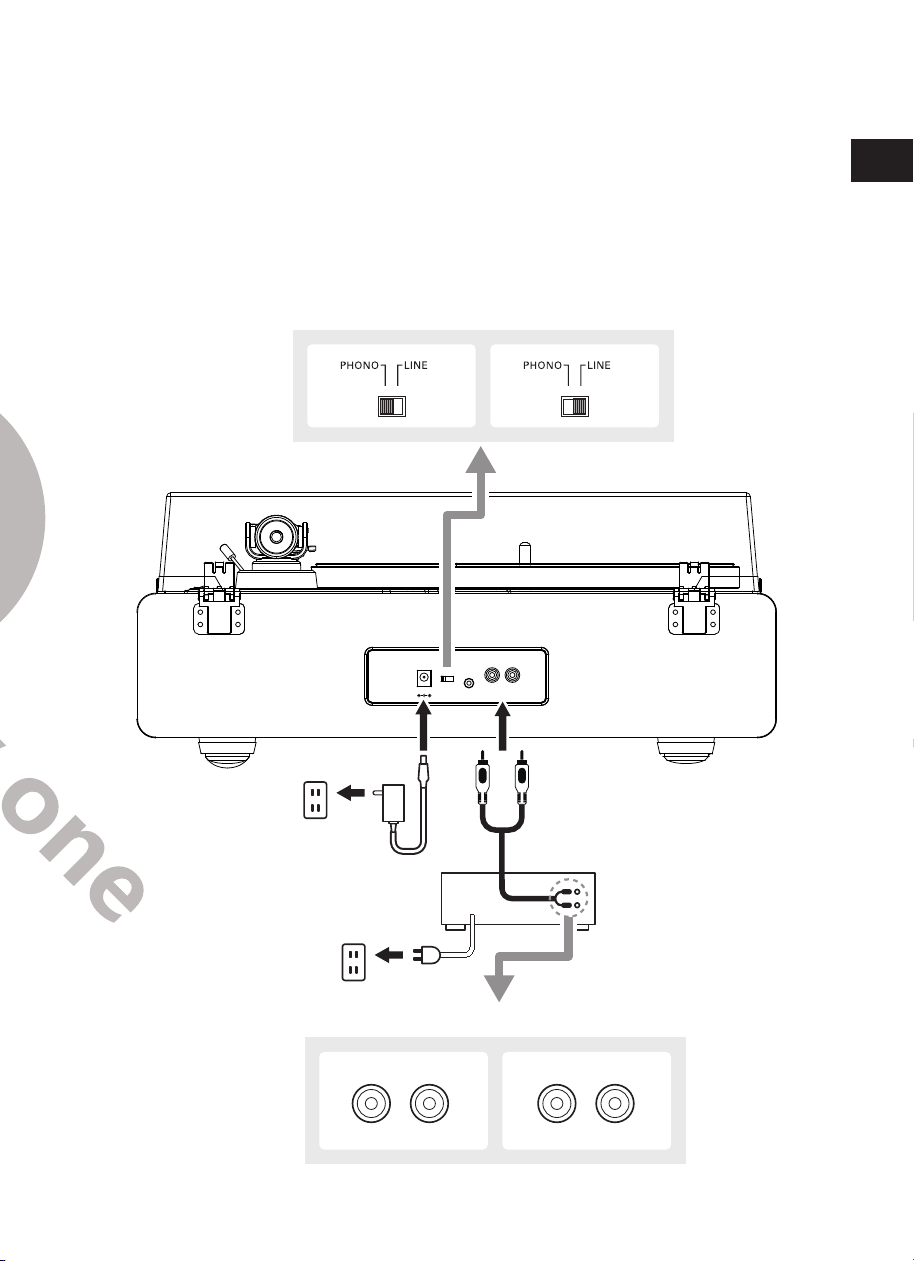
1. Setting pre-amplier selector switch
This product has a built-in phono equalizer function. You can use the product
even if you do not have a phono amplifier or connectable equipment with a
built-in phono amplifier.
Use the pre-amplifier selector switch to set the output, as shown below.
Connected equipment
being used
Position of pre-amplifier
selector switch
Where to connect RCA
audio cable
Device with phono input PHONO Phono input jack and
ground (earth) terminal
of connected equipment
Device without phono
input
LINE AUX or line input jack of
connected equipment
NOTE: The RCA Jacks are not designed to be connected directly to the
passive/unpowered speakers on LINE mode. If connected to the passive
speakers, there will be no sound.
2. Connecting the device
Align the settings for the pre-amplifier selector switch and connect the
RCA audio cable to an input jack that is compatible with the connectable
equipment you are using (amplifier, active speakers, etc.).
• The RCA audio cable's red jack is for the right (R) channel, and the white jack is
for the left (L) channel.
R
AUX OUTAUX IN
PHONE
DC12V
LINE OUT
L
With PHONO Without PHONO
To outlet
AUX
L R
PHONO
L R
With PHONO Without PHONO
To outlet
Connectable equipment
(Amplifier, etc.)
8 9
EN
DE
FR
ES
IT
EN
DE
FR
ES
IT
Connection to External Speaker with RCA Audio Cable
This turntable includes 4 built-in speakers and a built-in phone equalizer.
If you wish to use your own amplifier or speakers, please follow the instructions
below:
RCA wired connection
Active Speakers
or
Amplifier
NOTE: In order to achieve the best sound, it is advised to set the turntable
volume to a minimal level. Then the turntable's audio will be played back through
your own amplifier, speakers, etc.
1. Setting pre-amplier selector switch
This product has a built-in phono equalizer function. You can use the product
even if you do not have a phono amplifier or connectable equipment with a
built-in phono amplifier.
Use the pre-amplifier selector switch to set the output, as shown below.
Connected equipment
being used
Position of pre-amplifier
selector switch
Where to connect RCA
audio cable
Device with phono input PHONO Phono input jack and
ground (earth) terminal
of connected equipment
Device without phono
input
LINE AUX or line input jack of
connected equipment
NOTE: The RCA Jacks are not designed to be connected directly to the
passive/unpowered speakers on LINE mode. If connected to the passive
speakers, there will be no sound.
2. Connecting the device
Align the settings for the pre-amplifier selector switch and connect the
RCA audio cable to an input jack that is compatible with the connectable
equipment you are using (amplifier, active speakers, etc.).
• The RCA audio cable's red jack is for the right (R) channel, and the white jack is
for the left (L) channel.
R
AUX OUTAUX IN
PHONE
DC12V
LINE OUT
L
With PHONO Without PHONO
To outlet
AUX
L R
PHONO
L R
With PHONO Without PHONO
To outlet
Connectable equipment
(Amplifier, etc.)
10 11
EN
DE
FR
ES
IT
EN
DE
FR
ES
IT
Main Power Connection
1. Insert the DC plug of the AC adapter cord into the DC INPUT Jack at the back of the
turntable.
2. Plug the AC adapter into a normal power outlet.
NOTE:
Do not plug the AC power adapter into a power outlet before all turntable
assembly is completed. Before turning on turntable power, recheck all connections to
make sure they are correct and secure. Always turn off the turntable before connecting
or disconnecting from power.
Power Management Function
The turntable will automatically go into standby mode after 20 minutes of inactivity.
The indicator light will turn off.
To resume operation, press and hold the START button for 3 seconds.
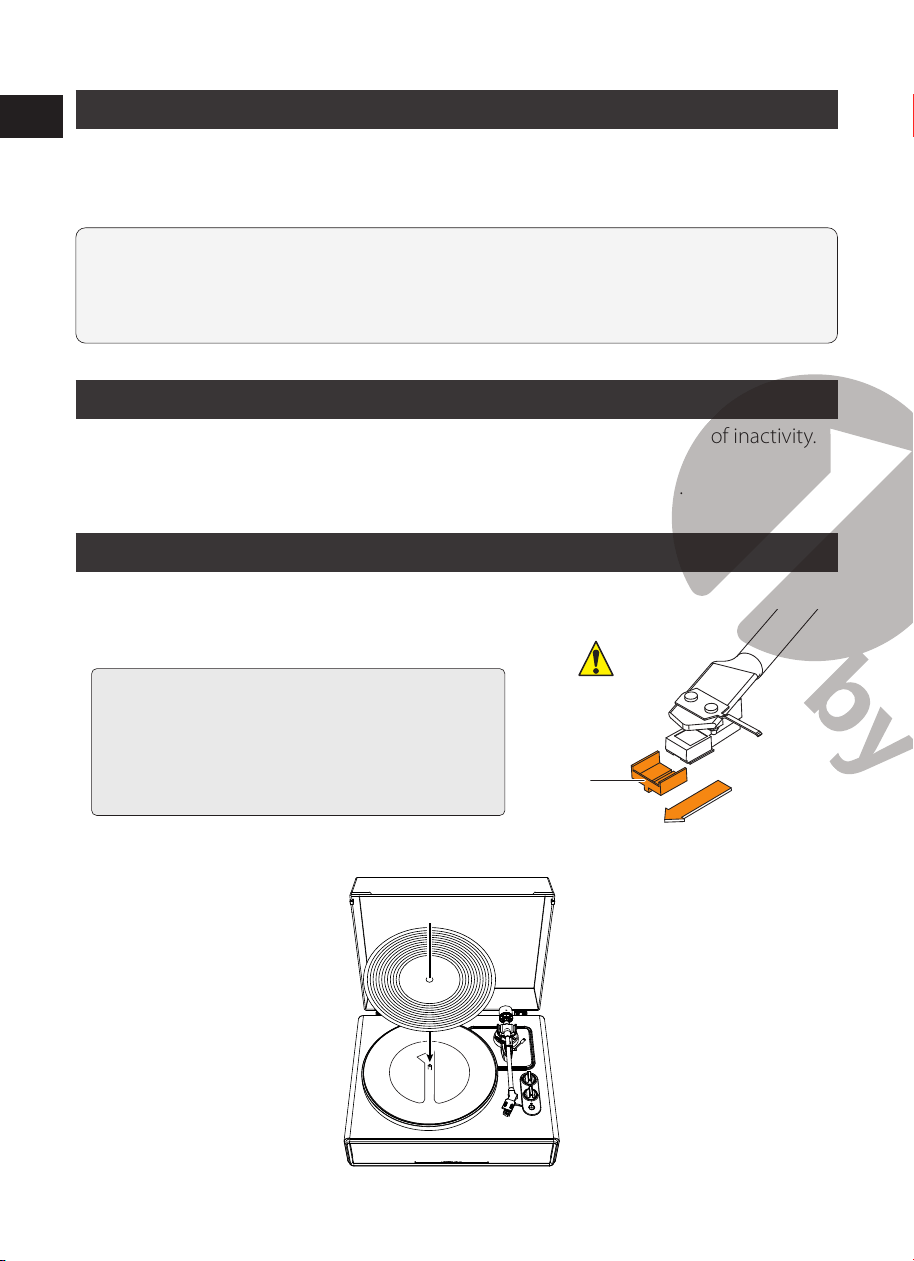
Playing a Record
1. Before playing a record
1.1 Pull the protector straight forward to remove
it.
NOTE: Applying a downward force may cause
the stylus to come off the body. Only low
volume is outputted if the stylus has come off,
or is about to come off, so refer to “Replacing
the stylus” to reattach the stylus correctly.
Protector
1.2 Place the record on the felt mat so that the center hole aligns with the spindle.
2. Turntable Operation
Sufficiently lower the volume of the amplifier and speakers first.
2.1 Connect the included power adapter to the turntable, press and hold the START
button for 3 seconds. The turntable will turn on. The indicator light will turn red.
2.2 Remove the stylus protector from the stylus.
2.3 Place the record on the slip mat.
2.4 Rotate the function knob to switch between 33 and 45 RPM speeds according to
the type of record.
2.5 Press the START button once and the platter will play or pause.
2.6 Unlock the tonearm clip and set the tonearm lift lever to the up position.
2.7 Position the tonearm over the desired location (groove) on the record.
2.8 Carefully lower the tonearm on the record.
2.9 Turn up the volume of the turntable as needed.
2.10 When you are finished playing the record, raise the tonearm, return it to rest on
the arm clip and long press the START button to turn off the turntable.
NOTE:
1. If the silent pause time between each track is longer than 3 minutes, the platter
will stop spinning automatically to avoid damaging the record. The indicator light
will turn red. To resume operation, press the START button.
2. If the felt mat gets dirty, it can easily scratch the record, so remove the felt mat
periodically and wipe off any dust.
3. To prevent the record from getting scratched and warping, remove it after use.
4. Do not use a disk stabilizer.
10 11
EN
DE
FR
ES
IT
EN
DE
FR
ES
IT
Main Power Connection
1. Insert the DC plug of the AC adapter cord into the DC INPUT Jack at the back of the
turntable.
2. Plug the AC adapter into a normal power outlet.
NOTE:
Do not plug the AC power adapter into a power outlet before all turntable
assembly is completed. Before turning on turntable power, recheck all connections to
make sure they are correct and secure. Always turn off the turntable before connecting
or disconnecting from power.
Power Management Function
The turntable will automatically go into standby mode after 20 minutes of inactivity.
The indicator light will turn off.
To resume operation, press and hold the START button for 3 seconds.
Playing a Record
1. Before playing a record
1.1 Pull the protector straight forward to remove
it.
NOTE: Applying a downward force may cause
the stylus to come off the body. Only low
volume is outputted if the stylus has come off,
or is about to come off, so refer to “Replacing
the stylus” to reattach the stylus correctly.
Protector
1.2 Place the record on the felt mat so that the center hole aligns with the spindle.
2. Turntable Operation
Sufficiently lower the volume of the amplifier and speakers first.
2.1 Connect the included power adapter to the turntable, press and hold the START
button for 3 seconds. The turntable will turn on. The indicator light will turn red.
2.2 Remove the stylus protector from the stylus.
2.3 Place the record on the slip mat.
2.4 Rotate the function knob to switch between 33 and 45 RPM speeds according to
the type of record.
2.5 Press the START button once and the platter will play or pause.
2.6 Unlock the tonearm clip and set the tonearm lift lever to the up position.
2.7 Position the tonearm over the desired location (groove) on the record.
2.8 Carefully lower the tonearm on the record.
2.9 Turn up the volume of the turntable as needed.
2.10 When you are finished playing the record, raise the tonearm, return it to rest on
the arm clip and long press the START button to turn off the turntable.
NOTE:
1. If the silent pause time between each track is longer than 3 minutes, the platter
will stop spinning automatically to avoid damaging the record. The indicator light
will turn red. To resume operation, press the START button.
2. If the felt mat gets dirty, it can easily scratch the record, so remove the felt mat
periodically and wipe off any dust.
3. To prevent the record from getting scratched and warping, remove it after use.
4. Do not use a disk stabilizer.
12 13
EN
DE
FR
ES
IT
EN
DE
FR
ES
IT
Bluetooth Operation
1. Connect the
included power adapter to the turntable and long press the START
button. The indicator light will turn red.
2. Rotate the function knob to Bluetooth mode. The indicator light will turn blue and
flash quickly. You will hear an activation sound from the turntable.
3. Turn on the Bluetooth feature of your media device and search for and select
“1byone BS020” to pair the media device and turntable.
4. Once your media device is successfully paired with the turntable, the turntable will
play a short confirmation sound. The blue indicator light will flash slowly.
5. Play and stream music from your media device to the turntable. The indicator light
will become solid.
Note: Bluetooth version: 5.0
AUX-IN Operation
This turntable includes an auxiliary audio signal input jack for connecting
external audio devices like MP3 players, CD players, and older, non-
dockable iPods so you can listen to your external source through the
turntable's speakers.
1. Use an audio cable (not included) with one 3.5 mm stereo connection on each end
of the cable.
2. Plug one end into the AUX-IN jack on the turntable and the other end to the Line
Out jack of the audio device.
3. Power on the turntable and audio device. The indicator light of turntable will be red.
4. The volume level can be controlled through the turntable. Operate all the functions
on the auxiliary device as usual.
5. Please note that AUX-IN function is a first-priority function. Even if the indicator light
for PHONO/BT is on, these functions won't work while the AUX-IN function is in use.
Please unplug the AUX-IN cable before using the PHONO/BT functions.
Care
Turntable Body
• When the turntable body is dirty or dusty, first disconnect the AC adapter and then
wipe off the dirt and dust with a soft, dry cloth.
• Do not use benzenes, thinners, etc.
• When storing the product for a long time, disconnect the AC adapter from the
outlet and wrap the product in plastic. Do not allow the product or packaging to
become damp. The drive belt should be removed to prevent unequal stretching.
Stylus Tip
• If dirt and grime are stuck to the stylus tip, clean it
with a commercially sold brush.
• We recommend using a stylus cleaner (not
included) if the stylus tip is considerably dirty.
Clean the stylus tip by moving the brush from the
rear to the front of the stylus tip.
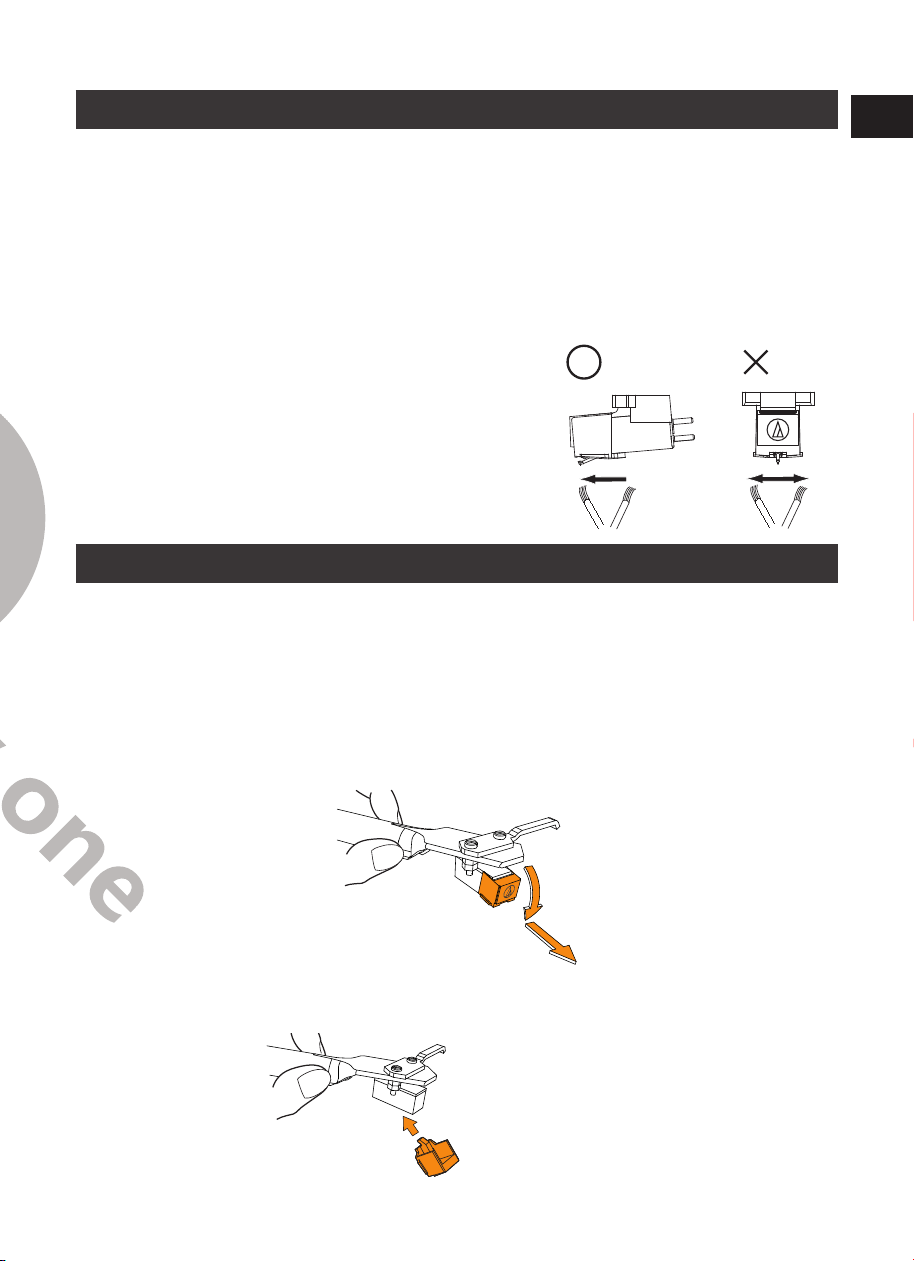
Replacing the Stylus
It's suggested to replace the stylus after 400 hours of use.
Removing the Stylus
• In addition to the deterioration of sound quality, records may also be damaged as
the cartridge’s stylus tip wears down.
• Be sure to disconnect the product’s AC adapter from the outlet.
• When replacing the stylus, hold the headshell and the cartridge body tightly.
Rotate the front of the stylus in a forward and down motion.
Installing a New Replacement Stylus
1. Mount the new replacement stylus to the cartridge.
Engage in body first
NOTE:
1. Make sure the tone arm is securely locked to avoid any damage.
2. When you are done, don’t forget to turn off the power on the turntable and your
external device.
12 13
EN
DE
FR
ES
IT
EN
DE
FR
ES
IT
Bluetooth Operation
1. Connect the
included power adapter to the turntable and long press the START
button. The indicator light will turn red.
2. Rotate the function knob to Bluetooth mode. The indicator light will turn blue and
flash quickly. You will hear an activation sound from the turntable.
3. Turn on the Bluetooth feature of your media device and search for and select
“1byone BS020” to pair the media device and turntable.
4. Once your media device is successfully paired with the turntable, the turntable will
play a short confirmation sound. The blue indicator light will flash slowly.
5. Play and stream music from your media device to the turntable. The indicator light
will become solid.
Note: Bluetooth version: 5.0
AUX-IN Operation
This turntable includes an auxiliary audio signal input jack for connecting
external audio devices like MP3 players, CD players, and older, non-
dockable iPods so you can listen to your external source through the
turntable's speakers.
1. Use an audio cable (not included) with one 3.5 mm stereo connection on each end
of the cable.
2. Plug one end into the AUX-IN jack on the turntable and the other end to the Line
Out jack of the audio device.
3. Power on the turntable and audio device. The indicator light of turntable will be red.
4. The volume level can be controlled through the turntable. Operate all the functions
on the auxiliary device as usual.
5. Please note that AUX-IN function is a first-priority function. Even if the indicator light
for PHONO/BT is on, these functions won't work while the AUX-IN function is in use.
Please unplug the AUX-IN cable before using the PHONO/BT functions.
Care
Turntable Body
• When the turntable body is dirty or dusty, first disconnect the AC adapter and then
wipe off the dirt and dust with a soft, dry cloth.
• Do not use benzenes, thinners, etc.
• When storing the product for a long time, disconnect the AC adapter from the
outlet and wrap the product in plastic. Do not allow the product or packaging to
become damp. The drive belt should be removed to prevent unequal stretching.
Stylus Tip
• If dirt and grime are stuck to the stylus tip, clean it
with a commercially sold brush.
• We recommend using a stylus cleaner (not
included) if the stylus tip is considerably dirty.
Clean the stylus tip by moving the brush from the
rear to the front of the stylus tip.
Replacing the Stylus
It's suggested to replace the stylus after 400 hours of use.
Removing the Stylus
• In addition to the deterioration of sound quality, records may also be damaged as
the cartridge’s stylus tip wears down.
• Be sure to disconnect the product’s AC adapter from the outlet.
• When replacing the stylus, hold the headshell and the cartridge body tightly.
Rotate the front of the stylus in a forward and down motion.
Installing a New Replacement Stylus
1. Mount the new replacement stylus to the cartridge.
Engage in body first
NOTE:
1. Make sure the tone arm is securely locked to avoid any damage.
2. When you are done, don’t forget to turn off the power on the turntable and your
external device.
14 15
EN
DE
FR
ES
IT
EN
DE
FR
ES
IT
2. Lift the stylus up until you hear a click.
3. Make sure there is no gap between the headshell and the cartridge.
Replacing the Belt
• The belt is a consumable part. Replace the belt if the speed of playback slows down
or irregular rotation occurs. As a rule of thumb, we suggest replacing the belt once a
year.
• Before replacing the belt, be sure to disconnect the product’s AC adapter from the
outlet.
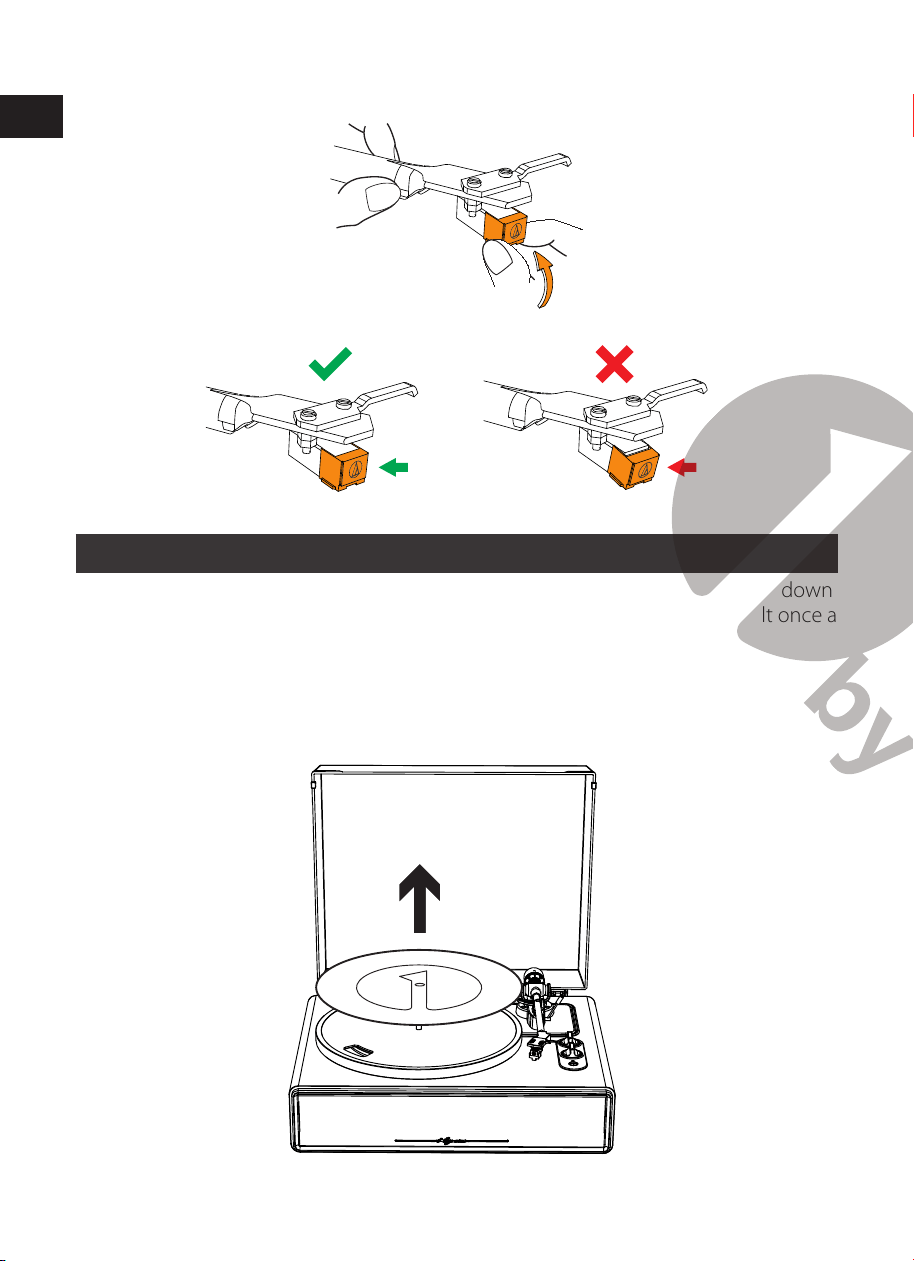
1. Remove the slip mat.
2. Remove the belt from the motor pulley.
3. Remove the main platter and then remove the old belt.
4. Turn the platter over and you will see a raised circle. Loop the new belt along
the middle circle.

14 15
EN
DE
FR
ES
IT
EN
DE
FR
ES
IT
2. Lift the stylus up until you hear a click.
3. Make sure there is no gap between the headshell and the cartridge.
Replacing the Belt
• The belt is a consumable part. Replace the belt if the speed of playback slows down
or irregular rotation occurs. As a rule of thumb, we suggest replacing the belt once a
year.
• Before replacing the belt, be sure to disconnect the product’s AC adapter from the
outlet.
1. Remove the slip mat.
2. Remove the belt from the motor pulley.
3. Remove the main platter and then remove the old belt.
4. Turn the platter over and you will see a raised circle. Loop the new belt along
the middle circle.
16 17
EN
DE
FR
ES
IT
EN
DE
FR
ES
IT
5. Attach the platter.
Align one of the openings with the position of the brass-colored motor pulley.
6. Place the belt on the brass-colored motor pulley
Grasp the belt that was attached in step 4 and, while pulling it, place it on the brass
motor pulley.
7. Using your hands, slowly rotate the platter ten times in a clockwise direction
as shown by the arrow below.
When the Turntable is Moved
Using the product's original packing materials, wrap the turntable in the reverse order
from when you unwrapped it. If you do not have the packaging materials, take the
following measures:
• After disconnecting the AC adapter from the outlet, remove the felt mat and platter,
and then wrap them so that they do not get damaged.
• Attach the protector to the cartridge.
• Use a string or something similar to tie the tonearm to the rest so that it does not
become dislodged.
• Wrap the turntable body with paper or a soft cloth so that it does not get damaged.

18 19
EN
DE
FR
ES
IT
EN
DE
FR
ES
IT
Troubleshooting
Problem Solution
The platter does
not spin.
• Is the AC adapter connected to the outlet?
-Connect the AC adapter to the outlet.
• What's the status of the indicator light?
- Power is on, but the indicator light is off. That means the
turntable is in ERP mode or not turned on. Press and hold the
START button for 3 seconds to reboot the turntable.
- The indicator light is blue. That means the turntable is in
Bluetooth mode. Please turn the Function knob to switch to
Turntable mode.
- The red indicator light will indicate Turntable mode.
• Has the belt slipped from the platter?
-Correctly place the belt on the platter.
• Is the belt placed on the motor pulley?
-Check that the belt is placed on the motor pulley (brass-colored)
correctly
.
• Has the belt been damaged?
-Replace it with a new belt.
• Is the AUX-IN cable pluged in?
-AUX-IN function is a first-priority function. Please unplug the
AUX-IN cable before using the PHONO/BT functions.
The platter spins,
but there is no
sound from the
turntable?
• Is the stylus damaged?
-Check the stylus and replace it, if necessary. It's suggested to
replace the stylus after 400 hours of use.
• Is the stylus placed correctly on the body of the cartridge?
-Check the cartridge and adjust it, if necessary.
The stylus skips. • Is the record warped?
-Check the record.
• Is the record scratched?
-Check the record.
• Is the stylus pressure correct?
-Refer to “Cartridge Tracking Force Adjustment” to readjust the
tracking force.
The turntable is
making a strange
‘howling’ sound.
• Is the product picking up excessive vibrations from the floor,
surfaces of the walls, or nearby speakers?
-Decrease the vibrations or mount the product on a surface that
is not subject to the effects of vibrations.
• Is the product mounted on an unstable surface?
-Check whether the surface on which the product is mounted is
suitable.
There is noise
when the record
is playing.
• Is there dust on the cartridge’s stylus tip?
-If dust is stuck to the stylus tip, clean it with a commercially sold
brush.
The sound when
the record is
playing is either
too fast or too
slow.
• Are the speed settings for this product correct?
-Please select the correct speed for the type of record being
played.
Playback speed
slows down or
there is irregular
rotation.
• Is the belt stretched out?
-Replace with a new belt.
• Is the belt installed correct?
-Refer to “Turntable Platter and Belt Setup” to setup the belt.
EN
DE
FR
ES
IT
2120
EN
DE
FR
ES
IT
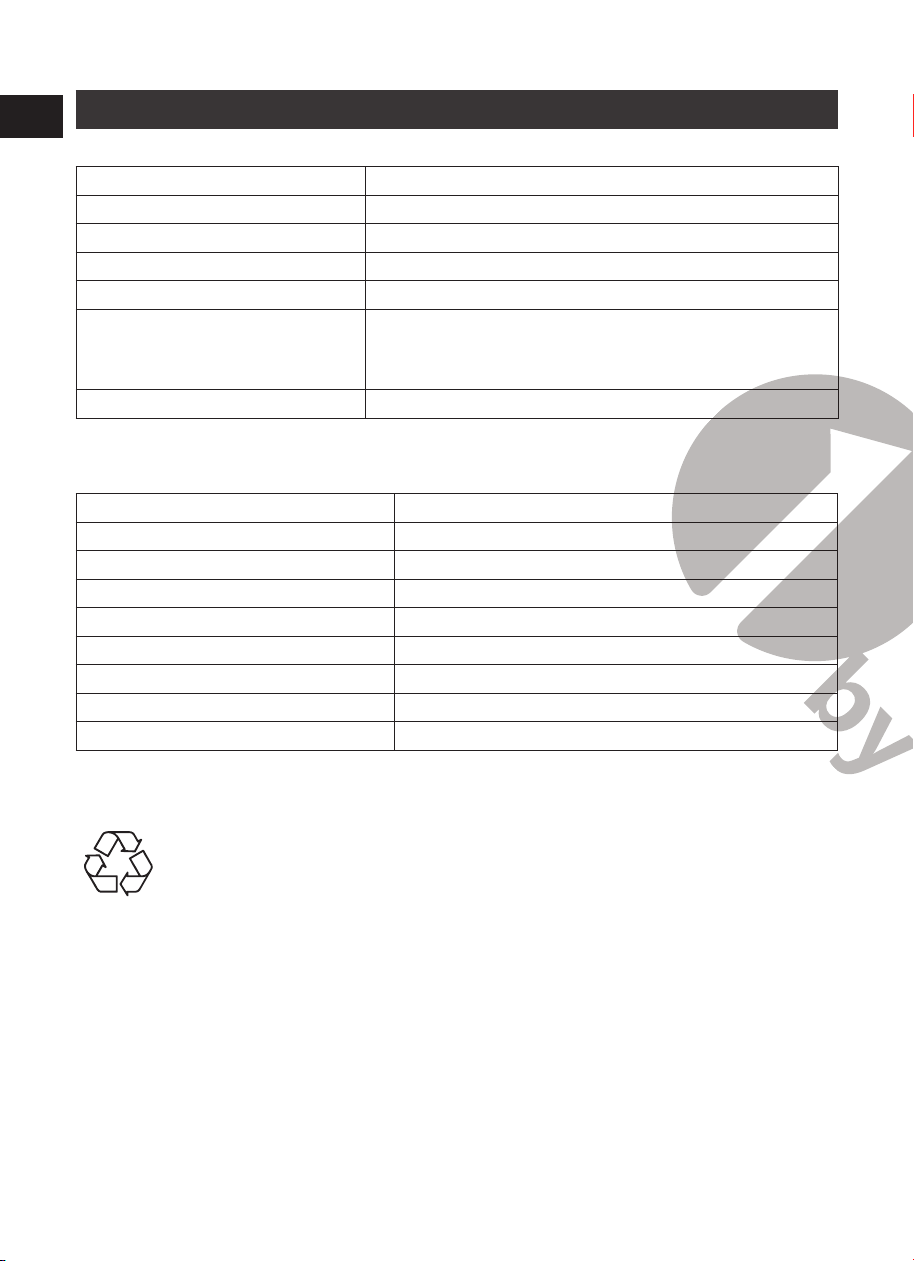
Specications
Turntable
Model 1-AD07US02, H009
Power Supply AC100-240V, DC output 12V 1500mA
Power Consumption 35W
Turntable Speed 33 1/3, 45 RPM
Output Power (RMS) 4Ω 18W X 2(BT) ,
5W X 2(PH)
Dimensions (L x W x H)
17.32” x 14.57” x 7.56” (440 x 370 x 192mm) (lid
closed), 15.75” x 16.73” x 18.19” (400 x 425 x 462mm)
(lid open)
Weight 13.3lb (6.05kg)
Stylus
Model Audio-Technica AT3600
Frequency Response 20Hz - 20kHz
Channel Balance <2.5dB
Channel Separation >18dB
Output Voltage 2.5mV
Recommended Load Resistance 47kΩ
Amplier Connection MM (Moving Magnet) - input
Recommended Tracking Force 3.5±0.5g
Weight 0.18oz (5.1g)
Note: Design and specifications are subject to change without notice.
This product’s packaging is made from environmentally friendly material
and can be disposed of at your local recycling plant.
Produktbeschreibung
Vielen Dank für den Kauf des 1byone High Fidelity Belt Drive Plattenspielers. Diese
Betriebsanleitung enthält wichtige Informationen über Sicherheit, Gebrauch und
Entsorgung. Verwenden Sie das Produkt wie beschrieben und bewahren Sie dieses
Handbuch zum späteren Nachschlagen auf. Wenn Sie diesen Plattenspieler verkaufen
oder weitergeben, geben Sie dieses Handbuch auch an den neuen Besitzer weiter.
Sicherheitshinweise
Lesen und verstehen Sie die gesamte Anleitung, bevor Sie dieses Produkt verwenden.
Bewahren Sie diese Anleitung zum späteren Nachschlagen auf.
1. Verwenden Sie den Plattenspieler nicht in der Nähe von Wasser.
2. Schließen Sie den Plattenspieler nur an eine Steckdose an, wie auf dem Typenschild
oder im Abschnitt "Technische Daten" dieser Bedienungsanleitung angegeben.
3. Der Plattenspieler hat einen polarisierten Stecker (ein Pin ist breiter als der andere).
Um das Risiko eines Stromschlags zu verringern, ist dieser Stecker so konzipiert, dass
er in nur einer Ausrichtung in eine polarisierte Steckdose passt. Wenn der Stecker
nicht vollständig in die Steckdose passt, drehen Sie den Stecker um. Wenn es immer
noch nicht passt, wenden Sie sich an einen qualifizierten Elektriker. Versuchen Sie
nicht, den Stecker in irgendeiner Weise zu verändern.
4. Schützen Sie das Netzkabel vor Betreten oder Einklemmen, insbesondere am
Netzstecker, an der Verbindungsstelle zwischen Stecker und Steckdose und an der
Verbindungsstelle zwischen Netzkabel und Lautsprecher.
5. Überlasten Sie keine Steckdosen oder Verlängerungskabel, da dies eine Brandgefahr
darstellt und einen elektrischen Schlag verursachen kann.
6. Stecken Sie niemals Gegenstände jeglicher Art durch Öffnungen in den
Plattenspieler, da sie gefährliche Spannungspunkte berühren oder Teile
kurzschließen können, die zu einem Brand oder einem elektrischen Schlag führen
können. Verschütten Sie niemals Flüssigkeiten jeglicher Art auf das Gerät.
7. Versuchen Sie nicht, den Plattenspieler selbst zu warten, da das Öffnen oder
Entfernen von Gehäuseteilen zu gefährlichen Spannungen oder anderen
Gefahren führen kann. Wenden Sie sich bei allen Wartungsarbeiten an qualifizierte
Servicetechniker.
8. Änderungen oder Modifikationen an der Drehscheibe, die nicht ausdrücklich von
der für die Einhaltung der Vorschriften verantwortlichen Stelle genehmigt wurden,
könnten die Befugnis des Benutzers zum Betrieb des Produkts aufheben.
9. Verwenden Sie keine Aufsätze, die nicht vom Hersteller empfohlen werden, da sie
Gefahren bergen können.

EN
DE
FR
ES
IT
2120
EN
DE
FR
ES
IT
Specications
Turntable
Model 1-AD07US02, H009
Power Supply AC100-240V, DC output 12V 1500mA
Power Consumption 35W
Turntable Speed 33 1/3, 45 RPM
Output Power (RMS) 4Ω 18W X 2(BT) ,
5W X 2(PH)
Dimensions (L x W x H)
17.32” x 14.57” x 7.56” (440 x 370 x 192mm) (lid
closed), 15.75” x 16.73” x 18.19” (400 x 425 x 462mm)
(lid open)
Weight 13.3lb (6.05kg)
Stylus
Model Audio-Technica AT3600
Frequency Response 20Hz - 20kHz
Channel Balance <2.5dB
Channel Separation >18dB
Output Voltage 2.5mV
Recommended Load Resistance 47kΩ
Amplier Connection MM (Moving Magnet) - input
Recommended Tracking Force 3.5±0.5g
Weight 0.18oz (5.1g)
Note: Design and specifications are subject to change without notice.
This product’s packaging is made from environmentally friendly material
and can be disposed of at your local recycling plant.
Produktbeschreibung
Vielen Dank für den Kauf des 1byone High Fidelity Belt Drive Plattenspielers. Diese
Betriebsanleitung enthält wichtige Informationen über Sicherheit, Gebrauch und
Entsorgung. Verwenden Sie das Produkt wie beschrieben und bewahren Sie dieses
Handbuch zum späteren Nachschlagen auf. Wenn Sie diesen Plattenspieler verkaufen
oder weitergeben, geben Sie dieses Handbuch auch an den neuen Besitzer weiter.
Sicherheitshinweise
Lesen und verstehen Sie die gesamte Anleitung, bevor Sie dieses Produkt verwenden.
Bewahren Sie diese Anleitung zum späteren Nachschlagen auf.
1. Verwenden Sie den Plattenspieler nicht in der Nähe von Wasser.
2. Schließen Sie den Plattenspieler nur an eine Steckdose an, wie auf dem Typenschild
oder im Abschnitt "Technische Daten" dieser Bedienungsanleitung angegeben.
3. Der Plattenspieler hat einen polarisierten Stecker (ein Pin ist breiter als der andere).
Um das Risiko eines Stromschlags zu verringern, ist dieser Stecker so konzipiert, dass
er in nur einer Ausrichtung in eine polarisierte Steckdose passt. Wenn der Stecker
nicht vollständig in die Steckdose passt, drehen Sie den Stecker um. Wenn es immer
noch nicht passt, wenden Sie sich an einen qualifizierten Elektriker. Versuchen Sie
nicht, den Stecker in irgendeiner Weise zu verändern.
4. Schützen Sie das Netzkabel vor Betreten oder Einklemmen, insbesondere am
Netzstecker, an der Verbindungsstelle zwischen Stecker und Steckdose und an der
Verbindungsstelle zwischen Netzkabel und Lautsprecher.
5. Überlasten Sie keine Steckdosen oder Verlängerungskabel, da dies eine Brandgefahr
darstellt und einen elektrischen Schlag verursachen kann.
6. Stecken Sie niemals Gegenstände jeglicher Art durch Öffnungen in den
Plattenspieler, da sie gefährliche Spannungspunkte berühren oder Teile
kurzschließen können, die zu einem Brand oder einem elektrischen Schlag führen
können. Verschütten Sie niemals Flüssigkeiten jeglicher Art auf das Gerät.
7. Versuchen Sie nicht, den Plattenspieler selbst zu warten, da das Öffnen oder
Entfernen von Gehäuseteilen zu gefährlichen Spannungen oder anderen
Gefahren führen kann. Wenden Sie sich bei allen Wartungsarbeiten an qualifizierte
Servicetechniker.
8. Änderungen oder Modifikationen an der Drehscheibe, die nicht ausdrücklich von
der für die Einhaltung der Vorschriften verantwortlichen Stelle genehmigt wurden,
könnten die Befugnis des Benutzers zum Betrieb des Produkts aufheben.
9. Verwenden Sie keine Aufsätze, die nicht vom Hersteller empfohlen werden, da sie
Gefahren bergen können.
EN
DE
FR
ES
IT
EN
DE
FR
ES
IT
22 23
10. Nur auf einen flachen, stabilen Tisch stellen oder mit dem Wagen,
Ständer, Stativ oder der Halterung verwenden, wie vom Hersteller
angegeben oder mit dem Plattenspieler verkauft wird. Wenn ein
Wagen verwendet wird, ist beim Bewegen der Wagen
PlattenspielerKombination Vorsicht geboten, um Verletzungen durch
Umkippen zu vermeiden.
11. Zur Belüftung und zum zuverlässigen Betrieb des Produkts sowie zum Schutz vor
Überhitzung sind Schlitze und Öffnungen im Gehäuse vorgesehen. Blockieren
oder verdecken Sie diese Öffnungen nicht.
12. Ziehen Sie den Netzstecker bei Gewittern oder bei längerer Nichtbenutzung aus..
Produktbeschreibung
R
AUX OUTAUX IN
PHONE
DC12V
LINE OUT
L
1 2 3 4
5
17
16
6
7
8
9
10
11
12
13
14
15
45 33
START
- +
1. DC-EINGANG-Buchse
2. Phono & Line Out Schalter
3. AUX IN-Buchse
4. Phono & Aux-Ausgangsbuchsen
5. Deckelscharnier
6. Gegengewicht
7. Tracking Force Dial
8. Tonarmhubhebel
9. Tonarmklammer
10. Tonarm
11. Funktion Drehknopf
12. Lautstärkeregler
13. Indikator
14. START-Taste
15. Nadel
16. Drehtischplatte
17. Drehtisch-Spindel
EN
DE
FR
ES
IT
EN
DE
FR
ES
IT
22 23
10. Nur auf einen flachen, stabilen Tisch stellen oder mit dem Wagen,
Ständer, Stativ oder der Halterung verwenden, wie vom Hersteller
angegeben oder mit dem Plattenspieler verkauft wird. Wenn ein
Wagen verwendet wird, ist beim Bewegen der Wagen
PlattenspielerKombination Vorsicht geboten, um Verletzungen durch
Umkippen zu vermeiden.
11. Zur Belüftung und zum zuverlässigen Betrieb des Produkts sowie zum Schutz vor
Überhitzung sind Schlitze und Öffnungen im Gehäuse vorgesehen. Blockieren
oder verdecken Sie diese Öffnungen nicht.
12. Ziehen Sie den Netzstecker bei Gewittern oder bei längerer Nichtbenutzung aus..
Produktbeschreibung
R
AUX OUTAUX IN
PHONE
DC12V
LINE OUT
L
1 2 3 4
5
17
16
6
7
8
9
10
11
12
13
14
15
45 33
START
- +
1. DC-EINGANG-Buchse
2. Phono & Line Out Schalter
3. AUX IN-Buchse
4. Phono & Aux-Ausgangsbuchsen
5. Deckelscharnier
6. Gegengewicht
7. Tracking Force Dial
8. Tonarmhubhebel
9. Tonarmklammer
10. Tonarm
11. Funktion Drehknopf
12. Lautstärkeregler
13. Indikator
14. START-Taste
15. Nadel
16. Drehtischplatte
17. Drehtisch-Spindel

EN
DE
FR
ES
IT
EN
DE
FR
ES
IT
24 25
Enthaltene Gegenstände
Überprüfen Sie vor dem ersten Gebrauch des Plattenspielers den Inhalt der
Verpackung, um sicherzustellen, dass alle Teile frei von sichtbaren Schäden sind. Bitte
bewahren Sie die Originalverpackung zum Umtausch oder zur Rücksendung auf.
1) Plattenspieler-Einheit
2) Netzadapter
3) Drehtisch-Deckel
4) Rutschmatte
5) Teller mit Gürtel
6) Gegengewicht
7) Patronenausrichtungmesser
8) 45 RPM-Adapter
9) Bedienungsanleitung
Plattenspieler installieren
• Montieren Sie das Produkt auf einer ebenen Fläche.
• Um die Auswirkungen von Vibrationen und Schalldruck zu vermeiden, montieren Sie
das Produkt nicht neben Gegenständen wie Lautsprechern.
• Wenn das Produkt neben einem Radio aufgestellt wird, kann es zu Funkstörungen
kommen. Versuchen Sie daher, das Produkt von Radios fernzuhalten.
• Wenn sich das Produkt in der Nähe von Geräten (Mobiltelefonen usw.) befindet, die
starke Funkwellen aussenden, können Störgeräusche auftreten.
Aufsetzen des Deckels
Setzen Sie die Scharniere des Deckels auf
die Scharniere des Plattenspielers.
Einrichtung von Drehscheibe und Riemen
1. Drehen Sie den Plattenteller um und prüfen Sie die Riemenposition.
Stellen Sie sicher, dass der Antriebsriemen in der Mitte des Kreises geschlungen ist.
Ein zu hoch oder zu tief in diesem Kreis liegender Antriebsriemen kann dazu führen,
dass der Antriebsriemen abfällt oder die Geschwindigkeit instabil wird.
2. Setzen Sie den Plattenteller auf die Spindel.
Stellen Sie sicher, dass der Plattenteller vollständig auf der Spindel sitzt.
Öffnung
Platte
Spindel
Motor-Riemenscheibe
3. Legen Sie den Riemen auf die Riemenscheibe des Motors.
Richten Sie eine der Plattentelleröffnungen mit der Motorrolle aus, und legen Sie
den Riemen gemäß der Abbildung auf die Motorrolle, während Sie an beiden Enden
des roten Bandes ziehen, das am Riemen befestigt ist. Achten Sie dabei darauf, den
Riemen nicht zu verdrehen.
Haken
Gürtel
Riemenscheibe
eines Motors
Gerade Verdreht Falsche Position
4. Entfernen Sie das rote Band vom Gürtel.
EN
DE
FR
ES
IT
EN
DE
FR
ES
IT
26 27
Platte drehen
1. Drehen Sie mit den Händen die
Platte zehnmal in Richtung des Pfeils (Abbildung 1).
2. Dieser Schritt dient zum Zurücksetzen des
automatischen Mechanismus, zum Entfernen von
Riemenverdrehungen und zum Sicherstellen, dass
der Riemen reibungslos über den Antriebsrand an
der Unterseite des Plattentellers läuft.
3. Legen Sie die Unterlage auf die Platte.
Stellen Sie sicher, dass das 1byoneLogo auf der Matte
nach oben zeigt
(Abbildung 2).
Patronenverfolgungskraft
Das mitgelieferte Gegengewicht eignet
sich für Kartuschen mit einem Gewicht
zwischen 3,0 - 6,0 g.
Counterweight
Mittellinie
Messtracker
1. Drücken Sie das Gegengewicht vorsichtig auf die Rückseite
des Tonarms (mit dem Zifferblatt in Richtung Vorderseite des
Plattentellers).
2. Ziehen Sie den Protektor gerade nach vorne, um ihn zu
entfernen.
HINWEIS: Das Ausüben einer nach unten
gerichteten Kraft kann dazu führen, dass der Stift vom Körper
fällt. Es wird nur eine geringe Lautstärke ausgegeben, wenn
sich der Stift gelöst hat oder gerade löst. Lesen Sie daher
„Ersetzen des Stifts“, um den Stift wieder richtig anzubringen.
3. Entfernen Sie den Kabelbinder und entriegeln Sie den Tonarm.
4. Senken Sie den Tonarmhebel und positionieren Sie die Kassette zwischen
Tonarmstütze und Plattenteller.
5. Drehen Sie das Gegengewicht vorsichtig, bis der Tonarm eine neutrale Balance
erreicht hat. Der Tonarm sollte in diese ausgeglichene Position zurückkehren,
wenn er nach oben oder unten bewegt wird. Diese Einstellung muss sorgfältig
durchgeführt werden.
Tonarm
Gegengewicht
Stellen Sie den Tonarm so ein, dass er gerade und neutral ausbalanciert ist
6. Sobald der Tonarm richtig ausbalanciert ist, legen Sie den Tonarm wieder in die
Ruhelage. Halten Sie das Gegengewicht fest, ohne es zu bewegen, und drehen
Sie das Spannungs-Rad vorsichtig, bis die Null mit der schwarzen Mittellinie auf
der Rückseite des Tonarms übereinstimmt. Vergewissern Sie sich, dass der Tonarm
immer noch ausbalanciert ist.
7. Drehen Sie abschließend das Gegengewicht und den Drehknopf für die
Nachführkraft zusammen gegen den Uhrzeigersinn (von vorne gesehen), um die
Nachführkraft gemäß den Empfehlungen des Patronenherstellers einzustellen.
Hinweis: Jede Markierung auf der Skala entspricht 0,1 g. Die empfohlene
Spurführungskraft für die werkseitig installierte Patrone beträgt 3,5 g ± 0,5 g. Drehen
Sie den Drehknopf für die Nachführkraft vorsichtig. Wenn "3,5" über der schwarzen
Linie auf der Oberseite des Tonarms zentriert ist, halten Sie bitte an.
Abbildung 1
Abbildung 2

EN
DE
FR
ES
IT
EN
DE
FR
ES
IT
26 27
Platte drehen
1. Drehen Sie mit den Händen die
Platte zehnmal in Richtung des Pfeils (Abbildung 1).
2. Dieser Schritt dient zum Zurücksetzen des
automatischen Mechanismus, zum Entfernen von
Riemenverdrehungen und zum Sicherstellen, dass
der Riemen reibungslos über den Antriebsrand an
der Unterseite des Plattentellers läuft.
3. Legen Sie die Unterlage auf die Platte.
Stellen Sie sicher, dass das 1byoneLogo auf der Matte
nach oben zeigt
(Abbildung 2).
Patronenverfolgungskraft
Das mitgelieferte Gegengewicht eignet
sich für Kartuschen mit einem Gewicht
zwischen 3,0 - 6,0 g.
Counterweight
Mittellinie
Messtracker
1. Drücken Sie das Gegengewicht vorsichtig auf die Rückseite
des Tonarms (mit dem Zifferblatt in Richtung Vorderseite des
Plattentellers).
2. Ziehen Sie den Protektor gerade nach vorne, um ihn zu
entfernen.
HINWEIS: Das Ausüben einer nach unten
gerichteten Kraft kann dazu führen, dass der Stift vom Körper
fällt. Es wird nur eine geringe Lautstärke ausgegeben, wenn
sich der Stift gelöst hat oder gerade löst. Lesen Sie daher
„Ersetzen des Stifts“, um den Stift wieder richtig anzubringen.
3. Entfernen Sie den Kabelbinder und entriegeln Sie den Tonarm.
4. Senken Sie den Tonarmhebel und positionieren Sie die Kassette zwischen
Tonarmstütze und Plattenteller.
5. Drehen Sie das Gegengewicht vorsichtig, bis der Tonarm eine neutrale Balance
erreicht hat. Der Tonarm sollte in diese ausgeglichene Position zurückkehren,
wenn er nach oben oder unten bewegt wird. Diese Einstellung muss sorgfältig
durchgeführt werden.
Tonarm
Gegengewicht
Stellen Sie den Tonarm so ein, dass er gerade und neutral ausbalanciert ist
6. Sobald der Tonarm richtig ausbalanciert ist, legen Sie den Tonarm wieder in die
Ruhelage. Halten Sie das Gegengewicht fest, ohne es zu bewegen, und drehen
Sie das Spannungs-Rad vorsichtig, bis die Null mit der schwarzen Mittellinie auf
der Rückseite des Tonarms übereinstimmt. Vergewissern Sie sich, dass der Tonarm
immer noch ausbalanciert ist.
7. Drehen Sie abschließend das Gegengewicht und den Drehknopf für die
Nachführkraft zusammen gegen den Uhrzeigersinn (von vorne gesehen), um die
Nachführkraft gemäß den Empfehlungen des Patronenherstellers einzustellen.
Hinweis: Jede Markierung auf der Skala entspricht 0,1 g. Die empfohlene
Spurführungskraft für die werkseitig installierte Patrone beträgt 3,5 g ± 0,5 g. Drehen
Sie den Drehknopf für die Nachführkraft vorsichtig. Wenn "3,5" über der schwarzen
Linie auf der Oberseite des Tonarms zentriert ist, halten Sie bitte an.
Abbildung 1
Abbildung 2
EN
DE
FR
ES
IT
EN
DE
FR
ES
IT
28 29
Verbindung zum externen Lautsprecher mit dem RCA-
Audiokabel
Dieser Plattenspieler verfügt über 4 eingebaute Lautsprecher und einen
eingebauten Entzerrer.
Wenn Sie Ihren eigenen Verstärker oder Ihre eigenen Lautsprecher verwenden
möchten, befolgen Sie bitte die nachstehenden Anweisungen:
Cinch-Kabelverbindung
Aktive Lautsprecher
oder
Verstärker
HINWEIS: Um den besten Klang zu erzielen, ist es ratsam, die Lautstärke des
Plattenspielers auf einen minimalen Pegel einzustellen. Dann wird der Ton des
Plattenspielers über Ihren eigenen Verstärker, Ihre eigenen Lautsprecher usw.
wiedergegeben.
1. Vorverstärker-Wahlschalter einstellen
Dieses Produkt verfügt über eine eingebaute Phono-Equalizer-Funktion.
Sie können das Produkt verwenden, auch wenn Sie keinen Phonoverstärker oder
keine anschließbaren Geräte mit einem eingebauter Phono-Verstärker haben.
Verwenden Sie den Vorverstärker-Wahlschalter, um den Ausgang wie unten
gezeigt einzustellen.
Anschließbare Geräte
werden verwendet
Position des Vorverstärkers
Wahlschalter
Wo wird der Cinch Audio
Kabel angeschlossen?
Gerät mit Phono-
Eingang
PHONO Phono - Eingangsbuchse
und Erdungsanschluss
von anschließbaren Geräte
Gerät ohne
PhonoEinganag
LINE AUX- oder
LineEingangsbuchse für
anschließbare Geräte
HINWEIS: Die Cinch-Buchsen sind nicht für den direkten Anschluss an die
passiven / nicht mit Strom versorgten Lautsprecher im LINE-Modus ausgelegt.
Bei Anschluss an die passiven Lautsprecher ist kein Ton zu hören.
2. Gerät anschließen
Schließen Sie die Einstellungen für den Vorverstärker-Wahlschalter ab und
schließen Sie das RCA-Audiokabel an eine Eingangsbuchse an, die mit den von
Ihnen verwendeten anschließbaren Geräten (Verstärker, Aktivlautsprecher usw.)
kompatibel ist.
• Die rote Buchse des RCA-Audiokabels ist für den rechten (R) Kanal und die
weiße Buchse für den linken (L) Kanal.
R
AUX OUTAUX IN
PHONE
DC12V
LINE OUT
L
Mit PHONO Ohne PHONO
Zum Ausgang
AUX
L R
PHONO
L R
Mit PHONO Ohne PHONO
Zum Ausgang
Anschließbare Geräte
(Verstärker usw.)
EN
DE
FR
ES
IT
EN
DE
FR
ES
IT
30 31
Hauptstromanschluss
1. Stecken Sie den Stromstecker des Netzadapterkabels in die Buchse DC INPUT an der
Rückseite des Plattentellers.
2. Stecken Sie den Netzadapter in eine normale Steckdose.
Hinweis:
Schließen Sie den Netzadapter nicht an eine Steckdose an, bevor der
gesamte Plattenspieler zusammenbau fertiggestellt ist. Überprüfen Sie vor dem
Einschalten des Plattenspielerzusammenbau Verbindungen, um sicherzustellen, dass
sie richtig verbunden und sicher sind. Schalten Sie den Plattenspieler immer aus, bevor
Sie ihn anschließen oder vom Strom abnehmen.
Energieverwaltungsfunktion
Nach 20 Minuten Inaktivität geht der Plattenspieler automatisch in den
Bereitschaftsmodus über. Die Anzeigeleuchte erlischt.
Um den Betrieb wieder aufzunehmen, halten Sie die START-Taste 3 Sekunden lang
gedrückt.
Eine Schallplatte abspielen
1. Vor dem Abspielen einer Aufnahme
1.1 Ziehe
n Sie den Protektor zum Entfernen
gerade nach
vorne.
HINWEIS: Das Ausüben einer nach unten
gerichteten Kraft kann dazu führen, dass der
Stift vom Körper fällt. Es wird nur eine geringe
Lautstärke ausgegeben, wenn sich der Stift
gelöst hat oder gerade löst. Lesen Sie daher
„Ersetzen des Stifts“, um den Stift wieder
richtig anzubringen.
Schutz
1.2 Legen Sie die Schallplatte so auf die Filzmatte, dass das Mittelloch mit der Spindel
ausgerichtet ist.
2. Plattenspieler-Betrieb
Verringern Sie zunächst die Lautstärke des Verstärkers und der Lautsprecher
ausreichend.
2.1 Schließen Sie das mitgelieferte Netzteil an den Plattenspieler an, drücken Sie die
START-Taste und halten Sie sie 3 Sekunden lang gedrückt. Der Plattenspieler schaltet
sich ein. Die Anzeigeleuchte leuchtet rot auf.
2.2 Entfernen Sie den Stylus-Schutz vom Stylus.
2.3 Legen Sie die Schallplatte auf die Gleitmatte.
2.4 Drehen Sie den Funktionsknopf, um je nach Art der Aufzeichnung zwischen 33
und 45 Umdrehungen pro Minute umzuschalten.
2.5 Drücken Sie die START-Taste einmal, und der Plattenteller wird abgespielt oder
angehalten.
2.6 Entriegeln Sie den Tonarmclip und stellen Sie den Tonarmlifthebel in die obere
Position.
2.7 Positionieren Sie den Tonarm über der gewünschten Stelle (Rille) auf der
Schallplatte.
2.8 Senken Sie den Tonarm auf der Platte vorsichtig ab.
2.9 Drehen Sie die Lautstärke des Plattenspielers nach Bedarf auf.
2.10 Wenn Sie mit der Wiedergabe der Platte fertig sind, heben Sie den Tonarm an,
legen Sie ihn wieder auf den Armclip und drücken Sie lange auf die START-Taste,
um den Plattenspieler auszuschalten.
HINWEIS:
1. Wenn die stille Pause zwischen den einzelnen Titeln länger als 3 Minuten
dauert, hört der Plattenteller automatisch auf, sich zu drehen, um die Platte
nicht zu beschädigen. Die Anzeigeleuchte leuchtet rot. Um den Betrieb wieder
aufzunehmen, drücken Sie die START-Taste.
2. Wenn die Filzmatte verschmutzt ist, kann die Schallplatte leicht zerkratzt werden.
Entfernen Sie die Filzmatte daher regelmäßig und wischen Sie den Staub ab.
3. Entfernen Sie die Schallplatte nach dem Gebrauch, um Kratzer und Verformungen
zu vermeiden.
4. Verwenden Sie keinen Plattenstabilisator.

EN
DE
FR
ES
IT
EN
DE
FR
ES
IT
30 31
Hauptstromanschluss
1. Stecken Sie den Stromstecker des Netzadapterkabels in die Buchse DC INPUT an der
Rückseite des Plattentellers.
2. Stecken Sie den Netzadapter in eine normale Steckdose.
Hinweis:
Schließen Sie den Netzadapter nicht an eine Steckdose an, bevor der
gesamte Plattenspieler zusammenbau fertiggestellt ist. Überprüfen Sie vor dem
Einschalten des Plattenspielerzusammenbau Verbindungen, um sicherzustellen, dass
sie richtig verbunden und sicher sind. Schalten Sie den Plattenspieler immer aus, bevor
Sie ihn anschließen oder vom Strom abnehmen.
Energieverwaltungsfunktion
Nach 20 Minuten Inaktivität geht der Plattenspieler automatisch in den
Bereitschaftsmodus über. Die Anzeigeleuchte erlischt.
Um den Betrieb wieder aufzunehmen, halten Sie die START-Taste 3 Sekunden lang
gedrückt.
Eine Schallplatte abspielen
1. Vor dem Abspielen einer Aufnahme
1.1 Ziehe
n Sie den Protektor zum Entfernen
gerade nach
vorne.
HINWEIS: Das Ausüben einer nach unten
gerichteten Kraft kann dazu führen, dass der
Stift vom Körper fällt. Es wird nur eine geringe
Lautstärke ausgegeben, wenn sich der Stift
gelöst hat oder gerade löst. Lesen Sie daher
„Ersetzen des Stifts“, um den Stift wieder
richtig anzubringen.
Schutz
1.2 Legen Sie die Schallplatte so auf die Filzmatte, dass das Mittelloch mit der Spindel
ausgerichtet ist.
2. Plattenspieler-Betrieb
Verringern Sie zunächst die Lautstärke des Verstärkers und der Lautsprecher
ausreichend.
2.1 Schließen Sie das mitgelieferte Netzteil an den Plattenspieler an, drücken Sie die
START-Taste und halten Sie sie 3 Sekunden lang gedrückt. Der Plattenspieler schaltet
sich ein. Die Anzeigeleuchte leuchtet rot auf.
2.2 Entfernen Sie den Stylus-Schutz vom Stylus.
2.3 Legen Sie die Schallplatte auf die Gleitmatte.
2.4 Drehen Sie den Funktionsknopf, um je nach Art der Aufzeichnung zwischen 33
und 45 Umdrehungen pro Minute umzuschalten.
2.5 Drücken Sie die START-Taste einmal, und der Plattenteller wird abgespielt oder
angehalten.
2.6 Entriegeln Sie den Tonarmclip und stellen Sie den Tonarmlifthebel in die obere
Position.
2.7 Positionieren Sie den Tonarm über der gewünschten Stelle (Rille) auf der
Schallplatte.
2.8 Senken Sie den Tonarm auf der Platte vorsichtig ab.
2.9 Drehen Sie die Lautstärke des Plattenspielers nach Bedarf auf.
2.10 Wenn Sie mit der Wiedergabe der Platte fertig sind, heben Sie den Tonarm an,
legen Sie ihn wieder auf den Armclip und drücken Sie lange auf die START-Taste,
um den Plattenspieler auszuschalten.
HINWEIS:
1. Wenn die stille Pause zwischen den einzelnen Titeln länger als 3 Minuten
dauert, hört der Plattenteller automatisch auf, sich zu drehen, um die Platte
nicht zu beschädigen. Die Anzeigeleuchte leuchtet rot. Um den Betrieb wieder
aufzunehmen, drücken Sie die START-Taste.
2. Wenn die Filzmatte verschmutzt ist, kann die Schallplatte leicht zerkratzt werden.
Entfernen Sie die Filzmatte daher regelmäßig und wischen Sie den Staub ab.
3. Entfernen Sie die Schallplatte nach dem Gebrauch, um Kratzer und Verformungen
zu vermeiden.
4. Verwenden Sie keinen Plattenstabilisator.
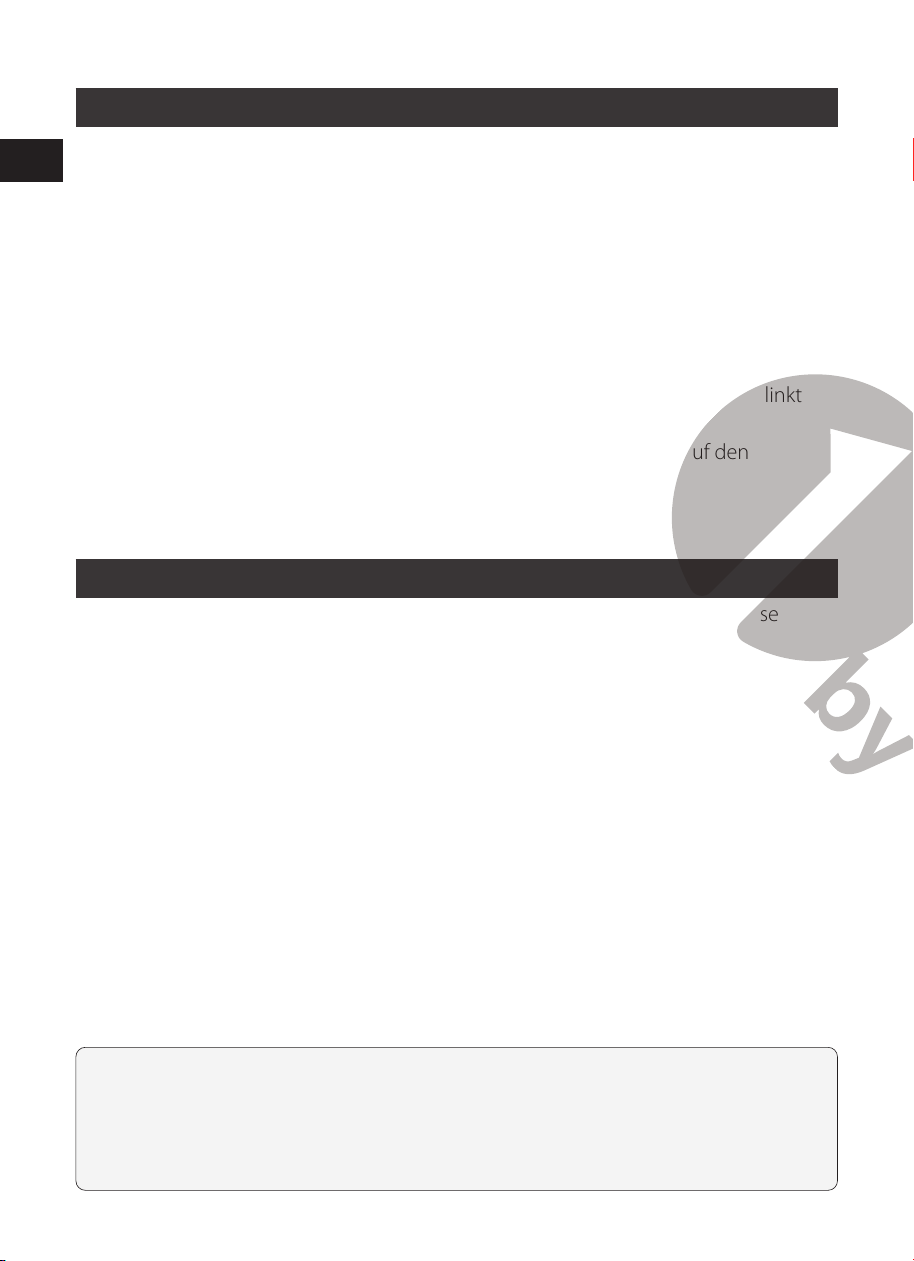
EN
DE
FR
ES
IT
EN
DE
FR
ES
IT
32 33
Bluetooth-Betrieb
1. Schließen Sie das mitgelieferte Netzteil an den Plattenspieler an und drücken Sie die
START-Taste lange, die Anzeigeleuchte leuchtet rot auf.
2. Drehen Sie den Funktionsknopf in den Bluetooth-Modus. Die Anzeigeleuchte
leuchtet blau und blinkt schnell. Sie hören ein Aktivierungsgeräusch von der
Drehscheibee.
3. Schalten Sie die Bluetooth-Funktion Ihres Mediengeräts ein und suchen Sie
nach "1byone BS020" und wählen Sie es aus, um das Mediengerät und den
Plattenspieler zu koppeln.
4. Wenn Ihr Mediengerät erfolgreich mit dem Plattenspieler gekoppelt wurde, gibt der
Plattenspieler einen kurzen Bestätigungston ab. Die blaue Anzeigeleuchte blinkt
langsam.
5. Spielen Sie Musik von Ihrem Mediengerät ab und streamen Sie sie auf den
Plattenspieler. Die Anzeigeleuchte wird solide werden.
Hinweis: Bluetooth-Version: 5.0
AUX-IN-Betrieb
Dieser Plattenspieler verfügt über eine zusätzliche Audiosignal-Eingangsbuchse
zum Anschluss externer Audiogeräte wie MP3-Player, CD-Player und ältere,
nicht andockbare iPods, damit Sie Ihre externe Quelle über die Lautsprecher des
Plattenspielers hören können.
1. Verwenden Sie ein Audiokabel (nicht mitgeliefert) mit einer 3,5-mm-
Stereoverbindung an jedem Ende des Kabels.
2. Stecken Sie ein Ende in die AUX-IN-Buchse des Plattenspielers und das andere Ende
in die Line Out-Buchse des Audiogeräts.
3. Schalten Sie den Plattenspieler und das Audiogerät ein. Die Anzeigeleuchte des
Plattenspielers leuchtet rot.
4. Der Lautstärkepegel kann über den Plattenspieler geregelt werden. Bedienen Sie
alle Funktionen des Zusatzgeräts wie gewohnt.
5. Bitte beachten Sie, dass die Funktion AUX-IN eine Funktion erster Priorität ist. Selbst
wenn die Anzeigeleuchte für PHONO/BT leuchtet, funktionieren diese Funktionen
nicht, solange die AUX-IN-Funktion verwendet wird. Bitte ziehen Sie das AUX-IN-
Kabel ab, bevor Sie die PHONO/BT-Funktionen verwenden.
Pege
Plattenspieler-Gehäuse
• Wenn das Gehäuse des Plattenspielers schmutzig oder staubig ist, ziehen Sie zuerst
den Netzadapter ab und wischen Sie dann Schmutz und Staub mit einem weichen,
trockenen Tuch ab.
• Verwenden Sie keine Benzole, Verdünner usw.
• Wenn Sie das Produkt längere Zeit aufbewahren, ziehen Sie den Netzadapter aus
der Steckdose und wickeln Sie das Produkt in Plastik ein. Lassen Sie es nicht feucht
werden. Der Antriebsriemen sollte entfernt werden, um eine ungleichmäßige
Dehnung zu vermeiden.
Reinigung des Stiftes
• Wenn Schmutz und Schmutz an der Stiftspitze haften
bleiben, reinigen Sie sie mit einer handelsüblichen Bürste.
• Wir empfehlen die Verwendung eines Stiftreinigers (nicht
im Lieferumfang enthalten), wenn die Stiftspitze stark
verschmutzt ist. Reinigen Sie die Stiftspitze, indem Sie die
Bürste von hinten zur Vorderseite der Stiftspitze bewegen
Austauschen des Stiftes
Es wird empfohlen, den Stift nach 400 Betriebsstunden auszutauschen.
Entfernen des Stiftes
• Zusätzlich zur Verschlechterung der Tonqualität können auch Schallplatten
beschädigt werden, wenn die Stiftspitze der Kassette sich verbraucht.
• Ziehen Sie unbedingt den Netzadapter des Produkts aus der Steckdose.
• Halten Sie beim Austauschen des Stifts die Headshell und das Patronengehäuse fest.
Drehen Sie die Vorderseite des Stifts vorwärts und rückwärts.
Installieren eines neuen Ersatzstifts
1. Setzen Sie den neuen Ersatzstift in die Patrone ein.
Nehmen Sie
zuerst am Körper teil
HINWEIS:
1. Stellen Sie sicher, dass der Tonarm sicher verriegelt ist, um Beschädigungen zu
vermeiden.
2. Wenn Sie fertig sind, vergessen Sie nicht, den Strom am Plattenspieler und Ihren
externen Geräten auszuschalten.
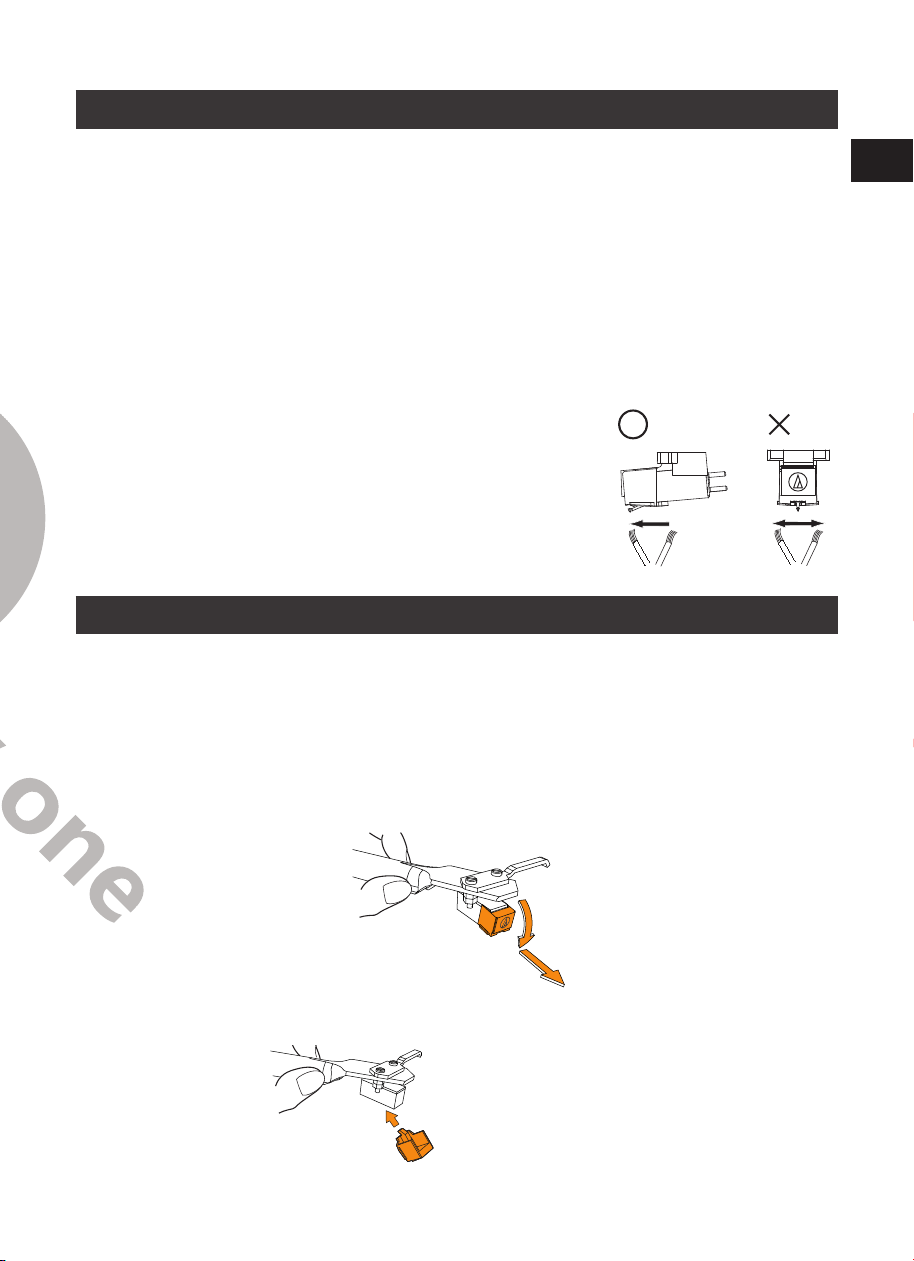
EN
DE
FR
ES
IT
EN
DE
FR
ES
IT
34 35
2. Heben Sie den Stift an, bis Sie ein Klicken hören.
3. Stellen Sie sicher, dass zwischen der Headshell und der Patrone kein Spalt
vorhanden ist.
Ersetzen des Riemens
• Der Riemen ist ein Verschleißteil. Tauschen Sie den Riemen aus, wenn die
Wiedergabegeschwindigkeit nachlässt oder unregelmäßige Drehung auftritt. Als
Faustregel empfehlen wir, den Riemen einmal im Jahr auszutauschen
• Ziehen Sie den Netzadapter des Produkts aus der Steckdose, bevor Sie den Riemen
austauschen.
1. Entfernen Sie die Unterlage.
2. Entfernen Sie den Riemen von der Motorriemenscheibe.
3. Entfernen Sie den Hauptteller und entfernen Sie dann den alten Riemen.
4. Drehen Sie den Teller um und Sie sehen einen erhabenen Kreis. Schleifen Sie
den neuen Riemen entlang des mittleren Kreises.
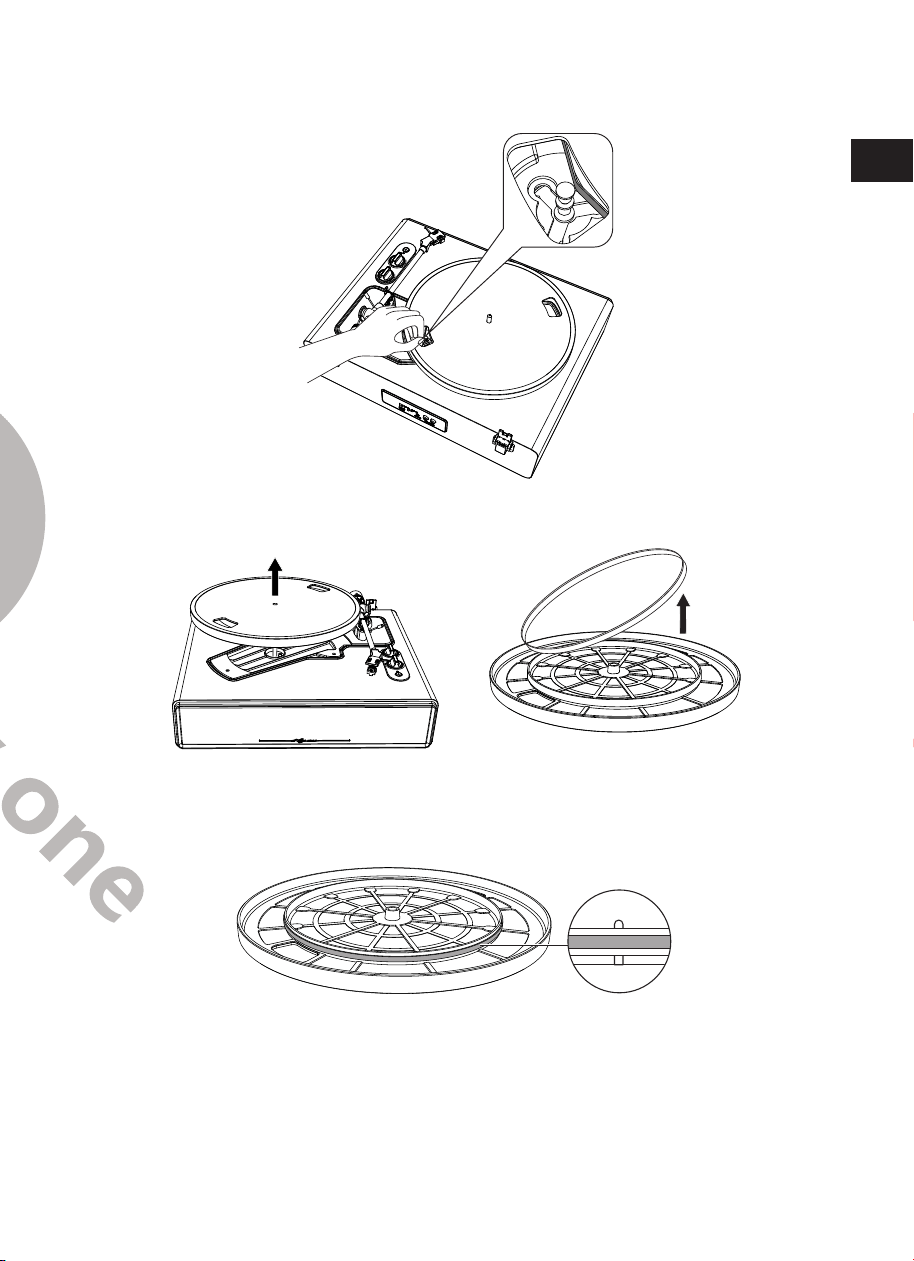
EN
DE
FR
ES
IT
EN
DE
FR
ES
IT
34 35
2. Heben Sie den Stift an, bis Sie ein Klicken hören.
3. Stellen Sie sicher, dass zwischen der Headshell und der Patrone kein Spalt
vorhanden ist.
Ersetzen des Riemens
• Der Riemen ist ein Verschleißteil. Tauschen Sie den Riemen aus, wenn die
Wiedergabegeschwindigkeit nachlässt oder unregelmäßige Drehung auftritt. Als
Faustregel empfehlen wir, den Riemen einmal im Jahr auszutauschen
• Ziehen Sie den Netzadapter des Produkts aus der Steckdose, bevor Sie den Riemen
austauschen.
1. Entfernen Sie die Unterlage.
2. Entfernen Sie den Riemen von der Motorriemenscheibe.
3. Entfernen Sie den Hauptteller und entfernen Sie dann den alten Riemen.
4. Drehen Sie den Teller um und Sie sehen einen erhabenen Kreis. Schleifen Sie
den neuen Riemen entlang des mittleren Kreises.
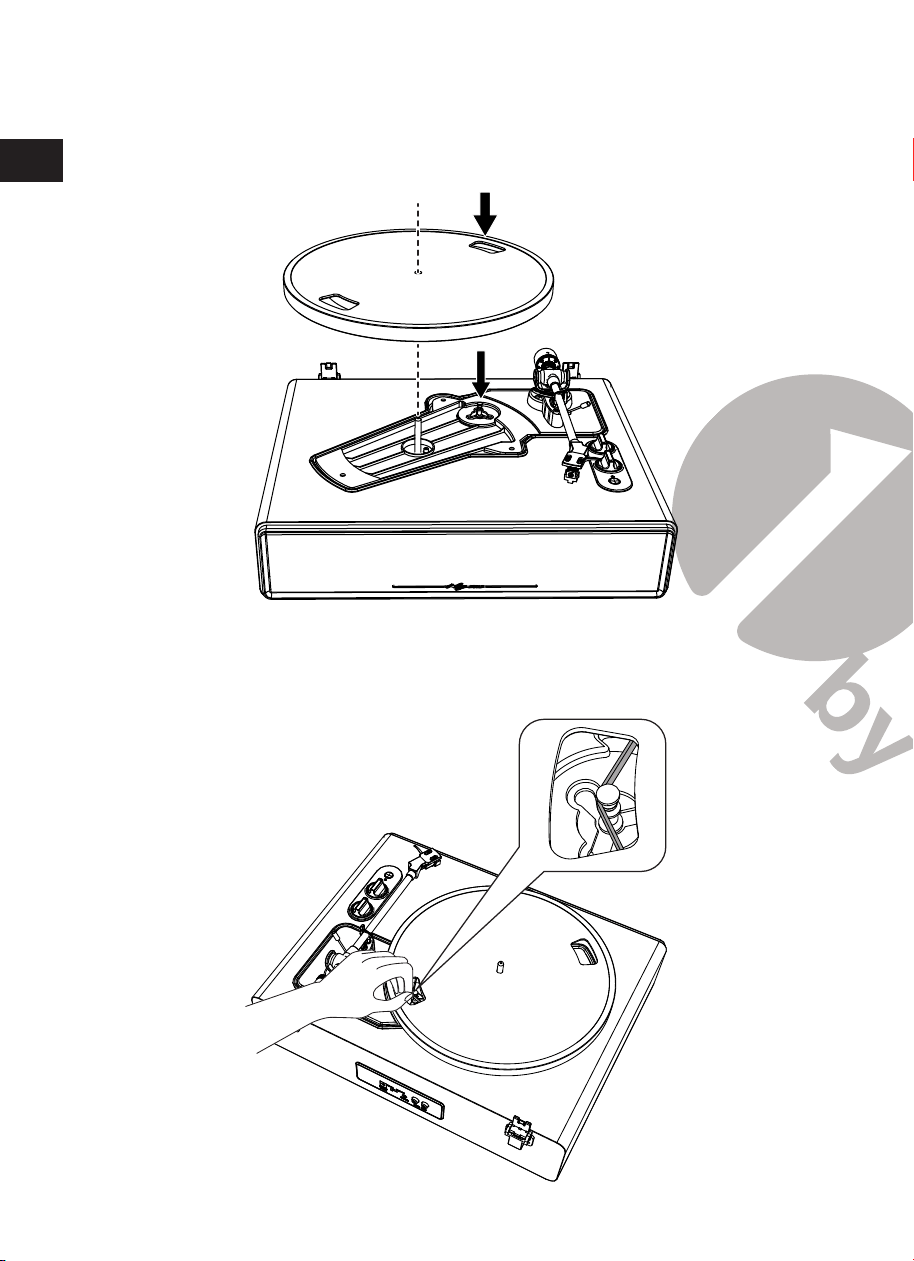
EN
DE
FR
ES
IT
EN
DE
FR
ES
IT
36 37
5. Bringen Sie den Plattenteller an.
Richten Sie eine der Öffnungen auf die Position der messingfarbenen
Motorriemenscheibe aus.
6. Legen Sie den Riemen auf die messingfarbene Motorriemenscheibe.
Fassen Sie den in Schritt 4 angebrachten Riemen und legen Sie ihn unter Zug auf
die Motorrolle aus Messing.
7. Drehen Sie den Plattenteller mit den Händen langsam zehnmal im
Uhrzeigersinn, wie durch den Pfeil unten dargestellt.
Wenn der Plattenteller bewegt wurde
Wickeln Sie den Plattenteller unter Verwendung des Originalverpackungsmaterials des
Produkts in umgekehrter Reihenfolge wie beim Auspacken ein. Wenn Sie nicht über
die Verpackungsmaterialien verfügen, ergreifen Sie die folgenden Maßnahmen:
• Entfernen Sie nach dem Trennen des Netzteils von der Steckdose die Filzmatte und
den Plattenteller und wickeln Sie sie dann so ein, dass sie nicht beschädigt werden.
• Bringen Sie den Schutz an der Patrone an.
• Binden Sie den Tonarm mit einer Schnur oder Ähnlichem an den Rest, damit er sich
nicht bewegt.
• Wickeln Sie den Plattenspieler mit Papier oder einem weichen Tuch ein, damit er
nicht beschädigt wird.
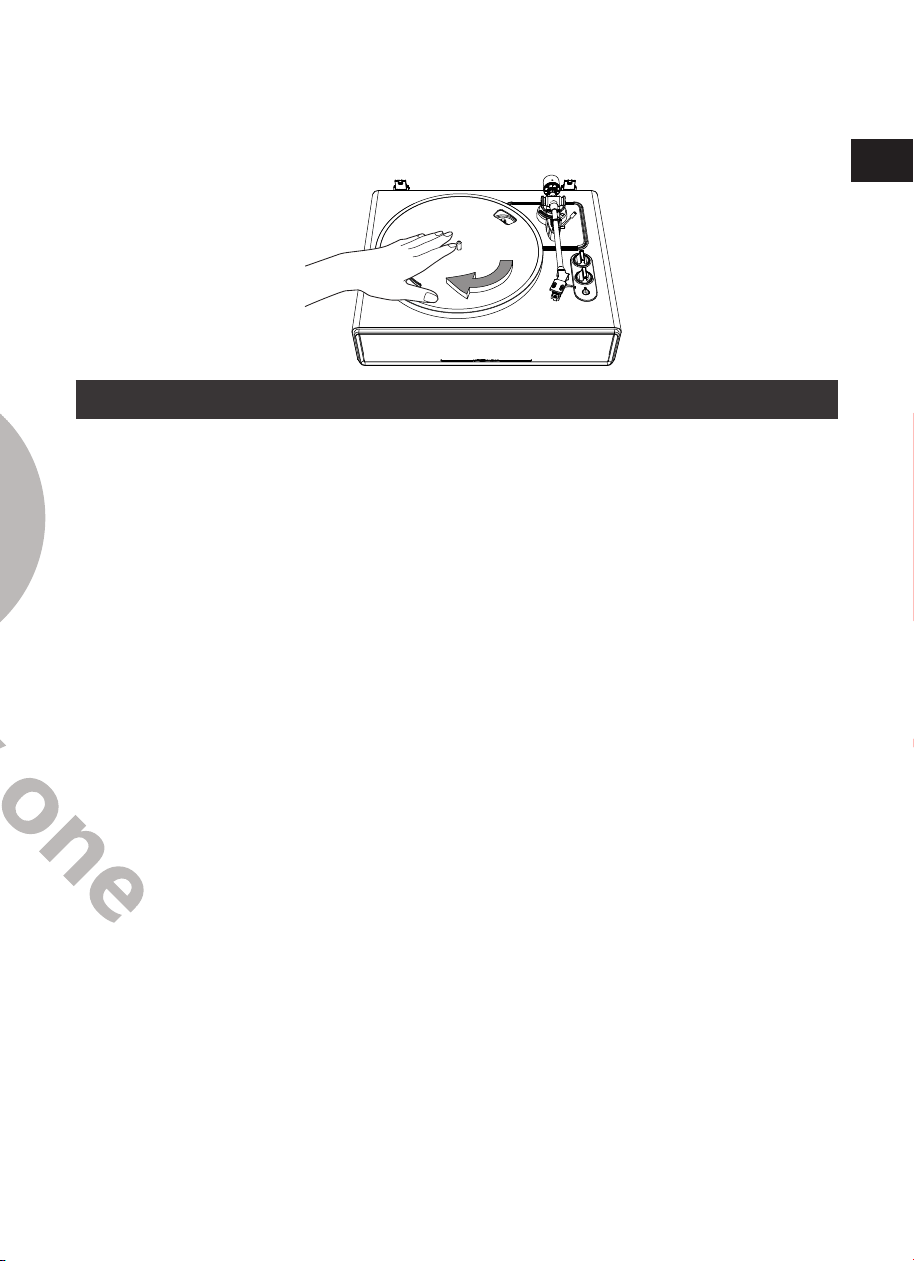
EN
DE
FR
ES
IT
EN
DE
FR
ES
IT
36 37
5. Bringen Sie den Plattenteller an.
Richten Sie eine der Öffnungen auf die Position der messingfarbenen
Motorriemenscheibe aus.
6. Legen Sie den Riemen auf die messingfarbene Motorriemenscheibe.
Fassen Sie den in Schritt 4 angebrachten Riemen und legen Sie ihn unter Zug auf
die Motorrolle aus Messing.
7. Drehen Sie den Plattenteller mit den Händen langsam zehnmal im
Uhrzeigersinn, wie durch den Pfeil unten dargestellt.
Wenn der Plattenteller bewegt wurde
Wickeln Sie den Plattenteller unter Verwendung des Originalverpackungsmaterials des
Produkts in umgekehrter Reihenfolge wie beim Auspacken ein. Wenn Sie nicht über
die Verpackungsmaterialien verfügen, ergreifen Sie die folgenden Maßnahmen:
• Entfernen Sie nach dem Trennen des Netzteils von der Steckdose die Filzmatte und
den Plattenteller und wickeln Sie sie dann so ein, dass sie nicht beschädigt werden.
• Bringen Sie den Schutz an der Patrone an.
• Binden Sie den Tonarm mit einer Schnur oder Ähnlichem an den Rest, damit er sich
nicht bewegt.
• Wickeln Sie den Plattenspieler mit Papier oder einem weichen Tuch ein, damit er
nicht beschädigt wird.
EN
DE
FR
ES
IT
EN
DE
FR
ES
IT
38 39
Fehlerbehebung
Problem Lösung
Die Platte dreht
sich nicht.
• Ist das Netzgerät an die Steckdose angeschlossen?
-Schließen Sie das Netzgerät an die Steckdose an.
• Wie ist der Status der Anzeigeleuchte?
-Der Strom ist eingeschaltet, aber die Anzeigeleuchte ist aus.
Das bedeutet, dass die Die Drehscheibe ist im ERP-Modus oder
nicht eingeschaltet. Drücken und halten Sie die START-Taste für 3
Sekunden, um den Plattenspieler neu zu starten.
-Die Anzeigeleuchte ist blau. Das bedeutet, der Plattenspieler ist
in Bluetooth-Modus. Bitte drehen Sie den Function-Knopf, um
auf Drehtisch-Modus.
-Die rote Anzeigeleuchte zeigt den Plattenspielermodus an.
• Ist der Gürtel von der Platte gerutscht?
-Legen Sie den Riemen korrekt auf den Teller.
• Ist der Riemen auf der Motorrolle platziert?
-Prüfen Sie, ob der Riemen richtig auf der Motorrolle
(messingfarben) liegt
.
• Ist der Riemen beschädigt?
-Ersetzen Sie ihn durch einen neuen Riemen.
• Ist das AUX-IN-Kabel eingesteckt?
-Die Funktion AUX-IN ist eine Funktion erster Priorität. Bitte
ziehen Sie den Stecker des AUX-IN-Kabels ab, bevor Sie die
PHONO/BT-Funktionen verwenden.
Der Teller dreht
sich, aber es
kommt kein
Ton vom
Plattenspieler?
• Ist der Tastereinsatz beschädigt?
-Kontrollieren Sie den Tastereinsatz und tauschen Sie ihn
gegebenenfalls aus. Es wird empfohlen, den Tastereinsatz nach
400 Betriebsstunden zu ersetzen.
• Ist der Stylus richtig auf dem Tonabnehmerkörper platziert?
-Kontrollieren Sie die Patrone und justieren Sie sie, falls
erforderlich.
Der Stift springt • Ist die Platte zerkratzt?
-Prüfen Sie die Schallplatte.
• Ist die Platte verzogen?
-Prüfen Sie die Schallplatte.
• Ist der Stiftdruck korrekt?
-Verweisen Sie auf "Cartridge Tracking Force Adjustment"
(Einstellung der Auflagekraft der Patrone), um die Auflagekraft
neu einzustellen.
Der Plattenspieler
macht ein
seltsames "Heul"-
Geräusch.
• Nimmt das Produkt übermäßige Vibrationen vom Boden, von
den Oberflächen der Wände oder von Lautsprechern in der
Nähe auf?
- Verringern Sie die Vibrationen oder montieren Sie das Produkt
auf einer Oberfläche, die keinen Vibrationen ausgesetzt ist.
• Ist das Produkt auf einer instabilen Oberfläche montiert?
-Prüfen Sie, ob die Oberfläche, auf der das Produkt montiert ist,
geeignet ist.
Während der
Wiedergabe ist
ein Rauschen zu
hören.
• Befindet sich Staub auf der Stiftspitze der Patrone?
- Wenn Staub an der Stiftspitze haftet, reinigen Sie ihn mit einer
handelsüblichen Bürste.
Der Ton während
der Wiedergabe
ist entweder zu
schnell oder zu
langsam.
• Sind die Geschwindigkeitseinstellungen für dieses Produkt
korrekt?
-Bitte wählen Sie die richtige Geschwindigkeit für die Art der
Aufzeichnung, die abgespielt wird.
Die Wiedergabeg-
eschwindigkeit
verlangsamt sich
oder es kommt zu
einer
unregelmäßigen
Drehung.
• Ist der Riemen gespannt?
-Ersetzen Sie ihn durch einen neuen Riemen.
• Ist der Riemen korrekt installiert?
-Zum Einrichten des Riemens auf "Einstellung der Drehscheibe
und des Riemens" zurückgreifen.
EN
DE
FR
ES
IT
EN
DE
FR
ES
IT
38 39
Fehlerbehebung
Problem Lösung
Die Platte dreht
sich nicht.
• Ist das Netzgerät an die Steckdose angeschlossen?
-Schließen Sie das Netzgerät an die Steckdose an.
• Wie ist der Status der Anzeigeleuchte?
-Der Strom ist eingeschaltet, aber die Anzeigeleuchte ist aus.
Das bedeutet, dass die Die Drehscheibe ist im ERP-Modus oder
nicht eingeschaltet. Drücken und halten Sie die START-Taste für 3
Sekunden, um den Plattenspieler neu zu starten.
-Die Anzeigeleuchte ist blau. Das bedeutet, der Plattenspieler ist
in Bluetooth-Modus. Bitte drehen Sie den Function-Knopf, um
auf Drehtisch-Modus.
-Die rote Anzeigeleuchte zeigt den Plattenspielermodus an.
• Ist der Gürtel von der Platte gerutscht?
-Legen Sie den Riemen korrekt auf den Teller.
• Ist der Riemen auf der Motorrolle platziert?
-Prüfen Sie, ob der Riemen richtig auf der Motorrolle
(messingfarben) liegt
.
• Ist der Riemen beschädigt?
-Ersetzen Sie ihn durch einen neuen Riemen.
• Ist das AUX-IN-Kabel eingesteckt?
-Die Funktion AUX-IN ist eine Funktion erster Priorität. Bitte
ziehen Sie den Stecker des AUX-IN-Kabels ab, bevor Sie die
PHONO/BT-Funktionen verwenden.
Der Teller dreht
sich, aber es
kommt kein
Ton vom
Plattenspieler?
• Ist der Tastereinsatz beschädigt?
-Kontrollieren Sie den Tastereinsatz und tauschen Sie ihn
gegebenenfalls aus. Es wird empfohlen, den Tastereinsatz nach
400 Betriebsstunden zu ersetzen.
• Ist der Stylus richtig auf dem Tonabnehmerkörper platziert?
-Kontrollieren Sie die Patrone und justieren Sie sie, falls
erforderlich.
Der Stift springt • Ist die Platte zerkratzt?
-Prüfen Sie die Schallplatte.
• Ist die Platte verzogen?
-Prüfen Sie die Schallplatte.
• Ist der Stiftdruck korrekt?
-Verweisen Sie auf "Cartridge Tracking Force Adjustment"
(Einstellung der Auflagekraft der Patrone), um die Auflagekraft
neu einzustellen.
Der Plattenspieler
macht ein
seltsames "Heul"-
Geräusch.
• Nimmt das Produkt übermäßige Vibrationen vom Boden, von
den Oberflächen der Wände oder von Lautsprechern in der
Nähe auf?
- Verringern Sie die Vibrationen oder montieren Sie das Produkt
auf einer Oberfläche, die keinen Vibrationen ausgesetzt ist.
• Ist das Produkt auf einer instabilen Oberfläche montiert?
-Prüfen Sie, ob die Oberfläche, auf der das Produkt montiert ist,
geeignet ist.
Während der
Wiedergabe ist
ein Rauschen zu
hören.
• Befindet sich Staub auf der Stiftspitze der Patrone?
- Wenn Staub an der Stiftspitze haftet, reinigen Sie ihn mit einer
handelsüblichen Bürste.
Der Ton während
der Wiedergabe
ist entweder zu
schnell oder zu
langsam.
• Sind die Geschwindigkeitseinstellungen für dieses Produkt
korrekt?
-Bitte wählen Sie die richtige Geschwindigkeit für die Art der
Aufzeichnung, die abgespielt wird.
Die Wiedergabeg-
eschwindigkeit
verlangsamt sich
oder es kommt zu
einer
unregelmäßigen
Drehung.
• Ist der Riemen gespannt?
-Ersetzen Sie ihn durch einen neuen Riemen.
• Ist der Riemen korrekt installiert?
-Zum Einrichten des Riemens auf "Einstellung der Drehscheibe
und des Riemens" zurückgreifen.
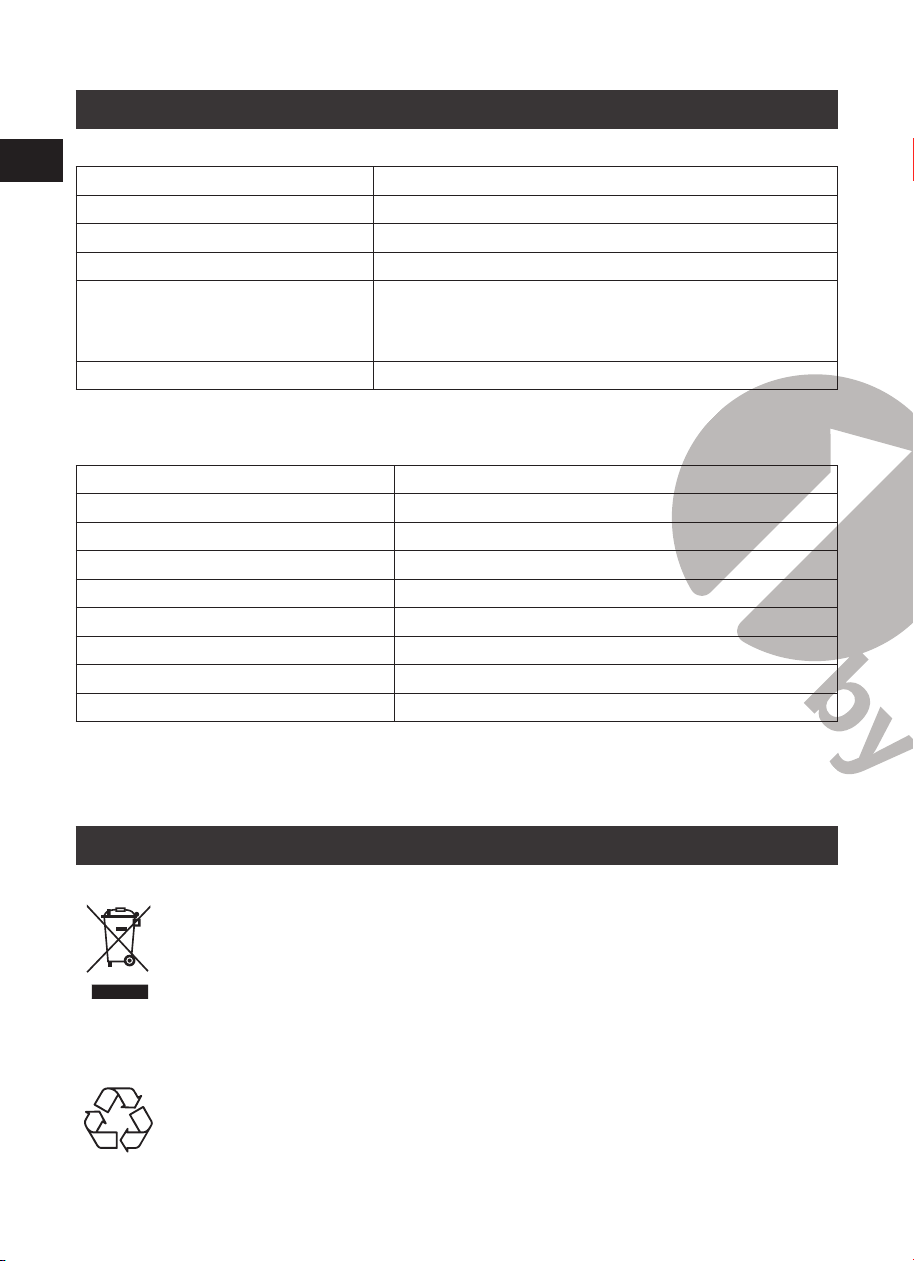
EN
DE
FR
ES
IT
41
EN
DE
FR
ES
IT
40
Technische Daten
Plattenspieler
Stromversorgung AC100-240V, DC-Ausgang 12V 1500mA
Stromverbrauch 35W
Plattenspieler Geschwindigkeit 33 1/3, 45 U/min
Ausgangsleistung (RMS) 4Ω 18W X 2(BT) ,
5W X 2(PH)
Abmessungen (L x B x H)
17.32” x 14.57” x 7.56” (440 x 370 x 192mm)(Deckel
geschlossen), 15.75” x 16.73” x 18.19” (400 x 425 x
462mm) (Deckel offen)
Gewicht 6.05kg (13.3lb)
Stift
Modell Audio-Technica AT3600
Frequenzbereich 20Hz - 20kHz
Kanal-Balance <2.5dB
Kanalabstand >18dB
Ausgangsspannung 2.5mV
Entladelastwiderstand 47kΩ
Verstärkeranschluss MM (Moving Magnet) - Eingang
Empfohlene Auagekraft 3.5±0.5g
Gewicht 5,1g
Hinweis: Design und Technische Daten können ohne Vorankündigung geändert
werden..
Entsorgung
Gerät Entsorgen
Werfen Sie das Gerät keinesfalls in den normalen Hausmüll. Dieses Produkt
unterliegt der europäischen Richtlinie 2012/19/EU..
Entsorgen Sie das Gerät über einen zugelassenen Entsorgungsbetrieb oder über Ihre
kommunale Entsorgungseinrichtung. Beachten Sie die aktuell geltenden Vorschriften.
Setzen Sie sich im Zweifelsfall mit Ihrer Entsorgungseinrichtung in Verbindung.
Die Verpackung besteht aus umweltfreundlichen Materialien, die Sie über
die örtlichen Recyclingstellen entsorgen können.
Introduction
Merci pour l’achat du Tourne Disque Haute Fidélité avec Courroie de Transmission
1byone. Ce manuel d’instructions contient d’importantes informations concernant
la securité, l’utilisation et le recyclage de ce produit. Utiliser le produit comme décrit
dans ce manuel et le conserver pour utilisation ultérieure.. Si vous vendez ou donnez
ce produit, veuillez également transmettre le manuel au nouveau propriétaire.
Instructions de Sécurité
Veuillez lire et comprendre ce manuel avant d’utiliser ce produit. Veuillez conserver
ces instructions pour consultations ultérieures
1. Ne pas utiliser ce tourne-disque à proximité d’eau.
2. Brancher ce tourne-disque uniquement sur une prise conformément à l’étiquette
ou à la section “Caractéristiques” du manuel d’instructions.
3. Le tourne-disque dispose d’une prise polarisée (une broche est plus grosse que
l’autre). Pour réduire le risque de choc électrique, le câble s’insère dans la prise
électrique dans un sens uniquement. Si le câble ne s’insère pas convenablement
dans la prise, veuillez inverser la position du câble. Si cela ne fonctionne toujours
pas, veuillez consulter un électricien qualifié. Ne pas modifier le câble.
4. Veuillez protéger le câble électrique de façon à ne pas se prendre les pieds dedans,
au niveau des branchements entre le câble et la prise électrique et entre le câble
électrique et les enceintes.
5. Ne pas surcharger les prises murales et les câbles d’extension car cela peut favoriser
les court-circuits ainsi que les chocs électriques.
6. Ne jamais pousser les objets de toute sorte dans le tourne-disque car ils peuvent
rentrer en contact avec des points électriquement sensibles et endommager des
pièces internes ce qui peut provoquer un choc électrique ou une incendie. Ne
jamais propager de liquide (quelque soit sa nature) sur le produit.
7. Ne pas tenter de réparer le tourne-disque vous même ou de retirer toute partie
du produit car cela peut provoquer une électrocution ou d’autres dangers. Veuillez
contacter le personnel qualifié en cas de problème.
8. Tout changement ou modifications de ce tourne-disque effectué non
conformément aux instructions de ce manuel peut influencer la capacité de
l’utilisateur à utiliser le produit.
9. Ne pas utiliser les accessoires non recommandés par le fabricant car ils peuvent
provoquer des accidents.

EN
DE
FR
ES
IT
EN
DE
FR
ES
IT
42 43
10. Ne placer le produit que sur des surfaces plates, dures et utiliser avec
le socle ou trépied comme indiqué par le fabricant ou vendu avec le
tourne-disque. Lorsqu’un caddie est utilisé, utiliser avec précaution
lorsque vous déplacer le tourne-disque pour éviter toute blessure avec
l'interrupteur.
11. Les fentes et ouvertures optimisent la ventilation afin d’assurer une utilisation sûre
du produit et pour le protéger de la surchauffe. Ne pas bloquer ou couvrir ces
ouvertures..
12. Débrancher le produit pendant les orages ou bien lorsqu’il n’est pas destiné à être
utilisé pendant une longue période.
Description du Produit
R
AUX OUTAUX IN
PHONE
DC12V
LINE OUT
L
1 2 3 4
5
17
16
6
7
8
9
10
11
12
13
14
15
45 33
START
- +
1. Connecteur d’alimentation externe
2. Commutateur Phono & Sortie Line
Out
3. Prise AUX IN
4. Prises de sortie phono et auxiliaire
5. Charnière du couvercle
6. Contrepoids
7. Suivi du cadran de force
8. Levier de levage du bras de lecture
9. Clip de bras de lecture
10. Bras de lecture
11. Bouton de fonction
12. Contrôle du volume
13. Indicateur
14. Bouton START
15. Cartouche de stylet
16. Tourne-disque
17. Broche du tourne-disque
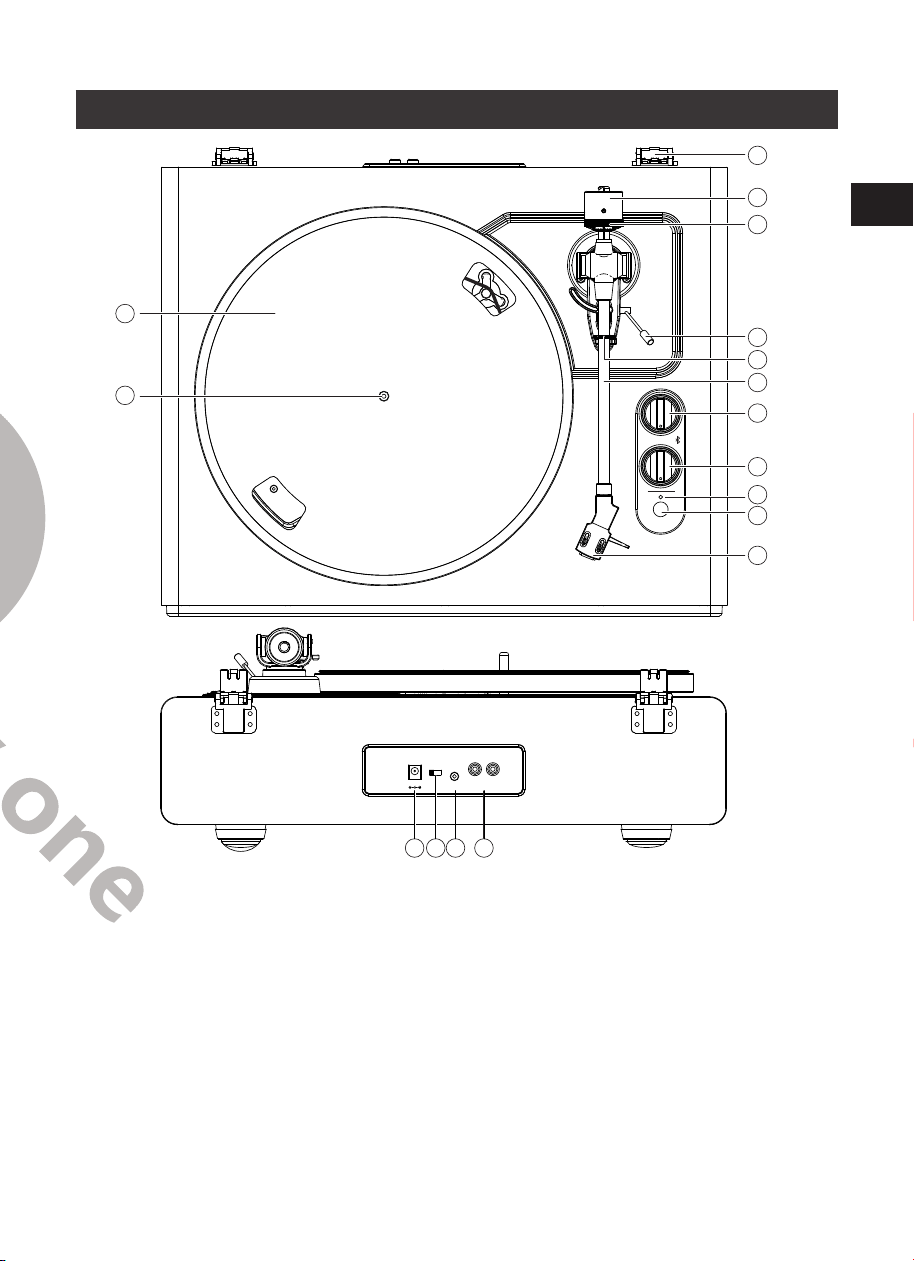
EN
DE
FR
ES
IT
EN
DE
FR
ES
IT
42 43
10. Ne placer le produit que sur des surfaces plates, dures et utiliser avec
le socle ou trépied comme indiqué par le fabricant ou vendu avec le
tourne-disque. Lorsqu’un caddie est utilisé, utiliser avec précaution
lorsque vous déplacer le tourne-disque pour éviter toute blessure avec
l'interrupteur.
11. Les fentes et ouvertures optimisent la ventilation afin d’assurer une utilisation sûre
du produit et pour le protéger de la surchauffe. Ne pas bloquer ou couvrir ces
ouvertures..
12. Débrancher le produit pendant les orages ou bien lorsqu’il n’est pas destiné à être
utilisé pendant une longue période.
Description du Produit
R
AUX OUTAUX IN
PHONE
DC12V
LINE OUT
L
1 2 3 4
5
17
16
6
7
8
9
10
11
12
13
14
15
45 33
START
- +
1. Connecteur d’alimentation externe
2. Commutateur Phono & Sortie Line
Out
3. Prise AUX IN
4. Prises de sortie phono et auxiliaire
5. Charnière du couvercle
6. Contrepoids
7. Suivi du cadran de force
8. Levier de levage du bras de lecture
9. Clip de bras de lecture
10. Bras de lecture
11. Bouton de fonction
12. Contrôle du volume
13. Indicateur
14. Bouton START
15. Cartouche de stylet
16. Tourne-disque
17. Broche du tourne-disque
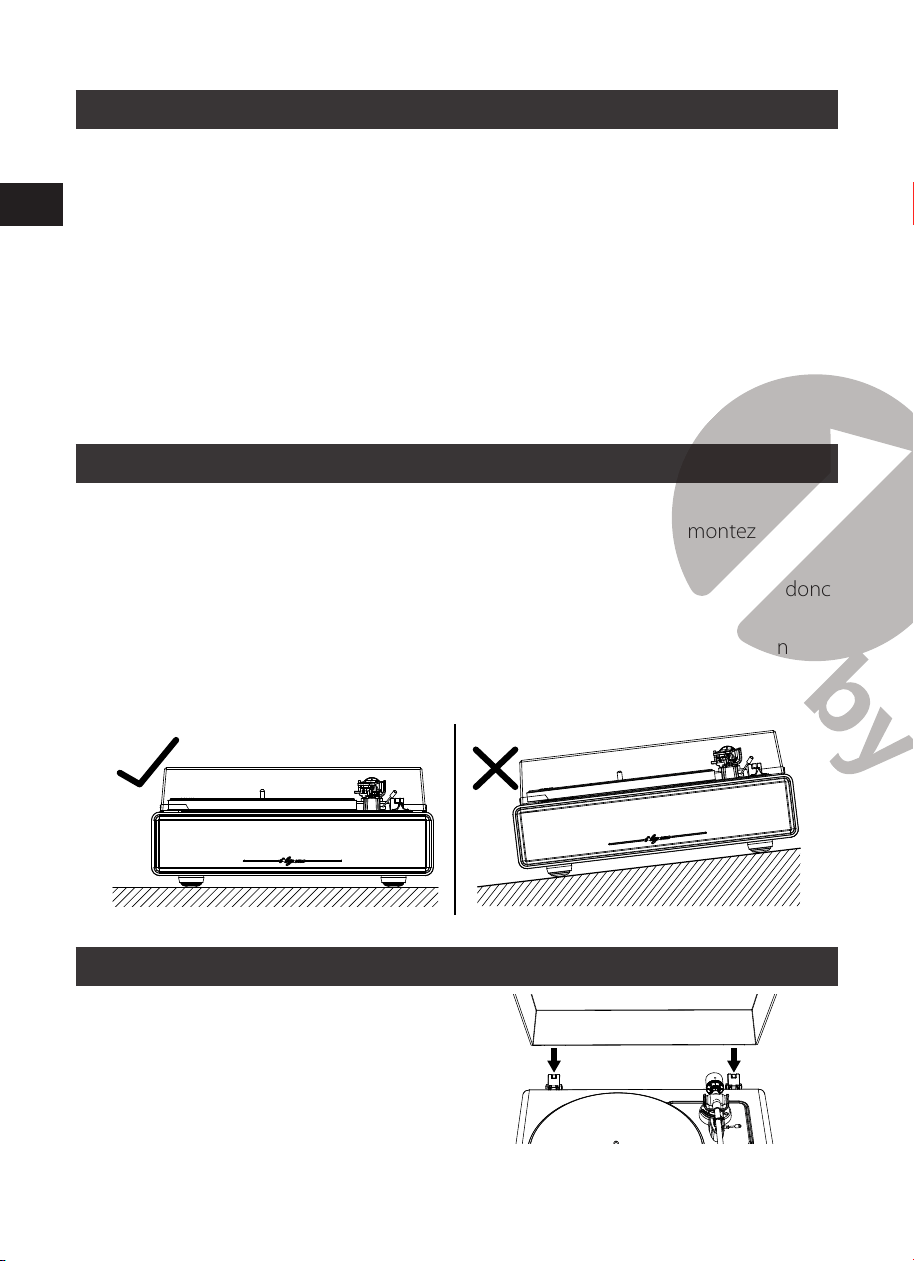
EN
DE
FR
ES
IT
EN
DE
FR
ES
IT
44 45
Cet emballage inclut
Avant d’utiliser le tourne-disque pour la première fois, veuillez vous assurer que toutes
les pièces sont bien dans l’emballage et en bon état. Veuillez conserver l’emballage
original en cas d’échange ou de retour.
1) Tourne-Disque
2) Adaptateur secteur
3) Couvercle du tourne-disque
4) Tapis antidérapant
5) Plateau avec courroie
6) Contrepoids
7) Guide Visuel d'Alignement pour Cartouche
8) Adaptateur 45 tours
9) Manuel d’Instructions
Installation du Tourne-Disque
• Veuillez monter l’appareil sur une surface horizontale.
• Pour éviter les effets des vibrations et de la pression acoustique, ne montez pas
l’appareil à côté de produits tels que des haut-parleurs.
• L’appareil peut capter les ondes radios s'il est placé à côté d'une radio. Veuillez donc
éloigner l’appareil de radios.
• Si le tourne-disque se trouve à proximité d' équipement électronique tel qu’un
téléphone portable qui émet de fortes ondes radio, du interférences sonores
peuvent alors se produire.
Installation du Couvercle
Veuillez encastrer les formes du couvercle
avec celles du tourne-disque.
Plateau Tourne-Disque et Installation de la Courroie
1. Retournez le plateau et vérifiez la position de la courroie.
Assurez-vous que la courroie d'entraînement est enroulée au milieu du cercle. Si la
courroie d'entraînement est située trop haut ou trop bas dans ce cercle, cela peut
provoquer la chute de la courroie d'entraînement ou une vitesse instable.
2. Placez le plateau sur la broche.
Assurez-vous que le plateau est bien en place sur la broche.
Ouverture
Plateau
Broche
Poulie
de moteur
3. Placez la courroie sur la poulie du moteur.
Alignez l'une des ouvertures du plateau avec la poulie du moteur, et tout en tirant
les deux extrémités du ruban rouge attaché à la courroie, placez la courroie sur la
poulie du moteur, comme indiqué sur le schéma. Lors de cette opération, veillez à
ne pas tordre la courroie.
Crochet
Courroie
Poulie de Moteur
Droit Entortillé
Mauvais emplacement
4.Retirez le ruban rouge de la courroie.
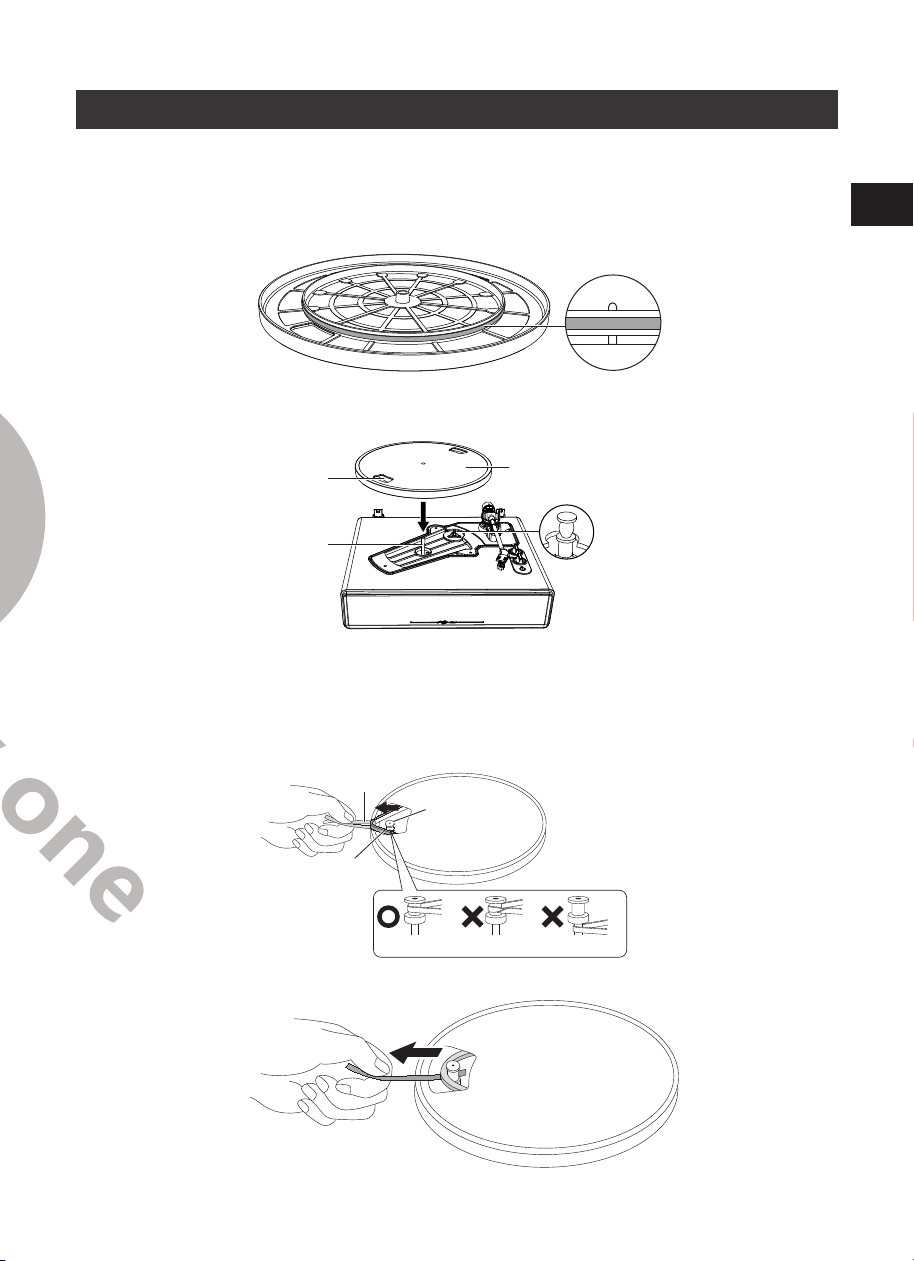
EN
DE
FR
ES
IT
EN
DE
FR
ES
IT
44 45
Cet emballage inclut
Avant d’utiliser le tourne-disque pour la première fois, veuillez vous assurer que toutes
les pièces sont bien dans l’emballage et en bon état. Veuillez conserver l’emballage
original en cas d’échange ou de retour.
1) Tourne-Disque
2) Adaptateur secteur
3) Couvercle du tourne-disque
4) Tapis antidérapant
5) Plateau avec courroie
6) Contrepoids
7) Guide Visuel d'Alignement pour Cartouche
8) Adaptateur 45 tours
9) Manuel d’Instructions
Installation du Tourne-Disque
• Veuillez monter l’appareil sur une surface horizontale.
• Pour éviter les effets des vibrations et de la pression acoustique, ne montez pas
l’appareil à côté de produits tels que des haut-parleurs.
• L’appareil peut capter les ondes radios s'il est placé à côté d'une radio. Veuillez donc
éloigner l’appareil de radios.
• Si le tourne-disque se trouve à proximité d' équipement électronique tel qu’un
téléphone portable qui émet de fortes ondes radio, du interférences sonores
peuvent alors se produire.
Installation du Couvercle
Veuillez encastrer les formes du couvercle
avec celles du tourne-disque.
Plateau Tourne-Disque et Installation de la Courroie
1. Retournez le plateau et vérifiez la position de la courroie.
Assurez-vous que la courroie d'entraînement est enroulée au milieu du cercle. Si la
courroie d'entraînement est située trop haut ou trop bas dans ce cercle, cela peut
provoquer la chute de la courroie d'entraînement ou une vitesse instable.
2. Placez le plateau sur la broche.
Assurez-vous que le plateau est bien en place sur la broche.
Ouverture
Plateau
Broche
Poulie
de moteur
3. Placez la courroie sur la poulie du moteur.
Alignez l'une des ouvertures du plateau avec la poulie du moteur, et tout en tirant
les deux extrémités du ruban rouge attaché à la courroie, placez la courroie sur la
poulie du moteur, comme indiqué sur le schéma. Lors de cette opération, veillez à
ne pas tordre la courroie.
Crochet
Courroie
Poulie de Moteur
Droit Entortillé
Mauvais emplacement
4.Retirez le ruban rouge de la courroie.
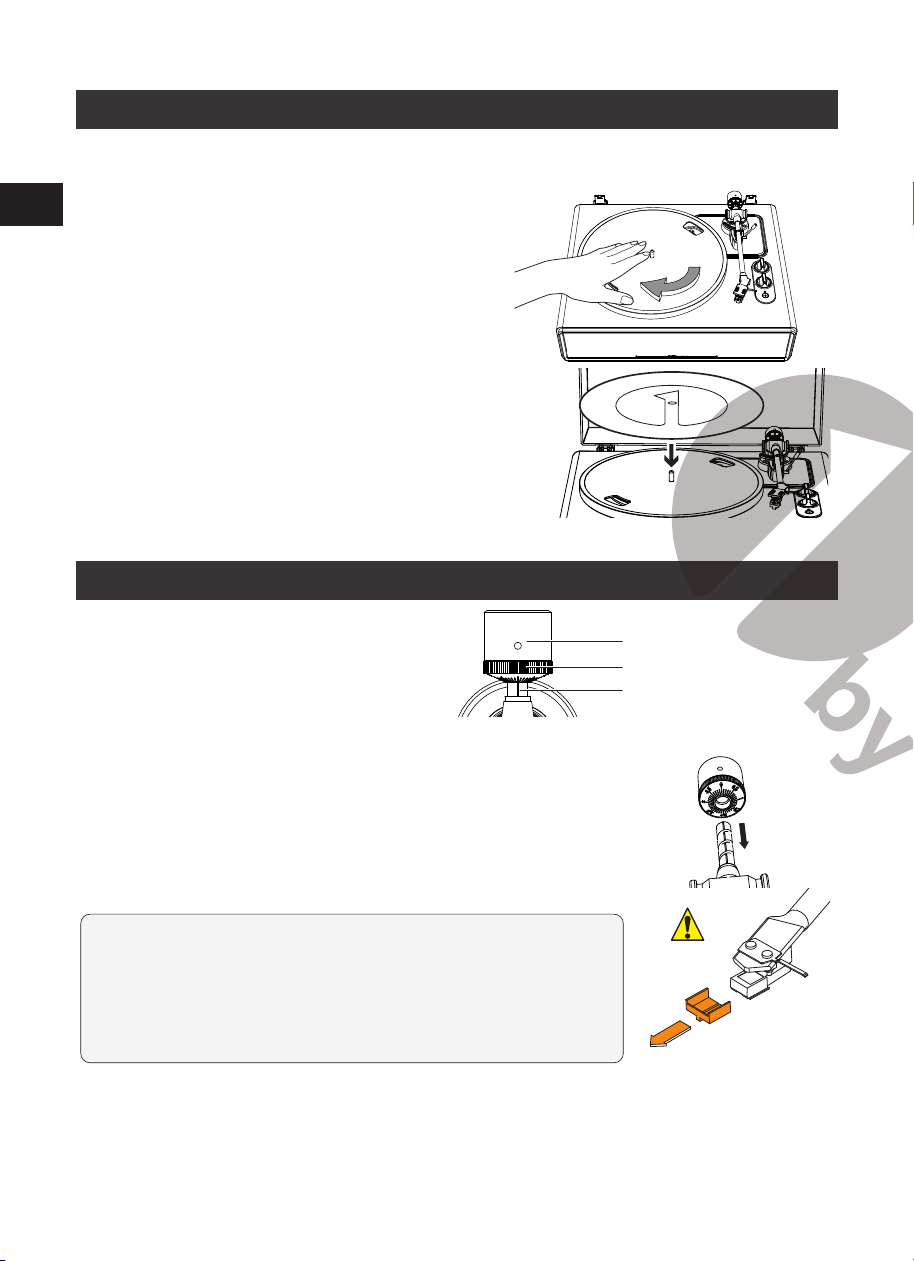
EN
DE
FR
ES
IT
EN
DE
FR
ES
IT
46 47
Faire tourner le plateau
1. À l'aide de vos mains, tournez
lentement le plateau dix fois dans la
direction de la flèche (schéma 1).
2. Cette étape consiste à réinitialiser
le mécanisme automatique, à se
débarrasser des torsions de la courroie
et à s'assurer que la courroie roule en
douceur le long du bord d'entraînement
sur la face inférieure du plateau.
schéma 1
3. Veuillez placer le tapis sur le dessus
du plateau. Assurez-vous que le logo
1byone sur le tapis est orienté vers le
haut (schéma 2).
schéma 2
Ajustement de la Force de la Cartouche
Le contre-poids fourni est adapté pour les
cartouches dont le poids varie entre 3 et
6 grammes.
Contre-poids
Ligne Centrale
Commande de suivi de la Force
1. Veuillez délicatement pousser et tourner le contrepoids sur
l’arrière de la tête de lecture
.
2. Veuillez retirer la languette et déverrouiller la tête de lecture
REMARQUE: L'application d'une force vers le bas peut
provoquer la chute du stylet (et donc le détachement de
son réceptacle). Seul un faible volume est émis si le stylet
s'est détaché ou est sur le point de se détacher. Reportez-
vous donc à la section «Remplacement du stylet» pour
repositionner le stylet correctement.
3. Veuillez retirer la languette et déverrouiller la tête de lecture.
4. Baisser le levier et positionner la cartouche dans l’espace entre le socle pour la tete
de lecture et le plateau.
5. Veuillez attentivement faire tourner le Contrepoids jusqu'à ce que le bras de lecture
soit en position d'équilibre neutre. Le bras de lecture devrait revenir dans sa position
d'équilibre s'il a été déplacé vers le haut ou vers le bas. Cet ajustement doit être
effectué minutieusement.
Tête de Lecture
Contre-poids
Ajuster le stylet de telle façon que le bras de lecture
soit de niveau et équilibré de manière neutre
6. Une fois que le bras de lecture est correctement équilibré, remettez-le sur son socle
de repos. Veuillez tenir le contrepoids sans le déplacer et tourner doucement le
cadran de variation de force jusqu'à ce que le zéro soit aligné avec la ligne centrale
noire à l'arrière du bras de lecture. Veuillez vérifier que le bras de lecture est bien
toujours équilibré de façon neutre.
7. Enfin, tournez le contrepoids et le cadran de force d’appui ensemble dans le sens
inverse des aiguilles d’une montre (vu de l’avant) pour régler la force d’appui
conformément aux recommandations du fabricant de la cartouche.
Remarque: Chaque marque sur l'échelle représente 0,1 g. La force d'appui
recommandée pour la cartouche installée en usine est de 3,5 g ± 0,5 g. Tournez avec
précaution le cadran de force d'appui. Lorsque «3,5» est centré sur la ligne noire sur
le dessus du bras de lecture, veuillez arrêter.
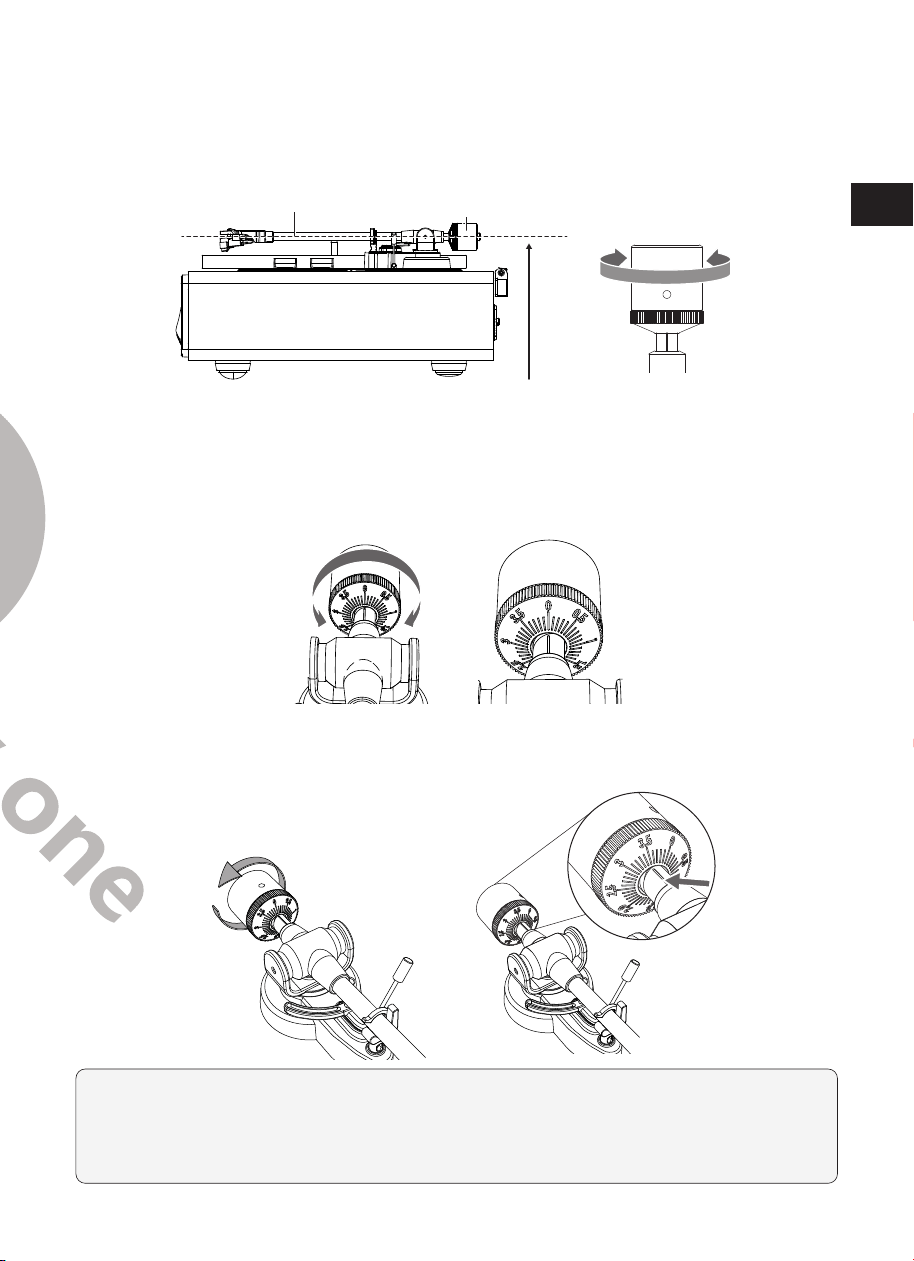
EN
DE
FR
ES
IT
EN
DE
FR
ES
IT
46 47
Faire tourner le plateau
1. À l'aide de vos mains, tournez
lentement le plateau dix fois dans la
direction de la flèche (schéma 1).
2. Cette étape consiste à réinitialiser
le mécanisme automatique, à se
débarrasser des torsions de la courroie
et à s'assurer que la courroie roule en
douceur le long du bord d'entraînement
sur la face inférieure du plateau.
schéma 1
3. Veuillez placer le tapis sur le dessus
du plateau. Assurez-vous que le logo
1byone sur le tapis est orienté vers le
haut (schéma 2).
schéma 2
Ajustement de la Force de la Cartouche
Le contre-poids fourni est adapté pour les
cartouches dont le poids varie entre 3 et
6 grammes.
Contre-poids
Ligne Centrale
Commande de suivi de la Force
1. Veuillez délicatement pousser et tourner le contrepoids sur
l’arrière de la tête de lecture
.
2. Veuillez retirer la languette et déverrouiller la tête de lecture
REMARQUE: L'application d'une force vers le bas peut
provoquer la chute du stylet (et donc le détachement de
son réceptacle). Seul un faible volume est émis si le stylet
s'est détaché ou est sur le point de se détacher. Reportez-
vous donc à la section «Remplacement du stylet» pour
repositionner le stylet correctement.
3. Veuillez retirer la languette et déverrouiller la tête de lecture.
4. Baisser le levier et positionner la cartouche dans l’espace entre le socle pour la tete
de lecture et le plateau.
5. Veuillez attentivement faire tourner le Contrepoids jusqu'à ce que le bras de lecture
soit en position d'équilibre neutre. Le bras de lecture devrait revenir dans sa position
d'équilibre s'il a été déplacé vers le haut ou vers le bas. Cet ajustement doit être
effectué minutieusement.
Tête de Lecture
Contre-poids
Ajuster le stylet de telle façon que le bras de lecture
soit de niveau et équilibré de manière neutre
6. Une fois que le bras de lecture est correctement équilibré, remettez-le sur son socle
de repos. Veuillez tenir le contrepoids sans le déplacer et tourner doucement le
cadran de variation de force jusqu'à ce que le zéro soit aligné avec la ligne centrale
noire à l'arrière du bras de lecture. Veuillez vérifier que le bras de lecture est bien
toujours équilibré de façon neutre.
7. Enfin, tournez le contrepoids et le cadran de force d’appui ensemble dans le sens
inverse des aiguilles d’une montre (vu de l’avant) pour régler la force d’appui
conformément aux recommandations du fabricant de la cartouche.
Remarque: Chaque marque sur l'échelle représente 0,1 g. La force d'appui
recommandée pour la cartouche installée en usine est de 3,5 g ± 0,5 g. Tournez avec
précaution le cadran de force d'appui. Lorsque «3,5» est centré sur la ligne noire sur
le dessus du bras de lecture, veuillez arrêter.
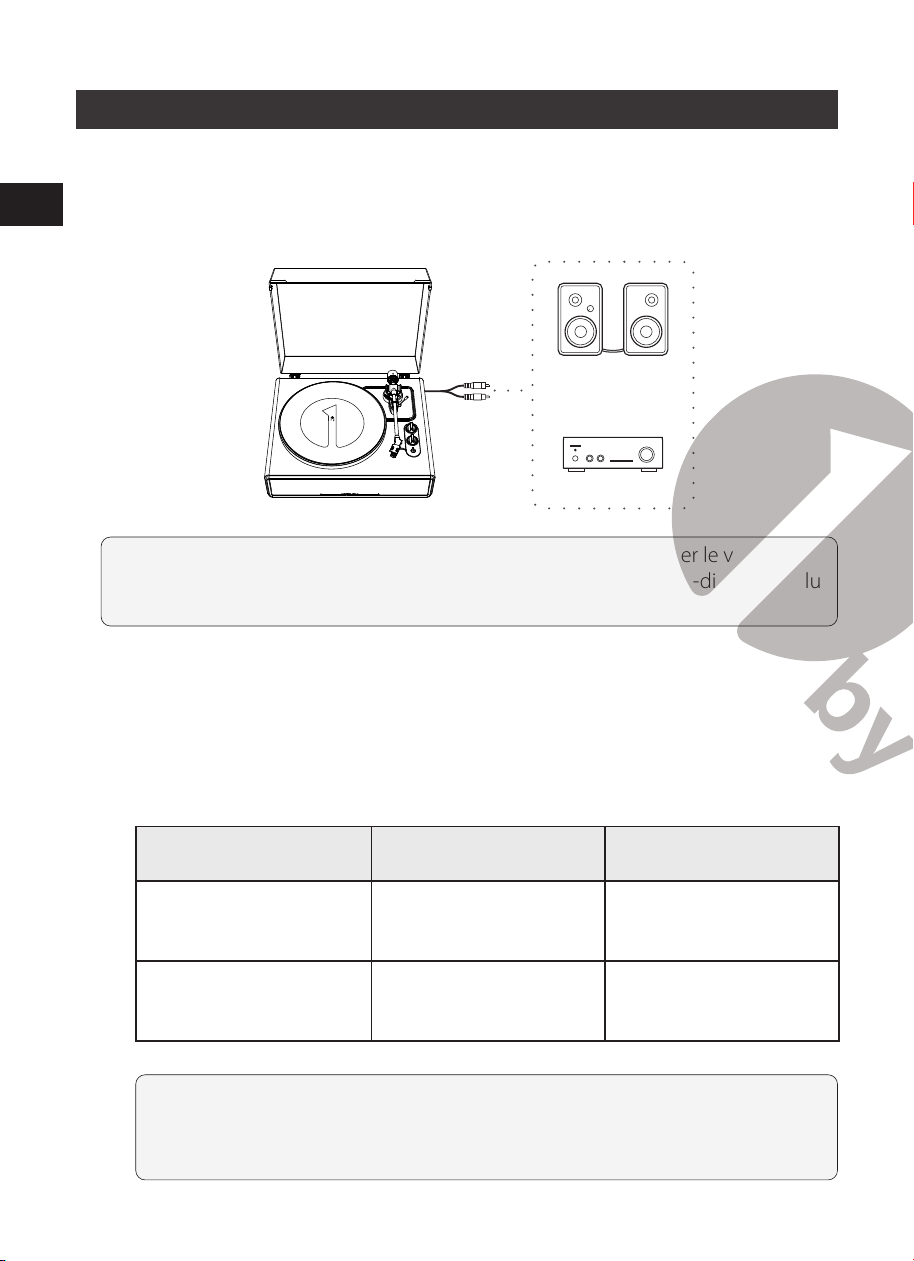
EN
DE
FR
ES
IT
EN
DE
FR
ES
IT
48 49
Connexion à un haut-parleur externe avec le câble audio RCA
Cette platine tourne-disque comprend 4 haut-parleurs intégrés et un égaliseur de
téléphone intégré.
Si vous souhaitez utiliser votre propre amplificateur ou enceintes, veuillez suivre les
instructions ci-dessous:
Connexion filaire RCA
Haut-parleurs actifs
ou
Amplificateur
REMARQUE: afin d'obtenir le meilleur son, il est conseillé de régler le volume de
la platine à un niveau minimal. Ensuite, l'audio de la platine tourne-disque sera lu
via votre propre amplificateur, haut-parleurs, etc.
1. Réglage de l’interrupteur pour préamplicateur
Réglage de l’interrupteur pour préamplificateur Ce produit a une fonction
d'égaliseur phono intégrée. Vous pouvez utiliser le produit même si vous ne
disposez pas d'un amplificateur phono ou d'un appareil connectable faisant
office d’amplificateur phono intégré.
Veuillez utiliser le sélectionneur du préamplificateur pour régler la sortie,
comme illustré ci-dessous.
Appareil de connexion en
cours d’utilisation
Position de l’interrupteur
du préamplificateur
Où connecter le câble
audio RCA?
Appareil avec entrée
phono
PHONO Prise d'entrée phono et
borne de terre pour
équipement connectable
Appareil sans entrée
phono
LIGNE Prise d'entrée AUX ou
connecteur d’entrée d'un
appareil connectable
REMARQUE: Les prises RCA ne sont pas conçues pour être connectées
directement aux haut-parleurs passifs / non alimentés en mode LIGNE. Si les
prises RCA sont connectées aux haut-parleurs passifs, il n'y aura pas de son.
2. Connexion de l’appareil
Veuillez ajuster les paramètres du sélectionneur pour l’interrupteur du
préamplificateur et connecter le câble audio RCA à une prise d'entrée
compatible avec les appareils connectables que vous utilisez (amplificateur,
haut-parleurs actifs, etc.).
• La prise rouge du câble audio RCA est pour le canal droit (R) et la prise blanche
est pour le canal gauche (L).
R
AUX OUTAUX IN
PHONE
DC12V
LINE OUT
L
Avec PHONO Sans PHONO
Vers la sortie
AUX
L R
PHONO
L R
Avec PHONO Sans PHONO
Vers la sortie
Appareils connectables
(Amplificateurs, ect)
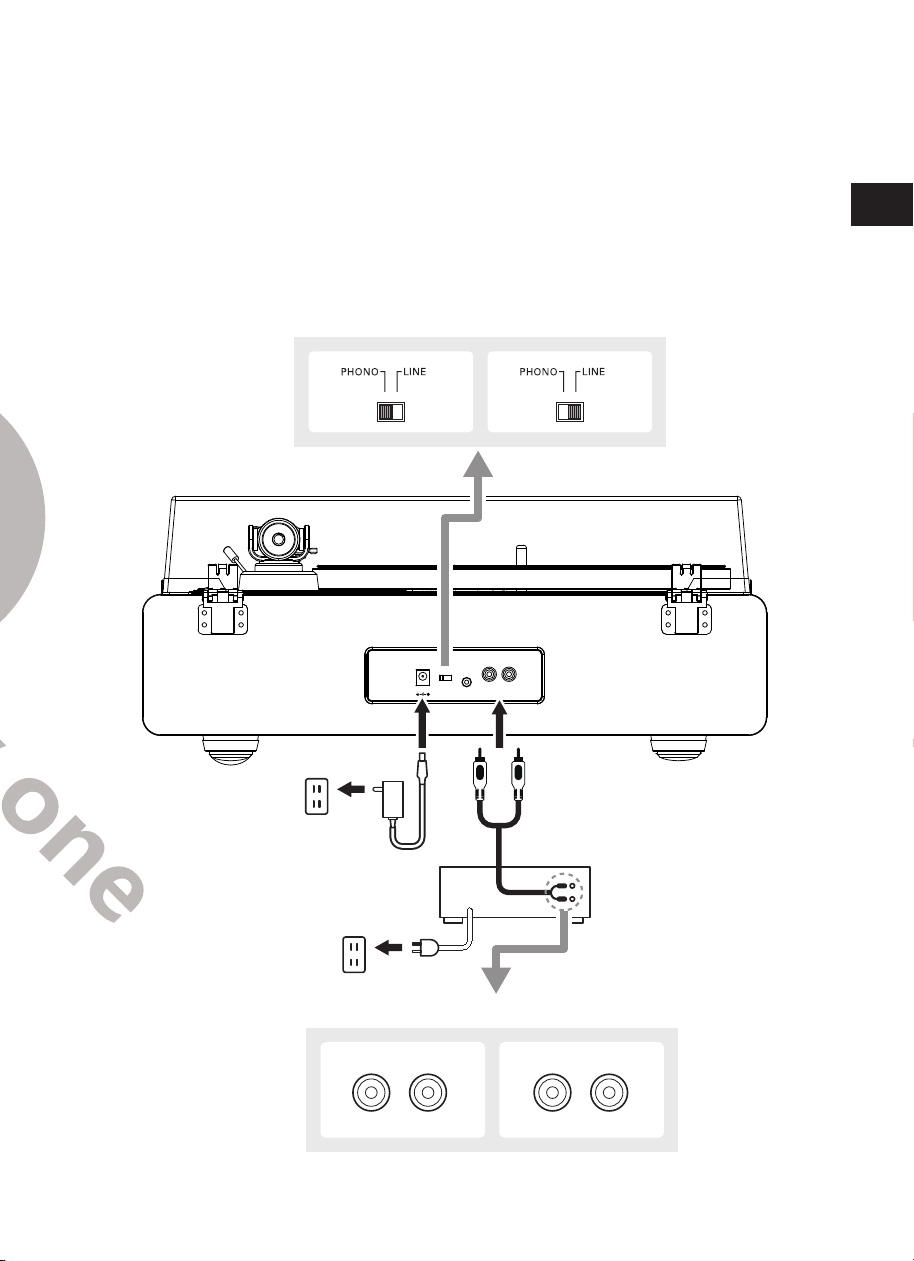
EN
DE
FR
ES
IT
EN
DE
FR
ES
IT
48 49
Connexion à un haut-parleur externe avec le câble audio RCA
Cette platine tourne-disque comprend 4 haut-parleurs intégrés et un égaliseur de
téléphone intégré.
Si vous souhaitez utiliser votre propre amplificateur ou enceintes, veuillez suivre les
instructions ci-dessous:
Connexion filaire RCA
Haut-parleurs actifs
ou
Amplificateur
REMARQUE: afin d'obtenir le meilleur son, il est conseillé de régler le volume de
la platine à un niveau minimal. Ensuite, l'audio de la platine tourne-disque sera lu
via votre propre amplificateur, haut-parleurs, etc.
1. Réglage de l’interrupteur pour préamplicateur
Réglage de l’interrupteur pour préamplificateur Ce produit a une fonction
d'égaliseur phono intégrée. Vous pouvez utiliser le produit même si vous ne
disposez pas d'un amplificateur phono ou d'un appareil connectable faisant
office d’amplificateur phono intégré.
Veuillez utiliser le sélectionneur du préamplificateur pour régler la sortie,
comme illustré ci-dessous.
Appareil de connexion en
cours d’utilisation
Position de l’interrupteur
du préamplificateur
Où connecter le câble
audio RCA?
Appareil avec entrée
phono
PHONO Prise d'entrée phono et
borne de terre pour
équipement connectable
Appareil sans entrée
phono
LIGNE Prise d'entrée AUX ou
connecteur d’entrée d'un
appareil connectable
REMARQUE: Les prises RCA ne sont pas conçues pour être connectées
directement aux haut-parleurs passifs / non alimentés en mode LIGNE. Si les
prises RCA sont connectées aux haut-parleurs passifs, il n'y aura pas de son.
2. Connexion de l’appareil
Veuillez ajuster les paramètres du sélectionneur pour l’interrupteur du
préamplificateur et connecter le câble audio RCA à une prise d'entrée
compatible avec les appareils connectables que vous utilisez (amplificateur,
haut-parleurs actifs, etc.).
• La prise rouge du câble audio RCA est pour le canal droit (R) et la prise blanche
est pour le canal gauche (L).
R
AUX OUTAUX IN
PHONE
DC12V
LINE OUT
L
Avec PHONO Sans PHONO
Vers la sortie
AUX
L R
PHONO
L R
Avec PHONO Sans PHONO
Vers la sortie
Appareils connectables
(Amplificateurs, ect)
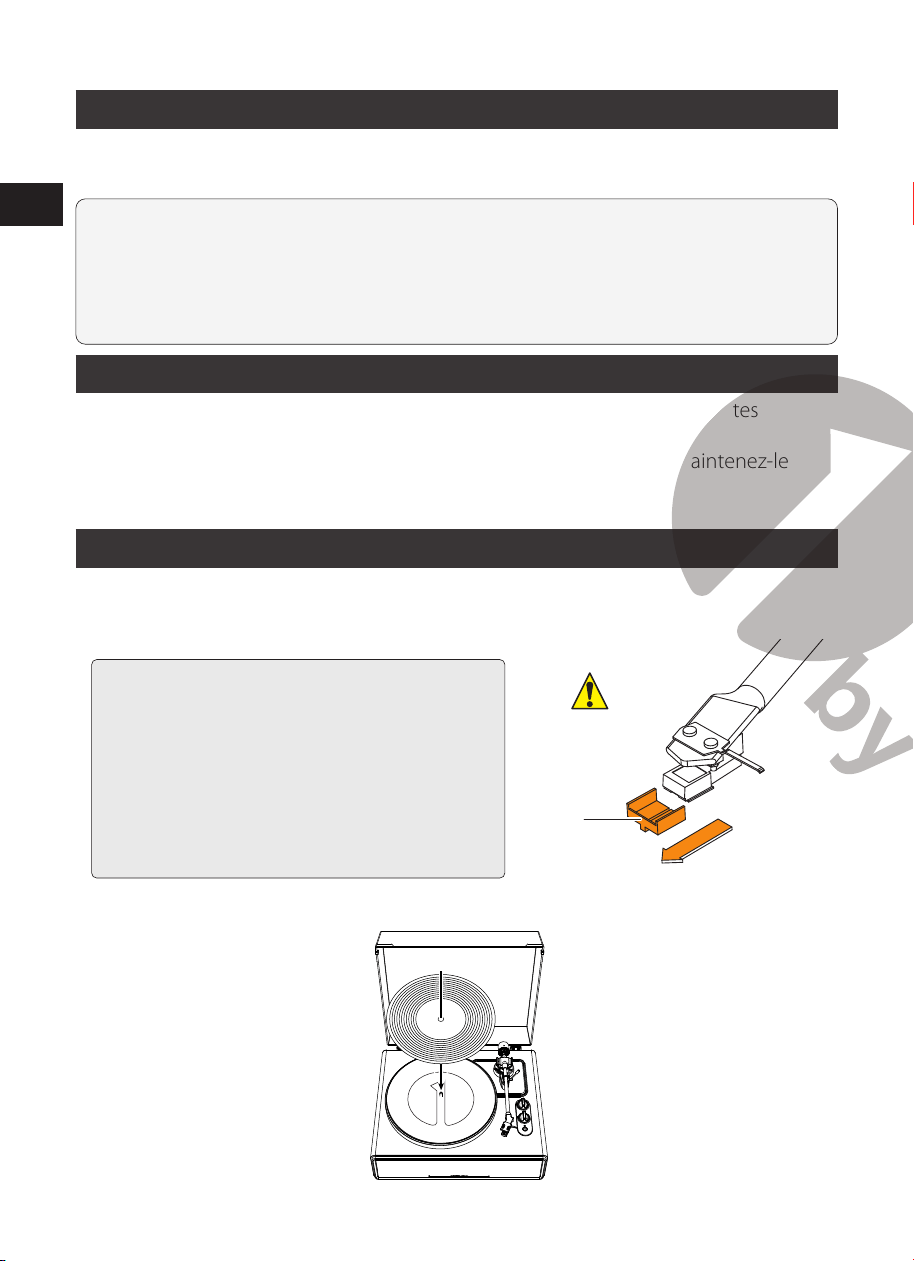
EN
DE
FR
ES
IT
EN
DE
FR
ES
IT
50 51
Alimentation Principale
1. Insérer la prise DC de l’adaptateur AC dans le jack d’entrée au dos du tourne-disque.
2. Brancher l’adaptateur AC dans une prise de courant traditionnelle.
Remarque:
Veuillez ne pas brancher l’adaptateur électrique AC dans une prise avant
que l’assemblage du tourne-disque ne soit complété. Avant d’allumer le tourne-disque,
veuillez vous assurer que tous les branchements sont effectués de façon correcte et
sécurisée. Veuillez toujours éteindre le tourne-disque avant de le brancher ou de le
débrancher.
Lire un Disque
Le tourne-disque passera automatiquement en mode veille après 20 minutes
d'inactivité. Le voyant lumineux s'éteint.
Pour reprendre le fonctionnement, appuyez sur le bouton START et maintenez-le
enfoncé pendant 3 secondes.
Lire un Disque
1. Avant de lire un disque
1.1 Tirer le dispositif de protection vers l’avant
pour le retirer.
REMARQUE: L'application d'une force vers
le bas peut provoquer la chute du stylet (et
donc le détachement de son réceptacle).
Seul un faible volume est émis si le stylet
s'est détaché ou est sur le point de se
détacher. Reportezvous donc à la section
«Remplacement du stylet» pour repositionner
le stylet correctement.
Dispositif de
Protection
1.2 Placez le disque sur le tapis de feutre de façon à ce que le trou central soit aligné
avec la broche.
2. Méthodes d’utilisation pour Tourne-Disque
Diminuez d'abord suffisamment le volume de l'amplificateur et des enceintes.
2.1 Connectez l'adaptateur secteur fourni avec le tourne-disque, appuyez sur le
bouton START et maintenez-le enfoncé pendant 3 secondes. Le tourne-disque
s'allumera. Le voyant lumineux deviendra rouge.
2.2 Retirez le protecteur de stylet du stylet.
2.3 Placez le disque sur le tapis antidérapant.
2.4 Tournez le bouton de fonction pour basculer des vitesses de 33 à 45 tours /
minutes en fonction du type d'enregistrement.
2.5 Appuyez une fois sur le bouton START et le plateau sera lu ou mis en pause.
2.6 Déverrouillez le support du bras de lecture et réglez le levier de levage du bras de
lecture en position haute.
2.7 Positionnez le bras de lecture sur l'emplacement souhaité (rainure) sur le disque.
2.8 Abaissez soigneusement le bras de lecture sur le disque.
2.9 Augmentez le volume de la platine vinyle si nécessaire.
2.10 Lorsque vous avez terminé la lecture du disque, soulevez le bras de lecture,
replacez-le sur le clip du bras et appuyez longuement sur le bouton START pour
éteindre la platine.
REMARQUES:
1. Si le temps de pause silencieux entre chaque piste est supérieur à 3 minutes, le
plateau s'arrêtera de tourner automatiquement pour éviter d'endommager le
disque. Le voyant lumineux sera rouge. Pour reprendre le fonctionnement, appuyez
sur le bouton START.
2. Si le tapis de feutre est sale, il peut facilement rayer le disque, veuillez dans ce cas
retirer le tapis de feutre périodiquement et essuyer toute poussière.
3. Pour éviter que le disque ne se raye et ne se déforme, retirez-le après utilisation.
4. N'utilisez pas de stabilisateur de disque.
EN
DE
FR
ES
IT
EN
DE
FR
ES
IT
52 53
Opération Bluetooth
1. Connectez l'adaptateur secteur inclu à la platine et appuyez longuement sur le bouton
START, le voyant devient rouge.
2. Faites pivoter le bouton de fonction sur le mode Bluetooth. Le voyant lumineux
devient bleu et clignote rapidement. Vous entendrez un son d'activation provenant
de la platine.
3. Activez la fonction Bluetooth de votre périphérique multimédia et recherchez et
sélectionnez “1byone BS020” pour coupler le périphérique multimédia et la platine.
4. Une fois que votre périphérique multimédia est correctement synchronisé avec
la platine, la platine émet un bref son de confirmation. Le voyant bleu clignotera
lentement.
5. Lisez et diffusez de la musique depuis votre appareil multimédia vers la platine. Le
voyant lumineux deviendra solide.
Remarque: version Bluetooth: 5.0
Fonctionnement AUX-IN
Cette platine tourne-disque comprend une prise d'entrée de signal audio
auxiliaire pour connecter des appareils audio externes tels que des lecteurs
MP3, des lecteurs CD et plus anciens, non verrouillable iPod pour que vous
puissiez écouter votre source externe via les haut-parleurs de la platine.
1. Utilisez un câble audio (non inclu) avec une connexion stéréo de 3,5 mm à chaque
extrémité du câble.
2. Branchez le câble audio dans la prise AUX-IN de la platine et dans la prise de sortie
de ligne de l'appareil audio.
3. Allumez la platine et le périphérique audio. Le voyant lumineux du tourne-disque
est rouge.
4. Le niveau de volume peut être contrôlé par le tourne-disque. Utilisez toutes les
fonctions de l'appareil auxiliaire comme d'habitude.
5. Veuillez noter que la fonction AUX-IN est une fonction de première priorité. Même si
le témoin lumineux de PHONO / BT est allumé, ces fonctions ne fonctionneront pas
tant que la fonction AUX-IN est en cours d'utilisation.
Veuillez débrancher le câble AUX-IN avant d'utiliser les fonctions PHONO / BT.
REMARQUE:
1. Veuillez vous assurer que le bras de lecture est positionné de façon sécurisée de
manière à éviter les endommagements.
2. Lorsque vous avez fini d'utiliser le produit, veuillez ne pas oublier d'éteindre le
tourne-disque et votre appareil externe.
Entretien
Tourne-Disque
• Lorsque le réceptacle est sale ou poussiéreux, veuillez tout d’abord débrancher
l'adaptateur secteur. Veuillez ensuite essuyer la saleté et la poussière avec un chiffon
doux et pour finir avec un chiffon sec.
• N'utilisez pas de benzène, de diluant, etc.
• Lorsque vous stockez le produit pendant une longue période, veuillez débrancher
l'adaptateur secteur de la prise et enveloppez le tourne-disque dans un sachet
plastique. Veiller à ne pas laisser le sachet plastique devenir humide. De plus, la
courroie d'entraînement doit être retirée pour éviter un étirement inégal.
Pointe de tête de lecture
• Si la poussière et la saleté sont coincées sous
l’aiguille veuillez la nettoyer avec une brosse.
• Nous recommandons également l’utilisation d’un
nettoyant pour aiguille (non inclus) si l’extrémité
de l’aiguille est sale. Veuillez nettoyer l’aiguille en
utilisant la brosse de l’arrière jusqu’à l’avant de
l’aiguille.
Remplacer l’Aiguille
Il est conseillé de remplacer le stylet après 400 heures d'utilisation.
Retirer l’Aiguille
• En plus de la détérioation de la qualité du son, les vynils peuvent être endommagés
en raison de l’usure de la cartouche.
• Veuillez vous assurer de déconnecter l'adaptateur secteur de l'appareil de la prise
électrique.
• Lors du remplacement du stylet, veuillez tenir fermement le porte-cellule et le
réceptacle de la cartouche.
Faites pivoter l'avant du stylet dans un mouvement vers l'avant et vers le bas.
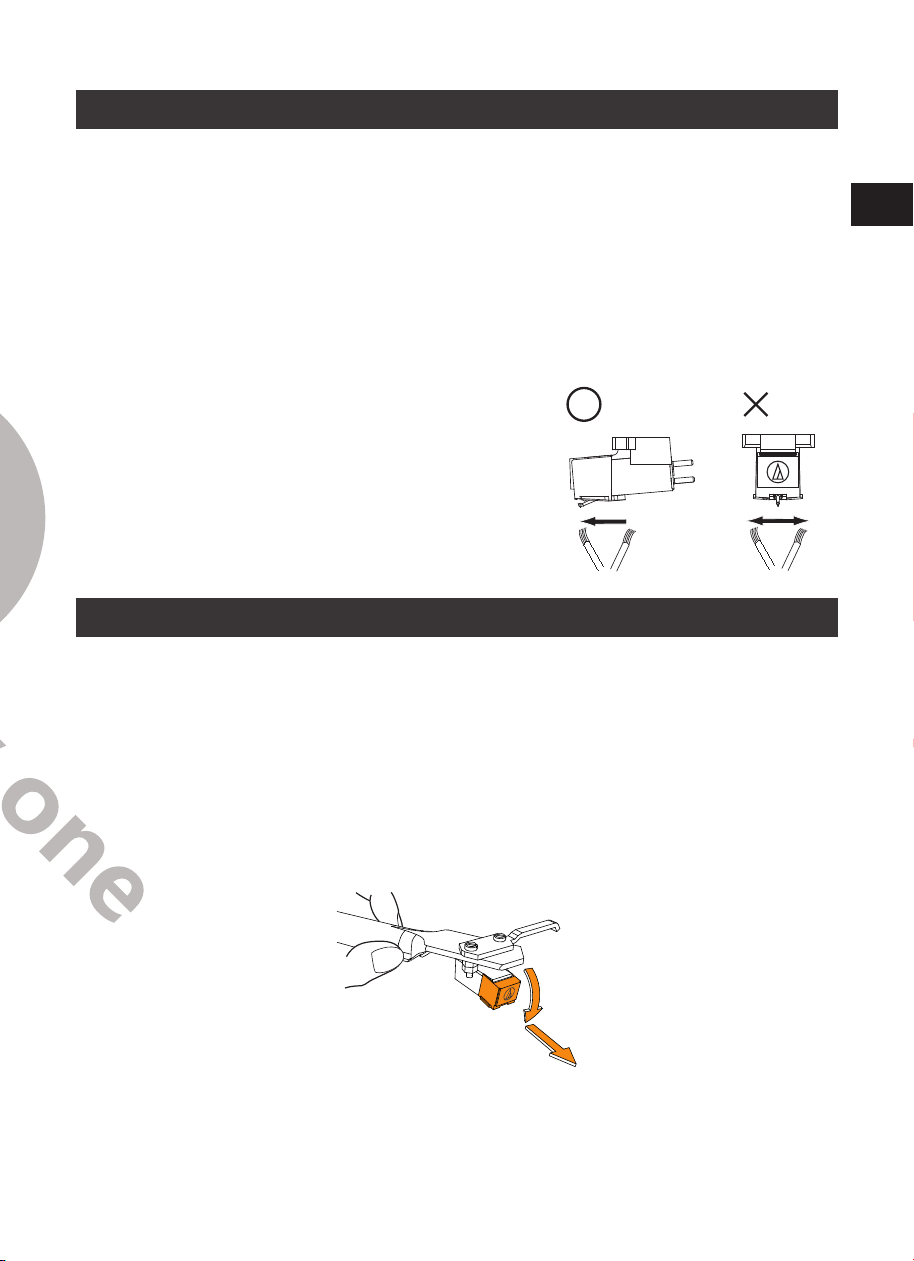
EN
DE
FR
ES
IT
EN
DE
FR
ES
IT
52 53
Opération Bluetooth
1. Connectez l'adaptateur secteur inclu à la platine et appuyez longuement sur le bouton
START, le voyant devient rouge.
2. Faites pivoter le bouton de fonction sur le mode Bluetooth. Le voyant lumineux
devient bleu et clignote rapidement. Vous entendrez un son d'activation provenant
de la platine.
3. Activez la fonction Bluetooth de votre périphérique multimédia et recherchez et
sélectionnez “1byone BS020” pour coupler le périphérique multimédia et la platine.
4. Une fois que votre périphérique multimédia est correctement synchronisé avec
la platine, la platine émet un bref son de confirmation. Le voyant bleu clignotera
lentement.
5. Lisez et diffusez de la musique depuis votre appareil multimédia vers la platine. Le
voyant lumineux deviendra solide.
Remarque: version Bluetooth: 5.0
Fonctionnement AUX-IN
Cette platine tourne-disque comprend une prise d'entrée de signal audio
auxiliaire pour connecter des appareils audio externes tels que des lecteurs
MP3, des lecteurs CD et plus anciens, non verrouillable iPod pour que vous
puissiez écouter votre source externe via les haut-parleurs de la platine.
1. Utilisez un câble audio (non inclu) avec une connexion stéréo de 3,5 mm à chaque
extrémité du câble.
2. Branchez le câble audio dans la prise AUX-IN de la platine et dans la prise de sortie
de ligne de l'appareil audio.
3. Allumez la platine et le périphérique audio. Le voyant lumineux du tourne-disque
est rouge.
4. Le niveau de volume peut être contrôlé par le tourne-disque. Utilisez toutes les
fonctions de l'appareil auxiliaire comme d'habitude.
5. Veuillez noter que la fonction AUX-IN est une fonction de première priorité. Même si
le témoin lumineux de PHONO / BT est allumé, ces fonctions ne fonctionneront pas
tant que la fonction AUX-IN est en cours d'utilisation.
Veuillez débrancher le câble AUX-IN avant d'utiliser les fonctions PHONO / BT.
REMARQUE:
1. Veuillez vous assurer que le bras de lecture est positionné de façon sécurisée de
manière à éviter les endommagements.
2. Lorsque vous avez fini d'utiliser le produit, veuillez ne pas oublier d'éteindre le
tourne-disque et votre appareil externe.
Entretien
Tourne-Disque
• Lorsque le réceptacle est sale ou poussiéreux, veuillez tout d’abord débrancher
l'adaptateur secteur. Veuillez ensuite essuyer la saleté et la poussière avec un chiffon
doux et pour finir avec un chiffon sec.
• N'utilisez pas de benzène, de diluant, etc.
• Lorsque vous stockez le produit pendant une longue période, veuillez débrancher
l'adaptateur secteur de la prise et enveloppez le tourne-disque dans un sachet
plastique. Veiller à ne pas laisser le sachet plastique devenir humide. De plus, la
courroie d'entraînement doit être retirée pour éviter un étirement inégal.
Pointe de tête de lecture
• Si la poussière et la saleté sont coincées sous
l’aiguille veuillez la nettoyer avec une brosse.
• Nous recommandons également l’utilisation d’un
nettoyant pour aiguille (non inclus) si l’extrémité
de l’aiguille est sale. Veuillez nettoyer l’aiguille en
utilisant la brosse de l’arrière jusqu’à l’avant de
l’aiguille.
Remplacer l’Aiguille
Il est conseillé de remplacer le stylet après 400 heures d'utilisation.
Retirer l’Aiguille
• En plus de la détérioation de la qualité du son, les vynils peuvent être endommagés
en raison de l’usure de la cartouche.
• Veuillez vous assurer de déconnecter l'adaptateur secteur de l'appareil de la prise
électrique.
• Lors du remplacement du stylet, veuillez tenir fermement le porte-cellule et le
réceptacle de la cartouche.
Faites pivoter l'avant du stylet dans un mouvement vers l'avant et vers le bas.
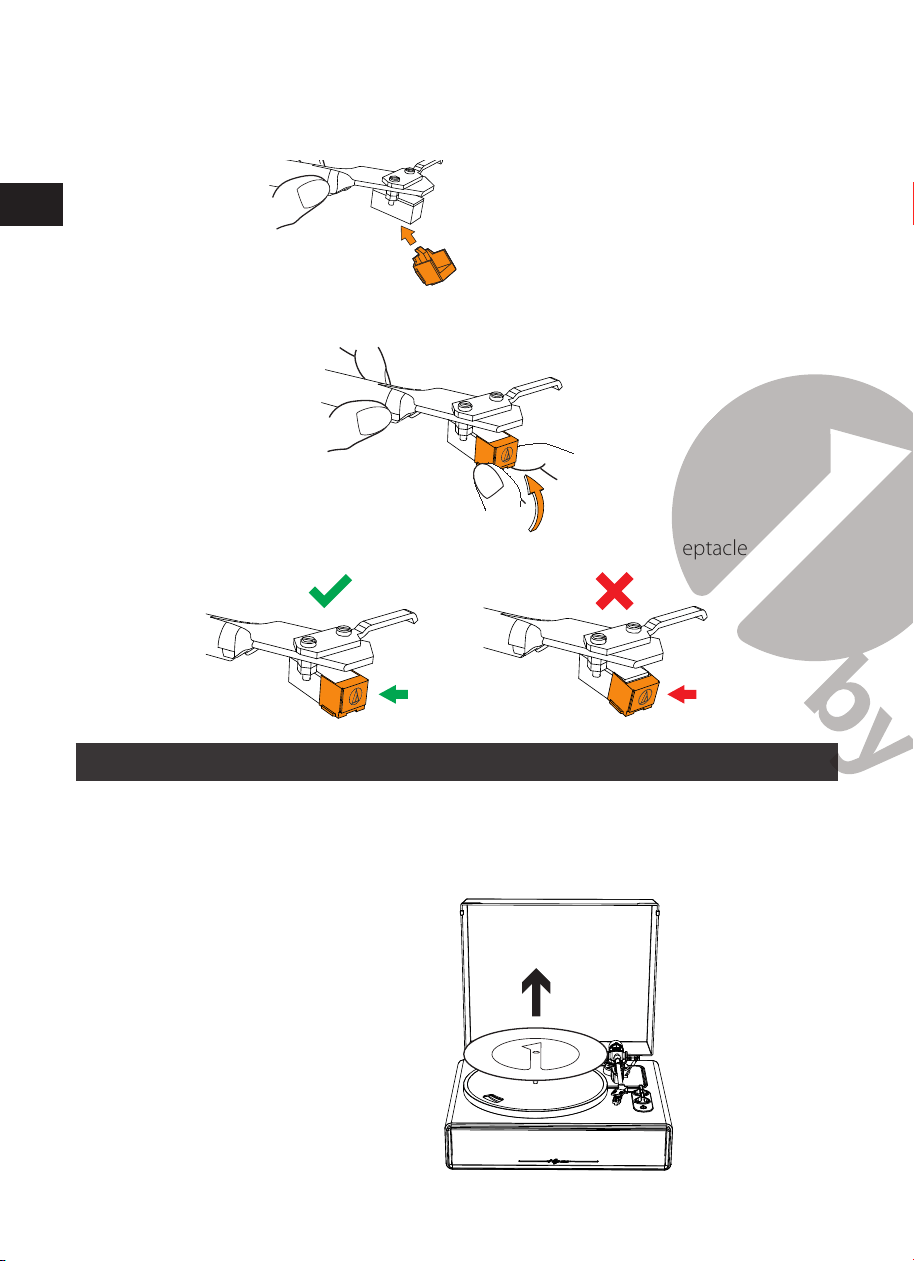
EN
DE
FR
ES
IT
EN
DE
FR
ES
IT
54 55
Installer un stylet de remplacement
1. Veuillez installer le nouveau stylet de remplacement sur la cartouche.
Veuillez d’abord
installer le réceptacle
2. Veuillez soulever le stylet jusqu'à ce que vous entendiez un clic.
3. Assurez-vous qu'il n'y a pas d'espace entre le porte-cellule et le réceptacle de la
cartouche
Remplacement de la Courroie
• La courroie est une pièce consommable. Remplacez la courroie si la vitesse de
lecture ralentit ou une rotation irrégulière se produit. En règle générale, nous vous
suggérons de remplacer la ceinture une fois par an.
• Avant de remplacer la courroie, veuillez vous assurer de débrancher l’adaptateur
secteur du produit de la prise.
1. Retirez le tapis.
2. Retirez la courroie de la poulie du moteur.
3. Retirez le plateau principal, puis retirez l'ancienne courroie.
4. Retournez le plateau et vous verrez un cercle en relief. Enroulez la nouvelle
courroie le long du cercle central.
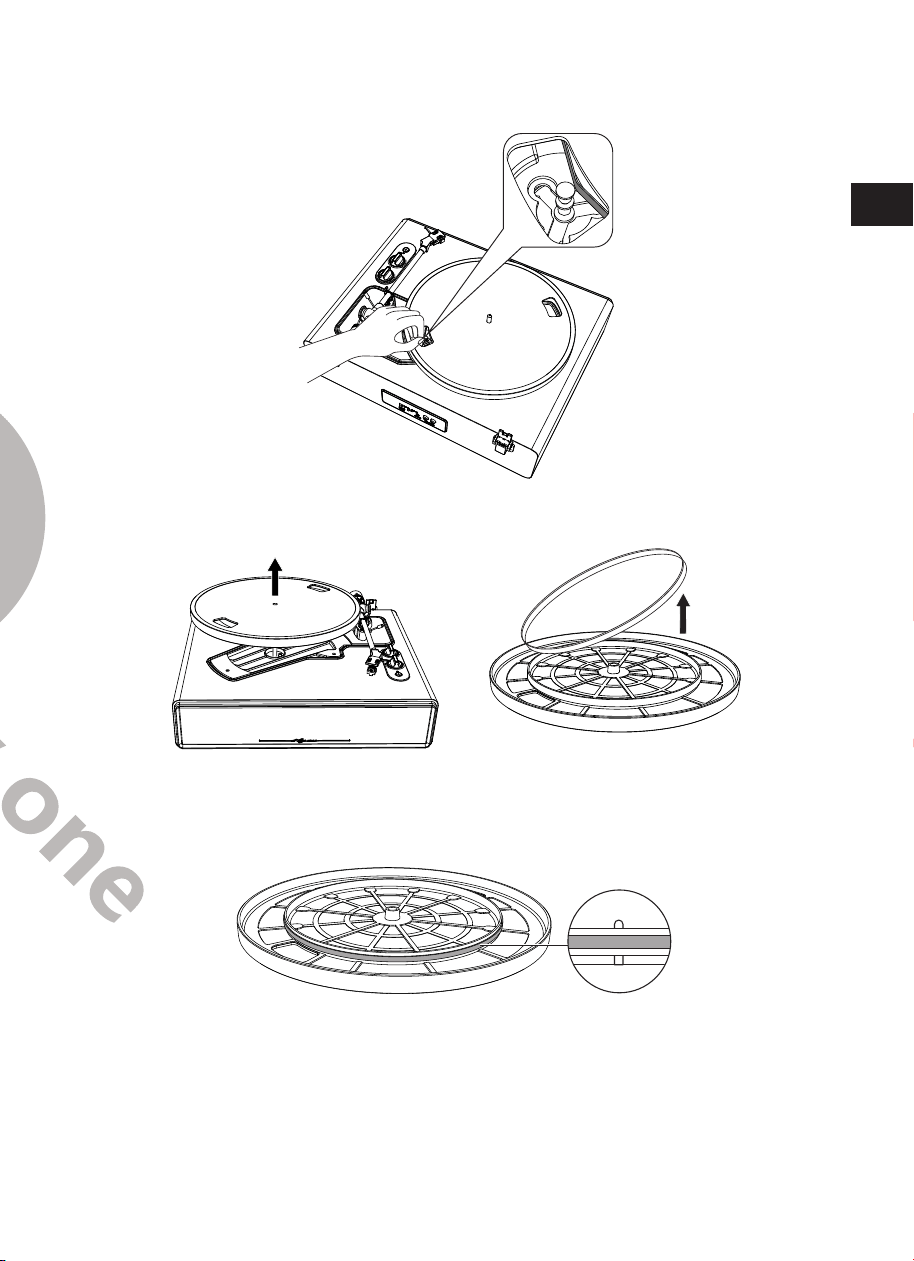
EN
DE
FR
ES
IT
EN
DE
FR
ES
IT
54 55
Installer un stylet de remplacement
1. Veuillez installer le nouveau stylet de remplacement sur la cartouche.
Veuillez d’abord
installer le réceptacle
2. Veuillez soulever le stylet jusqu'à ce que vous entendiez un clic.
3. Assurez-vous qu'il n'y a pas d'espace entre le porte-cellule et le réceptacle de la
cartouche
Remplacement de la Courroie
• La courroie est une pièce consommable. Remplacez la courroie si la vitesse de
lecture ralentit ou une rotation irrégulière se produit. En règle générale, nous vous
suggérons de remplacer la ceinture une fois par an.
• Avant de remplacer la courroie, veuillez vous assurer de débrancher l’adaptateur
secteur du produit de la prise.
1. Retirez le tapis.
2. Retirez la courroie de la poulie du moteur.
3. Retirez le plateau principal, puis retirez l'ancienne courroie.
4. Retournez le plateau et vous verrez un cercle en relief. Enroulez la nouvelle
courroie le long du cercle central.
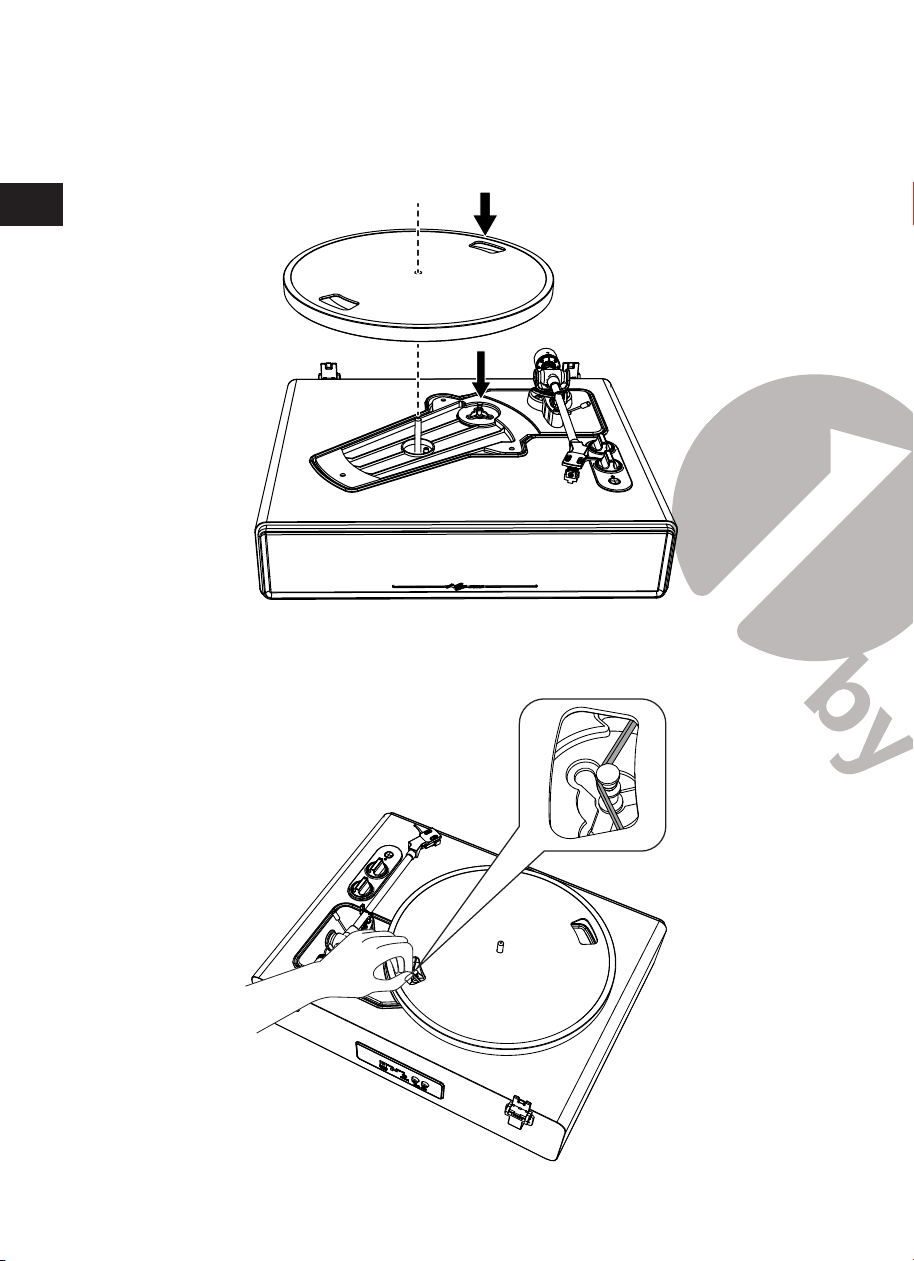
EN
DE
FR
ES
IT
EN
DE
FR
ES
IT
56 57
5. Fixez le plateau.
Alignez l'une des ouvertures avec la position de la poulie du moteur de couleur
laiton.
6. Placez la courroie sur la poulie du moteur de couleur laiton.
Saisissez la courroie qui a été attachée pendant l'étape 4 et, tout en la tirant, placez-
la sur la poulie du moteur en laiton.
7. À l'aide de vos mains, tournez lentement le plateau dix fois dans le sens des
aiguilles d'une montre comme indiqué par la èche ci-dessous.
Lorsque le tourne-disque est déplacé
En utilisant les emballages d'origine du tourne-disque, veuillez emballer le plateau
tournant dans l'ordre inverse de celui où vous l'aviez déballé. Si vous n'avez pas les
matériaux d'emballage, prenez les mesures suivantes:
• Après avoir débranché l'adaptateur secteur de la prise, veuillez retirer le tapis de
feutre et le plateau, puis les envelopper pour qu'ils ne soient pas endommagés.
• Veuillez utiliser le dispositif de protection pour cartouche.
• Veuillez utiliser une chaîne ou quelque chose de similaire pour relier le bras de
lecture au reste de l’appareil afin que l’ensemble ne bouge pas.
• Enveloppez le réceptacle du tourne-disque du avec du papier ou un emballage
similaire afin que l’appareil ne soit pas endommagé.
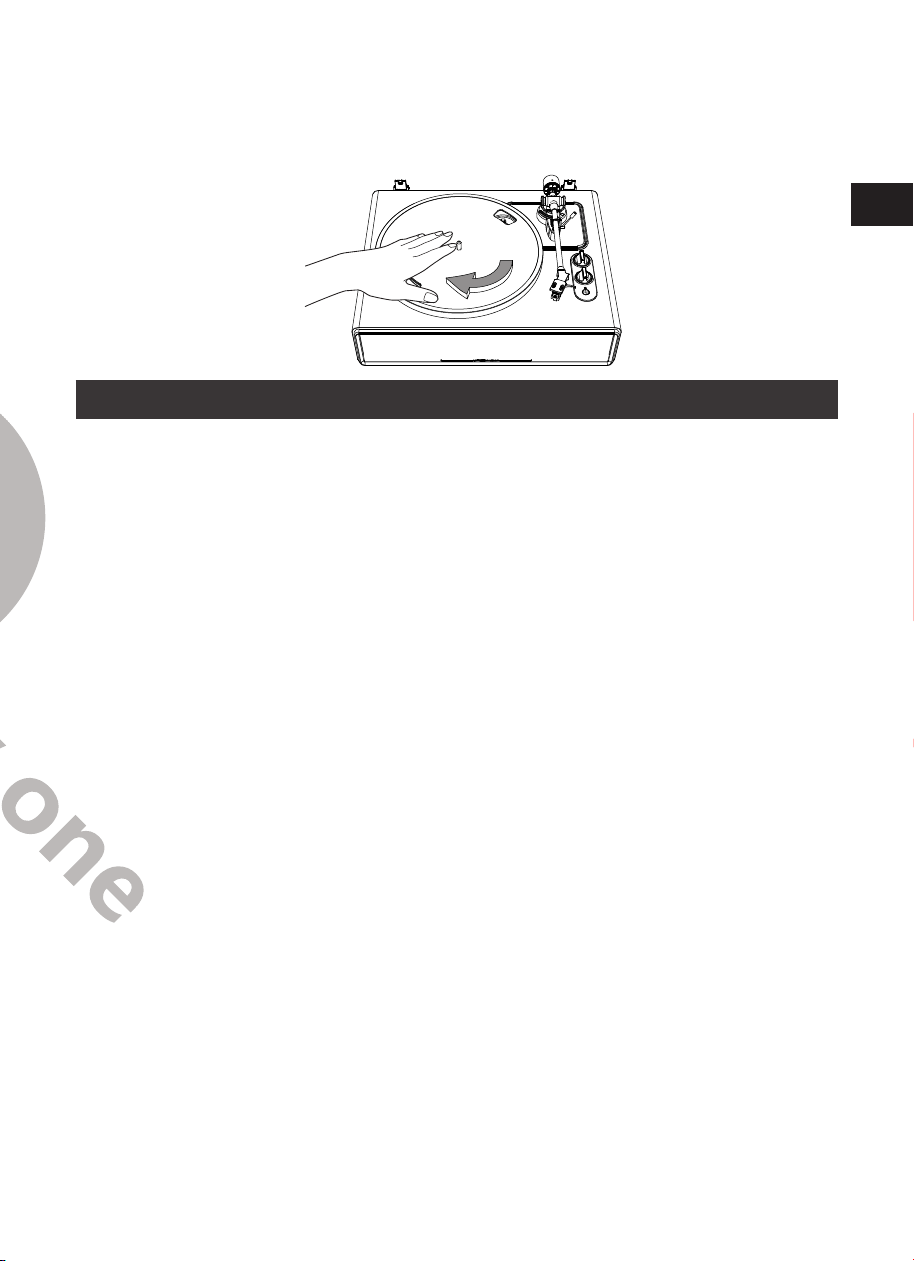
EN
DE
FR
ES
IT
EN
DE
FR
ES
IT
56 57
5. Fixez le plateau.
Alignez l'une des ouvertures avec la position de la poulie du moteur de couleur
laiton.
6. Placez la courroie sur la poulie du moteur de couleur laiton.
Saisissez la courroie qui a été attachée pendant l'étape 4 et, tout en la tirant, placez-
la sur la poulie du moteur en laiton.
7. À l'aide de vos mains, tournez lentement le plateau dix fois dans le sens des
aiguilles d'une montre comme indiqué par la èche ci-dessous.
Lorsque le tourne-disque est déplacé
En utilisant les emballages d'origine du tourne-disque, veuillez emballer le plateau
tournant dans l'ordre inverse de celui où vous l'aviez déballé. Si vous n'avez pas les
matériaux d'emballage, prenez les mesures suivantes:
• Après avoir débranché l'adaptateur secteur de la prise, veuillez retirer le tapis de
feutre et le plateau, puis les envelopper pour qu'ils ne soient pas endommagés.
• Veuillez utiliser le dispositif de protection pour cartouche.
• Veuillez utiliser une chaîne ou quelque chose de similaire pour relier le bras de
lecture au reste de l’appareil afin que l’ensemble ne bouge pas.
• Enveloppez le réceptacle du tourne-disque du avec du papier ou un emballage
similaire afin que l’appareil ne soit pas endommagé.
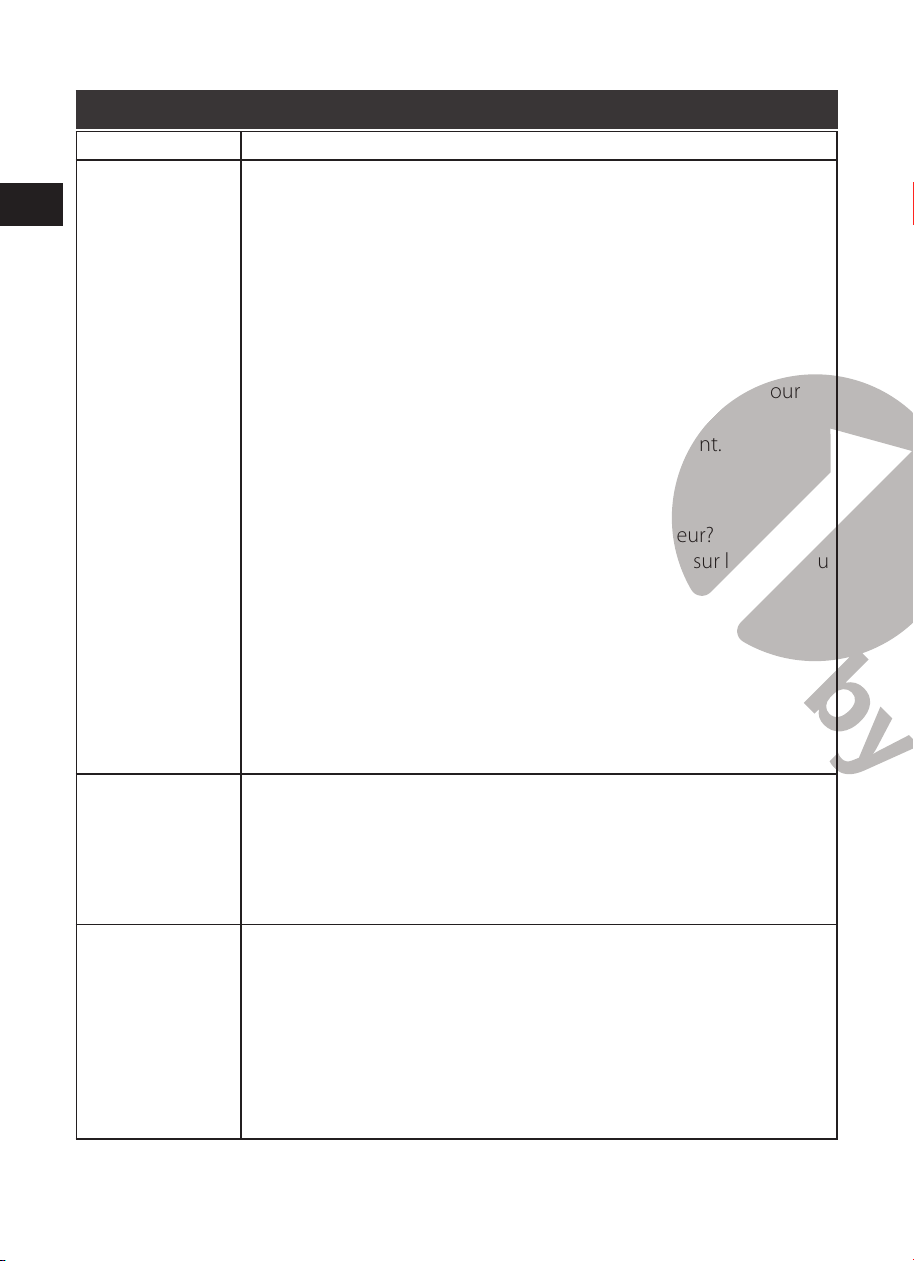
EN
DE
FR
ES
IT
EN
DE
FR
ES
IT
58 59
Résolution de Problèmes
Problème Solution
Le plateau ne
tourne pas.
• L'adaptateur secteur est-il connecté à la prise?
-Connectez l'adaptateur secteur à la prise.
• Quel est l'état du voyant lumineux?
-L'appareil est sous tension, mais le voyant est éteint. Cela signifie
que le tourne-disque est en mode ERP ou n'est pas allumé.
Appuyez et maintenez appuyé le START pendant 3 secondes
pour redémarrer la platine.
-Le voyant lumineux est bleu. Cela signifie que la platine est en
Mode Bluetooth. Veuillez tourner le bouton de fonction pour
passer en Mode tourne-disque.
-Le voyant rouge indique le mode plateau tournant.
• La courroie a-t-elle glissé du plateau?
-Placez correctement la courroie sur le plateau.
• La courroie est-elle placée sur la poulie du moteur?
-Vérifier que la courroie est correctement placée sur la poulie du
moteur (couleur laiton).
• La courroie a-t-elle été endommagée?
-Remplacez-le par une nouvelle courroie.
• Le câble AUX-IN est-il branché?
-La fonction AUX-IN est une fonction de première priorité.
Veuillez débrancher le câble AUX-IN avant d'utiliser les fonctions
PHONO / BT.
Le plateau tourne,
mais il n'y a pas
de son de la
platine?
• Le stylet est-il endommagé?
-Vérifiez le stylet et remplacez-le si nécessaire. Il est suggéré de
remplacer le stylet après 400 heures d'utilisation.
• Le stylet est-il correctement placé sur le corps de la cartouche?
-Vérifiez la cartouche et ajustez-la si nécessaire.
Le stylet saute. • L'enregistrement est-il déformé?
-Vérifiez le dossier.
• Le disque est-il rayé?
-Vérifiez le dossier.
• La pression du stylet est-elle correcte?
-Reportez-vous à “Réglage de la force de poursuite de la
cartouche” pour réajuster la force de suivi.
La platine produit
un étrange son
de ‘hurlement’.
• Le produit capte-t-il des vibrations excessives du sol, des
surfaces des murs ou des enceintes environnantes?
-Veuillez diminuer les vibrations ou monter le produit sur une
surface non soumise aux effets des vibrations.
• Le produit est-il monté sur une surface instable?
-Vérifiez si la surface sur laquelle le produit est monté est
convenable
Il y a du bruit lors
de la lecture du
disque.
• Y a-t-il de la poussière sur la pointe du stylet de la cartouche?
-Si de la poussière est présente à la pointe du stylet, veuillez la
nettoyer avec une brosse vendue dans le commerce.
Le son, lors de la
lecture du disque,
est soit trop
rapide ou trop
lent.
• Les paramètres de vitesse sont-ils corrects?
-Veuillez sélectionner la vitesse correcte pour le type de disque
en cours de lecture.
La vitesse de
lecture ralentit ou
bien la rotation
est irrégulière.
• La courroie est-elle tendue?
-Remplacer par une nouvelle courroie.
• La courroie est-elle installée correctement?
-Reportez-vous à “Configuration du plateau et de la courroie du
plateau tournant” pour configurer la courroie.
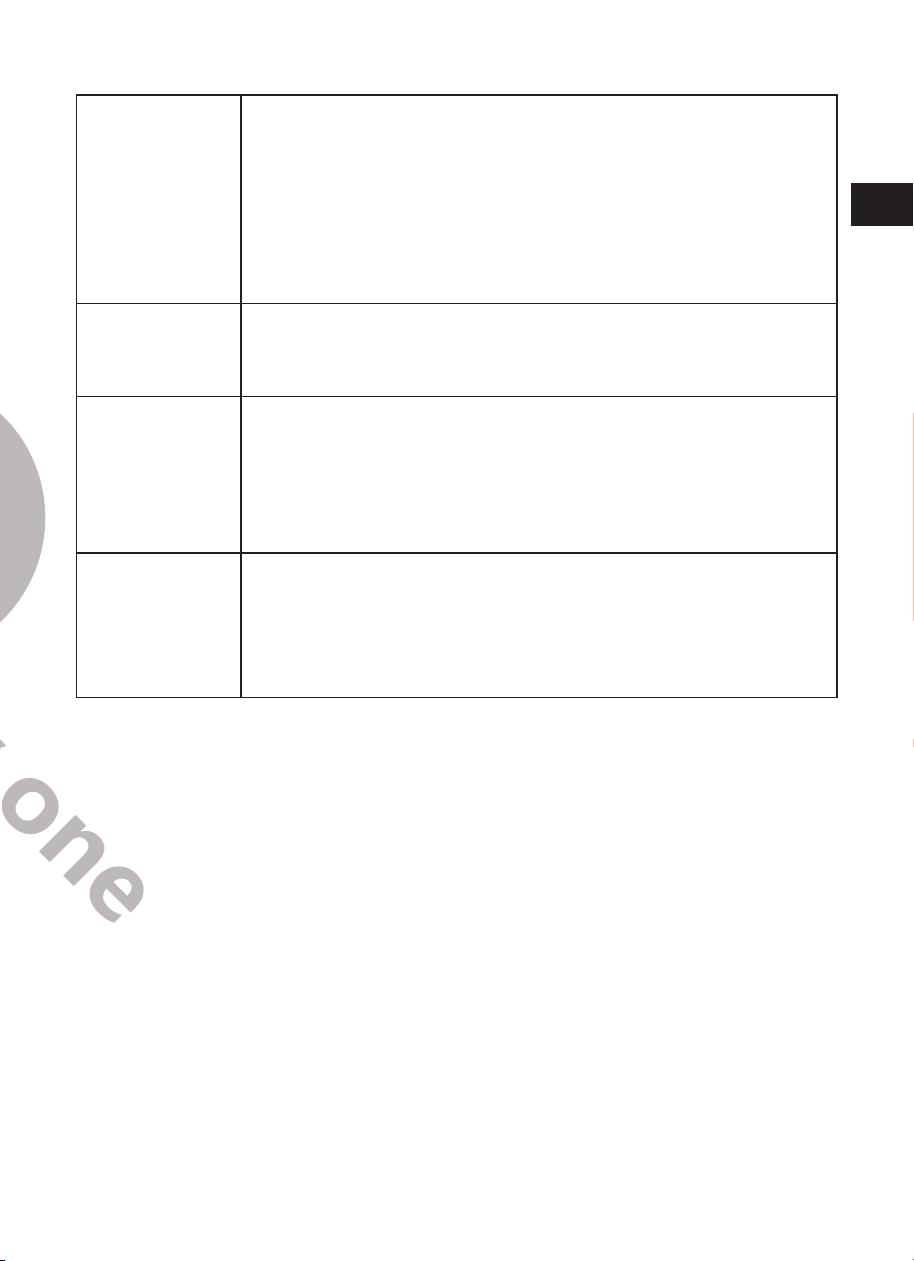
EN
DE
FR
ES
IT
EN
DE
FR
ES
IT
58 59
Résolution de Problèmes
Problème Solution
Le plateau ne
tourne pas.
• L'adaptateur secteur est-il connecté à la prise?
-Connectez l'adaptateur secteur à la prise.
• Quel est l'état du voyant lumineux?
-L'appareil est sous tension, mais le voyant est éteint. Cela signifie
que le tourne-disque est en mode ERP ou n'est pas allumé.
Appuyez et maintenez appuyé le START pendant 3 secondes
pour redémarrer la platine.
-Le voyant lumineux est bleu. Cela signifie que la platine est en
Mode Bluetooth. Veuillez tourner le bouton de fonction pour
passer en Mode tourne-disque.
-Le voyant rouge indique le mode plateau tournant.
• La courroie a-t-elle glissé du plateau?
-Placez correctement la courroie sur le plateau.
• La courroie est-elle placée sur la poulie du moteur?
-Vérifier que la courroie est correctement placée sur la poulie du
moteur (couleur laiton).
• La courroie a-t-elle été endommagée?
-Remplacez-le par une nouvelle courroie.
• Le câble AUX-IN est-il branché?
-La fonction AUX-IN est une fonction de première priorité.
Veuillez débrancher le câble AUX-IN avant d'utiliser les fonctions
PHONO / BT.
Le plateau tourne,
mais il n'y a pas
de son de la
platine?
• Le stylet est-il endommagé?
-Vérifiez le stylet et remplacez-le si nécessaire. Il est suggéré de
remplacer le stylet après 400 heures d'utilisation.
• Le stylet est-il correctement placé sur le corps de la cartouche?
-Vérifiez la cartouche et ajustez-la si nécessaire.
Le stylet saute. • L'enregistrement est-il déformé?
-Vérifiez le dossier.
• Le disque est-il rayé?
-Vérifiez le dossier.
• La pression du stylet est-elle correcte?
-Reportez-vous à “Réglage de la force de poursuite de la
cartouche” pour réajuster la force de suivi.
La platine produit
un étrange son
de ‘hurlement’.
• Le produit capte-t-il des vibrations excessives du sol, des
surfaces des murs ou des enceintes environnantes?
-Veuillez diminuer les vibrations ou monter le produit sur une
surface non soumise aux effets des vibrations.
• Le produit est-il monté sur une surface instable?
-Vérifiez si la surface sur laquelle le produit est monté est
convenable
Il y a du bruit lors
de la lecture du
disque.
• Y a-t-il de la poussière sur la pointe du stylet de la cartouche?
-Si de la poussière est présente à la pointe du stylet, veuillez la
nettoyer avec une brosse vendue dans le commerce.
Le son, lors de la
lecture du disque,
est soit trop
rapide ou trop
lent.
• Les paramètres de vitesse sont-ils corrects?
-Veuillez sélectionner la vitesse correcte pour le type de disque
en cours de lecture.
La vitesse de
lecture ralentit ou
bien la rotation
est irrégulière.
• La courroie est-elle tendue?
-Remplacer par une nouvelle courroie.
• La courroie est-elle installée correctement?
-Reportez-vous à “Configuration du plateau et de la courroie du
plateau tournant” pour configurer la courroie.
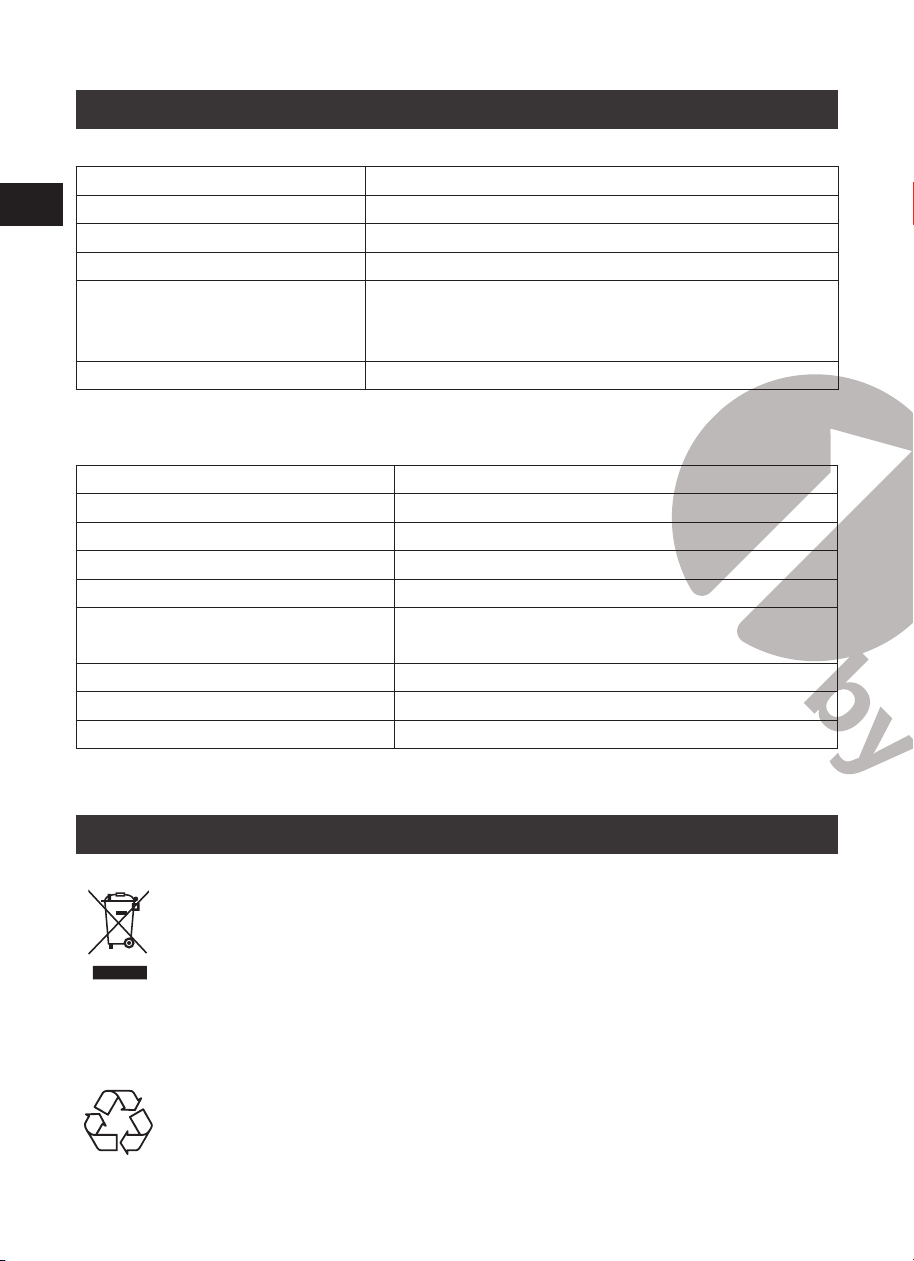
EN
DE
FR
ES
IT
61
EN
DE
FR
ES
IT
60
Caractéristiques Techniques
Tourne-Disque
Puissance de sortie AC100-240V, sortie DC 12V 1500mA
Consommation Electrique 35W
Vitesse du Tourne-Disque 33 1/3, 45 RPM
Puissance de sortie (RMS) 4Ω 18W X 2(BT) ,
5W X 2(PH)
Dimensions (L x l x H)
17.32” x 14.57” x 7.56” (440 x 370 x 192mm) (couvercle
fermé), 15.75” x 16.73” x 18.19” (400 x 425 x 462mm)
(couvercle ouvert)
Poids 6.05kg
Tëte de Lecture
modèle Audio-Technica AT3600
Fréquence de Réponse 20Hz - 20kHz
Equilibre des Canaux <2.5dB
Séparation des Canaux >18dB
Tension de Sortie 2.5mV
Résistance Au Chargement
Recommandée
47kΩ
Branchement à l’Amplicateur Aimant Mobile - entrée
Force d’Appui Recommandée 3.5±0.5g
Poids 5.1 grammes
Remarque: La conception et les caractéristiques de l'appareil sont sujets à des
changements sans préavisMise au rebut.
Mise au rebut
Mise au rebut de l'appareil
L'appareil ne doit en aucun cas être mis aux ordures ménagères normales.
Ce produit est assujetti à la directive européenne 2012/19/EU.
Eliminez l'appareil par l'intermédiaire d'une entreprise de traitement des
déchets autorisée ou via le service de recyclage de votre commune. Respectez
laréglementation en vigueur. En cas de doute, veuillez contacter votre centre de
recyclage.
L'emballage est réalisé à l'aide de matériaux écologiques qu'il est possible
de confier aux centres de recyclage proches de chez vous.
Introducción
Gracias por comprar 1byone tocadiscos. Este manual de instrucciones contiene
información importante sobre seguridad, uso y eliminación. Use el producto tal
y como se describe y guarde este manual para futuras referencias. Si vende este
tocadiscos o la transfiere, también entregue este manual al nuevo propietario.
Instrucciones de seguridad
Lea y comprenda este manual al completo antes de usar este producto. Guarde estas
instrucciones para futuras referencias.
1. No use el tocadiscos cerca del agua.
2. Conecte el tocadiscos únicamente al tipo de toma de corriente que se indica
en la etiqueta de marcado o en la sección "Especificaciones" de este manual de
instrucciones.
3. El tocadiscos tiene un enchufe polarizado (una clavija es más ancha que la otra).
Para reducir el riesgo de descarga eléctrica, este enchufe está diseñado para
encajar en una toma polarizada en una sola orientación. Si el enchufe no encaja
completamente en la toma de corriente, invierta el enchufe. Si todavía no encaja,
contacte a un electricista cualificado. No intente modificar el enchufe de ninguna
manera.
4. Proteja el cable de alimentación de ser pisado o pellizcado, particularmente en el
enchufe de alimentación, en el punto de conexión entre el enchufe y la salida y en
el punto de conexión entre el cable de alimentación y el altavoz.
5. No sobrecargue las tomas de corriente de la pared ni los cables de extensión, ya que
esto constituiría un peligro de incendio y podría provocar una descarga eléctrica.
6. Nunca introduzca objetos de ningún tipo en el tocadiscos a través de las aberturas,
ya que pueden tocar puntos de voltaje peligroso o cortocircuitar partes que podrían
provocar un incendio o descarga eléctrica. Nunca derrame líquido de ningún tipo
sobre el producto.
7. No intente reparar el tocadiscos usted mismo ya que al abrir o quitar los paneles
puede exponerse a voltajes peligrosos u otros peligros. Remita todos los servicios a
personal de servicio cualificado.
8. Los cambios o modificaciones en el tocadiscos que no estén expresamente
aprobados por la parte responsable del cumplimiento pueden anular la autoridad
del usuario para operar el producto.
9. No use accesorios no recomendados por el fabricante, ya que pueden causar
riesgos.

EN
DE
FR
ES
IT
61
EN
DE
FR
ES
IT
60
Caractéristiques Techniques
Tourne-Disque
Puissance de sortie AC100-240V, sortie DC 12V 1500mA
Consommation Electrique 35W
Vitesse du Tourne-Disque 33 1/3, 45 RPM
Puissance de sortie (RMS) 4Ω 18W X 2(BT) ,
5W X 2(PH)
Dimensions (L x l x H)
17.32” x 14.57” x 7.56” (440 x 370 x 192mm) (couvercle
fermé), 15.75” x 16.73” x 18.19” (400 x 425 x 462mm)
(couvercle ouvert)
Poids 6.05kg
Tëte de Lecture
modèle Audio-Technica AT3600
Fréquence de Réponse 20Hz - 20kHz
Equilibre des Canaux <2.5dB
Séparation des Canaux >18dB
Tension de Sortie 2.5mV
Résistance Au Chargement
Recommandée
47kΩ
Branchement à l’Amplicateur Aimant Mobile - entrée
Force d’Appui Recommandée 3.5±0.5g
Poids 5.1 grammes
Remarque: La conception et les caractéristiques de l'appareil sont sujets à des
changements sans préavisMise au rebut.
Mise au rebut
Mise au rebut de l'appareil
L'appareil ne doit en aucun cas être mis aux ordures ménagères normales.
Ce produit est assujetti à la directive européenne 2012/19/EU.
Eliminez l'appareil par l'intermédiaire d'une entreprise de traitement des
déchets autorisée ou via le service de recyclage de votre commune. Respectez
laréglementation en vigueur. En cas de doute, veuillez contacter votre centre de
recyclage.
L'emballage est réalisé à l'aide de matériaux écologiques qu'il est possible
de confier aux centres de recyclage proches de chez vous.
Introducción
Gracias por comprar 1byone tocadiscos. Este manual de instrucciones contiene
información importante sobre seguridad, uso y eliminación. Use el producto tal
y como se describe y guarde este manual para futuras referencias. Si vende este
tocadiscos o la transfiere, también entregue este manual al nuevo propietario.
Instrucciones de seguridad
Lea y comprenda este manual al completo antes de usar este producto. Guarde estas
instrucciones para futuras referencias.
1. No use el tocadiscos cerca del agua.
2. Conecte el tocadiscos únicamente al tipo de toma de corriente que se indica
en la etiqueta de marcado o en la sección "Especificaciones" de este manual de
instrucciones.
3. El tocadiscos tiene un enchufe polarizado (una clavija es más ancha que la otra).
Para reducir el riesgo de descarga eléctrica, este enchufe está diseñado para
encajar en una toma polarizada en una sola orientación. Si el enchufe no encaja
completamente en la toma de corriente, invierta el enchufe. Si todavía no encaja,
contacte a un electricista cualificado. No intente modificar el enchufe de ninguna
manera.
4. Proteja el cable de alimentación de ser pisado o pellizcado, particularmente en el
enchufe de alimentación, en el punto de conexión entre el enchufe y la salida y en
el punto de conexión entre el cable de alimentación y el altavoz.
5. No sobrecargue las tomas de corriente de la pared ni los cables de extensión, ya que
esto constituiría un peligro de incendio y podría provocar una descarga eléctrica.
6. Nunca introduzca objetos de ningún tipo en el tocadiscos a través de las aberturas,
ya que pueden tocar puntos de voltaje peligroso o cortocircuitar partes que podrían
provocar un incendio o descarga eléctrica. Nunca derrame líquido de ningún tipo
sobre el producto.
7. No intente reparar el tocadiscos usted mismo ya que al abrir o quitar los paneles
puede exponerse a voltajes peligrosos u otros peligros. Remita todos los servicios a
personal de servicio cualificado.
8. Los cambios o modificaciones en el tocadiscos que no estén expresamente
aprobados por la parte responsable del cumplimiento pueden anular la autoridad
del usuario para operar el producto.
9. No use accesorios no recomendados por el fabricante, ya que pueden causar
riesgos.
EN
DE
FR
ES
IT
EN
DE
FR
ES
IT
62 63
10. Solo colóquelo sobre una mesa plana y resistente o úselo con un
carrito, soporte, trípode o un soporte según lo especificado por el
fabricante o vendido con el tocadiscos. Cuando se usa un carro,
tenga cuidado al mover la combinación carrito / tocadiscos para
evitar lesiones por vuelco.
11. Las ranuras y aberturas en la caja están para la ventilación y para garantizar un
funcionamiento fiable del producto y protegerlo contra el sobrecalentamiento.
No bloquee ni cubra estas aberturas.
12. Desconecte el producto durante tormentas eléctricas o cuando no lo use
durante largos períodos de tiempo.
Descripción del producto
R
AUX OUTAUX IN
PHONE
DC12V
LINE OUT
L
1 2 3 4
5
17
16
6
7
8
9
10
11
12
13
14
15
45 33
START
- +
1. Toma de corriente
2. Interruptor de salida de línea y phono
3. Toma de entrada auxiliar
4. Tomas de salida de phono y auxiliar
5. Bisagra de la tapa
6. Contrapeso
7. Dial de fuerza de seguimiento
8. Palanca de elevación del brazo de
tono
9. Clip del brazo de tono
10. Brazo de tono
11. Perilla de función
12. Control de volumen
13. Indicador
14. Botón de inicio
15. Cartucho de la aguja
16. Plato giratorio
17. Eje de la plataforma
giratoria
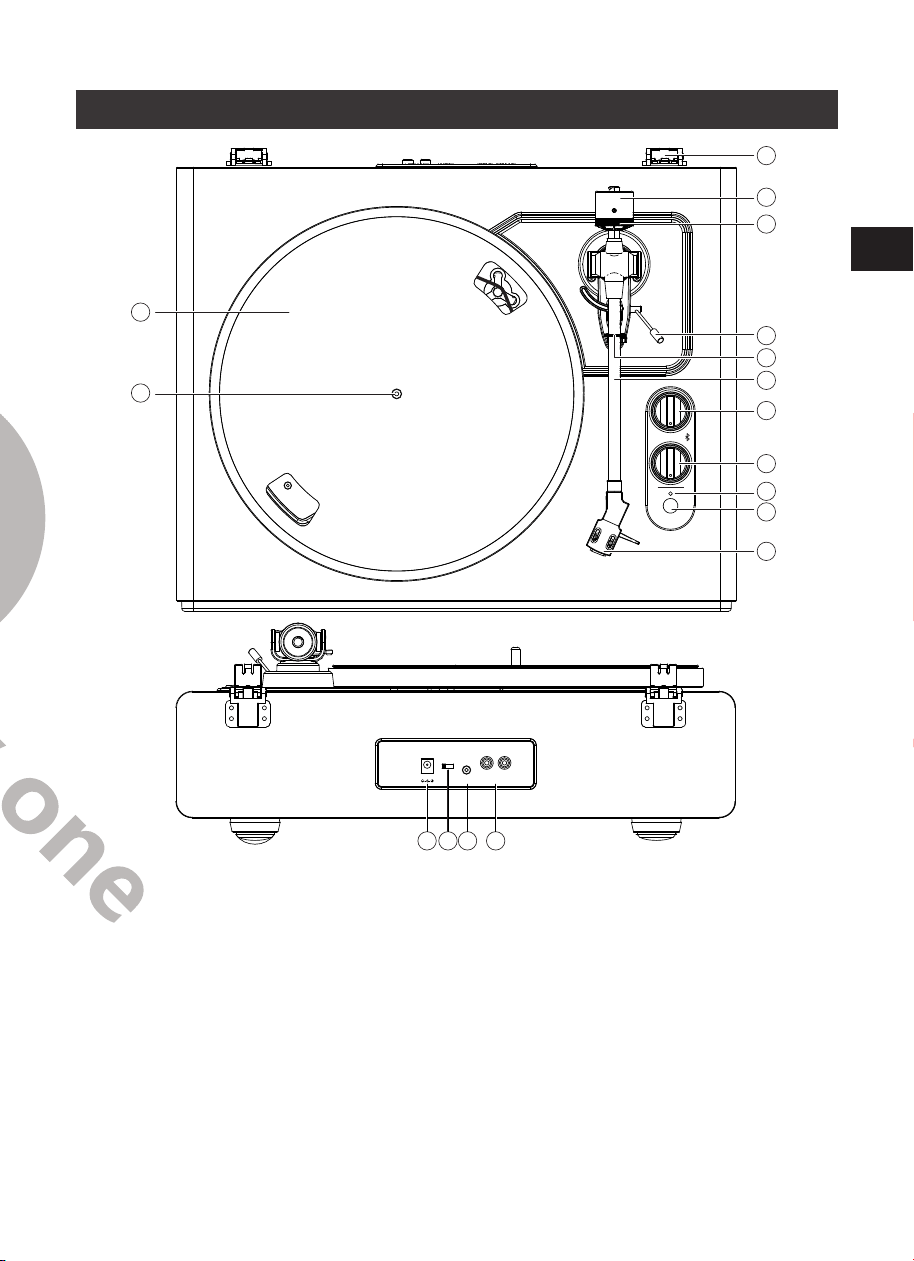
EN
DE
FR
ES
IT
EN
DE
FR
ES
IT
62 63
10. Solo colóquelo sobre una mesa plana y resistente o úselo con un
carrito, soporte, trípode o un soporte según lo especificado por el
fabricante o vendido con el tocadiscos. Cuando se usa un carro,
tenga cuidado al mover la combinación carrito / tocadiscos para
evitar lesiones por vuelco.
11. Las ranuras y aberturas en la caja están para la ventilación y para garantizar un
funcionamiento fiable del producto y protegerlo contra el sobrecalentamiento.
No bloquee ni cubra estas aberturas.
12. Desconecte el producto durante tormentas eléctricas o cuando no lo use
durante largos períodos de tiempo.
Descripción del producto
R
AUX OUTAUX IN
PHONE
DC12V
LINE OUT
L
1 2 3 4
5
17
16
6
7
8
9
10
11
12
13
14
15
45 33
START
- +
1. Toma de corriente
2. Interruptor de salida de línea y phono
3. Toma de entrada auxiliar
4. Tomas de salida de phono y auxiliar
5. Bisagra de la tapa
6. Contrapeso
7. Dial de fuerza de seguimiento
8. Palanca de elevación del brazo de
tono
9. Clip del brazo de tono
10. Brazo de tono
11. Perilla de función
12. Control de volumen
13. Indicador
14. Botón de inicio
15. Cartucho de la aguja
16. Plato giratorio
17. Eje de la plataforma
giratoria
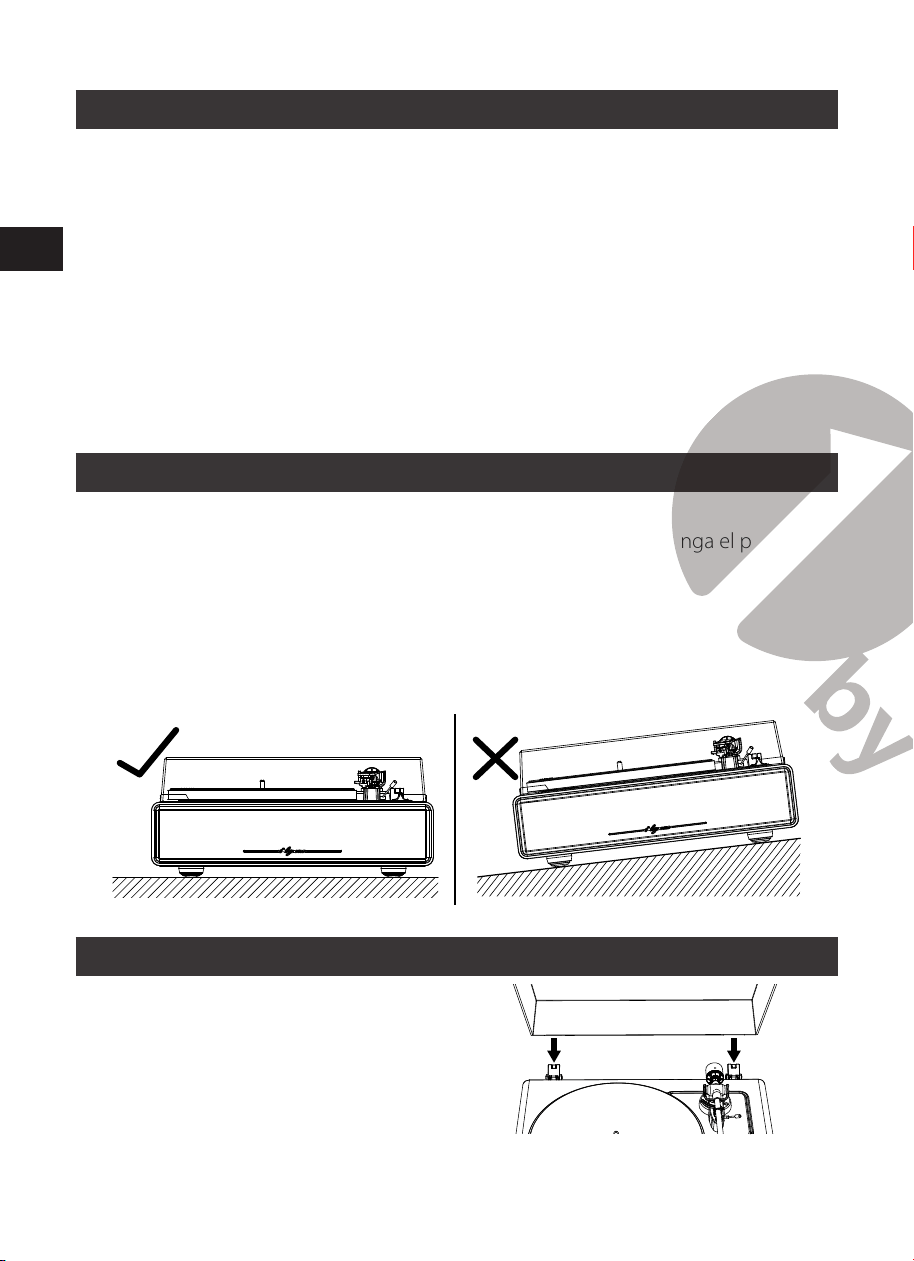
EN
DE
FR
ES
IT
EN
DE
FR
ES
IT
64 65
Artículos incluidos
Antes de usar el tocadiscos por primera vez, verifique el contenido del paquete para
asegurarse de que todas las piezas estén libres de daños visibles. Por favor, conserve
los materiales originales del embalaje para fines de cambio o devolución.
1) Tocadiscos
2) Adaptador de corriente
3) Tapa del tocadiscos
4) Alfombrilla de deslizamiento
5) Plato con correa
6) Contrapeso
7) Alineador transportador de la aguja
8) Adaptador de 45 RPM
9) Manual de instrucciones
Instalación del tocadiscos
• Ponga el producto en una superficie nivelada.
• Para evitar los efectos de las vibraciones y la presión acústica, no ponga el producto
junto a elementos tales como altavoces.
• El producto puede captar interferencias si se coloca al lado de una radio. Por lo
tanto, trate de mantener el producto alejado de radios.
• Si el producto está cerca de un equipo (teléfono móvil, etc.) que emite fuertes ondas
de radio, puede producirse ruido.
Instalación de la tapa
Inserte las bolsas con bisagras de la tapa
en las bisagras del tocadiscos.
Tocadiscos y conguración de la correa
1. Gire el plato y compruebe la posición del cinturón.
Asegúrese de que la correa de transmisión está enlazada en el centro del círculo.
Si la correa de transmisión está demasiado alta o baja en este círculo, la correa de
transmisión puede caerse o la velocidad puede ser inestable.
2. Coloque el plato en el eje.
Asegúrese de que el plato esté completamente asentado en el eje.
Apertura
Plato
Eje
Polea
del motor
3. Coloque la correa en la polea del motor.
Alinee una de las aberturas del plato con la polea del motor, y mientras tire de los
dos extremos de la cinta roja que viene adherida a la correa, coloque la correa en
la polea del motor, según el diagrama. Al hacer esto, tenga cuidado de no torcer la
correa.
Gancho
Correa
Polea del motor
Recto Torcido Ubicación errónea
4. Quite la cinta roja de la correa.
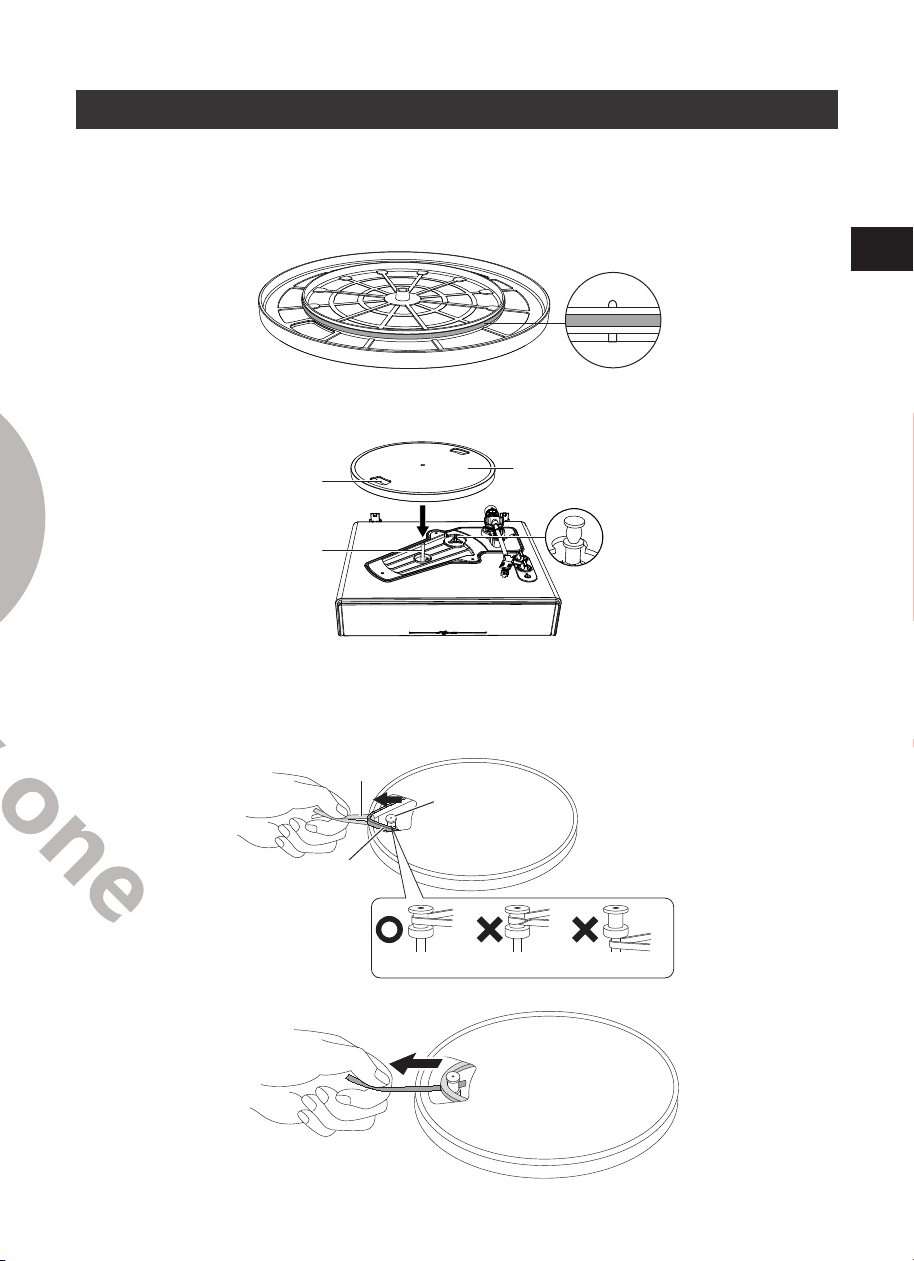
EN
DE
FR
ES
IT
EN
DE
FR
ES
IT
64 65
Artículos incluidos
Antes de usar el tocadiscos por primera vez, verifique el contenido del paquete para
asegurarse de que todas las piezas estén libres de daños visibles. Por favor, conserve
los materiales originales del embalaje para fines de cambio o devolución.
1) Tocadiscos
2) Adaptador de corriente
3) Tapa del tocadiscos
4) Alfombrilla de deslizamiento
5) Plato con correa
6) Contrapeso
7) Alineador transportador de la aguja
8) Adaptador de 45 RPM
9) Manual de instrucciones
Instalación del tocadiscos
• Ponga el producto en una superficie nivelada.
• Para evitar los efectos de las vibraciones y la presión acústica, no ponga el producto
junto a elementos tales como altavoces.
• El producto puede captar interferencias si se coloca al lado de una radio. Por lo
tanto, trate de mantener el producto alejado de radios.
• Si el producto está cerca de un equipo (teléfono móvil, etc.) que emite fuertes ondas
de radio, puede producirse ruido.
Instalación de la tapa
Inserte las bolsas con bisagras de la tapa
en las bisagras del tocadiscos.
Tocadiscos y conguración de la correa
1. Gire el plato y compruebe la posición del cinturón.
Asegúrese de que la correa de transmisión está enlazada en el centro del círculo.
Si la correa de transmisión está demasiado alta o baja en este círculo, la correa de
transmisión puede caerse o la velocidad puede ser inestable.
2. Coloque el plato en el eje.
Asegúrese de que el plato esté completamente asentado en el eje.
Apertura
Plato
Eje
Polea
del motor
3. Coloque la correa en la polea del motor.
Alinee una de las aberturas del plato con la polea del motor, y mientras tire de los
dos extremos de la cinta roja que viene adherida a la correa, coloque la correa en
la polea del motor, según el diagrama. Al hacer esto, tenga cuidado de no torcer la
correa.
Gancho
Correa
Polea del motor
Recto Torcido Ubicación errónea
4. Quite la cinta roja de la correa.
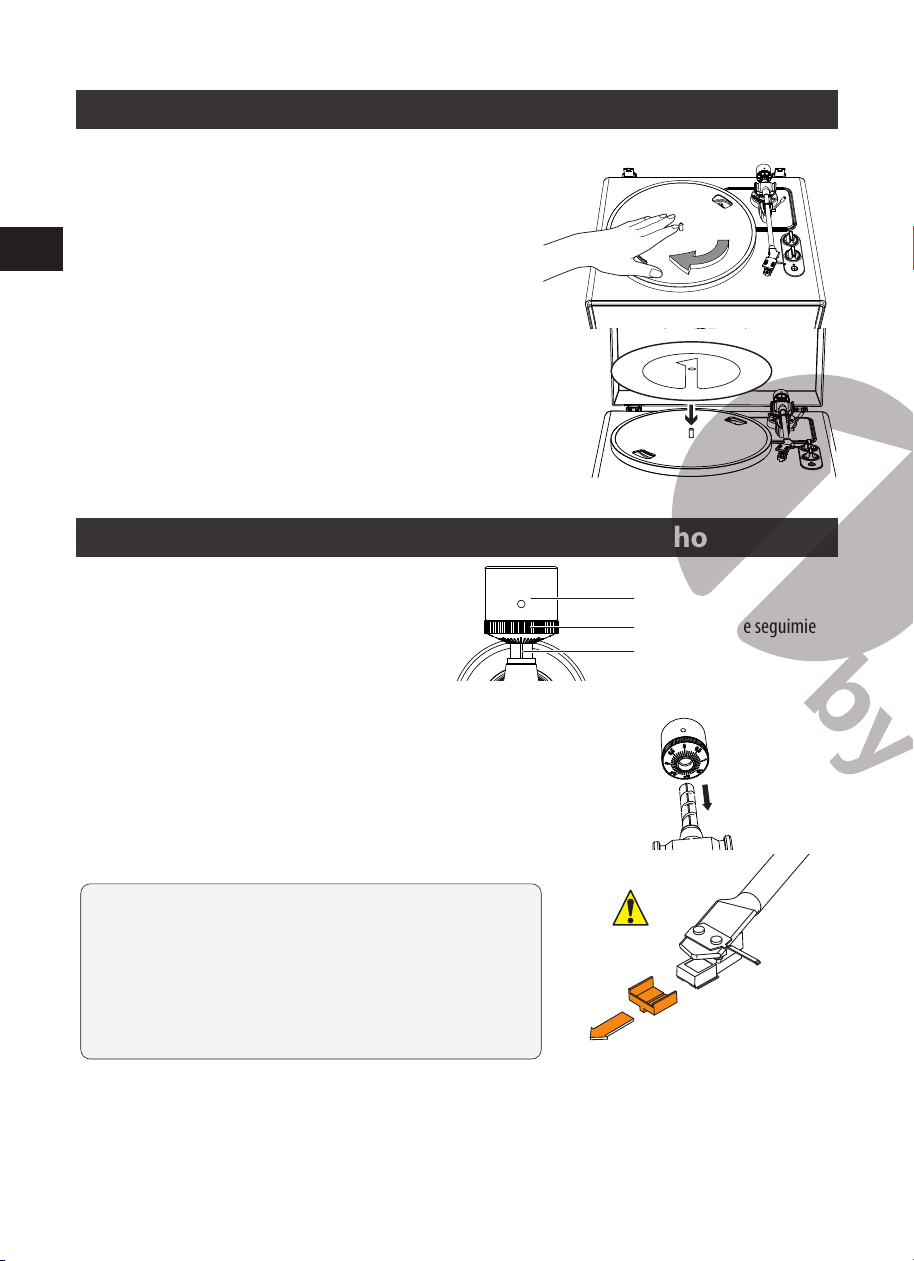
EN
DE
FR
ES
IT
EN
DE
FR
ES
IT
66 67
Rotación del plato
1. Utilizando las manos, gire lentamente el plato
diez veces en la dirección de la flecha (Figura 1).
2. Este paso es para restablecer el mecanismo
automático, deshacerse de los giros en la
correa y asegurarse de que la correa se deslice
suavemente a lo largo del borde impulsor en la
parte inferior del plato.
3. Coloque la alfombrilla encima del plato.
Asegúrese de que el logotipo de 1byone de
1byone de la alfombrilla esté hacia (Figura 2).
Ajuste de la fuerza de seguimiento del cartucho
El contrapeso suministrado está
adecuado para cartuchos que pesen
entre 3,0 y 6,0g.
Contrapeso
Línea central
Dial de fuerza de seguimie
1. Presione suavemente y gire el contrapeso hacia la
parte posterior del brazo (con el dial orientado hacia
la parte frontal del tocadiscos).
2. Tire del protector hacia adelante para quitarlo.
NOTA: Aplicar una fuerza hacia abajo puede
causar que el lápiz salga del cuerpo. Solo se emite
fuerza hacia abajo si el lápiz se ha salido o está a
punto de salirse, por lo tanto, consulte "Sustitución
del lápiz" para volver a colocar el lápiz
correctamente.
3. Retire la brida y desbloquee el brazo.
4. Baje la palanca elevadora del brazo y coloque el cartucho en el espacio entre el
soporte del brazo y el plato.
5. Gire cuidadosamente el contrapeso hasta que el brazo de tono se equilibre. El brazo
de tono debe volver a esta posición equilibrada si se mueve hacia arriba o hacia
abajo. Este ajuste debe hacerse con cuidado.
Brazo
Contrapeso
Ajuste para que el brazo esté nivelado y neutralmente equilibrado
6. Una vez que el brazo esté correctamente equilibrado, regrese el brazo a su reposo.
Sujete el contrapeso sin moverlo y gire suavemente el dial de fuerza de seguimiento
hasta que el cero esté en línea con la línea central negra en la parte posterior
del brazo. Verifique para asegurarse de que el brazo está todavía neutralmente
equilibrado.
7. Finalmente, gire el contrapeso y el dial de fuerza de seguimiento juntos en el
sentido contrario a las agujas del reloj (visto desde la parte delantera) para ajustar la
fuerza de seguimiento de acuerdo con las recomendaciones del fabricante del
cartucho.
Nota: Cada marca de la escala representa 0,1g. La fuerza de seguimiento
recomendada para el cartucho instalado de fábrica es de 3,5g±0,5g. Gire
cuidadosamente el dial de fuerza de seguimiento. Cuando "3.5" esté centrado sobre
la línea negra en la parte superior del brazo de tono, por favor, deténgase.
Figura 1
Figura 2
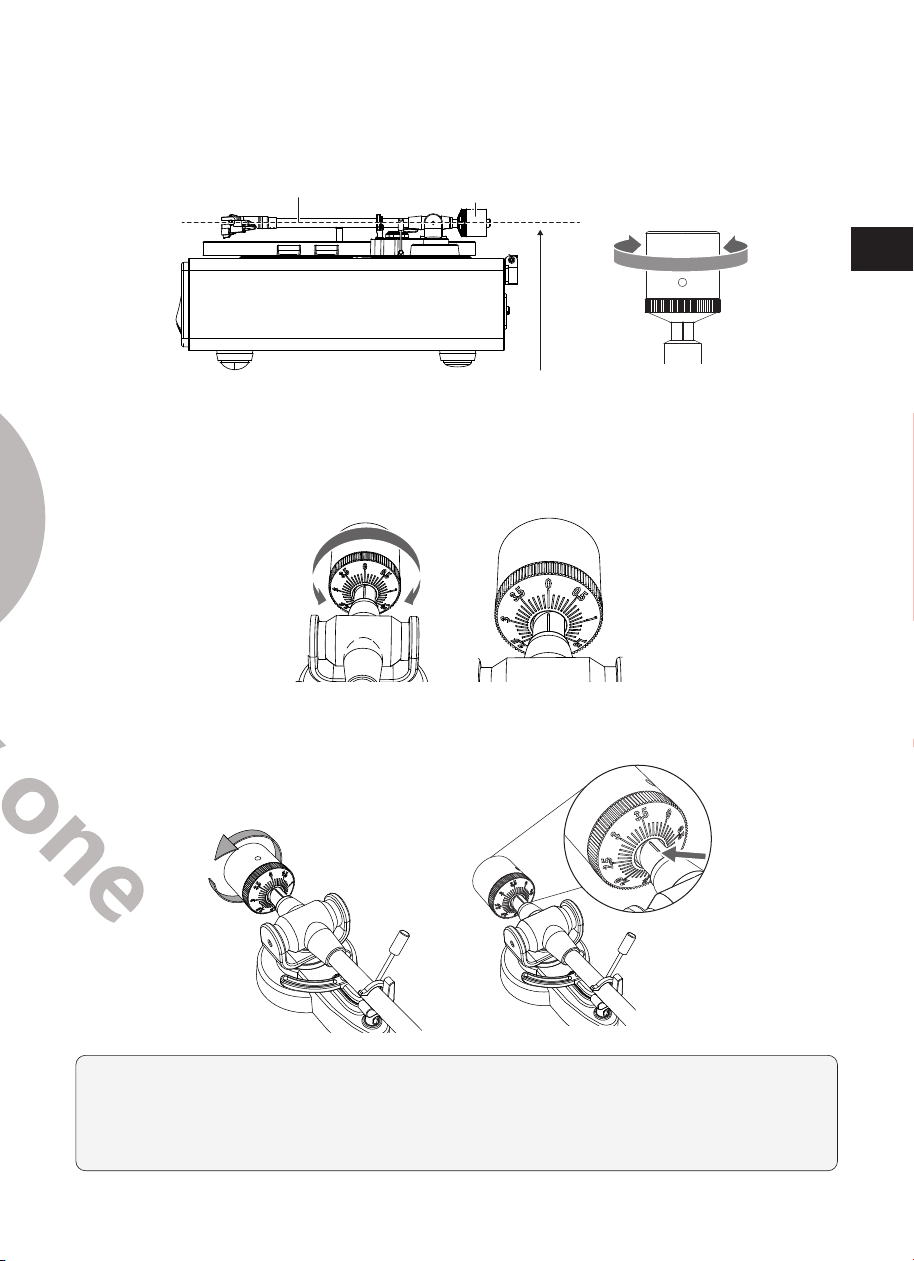
EN
DE
FR
ES
IT
EN
DE
FR
ES
IT
66 67
Rotación del plato
1. Utilizando las manos, gire lentamente el plato
diez veces en la dirección de la flecha (Figura 1).
2. Este paso es para restablecer el mecanismo
automático, deshacerse de los giros en la
correa y asegurarse de que la correa se deslice
suavemente a lo largo del borde impulsor en la
parte inferior del plato.
3. Coloque la alfombrilla encima del plato.
Asegúrese de que el logotipo de 1byone de
1byone de la alfombrilla esté hacia (Figura 2).
Ajuste de la fuerza de seguimiento del cartucho
El contrapeso suministrado está
adecuado para cartuchos que pesen
entre 3,0 y 6,0g.
Contrapeso
Línea central
Dial de fuerza de seguimie
1. Presione suavemente y gire el contrapeso hacia la
parte posterior del brazo (con el dial orientado hacia
la parte frontal del tocadiscos).
2. Tire del protector hacia adelante para quitarlo.
NOTA: Aplicar una fuerza hacia abajo puede
causar que el lápiz salga del cuerpo. Solo se emite
fuerza hacia abajo si el lápiz se ha salido o está a
punto de salirse, por lo tanto, consulte "Sustitución
del lápiz" para volver a colocar el lápiz
correctamente.
3. Retire la brida y desbloquee el brazo.
4. Baje la palanca elevadora del brazo y coloque el cartucho en el espacio entre el
soporte del brazo y el plato.
5. Gire cuidadosamente el contrapeso hasta que el brazo de tono se equilibre. El brazo
de tono debe volver a esta posición equilibrada si se mueve hacia arriba o hacia
abajo. Este ajuste debe hacerse con cuidado.
Brazo
Contrapeso
Ajuste para que el brazo esté nivelado y neutralmente equilibrado
6. Una vez que el brazo esté correctamente equilibrado, regrese el brazo a su reposo.
Sujete el contrapeso sin moverlo y gire suavemente el dial de fuerza de seguimiento
hasta que el cero esté en línea con la línea central negra en la parte posterior
del brazo. Verifique para asegurarse de que el brazo está todavía neutralmente
equilibrado.
7. Finalmente, gire el contrapeso y el dial de fuerza de seguimiento juntos en el
sentido contrario a las agujas del reloj (visto desde la parte delantera) para ajustar la
fuerza de seguimiento de acuerdo con las recomendaciones del fabricante del
cartucho.
Nota: Cada marca de la escala representa 0,1g. La fuerza de seguimiento
recomendada para el cartucho instalado de fábrica es de 3,5g±0,5g. Gire
cuidadosamente el dial de fuerza de seguimiento. Cuando "3.5" esté centrado sobre
la línea negra en la parte superior del brazo de tono, por favor, deténgase.
Figura 1
Figura 2
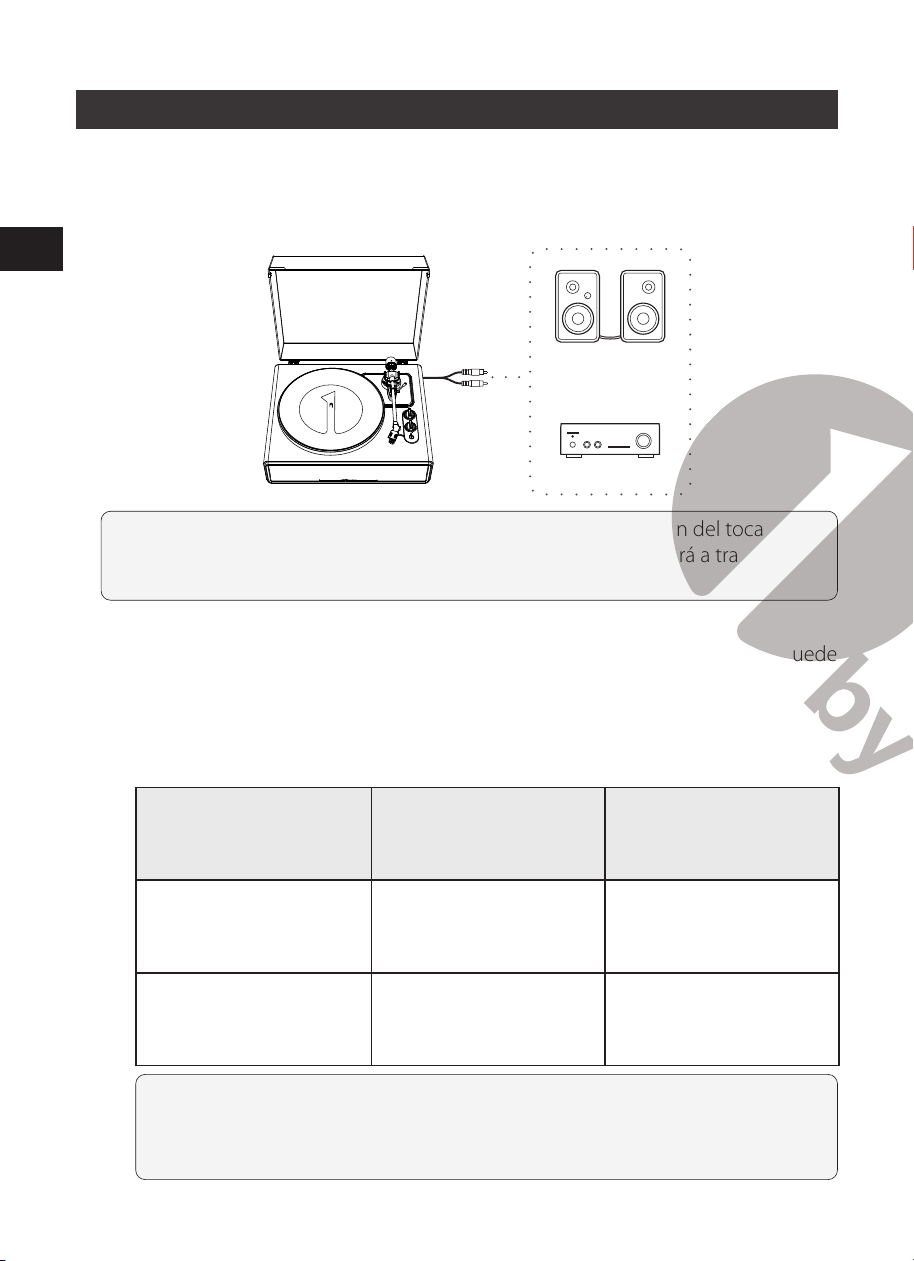
EN
DE
FR
ES
IT
EN
DE
FR
ES
IT
68 69
Conexión a un altavoz externo con el cable de audio RCA
Este tocadiscos incluye 4 altavoces incorporados y un ecualizador de teléfono
incorporado.
Si desea utilizar su propio amplificador o altavoces, por favor, siga las siguientes
instrucciones:
Conexión por cable RCA
Altavoces activos
o
Amplificador
NOTA: Para lograr el mejor sonido, se aconseja ajustar el volumen del tocadiscos
a un nivel mínimo. Entonces el audio del tocadiscos se reproducirá a través de su
propio amplificador, altavoces, etc.
1. Conguración del interruptor selector del preamplicador
Este producto tiene una función de ecualizador fonográfico incorporada. Puede
usar el producto incluso si no tiene un amplificador fonográfico o un equipo
conectado con un amplificador fonográfico incorporado.
Use el interruptor selector del preamplificador para configurar la salida, como
se muestra a continuación.
Equipo conectable en
uso
Posición del
interruptor selector del
preamplificador
Dónde conectar el cable
de audio RCA
Dispositivo con entrada
phono
PHONO Toma de entrada phono
y terminal de tierra (tierra)
del equipo conectable
Dispositivo sin entrada
phono
LÍNEA AUX o conector de
entrada de línea de
equipos conectables
NOTA: Las tomas RCA no están diseñadas para conectarse directamente a
los altavoces pasivos/sin alimentación en el modo LÍNEA. Si está conectado
a los altavoces pasivos, no habrá sonido.
2. Conexión del dispositivo
Alinee la configuración para el interruptor selector del preamplificador y
conecte el cable de audio RCA a una toma de entrada que sea compatible con
el equipo que está conectando (amplificador, altavoces, etc.).
• El conector rojo del cable de audio RCA es para el canal derecho (R), y el
conector blanco es para el canal izquierdo (L)
R
AUX OUTAUX IN
PHONE
DC12V
LINE OUT
L
Con PHONO Sin PHONO
Salida
AUX
L R
PHONO
L R
Con PHONO Sin PHONO
Salida
Equipo conectable
(Amplificador, etc.)

EN
DE
FR
ES
IT
EN
DE
FR
ES
IT
68 69
Conexión a un altavoz externo con el cable de audio RCA
Este tocadiscos incluye 4 altavoces incorporados y un ecualizador de teléfono
incorporado.
Si desea utilizar su propio amplificador o altavoces, por favor, siga las siguientes
instrucciones:
Conexión por cable RCA
Altavoces activos
o
Amplificador
NOTA: Para lograr el mejor sonido, se aconseja ajustar el volumen del tocadiscos
a un nivel mínimo. Entonces el audio del tocadiscos se reproducirá a través de su
propio amplificador, altavoces, etc.
1. Conguración del interruptor selector del preamplicador
Este producto tiene una función de ecualizador fonográfico incorporada. Puede
usar el producto incluso si no tiene un amplificador fonográfico o un equipo
conectado con un amplificador fonográfico incorporado.
Use el interruptor selector del preamplificador para configurar la salida, como
se muestra a continuación.
Equipo conectable en
uso
Posición del
interruptor selector del
preamplificador
Dónde conectar el cable
de audio RCA
Dispositivo con entrada
phono
PHONO Toma de entrada phono
y terminal de tierra (tierra)
del equipo conectable
Dispositivo sin entrada
phono
LÍNEA AUX o conector de
entrada de línea de
equipos conectables
NOTA: Las tomas RCA no están diseñadas para conectarse directamente a
los altavoces pasivos/sin alimentación en el modo LÍNEA. Si está conectado
a los altavoces pasivos, no habrá sonido.
2. Conexión del dispositivo
Alinee la configuración para el interruptor selector del preamplificador y
conecte el cable de audio RCA a una toma de entrada que sea compatible con
el equipo que está conectando (amplificador, altavoces, etc.).
• El conector rojo del cable de audio RCA es para el canal derecho (R), y el
conector blanco es para el canal izquierdo (L)
R
AUX OUTAUX IN
PHONE
DC12V
LINE OUT
L
Con PHONO Sin PHONO
Salida
AUX
L R
PHONO
L R
Con PHONO Sin PHONO
Salida
Equipo conectable
(Amplificador, etc.)
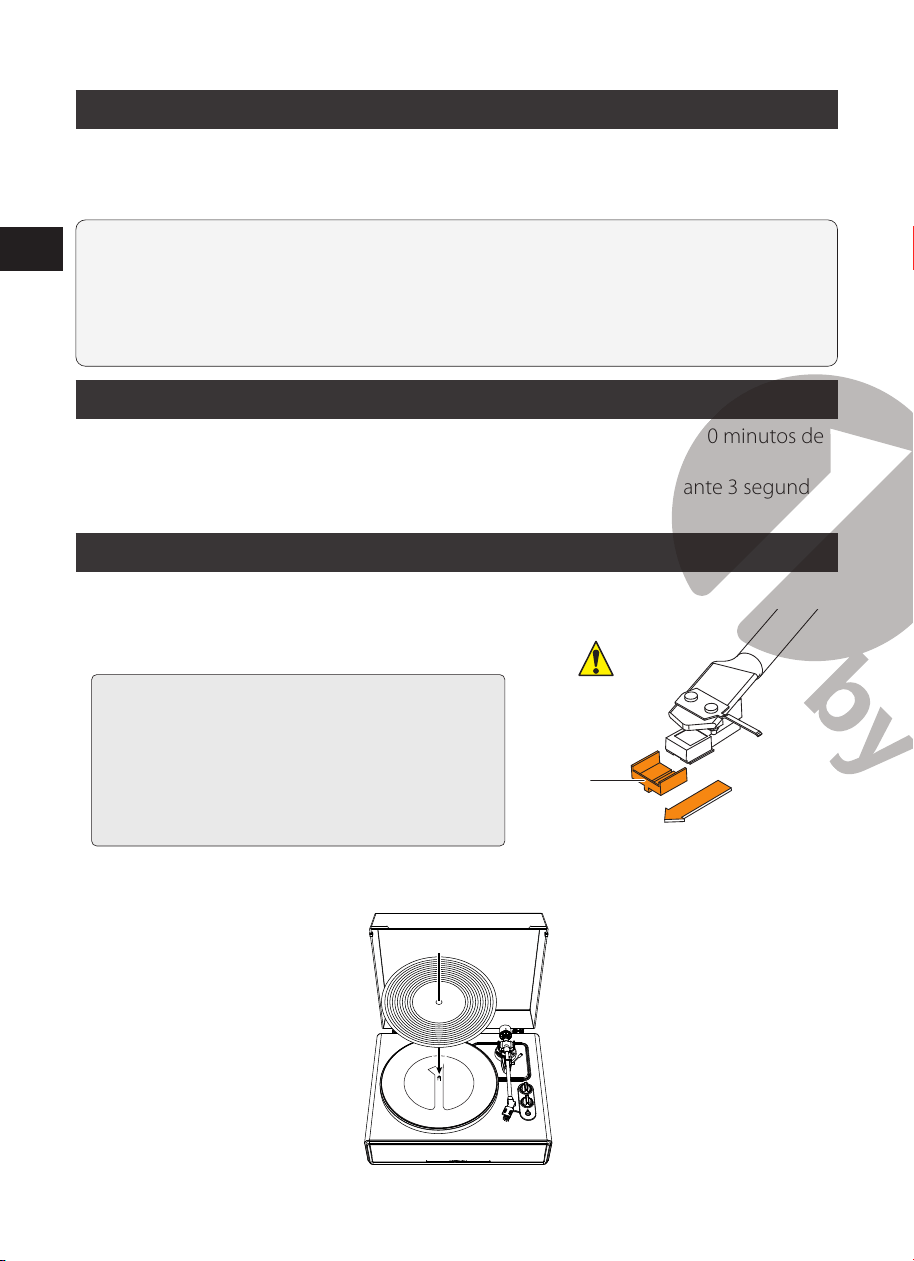
EN
DE
FR
ES
IT
EN
DE
FR
ES
IT
70 71
Conexión de alimentación principal
1. Inserte el enchufe de CC del cable del adaptador de CA en el conector de entrada
de CC en la parte posterior del tocadiscos.
2. Conecte el adaptador de CA a una toma de corriente normal.
NOTA:
No enchufe el adaptador de alimentación de CA a una toma de corriente antes
de completar todo el conjunto del tocadiscos. Antes de encender el tocadiscos, vuelva
a verificar todas las conexiones para asegurarse de que estén
correctas y seguras. Siempre apague el tocadiscos antes de conectar o desconectar la
alimentación.
Función de administración de energía
El tocadiscos pasará automáticamente al modo de espera después de 20 minutos de
inactividad. La luz indicadora se apagará.
Para reanudar la operación, mantenga pulsado el botón de inicio durante 3 segundos.
Reproducción de un disco
1. Antes de reproducir un disco
1.1 Tire del protector hacia adelante para
quitarlo.
NOTA: Aplicar una fuerza hacia abajo puede
causar que el lápiz salga del cuerpo. Solo se
emite fuerza hacia abajo si el lápiz se ha salido
o está a punto de salirse, por lo tanto, consulte
"Sustitución del lápiz" para volver a colocar el
lápiz correctamente.
Protector
1.2 Coloque el disco en la alfombrilla para que el orificio central se alinee con el eje.
2. Operación del tocadiscos
Baje lo suficiente el volumen del amplificador y de los altavoces primero.
2.1 Conecte el adaptador de corriente incluido al tocadiscos, mantenga pulsado el
botón de inicio durante 3 segundos. El tocadiscos se encenderá. La luz indicadora se
volverá roja.
2.2 Retire el protector de la aguja.
2.3 Coloque el disco en la alfombrilla de deslizamiento.
2.4 Gire la perilla de función para cambiar entre las velocidades de 33 y 45 RPM según
el tipo de disco.
2.5 Presione el botón de inicio una vez y el disco se reproducirá o hará una pausa.
2.6 Desbloquee el clip del brazo de tono y coloque la palanca de elevación del brazo
de tono en la posición superior.
2.7 Posicione el brazo de tono sobre la ubicación deseada (ranura) en el disco.
2.8 Baje con cuidado el brazo de tono al disco.
2.9 Suba el volumen del tocadiscos según sea necesario.
2.10 Cuando termine de reproducirse el disco, suba el brazo de tono, vuelva a
colocarlo en el clip del brazo y pulse durante un largo tiempo el botón de inicio
para apagar el tocadiscos.
NOTA:
1. Si el tiempo de pausa silenciosa entre cada pista es superior a 3 minutos, el plato
dejará de girar automáticamente para evitar dañar el disco. La luz indicadora será
roja. 2. Para reanudar la operación, pulse el botón de inicio.
2. Si la alfombrilla se ensucia, puede rayar fácilmente el disco, por lo tanto, quítela
periódicamente y limpie el polvo.
3. Para evitar que el disco se raye y se deforme, retírelo después de usarlo.
4. No use un estabilizador de disco.

EN
DE
FR
ES
IT
EN
DE
FR
ES
IT
70 71
Conexión de alimentación principal
1. Inserte el enchufe de CC del cable del adaptador de CA en el conector de entrada
de CC en la parte posterior del tocadiscos.
2. Conecte el adaptador de CA a una toma de corriente normal.
NOTA:
No enchufe el adaptador de alimentación de CA a una toma de corriente antes
de completar todo el conjunto del tocadiscos. Antes de encender el tocadiscos, vuelva
a verificar todas las conexiones para asegurarse de que estén
correctas y seguras. Siempre apague el tocadiscos antes de conectar o desconectar la
alimentación.
Función de administración de energía
El tocadiscos pasará automáticamente al modo de espera después de 20 minutos de
inactividad. La luz indicadora se apagará.
Para reanudar la operación, mantenga pulsado el botón de inicio durante 3 segundos.
Reproducción de un disco
1. Antes de reproducir un disco
1.1 Tire del protector hacia adelante para
quitarlo.
NOTA: Aplicar una fuerza hacia abajo puede
causar que el lápiz salga del cuerpo. Solo se
emite fuerza hacia abajo si el lápiz se ha salido
o está a punto de salirse, por lo tanto, consulte
"Sustitución del lápiz" para volver a colocar el
lápiz correctamente.
Protector
1.2 Coloque el disco en la alfombrilla para que el orificio central se alinee con el eje.
2. Operación del tocadiscos
Baje lo suficiente el volumen del amplificador y de los altavoces primero.
2.1 Conecte el adaptador de corriente incluido al tocadiscos, mantenga pulsado el
botón de inicio durante 3 segundos. El tocadiscos se encenderá. La luz indicadora se
volverá roja.
2.2 Retire el protector de la aguja.
2.3 Coloque el disco en la alfombrilla de deslizamiento.
2.4 Gire la perilla de función para cambiar entre las velocidades de 33 y 45 RPM según
el tipo de disco.
2.5 Presione el botón de inicio una vez y el disco se reproducirá o hará una pausa.
2.6 Desbloquee el clip del brazo de tono y coloque la palanca de elevación del brazo
de tono en la posición superior.
2.7 Posicione el brazo de tono sobre la ubicación deseada (ranura) en el disco.
2.8 Baje con cuidado el brazo de tono al disco.
2.9 Suba el volumen del tocadiscos según sea necesario.
2.10 Cuando termine de reproducirse el disco, suba el brazo de tono, vuelva a
colocarlo en el clip del brazo y pulse durante un largo tiempo el botón de inicio
para apagar el tocadiscos.
NOTA:
1. Si el tiempo de pausa silenciosa entre cada pista es superior a 3 minutos, el plato
dejará de girar automáticamente para evitar dañar el disco. La luz indicadora será
roja. 2. Para reanudar la operación, pulse el botón de inicio.
2. Si la alfombrilla se ensucia, puede rayar fácilmente el disco, por lo tanto, quítela
periódicamente y limpie el polvo.
3. Para evitar que el disco se raye y se deforme, retírelo después de usarlo.
4. No use un estabilizador de disco.
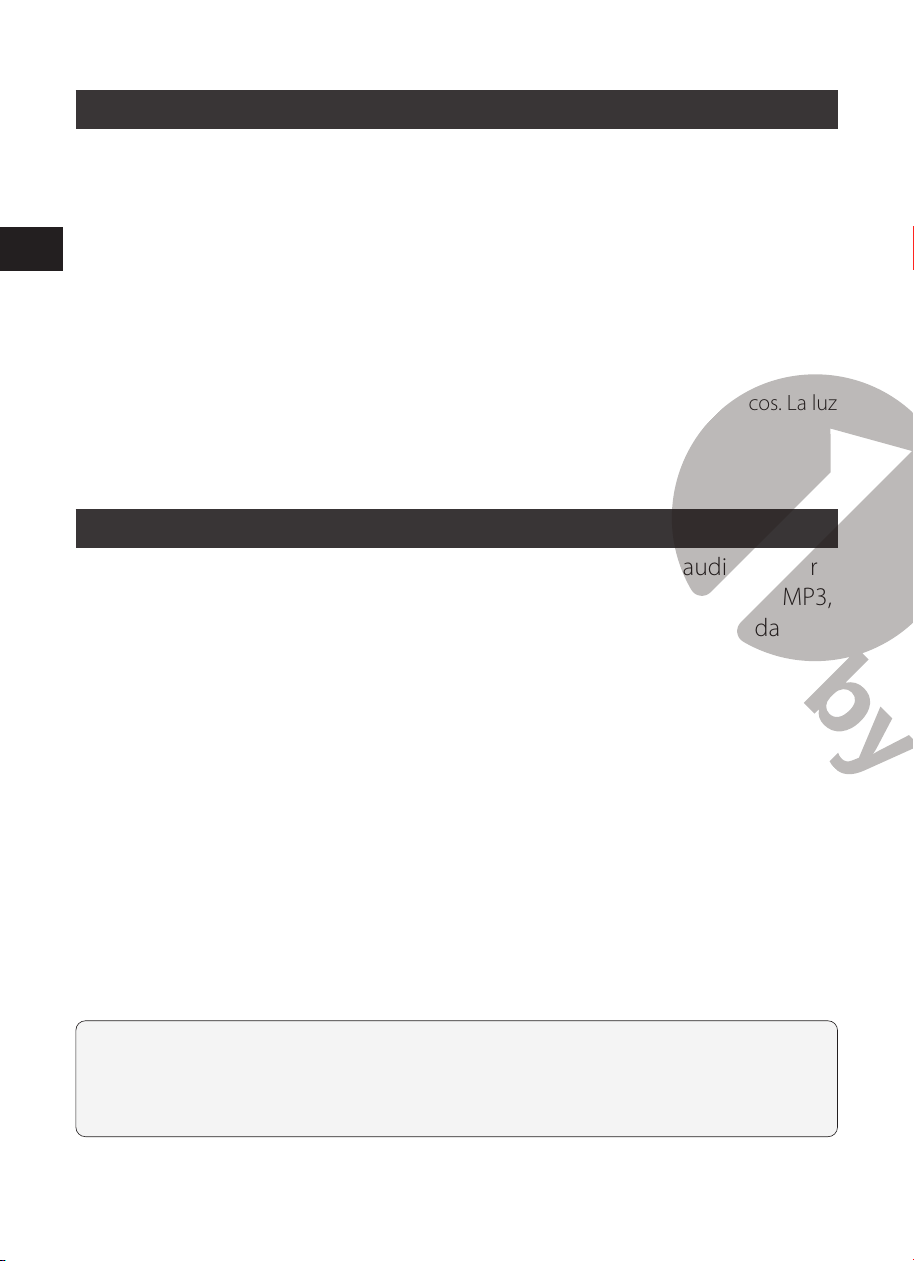
EN
DE
FR
ES
IT
EN
DE
FR
ES
IT
72 73
Operación Bluetooth
1. Conecte el adaptador de corriente incluido al tocadiscos y presione por largo tiempo el
botón de inicio, la luz indicadora se pondrá roja.
2. Gire la perilla de función al modo Bluetooth. La luz indicadora se vuelve azul y
parpadea rápidamente. Escuchará un sonido de activación en el tocadiscos.
3. Active la función Bluetooth de su dispositivo multimedia y busque y
seleccione“1byone BS020” para emparejar el dispositivo multimedia y el tocadiscos.
4. Una vez que su dispositivo multimedia se haya emparejado satisfactoriamente con
el tocadiscos, el tocadiscos reproducirá un breve sonido de confirmación. La luz
indicadora azul parpadeará lentamente.
5. Reproduzca y transmita música desde su dispositivo multimedia al tocadiscos. La luz
indicadora se volverá sólida.
NOTA: versión Bluetooth: 5.0
Operación auxiliar
Este tocadiscos incluye un conector de entrada de señal de audio auxiliar
para conectar dispositivos de audio externos como reproductores de MP3,
reproductores de CD e iPods antiguos no acoplables, para que pueda
escuchar su fuente externa a través de los altavoces del tocadiscos.
1. Use un cable de audio (no incluido) con una conexión estéreo de 3,5mm en cada
extremo del cable.
2. Conecte un extremo al conector auxiliar del tocadiscos y el otro extremo al conector
Line Out del dispositivo de audio.
3. Encienda el tocadiscos y el dispositivo de audio. La luz indicadora del tocadiscos es
roja.
4. El nivel de volumen puede controlarse a través del tocadiscos. Opere todas las
funciones del dispositivo auxiliar de la forma habitual.
5. Tenga en cuenta que la función auxiliar es una función de primera prioridad.
Aunque la luz indicadora del PHONO/BT esté encendida, estas funciones no
funcionarán mientras se utilice la función auxiliar.
Por favor, desenchufe el cable AUX-IN antes de utilizar las funciones PHONO/BT.
Cuidado
Cuerpo del tocadiscos
• Cuando el cuerpo del tocadiscos esté sucio o polvoriento, primero desconecte el
adaptador de CA y luego limpie la suciedad y el polvo con un paño suave y seco.
• No use bencenos, diluyentes, etc.
• Cuando guarde el producto durante un período prolongado, desconecte el
adaptador de CA de la toma de corriente y envuelva el producto en plástico; no
permita que se humedezca; la correa de transmisión debe retirarse para evitar
estiramientos desiguales.
Punta de la aguja
• Si polvo y suciedad están pegados a la punta de la
aguja, límpiela con un cepillo comercial.
• Recomendamos usar un limpiador de aguja
(no incluido) si la punta de la aguja está
considerablemente sucia. Limpie la punta de la
aguja moviendo el cepillo desde la parte posterior
hacia la parte delantera de la punta de la aguja.
Reemplazar la aguja
Se sugiere reemplazar la aguja después de 400 horas de uso.
Quitar la aguja
• Además del deterioro de la calidad del sonido, los discos también pueden dañarse a
medida que la punta de la aguja del cartucho se desgasta.
• Asegúrese de desconectar el adaptador de CA del producto de la toma de corriente.
•
Cuando reemplace la aguja, sostenga la cubierta y el cuerpo del cartucho firmemente.
Gire la parte frontal de la aguja hacia adelante y hacia abajo.
NOTA:
1. Asegúrese de que el brazo de tono esté bien fijado para evitar cualquier daño.
2. Cuando haya terminado, no olvide desconectar la alimentación del tocadiscos y
del dispositivo externo.
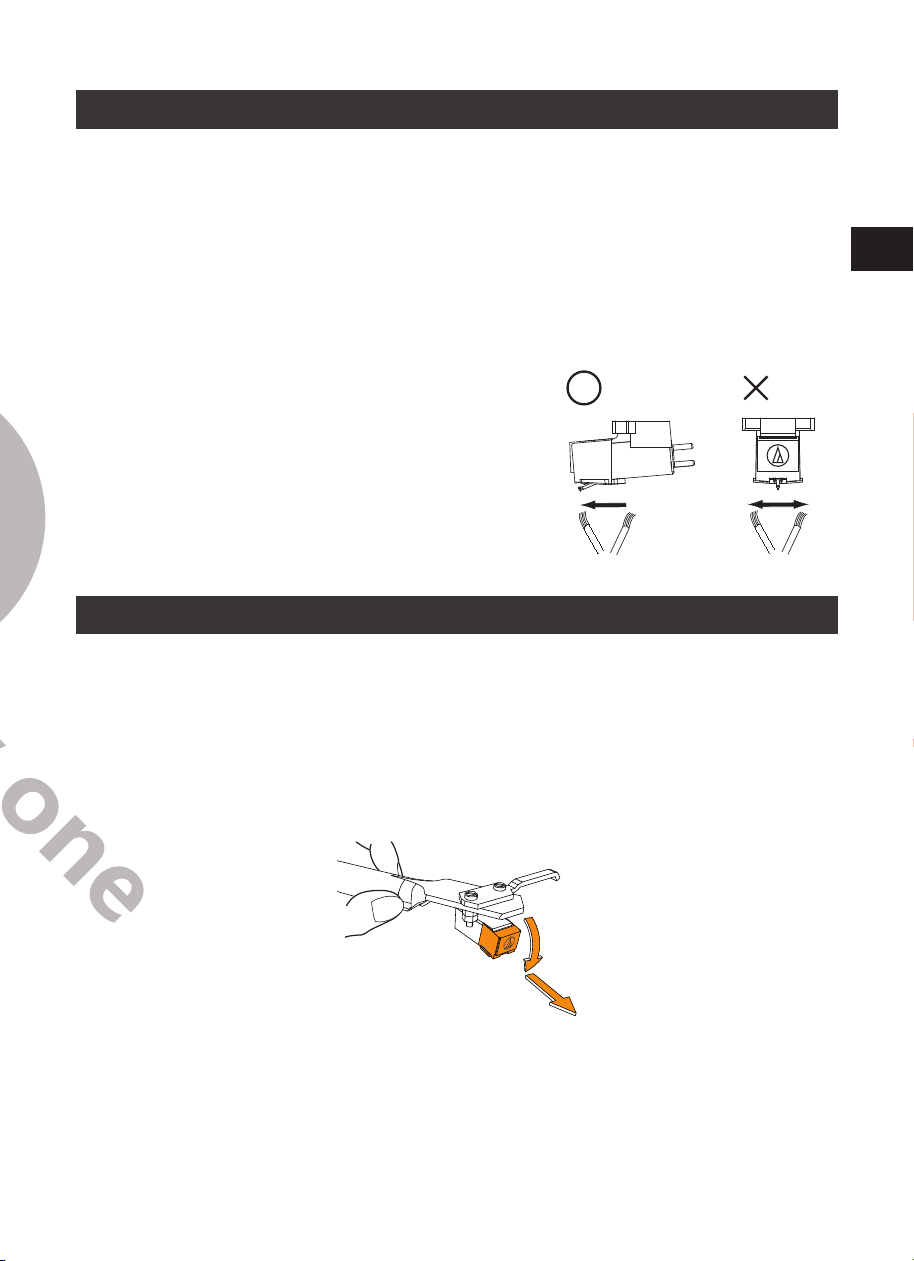
EN
DE
FR
ES
IT
EN
DE
FR
ES
IT
72 73
Operación Bluetooth
1. Conecte el adaptador de corriente incluido al tocadiscos y presione por largo tiempo el
botón de inicio, la luz indicadora se pondrá roja.
2. Gire la perilla de función al modo Bluetooth. La luz indicadora se vuelve azul y
parpadea rápidamente. Escuchará un sonido de activación en el tocadiscos.
3. Active la función Bluetooth de su dispositivo multimedia y busque y
seleccione“1byone BS020” para emparejar el dispositivo multimedia y el tocadiscos.
4. Una vez que su dispositivo multimedia se haya emparejado satisfactoriamente con
el tocadiscos, el tocadiscos reproducirá un breve sonido de confirmación. La luz
indicadora azul parpadeará lentamente.
5. Reproduzca y transmita música desde su dispositivo multimedia al tocadiscos. La luz
indicadora se volverá sólida.
NOTA: versión Bluetooth: 5.0
Operación auxiliar
Este tocadiscos incluye un conector de entrada de señal de audio auxiliar
para conectar dispositivos de audio externos como reproductores de MP3,
reproductores de CD e iPods antiguos no acoplables, para que pueda
escuchar su fuente externa a través de los altavoces del tocadiscos.
1. Use un cable de audio (no incluido) con una conexión estéreo de 3,5mm en cada
extremo del cable.
2. Conecte un extremo al conector auxiliar del tocadiscos y el otro extremo al conector
Line Out del dispositivo de audio.
3. Encienda el tocadiscos y el dispositivo de audio. La luz indicadora del tocadiscos es
roja.
4. El nivel de volumen puede controlarse a través del tocadiscos. Opere todas las
funciones del dispositivo auxiliar de la forma habitual.
5. Tenga en cuenta que la función auxiliar es una función de primera prioridad.
Aunque la luz indicadora del PHONO/BT esté encendida, estas funciones no
funcionarán mientras se utilice la función auxiliar.
Por favor, desenchufe el cable AUX-IN antes de utilizar las funciones PHONO/BT.
Cuidado
Cuerpo del tocadiscos
• Cuando el cuerpo del tocadiscos esté sucio o polvoriento, primero desconecte el
adaptador de CA y luego limpie la suciedad y el polvo con un paño suave y seco.
• No use bencenos, diluyentes, etc.
• Cuando guarde el producto durante un período prolongado, desconecte el
adaptador de CA de la toma de corriente y envuelva el producto en plástico; no
permita que se humedezca; la correa de transmisión debe retirarse para evitar
estiramientos desiguales.
Punta de la aguja
• Si polvo y suciedad están pegados a la punta de la
aguja, límpiela con un cepillo comercial.
• Recomendamos usar un limpiador de aguja
(no incluido) si la punta de la aguja está
considerablemente sucia. Limpie la punta de la
aguja moviendo el cepillo desde la parte posterior
hacia la parte delantera de la punta de la aguja.
Reemplazar la aguja
Se sugiere reemplazar la aguja después de 400 horas de uso.
Quitar la aguja
• Además del deterioro de la calidad del sonido, los discos también pueden dañarse a
medida que la punta de la aguja del cartucho se desgasta.
• Asegúrese de desconectar el adaptador de CA del producto de la toma de corriente.
•
Cuando reemplace la aguja, sostenga la cubierta y el cuerpo del cartucho firmemente.
Gire la parte frontal de la aguja hacia adelante y hacia abajo.
NOTA:
1. Asegúrese de que el brazo de tono esté bien fijado para evitar cualquier daño.
2. Cuando haya terminado, no olvide desconectar la alimentación del tocadiscos y
del dispositivo externo.
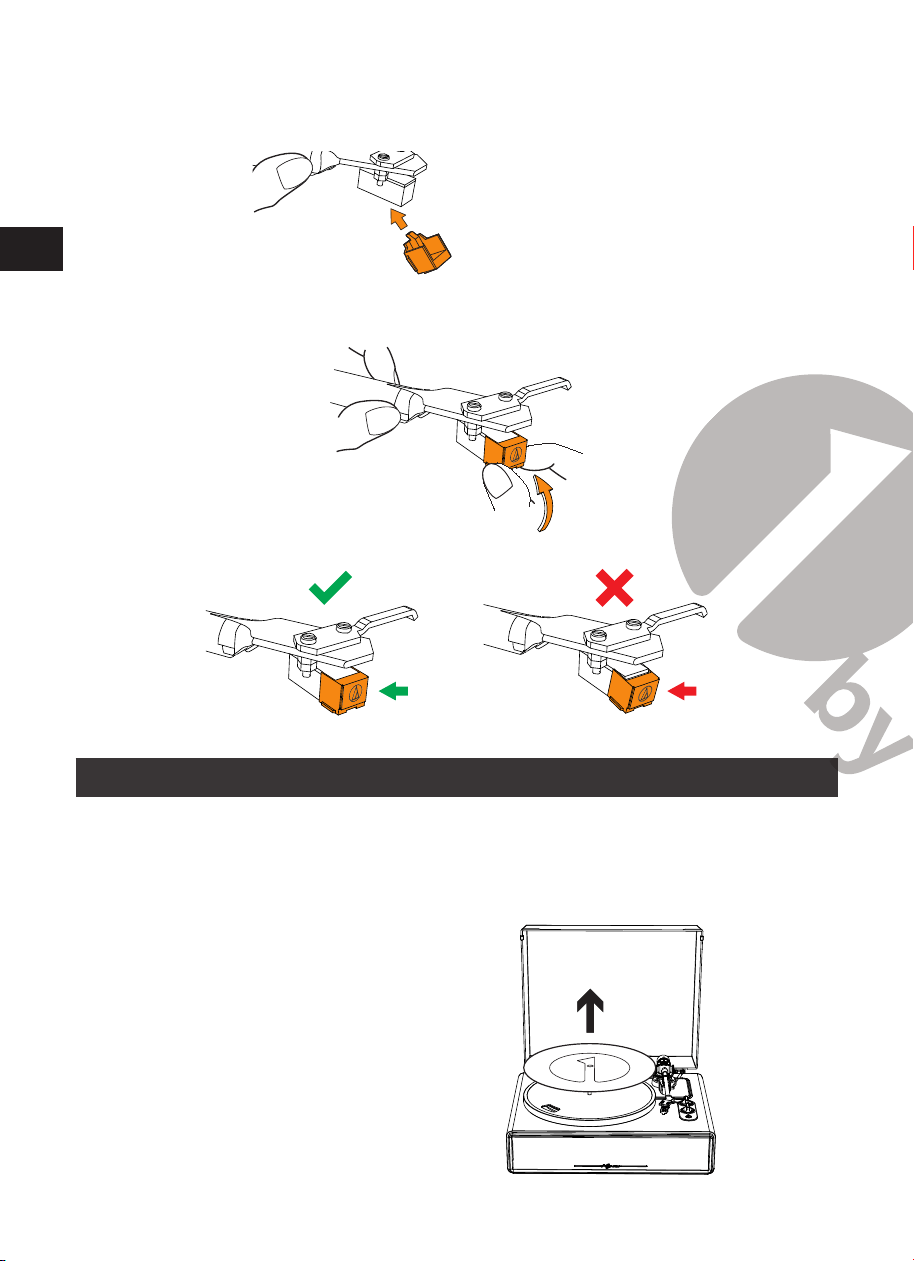
EN
DE
FR
ES
IT
EN
DE
FR
ES
IT
74 75
Instalar una nueva aguja
1. Ponga la nueva aguja de repuesto en el cartucho.
Acople primero
en el cuerpo
2. Levante la aguja hasta que escuche un clic.
3. Asegúrese de que no haya espacio entre el cabezal y el cartucho.
Sustitución de la correa
• La correa es una parte consumible. Reemplace la correa si la velocidad de
reproducción disminuye o si ocurre una rotación irregular. Como regla general,
sugerimos reemplazar la correa una vez al año.
• Antes de reemplazar la correa, asegúrese de desconectar el adaptador de CA del
producto de la toma de corriente.
1. Retire la alfombrilla antideslizante.
2. Retire la correa de la polea del motor.
3. Retire el plato principal y luego retire la correa vieja.
4. Gire el plato y verá un círculo elevado. Enrolle la correa nueva a lo largo del
círculo central.
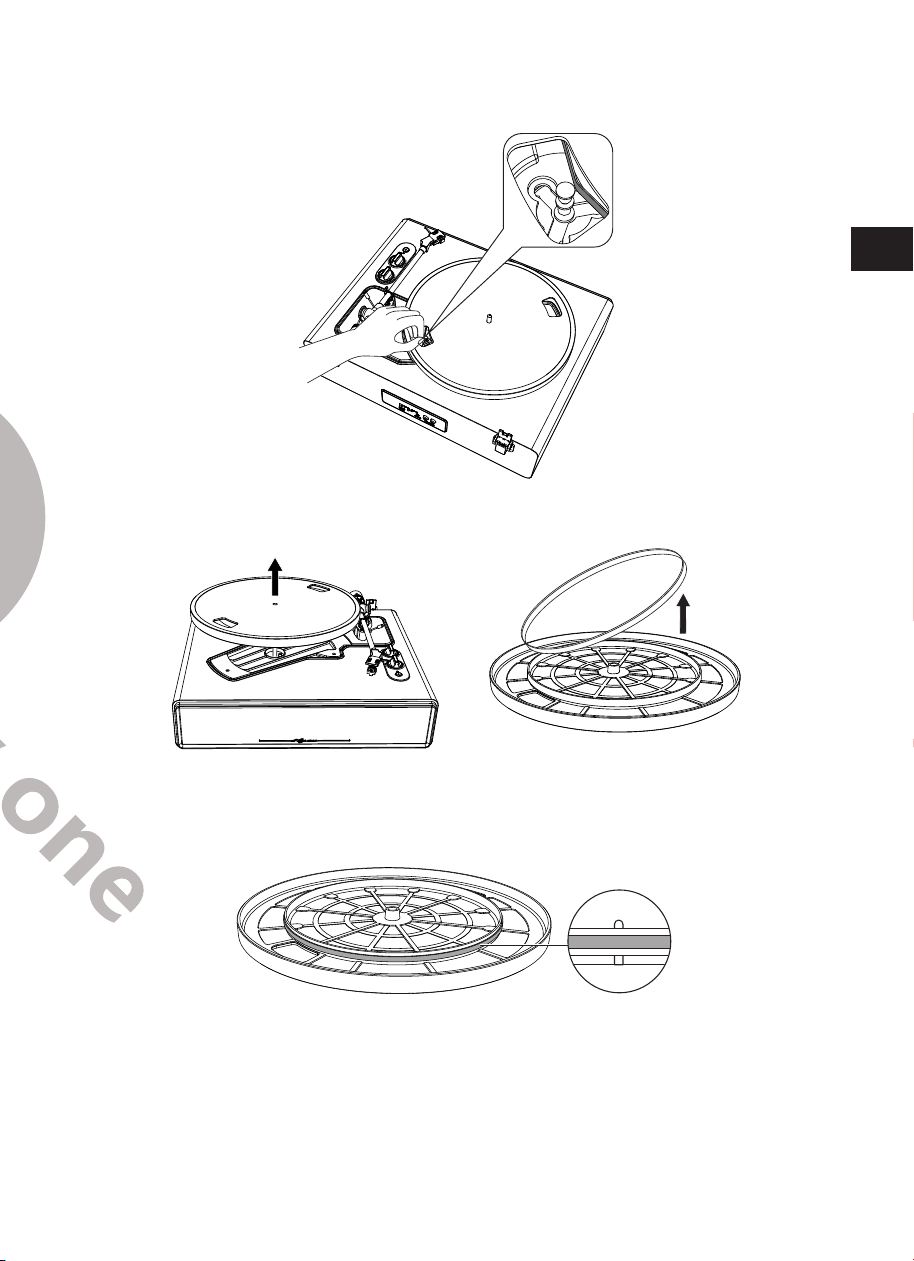
EN
DE
FR
ES
IT
EN
DE
FR
ES
IT
76 77
5. Coloque el plato.
Alinee una de las aberturas con la posición de la polea del motor.
6. Coloque la correa en la polea del motor de color latón.
Agarre la correa que fue fijada en el paso 4 y, mientras la tire, colóquela en la polea
del motor.
7. Con las manos, gire lentamente el plato diez veces en el sentido de las agujas
del reloj, como muestra la echa de abajo.
Cuando se mueve el tocadiscos
Utilizando los materiales de embalaje originales del producto, envuelva el tocadiscos
en el orden inverso desde el momento en que lo desenvolvió. Si no tiene los
materiales de embalaje, tome las siguientes medidas:
• Después de desconectar el adaptador de CA de la toma de corriente, retire la
alfombrilla y el plato, y luego envuélvalos para que no se dañen.
• Fije el protector al cartucho.
• Use una cuerda o algo similar para atar el brazo al resto para que no se mueva.
• Envuelva el cuerpo del tocadiscos con papel o un paño suave para que no se dañe.
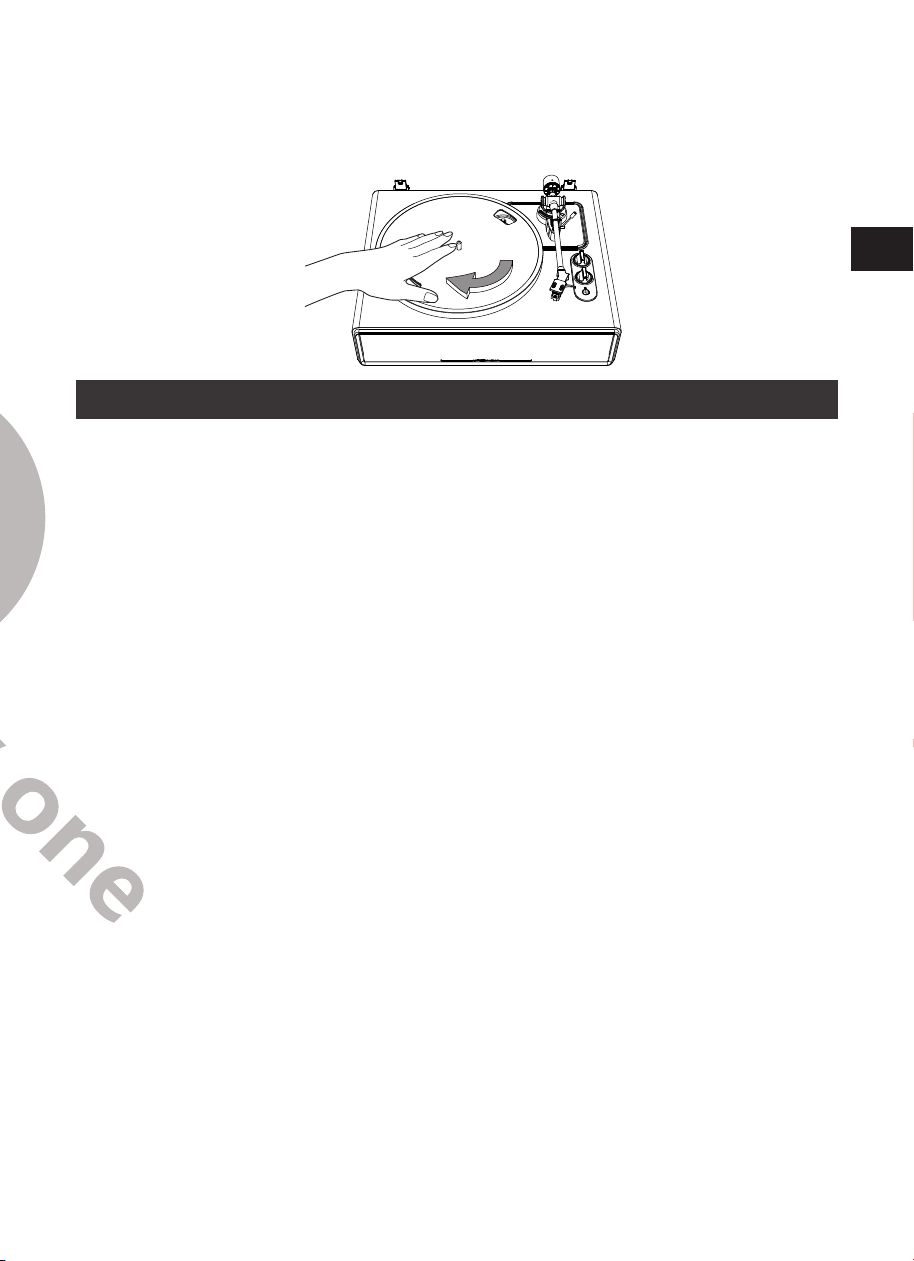
EN
DE
FR
ES
IT
EN
DE
FR
ES
IT
76 77
5. Coloque el plato.
Alinee una de las aberturas con la posición de la polea del motor.
6. Coloque la correa en la polea del motor de color latón.
Agarre la correa que fue fijada en el paso 4 y, mientras la tire, colóquela en la polea
del motor.
7. Con las manos, gire lentamente el plato diez veces en el sentido de las agujas
del reloj, como muestra la echa de abajo.
Cuando se mueve el tocadiscos
Utilizando los materiales de embalaje originales del producto, envuelva el tocadiscos
en el orden inverso desde el momento en que lo desenvolvió. Si no tiene los
materiales de embalaje, tome las siguientes medidas:
• Después de desconectar el adaptador de CA de la toma de corriente, retire la
alfombrilla y el plato, y luego envuélvalos para que no se dañen.
• Fije el protector al cartucho.
• Use una cuerda o algo similar para atar el brazo al resto para que no se mueva.
• Envuelva el cuerpo del tocadiscos con papel o un paño suave para que no se dañe.
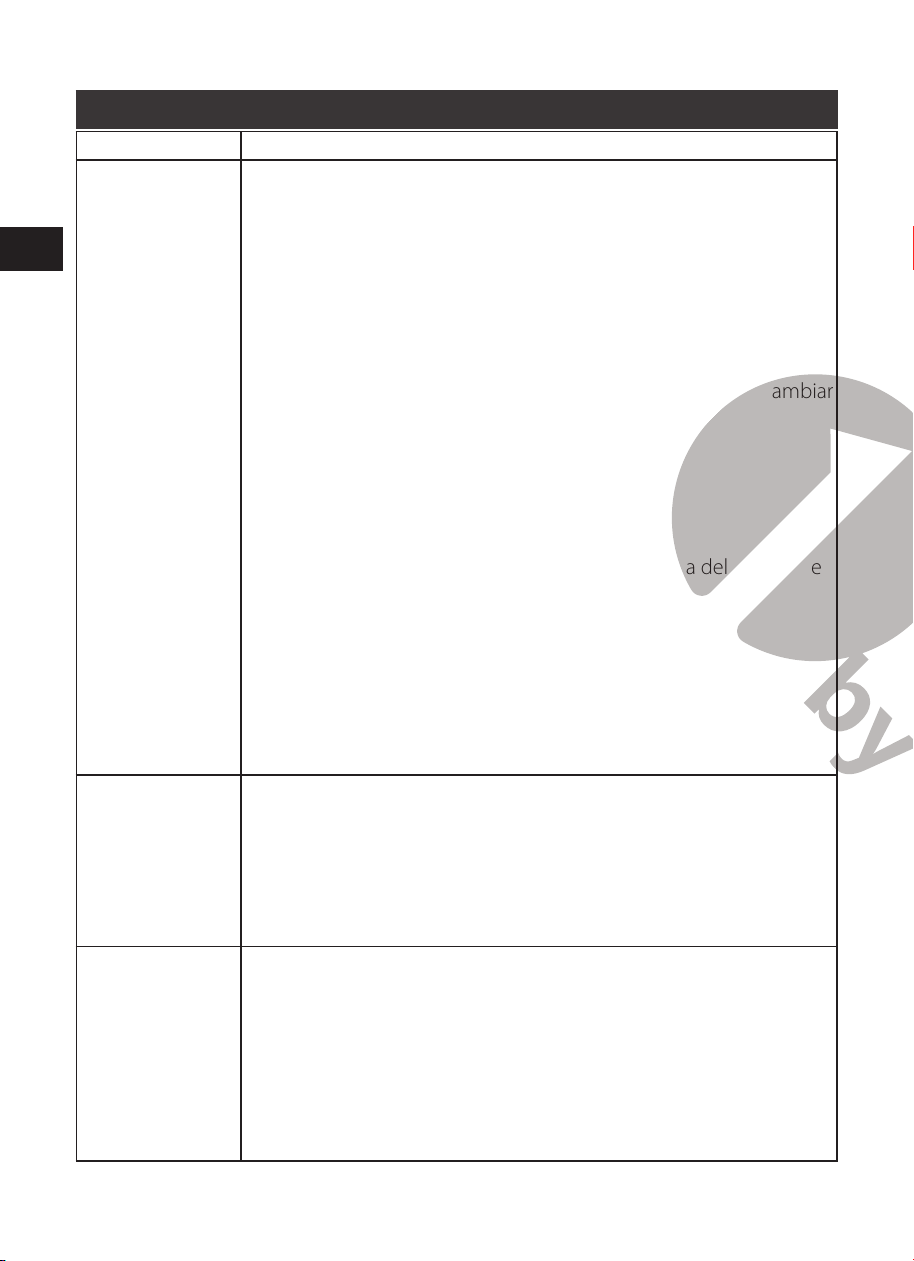
EN
DE
FR
ES
IT
EN
DE
FR
ES
IT
78 79
Solución de problemas
Problema Solución
El plato no gira. • ¿Está el adaptador de CA conectado a la toma de corriente?
-Conecte el adaptador de CA a la toma de corriente.
• ¿Cuál es el estado de la luz indicadora?
-Está enchufado, pero la luz indicadora está apagada. Eso
significa que el tocadiscos está en modo ERP o no está
encendido. Mantenga pulsada la tecla del botón de inicio
durante 3 segundos para reiniciar el tocadiscos.
-La luz indicadora es azul. Eso significa que el tocadiscos está en
Modo Bluetooth. Por favor, gire la perilla de función para cambiar
a Modo giratorio.
-La luz indicadora roja indicará el modo giratorio.
• ¿Se ha deslizado la correa del plato?
-Coloque correctamente la correa en el plato.
• ¿Está la correa colocada en la polea del motor?
-Verifique que la correa esté colocada en la polea del motor (de
color latón) correctamente.
• ¿Se ha dañado la correa?
-Sustitúyala por una correa nueva.
• ¿Está conectado el cable auxiliar?
-La función auxiliar es una función de primera prioridad. Por
favor, desenchufe el cable auxiliar antes de utilizar las funciones
PHONO/BT.
¿El plato gira, pero
no hay sonido del
tocadiscos?
• ¿Está dañada la aguja?
-Revise la aguja y cámbiela, si es necesario. Se sugiere reemplazar
la aguja después de 400 horas de uso.
• ¿Está la aguja colocada correctamente en el cuerpo del
cartucho?
-Compruebe el cartucho y ajústela, si es necesario.
La aguja salta. • ¿Está el disco deformado?
-Revise el disco.
• ¿Está rayado el disco?
-Revise el disco.
• ¿La presión de la aguja es la correcta?
-Refiérase a "Ajuste de la fuerza de seguimiento del cartucho"
para reajustar la fuerza de seguimiento.
El tocadiscos
está haciendo un
extraño sonido
de "aullido".
• ¿El producto capta vibraciones excesivas del suelo, las superficies
de las paredes o los altavoces cercanos?
-Disminuya las vibraciones o ponga el producto en una
superficie que no esté sujeta a los efectos de las vibraciones.
• ¿Está el producto puesto sobre una superficie inestable?
-Compruebe si la superficie sobre la que se pone el producto es
adecuada.
Hay ruido cuando
se reproduce el
disco.
• ¿Hay polvo en la punta de la aguja del cartucho?
-Si hay polvo adherido a la punta del lápiz, límpielo con un
cepillo comercial.
El sonido cuando
se reproduce
el disco es
demasiado rápido
o demasiado
lento.
• ¿Son correctos los ajustes de velocidad para este producto?
-Seleccione la velocidad correcta para el tipo de disco que se
está reproduciendo.
La velocidad de
reproducción
disminuye o hay
una rotación
irregular.
• ¿La correa está estirada?
-Sustitúyala por una correa nueva.
• ¿Está la correa instalada correctamente?
-Refiérase a "Configuración del plato giratorio y la correa" para
configurar la correa.

EN
DE
FR
ES
IT
EN
DE
FR
ES
IT
78 79
Solución de problemas
Problema Solución
El plato no gira. • ¿Está el adaptador de CA conectado a la toma de corriente?
-Conecte el adaptador de CA a la toma de corriente.
• ¿Cuál es el estado de la luz indicadora?
-Está enchufado, pero la luz indicadora está apagada. Eso
significa que el tocadiscos está en modo ERP o no está
encendido. Mantenga pulsada la tecla del botón de inicio
durante 3 segundos para reiniciar el tocadiscos.
-La luz indicadora es azul. Eso significa que el tocadiscos está en
Modo Bluetooth. Por favor, gire la perilla de función para cambiar
a Modo giratorio.
-La luz indicadora roja indicará el modo giratorio.
• ¿Se ha deslizado la correa del plato?
-Coloque correctamente la correa en el plato.
• ¿Está la correa colocada en la polea del motor?
-Verifique que la correa esté colocada en la polea del motor (de
color latón) correctamente.
• ¿Se ha dañado la correa?
-Sustitúyala por una correa nueva.
• ¿Está conectado el cable auxiliar?
-La función auxiliar es una función de primera prioridad. Por
favor, desenchufe el cable auxiliar antes de utilizar las funciones
PHONO/BT.
¿El plato gira, pero
no hay sonido del
tocadiscos?
• ¿Está dañada la aguja?
-Revise la aguja y cámbiela, si es necesario. Se sugiere reemplazar
la aguja después de 400 horas de uso.
• ¿Está la aguja colocada correctamente en el cuerpo del
cartucho?
-Compruebe el cartucho y ajústela, si es necesario.
La aguja salta. • ¿Está el disco deformado?
-Revise el disco.
• ¿Está rayado el disco?
-Revise el disco.
• ¿La presión de la aguja es la correcta?
-Refiérase a "Ajuste de la fuerza de seguimiento del cartucho"
para reajustar la fuerza de seguimiento.
El tocadiscos
está haciendo un
extraño sonido
de "aullido".
• ¿El producto capta vibraciones excesivas del suelo, las superficies
de las paredes o los altavoces cercanos?
-Disminuya las vibraciones o ponga el producto en una
superficie que no esté sujeta a los efectos de las vibraciones.
• ¿Está el producto puesto sobre una superficie inestable?
-Compruebe si la superficie sobre la que se pone el producto es
adecuada.
Hay ruido cuando
se reproduce el
disco.
• ¿Hay polvo en la punta de la aguja del cartucho?
-Si hay polvo adherido a la punta del lápiz, límpielo con un
cepillo comercial.
El sonido cuando
se reproduce
el disco es
demasiado rápido
o demasiado
lento.
• ¿Son correctos los ajustes de velocidad para este producto?
-Seleccione la velocidad correcta para el tipo de disco que se
está reproduciendo.
La velocidad de
reproducción
disminuye o hay
una rotación
irregular.
• ¿La correa está estirada?
-Sustitúyala por una correa nueva.
• ¿Está la correa instalada correctamente?
-Refiérase a "Configuración del plato giratorio y la correa" para
configurar la correa.
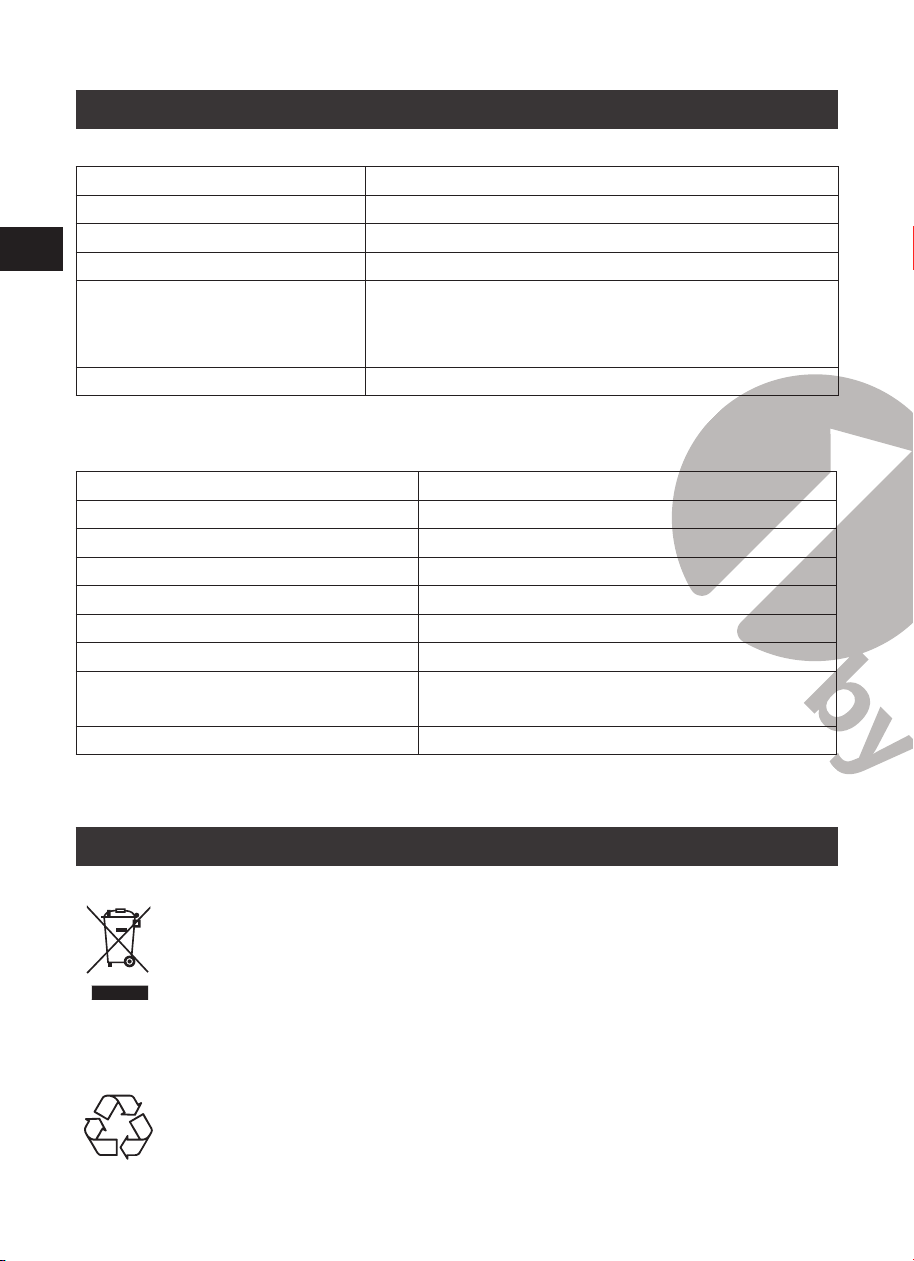
EN
DE
FR
ES
IT
81
EN
DE
FR
ES
IT
80
Especicaciones
Tocadiscos
Fuente de alimentación CA100-240V, salida CC 12V 1500mA
Consumo de energía 35W
Velocidad del tocadiscos 33 1/3, 45 RPM
Potencia de salida (RMS) 4Ω 18W X 2(BT) ,
5W X 2(PH)
Dimensiones (L x A x H)
17.32” x 14.57” x 7.56” (44 x 37 x 19cm) (tapa
cerrada),15.75” x 16.73” x 18.19” (40 x 42 x 46cm) (tapa
abierta)
Peso 13.3lb (6.05kg)
Aguja
Modelo Audio-Technica AT3600
Respuesta frecuente 20Hz - 20kHz
Balance de canal <2.5dB
Separación de canales >18dB
Tensión de salida 2.5mV
Resistencia a la carga recomendada 47kΩ
Conexión del amplicador MM (imán móvil) - entrada
Fuerza de seguimiento
recomendada
3.5±0.5g
Peso 0.18 oz
Nota: Diseño y especificaciones sujetos a cambio sin aviso.
Eliminación
Eliminación del producto
Bajo ninguna circunstancia se debe desechar este dispositivo en la basura
normal. Este producto está sujeto a las disposiciones de las directivas
europeas 2012/19/EU.
Elimine el dispositivo a través de una empresa o en un punto limpio. Por favor,
observe las normas actuales en desecho de productos. Contacte con el centro
municipal de desechos si tiene cualquier duda.
El embalaje está fabricado con material respetuoso con el medio ambiente
y puede ser desechado en su centro de reciclaje local.
Introduzione
Grazie per aver scelto il Giradischi Hi-Fi a Cinghia 1byone. Questo manuale d’istruzioni
fornisce importanti indicazioni per la sicurezza, l’uso e lo smaltimento. Usa il prodotto
come qui descritto e conserva il manuale per future consultazioni. Se vendi o regali il
giradischi, fornisci anche il libretto al nuovo proprietario.
Istruzioni di Sicurezza
Leggi e comprendi per intero questo manuale prima di usare il prodotto. Conserva le
istruzioni per rivederle in seguito.
1. Non usare il giradischi vicino all’acqua.
2. Collega il giradischi solo a prese elettriche del tipo indicato sulla targhetta o nella
sezione “Specifiche” di questo manuale d’istruzioni.
3. Il giradischi usa una spina polarizzata (una lamella è più larga delle altre). Per ridurre
il rischio di scosse, questa spina è progettata per essere inserita in un solo verso
dentro a una presa polarizzata. Se non entra completamente, prova a cambiare
verso. Se continua a non inserirsi correttamente, contatta un elettricista qualificato.
Non provare a modificare la spina elettrica in alcun modo.
4. Proteggi il cavo dall’essere calpestato o tirato, soprattutto all’altezza della spina, nel
punto di collegamento tra la presa e la spina elettrica e all’attaccatura tra cavo e
altoparlante.
5. Non sovraccaricarlo usando ciabatte o prolunghe che possono provocare incendi o
scosse.
6. Non infilare mai nessun tipo di oggetto attraverso le aperture del giradischi:
potrebbe toccare parti elettriche e creare cortocircuiti con rischi d’incendi e scosse.
Non versare mai nessun liquido sul prodotto.
7. Non provare a riparare da te il giradischi perché rimuovendo o aprendo i pannelli
della scocca ti esponi al rischio di scosse e altri incidenti. Contatta sempre del
personale qualificato per questi lavori.
8. Sostituzioni o modifiche apportate al giradischi o a suoi componenti e non
espressamente approvate da chi è responsabile della garanzia possono far perdere i
diritti sull’assistenza che coprono il giradischi.
9. Non usare accessori non raccomandati dal produttore perché ciò potrebbe
comportare rischi.

EN
DE
FR
ES
IT
81
EN
DE
FR
ES
IT
80
Especicaciones
Tocadiscos
Fuente de alimentación CA100-240V, salida CC 12V 1500mA
Consumo de energía 35W
Velocidad del tocadiscos 33 1/3, 45 RPM
Potencia de salida (RMS) 4Ω 18W X 2(BT) ,
5W X 2(PH)
Dimensiones (L x A x H)
17.32” x 14.57” x 7.56” (44 x 37 x 19cm) (tapa
cerrada),15.75” x 16.73” x 18.19” (40 x 42 x 46cm) (tapa
abierta)
Peso 13.3lb (6.05kg)
Aguja
Modelo Audio-Technica AT3600
Respuesta frecuente 20Hz - 20kHz
Balance de canal <2.5dB
Separación de canales >18dB
Tensión de salida 2.5mV
Resistencia a la carga recomendada 47kΩ
Conexión del amplicador MM (imán móvil) - entrada
Fuerza de seguimiento
recomendada
3.5±0.5g
Peso 0.18 oz
Nota: Diseño y especificaciones sujetos a cambio sin aviso.
Eliminación
Eliminación del producto
Bajo ninguna circunstancia se debe desechar este dispositivo en la basura
normal. Este producto está sujeto a las disposiciones de las directivas
europeas 2012/19/EU.
Elimine el dispositivo a través de una empresa o en un punto limpio. Por favor,
observe las normas actuales en desecho de productos. Contacte con el centro
municipal de desechos si tiene cualquier duda.
El embalaje está fabricado con material respetuoso con el medio ambiente
y puede ser desechado en su centro de reciclaje local.
Introduzione
Grazie per aver scelto il Giradischi Hi-Fi a Cinghia 1byone. Questo manuale d’istruzioni
fornisce importanti indicazioni per la sicurezza, l’uso e lo smaltimento. Usa il prodotto
come qui descritto e conserva il manuale per future consultazioni. Se vendi o regali il
giradischi, fornisci anche il libretto al nuovo proprietario.
Istruzioni di Sicurezza
Leggi e comprendi per intero questo manuale prima di usare il prodotto. Conserva le
istruzioni per rivederle in seguito.
1. Non usare il giradischi vicino all’acqua.
2. Collega il giradischi solo a prese elettriche del tipo indicato sulla targhetta o nella
sezione “Specifiche” di questo manuale d’istruzioni.
3. Il giradischi usa una spina polarizzata (una lamella è più larga delle altre). Per ridurre
il rischio di scosse, questa spina è progettata per essere inserita in un solo verso
dentro a una presa polarizzata. Se non entra completamente, prova a cambiare
verso. Se continua a non inserirsi correttamente, contatta un elettricista qualificato.
Non provare a modificare la spina elettrica in alcun modo.
4. Proteggi il cavo dall’essere calpestato o tirato, soprattutto all’altezza della spina, nel
punto di collegamento tra la presa e la spina elettrica e all’attaccatura tra cavo e
altoparlante.
5. Non sovraccaricarlo usando ciabatte o prolunghe che possono provocare incendi o
scosse.
6. Non infilare mai nessun tipo di oggetto attraverso le aperture del giradischi:
potrebbe toccare parti elettriche e creare cortocircuiti con rischi d’incendi e scosse.
Non versare mai nessun liquido sul prodotto.
7. Non provare a riparare da te il giradischi perché rimuovendo o aprendo i pannelli
della scocca ti esponi al rischio di scosse e altri incidenti. Contatta sempre del
personale qualificato per questi lavori.
8. Sostituzioni o modifiche apportate al giradischi o a suoi componenti e non
espressamente approvate da chi è responsabile della garanzia possono far perdere i
diritti sull’assistenza che coprono il giradischi.
9. Non usare accessori non raccomandati dal produttore perché ciò potrebbe
comportare rischi.
EN
DE
FR
ES
IT
EN
DE
FR
ES
IT
82 83
10. Posiziona il giradischi solo su superfici piane, solide e stabili o sfrutta
carrelli, treppiedi e staffe che rispettano le indicazioni del produttore
o sono venduti da esso. Quando usi un carrello, fai attenzione nello
spostare il giradischi per evitare che si ribalti provocando danni.
11. Le bocchette e le aperture nella scocca servono per la ventilazione, per garantire
un funzionamento affidabile del prodotto e per proteggerlo dal surriscaldamento.
Non bloccare o coprire queste aperture.
12. Scollega il prodotto durante i temporali o se non sarà usato per molto tempo.
Descrizione del Prodotto
R
AUX OUTAUX IN
PHONE
DC12V
LINE OUT
L
1 2 3 4
5
17
16
6
7
8
9
10
11
12
13
14
15
45 33
START
- +
1. Jack DC INPUT
2. Selettore Phono e Line
3. Jack AUX IN
4. Jack per Uscita Phono e Aux
5. Cerniera della Copertura
6. Contrappeso
7. Manopola di Regolazione Forza
8. Leva Sollevamento del Braccio
9. Blocco del Braccio
10. Braccio
11. Manopola delle Funzioni
12. Controllo Volume
13. Spia
14. Tasto START
15. Cartuccia Stilo
16. Piatto del Giradischi
17. Perno del Giradischi
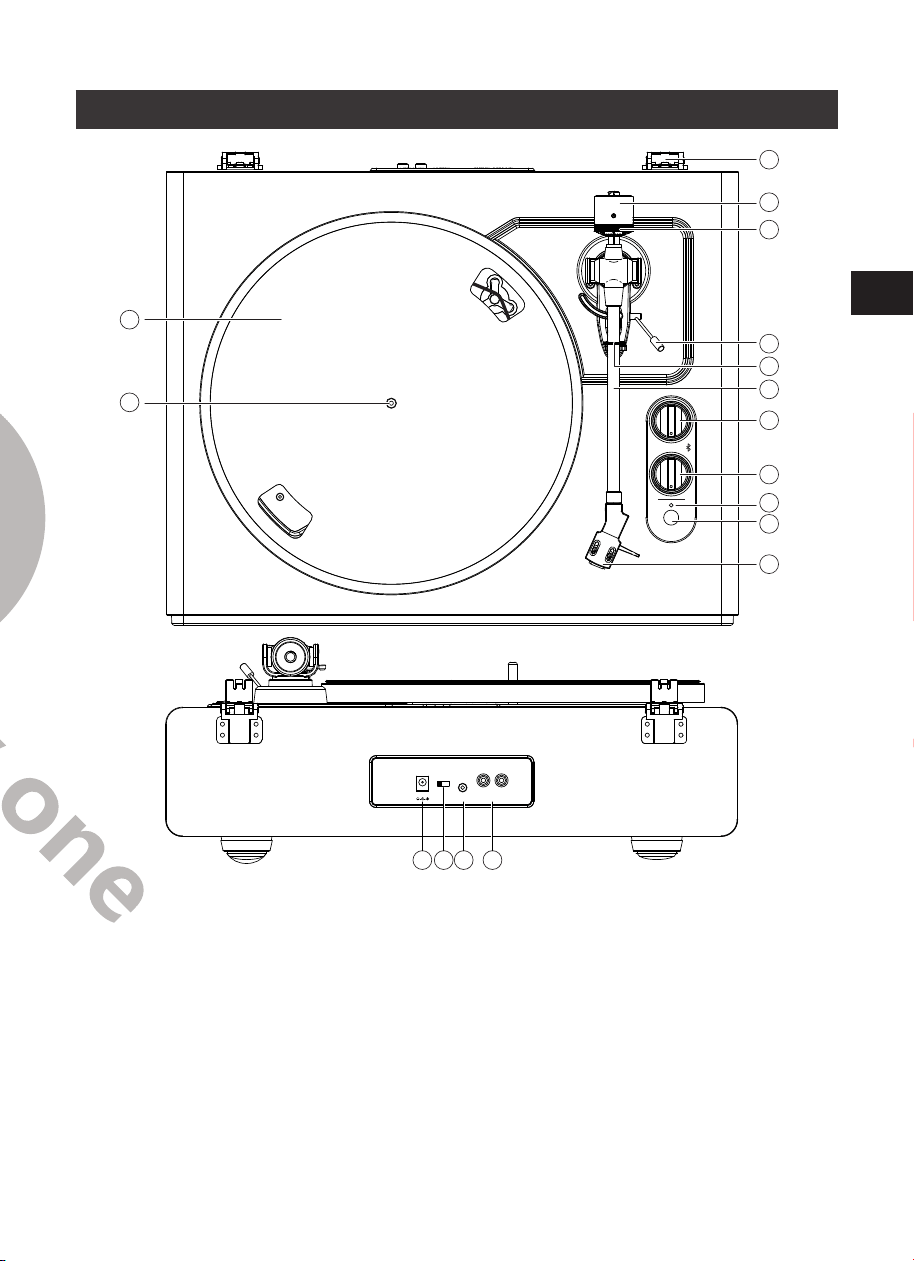
EN
DE
FR
ES
IT
EN
DE
FR
ES
IT
82 83
10. Posiziona il giradischi solo su superfici piane, solide e stabili o sfrutta
carrelli, treppiedi e staffe che rispettano le indicazioni del produttore
o sono venduti da esso. Quando usi un carrello, fai attenzione nello
spostare il giradischi per evitare che si ribalti provocando danni.
11. Le bocchette e le aperture nella scocca servono per la ventilazione, per garantire
un funzionamento affidabile del prodotto e per proteggerlo dal surriscaldamento.
Non bloccare o coprire queste aperture.
12. Scollega il prodotto durante i temporali o se non sarà usato per molto tempo.
Descrizione del Prodotto
R
AUX OUTAUX IN
PHONE
DC12V
LINE OUT
L
1 2 3 4
5
17
16
6
7
8
9
10
11
12
13
14
15
45 33
START
- +
1. Jack DC INPUT
2. Selettore Phono e Line
3. Jack AUX IN
4. Jack per Uscita Phono e Aux
5. Cerniera della Copertura
6. Contrappeso
7. Manopola di Regolazione Forza
8. Leva Sollevamento del Braccio
9. Blocco del Braccio
10. Braccio
11. Manopola delle Funzioni
12. Controllo Volume
13. Spia
14. Tasto START
15. Cartuccia Stilo
16. Piatto del Giradischi
17. Perno del Giradischi
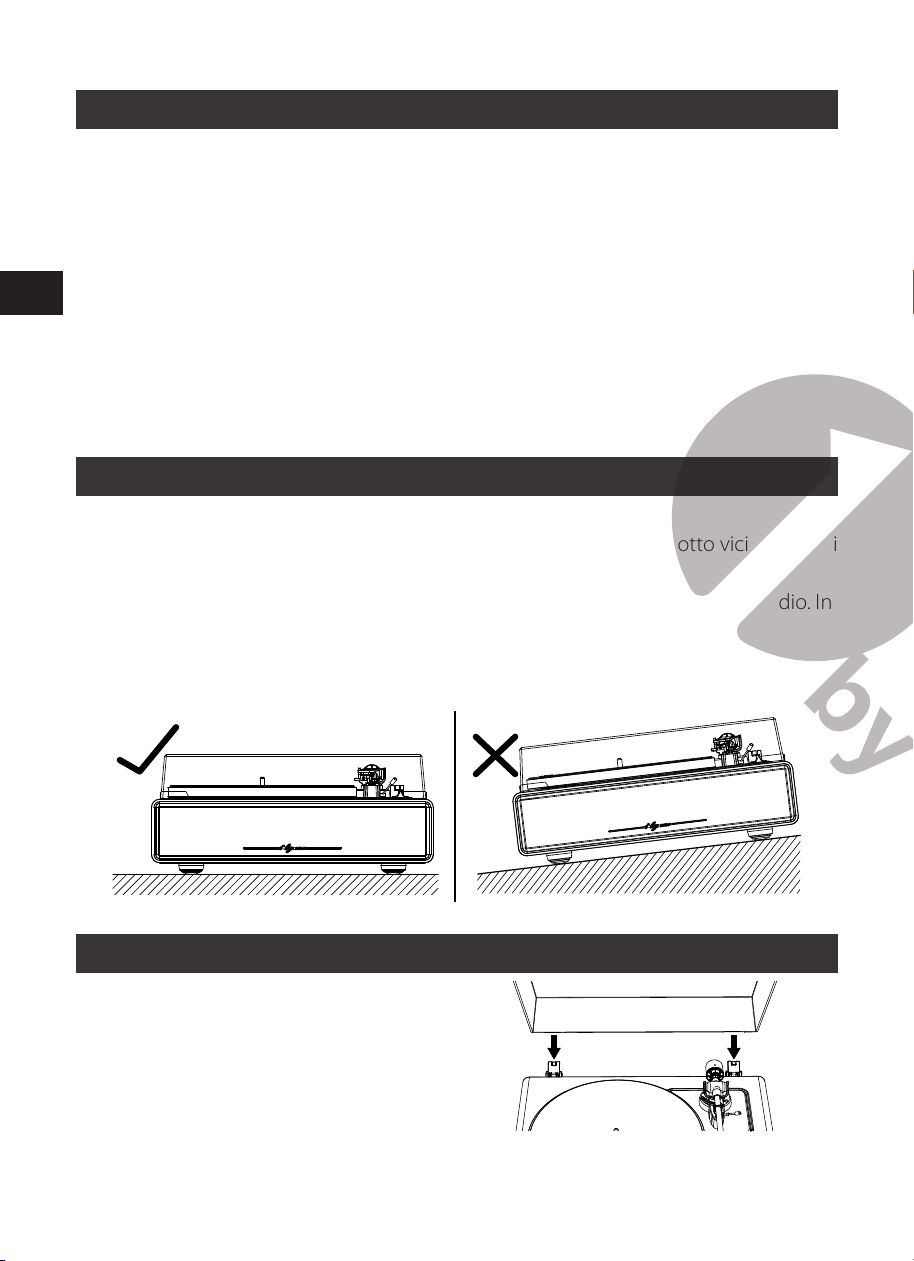
EN
DE
FR
ES
IT
EN
DE
FR
ES
IT
84 85
Accessori Inclusi
Prima di utilizzare il giradischi per la prima volta, controlla il contenuto della
confezione per assicurarti che tutte le parti siano prive di danni visibili. Conserva i
materiali d’imballaggio originali per cambi o restituzioni del prodotto.
1) Giradischi
2) Alimentatore
3) Copertura
4) Tappetino
5) Piatto con Cinghia
6) Contrappeso
7) Dima per Allineamento Testina
8) Adattatore 45 giri
9) Manuale di Istruzioni
Montare il Giradischi
• Monta il prodotto su una superficie piana.
• Per evitare le vibrazioni e la pressione acustica, non montare il prodotto vicino ad altri
prodotti simili o ad altoparlanti.
• Il prodotto potrebbe essere disturbato dalle frequenze se posto vicino a una radio. In
questo caso prova ad allontanarlo da essa.
• Se il prodotto è vicino a dispositivi che emettono forti onde radio (cellulari, e simili)
potrebbero sentirsi dei rumori.
Montare il Coperchio
Fissa l’alloggiamento dei cardini del
coperchio sui cardini del giradischi.
Piatto del Giradischi e Montaggio Cinghia
1. Gira il piatto sopra e controlla la posizione della cinghia.
Accertati che la cinghia sia avvolta nel mezzo del cerchio. Se è posizionata in questo
cerchio troppo in alto o troppo in basso potrebbe scivolare o causare velocità
irregolari.
2. Posiziona il piatto sul perno
Assicurati che il piatto sia completamente inserito nel perno.
Apertura
Piatto
Perno
Puleggia
del motore
3. Posiziona la cinghia sulla puleggia.
Allinea una delle aperture del piatto con la puleggia del motore e mentre tiri
entrambe le estremità del nastro rosso che è attaccato alla cinghia, fissala sulla
puleggia del motore, come mostrato. Durante questa operazione, fai attenzione a
non attorcigliare la cinghia.
Gancio
Cinghia
Puleggia del Motore
Ben Tesa Intrecciata Posizione Errata
4. Togli il nastro rosso dalla cinghia

EN
DE
FR
ES
IT
EN
DE
FR
ES
IT
84 85
Accessori Inclusi
Prima di utilizzare il giradischi per la prima volta, controlla il contenuto della
confezione per assicurarti che tutte le parti siano prive di danni visibili. Conserva i
materiali d’imballaggio originali per cambi o restituzioni del prodotto.
1) Giradischi
2) Alimentatore
3) Copertura
4) Tappetino
5) Piatto con Cinghia
6) Contrappeso
7) Dima per Allineamento Testina
8) Adattatore 45 giri
9) Manuale di Istruzioni
Montare il Giradischi
• Monta il prodotto su una superficie piana.
• Per evitare le vibrazioni e la pressione acustica, non montare il prodotto vicino ad altri
prodotti simili o ad altoparlanti.
• Il prodotto potrebbe essere disturbato dalle frequenze se posto vicino a una radio. In
questo caso prova ad allontanarlo da essa.
• Se il prodotto è vicino a dispositivi che emettono forti onde radio (cellulari, e simili)
potrebbero sentirsi dei rumori.
Montare il Coperchio
Fissa l’alloggiamento dei cardini del
coperchio sui cardini del giradischi.
Piatto del Giradischi e Montaggio Cinghia
1. Gira il piatto sopra e controlla la posizione della cinghia.
Accertati che la cinghia sia avvolta nel mezzo del cerchio. Se è posizionata in questo
cerchio troppo in alto o troppo in basso potrebbe scivolare o causare velocità
irregolari.
2. Posiziona il piatto sul perno
Assicurati che il piatto sia completamente inserito nel perno.
Apertura
Piatto
Perno
Puleggia
del motore
3. Posiziona la cinghia sulla puleggia.
Allinea una delle aperture del piatto con la puleggia del motore e mentre tiri
entrambe le estremità del nastro rosso che è attaccato alla cinghia, fissala sulla
puleggia del motore, come mostrato. Durante questa operazione, fai attenzione a
non attorcigliare la cinghia.
Gancio
Cinghia
Puleggia del Motore
Ben Tesa Intrecciata Posizione Errata
4. Togli il nastro rosso dalla cinghia
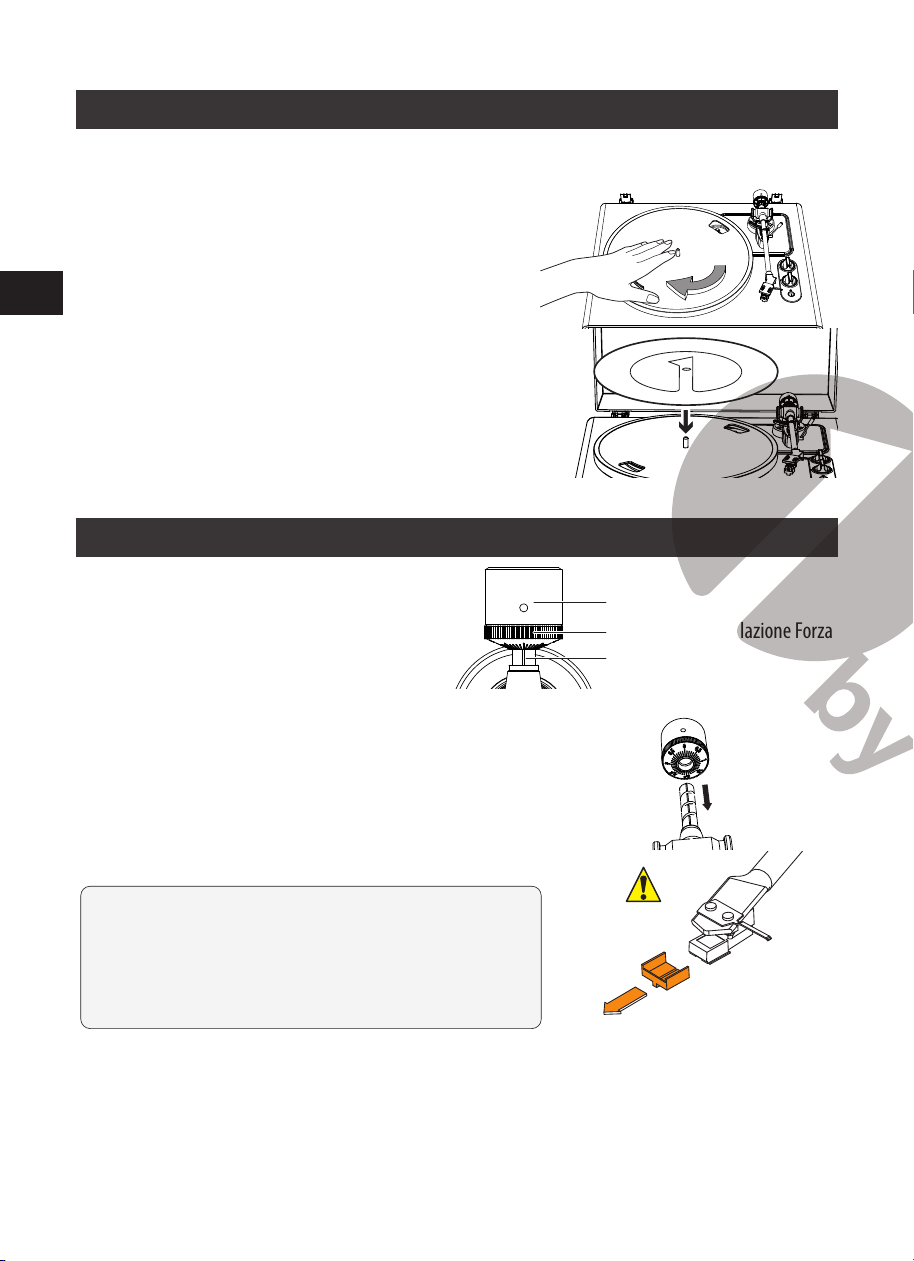
EN
DE
FR
ES
IT
EN
DE
FR
ES
IT
86 87
Piatto rotante
1. Con le mani, ruota delicatamente il piatto
per dieci volte nella direzione della freccia
(figura 1).
2. Questo passaggio serve per resettare il
meccanismo auto, eliminare arrotolamenti
della cinghia e accertarsi che essa scorra
fluidamente lungo la guida sotto al piatto
3. Posiziona il tappetino sopra al piatto.
Assicurati che il logo 1byone sia rivolto
verso l’alto (figura 2).
Regolazione della Pressione della Testina
Il contrappeso fornito è adatto a testine
con peso compreso tra 3,0 e 6,0 g.
Contrappeso
Linea centrale
Manopola di Regolazione Forza
1. Premi con delicatezza in avanti il contrappeso dal
retro del braccio e ruotalo (la ghiera deve essere
rivolta verso la parte frontale del giradischi).
2. Tira la protezione in avanti per rimuoverla.
NOTA: facendo forza verso il basso, lo stilo
potrebbe uscire. Abbassa il volume se lo stilo
fuoriesce o se sta per farlo, in questo caso
consulta la sezione “Sostituzione della Puntina” per
riattaccarlo correttamente.
3. Togli il laccetto e sblocca il braccio.
4. Abbassa la levetta del braccio e posiziona la testina nello spazio tra il braccio e il
piatto.
5. Ruota con attenzione il contrappeso finché il braccio non è ben bilanciato. Se
lo muovi in basso o in alto deve tornare nella posizione di equilibrio. Questa
regolazione va effettuata con estrema attenzione.
Braccio
Contrappeso
Regola il braccio in modo che sia in linea
6. Una volta che il braccio è correttamente bilanciato, riposizionalo sul sostegno. Tieni
il contrappeso senza muoverlo e ruota delicatamente la ghiera fino a far coincidere
lo zero con la linea nera al centro, sulla parte posteriore del braccio. Controlla che il
braccio sia bilanciato e in perfetto equilibrio.
7. Infine, ruota insieme in senso antiorario il contrappeso e la manopola di regolazione
trazione (come mostrato da vista frontale) per regolare la trazione della cartuccia
come indicato dal produttore.
ATTENZIONE: ogni segno indica una variazione di 0,1 g. La forza di trazione indicata
per la cartuccia montata dal produttore è 3,5 g ± 0,5 g. Ruota delicatamente la
manopola per la regolazione della trazione. Fermati quando il valore “3,5” è allineato
sopra la linea nera posta sul braccio
Figura 1
Figura 2
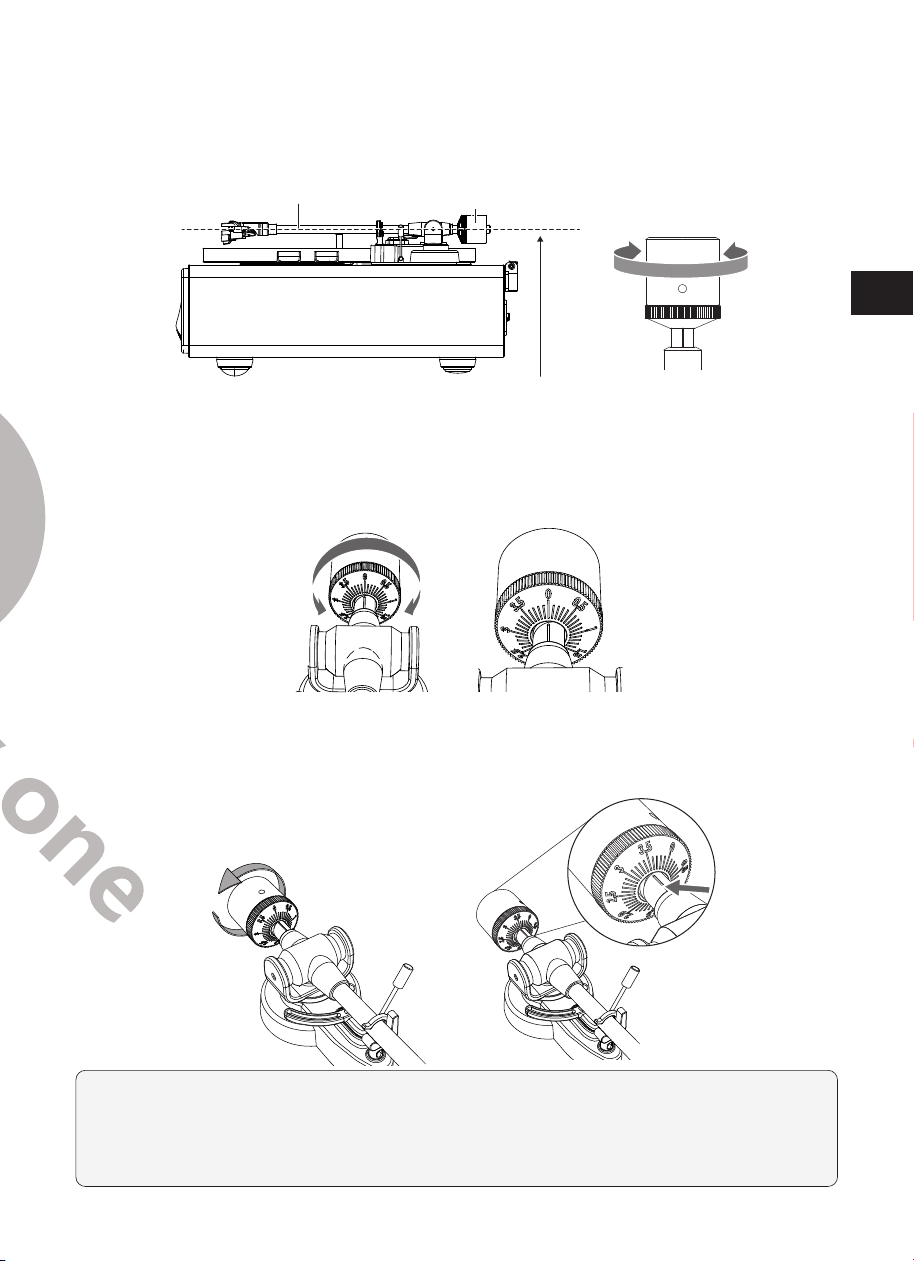
EN
DE
FR
ES
IT
EN
DE
FR
ES
IT
86 87
Piatto rotante
1. Con le mani, ruota delicatamente il piatto
per dieci volte nella direzione della freccia
(figura 1).
2. Questo passaggio serve per resettare il
meccanismo auto, eliminare arrotolamenti
della cinghia e accertarsi che essa scorra
fluidamente lungo la guida sotto al piatto
3. Posiziona il tappetino sopra al piatto.
Assicurati che il logo 1byone sia rivolto
verso l’alto (figura 2).
Regolazione della Pressione della Testina
Il contrappeso fornito è adatto a testine
con peso compreso tra 3,0 e 6,0 g.
Contrappeso
Linea centrale
Manopola di Regolazione Forza
1. Premi con delicatezza in avanti il contrappeso dal
retro del braccio e ruotalo (la ghiera deve essere
rivolta verso la parte frontale del giradischi).
2. Tira la protezione in avanti per rimuoverla.
NOTA: facendo forza verso il basso, lo stilo
potrebbe uscire. Abbassa il volume se lo stilo
fuoriesce o se sta per farlo, in questo caso
consulta la sezione “Sostituzione della Puntina” per
riattaccarlo correttamente.
3. Togli il laccetto e sblocca il braccio.
4. Abbassa la levetta del braccio e posiziona la testina nello spazio tra il braccio e il
piatto.
5. Ruota con attenzione il contrappeso finché il braccio non è ben bilanciato. Se
lo muovi in basso o in alto deve tornare nella posizione di equilibrio. Questa
regolazione va effettuata con estrema attenzione.
Braccio
Contrappeso
Regola il braccio in modo che sia in linea
6. Una volta che il braccio è correttamente bilanciato, riposizionalo sul sostegno. Tieni
il contrappeso senza muoverlo e ruota delicatamente la ghiera fino a far coincidere
lo zero con la linea nera al centro, sulla parte posteriore del braccio. Controlla che il
braccio sia bilanciato e in perfetto equilibrio.
7. Infine, ruota insieme in senso antiorario il contrappeso e la manopola di regolazione
trazione (come mostrato da vista frontale) per regolare la trazione della cartuccia
come indicato dal produttore.
ATTENZIONE: ogni segno indica una variazione di 0,1 g. La forza di trazione indicata
per la cartuccia montata dal produttore è 3,5 g ± 0,5 g. Ruota delicatamente la
manopola per la regolazione della trazione. Fermati quando il valore “3,5” è allineato
sopra la linea nera posta sul braccio
Figura 1
Figura 2
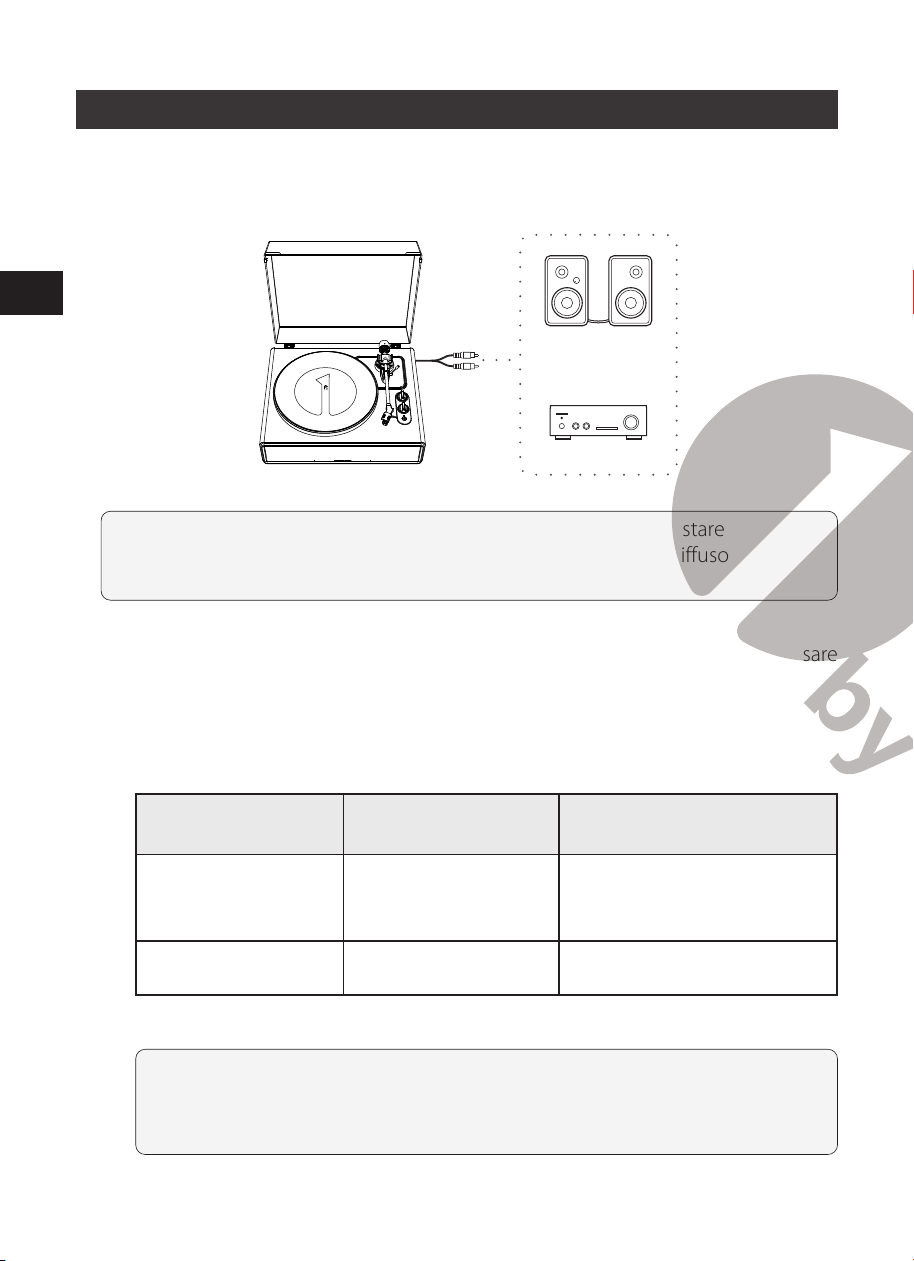
EN
DE
FR
ES
IT
EN
DE
FR
ES
IT
88 89
Collegarsi all’Altoparlante Esterno con il Cavo Audio RCA
Questo giradischi ha 4 altoparlanti e un equalizzazione inclusi.
Se desideri usare altri amplificatori o altoparlanti, segui le istruzioni sottostanti:
Connessione con cavi RCA
Altoparlanti Attivi
o
Amplificatori
ATTENZIONE: per avere un suono migliore, consigliamo di impostare
l’altoparlante sul volume minimo. Poi, l’audio del giradischi sarà diffuso attraverso
i tuoi amplificatori, altoparlanti ecc.
1. Impostare l’interruttore del pre-amplicatore
Questo prodotto ha una funzione di equalizzazione phono integrata. Puoi usare
il prodotto anche se non disponi di un amplificatore phono o non hai sistemi
per collegarlo ad apparecchiature con amplificatori phono incorporati.
Usa il selettore del pre-amplificatore per impostare l’uscita audio come
mostrato qui di seguito.
Apparecchiature
collegabili in uso
Posizione del selettore
del pre-amplificatore
Dove collegare il cavo
audio RCA
Dispositivo con
ingresso phono
PHONO Jack di ingresso phono e
morsetto di messa a terra delle
apparecchiature collegabili
Dispositivi senza
ingresso phono
LINE Ingresso AUX o LINE delle
apparecchiature collegabili
NOTA: i jack RCA non sono progettati per essere collegati direttamente
su altoparlanti passivi/non amplificati in modalità LINE. Se ti colleghi ad
altoparlanti passivi, non sentirai suoni.
2. Collegarsi al dispositivo
Allinea le impostazioni del selettore del pre-amplificatore e collega il cavo audio
RCA a un jack di ingresso compatibile con l'apparecchiatura che desideri usare
(amplificatori, altoparlanti attivi, ecc.).
• La presa rossa del cavo audio RCA è per il canale destro (R) e la presa bianca è
per il canale sinistro (L).
R
AUX OUTAUX IN
PHONE
DC12V
LINE OUT
L
Con PHONO Senza PHONO
Verso l’uscita
AUX
L R
PHONO
L R
Con PHONO Senza PHONO
Verso l’uscita
Apparecchi collegabili
(amplificatori ecc.)

EN
DE
FR
ES
IT
EN
DE
FR
ES
IT
88 89
Collegarsi all’Altoparlante Esterno con il Cavo Audio RCA
Questo giradischi ha 4 altoparlanti e un equalizzazione inclusi.
Se desideri usare altri amplificatori o altoparlanti, segui le istruzioni sottostanti:
Connessione con cavi RCA
Altoparlanti Attivi
o
Amplificatori
ATTENZIONE: per avere un suono migliore, consigliamo di impostare
l’altoparlante sul volume minimo. Poi, l’audio del giradischi sarà diffuso attraverso
i tuoi amplificatori, altoparlanti ecc.
1. Impostare l’interruttore del pre-amplicatore
Questo prodotto ha una funzione di equalizzazione phono integrata. Puoi usare
il prodotto anche se non disponi di un amplificatore phono o non hai sistemi
per collegarlo ad apparecchiature con amplificatori phono incorporati.
Usa il selettore del pre-amplificatore per impostare l’uscita audio come
mostrato qui di seguito.
Apparecchiature
collegabili in uso
Posizione del selettore
del pre-amplificatore
Dove collegare il cavo
audio RCA
Dispositivo con
ingresso phono
PHONO Jack di ingresso phono e
morsetto di messa a terra delle
apparecchiature collegabili
Dispositivi senza
ingresso phono
LINE Ingresso AUX o LINE delle
apparecchiature collegabili
NOTA: i jack RCA non sono progettati per essere collegati direttamente
su altoparlanti passivi/non amplificati in modalità LINE. Se ti colleghi ad
altoparlanti passivi, non sentirai suoni.
2. Collegarsi al dispositivo
Allinea le impostazioni del selettore del pre-amplificatore e collega il cavo audio
RCA a un jack di ingresso compatibile con l'apparecchiatura che desideri usare
(amplificatori, altoparlanti attivi, ecc.).
• La presa rossa del cavo audio RCA è per il canale destro (R) e la presa bianca è
per il canale sinistro (L).
R
AUX OUTAUX IN
PHONE
DC12V
LINE OUT
L
Con PHONO Senza PHONO
Verso l’uscita
AUX
L R
PHONO
L R
Con PHONO Senza PHONO
Verso l’uscita
Apparecchi collegabili
(amplificatori ecc.)
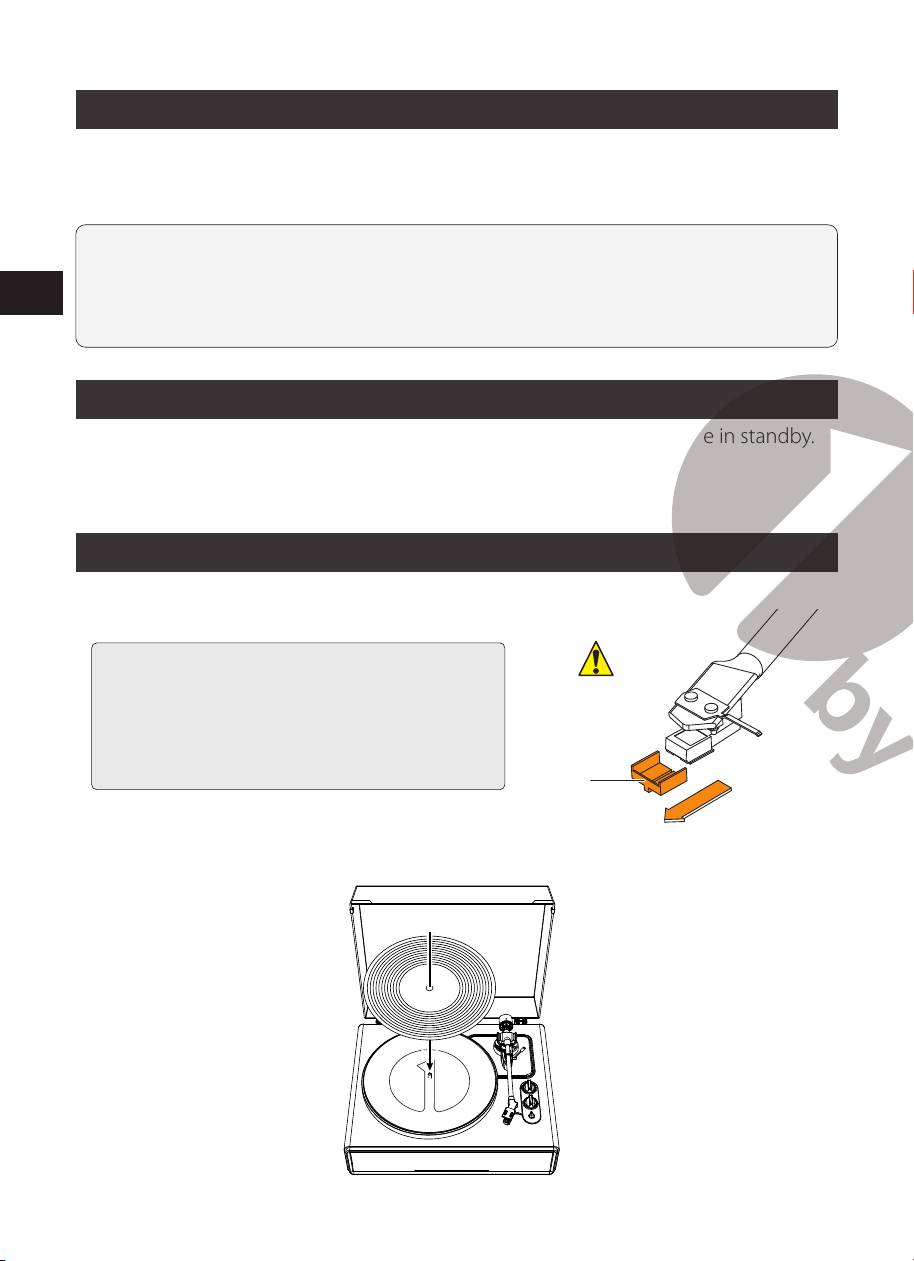
EN
DE
FR
ES
IT
EN
DE
FR
ES
IT
90 91
Connessione Principale per Alimentazione
1. Collega la presa CC dell’alimentatore CA nel Jack d’ingresso CC sul retro del
giradischi.
2. Collega l’alimentatore CA a una normale presa
NOTA:
Non collegare l’alimentatore CA a una presa prima di aver assemblato ogni
componente del giradischi. Prima di accendere il giradischi, controlla di nuovo che tutti
i collegamenti siano corretti e sicuri. Prima di collegarlo o staccarlo dalla presa, spegni
sempre il giradischi.
Gestire l’Alimentazione
Dopo 20 minuti di mancato utilizzo, il giradischi andrà automaticamente in standby.
La spia luminosa si spegnerà.
Per riattivarlo, tieni premuto per 3 secondi il tasto START.
Ascoltare un Disco
1. Prima di avviare l’ascolto
1.1 Tira la protezione in avanti per rimuoverla.
NOTA: facendo forza verso il basso, lo stilo
potrebbe uscire. Abbassa il volume se lo stilo
fuoriesce o se sta per farlo, in questo caso
consulta la sezione “Sostituzione della Puntina”
per riattaccarlo correttamente.
Protezione
1.2 Posiziona il disco sul tappetino in feltro in modo che il foro al centro sia allineato
con il perno di centraggio.
2. Gestire il Giradischi
Prima, abbassa adeguatamente il volume di amplificatori e altoparlanti.
2.1 Collega al giradischi l’alimentatore incluso. Tieni premuto per 3 secondi il tasto
START. Il giradischi si accenderà. La spia luminosa diventerà rossa.
2.2 Rimuovi dallo stilo la sua protezione.
2.3 Posiziona il disco sul tappetino.
2.4 Ruota la manopola delle funzioni per scegliere tra 33 e 45 RPM in base al diverso
tipo di disco.
2.5 Premi una volta il tasto START e il piatto partirà o si fermerà.
2.6 Togli il blocco del braccio e metti la leva di sollevamento in alto.
2.7 Metti il braccio sulla posizione desiderata (solco) del giradischi.
2.8 Abbassa delicatamente il braccio sul disco.
2.9 Alza a sufficienza il volume del giradischi.
2.10 Quando hai finito di ascoltare il disco, alza il braccio, rimettilo sul suo blocco e
tieni premuto il tasto START fino a spegnere il giradischi.
NOTA:
1. Se tra una traccia e l’altra c’è un intervallo senza suoni maggiore di 3 minuti, il piatto
smetterà automaticamente di girare per non rovinare il disco. La spia luminosa
diventerà rossa. Per riavviare l’ascolto, premi START.
2. Se il tappetino in feltro si sporca, può facilmente graffiare il disco, quindi rimuovilo
periodicamente per pulirlo dalla polvere.
3. Per evitare che il disco si graffi e si deformi, toglilo dopo l'uso.
4. Non utilizzare uno stabilizzatore del disco.
EN
DE
FR
ES
IT
EN
DE
FR
ES
IT
90 91
Connessione Principale per Alimentazione
1. Collega la presa CC dell’alimentatore CA nel Jack d’ingresso CC sul retro del
giradischi.
2. Collega l’alimentatore CA a una normale presa
NOTA:
Non collegare l’alimentatore CA a una presa prima di aver assemblato ogni
componente del giradischi. Prima di accendere il giradischi, controlla di nuovo che tutti
i collegamenti siano corretti e sicuri. Prima di collegarlo o staccarlo dalla presa, spegni
sempre il giradischi.
Gestire l’Alimentazione
Dopo 20 minuti di mancato utilizzo, il giradischi andrà automaticamente in standby.
La spia luminosa si spegnerà.
Per riattivarlo, tieni premuto per 3 secondi il tasto START.
Ascoltare un Disco
1. Prima di avviare l’ascolto
1.1 Tira la protezione in avanti per rimuoverla.
NOTA: facendo forza verso il basso, lo stilo
potrebbe uscire. Abbassa il volume se lo stilo
fuoriesce o se sta per farlo, in questo caso
consulta la sezione “Sostituzione della Puntina”
per riattaccarlo correttamente.
Protezione
1.2 Posiziona il disco sul tappetino in feltro in modo che il foro al centro sia allineato
con il perno di centraggio.
2. Gestire il Giradischi
Prima, abbassa adeguatamente il volume di amplificatori e altoparlanti.
2.1 Collega al giradischi l’alimentatore incluso. Tieni premuto per 3 secondi il tasto
START. Il giradischi si accenderà. La spia luminosa diventerà rossa.
2.2 Rimuovi dallo stilo la sua protezione.
2.3 Posiziona il disco sul tappetino.
2.4 Ruota la manopola delle funzioni per scegliere tra 33 e 45 RPM in base al diverso
tipo di disco.
2.5 Premi una volta il tasto START e il piatto partirà o si fermerà.
2.6 Togli il blocco del braccio e metti la leva di sollevamento in alto.
2.7 Metti il braccio sulla posizione desiderata (solco) del giradischi.
2.8 Abbassa delicatamente il braccio sul disco.
2.9 Alza a sufficienza il volume del giradischi.
2.10 Quando hai finito di ascoltare il disco, alza il braccio, rimettilo sul suo blocco e
tieni premuto il tasto START fino a spegnere il giradischi.
NOTA:
1. Se tra una traccia e l’altra c’è un intervallo senza suoni maggiore di 3 minuti, il piatto
smetterà automaticamente di girare per non rovinare il disco. La spia luminosa
diventerà rossa. Per riavviare l’ascolto, premi START.
2. Se il tappetino in feltro si sporca, può facilmente graffiare il disco, quindi rimuovilo
periodicamente per pulirlo dalla polvere.
3. Per evitare che il disco si graffi e si deformi, toglilo dopo l'uso.
4. Non utilizzare uno stabilizzatore del disco.
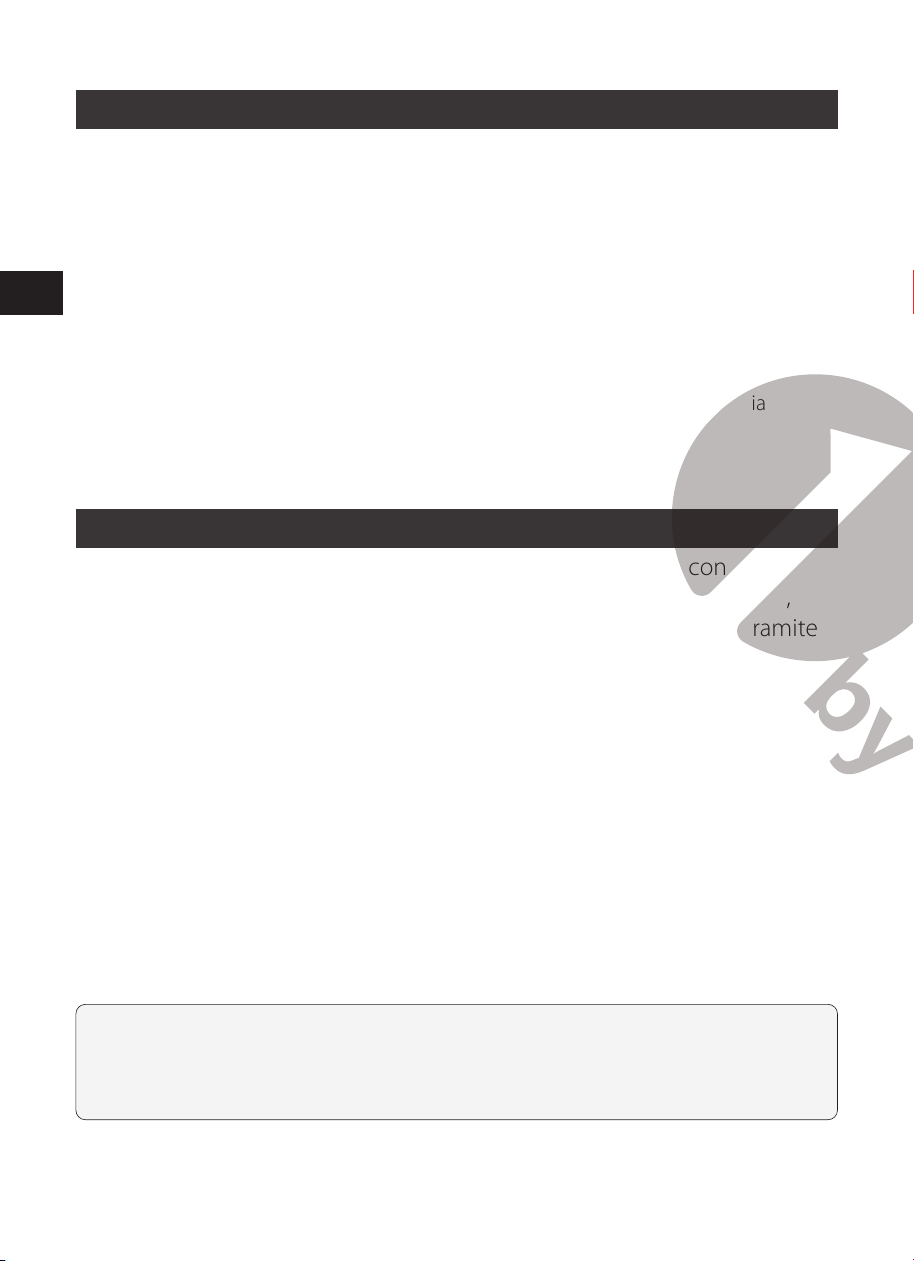
EN
DE
FR
ES
IT
EN
DE
FR
ES
IT
92 93
Operazioni con il Bluetooth
1. Collega l’alimentatore al giradischi e premi a lungo il tasto START. La spia luminosa
diventerà rossa.
2. Ruota la manopola delle funzioni sulla modalità Bluetooth. La spia luminosa
diventerà blu e lampeggerà velocemente. Il giradischi emetterà un suono di
attivazione.
3. Attiva il Bluetooth del tuo dispositivo. Poi, trova “1byone BS020” e selezionalo per
associare il dispositivo al giradischi.
4. Quando il tuo dispositivo sarà associato correttamente al giradischi, sentirai un
breve segnale sonoro di conferma. La spia luminosa blu lampeggerà lentamente.
5. Avvia la musica dal tuo dispositivo per sentirla attraverso il giradischi. La spia
luminosa resterà fissa.
Avviso: versione Bluetooth: 5.0
Gestione AUX-IN
Questo giradischi ha anche un jack di ingresso ausiliario che consente di
ricevere segnale audio collegando dispositivi esterni come lettori MP3,
lettori CD e vecchi iPod in modo da poter ascoltare la loro musica tramite
gli altoparlanti del giradischi.
1. Usa un cavo audio (non incluso) con connessione stereo da 3,5 mm su entrambe le
estremità.
2. Inserisci un’estremità nel Jack AUX-IN del giradischi e l’altra nel Jack Line Out del
dispositivo audio esterno.
3. Alimenta il giradischi e il dispositivo audio. La spia luminosa del giradischi è rossa.
4. Il livello del volume si può gestire attraverso il giradischi. Controlla normalmente
tutte le funzioni dal dispositivo esterno.
5. Ricordiamo che la funzione AUX-IN è una funzione prioritaria. Con la funzione AUX-
IN attiva, le funzioni PHONO/BT non si potranno usare anche se la loro spia luminosa
è accesa.
Scollega il cavo AUX-IN prima di usare le funzioni PHONO/BT.
ATTENZIONE:
1. Assicurati che il braccio sia bloccato saldamente per evitare danni.
2. Quando hai finito, ricorda di spegnere l’alimentazione del giradischi e del
dispositivo esterno.
Manutenzione
Corpo del Giradischi
• Quando il corpo del giradischi è sporco o impolverato, scollega l'alimentatore CA,
poi togli lo sporco e la polvere con un panno morbido e asciutto.
• Non utilizzare benzeni, diluenti, ecc.
• Per conservare a lungo il prodotto, scollega l'alimentatore CA dalla presa e avvolgi
il prodotto con della plastica; non lasciarlo all’umidità; rimuovi la cinghia di
trasmissione per evitare che si tiri in maniera disuguale.
Punta stilo
• Pulisci la puntina con un pennellino se è sporca o
grassa.
• Consigliamo di utilizzare un detergente per stilo
(non incluso) se la puntina è molto sporca. Pulisci
la puntina muovendo il pennellino dalla parte
posteriore della punta stilo in avanti.
Sostituzione della Puntina
Consigliamo di sostituire lo stilo dopo 400 ore di utilizzo.
Rimozione della Puntina
• Quando la puntina si usura, la qualità del suono si abbassa e i dischi si possono
rovinare.
• Accertati di scollegare l'alimentatore CA dalla presa.
• Quando sostituisci lo stilo, tieni saldamente la conchiglia della testina e il corpo della
cartuccia.
Ruota la parte anteriore dello stilo tirandola in avanti e verso il basso.
Installazione di un nuovo stilo di ricambi
1. Monta il nuovo stilo sulla cartuccia.
Fissalo prima sul
corpo della conchiglia

EN
DE
FR
ES
IT
EN
DE
FR
ES
IT
92 93
Operazioni con il Bluetooth
1. Collega l’alimentatore al giradischi e premi a lungo il tasto START. La spia luminosa
diventerà rossa.
2. Ruota la manopola delle funzioni sulla modalità Bluetooth. La spia luminosa
diventerà blu e lampeggerà velocemente. Il giradischi emetterà un suono di
attivazione.
3. Attiva il Bluetooth del tuo dispositivo. Poi, trova “1byone BS020” e selezionalo per
associare il dispositivo al giradischi.
4. Quando il tuo dispositivo sarà associato correttamente al giradischi, sentirai un
breve segnale sonoro di conferma. La spia luminosa blu lampeggerà lentamente.
5. Avvia la musica dal tuo dispositivo per sentirla attraverso il giradischi. La spia
luminosa resterà fissa.
Avviso: versione Bluetooth: 5.0
Gestione AUX-IN
Questo giradischi ha anche un jack di ingresso ausiliario che consente di
ricevere segnale audio collegando dispositivi esterni come lettori MP3,
lettori CD e vecchi iPod in modo da poter ascoltare la loro musica tramite
gli altoparlanti del giradischi.
1. Usa un cavo audio (non incluso) con connessione stereo da 3,5 mm su entrambe le
estremità.
2. Inserisci un’estremità nel Jack AUX-IN del giradischi e l’altra nel Jack Line Out del
dispositivo audio esterno.
3. Alimenta il giradischi e il dispositivo audio. La spia luminosa del giradischi è rossa.
4. Il livello del volume si può gestire attraverso il giradischi. Controlla normalmente
tutte le funzioni dal dispositivo esterno.
5. Ricordiamo che la funzione AUX-IN è una funzione prioritaria. Con la funzione AUX-
IN attiva, le funzioni PHONO/BT non si potranno usare anche se la loro spia luminosa
è accesa.
Scollega il cavo AUX-IN prima di usare le funzioni PHONO/BT.
ATTENZIONE:
1. Assicurati che il braccio sia bloccato saldamente per evitare danni.
2. Quando hai finito, ricorda di spegnere l’alimentazione del giradischi e del
dispositivo esterno.
Manutenzione
Corpo del Giradischi
• Quando il corpo del giradischi è sporco o impolverato, scollega l'alimentatore CA,
poi togli lo sporco e la polvere con un panno morbido e asciutto.
• Non utilizzare benzeni, diluenti, ecc.
• Per conservare a lungo il prodotto, scollega l'alimentatore CA dalla presa e avvolgi
il prodotto con della plastica; non lasciarlo all’umidità; rimuovi la cinghia di
trasmissione per evitare che si tiri in maniera disuguale.
Punta stilo
• Pulisci la puntina con un pennellino se è sporca o
grassa.
• Consigliamo di utilizzare un detergente per stilo
(non incluso) se la puntina è molto sporca. Pulisci
la puntina muovendo il pennellino dalla parte
posteriore della punta stilo in avanti.
Sostituzione della Puntina
Consigliamo di sostituire lo stilo dopo 400 ore di utilizzo.
Rimozione della Puntina
• Quando la puntina si usura, la qualità del suono si abbassa e i dischi si possono
rovinare.
• Accertati di scollegare l'alimentatore CA dalla presa.
• Quando sostituisci lo stilo, tieni saldamente la conchiglia della testina e il corpo della
cartuccia.
Ruota la parte anteriore dello stilo tirandola in avanti e verso il basso.
Installazione di un nuovo stilo di ricambi
1. Monta il nuovo stilo sulla cartuccia.
Fissalo prima sul
corpo della conchiglia
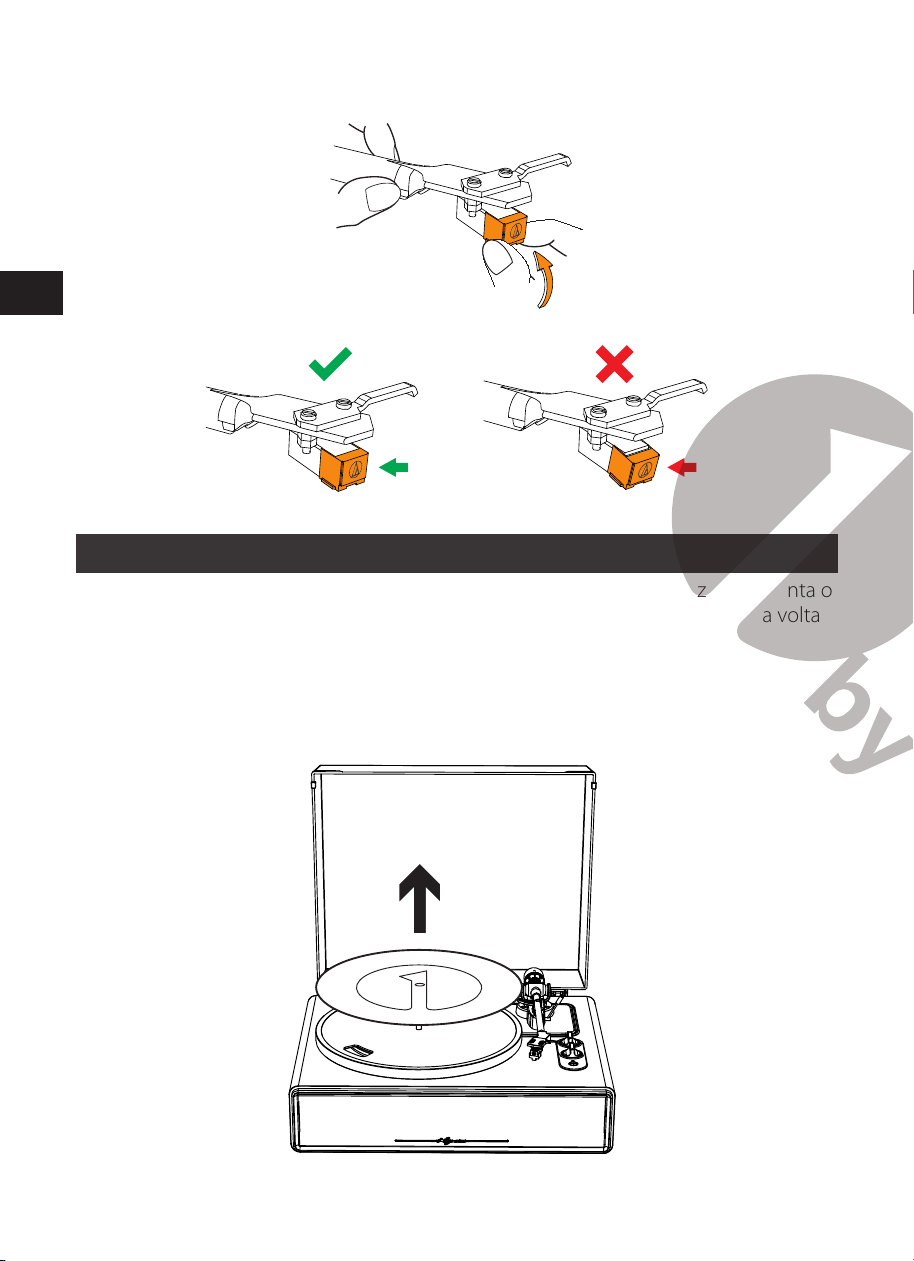
EN
DE
FR
ES
IT
EN
DE
FR
ES
IT
94 95
2. Solleva lo stilo fino a quando non senti uno scatto.
3. Accertati che non ci sia spazio tra la conchiglia della testina e la cartuccia.
Sostituire la Cinghia
• La cinghia è una parte usurabile. Sostituiscila se la velocità di riproduzione rallenta o
se scorre in modo irregolare. Di norma, si consiglia di sostituire la cinghia una volta
all’ anno.
• Prima di sostituire la cinghia, assicurati di aver scollegato dalla presa l'alimentatore
CA del prodotto.
1. Rimuovi il tappetino antiscivolo.
2. Rimuovi la cinghia dalla puleggia.
3. Togli il piatto principale e poi anche la cinghia.
4. Gira il piatto sopra e vedrai salire un cerchio. Avvolgi la nuova cinghia intorno
al cerchio centrale.
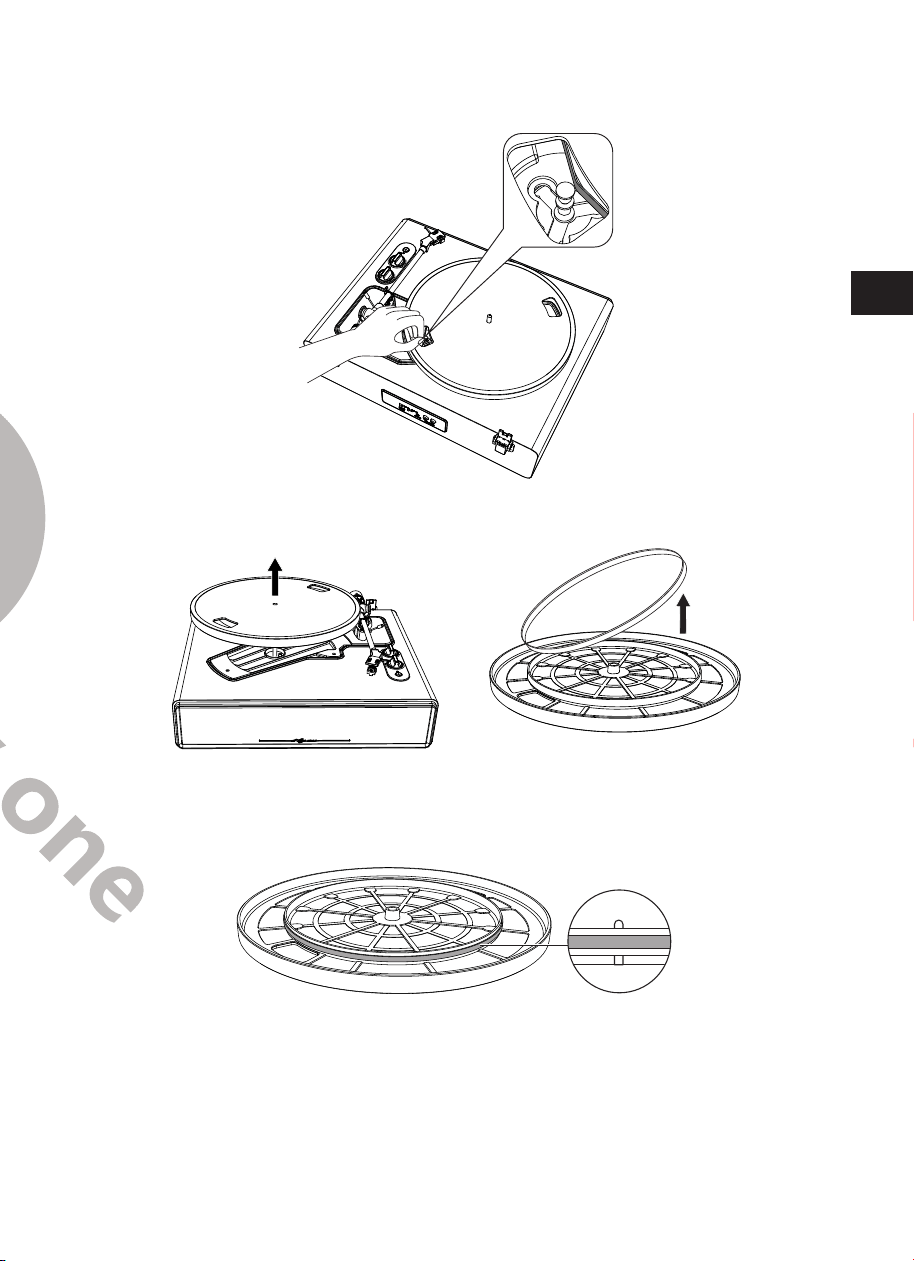
EN
DE
FR
ES
IT
EN
DE
FR
ES
IT
94 95
2. Solleva lo stilo fino a quando non senti uno scatto.
3. Accertati che non ci sia spazio tra la conchiglia della testina e la cartuccia.
Sostituire la Cinghia
• La cinghia è una parte usurabile. Sostituiscila se la velocità di riproduzione rallenta o
se scorre in modo irregolare. Di norma, si consiglia di sostituire la cinghia una volta
all’ anno.
• Prima di sostituire la cinghia, assicurati di aver scollegato dalla presa l'alimentatore
CA del prodotto.
1. Rimuovi il tappetino antiscivolo.
2. Rimuovi la cinghia dalla puleggia.
3. Togli il piatto principale e poi anche la cinghia.
4. Gira il piatto sopra e vedrai salire un cerchio. Avvolgi la nuova cinghia intorno
al cerchio centrale.
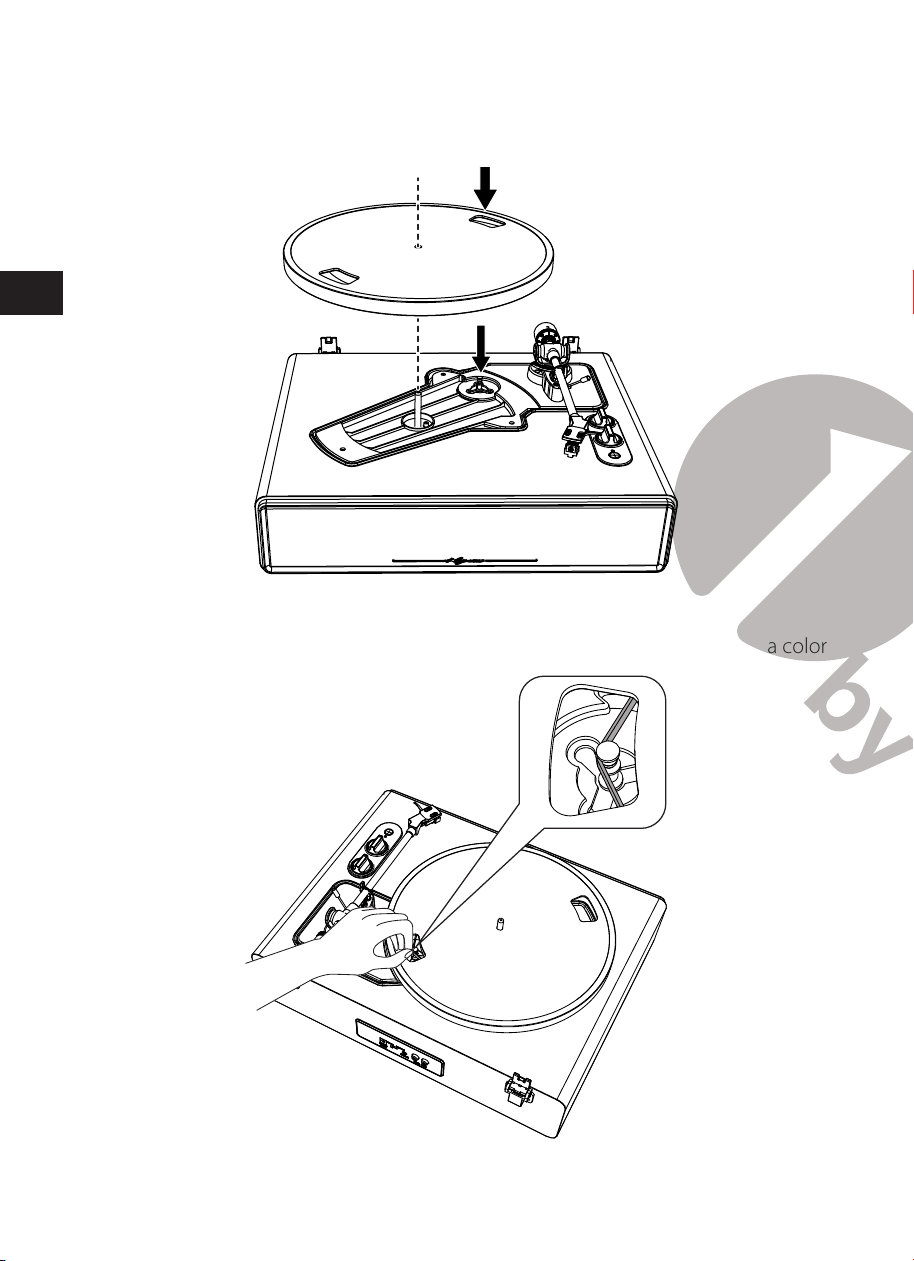
EN
DE
FR
ES
IT
EN
DE
FR
ES
IT
96 97
5. Attacca il piatto.
Allinea una delle aperture con la puleggia di color ottone.
6. Posiziona la cinghia sulla puleggia color ottone.
Afferra la cinghia attaccata al punto 4 e, mentre la tiri, sistemala sulla puleggia color
ottone.
7. Con le mani, ruota lentamente il piatto per dieci volte in senso orario, come
mostrato dalla freccia sottostante.
Quando sposti il giradischi
Utilizza i materiali di imballaggio originali del prodotto per avvolgere il piatto rotante
nell'ordine inverso rispetto a quando lo hai rimosso. Se non hai più i materiali di
imballaggio, adotta le seguenti precauzioni:
• Dopo aver scollegato l'alimentatore CA dalla presa, rimuovi il tappetino e il piatto;
poi avvolgili in modo che non si danneggino.
• Collega la protezione alla cartuccia.
• Usa una corda o qualcosa di simile per legare il braccio al suo sostegno in modo che
non si muova.
• Avvolgi il corpo del giradischi con della carta o del panno morbido in modo che
non si danneggi.
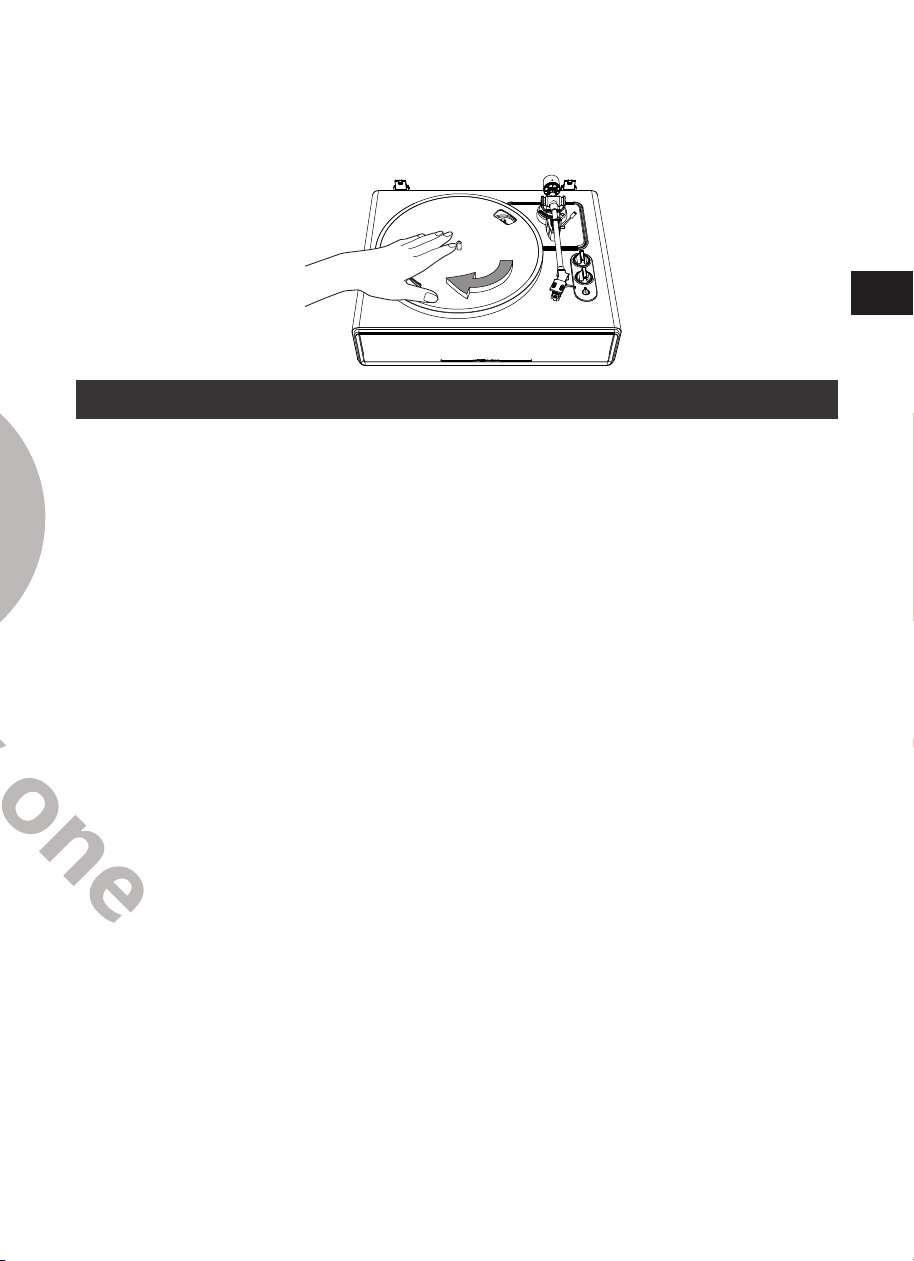
EN
DE
FR
ES
IT
EN
DE
FR
ES
IT
96 97
5. Attacca il piatto.
Allinea una delle aperture con la puleggia di color ottone.
6. Posiziona la cinghia sulla puleggia color ottone.
Afferra la cinghia attaccata al punto 4 e, mentre la tiri, sistemala sulla puleggia color
ottone.
7. Con le mani, ruota lentamente il piatto per dieci volte in senso orario, come
mostrato dalla freccia sottostante.
Quando sposti il giradischi
Utilizza i materiali di imballaggio originali del prodotto per avvolgere il piatto rotante
nell'ordine inverso rispetto a quando lo hai rimosso. Se non hai più i materiali di
imballaggio, adotta le seguenti precauzioni:
• Dopo aver scollegato l'alimentatore CA dalla presa, rimuovi il tappetino e il piatto;
poi avvolgili in modo che non si danneggino.
• Collega la protezione alla cartuccia.
• Usa una corda o qualcosa di simile per legare il braccio al suo sostegno in modo che
non si muova.
• Avvolgi il corpo del giradischi con della carta o del panno morbido in modo che
non si danneggi.
EN
DE
FR
ES
IT
EN
DE
FR
ES
IT
98 99
Risoluzione dei problemi
Problema Soluzione
Il piatto non gira. • L’alimentatore AC è collegato con l’uscita?
-Collega l’alimentatore AC all’uscita.
• Cosa fa la spia luminosa?
-Il giradischi è alimentato ma la spia luminosa è spenta. Significa
che il giradischi è in modalità ERP per la gestione energetica o
non è stato acceso. Riattivalo premendo per 3 secondi il tasto
START.
-La spia luminosa è blu. Significa che il giradischi è in modalità
Bluetooth. Ruota la manopola delle funzioni per passare sulla
modalità giradischi.
-La spia luminosa rossa segnala la modalità giradischi
• La cinghia è scivolata dal piatto?
-Posiziona correttamente la cinghia sul piatto.
• La cinghia è posizionata sulla puleggia?
-Controlla che la cinghia sia posizionata correttamente sulla
puleggia (color ottone).
• La cinghia si è danneggiata?
-Sostituiscila con una nuova.
• Il cavo AUX-IN è inserito?
-La funzione AUX-IN è prioritaria. Scollega il cavo AUX-IN prima
di usare le funzioni PHONO/BT.
Il piatto gira ma
il giradischi non
emette suoni?
• Lo stilo è danneggiato?
-Controlla lo stilo e, se necessario, sostituiscilo. Consigliamo di
sostituirlo dopo 400 ore di utilizzo.
• Lo stilo è montato correttamente sul corpo della cartuccia?
-Controlla lo stilo e, se necessario, sistemalo.
Lo stilo salta. • Il disco è deformato?
-Controllalo.
• Il disco è graffiato?
-Controllalo
• La pressione della puntina è corretta?
-Consulta la sezione "Regolazione della forza di trazione" per
regolare nuovamente la forza di tracciamento.
Il giradischi
emette uno
strano suono
"ululante"
• Il prodotto sta rilevando vibrazioni eccessive dal pavimento,
dalle superfici delle pareti o dagli altoparlanti nelle vicinanze?
- Riduci le vibrazioni o monta il prodotto su una superficie non
soggetta agli effetti delle vibrazioni.
• Il prodotto è montato su una superficie instabile?
-Controlla che la superficie su cui è montato il prodotto sia
adatta
Si sente del
rumore durante
la riproduzione
del disco.
• C'è polvere sulla punta dello stilo della cartuccia?
-Se la polvere è attaccata alla punta dello stilo, puliscila con un
comune spazzolino.
Il suono durante
la riproduzione
del disco è troppo
veloce o troppo
lento.
• La velocità per questo prodotto è impostata correttamente?
-Si prega di selezionare la velocità adatta al tipo di disco
riprodotto.
La velocità di
riproduzione
rallenta o c’è
una rotazione
irregolare.
• La cinghia è tesa?
-Sostituiscila con una nuova cinghia.
• La cinghia è montata correttamente?
-Consulta "Configurazione di piatto e cinghia del giradischi" per
sistemare la cinghia.
EN
DE
FR
ES
IT
EN
DE
FR
ES
IT
98 99
Risoluzione dei problemi
Problema Soluzione
Il piatto non gira. • L’alimentatore AC è collegato con l’uscita?
-Collega l’alimentatore AC all’uscita.
• Cosa fa la spia luminosa?
-Il giradischi è alimentato ma la spia luminosa è spenta. Significa
che il giradischi è in modalità ERP per la gestione energetica o
non è stato acceso. Riattivalo premendo per 3 secondi il tasto
START.
-La spia luminosa è blu. Significa che il giradischi è in modalità
Bluetooth. Ruota la manopola delle funzioni per passare sulla
modalità giradischi.
-La spia luminosa rossa segnala la modalità giradischi
• La cinghia è scivolata dal piatto?
-Posiziona correttamente la cinghia sul piatto.
• La cinghia è posizionata sulla puleggia?
-Controlla che la cinghia sia posizionata correttamente sulla
puleggia (color ottone).
• La cinghia si è danneggiata?
-Sostituiscila con una nuova.
• Il cavo AUX-IN è inserito?
-La funzione AUX-IN è prioritaria. Scollega il cavo AUX-IN prima
di usare le funzioni PHONO/BT.
Il piatto gira ma
il giradischi non
emette suoni?
• Lo stilo è danneggiato?
-Controlla lo stilo e, se necessario, sostituiscilo. Consigliamo di
sostituirlo dopo 400 ore di utilizzo.
• Lo stilo è montato correttamente sul corpo della cartuccia?
-Controlla lo stilo e, se necessario, sistemalo.
Lo stilo salta. • Il disco è deformato?
-Controllalo.
• Il disco è graffiato?
-Controllalo
• La pressione della puntina è corretta?
-Consulta la sezione "Regolazione della forza di trazione" per
regolare nuovamente la forza di tracciamento.
Il giradischi
emette uno
strano suono
"ululante"
• Il prodotto sta rilevando vibrazioni eccessive dal pavimento,
dalle superfici delle pareti o dagli altoparlanti nelle vicinanze?
- Riduci le vibrazioni o monta il prodotto su una superficie non
soggetta agli effetti delle vibrazioni.
• Il prodotto è montato su una superficie instabile?
-Controlla che la superficie su cui è montato il prodotto sia
adatta
Si sente del
rumore durante
la riproduzione
del disco.
• C'è polvere sulla punta dello stilo della cartuccia?
-Se la polvere è attaccata alla punta dello stilo, puliscila con un
comune spazzolino.
Il suono durante
la riproduzione
del disco è troppo
veloce o troppo
lento.
• La velocità per questo prodotto è impostata correttamente?
-Si prega di selezionare la velocità adatta al tipo di disco
riprodotto.
La velocità di
riproduzione
rallenta o c’è
una rotazione
irregolare.
• La cinghia è tesa?
-Sostituiscila con una nuova cinghia.
• La cinghia è montata correttamente?
-Consulta "Configurazione di piatto e cinghia del giradischi" per
sistemare la cinghia.
EN
DE
FR
ES
IT
100
Speciche
Giradischi
Alimentazione AC 100 - 240V, uscita DC 12V 1500 mA
Consumo 35W
Velocità Giradischi 33 1/3, 45 RPM
Potenza in uscita (RMS) 4Ω 18W X 2(BT) ,
5W X 2(PH)
Dimensioni (Lung. x Lar. x Alt.)
17.32” x 14.57” x 7.56” (440 x 370 x 192mm) con
coperchio chiuso.
15.75” x 16.73” x 18.19” (400 x 425 x 462mm) con
coperchio alzato.
Peso 6.05kg (13.3lb)
Stilo
Modello Audio-Technica AT3600
Frequenza di Risposta 20Hz - 20kHz
Bilanciamento Canale <2.5dB
Separazione Canale >18dB
Tensione in Uscita 2.5mV
Resistenza Raccomandata 47kΩ
Connessione Amplicatore MM (magnete mobile) – input
Forza d’Appoggio Consigliata 3.5±0.5g
Peso 5.1g (0.18oz)
Nota: le caratteristiche e le specifiche possono essere cambiate senza comunicazioni.
Smaltimento
Smaltimento dell’elettrodomestico
Non gettare mai l’elettrodomestico tra i normali rifiuti domestici.
Lo smaltimento di questo prodotto è regolato dalla direttiva europea
2012/19/EU.
Per lo smaltimento dell’elettrodomestico, contattare un’agenzia di smaltimento
specializzata o il comune. Si invita a rispettare le norme vigenti sullo smaltimento dei
rifiuti. Contattare il centro smaltimento rifiuti della propria area per informazioni e
assistenza.
La confezione è fatta di materiale riciclabile e può essere smaltita
nell’apposita raccolta differenziata.
CE Declaration of Conformity
We, 1byone Products Inc., confirm that the appliance as detailed below does comply
with all essential requirements of the EMC directive 2014/30/EU and governing EU-
regulations as mentioned below.
Article Description: HIGH FIDELITY BELT DRIVE TURNTABLE
Brand Name: 1byone
Model Number: 1-AD07DE02, H009
Applicable Standard(s)
EN 60065:2014+A11:2017
EN 55032: 2015, EN 55035: 2017
EN 61000-3-2: 2014, EN 61000-3-3: 2013
Ray Tang
Department Manager

UKCA Declaration of Conformity
We, 1byone Products Inc., confirm that the appliance as detailed below does comply
with all essential requirements of the relevant U.K. legislation for UKCA-marking and
governing UK-regulations as mentioned below.
Article Description: HIGH FIDELITY BELT DRIVE TURNTABLE
Brand Name: 1byone
Model Number: 1-AD07UK02, H009
Applicable Standard(s)
EN 60065:2014+A11:2017
EN 55032: 2015, EN 55035: 2017
EN 61000-3-2: 2014, EN 61000-3-3: 2013
Ray Tang
Department Manager
Customer Service/Kundenservice
Service Clients/Atención al cliente/Assistenza Clienti
UNITED STATES
Phone: +1 909-391-3888 (Mon-Fri 9:00am - 5:00pm PST)
Email: ushelp@1byonebros.com
CANADA Email: cahelp@1byonebros.com
UNITED KINGDOM
Phone: +44 158 241 2681 (Mon-Fri 9:00am - 6:00pm UTC)
Email: ukhelp@1byonebros.com
GERMANY/FRANCE
ITALY/SPAIN
Email: euhelp@1byonebros.com
BRAND OWNER
1byone Products Inc.
1230 E Belmont Street, Ontario, CA, USA 91761
Customer Service: +1 909-391-3888
www.1byonebros.com
EUROPEAN REPRESENTATIVE
REPEC
APEX CE SPECIALISTS LIMITED
Unit 3d North Point House, North Point Business Park,
New Mallow Road, Cork, T23 AT2P, Ireland
BRITISH REPRESENTATIVE
REPUK
APEX CE SPECIALISTS LIMITED
89 Princess Street, Manchester, M1 4HT, UK

UKCA Declaration of Conformity
We, 1byone Products Inc., confirm that the appliance as detailed below does comply
with all essential requirements of the relevant U.K. legislation for UKCA-marking and
governing UK-regulations as mentioned below.
Article Description: HIGH FIDELITY BELT DRIVE TURNTABLE
Brand Name: 1byone
Model Number: 1-AD07UK02, H009
Applicable Standard(s)
EN 60065:2014+A11:2017
EN 55032: 2015, EN 55035: 2017
EN 61000-3-2: 2014, EN 61000-3-3: 2013
Ray Tang
Department Manager
Customer Service/Kundenservice
Service Clients/Atención al cliente/Assistenza Clienti
UNITED STATES
Phone: +1 909-391-3888 (Mon-Fri 9:00am - 5:00pm PST)
Email: ushelp@1byonebros.com
CANADA Email: cahelp@1byonebros.com
UNITED KINGDOM
Phone: +44 158 241 2681 (Mon-Fri 9:00am - 6:00pm UTC)
Email: [email protected]
GERMANY/FRANCE
ITALY/SPAIN
Email: euhelp@1byonebros.com
BRAND OWNER
1byone Products Inc.
1230 E Belmont Street, Ontario, CA, USA 91761
Customer Service: +1 909-391-3888
www.1byonebros.com
EUROPEAN REPRESENTATIVE
REPEC
APEX CE SPECIALISTS LIMITED
Unit 3d North Point House, North Point Business Park,
New Mallow Road, Cork, T23 AT2P, Ireland
BRITISH REPRESENTATIVE
REPUK
APEX CE SPECIALISTS LIMITED
89 Princess Street, Manchester, M1 4HT, UK