GUIDE
|
GUIDE
|
GUÍA

2 3
When using electrical appliances,
basic safety precautions should be
followed, including the following:
1. Read all instructions before using.
2. Do not touch hot surfaces. Use
handles and knobs when available.
3. This appliance must be properly
installed and located in
accordance with these instructions
before it is used.
4. The use of accessory attachments
not recommended by the
appliance manufacturer may result
in fire, electrical shock or injury
to persons.
5. Do not place on or near a hot
gas or electric burner, or in a
heated oven.
6. Do not use outdoors.
7. To protect against fire, electric
shock and injury do not immerse
cords, plugs or the appliance in
water or any other liquid.
8. Do not fill the Water Reservoir
above the MAX FILL line.
9. Use only water in this appliance!
Do not put any other liquids or
foods in the Water Reservoir
except as instructed in the
cleaning instructions in this guide.
10. Turn off and unplug the brewer
before cleaning or maintenance.
Allow to cool before putting on
or taking off parts and before
cleaning the appliance.
11. For best operation, plug the
appliance into its own electrical
outlet on a dedicated circuit
to prevent flickering of lights,
blowing of fuses or tripping a
circuit breaker.
12. Do not operate any appliance
with a damaged Power Cord
or plug or after the appliance
malfunctions or is damaged
in any manner. Contact Keurig
Customer Service to report any
malfunction of or damage to
the brewer.
13. Do not let the Power Cord hang
over the edge of the table or
counter, or touch hot surfaces.
14. To disconnect, press the Power
Button on the brewer to “OFF”
status and then remove the plug
from the wall outlet.
15. Close supervision is necessary
when any appliance is used by or
near children.
16. Do not lift the brewer Handle
while brewing is in progress.
17. Always keep the Flip-Top
Reservoir Lid on the Water
Reservoir unless you are
refilling it.
18. This appliance is equipped with a
Power Cord having a grounding
wire with a grounding plug.
The appliance must be grounded
using a 3-hole properly grounded
outlet. In the event of an electrical
short circuit, grounding reduces
the risk of electrical shock.
19. If the outlet is a standard 2-prong
wall outlet, it is your personal
responsibility and obligation to
have it replaced with a properly
grounded 3-prong wall outlet.
20. Do not, under any circumstances,
cut or remove the third (ground)
prong from the Power Cord or
use an adapter.
21. Consult a qualified electrician if
the grounding instructions are not
completely understood, or
if doubt exists as to whether the
appliance is properly grounded.
22. Do not use the appliance for
other than its intended use.
23. Remove the shipping disk
before brewing.
IMPORTANT SAFEGUARDS
WARNING TO USERS
AND PARENTS:
1. DO NOT permit children to use
the brewer unless there is adult
supervision. Brewer dispenses
very hot water.
2. SPECIAL NOTICE FOR
HOT COCOA/OTHER USERS:
IMMEDIATELY AFTER USING A
HOT COCOA/OTHER PACK, RUN
A HOT WATER BREW CYCLE
without a pack to avoid the
possibility of clogging the exit
needle. DO NOT assume the next
user will do this.
SAVE THESE
INSTRUCTIONS.
WARNING
!
RISK OF FIRE OR
ELECTRIC SHOCK
DO NOT OPEN
WARNING: TO REDUCE THE RISK OF
FIRE OR ELECTRIC SHOCK, DO NOT
REMOVE THE BOTTOM COVER. NO USER
SERVICEABLE PARTS ARE INSIDE. REPAIR
SHOULD BE DONE BY AUTHORIZED
SERVICE PERSONNEL ONLY.

4 5
CAUTION: There are three sharp
needles that puncture packs, two
above the Pack Holder and the
other in the bottom of the Pack
Holder. To avoid risk of injury, do
not put your fingers in the Pack
Holder Assembly.
CAUTION: There is extremely hot
water in the Pack Holder during the
brew process. To avoid risk of injury,
do not lift the Handle or open the
Pack Holder Assembly during the
brewing process.
CAUTION: Do not fill above the
MAX FILL line. If you fill the Water
Reservoir above this point, you may
occasionally get a larger brew than
you selected for your first brew of
the day. If you prefer to have your
Water Reservoir filled to the top, we
recommend you use a large mug for
your first brew of the day to avoid
any risk of overflow.
CAUTION: Please always keep the
brewer in its upright position to
avoid potential injury and/or damage
to your brewer.
CAUTION: Very hot liquid. Adult
supervision required.
SHORT CORD INSTRUCTIONS:
A short power supply cord is
provided to reduce the risk of
becoming entangled in or
tripping over a longer cord.
Longer detachable power-supply
cords or extension cords are available
and may be used if care is exercised
in their use. If an extension cord is
used, (1) the marked electrical rating
of the cord set or extension cord
should be at least as great as the
electrical rating of the appliance;
(2) the cord should be arranged
so that it will not drape over the
countertop or tabletop where it
can be pulled on by children or
tripped over unintentionally; and
(3) the extension cord must include
a 3-prong grounding plug.
Your Keurig
®
2.0 brewer will not
work with packs that do not have
the Keurig
®
logo on them.
Keurig
®
2.0 brewers are not
compatible with the My K-Cup
®
reusable filter accessory.
THIS PRODUCT IS FOR HOUSEHOLD
USE ONLY.
WARNING
THIS PRODUCT CONTAINS
CHEMICALS, INCLUDING LEAD,
WHICH IS KNOWN TO THE STATE
OF CALIFORNIA TO CAUSE
CANCER, BIRTH DEFECTS OR
OTHER REPRODUCTIVE HARM.
TABLE OF CONTENTS
KEURIG
®
2.0 BREWING SYSTEM | K2.0-500 SERIES BREWER
Features 6
Touchscreen Controls 7
SECTION 1
Set-Up & Cleansing Brew 8
Brew Your First K-Cup
®
Pack 10
Brew Your First K-Carafe
TM
Pack 11
Set Carafe Auto Brew Mode 12
SECTION 2
Stopping the Brew Process 14
Adding Water 14
Dispensing Hot Water into a Mug 15
Adding a Favorite 16
Editing a Favorite 17
Using a Favorite 17
Settings Menu 18
Caring For Your Brewer 23
Maintenance Alerts 28
Recycling K-Carafe
TM
Packs 31
SECTION 3
Troubleshooting 32
SECTION 4
Warranty 34
6 7
K
L
M
N
F
G
D
E
C
B
A
I
J
H
K-CUP
®
PACKS
FUTURE KEURIG
®
BRAND PACKS
KEURIG BREW
®
SETTING
SELECTION SCREEN
K-CARAFE
TM
PACKS
2
3
4
5
6
READY
STEP 1
FROTH
STEP 2
FROTH
Lift to Begin
12
:
00
K
E
U
R
I
G
B
R
E
W
AUTO BREW
PRESS TO SET
READY
STRONG
HOT
COCOA
OTHER
A CC
DD
EB
B
A
A
C
D
B
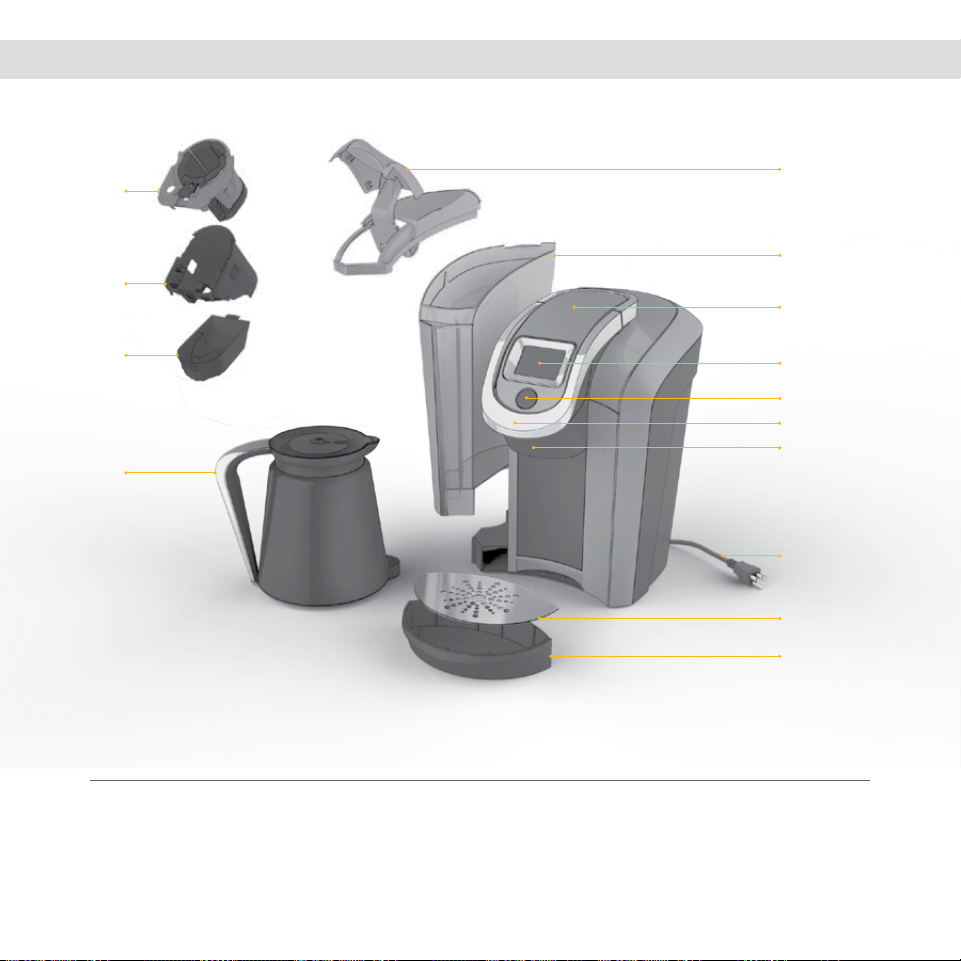
FEATURES
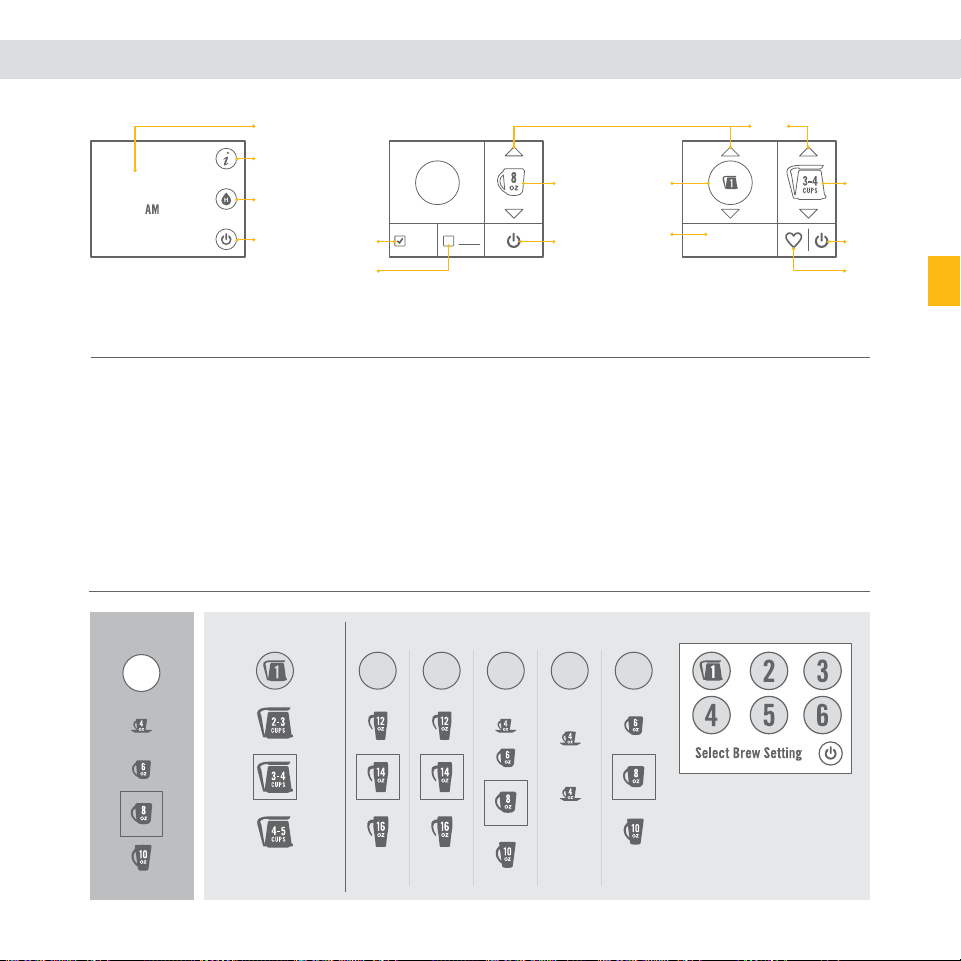
TOUCHSCREEN CONTROLS
K2.0-500 SERIES BREWER
A. Flip-Top Reservoir Lid
B. Water Reservoir
C. Top Housing
D. Touchscreen/Power Button
E. Brew Button
F. Handle
G. Brew Head
H. Power Cord
I. Drip Tray Plate
J. Drip Tray
K. Pack Holder
L. Housing
(K and L are the
Pack Holder Assembly)
M. Base
N. Keurig
TM
Carafe
BREW SETTINGS
(OUTLINE INDICATES DEFAULT SIZE)
A. KEURIG BREW
®
Setting 1
B. AUTO BREW
(only available for
K-Carafe
TM
packs)
C. Brew Size
D. Power Button
E. Favorites Button
A. STRONG
(only available for coffee)
B. HOT COCOA/OTHER
(for select non-coffee
beverages)
C. Brew Size
D. Power Button
HOME SCREEN
A. Clock
B. Settings Button
C. Hot Water Button
D. Power Button
SCREEN FOR
K-CUP
®
PACKS
SCREEN FOR
K-CARAFE
TM
PACKS
scroll
Select the KEURIG BREW
®
Setting that matches the
number on the pack lid.
6 7
K
L
M
N
F
G
D
E
C
B
A
I
J
H
K-CUP
®
PACKS
FUTURE KEURIG
®
BRAND PACKS
KEURIG BREW
®
SETTING
SELECTION SCREEN
K-CARAFE
TM
PACKS
2
3
4
5
6
READY
STEP 1
FROTH
STEP 2
FROTH
Lift to Begin
12
:
00
K
E
U
R
I
G
B
R
E
W
AUTO BREW
PRESS TO SET
READY
STRONG
HOT
COCOA
OTHER
A CC
DD
EB
B
A
A
C
D
B
FEATURES
TOUCHSCREEN CONTROLS
K2.0-500 SERIES BREWER
A. Flip-Top Reservoir Lid
B. Water Reservoir
C. Top Housing
D. Touchscreen/Power Button
E. Brew Button
F. Handle
G. Brew Head
H. Power Cord
I. Drip Tray Plate
J. Drip Tray
K. Pack Holder
L. Housing
(K and L are the
Pack Holder Assembly)
M. Base
N. Keurig
TM
Carafe
BREW SETTINGS
(OUTLINE INDICATES DEFAULT SIZE)
A. KEURIG BREW
®
Setting 1
B. AUTO BREW
(only available for
K-Carafe
TM
packs)
C. Brew Size
D. Power Button
E. Favorites Button
A. STRONG
(only available for coffee)
B. HOT COCOA/OTHER
(for select non-coffee
beverages)
C. Brew Size
D. Power Button
HOME SCREEN
A. Clock
B. Settings Button
C. Hot Water Button
D. Power Button
SCREEN FOR
K-CUP
®
PACKS
SCREEN FOR
K-CARAFE
TM
PACKS
scroll
Select the KEURIG BREW
®
Setting that matches the
number on the pack lid.

8 9
SET-UP & CLEANSING BREW
SECTION 1
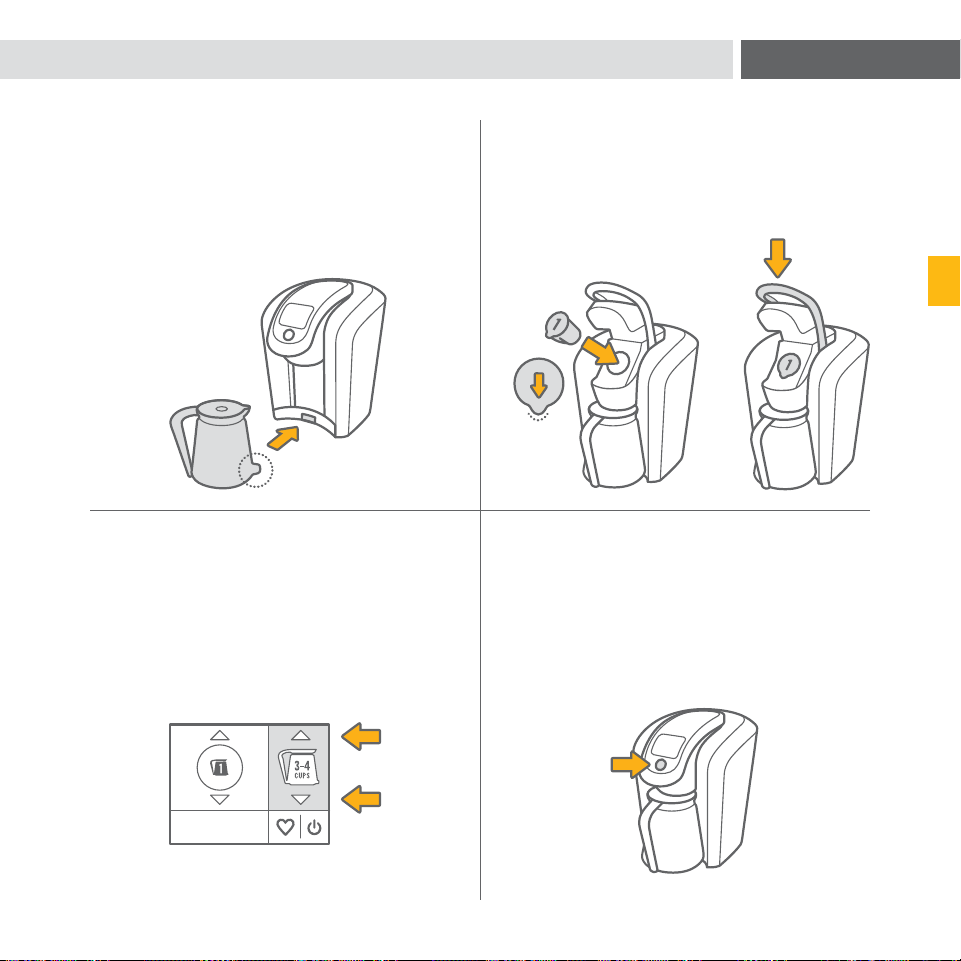
SET-UP
1. Place the brewer on a counter and plug
into a grounded outlet.
CLEANSING BREW
1. To begin a cleansing brew, place a
12 ounce mug on the Drip Tray.
3. Rinse the Water Reservoir, fill with
bottled or filtered water, and return it
to the brewer.
3. Hold down the Brew Button until
6 ounces of hot water has been
dispensed. The brewer will
automatically stop dispensing after
6 ounces.
2. Lift the Handle, remove and discard the
shipping disk.
2. Lift and lower the Handle. Do not place
a Keurig
®
brand pack in the Pack Holder.
4. Press the Power Button and wait
for preheating to complete, about
three minutes.
4. You are now ready to use your brewer!
8 9
SET-UP & CLEANSING BREW
SECTION 1
SET-UP
1. Place the brewer on a counter and plug
into a grounded outlet.
CLEANSING BREW
1. To begin a cleansing brew, place a
12 ounce mug on the Drip Tray.
3. Rinse the Water Reservoir, fill with
bottled or filtered water, and return it
to the brewer.
3. Hold down the Brew Button until
6 ounces of hot water has been
dispensed. The brewer will
automatically stop dispensing after
6 ounces.
2. Lift the Handle, remove and discard the
shipping disk.
2. Lift and lower the Handle. Do not place
a Keurig
®
brand pack in the Pack Holder.
4. Press the Power Button and wait
for preheating to complete, about
three minutes.
4. You are now ready to use your brewer!
READY
STRONG
HOT
COCOA
OTHER
READY
STRONG
HOT
COCOA
OTHER
AUTO BREW
PRESS TO SET
K
E
U
R
I
G
B
R
E
W
10 11
SECTION 1
BREW YOUR FIRST K-CUP
®
PACK
BREW YOUR FIRST K-CARAFE
TM
PACK
1. Place a mug on the Drip Tray.
Select a K-Cup
®
pack, place firmly in
the Pack Holder.
NOTE: Do not remove the foil lid or puncture the K-Cup
®
pack.
1. Make sure the Keurig
TM
Carafe is empty.
Remove the Drip Tray and insert the
Keurig
TM
Carafe securely in its place.
NOTE: Do not remove the foil lid or puncture the
K-Carafe
TM
pack.
NOTE: Refer to page 27 for Keurig
TM
Carafe operation.
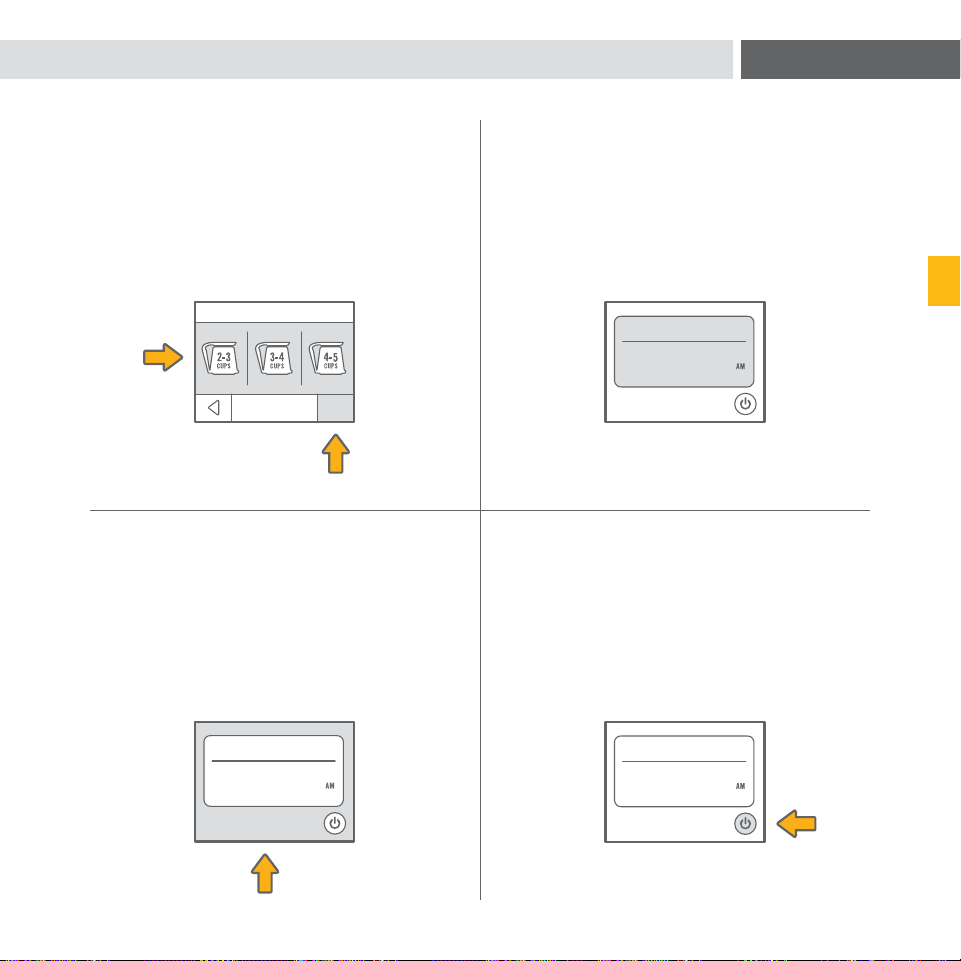
3. Select a Brew Size. Select STRONG if
desired. (STRONG setting is for coffee.)
3. Select a Brew Size.
NOTE: Make sure the number on the Touchscreen matches
the number of the K-Carafe
TM
pack you’re brewing in the
Pack Holder.
Press HOT COCOA/OTHER for select
non-coffee beverages.
NOTE: Make sure to check instructions on portion pack
packaging.
2. Lower the Handle.
CAUTION: There are sharp needles that puncture the K-Cup
®
pack above and below the Pack Holder. To avoid injury, do not
put your fingers in the Pack Holder.
NOTE: Your Keurig
®
2.0 brewer will not work with packs that
do not have a Keurig
®
logo on them.
2. Select a K-Carafe
TM
pack, place firmly in
the Pack Holder and lower the Handle.
CAUTION: There are sharp needles that puncture the
K-Carafe
TM
pack above and below the Pack Holder.
To avoid injury, do not put your fingers in the Pack Holder.
NOTE: Your Keurig
®
2.0 brewer will not work with packs that
do not have a Keurig
®
logo on them.
4. Press the Brew Button and enjoy your
first cup!
CAUTION: There is extremely hot water in the K-Cup
®
pack
during the brew process. To avoid injury, do not lift the Handle
during the brew process.
4. Press the Brew Button and enjoy your
first carafe of coffee!
CAUTION: There is extremely hot water in the K-Carafe
TM
pack
during the brew process. To avoid injury, do not lift the Handle
during the brew process.
READY
STRONG
HOT
COCOA
OTHER
READY
STRONG
HOT
COCOA
OTHER
AUTO BREW
PRESS TO SET
K
E
U
R
I
G
B
R
E
W
10 11
SECTION 1
BREW YOUR FIRST K-CUP
®
PACK
BREW YOUR FIRST K-CARAFE
TM
PACK
1. Place a mug on the Drip Tray.
Select a K-Cup
®
pack, place firmly in
the Pack Holder.
NOTE: Do not remove the foil lid or puncture the K-Cup
®
pack.
1. Make sure the Keurig
TM
Carafe is empty.
Remove the Drip Tray and insert the
Keurig
TM
Carafe securely in its place.
NOTE: Do not remove the foil lid or puncture the
K-Carafe
TM
pack.
NOTE: Refer to page 27 for Keurig
TM
Carafe operation.
3. Select a Brew Size. Select STRONG if
desired. (STRONG setting is for coffee.)
3. Select a Brew Size.
NOTE: Make sure the number on the Touchscreen matches
the number of the K-Carafe
TM
pack you’re brewing in the
Pack Holder.
Press HOT COCOA/OTHER for select
non-coffee beverages.
NOTE: Make sure to check instructions on portion pack
packaging.
2. Lower the Handle.
CAUTION: There are sharp needles that puncture the K-Cup
®
pack above and below the Pack Holder. To avoid injury, do not
put your fingers in the Pack Holder.
NOTE: Your Keurig
®
2.0 brewer will not work with packs that
do not have a Keurig
®
logo on them.
2. Select a K-Carafe
TM
pack, place firmly in
the Pack Holder and lower the Handle.
CAUTION: There are sharp needles that puncture the
K-Carafe
TM
pack above and below the Pack Holder.
To avoid injury, do not put your fingers in the Pack Holder.
NOTE: Your Keurig
®
2.0 brewer will not work with packs that
do not have a Keurig
®
logo on them.
4. Press the Brew Button and enjoy your
first cup!
CAUTION: There is extremely hot water in the K-Cup
®
pack
during the brew process. To avoid injury, do not lift the Handle
during the brew process.
4. Press the Brew Button and enjoy your
first carafe of coffee!
CAUTION: There is extremely hot water in the K-Carafe
TM
pack
during the brew process. To avoid injury, do not lift the Handle
during the brew process.

AUTO BREW
PRESS TO SET
K
E
U
R
I
G
B
R
E
W
AUTO BREW CARAFE AT:
CANCEL
6
:
00
CARAFE SET TO
AUTO BREW AT:
6
:
00
TOUCH HERE TO EDIT
DO NOT DISTURB!
CARAFE SET TO
AUTO BREW AT:
6
:
00
TOUCH HERE TO EDIT
DO NOT DISTURB!
AUTO BREW CARAFE SIZE:
SET
CARAFE SET TO
AUTO BREW AT:
6
:
00
TOUCH HERE TO EDIT
DO NOT DISTURB!
12 13
SET CARAFE AUTO BREW MODE
SECTION 1
1. Make sure the Keurig
TM
Carafe is empty.
Remove the Drip Tray and insert the
Keurig
TM
Carafe securely in its place.
4. Select the time you want to begin
brewing, then press the right arrow.
3. Select AUTO BREW PRESS TO SET.
2. Select a K-Carafe
TM
pack, place firmly in
the Pack Holder and lower the Handle.
NOTE: Ensure the current time is accurate. Refer to page 19
to adjust.
5. Select a Brew Size, then press SET.
7. To edit any options, select TOUCH
HERE TO EDIT.
6. The Touchscreen will indicate
DO NOT DISTURB!
8. To put the brewer in sleep mode,
quickly press and release the Power
Button.
Removing the Keurig
TM
Carafe
or lifting the Handle will cancel the
CARAFE AUTO BREW MODE.

More Water
Please.
CONTINUE
Brewing... Brewing...
Enjoy!
Lift to Begin
12
:
00
CANCEL
Want Hot Water?
Lift Handle.
Remove Pack.
Lower Handle.
14 15
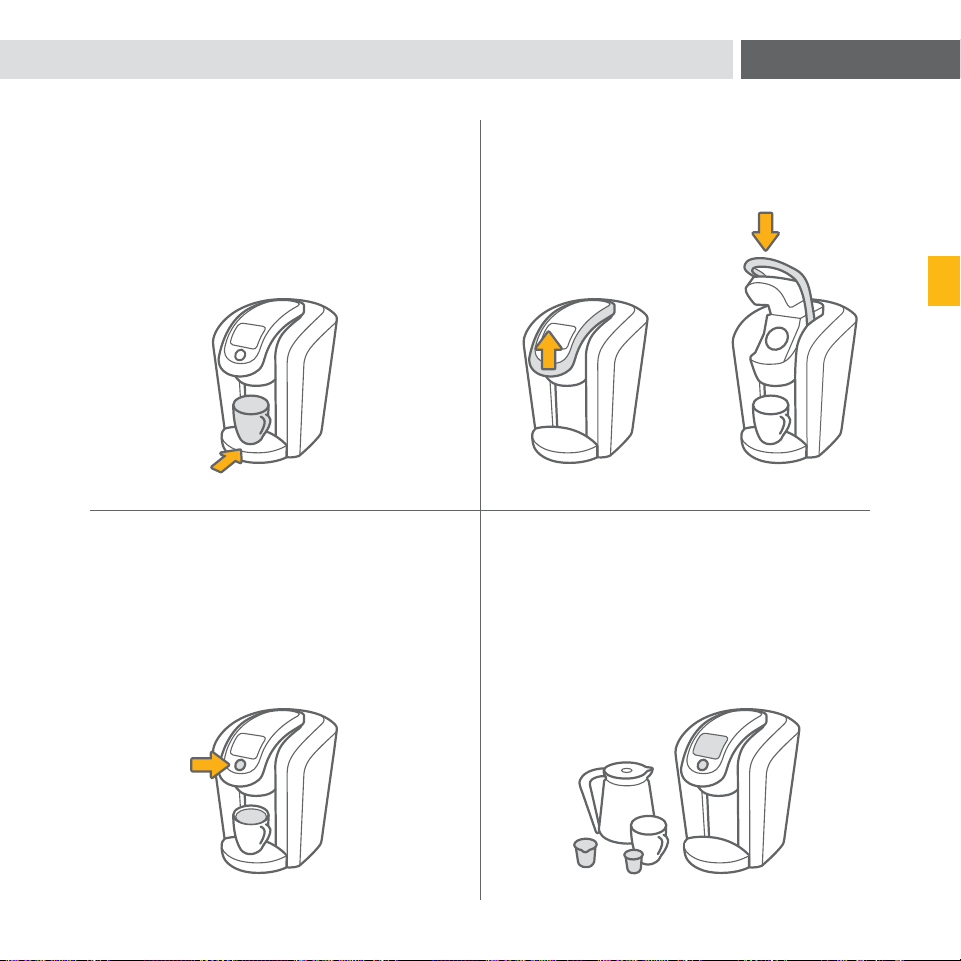
STOPPING THE BREW PROCESS
ADDING WATER
DISPENSING HOT WATER INTO A MUG
SECTION 2
FOR K-CUP
®
PACKS AND K-CARAFE
TM
PACKS (KEURIG BREW
®
SETTING 1)
To stop the brewing process, press and hold the Power Button for one second or
slowly lift the Handle. Remove and dispose of any used pack. Brewing a used pack is
not recommended.
Your Keurig
®
2.0 brewer will indicate when the water level in the Water Reservoir is low
and you will not be able to brew. The brewer will only indicate “More Water Please.” if
there is not enough to complete your brew.
For example: A Keurig
TM
Carafe will require more water than a 10 ounce mug.
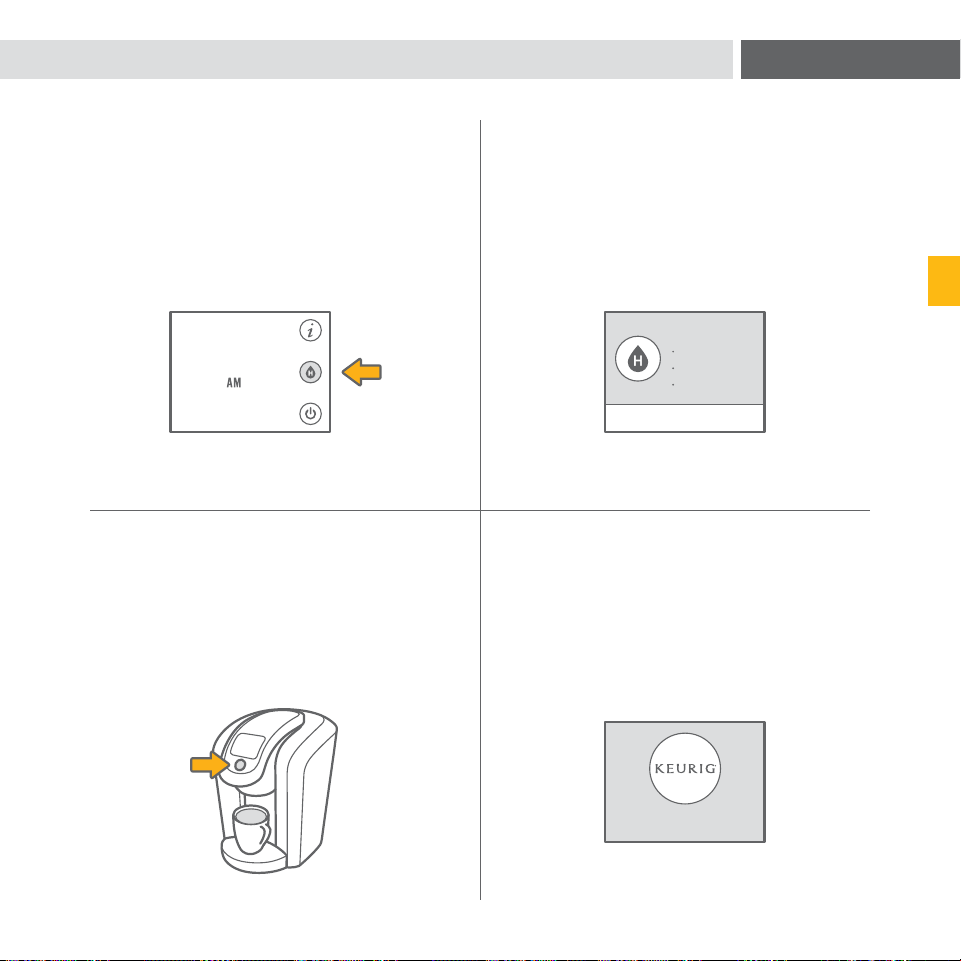
1. Press the Hot Water Button. 2. Follow the Touchscreen instructions.
3. Press and hold the Brew Button to
dispense up to 6 ounces of hot water.
The brewer will stop dispensing after
6 ounces.
4. When the brew process is complete,
the Touchscreen will indicate Enjoy!
More Water
Please.
CONTINUE
Brewing... Brewing...
Enjoy!
Lift to Begin
12
:
00
CANCEL
Want Hot Water?
Lift Handle.
Remove Pack.
Lower Handle.
14 15
STOPPING THE BREW PROCESS
ADDING WATER
DISPENSING HOT WATER INTO A MUG
SECTION 2
FOR K-CUP
®
PACKS AND K-CARAFE
TM
PACKS (KEURIG BREW
®
SETTING 1)
To stop the brewing process, press and hold the Power Button for one second or
slowly lift the Handle. Remove and dispose of any used pack. Brewing a used pack is
not recommended.
Your Keurig
®
2.0 brewer will indicate when the water level in the Water Reservoir is low
and you will not be able to brew. The brewer will only indicate “More Water Please.” if
there is not enough to complete your brew.
For example: A Keurig
TM
Carafe will require more water than a 10 ounce mug.
1. Press the Hot Water Button. 2. Follow the Touchscreen instructions.
3. Press and hold the Brew Button to
dispense up to 6 ounces of hot water.
The brewer will stop dispensing after
6 ounces.
4. When the brew process is complete,
the Touchscreen will indicate Enjoy!
AUTO BREW
PRESS TO SET
K
E
U
R
I
G
B
R
E
W
FAVORITES
A
EDIT
FAVORITES
A
EDIT
FAVORITES
A B
AUTO BREW
PRESS TO SET
K
E
U
R
I
G
B
R
E
W
CONFIRM
FAVORITES
ADD FAVORITE
YESNO
FAVORITES
A B
EDIT
AUTO BREW
PRESS TO SET
K
E
U
R
I
G
B
R
E
W
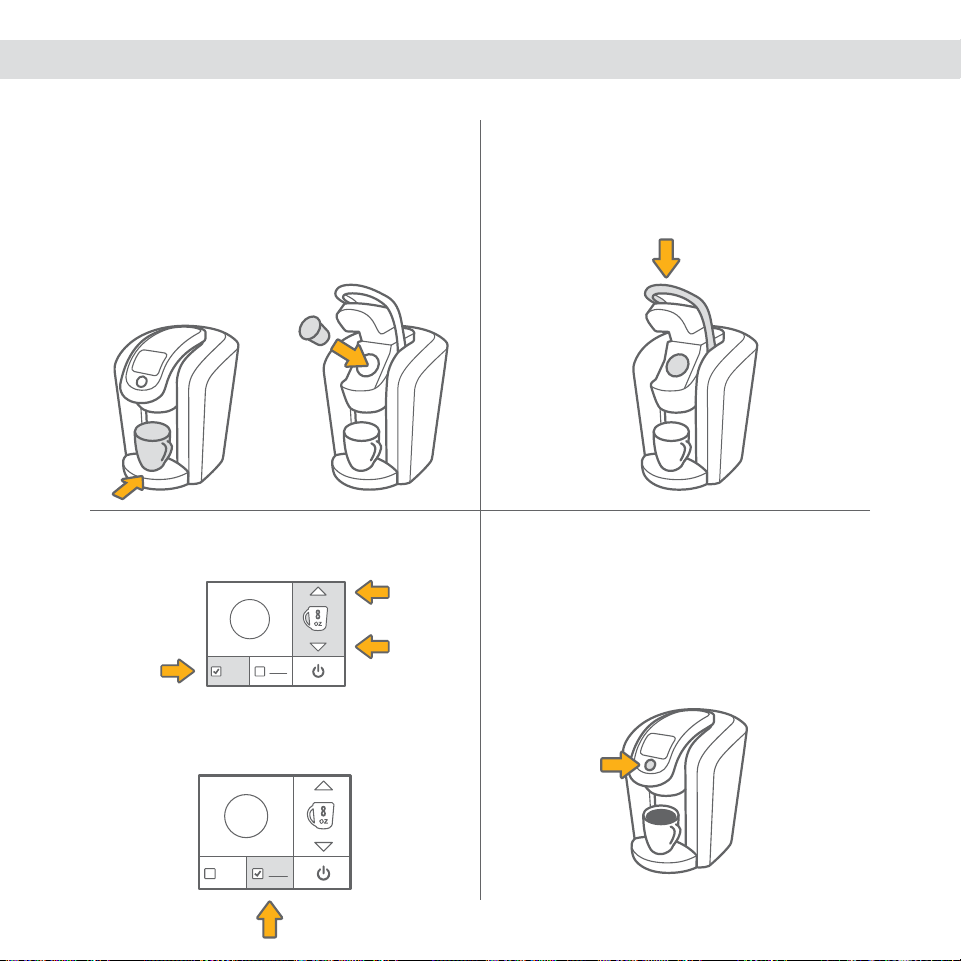
16 17
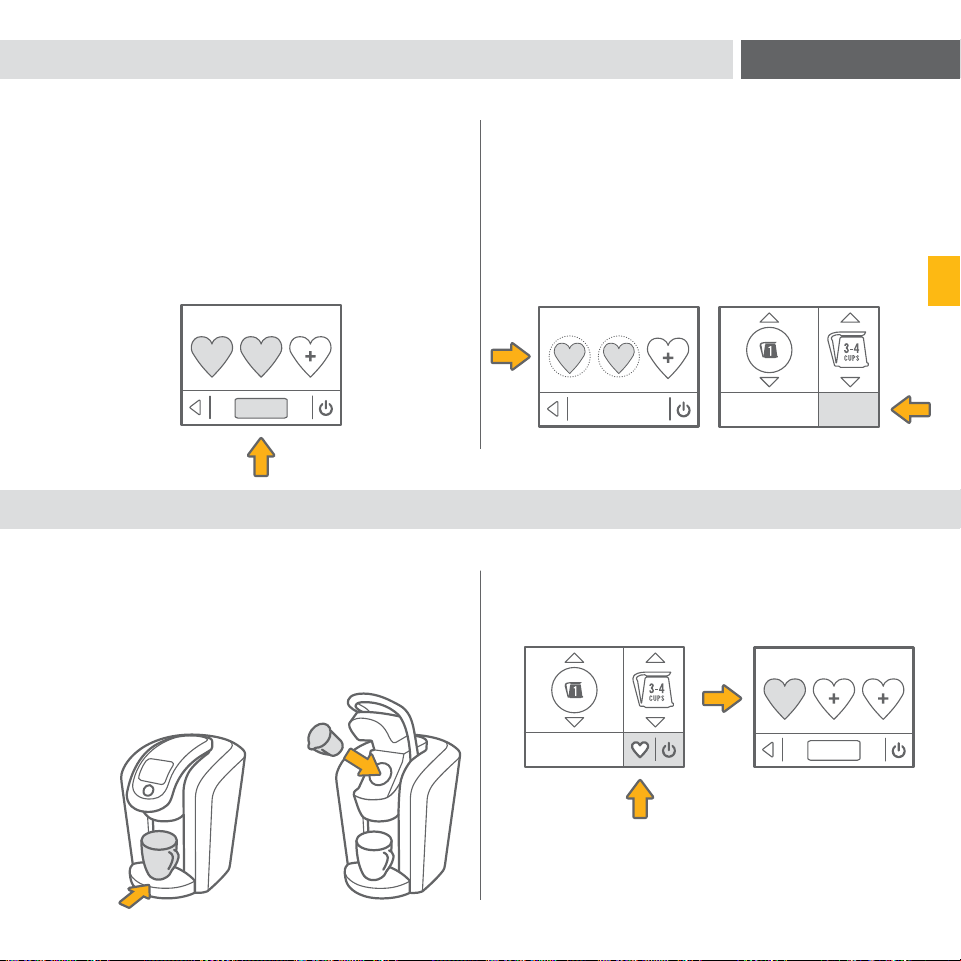
ADDING A FAVORITE
USING A FAVORITE
EDITING A FAVORITE
SECTION 2
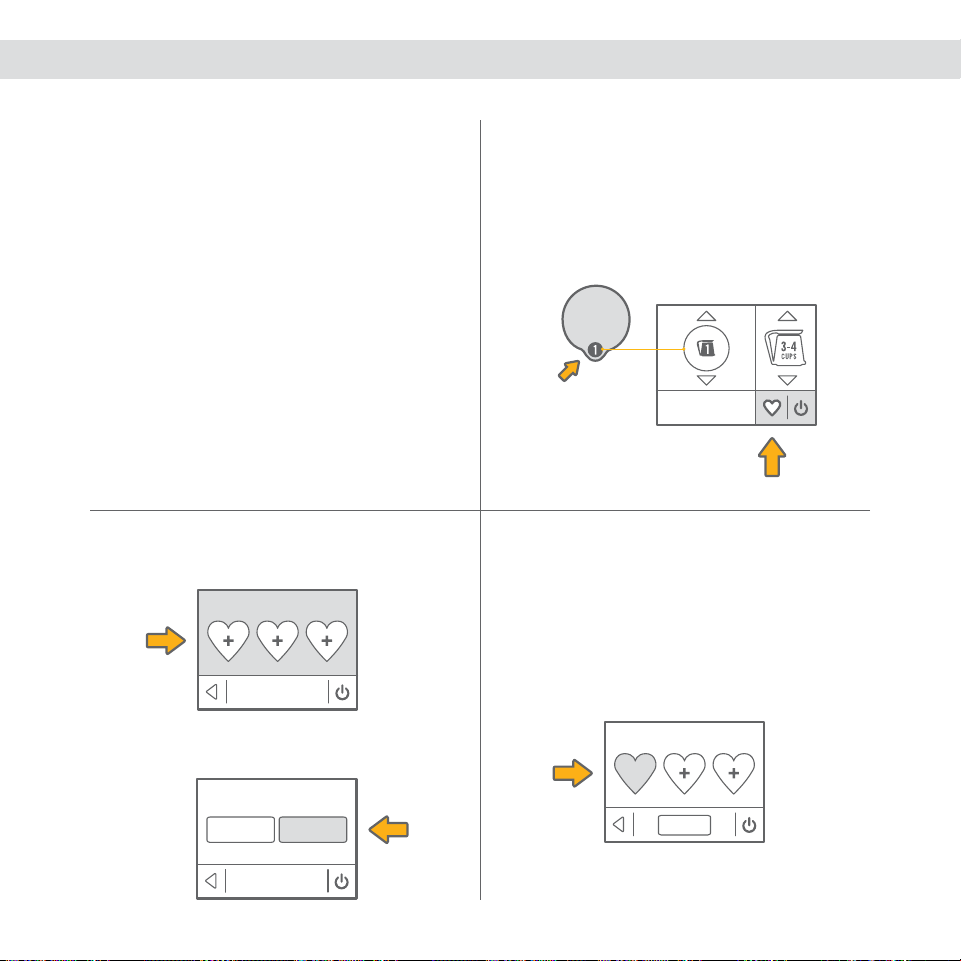
1. Press the Favorites Button and
select EDIT.
2. Select the FAVORITES icon that you
wish to change. Edit the settings and
press CONFIRM. Your settings are
now changed.
1. To set, first match the KEURIG
BREW
®
Setting to the number on the
pack you inserted. Then select your
favorite options for size and strength
(not available for all KEURIG BREW
®
Settings). Do not press the Brew Button,
press the Favorites Button.
The Favorites Button is like a little
shortcut to perfection. Just save the
settings you use most often and make
each day that much easier. You can save
your preferred settings for K-Carafe
TM
packs and future Keurig
®
brand
innovations (except K-Cup
®
packs).
2. Choose one of the three FAVORITES
icons to save your favorite.
3. Press a FAVORITES icon and the
Touchscreen will indicate the settings
for this favorite.
1. Place a mug on the Drip Tray. Place a
Keurig
®
brand pack in the Pack Holder
and lower the Handle.
NOTE: Favorites is only available for KEURIG BREW
®
Settings 1 through 6.
NOTE: If using KEURIG BREW
®
Setting 1, insert the empty
Keurig
TM
Carafe.
2. Press the Favorites Button and choose
the FAVORITES icon you would like
to brew.
Press the Brew Button.
NOTE: Make sure the selected favorite matches KEURIG
BREW
®
Settings 1 through 6 for the pack you’re brewing in
the Pack Holder.
Press YES to confirm.
AUTO BREW
PRESS TO SET
K
E
U
R
I
G
B
R
E
W
FAVORITES
A
EDIT
FAVORITES
A
EDIT
FAVORITES
A B
AUTO BREW
PRESS TO SET
K
E
U
R
I
G
B
R
E
W
CONFIRM
FAVORITES
ADD FAVORITE
YESNO
FAVORITES
A B
EDIT
AUTO BREW
PRESS TO SET
K
E
U
R
I
G
B
R
E
W
16 17
ADDING A FAVORITE
USING A FAVORITE
EDITING A FAVORITE
SECTION 2
1. Press the Favorites Button and
select EDIT.
2. Select the FAVORITES icon that you
wish to change. Edit the settings and
press CONFIRM. Your settings are
now changed.
1. To set, first match the KEURIG
BREW
®
Setting to the number on the
pack you inserted. Then select your
favorite options for size and strength
(not available for all KEURIG BREW
®
Settings). Do not press the Brew Button,
press the Favorites Button.
The Favorites Button is like a little
shortcut to perfection. Just save the
settings you use most often and make
each day that much easier. You can save
your preferred settings for K-Carafe
TM
packs and future Keurig
®
brand
innovations (except K-Cup
®
packs).
2. Choose one of the three FAVORITES
icons to save your favorite.
3. Press a FAVORITES icon and the
Touchscreen will indicate the settings
for this favorite.
1. Place a mug on the Drip Tray. Place a
Keurig
®
brand pack in the Pack Holder
and lower the Handle.
NOTE: Favorites is only available for KEURIG BREW
®
Settings 1 through 6.
NOTE: If using KEURIG BREW
®
Setting 1, insert the empty
Keurig
TM
Carafe.
2. Press the Favorites Button and choose
the FAVORITES icon you would like
to brew.
Press the Brew Button.
NOTE: Make sure the selected favorite matches KEURIG
BREW
®
Settings 1 through 6 for the pack you’re brewing in
the Pack Holder.
Press YES to confirm.

18
Lift to Begin
12
:
00
GRASS GREEN
CONFIRM SELECTION
SAVE
1 OF 4
WALLPAPER
SETTINGS
LANGUAGE
CLOCK
AUTO ON/OFF
1 OF 3
SETTINGS
LANGUAGE
CLOCK
AUTO ON/OFF
1 OF 3
TIME
11
:
32
SAVE
12 HR 24 HR
DIGITAL ANALOG
12
:
00
SAVE
DISPLAY
SETTINGS
LANGUAGE
CLOCK
AUTO ON/OFF
1 OF 3
SAVE
LANGUAGE
ENGLISH SPANISH FRENCH
CLOCK
TIME
DISPLAY
WALLPAPER
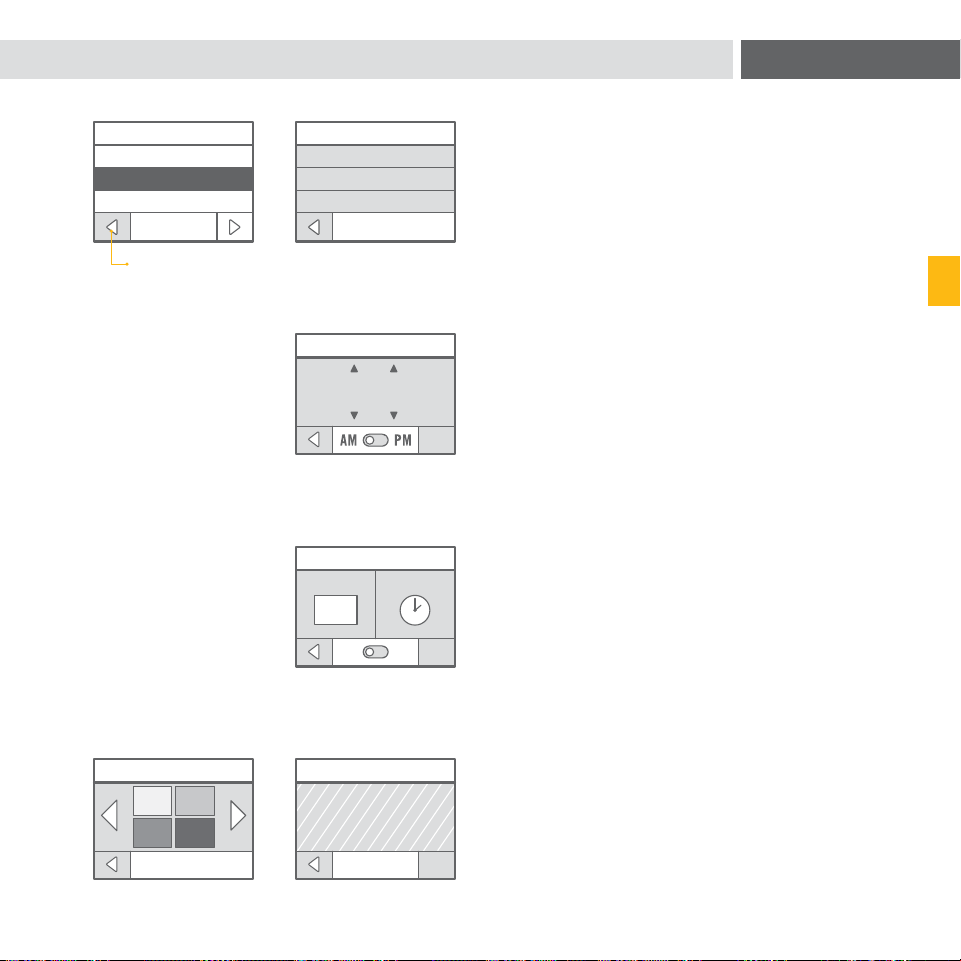
19
SET CLOCK
The CLOCK menu gives you the following
three settings.
Use the back button to return to the
SETTINGS menu.
ACCESS SETTINGS
Explore everything your Keurig
®
2.0
brewer has to offer by accessing the
SETTINGS menu. From the home
screen, select the Settings Button.
Use the arrows to scroll through the
menu. To exit, press the back button.
CHOOSE LANGUAGE
Press English, Spanish or French to select
the LANGUAGE.
Press SAVE to confirm or use the back
button to return to the SETTINGS menu.
Time: Set the current time using the
arrows, then choose AM or PM.
Press SAVE to confirm or use the back
button to return to the SETTINGS menu.
Display: Choose DIGITAL or ANALOG
DISPLAY. For DIGITAL DISPLAY only,
use the toggle to select 12 HR or
24 HR (military).
Press SAVE to confirm or use the back
button to return to the SETTINGS menu.
Wallpaper: You can customize your
Touchscreen color. Simply press a color
window to select a WALLPAPER for the
home screen.
Press SAVE to CONFIRM SELECTION
or use the back button to return to the
WALLPAPER menu.
SETTINGS MENU
SECTION 2
back button
back button
back button
18
Lift to Begin
12
:
00
GRASS GREEN
CONFIRM SELECTION
SAVE
1 OF 4
WALLPAPER
SETTINGS
LANGUAGE
CLOCK
AUTO ON/OFF
1 OF 3
SETTINGS
LANGUAGE
CLOCK
AUTO ON/OFF
1 OF 3
TIME
11
:
32
SAVE
12 HR 24 HR
DIGITAL ANALOG
12
:
00
SAVE
DISPLAY
SETTINGS
LANGUAGE
CLOCK
AUTO ON/OFF
1 OF 3
SAVE
LANGUAGE
ENGLISH SPANISH FRENCH
CLOCK
TIME
DISPLAY
WALLPAPER
19
SET CLOCK
The CLOCK menu gives you the following
three settings.
Use the back button to return to the
SETTINGS menu.
ACCESS SETTINGS
Explore everything your Keurig
®
2.0
brewer has to offer by accessing the
SETTINGS menu. From the home
screen, select the Settings Button.
Use the arrows to scroll through the
menu. To exit, press the back button.
CHOOSE LANGUAGE
Press English, Spanish or French to select
the LANGUAGE.
Press SAVE to confirm or use the back
button to return to the SETTINGS menu.
Time: Set the current time using the
arrows, then choose AM or PM.
Press SAVE to confirm or use the back
button to return to the SETTINGS menu.
Display: Choose DIGITAL or ANALOG
DISPLAY. For DIGITAL DISPLAY only,
use the toggle to select 12 HR or
24 HR (military).
Press SAVE to confirm or use the back
button to return to the SETTINGS menu.
Wallpaper: You can customize your
Touchscreen color. Simply press a color
window to select a WALLPAPER for the
home screen.
Press SAVE to CONFIRM SELECTION
or use the back button to return to the
WALLPAPER menu.
SETTINGS MENU
SECTION 2
back button
back button
back button
20 21
RESERVOIR
LIGHT
NIGHTLIGHT
TIMER
LIGHTING
SAVE
TURN NIGHTLIGHT OFF AT:
5
:
00
ENABLE
SAVE
TURN NIGHTLIGHT ON AT:
11
:
00
ENABLE
SET
NIGHTLIGHT
ON
SET
NIGHTLIGHT
OFF
NIGHTLIGHT TIMER
SAVE
WHITE GREEN
BLUE RED
RESERVOIR LIGHT
SETTINGS
LIGHTING
HIGH ALTITUDE
WATER FILTER REMINDER
2 OF 3
SAVE
TURN BREWER OFF WHEN IDLE FOR:
0
:
15
ENABLE
SETTINGS
LANGUAGE
CLOCK
AUTO ON/OFF
1 OF 3
SAVE
TURN BREWER ON AT:
7
:
00
ENABLE
SAVE
TURN BREWER OFF AT:
10
:
00
ENABLE
AUTO ON/OFF
AUTO ON
AUTO OFF
ENERGY SAVER
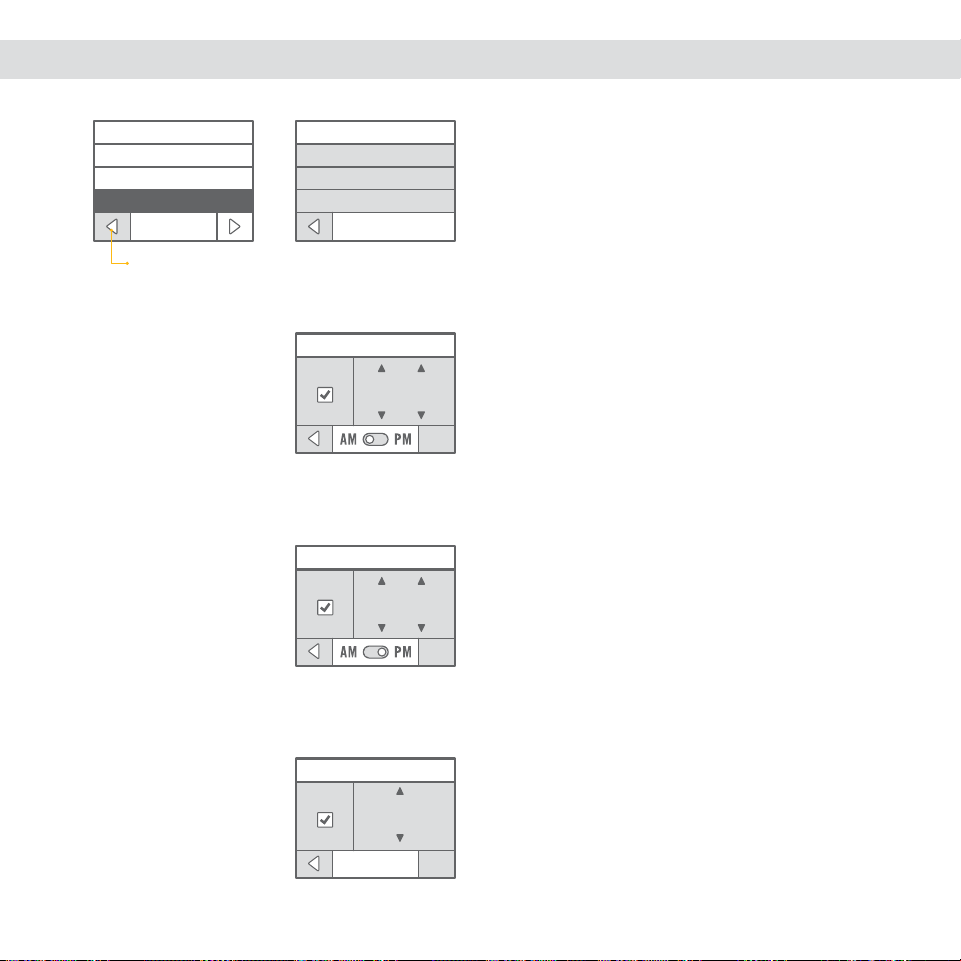
SETTINGS MENU
SECTION 2
ENABLE AUTO ON/OFF
You can leave your brewer on at all times
so it’s ready to make your perfect cup
any time of day, or you can set the AUTO
ON, AUTO OFF or ENERGY SAVER mode.
Use the back button to return to the
SETTINGS menu.
Auto On: Select ENABLE to activate
AUTO ON. Use the arrows to set the time
for the brewer to automatically turn on.
Press SAVE to confirm or use the back
button to return to the SETTINGS menu.
Auto Off: Select ENABLE to activate
AUTO OFF. Use the arrows to set the time
for the brewer to automatically turn off.
Press SAVE to confirm or use the back
button to return to the SETTINGS menu.
Energy Saver: Select ENABLE to activate
ENERGY SAVER mode. In increments of
15 minutes, set the brewer to turn off after
a set length of time after the last brew.
Press SAVE to confirm or use the back
button to return to the SETTINGS menu.
Select ENABLE to activate the NIGHTLIGHT
TIMER. Use the arrows to set the time for
the home screen to match the color of the
WATER RESERVOIR LIGHT.
Press SAVE to confirm or use the back
button to return to the SETTINGS menu.
APPLY LIGHTING
Everything looks better in the right
light. Choose the color of your WATER
RESERVOIR LIGHT and engage
NIGHTLIGHT TIMER to provide a warm
glow in your kitchen at night.
Use the back button to return to the
SETTINGS menu.
Water Reservoir Light: Choose white,
green, blue or red.
Press SAVE to confirm or use the back
button to return to the SETTINGS menu.
Nightlight Timer: Choose SET NIGHTLIGHT
ON or SET NIGHTLIGHT OFF.
Use the back button to return to the
SETTINGS menu.
back button
back button

20 21
RESERVOIR
LIGHT
NIGHTLIGHT
TIMER
LIGHTING
SAVE
TURN NIGHTLIGHT OFF AT:
5
:
00
ENABLE
SAVE
TURN NIGHTLIGHT ON AT:
11
:
00
ENABLE
SET
NIGHTLIGHT
ON
SET
NIGHTLIGHT
OFF
NIGHTLIGHT TIMER
SAVE
WHITE GREEN
BLUE RED
RESERVOIR LIGHT
SETTINGS
LIGHTING
HIGH ALTITUDE
WATER FILTER REMINDER
2 OF 3
SAVE
TURN BREWER OFF WHEN IDLE FOR:
0
:
15
ENABLE
SETTINGS
LANGUAGE
CLOCK
AUTO ON/OFF
1 OF 3
SAVE
TURN BREWER ON AT:
7
:
00
ENABLE
SAVE
TURN BREWER OFF AT:
10
:
00
ENABLE
AUTO ON/OFF
AUTO ON
AUTO OFF
ENERGY SAVER
SETTINGS MENU
SECTION 2
ENABLE AUTO ON/OFF
You can leave your brewer on at all times
so it’s ready to make your perfect cup
any time of day, or you can set the AUTO
ON, AUTO OFF or ENERGY SAVER mode.
Use the back button to return to the
SETTINGS menu.
Auto On: Select ENABLE to activate
AUTO ON. Use the arrows to set the time
for the brewer to automatically turn on.
Press SAVE to confirm or use the back
button to return to the SETTINGS menu.
Auto Off: Select ENABLE to activate
AUTO OFF. Use the arrows to set the time
for the brewer to automatically turn off.
Press SAVE to confirm or use the back
button to return to the SETTINGS menu.
Energy Saver: Select ENABLE to activate
ENERGY SAVER mode. In increments of
15 minutes, set the brewer to turn off after
a set length of time after the last brew.
Press SAVE to confirm or use the back
button to return to the SETTINGS menu.
Select ENABLE to activate the NIGHTLIGHT
TIMER. Use the arrows to set the time for
the home screen to match the color of the
WATER RESERVOIR LIGHT.
Press SAVE to confirm or use the back
button to return to the SETTINGS menu.
APPLY LIGHTING
Everything looks better in the right
light. Choose the color of your WATER
RESERVOIR LIGHT and engage
NIGHTLIGHT TIMER to provide a warm
glow in your kitchen at night.
Use the back button to return to the
SETTINGS menu.
Water Reservoir Light: Choose white,
green, blue or red.
Press SAVE to confirm or use the back
button to return to the SETTINGS menu.
Nightlight Timer: Choose SET NIGHTLIGHT
ON or SET NIGHTLIGHT OFF.
Use the back button to return to the
SETTINGS menu.
back button
back button

22
SAVE
HIGH ALTITUDE
ENABLE
SETTINGS
LIGHTING
HIGH ALTITUDE
WATER FILTER REMINDER
2 OF 3
SAVE
WATER FILTER REMINDER
ENABLE
SETTINGS
LIGHTING
HIGH ALTITUDE
WATER FILTER REMINDER
2 OF 3
YESNO
RESTORE FACTORY SETTINGS
ARE YOU SURE YOU WANT
TO RESTORE SETTINGS TO
FACTORY DEFAULTS?
SETTINGS
RESTORE FACTORY SETTINGS
3 OF 3
23
SETTINGS MENU
SECTION 2
ENABLE WATER FILTER REMINDER
If you are using a Keurig
TM
Water Filter,
select ENABLE to activate the WATER
FILTER REMINDER notices.
Press SAVE to confirm or use the back
button to return to the SETTINGS menu.
Refer to page 28 for more information.
ENABLE HIGH ALTITUDE
To ensure your brewer works properly at
higher altitudes (5,000 feet), ENABLE the
HIGH ALTITUDE mode.
Press SAVE to confirm or use the back
button to return to the SETTINGS menu.
RESTORE FACTORY SETTINGS
Press YES to restore your brewer to the
default settings. (Restoring defaults erases
any saved FAVORITES, AUTO ON/OFF
and LIGHTING. The clock will be set to
12:00 AM.)
Press NO to return to the SETTINGS menu.
CARING FOR YOUR BREWER
CLEANING THE BREWER EXTERIOR
Keep your Keurig
®
2.0 brewer looking its best by cleaning the exterior from time to time.
Just clean with a damp, soapy, lint-free, non-abrasive cloth. Never immerse the brewer in
water or other liquids.
CLEANING THE DRIP TRAY
The Drip Tray can accumulate up to 8 ounces of overflow. The Drip Tray and the Drip Tray
Plate should occasionally be rinsed clean. To remove the Drip Tray, simply slide it toward
you, keeping it level at all times to avoid spilling. Clean with a damp, soapy, lint-free,
non-abrasive cloth.
CLEANING THE WATER RESERVOIR AND THE FLIP-TOP RESERVOIR LID
Clean the Water Reservoir and the Flip-Top Reservoir Lid with a damp, soapy, lint-free,
non-abrasive cloth and rinse thoroughly.
Do not dry the inside of the Water Reservoir with a cloth as lint may remain. Be sure to
rinse the Water Reservoir thoroughly after cleaning to ensure that no cleaning solutions
remain as they may contaminate the water supply in the brewer.
DO NOT PLACE THESE ITEMS IN THE DISHWASHER.
back button
back button
back button
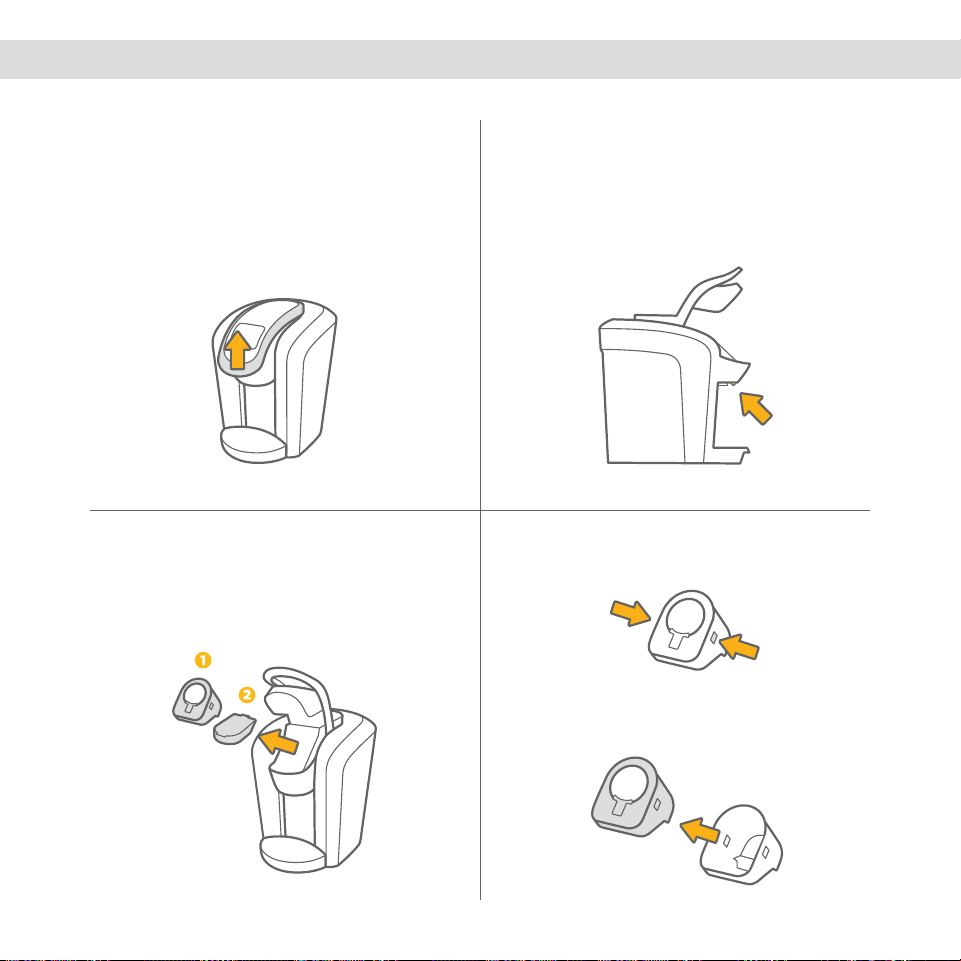
24 25
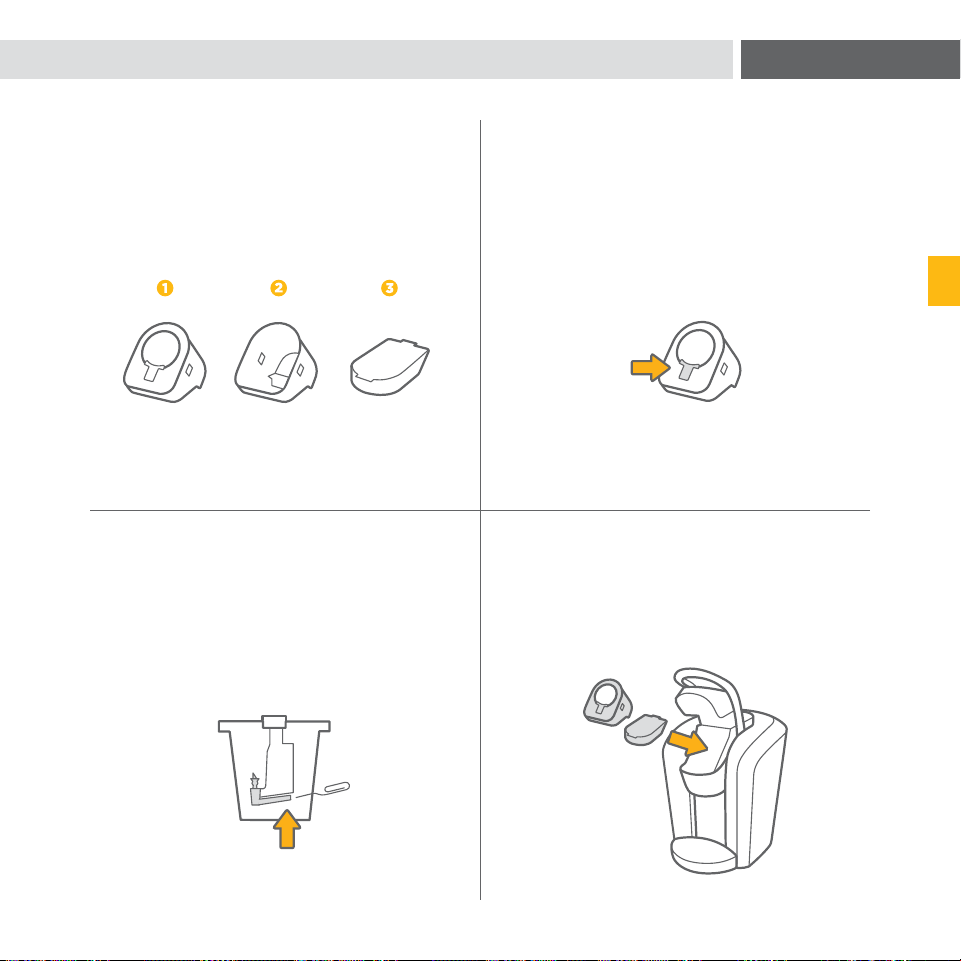
3. Pull out the Pack Holder Assembly (1)
and Base (2).
CLEANING THE PACK HOLDER
1. Lift the Handle.
2. Push up while grabbing the sides of the
Pack Holder Assembly. Pull away from
the brewer.
CAUTION: Sharp needles. Do not put fingers in chamber.
4. Press the release buttons on both sides
of the Pack Holder Assembly.
Separate the Pack Holder from
the Housing.
5. Clean the Pack Holder (1), Housing (2)
and Base (3) with a damp, soapy,
lint-free, non-abrasive cloth and
rinse thoroughly.
CLEANING THE EXIT NEEDLE
1. If a clog arises in the exit needle, push
the lever of the Pack Holder to reveal
the exit needle.
3. After all pieces are cleaned, place the
Base, then the Pack Holder Assembly
into the Brew Head. Lower the Handle.
CAUTION: Sharp needles. Do not put fingers in chamber.
2. Use a paper clip or similar tool to
loosen the clog. Rinse thoroughly with
hot water.
CARING FOR YOUR BREWER
SECTION 2
24 25
3. Pull out the Pack Holder Assembly (1)
and Base (2).
CLEANING THE PACK HOLDER
1. Lift the Handle.
2. Push up while grabbing the sides of the
Pack Holder Assembly. Pull away from
the brewer.
CAUTION: Sharp needles. Do not put fingers in chamber.
4. Press the release buttons on both sides
of the Pack Holder Assembly.
Separate the Pack Holder from
the Housing.
5. Clean the Pack Holder (1), Housing (2)
and Base (3) with a damp, soapy,
lint-free, non-abrasive cloth and
rinse thoroughly.
CLEANING THE EXIT NEEDLE
1. If a clog arises in the exit needle, push
the lever of the Pack Holder to reveal
the exit needle.
3. After all pieces are cleaned, place the
Base, then the Pack Holder Assembly
into the Brew Head. Lower the Handle.
CAUTION: Sharp needles. Do not put fingers in chamber.
2. Use a paper clip or similar tool to
loosen the clog. Rinse thoroughly with
hot water.
CARING FOR YOUR BREWER
SECTION 2
27 26
CARING FOR YOUR BREWER
SECTION 2
CLEANING THE KEURIG
TM
CARAFE
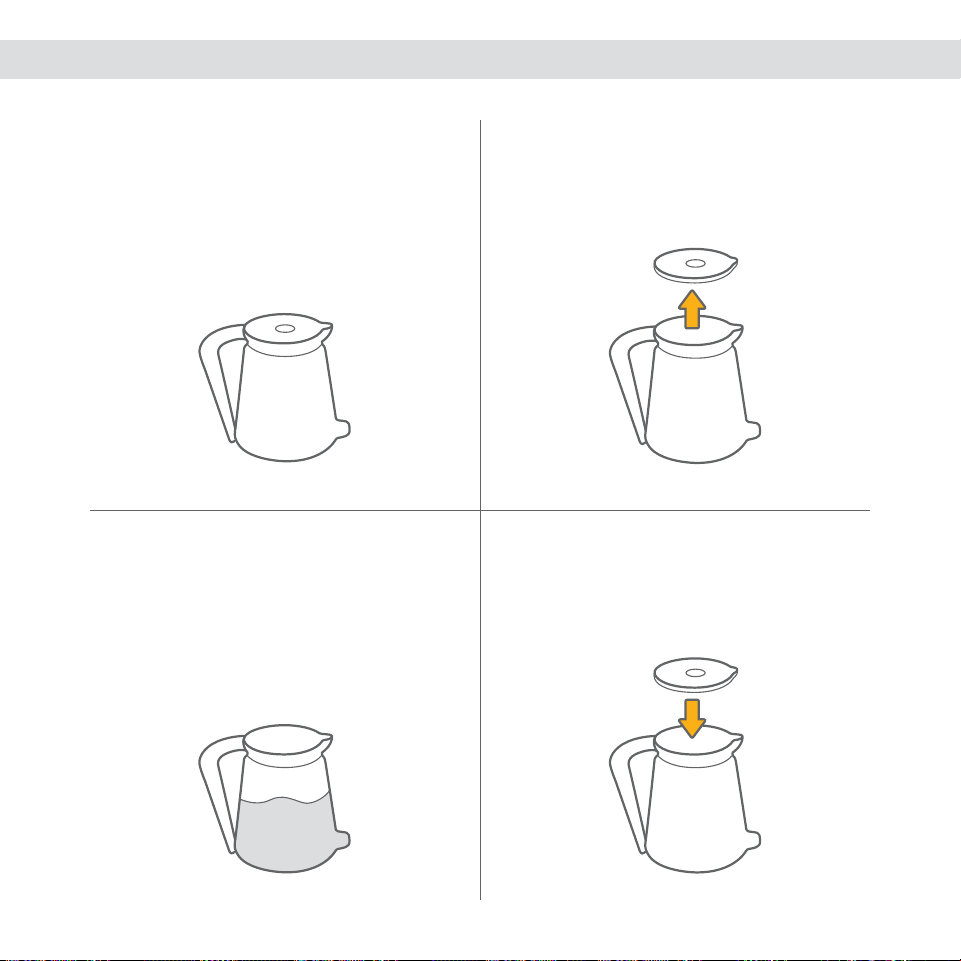
1. Carefully empty the Keurig
TM
Carafe.
2. Remove the lid.
4. Replace the lid. Ensure that the lid is
securely in place prior to brewing your
next carafe of coffee.
3. Wipe the inside of the Keurig
TM
Carafe
and the lid with a damp, soapy, lint-free,
non-abrasive cloth. Rinse thoroughly
with hot water. The Keurig
TM
Carafe
should not be placed in the dishwasher
or submerged.
KEURIG
TM
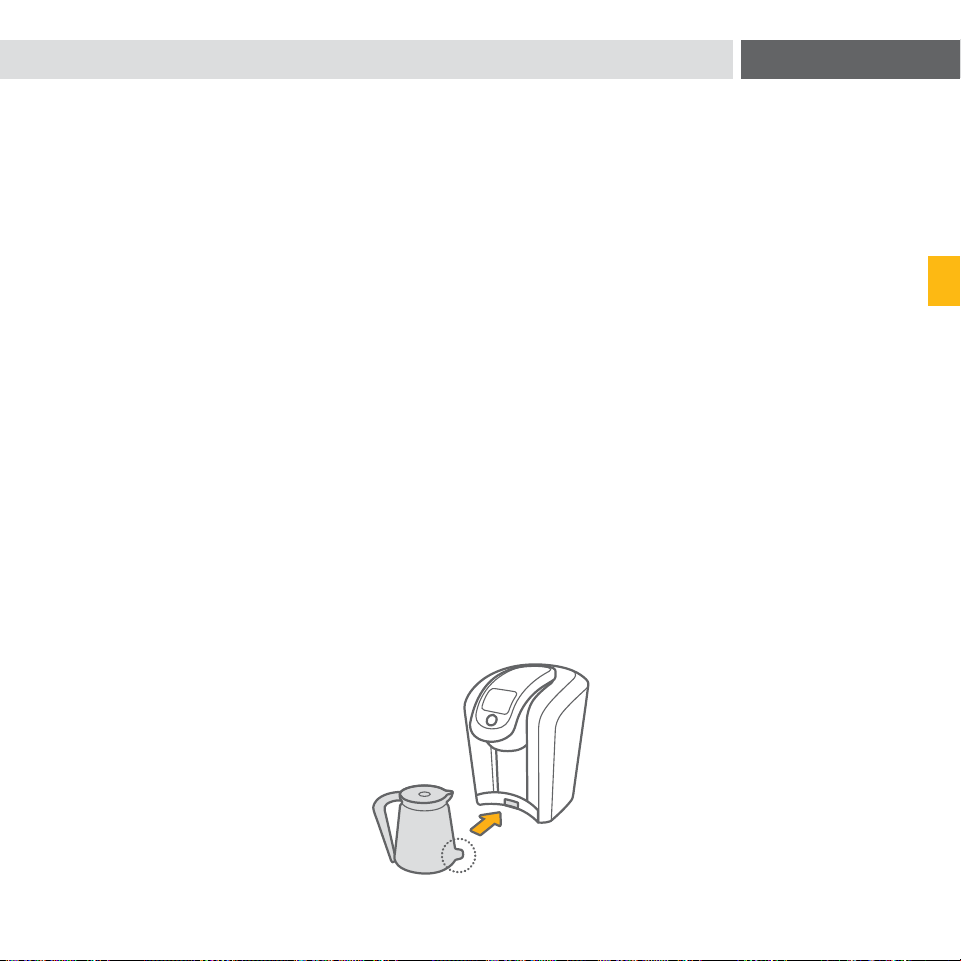
CARAFE OPERATION
This unique Keurig
TM
Carafe was specifically designed for use with the Keurig
®
2.0
brewer. To connect the Keurig
TM
Carafe to the brewer, make sure the Keurig
TM
Carafe is
securely inserted into the brewer. The Keurig
®
2.0 brewer contains a sensory system that
determines when the Keurig
TM
Carafe is in place and it is safe to begin brewing. If the
Keurig
TM
Carafe is not in place or incorrectly inserted, the brewing process will not begin.
If the Keurig
TM
Carafe is removed during brewing, brewing will stop.
CAUTION: Make sure the Keurig
TM
Carafe is empty before each use.
CAUTION: After brewing, the Keurig
TM
Carafe will contain extremely hot liquid. Take care
when pouring from the Keurig
TM
Carafe. Never place your hand over the Keurig
TM
Carafe
where hot steam is venting. Never allow children to use the Keurig
TM
Carafe or operate
the brewer without adult supervision. Press the Power Button to terminate the brew
process. Follow the instructions on the Touchscreen before removing the Keurig
TM
Carafe.
The brewer will return to the home screen. Remove and discard the used K-Carafe
TM
pack.
CAUTION: There is extremely hot water in the Pack Holder during the brew process.
To avoid risk of injury, do not lift the Handle during the brewing process.
To maintain the ideal combination of taste, freshness and temperature, we recommend
preheating the Keurig
TM
Carafe. To preheat the Keurig
TM
Carafe, fill it with hot water for
approximately 30 seconds and then pour out entirely prior to placing the Keurig
TM
Carafe
into the brewer.
CAUTION: HAND WASH ONLY. DO NOT SUBMERGE. DO NOT MICROWAVE.
27 26
CARING FOR YOUR BREWER
SECTION 2
CLEANING THE KEURIG
TM
CARAFE
1. Carefully empty the Keurig
TM
Carafe.
2. Remove the lid.
4. Replace the lid. Ensure that the lid is
securely in place prior to brewing your
next carafe of coffee.
3. Wipe the inside of the Keurig
TM
Carafe
and the lid with a damp, soapy, lint-free,
non-abrasive cloth. Rinse thoroughly
with hot water. The Keurig
TM
Carafe
should not be placed in the dishwasher
or submerged.
KEURIG
TM
CARAFE OPERATION
This unique Keurig
TM
Carafe was specifically designed for use with the Keurig
®
2.0
brewer. To connect the Keurig
TM
Carafe to the brewer, make sure the Keurig
TM
Carafe is
securely inserted into the brewer. The Keurig
®
2.0 brewer contains a sensory system that
determines when the Keurig
TM
Carafe is in place and it is safe to begin brewing. If the
Keurig
TM
Carafe is not in place or incorrectly inserted, the brewing process will not begin.
If the Keurig
TM
Carafe is removed during brewing, brewing will stop.
CAUTION: Make sure the Keurig
TM
Carafe is empty before each use.
CAUTION: After brewing, the Keurig
TM
Carafe will contain extremely hot liquid. Take care
when pouring from the Keurig
TM
Carafe. Never place your hand over the Keurig
TM
Carafe
where hot steam is venting. Never allow children to use the Keurig
TM
Carafe or operate
the brewer without adult supervision. Press the Power Button to terminate the brew
process. Follow the instructions on the Touchscreen before removing the Keurig
TM
Carafe.
The brewer will return to the home screen. Remove and discard the used K-Carafe
TM
pack.
CAUTION: There is extremely hot water in the Pack Holder during the brew process.
To avoid risk of injury, do not lift the Handle during the brewing process.
To maintain the ideal combination of taste, freshness and temperature, we recommend
preheating the Keurig
TM
Carafe. To preheat the Keurig
TM
Carafe, fill it with hot water for
approximately 30 seconds and then pour out entirely prior to placing the Keurig
TM
Carafe
into the brewer.
CAUTION: HAND WASH ONLY. DO NOT SUBMERGE. DO NOT MICROWAVE.

28 29
CONTINUE
Time to replace
the Water Filter!
NOT NOW
YES
Water Filter
Replaced?
NOT NOW
CONTINUE
Time to descale
the brewer!
NOT NOW
OK
Descaling is good maintenance.
Go to www.keurig.com
for instructions.
CANCEL
SECTION 2
MAINTENANCE ALERTS
Your brewer is designed to deliver the perfect cup time after time, year after year. To keep
it working at peak performance, your Keurig
®
2.0 brewer will let you know when it needs a
little attention.
TIME TO REPLACE THE KEURIG
TM
WATER FILTER (VISIT KEURIG.COM TO PURCHASE)
Your brewer will indicate “Time to replace the Water Filter!” after every 1,000 ounces
or two months. Once you’ve replaced the Keurig
TM
Water Filter, press YES to re-set the
WATER FILTER REMINDER notices.
TIME TO DESCALE THE BREWER
Depending on the mineral content of your water, calcium deposits or scale may build
up in your brewer, this is why we recommend using bottled or filtered water. Scale is
non-toxic but if left unattended can hinder brewer performance. Regularly descaling your
brewer every three to six months helps maintain the heating element, and other internal
parts that come in contact with water. Calcium deposits may build up faster, making it
necessary to descale more often.
You should promptly descale when the Touchscreen indicates “Time to descale the
brewer!” However, even if this is not indicated, you should continue to descale your brewer
every three to six months.
DESCALING YOUR BREWER
Before you begin, you will need a large mug, fresh water, Keurig
TM
Descaling Solution and
access to a sink. Do not use a paper cup.
• Empty the water from the Water Reservoir. If there is a Keurig
TM
Water Filter, remove and
set aside. Disable AUTO OFF features, if necessary (refer to page 20).
STEP 1: FIRST DESCALING SOLUTION RINSE
• Press and hold the Power Button to power the brewer off.
• Pour the entire bottle of Keurig
TM
Descaling Solution into the Water Reservoir. Then
fill the empty bottle with water and pour into the Water Reservoir. Press and hold the
Power Button to turn the brewer back on.
• Place a large mug on the Drip Tray and run a cleansing brew by pressing and holding the
Brew Button until 6 ounces of water has been dispensed. The brewer will automatically
stop dispensing after 6 ounces. Do not use a Keurig
®
brand pack. Pour the contents of
the mug into the sink.
STEP 2: SECOND DESCALING SOLUTION RINSE
• Repeat the cleansing brew process until the Touchscreen indicates “More Water Please.”
Let the brewer stand for at least 30 minutes while still on.
• After 30 minutes, discard any residual solution and rinse the Water Reservoir thoroughly.
STEP 3: FRESH WATER RINSE
• Ensure the Water Reservoir is filled with fresh water to and not beyond the MAX
FILL line.
• Place a large mug on the Drip Tray and run a cleansing brew. Pour the contents of the
mug into the sink.
• Repeat the cleansing brew process at least 12 times. You may need to refill the Water
Reservoir at least one time during this process.
NOTE: If “Time to descale the brewer!” is still indicated after completing the procedure, repeat the descaling procedure above.

30 31
5
MAINTENANCE ALERTS RECYCLING K-CARAFE
TM
PACKS
DESCALING YOUR BREWER (CONTINUED)
The cleaning action of Keurig
TM
Descaling Solution may result in a foam dispensed from
the brewer. This is natural, as the solution is reacting with the scale inside. For a brewer
that is heavily scaled, the brewer may not fill properly after the descaler is added. If this
occurs, you may see only a small or no output dispensed followed by the sound of air
blowing out. If this occurs:
• Turn off and unplug the brewer.
• If there is Keurig
TM
Descaling Solution in the Water Reservoir, discard the contents,
rinse the Water Reservoir thoroughly and refill with bottled or filtered water.
• Plug the brewer back in, power on, and repeat STEP 3: FRESH WATER RINSE (refer to
page 29). The brewer should begin to function normally as the solution is rinsed out and
the scale is removed. If the problem persists, allow the brewer to sit unplugged for at
least 30 minutes, then continue with the fresh water rinse.
Scan this QR code with your smartphone for step-by-step videos on cleaning, descaling
and more. Or if you prefer, you can watch the videos online at Keurig.com.
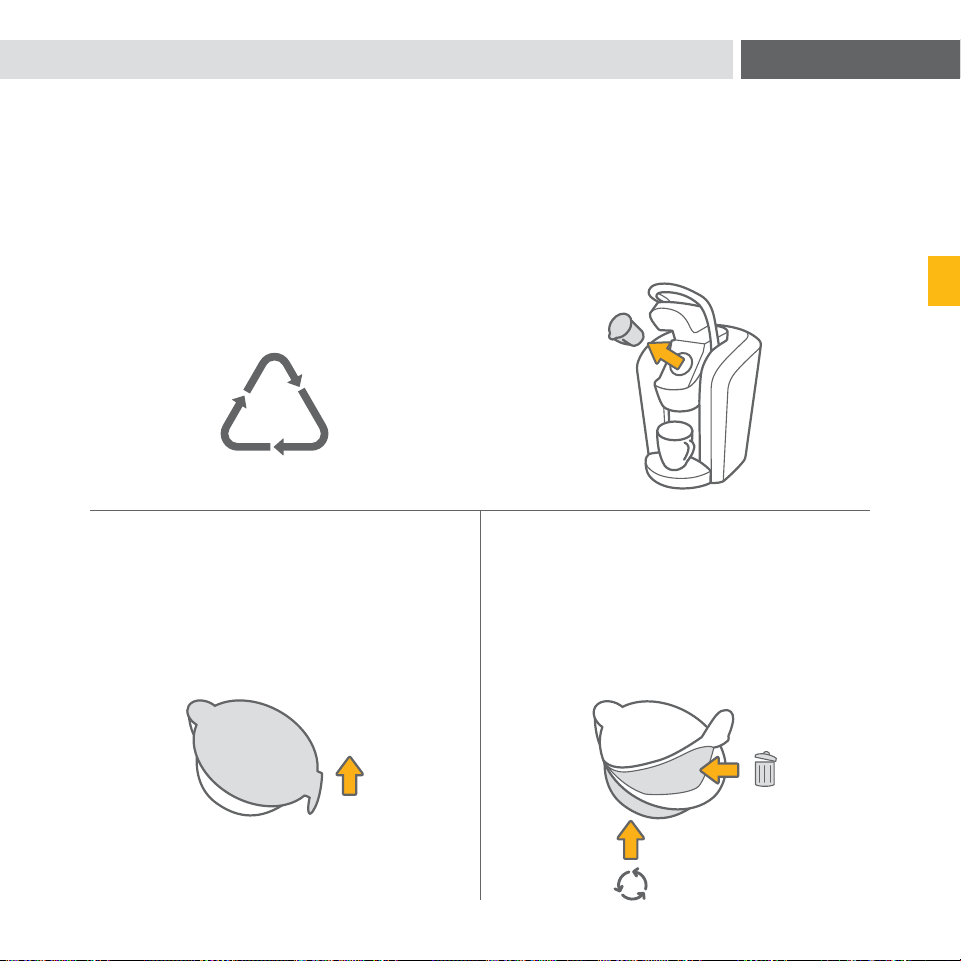
The plastic cups of K-Carafe
TM
packs
can be recycled wherever #5 plastic is
accepted. #5 plastic may not be recyclable
in your community today, so please check
locally with your municipality or waste
hauler, or visit Keurigrecycling.com for
more information.
1. Once brewing is complete, lift the
Handle and carefully remove the
K-Carafe
TM
pack by holding the
outer rim.
CAUTION: The K-Carafe
TM
pack will be hot after brewing.
Use caution when removing. Allow it to cool completely
before handling.
3. Once separated, discard the lid and the
attached filter. Recycle your K-Carafe
TM
pack’s plastic cup wherever #5 plastic
is accepted.
2. Once cool, separate the lid and filter
from the cup. The filter will adhere to
the lid.
SECTION 2
30 31
5
MAINTENANCE ALERTS RECYCLING K-CARAFE
TM
PACKS
DESCALING YOUR BREWER (CONTINUED)
The cleaning action of Keurig
TM
Descaling Solution may result in a foam dispensed from
the brewer. This is natural, as the solution is reacting with the scale inside. For a brewer
that is heavily scaled, the brewer may not fill properly after the descaler is added. If this
occurs, you may see only a small or no output dispensed followed by the sound of air
blowing out. If this occurs:
• Turn off and unplug the brewer.
• If there is Keurig
TM
Descaling Solution in the Water Reservoir, discard the contents,
rinse the Water Reservoir thoroughly and refill with bottled or filtered water.
• Plug the brewer back in, power on, and repeat STEP 3: FRESH WATER RINSE (refer to
page 29). The brewer should begin to function normally as the solution is rinsed out and
the scale is removed. If the problem persists, allow the brewer to sit unplugged for at
least 30 minutes, then continue with the fresh water rinse.
Scan this QR code with your smartphone for step-by-step videos on cleaning, descaling
and more. Or if you prefer, you can watch the videos online at Keurig.com.
The plastic cups of K-Carafe
TM
packs
can be recycled wherever #5 plastic is
accepted. #5 plastic may not be recyclable
in your community today, so please check
locally with your municipality or waste
hauler, or visit Keurigrecycling.com for
more information.
1. Once brewing is complete, lift the
Handle and carefully remove the
K-Carafe
TM
pack by holding the
outer rim.
CAUTION: The K-Carafe
TM
pack will be hot after brewing.
Use caution when removing. Allow it to cool completely
before handling.
3. Once separated, discard the lid and the
attached filter. Recycle your K-Carafe
TM
pack’s plastic cup wherever #5 plastic
is accepted.
2. Once cool, separate the lid and filter
from the cup. The filter will adhere to
the lid.
SECTION 2

32 33
BREWER SHUTS OFF OR TURNS ON AUTOMATICALLY
• Check to make sure that the AUTO ON/OFF settings have not been set (refer to page 20).
• The water level is low and a full cup cannot be brewed. Add water to the Water Reservoir.
THE TOUCHSCREEN INDICATES “MORE WATER PLEASE.”
• If the water level is not low, remove the Water Reservoir and empty the water. Then
thoroughly clean (refer to page 23). Fill the Water Reservoir to the MAX FILL line, return it
to the brewer and ensure it is seated properly in its base.
THE TIME IS NOT DISPLAYED ON THE TOUCHSCREEN
• If power is interrupted to the brewer by unplugging it, or if power is lost, follow the
procedure on page 19 to set the CLOCK.
THE K-CUP
®
PACK HAS A KEURIG
®
LOGO, BUT TOUCHSCREEN INDICATES “OOPS!”
• Your Keurig
®
2.0 brewer will not work with packs that don’t have the Keurig
®
logo
on them. Some Keurig
®
brand packs produced prior to January 2014 may not be
enabled to work with the Keurig
®
2.0 brewer. Please contact Customer Service at
1.866.901.BREW (2739) for a solution.
STILL HAVING TROUBLE? VISIT KEURIG.COM FOR MORE INFORMATION.
BREWER DOES NOT HAVE POWER
• Plug the brewer into an independent outlet without dimmer control.
• Check to be sure that the brewer is plugged in securely.
• Plug the brewer into a different outlet.
• Reset your home’s circuit breaker if necessary.
• Press and hold the Power Button and ensure the Touchscreen is illuminated.
BREWER WILL NOT BREW
• After placing a pack in the Pack Holder, make sure the Handle is lowered completely and
the Touchscreen displays the appropriate brew screen. Follow the brewing instructions
in SECTION 1 (refer to pages 10 – 11).
• If the Touchscreen indicates “More Water Please.” add water to the Water Reservoir or
make sure the Water Reservoir is seated properly in its base.
• If the Touchscreen indicates “More Water Please.” even after refilling, remove the Water
Reservoir and empty the water. Then thoroughly clean (refer to page 23). Fill the Water
Reservoir to the MAX FILL line, return it to the brewer and ensure it is seated properly in
its base.
• The Pack Holder may need to be cleaned (refer to pages 24 – 25) or the brewer may
need to be descaled (refer to pages 28 – 30).
• If you have completed the above procedure two times and this situation persists,
contact Customer Service at 1.866.901.BREW (2739).
BREWER BREWS ONLY A PARTIAL CUP
• Clean the Pack Holder if necessary (refer to pages 24 – 25).
• The Water Reservoir may have been removed during brewing. Replace the Water
Reservoir and perform a cleansing brew (refer to page 9) without a pack.
• Descale the brewer (refer to pages 28 – 30).
• If you have repeated the descale procedure on your brewer two times and it is still only
brewing a partial cup, contact Customer Service at 1.866.901.BREW (2739).
TROUBLESHOOTING
SECTION 3

34 3 5
WARRANTY
SECTION 4
LIMITED ONE YEAR WARRANTY
Keurig warrants that your brewer will be free of defects in materials or workmanship
under normal home use for one year from the date of purchase. It is recommended that
you fill out and return the warranty card enclosed with your brewer so that your purchase
information will be stored in our system. Keurig will, at its option, repair or replace a
defective brewer without charge upon its receipt of proof of the date of purchase. If a
replacement brewer is necessary to service this warranty, the replacement brewer may be
new or reconditioned. If a replacement brewer is sent, a new limited one year warranty will
be applied to the replacement brewer.
This warranty only applies to brewers operated in the United States and Canada. This
warranty gives you specific legal rights, and you may also have other rights that vary from
state to state and, in the case of Canada, from province to province.
The Keurig
®
2.0 brewer is designed to only work with Keurig
®
brand packs. Any damage
to or malfunction of your brewer resulting from the use of non-Keurig
®
brand packs and
accessories may not be covered by this warranty or may result in a service fee if the
damage or malfunction is determined to be caused by such use.
WHAT IS NOT COVERED BY THE LIMITED WARRANTY?
THIS WARRANTY DOES NOT COVER CONSEQUENTIAL OR INCIDENTAL DAMAGES
SUCH AS PROPERTY DAMAGE AND DOES NOT COVER INCIDENTAL COSTS
AND EXPENSES RESULTING FROM ANY BREACH OF THIS WARRANTY, EVEN IF
FORESEEABLE. Some states or provinces do not allow the exclusion or limitations of
incidental or consequential damages, so the above limitation or exclusion may not apply
to you depending on the state or province of purchase.
Nor does this warranty cover damages caused by use of non-Keurig
®
brand packs or
accessories, services performed by anyone other than Keurig or its authorized service
providers, use of parts other than genuine Keurig parts, or external causes such as abuse,
misuse, inappropriate power supply or acts of God.
OTHER LIMITATIONS
THIS WARRANTY IS EXCLUSIVE AND IS IN LIEU OF ANY OTHER EXPRESS WARRANTY,
WHETHER WRITTEN OR ORAL. IN ADDITION, KEURIG HEREBY SPECIFICALLY
DISCLAIMS ALL OTHER WARRANTIES WITH RESPECT TO YOUR K2.0-500 BREWER,
INCLUDING ANY IMPLIED WARRANTY OF MERCHANTABILITY OR FITNESS FOR ANY
PARTICULAR PURPOSE. Some states or provinces do not allow disclaimers of such
implied warranties or limitations on how long an implied warranty lasts, so the above
limitation may not apply to you depending on the state or the province of purchase.
HOW DO YOU OBTAIN WARRANTY SERVICE?
Keurig
®
brewers are high-quality appliances and, with proper care, are intended
to provide years of satisfying performance. However, should the need arise for warranty
servicing, simply call Keurig Customer Service at our toll free phone number
1.866.901.BREW (2739). Please do not return your brewer for servicing without first
speaking to Keurig Customer Service to obtain an Authorization to Return number
(ATR). Keurig
®
brewers returned without an ATR number will be returned to the sender
without servicing.
Keurig, Incorporated
33 Coffee Lane
Waterbury, VT 05676
1.866.901.BREW (2739)

36 37
GUIDE
FRANÇAIS

36 37
GUIDE
FRANÇAIS

38 39
Lorsque vous utilisez des appareils
électriques, vous devriez suivre
certaines mesures de sécurité,
notamment les suivantes :
1. Lire toutes les instructions avant
l’utilisation.
2. Ne pas toucher les surfaces
chaudes. Utiliser les poignées s’il
y en a.
3. Installer correctement l’appareil
et le placer dans un endroit
conforme aux présentes
instructions avant de l’utiliser.
4. L’utilisation d’accessoires non
recommandés par le fabricant
de l’appareil risque de causer un
incendie, une décharge électrique
ou des blessures.
5. Ne pas placer l’appareil sur un
élément électrique ou un brûleur à
gaz, ni à proximité. Ne pas placer
dans un four chaud.
6. Ne pas utiliser l’appareil à
l’extérieur.
7. Pour éviter les risques d’incendie,
de décharge électrique ou de
blessures, ne pas immerger la
fiche, le cordon d’alimentation ou
l’appareil dans l’eau ni dans aucun
autre liquide.
8. Ne pas dépasser la marque de
niveau plein (MAX).
9. Utiliser seulement de l’eau dans
cet appareil! Ne verser aucun
autre liquide ou aliment dans
le réservoir d’eau, à l’exception
des produits mentionnés dans
les instructions de nettoyage du
présent manuel.
10. Éteindre et débrancher l’appareil
avant de le nettoyer ou d’en faire
l’entretien. Laisser l’appareil refroidir
avant d’ajouter ou d’enlever des
pièces et avant de le nettoyer.
11. Pour un fonctionnement optimal,
brancher l’appareil dans une prise
de courant séparée sur un circuit
dédié pour éviter que les lumières
vacillent, que les fusibles sautent ou
que les disjoncteurs
se déclenchent.
12. Ne jamais utiliser un appareil
dont la fiche ou le cordon
d’alimentation est endommagé
ou un appareil qui présente un
trouble de fonctionnement ou qui
a été endommagé de quelque
façon que ce soit. Communiquer
avec le Service à la clientèle de
Keurig pour signaler tout mauvais
fonctionnement du système
d’infusion ou tout dommage à
celui-ci.
13. Ne pas laisser le cordon
d’alimentation pendre d’une table
ou d’un comptoir ni entrer en
contact avec une surface chaude.
14. Pour débrancher le système
d’infusion, appuyer d’abord sur le
bouton de mise en marche pour
éteindre l’appareil, puis retirer le
cordon de la prise.
15. Ne jamais laisser des enfants
utiliser le système d’infusion, ni
rester à proximité sans surveillance.
16. Ne pas soulever la poignée du
système d’infusion pendant
une infusion.
17. Toujours laisser le couvercle
sur le réservoir d’eau, sauf lors
du remplissage.
18. L’appareil est équipé d’un
cordon d’alimentation muni d’un
conducteur et d’une fiche de mise à
la terre. L’appareil doit être mis à la
terre en branchant la fiche dans une
prise de courant à contact de mise
à la terre à trois trous. En cas de
court-circuit, la mise à la terre réduit
les risques de décharge électrique.
19. Si la prise de courant est une prise
de courant murale standard à deux
trous, le propriétaire a l’obligation
et la responsabilité de la faire
remplacer par une prise de courant
à contact de mise à la terre à
trois trous.
20. Il ne faut en aucun cas couper
ou enlever la troisième broche
(mise à la terre) de la fiche du
cordon d’alimentation, ni utiliser
un adaptateur.
21. Consulter un électricien qualifié si
les instructions sur la mise à la terre
ne sont pas parfaitement comprises
ou en cas de doutes sur la mise à la
terre de l’appareil.
22. Ne pas utiliser l’appareil pour une
fin autre que celle pour laquelle il
a été conçu.
23. Retirer le disque de protection
avant l’infusion.
RÈGLES DE SÉCURITÉ IMPORTANTES
AVERTISSEMENT AUX
UTILISATEURS ET AUX PARENTS :
1. NE permettez PAS aux enfants
d’utiliser l’appareil sans la
supervision d’un adulte. L’appareil
distribue de l’eau très chaude.
2. AVIS SPÉCIAL AUX
UTILISATEURS DE CHOCOLAT
CHAUD/AUTRES BOISSONS :
APRÈS L’UTILISATION D’UNE
DOSETTE DE CHOCOLAT CHAUD/
AUTRE, LANCEZ IMMÉDIATEMENT
UN CYCLE D’INFUSION D’EAU
CHAUDE sans dosette pour
éviter une possible obstruction
de l’aiguille de sortie. NE tenez
PAS pour acquis que le prochain
utilisateur le fera.
VEUILLEZ
CONSERVER CE
MANUEL.
AVERTISSEMENT
!
RISQUE D’INCENDIE ET DE
DÉCHARGE ÉLECTRIQUE
NE PAS OUVRIR
AVERTISSEMENT : POUR RÉDUIRE LES RISQUES
D’INCENDIE ET DE DÉCHARGE ÉLECTRIQUE, NE
PAS RETIRER LA PARTIE INFÉRIEURE DU BOÎTIER.
CET APPAREIL NE CONTIENT AUCUNE PIÈCE
RÉPARABLE PAR L’UTILISATEUR. LES RÉPARATIONS
DOIVENT ÊTRE EFFECTUÉES UNIQUEMENT PAR UN
FOURNISSEUR DE SERVICE AUTORISÉ.

40 41
TABLE DES MATIÈRES
SYSTÈME D’INFUSION KEURIG
®
2.0 | MODÈLE K2.0-500
Caractéristiques 42
Commandes de l’écran tactile 43
SECTION 1
Préparation et infusion de nettoyage 44
Infusion de dosette K-Cup
®
46
Infusion d’une dosette K-Carafe
MC
47
Réglage d’infusion automatique de carafe 48
SECTION 2
Interruption d’une infusion 50
Ajout d’eau 50
Distribution d’eau chaude dans une tasse 51
Ajout de favoris 52
Modification de favoris 53
Utilisation de favoris 53
Menu des réglages 54
Entretien de votre système d’infusion 59
Alertes d’entretien 64
Recyclage des dosettes K-Carafe
MC
67
SECTION 3
Dépannage 68
SECTION 4
Garantie 70
ATTENTION : La dosette est perforée
par trois aiguilles pointues, deux
au-dessus et l’autre au fond du ou
compartiment à dosette. Pour éviter
tout risque de blessure, ne pas
mettre les doigts dans le support
à dosette.
ATTENTION : L’eau se trouvant dans
le support à dosette durant l’infusion
est extrêmement chaude. Pour
éviter tout risque de blessure, ne
pas soulever la poignée ni ouvrir le
boîtier du support à dosette durant
le cycle d’infusion.
ATTENTION : Veillez à ne pas
dépasser la marque de niveau plein
(MAX). Si vous mettez plus d’eau
dans le réservoir, il se peut que
la quantité d’eau de la première
infusion de la journée soit supérieure
à la quantité sélectionnée. Si vous
préférez remplir le réservoir jusqu’au
bord, nous vous recommandons
d’utiliser une tasse plus grande pour
la première infusion de la journée
afin d’éviter tout débordement.
ATTENTION : Toujours garder le
système d’infusion en position
verticale pour éviter tout dommage
au système d’infusion ou toute
blessure.
ATTENTION : Liquide très chaud.
Supervision d’un adulte requise.
INSTRUCTIONS POUR CORDON
D’ALIMENTATION COURT :
L’appareil est doté d’un cordon
d’alimentation court pour éviter qu’il
s’emmêle ou que quelqu’un trébuche
sur un cordon long. Si toutes les
consignes de sécurité sont suivies,
il est possible d’utiliser une rallonge ou
un cordon d’alimentation amovible plus
long. Si une rallonge est utilisée, (1) les
caractéristiques électriques inscrites sur
la rallonge doivent égaler ou excéder
celles de l’appareil, (2) le cordon doit
être fixé de façon à ce qu’il ne pende
pas d’une table ou d’un comptoir pour
éviter qu’un enfant puisse le saisir
ou que quelqu’un trébuche, et (3) la
rallonge doit être munie d’une fiche
avec contact de mise à la terre à
trois broches.
Votre système d’infusion Keurig
®
2.0 fonctionne uniquement avec des
dosettes portant le logo Keurig
®
.
Les systèmes d’infusion Keurig
®
2.0
ne sont pas compatibles avec les filtres
réutilisables My K-Cup
®
.
CE PRODUIT EST DESTINÉ À UN
USAGE DOMESTIQUE SEULEMENT.
AVERTISSEMENT
CE PRODUIT CONTIENT DES
PRODUITS CHIMIQUES, NOTAMMENT
DU PLOMB, UN MÉTAL QUI, SELON
L’ÉTAT DE LA CALIFORNIE, CAUSE
LE CANCER, DES ANOMALIES
CONGÉNITALES OU D’AUTRES
MALFORMATIONS GÉNÉTIQUES.

42 43
K
L
M
N
F
G
D
E
C
B
A
I
J
H
Choisir mode d'infusion
110
ml
170
ml
290
ml
230
ml
TASSES
TASSES
TASSES
170
ml
230
ml
290
ml
110
ml
ÉTAPE 1
MOUSSE
110
ml
ÉTAPE 2
INFUSION
110
ml
170
ml
230
ml
290
ml
410
ml
350
ml
470
ml
350
ml
410
ml
470
ml
DOSETTES K-CUP
®
FUTURES DOSETTES KEURIG
®
ÉCRAN DE SÉLECTION POUR MODES
D'INFUSION KEURIGBREW
®
DOSETTES K-CARAFE
MC
2
3
4
5
6
PRÊT
Soulever pour Commencer
12
:
00
K
E
U
R
I
G
B
R
E
W
INFUSION AUTO
APPUYER POUR RÉGLER
TASSES
PRÊT
FORT
CHOC.
CHAUD
AUTRE
230
ml
A CC
DD
EB
B
A
A
C
D
B
flèches de
défilement
CARACTÉRISTIQUES
COMMANDES DE L’ÉCRAN TACTILE
SYSTÈME D’INFUSION K2.0-500
A. Couvercle du réservoir d’eau
B. Réservoir d’eau
C. Boîtier supérieur
D. Écran tactile/Bouton de mise
en marche
E. Bouton d’infusion
F. Poignée
G. Mécanisme de perforation
H. Cordon d’alimentation
I. Plateau à tasse
J. Cuvette d’égouttage
K. Support à dosette
L. Boîtier
(K et L forment
l’assemblage du support
à dosette)
M. Base
N. Carafe Keurig
MC
RÉGLAGES D’INFUSION
(FORMATS PAR DÉFAUT ENCADRÉS)
A. Infusion Keurig
®
option 1
B. INFUSION AUTO
(dosettes K-Carafe
MC
seulement)
C. Format de tasse
D. Bouton de mise
en marche
E. Bouton des favoris
A. FORT
(café seulement)
B. CHOCOLAT CHAUD/
AUTRE
(boissons autres que le café)
C. Format de tasse
D. Bouton de mise
en marche
PAGE D’ACCUEIL
A. Horloge
B. Bouton de réglages
C. Bouton de distribution
d’eau chaude
D. Bouton de mise
en marche
ÉCRAN POUR
DOSETTES K-CUP
®
ÉCRAN POUR
DOSETTES K-CARAFE
MC
Choisissez infusion Keurig
®
option 1 qui correspond
au chiffre indiqué sur le
couvercle de la dosette.

44 45
PRÉPARATION ET INFUSION DE NETTOYAGE
SECTION 1
PRÉPARATION
1. Placez le système d’infusion sur un
comptoir et branchez-le dans une prise
avec mise à la terre.
INFUSION DE NETTOYAGE
1. Pour lancer une infusion de nettoyage,
placez une tasse de 350 ml (12 oz) sur
le plateau à tasse.
3. Rincez le réservoir d’eau, remplissez-
le d’eau embouteillée ou filtrée, et
replacez-le dans le système d’infusion.
3. Maintenez le bouton d’infusion enfoncé
jusqu’à ce que 170 ml d’eau (6 oz) aient
été distribués. Le système d’infusion
mettra automatiquement fin à la
distribution après que 170 ml d’eau
(6 oz) se soient écoulés.
2. Soulevez la poignée, puis retirez et jetez
le disque de protection.
2. Soulevez et abaissez la poignée du
système d’infusion. Ne placez pas
de dosette Keurig
®
dans le support
à dosette.
4. Appuyez sur le bouton de mise
en marche et attendez que le
préchauffage soit complété, soit
environ trois minutes.
4. Vous voilà prêt à utiliser votre
système d’infusion!
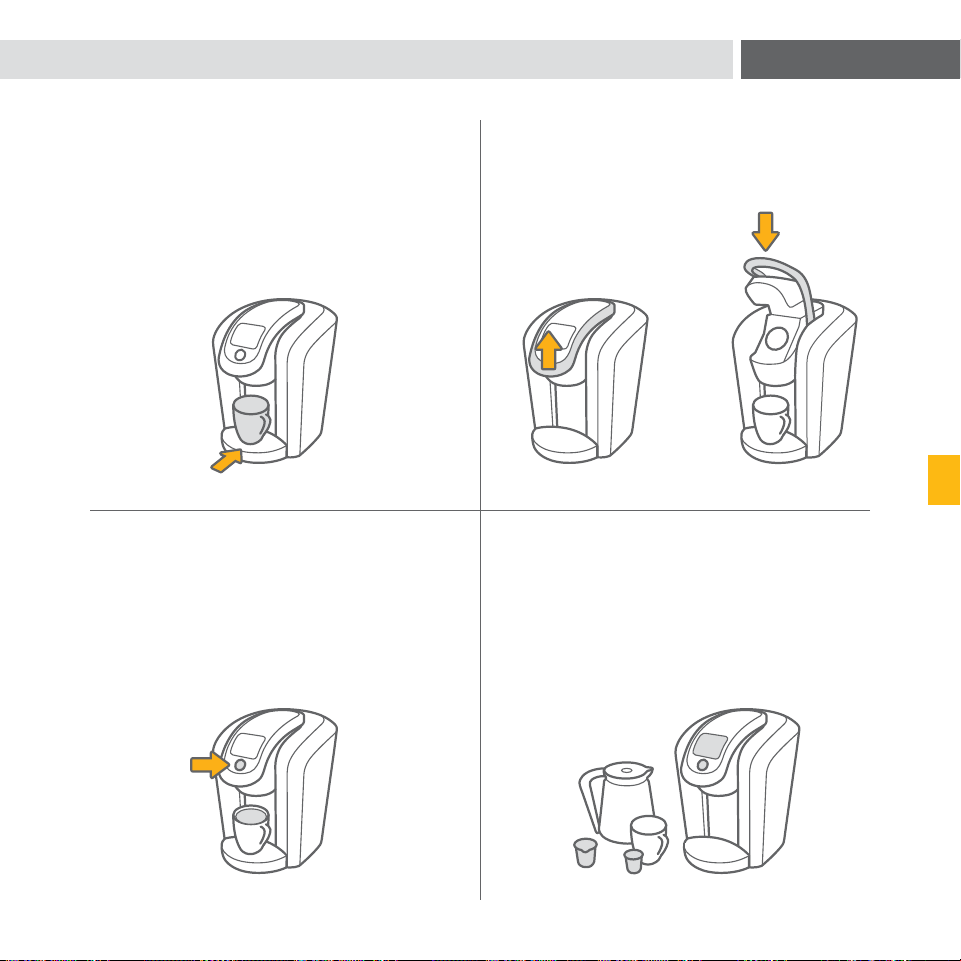
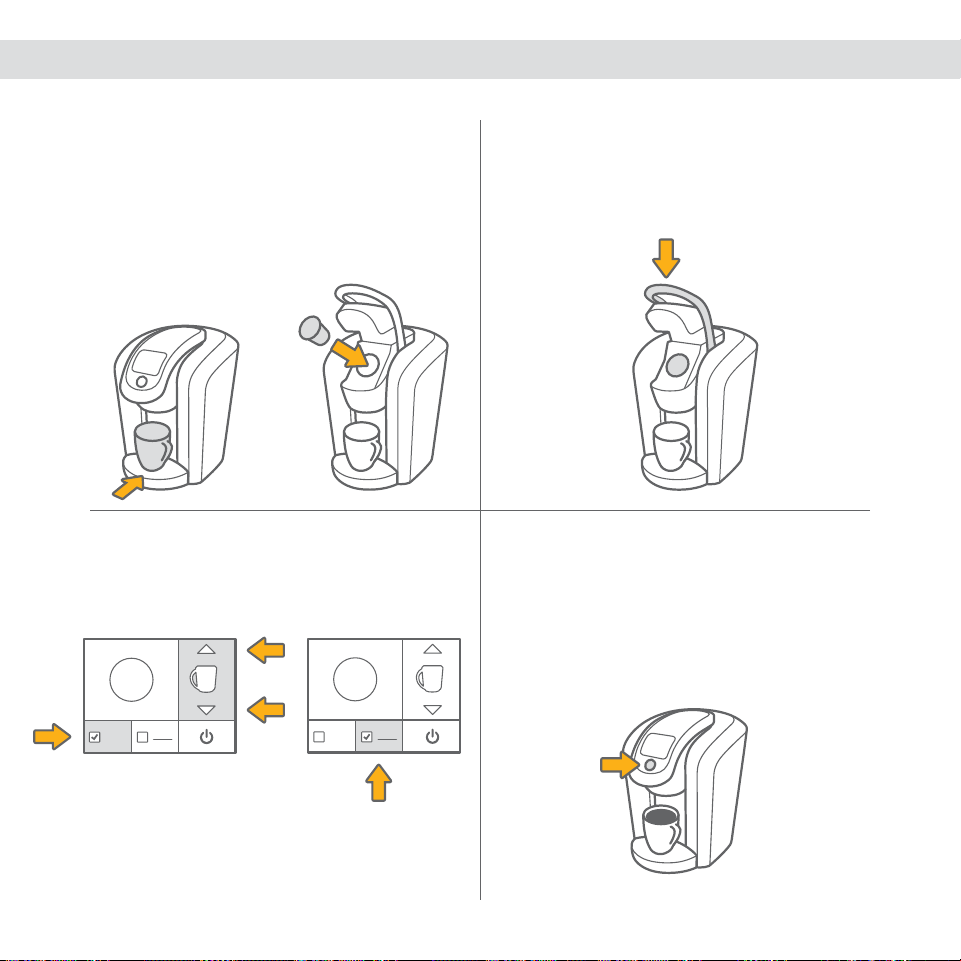
PRÊT
FORT
CHOC.
CHAUD
AUTRE
230
ml
PRÊT
FORT
CHOC.
CHAUD
AUTRE
230
ml
TASSES
INFUSION AUTO
APPUYER POUR RÉGLER
K
E
U
R
I
G
B
R
E
W
46 47
SECTION 1
INFUSION DE DOSETTE K-CUP
®
INFUSION D’UNE DOSETTE K-CARAFE
MC
1. Placez une tasse sur le plateau à tasse.
Choisissez une dosette K-Cup
®
et
insérez-la dans le support à dosette.
REMARQUE : Ne perforez pas la dosette K-Cup
®
et n’enlevez
pas son couvercle d’aluminium.
1. Assurez-vous que la Carafe Keurig
MC
est vide. Retirez le plateau à tasse et
insérez la Carafe Keurig
MC
bien en place.
REMARQUE : Ne perforez pas la dosette K-Carafe
MC
et
n’enlevez pas son couvercle d’aluminium.
REMARQUE : Voir la page 63 pour connaître le
fonctionnement de la Carafe Keurig
MC
.
3. Choisissez un format d’infusion.
Choisissez le réglage FORT si désiré.
(Le réglage FORT convient uniquement
au café.)
3. Choisissez un format d’infusion.
REMARQUE : Assurez-vous que le chiffre indiqué à l’écran
correspond à celui sur la dosette K-Carafe
MC
que vous avez
placée dans le support à dosette.
Sélectionnez l’option CHOCOLAT
CHAUD/AUTRE pour sélectionner une
boisson autre que le café.
REMARQUE : Assurez-vous de respecter les directives qui
figurent sur l’emballage de la dosette.
2. Abaissez la poignée.
ATTENTION : Les parties inférieure et supérieure du support
à dosette K-Cup
®
sont munies d’aiguilles pointues servant à
perforer la dosette. Pour éviter tout risque de blessure, ne pas
mettre les doigts dans le support à dosette.
REMARQUE : Le système d’infusion Keurig
®
2.0 fonctionne
uniquement avec des dosettes portant le logo Keurig
®
.
2. Choisissez une dosette K-Carafe
MC
,
insérez-la à fond dans le support à
dosette et abaissez la poignée.
ATTENTION : Les parties inférieure et supérieure du support à
dosette sont munies d’aiguilles pointues servant à perforer la
dosette K-Carafe
MC
. Pour éviter tout risque de blessure, ne pas
mettre les doigts dans le support à dosette.
REMARQUE : Le système d’infusion
Keurig
®
2.0 fonctionne uniquement avec
des dosettes portant le logo Keurig
®
.
4. Appuyez sur le bouton d’infusion, puis
savourez votre première tasse!
ATTENTION : Durant l’infusion, l’eau se trouvant dans le
support à dosette K-Cup
®
est extrêmement chaude. Pour
éviter tout risque de blessure, ne pas soulever la poignée
durant l’infusion.
4. Appuyez sur le bouton d’infusion et
savourez votre première carafe de café!
ATTENTION : Durant l’infusion, l’eau se trouvant dans le
support à dosette K-Carafe
MC
est extrêmement chaude. Pour
éviter tout risque de blessure, ne pas soulever la poignée
durant l’infusion.
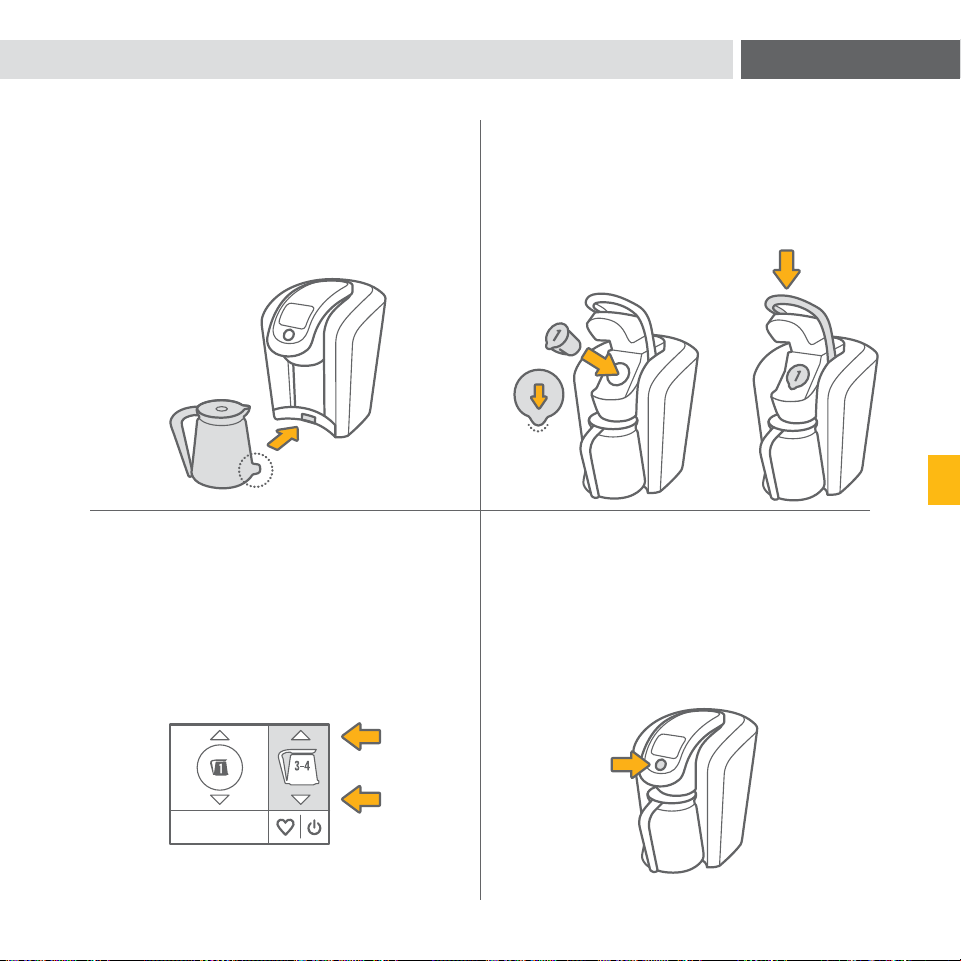
PRÊT
FORT
CHOC.
CHAUD
AUTRE
230
ml
PRÊT
FORT
CHOC.
CHAUD
AUTRE
230
ml
TASSES
INFUSION AUTO
APPUYER POUR RÉGLER
K
E
U
R
I
G
B
R
E
W
46 47
SECTION 1
INFUSION DE DOSETTE K-CUP
®
INFUSION D’UNE DOSETTE K-CARAFE
MC
1. Placez une tasse sur le plateau à tasse.
Choisissez une dosette K-Cup
®
et
insérez-la dans le support à dosette.
REMARQUE : Ne perforez pas la dosette K-Cup
®
et n’enlevez
pas son couvercle d’aluminium.
1. Assurez-vous que la Carafe Keurig
MC
est vide. Retirez le plateau à tasse et
insérez la Carafe Keurig
MC
bien en place.
REMARQUE : Ne perforez pas la dosette K-Carafe
MC
et
n’enlevez pas son couvercle d’aluminium.
REMARQUE : Voir la page 63 pour connaître le
fonctionnement de la Carafe Keurig
MC
.
3. Choisissez un format d’infusion.
Choisissez le réglage FORT si désiré.
(Le réglage FORT convient uniquement
au café.)
3. Choisissez un format d’infusion.
REMARQUE : Assurez-vous que le chiffre indiqué à l’écran
correspond à celui sur la dosette K-Carafe
MC
que vous avez
placée dans le support à dosette.
Sélectionnez l’option CHOCOLAT
CHAUD/AUTRE pour sélectionner une
boisson autre que le café.
REMARQUE : Assurez-vous de respecter les directives qui
figurent sur l’emballage de la dosette.
2. Abaissez la poignée.
ATTENTION : Les parties inférieure et supérieure du support
à dosette K-Cup
®
sont munies d’aiguilles pointues servant à
perforer la dosette. Pour éviter tout risque de blessure, ne pas
mettre les doigts dans le support à dosette.
REMARQUE : Le système d’infusion Keurig
®
2.0 fonctionne
uniquement avec des dosettes portant le logo Keurig
®
.
2. Choisissez une dosette K-Carafe
MC
,
insérez-la à fond dans le support à
dosette et abaissez la poignée.
ATTENTION : Les parties inférieure et supérieure du support à
dosette sont munies d’aiguilles pointues servant à perforer la
dosette K-Carafe
MC
. Pour éviter tout risque de blessure, ne pas
mettre les doigts dans le support à dosette.
REMARQUE : Le système d’infusion
Keurig
®
2.0 fonctionne uniquement avec
des dosettes portant le logo Keurig
®
.
4. Appuyez sur le bouton d’infusion, puis
savourez votre première tasse!
ATTENTION : Durant l’infusion, l’eau se trouvant dans le
support à dosette K-Cup
®
est extrêmement chaude. Pour
éviter tout risque de blessure, ne pas soulever la poignée
durant l’infusion.
4. Appuyez sur le bouton d’infusion et
savourez votre première carafe de café!
ATTENTION : Durant l’infusion, l’eau se trouvant dans le
support à dosette K-Carafe
MC
est extrêmement chaude. Pour
éviter tout risque de blessure, ne pas soulever la poignée
durant l’infusion.
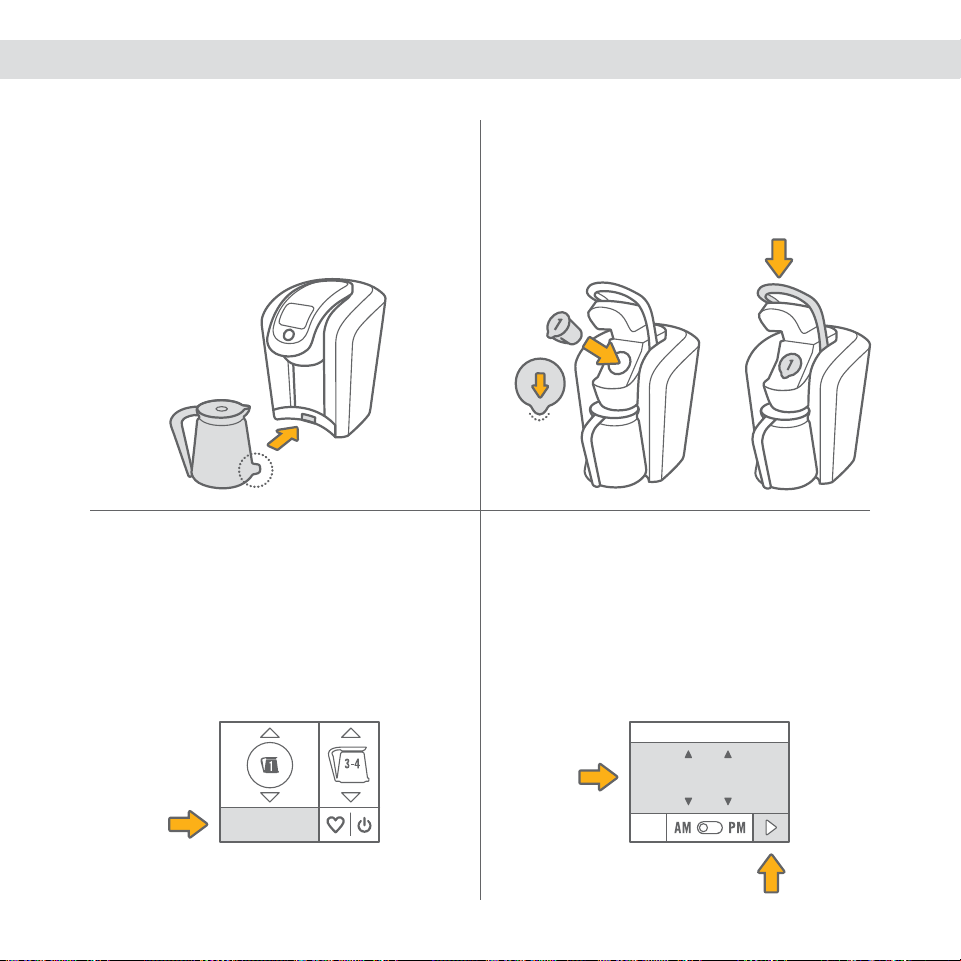
TASSES
INFUSION AUTO
APPUYER POUR RÉGLER
K
E
U
R
I
G
B
R
E
W
INFUSION CARAFE AUTO RÉGLÉE À :
ANNULER
6
:
00
INFUSION CARAFE
AUTO RÉGLÉE À :
6
:
00
APPUYER POUR MODIFIER
NE PAS INTERROMPRE!
INFUSION CARAFE
AUTO RÉGLÉE À :
6
:
00
APPUYER POUR MODIFIER
NE PAS INTERROMPRE!
TASSES
FORMAT INFUSION CARAFE AUTO :
RÉGLER
TASSES TASSES
INFUSION CARAFE
AUTO RÉGLÉE À :
6
:
00
APPUYER POUR MODIFIER
NE PAS INTERROMPRE!
48 49
RÉGLAGE D’INFUSION AUTOMATIQUE DE CARAFE
SECTION 1
1. Assurez-vous que la Carafe Keurig
MC
est vide. Retirez le plateau à tasse et
insérez la Carafe Keurig
MC
bien en place.
4. Réglez l’heure à laquelle vous souhaitez
lancer l’infusion, puis appuyez sur la
flèche droite.
3. Appuyez sur « INFUSION AUTO
APPUYEZ POUR RÉGLER ».
2. Choisissez une dosette K-Carafe
MC
,
insérez-la à fond dans le support à
dosette et abaissez la poignée.
REMARQUE : Assurez-vous que l’heure affichée est exacte.
Pour la régler, voir les directives à la page 55.
5. Choisissez un format d’infusion, puis
appuyez sur « RÉGLER ».
7. Pour modifier les réglages, appuyez sur
« MODIFIER LES RÉGLAGES ».
6. Le message « NE PAS INTERROMPRE! »
s’affichera.
8. Pour mettre le système d’infusion
en mode veille, appuyez et relâchez
rapidement le bouton de mise en
marche. Le fait de retirer la Carafe
Keurig
MC
ou de soulever la poignée
annulera le RÉGLAGE D’INFUSION
AUTOMATIQUE DE CARAFE.
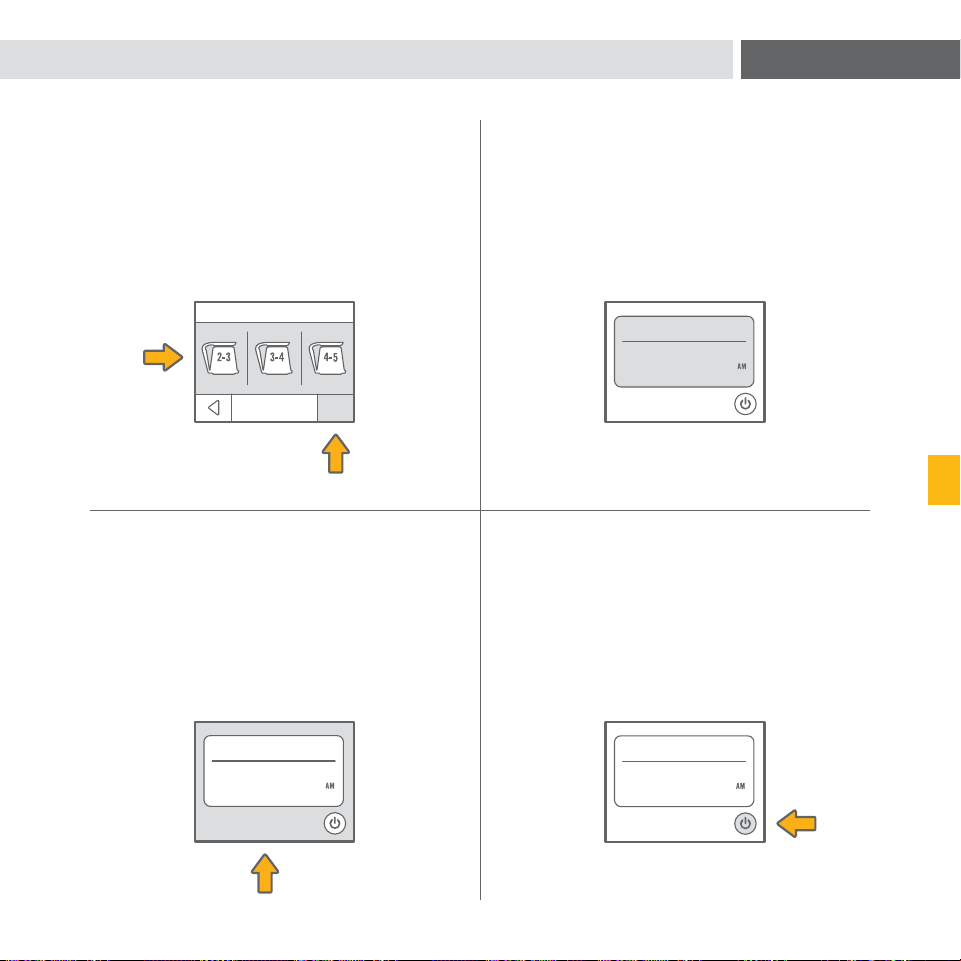
TASSES
INFUSION AUTO
APPUYER POUR RÉGLER
K
E
U
R
I
G
B
R
E
W
INFUSION CARAFE AUTO RÉGLÉE À :
ANNULER
6
:
00
INFUSION CARAFE
AUTO RÉGLÉE À :
6
:
00
APPUYER POUR MODIFIER
NE PAS INTERROMPRE!
INFUSION CARAFE
AUTO RÉGLÉE À :
6
:
00
APPUYER POUR MODIFIER
NE PAS INTERROMPRE!
TASSES
FORMAT INFUSION CARAFE AUTO :
RÉGLER
TASSES TASSES
INFUSION CARAFE
AUTO RÉGLÉE À :
6
:
00
APPUYER POUR MODIFIER
NE PAS INTERROMPRE!
48 49
RÉGLAGE D’INFUSION AUTOMATIQUE DE CARAFE
SECTION 1
1. Assurez-vous que la Carafe Keurig
MC
est vide. Retirez le plateau à tasse et
insérez la Carafe Keurig
MC
bien en place.
4. Réglez l’heure à laquelle vous souhaitez
lancer l’infusion, puis appuyez sur la
flèche droite.
3. Appuyez sur « INFUSION AUTO
APPUYEZ POUR RÉGLER ».
2. Choisissez une dosette K-Carafe
MC
,
insérez-la à fond dans le support à
dosette et abaissez la poignée.
REMARQUE : Assurez-vous que l’heure affichée est exacte.
Pour la régler, voir les directives à la page 55.
5. Choisissez un format d’infusion, puis
appuyez sur « RÉGLER ».
7. Pour modifier les réglages, appuyez sur
« MODIFIER LES RÉGLAGES ».
6. Le message « NE PAS INTERROMPRE! »
s’affichera.
8. Pour mettre le système d’infusion
en mode veille, appuyez et relâchez
rapidement le bouton de mise en
marche. Le fait de retirer la Carafe
Keurig
MC
ou de soulever la poignée
annulera le RÉGLAGE D’INFUSION
AUTOMATIQUE DE CARAFE.

50
CONTINUAR
Plus d'eau s.v.p.
Infusion... Infusion...
Savourez!
Soulever pour Commencer
12
:
00
ANNULER
Eau chaude
seulement?
Soulever la poignée.
Retirer la dosette.
Abaisser la poignée.
51
INTERRUPTION D’UNE INFUSION
AJOUT D’EAU
DISTRIBUTION D’EAU CHAUDE DANS UNE TASSE
SECTION 2
POUR L’INFUSION DE DOSETTES K-CUP
®
ET DOSETTES K-CARAFE
MC
(INFUSION
KEURIG
®
OPTION 1)
Pour interrompre l’infusion, appuyez et maintenez le bouton d’infusion pendant
une seconde ou soulevez lentement la poignée. Retirez et jetez toute dosette utilisée.
Il n’est pas recommandé de procéder à une infusion avec une dosette utilisée.
Votre système d’infusion Keurig
®
2.0 vous avisera si le niveau d’eau du réservoir est trop
bas pour que vous puissiez lancer une infusion. Le système d’infusion indiquera « Plus
d’eau s.v.p » s’il n’y a pas assez d’eau pour compléter l’infusion.
Par exemple : Une Carafe Keurig
MC
nécessite plus d’eau qu’une tasse de 290 ml (10 oz).
1. Appuyez sur le bouton de distribution
d’eau chaude.
2. Suivez les directives qui apparaissent
à l’écran.
3. Pressez et maintenez le bouton
d’infusion enfoncé pour obtenir
jusqu’à 170 ml d’eau (6 oz) d’eau
chaude. Le système d’infusion mettra
automatiquement fin à la distribution
après que 170 ml d’eau (6 oz) se
soient écoulés.
4. Une fois la distribution terminée, le
message « Savourez! » s’affichera.
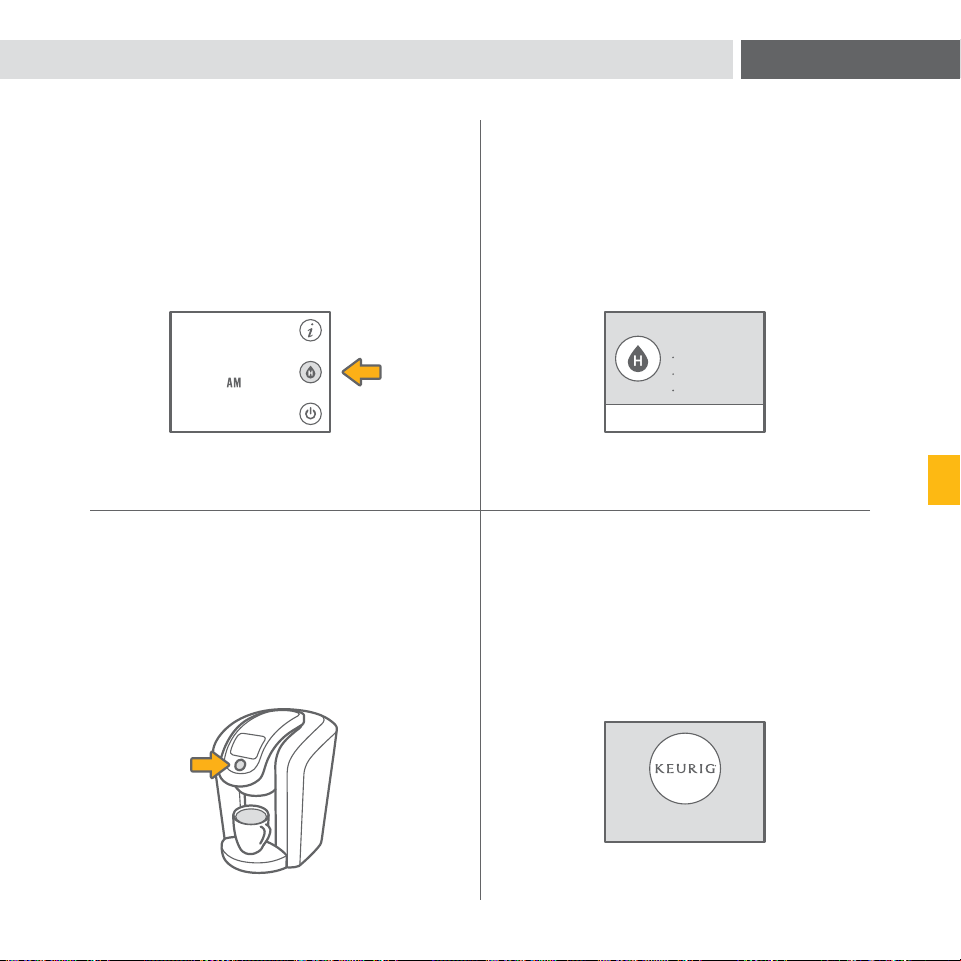
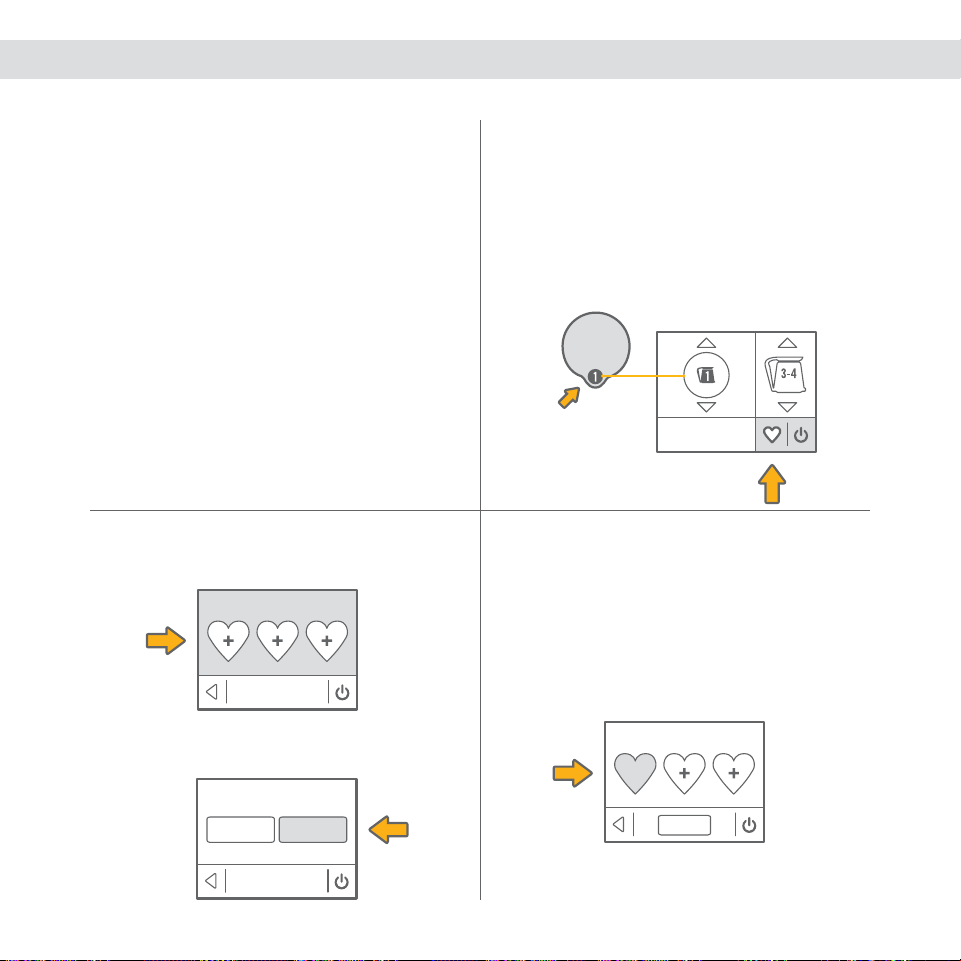
53
TASSES
INFUSION AUTO
APPUYER POUR RÉGLER
K
E
U
R
I
G
B
R
E
W
FAVORIS
A
MODIFIER
FAVORIS
A
MODIFIER
FAVORIS
A B
TASSES
INFUSION AUTO
APPUYER POUR RÉGLER
K
E
U
R
I
G
B
R
E
W
CONFIRMER
FAVORIS
AJOUTER UN FAVORI?
OUINON
FAVORIS
A B
MODIFIER
TASSES
INFUSION AUTO
APPUYER POUR RÉGLER
K
E
U
R
I
G
B
R
E
W
52
AJOUT DE FAVORIS
UTILISATION DE FAVORIS
MODIFICATION DE FAVORIS
SECTION 2
1. Appuyez sur le bouton des favoris
et sélectionnez « MODIFIER ».
2. Sélectionnez l’icône de FAVORIS que
vous souhaitez modifier. Modifiez les
réglages à votre guise, puis appuyez
sur « CONFIRMER ». Vos réglages ont
maintenant été mis à jour.
1. Pour régler un favori, assurez-vous d’abord que
infusion Keurig
®
option 1 corresponde au chiffre
inscrit sur la dosette que vous avez insérée. Puis,
choisissez vos réglages favoris pour le format
d’infusion et l’intensité (ces options ne sont pas
offertes pour tous les modes KEURIG BREW
®
).
N’appuyez pas sur le bouton d’infusion, mais
plutôt sur le bouton des favoris.
Le bouton des favoris est un raccourci
pour obtenir votre boisson parfaite :
vos réglages les plus souvent utilisés
étant sauvegardés, la préparation de vos
boissons au quotidien sera facilitée. Vous
pouvez sauvegarder vos réglages favoris
pour l’infusion de dosettes K-Carafe
MC
et des prochaines innovations Keurig
®
(à l’exception des dosettes K-Cup
®
).
2. Choisissez une des trois icônes des
FAVORIS pour sauvegarder vos réglages.
3. Appuyez sur une icône de FAVORIS
et les réglages sauvegardés pour ce
favori s’afficheront.
1. Placez une tasse sur le plateau à
tasse. Placez une dosette Keurig
®
dans le support à dosette et abaissez
la poignée.
REMARQUE : Les favoris ne conviennent qu’aux infusion
Keurig
®
option 1 à 6.
REMARQUE : Si vous choisissez infusion Keurig
®
option 1,
insérez une Carafe Keurig
MC
vide.
2. Appuyez sur le bouton des favoris et
sélectionnez l’icône de FAVORIS que
vous aimeriez infuser.
Appuyez sur le bouton d’infusion.
REMARQUE : Assurez-vous que votre favori corresponde au
infusion Keurig
®
option 1 à 6 inscrit sur la dosette que vous
avez placée dans le support à dosette.
Appuyez sur « OUI » pour confirmer.
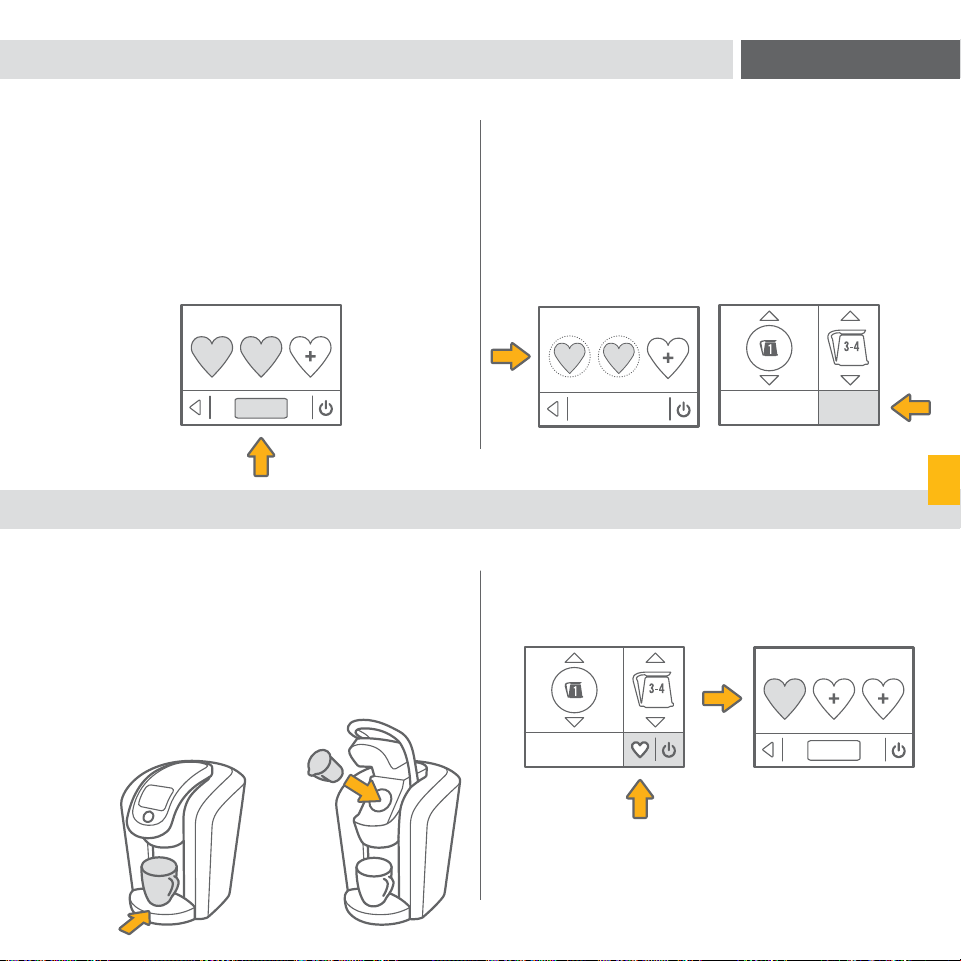
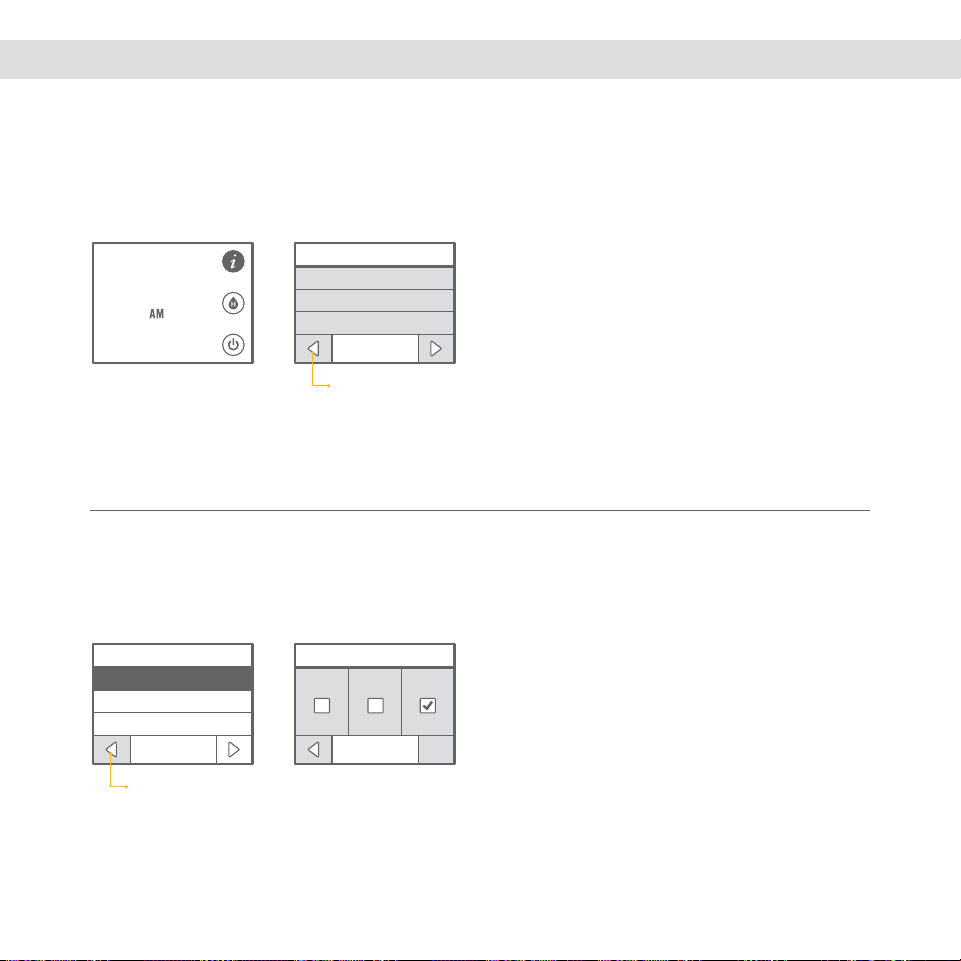
54 55
Soulever pour Commencer
12
:
00
VERT FORÊT
CONFIRMER LA SÉLECTION
OK
1 DE 4
ARRIÈRE-PLAN
RÉGLAGES
LANGUE D’AFFICHAGE
HORLOGE
MARCHE/ARRÊT AUTO
1 DE 3
RÉGLAGES
LANGUE D’AFFICHAGE
HORLOGE
MARCHE/ARRÊT AUTO
1 DE 3
HEURE
11
:
32
OK
12 HR 24 HR
NUMÉRIQUE CADRAN
12
:
00
OK
AFFICHAGE
RÉGLAGES
LANGUE D’AFFICHAGE
HORLOGE
MARCHE/ARRÊT AUTO
1 DE 3
OK
LANGUE D’AFFICHAGE
ANGLAIS ESPAGNOL FRANÇAIS
HORLOGE
HEURE
AFFICHAGE
ARRIÈRE-PLAN
RÉGLAGE DE L’HORLOGE
Le menu HORLOGE est divisé en trois
sous-sections.
Appuyez sur la flèche de retour pour
revenir au menu des RÉGLAGES.
ACCÉDER AUX RÉGLAGES
Explorez tout ce que votre système
d’infusion Keurig
®
2.0 vous offre en
accédant au menu des RÉGLAGES. À
partir de la page d’accueil, appuyez sur
le bouton des réglages.
Utilisez les flèches pour vous déplacer
dans le menu. Pour quitter le menu,
appuyez sur le bouton de retour.
CHOISIR LA LANGUE
Appuyez sur Anglais, Espagnol ou
Français pour choisir la LANGUE.
Appuyez sur « SAUVEGARDER » pour
confirmer ou sur le bouton de retour pour
revenir au menu des RÉGLAGES.
Heure : Ajustez l’heure au moyen des
flèches, puis choisissez AM ou PM.
Appuyez sur « SAUVEGARDER » pour
confirmer ou sur le bouton de retour pour
revenir au menu des RÉGLAGES.
Affichage : Choisissez l’affichage
NUMÉRIQUE ou À CADRAN. Dans le
cas de l’affichage NUMÉRIQUE, faites le
choix d’une période de 12 heures ou de
24 heures.
Appuyez sur « SAUVEGARDER » pour
confirmer ou sur le bouton de retour pour
revenir au menu des RÉGLAGES.
Arrière-plan : Vous pouvez personnaliser
la couleur d’affichage de l’écran tactile.
Vous n’avez qu’à choisir parmi la sélection
de couleurs affichée pour choisir un
ARRIÈRE-PLAN pour la page d’accueil.
Appuyez sur « SAUVEGARDER » pour
confirmer ou sur le bouton de retour pour
revenir au menu des RÉGLAGES.
MENU DES RÉGLAGES
SECTION 2
bouton de retour
bouton de retour
bouton de retour
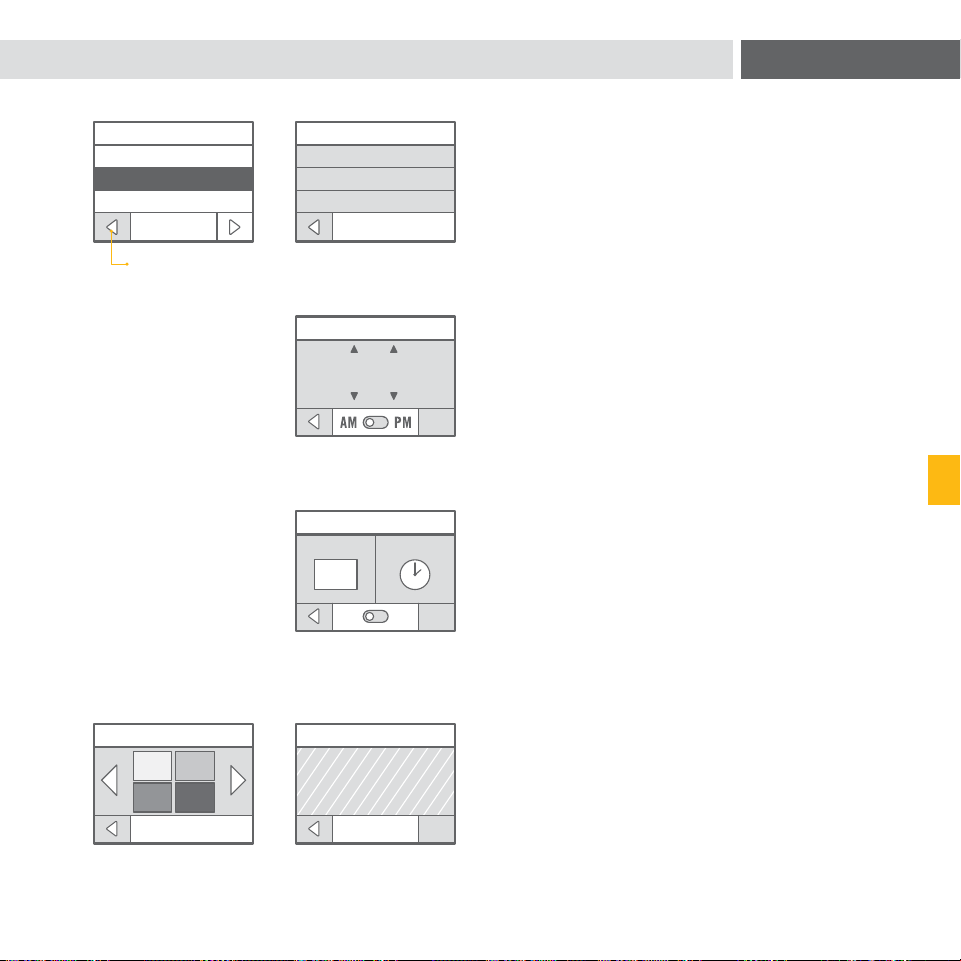
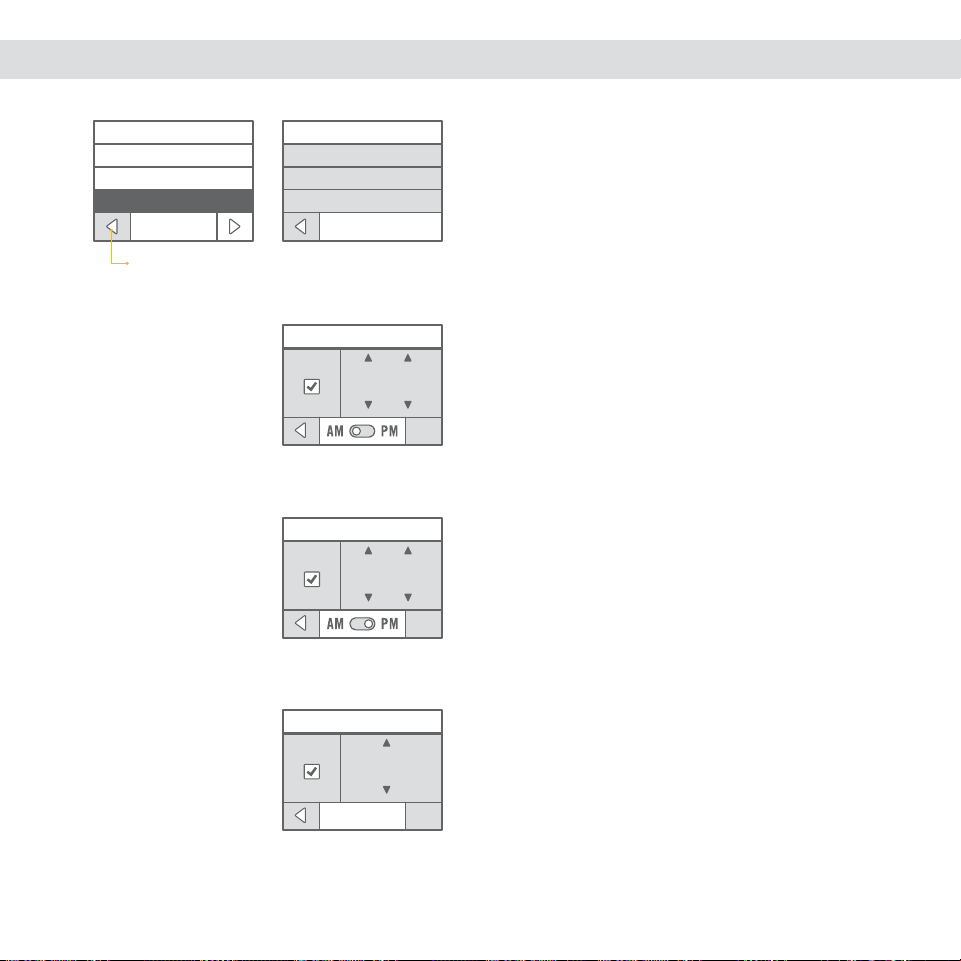
56 57
LUMIÈRE DU
RÉSERVOIR
MINUTERIE DE
L'ÉCLAIRAGE
ÉCLAIRAGE
OK
ÉTEINDRE L'ÉCLAIRAGE À :
5
:
00
ACTIVER
OK
ALLUMER L'ÉCLAIRAGE À :
11
:
00
ACTIVER
ALLUMER
L'ÉCLAIRAGE
ÉTEINDRE
L'ÉCLAIRAGE
MINUTERIE DE L'ÉCLAIRAGE
OK
BLANC VERT
BLEU
ROUGE
LUMIÈRE DU RÉSERVOIR
RÉGLAGES
ÉCLAIRAGE
HAUTE ALTITUDE
RAPPEL – FILTRE À EAU
2 DE 3
OK
ÉTEINDRE APRÈS UNE VEILLE DE :
0
:
15
ACTIVER
RÉGLAGES
LANGUE D’AFFICHAGE
HORLOGE
MARCHE/ARRÊT AUTO
1 DE 3
OK
METTRE EN MARCHE À :
7
:
00
ACTIVER
OK
ÉTEINDRE À :
10
:
00
ACTIVER
MARCHE/ARRÊT AUTO
MARCHE AUTO
ARRÊT AUTO
ÉCONOMIE D'ÉNERGIE
MENU DES RÉGLAGES
SECTION 2
ACTIVER MARCHE/ARRÊT AUTO
Vous pouvez laisser votre système d’infusion en
marche en tout temps, afin de pouvoir lancer
une infusion parfaite à toute heure de la journée.
Ou encore, vous pouvez activer les fonctions de
MARCHE AUTO, ARRÊT AUTO ou ÉCONOMIE
D’ÉNERGIE.
Utilisez le bouton de retour pour revenir au menu
des RÉGLAGES.
Mise en marche automatique : Choisissez l’option
« ACTIVER » pour activer la fonction MARCHE
AUTO. Utilisez les flèches pour régler l’heure à
laquelle vous souhaitez que le système d’infusion
se mette automatiquement en marche.
Appuyez sur « SAUVEGARDER » pour confirmer
ou sur le bouton de retour pour revenir au menu
des RÉGLAGES.
Arrêt automatique : Choisissez l’option
« ACTIVER » pour activer la fonction ARRÊT
AUTO. Utilisez les flèches pour régler l’heure
à laquelle vous souhaitez que le système d’infusion
s’éteigne automatiquement.
Appuyez sur « SAUVEGARDER » pour confirmer
ou sur le bouton de retour pour revenir au menu
des RÉGLAGES.
Économie d’énergie : Choisissez l’option
« ACTIVER » pour activer la fonction ÉCONOMIE
D’ÉNERGIE. Cette fonction permet de régler
le laps de temps avant l’arrêt automatique du
système d’infusion à la suite d’une infusion, par
intervalles de 15 minutes.
Appuyez sur « SAUVEGARDER » pour confirmer
ou sur le bouton de retour pour revenir au menu
des RÉGLAGES.
Choisissez l’option « ACTIVER » pour activer
la MINUTERIE DE L’ÉCLAIRAGE. Utilisez les
flèches pour régler l’heure à laquelle vous
souhaitez que l’éclairage de l’écran s’agence
à la couleur de la LUMIÈRE DU RÉSERVOIR.
Appuyez sur « SAUVEGARDER » pour
confirmer ou sur le bouton de retour pour
revenir au menu des RÉGLAGES.
ACTIVER L’ÉCLAIRAGE
Avec le bon éclairage, tout apparaît sous
son meilleur jour. Choisissez la couleur
de la LUMIÈRE DU RÉSERVOIR et fixez la
MINUTERIE DE L’ÉCLAIRAGE pour donner à
votre cuisine une douce lueur pendant la nuit.
Utilisez le bouton de retour pour revenir au
menu des RÉGLAGES.
Lumière du réservoir : Choisissez une
des quatre couleurs (blanc, vert, bleu
et rouge).
Appuyez sur « SAUVEGARDER » pour
confirmer ou sur le bouton de retour pour
revenir au menu des RÉGLAGES.
Éclairage : Appuyez sur ALLUMER
L’ÉCLAIRAGE ou ÉTEINDRE L’ÉCLAIRAGE.
Utilisez le bouton de retour pour revenir au
menu des RÉGLAGES.
bouton de retour
bouton de retour
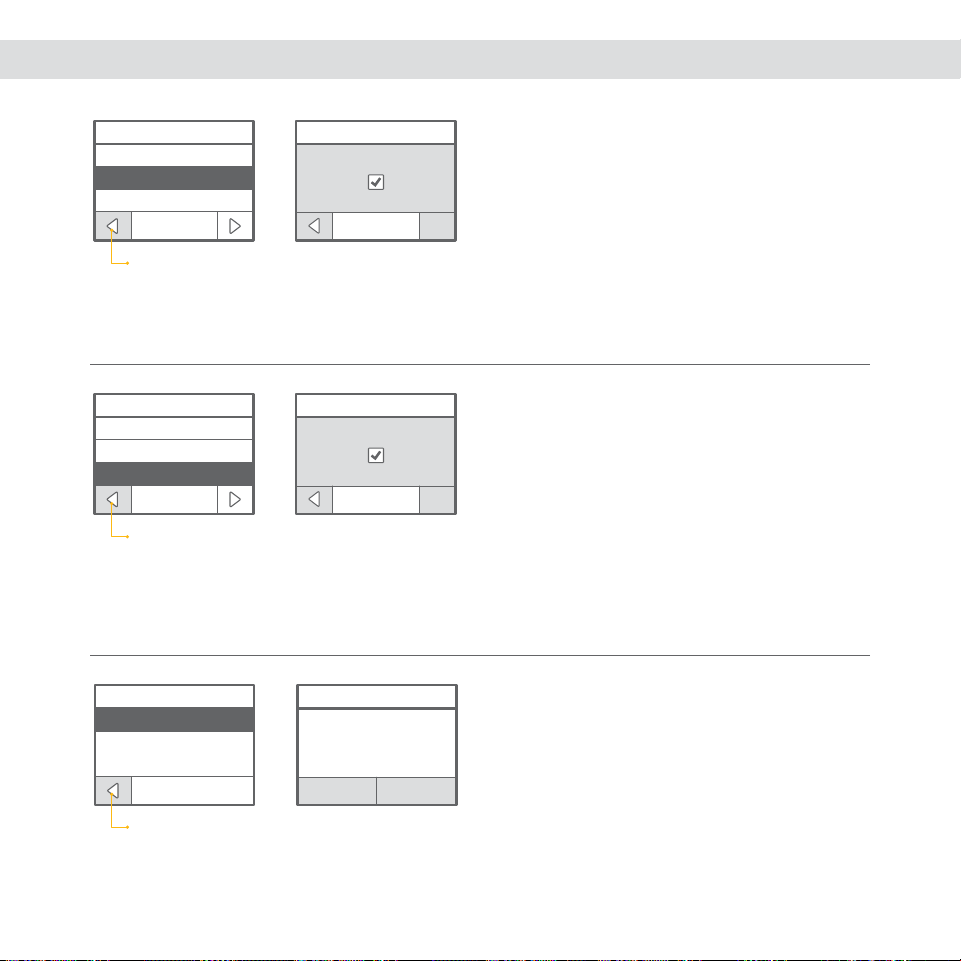
58 59
OK
HAUTE ALTITUDE
ACTIVER
RÉGLAGES
ÉCLAIRAGE
HAUTE ALTITUDE
RAPPEL – FILTRE À EAU
2 DE 3
OK
RAPPEL – FILTRE À EAU
ACTIVER
RÉGLAGES
ÉCLAIRAGE
HAUTE ALTITUDE
RAPPEL – FILTRE À EAU
2 DE 3
OUINON
RÉTABLIR LES RÉGLAGES PAR DÉFAUT
RÉTABLIR LES RÉGLAGES
PAR DÉFAUT?
RÉGLAGES
RÉTABLIR LES RÉGLAGES PAR DÉFAUT
3 DE 3
MENU DES RÉGLAGES
SECTION 2
ACTIVER LES RAPPELS POUR LE
FILTRE À EAU
Si vous utilisez un filtre à eau Keurig
MC
,
cochez l’option ACTIVER pour activer les
rappels concernant le filtre à eau.
Appuyez sur « SAUVEGARDER » pour
confirmer ou sur le bouton de retour pour
revenir au menu des RÉGLAGES.
Pour de plus amples renseignements, voir
la page 64.
ACTIVER LA FONCTION HAUTE
ALTITUDE
Pour vous assurer que votre système
d’infusion fonctionne correctement à
de hautes altitudes (plus de 1 500
m/5 000 pi), ACTIVEZ la fonction
HAUTE ALTITUDE.
Appuyez sur « SAUVEGARDER » pour
confirmer ou sur le bouton de retour pour
revenir au menu des RÉGLAGES.
RÉTABLIR LES RÉGLAGES PAR DÉFAUT
Appuyez sur « OUI » pour rétablir les
réglages par défaut. (En rétablissant
les réglages par défaut, les réglages
sauvegardés relativement aux FAVORIS et
aux fonctions MARCHE/ARRÊT AUTO et
ÉCLAIRAGE seront effacés. L’horloge sera
réglée à « 12:00 AM ».
Appuyez sur « NON » pour revenir au
menu des RÉGLAGES.
ENTRETIEN DE VOTRE SYSTÈME D’INFUSION
NETTOYAGE DE L’EXTÉRIEUR DU SYSTÈME D’INFUSION
Soignez l’apparence de votre système d’infusion Keurig
®
2.0 en nettoyant l’extérieur
périodiquement. Pour ce faire, il suffit de procéder à l’aide d’un chiffon humide et
savonneux, non pelucheux et non abrasif. Ne plongez jamais le système d’infusion dans
l’eau ni dans tout autre liquide.
NETTOYAGE DE LA CUVETTE D’ÉGOUTTAGE
La cuvette d’égouttage peut recueillir jusqu’à 230 ml (8 oz) de liquide. La cuvette
d’égouttage et le plateau à tasse doivent être occasionnellement vidés et rincés. Pour
enlever la cuvette d’égouttage, tirez-la simplement vers vous en prenant soin de toujours
la garder à l’horizontale pour éviter que le contenu ne se renverse. Nettoyez à l’aide d’un
chiffon humide et savonneux, non pelucheux et non abrasif.
NETTOYAGE DU RÉSERVOIR D’EAU ET DE SON COUVERCLE
Nettoyez le réservoir d’eau et son couvercle à l’aide d’un chiffon humide et savonneux,
non pelucheux et non abrasif, et rincez à fond.
Ne séchez pas l’intérieur du réservoir d’eau à l’aide d’un chiffon, car des peluches
pourraient y rester. Assurez-vous de rincer le réservoir d’eau à fond après le nettoyage
pour vous assurer qu’il ne reste aucune solution nettoyante, car celle-ci pourrait
contaminer l’eau du réservoir.
NE PLACEZ PAS CES PIÈCES DANS LE LAVE-VAISSELLE.
bouton de retour
bouton de retour
bouton de retour
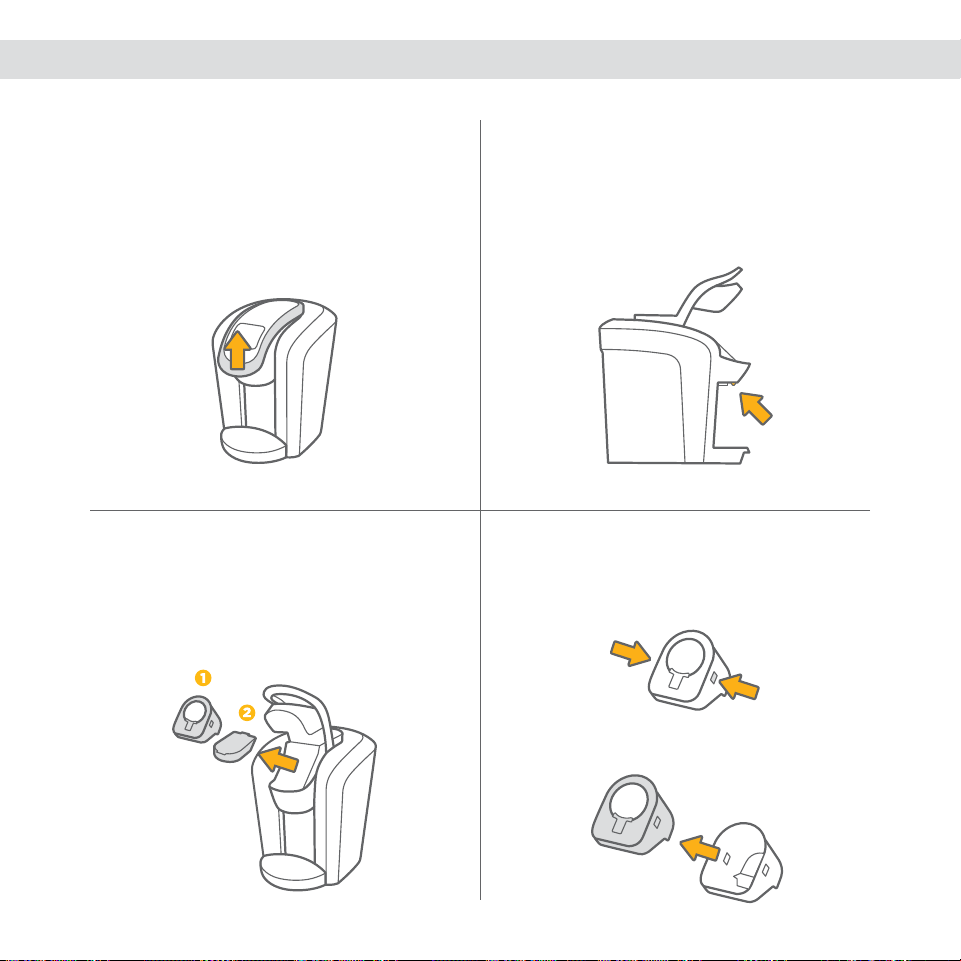
60 61
3. Séparez l’assemblage du support à
dosette (1) et la base (2).
NETTOYAGE DU SUPPORT À DOSETTE
1. Soulevez la poignée.
2. Poussez vers le haut tout en maintenant
les côtés de l’assemblage du support à
dosette. Retirez du système d’infusion.
ATTENTION : Aiguilles pointues. Ne pas mettre les doigts
dans le compartiment du support à dosette.
4. Appuyez sur les boutons de
déclenchement situés sur les deux
côtés de l’assemblage du support
à dosette.
Séparez le support à dosette du boîtier.
5. Nettoyez le support à dosette (1), le
boîtier (2) et la base (3) à l’aide d’un
chiffon humide et savonneux, non
pelucheux et non abrasif et rincez
à fond.
NETTOYAGE DE L’AIGUILLE DE SORTIE
1. Si l’aiguille de sortie est obstruée,
pressez le levier du support à dosette
pour accéder à l’aiguille de sortie.
3. Une fois le nettoyage de toutes les
pièces terminé, placez la base, puis
l’assemblage du support à dosette dans
le mécanisme de perforation. Abaissez
la poignée.
ATTENTION : Aiguilles pointues. Ne pas mettre les doigts
dans le compartiment du support à dosette.
2. Insérez un trombone ou un instrument
similaire pour enlever ce qui l’obstrue.
Rincez à fond avec de l’eau chaude.
ENTRETIEN DE VOTRE SYSTÈME D’INFUSION
SECTION 2
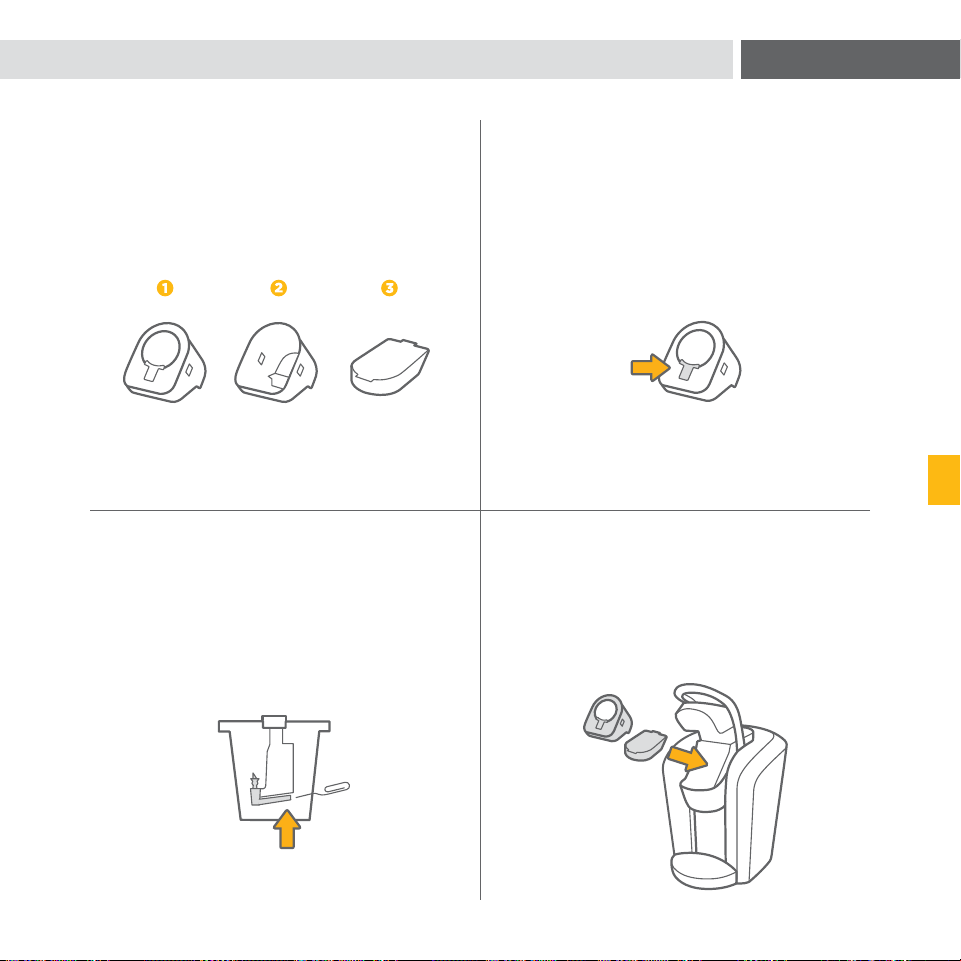

63 62
ENTRETIEN DE VOTRE SYSTÈME D’INFUSION
SECTION 2
NETTOYAGE DE LA CARAFE KEURIG
MC
1. Videz avec soin la Carafe Keurig
MC
.
2. Enlevez le couvercle.
4. Remettez le couvercle en place.
Assurez-vous que le couvercle est
bien en place avant de lancer votre
prochaine infusion de café ou d’une
autre boisson.
3. Essuyez l’intérieur de la Carafe
Keurig
MC
à l’aide d’un chiffon humide
et savonneux, non pelucheux et non
abrasif. Rincez à fond avec de l’eau
chaude. La Carafe Keurig
MC
ne devrait
pas être placée au lave-vaisselle ni
être immergée.
FONCTIONNEMENT DE LA CARAFE KEURIG
MC
Cette Carafe Keurig
MC
a été conçue spécifiquement pour l’utilisation avec le système
d’infusion Keurig
®
2.0. Pour utiliser la Carafe Keurig
MC
, assurez-vous qu’elle soit bien en
place dans le système d’infusion. Le système d’infusion Keurig
®
2.0 comprend un système
de détection qui détermine si la Carafe Keurig
MC
est en place et s’il est sécuritaire de
lancer l’infusion. Si la Carafe Keurig
MC
est enlevée ou mal placée, le processus d’infusion
ne sera pas lancé. Si la Carafe Keurig
MC
est retirée lors de l’infusion, celle-ci s’interrompt
automatiquement.
ATTENTION : Assurez-vous que la Carafe Keurig
MC
est vide avant chaque utilisation.
ATTENTION : Après une infusion, la Carafe Keurig
MC
contient du liquide extrêmement
chaud. Versez avec soin la boisson de la Carafe Keurig
MC
. Ne placez jamais votre main
au-dessus de la Carafe Keurig
MC
lorsque de la vapeur chaude s’en échappe. Ne laissez
jamais des enfants utiliser la Carafe Keurig
MC
ni le système d’infusion sans la supervision
d’un adulte. Appuyez sur le bouton de mise en marche pour mettre fin au processus
d’infusion. Suivez les directives indiquées à l’écran avant de retirer la Carafe Keurig
MC
.
La page d’accueil s’affichera à nouveau. Retirez et jetez la dosette K-Carafe
MC
utilisée.
ATTENTION : L’eau se trouvant dans le support à dosette durant l’infusion est
extrêmement chaude. Pour éviter tout risque de blessure, ne pas soulever la poignée
durant l’infusion.
Pour assurer une saveur, une fraîcheur et une température parfaites, nous recommandons
de préchauffer la Carafe Keurig
MC
. Pour préchauffer la Carafe Keurig
MC
, remplissez-la d’eau
chaude pendant une trentaine de secondes, puis jetez l’eau chaude avant de replacer la
Carafe Keurig
MC
sur le système d’infusion.
ATTENTION : LAVER À LA MAIN SEULEMENT. NE PAS IMMERGER. NE PAS METTRE AU
MICRO-ONDES.
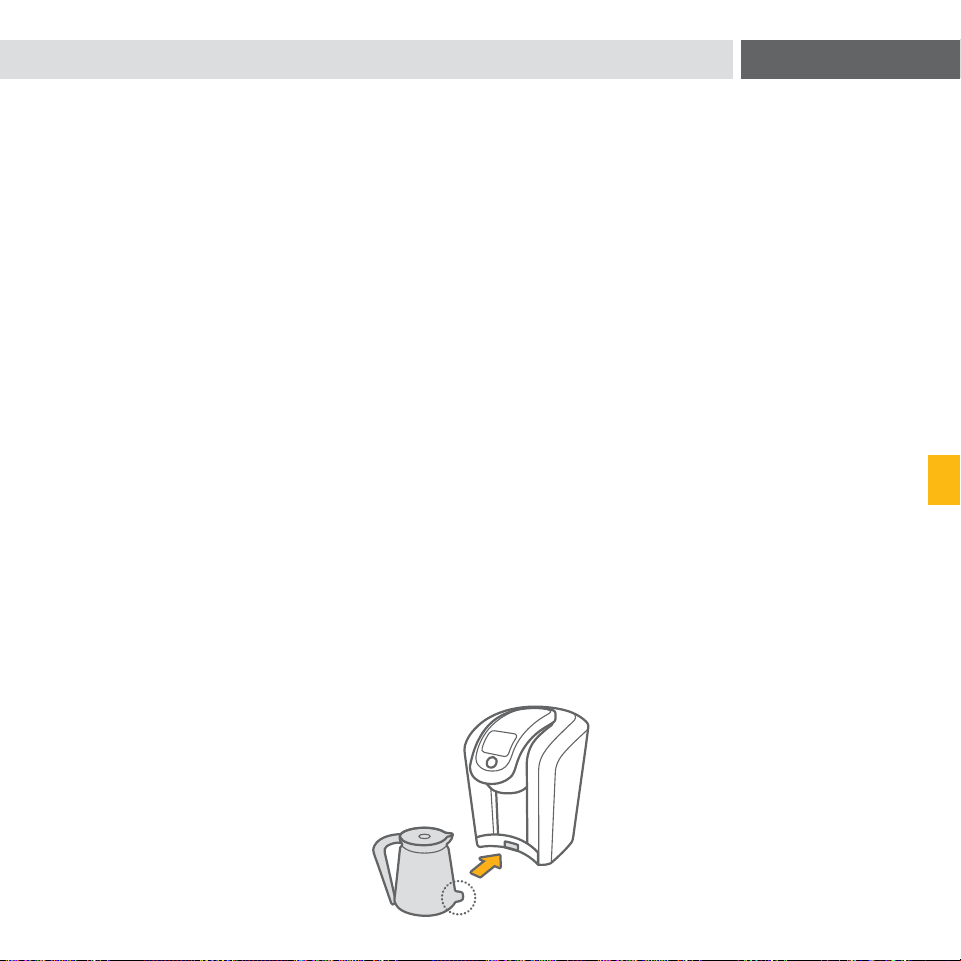

64 65
CONTINUER
Remplacer le
ltre à eau!
PAS MAINTENANT
OUI
Filtre à eau
remplacé?
PAS MAINTENANT
CONTINUER
Détartrage
nécessaire!
PAS MAINTENANT
OK
Le détartrage préserve
votre machine. Directives
à www.keurig.com.
ANNULER
SECTION 2
ALERTES D’ENTRETIEN
Votre système d’infusion est conçu pour produire chaque fois la perfection dans votre
tasse, année après année. Pour pouvoir continuer d’offrir une performance optimale, le
système d’infusion Keurig
®
2.0 vous fait savoir quand il a besoin d’un peu d’attention.
IL EST TEMPS DE REMPLACER LE FILTRE À EAU KEURIG
MC
(RENDEZ-VOUS SUR
KEURIG.CA POUR VOUS LE PROCURER)
Le système d’infusion affichera le message « Remplacer le filtre à eau! » après avoir infusé
30 L (1 000 oz), ou aux 2 mois. Une fois le remplacement du filtre à eau Keurig
MC
effectué,
appuyez sur « OUI » pour réinitialiser les RAPPELS – FILTRE À EAU.
IL EST TEMPS DE PROCÉDER À UN DÉTARTRAGE
Selon la teneur en minéraux de l’eau utilisée, il peut y avoir accumulation de dépôts
calcaires ou de tartre dans votre système d’infusion. C’est pourquoi nous recommandons
d’utiliser de l’eau embouteillée ou filtrée. Le tartre n’est pas toxique, mais s’il n’est pas
enlevé, il peut nuire au bon fonctionnement de votre système d’infusion. Un détartrage
de votre système d’infusion tous les 3 à 6 mois aide à garder en bon état l’élément
chauffant et les autres pièces internes en contact avec l’eau. Il arrive que les dépôts
calcaires s’accumulent plus rapidement; il est alors nécessaire de procéder au détartrage
plus souvent.
Lorsque le message « Détartrage nécessaire! » s’affiche, vous devriez effectuer un
détartrage sans tarder. Toutefois, même en l’absence de ce message, vous devriez tout
de même continuer de détartrer votre système d’infusion tous les 3 à 6 mois.
DÉTARTRAGE DE VOTRE SYSTÈME D’INFUSION
Vous aurez besoin d’une grande tasse en céramique, d’eau fraîche, de la solution de
détartrage Keurig
MC
et d’un accès à un évier. Ne pas utiliser un gobelet de carton.
• Videz l’eau du réservoir. Si votre appareil est doté d’un filtre à eau Keurig
MC
, retirez-le et
mettez-le de côté. Si nécessaire, désactivez la fonction ARRÊT AUTO (voir la page 56).
1
re
ÉTAPE : PREMIER RINÇAGE AVEC LA SOLUTION DE DÉTARTRAGE
• Appuyez sur le bouton de mise en marche et maintenez-le enfoncé pour éteindre
le système d’infusion.
• Versez toute la solution de détartrage Keurig
MC
dans le réservoir d’eau. Remplissez
ensuite la bouteille vide d’eau fraîche et versez l’eau dans le réservoir d’eau. Appuyez
sur le bouton de mise en marche et maintenez-le enfoncé pour remettre le système
d’infusion en marche.
• Placez une grande tasse sur le plateau à tasse et lancez une infusion de nettoyage en
appuyant sur le bouton d’infusion et en le maintenant enfoncé, jusqu’à ce que 170 ml
d’eau (6 oz) aient été distribués. Le système d’infusion mettra automatiquement fin à la
distribution après que 170 ml d’eau (6 oz) se soient écoulés. Veuillez ne pas utiliser de
dosette Keurig
®
. Jetez le contenu de la tasse dans l’évier.
2
e
ÉTAPE : DEUXIÈME RINÇAGE AVEC LA SOLUTION DE DÉTARTRAGE
• Répétez le processus d’infusion de rinçage jusqu’à ce que le message « Plus d’eau s.v.p »
s’affiche. Laissez ensuite le système d’infusion reposer en marche pendant au moins
30 minutes.
• Après 30 minutes, jetez le reste de solution de détartrage et rincez le réservoir d’eau
à fond.
3
e
ÉTAPE : RINÇAGE À L’EAU FRAÎCHE
• Remplissez le réservoir d’eau avec de l’eau fraîche jusqu’à la marque de niveau plein
(MAX), sans la dépasser.
• Placez une grande tasse sur le plateau à tasse et lancez un cycle d’infusion à l’eau
seulement. Jetez le contenu de la tasse dans l’évier.
66 67
5
ALERTES D’ENTRETIEN RECYCLAGE DES DOSETTES K-CARAFE
MC
DÉTARTRAGE DE VOTRE SYSTÈME D’INFUSION (SUITE)
• Répétez le processus d’infusion de rinçage au moins 12 fois. Vous aurez probablement à
remplir le réservoir d’eau au moins une fois durant le processus.
REMARQUE : Si le message « Il est temps de procéder à un détartrage! » est toujours affiché une fois la procédure terminée, répétez les
étapes de détartrage ci-dessus.
L’action nettoyante de la solution de détartrage Keurig
MC
peut entraîner la formation de
mousse dans le système d’infusion. Ce phénomène est naturel et résulte de la réaction de
la solution avec le tartre. Il est possible qu’un système d’infusion fortement entartré ne se
remplisse pas adéquatement une fois la solution de détartrage ajoutée. Dans ce cas, le
système d’infusion ne fournira qu’un mince filet de liquide, ou même rien du tout, et de
l’air qui sort se fera entendre. Si cela se produit :
• Éteignez et débranchez le système d’infusion.
• Si le réservoir d’eau contient de la solution de détartrage Keurig
MC
, videz-le, rincez-le à
fond et remplissez-le d’eau embouteillée ou filtrée.
• Rebranchez le système d’infusion, remettez-le en marche et répétez la 3
e
ÉTAPE :
RINÇAGE À L’EAU FRAÎCHE (voir la page 65). Le système d’infusion devrait fonctionner
normalement, la solution de rinçage étant graduellement évacuée et le tartre, éliminé. Si
le problème persiste, débranchez le système d’infusion et laissez-le reposer pendant au
moins 30 minutes avant de continuer le rinçage.
Lisez ce code QR avec votre téléphone intelligent pour visionner des capsules vidéo
expliquant étape par étape les techniques de nettoyage, de détartrage et autres.
Vous pouvez également visionner ces capsules en ligne à Keurig.com.
Le récipient de plastique des dosettes
K-Carafe
MC
peut être recyclé partout où
le plastique de type 5 est accepté. Le
plastique de type 5 n’est peut-être pas
recyclé actuellement dans votre région;
veuillez vérifier auprès des responsables
de votre municipalité ou de la gestion des
matières résiduelles, ou rendez-vous au
Keurigrecycling.com pour obtenir
plus d’information.
1. Une fois l’infusion complétée, soulevez
la poignée et retirez soigneusement
la dosette K-Carafe
MC
en la tenant par
la bordure.
ATTENTION : La dosette K-Carafe
MC
sera chaude après
l’infusion. Retirez-la avec précaution et laissez-la
complètement refroidir avant de la manipuler.
3. Une fois le couvercle et le filtre retirés,
jetez-les. Vous pouvez recycler vos
dosettes K-Carafe
MC
partout où le
plastique de type 5 est accepté.
2. Une fois refroidie, enlevez le couvercle
et le filtre de la dosette. Le filtre adhère
au couvercle.
SECTION 2
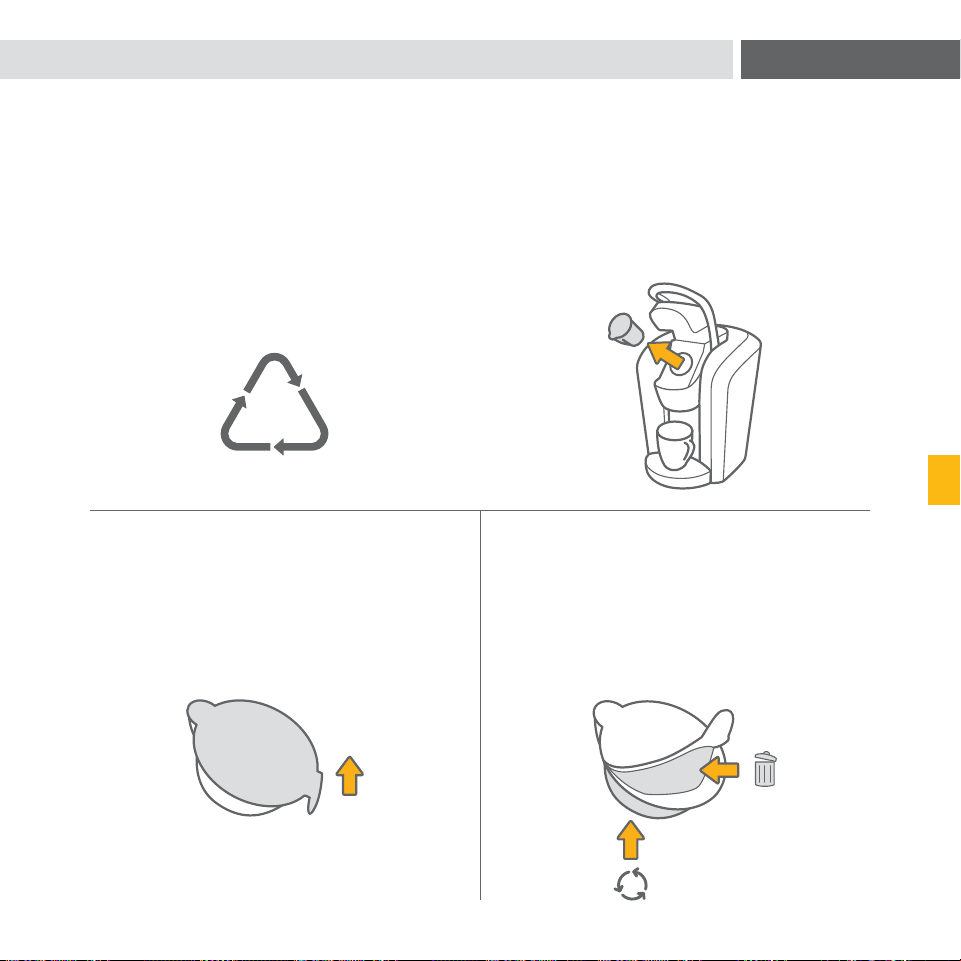

68 69
• Si vous avez répété les étapes de détartrage deux fois et que le système d’infusion
continue d’infuser une tasse incomplète, communiquez avec le Service à la clientèle au
1 866 901-2739.
LE SYSTÈME D’INFUSION S’ALLUME OU S’ÉTEINT AUTOMATIQUEMENT
• Assurez-vous que les fonctions MARCHE/ARRÊT AUTO n’ont pas été activées
(voir la page 56).
• Si le niveau d’eau est insuffisant pour infuser une tasse complète, ajoutez de l’eau dans
le réservoir.
L’ÉCRAN INDIQUE LE MESSAGE « PLUS D’EAU S.V.P. »
• Si le niveau d’eau est élevé, retirez le réservoir et videz l’eau. Puis, nettoyez-le à fond
(voir la page 59). Remplissez le réservoir d’eau jusqu’à la marque de niveau plein (MAX),
puis replacez-le sur le système d’infusion en vous assurant qu’il soit bien en place sur
sa base.
L’HEURE NE S’AFFICHE PAS À L’ÉCRAN
• Si le système d’infusion est débranché ou s’il y a une panne d’électricité, suivez la
procédure à la page 55 pour régler l’HORLOGE.
LE LOGO KEURIG
®
FIGURE SUR LA DOSETTE K-CUP
®
, MAIS L’ÉCRAN INDIQUE
« OUPS! »
• Le système d’infusion Keurig
®
2.0 fonctionne uniquement avec des dosettes portant
le logo Keurig
®
. Certaines dosettes Keurig
®
produites avant le mois de janvier 2014
pourraient ne pas fonctionner avec le système d’infusion Keurig
®
2.0. Veuillez
communiquer avec le Service à la clientèle au 1 866 901-2739 pour trouver une solution.
VOUS ÉPROUVEZ TOUJOURS UN PROBLÈME? RENDEZ-VOUS AU KEURIG.COM POUR
OBTENIR PLUS D’INFORMATION.
LE SYSTÈME D’INFUSION NE S’ALLUME PAS
• Branchez le système d’infusion dans une prise indépendante sans gradateur.
• Vérifiez que le système d’infusion est bien branché.
• Branchez le système d’infusion dans une autre prise.
• Réenclenchez le disjoncteur de votre domicile au besoin.
• Appuyez sur le bouton de mise en marche en le maintenant enfoncé, et assurez-vous
que l’écran tactile s’allume.
LE SYSTÈME D’INFUSION N’INFUSE PAS
• Placez une dosette dans le support à dosette, puis assurez-vous que la poignée
soit complètement abaissée et que l’écran d’infusion adéquat est affiché. Suivez les
directives d’infusion de la SECTION 1 (voir les pages 46 et 47).
• Si l’écran indique « Plus d’eau s.v.p. », versez de l’eau dans le réservoir ou assurez-vous
que le réservoir est bien installé sur sa base.
• Si l’écran indique « Plus d’eau s.v.p. » après le remplissage, retirez le réservoir et videz
l’eau. Puis, nettoyez-le à fond (voir la page 59). Remplissez le réservoir d’eau jusqu’à
la marque de niveau plein (MAX), puis replacez-le sur le système d’infusion en vous
assurant qu’il soit bien en place sur sa base.
• Le support à dosette doit peut-être être nettoyé (voir les pages 60 et 61) ou le système
d’infusion a peut-être besoin d’un détartrage (voir les pages 64 à 66).
• Si vous avez répété la procédure précédente deux fois et que le problème persiste,
communiquez avec le Service à la clientèle au 1 866 901-2739.
LE SYSTÈME D’INFUSION N’INFUSE PAS UNE TASSE COMPLÈTE
• Nettoyez le support à dosette si nécessaire (voir les pages 60 et 61).
• Le réservoir d’eau a peut-être été enlevé pendant l’infusion. Replacez le réservoir d’eau
et effectuez une infusion de nettoyage (voir la page 45) sans insérer de dosette.
• Procédez au détartrage du système d’infusion (voir les pages 64 à 66).
DÉPANNAGE
SECTION 3

70 71
GARANTIE
SECTION 4
GARANTIE LIMITÉE D’UN AN
Keurig garantit que chaque système d’infusion est exempt de tout défaut de pièces ou de
fabrication, sous réserve d’une utilisation domestique normale, pendant un an à partir de
la date d’achat. Nous vous recommandons de remplir et de retourner la carte de garantie
incluse avec votre système d’infusion pour que les données sur votre achat puissent
être consignées dans notre système. Keurig réparera ou remplacera, à son choix, un
système d’infusion défectueux sans frais, à la réception d’une preuve de la date d’achat.
Si le système d’infusion doit être remplacé durant la période de garantie, il pourra être
remplacé par un système d’infusion neuf ou par un système d’infusion remis à neuf. Le
système d’infusion de remplacement est alors couvert par une nouvelle garantie limitée
d’un an.
La présente garantie ne s’applique qu’aux systèmes d’infusion utilisés au Canada et aux
États-Unis. La présente garantie vous confère des droits légaux spécifiques et il se peut
que vous bénéficiiez d’autres droits qui peuvent varier d’une province à l’autre, et, dans le
cas des États-Unis, d’un État à l’autre.
Le système d’infusion Keurig
®
2.0 est conçu pour ne fonctionner qu’avec les dosettes de
marque Keurig
®
. Tout dommage ou toute défectuosité à votre système d’infusion résultant
de l’utilisation de dosettes et d’accessoires de marques autres que Keurig
®
pourrait ne pas
être couvert par la présente garantie ou pourrait entraîner des frais de réparation s’il est
déterminé que le dommage ou la défectuosité a été causé par une telle utilisation.
QU’EST-CE QUI N’EST PAS COUVERT PAR LA GARANTIE LIMITÉE ?
LA PRÉSENTE GARANTIE NE S’APPLIQUE PAS AUX DOMMAGES INDIRECTS, TELS
QUE LES DOMMAGES MATÉRIELS, ET NE COUVRE PAS LES FRAIS ET LES COÛTS
ENGENDRÉS PAR UNE VIOLATION DE LA GARANTIE, MÊME S’ILS SONT PRÉVISIBLES.
Certaines provinces ou certains États n’autorisent pas l’exclusion ou la limitation de
dommages indirects. Par conséquent, selon la province ou l’État où vous avez acheté
l’appareil, les exclusions ou les limitations susmentionnées peuvent ne pas s’appliquer
à vous.
La présente garantie ne s’applique pas non plus aux dommages résultant de l’utilisation
de dosettes et d’accessoires de marques autres que Keurig
®
, de réparations effectuées
par d’autres personnes que le personnel de Keurig ou l’un de ses fournisseurs de services
autorisés, de l’utilisation de pièces autres que les pièces d’origine Keurig ou de causes
externes telles qu’un usage abusif, une mauvaise utilisation, une mauvaise alimentation en
électricité ou des catastrophes naturelles.
AUTRES LIMITATIONS
LA PRÉSENTE GARANTIE EST EXCLUSIVE ET TIENT LIEU DE TOUTE AUTRE GARANTIE
EXPRESSE, VERBALE OU ÉCRITE. DE PLUS, KEURIG EXCLUT SPÉCIFIQUEMENT
TOUTE AUTRE GARANTIE TOUCHANT LE SYSTÈME D’INFUSION K2.0-500, Y COMPRIS
TOUTE GARANTIE IMPLICITE RELATIVE À LA QUALITÉ ET À L’ADAPTATION À UN
USAGE PARTICULIER. Certaines provinces et certains États n’autorisent pas les clauses
d’exonération de telles garanties implicites ni les limitations concernant la durée des
garanties implicites, et les limitations susmentionnées peuvent ne pas s’appliquer, selon la
province ou l’État où vous avez acheté l’appareil.
COMMENT FAIRE HONORER LA GARANTIE ?
Les systèmes d’infusion Keurig
®
sont des appareils de qualité qui, lorsqu’ils sont utilisés
et entretenus adéquatement, sont conçus pour durer plusieurs années. Si toutefois vous
deviez avoir recours à la garantie, il vous suffit d’appeler au Service à la clientèle de Keurig
en composant le numéro sans frais 1 866 901-2739. Avant de retourner votre système
d’infusion pour réparation, vous devez d’abord communiquer avec un représentant du
Service à la clientèle de Keurig pour obtenir un numéro d’autorisation de retour (ATR).
Tout système d’infusion Keurig
®
envoyé sans numéro d’autorisation de retour sera
retourné à l’expéditeur sans avoir été réparé.
Keurig, Incorporated
33 Coffee Lane
Waterbury, VT 05676
1 866 901-2739

72 73
ESPAÑOL
GUÍA
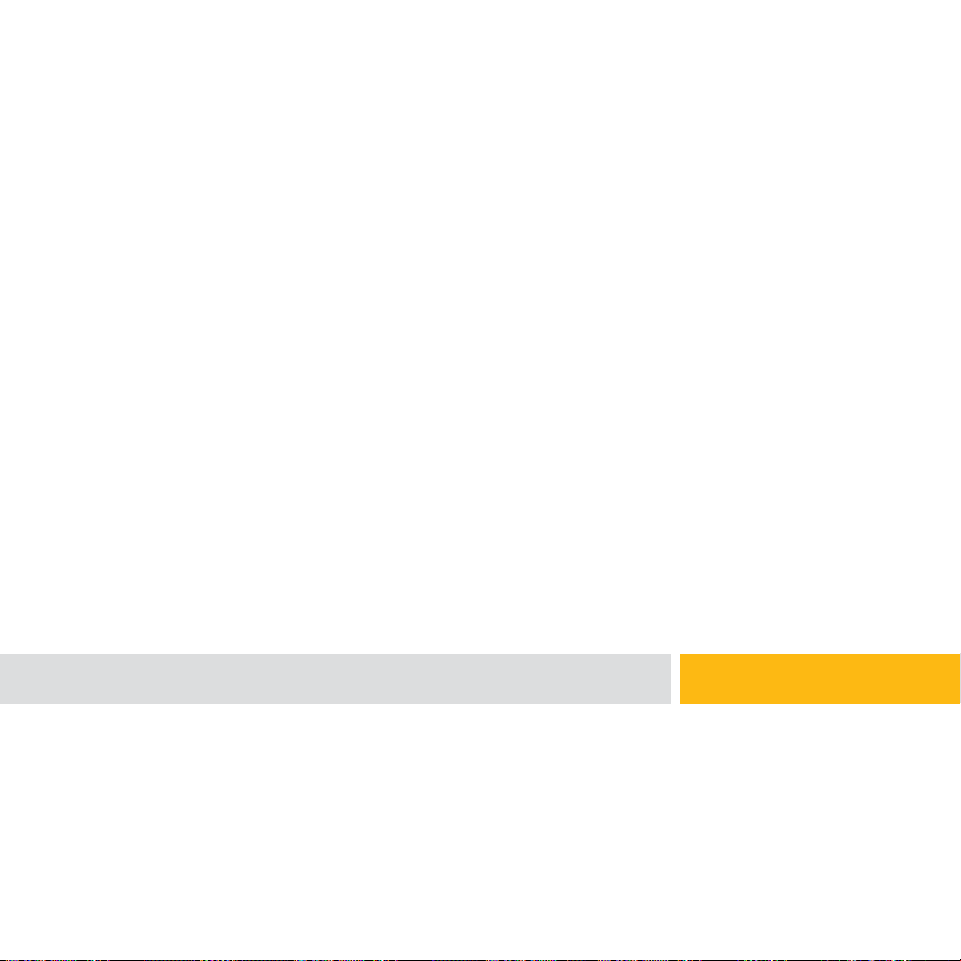
72 73
ESPAÑOL
GUÍA

74 75
Cuando use aparatos
electrodomésticos, debe seguir
precauciones básicas de seguridad,
incluso las siguientes:
1. Lea todas las instrucciones antes
de usarlo.
2. No toque las superficies calientes.
Use asas y perillas si las tiene.
3. Este aparato debe instalarse
y colocarse correctamente
siguiendo estas instrucciones
antes de su uso.
4. El uso de accesorios no
recomendados por el fabricante
puede causar incendios, descargas
eléctricas o lesiones a personas.
5. No lo coloque cerca o encima de
quemadores de gas o eléctricos,
ni en un horno caliente.
6. No lo use al aire libre.
7. No sumerja el aparato, sus cables
ni sus enchufes en el agua u otros
líquidos para evitar incendios,
descargas eléctricas o lesiones.
8. No llene el tanque de agua por
encima de la marca (MAX FILL).
9. ¡Use solo agua en este aparato!
No coloque ningún otro líquido
o alimento en el tanque de
agua, salvo lo indicado en las
instrucciones de limpieza de
esta guía.
10. Apague y desenchufe la cafetera
antes de limpiarla o darle
mantenimiento. Déjela enfriar
antes de agregar o retirar piezas
o limpiarla.
11. Para un funcionamiento óptimo,
enchufe el aparato en su propia
toma de corriente o en un circuito
propio para evitar el parpadeo de
luces, la quema de fusibles o la
desconexión del disyuntor.
12. No use ningún aparato con un
cable ni con un enchufe dañado
o después de una falla o si se
encuentra dañado de alguna
manera. Contactar el Servicio
al cliente de Keurig para avisar
de cualquier falla o daño de
la cafetera.
13. No deje que el cable cuelgue
de la orilla de la mesa o del
mostrador, ni que toque
superficies calientes.
14. Para desconectar, presione el
botón de alimentación de la
cafetera a la posición “APAGADO”
y luego retire el enchufe de la
toma de corriente.
15. Siempre supervise todo
electrodoméstico que se use
cerca de niños o que usen niños.
16. No levantar el asa de la cafetera
cuando se está preparando café.
17. Mantener siempre la tapa sobre el
tanque de agua salvo cuando lo
está llenando.
18. Este aparato está equipado de
un cable de alimentación con
un alambre y un enchufe de
conexión a tierra. El aparato
debe usar una toma de corriente
de 3 orificios correctamente
puesta a tierra. En la eventualidad
de un cortocircuito eléctrico, la
puesta a tierra reduce los riegos
de electrocución.
19. Si la toma de corriente es una
toma estándar para dos clavijas,
tiene la responsabilidad y la
obligación de reemplazarla por
una de 3 clavijas adecuadamente
puesta a tierra.
20. No corte ni retire, en ningún
caso, la tercera clavija (tierra)
del cable de alimentación ni use
un adaptador.
21. Consulte a un electricista
calificado si no comprende bien
las instrucciones de puesta a
tierra o si tiene dudas sobre la
puesta a tierra del aparato.
22. No use el aparato para otros fines
que no sean los especificados.
23. Retire el sello protector antes
de usar.
PRECAUCIONES IMPORTANTES
ADVERTENCIA PARA USUARIOS
Y PADRES:
1. NO permita que los niños usen
la cafetera sin la supervisión de
un adulto. La cafetera sirve agua
muy caliente.
2. INDICACIÓN PARTICULAR
PARA USUARIOS DE CACAO
CALIENTE: LUEGO DE USAR
UNA DOSIS DE CACAO
CALIENTE K-CUP
®
, ACTIVE DE
INMEDIATO UN CICLO DE AGUA
CALIENTE sin ninguna dosis para
evitar posibles obstrucciones en
la aguja de salida. NO espere que
lo haga el próximo usuario.
CONSERVE ESTAS
INSTRUCIONES.
ADVERTENCIA
!
RIESGO DE INCENDIO O
DE DESCARGA ELÉCTRICA
NO ABRIR
ADVERTENCIA: PARA REDUCIR EL
RIESGO DE INCENDIO O DE DESCARGA
ELÉCTRICA, NO RETIRE LA TAPA INFERIOR.
NO CONTIENE PIEZAS INTERNAS QUE
EL USUARIO PUEDA REPARAR, SOLO EL
PERSONAL DE SERVICIO AUTORIZADO
PUEDE REALIZAR REPARACIONES.

76 77
ÍNDICE
CAFETERA KEURIG
®
2.0 | CAFETERA SERIES K2.0-500
Características 78
Controles de la pantalla táctil 79
SECCIÓN 1
Instalación y limpieza de la cafetera 80
Preparar su primera dosis K-Cup
®
82
Preparar su primera dosis K-Carafe
TM
83
Configurar el modo infusión automática de la jarra 84
SECCIÓN 2
Detener la infusión 86
Agregar agua 86
Servir agua caliente en un tazón 87
Añadir un favorito 88
Modificar un favorito 89
Usar un favorito 89
Configurar el menú 90
Cuidar su cafetera 95
Alertas de mantenimiento 100
Reciclar las dosis K-Carafe
TM
103
SECCIÓN 3
Solución de problemas 104
SECCIÓN 4
Garantía 106
CUIDADO: Hay tres agujas filosas
que perforan las dosis, dos arriba y
otra abajo del soporte de dosis. Para
evitar riesgo de lesiones, no ponga
los dedos en el interior de la caja de
ensamble de la dosis.
CUIDADO: El agua dentro del
soporte de dosis está muy caliente
durante la preparación. Para evitar
cualquier tipo de lesión, no levante
el asa ni abra la caja del ensamble
durante la infusión.
CUIDADO: No lo llene por encima
de la marca (MAX FILL). Si llena el
tanque de agua por encima de esta
línea, es posible que su primera
infusión sea más grande que la
seleccionada. Si prefiere tener
un tanque lleno hasta la orilla, le
aconsejamos que use un tazón más
grande para su primera infusión; ello
evitará posibles derrames.
CUIDADO: Por favor, coloque
siempre su cafetera en posición
vertical, de este modo evitará
posibles lesiones y/o que se rompa
su cafetera.
CUIDADO: Líquido muy caliente. Se
requiere la supervisión de un adulto.
INSTRUCCIONES SOBRE EL
CABLE CORTO:
El cable de alimentación es corto
para reducir el riesgo de enredos
o tropiezos con el mismo. Están
también a la venta extensiones o
cables de alimentación más largos,
los que pueden usarse tomando las
precauciones debidas. Si usa una
extensión: (1) la capacidad eléctrica
indicada en el cable o en la extensión
debe ser por lo menos tan grande
como la indicada en el aparato;
(2) cuando instale el cable, evite que
cuelgue de la orilla del mostrador o
de la mesa, así los niños no pueden
jalarlo ni tropezarse con el mismo sin
querer y (3) la extensión debe tener
un enchufe de puesta a tierra con
3 clavijas.
Su cafetera Keurig
®
2.0 no
funcionará con dosis que no tengan
el logo Keurig
®
.
Las cafeteras Keurig
®
2.0 no son
compatibles con el accesorio de
filtro reutilizable My K-Cup
®
.
ESTE PRODUCTO ES
EXCLUSIVAMENTE PARA USO
DOMÉSTICO.
ADVERTENCIA
ESTE PRODUCTO CONTIENE
QUÍMICOS, INCLUSO PLOMO,
QUE, SEGÚN EL ESTADO DE
CALIFORNIA, PRODUCEN CÁNCER,
MALFORMACIONES CONGÉNITAS Y
OTROS DAÑOS REPRODUCTIVOS.

78 79
K
L
M
N
F
G
D
E
C
B
A
I
J
H
170
ml
290
ml
110
ml
230
ml
TAZAS
TAZAS
TAZAS
350
ml
170
ml
230
ml
290
ml
110
ml
ETAPA 1
ESPUMA
110
ml
ETAPA 2
INFUSIÓN
110
ml
170
ml
230
ml
290
ml
410
ml
470
ml
350
ml
410
ml
470
ml
DOSIS K-CUP
®
FUTURAS DOSIS MARCA KEURIG
®
PANTALLA DE SELECCIÓN DE
CONFIGURACIÓN KEURIG BREW
®
DOSIS K-CARAFE
TM
2
3
4
5
6
LISTO
Escoger modo de infusión
Levante para Comenzar
12
:
00
K
E
U
R
I
G
B
R
E
W
AUTO INFUSIÓN
PRESIONE PARA REGULAR
TAZAS
LISTO
FUERTE
CACAO
CALIENTE
OTRO
230
ml
A CC
DD
EB
B
A
A
C
D
B
CARACTERÍSTICAS
CONTROLES DE LA PANTALLA TÁCTIL
CAFETERAS SERIES K2.0-500
A. Tapa abatible del tanque
de agua
B. Tanque de agua
C. Cubierta superior
D. Pantalla táctil/Botón de
alimentación
E. Botón de infusión
F. Asa
G. Cabeza de distribución
H. Cable de alimentación
I. Rejilla
J. Plato de goteo
K. Soporte de dosis
L. Caja
(K y L forman el
ensamble del soporte
de dosis)
M. Base
N. Keurig
TM
Carafe
CONFIGURACIÓN DE INFUSIÓN
(TAMAÑO PREDETERMINADO ENMARCADO)
A. Configuración 1 KEURIG
BREW
®
B. AUTO INFUSIÓN
(disponible sólo para
dosis K-Carafe
TM
)
C. Tamaño de infusión
D. Botón de alimentación
E. Botón de favoritos
A. FUERTE
(disponible sólo para café)
B. CACAO CALIENTE/
OTRO (para bebidas que
no sean café)
C. Tamaño de infusión
D. Botón de alimentación
PANTALLA INICIAL
A. Reloj
B. Botón de configuración
C. Botón de agua caliente
D. Botón de alimentación
PANTALLA PARA
DOSIS K-CUP
®
PANTALLA PARA
DOSIS K-CARAFE
TM
desplazar
Seleccione la configuración
KEURIG BREW
®
que
corresponda al número
en la tapa de la dosis.
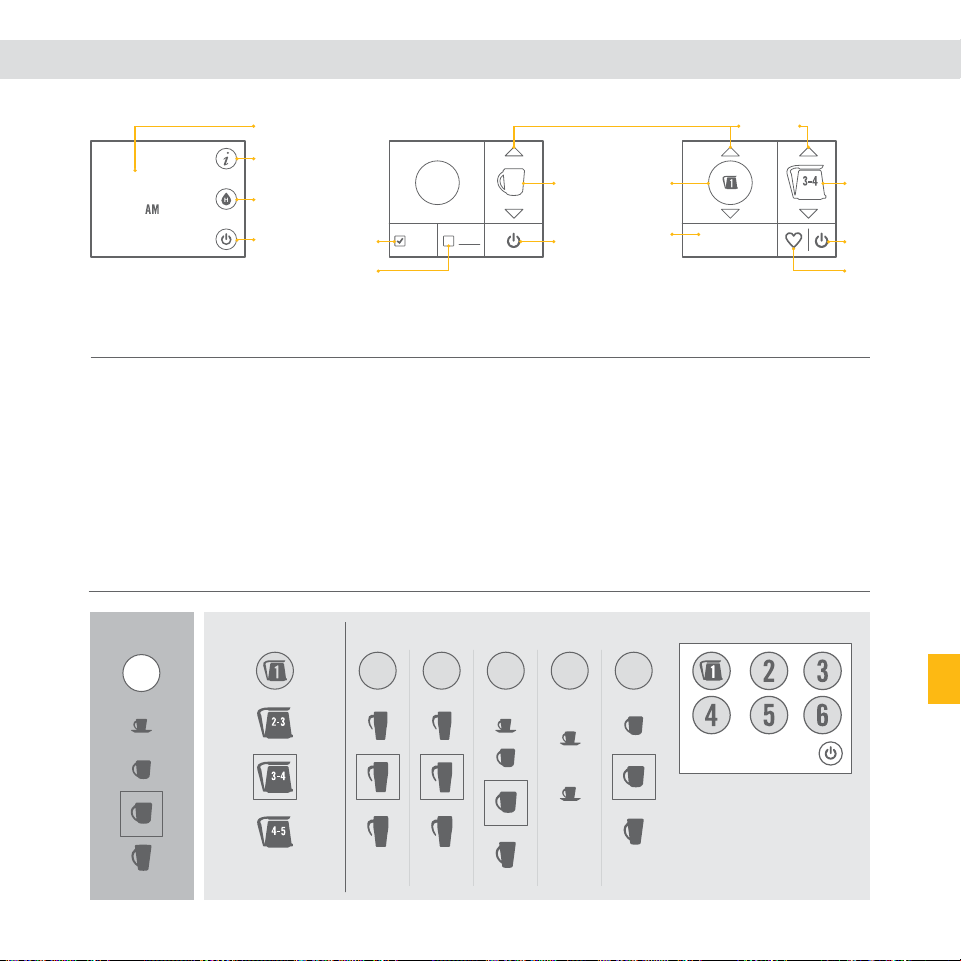
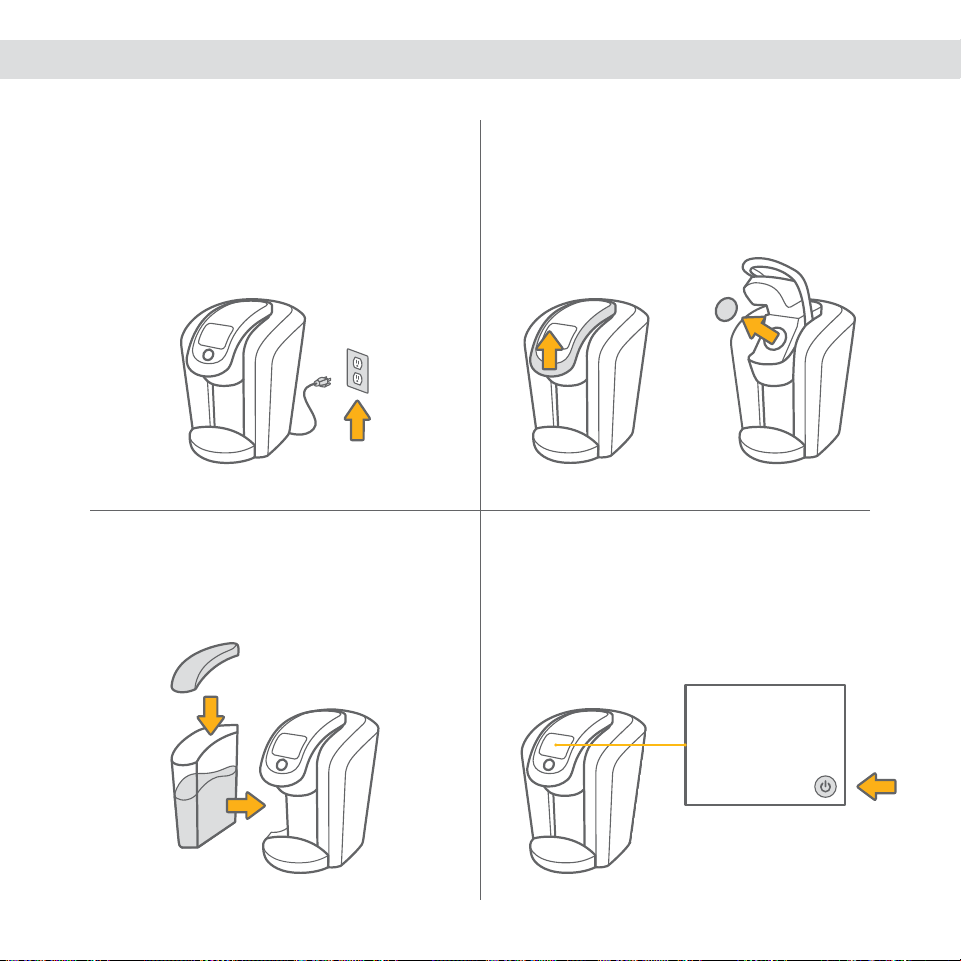
80 81
INSTALACIÓN Y LIMPIEZA DE LA CAFETERA
SECCIÓN 1
INSTALACIÓN
1. Coloque la cafetera en un mostrador y
enchúfela en una toma de corriente con
puesta a tierra.
INFUSIÓN DE LIMPIEZA
1. Para empezar una infusión de limpieza,
coloque un tazón de 350 ml (12 oz) en
el plato de goteo.
3. Enjuague el tanque de agua, llénelo con
agua embotellada o filtrada y vuelva a
colocarlo en la cafetera.
3. Presione el botón de infusión hasta
que la cafetera haya servido 170 ml
(6 oz) de agua caliente. Después de
servir 170 ml (6 oz), la cafetera dejará
de servir agua automáticamente.
2. Levante el asa, retire el sello protector
y deséchelo.
2. Levante y baje el asa. No coloque
ninguna dosis de marca Keurig
®
en
el soporte de dosis.
4. Presione el botón de alimentación
y espere que precaliente, apróx.
3 minutos.
4. ¡Su cafetera ya está lista para un
primer uso!
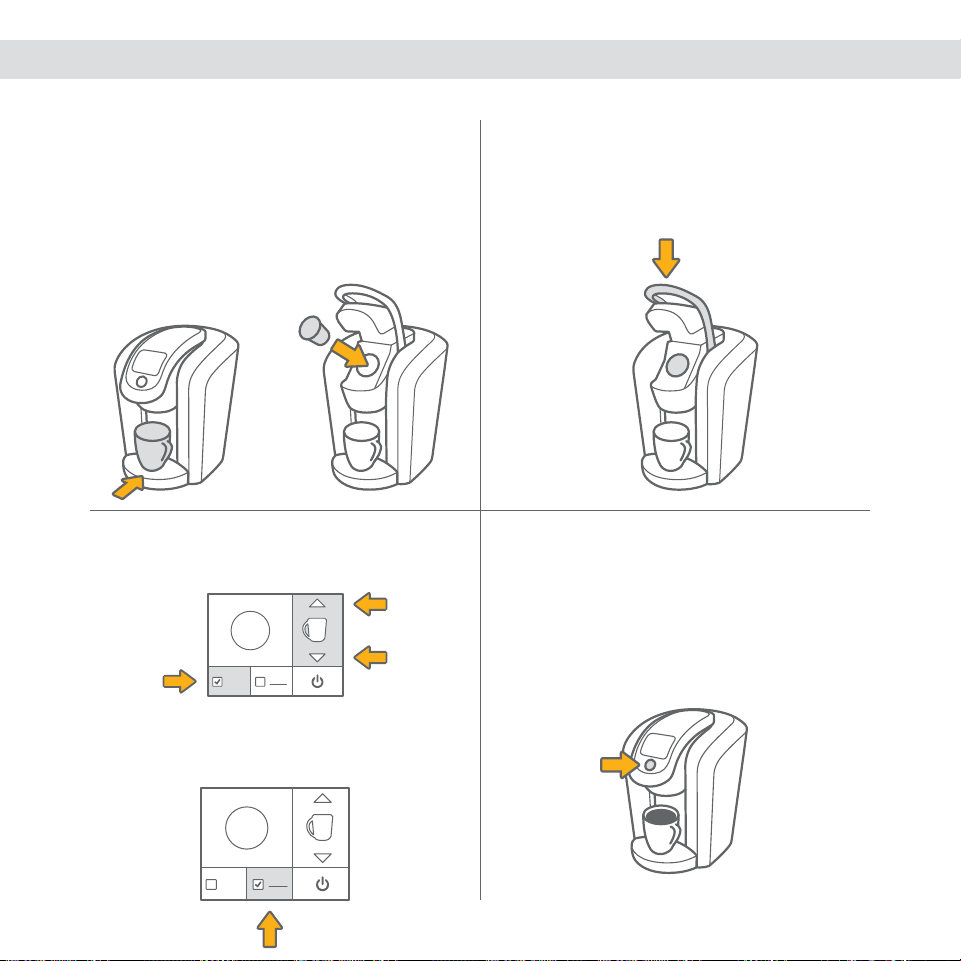
LISTO
FUERTE
CACAO
CALIENTE
OTRO
230
ml
LISTO
FUERTE
CACAO
CALIENTE
OTRO
230
ml
TAZAS
AUTO INFUSIÓN
PRESIONE PARA REGULAR
K
E
U
R
I
G
B
R
E
W
82 83
SECCIÓN 1
PREPARAR SU PRIMERA DOSIS K-CUP
®
PREPARAR SU PRIMERA DOSIS K-CARAFE
TM
1. Coloque un tazón en el plato de goteo.
Escoja una dosis K-Cup
®
y colóquela
firmemente en el soporte de dosis.
NOTA: No retire ni perfore la tapa de aluminio de la
dosis K-Cup
®
.
1. Asegúrese de que la jarra Keurig
TM
esté vacía. Retire el plato de goteo y
coloque la jarra Keurig
TM
correctamente
en su lugar.
NOTA: No retire la tapa de aluminio ni perfore la dosis
K-Carafe
TM
.
NOTA: Vea la página 99 para el funcionamiento de la
jarra Keurig
TM
.
3. Seleccione un tamaño de infusión.
Puede seleccionar FUERTE si lo desea
(solo para café).
3. Seleccione el tamaño de infusión.
NOTA: Asegúrese de que el número en la pantalla táctil
corresponda al número de la dosis K-Carafe
TM
que se está
preparando en el soporte de dosis.
Presione CACAO CALIENTE/OTRO
para seleccionar otras bebidas que no
sean café.
NOTA: Asegúrese de consultar las instrucciones en el envase
de la dosis.
2. Baje el asa.
CUIDADO: Arriba y abajo del soporte de dosis hay agujas
filosas que perforan la dosis K-Cup
®
. Para evitar lesiones,
no ponga los dedos en el interior del soporte de dosis.
NOTA: Su cafetera Keurig
®
2.0 no funcionará con dosis que
no tengan el logo Keurig
®
.
2. Seleccione una dosis K-Carafe
TM
,
colóquela firmemente en el soporte de
dosis y baje el asa.
CUIDADO: Hay agujas filosas que perforan la dosis K-Carafe
TM
arriba y abajo del soporte de dosis. Para evitar lesiones, no
ponga los dedos en el interior del soporte de dosis.
NOTA: Su cafetera Keurig
®
2.0 no funcionará con dosis que
no tengan el logo Keurig
®
.
4. ¡Presione el botón de infusión y disfrute
su primera taza!
CUIDADO: El agua dentro de la dosis K-Cup
®
durante la
preparación está muy caliente. Para evitar lesiones, no levante
el asa mientras se prepara la infusión.
4. ¡Presione el botón de infusión y disfrute
su primera taza de café!
CUIDADO: Durante la preparación, el agua dentro de la dosis
K-Carafe
TM
está muy caliente. No levante el asa durante la
infusión para evitar lesiones.
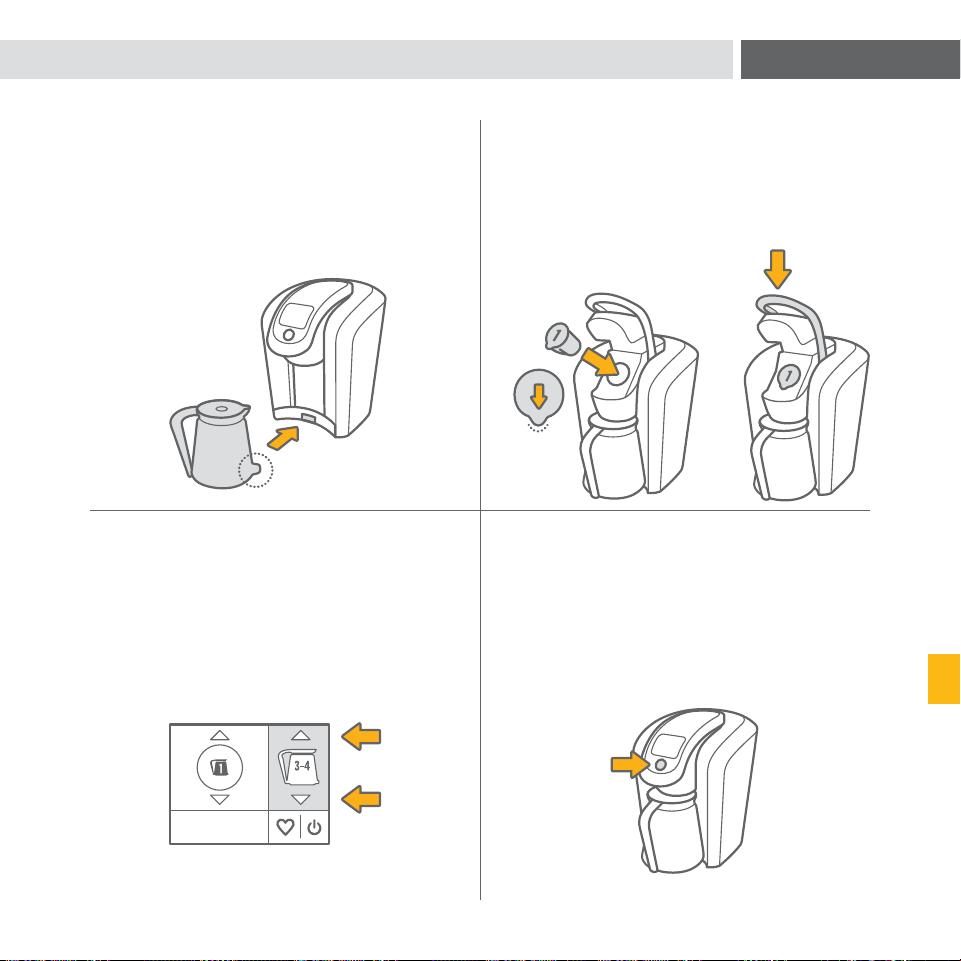
LISTO
FUERTE
CACAO
CALIENTE
OTRO
230
ml
LISTO
FUERTE
CACAO
CALIENTE
OTRO
230
ml
TAZAS
AUTO INFUSIÓN
PRESIONE PARA REGULAR
K
E
U
R
I
G
B
R
E
W
82 83
SECCIÓN 1
PREPARAR SU PRIMERA DOSIS K-CUP
®
PREPARAR SU PRIMERA DOSIS K-CARAFE
TM
1. Coloque un tazón en el plato de goteo.
Escoja una dosis K-Cup
®
y colóquela
firmemente en el soporte de dosis.
NOTA: No retire ni perfore la tapa de aluminio de la
dosis K-Cup
®
.
1. Asegúrese de que la jarra Keurig
TM
esté vacía. Retire el plato de goteo y
coloque la jarra Keurig
TM
correctamente
en su lugar.
NOTA: No retire la tapa de aluminio ni perfore la dosis
K-Carafe
TM
.
NOTA: Vea la página 99 para el funcionamiento de la
jarra Keurig
TM
.
3. Seleccione un tamaño de infusión.
Puede seleccionar FUERTE si lo desea
(solo para café).
3. Seleccione el tamaño de infusión.
NOTA: Asegúrese de que el número en la pantalla táctil
corresponda al número de la dosis K-Carafe
TM
que se está
preparando en el soporte de dosis.
Presione CACAO CALIENTE/OTRO
para seleccionar otras bebidas que no
sean café.
NOTA: Asegúrese de consultar las instrucciones en el envase
de la dosis.
2. Baje el asa.
CUIDADO: Arriba y abajo del soporte de dosis hay agujas
filosas que perforan la dosis K-Cup
®
. Para evitar lesiones,
no ponga los dedos en el interior del soporte de dosis.
NOTA: Su cafetera Keurig
®
2.0 no funcionará con dosis que
no tengan el logo Keurig
®
.
2. Seleccione una dosis K-Carafe
TM
,
colóquela firmemente en el soporte de
dosis y baje el asa.
CUIDADO: Hay agujas filosas que perforan la dosis K-Carafe
TM
arriba y abajo del soporte de dosis. Para evitar lesiones, no
ponga los dedos en el interior del soporte de dosis.
NOTA: Su cafetera Keurig
®
2.0 no funcionará con dosis que
no tengan el logo Keurig
®
.
4. ¡Presione el botón de infusión y disfrute
su primera taza!
CUIDADO: El agua dentro de la dosis K-Cup
®
durante la
preparación está muy caliente. Para evitar lesiones, no levante
el asa mientras se prepara la infusión.
4. ¡Presione el botón de infusión y disfrute
su primera taza de café!
CUIDADO: Durante la preparación, el agua dentro de la dosis
K-Carafe
TM
está muy caliente. No levante el asa durante la
infusión para evitar lesiones.

TAZAS
AUTO INFUSIÓN
PRESIONE PARA REGULAR
K
E
U
R
I
G
B
R
E
W
AUTO JARRA REGULADA A:
ANULAR
6
:
00
AUTO JARRA A:
6
:
00
PRESIONE AQUÍ PARA CAMBIAR
¡
NO INTERRUMPIR!
AUTO JARRA A:
6
:
00
PRESIONE AQUÍ PARA CAMBIAR
¡
NO INTERRUMPIR!
TAZAS
TAMAÑO DE AUTO JARRA:
REGULAR
TAZAS TAZAS
AUTO JARRA A:
6
:
00
PRESIONE AQUÍ PARA CAMBIAR
¡
NO INTERRUMPIR!
84 85
CONFIGURAR EL MODO INFUSIÓN AUTOMÁTICA DE LA JARRA
1. Asegúrese de que la jarra Keurig
TM
esté vacía. Retire el plato de goteo y
coloque la jarra Keurig
TM
correctamente
en su lugar.
4. Seleccione la hora de preparación,
luego presione la flecha derecha.
3. Seleccione AUTO INFUSIÓN PRESIONE
PARA REGULAR.
2. Seleccione una dosis K-Carafe
TM
,
colóquela firmemente en el soporte de
dosis y baje el asa.
NOTA: Asegúrese de que la hora sea la correcta. Vea la página
91 para ajustarla.
5. Seleccione el tamaño de infusión, luego
presione REGULAR.
7. Para cambiar cualquier opción,
seleccione PRESIONE AQUÍ
PARA CAMBIAR.
6. La pantalla táctil indicará ¡NO
INTERRUMPIR!
8. Para poner la cafetera en modo espera,
presione y libere rápidamente el botón
de alimentación. Si retira la jarra Keurig
TM
o levanta el asa, el MODO INFUSIÓN
JARRA AUTO.
SECCIÓN 1
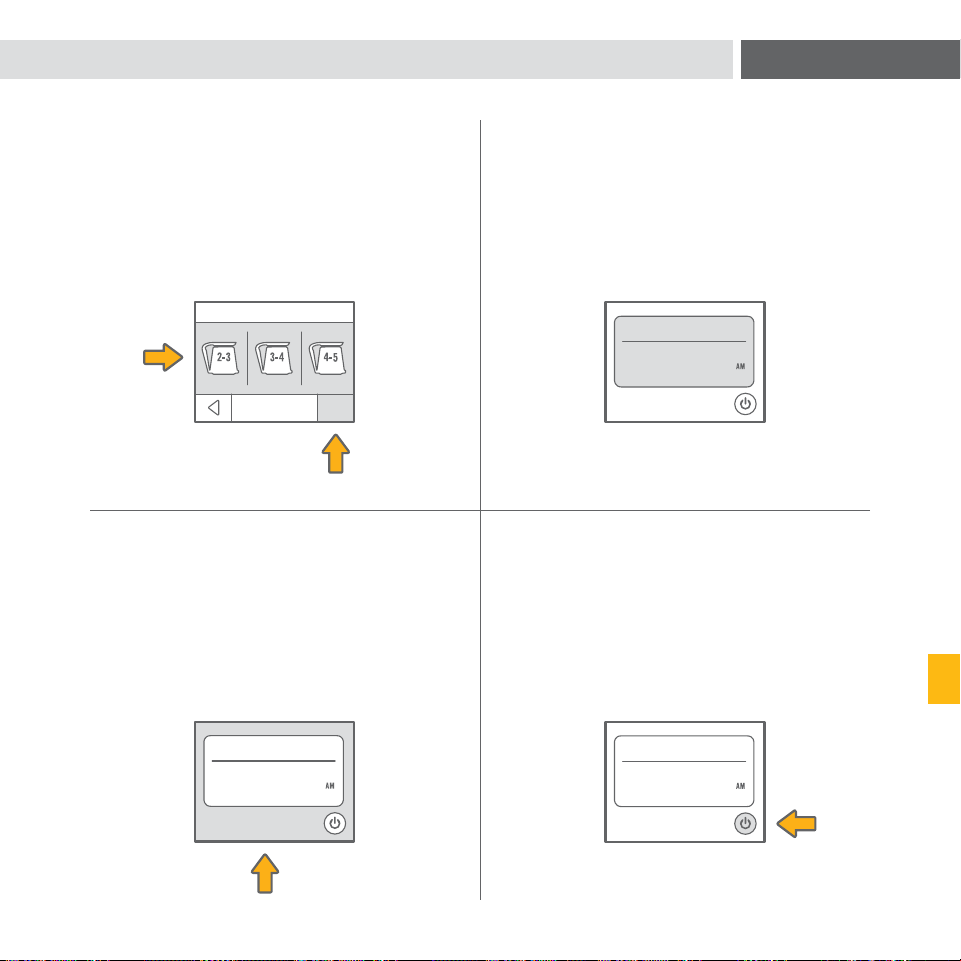
TAZAS
AUTO INFUSIÓN
PRESIONE PARA REGULAR
K
E
U
R
I
G
B
R
E
W
AUTO JARRA REGULADA A:
ANULAR
6
:
00
AUTO JARRA A:
6
:
00
PRESIONE AQUÍ PARA CAMBIAR
¡
NO INTERRUMPIR!
AUTO JARRA A:
6
:
00
PRESIONE AQUÍ PARA CAMBIAR
¡
NO INTERRUMPIR!
TAZAS
TAMAÑO DE AUTO JARRA:
REGULAR
TAZAS TAZAS
AUTO JARRA A:
6
:
00
PRESIONE AQUÍ PARA CAMBIAR
¡
NO INTERRUMPIR!
84 85
CONFIGURAR EL MODO INFUSIÓN AUTOMÁTICA DE LA JARRA
1. Asegúrese de que la jarra Keurig
TM
esté vacía. Retire el plato de goteo y
coloque la jarra Keurig
TM
correctamente
en su lugar.
4. Seleccione la hora de preparación,
luego presione la flecha derecha.
3. Seleccione AUTO INFUSIÓN PRESIONE
PARA REGULAR.
2. Seleccione una dosis K-Carafe
TM
,
colóquela firmemente en el soporte de
dosis y baje el asa.
NOTA: Asegúrese de que la hora sea la correcta. Vea la página
91 para ajustarla.
5. Seleccione el tamaño de infusión, luego
presione REGULAR.
7. Para cambiar cualquier opción,
seleccione PRESIONE AQUÍ
PARA CAMBIAR.
6. La pantalla táctil indicará ¡NO
INTERRUMPIR!
8. Para poner la cafetera en modo espera,
presione y libere rápidamente el botón
de alimentación. Si retira la jarra Keurig
TM
o levanta el asa, el MODO INFUSIÓN
JARRA AUTO.
SECCIÓN 1
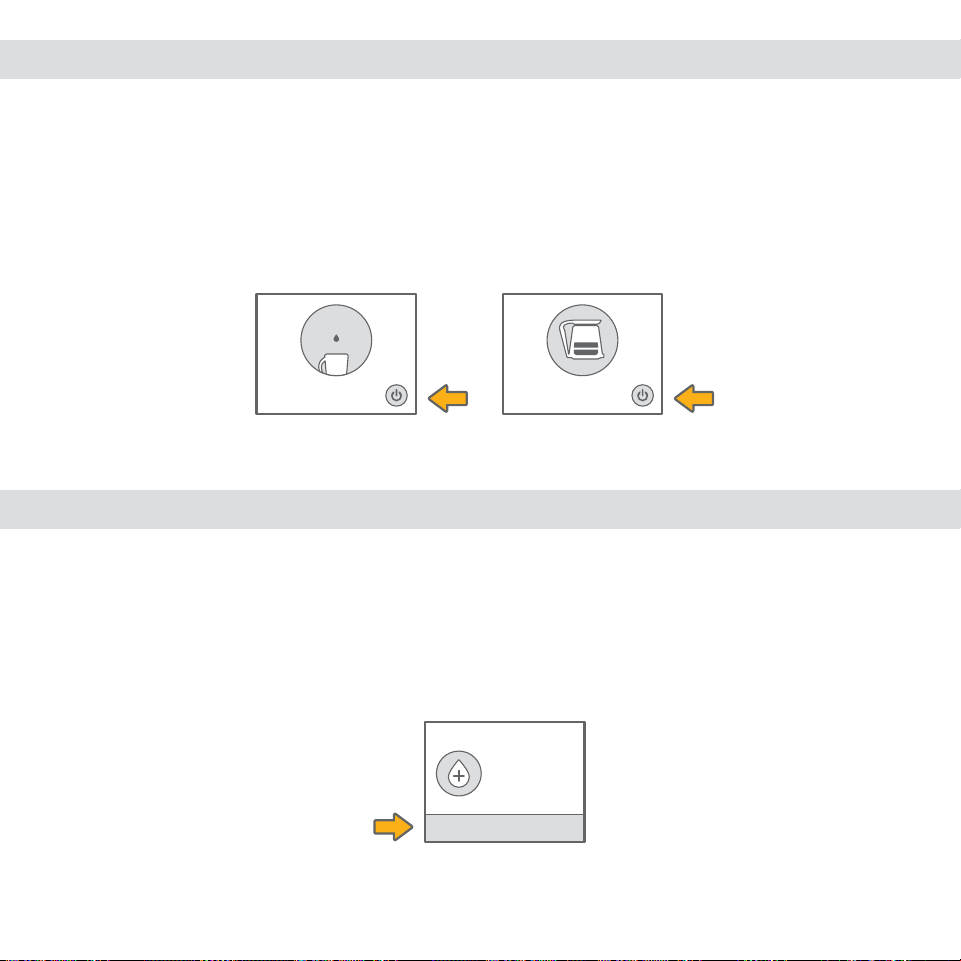
86
Más agua por
favor.
CONTINUAR
Preparando... Preparando...
¡Disfrute!
Levante para Comenzar
12
:
00
ANULAR
¿Agua caliente?
Levantar el asa.
Retire la dosis.
Bajar el asa.
87
DETENER LA INFUSIÓN
AGREGAR AGUA
SERVIR AGUA CALIENTE EN UN TAZÓN
PARA LAS DOSIS K-CUP
®
Y K-CARAFE
TM
(REGLAJE 1 DE KEURIG BREW
®
)
Para detener el proceso de infusión, mantenga presionado el botón de alimentación
por un segundo o levante lentamente el asa. Retire y deseche toda dosis usada. No es
aconsejable emplear una dosis usada.
Su cafetera Keurig
®
2.0 le indicará cuando el nivel de agua en el tanque de agua esté bajo
y no pueda preparar más infusiones. La cafetera solo le indicará “Más agua por favor.” si
no tiene la suficiente como para preparar su infusión.
Por ejemplo: Una jarra Keurig
TM
necesitará más agua que un tazón de 290 ml (10 oz).
1. Presione el botón de agua caliente. 2. Siga las instrucciones de la
pantalla táctil.
3. Mantenga presionado el botón infusión
para servir 170 ml (6 oz) de agua
caliente. Una vez distribuidas las 170 ml
(6 oz), la cafetera se detendrá.
4. Cuando la infusión esté lista, la pantalla
táctil indicará ¡Disfrute!
SECCIÓN 2
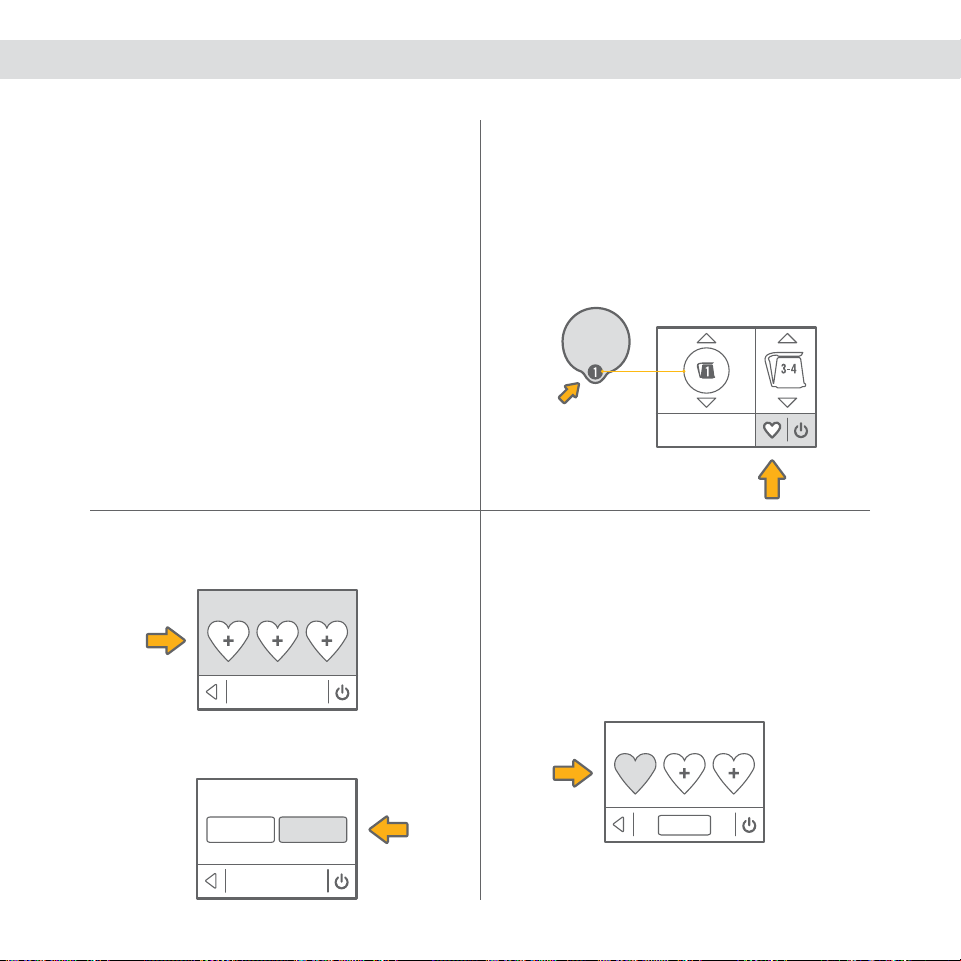
89
TAZAS
AUTO INFUSIÓN
PRESIONE PARA REGULAR
K
E
U
R
I
G
B
R
E
W
FAVORITOS
A
CAMBIAR
FAVORITOS
A
CAMBIAR
FAVORITOS
A B
TAZAS
AUTO INFUSIÓN
PRESIONE PARA REGULAR
K
E
U
R
I
G
B
R
E
W
CONFIRMAR
FAVORITOS
¿FAVORITO?
SÍNO
FAVORITOS
A B
CAMBIAR
TAZAS
AUTO INFUSIÓN
PRESIONE PARA REGULAR
K
E
U
R
I
G
B
R
E
W
88
AÑADIR UN FAVORITO
USAR UN FAVORITO
MODIFICAR UN FAVORITO
1. Presione el botón favoritos y
seleccione CAMBIAR.
2. Seleccione el ícono FAVORITOS
que desea cambiar. Modifique
las configuraciones y presione
CONFIRMAR. Sus configuraciones
ya están modificadas.
1. Para configurarla, asegúrese de que
el número de reglaje de la KEURIG
BREW
®
sea el mismo que el de la dosis
colocada. Luego seleccione su tamaño y
su potencia favoritas (no está disponible
para todas las configuraciones de
KEURIG BREW
®
). No presione el botón
infusión, presione el botón favoritos.
El botón favorito es como un pequeño
atajo hacia la perfección. Solo guarde
la configuración que utiliza con mayor
frecuencia y facilítese el día. Puede
guardar sus configuraciones favoritas para
dosis K-Carafe
TM
y futuras innovaciones de
marca Keurig
®
(salvo las dosis K-Cup
®
).
2. Escoja uno de los tres íconos de
FAVORITOS para guardar su favorito.
3. Presione un ícono de FAVORITOS
y la pantalla táctil indicará las
configuraciones para este favorito.
1. Coloque un tazón en el plato de goteo.
Coloque una dosis de marca Keurig
®
en
el soporte de dosis y baje el asa.
NOTA: Los favoritos solo están disponibles para los reglajes
de 1 a 6 de KEURIG BREW
®
.
NOTA: Si usa el reglaje 1 de KEURIG BREW
®
, coloque una
jarra Keurig
TM
vacía.
2. Presione el botón favoritos y escoja el
ícono de FAVORITOS que desea preparar.
Presione el botón infusión.
NOTA: Asegúrese de que el favorito seleccionado
corresponda a los reglajes de 1 a 6 de KEURIG BREW
®
para
la dosis que está colocada en el soporte de dosis.
Presione SÍ para confirmar.
SECCIÓN 2
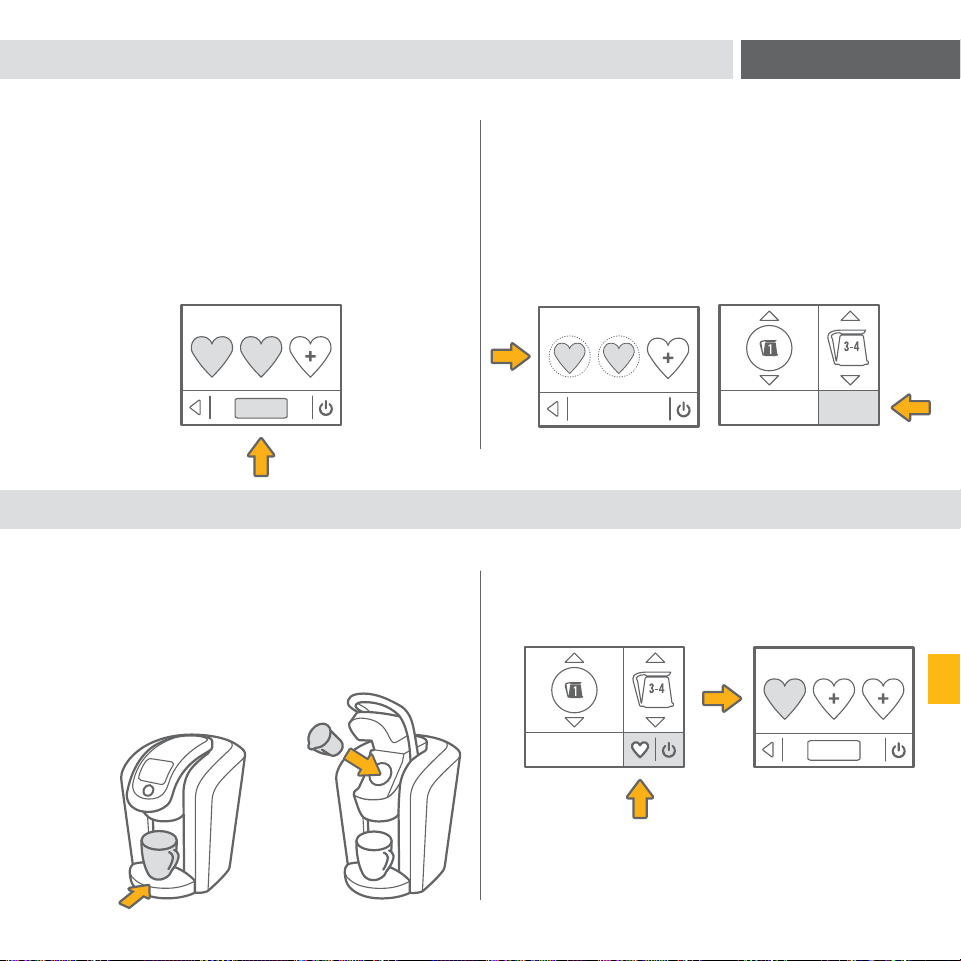
89
TAZAS
AUTO INFUSIÓN
PRESIONE PARA REGULAR
K
E
U
R
I
G
B
R
E
W
FAVORITOS
A
CAMBIAR
FAVORITOS
A
CAMBIAR
FAVORITOS
A B
TAZAS
AUTO INFUSIÓN
PRESIONE PARA REGULAR
K
E
U
R
I
G
B
R
E
W
CONFIRMAR
FAVORITOS
¿FAVORITO?
SÍNO
FAVORITOS
A B
CAMBIAR
TAZAS
AUTO INFUSIÓN
PRESIONE PARA REGULAR
K
E
U
R
I
G
B
R
E
W
88
AÑADIR UN FAVORITO
USAR UN FAVORITO
MODIFICAR UN FAVORITO
1. Presione el botón favoritos y
seleccione CAMBIAR.
2. Seleccione el ícono FAVORITOS
que desea cambiar. Modifique
las configuraciones y presione
CONFIRMAR. Sus configuraciones
ya están modificadas.
1. Para configurarla, asegúrese de que
el número de reglaje de la KEURIG
BREW
®
sea el mismo que el de la dosis
colocada. Luego seleccione su tamaño y
su potencia favoritas (no está disponible
para todas las configuraciones de
KEURIG BREW
®
). No presione el botón
infusión, presione el botón favoritos.
El botón favorito es como un pequeño
atajo hacia la perfección. Solo guarde
la configuración que utiliza con mayor
frecuencia y facilítese el día. Puede
guardar sus configuraciones favoritas para
dosis K-Carafe
TM
y futuras innovaciones de
marca Keurig
®
(salvo las dosis K-Cup
®
).
2. Escoja uno de los tres íconos de
FAVORITOS para guardar su favorito.
3. Presione un ícono de FAVORITOS
y la pantalla táctil indicará las
configuraciones para este favorito.
1. Coloque un tazón en el plato de goteo.
Coloque una dosis de marca Keurig
®
en
el soporte de dosis y baje el asa.
NOTA: Los favoritos solo están disponibles para los reglajes
de 1 a 6 de KEURIG BREW
®
.
NOTA: Si usa el reglaje 1 de KEURIG BREW
®
, coloque una
jarra Keurig
TM
vacía.
2. Presione el botón favoritos y escoja el
ícono de FAVORITOS que desea preparar.
Presione el botón infusión.
NOTA: Asegúrese de que el favorito seleccionado
corresponda a los reglajes de 1 a 6 de KEURIG BREW
®
para
la dosis que está colocada en el soporte de dosis.
Presione SÍ para confirmar.
SECCIÓN 2

90 91
Levante para Comenzar
12
:
00
VERDE PASTO
CONFIRMAR SELECCIÓN
GUARDAR
1 DE 4
FONDO DE PANTALLA
CONFIGURACIÓN
LENGUAJE
RELOJ
ENCENDIDO/APAGADO AUTO
1 DE 3
CONFIGURACIÓN
LENGUAJE
RELOJ
ENCENDIDO/APAGADO AUTO
1 DE 3
HORA
11
:
32
GUARDAR
12 HR 24 HR
DIGITAL ANALÓGICO
12
:
00
GUARDAR
VISUALIZAR
CONFIGURACIÓN
LENGUAJE
RELOJ
ENCENDIDO/APAGADO AUTO
1 DE 3
GUARDAR
LENGUAJE
INGLÉS ESPAÑOL FRANCÉS
RELOJ
HORA
VISUALIZAR
FONDO DE PANTALLA
CONFIGURAR EL RELOJ
El menú RELOJ le proporciona los tres
reglajes siguientes.
Use el botón atrás para regresar al
menú CONFIGURACIÓN.
ACCEDER A LA CONFIGURACIÓN
Explore todo lo que su cafetera
Keurig
®
2.0 ofrece a través el menú de
CONFIGURACIÓN. Seleccione el botón
configuración en la pantalla inicial.
Use las flechas para desplazarse en el
menú. Para salir, presione el botón atrás.
ESCOGER UN LENGUAJE
Presione inglés, español o francés para
seleccionar el LENGUAJE.
Presione GUARDAR para confirmar
o use el botón atrás para regresar al
menú CONFIGURACIÓN.
Hora: Ajuste la hora actual usando las
flechas, luego escoja AM o PM.
Presione GUARDAR para confirmar
o use el botón atrás para regresar al
menú CONFIGURACIÓN.
Visualizar: Escoja PANTALLA DIGITAL
o ANALÓGICO. Use el botón para
seleccionar 12 H o 24 H, solo para
PANTALLA DIGITAL.
Presione GUARDAR para confirmar
o use el botón atrás para regresar al
menú CONFIGURACIÓN.
Fondo de pantalla: Puede personalizar
el color de su pantalla. Solo presione un
color para seleccionar un FONDO DE
PANTALLA para su pantalla inicial.
Presione GUARDAR para CONFIRMAR
LA SELECCIÓN o use el botón atrás para
regresar al menú FONDO DE PANTALLA.
CONFIGURAR EL MENÚ
botón atrás
botón atrás
botón atrás
SECCIÓN 2
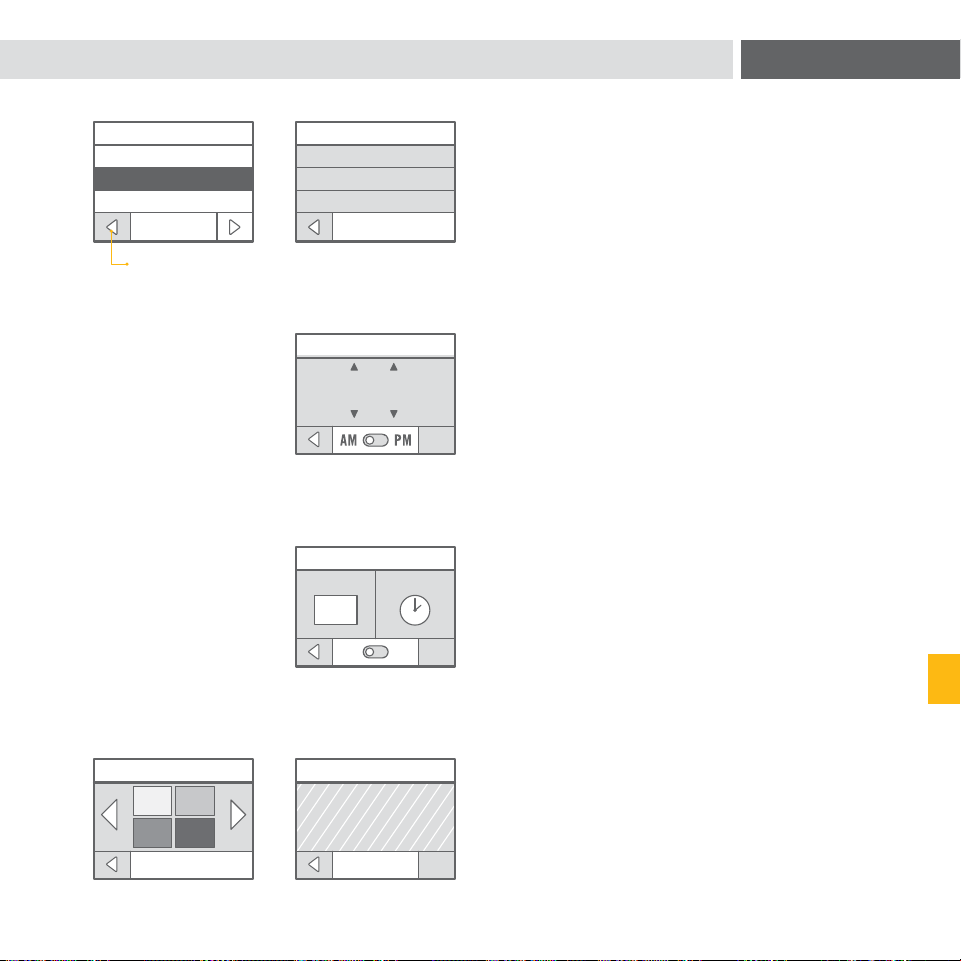
90 91
Levante para Comenzar
12
:
00
VERDE PASTO
CONFIRMAR SELECCIÓN
GUARDAR
1 DE 4
FONDO DE PANTALLA
CONFIGURACIÓN
LENGUAJE
RELOJ
ENCENDIDO/APAGADO AUTO
1 DE 3
CONFIGURACIÓN
LENGUAJE
RELOJ
ENCENDIDO/APAGADO AUTO
1 DE 3
HORA
11
:
32
GUARDAR
12 HR 24 HR
DIGITAL ANALÓGICO
12
:
00
GUARDAR
VISUALIZAR
CONFIGURACIÓN
LENGUAJE
RELOJ
ENCENDIDO/APAGADO AUTO
1 DE 3
GUARDAR
LENGUAJE
INGLÉS ESPAÑOL FRANCÉS
RELOJ
HORA
VISUALIZAR
FONDO DE PANTALLA
CONFIGURAR EL RELOJ
El menú RELOJ le proporciona los tres
reglajes siguientes.
Use el botón atrás para regresar al
menú CONFIGURACIÓN.
ACCEDER A LA CONFIGURACIÓN
Explore todo lo que su cafetera
Keurig
®
2.0 ofrece a través el menú de
CONFIGURACIÓN. Seleccione el botón
configuración en la pantalla inicial.
Use las flechas para desplazarse en el
menú. Para salir, presione el botón atrás.
ESCOGER UN LENGUAJE
Presione inglés, español o francés para
seleccionar el LENGUAJE.
Presione GUARDAR para confirmar
o use el botón atrás para regresar al
menú CONFIGURACIÓN.
Hora: Ajuste la hora actual usando las
flechas, luego escoja AM o PM.
Presione GUARDAR para confirmar
o use el botón atrás para regresar al
menú CONFIGURACIÓN.
Visualizar: Escoja PANTALLA DIGITAL
o ANALÓGICO. Use el botón para
seleccionar 12 H o 24 H, solo para
PANTALLA DIGITAL.
Presione GUARDAR para confirmar
o use el botón atrás para regresar al
menú CONFIGURACIÓN.
Fondo de pantalla: Puede personalizar
el color de su pantalla. Solo presione un
color para seleccionar un FONDO DE
PANTALLA para su pantalla inicial.
Presione GUARDAR para CONFIRMAR
LA SELECCIÓN o use el botón atrás para
regresar al menú FONDO DE PANTALLA.
CONFIGURAR EL MENÚ
botón atrás
botón atrás
botón atrás
SECCIÓN 2
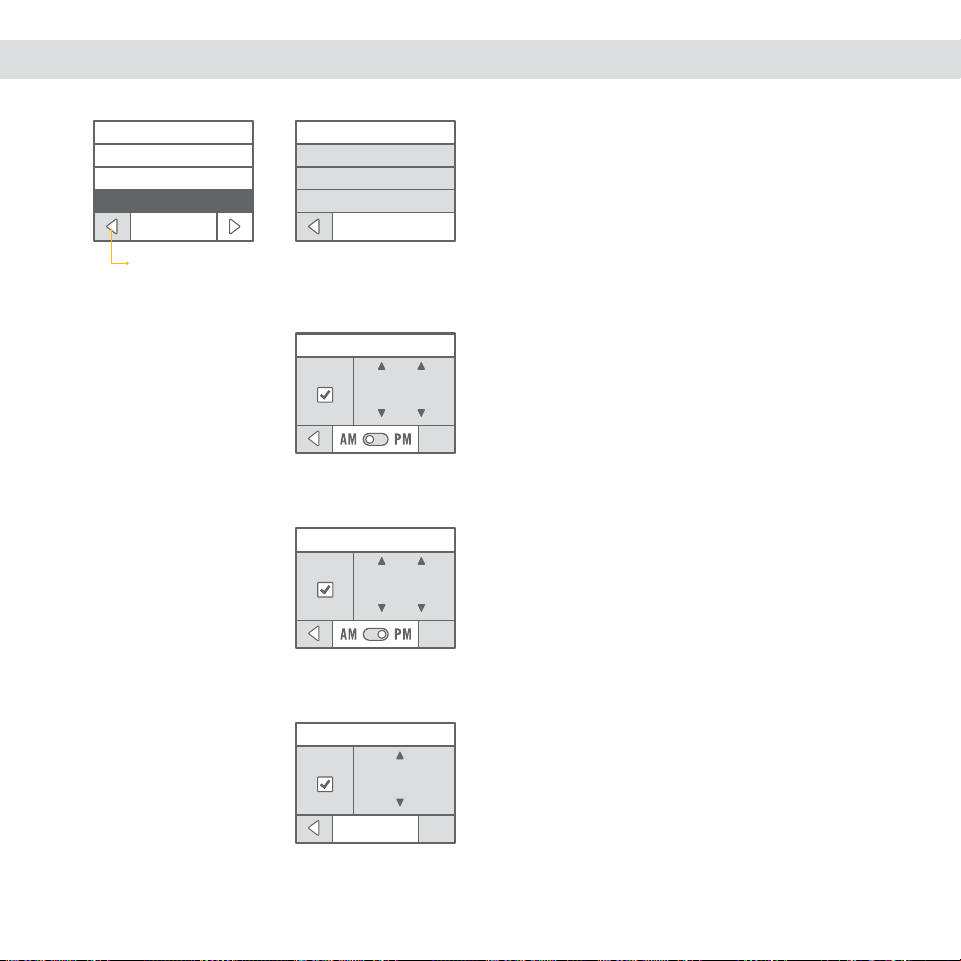
92 93
LUZ DEL
TANQUE
TEMPORIZADOR
DE LUZ
NOCTURNA
LUZ
GUARDAR
APAGAR LA LUZ A:
5
:
00
ACTIVAR
GUARDAR
ENCENDER LA LUZ A:
11
:
00
ACTIVAR
ENCENDER
LUZ
APAGAR LUZ
TEMPORIZADOR DE LUZ NOCTURNA
GUARDAR
BLANCO VERDE
AZUL ROJO
LUZ DEL TANQUE
CONFIGURACIÓN
LUZ
GRAN ALTITUD
FILTRO DE AGUA
2 DE 3
GUARDAR
APAGAR CUANDO INACTIVA POR:
0
:
15
ACTIVAR
CONFIGURACIÓN
LENGUAJE
RELOJ
ENCENDIDO/APAGADO AUTO
1 DE 3
GUARDAR
ENCENDER CAFETERA A:
7
:
00
ACTIVAR
GUARDAR
APAGAR A:
10
:
00
ACTIVAR
ENCENDIDO/APAGADO AUTO
ENCENDIDO AUTO
APAGADO AUTO
BAJO CONSUMO
CONFIGURAR EL MENÚ
ACTIVAR ENCENDIDO/APAGADO AUTOMÁTICO
Puede dejar su cafetera siempre encendida, así
está lista para prepararle una taza perfecta en
cualquier momento del día o puede activar el
modo ENCENDIDO AUTOMÁTICO, APAGADO
AUTOMÁTICO o BAJO CONSUMO.
Use el botón atrás para regresar al
menú CONFIGURACIÓN.
Encendido automático: Seleccione ACTIVAR
el ENCENDIDO AUTO. Use las flechas para
ajustar la hora de encendido automático de
la cafetera.
Presione GUARDAR para confirmar
o use el botón atrás para regresar al
menú CONFIGURACIÓN.
Apagado automático: Seleccione ACTIVAR el
APAGADO AUTOMÁTICO. Use las flechas para
ajustar la hora de apagado automático.
Presione GUADAR para confirmar
o use el botón atrás para regresar al
menú CONFIGURACIÓN.
Bajo consumo: Seleccione ACTIVAR para
poner en modo BAJO CONSUMO. Regule, con
incrementos de 15 minutos, en cuanto tiempo
después de la última infusión desea que se
apague la cafetera.
Presione GUARDAR para confirmar
o use el botón atrás para regresar al
menú CONFIGURACIÓN.
Seleccione ACTIVAR para poner el
TEMPORIZADOR DE LUZ NOCTURNA. Use
las flechas de la hora para que la pantalla
inicial combine con el color de la LUZ DEL
TANQUE DE AGUA.
Presione GUARDAR para confirmar
o use el botón atrás para regresar al
menú CONFIGURACIÓN.
APLICAR LUZ
Todo se ve mejor con la luz adecuada.
Escoja el color de la LUZ DEL TANQUE
DE AGUA y emplee el TEMPORIZADOR
DE LUZ NOCTURNA para darle un
aspecto cálido a su cocina en la noche.
Use el botón atrás para regresar al
menú CONFIGURACIÓN.
Luz del tanque de agua: Escoja entre
una luz blanca, verde, azul o rojo.
Presione GUARDAR para confirmar
o use el botón atrás para regresar al
menú CONFIGURACIÓN.
Temporizador de luz nocturna: Escoja
ENCENDER LUZ o APAGAR LUZ.
Use el botón atrás para regresar al
menú CONFIGURACIÓN.
botón atrás
botón atrás
SECCIÓN 2

94 95
GUARDAR
GRAN ALTITUD
ACTIVAR
CONFIGURACIÓN
LUZ
GRAN ALTITUD
FILTRO DE AGUA
2 DE 3
GUARDAR
FILTRO DE AGUA
ACTIVAR
CONFIGURACIÓN
LUZ
GRAN ALTITUD
FILTRO DE AGUA
2 DE 3
SÍNO
RESTABLECER CONFIGURACIÓN INICIAL
¿RESTABLECER
CONFIGURACIÓN INICIAL?
CONFIGURACIÓN
RESTABLECER CONFIGURACIÓN INICIAL
3 DE 3
CONFIGURAR EL MENÚ
ACTIVAR RECUERDE EL FILTRO
DE AGUA
Si usa un filtro de agua Keurig
TM
,
seleccione ACTIVAR para activar los
avisos RECUERDE EL FILTRO DE AGUA.
Presione GUARDAR para confirmar
o use el botón atrás para regresar al
menú CONFIGURACIÓN.
Vea la página 100 para más información.
ACTIVAR GRAN ALTITUD
Para asegurarse de que su cafetera
funcione bien a gran altitud
(5 000 pies/8 000 m), ACTIVAR el
modo GRAN ALTIDUD.
Presione GUARDAR para confirmar
o use el botón atrás para regresar al
menú CONFIGURACIÓN.
RESTABLECER CONFIGURACIÓN
INICIAL
Presione SÍ para restablecer la
configuración inicial de su cafetera.
(Restablecer la configuración inicial
borra todo: FAVORITOS, ENCENDIDO/
APAGADO AUTO y LUZ. El reloj
regresará a las 12:00 AM.)
Presione NO para regresar al
menú CONFIGURACIÓN.
CUIDAR SU CAFETERA
LIMPIAR EL EXTERIOR DE SU CAFETERA
Conserve su cafetera Keurig
®
2.0 lo más bella posible limpiando el exterior de vez en
cuando. Límpiela simplemente con un paño húmedo, enjabonado, no abrasivo y sin
pelusas. Nunca sumerja la cafetera en agua ni ningún otro líquido.
LIMPIAR EL PLATO DE GOTEO
El plato de goteo puede acumular hasta 230 ml (8 oz). Cada tanto, debe enjuagar
el plato de goteo y la rejilla. Para retirar el plato de goteo, solo deslícelo hacia usted,
manteniéndolo recto para evitar que se derrame. Limpie con un paño húmedo,
enjabonado, no abrasivo y sin pelusas.
LIMPIAR EL TANQUE DE AGUA Y SU TAPA ABATIBLE
Limpiar el tanque de agua y su tapa abatible con un paño húmedo, enjabonado, no
abrasivo y sin pelusas. Enjuague bien.
No seque el interior del tanque de agua porque pueden quedar pelusas dentro del mismo.
Asegúrese de bien enjuagar el tanque de agua después de limpiarlo para que no haya
restos de productos de limpieza que contaminen el agua de la cafetera.
NO COLOCAR ESTOS ARTÍCULOS EN EL LAVAPLATOS.
botón atrás
botón atrás
botón atrás
SECCIÓN 2

96 97
3. Saque el ensamble de soporte de dosis
(1) y la base (2).
LIMPIAR EL SOPORTE DE DOSIS
1. Levante el asa.
2. Empuje hacia arriba mientras agarra
ambos lados del ensamble de soporte
de dosis. Sáquelo de la cafetera.
CUIDADO: Agujas filosas. No ponga los dedos en
el compartimento.
4. Presione los botones situados a ambos
lados del ensamble de soporte de dosis.
Separe el soporte de dosis de la caja.
5. Limpie el soporte de dosis (1), la caja
(2) y la base (3) con un paño húmedo,
enjabonado, no abrasivo, sin pelusas.
Enjuague bien.
LIMPIAR LA AGUJA DE SALIDA
1. Si se obstruye la aguja de salida,
empuje la palanca del soporte de dosis
para exponer la aguja de salida.
3. Cuando todas las piezas estén limpias,
coloque la base, luego el ensamble
del soporte de dosis en la cabeza de
distribución. Baje el asa.
CUIDADO: Agujas filosas. No ponga los dedos en
el Compartimento.
2. Use un clip de papel o algo parecido
para limpiarla. Enjuague bien con
abundante agua caliente.
CUIDAR SU CAFETERA
SECCIÓN 2
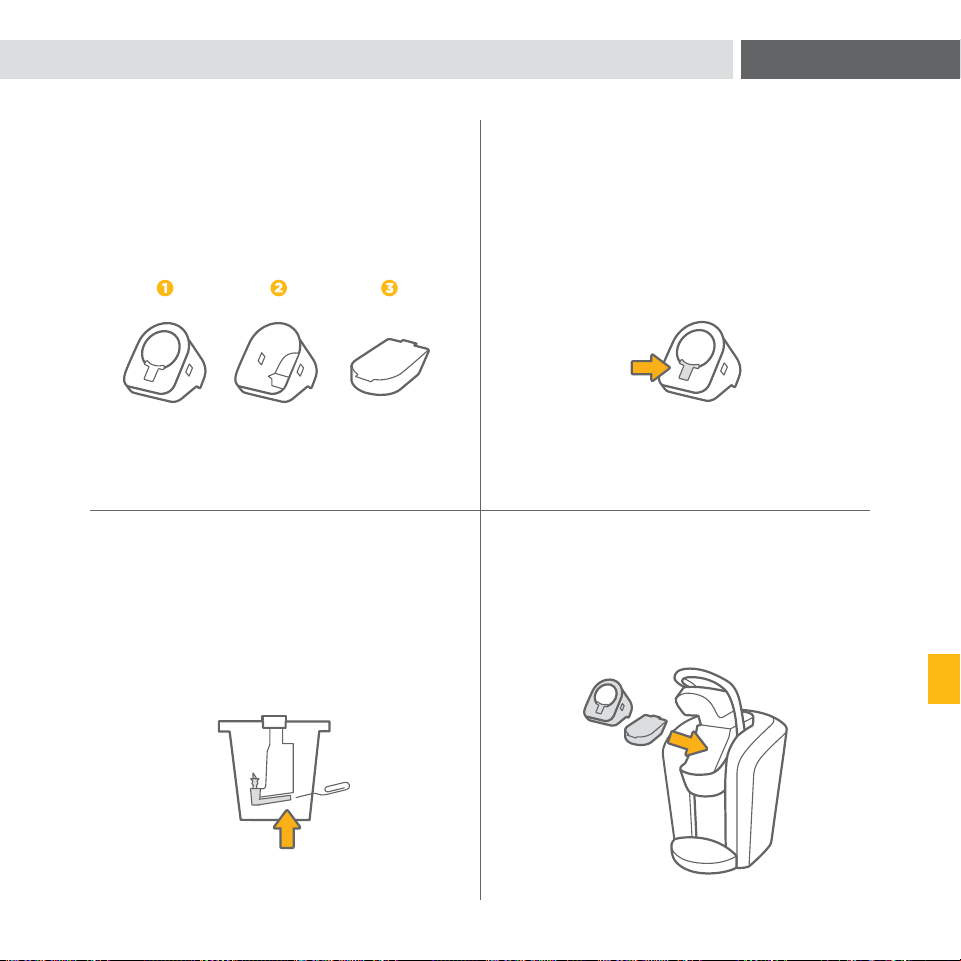
96 97
3. Saque el ensamble de soporte de dosis
(1) y la base (2).
LIMPIAR EL SOPORTE DE DOSIS
1. Levante el asa.
2. Empuje hacia arriba mientras agarra
ambos lados del ensamble de soporte
de dosis. Sáquelo de la cafetera.
CUIDADO: Agujas filosas. No ponga los dedos en
el compartimento.
4. Presione los botones situados a ambos
lados del ensamble de soporte de dosis.
Separe el soporte de dosis de la caja.
5. Limpie el soporte de dosis (1), la caja
(2) y la base (3) con un paño húmedo,
enjabonado, no abrasivo, sin pelusas.
Enjuague bien.
LIMPIAR LA AGUJA DE SALIDA
1. Si se obstruye la aguja de salida,
empuje la palanca del soporte de dosis
para exponer la aguja de salida.
3. Cuando todas las piezas estén limpias,
coloque la base, luego el ensamble
del soporte de dosis en la cabeza de
distribución. Baje el asa.
CUIDADO: Agujas filosas. No ponga los dedos en
el Compartimento.
2. Use un clip de papel o algo parecido
para limpiarla. Enjuague bien con
abundante agua caliente.
CUIDAR SU CAFETERA
SECCIÓN 2

99 98
CUIDAR SU CAFETERA
LIMPIAR LA KEURIG
TM
CARAFE
1. Vacíe con cuidado la Keurig
TM
Carafe.
2. Retire la tapa.
4. Vuelva a colocar la tapa. Asegúrese de
que la tapa esté bien colocada en su
lugar antes de preparar su próxima jarra
de café.
3. Limpie el interior de la jarra Keurig
TM
y
su tapa con un paño húmedo,
enjabonado, no abrasivo, sin pelusas.
Enjuague bien con agua caliente. No
debe ponerse la jarra Keurig
TM
en el
lavaplatos ni sumergirla.
USAR LA JARRA KEURIG
TM
Esta jarra Keurig
TM
es única y ha sido diseñada específicamente para la cafetera Keurig
®
2.0. Para colocar la jarra Keurig
TM
en la cafetera, asegúrese de que la jarra Keurig
TM
esté bien
colocada dentro de la cafetera. La cafetera Keurig
®
2.0 contiene un sensor que detecta
cuando la jarra Keurig
TM
está en su lugar y es seguro empezar la infusión. Si la jarra Keurig
TM
no está en su lugar o si está mal colocada, el proceso de infusión no comenzará. Si se
retira la jarra Keurig
TM
durante la preparación, se detendrá la infusión.
CUIDADO: Asegúrese de que la jarra Keurig
TM
esté vacía antes de cada uso.
CUIDADO: Al terminar la infusión, el líquido dentro la jarra Keurig
TM
estará muy caliente.
Tenga cuidado cuando sirva líquido con la jarra Keurig
TM
. Nunca ponga su mano arriba
de la jarra Keurig
TM
donde suelta el vapor. No permita que los niños usen la jarra Keurig
TM
o la cafetera salvo bajo la supervisión de un adulto. Presione el botón de alimentación
para terminar el proceso de infusión. Siga las instrucciones de la pantalla táctil antes de
retirar la jarra Keurig
TM
. La cafetera regresará a la pantalla inicial. Retire y deseche la dosis
K-Carafe
TM
usada.
CUIDADO: Durante la preparación, el agua dentro del soporte de dosis está muy
caliente. No levante el asa durante la infusión para evitar todo riesgo de lesiones.
Para conservar la combinación ideal de sabor, frescura y temperatura, recomendamos
precalentar la jarra Keurig
TM
. Para precalentar la jarra Keurig
TM
, llénela con agua caliente
durante aproximadamente 30 segundos y luego vacíela completamente antes de colocar
la jarra Keurig
TM
en la cafetera.
CUIDADO: SOLO LAVAR A MANO. NO LA SUMERJA. NO LA COLOQUE EN EL
MICROONDAS.
SECCIÓN 2
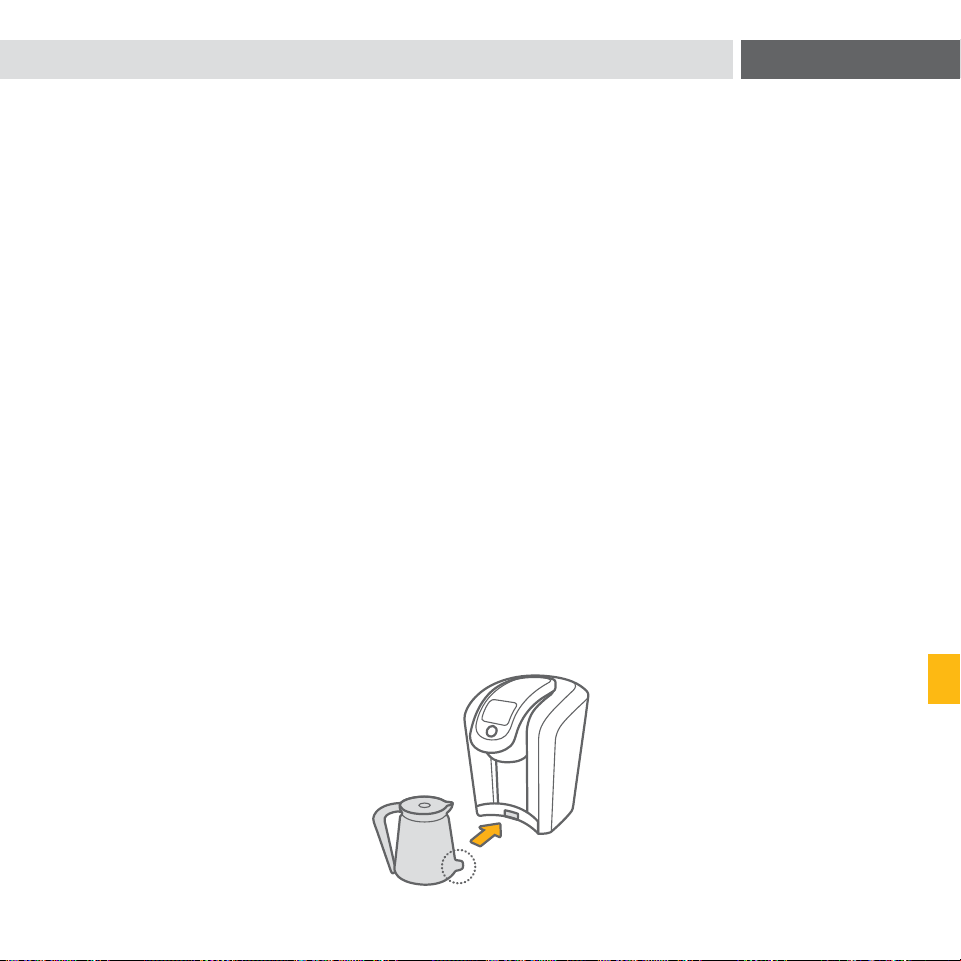
99 98
CUIDAR SU CAFETERA
LIMPIAR LA KEURIG
TM
CARAFE
1. Vacíe con cuidado la Keurig
TM
Carafe.
2. Retire la tapa.
4. Vuelva a colocar la tapa. Asegúrese de
que la tapa esté bien colocada en su
lugar antes de preparar su próxima jarra
de café.
3. Limpie el interior de la jarra Keurig
TM
y
su tapa con un paño húmedo,
enjabonado, no abrasivo, sin pelusas.
Enjuague bien con agua caliente. No
debe ponerse la jarra Keurig
TM
en el
lavaplatos ni sumergirla.
USAR LA JARRA KEURIG
TM
Esta jarra Keurig
TM
es única y ha sido diseñada específicamente para la cafetera Keurig
®
2.0. Para colocar la jarra Keurig
TM
en la cafetera, asegúrese de que la jarra Keurig
TM
esté bien
colocada dentro de la cafetera. La cafetera Keurig
®
2.0 contiene un sensor que detecta
cuando la jarra Keurig
TM
está en su lugar y es seguro empezar la infusión. Si la jarra Keurig
TM
no está en su lugar o si está mal colocada, el proceso de infusión no comenzará. Si se
retira la jarra Keurig
TM
durante la preparación, se detendrá la infusión.
CUIDADO: Asegúrese de que la jarra Keurig
TM
esté vacía antes de cada uso.
CUIDADO: Al terminar la infusión, el líquido dentro la jarra Keurig
TM
estará muy caliente.
Tenga cuidado cuando sirva líquido con la jarra Keurig
TM
. Nunca ponga su mano arriba
de la jarra Keurig
TM
donde suelta el vapor. No permita que los niños usen la jarra Keurig
TM
o la cafetera salvo bajo la supervisión de un adulto. Presione el botón de alimentación
para terminar el proceso de infusión. Siga las instrucciones de la pantalla táctil antes de
retirar la jarra Keurig
TM
. La cafetera regresará a la pantalla inicial. Retire y deseche la dosis
K-Carafe
TM
usada.
CUIDADO: Durante la preparación, el agua dentro del soporte de dosis está muy
caliente. No levante el asa durante la infusión para evitar todo riesgo de lesiones.
Para conservar la combinación ideal de sabor, frescura y temperatura, recomendamos
precalentar la jarra Keurig
TM
. Para precalentar la jarra Keurig
TM
, llénela con agua caliente
durante aproximadamente 30 segundos y luego vacíela completamente antes de colocar
la jarra Keurig
TM
en la cafetera.
CUIDADO: SOLO LAVAR A MANO. NO LA SUMERJA. NO LA COLOQUE EN EL
MICROONDAS.
SECCIÓN 2
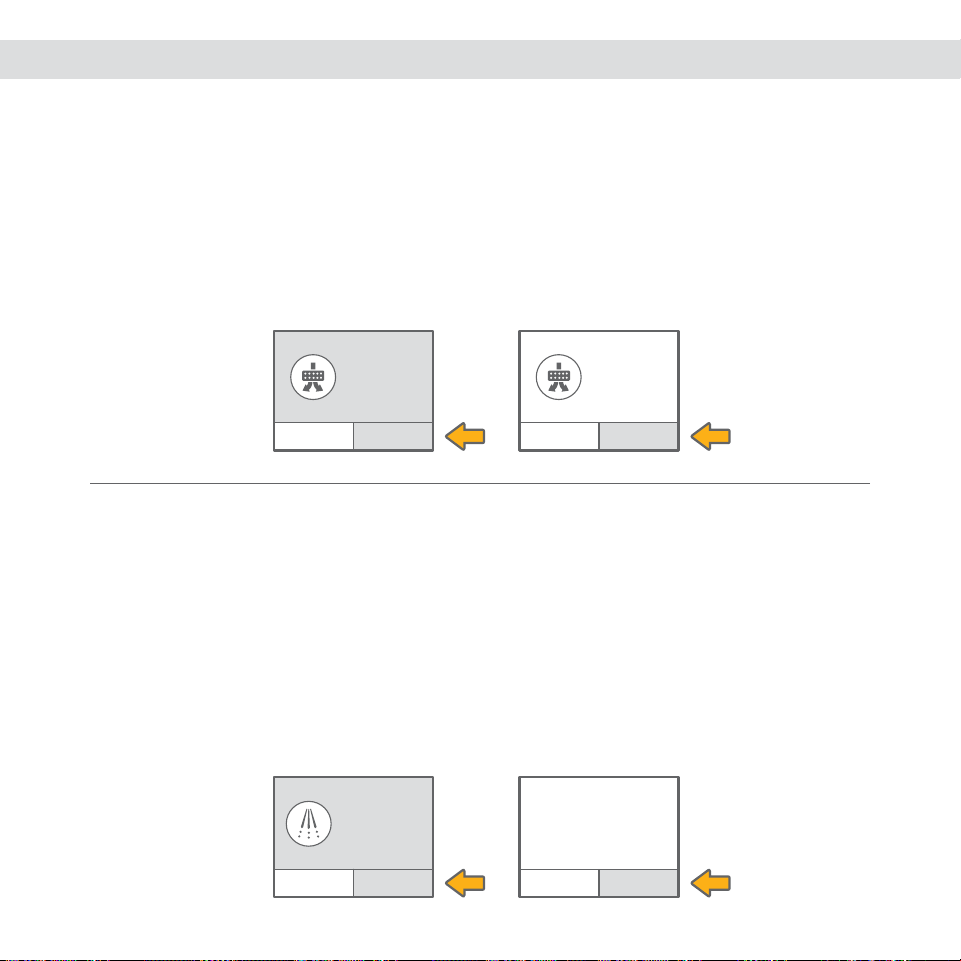
100 10 1
CONTINUAR
¡Cambiar el ltro
de agua!
NO AHORA
SÍ
¿Cambió ltro
de agua?
NO AHORA
CONTINUAR
¡Elimine la cal!
NO AHORA
OK
Quitar la cal, un buen mantenimiento.
Ver instrucciones a www.keurig.com.
ANULAR
ALERTAS DE MANTENIMIENTO
Su cafetera ha sido diseñada para proporcionarle la taza perfecta una y otra vez, año
tras año. Para conservarla en su rendimiento óptimo, su cafetera Keurig
®
2.0 le indicará
cuando necesita un poco de atención.
ES HORA DE CAMBIAR EL FILTRO DE AGUA KEURIG
TM
(VISITE KEURIG.COM
PARA COMPRARLO)
Su cafetera indicará “¡Cambiar el filtro de agua!” cada 30 L (1 000 oz) o dos meses. Una
vez cambiado el filtro de agua Keurig
TM
, presione SÍ para reactivar los avisos RECUERDE
EL FILTRO DE AGUA.
ES HORA DE ELIMINAR LA CAL
El contenido mineral del agua que usa puede producir depósitos de cal en su cafetera, por
lo que recomendamos usar agua embotellada o filtrada. La cal no es tóxica, pero puede
afectar el rendimiento de su cafetera. Quitar la cal de su cafetera cada tres a seis meses
ayuda a proteger el elemento de calentamiento y las otras piezas internas que están en
contacto con el agua. Si los depósitos de cal se acumulan con más rapidez, es necesario
quitar la cal con mayor frecuencia.
Debe quitar la cal no bien lo indique la pantalla táctil “¡Elimine la cal!” Sin embargo,
debe eliminar la cal de su cafetera cada tres a seis meses incluso aunque la cafetera no
se lo indique.
QUITAR LA CAL DE SU CAFETERA
Antes de empezar, necesitará un tazón más grande, agua fresca, solución Keurig
TM
para
quitar la cal y acceso a un fregadero. No use taza de papel.
• Vacíe el tanque de agua. Si hay un filtro de agua Keurig
TM
, retírelo y apártelo. De ser
necesario, desactive las funciones de APAGADO AUTOMÁTICO (vea la página 92).
ETAPA 1: PRIMER ENJUAGUE CON SOLUCIÓN PARA QUITAR LA CAL
• Mantenga presionado el botón de alimentación para apagar la cafetera.
• Vacíe toda la botella de solución Keurig
TM
para quitar la cal en el tanque de agua. Luego
llene la botella de agua y vacíela en el tanque de agua. Mantenga presionado el botón
de alimentación y vuelva a encender la cafetera.
• Coloque un tazón grande en el plato de goteo y haga una infusión de limpieza
manteniendo presionado el botón hasta que haya servido 170 ml (6 oz) de agua. La
cafetera se detendrá automáticamente después de servir 170 ml (6 oz). No use ninguna
dosis de marca Keurig
®
. Vacíe el contenido del tazón en el fregadero.
ETAPA 2: SEGUNDO ENJUAGUE CON SOLUCIÓN PARA QUITAR LA CAL
• Repita el procedimiento de infusión de enjuague hasta que la pantalla táctil indique
“Más agua por favor”. Deje descansar la cafetera durante por lo menos 30 minutos
mientras esté todavía encendida.
• Después de 30 minutos, deseche toda solución residual y enjuague bien el tanque
de agua.
ETAPA 3: ENJUAGUE CON AGUA FRESCA
• Asegúrese de que el tanque de agua esté lleno de agua fresca y de que no rebase la
marca de llenado (MAX FILL).
• Coloque un tazón grande en el plato de goteo y prepare una infusión de limpieza.
Deseche el contenido del tazón en el fregadero.
• Repita el procedimiento de infusión de limpieza por lo menos 12 veces. Tal vez necesite
llenar por lo menos una vez el tanque de agua durante este procedimiento.
NOTA: Si todavía indica “¡Elimine la cal!” después de terminar este procedimiento, vuelva a repetir el procedimiento antes mencionado
para quitar la cal.
SECCIÓN 2
102 103
5
ALERTAS DE MANTENIMIENTO RECICLAR LAS DOSIS K-CARAFE
TM
QUITAR LA CAL DE SU CAFETERA (SIGUE)
El uso de la solución Keurig
TM
para quitar la cal puede producir espuma en la cafetera.
Es natural que la solución reaccione así en contacto con la cal. Si hay mucha cal, es
posible que la cafetera no se llene correctamente después de agregar la solución. Si eso
ocurre, es posible de que haya poca o ninguna distribución seguido por un sonido de
aireque sale. Si eso ocurre:
• Apague y desenchufe la cafetera.
• Si hay solución Keurig
TM
para quitar la cal en el tanque de agua, deséchela, enjuague bien
el tanque de agua y vuélvelo a llenar con agua embotellada o filtrada.
• Enchufe de nuevo la cafetera, enciéndala, y repita la ETAPA 3: ENJUAGUE CON AGUA
FRESCA (vea la página 101). La cafetera debería empezar a funcionar normalmente
una vez que se haya enjuagado y quitado la cal. Si el problema persiste, desenchufe la
cafetera durante por lo menos 30 minutos, luego siga con el enjuague de agua fresca.
Escanee este código QR con su teléfono inteligente para ver los videos paso-a-paso
sobre limpieza, desincrustación y más. O si prefiere, puede ver los videos en línea
en Keurig.com
Los envases de plástico de las dosis
K-Carafe
TM
pueden reciclarse donde
se acepta el plástico n.
o
5. En algunas
comunidades aún no se lo recicla. Tenga
a bien verificar con su municipalidad o
la empresa de recolección de basura.
Para más información visite
Keurigrecycling.com.
1. Una vez terminada la infusión,
levante el asa y retire con cuidado la
dosis K-Carafe
TM
sujetándola por su
borde exterior.
CUIDADO: La dosis K-Carafe
TM
estará caliente después de la
infusión. Tenga cuidado cuando la retire. Deje que se enfríe un
poco antes de manipularla.
3. Una vez separados, deseche la tapa y
el filtro adjunto. Recicle el contenido
plástico de la dosis K-Carafe
TM
donde se
acepta el plástico n.
o
5.
2. Una vez que esté fría, separe la tapa y
el filtro del envase. El filtro se adhiere
a la tapa.
SECCIÓN 2
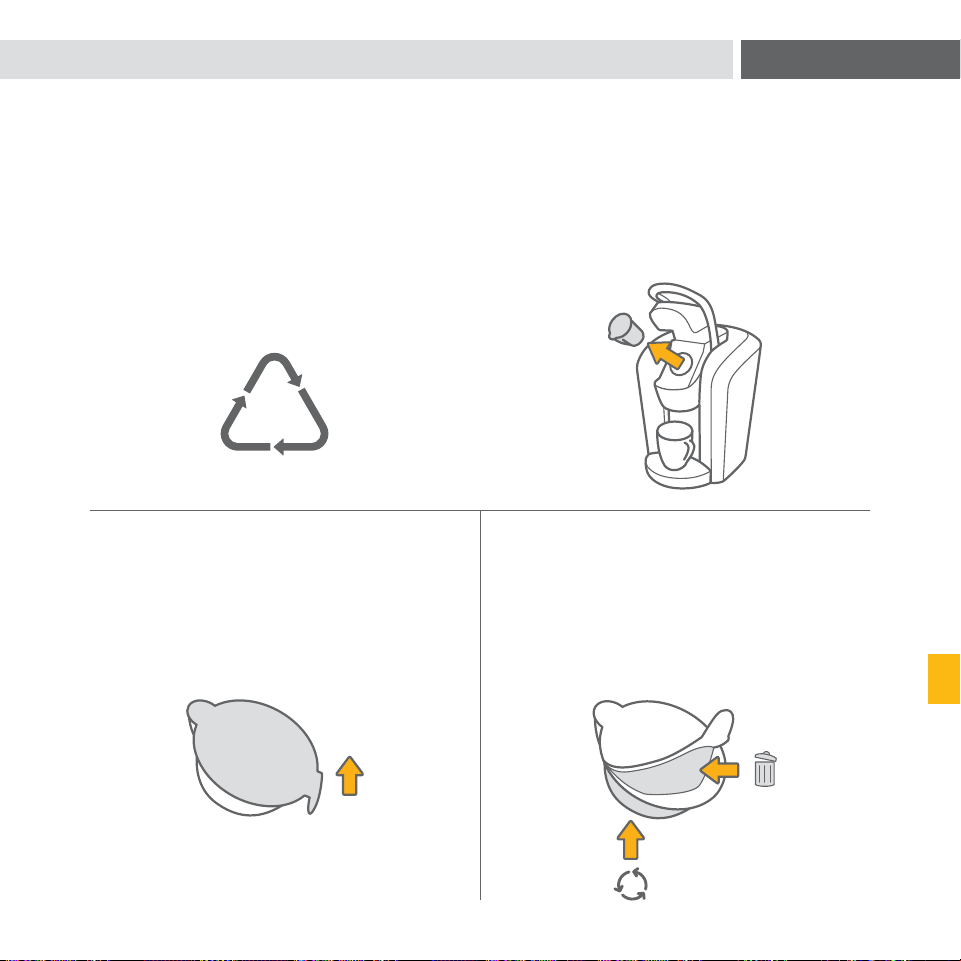

104 105
• Si ha realizado el procedimiento para quitar la cal de su cafetera dos veces y aún sirve una
taza incompleta, comuníquese con el Servicio al cliente al 1.866.901.BREW (2739).
LA CAFETERA SE APAGA O SE ENCIENDE AUTOMÁTICAMENTE
• Verifique que la configuración ENCENDIDO/APAGADO AUTOMÁTICO no ha sido
programada (vea la página 92).
• El nivel de agua está bajo y no se puede preparar una taza completa. Agregue agua al
tanque de agua.
LA PANTALLA TÁCTIL INDICA “MÁS AGUA POR FAVOR.”
• Si el nivel de agua no está bajo, retire el tanque de agua y vacíelo. Luego límpielo bien
(vea la página 95). Llene el tanque de agua hasta la marca de llenado (MAX FILL),
reinstálelo en la cafetera y asegúrese de que esté bien asentado en su base.
LA HORA NO APARECE EN LA PANTALLA TÁCTIL
• Si la corriente ingresando a la cafetera se ha cortado ya sea porque se le ha
desenchufada o porque se ha cortado la corriente, siga el procedimiento de la
página 91 para ajustar el RELOJ.
LA DOSIS K-CUP
®
TIENE EL LOGO KEURIG
®
, PERO LA PANTALLA TÁCTIL
INDICA “¡HUY!”
• Su cafetera Keurig
®
2.0 no funcionará con dosis que no tengan el logo Keurig
®
. Es posible
que ciertas dosis de marca Keurig
®
fabricadas antes de enero de 2014 no funcionen con
la cafetera Keurig
®
2.0. Comuníquese con el Servicio al cliente al 1.866.901.BREW (2739)
para solucionar el problema.
¿AÚN TIENE PROBLEMAS? VISITE KEURIG.COM PARA MÁS INFORMACIÓN.
LA CAFETERA NO ENCIENDE
• Enchufe la cafetera en una toma propia sin regulador de intensidad.
• Verifique que la cafetera esté enchufada correctamente.
• Enchufe la cafetera en otra toma de corriente.
• De ser necesario, restablezca el disyuntor de su casa.
• Mantenga presionado el botón de alimentación y asegúrese de que la pantalla táctil
esté iluminada.
LA CAFETERA NO FUNCIONA
• Después de colocar una dosis en el soporte de dosis, asegúrese de bajar el asa por
completo y de que se vea la pantalla de infusión adecuada en la pantalla táctil. Siga las
instrucciones de infusión de la SECCIÓN 1 (vea las páginas 82 y 83).
• Si la pantalla táctil indica “Más agua por favor”, agregue agua al tanque de agua o
asegúrese de que el tanque de agua esté bien asentado en su base.
• Si la pantalla táctil indica “Más agua por favor”, incluso luego de que lo haya llenado,
retire el tanque de agua y vacíelo. Límpielo bien (vea la página 95). Llene el tanque de
agua hasta la marca (MAX FILL), colóquelo de nuevo en la cafetera y asegúrese de que
esté bien asentado en su base.
• Es posible que el soporte de dosis necesite limpieza (vea las páginas 96 y 97) o que
deba quitar la cal de la cafetera (vea las páginas 100 a 102).
• Si ha realizado el procedimiento indicado más arriba y el problema persiste,
comuníquese con el Servicio al cliente al 1.866.901.BREW (2739).
LA CAFETERA SOLO PREPARA PARTE DE LA TAZA
• De ser necesario, limpie el soporte de dosis (vea las páginas 96 y 97).
• Es posible que el tanque de agua se haya movido durante la infusión. Reinstale el tanque
de agua y realice una infusión de limpieza (vea la página 81) sin dosis.
• Quite la cal de la cafetera (vea las páginas 100 a 102).
SOLUCIÓN DE PROBLEMAS
SECCIÓN 3

106 107
GARANTÍA
GARANTÍA LIMITADA DE UN AÑO
Keurig garantiza que su cafetera estará libre de defectos en los materiales o en la mano
de obra bajo condiciones normales de uso doméstico durante un año a partir de la fecha
de compra. Le recomendamos que llene y nos envíe la tarjeta de garantía que acompaña
su cafetera, así guardamos la información sobre su compra en nuestro sistema. Keurig se
reserva el derecho de reparar o reemplazar una cafetera defectuosa en cuanto recibe el
comprobante de la fecha de compra. Si es necesario reemplazar la cafetera para respetar
esta garantía, la cafetera de reemplazo puede ser nueva o reacondicionada. Si se le envía
una cafetera de reemplazo, esta tendrá una nueva garantía limitada de un año.
Esta garantía solo se aplica a las cafeteras usadas en los Estados Unidos y Canadá.
Esta garantía le otorga derechos legales específicos y puede que tenga también otros
derechos dependiendo de cada estado y, en el caso de Canadá, de cada provincia.
La cafetera Keurig
®
2.0 está diseñada para funcionar solo con dosis de marca Keurig
®
.
Es posible que los daños o el mal funcionamiento de su cafetera provocados por el uso
de dosis y accesorios que no sean de marca Keurig
®
no estén cubiertos por esta
garantía o que se apliquen costos de reparación si el daño o el mal funcionamiento es
consecuencia de haberlos usado.
¿QUÉ ES LO QUE NO CUBRE LA GARANTÍA LIMITADA?
ESTA GARANTÍA NO CUBRE DAÑOS CONSECUENTES O ACCIDENTALES TALES COMO
DAÑOS A LA PROPIEDAD Y NO CUBRE COSTOS NI GASTOS ACCIDENTALES QUE
PUEDAN SURGIR POR CUALQUIER INCUMPLIMIENTO DE ESTA GARANTÍA, INCLUSO SI
ES PREDECIBLE. Algunos estados o provincias no permiten la exclusión o la limitación de
daños consecuentes o accidentales, de ser así, es posible que la limitación o la exclusión
mencionada más arriba no se aplique según el estado o la provincia de compra.
Esta garantía tampoco cubre los daños causados por el uso de dosis o accesorios que
no sean de marca Keurig
®
, las reparaciones realizadas por cualquier persona que no sea
de Keurig o de sus proveedores de servicios autorizados, el uso de piezas que no sean
las piezas originales de Keurig, ni los daños causados por razones externas como la
negligencia, el mal uso, fuentes de alimentación inadecuadas y desastres naturales.
OTRAS RESTRICCIONES
ESTA GARANTÍA ES EXCLUSIVA Y SUSTITUYE CUALQUIER OTRA GARANTÍA
EXPLÍCITA, YA SEA ESCRITA U ORAL. ADEMÁS, KEURIG DESCONOCE
ESPECÍFICAMENTE, POR LA PRESENTE, TODA OTRA GARANTÍA RELATIVA
A SU CAFETERA K2.0-500, INCLUSO CUALQUIER GARANTÍA IMPLÍCITA DE
COMERCIABILIDAD O DE ADECUACIÓN PARA UN PROPÓSITO PARTICULAR. Algunos
estados o provincias no permiten la exclusión de estas garantías implícitas o limitaciones
de duración de garantía, de ser así, es posible que la limitación mencionada más arriba no
se aplique según el estado o la provincia de compra.
¿CÓMO CONSEGUIR UN SERVICIO DE GARANTÍA?
Las cafeteras Keurig
®
son aparatos de muy alta calidad y, con el cuidado adecuado,
le proporcionarán años de rendimiento satisfactorio. Sin embargo, si fuera necesario
usar la garantía, solo llame al servicio al cliente de Keurig al número telefónico gratuito
1.866.901.BREW (2739). No envíe su cafetera para reparación sin haber hablado
primero con el servicio al cliente de Keurig para obtener un número de autorización de
devolución (ATR). Las cafeteras Keurig
®
enviadas sin número ATR serán devueltas sin
haber sido reparadas.
Keurig, Incorporated
33 Coffee Lane
Waterbury, VT 05676
1.866.901.BREW (2739)
SECCIÓN 4
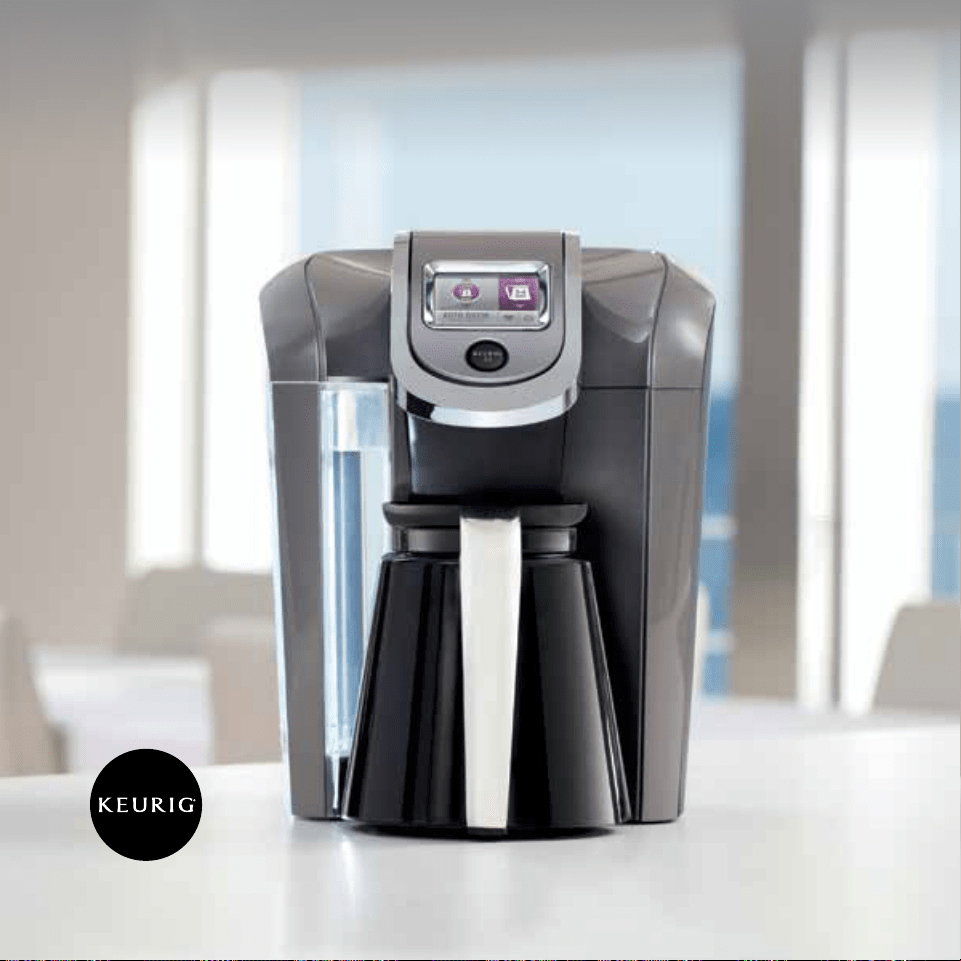
P/N | Pièce n
o
| Pieza n.
o
60-201461-000

