Loading ...
Loading ...
Loading ...
8
Unpacking
Carton Contents
• Cordless snow shovel upper pole assembly
• Cordless snow shovel lower pole assembly
• Middle pole
• Joint-xing knob, washer and bolt (2 sets)
• 24V iON+ lithium-ion battery
• 24V iON+ lithium-ion battery charger
• Manual with registration card
1. Carefully remove the cordless snow shovel and check to
see that all of the above items are supplied.
2. Inspect the product carefully to make sure no breakage or
damage occurred during shipping. If you nd damaged or
missing parts, DO NOT return the unit to the store. Please
call the Snow Joe
®
+ Sun Joe
®
customer service center at
1-866-SNOWJOE (1-866-766-9563).
NOTE: Do not discard the shipping carton and packaging
material until you are ready to use your new cordless snow
shovel. The packaging is made of recyclable materials.
Properly dispose of these materials in accordance with
local regulations.
IMPORTANT! The equipment and packaging material are
not toys. Do not let children play with plastic bags, foils
or small parts. These items can be swallowed and pose a
suocation risk!
Battery Pack Operation
The equipment is powered by a lithium-ion battery. The battery
pack is completely sealed and maintenance free.
mWARNING! Before rst use, the battery requires at least
2 hrs 20 mins charge time to be fully charged. When the battery
is at low capacity, recharge for 2 hrs 20 mins again before
resuming operation.
Battery Charge Level Indicator
The battery pack is equipped with a push button for checking
the charge level. Simply press the push button to read o the
battery charge level from the LEDs of the battery indicator:
• All 3 level monitoring LEDs are lit: Battery charge level
is high.
• 2 level monitoring LEDs are lit: Battery charge level is
decreasing. Stop work as soon as possible.
• 1 level monitoring LED is lit: Battery is at. Stop work
IMMEDIATELY and charge the battery. Otherwise the
battery’s service life will be greatly shortened.
NOTE: If the charge level button does not appear to be
working, insert the battery into the charger and charge as
needed.
NOTE: Immediately after using the battery pack, the charge
level button may display a lower charge than it will if checked
a few minutes later. The battery cells “recover” some of their
charge after resting.
Charger Operation
m
WARNING! Charge only 24V iON+ lithium-ion battery
packs with its compatible 24V iON+ lithium-ion quick charger.
Other types of batteries may cause personal injury and
damage.
To reduce the risk of electric shock, do not allow water to ow
into the charger's AC/DC plug.
When to Charge the iON+ 24VBAT-XR
Lithium-Ion Battery
NOTE: The iON+ 24VBAT-XR lithium-ion battery packs do
not develop a "memory" when charged after only a partial
discharge. Therefore, it is not necessary to run down the
battery pack before placing it into the charger.
• Use the battery charge indicator lights to determine when to
charge your iON+ 24VBAT-XR lithium-ion battery pack.
• You can "top-o" your battery pack's charge before starting
a big job or after a long day of use.
Charging the Battery
1. Press the push lock buttons on the battery to pull the
battery pack out of the equipment (Fig. 1).
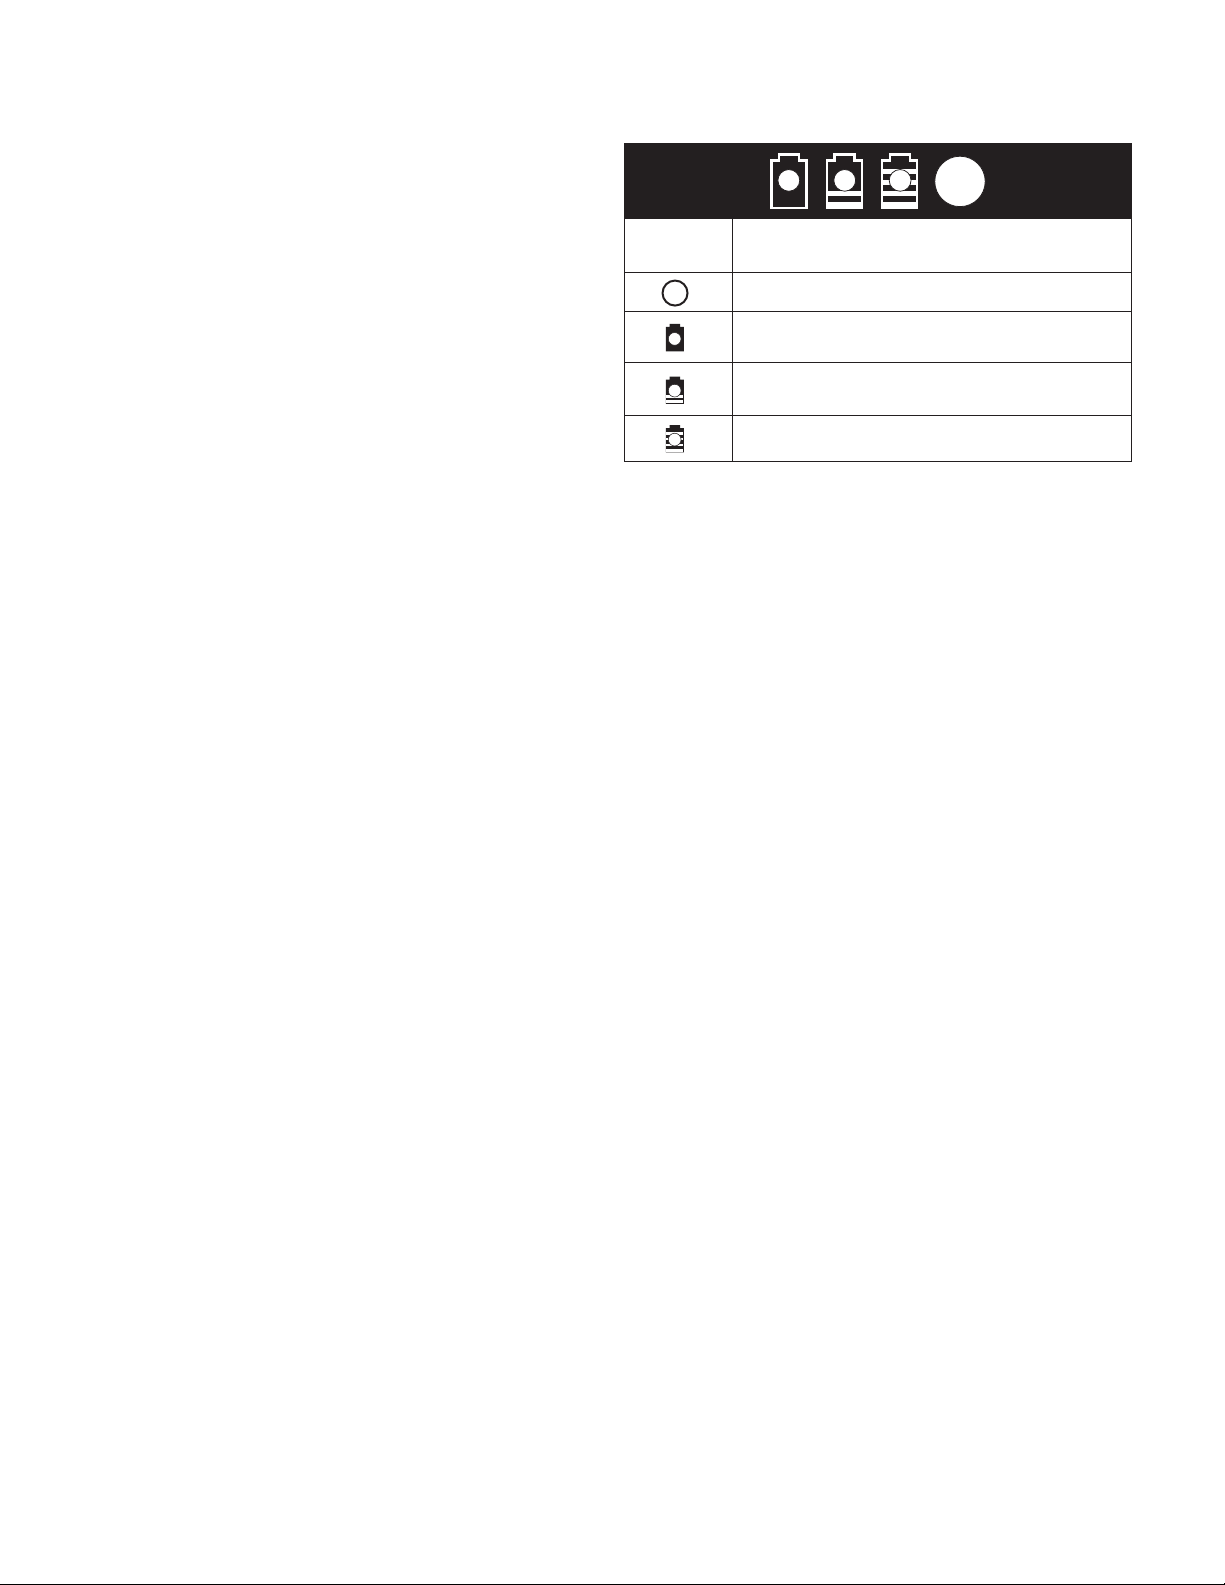
Charge level button
The battery is at 30% capacity
and requires charging
The battery is at 60% capacity
and requires charging soon
The battery is at full capacity
Light IndicatorsLights
Loading ...
Loading ...
Loading ...