Loading ...
Loading ...
Loading ...
If you have connected the soundbar’s remote (blue/white) to the vehicle audio
system’s remote wire, the soundbar will automatically turn on whenever the audio
system is turned on.
When the soundbar in in Standby, making a connection to the 3.5mm audio cable
will automatically turn on the soundbar and switch it to the 3.5mm input. If there is no
connection to the 3.5mm audio cable, pressing “Play” on a connected Bluetooth
device will automatically turn on the soundbar and the device will play through the
soundbar.
To put the soundbar in standby, press the Standby button.
The soundbar will automatically revert to standby when the vehicle’s audio system is
turned off and no audio is detected for five minutes from a connected Bluetooth
device, andthe high-leveland 3.5mm audioinputs.
Selecting an Input
The soundbar automatically selects the audio input based on the following priorities:
Priority 1: 3.5mm audio cable. Whenever there is a physical connection to this cable it
will have priority over the other inputs, even if no audio is playing through it. To listen to
another input, disconnect this cable.
Priority 2: Bluetooth. When there is no connection to the soundbar’s 3.5mm cable, a
connected Bluetooth device has priority and will play through the soundbar whenever
its “play” button is pressed.
Bluetooth Pairing
To pair a Bluetooth device with the soundbar, press the soundbar’s Bluetooth
button (the Bluetooth indicator will flash), go to the device’s Bluetooth menu and
pair it with the soundbar. The soundbar’s Bluetooth indicator will remain lit when it
is connected to a Bluetooth device.
Bluetooth Party Mode
The soundbar can maintain connection with up to 3 paired Bluetooth devices at
same time. The last connected device to enter the “play” mode will have its audio
play throughthe soundbar,placing any otherconnected devicesin “pause.”This
allows up to 3 people to share the soundbar, playing songs in turn. Pairing a 4th
device will disconnect the first paired device from the soundbar (although it will
remain paired).
Making a connection to the soundbar’s 3.5mm audio cable will override a Bluetooth
device, even if it is playing though the soundbar at the time.
Priority 3: Audio system head unit. When there is no connection to the soundbar’s
3.5mm cable and all connected Bluetooth devices are paused, the audio system
connected to the soundbar’s black RCA audio cable will play through the soundbar.
Making a connection to the soundbar’s 3.5mm audio cable or pressing “play” on a
connected Bluetoothdevice willoverride theblack RCA audioinput, evenif itis playing
though the soundbar at the time.
Controlling the Soundbar’s Volume
The soundbar’s volume is controlled by the volume of the source device playing
through it.
C
O
N
T
R
O
L
S
A
N
D
I
N
D
I
C
A
T
O
R
S
Bluetooth Remote
This remote controls the Bluetooth source that is playing through the soundbar.
Volume Down
Button
Track Down
Button
Volume Up
Button
Play/Pause
Button
Track Up
Button
Volume Up/Down Buttons:PresstoraiseandlowerthevolumeoftheBluetooth
source.
Play/Pause Button: Pressto playor pause theBluetooth source.
Track Up/Down Buttons: Press to skip ahead or skip back the track playing on the
Bluetoothsource. Press-and-holdto fast-forwardor fast-reversethrough the
currently-playing track.
The remote can be inserted into the soundbar’s end panel for storage. Press the
remote into the panel as shown below to store it; press the “Release” button to lift
out the remote.
Ext: The lights are controlled by the vehicle circuit the soundbar’s (orange/white)
illumination wire is connected to.
Auto: Thelights willturn on whenthe soundbaris on,and will turnoff whenthe
soundbar is in the standby mode.
Off: Turns off the lights.
Illumination Level Buttons: Sets the illumination level to high or low.
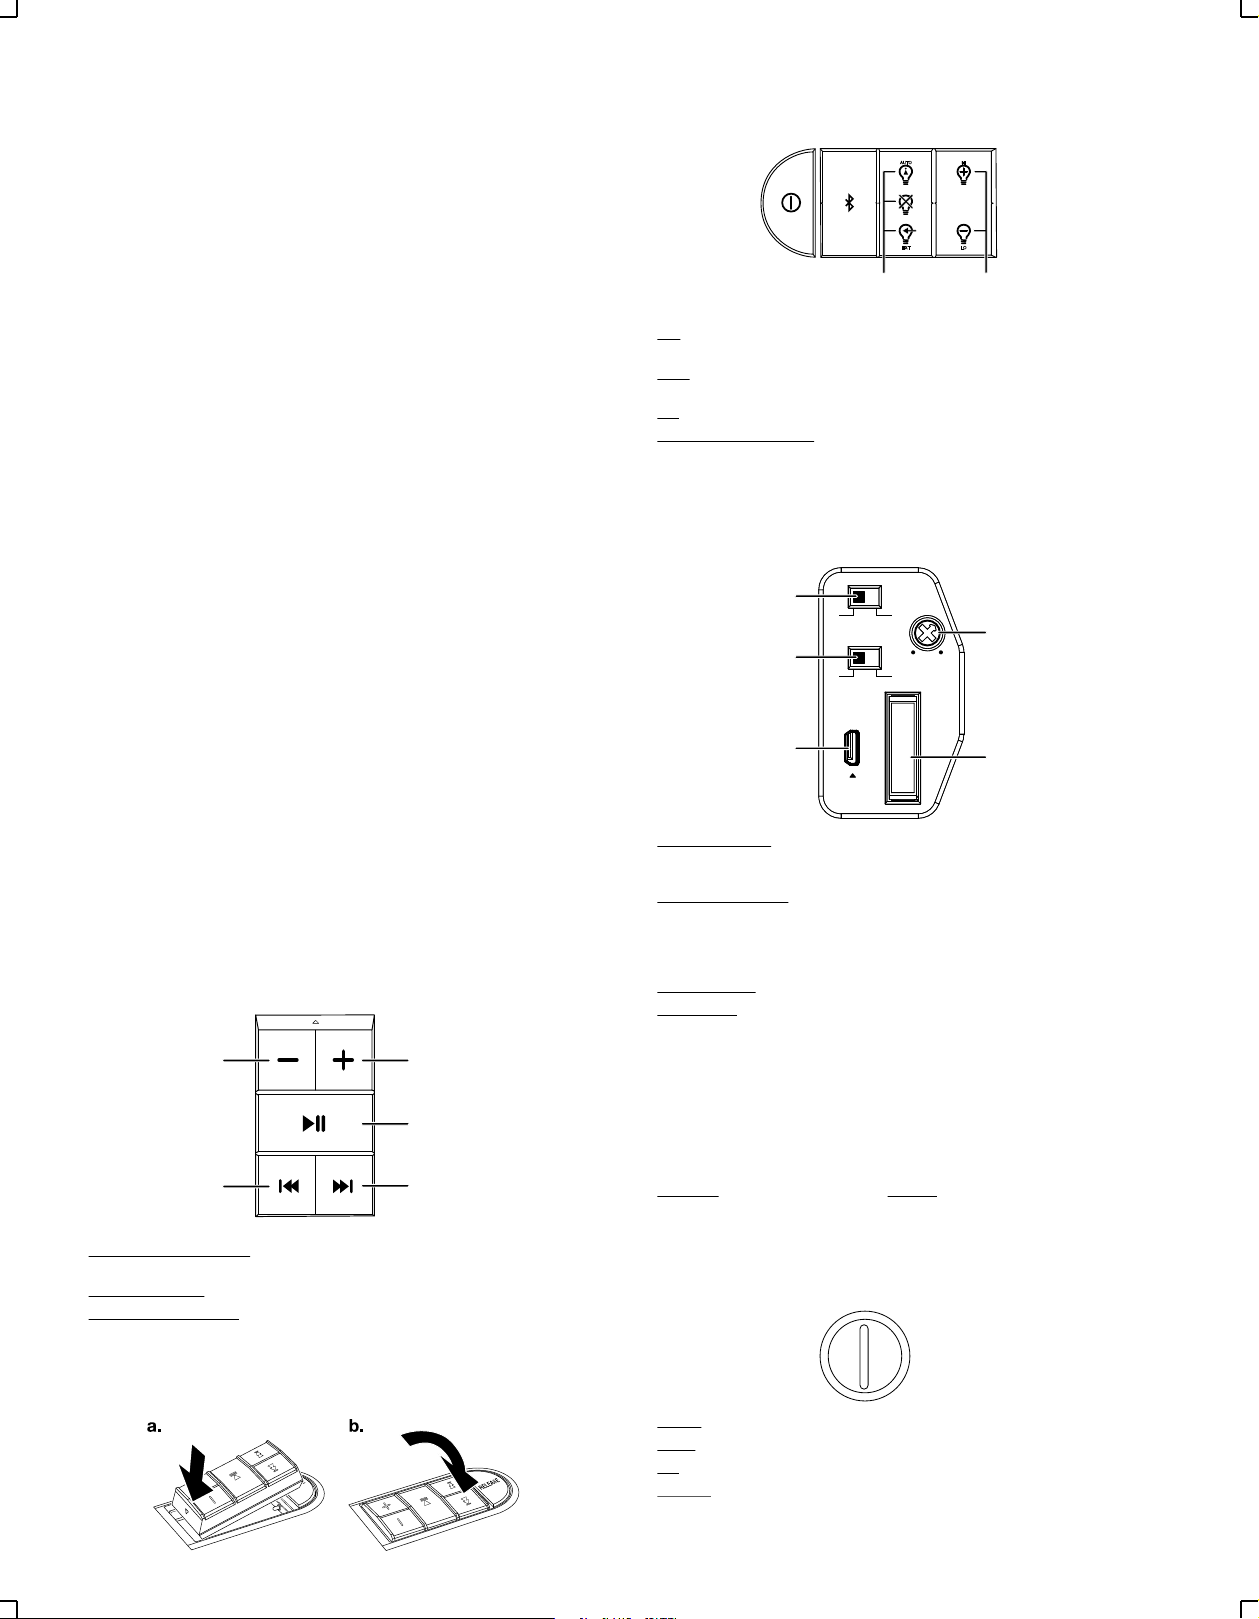
Control Panel
This panel is located on the soundbar behind the rear bridge plate and is not readily
accessible after you have mounted the soundbar in the vehicle. To access the panel,
remove the soundbar’s rear bridge plate. See the Assembly section (above) for
details.
Input Level Switch: Set to“Lo” if you’ve connected thesoundbar’s audio inputs to
the pre-outs of a car stereo head unit or other line-level source. Set to “Hi” if you’ve
connected the soundbar to the speaker-level outputs of a car stereo head unit.
Auto Turn-On Switch: If you set the Input Levelswitch to“Hi” andwant thesoundbar
to automatically turn on when it receives an audio signal from the vehicle’s audio
system,set theAutoTurn-On switchinthe “On”position. Ifnot,set theswitchin the
“Off” position. (The Auto turn-On switch has no effect if the Input Level switch is set
to “Lo.”)
Micro USB Port: Used for future software upgrades.
Gain Control: This control lets you maximize the soundbar’s audio output
performance.
1. Turn the soundbar Gain control fully counter-clockwise (all the way down).
2. Play some dynamic music through your source unit and turn its volume up to 3/4
volume.
3. Slowly turn the soundbar Gain control clockwise until the music begins to sound
distorted.
4. Turn the Gain Control counter-clockwise slightly until the music no longer sounds
distorted. Leave the Gain control in this position.
20A Fuse: Replace only with a fuse of identical rating (20A).
IMPORTANT: Replace the soundbar’s rear bridge plate before operating the vehicle.
DO NOToperate thevehicle withthe soundbar’srear bridgeplate removed.
Standby Indicator
TheStandby indicatorislocated onthe Standbybutton,and changescolorto
indicate the soundbar’s current operating state.
Amber: The soundbar is in standby mode.
White: The soundbar is on.
Off: The soundbar is off.
Flashing:Thesoundbarisinprotectionmodeduetoovercurrent,overvoltage,
undervoltage, overtemperature or DC offset. See the Troubleshooting section (below)
for details.
Soundbar Illumination Controls
These buttons control the soundbar’s illumination.
AUTO
EXT LO
HI
Illumination
Mode
Buttons
Illumination
Level
Buttons
AUTO TURN ON
INPUT LEVEL
GAIN
MIN
OFF ON
MAX
FUSE
20A
UPGRADE
LO HI
Input Level
Switch
Gain
Control
20A
Fuse
Auto Turn-On
Switch
Micro USB
Port
Page3
Loading ...
Loading ...
Loading ...