Loading ...
Loading ...
Loading ...
20 21
ninjakitchen.co.uk
ninjakitchen.co.uk
Yogurt
1 Add desired amount of milk to the pot.
2 Close the lid.
3 Move slider to AIR FRY/HOB, then use
the dial to select YOGURT. The default
temperature setting will display. Use the
up and down arrows to the left of the
display to select "YGt" or "FEr."
4 Use the up and down arrows to the right
of the display to adjust the incubation
time in 30-minute increments between
6 and 12 hours.
5 Press START/STOP to begin pasteurisation..
6 Unit will display "boil" while pasteurising.
When pasteurisation temperature is
reached, the unit will beep and display
"COOL".
7 Once the milk has cooled, the unit will
display ADD and STIR in succession and
the incubation time.
NOTE: Selecting a longer time will
lead to tangier yogurt with a thicker
consistency. Use 12 hours to achieve
Greek-style yogurt.
NOTE: If you prefer to pasteurise, cool
and add cultures not using the unit,
skip steps 1–9. Instead, press TEMP,
select "FEr," press TIME, select desired
incubation time, then press START/STOP
to begin.
8 Open the lid and skim the top o
the milk.
9 Add yogurt cultures to milk and stir
to combine. Close the lid and press
START/STOP to begin incubation
process.
10 The display will show "FEr" and will begin
counting down. When incubation time
is complete, the unit will beep and END
will flash 3 times on the display. The unit
will beep each minute for up to 4 hours
or until powered o.
11 Chill yogurt for up to 12 hours before
serving.
++
AIR FRY / HOB
YOGURT
USING THE
AIR FRY/HOB FUNCTIONS -CONT
Cleaning: Dishwasher & Hand-Washing
The unit should be cleaned thoroughly
after every use.
1 Unplug the unit from the wall socket
before cleaning.
2 To clean the cooker base and the
control panel, wipe them clean with
a damp cloth.
3 The cooking pot, silicone ring, reversible
rack, Cook & Crisp™ Basket and
detachable diuser can be washed in
the dishwasher.
4 The pressure release valve and anti-clog
cap, can be washed with water and dish
soap.
5 If food residue is stuck on the cooking
pot, reversible rack or Cook & Crisp™
Basket, fill the pot with water and allow
to soak before cleaning. DO NOT use
scouring pads. If scrubbing is necessary,
use a non-abrasive cleanser or liquid dish
soap with a nylon pad or brush.
6 Air-dry all parts after each use.
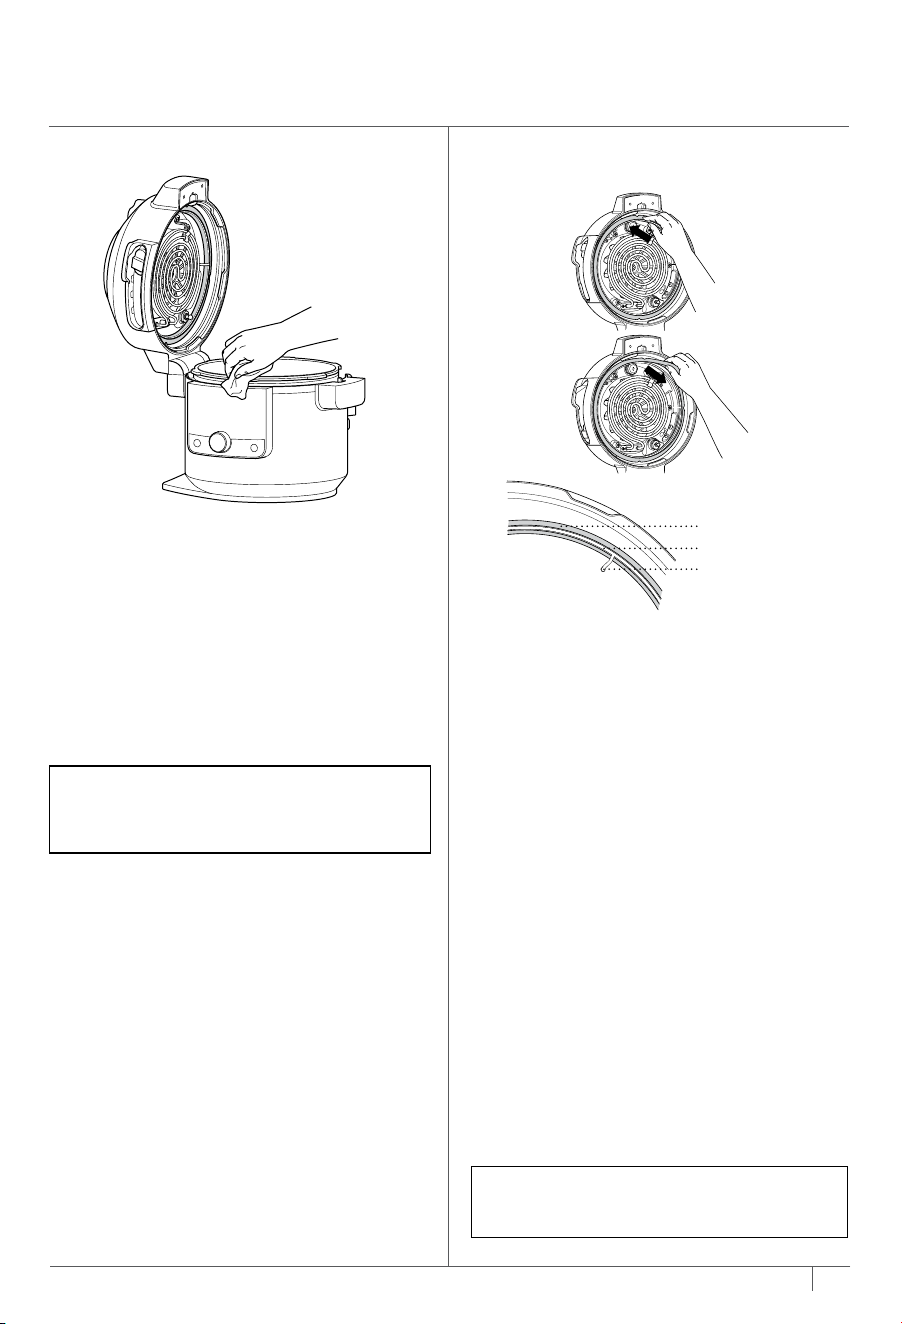
Removing & Reinstalling
the Silicone Ring
To remove the silicone ring, gently pull it
outward, section by section, from the silicone
ring rack. The ring can be installed with either
side facing up. To reinstall, carefully insert
the silicone ring under the rack. Start with
one section and work in both clockwise and
anti-clockwise directions until gently working
the last section of the silicone ring under the
rack. The last section of the silicone ring is
easiest to install when in between two of the
metal pins (see image above).
After use, remove any food debris from
the silicone ring and anti-clog cap.
Keep the silicone ring clean to avoid odour
Washing it in warm, soapy water or in the
dishwasher can remove odour. However, it is
normal for it to absorb the smell of certain
acidic foods. It is recommended to have
more than one silicone ring on hand. You
can purchase additional silicone rings at
ninjakitchen.co.uk.
NEVER pull out the silicone ring with
excessive force, as that may deform it and the
rack and aect the pressure-sealing function.
A silicone ring with cracks, cuts or other
damage should bereplaced immediately.
NOTE: NEVER put the cooker base in
the dishwasher or immerse it in water or
any other liquid.
NOTE: The silicone ring must be replaced
by one that is specific to a Foodi®
SmartLid Multi-cooker.
CLEANING & MAINTENANCE
Silicone Ring
Silicone Ring Rack
Metal Pin
Loading ...
Loading ...
Loading ...